Loading ...
Loading ...
Loading ...

6. ASSEMBLING THE
WELDER
Make sure the power supply information on the
machine’s rating plate is compatible with the power
supply you intend to connect it to.
A suitable plug must be fitted by a qualified
electrician.
This machines wiring has insulation stripped in
preparation for wiring a 16A plug (not supplied).
It is designed for connection to a 16amp power supply
rated at 230V AC.
Because it is constructed mostly of metal parts, it is a
Class 1 machine; meaning, it must have an earth
connection in the power supply. This is to prevent
electrocution in the event of a failure.
Note: Remove the plug from the socket before carrying
out adjustment, servicing or maintenance.
Check that the electrical supply delivers the voltage and
frequency corresponding to the welding machine and
that it is fitted with a delayed fuse suited to the maximum
delivered rated current.
Note: The welding machines are set to the highest
voltage at the factory.
6.1 DTi– Digital Technology Inside
Draper Tool’s newest models of welding machines
contain the latest digital technology, integrated into every
element of the machine’s control, improving every
aspect of performance.
More Functions
Internal micro-processors combined with digital circuitry
allow more functions to be managed within a single
machine, resulting in highly sophisticated machines
which are compact and lightweight.
Superior Performance
Digital signal stabilisation maintains the machine settings
for optimum performance during use, automatically
adjusting to humidity, temperature and other
environmental factors to ensure superior welding
performance in any conditions.
Precision Control
Digital technology enables various machine settings to
be applied with a high level of accuracy, giving the user
precision control of every element of their welding.
7. SETTING THE WELDER
7.1 GENERAL
This medium weight, portable welder requires no
special lifting instructions, however, it contains
dedicated circuitry and must be handled with care. The
welder is designed to weld with coated consumable
electrodes (MMA), using a filler wire feed through the
torch (MIG).
7.2 LOCATION
Locate the machine close to the correct power supply
and allow a 500mm air gap around to ensure sufficient
ventilation. There are two cooling fans located in the rear
of the machine housing which must be kept clear.
Equally, ensure no debris can be drawn into the
machine.
Make certain the location does not pose any hazards as
detailed in the safety instructions, before attempting to
start the machine.
Note: Refer to the rating label for energy input details.
For TIG operations, ensure the gas bottle is securely
mounted and in a vertical position according to the
manufacturer’s instructions.
Warning! Remove the plug from the socket before
carrying out adjustment, servicing or maintenance.
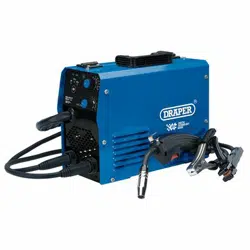
7.3 MMA (MANUAL METAL ARC)
To attach the electrode holder (13) to the front panel,
insert the plug into positive coupling (10) and twist to
lock.
Attach the earth clamp (12) to the negative coupling (11)
and twist clockwise to lock.
7.4 INSTALLING THE FILLER WIRE
(MIG WELDER) – FIGS. 1 - 4
The welding machine is designed to accept the standard
size drums of wire (1kg).
The welding wire can be either of the flux-cored types
this provides a means of shielding the weld pool from the
atmosphere.
Or non-flux wire with the gas hose connected to the back
of the machine.
Do not let the filler wire become uncoiled or tangled as
this will lead to problems with delivery to the welding
torch.
Select the filler wire suitable for the parent metal and
with a gauge to match the welder specification.
Note: If the welding machine is not regularly used,
remove the wire which is prone to rust and will cause
feed problems next time.
1. Open the side panel.
2. Unscrew the large plastic ring. Sit the reel on to the
hub (17) and make sure the peg locates in the back
of the reel. Refit the large plastic ring.
–
7
–
Loading ...
Loading ...
Loading ...