Specification
7-Day Digital Timer
Model: TUE-20
Voltage: 125VAC, 60Hz; Max. load: 15A General purpose or Resistive, 10A Tungsten, 1/2HP, TV-5
Battery backup: NiMH 1.2V >100 hours
OPERATING INSTRUCTIONS
1. Initial set up
Plug the timer into an outlet for approximately 1 hour to charge the internal battery. Then use a toothpick or sharp pencil to press the "R" button.
2. Switch to 12-hour mode
The timer system by default is 24-hour mode. Press "SET" and "CD" buttons simultaneously to switch to 12-hour mode. "AM" will be in the screen.
3. Set CLOCK and ON/OFF events
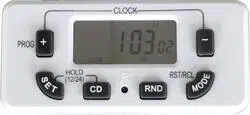
Use "PROG/+", "SET" and "-" buttons to set CLOCK and ON/OFF events.
4. Plug the timer into an outlet
This timer is a "grounded" device. It is only intended for use with a three-pronged grounded outlet.
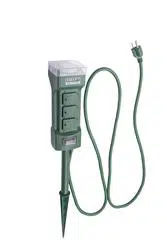
5. Attach up to two devices to the timer
Plug the devices into either outlet on the sides of the timer.
PROGRAMMING INSTRUCTIONS
1. Set CLOCK
a. Press and hold "SET" button for at least 2 seconds, "SET" and "MO" (Monday) will flash in the screen. Then press "PROG/+" or "-" button to select day of week.
b. Press "SET" button once to advance to hour setting. "SET" and "12" will flash in the screen, then press "PROG/+" or "-" to select current hour. Take note of AM/PM in top left of the screen.
c. Press "SET" button once again to advance to minute setting. "SET" and "00" will flash in the screen, then press "PROG/+" or "-" button to select current minute.
d. Press "SET" button one more time to complete the setup.
e. To reset CLOCK, repeat above steps.
f. While programming, press "PROG/+" and "-" buttons simultaneously to exit CLOCK setting mode.
g. While programming, if no button is pushed for 30 seconds the timer will return to CLOCK mode.
2. Set ON/OFF events
a. While the timer is at CLOCK mode, press "PROG/+" button once to enter into events setting mode. The screen will show the first ON event.
b. Press "SET" button once, "SET" and "MO" (Monday) will flash in the screen. Then press "PROG/+" or "-" button to select the desired day(s) of week for programming to be ON. Choose any individual day or blocks of days including:
- MO>TU>WE>TH>FR>SA>SU (To show every single day of the week one by one. The ON/OFF event is only activated on this selected day)
- MO, TU, WE, TH, FR, SA, SU
- MO, TU, WE, TH, FR
- SA, SU
- MO, TU, WE, TH, FR, SA
- MO, WE, FR
- TU, TH, SA
- MO, TU, WE
- TH, FR, SA
- MO, WE, FR, SU
c. Press "SET" button once again to advance to hour setting. "SET" and "12" will flash in the screen, then press "PROG/+" or "-" button to select hour of the desired ON time. Take note of AM/PM in top left of the screen.
d. Press "SET" button once again to advance to minute setting. "SET" and "00" will flash in the screen, then press "PROG/+" or "-" button to select minute of the desired ON time.
e. Press "SET" button one more time to complete setting of the first ON event.
f. Press "PROG/+" button once again to advance to the first OFF event.
g. Repeat the procedure b-e to complete setting of the first OFF event.
h. If necessary, repeat steps a-g to set additional 9 ON/OFF events.
i. While programming, press "PROG/+" and "-" buttons simultaneously to exit events setting mode and return to CLOCK mode.
j. While programming, if no button is pushed for 30 seconds the timer will return to CLOCK mode.
Please note:
a. Ensure ON/OFF events do not overlap. If events are overlapped, ON event or OFF event will be executed according to event time, not according to event number. OFF event has the priority over ON event.
b. If you want to activate ON/OFF events, ensure the timer must be in AUTO mode. Random and countdown functions are canceled.
3. Review, change, recall and restore ON/OFF events
a. To review ON/OFF events: While the timer is at CLOCK mode, press "PROG/+" button repeatedly, the screen will show ON/OFF events in order.
b. To change ON/OFF events: While the timer is at CLOCK mode, press "PROG/+" button repeatedly. Locate the event setting(s), then use Step 2b through 2e in the PROGRAMMING INSTRUCTIONS to change the setting.
c. To recall and restore ON/OFF events: While the timer is at CLOCK mode, press "PROG/+" button repeatedly. Locate the event setting(s), then press "RST/RCL" button once to delete the event, the event will be replaced by "-:--". Press "RST/RCL" button once again to resume the previous setting.
4. Set mode
While the timer is at CLOCK mode, press "MODE" button, the mode will show in bottom right of the screen.
"ON": The attached device will remain on.
"OFF": The attached device will remain off.
"AUTO": the attached device will be turned on and off according to program events.
Please note:
If the mode is turned from ON to AUTO, the attached device will keep on until the next programmed OFF time. If the mode is turned from OFF to AUTO, the attached device will keep off until the next programmed ON time.
5. Set countdown
a. While the timer is at CLOCK mode, press "-" button once to enter into countdown setting mode.
b. Press "SET" button once, "SET" and "OFF" will flash in the screen, press "PROG/+" or "-" button to select countdown ON or OFF. If "ON" is selected, the timer will be on during the countdown period, then it will be off once countdown program is completed. If "OFF" is selected, the timer will be off during the countdown period, then it will be on once countdown program is completed.
c. Press "SET" button once again to advance to hour setting. "SET" and "0" will flash in the screen, press "PROG/+" or "-" button to select hour for countdown time. (from 0 to 99 hours)
d. Press "SET" button once again to advance to minute setting. "SET" and "00" will flash in the screen, press "PROG/+" or "-" button to select minute for countdown time. (from 0 to 59 minutes)
e. Press "SET" button once again to advance to second setting. "SET" and "00" will flash in the screen, press "PROG/+" or "-" button to select second for countdown time. (from 0 to 59 seconds)
f. Press "SET" button one more time to complete the setup.
g. Press "CD" button once, countdown program is activated. Press "CD" button once again, countdown program will stop and restore countdown time what time you set.
h. The CD will flash in the screen when press "CD" button in CLOCK mode. It means CD function is activated.
i. While programming, press "PROG/+" and "-" buttons simultaneously to exit countdown setting mode and return to CLOCK mode.
j. While programming, if no button is pushed for 30 seconds the timer will return to CLOCK mode.
Please note:
If you want to activate countdown program, ensure the timer is in "AUTO" mode. Random function is canceled.
6. Random Function
a. Press "RANDOM" button. "R" will show in the screen. Random function is activated.
b. When random is activated, the timer will be in on position randomly for 10-31 minutes during the time gap from 6:00PM to 6:00AM.
c. Press "RANDOM" button again to cancel this function.
Please note:
a. If you want to activate random function, ensure the timer is in "AUTO" mode.
b. Once random function is activated, ON/OFF events (between 6:00PM and 6:00AM) and countdown program are automatically blocked.
7. Daylight Savings Time
Press "SET" and "MODE" buttons simultaneously to advance the time 1 hour for daylight savings time. "S" will show in the screen. Press the two buttons simultaneously again to set the time back 1 hour. "S" will disappear in the screen.
8. Operation Priority
Operation priority from the highest to the lowest when you use the timer:
ON or OFF ——— > Random ——— > Countdown ——— > ON/OFF Events.
HELPFUL TIPS
1. After charging the internal battery, you can unplug the timer from the outlet so that you can comfortably hold it in your hand to program.
2. Red LED indicator above "-" button will indicate ON and OFF status of the timer.
3. To automatically advance through the hour, minute and second selections, press and hold "PROG/+" or "-" button.
4. In case of power failure, timer will continue to work by using the internal battery. However, it can not turn the attached device on or off. Program will resume once power is restored. If the internal battery runs out, the screen will be blank. Therefore, reset CLOCK and ON/OFF events as explained in PROGRAMMING INSTRUCTIONS.
WARNINGS
WARNINGS – Risk of Electric Shock
- Keep children away.
- Do not use in wet locations.
- Do not plug two or more timers together.
- Always ensure the plug of any appliance is fully inserted into the timer outlet.
- If cleaning of the timer is required, remove from mains power and wipe timer with a dry cloth.
- Do not immerse timer in water or any other liquid.
- For indoor use only.
Risk of Fire
- Don't plug in an appliance where the load exceeds rated capacity.
- Do not use with extension cords.
- Do not use to control appliances that contain heating elements (cooking appliances, heaters, irons, etc.).
TROUBLESHOOTING
| PROBLEM |
POSSIBLE CAUSE |
CORRECTIVE ACTION |
| The attached device is not turned on or off according to ON/OFF events. |
1. Mode of the timer is in ON or OFF.
2. Random function is activated.
3. Countdown is activated.
4. The ON/OFF event's day(s) of week does not include the CLOCK's day of week.
5. Switch of the attached device is not turned on.
6. The attached device is broken.
7. The timer does not receive power. |
1. Ensure mode is in AUTO.
2. Ensure random function is canceled.
3. Ensure countdown is canceled.
4. The ON/OFF event's day(s) of week have to include the CLOCK's day of week.
5. Ensure that switch of the attached device is turned on.
6. Ensure the attached device works normally when it is plugged in an outlet.
7. Ensure the outlet in which the timer is plugged has power. |
| The attached device is turned on before or later the actual time. |
Current time of the timer is not be calibrated correctly. |
Reset the CLOCK as explained in step 1 in PROGRAMMING INSTRUCTIONS. |
FCC REGULATORY STATEMENT
This device complies with part 15 of the FCC Rules. Operation is subject to the following two conditions: (1) This device may not cause harmful interference, and (2) this device must accept any interference received, including interference that may cause undesired operation.
Warning: Any changes or modifications to this unit not expressly approved by the party responsible for compliance could void the user's authority to operate the equipment.
NOTE: This equipment has been tested and found to comply with the limits for a Class B digital device, pursuant to part 15 of the FCC Rules. These limits are designed to provide reasonable protection against harmful interference in a residential installation. This equipment generates, uses and can radiate radio frequency energy and, if not installed and used in accordance with the instructions, may cause harmful interference to radio communications. However, there is no guarantee that interference will not occur in a particular installation. If this equipment does cause harmful interference to radio or television reception, which can be determined by turning the equipment off and on, the user is encouraged to try to correct the interference by one or more of the following measures:
- Reorient or relocate the receiving antenna.
- Increase the separation between the equipment and receiver.
- Connect the equipment into an outlet on a circuit different from that to which the receiver is connected.
- Consult the dealer or an experienced radio/TV technician for help.