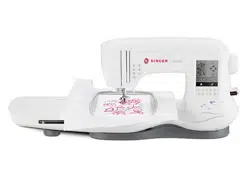
INSTRUCTION MANUAL
SE300
SE340
2
This household sewing machine is designed to comply with IEC/EN 60335-2-28 and UL 1594.
IMPORTANT SAFETY INSTRUCTIONS
When using an electrical appliance, basic safety precautions should always be followed,
including the following:
Read all instructions before using this household sewing machine. Keep these instructions
conveniently near the machine. Make sure to hand them over if the machine is given to a third
party.
Important Safety InStructIonS
DANGER
To reduce the risk of electric shock:
A sewing machine should never be left unattended when plugged in. Always unplug this
sewing machine from the electric outlet immediately after using and before cleaning,
removing covers or when making any other user servicing adjustments mentioned in the
instruction manual.
WARNING
To reduce the risk of burns, re, electric shock, or injury to persons:
• Do not allow to be used as a toy. Close attention is necessary when this sewing machine is
used by or near children.
• Use this sewing machine only for its intended use as described in this manual. Use only
attachments recommended by the manufacturer as contained in this manual.
• Never operate this sewing machine if it has a damaged cord or plug, if it is not working
properly, if it has been dropped or damaged, or dropped into water. Return the sewing
machine to the nearest authorized service center for examination, repair, electrical or
mechanical adjustment.
• Never operate the sewing machine with any air openings blocked. Keep ventilation openings
of the sewing machine free from the accumulation of lint, dust, and loose fabric.
• Keep ngers away from all moving parts. Special care is required around the sewing machine
needle.
• Always use the proper needle plate. The wrong plate can cause the needle to break.
• Do not use bent needles.
• Do not pull or push fabric while stitching. It may deect the needle causing it to break.
• Wear safety glasses.
• Switch the sewing machine off (“0”) when making any adjustment in the needle area, such as
threading needle, changing needle, threading bobbin, changing presser foot, etc.
• Never drop or insert any object into any opening.
• Do not use outdoors.
• Do not operate where aerosol (spray) products are being used or where oxygen is being
administered.
• To disconnect, turn all controls to the off (“0”) position, then remove plug from outlet.
• Do not unplug by pulling on cord. To unplug, grasp the plug, not the cord.
• The foot control is used to operate the machine. Avoid placing other objects on the foot
control.
• Do not use the machine if it is wet.
• If the LED lamp is damaged or broken, it must be replaced by the manufacturer or its service
agent or a similarly qualied person, in order to avoid a hazard.
• If the supply cord connected with the foot control is damaged, it must be replaced by the
manufacturer or its service agent or a similarly qualied person, in order to avoid a hazard.
3
SINGER® is the exclusive trademark of The SINGER® Company Limited S.à.r.l. or its Afliates.
©2015 The SINGER® Company Limited S.à.r.l. or its Afliates. All rights reserved.
PREFACE
Thank you for your purchase of this sewing machine.
This machine intended for household use will provide you with excellent performance in sewing
from light to heavy material and sewing embroidery designs and lettering.
Please refer to this booklet for proper use and optimum performance. To get the most out of your
sewing machine, read the entire instruction manual before attempting to operate the machine.
Then familiarize yourself with the machine by following the instruction manual page by page.
To ensure that you are always provided with the most modern sewing capabilities, the
manufacturer reserves the right to change the appearance, design or accessories of this sewing
machine when considered necessary without notication or obligation.
FOR EUROPE ONLY:
This appliance can be used by children aged from 8 years and above and persons with reduced
physical, sensory or mental capabilities or lack of experience and knowledge if they have been
given supervision or instruction concerning use of the appliance in a safe way and understand
the hazards involved. Children shall not play with the appliance. Cleaning and user maintenance
shall not be made by children without supervision.
The noise level under normal operating conditions is less than 70db.
The machine must only be used with foot control of type C-9001 manufactured by CHIEN HUNG
TAIWAN Ltd.
FOR OUTSIDE EUROPE:
This sewing machine is not intended for use by persons (including children) with reduced
physical, sensory or mental capabilities, or lack of experience and knowledge, unless they
have been given supervision or instruction concerning use of the sewing machine by a person
responsible for their safety. Children should be supervised to ensure that they do not play with
the sewing machine.
The noise level under normal operating conditions is less than 70db.
The machine must only be used with foot control of type C-9001 manufactured by CHIEN HUNG
TAIWAN Ltd.
SERVICING OF DOUBLE INSULATED PRODUCTS
In a double-insulated product, two systems of insulation are provided instead of grounding. No
ground means is provided on a double-insulated product, nor should a means for grounding
be added to the product. Servicing of a double-insulated product requires extreme care and
knowledge of the system and should be done only by qualied service personnel. Replacement
parts for a double-insulated product must be identical to those parts in the product. A double-
insulated product is marked with the words ‘DOUBLE INSULATION’ or ‘DOUBLE INSULATED’.
SETTING UP THE MACHINESEWING
SEQUENCING
EMBROIDERYMAINTENANCE
Important Safety InStructIonS
• This sewing machine is provided with double insulation. Use only identical replacement parts.
See instructions for Servicing of Double-Insulated Appliances.
SAVE THESE INSTRUCTIONS
Servicing should be performed by an authorized service representative.

4
table of contentS
SETTING UP THE MACHINE
MAIN PARTS .......................................................................... 6
ACCESSORIES ...................................................................... 7
REMOVABLE EXTENSION TABLE......................................... 7
TO OPEN THE ACCESSORY TRAY ................................... 7
TO REMOVE THE EXTENSION TABLE ............................. 7
ACCESSORY TRAY OF THE EMBROIDERY UNIT ............ 7
CHANGING THE PRESSER FOOT ........................................ 8
REMOVING THE PRESSER FOOT HOLDER .................... 8
NEEDLES................................................................................ 9
REMOVING & INSERTING THE NEEDLE ............................. 9
FABRIC, THREAD AND NEEDLE CHART .............................. 9
SETTING UP THE MACHINE ............................................... 10
ELECTRICAL CONNECTION ............................................... 10
FOOT CONTROLLER ........................................................... 10
MACHINE CONTROL FUNCTIONS ..................................... 11
TACK BUTTON WITH LED ................................................ 11
NEEDLE POSITION UP/DOWN BUTTON WITH LED ...... 11
SPEED CONTROL BUTTON ............................................. 11
THREAD CUTTER BUTTON WITH LED ........................... 11
START/STOP BUTTON ..................................................... 11
REVERSE STITCH BUTTON ............................................ 11
PRESSER FOOT LIFTER ................................................. 11
THREAD CUTTER ............................................................. 12
PRESSURE REGULATOR ................................................ 12
TOP COVER ...................................................................... 12
HAND WHEEL ................................................................... 12
DROP FEED LEVER ......................................................... 12
MOUNTING MACHINE IN SEWING CABINET ................. 12
SEWING PREPARATION .................................................... 13
TOUCH PANEL LCD ............................................................. 13
HOME SCREEN ................................................................ 13
HOME BUTTON ................................................................ 13
SEWING MODE .................................................................... 13
STITCH INFORMATION .................................................... 13
SELECTING A STITCH ......................................................... 13
SETTING OF THE STITCH PATTERN .............................. 14
MACHINE SETTINGS ........................................................... 14
SETTING BUTTON ............................................................ 14
THREAD TENSION ........................................................... 14
TWIN NEEDLE .................................................................. 15
AUDIBLE BEEP ................................................................. 16
CONTRAST OF SCREEN ................................................. 16
CALIBRATION SCREEN ................................................... 16
SOFTWARE VERSION ..................................................... 16
THREADING THE MACHINE ............................................... 17
BOBBIN SETTING ................................................................ 17
REMOVING THE BOBBIN ................................................. 17
SETTING SPOOL OF THREAD ON SPOOL PIN .............. 17
WINDING THE BOBBIN .................................................... 17
WINDING BOBBIN INDEPENDENTLY ............................. 18
INSERTING THE BOBBIN ................................................. 18
THREADING THE NEEDLE .................................................. 19
PREPARING TO THREAD MACHINE ............................... 19
SETTING SPOOL OF THREAD ON SPOOL PIN .............. 19
THREADING THE UPPER THREAD ................................ 19
THREADING THE NEEDLE EYE ...................................... 20
DRAWING UP THE BOBBIN THREAD ............................. 20
SEWING
STARTING TO SEW ............................................................. 21
WHERE TO USE EACH STITCH .......................................... 21
STARTING TO SEW .............................................................. 22
START AND END OF SEAM ............................................. 22
REVERSE STITCHING ..................................................... 22
TACK STITCH .................................................................... 23
TURNING CORNERS ........................................................ 23
SEWING HEAVY FABRIC ................................................. 23
SEWING OVER OVERLAPPED AREAS .......................... 23
WIDTH OF SEAM ALLOWANCE ....................................... 23
SEWING ................................................................................ 24
STRAIGHT STITCH SEWING ............................................... 24
STRAIGHT STITCH ........................................................... 24
STRAIGHT STITCH WITH AUTO-LOCK STITCH ............ 24
ZIGZAG STITCH SEWING .................................................... 24
SATIN STITCHING ............................................................ 24
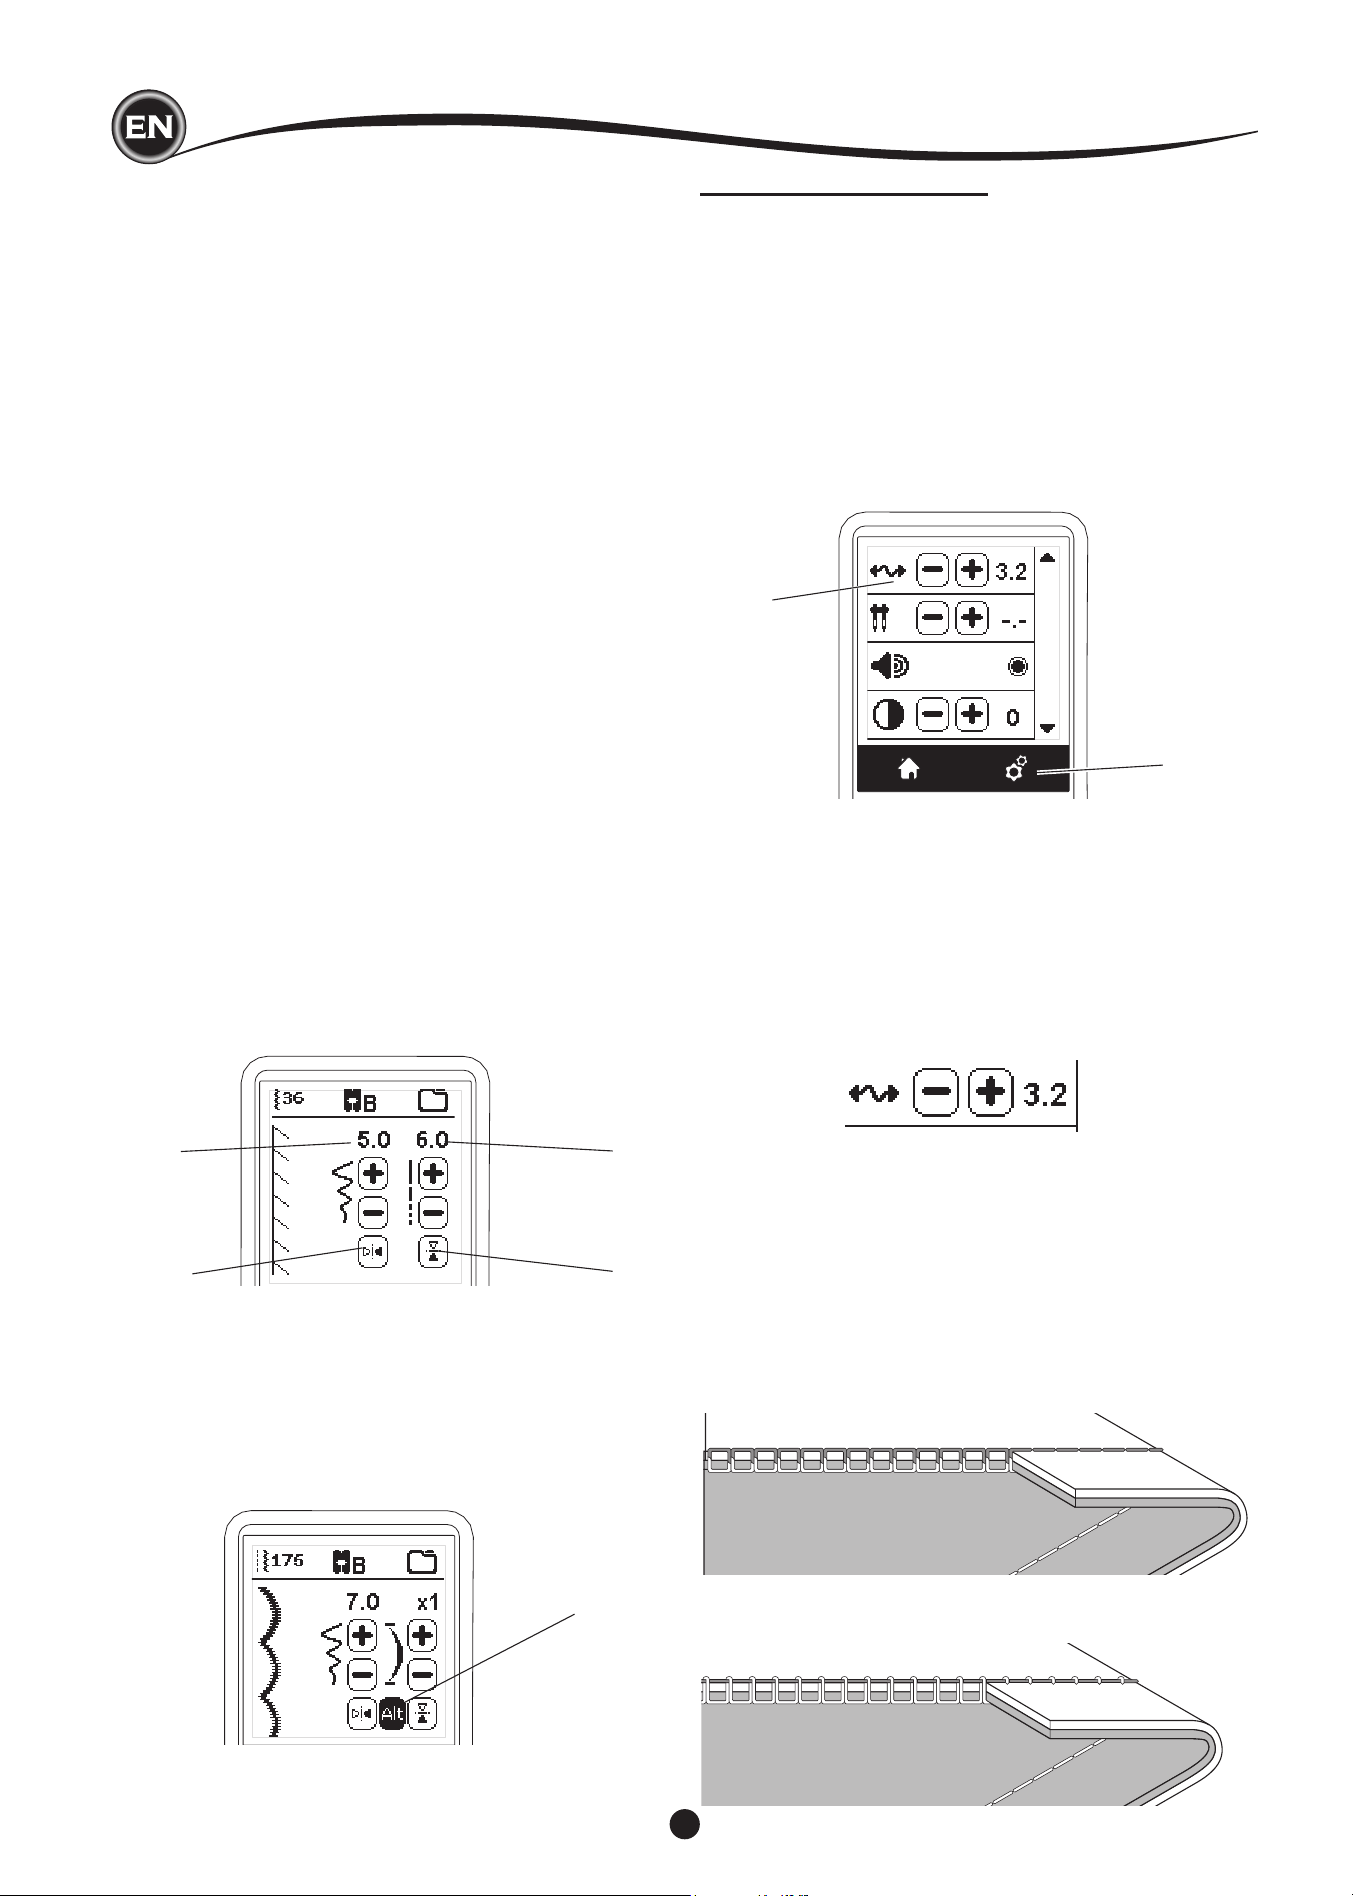
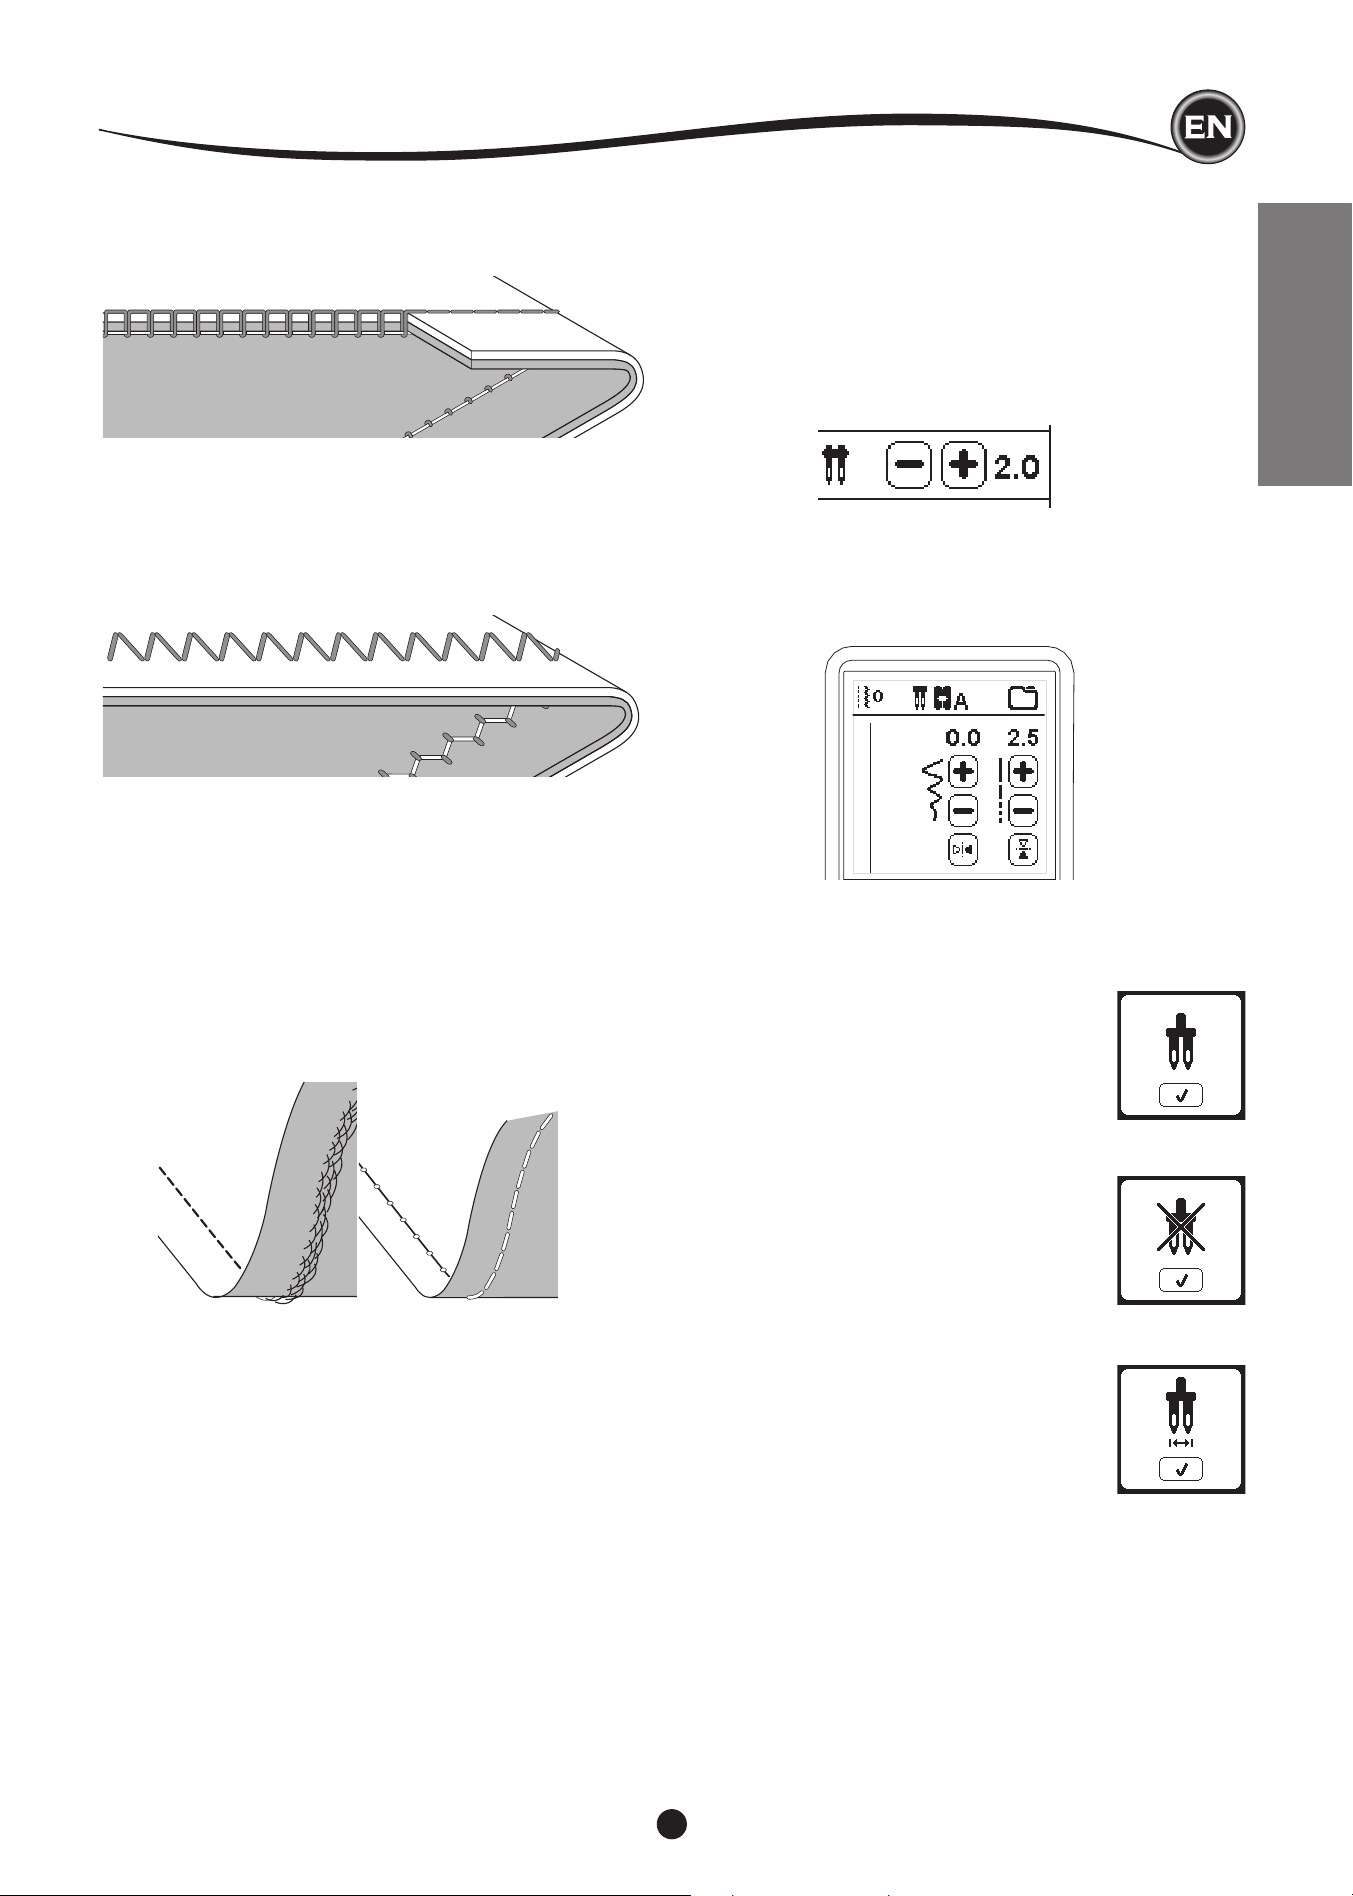
BLIND HEM STITCHING ....................................................... 25
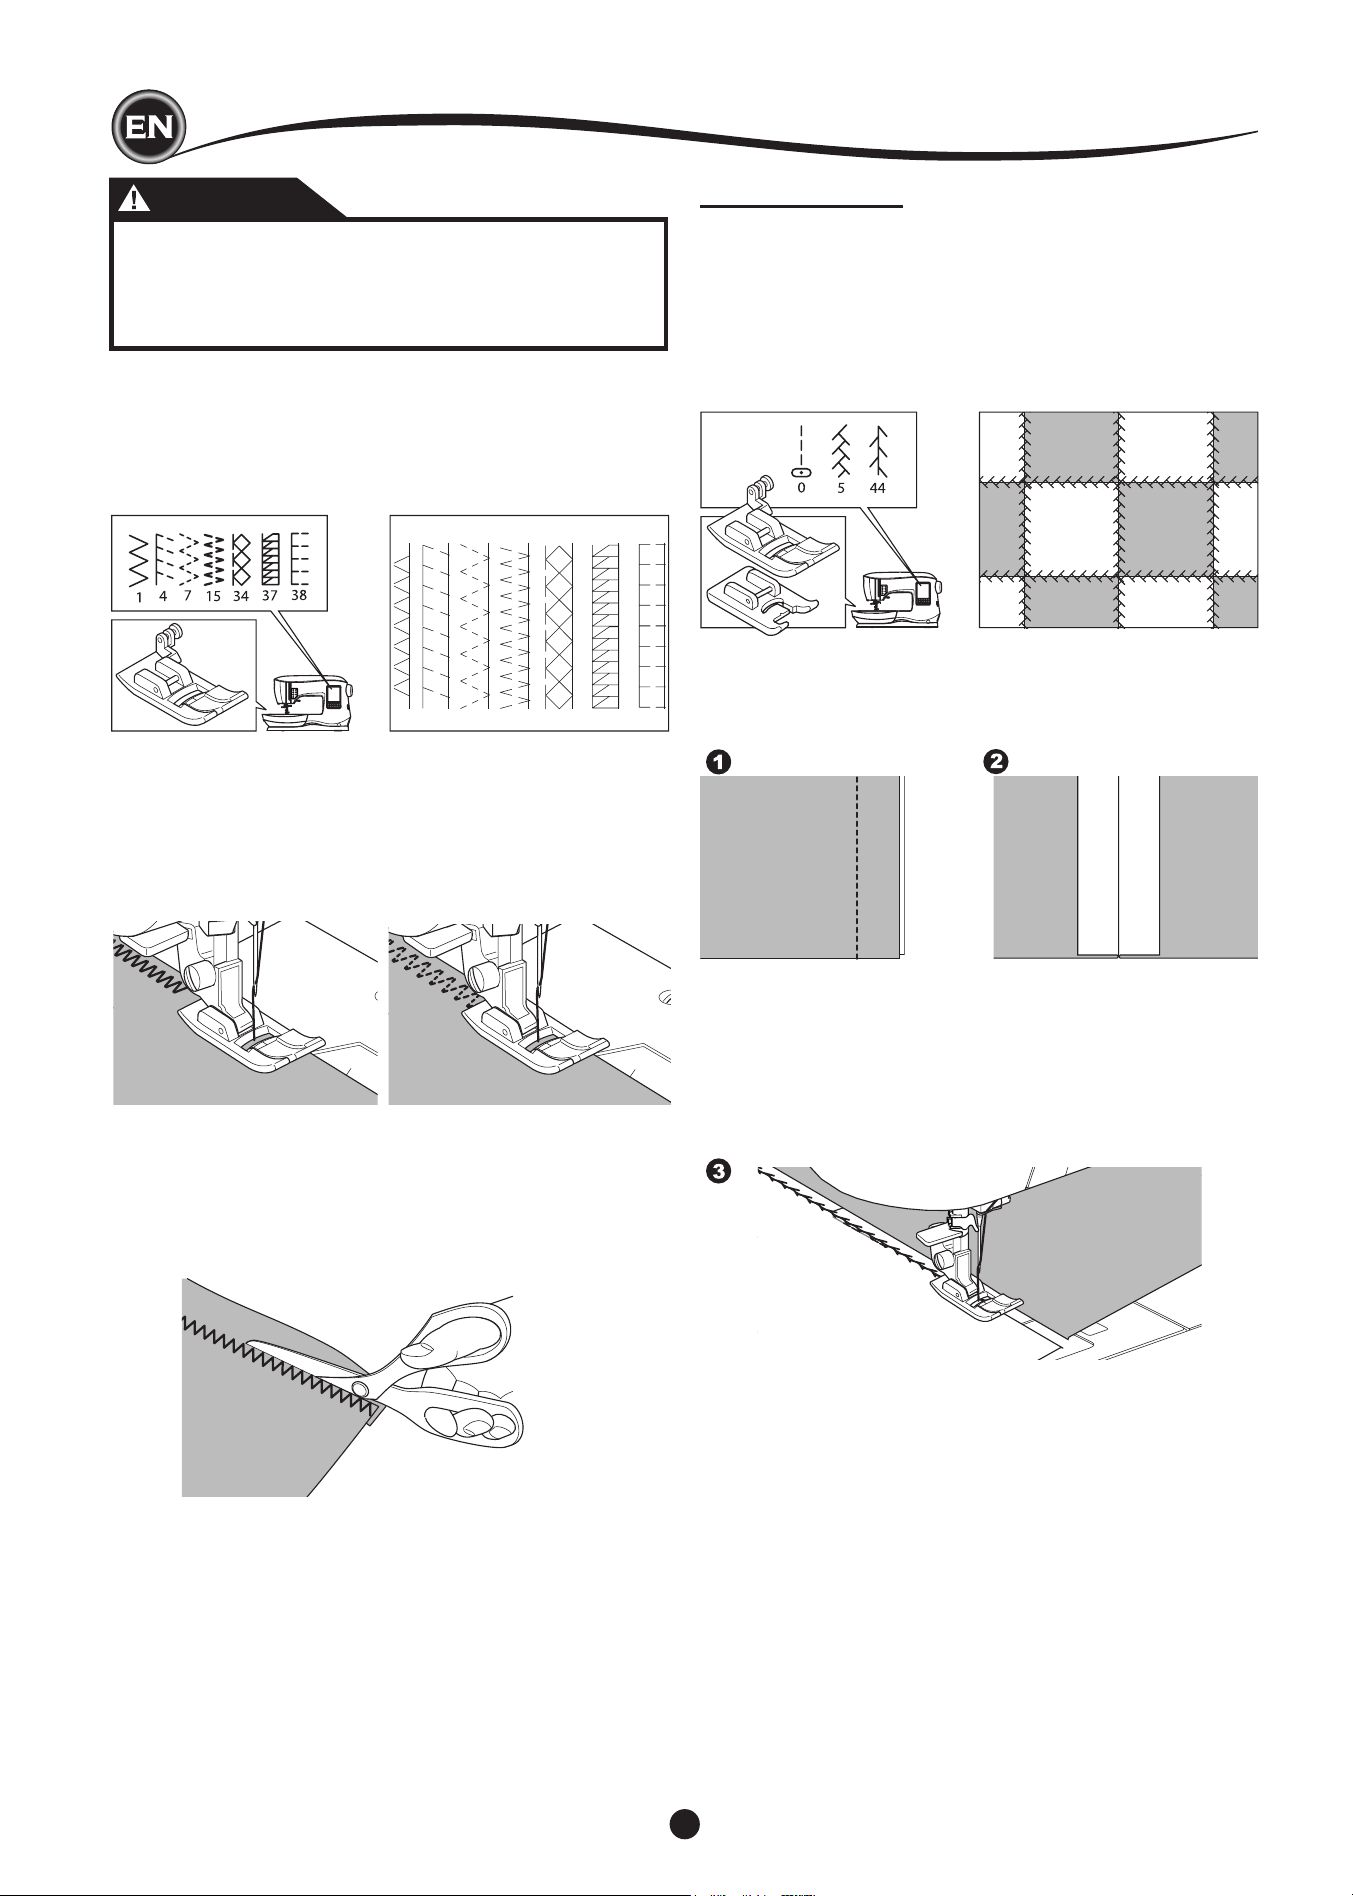
OVERCASTING-OVERLOCKING ......................................... 25
USING THE OVERCASTING FOOT ................................ 25
USING THE ALL-PURPOSE FOOT .................................. 26
CRAZY PATCH ...................................................................... 26
STRETCH STITCH SEWING ................................................ 27
MULTI-STITCH ZIGZAG ....................................................... 27
BASTING ............................................................................... 27
SEWING ON BUTTONS ....................................................... 28
THREAD SHANK ............................................................... 28
INSERTING ZIPPERS ........................................................... 29
CENTERED INSERTION ................................................... 29
LAPPED INSERTION ........................................................ 29
TO STITCH AROUND THE ZIPPER TAB .......................... 30
QUILTING .............................................................................. 30
JOINING THE PIECES OF FABRIC .................................. 30
QUILTING .......................................................................... 30
HAND LOOK QUILTING STITCH ...................................... 30
AUTOMATIC BAR-TACK AND DARNING ............................. 31
BUTTONHOLE SEWING ...................................................... 32
BOUND BUTTONHOLE ........................................................ 33
EYELET ................................................................................ 35
CONTINUOUS DECORATIVE PATTERN ............................. 35
SEWING LIGHTWEIGHT FABRICS .................................. 35
APPLIQUE............................................................................. 36
FREE ARM SEWING ............................................................. 36
PARALLEL SEWING FOOT ................................................. 36
TWIN NEEDLE SEWING ...................................................... 37
SEQUENCING
SEQUENCING ...................................................................... 38
SEQUENCE SEWING ........................................................... 38
SELECTING STITCH PATTERNS ..................................... 38
SELECTING LETTER STITCHES ..................................... 38
SHIFTING THE CURSOR (HIGHLIGHT) .......................... 39
CHECKING SELECTED PATTERNS AND LETTERS ....... 39
INSERTING PATTERN OR LETTER ................................. 39
DELETING PATTERN OR LETTER .................................. 39
HOW TO EDIT A LETTER FROM THE SEQUENCE ........ 39
ADJUSTING EACH PATTERN OR LETTER IN A
SEQUENCE ....................................................................... 40
SAVING SEQUENCE ........................................................ 40
SEW THE SEQUENCE ..................................................... 41
SINGLE SEQUENCE MODE ............................................. 41
SEWING SEQUENCE FROM BEGINNING ...................... 41

5
table of contentS
EMBROIDERY
EMBROIDERY PREPARATION ........................................... 42
CONNECTING THE EMBROIDERY UNIT ............................ 42
TO REMOVE THE EMBROIDERY UNIT ........................... 42
ATTACHING THE EMBROIDERY FOOT .............................. 42
MESSAGES AT START UP ................................................... 42
HOME SCREEN/HOME BUTTON ........................................ 43
HOME SCREEN ................................................................ 43
HOME BUTTON ................................................................ 43
EMBROIDERY MACHINE SETTINGS .................................. 43
SETTING BUTTON ............................................................ 43
THREAD TENSION ........................................................... 43
STOP FOR CUT ................................................................ 44
USING FABRIC AND STABILIZER ....................................... 44
FABRIC, STABILIZER, NEEDLE AND THREAD CHART .... 45
SECURING FABRIC IN EMBROIDERY HOOP .................... 46
ATTACHING THE EMBROIDRY HOOP TO THE MACHINE 46
REMOVING THE HOOP FROM THE MACHINE .............. 46
USB EMBROIDERY STICK .................................................. 47
CONNECTING USB STICK .............................................. 47
DESIGN BOOK .................................................................. 47
INDIVIDUAL DESIGN INFORMATION .............................. 47
EMBROIDERY SOFTWARE .............................................. 47
UPDATING YOUR MACHINE ............................................ 47
SELECTING DESIGNS ......................................................... 48
HOME SCREEN .................................................................... 48
EMBROIDERY COLLECTION .......................................... 48
SELECTING A DESIGN ........................................................ 48
TO SELECT A BUILT-IN DESIGN ...................................... 48
TO SELECT A USB DESIGN ............................................. 48
EDITING THE DESIGN ......................................................... 49
EMBROIDERY PLACEMENT SCREEN................................ 49
EMBROIDERY ROTATION AND MIRRORING SCREEN ..... 49
EMBROIDERY SCALING SCREEN ...................................... 49
EMBROIDERY OPTION SCREEN ........................................ 50
HOOP OPTION AND SELECTION .................................... 50
TRACING ........................................................................... 51
BASTING ........................................................................... 51
MONOCHROME ................................................................ 51
EMBROIDER A DESIGN ...................................................... 52
STITCH OUT SCREEN ......................................................... 52
START TO SEW .................................................................... 52
EMBROIDERY LETTERS ..................................................... 53
SELECTING EMBROIDERY LETTERS ................................ 53
EDITING EMBROIDERY LETTERS ...................................... 53
STITCHING OUT EMBROIDERY LETTERS ........................ 53
MAINTENANCE
POP-UP MESSAGES ........................................................... 52
RAISE THE NEEDLE ......................................................... 54
RAISE THE PRESSER FOOT ........................................... 54
LOWER THE PRESSER FOOT ........................................ 54
CALIBRATION FAILED ...................................................... 54
UPPER THREAD BREAKAGE .......................................... 54
THREAD JAM .................................................................... 54
MAIN MOTOR OVERLOAD ............................................... 54
MACHINE SET FOR TWIN NEEDLE ................................ 54
THE STITCH CANNOT BE SEWN WITH TWIN NEEDLE 54
STITCH WIDTH LIMITED FOR TWIN NEEDLE ................ 54
LOWER THE DROP FEED LEVER ................................... 54
THIS STITCH CANNOT COMBINE ................................... 54
PROGRAM TOO LONG TO ADD MORE STITCHES ........ 54
DELETE PROGRAM ......................................................... 55
OVERWRITE ..................................................................... 55
REMOVE THE HOOP ........................................................ 55
CONNECT USB ................................................................. 55
THE DATA ON THE USB STICK CANNOT BE READ ...... 55
CORRUPTED DATA .......................................................... 55
EMBROIDERY TOO LARGE ............................................. 55
WRONG HOOP TYPE ....................................................... 55
STOP COMMAND IN DESIGN .......................................... 55
CUT THREAD END ........................................................... 55
CHANGE THREAD COLOR .............................................. 55
EMBROIDERY FINISHED ................................................. 55
MAINTENANCE .................................................................... 56
CLEANING ............................................................................ 56
BOBBIN HOLDER ............................................................. 56
HOOK RACE AND FEED DOG ......................................... 56
HELPFUL HINTS .................................................................. 57
TECHNICAL SPECIFICATION ............................................. 58
DESIGN BOOK
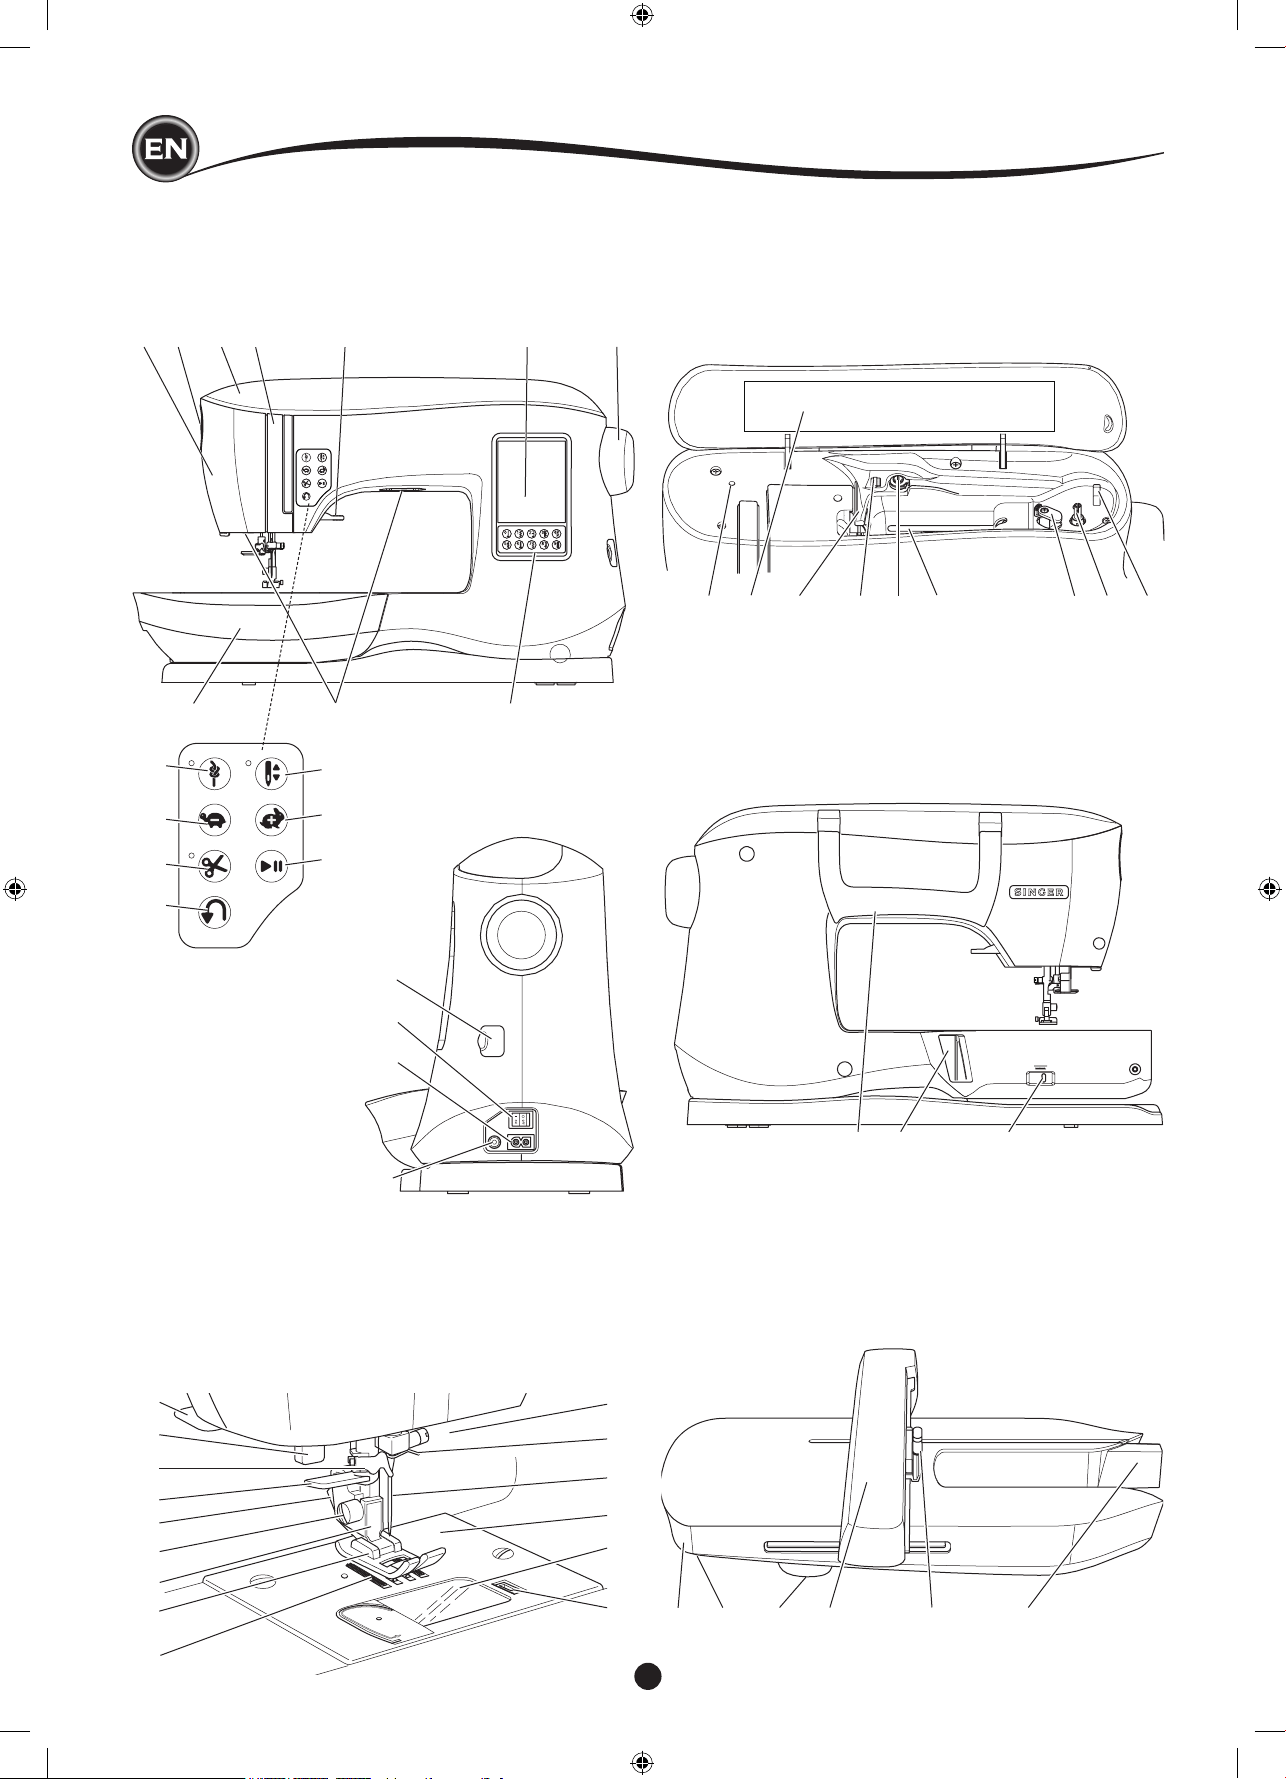
6
6. Touch Panel LCD
7. Hand Wheel
8. Removable Extension
Table
9. LED Lights
10. Ten-key Buttons
1. Face Plate
2. Pressure Regulator
3. Top Cover
4. Thread Take-Up Lever
(Inside)
5. Presser Foot Lifter
2 1 3 4 5 6
9 8
7
10
11
12
13
14
15
16
17
22
23
24
25
26
27
28
29
30
31
32
33
34
35
36
37 38 39 40 41 42 43 44 45
18
19
20
maIn partS
46. Handle
46 47 48
47. Embroidery Unit Connection Socket
48. Drop Feed Lever
49 51 52 53 54
- Embroidery Unit -
49. Accessory Tray
50. Embroidery Unit
Release Lever
51. Level Adjusting Feet
(Bottom of Unit)
52. Embroidery Hoop
Carriage
53. Embroidery Hoop
Connection Assembly
54. Embroidery Unit
Socket
50
18. USB Embroidery Stick
Socket
19. Power Switch
20. Connector for Power Cord
21. Connector for Foot Contloller
11. Tack Button with LED
12. Needle Position Up/
Down Button with LED
13.Speed Decrease Button
14. Speed Increase Button
15. Thread Cutter Button
with LED
16. Start/Stop Button
17. Reverse Stitch Button
22. Thread Cutter
23. Buttonhole Lever
24. Thread Guide
25. Needle Threader Lever
26. Presser Foot Release
Lever
27. Presser Foot Screw
28. Presser Foot Holder
29. Presser Foot
30. Feed Dogs
31. Needle Clamp Screw
32. Needle Thread Guide
33. Needle
34. Needle Plate
35. Bobbin Cover
36. Bobbin Cover Latch
37. Auxiliary Spool Pin
Holder
38. Pattern Chart
39. Thread Guide
40. Thread Guide
41. Bobbin Winding Tension
Disk
42. Spool Pin
43. Bobbin Winder Stop
44. Bobbin Winder Spindle
45. Bobbin Winder Thread
Cutter
21
7
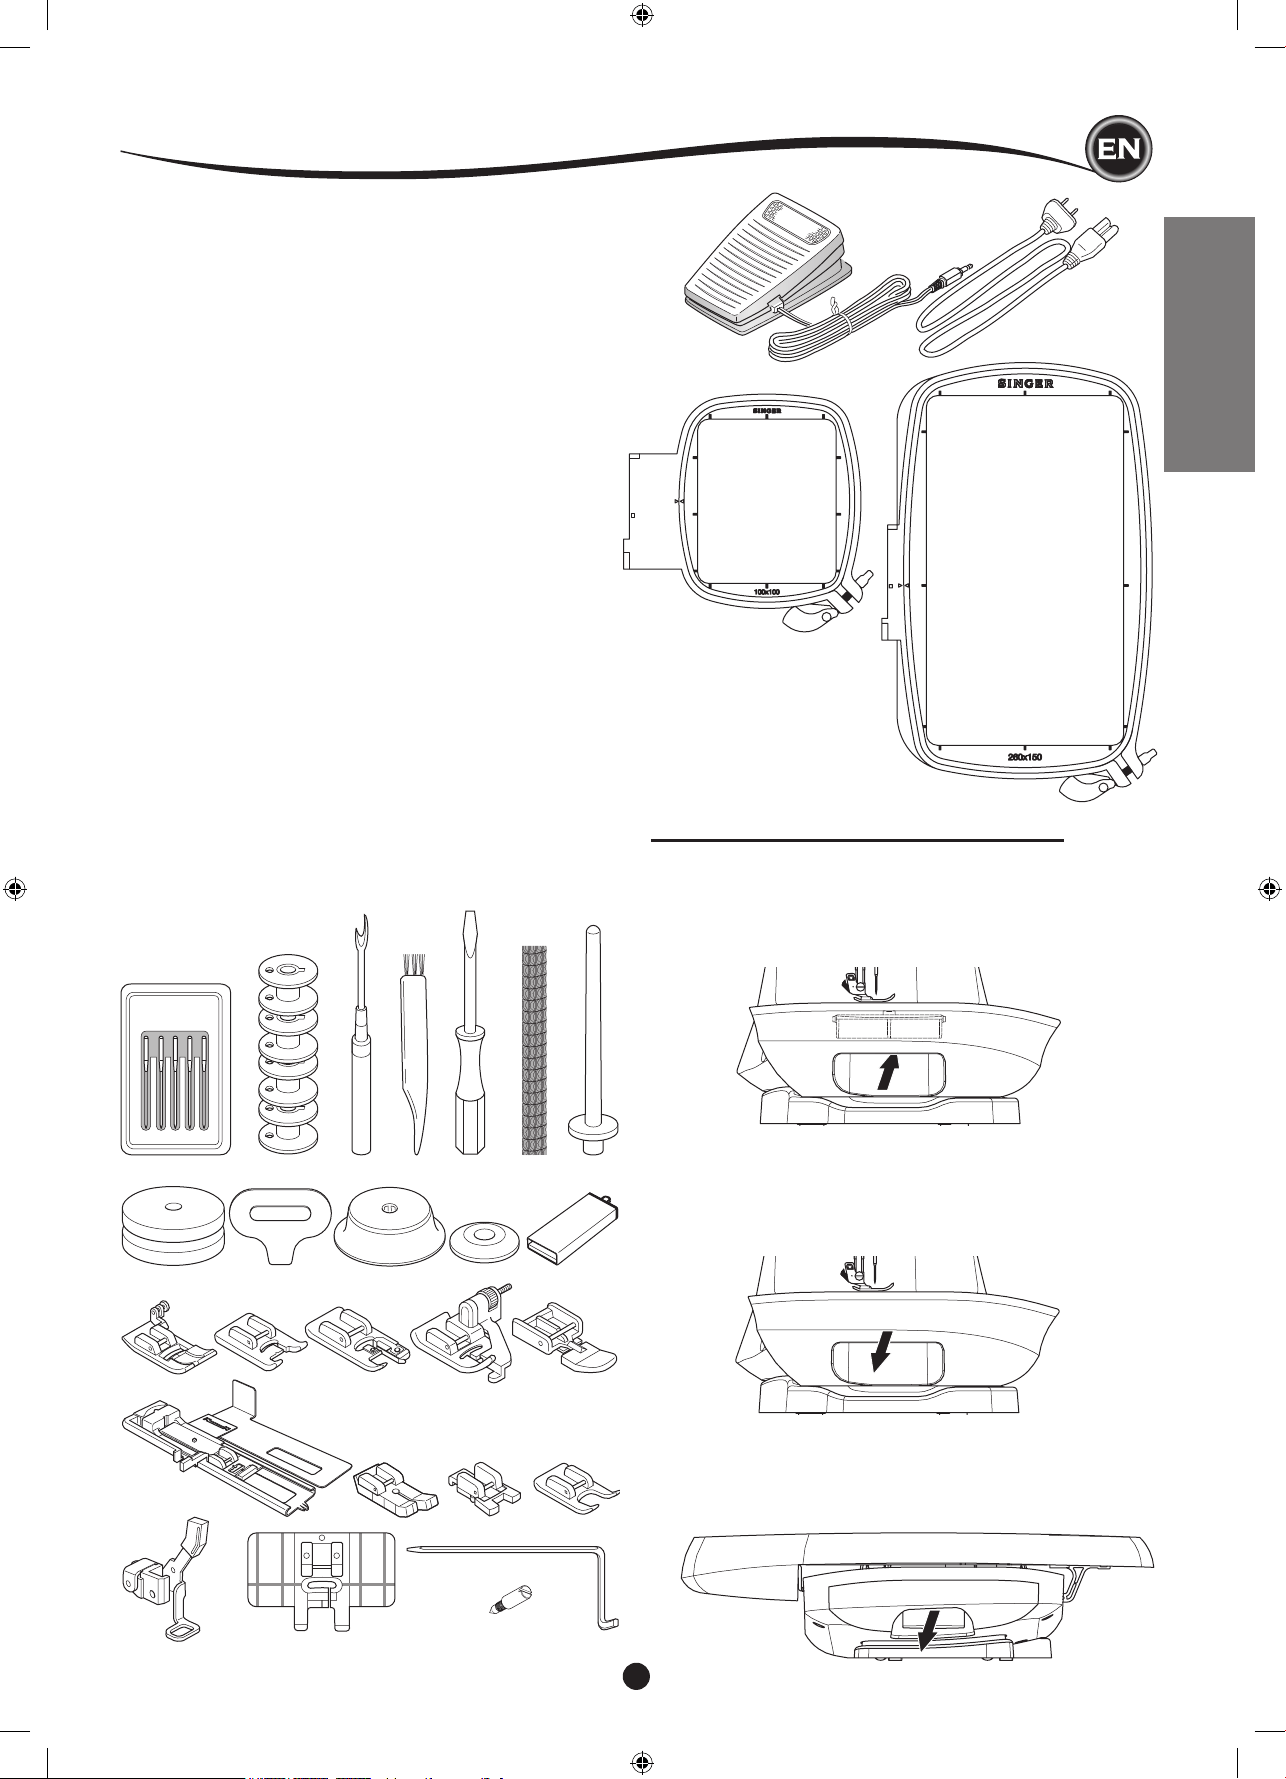
SETTING UP THE MACHINE
Some accessories are stored in the accessory tray.
1. Needle Pack
2. 5 SINGER Class 15 Bobbins (transparent)
(one is in the machine)
3. Seam Ripper
4. Brush
5. Screwdriver
6. Thread Net
7. Auxiliary Spool Pin
8. Felt Washers
9. Screwdriver for Needle Plate
10. Spool Cap
11. Small Thread Cap
12. USB Embroidery Stick
13. All-Purpose Foot (A) (on the machine when delivered)
14. Satin Foot (B)
15. Overcasting Foot (C)
16. Blind Hem Foot (D)
17. Zipper Foot (E)
18. Buttonhole Foot (F) and Underplate
19. Straight Stitch / Patchwork Foot
20. Button Sewing Foot
21. Open Toe Foot
22. Embroidery Foot (L)
23. Parallel Sewing Foot
24. Long Needle Clamp Screw
(used only for ziz-zag free-motion sewing)
25. Quilting Bar
26. Foot Controller
27. Power Line Cord
28. Embroidery Hoop 100mm x 100mm (4” x 4”)
29. Embroidery Hoop 260mm x 150mm (10 1/4” x 6”)
1
26
28
29
27
2 3
4
5 6 7
8 9
10
11 12
13
18
22
19 20 21
14 15 16 17
acceSSorIeS
acceSSory tray of the embroIdery unIt
The accessory tray is located on the left side of the embroidery
unit. Pull to open.
REMOVABLE EXTENSION TABLE
to open the acceSSory tray
The machine’s accessories are stored in the tray of the
removable extension table. To open the tray, reach under the
table, then pull the lever located under the table, while resting
your thumb on the top edge of the table.
23 2524
to remove the extenSIon table
Hold left side of the extension table and pull to the left. (NOT
pulling the lever for accessory tray.)
To attach, slide the table to the right.
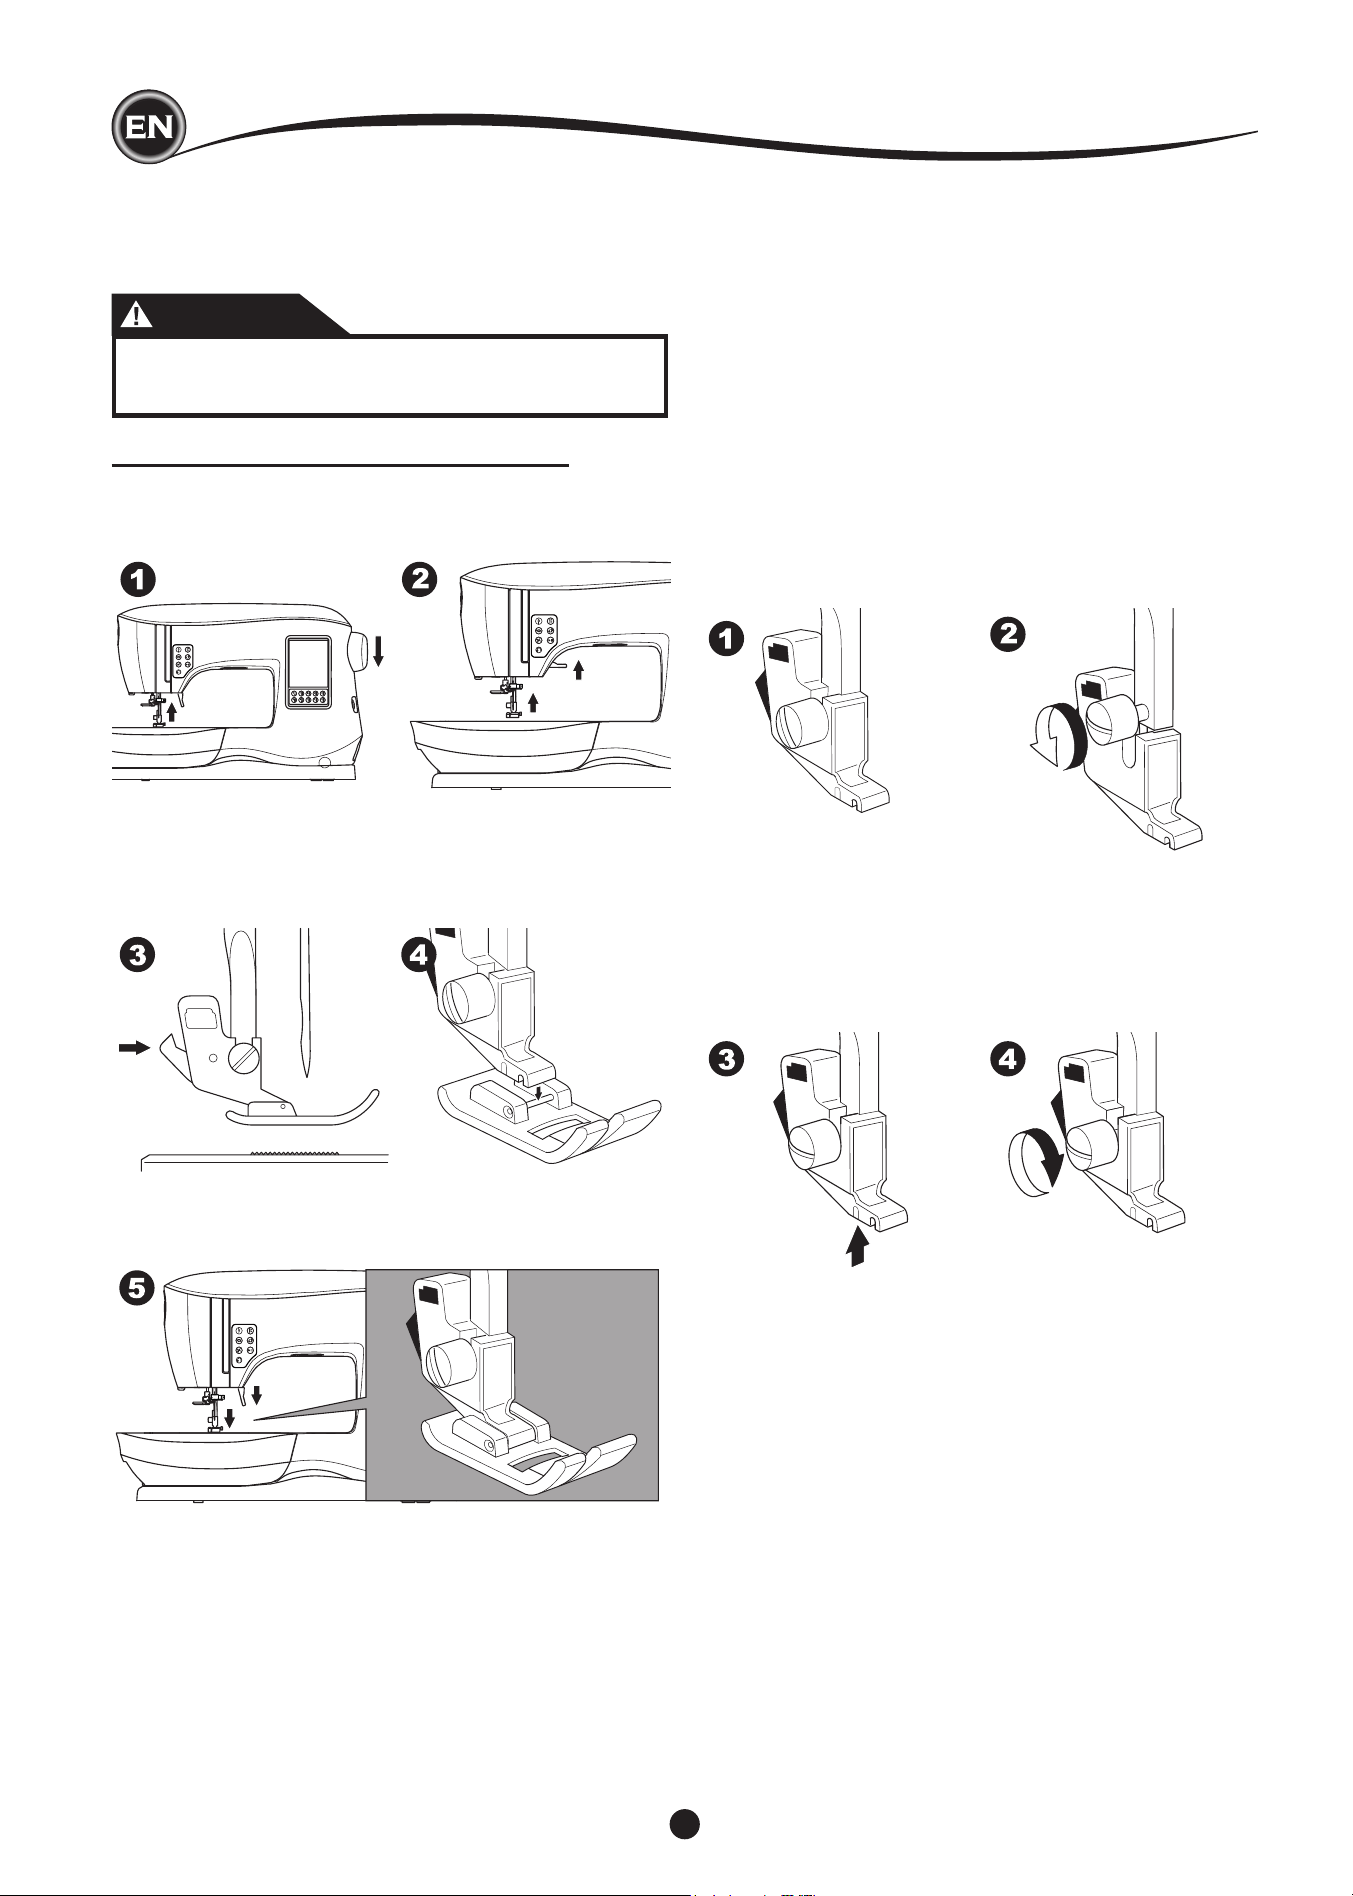
8
The presser foot must be changed according to the stitch
or technique you sew. Information on sewing and sewing
techniques begins on page 21.
CHANGING THE PRESSER FOOT
1. Turn the hand wheel toward you until the needle is at its
highest position.
2. Raise the presser foot lifter.
3. Remove the presser foot by pushing the presser foot
release lever toward you.
4. Place desired foot with its pin directly under the slot in
presser foot holder.
5. Lower the presser foot lifting lever and the presser foot will
snap into place.
removIng the preSSer foot holder
When attaching presser feet that have their own shank, or
when cleaning the machine, you should remove the presser
foot holder.
1. Remove the presser foot.
2. Loosen the presser foot screw and remove the presser foot
holder.
3. To replace the holder, pull up the holder as far as it will go
from bottom of presser bar.
4. Tighten the presser foot screw securely using the
screwdriver.
acceSSorIeS
CAUTION
To prevent accidents:
Turn off the power switch before you change the
presser foot.
NOTE: This sewing machine is a low shank model. When
shopping for optional SINGER presser feet and accessories,
make sure they are designed for low shank models.
9
SETTING UP THE MACHINE
FABRIC, THREAD AND NEEDLE CHART
Select size of thread and needle in accordance with fabric to
be sewn.
SINGER brand needles are recommended for this machine.
Type of Fabric
Light Weight -
thin georgette,
organdy, voile,
taffeta, silk, etc.
Medium Weight
- gingham,
pique, linen,
cotton, satin,
thin corduroy,
velvet
Heavy Weight
- gabardine,
tweed, denim,
corduroy
Stretch - double
knit, tricot,
spandex, jersey
Sweatshirt,
Swim-wear,
Double Knit,
Sweater Knit
Leather
Thread Size
All-purpose
polyester, ne
cotton, silk
All-purpose
polyester, ne
cotton, machine
quilting
All-purpose
polyester, heavy
duty, topstitching
thread
All-purpose
polyester
All-purpose
polyester
All-purpose
polyester, heavy
duty, topstitching
thread
Needle Size
9/70-11/80
11/80-14/90
14/90-
16/100
11/80-14/90
Needle for knit or
stretch fabrics
14/90
Needle for knit or
stretch fabrics
Needle
Type
SINGER
Style 2000
or 2020
SINGER
Style 2000
or 2020
SINGER
Style 2000
or 2020
SINGER
Style 2001
or 2045
SINGER
Style 2001
or 2045
SINGER
2032
Leather
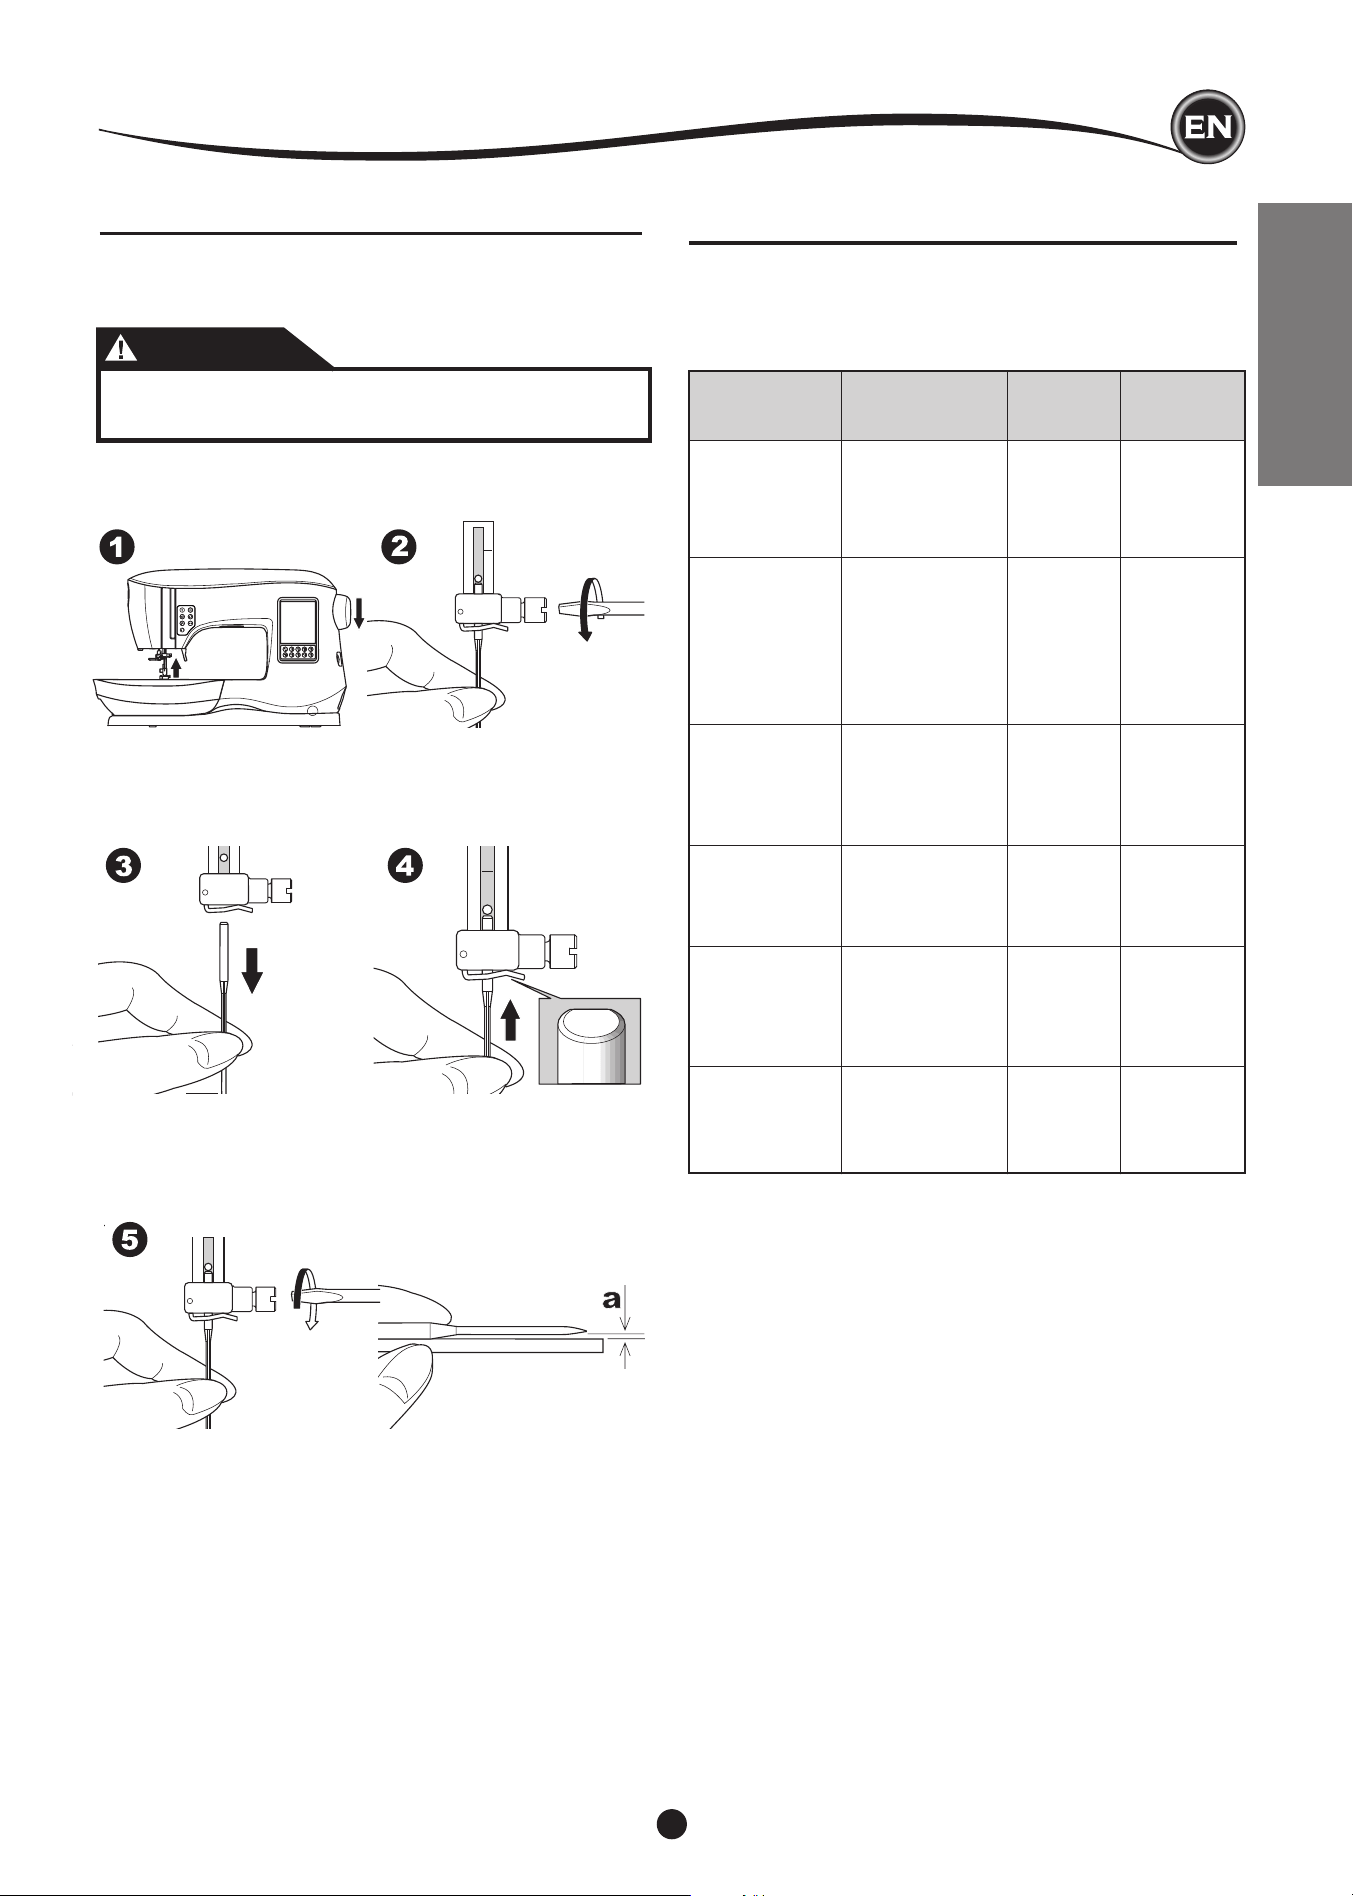
REMOVING & INSERTING THE NEEDLE
Select a needle of the appropriate style and size for the fabric
to be sewn.
CAUTION
To prevent accidents:
Turn off the power before removing the needle.
1. Turn the hand wheel toward you until the needle is at its
highest position.
2. Loosen the needle clamp screw.
3. Remove the needle.
4. Insert new needle into needle clamp with the at side to the
back and push it up as far as it will go.
5. Tighten the needle clamp screw.
Do not use a bent or blunt needle (a). Place needle on a
at surface to check its straightness.
needleS
NOTE:
For information on appropriate fabrics, stabilizers, needles and
threads for embroidery, see page 45.
10
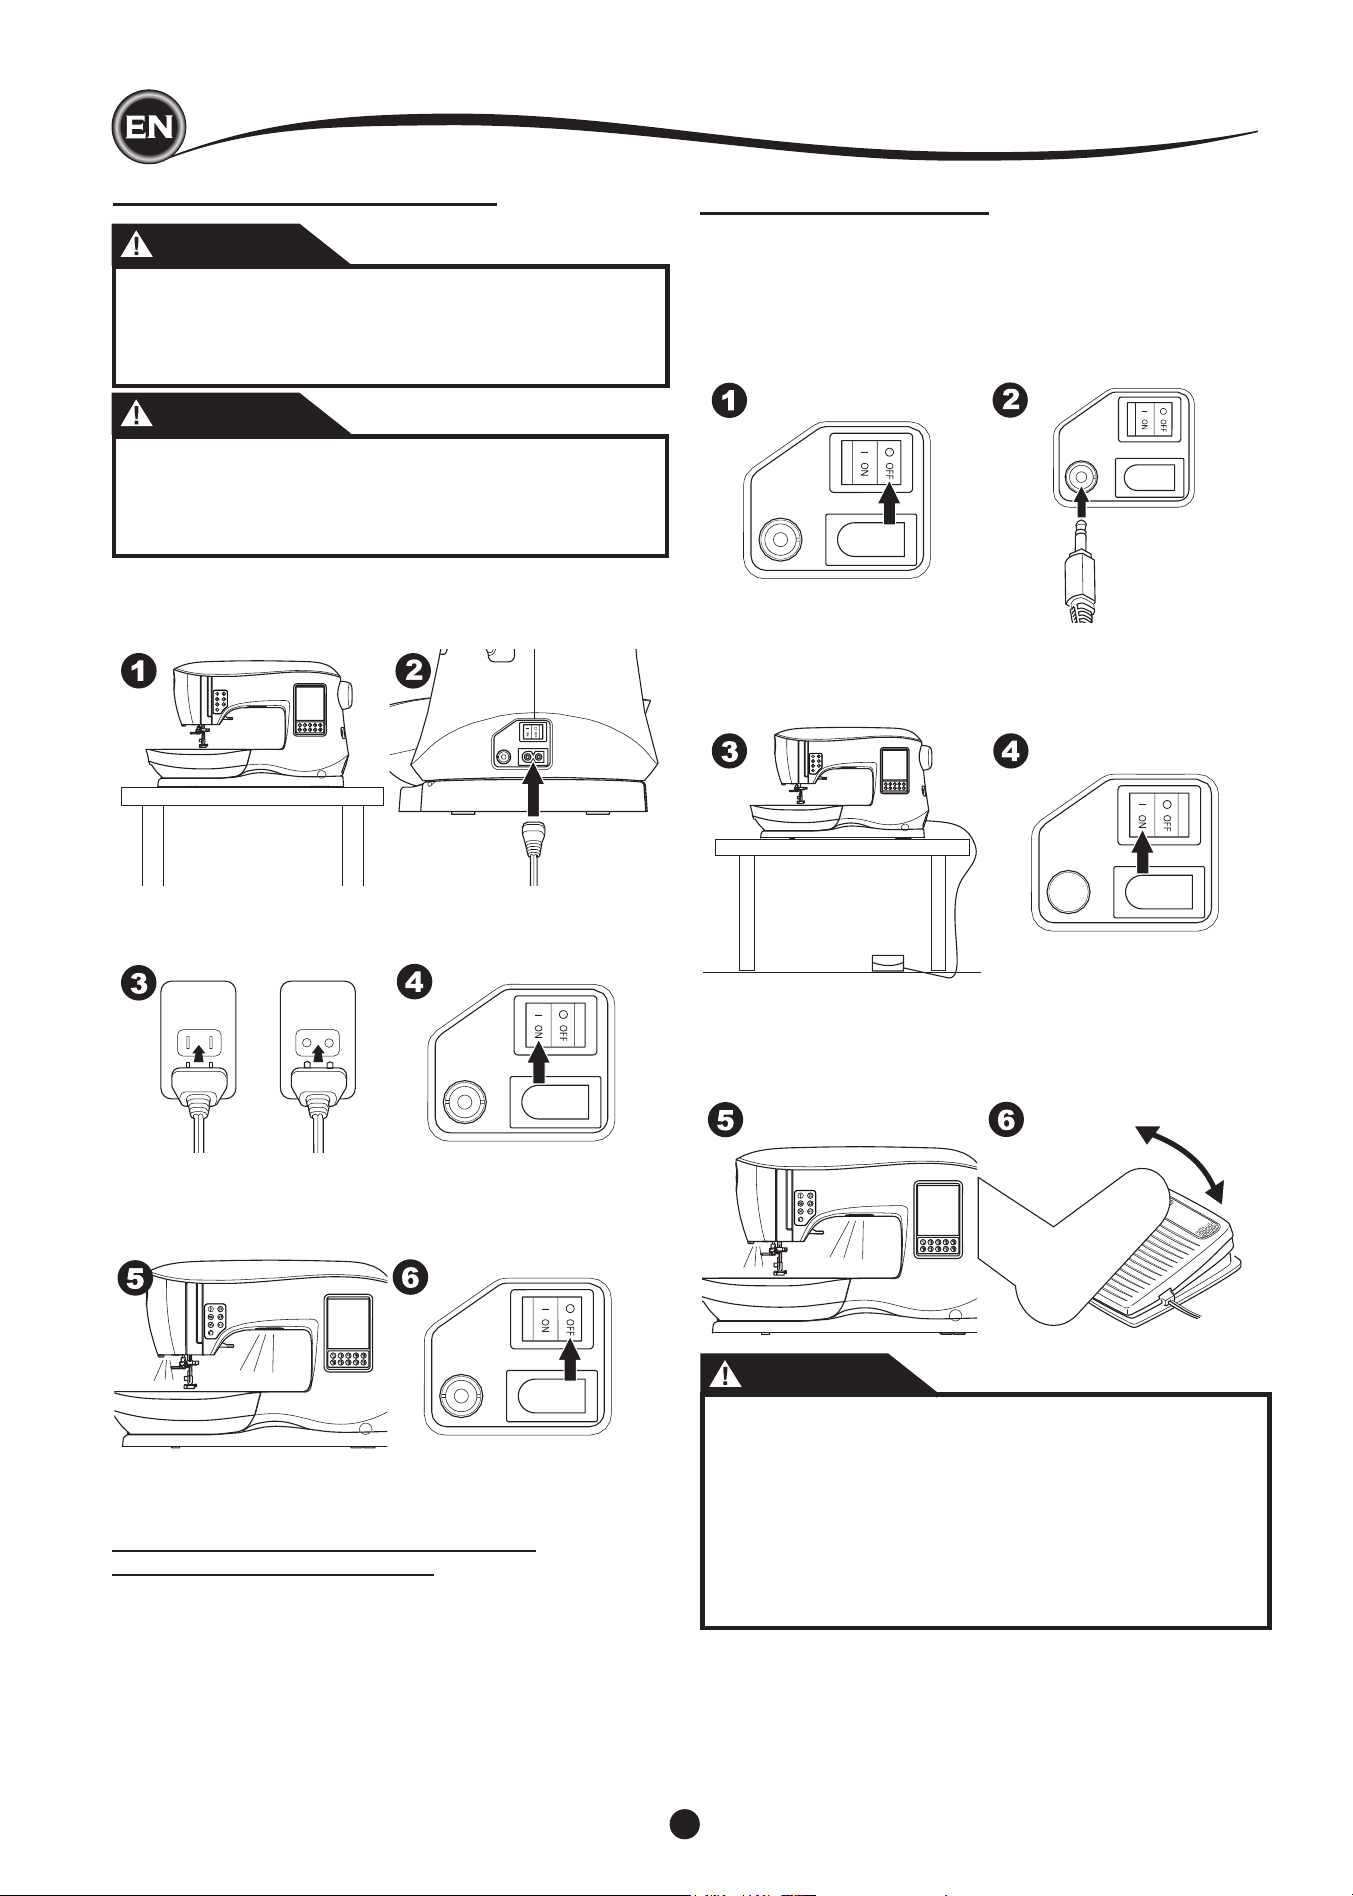
ELECTRICAL CONNECTION
DANGER
To reduce the risk of electric shock:
Never leave unattended when plugged in. Always
unplug this machine from the electric outlet
immediately after using and before maintenance.
WARNING
To reduce the risk of burns, re, electric shock, or
injury to persons:
Do not unplug by pulling on cord. To unplug, grasp
the plug, not the cord.
1. Place machine on stable surface.
2. Connect the power line cord to the machine by inserting
the 2-hole plug into the power cord connector.
SettIng up the machIne
3. Connect the power line plug to the electric outlet.
4. Turn on the power switch.
5. The lamps will light up when switch is turned on (symbol I).
6. To disconnect, turn the power switch to the off position (symbol
O), then remove plug from outlet.
FOR UNITED STATES AND CANADA USERS:
POLARIZED PLUG INFORMATION
This appliance has a polarized plug (one blade wider than the
other). To reduce the risk of electric shock, this plug is intended
to t in a polarized outlet only one way. If the plug does not t
fully in the outlet, reverse the plug. If it still does not t, contact
a qualied electrician to install the proper outlet. Do not modify
the plug in any way.
FOOT CONTROLLER
Use of foot controller will permit control of start, stop and speed
with your foot.
When the foot controller is connected, Start/Stop button will be
deactivated. (Next page)
1. Turn off the power switch. (symbol O)
2. Push foot controller plug into the connector on machine.
3. Place foot controller at your feet.
4. Turn on the power switch.
5. A lamp will light up when switch is turned on.
6. The harder you press the foot controller, the faster the
machine will sew. The machine will stop when foot
controller is released.
WARNING
To reduce the risk of burns, re, electric shock, or
injury to persons:
1. Turn off the power when connecting the foot controller
to the machine.
2. Handle the foot controller with care and avoid dropping
it on the oor. Be sure not to place anything on top of
it.
3. Use only foot controller provided with this machine. (type
C-9001 manufactured by CHIEN HUNG TAIWAN Ltd)
11
SETTING UP THE MACHINE
MACHINE CONTROL FUNCTIONS
tack button wIth led (a)
Press the tack button while sewing and your machine
sews a few Tack stitches and stops automatically. When
pressed while not sewing, machine will sew a tack and
stop automatically at the beginning of next sewing.
The LED light will turn on until tack stitch has completed.
needle poSItIon up/down button wIth led
(b)
Press this button to move the needle up or down. The
setting of the needle stop position is changed at the same
time. When needle position is setted to down, the LED will turn
on.
You can also tap the foot control to raise or lower the needle.
Speed control button (c, d)
The Speed Control Buttons allow you to incrementally increase
or decrease the sewing speed. When either button (C or D)
is pressed, a pop-up message appears showing the range of
speed settings available.
NOTE:
When the foot controller is connected, these buttons decrease
and increase the speed limit.
thread cutter button wIth led (e)
Press this button after sewing to cut the upper and bobbin
threads.
The LED will turn on and cut both threads automatically.
To cut before the needle moves to the start position of
the next stitch, press the Thread Cutter button while
sewing. The LEDs (A & E) will be lit and the machine
will cut the threads after the stitch or sequence has
completed.
CAUTION:
1.
Do not press this button when there is no fabric under the
presser foot or no need to cut the threads. The thread may
tangle, resulting in damage.
2. Do not use this button when cutting thread thicker than #30,
nylon thread or other speciality threads.
In this case, use the thread cutter (H).
3.
Do not use the Thread Cutter button when sewing with a twin
needle or a hemstitching (wing) needle.
Start/Stop button (f)
The machine will start running when Start/Stop button is
pressed and will stop when pressed the second time. The
machine will rotate slowly at start of sewing.
NOTE:
1. When the foot controller is connected, Start/Stop button will
be deactivated.
2. Bobbin winding function is independent from this button. (See
page 17)
SettIng up the machIne
preSSer foot lIfter (h)
The presser foot is raised or lowered by this lever.
If you are sewing on heavy fabric or several
layers of fabric, the presser foot can be raised higher to make
it easier to place the fabric underneath the presser foot.
NOTE:
Machine will not start when the presser foot is raised. (Except
for bobbin winding)
reverSe StItch button (g)
The machine will sew in reverse while this button is pressed.
When released, machine will sew forward.
12
thread cutter (I)
Use this cutter if the Thread Cutter button is not used.
1. Raise the presser foot and bring fabric and threads
backward after sewing.
2. Hook the threads to the thread cutter from back to front.
3. Pull the thread tails to cut the threads.
preSSure regulator (J)
The correct presser foot pressure allows fabrics to feed
properly while sewing. The setting of the presser foot pressure
is determined mainly by the weight of the fabric being sewn.
For lightweight fabrics such as sheers, batiste, voile, etc, the
pressure is decreased. For heavyweight fabrics like denim or
canvas, the pressure in increased.
To increase the pressure, turn dial to 5.
To decrease the pressure, turn dial to 1.
For most fabrics, turn dial to N.
top cover (k)
To open the top cover, lift up the front right side of the cover.
hand wheel (l)
By turning the hand wheel, the needle will raise or lower. You
should always turn hand wheel toward you.
drop feed lever (m)
The feed dogs project up through the needle plate, directly
below the presser foot. Their function is to move the fabric
while it is being sewn. The Drop Feed Lever located on the
back of the free arm controls the feed dogs.
For ordinary sewing, move the lever to the right. This raises
feed dogs to their highest position. For most sewing, the lever
should be in this position.
For darning or free-motion embroidery, or whenever fabric is to
be moved by hand, move the lever to the left to lower the feed
dogs.
NOTE:
After sewing with the feed dogs lowered, push the Drop
Feed Lever back to the right to resume sewing with feed
dogs engaged. Push the lever to the right and then turn the
handwheel toward you one full revolution. This will re-engage
the feed dogs.
N
mountIng machIne In SewIng cabInet (n)
There are two holes on the underside of the machine designed
for mounting the machine into a sewing cabinet. Align the
holes (indicated in the picture) with the corresponding holes in
the cabinet base. Attach the machine with screws. (Screws not
included)
SettIng up the machIne
M
13
SETTING UP THE MACHINE
A
B
home Screen (a)
When you turn on the power, machine will display the Home
Screen (see below). Home Screen will indicate two buttons:
a. Sewing Mode Button
By pressing this button, you can select and sew stitch
pattern normally.
b. Sequence Mode Button
By pressing this button, you can combine stitch patterns
and letters easily by selecting each pattern or letter.
FOR SELECTING AND SETTING OF SEQUENCE MODE,
SEE PAGE 38.
NOTE:
If the embroidery unit is attached, a different Home Screen will
appear. Turn the machine off, then remove the embroidery unit.
(See page 42)
home button (b)
You can return to the Home Screen from any other view by
pressing the Home Button.
SewIng preparatIon
SEWING MODE
At the Home Screen, by pressing the Sewing Mode button,
machine will select straight stitch rst. You can select and sew
all stitch patterns indicated in the Direct Selection Buttons and
the pattern chart located inside of the top cover.
NOTE:
It is not possible to sew when the embroidery unit is attached.
StItch InformatIon
a. Stitch Pattern
The shape of stitch pattern will change according to
the setting of stitch length, width, mirror/reverse and
elongation.
b. Pattern Number
c. Recommended Presser Foot
Indicated presser foot is one of suggested foot for normal
sewing. You can use other presser feet as described in this
instruction manual.
d. Stitch Width/Needle Position
e. Stitch Length/Density
SELECTING A STITCH
By pressing one of the Direct Selection Buttons (0-9), you can
select that stitch number immediately.
Press two or three digits in quick succession to select a stitch
from 10 and up. If the stitch number does not exist, you will
hear a beep and the last entered stitch number will remain
selected.
a
a
b
b
c
d e
TOUCH PANEL LCD
When you turn on the power, the touch panel LCD will display
the Home Screen.
NOTE:
If the message show below appears, this means the needle
is not in correct position. Turn the hand wheel toward you to
raise the needle to its highest position. Then press the “
✓”
button.
CAUTION
Do not press the screen too hard and do not use sharp
objects to touch it. Doing so can damage the screen.
Touch the screen with your nger only.
14
A
B
thread tenSIon (b)
This machine sets the thread tension automatically when
pattern is selected. However, you can change the thread
tension, as follows.
To increase the upper thread tension, press the + button.
To decrease the upper thread tension, press the – button.
If you change from pre-set, number will be highlighted.
You can start sewing while in this mode and change tension
while sewing.
To return to previous screen, stop sewing and press the Setting
Button again.
When another stitch pattern is selected, thread tension will
return to pre-set.
Preset Thread Tension
Upper and bobbin thread will lock approximately in the middle
of fabric.
SettIng of the StItch pattern
Your machine will automatically select optimum settings for
each stitch. You can make adjustments to every stitch as
desired. Adjusted settings only affect the selected stitch and
will be reset to default when another stitch is selected. Adjusted
settings are not automatically saved when the machine is
turned off.
f. Stitch Width/Needle Position
Increase or decrease the stitch width using + and - buttons.
For straight stitches, use + and - to move the stitch position
left or right.
When a setting is changed, the numbers will be highlighted.
When trying to exceed minimum or maximum settings, a
warning sound will be heard.
g. Stitch Length/Density
Increase or decrease the stitch length using + and -
buttons.
When sewing stitches from the Satin category (stitches
157-174), use the + and - buttons to increase or decrease
stitch density. This may be necessary depending on the
type of thread being used.
When a satin stitch is selected, the icon changes to show
that stitch density is active instead of stitch length.
h. Width Mirroring
By pressing the Width Mirror button, stitch will ip from left
to right.
i. Length Mirroring
By pressing the Length Mirror button, stitch will ip from top
to bottom.
When mirroring is active, the button will be highlighted. If
mirroring is not available, a warning sound will be heard.
j. Elongation
Stitches in the Elongation category (stitches 175-197) can
be elongated. The entire stitch will be longer but the density
will remain the same. Press the Alt button to show the
elongation setting instead of density for satin stitches. The
density changes to show an elongation symbol. Increase or
decrease the elongation of the satin stitch using the + and -
buttons.
f
h
g
i
j
MACHINE SETTINGS
SettIng button (a)
Before or during the sewing process, you can adjust the
settings by pressing the Setting Button.
The Setting Screen will appear.
This screen is scrolled by pressing the right side arrow buttons.
Pressing the Setting Button again, machine will return to
previous screen.
NOTE:
All settings except for thread tension will remain until you
change them. Thread tension will return to pre-set when you
change the pattern. Default settings will differ depending on the
stitch selected.
SewIng preparatIon
Upper Thread Tension Too Tight
Bobbin thread will appear on the top side of the fabric.
Decrease upper thread tension.
15
SETTING UP THE MACHINE
Upper Thread Tension Too Loose
Upper thread will appear on the bottom side of the fabric.
Increase upper thread tension.
Thread Tension for Decorative Stitching
Thread tension should be set to a slightly looser tension than
that for straight stitch.
The upper thread should appear slightly on the bottom side of
your fabric, for example, when doing decorative sewing.
Helpful Hints
1. If your sewing appears as shown in the illustration (stitches
on the top side of the fabric are good, but the bottom side
looks very loopy), it is most likely that the upper thread
is not threaded correctly. Refer to page 19 for correct
threading.
2. If after checking the top thread and the bobbin thread is still
showing on the top side, check the bobbin to see if it is set
correctly. Refer to page 18 for information on correct bobbin
setting.
twIn needle
Activate the twin needle program by pressing - or + buttons
to set the twin needle width. When a twin needle width is
selected, the width of all stitches is limited to prevent
needle breakage.
To deactivate, press - button until number of twin needle width
will disappear.
In sewing mode, the Twin Needle icon will be shown. The
setting is kept until you deactivate it.
See page 37 for more information about twin needle sewing.
SewIng preparatIon
POP-UP MESSAGES ABOUT TWIN NEEDLE
This pop-up message will appear when Twin
Needle program is activated.
Check the needle and press the “
✓”
button to
continue.
This message will appear when a stitch that
cannot be used with twin needle, is selected.
Press the the “
✓”
button and select another
pattern or reset the twin needle program.
This message will appear when stitch width is
adjusted to the limit.
Press the the “
✓”
button to continue.
16
i
ii
1
2
3
5
4
6
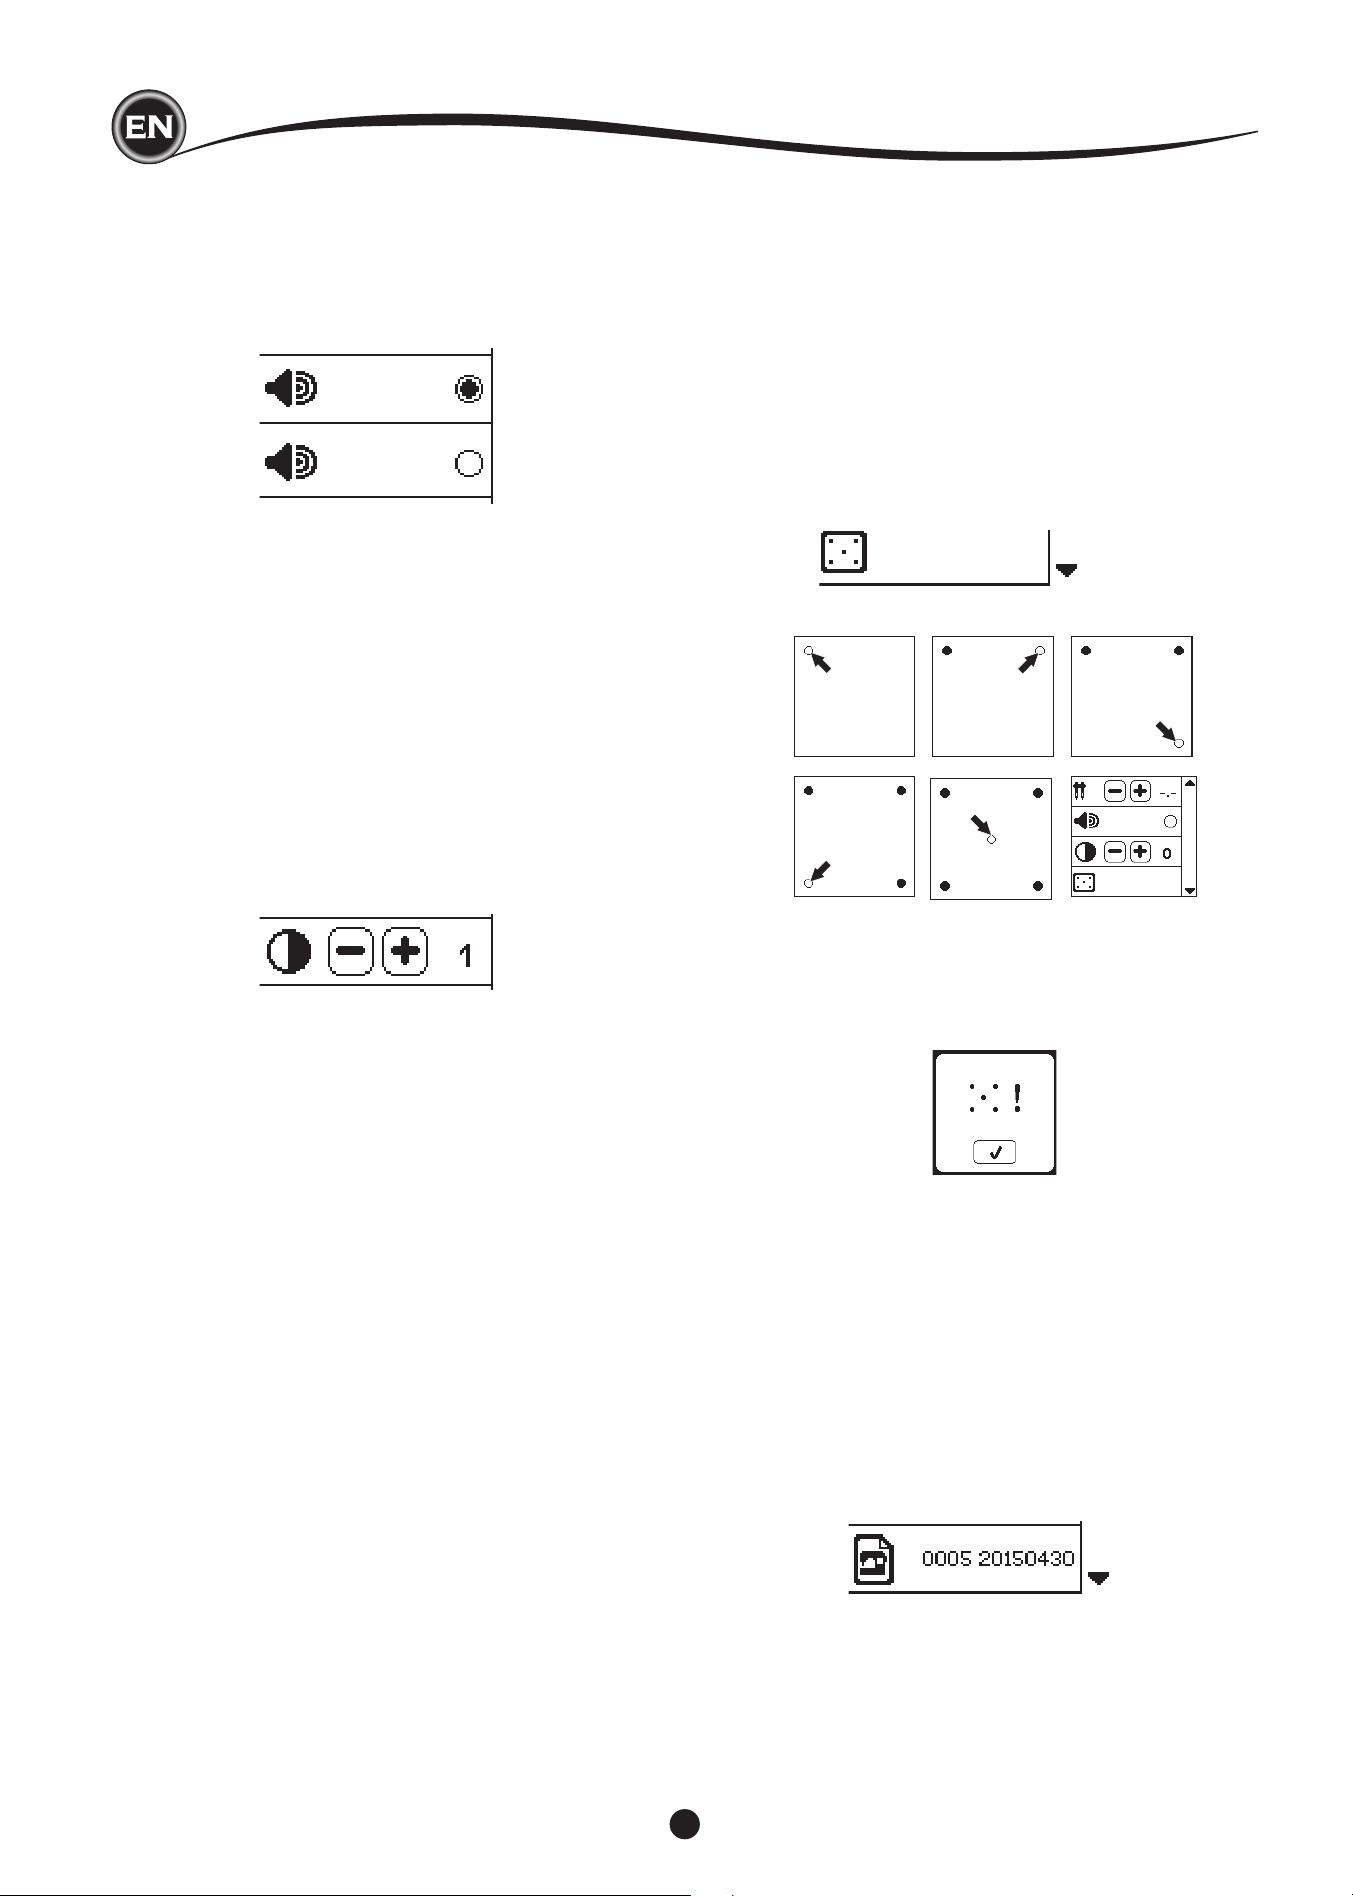
audIble beep
You can turn off the audible beep by pressing this button.
i. Audible Beep is on.
ii. Audible Beep is off.
contraSt of Screen
You can adjust the contrast of screen.
By pressing “+” or “–” button, contrast will increase or
decrease.
calIbratIon Screen
If the icons on the screen, in relationship to where you touch
the screen, seem misaligned, the screen may need calibrating,
as follows:
1. Scroll down the Settings Menu, then press the Calibration
Screen button.
2. Press the each “O” mark indicated on the screen 5
positions. (4 corners and center)
When calibration is completed, setting screen will appear
again.
Software verSIon
Software version of this sewing machine will be indicated at
the bottom of this screen.
You can update the software by using the USB embroidery
stick. (See page 47)
SewIng preparatIon
(example)
NOTE:
If calibration has not completed correctly, pop-up message will
appear. Press the “
✓
” button and retry the calibration.
17
SETTING UP THE MACHINE
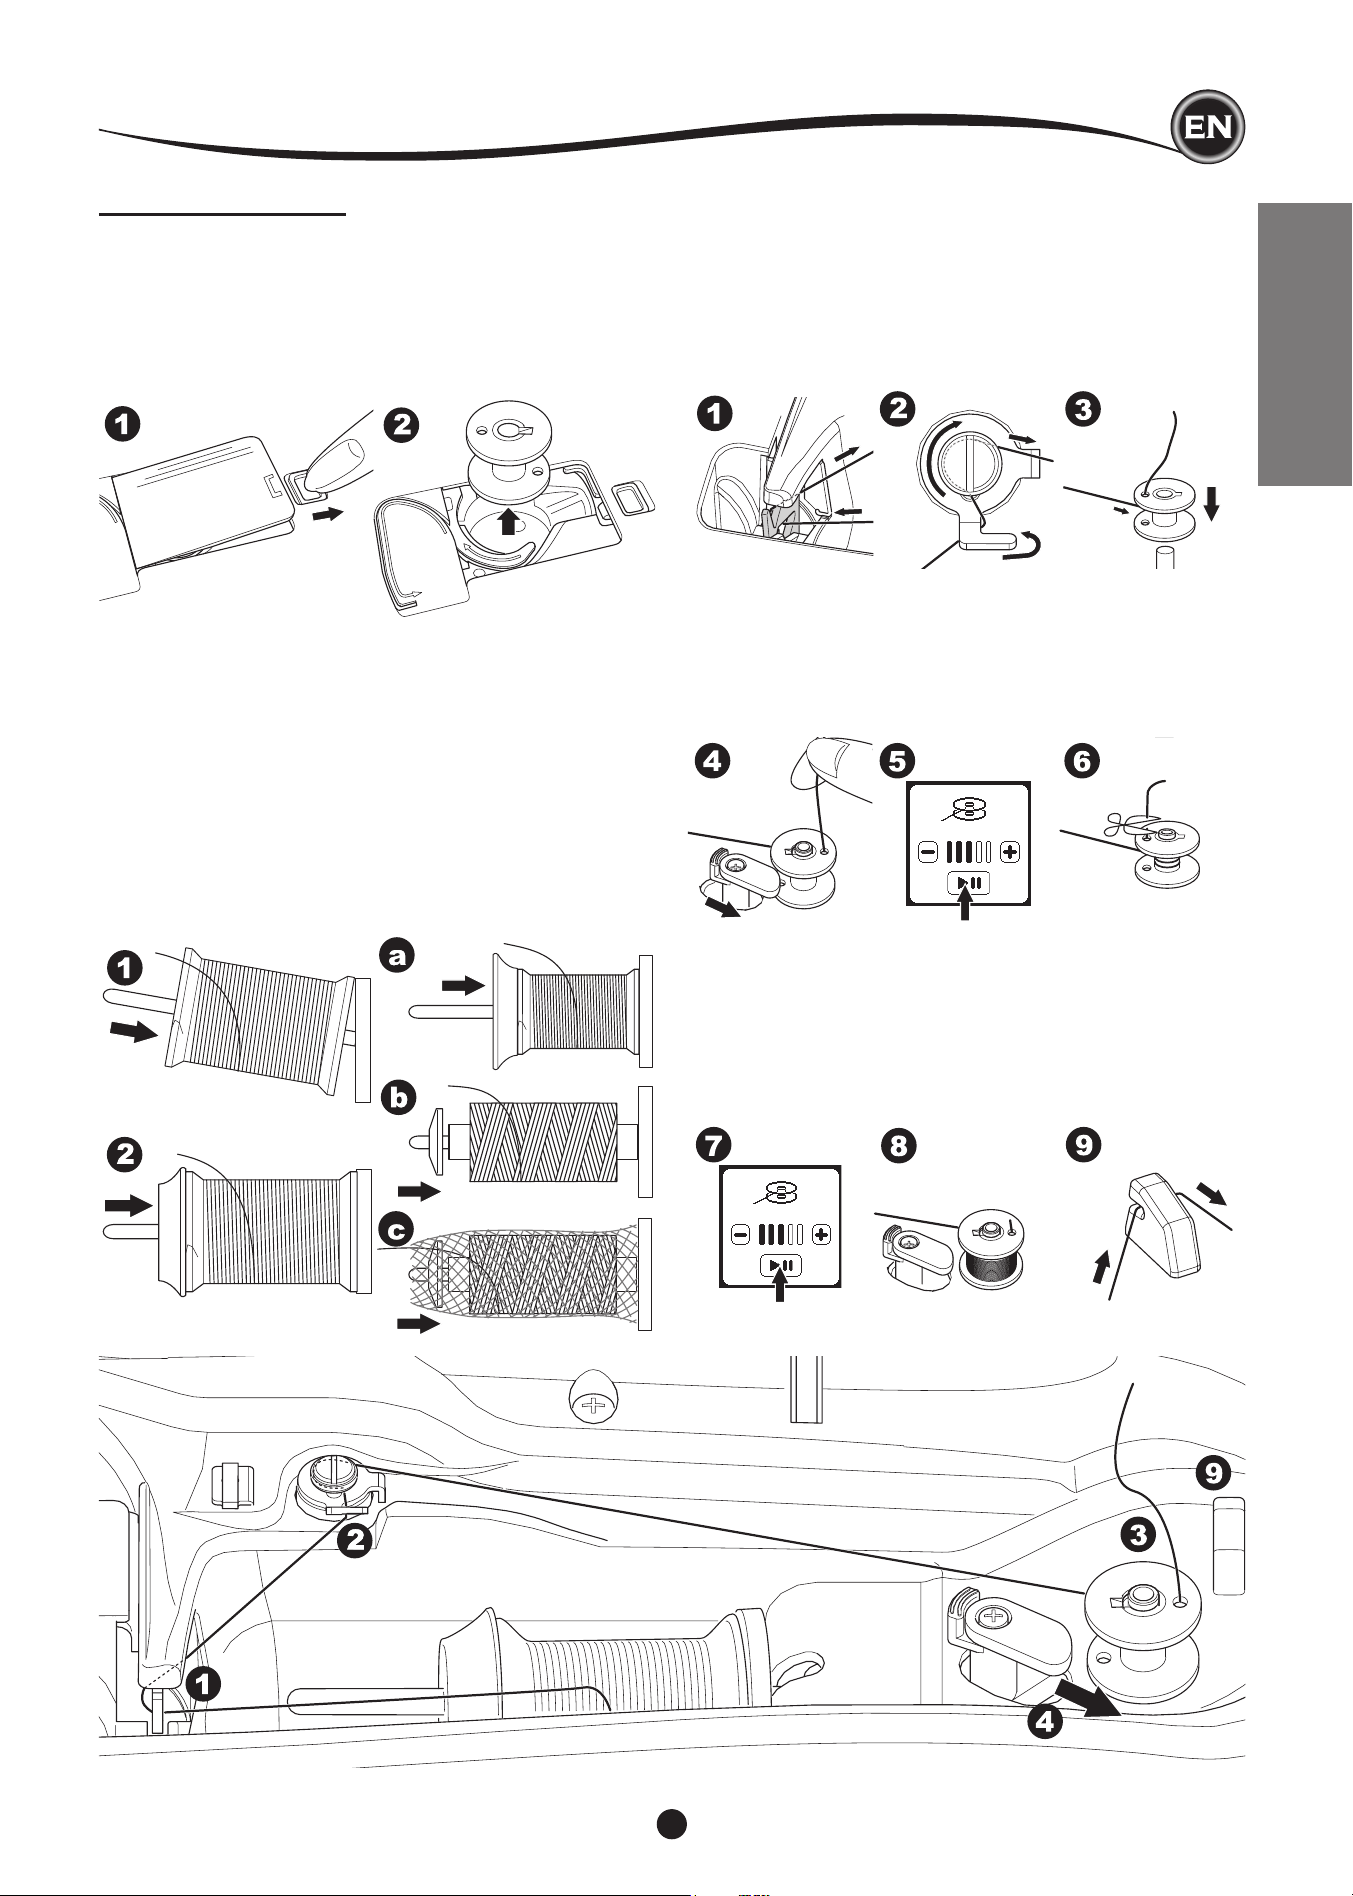
BOBBIN SETTING
Be sure to use only SINGER Class 15 bobbins (transparent) in
this machine.
removIng the bobbIn
1. Pull the bobbin cover latch to the right and remove the
bobbin cover.
2. Lift up the bobbin from the machine.
threadIng the machIne
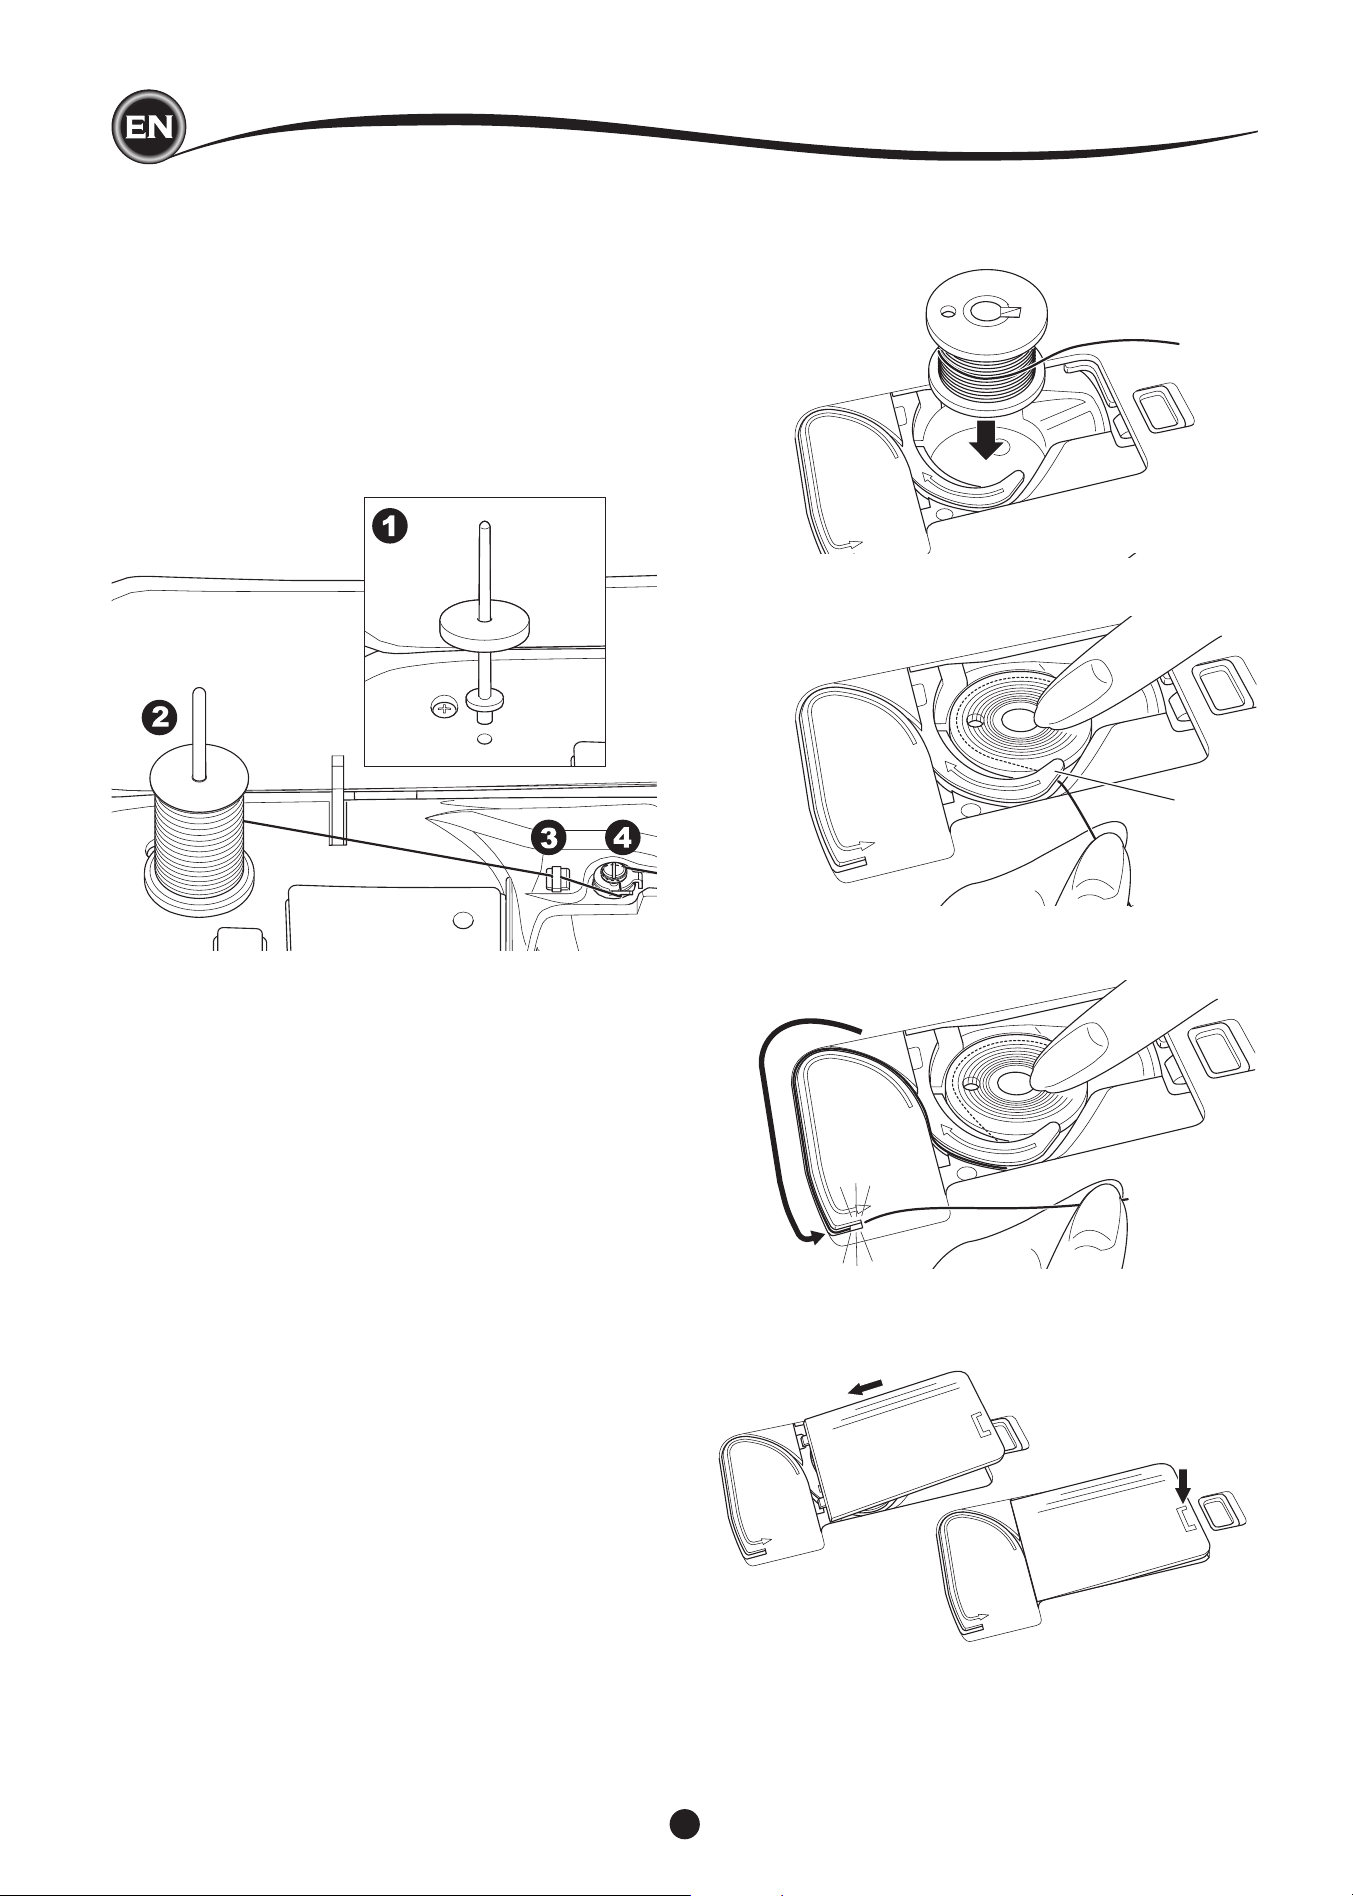
SettIng Spool of thread on Spool pIn
1. Pull up the left end of spool pin and set the felt washer and
the spool of thread on spool pin so that the thread unrolls
from the front of the spool.
2. Set the spool cap on spool pin as far as it will go.
a. Reverse spool cap direction according to the size of
spool.
b. Use the small spool cap when you use cross wound
thread. Leave small opening between cap and spool as
illustrated.
c. Set the thread net over the spool if thread unrolls too
easily.
wIndIng the bobbIn
1. Hold thread in both hands and hook thread to the guide
from front opening.
2. Bring thread to the right and pass it through the thread
guide from the back side. Pass thread under the bobbin
winding tension disk in a clockwise direction.
3. Insert thread through hole in bobbin and place the bobbin
on bobbin winder spindle.
4. Hold the end of the thread and push bobbin stopper to the
right. When the bobbin winding screen appears, press the
Start/Stop button on the screen to start winding.
5. After the bobbin winds a few turns, stop the machine by
pressing the Start/Stop button on the screen.
6. Cut the thread near the hole, as illustrated.
7. Start the machine again by pressing the Start/Stop button
on screen. You can adjust winding speed by pressing “+”
(faster) or “-” (slower) button on the screen.
8. When the bobbin is wound fully, the bobbin stopper will
return to the left and stop winding automatically.
9. Remove the bobbin from the spindle and cut thread with
the thread cutter.
18
InSertIng the bobbIn
1. Place bobbin into bobbin case, making sure the bobbin
turns in a counter-clockwise direction.
wIndIng bobbIn Independently
You can wind the bobbin independently while stitching.
1. Insert the auxiliary spool pin into the hole at the left side on
the top of the machine.
2. Place the felt washer and spool of thread onto the auxiliary
spool pin.
3. Bring thread to the right and hook the thread to the thread
guide from rear opening.
4. Follow the normal winding procedure from Steps 2 to 9 (on
page 17).
a
threadIng the machIne
2. Draw thread into notch (a) while holding the bobbin lightly
with your nger.
3. Pull thread along the groove, up and around the top, to the
left, then down.
Pull thread to the right to cut the thread.
4. Replace the bobbin cover. Set the left tabs into the holes in
needle plate and push the right side of bobbin cover down
until it clicks into place.
NOTE:
This machine can start to sew without drawing up the bobbin
thread.
If you want to draw up the bobbin thread, see page 20.
Be sure to use only SINGER Class 15 bobbins (transparent) in
this machine.
19
SETTING UP THE MACHINE
THREADING THE NEEDLE
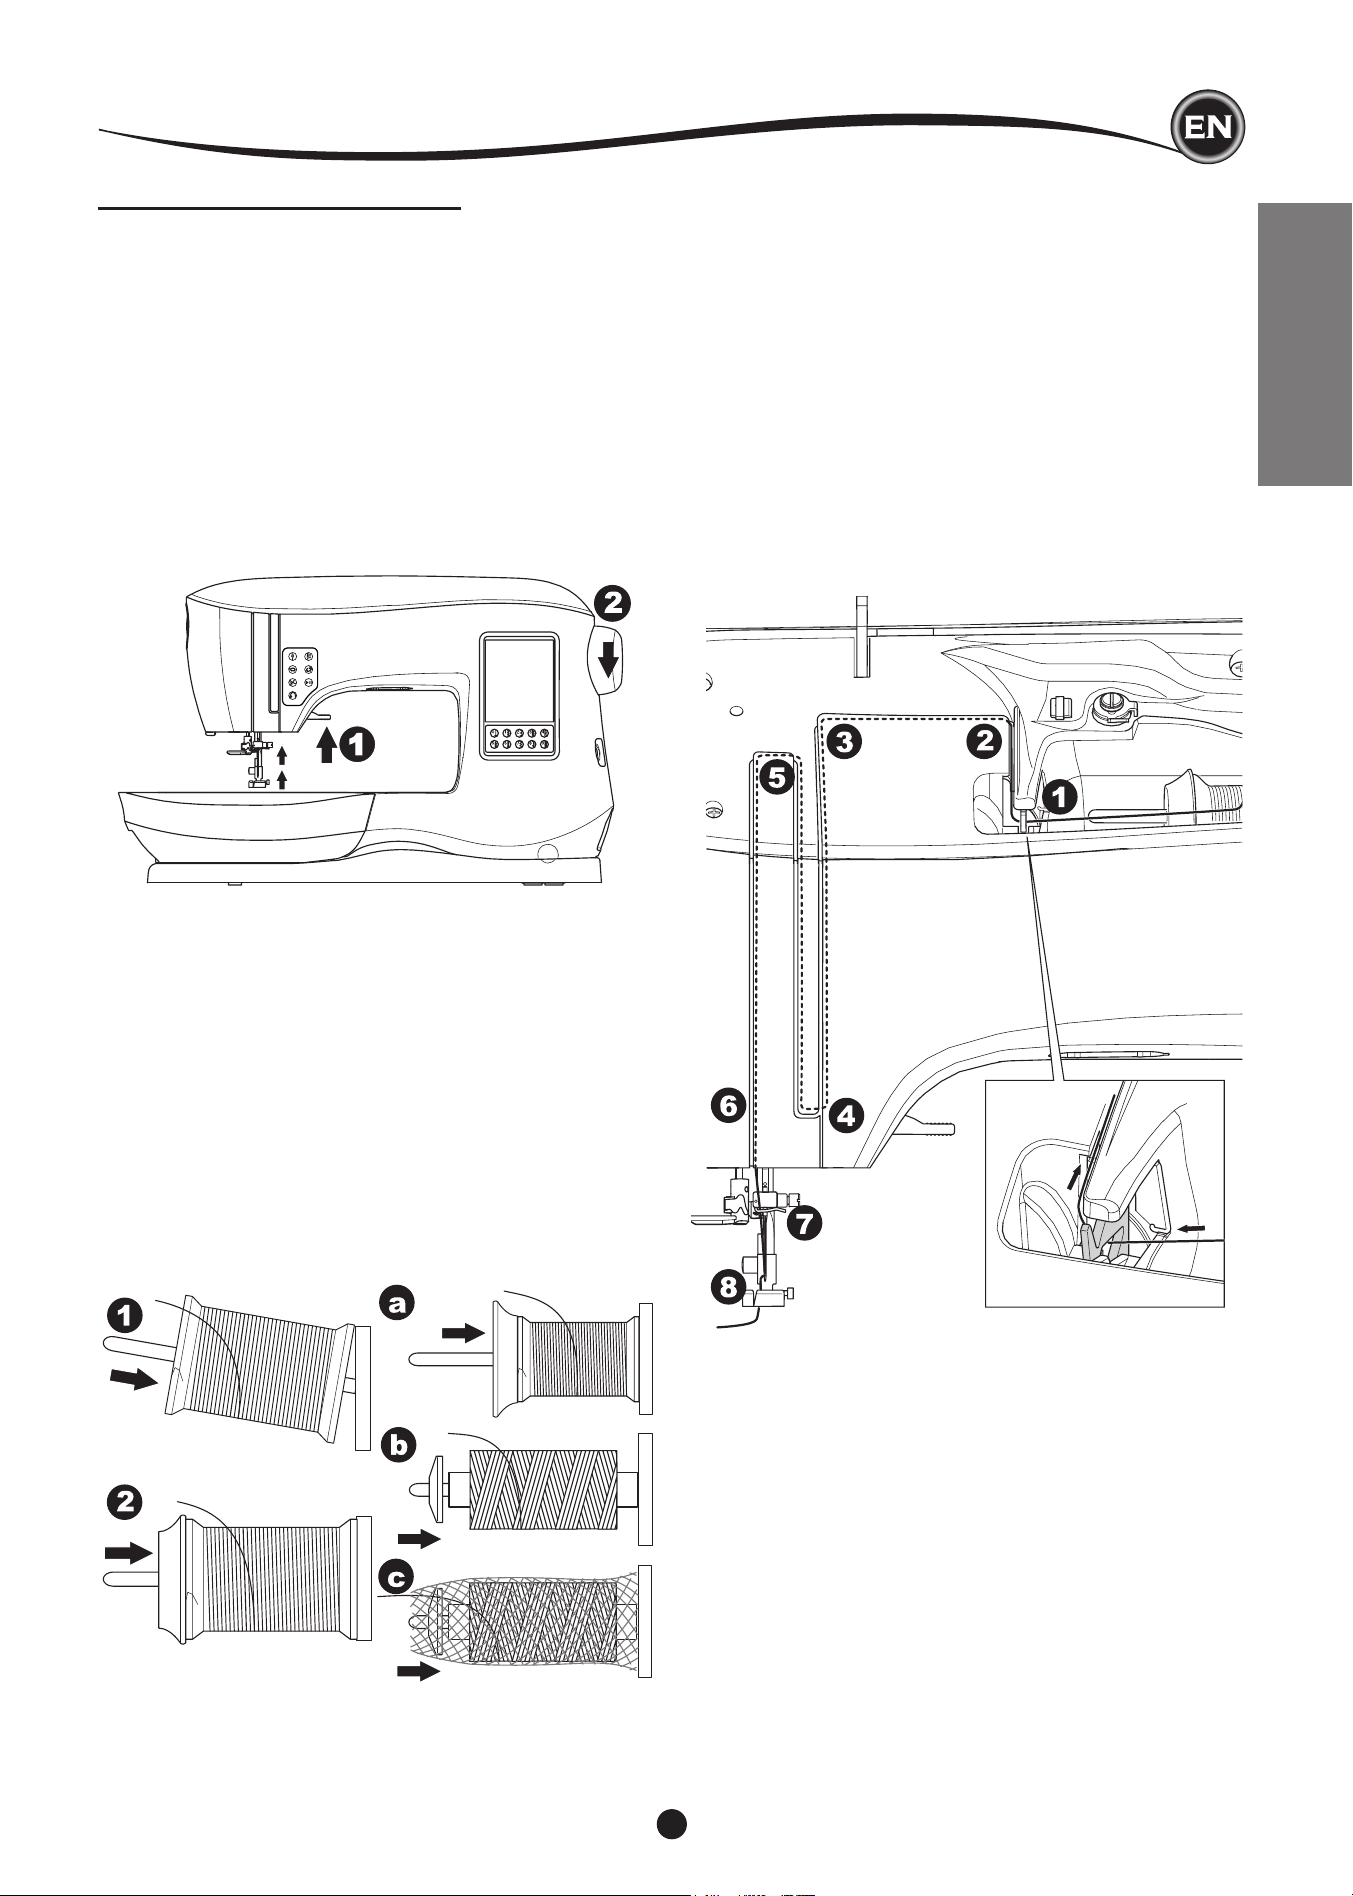
preparIng to thread machIne
1. RAISE THE PRESSER FOOT LIFTER. It is very important
to raise the presser foot lifter before you proceed to thread
the machine.
2. Raise the needle in highest position by turning the
handwheel toward you.
(Keep this position for threading the eye of the needle.)
NOTE:
It is very important to raise the presser foot lifter before you
thread the machine. Not doing so will likely result in poor
stitch quality, or excessive thread loops on the underside of
the fabric. Always raise the presser foot lifter before you begin
threading the machine.
threadIng the machIne
SettIng Spool of thread on Spool pIn
1. Pull up the left end of spool pin and set the felt washer and
the spool of thread on spool pin so that the thread unrolls
from the front of the spool.
2.
Set the spool cap on spool pin as far as it will go.
a. Reverse spool cap direction according to the size of
spool.
b. Use the small spool cap when you use cross wound
thread. Leave small opening between cap and spool as
illustrated.
c. Set the thread net over the spool if thread unrolls too
easily.
threadIng the upper thread
1. Hold thread in both hands and pass thread into the guide
from front opening.
2. Bring thread backward and pass through the slit from right
to left.
3. Bring thread to the left and pull thread down toward you
along the slit.
4. Pull the thread around the U-turn, then bring it back up.
5. To thread the take-up lever, draw thread up and bring
thread back down again from right to left along the slit.
6. Pull thread downward along the slit.
7. Draw thread through thread guide from right side opening.
8. Pass through needle eye from front to back.
Refer to next page for instructions on how to use needle
threader.
20
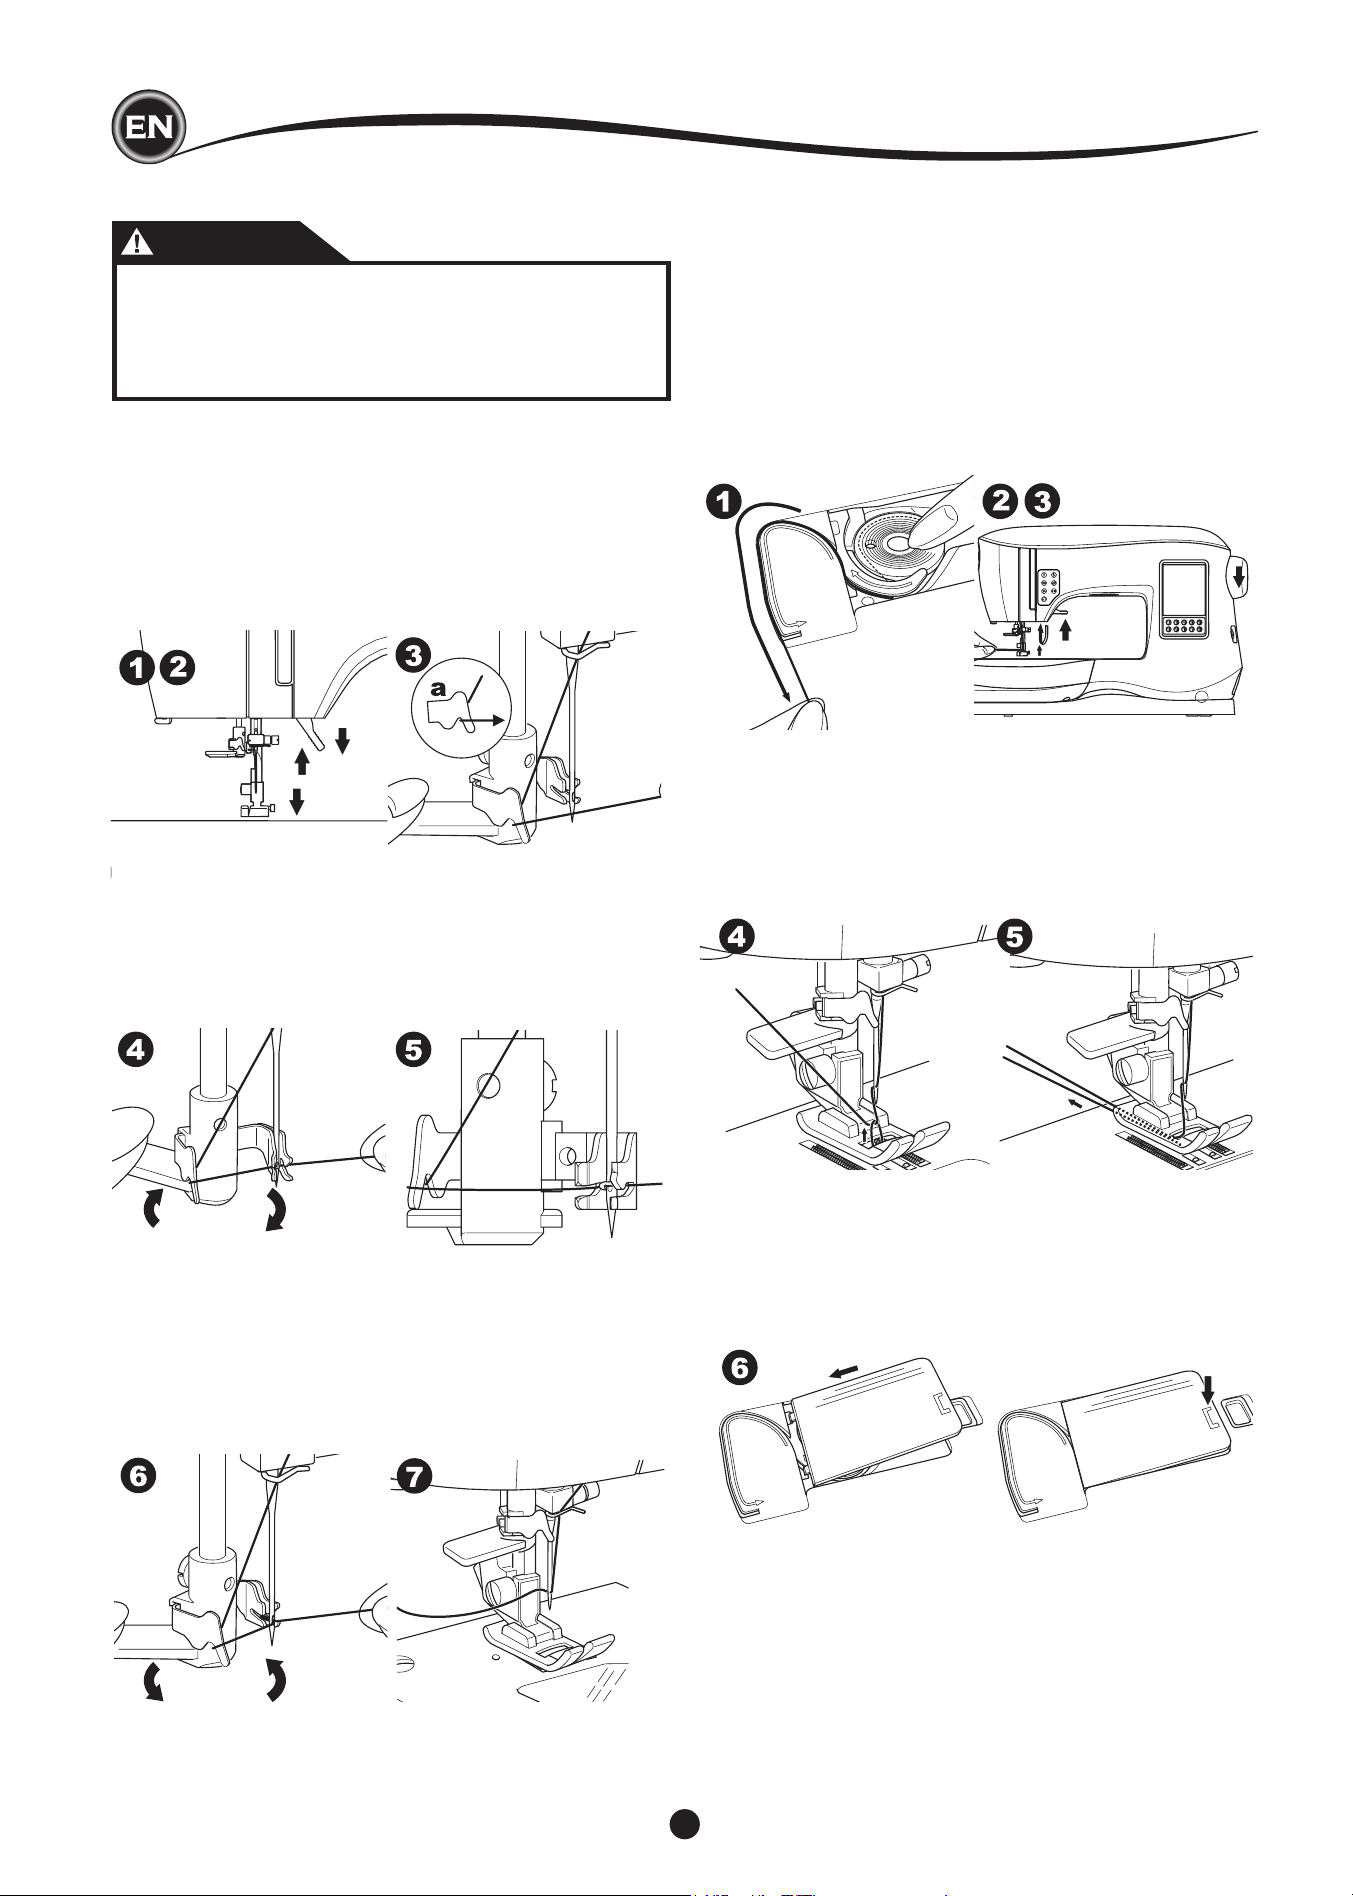
threadIng the needle eye
CAUTION
drawIng up the bobbIn thread
This machine can start to sew without drawing up the bobbin
thread. If you want to start sewing with longer bobbin thread,
draw up the bobbin thread as follows.
1. Insert the bobbin into the bobbin holder as shown on page
18, but do not cut thread.
2. Raise the presser foot.
3. Hold upper thread loosely and turn hand wheel toward you
one complete revolution.
To prevent accidents:
1. Keep ngers away from all moving parts. Special care
is required around the needle.
2. Do not lower the threader lever while machine is
operating.
NOTE:
The needle threader is used for needle sizes 11/80, 14/90, and
16/100.
1. Lower the presser foot.
2. Check that the needle is raised to its highest position. If it is
not, raise needle by turning the handwheel toward you.
3. Lower the threader slowly and draw thread through thread
guide (a) and pull toward the right.
4. Push the lever as far as it will go. The threader will turn and
the hook pin will go through the needle eye.
5. Draw the thread into the guide, making sure it is under the
hook pin.
6. Hold thread loosely and swing back the lever.
As the threader rotates back, the hook pin will pass
throughthe needle eye, forming a loop of thread.
7. Pull thread out about 10 cm (4 inches) through the needle
eye.
threadIng the machIne
4. Pull upper thread lightly. Bobbin thread will come up in a
loop.
5. Pull both upper and bobbin threads about 10 cm (4 inches)
toward the back of presser foot.
6. Replace the bobbin cover. (See page 18)
21
WHERE TO USE EACH STITCH
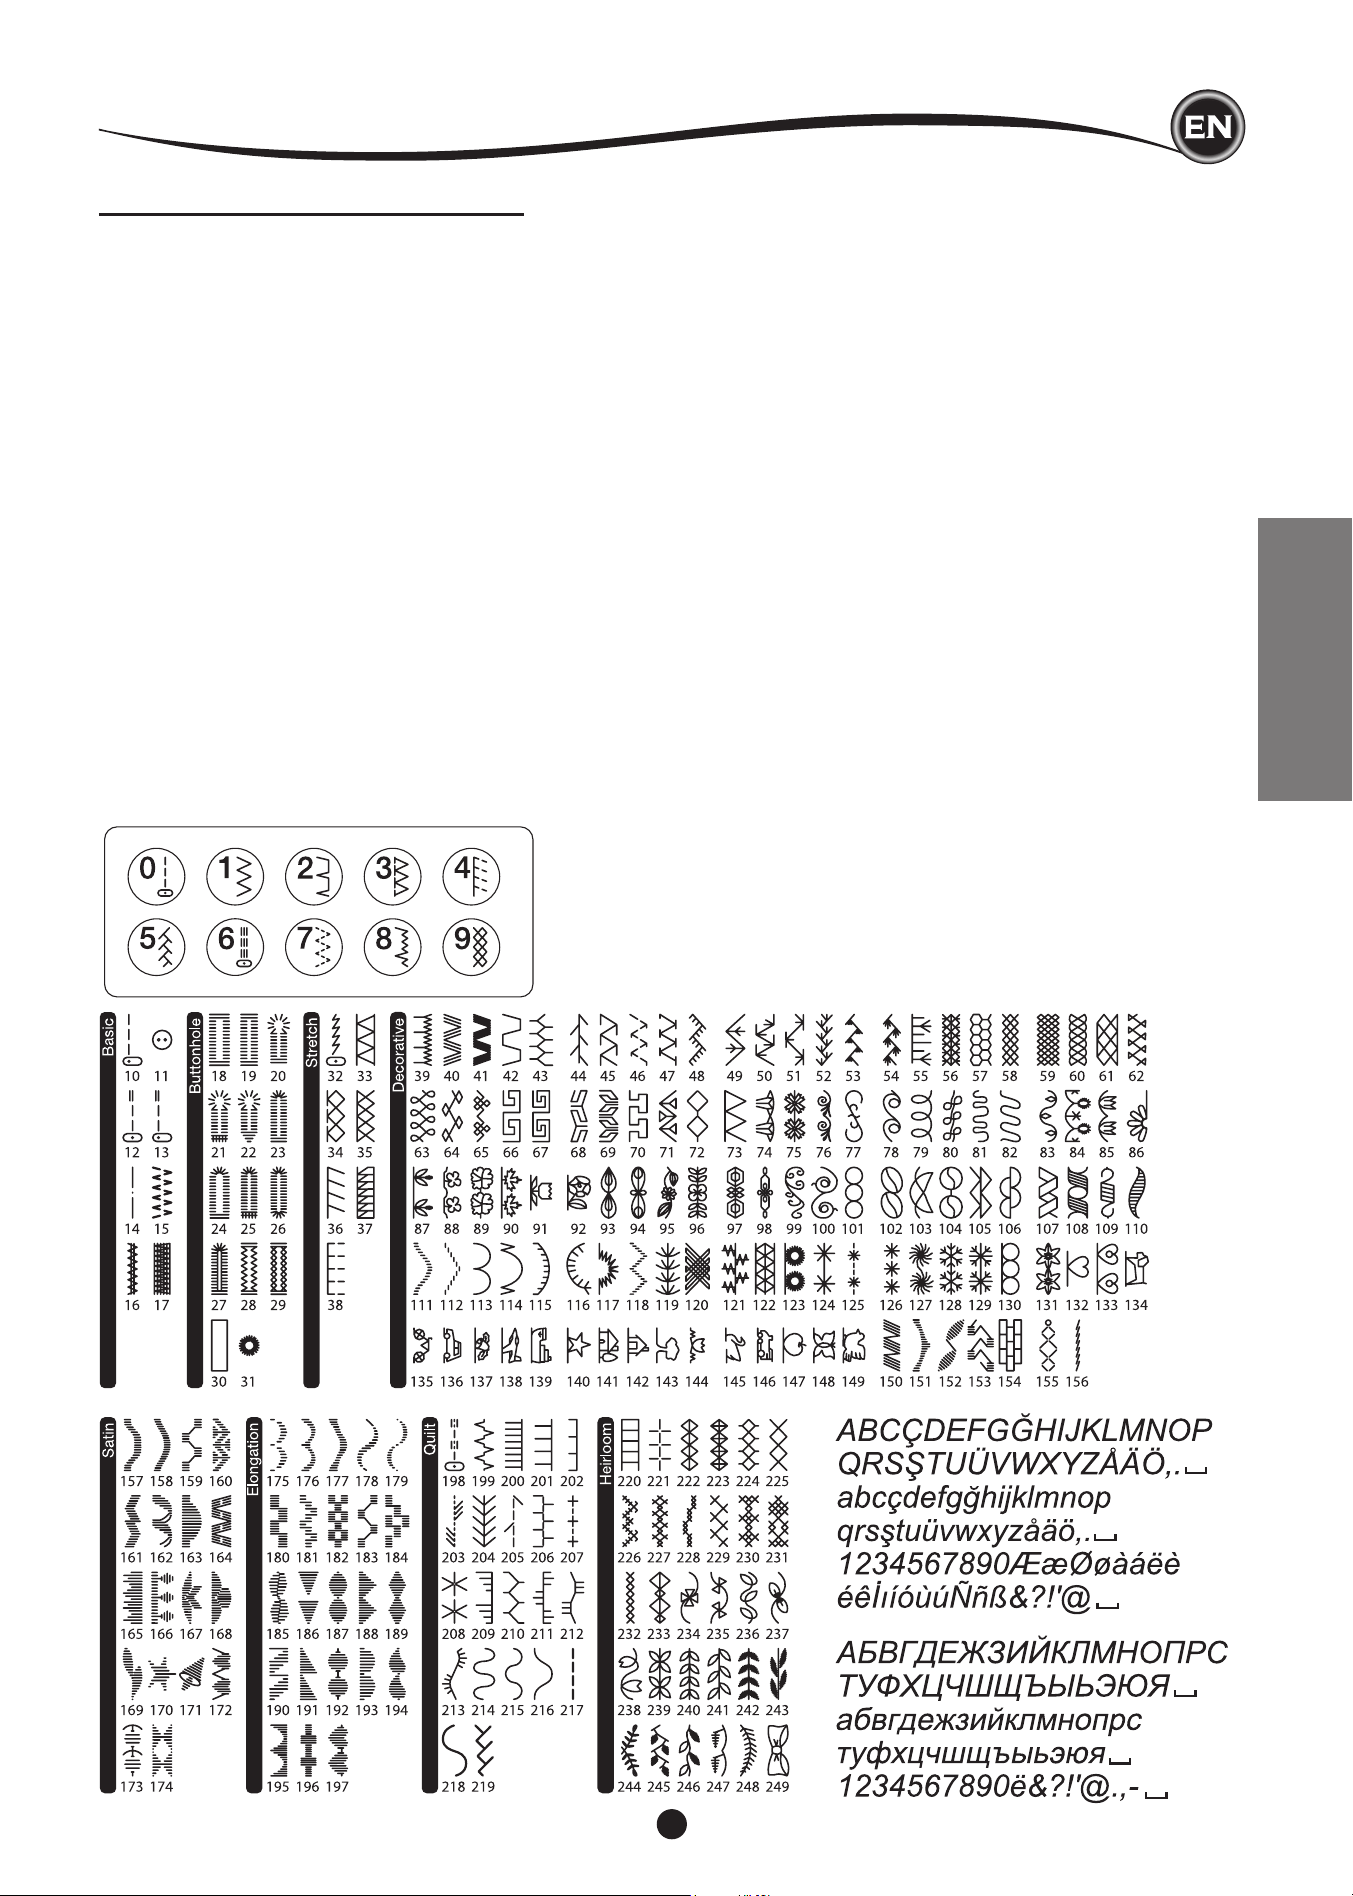
Direct (0-9)
0. Straight stitch center needle positon
• For top stitching, for basic sewing, zipper sewing, etc.
1. Zigzag stitch
• For overcasting, applique, etc.
2. Blind Hem
3. Overcasting
4. Overcasting of stretch fabric, decorative stitch
5. Feather stitch
6. Straight stretch stitch
• Reinforcement straight stitch
7. Multiple stitch zigzag
• For overcasting knit fabrics, elastic sewing, mending
8. Elastic blind hem
9. Honeycomb stitch
Basic (10-17)
10. Straight stitch left needle position
• For top stitching, for basic sewing, etc.
11. Button sewing
12. Straight stitch with auto-reverse stitch center
needle position
13. Straight stitch with auto-reverse stitch left needle
position
14. Basting
15. Double zigzag stitch
16. Bar-tack
17. Darning
Buttonhole (18-31)
18. Bar-tack Buttonhole (Wide)
19. Bar-tack Buttonhole (Narrow)
20. Keyhole Buttonhole
21. Keyhole Buttonhole with cross bar
22. Tapered Keyhole Buttonhole
23. Round Ended Buttonhole (Narrow)
24. Round Ended Buttonhole (Wide)
25. Round Ended Buttonhole with cross bar
26. Round Ended Buttonhole (both ends rounded)
27. Decorative Buttonhole
28. Stretch Buttonhole
29. Heirloom Buttonhole
30. Bound Buttonhole
31. Eyelet
Stretch (32-38)
32. Stem stitch for stretch fabrics
33.-38. Overcasting of stretch fabric, decorative stitch
Decorative (39-156)
40. Ric Rac stitch
41. Double Ric Rac stitch
44. Thorn stitch
Satin (157-174)
Elongation (175-197)
Quilt (198-219)
198. Hand-look quilting stitch
Heirloom (220-249)
Letter Stitch
Sequence sewing (See page 38)
StartIng to Sew
SEWING
22
STARTING TO SEW
Select the straight stitch center needle positon. (No. 0)
CAUTION
To prevent accidents:
While sewing, special care is required around the
needle. Machine automatically feeds the fabric, do not
pull or push the fabric.
Start and end of Seam
1. Check the presser foot (All-Purpose Foot).
Refer to page 8 for changing the presser foot.
2. Place the fabric under the presser foot and lower the
presser foot.
3. Hold back upper thread and press the Start/Stop button or
press the foot controller pedal.
Keep holding thread after sewing a few stitches.
Lightly guide the fabric while sewing.
You can regulate the sewing speed by pressing the Speed
Control buttons or the foot control. The buttons are used to
set the speed when using start/stop button and also sets
the top speed when using foot control.
4. When you reach end of seam, press the Start/Stop button
to stop sewing or release the foot controller pedal.
5. Press the Thread Cutter button.
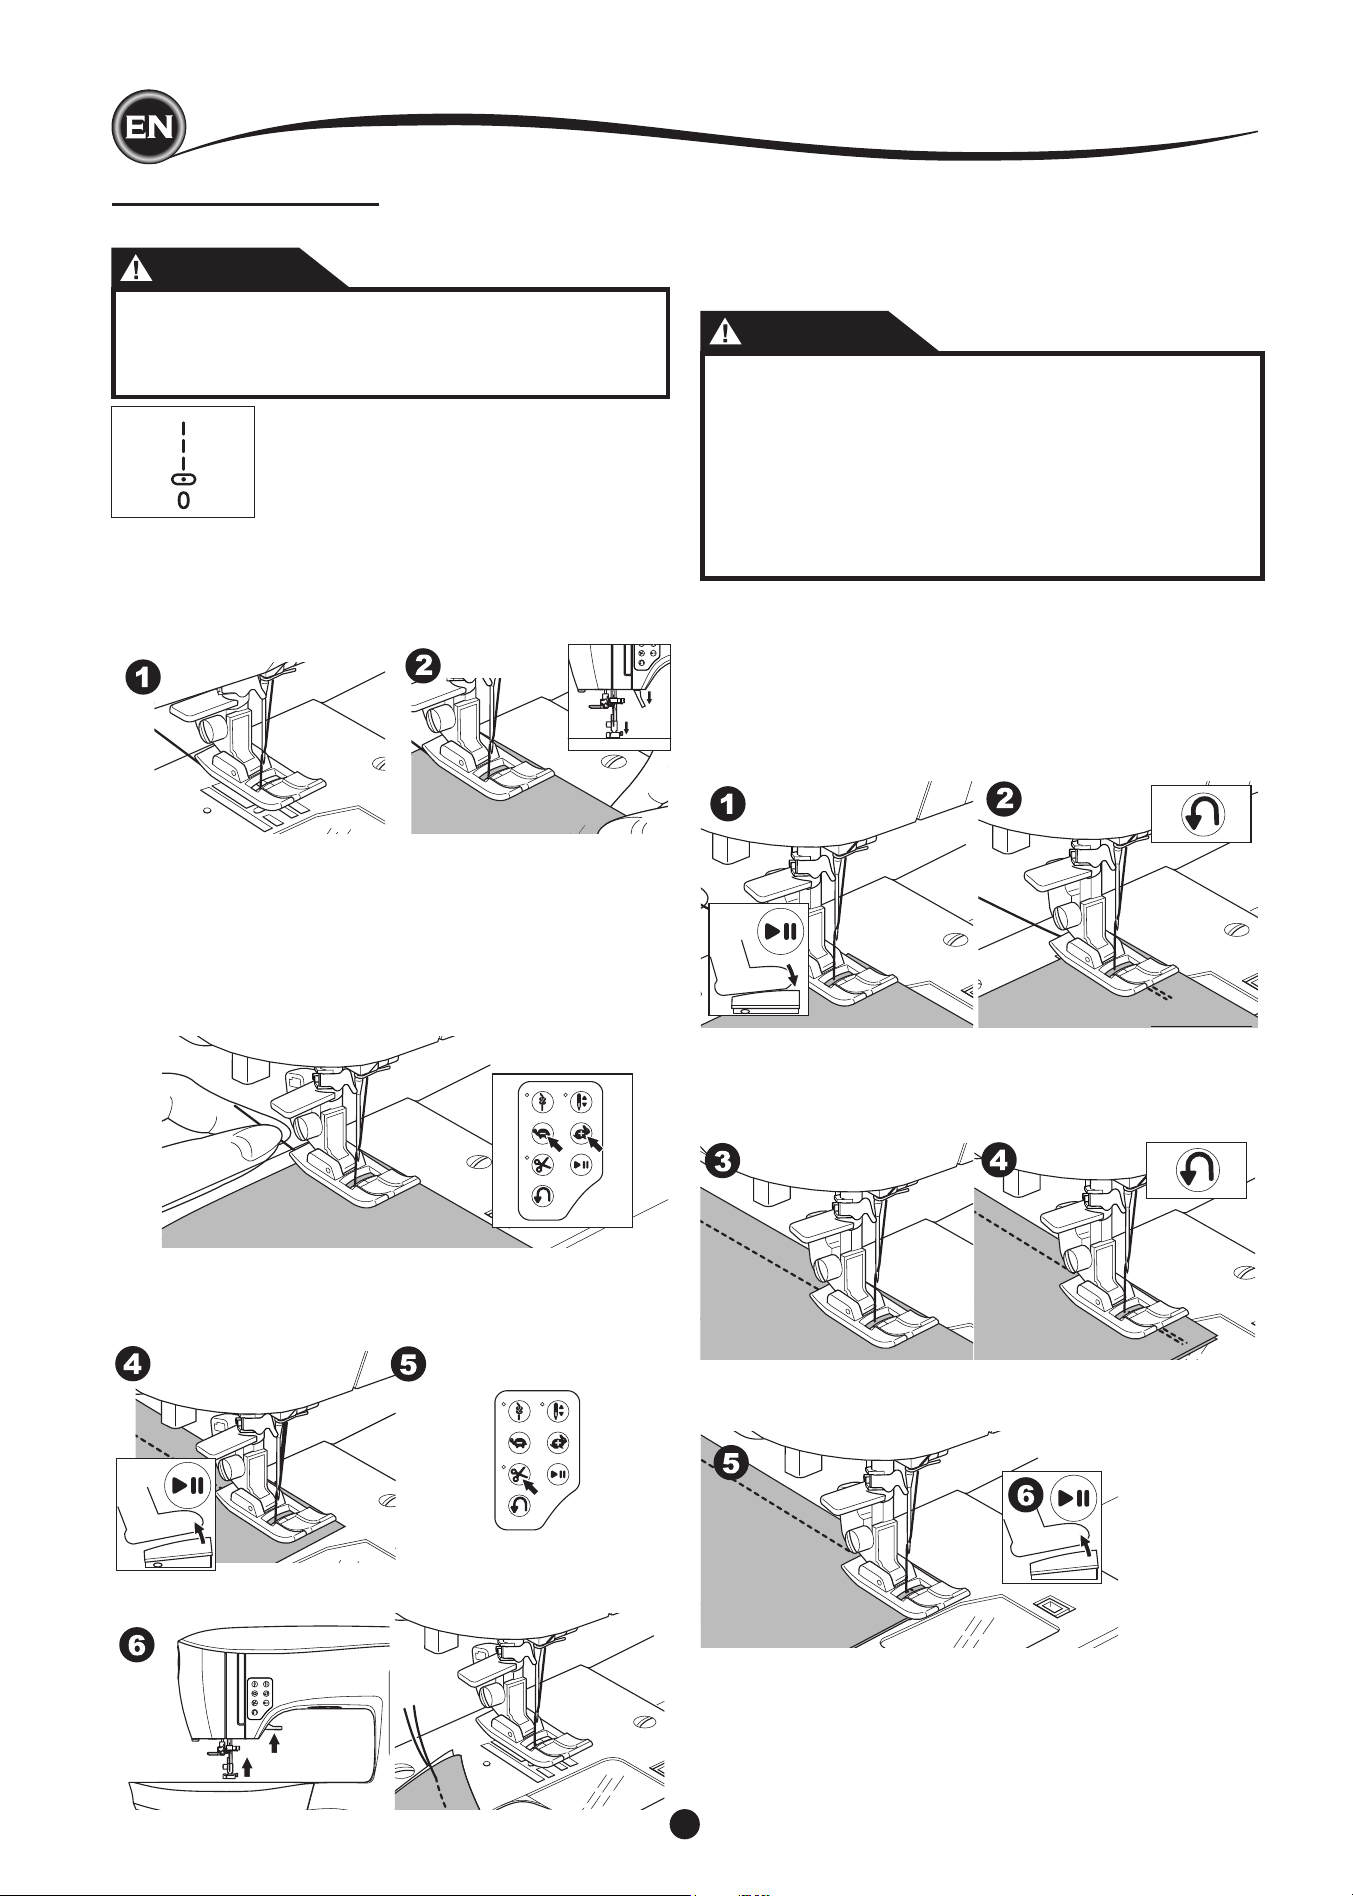
reverSe StItchIng
Reverse stitching is used for reinforcing the ends of the seams.
1. Start sewing 4-5 stitches.
2. Press and hold the Reverse button to sew reverse stitch
until start point.
6. Raise the presser foot lifter and remove the fabric.
3. Release the Reverse button and sew forward until reach
the end of seam.
4. Press and hold Reverse button and sew 4-5 reverse
stitches.
StartIng to Sew
5. Release Reverse button and sew until end of seam.
6. Stop sewing.
NOTE:
Stitch patterns No. 12 and No. 13 have a built-in reverse stitch.
See page 24 for information on how to sew these stitches.
Upper Thread Sensor
If upper thread is breaking, machine will stop automatically.
Rethread the upper thread and resume sewing.
CAUTION
1. Do not press the Thread Cutter button when there is
no fabric under the presser foot or no need to cut the
threads. The thread may tangle, resulting in damage.
2. Do not use the Thread Cutter button when cutting
thread thicker than #30, nylon thread or other specialty
threads. In this case, use the thread cutter located on
the left side of the machine. (See page 12)
3. Do not use the Thread Cutter button when sewing with
a twin needle or a hemstitching (wing) needle.
23
SEWING
tack StItch
You may sew tack stitches at the beginning and end of the
stitch.
1. Press the Tack button. LED light will be turned on.
2. Start to sew.
Machine will sew tacking stitches and stop automatically.
3. Start sewing again and sew the selected pattern.
4. When you reach the end of seam, press the Tack button.
Machine will sew tacking stitches and stop automatically.
turnIng cornerS
1. Stop the machine when you reach a corner.
2. Turn the hand wheel toward you to insert the needle into
fabric.
NOTE:
You can change the needle stop position by pressing the
Needle Up/Down button. When needle position is setted to
down, the LED will turn on.
You can also tap the foot control to raise or lower the
needle.
3. Raise the presser foot.
4. Use the needle as a pivot and turn fabric.
5. Lower the presser foot and resume sewing.
wIdth of Seam allowance
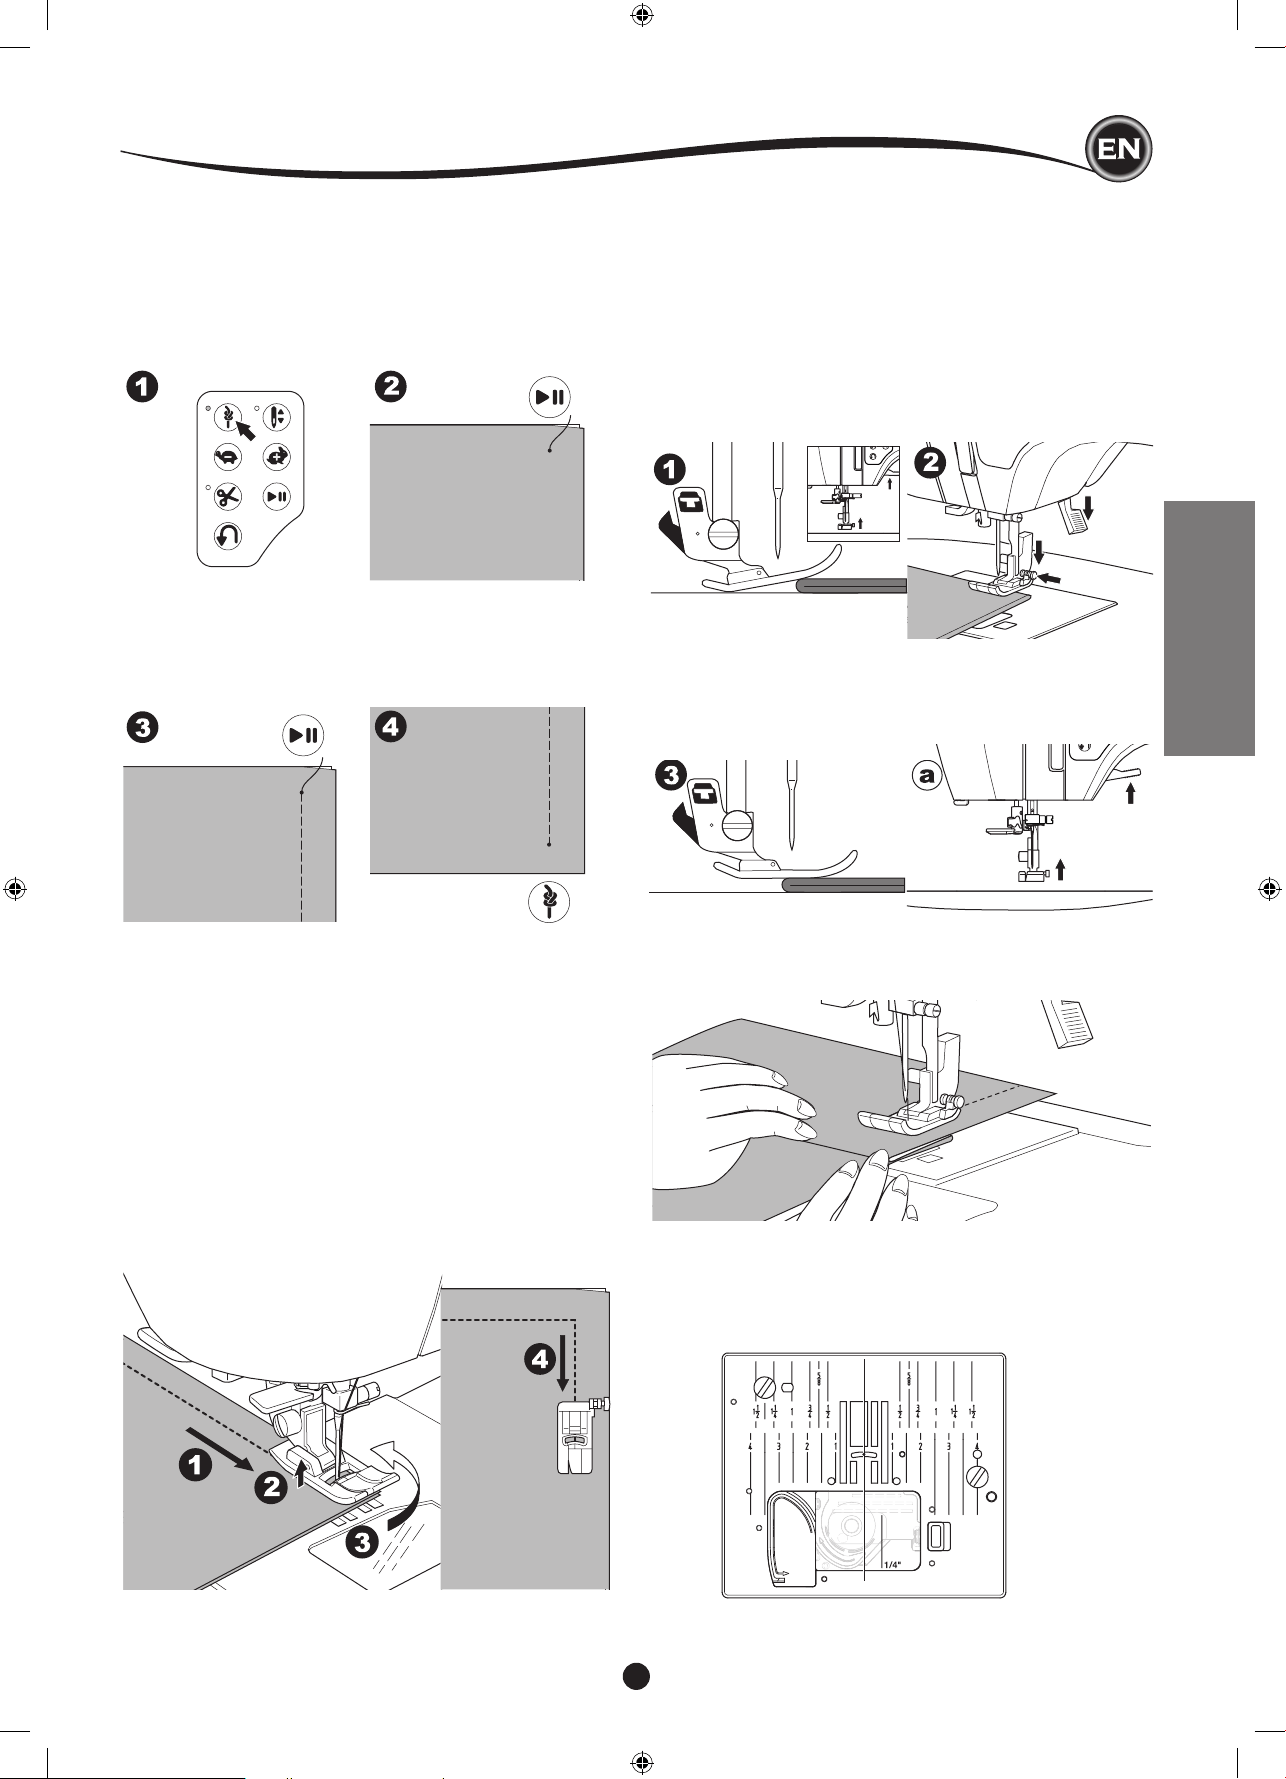
Guide lines on the needle plate indicate the distance from the
center needle positon. To keep a consistent seam allowance,
guide the fabric along the desired guide line on the needle
plate.
SewIng heavy fabrIc
When sewing heavy or thick fabrics, the toe end of the presser
foot tends to lift up when it comes to seams or other bulky
areas. To sew these heavy or thick fabrics:
1. When the toe of the presser foot begins to tilt up, lower the
needle into the fabric and then raise the presser foot lifter.
2. Push the Stabilizer Pin (located on the right side of the All-
Purpose Foot) and at the same time lower the presser foot
lifter. The presser foot should now be level on the thick
fabric.
SewIng over overlapped areaS
Guide the fabric with your hand when sewing over overlapped
areas.
3. Start sewing. After a few stitches, the Stabilizer Pin will
release.
a. The presser bar lifter can be raised one step higher for
placing heavy materials under the presser foot easily.
StartIng to Sew
24
Zigzag stitches are often used for applique and decorative sewing.
STRAIGHT STITCH SEWING
Straight stitch patterns should be selected to suit the type of fabric
being sewn. Left needle position (No.10, 13) is most suited for sewing
light weight fabrics.
No. 0. Center needle position
No. 10. Left needle position
No. 12. Center needle with built-in reverse stitch
No. 13. Left needle with built-in reverse stitch
All-Purpose Foot (A)
ZIGZAG STITCH SEWING
Your machine can sew zigzag stitches of various widths and lengths by
changing the settings of the stitch width and stitch length.
No. 1 Zigzag Stitch
All-Purpose Foot or Satin Foot (A, B)
StraIght StItch
1. Position the fabric under the presser foot and lower it.
2. Hold the upper thread loosely and start sewing.
Place hand lightly on the fabric while sewing.
3. When you reach the end of seam, stop sewing.
4. Press the Thread Cutter button.
StraIght StItch wIth auto-lock StItch
(pattern no. 12, 13)
1. Position the fabric under the presser foot and lower it.
2. Hold the upper thread loosely and start sewing.
Machine will sew 4-5 stitches forward and sew 4-5 stitches
backward and continue sewing forward.
3. When you reach the end of seam, press the Reverse button.
Machine will sew a few stitches backward and sew a few stitches
forward and stop automatically.
4. Press and release the Thread Cutter button.
SatIn StItchIng
To sew a satin stitch, shorten the stitch length and attach the Satin
Foot. (B)
Refer to next page for using the zig-zag to overcast.
SewIng
25
SEWING
OVERCASTING-OVERLOCKING
uSIng the overcaStIng foot
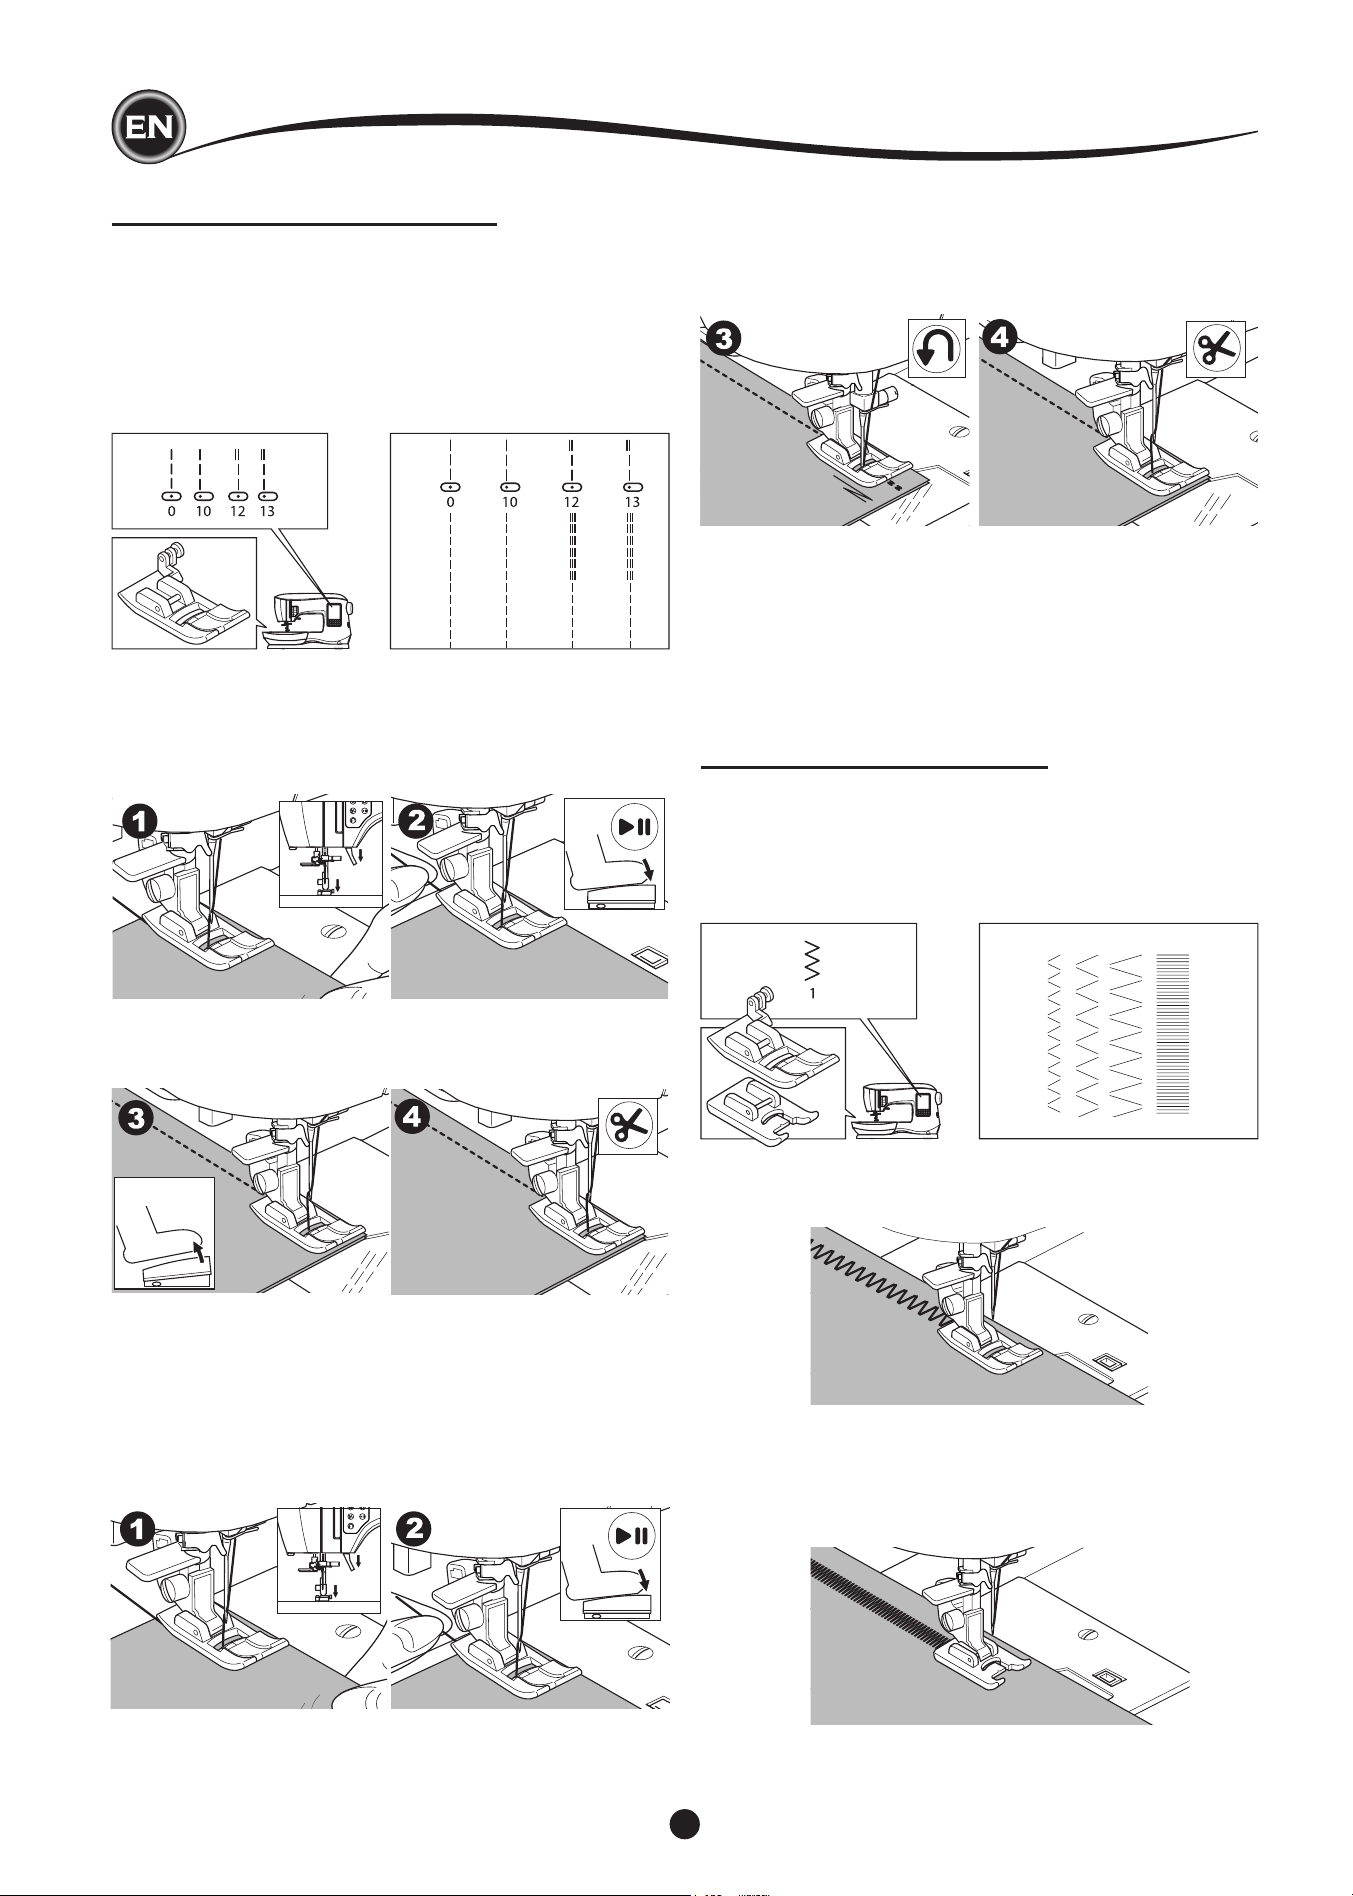
No. 1 (Stitch Width 5.0)
No. 3, 33, 35, 36 (Stitch Width 5.0 - 7.0)
Overcasting Foot (C)
Line up the fabric against the guide plate of the overcasting
foot so that the needle falls near the edge of the fabric.
No. 1 (Width=5.0) is used to help prevent raveling of fabrics.
5mm
1cm
5mm
BLIND HEM STITCHING
The hem is sewn without stitches showing on right side of
fabric.
No. 2 Blind hemming for non-stretch fabric
No. 8 Blind hem for stretch fabric
Blind Hem Foot (D)
1. Fold the fabric as shown in the illustration.
a. Medium, Heavy weight fabric
b. Light weight fabric
c. Wrong side of fabric
d. Overcasting
2. The guide (e) on the Blind Hem Foot helps ensure that the
fabric fold is guided evenly when blind hem stitching. The
guide (e) is adjusted by turning the adjusting screw (f).
3. Place fabric so that the straight stitches (or small zigzag
stitches) are on the protruding hem edge and the large
zigzag stitches just catch one thread of the folded edge (g).
If necessary, turn the screw (f) to adjust the foot so that the
needle slightly touches the folded edge of the fabric.
4. Lower the presser foot and sew hem, guiding fabric evenly
along the guide.
5. Turn the fabric over when you have completed sewing.
c. Wrong side of fabric
h. Right side of fabric
NOTE:
Test on a scrap piece of fabric similar to your project so you
can determine the best placement of the foot’s guide.
No. 3, 33, 35, 36 are designed to sew the seam and seam
nish at the same time.
SewIng
26
uSIng the all-purpoSe foot
No. 1, 4, 7, 15, 34, 37, 38
All-Purpose Foot (A)
Place fabric so that the needle falls near the edge of the fabric
when using the All-Purpose Foot.
No. 1 For narrower zigzag width (Width=2.0-4.5).
No. 4, 7, 15, 34, 37, 38 when sewing easy to ravel or stretch
fabrics.
CRAZY PATCH
Create interesting surface embellishment by sewing decorative
stitches over the seams. Try mixing several types of fabrics for
even more variety.
No. 0
All-Purpose or Satin Foot (A, B)
1. Place two pieces of fabric right sides together and sew a
long straight stitch.
2. Press the seam open.
No. 5, 44
3. With the right side of the fabric facing up, sew the decorative
stitch, making sure the stitches fall on both sides of the
seam.
CAUTION
To prevent accidents, the Overcasting Foot should
be used for sewing patterns 1, 3, 33, 35, 36 only. Do
not change the stitch settings. It is possible that the
needle could hit the presser foot and break when
sewing other patterns and settings.
NOTE:
g. If desired, trim the excess fabric after stitching is complete.
Be careful not to cut the threads while trimming.
SewIng
27
SEWING
STRETCH STITCH SEWING
Stretch stitches are strong and exible and will give with the
fabric without breaking. Good for knit fabrics as well as durable
fabrics like denim or twill.
No. 6 Straight Stretch Stitch
No. 32 Stem Stitch for Stretch fabrics
No. 40 Ric-rac Stitch
All-Purpose Foot (A)
We recommend that you use a needle for knit and synthetic
fabrics to prevent skipping stitches and thread breakages.
See page 9 for needle recommendations.
a. Jacket b. Trousers
c. Bag d. Pocket
MULTI-STITCH ZIGZAG
Used for sewing on elastic and overcast stitching.
No. 7 Multi-Stitch Zigzag
All-Purpose Foot (A)
A. Elastic Sewing
Pull elastic in front and back of needle while sewing.
B. Overcast Stitching
Used for easy to ravel and knit fabrics.
Needle should fall on extreme edge of fabric.
Refer to next page for overcasting.
BASTING
Basting is temporary stitching, used for tting garments, and
for gathering and marking fabric.
No. 14 Basting Stitch
All-Purpose Foot (A)
1. Place the fabric under the presser foot and then lower the
presser foot lifter.
2. Hold the upper thread loosely and start to sew.
Machine will make two stitches only.
5. Start to sew. Machine will sew two stitches.
6. Repeat them as many times as you need to nish the row
of stitching.
3. Raise the presser foot lifter.
4. Holding the upper thread, pull the required amount of fabric
to the rear and lower the presser foot lifter.
SewIng
NOTE:
To prevent the fabric layers from shifting, insert dress pins
crosswise to the basting direction.
Pull the bobbin thread to remove the stitching.
CAUTION
To prevent accidents, be sure the needle does not hit
pins while sewing.

28
SEWING ON BUTTONS
No. 11
Button Sewing Foot
3. Adjust the stitch width so that the needle enters the left
hole of button.
4. Check the swing of the needle by pressing the Width
Mirror Button to be sure the needle will not hit the button.
Bring the needle down into the holes of the button with the
handwheel to verify.
1. Lower the feed dogs by moving the Drop Feed Lever to the
left. (A pop up message appears when selecting stitch no.
11, press the “
✓”
mark.)
2. Attach the Button Sewing Foot. Align two holes of the
button with slot of presser foot and lower foot to hold the
button securely.
5. Set the number of stitches to sew on the button by pressing
the + and - buttons. Eight stitches is standard.
6. Start to sew at slow speed. The machine will sew the
number of stitches set on the display and then tie off and
stop.
SewIng
CAUTION
To prevent accidents:
Make sure that the needle does not hit the button
during sewing, otherwise needle may break.
7. Raise the foot and cut the threads remaining about 10 cm (4”)
long.
8. Pull the thread ends to the wrong side of the fabric with a
hand sewing needle. Tie the threads together to secure.
9. After sewing, move the Drop Feed Lever to the right.
NOTE:
To sew a 4-hole button, follow the procedure above for the
rst two holes. Then lift presser foot slightly and move fabric
to permit stitching the other two holes, either parallel or criss-
cross.
thread Shank
Buttons on coats and jackets often have a thread shank to
make them stand away from the fabric. Insert a straight pin or
sewing machine needle under the center slit of the foot from
the front. Sew over the pin or needle. To create a thread shank,
pull thread to the back side of the button and wind the thread
around the stitches. Tie the thread ends securely.
29
SEWING
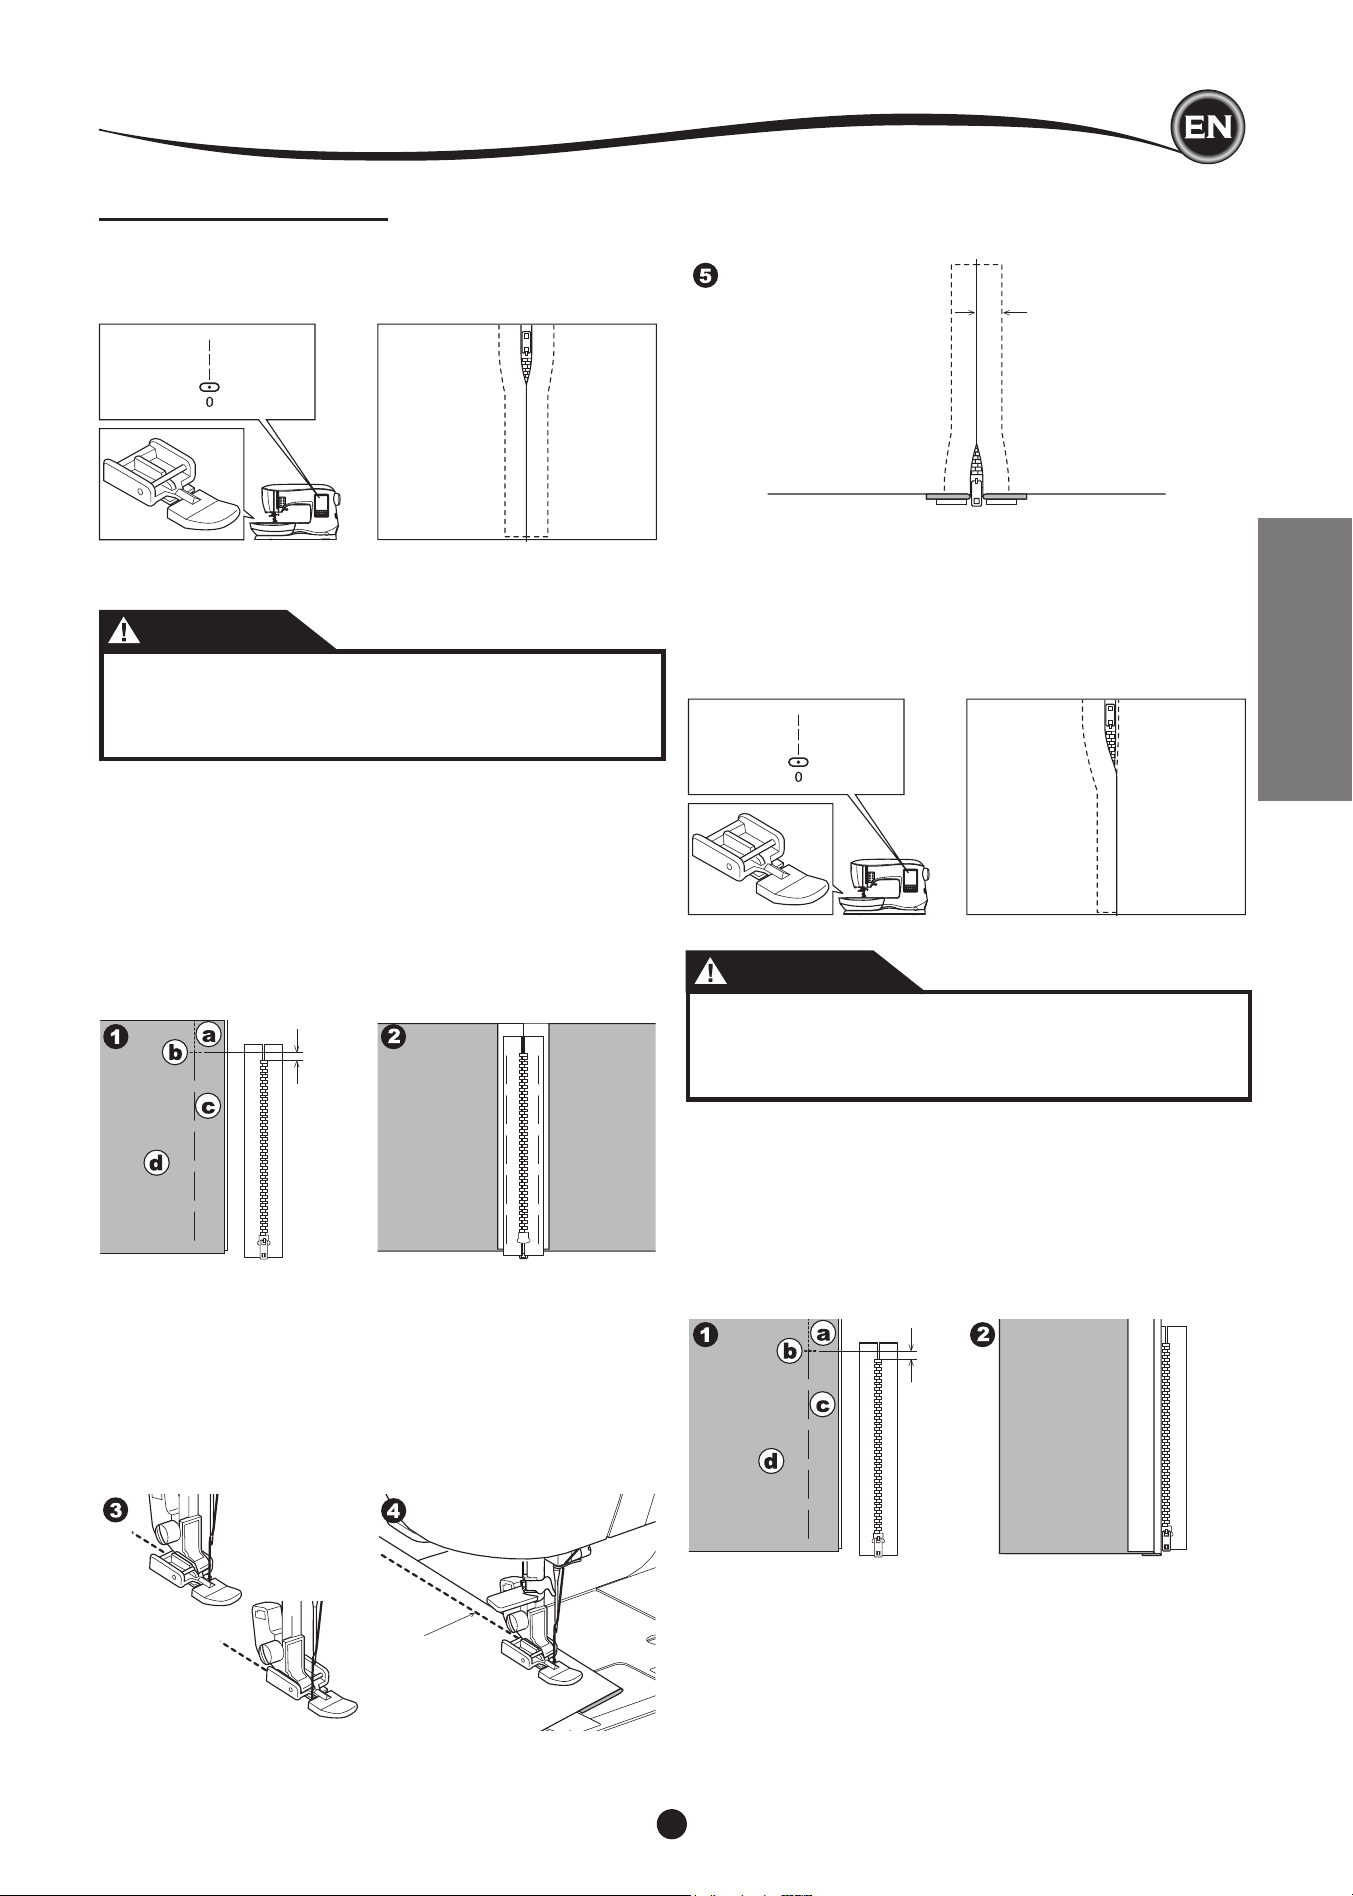
INSERTING ZIPPERS
centered InSertIon
No. 0 Straight Stitch (Center Needle Position)
Zipper Foot (E)
5 mm
7-10 mm
7-10
mm
CAUTION
To prevent accidents, do not change the needle
position. Changing needle position could cause the
needle hit the presser foot, which could break the
needle or damage the machine.
1. Baste the zipper opening to the seam line.
a: Straight stitch
b: End of opening
c: Basting
d: Wrong side of fabric
2. Press open the seam allowance.
Place the open zipper face down on the seam allowance
with the teeth against the seam line.
Baste the zipper tape.
3. Attach the Zipper Foot.
Attach the left side of the presser foot pin to the presser
foot holder when sewing the right side of the zipper, and
right side of the presser foot pin to the holder when sewing
the left side of the zipper.
4. Sewing on the right side of the fabric, stitch the left side of
the zipper from bottom to top.
5. Stitch across the lower end and right side of zipper.
Remove the basting and press.
lapped InSertIon
No. 0 Straight Stitch (Center Needle Position)
Zipper Foot (E)
5 mm
CAUTION
To prevent accidents, do not change the needle
position. Changing needle position could cause the
needle hit the presser foot, which could break the
needle or damage the machine.
1. Baste the zipper opening to the seam line.
a: Straight stitch
b: End of opening
c: Basting
d: Wrong side of fabric
2. Fold back to the left seam allowance.
Turn under the right seam allowance to form 3 mm (1/8”)
fold.
SewIng
30
3. Attach the Zipper Foot.
Attach the left side of the presser foot pin to the presser
foot holder when sewing the right side of the zipper, and
right side of the presser foot pin to the holder when sewing
the left side of the zipper.
4. Stitch the left side of zipper from bottom to top.
7-10 mm
5. Turn the fabric right side out stitch across the lower end
and right side of zipper.
6. Stop stitching with the needle down in the fabric when the
Zipper Foot reaches the zipper tab, about 5 cm (2”) from
the top of the zipper.
to StItch around the ZIpper tab:
1. Stop stitching before you reach the zipper tab.
2. Lower the needle into fabric.
3. Raise the presser foot and slide the zipper tab backwards
to clear the Zipper Foot.
4. Lower the presser foot and continue stitching.
5. Remove the basting stitches.
a. Zipper tab
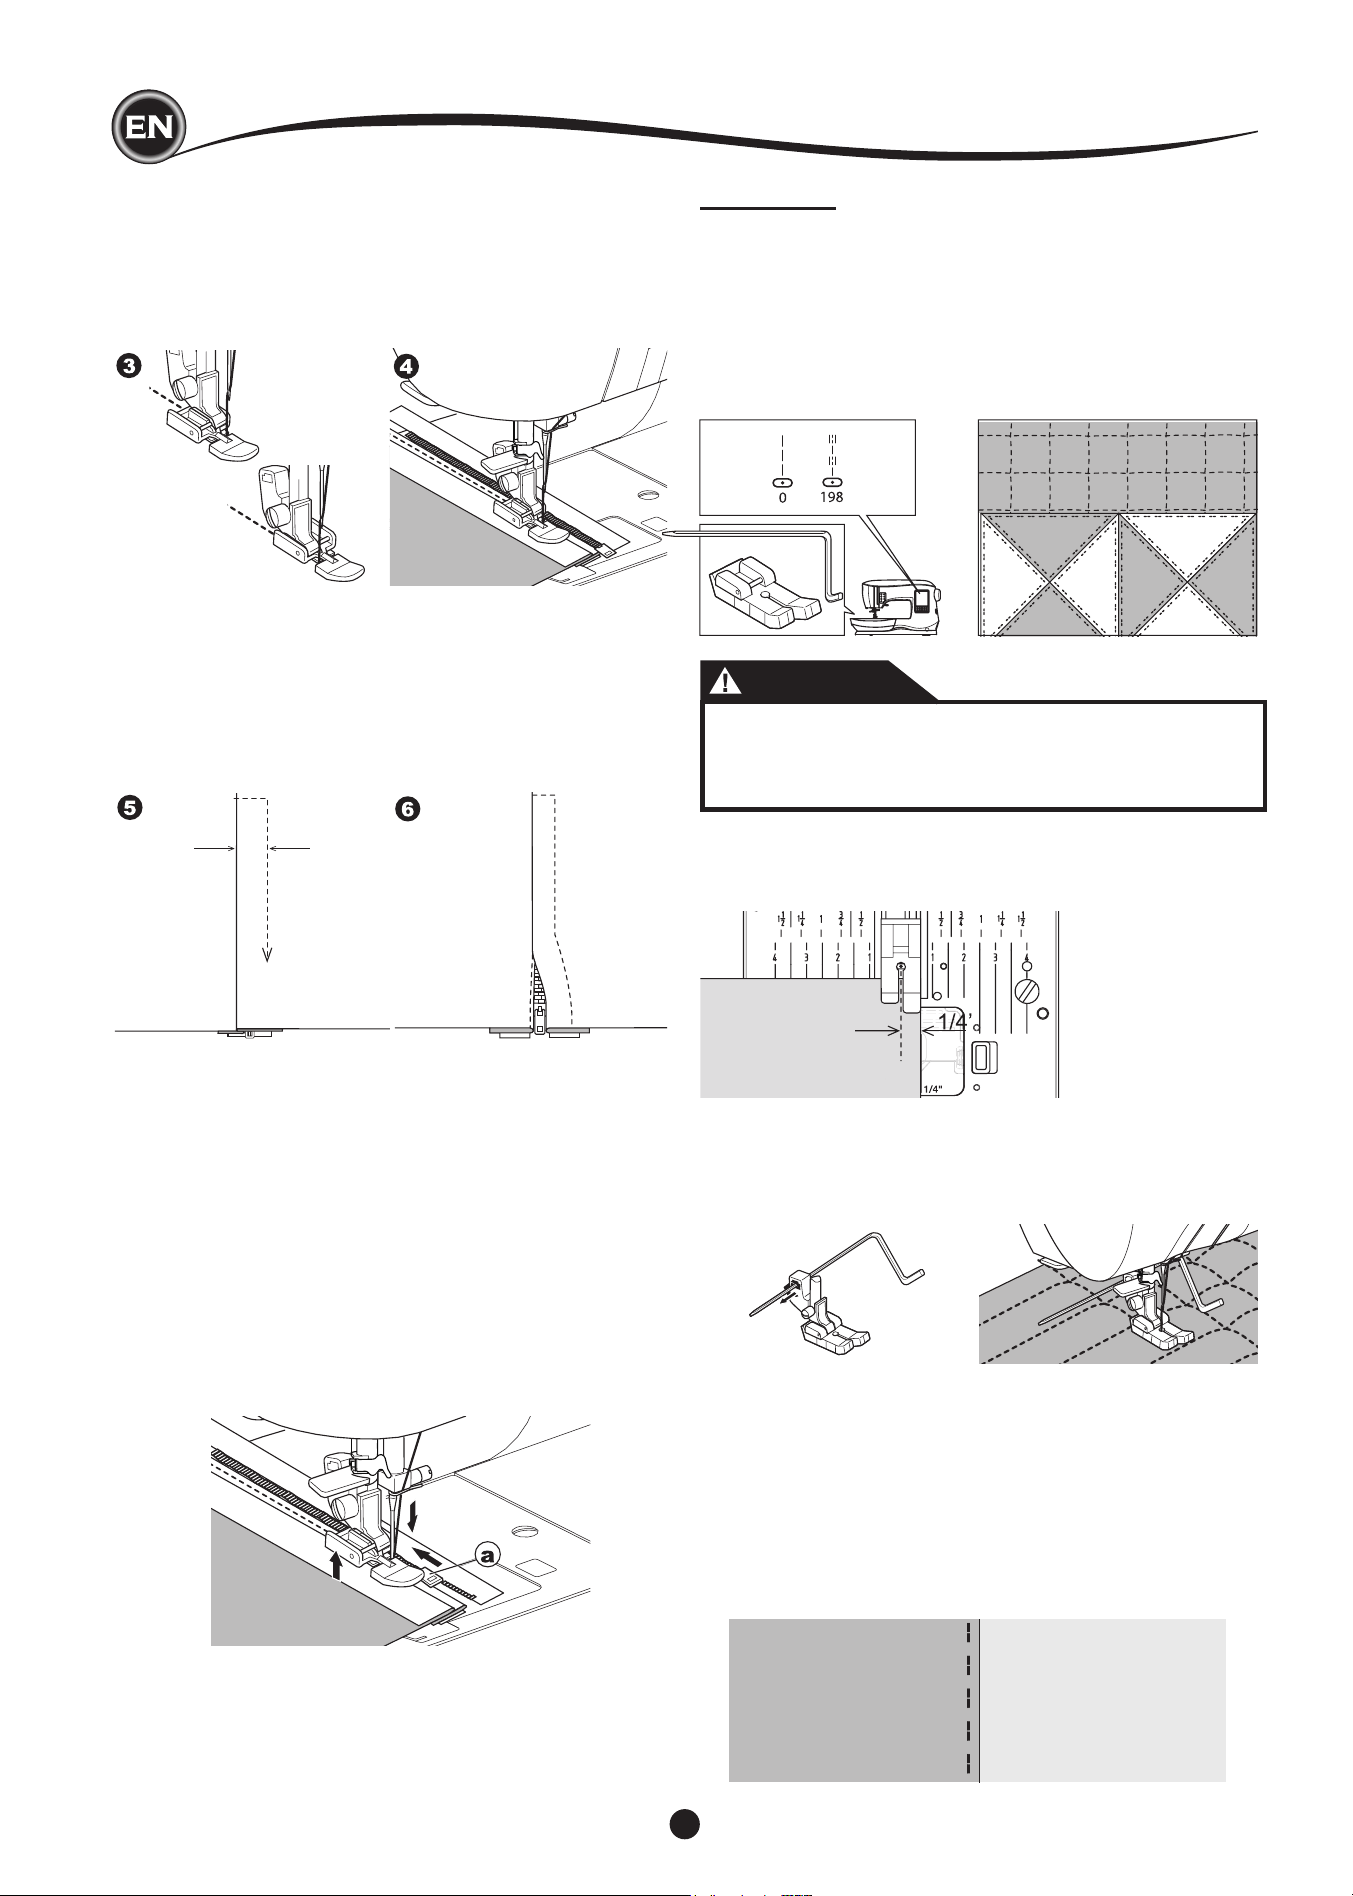
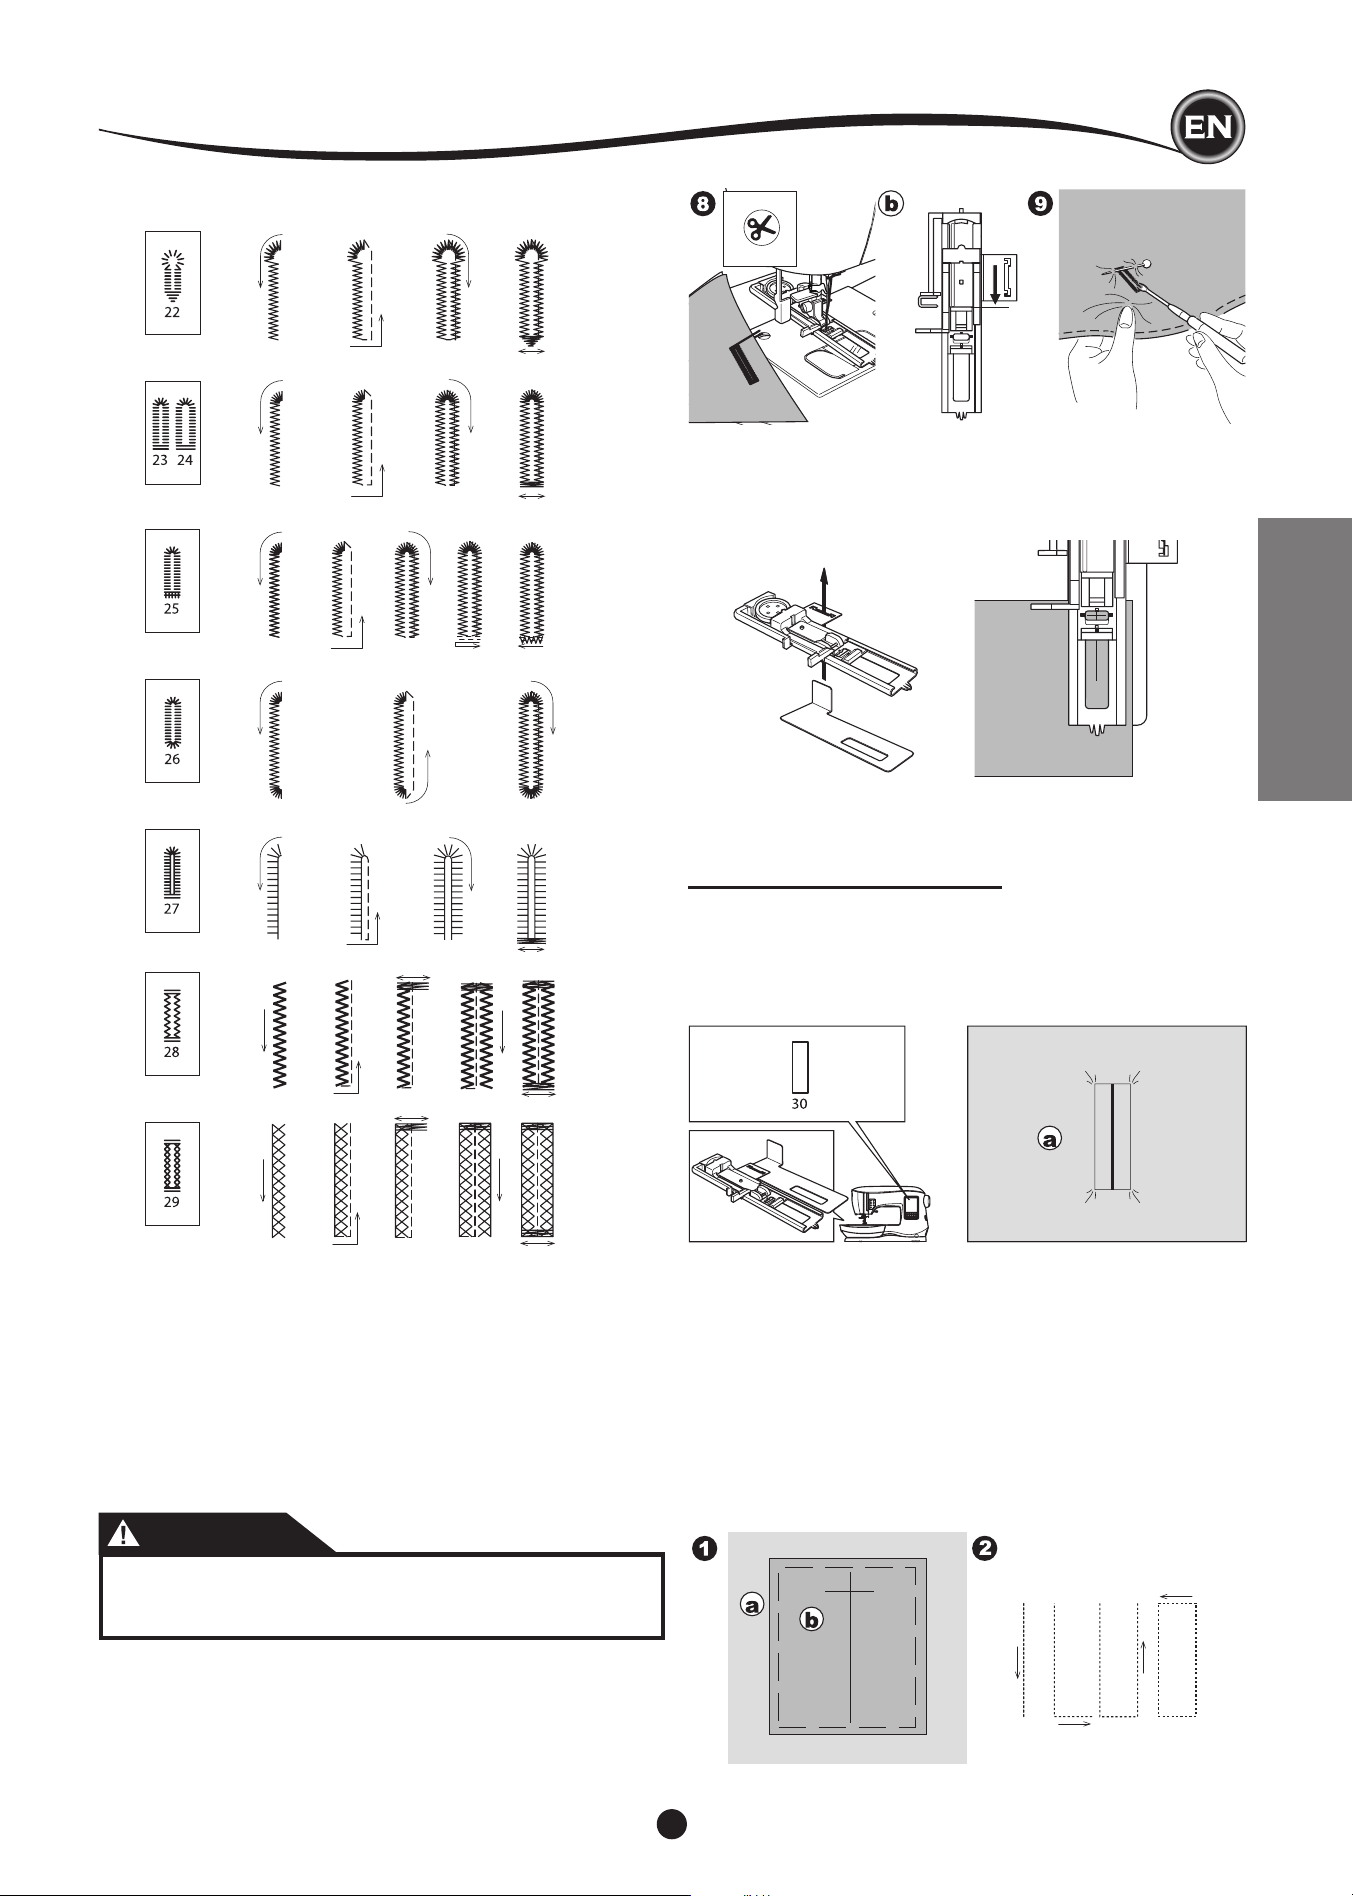
QUILTING
A quilt consists of three layers:
The topper, batting, and backing fabric. The top layer is formed
by shaped pieces of fabrics joined together, creating the quilt
topper.
No. 0 Straight Stitch (Center Needle Position)
No. 198 Hand Look Quilting Stitch
Straight Stitch / Patchwork Quilting Foot
Quilting Bar
CAUTION
To prevent accidents, do not change the needle
position. Changing needle position could cause the
needle hit the presser foot, which could break the
needle or damage the machine.
JoInIng the pIeceS of fabrIc
Join the pieces of fabric using Pattern No. 0 with a seam
allowance of 1/4 inch (6.3 mm)
QuIltIng
Sew three layers of material (topper, batting, backing). Use
quilting bar to sew successive rows. Insert quilting bar into the
hole of presser foot holder and set the spacing as desired.
hand look QuIltIng StItch (no. 198)
Use invisible nylon sewing thread or very lightweight thread
that matches the fabric on top. Place thread that contrasts to
the color of the fabric on the bobbin. Set the upper tension to
maximum or near maximum. When you sew, bobbin thread will
pull to the top and give the appearance of a traditional hand
quilting stitch. Adjust the thread tension and stitch length as
desired for the look you want to achieve for your project.
SewIng

31
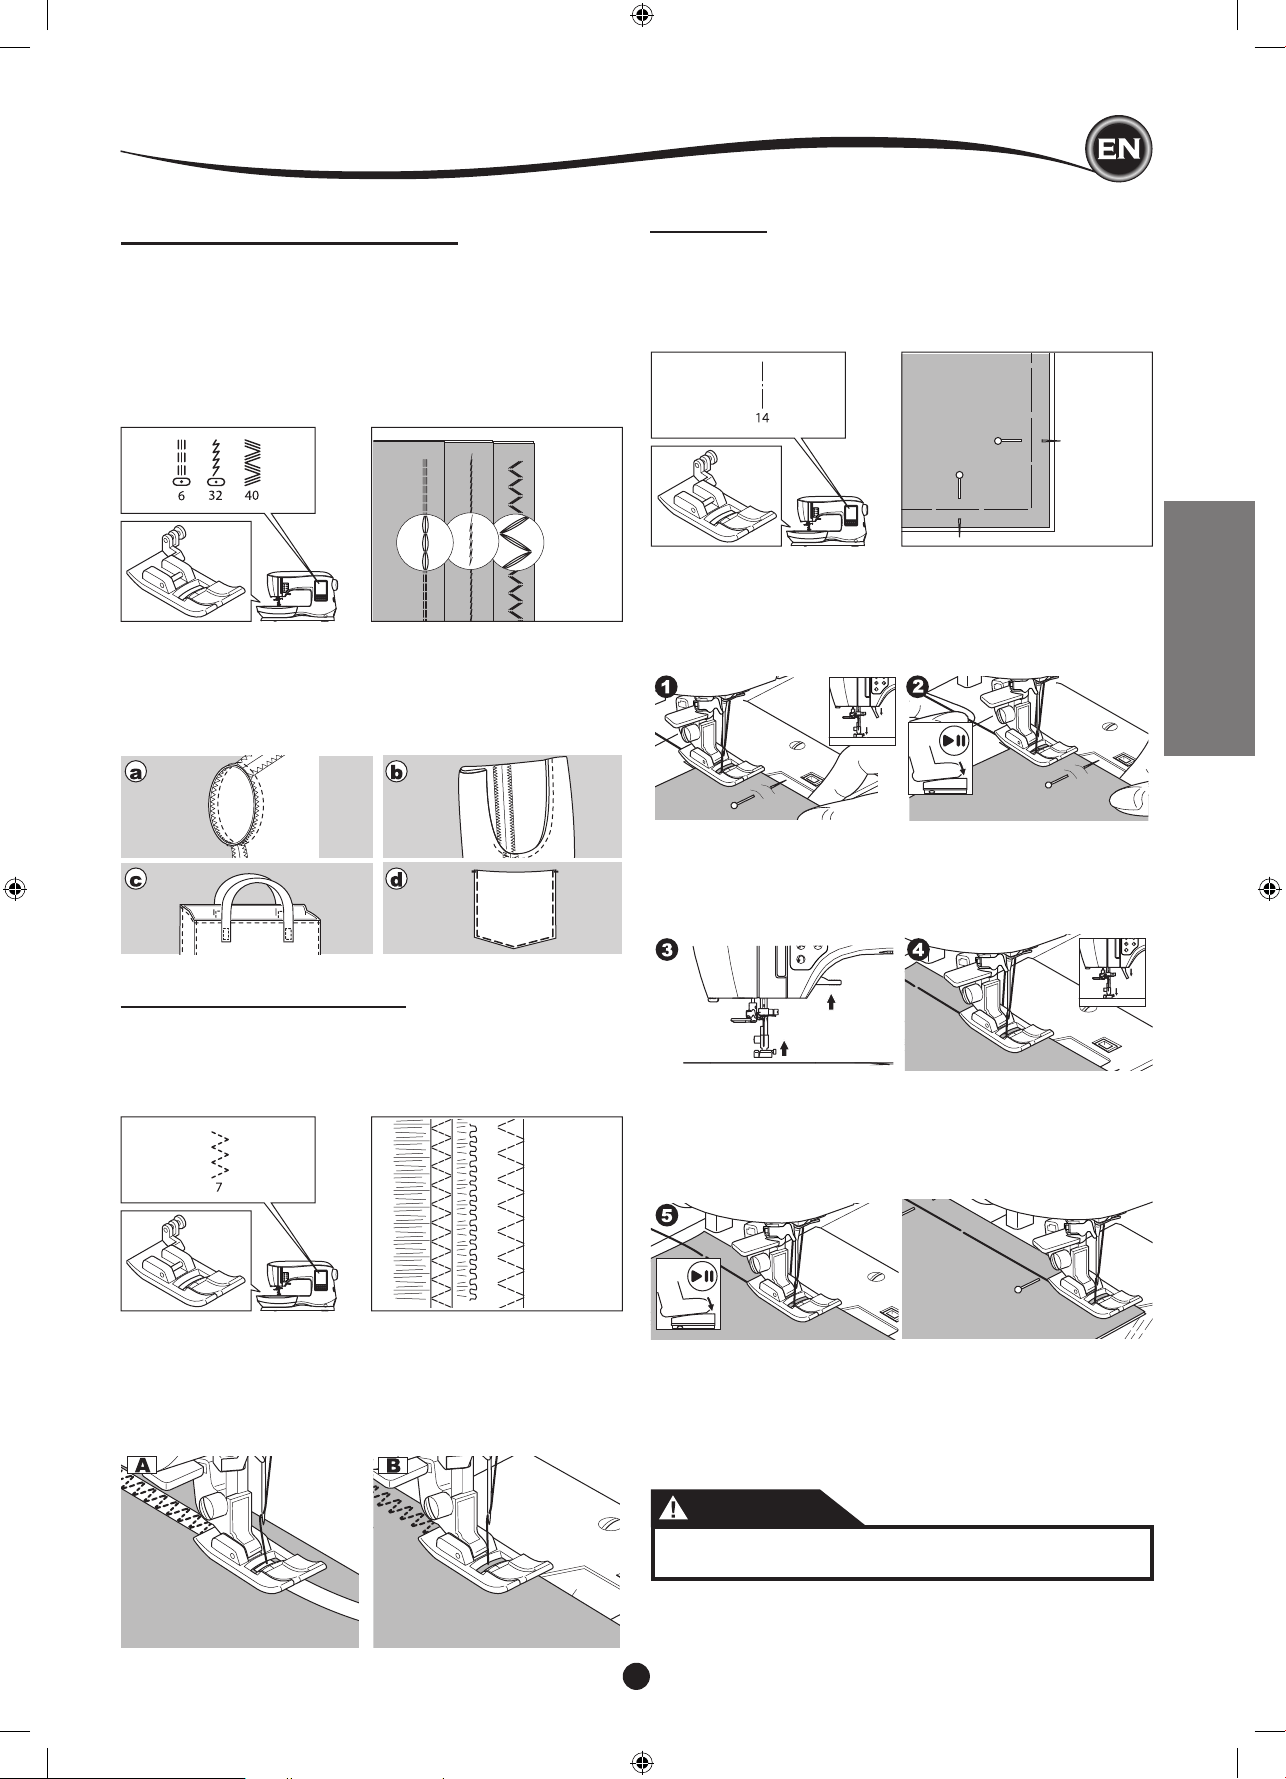
SEWING
AUTOMATIC BAR-TACK AND DARNING
You can sew automatic bar-tack and darning using the
Buttonhole Foot.
No. 16 Bar-tack, to reinforce areas that will be subject to strain,
such as pocket corners.
No.17 Darning, mending and other applications.
Buttonhole Foot
1 2 3 4
1 2
1. Adjust slide on base of Buttonhole Foot according to the
length of the bar-tack or darning to be sewn.
a= Length of bar-tack or darning
2. Pass upper thread through the hole of Buttonhole Foot and
bring upper thread to the left.
3. Position fabric under presser foot so that the starting point
is on the thick area.
Lower the foot.
b. When sewing the bar-tack on the edge of thick fabric, such
as a pocket, place a cardboard or fabric piece of the same
thickness beside the fabric to help keep the foot level as
you sew.
4. Lower the Buttonhole Lever completely.
NOTE:
Machine will not start to sew if Buttonhole Lever is not
lowered properly or buttonhole foot is not positioned
correctly.
5. Hold upper thread lightly and start the machine.
6. Machine will sew bar-tack or darning stitch, as shown.
Machine will stop automatically when the pattern is nished.
7. Press the Thread Cutter button and raise the presser foot
lifter to remove the fabric.
SewIng

32
BUTTONHOLE SEWING
Select the buttonhole style you want to sew.
This machine can sew 13 types of buttonholes.
18. Bar-tack Buttonhole (Wide)
19. Bar-tack Buttonhole (Narrow)
20. Keyhole Buttonhole
21. Keyhole Buttonhole with cross bar
22. Tapered Keyhole Buttonhole
23. Round Ended Buttonhole (Narrow)
24. Round Ended Buttonhole (Wide)
25. Round Ended Buttonhole with cross bar
26. Round End Buttonhole (both ends rounded)
27. Decorative Buttonhole
28. Stretch Buttonhole
29. Heirloom Buttonhole
30. Bound Buttonhole
NOTE:
Density of the sides of the buttonhole may be adjusted with
stitch length control.
1. Mark position and length of buttonhole on fabric.
3. Pass upper thread through the hole of Buttonhole Foot and
bring upper thread to the left.
4. Position fabric under presser foot so that the center line
mark is in the center of the Buttonhole Foot.
Lower the foot while pulling the frame of the Buttonhole
Foot towards you.
NOTE:
When sewing stretch fabrics, it is suggested that you use
interfacing on the backside of the fabric.
7. Machine will sew the buttonhole in the order as shown and
stop automatically after sewing.
1 2 3 4 5 6
1 2 3 4
1 2 3 4 5
2. Set button on the base.
If the button does not t securely on the base, adjust the
slide on the base to the diameter of the button, plus the
thickness of the button.
a = Length of button + thickness
5. Lower the Buttonhole Lever completely.
NOTE:
Machine will not start to sew if Buttonhole Lever is not
lowered properly or frame of Buttonhole Foot is not
positioned all the way forward.
6. Hold upper thread lightly and start the machine.
SewIng
33
SEWING
8. Press the Thread Cutter button and raise the presser foot
to remove the fabric.
To sew over same buttonhole, raise presser foot to return
to original position.
9. Use a seam ripper to cut open the center of the buttonhole,
being careful not to cut into the ends of the buttonhole. It is
helpful to place a pin at the end of the buttonhole to serve
as a stopper while cutting.
CAUTION
To prevent accidents:
When using seam ripper, do not put your nger in the
path of ripper.
1 2 3 4
1 2 3 4
1 2 3 4
1 2 3 4 5
1 2 3
1 2 3 4 5
NOTE:
For sewing buttonholes on hard-to-sew fabrics or along the
edge of multi-layered garments, install the Underplate. Place
the fabric between the Underplate and Buttonhole Foot.
BOUND BUTTONHOLE
A bound buttonhole provides a professional touch to tailored
garments like suits, coats and jackets.
30. Bound Buttonhole
Buttonhole Foot
1. Cut a patch of fabric 2.5 cm (1”) wide, 1 cm
(1/3”) longer than the nished buttonhole.
Baste a patch so that the center line of patch will align with
the center line mark of buttonhole.
a. Right side of fabric
b. Wrong side of patch
2. Lower the Buttonhole Lever and sew buttonhole. (See
previous page)
Machine will sew the buttonhole in the order as shown and
stop automatically after sewing.
1 2 3 4
1 2 3 4 5
SewIng
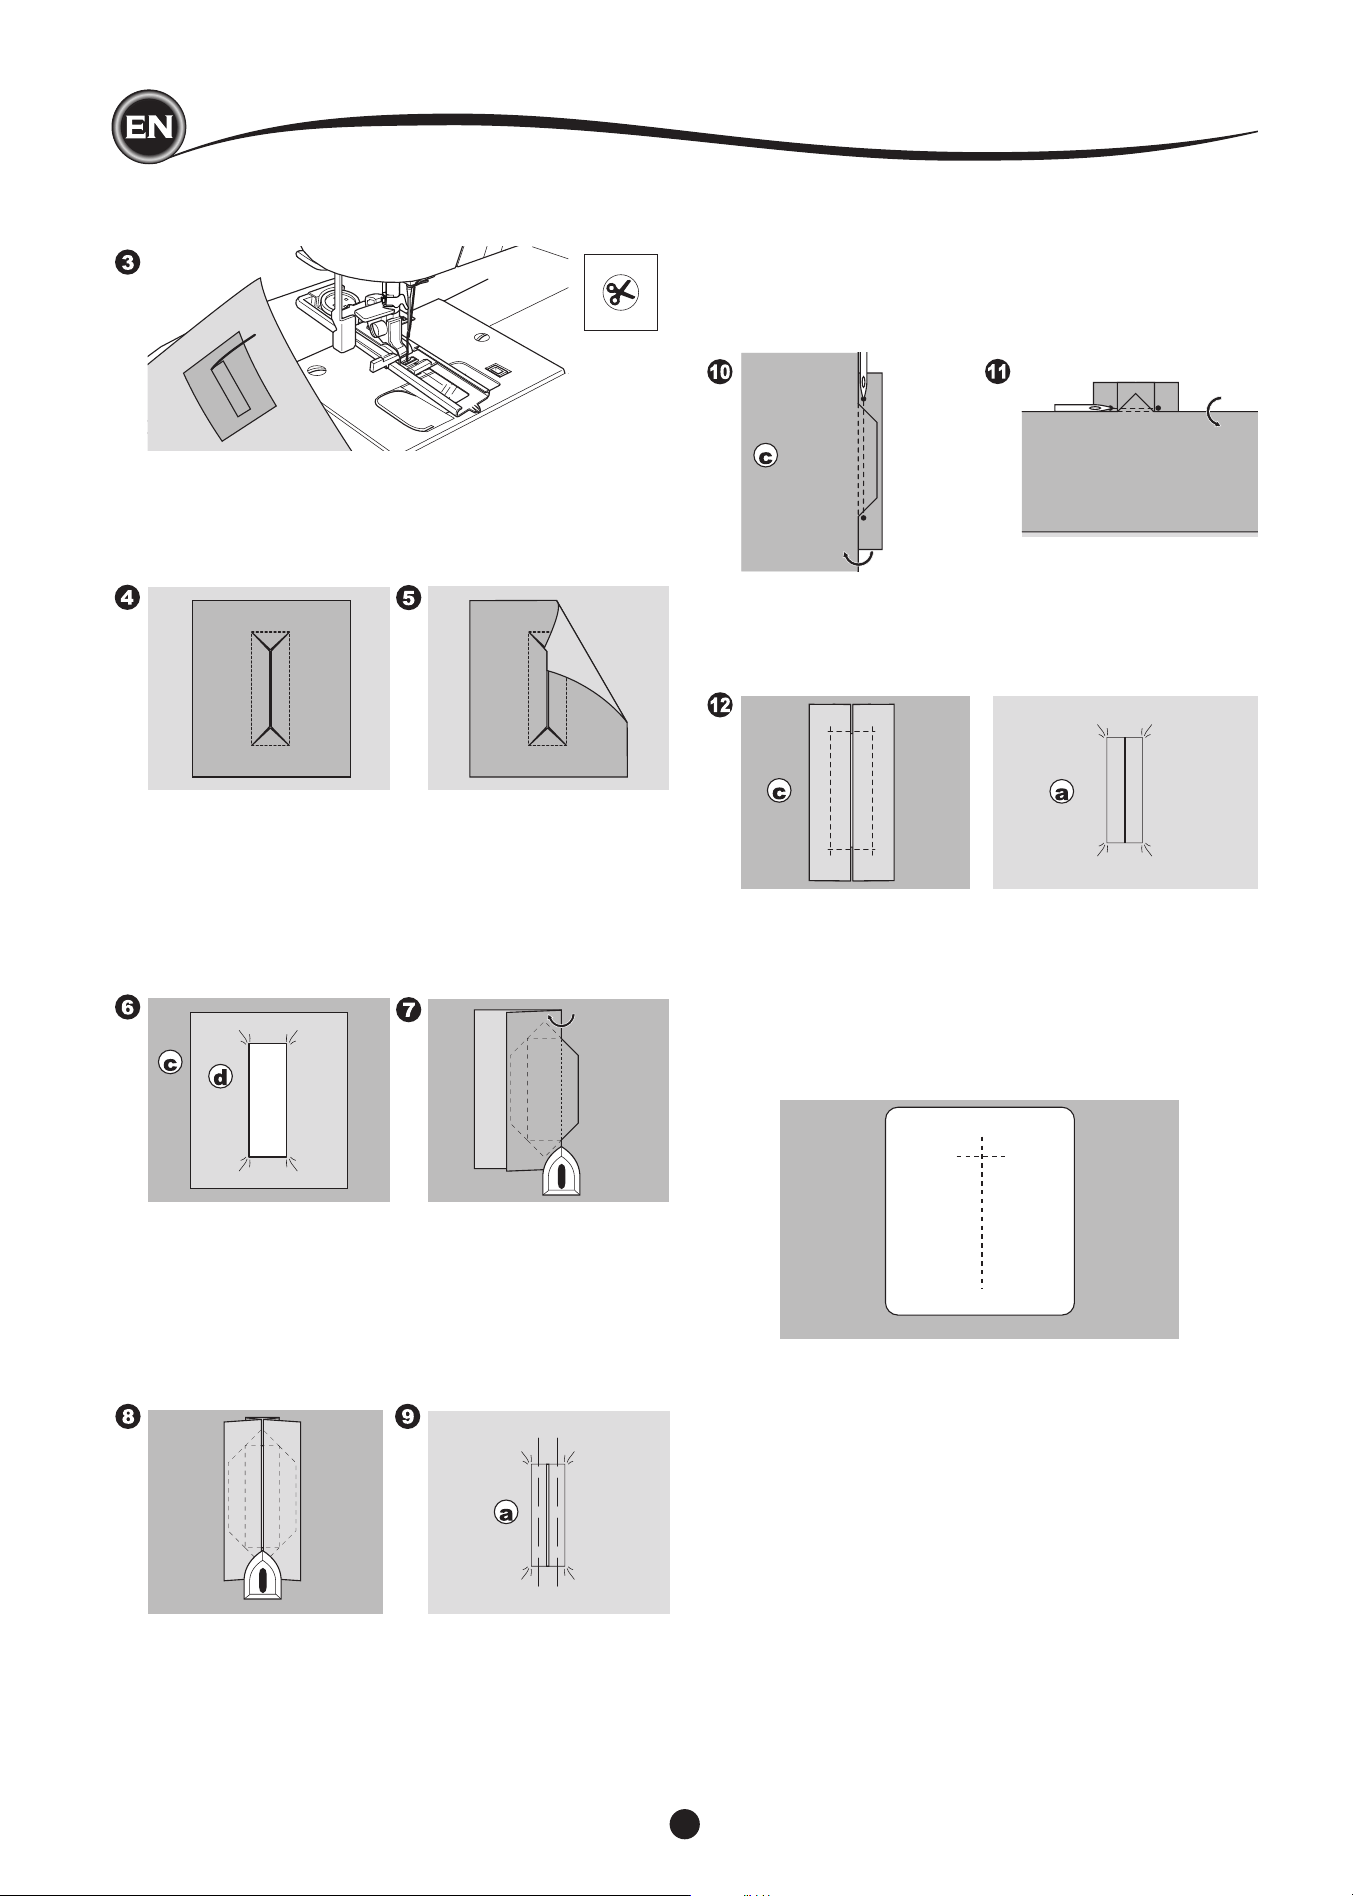
34
3. Press the Thread Cutter button and raise the presser foot
to remove the fabric.
10.Fold the fabric and stitch along the seams on each side,
just a needle width from the original stitching line. Remove
the basting.
c. Wrong side of fabric
11. Fold the fabric along the buttonhole end and stitch
triangular ends on the original stitching line.
4. Carefully cut through the center of buttonhole to within 3
mm of each end. Cut diagonally to each corner as shown.
Remove the basting.
5. Draw the patch through the opening to the underside.
6. Turn the fabric and pull the patch through the buttonhole
rectangle.
Press the patch.
c. Wrong side of fabric
d. Right side of patch
7. Turn the patch and press the side seam allowance.
8. Fold each side of the patch to form pleats that meet at the
center of the buttonhole and cover the opening. Press the
patch.
9. Turn the fabric to right side and baste along the center of
each fold.
a. Right side of fabric
12. Press and trim the patch to within 5 mm (3/16”) of the
stitching.
a. Right side of fabric
c. Wrong side of fabric
NOTE:
When sewing lighter weight fabric, reinforce buttonhole area.
Cut a patch of fusible interfacing 3 cm (1 1/4”) wider and 2 cm
(3/4”) longer than the buttonhole. Fuse to wrong side over each
buttonhole marking.
SewIng

35
SEWING
EYELET
This stitch pattern is used for making belt holes and other
similar applications.
31 Eyelet
Satin Foot (B)
You can choose 3 sizes of eyelets by changing the stitch
length.
1. Place the fabric under the presser foot and lower the
presser foot. Start the machine.
Machine will sew the eyelet and stop automatically.
CONTINUOUS DECORATIVE PATTERN
Use the Satin Foot for continuous decorative stitch patterns.
This foot has a groove on the underside to allow satin stitches (or
other closely spaced stitches) to feed freely under the foot.
No. 39-249
Satin Foot (B)
To customize the continuous decorative stitch pattern, you may
adjust the length and width of pattern. Experiment with fabric
scraps until you achieve the desired length and width.
2. Press the Thread Cutter button and raise the presser foot.
3. Make a hole in the center of the eyelet.
NOTE:
Eyelet punch is not provided with this machine.
SewIng lIghtweIght fabrIcS
When sewing lightweight fabrics, it is suggested that you use
stabilizer on the backside of the fabric. This can help prevent
stitches from puckering the fabric.
SewIng
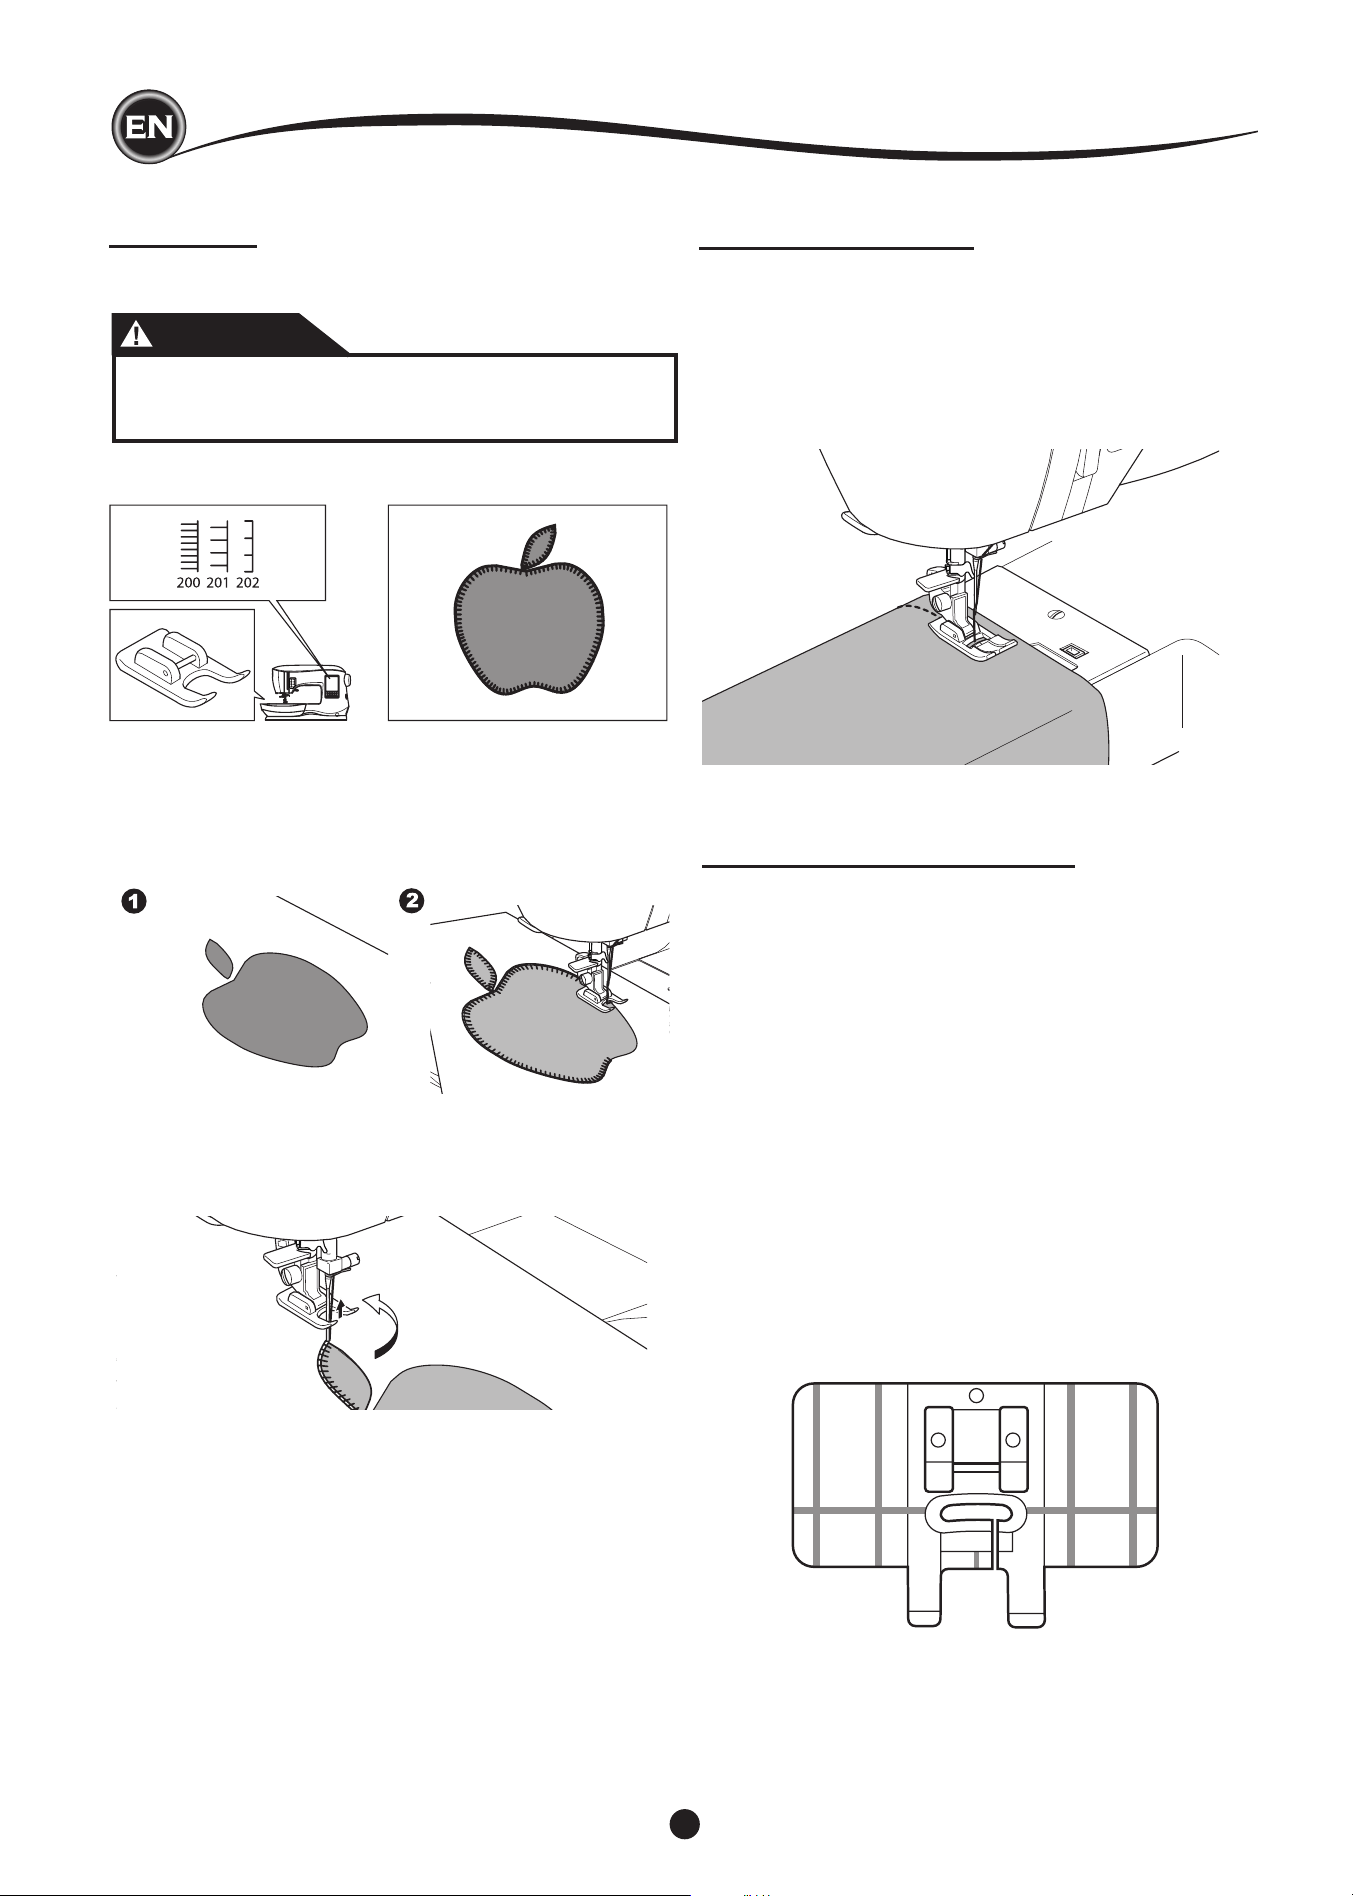
36
APPLIQUE
No. 200, 201, 202
Open Toe Foot
CAUTION
To prevent accidents, do not change the stitch width to
wider than 5.0. Otherwise, needle could hit the presser
foot and break.
1. Set the applique in place on the base fabric with temporary
fabric spray adhesive or by using fusible web.
2. Sew with the right side of the stitch following the right edge
of the applique as closely as possible.
FREE ARM SEWING
By simply removing the extension table, you can access the
free arm, making it easier to stitch hard-to-reach areas like
pant hems, sleeve cuffs and children’s clothing.
NOTE:
Refer to page 7 for Removing the Extension Table.
PARALLEL SEWING FOOT
This foot is used for sewing rows of stitching in parallel rows.
1. Snap on the Parallel Sewing Foot.
2. Sew the rst row of stitching.
3. Align the rst row of stitching either between or on the red
guideline markings on the foot, depending on the desired
distance from the rst row of stitching. Sew the next row of
stitching, using the red guidelines as a reference.
4. Align the two rows sewn, following the red guideline
markings on the foot, depending on the desired distance
between rows of stitching. Sew the next row of stitching,
using the red guideline markings as a reference.
5. Continue for as many rows as desired.
NOTE:
The rst vertical guideline, to either the left or right is 1/2”
from the center needle position. The second guideline is
approximately 1/4” from the rst guideline on either side.
There is a marking at the center front of the foot that can
also be used a reference.
When sewing sharp angles or curves, bring the needle to its
lowest position and raise the presser foot.
Use needle as pivot and turn fabric.
NOTE:
Applique can also be done with a satin stitch using the Satin
Foot (page. 24). It may be helpful to place a fabric stabilizer
underneath your work, which may help prevent any fabric
puckering.
SewIng
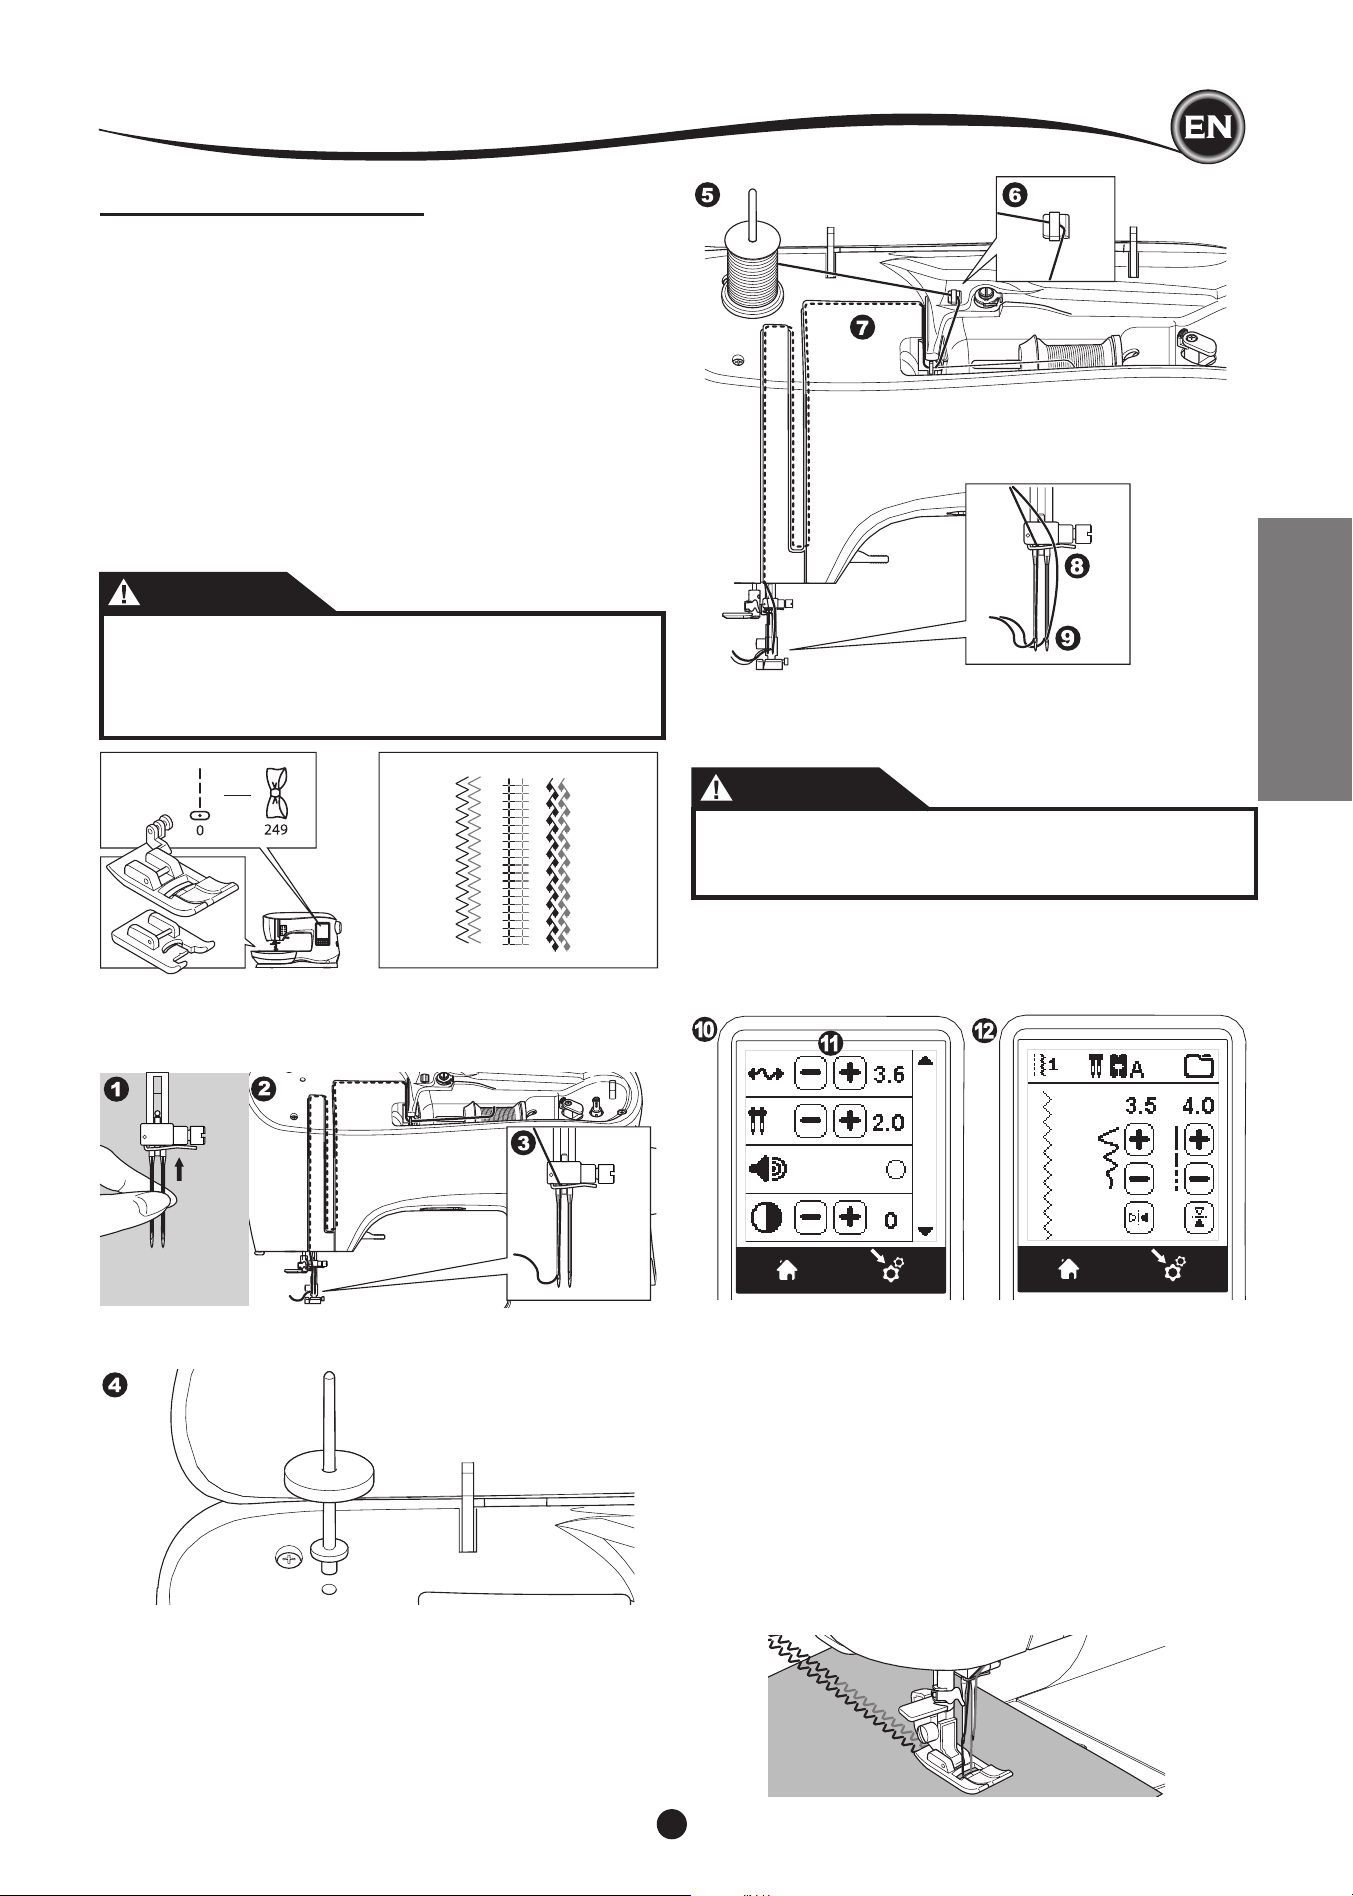
37
SEWING
10. Press the Setting Button.
11. Set the twin needle width to be used by pressing the + or -
button.
CAUTION
To prevent accidents:
If you did not set the twin needle width corrctly, needle
may hit the needle plate and break.
12. Press the Setting Button again and select the pattern you
desire.
Twin needle mark will appear on screen and the stitch width
will be reduced automatically.
TWIN NEEDLE SEWING
Interesting effects can be produced by sewing decorative
stitches using a twin needle. Try using two different colors of
thread for even more variety. Always make a test sample rst
to help you determine the best settings for the stitch you are
sewing.
All patterns except No. 11, 16-31 may be sewn with a twin
needle.
All-Purpose Foot or Satin Foot (A, B)
NOTE:
A twin needle is not provided with this machine.
CAUTION
To prevent accidents.:
a. Use only SINGER branded twin needles for this
machine. Other needles may break.
b. The needle threader cannot be used. Thread each
needle eye manually.
SewIng
1. Remove the single needle and insert twin needle.
2. Thread the rst thread as usual, following threading route.
3. Thread the left needle eye by hand from front to back.
4. Push the Auxiliary Spool Pin with felt washer into the hole.
5. Place second spool of thread.
6. Hook second thread to the hook from rear opening.
7. Thread the second thread same as rst.
8. For better sewing results, do not place the thread into the
needle bar thread guide.
9. Thread right needle eye by hand from front to back.
13. Always test the selected stitch by rst turning the hand
wheel toward you slowly, to ensure that the swing of the
needle doesn’t hit the sides of the foot.
14. Sew the stitches.
Twin needle mode will remain until you change the setting to “-.-”.
When the twin needle mode has been set back to “-.-”, the twin
needle icon will disappear from the main screen.
NOTE:
Twin needle sewing may be also used with sequencing by
setting to twin needle mode.
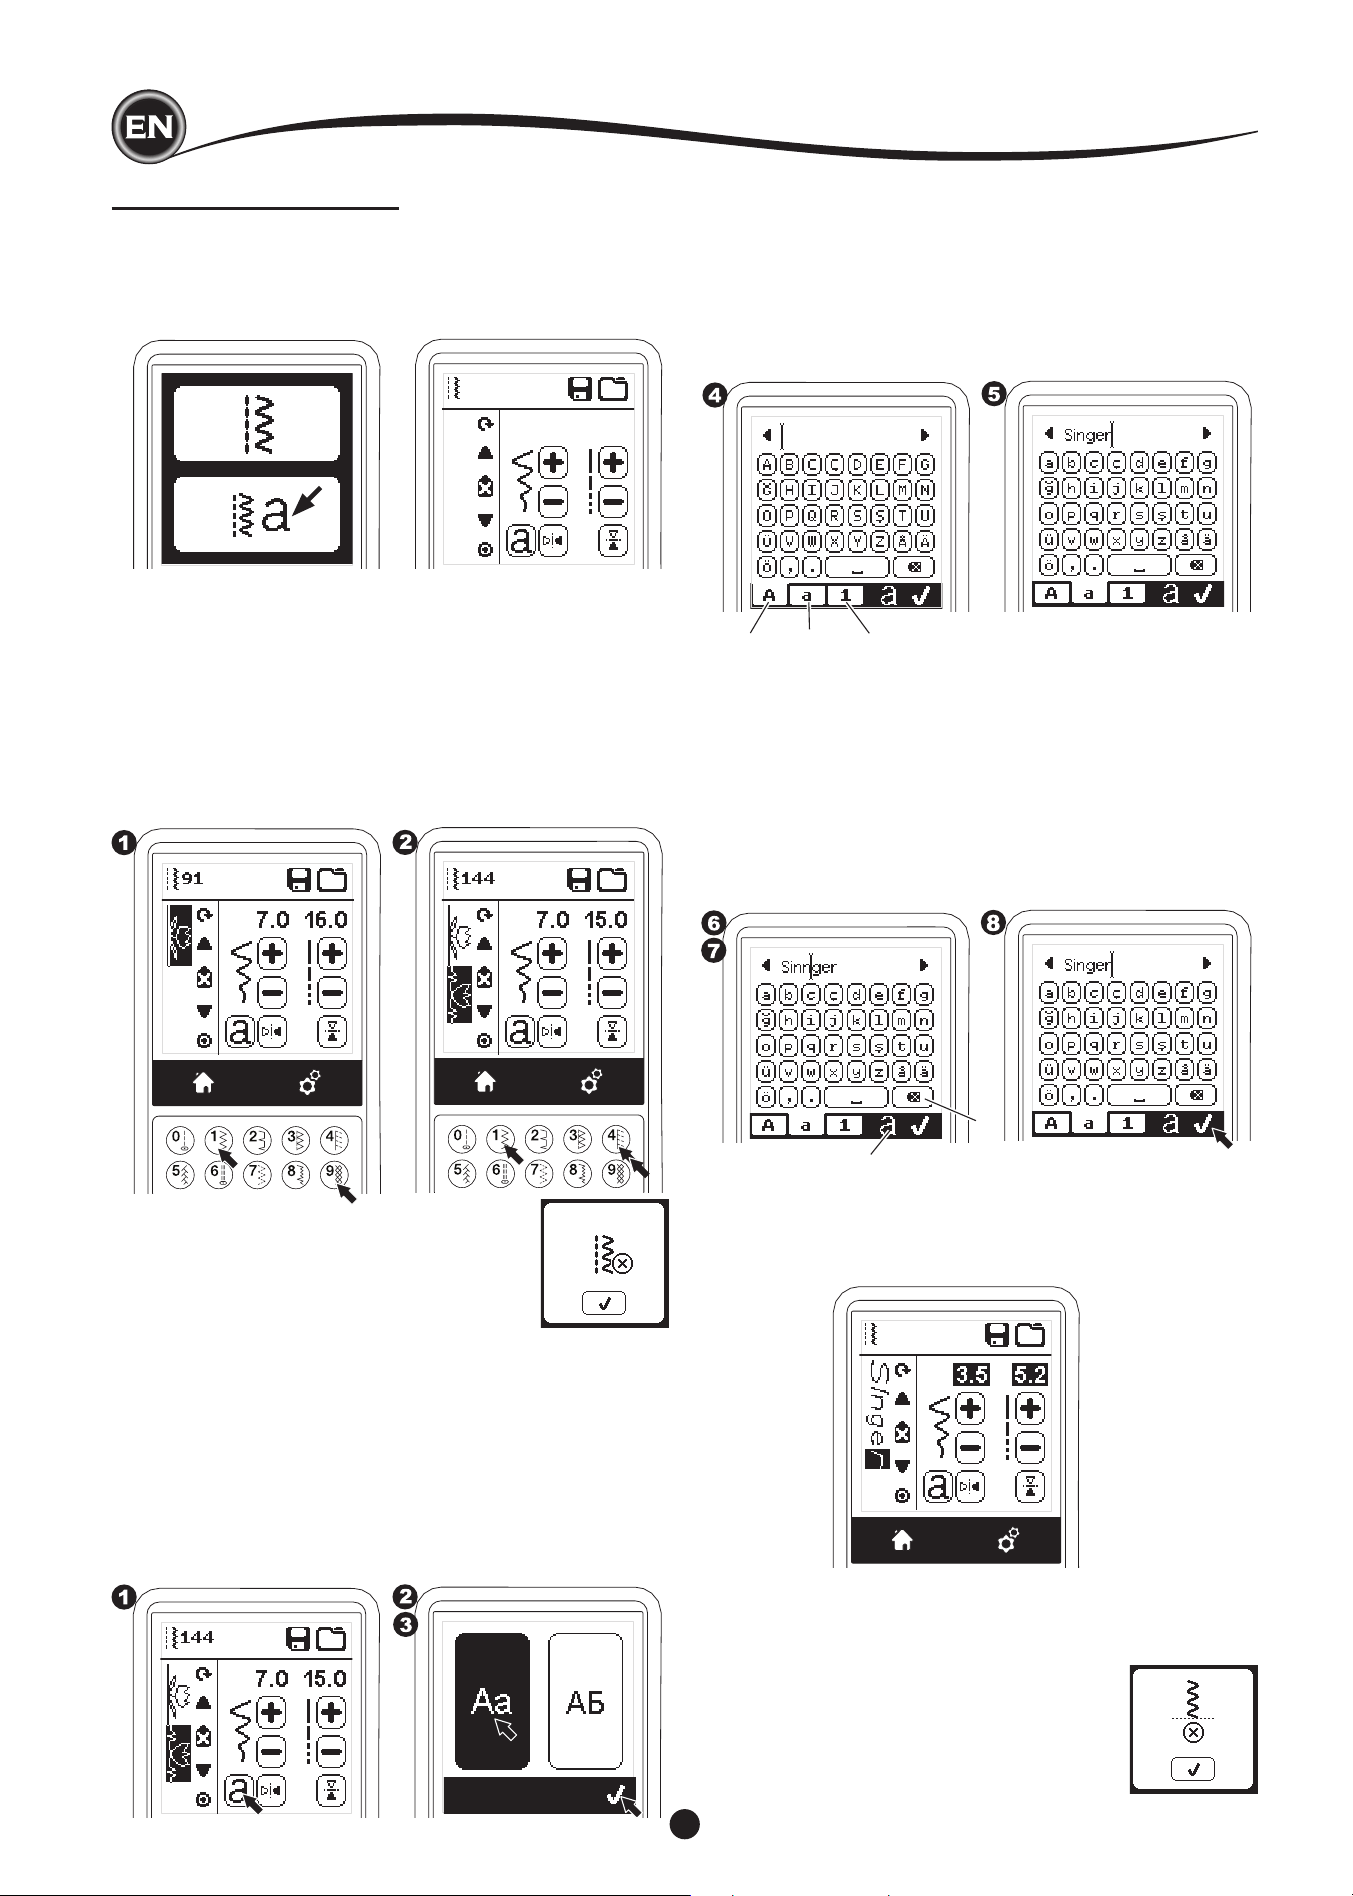
38
SEQUENCE SEWING
You can combine stitch patterns & letter stitches into a
sequence.
To enter the sequence mode, press the Sequence Button at
the Home Screen.
LCD will show the Sequence Screen.
SeQuencIng
SelectIng StItch patternS
1. Select the desired stitch patterns in the same manner as
that used for normal sewing. (See page 13 for information
on selecting stitches)
The selected patterns will display at the top left side of the
LCD screen.
2. After selecting a stitch, use the same procedure to select
the next stitch pattern. The selected pattern will be added,
and it will display on the left side of the LCD screen below
the previously selected pattern.
NOTE:
Some patterns may not combine into the
sequence. If you select a pattern that cannot be
combined, a message will appear on screen to
alert you of this. Press the “
✓
” button.
4. Press the desired letter directly. Press the Character tabs
(located at the bottom of the LCD screen) to change lower
case, numbers, etc.
a. Uppercase letters
b. Lowercase letters
c. Numeric letters and special letters
5. Selected letters will appear on the top line of the LCD
screen.
6. The arrow buttons on top line will move the cursor.
7. To insert the letter, move the cursor to the inserting point
and select letter.
To delete the letter, move the cursor to the right side of the
letter to be deleted, then press the Delete button (d).
To change the letter style, press the Style button (e).
8. When sequencing of letters is completed, press the “
✓”
mark.
The Sequence Screen will appear again.
a b c
When you return to the Sequence Screen, selected letters will
be shown on the left side of the LCD screen. The cursor may
disappear if the length of letters are over the indicating area.
See next page to shift the cursor.
e
d
NOTE:
1. If a letter is selected, which has a different base line (like “j”
or “g”), the width and length of other letters will be adjusted
to proportion automatically.
2. The sequence can contain a maximum
of 60 patterns and letters. Message will
appear when you reach the limit.
Press the “
✓”
button.
SelectIng letter StItcheS
1. To enter a letter stitch into the sequence, press the Letter
button on the LCD screen, which is indicated by a lower
case ‘a’, as shown below.
The Letter Style Selecting Screen will appear.
2. Press the left button for the Block font, press the right
button for the Cyrillic font. Selected button will be
highlighted.
3. Press the “
✓
” button.
Uppercase letter of selected style will appear.
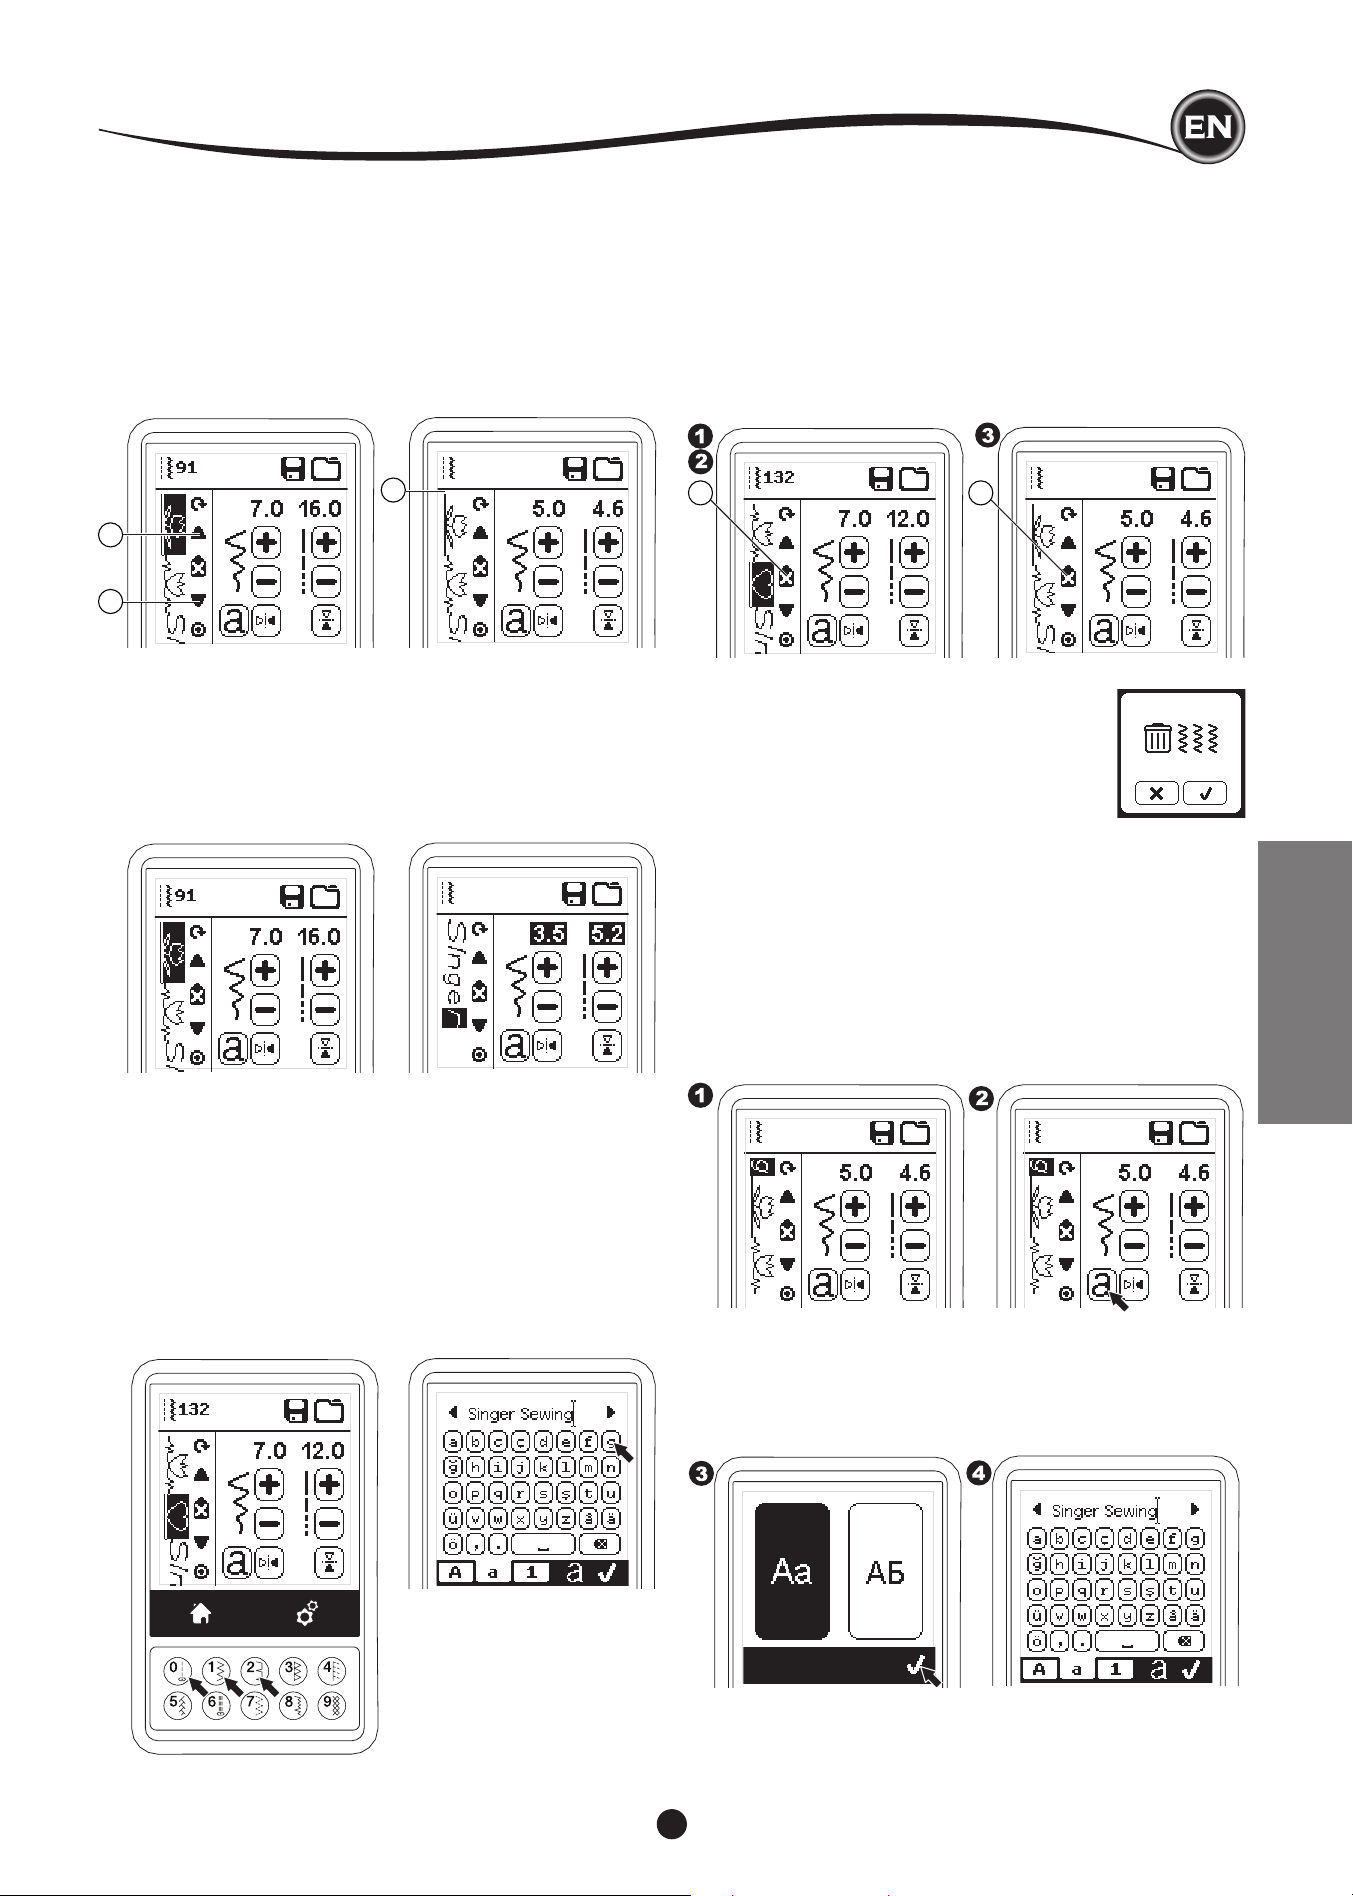
39
SEQUENCING
InSertIng pattern or letter
Machine will insert a pattern or letter to the next of the
highlighted pattern or letter.
Shift the cursor to highlight the pattern just before the desired
position.
To insert a pattern, select pattern number.
To insert a letter, press the Letter button and select or edit
letter as described on the previous page.
ShIftIng the curSor (hIghlIght)
The cursor position is the highlighted pattern or letter.
By pressing the Cursor buttons (a, b), cursor will shift up or
down.
The cursor is used to check selected patterns, insert patterns,
delete patterns or edit each pattern as described below.
NOTE: When the cursor is shifted to the top of sequence, it will
disappear. (c)
checkIng Selected patternS and letterS
As the length of the sequence increases, patterns and letters
will disappear from view on screen.
You can check patterns and letters by moving the cursor
upward or downward using the Cursor buttons.
deletIng pattern or letter
1. Shift the cursor to the pattern or letter you want to delete.
2. Press the Delete button (d) quickly (less than 0.5 sec.).
Machine will delete the pattern or letter and cursor will
shift to next pattern or letter. (If it was last pattern or letter,
cursor will shift to previous pattern or letter.
3. If you want to delete all patterns and letters, press and hold
the Delete button 0.5 sec. or shift the cursor to the top of
sequence and press the Delete button.
When deleting all patterns, a pop up will
appear, press the “
✓”
button. Machine will
delete all selected patterns and letters. To
cancel, press the “X” button.
SeQuencIng
c
a
b
d d
how to edIt a letter from the SeQuence
1. Shift the cursor to the letter you want to edit.
2. Press the Letter button.
The Letter Style Selecting Screen will appear.
3. Select letter style and press the “
✓
“ button.
Letter-Sequence screen will appear.
4. Edit the letter as described on the previous page.
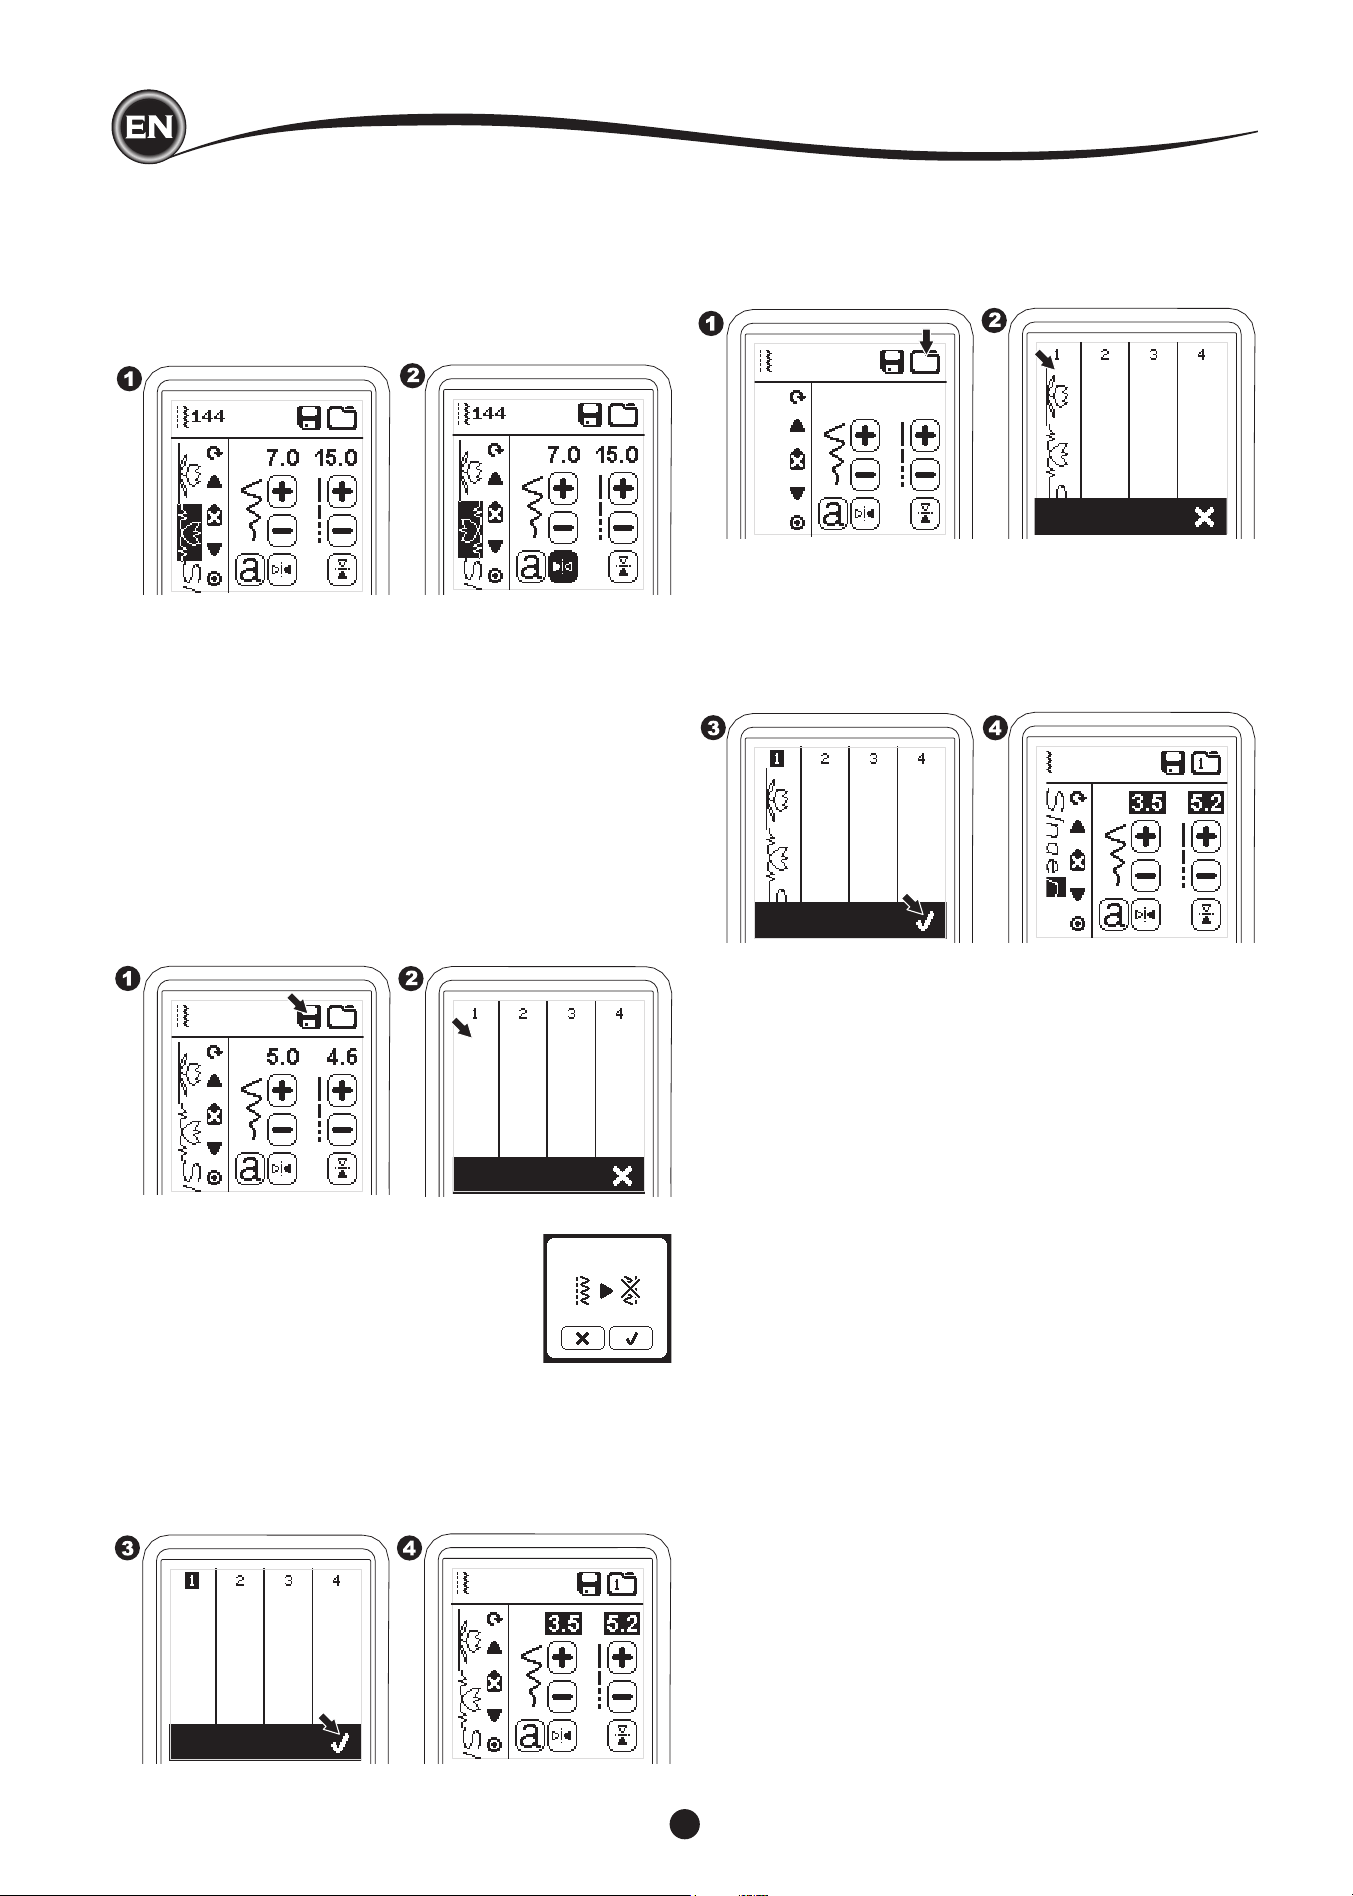
40
NOTE:
If the selected folder has a memorized
sequence in it previously, a message will
appear asking to rewrite over the previous
sequence or not. To rewrite (deleting
previous sequence), press the “
✓”
. To
cancel (exit), press the “X”. The message
will disappear.
3. When the selected memory number is highlighted, press
the “
✓
” button.
4. Sequence Screen will appear and the Folder icon indicate
the number of memorized folder.
b. To recall memorized sequence
1. Press the Load button on the Sequence Screen.
2. The memories are indicated by numbers. Press the desired
sequence/memory.
3. When the selected le number is highlighted, press the “
✓
”
button.
4. Recalled sequence is shown on the left side of LCD.
You can now sew the recalled sequence.
NOTE:
If another sequence has been created or loaded before
loading from memory, the loaded sequence will be added
to the next of cursor.
SavIng SeQuence
You can save stitch sequences into memory. There are
four separate memory folders for saving stitch sequences.
Memorized sequences remain in the memory if you turn off the
machine.
a. To memorize or save a sequence
1. Press the Memory button after you have selected patterns
or letters.
2. Select one of the four memories by pressing directly. (If
cancel, press “X” button)
adJuStIng each pattern or letter In a
SeQuence
You can change the settings (stitch width/length, mirror/
reverse) of each stitch pattern.
1. Shift the cursor to the pattern you want to edit.
2. Change the setting as normal setting. (Page 14)
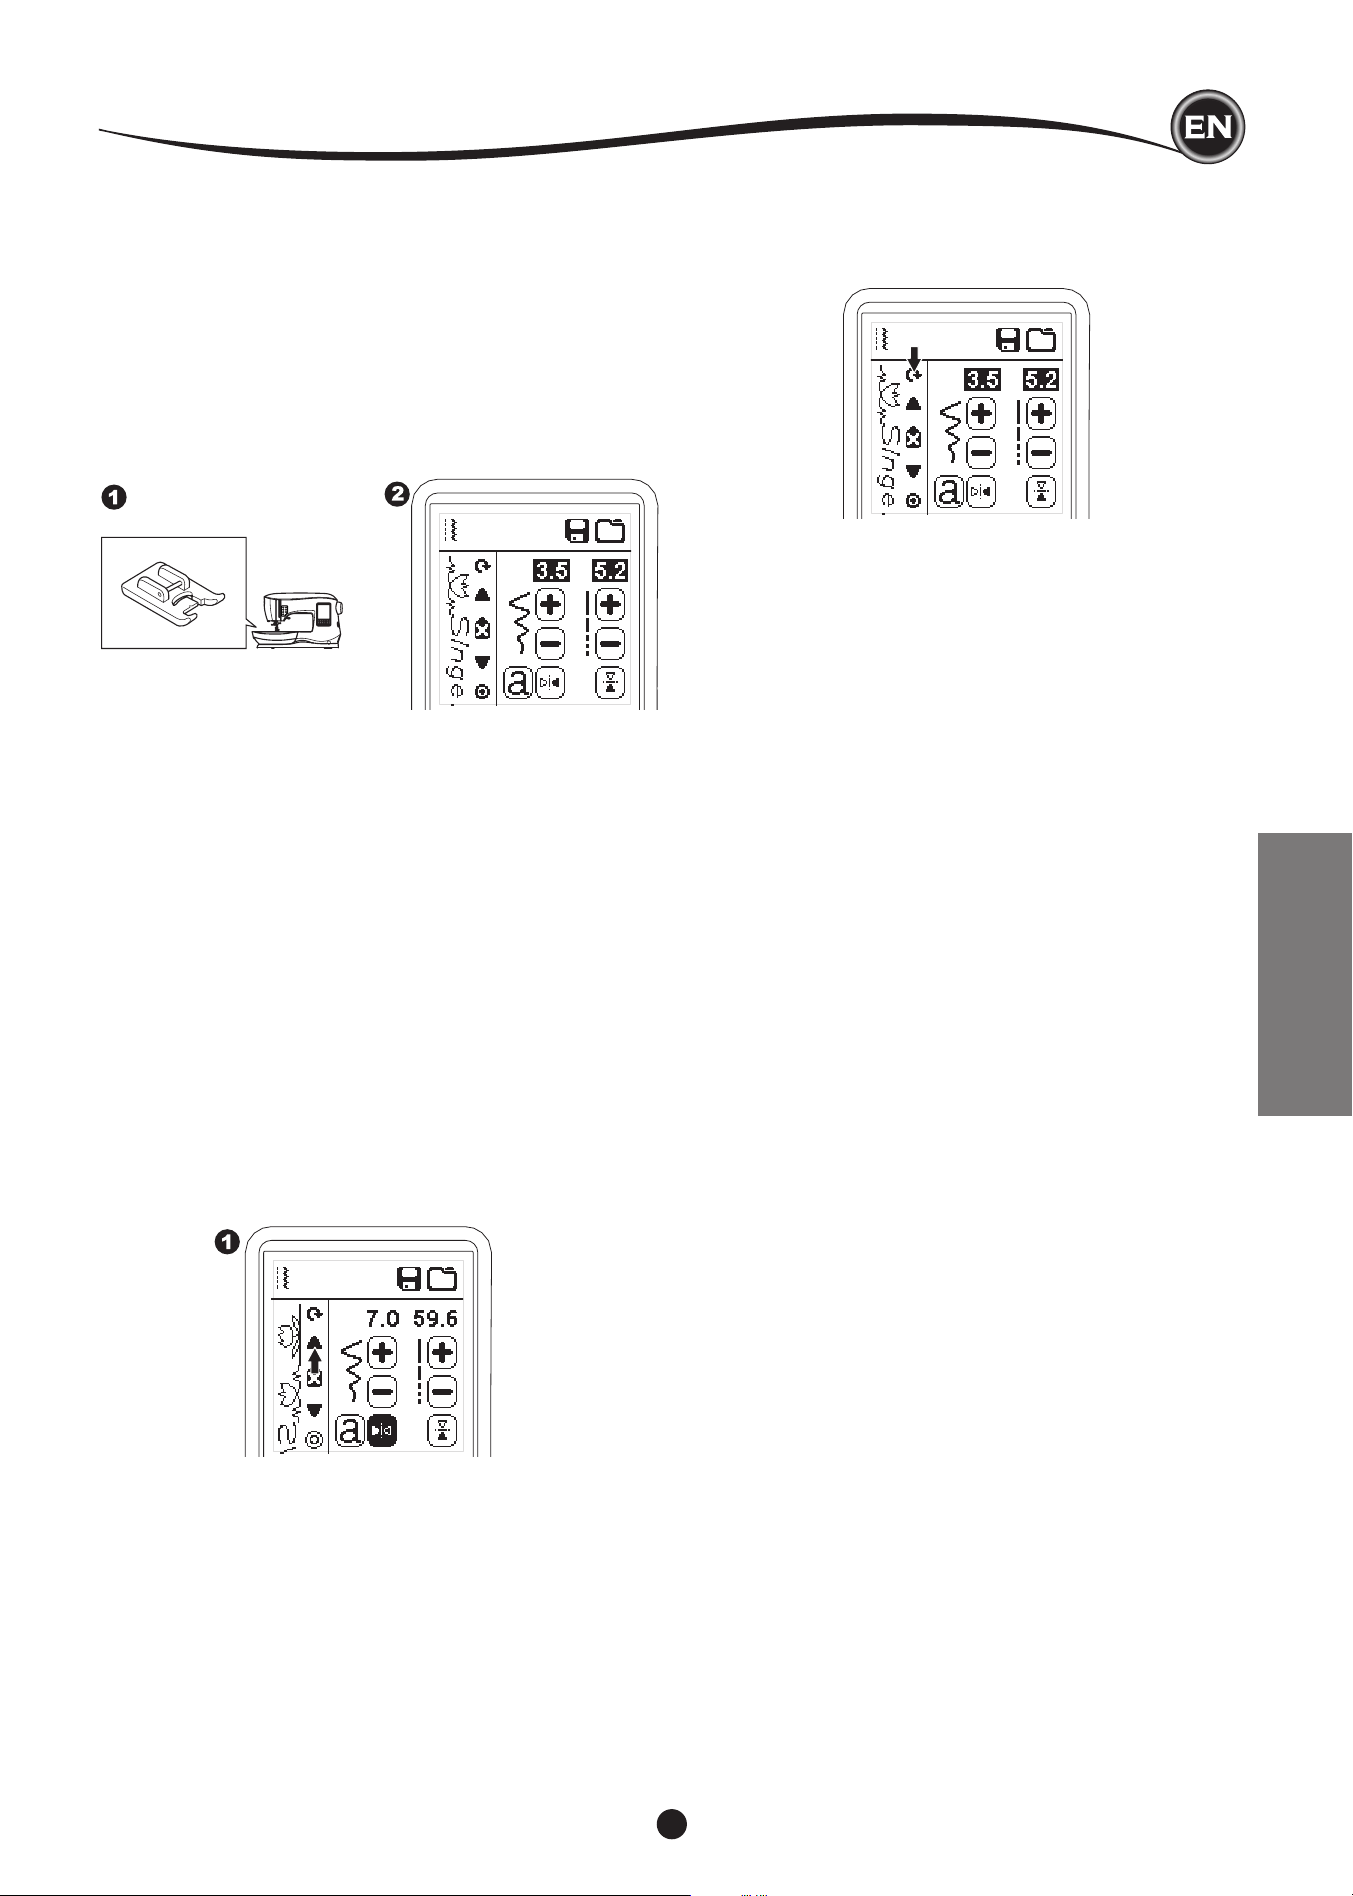
41
Sew the SeQuence
After selecting stitches for a sequence, the sequence will sew
repeatedly.
SEWING
1. Attach the Satin Foot when sewing decorative & letter
stitches.
2. Lower the presser foot and start sewing.
Machine will start sewing from rst entered, and sew the
sequence repeatedly.
SewIng SeQuence from begInnIng
Whenever pressing the Restart button, machine will start
sewing sequence from beginning.
NOTE;
By pressing the Thread Cutter button while sewing, machine
will stop at the end of sequence and cut threads.
SIngle SeQuence mode
By pressing the Single Sequence button, the icon will change
to a circle and activate the Single Sequence mode. This mode
has two functions.
1. Adjustments as one stitch pattern. The value of stitch
length and width are now common for all stitch patterns in
the sequence. You can change the length/width and mirror/
reverse of all stitches as one stitch pattern.
2. Sewing in single time.
The stitch sequence will sew one time
and then stop at the end of the sequence.
NOTE:
In this mode, the Delete button is not activated. Press the
Single Sequence button again to activate.
SeQuencIng
SEQUENCING
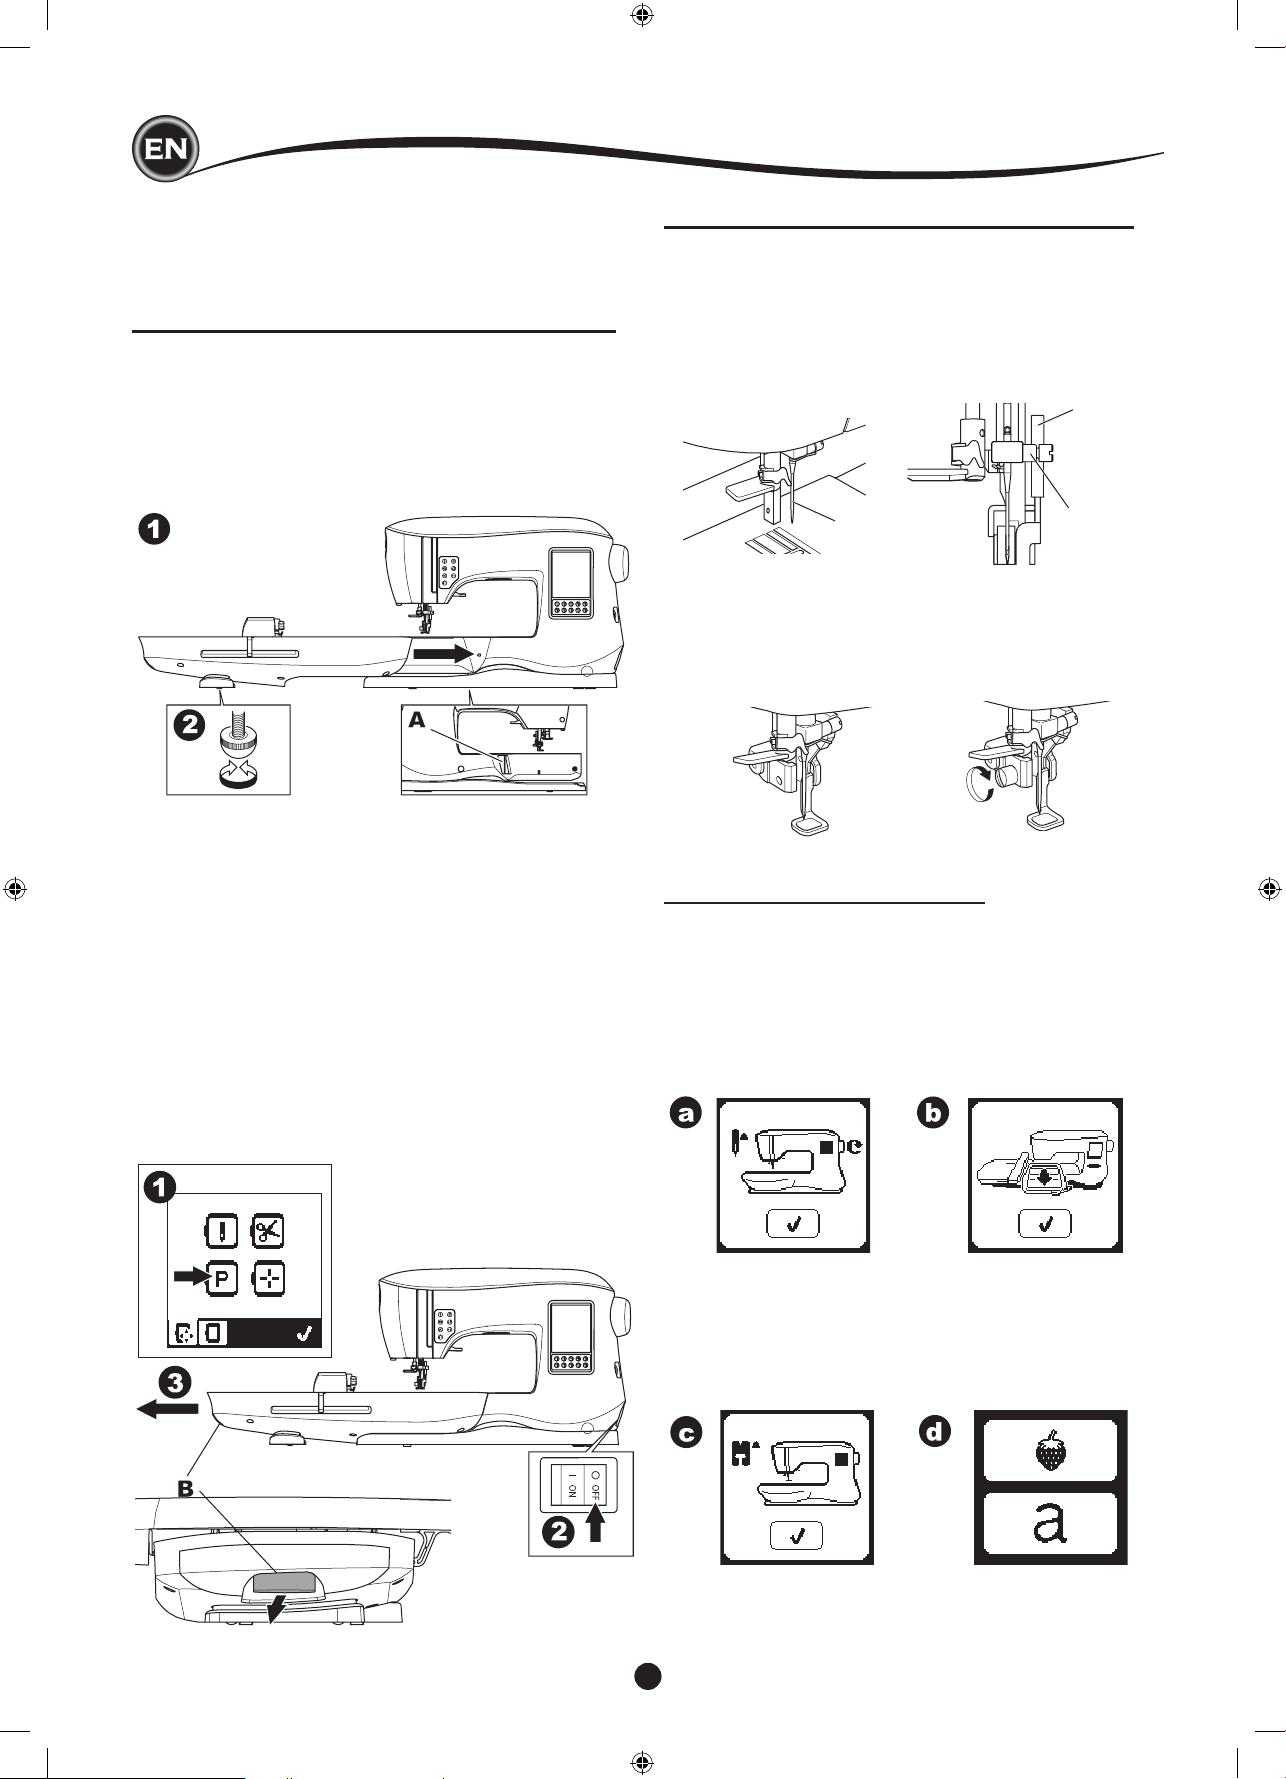
42
embroIdery preparatIon
ATTACHING THE EMBROIDERY FOOT
CONNECTING THE EMBROIDERY UNIT
There is a covered socket (A) behind the machine. The cover
will open automatically when connecting the embroidery unit.
1. Turn the machine off before connecting the embroidery unit.
2. Slide the embroidery unit onto the arm of the machine until
it plugs rmly into the socket.
3. If needed, use the level adjusting feet so that the machine
and embroidery unit are even with one another.
to remove the embroIdery unIt
Remove the hoop from the machine. (See Page 46)
1. To store the embroidery unit into the box, move the carriage
to park position by selecting Park Position in the Hoop
Option. (See page 50)
2. Turn off the machine.
3. Pull the lever (B) at the left, underneath the embroidery unit
and slide the unit to the left to remove it.
The cover of the socket closes automatically.
4. Store the embroidery unit in the original packing material.
1. Remove the presser foot and holder.
(See page 8)
Exchange the needle to an embroidery needle (a).
2. The arm (b) of Embroidery Foot should ride above the shaft
(c) of the needle clamp.
3. Slide the attaching head from your left to right so that it is
tted into the presser bar.
For easier access, lower the needle slightly by turning the
hand wheel toward you.
4. Tighten the presser foot screw securely.
Your sewing machine can convert to embroidery mode easily
by attaching the embroidery unit as follows.
b
a
c
MESSAGES AT START UP
When you turn the machine on, a series of messages will
appear on the screen.
a. If the needle is not in its highest position, this message
will appear. Turn the hand wheel toward you to raise the
needle to its highest position and then press the “
✓
” button.
b. If this message appears, remove the hoop (if attached),
clear the embroidery area and press the “
✓
” button.
c. If presser foot is lowered, this message will appear. Raise
the presser foot lifter and press the “
✓
” button.
When the messages a-c have cleared the screen, the
carriage will move to start point.
d. The Home Screen will appear.
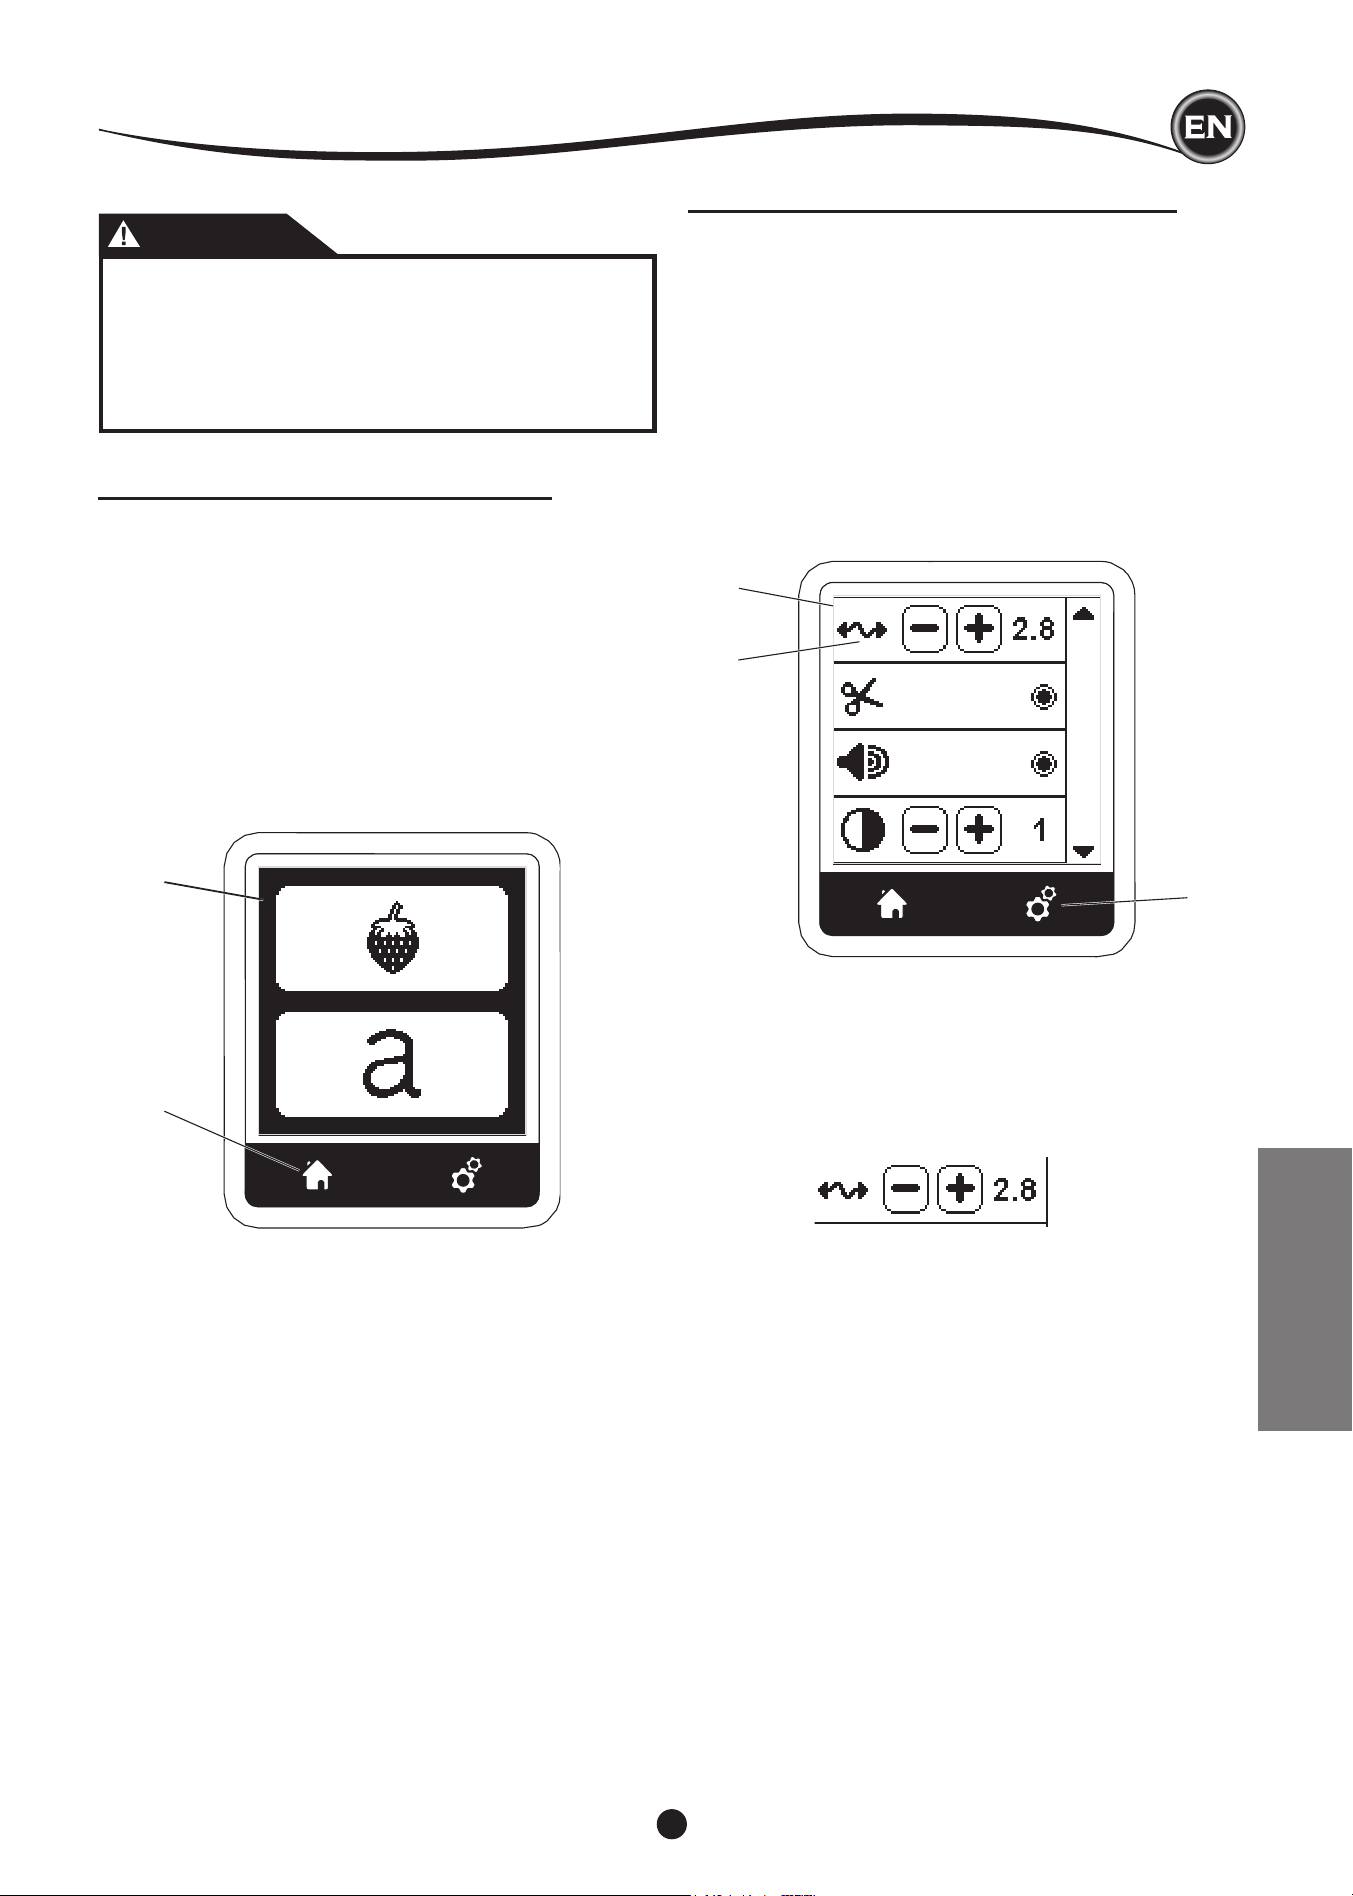
43
HOME SCREEN / HOME BUTTON
home Screen (a)
When you have attached the embroidery unit correctly, the
Embroidery Home Screen will appear.
You can start selecting and editing embroidery from this
screen.
home button (b)
You can go back to the Home Screen from anywhere by
pressing the Home Button.
At this time, all selected designs or letters and editing for
embroidery will be cleared.
A
B
embroIdery preparatIon
EMBROIDERY
C
(a)
D
EMBROIDERY MACHINE SETTINGS
SettIng button (c)
Before or during the embroidery process, you can adjust the
machine settings by pressing the Setting Button.
The Setting Screen will appear. (a)
This screen is scrolled by pressing the right side arrow buttons.
Pressing the Setting Button again, machine will return to
previous screen.
NOTE:
All settings except for thread tension will remain until you
change them. Thread tension will return to pre-set when you
load a design.
thread tenSIon (d)
This embroidery machine adjusts thread tension automatically.
However, depending on the thread or fabric being used, it
may be necessary to modify the tension setting to achieve the
desired results.
To obtain the desired thread tension, adjust as follows.
i. CORRECT THREAD TENSION
Upper thread appears slightly on the bottom side of fabric.
ii. UPPER THREAD TOO TIGHT
Bobbin thread appears on the top side of fabric.
Decrease the upper thread tension by pressing the “-”
button.
iii. UPPER THREAD TOO LOOSE
Upper thread is loose or makes loops.
Increase the upper thread tension by pressing the “+”
button.
(See illustration top of next page)
CAUTION
To prevent accidents:
1. Do not carry the sewing machine when embroidery
unit is attached. It may fall off.
2. Do not push nor pull the carriage forcefully. It may
break.
3. Do not hold the carriage to move the machine.

44
embroIdery preparatIon
USING FABRIC AND STABILIZER
Embroidery can be applied to many different types of
fabrics. Regardless of the fabric, it will be necessary to use
an appropriate type of stabilizer. (See page 45 for more
information)
Stabilizer serves as a foundation, holding fabric securely while
the embroidery machine stitches out the design, eliminating
distortion in the fabric and the design.
Different fabrics will require different types of stabilizer,
depending on the nature of the fabric and the density of the
design being embroidered. But most embroidery designs will
stitch out looking their best if the fabric is properly stabilized.
Stabilizer is mainly used as a backing, but at times, a stabilizer
is used on the top of the project as well.
A “Backing” goes on the back side of the area to be
embroidered. It may be hooped along with the fabric or hooped
alone, depending on the fabric and project.
A “Topper” means that an additional stabilizer is placed on the
top of the fabric, either hooped with the fabric or secured in
another manner. Its function is to ensure that the texture or loft
of the fabric is held down, providing a smooth surface for the
embroidery.
Though there are many types of stabilizers available, the most
common types are tear-away, wash away, and cut away.
Stabilizers come in different weights as well. After selecting the
best type of stabilizer for the project, choose the appropriate
weight. A good general rule is that the weight of the stabilizer
be compatible with the fabric.
Tear-away stabilizers are temporary, so once the excess is
removed after embroidering, the fabric itself must be able to
support the design on its own.
Tear-away stabilizers are usually recommended for woven
fabrics.
Cut-away stabilizers are permanent, and therefore a better
choice for supporting embroidery on unstable fabrics, to
prevent distortion. Simply trim away the excess from around
the design. Even after frequent laundering, the embroidery
design will stay intact.
Wash-away stabilizers rinse away from the embroidered area.
Though they are a good choice when sewing very light weight
fabrics, they can also be used as a topping. After removing the
main excess stabilizer, the rest is simply rinsed away.
There are also fusible and non-fusible version of stabilizer
available. Fusible stabilizers can be ironed onto the back of
the area to be embroidered, preventing distortion of the fabric
while hooping.
However, for fabrics that may be more sensitive to ironing,
the non-fusible stabilizers are used. In these cases, another
helpful tool is a temporary fabric spray adhesive. Use this to
temporarily ‘hold’ the fabrics and stabilizer while hooping and
embroidering, to prevent the fabrics from shifting during the
embroidery process.
Knowing how to properly stabilize involves a little trial and error
at rst. Follow the stabilizer manufacturer’s recommendations,
for best results.
i
ii
iii
top SIde bottom SIde
When thread tension is changed from the default (pre-set)
setting, the number will be highlighted.
NOTE:
If the bobbin has been threaded or inserted incorrectly, or if
the upper thread has not been threaded correctly, good thread
tension cannot be achieved. Check to make sure that the
bobbin and upper thread are correctly threaded before making
any adjustments.
i
ii
Stop for cut
When starting to embroider, the machine can be set so that it
will stop after a few stitches, allowing you the opportunity to cut
the thread tail.
You can select or deselect this function, as follows:
i. Stop for Cut is activated.
ii. Stop for Cut is deactivated.
audIble beep
contraSt of Screen
calIbratIon Screen
Software verSIon
These settings are same as sewing machine mode. See page
16.
45
a
b
cd
Generally, the stabilizer should be larger in size than the hoop
with which it is being used. When embroidery is completed,
use a ne point scissor to carefully remove any excess
stabilizer from the embroidery area.
a. Stabilizer
b. Hoop position
c. Fabric (Under side)
d. Embroidery surface (Top side)
NOTE:
It is possible to substitute SINGER
®
Syle 2020 needles for the
2000 Style, in either the 11/80 or 14/90 sizes.
It is possible to substitute SINGER
®
Style 2045 needles for the
2001 Style, in either the 11/80 or 14/90 sizes.
It is recommended to use SINGER
®
needles in your SINGER
®
embroidery machine.
embroIdery preparatIon
EMBROIDERY
PROJECTSTABILIZERHOOPING NEEDLE
BOBBIN
THREAD
NEEDLE THREAD
T-Shirts
Soft Mesh
Cut-Away
Hoop fabric and stabilizer together.
SINGER
®
Chromium
#2001
Size 11/80
BobbinfillPolyester or Rayon
Fleece
Cut-Away and
Topper
Hoop cut-away stabilizer. Pin topper
and fleece to the hooped cut-away
stabilizer.
SINGER
®
Chromium
#2001
Size 14/90
BobbinfillPolyester or Rayon
Towels
Topper and
Tear-Away
Hoop tear-away stabilizer. Pin topper
and towel to the hooped tear-away.
SINGER
®
Chromium
#2000
Size 14/90
Same color as
needle thread
or towel
Polyester is
recommended
Sweater Knits
Cut-Away
Stabilizer
Hoop cut-away stabilizer. Pin topper
and sweater to the hooped cut-away
stabilizer.
SINGER
®
Chromium
#2001
Size 14/90
BobbinfillPolyester or Rayon
Light Weight
Fabrics
Water-Soluble,
Light Tear-Away
Hoop fabric & stabilizer together.
SINGER
®
Chromium
#2000
Size 11/80
Bobbinfill
Rayon is most often
used
Medium to Heavy
Weight Tear-Away
Hoop fabric and stabilizer together.
SINGER
®
Chromium
#2000
Size 14/90
BobbinfillPolyester or Rayon
Denim
Medium to Heavy
Weight Cut-Away
Hoop fabric and stabilizer together.
SINGER
®
Chromium
#2000
Size 14/90
BobbinfillPolyester or Rayon
Napped Fabrics
Medium to Heavy
Weight Cut-Away
and Topper
Hoop cut-away stabilizer. Pin topper
and fabric to the hooped cut-away
stabilizer.
SINGER
®
Chromium
#2000
Size 1
4/90
BobbinfillPolyester or Rayon
Vinyl & LeatherCut-Away
Hoop cut-away stabilizer. Secure
fabric to the hooped cut-away
stabilizer.
SINGER
®
Chromium
#2000
Size 14/90
BobbinfillPolyester or Rayon
Medium to
Heavy Woven
Fabrics
FABRIC, STABILIZER, NEEDLE AND THREAD CHART
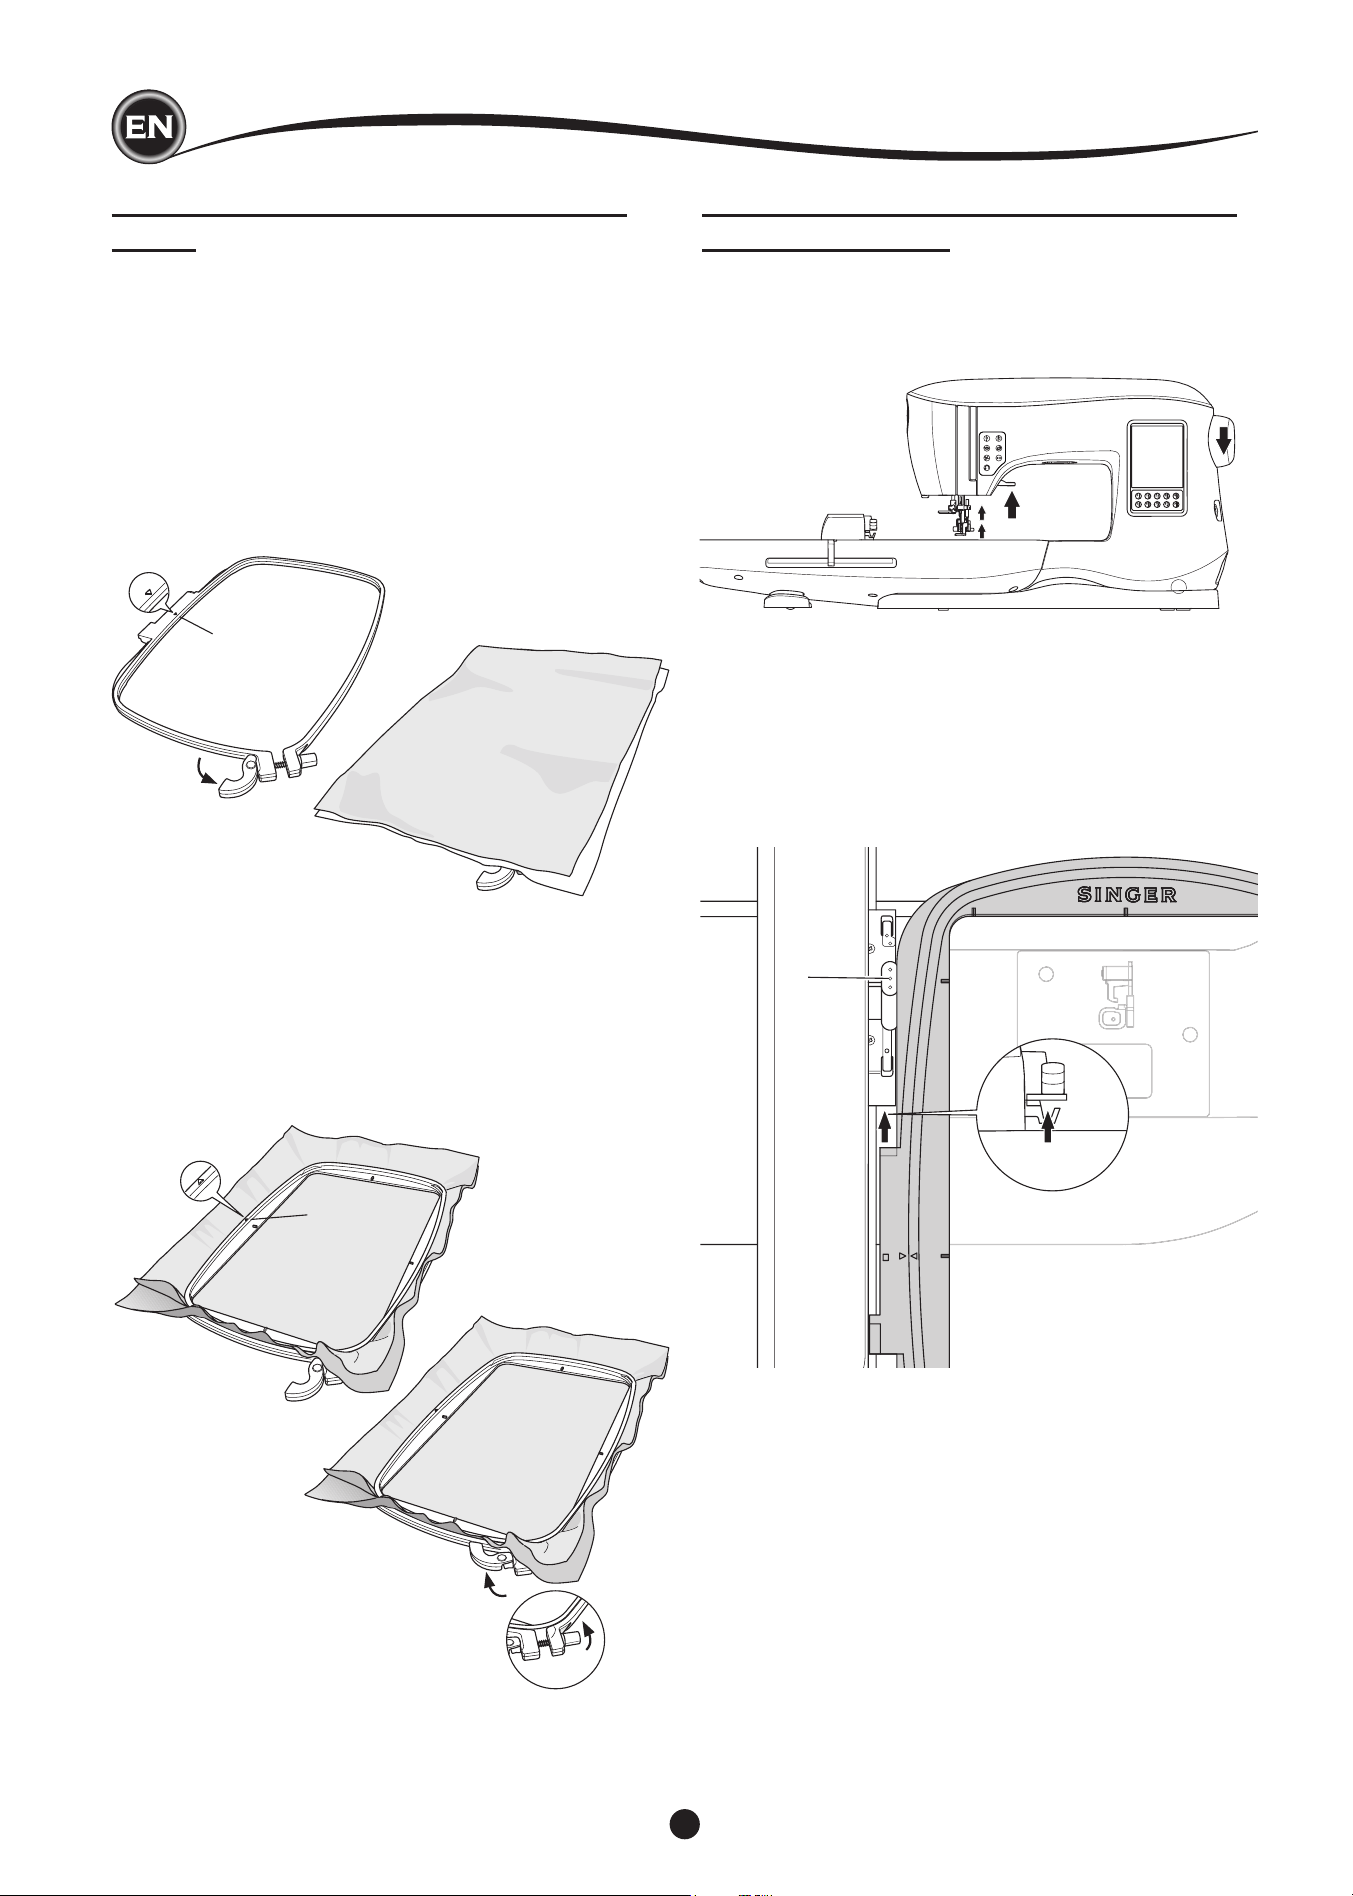
46
SECURING FABRIC IN EMBROIDERY
HOOP
For the best embroidery results, place a layer of stabilizer
beneath the fabric. When hooping stabilizer and fabric make
sure that they are smooth and securely hooped.
1. Open the Quick Release Lever on the outer hoop and
remove the inner hoop.
2. Place the outer hoop on a rm at surface with the screw
on the lower right. There is a small arrow in the center of
the left edge of the outer hoop which will line up with a
small arrow on the inner hoop.
3. Place stabilizer and the fabric, with the right sides facing
up, on top of the outer hoop.
1
2
3
4
5
6
embroIdery preparatIon
4. Place the inner hoop on top of the fabric with the small
arrow at the left edge and push rmly into the outer hoop.
5. Close the Quick Release Lever. Don’t force the Quick
Release Lever. If it seems as though it doesn’t want close,
loosen the retaining screw rst and then try closing the
Quick Release Lever again.
6. Adjust the pressure of the outer hoop by turning the
retaining screw. The fabric should be taut in the hoop for
the best results.
NOTE:
When embroidering additional designs on the same fabric, open
the Quick Release Lever, move the hoop to the new position
on the fabric and close the quick release lever. When changing
type of fabric, you might need to adjust the pressure using the
retaining screw. Do not force the Quick Release Lever.
ATTACHING THE EMBROIDERY HOOP
TO THE MACHINE
1. Raise the presser foot. Raise the needle to its highest
position by turning the hand wheel toward you.
2. Slide the hoop onto the embroidery unit from front to back
until it clicks into place.
NOTE:
Presser foot lever can be raised and held in a higher position
to help passing the hoop under the foot.
removIng the hoop from the machIne
Press and hold the Release Lever (a) on the hoop connection
assembly, then slide the hoop toward you.
a

47
USB EMBROIDERY STICK
Your machine comes with a USB stick. This stick contains the
following:
a. Design Data (embroidery designs)
b. Design Book (PDF le displaying images of included
embroidery designs and fonts, viewed on PC)
c. Individual Design Information (PDF le displaying details
on individual designs, viewed on PC)
connectIng uSb StIck
Your machine has a USB connector to read embroidery data
from the USB embroidery stick.
Open the cover and insert the USB embroidery stick in the
connector. The USB plug can only be inserted one way - do
not force it into the socket.
To remove, carefully pull the USB embroidery stick out straight.
NOTE:
Do not remove the USB embroidery stick while operating the
machine or stitching the embroidery, as this can damage the
les on your USB embroidery stick.
deSIgn book
A Design Book is provided, which displays an overview of the
included embroidery designs and fonts that come with your
machine. You can see an images of the designs, as well as
the dimensions and stitch count of the designs.
This book is a PDF le, which can be accessed from the USB
stick when placed in your PC. Your PC will need to have
Adobe Acrobat Reader installed in order to view the Design
Book. If your PC doesn’t have Acrobat Reader, access the
Adobe website to install it.
IndIvIdual deSIgn InformatIon
This is a PDF le that contains more specic information
about each individual embroidery design that comes with your
machine, such as the order of thread colors, suggested thread
colors and more.
This book is a PDF le, which can be accessed from the USB
stick when placed in your PC. Your PC will need to have
Adobe Acrobat Reader installed in order to view the Design
Book. If your PC doesn’t have Acrobat Reader, access the
Adobe website to install it.
embroIdery Software
Embroidery software is available for your machine, which will
allow you to use designs from other sources, such as design
CD’s and designs from the internet.
Go to singer.mysewnet.com for information on how to
download this software to your PC.
updatIng your machIne
Periodically, updates may be made available for your machine.
Your machine is updated via your USB stick.
1. Go to singer.mysewnet.com for information about available
updates for your machine.
2. Follow the instructions for how to update your machine.
EMBROIDERY
embroIdery preparatIon
48
SelectIng deSIgnS
HOME SCREEN
Selecting designs to embroider begins with the Home Screen.
The Home Screen has two main selections.
a. Selecting a design, editing and stitching.
b. Programming letters, editing and stitching.
a
b
1
c
2
3
d
e
1
2
3
f
g
h
embroIdery collectIon
(PDF le in your USB embroidery stick)
Your machine comes with 200 embroidery designs, as well as
embroidery fonts. You will nd 69 of these designs, plus the
fonts, built-in to the machine. The remainder of the designs
are on the USB stick.
The USB stick also has PDF les with information about the
designs. For more information about this, see page 47.
SELECTING A DESIGN
to Select a buIlt-In deSIgn
Your machine has 69 built-in embroidery designs.
1. Press the Design button on the Home Screen.
A ten-key screen will appear.
NOTE:
Press the machine tab (c) if USB tab is activated.
2. Select the design from the Embroidery Collection and press
the design number on the ten-key screen.
Selected number will appear in the top left of LCD.
To delete a number, press the Delete button (d).
If you want to know about selected design, press the info
button (e). The following information is indicated on the
screen.
i. Design name
ii. Design max width & height
iii. Total number of colors
iv. Total number of stitches
By pressing “
✓
” button, the information will disappear and
ten-key screen will appear again.
3. Press the “
✓
” button at ten-key screen.
The design is selected and Embroidery Placement screen
will appear.
to Select a uSb deSIgn
Your machine can read “.xxx” and “.dst” embroidery data
stored in the USB embroidery stick.
1. Insert the USB embroidery stick into the USB socket.
2. Press the design button on the Home Screen and then
press the USB tab (f).
Data list will appear in the screen.
Press the le or folder to select or open and press the “
✓
”
button.
When folder is opened, the list of designs included in that
folder will appear (g).
To go back, press the arrow button on the top line (h).
Press the info button for more information about the
selected design.
NOTE:
If the USB stick or a folder is empty or if readable le is not
included, empty mark will appear.
3. When le is loaded, embroidery placement screen will
appear.
49
Before you begin embroidering, you can edit designs, as
shown below, using the Edit Tabs.
NOTE:
A pop up message may appear if you did not attach the correct
hoop.
Press “
✓
” button and attach the hoop indicated in this message
or change hoop size setting at the Embroidery Option screen
(Next page).
EMBROIDERY ROTATION AND
MIRRORING SCREEN
1. Press the embroidery rotate and mirroring tab.
2. Press the Rotate button. By pressing this button, the design
will rotate 90 degrees clockwise. If the design is too wide or
too high to rotate 90 degrees, it will rotate 180 degrees.
The total rotation value will be indicated at the top right of
the LCD screen. Located to the left of the rotation value is
a ‘machine icon’, which will rotate as the rotation value is
changed.
3. Press the Mirror buttons.
a. Mirror from top to bottom
b. Mirror from side to side
The ‘machine icon’ (located near the top of the LCD screen)
will change to the selections made, indicating the new
orientation of the embroidery design.
2
a
b
c
d
e
1
a
b
1
3
2
a
b
c
1
2
edItIng the deSIgn
EMBROIDERY PLACEMENT SCREEN
You can move the placement or position of the selected
embroidery design, as follows:
1. Press the Embroidery Placement tab.
(When you have selected the design, this screen will
appear rst.)
2. Press the four arrow buttons to move the position.
a: up, b: left, c: right, d: down
The hoop will move according to the direction selected.
Each time the button is touched, the hoop will move. If the
button is touched and held, the movement will be done in
larger increments.
The values (X:Y:) near the top of the screen indicate
distance from center position.
NOTE:
The left side of screen is showing the embroidery area and
relative design position and size.
When you edit the design, this eld will redraw according to
your editing.
EMBROIDERY SCALING SCREEN
1. Press the Embroidery Scaling tab.
2. To increase the scale, press the upper arrow button (a).
To decrease the scale, press the lower arrow button (b).
The design will be scaled 5 percent each pressing on a
button.
The maximum scaling is +/- 20 percent.
If scaling is exceeding the hoop size, it cannot be selected.
To return to original size, press the button (c).
The value of the current scale is indicated between the
buttons, and size of scaled design is indicated on the top
line of screen.
EMBROIDERY
50
EMBROIDERY OPTION SCREEN
1. Press the Embroidery Option tab.
2. You can access embroidery options by pressing the
buttons, as shown below:
A. Hoop Option and Selection
B. Tracing
C. Basting
D. Monochrome
A
B
C
D
1
2
i
ii
iii
iv
A
v
hoop optIon and SelectIon (a)
The top right button shows the hoop size selected. Press this
button to select a hoop position or to change the hoop size.
HOOP OPTION - SELECT HOOP POSITION
When you press the Hoop Option and Selection button, the
Hoop Option screen will appear rst.
You can move the hoop to the following positions.:
i. Current Position:
When you want to return to the current stitch and start
embroidering again where the embroidery was interrupted,
press this button.
Hoop will move to current positon and return to embroidery
option screen.
NOTE:
You can also press the “
✓
” button to return to current
positon and Embroidery Option screen.
ii. Cut Position:
By pressing this button, move the hoop towards you,
making it easier to trim fabric when embroidering an
appliqué.
iii. Park Position:
When your embroidery is nished and you want to store
your machine, it will be necessary to move the hoop
carriage to Park position. Press the Park position button.
When the pop-up message (v) appears, remove the hoop
and press the “
✓
” button. The carriage will then move to
the correct position for storage.
Then, turn off the power switch and remove the unit.
NOTE:
It is very important that the hoop is removed, otherwise it
may be damaged.
iv. Center Position:
If you want to check where the center position of the hoop
will be placed on the fabric, press this button.
edItIng the deSIgn
NOTE:
When hoop is not attached, buttons “ ii, iv “ will be disabled.
51
HOOP SELECTION
When you select the design, machine will select most suitable
hoop automatically.
1. To change the hoop, press the second tab to open the hoop
list.
1
e
2
3
B
C
D
2. Select the hoop you want to use.
The hoop list can be scrolled by pressing the right side
arrow buttons.
Only hoops that are big enough for the selected design will
be possible to select.
Hoops that are too small are marked with an X and cannot
be selected.
Selected hoop is marked with a black dot.
3. Press the ”
✓
” button. Hoop size will change and the
Embroidery Option screen will appear.
At this time, all edits (rotation, mirroring and scaling) will be
reset. If you don’t want this, press the “X” button (e). Hoop
size and edits will not change and return to the Embroidery
Option screen.
NOTE:
If the hoop you have selected is not the same as the hoop
attached to the embroidery unit, a pop-up will appear to inform
you of this. Attach the correct hoop or select another hoop
from the list.
Hoops 260x150 and 100x100 are provided with this machine.
tracIng (b)
The Tracing function can be used to trace around the design
area. Press the second button to move the hoop so the needle
is placed in the upper left corner of where the design will be
embroidered. Each press of the button will move the hoop to
view all corners of the design.
On the fth press, the hoop will move to the center position
of the design and on the sixth press it will move back to its
original position.
The Tracing button will indicate the position by highlighting
mark.
baStIng (c)
By pressing the third button and pressing the Start/Stop button,
machine will sew a basting stitch around the design area as a
box.
Basting enables you to secure your fabric to a stabilizer placed
beneath it, especially when the fabric to be embroidered
cannot be hooped. Basting can also provide added support,
especially for unstable fabrics.
NOTE:
During basting, the design box will be indicated with a dashed
line and Basting button will be highlighted.
monochrome (d)
Press the fourth button to activate monochrome embroidery.
The machine will not stop for color block changes. Press the
button again to deactivate monochrome embroidery.
When Monochrome is activated, this button will be highlighted.
edItIng the deSIgn
EMBROIDERY
52
When you complete editing the design, press the Stitch Out
tab to start sewing.
STITCH OUT SCREEN
When you press the Stitch Out tab (A), the Stitch Out Screen
will appear.
a. Embroidery eld and position
b. Stitches left in color block / Total number of stitches left in
design.
By pressing -/+ buttons, stitch will go backward/forward.
Press and hold will increase stepping speed.
c. Current color / Total number of colors
By pressing -/+ buttons, color block will go backward/
forward.
a
b
c
A
2
3
4
1
9
7
6
8
embroIder a deSIgn
6. Press the Start/Stop button.
The machine will start embroidering the rst color of the
design.
NOTE:
If presser foot lifter is raised at this time, the pop up
message will appear. Lower the foot and press the “
✓
”
button.
START TO SEW
1. Thread the upper thread with the rst color.
CAUTION
To avoid injury:
Special care is needed for the needle when changing
the upper thread.
2. Pass the upper thread through the hole of the embroidery
foot from the top side.
3. Lower the presser foot lifter.
4. Hold the upper thread.
5. Clear sufcient space to accommodate movement of the
carriage and the hoop.
7. When Stop for Cut setting is on, machine stops
automatically after few stitches for cut thread end. A pop up
appears asking you to cut thread end. Cut thread end and
press the “
✓
” button. Continue embroidering by pressing
Start/Stop button.
8. When embroidering a color block is completed, machine
will stop automatically and cut upper thread.
A pop up will appears asking you to change color. Re-
thread with the next color and press “
✓
” button. Continue
embroidering by pressing Start/Stop button.
Each color segment is tied of at the end and the upper and
bobbin threads are cut.
9. When the entire embroidery is completed, your machine
cuts both threads and stops.
A pop-up informs you that your embroidery is nished.
Then press “
✓
button.
Raise the presser foot and remove the hoop.
53
You can select from 2 different font styles.
See embroidery collection.
SELECTING EMBROIDERY LETTERS
1. Press the Font button on the Home Screen.
The Font Selection screen will appear.
2. This machine has 2 fonts and each font has 3 sizes.
Press the Font button you want to sew and press the “
✓
”
button.
The uppercase letter screen will appear.
3. Select the letters you want to embroider.
To change to different types of characters, press the
tab that contains the desired characters, as follows:
a. Uppercase letters
b. Lowercase letters
c. Numeric letters and special letters
4. Selected letter will be added to the top line.
5. The arrow buttons on top line will move the cursor.
6. To insert a letter at any desired position, move the cursor to
the inserting point and select letter.
To delete the letter, move the cursor to the right side of the
letter to be deleted, then press the Delete button (d).
7. When sequence of letters is completed, press the "
✓"
mark.
The Stitch Out Screen will appear.
NOTE:
If no letters are selected, the Home Screen will appear.
You can return to letter selecting mode after pressing "
✓
" mark
by pressing Home Button.
You can add letters until largest hoop height (If width of
letters exceeds maximum width of hoop, 90 degree rotate
automatically).
a
b
1
2
3
a b c
d
7
5
6
4
embroIdery letterS
EDITING EMBROIDERY LETTERS
Lettering can be edited, similar to the way designs can be
edited.
STITCHING OUT EMBROIDERY
LETTERS
Stitching out embroidery letters works in the same way as
stitching out a design.
When stitching lettering, the values appear on screen.
a. Stitches left in current letter / Total number of stitches left
all letters
b. Current letter / Total number of all letters
The machine will stitch each letter, cutting the threads between
each letter.
NOTE: If desired, you can select the Monochrome function (see
page 51) so that all letters will sew without cutting between
each letter, cutting only at the end.
EMBROIDERY
5
54
pop-up meSSageS
machIne Set for twIn needle
This pop-up message will appear when
Twin Needle program is activated.
Check the needle and press the “
✓”
button to continue.
thIS StItch cannot be Sewn
wIth twIn needle
This message will appear when a stitch
that cannot be used with twin needle, is
selected.Press the the “
✓”
button and
select another pattern or reset the twin
needle program.
StItch wIdth lImIted for twIn
needle
This message will appear when stitch
width is adjusted to the limit.
Press the the “
✓”
button to continue.
calIbratIon faIled
If calibration has not completed correctly,
pop-up message will appear. Press the “
✓
”
button and retry the calibration.
lower the drop feed lever
When sewing on the button, this pop-up
will appear. Lower the Drop Feed Lever
and press the “
✓”
button to continue.
thIS StItch cannot combIne
Some patterns may not combine into
the sequence. If you select a pattern
that cannot be combined, a message
will appear on screen to alert you of this.
Press the “
✓
” button.
raISe the needle
If the needle is in lowered position and
need to be raised before function can
be executed, this pop-up meesage is
shown. Raise the needle and press the “
✓
”
button to close the pop-up message.
program too long to add
more StItcheS
The sequence can contain a maximum
of 60 patterns and letters. Message will
appear when you came to the limit.
Press the “
✓
” button.
maIn motor overload
If you are sewing on very heavy fabric or
if the machine is blocked when sewing,
the main motor can get overloaded and
the machine will stop sewing. The pop-up
message will close when the main motor
and power supply are secure.
lower the preSSer foot
This pop-up will appear when you start
the sewing without lowering the presser
foot. Press the “
✓
” button and lower the
presser foot lifter to start to sew.
raISe the preSSer foot
This pop-up will appear when the function
has chosen that the presser foot must
be up position. Press the “
✓
” button and
raise the presser foot lifter.
upper thread breakage
When the upper thread breaks or runs
out, this pop-up will appear and sewing
will stop.
Re-thread the upper thread and press “
✓
”
button.
Go back 3-4 stitches backward from
broken point by pressing “-” at sewing
screen.
Press the Start/Stop button to restart
sewing.
thread Jam
If upper or bobbin thread is jammed under
the needle plate, machine will stop and
pop-up this message.
Remove the hoop and needle plate (see
next page) Remove the thread jam and
reset needle plate. Press the “
✓
” button.
55
pop-up meSSageS
delete program
When deleting all patterns, a pop up will
appear, press the “
✓
” button. Machine will
delete all selected patterns and letters. To
cancel, press the “X” button.
overwrIte
If the selected folder has a memorized
sequence in it previously, a message will
appear asking to rewrite over the previous
sequence or not. To rewrite (deleting
previous sequence), press the “
✓”
. To
cancel (exit), press the “X”. The message
will disappear.
cut thread end
When starting to embroider or after
changing the thread, the machine will sew
a few stitches and then stop so you can
cut the thread end.
Note: This function is cancelled if ”Stop
For Cut” iss disabled in the SET Menu,
see page 44.
change thread color
When embroidering a color block
is completed, machine will stop
automatically and cut both threads.
A pop up will appears asking you to
change color. Re-thread with the next
color and press “
✓
” button.
embroIdery fInIShed
When the entire embroidery is completed,
your machine cuts both threads and stops.
A pop-up informs you that your embroidery
is nished. Then press “
✓
button.
embroIdery too large
This pop-up will appear if a design is too
large for this machine to read from USB
stick.
Stop command In deSIgn
This pop-up will appear when there is
a programmed stop in the design. The
machine will stop. Press “
✓
” button to
continue embroidering.
corrupted data
This pop-up will appear when the content
of the USB memory is corrupted and
cannot be read correctly.
connect uSb
This pop-up will appear if the USB
button is pressed without any USB stick
connected or if the USB stick is removed
during browsing of the stick or removed
when embroidering.
Connect USB stick and press the “
✓
”
button.
wrong hoop type
This pop-up will appear when the selected
hoop in the hoop selection list is not
the same as the hoop attached to the
embroidery unit. Attach the correct hoop
type and press the “
✓
” button.
the data on the uSb StIck
cannot be read
This pop-up will appear when your
embroidery machine cannot access the
information on the USB stick. This can be
caused by wrong le formats on the USB
stick, the USB stick could be damaged
or you might be using a USB stick that is
non-compatible with this machine.
remove the hoop
This pop-up will appear when a function
has been chosen that the forces the
embroidery unit to move outside the limits
for the attached hoop. In order for the
carriage to move freely, remove the hoop
and then press the “
✓
” button.
MAINTENANCE
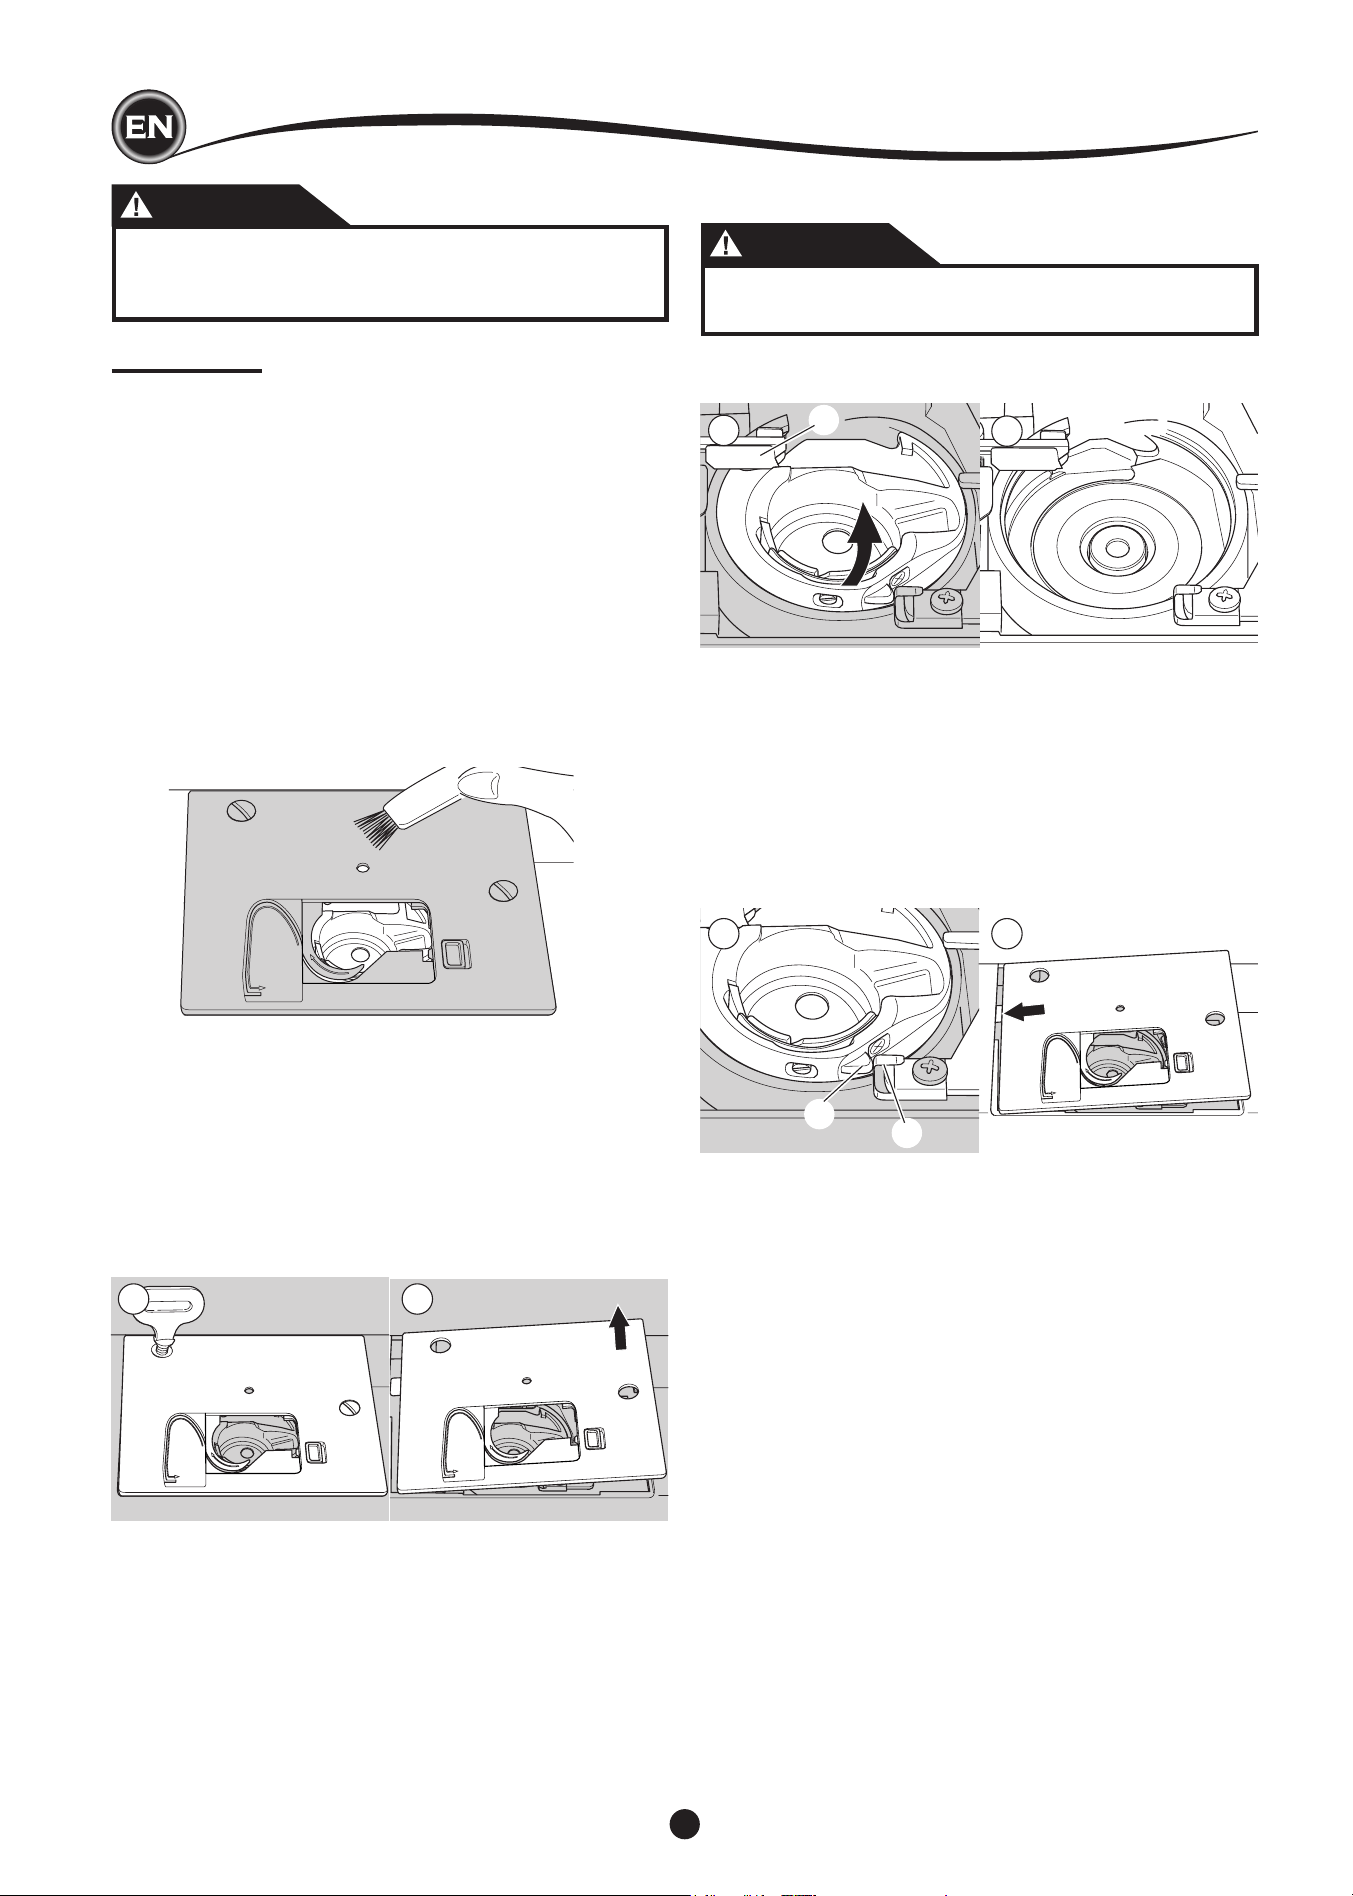
56
1 2
3
4
5 6
a
b
c
maIntenance
CLEANING
If lint and bits of thread accumulate in the hook, this will
interfere with the smooth operation of the machine. Check
regularly and clean the stitching mechanism as needed.
NOTE:
* An LED lamp is used to illuminate the stitching area. It does
not require replacement. In the unlikely event it does not
light up, call your authorized SINGER retailer for service.
* There is no need to lubricate this machine.
bobbIn holder
Remove the bobbin cover and bobbin.
Clean the bobbin holder with a brush.
hook race and feed dog
1. Remove the needle, presser foot and holder. Remove the
bobbin cover and bobbin. Remove the screws holding the
needle plate.
2. Remove the needle plate by lifting up the right side of the
plate.
3. Lift up the bobbin holder and remove it.
CAUTION
To prevent accidents, do not touch the thread cutter
unit (a).
4. Clean the hook race, feed dogs and bobbin holder with a
brush. Also clean them, using a soft, dry cloth.
5. Replace the bobbin holder into the hook race so that the tip
(b) ts to the stopper (c) as shown.
6. Replace the needle plate inserting the hook into the
machine.
Replace the screws and tighten.
DANGER
To reduce the risk of electric shock, disconnect the
power line plug from the electric outlet before carrying
out any maintenance.
57
MAINTENANCE
PROBLEM
Upper thread
breaks
Lower thread
breaks
Machine skips
stitches
Fabric puckers
Machine makes
loose stitches or
loops
Stitch pattern is
distorted
Threader does not
thread to needle
eye
Machine does not
feed properly
Needle breaks
Machine runs with
difculty
Machine will not
run
helpful hIntS
CORRECTION
Re-thread machine.
Remove entwined thread.
Re-insert needle.
Readjust thread tension.
Choose correct thread.
Re-thread the bobbin.
Rewind the bobbin.
Clean the holder.
Re-insert needle.
Insert new needle.
Choose correct size needle for fabric.
(use stretch needle)
Re-thread machine.
Re-thread the bobbin.
Insert new needle.
Readjust thread tension.
Select less dense design for fabric, or change
fabric type.
Use proper stabilizer for fabric being
embroidered.
Re-thread the bobbin.
Re-thread machine.
Readjust thread tension.
Attach correct foot.
Remove obstruction.
Adjust the thread tension.
Use proper stabilizer for fabric being
embroidered.
Raise the needle.
Re-insert needle.
Insert new needle.
Raise the feed dogs.
Regulate stitch length.
Clean the feed dog area.
Do not pull fabric.
Select correct foot and pattern.
Re-insert needle.
Choose correct size needle and thread.
Remove the needle plate and bobbin holder
and clean the hook race.
Insert plug fully into outlet.
Turn on the switch.
Lower the foot.
CAUSE
Machine not properly threaded.
Thread entwined around bobbin.
Needle inserted incorrectly.
Thread tension too tight.
Thread of incorrect size or poor quality.
Bobbin threaded incorrectly.
Bobbin wound unevenly or too full.
Dirt or lint in the bobbin holder.
Needle inserted incorrectly.
Bent or blunt needle.
Incorrect size of needle.
(on stretch fabric)
Machine not properly threaded.
Bobbin threaded incorrectly.
Blunt needle.
Thread tension too tight.
Design too dense for fabric being
embroidered.
Insufcient stabilizer.
Bobbin threaded incorrectly.
Machine not properly threaded.
Tension not adjusted properly.
Presser foot is not suited for the pattern.
Hoop or carriage is interferred.
Thread tension is not balanced.
Insufcient stabilizer.
Needle is not raised to highest position.
Needle inserted incorrectly.
Bent needle.
Feed dogs are lowered.
Stitch length not suitatble for fabric.
Lint and dust accumulated around feed dog.
Fabric pulled while sewing.
Needle is hitting the presser foot.
Needle inserted incorrectly.
Incorrect size needle or thread for fabric
being sewn.
Dirt or lint accumulated in the hook race and
feed dog.
Cord not plugged into electrical outlet.
Power switch is not turned on.
Presser foot is not lowered.
Page
19
18
9
14,43
9,45
18
17
56
9
9
9,45
19
18
9
14,43
48
45
18
19
14,43
8
52
14,43
45
20
9
9
12
14
56
21
24-
9
9,45
56
10
10
11
58
technIcal SpecIfIcatIon
Rated voltage 100–240V ~ 50–60Hz
Nominal consumption 55W
Light LED
Sewing speed 800 rpm maximum
Machine dimensions:
Length (mm) 241
Width (mm) 512
Height (mm) 310
Net weight (kg) 8.4
Embroidery unit dimensions:
Length (mm) 470
Width (mm) 506
Height (mm) 127
Net weight (kg) 3.2
• The technical specications and this Instruction manual can be changed without prior notice.
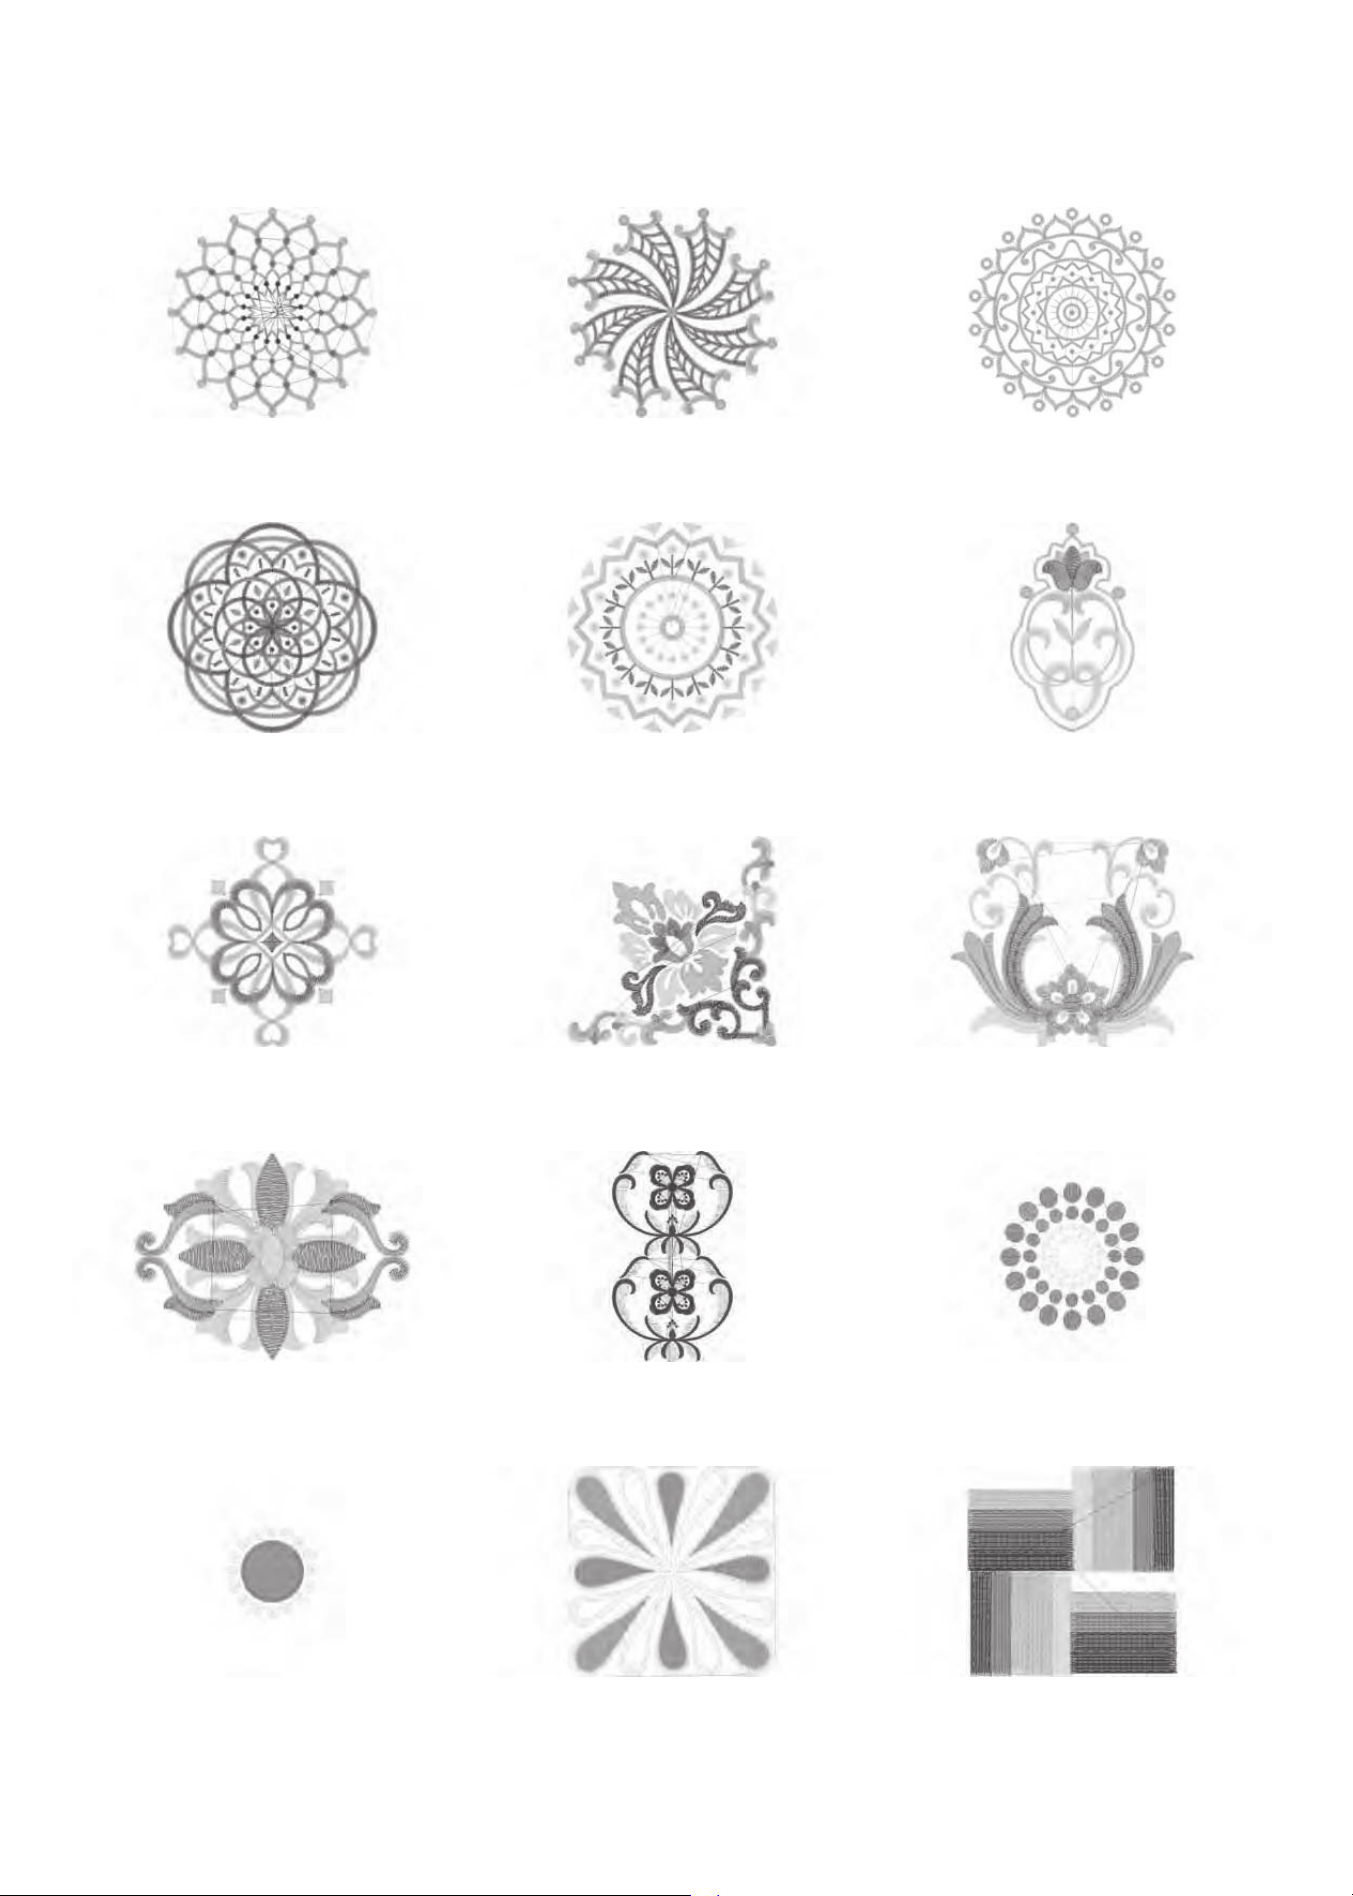
'HVLJQ
stitches:10669
Dim.:13X13 cm
'HVLJQ
stitches:13842
Dim.:12X12 cm
'HVLJQ
stitches:13895
Dim.:11X11 cm
'HVLJQ
stitches:11578
Dim.:10X10 cm
'HVLJQ
stitches:6550
Dim.:8X8 cm
'HVLJQ
stitches:4451
Dim.:5X8 cm
'HVLJQ
stitches:4655
Dim.:8X8 cm
'HVLJQ
stitches:10678
Dim.:10X10 cm
'HVLJQ
stitches:9788
Dim.:9X8 cm
'HVLJQ
stitches:9000
Dim.:9X7 cm
'HVLJQ
stitches:1
Dim.:15X25 cm
'HVLJQ
stitches:15915
Dim.:11X12 cm
'HVLJQ
stitches:11845
Dim.:11X11 cm
'HVLJQ
stitches:25974
Dim.:11X12 cm
'HVLJQ
stitches:8858
Dim.:8X8 cm
11
'HVLJQ
stitches:16164
Dim.:14X16 cm
'HVLJQ
stitches:2386
Dim.:4X4 cm
'HVLJQ
stitches:3728
Dim.:6X5 cm
'HVLJQ
stitches:11588
Dim.:8X10 cm
'HVLJQ
stitches:8812
Dim.:10X10 cm
'HVLJQ
stitches:2983
Dim.:6X6 cm
'HVLJQ
stitches:10385
Dim.:10X10 cm
'HVLJQ
stitches:6909
Dim.:10X10 cm
'HVLJQ
stitches:13079
Dim.:11X22 cm
'HVLJQ
stitches:19565
Dim.:12X20 cm
'HVLJQ
stitches:10626
Dim.:11X23 cm
'HVLJQ
stitches:18904
Dim.:9X23 cm
'HVLJQ
stitches:15284
Dim.:13X23 cm
'HVLJQ
stitches:8073
Dim.:9X9 cm
'HVLJQ
stitches:16670
Dim.:14X23 cm
2
2
'HVLJQ
stitches:4536
Dim.:10X10 cm
'HVLJQ
stitches:6953
Dim.:14X13 cm
'HVLJQ
stitches:11
Dim.:14X18 cm
'HVLJQ
stitches:8683
Dim.:14X18 cm
'HVLJQ
stitches:12848
Dim.:9X21 cm
'HVLJQ
stitches:39750
Dim.:15X22 cm
'HVLJQ
stitches:8963
Dim.:14X22 cm
'HVLJQ
stitches:5718
Dim.:10X8 cm
'HVLJQ
stitches:10431
Dim.:8X17 cm
'HVLJQ
stitches:11607
Dim.:10X17 cm
'HVLJQ
stitches:6009
Dim.:8X16 cm
'HVLJQ
stitches:8161
Dim.:8X16 cm
'HVLJQ
stitches:2946
Dim.:14X19 cm
'HVLJQ
stitches:7202
Dim.:15X20 cm
'HVLJQ
stitches:2807
Dim.:5X4 cm
3
'HVLJQ
stitches:11642
Dim.:15X20 cm
'HVLJQ
stitches:4816
Dim.:8X14 cm
'HVLJQ
stitches:1668
Dim.:8X8 cm
'HVLJQ
stitches:1634
Dim.:9X9 cm
'HVLJQ
stitches:1943
Dim.:10X9 cm
'HVLJQ
stitches:851
Dim.:15X14 cm
'HVLJQ
stitches:835
Dim.:15X15 cm
'HVLJQ
stitches:1474
Dim.:15X15 cm
'HVLJQ
stitches:1373
Dim.:13X15 cm
'HVLJQ
stitches:813
Dim.:14X15 cm
'HVLJQ
stitches:11422
Dim.:13X15 cm
'HVLJQ
stitches:11
Dim.:15X14 cm
'HVLJQ
stitches:6665
Dim.:15X15 cm
'HVLJQ
stitches:5089
Dim.:14X14 cm
'HVLJQ
stitches:5456
Dim.:14X14 cm
4
'HVLJQ
stitches:1665
Dim.:10X10 cm
'HVLJQ
stitches:2015
Dim.:9X9 cm
'HVLJQ
stitches:2766
Dim.:X9 cm
'HVLJQ
stitches:3300
Dim.:14X14 cm
'HVLJQ
stitches:2246
Dim.:10X9 cm
'HVLJQ
stitches:7029
Dim.:14X14 cm
'HVLJQ
stitches:1873
Dim.:X9 cm
'HVLJQ
stitches:
Dim.:1X1 cm
'HVLJQ
stitches:
Dim.:1X1 cm
'HVLJQ070
stitches:1786
Dim.:8X8 cm
'HVLJQ071
stitches:3027
Dim.:9X6 cm
'HVLJQ072
stitches:7378
Dim.:9X10 cm
'HVLJQ073
stitches:1677
Dim.:9X8 cm
'HVLJQ074
stitches:4718
Dim.:10X8 cm
'HVLJQ075
stitches:3189
Dim.:9X8 cm
5
'HVLJQ076
stitches:4979
Dim.:9X8 cm
'HVLJQ077
stitches:3955
Dim.:9X6 cm
'HVLJQ078
stitches:8102
Dim.:9X9 cm
'HVLJQ079
stitches:2198
Dim.:8X5 cm
'HVLJQ080
stitches:5424
Dim.:9X9 cm
'HVLJQ081
stitches:3619
Dim.:8X8 cm
'HVLJQ082
stitches:5284
Dim.:8X8 cm
'HVLJQ083
stitches:5569
Dim.:8X9 cm
'HVLJQ084
stitches:32729
Dim.:15X17 cm
'HVLJQ085
stitches:5939
Dim.:8X8 cm
'HVLJQ086
stitches:3714
Dim.:5X6 cm
'HVLJQ087
stitches:1658
Dim.:4X5 cm
'HVLJQ088
stitches:3593
Dim.:5X6 cm
'HVLJQ089
stitches:3
Dim.:7X15 cm
'HVLJQ090
stitches:2344
Dim.:3X16 cm
6
'HVLJQ091
stitches:18487
Dim.:14X14 cm
'HVLJQ092
stitches:14250
Dim.:14X13 cm
'HVLJQ093
stitches:19492
Dim.:11X15 cm
'HVLJQ094
stitches:9809
Dim.:8X17 cm
'HVLJQ095
stitches:9696
Dim.:9X17 cm
'HVLJQ096
stitches:7729
Dim.:8X8 cm
'HVLJQ097
stitches:7138
Dim.:7X6 cm
'HVLJQ098
stitches:13032
Dim.:7X7 cm
'HVLJQ099
stitches:15956
Dim.:9X9 cm
'HVLJQ100
stitches:3213
Dim.:2X14 cm
'HVLJQ101
stitches:3878
Dim.:6X16 cm
'HVLJQ102
stitches:3873
Dim.:8X8 cm
'HVLJQ103
stitches:1690
Dim.:6X5 cm
'HVLJQ104
stitches:1063
Dim.:2X4 cm
'HVLJQ105
stitches:957
Dim.:3X cm
7
'HVLJQ106
stitches:11877
Dim.:9X9 cm
'HVLJQ107
stitches:3046
Dim.:X3 cm
'HVLJQ108
stitches:1527
Dim.:3X3 cm
'HVLJQ109
stitches:1118
Dim.:2X2 cm
'HVLJQ110
stitches:1887
Dim.:2X8 cm
'HVLJQ111
stitches:3562
Dim.:3X9 cm
'HVLJQ112
stitches:1914
Dim.:5X7 cm
'HVLJQ113
stitches:3962
Dim.:5X4 cm
'HVLJQ114
stitches:2898
Dim.:5X5 cm
'HVLJQ115
stitches:1486
Dim.:4X6 cm
'HVLJQ116
stitches:305
Dim.:X2 cm
'HVLJQ117
stitches:6631
Dim.:6X14 cm
'HVLJQ118
stitches:4635
Dim.:5X11 cm
'HVLJQ119
stitches:2829
Dim.:9X5 cm
'HVLJQ120
stitches:6835
Dim.:9X18 cm
8
'HVLJQ121
stitches:9219
Dim.:13X14 cm
'HVLJQ122
stitches:35046
Dim.:13X21 cm
'HVLJQ123
stitches:17232
Dim.:12X20 cm
'HVLJQ124
stitches:10269
Dim.:9X13 cm
'HVLJQ125
stitches:19996
Dim.:7X17 cm
'HVLJQ126
stitches:12328
Dim.:6X17 cm
'HVLJQ127
stitches:14858
Dim.:9X9 cm
'HVLJQ128
stitches:3466
Dim.:6X5 cm
'HVLJQ129
stitches:18735
Dim.:10X10 cm
'HVLJQ130
stitches:6617
Dim.:9X8 cm
'HVLJQ131
stitches:9157
Dim.:8X9 cm
'HVLJQ132
stitches:6152
Dim.:9X5 cm
'HVLJQ133
stitches:3714
Dim.:10X5 cm
'HVLJQ134
stitches:7003
Dim.:10X7 cm
'HVLJQ135
stitches:6213
Dim.:9X6 cm
9
'HVLJQ136
stitches:7303
Dim.:8X8 cm
'HVLJQ137
stitches:6840
Dim.:10X9 cm
'HVLJQ138
stitches:11844
Dim.:9X10 cm
'HVLJQ139
stitches:3816
Dim.:7X6 cm
'HVLJQ140
stitches:9005
Dim.:9X7 cm
'HVLJQ141
stitches:11307
Dim.:7X8 cm
'HVLJQ142
stitches:7073
Dim.:9X8 cm
'HVLJQ143
stitches:43316
Dim.:14X22 cm
'HVLJQ144
stitches:8809
Dim.:9X9 cm
'HVLJQ145
stitches:6780
Dim.:7X9 cm
'HVLJQ146
stitches:8785
Dim.:9X9 cm
'HVLJQ147
stitches:7457
Dim.:6X9 cm
'HVLJQ148
stitches:8247
Dim.:6X9 cm
'HVLJQ149
stitches:1070
Dim.:4X6 cm
'HVLJQ150
stitches:3592
Dim.:6X8 cm
10
'HVLJQ151
stitches:9935
Dim.:7X9 cm
'HVLJQ152
stitches:7238
Dim.:9X7 cm
'HVLJQ153
stitches:18593
Dim.:8X17 cm
'HVLJQ154
stitches:8273
Dim.:6X8 cm
'HVLJQ155
stitches:11944
Dim.:8X8 cm
'HVLJQ156
stitches:8766
Dim.:6X8 cm
'HVLJQ157
stitches:8749
Dim.:9X9 cm
'HVLJQ158
stitches:5945
Dim.:6X6 cm
'HVLJQ159
stitches:12104
Dim.:9X10 cm
'HVLJQ160
stitches:11477
Dim.:7X10 cm
'HVLJQ161
stitches:19648
Dim.:13X22 cm
'HVLJQ162
stitches:1746
Dim.:7X9 cm
'HVLJQ163
stitches:8334
Dim.:12X17 cm
'HVLJQ164
stitches:2843
Dim.:3X7 cm
'HVLJQ165
stitches:4746
Dim.:10X6 cm
11
'HVLJQ166
stitches:2651
Dim.:9X2 cm
'HVLJQ167
stitches:3494
Dim.:9X4 cm
'HVLJQ168
stitches:3535
Dim.:9X3 cm
'HVLJQ169
stitches:9566
Dim.:5X5 cm
'HVLJQ170
stitches:2315
Dim.:4X5 cm
'HVLJQ171
stitches:2353
Dim.:5X5 cm
'HVLJQ172
stitches:36511
Dim.:14X17 cm
'HVLJQ173
stitches:7361
Dim.:6X8 cm
'HVLJQ174
stitches:10438
Dim.:6X16 cm
'HVLJQ175
stitches:6334
Dim.:10X16 cm
'HVLJQ176
stitches:23243
Dim.:10X16 cm
'HVLJQ177
stitches:16003
Dim.:7X9 cm
'HVLJQ178
stitches:8430
Dim.:7X6 cm
'HVLJQ179
stitches:11520
Dim.:5X10 cm
'HVLJQ180
stitches:6091
Dim.:8X6 cm
2
12

'HVLJQ181
stitches:6252
Dim.:9X6 cm
'HVLJQ182
stitches:9969
Dim.:7X8 cm
'HVLJQ183
stitches:9055
Dim.:7X7 cm
'HVLJQ184
stitches:7322
Dim.:8X8 cm
'HVLJQ185
stitches:6510
Dim.:9X7 cm
'HVLJQ186
stitches:8558
Dim.:9X7 cm
'HVLJQ187
stitches:8075
Dim.:12X9 cm
'HVLJQ188
stitches:6047
Dim.:6X6 cm
'HVLJQ189
stitches:6770
Dim.:8X4 cm
'HVLJQ190
stitches:6203
Dim.:6X4 cm
'HVLJQ191
stitches:3302
Dim.:5X4 cm
'HVLJQ192
stitches:4201
Dim.:6X4 cm
'HVLJQ193
stitches:21965
Dim.:7X14 cm
'HVLJQ194
stitches:3289
Dim.:9X7 cm
'HVLJQ195
stitches:1631
Dim.:4X2 cm
13
'HVLJQ196
stitches:2375
Dim.:3X3 cm
'HVLJQ197
stitches:1063
Dim.:2X2 cm
'HVLJQ198
stitches:9094
Dim.:6X14 cm
'HVLJQ199
stitches:8184
Dim.:4X13 cm
'HVLJQ200
stitches:9123
Dim.:10X7 cm
14
Font 1 : Block
30, 15 and 7 mm
Font 2 : Script
25, 15 and 7 mm
Characters included :
$%&d'()*ö+,-./0123456ù78h9:;<=cbg63$&(
DEFoGHIJ÷KLMNOPQRSTUVúWXYZ[\]nl|VSDFH
¡jisqprøÕty~fx"¶#VSDFH
74
CE – Authorised Representative
VSM GROUP AB, SVP Worldwide
Drottninggatan 2, SE-56184,
Huskvarna, SWEDEN
Please note that on disposal, this product must be safely recycled in accordance with relevant
National legislation relating to electrical/electronic products. Do not dispose of electrical appliances
as unsorted municipal waste, use separate collection facilities. Contact your local government for
information regarding the collection systems available.
When replacing old appliances with new ones, the retailer may be legally obligated to take back
your old appliance for disposal free of charge.
If electrical appliances are disposed of in landlls or dumps, hazardous substances can leak into
the groundwater and get into the food chain, damaging your health and well-being.

75

HP35593-05 English C5
