
S0100 / S0105
INSTRUCTION MANUAL
This manual downloaded from http://www.manualowl.com

IMPORTANT SAFETY INSTRUCTIONS
When using an electrical appliance, basic safety precautions should always be followed,
including the following:
Read all instructions before using this household sewing machine. Keep the instructions at a
suitable place close to the machine. Make sure to hand them over if the machine is given to a
third party.
This appliance can be used by children aged from 8 years and above and persons with reduced
physical, sensory or mental capabilities or lack of experience and knowledge if they have been
given supervision or instruction concerning use of the appliance in a safe way and understand
the hazards involved. Children shall not play with the appliance. Cleaning and user maintenance
shall not be made by children without supervision.
DANGER -
TO REDUCE THE RISK OF ELECTRIC SHOCK:
A sewing machine should never be left unattended when plugged in. The electrical socket, to
which the machine is plugged in should be easily accessible. Always unplug this sewing
machine from the electric outlet immediately after using and before cleaning, removing covers,
lubricating or when making any other user servicing adjustments mentioned in the instruction
manual.
WARNING -
TO REDUCE THE RISK OF BURNS, FIRE, ELECTRIC SHOCK,
OR INJURY TO PERSON:
• Do not allow to be used as a toy. Close attention is necessary when this sewing machine is
used by or near children.
• Use this sewing machine only for its intended use as described in this manual. Use only
attachments recommended by the manufacturer as contained in this manual.
• Never operate this sewing machine if it has a damaged cord or plug, if it is not working
properly, if it has been dropped or damaged, or dropped into water. Return the sewing machine
to the nearest authorized dealer or service center for examination, repair, electrical or
mechanical adjustment.
• Never operate the sewing machine with any air openings blocked. Keep ventilation openings
of the sewing machine and foot control free from the accumulation of lint, dust, and loose
cloth.
• Keepngersawayfromallmovingparts.Specialcareisrequiredaroundthesewingmachine
needle.
• Always use the proper needle plate. The wrong plate can cause the needle to break.
• Do not use bent needles.
• Donotpullorpushfabricwhilestitch-ing.Itmaydeecttheneedlecausingittobreak.
• Wear safety glasses.
This manual downloaded from http://www.manualowl.com

3
• Switchthesewingmachineoff(“0”)whenmakinganyadjustmentintheneedlearea,suchas
threading needle, changing needle, threading bobbin, or changing presser foot, etc.
• Never drop or insert any object into any opening.
• Do not use outdoors.
• Donotoperatewhereaerosol(spray)productsarebeingusedorwhereoxygenisbeing
administrated.
• Todisconnect,turnallcontrolstotheoff(“0”)position,thenremoveplugfromoutlet.
• Do not unplug by pulling on cord. To unplug, grasp the plug, not the cord.
• The foot control is used to operate the machine. Never place other objects on the foot control.
• Do not use the machine if it is wet.
• If the LED lamp is damaged or broken, it must be replaced by the manufacturer or its service
agentorasimilarlyqualiedperson,inordertoavoidahazard.
• If the cord connected with the foot control is damaged, it must be replaced by the
manufactureroritsserviceagentorasimilarlyqualiedperson,inordertoavoidahazard.
For Overlock Machines only:
• Never operate without cutter cover or coverstitch table is securely installed.
SAVE THESE INSTRUCTIONS
This manual downloaded from http://www.manualowl.com

4
Table of contents
Parts of the machine........................................................5
Accessories .....................................................................6
Connecting the foot control and the power supply ..........6
Setting up the telescopic thread stand ............................7
Opening and closing the front cover ................................7
Removing and replacing the at bed extension...............7
Presser foot lift.................................................................8
Changing the needles......................................................8
Changing the presser foot ...............................................8
Disengage the movable upper cutter...............................9
Attaching the 2-thread overlock converter .......................9
Threading the machine ..................................................10
Threading the upper looper (purple) ..............................11
Threading the lower looper (yellow) ..............................12
Threading the right needle (green) ................................13
Threading the left needle (blue).....................................13
Changing thread ............................................................14
Start sewing ...................................................................14
Thread tension settings .................................................15
Differential feed adjustment ...........................................16
Presser foot pressure adjustment..................................17
Stitch width settings .......................................................17
Stitch length settings .....................................................17
Stitch nger lever setting ...............................................18
Rolled edge sewing .......................................................18
Flatlock sewing ..............................................................19
Corded overlock ............................................................20
Pin placement ................................................................20
Securing the thread chain..............................................20
Machine maintenance ...................................................21
Cleaning ........................................................................21
Oiling .............................................................................21
Replacing the stationary cutter ......................................22
Storage ..........................................................................22
Servicing ........................................................................22
Trouble shooting ............................................................23
Stitch table .....................................................................24
Fabric / Needle / Thread table .......................................28
Specications ................................................................28
This manual downloaded from http://www.manualowl.com

5
1
2 3 4 5
6
8
9
10
11
12
13
14
15
16
17
18
19
7
24
21
20
26
25
23
22
27
Parts of the machine
1. Presser foot pressure adjustment
2. Leftneedlethreadtensiondial(blue)
3. Rightneedlethreadtensiondial(green)
4. Upperlooperthreadtensiondial(purple)
5. Lowerlooperthreadtensiondial(yellow)
6. Handle
7. Thread cutter
8. Presser foot lifter
9. Stitchplate
10.Flatbedextension
11. Front cover
12. Differential feed adjusting lever
13. Power & light switch
14. Hand wheel
15.Stitchlengthdial
16.Spoolstand
17. Cone holder
18.Spoolpin
19. Telescopic thread stand
20.Presserfoot
21. Movable upper cutter
22.Stationarylowercutter
23. Lower looper
24. Upper looper
25.Stitchngerlever
26.Seamwidth/cuttingwidthadjustmentknob
27.LED-light,(availableoncertainmodels)
This manual downloaded from http://www.manualowl.com
6
1
2
3
4
Accessories
1. 2-thread converter
2. Needlepackincludingthreeneedles,size#14/90andtwo
needles,size#12/80.Twoneedles,size#14/90,areinthe
machine on delivery.
3. Screwdriver
4. Tweezers
Connecting the foot control and the
power supply
Foot control to use with this machine:
- Type GTC/HKT 72C for 220-240V manufactured by
DANYANG GUOTI MOTOR & APPLIANCE CO., LTD /
ZHEJIANG HUAXING ELECTRIC MOTOR CO., LTD.
- Type GTE/HKT 7 for 100-120V manufactured by DANYANG
GUOTI MOTOR & APPLIANCE CO., LTD /ZHEJIANG
HUAXING ELECTRIC MOTOR CO., LTD.
Before plugging your machine in, make sure the voltage
is the same as indicated on the plate under the machine.
Specicationsvaryfromcountrytocountry.
1. Connectthefootcontrol/electricpowercordtothesocket
on the machine.
2. Plug the power cord plug into the electric outlet.
3. Pushthepowerswitchto“-”toturnonthemachine.
4. Press the foot control to start sewing. Use the foot control
to adjust the sewing speed. The harder you press, the faster
the machine will sew. To stop the machine from sewing,
remove your foot from the control.
5. Pushthepowerswitchto“O”toturnoffthemachine.
Note: When the front cover is open the safety switch is
activated and prevents the machine from sewing, even if the
foot control is pressed.
Note: Your overlock machine is adjusted to provide the best
stitch result at normal room temperature. Extreme hot and cold
temperatures can affect the sewn result.
POLARIZED PLUG INFORMATION
(FOR U.S.A. & CANADA ONLY)
Thisappliancehasapolarizedplug(onebladewiderthan
theother).Toreducetheriskofelectricshock,thisplugis
intendedtotinapolarizedoutletonlyway.Iftheplug
doesnottfullyintheoutlet,reversetheplug.Ifitstill
doesnott,contactaqualiedelectriciantoinstallthe
proper outlet. Do not modify the plug in any way.
1
2
3
4
This manual downloaded from http://www.manualowl.com

7
Setting up the telescopic thread stand
Extend the telescopic thread stand to its full height, then turn
until it clicks into place.
Place the thread spools or cones over the cone holders on the
spool pin.
If the machine is already threaded, straighten the threads to
prevent tangling.
Opening and closing front cover
Open the front cover
First push the cover to the right as far as it will go and then pull
it downward toward you.
Close the front cover
First pull the cover upward and then slide it to the left until it
locks.
Note: The front cover has a safety switch and the machine will
not sew if the front cover is open.
Removing and replacing the at bed
extension
Free arm sewing
Forafreearmmachine,slideofftheatbedextension.The
free arm makes it easier to sew small items and hard to reach
areas such as armholes and overcasting trouser cuffs.
To remove the at bed extension
Slidetheatbedextensiontotheleftandremoveitfromthe
machine.
To replace the at bed extension
Aligntheprojectionontheatbedextensionwiththegroove
on the back of the free arm and slide it to the right until it snaps
into place.
This manual downloaded from http://www.manualowl.com
8
A
A
Presser foot lift
Raisethepresserfootwiththepresserfootliftlever(A)atthe
back of the machine.
Changing the needles
Turn off the main power switch and unplug the machine.
1. Turn the hand wheel toward you until the needles are at the
highest position.
2. Loosen,butdonotremovetheleft(B)and/orright(A)
needle clamp screw with the small screwdriver while you
are holding the needles.
3. Removetheleftand/orrightneedle.
4. Holdthenewneedle/swiththeatsurfacetotheback.
2. Inserttheneedle/sintotheleftand/orrightneedleclampas
far as it will go.
3. Securelytightentheleft(B)and/orright(A)needleclamp
screw.
Changing the presser foot
Turn off the main power switch and unplug the machine.
1. Raise the presser foot.
2. Turn the hand wheel toward you until the needles are in the
highest position.
3. Push the white button on the back of the presser foot bar
(A),andthefootwillcomeoff.
4. Place the new foot with the pin right underneath the groove
of the ankle and lower the presser foot. Push the white
buttononthebackofthepresserfootbar(A)andthefoot
will snap into place.
This manual downloaded from http://www.manualowl.com
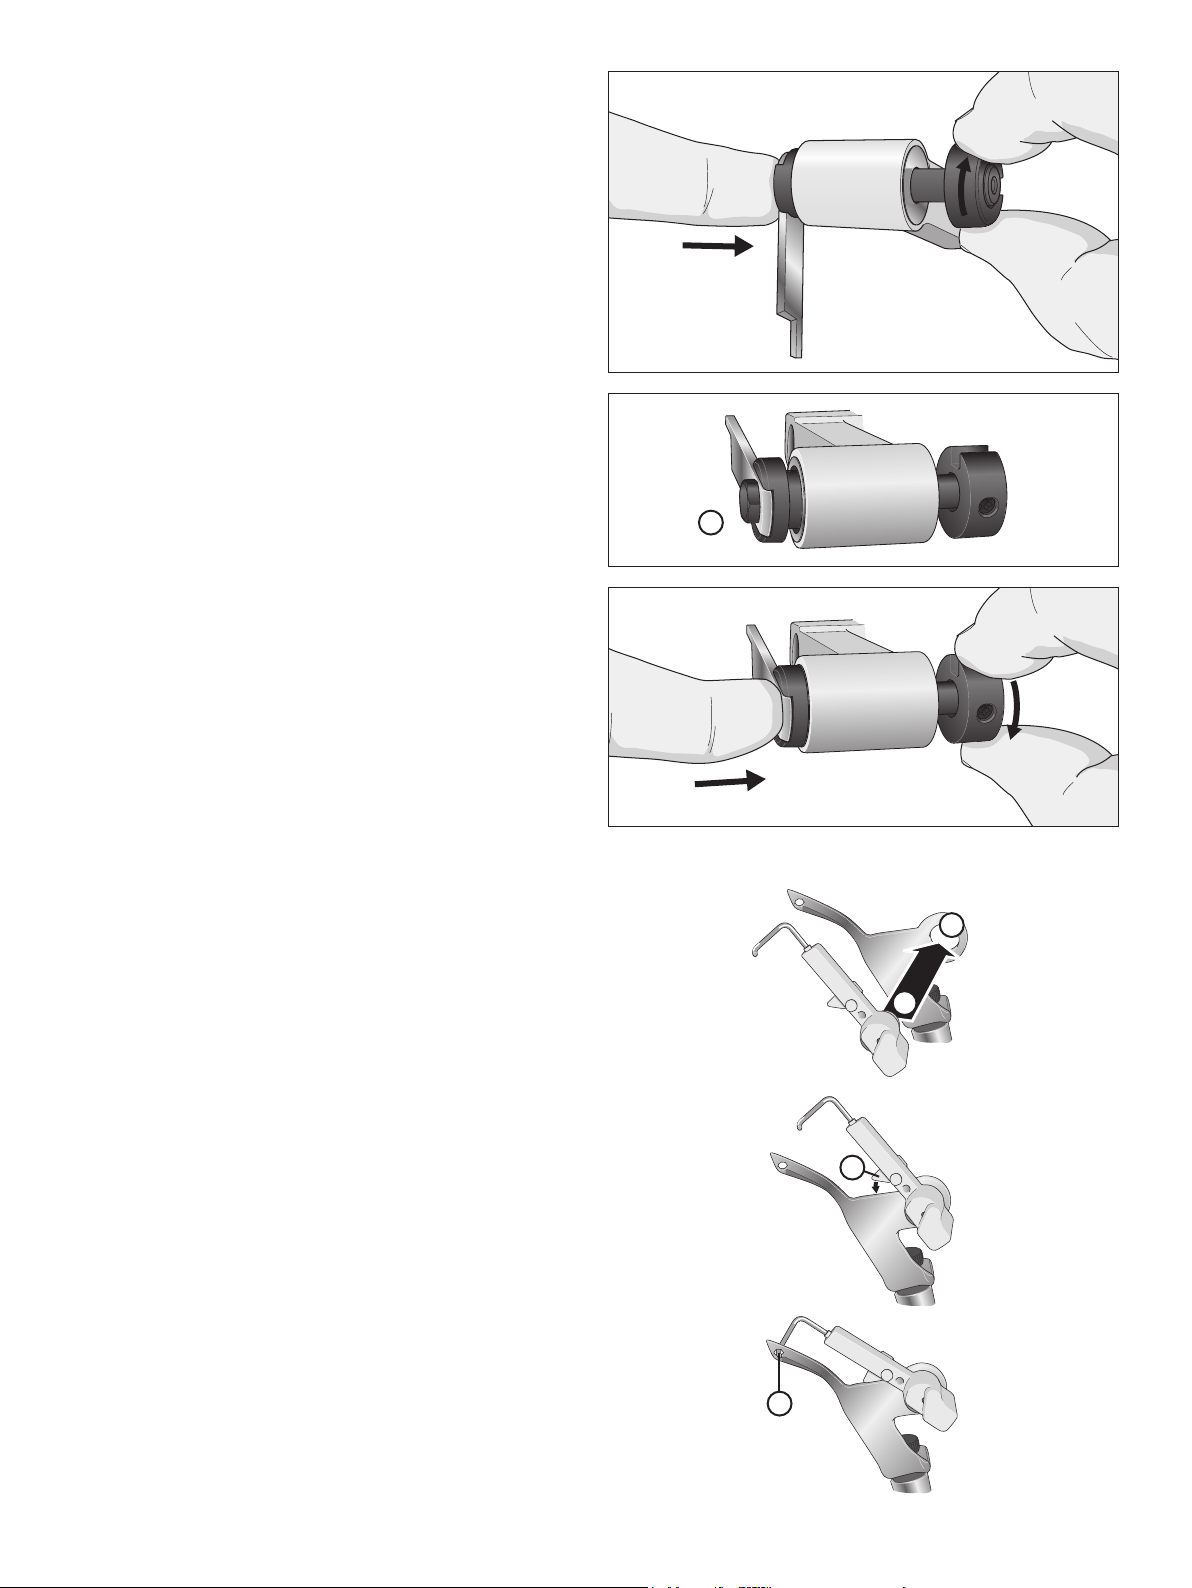
9
A
B
C
D
A
Disengage the movable upper cutter
Place the movable upper cutter in nonworking
position
1. Turn the hand wheel toward you until the upper cutter is
raised to the highest position.
2. Open the front cover.
3. Push the movable cutter holder to the right as far as it will
go.
4. Turn the knob away from you until the cutter clicks into the
nonworkinghorizontalposition(A).
Note: If the cutter stops in the up position;
- Turn the hand wheel toward you until the cutter clears the top
of the machine. Continue to rotate the cutter to the horizontal
position.
To place the movable upper cutter back in cutting
position
1. Open the front cover and push the movable cutter holder to
the right as far as it will go.
2. Turn the knob up and toward you until the cutter clicks into
the cutting position.
Note: Always have the cutter down in the cutting position
when sewing, because this machine must trim off any excess
fabric to form the stitch over the fabric edge.
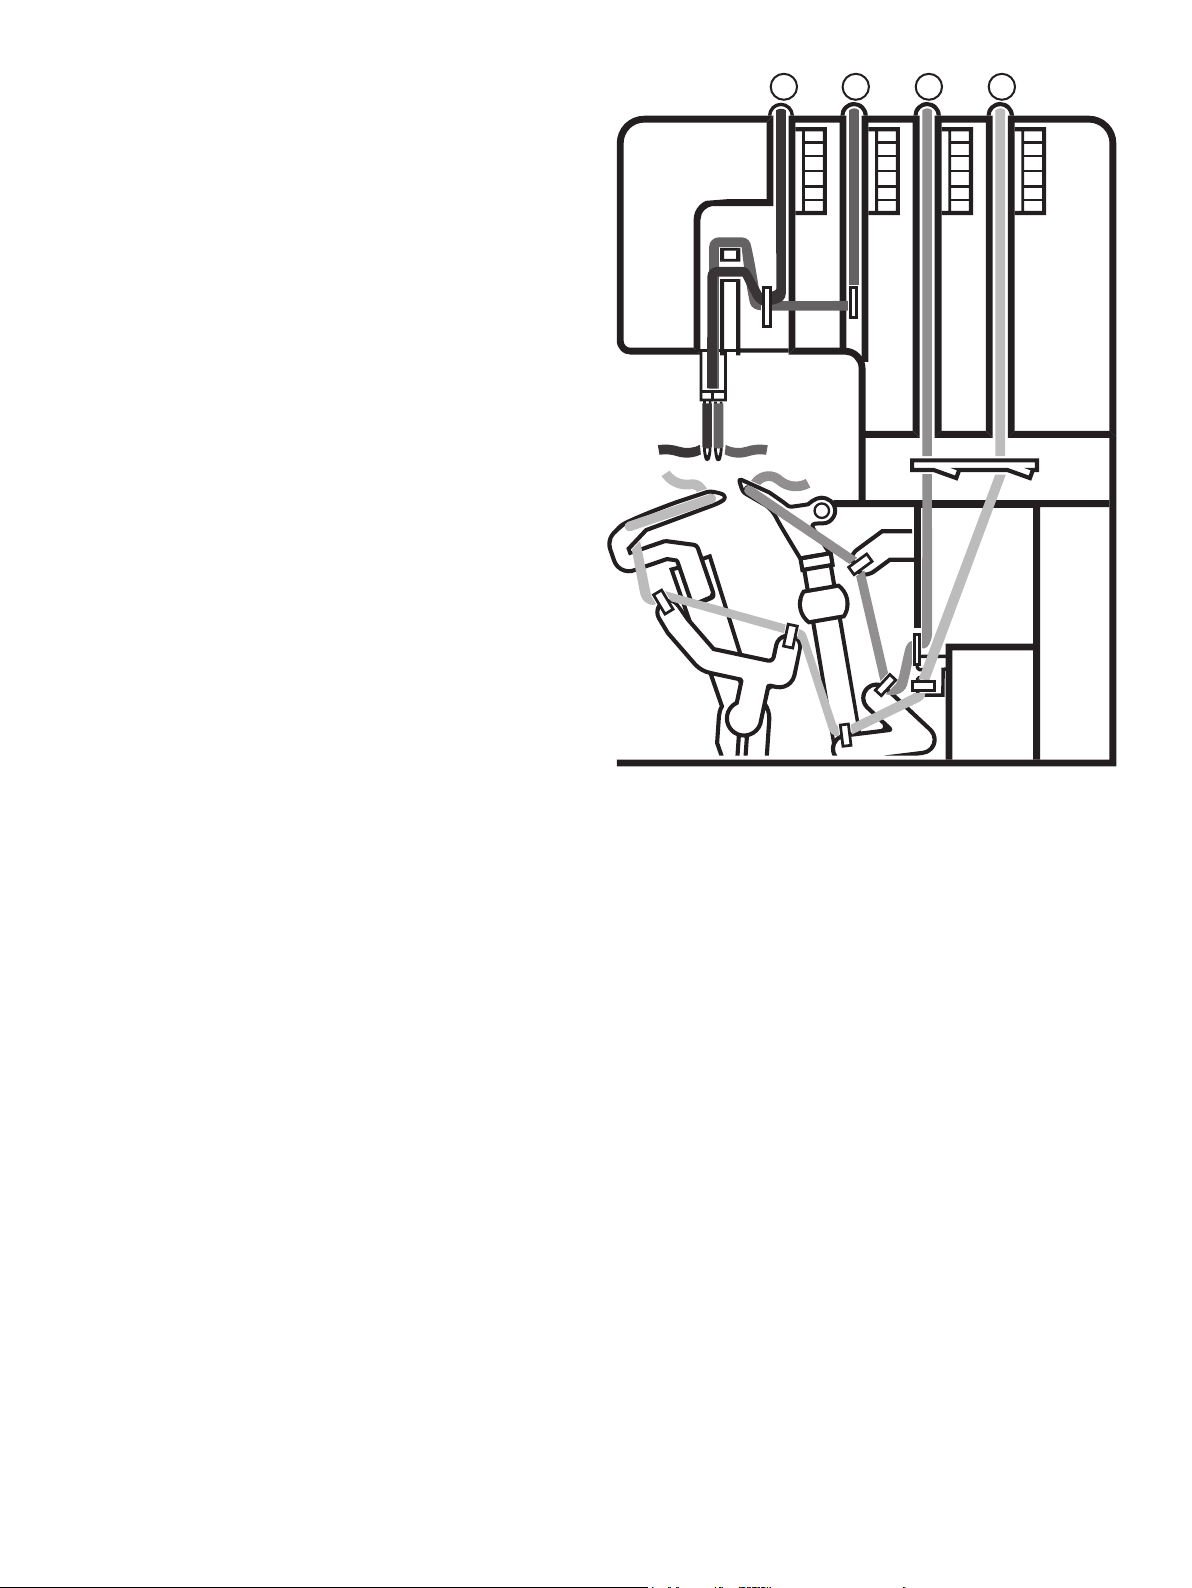
Attaching the 2-thread overlock
converter
2-thread overlock stitches are sewn using one needle thread
and the lower looper thread. Before sewing, the two-thread
converter must be attached to the upper looper, so the machine
will sew with only two threads.
1. Open the front cover.
2. Bring the upper looper to its lowest position by turning the
handwheel toward you.
3. Insertthepin(A)oftheconverterinthehole(B)ofthe
upper looper.
4. Putthepositioningrib(C)incontactwiththeupperedgeof
the looper.
5. Insertthepoint(D)intheholeoftheupperlooper.
Removing the 2-thread overlock converter
1. Removethepoint(D)fromtheholeoftheupperlooperand
remove the converter.
2. Put the the 2-thread converter back to the accessory storage.
This manual downloaded from http://www.manualowl.com
10
2
3
4
1
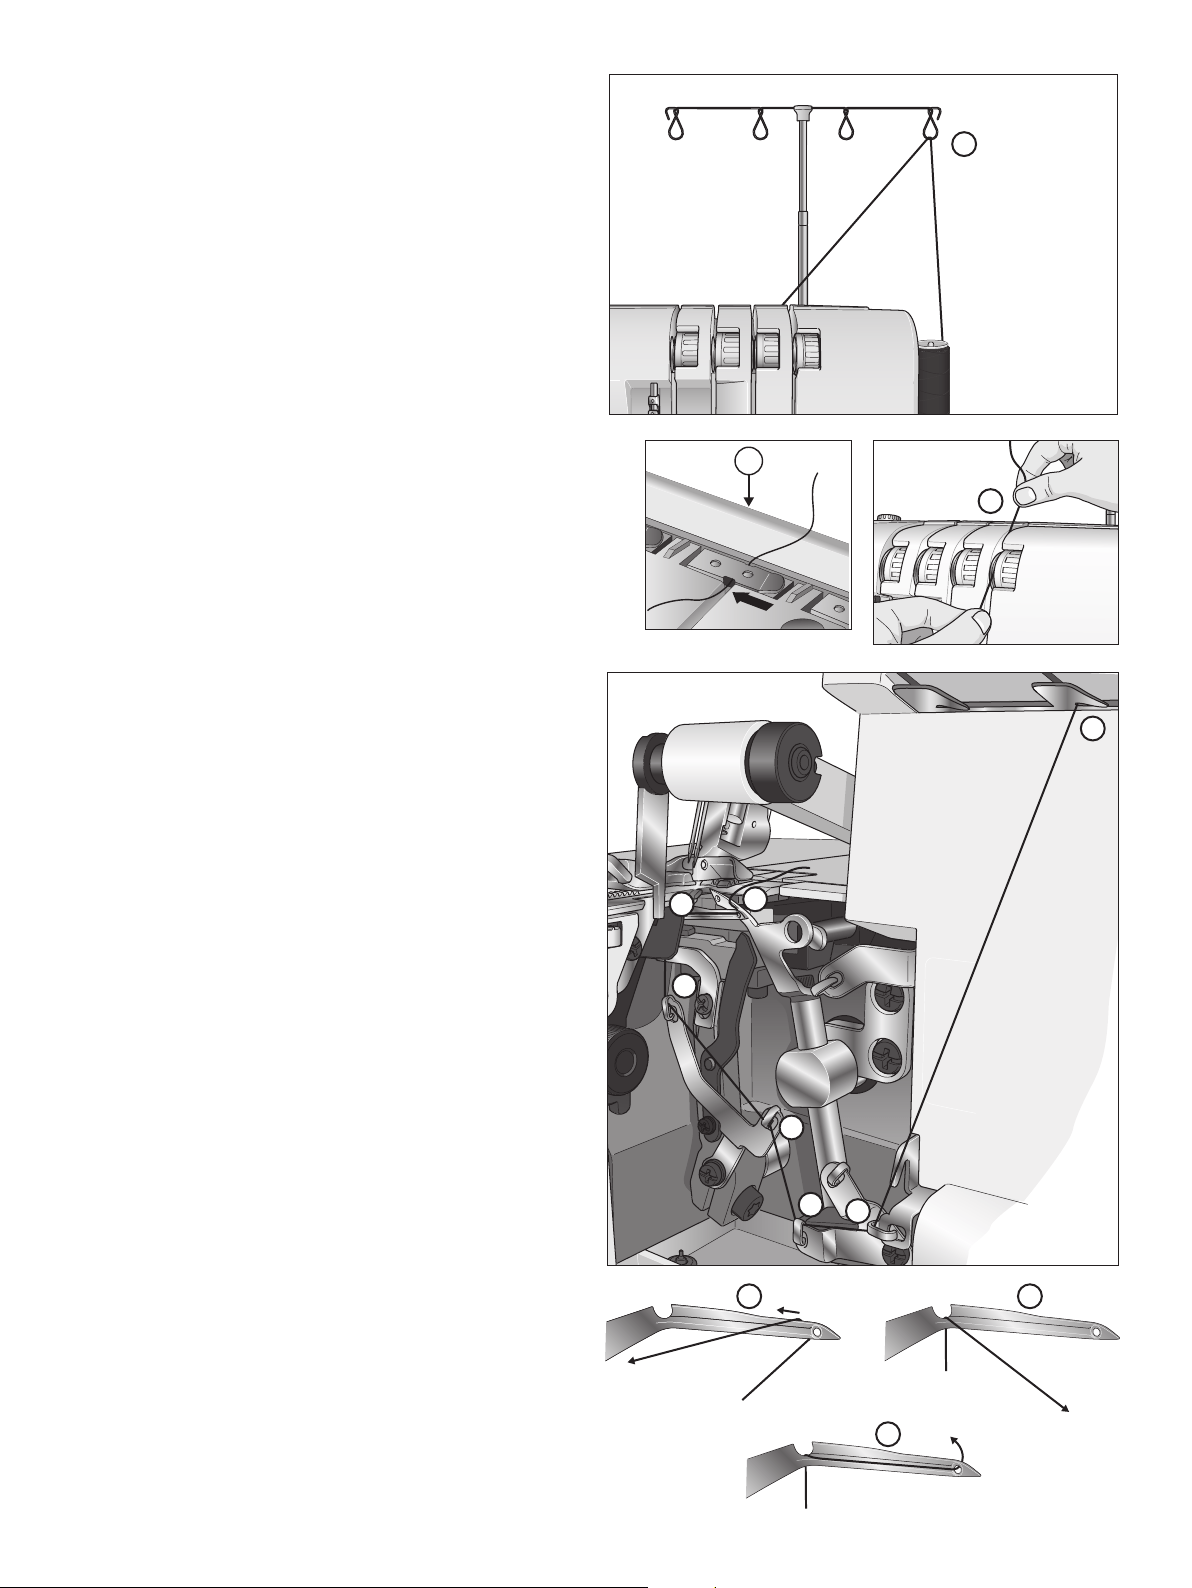
Threading the machine
A color coded diagram is located inside the front cover for
quickreference.
When threading the machine, thread only in the following
order:
1. Upper looper threading - Purple
2. Lower looper threading - Yellow
3. Right needle threading - Green
4. Left needle threading - Blue
Important:
If the lower looper should come unthreaded, do the following;
1. Unthreadtheneedle(s)
2. Thread the lower looper
3. Threadtheneedle(s)
This manual downloaded from http://www.manualowl.com

11
1
3
4
5
6
7
8
8
2
Threading the upper looper (purple)
1. Pass the thread from back to front through the thread guide
onthethreadstand(1).
2. Pull the thread from left to right under the thread guide at
thebackonthetopcover(2).Usethetweezerstomakethe
threading easier.
3. While holding the thread with both hands, pass it between
the tension discs and pull it down to make certain it is
properlyplacedbetweenthetensiondiscs(3).
4. Thread the looper area of the machine following the purple
colorcodedthreadguides(4-7).Usethetweezerstomake
the threading easier.
5. Use the tweezers to bring the thread behind the lower looper
and thread into the hole in the upper looper from front to
back(8).
6. Pullabout10cmofthreadthroughthelooperanditplace
to the back of the stitch plate.
This manual downloaded from http://www.manualowl.com
12
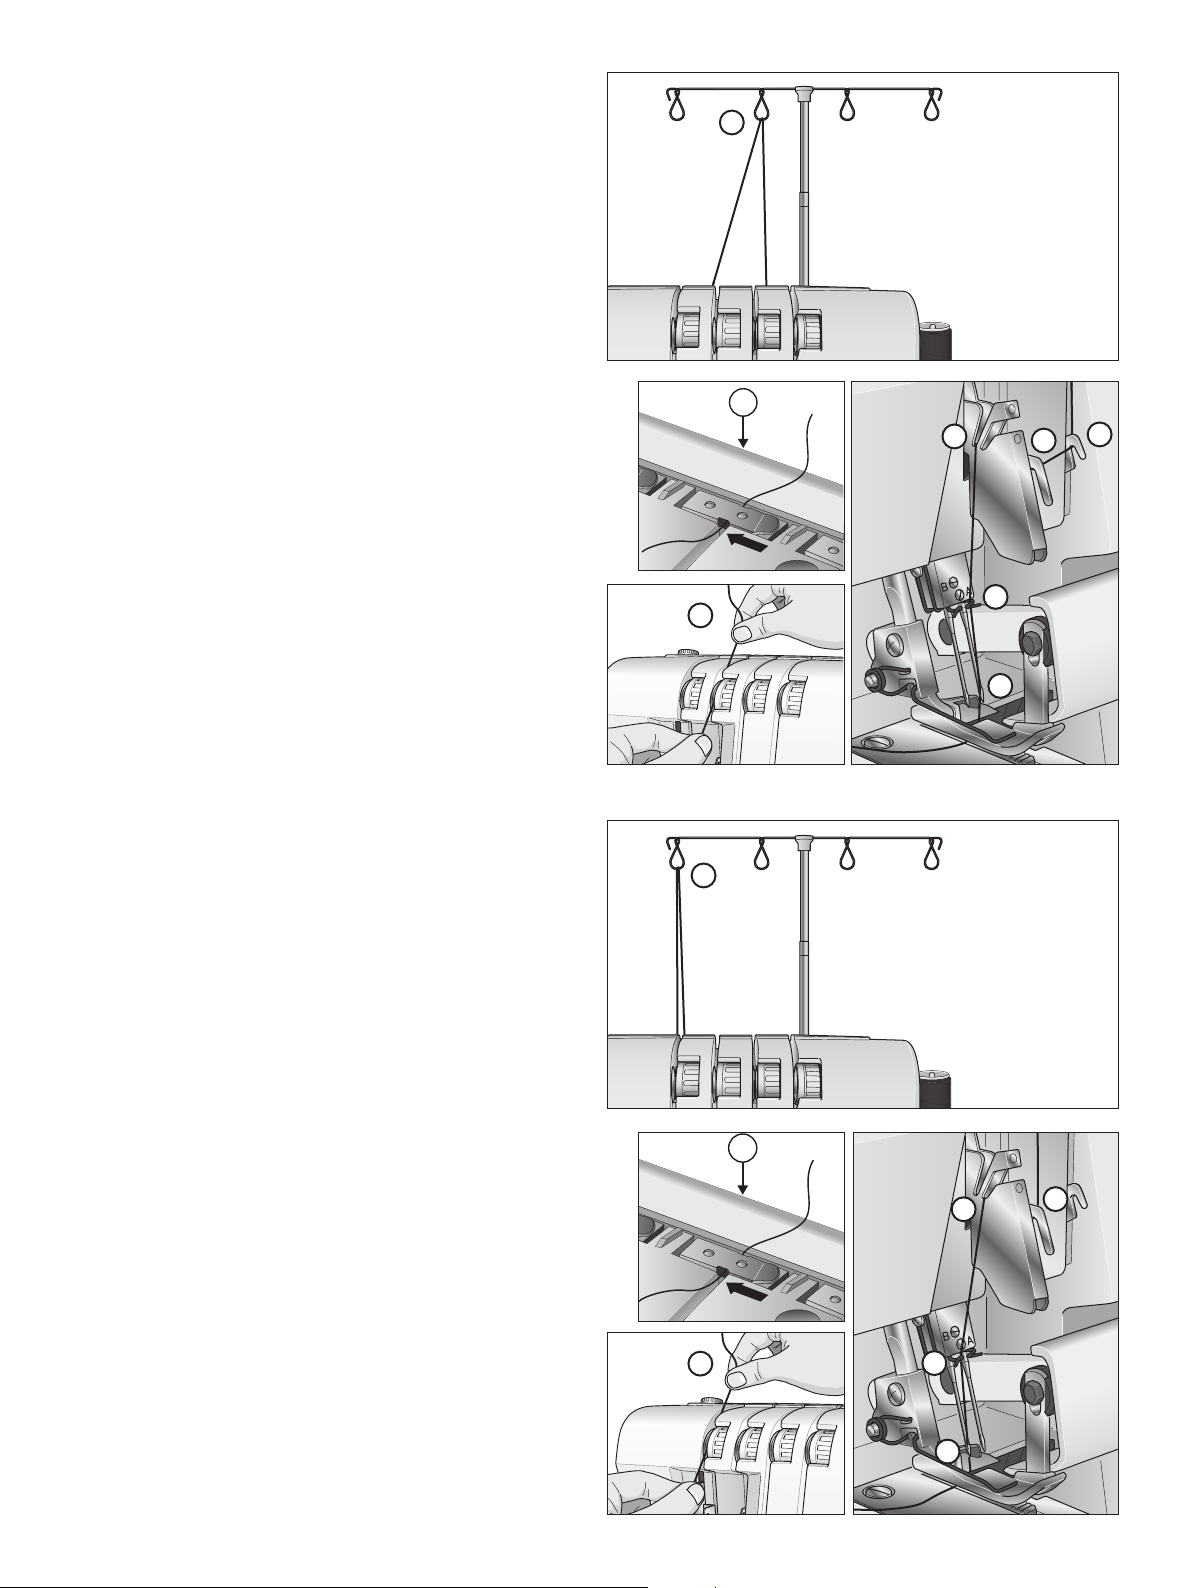
3
1
4
5
6
7
8
10
9
10
9A
9B
2
Threading the lower looper (yellow)
1. Pass the thread from back to front through the thread guide
onthethreadstand(1).
2. Pull the thread from left to right under the thread guide on
thebackofthetopcover(2).Usethetweezerstomakethe
threading easier.
3. While holding the thread with both hands, pass it between
the tension discs and pull it down to make certain it is
properlyplacedbetweenthetensiondiscs(3).
4. Turn the hand wheel toward you until the lower looper is at
the far right.
5. Thread the looper area of the machine following the yellow
colorcodedthreadguides(4-8).Usethetweezerstomake
the threading easier.
6. Pass the thread behind and over the tip of the lower looper
(9A).Thenpullitgentlytotheleftuntilitwillslipintothe
slotinthelowerlooper(9B).
7. Pick up the thread and pass it through the hole of the lower
looper(10).Thethreadshouldbepositionedinthegroove
of the lower looper.
8. Pullabout10cmofthreadthroughthelooperandplaceit
over the upper looper and to the back of the stitch plate.
This manual downloaded from http://www.manualowl.com
13
1
3
1
4
5
6
7
8
4
5
6
7
2
3
2
Threading the right needle (green)
1. Pass the thread from back to front through the thread guide
onthethreadstand(1).
2. Pull the thread from left to right under the thread guide on
thebackofthetopcover(2).Usethetweezerstomakethe
threading easier.
3. While holding the thread with both hands, pass it between
the tension discs and pull it down to make certain it is
properlyplacedbetweenthetensiondiscs(3).
4. Continuetothreadpoints(4-7).
Note: Be sure to pass the thread through the upper thread path
ofthethreadguide(6).
5. Threadtheeyeoftherightneedle(8).Usethetweezersto
make needle eye threading easier.
6. Pullabout10cmofthreadthroughneedleeyetohangfree.
7. Raise the presser foot and place the thread to the back,
under the presser foot.
Threading the left needle (blue)
1. Pass the thread from back to front through the thread guide
onthethreadstand(1).
2. Pull the thread from left to right under the thread guide on
thebackofthetopcover(2).Usethetweezerstomakethe
threading easier.
3. While holding the thread with both hands, pass it between
the tension discs and pull it down to make certain it is
properlyplacedbetweenthetensiondiscs(3).
4. Continuetothreadpoints(4-6).
Note: Be sure to pass the thread through the lower thread path
ofthethreadguide(5).
5. Threadtheeyeoftheleftneedle(7).Usethetweezersto
make needle eye threading easier.
6. Pullabout10cmofthreadthroughneedleeyetohangfree.
7. Raise the presser foot and place the thread to the back,
under the presser foot.
This manual downloaded from http://www.manualowl.com

14
Changing thread
The following is an easy way to change threads:
1. Cut the thread in use near the spool, behind the guides on
the telescopic thread stand.
2. Remove the thread spool and place the new thread on the
spool pin.
3. Tie the end of the new thread to the end of the old thread.
Cutthethreadtailsto2-3cminlengthandrmlypullboth
threads to test knot security.
4. Raise the presser foot.
5. First note tension dial settings and then turn the tension
dialsdownto“0”.
6. Pull the threads through the machine one at a time until the
knots are in front of the needle. If the threads do not pull
easily, check for tangles on thread guides or looping under
thread stand.
7. Cut the thread behind the knot and thread the needle.
8. Return tension dials to previous settings.
Note: When using standard thread spools, place the thread
unreeling disc as shown to prevent the thread from getting
caught on the edge of the spool.
Start sewing
1. When the machine is completely threaded, close the front
cover and bring all of the threads over the stitch plate and
slightly to the left under the presser foot.
2. Ensure that the upper blade moves against the lower blade
correctly by turning the handwheel slowly toward you. If
the blades are not moving correctly, check if there are any
fabric or waste thread stuck between the blades.
3. Hold the threads and apply a slight tension.
4. Turn the hand wheel toward you 2 or 3 complete turns
to start making a thread chain. Check if all threads wind
aroundthestitchngerofthestitchplate.Ifthethreads
donotwindaroundthenger,makesureeachthreadis
threaded correctly.
5. Continue holding the thread chain while pressing the foot
control.Sewuntilthechainis5-8cminlength.
6. Place fabric under the front of the presser foot and sew a
test sample. Guide the fabric slightly with your left hand
whilesewing.Donotpullonthefabricasthismaydeect
the needle, causing it to break.
7. When you reach the end of the fabric, continue sewing
whiledrawingthenishedfabricgentlybackwardsandto
the left. This is called chaining off. It prevents the threads
from coming undone and prepares for next sewing.
8. Cut off the thread chain 2-5 cm behind the presser foot
using the thread cutter on the left side of the machine. Pull
the threads around the thread cutter from the back, then
toward you.
Thread chain
Chaining off Thread cutter
This manual downloaded from http://www.manualowl.com
15
right side
wrong side
upper looper
lower looper
right needle
left needle
right side
wrong side
upper looper
lower looper
right needle
left needle
right side
wrong side
upper looper
lower looper
right needle
left needle
right side
wrong side
upper looper
lower looper
right needle
left needle
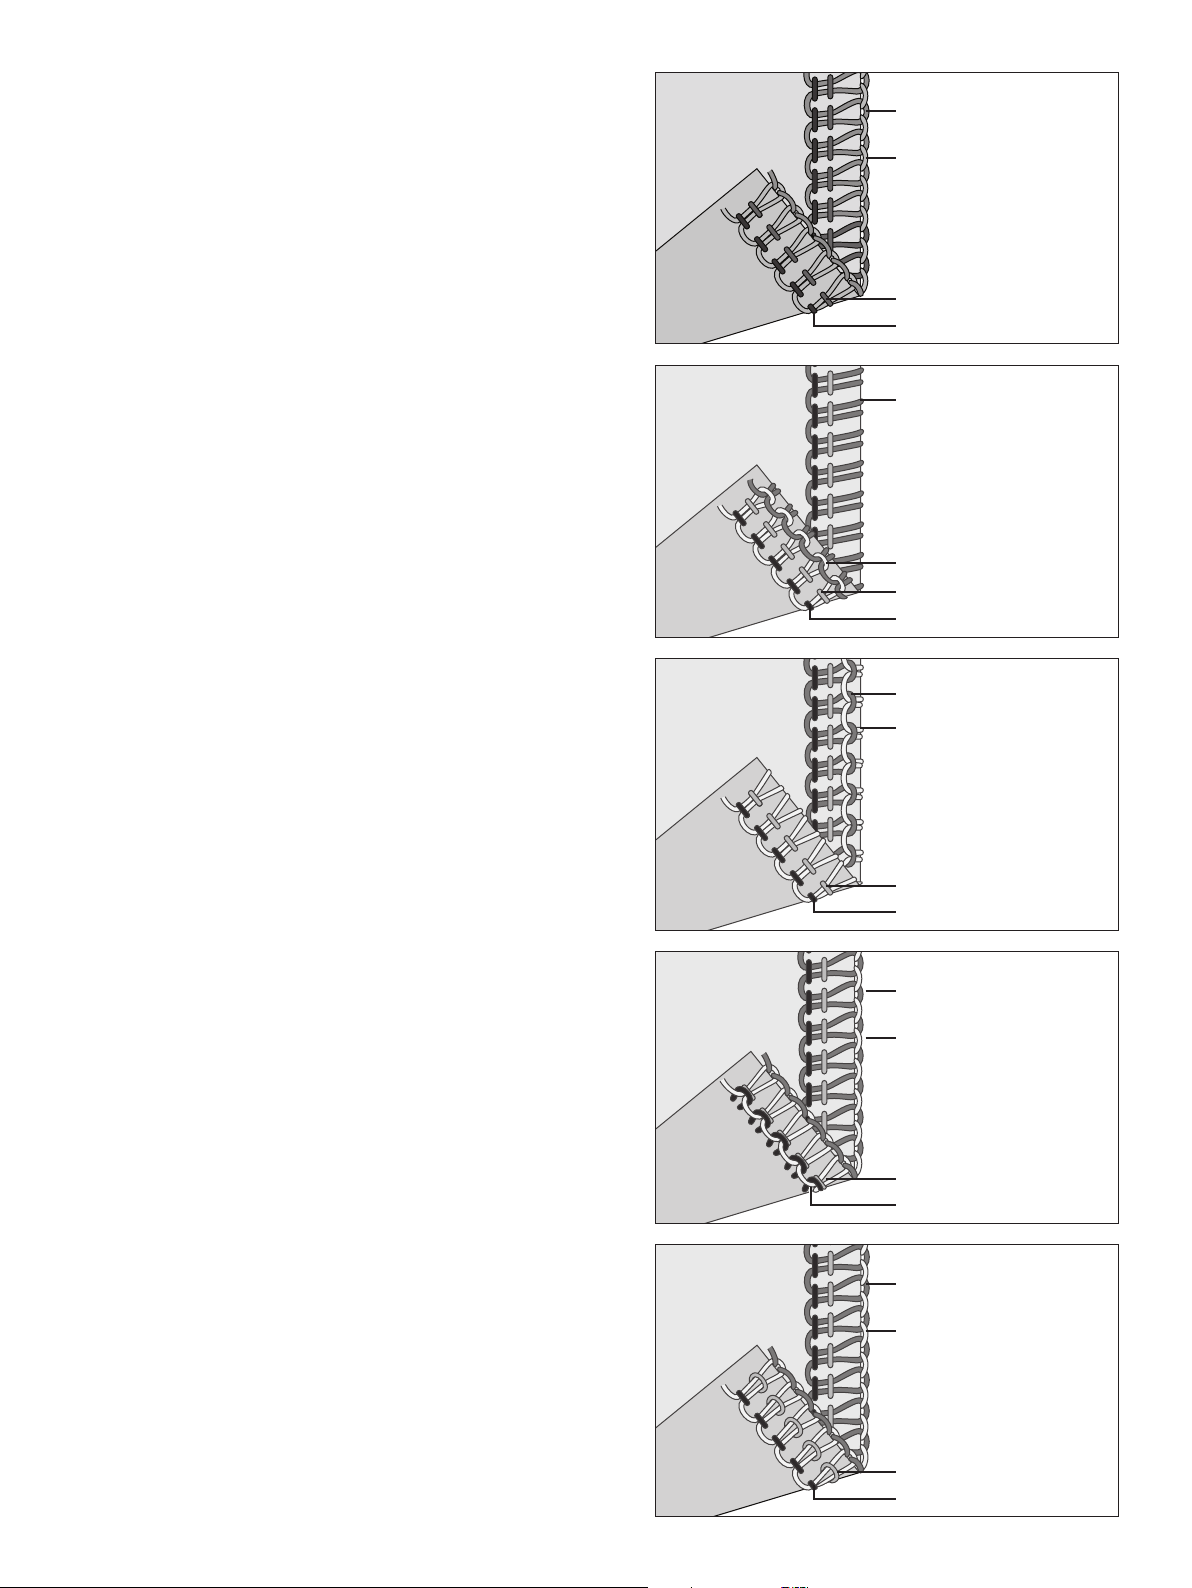
Thread tension settings
Setthethreadtensiontosuitthetypeoffabricandthreadused.
As the number on the thread tension discs increases, the thread
tension becomes tighter.
Lower looper thread and upper looper thread should be well
balancedwiththesametension(bothlooperthreadsshould
crossattheedgeofthefabrics).Needlethreadsshouldnotbe
toolooseortootight,butequallybalancedtension.
Seethestitchtableonpages23-26forthreadtension
recommendations for each stitch.
When the upper looper thread is too loose
The upper looper thread is unbalanced when it is pulled to the
wrong side of the fabric. Tighten the thread tension of the upper
looper(purple)orloosenthethreadtensionofthelowerlooper
(yellow).
When the lower looper thread is too loose
The lower looper thread is unbalanced when it is pulled to the
right side of the fabric. Tighten the thread tension of the lower
looper(yellow)orloosenthethreadtensionoftheupperlooper
(purple).
When the left needle thread is too loose
The left needle thread is too loose, tighten the thread tension of
theleftneedle(blue)orloosenbothlooperthreads(purpleand
yellow).
When the right needle thread is to loose
The right needle thread is too loose, tighten the thread tension
oftherightneedle(green).
Upper looper thread
Lower looper thread
Right needle thread
Left needle thread
Right side
Wrong side
Upper looper thread
Lower looper thread
Right needle thread
Left needle thread
Right side
Wrong side
Upper looper thread
Lower looper thread
Right needle thread
Left needle thread
Right side
Wrong side
Upper looper thread
Lower looper thread
Right needle thread
Left needle thread
Right side
Wrong side
Upper looper thread
Lower looper thread
Right needle thread
Left needle thread
Right side
Wrong side
This manual downloaded from http://www.manualowl.com
16
Differential feed adjustment
The differential feed system consists of two sets of feed
teeth arranged one behind the other. Both feed teeth work
independently of each other to give perfect results when sewing
on speciality fabrics. When the amount of feed by the front feed
teeth is changed in relation to the feed by the rear feed teeth it
will“stretch”or“gather”thefabric.
Use the differential feed to prevent stretching of knit fabrics
and puckering of lightweight fabrics.
For overlock stitching on normal fabric, set the differential feed
adjusting lever to N.
Gathered overlock (stretch, knit fabrics)
When overedging stretch fabric, such as knits and jersey,
adjustthedifferentialfeedtoanumberbetweenNand2.0.
The setting depends on the fabric being sewn. Test sew with
different settings before sewing on your project.
Stretch overlock (lightweight fabrics)
When overedging light woven or loosely knit fabrics, such as
silk and silky knitwear, adjust the differential feed to a number
between0.7andN.Whensewing,applygentletensiontothe
fabric by holding the seam lightly in front and back of the
presser foot. The setting depends on the material being sewn
as well as the wished amount of stretching. Therefore, test sew
with different settings before sewing on your garment.
Fabric Differential feed 1.0 Adjustment Result
Stretch fabric
(Knit, jersey)
N - 2.0
Non-stretch fabric
(Chino, denim)
N
Lightweight fabric
(Silk, silky knitwear)
0.7 - N
This manual downloaded from http://www.manualowl.com

17
Presser foot pressure adjustment
The presser foot pressure is pre-set for sewing based on normal
conditions. Adjustment might in some conditions be necessary.
Increaseordecreasethepressureuntilyouaresatisedwith
the result. Always test sew on a sample of your fabric before
sewing on your garment.
Less pressure: Decrease the pressure by turning the adjustment
tool in counter-clockwise direction.
More pressure: Increase the pressure by turning the
adjustment tool in clockwise direction.
Stitch width settings
The stitch width can be increased or decreased by changing the
needle position or with the width adjustment knob.
Width adjustment by changing needle position
A)Whenonlytheleftneedle,orwhenbothneedlesareused
the stitch width is 5.7 mm.
B)Whenonlytherightneedleisusedthestitchwidthis3.5
mm.
Width adjustment with the width adjustment knob
Bynetuningthecuttingwidth,usingthewidthadjustment
knob further adjustment are possible within the range shown
below:
A)Whenonlytheleftneedleisused:5.2-6.7mm
B)Whenonlytherightneedleisused:3.0-4.5mm
Turn the knob to adjust the desired seam width, using the
graduations on the stitch plates as a guideline.
Stitch length settings
Thestitchlengthdialshouldbeseton“N”formostsewing.
Adjust the stitch length to 4 mm when sewing on heavy weight
fabrics. Adjust the stitch length to 2 mm when sewing on light
weight fabrics.
A) Left needle B) Right needle5.7 mm 3.5 mm
This manual downloaded from http://www.manualowl.com
18
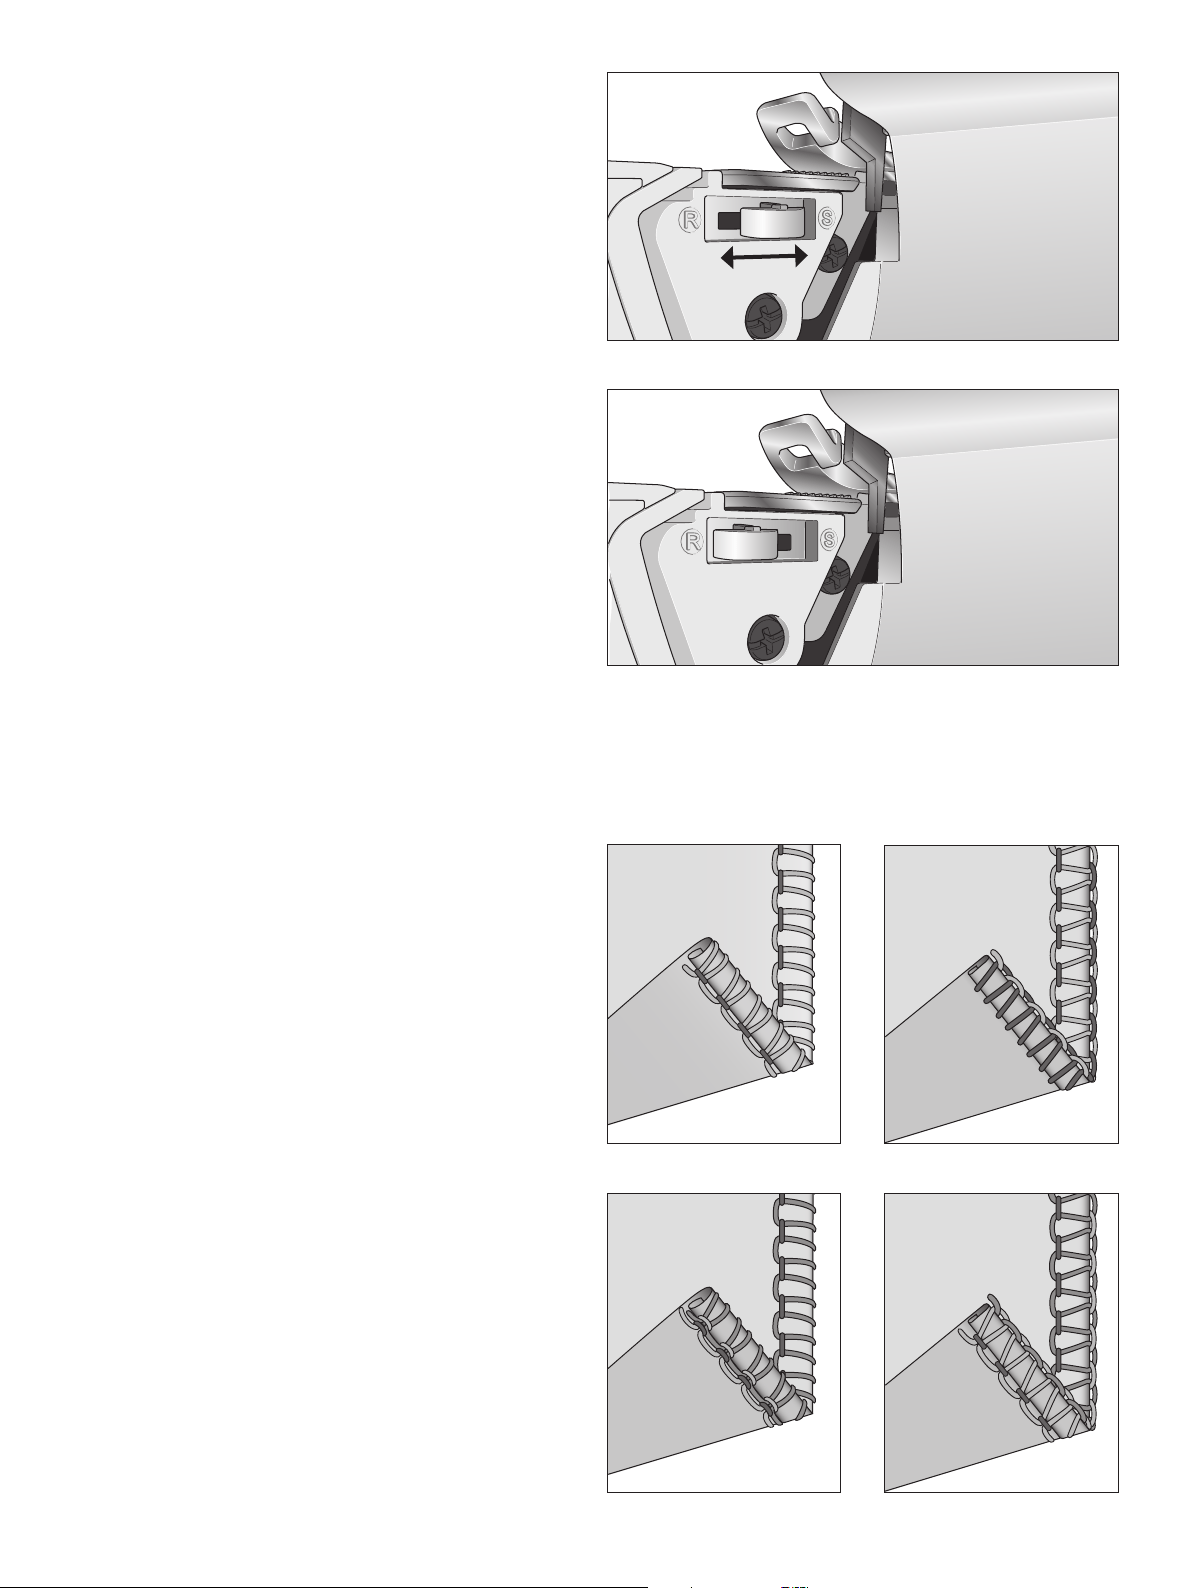
Stitch nger lever setting
Thestitchngerlevershouldbesetto“S”forallstandard
overlock sewing. To sew rolled edge you need to retract the
stitchngerbysettingthestitchngerleverto“R”.When
movingthestitchnger,besuretopushtheleverasfarasit
will go in each direction.
Rolled edge sewing
The rolled edge stitch is appropriate for light weight fabrics
such as lawn, voile, organdy, crepe, etc. The rolled edge is
achieved by adjusting the thread tension to make the fabric
edge roll under the fabric while overlocking. Adjust the thread
tension to change the degree of rolling. To sew rolled edge
youneedtosetthestitchngerleverto“R”.Theminimum
overlock stitch width that can be obtained for rolled edging is
approximately 1.5 mm since the cutting width cannot be set
below 3.5 mm.
A variant of the rolled edge stitch is the narrow edge. It can be
obtained by adjusting the thread tension according to the stitch
table on pages 23-26.
Tip: For a beautiful rolled edge, thread the upper looper
with a decorative thread and the needle and lower looper with
lightweight regular thread.
2-thread rolled edge / narrow edge
1. Attachthe2-threadoverlockconverter(seepage8).
2. Use the right needle thread and lower looper thread.
3. Movethestitchngerleverto“R”.
4. Setthestitchlengthdialto“N-2”foraneseam.
5. Setthethreadtensionaccordingtothestitchtableonpages
23-26.
6. Make a thread chain and test sew on a sample of your fabric
before sewing on your garment. Hold the thread chain while
beginning to sew to keep it from curling into the seam.
3-thread rolled edge / narrow edge
1. Use the right needle thread and the upper and lower looper
threads.
2. Movethestitchngerleverto“R”.
3. Setthestitchlengthdialto“N-2”foraneseam.
4. Setthethreadtensionaccordingtothestitchtableonpages
23-26.
5. Make a thread chain and test sew on a sample of your fabric
before sewing on your garment. Hold the thread chain while
beginning to sew to keep it from curling into the seam.
2-thread rolled edge 2-thread narrow edge
3-thread rolled edge 3-thread narrow edge
This manual downloaded from http://www.manualowl.com

19
Flatlock sewing
AFlatlockStitchismadebyadjustingthetensionofthe2-or
3-thread overlock stitch, sewing the seam and pulling the
fabricaparttoattentheseam.Thetensionsmustbeadjusted
correctlyforthefabrictopullat.
TheFlatlockStitchcanbeusedbothasadecorative
constructionstitch,sewingtwopiecestogether(Standard
FlatlockStitch),orforornamentationonlyononepieceof
fabric(OrnamentalFlatlockStitch).
TherearetwowaystosewaFlatlockStitch.Eitherwiththe
wrong sides of the fabric together to create a decorative look,
orwiththerightsidestogether,tocreateaLadderStitch.
Standard Flatlock Stitch
1. Use the left needle.
2. For2-threadFlatlock:Attachthe2-threadconverter(see
page8).Threadthelowerlooperandtheleftneedle.
For 3-thread Flatlock: Thread the lower and upper looper
and the left needle.
3. Setthethreadtensionaccordingtothestitchtableonpages
23-26.
4. Place the wrong sides of the two pieces of fabric together to
sew a decorative stitch on the right side of the garment.
5. Sewtheseam,trimmingtheexcessfabric.Theneedle
thread will form a V on the underside of the fabric. The
lower looper thread will pull into a straight line at the fabric
edge.
6. Unfold the fabric and pull on opposite sides of the seam to
pullthestitchesat.
Ornamental atlock stitch
1. Place the movable upper cutter in the nonworking position.
The fabric should not be trimmed on this stitch.
2. Follow steps 1-3 above.
3. Fold the fabric piece, wrong sides together, to sew a
decorative stitch on the right side of the garment.
4. Position the fabric so the seam is sewn with part of the
stitch extending off the fabric.
5. Unfold the fabric and pull on opposite sides of the stitch to
atten.
Tip: The upper looper thread is the prominent thread in the
atlockstitch.Placeadecorativethreadintheupperlooperand
regular threads in the lower looper and needle.
Ladder stitch
To create a ladder stitch, sew with right sides of the fabric
together. The needle thread will be the prominent thread that
creates the ladder.
2-thread atlock stitch 3-thread atlock stitch
2-thread ladder stitch
Standard atlock stitch Ornamental atlock stitch
3-thread ladder stitch
This manual downloaded from http://www.manualowl.com

20
Corded overlock
Corded overlock can be used to strengthen stitches when
joining elastic fabrics such as knits. Cording prevents knit
fabrics from stretching and also stabilize the seams.
1. Insert the cord through the hole in the front of the foot.
2. Position the cord under the foot to the back of the machine
and sew the garment seam.
3. The cord is attached in the stitch as the seam is sewn.
Pin placement
Insert straight pins to the left of the presser foot. The pins will
be easy to remove and are away from the cutters.
Warning: Sewing over pins will damage and might destroy the
edge of the cutters.
Securing the thread chain
1. Thread the chain into a large eyed, hand sewing needle.
2. Insert the needle into the end of the seam and pull the chain
into the seam to secure the threads.
This manual downloaded from http://www.manualowl.com
21
Machine maintenance
Anoverlockrequiresmorefrequentmaintenancethana
conventional machine for two reasons:
- A lot of lint is produced when the cutters are cutting the the
fabric.
- An overlock runs at a very high speed and needs to be oiled
frequentlytolubricatetheinternalworkingparts.
Cleaning
Turn off the main power switch and unplug the machine.
Open the front cover and remove all the lint using the lint brush
from the accessory case.
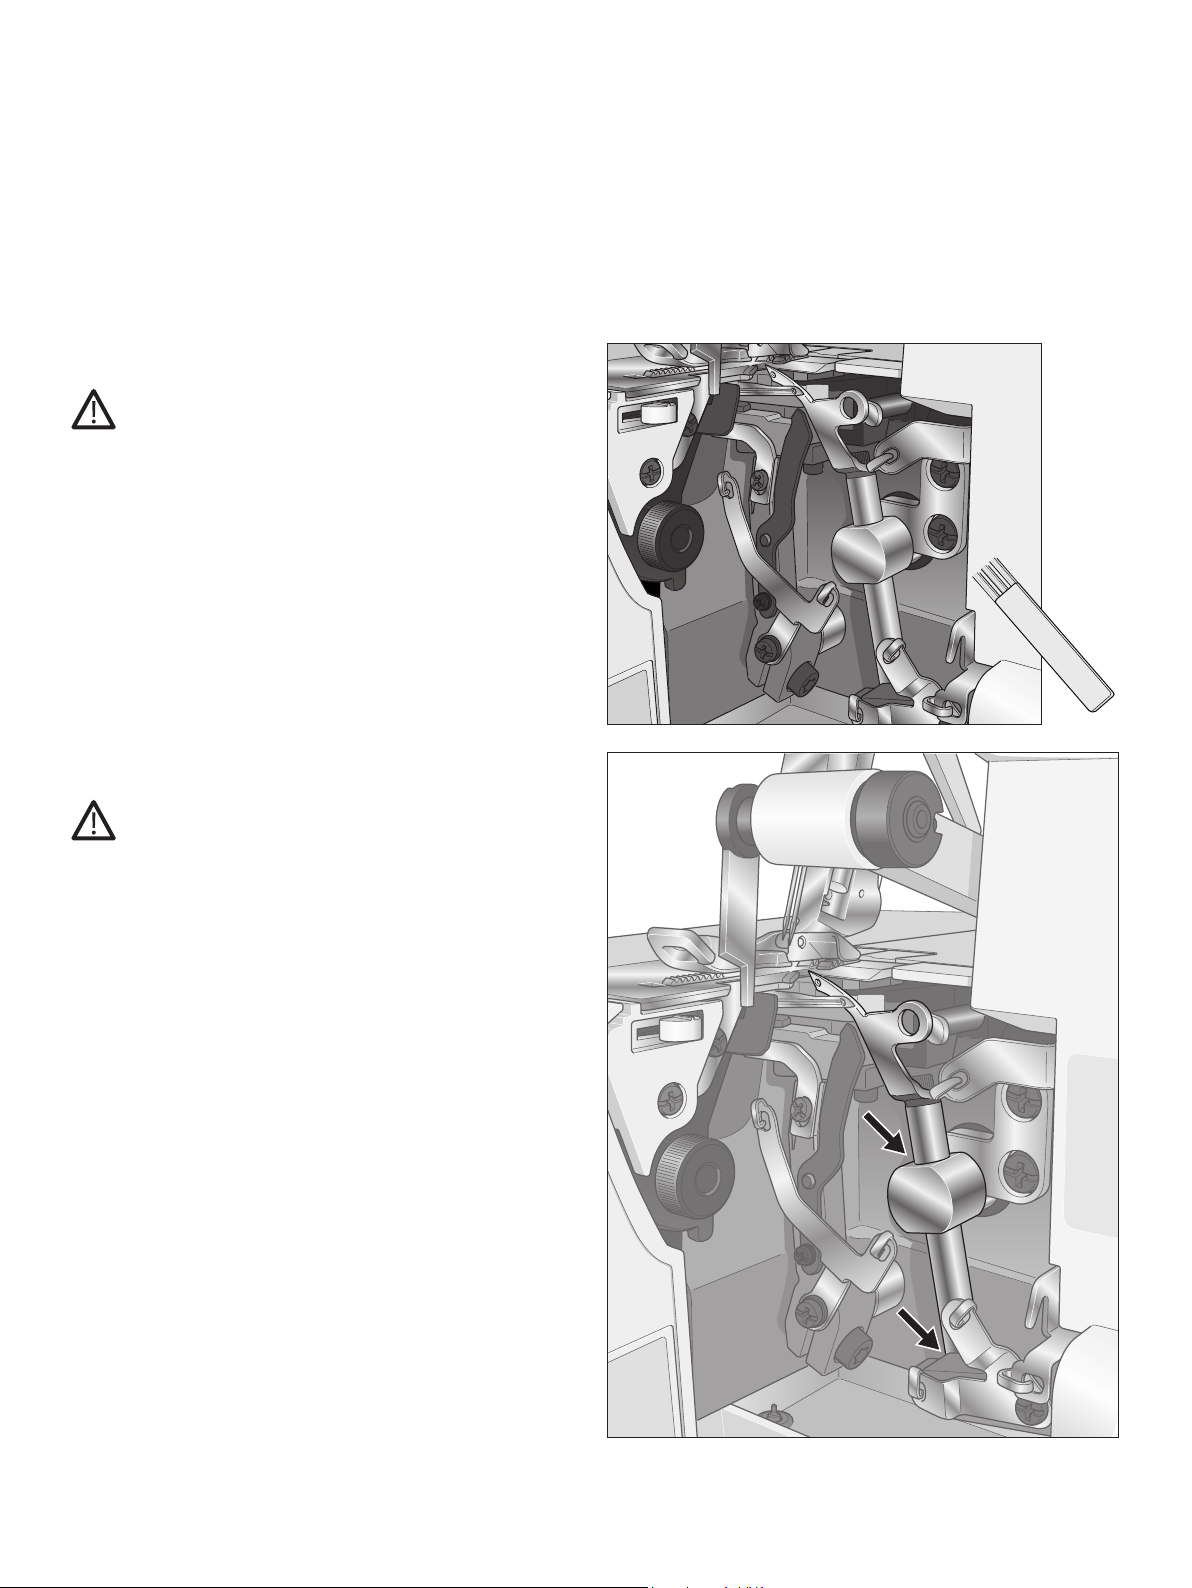
Oiling
Turn off the main power switch and unplug the machine.
Tokeepthemachinerunningsmoothlyandquietlythemoving
parts, pointed out in the picture, must be lubricated often.
Use sewing machine oil. Do not use any other oil, it could
damage the machine.
Wipe the machine surface to remove all excess oil before
sewing.
This manual downloaded from http://www.manualowl.com

22
1
2
3
Replacing the stationary cutter
Turn off the main power switch and unplug the machine.
The stationary cutter should be changed when it becomes dull.
The stationary cutter can be replaced according to the following
directions.Ifyouarehavinganydifculties,consultyour
dealer to make the necessary adjustments.
1. Openthefrontcoverandsetthemovableuppercutter(1)in
nonworking position.
2. Loosenthestationarycuttersetscrew(2)andremovethe
stationarycutter(3).
3. Place a new stationary cutter in the groove of the stationary
cutter holder.
4. Tightenthestationarycuttersetscrew(2).
5. Returnthemovableuppercutter(1)toitsworkingposition.
6. Turn the handwheel so the needles are in their lowest
position.
7. Make sure the front edge of the movable upper cutter is 1-2
mm lower than the cutting edge of the stationary cutter.
Storage
When the machine is not in use, be sure to keep it unplugged.
Cover the machine with the vinyl cover to protect it from the
dust.Storethemachine,soitisnotexposedtodirectsunlight
or humidity.
Servicing
Ifyouhaveanyquestionsregardingserviceand/oroperation,
contact the store where the machine was purchased.
This manual downloaded from http://www.manualowl.com

23
Trouble shooting
Problem Solution Page
Fabric does not feed well - Lengthen stitch length.
- Increase presser foot pressure for heavy weight fabric.
- Decrease presser foot pressure for light weight fabric.
- Check the differential feed.
17
17
17
16
Needle breaks - Insert needle correctly.
- Do not pull fabric while sewing.
- Tighten needle set screw.
- Use a larger size needle on heavy fabrics.
8
14
8
8
Thread breaks - Check threading.
- Check for tangled or caught thread.
- Insert needle correctly.
- Insert new needle, current needle may be bent or have a blunt point.
-Usehighqualitythread.
- Loosen thread tension.
10-13
8
8
28
15
Stitchesskip - Insert new needle, current needle may be bent or have a blunt point.
- Tighten needle set screw.
- Insert needle correctly.
- Change type or size of needle.
- Check threading.
- Increase presser foot pressure.
-Useahighqualitythread.
8
8
8
8
10-13
17
28
Irregular stitches - Balance thread tension.
- Check for tangled or caught thread.
- Check threading.
15
10-13
Fabric puckers - Loosen thread tension.
- Check for tangled or caught thread.
-Usehighqualitylightweightthread.
-Shortenstitchlength.
- Decrease presser foot pressure for light weight fabrics.
- Check the differential feed.
15
28
17
17
16
Irregular trimming - Check alignment of the cutters.
- Replace one or both cutters.
22
22
Fabric jams - Be sure the cutters are in sewing position.
- Check for tangled or caught thread.
- Compress thick layers of fabric with conventional machine before
sewing with overlock.
Machine does not operate - Connect machine to power source correctly. 6
This manual downloaded from http://www.manualowl.com

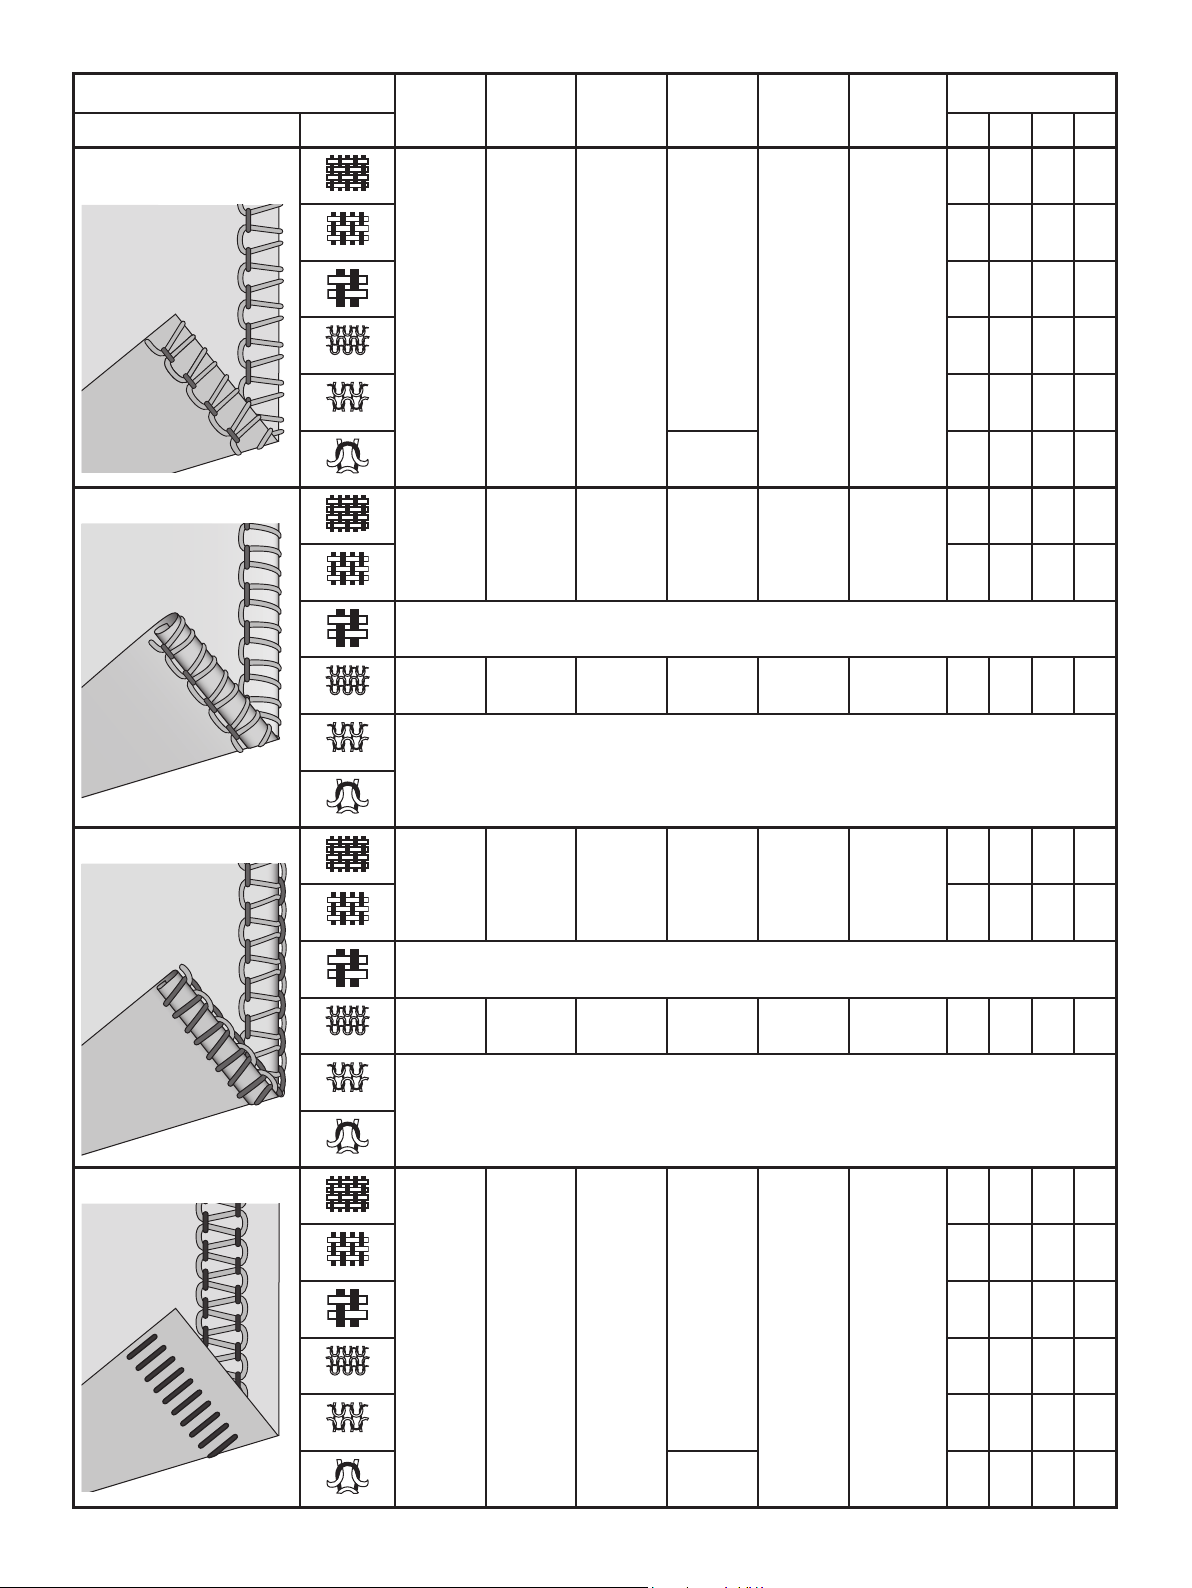
24
Combination Needle
position
Stitch
length
Stitch
width
Differen-
tial feed
Stitch
nger
2-thread
converter
Thread tension
Stitch Fabric
Y R G B
2-thread overlock, wide
Left N R(3.5)
N
S Yes
0.0 - - 5.0
0.5 - - 5.0
1.0 - - 5.0
0.0 - - 5.0
1.0 - - 5.0
1.5 1.0 - - 5.0
2-thread overlock,
narrow
Right
N
R(3.5)
N
S Yes
- 0.0 - 4.0
- 0.5 - 5.0
- 1.0 - 5.0
- 0.0 - 4.5
- 0.5 - 4.5
1.5 - 1.0 - 5.0
2-thread overlock, wrap,
wide
Left N R(3.5)
N
S Yes
2.5 - - 1.0
3.5 - - 1.0
4.0 - - 1.0
2.5 - - 1.0
3.5 - - 1.0
1.5 4.0 - - 1.0
Please note:
The settings shown in this table are our recommendations
based on normal conditions. It may be necessary to adjust
the thread tension according to the stitch, type of fabric
and thread you are using. For best results make tension
adjustments in small increments of no greater than half
a number at a time. Always test sew on a sample of your
fabric before sewing on your garment.
Stitch table
Explanation of the fabric symbols
Woven light
Chiffon, voil, organza,
batiste, silk, etc.
Stretch light
charmeuse, nylon, tricot,
single knit jerseys, etc.
Woven medium
Cotton, chino, wool,
satin, etc
Stretch medium
double knit, velour,
swimwear, etc.
Woven heavy
denim, canvas,
terrycloth, etc.
Stretch heavy
sweatherknits,eece,
etc.
This manual downloaded from http://www.manualowl.com
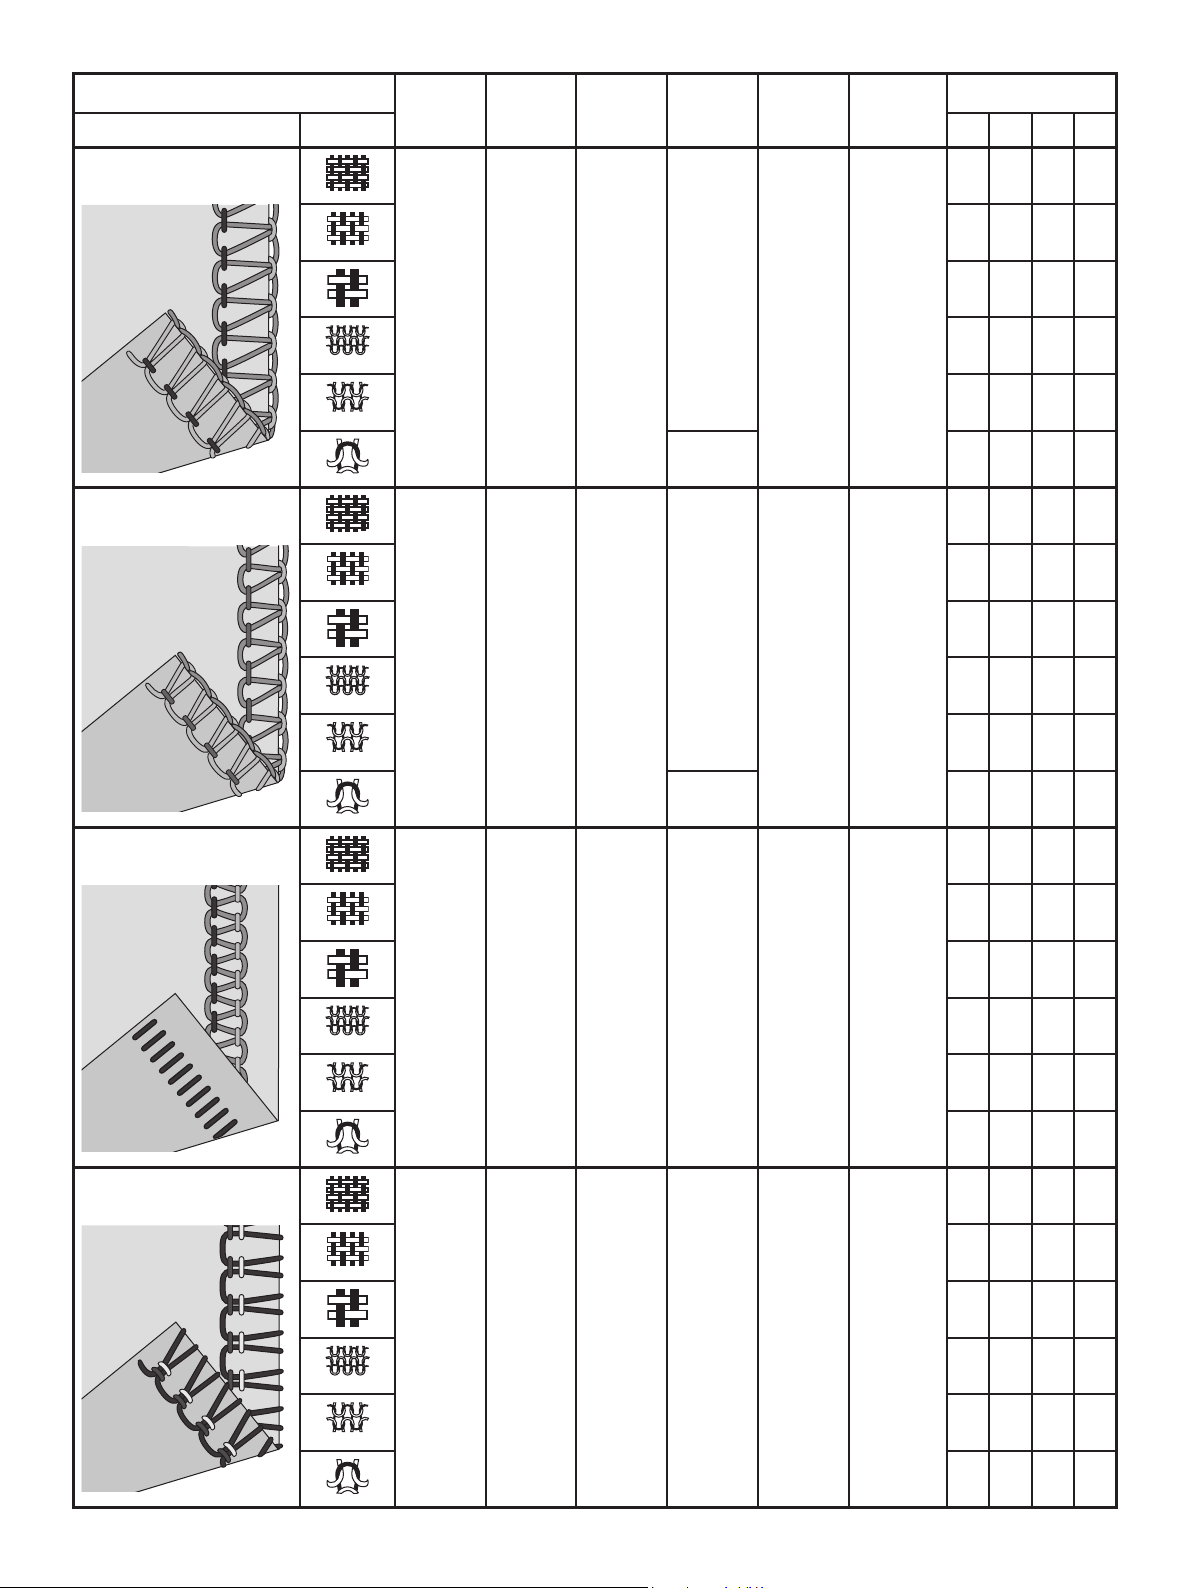
25
Combination Needle
position
Stitch
length
Stitch
width
Differen-
tial feed
Stitch
nger
2-thread
converter
Thread tension
Stitch Fabric
Y R G B
2-thread overlock, wrap,
narrow
Right N R(3.5)
N
S Yes
- 3.5 - 2.0
- 4.0 - 2.0
- 5.0 - 2.0
- N - 2.0
- 4.0 - 2.0
1.5 - 5.0 - 2.0
2-thread rolled edge
Right 1 3 N R Yes
- N - 2.0
- N - 2.0
Not recommended
Right 1 3 N R Yes - N - 2.0
Not recommended
2-thread narrow edge
Right 1 3 N R Yes
- 1.5 - 4.0
- 1.5 - 4.0
Not recommended
Right 1 3 N R Yes - 2.0 - 4.0
Not recommended
2-thread atlock stitch
Left N R(3.5)
N
S Yes
0.0 - - 5.0
0.5 - - 5.0
1.0 - - 5.0
0.0 - - 5.0
0.5 - - 5.0
1.5 1.0 - - 5.0
This manual downloaded from http://www.manualowl.com
26
Combination Needle
position
Stitch
length
Stitch
width
Differen-
tial feed
Stitch
nger
2-thread
converter
Thread tension
Stitch Fabric
Y R G B
3-thread overlock stitch,
wide
Left N R(3.5)
N
S No
2.5 - N N
N - N N
3.5 - N N
2.5 - N N
N - N N
1.5 N - N N
3-thread overlock stitch,
narrow
Right N R(3.5)
N
S No
- 2.5 N N
- N N N
- 3.5 N N
- 2.5 N N
- N N N
1.5 - N N N
3-thread atlock stitch,
narrow
Left N R(3.5) N S No
4.0 - 0.0 8.0
4.0 - 0.0 8.5
5.0 - 0.0 8.5
4.0 - 0.0 8.0
5.0 - 0.0 8.5
5.0 - 0.0 8.5
3-thread stretch
overlock
Right N R(3.5) N S No
- N 1.0 7.0
- 3.5 1.0 7.0
- 4.0 1.0 7.0
- 3.5 1.0 6.0
- 3.5 1.0 6.0
- N 1.0 6.0
This manual downloaded from http://www.manualowl.com
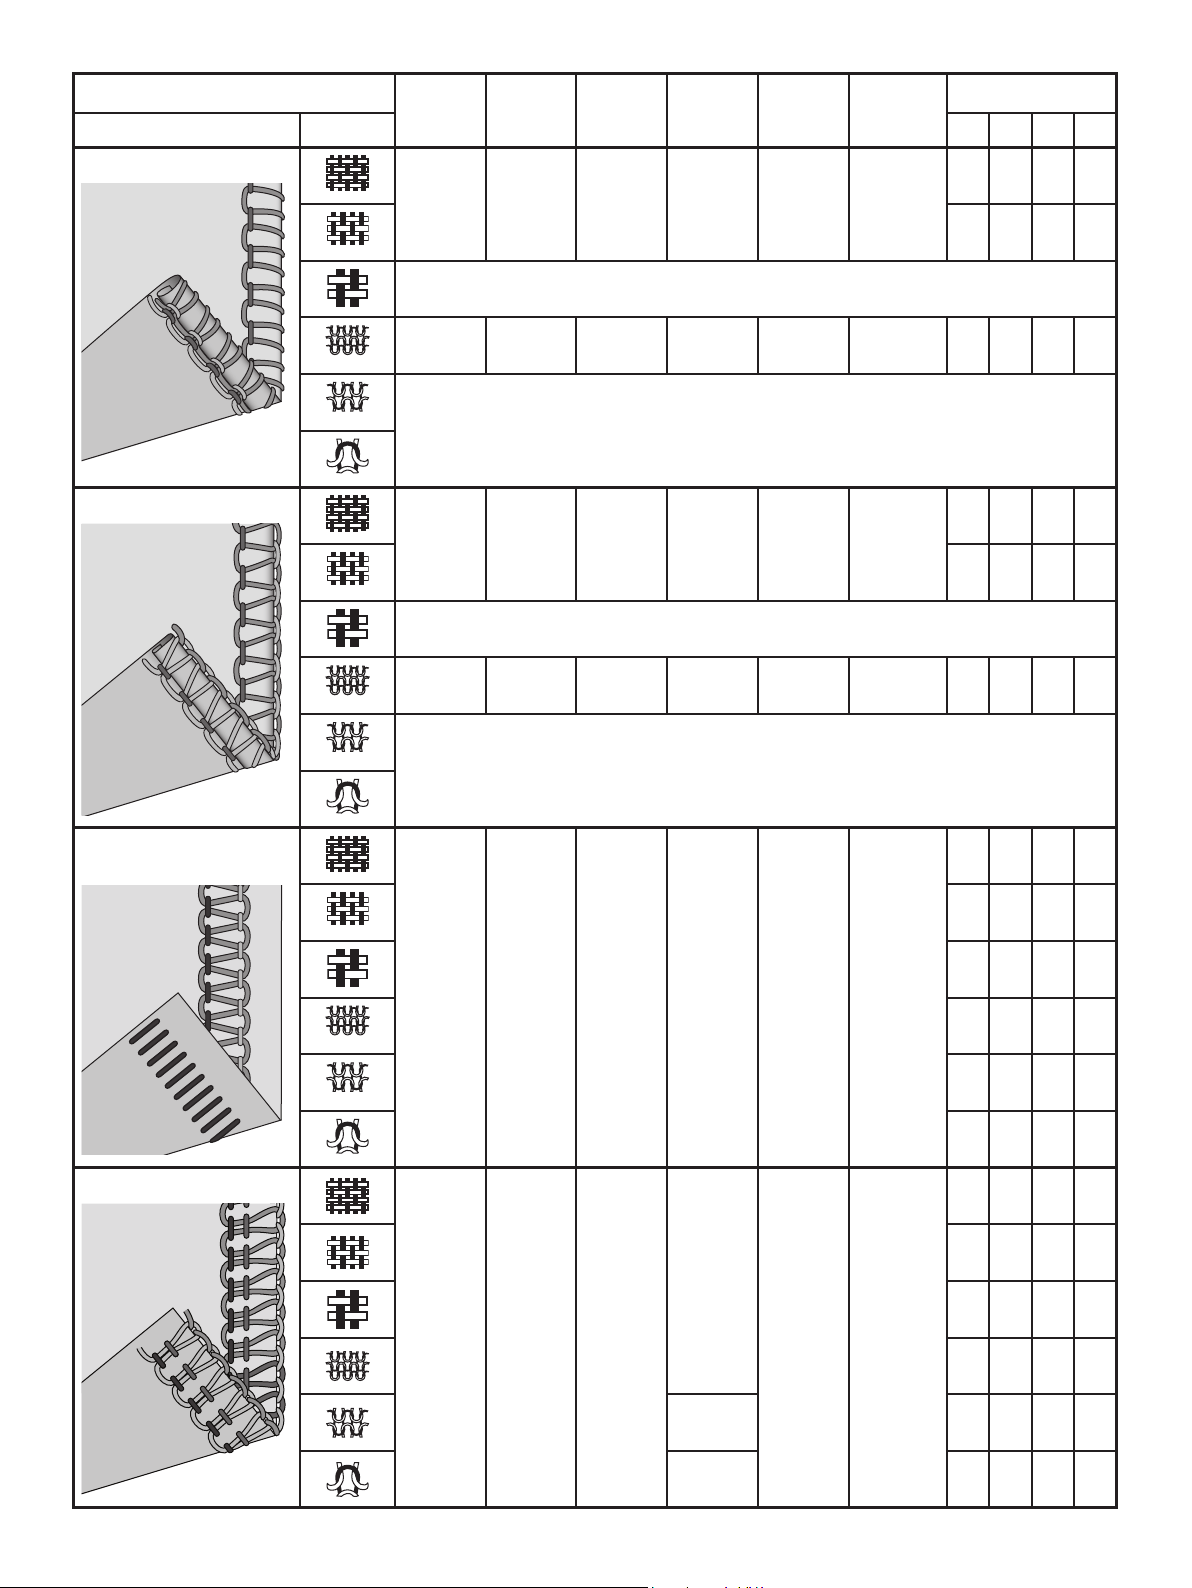
27
Combination Needle
position
Stitch
length
Stitch
width
Differen-
tial feed
Stitch
nger
2-thread
converter
Thread tension
Stitch Fabric
Y R G B
3-thread rolled edge
Right 1 3 N R No
- 2.0 5.0 7.0
- 2.0 5.0 8.0
Not recommended
Right 1 3 N R No - N 4.0 6.0
Not recommended
3-thread narrow edge
Right 1 3 N R No
- N 5.0 N
- N 5.0 4.0
Not recommended
Right 1 3 N R No - N 5.0 N
Not recommended
3-thread atlock stitch,
wide
Left N R(3.5) N S No
0.5 - 5.0 7.0
0.5 - 5.0 7.0
0.5 - 5.0 7.0
0.5 - 5.0 7.0
0.5 - 5.0 7.0
0.5 - 5.0 7.0
4-thread overlock stitch
Both N R(3.5)
N
S No
2.5 2.5 N N
N N N N
3.5 3.5 N N
2.5 2.5 N N
1.5 N N N N
2.0 3.5 3.5 N N
This manual downloaded from http://www.manualowl.com

28
Fabric / Needle / Thread table
Fabric Light fabric
(voile,crepe,georgette,etc.)
Medium fabric
(cotton,chino,wool,satinetc.)
Heavy fabric
(denim,jersey,tweedetc.)
Needle
#12/80 #12/80,#14/90 #14/90
Thread
Polyester(spunlament)
Twisted thread
#60/2-#80/2
(Twistedthread
#80/3-#100/3)
Twisted thread
#60/2
Twisted thread
#50/2-#60/2
Specications
Sewing speed
Maximum1300stitches/min
Stitch length
1.0-4.0mm
Differential feed ratio
0.7-2.0
Overlock stitch width
Left needle: 5.2-6.7 mm
Rightneedle:3.0-4.5mm
Rolled hem: 1.5 mm
Needle bar stroke
27 mm
Presser foot rise
4.5 mm
Needles
INSPIRAoverlockneedles-
systemELx705
size:#14/90,#12/80
Number of needles
2, 1
Number of threads
2, 3, 4
Type of lamp
LED light
Machine dimensions
Width
Depth
Height
301mm
280mm
270mm
Weight
6.0kg
This manual downloaded from http://www.manualowl.com

Wereservetherighttochangethemachineequipmentandtheassortmentofaccessorieswithoutprior
notice,ormakemodicationstotheperformanceordesign.Suchmodications,however,willalwaysbe
tothebenetoftheuserandtheproduct.
INTELLECTUAL PROPERTY
SINGER,andtheCameo“S”Design,areexclusivetrademarksofTheSingerCompanyLimitedS.à.r.l.
oritsAfliates.
Please note that on disposal, this product must be safely recycled in ac-
cordancewithrelevantNationallegislationrelatingtoelectrical/electron-
ic products. Do not dispose of electrical appliances as unsorted muncipal
waste, use separate collection facilities. Contact your local government
for information regarding the collection systems available. When replac-
ing old appliances with new ones, the retailer may be legally obligated to
take back your old appliance for disposal free of charge.
Ifelectricalappliancesaredisposedofinlandllsordumps,hazardous
substances can leak into the groundwater and get into the food chain,
damaging your health and well-being.
This manual downloaded from http://www.manualowl.com

This manual downloaded from http://www.manualowl.com

This manual downloaded from http://www.manualowl.com

471075126 A • English • ©2020 The Singer Company Limited S.à.r.l. or its Afliates. • All rights reserved • Printed on environment friendly paper
This manual downloaded from http://www.manualowl.com