Owner 's Manual for Denon AVR-X6700H
Table of Contents
- Accessories
- Inserting the batteries
- Operating range of the remote control unit
- Features
- High quality sound
- High performance
- Easy operation
- Part names and functions
- Front panel
- Display
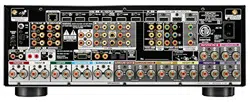
- Rear panel
- Remote control unit
- Connections
- Speaker installation
- Connecting speakers
- Before connecting speakers
- Speaker configuration and “Amp Assign” settings
- Connecting 5.1-channel speakers
- Connecting 7.1-channel speakers
- Connecting 9.1-channel speakers
- Connecting 11.1-channel speakers
- Connecting 13.1-channel speakers
- Bi-amp connection
- Connecting 9.1-channel speakers: Second pair of front speakers
- Connecting multi-zone speakers
- Connecting an external power amplifier
- Connecting a TV
- Connection 1 : TV equipped with an HDMI connector and
- ARC (Audio Return Channel) / eARC
- Enhanced Audio Return Channel)
- Connection 2 : TV equipped with an HDMI connector and
- ARC (Audio Return Channel) / eARC
- Enhanced Audio Return Channel)
- Connection 3 : TV equipped without an HDMI connector
- Connecting a playback device
- Connecting a set-top box (Satellite tuner/cable TV)
- Connecting a DVD player or Blu-ray Disc player
- Connecting a player device compatible with the
- Connecting a video camcorder or game console
- Connecting a turntable
- Connecting a USB memory device to the USB port
- Connecting FM/AM antennas
- Connecting to a home network (LAN)
- Wired LAN
- Wireless LAN
- Connecting an external control device
- REMOTE CONTROL jacks
- TRIGGER OUT jacks
- Connecting the power cord
- Playback
- Basic operation
- Turning the power on
- Selecting the input source
- Adjusting the volume
- Turning off the sound temporarily (Muting)
- Playback a DVD player/Blu-ray Disc player
- Playing a USB memory device
- Playing files stored on USB memory devices
- Listening to music on a Bluetooth device
- Playing music from Bluetooth device
- Pairing with other Bluetooth devices
- Reconnecting to this unit from a Bluetooth device
- Listening to audio on Bluetooth headphones
- Listening to audio on Bluetooth headphones
- Reconnecting to a Bluetooth headphones
- Disconnecting Bluetooth headphones
- Listening to FM/AM broadcasts
- Listening to FM/AM broadcasts
- Tuning in by entering the frequency (Direct Tune)
- Changing the tune mode (Tune Mode)
- Tuning in to stations and presetting them automatically (Auto
- Preset Memory)
- Presetting the current broadcast station (Preset Memory)
- Listening to preset stations
- Specify a name for the preset broadcast station (Preset Name)
- Skipping preset broadcast stations (Preset Skip)
- Cancelling Preset Skip
- Listening to Internet Radio
- Listening to Internet Radio
- Playing back files stored on a PC or NAS
- Playing back files stored on a PC or NAS
- Getting the HEOS App
- HEOS Account
- Playing from streaming music services
- Listening to the same music in multiple rooms
- AirPlay function
- Playing songs from your iPhone, iPod touch or iPad
- Playing iTunes music with this unit
- Play a song from your iPhone, iPod touch or iPad on multiple
- AirPlay 2)
- Spotify Connect function
- Playing Spotify music with this unit
- Convenience functions
- Adding to HEOS Favorites
- Playing back HEOS Favorites
- Deleting a HEOS Favorites
- Adjusting the audibility of dialog and vocals (Dialog Enhancer)
- Adjusting the volume of each channel to match the input source
- Channel Level Adjust)
- Adjusting the tone (Tone)
- Displaying your desired video during audio playback (Video
- Select)
- Adjusting the picture quality for your viewing environment (Picture
- Mode)
- Playing the same music in all zones (All Zone Stereo)
- Changing the speaker settings to match the listening environment
- Speaker Preset)
- Selecting a sound mode
- Selecting a sound mode
- Direct playback
- Pure Direct playback
- Auto surround playback
- Description of sound mode types
- Sound mode that can be selected for each input signal
- HDMI Control function
- Setting procedure
- Smart Menu function
- Sleep timer function
- Using the sleep timer
- Quick select plus function
- Calling up the settings
- Changing the settings
- Panel lock function
- Disabling all key button operations
- Disabling all button operations except VOLUME
- Canceling the Panel lock function
- Remote lock function
- Disabling the sensor function of the remote control unit
- Enabling the remote sensor function
- Web control function
- Controlling the unit from a web control
- Playback in ZONE2/ZONE3 (Another room)
- Connecting ZONE
- Playback in ZONE2/ZONE
- Settings
- Menu map
- Menu operations
- Audio
- Subwoofer Level Adjust
- Bass Sync
- Surround Parameter
- Restorer
- Audio Delay
- Volume
- Audyssey®
- Graphic EQ
- Video
- Picture Adjust
- HDMI Setup
- Output Settings
- Component Video Out
- On Screen Display
- Screen Saver
- K/8K Signal Format
- HDCP Setup
- TV Format
- Inputs
- Input Assign
- Source Rename
- Hide Sources
- Source Level
- Speakers
- Audyssey® Setup
- Procedure for speaker settings (Audyssey® Setup)
- Error messages
- Retrieving Audyssey® Setup settings
- Manual Setup
- Amp Assign
- Speaker Config.
- Distances
- Levels
- Crossovers
- Bass
- Front Speaker
- Playback
- Speaker Preset
- Network
- Information
- Connection
- Wi-Fi Setup
- Settings
- Network Control
- Friendly Name
- Diagnostics
- AirPlay
- HEOS Account
- You have not signed in
- You have already signed in
- General
- Language
- ECO
- Bluetooth Transmitter
- ZONE
- Setup / ZONE
- Setup
- Zone Rename
- Quick Select Names
- Trigger Out 1 / Trigger Out
- Front Display
- Firmware
- Information
- Usage Data
- Save & Load
- Setup Lock
- Reset
- Operating external devices with the remote control unit
- Registering preset codes
- Operating devices
- Initializing registered preset codes
- Specifying the operating zone with the remote control
- Resetting the remote control unit
- Tips
- Tips
- Troubleshooting
- Power does not turn on / Power is turned off
- Operations cannot be performed through the remote control unit
- Display on this unit shows nothing
- No sound comes out
- Desired sound does not come out
- Sound is interrupted or noise occurs
- No video is shown on the TV
- The menu screen is not displayed on the TV
- The color of the menu screen and operations content displayed
- on the television is different from normal
- AirPlay cannot be played back
- USB memory devices cannot be played back
- Bluetooth cannot be played back
- The Internet radio cannot be played back
- Music files on PC or NAS cannot be played back
- Various online services cannot be played
- The HDMI Control function does not work
- Cannot connect to a wireless LAN network
- When using HDMI ZONE2, the devices does not function properly
- Update/upgrade error messages
- Resetting factory settings
- Resetting network settings
- Restoring the firmware to the factory defaults
- Appendix
- About HDMI
- Video conversion function
- Playing back a USB memory devices
- Playing back a Bluetooth device
- Playing back a file saved on a PC or NAS
- Playing back Internet Radio
- Personal memory plus function
- Last function memory
- Explanation of terms
- Trademark information
- Specifications
- Index
Basic operation
Turning the power on
1 Press POWER X to turn on power to the unit.
Selecting the input source
1 Press the input source select button to be played back.
The desired input source can be selected directly.
- You can also select the input source by turning SOURCE SELECT on the main unit.
Adjusting the volume
1 Use VOLUME df to adjust the volume.
- The variable range differs according to the input signal and channel level setting.
- You can also adjust the master volume by turning MASTER VOLUME on the main unit
Turning off the sound temporarily (Muting)
1 Press MUTE:. 0
- MUTE indicator on the display flashes.
- appears on the TV screen.
NOTE
- The sound is reduced to the level set at “Mute Level” in the menu. (v p. 200)
- To cancel mute, either adjust the sound volume or press MUTE: again.
- If : is displayed on the TV screen for more than 5 minutes when the “Screen Saver” is set to “On”, the : symbol moves randomly over the TV screen. (v p. 218) (This feature will be supported via firmware update.)
Playback a DVD player/Blu-ray Disc player
The following describes the procedure for playing DVD player/Blu-ray Disc player.
1 Prepare for playback.
- A Turn on the power of the TV, subwoofer and player.
- B Change the TV input to the input of this unit.
2 Press POWER X to turn on power to the unit.
3 Press DVD or Blu-ray to switch an input source for a player used for playback.
4 Play the DVD player or Blu-ray Disc player.
- Surround playback (v p. 150)
Playing a USB memory device
- WMA
- MP3
- WAV
- MPEG-4 AAC
- FLAC
- Apple Lossless
- DSD
Playing files stored on USB memory devices
1 Insert a “FAT32” or “NTFS” formatted USB memory device into the USB port.
2 Press USB to switch the input source to “USB”.
3 Select the name of this unit.
4 Browse the music on your USB memory device and select something to play.
- When you select something to play you will be asked how you want to queue up your music.
Play Now: Inserts the item into the queue after the currently playing track and plays the selected item immediately.
Play Now & Replace Queue: Clears the queue and plays the selected item immediately.
Play Next: Inserts the item into the queue after the current song and plays it when the current song ends.
Add to End of Queue: Adds the item to the end of the queue.
5 Use ui to select the “Play Now” or “Play Now & Replace Queue”, then press ENTER. Playback starts.
When an MP3 music file includes album art data, the album art can be displayed while playing the file.
NOTE
- Note that Denon will accept no responsibility whatsoever for any problems arising with the data on a USB memory device when using this unit in conjunction with the USB memory device.
- When a USB memory device is connected to this unit, the unit loads all of the files on the USB memory device. Loading may take a while if the USB memory device contains a large number of folders and/or files.
Operations accessible through the option menu
- Adjusting the audibility of dialog and vocals (Dialog Enhancer)” (v p. 143)
- Adjusting the volume of each channel to match the input source (Channel Level Adjust)” (v p. 144)
- Adjusting the tone (Tone)” (v p. 145)
- Displaying your desired video during audio playback (Video Select)” (v p. 146)
- Playing the same music in all zones (All Zone Stereo)” (v p. 148)
Listening to music on a Bluetooth device
Music files stored on Bluetooth devices such as smartphones, digital music players, etc. can be enjoyed on this unit by pairing and connecting this unit with the Bluetooth device. Communication is possible up to a range of about 98.4 ft/30 m.
NOTE To play back music from a Bluetooth device, the Bluetooth device needs to support the A2DP profile.
Playing music from Bluetooth device
In order to enjoy music from a Bluetooth device on this unit, the Bluetooth device must first be paired with this unit. Once the Bluetooth device has been paired, it does not need to be paired again.
1 Prepare for playback.
A Connect the supplied external antennas for Bluetooth/wireless connectivity to the Bluetooth/wireless LAN antenna connectors on the rear panel. (v p. 25)
B Press POWER X to turn on power to the unit.
2 Press Bluetooth. When using for the first time, the unit will go into the pairing mode automatically and “Pairing...” will appear on the display of the unit.
3 Activate the Bluetooth settings on your mobile device.
4 Select this unit when its name appears in the list of devices displayed on the screen of the Bluetooth device. Connect to the Bluetooth device while “Pairing” is being displayed on the display of the unit. Perform the connection with the Bluetooth device close to the unit (about 3.3 ft/1 m).
5 Play music using any app on your Bluetooth device.
- The Bluetooth device can also be operated with the remote control of this unit.
- The next time the Bluetooth button is pressed on the remote control unit, this unit automatically connects to the last Bluetooth device that was connected.
Press STATUS on this unit during playback to switch the display between Title name, Artist name, Album name, etc.