
WT06 I QUICK START GUIDE
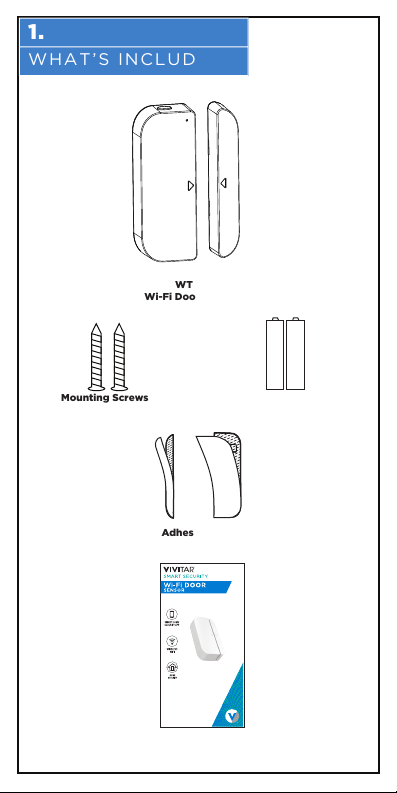
WHAT’S INCLUDED
1.
Mounting Screws AAA Batteries (2x)
WT06
Wi-Fi Door Sensor
Quick Start Guide
with Warranty Information
Adhesive Tape
WT06 I QUICK START GUIDE
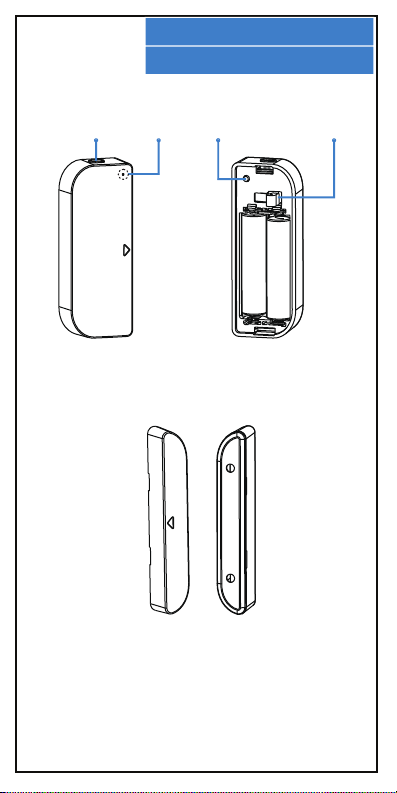
A QUICK LOOK
2.
Sensor
Magnet
LED
Indicator
Light
Power
Button
Latch
Button
Tamper
Button
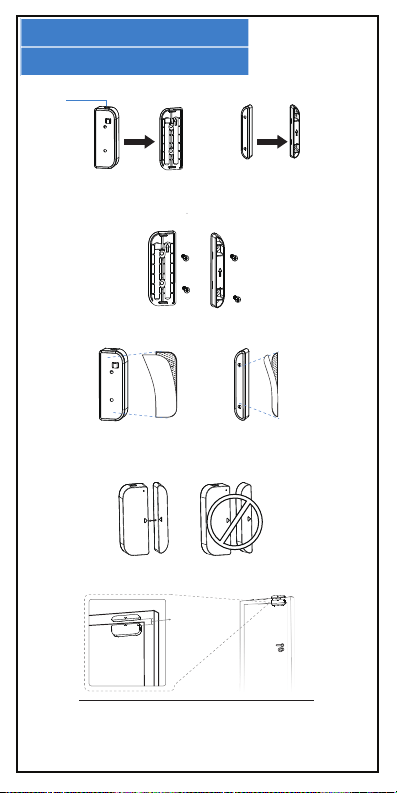
MOUNTING
3.
Latch
Button
10mm Max
To mount your sensor to a wall, follow the steps below.
1. Press down on the latch button and remove the battery
compartment cover from your sensor. Then pull the cover o of your
magnet. Use a flathead screwdriver or other similar device if you are
having trouble pulling o the magnet’s cover.
2. Use the included screws to screw the battery compartment cover
and sensor cover to your wall, door or window.
3. As an alternative to using screws, you use the included adhesive
tape to attach your sensor and magnet to your wall, door or window.
Make sure to wipe all surfaces clean before applying the adhesive
tape.
5. The sensor and magnet must be no greater than 10mm away from
each other when your door or window is closed. Do not attach to
metal surfaces or use outdoors or near water.
4. Make sure that the magnet and sensor are properly lined up, so
that the arrows on each piece are facing each other.
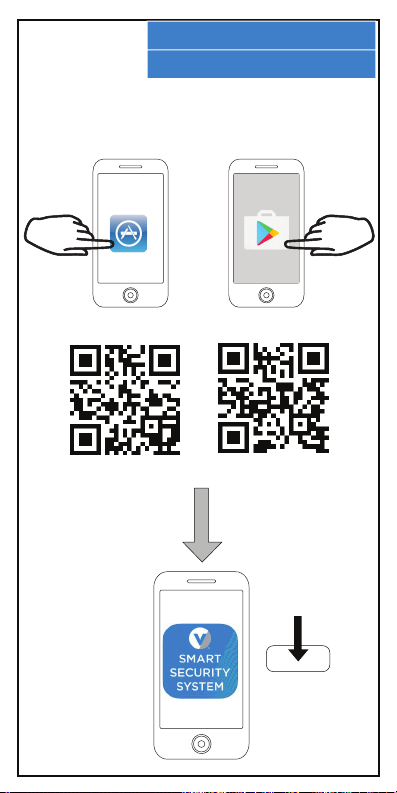
APP INSTALLATION
4.
In order to use your camera, you will first need to download the Vivitar
Smart Security 2 App, which is available on the Google Play Store and
on the iPhone App Store.
OR
iPhone Android
Install
Vivitar
Smart
Security 2
App
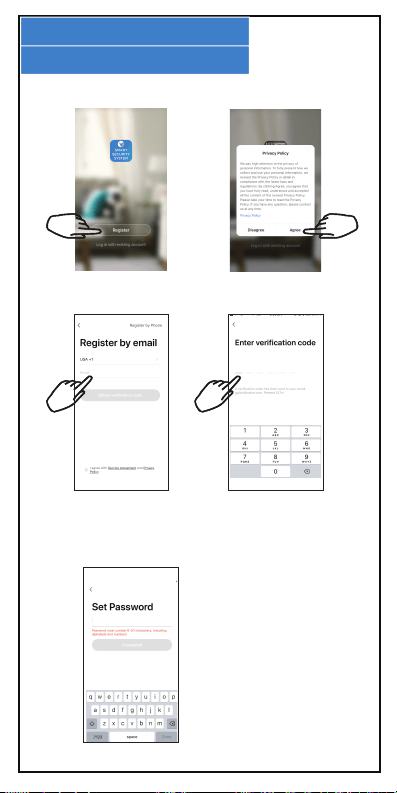
APP REGISTRATION
5.
To successfully use the Vivitar Smart Security 2 App, you will first
need to create an account. To do so, follow the steps below.
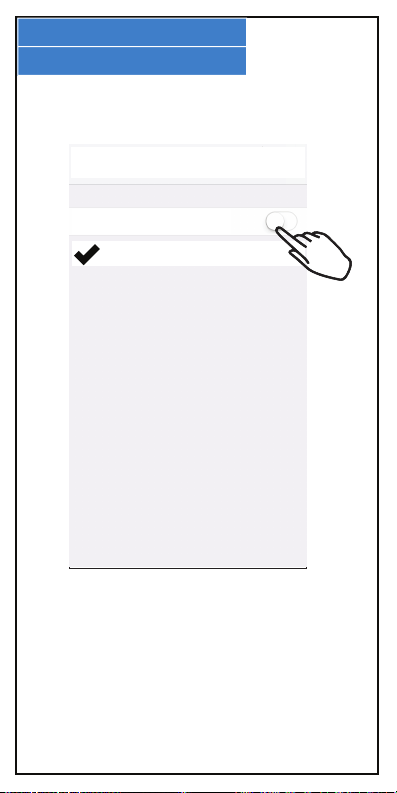
Open the Vivitar
Smart Security 2 App
and press “Register.”
Enter your e-mail
address or phone
number to create an
account.
You will receive a
verification code over
email or text message.
Enter it here.
Setup a password for your
account. Once finished,
you can login to your
account.
Agree to the terms of
the privacy policy.
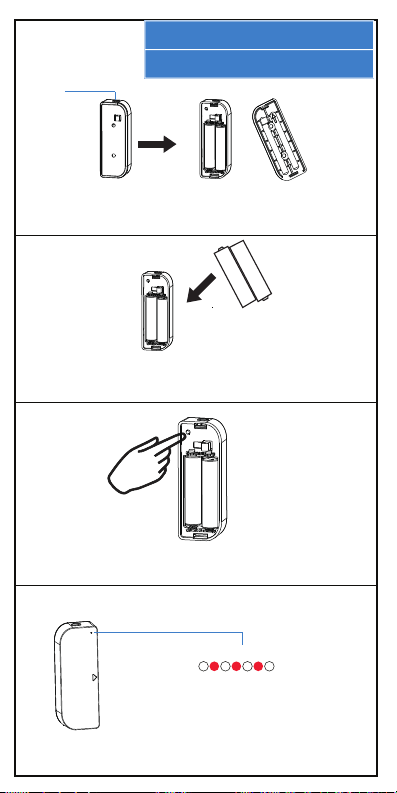
SENSOR SETUP
6.
2. Insert the included AAA batteries into the battery compartment,
making sure that they are inserted with the correct polarity (+,-_ as
displayed in the battery comartment.
3. Press and hold the power button for approximately 7 seconds so
that your sensor enters Wi-Fi setup mode.
4. The LED indicator light will turn red and flash rapidly once your
sensor is in Wi-Fi setup mode.
1. Press down on the latch button and remove the battery
compartment cover from your sensor in order to access the battery
compartment.
LED Indicator Light
(Flashing rapidly) = Ready for Wi-Fi Connection
Latch
Button
Go to your phone’s settings menu, and make sure
that your phone is connected to a 2.4GHz Wi-Fi
network.
WI-FI CONNECTION
7.
Wi-Fi
MyNetwork2.4g
WI-FI CONNECTION
8.
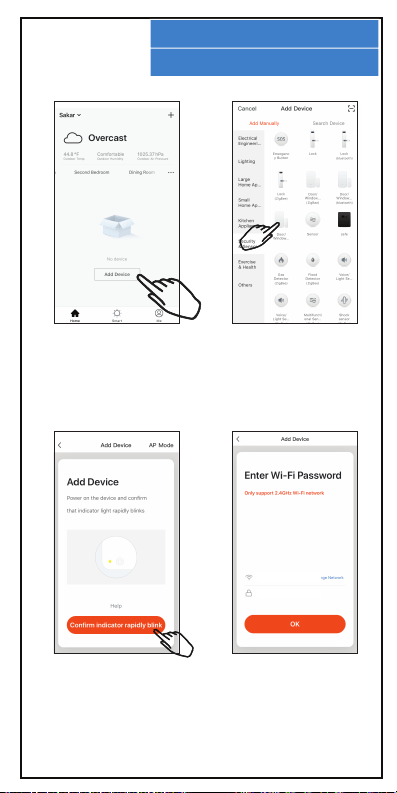
Open your Vivitar Smart
Security 2 app. Select
“Add Device” in order to
choose a device to add to
your home network.
In the Add Device screen,
under the category of
Security & Sensor, select
to add a Door/Window
Sensor.
Confirm that the LED
Indicator Light on your
sensor is still blinking
rapidly, then proceed to the
next step.
Enter your Wi-Fi network
name and password.
MyNetwork2.4g
PASSWORD
WI-FI CONNECTION
9.
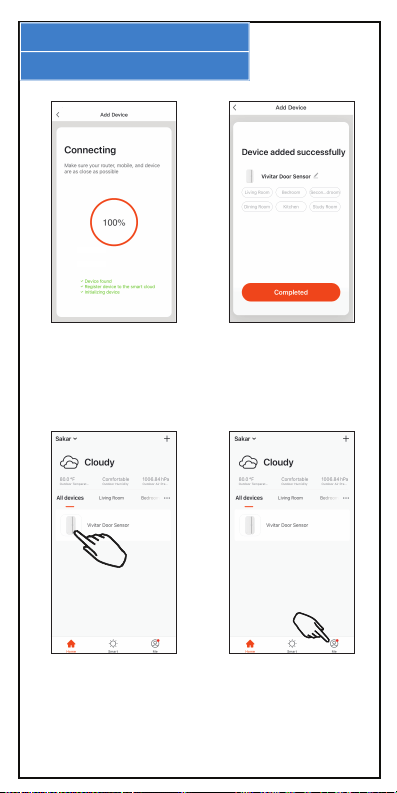
Wait as the Wi-Fi
connection is established.
Once the connection is
established, you can use
the App to see the status
of your sensor.
Access the device’s
control screen by clicking
on it in the main screen of
your App.
Press the Me icon to
access settings and
additional help with using
your app.
USING THE APP
10.
NOTE: Screen shots displayed in this user’s guide of the Smart
Security 2 software application may appear dierently than those
currently featured in your app as frequent updates and
improvements are being made to the software.
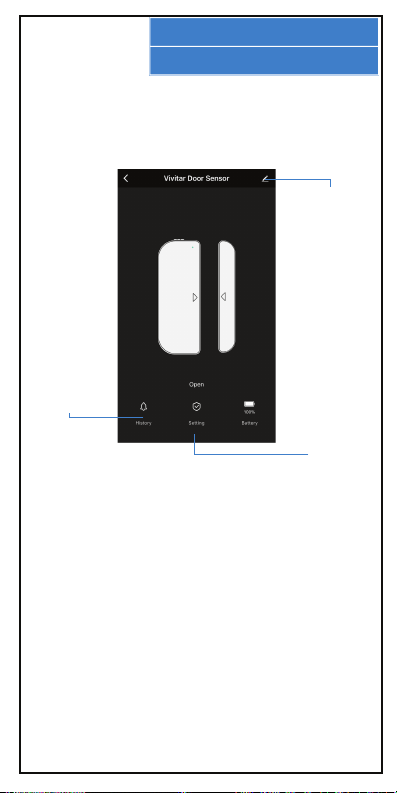
Press the More
icon for more
settings options.
Press the settings
icon to choose
what type of
alerts you
receive.
Press the
History icon to
view records
of alerts you
have received.
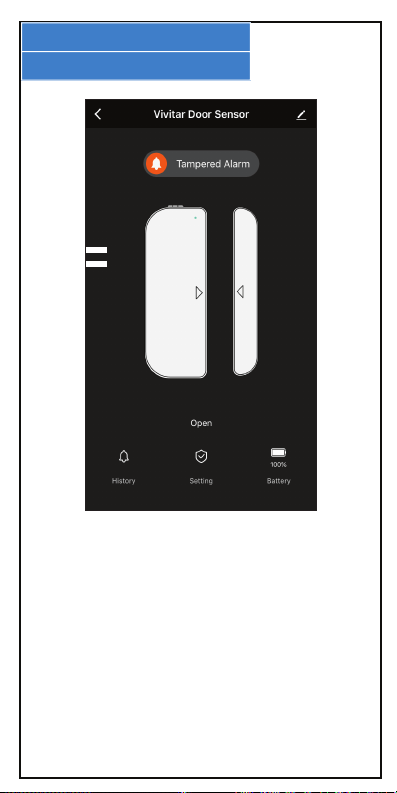
When your sensor and magnet have been separated, you will receive
an alert.
NOTE: If you are having problems receiving notifcations, go to your
phone’s settings menu and be sure that notifications for the Vivitar
Smart Security 2 app are enabled.
RECEIVING ALERTS
11.
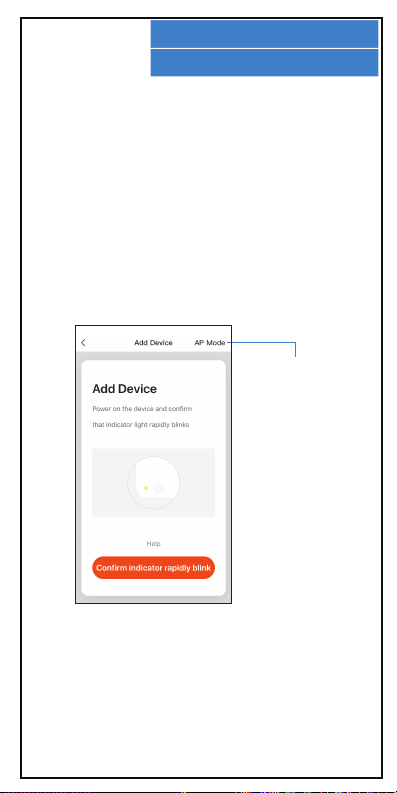
AP Mode
NOTES
12.
--To test the sensor’s Wi-Fi status, quickly push down on the
tamper button. If the LED indicator light quickly turns purple and
flashes, then the sensor in not connected to Wi-Fi. If it quickly turns
blue and flashes, then Wi-Fi is connected.
--If the LED indicator light is turn red and flashing slowly, it
indicates that you are in AP Mode. Use AP Mode only if you want
to use your sensor with your phone, but do not have access to a
Wi-Fi network and your phone will be in close proximity to your
sensor. Press and hold the power button for 7 seconds to switch
between AP mode and standard Wi-Fi quick connect mode. The
LED indicator light will flash rapidly when in Wi-Fi quick connect
mode.

FCC STATEMENT
13.
Changes or modifications not expressly approved by the party
responsible for compliance could void the user’s authority to operate
the equipment.
This device complies with Part 15 of the FCC Rules. Operation is
subject to the following two conditions: (1) this device may not cause
harmful interference, and (2) this device must accept any interference
received, including interference that may cause undesired operation.
This equipment has been tested and found to comply with the limits
for a Class B digital device, pursuant to Part 15 of the FCC Rules.
These limits are designed to provide reasonable protection against
harmful interference in a residential installation. This equipment
generates, uses and can radiate radio frequency energy and, if not
installed and used in accordance with the instructions, may cause
harmful interference to radio communications. However, there is no
guarantee that interference will not occur in a particular installation.
If this equipment does cause harmful interference to radio or
television reception, which can be determined by turning the
equipment o and on, the user is encouraged to try to correct the
interference by one or more of the following measures:
-- Reorient or relocate the receiving antenna.
-- Increase the separation between the equipment and receiver.
-- Connect the equipment into an outlet on a circuit dierent from
that to which
the receiver is connected.
-- Consult the dealer or an experienced radio/TV technician for help.
Keep manual and all relevant
information for future reference.

WARRANTY CARD
10.
This warranty covers the original consumer purchaser only and is not
transferable.
This warranty covers products that fail to function properly UNDER
NORMAL USAGE, due to defects in material or workmanship. Your
product will be repaired or replaced at no charge for parts or labor for
a period of one year.
What Is Not Covered by Warranty:
Damages or malfunctions not resulting from defects in material or
workmanship and damages or malfunctions from other than normal
use, including but limited to, repair by unauthorized parties,
tampering, modification or accident.
To Obtain Warranty Service and Troubleshooting Information:
Call 1-800-592-9541 or Visit our website at www.vivitar.com.
To receive Warranty service along with the name and address of an
authorized product service center, the original consumer purchaser
must contact us for problem determination and service procedures.
Proof of purchase in the form of a bill of sale or receipted invoice,
evidencing that the Product is within the applicable Warranty
period(s), MUST be presented in order to obtain the requested service.
It is your responsibility to properly package and send any defective
products along with a dated copy of proof of purchase, a written
explanation of the problem, and a valid return address to the
authorized service center at your expense. Do not include any other
items or accessories with the defective product. Any products
received by the authorized service center that are not covered by
warranty will be returned unrepaired.
NO WARRANTIES, WHETHER EXPRESS OR IMPLIED, INCLUDING, BUT NOT
LIMITED TO, ANY IMPLIED WARRANTIES OF MERCHANTABILITY OR
FITNESS FOR A PARTICULAR PURPOSE, OTHER THAN THOSE EXPRESSLY
DESCRIBED ABOVE SHALL APPLY. DISTRIBUTOR FURTHER DISCLAIMS ALL
WARRANTIES AFTER THE EXPRESS WARRANTY PERIOD STATED ABOVE.
NO OTHER EXPRESS WARRANTY OR GUARANTY GIVEN BY ANY PERSON,
FIRM OR ENTITY WITH RESPECT TO THE PRODUCT SHALL BE BINDING ON
DISTRIBUTOR. REPAIR, REPLACEMENT, OR REFUND OF THE ORIGINAL
PURCHASE PRICE - AT DISTRIBUTOR’S SOLE DISCRETION -ARE THE
EXCLUSIVE REMEDIES OF THE CONSUMER. IN NO EVENT WILL
DISTRIBUTOR, ITS MANUFACTURERS, OR SAKAR INT. BE LIABLE FOR ANY
INCIDENTAL, DIRECT, INDIRECT, SPECIAL, PUNITIVE OR CONSEQUENTIAL
DAMAGES (SUCH AS, BUT NOT LIMITED TO, DAMAGES FOR LOSS OF
PROFITS, BUSINESS, SAVINGS, DATA OR RECORDS) CAUSED BY THE USE,
MISUSE OR INABILITY TO USE THE PRODUCT. EXCEPT AS STATED HEREIN,
NO OTHER WARRANTIES SHALL APPLY. NOTWITHSTANDING THE
FOREGOING, CONSUMER’S RECOVERY AGAINST DISTRIBUTOR SHALL NOT
EXCEED THE PURCHASE PRICE OF THE PRODUCT SOLD BY DISTRIBUTOR.
THIS WARRANTY SHALL NOT EXTEND TO ANYONE OTHER THAN THE
ORIGINAL CONSUMER WHO PURCHASED THE PRODUCT AND IS NOT
TRANSFERABLE.
Some countries, states or provinces do not allow the exclusion or limitation of
incidental or consequential damages or allow limitations on warranties, so
limitation or exclusions may not apply to you. This warranty gives you specific
legal rights, and you may have other rights that vary from state to state or
province to province. Contact your authorized retailer to determine if another
warranty applies. This product is manufactured, distributed and sold by
SAKAR International, Inc. All other trademarks are the property of the
respective owner, who has not sponsored, endorsed or approved this product.
WARRANTY CARD
14.