
Kelvinator InstaKnight Recess Box KGCRB1C
Installation Instructions
Install the gas, cold water and hot water piping through
the slots located at the bottom or back of the recess box
in accordance with AS 5601 and AS 3500. If an outlet or
isolating switch is to be installed inside the recess box to
supply power to the water heater, an electrician should also
install the electrical cable through the slots on the recess box
at this time.
Installing Kelvinator InstaKnight gas continuous flow
water heater in the recess box
1. Copy the details of the Kelvinator InstaKnight gas
continuous flow water heater from the rating label located
on the right hand side of the water heater to the inside of
the recess box cover. This information may be required
for warranty or service and the model number, serial
number and gas type in particular are important.
2. Mount the Kelvinator InstaKnight gas continuous flow
water heater inside the recess box by aligning the
brackets on both the water heater and the recess box
and fixing it in place with the screws provided on the
mounting brackets.
3. This recess box is provided with a locking bracket security
feature. Slide the locking bracket over the top mounting
screw and secure with a padlock (padlock not supplied,
requires bolt ø6mm or less).
4. Connect the gas, cold water and hot water piping to the
Kelvinator InstaKnight gas continuous flow water heater
(refer to the installation manual supplied with the water
heater for instructions).
5. A weatherproof electrical power outlet or isolating switch
can be fitted inside or outside the box in accordance with
the AS 3000 wiring rules. Means for disconnection of the
water heater must be available either by having the plug
accessible or by incorporating a switch in the fixed wiring
in accordance with the wiring rules.
6. Seal the slots provided for plumbing inside the recess
box and any remaining holes or internal joins with suitable
sealant to prevent water or gas infiltration into the wall
cavity. Failure to do so could result in damage to property
and a potentially dangerous situation, and may void the
Electrolux warranty.
7. Use a suitable sealant between the recess box and the
wall to weatherproof the installation.
8. Place the cover over the recess box and fix in place using
the screws provided.
Refer to the installation manual supplied with the water
heater for commissioning instructions and to ensure the
water heater has been installed correctly.
warning
• Therecessboxisforoutdoorinstallationonly.
• Therecessboxmustbeinstalledbyanauthorisedperson.
• Therecessboxistobeinstalledinawellventilatedand
accessiblelocation.
• Therecessboxisnottobeusedforanythingother
thanitsintendedpurposeormodiedinanyway.
• Therecessboxistobeinstalledinsideawallcavityand
mustnotbeinstalledinanyotherconguration.
• Therecessboxisnottobeinstalledinthevicinityof
anyammablematerialsorliquids.
• Theairintakelouvresandairexhaustoutletonthe
recessboxmustnotbeobstructedatanytime.
• TherecessboxisdesignedforKelvinatorInstaKnight
gascontinuousowwaterheatersonlyandisnot
suitableforwaterheatersofanotherbrandor
manufacturer.
InstallationInstructions:
The Kelvinator InstaKnight recess box is to be installed by an
authorised person and all relevant building, plumbing, gas
and electrical codes are to be adhered to in conjunction with
the relevant Australian standards. The installation location
of the Kelvinator InstaKnight gas continuous flow water
heater must comply with AS 5601 and must be considered
when choosing the installation location of the recess box
(refer to figure 5.3 of AS 5601 for minimum clearances). For
specific instructions on the connection, installation and
commissioning of the Kelvinator InstaKnight gas continuous
flow water heater refer to the installation manual supplied
with the unit. Any damage to the water heater due to
improper installation of the recess box will not be covered by
the Electrolux warranty.
Before installing the recess box, carefully read these installation
instructions as well as the installation manual supplied with the
Kelvinator InstaKnight gas continuous flow water heater.
New Building Installation – Masonry Wall
Follow these steps to install the recess box in a new wall as
the masonry is being laid:
a) Cut the remaining strips holding the tabs in place with
tin snips so they are free to fold outwards
b) Fold out the tabs outwards into the horizontal position
c) Place the recess box in position on the new masonry wall
d) Fix the tabs into the joins of the masonry work as the
masonry wall is being laid.
Existing Building Installation
Follow these steps to install the recess box in an existing wall:
a) Prepare an opening in the wall with height of 934mm and
width of 364mm (4mm added to the actual dimensions of
the recess box for clearance)
b) Ensure the cavity is at least 160mm deep
c) Remove the cover on the recess box by removing the four
screws holding it in place
d) Place the recess box in the wall cavity
e) Choose a location to fix the recess box to the wall
structure and drill holes in the sides of the recess box
accordingly (ensure the fixings will not prevent the water
heater from fitting into the recess box)
f) Fix the recess box to the wall structure
using suitable fasteners.
Kelvinator InstaKnight Recess Box KGCRB1C
Installation Instructions
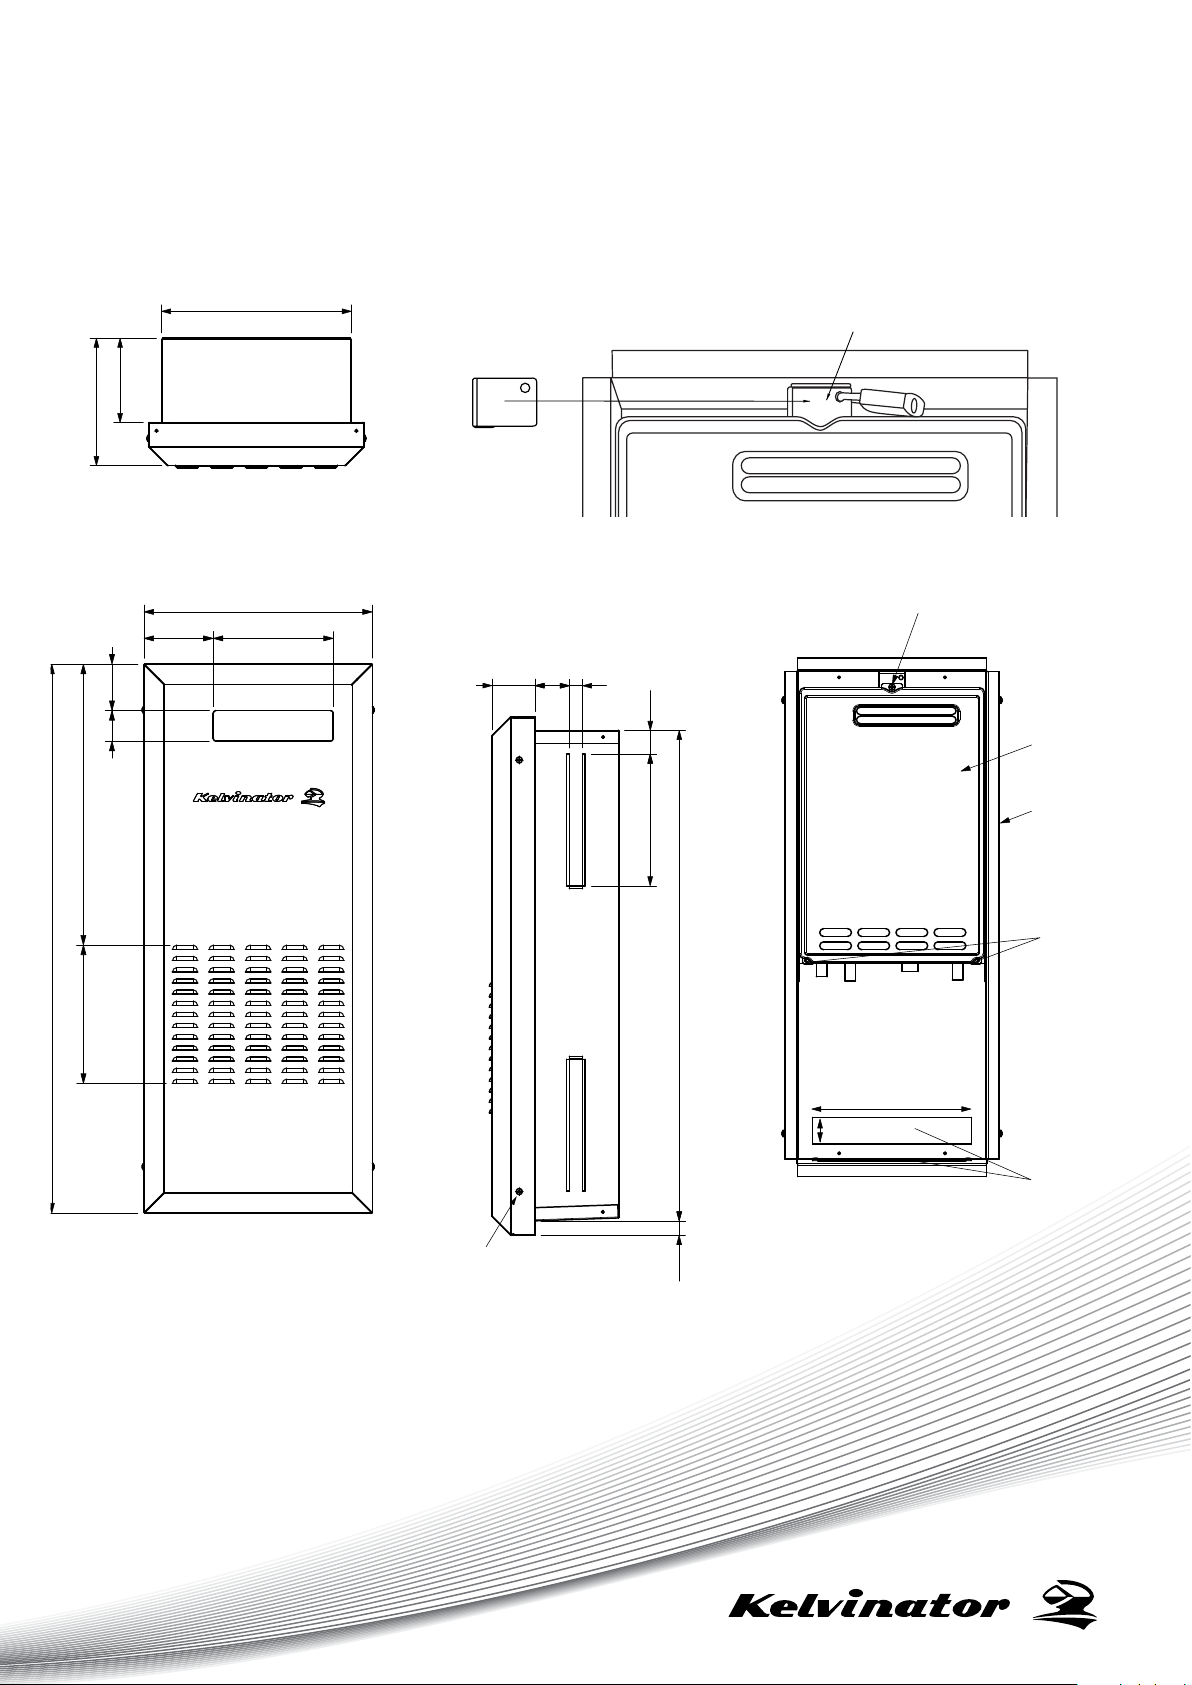
Designedonlyfor20Land26LKelvinatorInstaKnightgascontinuousowwaterheaterswiththefollowingmodelnumbers:
KGC20BNA/KGC20BLA KGC26BNA/KGC26BLA KGC20SNA/KGC20SLA
KGC20KNA/KGC20KLA KGC26KNA/KGC26KLA KGC26SNA/KGC26SLA
Please note: all measurements are in mm.
409
124 215
air exhaust
air intake louvres
983
503
248
8355
locking bracket security feature – slide over top mounting screw
and secure with padlock. (padlock not included)
360
242
160
water
heater
recess
box
screws fitted
to lower
brackets here
300
screw fitted to
upper bracket here
holes
provided for
plumbing
pipes
82
25
65
cover fixing screw
930
27
250
45
wall
reference
P/No. ES6102
© 2012 Electrolux Home Products Pty Ltd.
ABN 51 004 762 341
KHWRBIM_Sep12
50
