
OWNER’S MANUAL • 4
3 • THE NUWAVE MINI COMPLETE COOKBOOK
14. Do not disassemble the product. There are no user serviceable
parts.
15. Do not leave the appliance unattended while in use.
16. Use the handles when lifting the dome from the base.
17. Do not touch hot surfaces. Use the handles provided or use oven
mitts.
18. Stop or pause cooking before removing the dome to check or turn
food. The dome and power head should be placed on the dome
holder.
19. Always remove the dome away from you so the escaping steam is
channeled away from your face.
20. If the power cord is damaged, it should be replaced by a special
cord or assembly from the manufacturer or its service agent.
21. Use caution when disposing of hot grease.
22. Keep this manual handy for easy future reference.
SAVE THESE INSTRUCTIONS
ELECTRICAL INFORMATION:
The cord length of this appliance was selected to reduce Safety Hazards that
may occur with a long cord. Extension cords are available and may be used if
care is exercised in their use. If an extension cord is used: (1) the marked
electrical rating of the extension cord should be at least as great as the
electrical rating of the appliance, and (2) the longer cord should be arranged
so that it does not drape over the counter or table top where it could be
accidentally pulled off the counter or table or tripped over.
Certain models of the appliance may have a polarized plug (one blade is
wider than the other). To reduce the risk of electric shock, this plug is intended
to fit into a polarized outlet only one way. If the plug does not fully fit into the
outlet, reverse the plug. If it still does not fit, contact a qualified electrician. Do
not attempt to modify the plug in anyway.
W A R N I N G
IMPORTANT SAFEGUARDS
When using electrical products, especially when children are present,
basic safety precautions should always be followed.
READ ALL INSTRUCTIONS BEFORE USING
DANGER – To reduce the risk of electrocution:
1. Read all instructions, safeguards, and warnings before using the
appliance.
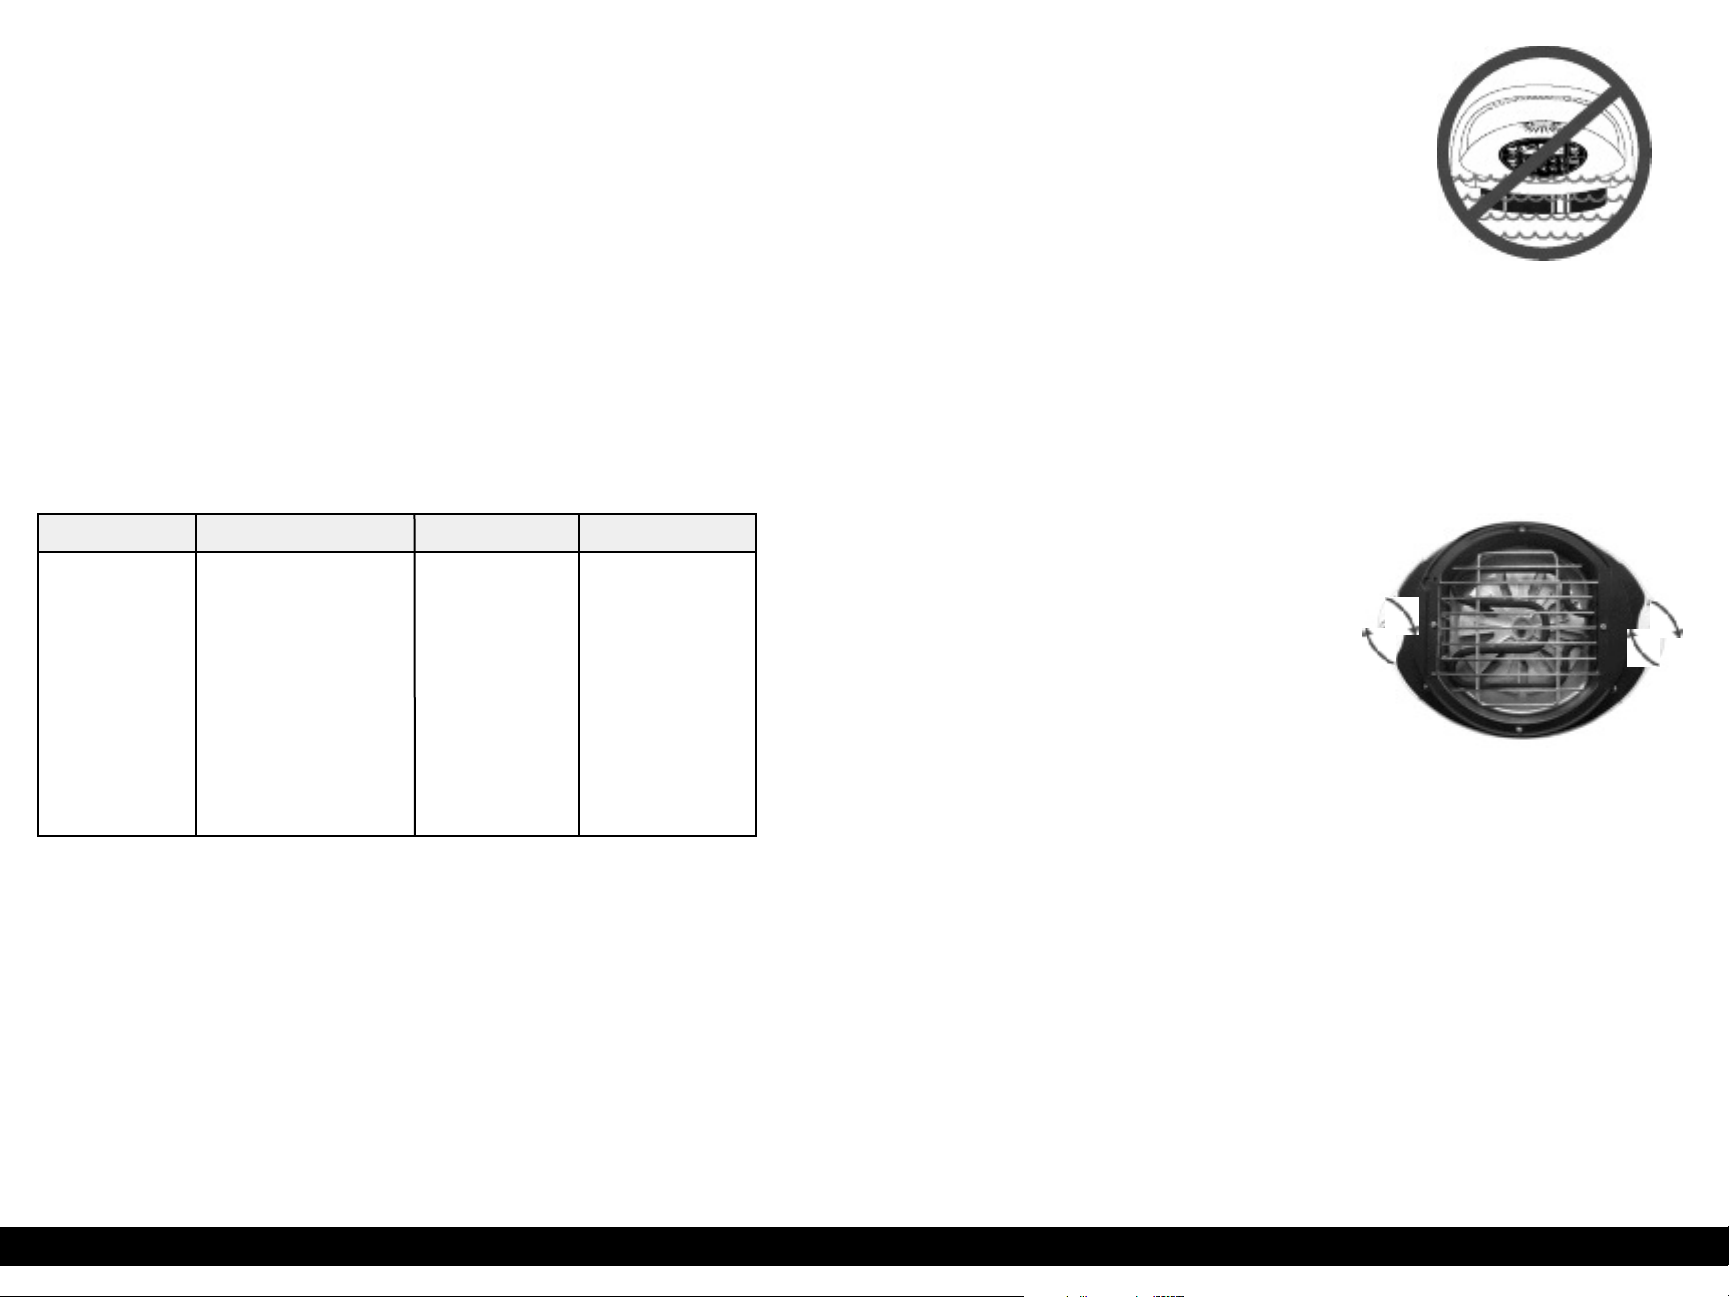
2. Do not place appliance where it can fall or be pulled into water or other
liquids.
3. Do not reach for an appliance that has fallen into water. Unplug
immediately!
4. Do not immerse cord, plug, or power head in water or other liquids.
WARNING – To reduce the risk of burns, electrocution, fire, or injury:
1. This appliance should not be used by children. Close supervision is
necessary when this product is used near children.
2. Do not use this appliance for anything other than its intended use.
Do not use any other accessories or attachments not recommended
by the manufacturer. They may result in fire, electrical shock, or
personal injury.
3. Never operate this appliance if it has a damaged cord or plug, is not
working properly, has been dropped or damaged, or dropped into water.
Return the appliance to an authorized customer service center for
inspection, repair, or adjustment.
4. Keep the cord away from heated surfaces.
5. Always unplug power cord by pulling on the plug. DO NOT unplug by
pulling on the cord.
6. Never force the plug into an outlet.
7. Do not operate outdoors or operate where aerosol (spray) products are
being used or where oxygen is being administered.
8. Do not let the cord hang over the edge of the table or counter.
9. Do not place on or near hot gas or electric burner or in a heated oven.
10. Do not move the appliance while it contains hot food. Use extreme
caution when removing hot liner pan or cooking rack.
11. Before removing plug from the wall, turn the unit off first.
12. Check all electrical wiring. Beware of damaged cord or plug.
13. This appliance is for household use only; it is designed to process
normal household quantities. It is not suitable for continuous or
commercial operation.
Electric shock hazard. Use with adequate electrical system.
Do not use if cord or plug is damaged.
WARNING: All metal items in the oven, such as the liner pan
and cooking rack can get very hot during cooking. Please be
careful when removing these items from a hot oven. Always
wear oven mitts or use pot holders. Allow liner pan and cooking
rack to cool completely before cleaning. The dome opening may
expand slightly when hot. In rare instances, the power head
could detach itself from the dome completely thereby causing
hot air to escape from between the dome and the power head.

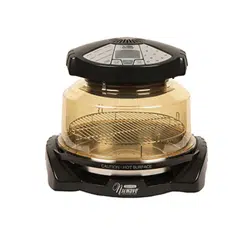
ASSEMBLY:
• Place base tray on a firm stable surface.
• Place liner pan inside base tray.
• Place dual level cooking rack on the liner pan
according to cooking requirements.
• Place food on the cooking rack.
• Place dome over food and on to base tray.
The dome should fit on to the base evenly.
• Place power head into the rim of the dome (image A)
and lock it into place by rotating the power head
clockwise until the locking lugs are engaged (image B).
• Set cook time and power level according to
cooking requirements.
TO SECURE THE NUWAVE MINI FOR EASY
TRANSPORTING:
The NuWave
®
Mini
TM
Oven is equipped with specially
designed “clips” built into the base handles for convenience.
Locking the oven with the clips can be done in 4 easy steps:
1) With fingertips, gently pull “clips” from closed position in handles out
away from base.
2) Rotate clips to a 45 degree angle, lift up at angle.
3) Position the clips so that the dome’s rim is centered in the groove of the clips
4) Gently slide the clips forward towards the dome to secure in in place.
5) Make sure that the power head is completely fastened to the dome and the
clips are locked in place before picking the oven up. Always lift oven with one
hand on the handle and one hand underneath the oven’s base for support.
6) To unlock the clips from the dome, simply reverse the steps.
CAUTION: Never lock the oven with the clips when cooking.
GENERAL USE INSTRUCTIONS:
• Make sure the unit is safely plugged into a properly grounded outlet and that
the cord is not touching any hot objects.
• Make sure that the liner pan has been placed within the base.
• Do not place the liner pan directly onto a stove burner or direct heat source.
Damage may result.
• Metal or glass dishes, pans, and foil or anything used in a regular oven may
be safely used within the NuWave Mini Oven.
OWNER’S MANUAL • 6
5 • THE NUWAVE MINI COMPLETE COOKBOOK
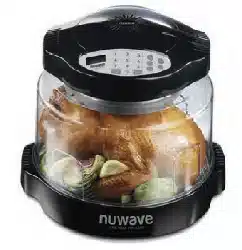
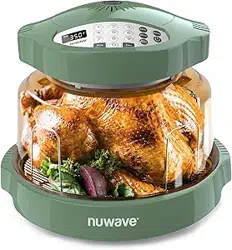
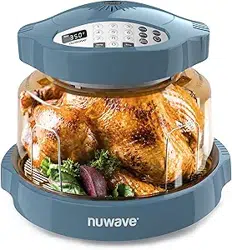
PARTS / ASSEMBLY DIAGRAM
Power Head
with easy to use digital
control panel
Dome
transparent, light weight,
& highly durable
Cooking Rack
Reversible (1/4” or 1” Height)
Liner Pan*
“Eco-friendly, Easy clean”
non-stick enamel
(No PTFE and No PFOA)
Base
can also be used
as a serving tray
Dome Holder
is uniquely designed to
securely hold your NuWave
Mini’s dome and power head
assembly
1
2
3
4
A
B
top view
top view
*MORE INFORMATION ABOUT OUR LINER PAN:
Our customers safety and well being are very important to us. We are continually looking to better
our products in ways that will benefit you. A good example of what helps separate us from many
other products in the market is the quality and safety of the NuWave Mini Oven’s liner pan.
Many cookware products are still using chemicals such as PTFE and PFOA to make non-stick
cookware. PTFE and PFOA are extremely dangerous chemicals with a melting point of
327 degrees C that can affect a person's health in various ways. Through our research, we have
found that one of the healthiest, most durable, easy to clean, and stick resistant cooking surfaces
available is enamel.
The enamel coating is an advanced method of applying a protective finish to products, such as our
liner pan. The ceramic powder used for the process is made out of porcelain particles that are
durable, high-quality and create an attractive finish. Furtermore, enamel coated surfaces are the
longest-lasting and are resistant to chipping, scratching, and fading. The maximum temperature
resistance is impressive at up to 840 degrees C.
Enamel coated product is safe to use with all utensils, including metal. By following the guidelines
above you will extend the lifetime of your liner pan.
* Avoid direct contact of any acidic substance such as lemon to the inner pan surface.
* Avoid any impact on a hard surface can cause the pan to dent or chip.

OWNER’S MANUAL • 8
7 • THE NUWAVE MINI COMPLETE COOKBOOK
COOKING INSTRUCTIONS
Lift dome only by the handle on the power head. Once
the power head and the dome are assembled, the
handle on the power head will allow you to lift both
together when removing or checking food.
When removing the liner pan while it is still hot, be
extremely careful and always use oven mitts.
For best results, follow the time, power, and cooking
rack height instructions given in the cooking chart and the
book.
No pre-heating required.
HOW TO OPEN POWER HEAD AND DOME ASSEMBLY
Make sure the power head is tightly locked onto the dome, then the whole
assembly can be easily lifted and put aside as shown in steps 1, 2 and 3.
Step 1: Place dome holder either in the back of the oven or off to the side.
Step 2: Make sure both feet of the dome holder are placed inside the base as
shown, and the dome holder is resting horizontally on a flat surface.
Step 3: Place the assembled power head and dome at a 45° angle on
the dome holder as shown.
C A U T I O N
Do not touch the dome or any surface on the cooking
area during operation. The air inside the dome can
reach 329°F (165°C) which makes the surface very hot
and may cause burns.
Do not open the dome or remove the power head while
it is still operating. Turn the cook time dial to “OFF” first
to turn off the power before removal, or if digital oven,
push “PAUSE”.
DIRECTIONS FOR THE NUWAVE MINI
EASY START:
Oven is preset to cook at Power Level 10.
To start cooking, press COOK TIME button, enter time required, and press
START. If cooking at any other power level other than HI (10), the power level
button will be needed. See “Setting Power Level”on page 9.
CONTROL PANEL ON POWER HEAD:
“0” should appear in the display panel when the program is clear.
SETTING COOK TIME:
Press the COOK TIME button. The MIN indicator will flash in the lower right
corner of the display panel. Enter the required time in hours and minutes by
pressing the corresponding numerals. For example, 1 hour and 30 minutes
would be entered by pressing 130. The display panel will show 1:30. If required
time is in minutes, you only need to enter 1 or 2 numbers. For example, 5
minutes, just push 5; 46 minutes, push 46. If the number needs to be corrected,
clear the entry by pressing the pause/clear button twice. Then re-enter the
correct numbers.
START COOKING:
Press START to begin cooking. The remaining cooking time will appear in the
display panel and the colon between the hours and minutes will blink ON and
OFF. The oven will automatically stop cooking when the time has expired and
will beep to alert you that it has stopped.
PAUSE / CLEAR COOKING:
To PAUSE the cooking time, press the PAUSE / CLEAR button one time. The
remaining cooking time will stay in the display panel but the colon will not be
blinking.
To CLEAR the cooking time during cooking, press the PAUSE / CLEAR button
twice. The remaining cook time will be fully cleared and a “0” will appear.
Display
Panel
Cook Time
Start
Pause / Clear
Power Level
1
2
3
CLEANING AND CARE INSTRUCTIONS
BEFORE USING:
Before using, wash dome, liner pan, base, and
cooking rack in warm soapy water or clean in the
dishwasher.
IMPORTANT - Do not wash or immerse power
head in water or in dishwasher. The outer surface
can be cleaned by wiping carefully with a damp dishcloth or sponge.
GENERAL INSTRUCTIONS:
• Unplug the unit before cleaning.
• Dome and all other parts, except the power head are dishwasher safe.
Protect the metal and plastic surfaces; do not use abrasive cleaners or
scouring pads.
• Clean after each use.
• The outer surface of the power head can be cleaned by wiping it with
a damp cloth.
• Any other servicing should be performed
by an authorized service representative
Handle securement Instructions:
• The user should check periodically for
looseness and retighten screws or
nuts according to manufacturer's
instructions.
CAUTION:
Over tightening can result in stripping
of screws or cracking of handle."
IMPORTANT TIPS:
1. Check the power outlet for proper operation. Do not operate the unit with
other major appliances in the same power outlet. Check power level if the
unit cooks too slowly.
2. Check to see if electrical plug is properly plugged into the outlet.
3. Always turn off and unplug the unit before washing.
4. Moisture may build up inside the dome when cooked food is not removed
soon after cook time has expired. The steam / moisture build up can be
avoided by doing the following:
• Remove food soon after it is done cooking.
• If it is desirable to keep the food warm until served,
reset cooking time at a lower power level (1 or 2).
9 • THE NUWAVE MINI COMPLETE COOKBOOK
OWNER’S MANUAL • 10
SETTING THE POWER LEVEL:
• Press the POWER LEVEL button.
• The default “HI” setting is indicated in the display panel (power level 10).
• PWR indicator flashes in the display panel. To override the default and change
the power level, just press the desired cooking power: 1 (low power) to
9 (near high power). The power is entered as a single digit.
To reset to HI, press 0.
• Verify the correct power setting on the control panel.
• If power setting needs to be corrected, re-enter the required number.
• To check power level during cooking, press POWER LEVEL once and setting will
appear on the display panel for a few seconds. Remaining cooking time will then
re-appear.
NOTE: Maximum allowed cook time for POWER LEVEL HI is 2 hours. If
cooking time is set to more than that, it will automatically revert back to 2:00
hours. Simply add more time after the initial 2 hours has expired. For lower
power settings, maximum allowed time is 9 hours 59 minutes.
*Do not press Power Level unless you want to change the Default setting.
Power Level Oven Temperature Press Button Panel Display
10(HI) 329°F (165°C) 0 (High) PHI
9 311°F (155°C) 9 P90
8 284°F (140°C) 8 P80
7 257°F (125°C) 7 P70
6 230°F (110°C) 6 P60
5 203°F (95°C) 5 P50
4 174°F (79°C)4 P40
3 149°F (65°C) 3 P30
2 120°F (49°C) 2 P20
1 108°F (42°C) 1 (Low) P10
GENERAL RULES:
• Use food combinations that take about the same time for each to cook. For
example: pork or chicken and potato wedges; fish and stewed tomatoes; or
frozen beef with baked potatoes.
• To avoid burning, place aluminum foil over the food.
• Remember that the infrared rays do not penetrate the aluminum but the heat
will circulate throughout the oven.
• Use shallow dishes or light aluminum pans for cooking.
• For warming bread, place it on the 1/4” rack or the liner pan and cover with
aluminum foil. For grilling bread, place it on the 1” rack
.
To tighten handle, turn screws clockwise.
OWNER’S MANUAL • 12
11 • THE NUWAVE MINI COMPLETE COOKBOOK
THE MANUFACTURER WARRANTS:
The infrared cooking system including power head, dome, cooking rack, liner
pan, base, and all electrical components to be free from defects and
workmanship under normal household use, when operated in accordance with
the Manufacturer’s written instructions provided with each unit for one (1) year
from date of purchase. The Manufacturer will provide the necessary parts and
labor to repair any part of the infrared cooking system at Hearthware Home
Products Service Department. After the expiration of the warranty, the cost of
the labor and parts will be the responsibility of the owner.
THE WARRANTY DOES NOT COVER:
The non-stick coating (if applicable) on any part of the cooking system. The
Limited Warranty is voided if repairs are made by an unauthorized dealer or the
serial number data plate is removed or defaced. Normal deterioration of finish
due to use or exposure is not covered by this Warranty. This Limited Warranty
does not cover failure, damages or inadequate performance due to accident,
acts of God (such as lightning), fluctuations in electric power, alterations, abuse,
misuse, misapplications, corrosive type atmospheres, improper installation,
failure to operate in accordance with the Manufacturer’s written instructions,
abnormal use or commercial use.
TO OBTAIN SERVICE:
The owner shall have the obligation and responsibility to: Pay for all services
and parts not covered by the warranty; Prepay the freight to and from Service
Department for any part or system returned under this warranty; Carefully
package the product using adequate padding material to prevent damage in
transit. The original container is ideal for this purpose. Include in the package
owner’s name, address, daytime telephone number, a detailed description of
the problem, and your RETURN GOODS AUTHORIZATION NUMBER
(RGA number):
Call 1-888-NUWAVE1(689-2831) or e-mail [email protected]
to obtain the RGA number. Provide the cooking system model & serial number
and proof of date of purchase (a copy of the receipt) when making claims
under this warranty.
MANUFACTURER’S OBLIGATION:
The Manufacturer’s obligation under this Limited Warranty is limited to repairing
or replacing any part of the infrared cooking system expressly covered by this
Limited Warranty which upon examination is found to be defective under normal
use. The Limited Warranty is applicable only within the continental United States
and only to the original purchaser of manufacturer’s authorized channels of
distribution. The limited warranty may not be altered, varied or extended except
by written instrument executed by the manufacturer. The remedy of repair or
replacement as provided under this limited warranty is exclusive. In no event
shall the manufacturer be liable for any consequential or incidental damages
to any person, whether or not occassioned by negligence of the manufacturer,
including without limitation, damages for loss of use, costs of substitution,
property damage, or other money loss.
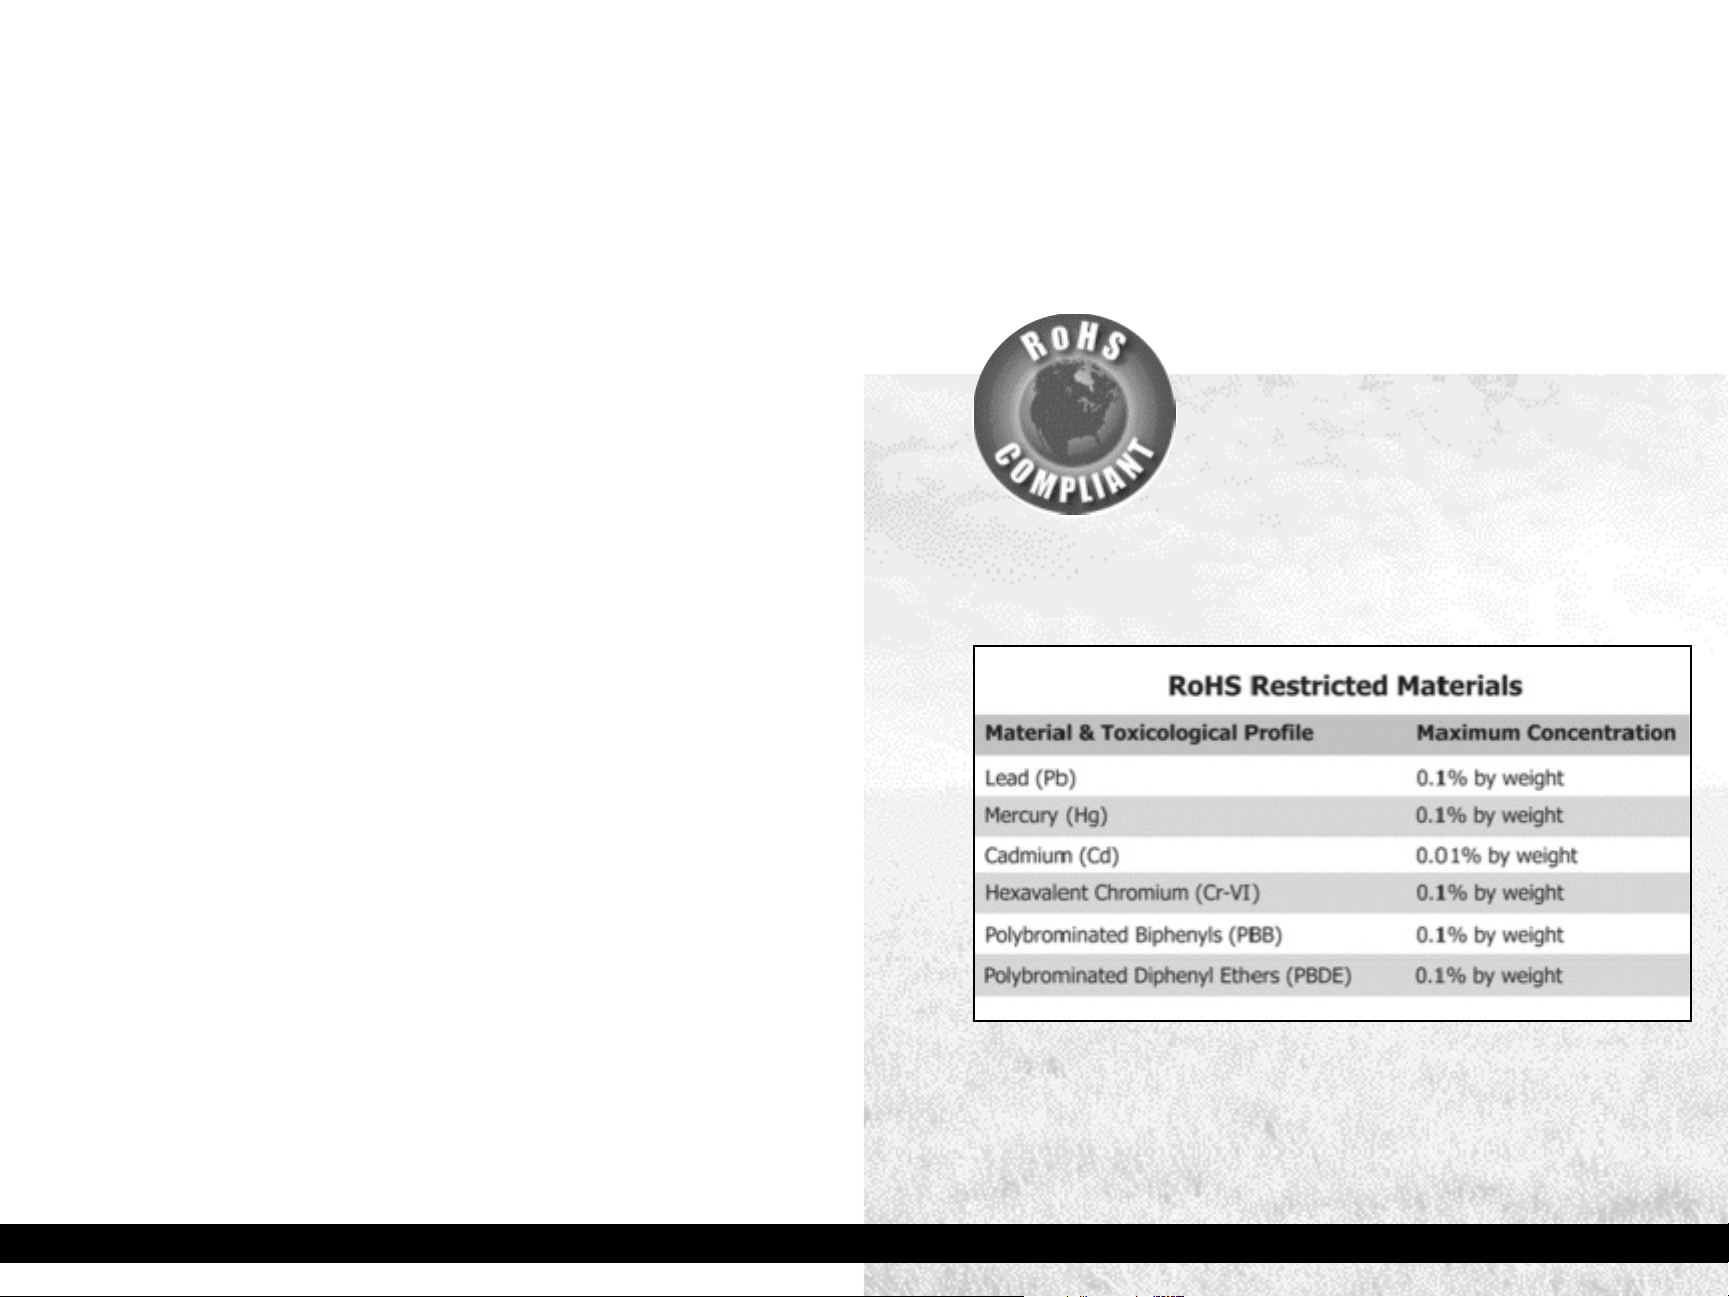
At Hearthware Home Products, we have taken a
great amount of care in ensuring that our products are
safe and secure for every household. All Nuwave
®
Pro
and Nuwave
®
Mini
TM
Infrared Ovens are built and
manufactured in strictest compliance with RoHS*
standards.
Although US manufacturers are not bound by law to follow RoHS standards,
Hearthware has made a conscious decision to voluntarily follow this directive
to preserve the safety of its consumers and the environment.
*RoHS stands for "the Restriction of the use of certain Hazardous
Substances in electrical and electronic equipment".
If you want to find out more about the RoHS Directive, please visit
http://en.wikipedia.org/wiki/RoHS
Some states do not allow the exclusion or limitation of incidental or
consequential damages, so the above limitation exclusions may not apply. This
Limited Warranty gives specific legal rights, and there may also be other rights
which vary from state to state. Except as otherwise expressly provided above,
the manufacturer makes no warranties expressed or implied arising by law or
otherwise, including without limitation, the implied warranties of merchantability
and fitness for a particular purpose to any other person.
READ YOUR OWNER’S MANUAL: If you still have any questions about
operation or warranty of the product, please contact Hearthware Home Products
at 1-888-NUWAVE1(689-2831) or e-mail [email protected]
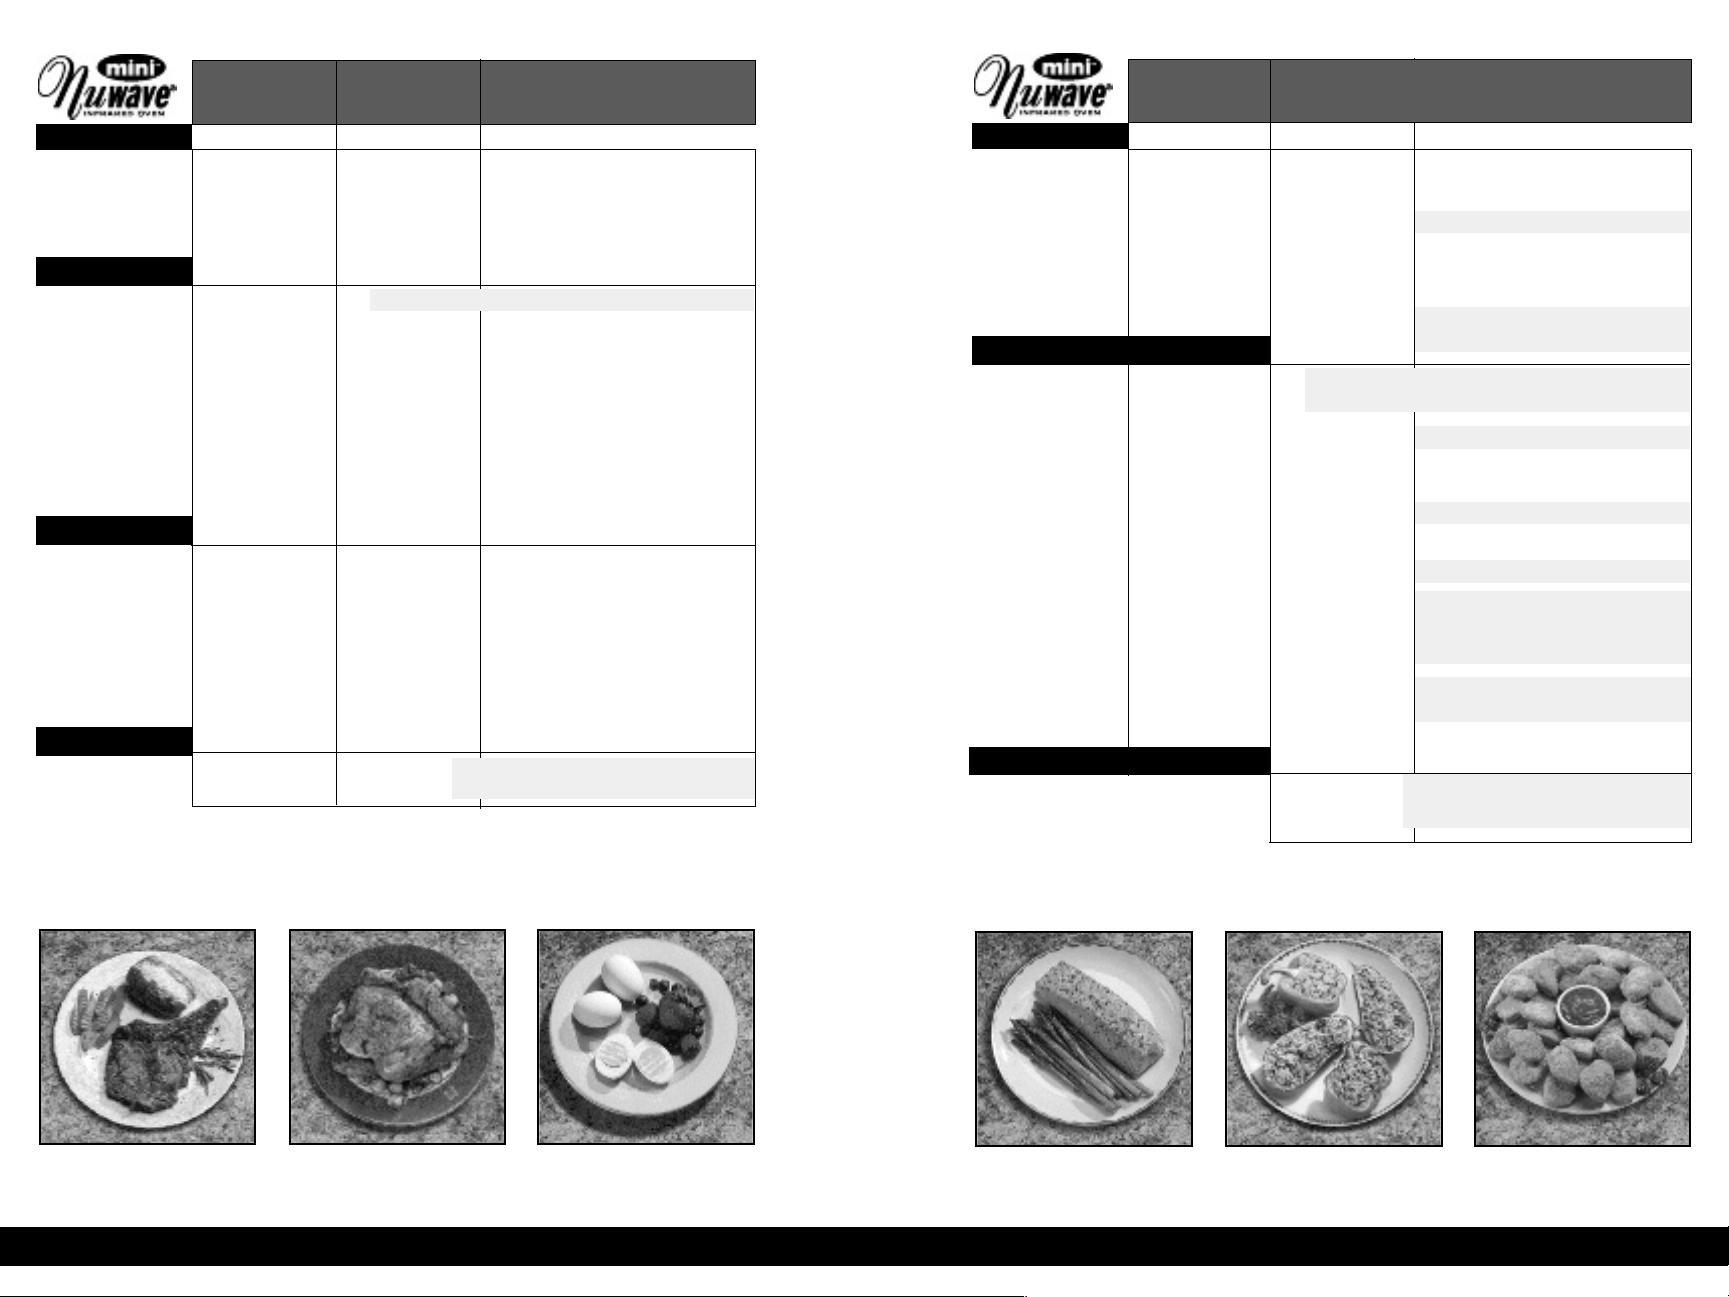
Scallops and/or Lobster turn opaque
when cooking is complete.
Cut in half, remove seeds and
membrane, place in shallow dish,
brush with oil.
Fresh Frozen For Best Results
Time Time Notes:
COOKING GUIDE • 14
13 • THE NUWAVE MINI COMPLETE COOKBOOK
Place directly on rack.
Covering with foil may increase time.
Seafood:
Fish: Fillets 3-4 min/side 5-7 min/side 150˚F (65˚C)
(
1
/
2” thick)
Shrimp 3-4 min/side 4-6 min/side
Cooking time may vary with size.
(Medium
21
/
25 size)
Scallops, Sea 4 min/side 5 min/side
Scallops, Bay 3 min/side 3-4 min/side
Lobster Tails 4oz. 4 min/side 6 min/side
Vegetables / Fruits:
Corn on the Cob 5 min/side Alternative, season to taste and wrap in foil.
Root Vegetables 20-30 min. Cut into 2 inch cubes. spray with oil.
Potatoes: Whole 45-47 min. 8 ounces each
1
/
2 Lengthwise 30 min.
French Fries 20 min.
Roasted Onions 20 min.
Cut
1
/
2 inch top, brush with oil.
Roasted Garlic 25 min.
Steamed Broccoli 7-9 min.
Varies with thickness.
Squash 30-35 min.
Eggplant 12-15 min.
(
1
/
2” slices)
Baked Apples 18-20 min.
Remove core.
Baked Pears 20-25 min. Cut in half, remove core.
Snacks / Convenient Foods
Pre-Cooked Frozen Appetizers: 6-8 min/side
Egg rolls, poppers, hot wings,
onion rings, mozzarella sticks, etc.
Fresh Frozen Internal Meat Temperature
Time Time (by thermometer) / Notes:
Beef / Lamb:
Patties (
1
/
2” thick) 4-5 min/side 6-7 min/side 150˚F (65˚C)
Steaks (1” thick) 5-6 min/side 11 min/side Rare 135˚-140˚F (60˚C)
6-7 min/side 13 min/side Med. Rare 140˚-150˚F (66˚C)
7-8 min/side 14 min/side Medium 150˚-160˚F (71˚C)
9-10 min/side 18 min/side Well-Done 160˚-170˚F (77˚C)
Pork:
Bacon 8 minutes For Extra Crispy, flip & cook an additional 2 minutes.
Sausage Links 4 min/side 5 min/side
Patties 5 min/side 7 min/side 165˚F (74˚C)
Italian, Bratwurst 5 min/side 8 min/side 165˚F (74˚C)
Chops 5 min/side 10-12 min/side 160˚-170˚F (71˚-77˚C)
Tenderloins, small 10-12 min/side 20 min/side 160˚-170˚F (71˚-77˚C)
Spare Ribs 15 min/side 25 min/side 160˚-170˚F (71˚-77˚C)
Country Style Ribs 13 min/side 20 min/side 160˚-170˚F (71˚-77˚C)
Hot Dogs 6 min/side 10 min/side 150˚F (65˚C)
Poultry:
Pieces: 10 min/side 13 min/side 170˚F (76˚C)
Breasts, Legs, Thighs
Whole 15 min/lb. 23-25 min/lb. 180˚F (82˚C)
Breasts
Boneless/Skinless 7-8 min/side 10 min/side 170˚F (76˚C)
Cornish Hen 15-20 min/lb. 30-35 min/lb. 170˚-180˚F (77˚-82˚C)
Whole (1-1
1
/
2 lb.)
Eggs:
Boiled 8-11 min. Cook time based on doneness. Let cool,
rinse with cool water, peel, and serve.