Loading ...
Loading ...
Loading ...
• Fasten the front and side beams on the paired legs
with hex carriage bolts, washers and hex nuts.
• Set stand in an upright position, ensuring that the
holes on the top edge of the panels line up suffi-
ciently to allow hex head screws to pass through.
Tighten fully the hex carriage bolts and hex nuts.
• Press rubber feet on to the end of stand legs.
• With assistance lift band saw and carefully position
in place on top of stand.
• Fix in position using hex head screw, through wash-
er, band saw base, stand, and washer. Secure on
underside with hex nut. Repeat procedure for all four
corners before tightening fully.
WARNING: To Avoid back injury, get help lifting the
band saw. Bend your knees, lift with your legs, not your
back.
(STD) Standard hardware item available locally.
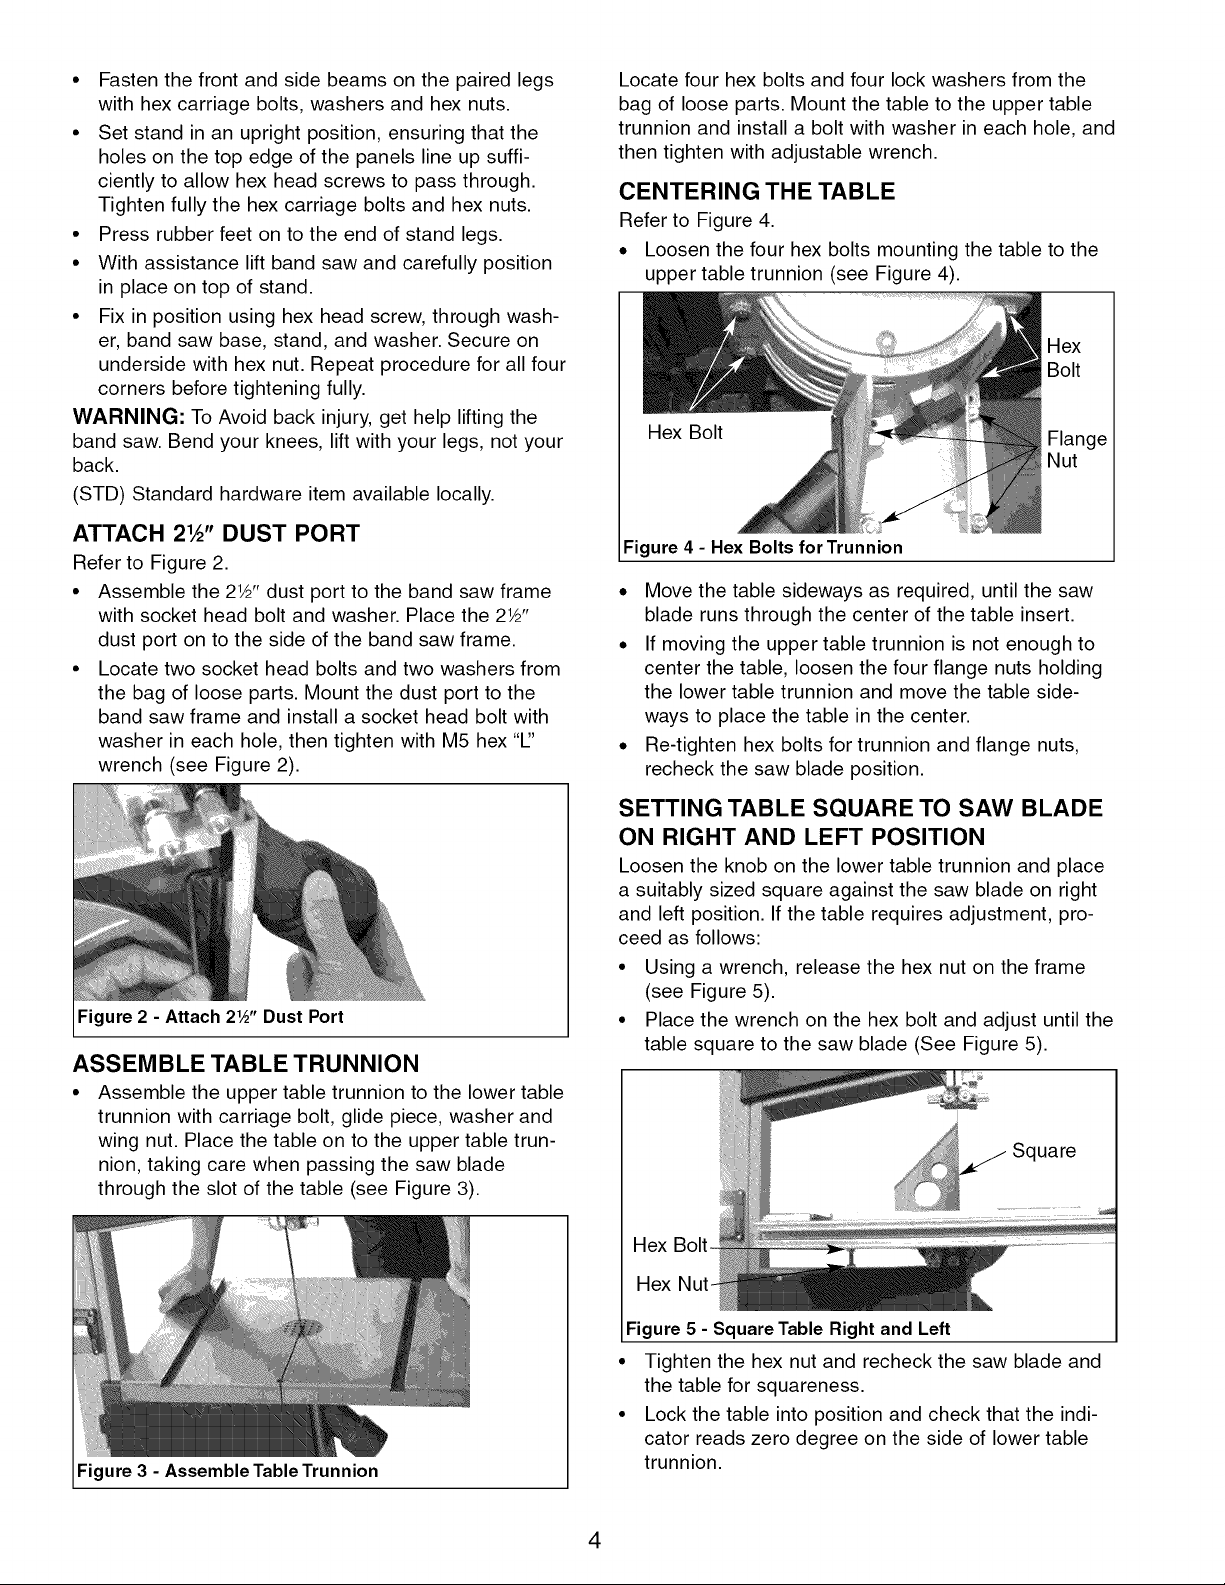
ATTACH 21_" DUST PORT
Refer to Figure 2.
• Assemble the 2W' dust port to the band saw frame
with socket head bolt and washer. Place the 2½"
dust port on to the side of the band saw frame.
• Locate two socket head bolts and two washers from
the bag of loose parts. Mount the dust port to the
band saw frame and install a socket head bolt with
washer in each hole, then tighten with M5 hex '1"
wrench (see Figure 2).
Figure 2 - Attach 21/_" Dust Port
ASSEMBLE TABLE TRUNNION
Assemble the upper table trunnion to the lower table
trunnion with carriage bolt, glide piece, washer and
wing nut. Place the table on to the upper table trun-
nion, taking care when passing the saw blade
through the slot of the table (see Figure 3).
Figure 3 - Assemble Table Trunnion
Locate four hex bolts and four lock washers from the
bag of loose parts. Mount the table to the upper table
trunnion and install a bolt with washer in each hole, and
then tighten with adjustable wrench.
CENTERING THE TABLE
Refer to Figure 4.
• Loosen the four hex bolts mounting the table to the
upper table trunnion (see Figure 4).
Hex Bolt
Figure 4 - Hex Bolts for Trunnion
• Move the table sideways as required, until the saw
blade runs through the center of the table insert.
• If moving the upper table trunnion is not enough to
center the table, loosen the four flange nuts holding
the lower table trunnion and move the table side-
ways to place the table in the center.
• Re-tighten hex bolts for trunnion and flange nuts,
recheck the saw blade position.
SETTING TABLE SQUARE TO SAW BLADE
ON RIGHT AND LEFT POSITION
Loosen the knob on the lower table trunnion and place
a suitably sized square against the saw blade on right
and left position. If the table requires adjustment, pro-
ceed as follows:
• Using a wrench, release the hex nut on the frame
(see Figure 5).
• Place the wrench on the hex bolt and adjust until the
table square to the saw blade (See Figure 5).
aex
Hex
Figure 5 - Square Table Right and Left
• Tighten the hex nut and recheck the saw blade and
the table for squareness.
• Lock the table into position and check that the indi-
cator reads zero degree on the side of lower table
trunnion.
4
Loading ...
Loading ...
Loading ...