
Operating Instructions
Before first use of the unit
read these operating instructions
and act in accordance with them.
59689840 (05/19)
WD 3 P
11
12
13
14
15
16
17
18
2
3

4
– 5
Dear Customer,
Before using your appliance for the
first time, read these original operating
instructions, act in compliance with
them, and keep them for later use or
for subsequent owners.
In accordance with the descriptions and the safety infor-
mation in these operating instructions the appliance is
intended for use as a multi-purpose vacuum cleaner.
This appliance has been designed for use in private
households and is not intended for commercial use.
– Protect the unit from rain. Do not store outside.
– This device may not be used to suck in ash and
soot.
Use the multi-purpose vacuum cleaner only with:
– Original filter bag.
– Original spare parts, accessories and special ac-
cessories.
The manufacturer is not responsible for any damages
that may occur on account of improper use or wrong op-
erations.
The packaging material can be recycled. Please
do not place the packaging into the ordinary re-
fuse for disposal, but arrange for the proper re-
cycling.
Old appliances contain valuable materials that
can be recycled. Please arrange for the proper
recycling of old appliances. Please dispose your
old appliances using appropriate collection sys-
tems.
Electrical and electronic devices often contain compo-
nents which could potentially pose a danger to human
health and the environment if handled or disposed of in-
correctly. However, these components are necessary
for the proper operation of the device. Devices marked
with this symbol must not be disposed of with regular
household rubbish.
Filters and filter bags are made from environment-
friendly materials.
They can therefore be disposed off through the normal
household garbage provided you have not sucked in
substances that are not permitted to be thrown into
household garbage.
Notes about the ingredients (REACH)
You will find current information about the ingredients
at:
www.kaercher.com/REACH
The warranty terms published by the relevant sales
company are applicable in each country. We will repair
potential failures of your appliance within the warranty
period free of charge, provided that such failure is
caused by faulty material or defects in manufacturing. In
the event of a warranty claim please contact your dealer
or the nearest authorized Customer Service centre.
Please submit the proof of purchase.
Our KÄRCHER branch will be pleased to help you fur-
ther in the case of questions or faults.
At the end of the operating instructions you will find a se-
lected list of spare parts that are often required.
You can procure the spare parts and the attachments
from your dealer or your KÄRCHER branch office.
DANGER
– The appliance may only be
connected to alternating cur-
rent. The voltage must corre-
spond with the type plate on
the appliance.
– Never touch the mains plug
and the socket with wet
hands.
– Do not pull the plug from the
socket by pulling on the con-
necting cable.
– Check the power cord with
mains plug for damage be-
fore every use. To avoid risks,
arrange immediately the ex-
change by an authorized cus-
tomer service or a skilled
electrician, if the power cord
is damaged.
– To avoid accidents due to
electrical faults we recom-
mend the use of sockets with
a line-side current-limiting cir-
cuit breaker (max. 30 mA
nominal tripping current).
Contents
General notes EN 5
Safety instructions EN 5
Description of the Appliance EN 7
Operation EN 8
Care and maintenance EN 9
Troubleshooting EN 9
Technical specifications EN 9
General notes
Proper use
Environmental protection
Disposing the filters and filter bags
Warranty
Customer Service
Ordering spare parts and special
attachments
Safety instructions

– 6
– Turn off the appliance and re-
move the mains plug prior to
any care and maintenance
work.
– Repair works may only be
performed by the authorised
customer service.
WARNING
– This appliance is not intended
for use by persons with limit-
ed physical, sensory or men-
tal capacities or lacking expe-
rience and/or skills, unless
such persons are accompa-
nied and supervised by a per-
son in charge of their safety
or they have received precise
instructions on the use of this
appliance and have under-
stood the resulting risks.
– Children may only use this
appliance if they are over the
age of 8 and supervised by a
person in charge of their safe-
ty, or if they have received in-
structions on the use of this
appliance and have under-
stood the resulting risks.
– Children must not play with
this appliance.
– Supervise children to prevent
them from playing with the
appliance.
– Cleaning and user mainte-
nance must not be performed
by children without supervi-
sion.
– Keep packaging film away
from children - risk of suffoca-
tion!
– Switch the appliance off after
every use and prior to every
cleaning/maintenance proce-
dure.
– Risk of fire. Do not vacuum up
any burning or glowing ob-
jects.
– The appliance may not be
used in areas where a risk of
explosion is present.
– Immediately switch the appli-
ance off or pull the power plug
if foam forms or liquids es-
cape!
– Do not use abrasives, glass
or universal cleaners! Never
immerse the appliance in wa-
ter.
Certain materials may produce
explosive vapours or mixtures
when agitated by the suction air!
Never vacuum up the following
materials:
– Explosive or combustible
gases, liquids and dust parti-
cles (reactive dust particles)
– Reactive metal dust particles
(such as aluminium, magne-
sium, zinc) in combination
with highly alkaline or acidic
detergents
– Undiluted, strong acids and
alkalies
– Organic solvents (such as
petrol, paint thinners, ace-
tone, heating oil).
In addition, these substances
may cause the appliance materi-
als to corrode.
– 7
DANGER
Pointer to immediate danger,
which leads to severe injuries or
death.
몇 WARNING
Pointer to a possibly dangerous
situation, which can lead to se-
vere injuries or death.
몇 CAUTION
Pointer to a possibly dangerous
situation, which can lead to mi-
nor injuries.
ATTENTION
Pointer to a possibly dangerous
situation, which can lead to
property damage.
Illustrations on fold-out page!
When unpacking the product, make sure
that no accessories are missing and that
none of the package contents have been
damaged. If you detect any transport
damages please contact your dealer.
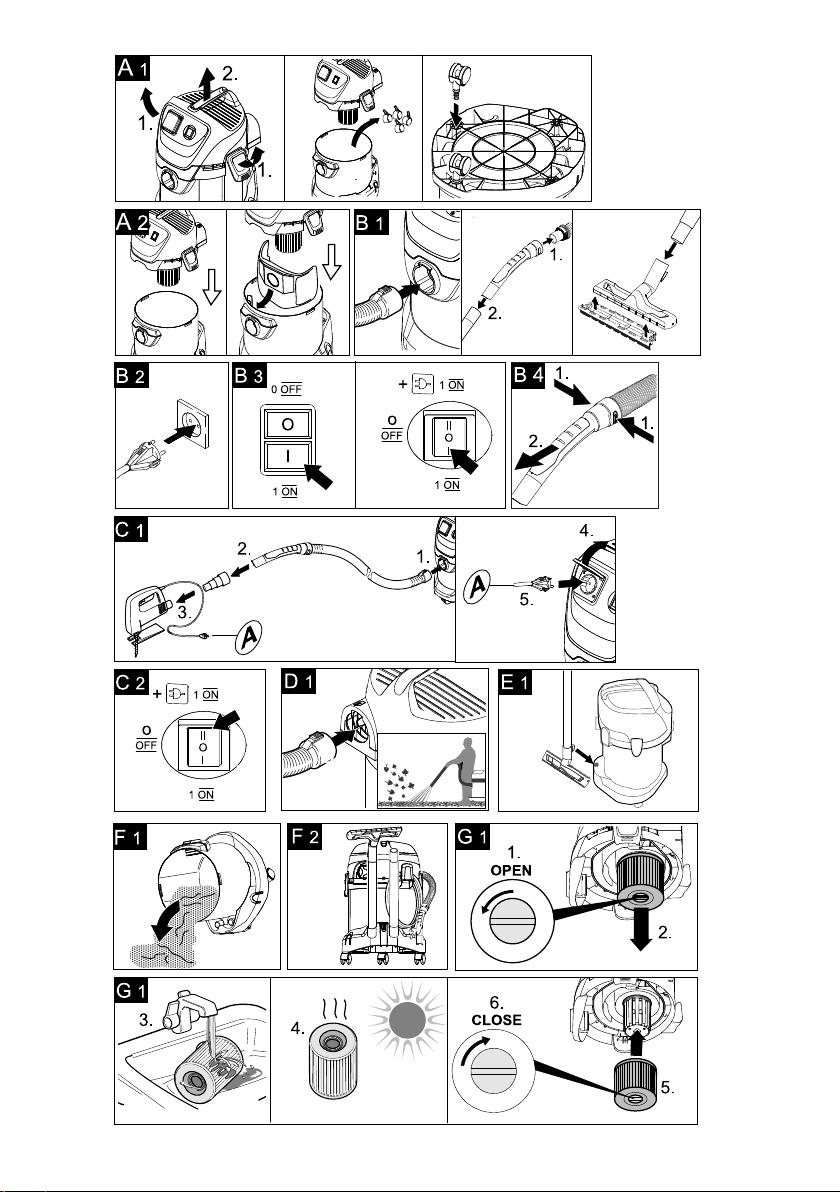
Illustration
To connect the suction hose during vacuuming.
Illustration
Position I: Suction or blowing
Position 0: Appliance is switched off
Illustration
Position I: Suction or blowing
Position II: Automatic vacuuming with connected
electric tool
Position 0: Appliance and the connected electric
tool are switched off
Note: Observe the maximum connected load (see
Chapter "Technical data").
Illustration
To connect an electric tool.
To carry the appliance or to remove the appliance
head after unlocking.
Illustration
To store the mains cable.
Illustration
Connect the suction hose to the blower connection,
this will activate the blower function.
Illustration
Pull out to open, push in to lock.
Illustration
To rest the floor nozzle during work interruptions.
Illustration
The accessories compartment allows the storage
of suction pipes and suction nozzles on the appli-
ance.
Illustration
The steering rollers are located in the waste con-
tainer when the appliance is delivered. These must
be attached prior to starting up the appliance.
Note: Do not use a filter bag for wet vacuuming!
Illustration
Recommendation: To vacuum fine dust, use the
filter bag.
Illustration
The cartridge filter must always be installed - with
wet and dry vacuuming.
Note: Let the wet cartridge filter dry prior to using it for
dry vacuuming.
Hazard levels
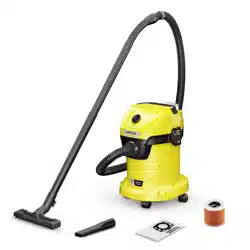
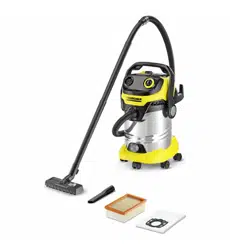
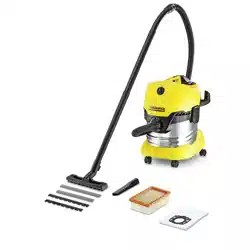
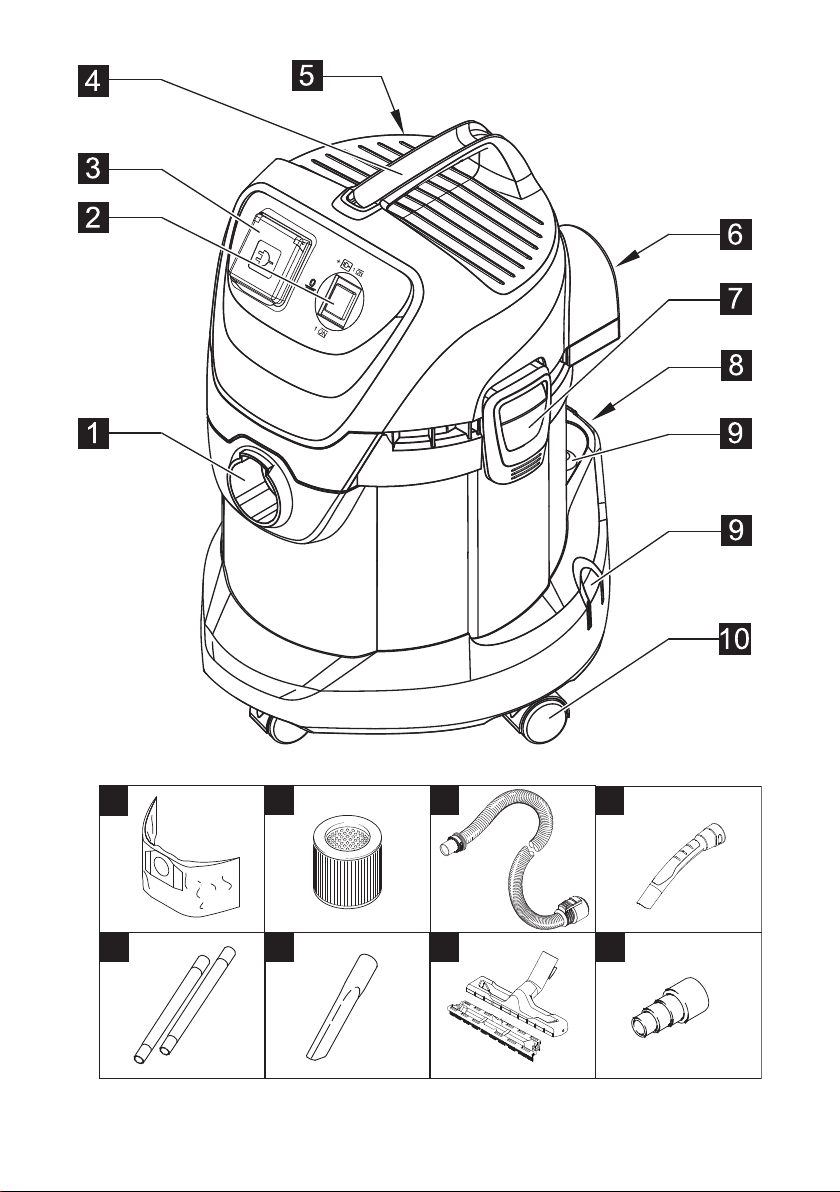
Description of the Appliance
Suction hose connection
ON/OFF switch for appliance
(without built-in socket)
ON/OFF switch for appliance
(with built-in socket)
Machine socket
Carrying handle
Cable hook
Blowing connection
Container closure
Parking position
Accessory mount
Steering roller
Filter bag
Cartridge filter

– 8
Illustration
Push the suction hose into the connection on the
appliance, it snaps in place.
In order to disconnect it, push down with your
thumb and pull the suction hose out.
Note: Accessories, such as suction brushes (optional)
can be directly attached to the connecting piece and
thus connected to the suction hose.
For convenient working even in tight spaces.
The removable handle can be attached between the ac-
cessories and the suction hose if necessary.
See position 14.
Recommendation: In order to vacuum the floor, attach
the handle to the suction hose.
Illustration
Connect the handle with the suction hose until it
snaps in place.
Illustration
To remove the handle from the suction hose, press
the notch using your thumb and pull off the handle.
Note: Due to removing the handle, accessories can be
directly attached to the suction hose.
Recommendation: In order to vacuum the floor, attach
the handle to the suction hose.
See position 13.
Illustration
Put both suction tubes together and connect them
with the handle.
For edges, joints, heaters and hard to reach loca-
tions.
Illustration
Note: For vacuuming dry dirt or water off the floor -
always work with the insert (brush strip and rubber
lip) in the floor nozzle.
Illustration
To connect the suction hose with an electric tool
Adapt the adapter to the connection diameter of the
electric tool using a knife if necessary.
ATTENTION
Always work with an inserted cartridge filter during wet
as well as dry vacuum cleaning!
Illustration
Mount loose parts delivered with appliance prior to
start-up.
Illustration
Connect accessories.
Illustration
Plug in the mains plug.
Illustration
Turn on the machine.
ATTENTION
Check the filter for damage prior to installation and re-
place as necessary.
Work with a dry cartridge filter only!
Illustration
Recommendation: To vacuum fine dust, use the
filter bag.
– The filling level of the filter bag depends on the dirt
that is sucked in.
– The filter bag needs to be replaced more frequently
while sucking in fine dust, sand, etc.
– Clogged filter bags can burst - therefore make sure
to replace the filter bag in a timely manner!
ATTENTION
Vacuum cold ashes only when using a pre-filter.
Order no. basic design: 2.863-139.0, premium design:
2.863-161.0.
For vacuuming up moisture or liquids pay attention
to the correct floor nozzle insert and connect the
corresponding accessories.
ATTENTION
Do not use a filter bag!
Note: If the container is full, a float closes the suction
opening, and the appliance works at a higher speed.
Switch off the appliance immediately, and empty the
container.
Illustration
Adapt the adapter to the connection diameter of the
electric tool using a knife if necessary.
Connect the adapter to the handle of the suction
hose and connect it to the electric tool connection.
Connect the mains plug of the electric power tool to
the vacuum cleaner.
Illustration
Switch the vacuum cleaner to Position II and start
working.
Suction hose with connecting piece
Removable handle
Suction tubes 2 x 0.5 m
Crevice nozzle
Floor nozzle
Adapter
Operation
Before Startup
Start up
Dry vacuum cleaning
Information filter bag
Wet vacuum cleaning
Working with electrical power tools
– 9
Note: As soon as the electric tool is switched on, the
suction turbine starts with a 0.5 second delay. If the
electric tool is switched off, the suction turbine contin-
ues to run for approx. 5 seconds in order to vacuum up
the remaining dirt in the suction hose.
Cleaning hard to reach locations or, where vacuuming
is not possible, like leaves from a gravel bed.
Illustration
Connect the suction hose to the blower connection,
this will activate the blower function.
Turn off the appliance.
Illustration
Hook the floor nozzle into the parking position.
Turn off the appliance and disconnect the mains
plug.
Illustration
Remove the appliance head and empty the reser-
voir.
Illustration
Stow away the mains cable and accessory at the
machine. Store the appliance in a dry room.
Clean the appliance and accessory parts made of
plastic with a commercial plastic cleaner.
If required, rinse the container and accessories
with water properly and dry them before reuse.
Illustration
Only clean the cartridge filter under running water;
do not wipe or brush. Let it dry completely prior to
installation.
If the cleaning power of the appliance deteriorates
please check the following:
Accessories, suction hose or suction pipes are
clogged, please remove the obstruction using a
stick.
Illustration
Filter bag is full, install new filter bag.
Illustration
Cartridge filter is dirty, knock off dirt from cartridge
filter and clean under running water if necessary.
Replace damaged cartridge filter.
Subject to technical modifications!
Australia
KÄRCHER Pty. Ltd.
385 Ferntree Gully Road,
Mount Waverley, Victoria, AU. 3149
1800 675 714 (Free Call)
www.karcher.com.au
New Zealand
Karcher Ltd.
66 Allens Road,
East Tamaki, Aukland
(09) 274-4603
www.karcher.co.nz
Blowing function
Interrupting operation
Finish operation
Empty the container
Storing the appliance
Care and maintenance
Troubleshooting
Decreasing cleaning power
Technical specifications
Mains voltage 220 - 240 V
Frequency 50-60 Hz
Output P
nom
1000 W
Max. connection output of appli-
ance socket
1300 W
Mains fuse (slow-blow) 10 A
Container capacity 17 l
Water intake with handle 10 l
Water intake with floor nozzle 8 l
Power cord H 05VV-F3G1,5
Weight (without accessories) 5,7 kg
Sound pressure level
(EN 60704-2-1)
75 dB(A)
Customer Service

www.kaercher.com/dealersearch
Alfred Kärcher 6( & Co. KG
Alfred-Kärcher-Str. 28-40
71364 Winnenden (Germany)
Tel.: +49 7195 14-0
Fax: +49 7195 14-2212