Loading ...
Loading ...
23. DIRECTION OF FEED. Feed work into a blade or cutter
against the direction of rotation of the blade or cutter
only.
24. WARNING: Dust generated from certain materials can
be injurious to your health. Always operate saw in well
ventilated areas and provide for proper dust removal.
SPECIFMC SAFETY INSTRUCTmONS
FOR THE TABLE SAW
1.
ALWAYS USE SAW BLADE GUARD spreader and
anti-kickback pawls for every operation fer which
they can be used, including through-sawing.
Through-sawing operations are those in which the
blade cuts completely through the workpiece
when ripping or cress-cutting,
2. ALWAYS HOLD THE WORK FIRMLY against the
miter gauge or rip fence.
.
USE A PUSH STICK when required. Always use a
push stick for ripping narrow stock. Refer to ripping
applications in the instruction manual where the
push stick is covered in detail. See the push stick
pattern included in this Owner's Manual.
. NEVER PERFORM ANY OPERATION
"FREE HAND", which means using your hands
only to support or guide the werkpiece. Always
use either the fence or the miter gauge to position
and guide the work.
5. NEVER STAND or have any part of your body
in line with the path of the saw blade. Keep your
hands out of the line of the saw blade.
6. NEVER REACH behind or over the cutting tool
for any reason.
7. REMOVE the rip fence when cross-cutting.
8. DO NOT USE molding head set with this saw.
9. FEED WORK INTO THE BLADE against the
direction of rotation only.
10. NEVER use the fence as a cut-off gauge when
cross-cutting.
1i. NEVER ATTEMPTTO FREE A STALLED SAW
BLADE without first turning the saw OFR Turn
power switch OFF immediately to prevent motor
damage.
12.
13.
t4.
PROVIDE ADEQUATE SUPPORT to the rearand
sides of the saw table for wide or long Wbrkpiece_i
AVOID KICKBACKS (work thrown back towards
you) by keeping the blade sharp, keeping the rip
fence )arallel to the saw blade, and by keeping the
spreader, anti-kickback pawls, and guard in place
and functioning. Do not release work before it is
pushed all the way past the saw blade. Do not rip
work that is twisted, warped, or does not have a
straight edge to guide along the fence.
AVOID AWKWARD OPERATIONS and hand
positions where a sudden slip could cause your
hand to move into the cutting tool.
15.
NEVER USE SOLVENTS to clean plastic parts.
Solvents could possibly dissolve or otherwise
damage the material. Only a soft damp cloth should
be used to clean plastic parts.
16. MOUNT your table saw before performing any
cutting operations. Refer to installation instructions.
17. NEVER CUT METALS or materials which may make
hazardous dust.
18.
ALWAYS USE IN A WELL VENTILATED AREA.
Remove sawdust frequently. Clean out sawdust from
the interior of the saw to prevent a potential fire
hazard.
19. NEVER LEAVE THE TOOL running unattended.
Don't leave the too! until it comes to a complete stop.
20.
For proper operation follow the instructions of this
owner's manual titled "SAW MOUNTED TO WORK
SURFACES." Failure to provide sawdust falFthrough
and removal hole will allow sawdust to build up in
the motor area, which may result in a fire hazard or
cause motor damage.
ELECTRICAL REQUIREMENTS
POWER SUPPLY AND MOTOR
SPECIFICATIONS
To avoid electrical hazards, fire hazards, or damage to
the tool, use proper circuit protection. Use a separate
electrical circuit for your tools.Your saw is wired at the
factory for t20V operation. Connect to a 120V, 15 Amp
circuit and use a I5 Amp time delay fuse or circuit
breaker. To avoid shock or fire, if power cord is worn or
cut, or damaged in any way, have it replaced
immediately.
GROUNDING INSTRUCTIONS
IN THE EVENT OF A MALFUNCTmON OR BREAKDOWN,
grounding provides a path of least resistance for electric
current and reduces the risk of electric shock. This too!
is equipped with an electric cord that has an equipment
grounding conductor and a grounding plug. The plug
MUST be plugged into a matching receptacle that is
properly installed and grounded in accordance with ALL
local codes and ordinances.
DO NOT MODIFY THE PLUG PROVIDED. If it will not
fit the receptacle, have the proper receptacle installed
by a qualified electrician.
IMPROPER CONNECTION of the equipment grounding
conductor can result in risk ef electric shock. The
conductor with the green insulation (with or without
yellow stripes) is the equipment grounding conductor. If
repair or replacement of the electric cord or plug is
necessary, DO NOT connect the equipment grounding
conductor to a live terminal.
CHECK with a qualified electrician or service person if
you do not completely understand the grounding
instructions, or if you are not sure the tool is properly
grounded.
USE A SEPARATE ELECTRICAL CIRCUIT for your
tools. This circuit must not be less than #12 wire and
should be protected with a 15 Amp time delay fuse.
Before connecting the motor to the power line, make
sure the switch is in the OFF position and the electric
current is rated the same as the current stamped on the
motor nameplate. Running at a !ower voltage will
damage the motor.
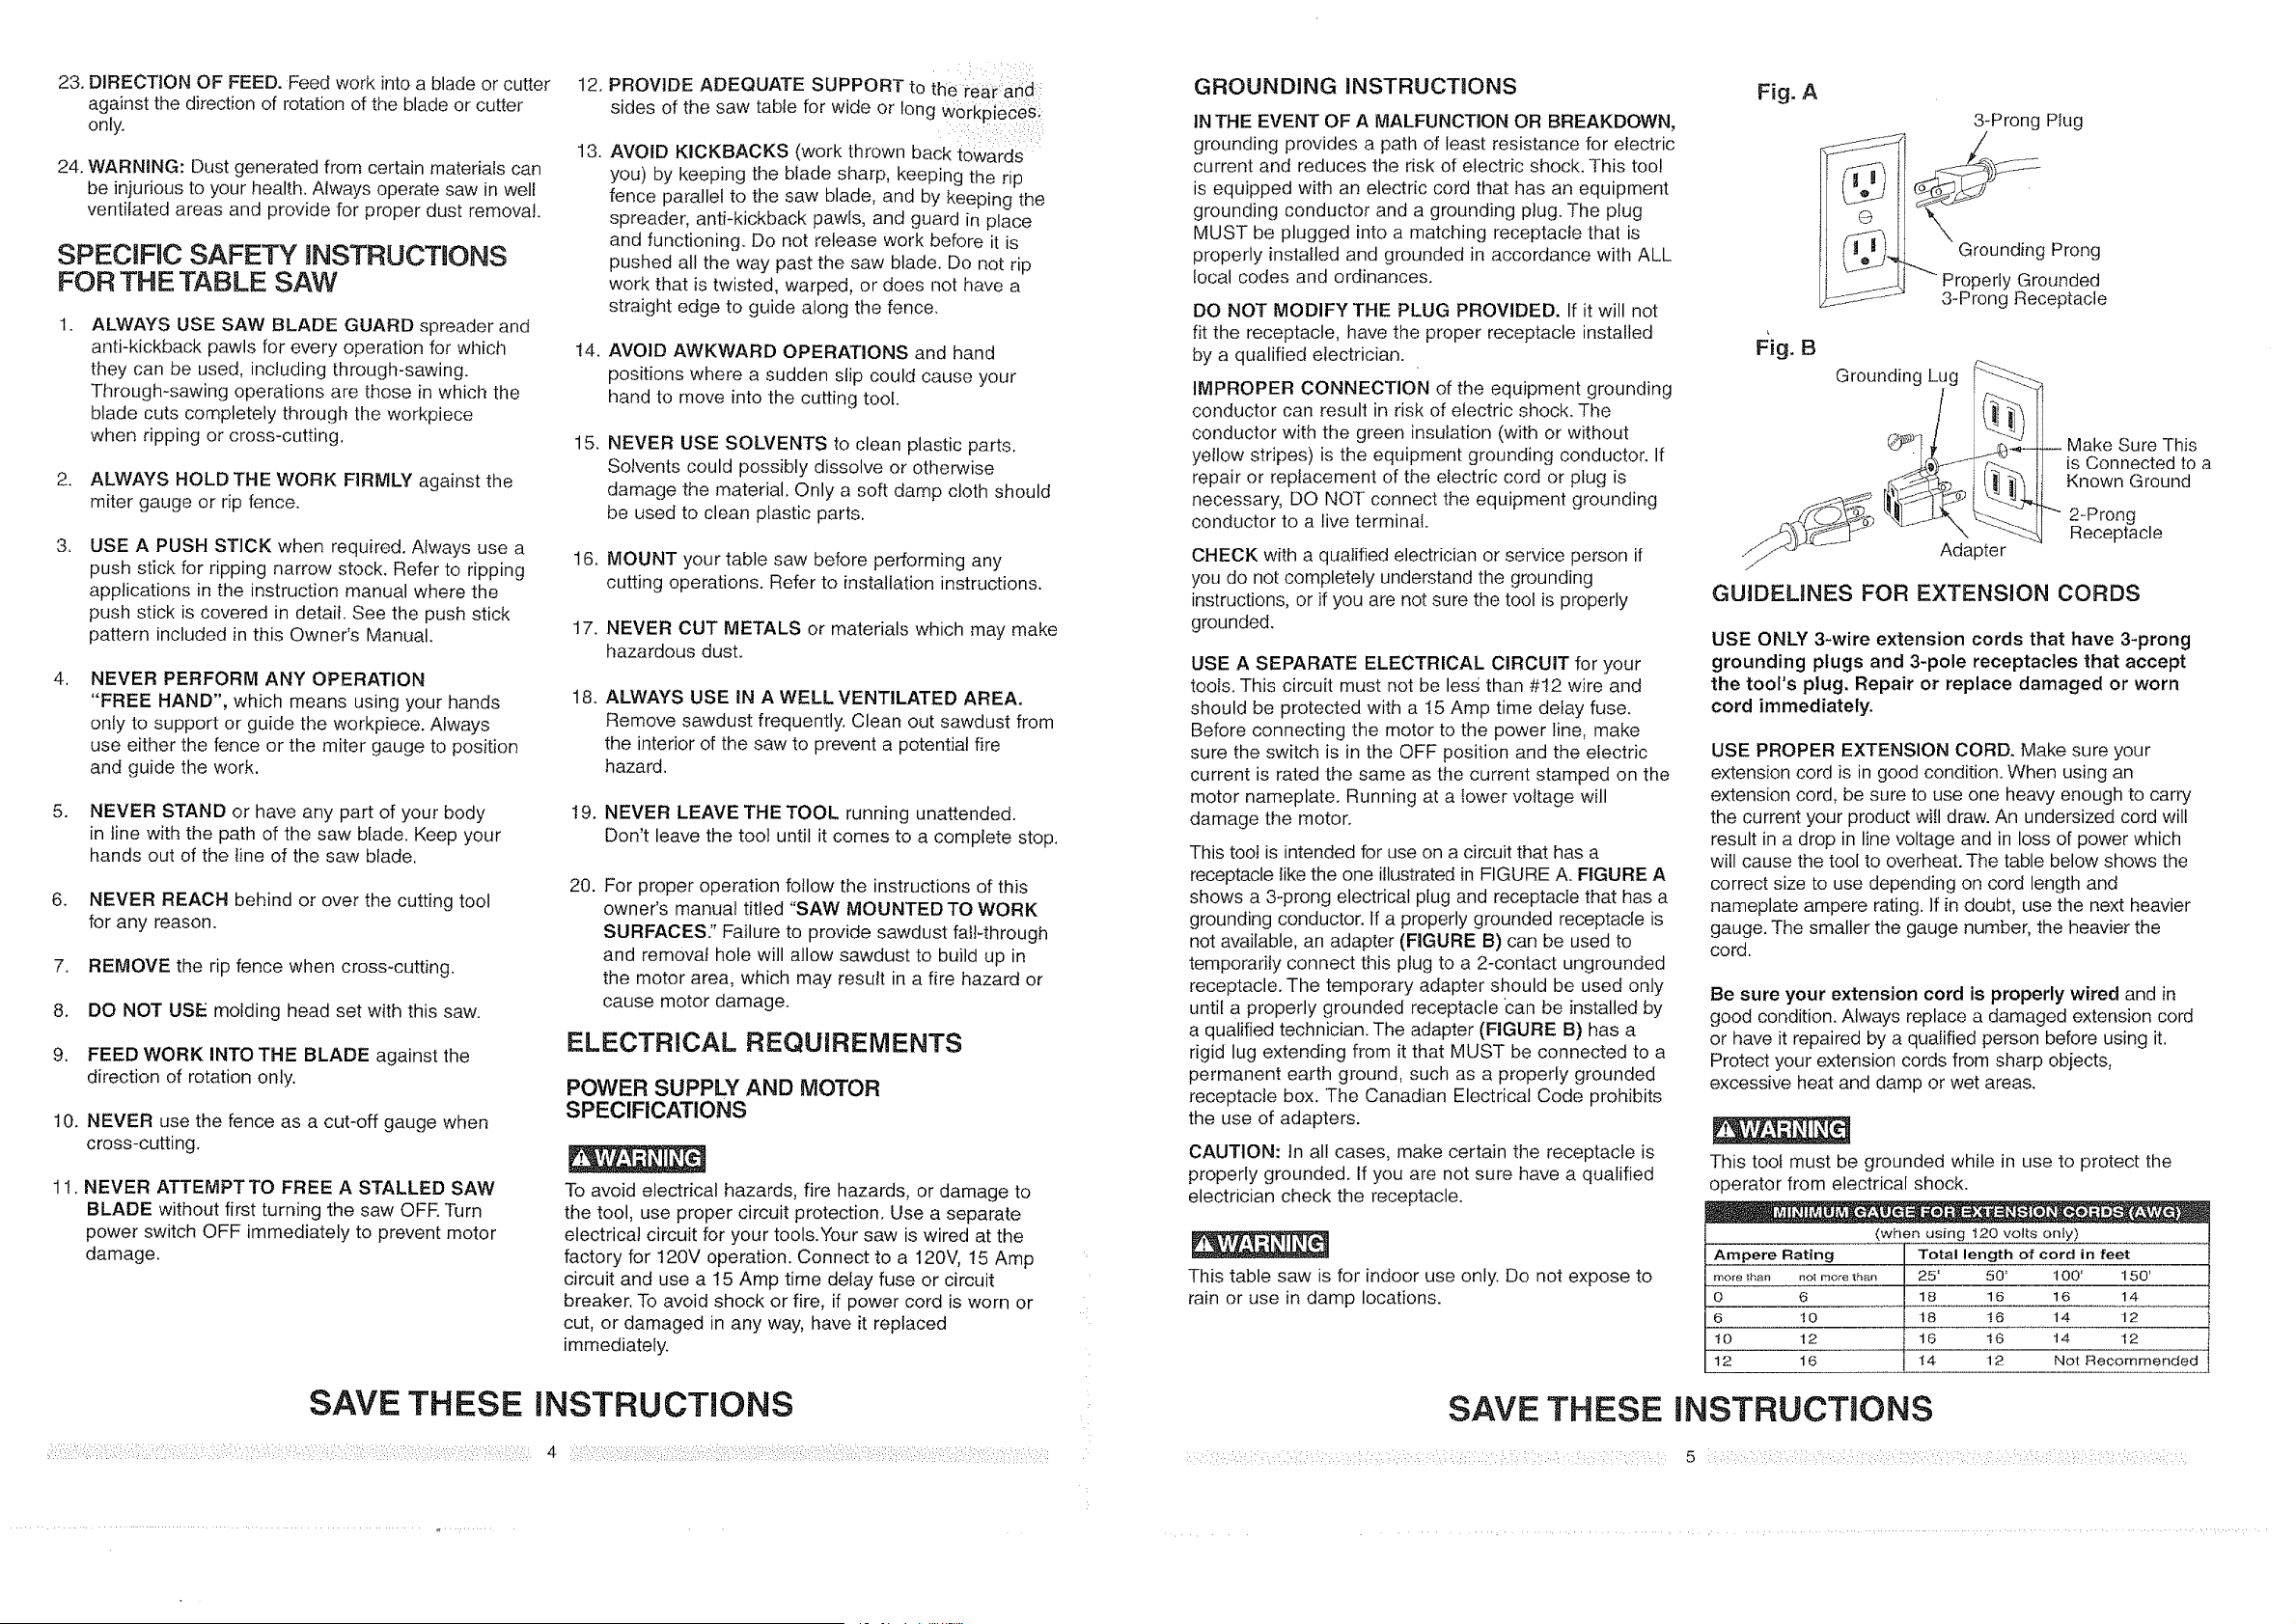
This toot is intended for use on a circuit that has a
receptacle like the one illustrated in FIGURE A. FIGURE A
shows a 3-prong electrical plug and receptacle that has a
grounding conductor. If a properly grounded receptacle is
not available, an adapter (FIGURE B) can be used to
temporarily connect this plug to a 2-contact ungrounded
receptacle. The temporary adapter should be used only
until a properly grounded receptacle can be installed by
a qualified technician. The adapter (FIGURE B) has a
rigid lug extending from it that MUST be connected to a
permanent earth ground, such as a properly grounded
receptacle box. The Canadian Electrical Code prohibits
the use of adapters.
CAUTION: tn all cases, rnake certain the receptacle is
properly grounded, if you are not sure have a qualified
electrician check the receptacle.
This table saw is for indoor use only. Do not expose to
rain or use in damp locations.
SAVE THESE
Fig. A
® i
3-Prong PIug
---....
j Prong
Properly Grounded
3-Prong Receptacle
Fig. B
Greunding_qiLug _[_'_i_
_-- Adapter
_ Make Sure This
is Connected to a
Known Greund
"" 2-Prong
Receptacle
GUIDELINES FOR EXTENSION CORDS
USE ONLY 3-wire extension cords that have 3-prong
grounding plugs and 3-pole receptacles that accept
the tool's plug. Repair or replace damaged or worn
cord immediately.
USE PROPER EXTENSION CORD. Make sure your
extension cord is in good condition. When using an
extension cord, be sure te use one heaW enough to carry
the current your product will draw. An undersized cord will
result in a drop in line voltage and in loss of power which
will cause the tool to overheat. The table below shows the
correct size to use depending on cord length and
nameplate ampere rating. If in doubt, use the next heavier
gauge. The smaller the gauge number, the heavier the
cord.
Be sure your extension cord is properly wired and in
good condition. Always replace a damaged extension cord
or have it repaired by a qualified person before using it.
Protect your extension cords from sharp objects,
excessive heat and damp or wet areas.
This toot must be grounded while in use to protect the
operator from electrical shock.
(when using 120 volts only)
Ampere Rating Total length of cord in feet
more than not more than 25' 50' 100' 150'
0 6 18 16 16 14
6 10 18 t6 14 12
10 12 16 t6 14 12
12 16 t 4 12 Not Recommended
INSTRUCTIONS
5 : ::': : ::
Loading ...
Loading ...
Loading ...