
R
?
LAUNAM S’RENWO
LEUNAM
NOITASILITU’D
elèdoM • ledoM
•
ldM
:NOITUAC
yt
efas lla wollof
dna dae
R
gnitarepo dna selur
esu tsrif erofeb snoitcurtsni
.tcudorp siht fo
: EDRAG NE ESIM
tnemevitnetta eril zelliueV
te étirucés ed sengisnoc sel
noitas
i
litu'
d
sevitceri
d
sel
ed elaitini noitasilitu'l tnava
.tiudorp ec
:AICNETREVDA
y ael euq
etnatropm
i
sE
ed salger sal sadot evresbo
ed senoiccurtsni e dadiruges
r
asu e
d
s
et
na nói
c
a
r
epo
aremirp rop otcudorpetse
.zev
RENOITIDNOC RIA ELBATROP
1. .
.
.
. .
.
.
. .
.
.
.
. .
.
.
. .
. .
. stne
t
n
o
c
f
o
e
lba
T
FITATROP RUESITAMILC
51. .
.
. . . .
.
.
. . .
.
.
. . . .
.
.
se
r
èitam s
e
d
el
baT
9
Z
6 H1N
a
d
a
naC
o
ira
t
n
O
,
h
p
l
e
uG
,
8
7
71
x
oB OP ,dt
L s
tcu
d
orP
ybn
a
D
9660-93854 ASU oihO ,yaldniF ,966 xoB OP ,cnI stcudorP ybnaD
.80.01.1 noisreV
!SNOITCURTSNIESEHTEVAS
!
SN
OI
TCUR
T
SNISE
C
REDRAGE
V
UAS
DPAC9009
stnetnoC fO elbaT
2 . .
.
.
.
. .
. .
. . .
.
.
.
.
. .
.
.
.
. .
. .
. . .
. .
.
.
.snoit
a
cificepS ti
n
U
d
na noitcudortnI
3 . . . . . . . . . . . . . . . . . . . . . . . . . . .noitamrofnI ytefaS tnatropmI dna lacirtcelE
4 . . . . . . . . . . . . . . . . . . . . . . .seirosseccA noitallatsnI dna spiT gnivaS-ygrenE
5 .
.
.
. . .
.
.
. . . .
.
.
. . .
.
.
. . .
.
.
. . . .
.
.
.
.
.
.
.
.
. . .
.
.
. .noita
ll
ats
nI
t
iK
w
o
d
niW
snoitcurtsnI gnitarepO
6
.
. . . .
.
. . . .
. . . . .
.
.
. . . .
.
. . . .
. . . . .
.
.
. . . .
.le
n
aP lortnoC
eh
t
fo
s
e
r
utaeF
7 . . . .
.
. . . .
. . . . .
.
.
. . . .
.
. . . .
.
. . . .
. . . . . .
.
. . . .
.
.
. . . .gni
n
oitidnoC
r
iA •
8 . . . . . . . . . . . . . . . . . . . . . . . . . . . . . . . . . . . . . . . . .reifidimuheD & ylnO naF •
. . . . . . . . . . . . . . . . . . . . . . . . . . . . . . . . . . . . . . . . . . . . . . . . . . .remiT-otuA •
. .
. .
.
. .
.
.
.
.
.
.
.
.
.
.
.
. .
.
. .
.
.
.
.
.
.
.
.
.
.
.
.
.
.
.
.
.
.
.
.
e
cn
anet
niaM d
na
e
ra
C
.
. . .
.
.
. .
.
.
.
.
.
.
.
. .
.
.
. .
.
.
.
.
.
.
.
. .
.
.
. .
.
.
.
.
.
.
.
. .
.
.
. .
.
.
.
. .
.
.
ytna
rraW
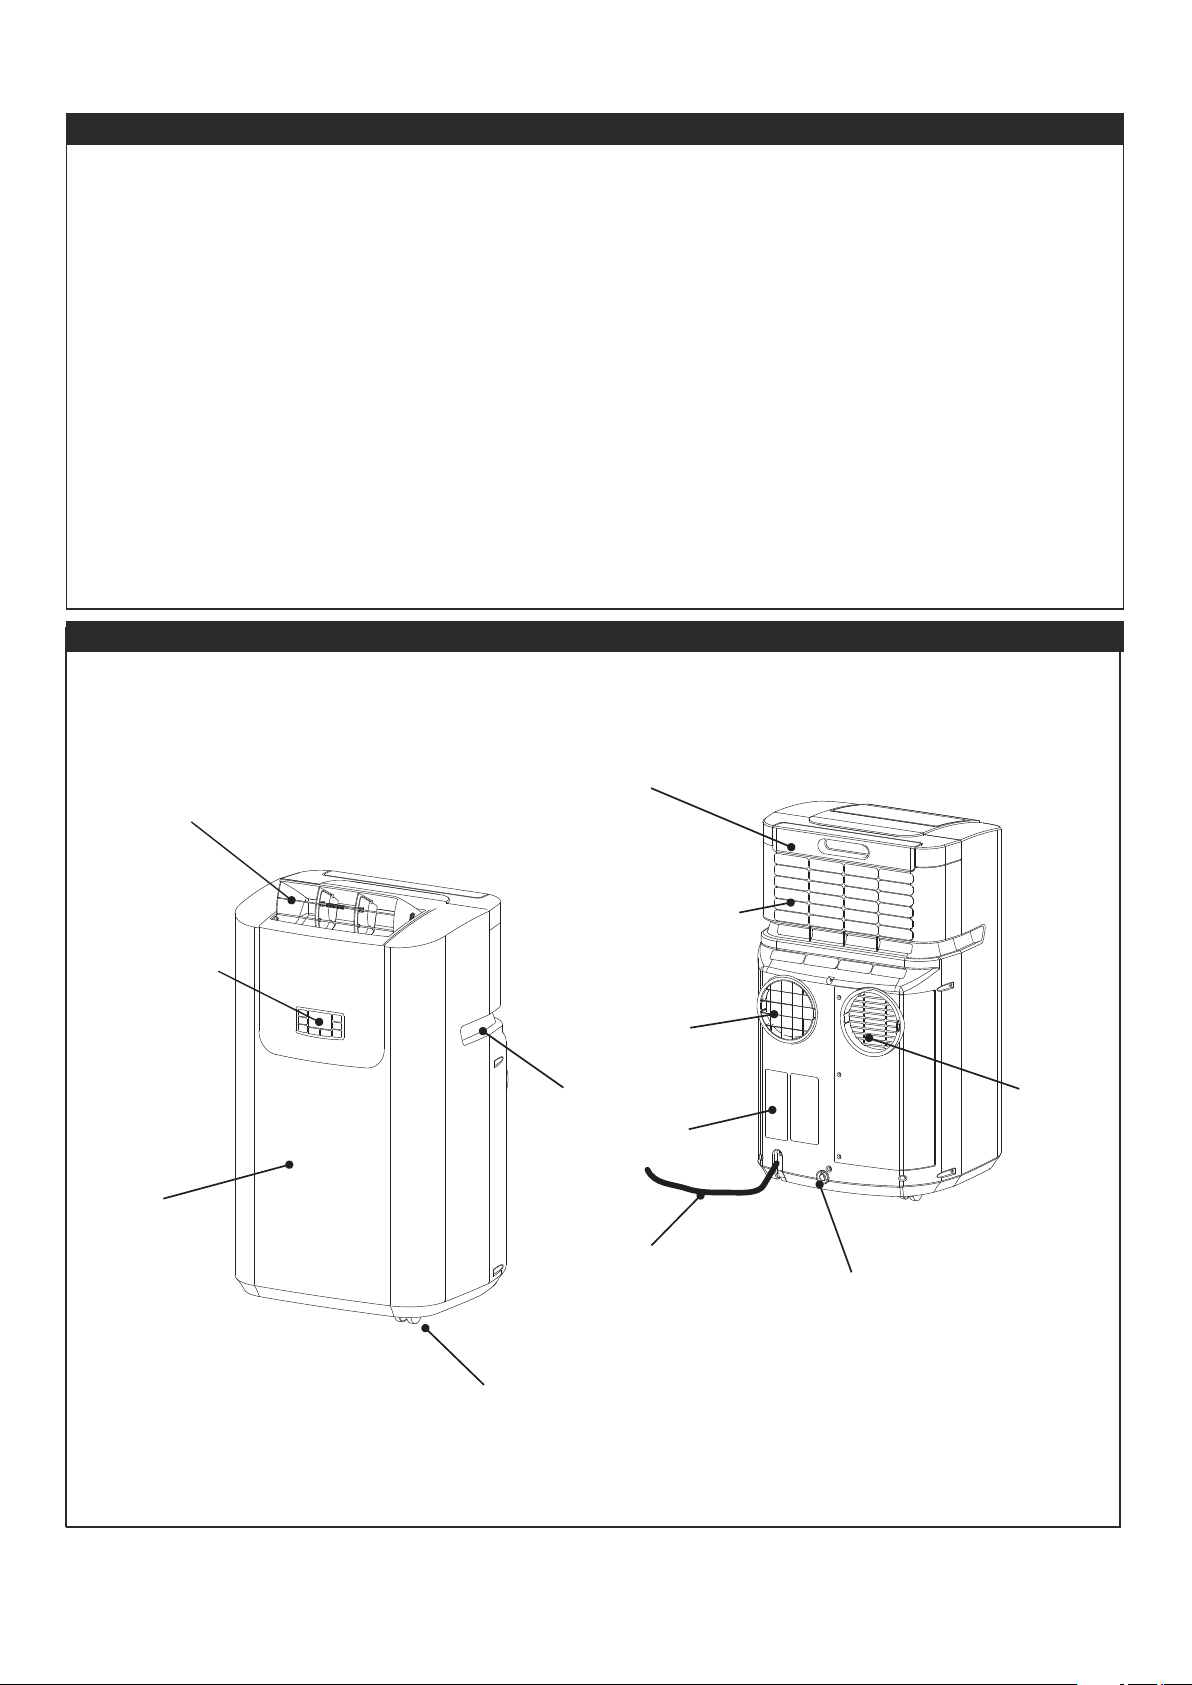
noitacifitnedI straP tinU
1
LCD Display
Front panel
Air exhaust for air to be
cooled/filtered
Handles
Wheels
Air filter
Air inlet for air
to be cooled
/filtered
Air inlet
Air outlet
Cover
Electricity cable
Water drain
.
.
.
. . .
.
.
. . .
.
.
. . .
.
.
. . . .
.
.
. . .
.
.
. . .
.
.
. .
.
.
.
.
.
. . .
.
.
. . •
Remote Control
9
10
11
12

noit
c
udo
r
tnI
”
tro
f
moC
em
o
H
“ eht fo
l
l
a
h
ti
w
y
li
m
af
r
u
oy
dn
a
uoy e
d
i
v
o
r
p
o
t
ec
n
a
i
l
ppa
Danby
Danby
Danby
a
g
n
is
o
o
hc
r
of
uo
y k
n
ahT
noitamr
o
fni elbaulav ht
i
w uoy edivorp lliw launaM s’ren
w
O sihT.ec
i
ffo ro egattoc ,e
m
oh ru
o
y rof
s
t
neme
r
iuqer
r
uoy
,de
n
i
a
t
n
i
am
ylr
e
p
o
rp
fI
.e
c
n
a
i
lppa w
en
ru
o
y
f
o
e
c
nane
tni
a
m
d
na e
ra
c
re
po
rp
eh
t
rof
yra
ss
e
cen
eht
d
a
e
r
dn
a
s
tnem
om
wef
a
ekat
esae
lP
.noitarepo eer
f
elb
u
ort fo sra
e
y ynam
uoy evi
g
lli
w
ecnailp
p
a
.e
c
n
ailppa s
i
ht f
o
s
tcep
s
a
l
a
noi
t
a
r
e
p
o
eht fo
l
l
a
htiw fle
s
ruoy
ez
i
ra
i
l
im
af
dna
ylhg
u
o
r
o
h
t s
n
oitcur
t
sni
,
e
cn
a
ilp
p
a
g
nissec
o
r
p
-r
ia
,
g
n
i
g
n
a
h
c
x
e
-r
ia m
o
or noit
c
nuf-it
l
um
a s
i
reno
i
tid
n
oC-ri
A
e
lb
a
t
ro
P
r
u
o
Y
eb nac tinu sihT.naF tnedn
e
pednI dna
gniyfidimuheD ,gnino
i
tid
n
oC
riA fo snoit
c
nuf e
h
t uo
y
reffo ot dengised
ecnei
n
evnoc
e
ht
e
n
i
gam
I
.s
e
tun
i
m ts
u
j
ni pu-
t
es
dn
a emo
h r
uo
y n
ihti
w
m
oor
o
t
m
o
or mo
r
f devom
yltne
i
n
evno
c
.erehwyna ,emityna ,spitregnif ruoy ta
trofmoC emoH elbatroP fo
e
ht htiw g
n
o
l
a ,ega
p
si
h
t ot t
p
ie
c
er
/
pils
sel
a
s
r
uo
y
fo
y
po
c
a
h
c
at
t
a
u
o
y
t
s
eg
g
u
s
ew yam
,e
c
ner
e
fer y
s
a
e roF
.tinu eht fo lenap raer eht no detacol
etalp
em
an sr
e
rut
c
afunam eht no
det
a
col
s
i hcihw noitamrof
n
i g
n
iwollof
:
rebm
uN
le
doM
_
__
____
_
__
___
_
__
__
____
_
__
__
_______
_
________
_
____
__
_:
r
e
b
m
u
N la
ire
S
____
_
_
_
__
_
_
_
_
_
____
_
_
_
____
_
_
_
____
_
________________:
e
sahc
r
uP
f
o
eta
D
__
_
______
_
_____________
_
_____________
_
___:sserddA d
n
a em
a
N s’relaeD
a tcatno
c
oT.sei
r
iu
qni
l
a
reneg rof ro/dna gnicivre
s
se
r
iuqer
t
inu r
u
oy fi d
e
r
i
u
q
er e
b
l
l
i
w
n
o
i
t
am
r
o
f
n
i
si
hT
.
E
ERF
L
L
OT y
bna
D
l
l
ac
,e
v
i
tatne
ser
p
e
R e
c
ivr
e
S
r
emot
su
C
Y
B
NAD
-
6
2-
008-1
2
:ETON
e
s
e
ht dn
a
noita
mr
ofni si
h
t
,
er
of
er
eh
T
.
tnem
ev
or
p
mi
y
d
a
ets
n
i
s
t
l
use
r
h
c
r
ae
s
er g
ni
u
n
it
no
C
.ec
i
t
o
n tuohtiw egna
h
c o
t
tc
e
jbus era s
n
o
i
t
a
cif
i
ce
p
s
sn
o
i
t
aci
f
ic
e
pS t
i
n
U
r
e
bm
uN
ledoM
y
tic
a
paC gnilooC
l
e
v
e
L
e
s
i
o
N
sdeepS naF
3
woL / muid
eM
/
hgiH
M
FC
wo
l
f
ri
A
zH 06
/
V
5
11e
c
r
u
oS
r
e
woP
tnaregirfeR
thgie
W tin
U
30-1/2”
x
"4
/
1-5
1 x
"
6/
1
-
7
1
H x
D x
W
)s
e
hc
n
i(
s
n
o
i
sn
em
iD
t
i
n
U
577 x 883 x 634H x D x W )mm( snoisnemiD tinU
lort
noC etome
R
k
c
o
lC
yaD f
o
em
i
T
r
em
iT
-
o
tuA
R-410A
).b
l 06(
gk 27.2
oN
s
eY
DPAC9009
DPAC9009
9000 Btu/h
53dB
342/318/288
oN
r
eno
i
t
i
dnoc
ria
sih
t
h
t
iw
deilp
pu
s
d
r
oc
re
wop
e
hT
eciv
e
d n
o
it
c
et
ed e
gak
ae
l tn
e
r
r
u
c
a
s
n
iat
n
o
c
ot refer esaelP.erif fo ksir eht ecuder ot dengised
eht nI.sliated rof "droC ylppuS rewoP" noitces eht
tonnac ti ,d
e
gamad si droc y
l
ppus re
w
op e
h
t
t
neve
droc wen a htiw decalper eb tsum ti deriaper eb
.rer
u
t
c
afu
n
aM
t
c
udo
r
P eh
t
m
o
rf
•eb ecived siht dluohs secnatsmucric on rednU
.ffo ro no renoitidnoc ria eht nrut ot desu
•ni dehsup eb syawla tsum nottub’TESER‘ ehT
.noitarepo tc
e
rr
o
c r
o
f
)de
g
a
g
ne(
•
sliaf ti fi decalper eb
tsum
droc ylp
p
us rewop ehT
.
n
i d
e
hsup s
i
n
ottub’T
S
ET‘ eht
n
ehw
t
eser ot
•eb
t
onnac ti ,d
e
gamad si droc y
l
ppus re
w
op e
h
t
f
I
droc wen a htiw decalper eb tsum tI.deriaper
.rerutcafunaM tcudorP eht morf deniatbo
snoitcurtsnI ytefaS tnatropmI
snoitacificepS lacirtcelE
yna evlose
r
dn
a
ylppus rewo
p
e
lbaliava kcehC.1
dna noitallatsni EROFEB smelborp gniriw
htiw ylpmoc tsum gniriw llA.tinu siht fo noitarepo
eb dna sedoc lacirtcele lanoitan dna lacol
evah uoy fI.naicirtcele deifilauq a yb dellatsni
g
ni
w
ollo
f e
h
t
g
nid
r
age
r
sno
i
t
seu
q
yna
.nai
ci
rt
c
e
le
d
eif
i
lauq a
t
catno
c
,s
noi
t
c
urt
sni
redn
u
spma etalpeman sward ecnailppa sihT.2
edoM gnilooCylreporp yna ni desu eb yam dna
dlohesuoh pma 31 esoprup lareneg ,deriw
.elcatpecer dednuorg
s
i
t
i
nu siht
,
n
o
i
t
c
e
t
o
rp
d
n
a
y
t
efa
s
ru
oy
roF
.
3
nehw gulp droc rewop eht hguorht dednuorg
ton era uoy fI.teltuo llaw gnihctam a otni deggulp
era emoh ruoy ni steltuo llaw eht rehtehw erus
d
eif
ila
uq
a t
l
u
sn
o
c
e
s
aelp
,de
dnu
o
r
g
yl
rep
o
rp
.na
ici
r
tcele
.
4
RALUGE
R
R
O SR
E
TPADA
GU
LP
ESU TO
N
OD
.
TIN
U
S
I
H
T
H
TIW SDR
OC N
OISNE
TX
E
s
i
t
i
f
I
,tinu
sih
t ht
i
w
dro
c
noi
sn
e
t
xe
n
a
e
su
ot y
ra
ssec
en
“ devorppa na esurenoitidnoc riadroc noisnetxe”
.)serots erawdrah tsom ta elbaliava( ylno
s
y
a
w
la ,yrujni lan
o
s
r
ep fo ytili
b
is
s
op eh
t
di
o
va oT.5
erofeb ,tinu eht ot ylppus rewop eht tcennocsid
.gnicivres
ro/dn
a
gn
i
l
l
atsni
1 e
lbaT
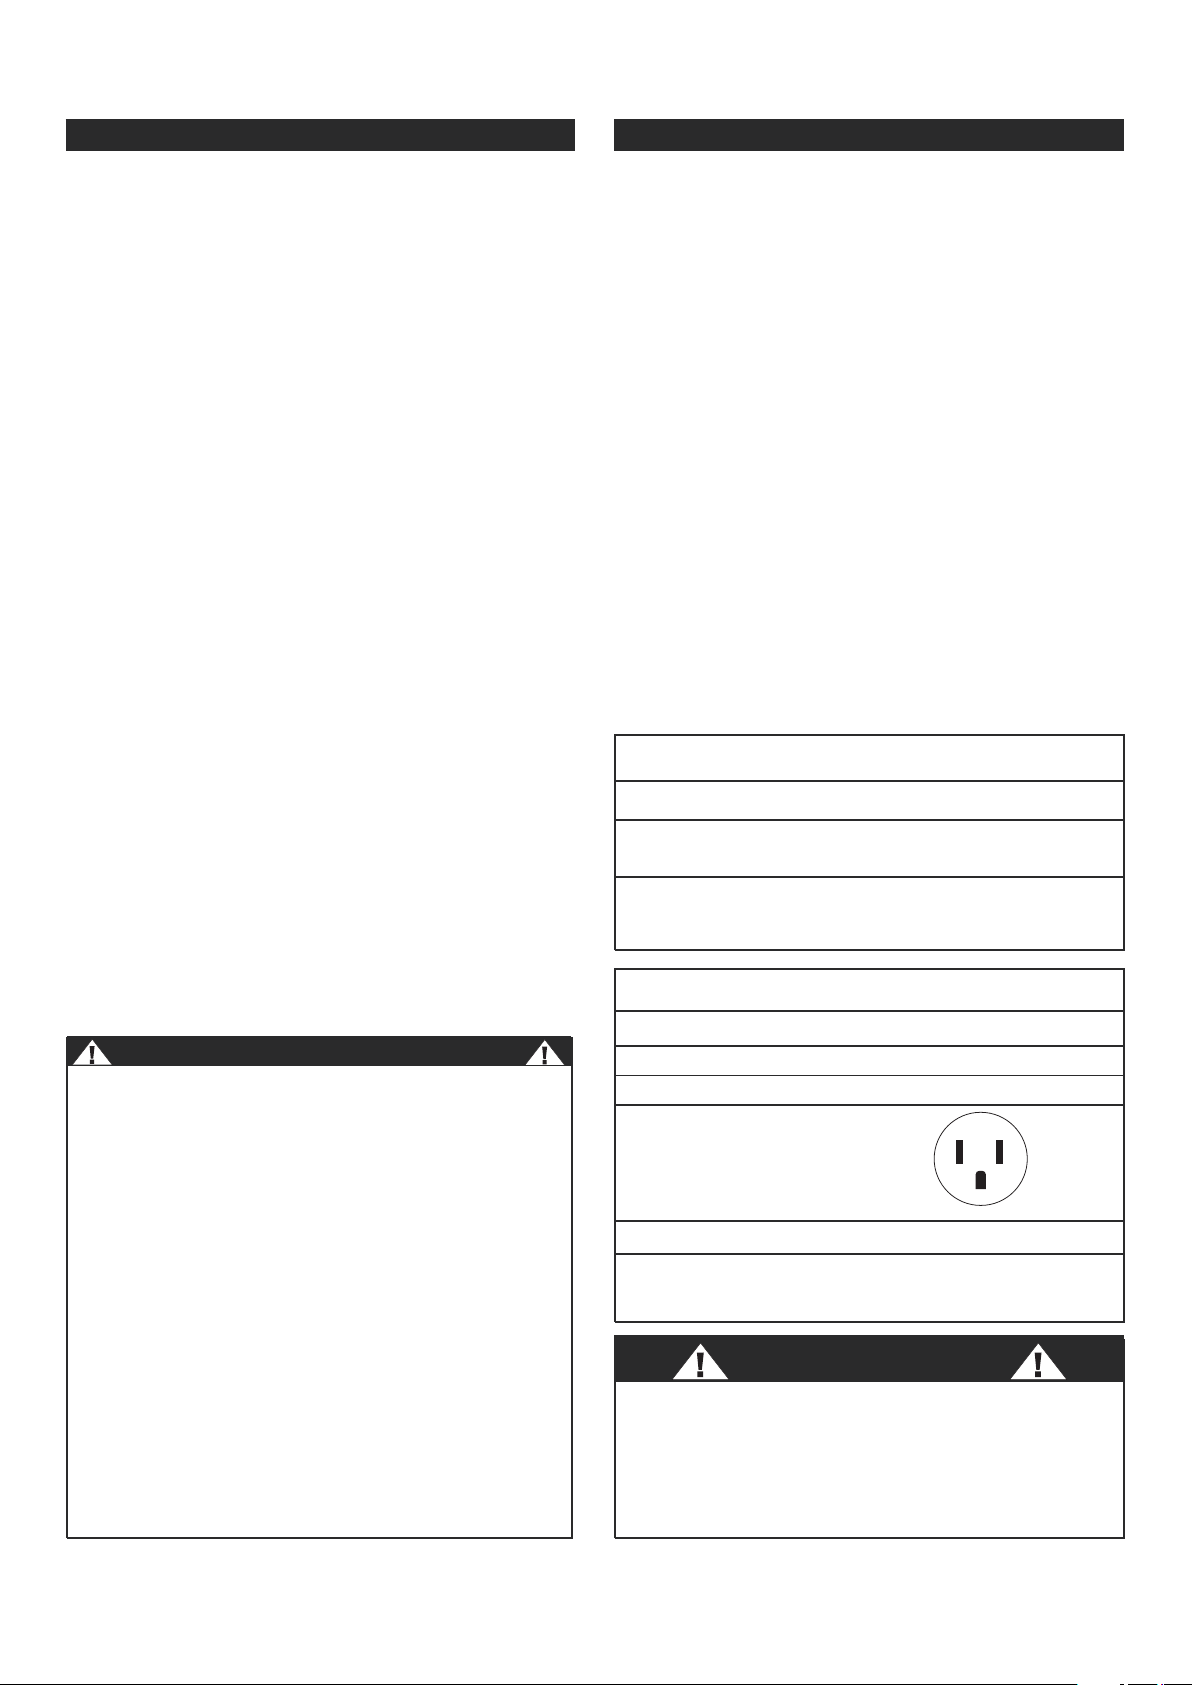
tiucriC hcnarB laudividnI detsegguS
*eziS eriW GWAspmA etalpemaN
6
110
egaG eriW naciremA -GWA
.gnitar erutarepmet C°105 ta eriw reppoc no desaB *
2
e
l
b
aT
sepyT esuF dna elcatpeceR
521stloV detaR
3
1
s
pmA
teltuO llaW
51eziS esuF
epyT gulPesuF yaleD emiT
)r
e
kaerb tiucric ro(
fT
ren
o
iti
d
n
o
c r
i
a
s
ih
t
h
ti
w
de
i
lp
p
us droc rewop e
h
T
rewop eht ot egamad sesnes taht ecived a sniatnoc
g
n
i
kr
o
w s
i d
roc y
l
p
p
us
re
wo
p
ru
o
y
fi
tset
oT
.dr
o
c
;gniwollof eht od tsum uoy ,ylreporp
lacirtcele na ot droc ylppus rewop eht tcennoC.1
.
te
l
tuo
snottub owt fo evisulcni si droc ylppus rewop ehT.2
si nottub enO.gulp eht fo daeh eht no detacol
dekr
am
s
i n
o
ttub
r
eht
o
e
ht ,’TS
E
T‘
d
ekra
m
a raeh lliw uoy ,nottub’TSET‘ eht sserP.’TESER‘
.tu
o
spop nottub’TE
S
ER‘ eht sa kcilc
sa kcilc a raeh lliw uoy ,nottub’TESER‘ eht sserP.3
.segagne nottub eht
d
na
d
ezig
r
ene
wo
n
si
d
ro
c y
lpp
us
rew
op e
h
T
.4
nO(.r
e
no
it
id
n
o
c
ri
a
eht
o
t
yti
c
ir
t
c
e
l
e
g
n
iy
lpp
us
n
o t
h
gil
a yb
de
ta
c
idni o
sla
s
i
siht
stc
udo
r
p
e
mo
s
.)daeh gulp eht
NOITUAC
erehw ecaps a ni dednettanu tinu siht evael ton oD
tin
u
de
l
i
a
f
a
o
t
t
ca
e
r to
n
na
c
ohw
slamina
r
o
e
l
poep
emertxe esuac nac tinu deliaf A.detac
o
l era
,
de
s
o
l
cn
e
n
a hcus n
i
htaed ro
g
nit
a
ehr
e
vo
.e
ca
p
s
de
dn
ettan
u
3
droC ylppuS rewoP
!GNINRAW
:
gnidn
u
org e
h
t
f
o
noi
t
cenn
o
c r
e
por
pm
I
;fo ksir a ni tluser nac gulpkcohS cirtcelE,eriF
eht htiw detaicossa snosreP ot yrujnI ro/dna
.ecnailppA
ro
na
i
cir
tc
ele deifilauq a h
t
iw
kcehC
eht taht tbuod ni era uoy fi evitatneserper ecivres
.dedn
u
org ylre
p
orp s
i
e
cnailp
p
a
10
se
i
rosseccA
s
e
ir
o
s
s
ecc
A
noi
t
a
l
la
t
snI
1.
giF
y
titnauQnoitpir
c
seD
NOIT
U
AC
,seitl
uc
i
f
fid n
o
it
a
repo
/
no
i
tall
a
t
sni
d
iov
a
oT
.
yl
h
g
u
o
roht s
n
oitcurtsn
i
ese
h
t daer
drazaH kcohS cirtcelE
lanosrep f
o
yt
i
lib
is
so
p
e
h
t
d
i
ov
a
o
T
tinu eht
o
t
r
e
wo
p
tc
e
n
n
ocsid
,
yr
u
jni
.gni
c
ivr
e
s r
o
g
n
i
l
l
a
t
sni e
r
ofe
b
sp
iT
gniva
S
-
yg
r
en
E
y
l
h
gi
h
eb
ot d
engised si
ec
nai
lp
pa ru
oY
.sgnivas
ygre
n
e ni
t
neiciffeeseht wo
l
loF
:
y
c
n
e
ic
i
ff
e
r
et
a
e
rg
ro
f
s
n
o
i
t
a
d
n
emm
o
cer
ruo
y
s
t
iu
s
ta
h
t
g
n
it
te
s
ta
t
s
o
m
r
e
ht a
t
c
ele
S
)1
.g
n
ittes nesohc
taht
t
a
e
va
e
l d
n
a
sdee
n
trofmoc
e
n
r
o
br
i
a
g
nivo
mer
n
i
tn
e
i
c
i
f
f
e
yre
v
s
i
re
t
l
i
f
r
ia
eh
T
)
2
.semit lla ta
n
aelc retl
i
f ria eht peeK.selcitrap
t
cer
i
d
pe
ek
o
t
seda
h
s
r
o
sni
a
t
r
uc
,
s
e
p
a
r
d
e
s
U
)
3
t
u
b ,moor
g
nit
a
eh dna gnitartenep m
o
rf
t
h
g
i
lnus
r
ia e
ht
tc
u
r
t
sbo
o
t
s
ni
atr
uc
r
o
separd
wo
lla
t
on
o
d
.
t
inu
eht
dnuora wo
l
f
r
ia
ro
o
d
t
uo
eh
t
er
o
feb
ren
oit
i
d
no
c
r
ia
ruoy
trat
S
)4
na s
d
i
o
va sihT.el
b
atrofmocnu dn
a
toh
s
emoce
b
gn
i
lo
oc s
i
tin
u
eht
eli
h
w t
ro
f
m
o
c
s
i
d
fo
d
o
i
re
p
la
i
t
i
n
i
pots/t
r
ats cita
m
otu
a
e
ht fo
e
s
U
.
m
oor e
h
t
f
f
o
el
b
am
ma
rg
o
rpR
E
MIT
r
ojam
a eb nac
eruta
e
f
.tnetxe tselluf
e
h
t
ot dezilitu
f
i drager siht ni
t
e
ss
a
,
h
g
uo
n
e l
o
o
c
era
s
erutarepmet
roo
d
tuo n
e
hW )5
eh
t e
s
u
d
n
a
f
f
o
r
en
o
i
tid
noc
r
i
a e
ht
n
r
u
t
NAF
E
D
OMnoWO
LroM
U
I
D
E
M,
H
GIHsihT.
gniloo
c
e
mo
s
g
nidi
v
o
rp ,
ri
a
r
oodn
i
seta
l
ucr
ic
.ytic
i
r
t
cele ssel s
e
z
i
l
itu dna trofmoc
TN
ATR
O
PMI
ec
n
a
r
a
e
lc )mc 0
3
(
"
8
.11
t
s
ae
l
t
a
e
b
d
luoh
s
e
re
h
T
gni
dliub
ro
s
tc
e
j
b
o
reht
o
yn
a d
na t
inu
e
ht
ne
ew
t
e
b
l
evel a
n
o
d
e
l
l
a
t
s
ni eb
dluo
h
s
d
n
a
e
r
u
t
c
u
r
t
s
d
et
ne
v
e
b ot
e
va
h
t
o
n
se
od
t
i
n
u
e
hT
.
e
cafru
s
e
d
om yln
O
naF
r
o
re
fid
i
mu
h
e
D
gn
ir
u
d
edi
s
tuo
.no
i
ta
re
p
o
Danby
:
ET
ON
t
a
d
e
l
l
a
ts
n
i e
b
ts
um
t
i
k
wo
d
n
i
w
ts
u
a
hxe
e
h
T
eht rednu gnitarepo si tinu eht nehw semit
l
l
aRIA
GN
INO
I
TI
DNOC.
ed
om
ti
K
redilS wodniW elbatsujdA
)mc3
0
2
(
”
0
8~)
m
c
2
7
(
”
3
/1
8
2
1 .
gi
Fs
ei
ross
eccA n
oitall
ats
nI
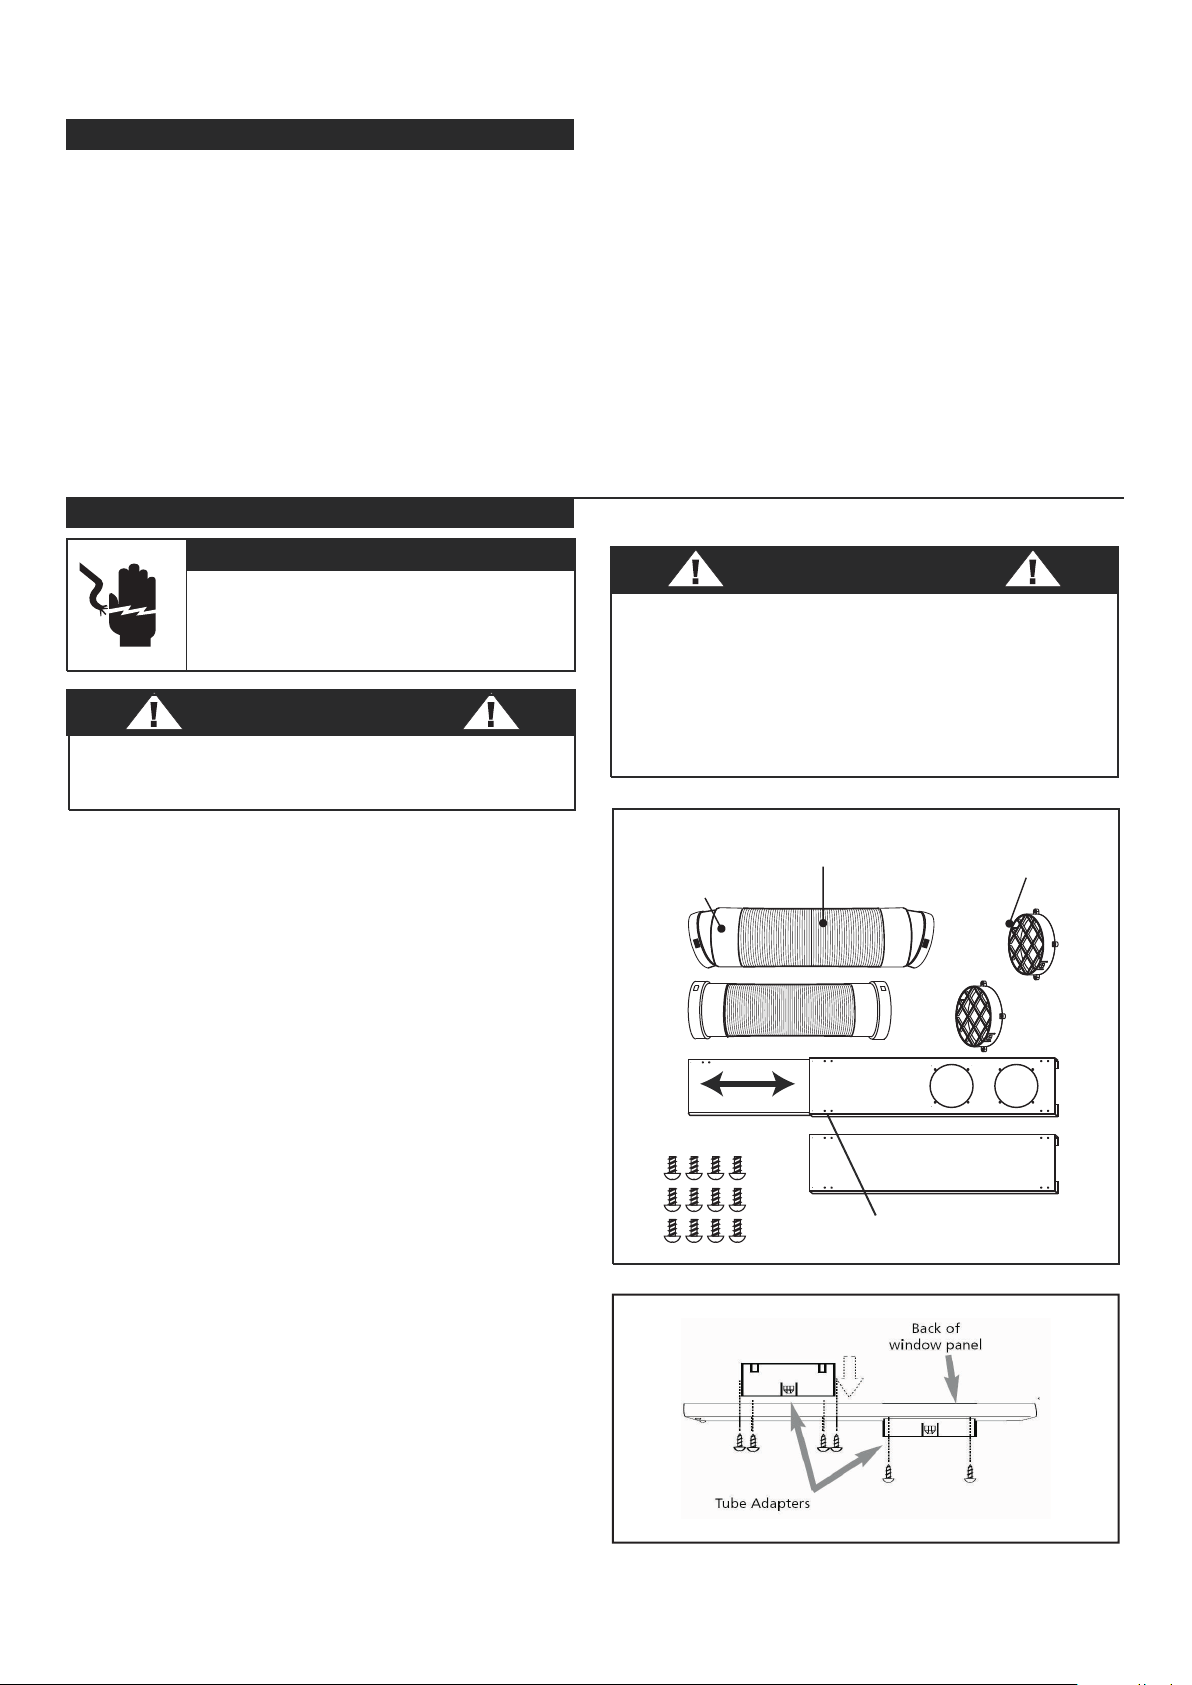
Flexible Exhaust Hose
Exhaust nozzle
connector
Fixture
Flexible Exhaust Hose(ø13cm)&
nozzle connector(2pcs).............................1/set
from 17-7/10”(45cm) up to 53-1/6”(135cm)
Flexible Exhaust Hose(ø11cm)&Exhaust
nozzle connector(2pcs).............................1/set
from 15-3/4”(40cm) up to 51-1/5” (130cm)
Adjustable window door slider kit................3pcs
from 28 1/3”(72cm) up to 80”(203cm)
Fixture......................................................2pcs
...................................................12pcs
Exhaust
Screws
5
Instructions for assembling the window adapter kit Fig.2
a) Insert tube adapters through the back of the window
b) Secure each tube adapter with four screws through
thefront of the window panel.
c) Insert window panel extensions into window panel.
Lightly tighten the screws in the window panel to hold
the extensions in place.
panel.
2 .
gi
F
4
Screws
5
noi
t
all
a
t
s
nI
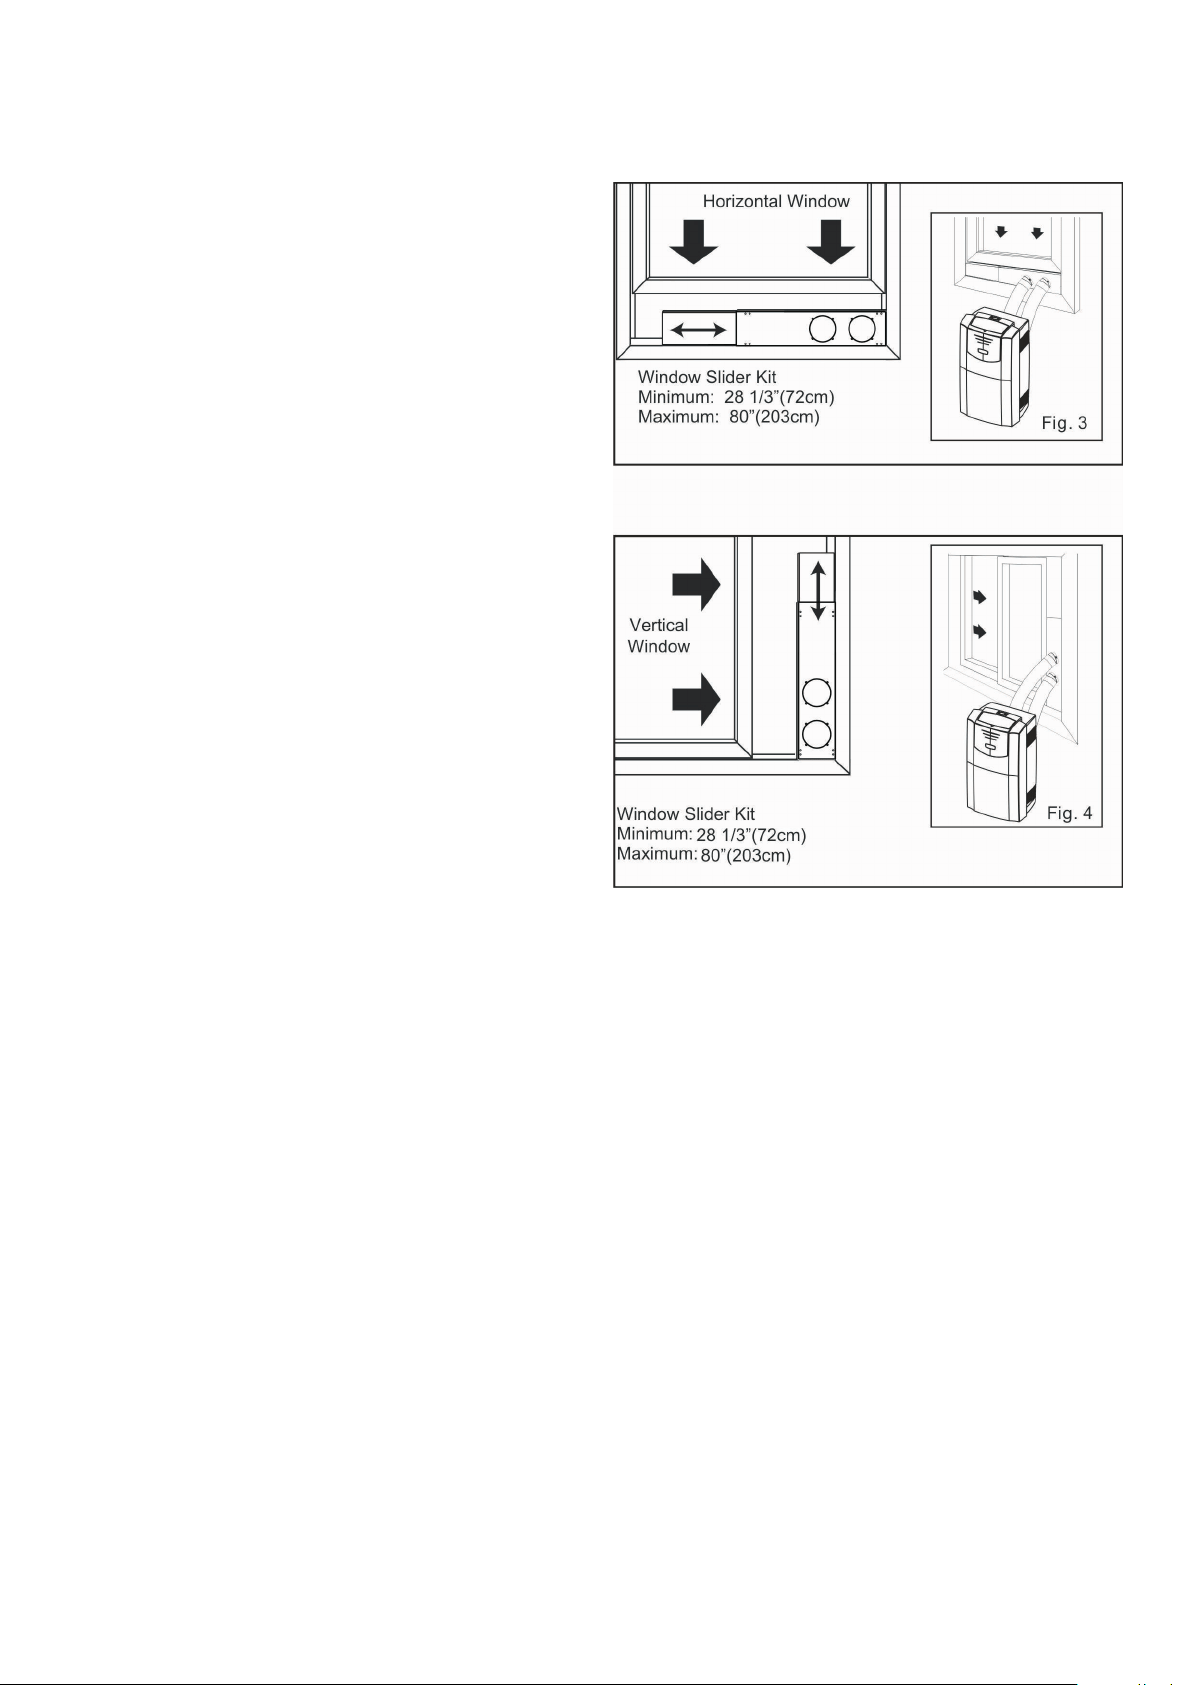
tiK
wodniW
tsom
tif
o
t de
n
gise
d
n
e
eb
s
ah
tik wodniw
r
uo
Y
a ot
pu swod
n
iw”latn
o
ziroh“
/”
lacitrev“ dradnats
ro
F f 80”(203cm)o
t
hgi
e
h
m
um
i
x
am
sn
oi
tis
o
p
kco
l
i
t
lum ,sn
o
it
aci
lpp
a
wo
dni
w
l
aci
t
r
e
v
noitces redils hcae fo egde eht no dedivo
r
p era
.r
eh
t
e
go
t
n
o
itc
es
g
n
idils hca
e
eruc
es
ot
eru
s
g
n
i
ka
m
,noi
t
ac
o
l
e
l
batiu
s
a
t
celeS
)
1
.tel
t
u
o
l
acirtc
e
le n
a
ot
s
s
ecc
a
eva
h
uoy
eht fo ed
i
s raer
eht
o
t
esoh elb
i
xelf
e
ht ll
a
tsnI
)
2
eh
t
fo pot n
o
ral
l
oc esoh
eht tresnI.tin
u
o
tn
i
kco
l
ot tsiwt
d
na
gn
in
ep
o
tsu
ahx
e
.
n
oi
t
isop
sa t
iK
redilS wodniW elbatsuj
d
a eht llatsnI )3
.
4
,
3
.s
’
gi
F.
deriu
q
e
r
el
bix
el
f
eht
fo
d
ne
e
tis
op
po
eh
t
ll
a
tsn
I
)
4
ts
ua
hx
e
w
o
dni
w
e
h
t o
t
ni e
s
oh tsuahxe
.
r
etpada
eh
t otni ret
pada tsuahxe
wod
n
iw
eh
t
ll
ats
n
I
)
5
er
us gnikam ,noi
tces redi
l
s eht
ni
g
ni
n
epo
.e
r
uces
e
r
a s
n
oi
tc
e
s
redils wodniw
e
ht
a otni tinu eht gulP
)
6dednuorg zH 06 / V 511
.t
e
lt
u
o
l
aci
r
tce
le
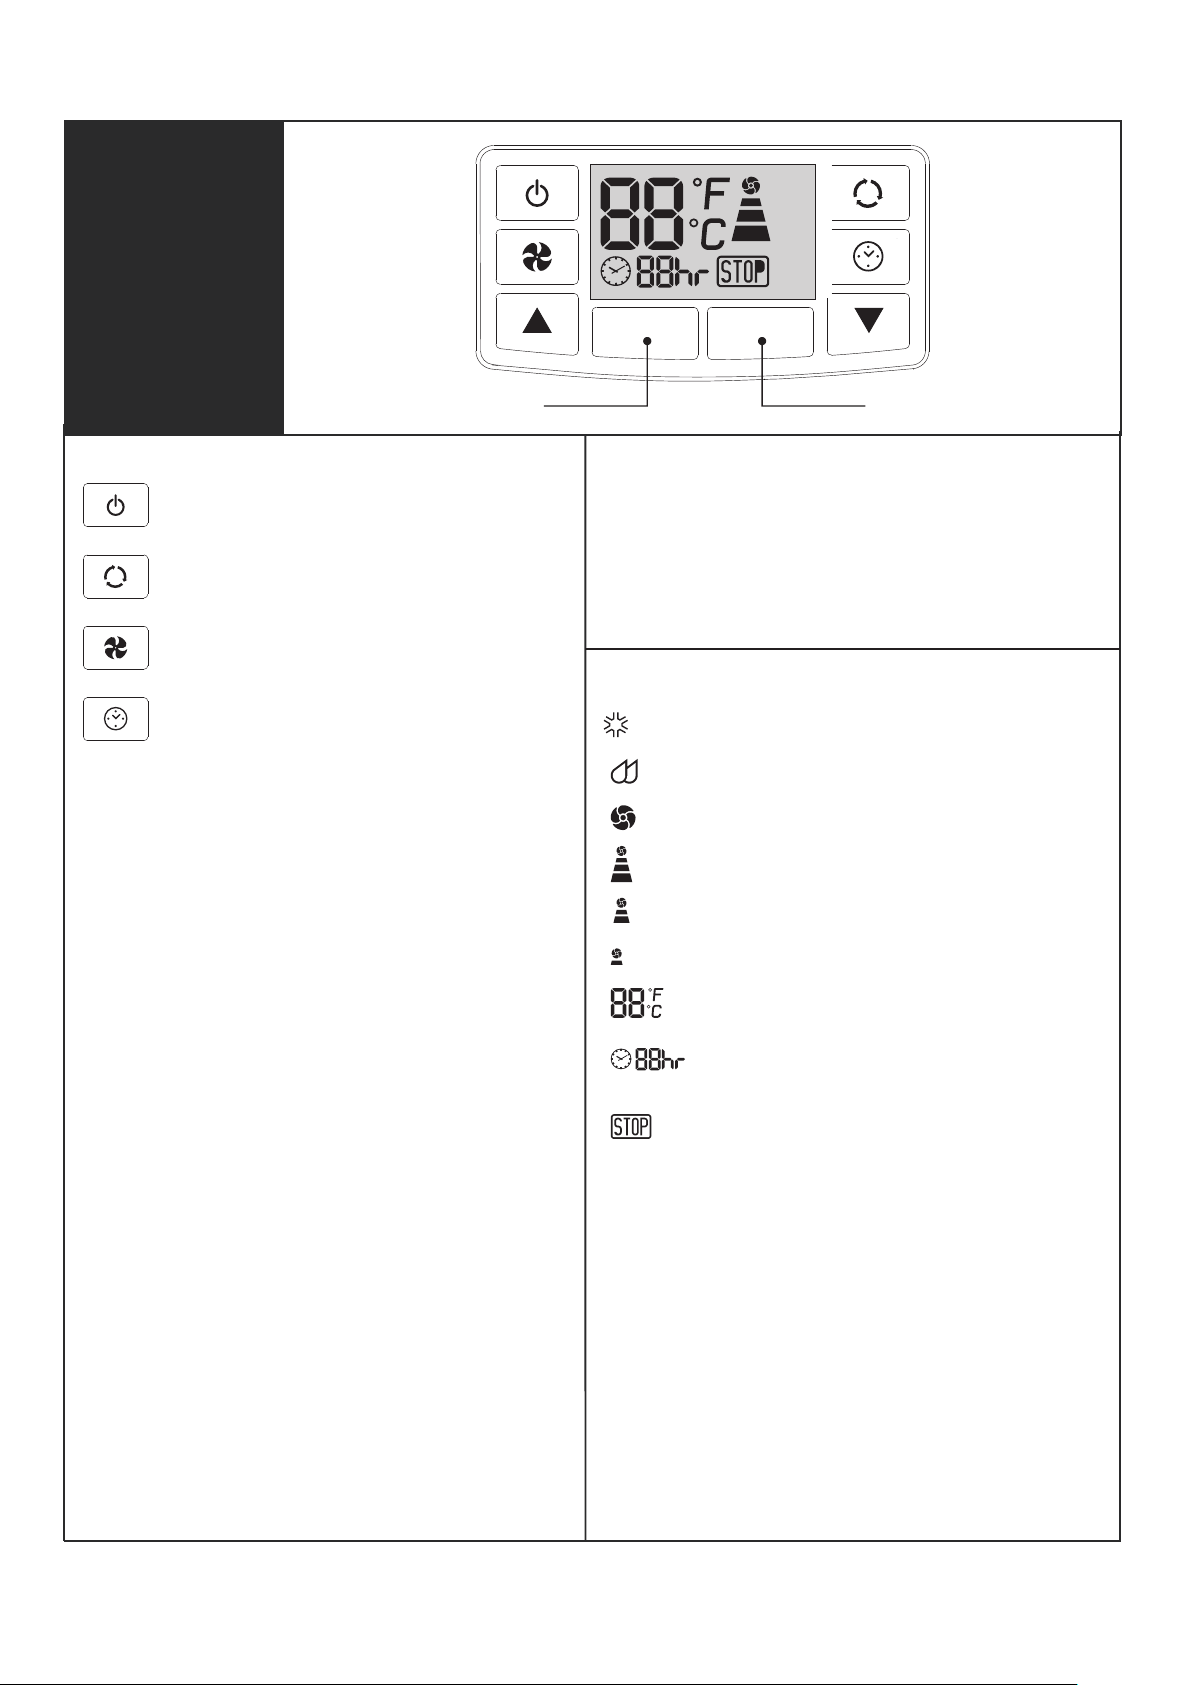
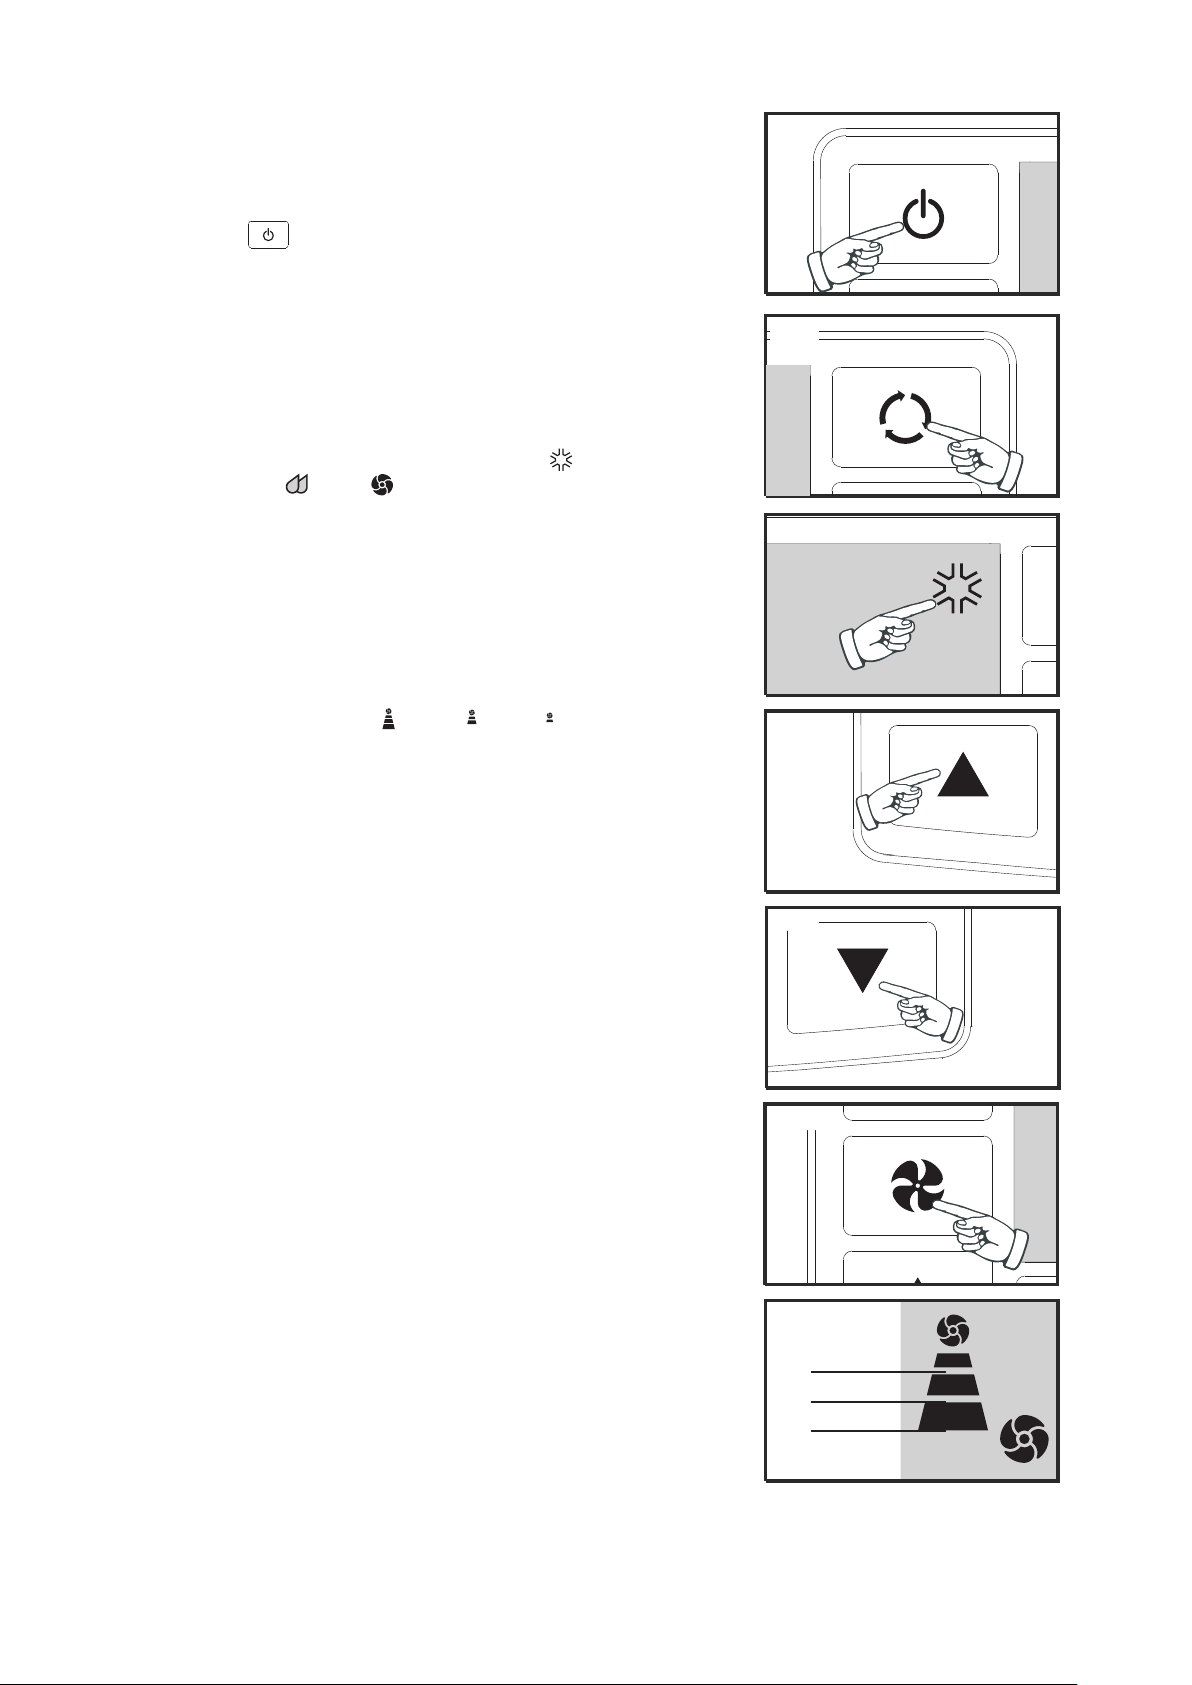
SNOITCNUF DAP YEK
s
e
rutaeF
eht fo
lortnoC
l
en
a
P
:HC
T
IW
S
R
EWOP.f
fO
/
nO
ti
nu
s
n
r
uT
EDOM:hguorht llorcs ot uoy swollA
gnitarepo d
e
rised
eht t
c
eles dna
.edom
6
Fan only mode
High fan speed
Med fan speed
Low fan speed
Warning light
the machine will stop running
Display timer setting of auto
switch on/off
Display set temperature
: NA
F
n
a
f
tn
ere
ffi
d e
er
ht
m
or
f
t
celeS
;sgnittes
.
woL dna
m
uideM h
gi
H
AUTO-TIMER
AUTO-TIMER Adjust:
Auto turn off :
With machine in running mode, press timer
button forsetting timer control. Press "▲" or "▼"
to select number of hours you would like the
unit to run before it automatically shuts off.
Auto turn on :
With machine in stand by mode, press timer
button for setting timer control. Press "▲" or "▼"
to select number of hours before the unit
automatically starts running in airconditioning
mode.
Note : The time is adjustable between 1~24
hours.
TEMPERATURE Adjust:
● Used for adjusting the thermostat.
● The default display is room temperature.
● In cooling mode, when " ▲ " or " ▼ " button
is pressed, the set temperature is displayed
and may be adjusted. After 15 seconds the
display will revert back to room temperature.
Temperature is only adjustable in cool mode.
Note : By pressing both " ▲ " / " ▼ "
buttons at thesame time for more than 3
seconds, the display will toggle between
Celsius and Fahrenheit.
Warning LightReceiving sensor
Warning Light
Condensed water may accumulate in the unit.
If the internal tank becomes full, the Warning
signal in the LCD Display will light up and the
unit will not operate until the unit has been
drained.
LCD Display
Cooling mode
Dehumidify Mode.
:
sno
i
t
cu
rt
snI
gnit
a
r
epO gnino
i
t
idno
C ri
A
ylreporp
eb tsum esoh
tsua
h
xe eh
T:
T
N
ATROPMI
.e
d
om
g
n
in
o
itidn
o
c ria g
n
iru
d
)sro
o
d
t
uo(
de
t
ne
v
eht sserP)1HCTIWSREWOP yek
A gi
F
ot
e
h
tdna
,
t
i
n
u
e
h
t
n
o h
c
t
iw
s
t
e
s
s
uo
i
v
e
r
p
er
u
tarepme
t
erutarepmet eht ni nwohs
e
b lliw
.
l
en
a
p l
or
t
n
oc e
h
t
f
o
a
e
r
a y
a
l
p
s
id
e
h
t ss
er
P)2
E
DOM yek
B giF.
eht
l
itn
u
LOOC
l
e
n
a
p
l
o
rtnoc
e
h
t n
o
s
e
t
a
n
im
u
l
l
i
t
h
g
i
l
r
o
t
ac
i
d
n
i
giF
C.
l
l
iw
ye
k
EDOM e
h
t
f
o n
o
i
ss
erp
e
d h
c
aE
( g
n
ittes e
d
om tnereffid a o
t
e
cnav
d
alooC-
r
e
i
f
i
d
i
m
uh
e
D-naF
.
)
e
s
a
e
r
c
ed
r
o
e ▲
s
a
e
rc
n
i et
a
ir
p
o
r
p
p
a
e
h
t
s
ser
P)
3
s
nottu▼ b
D-1&2 giF
gnitarepo elb
a
tius
a
tc
e
les ot
e
r
a
sgnit
t
es er
u
t
a
r
e
pm
eT.
gni
t
t
e
s
e
r
utare
pm
et
n
e
e
wteb
elba
t
su
j
d
a
e
h
t ss
er
P)4
N
A
F
yek
E gi
F
deri
s
ed
e
h
t
tc
e
le
s
ot
g
n
it
t
es d
e
e
ps
naf.)woL
- d
e
M
-
hg
i
H
(
lenap lortno
c eht no raeppa
l
l
iw
noi
t
celes ruoY
a ot ecnavd
a
l
l
iw
yek
n
a
f
e
h
t
f
o n
o
i
ss
erp
e
d
h
c
ae(
.
)gn
i
tte
s
tnereffid
•t
es eht nehw yll
a
ci
ta
mo
t
ua
sp
o
ts
g
n
il
o
oC
gnilooC
.deveihca si erut
a
repmet
s
es
i
r
er
uta
r
e
pm
e
t moo
r
e
ht
nehw s
e
mu
s
er
.leve
l
eruta
r
epmet”te
s“
e
h
t
e
vo
b
a
7
AgiF
BgiF
FC
gi
E
giF
Low
Medium
High
F
giF
D-2giF
D-1giF
16°C(61°F)~32°C(89°F).

Fan Operating Instructions:
Note:During Fan mode,the exhaust hose does
not have to be vented outdoors.
1) Press the on/off) key pad to switch on the(
unit.
Fig G
2) Press the MODE key
Fig H
until the FAN
indicator illuminates on the control panel
Fig I
.
Each depression of the MODE key will advance
to a different mode setting (Cool-
Dehumidifier - Fan).
3) Press the FAN key Fig J to select the desired
FAN SPEEDsetting.Your selection will appear on
the control panel.Each depression of the fan key
will advance to a different fan speed (High -
Med -Low ) as shown in Fig K.
Dehumidifier Operating Instructions:
Note:During dehumidifier mode,the exhaust
hose does not have to be vented outdoors.
1)
Press the (on/off) key pad to switch on the
unit.
Fig G
2) Press the MODE key
Fig L
until the DRY
indicator illuminates on the control panel
Fig M
.
Each depression of the MODE key will advance
to a different mode setting (Cool-
Dehumidifier - Fan).
•
Important
:There is no fan speed or temperature
adjustment during dehumidifier mode.The fan
speed is factory set for Lowand the dehumidifier
operates continuously (non-stop) regardless of
ambient humidity level or set temperature.
FI
gi
HgiF
GgiF
J
giF
Low
Medium
High
K
giF
FM
gi
LgiF
8

:snoitcurtsnI remiT-otuA
no
itc
ele
s
e
uqin
u a
s
reff
o
e
ruta
ef R
E
MI
T
-
OTUA e
h
T
ffo ro/dna no citamotua ylluf ,eciohc elpitlum fo
r
ed
nu
sr
h
4
2 - 1
ne
ewteb s
m
a
rgo
r
p
)po
ts/trat
s(
.tinu trofm
o
C em
o
H
r
uoy fo edom eno y
n
a
:swoll
o
f sa e
r
a
s
m
a
r
g
o
rp
e
hT
)a:ffO- otuAeh
t
f
f
o nrut lliw t
a
h
t
emit
a
t
c
eles-erP
n
e
ew
t
e
b
( y
llac
ita
m
o
tu
a
t
i
n
u
)b:nO-otuAeht no nrut lliw taht e
m
it a tceles-er
P
n
ee
wt
eb
(
y
ll
a
citamotua
ti
n
u
)cffO-otu
A
& nO
-
o
t
uAlliw taht
em
i
t a
t
celes-
e
rP:
t
a
)
yl
l
a
c
itamotua(
F
F
O
/
NO
ti
n
u
eht
n
r
u
t
nee
w
teb(
semit deif
i
ce
p
s
:e
to
Nsa ,
yl
iad dem
rof
r
ep
eb t
sum
snoit
cn
uf eseh
T
retfa desare/delecnac yllacitamotua si margorp eht
.
d
e
d
n
e
sa
h
m
a
rgor
p
e
ht
.)
s
r
h 4
2
-
1
.)
s
r
h 4
2
-
1
.)
s
r
h 4
2
-
1
9
serutae
F
l
o
r
t
no
C
et
o
m
e
R
sno
ttu
B
lor
tnoC
er
iu
q
er
l
l
iw
lort
n
oc
et
o
m
e
r
d
l
eh
d
n
ah
e
ht
e
t
are
p
o
o
T
.) de
dulcn
i( seirettab enilaklA”AAA“ owt
:n
ehw d
e
c
alp
e
r
eb
dluohs
s
e
ir
e
tt
aB
o
t gnitpmetta nehw draeh si )peeb( langis oN )a
.
t
i
nu
n
i
am
eh
t
m
ar
gor
p
d
n
a
m
moc
a
o
t
d
n
o
p
s
e
r
to
n
s
e
o
d tin
u
n
ia
m
e
h
T
)b
.lo
r
tn
o
c
etom
e
r
eh
t
y
b de
u
ssi
:tn
em
ecalper
y
rettaB
no
i
t
c
eri
d
eht
n
i etomer eht
n
o
r
evoc raer e
h
t edilS.
1
e
ht
l
it
n
u )
y
l
t
ne
g(
g
n
i
l
l
u
p
e
u
n
it
n
oC.wo
rr
a
e
ht
f
o
.
t
i
nu
e
ht
m
orf
y
l
e
te
l
p
m
o
c
s
et
ar
ap
es r
evo
c
e
m
as eht
g
n
iwo
l
l
of
)AAA( se
i
re
t
ta
b
)2( tr
e
snI
.
2
y
r
et
t
a
b
e
ht
ed
is
n
i
d
etc
i
pe
d
)yt
i
r
a
lo
p(
n
o
it
a
t
n
e
ir
o
)-/+(.rebmahc
.
r
evoc ra
er
l
l
ats
n
i-eR.3
dednetxe rof desu
eb ton
l
l
i
w lo
r
tnoc etom
e
r
eht fI.
4
d
luoh
s
s
eiret
t
ab ,).cte
s
n
o
itac
a
v( emi
t
fo s
d
o
ir
ep
.
d
e
vo
m
e
r
e
b
sre
t
em
8
f
o
e
g
n
ar a
n
i
htiw seta
r
e
p
o
e
tomer
e
hT
.
t
i
n
u
n
i
a
m
e
h
t
e
d
i
s
n
i
d
et
a
c
o
l
r
ev
i
e
c
e
r
e
h
t
m
o
r
f
)
.
t
f
6
2
(
et
o
mer dn
a
r
eviecer eht
n
e
ewteb noitcur
t
sbo yn
A
o
t
y
t
i
l
i
ba
eh
t
g
n
itim
i
l
,e
c
n
ere
fr
et
n
i la
n
g
i
s
e
s
u
a
c y
a
m
.t
i
n
u
n
i
a
m
e
h
t
m
a
r
g
or
p
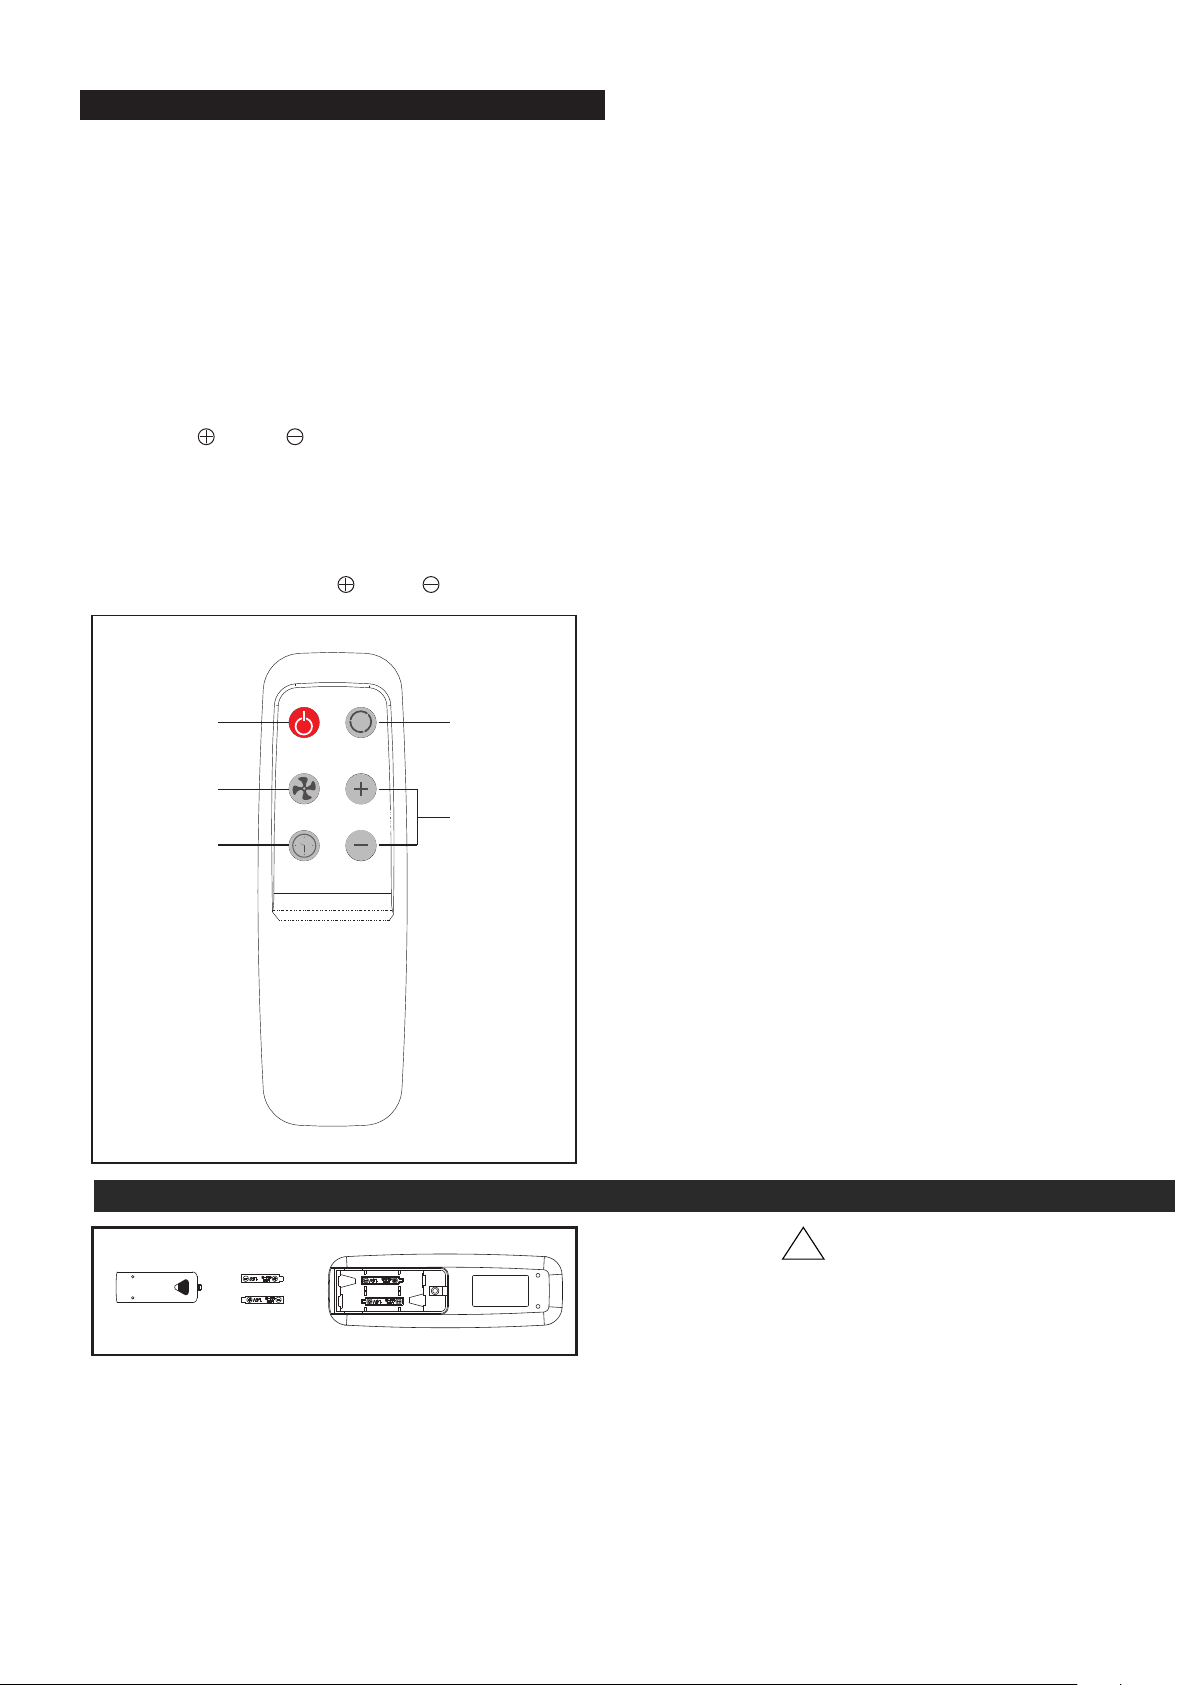
10
.1.hcti
ws
rewoP
.2e
doM
.
3
d
e
ep
S
n
aF
1
2
3
4
5
4. On / Off Timer
5. Time / Temperature Set
● Used for adjusting the timer and temperature.
● The default display on control panel is room
temperature.
● When " " or " " key is pressed in cool
mode, the set temperature is displayed and
may be adjusted. After 10 seconds the
display will revert back to room temperature.
● Timer setting is available from 1-24 hours
by pressing the key " " on " ".
Notes
1. Do not drop the remote control.
2. Do not place the remote control in alocation
exposed to direct sunlight.
3. The remote control should be placed about 1
meter or more away from TV, or any electical
appliances.
This Class B digital apparatus complies with
canadian ICES-003.
The functions work the same as your
dehumidifier's touch controls.
Batteries : Remove the cover on the back of
the remote controller and insert the batteries
with the( + ) and ( - ) poles pointing in
the proper direction.
CAUTION
Use only AAA or IEC R03 1.5V batteries.
Remove the batteries if the remote controller
is not used for a month or longer.
Do not attempt to recharge the supplied batteries
All batteries should be replaced at the same time.
Do not dispose of the batteries in a fire as
they may explode.
!
PLACING BATTERIES IN REMOTE CONTROL
ecnanetn
i
aM
d
na eraC
)
1t
oN
o
D
yna
ro
r
en
niht
,
en
ezn
e
b
,en
ilo
s
ag e
s
u
ese
h
t s
a
, tinu siht naelc ot sl
a
cimehc rehto
dna
hs
i
n
i
f e
h
t
o
t
eg
am
a
d e
s
u
a
c
y
am
s
e
c
n
a
t
s
bu
s
.s
t
rap citsalp fo
noi
t
amrofed
)2 r
e
ve
N
r
eta
w
g
nir
uo
p
yb
t
in
u e
ht
n
a
e
lc
ot
tpm
e
tta
l
l
iw
siht sa
,sae
r
a
eca
f
rus
eht fo
yna
r
ev
o
y
l
t
cer
i
d
dna stnen
o
pm
o
c
la
c
irtcel
e
fo
n
oit
a
r
o
ireted e
s
ua
c
.n
o
it
al
usn
i g
ni
r
iw
NOI
TUA
C
si t
i
,
t
i
n
u
siht
g
ni
c
ivr
e
s r
o
gn
i
nael
c
ero
f
eB
m
orf d
et
ce
n
no
c
si
d
eb
t
i
n
u
e
h
t t
aht
d
e
dn
e
mmo
c
e
r
.
teltuo
y
l
p
pu
s
la
c
irtc
e
le
y
n
a
11
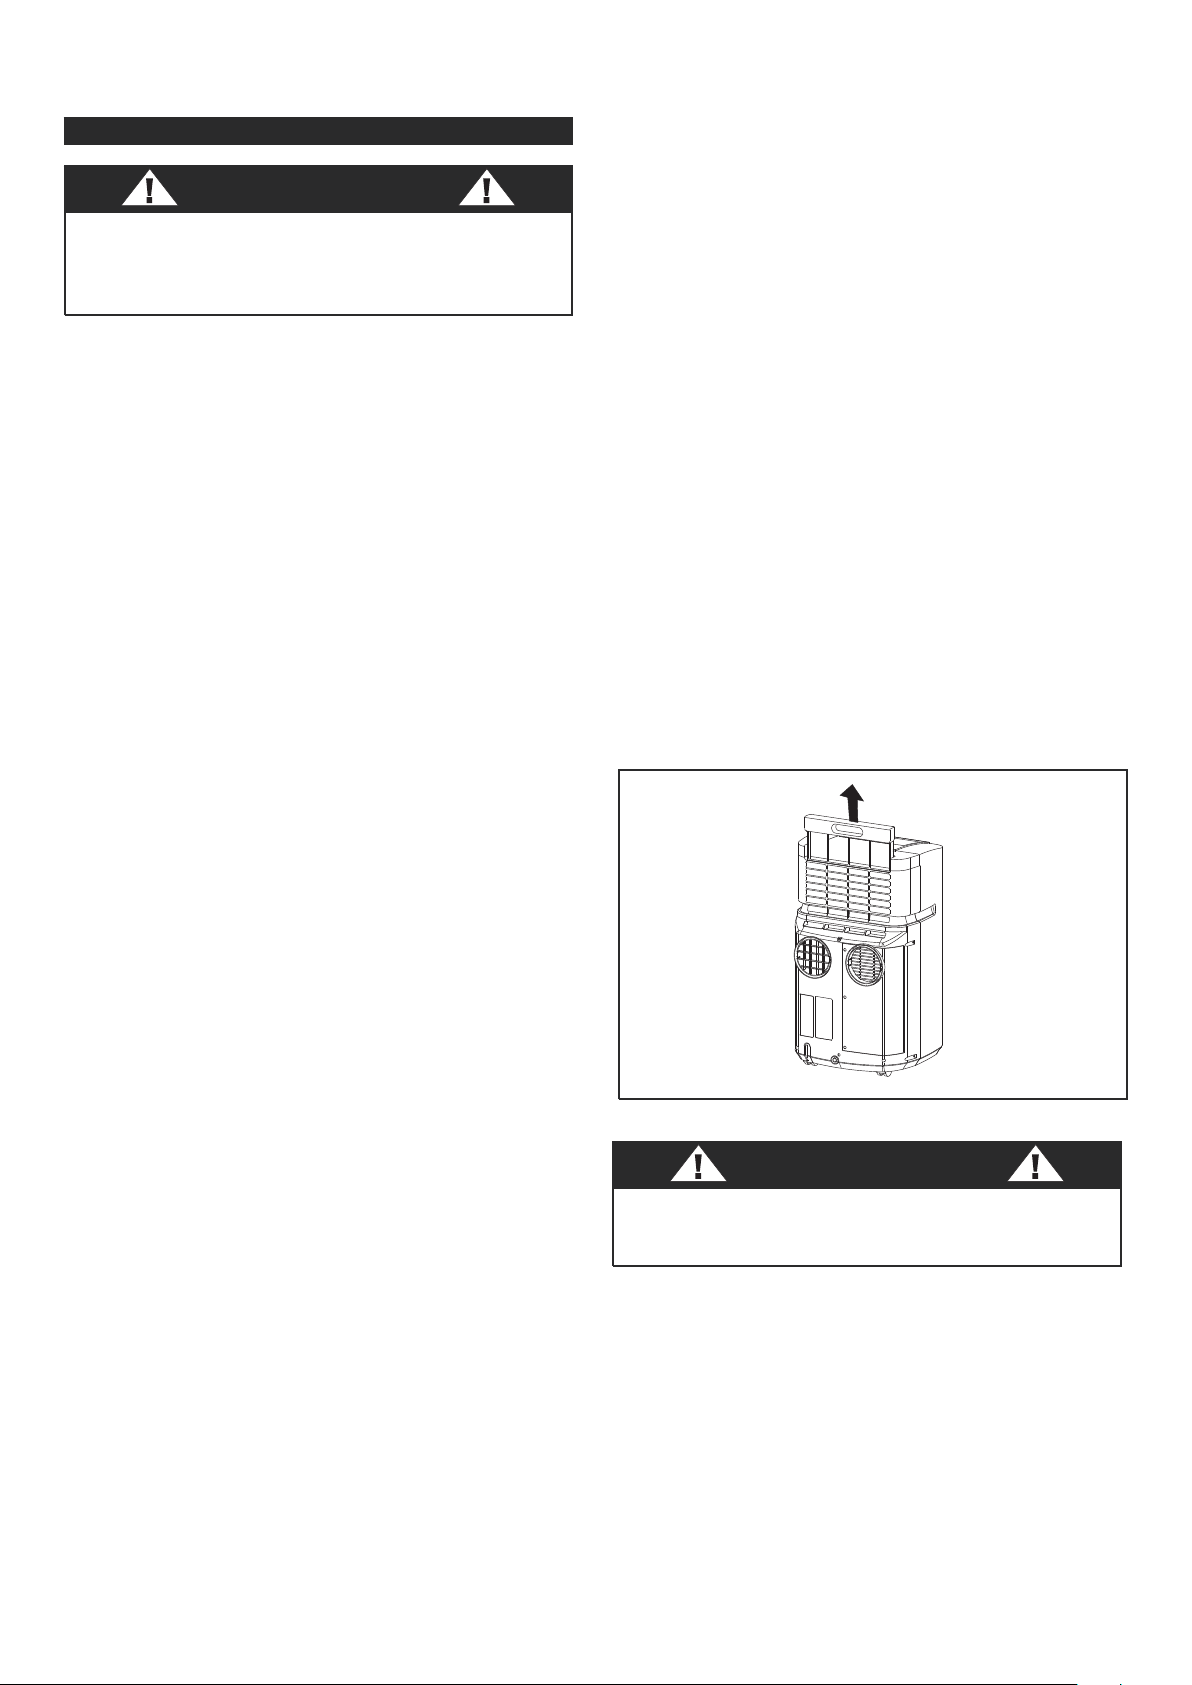
retl
i
F
ri
A
eh
t
f
o
g
n
inae
lC
d
na
lavome
R
ria ,trid/tsud htiw de
g
golc semoceb retlif ria eht fI
eh
T.
y
c
n
e
i
c
i
ffe
g
n
il
o
oc
s
e
c
u
d
er
d
na
d
e
tc
i
r
t
s
er
s
i
wo
l
f
.s
k
eew
)
2
(
o
w
t yrev
e
d
en
a
e
l
c
eb dluohs retlif ria
yr
a
s
s
e
ce
n
e
b y
am
g
ni
n
ae
l
c
tn
e
uqe
r
f
e
roM
ria ehT:ETON.ytilauq ria roodni nopu gnidneped
.t
i
nu
eht
fo e
dis
r
aer
)
r
ep
p
u
(
e
h
t t
a
d
e
tac
o
l si
r
et
l
i
f
revoc re
t
lif ria eht lluP:retlif ria eht evomer oT
)
1
w
orra eht fo noitce
r
id
e
ht ni drawpu
8 gi
F
dna
.
re
t
l
if
r
i
a
e
h
t
e
v
o
me
r
y
b devomer eb nac retlif eht ni deggolc triD/tsuD )2
.s
a
era d
e
l
i
o
s e
ht
g
n
i
nael
c
m
uu
c
a
v
ypaos mrawekul ni dehsaw eb osla nac retlif ehT )4
d
l
im A
.
h
sur
b
a
h
tiw
y
lt
h
gil
ti gni
b
bur
e
lihw re
taw
.
d
ednemmoc
e
r s
i
)pao
s
g
n
i
hs
a
w
hs
i
d
(
t
n
e
g
r
e
t
e
d
emit woll
A
.retaw nae
l
c
g
nisu llew retlif eht esniR )5
.t
i
nu eht
o
t
n
i
gn
i
l
l
a
ts
n
i
er
e
r
of
e
b
yr
d
o
t
.
revoc dna retlif ria eht ecalpeR )6
elbaliava si noi
t
amrofni retlif ria
tneme
calpeR
)7
:
ta tnem
t
ra
p
eD ecivreS
remotsuC eh
t
yb
)
9
2
62-362-008-1(
Y
BNA
D
-62-008-1
N
OITU
AC
eca
l
p
n
i retl
if r
i
a
e
h
t tuohtiw t
i
nu eh
t etarepo reveN
.
t
inu
eht
o
t
eg
am
a
d
n
i tlu
s
e
r
y
am s
i
ht
s
a
8
.
giF

LIMITED AIR CONDITIONER WARRANTY
This quality product is warranted to be free from manufacturer’s defects in material and workmanship, provided that the unit is used under the normal operating
conditions intended by the manufacturer.
This warranty is available only to the person to whom the unit was originally sold by Danby or by an authorized distributor of Danby, and is non-transferable.
TERMS OF WARRANTY
Plastic parts, are warranted for thirty (30) days only from purchase date, with no extensions provided.
First Two Years
During the first twenty four (24) months, any electrical parts of this product found to be defective, including any sealed system units, will
be repaired or replaced, at warrantor’s option, at no charge to the ORIGINAL purchaser.
To obtain
Danby reserves the right to limit the boundaries of “In Home Service” to the proximity of an Authorized Service Depot. Any appliance
Service
requiring service outside the limited boundaries of “In Home Service” ,
i
t will be the consumer’s responsibility to transport the appliance (at
their own expense) to the original retailer (point of purchase) or a service depot for repair. Contact your dealer from whom your unit was
purchased, or contact your nearest authorized Danby service depot, where service must be performed by a qualified service technician.
If service is performed on the units by anyone other than an authorized service depot, or the unit is used for commercial application, all
obligations of Danby under this warranty shall be at an end.
EXCLUSIONS
Save as herein provided, Danby Products Limited (Canada) or Danby Products Inc. (U.S.A.), there are no other warranties, conditions, representations or
guarantees, express or implied, made or intended by Danby Products Limited or its authorized distributors and all other warranties, conditions, representations or
guarantees, including any warranties, conditions, representations or guarantees under any Sale of Goods Act or like legislation or statue is hereby expressly
excluded. Save as herein provided, Danby Products Limited (Canada) or Danby Products Inc. (U.S.A), shall not be responsible for any damages to persons or
property, including the unit itself, howsoever caused or any consequential damages arising from the malfunction of the unit and by the purchase of the unit, the
purchaser does hereby agree to indemnify and save harmless Danby Products Limited from any claim for damages to persons or property caused by the unit.
GENERAL PROVISIONS
No warranty or insurance herein contained or set out shall apply when damage or repair is caused by any of the following:
1) Power Failure.
2) Damage in transit or when moving the appliance.
3) Improper power supply such as low voltage, defective house wiring or inadequate fuses.
4) Accident, alteration, abuse or misuse of the appliance such as inadequate air circulation in the room or abnormal operating conditions,
(extremely high or low room temperature).
5) Use for commercial or industrial purposes.
6) Fire, water damage, theft, war, riot, hostility, acts of God such as hurricanes, floods etc.
7) Service calls resulting in customer education.
Proof of purchase date will be required for warranty claims; so, please retain bills of sale. In the event warranty service is required, present this document to our
AUTHORIZED SERVICE DEPOT.
Danby Products Limited
PO Box 1778, 5070 Whitelaw RD, Guelph, Ontario, Canada N1H 6Z9
Telephone: (519) 837-0920 FAX: (519) 837-0449
Danby Products Inc.
PO Box 669, Findlay, Ohio, U.S.A. 45839-0669
Telephone: (419) 425-8627 FAX: (419) 425-8629
06/06
Warranty Service
In Home on Models 6,000 BTU or Greater