
Use & Care Guide
®
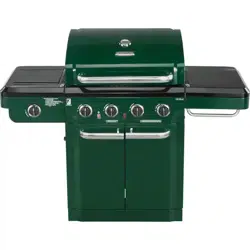
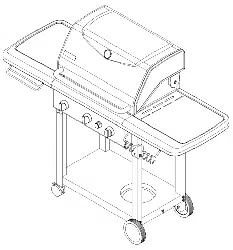
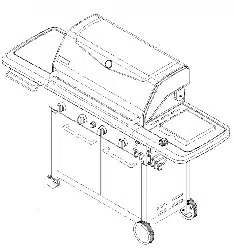
Liquid Propane Gas Grill
Sears Model No: 119.16216010
Kmart Item No: 640-01331376-2
Safety
Parts
Use and Care
Assembly
Espa_ol, Pg. 27
This Grill is for Outdoor Use Only
• Read and follow all Safety, Assembly,
and Use & Care Instructions in this
Guide before assembling and
cooking with this grill.
• Failure to follow all instructions in
this Use & Care Guide may lead
to fire or explosion, which could
result in property damage, personal
injury or death.
Grill Information Center
Missing Parts? Assembly Questions?
Operation Problems? Before
returning grill to store,
call 1-800-933-0527
Tools needed for assembly:
Protective work gloves and eyewear
Phillips head screwdriver (included
in hardware pack)
SAVE THESE INSTRUCTIONS!
See our extensive assortment of outdoor living products on-line at
www.sears.com and www.kmart.com
Sears Brands Management Corporation, Hoffman Estates, IL 60179 U.S.A.
© 2010 Sears Brands, LLC Printed in China B10PG23-A
Primary Safety Warnings. .................................. 1-3
Warranty Information ............................................ 2
Pre-Assembly instructions .................................... 3
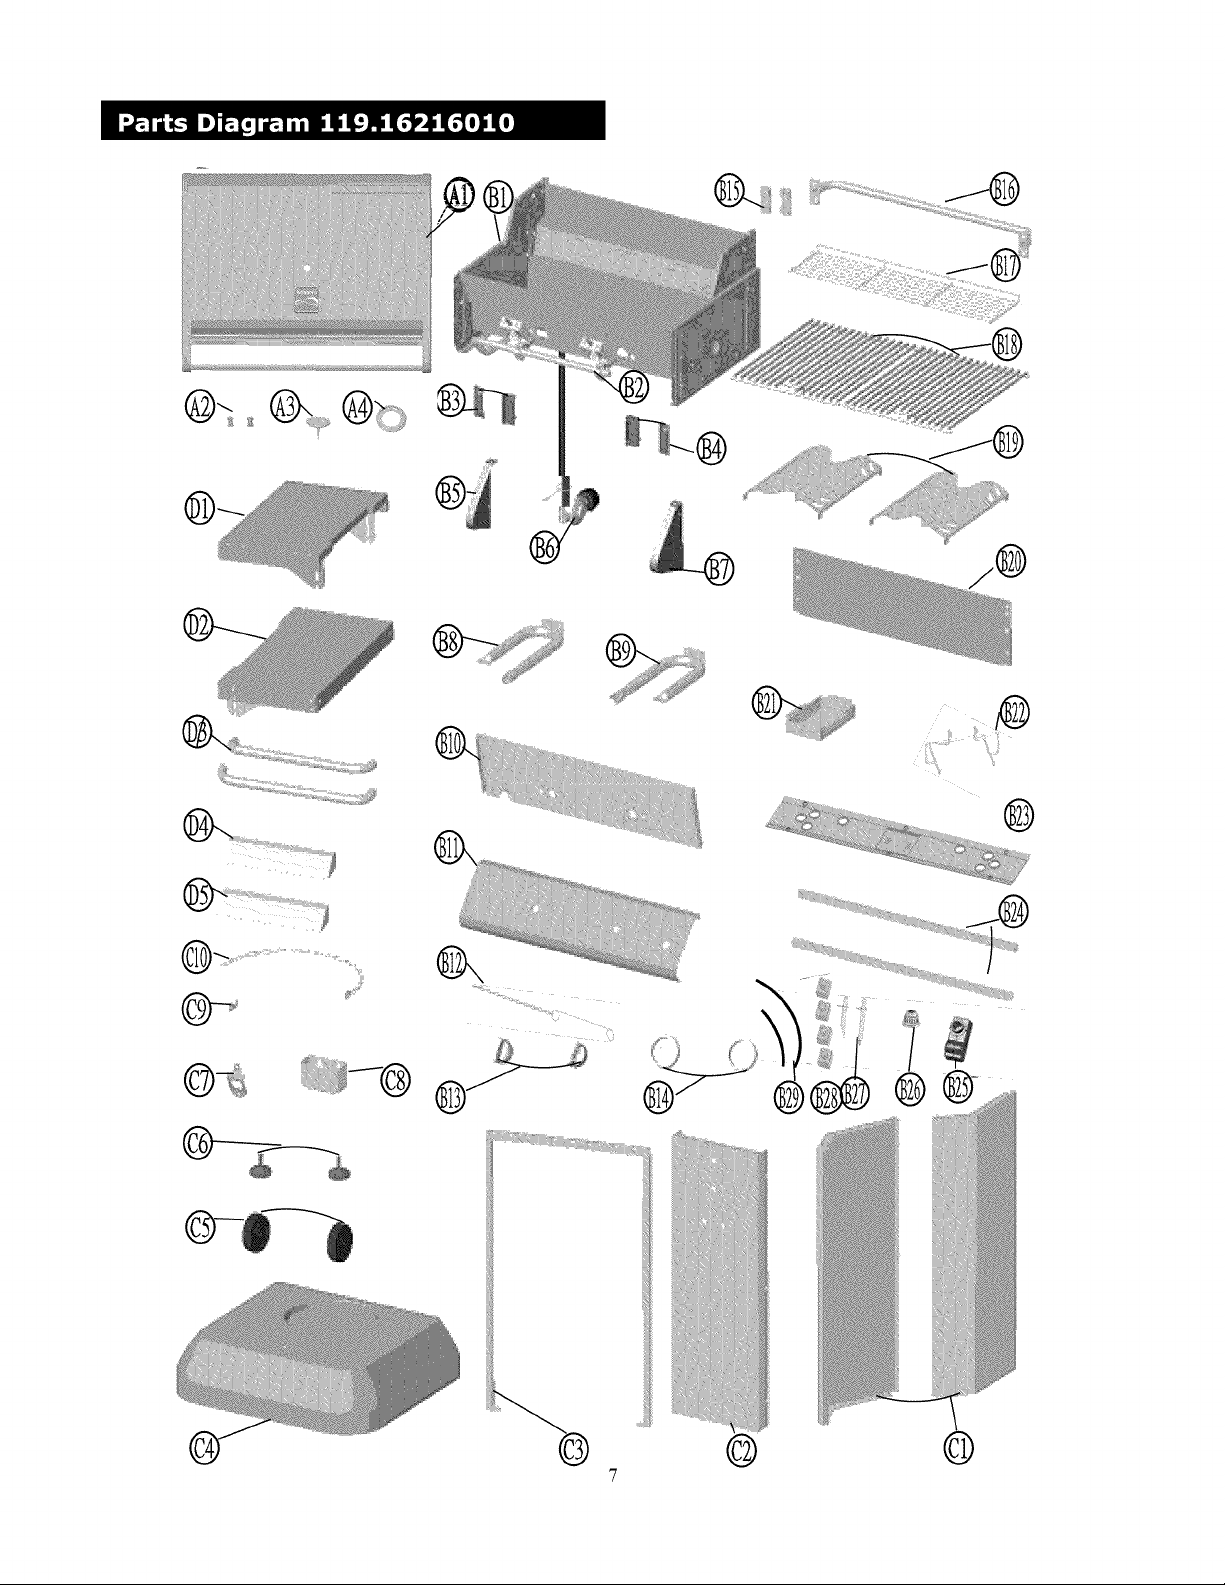
Part Diagram and Lists ...................................... 4-6
Assembly Instructions ..................................... 8-17
Use & Care Instructions ................................. 18-27
Frequently Asked Questions ........................................ 27
Spanish Guide ........................................................... 28-54
Repair Protection Agreement ...................................... 55
Sears Parts and Service Information ......................... 56
Kenmore Full Warranty
if this grill fails due to a defect in material or
workmanship within one year from the date of purchase,
call 1-800-4-MY-HOME® to arrange for
free repair (or replacement if repair proves impossible).
For five years from the date of purchase, the
stainless steel burners will be replaced free of
charge if they rust through. After the first year
from the date of purchase, you must pay the labor
cost to have them installed.
All warranty coverage excludes ignitor batteries,
grill part paint loss, discoloration, and surface
rusting, which are either expendable parts that can
wear out from normal use within the warranty
period, or are conditions that can be the result of
normal use, accident or improper maintenance.
All warranty coverage is void if this grill is ever used for
commercial or rental purposes.
All warranty coverage applies only if this grill is used in
the United States.
This warranty gives you specific legal rights, and you
may have other rights which vary from state to state.
Sears, Roebuck and Co., Hoffman Estates, IL
60179
For residential use only. Do not use for commercial cooking.
IF YOU SMELL GAS:
Shut off gas to the appliance.
Extinguish any open flame.
Open lid.
If odor continues, keep away
from the appliance and immediately
call your gas supplier or your fire
department.
• Do not store or use gasoline or other
flammable liquids or vapors in the
vicinity of this or any other appliance.
• An LP cylinder not connected for use
shall not be stored in the vicinity of this
or any other appliance.
If you are missing parts, need assistance during
assembly, or have any other questions, please call 1-
800-933-0527 between the hours of 8:30am and
5:00pm, Monday through Friday, Central time.
Note that you will be speaking with a representative
of the grill manufacturer and not a Sears employee.
Product Record
IMPORTANT: Fill out the product record
information on below.
• Model Number 119.16216010
Serial Number
(See silver CSA plate inside of Cabinet Panel)
• Date Purchased
California Proposition 65
1. Combustion by-products produced when using this
product contain chemicals known to the State of
California to cause cancer, birth defects, and other
reproductive harm.
2. This product contains chemicals, including lead and
lead compounds, known to the State of California to
cause cancer, birth defects or other reproductive harm.
DONOTlightthisgrillwithoutfirst reading
the LightingInstructions.
DONOTlightthisgrillwithoutcheckingthe
burnertubesfor blockagethat couldhave
occurredduringshipment.SeetheCleaning
andMaintenanceInstructions.
Theinstallationmustconformwith localcodesor,
in theabsenceof localcodes,with eitherthe
NationalFuelGasCode,ANSIZ223.1/NFPA54,
orCAN/CGAB149.1,NaturalGasandPropane
InstallationCode,or PropaneStorageand
HandlingCode,B149.2.
• DONOTuseanytypeof charcoalinthisgrill.
• DONOToperatethemainburnersandback
burneratthe sametime.(If Equipped)
• ALWAYSinspectthegreasetray beforeeach
use.Removeandcleanasnecessary.
Allelectricalaccessories(suchasarotisserieor
light)mustbeelectricallygroundedin accordance
withlocalcodes,or intheabsenceof localcodes,
withthe NationalElectricalCode,ANSI/NFPA70,
ortheCanadianElectricalCode,CSAC22.1.Keep
anyelectricalcordsawayfromhotsurfaces.
Thisoutdoorcookinggasapplianceisnotintended
to beinstalledin or onboatsor recreational
vehicles.
Liquid Propane Gas (LPG) grills must be used with
the liquid propane gas regulator assembly
supplied. This grill is not convertible to natural
gas.
ALWAYS keep the gas hose assembly away from
any heated surface and dripping grease. Avoid
unnecessary twisting of the hose. Visually
inspect the hose prior to each use for cuts,
cracks, excessive wear, or other damage. Do not
use the gas grill if the hose appears damaged.
Call Sears at 1-800-4-MY-HOME®
(1-800-469-4663) for a Kenmore replacement
gas hose assembly.
• NEVER use your gas grill in a building,
garage, porch, shed, breezeway or any
other enclosed area.
• NEVER obstruct the flow of ventilation
air around your gas grill cabinet.
• DO NOT leave children and pets
unattended in the area when the grill is
in operation.
• ENSURE the grill is on a level surface
when in operation. You can adjust the
feet in front to level and stabilize the grill.
• NEVER attach an unregulated gas line
to this appliance.
PRE-ASSEMBLY
• Two people will be necessary to assemble the
larger parts of the grill.
• Lay a cardboard sheet on the floor and use as a
work surface to protect floor and grill parts from
scratches.
• Once all parts are removed and unpacked,
use the Hardware and Part Diagrams to ensure all
items are included and free of damage.
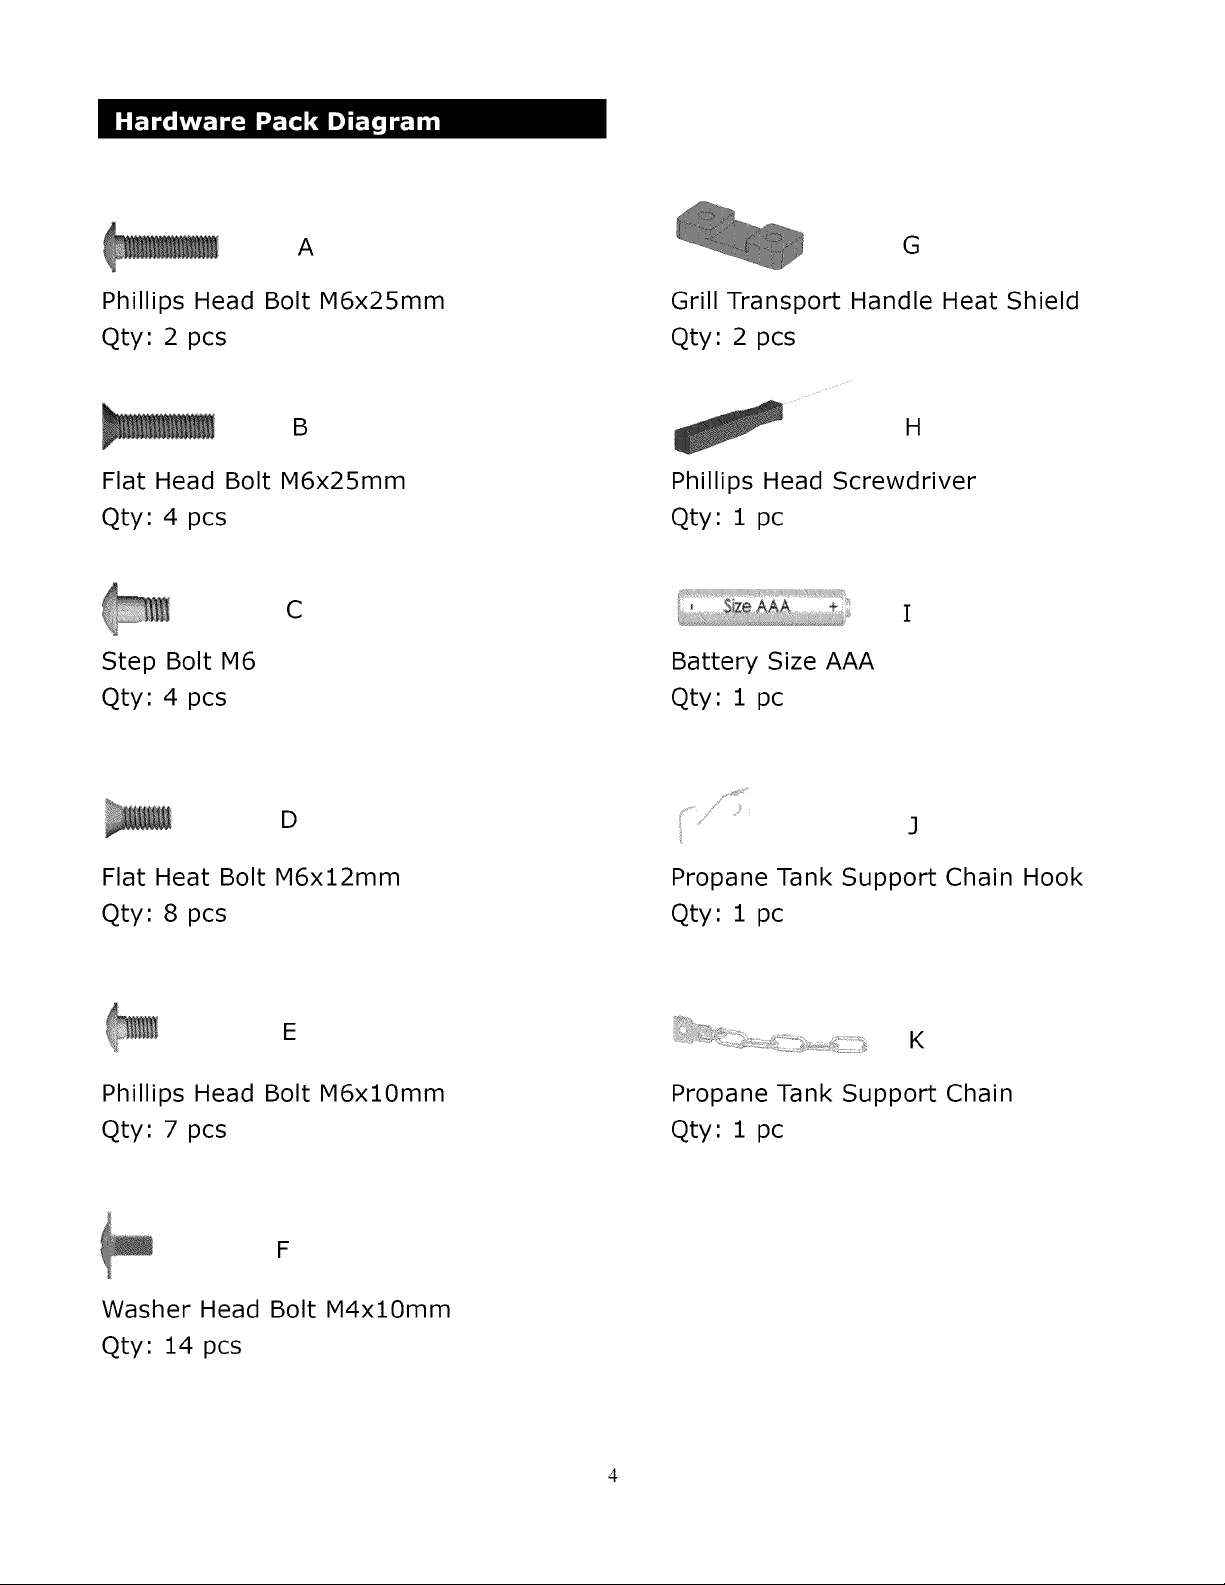
A
Phillips Head Bolt M6x25mm
Qty: 2 pcs
B
Flat Head Bolt M6×25mm
Qty: 4 pcs
Step Bolt M6
Qty: 4 pcs
C
D
Flat Heat Bolt M6×12mm
Qty: 8 pcs
E
Phillips Head Bolt M6xl0mm
Qty: 7 pcs
F
Washer Head Bolt M4xl0mm
Qty: 14 pcs
G
Grill Transport Handle Heat Shield
Qty: 2 pcs
! H
Phillips Head Screwdriver
Qty: 1 pc
Battery Size AAA
Qty: 1 pc
j,7 ....
Propane Tank Support Chain Hook
Qty: 1 pc
K
Propane Tank Support Chain
Qty: 1 pc
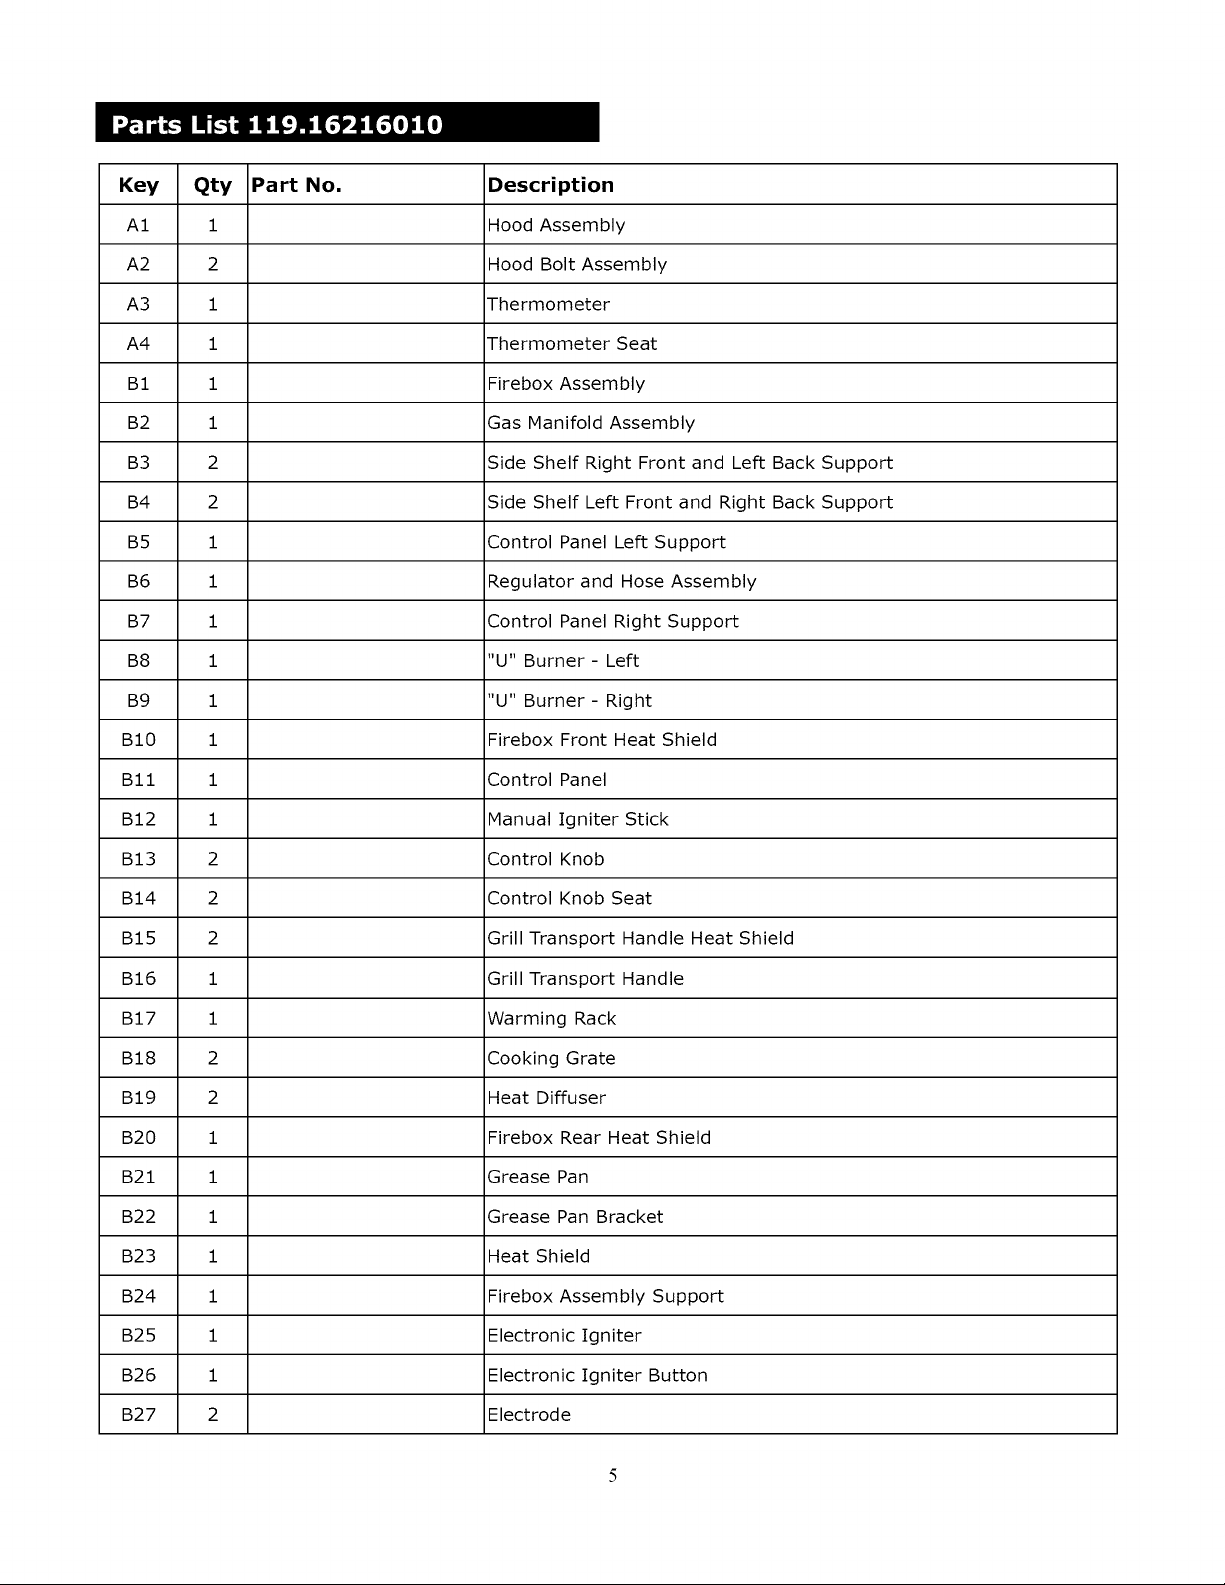
Key Qty Part No. Description
A1 1 Hood Assembly
A2 2 Hood Bolt Assembly
A3 1 Thermometer
A4 1 Thermometer Seat
B1 1 Firebox Assembly
B2 1 Gas Manifold Assembly
B3 2 Side Shelf Right Front and Left Back Support
B4 2 Side Shelf Left Front and Right Back Support
B5 1 Control Panel Left Support
B6 1 Regulator and Hose Assembly
B7 1 Control Panel Right Support
B8 1 "U" Burner- Left
B9 1 "U" Burner- Right
B$0 1 Firebox Front Heat Shield
B11 1 Control Panel
B12 1 Manual igniter Stick
B13 2 Control Knob
B14 2 Control Knob Seat
B15 2 Grill Transport Handle Heat Shield
B16 1 Grill Transport Handle
B17 1 Warming Rack
B18 2 Cooking Grate
B19 2 Heat Diffuser
B20 1 Firebox Rear Heat Shield
B21 1 Grease Pan
B22 1 Grease Pan Bracket
B23 1 Heat Shield
B24 1 Firebox Assembly Support
B25 1 Electronic igniter
B26 1 Electronic igniter Button
B27 2 Electrode
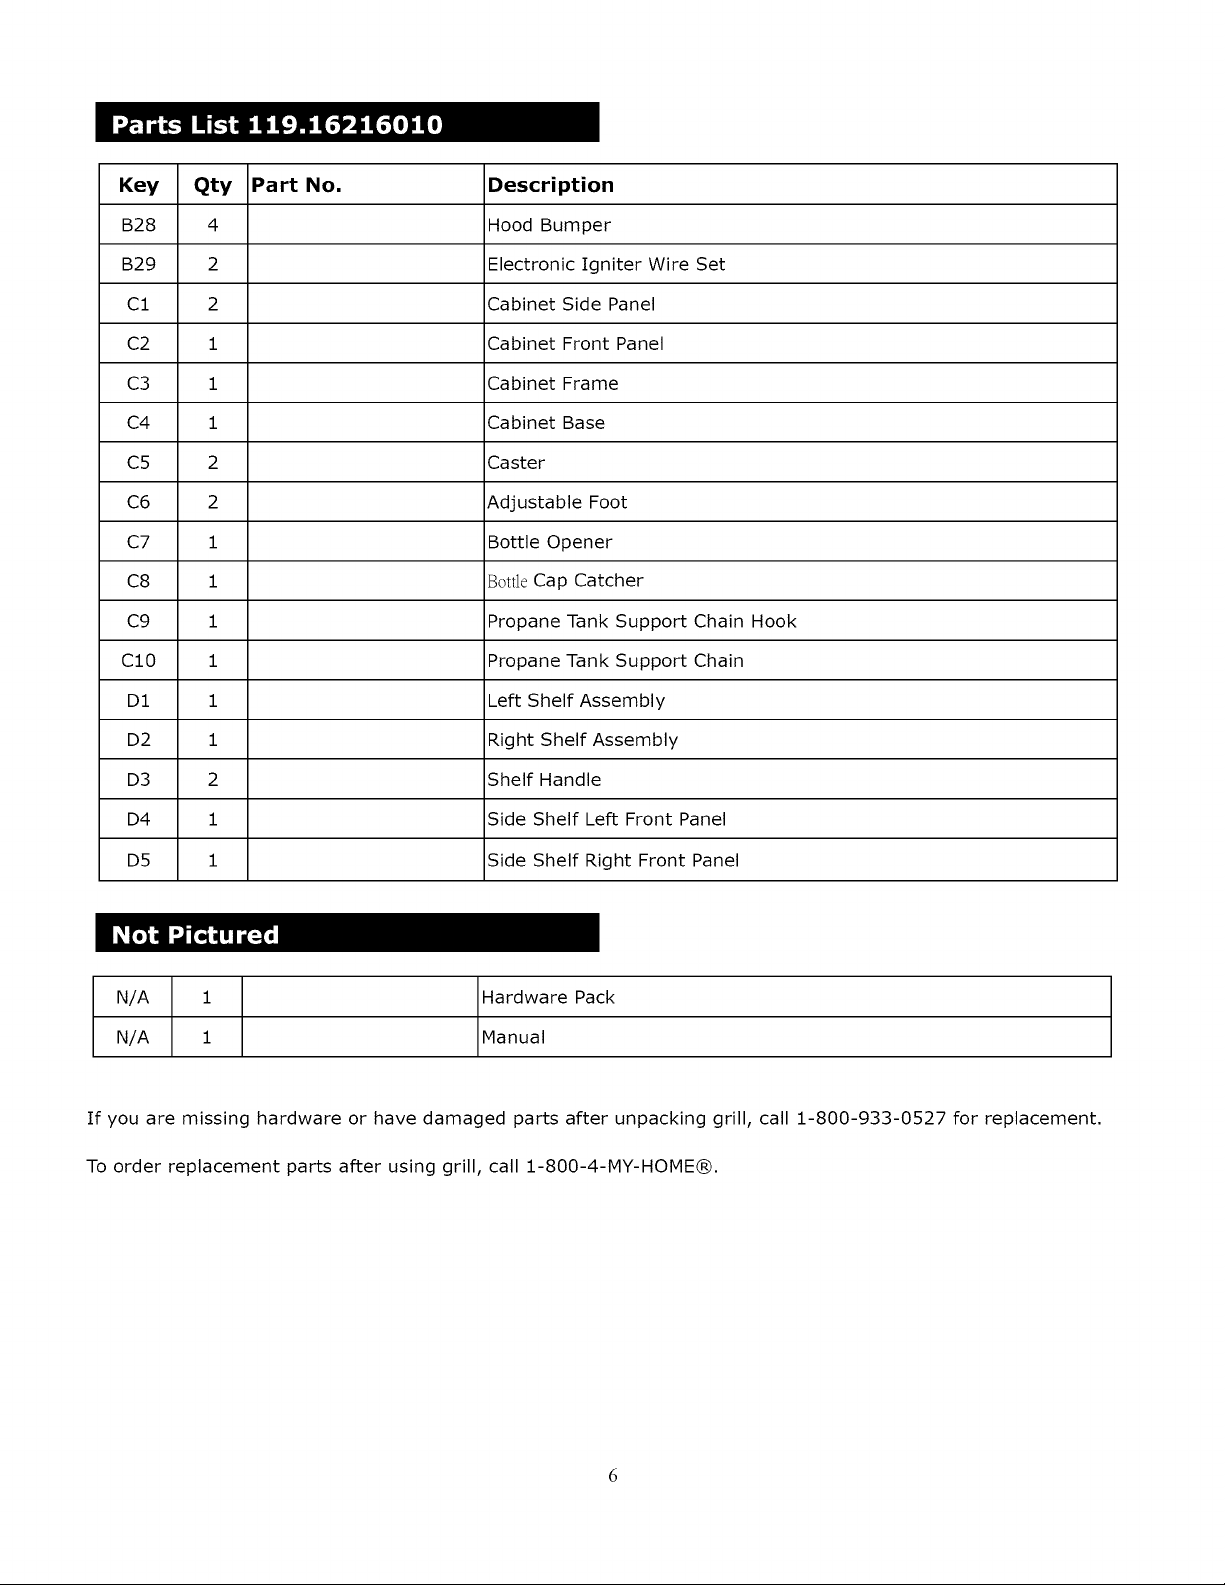
Key Qty
B28 4
B29 2
C1 2
C2 1
C3 1
C4 1
C5 2
C6 2
C7 1
C8 1
C9 1
CI0 1
D1 1
D2 1
D3 2
D4 1
D5 1
Part No.
Description
Hood Bumper
Electronic Igniter Wire Set
Cabinet Side Panel
Cabinet Front Panel
Cabinet Frame
Cabinet Base
Caster
Adjustable Foot
Bottle Opener
Bottle Cap Catcher
Propane Tank Support Chain Hook
Propane Tank Support Chain
Left Shelf Assembly
Right Shelf Assembly
Shelf Handle
Side Shelf Left Front Panel
Side Shelf Right Front Panel
N/A 1 Hardware Pack
N/A 1 Manual
If you are missing hardware or have damaged parts after unpacking grill, call 1-800-933-0527 for replacement.
To order replacement parts after using grill, call 1-800-4-MY-HOME®.
\
©

Install Cabinet Left Side Panel and Right Side Panel
[] Attach Cabinet Left Side Panel to the Cabinet Base using 1 Phillips Head Bolt (M6xlOmm).
[] Attach Cabinet Right Side Panel to the Cabinet Base using i Phillips Head Bolt (M6xiOmm),
Do not fully tighten any bolts at this time,
Phillips Head Bolt M6xiOmm
Qty: 2
Install Cabinet Front Panel
[] Attach Cabinet Front Panel to the Cabinet Base using 1 Phillips Head Bolt (M6xiOmm),
[] Attach Cabinet Front Panel to the Cabinet Left and Right Side Panels using 6 Washer Head Bolts
(M4xiOmm), Do not fully tighten any bolts at this time,
Phillips Head Bolt M6xiOmm
Qty: i
Washer Head Bolt M4xiOmm
Qty: 6
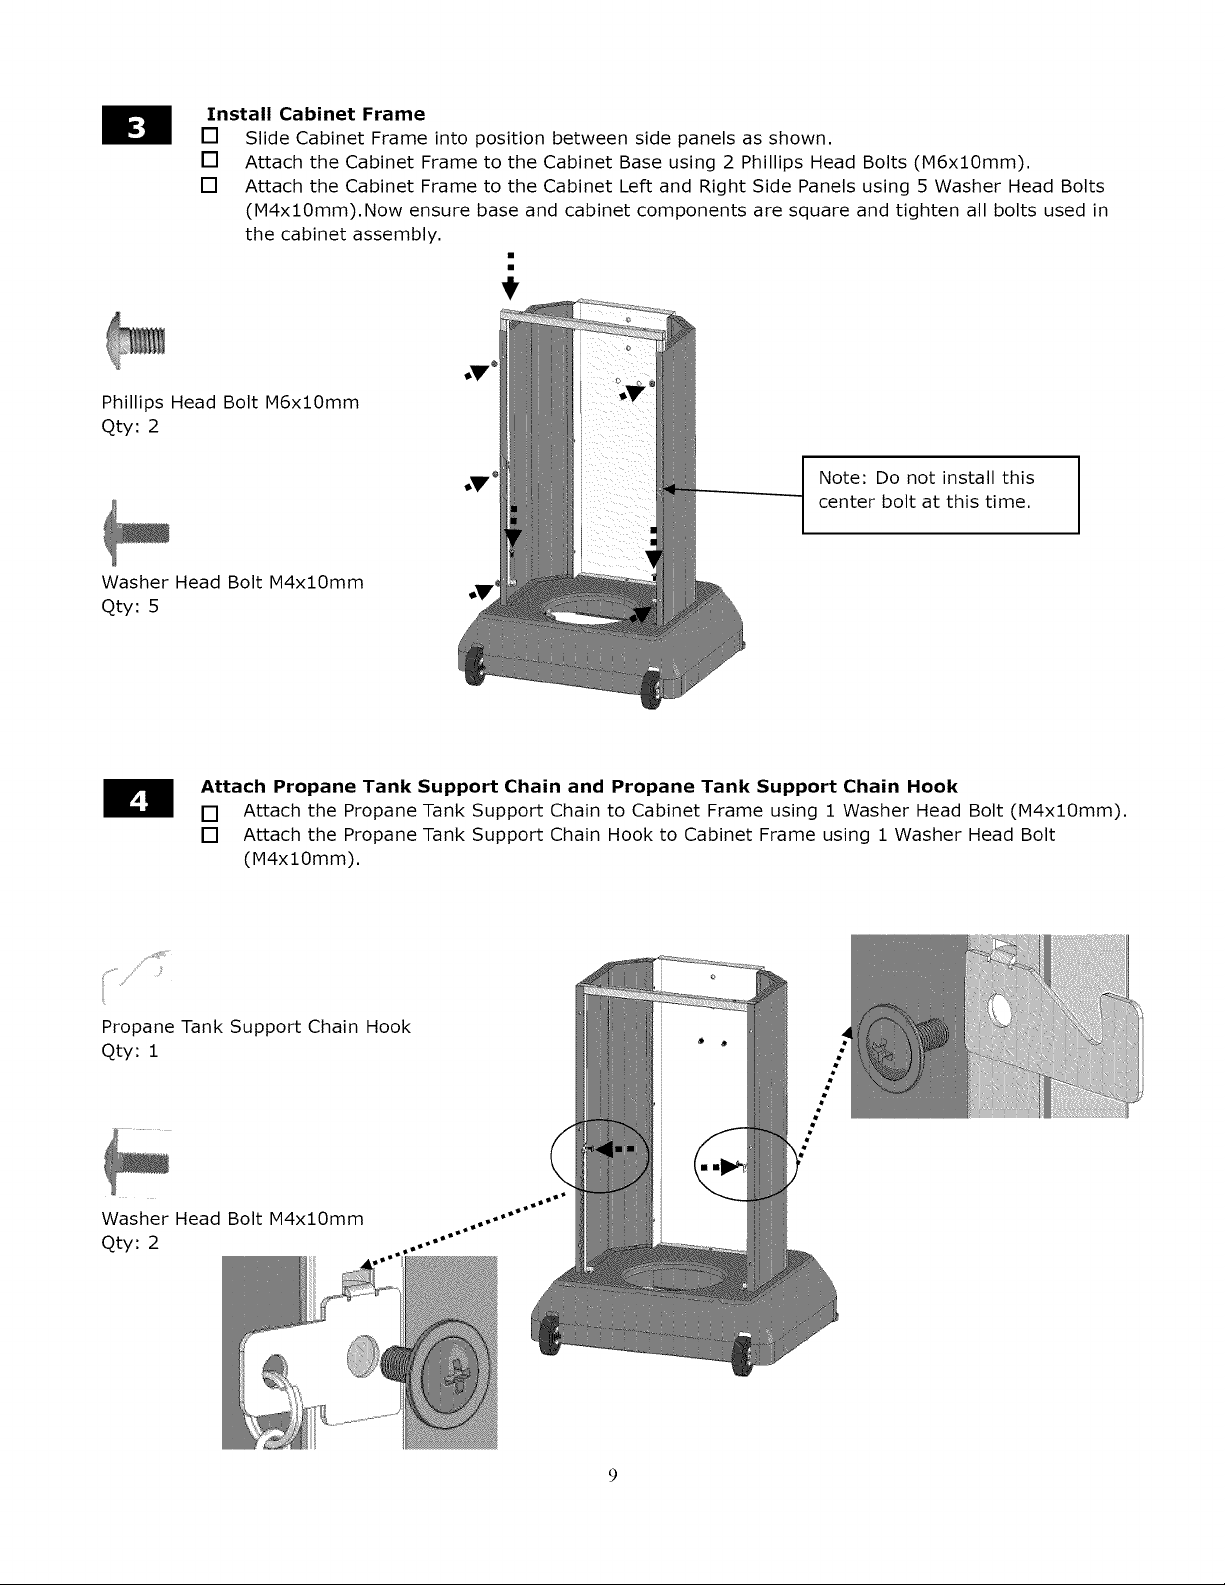
Install Cabinet Frame
[] Slide Cabinet Frame into position between side panels as shown.
[] Attach the Cabinet Frame to the Cabinet Base using 2 Phillips Head Bolts (M6xlOmm),
[] Attach the Cabinet Frame to the Cabinet Left and Right Side Panels using 5 Washer Head Bolts
(M4xlOmm),Now ensure base and cabinet components are square and tighten all bolts used in
the cabinet assembly,
+
Phillips Head Bolt M6xlOmm
Qty: 2
Washer Head Bolt M4xlOmm
Qty: 5
Note: Do not install this
center bolt at this time,
Attach Propane Tank Support Chain and Propane Tank Support Chain Hook
[] Attach the Propane Tank Support Chain to Cabinet Frame using 1 Washer Head Bolt (M4xlOmm).
[] Attach the Propane Tank Support Chain Hook to Cabinet Frame using 1 Washer Head Bolt
(M4xlOmm),
Propane Tank Support Chain Hook
Qty: 1
Washer Head Bolt M4xlOmm
Qty: 2
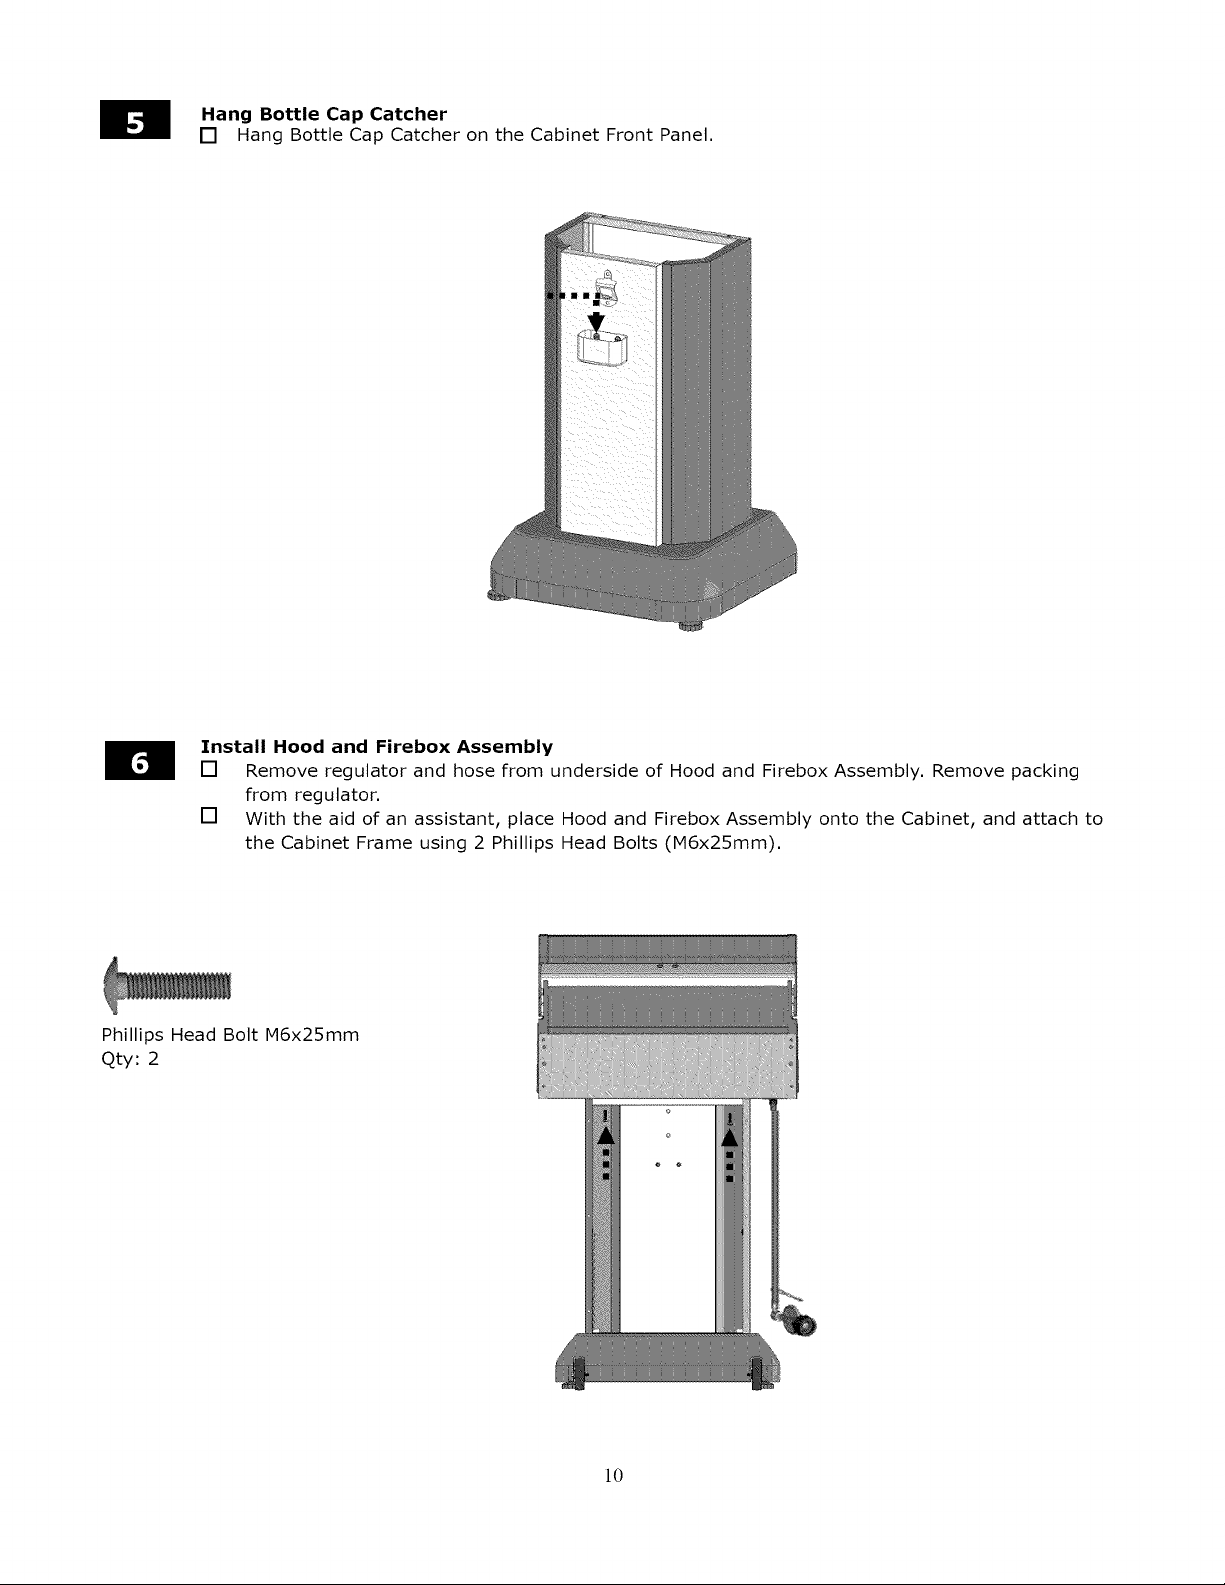
Hang Bottle Cap Catcher
[] Hang Bottle Cap Catcher on the Cabinet Front Panel.
Install Hood and Firebox Assembly
[] Remove regulator and hose from underside of Hood and Firebox Assembly. Remove packing
from regulator.
[] With the aid of an assistant, place Hood and Firebox Assembly onto the Cabinet, and attach to
the Cabinet Frame using 2 Phillips Head Bolts (IV16x25mm).
Phillips Head Bolt M6x25mm
Qty: 2
10
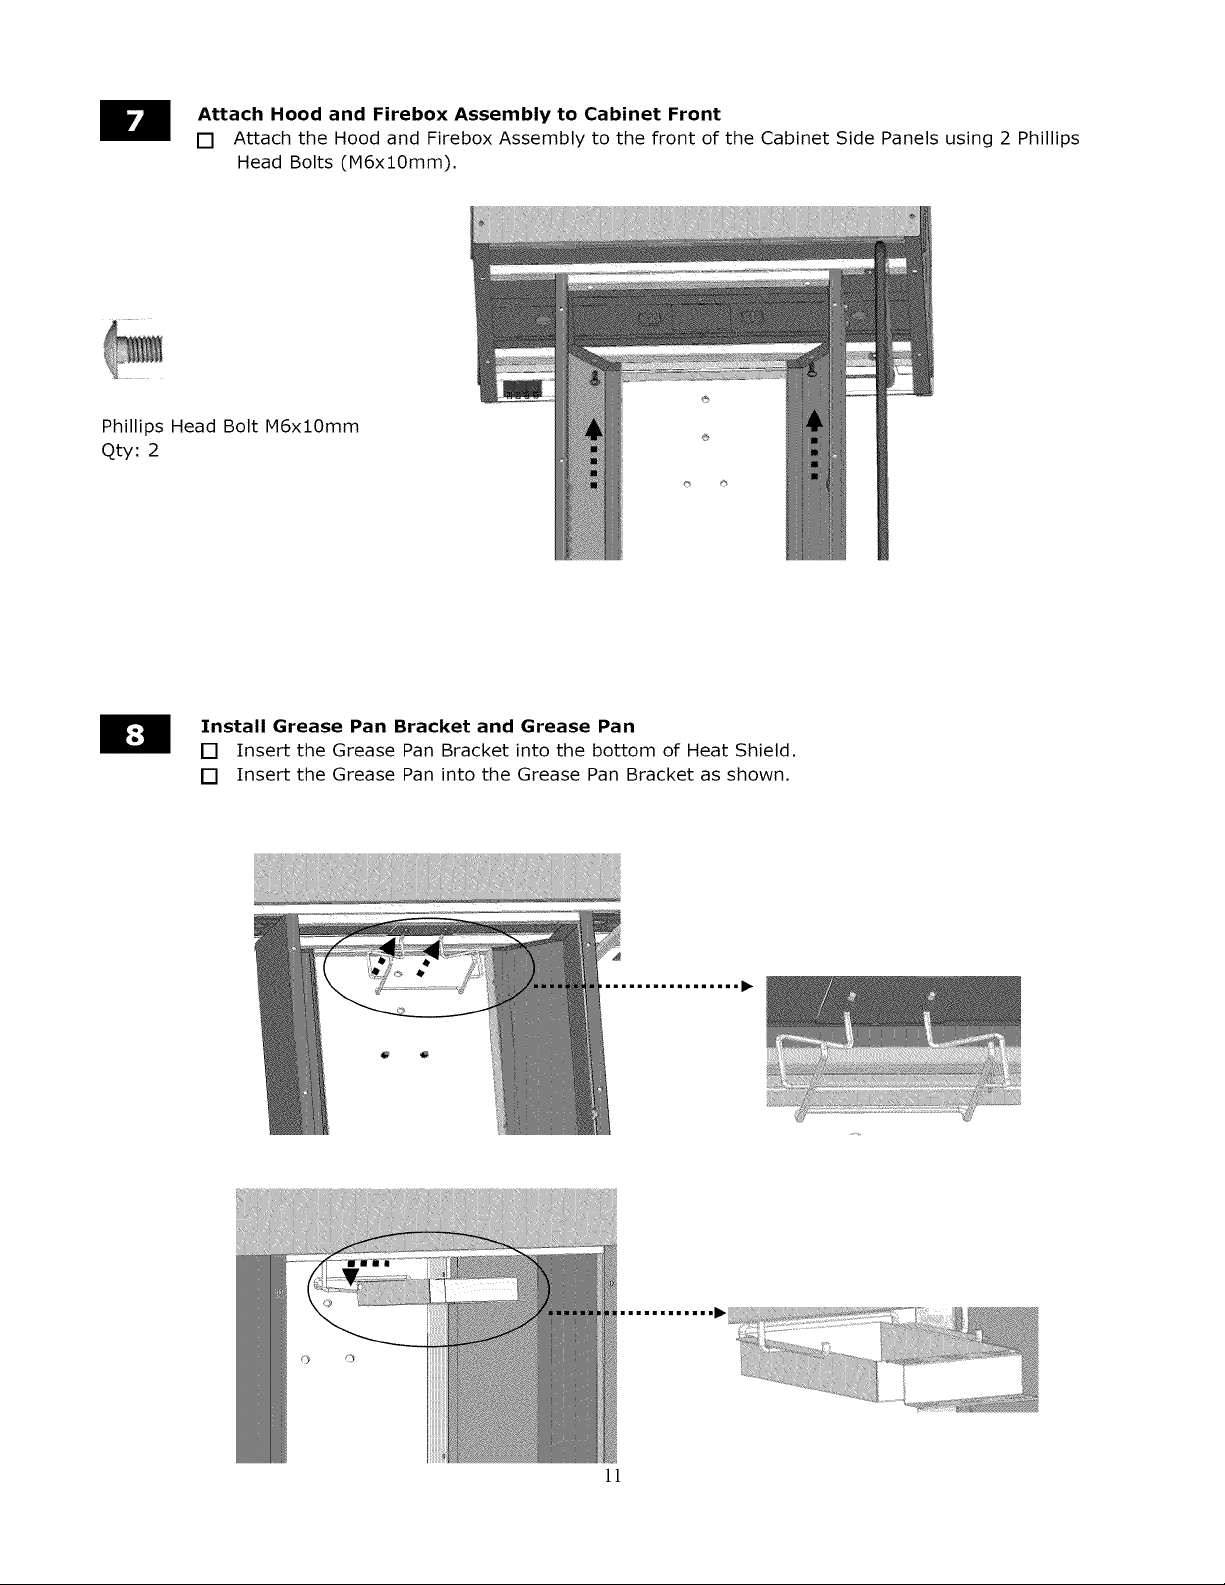
Attach Hood and Firebox Assembly to Cabinet Front
[] Attach the Hood and Firebox Assembly to the front of the Cabinet Side Panels using 2 Phillips
Head Bolts (M6xl0mm),
Phillips Head Bolt M6xl0mm
Qty: 2
®
Install Grease Pan Bracket and Grease Pan
[] Insert the Grease Pan Bracket into the bottom of Heat Shield.
[] Insert the Grease Pan into the Grease Pan Bracket as shown.
1!
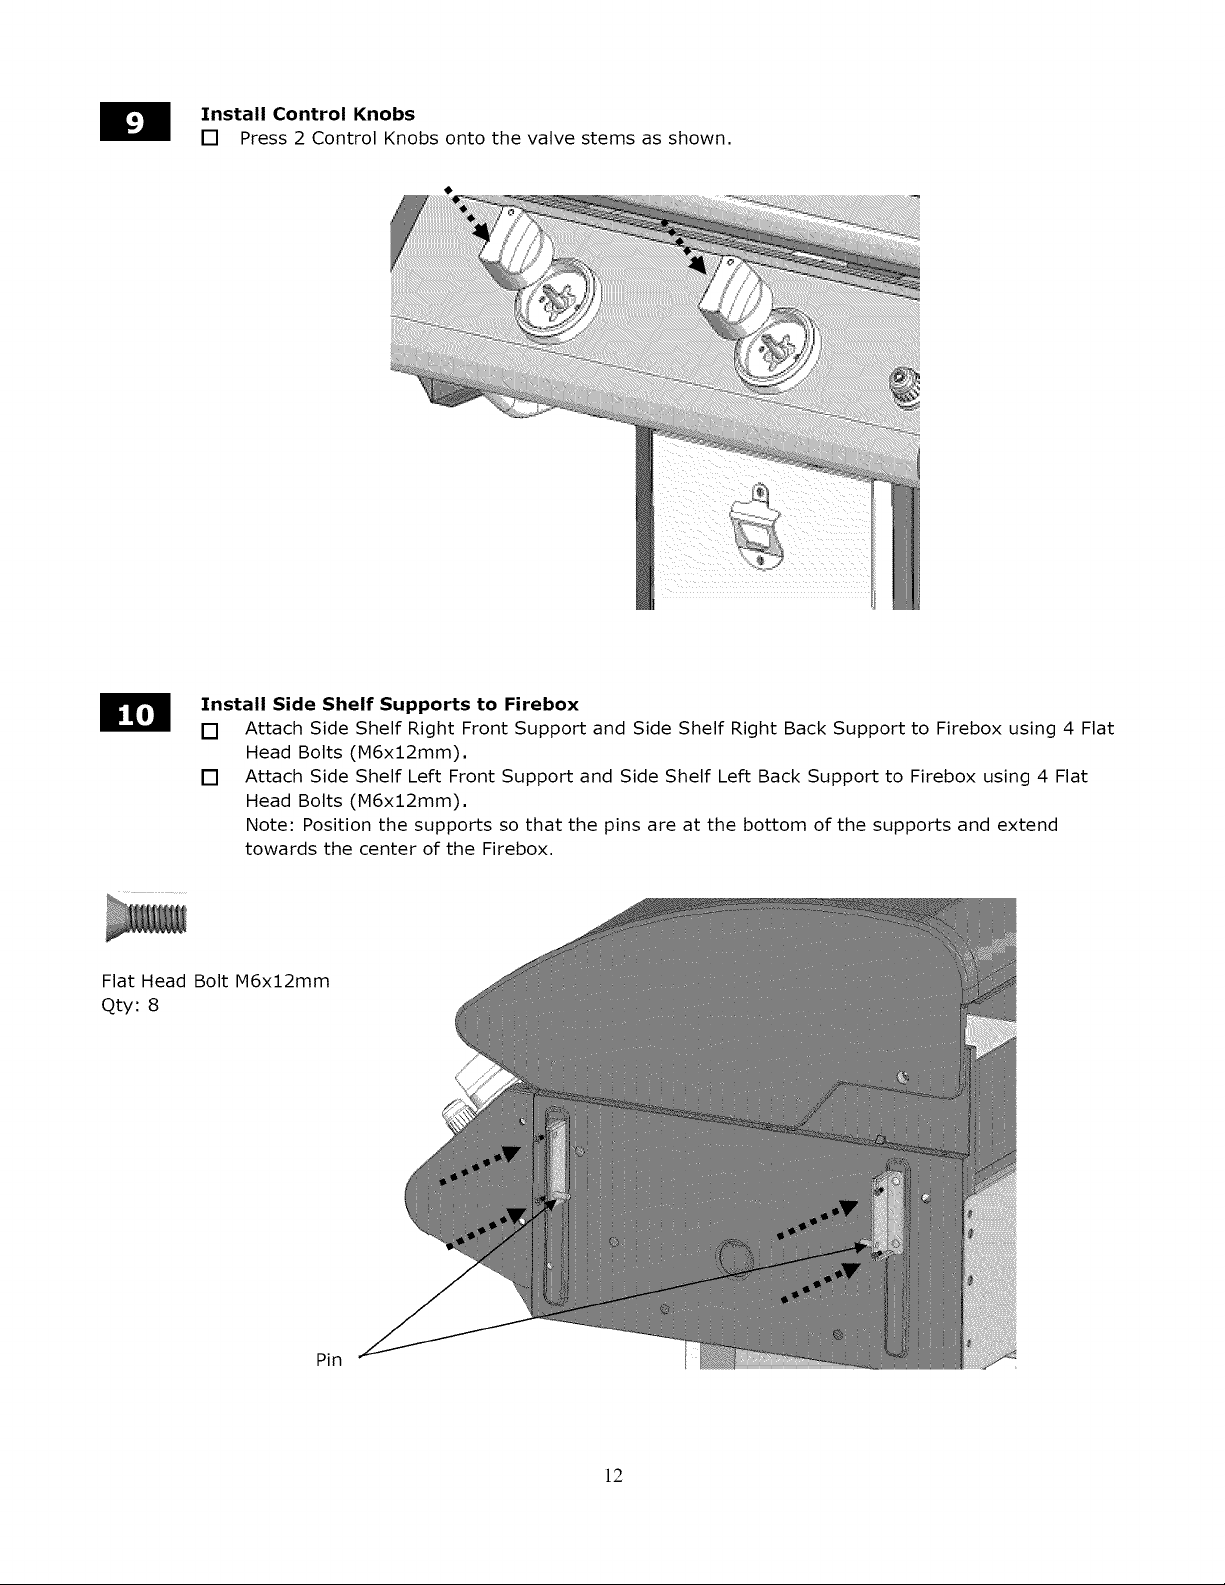
Install Control Knobs
[] Press 2 Control Knobs onto the valve stems as shown.
Install Side Shelf Supports to Firebox
[] Attach Side Shelf Right Front Support and Side Shelf Right Back Support to Firebox using 4 Flat
Head Bolts (M6xl 2mm).
[] Attach Side Shelf Left Front Support and Side Shelf Left Back Support to Firebox using 4 Flat
Head Bolts (M6x12mm),
Note: Position the supports so that the pins are at the bottom of the supports and extend
towards the center of the Firebox.
FlatHead BoltM6x12mm
Qty: 8
Pin
12
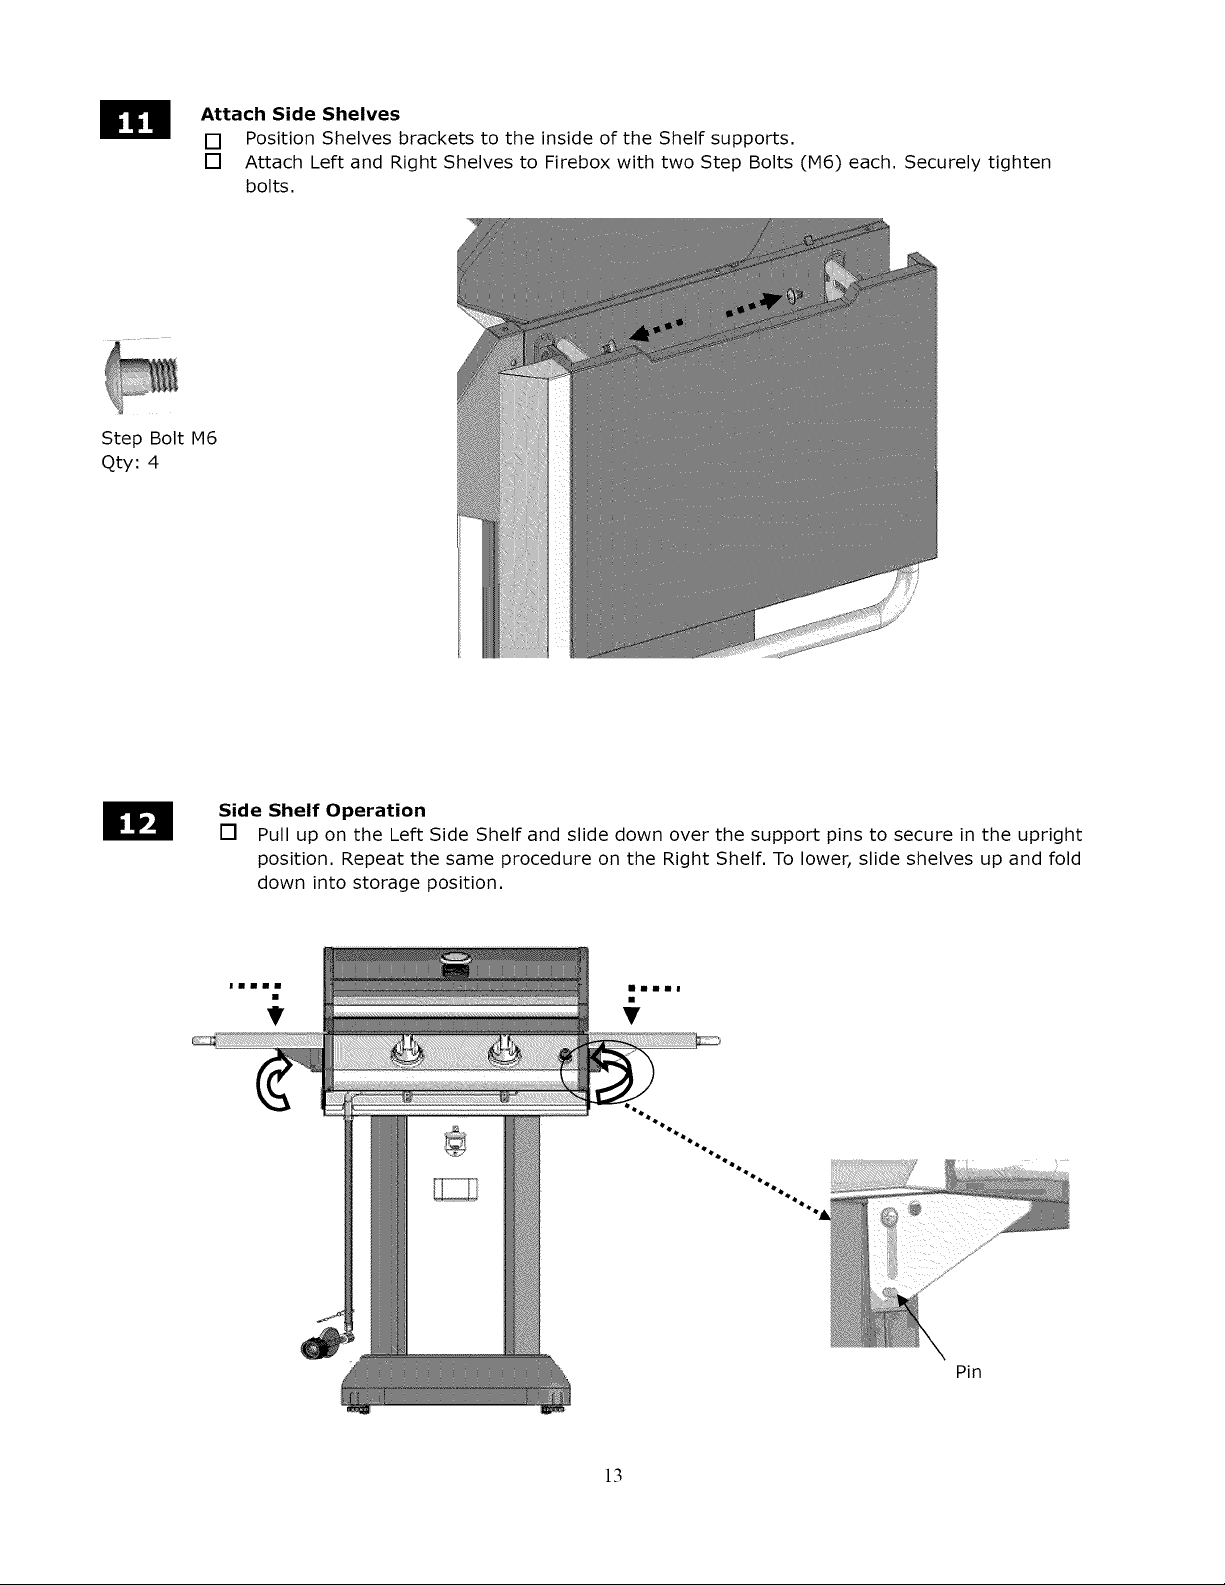
Attach Side Shelves
[] Position Shelves brackets to the inside of the Shelf supports.
[] Attach Left and Right Shelves to Firebox with two Step Bolts (M6) each. Securely tighten
bolts.
Step Bolt M6
Qty: 4
Side Shelf Operation
[] Pull up on the Left Side Shelf and slide down over the support pins to secure in the upright
position. Repeat the same procedure on the Right Shelf. To lower, slide shelves up and fold
down into storage position.
i II II I1_
mmmml
Pin
13
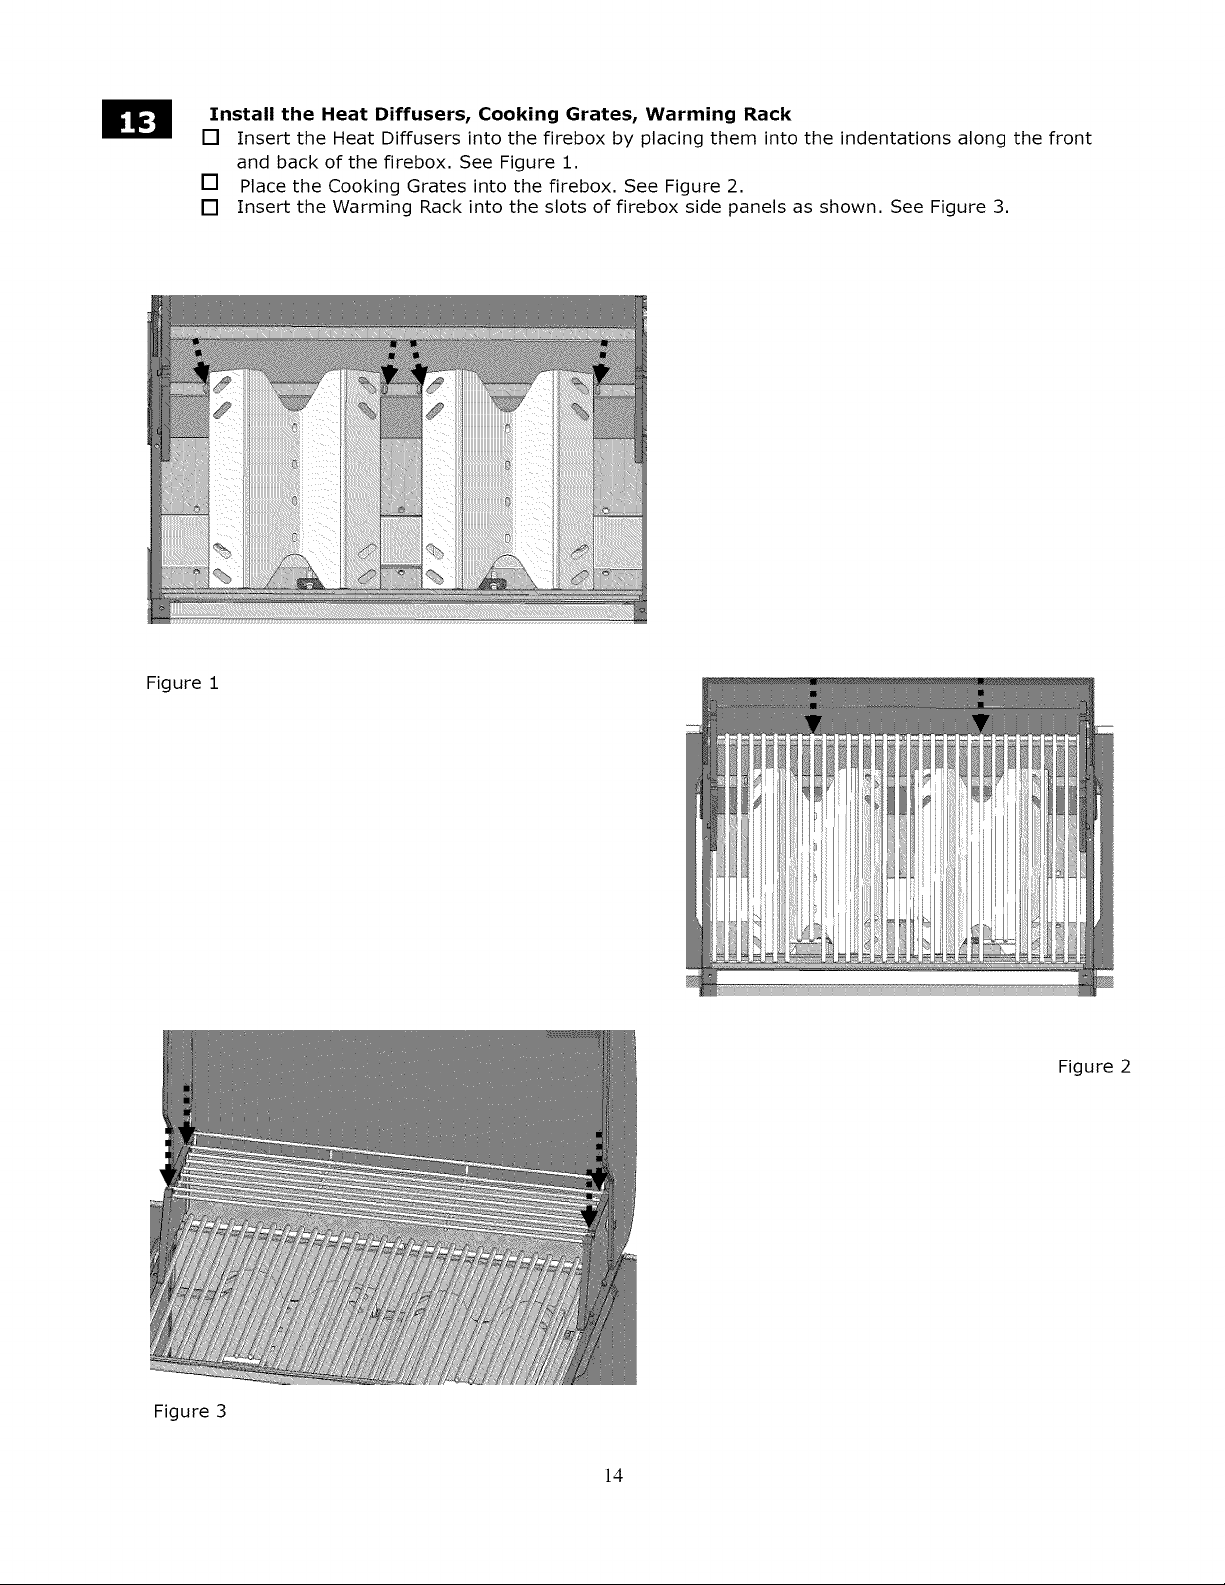
I_ Install the Heat Diffusers, Cooking Grates, Warming Rack
[] Insert the Heat Diffusers into the firebox by placing them into the indentations along the front
and back of the firebox, See Figure 1,
[] Place the Cooking Grates into the firebox, See Figure 2,
[] Insert the Warming Rack into the slots of firebox side panels as shown, See Figure 3,
Figure i
Figure 2
Figure 3
14
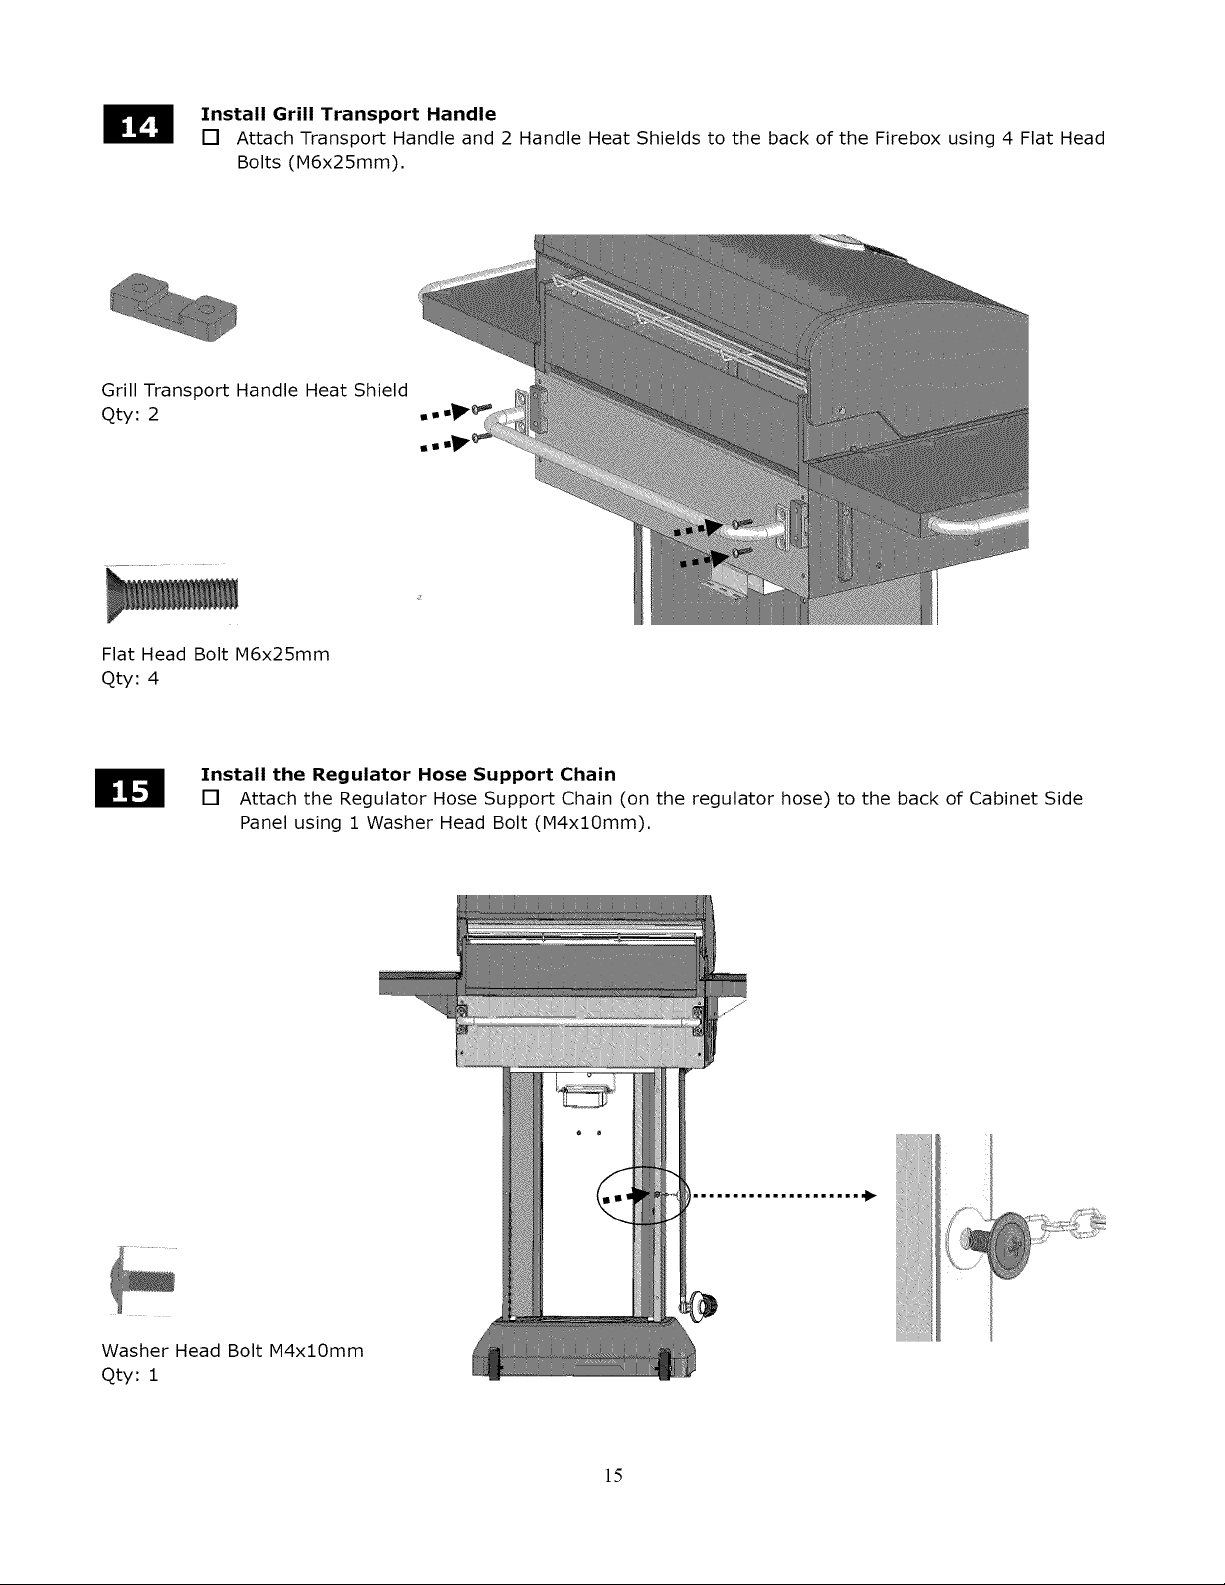
Install Grill Transport Handle
[] Attach Transport Handle and 2 Handle Heat Shields to the back of the Firebox using 4 Flat Head
Bolts (M6x25mm).
Grill Transport Handle Heat Shield
Qty: 2
Flat Head Bolt M6x25mm
Qty: 4
Install the Regulator Hose Support Chain
[] Attach the Regulator Hose Support Chain (on the regulator hose) to the back of Cabinet Side
Panel using 1 Washer Head Bolt (M4xl0mm),
Washer Head Bolt M4xl0mm
Qty: 1
15
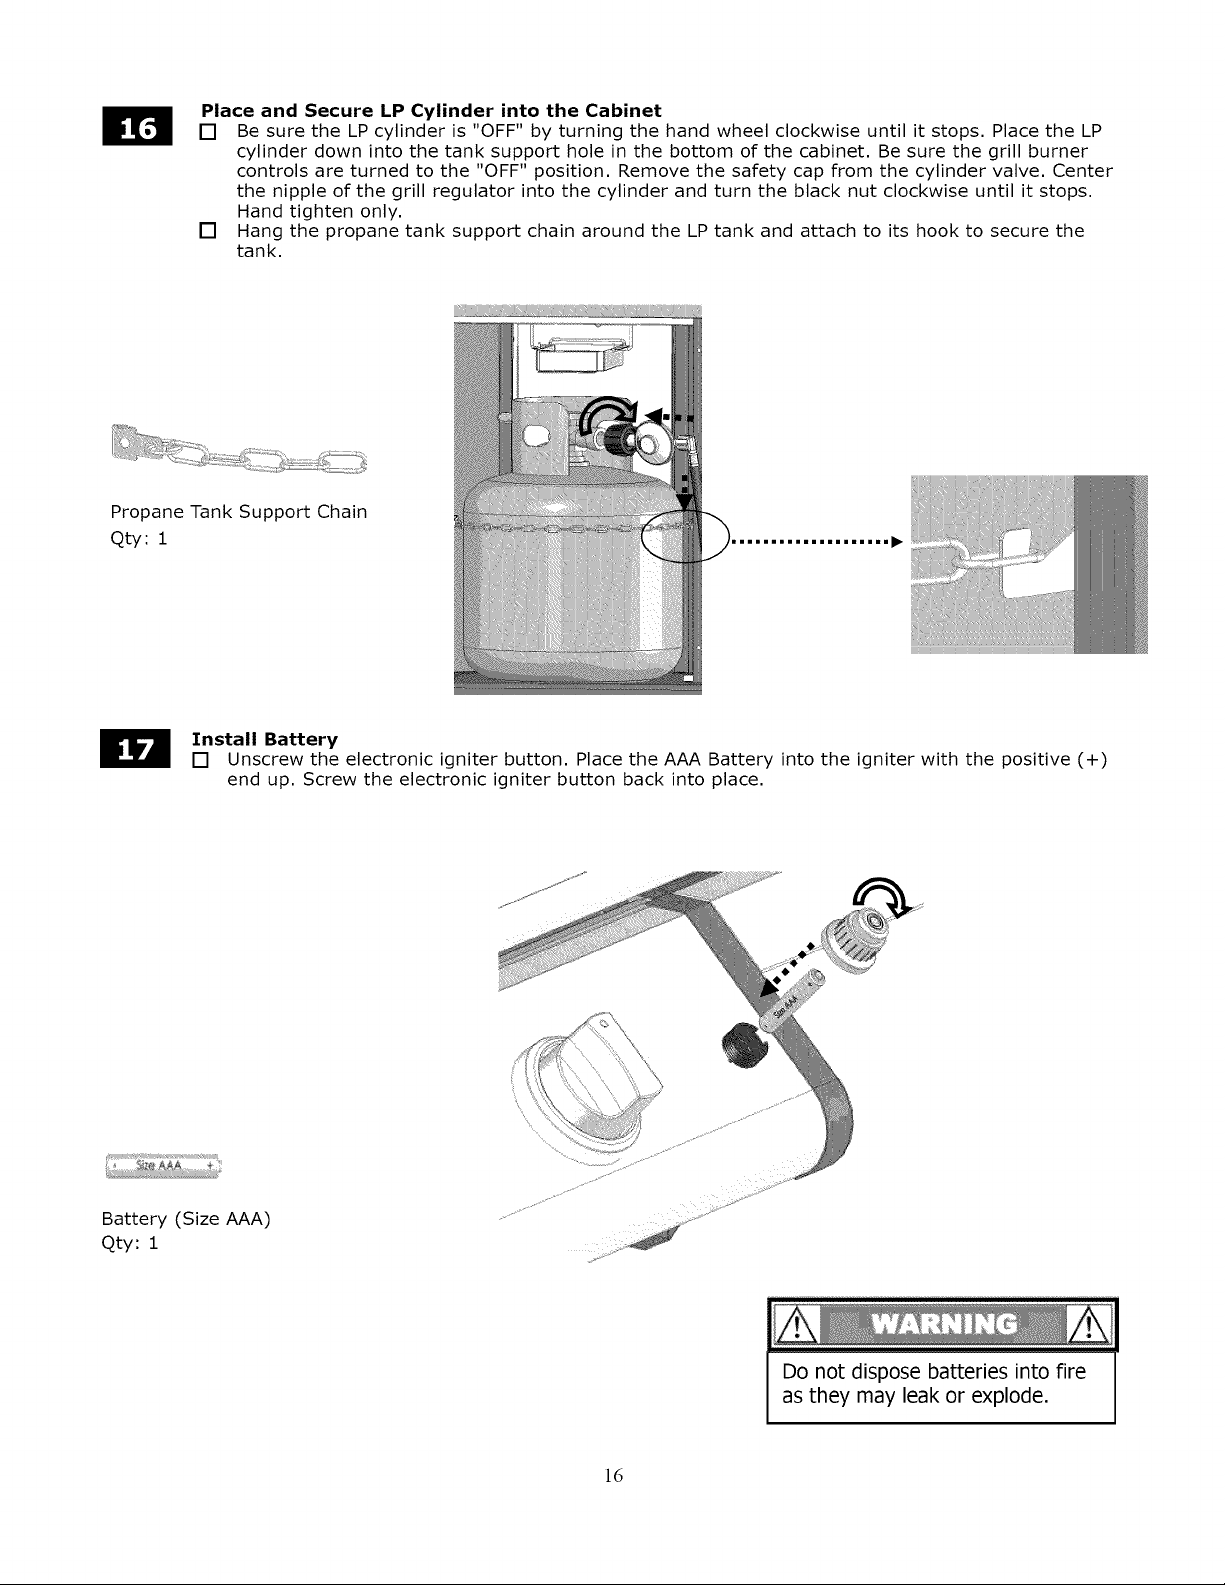
Place and Secure LP Cylinder into the Cabinet
[] Be sure the LP cylinder is "OFF" by turning the hand wheel clockwise until it stops. Place the LP
cylinder down into the tank support hole in the bottom of the cabinet. Be sure the grill burner
controls are turned to the "OFF" position, Remove the safety cap from the cylinder valve, Center
the nipple of the grill regulator into the cylinder and turn the black nut clockwise until it stops,
Hand tighten only,
[] Hang the propane tank support chain around the LP tank and attach to its hook to secure the
tank,
Propane Tank Support Chain
Qty: 1
immlmmlmmlm,i •
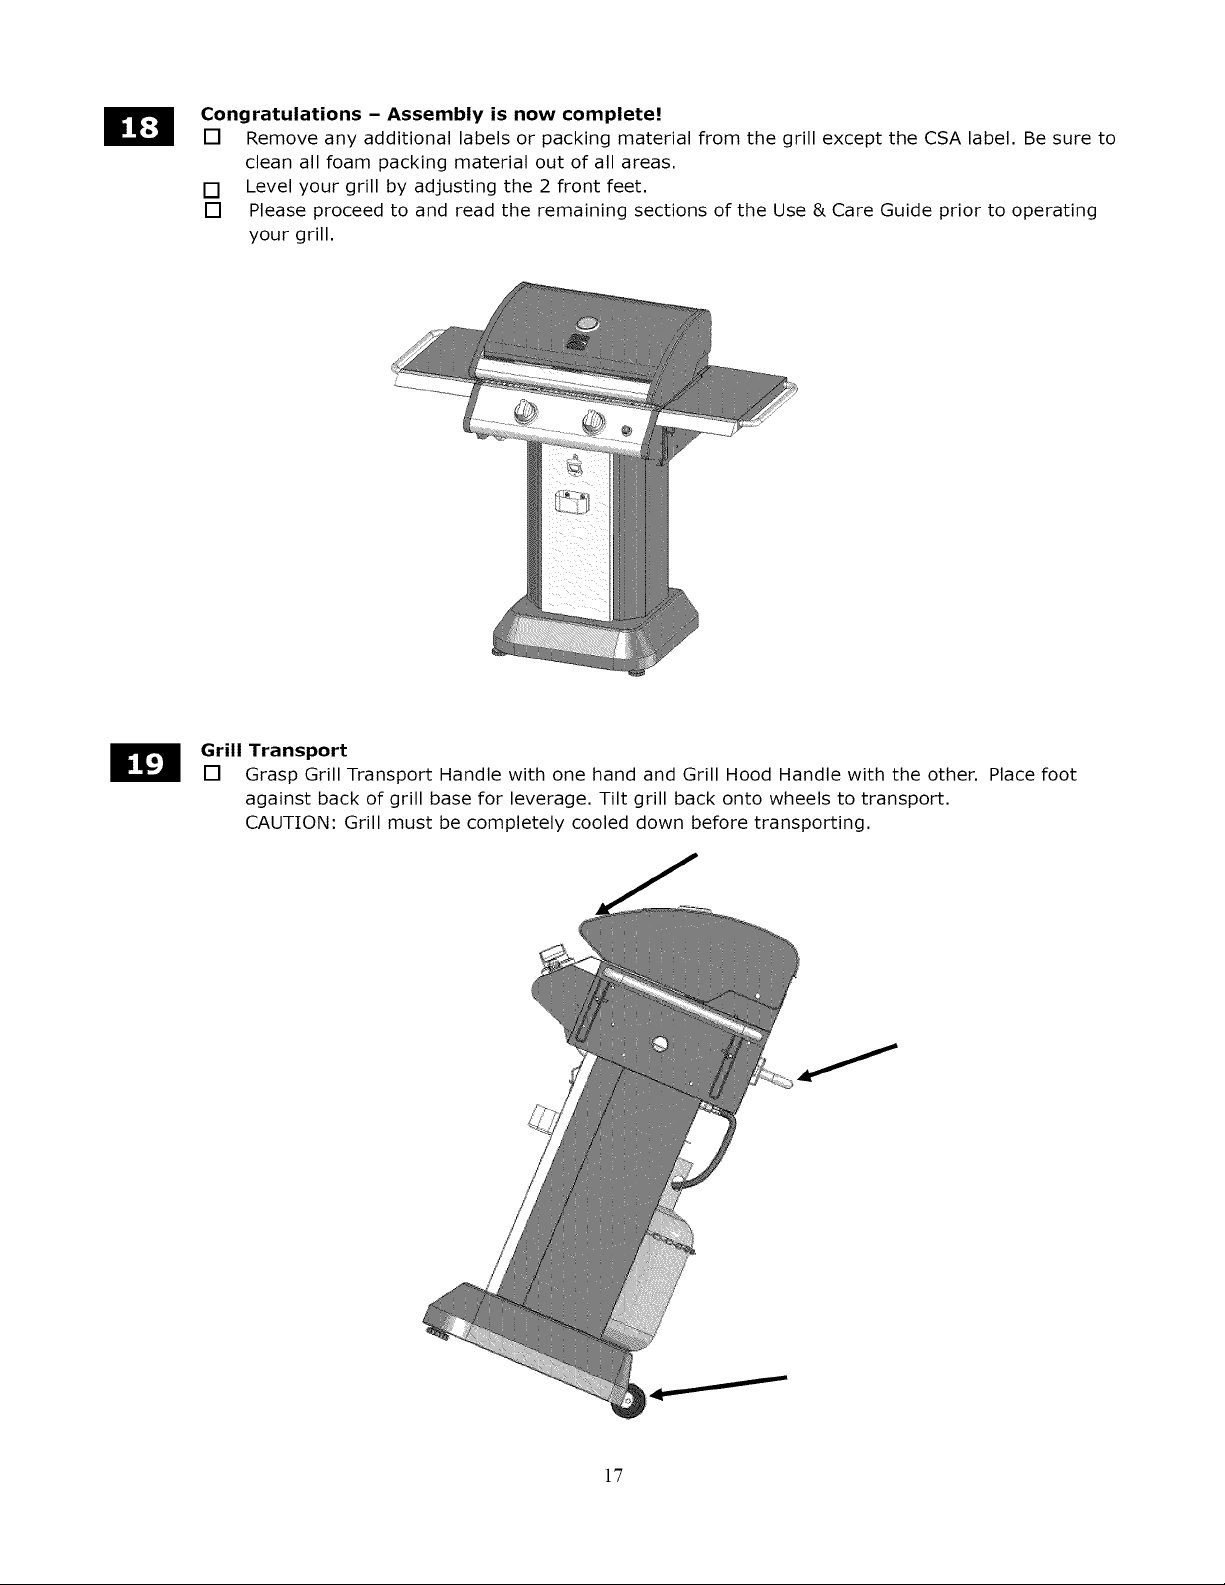
Install Battery
[] Unscrew the electronic igniter button. Place the AAA Battery into the igniter with the positive (+)
end up, Screw the electronic igniter button back into place,
Battery (Size AAA)
Qty: 1
Do not dispose batteries into fire
as they may leak or explode.
ld
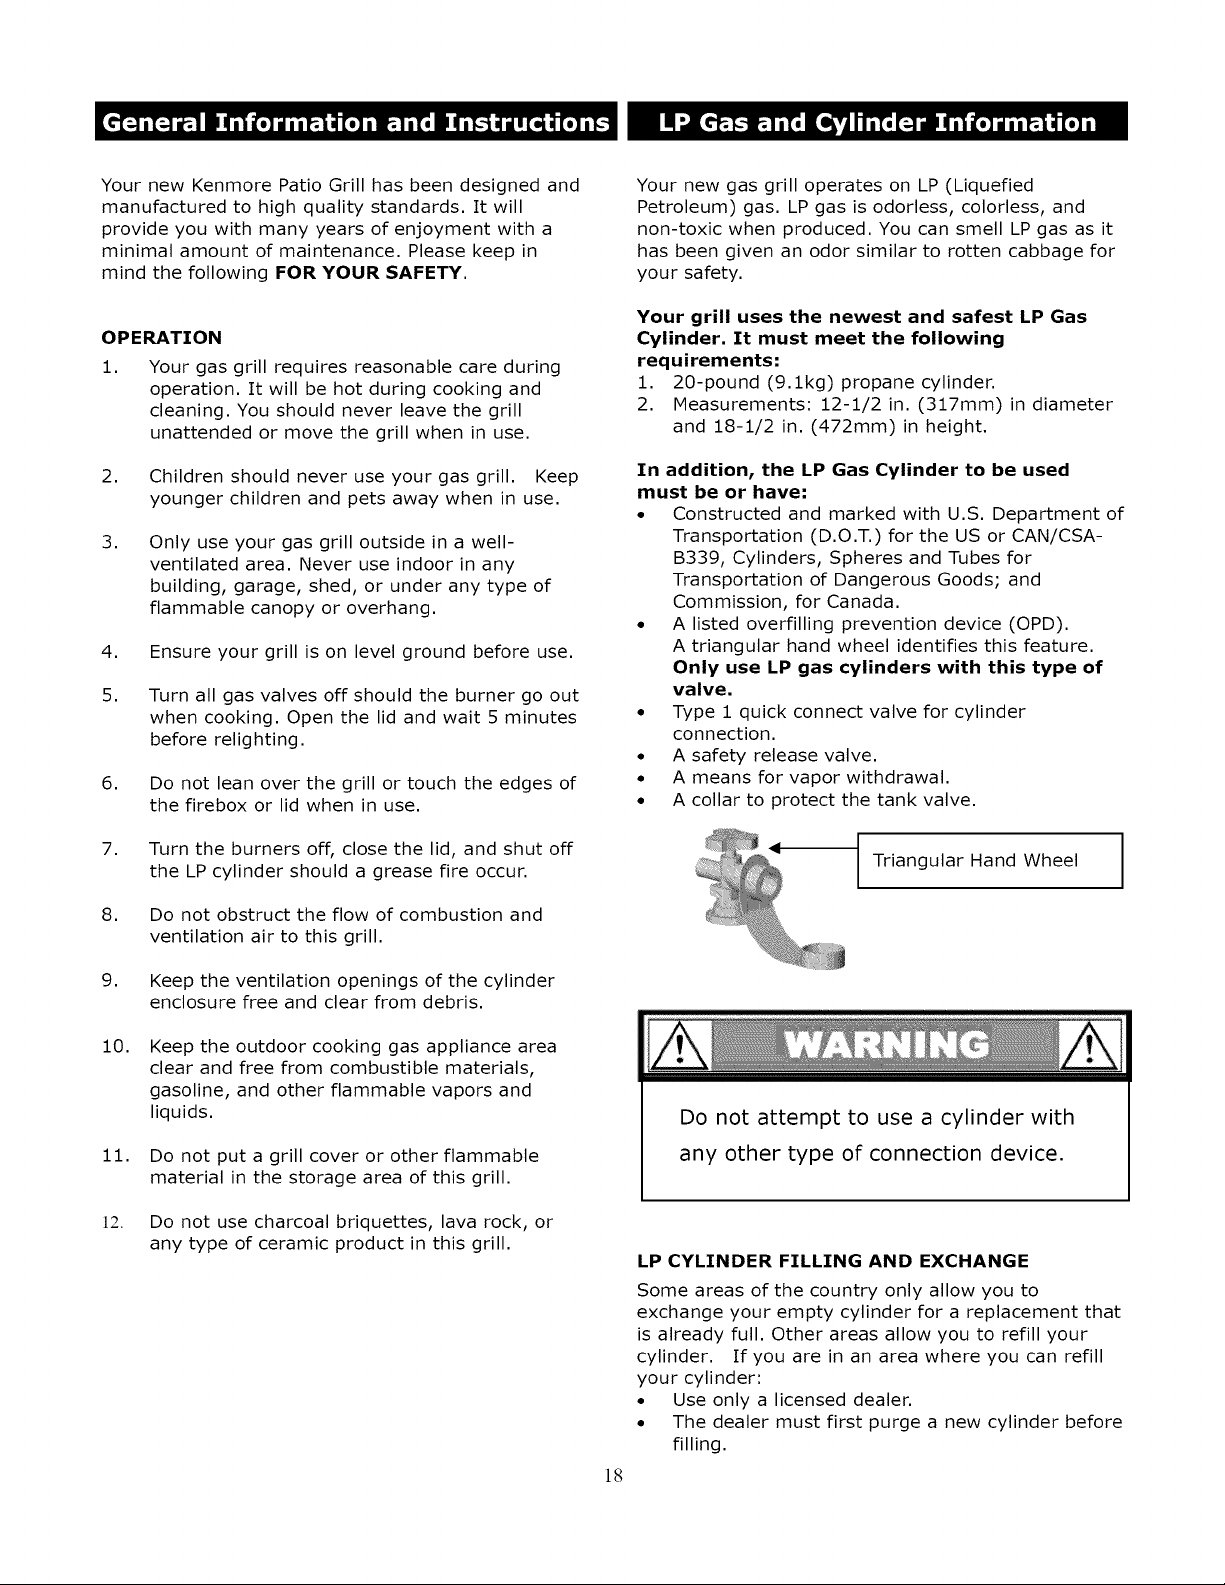
Congratulations - Assembly is now complete!
[] Remove any additional labels or packing material from the grill except the CSA label. Be sure to
clean all foam packing material out of all areas.
[] Level your grill by adjusting the 2 front feet.
[] Please proceed to and read the remaining sections of the Use & Care Guide prior to operating
your grill.
Grill Transport
[] Grasp Grill Transport Handle with one hand and Grill Hood Handle with the other. Place foot
against back of grill base for leverage. Tilt grill back onto wheels to transport.
CAUTION: Grill must be completely cooled down before transporting.
17
YournewKenmorePatioGrillhasbeendesignedand
manufacturedto highqualitystandards.It will
provideyouwithmanyyearsof enjoymentwitha
minimalamountof maintenance.Pleasekeepin
mindthefollowingFOR YOUR SAFETY.
Your new gas grill operates on LP (Liquefied
Petroleum) gas. LP gas is odorless, colorless, and
non-toxic when produced. You can smell LP gas as it
has been given an odor similar to rotten cabbage for
your safety.
OPERATION
1,
Your gas grill requires reasonable care during
operation. It will be hot during cooking and
cleaning. You should never leave the grill
unattended or move the grill when in use.
2,
Children should never use your gas grill. Keep
younger children and pets away when in use.
3,
Only use your gas grill outside in a well-
ventilated area. Never use indoor in any
building, garage, shed, or under any type of
flammable canopy or overhang.
4. Ensure your grill is on level ground before use.
5. Turn all gas valves off should the burner go out
when cooking. Open the lid and wait 5 minutes
before relighting.
6,
Do not lean over the grill or touch the edges of
the firebox or lid when in use.
7. Turn the burners off, close the lid, and shut off
the LP cylinder should a grease fire occur.
8, Do not obstruct the flow of combustion and
ventilation air to this grill.
Your grill uses the newest and safest LP Gas
Cylinder. It must meet the following
requirements:
1. 20-pound (9.1kg) propane cylinder.
2. Measurements: 12-1/2 in. (317mm) in diameter
and 18-1/2 in. (472mm) in height.
In addition, the LP Gas Cylinder to be used
must be or have:
• Constructed and marked with U.S. Department of
Transportation (D.O.T.) for the US or CAN/CSA-
B339, Cylinders, Spheres and Tubes for
Transportation of Dangerous Goods; and
Commission, for Canada.
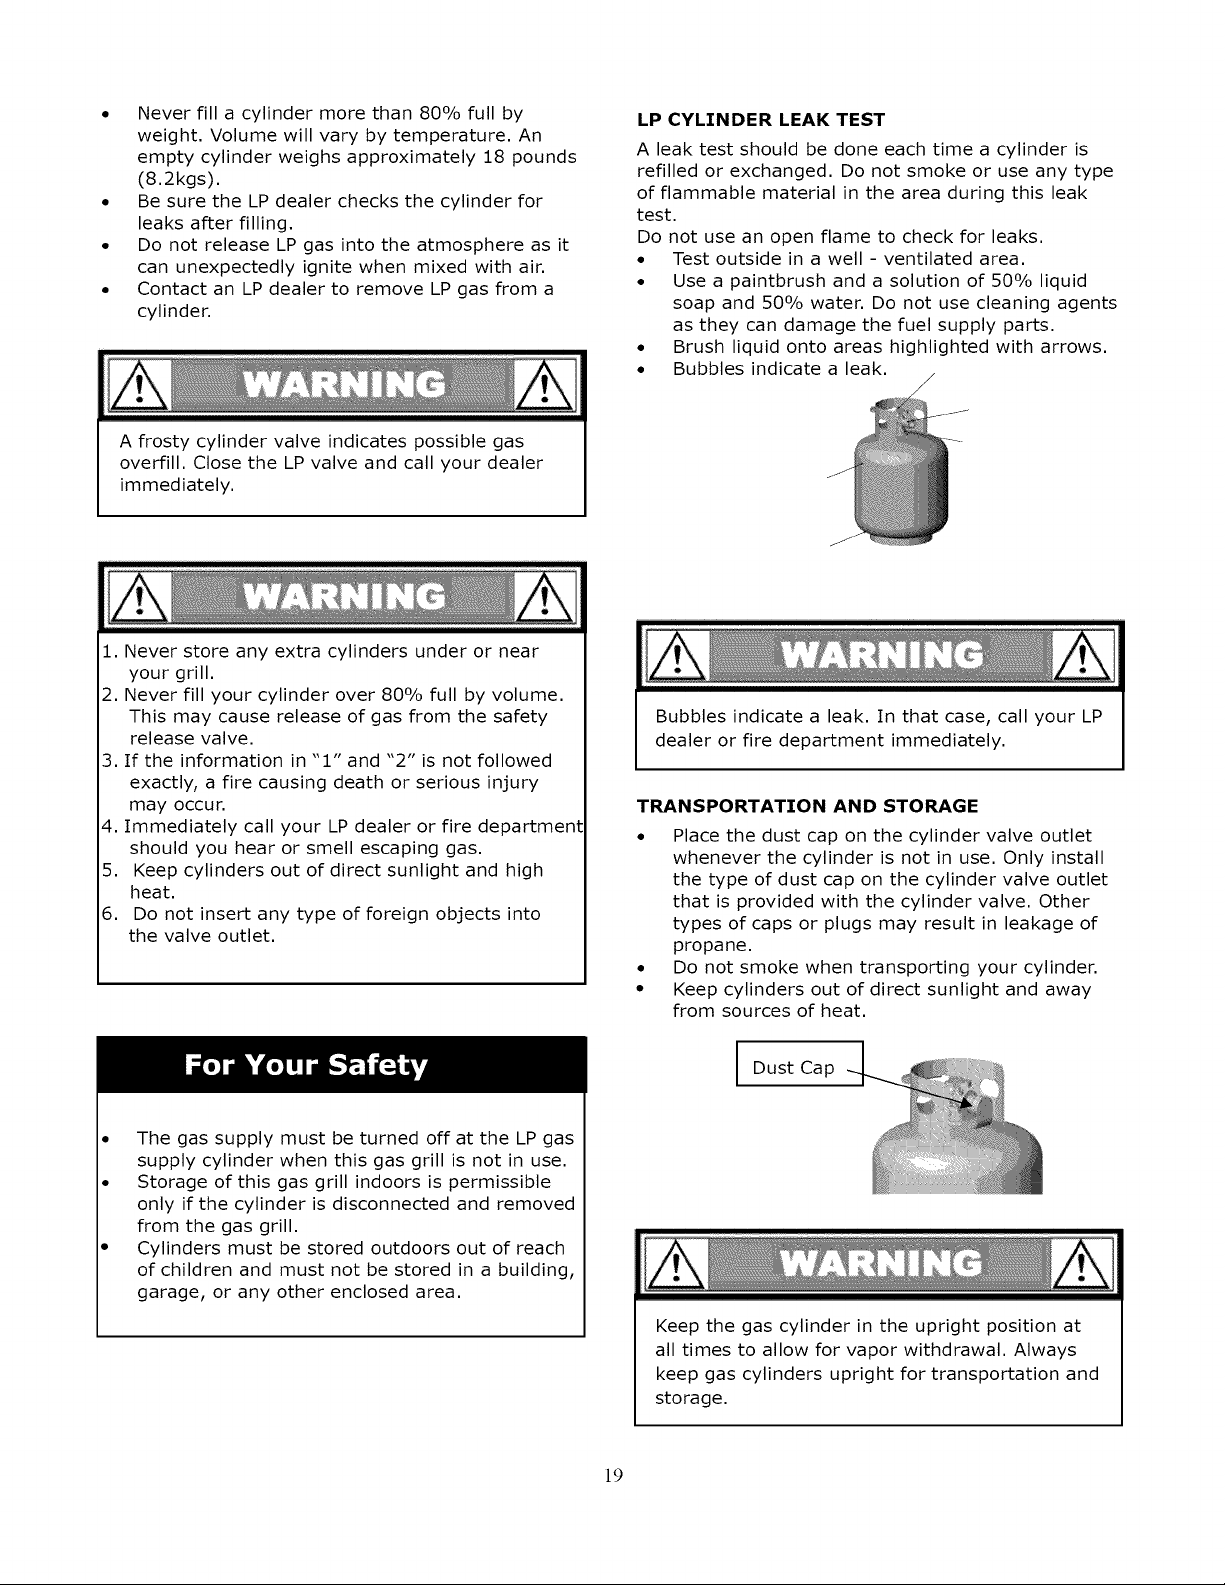
• A listed overfilling prevention device (OPD).
A triangular hand wheel identifies this feature.
Only use LP gas cylinders with this type of
valve,
• Type 1 quick connect valve for cylinder
connection.
• A safety release valve.
• A means for vapor withdrawal.
• A collar to protect the tank valve.
Triangular Hand Wheel
I
9,
Keep the ventilation openings of the cylinder
enclosure free and clear from debris.
10.
11.
Keep the outdoor cooking gas appliance area
clear and free from combustible materials,
gasoline, and other flammable vapors and
liquids.
Do not put a grill cover or other flammable
material in the storage area of this grill.
Do not attempt to use a cylinder with
any other type of connection device.
]2.
Do not use charcoal briquettes, lava rock, or
any type of ceramic product in this grill.
]8
LP CYLINDER FILLING AND EXCHANGE
Some areas of the country only allow you to
exchange your empty cylinder for a replacement that
is already full. Other areas allow you to refill your
cylinder. If you are in an area where you can refill
your cylinder:
• Use only a licensed dealer.
• The dealer must first purge a new cylinder before
filling.
• Neverfill acylindermorethan80%full by
weight,Volumewillvarybytemperature.An
emptycylinderweighsapproximately18 pounds
(8.2kgs).
• BesuretheLPdealerchecksthecylinderfor
leaksafterfilling.
• DonotreleaseLPgasintotheatmosphereasit
canunexpectedlyignitewhenmixedwithair.
• Contactan LPdealerto removeLPgasfroma
cylinder.
A frostycylindervalveindicatespossiblegas
overfill.Closethe LPvalveandcallyourdealer
immediately.
LP CYLINDER LEAK TEST
A leak test should be done each time a cylinder is
refilled or exchanged. Do not smoke or use any type
of flammable material in the area during this leak
test.
Do not use an open flame to check for leaks.
• Test outside in a well - ventilated area.
• Use a paintbrush and a solution of 50% liquid
soap and 50% water. Do not use cleaning agents
as they can damage the fuel supply parts.
• Brush liquid onto areas highlighted with arrows.
• Bubbles indicate a leak.
/
/
/
1. Never store any extra cylinders under or near
your grill.
2. Never fill your cylinder over 80% full by volume.
This may cause release of gas from the safety
release valve.
3. If the information in "1" and "2" is not followed
exactly, a fire causing death or serious injury
may occur.
4. Immediately call your LP dealer or fire department
should you hear or smell escaping gas.
5. Keep cylinders out of direct sunlight and high
heat.
6. Do not insert any type of foreign objects into
the valve outlet.
Bubbles indicate a leak. In that case, call your LP
dealer or fire department immediately.
TRANSPORTATION AND STORAGE
• Place the dust cap on the cylinder valve outlet
whenever the cylinder is not in use. Only install
the type of dust cap on the cylinder valve outlet
that is provided with the cylinder valve. Other
types of caps or plugs may result in leakage of
propane.
• Do not smoke when transporting your cylinder.
• Keep cylinders out of direct sunlight and away
from sources of heat.
The gas supply must be turned off at the LP gas
supply cylinder when this gas grill is not in use.
Storage of this gas grill indoors is permissible
only if the cylinder is disconnected and removed
from the gas grill.
Cylinders must be stored outdoors out of reach
of children and must not be stored in a building,
garage, or any other enclosed area.
Dust Cap
Keep the gas cylinder in the upright position at
all times to allow for vapor withdrawal. Always
keep gas cylinders upright for transportation and
storage.
19
Thepressureregulatorandhoseassemblyprovided
withthis gasgrillmustbeused.Thisregulatorisset
for anoutletpressureof 11 incheswatercolumn.
Replacementpressureregulatorsandhose
assembliesmustbethosespecifiedin the partslist.
Yourregulatorisequippedwitha Q.C.C.Type1 quick
connectsystem.It willnotallowgasto flowuntila
positivesealhasbeenmade.It hasaflow-limiting
devicethat willrestricttheflowof gasto 10cubic
feetperhour(0.28cubicmetersperhour).
TO PLACE THE CYLINDER INTO THE GRILL
CABINET
1. Place the LP tank cylinder in the cabinet Base.
front of the tank valve should face out from the
enclosure.
2. Wrap the tank support ring around the tank and
latch over its hook to secure the tank.
TO CONNECT THE CYLINDER TO THE
REGULATOR AND HOSE
1. Place the cylinder into the cabinet following the
information in the assembly instructions.
2. Be sure the LP cylinder is "OFF" by turning the
hand wheel clockwise until it stops.
3. Be sure the burner controls are turned to the
"OFF" position.
4. Remove the safety cap from the cylinder valve.
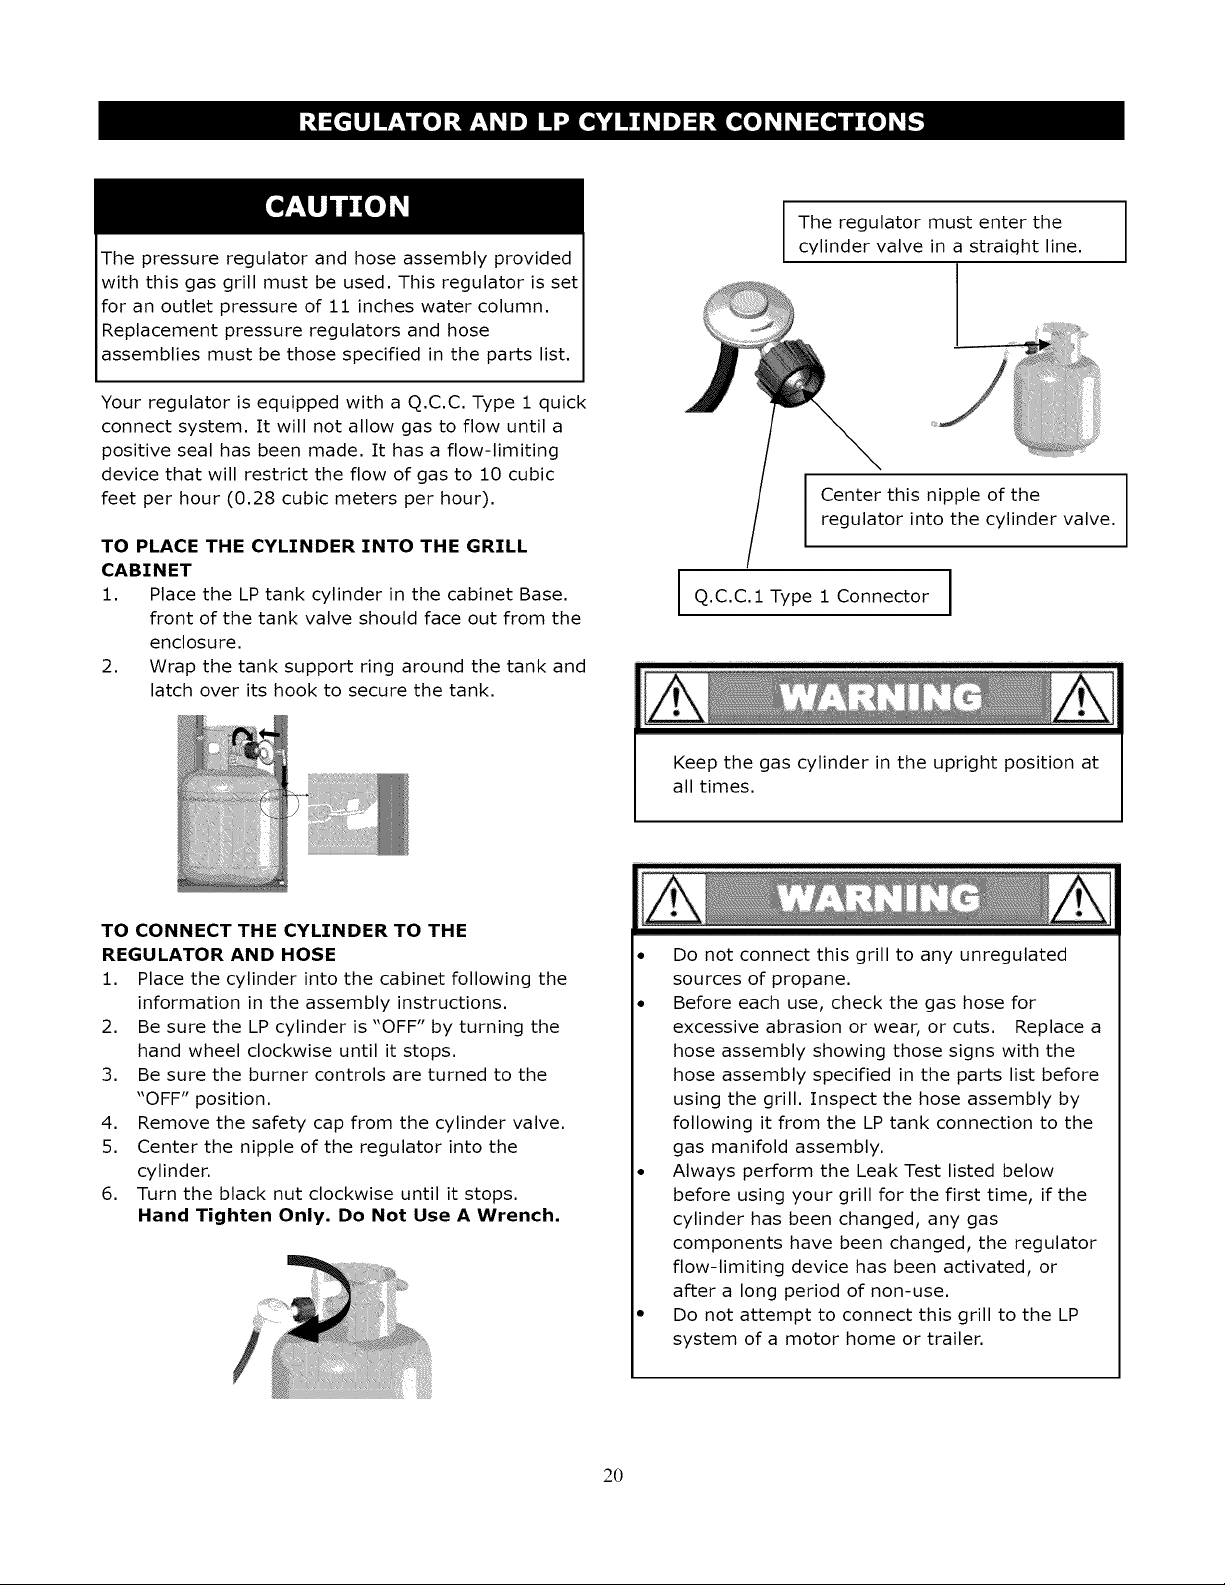
5. Center the nipple of the regulator into the
cylinder.
6. Turn the black nut clockwise until it stops.
Hand Tighten Only, Do Not Use A Wrench.
I he regulator must enter the I
cylinder valve in a straiqht line.
I
Center this nipple of the I
regulator into the cylinder valve.
I
I Q.C.C.1 Type 1 Connector I
Keep the gas cylinder in the upright position at
all times.
• Do not connect this grill to any unregulated
sources of propane.
• Before each use, check the gas hose for
excessive abrasion or wear, or cuts. Replace a
hose assembly showing those signs with the
hose assembly specified in the parts list before
using the grill. Inspect the hose assembly by
following it from the LP tank connection to the
gas manifold assembly.
• Always perform the Leak Test listed below
before using your grill for the first time, if the
cylinder has been changed, any gas
components have been changed, the regulator
flow-limiting device has been activated, or
after a long period of non-use.
• Do not attempt to connect this grill to the LP
system of a motor home or trailer.
2O
LEAK TESTING THE REGULATOR, VALVES,
HOSES, AND CONNECTIONS
1. Ensure the LP cylinder valve and burners are
"OFF".
2. Ensure the LP cylinder is connected to the
regulator.
3. Mix up a solution of 50% water and 50% liquid
dish soap. Do not use any household cleaner
solution.
4. Open the LP tank valve by turning the hand
wheel counterclockwise. If you hear a rushing
sound, turn the gas off immediately. In that case,
there could be a leak at the connection.
Reconnect the cylinder to the regulator.
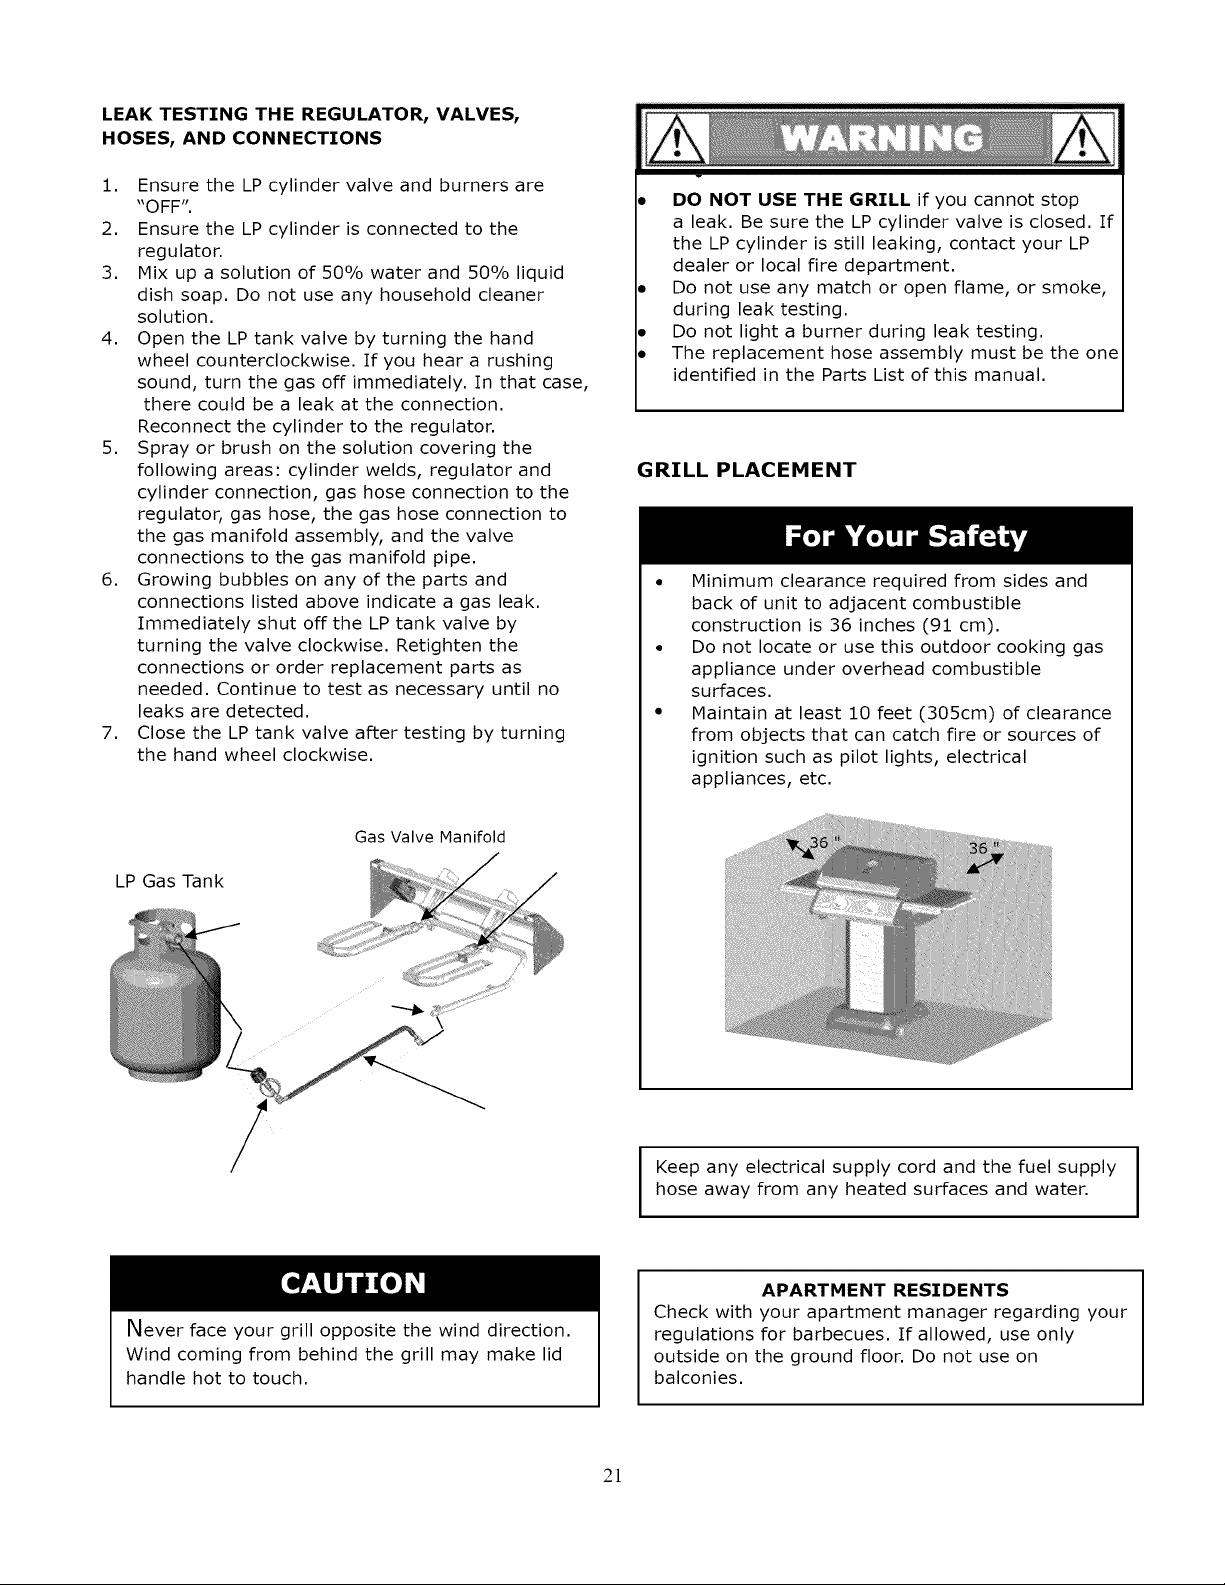
5. Spray or brush on the solution covering the
following areas: cylinder welds, regulator and
cylinder connection, gas hose connection to the
regulator, gas hose, the gas hose connection to
the gas manifold assembly, and the valve
connections to the gas manifold pipe.
6. Growing bubbles on any of the parts and
connections listed above indicate a gas leak.
Immediately shut off the LP tank valve by
turning the valve clockwise. Retighten the
connections or order replacement parts as
needed. Continue to test as necessary until no
leaks are detected.
7. Close the LP tank valve after testing by turning
the hand wheel clockwise.
LP Gas Tank
Gas Valve Manifold
DO NOT USE THE GRILL if you cannot stop
a leak. Be sure the LP cylinder valve is closed. If
the LP cylinder is still leaking, contact your LP
dealer or local fire department.
Do not use any match or open flame, or smoke,
during leak testing.
Do not light a burner during leak testing.
The replacement hose assembly must be the one
identified in the Parts List of this manual.
GRILL PLACEMENT
• Minimum clearance required from sides and
back of unit to adjacent combustible
construction is 36 inches (91 cm).
• Do not locate or use this outdoor cooking gas
appliance under overhead combustible
surfaces.
• Maintain at least 10 feet (305cm) of clearance
from objects that can catch fire or sources of
ignition such as pilot lights, electrical
appliances, etc.
/
I
Keep any electrical supply cord and the fuel supply I
hose away from any heated surfaces and water.
I
Never face your grill opposite the wind direction.
Wind coming from behind the grill may make lid
handle hot to touch.
APARTMENT RESIDENTS
Check with your apartment manager regarding your
regulations for barbecues. If allowed, use only
outside on the ground floor. Do not use on
balconies.
2!
BEFORE AND AFTER LIGHTING
• Ensure your grill is located on a level surface and
use the adjustable feet as necessary to stabilize.
• Keep the gas grill area clear and free from
combustible materials, gasoline, and other
flammable vapors and liquids.
• Ensure nothing is obstructing the flow of
combustion and ventilation air.
• Ensure the ventilation openings of the cylinder
enclosure are free and clear of debris.
• Visually check burner flames.
• Never move the grill when it is hot.
5,
6.
7,
within 5 seconds, turn the burner control knob
to "OFF". Wait for 5 minutes for the gas to clear
and repeat the lighting procedure.
Repeat step 4 to light other burner.
Follow the match lighting instructions below if
burners do not light.
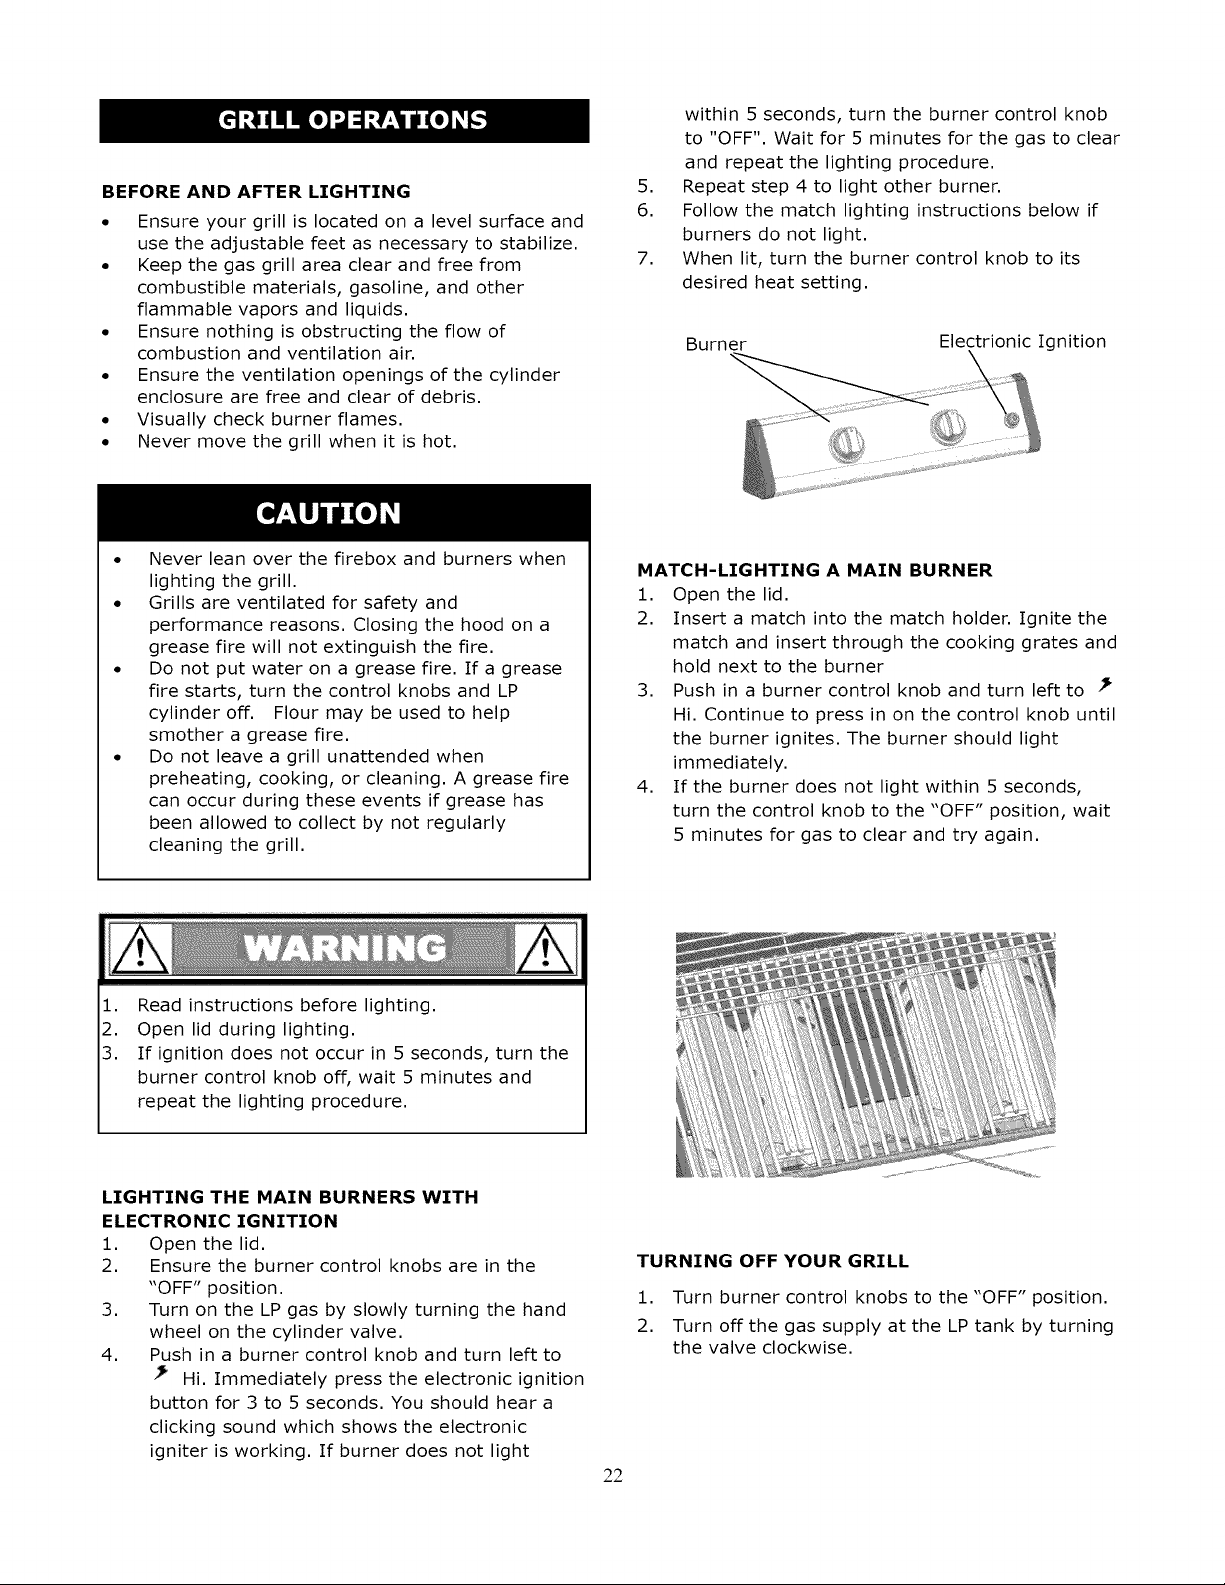
When lit, turn the burner control knob to its
desired heat setting.
Burner Electrionic Ignition
• Never lean over the firebox and burners when
lighting the grill.
• Grills are ventilated for safety and
performance reasons. Closing the hood on a
grease fire will not extinguish the fire.
• Do not put water on a grease fire. If a grease
fire starts, turn the control knobs and LP
cylinder off. Flour may be used to help
smother a grease fire.
• Do not leave a grill unattended when
preheating, cooking, or cleaning. A grease fire
can occur during these events if grease has
been allowed to collect by not regularly
cleaning the grill.
MATCH-LIGHTING A MAIN BURNER
i. Open the lid.
2. Insert a match into the match holder.Ignitethe
match and insertthrough the cooking grates and
hold next to the burner
3. Push in a burner controlknob and turn leftto "_
Hi. Continue to press in on the controlknob until
the burner ignites.The burner should light
immediately.
4. If the burner does not light within 5 seconds,
turn the control knob to the "OFF" position, wait
5 minutes for gas to clear and try again.
1. Read instructions before lighting.
2. Open lid during lighting.
3. If ignition does not occur in 5 seconds, turn the
burner control knob off, wait 5 minutes and
repeat the lighting procedure.
LIGHTING THE MAIN BURNERS WITH
ELECTRONIC IGNITION
1. Open the lid.
2. Ensure the burner control knobs are in the
"OFF" position.
3. Turn on the LP gas by slowly turning the hand
wheel on the cylinder valve.
4. Push in a burner control knob and turn left to
Hi. Immediately press the electronic ignition
button for 3 to 5 seconds. You should hear a
clicking sound which shows the electronic
igniter is working. If burner does not light
TURNING OFF YOUR GRILL
i. Turn burner control knobs to the "OFF" position.
2. Turn off the gas supply at the LP tank by turning
the valve clockwise.
22
• Do not clean any part of your barbecue grill in a
self-cleaning oven.
• Do not use oven cleaners, abrasive kitchen
cleaners, cleaners that contain citrus products, or
mineral spirits.
• Do not use any type of steel bristled brush.
• Clean your grill regularly to prohibit grease build-
ups and avoid a grease fire or excessive flare-ups.
• Always wear protective gloves when cleaning your
grill.
Stainless Steel and Painted Surfaces
Wash with a mild dish soap and warm water, A cloth,
soft brush, or plastic cleaning pad can be used. Rinse
thoroughly and wipe dry. There are many specific
stainless steel cleaners available. Follow the
manufacturer's directions. Always polish in the
direction of the lines. Do not allow dirt and grease to
accumulate. Do not use steel wool, as it will scratch
the surface.
In addition, the following products and naturally
occurring substances in the outdoors will damage all
stainless steel finishes. Use caution so that they do
not come in contact with your gas grill. Immediately
wash them off and dry the stainless steel should they
ever come in contact with your Gas Grill. These
include, but are not limited to, Pool Chemicals
(chlorine and bromine), Lawn Fertilizer, Ice Melting
Salts, Sea or Salt Water, Urine, Bird Droppings, and
Tree Sap. Store your grill 50 to 100 feet away
from a pool as many pool chemicals will cause
rust.
Porcelain Surfaces
Use a baking soda and water solution or nonabrasive
scouring powder for stubborn stains.
Cooking Grates, Warming Rack, and Heat
Diffusers
Use a stiff brass brush. Wash with warm water and
mild dish soap as needed, rinse, and dry.
Electronic Igniter
Visually inspect for cracks. Replace if a crack is
found.Do not use water to clean the igniter.
Electronic Ignition Maintenance
Your grill is equipped with electronic ignition. It's
powered by one AAA size battery. Replace the
battery when necessary. Unscrew the igniter top.
Place the new battery into the igniter with the
positive (+) end of the battery facing up. Screw the
igniter top back into place.
23
Batteries will deteriorate over time. This
can cause their casings to leak.
Remove the battery from the electronic ignition
when storing your grill.
Check the condition of the battery periodically
before use.
Burners
We recommend you clean your burners at least twice
a year, or before use if the grill has not been used in
over one month.
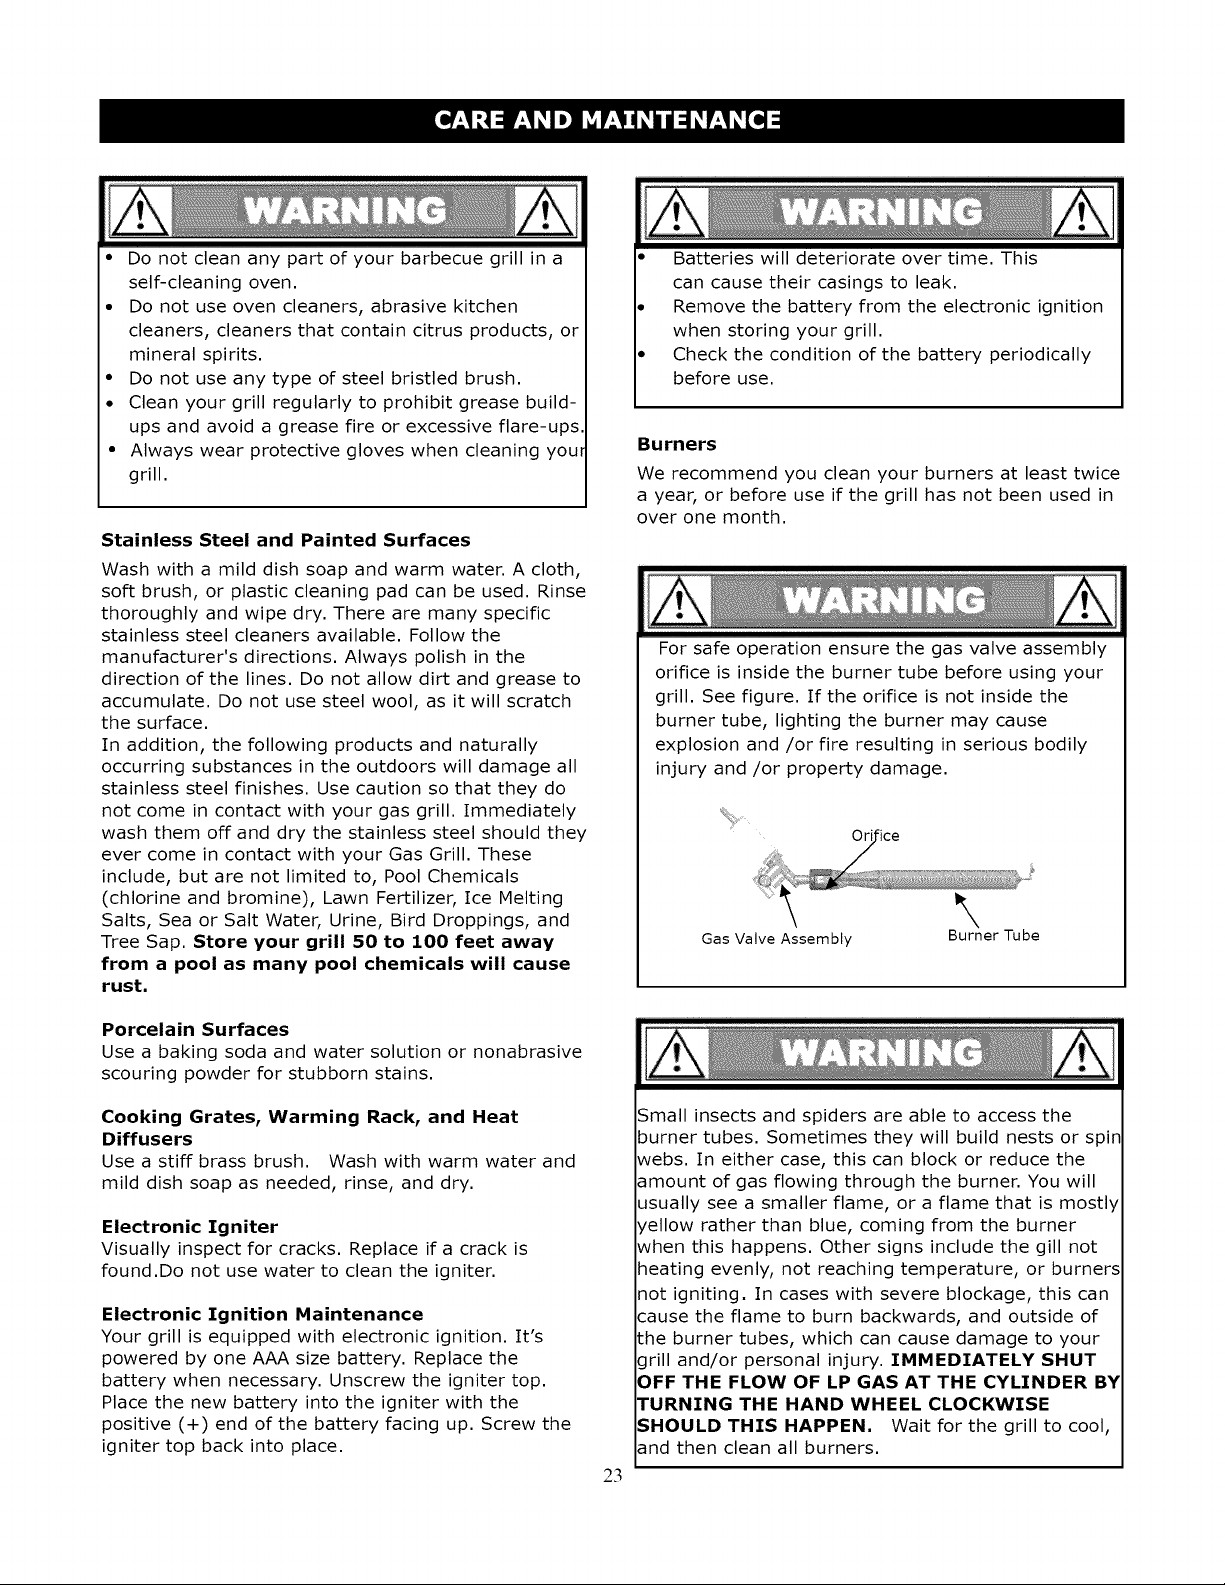
For safe operation ensure the gas valve assembly
orifice is inside the burner tube before using your
grill. See figure. If the orifice is not inside the
burner tube, lighting the burner may cause
explosion and/or fire resulting in serious bodily
injury and/or property damage.
Gas Valve Assembly
Burner Tube
Small insects and spiders are able to access the
burner tubes. Sometimes they will build nests or spit
webs. In either case, this can block or reduce the
amount of gas flowing through the burner, You will
usually see a smaller flame, or a flame that is mostly
yellow rather than blue, coming from the burner
when this happens. Other signs include the gill not
heating evenly, not reaching temperature, or burners
not igniting. In cases with severe blockage, this can
cause the flame to burn backwards, and outside of
the burner tubes, which can cause damage to your
grill and/or personal injury. IMMEDIATELY SHUT
OFF THE FLOW OF LP GAS AT THE CYLINDER BY
TURNING THE HAND WHEEL CLOCKWISE
SHOULD THIS HAPPEN. Wait for the grill to cool,
and then clean all burners.
When to Look for Spiders
You should inspect the burners at least twice a year
or immediately after any of the following conditions
Occur:
i, The smell of gas in conjunction with burner
flames appearing yellow.
2, The grill does not reach the temperature.
3, The grill heats unevenly.
4. The burners make popping noise.
Cleaning the Main Burners
1. Ensure the LP gas is turned off at the LP cylinder,
2. Remove the cooking grates and heat diffusers.
3. Remove the Phillips head screws located at the
back end of each burner,
4. Lift each burner up and out.
5. Clean the inside of the burner using a stiff wire.
A straightened coat hanger is one suggested tool.
An alternative way to clean the inside of the
burner is using compressed air, Always wear eye
protection if using this method. Never enlarge
the burner ports during cleaning.
6. Brush the outer surface of the burner.
7. Ensure all ports (holes) are free of all debris.
8. Inspect the burner, Replace if any cracks or
enlarged holes.
9. Reinstall the burners making sure the burners
seat over the valves as shown in the figure below.
i0. Secure the back of the burners to the firebox
with the Phillips head screws.
il. Replace the heat diffusers and cooking grates.
i2. Perform a Leak Test described earlier in this
guide.
Properly locating the burner with respect to the
orifice is vital for safety.
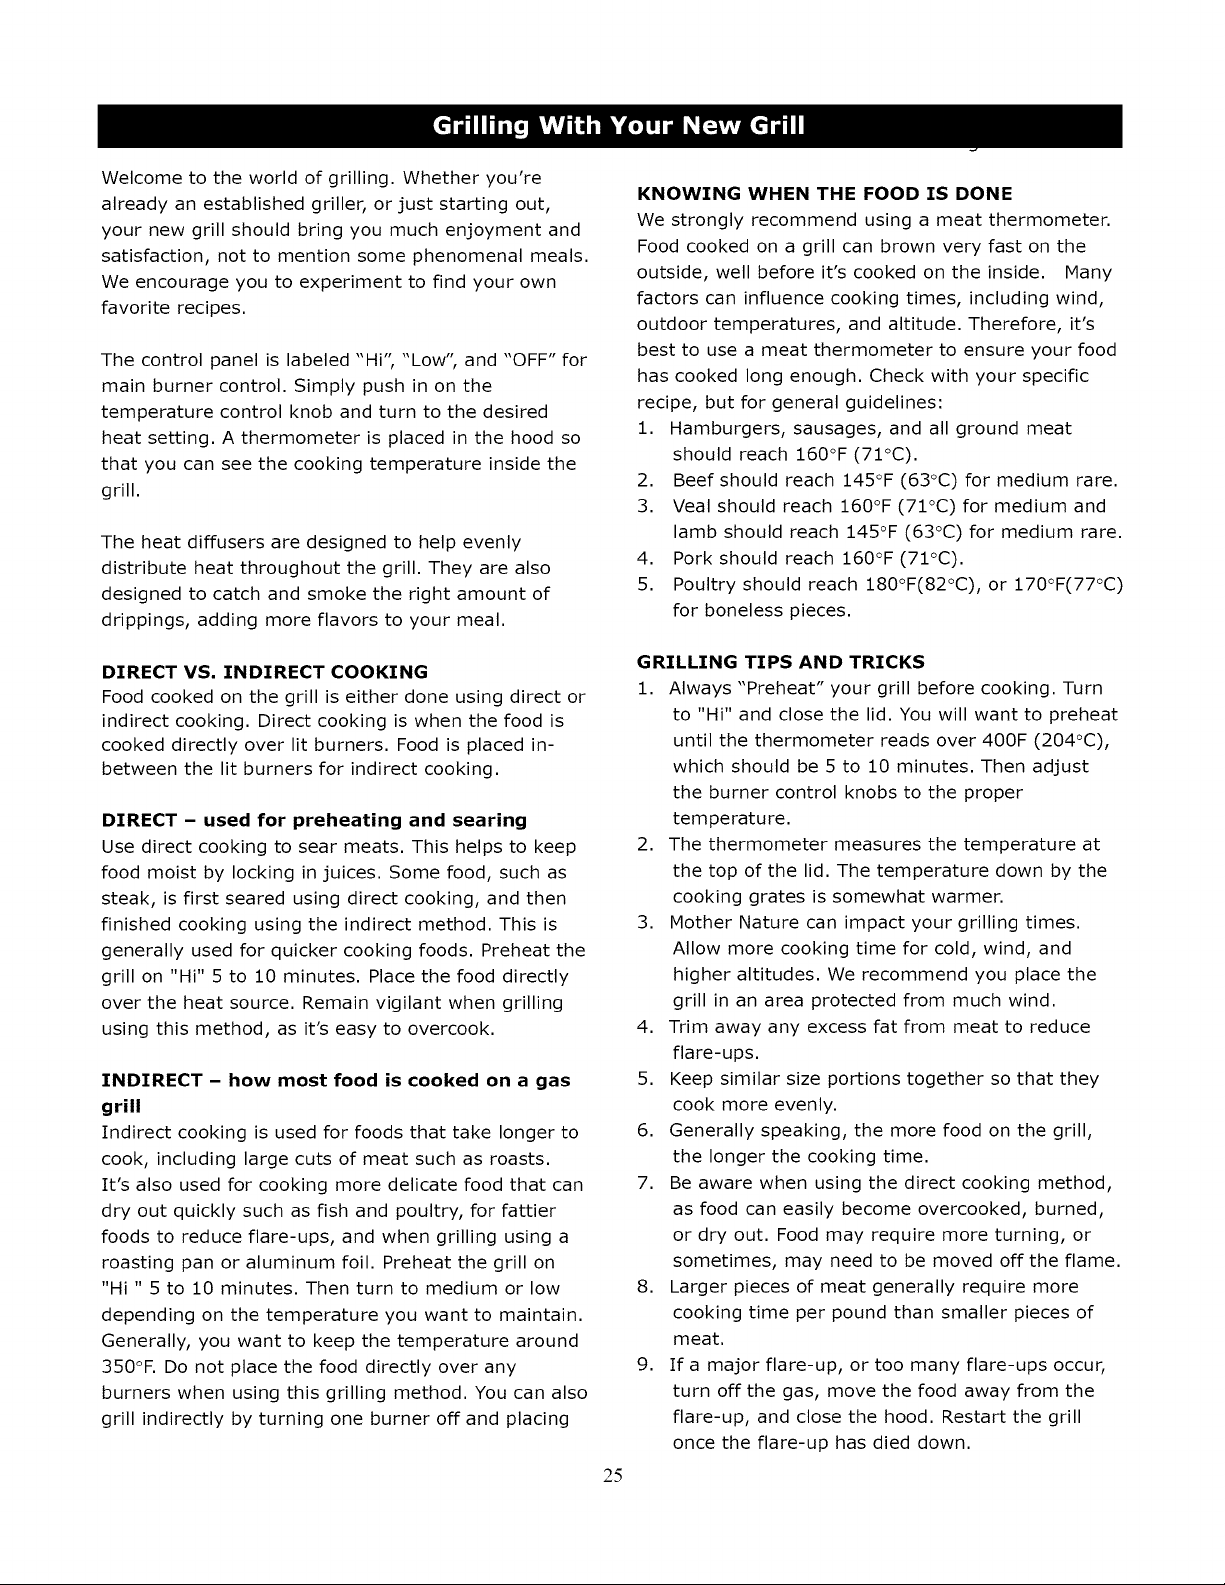
Burner Flames
Always inspect the burner flame after lighting. A
good flame should be primarily blue with a yellow tip
and have a minimal amount of noise. Some yellow
tips are OK if under one inch.
New burners sometimes have oil residue, which will
cause yellow flame when burning off. Variations in
gas supply, altitude, weather, and other factors can
all impact burner performance.
Older grills can also show more yellow flame as food
deposits, oils, and fats can build up.
Good
Always
i. Keep the grilling area clear and free from
combustible materials, gasoline and other
flammable vapors and liquids.
2. Do not obstruct the flow of combustion and
ventilation air.
3. Keep the ventilation openings of the cylinder
enclosure free and clear from debris.
Grill Storage
i. Clean your grill before storage.
2. Storage of a gas grill indoors is permissible only
if the cylinder is disconnected and removed from
the gas grill.
3. Remove the battery from the electronic ignition.
4. Cover the grill.
5. Perform a Leak Test before use after storage.
24
Welcometo theworldof grilling.Whetheryou're
alreadyanestablishedgriller,or just startingout,
yournewgrillshouldbringyoumuchenjoymentand
satisfaction,notto mentionsomephenomenalmeals.
Weencourageyouto experimentto findyourown
favoriterecipes.
Thecontrolpanelis labeled"Hi","Low",and"OFF"for
mainburnercontrol.Simplypushin onthe
temperaturecontrolknobandturnto thedesired
heatsetting.Athermometeris placedin thehoodso
that youcanseethecookingtemperatureinsidethe
grill.
Theheatdiffusersaredesignedto helpevenly
distributeheatthroughoutthegrill.Theyarealso
designedto catchandsmoketherightamountof
drippings,addingmoreflavorsto yourmeal.
KNOWING WHEN THE FOOD IS DONE
We strongly recommend using a meat thermometer.
Food cooked on a grill can brown very fast on the
outside, well before it's cooked on the inside. Many
factors can influence cooking times, including wind,
outdoor temperatures, and altitude. Therefore, it's
best to use a meat thermometer to ensure your food
has cooked long enough. Check with your specific
recipe, but for general guidelines:
1. Hamburgers, sausages, and all ground meat
should reach 160°F (71°C).
2. Beef should reach 145°F (63°C) for medium rare.
3. Veal should reach 160°F (71°C) for medium and
lamb should reach 145°F (63°C) for medium rare.
4. Pork should reach 160°F (71°C).
5. Poultry should reach 180°F(82°C), or 170°F(77°C)
for boneless pieces.
DIRECT VS. INDIRECT COOKING
Food cooked on the grilliseither done using director
indirectcooking. Directcooking iswhen the food is
cooked directlyover litburners. Food isplaced in-
between the litburners for indirectcooking.
DIRECT - used for preheating and searing
Use direct cooking to sear meats. This helps to keep
food moist by locking in juices. Some food, such as
steak, is first seared using direct cooking, and then
finished cooking using the indirect method. This is
generally used for quicker cooking foods. Preheat the
grill on "Hi" 5 to 10 minutes. Place the food directly
over the heat source. Remain vigilant when grilling
using this method, as it's easy to overcook.
INDIRECT - how most food is cooked on a gas
grill
Indirectcooking isused for foods that take longer to
cook, includinglarge cuts of meat such as roasts.
It'salso used for cooking more delicatefood that can
dry out quickly such as fishand poultry,for rattier
foods to reduce flare-ups, and when grilling using a
roasting pan or aluminum foil. Preheat the grill on
"Hi " 5 to 10 minutes. Then turn to medium or low
depending on the temperature you want to maintain.
Generally, you want to keep the temperature around
350°R Do not place the food directly over any
burners when using this grilling method. You can also
grill indirectly by turning one burner off and placing
GRILLING TIPS AND TRICKS
i. Always "Preheat" your grillbefore cooking. Turn
to "Hi" and close the lid.You willwant to preheat
until the thermometer reads over 400F (204°C),
which should be 5 to 10 minutes. Then adjust
the burner control knobs to the proper
temperature.
2. The thermometer measures the temperature at
the top of the lid. The temperature down by the
cooking grates is somewhat warmer.
3. Mother Nature can impact your grilling times.
Allow more cooking time for cold, wind, and
higher altitudes. We recommend you place the
grill in an area protected from much wind.
4. Trim away any excess fat from meat to reduce
flare-ups.
5. Keep similar size portions together so that they
cook more evenly.
6. Generally speaking, the more food on the grill,
the longer the cooking time.
7. Be aware when using the direct cooking method,
as food can easily become overcooked, burned,
or dry out. Food may require more turning, or
sometimes, may need to be moved off the flame.
8. Larger pieces of meat generally require more
cooking time per pound than smaller pieces of
meat.
9. If a major flare-up, or too many flare-ups occur,
turn off the gas, move the food away from the
flare-up, and close the hood. Restart the grill
once the flare-up has died down.
25
10.Turnfoodsinfrequently.Generally,onlyturna
steakonceduringcooking.
11.Usetongsratherthanaforkwhenturningthe
foodonthe grill. Lessjuicewillbe lostthat way.
12.Knowyoursauceandwhento apply.Oiland
vinegarbasedsaucescanbebrushedonany
time.Sugarbasedsauceslikebarbecuesauce
shouldbeappliedduringthelastfewminutesof
cooking.
13.A timercanhelpyoukeepfromover-cookingthe
food.
14.Useinsulatedprotectivemittsorpotholders
whenworkingarounda grillin operation.
15.Usea smallamountof cookingoil onthecooking
gratesbeforeheatingto reducefoodsstickingon
thegrates.
FOODSAFETY
1. Alwaysusesafefoodhandlingandpreparation
whenusingthisgrill.
2. Washall poultry,seafood,andvegetablesbefore
cooking.
3. Useseparateplatters,plates,andutensilsfor
uncookedandcookedfoods.
4. Leaveall meat,poultry,andseafoodin the
refrigeratoruntilreadyto cook.
5. Usea meatthermometerto ensurefoodsare
adequatelycooked.
BURNER WILL NOT LIGHT
1. Gas supply is turned off. Turn on gas at LP
cylinder,
2. Out of propane. Check to be sure you still have
propane in your tank.
3. Regulator is not properly seated into the tank
valve. Remove and reattach. Hand tighten only.
4. Crimped fuel supply hose. Inspect and straighten.
5. Regulator failure or damaged hose. Order
replacement part and replace.
6. Make sure you can hear the electronic igniter
clicking. If not, replace the battery with an AAA
size. Inspect the electrode to be sure it's not
coated in grease or dirt, If so, clean with rubbing
alcohol. Check the distance from the electrode
tip to the burner, The tip of the electrode should
be 1/8" to 1/4" from the main burner, Adjust if
necessary. Inspect the electrode to be sure it's
not cracked or broken. If so, order replacement
parts and replace.
7. Blockage in the gas system. Inspect the burner
to be sure insects, spider webs, etc do not block
them. Clean if necessary. Inspect under the
control panel to be sure the burner are aligned
properly with the valves.
IRREGULAR FLAME OR YELLOW FLAME
1. New burner may have residual oil, which will
burn off.
2. Tubes in burners are blocked. Remove and clean.
3. Burner has a high grease or dirt build-up.
Remove and clean.
4. Burner is not aligned properly with the valves.
Inspect under the control panel.
SUDDEN DROP IN GAS PRESSURE OR FLAMES
BLOW OUT
1. Out of gas. Check to be sure you still have
propane in your tank.
2. Your excessive fuel flow valve has tripped,
thereby reducing the flow of gas. Turn off all
burners, wait 30 seconds, and relight grill. If
problem persists, turn off all burners. Disconnect
regulator from tank. Wait 10 minutes. Reconnect
regulator and leak test. Slowly turn on LP tank
and relight grill. Other ways the flow limiting
device can be activated include
a. A ruptured gas hose. Inspect, perform a leak
test, and replace as necessary.
26

3,
b. Opening the control knob before turning on
the LP gas at the cylinder. Turn on the gas
at the LP cylinder first before turning on a
control knob to light.
c. Improper purging of cylinder before it was
filled. See your LP gas dealer.
Wind could be blowing out your burner. Turn
front of grill to face wind or move out of the wind.
EXCESSIVE FLARE-UPS
1. Heat diffuser, inside of grill, grates, and burners
need to be cleaned.
2. Grease tray needs to be cleaned and emptied.
3. Using too high of heat to cook. Reduce control
knob setting.
4. Direct cooking method will produce more flare-
ups than indirect. If using direct method, try
using indirect.
FIRE BEHIND CONTROL PANEL
Immediately shut off cylinder valve and allow grill to
cool.
1. Check burner for obstructions and clean.
2. Inspect under the control panel to be sure the
burners are aligned properly with the valves.
3. Gas is leaking from a faulty connection or
damaged hose. Perform a leak test and inspect
for leaks. Tighten or replace parts as necessary.
Can I convert my gas grill from one fuel source
to another?
No. Your gas grill is manufactured to specific
standards developed by CSA and ANSI for
your safety and grilling performance for LP
Gas. We do not offer conversion kits nor do
we recommend you change the fuel type.
How are your grills tested?
Our grills are tested and certified by CSA, a
leading worldwide independent testing center,
to meet or exceed various CSA and ANSI
standards along with various performance
standards. The burners and gas line in each
grill are also individually tested when each
grill comes off the assembly line just prior to
packaging. Each burner is ignited for this test.
What is the humming noise I sometimes here
coming from my regulator?
The humming sound you can hear is just gas
flowing through the regulator. There is no
need to be concerned with a low volume of
noise.
My grill has a low flame on some burners, or
some burners will not light at all. What can
cause this?
This can be caused by the regulator's flow
limiting device, which is generated by a
sudden change in pressure. Opening the tank
valve too quickly can cause this. In this case,
close the LP tank valve and disconnect from
the regulator. Let it stand for 10 minutes.
Reconnect the regulator to the LP tank. Open
the grill lid. Slowly open the LP tank valve.
Follow the burner lighting procedures and
light the burner furthest from the LP tank.
Continue to light the other burners as you
move towards the LP tank.
Can I use ceramic plates, briquettes of any kind,
or lava rocks?
No. Your grill is designed for use only with
heat diffusers. Grease drips down on to the
diffusers and is burned, creating steam and
additional flavor.
27
Congratulationsonmakinga smartpurchase.Your
newKenmore<R_productisdesignedand
manufacturedfor yearsof dependableoperation.But
likeall products,it mayrequirerepairfromtimeto
time.That'swhenhavinga RepairProtection
Agreementcansaveyoumoneyandaggravation.
Here'swhattheRepairProtectionAgreement*
includes:
[] Expert service by our 10,000 professional
repair specialists
[] Unlimited service and no charge for parts and
labor on all covered repairs
[] Product replacement up to $1500 if your
covered product can't be fixed
[] Discount of 10% from regular price of service
and related installed parts not covered by the
agreement; also, 10% off regular price of
preventive maintenance check
[] Fast help by phone - we call it Rapid Resolution-
phone support from a
Sears representative, Think of us as a "talking
owner's manual."
Once you purchase the Repair Protection Agreement,
a simple phone call is all that it takes for you to
schedule service. You can call anytime day or night,
or schedule a service appointment online.
The Repair Protection Agreement is a risk-free
purchase. If you cancel for any reason during the
product warranty period, we will provide a full refund.
Or, a prorated refund anytime after the product
warranty period expires. Purchase your Repair
Protection Agreement today!
Some limitations and exclusions apply. For
prices and additional information in the U.S.A.
CALL 1-800-827-6655.
*Coverage in Canada varies on some items. For
full details call Sears Canada at 1-800-361-
6665
Sears Installation Service
For Sears professional installation of home
appliances, garage door openers, water heaters, and
other major home items, in the U.S.A. or Canada call
1-800-4-MY-HOME®
Felicitaciones por su compra inteligente. Su nuevo
producto Kenmore® viene dise_ado y manufacturado
para confiables operaciones por amos. Pero, como
todo producto, puede requerer reparaciones de vez
en cuando. All[ es cuando un Acuerdo de Protecci6n
de Reparaci6n puede ahorrar su dinero y
agravamiento.
A continuaci6n son los elementos del Acuerdo :
[] Servicio de experto por nuestros 10,000
especialistas de reparaci6n.
[] Servici sin I[mite y cero cambio de piezas y mano
de obra en todas las reparaciones.
[] Repuesto de producto hasta a $1500 si su
producto amparado no se puede arreglar
[] 10% de descuento del precio regular de serviceio
y piezas relacionadas con el servicio que no sean
cubiertas por el acuerdo y, 10% de descuento del
precio regular de la preventiva revisi6n de
mantenimiento.
[] Ayuda inmediata por telbfono - le decimos
Tel_fono de Resoluci6n R_pida - entregada por un
representante de Sears. Piense en nosotros como
un "Manual de Usuario Parlante."
Una vez Ud. compre el Acuerdo, todo Io que necesita
es una Ilamada telef6nca para programar el servicio.
Ud. puede hacer la Ilamada en el dim o en la noche, o
programar una cita para servicio.
El Acuerdo de Protecci6n por Reparaci6n se trata de
una compra libre de riesgos. Si Ud. cancela la
compra por cualquier raz6n durante el per[odo de la
garant[a del producto, le reembolsamos todo el costo.
O, un reembolso proporcional en cualquier momento
luego de la fecha de vencimiento de la garantia del
producto, iCompre su Acuerdo de Protecci6n por
Reparaci6n hoy!
Algunas limitaciones y exclusions ser&n
aplicadas. Por precios y mayor informacibn en
E.U., Ilamar a 1-800-827-6655.
* La garantia puede variar para algunos
articulos en Canad&. Para mayor informacibn,
Ilamar a Sears Canada en-800-361-6665
Seecio de Instalacibn Sears
Por la instalaci6n professional Sear de aparatos
dom_sticos, abrepuertas de garage, calentadores de
agua y otros grandes articulos dom_sticos en E.U. o
Canadc_, Ilamar a
1-800-4-MY-HOME®
28
Your Home
For expe_ troubleshooting and home solutions advice:
iiiiiiiiii age
For repair- in your home -of all major brand appliances,
lawn and garden equipment, or heating and cooling systems,
no matter who made it, no matter who sold it!
For the replacement parts, accessories and
owner s manuals that you need to do-it-yourself.
For Sears professional installation of home appliances
and items like garage door openers and water heaters,
1-800-4-MY-HOME ® (1-800-469o4663)
Ca!l anytime, day or night (U,S,A, and Canada)
www,sears,com www,sears,ca
o.r .o e
For repair of carry-in items like vacuums, lawn equipment,
iiiiiiiiii and electronics, call anytime for the location of your nearest .....................
iiiiiiiiii So°r .o o,r o ioeCon,er
1-800-488-1222 (u.s A,) 1-800-469-4663 (Canada) .....................
www.sears.com www,sears.ca
To purch:se t protection agreement on t prod:ct s:rviced bY Sears:
1 800 82:7 6655 (U.S.A.) 1 800 361 6665 (Canada)
Para pedir servicio de reparacidn Au Canada pour service en fran_ais:
a domicilio, y para ordenar piezas:
1-800-LE-FOYER Mc
WWW sears .ca
¢;_Registe_'_ Trademark / _,_Trademark / s_ Service Mark oi Sea_s Bia_ds, LLC
@ Marca RegisSad_ / T_,,_Marca de Fabric;_ M_rc_{ de 8erv_';iO d_._S_z_}rs8mads_ LLC
r_::Marque de commerce /_4e M_rque deposee de Sears Brands_ LLC
© Sears Brands, LLC
29