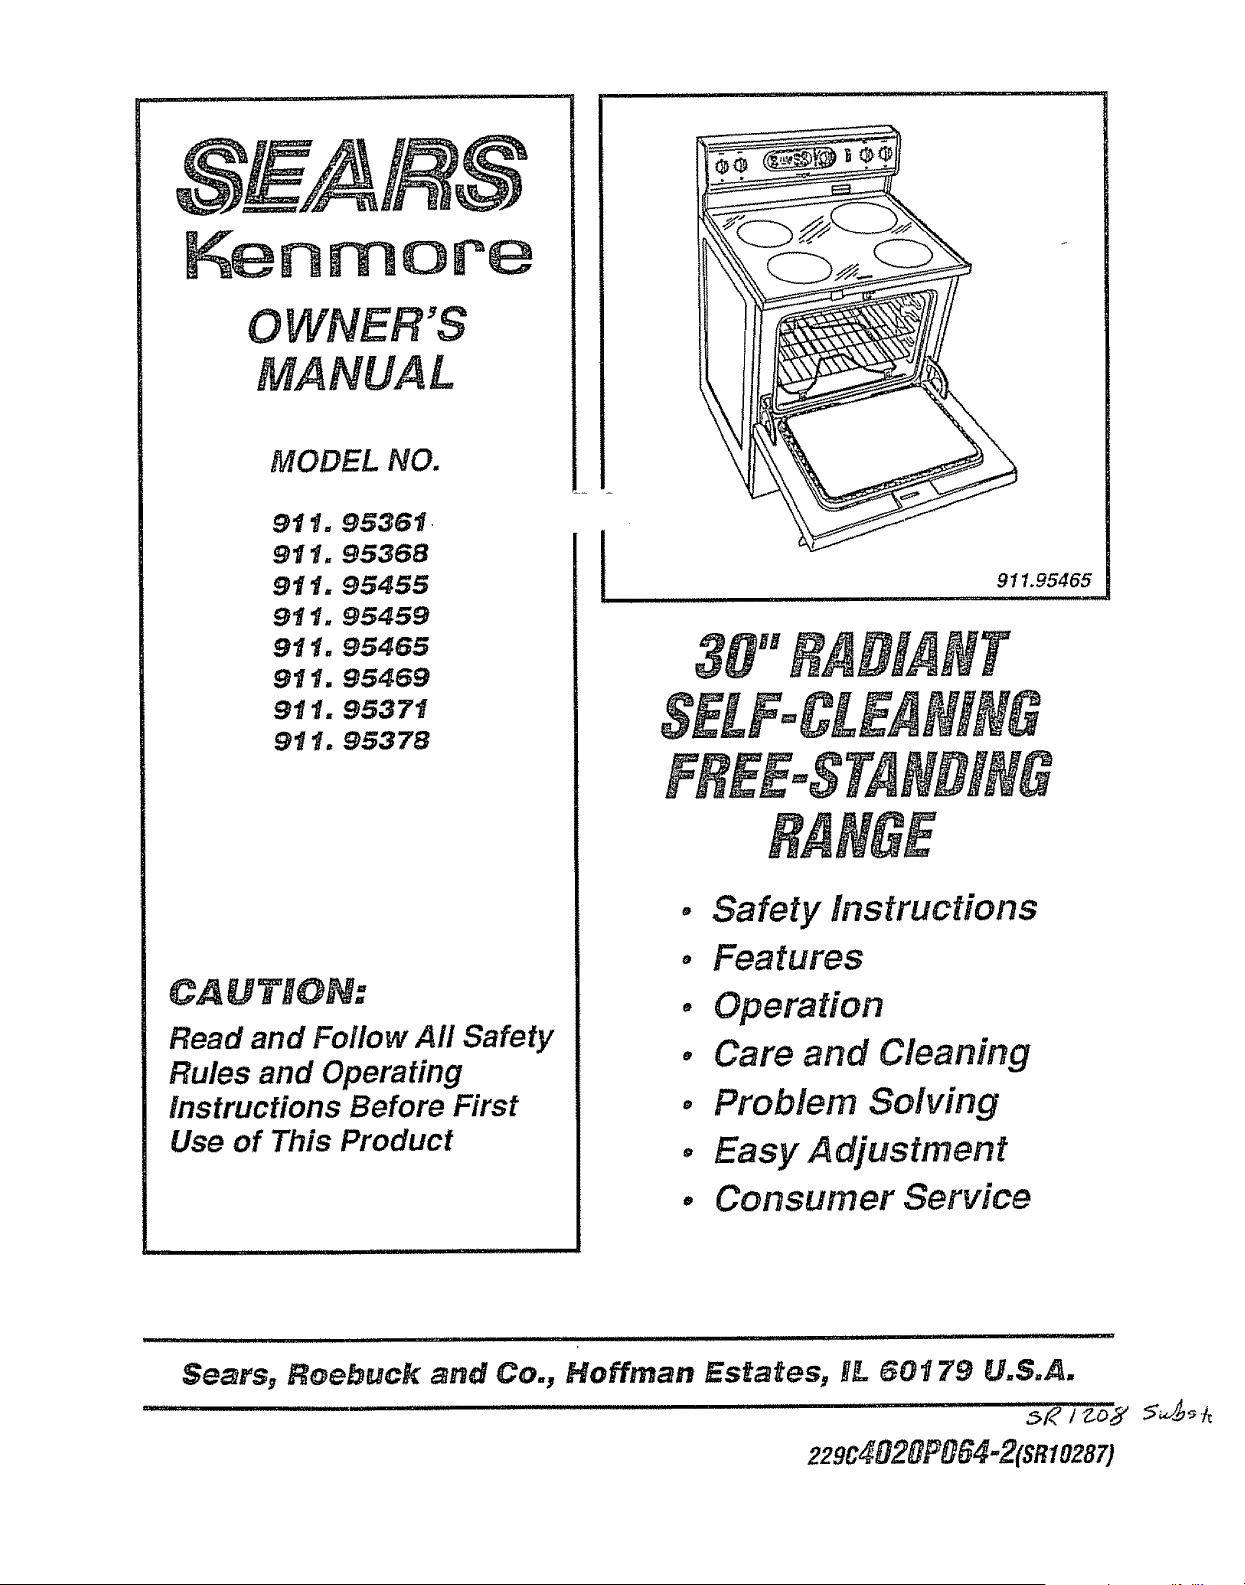
I( nmore
OWNER'S
MANUAL
MODEL NO.
9ft. 9536t.
91t. 9536B
9tt. 95455
9tl. 95459
91t. 95465
91t. 95469
gtt. 95371
91t. 95378
CA UTIOP_:
Read and Follow All Safety
Rules and Operating
instructions Before First
Use of This Product
I 911,95465
• Safety Instructions
o Features
. Operation
° Care and Cleaning
° Problem Solving
° Easy Adjustment
• Consumer Service
Sears_ Roebuck and Co., Hoffman Estates_ NL 60179 U.S.A.
................'........................................ 5f4/_o-_'5._._
229C4028FO64-2(SR10287)
Range Safety ............................................3-6
Stability Device ......................................... 3
Removal of Packaging Tape ..................... 7
Features of Your Range ...................... 8
Protecting Your New Cooktop ............. 7
Cooking Zones ........................................ 9
Cooking Utensils and Woks .................. 9
Checking Your Cookware ................ 9
Radiant Coils ......................................... 9
Cookware Performance ...................... 9
Radiant Unit Cycle .................................. t0
Control Settings ................................... t0
Home Canning ....................................... t0
How to Set Bake ..................................... 15
Oven Cooking Tips ........................ t3-I5
Temperature Adjustment ........................ 15
Broiling .................................. 16
General Rules, Preparing Meats for
Broiling, How to Set Broil ...................... I6
SeBf.CSe_n_.g ..................... t7-18
Preparing Your Oven ..................................17
Oven Door Gasket ................................ I7
Door Lock Device ............................. 17
Walls of the Oven ......................... 17
How to Set A Clean Cycle ................... 18
To Stop A Cycle ............................. 18
After The Cycle ................................... I8
Control Panel ................................... 20
Broiler Pan and Grid .......................... 20
Painted Surfaces ..........................................20
Glass Ceramic Cooktop ........................ 19
Arrow Pads ......................................... 1I
Display ..................................................... t !
Indicator Lights ...................................... 1 I
F-Codes ............................................... 1I
PF.Codes ................................................ 11
Black-Out Display ................................. 1t
Automatic Shut-Off ......................... 1t
To Set the Clock .................................... I2
To Set the Timer .................................... 12
To Reset the Timer ............................... 12
To Cancel the Timer ............................. 12
Surface Control Knobs ...................... 21
Oven Light Bulb ............................ 2I
Storage Drawer ............................ 22
Oven Racks .......................................... 23
Oven Door ....................................... 23
Before Calling for Service .............. 24, 25
Temperature Adjustment .................... 26
Consumer Service Numbers .................. 27
Warranty
For your convenience and future reference, please write down
your model and serial numbers in the space provided. They are
located on the front frame behind the storage drawer.
MODEL NUMBER:
SERIAL NUMBER:
2
_oo_s yo# _f_i need]:
Phiflips head screwdriver
1 3/8" open end or adjustable wrench
!, Remove the bracket from the prepack
located inside the oven.
3t_
Decide whether the bracke t wilt be instalte d
on the right or left side of range location.
If the bracket side of the range is adjacent
to a cabinet, place the bracket against
back wall and cabinet as shown below.
ADJACENT CABINET OR FINAL
LOCATt,Oi'{ OF RANGE SIDE
PANEL
OUTSIDE EDGE OF
_,,..,.---- BRACKET TO BE
\!,4i WALL BEHIND
4m
m
w
w
3
If there is no adjacent cabinet, determine
where the location of the range side (painted
outside panel) will be Place the bracket
with its outside edge at this location and
against back waft, See illustration below,
Determine whether you will anchor the
bracket to the floor or waft. Make sure this
location is clear of electrical wiring or
plumbing.
Fasten the bracketsec urely with the screws
provided Screws are self-drilling in wood,
plywood, particle and chip board, and
most metal framing.. If attaching to
masonry, you can buy suitabfe screws and
anchors at hardware stores. Use a masonry
drill to drift the required holes..
BRACKET
\
SCREW MUST ENTER \N' 4
WOOD OR METAL
• " t" V' , , , L¸ • "
WALL
PLATE
/
Using the wrench, back out the four leg
levelers at least two turns. See your
installation guide for more leveling
information before positioning range,
Slide the range into place, Be sure rear leg
levelerfu!fy engages the slot in the bracket If
range cannot be moved back far enough
for rear leg leveler to enter bracket, move
bracket forward as required and attach to
floor in new location
important safety instruction continued
To insure safety for yourself, family and home,
please read .your Owner's Manual carefully.
Keep it handy for reference. Pay close
attention to Safety Sections.
_E SUL_E your appliance iS installed and
grounded by a qualified technician.
EMPG_TA_T S_IFETY _OTgCE!
T_e C_tHfornia Safe Drinking Wa#er
_nd _'oxic Er_force_ent Ac_
requires _he governer of C_ifornia
to pubBish a Bist of substances
_nown _o _he s_'a_e to cayuse bi_h
defects or o_her reprod#c_ive harm
and requires businesses _o warn
_heir customers ef po_entBal
e_:posure _o such substances.
Toprevent acciden_! tipping ef the
range from abnormal usage,
including excessiveloadingef the
_ven door, attach it to the wall or
floorbyins_allingthe_nti- Tipdevice
supplied, tf the range is movedfor cleaning,
servicing er any reason, be sure the Anti.Tip
device is re-en_agedproperlywhen the range
is slid back in the opening. Failure _odo so
could result in _herange tipping ur personal
injury. Toinspectthe anti-Up device, remove
the s_eraEedrawerand lookto see if therear
leglevelerfulty engagestheslotin thebrackeL
DO NGT touch heating elements, surfaces
near them or interior oven surfaces.. These
may be hot enough to bum even though they
are dark in color, During and after use, do not
touch or let clothing or flammable material
contact the elements or hot surfaces until they
have had time to cool Other surfaces near the
oven vent opening, oven door, window and
cooktop surfaces may also be hot enough to
cause burns,
_0 NOT leave children unattended near an
appliance in use,
,, Not to play with controls or
any part of the appliance,
,, Not to sit, climb or stand on
the door or any other part of
the appliance.
C,_UT_Gt_: Never store items
of interest to children on the
backguard or in cabinets
above the appliance. Children
climbing on the appliance
could be seriously injured.
KEEP TH_S book for later use,
NEVER TRY to repair or replace any part of
the appliance unless instructions are given in
this manual, All other work shoutd be done by
a quafified technician,
_EVER USE your appliance
for warming or heating the room,
_.WA YS KEEP combustible
wall coverings, curtains, dish
cloths, towels, pothofders and
other finens a safe distance from
the appliance,
NEVER HEAT unopened food containers
Pressure buildup can cause the container to
burst and cause injury=
important safety instruction continued
NEVER LEAVE jars or cans of fat or
drippings in .your oven.
ALWAYS KEEP the oven and surface unit
areas free from things that will bum.. Food,
wooden utensils, grease buildup, gasoline and
other flammable vapors or
liquids could catch fire
Plastic utensils could melt and
canned foods could explode.
Your appliance should never
be used as a storage area..
SOME C_-E_,_ERS produce _----J .
noxious fumes and wet cloths
or sponges could cause steam
bums..
NEVER WEAR hanging or loose fitting
clothing when using .your appliance,
NEVER USE a towel or other
bulky cloth as a potholder an d
make sure the potholder is
dr,/. Moist potholders could
cause steam bums., Do not let
potho!ders touch heating
elements..
ONLY SOME kinds of glass or ceramic
cookware can be used for cooktop cooking.
Make sure the cookware you choose to use is
designed for cooktop cooking without
breaking due to the sudden changes in
temperatures,
ALWAYS USE care when touching cooktop
cooking zones. They wil! retain heat after the
range has been tumed off.
NEVER BLOCK the oven air vent on the
backguard of the range,
COOKWARE USED for
cooktop cooking should be
flat on the bottom and large
enough to cover the heating area being used.
This will improve heating efficiency,
Undersized utensils expose the heating area
and may result in direct contact or ignition of
clothing
NEVER LEA VE surface units unattended at
high settings Boilovers result in smoking or
greasy spills that could catch fire.
ALWAYS turn utensil handles inward and
away from other surface units to reduce the
risk of burns, ignition, unintended contact or
spillage.
NEVER cook on a broken cooktop; cleaning
solutions or spillage could penetrate it and
create the risk of efectriCaf shock or fire.
PLACE OVEN RACKS in the desired
position while the oven is cool ffracksmust be
moved while oven is hot, do not fet the potholder
contact the hot oven element
AFTER BROILING, always take the broiler
pan and grid out of the oven and clean them,
Leftover grease in the broiler pan cou/d catch fire
next time you use your oven..
ALWAYS USE care when opening the oven
door Let hot air and steam escape before
moving foods
NEVER USE aluminum foil to line the oven
bottom. Improper use of foil could result in the
risk of electrical shock and fire.
5
CILE, AH ONLY the parts listed in this manual
Follow all cleaning instruction& Be sure to
remove the broiler pan and grid before starting
the self-clean cycle°
_F T'H_ SELF4#LF_A_NG mode
malfunctions, turn off the controls or disconnect
the power supply_ Have serviced by a qualified
technician_
MEV'_.R F_UB_ move or damage the door
gasket on self-cleaning ranges.
¢_E_cER "_F_Y to clean utensils, cookware,
removable parts or broiler pan and grid in the
self-clean cycle.
DO _GT US_ oven cleaners- No commercial
oven cleaner or protective coating of any kind
should be used in or around any part of the oven.
EAD AND
STAN#THBS
COOKTOP GF_E_S_ FERE:
_ever pi¢_ up a fH_ng pan,,,
I. Turn off the surface elements.
2, Smother the flame with
a tightly fitting lid,
baking soda or use a
dry chemical foam or
halon type extinguisher.
GV_M F_E:
Do nor: _ry 'Eo_ve _.#e pa#!
_. Close the oven door and turn
controls off
2. If fire continues, throw baking
soda on the fire, or use a d_.
chemical, foam, or halon type extinguisher.
6
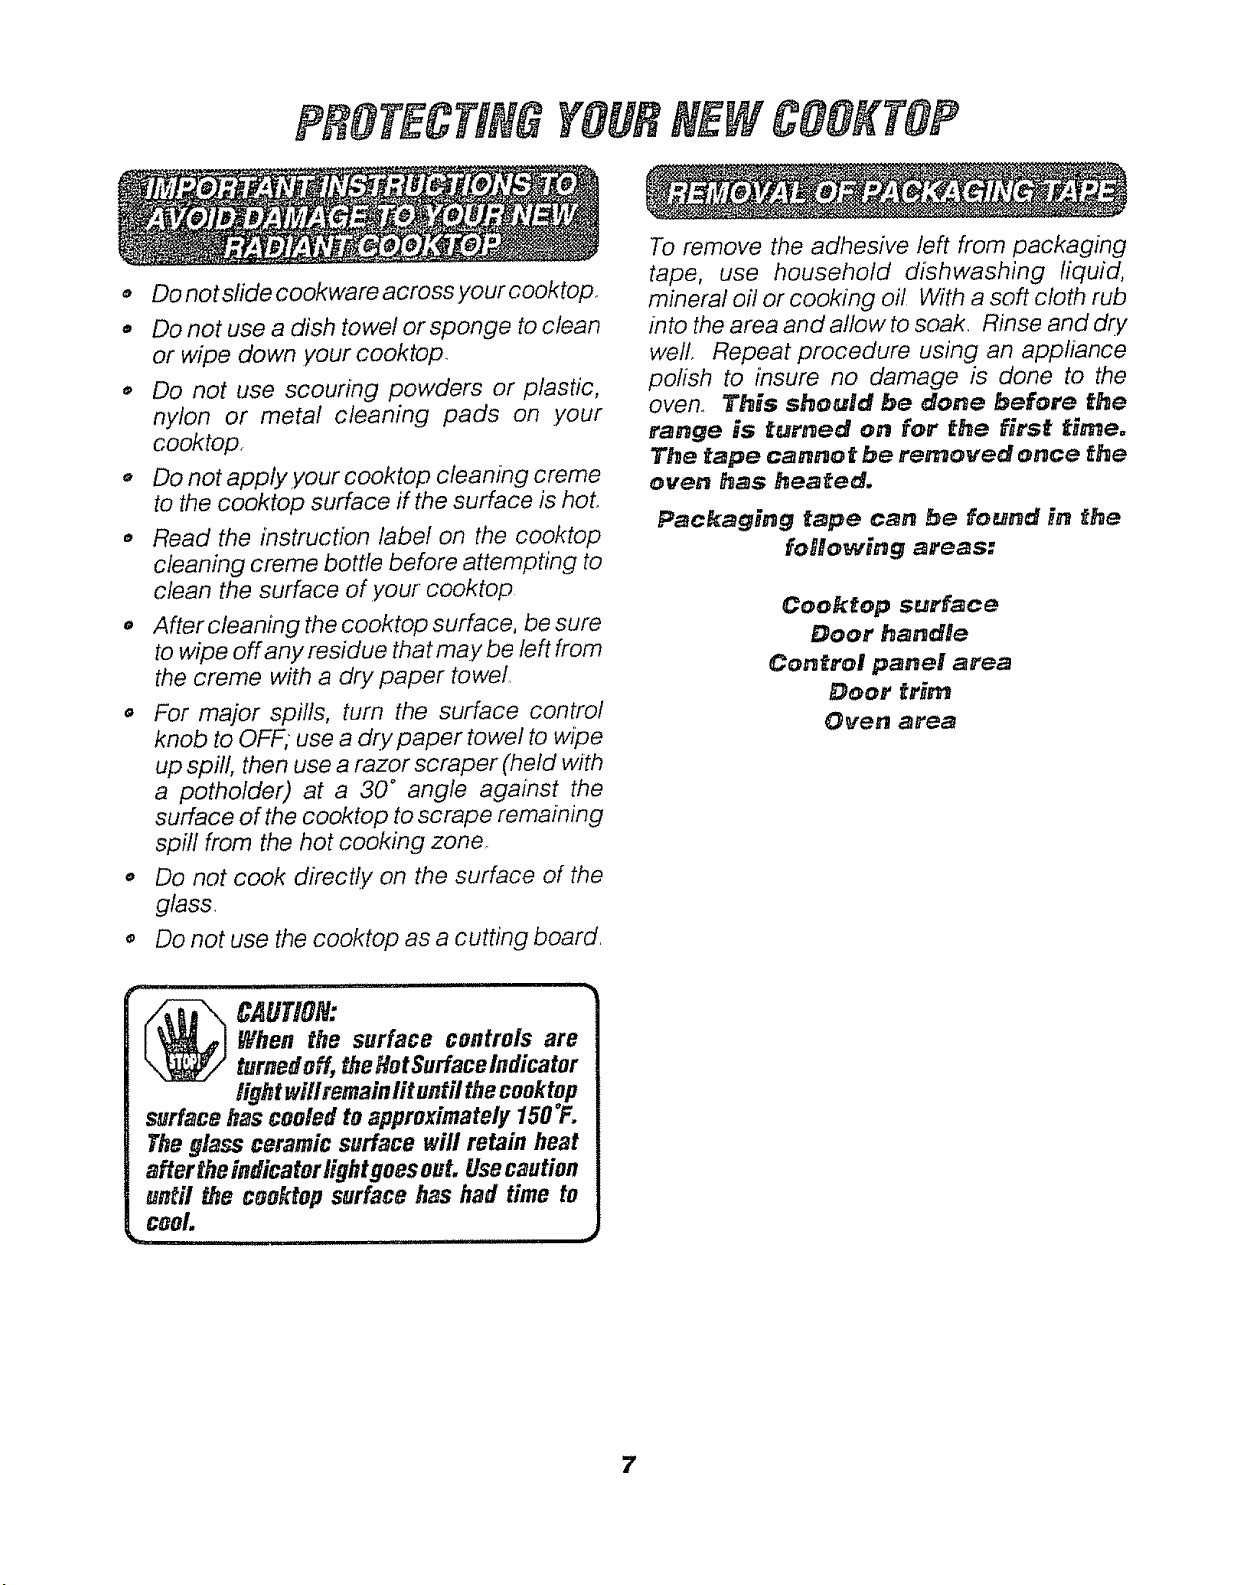
PROTECTING
#000P
0
0
Do not slide cookware across.your cooktop.
Do not use a dish towel or sponge to clean
or wipe down .your cooktop
_, Do not use scouring powders or plastic,
nylon or metal cleaning pads on .your
cooktop_
o Do not apply.your cooktop cleaning creme
to the cooktop surface if the surface is hoL
• Read the instruction label on the cooktop
cleaning creme bottle before attempting to
clean the surface of.your cooktop
After cleaning the cooktop surface, be sure
to wipe off any residue that may be left from
the creme with a dry paper towel.
o For major spills, turn the surface control
knob to OFF; use a dry paper towel to ,wipe
up spill, then use a razor scraper (held with
a potholder) at a 30 ° angle against the
surface of the cooktop to scrape remaining
spill from the hot cooking zone.
° Do not cook directly on the surface of the
glass.
Do not use the cooktop as a cutting board.
I _ J _' When the surface controls are
"_ I _,' turnedoff,theHotSu_acelndicator
light will remain lit until the cooktop
surface has cooled to approximately 150 °F.
The gla_ ceramic surface will retain heat
after the indicator light goes out. Use caution
until the cooMop surface has had time to
cool. ..
To remove the adhesive left from packaging
tape, use household dishwashing fiquid,
mineral oil or cooking oil With a soft cloth rub
into the area and al!ow to soak. Rinse and dry
welt. Repeat procedure using an appliance
pofish to insure no damage is done to the
oven_ ThEs should be done before the
range is turned on for _he first fErne.
The tape cannot be removed once the
oven has heated.
Packaging tape can be found in the
foEHowing areas:
Cooktop surface
Door hancHe
Control panel area
Door trim
Oven area
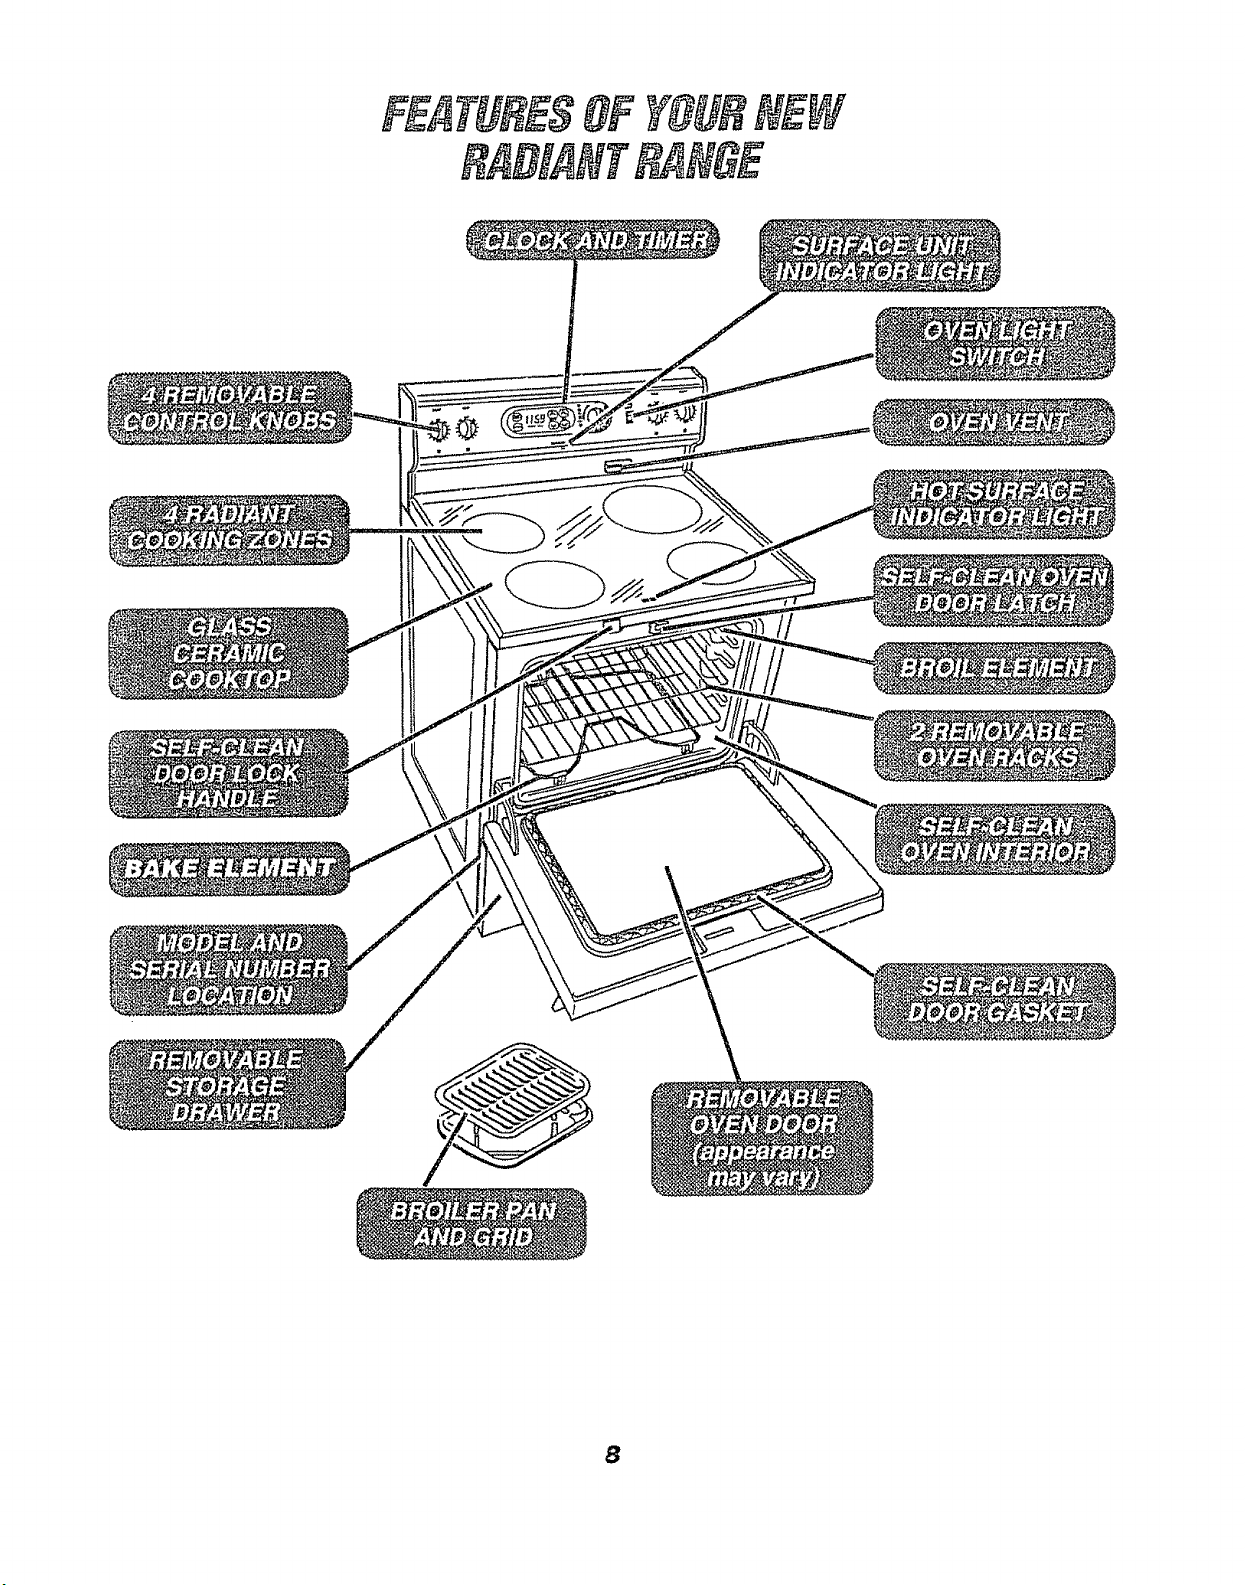
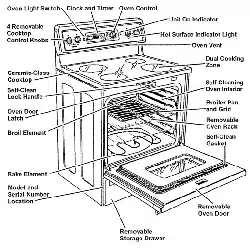
FEATURESOFYS#R_EW
R_D#ANT__GE
8

R, A#T C00KTOPC00KIN;
Before using your new radiant
cooktop, clean it with the Cooktop
Cleaning Creme®. This will leave
a protective coating.
The cooking zones are shown by the outline on
the glass., The sign near each control knob
shows you which radiant zone is turned on by
that knob.
O@
0
_ "2"/._-_ /_ _._._ RIGHT
O©
REAR 0"0 0"0
@0 O@
LEFT RIGHT
FRONT FRONT
Use pans and woks that are flat on the bottom,
The size of the pan should be the same size as
the zone used when cooking°
tf .you don't know if
.your cookware is flat
on the bottom, try this
test. Turn your pan
upside down on the
countertop, place a ruler flat against the
surface of the pan The bottom of the pan and
the edge of the ruler should fit flush against
each other all the wa.y across Turn the ruler a
full 360 degrees, checking as.you turn for any
space between the two surfaces..
S,ai_Hess SteeH: Highly recommended for
use with your new cooktop, Especially good
with a sandwich clad bottom°
AHurninurn: Heavy weight aluminum
cookware recommended
Cast Erer,: Cast iron cookware that is
completely covered with porcelain enamel is
recommended. Cast iron that is not covered
with porcelain enamel maY scratch the glass
ceramic surface of the cooktop,
Copper Bo**o_,: Has good performance,
but it can leave a residue on the cooktop
surface.
Gnass.Ceramic or Stoneware: Usable,
but not recommended. It may scratch the
surface of the cooktopo
SIZE OF
COOKING
ZONE
Pans should be flat on bottom
When the knobs are turned on, coils beneath
the glass radiate heat through the glass to the
cooking utensil, It will take a few minutes for
the coils to heat; as they do, a red glow can be
seen on the surface of the cooktop.
9 radiant cooking continued
COOKINGcont .e
The Temperature Limiters of the cooking zones
previde a protection for your new cooktop
The Limiters will turn the radiant coils on and
off while cooking or canning, This procedure
helps maintain an even cooking temperature
wi_hput allowing the cooking zones to
overheat,
_B
U_e_ for quick starts, such as
brit_ging water to a boil.
Water-bath or pressure canners and large
diameter pots extending more than 1"beyond
the edge of the cooktop zones may be used
whencanning This is because the temperature
needed to boil water is not harmful to the
surfaces surrounding the cooktop zones°
However, do not use Barge dHameter
canners_ po_s _r pans for _y_hBng
_fther _['_zra bo_B_r_g _a_er.
NED
_Jsed for slow boil and saut6ing.
_0
Used for steaming foods or
keeping cooked foods at
serving temperature.
t o Push down to tum the
knob.
2. Set on or between
marks for' desired
f_eat,
1. Be sure the canner is centered over the
zones,,
2. Make sure the canner is flat on the bottom,
NN
m
4_
Use recipes and procedures from
reputable sources These are available
from manufacturers such as Ball and Kerr
and the Department of Agriculture
Extension Service
Use caution while canning, to pre vent bums
from steam or heat
10
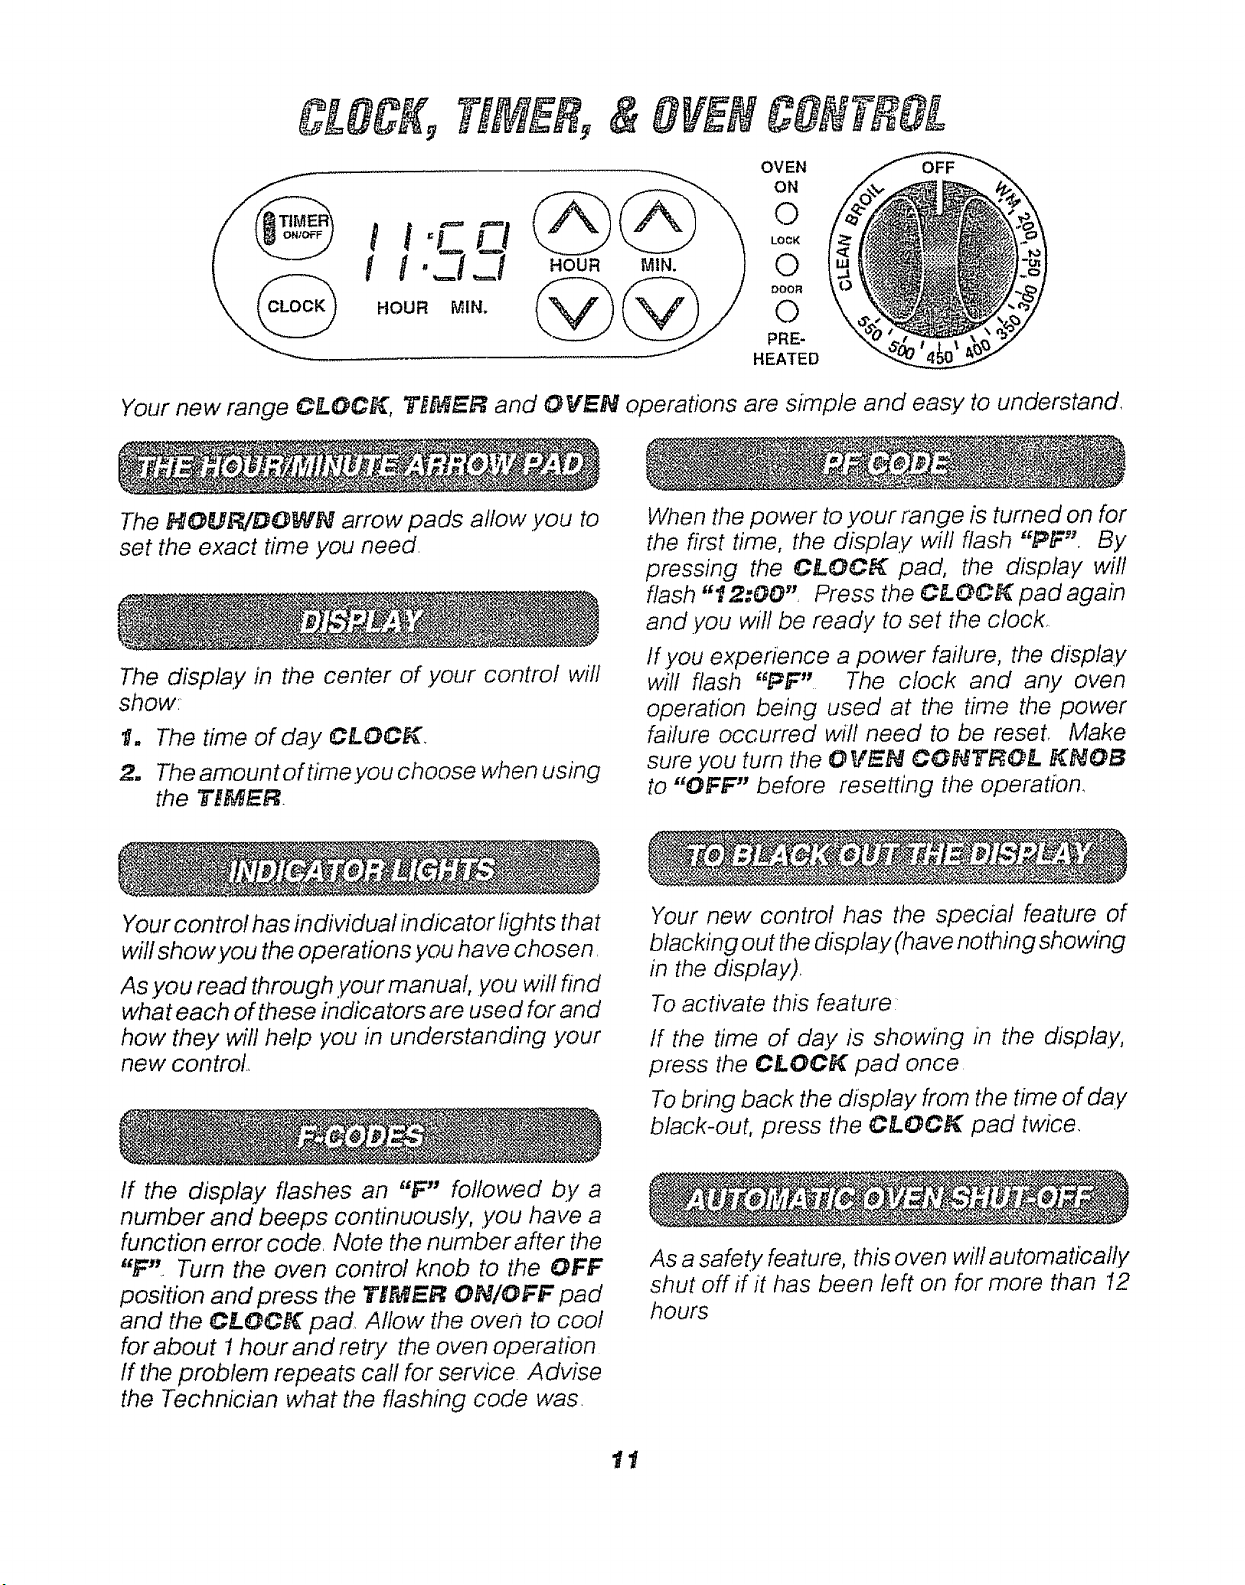
HOUR MIN.
HOUR
@
MIN.
OVEN
ON
©
LOCK
©
DOOR
©
PRE-
HEATED
Your new range CLOCK, T_f_ER and OVEN operations are simple and easy to understand.
The HOU£.t/DGW_._ arrow pads allow.you to
set the exact time you need.
The display in the center of .your control will
show:
1. The time of day CLOCK,
2,, The amount of time you choose when using
the T_MER.
When the power to your range is turned on for
the first time, the display wil! flash "FF". By
pressing the CLOCK pad, the display wilt
flash "12:G0"_ Press the CLOCK pad again
and .you wilt be ready to set the clock,
ff you experience a power failure, the display
will flash "FF" The clock and any oven
operation being used at the time the power
failure occurred wifl need to be reset, Make
sure you turn the 0 VEN COHT_GL KNOB
to "OFF" before resetting the operation,
Your control has individual indicator lights that
will show you the operations you have chosen
As you read through .Four manual, you wilt find
what each of these indicators are use d for an d
how they will help you in understanding your
new control.,
Your new control has the special feature of
blacking out the display (ha ve nothing showing
in the cfispfay)
To activate this feature
tf the time of day is showing in the display,
press the CLOCK pad once
To bring back the display from the time of day
black-out, press the CLOCK pad twice,
If the display flashes an "F" followed by a
number and beeps continuous!y, ,you have a
function error code. Note the number after the
_'F',. Turn the oven control knob to the OFF
position and press the TNMER ON/OFF pad
and the C&OCK pad, Allow the oven to cool
for about 1 hour and retry the oven operation
If the problem repeats call for service Advise
the Technician what the flashing code was.
As a safety feature, this oven will automatical!y
shut off if it has been left on for more than 12
hours
11
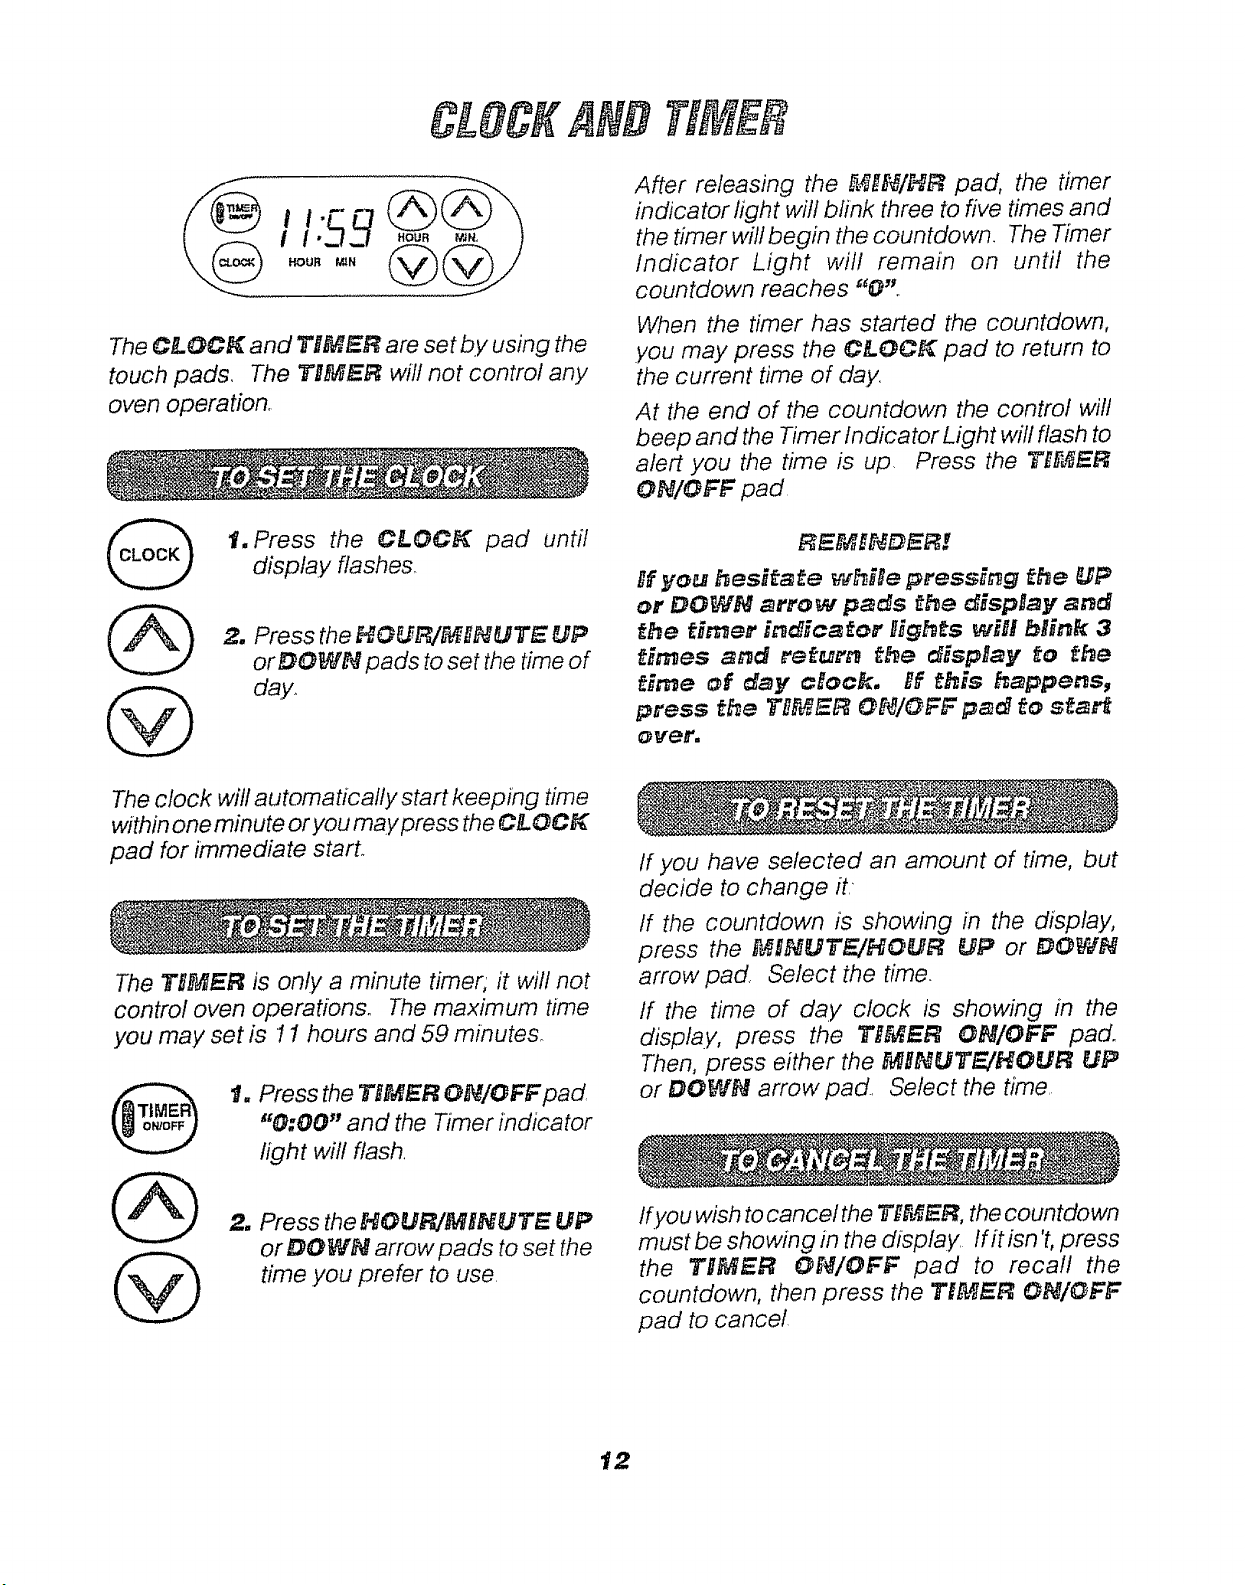
8#K T#M
The CLGCK and "rIMER are set by using the
touch pads. The TBMER will not control any
oven operation.
After releasing the _t_/f_._R pad, the timer
indicator light will blink three to five times and
the timer will begin the countdown. The Timer
Indicator Light will remain on until the
countdown reaches "e',,
When the timer has started the countdown,
.you may press the CLOCK pad to retum to
the current time of day,
At the end of the countdown the control will
beep and the Timer fndicator Light will flash to
alert you the time is up. Press the "€'E¢,gER
Of_/OFF pad
1.Press the CLOCK pad until
display flashes.
2. Press the HGUR/MfE'_UTE UP
or DO_/_t,8 pads to set the time of
day.
REt,_E_DEB!
The clock will automatically start keeping time
within one minute or you may press the CILGCK
pad for immediate starL
The 1r_ER is on!y a minute timer; it will not
control oven operations° The maximum time
you may set is ! 1 hours and 59 minutes.
@
@
@
t. Press the T_MER O_/OFFpad
"_:00" and the Timer indicator
light will flash.
2, Press the _fOUR/M_NU'rE UP
or #O_ arrow pads to set the
time you prefer to use.
tf you have selected an amount of time, but
decide to change it.
If the countdown is showing in the display,
press the M#_U'YE/_GUR UP or #O_P,f_
arrow pad. Select the time.
If the time of day clock is showing in the
display, press the T_,!_ER OP,_/OFF pad.
Then, press either the _t_UTFF_JHOUR UP
or DOWN arrow pad. Select the time.
tf you wish to cancel the Tf._._ER, the countdown
must be showing in the display If it isn %press
the T#MER G ft,/OFF pad to recall the
countdown, then press the 7"_MER GN/_FF
pad to cancel
12
ON TIPS
It is normal to have some odor when using .your
oven for the first time. This is caused by the
heating of new parts and insulation
To help eliminate this odor, ve###_ate _'_e
room _y epe_c_g a wH++_o_ _r using a
ve_t hood,
UMPORTA_7:
Never cover the oven
bottom or oven rack
with aluminum foil,,
improper use can
cause poor heat flow,
poor baking results,
and may damage the
oven finish.
I ...... '
The oven vent is located on the back of the
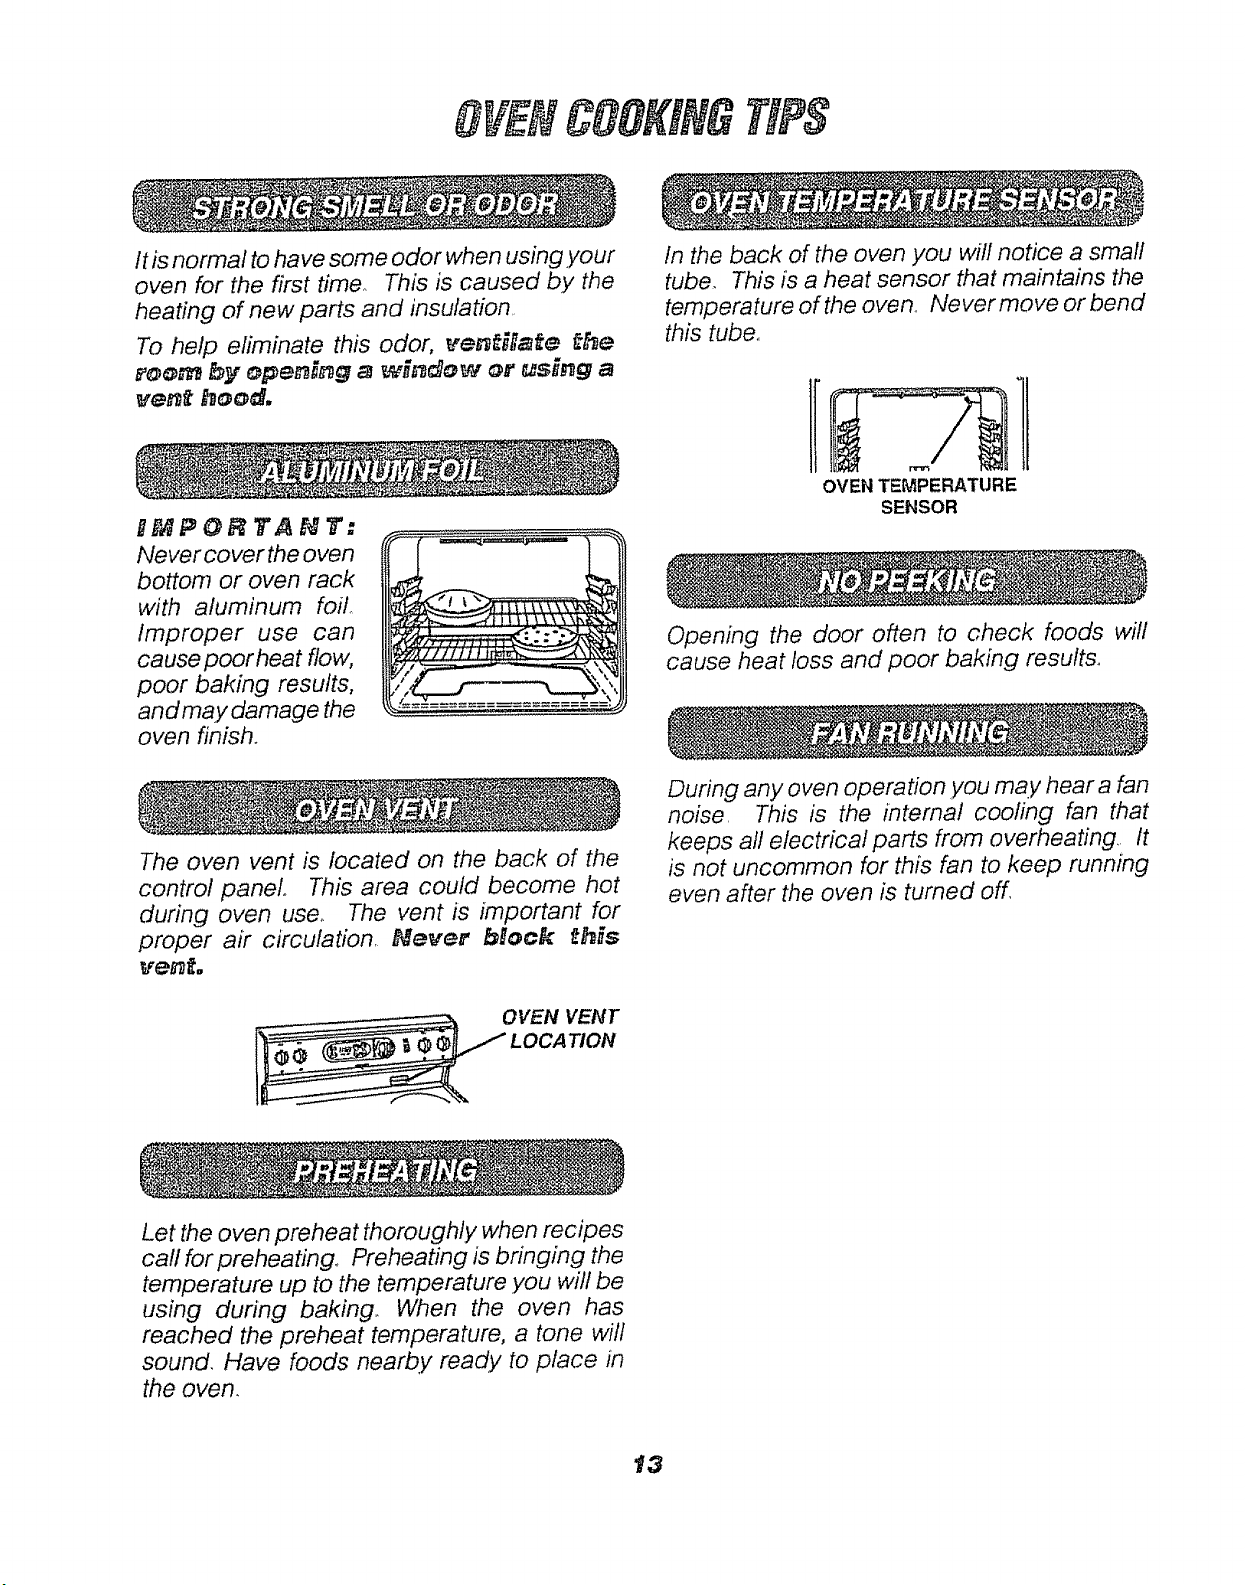
In the back of the oven you wifl notice a small
tube. This is a heat sensor that maintains the
temperature of the oven Never move or bend
this tube,,
+
OVEN TEMPERATURE
SENSOR
control panel° This area could become hot
during oven use. The vent is important for
proper air circulation, Never block _his
ver_lt.
Opening the door often to check foods will
cause heat loss and poor baking results.
During any oven operation,you may hear a fan
noise This is the internal coofing fan that
keeps all electrical parts from overheating, It
is not uncommon for this fan to keep running
even after the oven is turned off,
OVEN VENT
Let the oven preheat thoroughly when recipes
call for preheating,, Preheating is bringing the
temperature up to the temperature ,you will be
using during baking,, When the oven has
reached the preheat temperature, a tone will
sound. Have foods nearby ready to place in
the oven.
t3
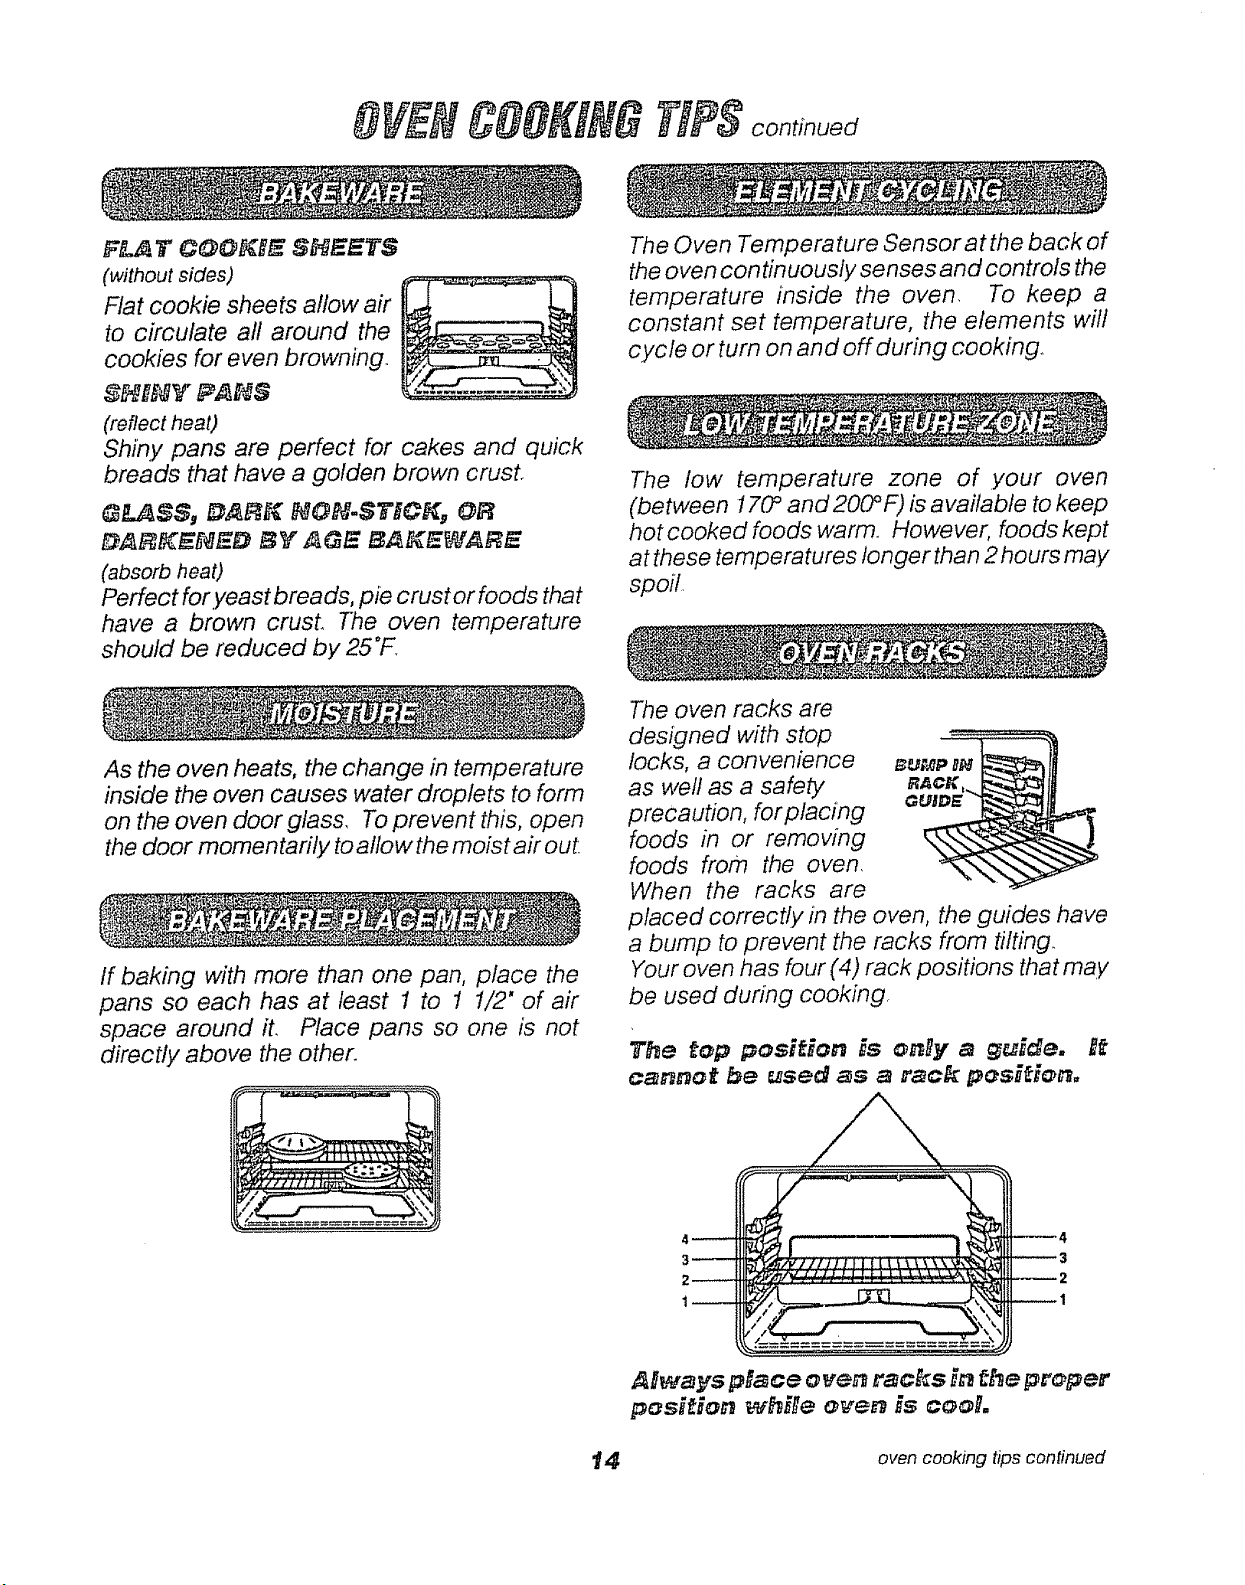
FLAT COOKIE SHEETS
(without sides)
Flat cookie sheets allow air
to circulate all around the
cookies for even browning.
(reflect heat)
Shiny pans are perfect for cakes and quick
breads that have a golden brown crust.
_LASS, _ABff¢ _O_.$TSCK_ O_
_L_KE_ED BY _GE B_E_A_E
(absorb heat)
Perfect for yeast breads, pie crust or foods that
have a brown crust. The oven temperature
should be reduced by 25°F
The Oven Temperature Sensor at the back of
the oven continuously senses and controls the
temperature inside the oven, To keep a
constant set temperature, the elements will
cycle or turn on and off during cooking°
The low temperature zone of your oven
(between 170 ° and 2OO°F) is available to keep
hot cooked foods warm. However, foods kept
a t these temperatures longer than 2 hours may
spoil.
As the oven heats, the change in temperature
inside the oven causes water droplets to form
on the oven door glass, To prevent this, open
the door momentari!y to allowthe moist air ou_
If baking with more than one pan, place the
pans so each has at least I to 1 1/2" of air
space around it. Place pans so one is not
directly above the other.
The oven racks are
designed with stop
locks, a convenience
as well as a safety
precaution, for placing
foods in or removing
foods from the oven,
When the racks are
placed correctly in the oven, the guides have
a bump to prevent the racks from tilting..
Your oven has four (4) rack positions that may
be used during cooking°
The *op posi*ion Es o_UV a guicge. I_,
cannot be used as a rac& posi*io_,
AHv_ays pilate over_ rac_s _ ,he proper
position wM_e eve_ is c_M.
_4 oven cooking tips continued
OVEN
You may feel that your new oven cooks
differently than the oven it replaced° We
recommend that you use your new oven a
few weeks to become more familiar with it,
following the times given in .your recipes as
a guide. See Do It "Yourself Temperature
Adjustment in the back of this manual, if .you
fee! .your oven is too hot or too cool for .your
cooking preference.
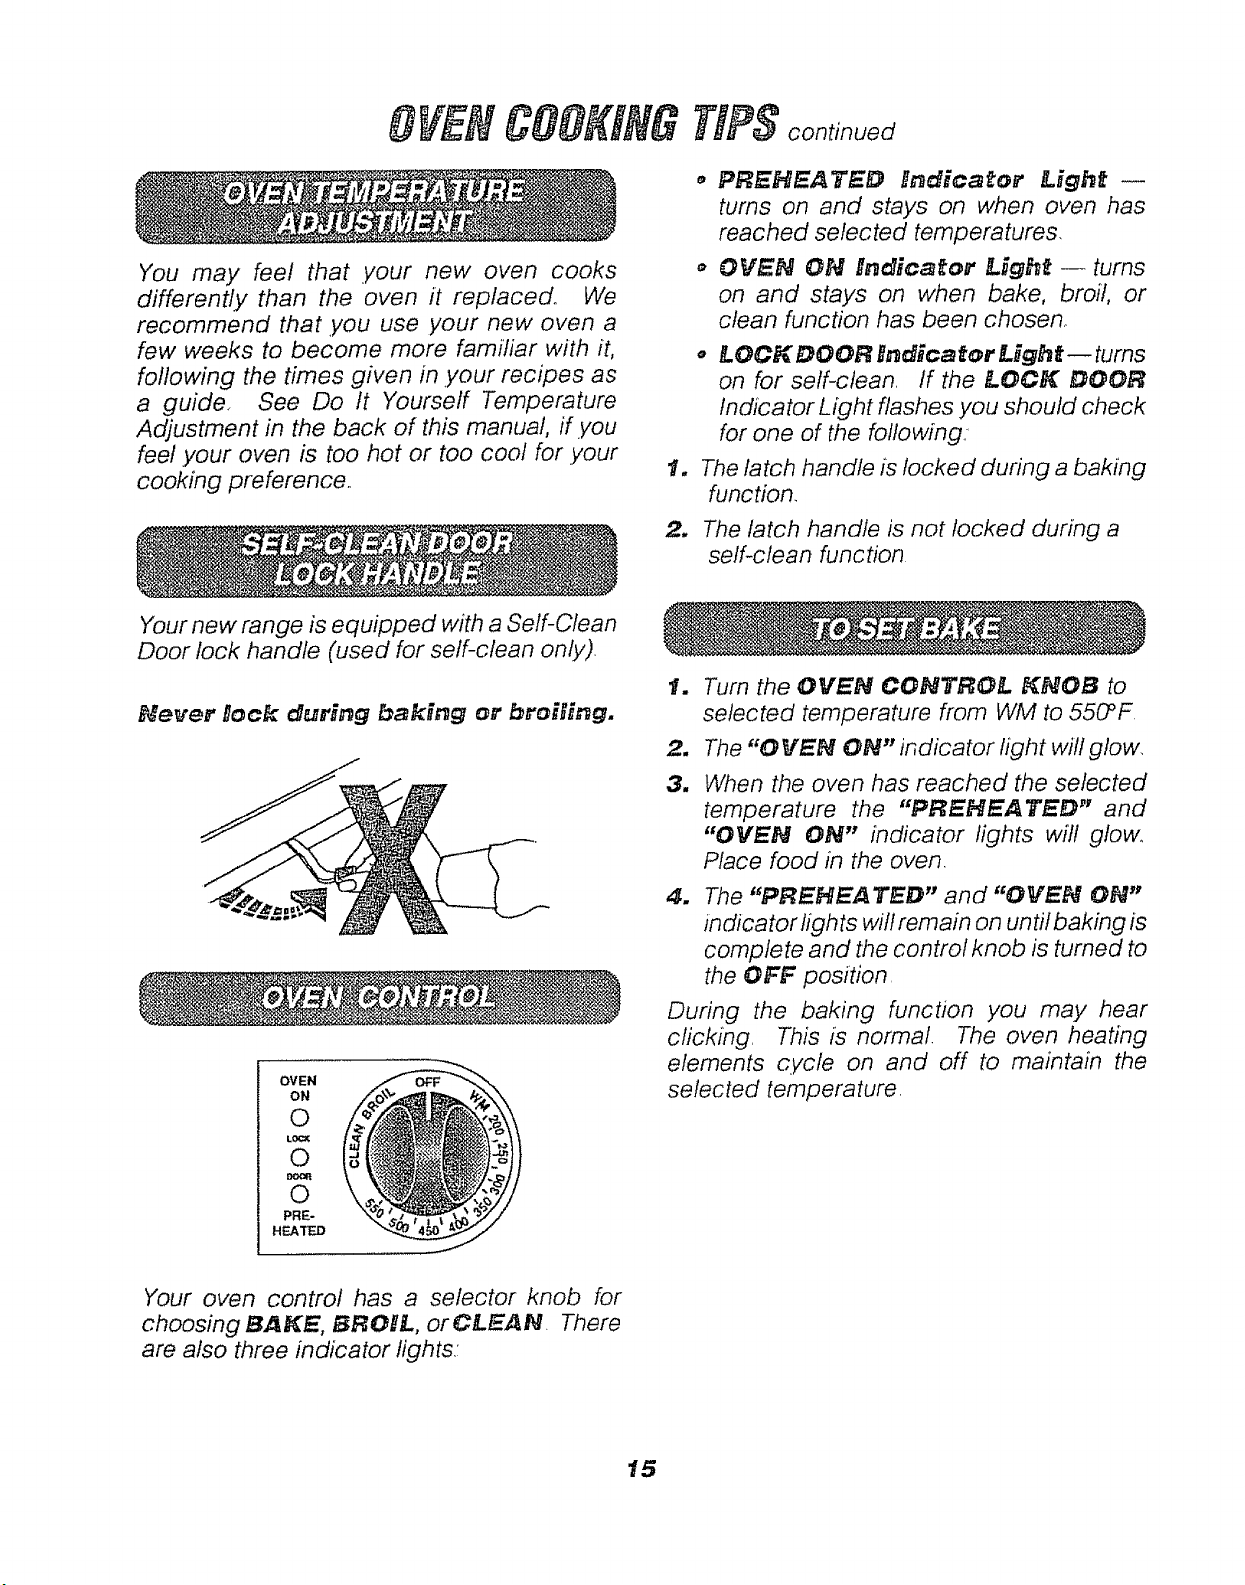
Your new range is equipped with a Self-Clean
Door lock handle (used for self-clean only)
TIPS continued
,, PREHEATED _ndica_or Light
turns on and stays on when oven has
reached selected temperatures,
OVEN ON gndicator L_gh_ -- turns
on and stays on when bake, broi!, or
clean function has been chosen°
o LOCK DOOR #ndica for Light _ turns
on for self-clean, if the LOCK DOOR
Indicator Light flashes you should check
for one of the following:
1, The latch handle iS locked during a baking
function.
2. The latch handle is not locked during a
self-clean function
_Sever _ock during baking or broiHing.
OVEN
ON
©
LOCa_
©
o
PRE-
HEATED
1. Tum the OVEN CONTROL KNOB to
selected temperature from WM to 550°F
2, The "0 VEN ON" indicator light will glow.
3, When the oven has reached the selected
temperature the "PREHEATED" and
"OVEN ON" indicator lights will glow_
Place food in the oven
4, The "PREHEATED" and "OVEE_ ON"
indicator fights wifl remain on untif baking is
complete and the controf knob is turned to
the OFF position
During the baking function you may hear
clicking This is normal The oven heating
elements cycle on and off to maintain the
selected temperature
Your oven control has a selector knob for
choosing BAKE, BROEL, orCLEAN. There
are also three indicator lights,:
15
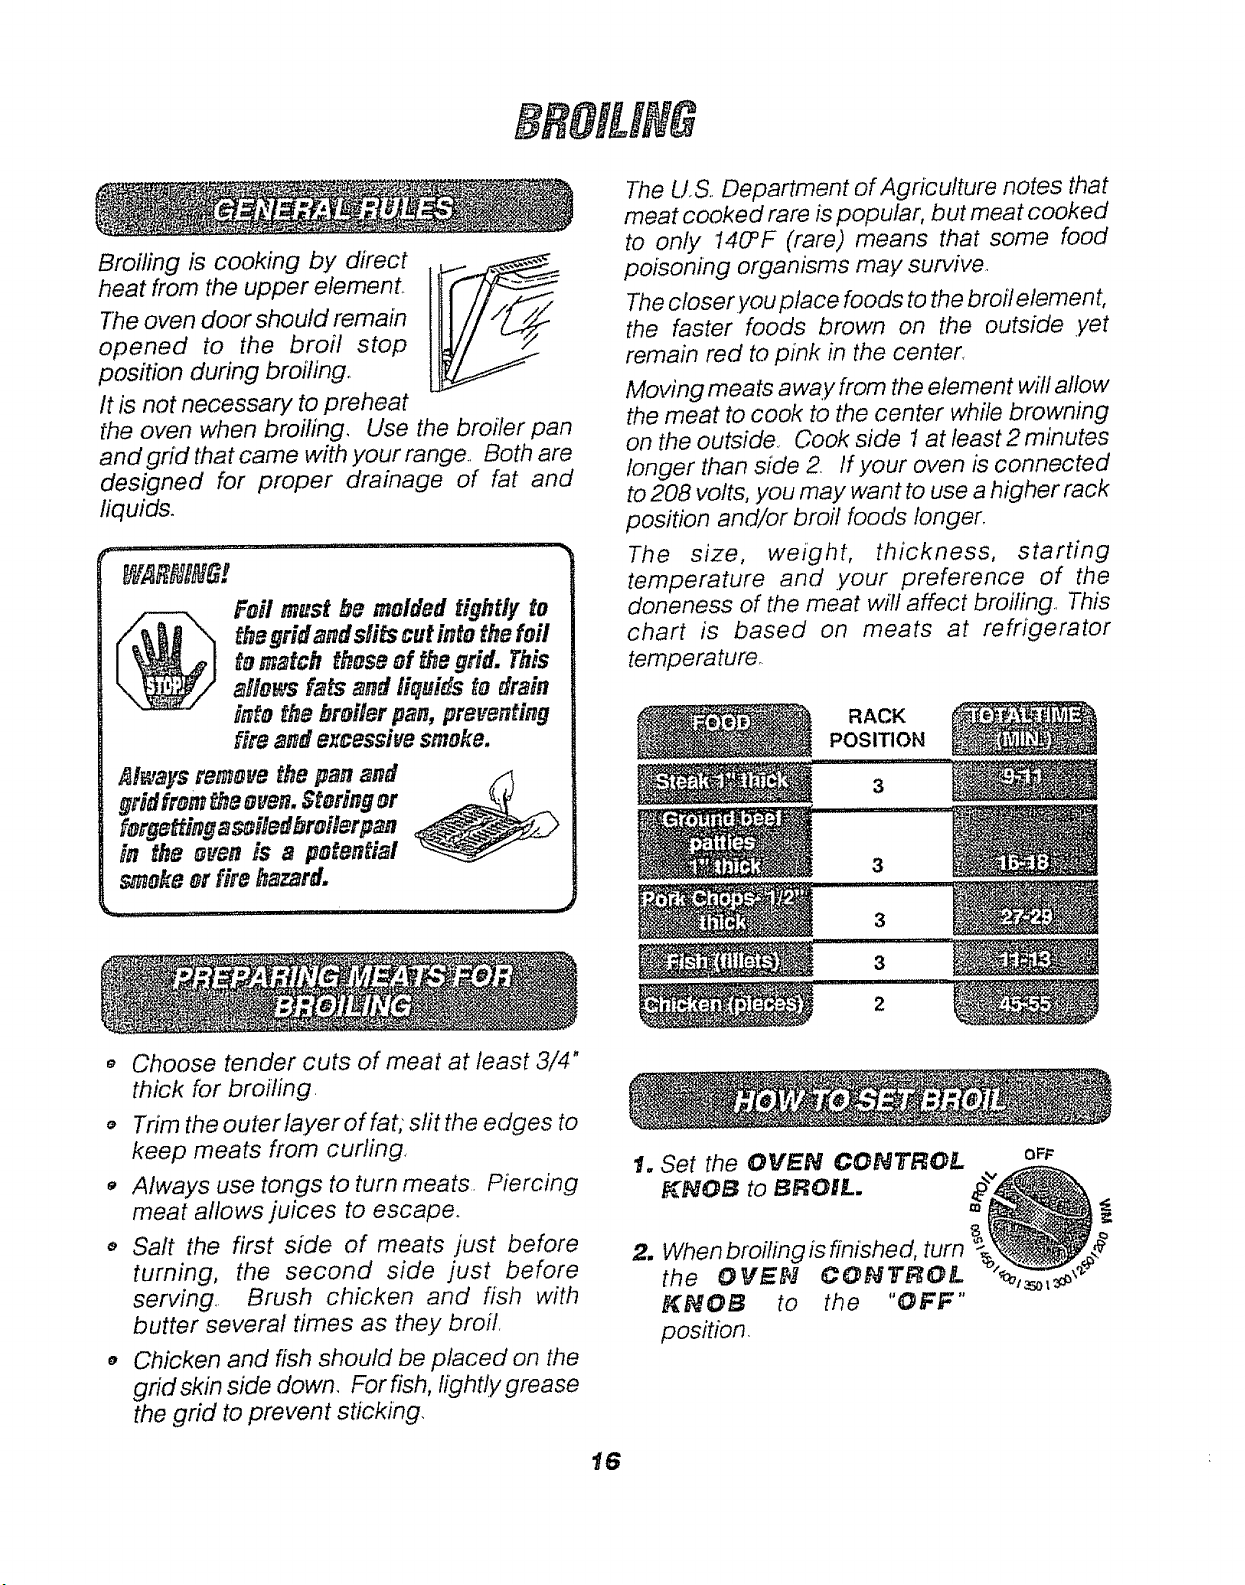
Broiling is cooking by direct
heat from the upper element.
The oven door should remain
opened to the broil stop
position during broiling,.
It is not necessary to preheat
the oven when broiling, Use the broiler pan
and grid that came with your range.. Both are
designed for proper drainage of fat and
liquids.
The US. Department of Agriculture notes that
meat cooked rare is popular, but meat cooked
to only 140=F (rare) means that some food
poisoning organisms may survive,
The closer you place foods to the brofl element,
the faster foods brown on the outside yet
remain red to pink in the center,
Moving meats away from the element will allow
the meat to cook to the center while browning
on the outside, Cook side I at feast 2 minutes
longer than side 2 If your oven is connected
to 208 volts, ,you may want to use a higher rack
position and/or broil foods Ionger_
The weight, thickness, starting
temperature and .your preference of the
doneness of the meat wifl affect broih'ng., This
chart is based on meats at refrigerator
temperature_
RACK
POSITION
3
Choose tender cuts of meat at least 3/4"
thick for broiling.
Trim the outer layer of fat; slit the edges to
keep meats from curling
Always use tongs to turn meats. Piercing
meat allows juices to escape.
Salt the first side of meats just before
turning, the second side just before
serving.. Brush chicken and fish with
butter several times as they broil,
Chicken and fish should be placed on the
grid skin side down. For fish, lightly grease
the grid to prevent sticking.
3
1. Set the OVEN CONTE_OL
KNOB to BRONL.
2. When broiling is finished, turn
the OVE_S CONTROL
KNOB to the "OFF"
position,
OFF
t6
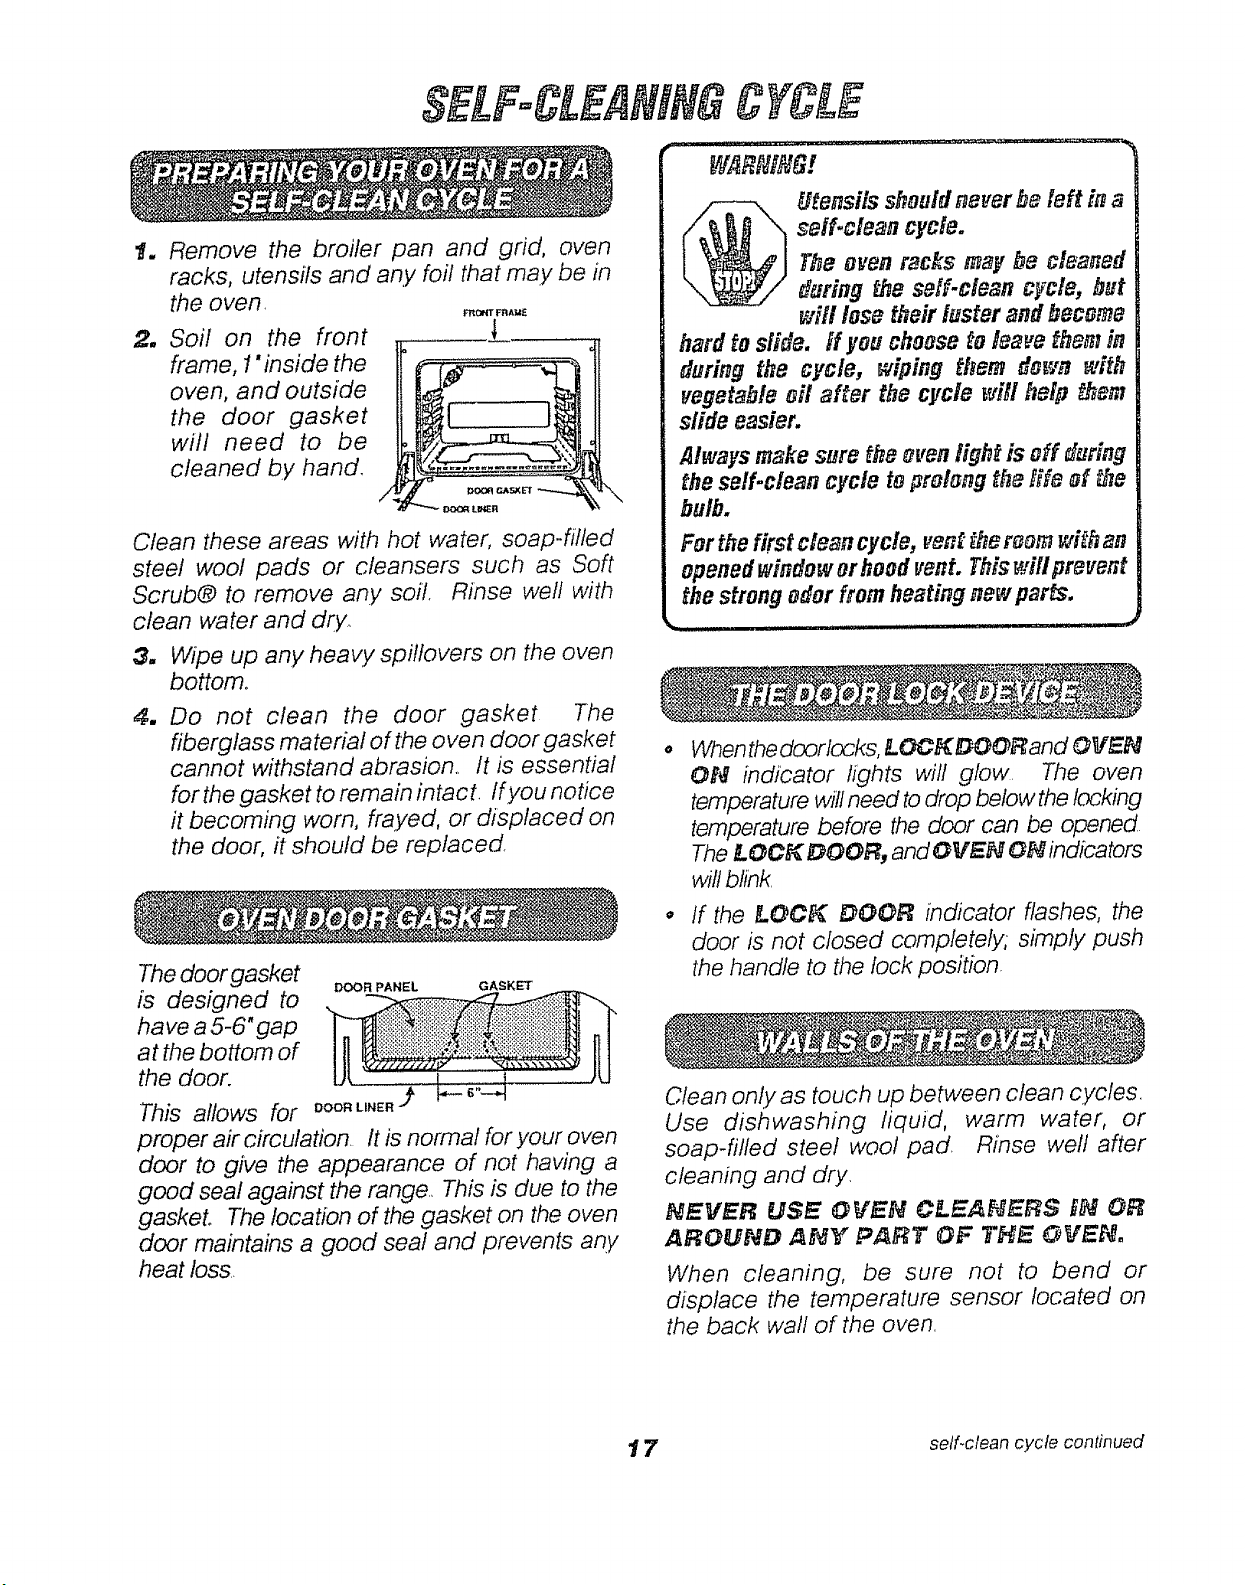
SELF t#ft#G CYCLE
2. Soil on the front
frame, 1"inside the
oven, and outside
the door gasket
will need to be
cleaned by hand.
1. Remove the broiler pan and grid, oven
racks, utensils and any foil that may be in
the oven,
_owr FR^_£
Clean these areas with hot water, soap-rifled
steel wool pads or cleansers such as Soft
Scrub® to remove any soil, Rinse well with
clean water and dry,
3. Wipe up any heavy spillovers on the oven
bottom°
4. Do not clean the door gasket The
fiberglass material of the oven door gasket
cannot withstand abrasion., It is essential
forthe gasket to remain intact, lf you notice
it becoming worn, frayed, or displaced on
the door, it should be replaced
The door gasket bOO.PANE, GASKE'r
is designed to
have a 5-6"gap
at the bottom of
the door.
This allows for oooRu.E.)
proper air circulation. It is normal for your oven
door to give the appearance of not having a
good seal against the range,, This is due to the
gasket. The location of the gasket on the oven
door maintains a good seal and prevents any
heat loss,.
tens{lsshould never be left in a
elf.clean cycle.
] ( the ovenracksmaybe clea ed
Mill lose their luster and beconte
hard to slide, if you cheese to leave them nn
I during the cycle, wiping tl_ern down _,_th
j vegetable eil after the cycle e_ill help _em
j slide easier.
Always make sure the even fight is off dunng
J the self-clean cycle to Frolong the _ife of the
I bulb.
! For the first clean cycle, veM the room wRh an
I opened window orhood vent, This _,illpreFefit
When thedoor locks, LOCK _GR and GVEt_
ON indicator lights will glow The oven
temperature will need to drop below the locking
temperature before the door can be opened
The fLOCK DGGR_ and GVE_ Gt_ indicators
will blink
If the LGCK DOOR indicator flashes, the
door is not closed completely; simply push
the handle to the lock position
Clean on!y as touch up between clean cycles.
Use dishwashing liquid, warm water, or
soap-filled steel wool pad Rinse wet! after
cleaning and dry,
NEVER USE GVEN CLEAE_$ERS t_P#GR
AROUND ANY PA_T GF THE GVEt_,
When cleaning, be sure not to bend or
displace the temperature sensor located on
the back wall of the oven,
"17 selFclean cycle continued

CY#LEcontinued
t. For best results, follow the steps in
BEFORE A CLEAH CYCLE.
2. Slide the handle to the right.
Turn the oven control knob to the off position.,
You will need to wait for the oven temperature
to drop below the lock temperature (approx_ 1
hour) before attempting to open the door,. The
indicator light will not blink if the cycle is
interrupted,
3, Turn the oven control knob to 'CLEAN"
The "LOCK DOOR'S-and "OVEN ON"
indicator lights will glow.
If you tum the oven control knob to CLEAN
and forget to lock the door, the "LGCK
DGGR" indicator light will flash, alerting
you to lock the door.
4, The clean cycle lasts 4 hours and 20
minute& The "OVEN OH" and "LOCK
DOOR" indicator lights will blink at the end
of the clean cycle The oven door cannot
be unlocked until the temperature has
cooled and the door handle slides easily to
the left,
5. After the cycle is finished, turn the oven
control knob to the off position and unlock
the door,
After the cycle, you may
notice some white ash in
the oven.. Just wipe it up
with a damp cloth or
sponge.
If white spots remain, scrub them with a
soap-filled steel wool pad, Be sure to rinse
thoroughly These are usually deposits of salt
that cannot be removed during the cycle
_f fer any re.son you are mot satisfied
wit[, the cHean_ng results, just repea_
_he cycBe.
18
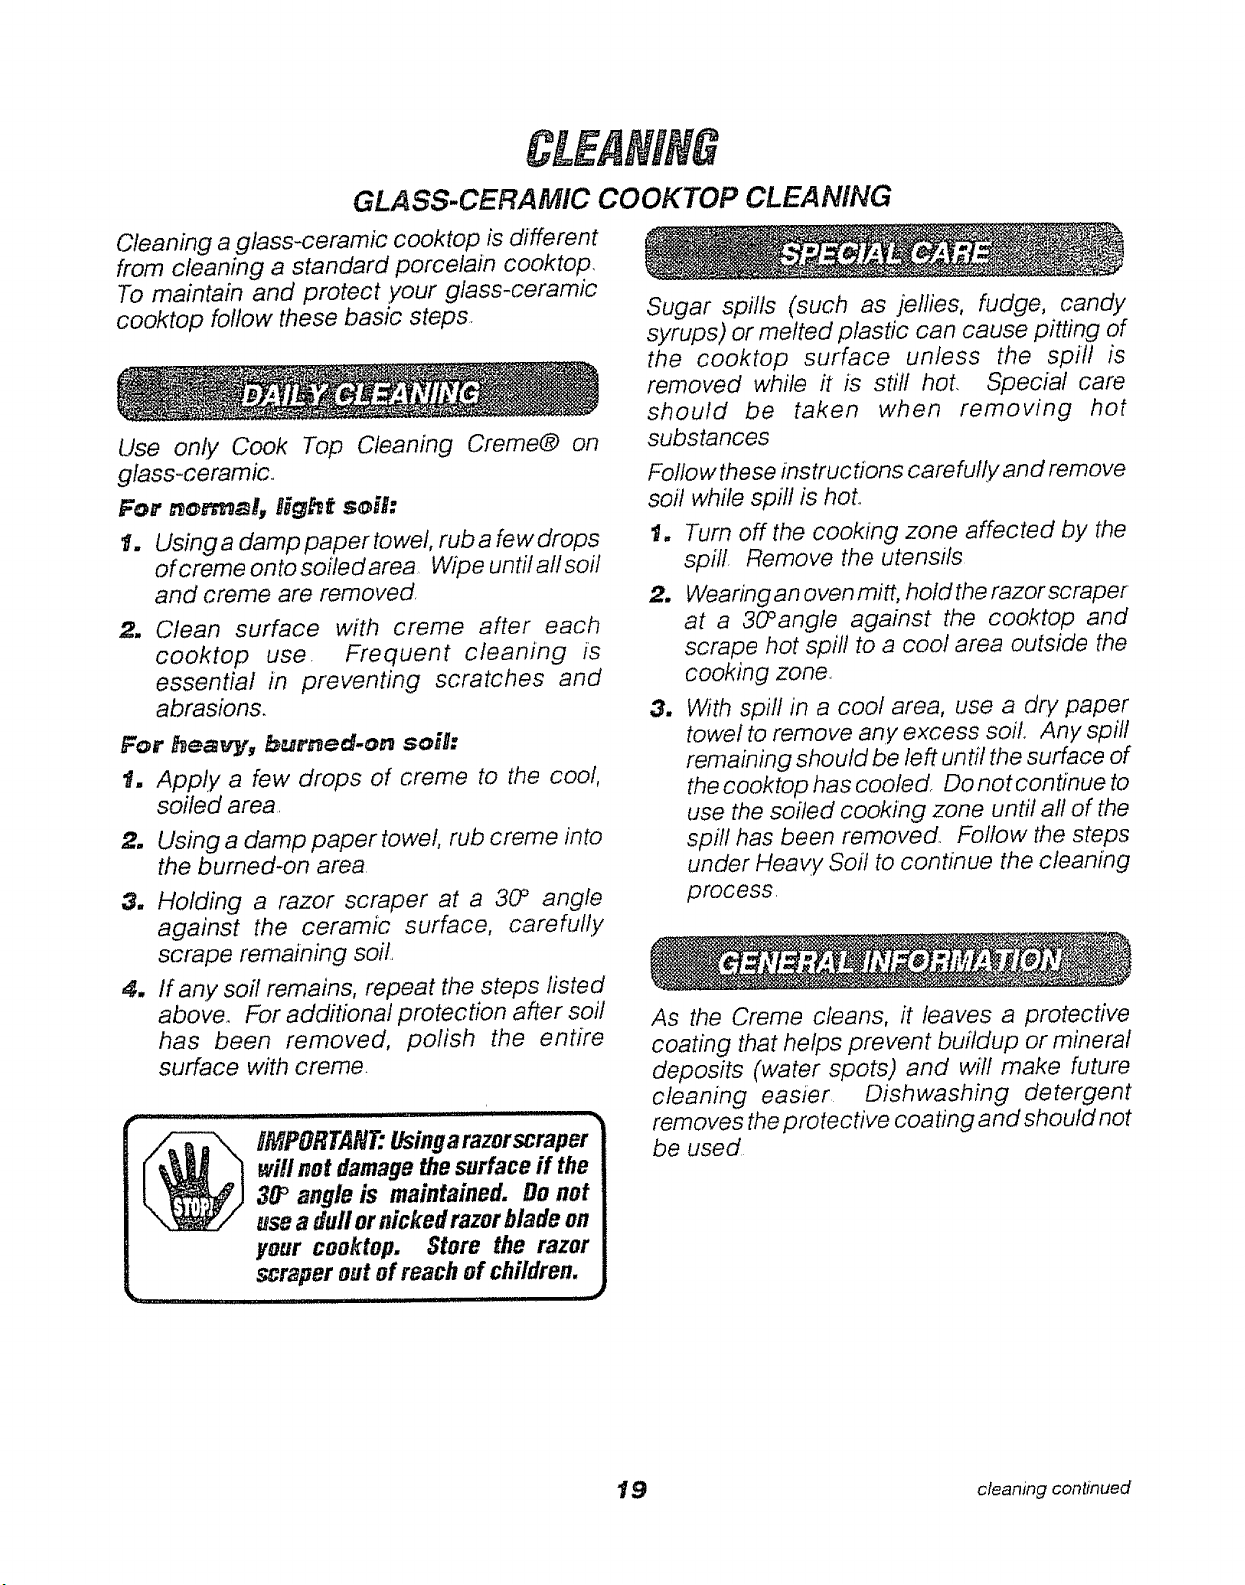
GLASS-CERAMIC COOKTOP CLEANING
Cleaning a glass-ceramic cooktop is different
from cleaning a standard porcelain cooktop,
To maintain and protect .your glass-ceramic
cooktop foflow these basic steps.
Use only Cook Top Cleaning
glass-ceramic.
For _o_R, night soil:
Creme® on
t, Using a damp papertowel, rub a few drops
of creme onto soiled area IMpe until all soil
and creme are removed
Clean surface with creme after each
cooktop use. Frequent cleaning is
essential in preventing scratches and
abrasions.
For he_vy_ burned.on soiB:
1. Apply a few drops of creme to the cool,
soiled area,
2. Using a damp paper towel, rub creme into
the burned-on area.
3, Holding a razor scraper at a 30 ° angle
against the ceramic, surface, careful!y
scrape remaining soi!..
4. If any soil remains, repeat the steps listed
above. For additional protection after soil
has been removed, polish the entire
surface with creme.
i ,l_lr_ i, u_lH 'hi'HI i i'll I nil .
-_--.\ NMPORTANT."Usingarazorscraper
L witlnot damage the surface ff the
_, 30° angle is ma.intamed. Do not
_/" use a duli or mcked razor blade on
your cooktop. Store the razor
,, scraper out of reach of children,
I I I II
Sugar spills (such as jellies, fudge, candy
syrups) or melted plastic can cause pitting of
the cooktop surface unless the spill is
removed while it is still hot. Special care
should be taken when removing hot
substances
Folfow these instructions careful!y and remove
soil while spill is hot,.
1I, Turn off the cooking zone affected by the
spill. Remove the utensils
2.
m
Wearing an oven mitt, hold the razor scraper
at a 30_angle against the cooktop and
scrape hot spill to a cool area outside the
cooking zone..
With spill in a cool area, use a dry paper
towel to remove any excess soil Any spill
rernaining should be left until the surface of
the cooktop has cooled Do not continue to
use the soiled cooking zone until all of the
spill has been removed. Follow the steps
under Heavy Soil to continue the cleaning
process.
As the Creme cleans, it leaves a protective
coating that helps prevent buildup or mineral
deposits (water spots) and will make future
cleaning easier Dishwashing detergent
removes the protective coating and should not
be used
19 cleaning continued
MORE ON YOUR NEW GLASS-CERAMiC COOKTOP CLEANING
• Most cleaners contain ammonia, chemicals
and abrasives that damage the surface of
your cooktop. Use only the Cooktop
Cleaning Creme® for proper cleaning and
protection of your ceramic surface..
_, If you slide aluminum or copper cookware
across the surface of the cooktop, they may
leave metal markings which appear as
scratches. Use the razor scraper and
cooktop creme to remove these marks
Failure to remove this residue immediately
may leave permanent marks.
o If pots with a thin overlay of aluminum,
copper or enamel boil dry, bonding with the
ceramic surface of the cooktop may occur.
This black discoloration should be removed
immediately or it could becpme permanent.
,, Use of window cleaner may leave an
iridescent film on the cooktop. Cleaning
Creme will remove this film.
* Water stains (mineral deposits) are
removable using the creme or full strength
white vinegar.
Do not use a dull or nicked razor blade on
your cooktop_
o Do not use abrasive cleaners or abrasive
scouring pads on your cooktop.
o Plastic mesh pads, such as Dobie®maybe
used
To order additional Cooktop Cleaning Creme®,
call your nearest Sears Service Center or
Retail Store, ask for (Stock No 40079)
CLEANPNG MATERIALS TO USE:
• Dishwashing detergent
• Warm water
o Soft cloth
Do r_ot use abr_sHve _e_ersg
ind_sr_r_al cNeac_ers _r bHe_ch,
TO CLEAH:
Wipe with soft cloth and warm soapy water.
Rinse and dry well
CLEAt_I_HG MA TER#ALS TO USE:
Dishwashing detergent
o Warm water
,, Soap-filled scouring pad
,, Commercial oven cleaner
TO CLEAN:
Allow the pan to soak. Sprinkle the grid with
dishwashing detergent and cover with a damp
cloth orpaper towel, Rinse and dry well Scour
as needed. You may also place both the pan
and grid in the dishwasher
CLEANR_G MA TEREALS TO USE:
,, Dishwashing detergent
_, Warm water
,, Paper towels
TO CLEAN
Do not use oven cleaners, cleansing powder,
or harsh abrasives. If marinades, tomato sauce,
basting materiafs, etc. should spill, wipe up as
much as possible. When surfaces have cooled
thoroughly clean painted areas,
2O
CLEANING MA TERNALS TO USE:
* Dishwashing detergent
,, Warm water
, Soft cloth
MOLDED
RIB
SPRING
CLIP
TO REMOVE:
t. Be sure the control knob is in the off
position,
2, Pull straight off the stem Using a piece of
string can make removing the knob easier.,
Slip the string under and around the knob,
pulling straight out,
TO CLEAN:
Wash the knob thoroughly with soapy water,
Dry completely with a soft cloth. DO NOT let
_he kneb soak.
TO REPLACE."
t. Check the back of the knob_ The molded
rib of the knob is designed to fit perfectly
onto the knob stem
2. Align the molded rib to the clear groove in
the knob stem.
3, Push the knob back as far as it wilt go_
GLASS
RETAINER
LIVE COLLAR
BU
GLASS
COVER
TO REPLACE:
1. Unscrew glass cover and remove_
2, Unscrew the light blub
3, Replace the bulb with a 3 1/2" 40
appliance bulb
4, Replace the cover
watt
21 removable parts continued
CLF-J_NBNG MATERIALS TO USE:
• Dishwashing detergent
e Damp cloth
Warm water
TO L_EMOVE:
1, Pull the drawer out until it
stops:
2, Lift the front of the drawer
until the stop guide of the
drawer clears the stop
guide on the base rail.
3, Lift the dravver up and
over the drawer stop.
TO CLEAN:
STOP GUIDE
Wipe the inside and outside with warm soapy
water and a damp cloth or sponge, Do not use
harsh abrasives or scouring pads on the
drawer.
STOP GUIDE
TO REPLACE:
1Y, Lift the front of the drawer
stop and lower the stop of
the drawer through the
opening of the base rail.
2, Lower the front of the
drawer and push back
the drawer until it stops.
P_RT$ continued
m
Lift up on the front of the drawer until the
stop guide of the drawer clears the stop
guide of the base rail Slide the drawer into
place..
L ,l_L_,,,llll , lll_ m,, ill,
CAUTION: The drawer gives you
space for keeping cookware and
bakeware.
Plastics and flammable materi_ls
should not be kept in this drawer.
Do not overload the sterage drawer, ff the
drawer is too heavy, it may slip off the base rail
when opened.
,llqlql ..............................
22 removable parts continued
PAR con ue
CLEANING MATERIALS TO USE:
o Dishwashing detergent
• Warm water
° Scouring pad or soap-filled steel wool
pad
BROIL STOP POS1TON
RAISED BACK
OF THE RACK
BUMP
IN
GUIDE
i<
TO REMOVE:
1. Pull the racks out to the stop lock positionr
2. Pull up the front of the rack and slide under
the bump of the rack guide
TO CLEAN:
Clean with warm water and detergent For
hard to remove stains, gent!y scrub with a
scouring pad or a soap-rifled steel wool pad
Rinse well
TO REPLACE:
1. Place the raised back of the rack onto the
rack guides°
2. Lift the front of the rack until the raised back
slides under the bump of the rack guides
3. Slide the rack all the way back
TO REMOVE:
1. Open the door to the broi! stop position
2. Grasp the door at each side and lift up
and off the hinges DO NOT LIIFT
DOOR BY" THE HANDLE.
CAUTIOH: When the door is
removed and the hinge arms are at
the broil stop position, as a
precaution, cover the hinge arms
with toweling or an empty paper
towel roll. Bo not bump or try to move the hinge
arms while working in the oven area. They
could snap back causing injury to the hands or
damage theporcelain finish of the front frame.
== -_
TO REPLACE:
1. Make sure the hinge arms are in the broil
stop position
2. Lift the door by the sides
3. Line up the slots at the bottom edge of the
door with the hinge arms
4. Slide the door down onto the hinge arms as
far as it wifl go=
5. Close the door
23
BEFORECALLINGFOR
To save you time and money, before making a service calf check the fist below for any problem you may
feel you have with the performance of your range If the problem is something you cannot fix use the
Consumer Service Numbers located at the back of this manual° When rnaMng any calls _,ave f:he
Model _o., RepaEr Parts Rist, Use and Care Manual and the Da_e of Purchase ava_Eable.
PROBLEM POSSIBLE CA USE POSSIBL E SOL UTtON
TtJe display of ),our
control is flasMng
"F" foIBowed by a
number or iet_er.
Range malfunction
Turn the oven control knob to off Press the
CLOCK pad and the TBMER ONIOFF pad,
Let the range cool for I hour and place the
range back into an oven or cleaning operation,
If code repeats call for service,
Tiny sra,ches or
_brasions on ,he
coo_.ep.
a. Use of incorrect cleaning
materials
b. Coarse particles (salt,
etc ) between cookware
bottom and cooking
surface
Ct
Cookware with rough
bottoms
a. Use only Cooktop Cleaning Creme@
b. Make sure the cooktop surface and bottom
of cookware are clean before using
c. Use only flat bottomed cookware
Meta_l markings on *he
cooktop surface (may
appear as scratches).
Areas of discoloration
on _he cooktop surface.
Sliding or scraping metal
utensils and cookware
across cooktop surface
Mineral deposits from water
or food
Use recommended cleaning procedure to
clean the cooktop surface
UlllJlU Ull_,,:,l,,
Use recommended cleaning procedure to
clean 'the cooktop surface
Dark streaks and
specks on the
cooktop surface.
a. Encrusted believers or
grease spatters
b. Incorrect cleaning
materials,
a. Use razor scraper and follow the directions in
the cleaning section of this manual,,
b. Use only the Cooktop Cleaning Creme@ on
the cooktop surface
Oven ter_perafure Thermostat Calibration
seems inaccurate.
See the temperature adjustments described
following this section
Oven will net unlock. Clean cycle is not finished,
........ i i ii illll,, i,n,n,u,,,iillll,,, lllll ........ i, _ _
Oven temperature must drop below the lock
temperature before the door will unlock,
Oven Righ_ does no_
wor_.
a Light switch in off position, a. Check switch oven light switch setting,
b, Oven light bulb burned b. Check the oven light bulb
out
24 before calling for service continued

CALLIH6FORSERVICE
PROBLEM
........................... i1,11111 ,i, iii I IIIII
Foods do not broil
properly,
Oven smokes.
............. nnll ,lu ,,,,,,,,,,,,
Cooktop will not
work, oven is ok.
POSSIBLE CA USE POSSIBLE SOL UTION
a. Check broil pan placement, see broiling
section
b. Do not preheat when broiling
c, Check broiling section.
d. Open door to broil stop position,
a. Improper rack
position
b. Oven preheated
c. Improper use of foil,
d. Oven door closed during
broiling,
e. Low voltage (208 volts)
e. Use higher rack position and/or longer
cooking time
f. Check broiling chart in broifing section,
a. Check for heavy spillover,
b. Do not let foil cover slits in the grid, this
wilt prevent grease drainage,
c. Clean pan and grid after each use.
f. Improper broiling time.
i i H, ill llll,,l,,i,,:,,,, , i i ii, i i ill, ,u,,,,i
a. Dirty oven
b. Improper use
of aluminum foil,
c. Broiler pan containing
grease left in the oven.
i illlll , iiq iiii ,i / i Hin Hnll ,llll Ullqnl,,,,,, ,,,,,,.,
a. Control set improperly, a. Push knob in while turning to
temperature setting,
Oven will not
work, cooktop ok.
a. Control set improperly, a. Check the control and check oven
cooking section,
b. Control knob turned too far b, The indicator mark on the knob should
past 55CP_ afign exactly with 550°.,
i ,,u,t i :: i ,Ha ,l,,,,,,,,u,,, n,,, i i i ......................
Oven door
accidentally locked
while
baking.
a Do not force the lock a.
handle Temperatures
above the locking
temperature wilt prevent the
lock handle from sliding to
the unlock position
. ............. ,, n,,,.
Turn the control knob to the off position,
Allow the oven to coot until the
temperature inside drops below the lock
temperature and the handle slides easily
,,Ul, n j, ,ll"ln,i _ i lll, ll n
Cleaning results were a. Clean cycle interrupted,
poor. b. Oven was heavily soiled,
a. Aflow the oven to clean its full cycle, *
b, Heavy spillovers should be cleaned
before the cycle is set,
25
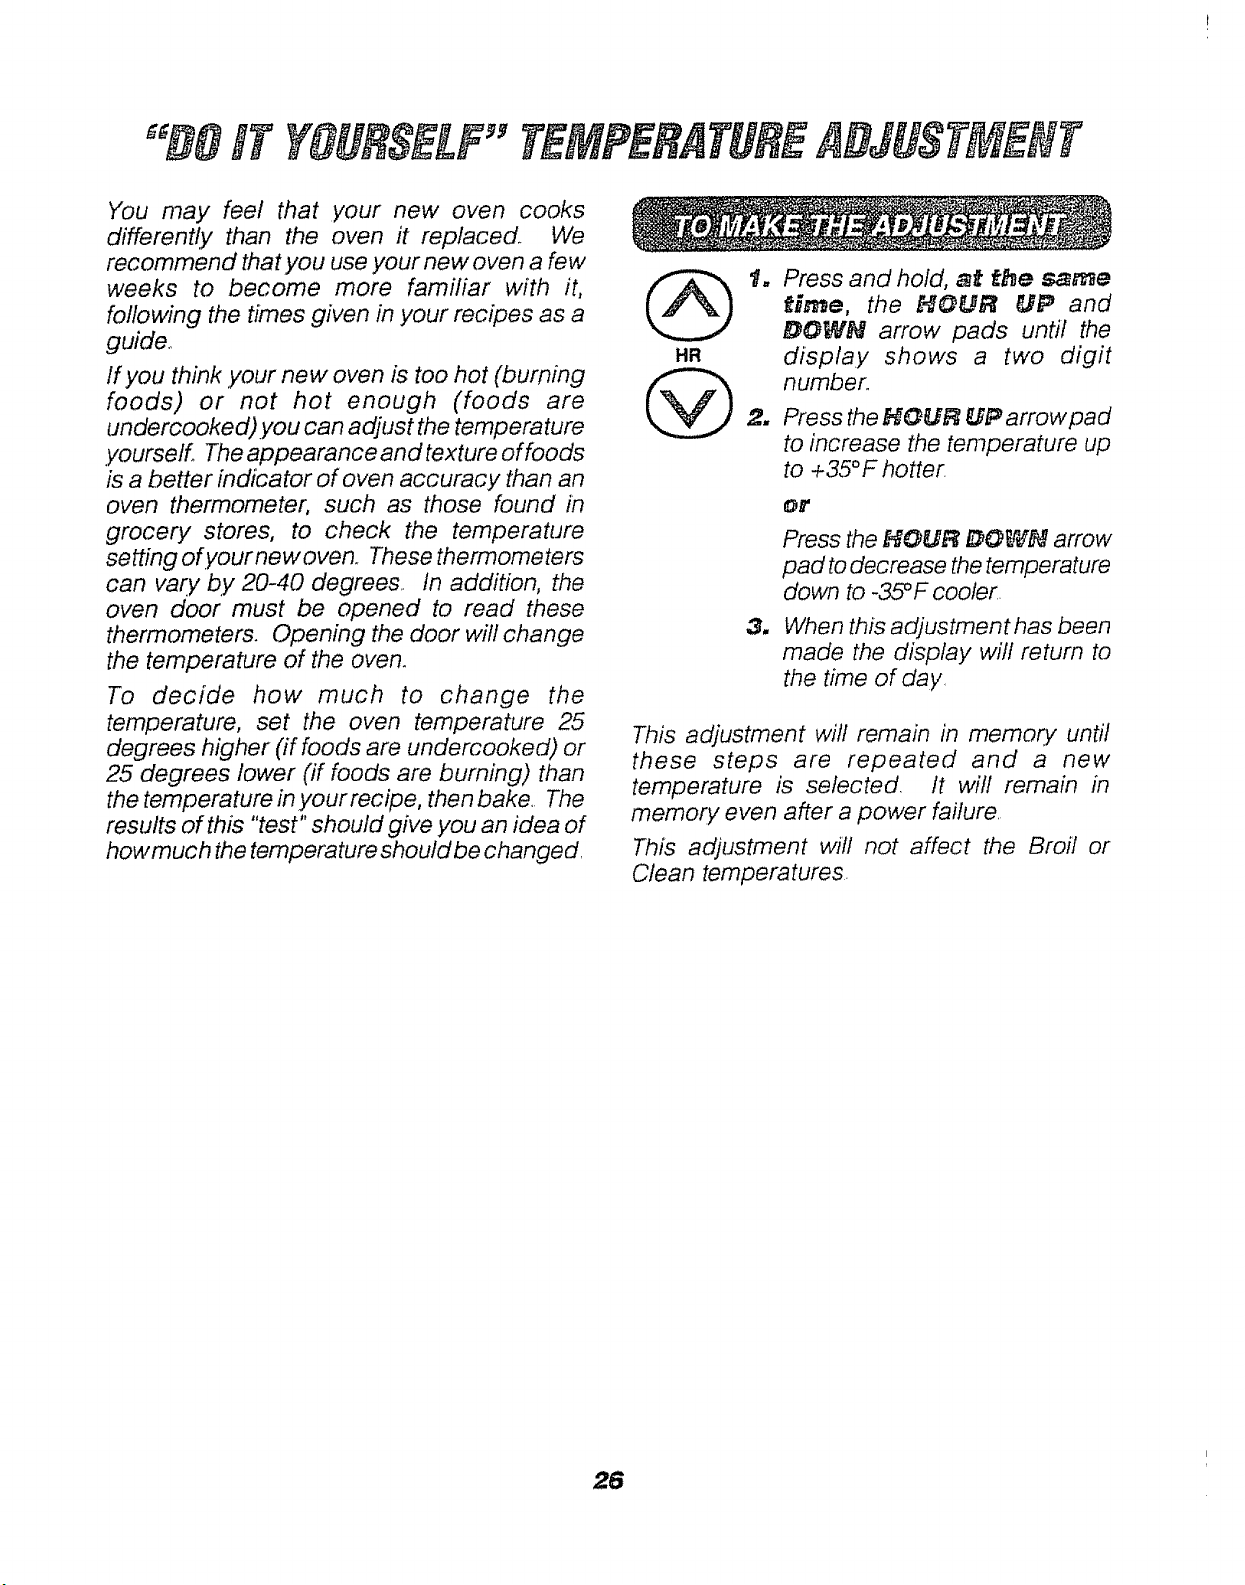
IT YOURS P'
ADJUSTMENT
You may feel that your new oven cooks
different!y than the oven it replaced. We
recommend that you use your new oven a few
weeks to become more familiar with it,
following the times given in your recipes as a
guide.,
If you think your new oven is too hot (burning
foods) or not hot enough (foods are
undercooked).you can adjust the temperature
,yourself_ The appearance and texture of foods
is a better indicator of oven accuracy than an
oven thermometer, such as those found in
grocery stores, to check the temperature
setting of your new oven.. These thermometers
can vary by 20-40 degrees.. In addition, the
oven door must be opened to read these
thermometers. Opening the door will change
the temperature of the oven.
To decide how much to change the
temperature, set the oven temperature 25
degrees higher (if foods are undercooked) or
25 degrees lower (if foods are burning) than
the temperature in your recipe, then bake The
results of this "test" should give you an idea of
howmuch the temperature should be changed.
@
HR
@
t. Press and hold, at the ._e
2.
R
time, the _OUR UP and
DOWN arrow pads until the
display shows a two digit
number.
Press the HOUR UP arrowpad
to increase the temperature up
to +35°F hotter.
or
Press the _OUR DO[r_ arrow
pad to decrease the temperature
down to -35°F cooler.
When this adjustment has been
made the display will return to
the time of day.
This adjustment will remain in memo_, until
these steps are repeated and a new
temperature is selected, It will remain in
memory even after a power failure.
This adjustment wilt not affect the Broil or
Clean temperatures.
26
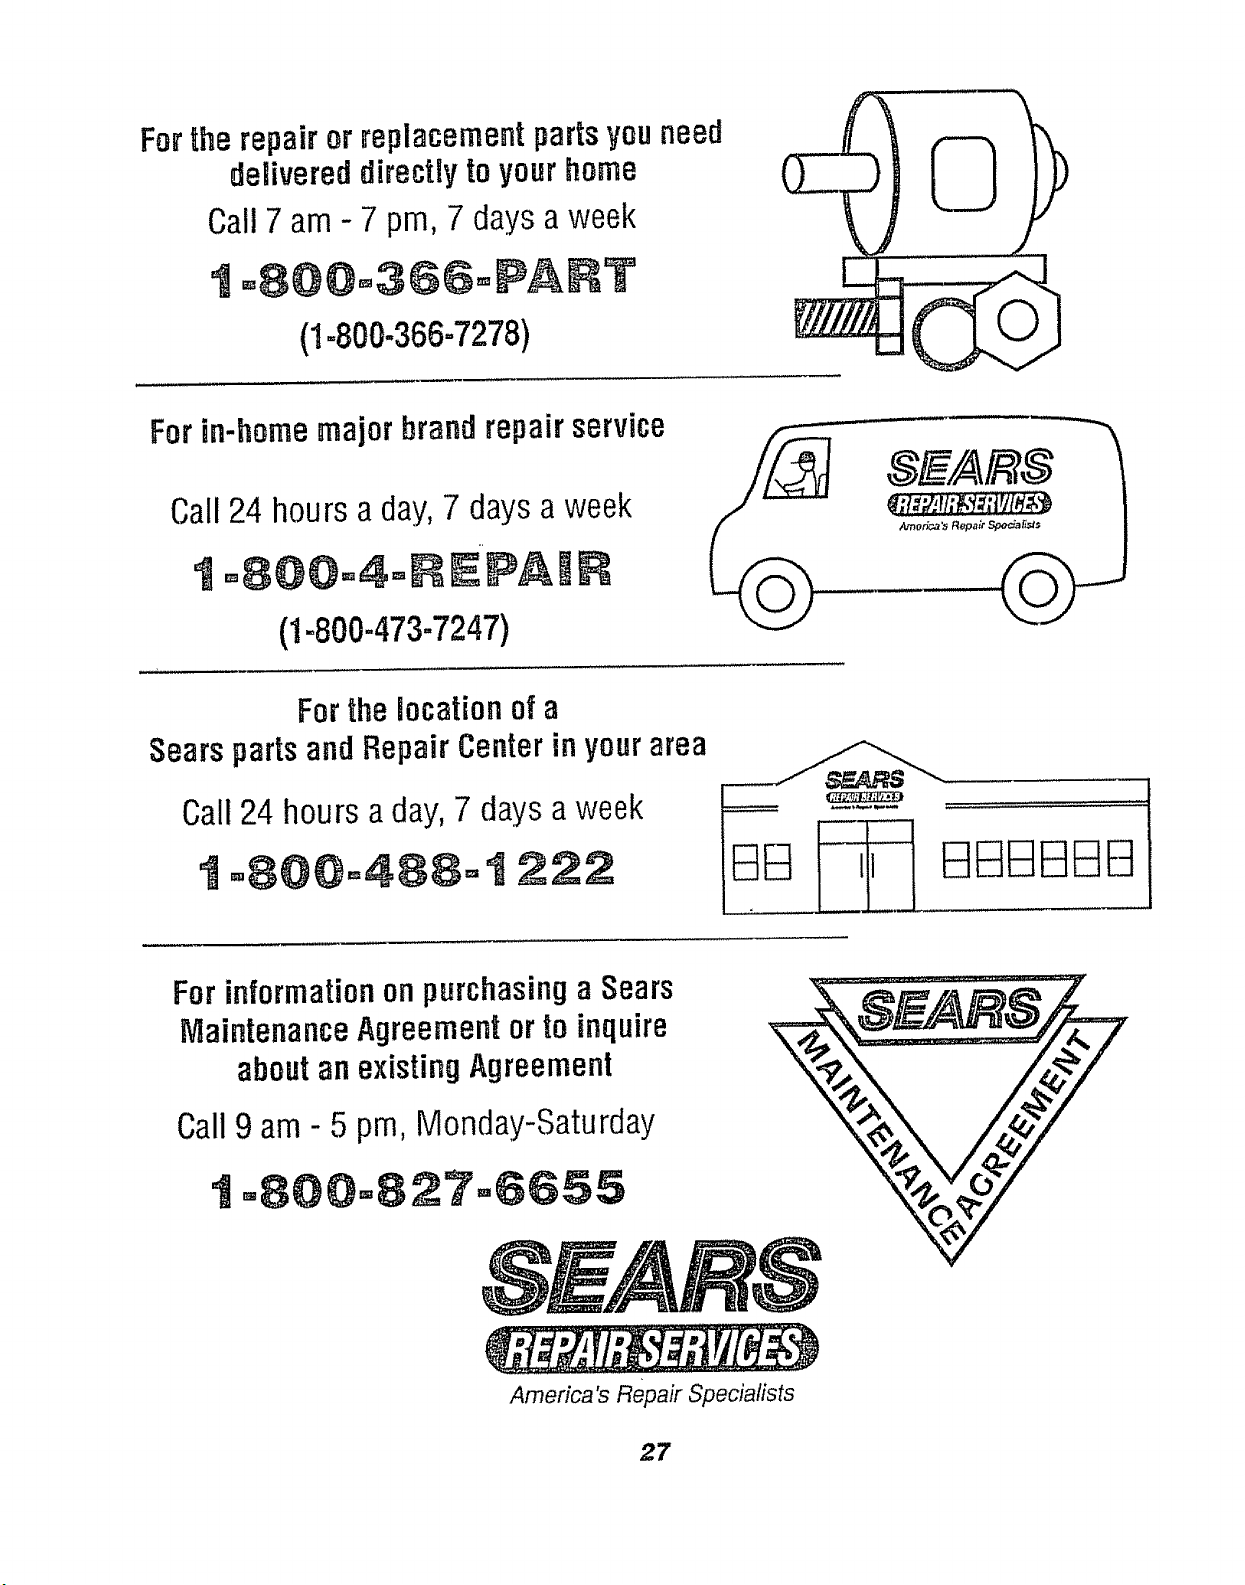
Forthe repairor replacementpartsyouneed
delivered directlyto yourhome
Call 7 am - 7 pm, 7 days a week
t =S00o366oPART
(1=800-366-7278)
©
Forin-homemajorbrandrepairservice
Call 24 hours a day, 7 days a week
1 °8OO-4° EPA
(1-800-473-7247)
Forthe locationof a
Sears parts and Repair Center in yourarea
Call 24 hours a day, 7 days a week
o80@°488o 1 222
BB
BBBBBB
Forinformationon purchasing a Sears
Maifltenance Agreement or to inquire
about an existingAgreement
Call 9 am - 5 pm, Monday-Saturday
t m 0=8 7-6
America's Repair Specialists
27
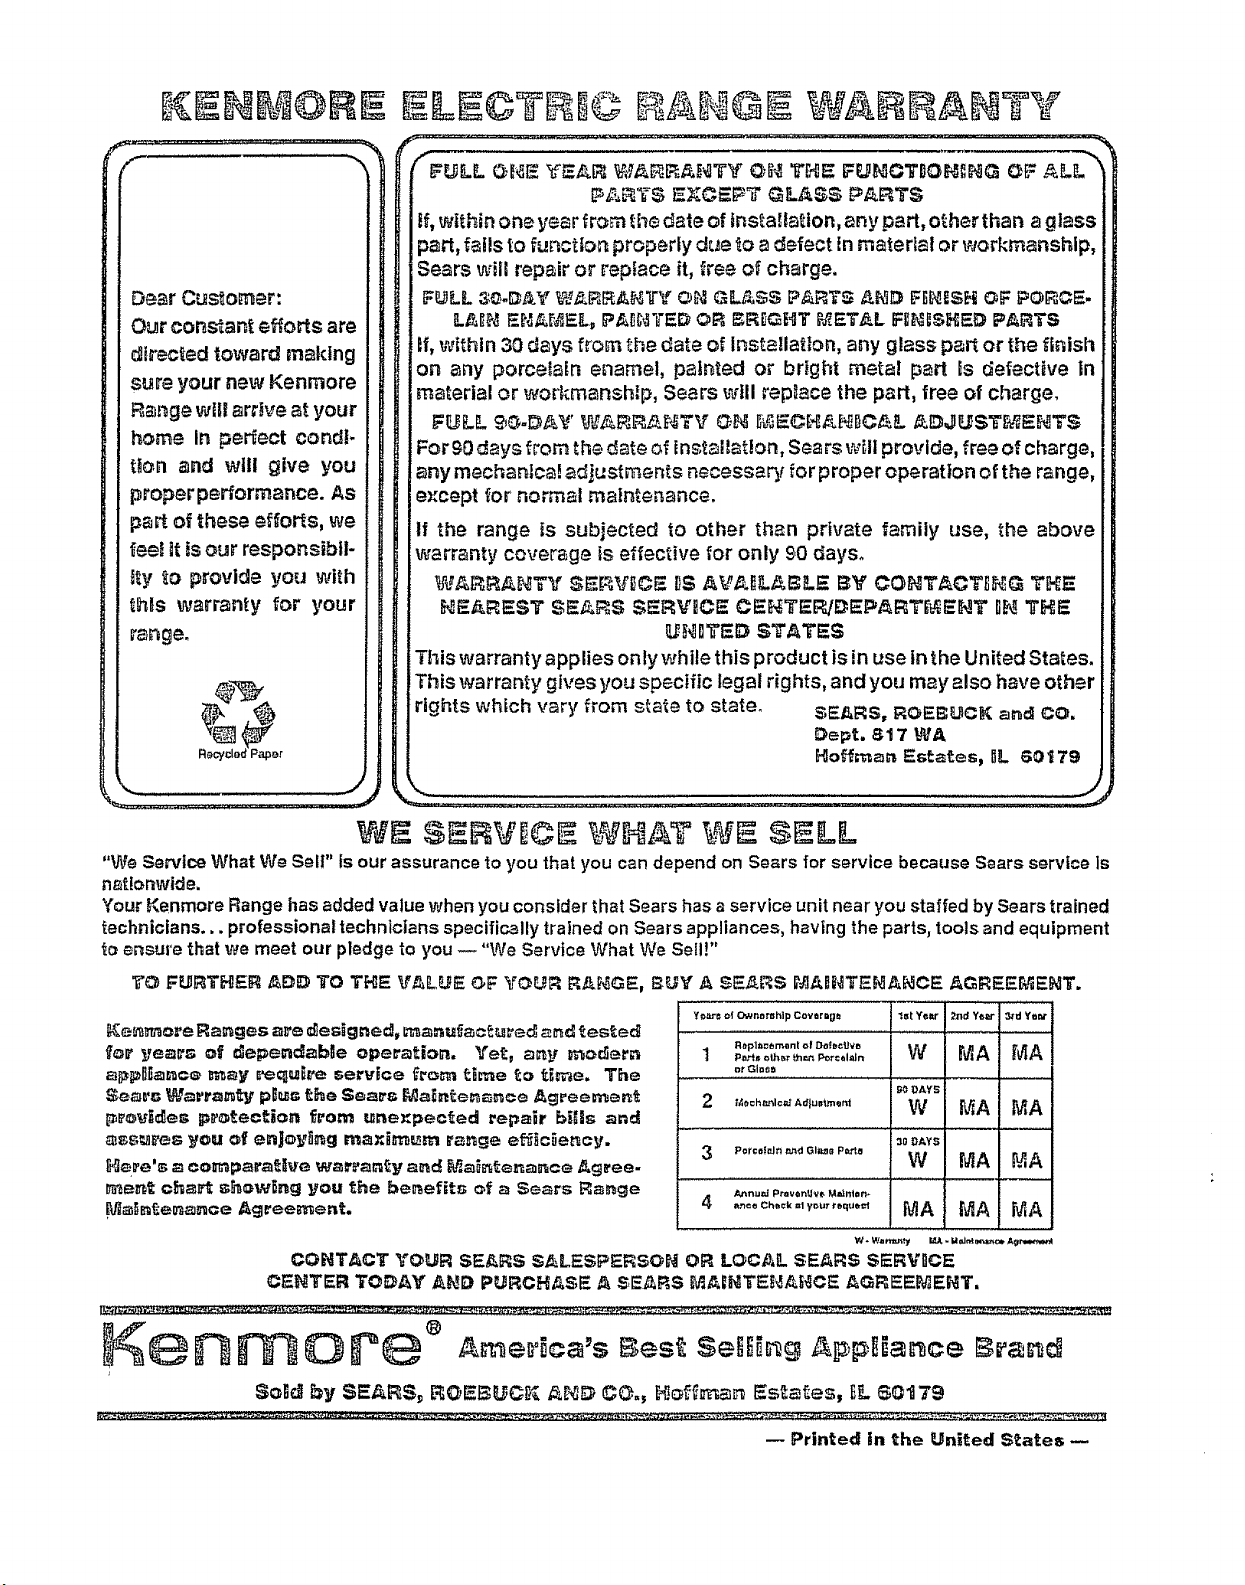
EHB @RE
F .........
Dear Customer:
Our constant efforts are
d_rec_ed toward making
sure your new Kenrnore
Range wtl arrive at your
home In perfect tona!!-
ton and wtll give you
proper pertormance. As
part of these efforts, we
leet it is our responsibti-
ly _o provide you with
_hRs warranty for your
range.
Rec--icled Paper
%-_ J L , ,, , , ,,,,,,J _J
;Fl_pl_em_nl of Dof_¢tlW
1 .,_.o.,..==_=.,_. W MA MA
or GI=I_
: ...
2 M,o = h _nlc_d A dju ,tree nt V_ f t'_'A NA
CONTACT YOUR SEARS SALESPERS@N OR LOCAl. SEARS SERVICE
CEI!TER TODAY AND PURCHASE A S._RS MA=h!TE_AblC5 AGREE_ilE_T.
FienlTlore °
Printed in the Unit!ed States
TO FURTHER _DD TO THE VALUE GF YOUR RAItGE, BUY A SE_RS _JAItI_TENANCE _GREEII41ENT.
y_= _f Ownership Coverage i 1st Ye=# 2_d Y,_=r 3_d YnB
"We Se_ice What We SeW' is our assurance to you that you can depend on Sears for service because Sears servlce is
nationwide.
Your Kenmore Range has added value when you consider that Sears has a service unit near you staffed by Sears trained
technicians.., professional technicians specifically trained on Sears appliances, having the parts, tools and equipment
_ ensure that we meet our pledge to you _ "We Service What We Sell!"
Nenmore
MANUAL DEL
COHSUMtDOR
MODELO NO.
91to9536_
B##. 95368
9#t. 95455
9tl. 95459
9t!,95465
9##.95469
9##. 9537#
9##.95378
PFtECA UCIOH:
Lea y siga todas tas
reglas y las instrucciones
para el funcionamiento
an_es de usar este
producto pot primera vez.
o Carac,er_s;_icas
o Fur_cio_ar__
Cuidado y L#r_#_.
. A_us*_ F_cH
ESTUFAIRRADIA JTEE[ECTRICA
INDICE
Seguridad de la estufa ...................... 3-6
Dispositivo contra vofcaduras ................. 3
Cdmo sacar fa cinta de empaque .......... 7
Caracterfsticas de su estufa ................. 8
Cdmo proteger su nueva cubierta
para cocinar .......................................... 7
Zonas para cocinar .....................................9
Utensilios y woks para cocinar .............. 9
Cdmo revisar los utensflios ................ 9
Espirales radiantes .............................. 9
Eficiencia de los utensilios ................... 9
Ciclo de ta unidad radiante ................... t0
Cdmo programar los controfes ........ I0
Cdmo hacer conservas en casa .......... I0
Consejos para cocinar en el homo ...... 15
Cdmo programar para homear ...... t3-15
C#mo asar a la parriHBa ................... 16
Regfas generales, Cdmo preparar tas
cames para asar a la parrilla,
Cdmo programar para asar a la parrifla,, 16
Autolimpieza .................................. 17-18
Como preparar el homo ........................ 17
Setfo de la puerta del homo .................. I7
Dispositivo para enanchar ta puerta
Paredes de ta cavidad ......................... I7
C6mo programar un cicfo de
autotimpieza .......................................... t8
Cdmo interrumpir un ciclo .................. t8
Oespu_s def ciclo .................................. 18
Panel de controt ................................... 20
Cacerola y parrilla para asar ................. 20
Superficies pintadas ............................ 20
Superficie de Vidrio-cer_mica ............ 19
Botones con flechas ......................... 1t
Dial .......................................................... 1I
Luces Indicadoras ............................ 11
Cddigo F ....................................... tl
Cddigo PF ......................................... 1t
Como Poner El Dial En Bfanco ....... 1I
Apagado autom_tico ............................ 11
Cdmo poner el refoj ............................. 12
Cdmo programar el crondmetro .......... t2
Cdmo reprogramar el crondmetro ..... 12
Para cancelar el crondmetro ............... I2
Perillas de control de la superficie .........2!
Foco de la luz dot homo ......................... 21
Cajdn de almacenamiento .................... 22
Parriflas de homo ........................ 23
Puerta def homo ................................... 23
Antes de flamar para un servicio ...............
....................................................... 24,25
Ajustes a fa temperatura ......................... 26
Ndmeros para servicios dot
consumidor ..................................... 27
Garantfa
Para su conveniencia y referencia futura. Por favor escriba el ret_rnero de r_orIeU_ Y de
$erie en el espacio que se provee. Est_n ubicados en el marco frontal de_r_s de #a puerEa_.
NUMERO DE MODE&O: NUM£RO /DE SERL_L:

Herrar_Ber_tas que necesBftar#:
Destomillador de cabeza Phill_Ds
Llave ajustable o abierta de 1 3/8"
1. Saque la abrazadera de! preempacado
ubicado dentro de! homo
2. Oecida si la abrazadera ser# instatada en el
lado derecho o izquierdo de la ubicacidn de la
estufa
3_
Si e! lado de la abrazadera de ta estufa es
adyacente al gabinete, coloque la abrazadera
contra la pared de atr_s y el gabinete como se
muestra mds abajo
GABINE3"E ADYACENTE O
UBICACION FINAL DEL PANEL
LATERAL DE LA ESTUFA
ORILLA EXTERIOR DE LA
A19.RAZADERA DEBE ESTAR
EN UNEA CON EL LADO
tZQUIERDO O DERECHO DE LA
ESTUFA X
PARED DETRAS
DE LA PARED
4_
m
Si no hay un gabinete adyacente, determine
cu_l ser_ ta ubicacidn del panel de la estufa
pintado Coloque la abrazadera con su orilta
exterior en este lugar y contra ta pared de
atrds. Vea la ilustracidn de abajo
Determine si va a anclar fa abrazadera al piso
o a la pared, Asegdrese que esta ubicacidn
este fibre de atambres e!_ctricos o pfomeda.
Pegue fa abrazadefa firmemente con los
tomitfos que seproveen Los tomil;os son para
madera, madera terciada, tabtas de partfculas
yfragmentos, y la mayorfa de memos de metal
Siva a ancfar a cemento, usted puede comprar
tomillos y ancfas adecuadas en fas ferreterfas
Use barrenos para cemento pare hacer los
hoyos requeridos
ABRAZADERA J
ANCLADO A LA PARED
Usando una flave ingles& saque fas cualm
pates niveladoras pot to menos dos vuettas
Vea su gufa de instalacidn pare mbs informaci6n
pare la nivetaciCn antes de poner ta estufa en
posici6n,
Destice y coloque fa estufa en posicidn,
AsegOrese que el nivelador de ta pate trasera
agarra completamente la ranura an fa
abrazadera, Si la estufa no se puede mover
suficientemente hacia atr_Is para que et
nivetador de la pate entre en /a abtazadera,
mueva fa abrazadera hacia adefante como se
requiera y 9nclela af piso en un fugar diferente
instrucciones de seguridad importantes contend'an
Para garantizar su seguridad, la de su familia y la
de su hogar, per favor lea su Manual del
Consumidor cuidadosamente. Mant_ngalo a fa
mane para referencias_ Ponga mucha atencidn a
las secciones de seguridad.
ASEGURE$_ que su estufa sea instatada per un
t_cnico especializado y que haga tierra
adecuadamente.
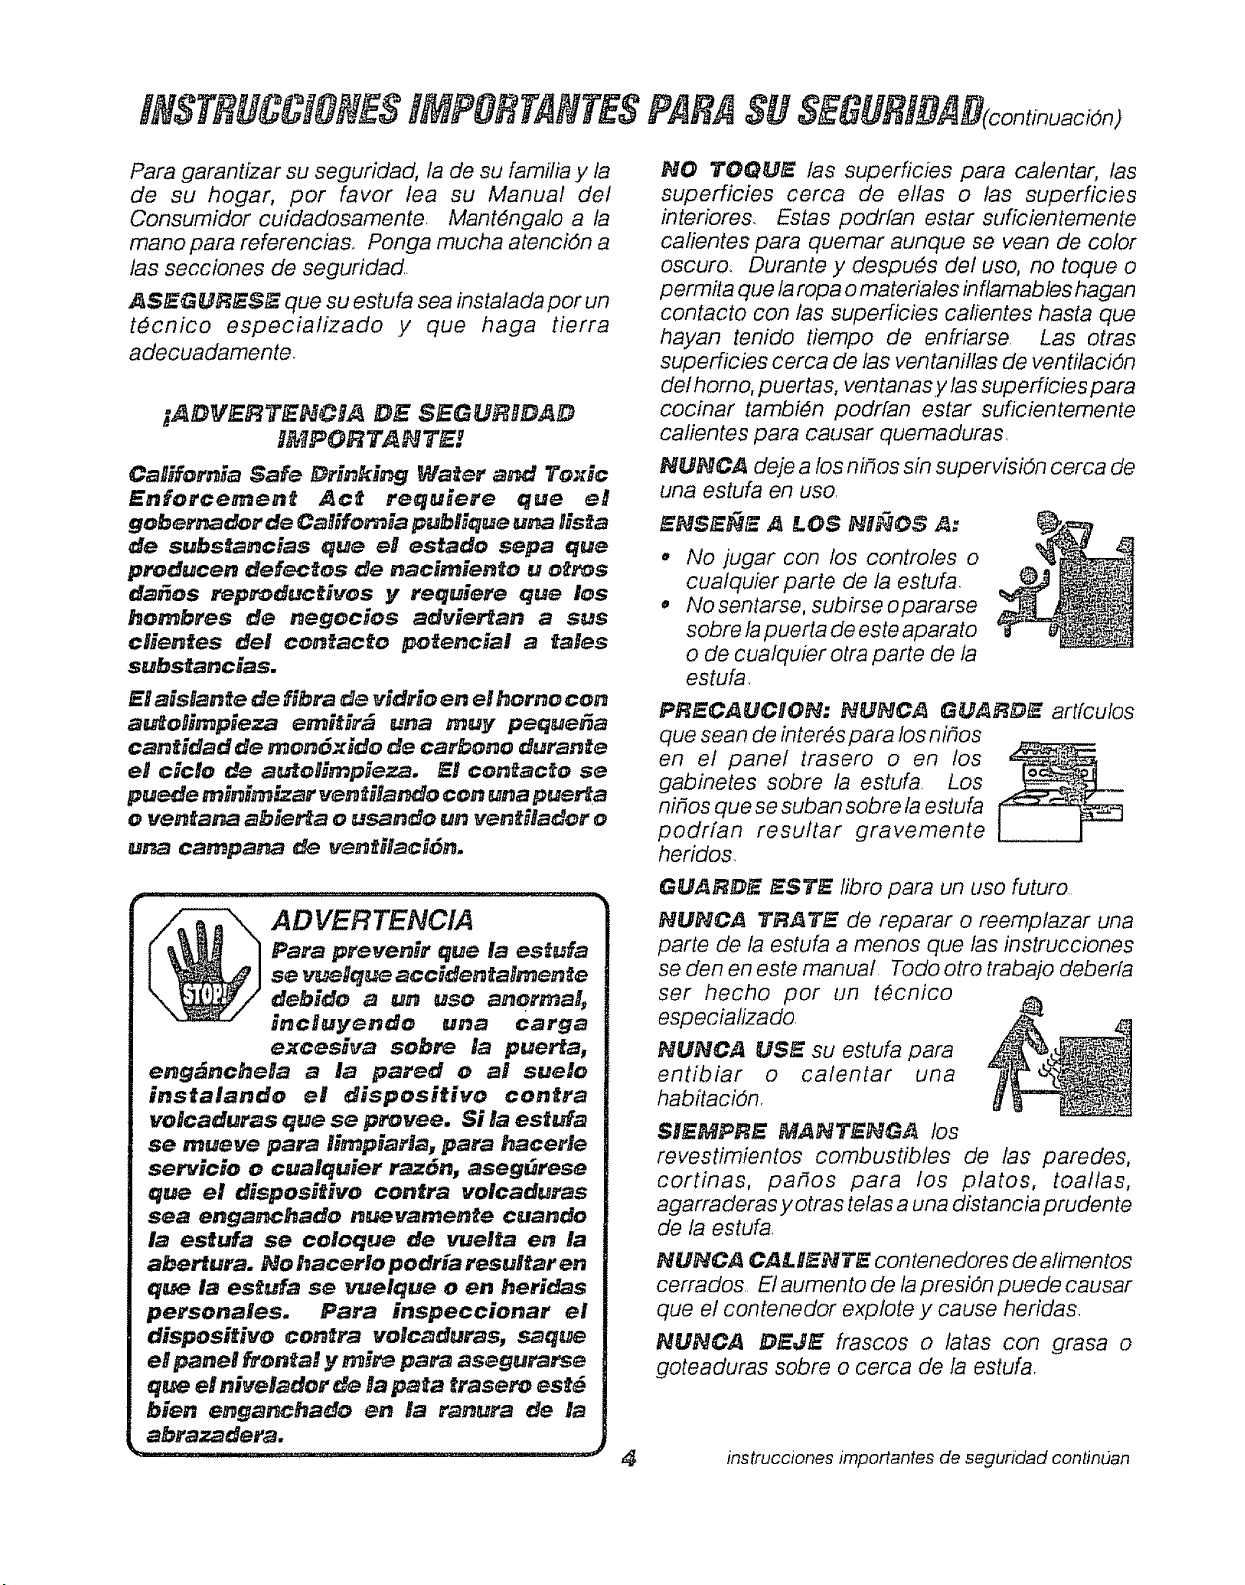
;ADVERT_JCmA D_ SEGURnDAD
BMPGR_'AHTE[
CallNfornia Safe g_rKnki_g Water and Toxic
Enforcernent Act requiere que ell
goberr_r de Call6fon_ia pubHBque urDa Bis_a
de substancias flue e8 estado sepa flue
producen def_ctos _e nacimiento u o_ros
da_os reproductivos y requiere que los
hombres de negocios advier_an a sus
cllientes dell con_acto _tenciall a _alles
substanc_as.
Ell ai$llan_e de [ibra de vidrio en ell _orno con
au_ollimpieza emi_ir_ una mu¥ pe_ue_a
can_idad de monoxide de c_r_no durance
ell ciclo de au_ollimpieza. El con_ac_o se
pu_de minim_r ven_i_ando con una puer_a
o ven_ana a_ier_a o usa_do un ven_lllador o
urea camparm de ven_illaci_n.
NO TOQU_ fas superficies para catentar, tas
superficies cerca de elfas o las superficies
interiores. Estas podrfan estar suficientemente
calientes para quemar aunque se vean de color
oscuro. Durante y despu#s def use, no toque o
permita que la ropa o materiales inflamables hagan
contacto con fas superficies calientes hasta que
hayan tenido tiempo de enfriarse Las otras
superficies cerca de fas ventanilfas de ventitacidn
del horno, puertas, ventanas y fas superficies para
cocinar tambi#n podrfan estar suficientemente
cafientes para causar quemaduras.
NU_C_ deje a los ni_os sin superwsidn cerca de
una estufa en use.
@
No jugar con los controles o
cualquier parte de la estufa,
No sentarse, subirse o pararse
sobre fa puerta de este aparato
o de cualquier otra parte de fa
estufa,
PRECAUC_O_: NU_C_ GU_R£_ artfculos
que sean de inter_s para los ni_os
en el panel trasere o en los __
gabinetes sobre la estufa Los
nidos que se suban sobre la estufa
podrfan resuftar gravemente ..
heridos
GU,_R_ _STi'_ libro para un use future
NU_C_ TRITE de reparar o reempfazar una
parte de la estufa a menos que fas instrucciones
se den en este manual. Todo otro trabajo deberfa
ser hecho per un t_cnico
especializado
NUNCA US_ su estufa para
entibiar o calentar una
habitacidn
SllE_PRE MAN1r_tttVlG._ los
revestimientos combustibles de fas paredes,
cortinas, patios para los plates, toatlas,
agarraderas y otras tefas a una distancia prudente
de ta estufa
NUP_CA CAL_E_#'i'E contenedores de alimentos
cerrados El aumento de la presidn puede causar
que el contenedor expfote y cause heridas,
NU_CA DEJE frascos o latas con grasa o
goteaduras sobre o cerca de fa estufa,
instrucciones importantes de seguriclad continuan
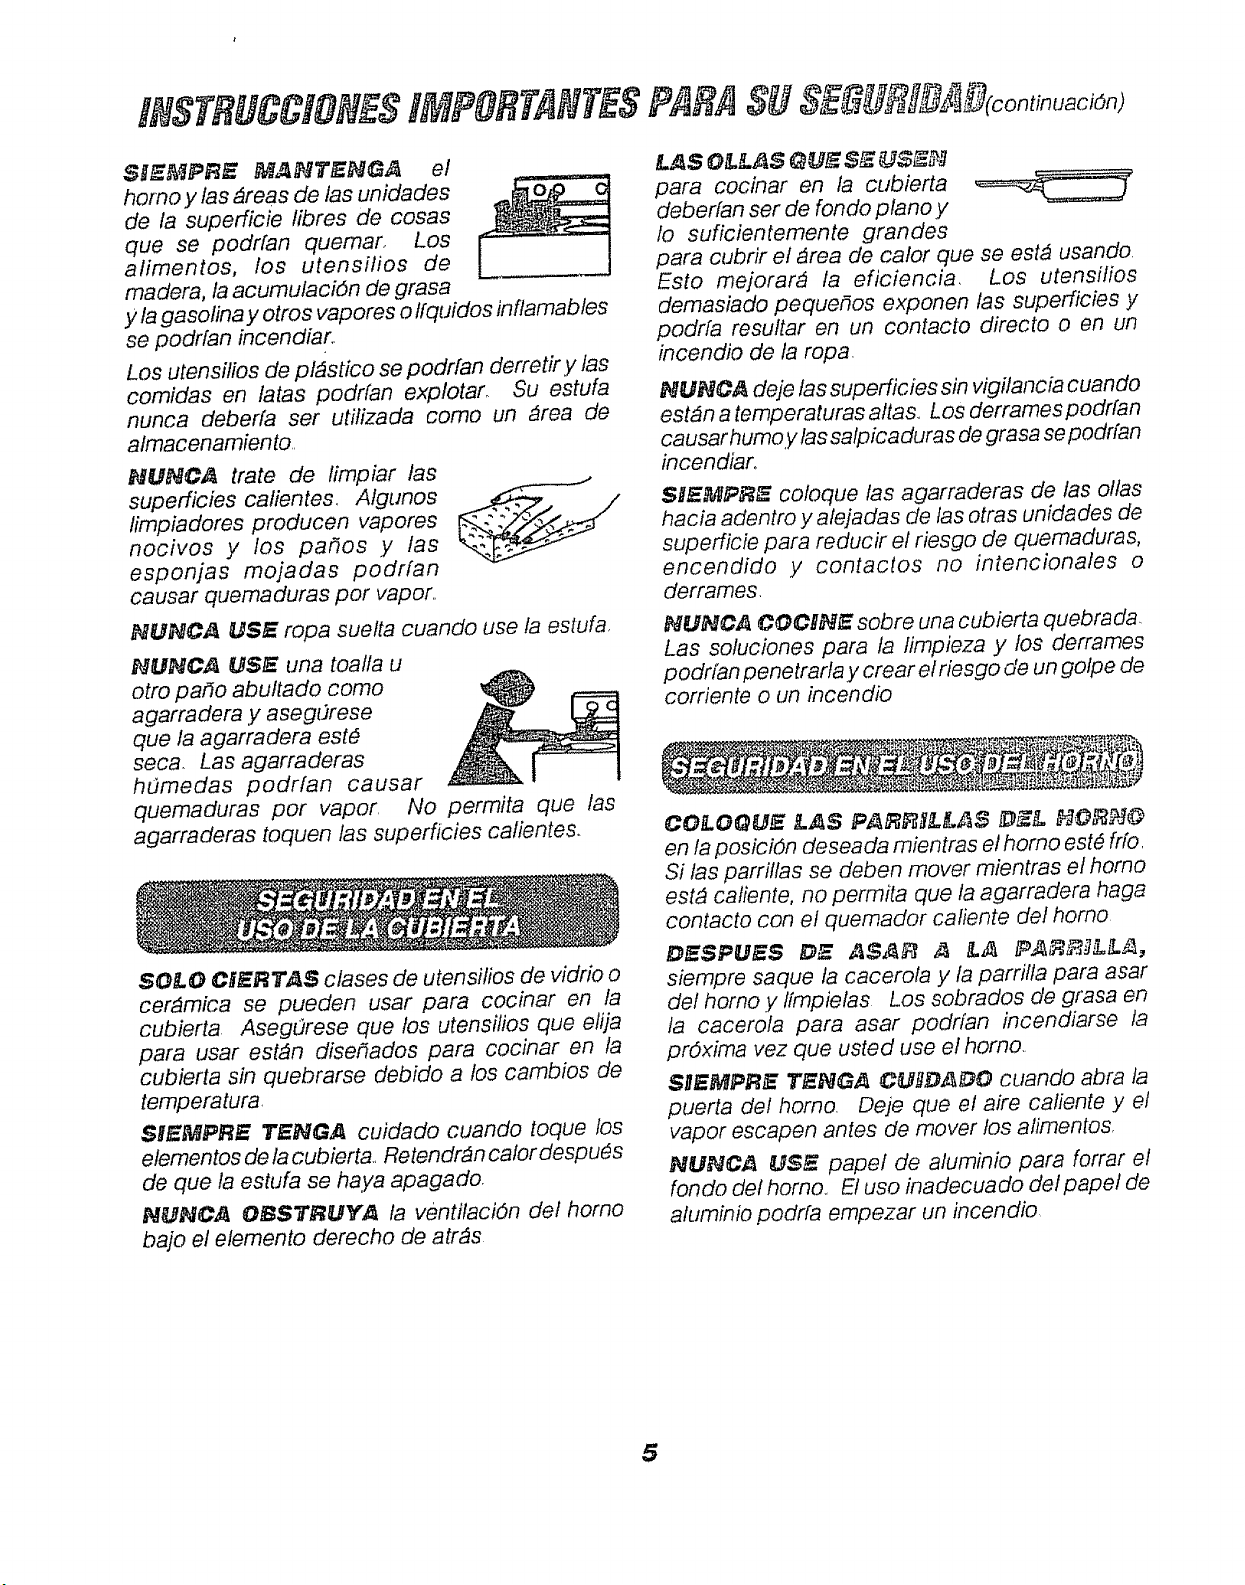
INSTRUCCIOH£$IMFORTAHTE$
$NEMPRF. _f#,_TE_G,_ el
homo y las areas de las unidades
de la superficie libres de cosas
que se podrfan quemar. Los
alimentos, los utensilios de
madera, la acumulacidn de grasa
y la gasolinay otros vapores o ffquidos inflamables
se podrfan incendiar..
Los utensilios de pl_stico se podrfan derretir y las
comidas en latas podrfan explotar. Su estufa
nunca deberfa set utilizada como un _rea de
almacenamiento.
HUNCA trate de Iimpiar las
superficies calientes. Algunos
Iimpiadores producen vapores
nocivos y los pa_os y las
esponjas mojadas podrfan
causar quemaduras pot vapor,.
NUt, CA USE: ropa suelta cuando use la estufa
HUt_CA USE una toalla u
otro par_o abultado como
agarradera y asegE_rese
que la agarradera est#
seca. Las agarraderas
hdmedas podrfan causar
quemaduras por vapor, No permita que tas
agarraderas toquen fas superficies calientes.
SOLO CHERT"AS clases de utensilios de vidrio o
ceramica se pueden usar para cocinar en la
cubierta Asegdrese que los utensilios que etija
para usar estbn disefiados para cocinar en la
cubierta sin quebrarse debido a los cambios de
temperatura
SHEMPRF. TENGA cuidado cuando toque los
elementos de la cubierta. Retendr_n cafor despues
de que la estufa se haya apagado.
NUNOA OBSTRUYA la ventilacidn del homo
bajo el elemento derecho de atr,_s
para cocinar en la cubierta
deberfan set de fondo plano y
Io suficientemente grandes
para cubrir el area de calor que se est# usando.
Esto mejorar_ la eficiencia, Los utensifios
demasiado pequet_os exponen las superficies y
podrfa resultar en un contacto directo o en un
incendio de/a ropa.
NUNCA deje fas superficies sin vigilancia cuando
est,1n a temperaturas arias. Los derrames podrfan
causar humo y fas salpicaduras de grasa se podffan
incendiar,.
S/IF.M_P.E cotoque las agarraderas de tas ollas
hacia adentro y atejadas de fas otras unidades de
superficie para reducir el riesgo de quemaduras,
encendido y contactos no intencionales o
derrames.
NUNCA COCNNE sobre una cubierta quebrada.
Las soluciones para ta fimpieza y los derrames
podrfan penetrarla y crear el riesgo de un gotpe de
corriente o un incendio
en la posicidn deseada mientras el homo est# fnb,
Si las parrillas se deben mover mientras el homo
est_ catiente, no permita que la agarradera haga
contacto con el quemador caliente def homo
siempre saque ta cacerofa y fa parri/fa para asar
def homo y Ifmpielas Los sobrados de grasa en
ta cacerola para asar podrfan incendiarse la
prdxima vez que usted use el homo..
SBEMPRE TENG_ C_#,#,#O cuando abra fa
puerta del homo, Deje que el aire caliente y et
vapor escapen antes de mover los atimentos
NUNC_ #$E papef de aluminio para forrar el
fondo def homo., El uso inadecuado del papet de
aluminio podrfa empezar un incendio
5
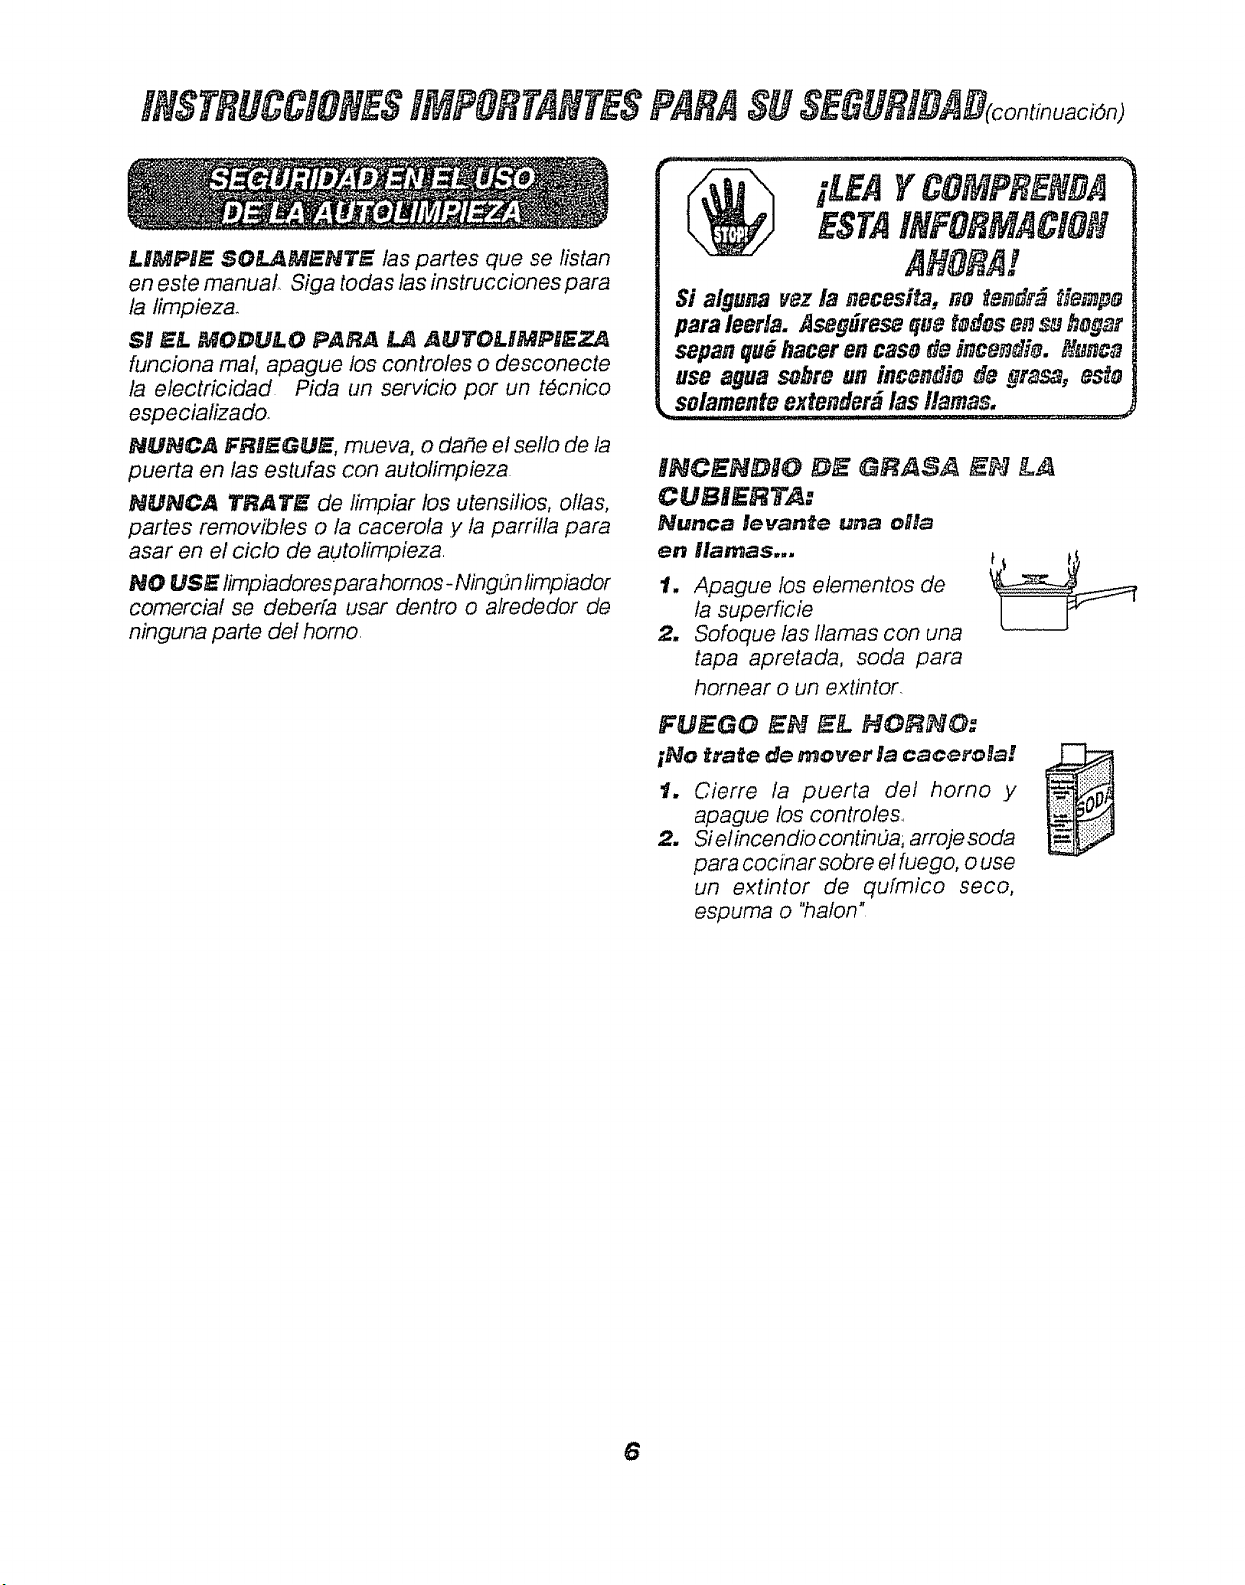
ILIMPRE SO_MENTE las partes que se listan
en este manual Siga todas las instrucciones para
la limpieza.
$fl EL MODULO PARA _ AUTOLNMPgE_
ffmciona mal, apague los controles o desconecte
la electricidad Pida un servicio pot un t_cnico
especializado.
NUNOA FRIEGUE, mueva, o dar_e el sello de la
puerta en las estufas con autolimpieza.
NUNCA TRA TE de limpiar los utensflios, olfas,
partes removibles o la cacerola y fa parrilta para
asar en el ciclo de autolimpieza.
NO USE limpiadores para hornos-Ningdn limpiador
comercial se deberfa usar dentro o alrededor de
ninguna parte del homo,
HNCF.ND/IO DE GRAS_ E_ L_t
CUBHERTA:
Nunca Bevan_e una oHRa
ere llamas,,.
1, Apague los elementos de _
fa superficie
2. Sofoque fas llamas con una
tapa apretada, soda para
hornear o un extintor.
FUEGO EH EL HOF_i#O:
;No _ra_e de mover la cacero_a[
2.
Cierre la puerta det homo y
apague los controfes,
Si efincendio continOa; arroje soda
para cocinar sobre el fuego, o use
un extintor de qufmico seco,
espuma o "hafon"
6

SU YU£VA
O
_p
No arrastre los utensilios sobre la cubierta
No use una toalla o esponja para pfatos para
limpiar la cubierta
No use polvos para fregar, o lanfllas de pf_tstico
o de metal sobre la cubierta
,, No aplique crema para limpiar la cubierta si la
supefficie est# calienteo
• Lea las instrucciones en la etiqueta de la bote!la
de crema para limpiar la cubierta antes de tratar
de limpiar la superficie de fa cubierta,
o Despu#s de limpiar la superficie de la cubierta,
aseg#rese de sacar todo el residuo de la crema
que podrfa quedar con una toalla de papel
secao
. Para derrames grandes, ponga la perilla de
control de la superficie en OFF (APAGADO);
use una toalfa de papel seca para fimpiar el
derrame, luego use un raspador a hoja (sujetado
con una agarradera) en un _ngulo de 30 grados
sobre la superficie para raspar el resto det
derrame de la zona para cocinar catiente.
o No cocine directamente sobre la superficie de!
vidrio.
0
No use la superficie como tabla para cortar
r
PRECAUCiOH:Ceandolos controles
_ e la superficie se apaguen, la luzlndicadora de Calor de la Superficie
permanecer_encendida hasta que la
superficie se haya enfriado hasta
aproximadamente150 gradosF. La superficie
de vidrio-cer_micaretendr_calor despu6sque
la luz indicadora se haya apagado. Ten.qa
cuidadohasta que la superficiedela cubierta
haya tenido tiempode enfriarse.
....................... : :1 i,illill,,
Para sacar el adhesivo que queda de la cinta de
empaque, use un detergente Ifquido normal para
platos, aceite minerat o para cocinar. Con un pa_o
suave frote el _rea y permita que se remoje,
Enjuaque y seque bien_ Repita el procedimiento
usando un pulidor para estufas para asegurarse
que el homo no se dane, Es_o ¢#ebe_'Sa hacerse
antes que n_ es_ufa se enc#e_:_a p_r
primera vez, La cinta no se puede s_c_r
una vez que e8hor_o ha s6_30caUe_:_,_o
La c_e_a adhes_va de e_paq_e
puede encontrar em #ss
s_'gu_en_es:
Super#ic_ede #a cu_;_eE*_
Man_a de _apuer_a
Area de_ pane_ de c_£re_
Area de_ hO_o
7
CARACT I$TtCA$
8
Antes de usar su nueva cubierta para
cocinar radiante, lfmpiela con Cooktop
Cleaning Creme. Esto dejar,_ una
capa protectora.
Las zonas para cocinar se muestran con un dibujo
sobre el vidrio. La serial cema de cada peri!la de
control le muestra cu_l zona radiante se enciende
con esa peri!la.
ZONAS PARA COCINAR O_
Si usted no sabe si sus utensilios
tienen fondo plane, haga esta
prueba, lnvierta fa ella sobre la
cubierta, cofoque una regfa
sobre la superficie de fa offa El
rondo de fa ofta y el fife de la regla deberfan
coincidir uno contra el otto a tray, s de lode el
largo, Haga girar fa regla 360 grades, revisando
mientras la da vuelta cuafquier espacio que podrfa
existir entre/as dos superficies
TRASERA
JZ U/ERo, @0 O@
FRENTE FRENTE
DERECHA
Use elias y woks que tengan fondo plane. El
tamafio de los utensflios debedan ser del mismo
tama#o que la zona que se estb usando para
cocinar
Acero _#o=Bdab_e: Altamente recomendado
para uso con su nueva cubierta para cocinar.
Especialmente bueno con un rondo de tipo doble,
AtuminHo: Se recomienda los utensilios de
aluminio pesado,
H_erro forja¢_o: Tiene un eficiencia pobre .y
podrfa rayar la superficie de fa cubierta
Fondo de cobre: Tiene buena eficiencia, pero
podrfa dejar un residue sobre fa superficie de la
cubierta
Uftens_8ios de v_r_o.cerbr_ca y _edr_:
Podrian rayar la superficie de ta cubierta
FONDO DE _ LAS OLLAS
LA OLLA ---__ . DEBERIANTENER
FONDO PLANO
TAMA_!O DE LA ZONA PARA
COCINAR
Cuando fas peri/fas est#n encendidas, los espirales
bajo e! vidrio irradian calor a trav#s del vidrio hacia
el utensilio para cocinar Tomar# varies minutes
para que los espirales se catienten, a medida que
lo hacen se puede ver una irradiacidn roja sobre fa
superficie de fa cubierta para cocinar
9 cr_mo cocinaf en una cubierta irradiante continua
continuacidn
Los limitadores de temperatura de las zonas para
cocinar pmveen una protecci6n para su nurva
cubierta, Los limitadores encender_n y apagar_n
los espirales irradiantes mientras cocine o haga
conservas., Este procedimiento ayuda a mantener
una temperatura constante sin permitir que fas
zonas para cocinar se sebrecalienten,
Se pueden hacer conservas a bar_o marfa o con
oflas a presidn, o con ollas de di_metro grande que
se extiendan m,ts de 1" de ta orifla def quemador,
Esto se puede hacer porque ta temperatura que se
necesita para hervir el agua no da_ia tas superficies
que rodean a los quemadores .._ne_a_lO_ no
use utensilios o _reBdoras _. di_me_ro
grande para o_ro prop6sE_o Rue _o se_
hervir agua.
HI
Se usa para comienzos r_pidos, tal
como para hervir agua,
MED
Se usa para hervir y frefr,
l.O
Se usa para comidas al vapor o
para mantener los alimentos a
temperaturas para ser servidos
t. Empuje para hacer girar
la perilla,
2_
Coloque entre las
mamas para el cafor
deseado
_EO
1. Asegurese que la otla est_ centrada sobre el
quemador,
2. Asegurese que la otla sea de rondo ptano,
3. Use recetas y procedimientos de buenas
fuentes. Estas se encuentran disponibles de
fabricantes tales como Ball and Kerr y el
Servicio de Extensi6n del Departamento de
Agncultura,
4. Tenga cuidado cuandohaga conservas, para
prevenir quemaduras a causa de vapor o
calor
I0
!ILC!
HOUR MIN.
HOUR
@
OVEN
ON
0
LOCI(
('9
©
PRE-
HF-_TED
Su nuevo control es simple, fbcil de entender y fe permite programar las siguientes operaciones
El botdn con fas flechas para SUBfR o BAJAR Las
HORAS le permite seleccionar la hora exacta que
necesita
El dial en el centro de su control mostrar_;
1. El re/o] para la hora del dfa.
2, La cantidad de tiempo que ha sefeccionado
cuando use el crondmetro.
Cuando fa corriente se prende por primera vez en
su estufa, el dial har9 pesta#ear "PF". Apretando
el Botdn de Refoj el dial cambiarb a "12. 00", el cuaf
pesta4ear_. Empuje el Bot6n def Reloj nuevamente
.y usted estarb lista para poner el Refoj.
El COdigo "PF" tambi#n ocurrirb cuando haya un
corte de corriente. Cuando la electricidad vuelva,
ef Refoj y et Cron6metro, si usted tos ha programado
antes del corte de corriente, tendrbn que ser
programados nuevamente.
Su control tiene luces indicadoras individuafes
que le mostrar#n las funciones que usted ha
seleccionado.
A medida que usted lea su manual encontrar# el
propdsito de cada uno de estos indicadores y
cdmo le ayudar_n a entender su nuevo control.
Si el control hace pestafiear una "F'seguida
de un ndmero y un tono continuo, existe un
error en el cddigo de la funcidn. Tome nota del
ndmero despu#s de la "F'. Ponga la perilla
del control del homo eh la posicidn de apagado
OFF y empuje el botdn TNMER O_/OFF y et
botdn del CLOCK Permita que el homo se
enfrfe por 1 hora y trate nuevamente fa
operacidn del homo. Si el problema se repite
llame para un servicio. Dfagale al t#cnico qu#
cddigo estaba pestafieando
Si usted prefiere no ver ta hora def dfa en el dial,
su nuevo control te ofrece fa caracterfstica especial
de poner el dial en bfanco, o de no mostrar nada
en el dial
Para activar esta funcidn
Si la hora del dfa se muestra en el dial, empuje et
boron del retoj dos veces.
Para activar nuevamente el dial del Reloj, ernpuje
el boron del reloj dos veces
Como medida de precauckln este homo se
apagar_ autom_ticamente si se deja prendido pot
mbs de 12 horas
11
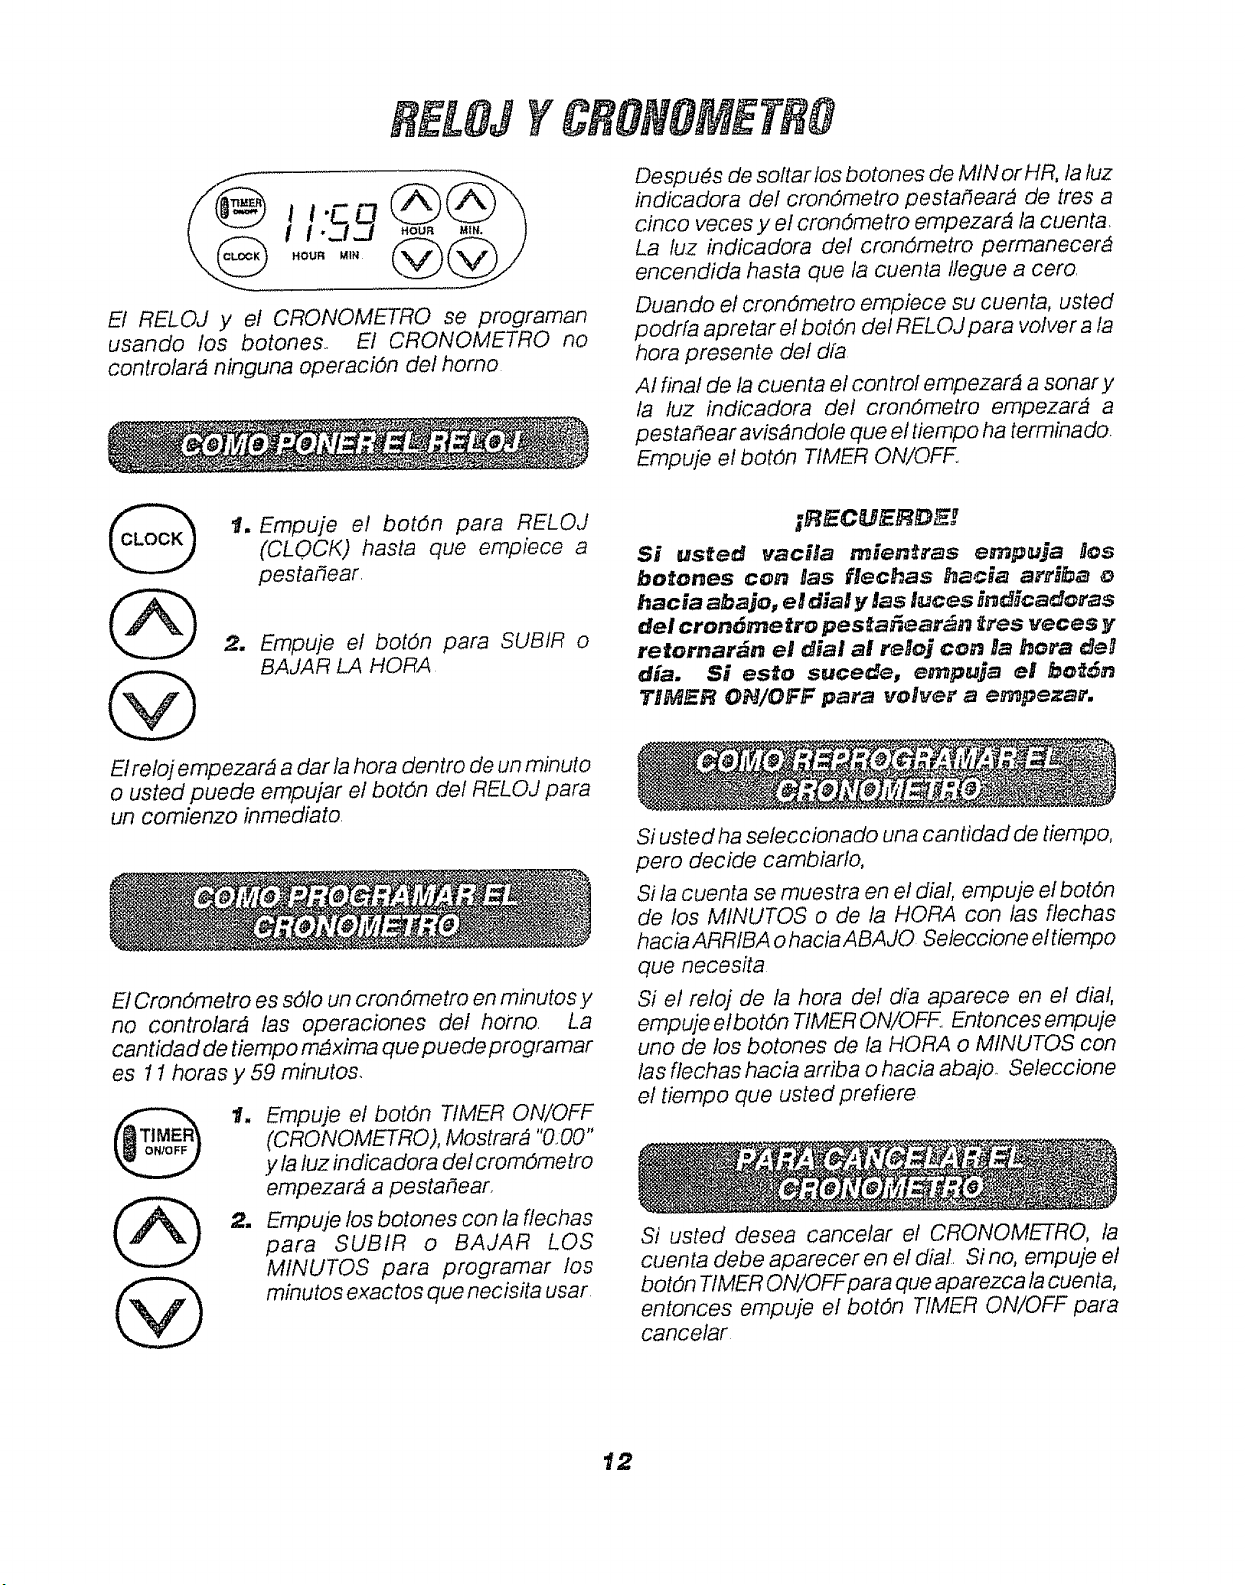
RELOJYCRONOM RO
El RELOJ y el CRONOMETRO se programan
usando los botones.. El CRONOMETRO no
controlar_ ninguna operaci6n del homo
Despu_s de sottar tos botones de MtN or HR, ta luz
indicadora def crondmetro pestar_ear9 de tres a
cinco veces y el crondmetro empezar_ la cuenta
La tuz incficadora def crondmetro permanecerb
encendida hasta que la cuenta tfegue a cero.
Duando el crondmetro empiece su cuenta, usted
podrfa apretar el botdn del RELOJ para volver a ta
hora presente def dfa
A! final de ta cuenta el control empezarb a sonar y
la tuz indicadora def cron6metro empezar,_ a
pestar_ear avis,lndofe que et tiempo ha terminado.
Empuje el botOn TIMER ON/OFF.
i/, Empuje el botOn para RELOJ
(CLOCK) hasta que empiece a
pestafiear.
2, Empuje e! botOn para SUBfR o
BAJAR LA HORA
;RECUERDE_=
Si usted vacHa rnien_ras e_puja Ros
botones con Bas flechas hacia arriba o
hacia abajo, e! dia! y !as !uces _nd_cadoras
del cron6rnetro pes,a_ear_n _res veces y
retornar_n el dial al re!oj con n3 hora deB
dia. Si esfto sucede, empuja el bo_n
TIIMER ON/OFF para voiver a empezar.
EI reloj empezarb a dar la hora den fro de un minuto
ousted puede empujar el botOn del RELOJ para
un comienzo inmediato
El CronOmetro es solo un crondmetro en minutos y
no controlar,_ las operaciones del homo. La
cantidad de tiempo m,_xima que puede programar
es 11 horas y 59 minutos,
1. Empuje el botOn TIMER ON/OFF
(CRO NOMETRO ), Mostrar# "000"
.yla luz indicadora del cromOmetro
empezar# a pestaY_ear,
2. Empuje los botones con ta flechas
para SUBIR o BAJAR LOS
MINUTOS para pmgramar los
minutos exactos que necisita usar
Si usted ha sefeccionado una cantidad de tiempo,
pero decide cambiarfo,
Si ta cuenta se muestra en el dial, empuje el botOn
de los MfNUTOS o de ta HORA con las ftechas
hacia ARRtBA o hacia ABAJO Sefeccione ef tiempo
que necesita
Si el refoj de la hora del dfa aparece en el dial,
empuje el botOn TIMER ON/OFF. Entonces empuje
uno de los botones de fa HORA o MfNUTOS con
tas flechas hacia arriba o hacia abajo Seleccione
el tiempo que usted prefiere
Si usted desea cancetar el CRONOMETRO, la
cuenta debe aparecer en el dial. Si no, empuje et
botOn TIMER ON/OFFpara que aparezca la cuenta,
entonces empuje el botdn TIMER ON/OFF pafa
cancelar
t2

P+Pd
Es normal sentir un poco de olor cuando use su
homo por primera vez Esto es causado por el
calentamiento de las partes nuevas y del aislante,.
Para ayudar a eliminar este olor, venft_Se 8a
habS_aci6¢_ abr#e##o r_na ven_a#a o
usar#d# ur,Ja car_par_a #_ vea_#aci6a.
En la parte trasera det horno
usted notar# un peque#o
tubo. Esto es un sensor de
ca/or que mantiene la
temperatura del homo,
Nunca mueva o doble este
tubo
SENSOR DE
TE_PEFIATIJRA DEL
HORNO
IMPORTAN't'E: Nunca
cubra el rondo del homo o
la parrilla de! homo con
papel de aluminio El uso
inadecuado puede causar
una mala circulacidn del
calor, pobres resultados al
homear, y podrfa da_iar el
acabado del homo
Si abre la puerta para mirar los alimentos causar#
una p_rdida de cafor, La perdida de calor causar_
malos resultados cuando homee, Use la luz del
homo para rew_ar los alimentos mientras se
homean
La ventilaci6n del homo est_ ubicada
inmediatamente sobre ta puerta, Esta ¢drea se
podrfa calentar mucho durante el uso de! homo,
La ventilacidn es importante para la correcta
circulaci6n del aire _unca obstruya Ha
ver_gBaci_r_.
Durante cualquier operaci6n del horno usted podda
ofr un ruido de ventifador, Esto es el ventitador
intemo para enfriar y prevenir que todas fas partes
el#ctricas se recatienten No es poco comun que
et ventilador siga corriendo incluso despu#s que
e! homo se haya apagado
UBtCA ClON DE
LA
VENTILACION
DEL HORNO
Permita que el homo se precaliente bien cuando las
recetas requieren precalentamiento. El
precalentamiento es subir la temperatura a la
temperatura que va a usar cuando hornee. Cuando
el homo llegue a la temperatura de precalentamiento,
sonar_ un tono. Tenga los alimentos a fa mano y
listos para ponerlos en el homo,.
"U3 consejos para cocinar en el homo continoan
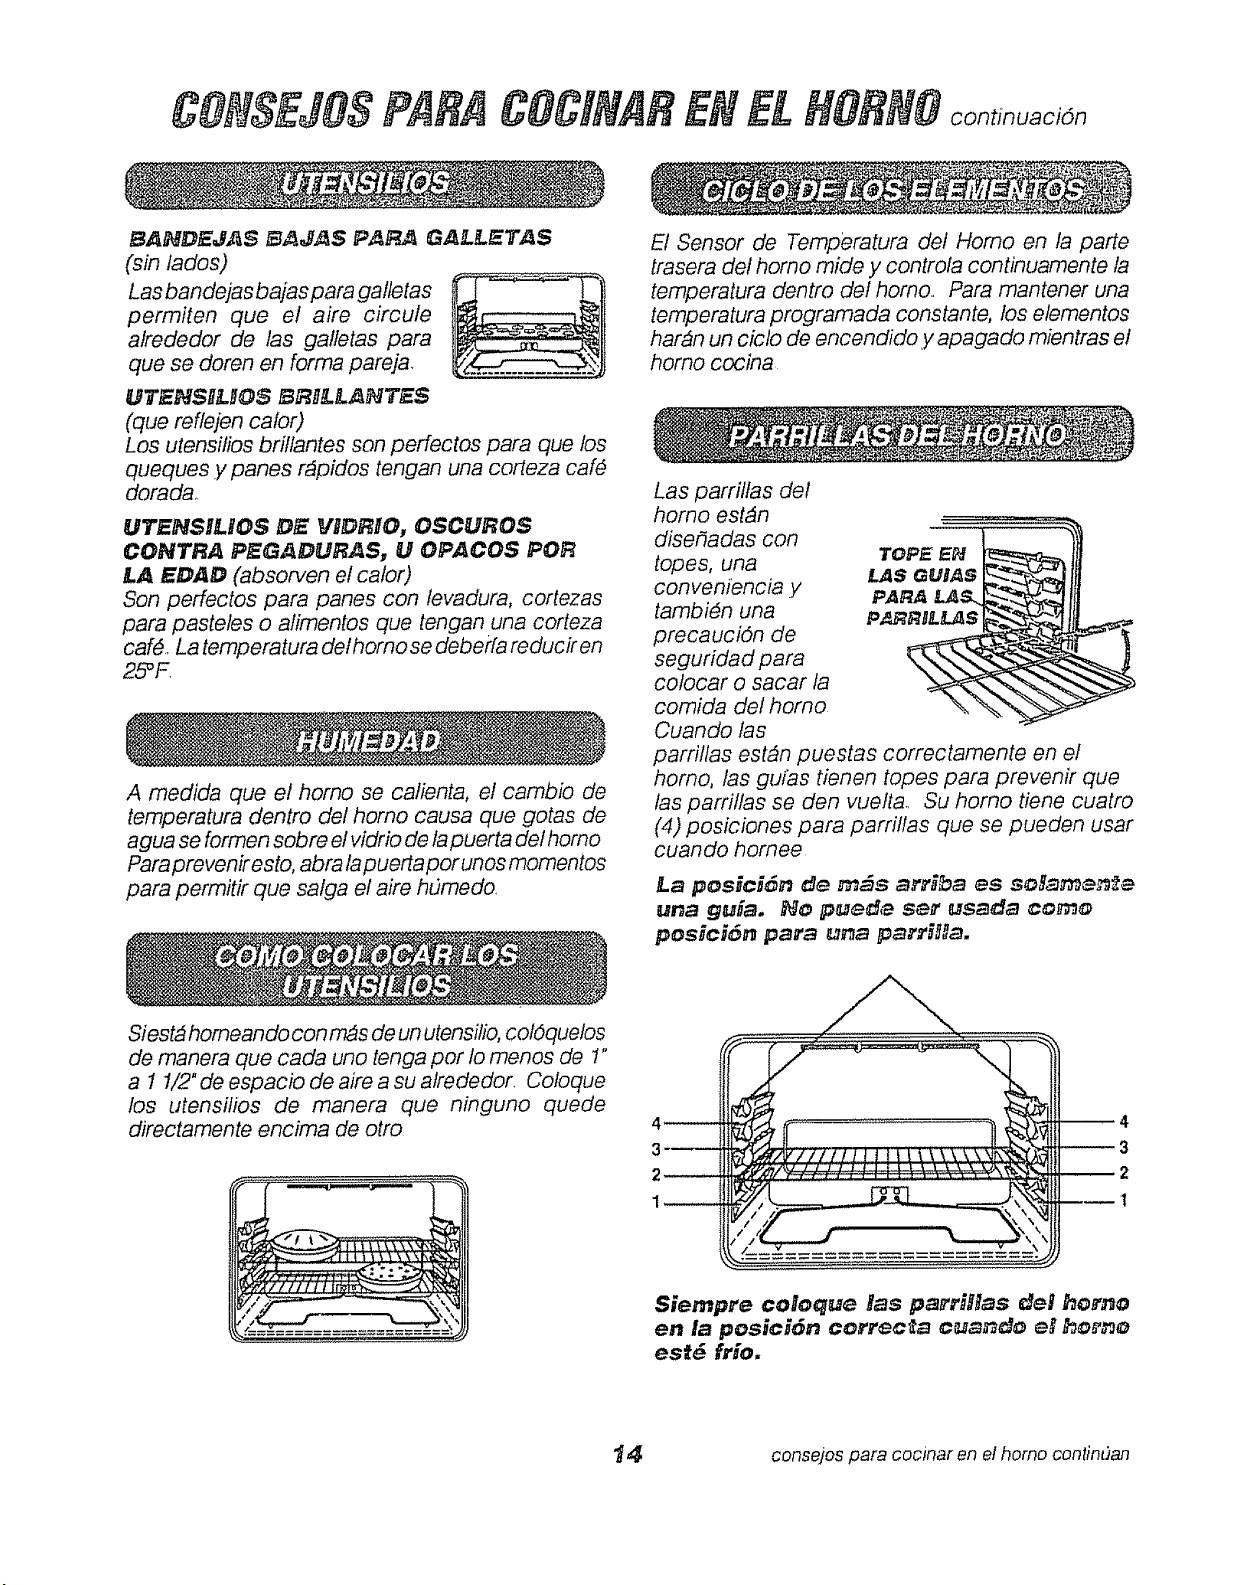
#OHSEJO$PARA
EL
continuacidn
BANDE&_S EJAJAS P,_ GALLETA$
Las bandejas bajas para galletas
permiten que el aire circule
alrededor de las galletas para
que se doren en forma pareja.
UTENSnLHOS _RULLANTES
(que reflejen calor)
Los utensilios brillantes son perfectos para que los
queques y panes rbpidos tengan una corteza caf_
dorada.
UTENSHLNOS DE WDRIO, OSCUROS
CONTRA PEGADURAS, U OPACOS POR
LA EDAD (absorven el cafor)
Son perfectos para panes con fevadura, cortezas
para pasteles o alimentos que tengan una corteza
caf_. La temperatura del horno se debeff a reduc ir en
25_F.
A medida que el homo se calienta, el cambio de
temperatura dentro det homo causa que gotas de
agua se formen sobre el vidrio de la puerta def homo
Para prevenir esto, abra la puerta por unos momentos
para permitir que salga el aire hdmedo
Et Sensor de Temperatura det Homo en fa parte
trasera del homo mide y controfa continuamente la
temperatura dentro def homo.. Para mantener una
temperatura programada constante, los elementos
har,_n un ciclo de encendido y apagado mientras e!
homo cocina
Las parrilfas del
homo estbn m
dise_adas con
topes, una
conveniencia y
tambi_n una
precaucid>n de
seguridad para __-
colocar o sacar la "
comida del homo
Cuando fas
parrillas estbn puestas correctamente en el
homo, las gufas tienen topes para prevenir que
fas parrilfas se den vuefta. Su homo tiene cuatro
(4) posiciones para parrilfas que se pueden usar
cuando homee
La posici6n de _'_s _'rlba es se_am_:_:
una guia. Ho pued,_ set usada ¢o_
posici6n para urea parriBHa.
Siest_ horneando con rn_s de un utensilio, cofdquelos
de manera que cada uno tenga por fo menos de 1"
a 1 1/2"de espacio de aire a su afrededor_ Cofoque
los utensilios de manera que ninguno quede
directamente encima de otro
Siempre coloque las parri_las de_ _orno
en la posicidn c_rr_c*B cu_r_do _ _o_r_o
es_ frio.
_ 4 consejos para cocinar en el homo continOan

Usted podrfa pensar que su homo nuevo cocina
diferentemente al homo que reemplaz5, Le
recomendamos que use su homo nuevo por varias
semanas para que se familiarice m#s con _1,
siguiendo los tiempos que se dan en la receta
como una gufao Vea la secci6n Ajustes de
Temperatura-Hbgalos Usted Mismo en fa seccidn
para hornear de este manual si cree que el homo
est_ demasiado caliente o demasiado fifo para su
preferencia cuando cocine,
o Lu,z #r_4_ca#ora ¢_e
FrecaHer_fta_r, e6er_#_ se prende y
permanece encendida cuando el homo haya
alcanzado fa temperatura seteccionada
o La Ou2. que Hr_Hca q_ _n H_'_ es[f_
encer_cHdo (Ov_ 0_)_ se prende y
permanece encendida cuando la funci6n de
homear, asar, o timpiar ha sido seleccionada
* La Uur. del! cerro_o _ Ha pu_r*a _L_c_
Door}-- se prende para la autolimpieza. Si la
luz del C,ERROJO DE £,_ PUEP,7"_ pestafiea,
revise uno de fo siguiente:
_m
2.
La manilfa delcerrojo est_ cerrada durante ta
funcidn de homear;
La manilla del cerrojo no estb cerrada durante
fa funcfon de autofimpieza
Su nueva estufa viene equipada con una manilfa
que puede ocultarse debajo de fa cubierta
cuando no se encuentra en posiciSn cerrada
ManiHa para cerrar/a_Hr e# seguro
de _a puer_a de_ #orno.
OVEN
ON
©
o
©
PRE.
HEATED
2.
3.
D# vuefta ta peri!la OVE_ CO#_TRGL a la
temperatura deseada de tibio WM hasta 550_F
La luz indicadora HOFJ_O E_CE_B#D©
(OVE_ 0t_) se encenderb.
Cuando et horno haya atcanzado ta temperatura
seleccionada las luces "PP.EHEZ_3"E_" _'
"OVEN GF_" se encenderbn Ponga la comida
en el homo
4. Las luces indicadoras de "PREHE,_ TED" y
"0 VEN O_t" permanecer#n encendidas hasta
que el horneado haya terminado y ta perilla de
control se haya puesto en fa posici5n de
apagado [OFF_
Es posible que durante ta funcidn de homear
escuche un son!do de click, Esto es normal, Los
elementos catentadores del homo se prenden y
se apagan para mantener la termperatura
deseada,
El contro! de su homo tiene una perifla para
seteccionar Homear, Asar o Limpiar, Haytambi#n
tres luces indicadoras:
115
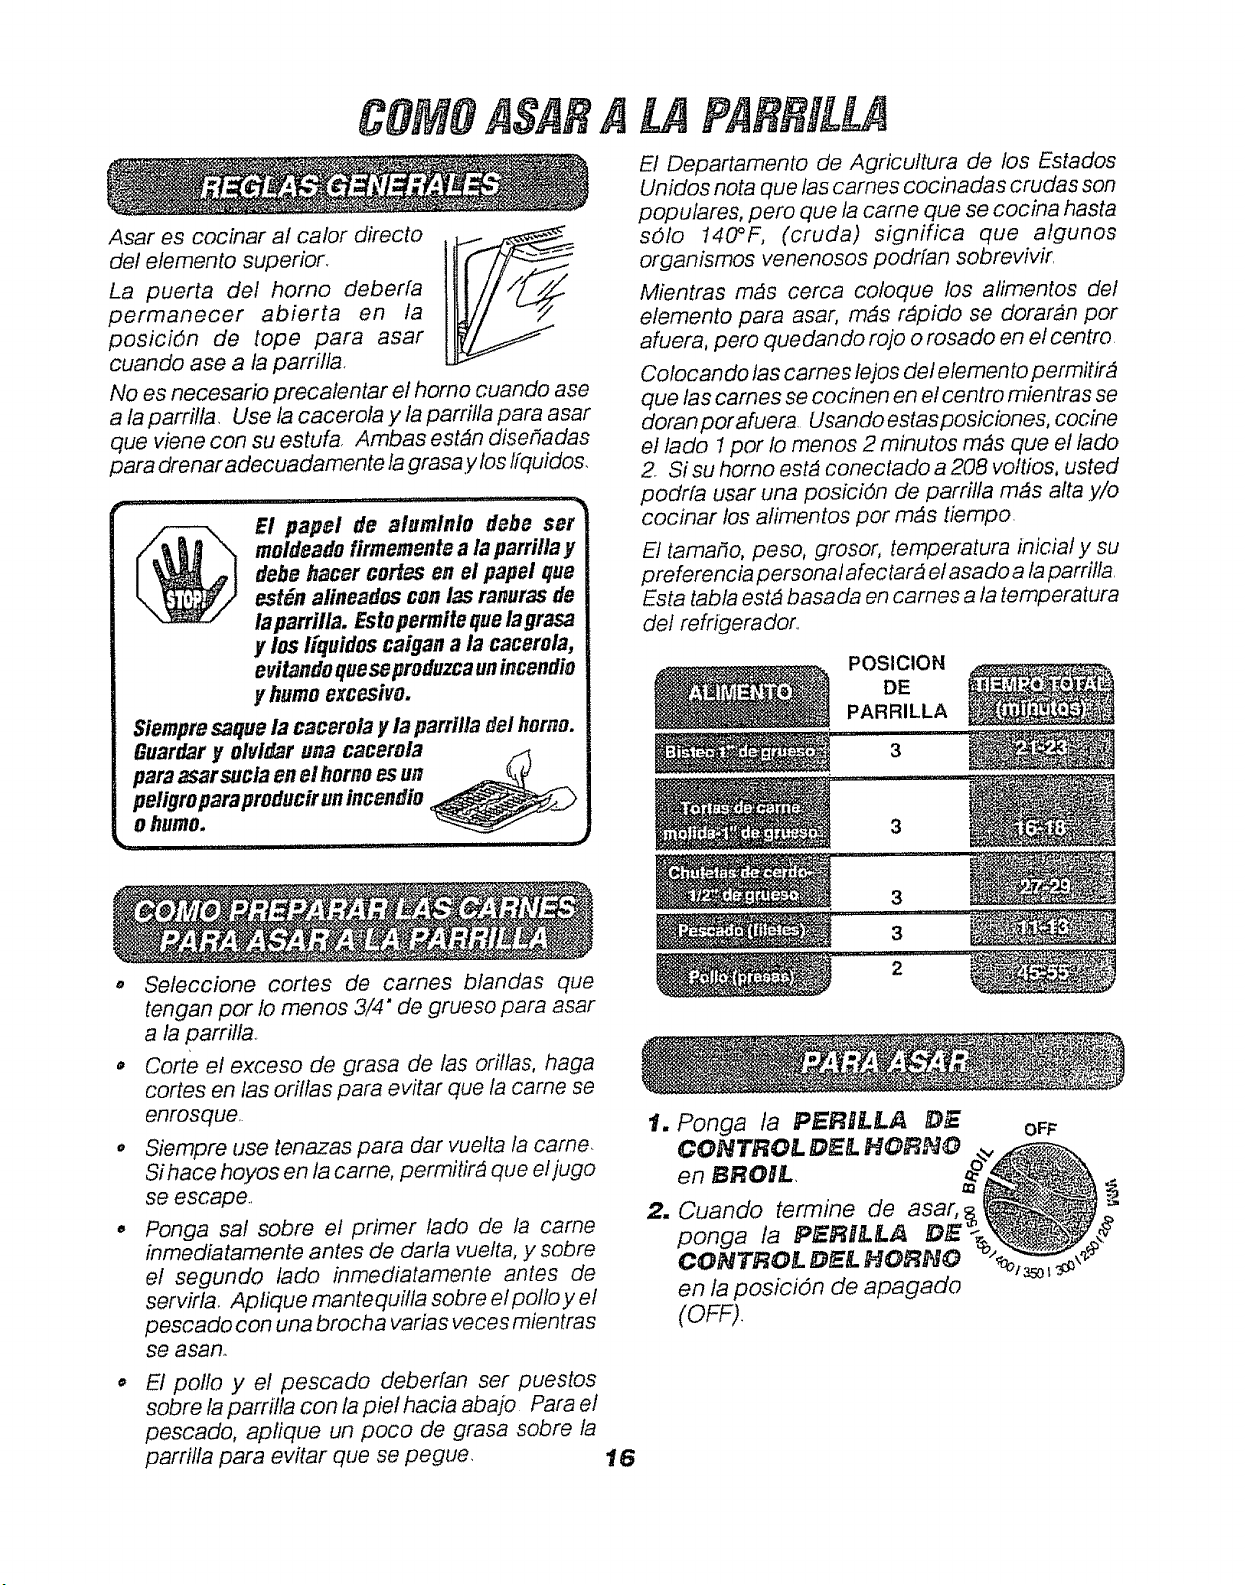
ASARA
Asar es cocinar al calor directo
del elemento superior.
La puerta del homo deberfa
permanecer abierta en la
posicidn de tope para asar
cuando ase a la parrilla,
No es necesario precalentar el homo cuando ase
a la parrilla Use la cacerola y la parrifla para asar
que viene con su estufa Ambas estbn dise#adas
para drenar adecuadamente lagrasa y los lfquidos.,
El papel de alumlMo debe ser
moldeado firmemeMe a la parrilla y
debe hater cortes en el papel que
est6n alineados con las ranuras de
laparrilla. Estoperm#e que la grasa
y los Ifquidos caigan a la rCaCerola,
evitando queseproduzca un incendio
y hgmo exc_sivo.
Siempre saque la cacerola y la parriila del homo.
Guardar y olvldar una cacerola
para z_sarsucla en el homo es un
peligro para producir un incendio
o hurao.
PARRILL
El Departamento de Agricultura de los Estados
Unidos nota que fas cames cocinadas crudas son
populates, pero que ta came que se cocina hasta
sdlo 140°I, (cruda) significa que algunos
organismos venenosos podrfan sobrevivir
Mientras m_s cerca coloque los alimentos det
elemento para asar, m_s r_pido se dorar_n por
afuera, pero quedando rojo o rosado en el centro
Colocando las cames lejos del elemento permitirb
que las carnes se cocinen en el centro mientras se
doran por afuera, Usando estas posiciones, cocine
el fado 1por Io menos 2 minutos mbs que et fado
2, Si su homo estb conectado a 208 voltios, usted
podrfa usar una posicidn de parrifla mbs alta y/o
cocinar los alimentos pot m#s tiempo,
El tamaY_o, peso, grosor, temperatura iniciat y su
preferencia personal afectarb el asado a la parritla,
Esta tabfa est,t basada en cames a ta temperatura
de! refrigerador,
POSIClON
DE
PARRILLA
,, Seleccione cortes de carnes blandas que
tengan por Io menos 3/4" de grueso para asar
a la parrilla.
• Corte el exceso de grasa de las oritfas, haga
cortes en las orillas para evitar que la came se
enrosque.
Siempre use tenazas para dar vuelta la came_
Sihace hoyos en la came, permitir_ que el jugo
se escape.,
Ponga sal sobre el primer lado de la came
inmediatamente antes de darla vuefta, y sobre
el segundo lado inmediatamente antes de
servirla. Aplique mantequilla sobre el pollo y el
pescado con una brocha varias veces mientras
se asan.
El polio y el pescado deberfan ser puestos
sobre la parrilla con la piel hacia abajo Para el
pescado, aplique un poco de grasa sobre la
parrilla para evitar que se pegue,
2.
16
3
3
Ponga la PERaLLA DE
CONTROL DF.L HGRNO
en BROSL,
Cuando termine de asar
ponga la PERH-LA
CONTROL DEL HORt_O
en la posicJdn de apagado
(OFF).
OFF
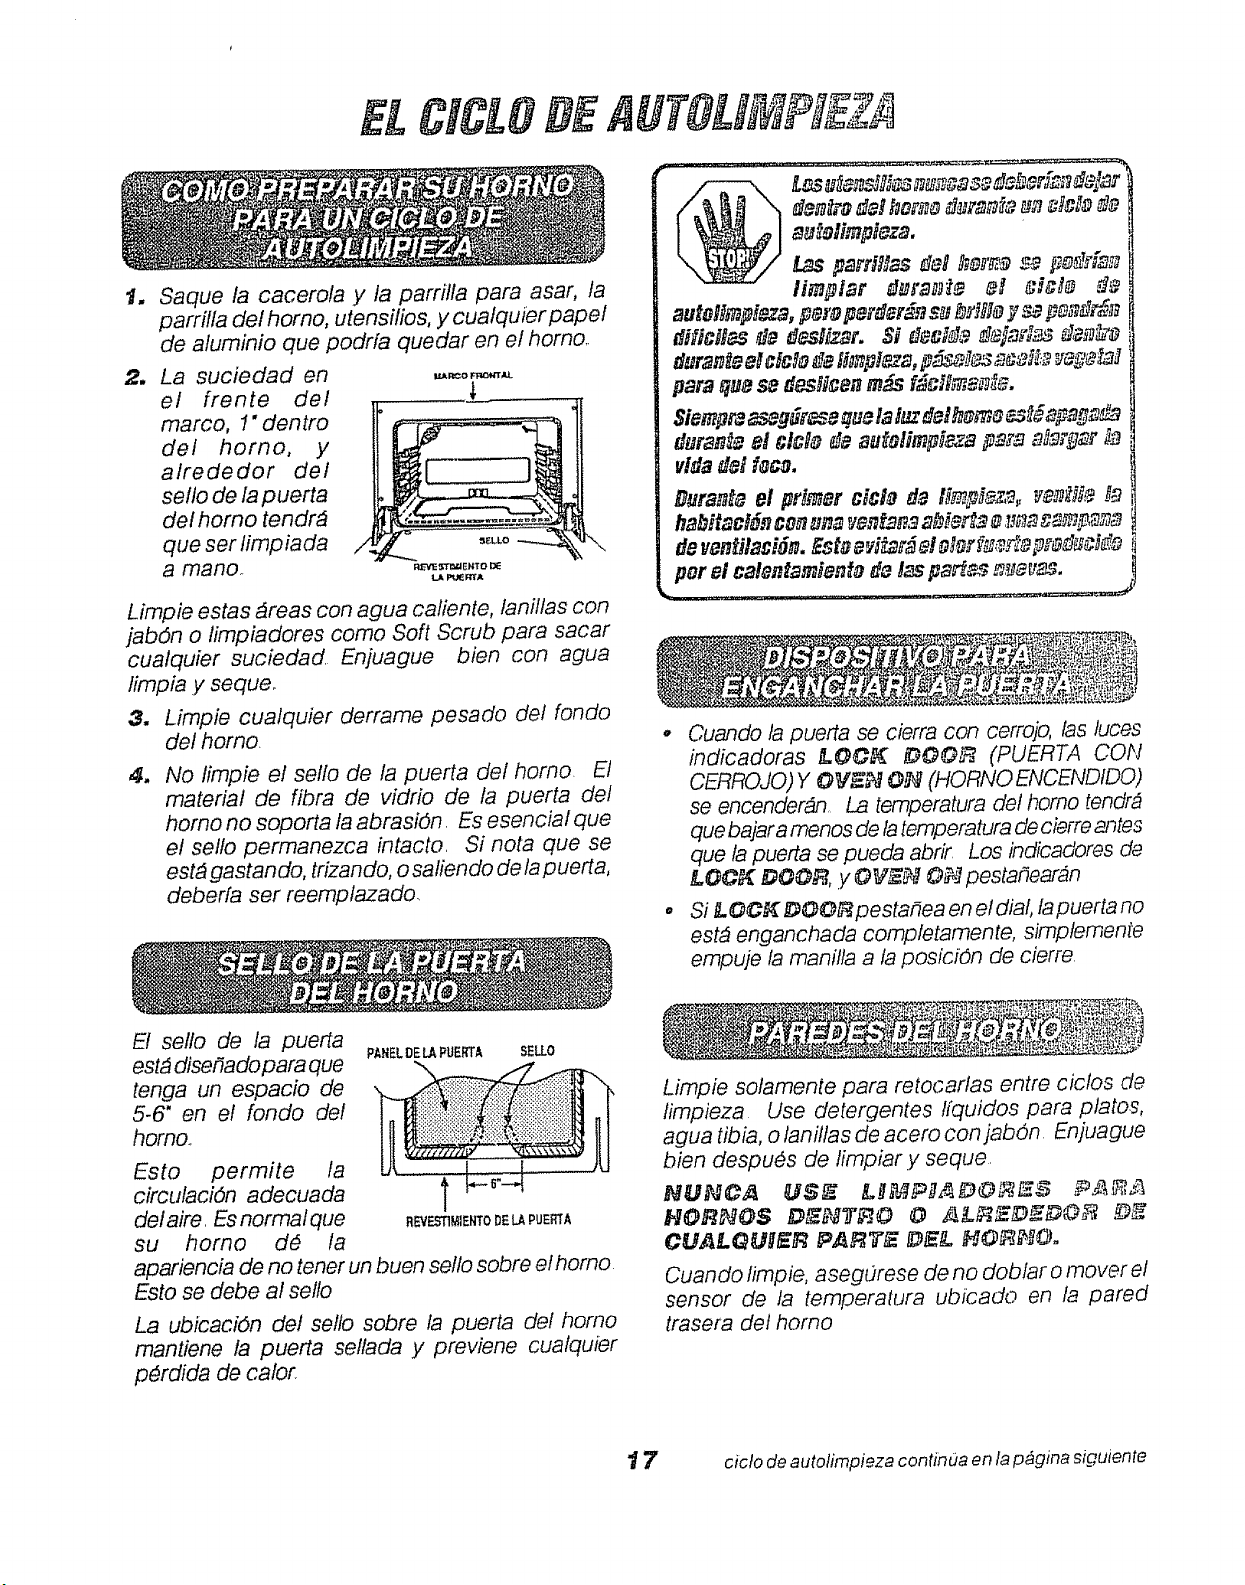
ELCICL0 DEA
t. Saque la cacerola y la parrilla para asar, fa
parrilla del homo, utensilios, y cualquier papel
de aluminio que podrfa quedar en el homo,.
2.. La suciedad en
el frente del
marco, 1" dentro
del homo,
alrededor d_
seflo de la puerta
del homo tendr_
que ser limpiada
a mano_
R£:V_b'TT_EHTO L_
]J_ Pf_ _ A
\
Limpie estas breas con agua caliente, laniltas con
jab6n o limpiadores como Soft Scrub para sacar
cualquier suciedad Enjuague bien con agua
limpia y sequeo
3. Limpie cualquier derrame pesado del fondo
del horno.
4. No limpie el sello de ta puerta del homo. Et
material de fibra de vidrio de la puerta del
homo no soporta la abrasidn, Es esencial que
el sello permanezca intacto, Si nota que se
estb gastando, trizando, o saliendo de la puerta,
deberfa set reemptazado.
o Cuando ta puerta se cierra con cerrojo, /as tuces
indicadoras _._C_ DO_ (PUERTA CON
CERROJO) Y _V_ _ (HORNO ENCENDfDO)
se encenderbn La temperatura det homo tendrb
que bajar a menos de fa temperatura de cierre antes
que fa puerta se pueda abrir Los indicadores de
LOC_ D_,,, .y _V_ _I pesta_earan
o Si _._DOO_pesta_ea en eldial, fapuertano
estb enganchada completamente, simpfemente
empuje la manitta a ta posici_n de cierre
El sello de la puerta
estb dise_fado para que
tenga un espacio de
5-6" en el rondo del
homo.
Esto permite fa
circulacidn adecuada l
delaire, Esnormalque _'n_E,TO _L_ PU_T_
SU homo d_ la
apariencia de no tener un buen sello sobre el homo
Esto se debe al selfo
La ubicacidn del selfo sobre la puerta del homo
mantiene la puerta sellada y previene cuafquier
p_rdida de calor.
Limpie sotamente para retocarlas entre ciclos de
limpieza Use detergentes ffquidos para ptatos,
agua tibia, o ianiltas de acero con jabdm Enjuague
bien despu_s de limpiar y seque,
Cuando limpie, asegurese de no doblar o mover el
sensor de /a temperatura ubJcado en la pared
trasefa det homo
17 cicto de autolimpieza contin(Ja en la pggina siguiente
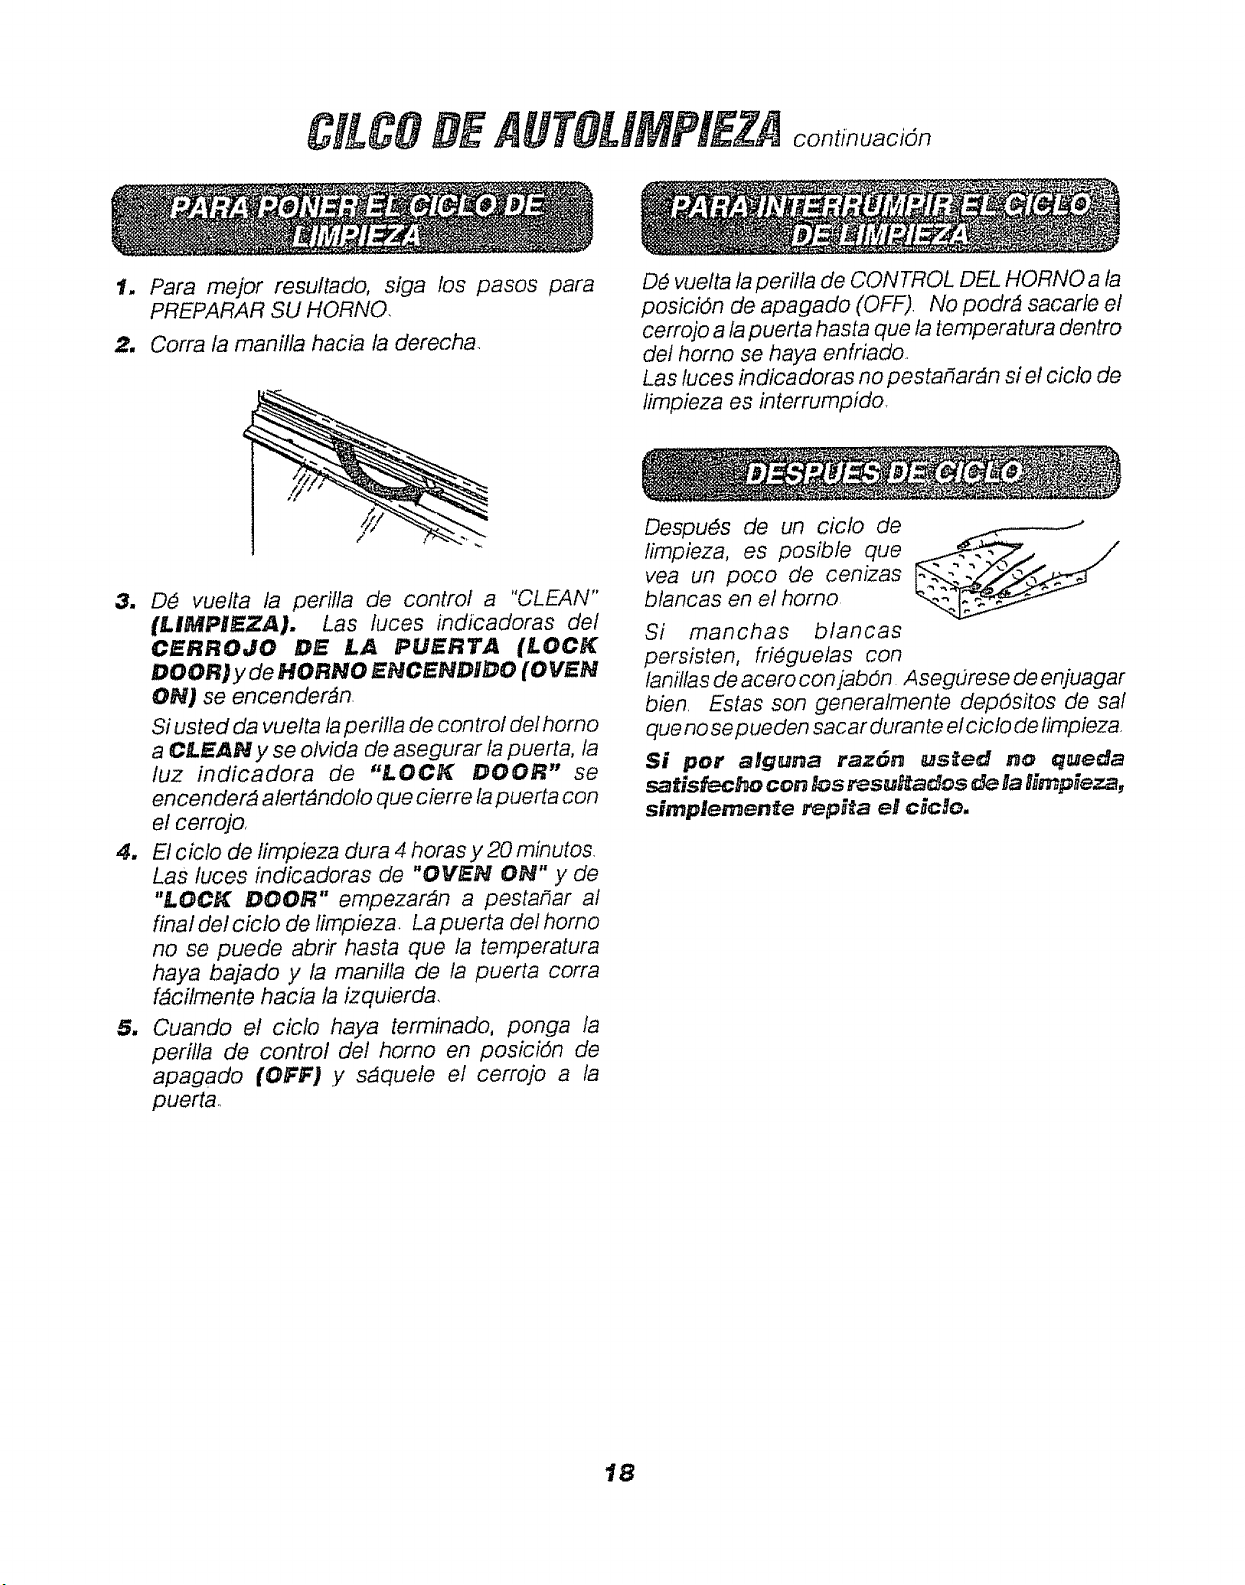
continuacidn
1. Para mejor resultado, siga los pasos para
PREPARAR SU HORNO.
2. Corra la manilla hacia fa derecha.
D_ vuetta ta perilla de CONTROL DEL HORNO a fa
posicidn de apagado (OFF). No podr_ sacarle el
cerrojo a fa puerta hasta que ta temperatura dentro
del homo se haya enfriado.
Las luces indicadoras no pestadargn si el ciclo de
fimpieza es interrumpido.
3. D_ vue/ta /a perilla de control a "CLEAN"
(LIMPIIEZA). Las luces indicadoras del
CERROJO DE LA PUERTA (LOCK
DOOR) y de HORNO ENCENDIDO (OVEN
ON) se encender_n
Si usted da vuelta ta perilla de control del homo
a CLEANy se olvida de asegurar fa puerta, fa
luz indicadora de "LOCK DOOR" se
encenderb alertbndolo que cierre la puerta con
el cerrojo,
4. El ciclo de limpieza dura 4 horas y 20 minutos
Las luces indicadoras de "OVEN ON" y de
"LOCK DOOR" empezarbn a pesta_ar al
final del ciclo de limpieza La puerta del homo
no se puede abrir hasta que la temperatura
haya bajado y la manilla de ta lauerta corra
f_cilmente hacia la izquierda,
5. Cuando el ciclo haya terminado, ponga ta
perilla de control del homo en posicidn de
apagado (OFF)y s_quele el cerrojo a ta
puerta,,
Despu_s de un cic!o de
limpieza, es posibfe que ..
vea un poco de cenizas "." ._
btancas en et homo _._.__
Si manchas blancas
persisten, fri_guelas con
fanillas de acero con jabdn AsegEJrese de enjuagar
bien Estas son generatmente depdsitos de saf
que no se pueden sacar durante el cicfo de fimpieza
Si por alguna raz6n us_ed no queda
satis[ec_ con _os _su#ados _ Ba B#mp_e___,
sirnplemente repi_a ei c_cHo.
18
COMO LIMPIAR LA CUBiERTA DE VIDRIO-CERAMICA
La limpieza de la cubierta de vidrio.cerbmica es
diferente a la limpieza de la cubierta de porcelana
comun. Para mantener y proteger la cubierta de
vidrio-cer_mica siga estos pasos b_sicos,
Use solamente Cook Top Cleaning Creme sobre
vidrio-cerbmica.,
Para sucle_d r_rmag, H_via_na:
I. Usando una toalla humeda, frote varias gotas
de crema sobre el brea sucia, Lfmpiefa hasta
que toda la suciedad y la crema sean
removidas.
2. Limpie la supefficie con crema despu#s de
cada vez que cocine, La limpieza frecuente es
esencial para prevenir rayaduras y abrasiones
Para suciedad pesada, quemada:
1, Aplique unas gotas de crema en el 9rea sucia
cuando est_ frfa
2,
3.
m
Usando una toalla de pape! humeda, frote fa
crema sobre el brea con la suciedad quemada,
Sujetando un raspador en un 9nguto de 30
grados sobre la superficie de cer_mica,
cuidadosamente raspe elresto de fa suciedad
Si queda atgo de suciedad, repita los pasos
que se listan arriba Para proteccidn adicionaf
despu#s que la suciedad haya sido removida,
pula toda la superficie con crema,,
r
IMPORTANTE: E1 use de un
raspadornodafiar_lasuparficiesi
se mantiene un _ngulo de 30
grados. No use una hoja para
afeitarse que est6 gastada o
mellada sobre la cubierta. Guarde
elraspadorahojafuera del alcance
de los nifios.
[ i i ,11 i1,,1111 i iii i,ii/ '_
Los derrames de azt)cares (tales como jaleas,
ch oc date, ,yjarabe s) o e Ipf_s tico derre tido pue de
causarhoyos en la cubierta a menos que el derrame
se saque mientras todavfa est# caliente, Se debe
usar un cuidado especial cuando se limpian
sustancias calientes
Siga estas instrucciones cuidadosamente y limpie
la suciedad mientras el derrame est# caliente
lm
2.
m
Apague la zona para cocinar afectada por el
derrame Saque los utensilios
Usando un guante para homo, sujete el
raspador en un bngulo de 30 grados sobre la
cubierta y raspe el derrame catiente hacia un
brea frfa fuera de la zona para cocinar
Con el derrame en un brea frfa, use una toalla
de papel seca para remover cualquier exceso
de suciedad Cualquier suciedad que quede
deberfa dejarse hasta que la superficie se
enfrfe No continue usan do el _rea para cocinar
sucia hasta que todo el derrame haya sido
removido, Siga los pasos bajo Suciedad
Pesada para continuar et proceso de limpieza
A medida que ta crema fimpia, deja una capa
protectora que aYuda a prevenir ta acumulaci6n
de depdsitos minerafes (manchas de agua) yhar_
ta limpieza futura mds fbcil, Et detergente para los
platos elimina ta capa protectora y no deberfa ser
usado
_ limpieza continua
continuacidn
MAS ACERCA DE I.A LIMPIEZA DE LA CUBIERTA DE VIDRIO-CERA ICA
,, La mayorfa de Ios limpiadores contienen amonia,
qufmicos y abrasivos que dar_an la superficie
de su cubierta Use solamente Cooktop Cleaning
Creme para una limpieza adecuada y para la
proteccidn de su superficie de cer_mica
o Siustedarrastra ollas de aluminio o cobre sobre
la supefficie de la cubierta, podrfan dejar marcas
de metal en forma de rayas_ Use el raspador y
la crema para la superficie para sacar estas
mamas Si no saca este residuo inmediatamente,
podrfa producir marcas permanentes
. Si las ollas enchapadas con una capa detgada
de aluminio, cobre o esmalte hierven cuando
est_n secas, se podrfan pegar a la superficie de
la cubierta. Esta descoloracidn negra deberfa
set sacada inmediatamente o t_odrfa set
permanente.
o El uso de un limpiadorpara vidriospodria dejar
una capa irridescente sobre ta cubierta. La
crema para limpiar sacar_ esta capa
o Las manchas de agua (depdsitos minerales)
son removibles usando.y vinagre blanco a toda
fuerza.
,, No use un raspador con una hoja gastada o
mellada sobre la cubierta..
, Nouse limpiadoresabrasivosolanillasabrasivas
sobre la cubierta
o Se puede usar lanilfas de pfdstico tal como
Dobie.
Para ordenar Cooktop Cleaning Creme adicional,
llame a su Centro de Servicio o tienda Sears m_s
cercana, pida el (Stock No 40079).
QUE MA T_RgAL_$ DE LnMPI_ZA U._'_:
, Detergente lfquido para platos
,, Agua tibia
• Par_o suave
No use Bimpadores a#_as_vos, D_Had_r_._
industriaResp o Ma_quedo._ss {cBo_D.
PARA LEMFHAFJ:
Limpie con agua tibia con jabdn Enjuague y
seque bien
QUE MA TERIALE$ DE LNMPE_Z,_ USAR:
* Detergente lfquido para pfatos
o Agua tibia
* Lanillas de acero con jabdn
o Limpiador comerciat para
homos
COMO LIMPHAR:
Permita que la cacerofa se remoje Ponga
detergente para platos sobre ta parrilla .y cubra
con un paso o una toatla humeda por un rato
Friegue a medida que sea necesario Lave,
enjuague, y seque bien, Usted tambi#n podrfa
poner fa cacerola y la parritla en fa tavadora de
platos.
2O
QUE MA TERIALES DE LIMP_Z_ U$_:
• Detergente liquido para plates
° Agua tibia
• PaSo suave
COMO LBMPflAR:
No use limpiadores para hornos, potvos para
limpiar, o abrasivos fuertes, Si satsas para sasonar,
salsa de tomates, materiales para batidos, etc., se
derraman, lfmpiefos 1o m_s posible, Cuando tas
superficies se enfrfen fimpie bien las superficies
pintadas
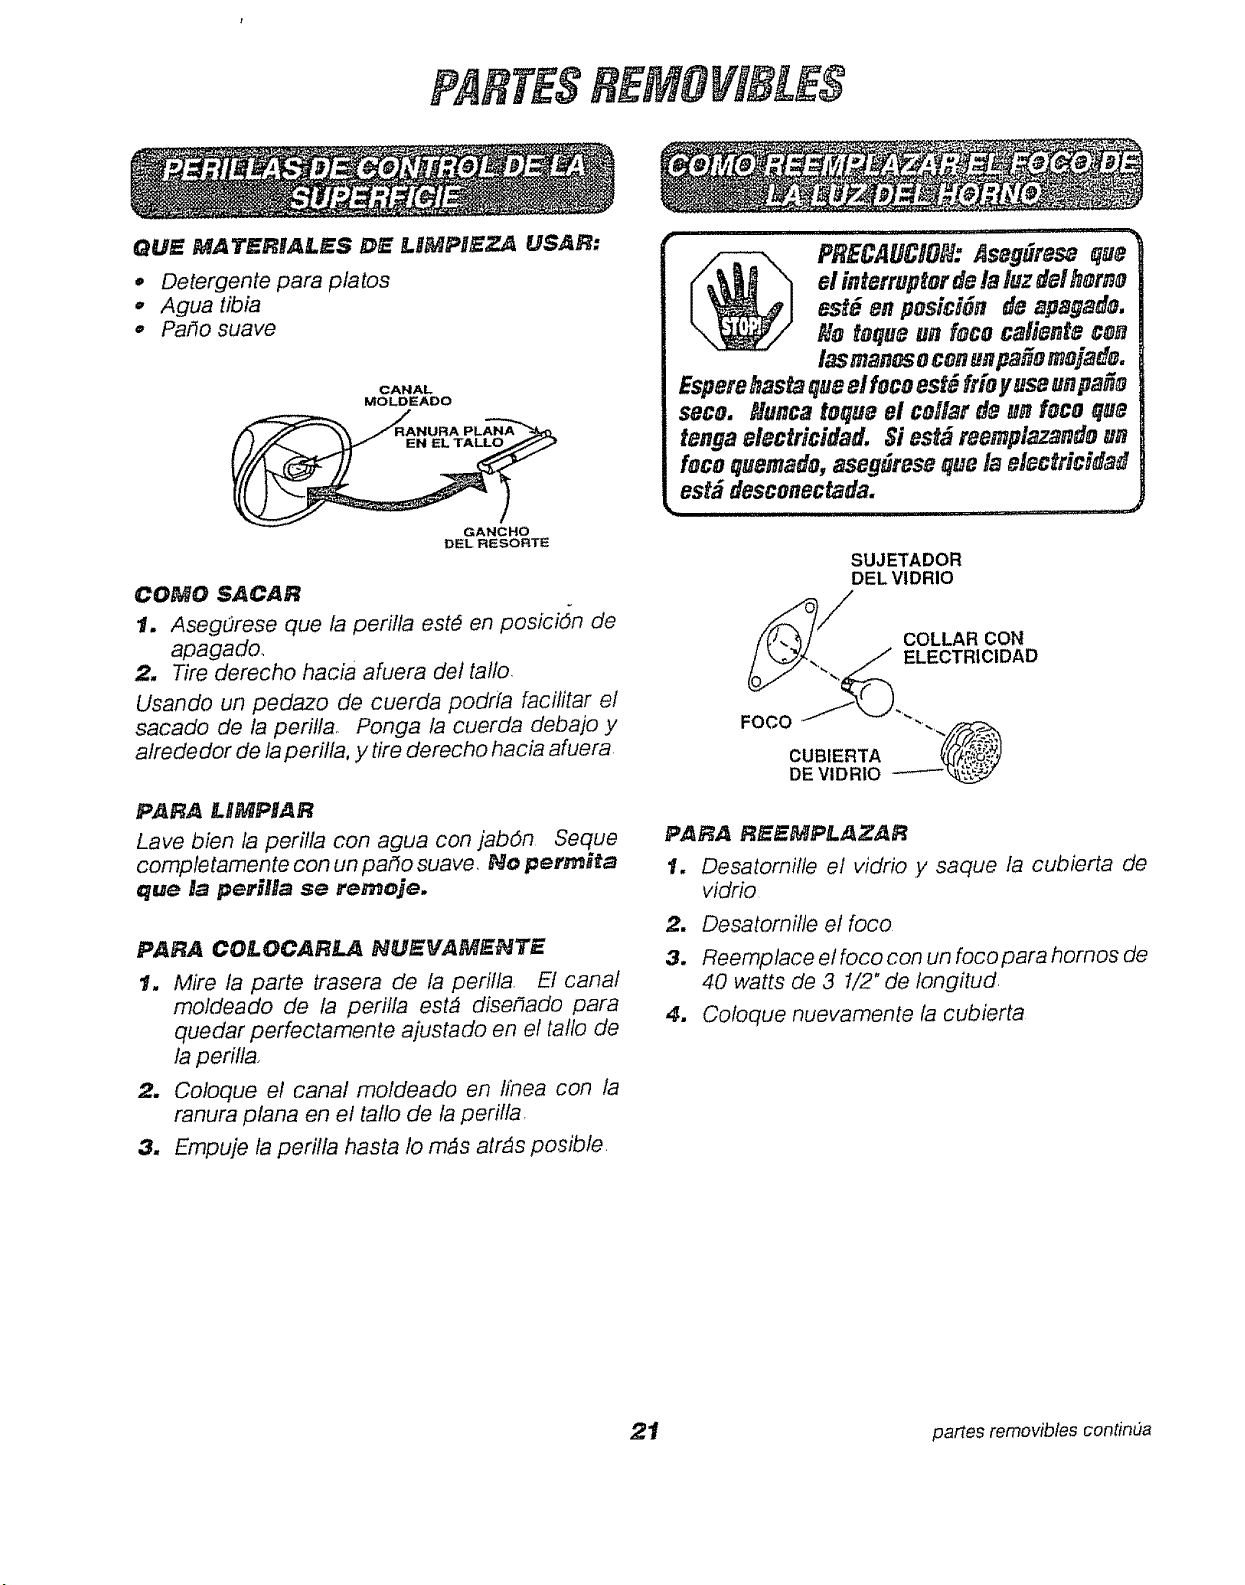
FARTESREMOVISLE$
QUE MATERIAL,S DE LtMPHEZJ_ USAR:
° Detergente para platos
o Agua tibia
o Patio suave
CANAL
MOLDEADO
GANCHO
DEL RESORTE
COMO SACAR
t. Asegdrese que la perilla est_ en posicirJn de
apagado,
2. Tire derecho hacia afuera del ta!lo
Usando un pedazo de cuerda podrfa facifitar el
sacado de la perilla. Ponga la cuerda debajo y
alrededor de la perilla, y tire derecho hacia afuera
PARA LIMPNAR
Lave bien la peritla con agua con jabdn Seque
completamente con un par_o suave, No perm6ta
que Ba perilna se rernoje.
PARA COLOCARLJ_, NUEVAMENTE
1. Mire la parte trasera de la perilla El canal
moldeado de la perilla est,_ diseJiado para
quedar perfectamente ajustado en et taflo de
la perilla
2. Coloque el canal moldeado en lJbea con la
ranura plana en el tal!o de la perilla.
3. Empuje la perilla hasta 1o mbs atrbs posible,
SUJETADOR
DEL VIDRIO
COLLAR CON
._ ELECTRICIDAD
FOCO J_'"J'"
CUBIERTA _
DE VIDR10
PARA REEMPLAZ_R
1. Desatornitle el vidrio y saque fa cubierta de
vidrio
2. Desatornitte el foco
3. Reemptace el foco con un foco para homos de
40 watts de 3 1/2" de fongitud
4. Cofoque nuevamente la cubierta
21 partes removibles continua
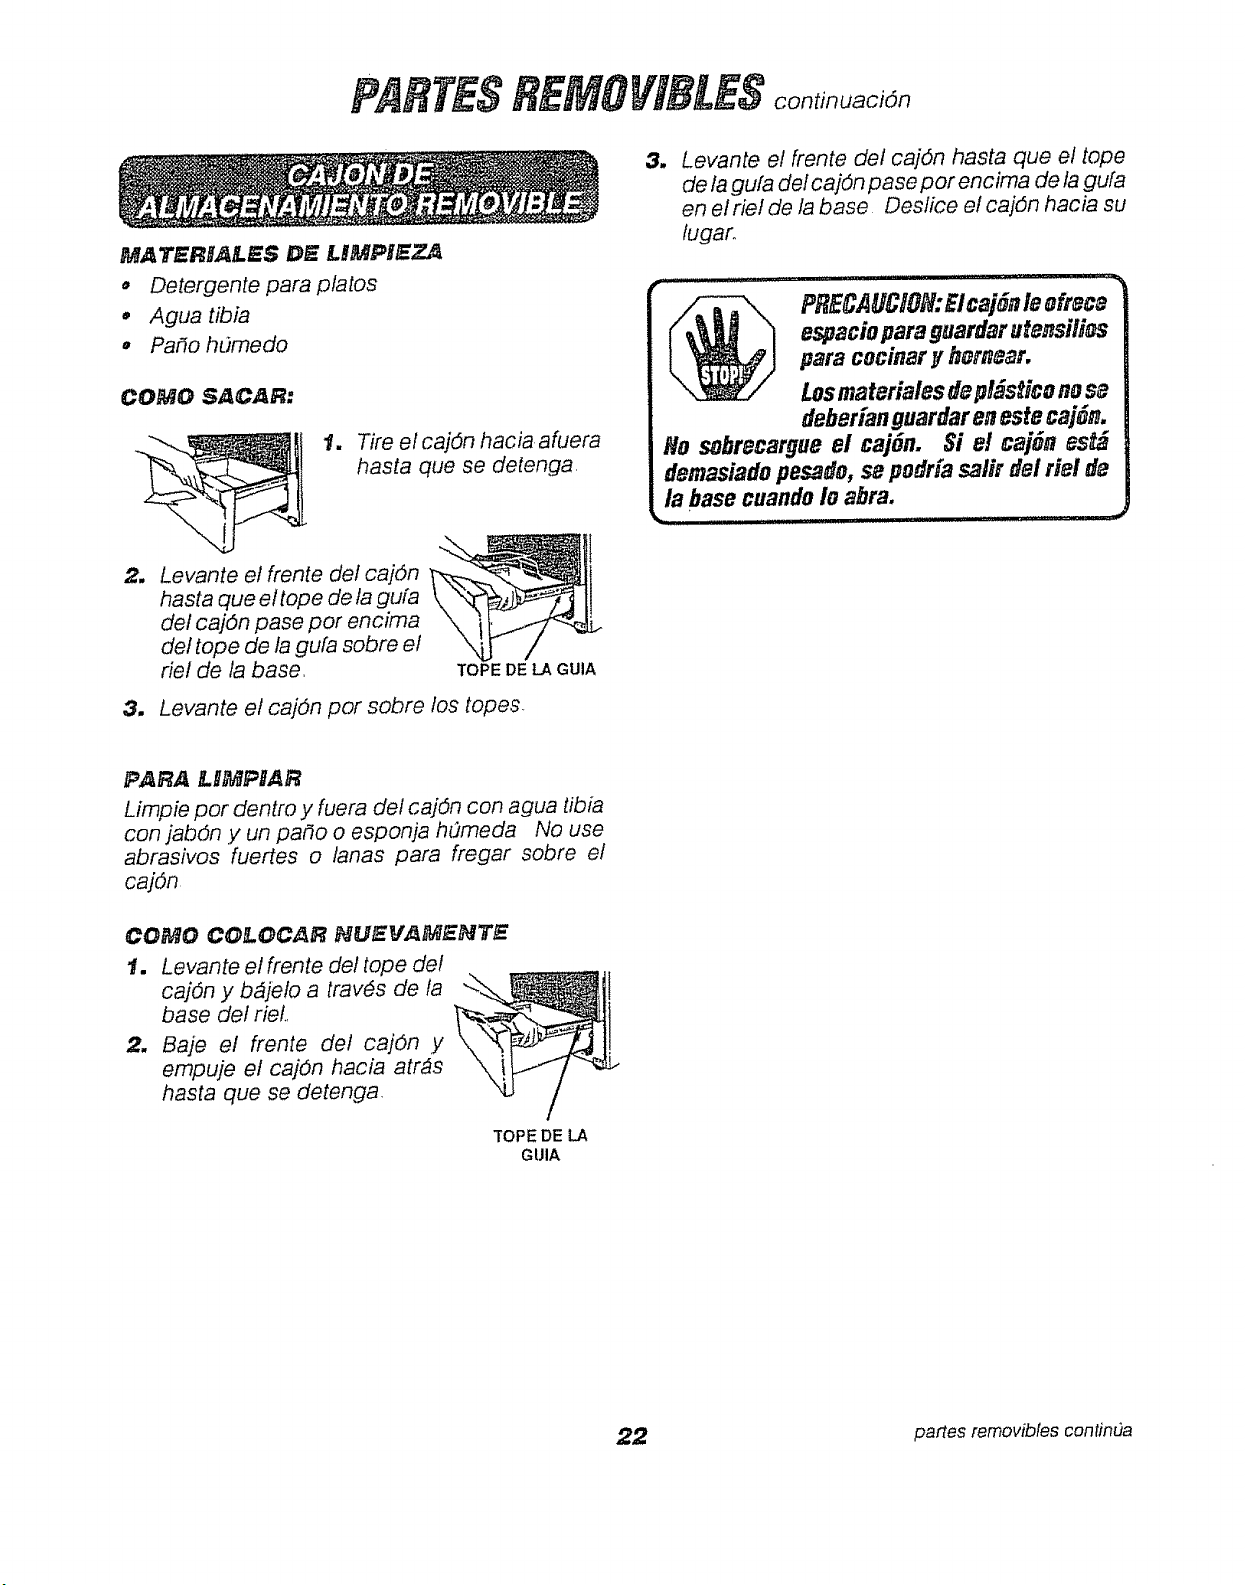
PARTES
MA T==RHA£_S DF. LIMPlEZA
continuacidn
o Detergente para platos
• Agua tibia
o Pa#o hLJmedo
COMO SACAR:
.__ I. Tire e! caj6n hacia afuera
hasta que se detenga
2, Levante el frente del caj6n _------------_____ _I
hasta que el tope de la gufa
del cajdn pase por encima
de! tope de la gufa sobre el
riel de la base, TOPEDELA GUIA
3, Levante el cajdn por sobre los topes.
m
Levante el frente de/cajdn hasta que el tope
de ta gu/a del caj6n pase pot encima de ta gufa
en el rie! de la base Deslice e! cajdn hacia su
tugaro
PRECAUClON:EIcajGnleo#ece
espacio para guardar utensilios
para cocinar y hornear,
Los materiales de pl_stico no sa
deberfanguardaren este cajun.
No sobrecargueel caj6n. Si el caj#n es_
demasiado pesado, sepodrfa salir del riel de
la basecuandoIo abra.
PARA /LHMPBAR
Limpie pot dentro y fuera del cajdn con agua tibia
con jabdn y un patio o esponja hOmeda No use
abrasivos fuertes o fanas para fregar sobre el
cajbn
COMO COLOCAR t_UEVAMIENT_:
t. Levante e! frente del tope del
cajdn y bbjelo a tray,s de la ".._ _:
base de/rieL
2. Baje el frente det caj6n y \ _'_
empuje el cajrJn hacia atrbs
hasta que se detenga
TOPE DE LA
GUIA
22 partes removibfes continua
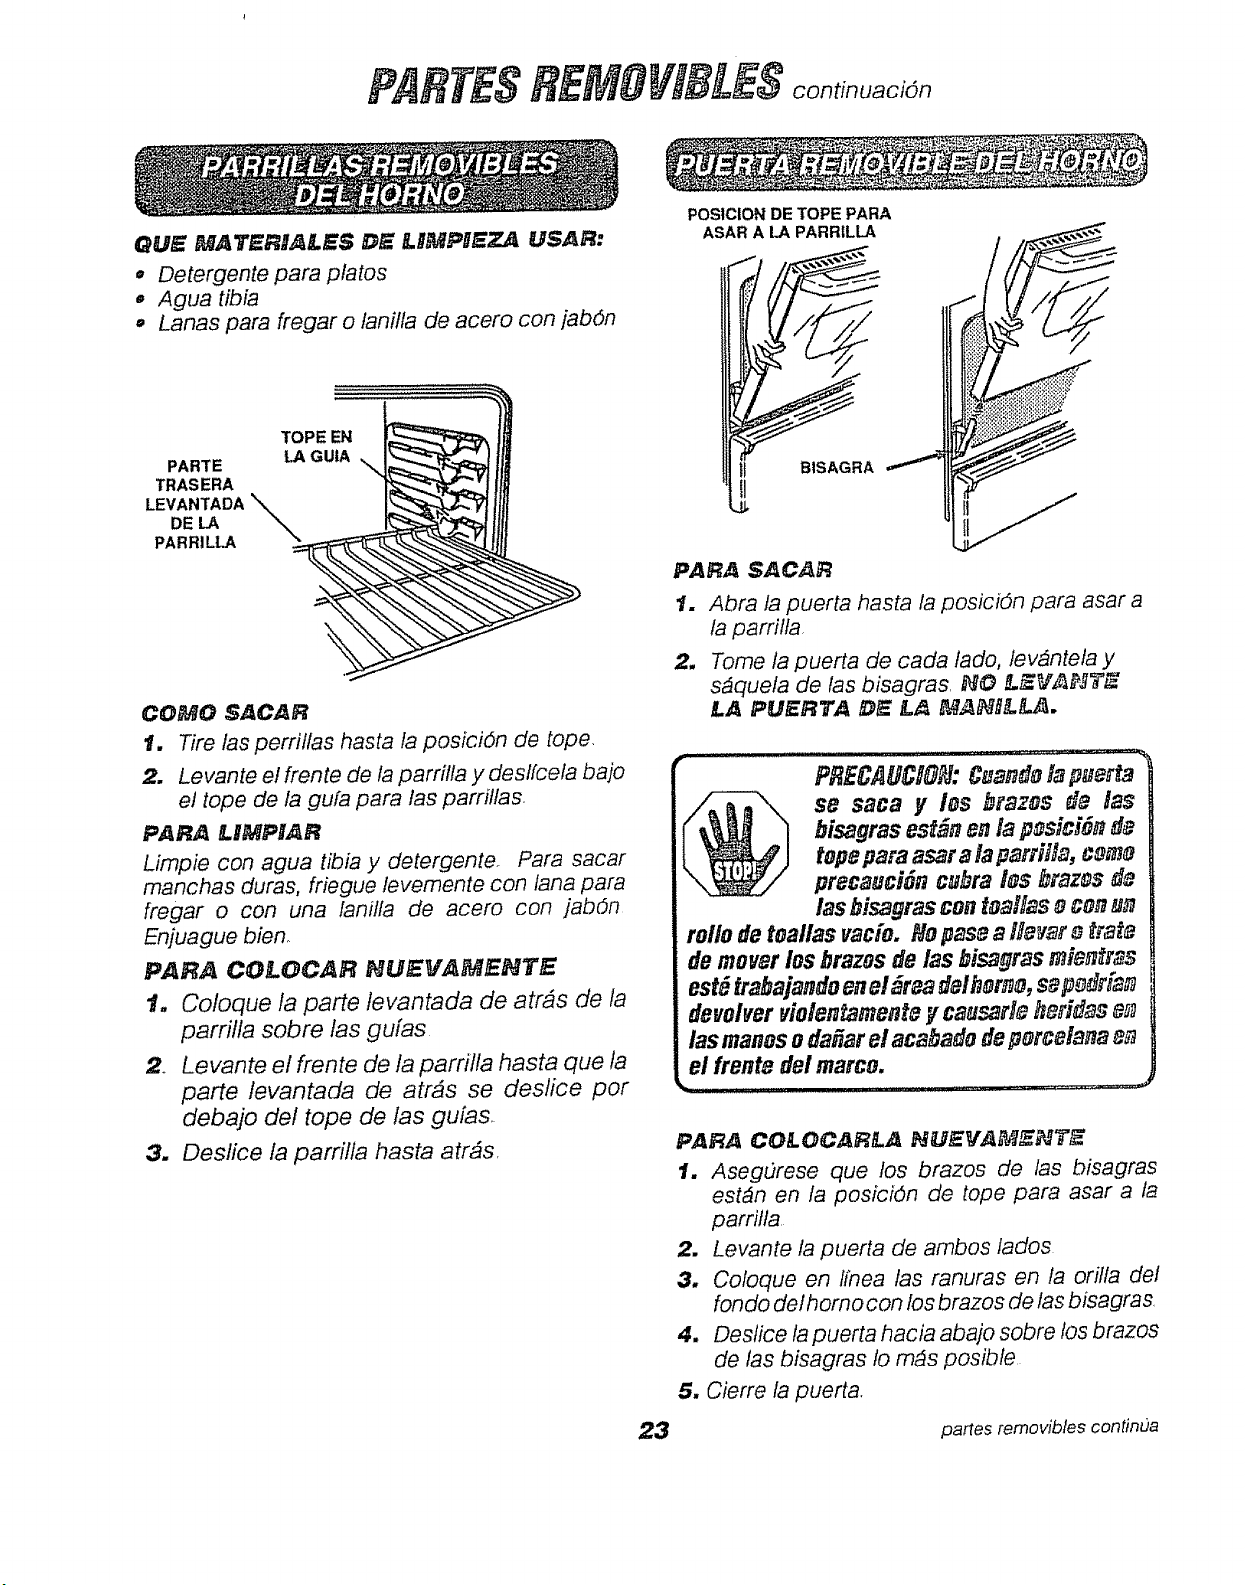
PA#TES
continuacidn
QUE MA TERBAL_$ DE LIMPBEZA USAR:
• Detergente para platos
• Agua tibia
o Lanas para fregar o lanflla de acero con jabd_n
POSICION DE TOPE PARA
ASAR A LA PARRILLA
PARTE
TRASERA
LEVANTADA"--.DELA
PARRILLA
TOPE EN
LA GUIA
COMO SACAR
t. Tire las perriflas hasta la posicidn de tope,
2. Levante el frente de la parrilfa y deslfcela bajo
el tope de la gufa para las parrillas.
PAR,_ LIMPNJ_,R
Limpie con agua tibia y detergenteo Para sacar
manchas duras, friegue levemente con lana para
fregar o con una lanilla de acero con jabdn
Enjuague bien
PARA COLOCAR t_UEVAMENTE
1. Coloque la parte levantada de atrbs de la
parrilla sobre las gufas
2o Levante el frente de la pamlla hasta que fa
parte levantada de atrbs se deslice por
debajo del tope de las gu[as,
3. Deslice la parrilla hasta atrbs,
BISAGRA
PAIRA SACAR
lm
2.
Abra fa puerta hasta la posici#n para asar a
la parrilfa
Tome ta puerta de cada fado, fev_nteta y
s_quela de las bisagras. _O LEVAP_TE
LA PUERTA DF. L_ M_NflLL._.
r PRECAUCIO#:Cuando_apue_ta
se saca y los brazo, de la$
bisagrasest_n en la p_sici6n d_
topepara asara/a parriHa, c_mo
precaucidn cubra los brazes d_
las bisagrascon toalias o con ut_
rollo de toallas vac[o. Ha pase a lie_ar o trate
de mover los brazos de las bisagrasmieMms
est6trabajandoenel greadelhemo,ssp_dr[a_
devolverviolentamentey causarle heridase_
las manos o dafiar el acabado de porcelana _
el frent_ del marco.
k= , .... , .... ._
PARA COLOC_RILA NUEV/_MEP#TE
1. Asegurese que los brazos de las bisagras
est_n en fa posicidn de tope para asar a ta
parriila
2. Levante la puerta de ambos lados
3. Coloque en l/nea las ranuras en fa oriifa del
fondo def horno con los brazos de tas bisagras
4. Destice la puerta hacia abajo sobre los brazos
de las bisagras Io robs posibfe
5. Cierre fa puerta,
23 partes removibles continua
AH S S VICIO
Para ahorrar tiempo y dinero, antes de lfamar para un servicio, revise fa fista de mbs abajo para cuatquier
problema que usted crea que tiene con el funcionamiento de su estufa. Si ef probfema es afgo que usted
no puede reparar, use los Numeros de Servicio para el Consumidor que se encuentran al final de este
manual. Cuando haga un Harnado, tenga disponHble el n_mero de modelo, n_s_a de parses
para reparacUones, rnanuaa de use y cuNdado y 13 fecha de compra.
PROBLEMA POSIBLE CA USA
El dial de! contr_l
pesfa_ea un "F"
seguida per un
ndr#ero o Hefra.
Peque_as rayas o a.
abrasiones en la
cubier_ de cocinar b.
(Pueden aparecer
come rayitas),
Mal funcionamiento de ta
estufa
POSIBLE SOLUCfON
,, i ,, _ ................
Ponga la perflla de controB en pos_ci6n
de apagado. Permita que ta estufa se enfrfa
per una hera y ponga nuevamente et homo en
funcionamiento
ii ,,in,ll Hi , i m_, , , TT_
Use de materiates de a, Use s6fo Cooktop Cleaning Creme®
limpieza incorrectos
Particulas _speras (sal,
etc ) entre el rondo de los
utensifios y la cubierta de
cocinar
b. Asegurese de que los fondos de los utensilios
y la cubierta de cocinar est#n timpios antes de
usarse
[
Marcas de metaH en la
cubierta de cocinar
(Pueden aparecer
como peque_a$
rayitas.
c. Utensifios con fondos
_speros
ii, ii IIIIIIIII1'1 I I _ I ,
Arrastrar o raspar la
cubierta de cocinar con
utensilios de metal
c. Use solamente elias de rondo ptano
Use limpiadores de cubiertas de cocinar
recornendados
Areas de descoloraci_n Depdsilos minerales de
sobre la cubierta de agua o alimentos
cecinar.
Use timpiadores de cubiertas de cocinar
recomendados
Bandas y manchas
oscuras sobre Ha
cubierta de cecHnar,
a. Derrames y manchas
de grasa incrustados,
c. Materiales de limpieza
incorrectos
a. Use raspador de hoja y siga fas instrucciones
en fa tabla,
b. Use.timpiadores recomendados en ta table de
timpieza
La temperatura dell
homo no parece
estar exacta.
Calibraci6n det control def
homo,
Vea ta seccidn de cdmo cocinar en el homo
La puerta del I_orno no
se puede abrir.
El ciclo de limpieza no estb
complete
La temperatura def homo debe bajar m#s que fa
temperatura de cierre antes que la puerta se
pueda abrir.
La luz de Iherno no
funciona.
a, El interrupter de la luz
estb apagado_
b, El foco necesita ser
reempfazado,
a. Revise la posici6n det interruptoF
b. Revise o reempface el foco de fa luz,,
24 antes de llamar para un servicio continE_a
SEP V CE#con, n.ac n
PROBLEMA POSIBLE CA USA
POStBLE SOLUCtOH
i ,. m ,,n,,t ,_, ..... ,......
Los alimen*os no a.
Se asan
adecuadan=ente a b.
la parrilla, c.
d.
Posicidn incorrecta de la a.
parrilla,
El homo se precafent6,
E! horno humea.
Mal uso de papel de
aluminio,
La puerta de! homo se
cerrd durante el asado a
b_
C.
dll
Revise la posicidn de/as cacerolas;
vea la seccidn para asar a la parrilta,
Noprecaliente cuando ase a la parrilfa
Lea la secddn para asar a fa parrilfa
Abra la puerta a fa posicidn de tope
para asar,
la parritla
e. Bajo voltage (208 e.
Voltios).
f. Cantidad de tiempo L
incorrecta para asar.
a. Homo sucio a,
Use posici6n de parrifla m#s alta y/o
ase por robs tiempo,
Vea fa tabfa para asar en la secci6n
de c6mo asar a fa parrifta
Vea que no hayan derrames grandes
b. Maf uso de papef de b.
alumJnio.
c. Se dejd fa cacerofa para
asar con grasa dentro del c,
homo
No se recomienda et uso del papel de
aluminio
Limpie la cacerota y la parrilfa despu_s de
cada uso,
a. Los elementos est#n a.
La cubier*a no
funciona, horno desenchufados
OK. b. Control en posicidn
incorrecta
.............................. .,.L._,,,,,,
Revise los elementos, asegurese que
est_n enchufados correctamente en
los receptbculos
Empuje la perilta mientras ta hace
girar para seteccionar fa temperatura
Homo no func_ona,
Cubierta OK
a. Control puesto
incorrectamente
b. Perilla de control mucho
m#s all# de 500 _
bll
Revise el control y la seccidn de c(_mo
cocinar en el homo
La marca de ta peritfa debe estar
alineada exactamente con 506£ grados,
puer a hor.o
a No fuerce ta manilla del
se cierra
accidentalmente cerrojo
con cerrojo
mientras se
hornea.
a. Las temperaturas m_ts alias que tas
temperaturas de cerrado evitar#n que
la manilta det cerrojo se desfice a ta
posiciOn de abierto
ii i ii , _.................
MaBos resu#ados
de nimpieza.
a. Ciclo de fimpieza
interrumpido
b. Homo demasiado sucio.
a. Permita que el homo se timpie por un
ciclo completo,
b. Los derrames pesados se deberfan
fimpiar antes de programar un ciclo de
limpieza
25
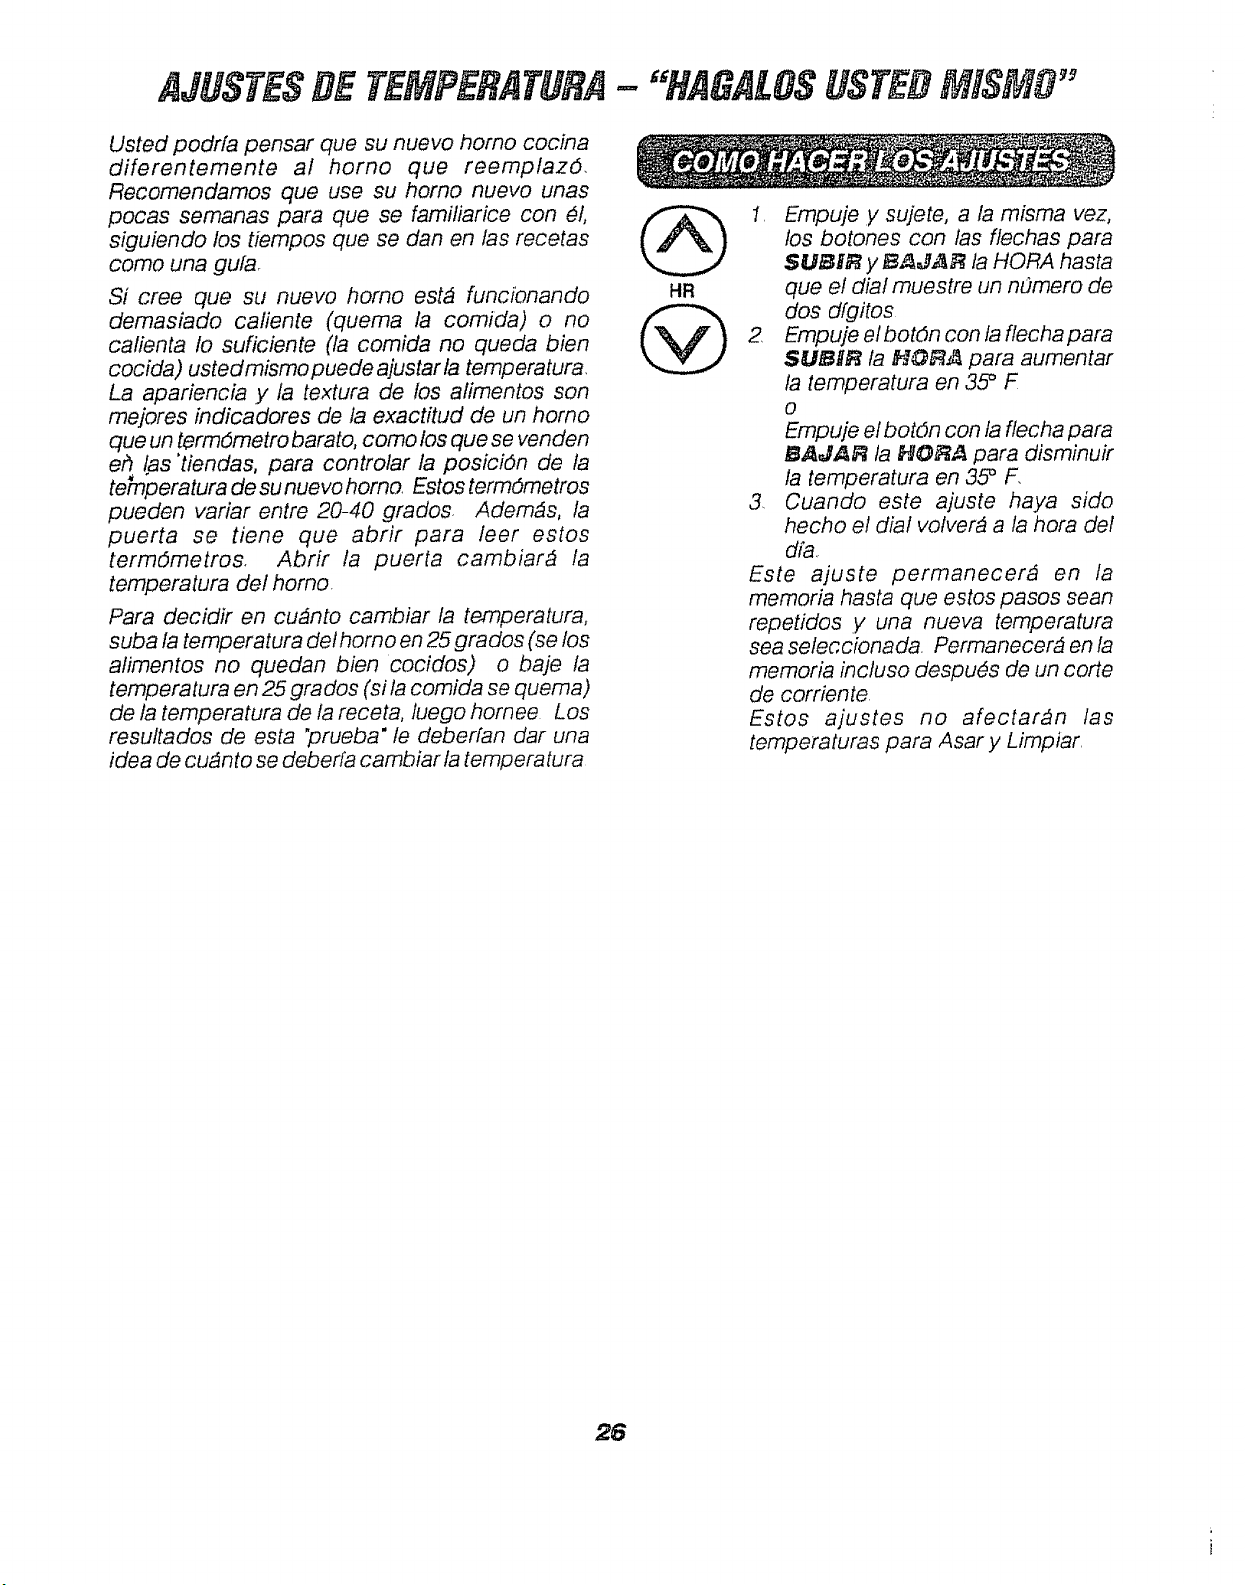
Usted podrfa pensar que su nuevo homo cocina
diferentemente al horno que reemplazd,
Recomendamos que use su homo nuevo unas
pocas semanas para que se familiarice con _1,
siguiendo los tiempos que se dan en fas recetas
como una gufar
Si cree que su nuevo homo est_ funcionando
demasiado caliente (quema la comida) o no
calienta Io suficiente (la comida no queda bien
cocida) usted mismo puede ajustar la temperatura
La apariencia y la textura de los alimentos son
mejores indicadores de la exactitud de un homo
que un termdmetro barato, como los que se venden
eh las 'tiendas, para controlar la posici6n de fa
tef-n'peratura de su nuevo horno. Estos termdmetros
pueden variar entre 20-40 grados Adem,ls, la
puerta se tiene que abrir para leer estos
termdmetros. Abrir fa puerta cambiar,t la
temperatura del homo.
Para decidir en cubnto cambiar fa temperatura,
suba la temperatura defhomo en 25 grados (se los
alimentos no quedan bien cocidos) o baje ta
temperatura en 25 grados (si la comida se quema)
de la temperatura de la receta, luego homee Los
resultados de esta "prueba" le deberfan dar una
idea de cubnto se deberfa cambiar la temperatura
HR
1. Empuje .y sujete, a la misma vez,
los botones con fas flechas para
SUBNR y B._J_ ta HORA hasta
que el dial muestre un nOmero de
dos dfgitos
2 Empuje elbotdn con fa flechapara
SUBHR fa HORA para aumentar
ta temperatura en 35° F
o
Empuje el botdn con fa ftecha para
BAJ,_R la HO_,,_ para disminuir
la temperatura en 350 F,
3, Cuando este ajuste haya sido
hecho et dial volver_ a la hora del
dfa
Este ajuste permanecerb en fa
memoria hasta que estos pasos sean
repetidos ,y una nueva temperatura
sea seleccionada Permanecerb en fa
memoria inctuso despu_s de un corte
de corriente
Estos ajustes no afectar#n las
temperaturas para Asar y Limpiar,
26
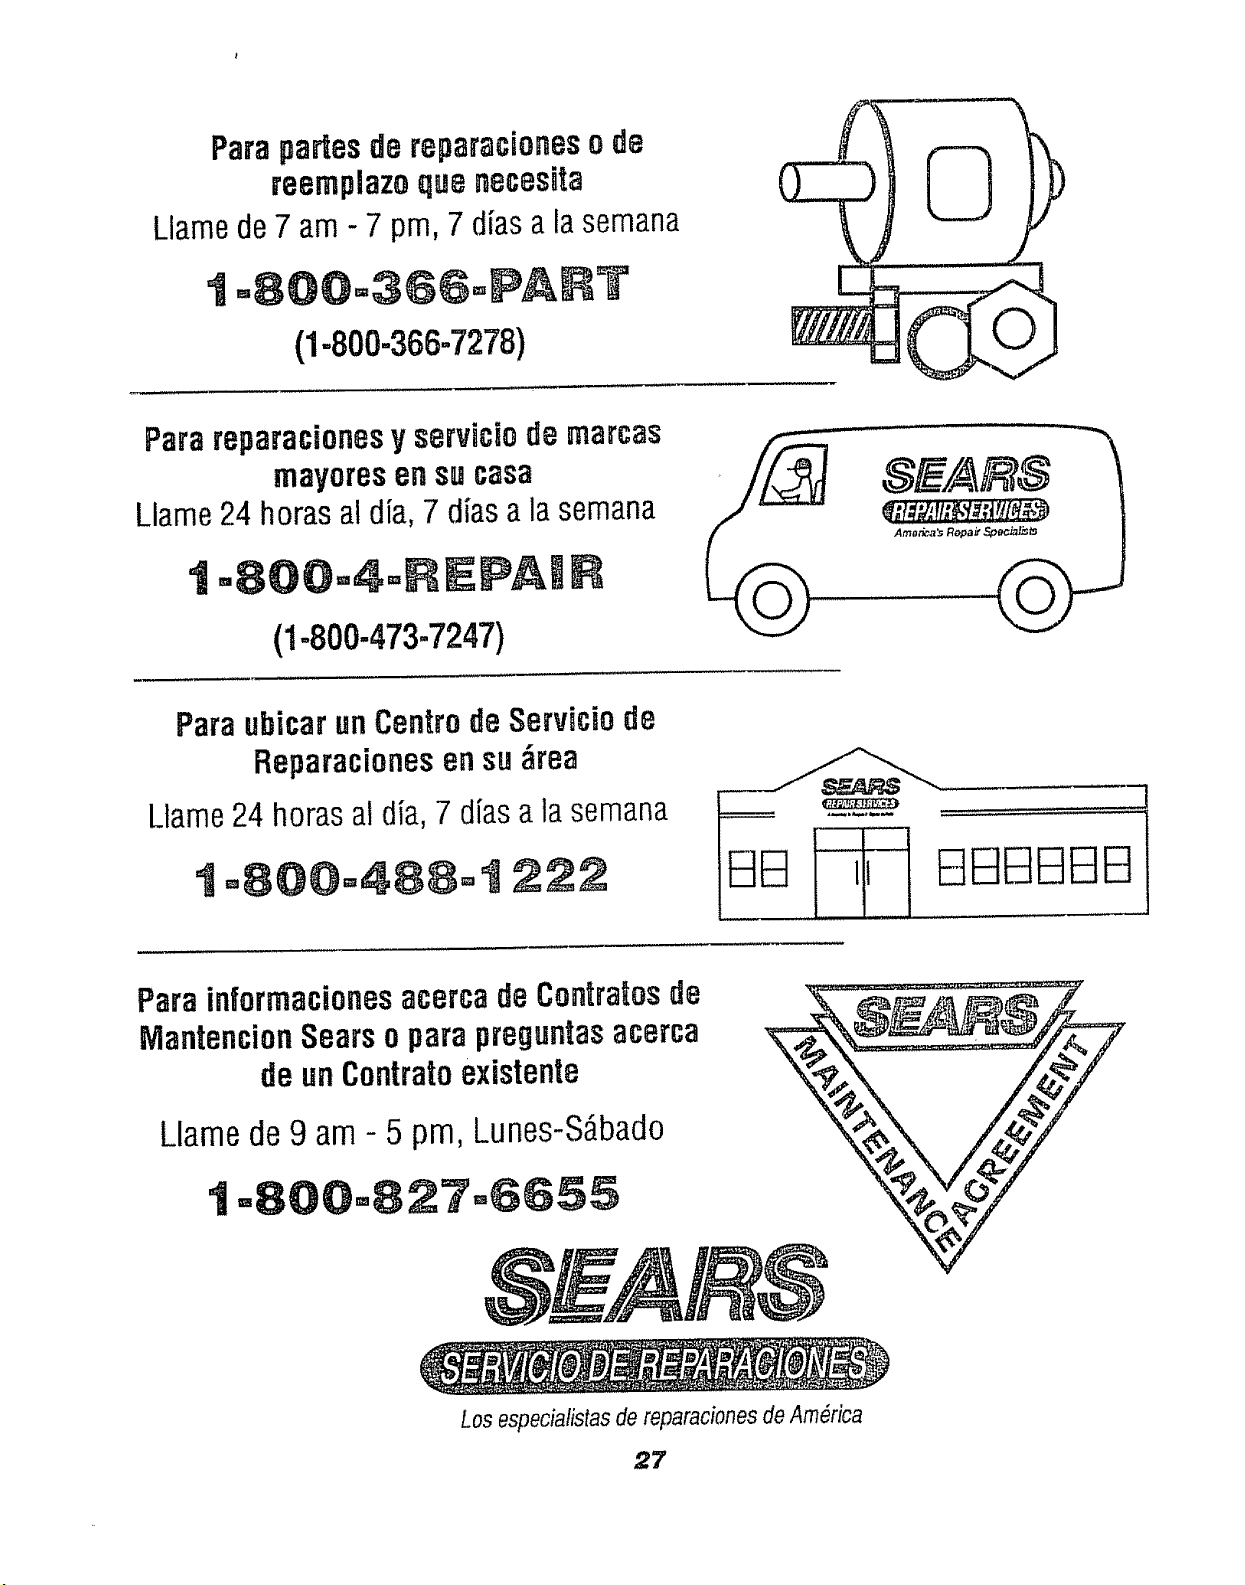
Parapartesde reparacioneso de
reemplazoquenecesHta
Liamede 7 am - 7 pm, 7 diasa la semana
-SO0=366oPART
(1-800-366-7278)
Parareparacionesy serviciode marcas
mayoresensucasa
Llame24 horasai dia, 7 dias a la semana
1.800.4=
(1-S00-473-7247)
,=,,,i i ,,
IJ _ j _ W ....
ParaubicarunCentro de Servic[o de
Reparacionesen su_rea
Llame24 horasal dia, 7 dias a la semana
2
'_U
BBBBBB
Para informacionesacercade Contratosde
MantencionSearso parapreguntasacerca
de un Contratoexistente
Llamede 9 am - 5 pm, Lunes-S_bado
-800=827-6
Los especialistasde reparaciones de America
27'
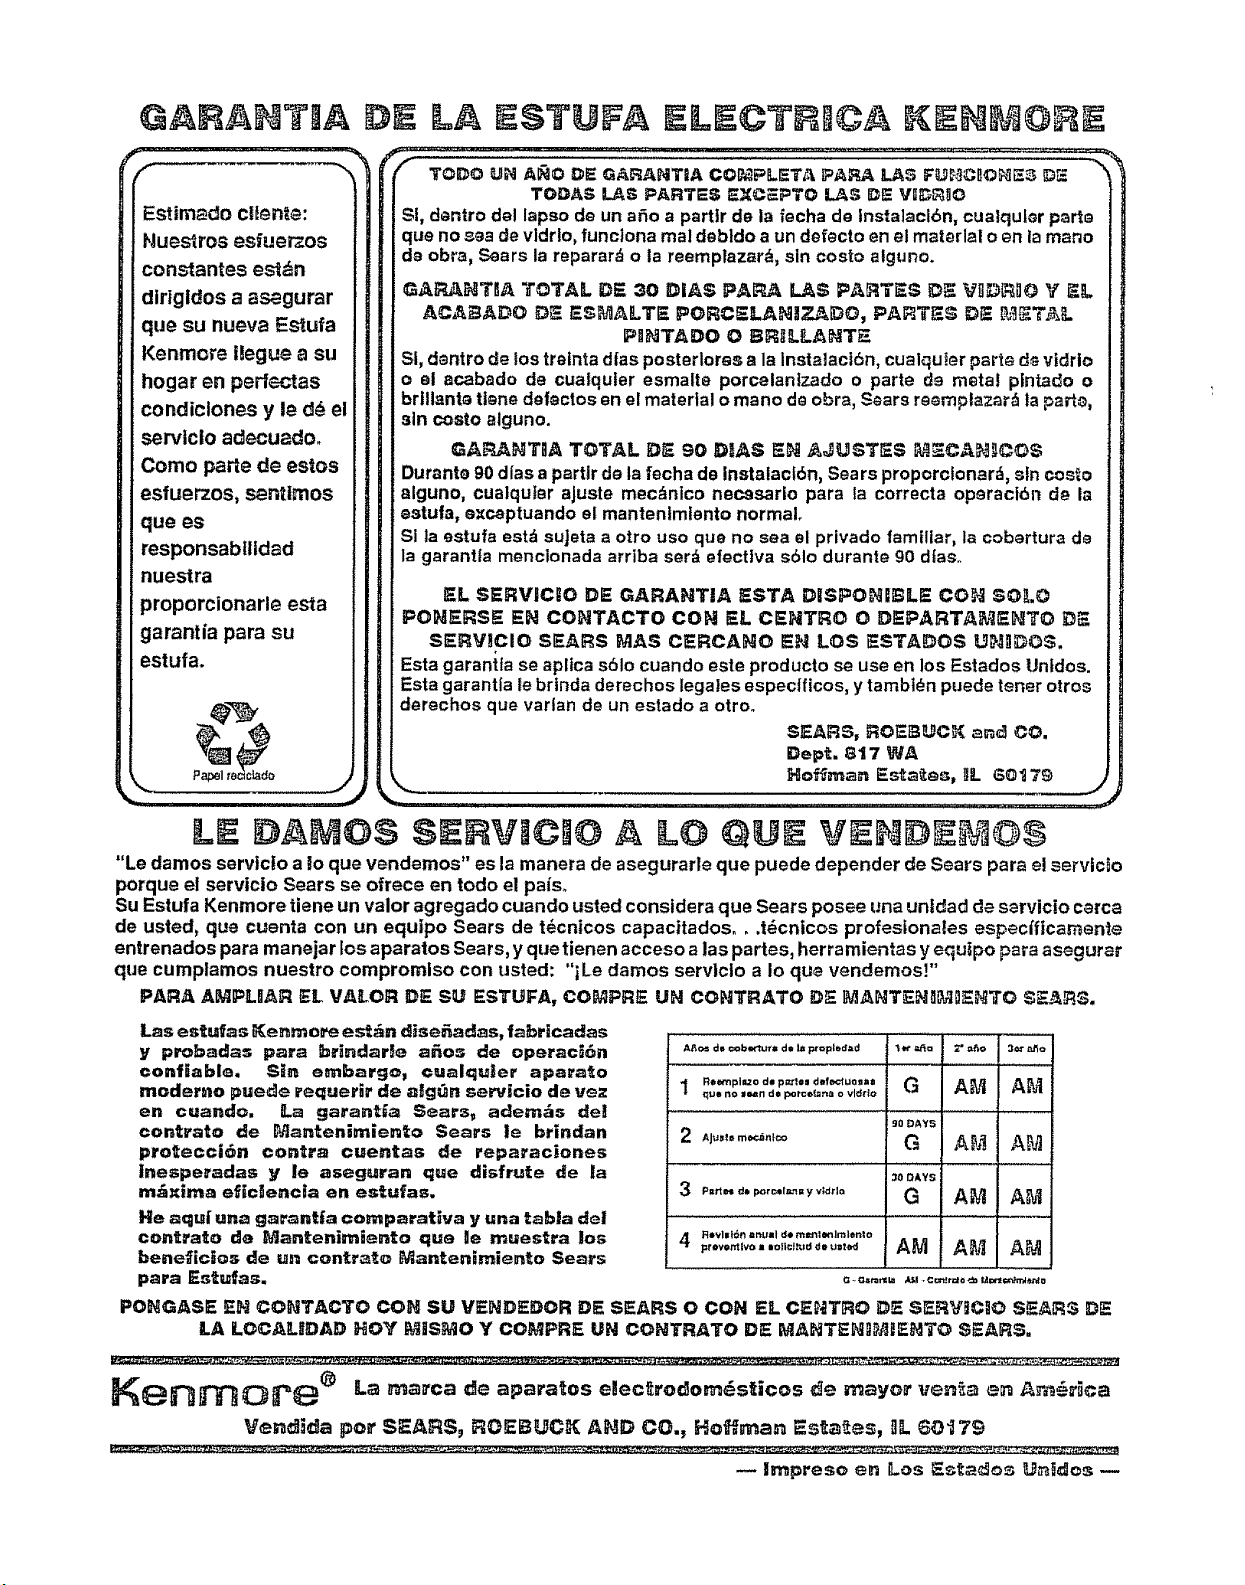
,, L
Estirn_.do cllient_:
Nuestros esfuerzos
constantes es_n
dirigldos a as_gurar
qua su nueva Estufa
Kenmore ffegue a su
hogar en peric-,ctas
condiclones y le d_ el
servtcio adecuado.
Come par_e de estos
esfuerzos, sentimos
que es
responsabllidad
nuestra
proporcionarle esta
garantia para su
estufa.
r
TODO UN ANO DE GARAMT|A COP_PLETA PARA I.AS FU_CBO_E3 D_.
TODAS LAS PARTES EXC_PTO LAS DE Vg_aO
_l, dentro d_l lapse de un a_o a partir de la {echa de Instalaclbn, cualquiGr parts
qua no sea de vldr[o, funclona real debldo a un defecto en el mat_rlali o en la mane
de obra, Sears la reparard ota reemplazard, sin costo alguno.
GARA_TnA TOTAL DE 30 DIAS PARA LAS PART_S DF= VI]DR_O Y _L
AC#=_ADO D_- E$_ALT_ PORCELANiI_DO, PART_ D=- _ET_
P_NTADO O BR#LLAI_TE
Si, dentro de los tretnta d{as posterliores ala instalacibn, cualquter parts ds vtdrio
o el acabado de cuatquler esmalte porcelantzado o parte _ meta! plntado o
brlillante ttene defectos en el material o mane de o_ra, Sears rs_mplazard ta part€,
sin costo alguno.
GARA_T_ TOTAL D_E_0 D_AS E_ _USTES _C_CGS
Durante 90 dias a partir de la fecha de instalacl_n, Sears proporcienard, sin cease
alguno, cualquter ajuste mecdnico necesario pare la correcta operact6n de la
®stufa, s_ceptuando el mantentmlento normal.
SI la estufa estd suJetaa otro use qua no sea el privado familiar, la cobertura d_
la garant{a mencionada arriba serd efect]va able durante 90 dies.
_L SERVICI_O DE GARANTIA _STA DISPO_It_LE CO_l _OLO
PONERSE EN CO_TACTO CON _L CENTRO O DEPARTA_NTO _5
SERV_CIO SEARS MAS CERCA_O _=_ LOS ESTA_OS U_O_.
Esta garantla se aplica s61o cuando este producto se use en los Estados Untdos.
Esta garantia {e brinda derechos legales espec|ficos, y tambt_n puede tenet otros
derechos qua varlan de un estado a otroo
SE_RS, RoE_c_ _n_ CO.
Dept. $17 WA
Hoffma_ Es_e_, _L _30_7_
"Le dames servicio a lie que vendemos" es la manera de asegurarlie que puede depender de Sears pare el servicio
porque el serviclo Sears se ofrece en todo el pafs_
Su Estufa Kenmore tiene un valor agregado cuando usted considera que Sears poses una unlidad de s_rvicio c_rca
de usted, qua cuenta con un equipo Sears de tdcnicos capacitados. _ .t_cnicos profesionales especfftcamen_e
entrenados pare manejar los aparatos Sears, y que tienen acceso alas partes, herramientas y equ_po pare asegurar
qua cumplamos nuestro compromliso con usted: "iLe dames serviclo a io qu_ vendemos!"
PARA AMPL_#_R _L VALOR DE SU ESTUFA, COMPRE UN CONTRATO DR M_INTEN_E_TO SE._R._.
Los estufas _enmore es_&n d_se_adas, fabricadas
y pl_badas pare _r_ndarlla a_os de eperac_n
confiable, S_n embargo, cualquier apara'lo
modemo puede requerir de a_g_n servicio de v_z
en cuando. La garantia Sears_ adem&s de!
confrere de ManLenimien_o Sears le brindan
pro_ecci_n centre cuentas de reparaciones
inesperadas y le aseguran qua disfrute de Ira
m_ima ef_c_encta en es_ufas,
He aqu| una garant|a comparat_va y una tabla del
concrete de Mantenimiento qua lie muestra los
bene_icies de un contr._o Mantenimiento Sears
para Estufas.
A_os de _bertur= de b=pr=ple, d_d tar _f_a 2" _,=_o 3_ _u_o
1 "_P"=°_'P_"_"_"°"' G AM AM
_tJe rtO llMrl de porc_|:l_ o vldtt_
90 DAYS
30 _AYS
3 P.rt.d. porc_l==yv;drl. G AN AN
R*vlll6n =nu=l de menl_lmlen_o
G .Oa, mll_lZl Ar_ , Cor_r_t 0 do U.=oPZcr_rr_eNo
POHGASE EH CONTACTO CON SU VENDEDOR DR SEARS 0 CON EL CE_TRO DE SERV_C_O SEAR3 DE
LA LOCA]L_DAD HOY 11_iSWtOY COMPRE UN CONTRATO DE MAHTEI_gPAiEHTO SEARS.
K_'_j_"_O_ _ La m_rca de apara_os elec_ro_om_s_icos _e mayor ven_ en ,_'_-_='_ca
Vendida per SEARS_ ROEBUCN AND CO., HoP=man Ns_es, ill _:_O_JT_
Impreso en Los N_a_o_ _]id_