OWNER'S MANUAL
RADIANT
30" ELECTRIC
SELF.CLEANING
FREE.STANDING
RANGE
MODEL NO,
911.95575
911,95576
911.95579
CAUTION:
Before using this range,
read thls m-ai_tial arid
follow all its Safety Rules
and Operating
Instructions.
• Safety Instructions
e operauon
• Care and Cleaning
• Problem Solving
ulll ii i i ii illlllll
Sears, Roebuck and Co., Hoffman Estates, IL 60179 U.S.A.
_L_ ,,ill iuLJ
229c4020P115.1 (SR-10326)
TableofContents
SELF+CLEANING
RADIANTFREESTANDINGRANGE
Range Safety ......................... 3-6
Stability Device ......................... 3
Protecting the Cooktop ............. 7
Removal of Packaging Tape .... 7
Features of Your Range ........... 8
Cooking Zones ......................... 9
Cooking Utensils ...................... 9
Checking Your Cookware ......... 9
Co(_kware Performance ............ 9
Raeiant Coils .......................... 10
Radiant Unit Cycle .................. 10
Control Settings ....................... 10
Dual Cocking Zone ................. 10
Simmer ................................... 11
Home Canning Tips ................ 11
Hour/Minute Arrow Pad .......... 12
Display .................................... 12
F-Codes .................................. 12
Power Code ............................ 12
Automatic Oven Shut-Off ........ 12
Oven Control .......................... t3
Indicator Lights ....................... 13
Clock ...................................... 14
Kitchen Timer ......................... 14
Oven Cooking Tips ............ 15-17
Baking ..................................... 17
Broiling ................................... 18
Self+Cleaning Cycle ........... 19-20
Glass Cooktop Cleaning ... 21-22
Control Panel .......................... 22
Broiler Pan and Grid ............... 22
Control Knobs ......................... 23
Oven Light Bulb ...................... 23
Oven Racks ............................ 24
Oven Door .............................. 24
Storage Drawer ...................... 25
__ _J
_.,.,.. .j ;[e] :l ! :lj_l:_oJl rJl_[_
Before Calling for Service ...........
........................................... 26-28
Temperature Adjustment ........ 29
Warranty ................................. 31
Consumer Service Numbers.. 32
For your convenience and future reference, please write down
your model and serial numbers In the space provided. They are
located on the front frame behind the storage drawer.
MODEL NUMBER"
2
SERIAL NUMBERI
................................. ' I
IMPORTANTSAFETY
INSTRUCTIONS
SAVE THESE INSTRUCTIONS
Read all instructions before using this appliance. When using
gas or electrical appliances, basic safety precautions should
be followed, Including the following:
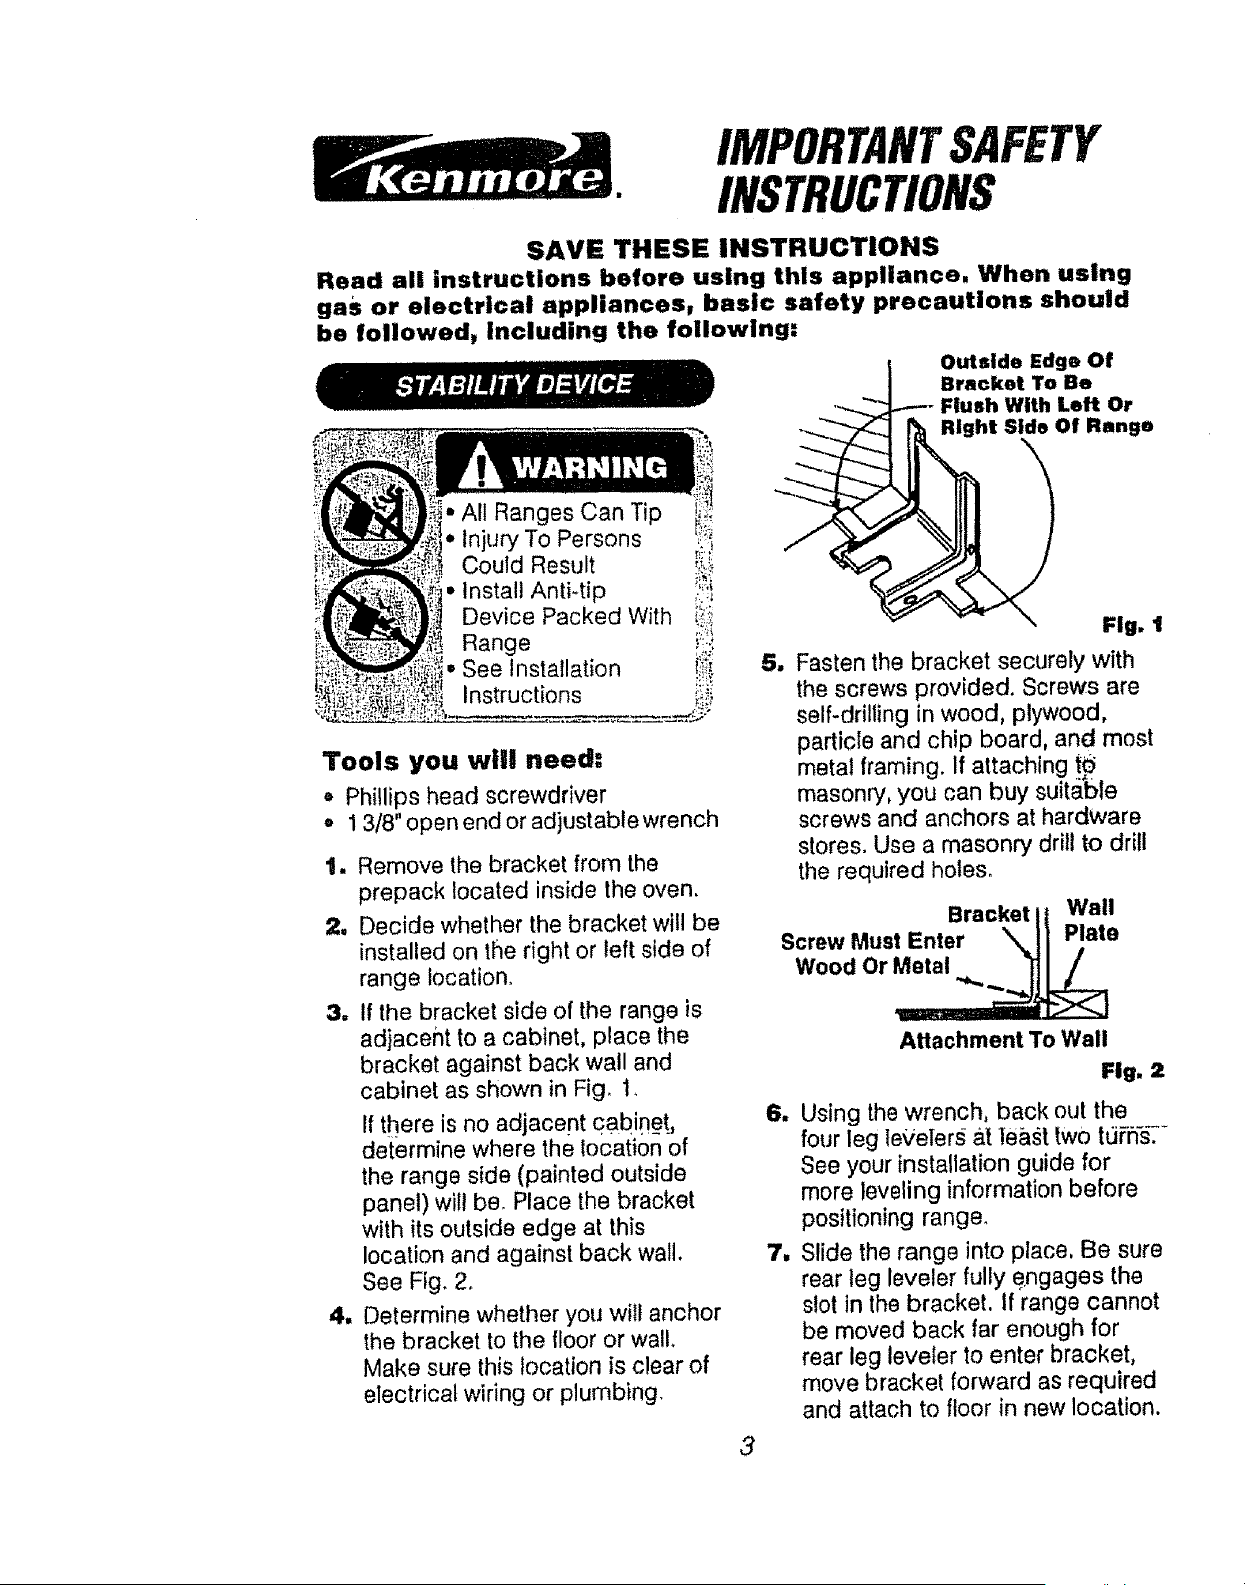
Outside Edge Of
Bracket To Be
Flush With Left Or
Right Side Of Range
• Install Anti-tip _';
Device Packed With
Range ,..;
• See Installation i;ii'_
Tools you wl!! need:
• Phillips head screwdriver
• 1 3/8" open end or adjustable wrench
t. Remove the bracket from the
prepack located inside the oven,
2. Decide whether the bracket will be
installed on the right or left side of
range location.
8. If the bracket side of the range is
ad}acei_t to a cabinet, place the
bracket against back wall and
cabinet as shown in Fig. 1.
If there is no adjacent cabinet,
determine where the location of
the range side (painted outside
panel) will be. Place the bracket
with its outside edge at this
location and against back wall.
See Fig. 2.
4. Determine whether you will anchor
the bracket to the floor or wail.
Make sure this location is clear of
electrical wiring or plumbing.
3
Fig. t
m Fasten the bracket securely with
the screws provided. Screws are
self-drilling in wood, plywood,
particle and chip board, and most
metal framing. If attaching
masonry, you can buy suitable
screws and anchors at hardware
stores. Use a masonry drill to drill
the required holes°
Bracket I| Wall
Screw Must Enter \. ]1 Plate
Wood Or Metal "_..,.
Attachment To Wall
Fig. 2
n
u
Using the wrench, back out the
four leg te_iefers at lea._t two td_n_--
See your installation guide for
more leveling information before
positioning range.
Slide the range into place, Be sure
rear leg leveler fully engages the
slot in the bracket, If range cannot
be moved back far enough for
rear leg leveler to enter bracket,
move bracket forward as required
and attach to floor in new location,

IMPORTANTSAFETY
INSTRUCTIONS
IIIII f
_ WARNING! To prevent _
accidental tipping of
the range from abnor-
mal usage, including exces.
sive loading of the oven door,
attach the range to the wall
or floor by installing the Anti-
Tip device supplied, if the
range is moved for cleaning,
servicing or any reason, be
sure the Anti.Tip device is re.
engaged properly when the
range is slid back in the open=
Ing. Failure to do so could
result in the range tipping or
personal Injury, To inspect the
anti-tip devlce, remove the
storage drawer and look to
see if the rear leg leveler fully
engages the slot in the
bracket.
_rf_l I I 'lllFl' I I I_
important: To insure safety for
yourself, family and home, please read
your Owner's Manual carefully. Keep it
handy for reference. Pay close attention
to Safety Sections. BE SURE your
appliance is installed and grounded by a
qualified technician.
* DO NOT leave children alone or
unattended near an appliance in user
. TEACH CHILDREN not to play with
controls or any part of the appliance,
and not to sit, climb or stand on the
door, or any other part of the appliance.
o
ti
CAUTION: NEVER STORE items
of interestto children on the
backguard or in cabinets above the
appliance, Children climbing on the
appliance could be seriously injured.
KEEP THIS book forlateruse,
NEVER USE your appliance for
warming or heating the room.
NEVER TRY to repair or replace any
part of the appliance unless instruc-
tions are given in this manual. All other
work should be done by a qualified
technician°
• ALWAYS KEEP combustible walt
coverings, curtains, dish cloths,
towels, pothotders, and other linens a
safe distance from the appliance.
• NEVER HEAT unopened food
containers. Pressure buildup can
cause the container to burst and cause
injury.
• NEVER LEAVE jars or cans of fat or
drippings In your oven°
• ALWAYS KEEP the oven and
surface unit areas free from things that
wilt burn. Food, wooden utensils, and
grease buildup could catch fire.
Plastic utensils could melt and canned
foods could explode. Your appliance
should never be used as a storage
area.
• ALWAYS KEEP your appliance clear
of things that will burn (gasoline and
other flammable vapors or liquids).
• NEVER TRY to clean a hot surface.
Some cleaners produce noxious
fumes, and wet cloths or sponges
could cause steam burns.
NEVER WEAR loose fitting clothing
when using your appliance.
NEVER USE a towel or other bulky
cloth as a potholder, and make sure
the potholder is dry. Moist potholders
and wet cloths or sponges could
cause steam burns. DO NOT let
potholders touch hot heating elements.
4
IMPORTANTSAFETY
INSTRUCTIONS
DO NOT touch cooktop zones,
surfaces near them, or interior oven
surfaces. These may be hot enough to
cause burns even though they are
dark in color. During and after use, do
not touch or let clothing or flammable
material contact the elements or hot
surfaces until they have had time to
coot. Other surfaces near the oven
vent openings, oven door and
window, and cooktop surfaces may
also be hot enough to cause burns_
• ONLY SOME kinds of glass or
ceramic cookware can be used for
cooktop cooking. Make sure the
cookware you choose to use is
designed for cooktop cooking without
breaking due to the sudden tempera-
ture change.
• ALWAYS USE care when touching
cooktop zones. They will retain heat
after the range has been turned off°
• NEVER BLOCK the oven air vent
behind the right rear element.
_,COOKWARE USED for cooktop
cooking should be flat on the bottom
and large enough to cover the heating
area being used. Undersized t._.ensils
expose the heating element and may
result in direct contact or {gnition of
clothing.
° NEVER LEAVE surface units
unattended at high settings. Boilovers
result in smoking or greasy spills
which could catch fire,
• NEVER cook on a broken cooktop;
cleaning solutions and spillage could
penetrate il and create the risk of
electrical shock or fire.
ALWAYS TURN utensil handles
inward and away from other surface
units to reduce the risk of burns,
ignition, unintended contact, and
spillage.
• PLACE OVEN RACKS in the
desired position while the oven is
cool If racks must be moved while
oven is hot, do not let pothogder
contact the hot oven_e{ement.
, AFTER BROILING, always take
the broiler pan and _id out of the
oven and clean there, Leftover
grease in the broiler pan could catch
fire the next time yoduse your oven.
• ALWAYS USE car_when opening
the oven door_ Let hot air and steam
escape before moving foods.
o NEVER USE aluminum foil to fine the
oven bottom. Improper use of foil could
result in the,risk of electrical shock and
fire.
5
iMPORTANTSAFETY
iNSTRUCTIONS
* CLEAN ONLY the parts listed in this
manual° Follow a!l cleaning
instructions. Be sure to remove broiler
pan and grid before the self-clean
cycle.
, NEVER TRY to clean utensils,
cookware, removable parts, or broiler
pan and grid in the selFclean cycle,
, DO HOT USE oven cleaners - No
commercial oven cleaner, or protective
coating of any kind, _hould be used in
or around any part of the oven,
, NEVER force the latch handle open
while oven is hot.
IMPORTANT SAFETY
NOTICEI
The California Safe Drinking
Water and Toxic Enforcement
Act requires the governor of
California to publish a list of
substances known to the state
to cause birth defects or other
reproductive harm and re.
quires businesses to warn
their customers of potential
exposure to such substances.
The fiberglass insulation in a
self-cleaning oven will give off
a very small amount of carbon
monoxide during the cleaning
cycle. Exposure can be mini-
mized by venting with an open
door or window or using a
ventilation fan or hood.
READ AND UNDERSTAND
THIS INFORMATION NOW!
Be sure everyone in your home
knows what to do In case of fire,
Never use water on a grease
fire; it will only spread the
flames,
¢OOKTOP GREASE FIREI
Never pick up a flaming pan,..
1. Turn off the surface elements.
2, Smother the flame with a tightly
fitting ltd. Use baking soda or a dry
chemical, foam, or hafon type
extinguisher.
OVEN FIRE:
Do not try to move the panl
t. Close the oven door and turn
controls off,
.
It fire continues, carefully open the
door, throw baking soda on the fire,
or u_e a dry chemical, foam, or
halon type extinguisher,
6
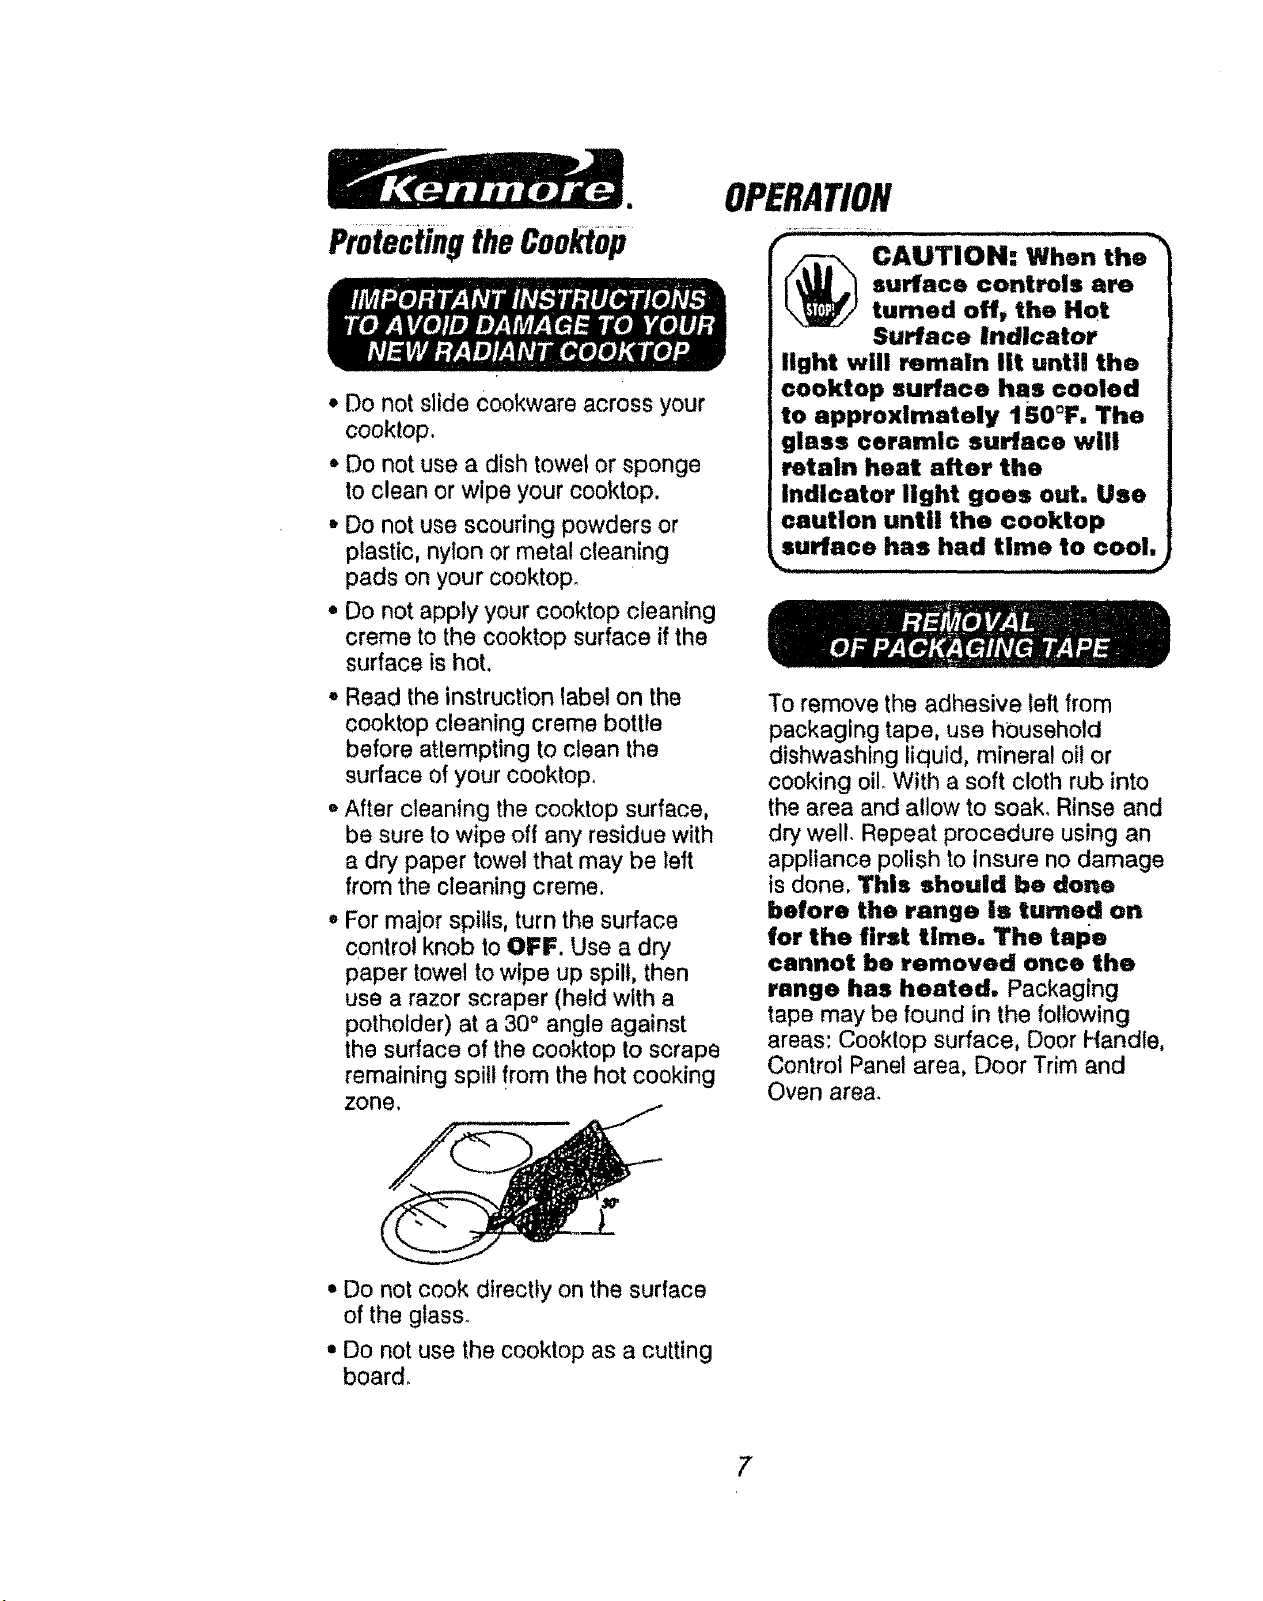
ProtectingtheCooktop
• Do not slide Cookware across your
cooktop.
• Do not use a dish towel or sponge
to clean or wipe your cooktop.
• Do not use scouring powders or
plastic, nylon or metal cleaning
pads on your cooktop.
• Do not apply your cooktop cleaning
creme to the cooktop surface if the
surface is hot.
• Read the instruction label on the
cooktop cleaning creme bottle
before attempting to clean the
surface of your cooktop,
• After cleaning the cooktop surface,
be sure to wipe off any residue with
a dry paper towel that may be left
from the cleaning creme.
o For major spills, turn the surface
control knob to OFF. Use a dry
paper towel to wipe up spill, then
use a razor scraper (held with a
potholder) at a 30° angle against
the surface of the cooktop to scrape
remaining spill !rom the hot cooking
zone,
OPERATION
JJJi ,m. ,
_ AUTION: When the
surface controls _re
turned off, the Hot
Surface Indicator
light will remain lit until the
cooktop surface has cooled
to approximately 150°F. The
glass ceramic surface will
retain heat after the
Indicator light goes out. Use
caution until the cooktop
surface has had time to cool.
To remove the adhesive left from
packaging tape, use household
dishwashing liquid, mineral oil or
cooking oil. With a soft cloth rub into
the area and allow to soak,. Rinse and
dry well. Repeat procedure using an
appliance polish to insure no damage
is done. This should be done
before the range Is turned on
for the first time. The tape
cannot be removed once the
range has heated. Packaging
tape may be found in the following
areas: Cooktop surface, Door Handle,
Control Panel area, Door Trim and
Oven area.
• Do not cook directly on the surface
of the glass.
• Do not use the cooktop as a cutting
board.
OPERATION
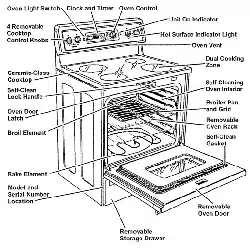
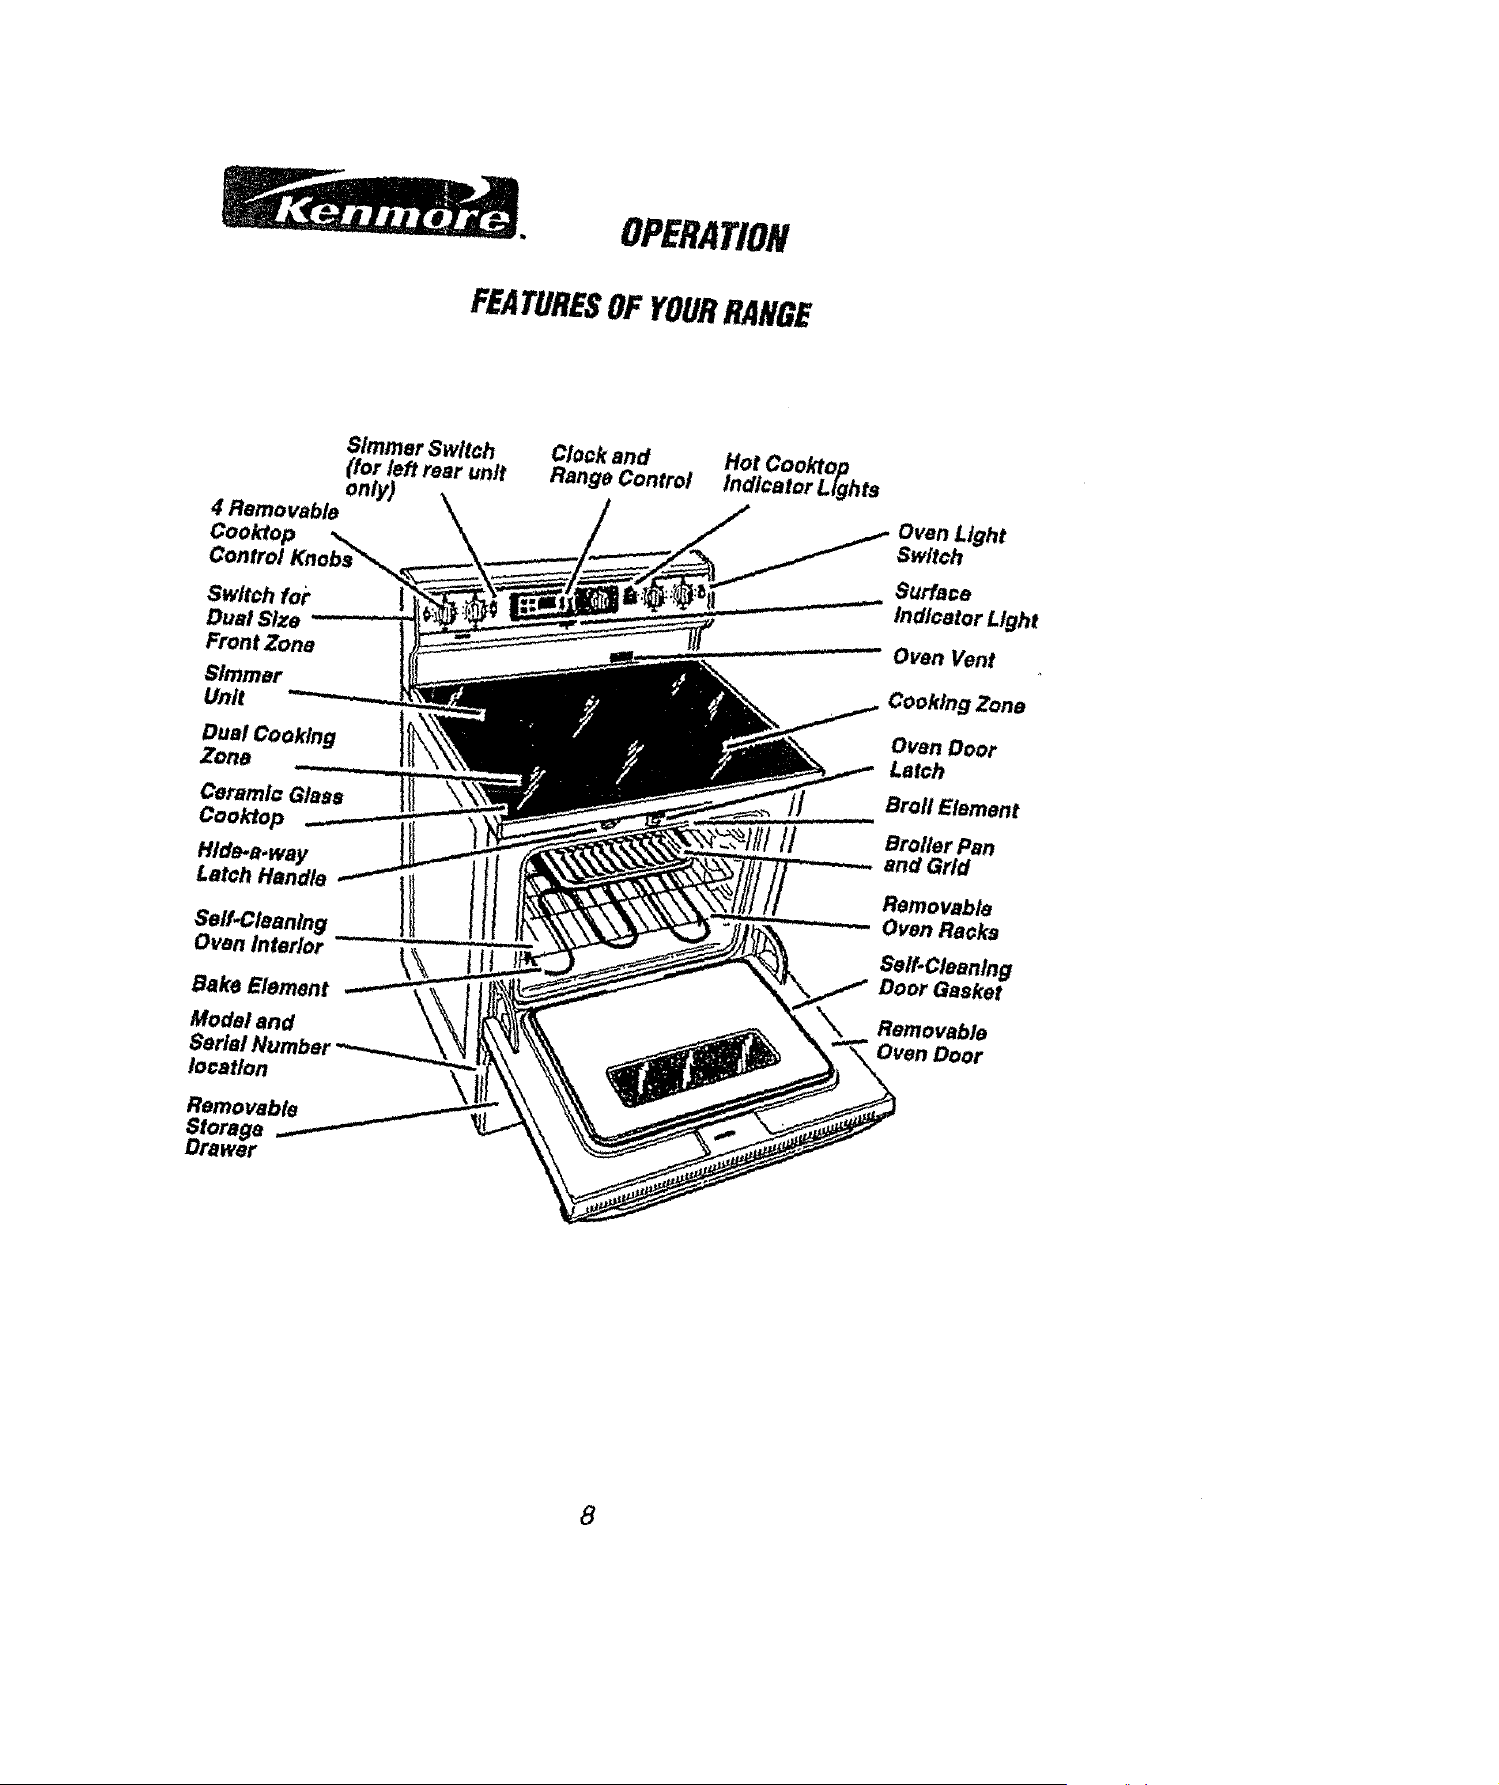
FEATURESOFYOURRANGE
4 Removable
Simmer Switch
(for left rear unit
only)
Switch fop
Dual Size
Front Zone
Simmer
Unit
Dual Cooking
Zone
Ceramic Glass
Cooktop
Hide-a.way
LatchHandla Ii
Self.Cleaning _ _ _ . _
Oven Interior
Bake Element
Model and
location
Removable
_taorage
war
Clock and
Range Control
Hot Cool(top
indicator Lights
Oven Light
Switch
Surface
Indicator Light
Oven Vent
Cooking Zone
Oven Door
Latch
Broil Element
Broiler Pan
and Grid
Removable
Oven RaGka
Self.Cleaning
Door Gasket
Removable
Oven Door
#
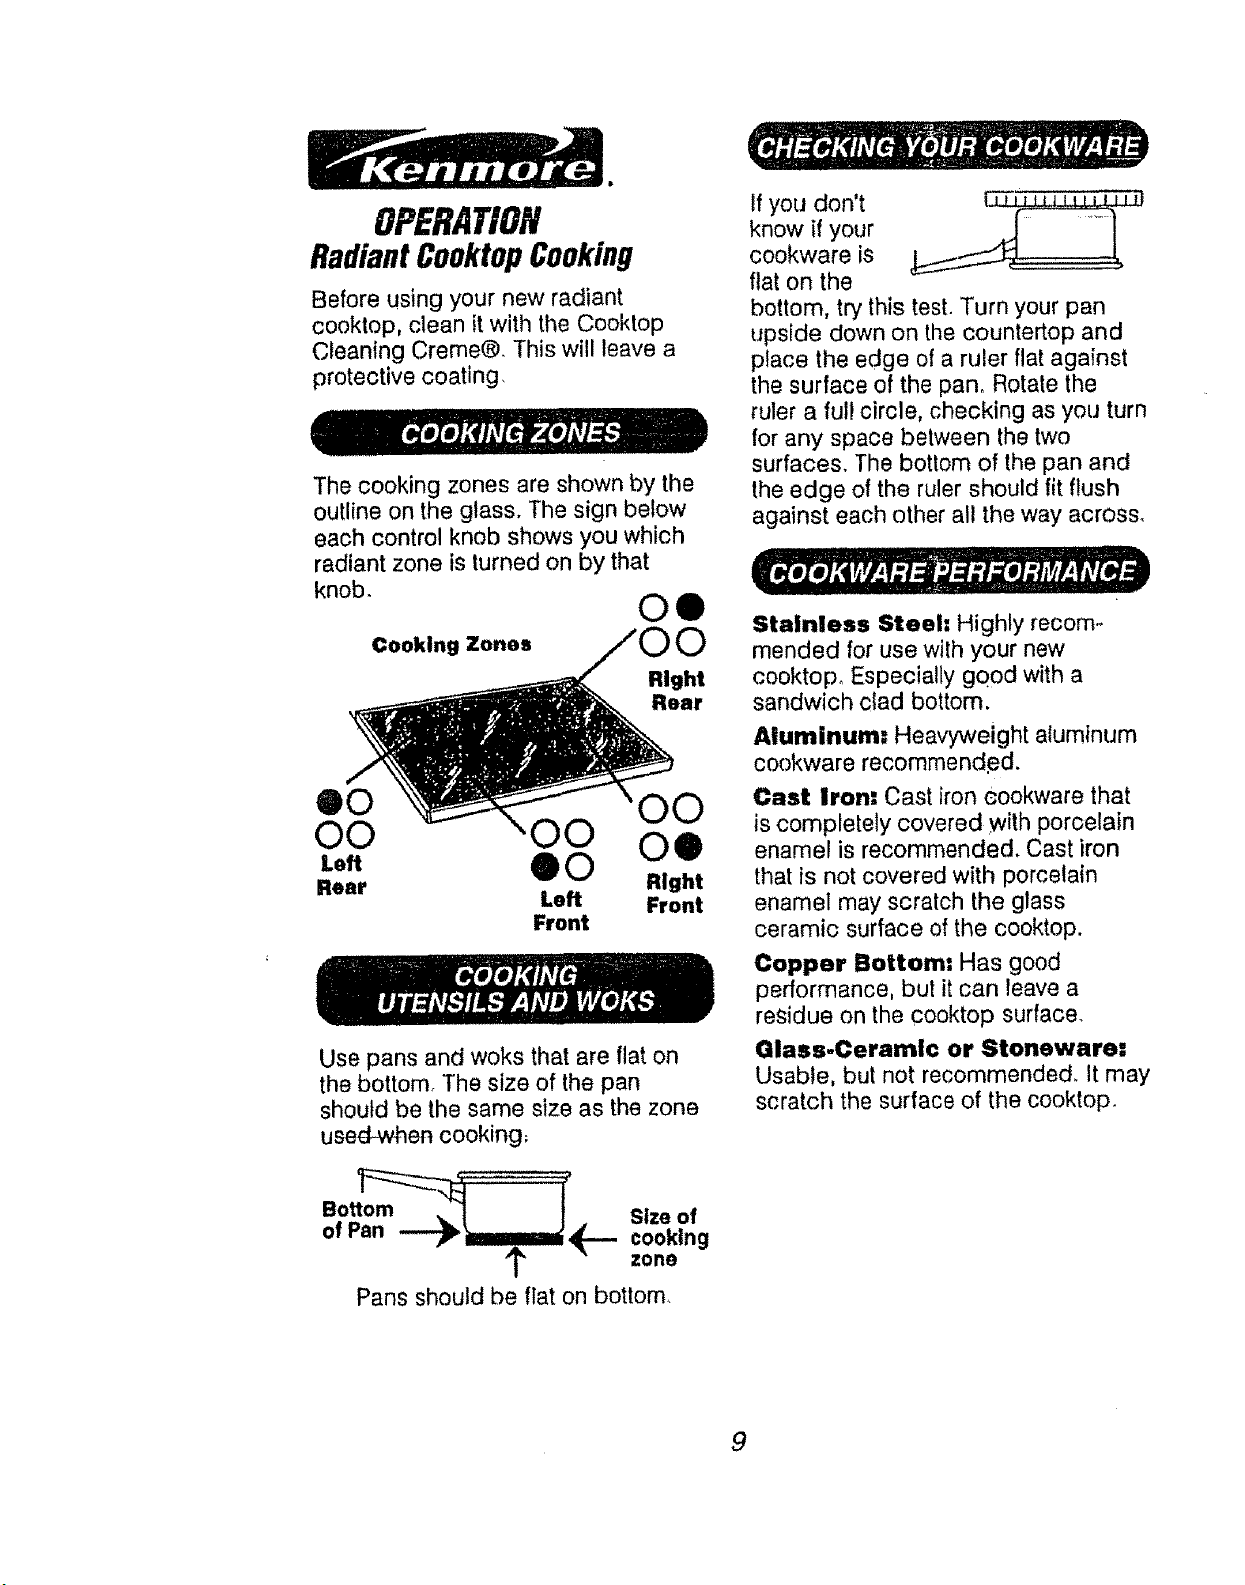
OPERATION
Radiant CooktopCooking
Before using your new radiant
cooktop, clean it with the Cooktop
Cleaning Creme®. This will leave a
protective coating.
The cooking zones are shown by the
outline on the glass. The sign below
each control knob shows you which
radiant zone is turned on by that
knob.
O@
Cooking Zones
Right
Rear
eo oo
O0 O0 oe
"°" @0 .ig,,t
Rear Loft Front
Front
Use pans and woks that are flat on
the bottom The size of the pan
should be the same size as the zone
used-when cooking,
tf you don't F_', t m_t,,, J
know if your
cookware is
flat on the
bottom, try this test. Turn your pan
upside down on the countertop and
place the edge of a ruler flat against
the surface of the pan. Rotate the
ruler a ful! circle, checking as you turn
for any space between the two
surfaces. The bottom of the pan and
the edge of the ruler should fit flush
against each other al! the way across.
Stainless Steel: Highly recom-
mended for use with your new
cooktop. Especially good with a
sandwich clad bottom.
Aluminum: Heavyweight aluminum
cookware recomrnend,ed.
Cast iron: Cast iron eookware that
is completely covered with porcelain
enamel is recommended. Cast iron
that is not covered with porcelain
enamel may scratch the glass
ceramic surface of the cooktop.
Copper Bottom: Has good
performance, but it can leave a
residue on the cooktop surface.
Glass-Ceramic or Stoneware:
Usable, but not recommended. It may
scratch the surface of the cooktop.
Size of
cooking
zone
Pans should be flat on bottom
9
OPERATION
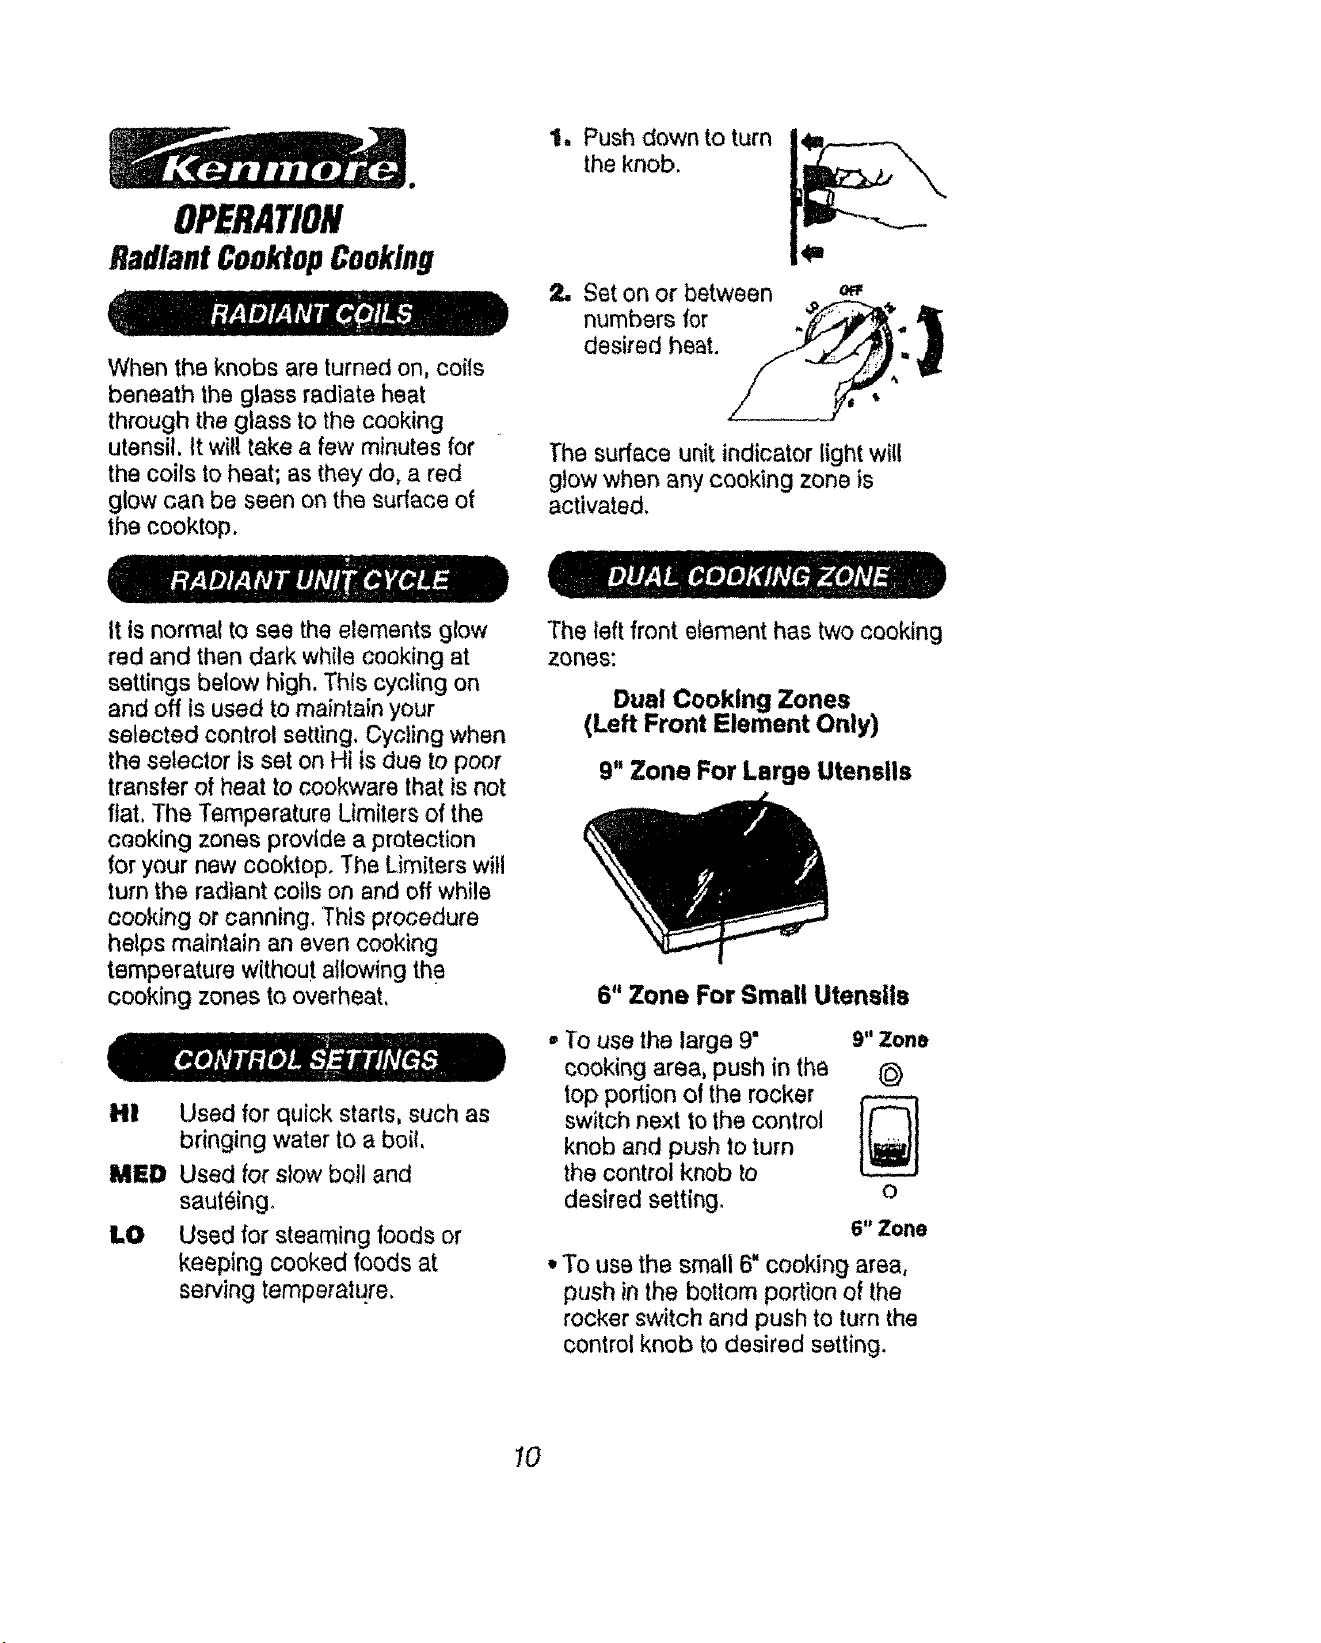
1, Push down to turn
the knob.
Radiant ConktopCooking
When the knobs are turned on, coils
beneath the glass radiate heat
through the glass to the cooking
utensil. It will take a few minutes for
the coils to heat; as they do, a red
glow can be seen on the surface of
the cooktop.
Set on or between
numbers for )
desired heat.
The surface unit indicator light will
glow when any cooking zone is
activated,
It is normal to see the elements glow
red and then dark while cooking at
settings below high, This cycling on
and off is used to maintain your
selected control setting, Cycling when
the selector is set on Hi is due to poor
transfer of heat to cookware that is not
flat. The Temperature Ltmiters of the
cooking zones provide a protection
for your new cooktop. The Limiters will
turn the radiant coils on and off while
cooking or canning, This procedure
helps maintain an even cooking
temperature without allowing the
cooking zones to overheat.
HI Used for quick starts, such as
bringing water to a boil.
MED Used for slow boll and
saut_ingo
LO Used for steaming foods or
keeping cooked foods at
serving temperature,
The left front element has two cooking
ZOneS:
Dual Cooking Zones
(Left Front Element Only)
9" Zone For Large Utensils
6" Zone For Small Utensils
• To use the large 9" 9" Zone
cooking area, push in the
top portion of the rocker
switch next to the control
knob and push to turn
the control knob to
desired setting, o
6" Zone
• To use the small 6" cooking area,
push in the bottom portion of the
rocker switch and push to turn the
control knob to desired setting.
10
OPF.RATION
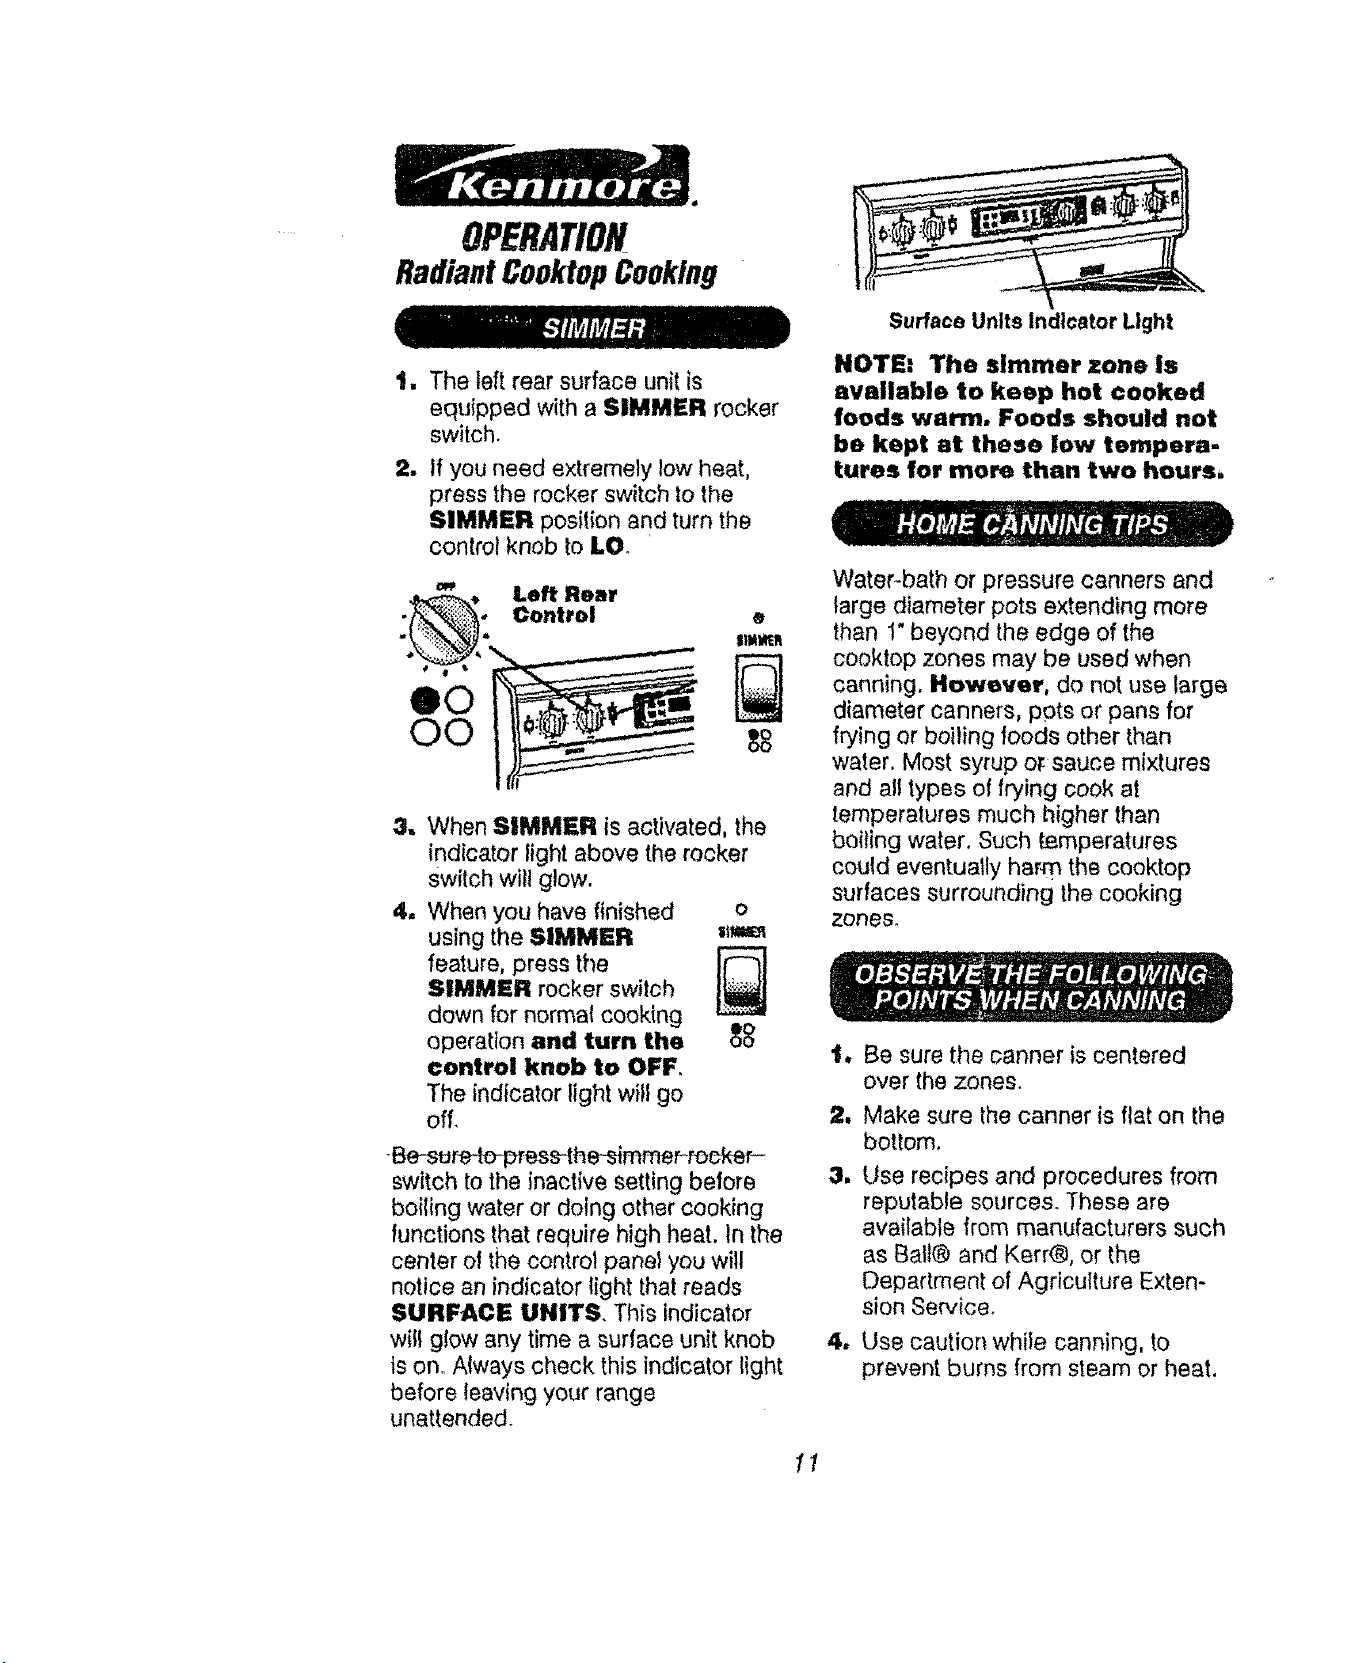
Radiant CooktopCooking
Surface Units indicator Light
IU
1
The left rear surface unit is
equ{pped with a SIMMER rocker
switch.
If you need extremely low heat,
press the rocker switch to the
SIMMER position and turn the
control knob to LO
•, Left Rear
.._*. Control
eo
oo
tt
J
When SIMMER is activated, the
indicator light above the rocker
Switch will glow.
When you have finished o
using the SIMMER ilw
feature, press the
SIMMER rocker switch
down for normal cooking
operation and turn the _
control knob to OFF
The indicator light will go
off.
-Be-sure-lol_resHhe--simmer-rocker-
switch to the inactive setting before
boiling water or doing other cooking
functions that require high heat. In the
center of the control panel you will
notice an indicator light that reads
SURFACE UNITS, This indicator
wifl glow any time a surface unit knob
is on_ Always check this indicator light
before leaving your range
unattended.
NOTE: The simmer zone is
available to keep hot cooked
foods warm. Foods should not
be kept at these low tempera-
tures for more than two hours,
Water-bath or pressure canners and
large diameter pots extending more
than 1" beyond the edge of the
cooktop zones may be used when
canning, However, do not use large
diameter canners, pots or pans for
frying or boiling foods other than
water. Most syrup or: sauce mixtures
and all types of frying cook at
temperatures much higher than
bailing water. Such temperatures
could eventually harm the cooktop
surfaces surrounding the cooking
zones.
'1, Be sure the canner is centered
over the zones.
2, Make sure the canner is flat on the
bottom,
3, Use recipes and procedures from
reputable sources. These are
available from manufacturers such
as Ball@ and Kerr@, or the
Department of Agriculture Exten-
sion Service.
4, Use caution while canning, to
prevent burns from steam or heat.
I1
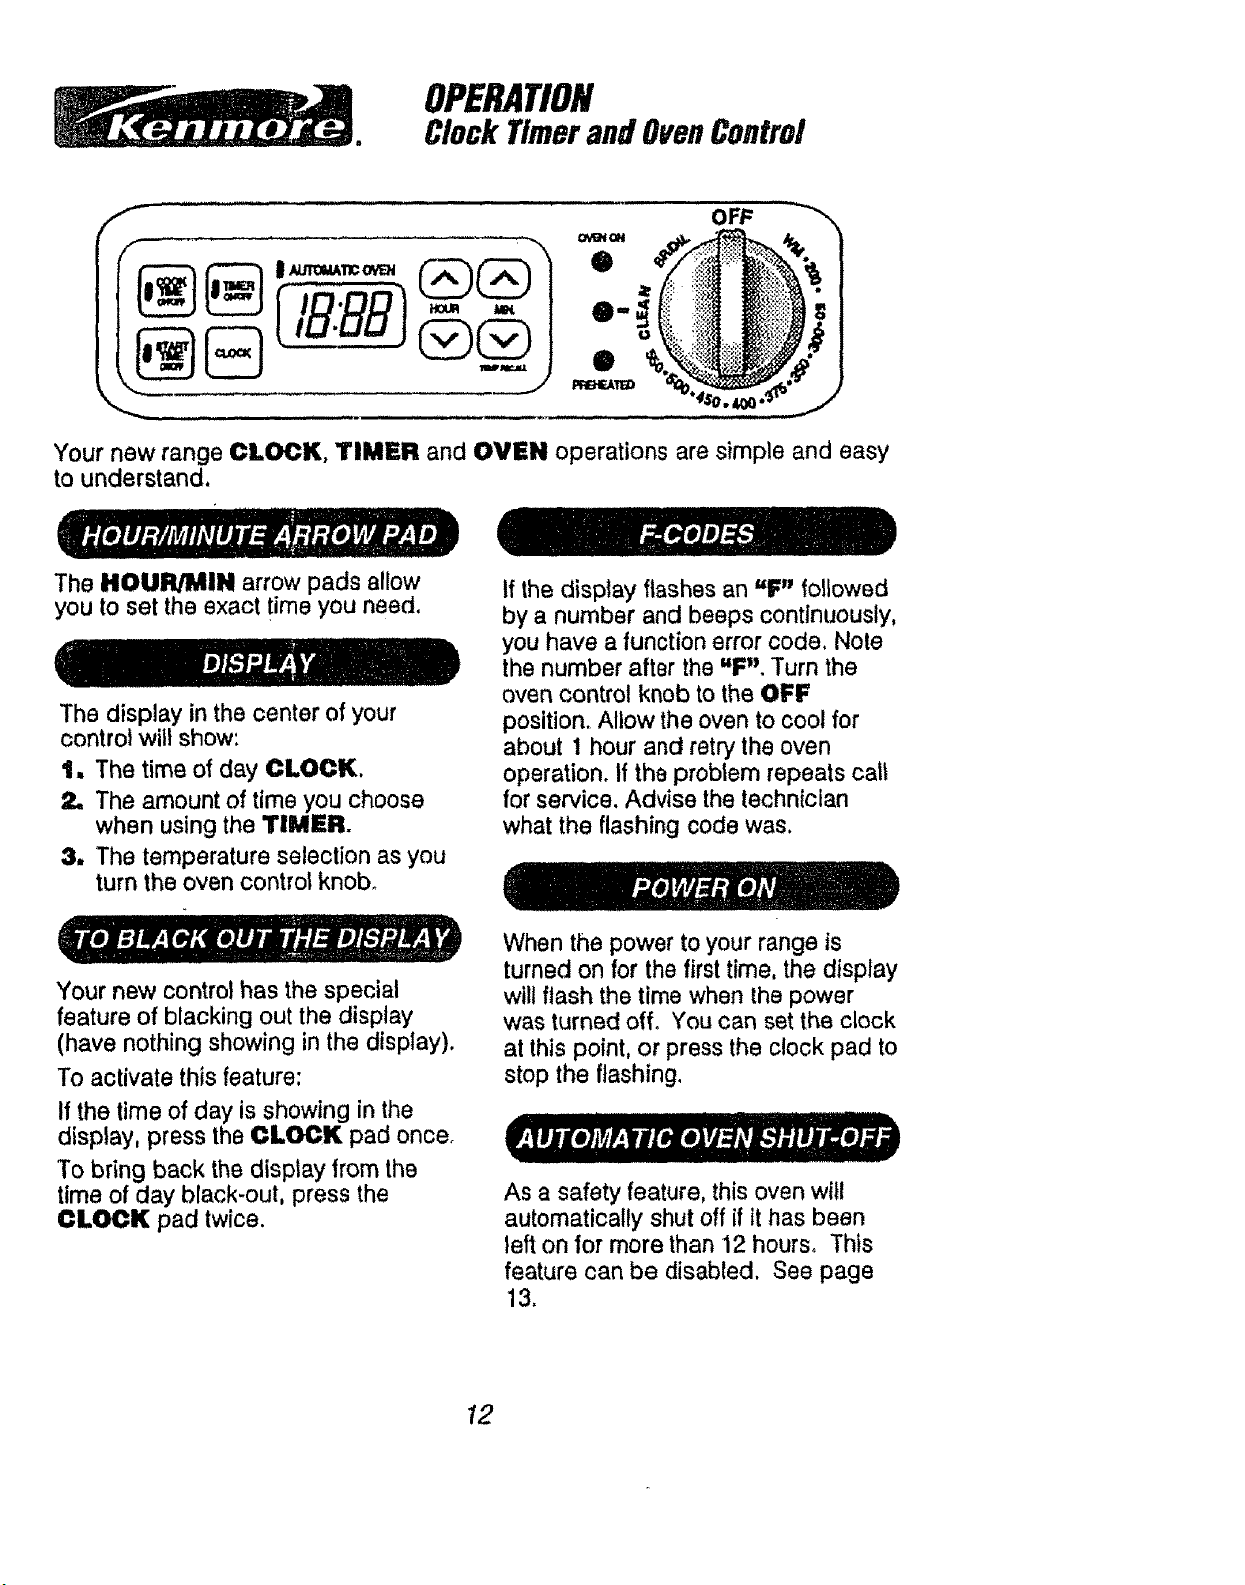
OPERATION
Clock Timerand OvenControl
80 (/8.gB) "-
,.., j t_,_rJ
i
Your new range CLOCK, TIMER and OVEN operations are simple and easy
to understand.
The HOUR/MIN arrow pads allow
you to set the exact time you need.
The display in the center of your
control wilt show:
1, The time of day CLOCK.
2, The amount of time you choose
when using the TIMER.
3, The temperature selection as you
turn the oven control knob°
If the display flashes an "F" followed
by a number and beeps continuously,
you have a function error code. Note
the number after the "F". Turn the
oven control knob to the OFF
position. Allow the oven to cool for
about 1 hour and retry the oven
operation. If the problem repeats call
for service. Advise the technician
what the flashing code was.
Your new control has the special
feature of blacking out the display
(have nothing showing in the display).
To activate this feature:
If the time of day is showing in the
display, press the CLOCK pad once,
To bring back the display from the
time of day black-out, press the
CLOCK pad twice.
When the power to your range is
turned on for the first time, the display
wilt flash the time when the power
was turned off. You can set the clock
at this point, or press the clock pad to
stop the flashing,
As a safety feature, this oven wi!l
automatically shut off if it has been
left on for more than 12 hours. This
feature can be disabled. See page
13.
12
r__ m
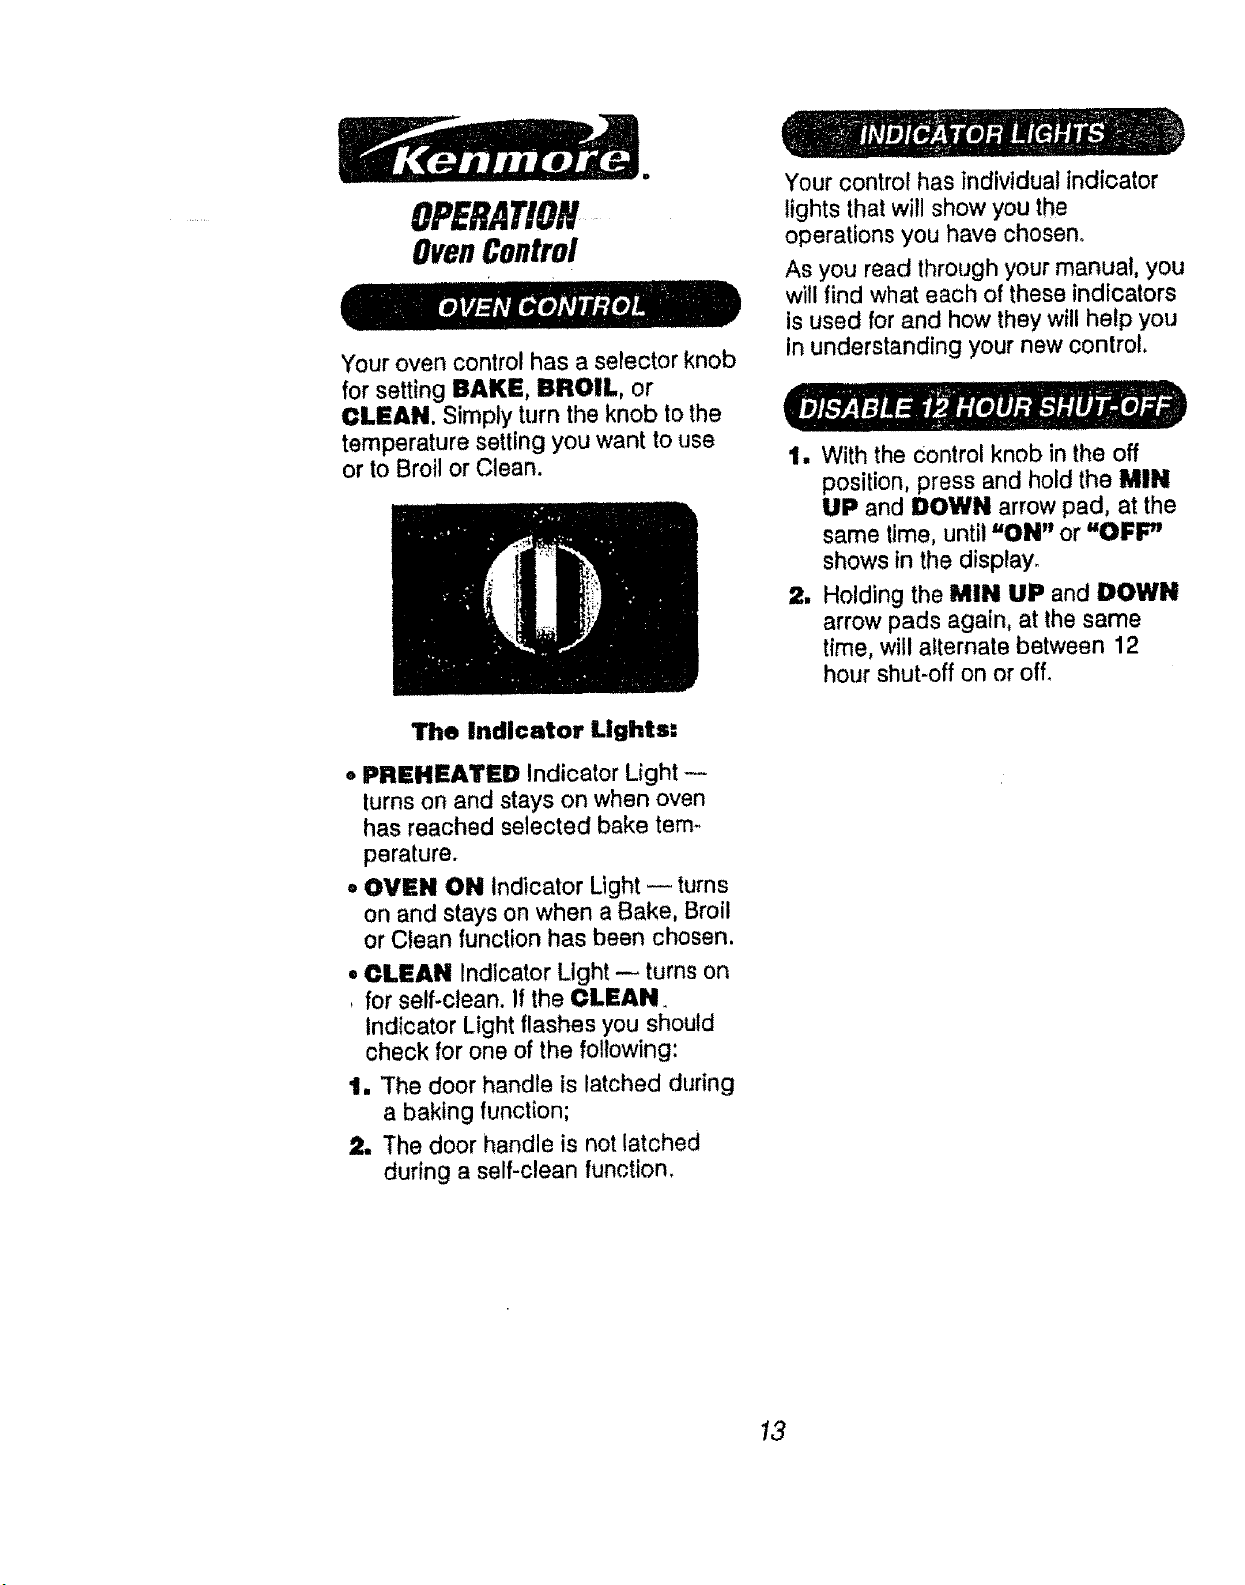
OPERATION
OvenControl
Your oven control has a selector knob
for setting BAKE, BROIL, or
CLEAN. Simply turn the knob to the
temperature setting you want to use
or to Broil or Clean.
The Indicator Lights:
o PREHEATED Indicator Light
turns on and stays on when oven
has reached selected bake tem_
perature.
• OVEN ON Indicator Light -- turns
on and stays on when a Bake, Broil
or Clean function has been chosen,
• CLEAN Indicator Light -- turns on
, for self-clean. If the CLEAN_
Indicator Light flashes you should
check for one of the following:
t. The door handle is latched during
a baking function;
2. The door handle is not latched
during a self-clean function.
Your contro! has individual indicator
lights that will show you the
operations you have chosen°
As you read through your manual, you
will find what each of these indicators
is used for and how they will help you
In understanding your new control,
1. With the Control knob in the off
position, press and hold the MIN
UP and DOWN arrow pad, at the
same time, until "ON" or "OFF"
shows in the display.
2. Holding the MIN UP and DOWN
arrow pads again, at the same
time, will alternate between 12
hour shut-off on or off.
13
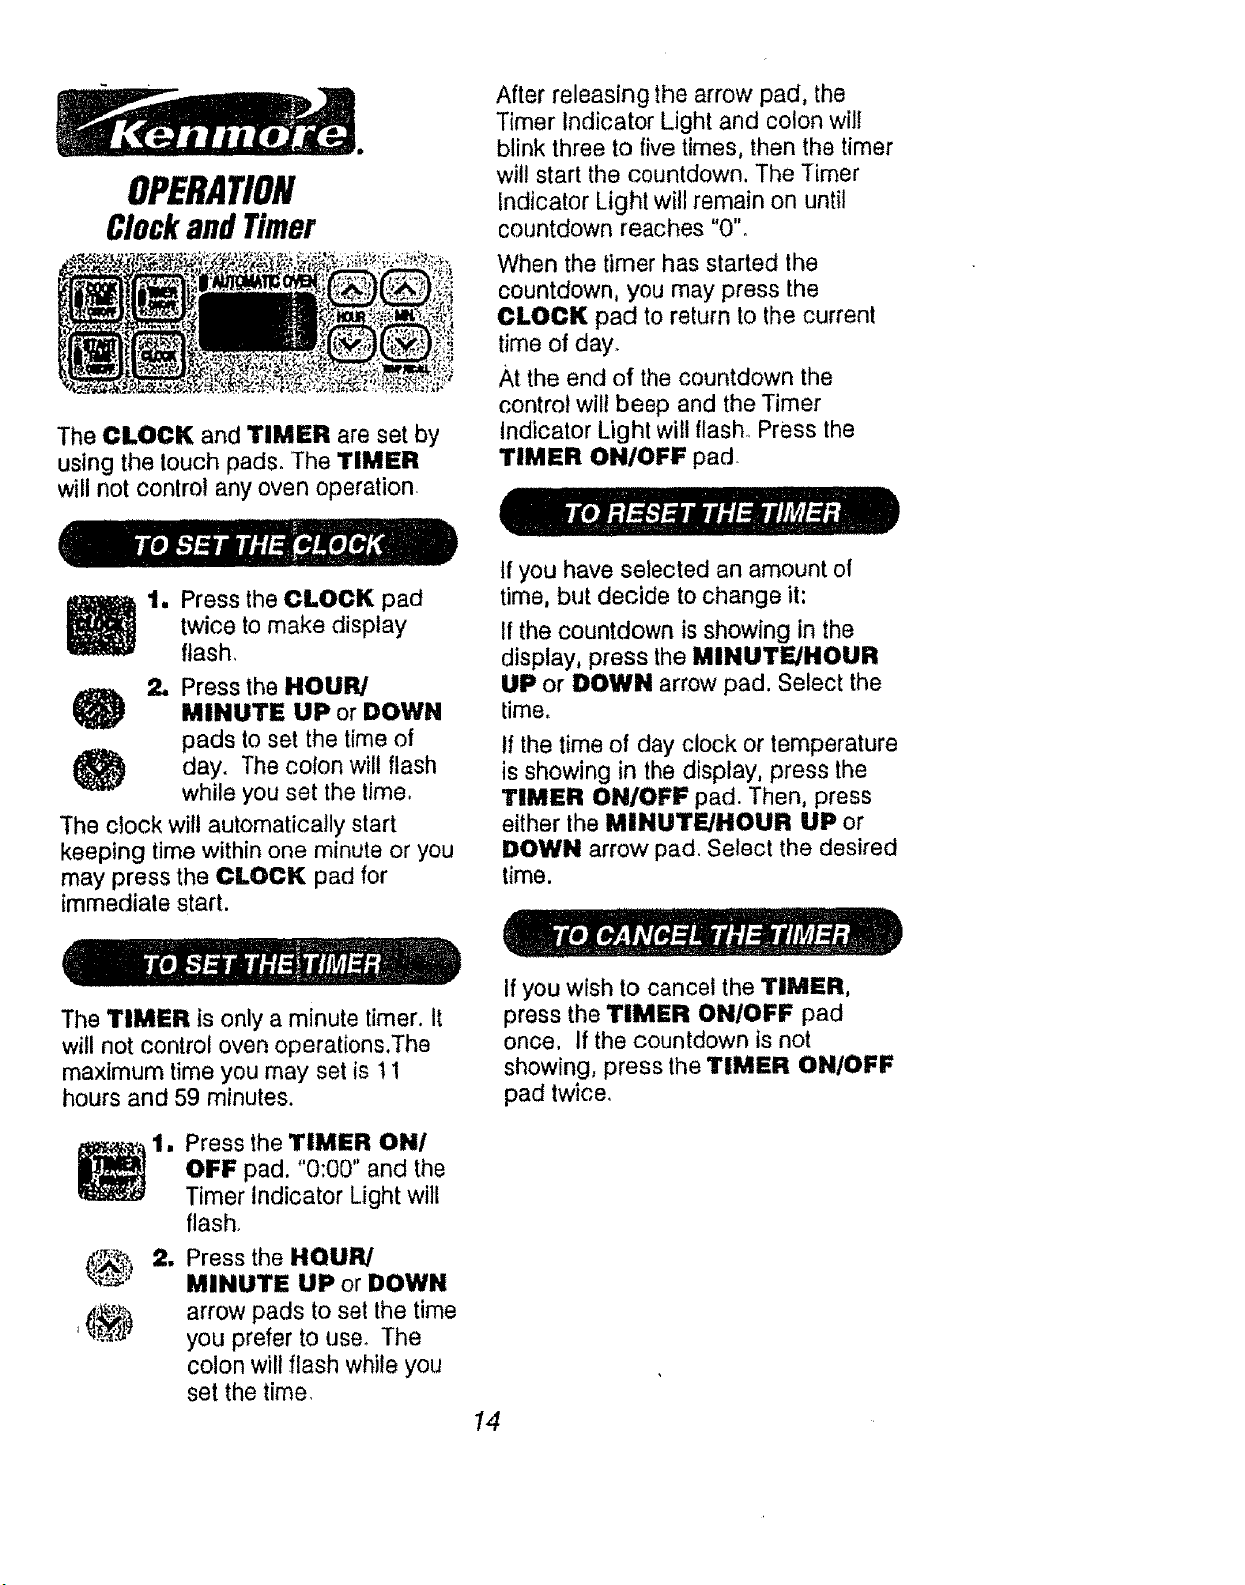
OPERATION
ClockandTimer
The CLOCK and TIMER are set by
using the touch pads. The TIMER
will not control any oven operation
After releasing the arrow pad, the
Timer Indicator Light and colon wil!
blink three to five times, then the timer
wil! start the countdown. The Timer
Indicator Light will remain on until
countdown reaches "0"°
When the timer has started the
countdown, you may press the
CLOCK pad to return to the current
time of day+
At the end of the countdown the
control will besp and the Timer
Indicator Light will flash, Press the
TIMER ONIOFF pad,
1. Press the CLOCK pad
twice to make display
flash,
2, Press the HOURI
MINUTE UP or DOWN
pads to set the time of
day. The colon will flash
while you set the time.
The clock will automatically start
keeping time within one minute or you
may press the CLOCK pad for
immediate start.
tf you have selected an amount of
time, but decide to change it:
If the countdown is showing in the
display, press the MINUTE/HOUR
UP or DOWN arrow pad. Select the
time,
tf the time of day clock or temperature
is showing in the display, press the
TIMER ON/OFF pad. Then, press
either the MINUTE/HOUR UP or
DOWN arrow pad, Select the desired
time.
The TIMER is only a minute timer. It
will not control oven operations.The
maximum time you may set is 11
hours and 59 minutes.
1
w
Press the TIMER ON/
OFF pad. "0:00" and the
Timer indicator Light will
flash.
Press the HOURI
MINUTE UP or DOWN
arrow pads to set the time
you prefer to use, The
colon will flash while you
set the time,
If you wish to cancel the TIMER,
press the TIMER ON/OFF pad
once, If the countdown is not
showing, press the TIMER ONIOFF
pad twice,
14
OPERATION
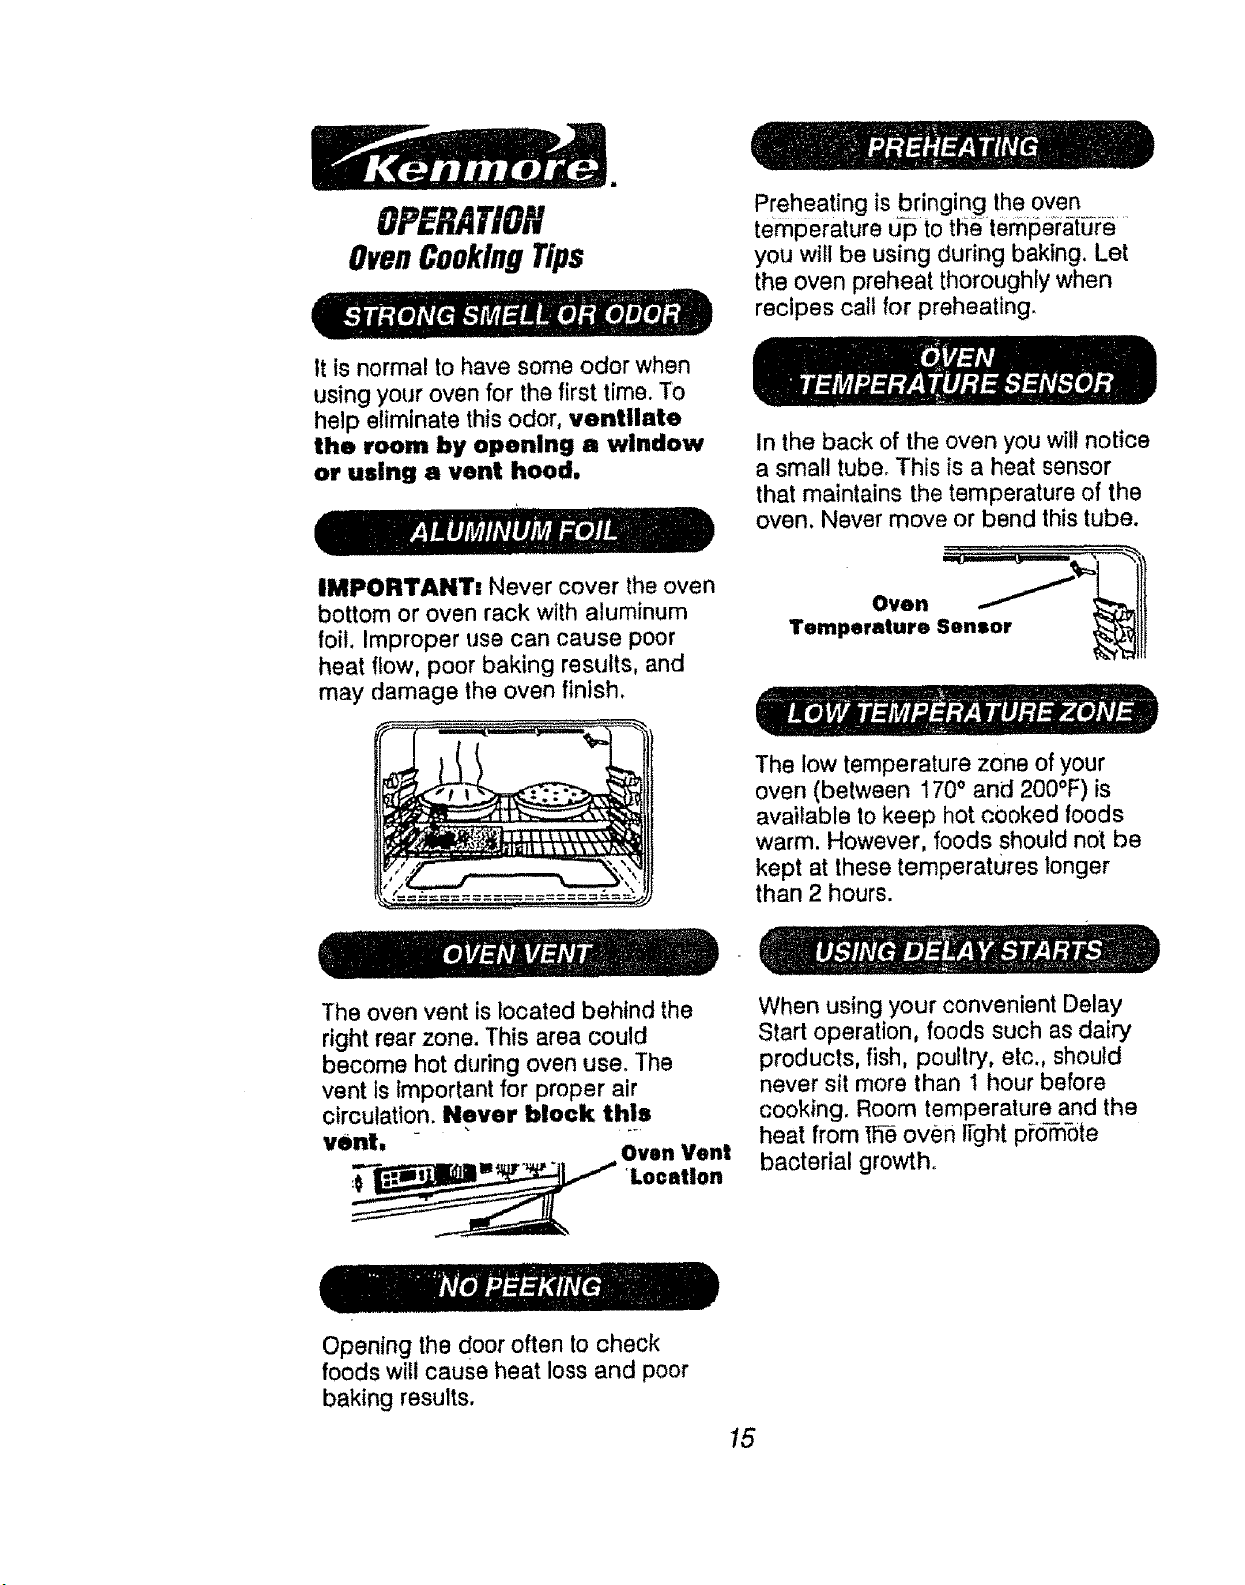
OvenCookingTips
It is normal to have some odor when
using your oven for the first time. To
help eliminate this odor, ventilate
the room by opening a window
or using a vent hood.
Preheating is bringing the oven
temperature u-p to tl_e temlserature
you will be using during baking. Let
the oven preheat thoroughly when
recipes call for preheating.
In the back of the oven you will notice
a small tube° This is a heat sensor
that maintains the temperature of the
oven. Never move or bend this tube.
IMPORTANT: Never cover the oven
bottom or oven rack with aluminum
foil. Improper use can cause poor
heat flow, poor baking results, and
may damage the oven finish.
Oven
Temperature Sensor
The low temperature zone of your
oven (between 170 ° and 200°F)is
available to keep hot cooked foods
warm. However, foods should not be
kept at these temperatures longer
than 2 hours.
The oven vent is located behind the
right rear zone. This area could
become hot during oven use. The
vent Is important for proper air
circulation. Never block this
vent, . Oven Vent
Location
When using your convenient Delay
Start operation, foods such as dairy
products, fish, poultry, etc., should
never sit more than t hour before
cooking. Room temperature and the
heat from _q_ oven light p_d_nSte
bacterial growth.
Opening the door often to check
foods will cause heat loss and poor
baking results,
15
OPERATION
OvenCookingTips
GLASS, DARK NON-STICK OR
DARKENED BY AGE BAKE-
WARE, absorbs heat and can be
used for yeast breads, pie crust or
foods that need a brown crust° The
oven temperature, when using these
pans, should be reduced by 25°F.
The Oven Temperature Sensor at
the back of the oven continuously
senses and controls the tempera-
ture inside the oven. To keep a con-
stant set temperature, the elements
wilt cycle or turn on and off during
cooking
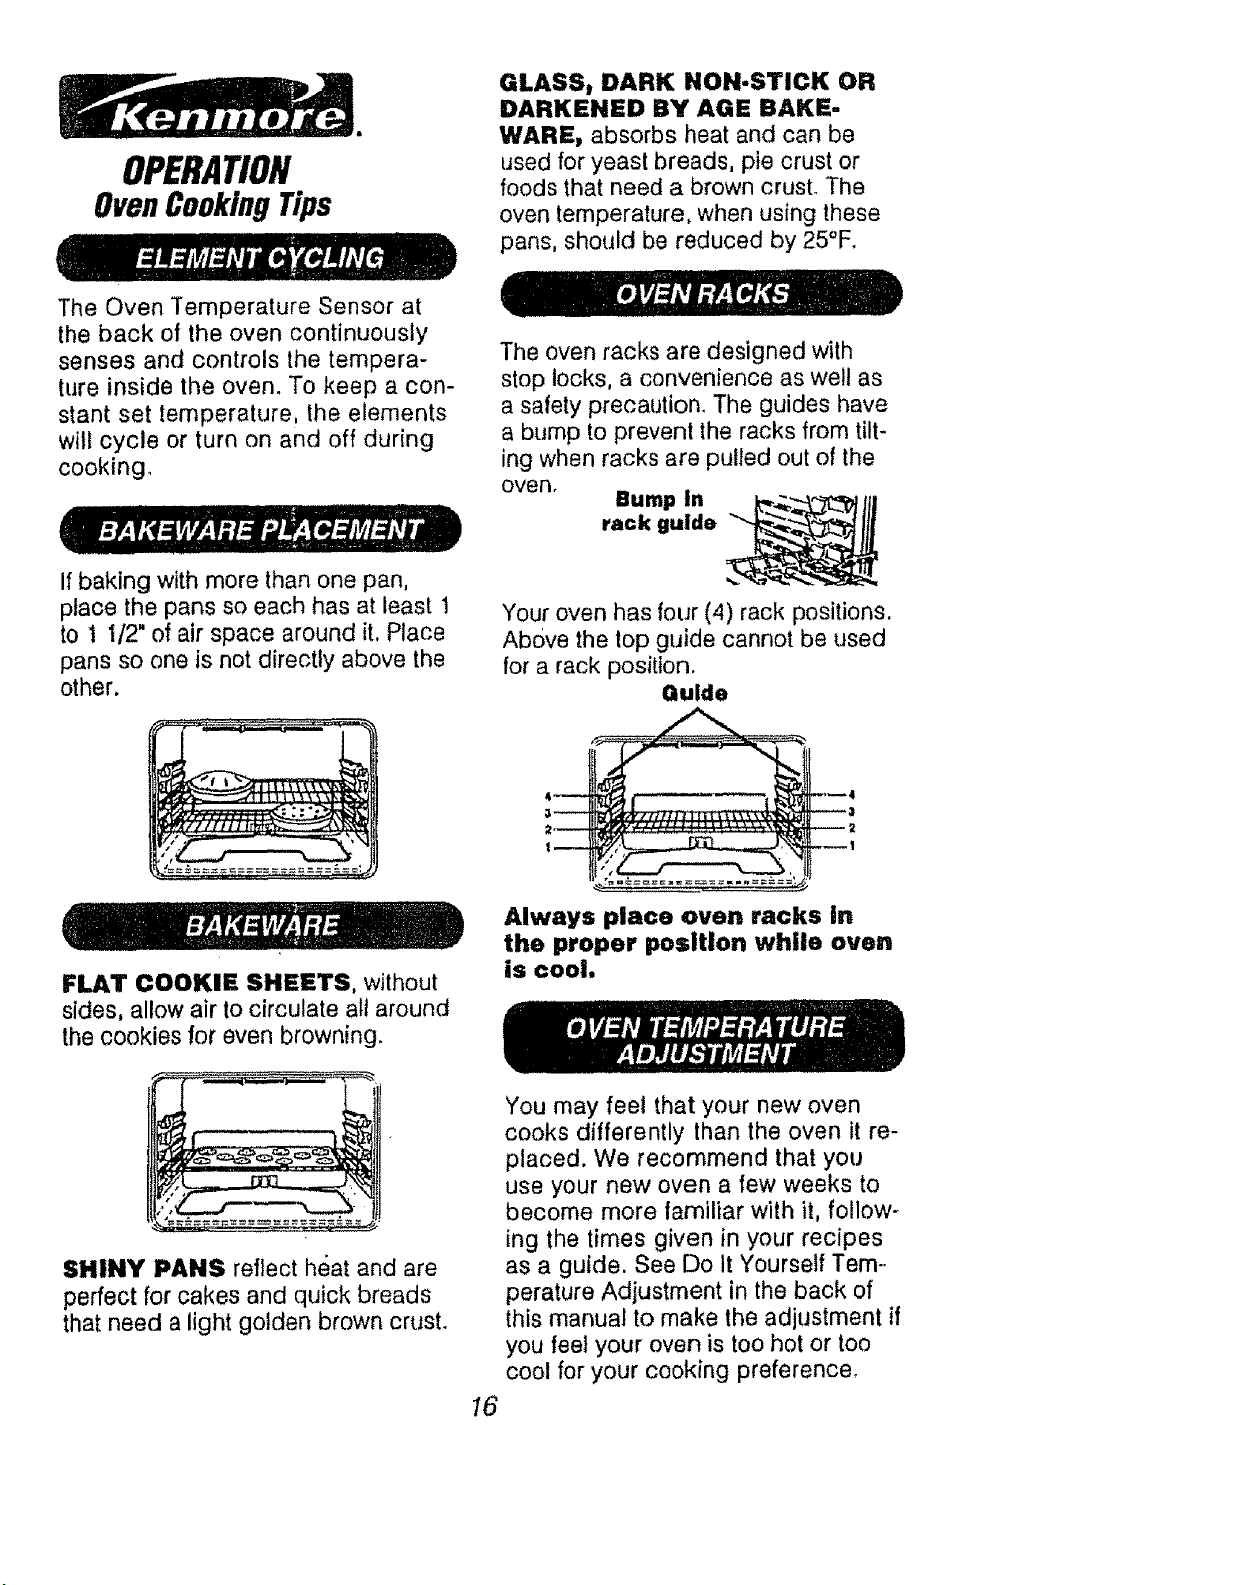
If baking with more than one pan,
place the pans so each has at least 1
to ! I/2" of air space around it, Place
pans so one is not directly above the
other.
FLAT COOKIE SHEETS, without
sides, allow air to circulate all around
the cookies for even browning.
The oven racks are designed with
stop locks, a convenience as wel! as
a safety precaution_ The guides have
a bump to prevent the racks from tilt-
ing when racks are pulled out of the
oven,
Bump in
rack guide
Your oven has four (4) rack positions.
Above the top guide cannot be used
for a rack position.
Guide
Always place oven racks in
the proper posltlon while oven
is cool.
SHINY PANS reflect heat and are
perfect for cakes and quick breads
that need a light golden brown crusL
16
You may feet that your new oven
cooks differently than the oven it re-
placed. We recommend that you
use your new oven a few weeks to
become more familiar with it, follow-
ing the times given in your recipes
as a guide. See Do It Yourself Tem-
perature Adjustment in the back of
this manual to make the adjustment if
you feet your oven is too hot or too
cool for your cooking preference.
OPERATION
OvenCookingTips
5, Whenthe set amountof cook'limehas
reachedzero,a tone will sound and
the COOK TIME and OVEN ON
indicator lights will blinkuntil the oven
controlknob is turned to the OFF po-
sition.
t. Turn the OVEN CONTROL KNOB
to selected temperature from WM to
550°F. As the knob turns lhe control
display will show the changing tem-
peratures. When the display shows
your selected lemperature release the
control knob. The temperature will re.
main in the display for 5 seconds then
return to the time of day. To recall the
temperature display press the minute
down arrow pad.
2. The "OVEN ON" indicator lighl will
glow,
3, When the oven has reached the se-
lected temperature, a series of short
tones will sound, and the "PRE-
HEATED" and "OVEN ON" indica-
tor lights will glow,
4. The "PREHEATED" and "OVEN
ON" indicator lights will remain on un-
til baking is complete and the conlrol
knob is turned to the OFF position,
t, Make sure the correct time of day is
showing in the display.
2. Press the COOK TIME ON/OFF
pad.
3, P_essthe HOUR andfo_MINUTE
UP or DOWN arrow pad, to set how
long you want foods to cook.
4, Turn the Oven Conlro! Knob to the
baking temperature you want to use.
The Oven On and Automatic Oven
indfcalor lights will glow. When the
temperature reaches the temperature
you have selected, the Preheated
indicator light will glow.
t, Make sure lhe correct lime of day is
showing in the display.
2. Press the COOK TIME ON/OFF pad.
3, Press the HOUR and/or MINUTE UP
or DOWN arrow pad, Io set how long
you want foods to cook.
4, Press the START TIME ON/OFF
pad.
5, Press the HOUR and/or MINUTE UP
or DOWN arrow pad to set the time of
day you want lhe oven to lurn on.
6. Turn the OVEN CONTROL KNOB to
the baking temperature you want to
use_'The oven on indicator light wil!
blink when the AUTOMATIC OVEN
times are set, but a temperature is not
selected,
7. The START TIME and AUTOMATIO
OVEN indicator lights will glow.
8, When lhe start lime is reached the oven
wilt aulomalically turn on and start
cooking.
9, When the temperature inside the oven
reaches the selected temperature the
PREHEATED indicator light wil! glow.
10, When baking is finished the Cooktime
and Oven On (ndicator Lighls will blink
until the control knob ts turned off.
NOTE:, Afler_pressingthe-Oook Time-or---
Starl Time pads, if you hesitate before
pressing the Hour/Minute pads, the display
will blink 5 times and return to the time of
day. If lhis happens just press again the
Time pad you were setting to continue.
Cook Time, Clock, Timer, Start Time
can be recalled by pressing the desired
pad once. Press the UP or DOWN arrow
pads if a time change is desired.
17

OPERATION
Broiling
Broiling is cooking by direct heat
from the upper element, The oven
door should remain open to the broil
stop position during broiling,
It Is not necessary to preheat the
oven when broiling° Use the broiler
pan and grid that came with your
range. Both are designed for proper
drainage of fat and liquids,
iiiiiiiiiii , i iiiiiirl , i
lf foil is used It must
be molded tightly to
the grid and slits cut
into the foil to match
those of the grid. This
allows fats and liquids to
drain into the broiler pan,
preventing fire and
excessive smoke.
Always remove the pan and
grid from the oven.
Storing or forgetting
a soiled broiler pan
in the oven is a potential
smoke or fire hazard.
b_ ..... -,d
The U.S, Department of Agriculture
notes that meat cooked rare is
popular, but meat cooked to only
140°F (rare) means that some food
poisoning organisms may survive,
The closer you place foods to the
broil element, the faster foods brown
on the outside yet remain red to pink
in the center.
Moving meats away from the element
will allow the meat to cook to the
center while browning on the outside.
Cook side 1 at least 2 minutes longer
than side 2. If your oven is connected
to 208 yolts, you may want to use a
higher rack position and/or broil
foods longer.
The size, weight, thickness, starting
temperature and your preference of
the doneness of the meat will affect
broiling. This chart is based on meats
at refrigerator temperature°
FOOD
Steak1" thick
Ground beef
pattJes
1"thick
Pork Chopa.1/2"
thick
_lah_!!!!ele)
Chicken (plecee)
RACK
POSITION
3
3
3
ii
s
!1
2
TOTAL
TIME (M!N.)
9-11
18-18
i
27-2g
iiii i
11-13
45.55
tD
2,
3.
Set the OVEN CONTROL
KNOB to BROIL.
The "OVEN ON" indicator light
will glow.
When broiling is finished, turn the
OVEN CONTROL KNOB to the
"OFF" position.
18
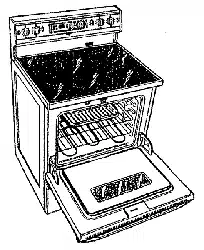
$8/foC/eam'ngCycle
CAREANDCLEANING
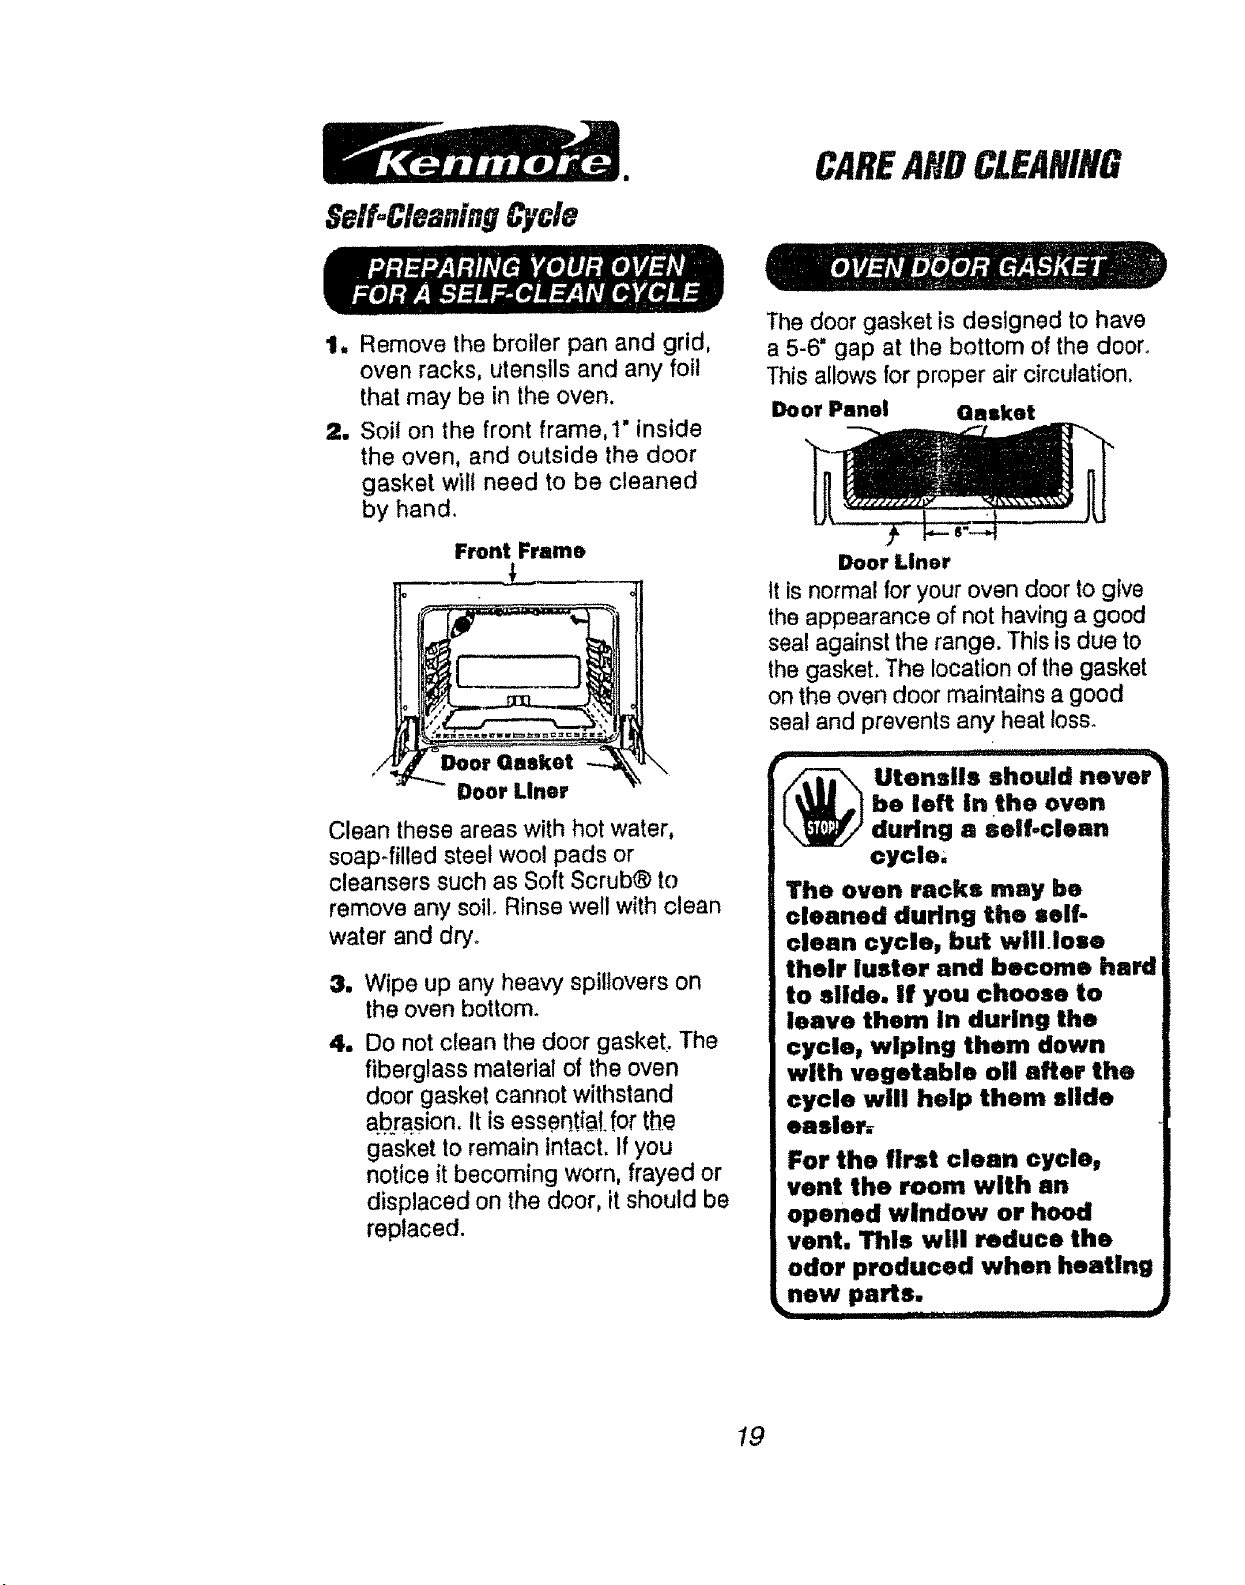
1, Remove the broiler pan and grid,
oven racks, utensils and any foil
that may be in the oven.
2. Soil on the front frame, l" inside
the oven, and outside the door
gasket wilt need to be cleaned
by hand.
/
Front Frame
Doer Liner
\
Clean these areas with hot water,
soap-filled steel wool pads or
cleansers such as Soft Scrub® to
remove any soil_ Rinse well with clean
water and dry.
3. Wipe up any heavy spillovers on
the oven bottom.
4. Do not clean the door gasket, The
fiberglass material of the oven
door gasket cannot withstand
a bra.sion. It is essen.ti_a!,for the
gasket to remain intact. If you
notice it becoming worn, frayed or
displaced on the door, it should be
replaced.
The door gasket is designed to have
a 5-6" gap at the bottom of the door.
This allows for proper air circulation.
Door Panel Gasket
Door Liner
It is normal for your oven door to give
the appearance of not having a good
seal against the range. This is due to
the gasket. The location of the gasket
on the oven door maintains a good
seal and prevents any heat loss_
_ tensils should never
be left in the oven
during a Self.clean
cycle,
The oven recks may be
cleaned during the self-
clean cycle, but will lose
their luster and become hard
to slide. If you choose to
leave them In during the
cycie_ wiping them down
with vegetable oll after the
cycle will help them slide
easleh
For the first clean cycle,
vent the room with an
opened window or hood
vent. This will reduce the
odor produced when heating
new parts.
b_ .....
......... |
19
AREANDCLEANING
telf.CleaningCycle
i, For best results, follow the steps in
PREPARING YOUR OVEN,
2, If your handle is hidden, tilt the
cooktop and pull the handle out as
far a_ it will go.
3, Slide the handle to the right. Do not
force the handle_ If it does not slide
easily, you have not pulled it out
from the latch cover as far as it
wilt go. Repeat Step 2.
4, Turn the oven control knob to
"CLEAN". The "CLEAN", "AU.
TOMATI(; OVEN", "COOK
TIME", and "OVEN ON" indica-
tor lights will glow.
5, The handle will lock when high tem-
peratures are reached inside the
oven,
6, The clean cycle lasts 4 hours and
20 minutes. This includes a cool
down time. You may change this
clean time from 3 hours up to 5
hours and 59 minutes by pressing
the HOUR andlor MINUTE UP or
DOWN arrow pad, while the colon
is flashing_
When the clean cycle has started, you
may press the CLOCK pad to return
the display to the time of day. By
pressing the COOK TIME pad you
can return to the remaining clean time.
7. When the cycle is finished, the
"OVEN ON" and "CLEAN" indi-
cator lights witl flash untit the oven
control knob is turned to lhe off po-
sitiono
8, When the temperature has cooled,
the door handle wil! easily slide to
the lelt.
2.
For best results, follow the steps
in PREPARING YOUR OVEN.
If your handle is hidden, lift the
cooktop and pult the handle out as
far as it wilt go.
3, Slide the handle to the right. Do
not force the handle. If it does not
slide easily, you have not pulled it
out from the latch cover as far
as it will go_ Repeat Step 2.
4, Turn the oven controi knob to
"CLEAN". The "CLEAN" and
"OVEN ON" indicator lights will
glow.
5, To delay the start of the clean
cycle press the START TIME
ONIOFF pad.
6, Press the HOUR and/or
MINUTE UP or DOWN arrow
pad to set the time of day you
want the oven to start cleaning au-
tomatically. The "OVEN ON" in-
dicator light is off until the start
time is reached.
J
When the cycle is finished the
"OVEN ON" and "CLEAN" indi-
cator lights will flash. Turn the
oven control knob to the off posi-
tion and unlock the door.
Turn the oven control knob to the off
position_ Wait (approx. 1 hour) before
attempting to open the door. The indi-
cator light will not blink if the cycle is
interrupted.
if any white spots remain, wipe with a
damp cloth or sponge, or scrub them
with a soap-filled steel wool pad and
rinse thoroughty,
_r__ _
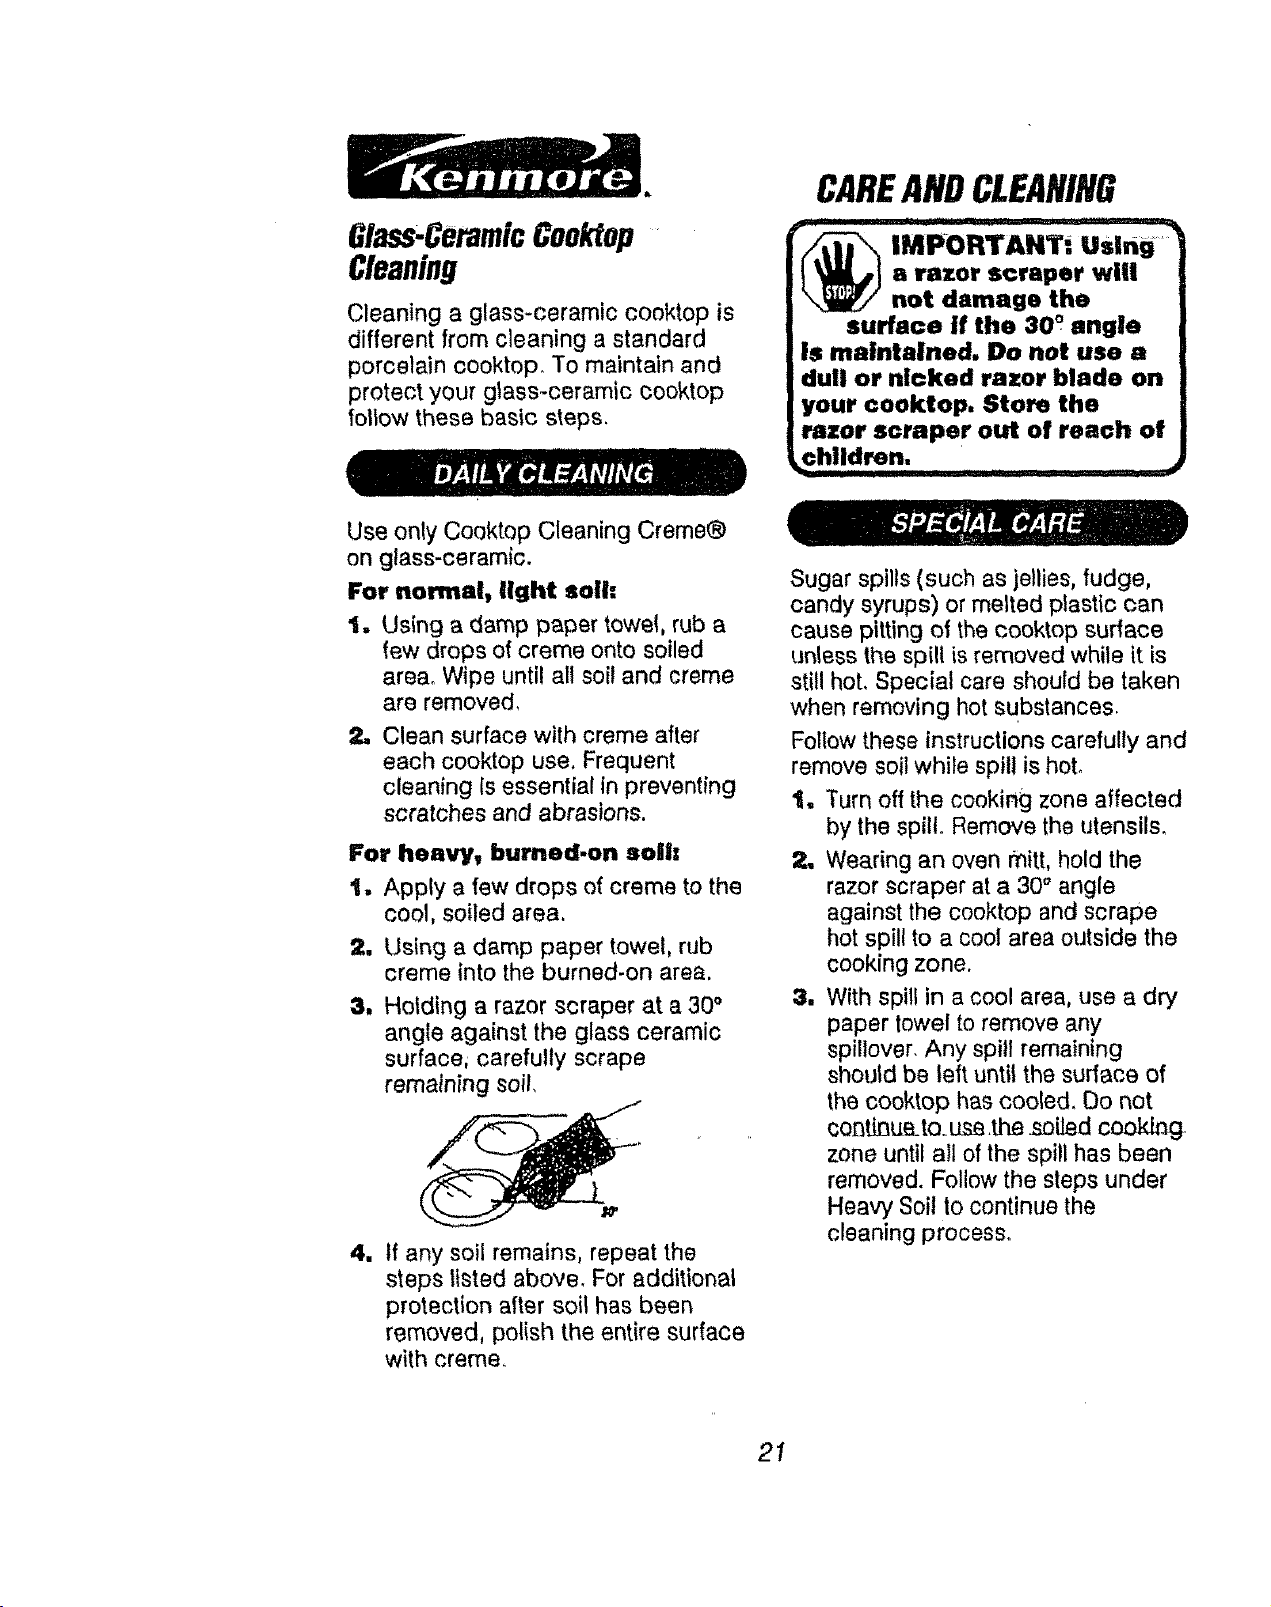
Grass.CeramicCookfop
Cleaning
Cleaning a glass-ceramic cooktop is
different from cleaning a standard
porcelain cooktop. To maintain and
protect your glass-ceramic cooktop
follow these basic steps.
CAREANDCLEANING
_ MPoRTA.I"_
a razor scraper will
not damage the
surface if the 30° angle
Is malntained. Do not use a
dull or nicked razor blade on
your cooktop. Store the
razor scraper out of reach of
_hlldren. ..... . .
Use only Cooktop Cleaning Creme®
on glass-ceramic.
For normal, light solh
1. Using a damp paper towe£ rub a
few drops of creme onto soiled
area. Wipe until all soil and creme
are removed,
2. Clean surface with creme after
each cooktop use. Frequent
cleaning is essential In preventing
scratches and abrasions,
For heavy, burned.on soih
t. Apply a few drops of creme to the
cool, soiled area.
2. Using a damp paper towel, rub
creme into the burned-on area.
3. Holding a razor scraper at a 30"
angle against the glass ceramic
surface, carefully scrape
remaining soil,
4. tf any soil remains, repeat the
steps listed above. For additional
protection after soil has been
removed, polish the entire surface
with creme.
Sugar spills (such as jellies, fudge,
candy syrups) or melted plastic can
cause pitting of the cooktop surface
unless the spill is removed while it is
still hot. Special care should be taken
when removing hot substances.
Follow these instructions carefully and
remove soil while spill is hot.
1. Turn off the cooking zone affected
by the spill. Remove the utensils,
2. Wearing an oven #nitt, hold the
razor scraper at a 30 ° angle
against the cooktop and scrape
hot spill to a cool area outside the
cooking zone,
8. With spill in a cool area, use a dry
paper towel to remove any
spillover. Any spill remaining
should be left until the surface of
the cooktop has cooled. Do not
contioue_to.use the soiled cookiag
zone until all of the spill has been
removed. Follow the steps under
Heaw Soil to continue the
cleaning process_
21
CAREANDCLEANING
Glass-Ceramic Cooktop
Cleaning
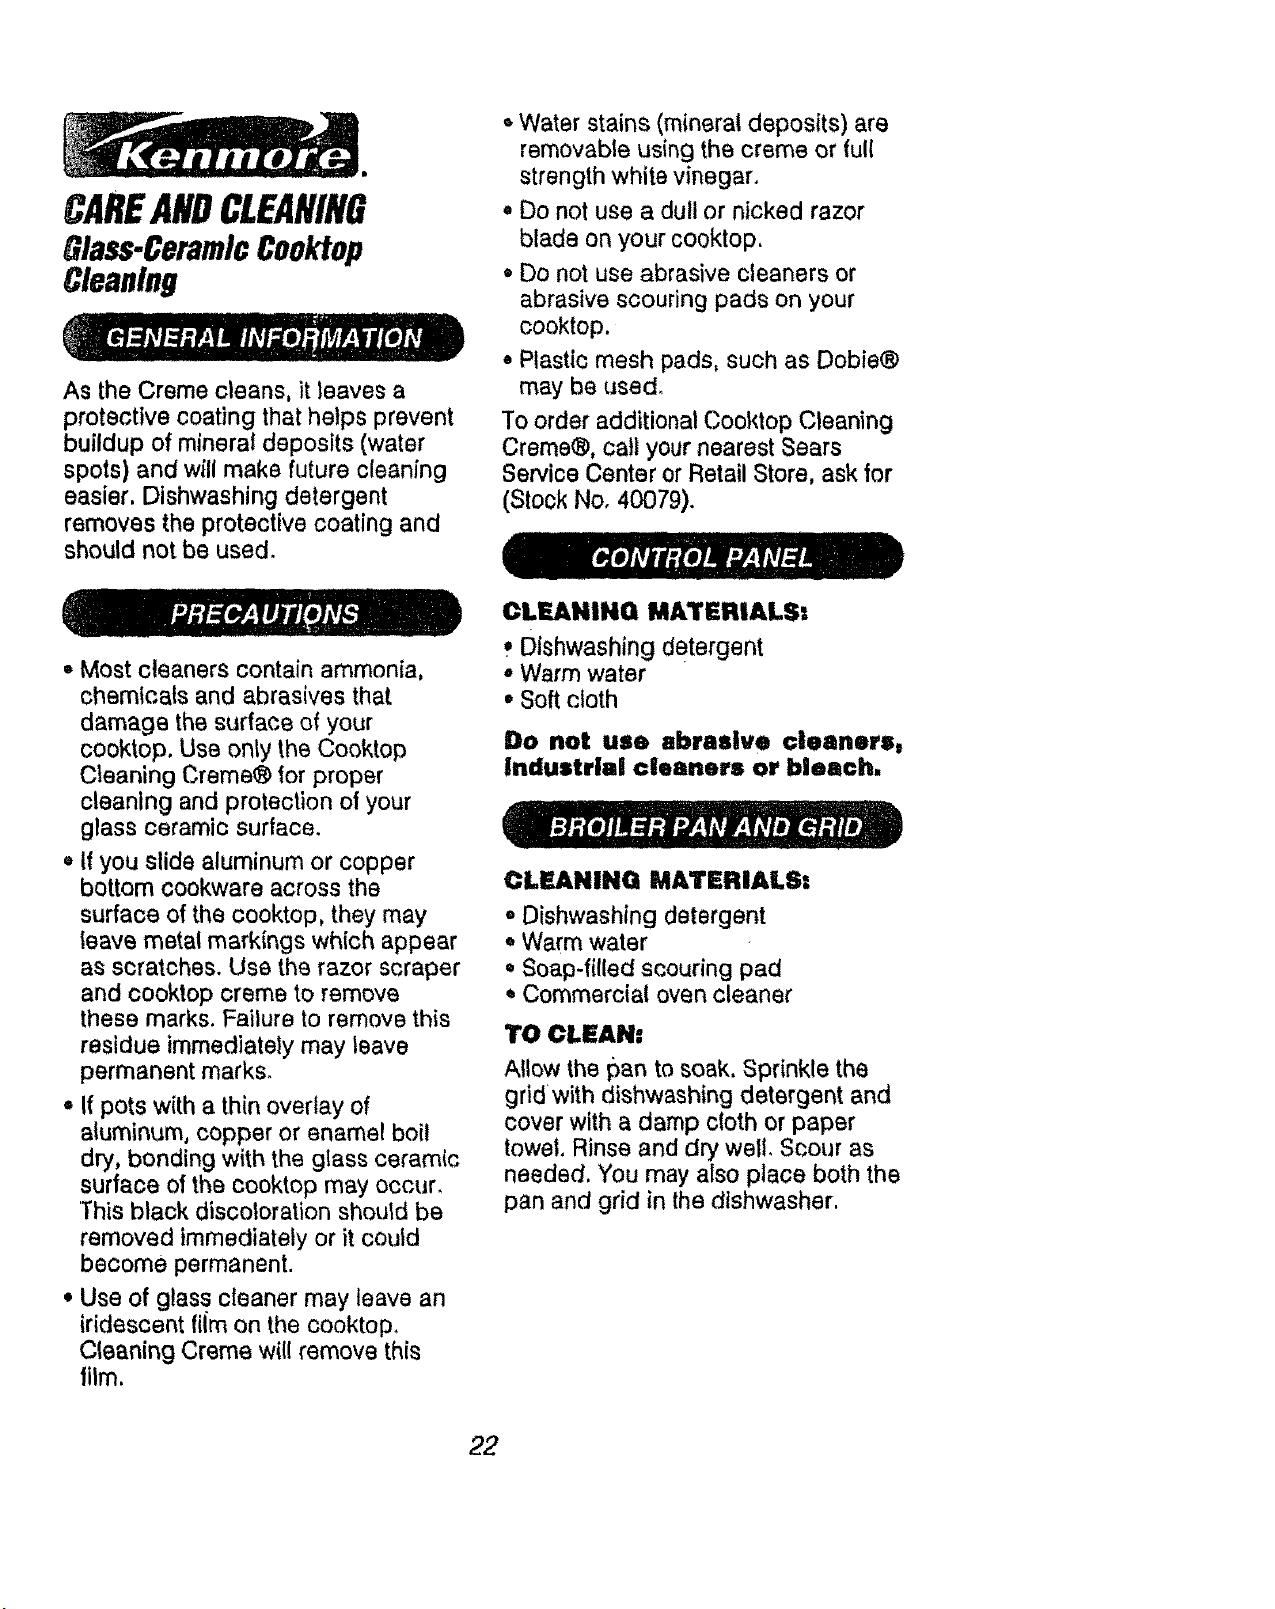
As the Creme cleans, it leaves a
protective coating that helps prevent
buildup of mineral deposits (water
spots) and will make future cleaning
easier, Dishwashing detergent
removes the protective coating and
should not be used.
* Water stains (mineral deposits) are
removable using the creme or full
strength white vinegar.
o Do not use a dull or nicked razor
blade on your cooktop.
, Do not use abrasive cleaners or
abrasive scouring pads on your
cooktop.
, Plastic mesh pads, such as Dobie®
may be used_
To order additional Cooktop Cleaning
Creme®, call your nearest Sears
Service Center or Retail Store, ask for
(Stock No. 40079).
° Most cleaners contain ammonia,
chemicals and abrasives that
damage the surface of your
cooktop. Use only the Cooktop
Cleaning Creme® lot proper
cleaning and protection of your
glass ceramic surface.
• If you slide aluminum or copper
bottom cookware across the
surface of the cooktop, they may
leave metal markings which appear
as scratches. Use the razor scraper
and cooktop creme to remove
these marks. Failure to remove this
residue immediately may leave
permanent marks.
• If pots with a thin overlay of
aluminum, copper or enamel boil
dr,/, bonding with the glass ceramic
surface of the cooktop may occur.
'This black discoloration should be
removed immediately or it could
become permanent.
• Use of glass cleaner may leave an
iridescent film on the cooktop.
Cleaning Creme wil! remove this
film.
CLEANING MATERIALS:
, Dlshwashing detergent
° Warm water
* Soft cloth
Do not use abrasive ¢leaners:
Industrial cleaners or bleach.
CLEANING MATERIALS:
• Dishwashing detergent
,, Warm water
• Soap-filled scouring pad
,, Commercial oven cleaner
TO CLEAN:
Atlow the 15an to soak, Sprinkle the
gridwith dishwashing detergent and
cover with a damp cloth or paper
towel. Rinse and dry well. Scour as
needed. You may also place both the
pan and grid in the dishwasher.

CAREANDCLEAHINa,..
RemovableParts
CLEANING MATERIALS:
• Dishwashing detergent
• Warm water
• Soft cloth
Molded Rib
Clear
Groove In
Stem
Spring Clip
TO REMOVE:
t, Be sure the control knob is in the
off position.
2, Pull straight off the stem.
Using a piece of string can make
removing the knob easier. Slip the
string under and around the knob,
pulling straight out.
TO CLEANz
Wash the knob thoroughly with soapy
water. Dry completely with a soft cloth.
DO NOT let the knob soak
TO REPLACE:
1, Check the back of the knob. The
molded rib oJ th_ek_nobi_s_d_esigned
to fit perfectly onto the knob stem.
2, Align the molded rib to the clear
groove in the knob stem.
3, Push the knob back as far as it will
go.
; -_T_ ...... ":_-" ::: .................. 4
CAUTION: Be sure
the oven Ught
switch is in the off
position. Do not
touch a hot light bulb with
wet hands or a wet cloth.
Wait until the bulb has
cooled and use a dry cloth.
Never touch the live collar el
the bulb. If you are replacing
a broken light bulb make
sure the power supply is off.
Glass Retainer
TO REPLACE:
t. Unscrewand removethe glass cover.
2, Unscrew the light blub.
3, Replace the bulb with a 31/2" 40 watt
appliance bulb_
4, Replace the cover.
23
D
CAREANDCLEANING
RemovableParts
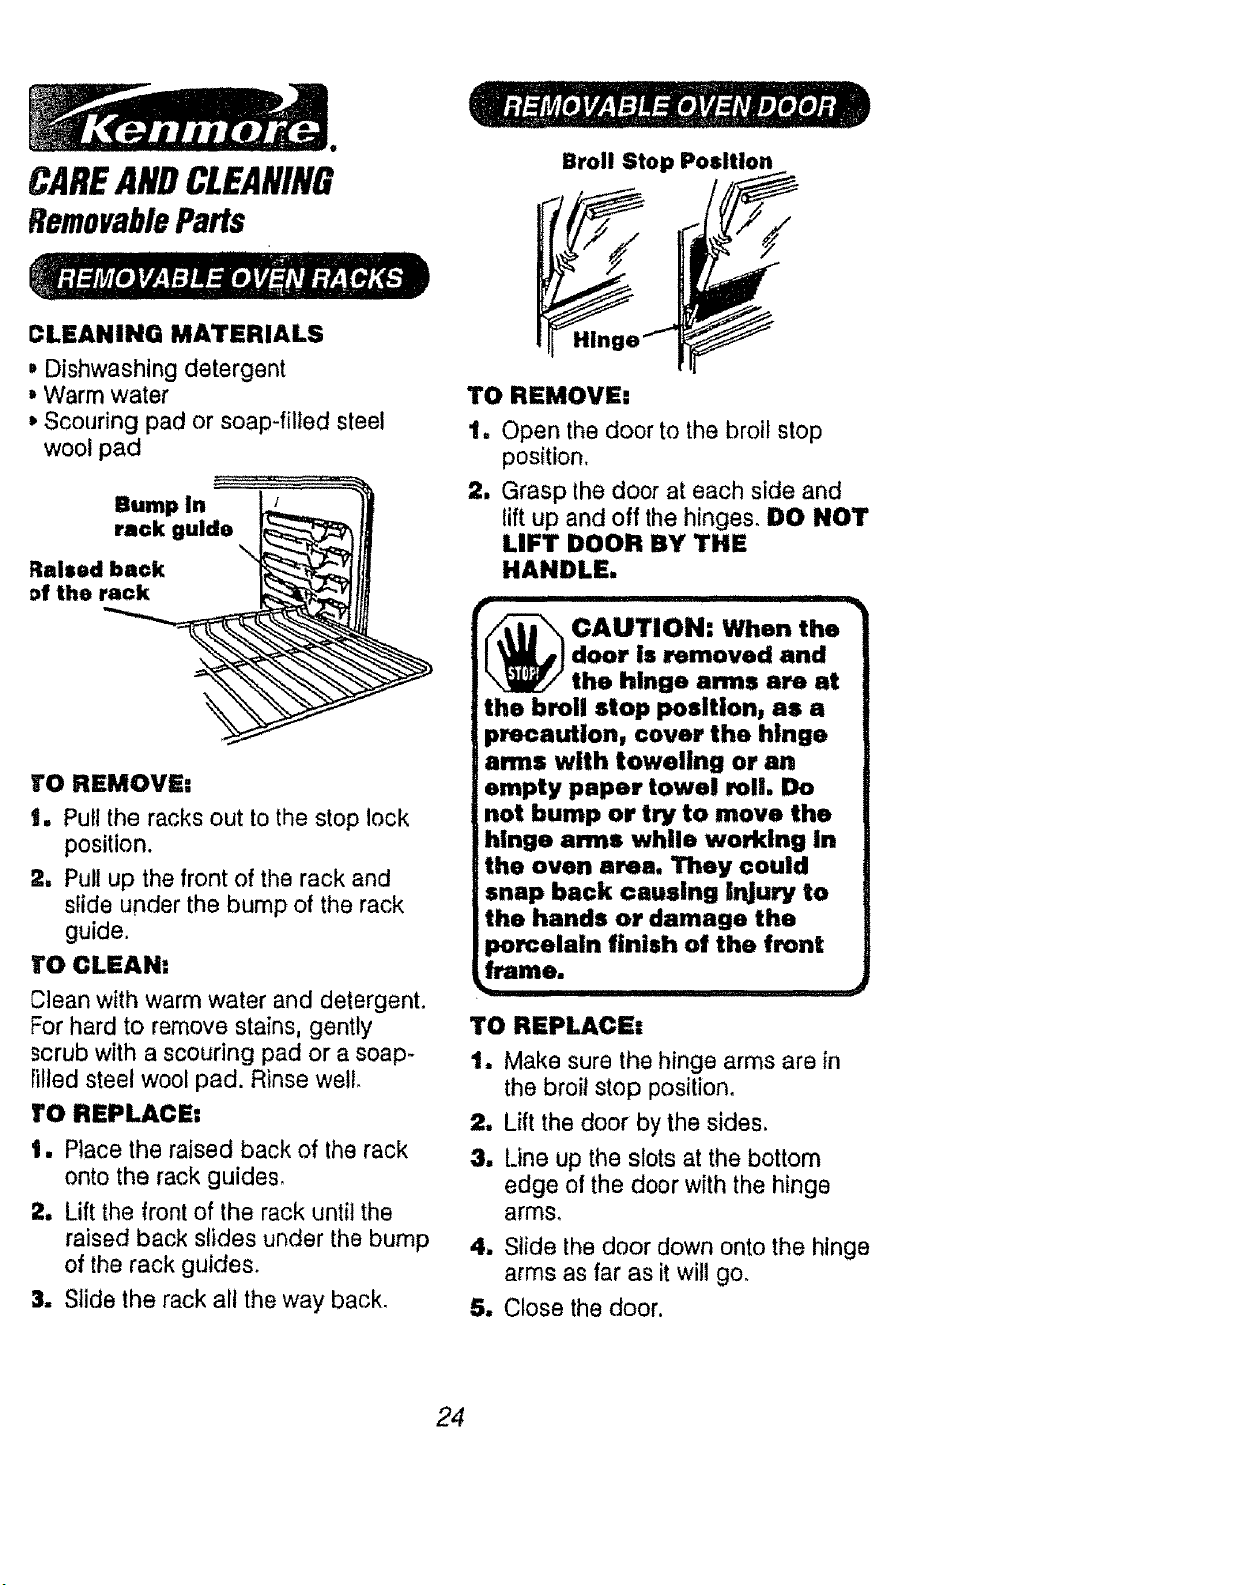
CLEANING MATERIALS
, Dishwashing detergent
mWarm water
Scouring pad or soap-fitted steel
wool pad
Bump in
rack guide
Raised back
Df the rack
rO REMOVE:
t. Pull the racks out to the stop lock
position.
2, Pull up the front of the rack and
slide under the bump of the rack
guide.
rO CLEAN:
Clean with warm water and detergent.
For hard to remove stains, gently
scrub with a scouring pad or a soap-
titled steel wool pad. Rinse well.
TO REPLACE:
t. Place the raised back of the rack
onto the rack guides.
2, Lift the front of the rack until the
raised back slides under the bump
of the rack guides.
3. Slide the rack all the way back,
Broil Stop Position
TO REMOVE:
1, Open the door to the broil stop
1
position.
Grasp the door at each side and
lift up and off the hinges. DO NOT
LIFT DOOR BY THE
HANDLE.
I
_ AUTION: When the
door Is removed and
the hinge arms are at
the broil stop position, as a
precaution, cover the hinge
arms with toweling or an
empty paper towel roll. Do
not bump or try to move the
hinge arms while working in
the oven ares. They could
snap back causing injury to
the hands or damage the
porcelain finish of the front
frame,
bq
TO REPLACE:
1, Make sure the hinge arms are in
the broil stop position.
2, Lift the door by the sides.
3, Line up the slots at the bottom
edge of the door with the hinge
arms.
m
Slide the door down onto the hinge
arms as far as it will go.
5. Close the door,
24
CAREANDCLEANINg...........
RemovableParts
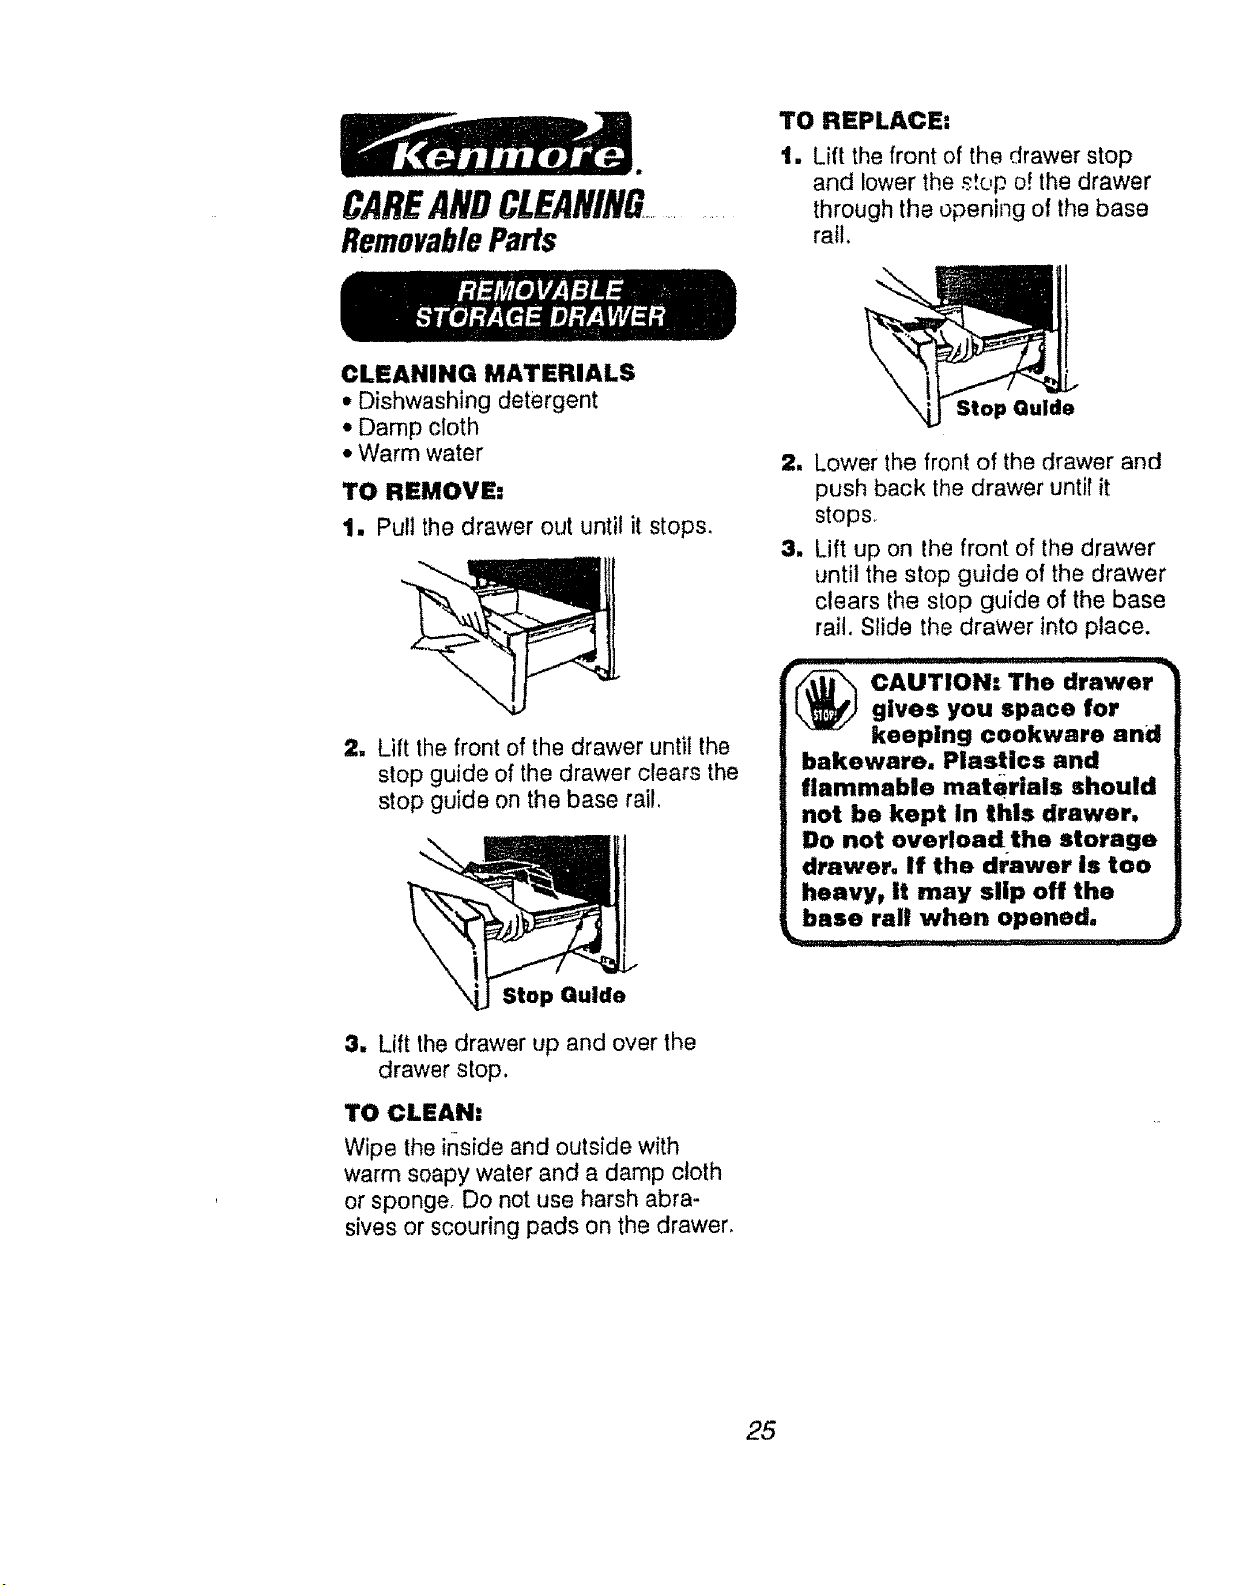
TO REPLACE:
1, Lift the front of the drawer stop
and lower the st_.,p o! the drawer
through the opening of the base
rail.
CLEANING MATERIALS
• Dishwashing detergent
• Damp cloth
• Warm water
TO REMOVE:
1. Pull the drawer out until it stops.
2. Lift the front of the drawer until the
stop guide of the drawer clears the
stop guide on the base rai!,
Stop Guide
3. Lift the drawer up and over the
drawer stop,
TO CLEAN:
Wipe the inside and outside with
warm soapy water and a damp cloth
or sponge. Do not use harsh abra-
sives or scouring pads on the drawer.
2. Lower the front of the drawer and
push back the drawer until it
stops.
3. Lift up on the front of the drawer
until the stop guide of the drawer
clears the stop guide of the base
rail. Slide the drawer into place.
, , , ,,,,,,,,,,,,,,,,,,,,, ; ..........
CAUTION: The drawe, "1
gives you space for |
keeping cookware and--
bakeware. Plastics and
flammable materials should
not be kept In this drawer,
Do not overload the storage
drawer. If the drawer is too
heavy, it may slip off the
base rail when opened.
25
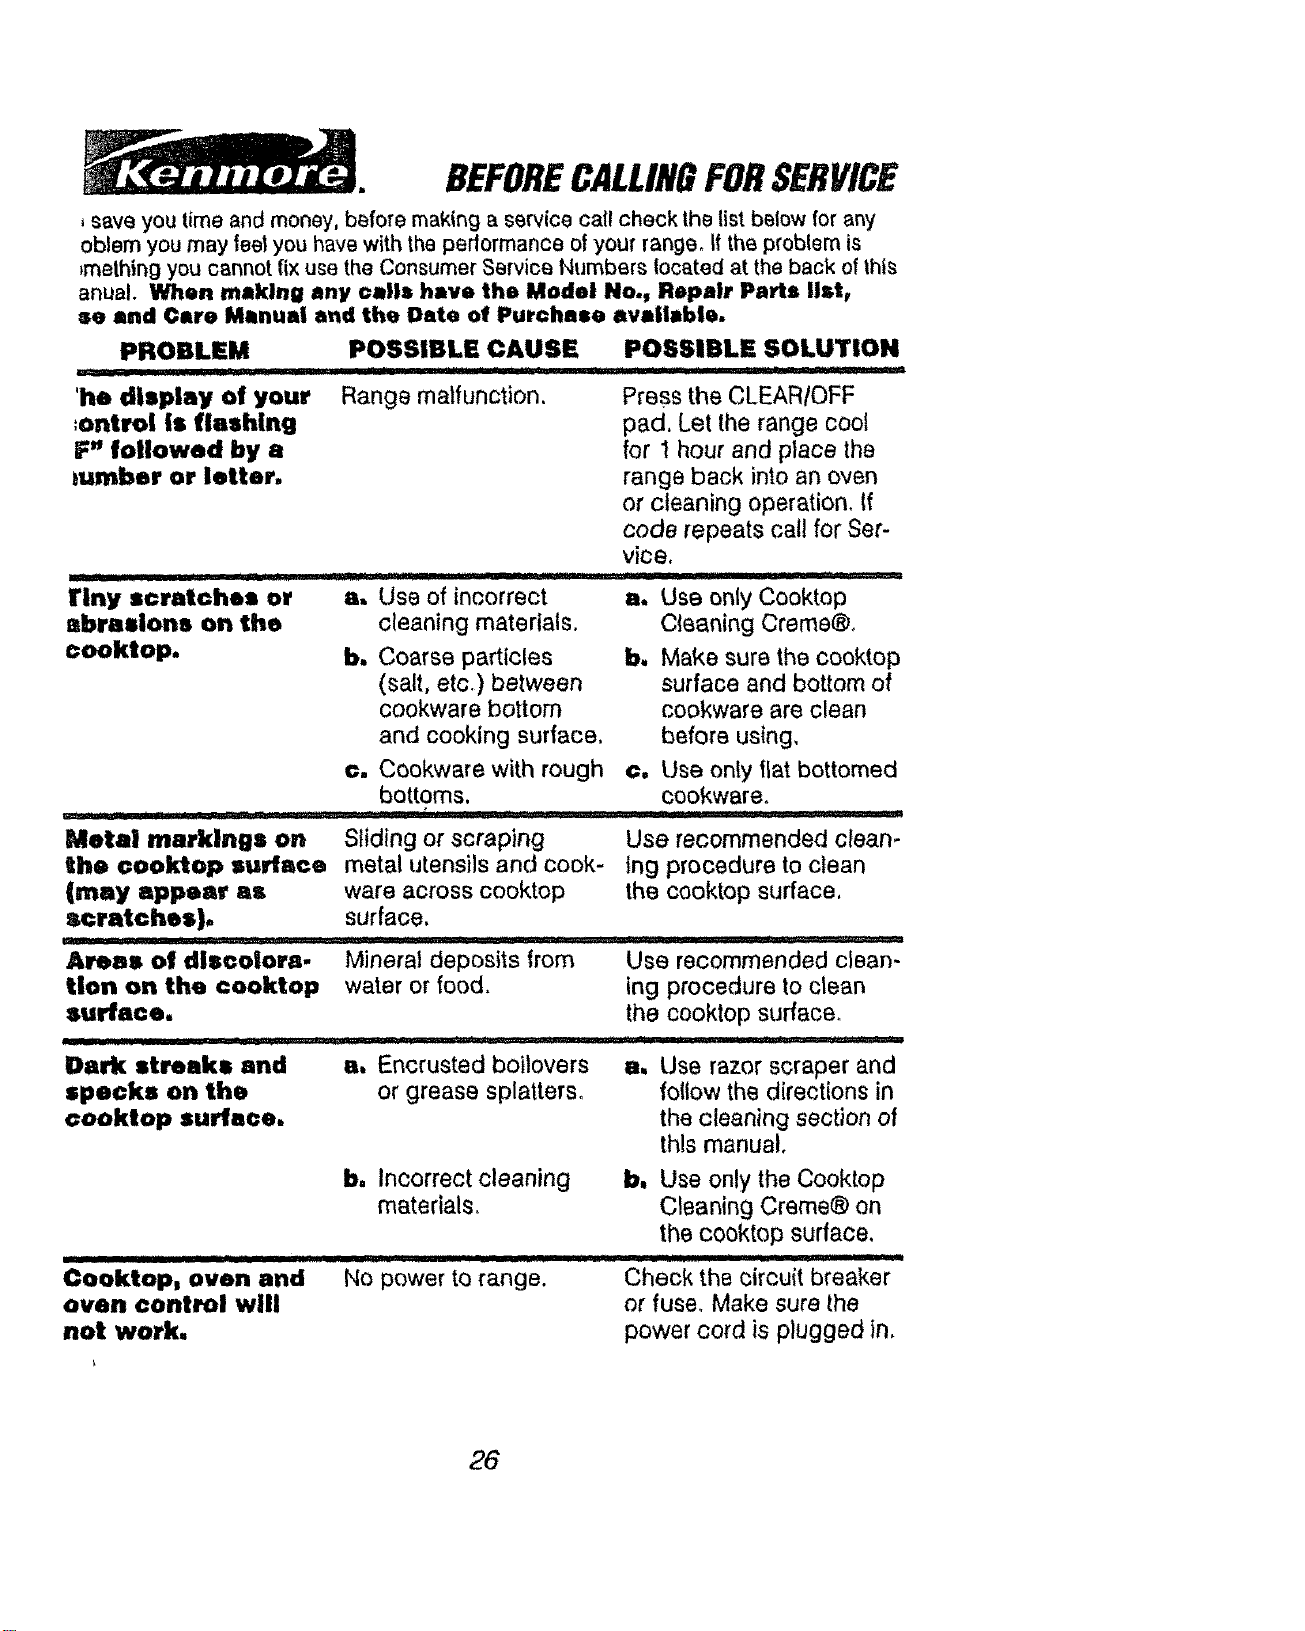
BEFORECALLINGFORSERVICE
, _ave you time and money, before making a se{v{ce call check the tist below for any
oblem you may fee| you have with the pedormance of your range° If the problem is
+toothing you cannot fix use the Consumer Service Numbers located at the back of thl._
anual. When making any calls have the Model No,, Repair Parts list W
se and Care Mlnual and the Date of Purchase available,
PROBLEM
............ ......... III1'1'11'111I I
he display of your Range malfunction.
;ontrol Is flashing
F" followed by a
mmher or letter.
1tiny scratches or
abrasions on the
cooktop.
POSSIBLE CAUSE POSSIBLE SOLUTION
ill II II il IIIIII II I i II rll
Press the CLEAR/OFF
pad. Let the range cool
for 1 hour and place the
range back into an oven
or cleaning operation, tf
code repeats cal! for Ser-
vice.
..... I IIII '11 I I '
a. Use only Cooktop
Cleaning Creme®+
b, Make sure the cooktop
surface and bottom of
cookware are clean
before using.
c, Use only flat bottomed
cookware.
"s' use of incorrect
cleaning materials.
b, Coarse particles
(salt, etc.) between
cookware bottom
and cooking surface.
c. Cookware with rough
bottoms.
Metal markings on Sliding or scraping
the cooktop surface metal utensils and cook-
ware across cooktop
surface.
'll I I[1' ,_.... .......... .........................
Mineral deposits from
water or food.
Use recommended clean-
Ing procedure to clean
the cooktop surface.(may appear as
scratches).
Areas of discolora-
tion on the €ooktop
surface.
Dark streaks and
specks on the
cooktop surface.
a. Encrusted boilovers
or grease splatters.
Use recommended clean-
ing procedure to clean
the cooktop surface+
a, Use razor scraper and
follow the directions in
the cleaning sect}on of
this manual.
b. Incorrect cleaning
materials_
[_1 I IL 'ZI_ .... I III I'll I1'1111111 II III
Cooktop, oven and No power to range.
oven control will
not work.
b. Use only the Cooktop
Cleaning Creme® on
the cooktop surface.
' ' I[IIB IIP_ IIII IWJlII. 11 I II _ .........
Check the circuit breaker
or fuse. Make sure the
power cord is plugged in.
26
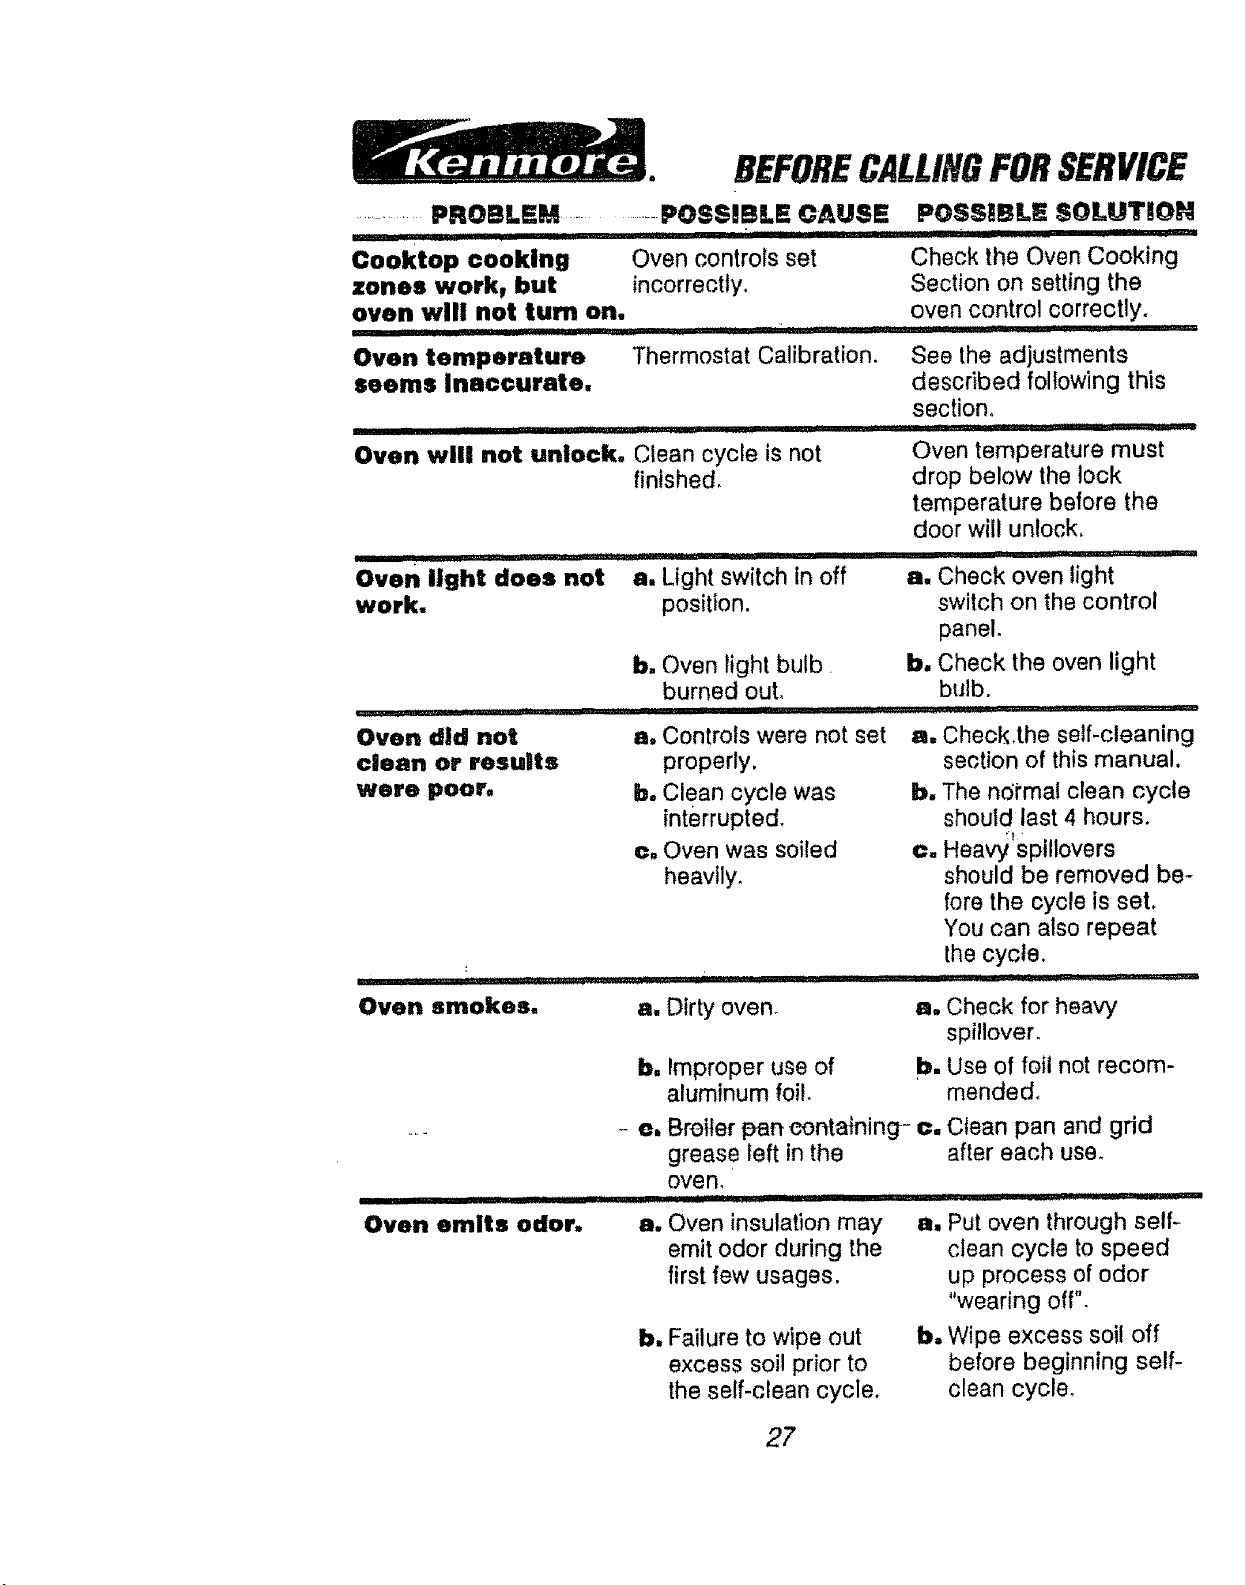
BEFORECALLINGFORSERVICE
...... PROBLEM ....... POSSIBLE CAUSE POSSIBLE SOLILIT!O_
Cooktop cooking Oven controls set Check the Oven Cooki
zones work, but incorrectly. Section on setting the
oven will not turn on, oven control correctly.
................. ! 'I'I ......... "HI"II ....... "....
Oven temperature Thermostat Calibration. See the adjustments
seems Inaccurate, described following this
............................... I I
Oven will not unlock, Clean cycle is not
finished.
Hill! ' I I III1'11 '111 '1 '"lqlll L' I'1 I
Oven light does not a. Light switch in off
work. position.
section.
r I' II IIIIIIII1"1'111111'' ...i .........
Oven temperature must
drop below the lock
temperature before the
door will unlock.
'liillI I '
a. Check oven light
switch on the control
panel.
b, Oven light bulb b, Check the oven light
burned out. bulb.
I, '11I' I I' I,'l'P,',l F.,r, I ' '8
a, Controls were not set a. Check.the self-cleaningOven did not
clean or results
were poor°
properly.
b. Clean cycle was
interrupted.
c, Oven was soiled
heavily.
section of this manual.
b, The nc;tmal clean cycle
should last 4 hours.
fT
c. Heavy spillovers
should be removed be-
fore the cycle is set.
You can also repeat
the cycle.
r ' I I ilqi i,'Jl!!,!ui _ ii I - ....
Oven smokes,
I'1 I II III ,,111, ..........
Oven emits odor.
a, Dirty oven_
b, Improper use of
aluminum foil.
a, Check for heavy'
spillover.
b. Use of foil not recom-
mended.
- o, Broiler Pan oontaining- c.
grease left in the
oven.
a, Oven insulation may
emit odor during the
first few usages.
Clean pan and grid
after each user
b, Failure to wipe out
excess soil prior to
the self-clean cycle.
• .r IIIIII ,' '"' ................. --- --
a, Put oven through self-
clean cycle to speed
up process of odor
"wearing off".
b, Wipe excess soil off
before beginning self-
clean cycle.
27
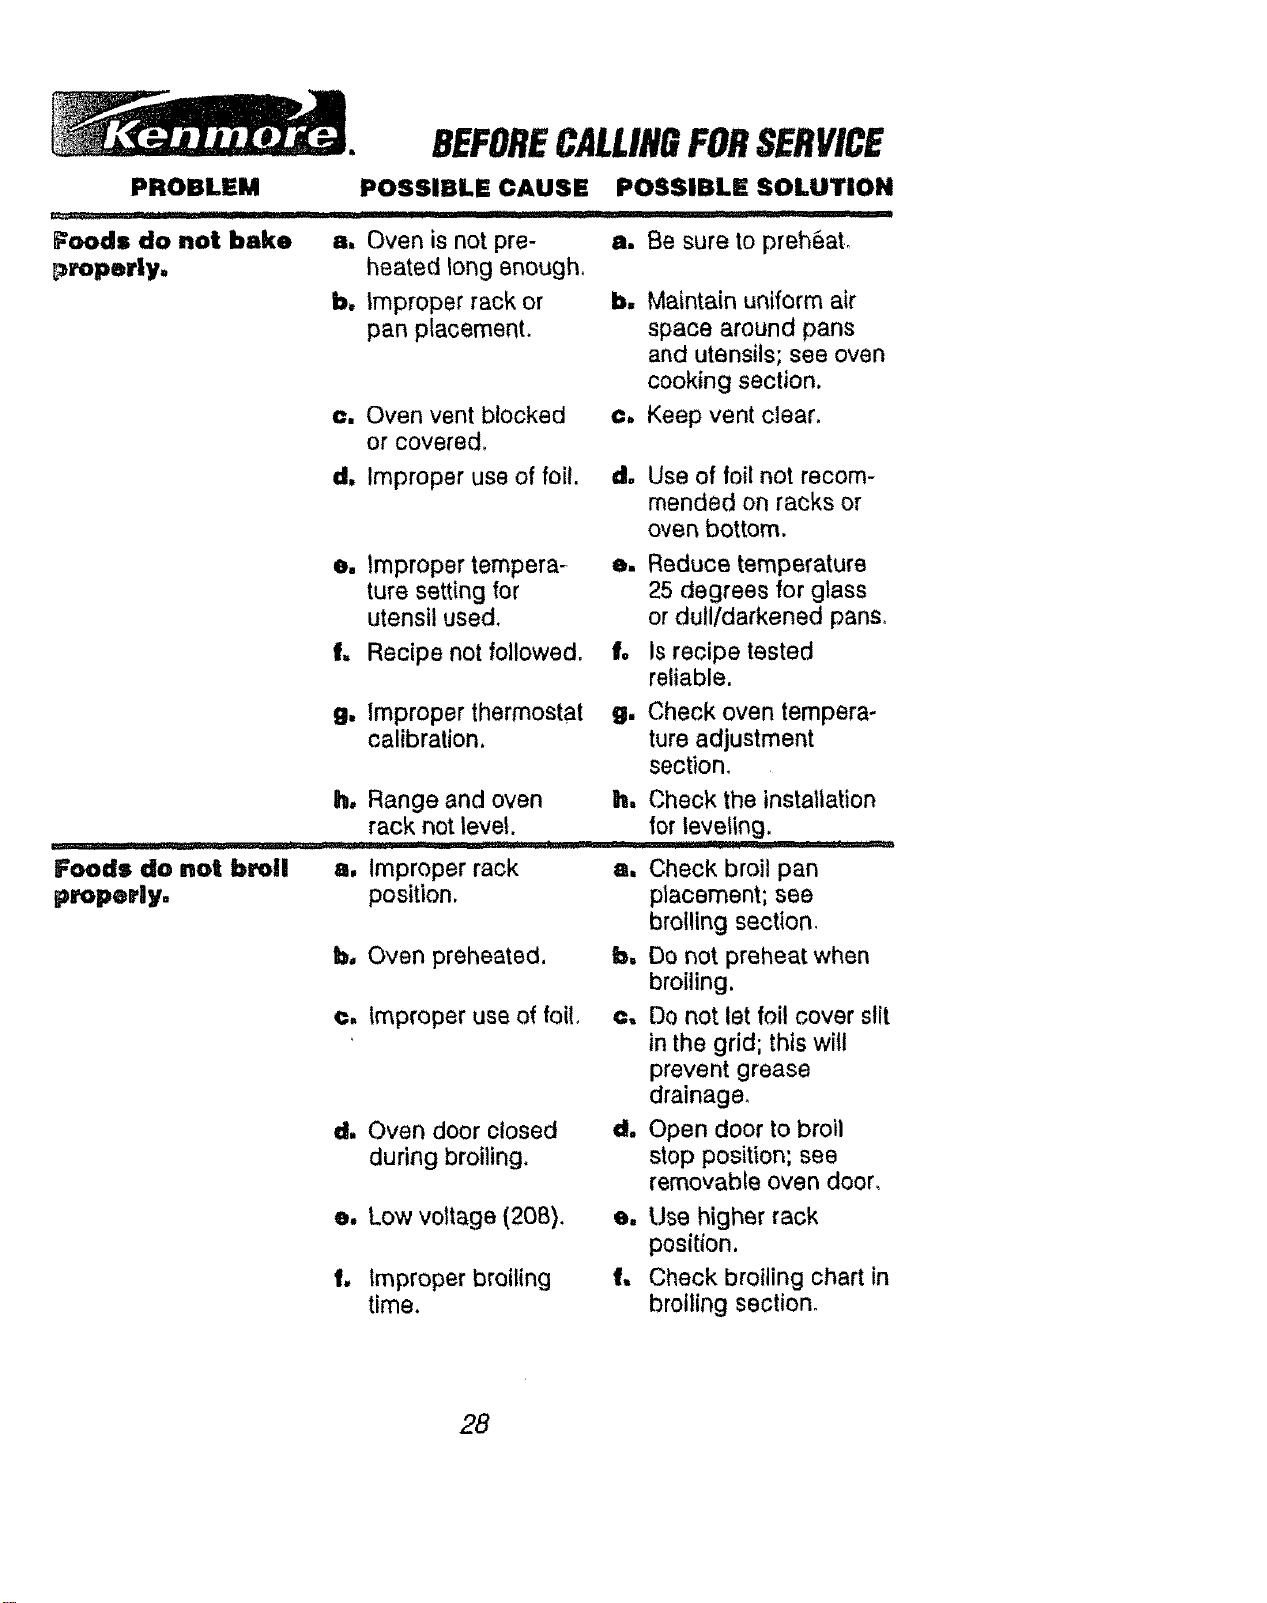
BEFORECALLINGFORSERVICE
PROBLEM
Foods do not bake
proper|y.
POSSIBLE CAUSE POSSIBLESOLUTION
c. Oven vent blocked
or covered,
I ! -- ................. ......
a, Oven is not pre- a. Be sure to preh_aL
heated long enough°
b, improper rack or b. Maintain uniform air
pan placement, space around pans
and utensils; see oven
cooking section.
c, Keep vent clear.
d, Improper use of foil. ,4,, Use of foil not recom-
mended on racks or
oven bottom.
e. Improper tempera-
ture setting for
utensil used.
f, Recipe not followed,
e. Reduce temperature
25 degrees for glass
or dull/darkened pans,
f. Is recipe tested
reliable.
g. Improper thermostat g, Checkoven tempera-
calibration, ture adjustment
section.
h, Range and oven
rack not level,
Foods do not broil a, Improper rack
properly, position.
bo Oven preheated,
c° Improper use of foil,
d. Oven door closed
during broiling,
h, Check the installation
for .................
a. Check broilpan
placement; see
broiling section.
b, Do not preheat when
broiling.
c, Do not let foil cover slit
in the grid; this will
prevent grease
drainage,
d, Open door to broil
stop position; see
removable oven door,
e. Low voltage (208).
f, Improper broiling
time.
e, Use higher rack
position.
f, Check broiling chart in
broiling section,
28
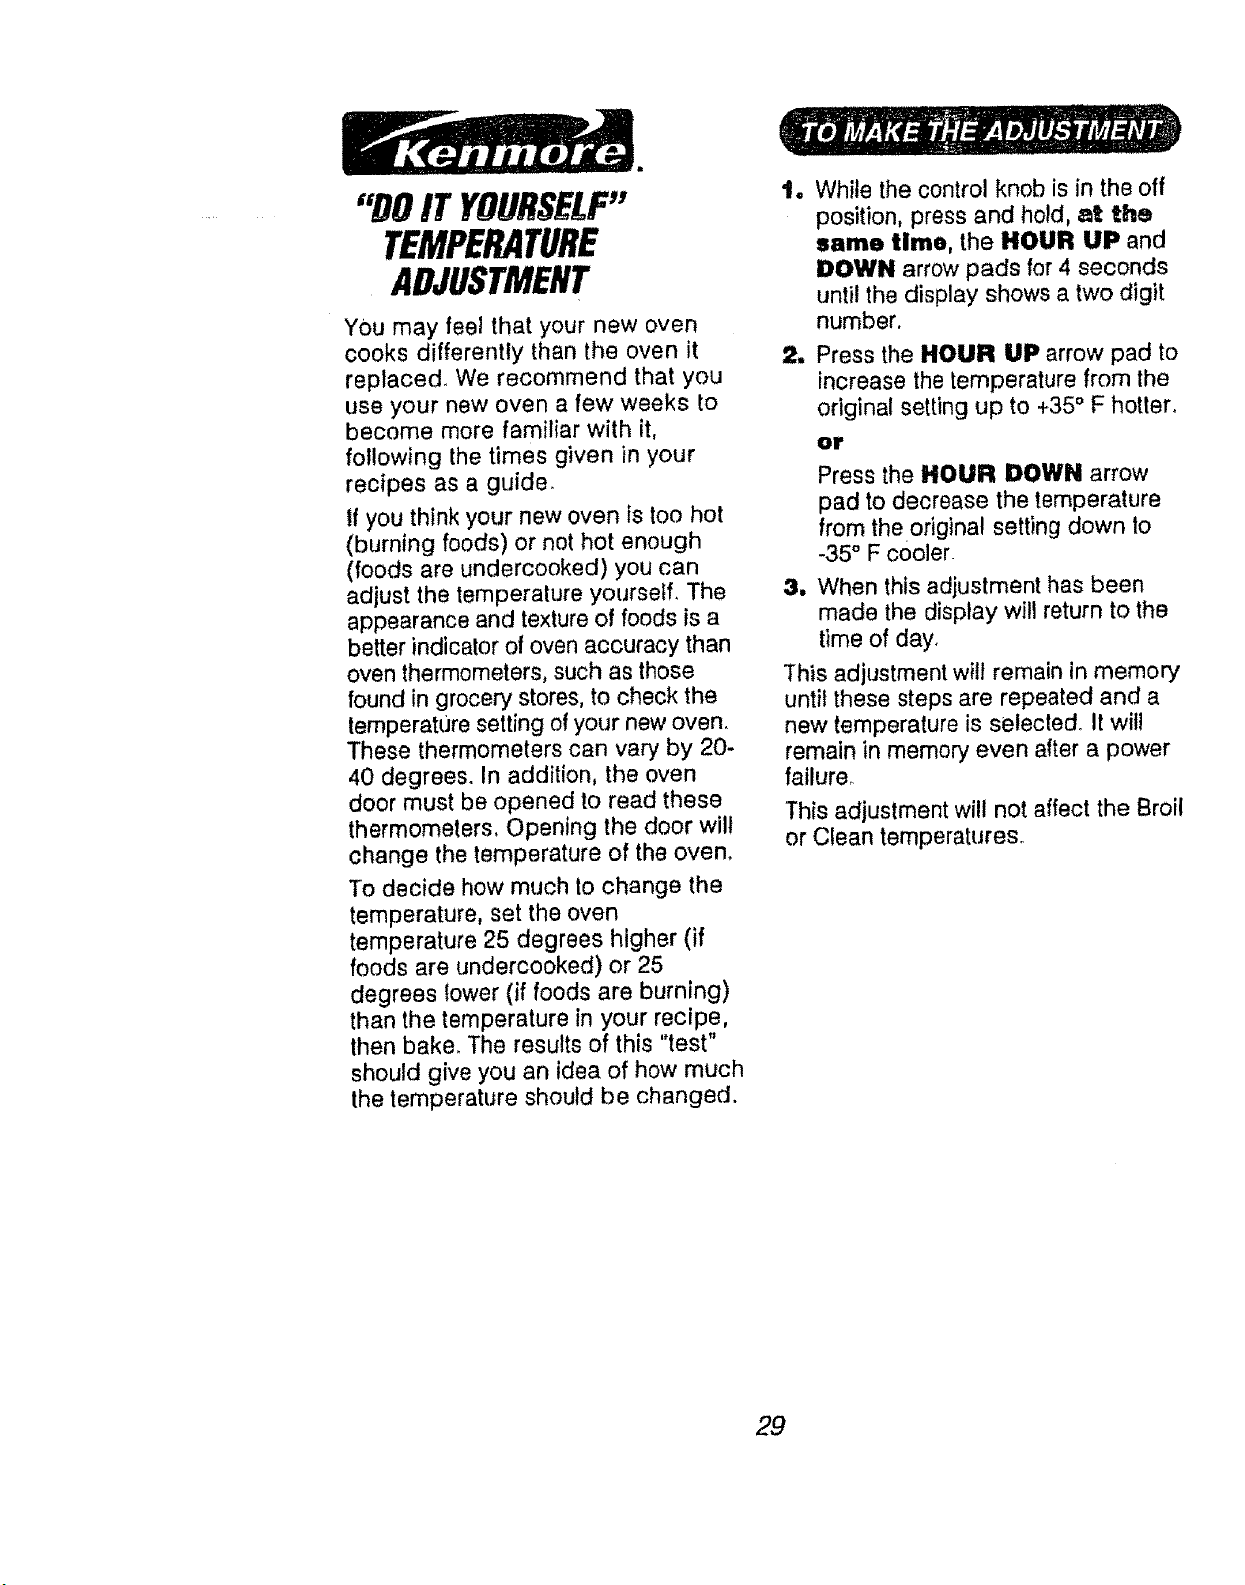
"DOIT YOURSELF"
TEMPERATURE
ADJUSTMENT
YOU may feel that your new oven
cooks differently than the oven it
replaced. We recommend that you
use your new oven a few weeks to
become more familiar with it,
following the times given in your
recipes as a guide.
If you think your new oven is too hot
(burning foods) or not hot enough
(foods are undercooked) you can
adjust the temperature yourself. The
appearance and texture of foods is a
better indicator of oven accuracy than
oven thermometers, such as those
found in grocery stores, to check the
temperat0re setting of your new oven.
These thermometers can vary by 20-
40 degrees. In addition, the oven
door must be opened to read these
thermometers, Opening the door wilt
change the temperature of the oven.
To decide how much to change the
temperature, set the oven
temperature 25 degrees higher (if
foods are undercooked) or 25
degrees lower (if foods are burning)
than the temperature in your recipe,
then bake. The results of this "test"
should give you an idea of how much
the temperature should be changed.
While the control knob is in the off
position, press and hold, at the
same time, the HOUR UP and
DOWN arrow pads for 4 seconds
until the display shows a two digit
number.
2. Press the HOUR UP arrow pad to
increase the temperature from the
original setting up to +35 ° F hotter.
or
Press the HOUR DOWN arrow
pad to decrease the temperature
from the original setting down to
-35 ° F cooler.
3, When this adjustment has been
made the display will return to the
time of day,
This adjustment will remain in memory
until these steps are repeated and a
new temperature is selected. It will
remain in memory even after a power
failure_
This adjustment will not affect the Broil
or Clean temperatures°
29

NOTES
30
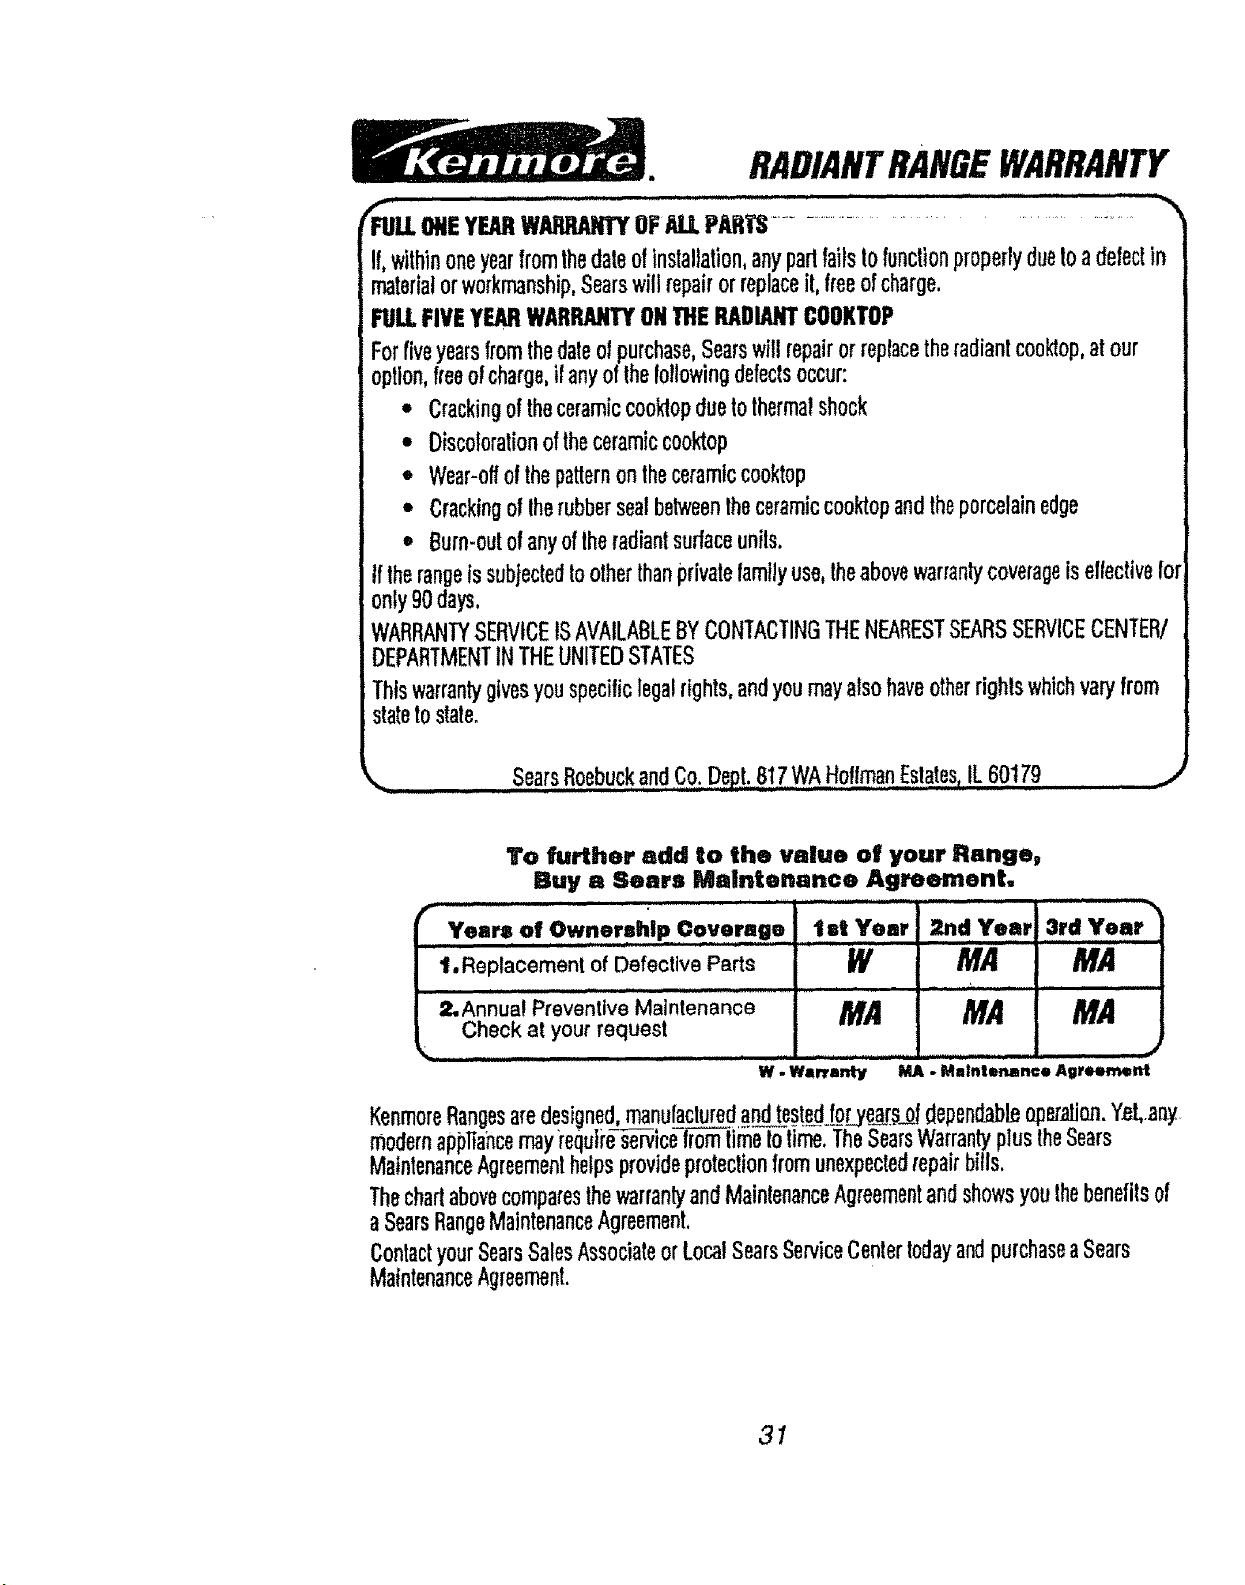
RADIANTRANGEWARRANTY
%,, ...................................."
If,withinoneyearfromthedateofinstallation,anypadfailstofunctionproperlyduetoadefectin
materia!orworkmanship,Searswillrepairorreplaceit, freeof charge.
FULLFIVEYEARWARRANTYONTHERADIANTCOOKTOP
Forfiveyearsfromthedateofpurchase,Searswillrepairorreplacetheradiantcooktop,atour
option,freeo!charge,ifanyofthefollowingdefectsoccur:
• Crackingoftheceramiccooklopduetothermalshock
• Discolorationoftheceramiccooktop
• Wear-offofthepatternontheceramiccooktop
• Crackingoftherubbersealbetweentheceramiccooktopandtheporcelainedge
= Burn-outofanyoftheradiantsurfaceunits.
tftherangeissubjectedtootherthanprivatefamilyuse,theabovewarrantycoverageiseffectivefor
only90days,
WARRANTYSERVICEtSAVAILABLEBYCONTACTINGTHENEARESTSEARSSERVICECENTER/
DEPARTMENT1NTHEUNITEDSTATES
;Thiswarrantygivesyouspecificlegalrights,andyoumayalsohaveotherrightswhichvaryfrom
;statetostate.
,,_.................... SearsRoebuckand.C.ot....Dept.817WA Hoff_manEstatesIL 60179..
To further add to the value of your Range,
Buy a Sears Maintenance Agreement.
Years of OWnership Coverage i tat Year 2nd Year 3rd Year
'1. Replacement of Defective Parts W MA ...... MA
............. ,,,_ uJi
2,Annual Preventive Maintenance MA MA MA
Check at your request
W - Wln'anty MA. Malnlenam:e Agreew_nt
KenmoreRangesaredesigned,manufacturedandtes!_.Lor_y_[.s_fdependableope,r_on.Y.eL.any
modernapj_liahcemayrequii_-s_lce-lr-_iime-Jotirne.TheSearsWarrantyplustheSears
MaintenanceAgreementhelpsprovideprotectionfromunexpectedrepairbills,
ThechartabovecomparesthewarrantyandMaintenanceAgreementandshowsyouthebenefitsof
a SearsRangeMaintenanceAgreement,
ContactyourSearsSalesAssociateorLocalSearsServiceCentertodayandpurchaseaSears
MaintenanceAgreement.
31

For the repair or replacementparts you need
delivered directly to your home
Call7am - 7 pro,7 daysa week
1-800-366-PART
(1-800-366-7278)
©
For in.home major brandrepair service
Call 24 hours a day, 7 days a week
1-800-4-REPAIR
(1-800-473-7247)
For the location of a
Searsparts and Repair Center in yourarea
Call 24 hours a day, 7 days a week
1-800-488-1222
,,, , ,, ,
Forinformation onpurchasinga Sears
Maintenance Agreementor to inquire
about an existingAgreement
Call9am- 5 pm,Monday-Saturday
1-800-827-6655
8F-/ S
America's Repair Specialists
32
MANUAL DEL
CONSUMIDOR
ESTUFA ELECTRICA
RADIANTE DE 30"
INDEPENDIENTE CON
AUTOLIMPIEZA
MODELO NO.
911.95575
911o95576
91.1o95579
PRECAUCBON:
Lea y siga todas las
reglas y lasinstrucciones
para el funcionamlento
antes de usar este
producto por primera vez.
• Instrucciones de
Seguridad
• Funclonamiento
• Cuidado y Limpleza
• C6mo Resolver
Problemas
ii ii,lllll _l j _ . i ill ii ill i,illlll ,,[iu .
Sears, Roebuck and Co., Hoffman Estates, IL 60179 U.S.A.
229C4020P115-1 (SR-10326)
_g
Seguridad en el uso de la
estufa ........................................... 3_6
Dlsposittvo contra volcaduras ........ 3
C6mo proteger la cublerta ............. 7
C6mo secer la clnta de empaque .. 7
Caracter|stlcas de su estufe ........... 8
Zones pare coclnar ........................ 9
Utenslllos para coclnar ................... 9
C6mo reviser los utensilios ............. 9
Eficlencla de los utenstiios ............. 9
Esptrales Irredlentss ..................... 10
Ciclo de la unldad trradlante ........ 10
Posicldn de los controles ............. 10
Zone doble pare cocinar .............. 10
Fuego lento ................................... 11
Consejos pare hecsr conserves ..11
Funciones tredlcionates del
homo .............................................12
Funolones eutom_ticas del
homo ............................................. 12
Otros botones ..... ,......................... 12
Panel de control ............................ 13
ReloJ ..............................................14
Cron6metro de lacocina ............14
Tonos ..................................:........15
ESTIIFAELECTiIIC,A TIP
"iNDEPENDIENT£"CON
AUTOLIMPIEZA
Cbdlgo F .......................................15
ConseJos pare coclneren el
homo ........................................16-17
C_no hornear...............................IB
C6mo esar a la parrille ................. 19
E! clclo de autollmpleza .......... 20.21
Programas especlates ............. 22-23
I PJPO _ f" '
C6mo limplarlacublertade
vidrlo........................................24-25
Panel de control............................25
Cacero_a y pardllepare asar
ala parrllla....................................25
Perlllesde control.........................26
Foco de leluzdelhomo ...............26
Caj6n de elmacenamlento ............ 28
Perrtlles del homo ......................... 27
Puerta del homo ........................... 27
Antes de Ilamer pare un
servlclo .................................... 29-3 t
AJustes a Istemperature ....;......... 32
Garantfa........................................33
N0meros pare servlclosdel
consumldor ................................... 34
Pare su €onvenlencla y referencle luturn, par favor oecr|ba el nGmoro de
modelo y de eerie en e| esps:lo qua sa provee, Eetln ubicedos en el
marco frontal detr_e dol ©e|6n.
NUMERO DE MODELO: NUMEflO DE SEfll/;
2
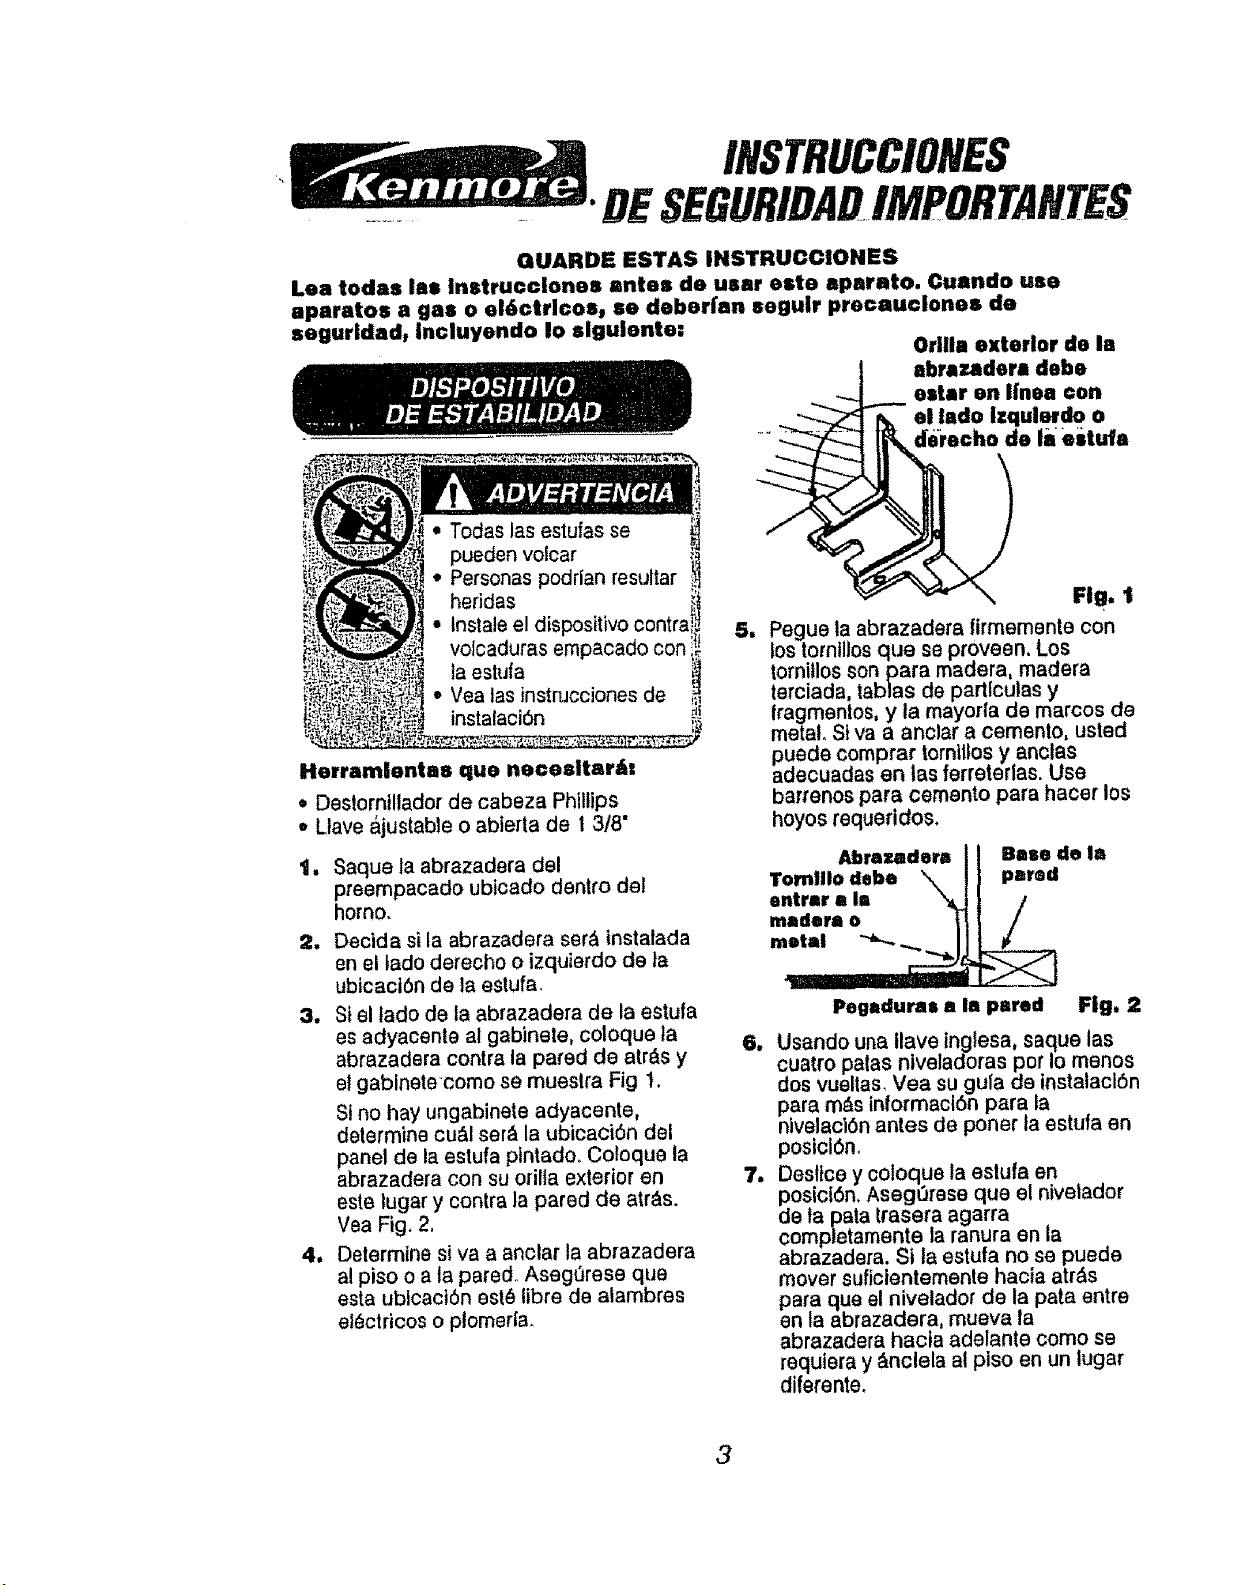
INSTRUCCIONES
............ DESEGURIDADIMPORTANTES
GUARDE ESTAS INSTRUCCIONES
Lea redes lab Inatru©clones antes de user este aparato. Cuando use
aparatos a gas o el6ctricos, se deberfan seguir precau©lones de
segurldad, incluyendo Io slguiente:
Orilla exter|or do la
Herram|entaa qua neceaitar_t
* Destornillador de cabeza Phillips
,, Uave ajustable o abterta de ! 3/8"
t, Saque la abrazadera del
preempacado ubicado dentro del
homo.
2. Decida si la abrazadera set& instatada
en el tado derecho o izquierdo de ta
ubtcactSn de la estufa.
3. St el lade de la abrazadera de la estufa
es adyacente al gabinete, coloque la
abrazadera contra la pared de atr_s y
e! gablnetecomo se muestra Fig t.
Sf no hay ungabinete adyacente,
determine cu&l ser;_ la ubicaci6n del
panel de la estufa ptntado. Cotoque la
abrazadera con su oritla exterior en
este lugar y contra la pared de atr_s.
Vea Fig. 2.
4, Determine si va a anclar la abrazadera
a! piso o a ta pared. Aseg_rese qua
esta ubicaci6n est,) libra de alambres
el_ctricos o plomerla.
iibrazaderl debe
.-- _ ester on I|nea con
_'--_ r_ el lade izqulerdo o
_ \ Fig. 1
5. Pegue la abrazadera firmemente con
los torn,los qua se proveen, Los
tornitlos son para madera, madera
terciada, tablas de partlculas y
fragmentos, y la mayorla de marcos de
metal. St va a anclar a cemento, usted
puede comprar tornillos y anclas
adecuadas en las ferreterlas. Use
barrenos para cemento para hacer los
hoyos requeridos.
g
m
Abrazadera _ I Base de la
Temllle debe _ _ ] pared
entrar a Ii _ ] /
rn,uerae tll /
metal _ ... "-_
Pegmduras e la pared Fig. 2
Usando una Ilave tnglesa, saque las
cuatro palas nlveladoras per Io manes
dos vueltas_ Vea su gula de tnstalaclSn
para m&s tnformacl6n para la
nivelacl6n antes de porter la estufa en
postcl6n,
Desttce y coloque la eslufa en ,
posictSn. Asegt_rese qua el nivelaaor
de la pata trasera agarra
completamente la ranura en la
abrazadera. Si la estufa no se puede
mover suficlentemente hacia atr&s
para qua el niveladof de la pata entre
en la abrazadera, mueva la
abrazadera hacla adelante come se
requiera y &nclela al piso en un tugar
diferente,
3
INSTRUCCIONES
DESEGURIDAD
IMPORTANTES
I " I I' I
r
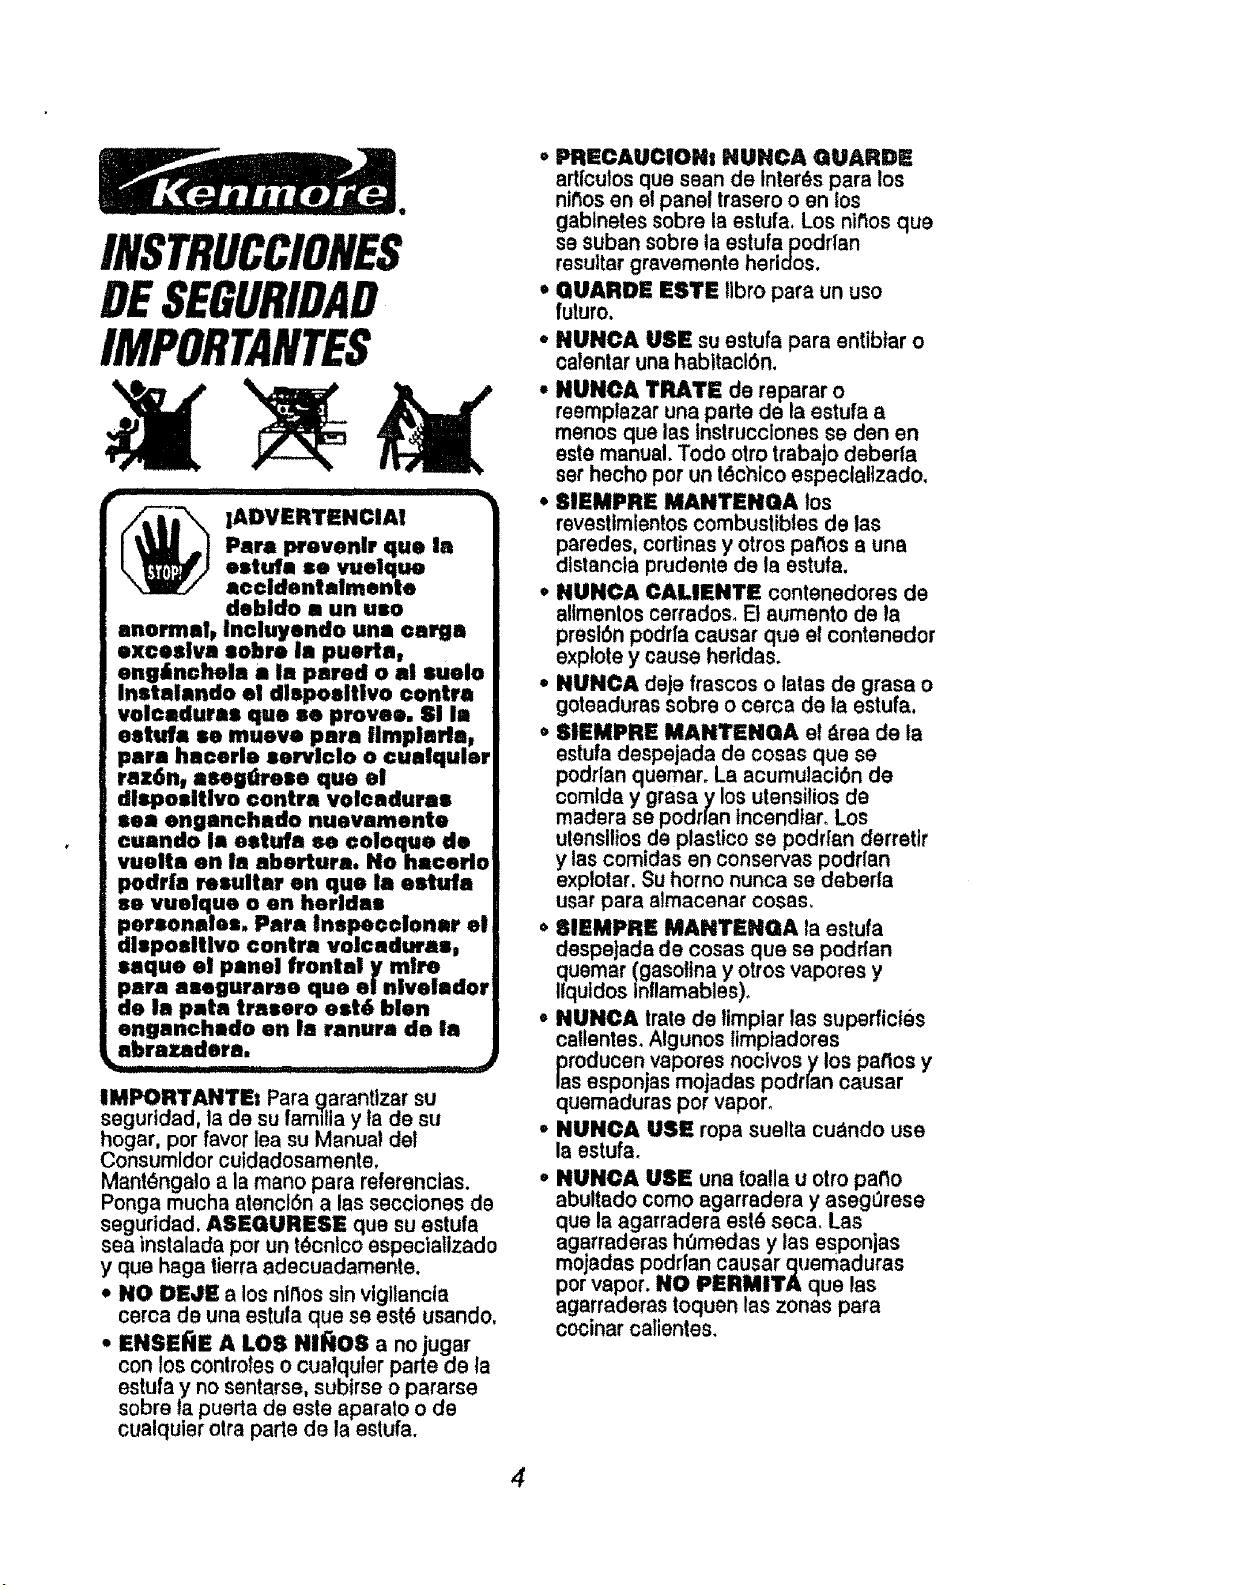
_ IADVERTENCIA!
Pare prevenlr que la
estufa se vuelque
accidentalmente
debido a un usa
anormal, incluyendo una oarga
exceslva sabre la puerta,
engllnchela a la pared o al suelo
Instalando el dlsposltlvo centre
volcaduraa que ae provee. SI la
eetufa se mueve pare ilmplarla,
pare hacerle servlclo o cualquler
raz6n, aseg_mrese qua el
dlspositlvo centre volcaduras
sea enganchado nuevamente
cuando la estufa se €oloque de
vuelta en la abertura. No haeedo
podr|a resulter en qua la estufa
so vuelque o on herldae
peraonale=. Pare Jnspecolonar el
disposlUvo centre volcedures,
saque el panel frontal y mire
pare aeegurarse qua e/nivelador
de la pate traeero est6 blen
enganchado en la ranura de la
abrazadera.
IMPORTANTE: Para g arantlzar su
seguddad, la de su fam=tia y ta de su
hogar, par favor lea su Manual del
Consumldor cuidadosamente.
Mant_ngalo ala mane para referencias.
Ponga mucha atencf6n alas secciones de
seguridad. ASEGURESE qua su estufa
sea instalada par un t_cnlco especlalizado
y qua haga tierra adecuadamente.
• NO DEJE a los nltlos sin vigllancta
cerca de una estufa qua se est_ usando,
° ENSERE A LOS HI,lies a no jugar
con los confreres o cualquter parte de ta
estufa y no sentarse, subirse o pararse
sabre ta puerta de este aparato o de
cualquiar otra parle de la estufa.
• PRECAUCIONs NUNCA GUARDE
artfcutos qua sean de interns para los
nit_osen et panel trasero o en los
gablnetes sabre la estuf& Los nines qua
se suban sabre la estufa poddan
resultar gravemente heridos.
• GUARDE ESTE libra pare un usa
future.
° NUNCA USE su estufa pare entlblar o
calentar una habltacl6n,
• NUNOA TRAlrE de raparar o
reemptazar una parte de la estufa a
manes qua las instrucclones se den en
este manual. Todo afro trabajo deberfa
ser hacho par un t_chico especlallzado,
° $1EMPRE MANTENGA los
revesttmientos combustibles de las
parades, cortinas y arras pattos a una
dlstancla prudente de la estufa.
° NUNCA CALIENTE contenedores de
allmentos cerradoso Et aumento de la
presl6n podrfa causer qua el contenedor
exptote y cause hertdas.
° NUNCA deja frescos o lares de grasa o
goteaduras sabre o cerca de la estufa.
° SIEMPRE MANTENGA el _rea de la
estufa despejada de cases qua se
podrlan quemaro La acumulaci6n de
comlda y grasa y los utensdios de
madera se podrl'an tncendtaro Los
ulensllios de plasttco se podrian derretir
y las comidas en conservas poddan
explotar. Su homo nunca se deberfa
usar pare almacenar cases.
= 81EMPRE MANTENGA la estufa
despe]ada de cosas qua se poddan
lquemar (gasoltna y arras vapores y
lquidos Inflamables).
° NUNCA kate de limpiar las superficies
caltenteso Algunos limptadores
_arOducen vapores natives y los patios y
s esponjas mojadas podrran causer
quemaduras par vapor.
° NUNCA USE ropa suelta cu_ndo use
la estufa.
= NUNCA USE una toa!la u otro patio
abultado coma agarradera y aseg_3rese
qua la agarrad,era esl_ seca. Las
agarraderas humedas y las esponjas
mojadas podrran causar quemaduras
par vapor. NO PERMIlrA qua las
agarraderas toquen las zones pare
cocinar calientes.
4
INSTRUCCIONES
DESEGURIDAD
IMPORTANTES
• NO TOQUE los superficies para calentar,
los superficies cerca de elias o los
. sgp.e_ici_p, inter!_ore_.s..Es{as podrl_n €slur
suliclentemente ca!ientes pare quemar
aunque se vean de color oscuro° Durante y
despu_s del uso, no toque o permita qua la
rope o maleriales inflamables hogan
contacto con las superficies calientes hasta
qua hayan tenldo liempo de enlriarse, Las
otras superficies cerca de las ventanillas de
ventilaci6n del homo, puertas, ventanas y
los superlicies para cocinar tambi_n
podrlan estar suticlenlemenle calienles
pare causar quemaduras.
,, SOLO ClI_TAS clases de utenstlios de
vtdrlo o cer_ffnlca se pueden usar para
coctnar en la cublerta, Aseg_rese qua los
utensllios, qua selecclone esl&n disettados
pare coclnar sobre la cubierla sin
quebrarse debldo a los s,3bilos cambios de
temperatura,
• SIEMPRE TENGA cuidado cuando
loque los elementos de la cubierta.
Retendr_m ca!ordespu_s de qua la estula
se haya apagadoo
• NUNGA OBSTRUYA la ventilaci6n del
homo detr&s el elemento derecho de atrC,s_
= I.AS OLLAS QUE SE USEN para
coctnar en la cubierta deberlan ser de
rondo piano y Io suficientemente grandes
para cubrtr et _rea qua se est& utilizando.
Los ulensitios qua son demasiado
pequetlos exponen el etemenlo calentador
_nPOdrlacausar un contaclo direclo o el
cendio de la rope.
• NUNCA DEJE los unJdades de
superficie sin vigilancia a lemperaturas
alias, Los derrames podrfan resutlar an
podrian incendiaro
• NUNCA COI_INE sobre una cubierta
para coctnar quebradao Los soluciones
para ta limpieza y los derrames podrlan
penelrarla y crear un rtesgo de coflfle de
corriente o de Incendioo
• SIEMPRE COLOQUE las agarraderas
(manillas) de los olios hacla adentro y lejos
de las otras unidades de {a superficie para
-reductrehriesgo de _quernaduras,
encendido, un contacto y detrains
accidental.
• COLOQUE LAS PARRILLAS DEL
HORNO en la posici6n deseada
mlentras el homo est_ frlo. Sl los parrillas
se deben mover mientras el homo est&
calienle, no permi/a qua la agarradera
haga conlacto con el quemador caliente
del homo°
• DESPUES DE ASAR A LA
PARRILLA, siempre saquela cacerola y
la parrtlla pare asardel homo y tlmpielas°
Los sobrados de grasa en ia cacerola
pare asar podrtan incendiarse la pr6xtma
vez qua usted use et homo.
• SIEMPRE TENGA ouidado cuando
abra la puerto del homo. Dsje qua el aira
caliente y el vapor escapen antes de
mover los allmenlos.
° NUNCA UTILICE papal de alumtnio
para cubrir el londo del horno. El uso
tncorrecto del papal de aluminto podrla
resullar en el rtesgo de un golpe de
corriente e tncendio.
5
INSTRUCCIONES
DESEGURIDAD
IMPORTANTES
* LIMPIE SOLAMENTE Ins pades qua se
hstan en esle manual. Sign lodas las
Instrucctones pars la limpieza.
* Sl EL MODULO PARA LA
AUTOLIMPIEZA functona m_, apagua
controles o descon_clB la electricldado
Pida un unidsd servlclo per un t_cntco
especlalizado.
, HUNCA FRIEOUE, muava, o d_e el
sello de la puarta an |as estufas con
autoUmpleza.
. NUHCA TRATE de limpiar los ulenstltos,
elias, partes removibles o Is cacerois y la
parriita pars asar en eI ciclo de
autollmpiaza_
* NO USE limpiadores pars homes. No se
deberfa user nlnguna class de limpiador
pars homes o cremas prolectorasdesire o
alrededor de cuslquier parts del homo°
IADVERTEHCIA DE
SEGURIDAD IMPORTANTE!
Callfomla Safe Drinking Water and
Toxic Enforcement Act requlore qua
el gobarnadcr de Califom|a publlqua
una lists de substenclae qua el
ostado mope qua producen defectos
do naclmlanto u otrcs daflos
reproducttvos y raqularo qua los
hombres de negoclos advlertan a
sus ©llontas del oontacto potential
a tales substanclas. El altlanto de
fibre do vldrio on el homo con
au_tcUmpleza smitlr_ usa muy
pequatla cantidad de mon6xldo do
carbono durante el clclo de
eutollmplaza, El €ontacts so puede
mlnlmlzar ventllando con usa puerta
o vantana ablerta c uundo un
venfllndor o usa campana de
ventilacl6n.
forte Ion reclplantea para
derramaa con papal do
alumlnlo. El papal de alumlnlo
puade obstrulr el paso normal
del ealory daf_ar la estufa,
Slempre utllloe alias y woks do
rondo piano y del mismo temat_o
del elemento qua so eat&
usando. Las utensltlos no se
dobertfan extender m&e a|ll de
l"dal borde dol elemonto pars
ooclnar.
;LEA Y COMPRENDA
ESTA INFORMA¢IOH AHORA!
AeegGreee quo redo= en su hogar
aapnn qu6 hater en case de
Incendio. Nunca use egua sabre un
Incendlo de grass; esto eolamente
extender& laa llamas.
iNCENDIO rOE GRASA EN LA
CUBIERTA:
Hunce levnnte una ella on llamas.,,
1. Apaguo toe slementos de _a supefficie.
2. Sofoque la llama con usa taps
apretada, soda pars cocinar o con un
extintor qu_mlco, a espuma o 'haler€,
FUEGO EH EL HORHO_
lNo trata de mover la oacorola!
1. C_erre la puerta dat homo y apague
los controles.
2, St e! Incendlo continea,
cutdadosamenta abra la puerta, arroje
soda pars coclnar sabre et fuego, o
use un extlntor de qulmico lace,
espuma o 'halon'o
6
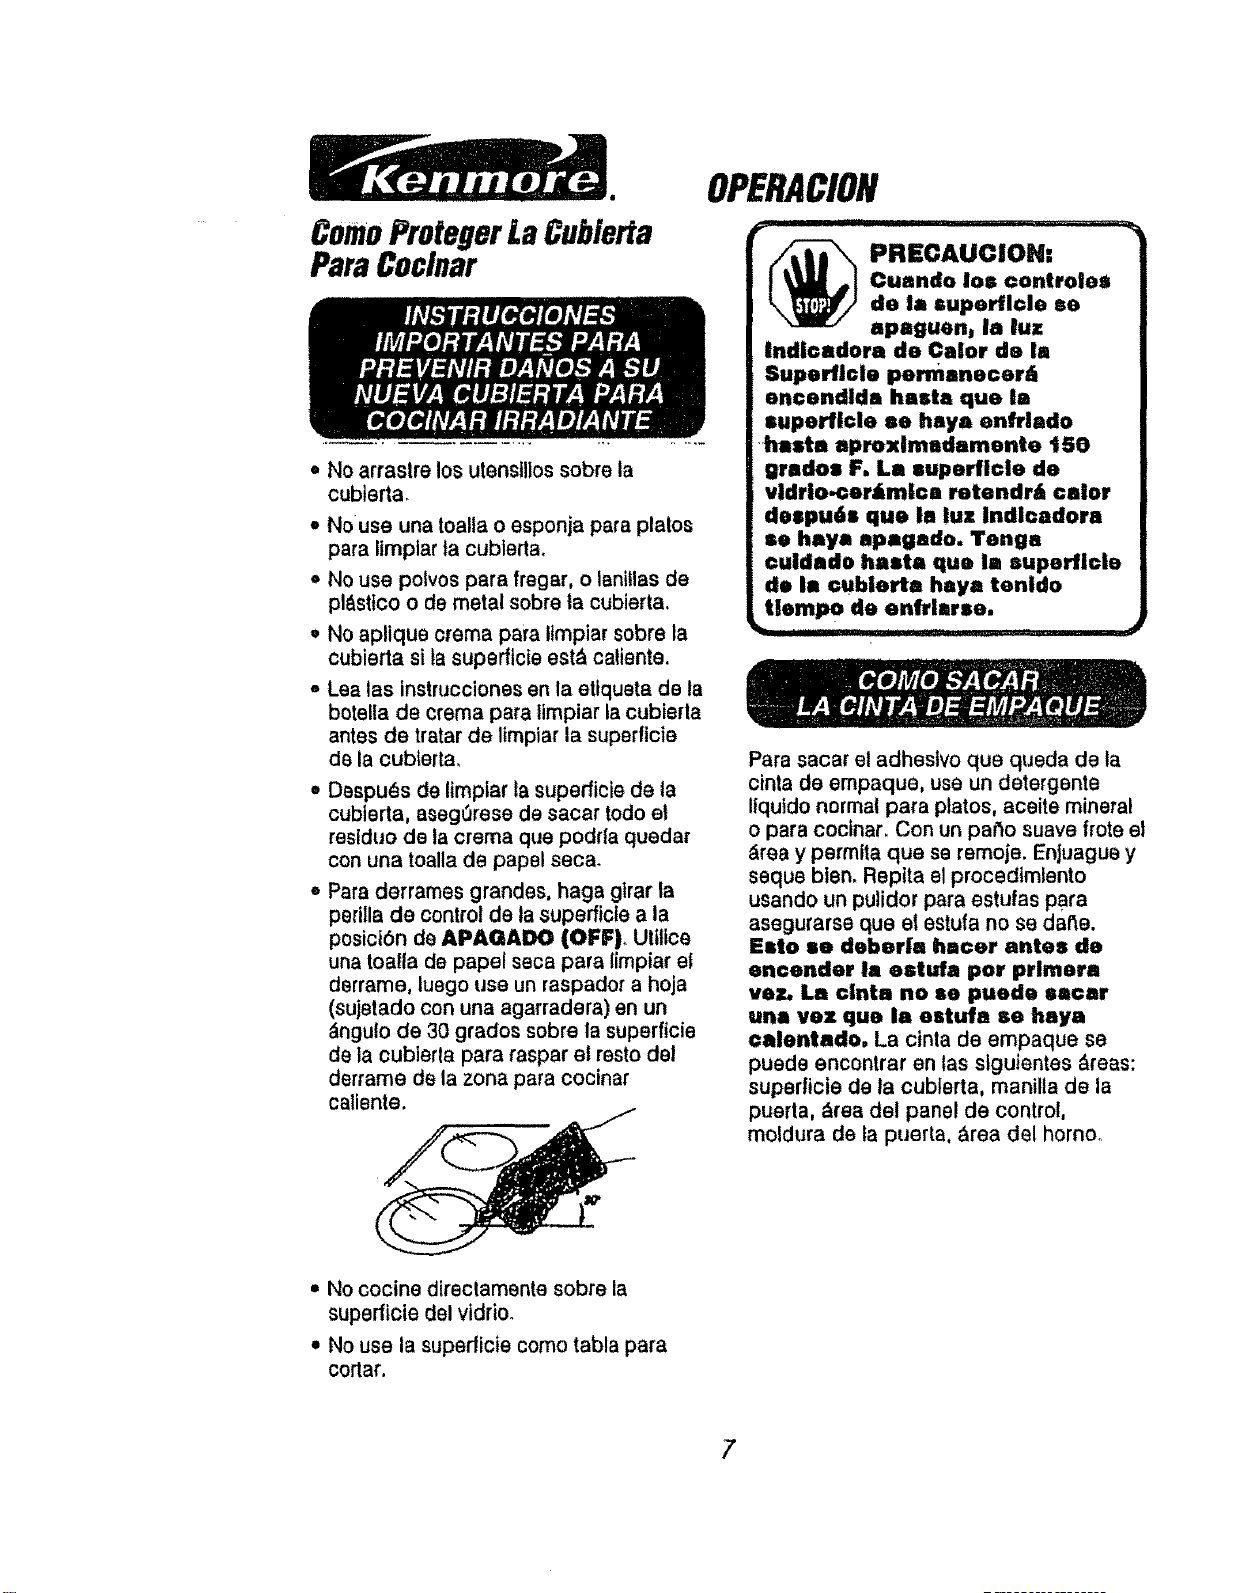
ComeProtegerLa Cubierta
Pare Cocinar
No arraslre los utensillos sobre la
cubterta,
o
• No use una toalla o esponja para plates
para limplar ta cublerta.
o No use pelves para fregar, o laniflas de
pl&stico o de metal sobre ta cubierta.
• No aplique crema pare Itmpiar sobre la
cubierta si ta supefflcte est_ caliente.
- Lea las instrucciones en la eltqueta de ta
botella de crema pare limpiar la cubierla
antes de tratar de ltmpiar la superticie
de la cubterta.
• Despu_s de limpiar [a superficle de ta
cubierta, a_egOrese de sacar todo et
residue de ta creme qua podrfa quedar
con una toalla de papal seca.
•Para derrames grandes, haga gtrar la
peri!la de control de Is superficte ala
posici6n de APAGADO (OFF), Uliftce
una toalla de papal saga para limpiar el
derrame, luego use un raspador a hoja
(sujetado con una agarradera) en un
_ngulo de 30 grades sobre la superficie
de la cublerla para raspar el taste del
derrame de la zona para cocinar
caliente.
OPERACION
_ PRECAUCiON:
-haste aproxlmadamenta t50
grades F. La superficle de
vldrio_cer£mlca retendr£ caior
se haya apagado. Tenga
de la cubleda haya tenldo
Para sacar el adheslvo qua queda de la
cinta de empaque, use un detergente
Itqufdo normal para plates, aceite mineral
opara cocinar. Con un pa_o suave frote el
&rea y permita qua se remoje. Enjuague y
seque bien. Reptta el procedimlento
usando un pulidor pare estufas pare
asegurarse qua el estufa no se derma.
Esto se deber|a hacer antes de
encender la estufa per prlmera
vez. La clnta no se puede sacar
una vez qua la estufa se haya
calentade, La cinta de empaque se
puede encontrar en tas siguientes &teas:
superficie de la cublerta, manilla de la
puerta, _rea del panel de control,
moldura de fa puer|a, _,rea del homo°
• No cocine directamente sobre la
superficie del vidrio.
• No use la superficie come tabla para
cortar.
7
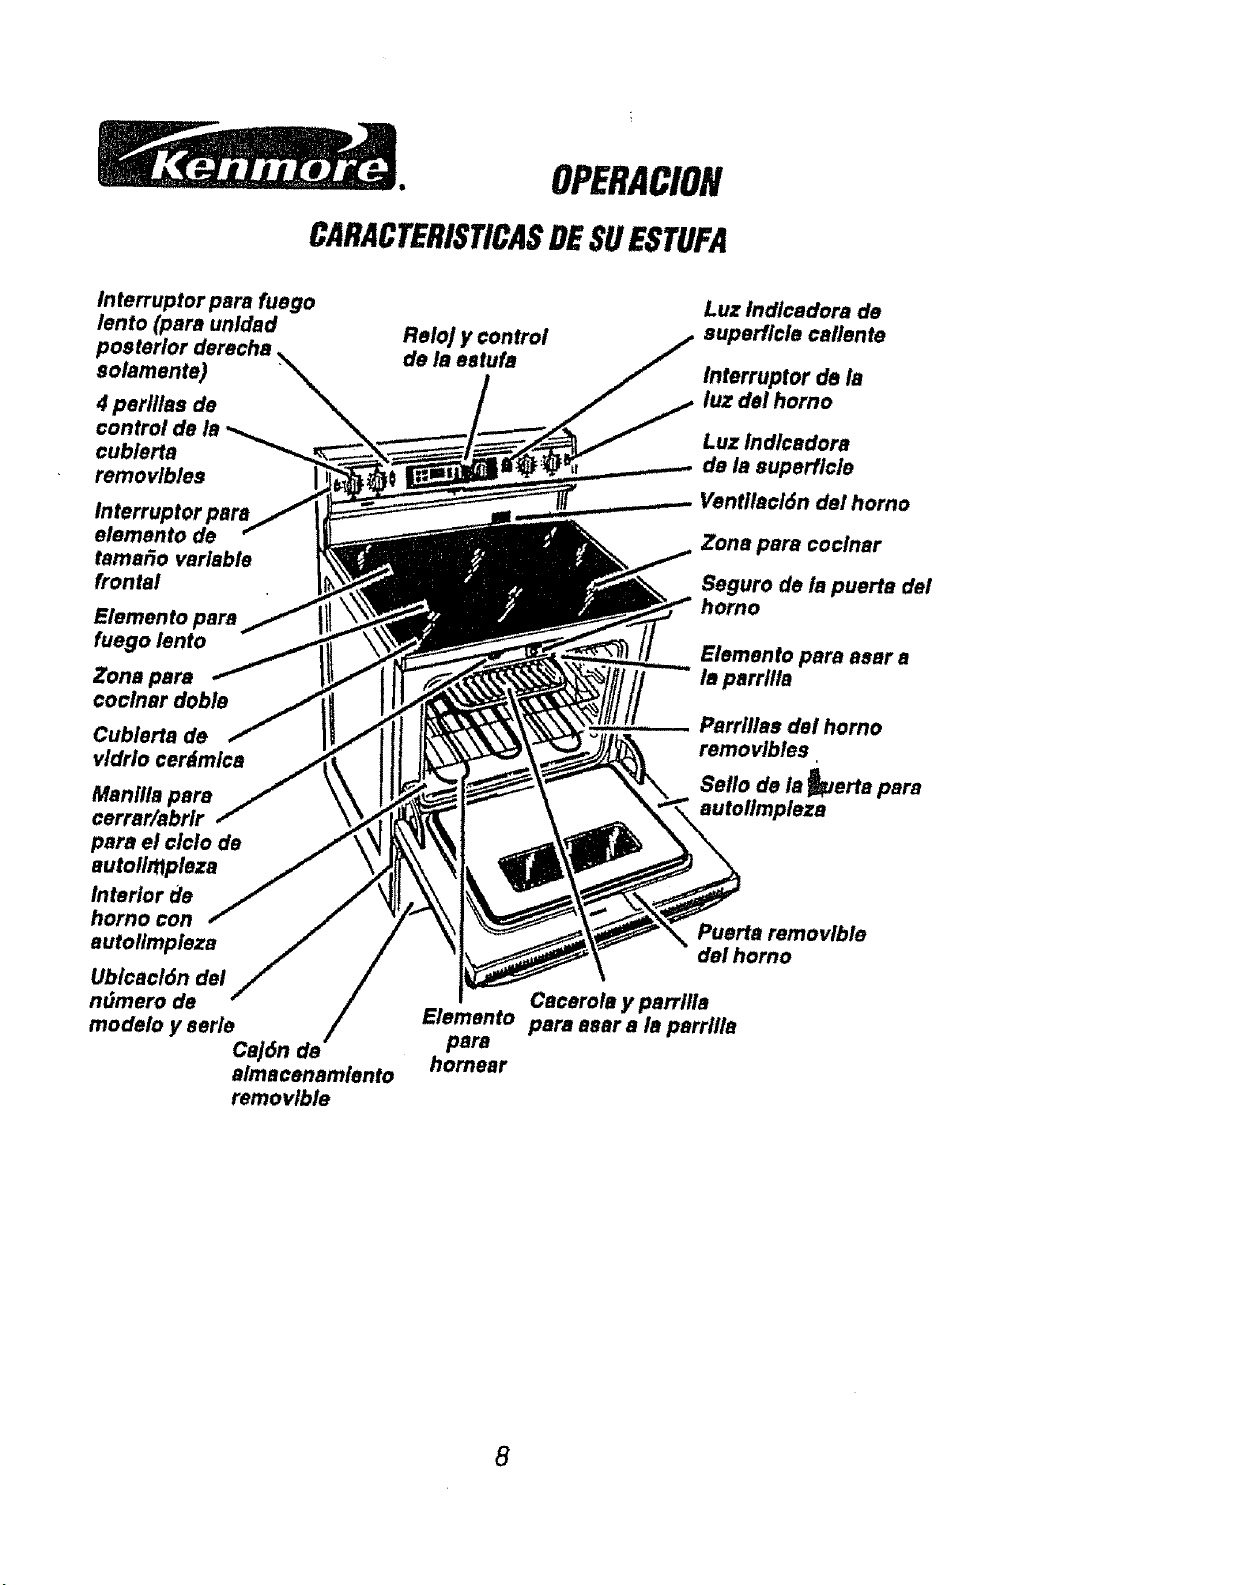
OPERACION
CARACTERISTICASDESUE$TUFA
Interruptor pars fuego
lento (pars unldad
posterior derecha,
solamente)
4 pertllas de
control
cublerta
removlbles
Interruptor pars
elemento de
tamafio variable
frontal
Elemento pars
fuego lento
Zone pars
coclnar dobla
Cublerta de
vidrlo cerdmica
Maniila pars
cerrar/abrir
pars el €lclo de
autolinlpleza
Interior de
horno con
autoltmpleza
Ublcaci6n del
ndmero de /
modelo y aerlet...dn..,./
de
almacenamlento
removible
RetoJ y control
de la eatufa
Luz indlcadora de
superflcle callente
lnterruptor de la
luz del homo
Luz lndlcsdora
de la superficle
Ventilacl6n del homo
Zone pars coclnar
Seguro de ia puerte dal
homo
Elemento pars asar a
la parrtlla
Parrlllas del homo
removlbles
Seflo de la _uerta pars
autollmpleza
Puerla removlble
del homo
Cacerola y parrilla
Elemento pare asar ala parrlila
pars
hornear
8

OPERACION
CGmoCocinarSobreUna
CubiertaRadiante
Antes de usar su nueva cubterta pare
cocinar radiante, Ilmplela con Cooktop
Cleanfng Creme®. Esto dejar_ una capa
protectora_
Las zonas pare cocinar se muestran con
un dtbujo sobre el vtdrio, La marca cerca
de cada peritla de control le muestra cu_t
zona radi_nte se enciende con esa perilla.
Zones para cocinar
OO
Trasera
deracha
©O
el
OO @0 Frente
Trasera Frente de roche
lzqulerda izquierda
Use elias y woks qua lengan fondo plane.
El tamat_o de los utensiltos debertan ser
del mismo tamaSo qua la zona qua se est_
usando para cocinar.
Lee elias
__(_._ deberian
Fondo tenor
de rondo
Is ella piano
Tamale de ia zone
pare coclnar
Si usted no sabe si ,,,_,, ,,, ,,, ,,,-a
sus utensilios t.ienen , J4_ !
rondo plane, haga
esta prueba. Invierta la
ella sobre la cubierta, coloque una regla
sobre la superflcie de la otla. Haga girar la
regla en un clrculo complete, revtsando
mientras la da vuelta cuatquier espacio
qua podda existir entre tas dos
superficies. El rondo de la ella y et file de
la regla deberian coincidir uno sobre el
otto a trav6s de todo el largo.
Acero inoxldabie: Attamente
recomendado para use con su nueva
cubierla para cocinar. Especialmente
bueno con ur_rondo de ripe doble.
Alumlnlo; Se recomienda los utensilios
de aluminio pesado.
Hierro ferJado: Las elias de hterro
forjado qua son completamente cubiertas
con porcelana son recomendadas. Las
elias de hierro forjado que no son
cublertas con porcelana podr[an rayar la
superficie de vidrio car&mica de la
cubierta
Fo.do do cobra: Ttene buena
eficiencia, pete podrla dejar un residue
sobre la superficte de la cubierta_
Vidrlo cerlmica o pledra: Son
utilizables, pare no recomendados.
Poddan rayar la superficle de ta cubierta.
9
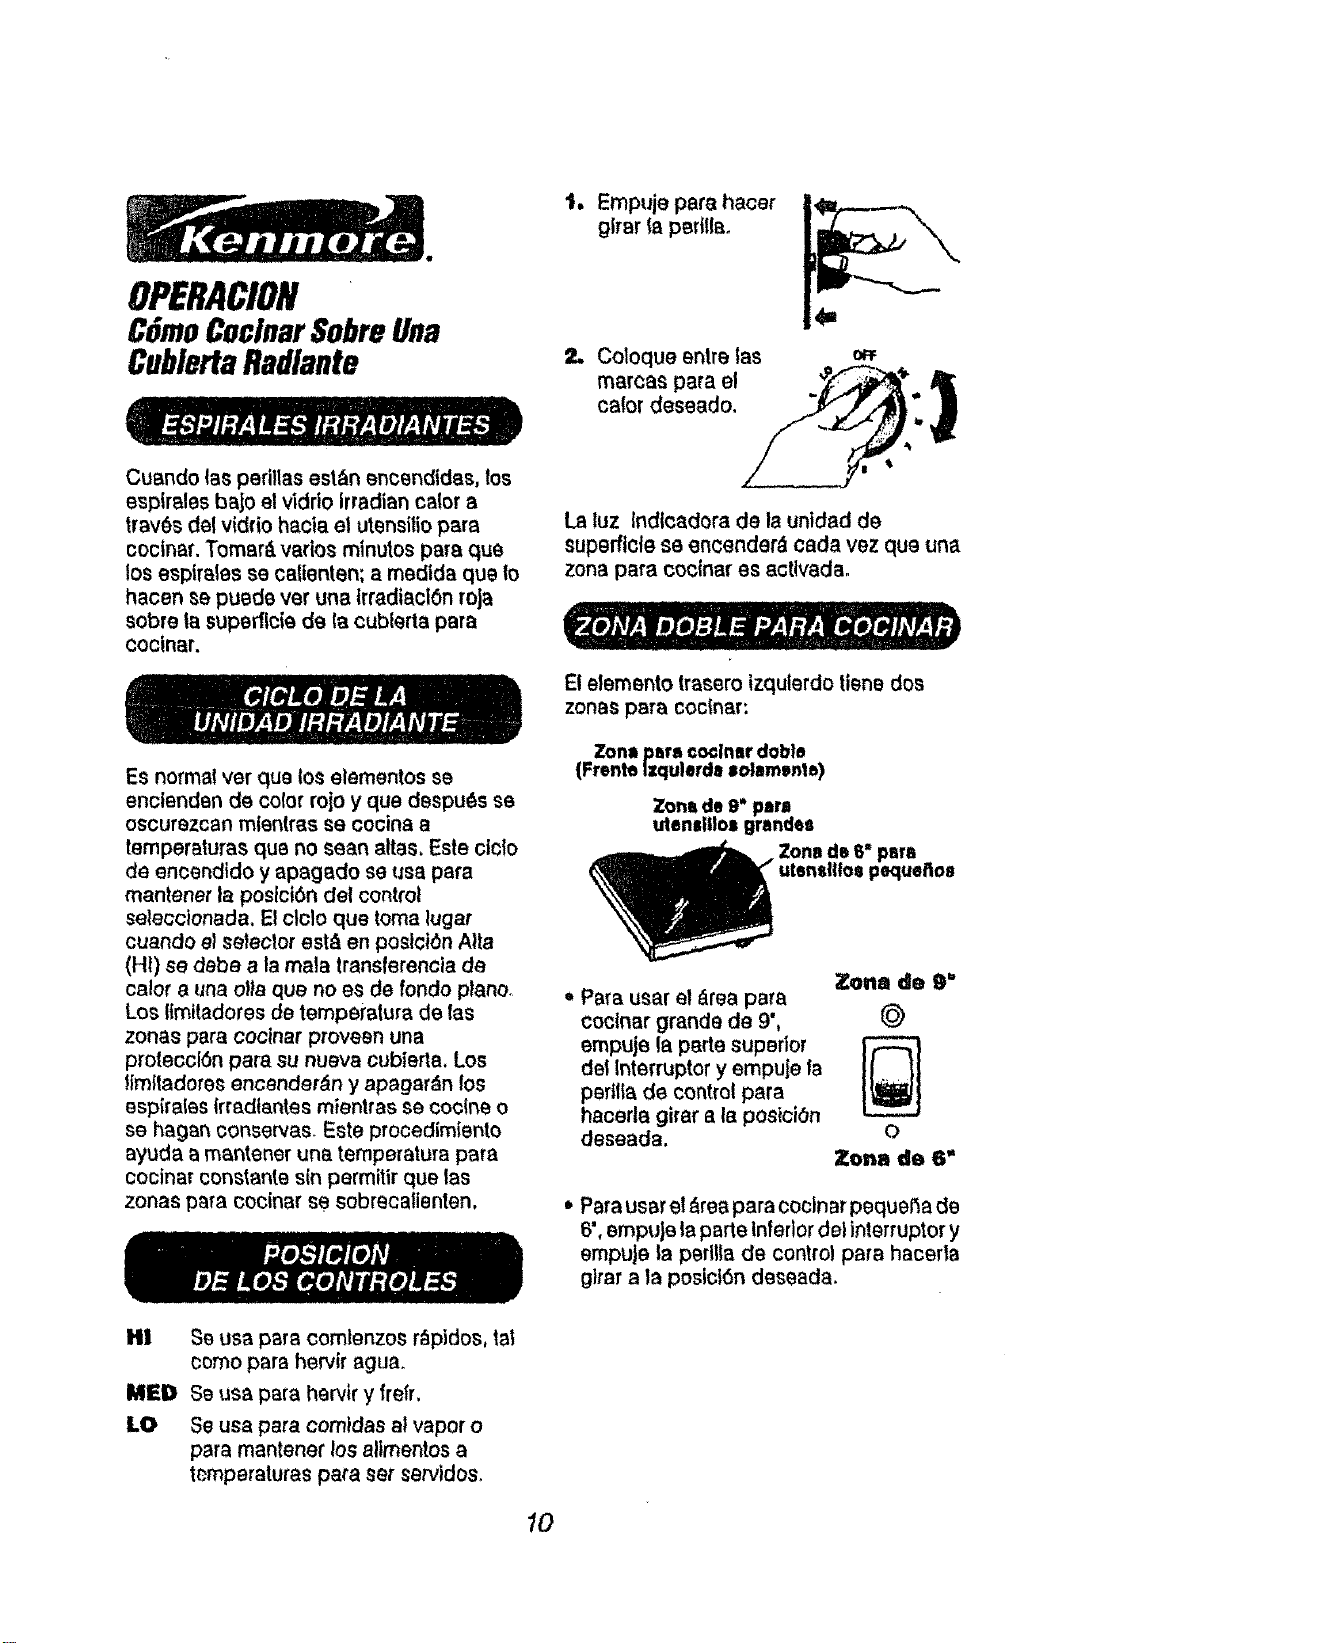
OPERACION
t. Empuje pare hacer
glrar ta pedlla.
CGmoCoclnar$obreUna
CublertaRadlante
CuBndo las perillas estftn encendidas, los
esplreles bajo el vidrto Irradian calor a
trav6s del vidrio hacla el utensilio pare
cocinaf. Tomartl vados minutes pare qua
los espfrales se caUenten; a medida qua lo
hacen se puede ver una Irradiacl6n roja
sobre fa superficie de la cublerta pare
cocinar.
Es normaf vet qua los elementos se
enclenden de color rojo y qua despu_s se
oscurezcan mlenlras se cocina a
temperatures qua no seen aires, Este cic!o
de encendido y apagado se usa para
mantener la poslci6n del control
seleccionada, El clclo qua toma lugar
cuando el seteclor est_ en poslct6n Alta
(HI) se debe ala mala transferencia de
ca!or a una otta qua no es de rondo piano_
Los Itmitadores de temperature de las
zones pare cocinar proveen una
proteccl6n pare su nueva cubierta. Los
!imitaderes encender_n y apagar_n los
espirales (rredientes mientras se cocine o
se hagen conserves. Este procedimtente
ayuda a mantener una temperature pare
cocinar constante sin permitir qua las
zones pare cocinar se sobrecalienten,
Coloque entre tas o_
marcas para el _'I
/"
/ y.'
La iuz Indlcadora de la untdad de
supefficle se encender¢ cada vez qua una
zone para coclnar es actlvada.
E! elemento tra_ero izquterdo liana dos
zones pare coctnar:
Zo.a de 9"
Pare usar el _rea pare
coclnar grande de 9', i_
empuje la parte superior
del lnterruptor y empuje la
pedlfa de control para
hacerla girar a la posiciOn
deseada, o
Zona de 6"
Pare user el&tea pare coclnar pequel_a de
6', empuje la parle inferior del interrupter y
ampule la perllla de control pare hacerla
glrar ala posict6n deseada.
HI Se usa pare comlenzos f_pldos, tel
come pare hervfr ague.
MIlD Se usa para harvtr y frefr,
LO Se usa pare comldas al vapor o
pare mantener los altmentos a
t_mperaluras pare set servldos.
10
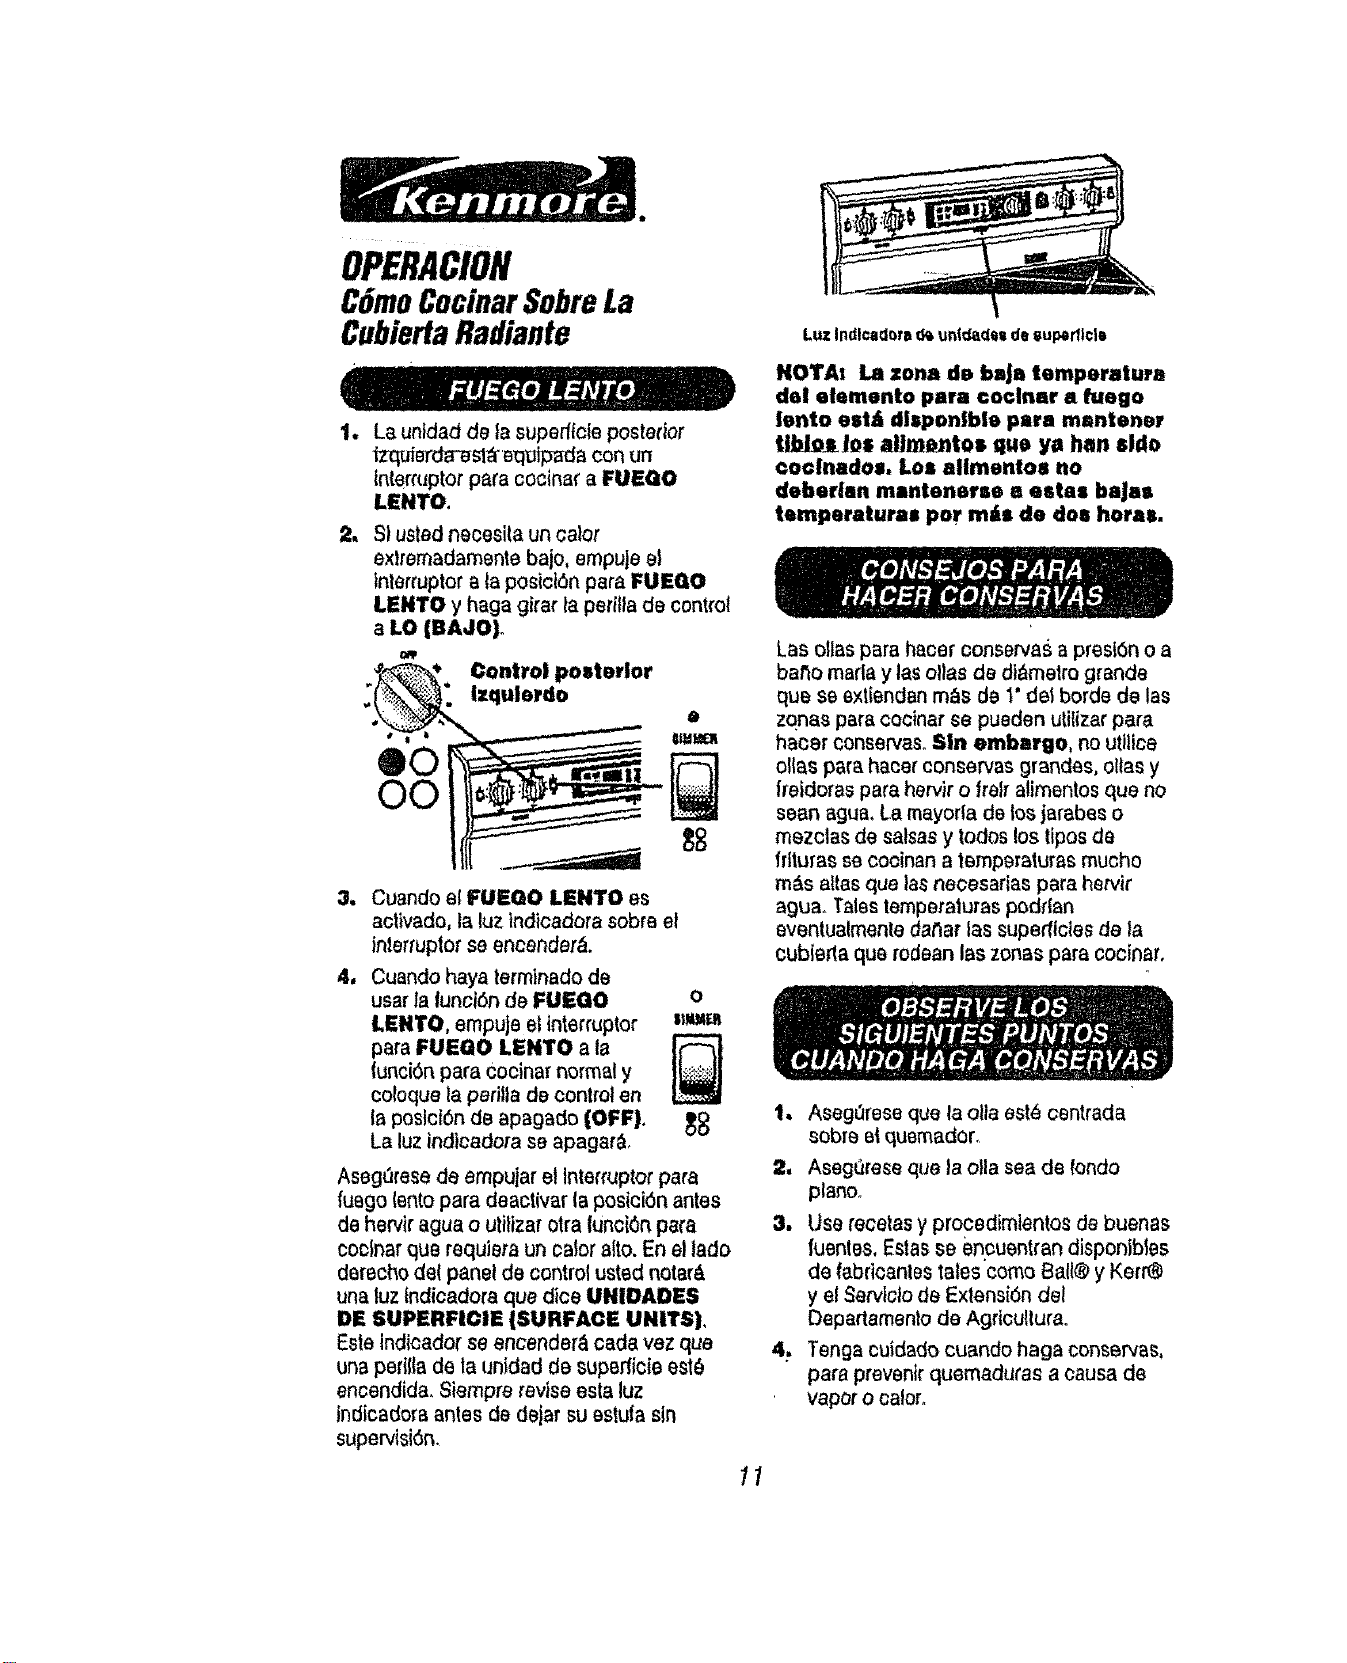
OPERACION
CGmoCooinarSobreLa
CubiertaRadiants
1
La unldad de la superftcie poster}or
fzqui_"a_sl_ equip_a con un
tn_emJptor pare cocina_' a FUEGO
LENTO.
S) ustad necesita un cator
extremadamente bajo, empuje el
Inlerruptor ata posiciOn para FUEGO
LENTO y haga girar la peritla de control
a LO |BAJO).
m
Control posterior
" Izqulerde
tD
#
®0
O0
0
IUMI_R
3. Cuando el FUEGO LENTO es
activado, la luz tndicadora sobre el
interfuplor se encender_.
4. Cuando haya terminado de
user la lunctOn de FUEGO o
LENTO, empuje el tnter_uptor _;_
para FUEGO LENTO ala
funciOn para Cocinar normal y
coloque la peritla de control en
la poslclOn de apagado (OFF). _
La luz indicadora se apagar&o
Aseg_rese de empujar el Interruptor pare
{uago lento para deactivar la posiciOn antes
de hervir ague o utilizer otra lunci_n pare
co_}nar qua requiera un ca_or alto. En el lado
de[echo de( panel de control usted notar&
una luz tndicadora qua dice UNIDADES
DE SUPERFICIE {SURFACE UNITS]I,
Este indicador se encender_ cada vez qua
una perilla de la unidad de superficie est6
encendida. Siempre revise asia luz
indicadcra antes de dejar su estufa sin
supervision.
Luz Ind!ca_ora d_ un{daclelde _upodtclb
NOTAI La zona de b..|a temperatura
dal elemento para coclnar a fuego
lento est_ disponlble pira mantener
|l_lol alim_ntos q,e ya ban side
€oclnados. Los allmentos no
deberlan mantenefse a estas baJas
temperaturas per m_s de dos horas.
Las ollas para hater conserves a preston o a
ba_o marfa y las ollas de dt&metro grands
qua se extiendan m_s de t' del borde de las
zqnas para cocinar se pueden utilizar pare
haoer conserves. Sin embargo, no utilice
oltas pare hacer conserves grandes, oltas y
lreidoras pare hervir o frelr a!imentos qua no
seen ague, La mayorla de los jarabes o
mezclas de salsas y todos los tipos de
fdturas se cocinan a temp_ratura_ mucho
m&s atlas qua las necesarlas para hervir
ague. Tales temperatures podr|an
eventualmente dat_ar las super_ic_es de la
cubleda qua rodean las zones para cocinar.
t. Aseg_rese qua la olla est_ centrada
_obre et quemader.
2, Aseg(_rese qua la o)la sea de rondo
planoo
3. Use recetasy procedimtentos de buenas
fuentes, Eslas se encuentran disponibtes
de fabricanles talescomo 8all® y Kerr@
y el Servlclo de ExtensiOn del
Departamento de Agricultura.
4. Tenga cuidado cuando haga conservas,
pare prevenir quernadu(as a cause de
vapor o caloro
11
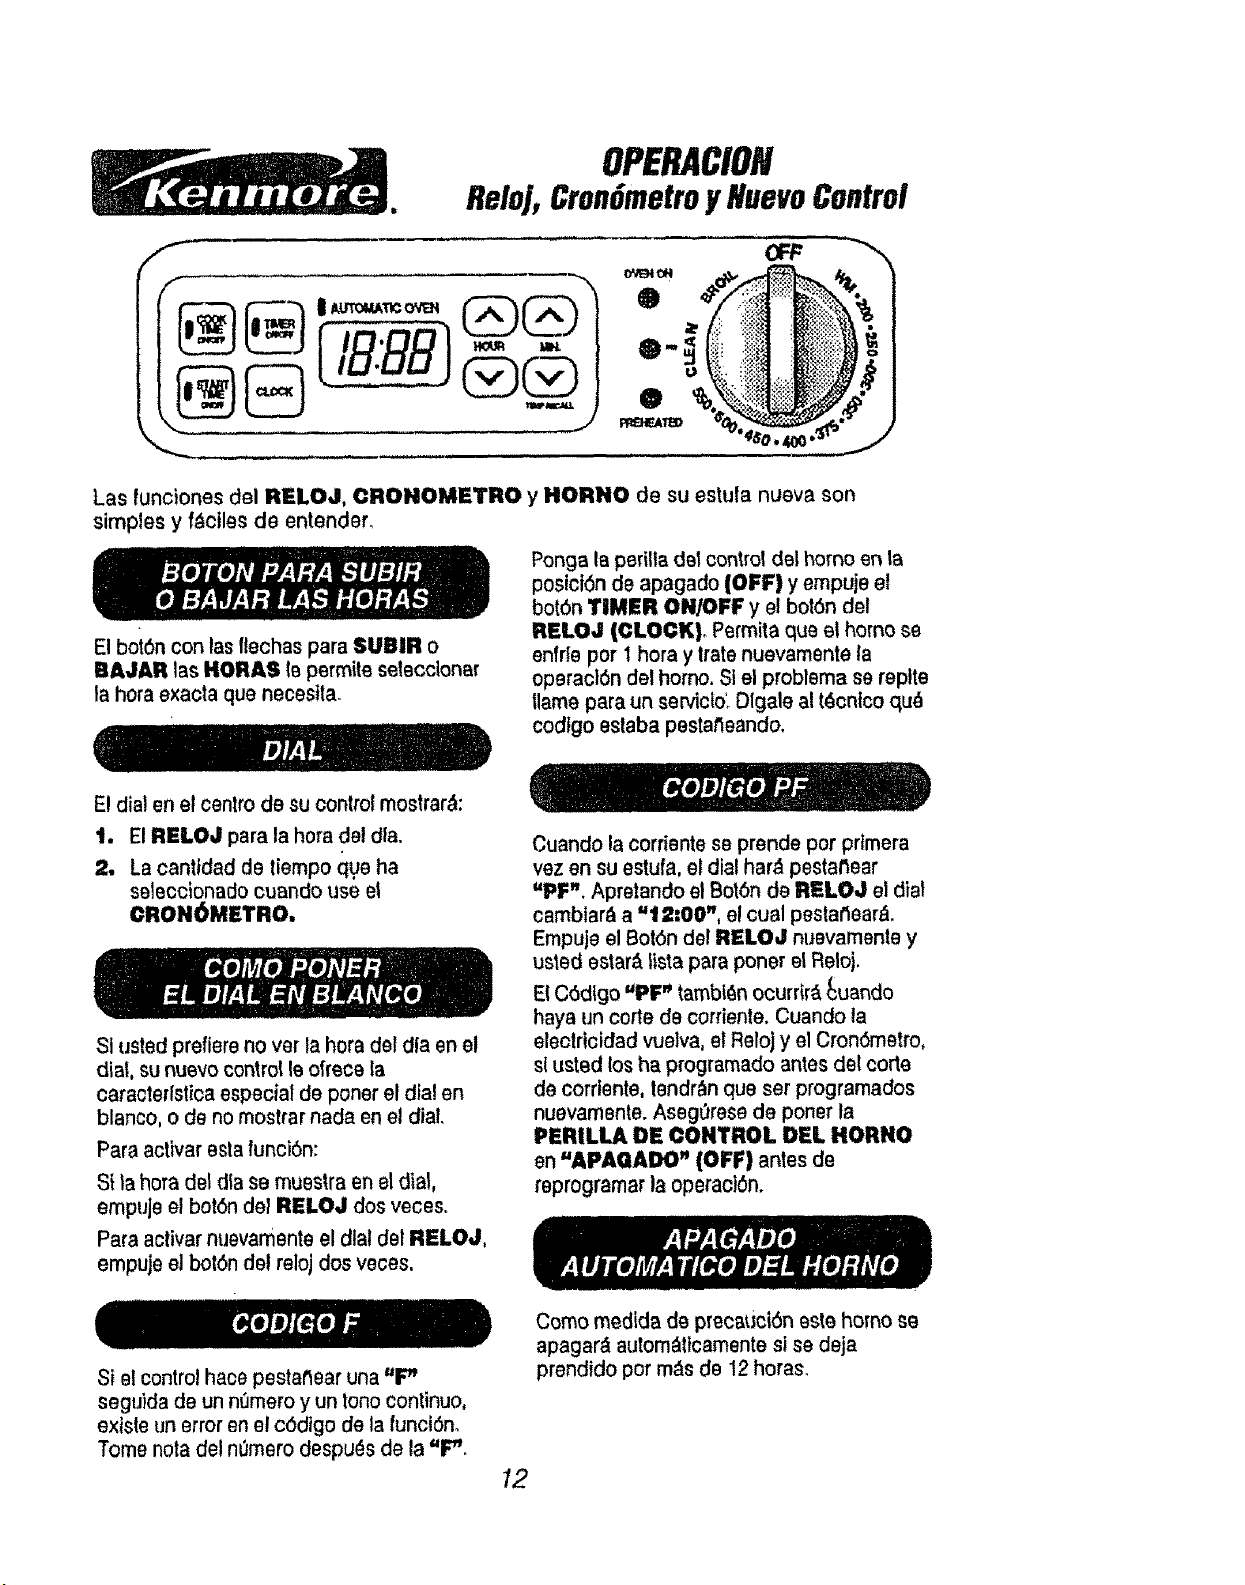
r___ _
OPERACiON
Reloj,Cron6metroy NuevoControl
Las funciones del RELOJ, CRONOMETRO
simples y f_ciles de entender.
El bot6n con las ftechas para SUBIR o
BAJAR tas HORAS tB permite seteccionar
la hera exacta qua necesta.
y HORNO de su estula nueva son
Ponga la p{)rlta del control del homo en la
posici6n do apagado (OFF) y empuje el
bot(Sn TIMER ONIOFF y el botSn del
RELOJ (¢LOCK|. Permita qua e! homo se
enfrle per I hera y trate nuevamente la
operact6n del horno. SI el problema se replte
lame para un servicio'oDlgale al t_cntco qu_
codtgo estaba pestatieando,
El dia! en el centre de su control mostrar&:
1. El RELOJ para la hera del dla.
2. La canldad de tiempo qua ha
seleccionado cuando use el
CRON6METRO,
SI usted prefiere no ver la hera del alia en el
dial, su nuevo control le efface la
caracterlslica especial de poner el dia! en
blanco, o de no mostrar nada en el dial,
Para actvar esta funci0n:
St la hera dal dia sa muestra en el dial,
empuJeel bot6n del RELOJ dos veces.
Para activar nuevamenteel dtal del RELOJ,
empuje el bol6n del reloj dos races.
Si et control hace pestatlear una "F"
seguida de un nt_mero y un tone continue,
extsle un error en el c6dtgo de la funcidn.
Tome nota del nOmero despu_s de la =F",
Cuando la corriente se prende per prtmera
vez en su estufa, el dia! har_ pestat'_ear
=PF", Apretando el Bot6n de RELOJ et dial
camblar& a =t 2-'00", e! cual pestatlear_.
Empuje el Botdn del RELOJ nuevamente y
usted estar& fsta para poner el Reloj.
El C6dtgo "PF" tambl_n ocurrtr_, _uando
haya un code de corriente. Cuando la
eleclrictdad vuelva, el Reloj y el Cron6metro,
sl usted los ha programado antes del corte
de corrtente, lendr_n qua set programados
nuevamente. Aseg0rese de poner ta
PERILILA DE CONTROL DEL HORNO
en "APAQADO" (OFF) antes de
reprogramar la operaci6n.
Come medida de precatJci6n este homo se
apagar_ autom&ttcamente si se deja
prendido per m&s de !2 horas,
12
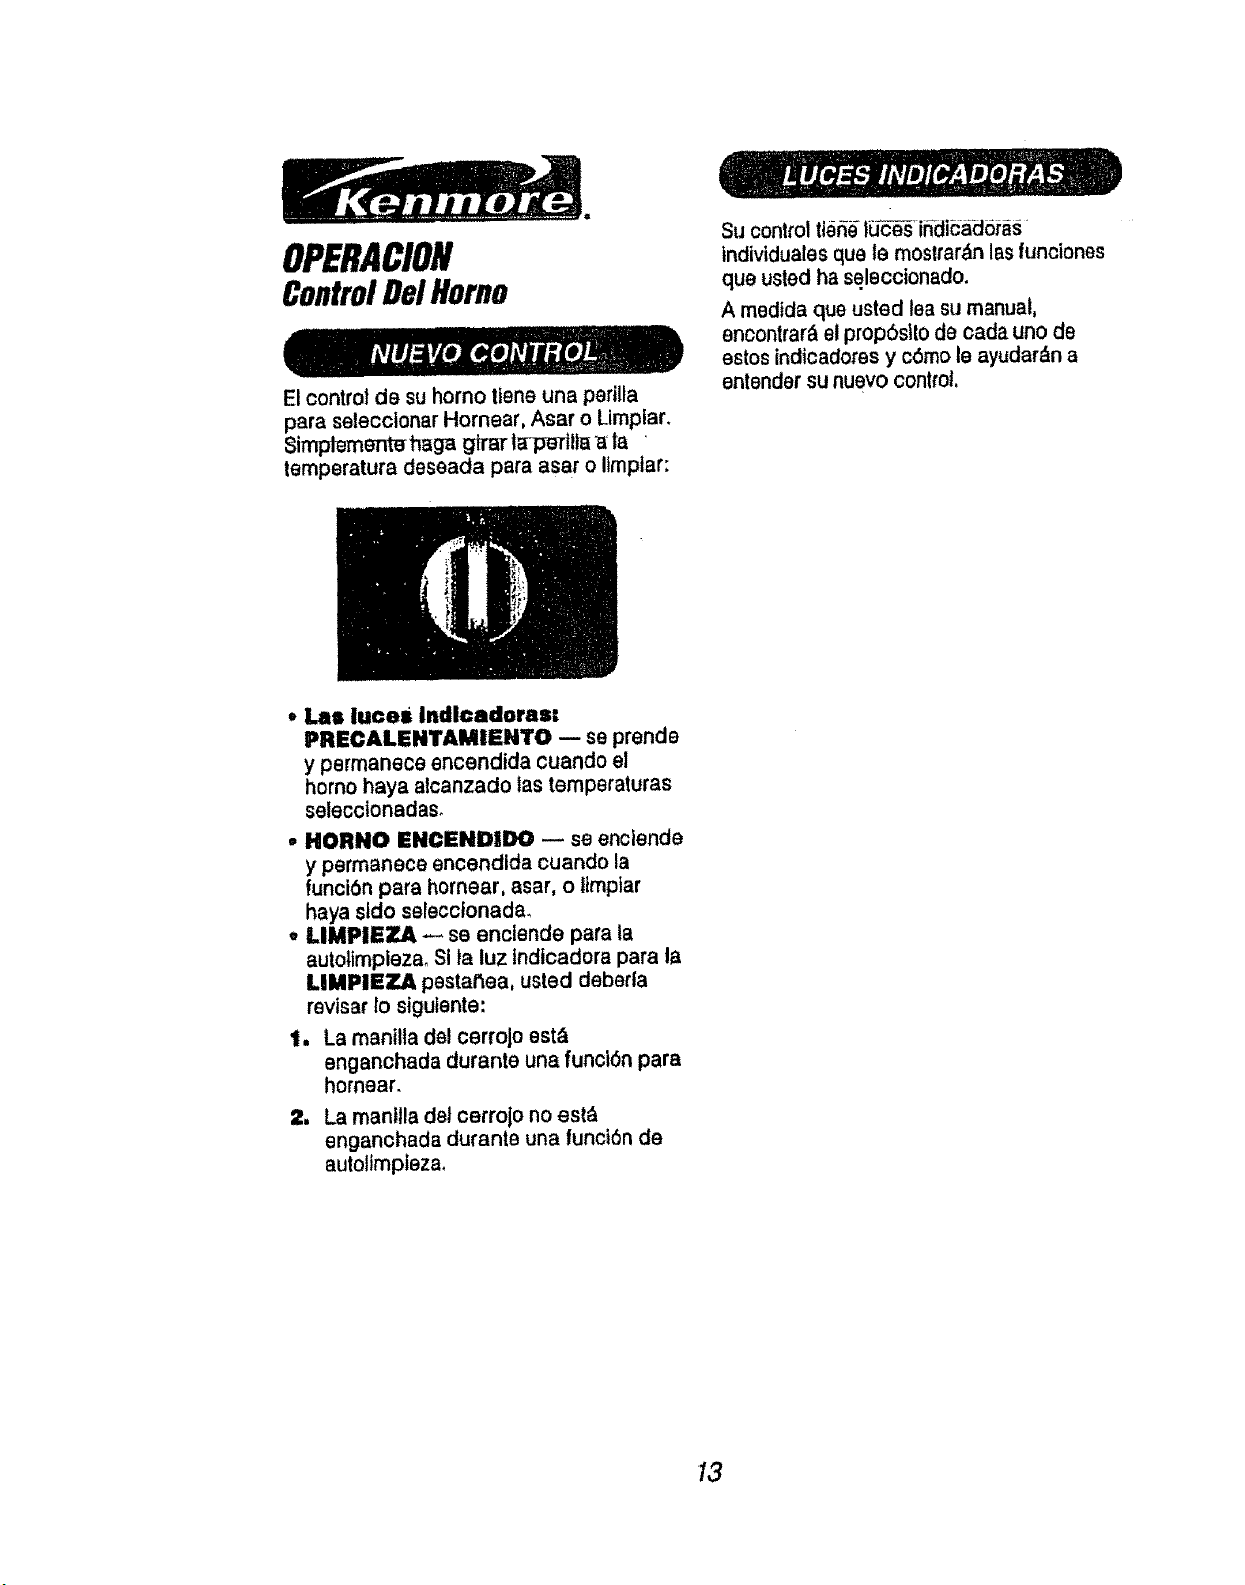
OPERACION
ControlDelHomo
El control de su homo llene una pertlla
para seleccionar Hornear, Asar o Limplar.
Simptemente haga girar ta-p_Ttlh__ la
temperatura deseada para asar o Itmptar:
Su control tleSe-li3c_ in_dib_ad6ras
tndividuates que le moslrar&n las funciones
que usted ha se.leccionado.
A medtda que usted lea su manual,
encontrar& el prop6slto de cada uno de
estos indicadores y c6mo le ayudar_n a
entender su nuevo control.
, Las iuce= indlcadoras:
PRECALENTAMIENTO -- se prende
y permanece encendida cuando el
homo haya alcanzado Ias temperaturas
seleccionadas°
• HORNO ENCENDIDO _ se enclende
y permaneca encendlda cuando la
funci6n para hornear, asar, o ttmpiar
haya sldo seleccJonada.
,, LIMPIEZA -- se enclende para la
autoltmplezao SI ta luz Indtcadora para la
LIMPIEZA pestattea, usted debetfa
revisar 1osiguiente:
1. La manilta del cerroJo est_
enganchada durante una funci6n para
hornear.
2. La mantila det carrojo no es{_
enganchada durante una funci6n de
autolimpieza,
13
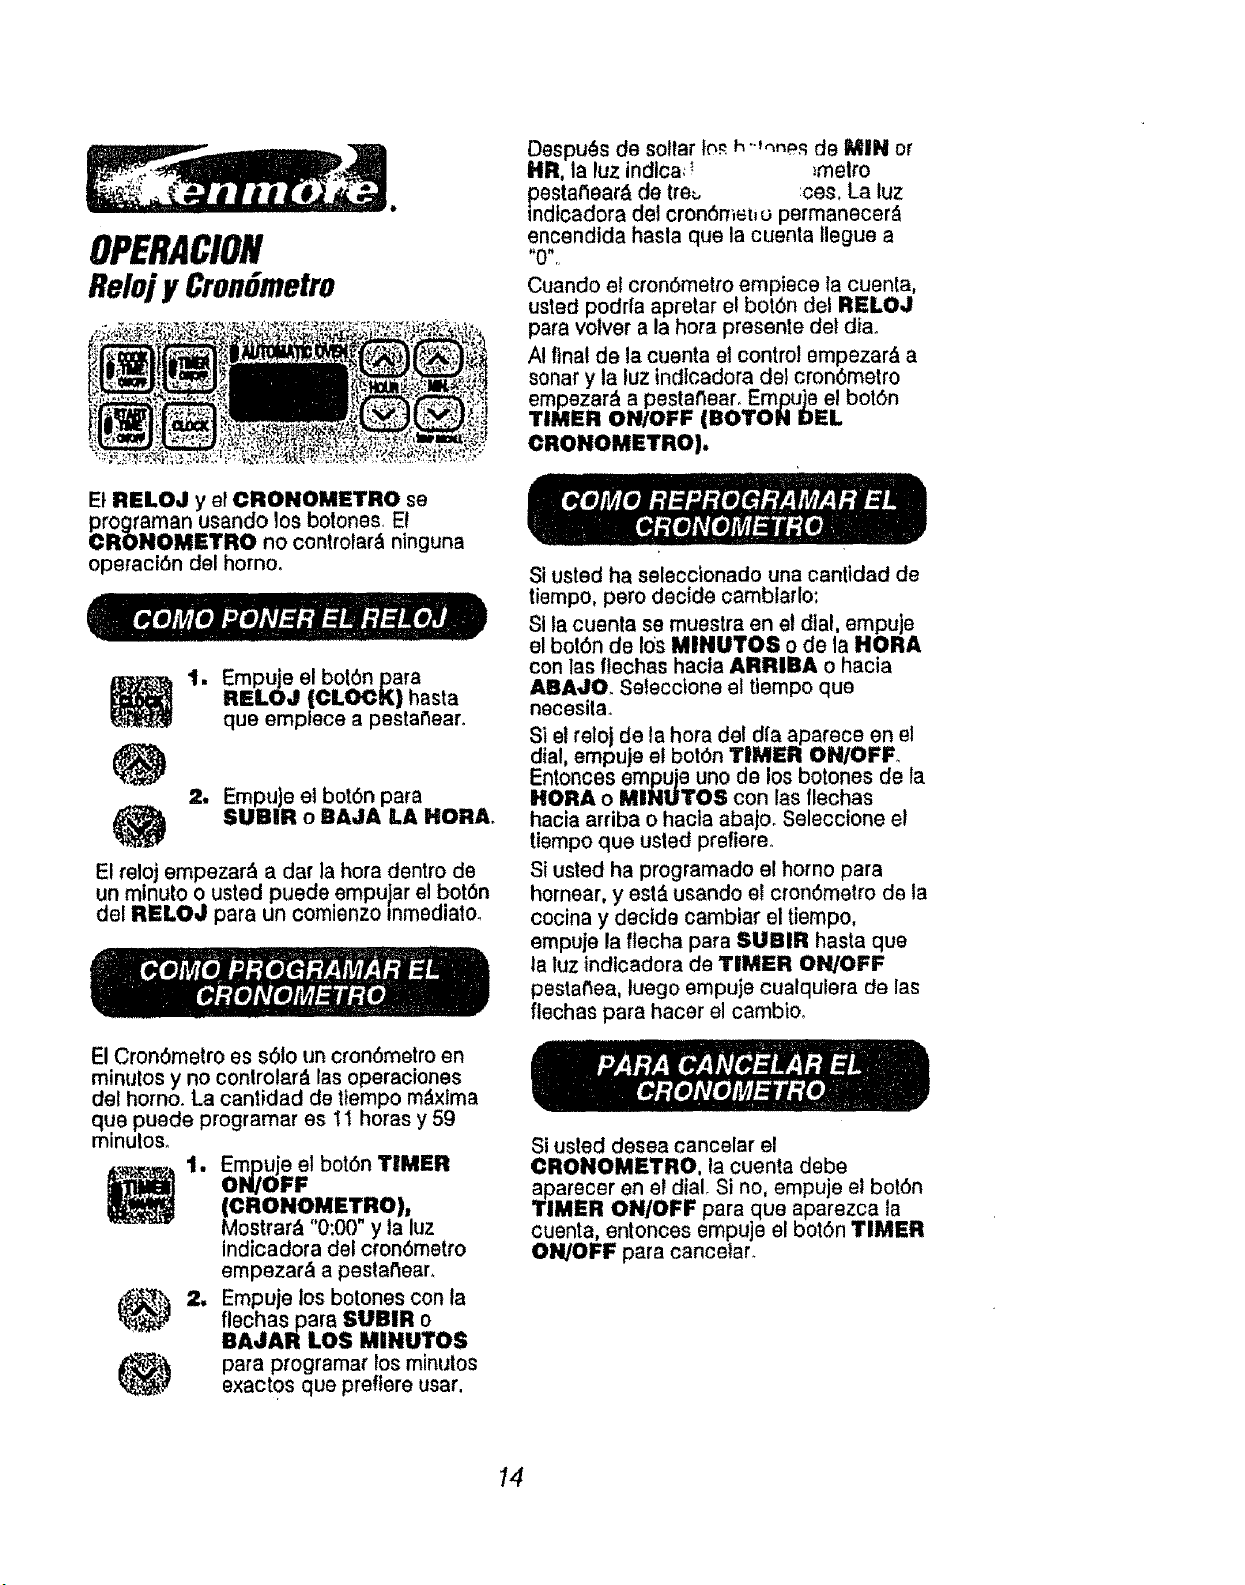
OPERACION
Reloj y CronSmetro
Et RELOJ y el ¢RONOMETRO se
programan usando Io_;botones, El
CRONOMETRO no controlar& ninguna
operaci6n del horno.
1. Empuje el bot6n pare
RELOJ (CLOCK) haste
que emplece a pestar_ear.
2. Empu)e el bot6n para
SUBIR o BAJA LA HORA.
El reloj empezar_l a dar lahora dentro de
un minuto ousted puede empular el bot6n
del RELOJ para un comienzo mmediato_
El Cron6metro es s6to un cron6metro en
minutos y no controlar_l las operaciones
det homo° La cantidad de ttempo m_xlma
que puede programar es 11 horas y 59
minulos.
1. Empuje el bot6n TIMER
ON/OFF
(CRONOMETRO),
Mostrar& "0:00" y la luz
indicadora del cron6metro
empezar_ a pesta_ear.
2. Empuje los botones con la
flechas para SUBIR o
BAJARLOS MINUTOS
pare programar los minutos
exactos que preftere usar,
Despu_s de sottar fo_ h .._,_n_,,_de MIN or
HR, la luz indica;: _melro
pestatlear& de tre- :ces, La tuz
mdlcadora det cron6met_ o permanecer_
encendida hasla que la cuenta ilegue a
_'_0 _ _,
Cuando el cron6metro empiece la cuenta,
usted podffa apretar el bot6n del RELOJ
para votver ala hora presente del dia.
A! final de la cuenta et contro! empezar_l a
sonar y la luz tndtcadora del cron6metro
empezar_ a pestatlear,, Empu)e el bot6n
TIMER ON/OFF (BOTON DEL
¢RONOMETRO).
Si usted ha seleccionado una cant!dad de
tiempo, pero decide camblarlo:
Si la cuenta se muestra en et dial, empuje
el bot6n de 10sMINUTOS o de la HORA
con las flechas hacta ARRIBA o hacia
ABAJO. Se!eccione el tiempo que
necesilao
Si el reloj de lahora del dla aparece en el
dial, empuje el bot6n TIMER ON/OFF
ENtonces empuje uno de los botorles de Ia
HORA o MINUTOS con las flechas
hacia arriba o hacla abajo. Seleccfone e!
tiempo que usted prefiere..
Si usted ha programado el homo pare
hornear, y esl._ usando el cron6metro de la
cocina y decide cambiar el tiempo,
empuje la flecha para SUBIR hasta que
la luz indlcadora de TIMER ON/OFF
pestar_ea, luego empuje cualqulera de las
ftechas para hacer el cambioo
Si usted desea canceler el
@RONOMETRO, la cuenta debe
aparecer en e! dial, Si no, empuje el bot6n
TIMER ON/OFF para que aparezca la
cuenta, entonces empuje el bot6n TIMER
ON/OFF para canceler.
14
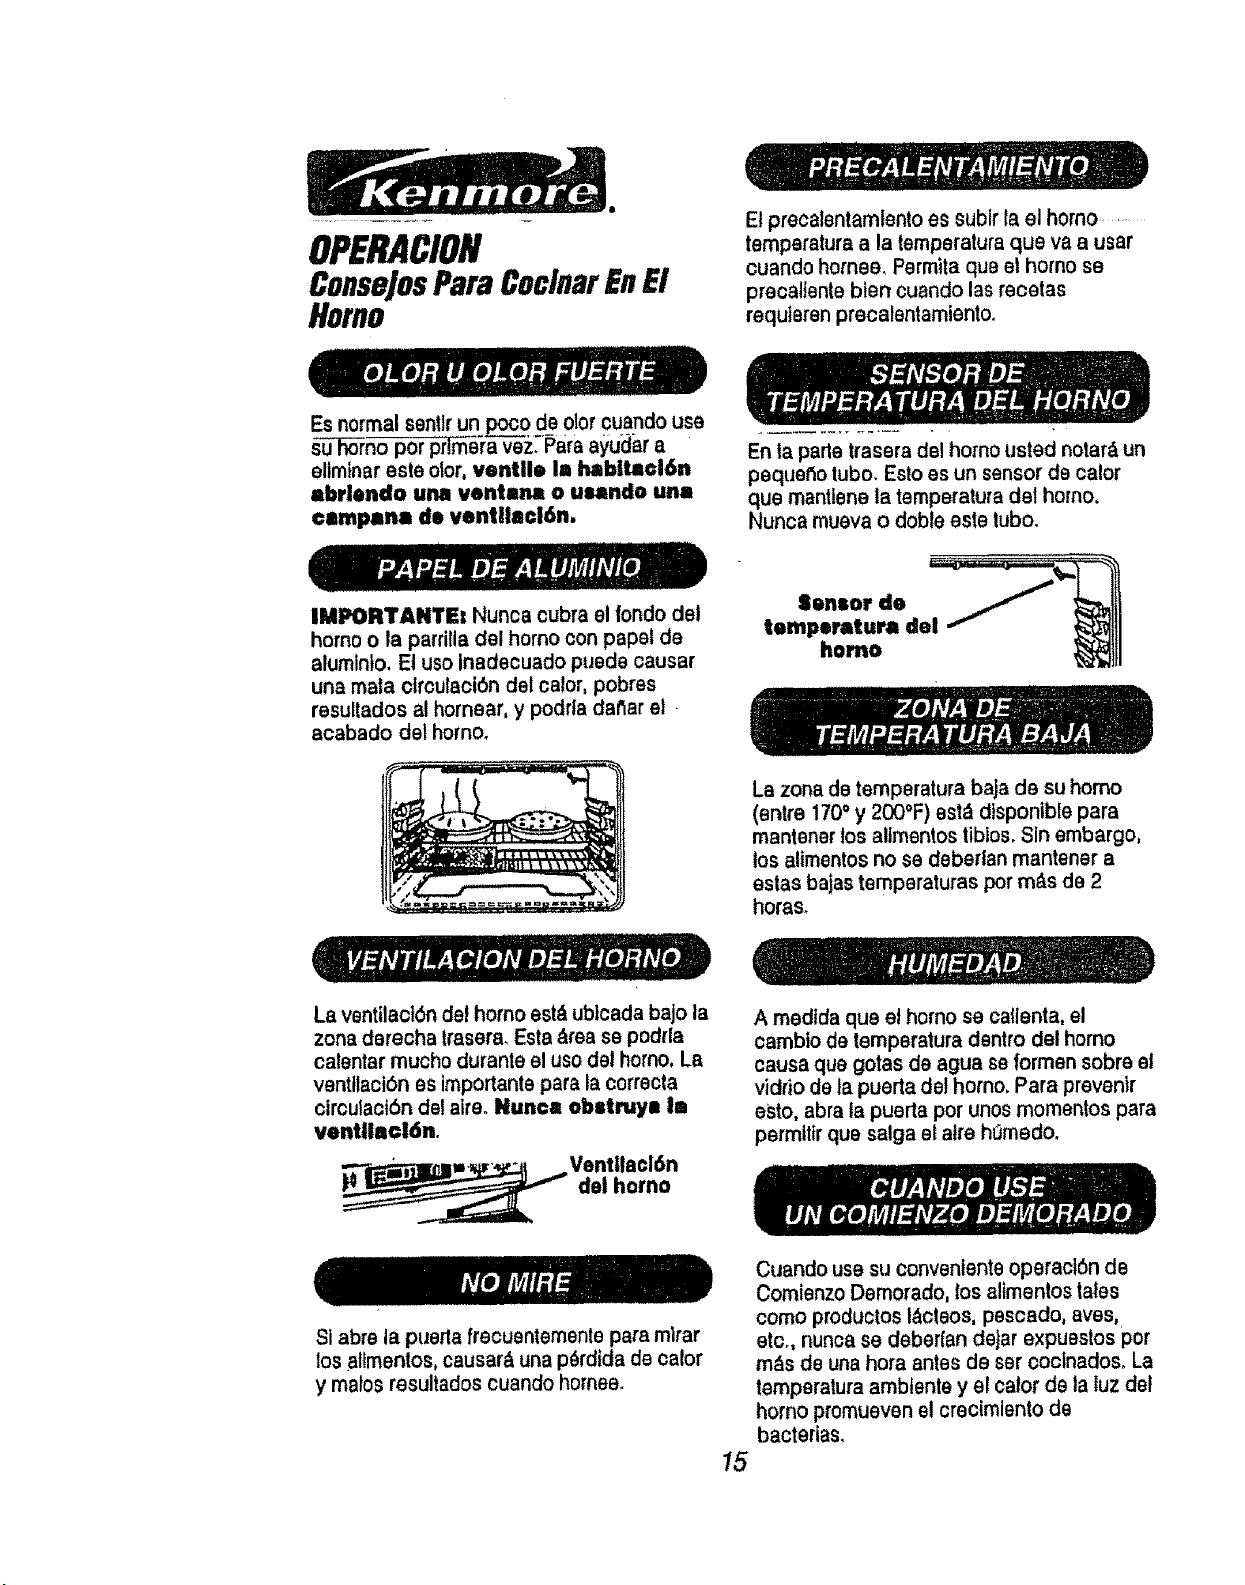
OPERACION
ConseJosPars CoclnarEnEl
Homo
El precalentamfento es subir ta el homo........
temperature ala temperaturaque va a user
cuando homes, Permita que el homo se
preca!tente bien cuando las recetas
requtsrenprecalsntamientoo
Es normal sentlrun pocode olorcuandouse
su homopor pr-I--rne?_vez,Pare a_iuclara
eliminareste otor,ventile Ia habltacl6n
abrlendo una vent=me o uundo una
campana do venfllacl6n.
En ta parle trasera del homo usted notar& un
pequeSo lubo. Esto es un sensor de ca!or
que mantlene la temperature del homo.
Nunca mueva o doble este tubs.
IMPORTANTE= Nunca cubra el rondo del
homo o la parrilla del homo con papel de
alumlnto, El uso Inadecuado puede causer
una mala ctrcutaci6n def calor, pobres
resultados al hornear, y podrla datlar el
acabado del horns.
Sensor de
temperature clel
homo
La zone de temperatura baja de su homo
(entre 1700 y 200"F) est_ disponible pars
mantener los altmentos tiblos. Sin embargo,
los aUmentos no se deberlan mantener a
estas bajas temperatures pot m&s de 2
horas.
La ventilacl6n del homo est_ ublcada bajo la
zone derecha trasera, Esta _rea se podrla
calentar mucho duranle el uso del homo. La
ventllact6n es importants pars la corrects
circulaoibn del aires Nunca obstmya la
ventllacl6n,
VentilacMn
del homo
A medtda que el homo se callenta, el
cambio de temperature dentro del homo
cause que gotas de ague se lormen sobre el
vidrio de ta puerta del homo, Para prevenir
esto, abra la puerta por unos momentos para
permtltr que salga et atre h_medo.
Si abre la puerla frecusntemente pare mlrar
los atfmentos, causar& una p6rdida de calor
y malos resultados cuando homes.
15
Cuando use su conveniente operacl6n de
Comienzo Demorado, los altmentos tales
corns productos I&ctsos, pescado, ayes,.
etc., nunca se deberlan dejar expusstos pot
m_s de una hora antes de set cocinados. La
temperatura amblsnte y el cafor de la luz del
homo promueven e! crecimlento de
bacterias.
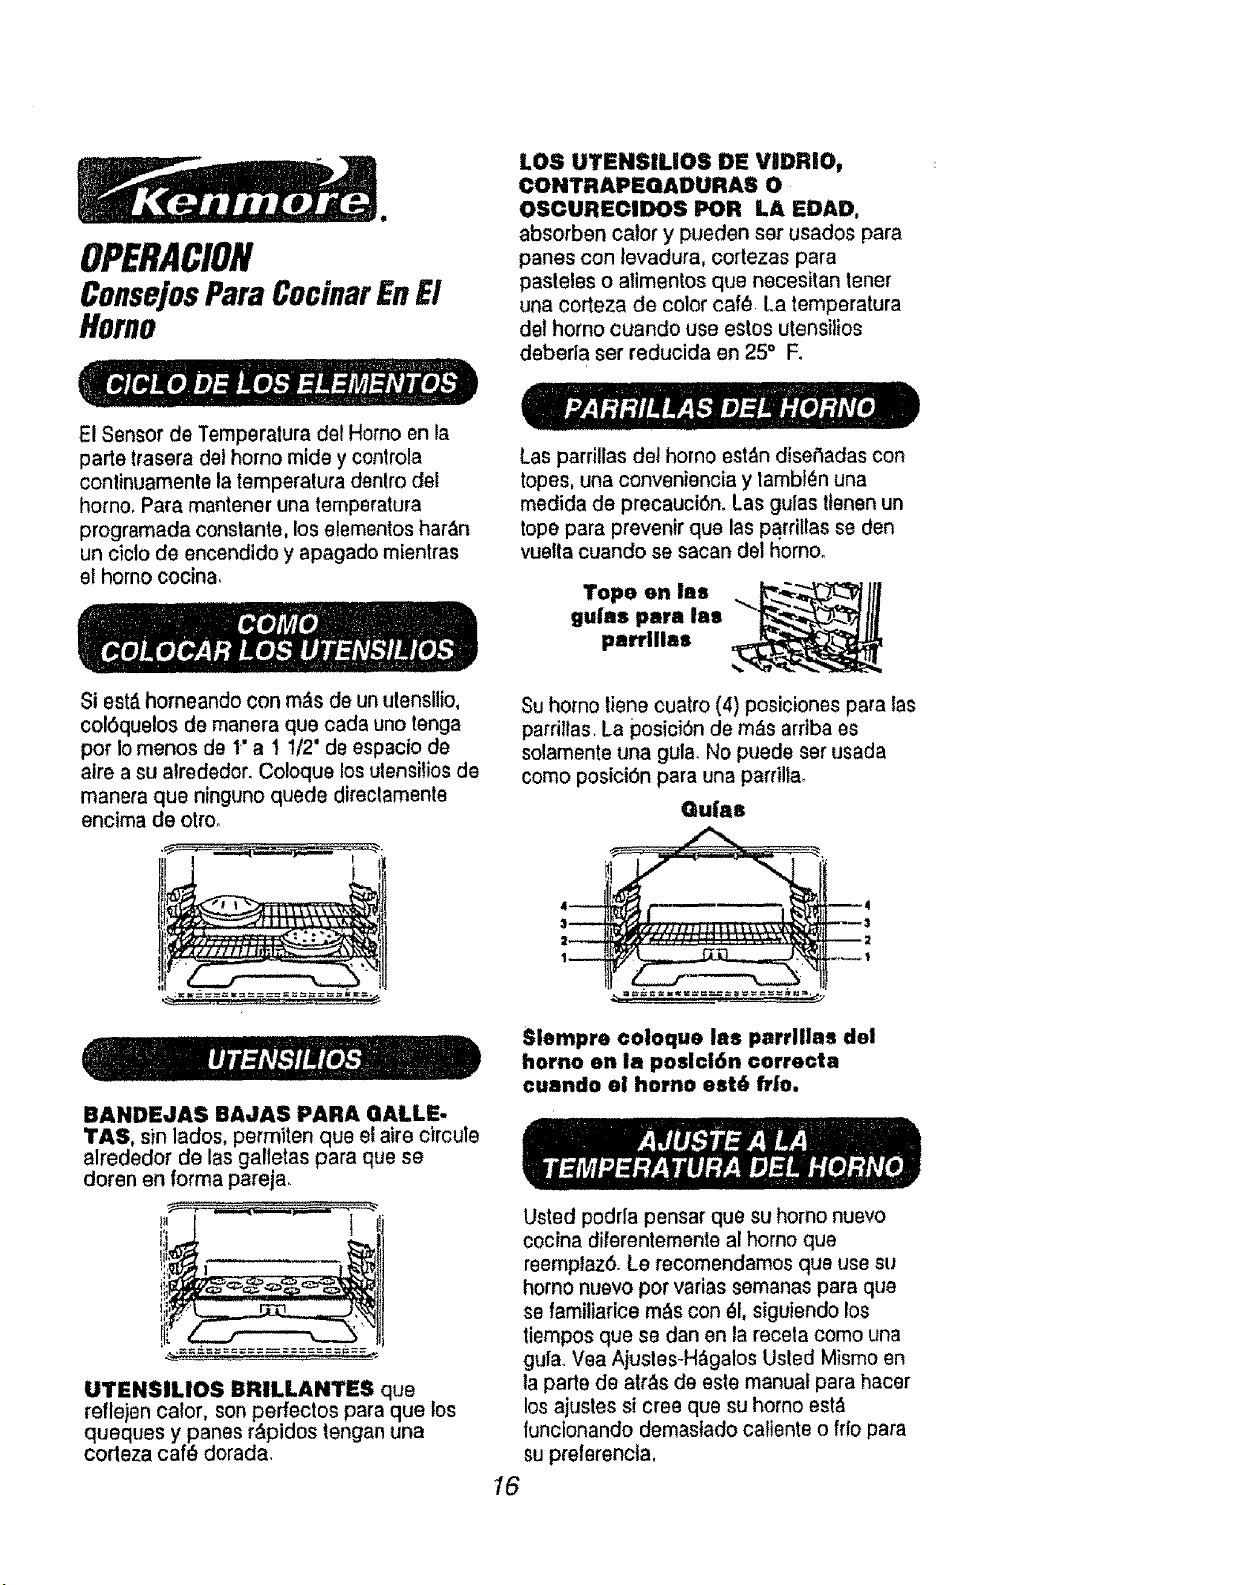
OPERACION
ConsejosPara CocinarEnEl
Homo
LOS UTENSILIOS DE VIDRIO,
CONTRAPEGADURAS O
OSCURECIDOS POR LA EDAD0
absorben calory pueden ser usados pars
panes con levadura, cortezas para
pasleles o alimentos qua necesitan toner
una corteza de color caf_ La temperatura
del homo cuando use estos utensilios
daberla ser reducida en 25° Fo
El Sensor de Temperatura del Homo en la
parte trasera del homo mide y controla
continuamenle la temperatura denlro del
homo, Para mantener una temperatura
programada constante, los etementos har_n
un ciclo de encendido y apagado mlentras
el homo cocina,
Si est,. homeando con m_s de un ulensilio,
col6quelos de manera que cada uno tenga
pot Io menos de 1" a t 1/2' de espacio de
alre a su alrededor_ Coloque los ulensitios de
manera qua ninguno quede direclamente
encima de otro.
BANDEJAS BAJAS PARA GALLE-
TAS, sin lados, permlten qua el aire circule
alrededor de las galletas para que se
doren en forma pareja_
t
UTENSILIOS BRILLANTES qua
refle)en calor, son perfectos para que los
queques y panes r_pidos tengan una
codeza caf_ dorada,
Las pardllas del horno est_n diser_adas con
topes, una conveniencia y lambl(_n una
medida de precauci6n_ Las guias ttenen un
tope para prevenir qua las parrillas se den
vuelta cuando se sacan dot homo°
Tope on Ins ....__._Jti
gu|as para las
parrillas
Su homo tiene cuatro (4) posiciones para las
parrillas. La posici6n de m&s arfiba es
solamente una gula. No puede set usada
corno posicigbn para una parrilta.
Gu|as
1
Slempre coloque las parrlllas del
homo on la posicJ6n correcta
cuando el homo est6 fr|o.
Usted podrla pensar qua su horno nuevo
cocina diferenternente al horno qua
roemplazS. Le recomendamos qua use su
homo nuevo pot varias semanas pare qua
se familiarice rn_s con _1, siguiendo los
tiernpos qua so dan on la recela como una
gufao Voa Ajustes_H&galos Usted Mismo en
la parte do atr_s de este manual para hacer
los ajustes si cree qua su homo ost_
funcionando demasfado caliente o fr!o para
su preforencia,
16
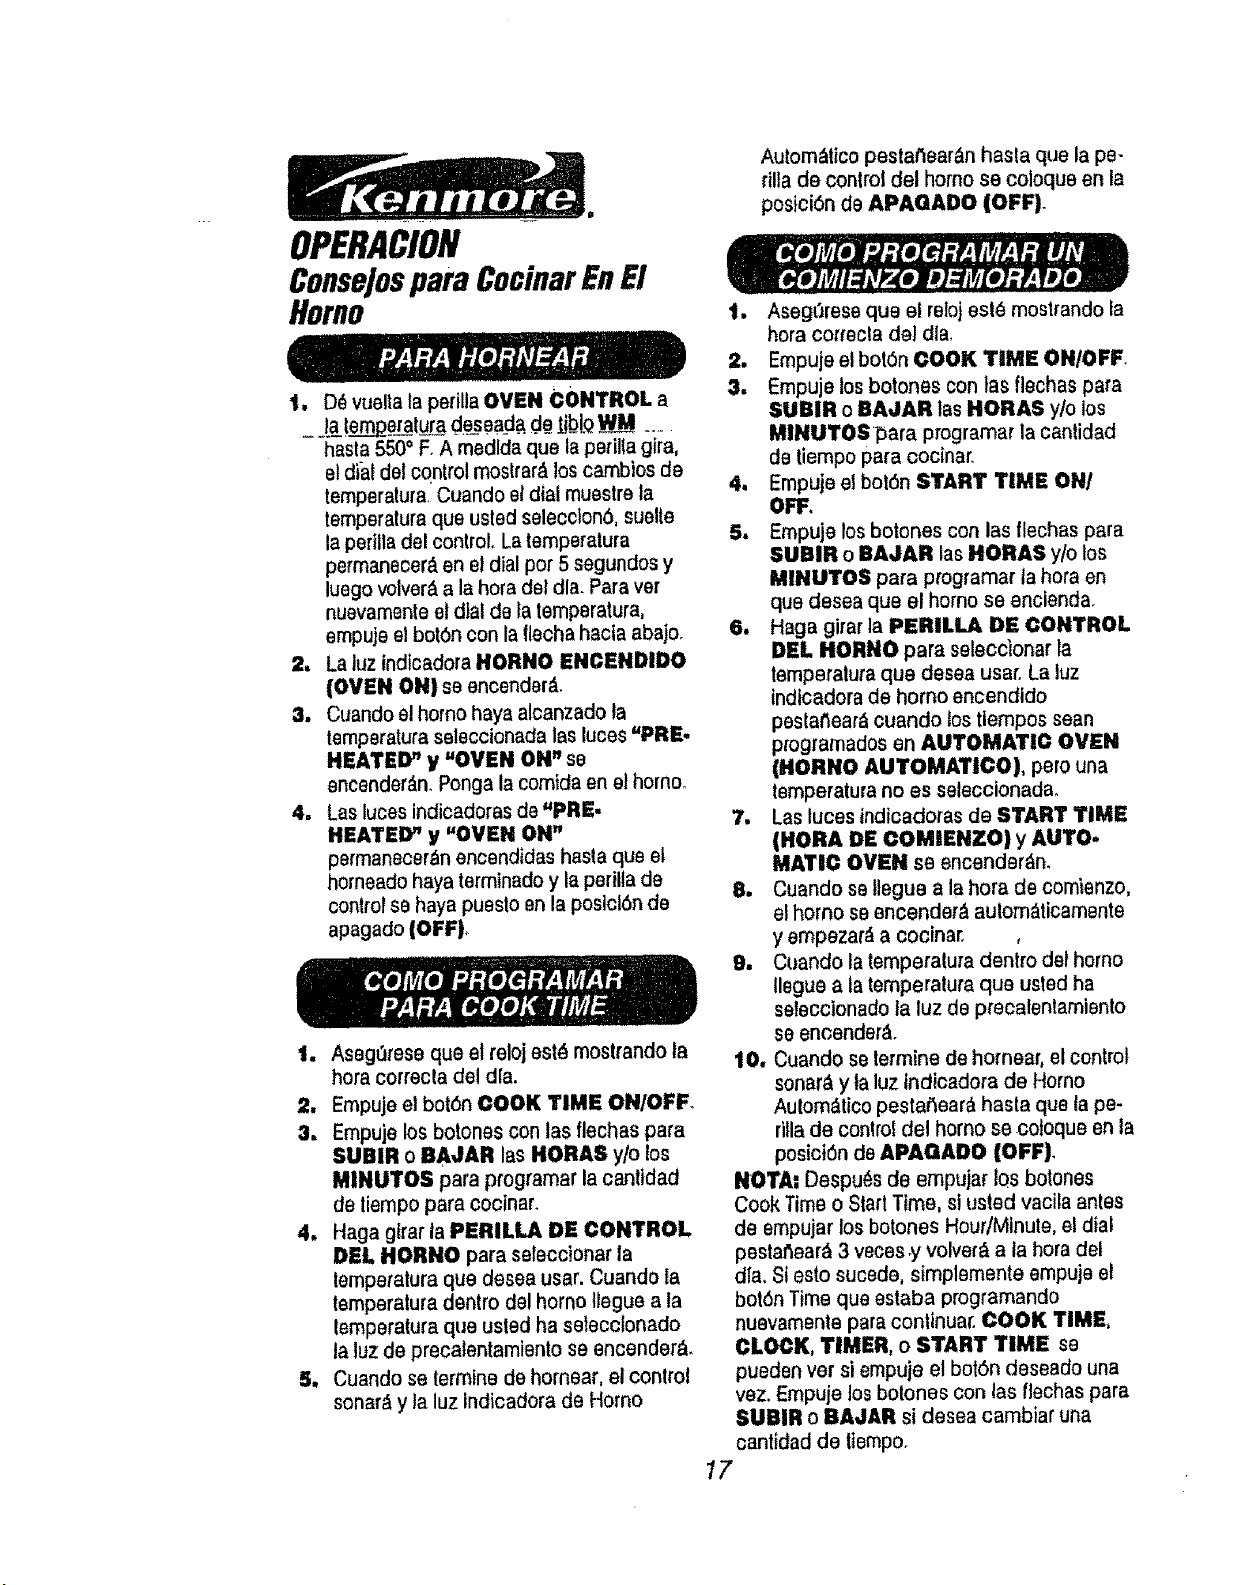
OPERACION
Autom&tico pestatlear_n hasla que la pe-
rilla de control del homo se coloque en la
posiciSn de APAOADO (OFF).
ConseJospara CocinarEn E1
Homo
1. D_ vuelta la perilla OVEN CONTROL a
la lem_o_lura .d_sea_d_de tiblQWM .....
hasla 550oF. A medlda qua la perilta gira,
el dial del control moslrar_l los cambios de
temperatura Cuando et dial muestre la
lemperatura qua usled selecclonb, suelte
la perilla del control. La {emperatura
permanecer& en et dial per 5 segundos y
luego volver_ a la hera del alia. Para vet
nuevamente el dial de la temperatura,
empuje el bot6n con la llecha hacia abajoo
2. La luz indlcadora HORNO ENCENDIDO
(OVEN ON) se encender_.
3. Cuando el homo haya aJcanzado Ja
temperatura seleccionada las luces "PRE-
HEATED" y "OVEN ON" se
encender&n. Ponga la comida an el horno_
4. Las luces indicadoras de =PRE.
HEATED" y `'OVEN ON"
permanecer_n encendidas hasta qua el
horneado haya terminado y la perilta de
control se haya pueslo en la posicl6n de
apagado (OFF).
1. Aseg_rese que el reloj est6 moslrando la
hera correcta del dla.
2, Empuje el bot6n COOK TIME ON/OFF.
3. Empuje los botones con las flechas para
SUBIR o BAJAR las HORAS y/o los
MINUTOS para programar la cantldad
de liempo para cocinar.
4. Haga gtrar ia PERILLA DE CONTROL
DEL HORNO para saleccionar la
temperatura qua desea usar. Cuando la
temperatura dentro del homo tJegue a ta
lemperatura qua usled ha seleccionado
la luz de precalentamiento se ancender&.
5. Cuando se {ermine de homear, el conlrol
sonar_ y la luz indicadora de Homo
t. Aseg_;trese qua el reloj est_ mostrando la
hera correcla del dla,
2, Empuje el boron COOK TiME ON/OFF
3. Empuje JoEbe{ones con }as flechas pafa
SUBIR o BAJAR tas HORAS y/o los
MINUTOS_ara programar la cant{dad
de tiempo para cocinar.
4, Empuje el bol6n START TIME ON/
OFF.
5. Empuje los botches con las flechas para
SUBIR o BAJAR las HORAS y/o los
MINUTOS para p_rogramarJahera en
que desea qua el homo se encienda,
6. Haga girar la PERILI.A DE CONTROL
DEL HORNO para seleccionar la
temperalura qua desea usaroLa luz
indicadora de homo encendido
peslat_ear_ cuando tOEtiempos sean
programados en AUTOMATIC OVEN
(HORNO AUTOMATICO), pare una
temperatura no es seleccionadao
7. Las tuces indicadoras de START TIME
|NORA DE COMIENZO) y AUTO.
MATE(: OVEN se encender_n_
8. Cuando se Itegue a la hera de comienzo,
el homo sa encendar,_ autom_ticamente
y empezar_ a cocinar. ,
9. Cuando la temperalura den{re del homo
llegue a la temperalura qua usted ha
seleccionado la luz de precalenlamiento
so encender&°
t0. Cuando so {ermine de hornear, el control
sonar_ y ta luz tndicadora de Homo
Aulom_lico peslaf_oar_ basic quota pe-
riUade control del homo se,cotoque en la
posiciOn de APAGADO (OFF)_
NOTA= Despu_s de empujar los be{ones
Cook Time o Slart Time, si usted vacila antes
de empujar los be{ones Hour/Minute, el dial
pestatlear_ 3 veces,y velvet& a la hera del
dla. St esto sucedo, simplemente ompuje el
bot6n Time qua ostaba programando
nuevamente para continuar. COOK TIME,
CLOCK, TIMER, o START TIME se
pueden vet si empuje el bol_)n deseado una
vez, Empuje los botones con las flechas para
SUEIIR o BAJAR si desea cambiar una
cantidad de flempo.
17
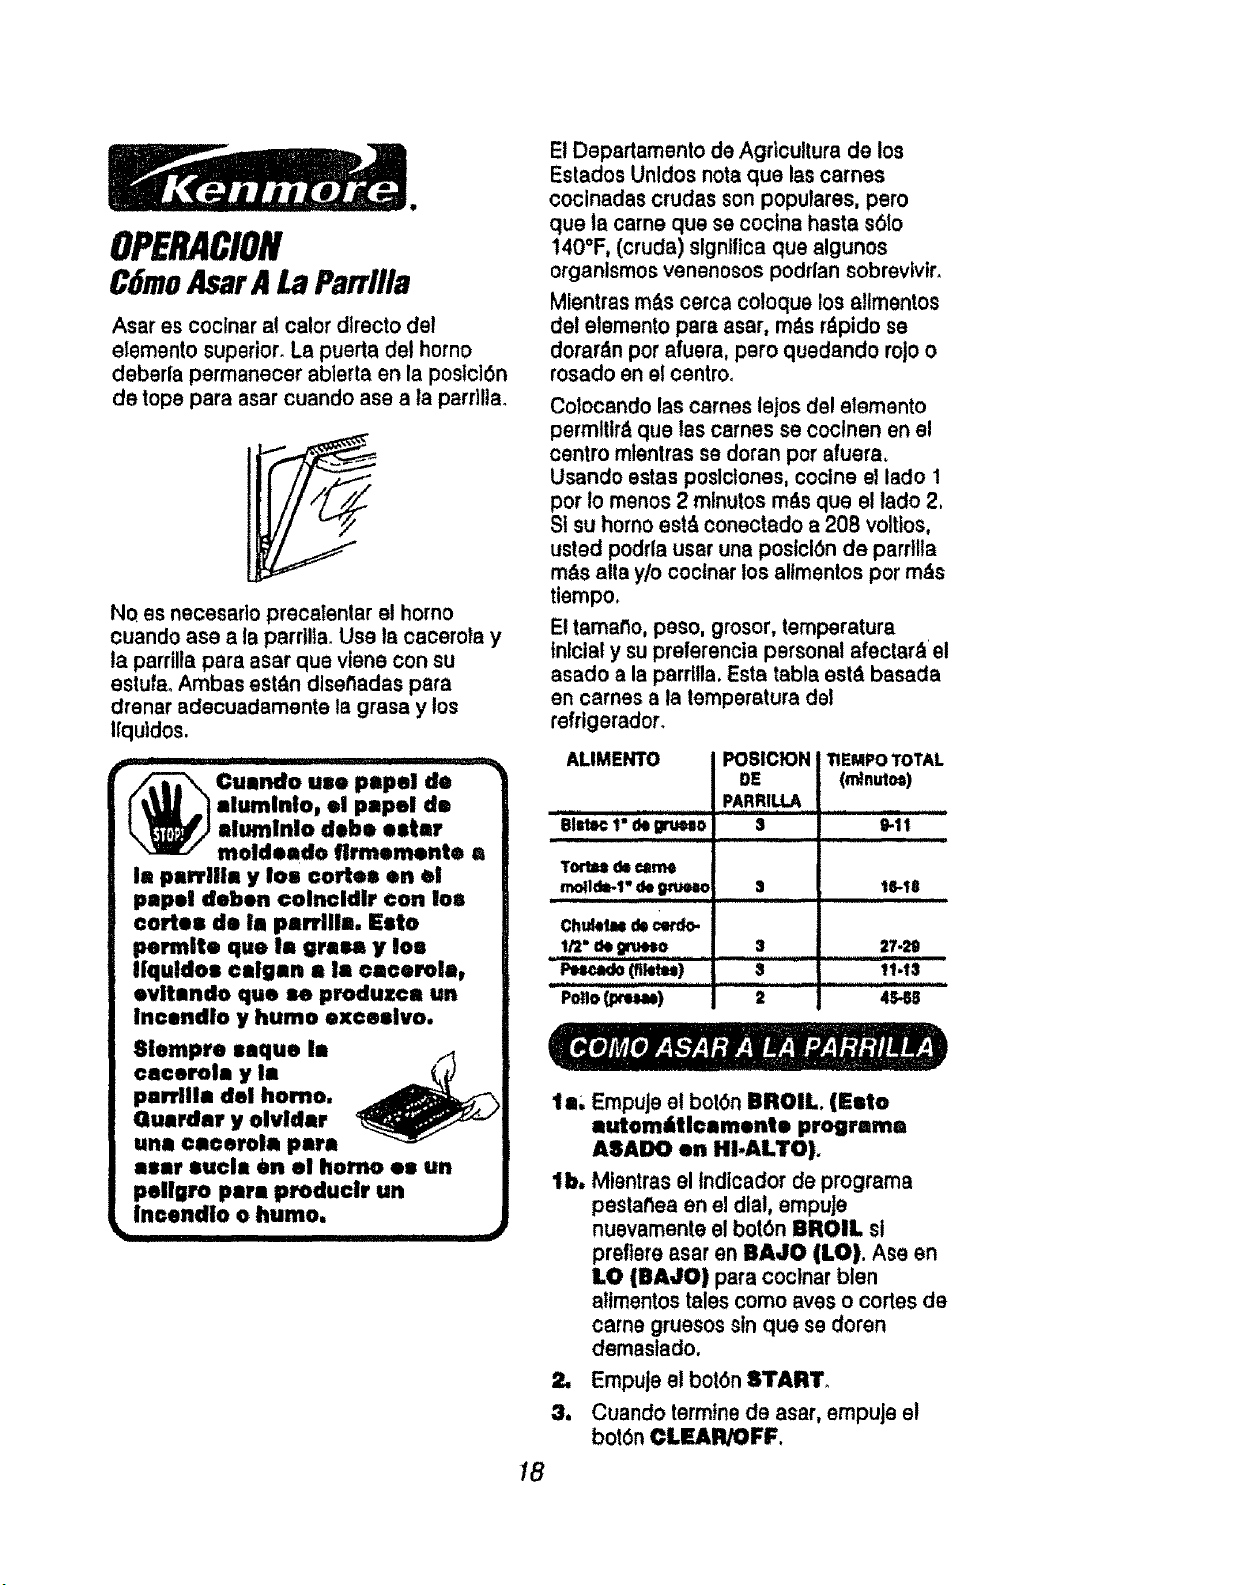
r__ o
OPERAClON
C6moAsarA LaParrllla
Asar es coclnar al calor dlrecto del
elemento superior. La puerta del homo
deberfa permanecer ablerta en la poslcl_n
de tope pare asar cuando ass ala pardltao
NQ es necesarlo preoalentar e! homo
cuando ass ala parrtlta. Usa la cacerola y
la parrilla pare asar qua vlene con eu
estufao Ambas est&n dlsettadas para
droner adecuadamente la grass y los
Ifquldos.
":i '_i ' LIL_' III11 _ I "11 I""1
_ usndo use pepsi de
elumlnlo, el pepsi de
elumlnlo debe ester
moldoedo flrmemente a
le parrlile y los cortes en el
pepsi deben €olncldlr con los
cortes de In parrllle. Esto
permlto que In green y los
Ifquldoe calgen a la cacerols,
evitsndo que se produzce un
lncsndlo y humo excesivo.
Slempre ssque le
cecorola y le
pa_rllle del homo.
Guarder y olvldar
une cieeerola pare
pellgro pare produclr un
Incendlo o hurno.
Et Departamento de Agriculture de los
Estados Unldosnote qua las carries
cocinadas crudas son populares, pero
que la came qua se coctna haste s01o
140('F, (crude) signifies qua algunos
organlsmosvenenosoepodrlan sobrevlvin
Mientrasm&scerca coloque los allmentos
del etementopare esar, m&srepido se
dorar_m per afuera, pore quedando rojo o
rosado an el centroo
Colocando lee carnes lejos del etemento
permltlr& que las carnes se coclnen en el
centre mtentras se doran per afuera.
Usando estas poslctones, coclne el lade 1
per io menos 2 mtnutos m&s qua el tado 2,
Sl su homo est& conectado a 20B voltlos0
usted podrla user una postci6n de parrllla
m&e alta y/o coctnar los allmentos per m_s
tiempo.
Et tamatto, peso, grosor, temperature
tnlclal y su preferencia personal afecter_ el
asado a la parrllla, Esta table est& basada
en carnes a la temperature del
refrlgerador.
ALIMENTO
Bl_tc 1"de grueeo
Tortmi de came
Chule_ decerdo.
1/2" de _'+,,Je'lO
Po.o (!_._)
POSICION
DE
PARRILLA
$
$
2
TIEMPO TOTAL
(m_nutos)
9-11
i
18-I5
27.28
11.13
4_S
18
lb.
Empuje el boronBROIL. (Esto
automMIcemente programs
ASADO en HI.ALTO).
Mientras el tndlcador de programs
pestattea en el dial, empuje
nuevamenteel bot0n BROIL sl
preflere asar an BAJO (LO). Ass an
LO (BAde) pare coclnar blen
altmentostales come aves o cortes de
came gruesossin que se doren
demasfado.
2. Empuje elbot6n START.
3. Cuando terrainsde asar, empuje el
bot6nCLEAR/OFF.
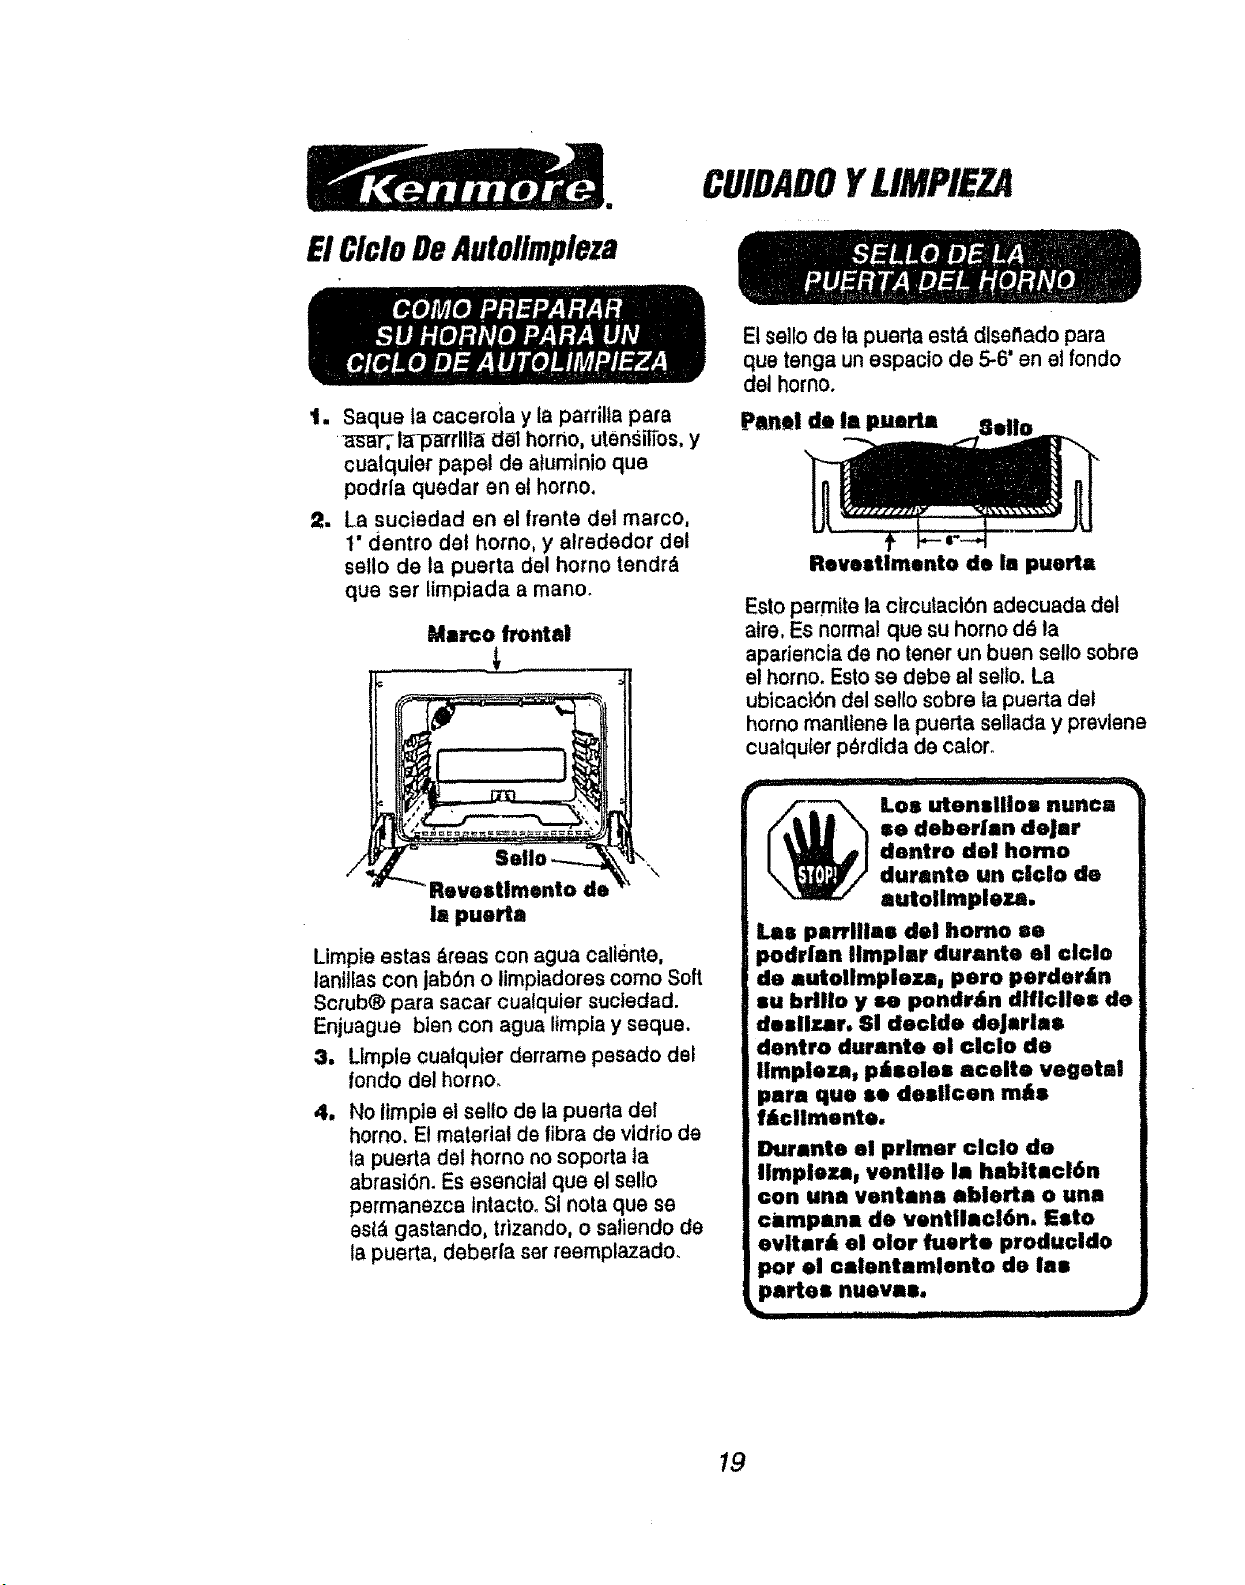
r__ g
El CicloDeAutollmpleza
CUIDADOYLIMPIEZA
1. Saqueta caceroia y ta parrilta para
;_sa]T,l_-p_rllta _I_1horno, uten._itTos,y
cualquier papal de aluminio qua
podrla quedar en et barrio.
2. La suctedad en el frente del marco,
t" dentro del homo, y atrededor del
sello de ta puerta del homo tendr&
qua ser limpiada a mano.
Marco frontal
El sello de la puerta est_ dlsefladopara
qua tenga un espacio de 5-6' en et rondo
del horno.
Panel de la puerla
Revesttmento de le puert=
Esto permite la clrcutacibn adecuada del
aire, Es normal qua su homo d_ la
apariencia de no tenor un buen sello sabre
el homo. Esto se debe al sello. La
ubicact6n del sello sabre la puerta del
horno manUene la puerta sellada y prevtene
cualquter p_rdida de cator.
Revestlm®nto de
la puerta
Limpie estas _,reas con ague callente,
lantllas con jab6n o limpiadores coma Soft
Scrub® pare sacar cuatquler suctedad.
Enjuague bien con ague limpla y seque.
3. Llmple cualquter derrame pesado del
fondo del homo.
4, No iimpie et selto de la puerla del
homo, El material de libra de vidrio de
la puerla del homo no soporta la
abrasi6n. Es esencial qua el sello
permanezca lntactoo SI note qua sa
est_ gastando, trizando, o saliendo de
la puerta, deberfa set reemplazado.
r _ Los utenslllae nunca
se debedan deJer
dentro del homo
durante un clclo de
autollmpleza.
Las perrlllas del homo se
poddan llmpler durante el €lclo
de autollmpleza_ poro perder£n
su brlllo y se pondr_in dlficiles de
deslizar. SI decide deJarlas
dentro durante el clclo de
Ilmpleza, plseles aceite vegetal
pare que se desllcen mlts
Mcllmente.
Durante el primer clclo do
Iimpleza_ ventlle Is habltacl6n
con une ventena abierta o une
campane de ventilecl6n. Esto
evttar_ el olor fuerte producido
par el ©elentemlento de lea
partes nueves.
19
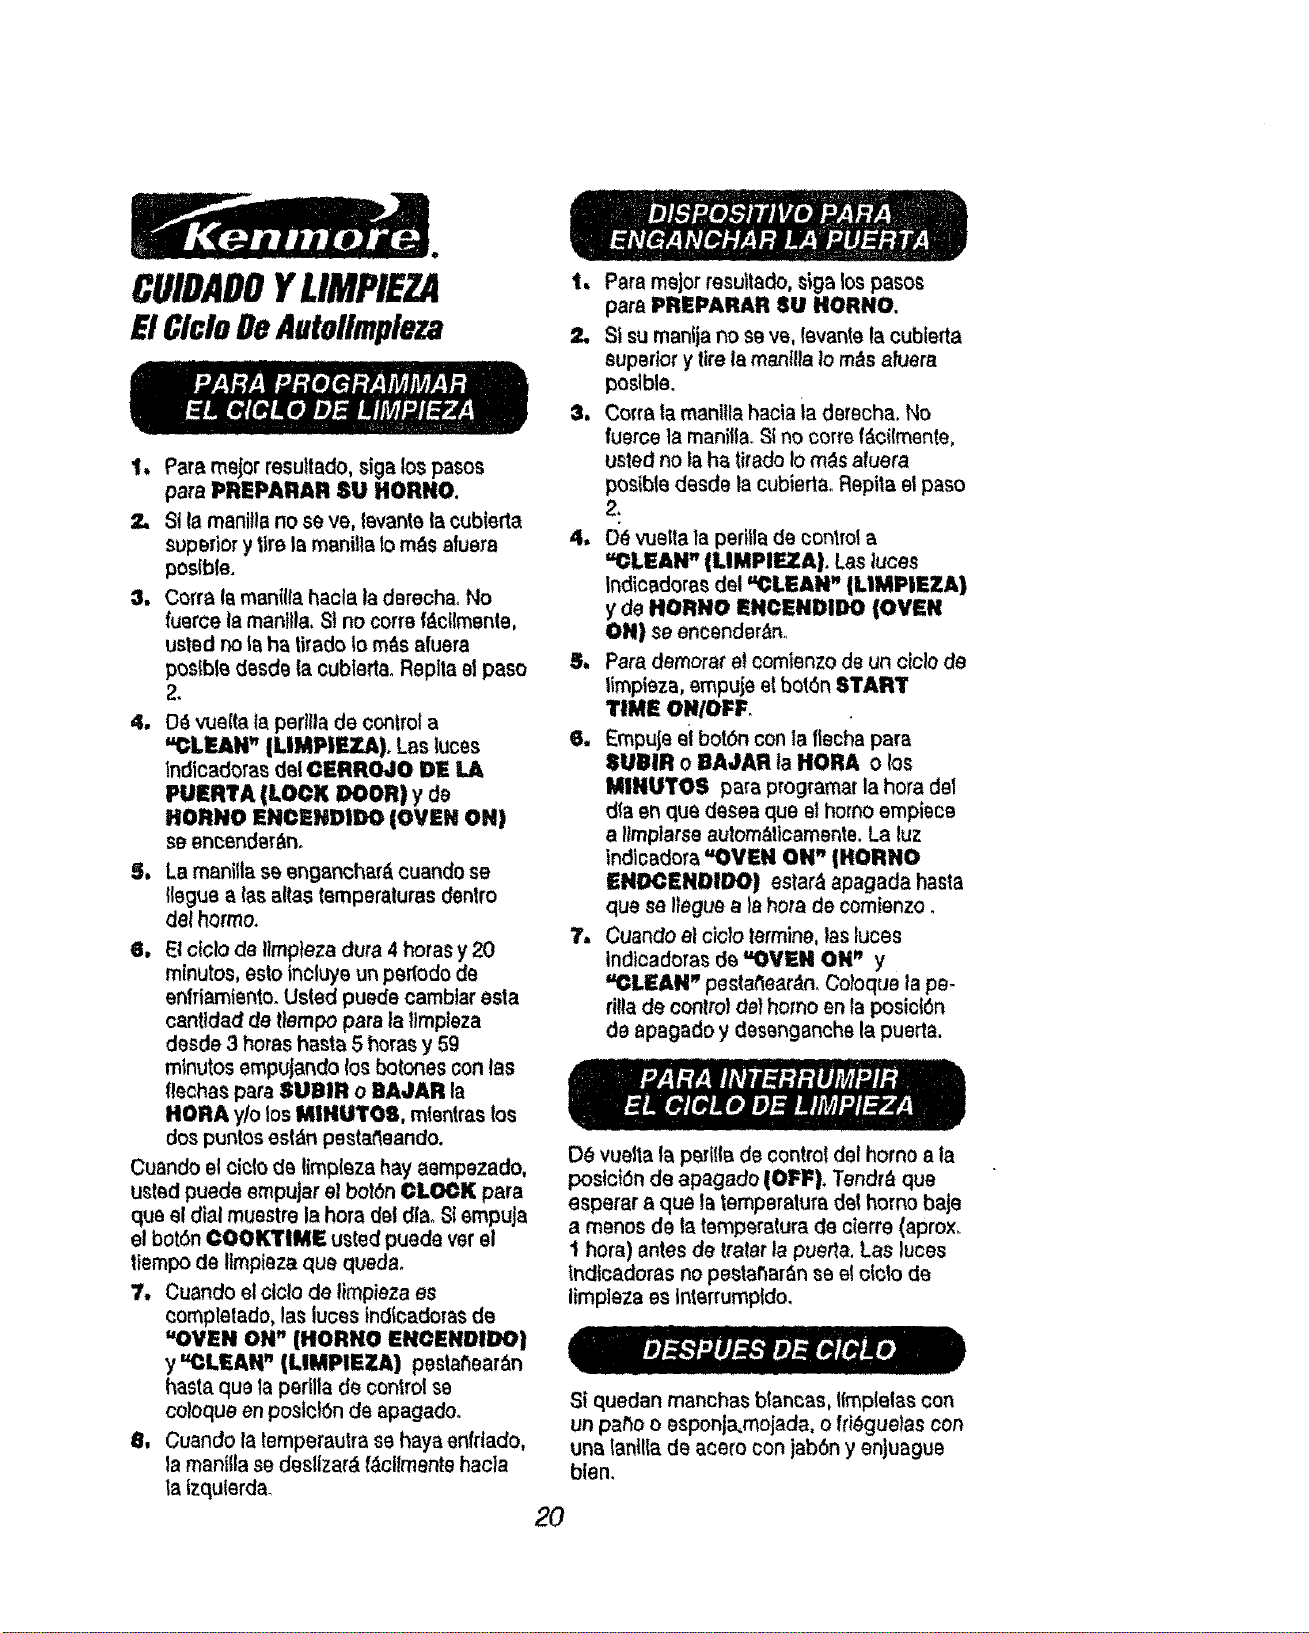
CUIDADOYLIMPIEZA
E1CicloDeAutoiimpleza
1. Pareme,orresuitado,siga lospesos
pare PREPARAR SU HORNO.
2, Si la manitla no seve, levante la cubierta
superior y tire la manilla 1om_s aluera
poslble.
3, CorralameniIlahaoleladerechaoNo
fuercelaman/lie.$Ino corm f_cIImenle,
usted no la ha lirado 1om_s afuera
poslbledesde lacubleda.Repltaelpaso
2.
4, O_ vuefta la perilta de control a
"CLEAN" (LIMPIEZA), Las lutes
lndicadc)ras delCERROJO DE LA
PUERTA {LQGK DOOR) y de
HOIINO ENI_ENDIDO (OVEN ON)
se Bn_ender_n°
I, LB manilla se enganchar_ cuando se
tlegua alas altas temperaluras dentro
del hormo.
6. El ctclo de Iimpteze dura 4 horas y 20
minutos, esto incluys un parlodo de
enfriamiento. Usled puede camblar esta
cantlded de tlempo para le llmpleza
desde 3 bores haste 5 horas y 59
mlnutos empujando los botones con las
flechas pare SUBIR o BAJAR la
HORA y/o los MINUTOS, mtentras los
dos puntos est_n pastaCieando.
Cuando el ciclo de limpIeza hay aempezado,
u_ted puede empujar el bot6n ¢ILOCK pare
qua el dial muestre la hora det dlao St empuja
el bot6n OOOKTIME usted puede vat el
ttempo de Itmpisza qua quads.
7, Cuando el ciclo de limpieza es
complelado, las lutes tndicadoras de
"OVEN ON" (HORNO ENQENDIDO)
y ='CLEAN n {LIMPIEZA) pestahear_n
hasta qua la perilla de control se
coloque en poslcl6n de apagadoo
8, Cuando la Iemperautra se haya enfrlado,
ta manilla se desllzar_ f_cllmente hacla
la Izquterda_
I I_[_If._Ii1{lj]_l;ll.'i',IJIJI_t|IrJI
t, Pare major resuitado, _iga los pesos
pare PREPARAR SU HORNO.
2, Si su manija no se re, levante la cubierta
superior y tire la manilla lo m_s aluere
poslble.
3° Corralaman/liehaciaiaderecha.No
fuerce la manifla. SI no torte f_cilmente,
usted no la ha tirado Io m_is afuera
posible desde la cubierta.. Repita st paso
2.
4, O_ vuelta la perilla de conlro! a
"CLEAN" (LIMPIEZA). Las luces
Indicsdora_ del "CLEAN" {LIMPIEZA)
y de HORNO ENCENOIDO (OVEN
ON) se encender_no
S. Para demorar el Qomlenzo de un ciclo de
limpieza, empuja el boron START
TIME ON/OFF
6, EmpuJe ei botch con Ia flecha pare
!IUIIR o ilAJAR la NORA o los
MINUTO$ pare programar la hora del
die an qua desea qua el homo empisce
a limplarse autorn_lioamente. La luz
indicadora, "OVEN ON n |HORNO
ENI_ENDtDO) eslar& apagada haste
que se Ileg_m a la hora de comienzo.
7, Cuando el cicto termin_, las luces
Indtcadoras de "OVEN ON" y
=OLEAW' pesla_ear_n. Co_oqua la pe-
d!lade conlrot del homo en ta posiciOn
de apagado y desenganche la puerta.
D_ vuelta le p_rllla de control dsl homo a la
poslci_n de apagado (OFF). Tendr& qua
esperar a qua latemperature deIhomo baje
a menos de la temperature de cierre (aprox.
1 hora) antes de trelar la puerla. Les luces
lndtcadoras no pestahar_n se eloiolode
limpleza es Interrumpldo.
Si quedan manchas btancas, !Implelas con
un paho o esponja_mojada, o fri_guelas con
una lantlla de acaro con jabOn y enjuague
blen.
20
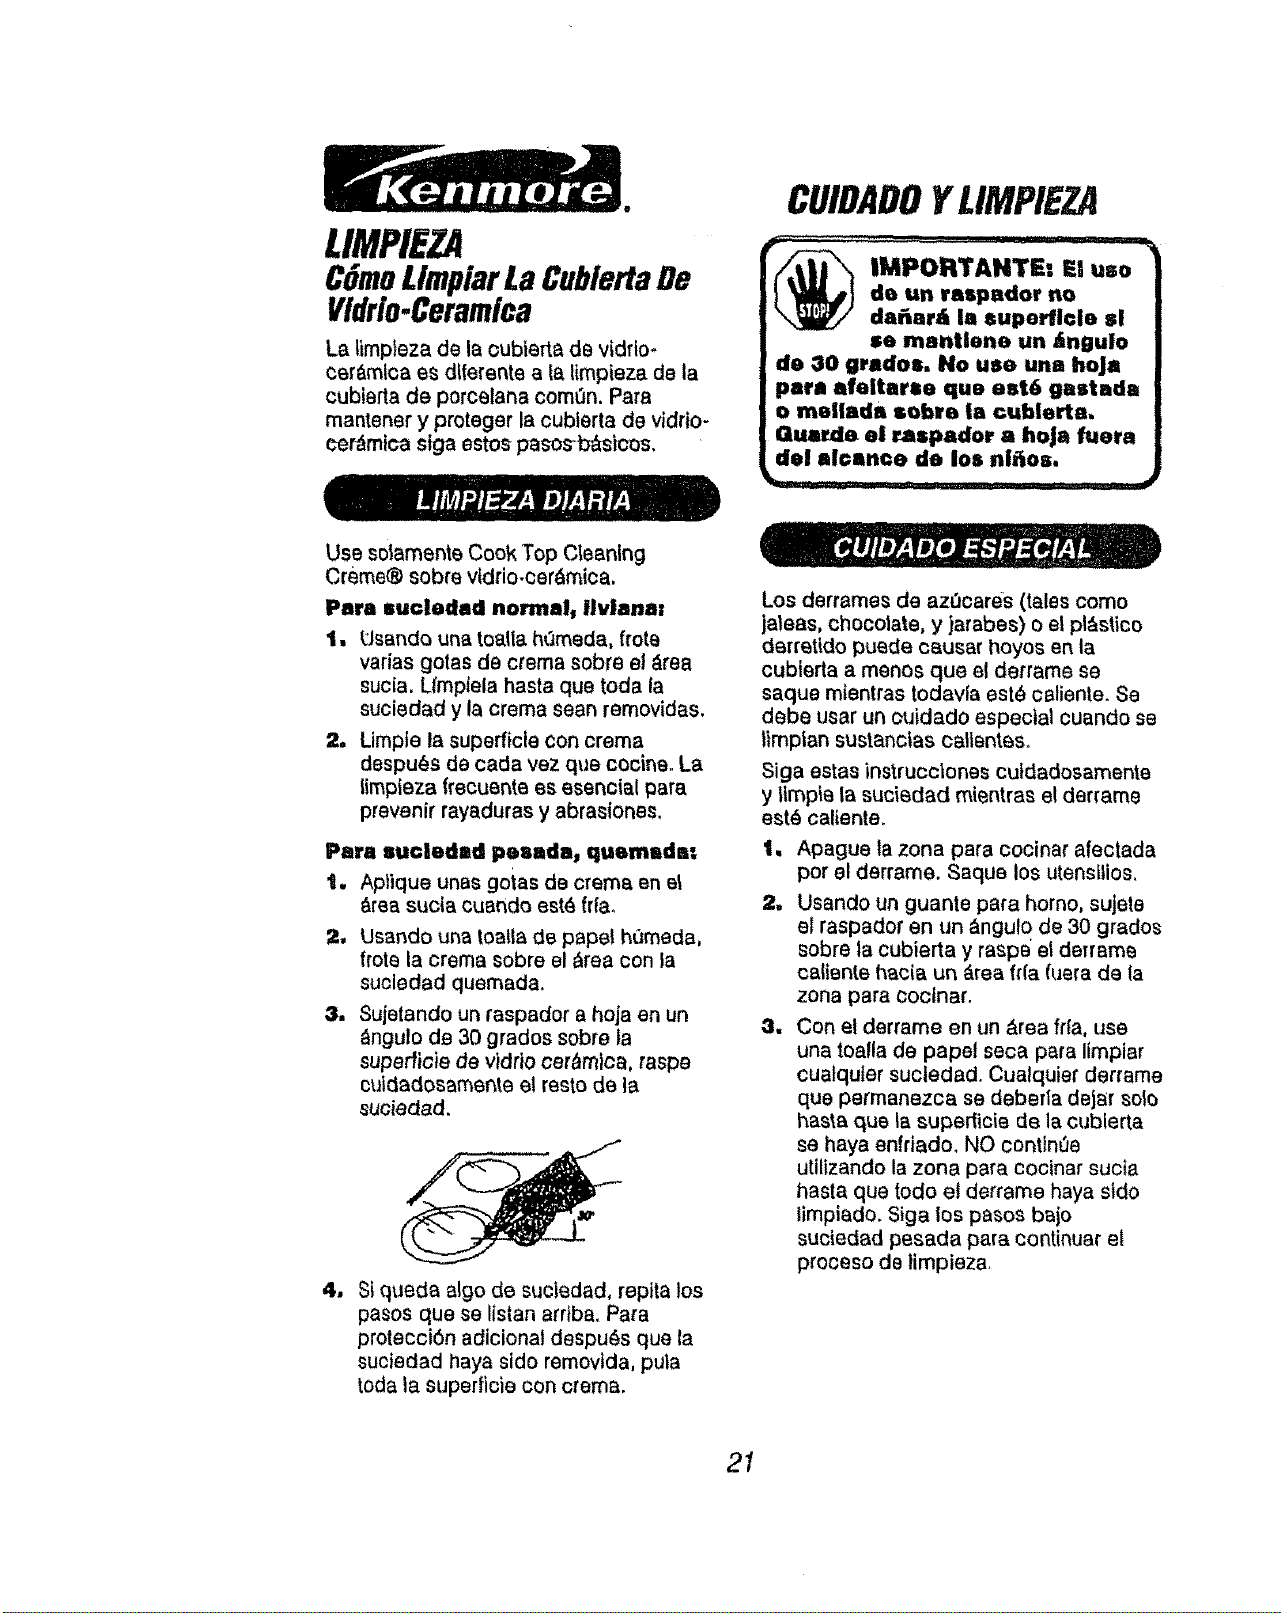
LIMPIEZA
CGmeLimpiarLaCubiertaDe
Vldrio.Ceramica
La limpieza de la oubterta de vtdrio-
cer&mlca es dlferente a la limpieza de la
cubterta de porcelana comLtn. Para
mantener y proteger la cublerta de vidrio-
¢er_mica siga estos pasos-b&stcos.
CUIDADOYLIMPIEZA
-- _ - ,, ...... I=1 III'IHI'I tl
e -_ .,_
_ MPORTANTEz El uso
de un raspador no
da_ar& |a supo_lcle s|
se mantlene un £ngulo
de 30 grsdos, No use una hoJa
para afeitarso que est6 gastada
o me|lads sQbre la cublerta,
Guard8 el raspador a hoJa fuera
del al©ance de los ni_os.
Use sclamente Cook Top Cleaning
Creme® sobre v_drio-cer_mica,
Para sucledad normal, Ilvlanal
1. Usando una toa.lla h_meda, frote
varias gotas de crema sobre el _rea
sucfa. Ll'mpiela hasta qua toda la
suciedad y la crema sean removidas.
2. Limpte ta superficle con crema
despu_s de cada vez que cccineo La
limpieza frecuente es esencial para
prevenir rayaduras y abrasiones.
Para suc|ed=d pesada, quemsda:
t. Aplique unas gotas de crema en el
&rea sucia cuando est_ fda.
2tl
s
Ussndo una toslla de papei hOmeda,
frote la crema sobre el _rea con Is
sucledad quemada.
$ujetando un raspador a hoja en un
_ngulo de 30 grados sobre la
superficie de vidrio cer_mica, raspe
cuidadosamente el resto de la
suciedad.
4, Si queda algo de suciedad, repita los
pasos que se listan arriba. Para
protecci6n adicional despu_s que la
suciedad haya sido removicla, pula
toda la superficie con crema.
Los derrames de az_cares (tales come
jaleas, chocolate, y )arabes) o el pl&s|ico
derret_do puede causar hoyos en la
cubterta a menos que el derrame se
saque mtentras todavia est_ caliente. Se
debe usar un ouidado especial cuando se
limplan sustanctas ca!|entes.
Siga estas instrucciones cutdadosamente
y limpie la suciedad mientras e! derrame
est_ caliente.
lm
2.
w
Apague ta zona para cocinar afectada
por el derrame. Saque los utensilios.
Usando un guante para homo, sujete
el raspador en un &ngufo de 30 grados
sobre la cubierta y raspo el deTrame
csliente I_acia un &rea frfa fuera de ta
zona para coctnar.
Con el derrame en un &tea fr[a, use
una toalla de papel seca para limpiar
cuatqufer sucledad. Cualquier derrame
que permanezca se deberla dejar so!o
basra que Is superticie de la cubierta
se haya enfriado. NO continue
utilizando la zona para cocinar sucis
hasta que todo e! derrame haya stdo
limpiado. Siga los pasos bajo
suciedad pesada para continuar el
proceso de timpieza,
21
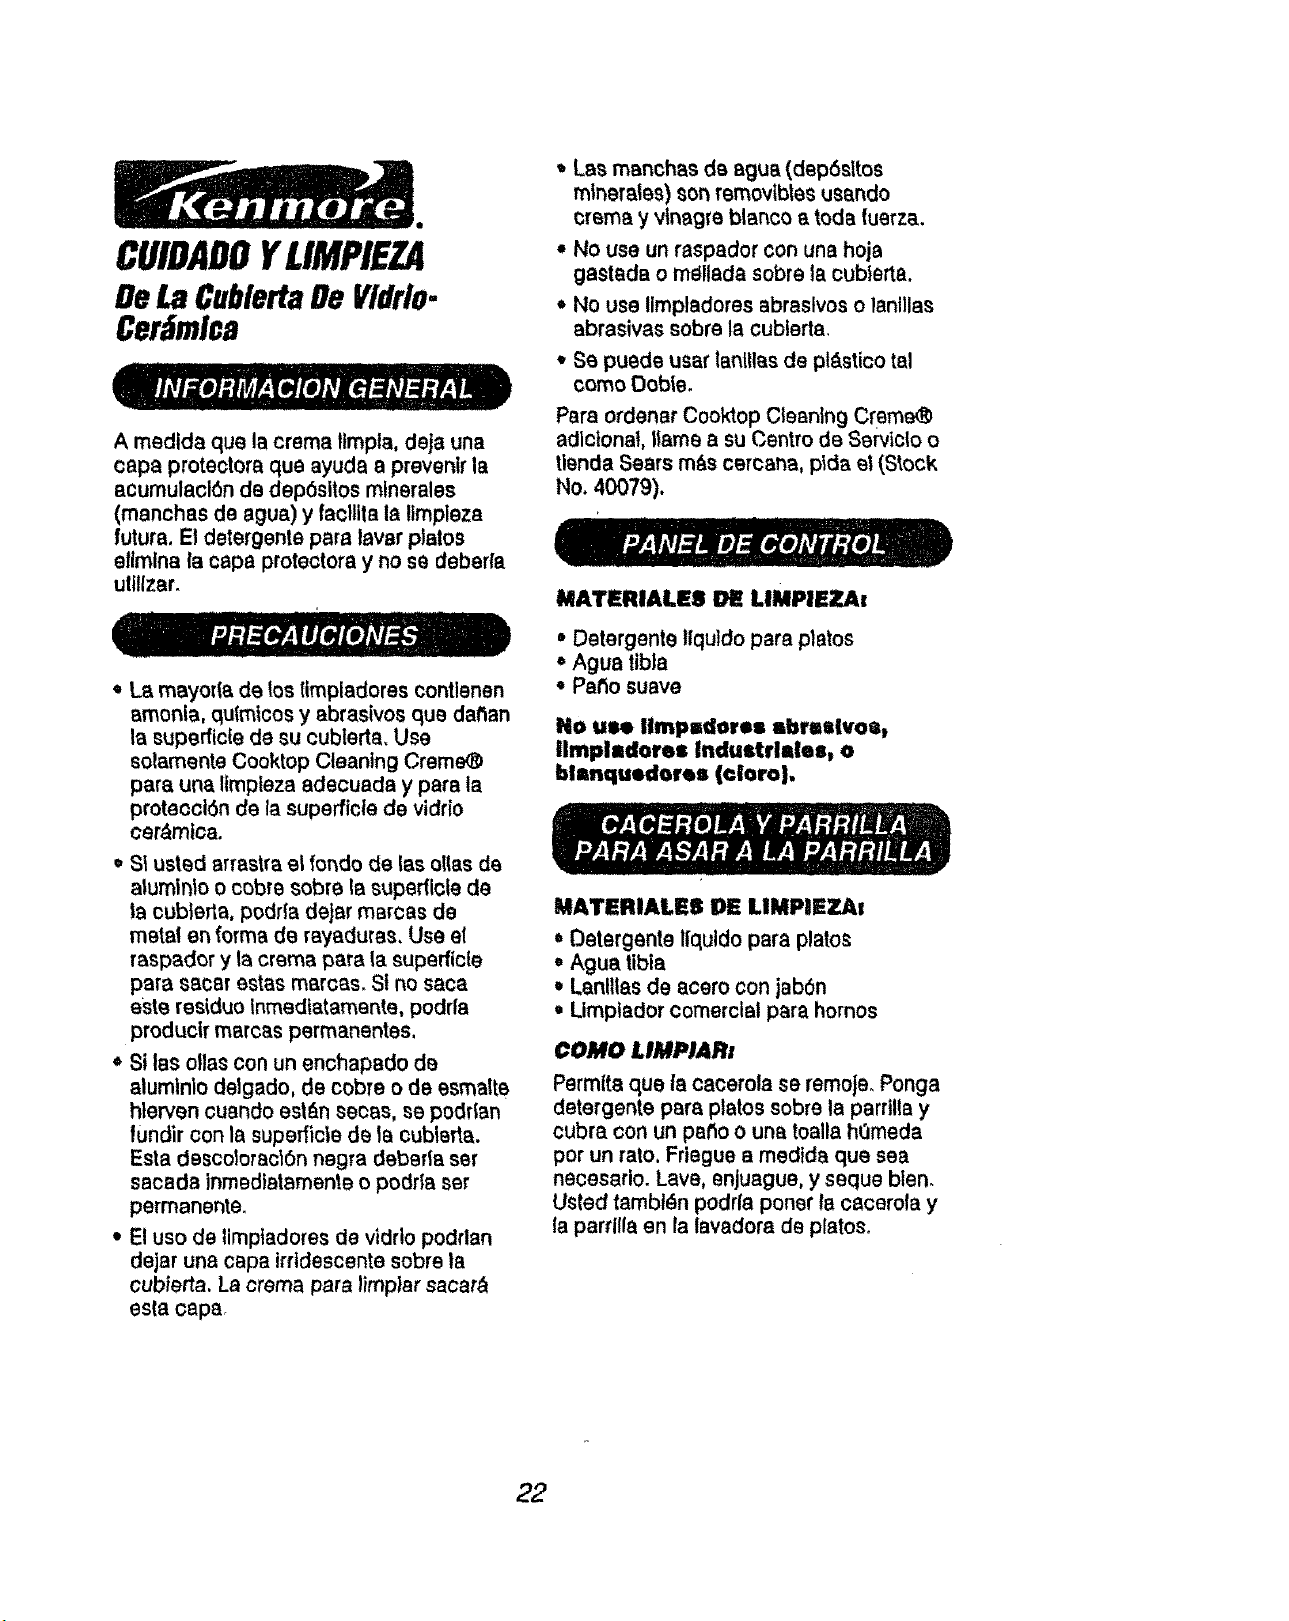
CUIDADOYUMPIEZA
De La CubiertaDe Vidrlo.
Ceramics
A medlda qua la creme limpla, deja una
cape protectora qua ayuda a prevenir la
acumulacl6n de dep6sltos mlnerales
(manchas de ague) y facltlla Is !lmpleza
future,El detergents pare lavar pialos
atlmlnsfa cape protectorsy no se deberfa
utilizer.
• La mayo_ts de los timpladores contlenen
amonis, qulmtcos y abrastvos qua datian
Is supefficle de su cublerta. Use
solsmente Cooktop Cleaning Creme@
pare una limpleza adecuada y para la
protecci6n de la superficle de vidrio
car&mica.
• St usted srrastra el rondo de las ollas de
aluminio o cobra sobre la superllcle de
Ia cubierta, podrfa dejar maroas de
metal en forms de rayadures. Use el
raspador y la creme pars Is superficle
pare sacar estas msrcss. St no sacs
este restduo Inmediatamante, podda
producir maroes permanentes.
,_ Si lea ollas con un enchapado de
alumlnlo delgado, de cobre o de esmalte
hterven cuando es|_n seoas, se podrlan
tundir con la superfic|e de le eublerta.
Esta descoloraot6n negra deberla ser
sacada inmedlatamente o podrta set
permanente.
• El uso de limptadores de vidrlo podrlan
dejar una cape irrtdescente sobre ta
cubierta, Ls creme pare }impiar sacar_
esla cape.
* Las msnchas ds ague (depSsltos
mlnerales) son removfbtesusendo
creme y vinsgre blanco a toda fuerza.
. No use un raspador con una hoja
gastada o mellladasobre la cubterta.
. No use Iimpladoresabrastvoso lanlllas
abrasives sobre le cublerts_
• Se puede user lenities de plAstico tel
como Oobieo
Pars ordenar Cooktop Cteanlng Crem_
adictonat,llama a su Centro de Sewiclo o
tlenda Sears m_s c_roana, ptds el(Stock
No. 40079).
MATERIALES DE LIMPIEZAI
• Detergente llquido pare platos
• Ague tibia
• Patio suave
No use |lmpsdores sbrms|voa_
ilmpladores Inductrlsles, o
blsnquedores (€ioro),
MATERIALES DE LIMPNEZA=
• Detergente llquldo pare platos
• Ague tibia
,, Lanlllas de acero con jab0n
• Limplador comerclal pare hornos
COMO LIMPIARI
Perm{ta clue la cacerola se remoje. Ponga
detergente pare platos sobre la parrilia y
cubra con un patio o una toalla hOmeda
por un rato. Friegue a medlda qua sea
necesario. Lave, enjusgue, y seque bten_
Usted tambl_ln podrfa poner la cscemfa y
la parrlfla en Is lavadora de platoso
22
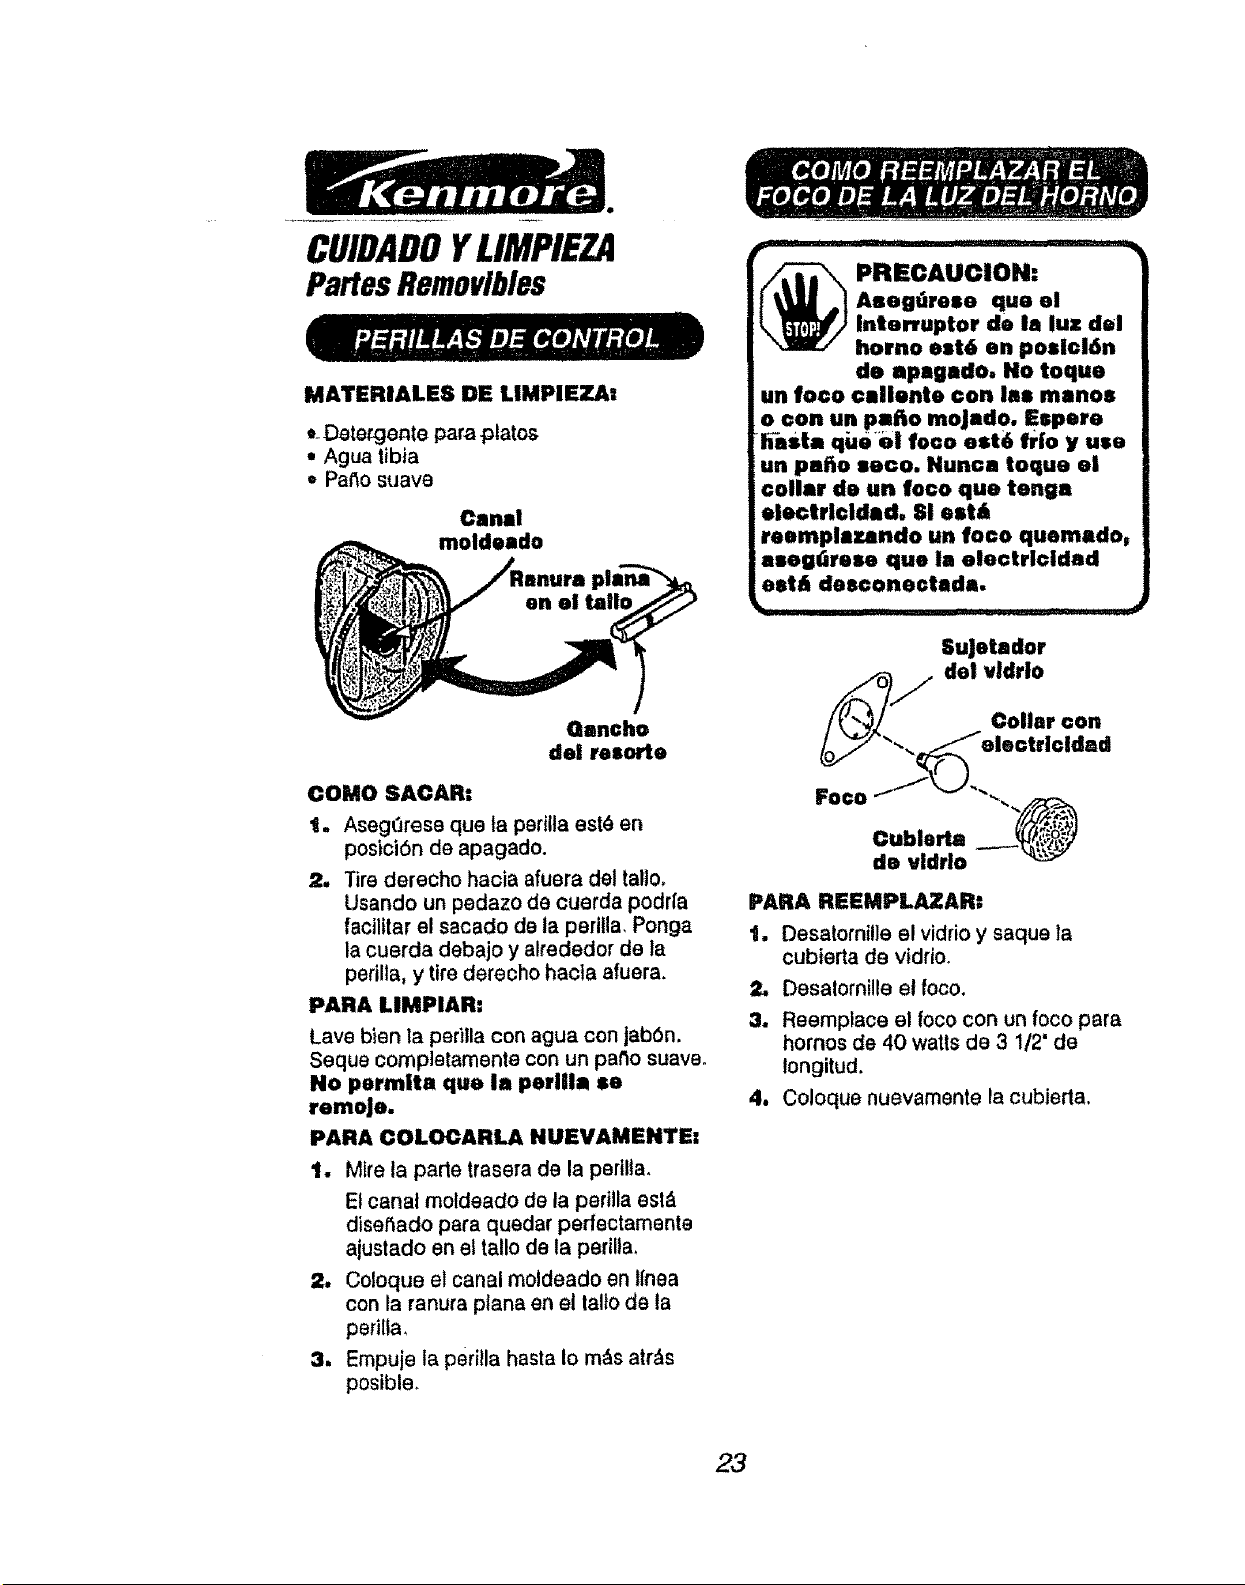
CUIDADOYLIMPIEZA
Partes Removibles
MATERIALES DE LIMPIEZA=
ooOetergento para platos
• Agua tibia
• Patio suave
Canal
moldaado
Oancho
del resorte
COMe SACAR:
1. Aseg,3rese que ta perilla est6 en
posici6n de apagado.
2. Tire derecho hacia afuera del talto.
Usando un podazo de cuerda podrla
facilitar el sacado de la perllla Ponga
la cuerda debajo y alfededor de la
perilla, y tire derecho hacta afuera.
PARA LIMPIAR:
Lave bien la perilla con agua con jab6n,
Seque completamente con un patio suave
No permita qua ia perllla $e
remoJe.
PARA COLOCARLA NUEVAMENTE:
1. Mire ta parte trasera de la perilla.
Et canal moldeado de la perilla esl_
disetiado para quedar perfectamente
ajustado en el tallo de la perilla,
2. Coloque el canal moldeado en lfnea
con la ranura ptana en el talto de la
pedlla.
3. Empuje la perilla hasta Io m_s atr&s
posible
- -- .... 7
_ RECAUCION:
AsegGrese qua el
Interrupter de In luz del
harno est6 en poslcl6n
de apagado, He toque
un face caliante con las manes
o con un patio moJado, Espare
h-asta quael face est6 fr|o y use
un pafio saco. Nunca toque el
collar do un face qua tenga
eleotricidad, SI est&
reemplazando un face quemado,
asegGrese qua la elactricidad
est& desconectade.
_1 I I qlllll ....... .e
SuJetador
jdel vldrio
Collar con
--_L@electricldad
PARA REEMPLAZAR:
t. Desatornille el vidrio y saque la
cubierta de vidrio
2. Desalornille et foco.
3. Reemplace el foco con un foco para
hornos de 40 watts de 3 1t2' de
longitud
4. Coloque nuevamente la cubierla,
23
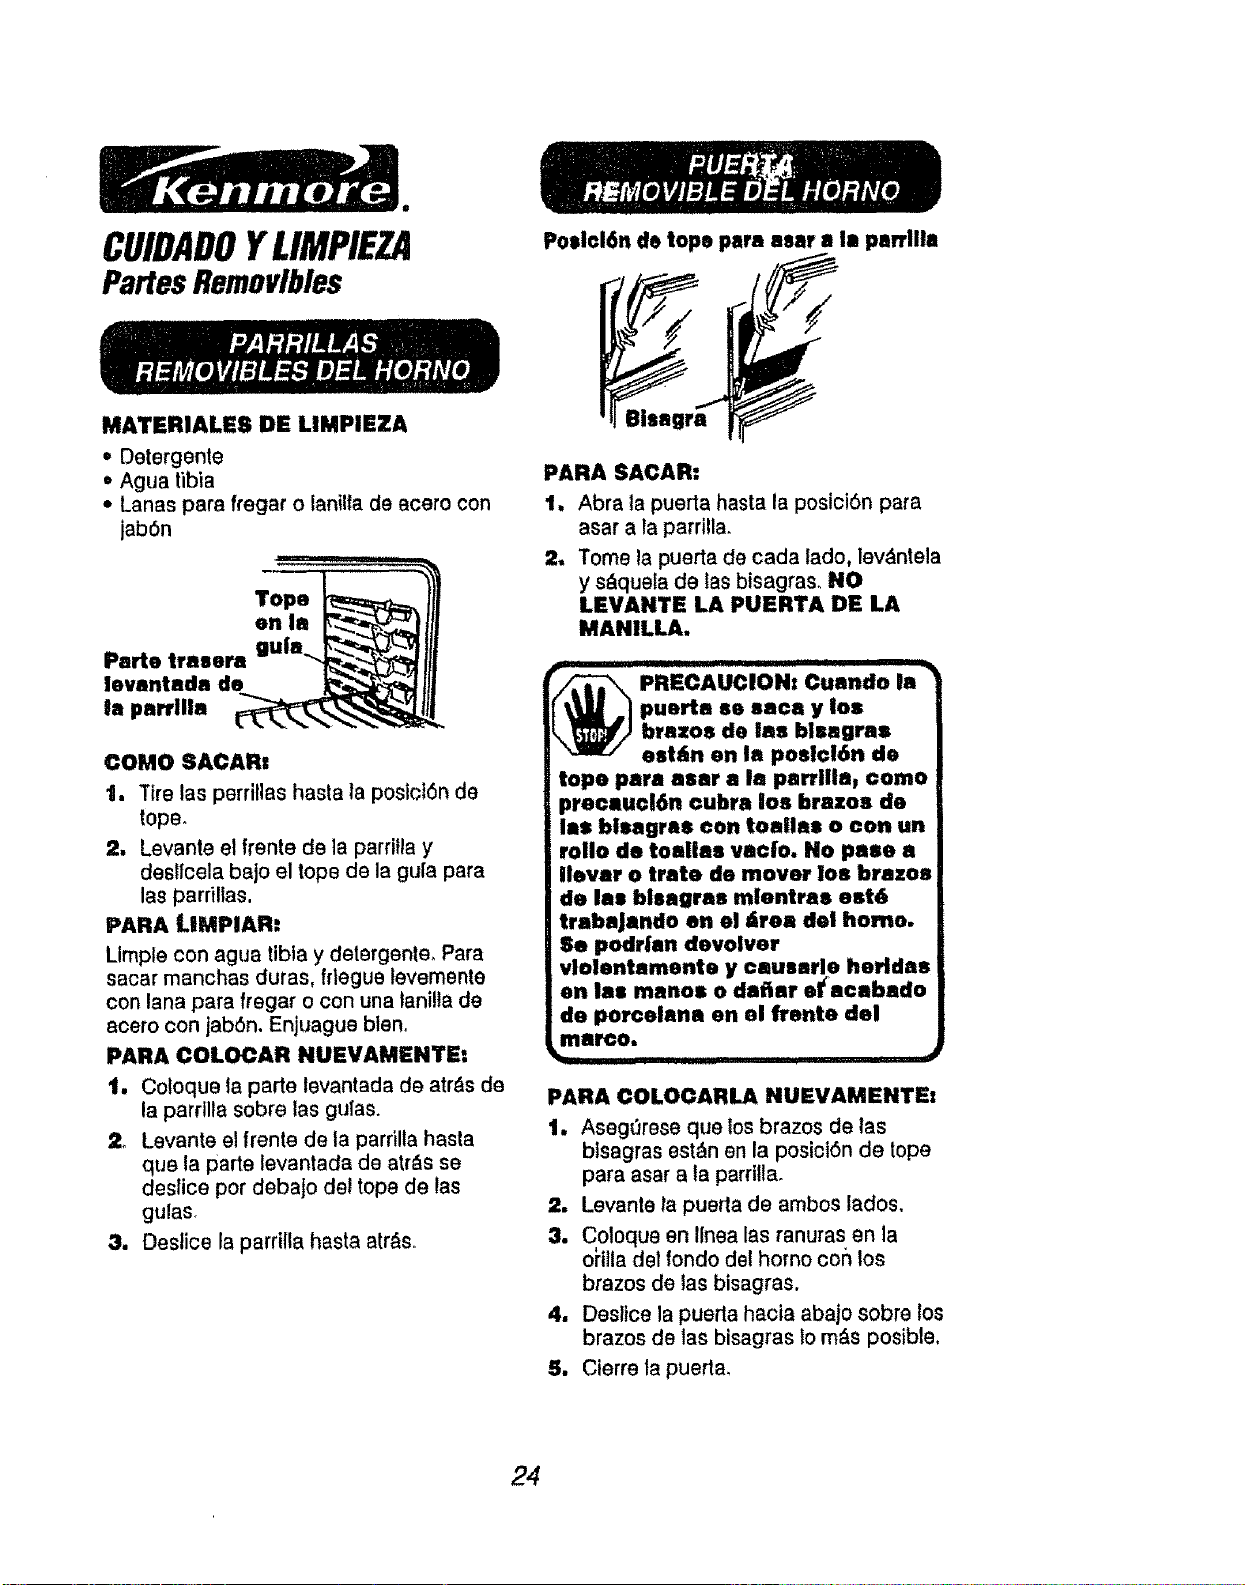
CUIDADOYLIMPIEZA
Partes Removlbles
MATERIALES DE LIMPIEZA
• Detergente
• Ague tibia
• Lanes pare fregar o lenilta de ecero con
jabSn
Tope
en In
Parte trasera gu|a_..
leventedn de
In pnrrllln
COMO SACARz
1. 1"iretas perrillas haste la posict6n de
tope.
2, Levante el frente de la parritla y
des!fcela bajo el tope de la gu[a para
las pardlla_.
PARA LIMPIAR.
Llmpte con ague tibia y detergente. Pare
8acar manchas duras, frlegue levemente
con lena pare fregar o con una lani!la de
acero con jab6n. Enjuague blen°
PARA ¢OLOCAR NUEVAMENTE:
1. Coloque la parle levantada de atr_s de
la parrllla sobre las gulas.
2 Levante el frente de la parrilla haste
que la parte tevantada de atr_s se
deslice per debajo del tope de las
gulas.
3. Deslice la parrilla haste air,so
Poelcl6n de tops pare aear a la perrll!!
PARA SACAR:
1, Abra la puerta haste la posiciOn para
asar a la parrilla.
2, Tome la puerta de cada lade, lev&ntela
y s&quela de las bisagras_ NO
LEVANTE LA PUERTA DE LA
MANILLA.
IIIII '1 ,i
_ RECAU¢IONx Cuendo la
puerta so eaca y Ioz
brazos de Ins blsagras
oet6n en la poslcl6n de
tope pare asar a la perflila_ como
precaucl6n cubra los brazos de
la$ blsagra8 con toe|ins o con un
rcllo de toallas vec|o, No pase a
Ilever o trate de mover los brezos
de las blsagras mientras est6
trabaJendo en o! Area del home.
Se podr|en devo|ver
vlolentamente y causerie betides
en lee manos o def_nr el_acabado
de porcelena en ol frente del
marco.
i.- .... •
PARA COLOCARLA NUEVAMENTEz
1. Aseg_rese quo los brazes de las
btsagras est_n en la posiciOn de tope
pare asar ala parritla.
2, Levante Ia puerla de ambos lades.
3. Coloque en Ilnea las tenures en la
oi'itla del rondo del homo con los
brazes de las bisagras.
4, Desltce la puerta hacia abajo sobro los
brazes de las bisagras Io m_,s posible,
5, Cierre la puerta.
24

CUIDADOYLIMPIEZA
Partes Removibles
COMO COLOCAR NUEVAMENTE
1. Levante el frente def tope del cajSn y
b_belo a trav6sde la aberlura en la
base del rieL
MATERIALES DE LI-MPI_'ZA
• Detergente para ptatos
• Agua libla
• Patio h_medo
COMO SACAR-
1. Tire el caj6n hacta afuera hasta qua
se detenga.
2, Levante et frente del caj6n hasta qua
el tope de la gu[a del caj6n pase por
encima del tope de la gula sobre el riel
de la base.
do
la gu|n
2. Baje el frente del caj6n y empuje el
caj6n hacia atr&s hasta qua se
detengao
3. Levante el frente del caj6n hasLa qua
el tope de la gula del caj6n pase pot
encima de la guta en el riel de la
base Deslice el cajOn ha cia su lugaro
P.SCAUCIO,:SloajG.
,'_ ofrece espaolo para
\_f_/) guardar utens|llos para
coclnar y homear. Los
materlales inflamab|es y de
pld;stico no se debar|an guardar
en este caJ6n. No sobrecargue
el oaJ6n. S| el caJ6n estit
demaslado pasado, se podHa
sallr del rlel de la bass cuando
18 abra.
Tope de
la gu|a
3. Levante el caj6n por sobre los topes,
PARA LIMPIAR
Limpie pot clenlro y fuera del caj6n con
agua tibia con jab6n y un paso o esponja
hL3meda. No use abrasivos fuertes o lanas
para fregar sobre el caj(Sn.
25
r__ tt
ANTESDELLAMARPARAUN
SERVICIO
Para ahorrar tJempo y dtnaro, antes de !famar para un serv}clo, revise |a I[sta de rods abajo
para cualquier problema qua usted crea qua tlene con el funclonamiente de su estufa. SI
el problema es alga qua usted no puede reparar, use los N_meros de Servfcto para et
Consumldor qua se encuentran a! final de este manual. Cuando Itaga un llamsdof
tonga dltponlble QI nGmero de modelo_ Ilsta do partes para reparaclonos_
manual de usa y euldado y is laths de €oml_a.
PROBLEMA POSIBLE CAUSA POSIBLE SOLUCIOH
...... ' rill r ....
El dial de! control
pestaRos una =1=" estufa°
eogulda par un nQmero
o Iotrs.
Pequeflae rayaduras o
sbranlonss sobrt la
©ublarta.
i'_ il , ,i
a. Use de matertales de
limpleza Incorrectos.
b. Partlculas &speras (sal,
etc,)entreelrondo de tas
aliasy lasuperficiepara
cOclnar.
€, Utensilios con fondos
_speros,
Mal funclonaml_nto de la Empuje el bot6n CLEAR/OFF.
Permita que la estufa se
enfrie per une hera y ponga
nuevamente el homo en
funclonamiento. St et
probfema se repite, flame
para un servicio.
a. Use solamenta Cooktop
Cleaning CremeS.
b. AsegQreae que la
superficle de la cubierta y
el fondo de tas atlas est_n
{implas antes de usarlas,
_. Use solamente elias de
rondo piano.
Msrcas de mota! en Is Arrastrar o raspar los Use el procedimiento
superlflcle de Is utenslflos sabra la recomandado para limpiar la
cublarta [puodon verse sup_fficie de la ¢ubierta. superflcio de la cublerta.
€omo rsyaduras). _ .. _
A_II do doscoloracl6n Dep6sltos de mlnerales
sabre la superllclo de agua o altmentos_
de la cub|srta.
_ _ _ _ _ " • ........... _7 / ,,:, ¸¸:7¸
Use procedimlentos de
limpleza recomendados para
ltmptar fa superficie de la
cubierta.
........ .. ...... - ..... rr;I it1 ]' .................
Bsndas y manchas a_ Derrames o
oscuras sabra la salplcaduras de
=upodlcle de in grasa tncrustadas.
cublerta.
b. Use de materiales
de limp)eza
lncorrectos.
.... II ]1' _ I i II]
a. Use un raspador a hoia y
siga las d)recciones en la
secciOn para la limpieza
de este manual.
b. Use solamente Cooktop
Cleaning Creme® sabre ta
superficie de lacubierta,
................... I 'J]HIJ
Loa controlas de la
cublerta, homo y
control dM homo no
funclonan.
No pasa electrlctdad a
laestufa,
Revise el clrcuito principal o
los fuslbles. AsegOrese qua el
cord(m est& enchufado,
26
ANTESDELLAMARPAPAUN
SERVICIO
PROBLEMA
I IIII Ill I I II
Los zones paro
coclnar de la cublerta
funcionanj pero el
homo no enciende.
Controles de! homo
puestos
tncorrectamente_
IIII I II IIr"ll'l,I........ ..........
ILa temperature del Calbracl6n del control
homo no pl!rIol esllr deI homo°
OXIOtI.
POSIBLE CAUSA POSIBLE SOLUCION
..................... Ill l _L T _ ]!I!I Jr: .............. _lJlIL .......
Revise la secci6n de c6mo
cocinar en el homo y c6mo
co!ocar el control del homo
correctamente.
........ , i,iii : _ 7
Vea la secci6n de c6mo
cooinar en el homo.
Illl I 'lllr r IIF I I 'lll'll'l "
La puerto do! homo no El ctclo de i{mpleza no
so dosongancho, ha terminado.
'i ..... .........
La luz dol homo no a, El interruptor de la
funclona luz est_ apagado.
b. El foco necesila
...............................................................ser reemplazado.
El homo no so Ilmpl6 a, Los controles no se
o los resultados pusleron bleno
fuoron malos,
b El ciclo de Ilmpteza
fue interrumpldo.
I
€. El homo estaba
demasiado sucio.
El horno humea a Homo sucio.
Ei home emlte un
olor.
b. Mat uso de papel de
aluminio.
€. Se dej6 la cacerola pare
asar con grasa dentro
del homo.
II
a, El aislante del homo
podr{a emttir un olor
durante los primeros
USOS.
b= No limptar et excese
de suctedad antes del
ciclo de autolimpleza.
La temperature det homo
debe caer a menos de la
temperatura de enganohe
antes que se pueda abrir la
puerta.
a Revise ta posiciSn del
interruptor.
b, Revise o reemplace el
foco de la luz.
a. Lea la secctSn de
autolimpieza de este
manual.
b, E! clclo de limpieza normal
deberia ser de 4 horas y
20 minutos.
c, Los derrames grandes se
deberlan ttmplar antes de
programar un cicto. Usted
tambi_n podrla repetir el
ciclo.
a, Vea que no hayan
derrames grandes.
b, No se recomienda el uso
det papel de aluminlo.
c, Ltmpie la cacerola y la
pardlta despu_s de coda
USO,
I1'1 II' I II
a, Ponga e! homo en un ciclo
de autolimpleza para
acelerar el proceso de
ettmtnar el olor.
b, Llmpie el exceso de
sucledad antes de
comenzar un ciclo de
autolimpieza.
27
ANTESDELLAMARPARAUN
SERVICIO
PROBLEMA POSIBLE CAUSA POSIBLE $OLUCION
Los alimentos no Se
homean
ade©uadam_nte.
e, El homo nose
precalen|6 Io
suficiente.
b, Posicibn incorrecta
de la parritla o la
cacerota.
¢. La ventilaci6n del
homo est_ obstruida
o cubterta.
dl, [Jso tncorrecto del
papel de aluminlo.
e. Temperatura
incorrecta pare ei
utensilio ueado.
f, No se sigui6 la
receta.
g, Mala calibracl6n del
conlrol del homo.
he
Los al|mentos ,o se 8.
asan adocumdamente
a la parrllla.
La estufa o la parrilla
det homo no est&n
niveladas.
Po_tcl6n incorrecta
de la parrilla.
b, EIhOmO S_
precalent&
c, Mal use de papel do
aluminio.
al
d, La pueda del homo se
oerr6 durante el asado
ata parrilta.
e. Bajo voltage (208
Vollios).
fl
Canttdad de tiempo
inoorrecta para asar.
28
Aseg0rese de
precalentar haste que
suene et tono.
b, Mantenga un espacio de
aire unlforme alrededor
de 1as ollas y utensitios.
Vea la secci6n para
Cocinar en el Homo.
¢, Mantenga la venlilaci6n
despejada.
d, No cubra las parrlllas o
el rondo del homo
cuendo homee°
eo Reduzca ta temperature
en 25 grados para
utensilios do vidrto,
oscuros u opacos.
f, Es la receta de
conflaneza y probada?
g, Revise la secci6n de
ajustes ala temperature
que slgue esta seccl6n.
h, Vea las fnstrucciones de
instalaci6n pare la
nivelaci6n.
a, Revise la posici6n de las
cacerolas; yea la
secci6n pare asar a la
parrillao
b. No precaliente cuando
ase ala parrilta.
c, No permita que el papel
de aluminio cubra las
"ranuras de la parrilla;
esto obstrutr_ el drenage
de la grasa.
d, Abra la puerta ala
pestcibn de tope para
as_r_
e, Use po_icl6n de parrilla
m&s alta y/o ase por m_s
tiempo.
f, Vea la tab_a pare a_ar en
la secci6n de cdmo asar
ala parri!iao
AJUSTESDE TEMPERATURA-
"HAGALOSUSTEDMISMO"
Usted podr[a pensar qua su nuevo homo
cocina diferentemente al homo qua
reemplaz6, Recomendamos qua use su
homo nuevo unas pocas semanas para
qua se famJlladce con _1,sJguiendo los
fiempos qua se dan en las recetas como
una gula.
Si cree que su nuevo homo est&
funcionando demasiado caliente (quema
ta comida) o no calienta 1osuflciente (la
comida no queda blen cocida) usted
mismo puede ajustar la temperaturao La
apariencla y la textura de los altmenlos
son mejores Indicadores de ta exactitud
de un homo qua un termSmetro barato,
corno los qua se venden en las tJendas,
para controlar la poslciSn de la
temperature de su nuevo homo, Estos
term6metros pueden variar entre 20-40
grados, Adam,s, la puerta se ttene qua
abrir para leer es{os term6metros_ Abdr (a
puerta camblar& la temperatura del horno_
Pare decldir en cu,_nto cambiar la
temperature, suba {a temperalura del
horno en 25 grados (st los aiimentos no
quedan bien cocidos) o baje la
temperatura en 25 grados (si ta comtda se
quema) de la temperature de la receta,
luego h6rnee, Los resultados de esta
"prueba" le deberlan dar una Idea de
cu&nto se deber{a camblar la temperaturao
1. £mpuje y sujeta, ata mtsma vez, los
botones con las Iiechas para SUBIR y
BAJAR la HORA hasta qua el dial
muestre ud n_mero de dos dfgitos_
2. Empuje la flecha pare SUBIR la
HORA para aumentar la temperatura
en 35" F de ta temperature original.
o
Empuja ta ftecha pare BAJAR fa
HORA para disminuir ta temperatura
en 35" F de la temperatura original.
3. Cuando e_te ajuste haya sido hecho el
dial volver& ala hora del die.
£ste ajuste permanecer_ en la memoda
hasta qua estos pasos seen repetldos y
una nueva temperature sea seleccionada.
Permanecer_l en la memoria lncluso
despu_s de un corte de corriente,
Estos ajustes no afectar_n las
temperaluras para Asar y Limptar.
29

NOTAS
30
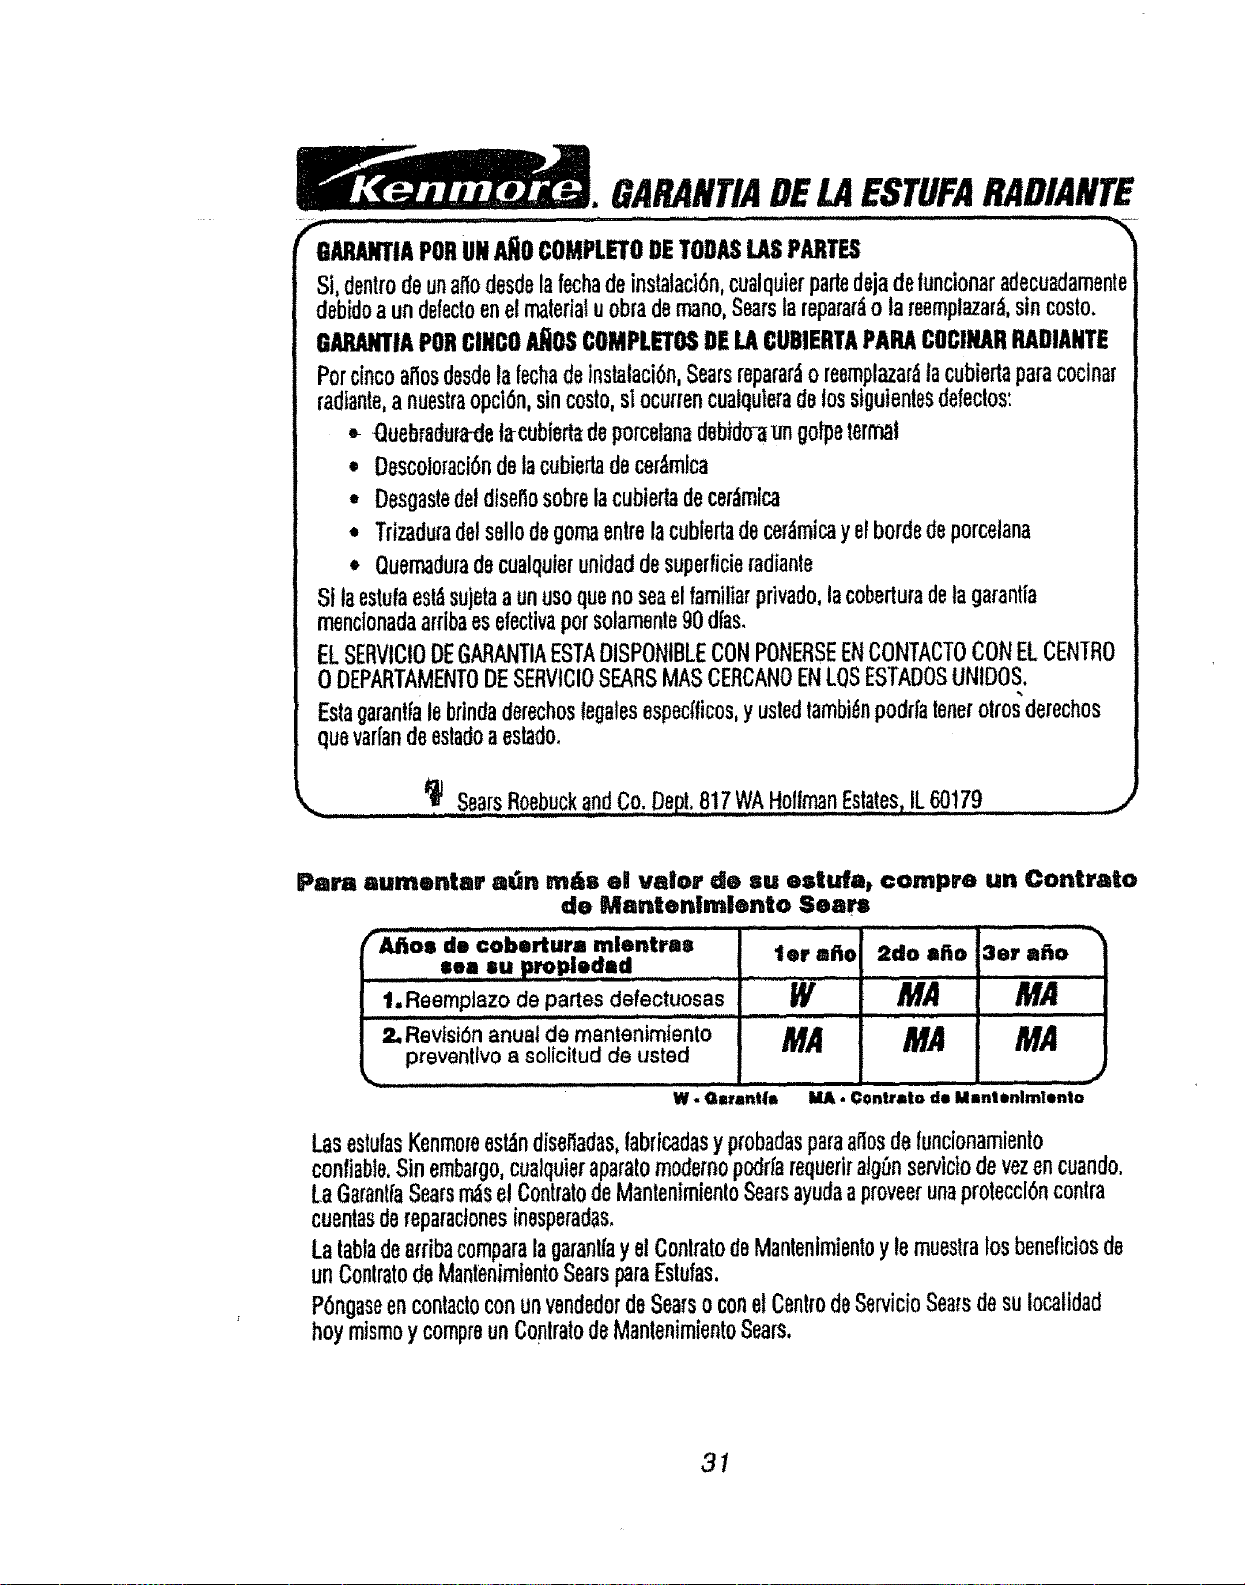
_#_p_._ ii,i •. i_¸
GARANTIADELAESTUFARADIANTE
6ARANTIAPORUNA_OCOMPLETODETODASLASPARTES
Si,dentrodeunatIodesdeIsfechadeinstatacl6n,cualquierparledejadefuncionaradecuadamente
debidoaundefectoenel materialu obrsdemano,Searstareparar,'io tareemplazar,_,sincosto.
GARANTtAPORCINCOA_OSCOMPLETOSDELACUBIERTAPARACOCINARRADIANTE
Porcincoailosdesdelafechadeinstalaci6n,Searsreparsr,_o reemplazar_la cubiertsparacoclnar
radfante,a nuestraopci6n,sincosto,slocurrencualquleradelosstguientesdefeclos:
•- Quebradura-deta-cubie_deporcelansdebido_ungolpetern_l
• Dascoloraci6ndeIscubierladecer_mica
• DesgastedeldiserfosobreIscubiertadecat,mica
• Trizaduradelsellodegomaentrelacubiertadecer_tmicay elbordedeporcelans
• Ouemadursdecualquierunidaddesuperficieradiante
St Isestufaesl_sujetaa unusoquanoseaelfamiliarprivado,lacoberturadetagarsntia
_nclonadaarribaesefectivaporsolamente90dfas.
ELSERVICIODEGAFIANTIAESTADISPONIBLECONPONERSEENCONTACTOCONELCENTRO
0 DEPARTAMENTODESERVICIOSEARSMASCERCANOENLOSESTADOSUNIDOS.
Estagaranffalebrindaderechoslegalesespeclficos,y usfedtambi6npoddatenetotro_derechos
quavarfandeestadoa estado,
_. t_ SearsRoebuckandCo.Dep_t,817WAHoflmanEstates,IL60179 ._.,
Para aumentar aGn m_s e| valor de su estufa, compre un Contra|o
de Mantenlmlento Sears
rAitos de cobortura mlentra= ter aho 2do alto 3er atto
.......=oa SU propiedad
'l.Reemptazodepartesdefectuosas _/r MA MA
Revisibn"anua'i"demantenimtento MA MA MA
preventlvo a solicitudde usted
W - G_'ant|s MA • €0nttato de Mmnlenlmlento
LasestufasKenmoreest_ndisetIadas,fabricadasyprobadasparaaflosdefuncionamiento
conliable,Sinembargo,cualquieraparatomodernopodrfarequeriratg6nservictodevezencuando,
LaGsrantfaSearsAs e!ContratodeMsntenim_entoSearsayudaaproveerunaproteccl6ncontra
cuentasdereparaclonesinesperadas.
Latabladeardbacomparalagarantfay elConlratodeMantenlmientoyle muestralosbeneflctosde
unConlratodeMantenlmtentoSearsparaEstufas,
P6ngaseencontactoconunvendedordeSearsoconelCentrodeServicioSearsdesuIocalidad
hoymismoy compreunConlratodeMsntenimientoSears,
31

Sears se complaoe en ofrecer a sus clientes
servicio de reparaci6n de aparatos
electrodom6sticos y electr6nlcos de todas las
marcas.
En Sear usted puede contar con operadores en
espafiol a los que puede Ilamar sin cargo alguno,
Para servicio de reparacl6n a domlcllio,
Llame 24 horas a! dla, 7 dlas a la semana
I 800-676-5811
Para ordonar plezas con entrega a domlclllo,
Llame de 7 am a 7 pm, 7 dfas a la semana
1 800-659-7084
L
SEARS