Home
Bookmarks
Home
ISpring
ISpring UVF55FS User Manual
Page 16
ISpring UVF55FS Whole House UV Water Filter
User Manual - Page 16
For UVF55FS.
PDF File Manual
,
16 pages
,
Read Online
|
Download pdf file
More photos
/
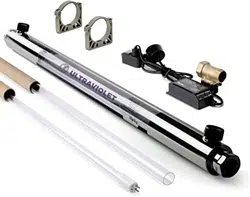
iSpring Whole House Ultraviolet Light Water Filter
Installation and Maintenance Manual
Model UVF55FS
/
Please read the User's Manual Carefully and keep it available
Overview
Reminders
- Please do not install this product outside or at a place where it is exposed to direct sunlight or freezing temperature.
- Please install this product at a place where it is easy to access and maintain.
- Avoid jarring/bumping, freezing, overheating and corrosive chemicals.
Specs and Conditions
Installation
Before Installation
The unit comes with two ports. Both are 1-inch MNPT and can be used as an inlet or outlet. Please choose the correct fittings to fit your plumbing. For easy maintenance, it is recommended that you install an inlet valve and an outlet valve before and ...
The unit should be installed after a sediment filter, as sediments in the water can block UV light and become a shelter for contaminants. Thus, water coming into the UV filter must be clear (free of particles larger than 20 microns). It is recommended...
If water flow speed exceeds rated flow, please install a flow-limiting or pressure-limiting device. If the water pressure is over 43 psi, please install a pressure regulator in the inlet/outlet in order to protect the quartz sleeve.
Please install the filter at a position by the retaining clip, retaining nuts or other mounting device in order to prevent it from dropping due to the vibration caused by water and causing damages to the internal fragile parts.
The ultraviolet water filter is not designed to eliminate bad tastes or smells, biological materials, chemicals, silt, heavy metal and other kinds of impurities, and it does not reduce sediments which affects the efficiency of the UV lamp. Therefore,...
Installation Steps
Step1 - Before mounting the two black plastic clips onto the wall, make sure there is enough room for both the stainless-steel housing and access for future servicing. It can be installed horizontally or vertically. (If you choose vertical mounting, m...
Step2âOpen the package to check all components inside: Filter Chamber, UV Lamp, Quartz Tube, O-rings, Electronic Ballast, Clamps, Flow switch. Make sure that the Quartz Tube and UV Lamp are clean before installation (clean it with alcohol or mild dete...
Step3âRemove both Open and Closed End Nut from filter Chamber.
//
Step4âInstall O-ring onto the open end of Quartz Tube (12mm from the edge).
/
Step 5âInsert the quartz tube into the Filter chamber. Step6âInstall O-ring onto the closed end of the quartz tube.
/
//
//
Step8 âHand-screw open end nut on the filter chamber (open end of quartz tube). To protect the O-ring, do not over tighten.
Step7âHand-screw closed end nut on the filter chamber(closed end of quartz tube). To protect the O-ring, do not over tighten.
// ///
Step10 âCarefully insert the UV lamp into the quartz tube through open end nut.
/
/
System Operation
Water Quality Guidelines
Maintenance
- For your safety, ALWAYS wear goggles and turn the power OFF before REPLACING the UV lamp or CLEANING the quartz sleeve! Servicing the unit with power on will also cause damage to the ballast. Never service the UV lamp or quartz sleeve without wearin...
- Over time, minerals in the water slowly form a coating on the quartz sleeve. This coating must be removed periodically, as it reduces the amount of UV light reaching the water. Please carefully clean the lamp and quartz sleeve at least 2-3 times a y...
- To clean the lampâWear rubber, latex or nitrile gloves to avoid contaminating the lamp.
Unplug the power, shut off both inlet and outlet valves, and remove the entire housing from the water line.Next, drain the water and remove the black rubber cap which has the power cord attached, then remove the lamp from the quartz sleeve. Wipe the l...
- To clean the quartz sleeveâUse great care when handling the quartz sleeve as it is very fragile; avoid bumping or jarring it.
Unplug the power, shut off both inlet and outlet valves, and remove the entire housing from the water line. Next, drain the water and remove the black rubber cap which has the power cord attached, then remove the lamp from the quartz sleeve. Pour vine...
- The UVF55FS come with a flow sensor that turns the UV unit on and off automatically with water flow. Push control switch to button âAUTOâ, the UV lamp will start working automatically when there only water flowing. Push control switch to button âMOV...
- The amount of UV light created by the lamp decreases over time, therefore the lamp should be replaced every 12 months.
Troubleshooting
Warranty
Warranty Registration
/
iSpring Water Systems,LLC
Atlanta, Georgia, USA
Page 16/16
Page 1
Page 2
Page 3
Page 4
Page 5
Page 6
Page 7
Page 8
Page 9
Page 10
Page 11
Page 12
Page 13
Page 14
Page 15
Page 16
Contents
Table of Contents
Search
Previous
Next
Troubleshooting
Bookmarks
Loading ...
Loading ...
Loading ...
iSpring
Wa
ter S
ystems,L
LC
A
tlan
ta
, G
eorg
ia,
U
SA
15
File type: PDF
File name: 27046202_uvf55fs.pdf
File size: 671.33 KB
File Language: English
Pages: 16
Author: ISpring
File created: 2020-08-31
Published: 2022-03-12
Updated: 2023-05-06
Verified by
Jaqueline Hayes
on 2023-05-06
Download File
Table of Contents
×
/
1
iSpring Whole House Ultraviolet Light Water Filter
1
Installation and Maintenance Manual
1
Model UVF55FS
1
/
1
Please read the User's Manual Carefully and keep it available
1
Overview
2
Reminders
4
- Please do not install this product outside or at a place where it is exposed to direct sunlight or freezing temperature.
4
- Please install this product at a place where it is easy to access and maintain.
4
- Avoid jarring/bumping, freezing, overheating and corrosive chemicals.
4
Specs and Conditions
4
Installation
5
Before Installation
5
The unit comes with two ports. Both are 1-inch MNPT and can be used as an inlet or outlet. Please choose the correct fittings to fit your plumbing. For easy maintenance, it is recommended that you install an inlet valve and an outlet valve before and ...
5
The unit should be installed after a sediment filter, as sediments in the water can block UV light and become a shelter for contaminants. Thus, water coming into the UV filter must be clear (free of particles larger than 20 microns). It is recommended...
5
If water flow speed exceeds rated flow, please install a flow-limiting or pressure-limiting device. If the water pressure is over 43 psi, please install a pressure regulator in the inlet/outlet in order to protect the quartz sleeve.
5
Please install the filter at a position by the retaining clip, retaining nuts or other mounting device in order to prevent it from dropping due to the vibration caused by water and causing damages to the internal fragile parts.
5
The ultraviolet water filter is not designed to eliminate bad tastes or smells, biological materials, chemicals, silt, heavy metal and other kinds of impurities, and it does not reduce sediments which affects the efficiency of the UV lamp. Therefore,...
5
Installation Steps
5
Step1 - Before mounting the two black plastic clips onto the wall, make sure there is enough room for both the stainless-steel housing and access for future servicing. It can be installed horizontally or vertically. (If you choose vertical mounting, m...
5
Step2âOpen the package to check all components inside: Filter Chamber, UV Lamp, Quartz Tube, O-rings, Electronic Ballast, Clamps, Flow switch. Make sure that the Quartz Tube and UV Lamp are clean before installation (clean it with alcohol or mild dete...
6
Step3âRemove both Open and Closed End Nut from filter Chamber.
6
//
6
Step4âInstall O-ring onto the open end of Quartz Tube (12mm from the edge).
6
/
6
Step 5âInsert the quartz tube into the Filter chamber. Step6âInstall O-ring onto the closed end of the quartz tube.
7
/
7
//
7
//
7
Step8 âHand-screw open end nut on the filter chamber (open end of quartz tube). To protect the O-ring, do not over tighten.
7
Step7âHand-screw closed end nut on the filter chamber(closed end of quartz tube). To protect the O-ring, do not over tighten.
7
// ///
8
Step10 âCarefully insert the UV lamp into the quartz tube through open end nut.
8
/
9
/
9
System Operation
10
Water Quality Guidelines
10
Maintenance
11
- For your safety, ALWAYS wear goggles and turn the power OFF before REPLACING the UV lamp or CLEANING the quartz sleeve! Servicing the unit with power on will also cause damage to the ballast. Never service the UV lamp or quartz sleeve without wearin...
11
- Over time, minerals in the water slowly form a coating on the quartz sleeve. This coating must be removed periodically, as it reduces the amount of UV light reaching the water. Please carefully clean the lamp and quartz sleeve at least 2-3 times a y...
11
- To clean the lampâWear rubber, latex or nitrile gloves to avoid contaminating the lamp.
11
Unplug the power, shut off both inlet and outlet valves, and remove the entire housing from the water line.Next, drain the water and remove the black rubber cap which has the power cord attached, then remove the lamp from the quartz sleeve. Wipe the l...
11
- To clean the quartz sleeveâUse great care when handling the quartz sleeve as it is very fragile; avoid bumping or jarring it.
11
Unplug the power, shut off both inlet and outlet valves, and remove the entire housing from the water line. Next, drain the water and remove the black rubber cap which has the power cord attached, then remove the lamp from the quartz sleeve. Pour vine...
11
- The UVF55FS come with a flow sensor that turns the UV unit on and off automatically with water flow. Push control switch to button âAUTOâ, the UV lamp will start working automatically when there only water flowing. Push control switch to button âMOV...
12
- The amount of UV light created by the lamp decreases over time, therefore the lamp should be replaced every 12 months.
12
Troubleshooting
12
Warranty
13
Warranty Registration
15
/
16
iSpring Water Systems,LLC
16
Atlanta, Georgia, USA
16
Search:
×
Search