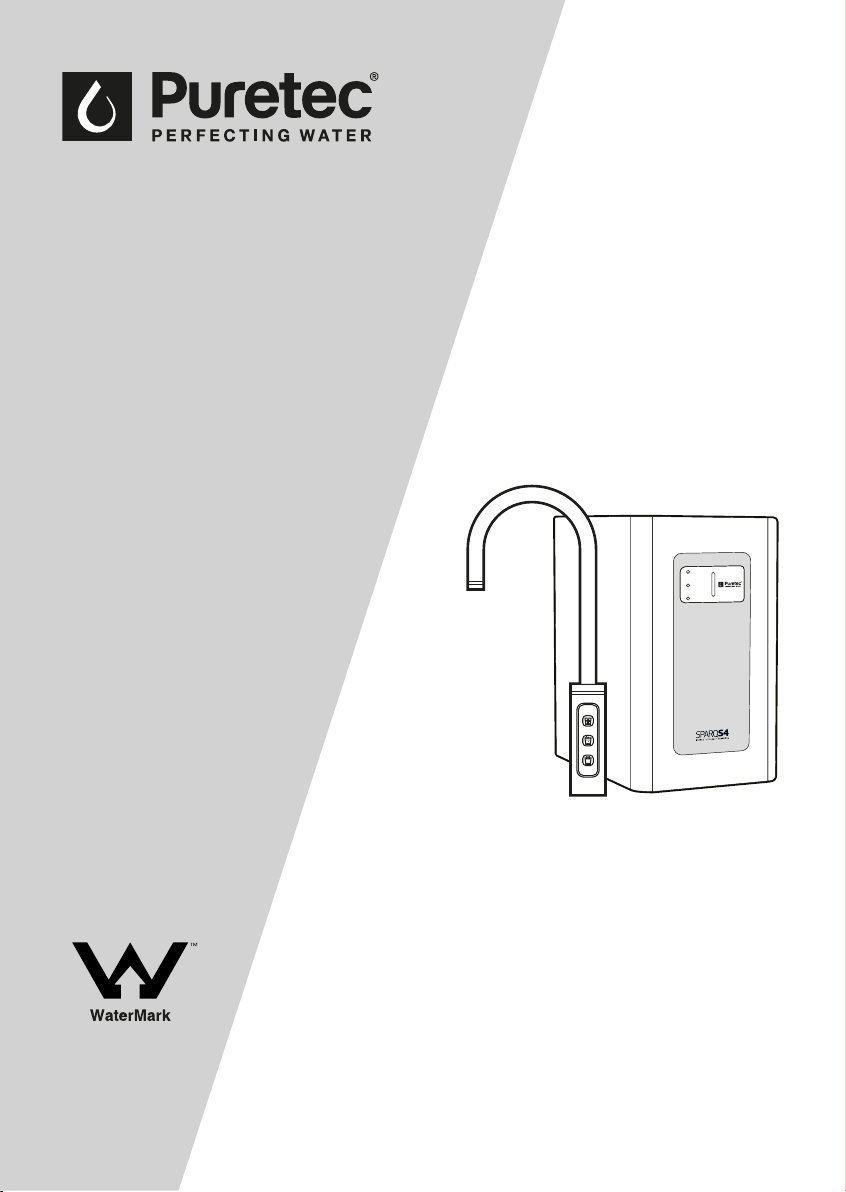
User Guide
Sparkling, Chilled & Still Water System
For correct operation & installation it is essential to observe these instructions.
FEB2019
SODA
COLD
CHILLING
WMTS 105
Certicate No. 23291
Australian Certication
Services
Sparq S4

2 Installation & Operation Manual Copyright © Puretec Pty Ltd 2019
AUSTRALIA
Customer Service: 1300 140 140
Email: [email protected]
Web: www.puretec.com.au
NEW ZEALAND
Customer Service: 0800 130 140
Email: [email protected]
Web: www.puretec.co.nz
What's Inside
What's Inside
Puretec Customer Service ...........................................................................................................................3
Installation Record
...........................................................................................................................................3
Before Installation
.............................................................................................................................................4
Parts Included
......................................................................................................................................................4
Specications
.......................................................................................................................................................5
Dimensions
............................................................................................................................................................5
Tap Button Identication
...............................................................................................................................6
Installation Procedure ....................................................................................................................................8
How To Use Quick Connect Fittings
......................................................................................................10
How To Operate The Tap
............................................................................................................................12
Filter Maintenance
.........................................................................................................................................12
Gas Replacement
............................................................................................................................................13
Troubleshooting
...............................................................................................................................................14
Warranty
..............................................................................................................................................................15
3 Copyright © Puretec Pty Ltd 2019 Puretec Sparq S4 User Guide
Introduction
Puretec Customer Service
Thank you for purchasing a Puretec Sparq S4 Drinking Water Appliance. The Sparq S4 is
a proven performer manufactured from only quality materials and components. It will
give years of reliability and trouble-free operation if maintained properly.
Caution: Do not use with water that is microbiologically unsafe or without adequate
disinfection before or aer the system.
The Puretec Sparq S4 is designed for metropolitan supply water only.
Puretec Drinking Water Appliances are designed to run economically for many years and
this is dependent on the initial installation and periodic maintenance.
Flush system for 5 minutes or more, aer any period of non-use, more than 2 weeks.
Note: Where maximum line pressure exceeds 500 kPa, the supplied multivalve must
be installed to comply with Australian Plumbing Standards.
PRODUCT INFORMATION
Model Number:
SPARQ-S4
Serial / Batch Number:
(Refer to label on the rear of the unit)
Purchased From:
Date of Installation:
Installer / Plumber Details:
Installation Record
For future reference, ll in the following data:
All installation and service work should be completed by qualied tradespeople. Faulty
operation due to unqualied persons will result in voided warranty.
All plumbing must comply with AS 3500.1 and AS3500.2.15.
4 Installation & Operation Manual Copyright © Puretec Pty Ltd 2019
Before Installation
Read the instructions and check if there is adequate space to mount all of the
components.
Check the mains water pressure is between 172 - 500kPa.
NOTE: This product must be connected to MAINS WATER ONLY.
Check the appliance rating plate and ensure correct power is available for the appliance.
Check the under counter cupboard supporting the appliance is adequate for the total net
weight of 24kg (including the gas bottle).
IMPORTANT NOTE: Ensure there is adequate ventilation available through the cupboard.
If there is inadequate ventilation, and the cupboard temperature rises to above 40°C, the
system may become damaged and malfunction which will void the product warranty. To
ensure there is sucient cross-ow ventilation suitable holes or vents will need to be cut
into the cupboard and door.
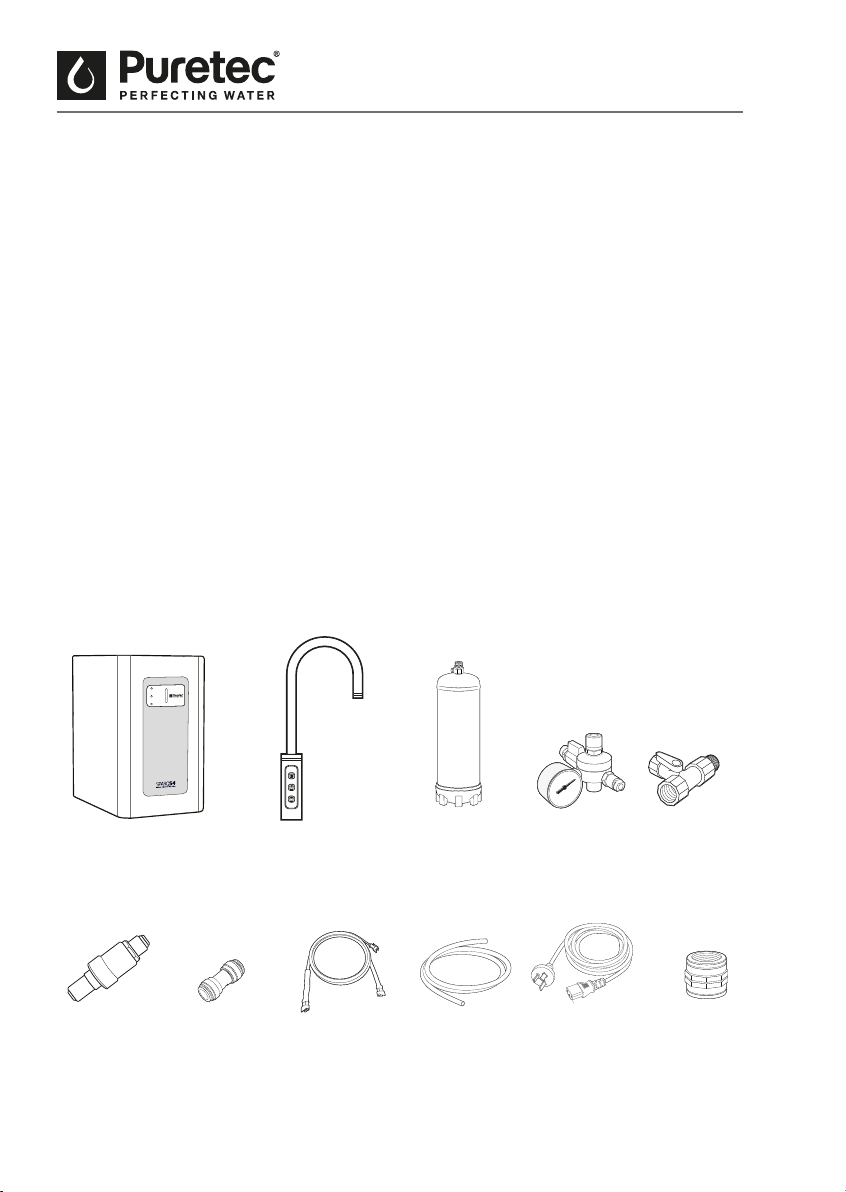
Parts Included
Pre-Installation
Sparq Unit Faucet/Tap
Wiring Loom
SmartTee
TM
CO
2
Bottle
TubingMultivalve
Regulator
SODA
COLD
CHILLING
Power CordStraight
Connector
Spacer
5 Copyright © Puretec Pty Ltd 2019 Puretec Sparq S4 User Guide
Specications
Specications
A Ø26mm hole is required for faucet (Max. 30mm).
^Warranty cover parts and labour for the period of 1 year where applicable subject to approval.
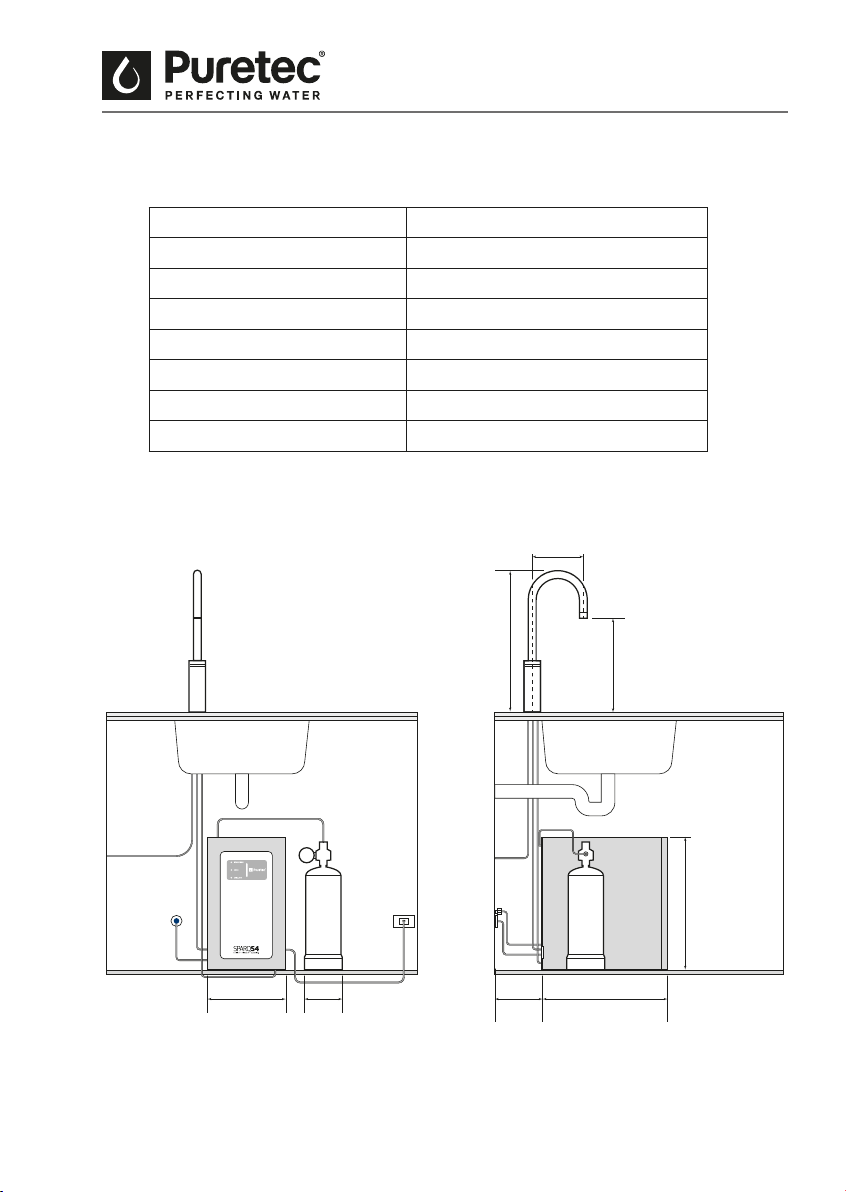
Dimensions
Model: SPARQ-S4
Throughput L/hour: 20
Chilled Temperature: 4°C to 10°C
Power Requirements: 50Hz / 220~240 V
Max Power Consumption: 100 W
Tap Dimensions: 423 (H) x 205 mm (W)
Appliance Dimensions: 390 (H) x 81 (W) x 105 (D) mm
Warranty: 1 year^
205mm
Minimum
150mm
Air Gap
370mm230mm
390mm
260mm
402 mm
115mm
Fig.1
6 Installation & Operation Manual Copyright © Puretec Pty Ltd 2019
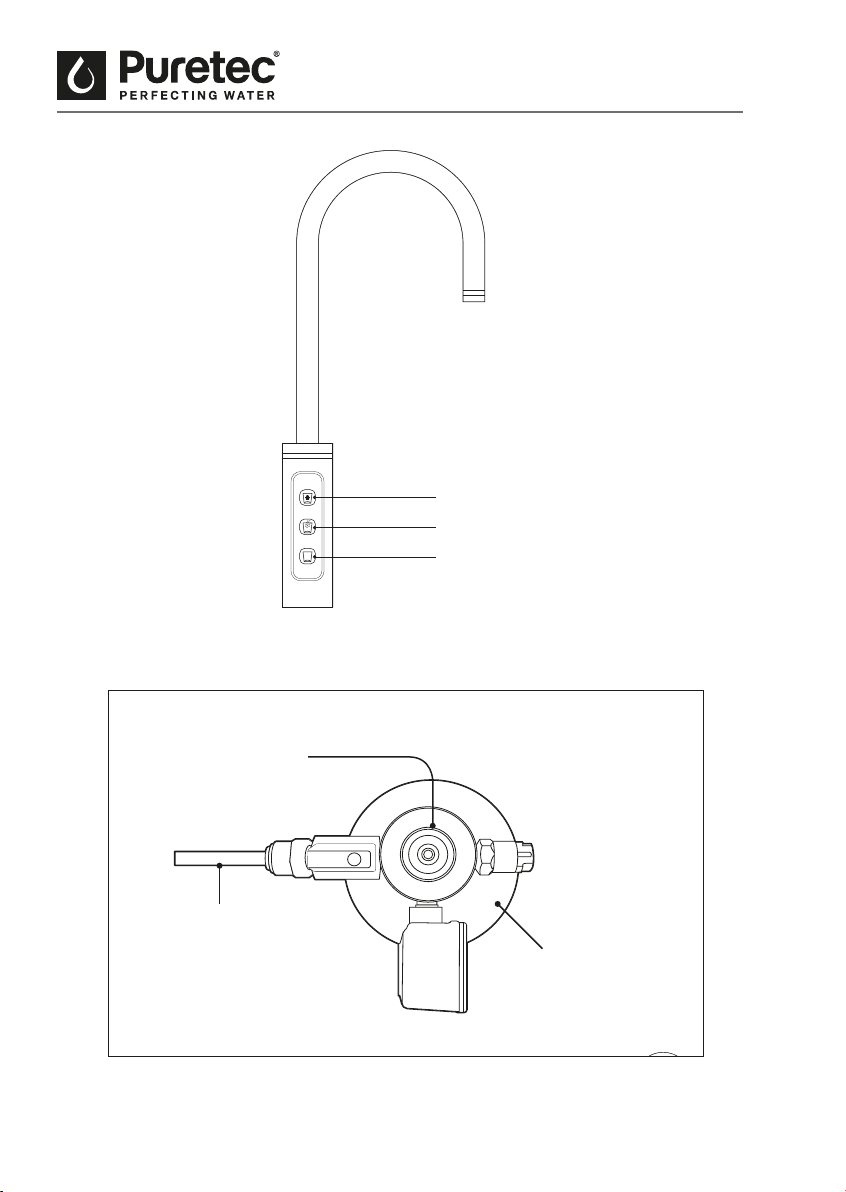
System Identication
Tap Button Identication
Cold
Sparkling
Ambient
Fig.2
Pressure Regulator
CO
2
Bottle
CO
2
Tube (Black)
7 Copyright © Puretec Pty Ltd 2019 Puretec Sparq S4 User Guide
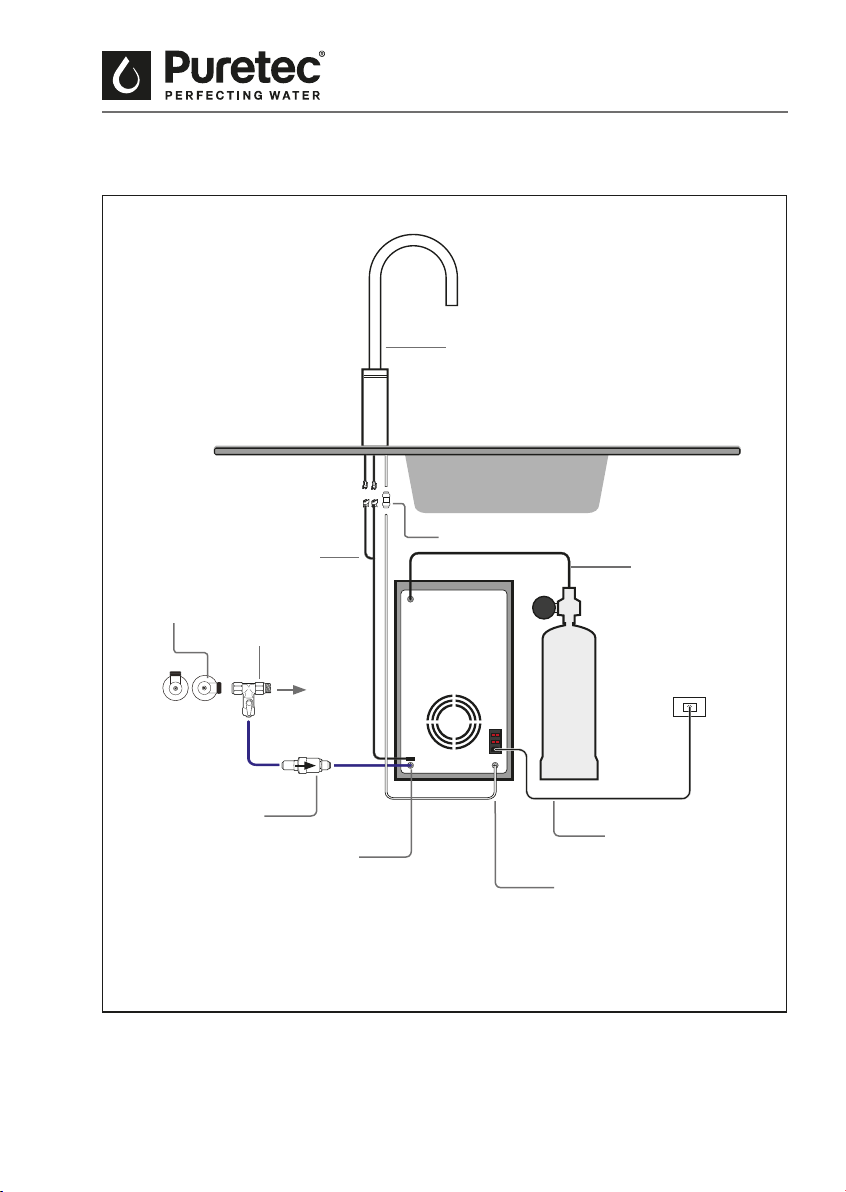
System Identication
Fig.3
Note: All lines are 1/4" tube.
Water Inlet Connection
(Blue)
Multivalve
Water Outlet
(White)
CO
2
Connector
(Black)
Straight Connector
Unit Power Supply
Wiring Loom
Smart Tee
Tap
Water Inlet
Sparq Faucet

8 Installation & Operation Manual Copyright © Puretec Pty Ltd 2019
Installation
Installation Procedure
VERY IMPORTANT! These installation steps are VERY important and must be
followed in the correct sequence. Remove all packaging before installation including
tubes on the back of the unit (see Fig.4 for how to remove tubes).
1. Select a suitable position for the tap so that it dispenses into the sink bowl with ample
clearance below the outlet and drill a 26 mm hole (max 30 mm).
2. Isolate water supply. Uninstall the connections on the cold water line and connect the
Smart Tee™. Reinstall the previous connection to the tee valve.
3. Connect the Multivalve to the Smart Tee™ with a length of BLUE tubing. Please see
Fig.3 for water ow direction.
4. Connect the Straight Connector to the White Tube connected to the tap (see Fig.3).
5. Remove the black plastic nut from the tap thread and connect the Wiring Loom to the
tap (see Fig.3).
6. Feed the Straight Adaptor and Wiring Loom through the tap hole and place tap into
position.
7. Screw the tap nut and tighten making sure the tap is correctly positioned on top.
Fixing the tap to a sink may require more care to align all parts.
Note: For thin bench tops or a sink mount, use the supplied spacer, slipping it up the
thread, followed by the black nut to tighten.
8. Choose the best position for the unit with required 150 mm clearance for ventilation
to the rear and top of the unit. Remember to allow access room for changing lters
and a suitable place where water spillage will not cause damage.
9. With a length of BLUE tubing (enough length to pull out of the cupboard to change
lters if not enough height), connect the Multivalve to the inlet at the back of the unit
(see Fig.3). Note: If cupboard space does not permit enough space for lter changes,
leave enough tube length to allow the lter system to come out of the cupboard to
change the lters.
10. With a length of WHITE tubing, connect the straight adaptor to the water outlet.

9 Copyright © Puretec Pty Ltd 2019 Puretec Sparq S4 User Guide
Installation
11. Attach the Wiring Loom from the tap to the unit (see Fig.3).
12. Connect the power cord (DO NOT TURN POWER ON).
DO NOT turn on the water/and or power supply, this will be done in Step 22-26 of
Cold/Ambient Water Startup on Page 10.
13. Position the CO
2
bottle as close to the unit as possible, ensuring the bottle is upright.
NOTE: Bottles should always be upright during storage and transit. If the bottle
has been le horizontal, place upright and let stand for 60 minutes for contents
to settle before initialising.
The SPARQ-CO
2
is NOT rellable.
14. Ensure regulator is o by turning the shut-o valve into the closed position.
15. Connect the CO
2
bottle to the regulator. Screw the regulator on rmly (warning: some
CO
2
will escape as the valve in the bottle is depressed).
16. Attach the BLACK tube to the CO
2
connection at the back of the unit and CO
2
bottle
(See Fig.2).
DO NOT open the regulator, this will be done in Step 27 of Soda/Sparkling Water
Startup on page 11.
17. Double check all tubes have been connected properly.
18. Check all plumbing ttings have been tightened and all tubing is connected rmly.
19. Ensure there is adequate ventilation around the unit (150 mm).
20. Check all tubes from the undersink unit to the tap, ensure there are no sags or kinks in
the hoses, and any tube sag is minimised as it can cause ow to be reduced.
10 Installation & Operation Manual Copyright © Puretec Pty Ltd 2019
Installation
21. Check all electrical connections are correct and there are no loose wires.
COLD/AMBIENT WATER
22. Turn on the water and check for leaks.
23. Allow tank to ll for 5 minutes.
24. Turn on the power supply at the power point - tap should light up and aer a minute
all lights on the tap will be blue.
25. Flush the lters by pressing on the cold button on the tap rst for 1 minute and
followed by the ambient button for another minute (it is normal for black nes,
cloudiness or micro-bubbles to come through). To activate water ow, press the button
once and the ring light on the top goes green, then press the button again for water
ow.
26. Turn on the COLD power switch on the back of the chiller. The chilling indicator on
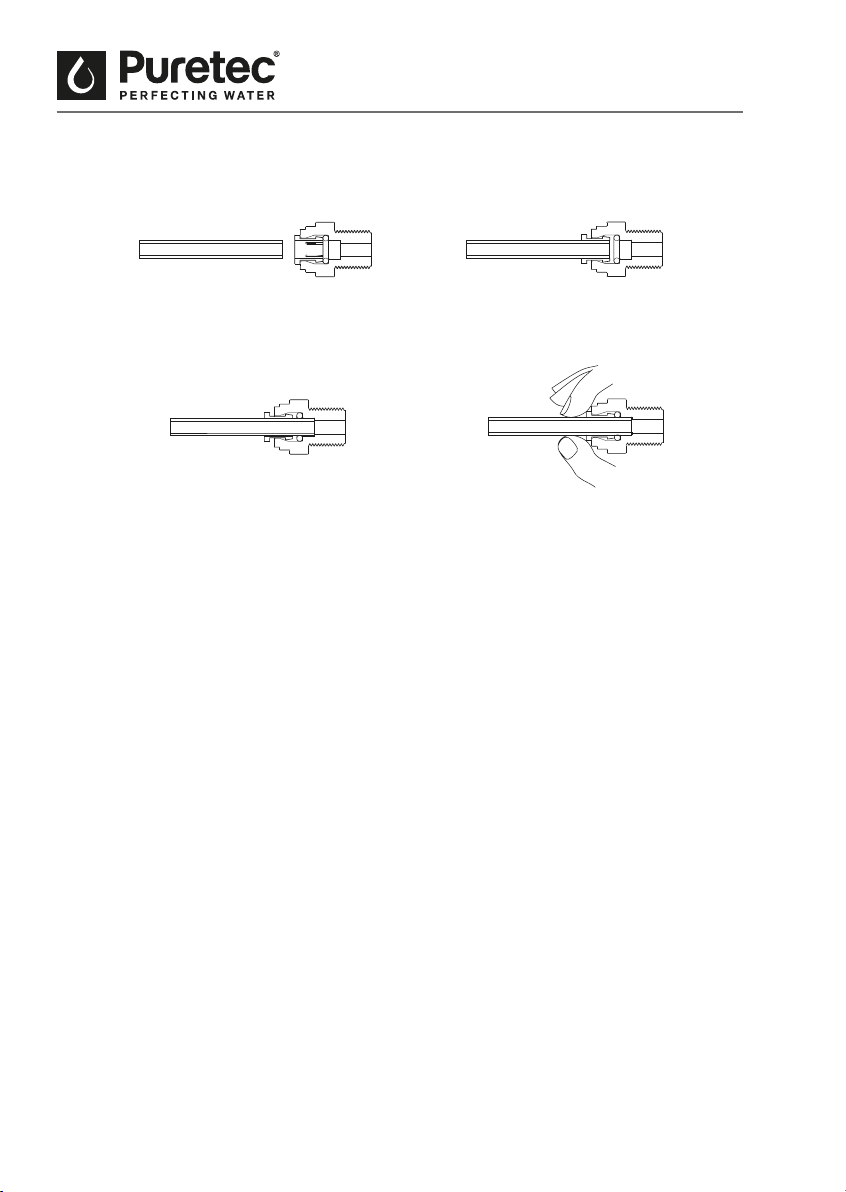
1. Cut the tube square and
push in to the tube stop. For
metal tube remove burrs and
chamfer tube end to prevent
O-Ring seal being damaged.
DISCONNECTION PROCEDURE
4. Push collet against body and
slide tube out of tting.
2. Fitting grips before it seals.
Ensure tube is pushed in to
tube stop.
How To Use Quick Connect Fittings
3. Tube is secured in
position.
Fig.4

11 Copyright © Puretec Pty Ltd 2019 Puretec Sparq S4 User Guide
Installation
the front panel of the unit will turn o once the correct temperature is reached. The
temperature is preset to 4-10 degrees. It takes up to 20 minutes.
SODA/SPARKING WATER
27. Ensure CO
2
bottle is connected rmly to the regulator and the gas tube is tted.
28. Turn on the SODA power switch on the back of the chiller.
29. Open the regulator valve.
30. Turn o the water supply at the inlet (Smart Tee™ valve).
31. Purge the Soda line for 1-2 minutes by pressing on the Sparkling Button on the tap
until the water ow stops and only CO
2
comes out.
32. Restore the water supply and allow 1-2 minutes for the lines to rell.
33. Operate the Sparkling Button on the tap (approx. 15 sec.) until excess CO
2
excess has
been dispensed.
34. Your Puretec system is now ready for use. It may require an hour or two for the
sparkling water to reach full "zz".
NOTE: A small amount of water will come out aer using the Sparkling feature for
1-2 seconds. This is normal as the CO
2
is purged from the line.

12 Installation & Operation Manual Copyright © Puretec Pty Ltd 2019
Filter Maintenance - Every 12 Months or When Taste Returns
1. Turn o ball valve and purge lines by pressing tap on until ow stops.
2. Remove lter cover by pushing the clip in.
3. Remove lter manifold pushing in the button to unclip.
4. Unscrew old lters from the manifold.
5. Clean inside manifold (wipe down) so there is no excess water.
6. Screw in new lters.
7. Reinsert manifold ensuring it is clipped in properly.
8. Restore water supply checking that there is no water leaks.
9. Reinstall the lter cover.
10. Flush the lters for 10 minutes by operating the ambient water button rstly for 3
minutes and then the chilled water button for 3 minutes or until black carbon nes have
cleared. It is usual for there to be black carbon nes and/or white cloudiness initially,
however these will clear up.
How To Operate The Tap
When the BLUE light is on, the tap is in 'Sleep Mode'. Press the desired button once and the
LED light will change from Blue to Green to indicate that the tap is ready. Press the button
again to start dispensing water.
1. Push the button (top) for cold water.
2. Push the button (middle) for sparkling water.
3. Push the button (bottom) for ambient water.
Operation & Maintenance

13 Copyright © Puretec Pty Ltd 2019 Puretec Sparq S4 User Guide
Gas Replacement
Gas Replacement - As Required
1. Close regulator, turn o soda button and water supply.
2. Purge sparking lines by pressing the sparkling button for 30 sec.
3. Disconnect regulator from BLACK tubing.
4. Unscrew the regulator from CO
2
bottle (turn the regulator anti-clockwise).
5. Connect regulator to new CO
2
bottle (turn the regulator clockwise).
6. Connect BLACK tubing to regulator.
7. Open the regulator and turn on the soda switch (at rear of the unit).
8. Purge the soda line for 1-2 minutes by operating the sparking/soda button on the tap
until the water ow stops and only CO
2
comes out.
9. Restore the water supply and allow 1-2 minutes for the lines to rell.
10. Operate the sparkling water button on the tap for 30 seconds or until excess CO
2
has
been dispensed.
11. Your Puretec system is now ready for use. It may require an hour or two for the
sparkling water to reach full "zz".
14 Installation & Operation Manual Copyright © Puretec Pty Ltd 2019
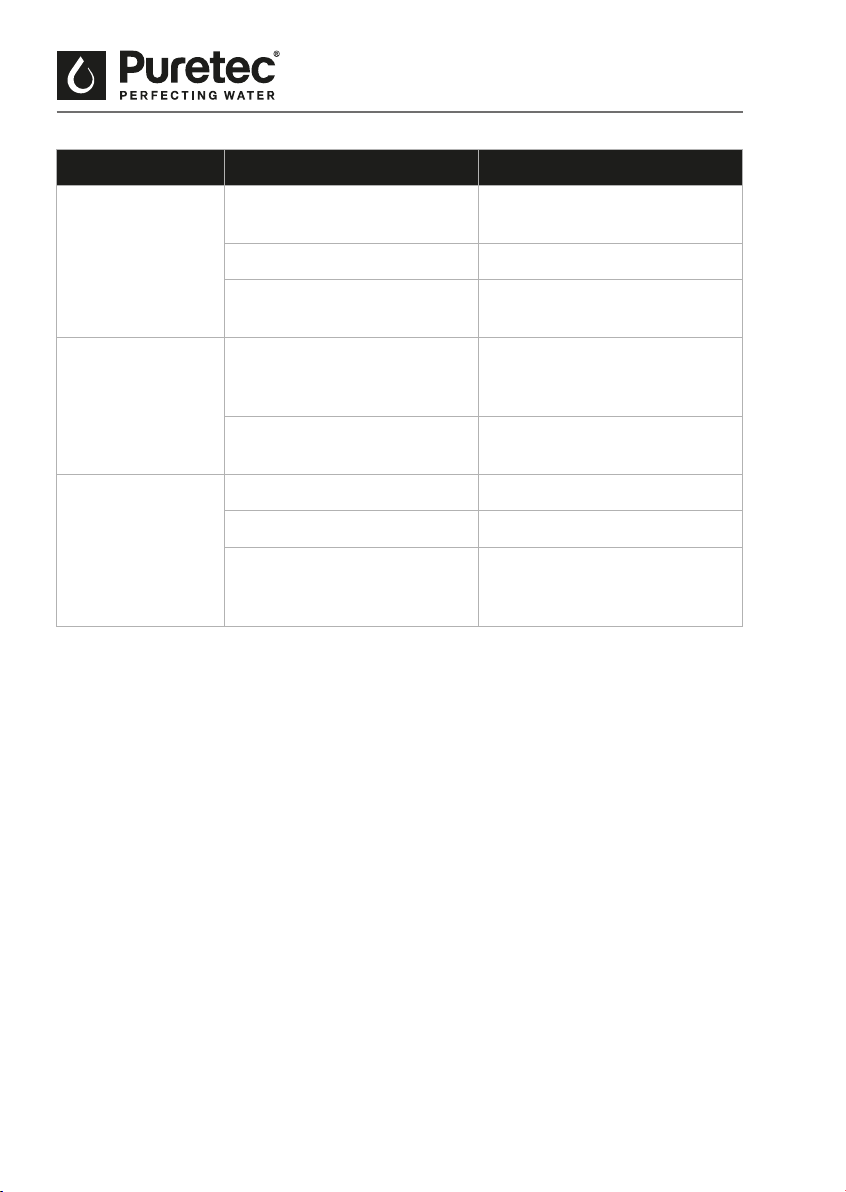
Troubleshooting
SYMPTOMS POSSIBLE CAUSE POSSIBLE SOLUTION
No cold water. Cold temperature switch is o. Please turn the cold
temperature switch on.
Refrigerant is low. Call your service provider.
Problem with compressor or
thermostat.
Call your service provider.
No cold water
from tap.
Ice blockage. Please turn o the power
supply and allow 24 hrs for the
blockage to melt.
No water inside the cold water
tank.
Please check mains water
supply.
Soda not working
or at.
CO
2
bottle is empty. Replace CO
2
bottle.
Soda power is o. Turn on the soda power switch.
CO
2
line needs purging. Follow the instructions in
changing the CO
2
bottle to
purge the line.

15 Copyright © Puretec Pty Ltd 2019 Puretec Sparq S4 User Guide
Warranty
WARRANTY
Any claim under this warranty must be made within 1 year of the date of purchase of the
product. This product is warranted to be free of defect of material and workmanship for
1 year from date of purchase. To make a claim under the warranty, take the product and
proof of purchase to place where you purchased the product, and they will lodge a Warranty
Request with Puretec. 1 year warranty is parts and labour. Excludes cartridges and canisters.
Puretec will pay your reasonable, direct expenses of claiming under this warranty. You may
submit details and proof of your expense claim to place of purchase for consideration.
The warranty only applies if the product was used and/or installed in accordance with the
user guide and/or installation instructions. This warranty is given in lieu of all other express
or implied warranties and manufacturer shall in no circumstance be held liable for damages
consequential or otherwise or delays caused or faulty manufacturing except as excluded by
law.
Applicable to all above, is that the warranties need to be approved by Puretec to ensure
product was not incorrectly used, installed or claimed. False and incorrect claims will be
pursued at Puretec’s discretion, including chargeable inspection and labour costs incurred.
WARRANTY / AUSTRALIA
This warranty is given by Puretec Pty Ltd, ABN 44 164 806 688, 37-43 Brodie Road Lonsdale
SA 5160, telephone no. 1300 140 140 and email at [email protected].
This warranty is provided in addition to other rights and remedies you have under law: Our
goods come with guarantees which cannot be excluded under the Australian Consumer Law.
You are entitled to replacement or refund for a major failure and to compensation for other
reasonably foreseeable loss or damage. You are also entitled to have the goods repaired or
replaced if the goods fail to be of acceptable quality and the failure does not amount to a
major failure.
WARRANTY / NEW ZEALAND
This warranty is given by Puretec Ltd, Reg. No 4464398, PO Box 875, Cambridge 3450, NZ,
telephone no. 0800 130 140 and email at [email protected].
This warranty is provided in addition to other rights and remedies you have under law: Our
goods come with guarantees which cannot be excluded under the Consumer Guarantees Act.
You are entitled to replacement or refund for a major failure and to compensation for other
reasonably foreseeable loss or damage. You are also entitled to have the goods repaired or
replaced if the goods fail to be of acceptable quality and the failure does not amount to a
major failure.

Puretec water care products are designed, manufactured and supported by Puretec Ltd the name you can trust for viable and proven water
solutions. The complete range of Puretec products are developed, rened, made to meet and exceed stringent specications for the worldwide
market. All pictures and information are supplied as a guide only. Fittings not Included. ^1 Year Platinum Protection applies to Puretec Systems
when used in conjunction with a Puretec lter cartridge. Warranty excludes cartridges.
Important Note: Sales of products are subject to our Terms and Conditions which are available upon request. All specications, information and
photos are a guide only and are subject to change without notice. Please ring to conrm details. Warning: For correct operation of this appliance it
is essential to observe manufacturer’s instructions. Caution: Do not use with microbiologically unsafe water or water of unknown quality without
adequate disinfection before or aer the system. Under normal circumstances a pressure limiting valve is not required. However, if incoming
water pressure exceeds 500 kPa, a pressure limiting valve must be tted prior to inlet. Copyright © Puretec Ltd 2018