Built‐inModels
ForOutdoor UseOnly
IMPORTANT:ReadthelightinginstructiononPage20beforefirsttimeuse!
Toinstallerorpersonassemblinggrill:Leavethismanualwithgrillforfuturereference.
Toconsumer:Keepthismanualforfuturereference.
COYOTEOUTDOORLIVI NG,INC.
www.coyoteoutdoor.com
CoyoteStainlessSteelGasGrill
Use&CareManual
ForLiquidPropaneandNaturalGasModels
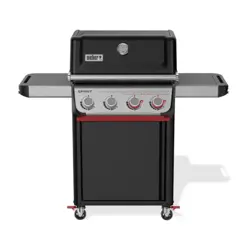
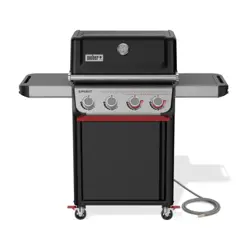
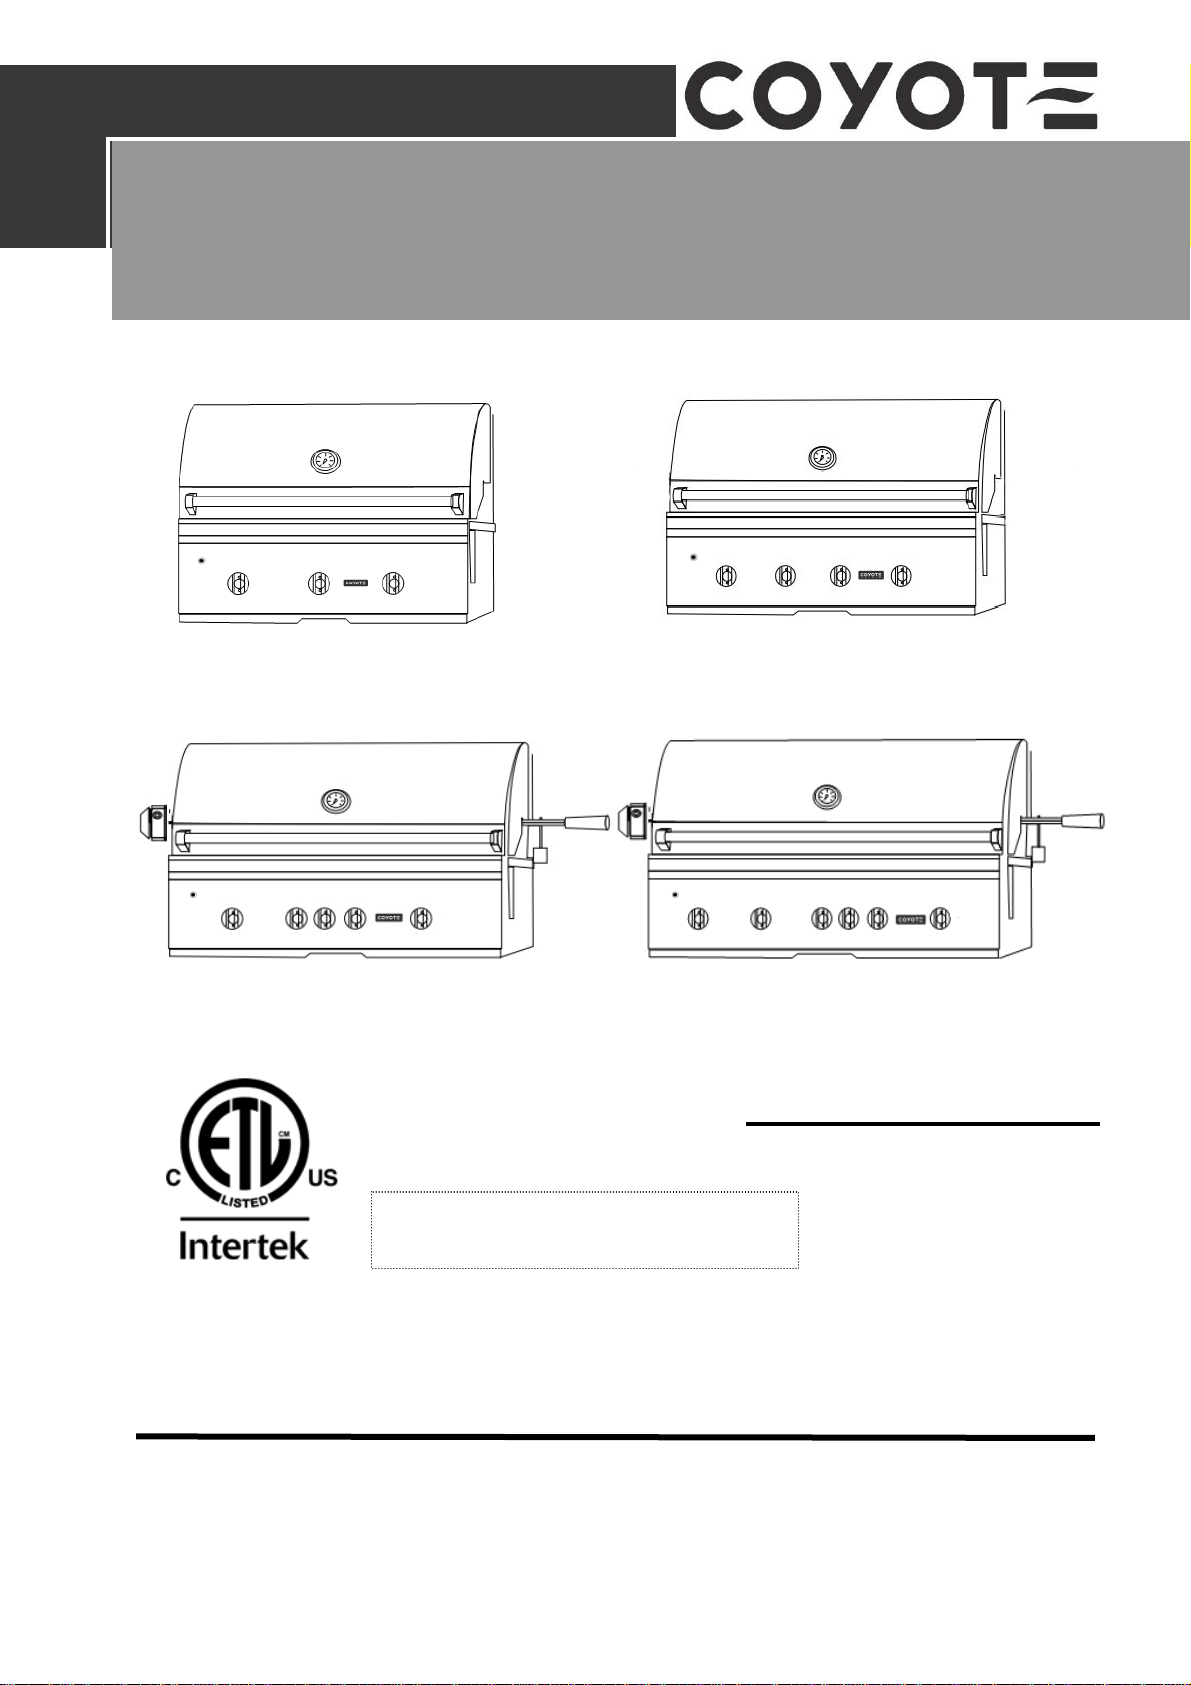
Coyote 34" C1C34 Coyote 36" C1C36
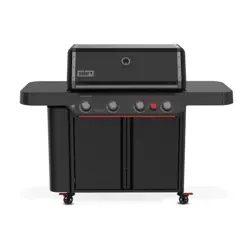
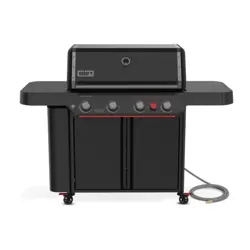
Coyote 36" C1S36/C1SL36 Coyote 42" C1SL42
Conforms to ANSI STD Z21.58-2015
Certified to CSA STD 1.6-2015
Outdoor Cooking Gas Appliance
4004477
PUT SERIES NO. LABEL HERE

Welcome&Congratulations
Congratulations on your purchase of a new grill! We are very proud of our product and we are
completely committedtoproviding you withthebest servicepossible. Yoursatisfactionisour #1
priority.
Please read this manual carefullyto understand all the instructionsabouthow to install,operate
andmaintainforoptimumperformanceandlongevity.
Weknowyou’llenjoyyournewgrillandthankyouforchoosingourproduct.Wehopeyouconsider
usforfuturepurchases.
Pleaseread andsavetheinstructions
This Manual provides specific operating instructions for your model. Use your grill only as
instructedinthismanual.Theseinstructionsarenotmeanttocovereverypossibleconditionand
situation that may occur. Common sense and caution must be practiced when installing,
operatingandmaintaininganyappliance.
1
TableofContents
SafetyInstructions…............................2
GrillModels.......................................4
LocatingtheGrill...............................5
GasRequirements............................8
UsingYourBurn ers &Grilling............14
LightingYourGrill............................…19
OperationandFeatures.................….21
Care&Maintenance...........................22
TroubleshootingYourGrill..........……26
LimitedWarranty..........................…...28
PartsListings................................…..30
SafetySymbols
• WARNING
IFYOUSMELLGAS:
1. Shutoffgastotheappliance.
2. Extinguishanyopenflame.
3. OpenLid.
4. Ifodorcontinues,keepawayfromthe
applianceandimmediatelycallyourgassupplier
oryourfiredepartment.
• WARNING
WARNING:
1. DO NOT store or use gasoline or other
flammable liquids or vapors in the vicinity of
thisoranyotherappliance.
2.AnLPcylindernotconnectedforuseshallnot
be stored in the vicinity of this or any other
appliance.
• WARNING
DANGER indicates an imminently
hazardoussituationwhich,ifnotavoided,
willresultindeathorseriousinjury.
• CAUTION
CAUTION indicates a potentially
hazardoussituationwhich,ifnotavoided,
mayresultinminorormoderatepersonal
injury,orpropertydamage.
• WARNING
FOROUTDOORUSEONLY:
NEVER operate grill in enclosed areas, as this
could lead to gas accumulating from a leak,
causing an explosion or a carbon monoxide
buildup which could result in injury or death.
DO NOT use your grill in garages, breezeways,
sheds or any enclosed area. NOT FOR USE BY
CHILDREN. If these instructions are ignored, a
hazardous fire or explosion could result in
physicalinjury,deathorpropertydamage!
• WARNING
WARNING indicates a potentially
hazardoussituationwhich,ifnotavoided,
couldresultindeathorseriousinjury.

2
WARNING: Improper installation, adjustment, alteration, service or maintenance can cause injury or
property damage. Read the installation, operating and maintenance instructions thoroughly before
installingorservicingthisequipment.
GeneralSafetyInstructions
1. ForHouseholdOutdoorUseOnly–DONOTuseindoorsorinanytypeofenclosedareasuchasagarage,
shed or breezeway. Keep clear of trees and shrubs. The grills are not intended for installation in or on
recreationalvehicles,portabletrailers,boatsoranyothermovinginstallation.Notforcommercialuse.
2. The area surrounding your new grill should be kept clean and free from flammable liquids and other
combustiblematerialssuchasmops,ragsorbrooms,aswellassolvents,cleaningfluids,andgasoline.
3. To reduce the risk of serious or fatal injury from breathing toxic fumes and from explosion and fire as a
resultofleakinggas,useonlyoutdoorsinanopenareawithgoodventilation.Donotobstructtheflowof
combustionandventilationair.
4. Never usethegrillin windyconditions. Iflocated ina consistentlywindyarea(oceanfront,mountaintop,
etc.)awindbreakwillberequired.Alwaysadheretothespecifiedclearanceslisted.
5. Donotleavethegrillunattendedwhilecooking.
6. Donotusenaturalgasinaunitdesignedforliquidpropanegasorviceversa.
7. Donotusefuelsuchascharcoalbriquettesinagasgrill.
8. Keepchildrenandpetsawayfromhotgrill.DONOTallowchildrentouseorplaynearthegrill.
9. Never attempt to repair or replace any part of the grill yourself unless specifically recommended in this
manual.Allotherservicesshouldbeperformedbyaqualifiedservicetechnician.
10. Never leanover an opengrill.Do notplaceclothing or otherflammablematerialonor nearthegrill. Do
notwearloose‐fittingclothesorlongsleeveswhileusingthegrillassomefabricscanbehighlyflammable.
11. Have an ABC fire extinguisher accessible. Never attempt to extinguish a grease fire with water or other
liquids.
12. Never use aluminum foil to line the grill racks or the drip trays, this can alter airflow for proper
combustionandalsobuildupheatinthecontrolareacausingtheknobsandignitertomelt.
13. Whenusingthegrill,donottouchthegrillrack, burnergrate,orimmediatesurroundings astheseareas
becomeextremelyhotandcancauseburns.Alwaysuseacoveredhandwhenopeningthegrillhoodand
onlydososlowlytoallowheatandsteamtoescape.
14. DO NOTallow greaseorother hotmaterialdrippingfromthe grillontovalve,hoseor regulator,turnoff
gassupply immediately.Afterthe grillhascooled, determinethecauseand correctit.After cleaningthe
valve,hoseandregulator,performaleaktestbeforecontinuinguse.
15. Donotheatanyunopenedglassormetalcontaineroffoodonthegrill.Pressuremaybuildupandcause
thecontainertoburst,possiblyresultinginseriouspersonalinjuryordamagetothegrill.
16. Keep any electrical supply cords away from water or heated surfaces. Electrical cords should be placed
awayfromwalkwaystoavoidtrippinghazard.
17. Keepgassupplylinesasshortaspossible.
18. Nevermovethegrillwhenhot.
19. DONOTusewhileundertheinfluenceofdrugsoralcohol.
20. DONOTstoreasparegascylinderunderornearyourgrill.
21. DO NOT grill without the drip tray in place, hot grease could leak downward and produce a fire or an
Safety Instructions

3
explosion.Driptrayshouldbepushedallthewaytotheracklocatedjustunderthegrill.
22. Grease is extremely flammable. Let hot grease cool down before attempting to handle or dispose of it.
Thedriptrayshouldbecleanedandfreeofgreaseonaregularbasis.
23. In the event that a burnergoesout, turnburnerknobs to thefullOFFposition, fully open the grill hood
andletitairout.Donotattempttousethegrilluntilthegashashadtimetodissipate.
24. Donotusegrilluntilleakcheckhasbeenmade.
25. Turnoffthecylindervalvewhenyourgrillisnotinuse.
26. Ensurethecontrolknobsareinthe“OFF”positionwhennotinuse.
27. Useonlya GroundFaultInterrupter(GFI)protectedcircuitwiththisoutdoorcookinggasappliance.
CALIFORNIAPROPOSITION65‐WARNING:Theburningofgascookingfuelsgeneratessomebyproductswhich
areonthelistofsubstanceswhichareknownbytheStateofCaliforniatocausecancerorreproductiveharm.
California law requires businesses to warn customers of potential exposure to such substances. To minimize
exposure to these substances, always operate this unit according to the Use and Care Manual, ensuring you
providegoodventilationwhencookingwithgas.
4
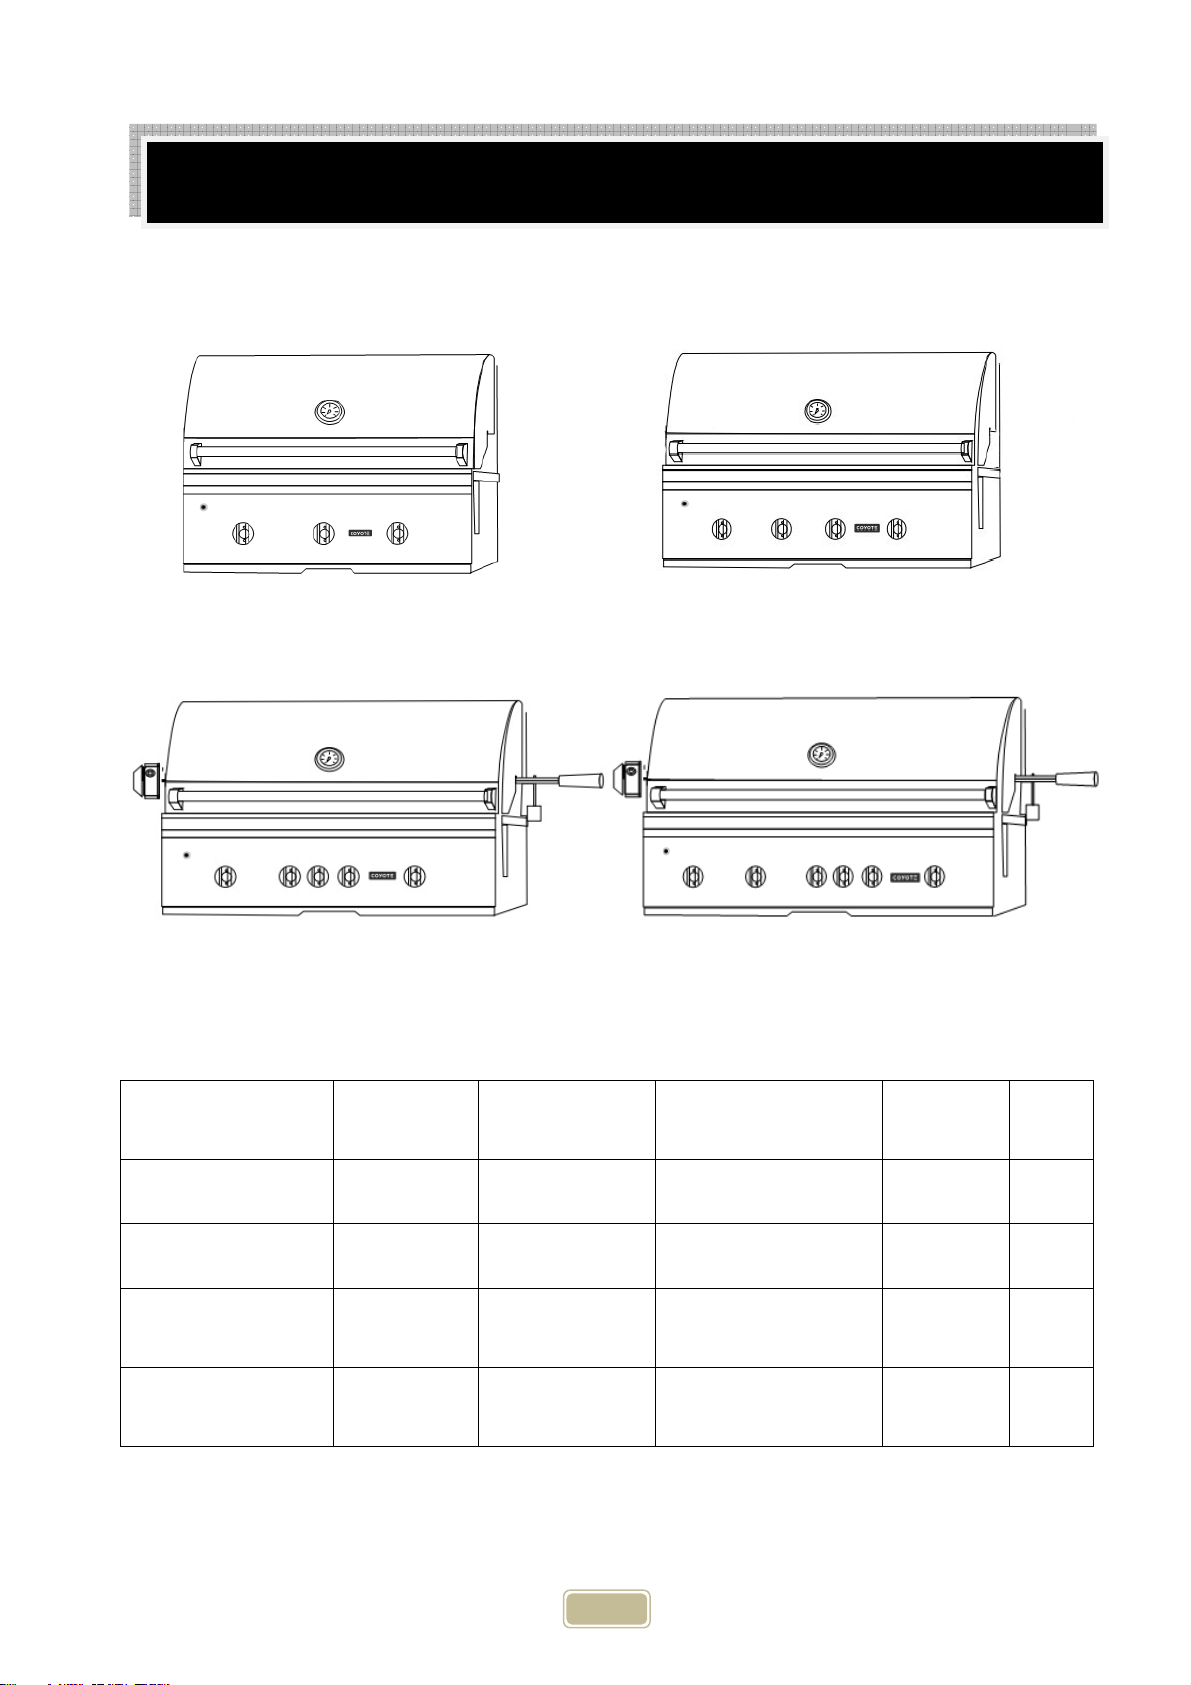
Whetheryouareinneedofaslimmer3Burnergrillforyourpatio,orareinneedofa larger42”grill,thatcan
entertainandbringstyletoanysizeparty,Coyotehasthegrillforyou!
ModelNo. ProductSi ze
(inch/mm)
BTU/HR
(Main/Back)
Burner(s) Rotisserie
Motor
Hood
Light
C1C34 34"(863)
60,000/None
3SUSburners No Yes
C1C36 36"(902)
80,000/None
4SUSburners No Yes
C1S36/C1SL36 36"(902)
75,000/15,000
3infinityburners, 1sear
and1backburner
Yes Yes
C1SL42 42"(1067)
95,000/15,000
4infinityburners, 1sear
and1backburner
Yes Yes
Grill Models
Coyote 34" C1C34 Coyote 36" C1C36
Coyote 36" C1S36/C1SL36 Coyote 42" C1SL42

5
Check your local building codes for theproper method of installation. In the absence of local codes, this unit
shouldbeinstalledinaccordancewiththeNationalFuelGasCodeNo.Z223.1‐1998USAorCAN/CGA‐B149.1/.2
Natural Gas/Propane Code (Canada) latest edition or the National Electrical Code ANSI/NFPA No. 70 or the
CanadianElectricalCodeCSAC22.1,1990orlatestversion.
- Before installi ng built‐in grills in enclosures, copy all product information such as model number, serial
numberandtypeofgrill(e.g.naturalgasorLP)andstoreinformationinasafeplace.
- Ifthegrill isinstalled bya
professionalinstaller ortechnician,besurethatheshows youwher e yourgas
supply shut‐off is located. All gas lines must have a shut‐off that is readily and easily accessible. If you
smellgas,checkforgasleaksimmediately.Checkonlywithasoapandwatersolution.Nevercheck
forgas
leakswithanopenflame.
Notice:Westronglyrecommend professionalinstallationandhookupoftheGasBBQgrill.Theseinstructio ns will
provideyouwiththemeasurementsnecessaryforyouoryourbuildertoconstructamasonrystructuretohouse
youroutdoorgasgrill.
IMPORTANT:Gasfittings,regulator,andinstallersuppliedshut‐offvalvesmustbeeasilyaccessible.
LOCATIONOFYOURGRILL:
Locate the grill only in a well ventilated area. Never locate the grill in a building, garage, breezeway, shed or
othersuchenclosedareaswithoutanapprovedventilationsystem.Duringheavyuse,thegrillwillproducea lot
ofsmoke.Ensurethereisadequateareaforittodissipate.
VentilationRequirementsforProperOperationofyourCoyoteGrill
• Ventilationforagasgrillisabsolutelymandatorytoensurethatyourgrillperformsasintendedandto
ensurethesafetyofyouandyourfamily.TheventsthatarerequiredtohonoraCoyotewarranty,not
only ensure that any heat that is trapped inside your grill from environmental factors (such as wind)
escape but they also allow any gas that has leaked from a tank or connection, to escape before a
buildupofsuchgascanoccurandpossiblyignite.
• Asimplewaytothinkofwhatisoccurringinsideyourgrillisthatwhenyourburnersareon,theyare
emitting a flame that creates the heat to cook your food. This heat must exhaust from the grill,
otherwise you would eventually have a unit that would not only build up immense heat but also
immensepressure.Thiscouldcauseseveredamagetonotonlythegrillbutanyoperatorsorproperty
near by. With that said, if you have wind coming intothe back of your unit, the problem will not be
with the wind hitting your flames and causing them to push the flame downward. The problem
actuallylieswiththewindactingasablockfortheexhaust,whichismainlyoutthebackofthehood
(above the rear panel but below the top of the hood). This blockage of exhaust is what starts the
problems.
• Iftheislandisventilatedproperly(withaminimumof2ventsforcrossventilationandatleast20sqin
oneachvent)thenanyheatthatistrappedinsideduetowindshould beabletodissipateout ofthe
island vents. However, if the island is not ventilated properly and the wind is coming from the back,
thentheheatwilltrytoescapethroughtheeasiestexit,whichwillmostlikelybethroughthebottom
ofthegrillandfrontcontrolpanel.Thiscancausethecontrolpanelandknobstogethottothetouch
andpossiblyeven burnyour fingers, not tomentionthat it can melt allrubber gaskets on thevalves
Locating the Grill

6
anddamagetheignitionsystemtowhereitwillneedfullreplacement.
• Ventilation and the variable of your most common wind direction must always be considered when
planningyouroutdoorcookingisland. Just the same as you would plan the layout and measureyour
indoor kitchen, you must also do the same for the outdoors but you can not forget about Mother
Natureandtheeffectsshecanhaveonyouroutdoorcookingequipment.
o CoyoteWindGuards:Ifyoudorunintoasituationwhereyouwillhavewindcomingintothe
back of the unit, Coyotedoessell"Wind Guards" that help keep your grilll from overheating
due to no exhaust occuring out the back of the grill. Our Wind Guards should never be
consideredasa guaranteedsolutiontothisproblem.Theyareonlyintendedtohelpthewind
divertup andover thetopofthe grill.Ifthewindis strong,thenyou canstill haveproblems
withtheheatbeingtrappedinthehood.OurWind Guardscan bepurchasedthroughanyof
ourauthorizeddealers.
Clearance:
• TO NON‐COMBUSTIBLE CONSTRUCTION: For non‐combustible material, Coyote grills can be placed
directlyon,oradjacentto thenon‐combustiblematerial.The hoodonaCoyotegrillpivotsmainlyon
thebody.Ifyouhaveawallorpartitionbehindtheunitthatwouldblockventilation,thenaminimum
of7"clearancefromthebackofthegrilltothewallisneededforthepurposeofventilation.Ifyoudo
nothaveawallorpartitionblockingtheventilationoftheunit,thenyouonlyneedanextra2"behind
theunitforthehoodtoopenfully.Ifyouwishtousetherotisserieoption,youwillwanttomakesure
that you leave adequate space (at least 6") on each side of the grill so that the motor and rotisserie
spit handle will have room on the counter, as these extend past the overall dimensions of the grill
body.
• CLEARANCETOCOMBUSTIBLECONSTRUCTION:Forcombustibleconstruction,youmusthaveatleast
24"clearancetoanycombustiblematerial (in anydirection) for aCoyoteWarrantytobeupheld and
forthesafetyofthehomeowner.YoucanNOTlocatethegrillunderanycombustiblematerialwithout
anapprovedventilationsystemdirectlylocatedabovetheunit.
• INSULATEDJACKETSANDCOMBUSTIBLECONSTRUCTION:Ifyoumustusecombustiblematerialtobuild
yourgrillislandANDyouaregoingtobewithin24"ofthegrillwiththiscombustiblematerial,thenyou
mustusetheappropriateCoyoteInsulatedJacket.Theinsulatedjacketwillactasabarriertoprotect
your grill island from the heat and fire of your Coyote grill. If an insulated jacket is not used in a
combustible material island, the warranty on the Coyote grill will be voided immediately and safety
cannotbeensured.
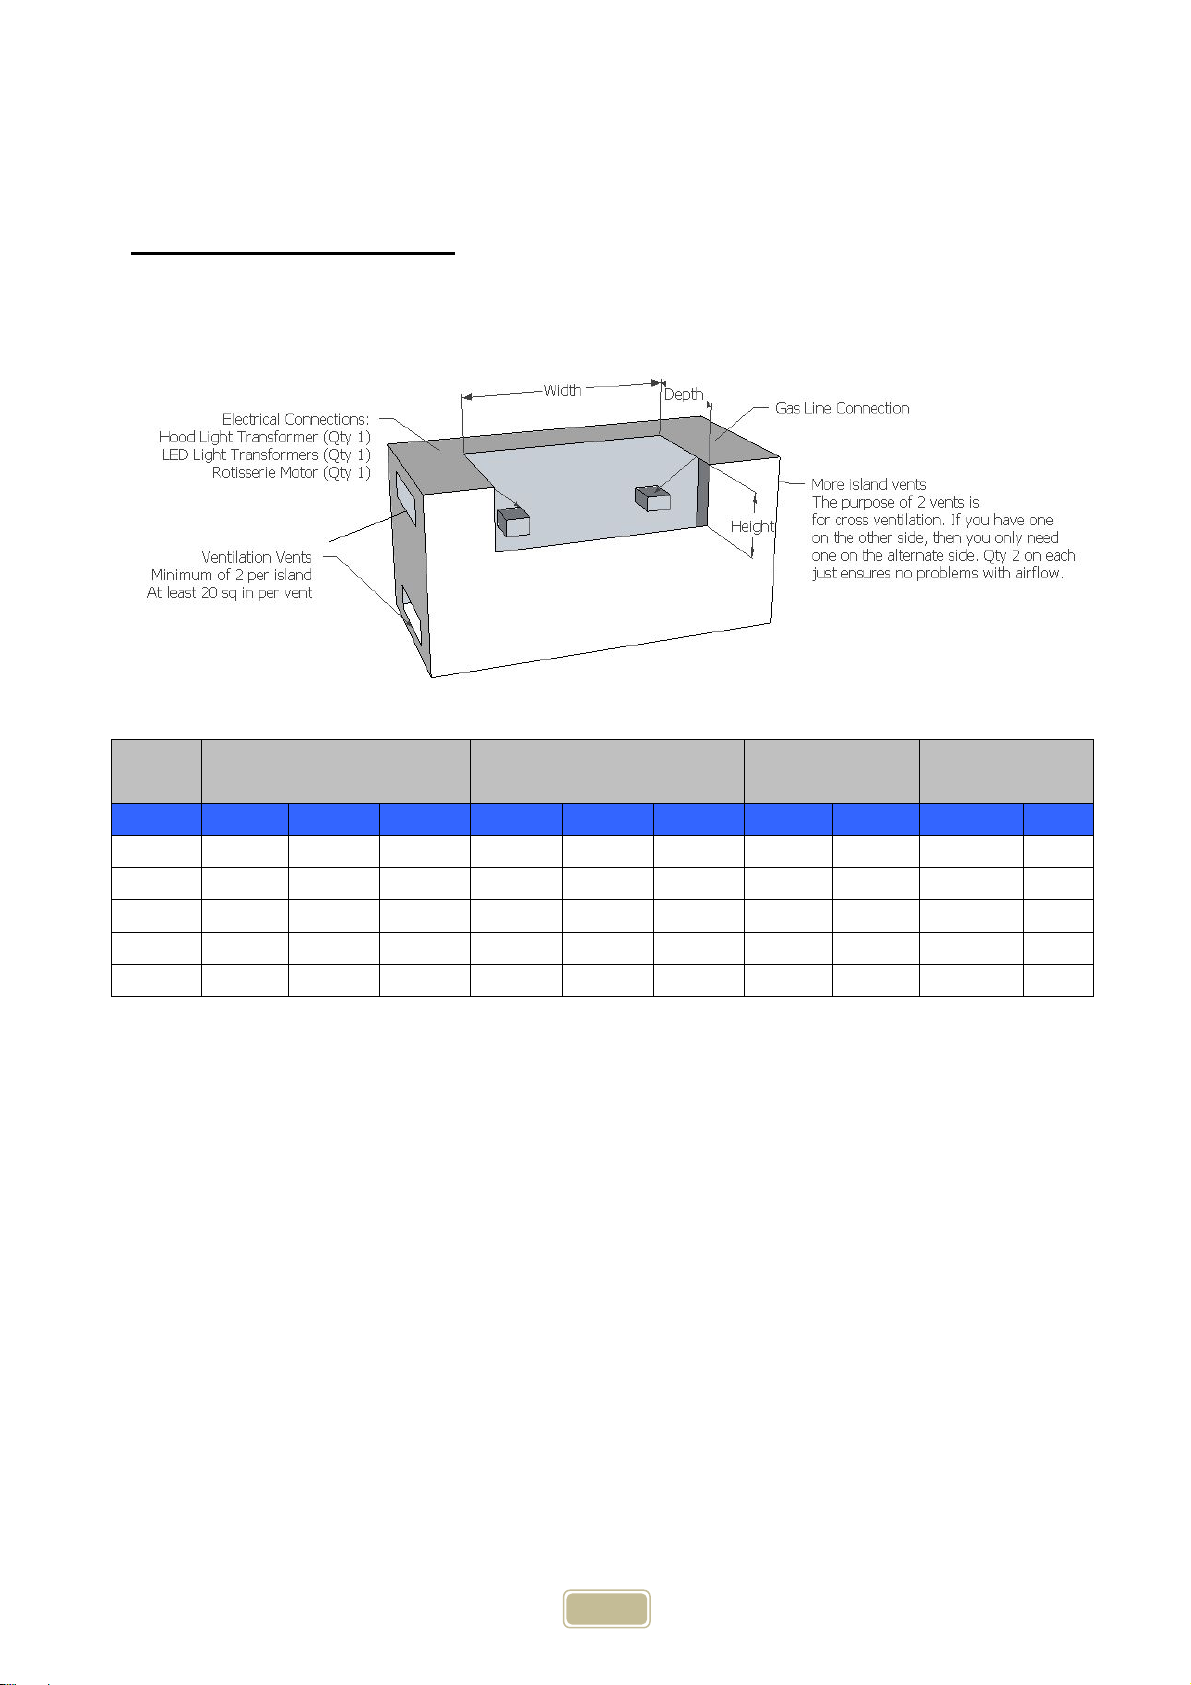
ForBuilt‐inInstallations
Abuilt‐in grillisdesignedfor easyinstallation intomasonry enclosures.Fornon‐combustible applications,the
grilldropsintotheopening(asshownincut‐outdetaildrawing‐Fig.A)andhangsfromthegrillbodyitself.A
bottomdeckisnotrequiredtosupportthegrillfromthebottom.Itisalsorequiredthat:
• Twoventilation holes,ofatleast20sqinchesinsize,mustbepresenttohelpreleaseanygasfroma
leak.
AsPropaneisheavierthanair,locateyourventsatthetankvalveheightorlower
• Thecountershouldbeflatandlevelinreferencetothefloor.
LPTANKSTORAGEMUSTBEISOLATEDINASEPARATECOMPAR TMENTFROMTHATOFTHEGRILLANDITMUST
BEVENTEDASWELL.(RECOMMENDBOTTOMVENTSFORLP)
7
CutoutDimensionsFigureA
Model CutoutDimensions OverallDimensions TotalBTURatings
ElectricalOutlets
Needed(110V)
Grills
Height Width Depth Height Width Depth LP NG Rotisserie Lights
C1C34 101/4" 31" 201/2" 23" 34" 251/2" 60,000 60,000 No Qty1
C1C36 101/4" 321/2" 201/2" 23" 351/2" 251/2" 80,000 80,000 No Qty1
C1S36 101/4" 321/2" 201/2" 23" 351/2" 251/2" 90,000 90,000 Qty1 Qty1
C1SL36 101/4" 321/2" 201/2" 23" 351/2" 251/2" 90,000 90,000 Qty1 Qty2
C1SL42 101/4" 391/2" 201/2" 23" 42" 251/2" 110,000 110,000 Qty1 Qty2
8
IMPORTANT: Before connecting grill to gas source, make sure BBQ Grill control knobs are in the “OFF”
position.
• Verify the type of gas supply to be used, either natural or LP, and make sure the marking on the
applianceratinglabelagreeswiththatofthesupply.
• All pipe sealants must be an approved type and resistant to the actions of LP gas. Never use pipe
sealantonflarefittings.
• Theinstallationofthisappliancemustconformwithlocalcodesor,inthe absenceoflocalcodes,with
eitherNationalFuelGasCode,ANSIZ223.1/NFPA54,NaturalGasandPropaneInstallationCode,CSA
B149.1,orPropaneStorageandHandlingCode,B149.2,ortheStandardforRecreationalVehicles,ANSI
A119.2/NFPA1192M,andCSAZ240RVSeries,RecreationalVehicleCode,asapplicable.
WARNING:GasvalvesarepresetatthefactorytooperateonLPornaturalgas.Ifyouwishtoconvert,besure
tocontactyourgrilldealerFIRST!
Thispropane gasgrillis designedtooperate onpropanegas ONLY,at apressureregulated at11”(279.4mm)
watercolumn(W.C.)when equippedwiththecorrectpropane orificesonthevalvesand apropaneregulator
onthesupplylineregulatedattheresidentialmeter.TheLPgasgrillisdesignedtobeusedwithastandard20
lbsgascylinderand mustbeconstructedandmarkedinaccordancewithspecificationsoftheUSDepartment
ofTransportationforpropanegascylinders.
Always keep cylinder securely fastened in an upright position. Never connect an unregulated propane gas
cylindertothegrill.
Donotsubjectpropanecylinderstoexcessiveheat.
CAUTION:NeverstoreaLPgascylinderinsideabuildingorinthevicinityofanygas‐burningappliance.
Cylinder Specifications
- AnyL.P. gassupplycylinderusedwiththisgrill must beapproximately12 inchesdiameter and18 inches
high.Themaximumfuelcapacityis80%andisapproximately20poundsofpropane.
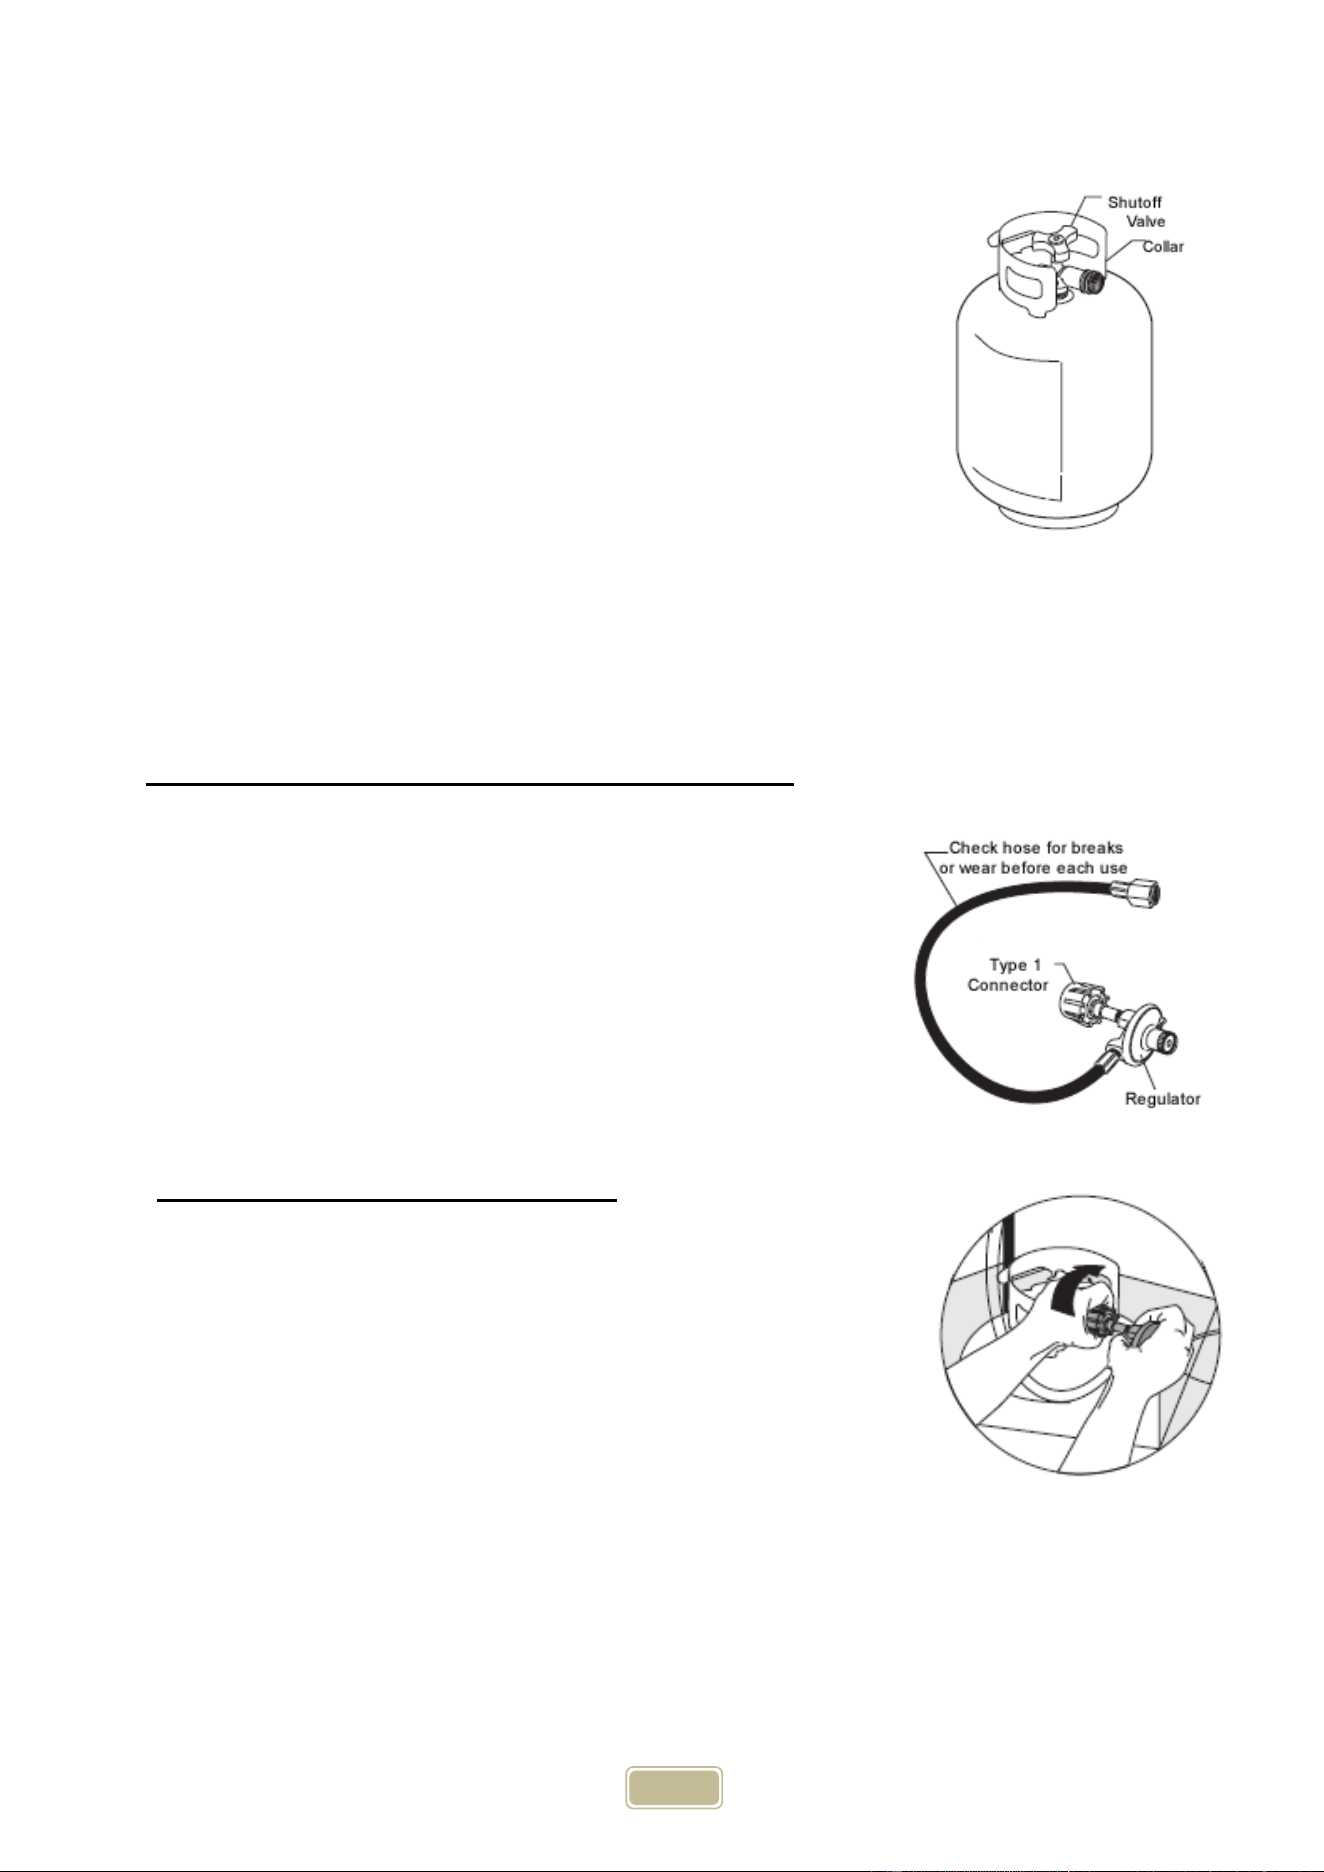
- TheL.P.cylindermusthaveashut‐offvalve(seepicture)terminatinginaType1L.P.
-
AType 1 compatible cylinder with aType 1cylindervalve hasaback‐checkvalve which doesnotpermit
WARNING: Never attach an unregulated gas line to the appliance. Connection to an
unregulated gas line can cause excessive heat or fire.
NOTE: Always have a qualified service technician perform difficult conversions
or modifications.
LP Gas Hook-up
Gas Requirements
9
gasflow,untilapositivesealhasbeenobtained.
- Thecylindermustbearrangedforvaporwithdrawal.Itmustalsoincludea
collar to protect the cylinder valve. A safety relief device having direct
communicationwiththevaporspaceofcylindermustbeprovided.Thiswill
expel high pressure gas
if the cylinder is overfilled or overheated which
couldresultinfireorexplosion.
- All L.P. gas cylinders used with this appliance shall be constructed and
markedinaccordancewiththespecificationsforL.P.gascylindersoftheU.
S.DepartmentofTransportation(DOT)ortheNationalStandardofCanada,
CAN/CSA‐B339, Cylinders, Spheres and Tubes for Transportation of
Dangerous Goods; and Commission, as applicable; and shall be provided
withalistedoverfillingpreventiondevice.
- ReadlabelsontheL.P.GasSupplyCylinder.
- Newcylindersarealwaysshippedemptyforsafety.
- AllowonlyqualifiedL.P.gasdealerstofill
orrepairyourL.P.gassupplycylinder.
- Informthegasdealerifitisaneworusedcylindertobefilled.
- Afterfilling,havethegasdealercheckforleaksandtoseethatthereliefvalveremainsfreetofunction.
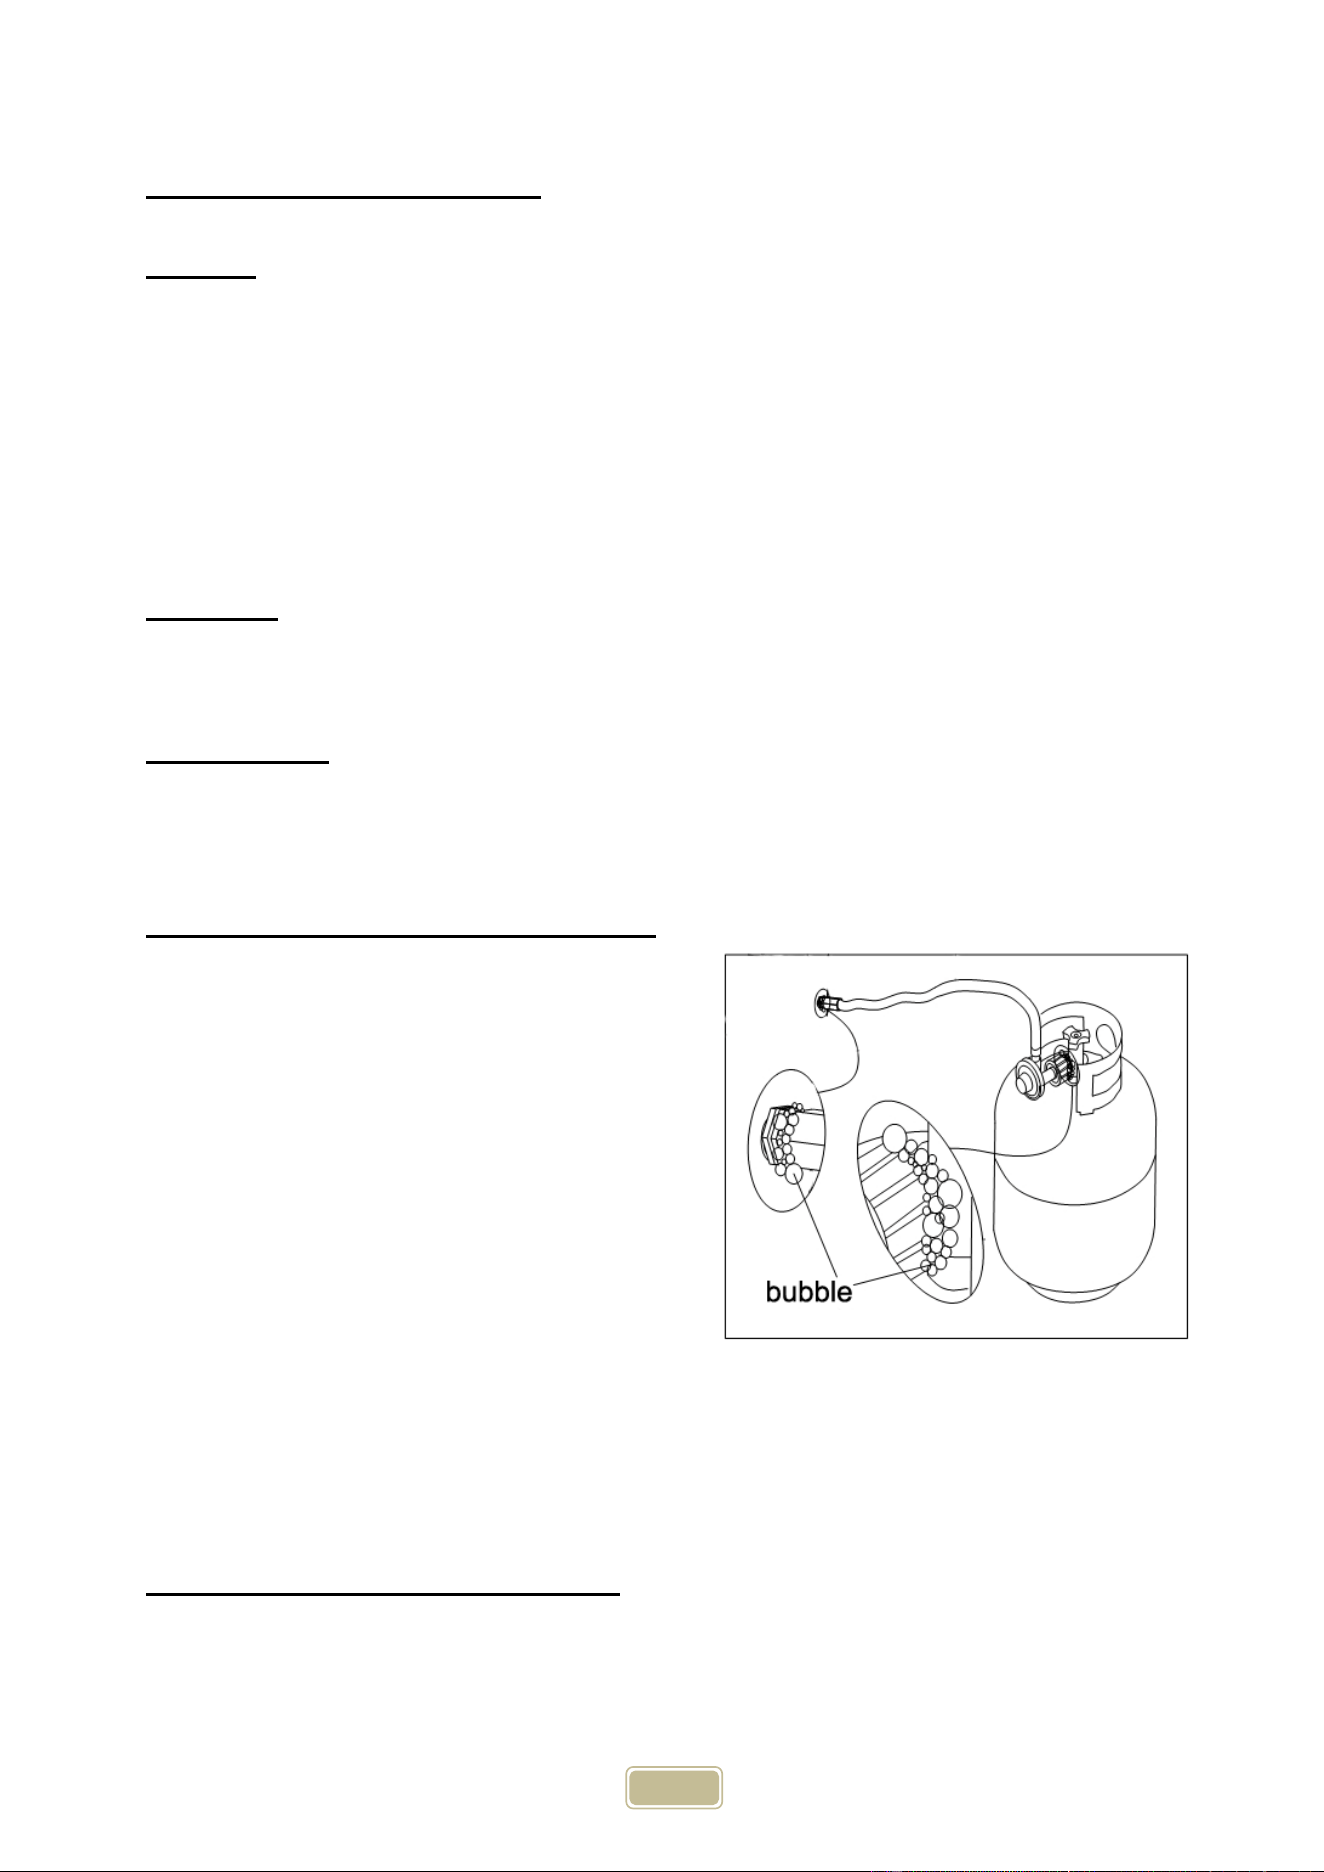
HoseandRegulator(Comesstandardwiththegrill)
TheType1connectionsystemhasthefollowingfeatures:
- The system will not allow gas to flow until a positive connection has
beenmade.
NOTE: The cylinder control valve must be turned off before any
connectionismadeorremoved.
- The system has a thermalelement that will shut off
the flow of gas in
theeventofafire.
- The system has a flow limiting device which, when activated,will limit
theflowofgasto10cubicfeetperhour.
- NEVERusegrillwithout leaktestingthisconnection.
LP(Propane)GasSupplyConnection
1. The tank valve should be in the “OFF” position. If not, turn the knob
clockwiseuntilitstops.
2. Makesureallburnervalvesareinthe“OFF”position.
3. Alwaysconnectthegassupplyregulatorasfollows:
Insert the regulator inlet into the tank valve and turn the coupling nut
clockwiseuntilthecouplertightensup(seepicture).Donotovertightenthe
coupler.Turnthemaintankvalveonandturn theburnercontrolvalveson
theunittothe“HIGH”position forabout20secondstoallowtheairinthe
systemtopurgebeforeattemptingtolighttheburners.
10
Pre‐OperationLeakTesting
DANGER
1. Donotinsertanytoolintothevalveoutletorsafetyreliefvalve.Youmaydamagethevalveandcausea
leak.Leakingpropanemayresultinexplosion,fire,severepersonalinjury,ordeath.
2. Ifaleakisdetectedatanytimeoryoucannotstopagasleak,
immediatelyclosepipelinevalveandcallLP
gassupplieroryoufiredepartment!
3. Checkallgassupplyfittingsbeforeeachuseandeachtimethegassupplycylinderisconnectedtothe
regulator.Haveaqualifiedservicetechnicianleaktestthegrillanytimeapartofthegas
systemis
replaced.
WARNING
Neverattempttoattachthisgrilltotheself‐containedLPgassystem.Donotusegrilluntilleak testing.
BeforeTesting
DO NOT smoke while leak testing. Extinguish all open flames. Never leak test with an open flame. Mix a
solutionofequalpartsmilddetergentorliquidsoapandwater.
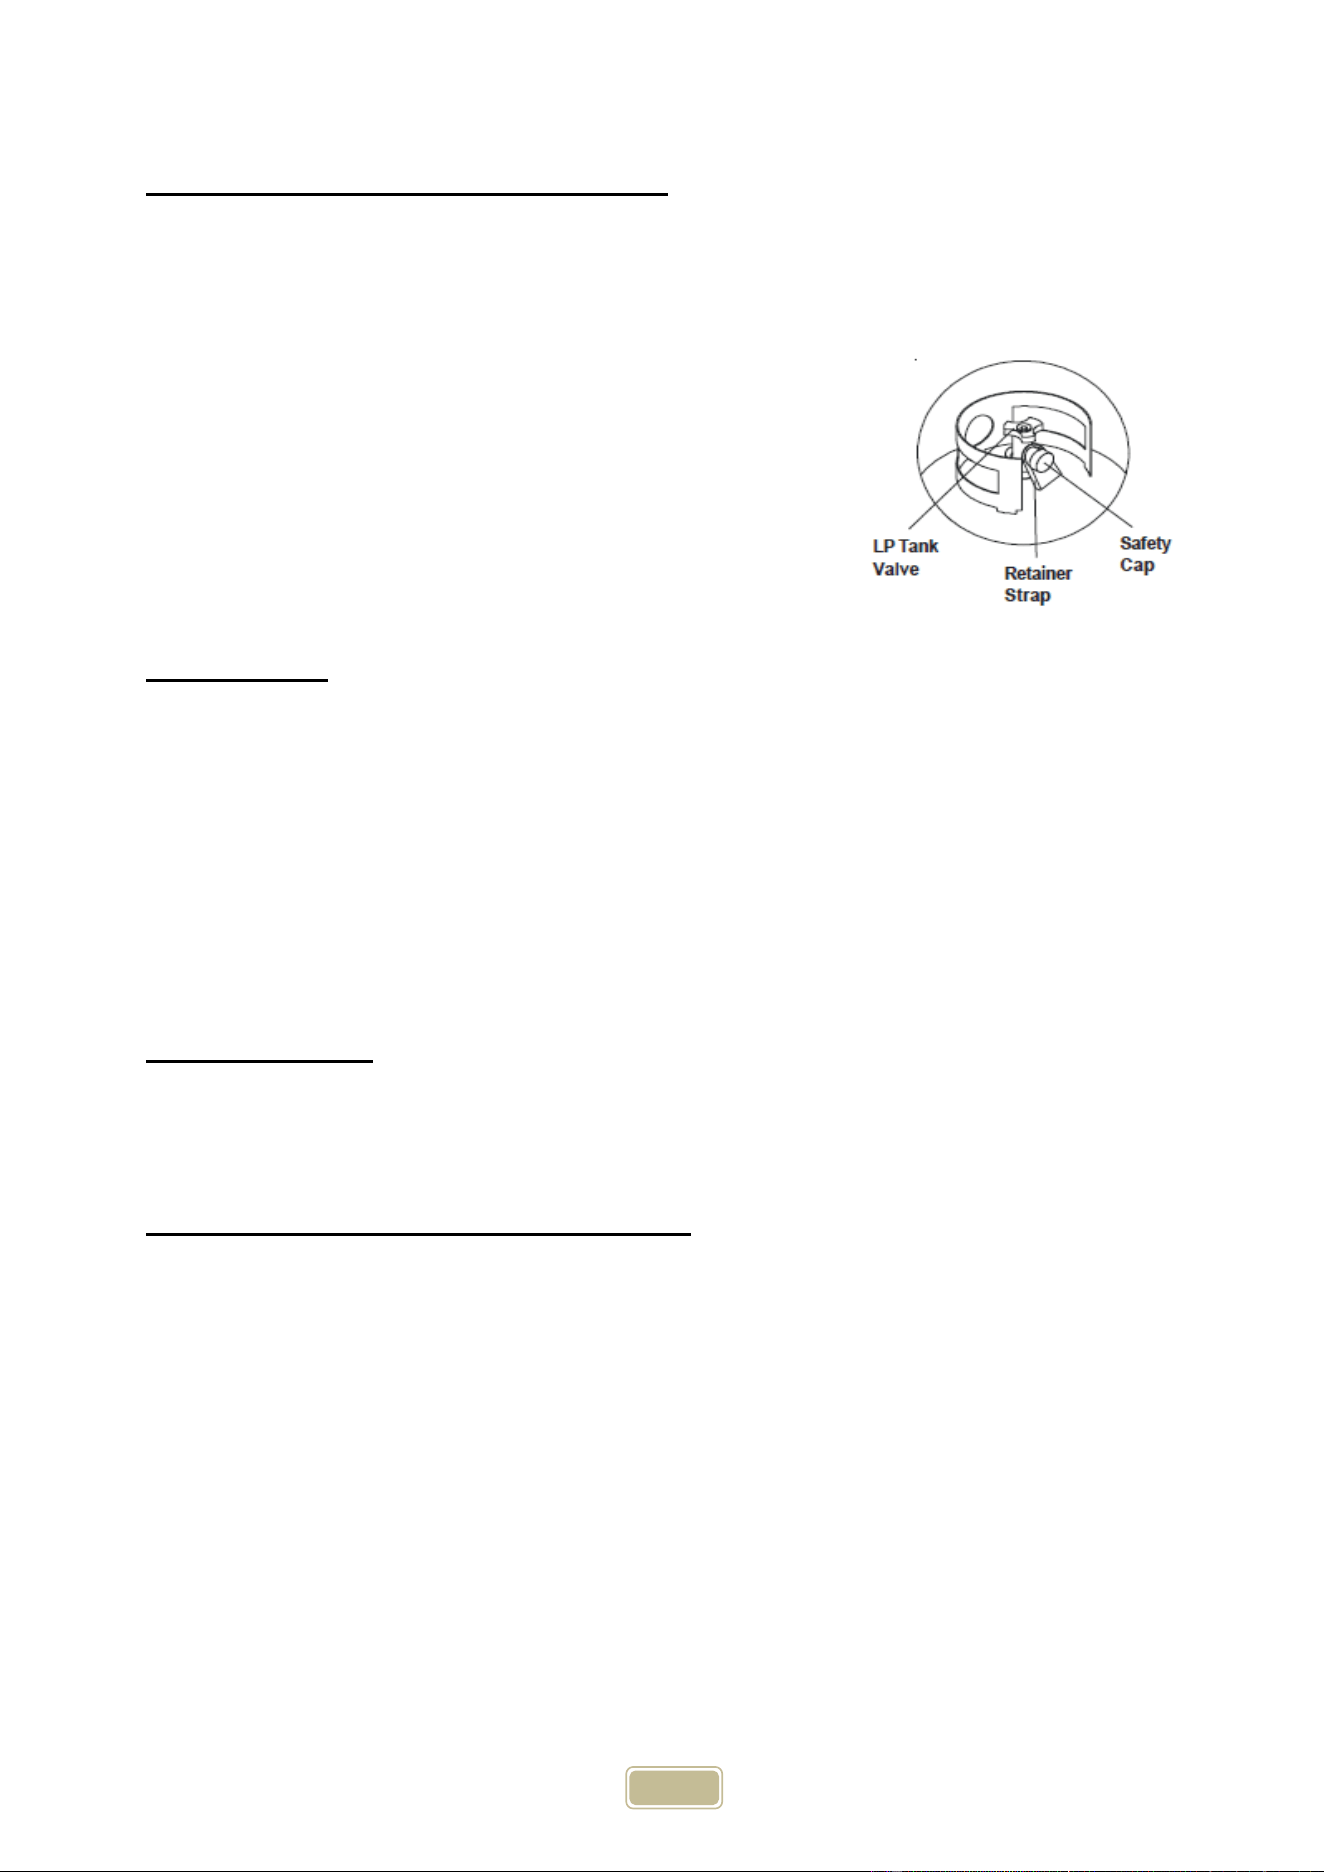
LeakTestingValves,HoseandRegulator
1.TurnallgrillcontrolknobstoOFF.
2.BesurehoseistightlyconnectedtoLPtank.
3.CompletelyopenLPtankvalvebyturningcylindervalve
knobcounterclockwise(righttoleft).Ifyouheararushing
sound, turn gas off immediately. There is a major leak at
the connection.
Correct before proceeding by calling
franchiserforreplacementparts.
4.Brush soapy solution onto areas where bubbles are
showninLPtank(seepicture).
5.If“growing” bubblesappear,thereisaleak.CloseLP
tankvalveimmediatelyandretightenconnections.Ifleads
cannotbestoppeddonottryto
repair.Callfranchiserfor
replacement.
6.AlwayscloseLPtankvalveafterperformingleaktestbyturningcylindervalveknobclockwise.
NOTE:Whenleaktestingthisappliance,makesuretotestandtightenalllooseconnections,includingtheside
burner.Aslightleakinthesystemcanresultinalowflame,orahazardouscondition.
LPGasSupplyCylinderDisconne ctio n
1. Turntheburnervalvesoff.
2. Turnthetankvalveoff.(Turnclockwisetostop).
3. Detachtheregulatorassemblyfromthetankvalvebyturningthequickcouplingnutcounterclockwise.
11
LPTankRemoval,TransportandStorage
- Turn OFF all control knobs and LP tankvalve. Turn coupling nut counterclockwise by hand only‐donot
use tools to disconnect. Lift LP tank wire upward off of LP tank collar, then lift LP tank up and off of
support bracket. Install safety cap onto LP tank valve. Always
use cap and strap supplied with valve.
Failure to use safety cap as directed may result in serious
personalinjuryand/orpropertydamage.
- AdisconnectedLPtankinstorageorbeingtransportedmusthave
asafetycapinstalled
(asshown). Donotstore an LPtankinenclosed spacessuch
asa
carport, garage, porch, covered patio or other building. Never
leaveaLPtankinsideavehiclewhichmaybecomeoverheatedby
thesun.
- DonotstoreLPtankinanareawherechildrenplay.
LPTankFilling
- Useonlylicensedandexperienceddealers.
- LPdealermustpurgedtankbeforefilling.
- DealershouldNEVERfillLPtankmorethan80%ofLPtankvolume.Volumeofpropaneintankwillvaryby
temperature.
- A frosty regulator indicates gas overfill. Immediately close LP tank valve and call local
LP gas dealer for
assistance.
- Donotreleaseliquidpropane(LP)gasintotheatmosphere.Thisisahazardouspractice.
- ToremovegasfromLPtank,contactanLPdealerorcallalocalfiredepartmentforassistance.Checkthe
telephonedirectoryunder“Gascompanies”fornearestcertifiedLP
dealers.
LPTankExchange
- ExchangeyourType1cylinderwithOPDsafetyfeature‐equippedONLY.
- AlwayskeepnewandexchangedLPtanksinuprightpositionduringuse,transitorstorage.Leaktestnew
andexchangedLPtanksBEFOREconnectingtogrill.
LargeCapacityPropaneTanksandHomes:
• LP (Liquid Propane) Coyote Grills can be installed into propane fueled houses. Meaning that if your
entire house is plumbed for propane and you have an exterior connection for such use, then a
standard LP grill from Coyote will meet your needs, regardless of the size. Any appliance can be
installedifinstalledproperly!ThatistheCoyoteway!
o Coyote does not supply any gas fittings or lines, other than the regulator needed within the
grillbox
o All Coyote LP Grills come with a 20lb tank regulator. This regulator can not be used or
modifiedtoworkon
anyothersetup.
Ifyouarerunningoff ofalargecapacitytank(morethan20lbs),thenan“in‐line”LP
regulator is needed, Coyote Customer Service must be contacted to assist with this
situation.
o Ascountiesvaryfromstatetostate, it is upon the owner/installer to ensure
thatallcounty,
stateandfederalcodesarefollowedforanygasinstallation.
12
-
Always check the rating plate to make sure the gas supply you are hooking up to is the gas type the grill is
manufacturedfor.
ThisnaturalgasgrillisdesignedtooperateonnaturalgasONLY, atapressureregulatedat4”(101.6mm)water
column(W.C.)whenequippedwiththecorrectnaturalgasorificesonthevalvesandanaturalgasregulatoron
thesupplylineregulatedattheresidentialmeter.
IMPORTANT:Neverconnectthegrilltoanunregulatedgassupply.
Naturalgasconnectionsmustbeperformedbyalicensedcontractororlocalgascompanyrepresentative.
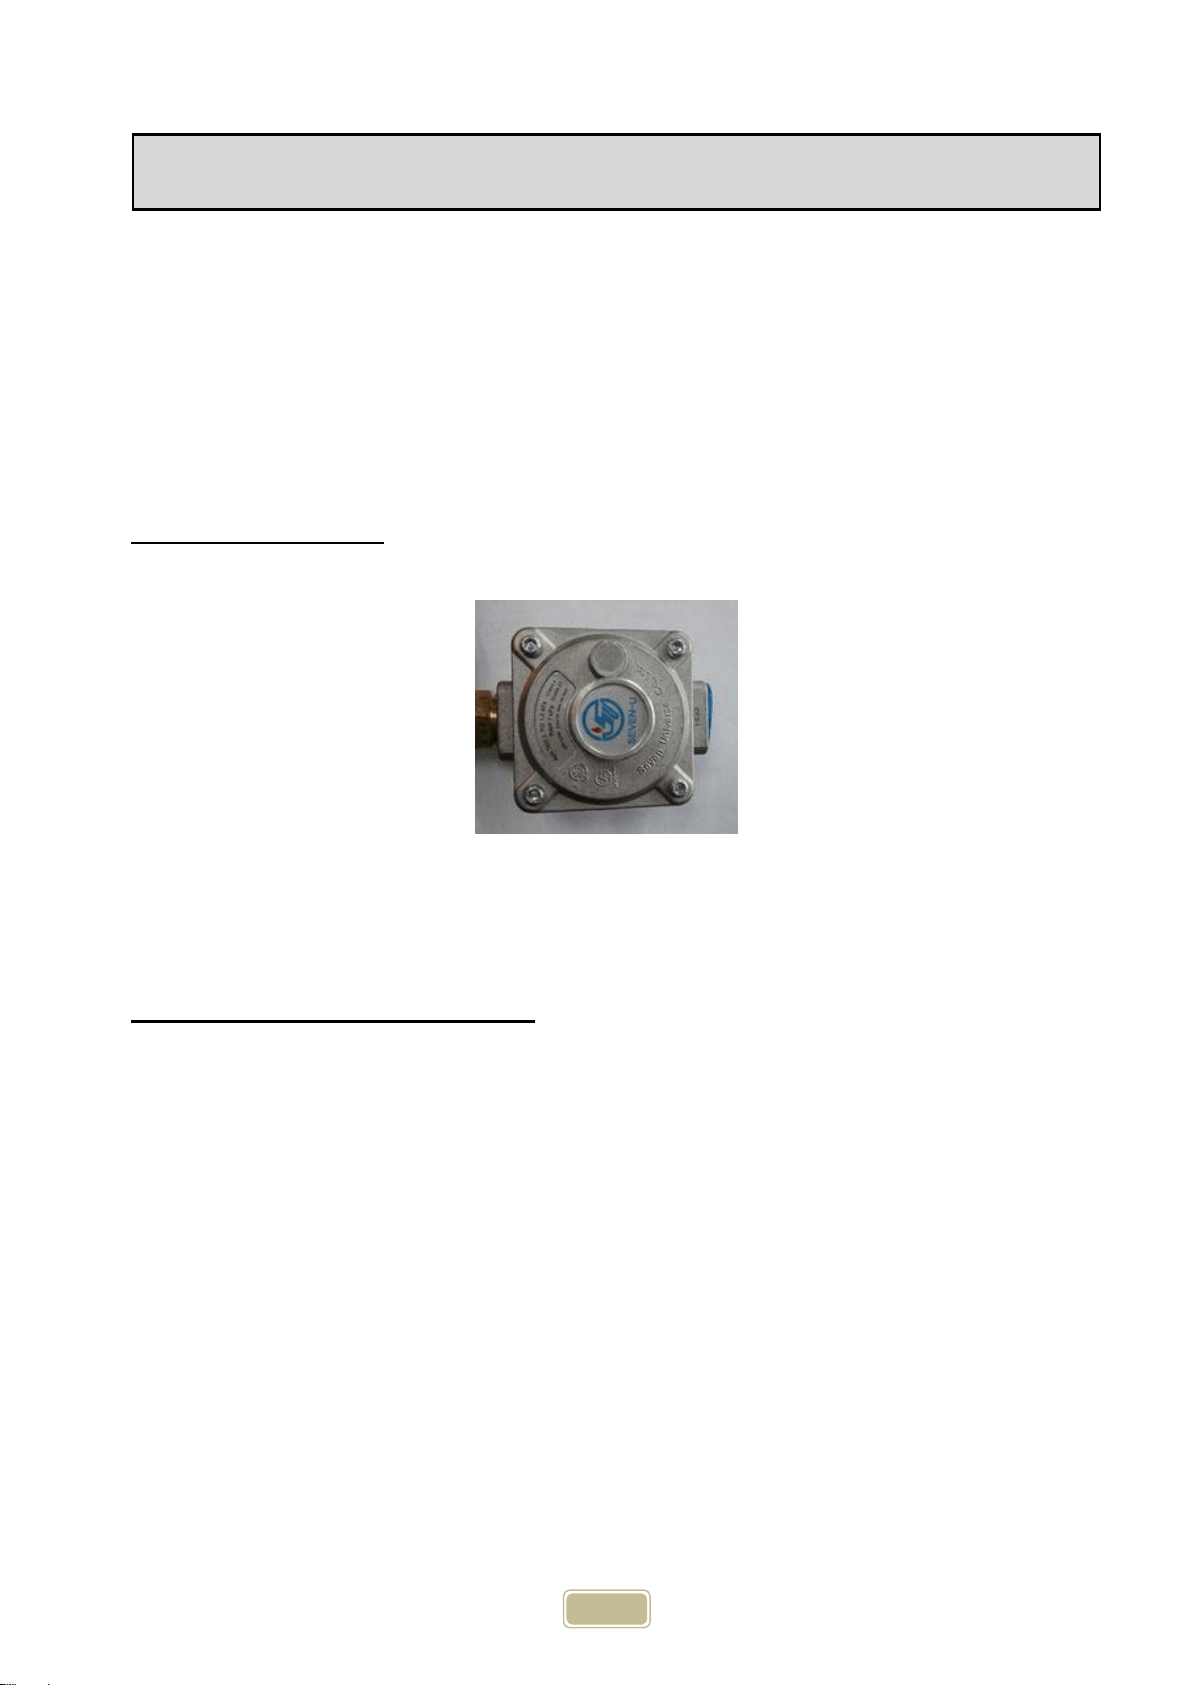
NaturalGasRegulator
IMPORTANT:NEVERusegrillwithoutleaktestingthisconnection.
Naturalgasregulatormodel:GR120
Gaspressure:4”(101.6mm)
Maximumrateworkingpressure:1/2Psig
NaturalGasSupply and Connection
1. Makesureallburnervalvesareinthe“OFF”position
2. AllNGunitsneedtohavearegulatorandshut‐offvalveonthesupplyline.
3. AllPipethreadsneedtohaveproper,gasrated,outdoorratedthreadsealant.Flareendsdonotneedor
utilizepipesealant.
4. YourNGCoyotegrillcomeswitha½”regulator,alongwitha18”blackhose.
a) Youneedtosealtheregulatortothehoseusingyourpipesealant.
b) Thenattachtheflareendtoyourmanifoldline,withnopipesealant.
c) Next,attachyournextconnectionhose(notincluded)totheothersideoftheNGregulator(itisalso
½”MIP)
i. Wesuggestusing½”stainlesssteelcorrugatedhosesforallNGGrills
ii. Makesurethatyoupurchaseahoseofadequatelengthandcapacityfortheintended
application.
d) Connecttheotherendofthishose,toyourshutoffvalve
i. Dependingonyourchoiceofhoseandshut‐off,thenipplegoingintotheshut‐offvalvemay
vary.
e) Testallconnectionsforleakswithasoapandwatersolution.
Natural Gas Hook-up

13
HighElevationInstallationandUse
CoyoteGrillsaredesignedto operatemostefficientlyat0‐2000feetabovesealevel. From2000‐4000feetabovesea
levelyouwillnotnoticeanysubstantialdecreaseinyourheat,althoughmoregasiscombusti ngwithintheburners
duetolessoxygen.Above4000feet,youmayexperiencealittlelongercookingtimeonyourgrillthanyouwould
experience at sea level. But again, this is just due to the air/fuel mixture taking place within the burners. If any
problemsorconcernsexistaboutyourlocationorelevation,please contactCoyo teCustomerServiceforassistance.
GasConversions–NaturalGasandPropane
Coyotegrillsareabletobeconvertedbutyoumustobtainthecorrectconversionkitandwealwayrsrecommend
that any gas appliance conversion should always be performed by a Licensed Plumber or a certified Installer.
ConversionkitsaresoldforCoyotegrillsandcan bepurchasedthroughyourdealer,orCoyote’sCustomerService
Department.AnyotherkitororificesusedthatarenotofCoyotebrand,willautomaticallyvoidanywarrantyonthe
unit.Furthermore,itisimportanttounderstand thatwhereeverthereisaburner,thereisanorificethatwillneed
tobe changed(donotforgettherotisserieorsearburner).
ThestepsforconvertingyourCoyotegrills mainandsea rburnersare:
1. Pullgrilloutofislandorcart.
2. RemoveDripPanandCoo kingGrates
3. Unscrewboltconnectingthemanifoldpipetothegrillbody,located atthebacksideofthegrill.
4. Unscrewthe4bolts holdingthefaceplateto thebody(onthefrontedgewhereyourcookinggratesits)
5. Unscrewthe2bolts(oneachside)ofthemanifoldandfaceplateassembly,thatholdsthisentireassembly
tothe bodyof thegrill.
6. Disconnectallwiresandflexlines,fromthevalv esandigni terassemblywhilepayingcloseattentiontotheir
originallocati on.
7. Slideentirecontrolpanelandvalveassemblyoutfromthegrillbody.
8. Flipcon trolpaneloveronitsside,so you haveeasyaccess tothevalves.
9. SearBurnerG rillsOnly–Removecen terknob,unscrewtopandbottomscrews only.
a. Thesafetyvalvethatcontrolsthethermocouple onyoursearburnermustbecompletelychanged.
Youcanno tchangeonlytheorifice.
10. SearBurnerGrillsOnly–Unscrewbasebr acke t,holdcentervalveto gasmanifoldpipeandremovevalve
11. SearBurnerGrillsOnly–InstallnewSafetyValveinthecorr ectgastypeandfollowth ere movalinstructions
inreverse.
12. Oncethepanelisflippedover,youwillseetheorificeattheendofthevalve.Withawrenchremovethe
orificefromthevalveandinstallthenewgasorifice,
13. Re‐assembleinreverseandtestallconn ecti onsagainwithasoapy watersolutiontoensurenoleaks.
Toconvert yo urrearburnerorifice:
1. Removeyourentirerotisserieassembly
2. Removethebackpanelthatcoversyourrearrotisserieburner
a. With thehoodopen,removethe4screwsontopofthispanel
b. Withthehoodclose d,removethe 4screwsonthebackofthispanel
c. Withthehoodclosed,lookunderneaththissamebackpanelandyouwillsee4‐5bolts(depending
onyour gri ll),theseonlyneedtobeloosened
3. Next,pull theentirepanel(starti ngfromtheback)outfromth egrill
a. Itisdesignedtofittight,soyoumayneedaflatheadscrewdrivertopopthestainlessawayfromthe
body
4. Next,youwillseeth egasline,brasselbowandorifice
5. Useawrenchtore movetheorificeandinstallthenewone
6. Re‐assembleinreverseandcheckyourbac kburnertoensureproperig nitionandburning
14
Yourgrillisdesignedto reach atemperature thatyou setbyadjustingavalvetha tin tur nsadjuststheamountofgas
that goes through each burner. This Valve is located behind your knob and is the key to your heat and fuel
consumption.Anexamplebeing:Cookingonlowwillgiveyoulongeruseoutofa20lbLPtankthanwillcookingon
highevery singletime.
Furthermore,thewaytoignitetheburnersisthroughthevalves,sopleaseunderstandtheimportanceofthispiece
andtheposition/caretakentotheknobs.
• Example:Ifyouforgettoturnaknoboffandtheburnerisnotlit,thenyouwillhaveagasleakoutofthat
valve.Youmustbeawareofyourgrillsstatusandberesponsible!
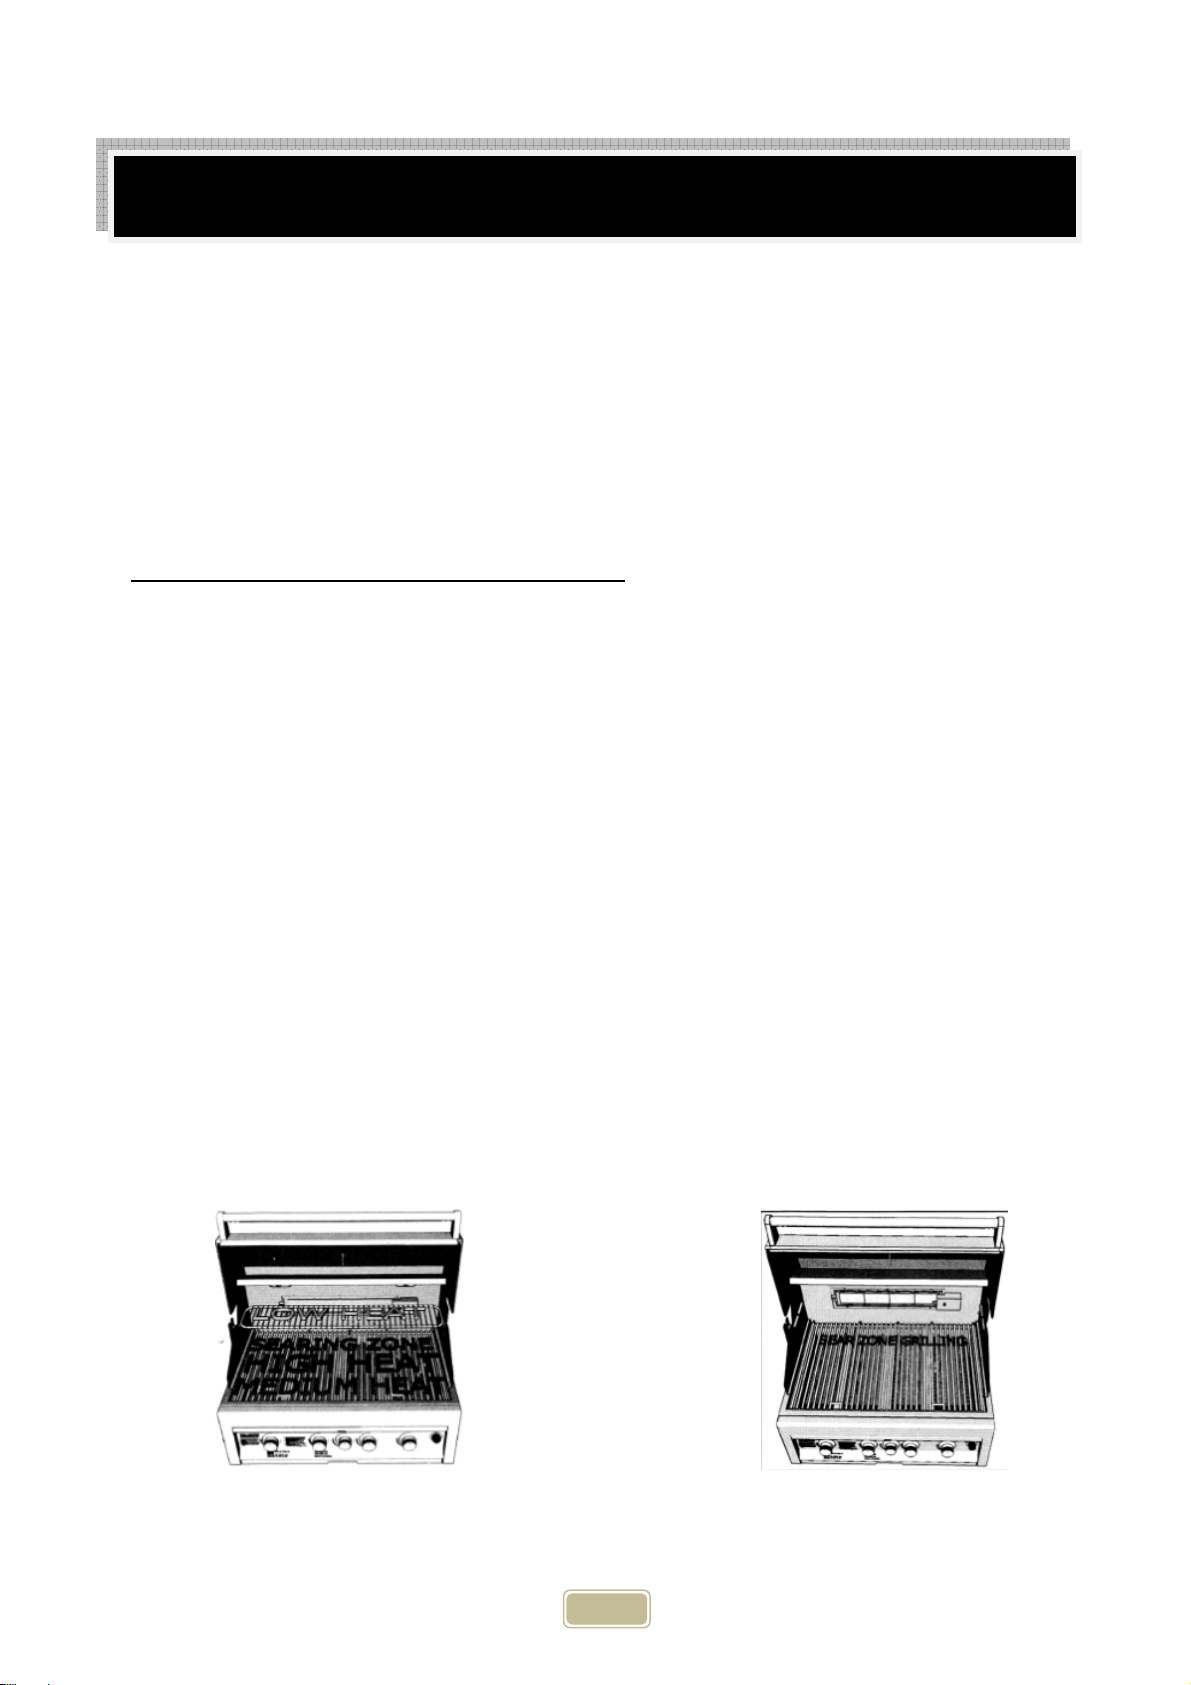
BurnerConfigurationandHeatDispersion:
Ifyoulookundertheveryfrontofyourcookinggrates,youwillrealizethatforthefirstfewinches,theburnerdoes
notreleaseanygas.Thisisdesignedtobethemediumheatportionofyourgrillforseveralreasons.
• Onebeingthattheflavorizersensureevenheat
dispersionlaterallyacrossyourgrillscookingsurface,sothe
frontisdesignedtobeyourmediumheatsection,whileyoucanutilizethemiddleofyourcookinggratesto
getagoodhighheat(donotforgetthatthisalldependsonhowhighyouhaveyourvalvesturnedas
well).
• Asyoumovetowardsthebackofyourgrillandpastthemiddlesection,youwillrealizethatthisisthe
hottestportionofyourgrill.
o Underneath,wheretheburnerisboltedtothebackofthebody,youwillseethatthereisa
“crossover”inbetweeneachburner.Thiscrossover,sendsgasfromoneburnertothenext(aslong
asthevalvesareopen),toensurethatallofyourburnerswilllightin
caseyourignitersfail.
o
Forexample,ifyoucanonlygetoneburnertolight,youjustneedtokeepthehoodopenandturn
onthevalvenexttoit,tothehighposition.Gaswillthentravelthroughthenew/openburnerand
willcatchtheflamefromtheinitialburner.Thiscrossoverdoes
provideyouconstantheatacross
thebackthatincreasesthetemperatureandprovidesyouwithyourhottestpositiononthegrill
(unlessyouhaveaCSmodelwithasearburner–inwhichthesearburnerwillprovideyourhighest
temperatureforcooking/searing).
Tounderstandhowthiswilleffectyourcooking,pleasetakealookatthepicturesbelowforvisualassistance.
Using Your Burners and Grilling Safely
15
BurnerUse–Indirect,Direct,Sear,RotisserieCooking
Asyoucanimagine,bycontrollinghowmuchgasflowsthroughyourburner;determinesthesizeofyourflame.The
idealflamewillbeblue,withnoyellowtip,orexcessivenoisecomingoutoftheburner.
Ifyouhappento haveanyoftheseproblems:
• Youwillwanttochecktheairadjustmentscrewonthesideoftheburneritself(calledtheAirVenturi)and
alsotheadjustmen tscrewthatresidesdirectlybelowtheorificetoensurepropergasflowintotheburner
fromthevalve
• Therearemanyreasonsthatcancausepoorflamesandheatbutnonearemoreseriousthanagasleak,so
alwayspayattentionforthe odorofgas(N GorLP) butdono talsoforgetto cleanyour burners!
For Direct Cooking you simply cook your food over a direct flame that is hot and quick to cook but is also the
quickestwaytoburnyour food.Payattentioncloselyifyouchoosethisme thod!
IndirectCookinghoweverisused for larger cutsofmeatsandanything thatyouareintendingtokee pniceandjuicy!
• All you need to do is turn off the burner that lies under the food being cooked and adjust the exterior
burnersflamesothatyoucreateaslow,constantandevencookingenvironmentforyourfood!
Ifyouarelookingforacookingexperiencethatwillalmostinstantlycookyourfooditem,thenSearCookingisan
essential!SearCookingusesaceramicburnerthatemitsadifferentform ofheatthatcanproduceamuchhigher
temperatur equicker,tolockinthejuices!
Now,ifyouarelookingforanexperiencethatwillallowyoutohaveajuicybird,straightfromtherotisserieofyour
grill,thenRotisseri eCookingisgoingtobeyourchoice!Coyotegrillsutilizethesameceramicburnertechnologyin
theirsearburner,astheirrotisseriebur ner,alongwithamotoran dspitthatwillholdandrotateupto20lbsoffood.
Allowingyo utocoo kabirdamazinglyquick,withoutburningorcharringanyporti onofit.
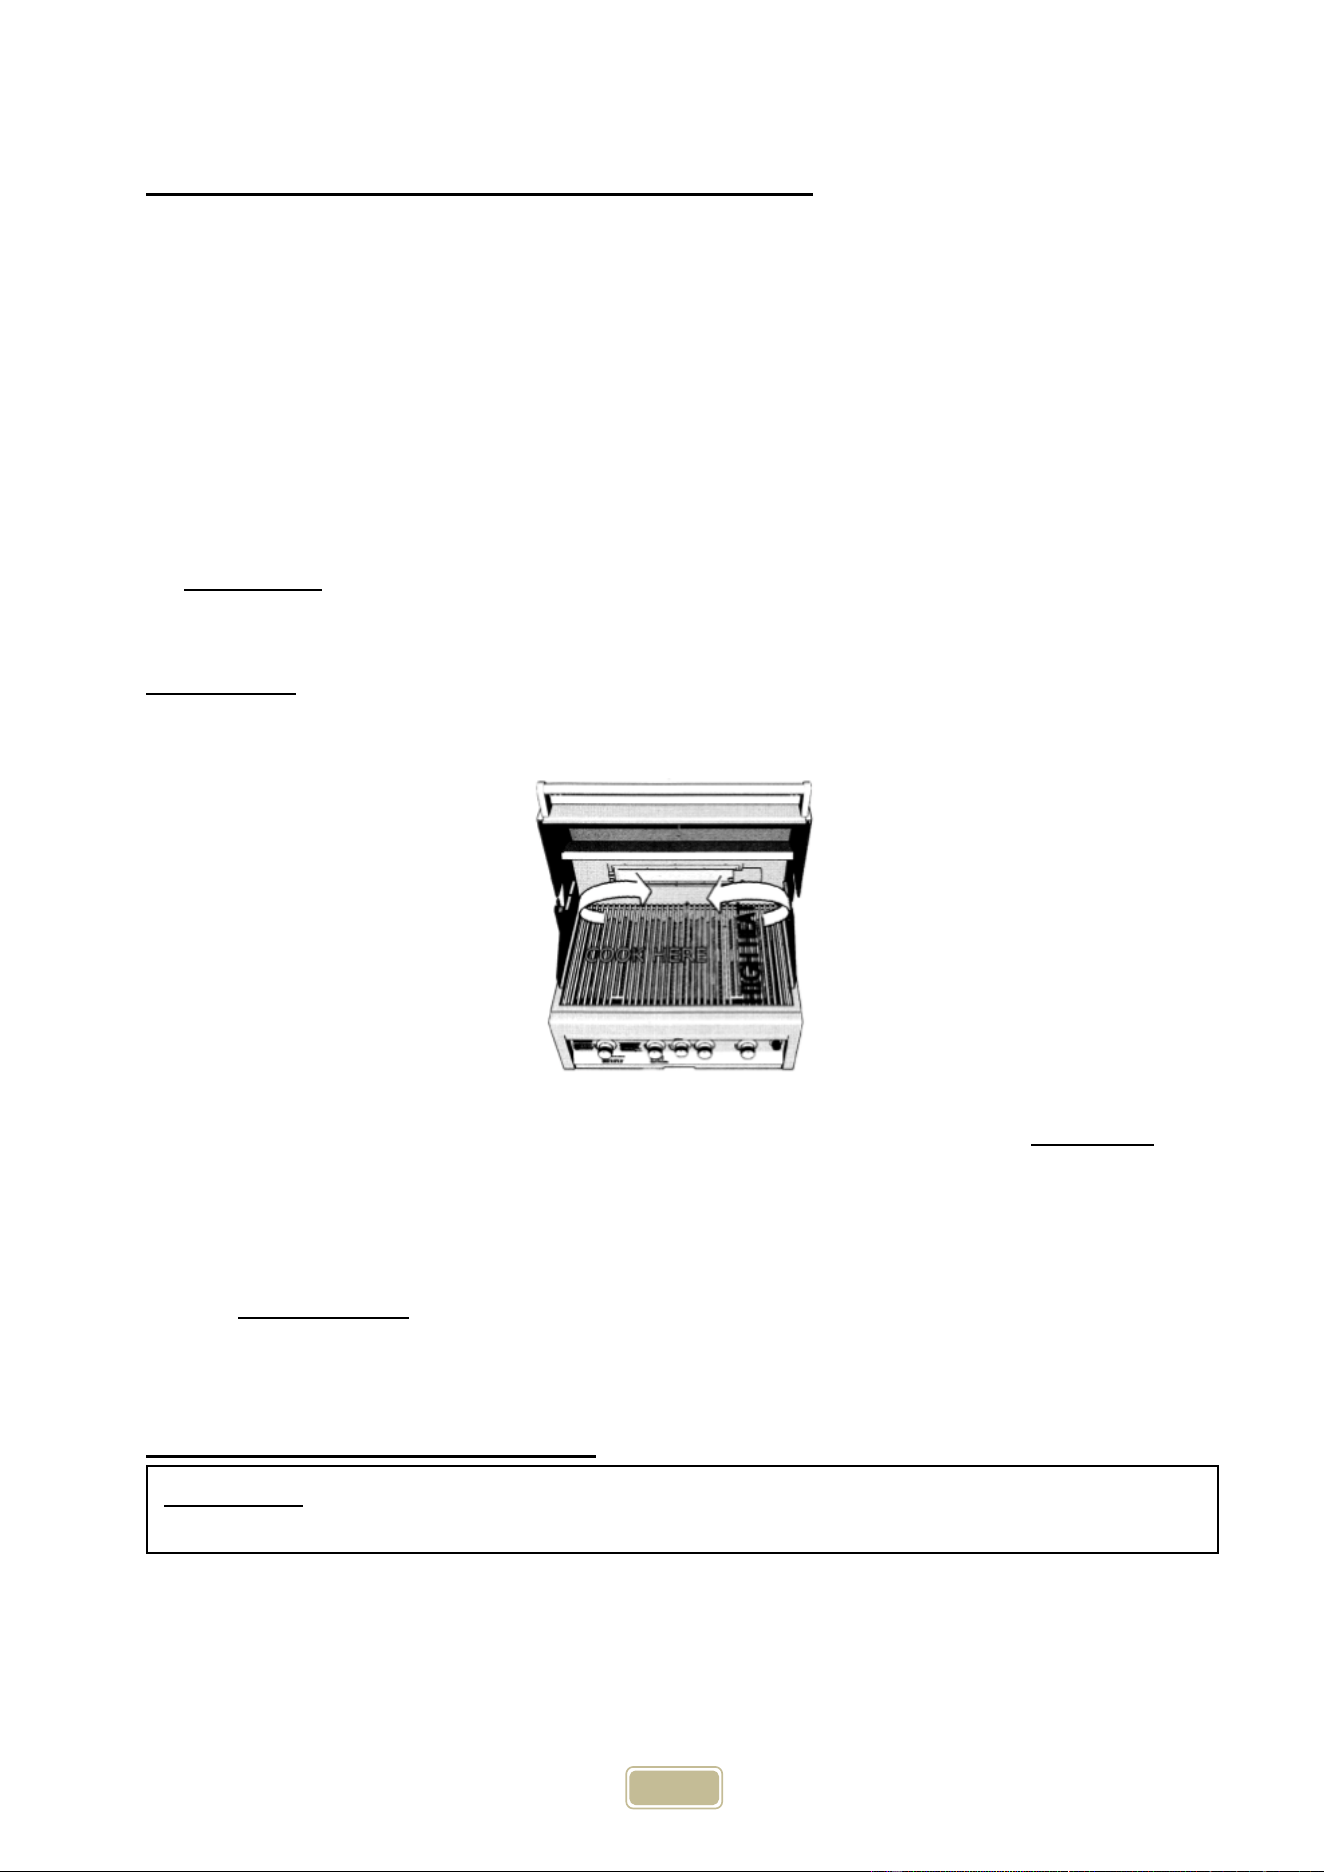
InstructionforRotisserieAssembly
Rotisserieismostlyusedtocooklargepiecesofmeatandpoultrytoassureslow,evencooking.Theconstant
turning provides a self‐basting action, making food cooked on a rotisserie exceptionally moist and juicy.
Rotisserie cooking generally requires 1 ½ to 4½ hrs to cook depending on the size and type of meat being
cooked. You can have rotisserie cooking with indirect heat with infrared rotisserie burner. Preferred by
professionalchefsoverothermethods,theintenseheatisidealforsearinginthenaturaljuicesandnutrients
foundinqualitymeats.
WARNING: Never stand with your head directly over the Grill when preparing to light the Rotisserie
burner, to prevent possible bodily injury.
16
For successful rotisserie, the meat should be centered and balanced as evenly as possible on the spit rod to
avoidoverworkingtherotisseriemotor.
1. AttachMotorBracketAssemblytothesideofthebarbecueframe(canbemounted oneitherleftorthe
rightsideofthe frame)usingtwoscrewsandtwonuts.
2. InsertRotisserie MotorontoMotorBracketAssembly.
3. AssembleKeyWasher,Counter‐balanceandhandletoSpitRod.SlideShaftCollarwithlongendtowards
handle.
4. SlideProngForkswiththeprongsfacingawayfromthehandleontotheSpitRod.PlacefoodontoSpit
Rod and secure with the second Prong Forks. Secure with thumbscrews. Place Spit Rod assembly and
position into Motor. Secure position with thumbscrew. It may be necessary to secure any loose
portionswithbutcher'sstring.Neverusenylonorplasticstringasitwillmeltandruinthefood.
5. Oncethefoodissecured,placethesharpendoftheSpitRodontothemotor,andthenresttheSpit
Rodonthesupportsateithersideofthegrill.
6. EnsurethatallBoltsareti gh te ned securely.
7. Whentherotisserieisbeingoperatedexclusively,itisstronglyrecommendedthatapanbeplacedon
thegrillinggrids,beneaththefoodtocatchthemeatdrippings.Thiswillpreventexcessivebuildupof
drippingsonthegridsandfacilitatecleaning.
a) If your food is large and a pan will not fit on top of the grates, you can remove the cooking
gratesandplaceyourpandirectlyontheflavorizers.
i. Thecenterofyourspitrodtothetopofthehood,equalsthesamedistancefromthespit
rodtothetopoftheflavorizers.
NOTE: Close hood carefully and align Motor Bracket and Shaft Mounting Bracket so that Rotisserie Rod is in
betweenthehoodopenings.
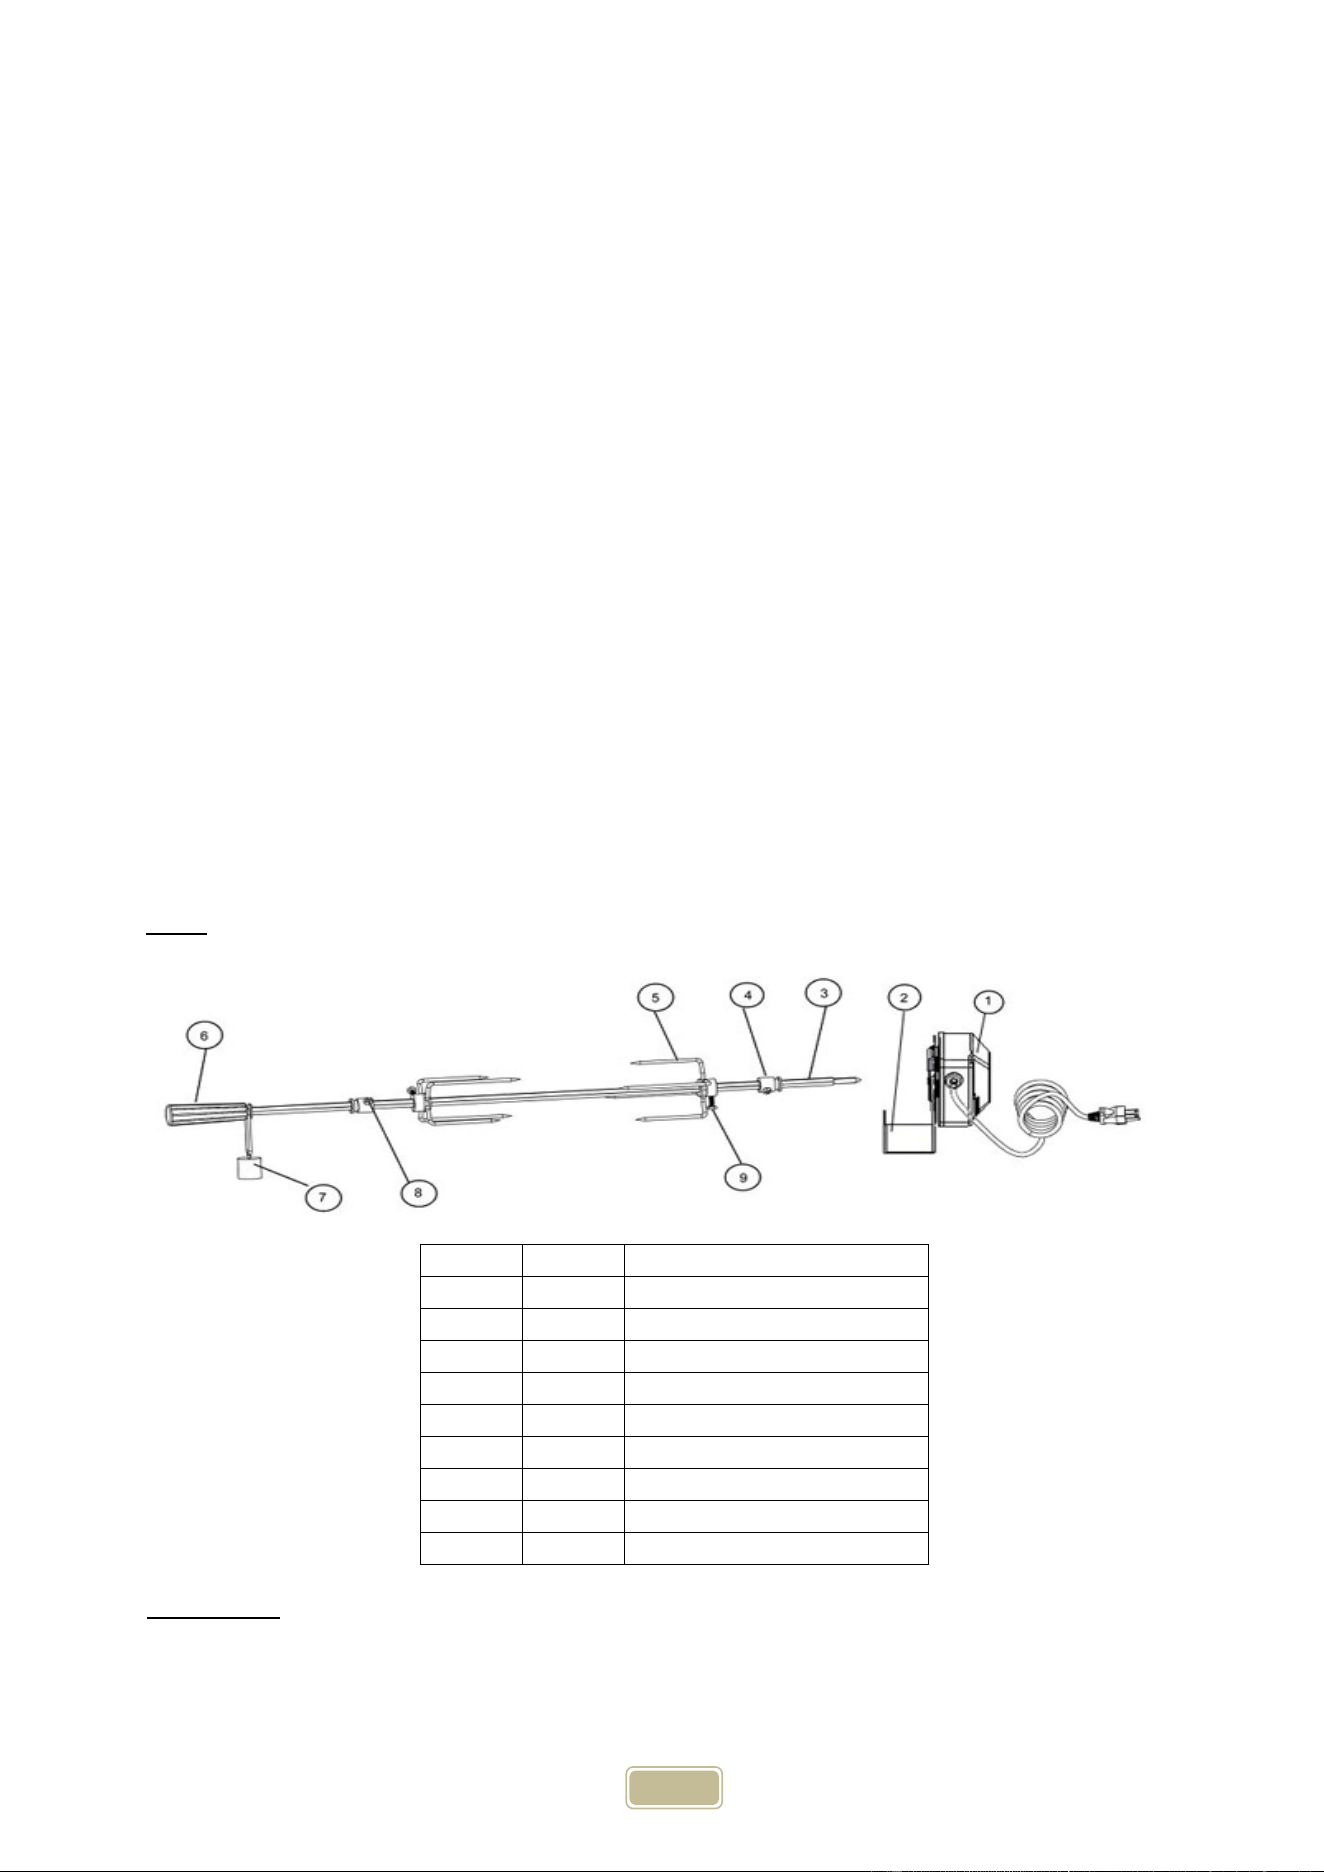
No. Qty Description
1 1 110VMotor
2 1 MotorBracket
3 1 SpitRod
4 2 ShaftCollar
5 2 4‐ProngFork
6 1 Handle
7 1 Counterbalance
8 2 Screw
9 2 HexagonalHeadScrew
WARNING: Never operate Rotisserie Burner with main (other) burner(s) “ON”. Warming Rack must be
removedwhenRotisserieBurnerisON.
17
ElectricalGroundingInstructions:
• The rotisserie motor is equipped with a three‐prong grounding plug for your protection against
electricshock.Thisplugmustbeinserteddirectlyintoaproperlygroundedthree‐prongreceptacle.Do
notcutorremovethegroundingprongfromthisplug.
• Therotisseriemotormust beelectrically grounded inaccordance withlocal codesor, intheabsence
of local codes, in accordance with the National Electrical Code, ANSI/NFPA 70‐1990 or Canadian
ElectricalCode,CSAC22.1.
• Donotuseanextensioncordtosupplypowertoyourgrill.Suchusemayresultinfire,electricalshock
orotherpersonalinjury. Donotinstallafuseintheneutralorgroundcircuit.Afuseintheneutralor
ground circuit may result in an electrical shockhazard. Do not ground this appliance to a gassupply
pipeorhotwaterpipe.
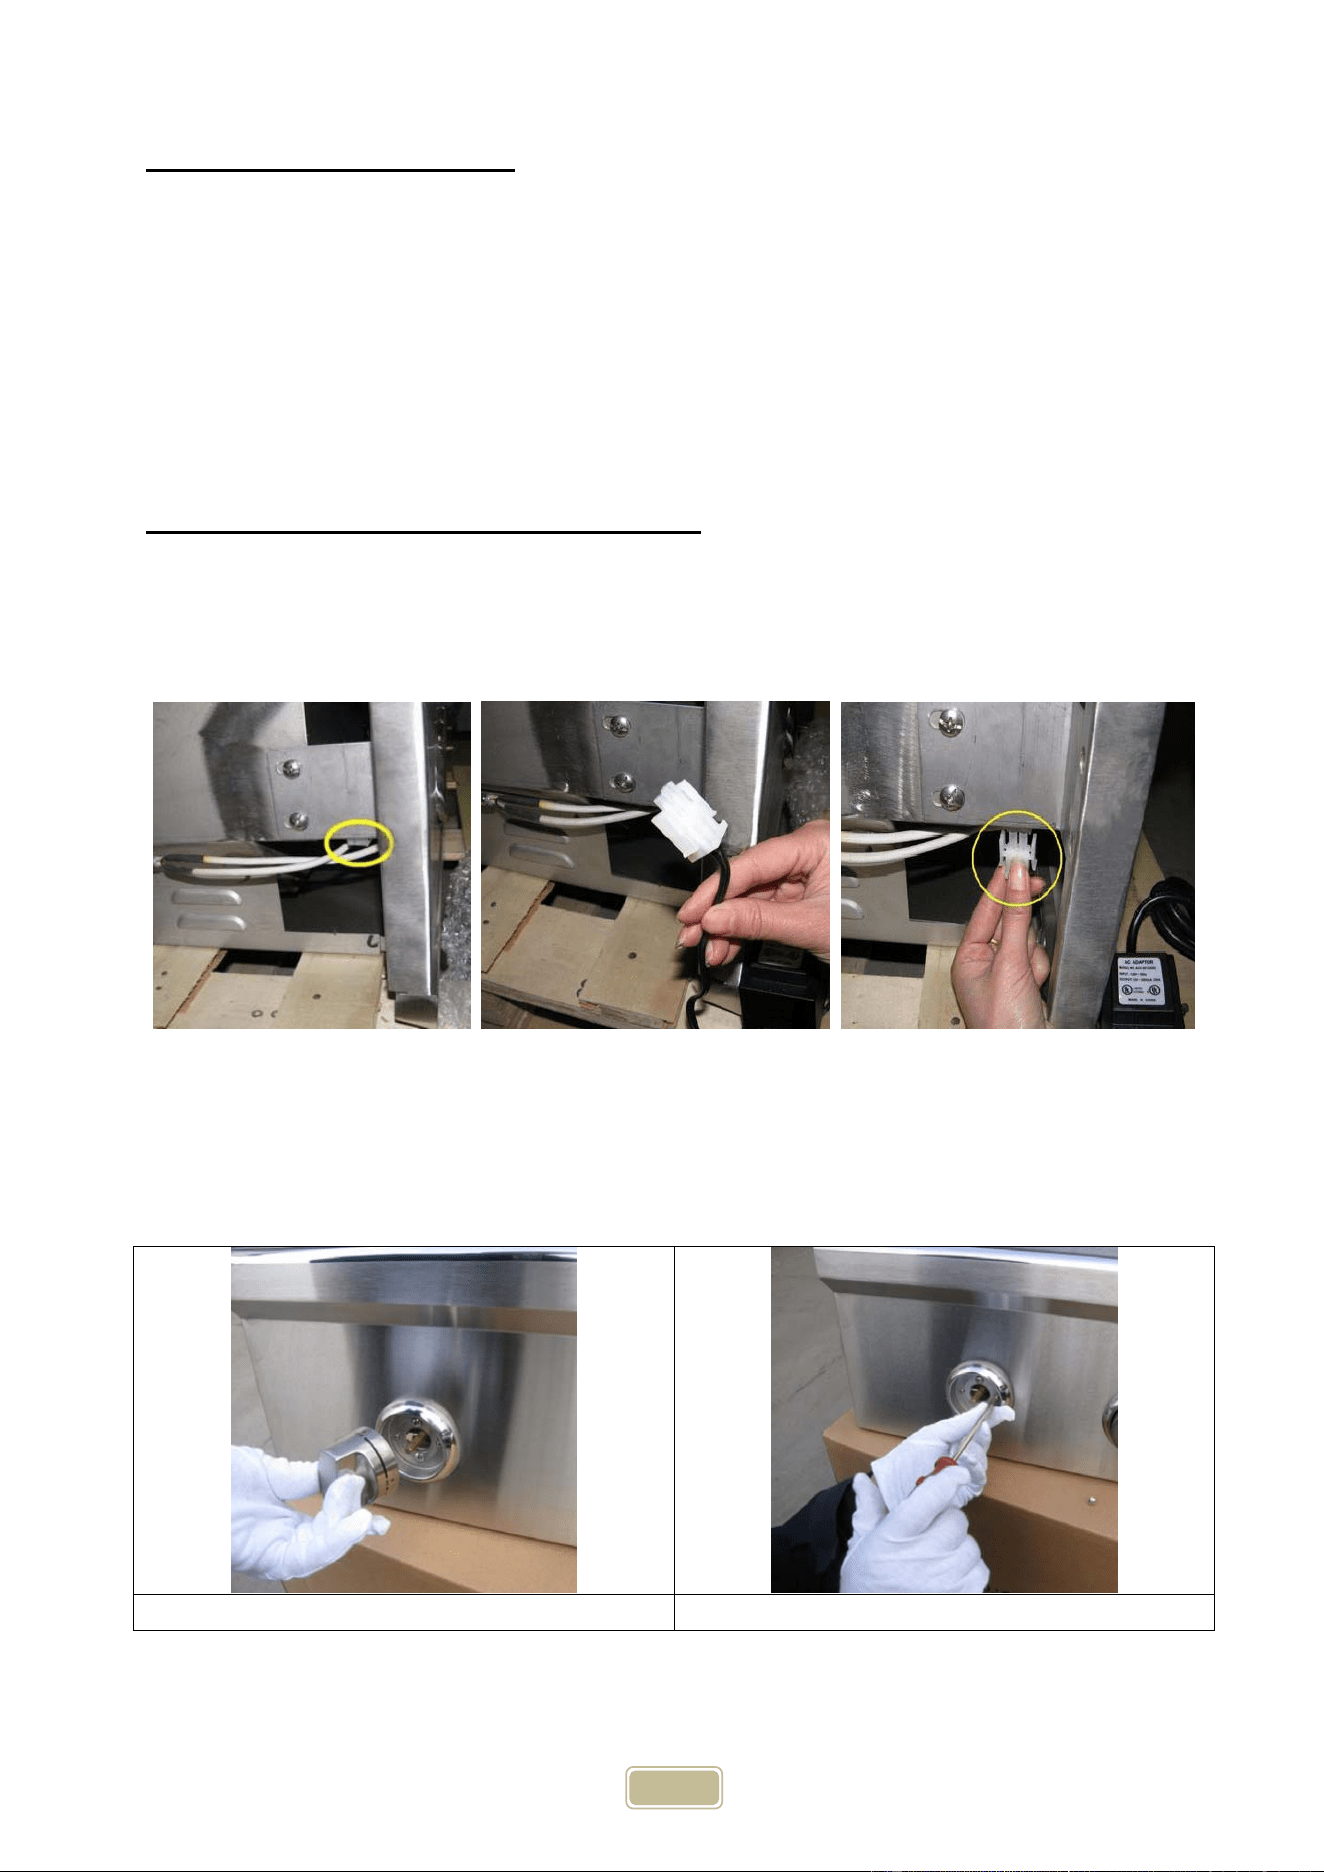
InstructionforConnectingtheTransformer
1. Transformer for Interior Lights‐Yourtransformer will connect on the left side of your grill (looking at it
fromthefront)andoperatesthelightsinsideyourgrill.Followthepicturesandinsertthewhitemaleplug
into the white female socket, on the left side of your grill and then plug the transformer into a standard
110voutlet.
LeftSideofGrillsMalePlugFemaleSocket
2. TransformerforBackLitKnobs–(only onC1 SL3 6andC1SL 42modelswithbacklitknobs)
Yourtransformer willconnectontheleftside of yourgrill (looking atit fromthefront) andoperatestheLED
lightsbehindknobbezels.Followthepicturesandconnectthetransformer,andthenplugthetransformerinto
astandard110voutlet.ReadbelowinstructionforhowtochangenewLEDs.
RemovetheKnob RemovetheScrews
18
TakeDow ntheKnobBezel TheLE DPlasticBezel
PullOu ttheWires DisconnecttheWireandChangeNewLEDs
Dothe oppositetoassembletheLEDs.
WARNING:ThetransformershouldbekeptawayfromtheheatoftheBBQ.
19
GENERALRULES
Donotleavethegrillunattendedwhilecooking!
- Makesurethegrillhasbeenleaktestedandisproperlylocated.
- Checktheendofeachburnertubeisproperlylocatedovereachvalveorifice.
- Lightthegrillburnersusingtheinstructionsprovidedinthismanual.
- Adjustheatsettingstoyourdesiredcookingtemperature.
- Allowgrillto
cooldown,wipeoffanysplattersorgreaseandcleanthedriptrayasneeded.
- Donotputacoveronthegrillwhileitisstillhotasitcouldstartafire.
NOTE:Ifforsomereason,ignitersfailtolight,burnerscanbelitwithagaslighter.
NOTE:Replacebatteryunderignitioncap(twistoffcounter‐clockwise)
NOTE:Tolightgasgrillwithagaslighter,makesurethegrillhas
been leak tested and burners be properly located. Remove the
cooking grids and flavorizers from burner you wish to light. Insert
long‐necked gas lighter placing near to burner ports. Press in the
lastrightcontrolknob
androtate left to“HIGH”settingto release
gas. Turn on the button on gas lighter, burner should light
immediately. Place back the cooking grids and flavorizers. Adjust
burnerstodesiredcookingtemperature.
WARNING
• DONOTusethegrillifgasodorispresent.
• DONOTstandwithhead,body,orarmsoverthegrillwhenlighting.
• Inspectthehosebeforeusingthegrill.Ifthereisexcessiveabrasionorwear,orifthehoseiscut,it
mustbereplacedprior
totheoutdoorcookinggasappliancebeingputintooperation.The
replacementhoseassemblyshallbethatspecifiedbythemanufacturer.
• Ensuretheareaaroundthebarbecueisclearofflammablesubstancessuchasgasoline,yarddebris,
wood,etc.
• Ensurethereisnoblockageoftheairflowthrough
theventspacelocatedbelowthefaceoftheunit.
DANGER
• Failuretoopenthelidwhileignitingthebarbecue’sburners,ornotwaiting5minutestoallowthegas
toclearifthebarbecuedoesnotlight,mayresultinanexplosiveflame‐upwhichcancauseserious
bodilyinjuryordeath.
Keep any electrical supply cords and the fuel supply hose away from any
heated surfaces.
Lighting the Grill

20
UsingtheIgnitionSystem:
1. Openthecanopy
2. Keepyourbody,armsandface
asfarawayfromtheburners
andcookingsurfaceaspossible
3. Depressandrotatetheknobcounterclockwisetothe"High"position.
a. Asyouarenearingthe"High"position,youwillnoticethevalvegettingtoughertoturn.Thisisthe
springinsidethevalvebuildingupenergytocreatethespark.Onceyouhearaclick,theigniterhas
firedthesparkandyoumustturnthevalvecompletelyoffto
generateanotherspark.
b. Donotturntheknobtoofast,asyouneedthegastotravelintoyourmanifold,thentoyourvalve
andfinallyintotheburnerwhereitwillmeetthesparkfromtheigniter(atthefrontoftheburner).
Alternatively,ifyouturnit
tooslow,youcancauseabuildupofgasinthegrillandcreatealarge
flashwhenitignites.
4. Iftheburnerdoesnotcatchonthefirstattempt,tryagainimmediatelybutbeveryawareofanygas
buildingupinsidethegrill.Ifthegrilldoes
lightafterthreeconsecutiveattempts,turnthevalvestothe
"Off"positionandallowthegrilltoclearofanybuiltupgasfor5minutes.
5. Ifatthispointthegrillwillstillnotignite,youcantrythemanuallightingprocessbelowwithalongstem
lighter
andyoucanalsocontactCoyoteCustomerServiceforfurtherassistancetotroubleshootyourgrill.
6. Toturnthegrill"Off,"yousimplyturneachknobclockwiseuntilitcannotturnanymore.Itisalsonormalto
experienceapoppingnoisewhentheburnersareturnedoffabruptly.
ManuallyLightingtheBurners:
• Ifforsomereason,ignitersfailtolight,burnerscanbelitwithagaslighter.
o Tolightgasgrillwithagaslighter,makesurethegrillhasbeenleak testedandburnerscan
beproperlylocated.Removethecookinggridsandflavorizersfromtheburneryou
wishto
light.Insertlong‐neckedgaslighter,placingitneartheburnerports.Pressinthefarright
controlknobandrotateleftto“HIGH”settingtoreleasegas.Turnonthebuttonongaslighter,
burnershouldlightimmediately.Placebackthecookinggridsandflavorizers.Adjustburners
to
desiredcookingtemperature.
Lighting Instructions for:
C1C34 – C1C36 – C1S36 – C1SL36 – C1SL42
21
When you first ignite your grill burn the grill to get rid of any odors or debris that may be left over from
manufacturingandtransit.This isdoneby operatingyourgrill atthe“HIGH” settingwith thehoodclosedfor
nomorethan5minutes.
• Sincethisisahightemperaturegrill;closingthehoodwillcauseheattobuildupandcouldeasilycause
anexcessiveflare‐upthatcouldcauseinternaldamagetothegrill(knobs,igniter,etc.).
• Afteryouhave“burnedoff”thegrill,youarereadyforcooking!
PreparingFoodfortheGrill
- Alwayscookfoodsadequately.Undercookedfoodscanretainbacteria,especiallyifthawedorexposedto
warmconditionspriortocooking.
- Alwaysuseseparateplatesandutensilsforthehandlingofrawfood.Neverplacerawfoodandcooked
foodonthesameplate,andneverplacecookedfoodonaplatethatwasusedforhandlingrawfood.
- Alwayscarefullywashallplatesandutensilsusedtohandlerawfoodbeforeusingthemtohandlecooked
food.
- Alwayswashallvegetables,seafoodandpoultrybeforecooking.
- Alwaysleaveuncookedfoodsintherefrigeratoruntilyouarereadytostartcooking.
- Alwaysmarinatemeatintherefrigerator.Disposeoftheexcessmarinade,andneverreuseit.
GrillingTips:
- Ifyoupre‐cookmeatorpoultry,dosoimmediatelybeforegrilling.
- Refrigerateleftoverswithin2hoursoftakingfoodoffthegrill.
- Neverletthetrayboildry.Thatcouldbehazardous,asgreasefromfattyfoodsthathave
collectedinthetraycouldigniteandpossiblycausebodilyinjuryorpropertydamage.
- Useameatthermometertobesurefoodhasreachedasafeinternaltemperature.
- Alwaystrimexcessfatfromyourfoodstoreducetheoccurrenceofflare‐upsduringcooking.
- Applyalightcoatingofcookingoiltothecookinggridsbeforegrilling,topreventfoodsfromsticking.
- Cooksimilarportionsizestogether,sothattheyallcookevenly.
- Usetongstoturnfoodsonthegrill.
- NeverpiercefoodswhiletheyarecookingontheGrill,asthiswilldrythemout.
- Turnfoodsinfrequently.Somechefssaythatagoodsteakshouldneverbeturnedmorethanonce.
- Applysugar‐basedsaucessuchascommercialbarbecuesaucesonlyduringthelatterstagesofcooking,to
preventcharring.
- Soakthestringyouusetotieuproastsandpoultryontherotisseriespittoprotectitfromburning.
- Useadisposablealuminumtrayfilledwithwater,fruitjuice,wineoramarinadetoaddextraflavorand
moisturetoslow‐cookedfoodslikeroasts,wholechickens,turkeysorducks.
ControllingFlare‐ups
Flare‐ups are a part of cooking meats on a gas grill. This adds to the unique flavor of cooking on a gas grill.
Excessiveflare‐upsresultingfromthebuild‐upofgreaseinthebottomofthegrillcanover‐cookthefoodand
cause a dangerous situation for you and your grill. If this should occur, DO NOTpour water onto the flames,
whichcancause the grease to splatter andcouldresultinseriousburnsorbodily harm. If grease fire occurs,
closethehoodandturn offthemainburnersuntilthegreaseburnsout.Use
cautionwhen openingthehood
assuddenflare‐upsmayoccur.
ToMinimizeFlare‐ups:
- Trimexcessfatfrommeatspriortocooking.
- Cookmeatswithhighfatcontents(chickenorpork)onLowsettingsorindirectly.
- Ensurethatyourgrillisonlevelgroundandthegreaseisallowedtoevacuatethegrillthroughthedrain
hole.
Operations and Features
WARNING:Alwaysobservesafefood‐handlingandsafefood‐preparationpracticeswhenusingthisGrill,to
preventfood‐borneillnesses.

22
DRIPTRAY
Thedriptraylocatedbelow thegrillshouldbecleanedperiodicallytopreventheavybuildupofdebris.
NOTE:Allowthedriptraytocoolbeforeattemptingtoclean.
IMPORTANT: Do not leave the grill outside during inclement weather unless it is covered (cover sold
separately).Rainwatercancollectinsidethegrill,thegrillcartorthedriptrayifleftuncovered.Ifthedriptrayis
notcleanedafteruseandthegrillisleftuncovered , thedriptraywillfillwithwatercausinggreaseandwaterto
spillintothegrillcart.Werecommendcleaning andstoringthedriptrayaftereveryuse.
COOKINGGRATES
Thecookinggratescanbecleanedimmediatelyaftercookingiscompletedandafterturningoffthegrill.Weara
barbecuemittandscrubthecookinggrateswithadampcloth.Ifthegrillisallowedtocooldown,cleaningthe
grateswillbeeasierifremovedfromthegrillandcleanedwithamilddetergent.
FLAVORIZERS
Washingtheflavorizersaftereveryuseisnotnecessarybutperiodicallyitissuggestedyouwashtheminasoap
andwarmwatersolution.Useawirebrushtoremovestubbornburnedoncookingresidue.Drytheflavorizers&
flamedividersthoroughlybeforeyoureinstalltheminthecookinginsert.
BURNERS
IMPORTANT: Gas control knobs should be in the “OFF” position and fuel line should be disconnected. To
reducethechanceofFLASHBACK,theprocedurebelowshouldbefollowedatleastonceamonthorwhenyour
grillhasnotbeenusedforanextendedperiodoftime.
MainBurners:
1. Removeyourmainburnersfromthegrillbyremovingthenutholdingtheburnerdowninthebackand
carefullyliftingeachburnerupandawayfromthegasvalveorifice.
2. Wirebrushentireoutersurfaceofburnertoremovefooddebrisanddirt.Cleananycloggedportswith
astiffwiresuchasanopenpaperclip.
3. Inspect the burnerfor damage (cracks or holes) and if such damage is found, order and install a new
burner.
4. Afterinstallation,checktoinsurethatgasvalveorificesarecorrectlyplacedinsideendsofburnertubes.
Alsocheckpositionofsparkelectrode.
Sear Burners: Sear burners are made out of ceramic and emit gas in a honeycomb pattern that is almost
impossibletosee.However,theseburnersgetexceptionallyhotandcanbeexceptionallyeasytodamage.
Thewaytocleantheseburnersis:
1. Removealllargepiecesoffoodfromthetopoftheburner
Care & Maintenance
CAUTION: All cleaning and maintenance should be done only when grill is cool & with the fuel
supply turned off at the cylinder. If your grill is set up for use with Natural Gas, turn off gas supply at
the s
y
stem manual shut off valve.

23
2. Turntheburneronhighandletthetemperaturedothework
3. Donotleavethegrillunattendedwhiledoingthisasyouwillwanttomakesurenoexcessiveflare
upsoccur
4. Onceallexcessgreasehasbeenburnedoff,youarereadytogo!
a. An easy way to keep your sear burner from getting dirty is to allow it to run for a few
minutes after you are done cooking, so that you do not have to re‐heat your grill just to
clean.
StainlessSteelCareandMaintenance
Itisacommonmisconceptionthatstainlesssteelwillmaintainitsoriginalfactoryshinewithlittlehelpfromthe
consumer.Unfortunately,thisisnottrue.Stainlesssteelwillnotstain,discolor,corrodeorrustasfastasother
types of steel, but it is not fully stain or weather proof. If it is not properly maintained, all grades of stainless
steel can face surface discoloration, corrosion and eventually rust. Any stainless steel that is exposed to the
environment will requireattention and carethroughout its life to ensurethat it keeps its shine and structural
integrity.
CleaningtheStainlessSteelandPolishing
1. Tocleanthestainlesssteelyouwillwanttowashoffalldirtanddebrisfromthesteelwithwarmwater.
Ifyouhavetoughspotstoclean,thenadegreasersuchasFormula409canbeused.
2. Next,youwillwanttorinseanddrythesteelthoroughlywithacleantowel.Donotallowthesteeltoair
dryasthestandingwatercancause surfacediscoloration.
3. Thelastthingyouwanttodoistoprotecttotheunitwithagoodpolish.Thereareseveralpolisheson
themarketthatworkgreat(BarkeepersFriendPolishandStainlessSteelMagicareafew)andwillhelp
keepyourgrillprotectedfromtheelementsforalongerperiodoftime.Mostofthesepolishesaretoxic,
soyouwouldonlywanttousetheseontheexteriorofthegrill(notyourcookinggratesorflavorizers).
a. Youwillwanttoapplythepolishtoacleanpapertowelandwipewiththedirectionofthegrain
inthestainlesssteel.
b. Thereshouldbenoexcessliquidonthesurfacebutitisacceptableforittobealittleoily,asthat
willdissipate.
4. If you have a situation where your grill has developed surface discoloration or surface rust, then you
needtocleantheunitasstatedaboveanduseagoodpolish(BarkeepersFriendPolish,orInstantRust
Out)toremovethespots.
a. Eachofthese polishing agentstakeabout30secondstowork andthen yousimplywipe offthe
product (if needed use a soft Scotch‐Brite pad to remove any tough spots.) If you used
BarkeepersFriend,thenyou donotneed todo anything further. If youusedInstant Rust Out
(or another cleaning agent), you would want to wipe it down with fresh water and dry it off
again with a clean towel and then coat the steel with a layer of WD‐40 or another Stainless
Polishingsolution,whichwillactasasurfaceprotectantforthesteel.
i. IMPORTANT:Besurenottohaveyourgrillonwhenusinganyflammableproduct,such
asWD‐40.Theseproductsareextremelyflammableintheiraerosolform.
EnvironmentalFactorsthatcanaffectyourGrill
Mother Nature is a wonderful thing but unfortunately she can be tough on outdoor appliances. There are
severalusualcausesforsurfacediscolorationandcorrosiononyourstainlesssteeloutdoorequipment:
1) Mortar (which contains lime) from the island assembly process, has rested on the unit for a pro‐longed
periodoftimeandtheunitwasnotcleanedquickly

24
2) Poolchemicalsweresplashedontothegrill(chlorineandacidwillcauseveryquickproblems)andtheunit
wasnotcleanedoffquickly
3) Hardwaterfromsprinklers(chlorineinthewater)wasallowedtositontheunit
4) Saltfromtheoceanair/waterwasallowedtorestuponthegrillforaprolongedperiodoftimebeforebeing
cleaned(beachownersmustbediligentinmaintainingtheiroutdoorstainlessequipment)
5) Dust,orrust,fromothermetalsfounditwaysontothegrillandwasleftonforanextendedperiodoftime.
6) Organic matters (such as certain types of food) might havegotten onto the surface of the grill andit was
thencovered.Withhighhumidityandlowoxygen,corrosionwillstarttotakeplace.
7) Sprays and cleaning solutionscontaining alkaline, lime, acid, salt might have been left on the grill surface
un‐dried.
8) Nostainlesssteelpolishwaseverusedafteroneoftheabovementionedactstookplace.
WaystoAvoidRustonyou rGrill:
1) Always purchase a Coyote Grill cover for your unit. This will ensure that your cover is correct fit and
breathable,whileprovidingtheprotectionneededtokeepallothercontaminantsoffofthesurface.
2) Wheninstallingtheunit,makesuretokeeptheunitcoveredwhenanymasonryworkisbeingperformed.If
anymortarordustdoescomeinto contactwith thestainless,makesure towipeitoffas soonaspossible
anduseastainlesssteelpolishimmediatelyafterwards.
3) Positionyourgrillawayfromareasthatcanreceivewatersplashfromapoolorhottub.
4) Donotstorepoolchemicalsinyourislandorislandcabinets.
HowtoRemoveScratchesfromyourStainlessSteel:
Ifyoursituationisalittlemoreseriousandyouhaveobtainedscratchesinyourequipment,thenyouwillneed
to purchase a “stainless steel scratch kit.”These kits are popular in retail stores but can be easier to obtain
online.Averypopularoneiscalled“Scratch‐B‐Gone.”Withthesekits,youwillnotpolishtheunituntilyouare
donere‐scratchingtheentireproductyouareworkingon.Withascratchkit,thegoalistoliterallyre‐scratchthe
entiresurface,sothatthe original grains are replaced byyournewscratched‐in grains.With this practice, you
mustbewillingtodotheentiresurfaceasyouwillnoticeastartandstoppoint.Also,becarefultopayattention
to your rolled or finished edges as these scratch kits will ruin this finish. After you have used the kit, you will
wanttofollowitupwithagoodstainlesspolish(asmentionedprior)andthenadrytowelforafinalwipedown.
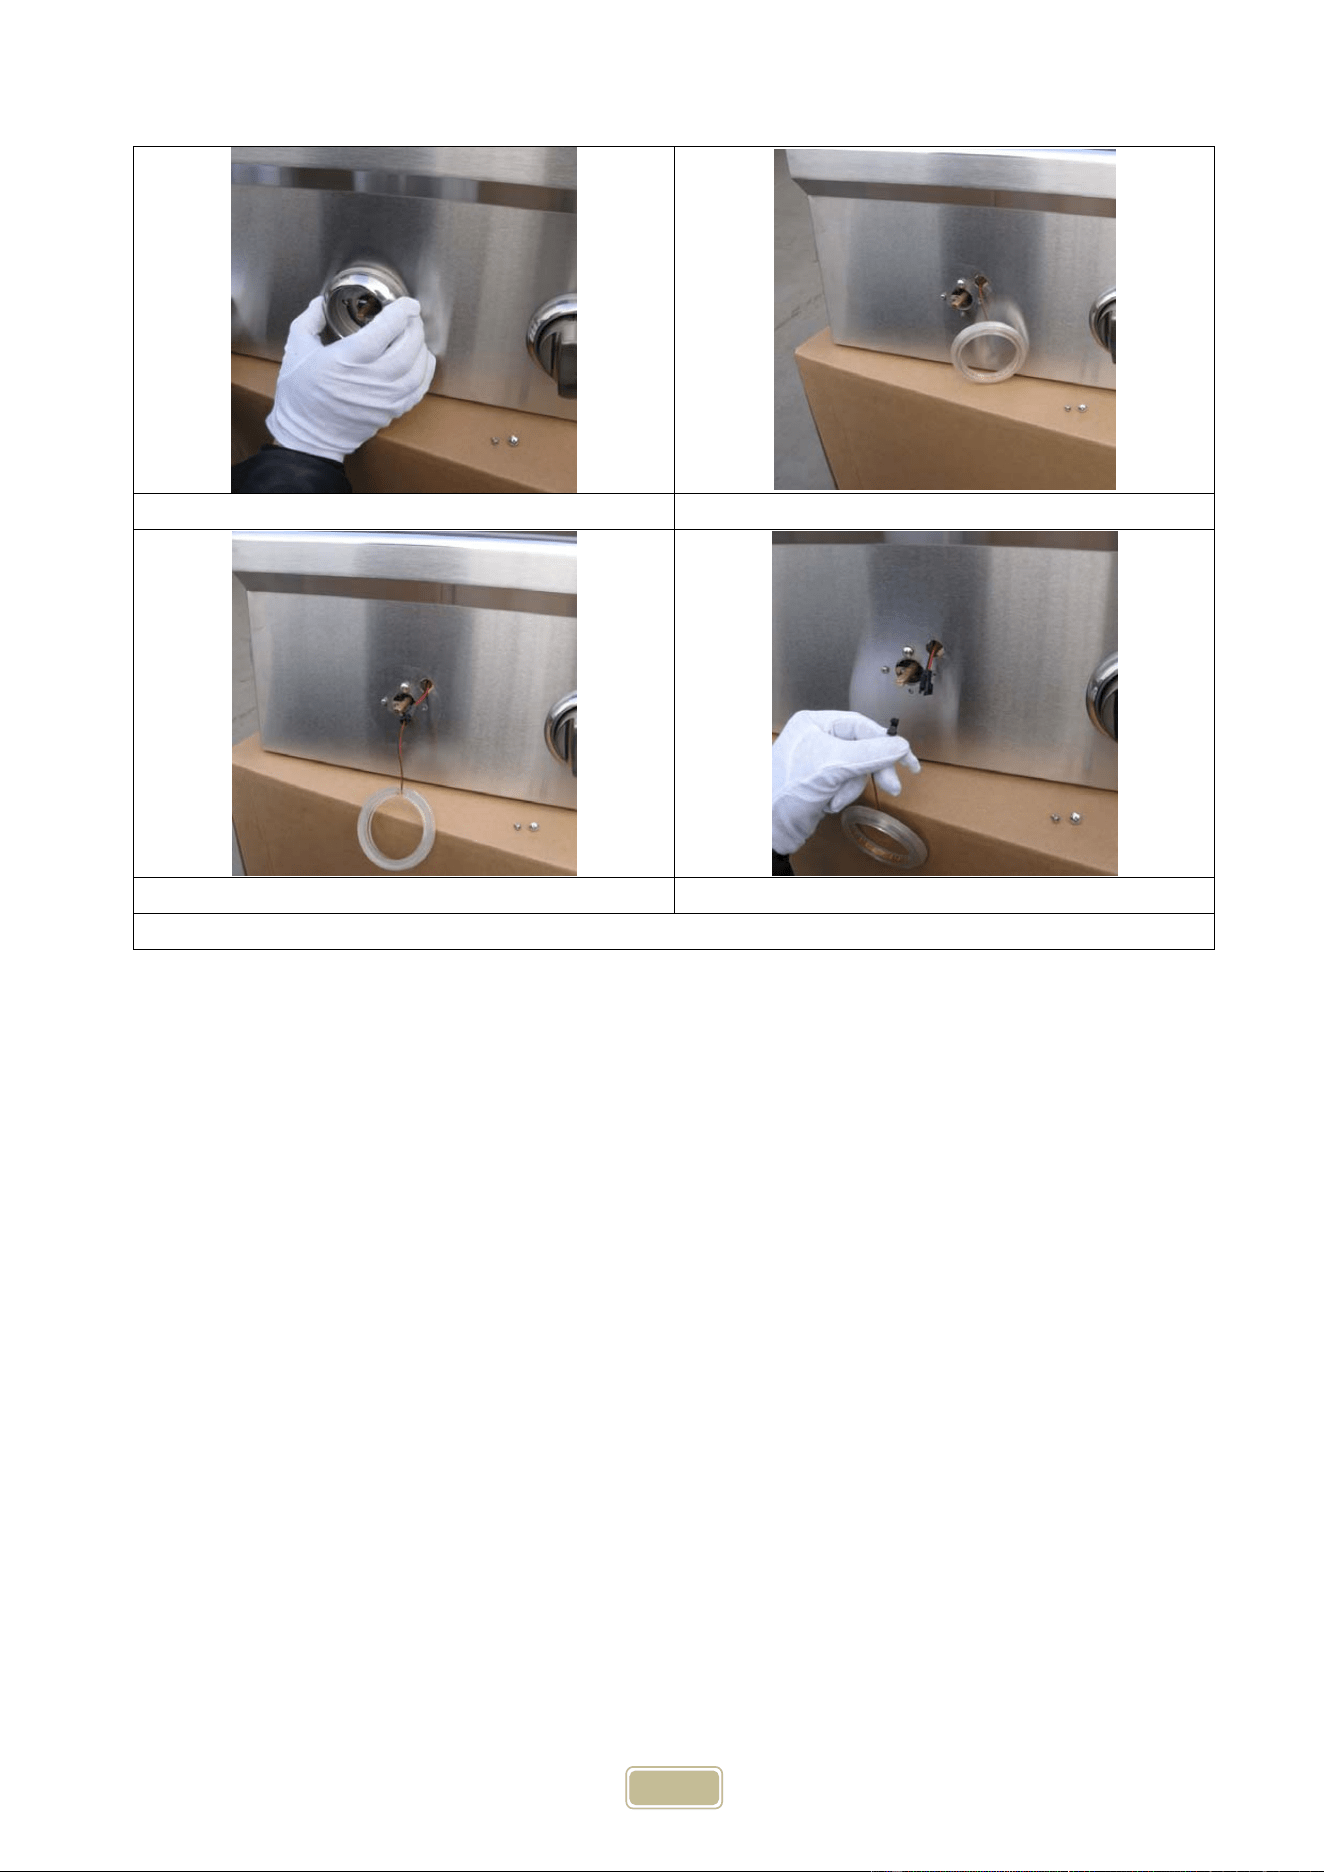
HOWTOCHANGETHELIGHTBULBS
1. Removethescrewholdingthebulblens.
2. Reach in using your fingers only, grip the two outside edges of the light bulb, do not grip the top or
bottom of the bulb, as it might break. Pull the bulb straight out, so that the two electrode wires are
completelyremovedwithbulb.Placebulbintrash.
3. When installing the new halogen bulb be sure to use a clean cloth or paper towel to ensure the
longevityofthebulb.
4. Insert the new bulb using your clean cloth and gently snap it into position. Wipe off any fingerprints
and/orgreasethatmayhavetransferredtothebulb.
5. Re‐installthebulblensandcover
6. Fliptheswitchontochecklights.
25
ANNUALCLEANINGOFGRILLHOUSING
Burn‐offthe barbecueafter every cookout will keep it readyforinstant use, however, once a year you should
givetheentiregrillathoroughcleaningtokeepitintopoperatingcondition.
1.Shutoffgassupplyatsourceanddisconnectsfuelline.Protectfuellinefitting.
2.Removeandcleanthecookinggrids,flavorizersandburners.
3.Removewarmingrackandwashwithmilddetergentandwarmwater.
4.Coverthegasvalveorificeswithapieceofaluminumfoil.
5.Brushtheinsideandbottomofthegrillwithastiffwirebrush,andwashdownwithamildsoapandwarm
watersolution.Washthoroughlyandletdry.
6.Removealuminumfoilfromorificesandcheckorificesforobstruction.
7.Checkelectrode.
8.Reinstallflavorizers,cookinggrids,andwarmingrack.
9.Reconnecttogassourceandobserveburnerflameforcorrectoperation.
IMPORTANT:YoushouldNOTlinethebottomofthegrillhousingwithaluminumfoil,sandoranyothergrease
absorbentsubstance.Greasewillnotbeabletodripintothedriptrayandagreasefiremayoccur.
MAINTENANCEGUIDELINES
1. Keepoutdoorcookinggasapplianceareaclearandfreefromcombustiblematerials,gasolineandother
flammablevaporsandliquids.
2. Donotobstructtheflowofcombustionandventilationair.
3. Keeptheventilationopening(s)ofthecylinderenclosurefreeandclearfromdebris.
4. Visuallycheckburnerflames.Burnerflamesshouldbeblueandstablewithnoyellowtips,excessivenoise,or
lifting.Ifanyoftheseconditionsexistcallourcustomerserviceline.
5. Cleanoutdoorcookinggas appliance,includingspecialsurfaces,withrecommended cleaningagents,if
necessary.
6. Checkandcl ean burnerforinsectsandinse ctnests.Acloggedtubecanleadtoafirebeneaththegrill.
RecommendedCleanersforSpecificSituations
JOB CLEANINGAGENTS COMMENTS
RoutineCleaning
Soap,ammonia,detergent
Medallion
Applywithclothorsponge
Fingerprints&smears Arcal20,Lac‐O‐NuEcoshine Providesbarrierfilm
Stubbornstains&
discoloration
Cameo,Talc,Zud
FirstImpression
Rubindirectionof polishlines
Grease&Oil
Anygoodcommercialdetergent
Applywithspongeorcloth
Restoration/Passivation Benefit,SuperSheen
26
GENERALTROUBLESHOOTING
Youshouldinspecttheburnersatleastonceayearorimmediatelyifanyofthefollowingconditionsoccur:
• Thesmellofgas.
• Flamesappearingmostly yellow.(SomeyellowatthetipsisOK )
• Thegrillwillnotgethotenough.
• Burnersmakeasnappingnoise.
• Thegrillheatsunevenly.
SPIDERANDINSECTWARNING
WHENTOLOOKFORSPIDERS
Youshouldinspecttheburnersonceayearorimmediatelyafteranyofthefollowingconditionsoccur:
1.Thesmellofgasinconjunctionwiththeburnerflamesappearingyellow.
2.Thegrilldoesnotreachtemperature.
3.Thegrillheatsunevenly.
4.Theburnersmakepoppingnoises.
BEFORECALLINGFORSERVICE
Ifthegrilldoesnotfunctionproperly,usethechartbelowbeforecontactingyourdealerforservice.Youmay
saveyourselfthecostofaservicecall.Troubleshootingisforgeneralpurposesonly.Iftheproblemstillexists,
contactyourdealerorthenearestauthorizedagencyforservice.
Problem: PossibleCausesandSolutions:
Grillwillnotlightwhentheigniter
buttonispushed.
• Isyourgassupplyturnedon?
• IfthisisanL.P.grill,istheregasinyourtank?Checkyourgaslevel.
• Isoneofyourburnersturnedon?Allowupto5secondsofgasflow
toignite.
• Isyourigniterworking?
‐Youshouldhearasnapping
soundwhenyoupresstheigniter.
‐Ifyouhearasnappingsound,canyouseeasparkatthe
electrodes?
Note:Youwillneedtoremoveyourcookinggratesandflavorizers
toseetheelectrodes.Theelectrodesshouldhavea1/8”to¼”gap
betweentheelectrodeandcontactpoint.
Troubleshooting Your Grill
INSECTWARNING:Spidersandinsectscannestintheburnersofthisandothergrills,whichcoulddisrupt
gas flow. This dangerous condition could cause a fire behind and beneath the valve panel, damaging the grill
andmakingitunsafetooperate.Werecommendyoucheckthegrillandremoveanyspiders,insectsandwebs
atleastoncea
y
eartoreducethisrisk.

27
• Checkyourigniterbatteryandreplaceifneeded.
• Checkforloosewireconnectionstotheigniterorelectrodes.
• Checktoseeifdebrisisblockingtheelectrodes.
• Iftheigniterisnotworking,canyoulightthegrillwithalighter?
Flare‐ups • Checkflavorizersandcookinggratesforexcessfoodorgrease
build‐up.
• Ensuregrillisnotplaceddirectlyinthepathofwind.
Besuredriptrayisclean(donotusealuminumfoilondriptray.)
Note:Someflare‐upsmaybeinevitableifcookinggreasyfoods.
YellowFlames
• Checktheburnerinletforobstructions,particularlyatairinletsfor
eachburner.
• Grillmaybeinanareathatistoowindy.
Flame blows out on low setting or
hasunevenheatdistribution.
• Checkforspiderwebsorinsectnestinventuriandcleanventuri.
• Coldgrillneedstobepreheatedfor5minutesonhighsetting.
• Venturimaybemisalignedandneedstobelinedupoverorifices.
• Cold and windy weather will require you to move grill away from
thewind.
• Lack of fuel. Check to see cylinder valve is open and cylinder has
fuel.
Lowheatwiththeknobon“HIGH”
• Checktoseeifthefuelhoseisbentorkinked.
• Makesurethegrillareaisclearofdust.
• Checkyourgassupplyandgaspressure.
• If it is only one burner that appears low, make sure the orifice or
burnerisclean.
GrillisTooHot
• Excessgreasebuild‐upcausinggreasefires.
• Damagedorfaultyregulator.
Replacewithfactoryauthorizedparts.
• Cookonalowertemperaturesetting.
Flame behind control panel or
controlknobarea.
IMMEDIATELYshutoffcylindervalveandallowgrilltocool.
• Checkforspiderwebsorinsectnestinventuriandcleanventuri.
• Gas is leaking from a faulty connection. Tighten connections with
an adjustable wrench and replace damaged parts. Perform a leak
testonallconnectionsbeforecooking ongrillagain.
• Venturimaybemisalignedandneedstobelinedupoverorifice.
Fireatanyconnection. IMMEDIATELYshutoffcylindervalveandallowgrilltocool.
• Gas is leaking from a faulty connection. Tighten connections with
anadjustablewrenchandreplacedamagedparts.
• Performaleaktestonallconnectionsbeforecookin g ongrillagain.

28
CoyoteOutdoorwarrantstotheoriginalpurchaserattheoriginalsiteofdeliverywithproofofpurchase
ofeachOutdoorGasgrill/Sideburnerthatwhensubjecttonormalresidentialuse,itisfreefromdefects
inworkmanshipandmaterialsfortheperiodsspecifiedbelow.Thiswarrantyexcludesgrillsusedinrental
andcommercialappli cations.Thiswarrantyexcludessurfacecorrosion,scratches,anddiscolorationwhich
mayoccurduringregularuse.ItdoesNOTcoverlabororlaborrelatedcharges.Therewillbeshippingand
handlingchargeforthedeliveryofthewarrantypart(s).
COMPONENTWARRANTYPERIOD
CookingGrids(norustorburnthrough)………………………..................................5years(limited)
FlavorizerBars(norustorburnthrough)………………………………….......................2years(limited
Electric/PlasticComponents………………………………………………………....................2years(limited)
Ignitionsystems/Valves………………………………………………………………...................1year(limited)
Stainlesssteelframe/housing…………………………………………………….....................LimitedLifetime
StainlessSteelBurners(norustorburnthrough).………………….........................LimitedLifetime
Ourobligationunderthiswarrantyislimitedtorepairorreplacement,atouroption,oftheproductduring
thewarrantyperiod.TheextentofanyliabilityofCoyoteunderthiswarrantyislimitedtorepairor
replacement.Thiswarrantydoesnotcovernormalwearofparts,damageresultingfromanyof
the
following:negligentuseormisuseoftheproduct,useonimproperfuel/gassupply,usecontraryto
operatinginstructions,oralterationbyanypersonotherthanafactoryservicecenter.Thewarranty
periodisnotextendedbysuchrepairorreplacement.
WARRANTYCLAIMPROCEDURE:IfyourequireserviceorpartsforyourCoyoteGrill,pleasecontactour
WarrantyServiceCenterforfactorydirectassistance.Ourhoursofoperationare8amto4pmCST.The
phonenumberis855.520.1559andtheFaxnumber is214.520.1450.Youmayalsofilloutwarranty
claims
onlineatwww.coyoteoutdoor.com.Pleasehaveyourmodelnumber,serialnumberandproofof
purchaseavailableforanywarrantyclaim.
CoyoteOutdoormayrequirethereturnofdefectivepartsforexaminationbefo reissuingreplacement
parts.Ifyouarerequiredtoreturndefectiveparts,shippingchargesmustbeprepaidby
thecustomer.
UponexaminationandtoCoyoteOutdoor’sdetermination,iftheoriginalpartisprovendefective,Coyote
Outdoor,mayapproveyourclaimandelecttoreplacesuchpartswithout charge.Inanyinstance,
customerisresponsibleforshippingandhandlingofthereplacementparts.Productrepairasprovided
underthiswarranty
isyourexclusiveremedy.CoyoteOutdoorshallnotbeliableforanyincidentalor
consequentialdamagesforbreachofanyexpressorimpliedwarrantyonitsproducts.
Thiswarrantydoesnotcoveranyfailuresoroperatingdifficultiesduetoaccidents,abuse,misuse,
alteration,misapplication,vandalism,improperinstallation,maintenanceorservice,
damagescausedby
flashbackfireorgreasefires,assetoutintheOwner’sManual.Thiswarrantydoesnotcoverscratches,
dents,corrosionordiscolorationcausedbyweather,heat,abrasiveandchemicalcleaners,poolorspa
chemicals,and/oranytoolsusedintheassemblyorinstallationofthisunit.This
warrantydoesnotcover
paintloss,surfacerust,corrosionorstainlesssteeldiscolorationwhichisconsiderednormalwearandtear.
Limited Warranty

29
Thiswarrantydoesnotcoverthecostofanyinconvenience,personalinjury,orpropertydamagedueto
improperuseorproductfailure.Deteriorationordamageduetosevereweatherconditionssuchashail,
hurricanes,earthquakes,tsunamis,tornadoes,terrorism,discolorationduetoexposuretochemicals
eitherdirectlyorintheatmosphere,Acts
ofGod/forcesofNaturearenotcoveredbythislimited
warranty.
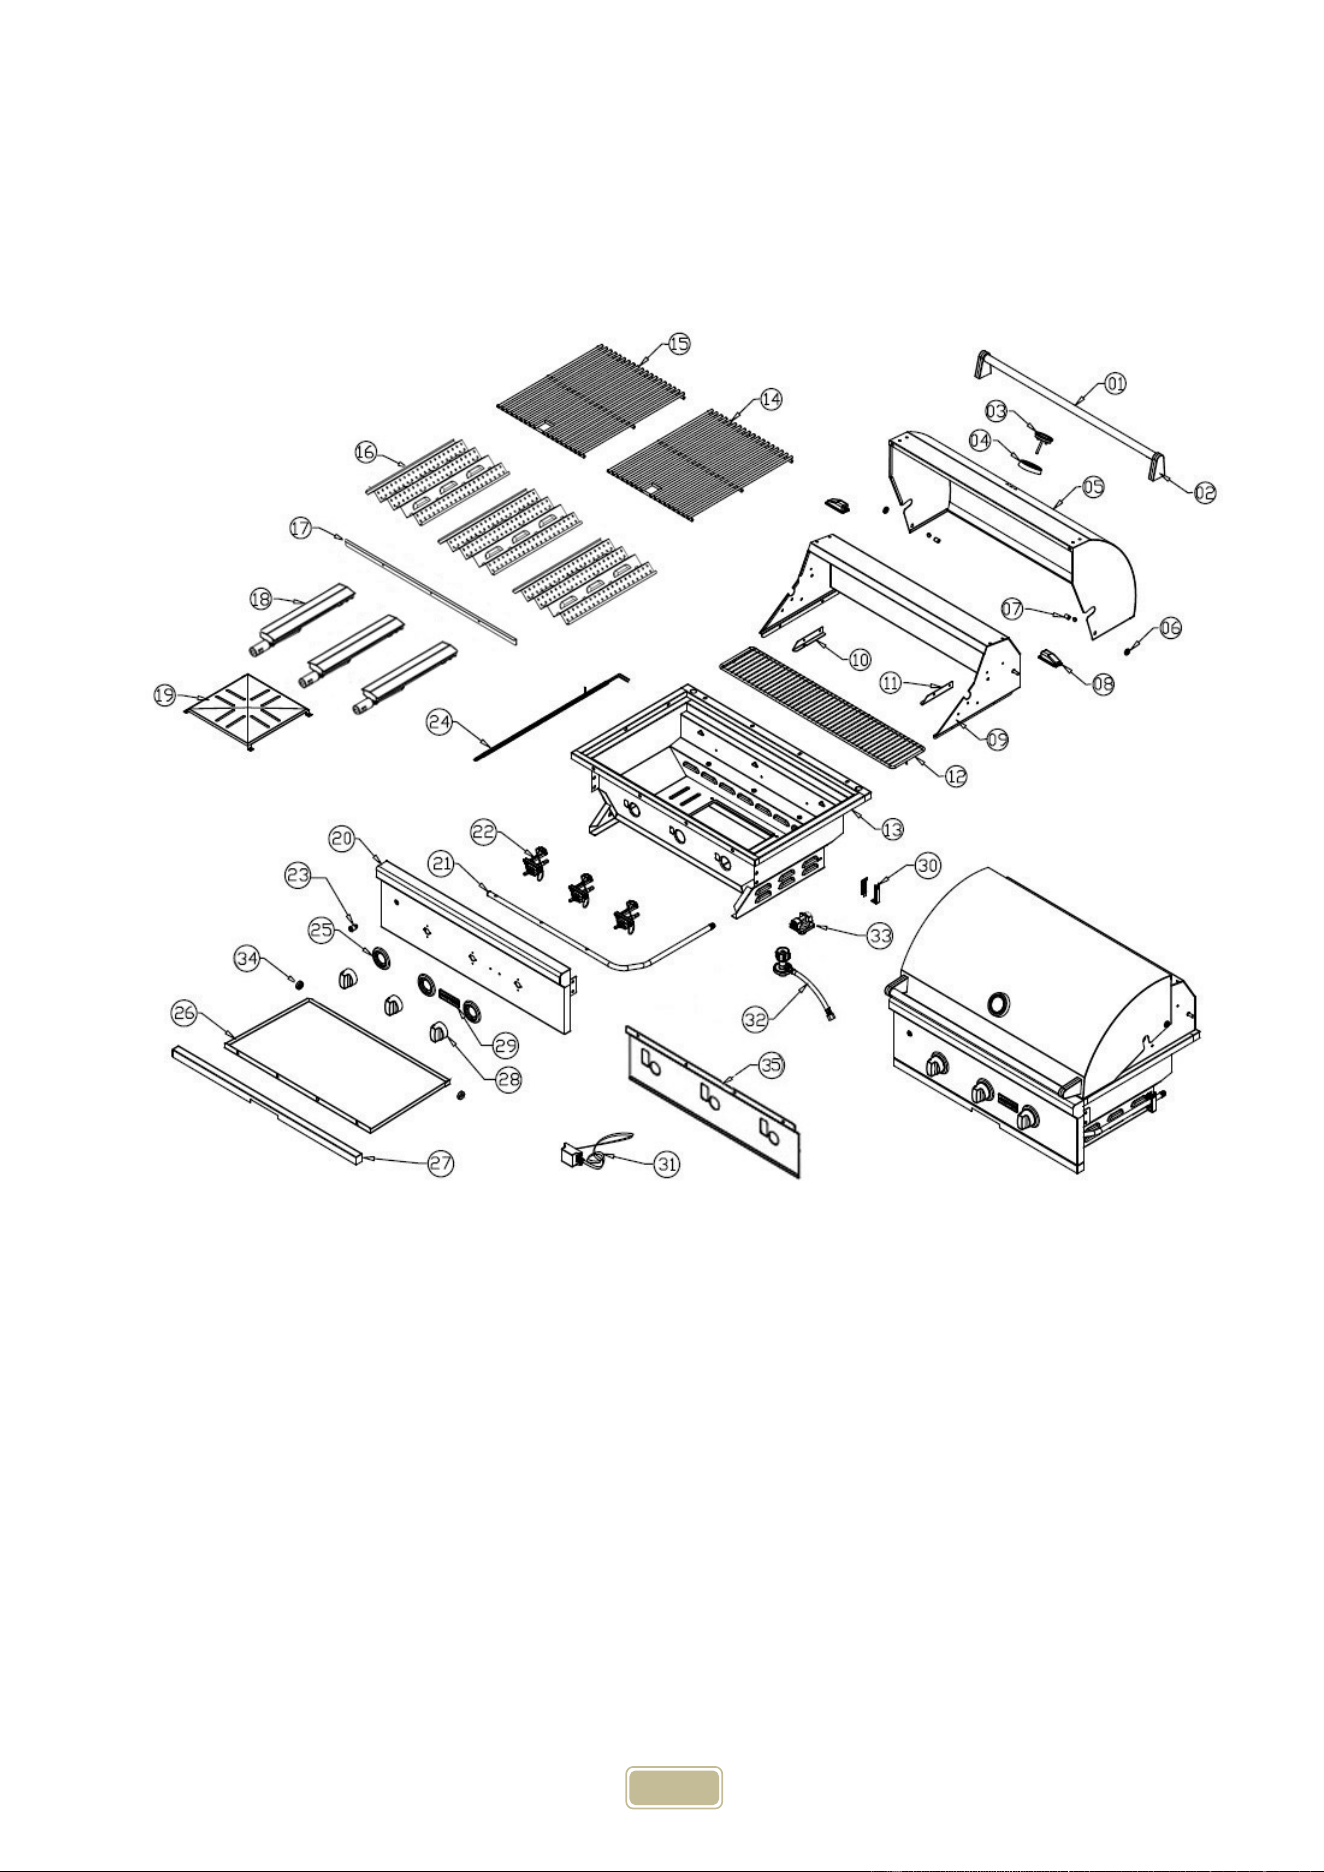
30
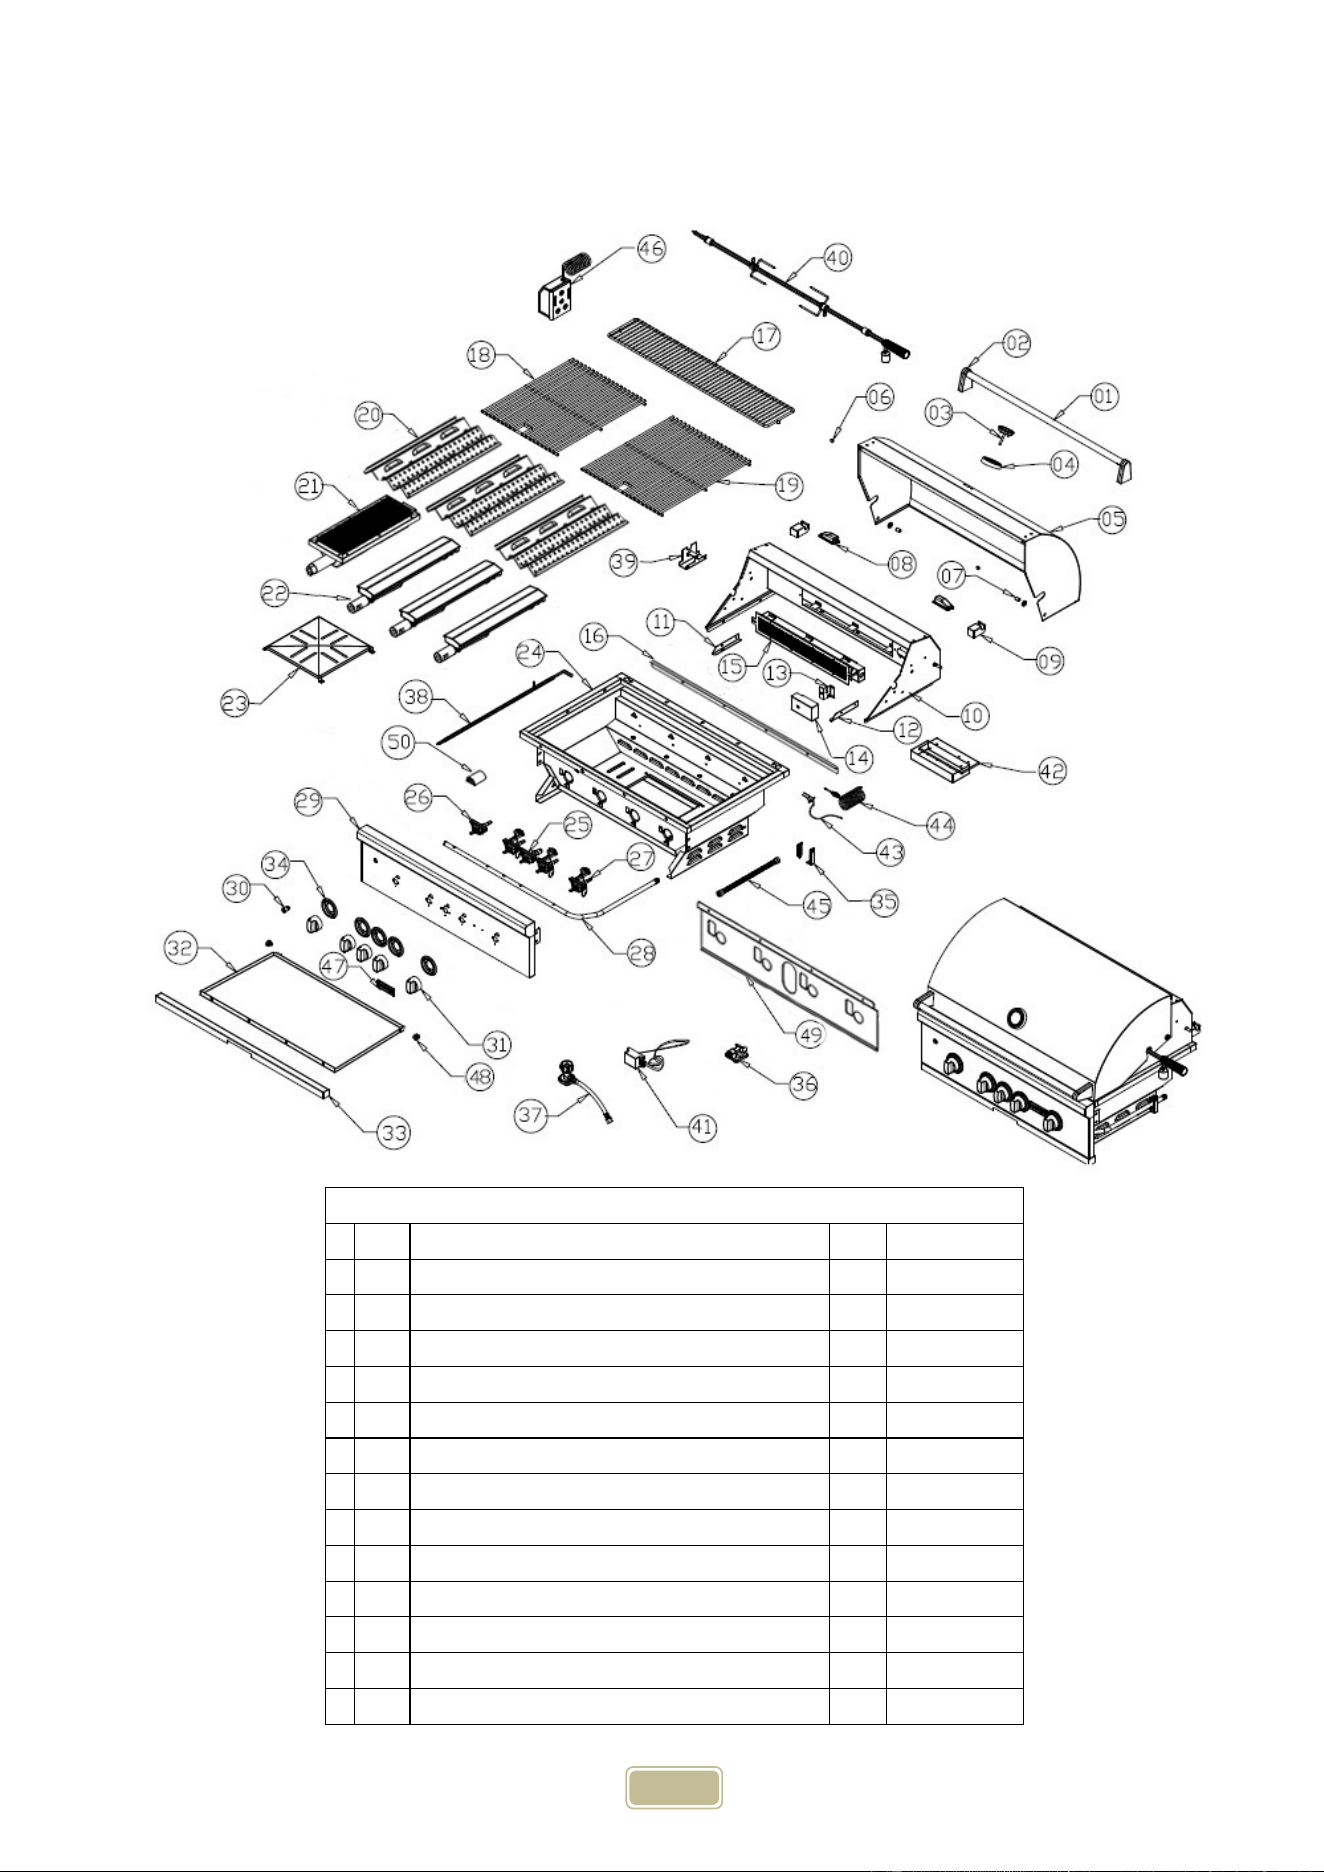
C1C34ExplodedPartsView
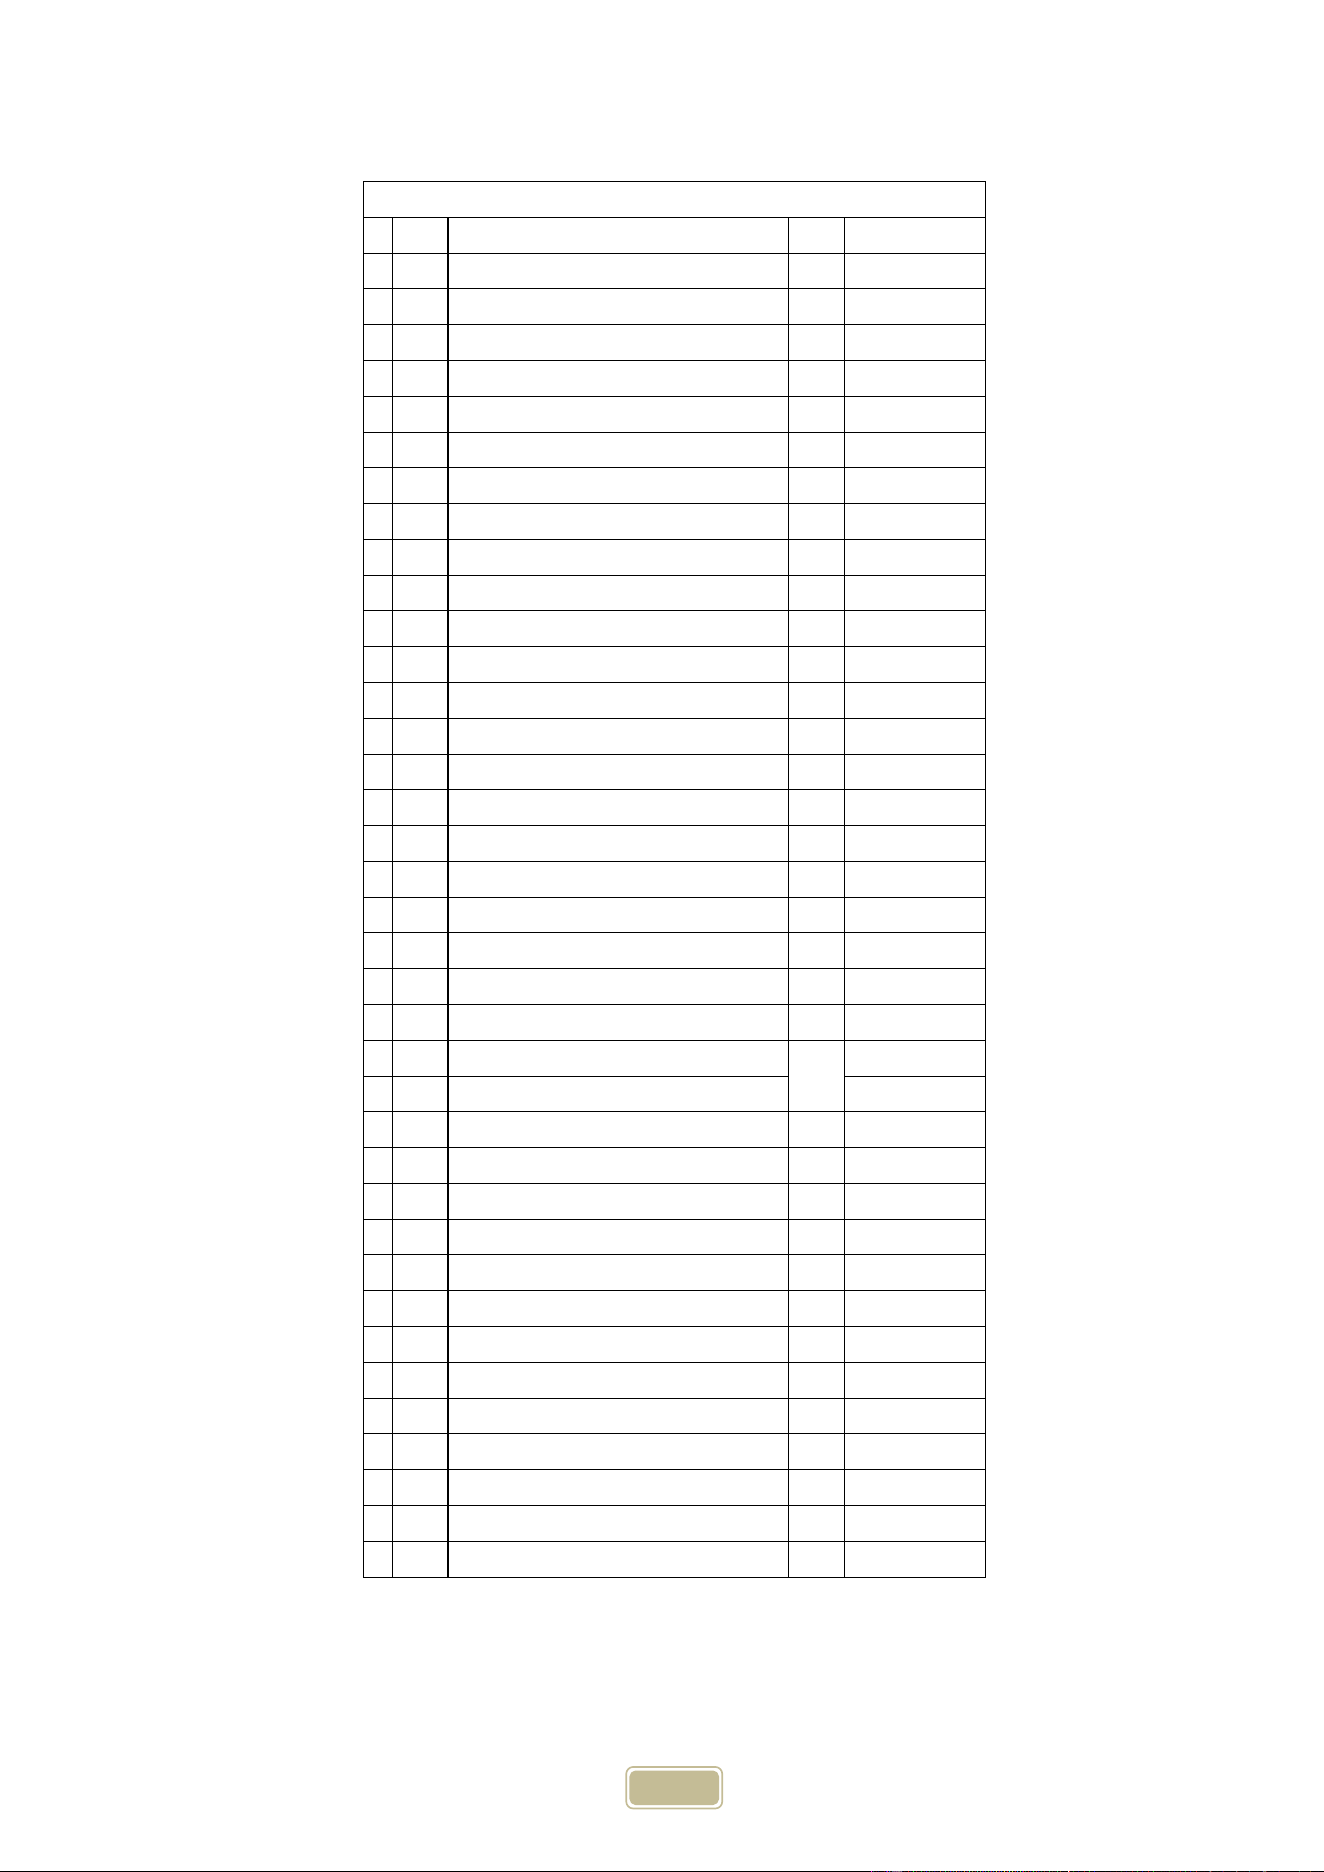
31
C1C34PartsListing
No. Name Qty PartNo.
1 HoodHandle‐3B 1 C3B00006
2 HandleFixing 2 C0000007
3 Thermometer 1 C0000022
4 ThermometerBase 1 C0000044
5 Hood‐3B 1 C3B00005
6 RubberStopper 2 C0000032
7 HoodConnectorHardware 2 C0000045
8 Light 2 C0000014
9 LowerHood‐3B 1 C3B00007
10 WarmingRackBracket‐Left 1 C0000025‐1
11 WarmingRackBracket‐Right 1 C0000025‐2
12 WarmingRack‐3B 1 C3B00008
13 Firebox‐3B 1 C1C34003
14 Grate(1pc)18Bar 1 CSG00018
15 Grate(1pc)19Bar 1 CSG00019
16 Flavorizer‐3B 3 C1C34009
17 FlavorizerBracket‐3B 1 C1C34004
18 CastSSBurner 3 C1000001
19 FireboxBottomCover 1 C0000046
20 ControlPanel‐3B 1 C1C34001
21 GasPipe‐C34LP
1
C1C3410L
21 GasPipe‐C34NG C1C3410N
22 StandardValveLP
3
C1C00012
22 StandardValveNG C1C00013
23 LightSwitch 1 C0000052
24 3‐BurnerLightWire 1 C3000001
25 KnobBase 3 C0000012
26 DripTray‐3B 1 C3B00002
27 DripTrayFrontBar‐3B 1 C3B00012
28 Knob 3 C0000011
29 LogoBadge 1 CH500019
30 GasPipeClamp 1 C0000044
31 Transformer 1 C0000023
32 LPRegulator 1 C0000030
33 NGRegulator 1 C0000038
34 DripTrayWheel 2 C0000057
35 HeatResistancebarrier‐C34 1 C1C34014
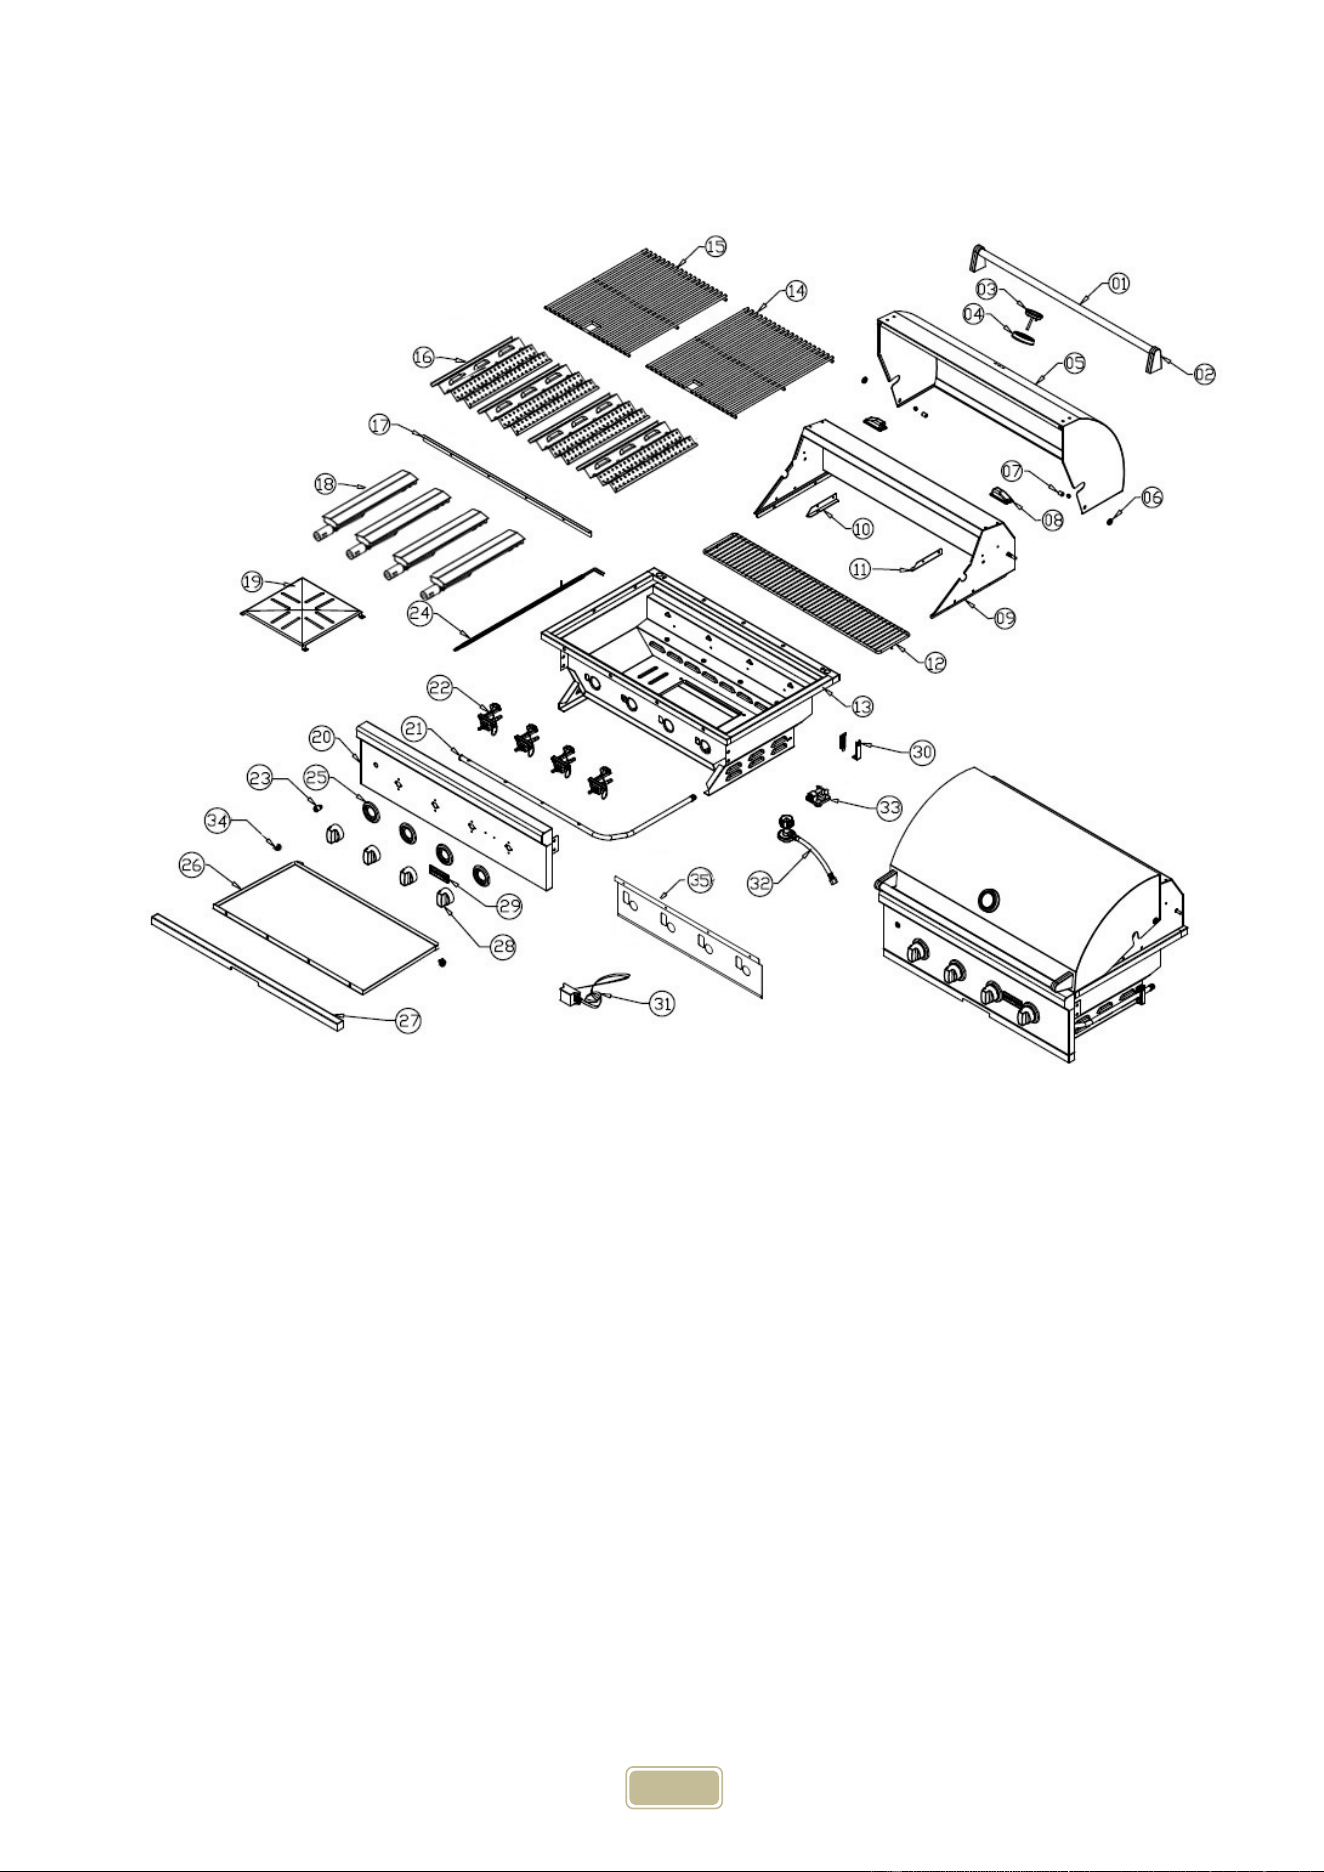
32
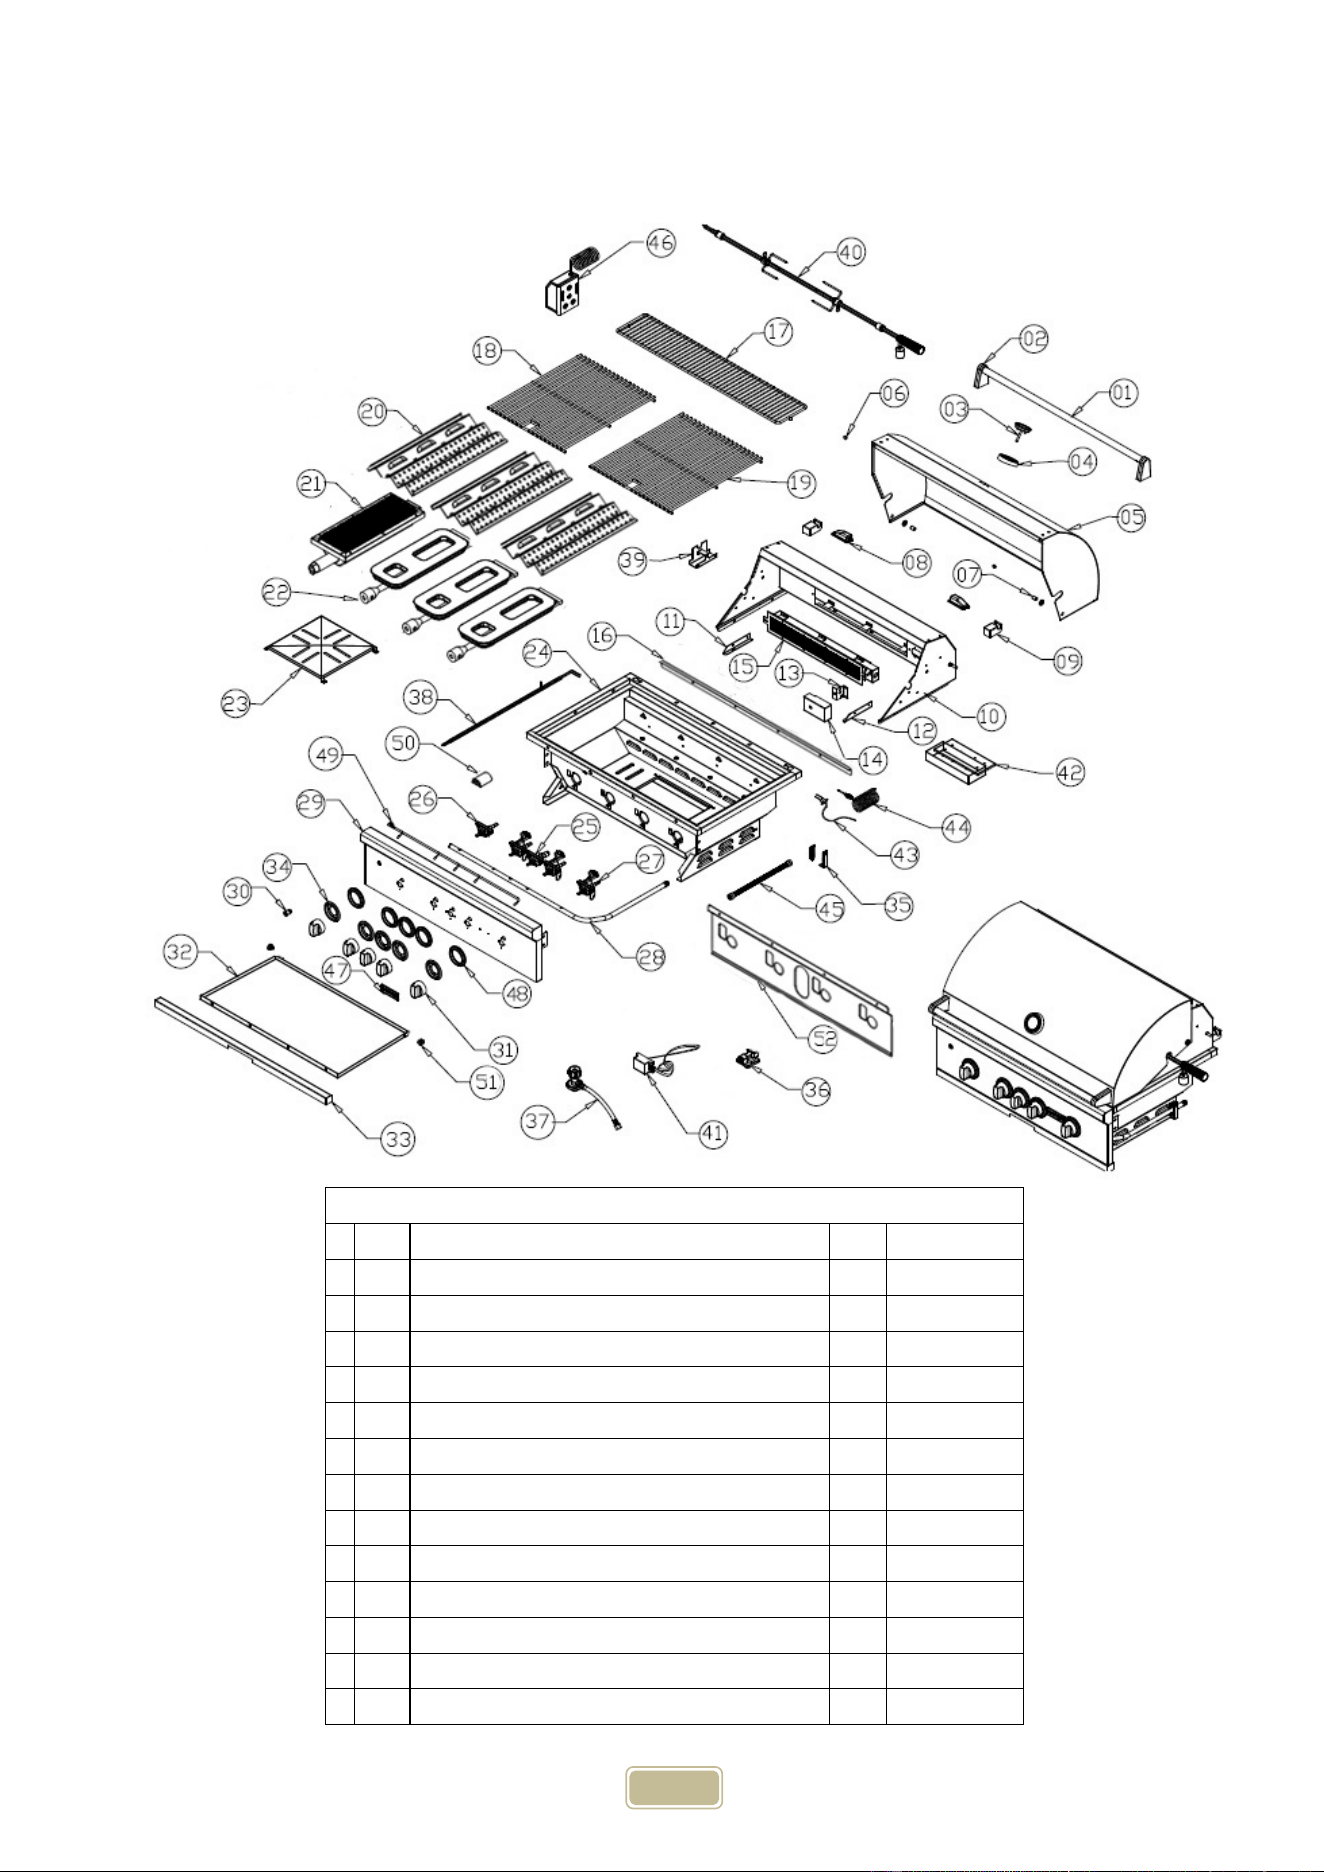
C1C36ExplodedPartsView
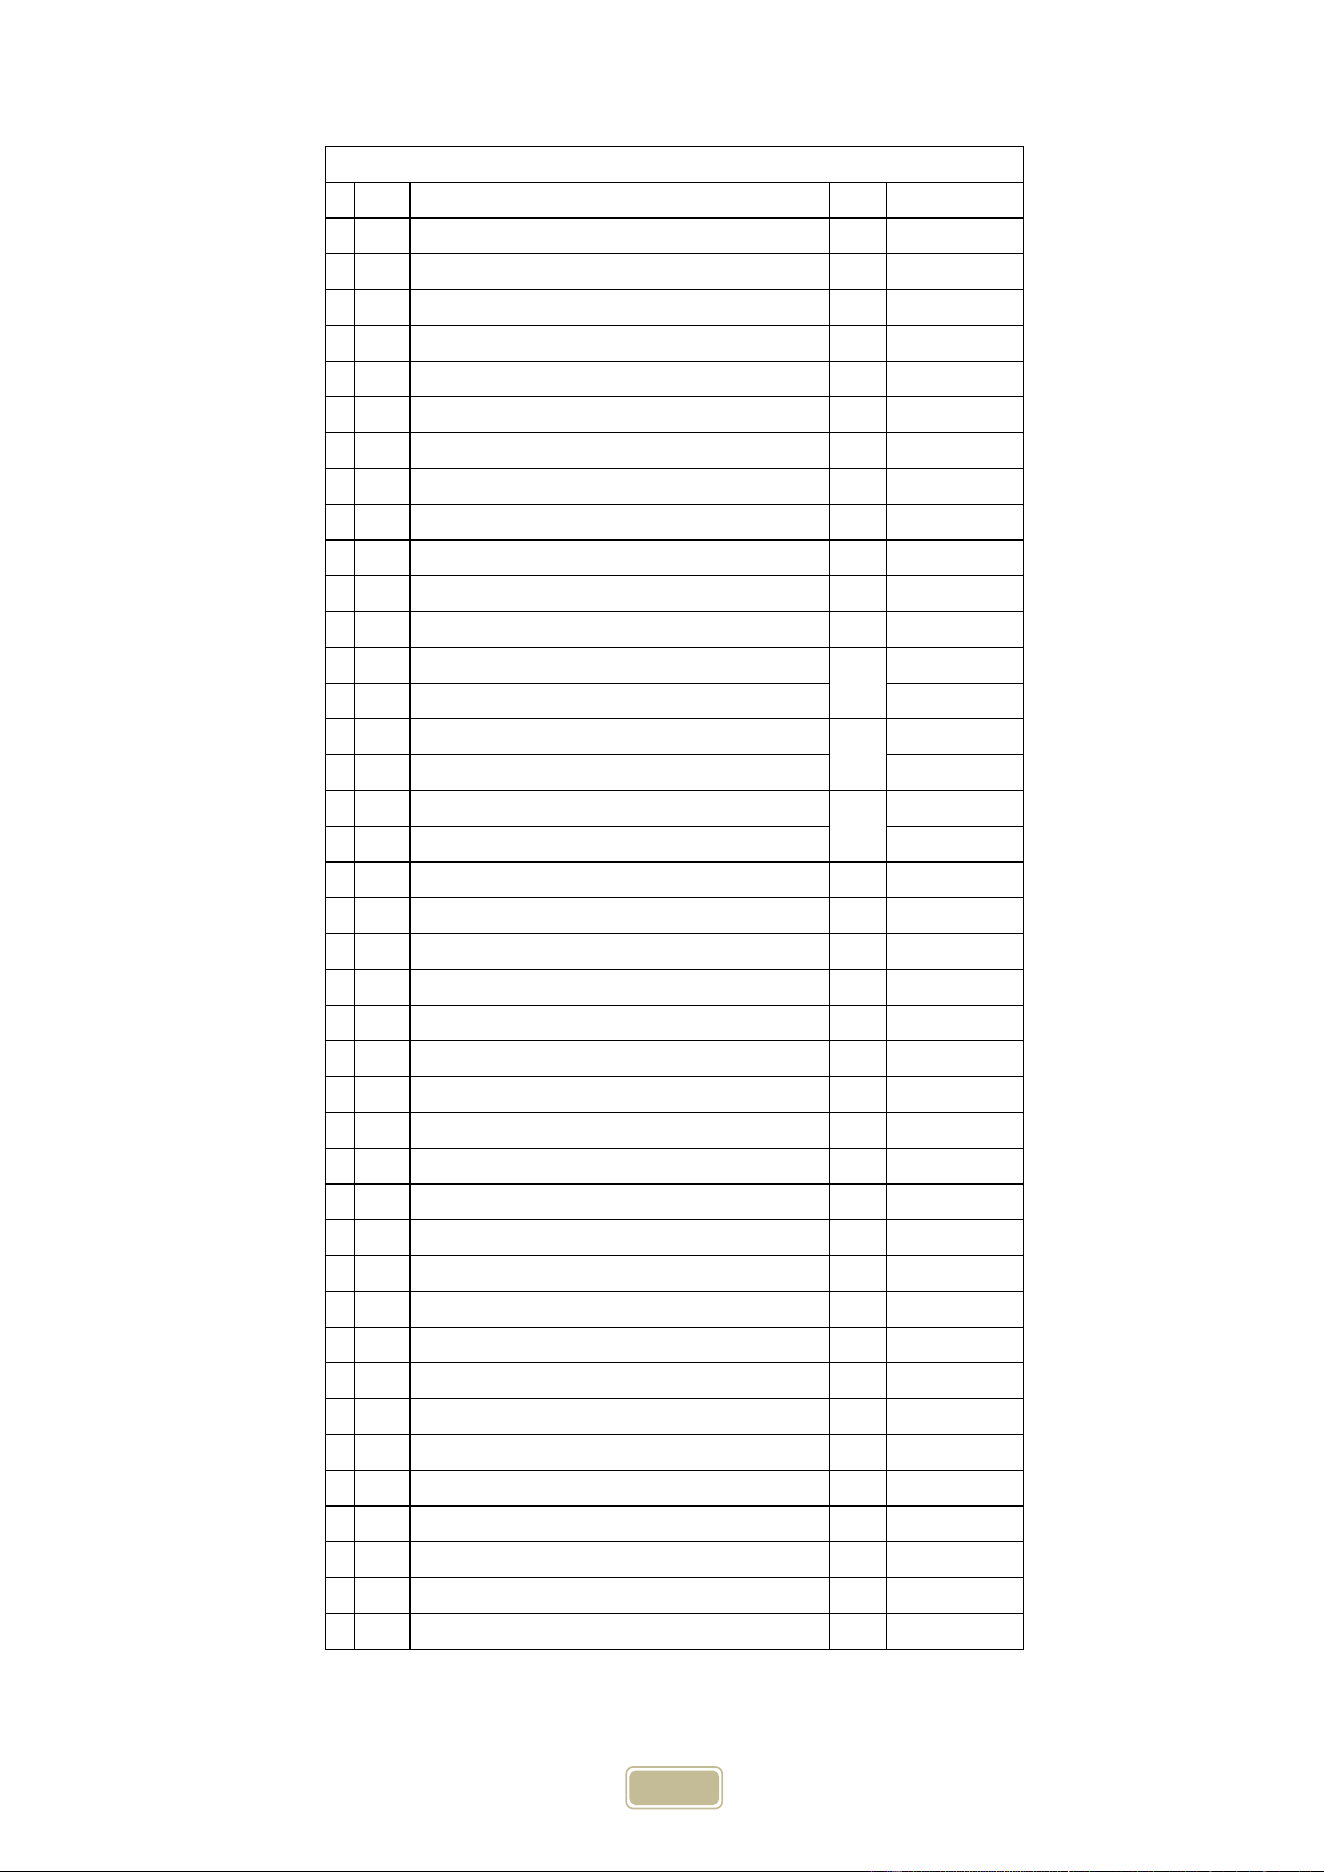
33
C1C36PartsListing
No. Name Qty PartNo.
1 HoodHandle‐36 1 C3600006
2 HandleFixing 2 C0000007
3 Thermometer 1 C0000022
4 ThermometerBase 1 C0000044
5 Hood‐36 1 C3600005
6 RubberStopper 2 C0000032
7 HoodConnectorHardware 2 C0000045
8 Light 2 C0000014
9 LowerHood‐C36 1 C1C360007
10 WarmingRackBracket‐Left 1 C0000025‐1
11 WarmingRackBracket‐Right 1 C0000025‐2
12 WarmingRack‐36 1 C3600008
13 Firebox‐36 1 C1360003
14 Grate(1pc)19Bar 1 CSG00019
15 Grate(1pc)20Bar 1 CSG00020
16 Flavorizer‐36 4 C1360009
17 FlavorizerBracket‐36 1 C1360004
18 CastSSBurner 4 C1000001
19 FireboxBottomCover 1 C0000046
20 ControlPanel‐C36 1 C1C36001
21 GasPipe‐C36LP 1 C1C3610L
21 GasPipe‐C36LP 1 C1C3610N
22 StandardValveLP
4
C1C00012
22 StandardValveNG C1C00013
23 LightSwitch 1 C0000052
24 4‐BurnerLightWire 1 C4000001
25 KnobBase 4 C0000012
26 DripTray‐36 1 C1360002
27 DripTrayFrontBar‐36 1 C1360011
28 Knob 4 C0000011
29 LogoBadge 1 CH500019
30 GasPipeClamp 1 C0000044
31 Transformer 1 C0000023
32 LPRegulator 1 C0000030
33 NGRegulator 1 C0000038
34 DripTrayWheel 2 C0000057
35 HeatResistancebarrier‐C36 1 C1C36014
34
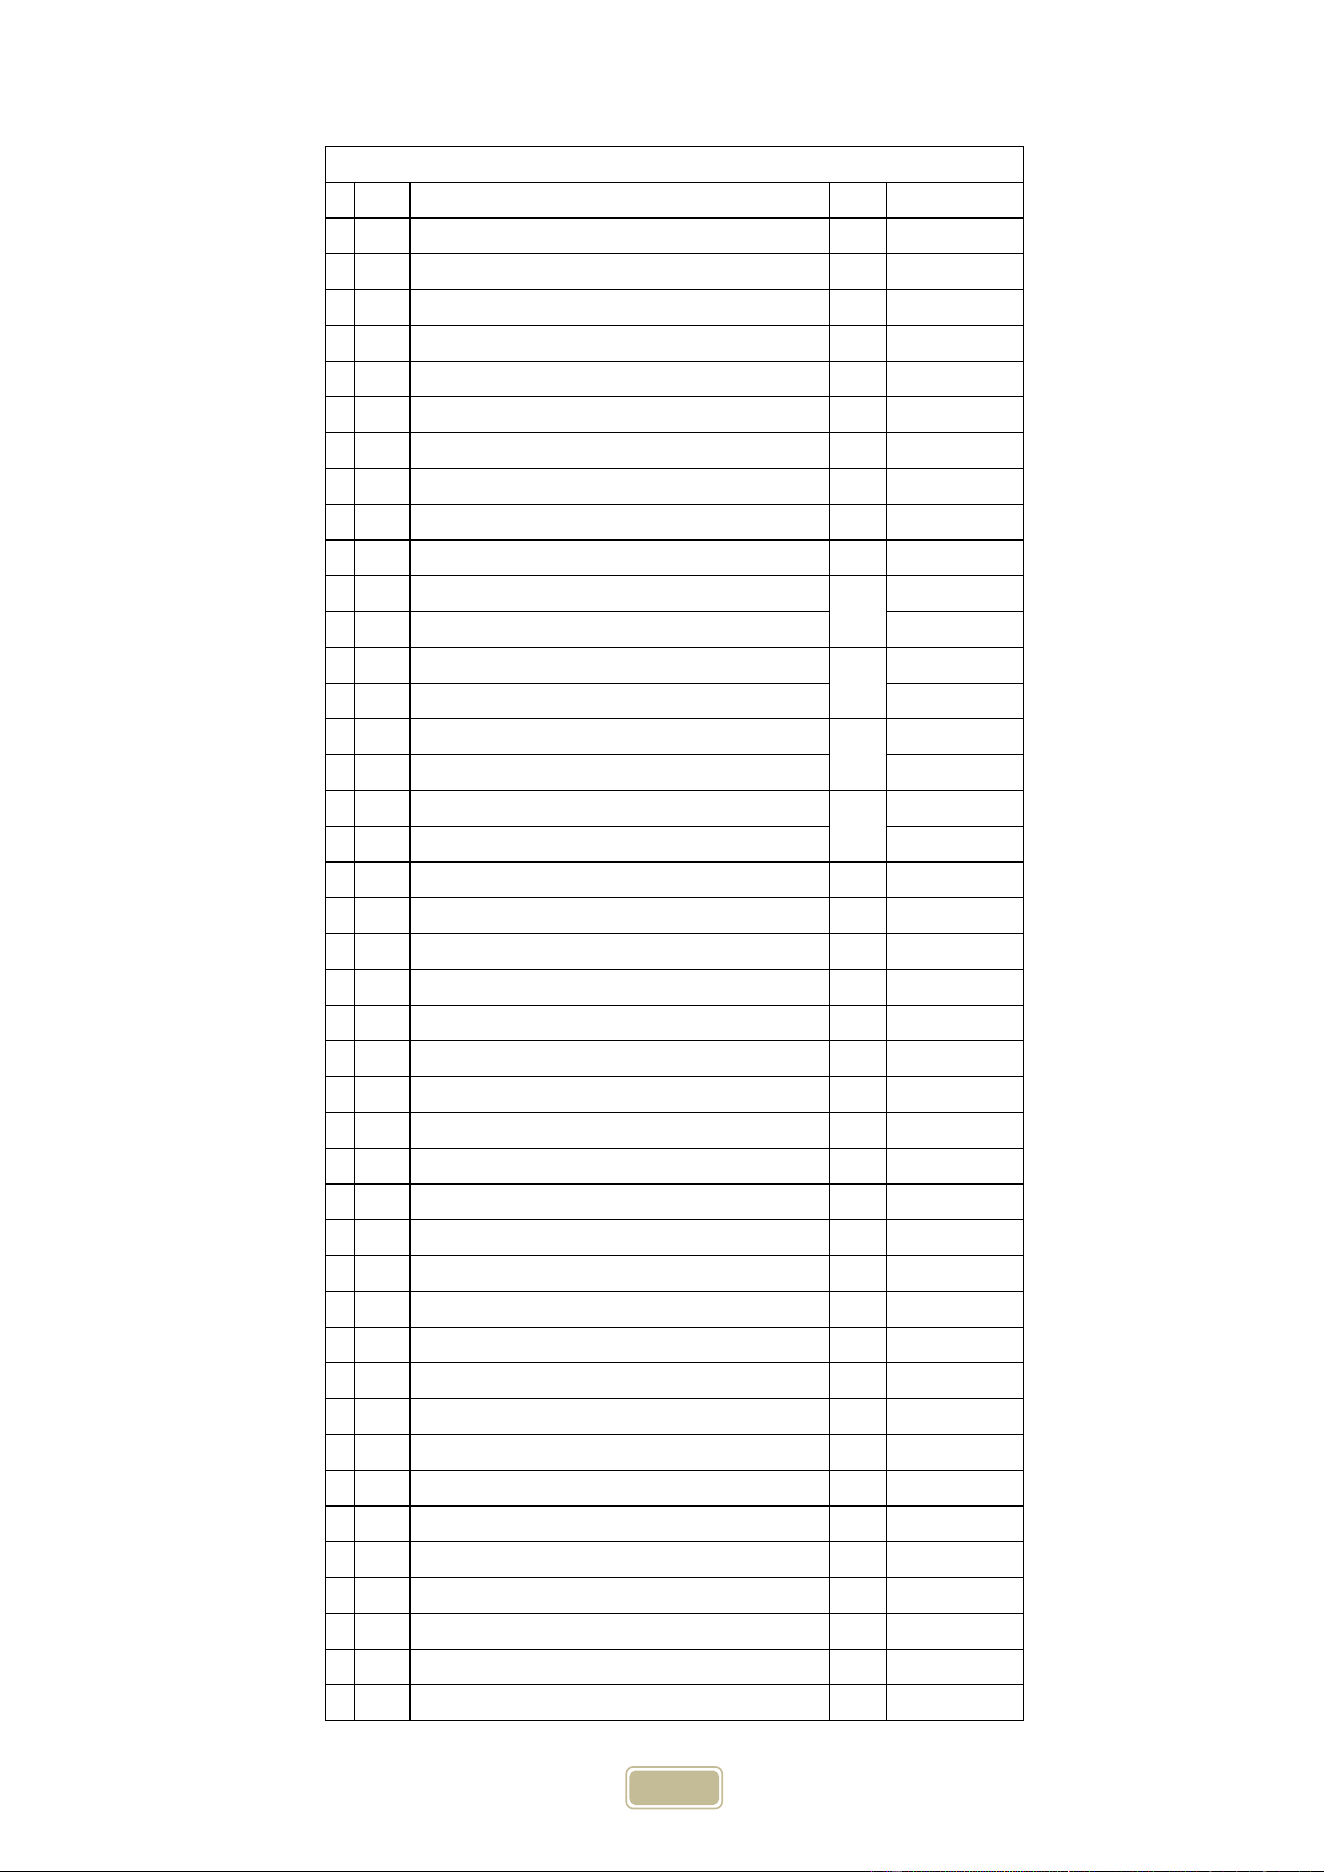
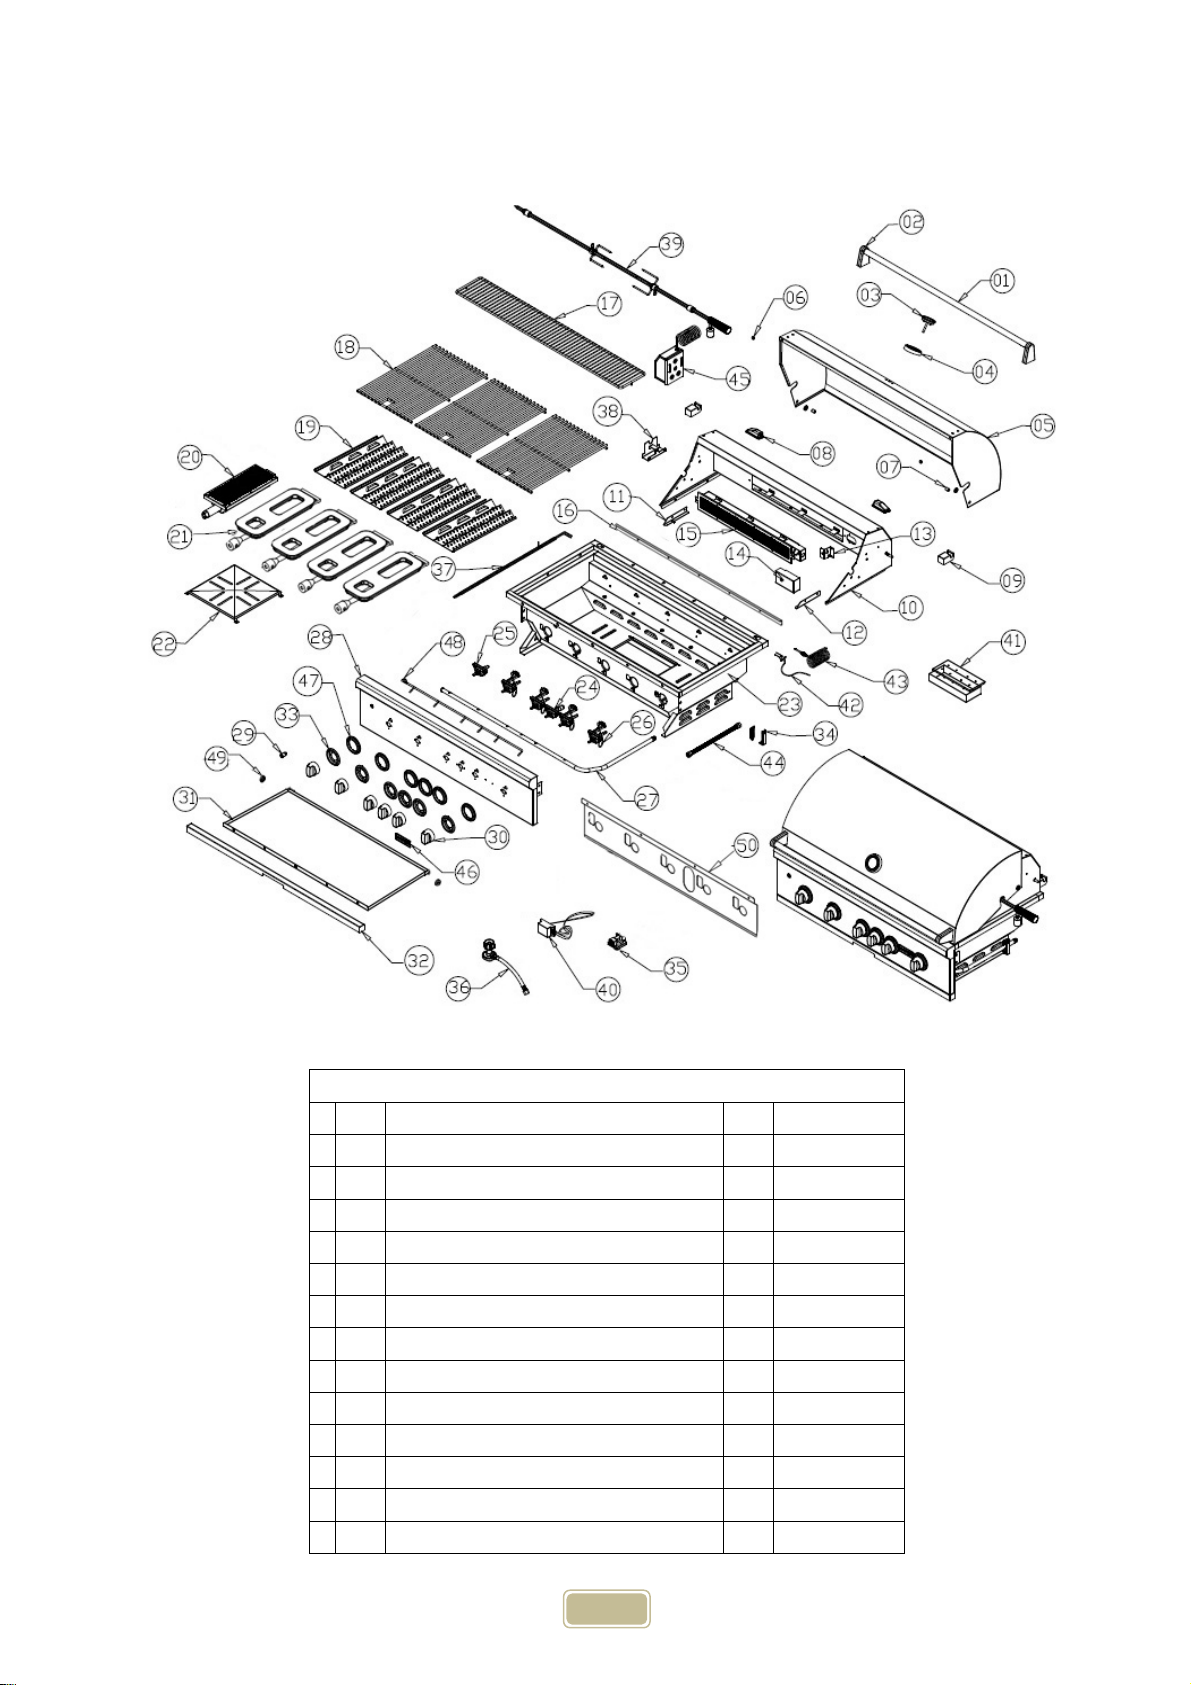
C1S36ExplodedPartsView
C1S36PartsListing
No. Name Qty PartNo.
1 HoodHandle‐36 1 C3600006
2 HandleFixing 2 C0000007
3 Thermometer 1 C0000022
4 ThermometerBase 1 C0000044
5 Hood–36 1 C3600005
6 RubberStopper 2 C0000032
7 HoodConnectorHardware 2 C0000045
8 Light 2 C0000014
9 RotisserieRodBracket 2 C0000018
10 LowerHood‐S36 1 C1S36007
11 WarmingRackBracket‐Left 1 C0000025‐1
12 WarmingRackBracket‐Right 1 C0000025‐2
13 IRBurnerLightingBracket 1 C0000053
35
C1S36PartsListing
14 IRBurnerLightingBox 1 C0000054
15 IRBurner‐36 1 C3600011
16 FlavorizerBracket‐36 1 C1360004
17 WarmingRack‐36 1 C3600008
18 Grate(1pc)19Bar 1 CSG00019
19 Grate(1pc)20Bar 1 CSG00020
20 Flavorizer‐36 3 C1360009
21 SearBurner 1 C0000019
22 CastSSBurner 3 C1000001
23 FireboxBottomCover 1 C0000048
24 Firebox‐36 1 C1360003
25 SafetyValve(IRBurner)LP 1 C1S00013
25 SafetyValve(IRBurner)NG 1 C1S00014
26 SearBurnerValveLP
3
C1S00015
26 SearBurnerValveNG C1S00016
27 StandardValveLP
1
C1C00012
27 StandardValveNG C1C00013
28 GasPipe‐S36LP
1
C1S3610L
28 GasPipe‐S36LP C1S3610N
29 ControlPanel‐S36 1 C1S36001
30 LightSwitch 1 C0000052
31 Knob 5 C0000011
32 DripTray‐36 1 C1360002
33 DripTrayFrontBar‐36 1 C1360011
34 KnobBase 5 C0000012
35 GasPipeClamp 1 C0000044
36 NGRegulator 1 C0000038
37 LPRegulator 1 C0000030
38 4‐BurnerLightWire 1 C4000001
39 MotorBracket 1 C0000016
40 RotisserieKit‐36 1 CROT0036
41 Transformer 1 C0000023
42 SmokerBox 1 C0000020
43 IRBurnerLightingElectrode 1 C0000950
44 Thermocouple‐36 1 C3600018
45 StainlessSteelCorrugatedHose 1 C0000031
46 Motor 1 C0000015
47 LogoBadge 1 CH500019
48 DripTrayWheel 2 C0000057
49 HeatResistancebarrier‐S36 1 C1S36014
50 AirCollectorforSearBurner 1 C0000058
36
C1SL36ExplodedPartsView
C1SL36PartsListing
No. Name Qty PartNo.
1 HoodHandle‐36 1 C3600006
2 HandleFixing 2 C0000007
3 Thermometer 1 C0000022
4 ThermometerBase 1 C0000044
5 Hood–36 1 C3600005
6 RubberStopper 2 C0000032
7 HoodConnectorHardware 2 C0000045
8 Light 2 C0000014
9 RotisserieRodBracket 2 C0000018
10 LowerHood‐S36 1 C1S36007
11 WarmingRackBracket‐Left 1 C0000025‐1
12 WarmingRackBracket‐Right 1 C0000025‐2
13 IRBurnerLightingBracket 1 C0000053
37
C1SL36PartsListing
14 IRBurnerLightingBox 1 C0000054
15 IRBurner‐36 1 C3600011
16 FlavorizerBracket‐36 1 C1360004
17 WarmingRack‐36 1 C3600008
18 Grate(1pc)19Bar 1 CSG00019
19 Grate(1pc)20Bar 1 CSG00020
20 Flavorizer‐36 3 C1360009
21 SearBurner 1 C0000019
22 InfinityBurner 3 C1SL0001
23 FireboxBottomCover 1 C0000048
24 Firebox‐36 1 C1360003
25 SafetyValve(IRBurner)LP
1
C1S00013
25 SafetyValve(IRBurner)NG C1S00014
26 SearBurnerValveLP
3
C1S00015
26 SearBurnerValveNG C1S00016
27 StandardValveLP
1
C1C00012
27 StandardValveNG C1C00013
28 GasPipe‐S36LP
1
C1S3610L
28 GasPipe‐S36LP C1S3610N
29 ControlPanel‐S36 1 C1S36001
30 LightSwitch 1 C0000052
31 Knob 5 C0000011
32 DripTray‐36 1 C1360002
33 DripTrayFrontBar‐36 1 C1360011
34 KnobBase 5 C0000012
35 GasPipeClamp 1 C0000044
36 NGRegulator 1 C0000038
37 LPRegulator 1 C0000030
38 4‐BurnerLightWire 1 C4000001
39 MotorBracket 1 C0000016
40 RotisserieKit‐36 1 CROT0036
41 Transformer‐SL 1 C0000055
42 SmokerBox 1 C0000020
43 IRBurnerLightingElectrode 1 C0000950
44 Thermocouple‐36 1 C3600018
45 StainlessSteelCorrugatedHose 1 C0000031
46 Motor 1 C0000015
47 LogoBadge 1 CH500019
48 LEDLightRing 5 C0000041
49 LEDWiringHarness‐36 1 C0000042
50 AirCollectorforSearBurner 1 C0000058
51 DripTrayWheel 2 C0000057
52 HeatResistancebarrier‐S36 1 C1S36014
38
C1SL42ExplodedPartsView
C1SL42PartsListing
No. Name Qty PartNo.
1 HoodHandle‐42 1 C4200006
2 HandleFixing 2 C0000007
3 Thermometer 1 C0000022
4 ThermometerBase 1 C0000044
5 Hood–42 1 C4200005
6 RubberStopper 2 C0000032
7 HoodConnectorHardware 2 C0000045
8 Light 2 C0000014
9 RotisserieRodBracket 2 C0000018
10 LowerHood‐42 1 C4200007
11 WarmingRackBracket‐Left 1 C0000025‐1
12 WarmingRackBracket‐Right 1 C0000025‐2
13 IRBurnerLightingBracket 1 C0000053

39
C1SL42PartsListing
14 IRBurnerLightingBox 1 C0000054
15 IRBurner‐42 1 C4200011
16 FlavorizerBracket‐42 1 C1420004
17 WarmingRack‐42 1 C4200008
18 Grate(1pc)15Bar 3 CSG00015
19 Flavorizer‐42 4 C1420009
20 SearBurner 1 C0000019
21 InfinityBurner 4 C1SL0001
22 FireboxBottomCover 1 C0000048
23 Firebox‐SL42 1 C1420003
24 SafetyValve(IRBurner)LP
1
C1S00013
24 SafetyValve(IRBurner)NG C1S00014
25 SearBurnerValveLP
1
C1S00015
25 SearBurnerValveNG C1S00016
26 StandardValveLP
4
C1C00012
26 StandardValveNG C1C00013
27 GasPipe‐SL42LP
1
C1S4210L
27 GasPipe‐SL42NG C1S4210N
28 ControlPanel‐42 1 C1420001
29 LightSwitch 1 C0000052
30 Knob 6 C0000011
31 DripTray‐42 1 C1420002
32 DripTrayFrontBar‐42 1 C1420011
33 KnobBase 6 C0000012
34 GasPipeClamp 1 C0000044
35 NGRegulator 1 C0000038
36 LPRegulator 1 C0000030
37 5‐BurnerLightWire 1 C5000001
38 MotorBracket 1 C0000016
39 RotisserieKit‐42 1 CROT0042
40 Transformer‐SL 1 C0000055
41 SmokerBox 1 C0000020
42 IRBurnerLightingElectrode 1 C0000950
43 Thermocouple‐42 1 C4200018
44 StainlessSteelCorrugatedHose 1 C0000031
45 Motor 1 C0000015
46 LogoBadge 1 CH500019
47 LEDLightRing 6 C0000041
48 LEDWiringHarness‐42 1 C0000043
49 DripTrayWheel 2 C0000057
50 HeatResistancebarrier‐42 1 C1S42014