2020-08-28 v1
User Guide
907X 50C

2
www.hasselblad.com
CONTENTS
907X 50 C USER GUIDE
1 INTRODUCTION 7
1.1 907X 50C 8
1.2 907X 50C features 9
1.3 Included items 12
1.4 907X50CTechnicalspecications 13
1.5 System requirements 15
1.6 New in this version 15
1.7 About this user guide 15
1.8 Glossary 16
1.9 Updatecamerarmware 16
2 LENSES 17
2.1 XCD Lens Range 18
XCD 4/21 18
XCD 3.5/30 18
XCD 3.5/45 18
XCD 4/45P 18
XCD 2.8/65 18
XCD 1.9/80 19
XCD 3.2/90 19
XCD 3.5/120 Macro 19
XCD 2.8/135 and X Converter 1.7 19
XCD 3,5-4,5/35-75 20
Filters 20
3 QUICK START 21
3.1 Quick start 22
Firmware 22
Assembling the camera 22
Battery 23
SD card 23
3.2 Charging the battery 24
Battery charger 24
Charge the battery 24
Charging from the USB port 24
Attach the lens 25
Attach the shoulder strap 26
Using the protective covers 27
The First capture 28
The First capture – continued 29
Viewingtherstcaptureonthecomputer 30

3
CONTENTS
www.hasselblad.com907X 50 C USER GUIDE
4 SAFETY 31
4.1 Safety and Warnings 32
4.2 Cautions 32
4.3 Disposal 33
4.4 FCC 34
4.5 ISED 34
5 PARTS & CONTROLS 35
5.1 Parts, components, buttons and controls 36
5.2 Ports and connections 42
5.3 Display and screens 43
Tilt display 43
6 USING THE 907X 44
6.1 Touch display 45
Touch display navigation 45
Available screens 46
6.2 Touch display main menu 47
Main Menu 47
Add shortcuts to main menu favourites 47
How to add shortcuts to main menu 48
How to remove shortcuts on the main menu 48
How to move shortcuts on the main menu 48
Control screen 49
Locked exposure parameters on the control screen 50
Settings on the control screen 51
Self Timer settings 57
Interval settings 58
Interval operation 59
Exposure bracketing settings 60
Exposure bracketing operation 61
Long exposure screen 61
Focus Bracketing 62
Focus Bracketing settings 63
Focus Bracketing Operation 64
Step Size 65
DoF and Step size visualized 66
Examples 67
Fixed exposure compensation setting 68
Light meter mode 69
6.3 Memory cards 70
Insert the SD memory card 71

4
CONTENTS
www.hasselblad.com907X 50 C USER GUIDE
Remove the SD memory card 71
Recommended memory cards 71
Format SD cards 72
6.4 Live view indications 73
Live view overlays 74
Zooming in live view 74
Live view Settings 75
6.5 Focusing 76
Autofocus 76
AF indications 77
Manual focus 78
Focus peaking 79
6.6 Move autofocus point 80
6.7 Resize autofocus point 80
Menu screen navigation 81
6.8 Browsing, preview and histogram 83
Browsing images 83
Zooming 84
Browsing images – nine-view 84
Select folder to browse 85
Select card to browse 85
Create new folder 86
Delete images 87
Browse overlays 88
Histograms 89
6.9 Image Rating 90
Rating Function 90
6.10 Video Recording 91
How To Record Video 91
How to View Recorded Video 92
7 907X CONTROL GRIP 93
7.1 907X Control Grip 94
Parts and Controls 94
Attaching the Control Grip 95
Using the Control Grip 96
Joystick 97
8 907X OPTICAL VIEWFINDER 99
8.1 907XOpticalViewnder 100
Attaching to the camera 100
OVF Markings 101

5
9 PHOCUS 102
9.1 Phocus overview 103
Phocus 103
Features in Phocus 104
Phocus Mobile 2 105
9.2 Connect to a computer 106
9.3 Connect to an iPad pro 106
Using cable 106
Using Wi-Fi 106
9.4 Connect the Camera to an iPad Pro over Wi-Fi 107
Bluetooth assisted Wi-Fi connection 107
Manual Wi-Fi connection 108
9.5 PhocusandHasselbladcaptureles 109
10 SETTINGS 110
10.1 The camera settings menu 111
E xposure 111
Increment settings 112
Shutter function settings 113
True Exposure explained 114
AE-L (AE-Lock) / Quick Adjust 115
Auto ISO / P / Full Auto 116
Crop & Orientation 117
Image orientation 118
Image quality settings 119
Focus settings 120
Flash settings 123
Cameracongurationsettings 124
10.2 Video settings menu 126
10.3 General settings menu 128
Connectivity settings 129
Display 130
Live view 131
Preview 132
Touch 133
Custom Buttons 134
Storage 135
How to format a memory card 136
Sound 137
Date & Time 138
Power 139
Spirit Level 140
CONTENTS
www.hasselblad.com907X 50 C USER GUIDE

6
Calibrate Spirit Level 141
Language 142
Service 143
Firmware update 144
Lensrmwareupdate 145
Log data 146
Default settings 147
Resetlecounter 148
About 149
11 ACCESSORIES 150
XH Lens adapter 151
XV Lens adapter 151
Tripod mount ring 75mm 151
XPan Lens adapter 152
Release cord X 152
Battery charging hub 152
12 APPENDIX 153
12.1 Change from a foreign language 154
12.2 Cleanthesensorlter 155
12.3 Clean the lens glass surface 155
Remove dust 155
Remove smear 155
12.4 Error messages 156
12.5 Information about the 907X user guide 156
Updates 156
3D product images 156
Trademarks 156
Copyright 156
CONTENTS
www.hasselblad.com907X 50 C USER GUIDE

1 INTRODUCTION
www.hasselblad.com
8
INTRODUCTION
CONTENTS
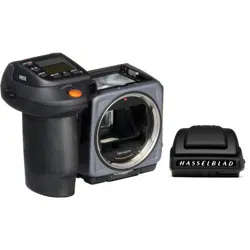
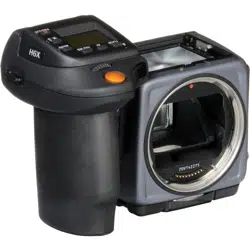
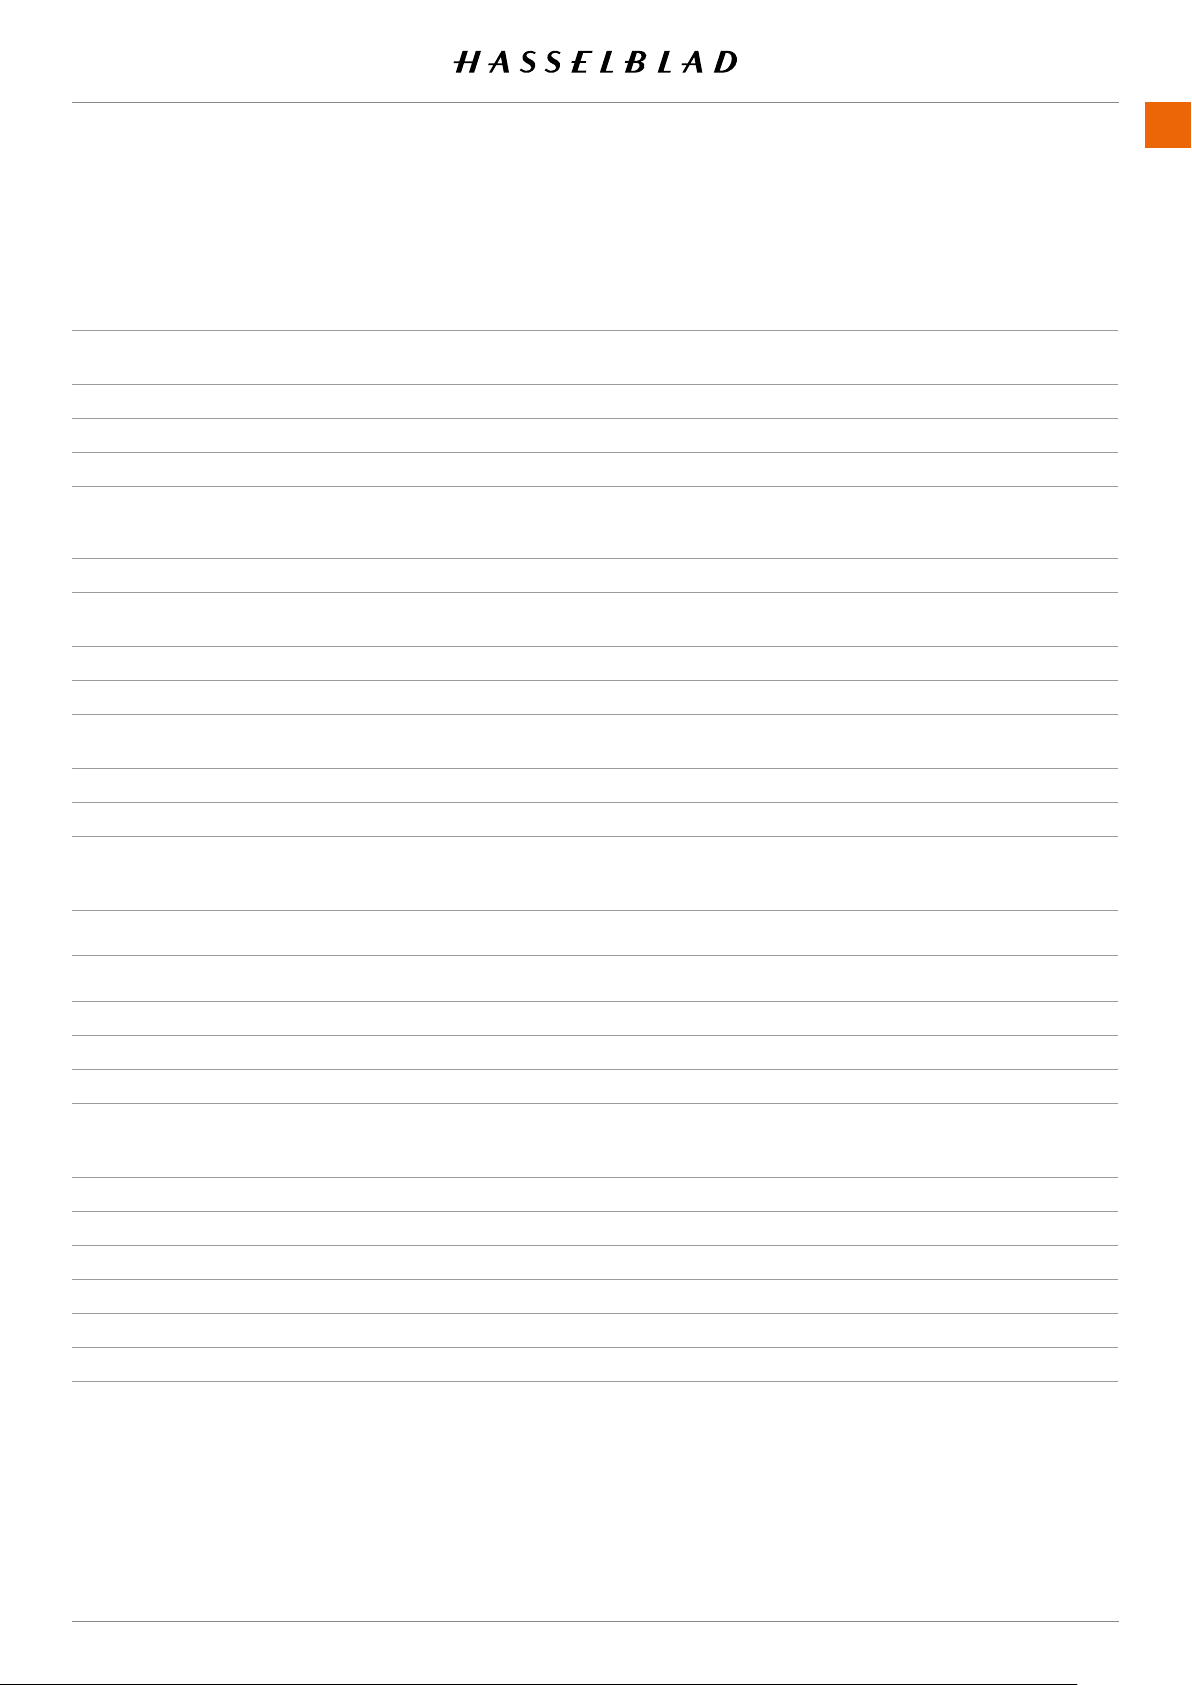
1.1 907X 50C
With the CFV II 50C digital back and the 907X camera body,
Hasselblad’s photographic history is connected in one
system. Bridge the past and the present with the modernised
CFV II 50C attached to a classic Hasselblad V System camera.
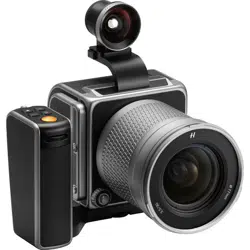
Merge the CFV II 50C with the 907X to create a whole new
combination that enables shooting with a variety of Hassel-
blad optics, ranging from the V System, H and XPan lenses to
our latest XCD lens range.
This User Guide describes the functionality of the 907X 50C
Camera. A separate User Guide is available that explains how
to use the CFV II 50C on V System and Technical Cameras.
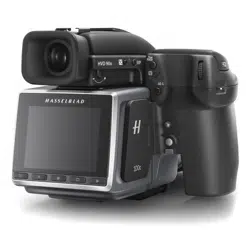
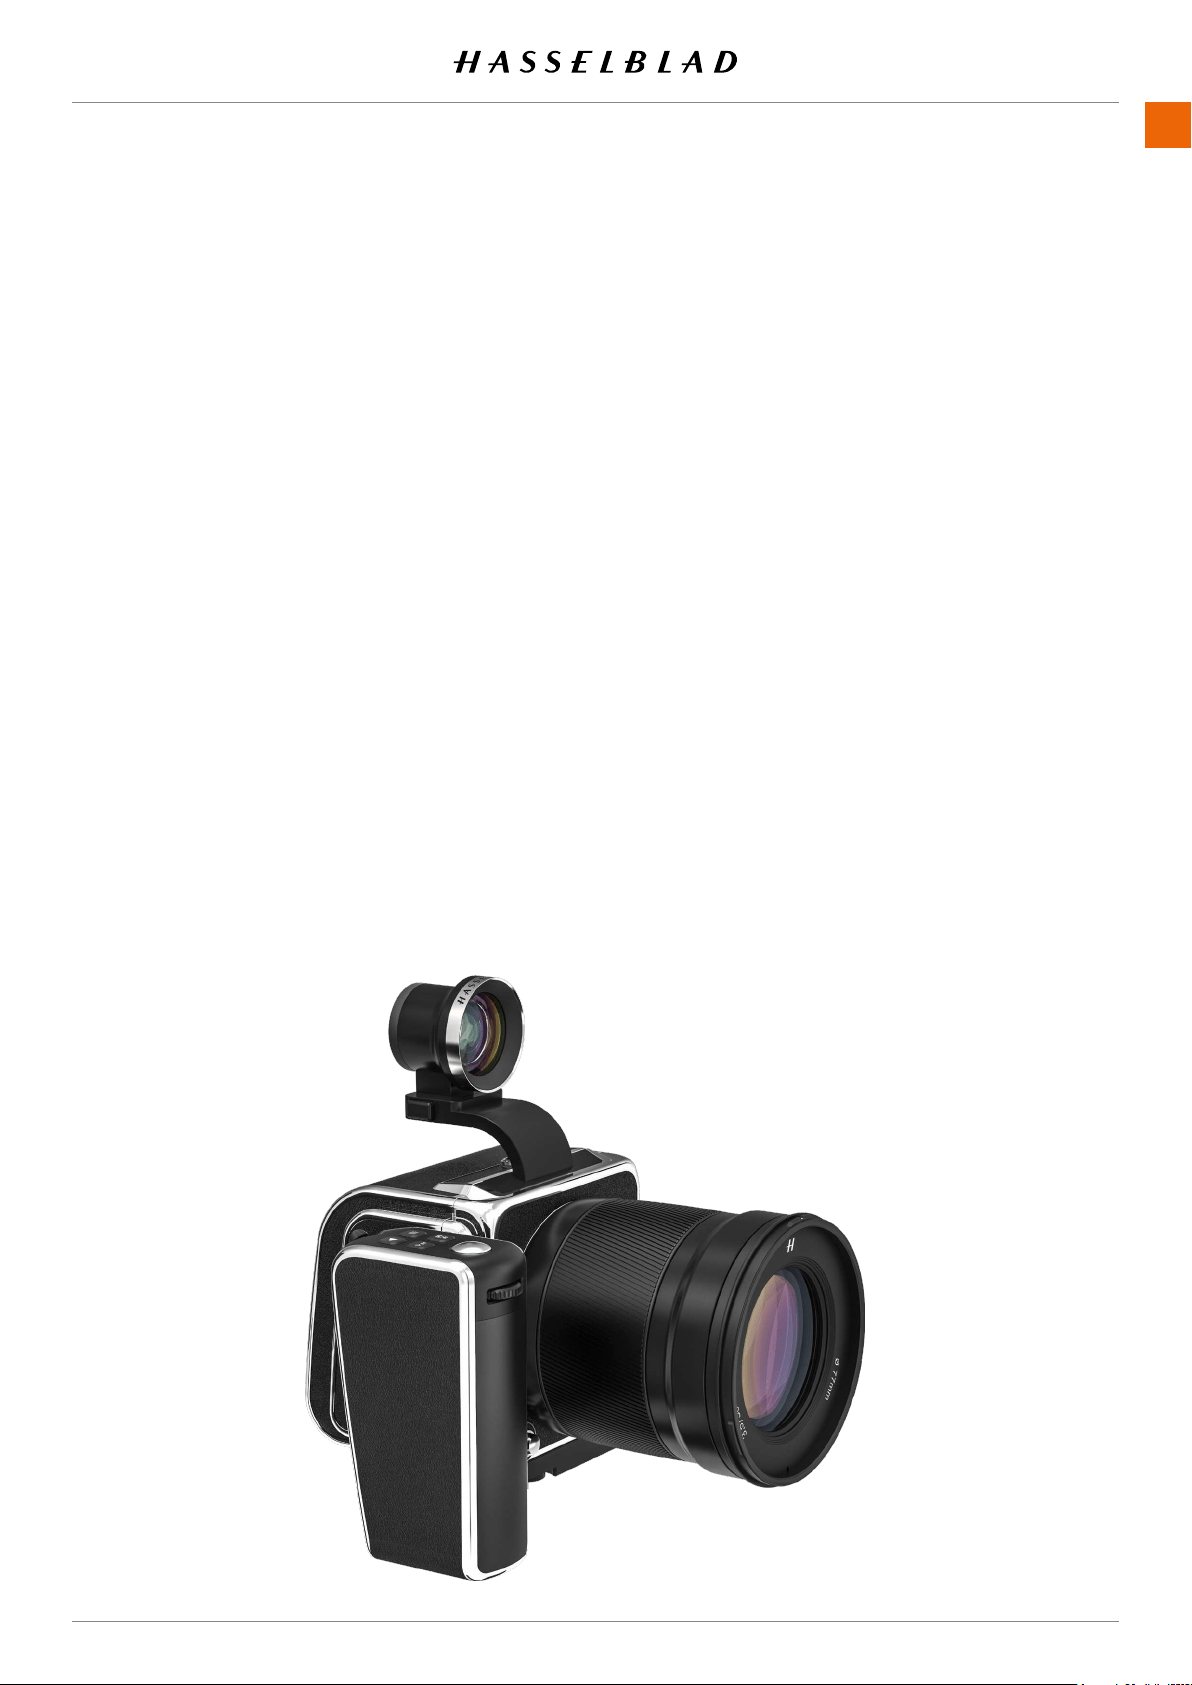
Reminiscent of the classic V System camera combined with Hasselblad’s high-end digital medium
format technology, the 907X camera offers a truly distinct photographic experience. Small and
compact, it produces unparalleled medium format image quality. The CFV II 50C’s tilt screen enables
the classic waist-level shooting style of the V System, hinting to Hasselblad’s history while letting
photographers compose their images from a new point of view in the digital era.
907X 50 C USER GUIDE

www.hasselblad.com
9
INTRODUCTION
CONTENTS
Full XCD Lens support
All XCD Lenses can be fully used with the same functionality
as on an X System Camera, including Autofocus.
HC/HCD Lens support
All HC and HCD Lenses can be used with full functionality,
including Autofocus using the optional XH Lens Adapter.
V System and XPan System lenses
All Lenses from the Hasselblad V and XPan Systems can be
used in electronic shutter mode. Requires optional XV or XPan
Lens adapters.
3rd Party Lens support
By using lens adapters from 3rd party manufacturers, almost
all other lenses can be used in electronic shutter mode on the
907X camera.
1.2 907X 50C FEATURES
907X 50 C USER GUIDE
www.hasselblad.com
10
INTRODUCTION
CONTENTS
V System Camera support
The CFV II 50C digital back can be removed from the 907X
camera body and be used on most V System Cameras ever
built. See the separate User Guide for the CFV II 50C for more
information.
Touch screen interface
Equipped with a smartphone style user interface, the rear
touch 3.3 inch display allows quick and simple access to the
digital back shooting settings including WB and ISO. There is
also the option of adding up to 8 favourite icons to the main
menu display to allow fast access to your most frequently used
functions and settings.
Tilt screen
The rear screen can be tilted upwards 90 degrees for conven-
ient operation in many situations.
Live view
High frame rate live view is available to assist with critical
focusing of the image.
Dual SD media card slots
Equipped with dual UHS-II compatible media card slots,
the digital back will automatically use them concurrently for
storage.
Battery inside
Improving on previous CFV models, the interchangeable and
rechargeable battery is now located inside the CFV, behind
the SD card lid. This enables the streamlined shape and
design to be maintained and makes it possible to adapt to
basically all V System cameras ever made. Battery type is the
same that is used for X System cameras.
907X 50 C USER GUIDE

www.hasselblad.com
11
USB 3 Type C
Simplifying and enhancing tethered shooting to your Mac or
PC, the USB 3 interface allows easy connectivity with today’s
high speed ports.
Built-in Wi-Fi
The Wi-Fi function uses both 2.4 and 5 GHz and has the
option of 802.11 b, g, n, a, ac (a and ac depending on region)
connections. A separate App for iOS, Phocus Mobile 2 is
available for download from the Apple App Store.
Huge 14 stop dynamic range
Makes it easier to keep details in both deep shadows and
bright highlights. It will also allow fantastic HDR images to be
assembled from less captures.
Large 43.8 x 32.9mm 50MP sensor
For amazing image resolution with low image noise, enabling
enlargements in breathtaking quality.
Shallow depth of eld
Thelargersizeofthesensordeliversashallowerdepthofeld
with a given focal length compared to a Full Frame 35mm
camera enabling easier separation of your subject from the
background and super smooth Bokeh with Hasselblad lenses
delivering the classic “medium format look” to your images.
HNCS Hasselblad Natural Colour Solution
HNCS saves time and enables high colour accuracy. Especially
importantwithskintonesandspecicproducttonesthatnow
are going to be perfectly rendered.
JPEG & RAW les
TheJPEGlesareHNCproledsoyoucanprintstraightfrom
afolderforamazingquality.RAWlesareretainedforyour
nalmasterpieces.
Digital lens corrections
TheDigitallenscorrection,whichisappliedattheleediting
stage, takes care of any colour aberration, distortion and light
fall off however minor (which is inherent in any lens, anywhere)
and resolves the situation automatically.
Hasselblad Phocus digital imaging software
The Hasselblad Phocus Digital imaging software is a capture,
processingandlemanagementapplicationaimedprimarily
atHasselbladRAWlehandling.Thedesktopversionis
compatible with both Mac and PC and is a free download
from www.hasselblad.com.
Hasselblad Phocus Mobile 2 app for iOS
Use the iPad Pro to edit images directly from the camera.
Phocus Mobile 2 offers remote viewing and control when
shooting tethered (Wi-Fi or USB cable). Phocus mobile 2 is
free to download at Apple´s App Store for the iPad Pro.
The 907X camera is not compatible with the previous version
of Phocus Mobile.
INTRODUCTION
CONTENTS907X 50 C USER GUIDE
www.hasselblad.com
12
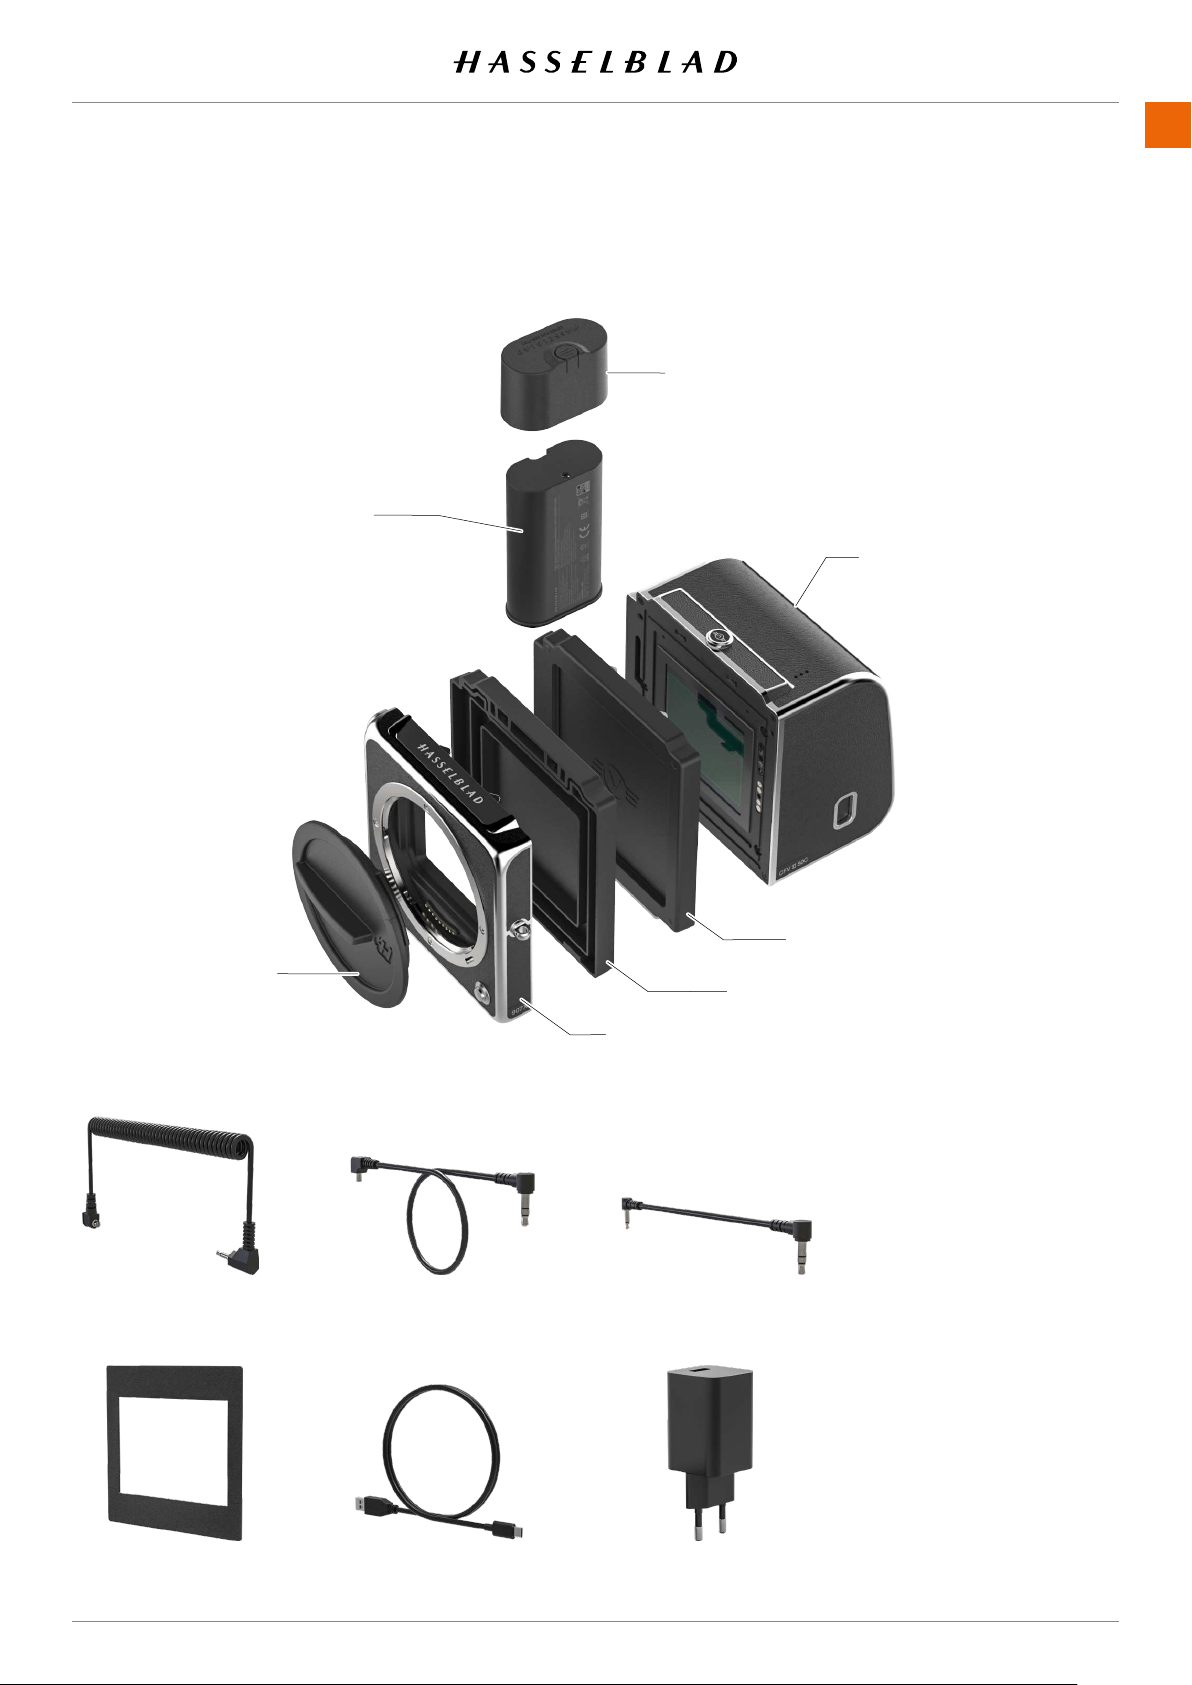
1.3 INCLUDED ITEMS
The 907X 50C camera is delivered with the following items.
INTRODUCTION
CONTENTS
Flash sync input cable
Focusing screen mask
44x33mm
USB A to C cable, 80cm USB charger
Flash sync output cable Exposure cable CW
● Shoulder strap
● Quick Start guide
● In the box
● Warrantyleaet
● Disclaimer and
safety guidelines
● Registration card
Battery
Battery protective cap
907X camera body
907X rear protective cover
CFV front protective cover
CFV II 50C
Front protective
cover
907X 50 C USER GUIDE
www.hasselblad.com
13
INTRODUCTION
CONTENTS907X 50 C USER GUIDE
1.4 907X 50C TECHNICAL SPECIFICATIONS
Continued on the next page.
Camera Type
Medium Format Mirrorless Digital camera with Autofocus, Auto exposure and interchangeable
lenses.
Construction Machined aluminium. Tripod socket 1/4”.
Sensor Type CMOS, 50 megapixels (8272 × 6200 pixels, 5.3 × 5.3 µm).
Sensor Dimensions 43.8 × 32.9 mm.
Image Size
Stills: 3FR RAW capture 106 MB on average. JPEG: Up to 22 MB, TIFF 8 bit: 154 MB.
Video: 2.7K (2720 x 1530) and HD (1920 x 1080), max 29:59 minutes/clip). Video covers the full
sensor width in a 16:9 ratio.
File Format Hasselblad 3FR RAW, Full size JPEG. Video: H.264 Compressed (29,97 fps).
Shooting Mode
Single shot and Video, Continuous, Self Timer, Interval Timer, Exposure Bracketing and Focus
Bracketing.
ColourDenition 16-bit; Dynamic range up to 14 stops.
ISO Speed Range ISO Auto, 100, 200, 400, 800, 1600, 3200, 6400, 12800, 25600.
Storage Options
DualUHS-IISDcardsortetheredtoMacorPC.Max1TB.SDCardscanbeusedinOverowor
Backup (images only) mode. Recommended cards are listed on page 71.
Colour Management Hasselblad Natural Colour Solution (HNCS).
Storage Capacity A 64 GB card holds approximately 600 RAW or 6000 JPEG High Quality images on average.
User Interface
Touch interface including swipe, scroll and pinch/spread to zoom. Camera grip with buttons and
Scroll Wheels. Many camera functions and settings can be controlled from a tethered computer or
iPad Pro/iPad Air (2019) over Wi-Fi or tethered.
Display 3.2 inch TFT type, 24 bit colour, 2.36 M dots (1024 x 768). Can be tilted up to 90 degrees.
Live View On camera and host computer with high frame rate.
Histogram Feedback Yes, in Browse Mode on rear display.
IR Filter Mounted in front of sensor.
Acoustic Feedback Yes.
Software
Phocus for Mac and Windows. Compatible with Adobe Photoshop Lightroom® and Adobe Camera
Raw®.
Phocus Mobile 2 for iPad Pro and iPad Air (2019).
Platform Support Macintosh: OS X version 10.12.2 or later. PC: XP/Vista/Windows 7 (32 and 64 bit)/ 8 / 10.
iOS device Support iPad Pro or iPad Air (2019 or later).
Host Connection Type USB 3.0 (5 Gbit/s) Type-C connector.
Additional Connections Audio In/Out.
Operating Temperature -10to45˚C.14to113˚F.
Wi-Fi 802.11 b, g, n, a, ac (a and ac depending on region).

www.hasselblad.com
14
Lenses
Hasselblad XCD lenses with built in electronically controlled shutter and aperture. Automatic or
manual focusing with instant manual focus override. Lens shades can be mounted in reverse for
transport.
Compatible with all H System lenses and some H System accessories using an XH Lens Adapter.
Also compatible with V System and XPan Lenses using a XV or XPan Lens Adapter. Many other
lenses via 3rd party lens adapters (E-shutter only).
Shutter
Electronically controlled lens shutter with speeds up to 1/2000 s. Flash sync at all speeds. Optional
electronic shutter.
Shutter Speed Range
68 minutes to 1/2000 s with XCD Lenses. 1/800 s or 1/2000 s with HC/HCD Lenses. Electronic
shutter 68 min to 1/10000 s.
Flash Sync Speed Flash can be used at all shutter speeds. Mechanical shutter only.
Flash Compatibility Socketforconnectionofexternalashesviaincludedsynccable.
Focusing
Automatic and manual focusing. Instant manual focus override. Automatic focusing using contrast
detection. 100% zoom or Focus Peaking available in manual focus. Up to 117 selectable autofocus
points.
Exposure Metering Spot, centre weighted and centre spot.
Power Supply
Rechargeable Li-ion battery (7.27 VDC/3400 mAh). Compatible with the 3200 mAh battery.
Can be charged in camera via USB or with optional external charger. Plug for external DC Power.
Dimensions
907X + CFV II 50C: 102 × 93 × 84 mm, 907X only: 102 × 91 × 28 mm, CFV II 50C only: 91 × 93 × 61
mm.
Weight 740 g (CFV II 50C: 540 g / 907X Camera Body: 200 g). Excluding battery and SD card.
INTRODUCTION
CONTENTS907X 50 C USER GUIDE
907X 50C TECHNICAL SPECIFICATIONS – CONTINUED
www.hasselblad.com
15
INTRODUCTION
CONTENTS
1.5 SYSTEM REQUIREMENTS
Storage and editing of images requires certain minimum com-
puter capabilities. Large images require a reasonably high
performancecomputerwithsufcientmemory,advanced
graphics capabilities and a recent operating system.
It is recommended that the computer has a USB 3 connector,
which will allow you to load images more quickly from the
camera. A USB SD card reader is also required for image
transfer from the SD cards.
1.6 NEW IN THIS VERSION
ThisistherstversionofthisUserGuide.Itdescribesthe
functionalityavailablewithCFVII50Crmwareversion1.3.0
or later.
1.7 ABOUT THIS USER GUIDE
This User Guide is designed for on-screen PDF reading to take
advantage of the interactivity functions and search tools.
Interactive PDF
You can navigate the user guide by selecting a chapter in
the Table of Contents. This interactive feature is available on
nearly all PDF readers, computer platforms and web browsers.
All pages contain a link back to the Table of Content and most
page references also work as a click-able link.
Search Tools
OnmostPDFreadersyoucanusethesearchtooltonda
specicsubject,functionorsetting.
Format and Printing the User Guide
Please note that the format is A4 to conform with the most
common standard. Therefore if printing to US Letter format or
similar please ensure you select “Fit to Printable Area” in the
page scaling dialogue.
Photo Credits
Mattias Hammar: 67 and 121
Mads Selvig: 16, 103, 104, 105 and 106
Philip Liljenberg: 124
Jens Karlsson: 85
Ian Lawson: 46 and 90
907X 50 C USER GUIDE
www.hasselblad.com
16
INTRODUCTION
CONTENTS
1.8 GLOSSARY
In this user guide a few different terms are used:
Short-Press: Press and release a button within one second.
Long-Press: Press and hold a button for 1 second or more.
Tap: This means to touch a value or icon on the display with
yourngerbriey.Thisonlyworkswithabarengerorwhen
special touch-display gloves are used.
Double-Tap: Quickly tap the same location on the display
within 1 second. This is mainly used to zoom in an image or
Live View.
Swipe: A sliding movement is when you press and hold the
ngerandslideinonedirection.Thisistypicallyusedwhen
selecting a value from a list or when panning in a zoomed-in
image.
Spread:Placetwongersonthedisplayandmovethem
apart. Typically used for zoom in.
Pinch:Placetwongersonthedisplaywithadistance
betweenandmovethengerstogether.Typicallyusedwhen
zooming out.
Tethering: When the Camera is connected with a USB cable
to a computer.
1.9 UPDATE CAMERA FIRMWARE
The Camera can be updated with improvements and new
functions.
Before you start to use your new camera, please visit www.
hasselblad.comanddownloadthelatestcamerarmware
and update the camera system to make sure you get the latest
functionality. Also make sure to download the latest version of
this user guide.
See page 144 for an in-depth description on how to down-
loadthecamerarmwareandupdateyourcamera.
907X 50 C USER GUIDE

2 LENSES
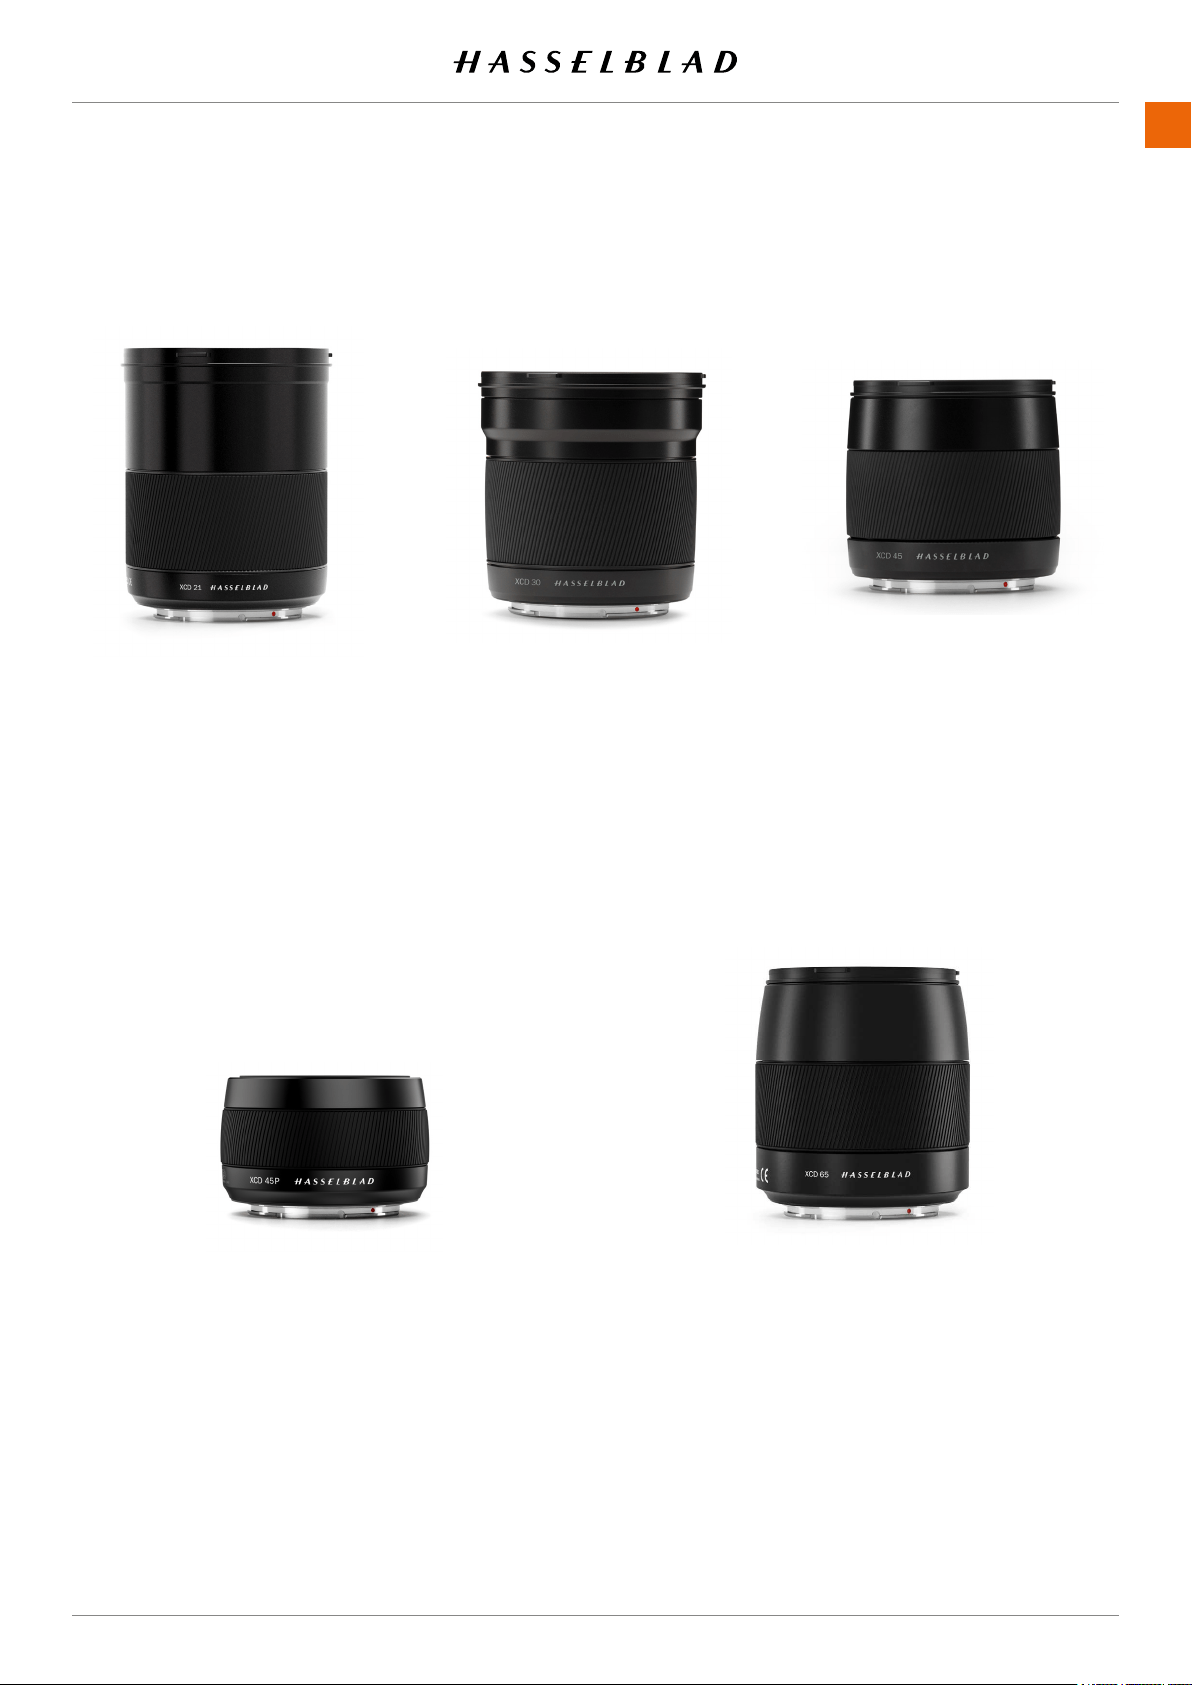
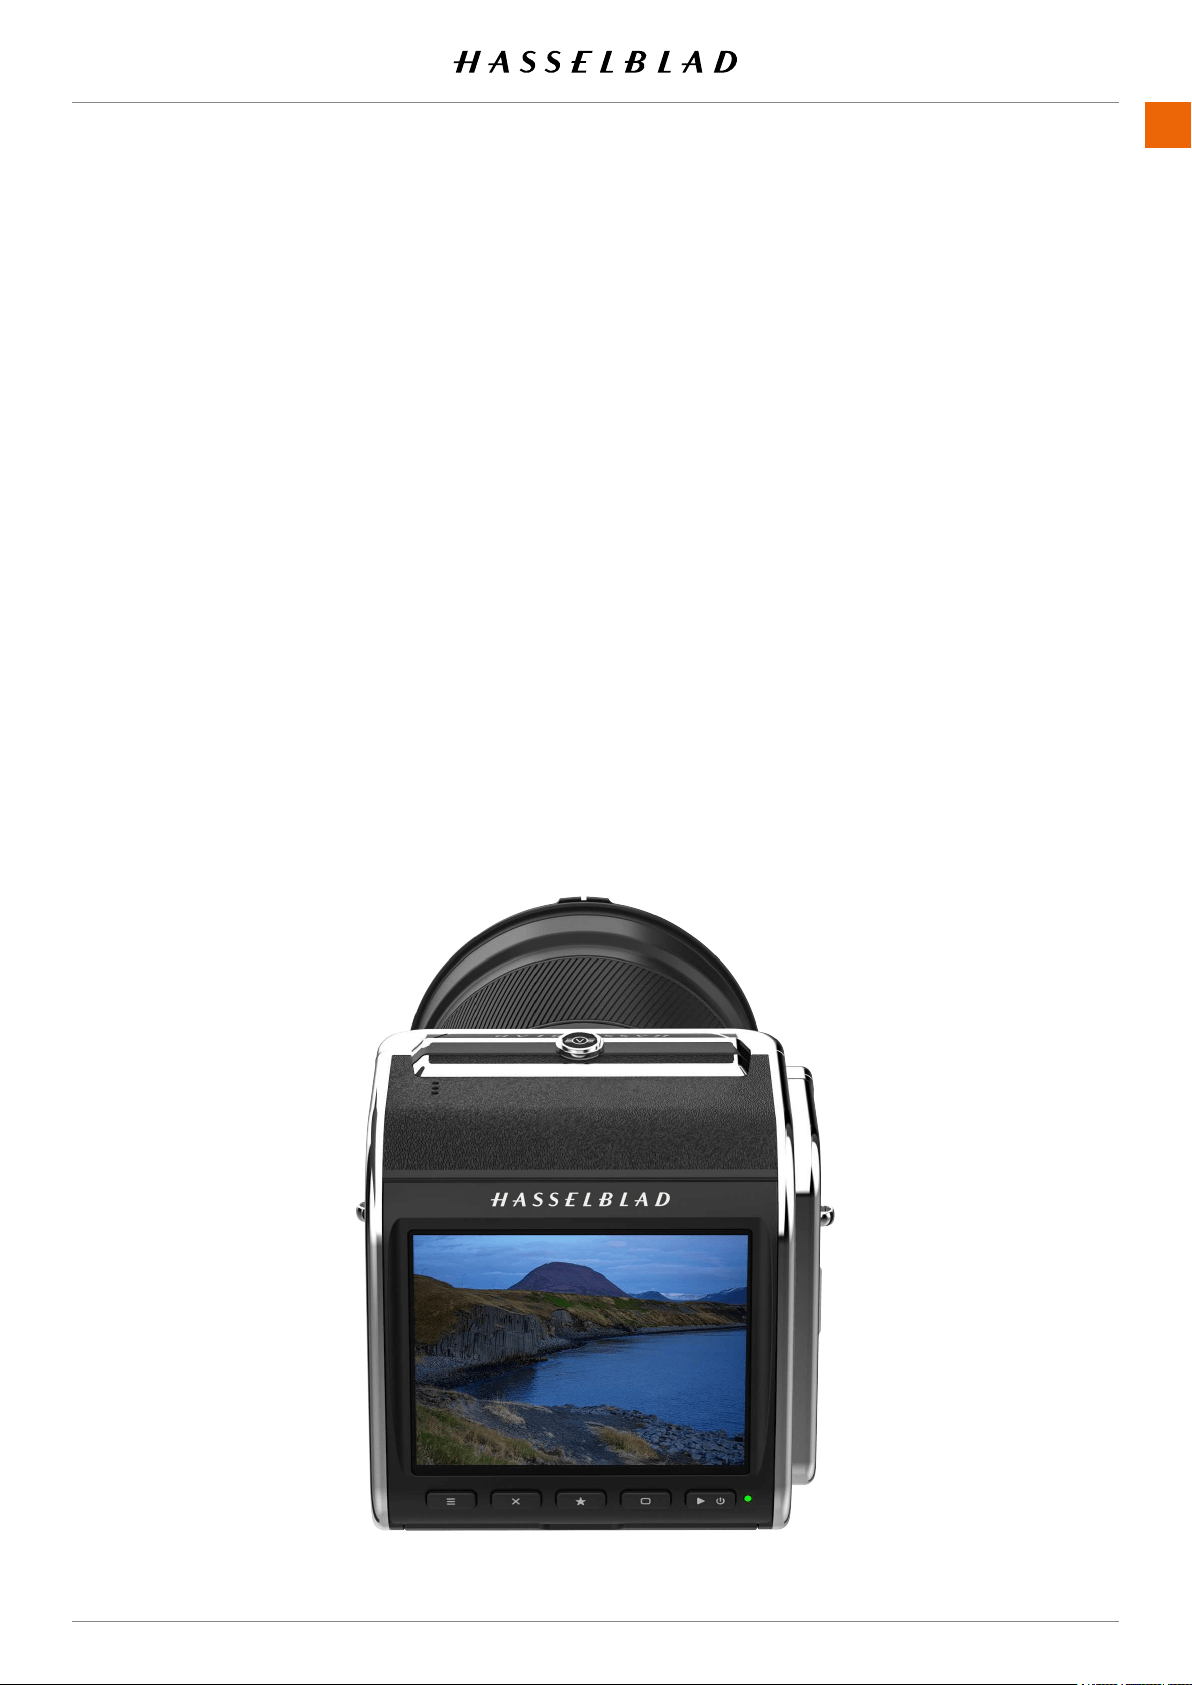
2.1 XCD LENS RANGE
XCD 2.8/65
The XCD 65 mm is a normal
lens. Its focal length provides a
50mmequivalenteldofview.
Its high aperture and excellent
close-range performance makes
it perfect for general type of
photography as well as for
reproduction.
XCD 4/21
The XCD 21 is the ultra wide-angle
lens. Its extremely short focal
length provides a 17 mm full frame
equivalent lens, making it perfect
for landscape and architecture
photography.
XCD 3.5/30
The XCD 30 is a wide-angle lens.
Its focal length provides a 24 mm
equivalenteldofview,makingit
the perfect landscape, reportage
and travel lens.
XCD 3.5/45
The XCD 45 is the ideal standard
lens. Its moderate wide-angle
focal length provides a 35 mm
equivalenteldofview,makingit
the perfect general purpose lens.
XCD 4/45P
The XCD 45P is a highly compact
lens. Its focal length provides a
35mmequivalenteldofview,
making it a perfect general
purpose and travel lens.
www.hasselblad.com
18
LENSES
CONTENTS907X 50C USER GUIDE
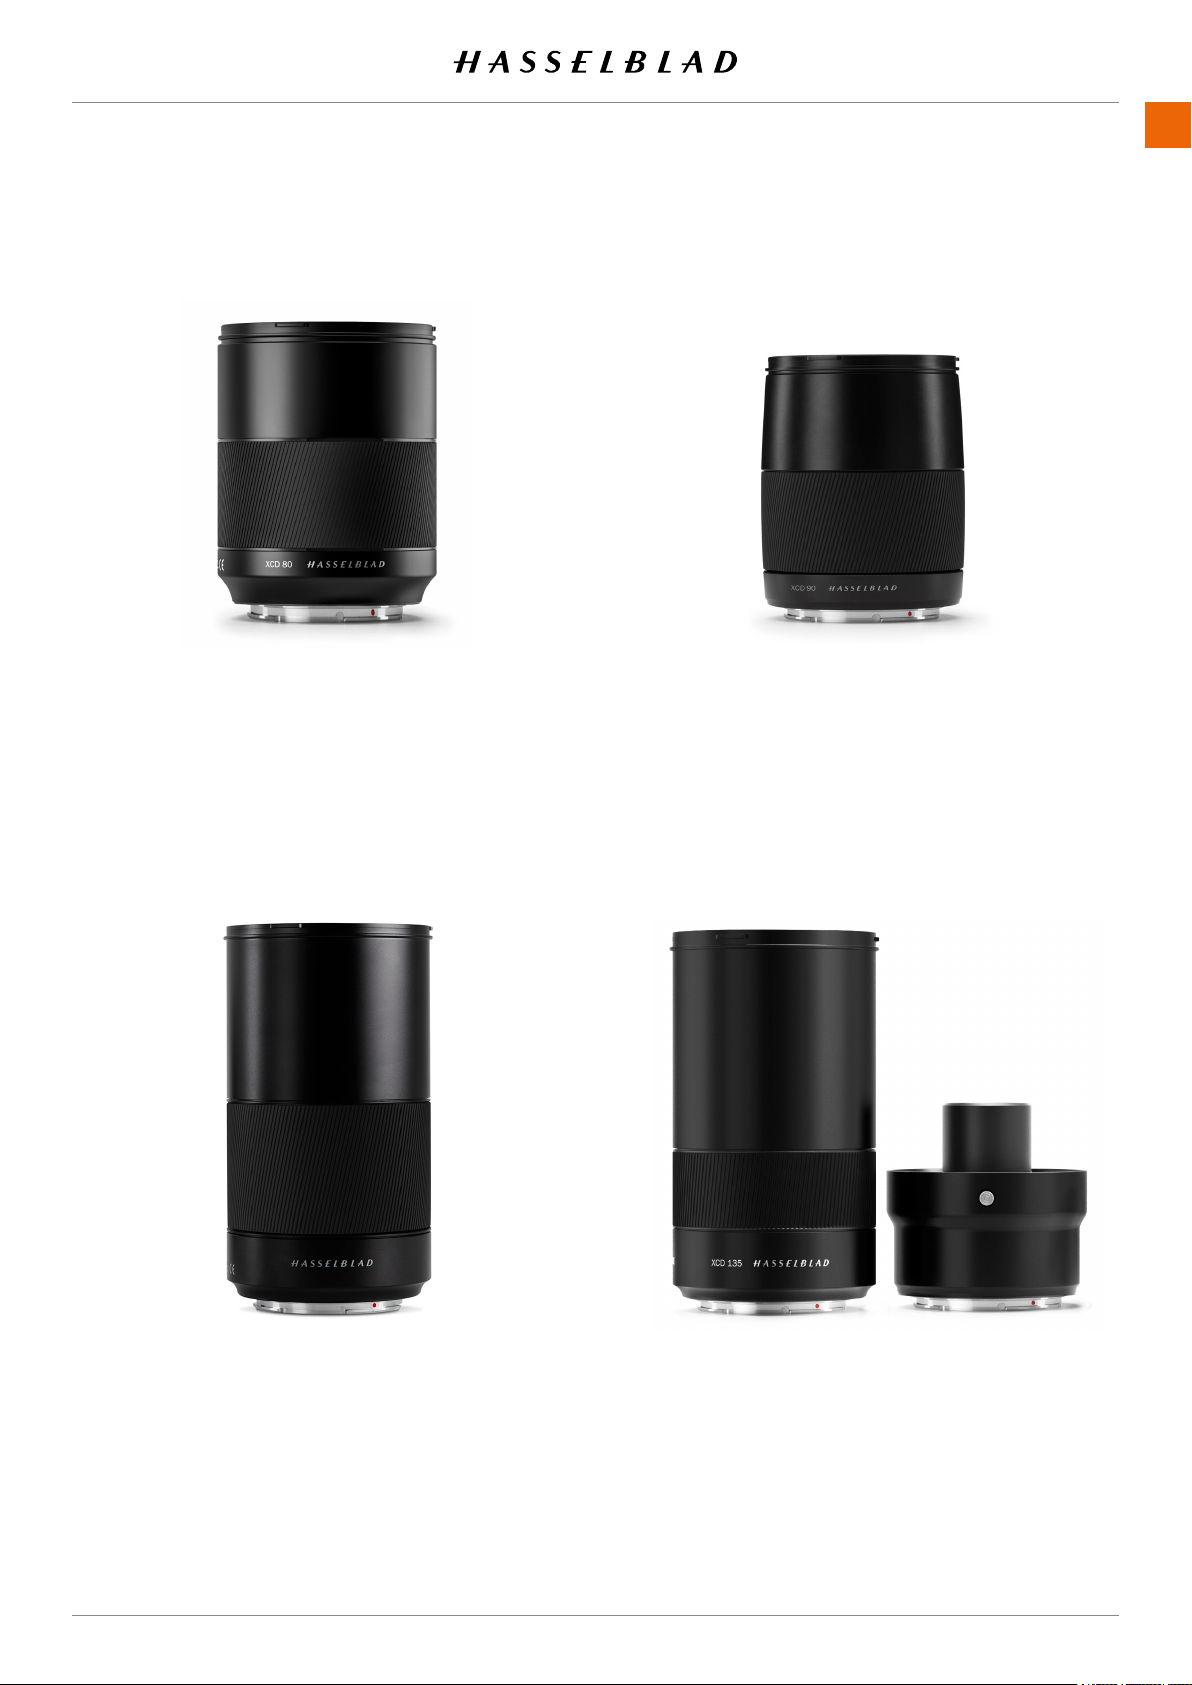
XCD 2.8/135 AND
X CONVERTER 1.7
The XCD 135 is a moderate tele-
photo lens with a dedicated 1.7x
converter, providing a 4.8/230mm
lens. 35 mm equivalent focal
lengths are 107 and 181 mm.
XCD 3.2/90
The XCD 90 is a light and compact
short telephoto lens. Its moderate
focal length provides a 71 mm
equivalenteldofview,makingit
a perfect all-round lens.
XCD 3.5/120 MACRO
The XCD 120 is the ideal macro
lens. It is suitable for both close-
up work and for portrait or other
photography requiring a longer
focal length. Focuses down to an
image scale of 1:2. It has a 95 mm
equivalenteldofview.
XCD 1.9/80
The XCD 80 is a high-aperture
lens, providing very short depth-
of-eldwithbeautifulBokeh,
especially useful for available light
portrait photography. It has a 63
mmequivalenteldofview.
www.hasselblad.com
19
LENSES
CONTENTS907X 50C USER GUIDE
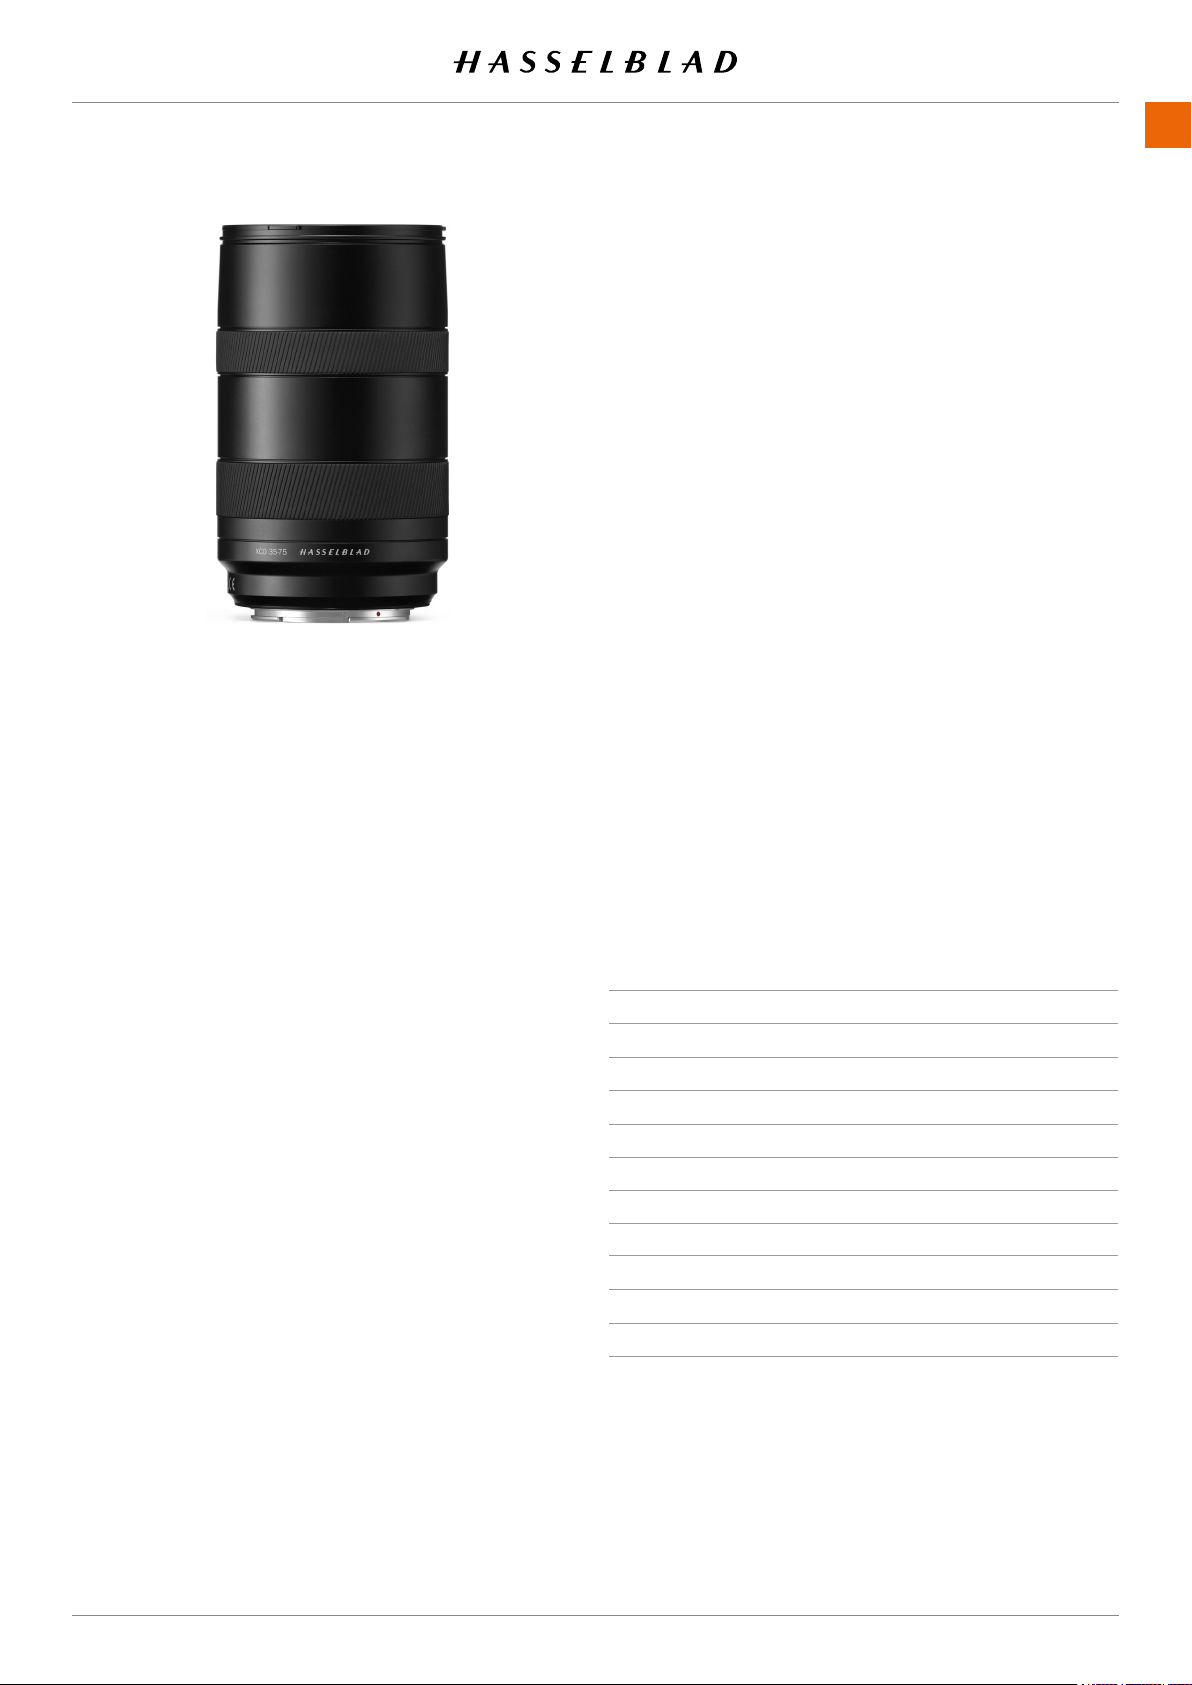
XCD 3,5-4,5/35-75
This Zoom lens is ideal for photogra-
phers who are looking to keep the
amount of equipment they carry when
travelling to a minimum but don’t
want to compromise on image quality.
Focuses down to 0.42m (W) / 0.6m (T). It
hasa28-58mmequivalenteldofview.
FILTERS
TheXCDLenseshaveathreadedltermountwithdiameteras
shown in the table to the right.
As there is no rotation of the front section of the lens when
thefocusischanged,thelterdonotrotateeither.Thisis
particularlyusefulwhenusingpolarizingorgraduatedlters
where the orientation is critical.
LENS FILTER DIAMETER
XCD 21
ø 77mm
XCD 30
ø 77mm
XCD 45
ø 67mm
XCD 45P
ø 62mm
XCD 65
ø 67mm
XCD 80
ø 77mm
XCD 90
ø 67mm
XCD 120 Macro
ø 77mm
XCD 135
ø 77mm
XCD 35-75
ø 77mm
www.hasselblad.com
20
LENSES
CONTENTS907X 50C USER GUIDE

3 QUICK START
www.hasselblad.com
22
QUICK START
CONTENTS
3.1 QUICK START
FIRMWARE
www.hasselblad.
com
the procedure on . Instructions on how to update
.
Note!
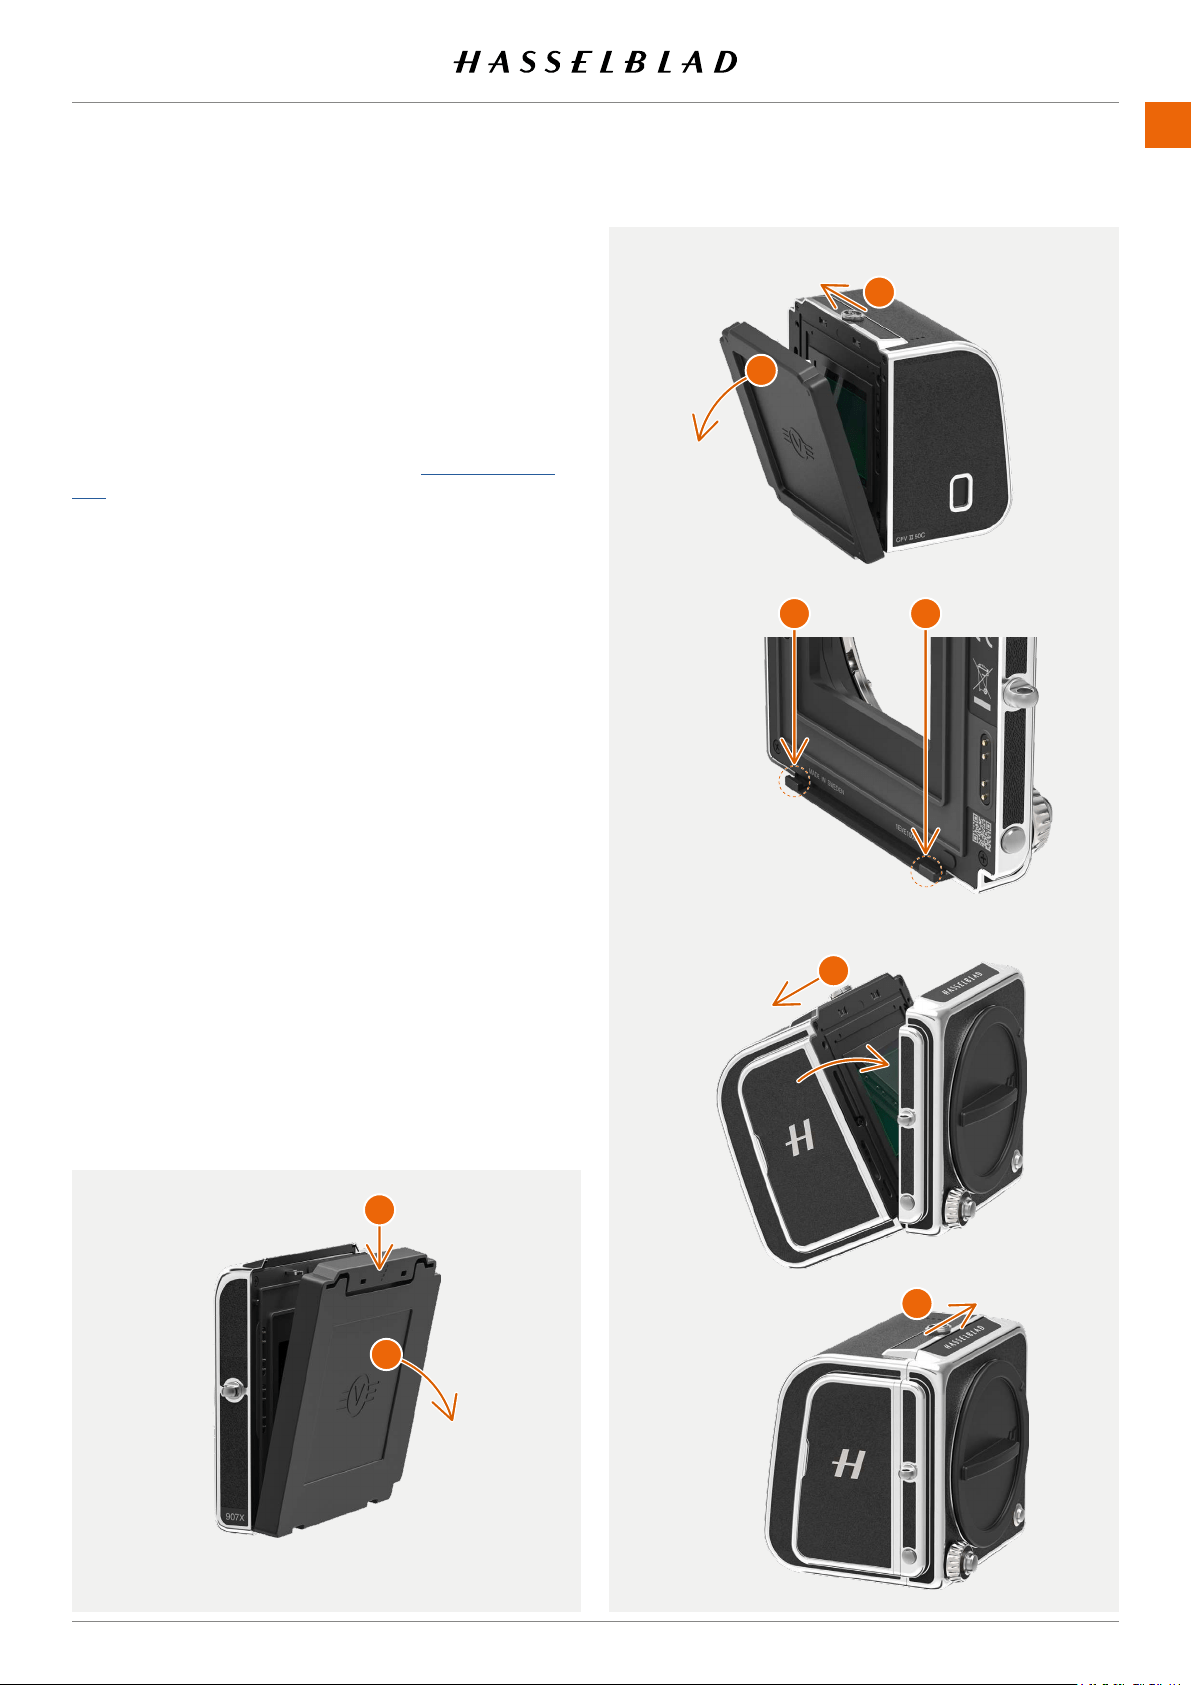
ASSEMBLING THE CAMERA
1
(A)
backwards (B).
2
(C) in the direction of the arrow and
(D).
3
(E).
button on the open position (F).
5 When the CFV II is attached to the camera, release the lock
6 button (G)
907X 50C USER GUIDE
A
B
C
D
E
A
B E
www.hasselblad.com
23
QUICK START
CONTENTS
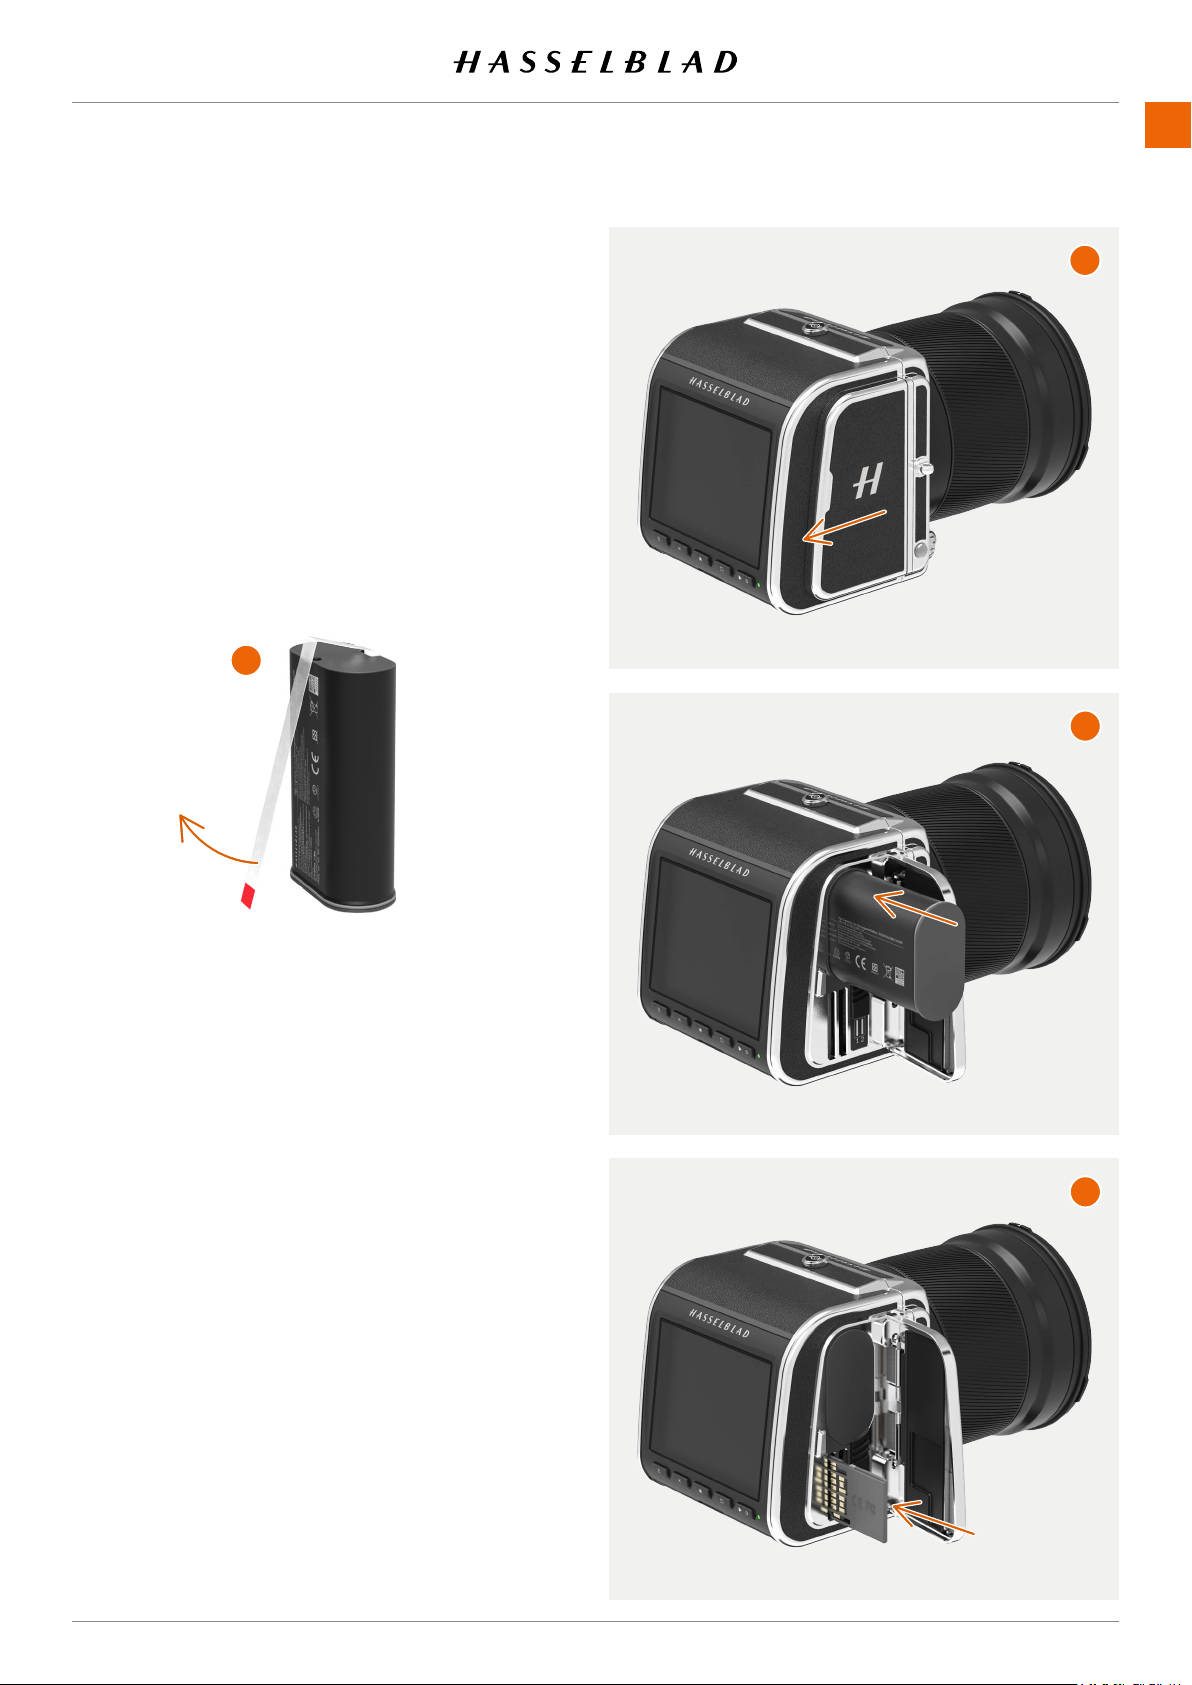
BATTERY
(A) and
until it clicks in place. (B)
Note!
Note!
remove the plastic (1)
Note!
SD CARD
Insert the SD card into slot 1 or 2. The contact side of the card
(C).
.
.
1
907X 50C USER GUIDE
A
B
C
www.hasselblad.com
QUICK START
CONTENTS907X 50C USER GUIDE
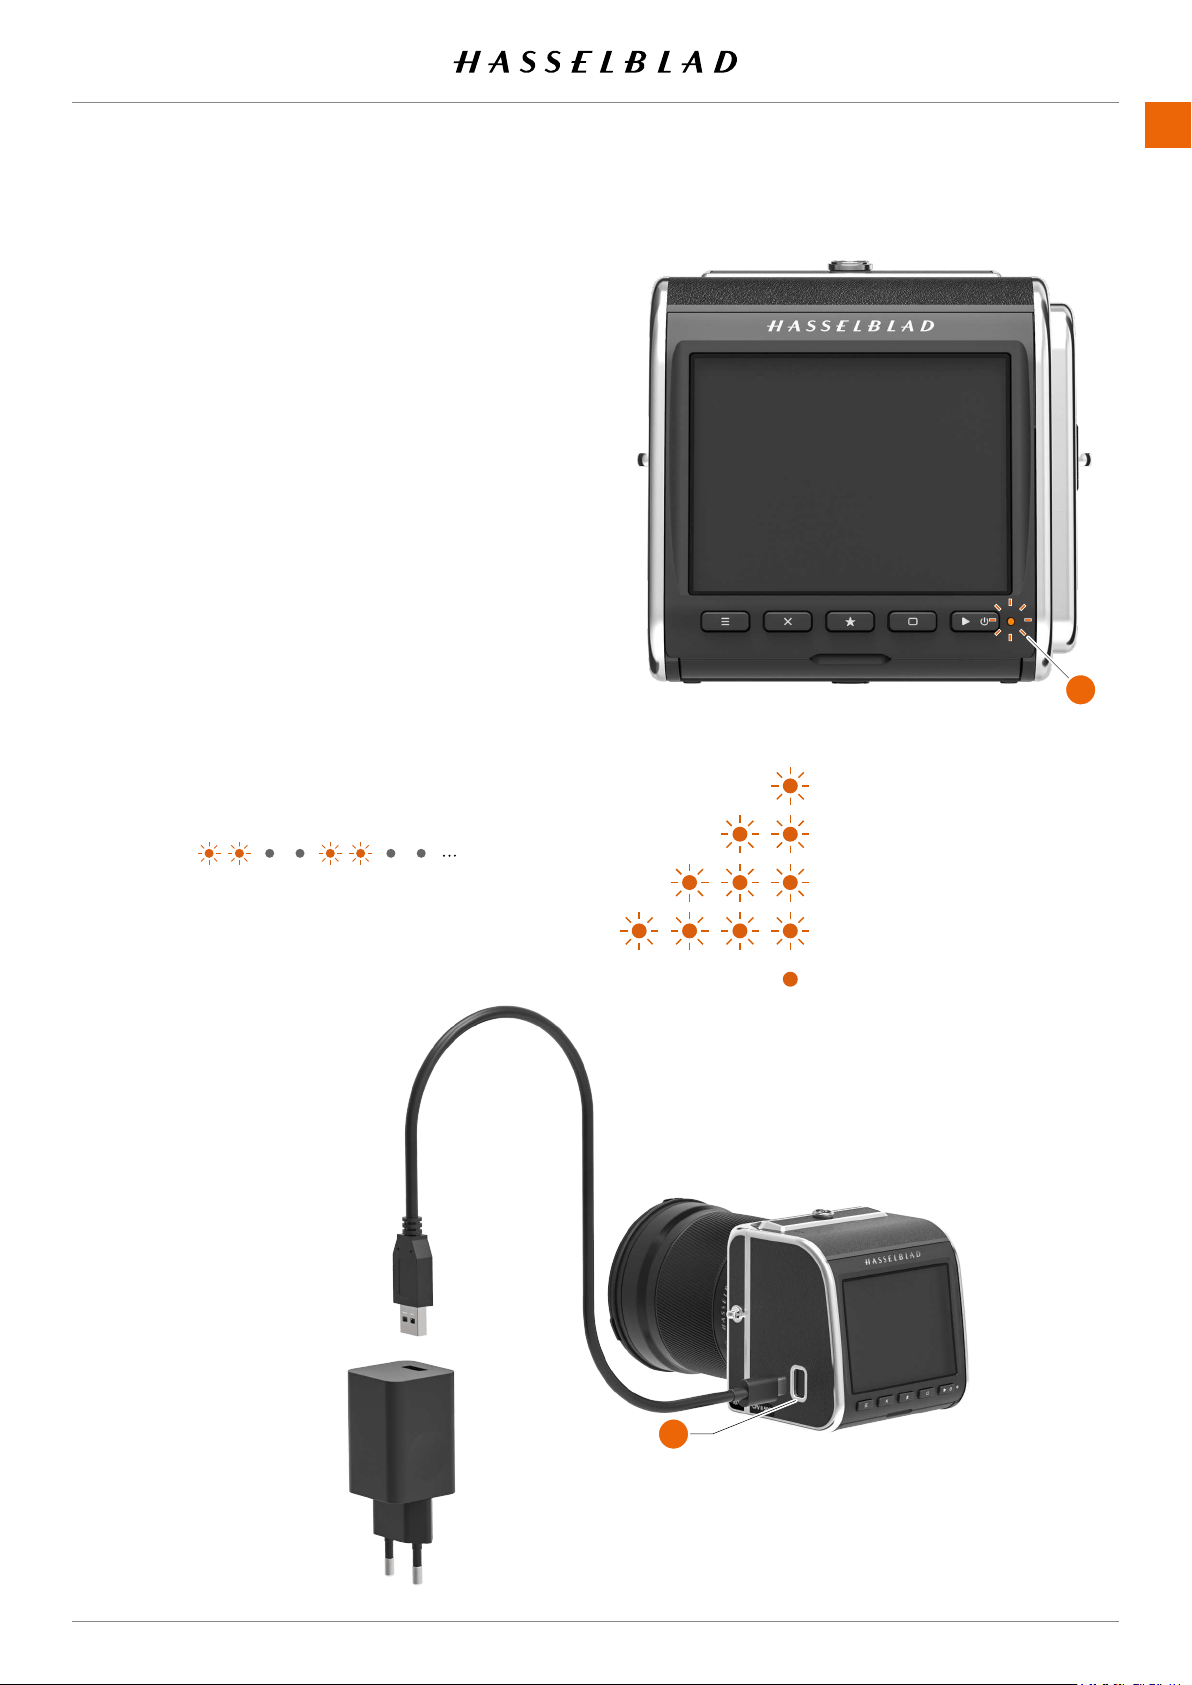
3.2 CHARGING THE BATTERY
BATTERY CHARGER
CHARGE THE BATTERY
(A). Insert
domestic socket.
CHARGING FROM THE USB PORT
(B) indicates
.
B
A
www.hasselblad.com
25
QUICK START
CONTENTS
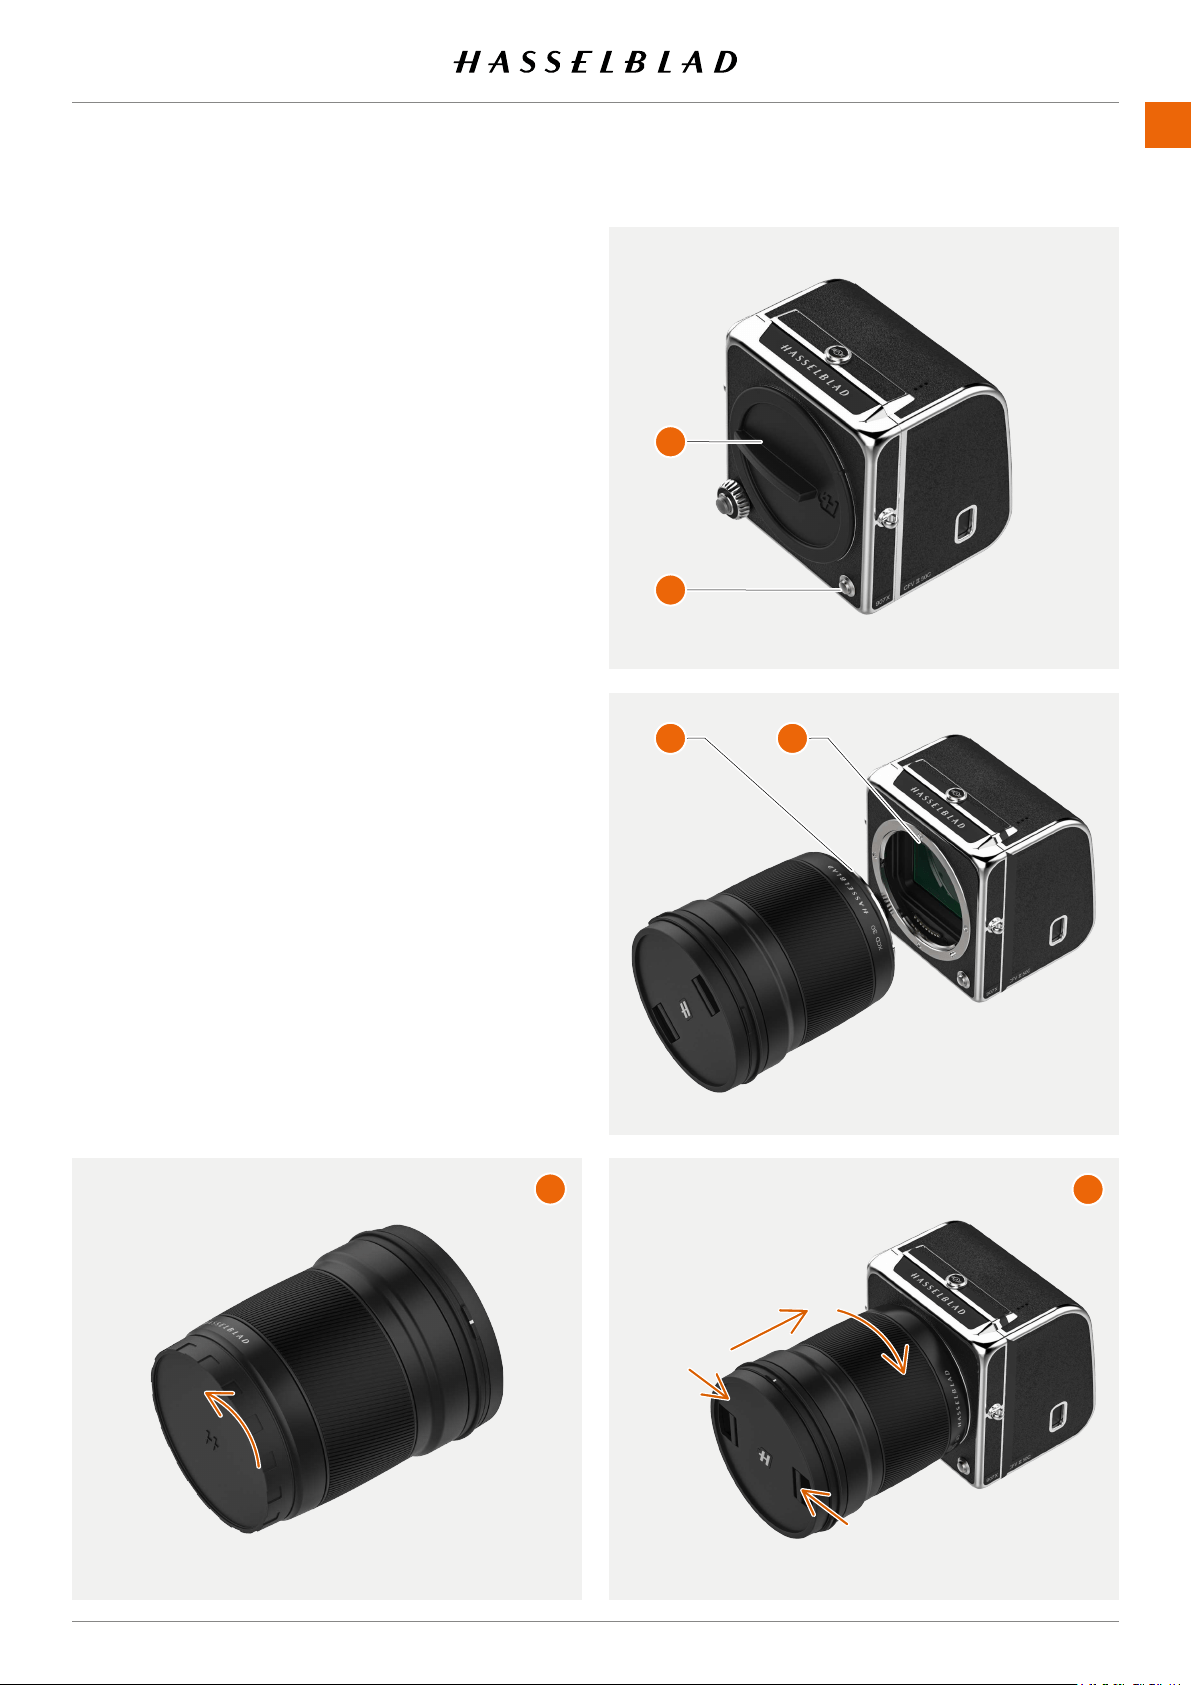
ATTACH THE LENS
●
counter clock-wise (A). Then remove the front protec-
tive cover (B)
button (C)
● (D) with the index on the
camera (E) and insert the lens. Rotate the lens clock-
wise until it clicks into place (F).
●
(F).
Note!
In order to collect as little dust as possible on the sensor, we
You can use a soft dust brush or compressed air to remove
dust. Also see .
907X 50C USER GUIDE
A
B
D
F
C
E
www.hasselblad.com
26
QUICK START
CONTENTS
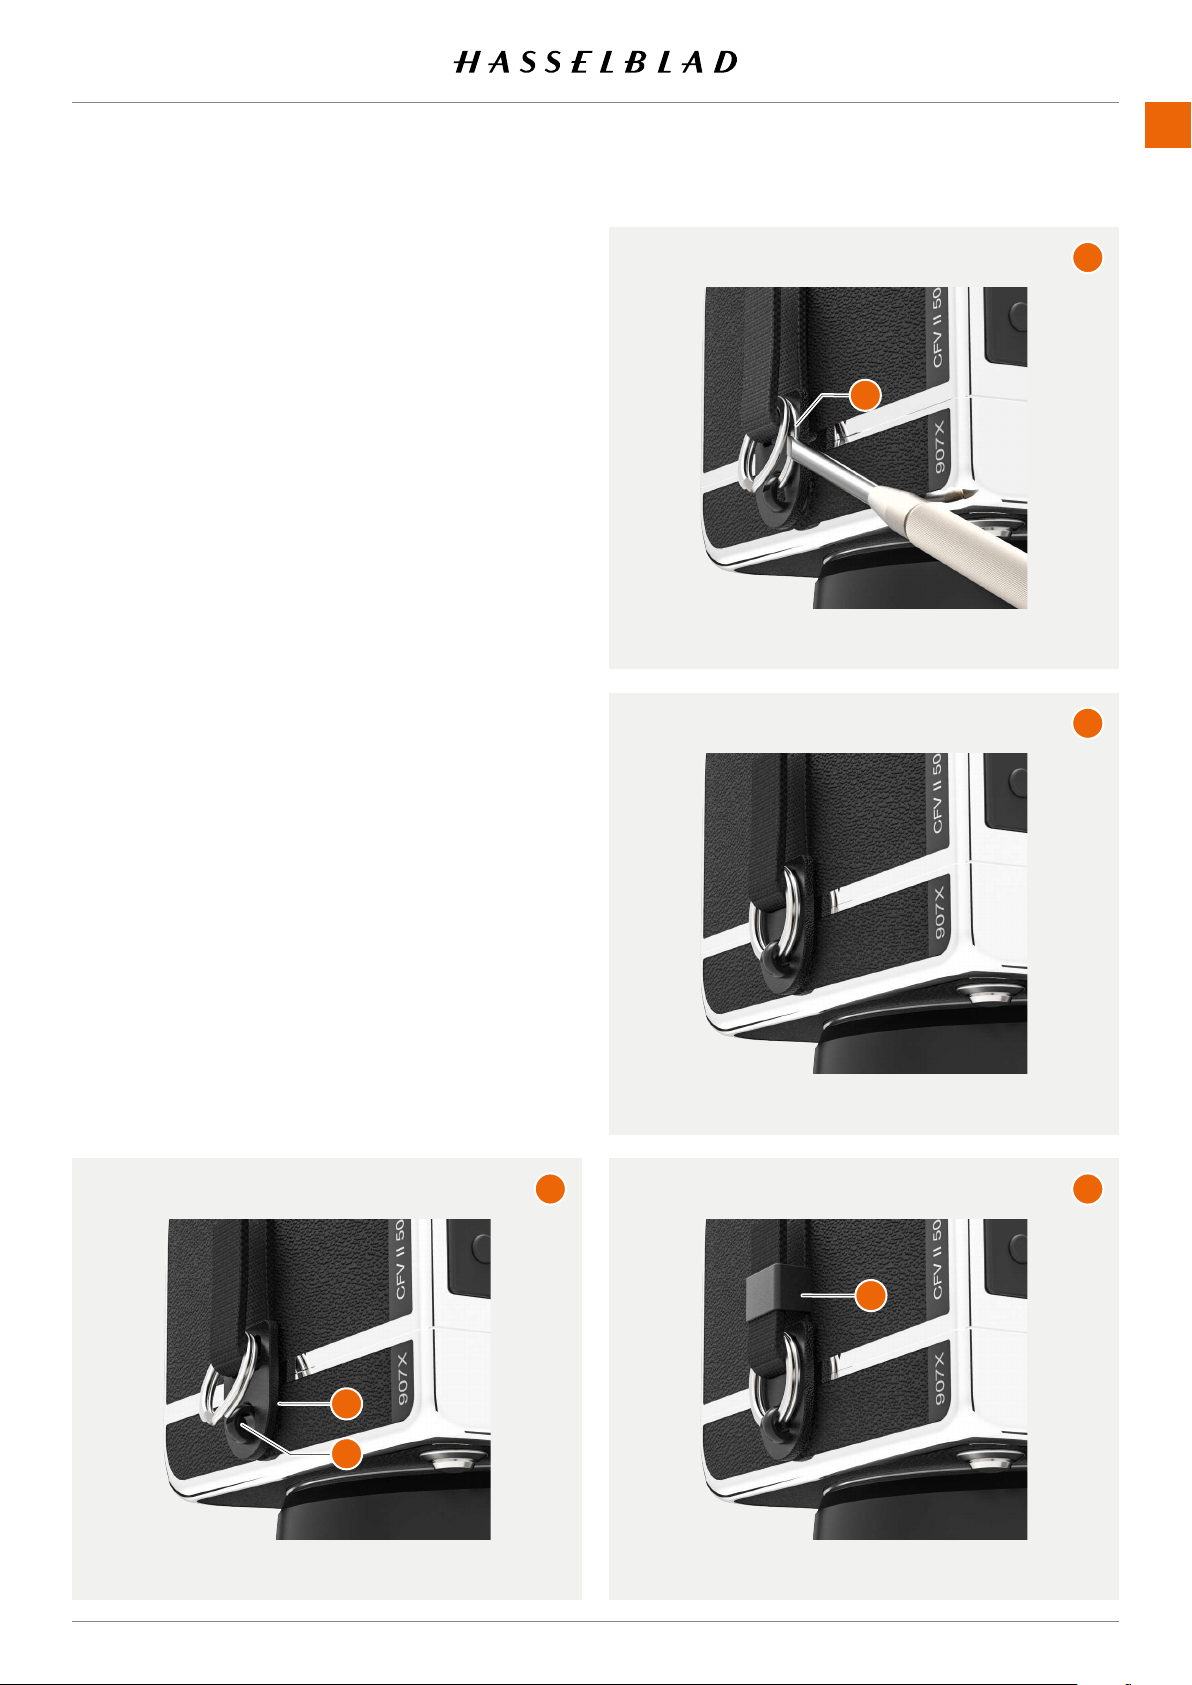
ATTACH THE SHOULDER STRAP
these instructions:
A
end (1)(2).
B (3)
screwdriver or a small knife. Be careful not to scratch the
camera.
C
D (4) down.
Repeat the process for the other side of the camera.
Note!
907X 50C USER GUIDE
1
A
B
C
D
2
3
www.hasselblad.com
QUICK START
CONTENTS
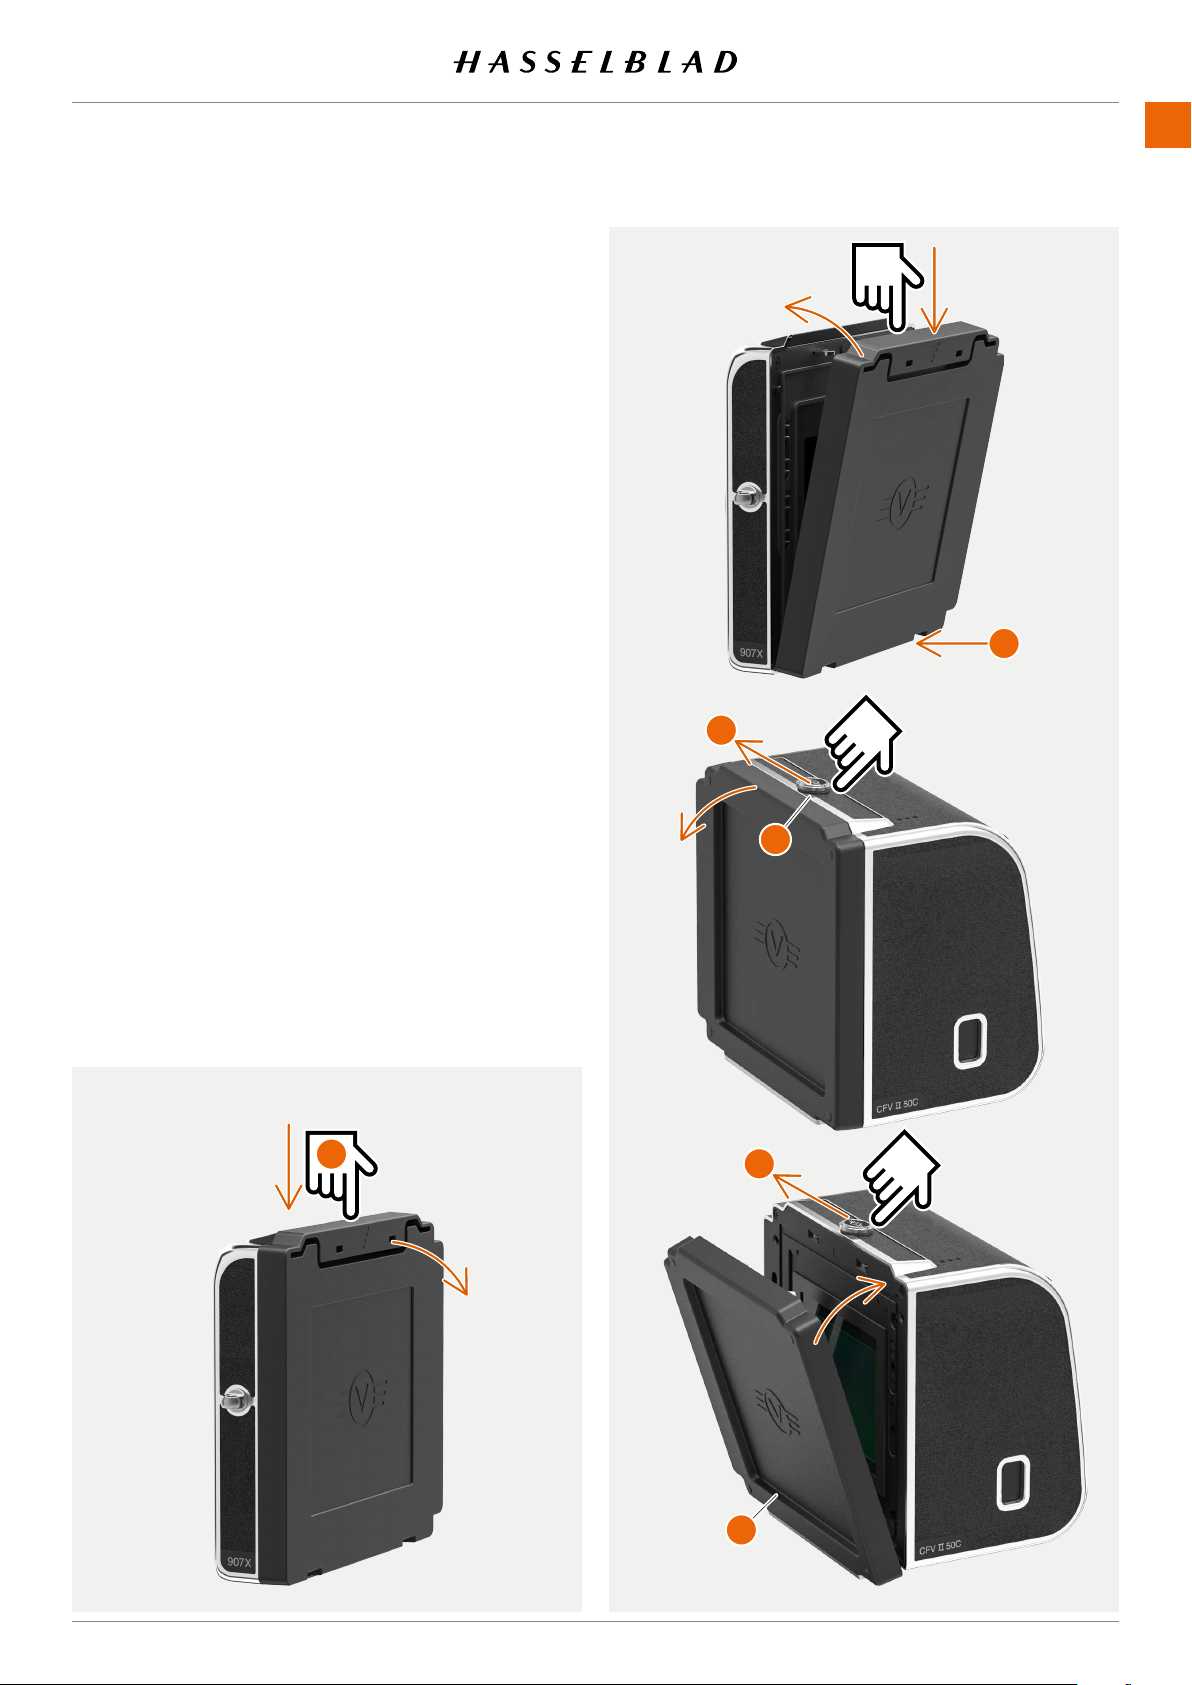
USING THE PROTECTIVE COVERS
should be used. The front protective cover is explained on
.
Camera rear protective cover
To remove:
Press the top part (A) down and tilt the cover backwards to
release it.
To at tach:
Place the cover on the lower supports (B) and press the top
part (A)
part.
CFV protective cover
To remove:
(C) in the direction of the arrow (E)
and tilt the cover forwards to release.
To at tach:
Place the CFV on the lower supports (D) and slide the
(E). Tilt the
cover inwards until it locks.
907X 50C USER GUIDE
A
B
C
D
E
E
www.hasselblad.com
28
QUICK START
CONTENTS
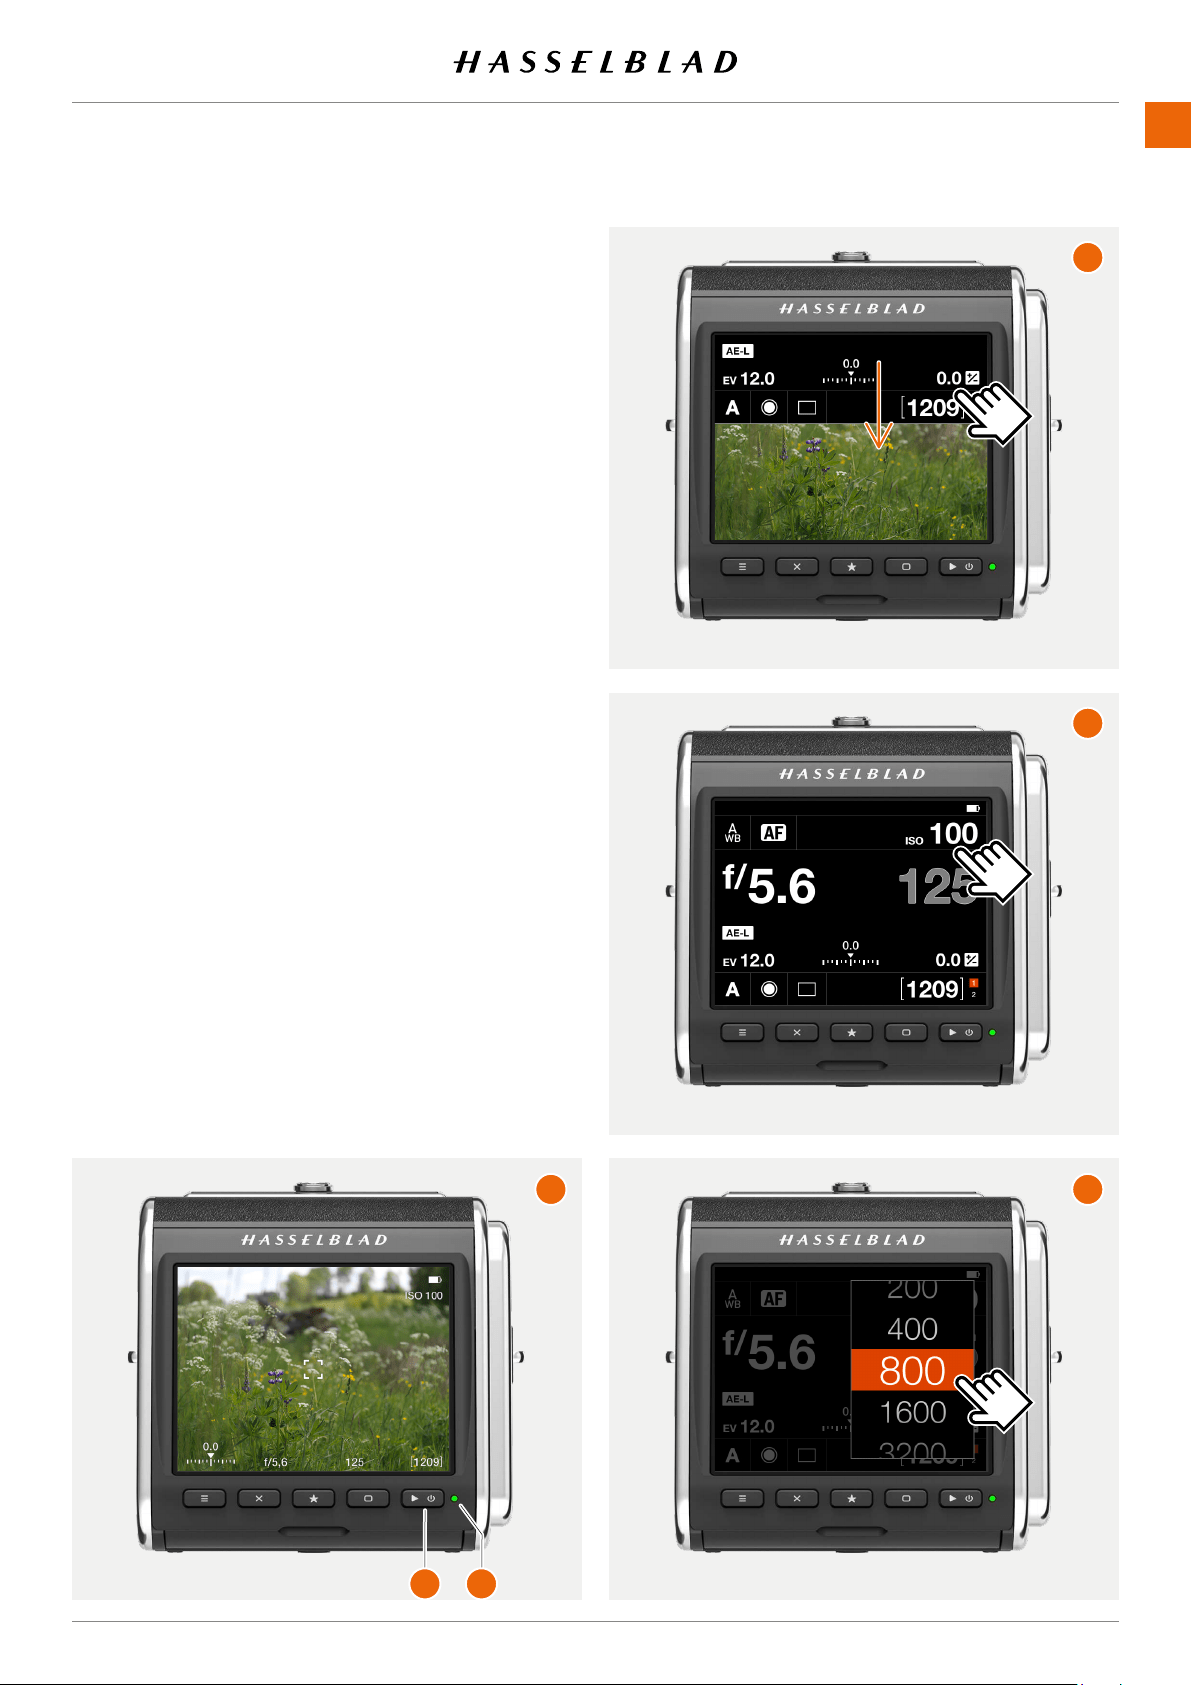
THE FIRST CAPTURE
Press and hold the power button (1) for one second to turn
(2)
aperture if required. Aperture and shutter speed are indicated
at the bottom of the live view screen (A)
seconds.
different value:
●
rear buttons.
●
to reveal the control screen (A). You can do this from
● (B). Scroll
tap the required value (C)
Note!
See more on .
907X 50C USER GUIDE
C
D
A
B
1
2
www.hasselblad.com
QUICK START
CONTENTS
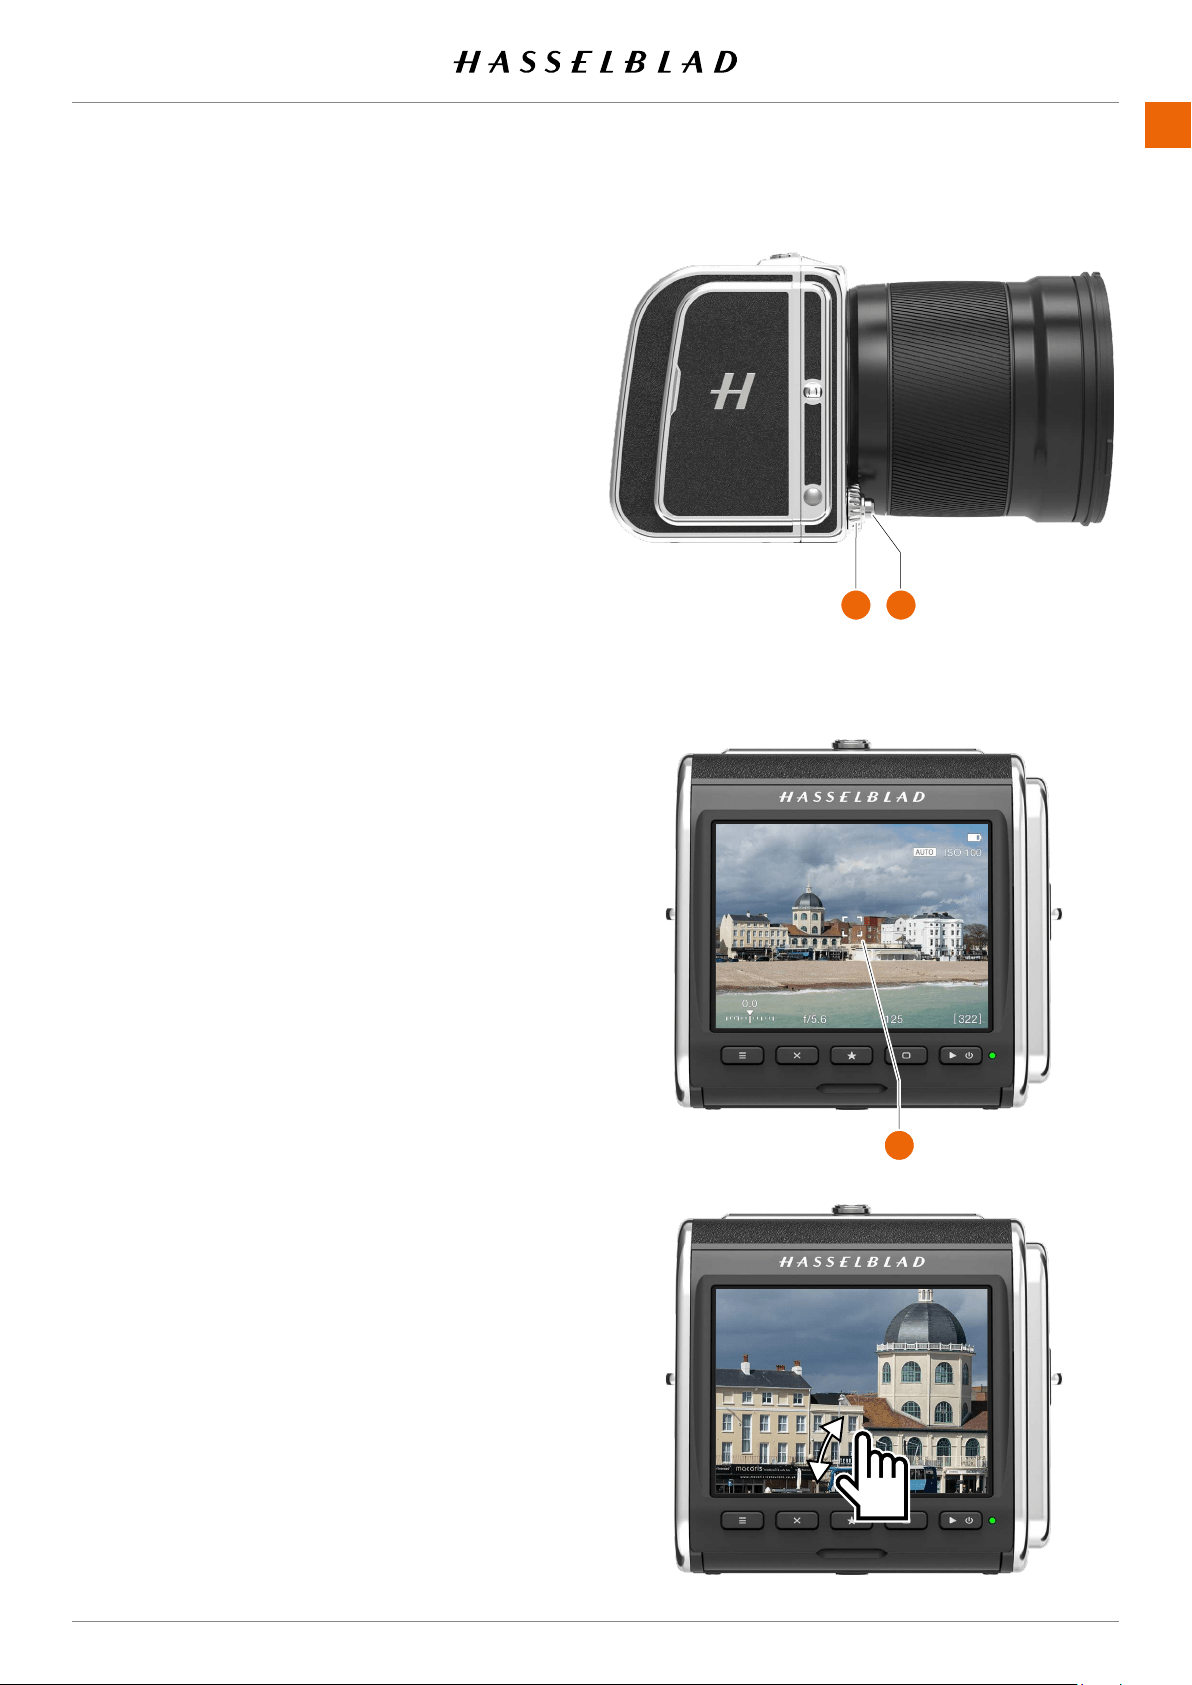
THE FIRST CAPTURE – CONTINUED
shutter release (1) to activate live view.
To select a different aperture value, turn the control wheel (2).
When the exposure mode is set to A, the camera will automati-
(3).
See more on .
907X 50C USER GUIDE
1 2
3
www.hasselblad.com
30
QUICK START
CONTENTS
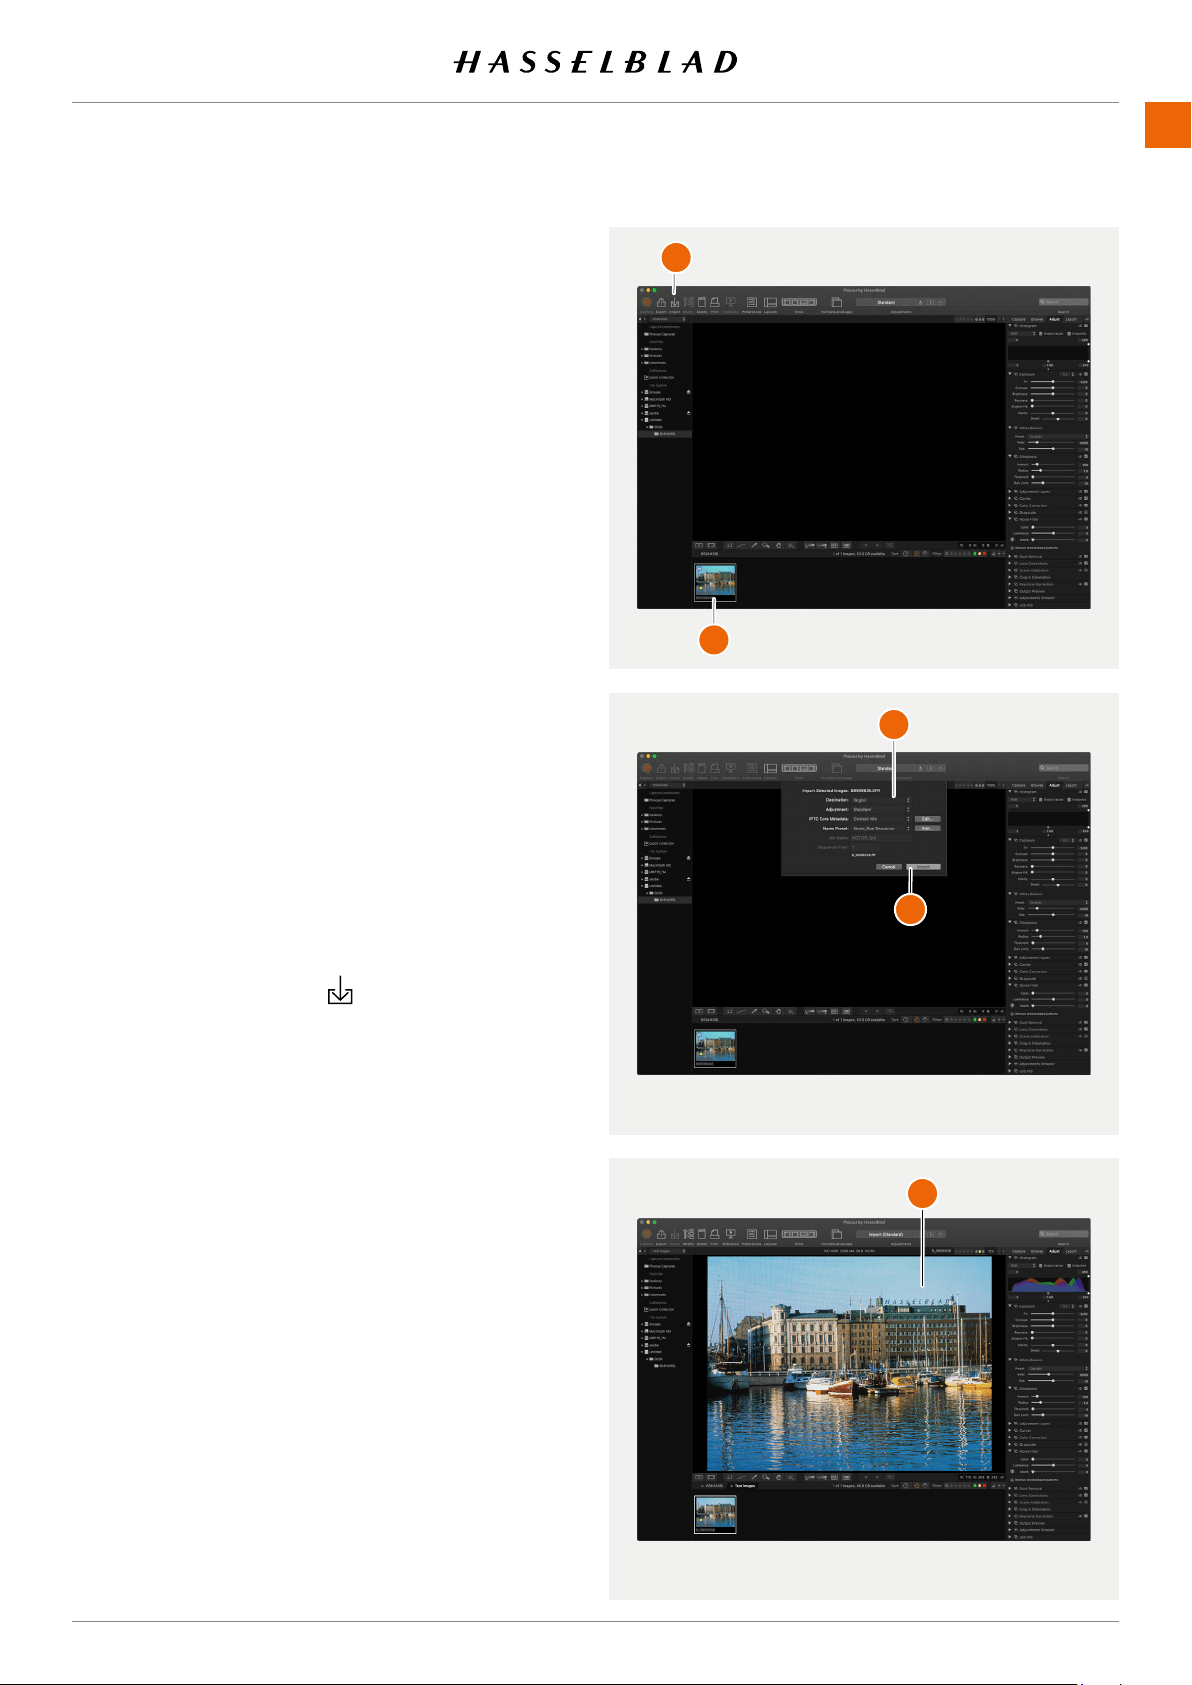
VIEWING THE FIRST CAPTURE ON THE
COMPUTER
to take the SD card from the camera and place it in an SD card
of the card reader.
Note! Do not remove the card from the camera while the
computer. Phocus is available as a free download from www.
for Phocus.
1 Start Phocus.
2 Connect the card reader to the computer and insert the
card.
3
(A).
in the top panel (B).
5 -
(C).
6 (D).
Viewer Window (E)
Note!
907X 50C USER GUIDE
A
B
C
D
E

4 SAFETY

www.hasselblad.com
32
907X 50C USER GUIDE
SAFETY
CONTENTS
4.1 SAFETY AND WARNINGS
Warning!
Do not place cables between camera and computer so
that there is a risk for people to trip and fall. This can cause
personal injury and/or damage to the equipment.
Warning!
If you use spare battery packs, make sure to use protective
caps on the contacts. The contacts can short circuit and catch
re,ifnotprotected.Thiscancausepersonalinjuryand/or
damage to the equipment.
Warning!
Do not expose batteries (battery pack and batteries installed)
toexcessiveheatsuchassunshine,reorsimilar.Ifexposed,
thebatteriescancatchre.Thiscancausepersonalinjury,
damage to the equipment and the surrounding environment.
Warning!
Becarefulwhenworkingwithstrobeandashunits.Thiswill
prevent personal injury and/or damage to the equipment.
Warning!
Operation of this equipment in a residential area could cause
radio interference.
4.2 CAUTIONS
Caution!
Be careful when you use the camera. The camera is a preci-
sion instrument. This will help prevent damage to the camera.
Caution!
Danger of explosion if battery is incorrectly replaced. Replace
only with the same or equivalent type.
Caution!
Donotusebatteriesotherthanspecied.Thiscancause
damage to the batteries.
Caution!
Use protective covers as much as possible. The protective
covers will help prevent damage to the equipment.
Caution!
Use a protective case or camera bag when you transport the
equipment. This will help prevent damage to the equipment.
Caution!
Protect the equipment from oil fumes, steam, humid
conditions and dust. This will help prevent damage to the
equipment.
Caution!
Seal all equipment in a plastic bag or similar if you enter damp
and humid condition from dry and cold condition. Wait until
the equipment has acclimatized to the new temperature
before you remove the equipment from bag. This will help
prevent damage to the equipment.
Caution!
Avoid frequent and high temperature changes. This can cause
damage to the equipment.
Caution!
Keep camera and equipment away from moisture. If your
camera becomes wet, disconnect from electric power and let
camera dry before further use. This will help prevent damage
to the equipment.
Caution!
Store the equipment in a dry environment. This will help
prevent damage to the equipment.
Caution!
Be careful when you attach/detach the components to/from
the camera. This will help prevent damage to the data bus
connections.
Caution!
Use the grip or strap when you lift and handle to camera. This
will help prevent damage to the camera.
Caution!
Donotinsertngersintothecamerabody.Thiscancause
damage to the equipment.
Caution!
Donottouchthelensglasssurfaceswithyourngers.Thiscan
cause damage to the equipment.
Caution!
DonottouchtheCMOSSensorwithyourngers.Thiscan
cause damage to the equipment.
Caution!
Keep all equipment out of reach of small children. This will
prevent damage to the equipment.

www.hasselblad.com
33
907X 50C USER GUIDE
SAFETY
CONTENTS
Caution!
When cleaning the camera, remove the batteries. This will
prevent damage to the camera.
Caution!
If you leave the camera unused for a long period, remove the
batteries. This will prevent damage to the equipment.
Caution!
DonottrytoremovetheglassIRlterfromthefrontofthe
CMOS (due to dust or similar). This can cause damage to the
equipment. Always contact your local Hasselblad Authorized
Service Centre.
Caution!
If you use canned compressed air to clean the glass of the IR
lter,readtheinstructionsverycarefullybeforeuse.Thiswill
helppreventdamagetothelter.
4.3 DISPOSAL
This product must be put in municipal waste.
Check local regulations for disposal.

www.hasselblad.com
34
907X 50C USER GUIDE
SAFETY
CONTENTS
4.4 FCC
Federal Communication Commission Interference Statement:
This equipment has been tested and found to comply with the
limits for a Class B digital device, pursuant to Part 15 of the
FCC Rules. These limits are designed to provide reasonable
protection against harmful interference in a residential
installation.
This equipment generates, uses and can radiate radio
frequency energy and, if not installed and used in accordance
with the instructions, may cause harmful interference to
radio communications. However, there is no guarantee that
interference will not occur in a particular installation. If this
equipment does cause harmful interference to radio or
television reception, which can be determined by turning the
equipment off and on, the user is encouraged to try to correct
the interference by one of the following measures:
● Reorient or relocate the receiving antenna.
● Increase the separation between the equipment and
receiver.
● Connect the equipment into an outlet on a circuit
different from that to which the receiver is connected.
● Consult the dealer or an experienced radio/TV
technician for help.
FCC Caution
Anychangesormodicationsnotexpresslyapprovedby
the party responsible for compliance could void the user’s
authority to operate this equipment.
This device complies with Part 15 of the FCC Rules. Operation
is subject to the following two conditions:
1 This device may not cause harmful interference, and
2 This device must accept any interference received, includ-
ing interference that may cause undesired operation.
FCC Radiation Exposure Statement:
This equipment complies with FCC radiation exposure limits
set forth for an uncontrolled environment. The highest SAR
value as reported to the authorities for the CFVII 50C SE
50YOM when tested for use by the Body is 0.27 W/kg and
Extremity is 0.301W/kg against a limit of 1.6W/kg.
4.5 ISED
RSS-GenInformationfortheCerticationofRadioApparatus
This device complies with ISED licence-exempt RSS stand-
ard(s). Operation is subject to the following two conditions:
1 This device may not cause interference, and
2 This device must accept any interference, including
interference that may cause undesired operation of the
device.
Cet appareil est conforme au(x) standard(s) RSS exempt(s)
de licence de ISED. Son fonctionnement est sujet aux deux
conditions suivantes:
1 cet appareil ne doit pas occasionner d’interférence
2 cet appareil doit supporter toutes les interférences, y
compris celles qui pourraient provoquer un mauvais
fonctionnement de cet appareil.
RSS-102 RF Exposure Compliance of Radiocommunication
Apparatus
The CFVII 50C SE 50YOM has been designed to comply
with safety requirements for exposure to radio waves. SAR
testing has been performed in accordance with RSS-102, with
theCFVII50CSE50YOMtransmittingatitshighestcertied
power level in all used frequency bands. The highest Body
SAR value for the CFVII 50C SE 50YOM when tested was 0.27
W/kg against a limit of 1.6 W/kg. Extremity SAR was measured
to 0.301 W/kg.
Please follow the instructions included in the user guide for
product installation and use.
Le X1D-50c a été conçu pour se conformer aux exigences de
sécurité en matière d’exposition aux ondes radio.
Des tests SAR ont été effectués conformément à la RSS-102
avec le CFVII 50C SE 50YOM transmettant à son plus haut
niveaudepuissancecertiédanstouteslesbandesde
fréquences utilisées.
La valeur SAR la plus élevée pour la CFVII 50C SE 50YOM lors
des tests était de 0,27 W/Kg contre une limite de 1.6 W/kg. On
a mesuré l’extrémité SAR à 0,301 W/kg.
Merci de suivre les instructions fournies dans le mode
d’emploi pour l’installation et l’utilisation du produit.

5 PARTS & CONTROLS
PARTS & CONTROLS
www.hasselblad.comCONTENTS
36
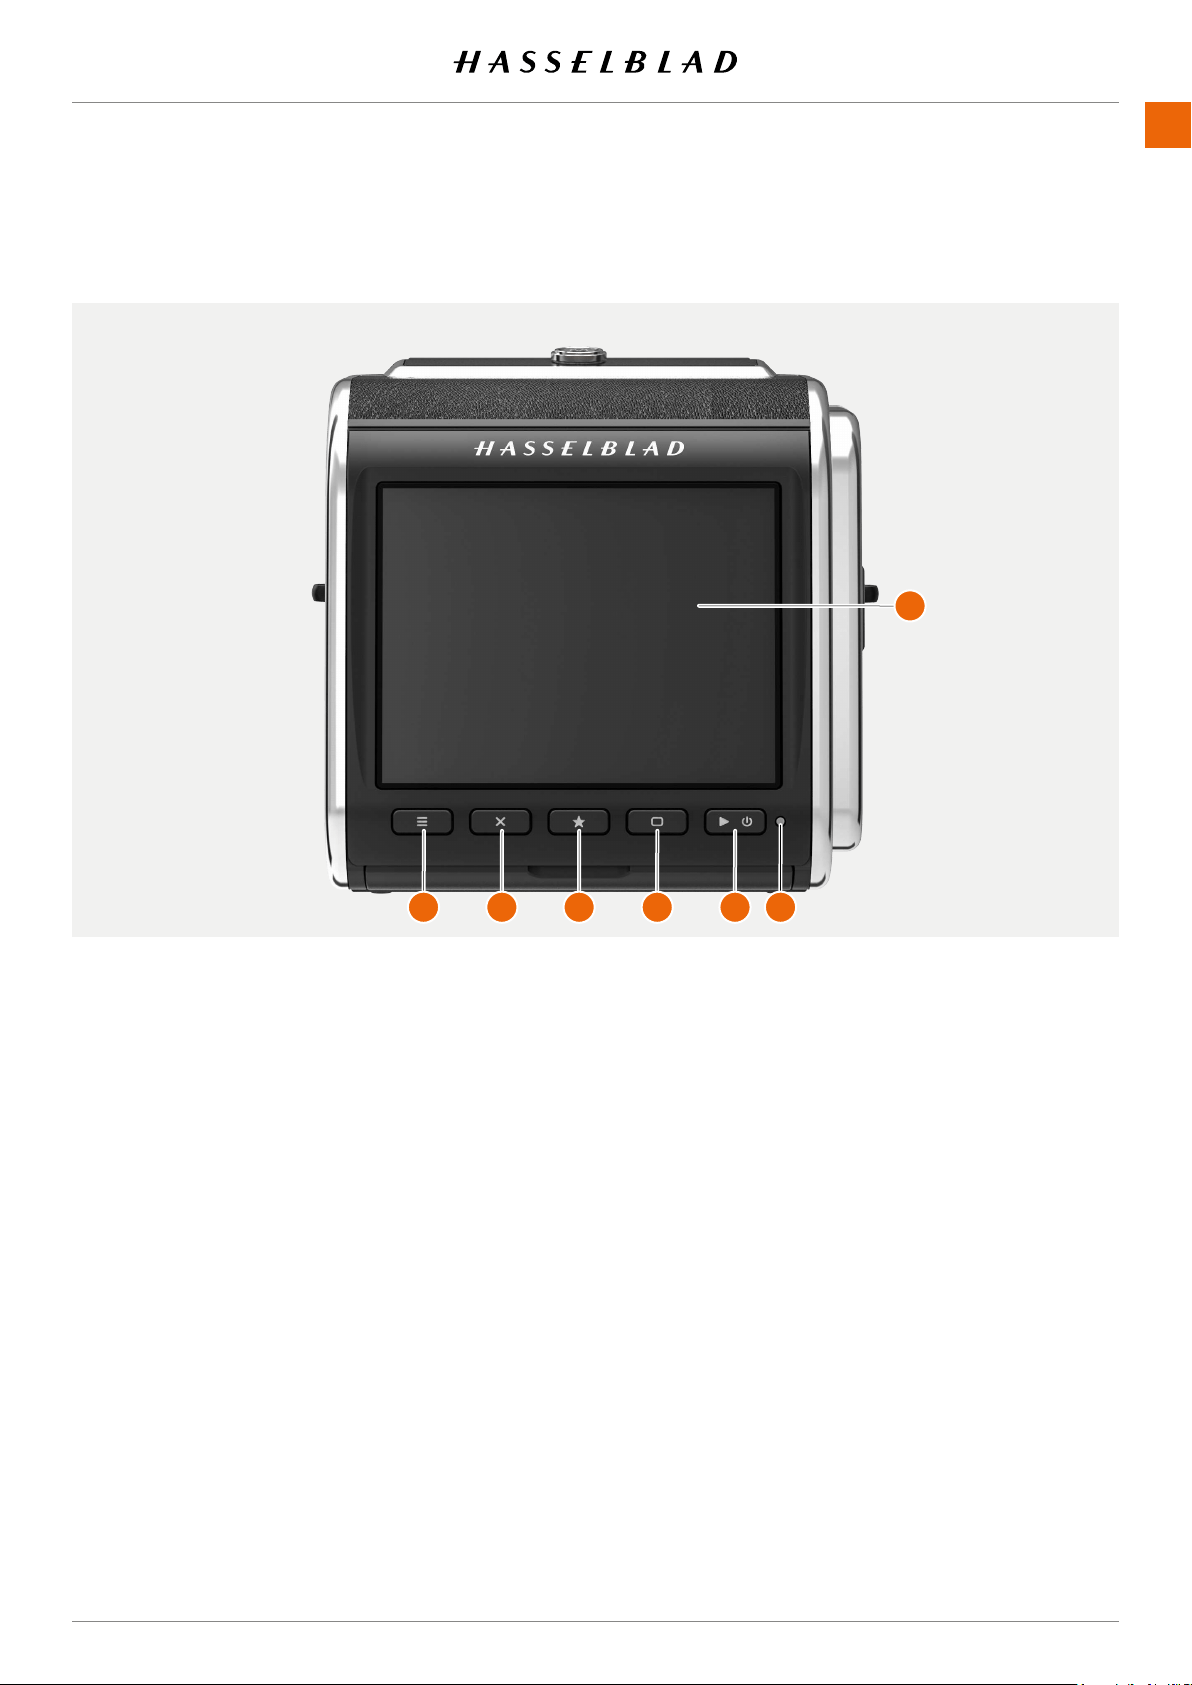
1
Menu Button
This button opens the main menu. If the main menu is
already active, the control screen is shown.
2
Cross Button
Function depends on screen information. The button
acts as delete image button in browse mode. The button
moves the selector up in menus. In control screen it used
for parameter selection.
3
Star Button
In browse mode this button is used to rate images. See
page 90. If image rating is turned off in the settings
(page 125), the star button will zoom out to 9-view. In live
view the star button will zoom in to for precise focusing.
It is also used as a select button when controlling camera
settings using buttons.
4
Display button
Function depends on screen information. The button
changes the overlay in live view mode. In menus, it moves
the selector down. When the control screen is active, it is
used for parameter selection.
5
On/Off and browse button
A long-press (press and hold for one second) will turn
On or Off the camera depending on the previous state.
A short-press activates the display and shows the last
captured image.
6
Status LED
Green color: indicates that the camera is ready to make a
capture.
Yellow colour: The camera is busy and not ready to make
a capture.
Red color: Error state
Blinking: The image is written to the card or host comput-
er.
7
Touch display
Multi-touch display with full touch support to control
all settings of the camera as well as panning, pinch and
spread zoom for image review. The display can be tilted
up to 90 degrees upwards.
Note!
You can force the camera into standby mode to save power by
pressing and holding the Menu button and making a short-
press on the On/Off button.
5.1 PARTS, COMPONENTS, BUTTONS AND CONTROLS
907X 50C USER GUIDE
1 2 3 4 5 6
7

PARTS & CONTROLS
www.hasselblad.comCONTENTS
37
1
Control wheel
Control wheel used for aperture and shutter speed
setting. In browse mode it will change image.
2
Shutter Release Button
A two-position shutter release button. First position will
activate Live View or start AF. Second position will capture
the image
3
Lens Mount Index
Index for lens mount alignment.
4
Lens Locking pin
Locks the lens onto the camera. Controlled by the Lens
Release Button
(6)
.
5
Lens Contact
Contacts for lens communication.
6
Lens Release Button
Button to release the lens or front protective cover.
907X 50C USER GUIDE
1
2
3
5
6
4
PARTS & CONTROLS
www.hasselblad.comCONTENTS
38
1
Contacts
Contacts used for lens and camera control.
2
CFV Hooks
Hooks that hold the CFV II in locked position.
3
CFV lock pins
Secures a stable and precise mount for the CFV II back.
4
CFV Support
Lower support for the CFV II.
907X 50C USER GUIDE
1
1
1
2
4
3 3
PARTS & CONTROLS
www.hasselblad.comCONTENTS
39
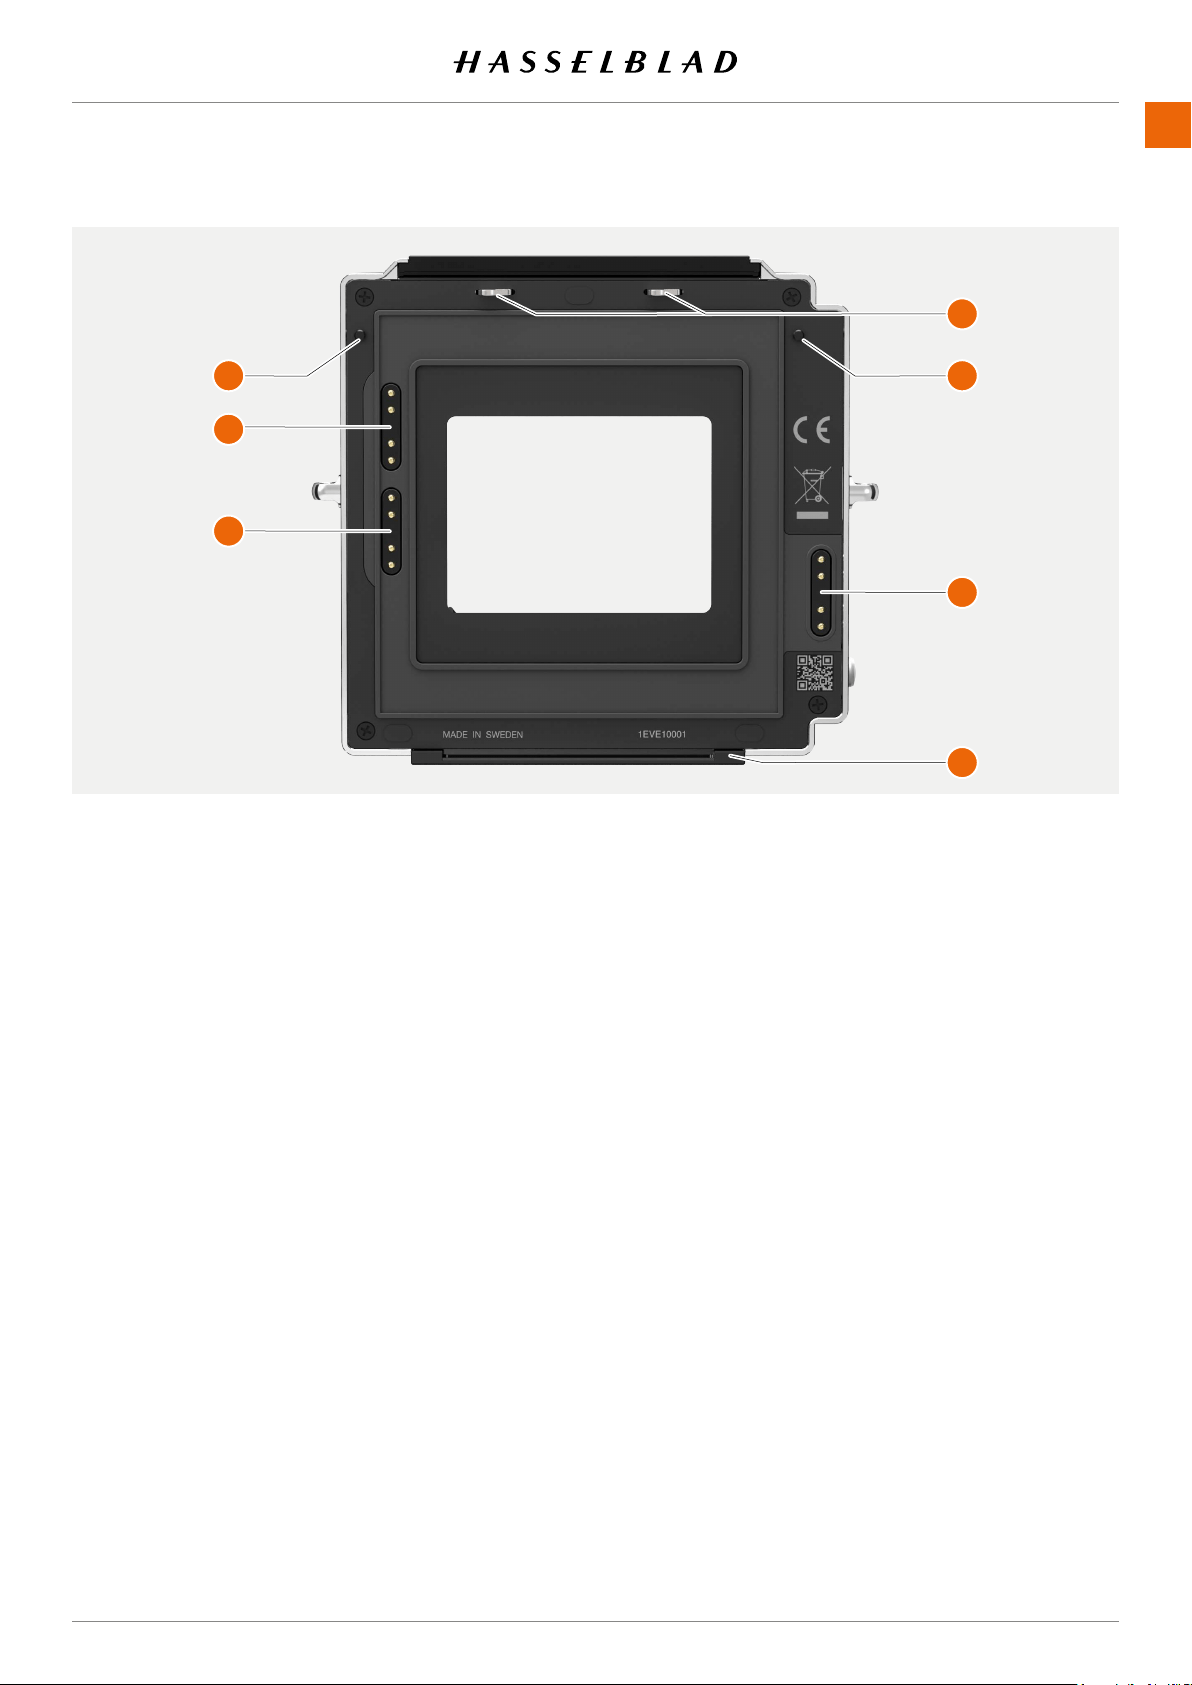
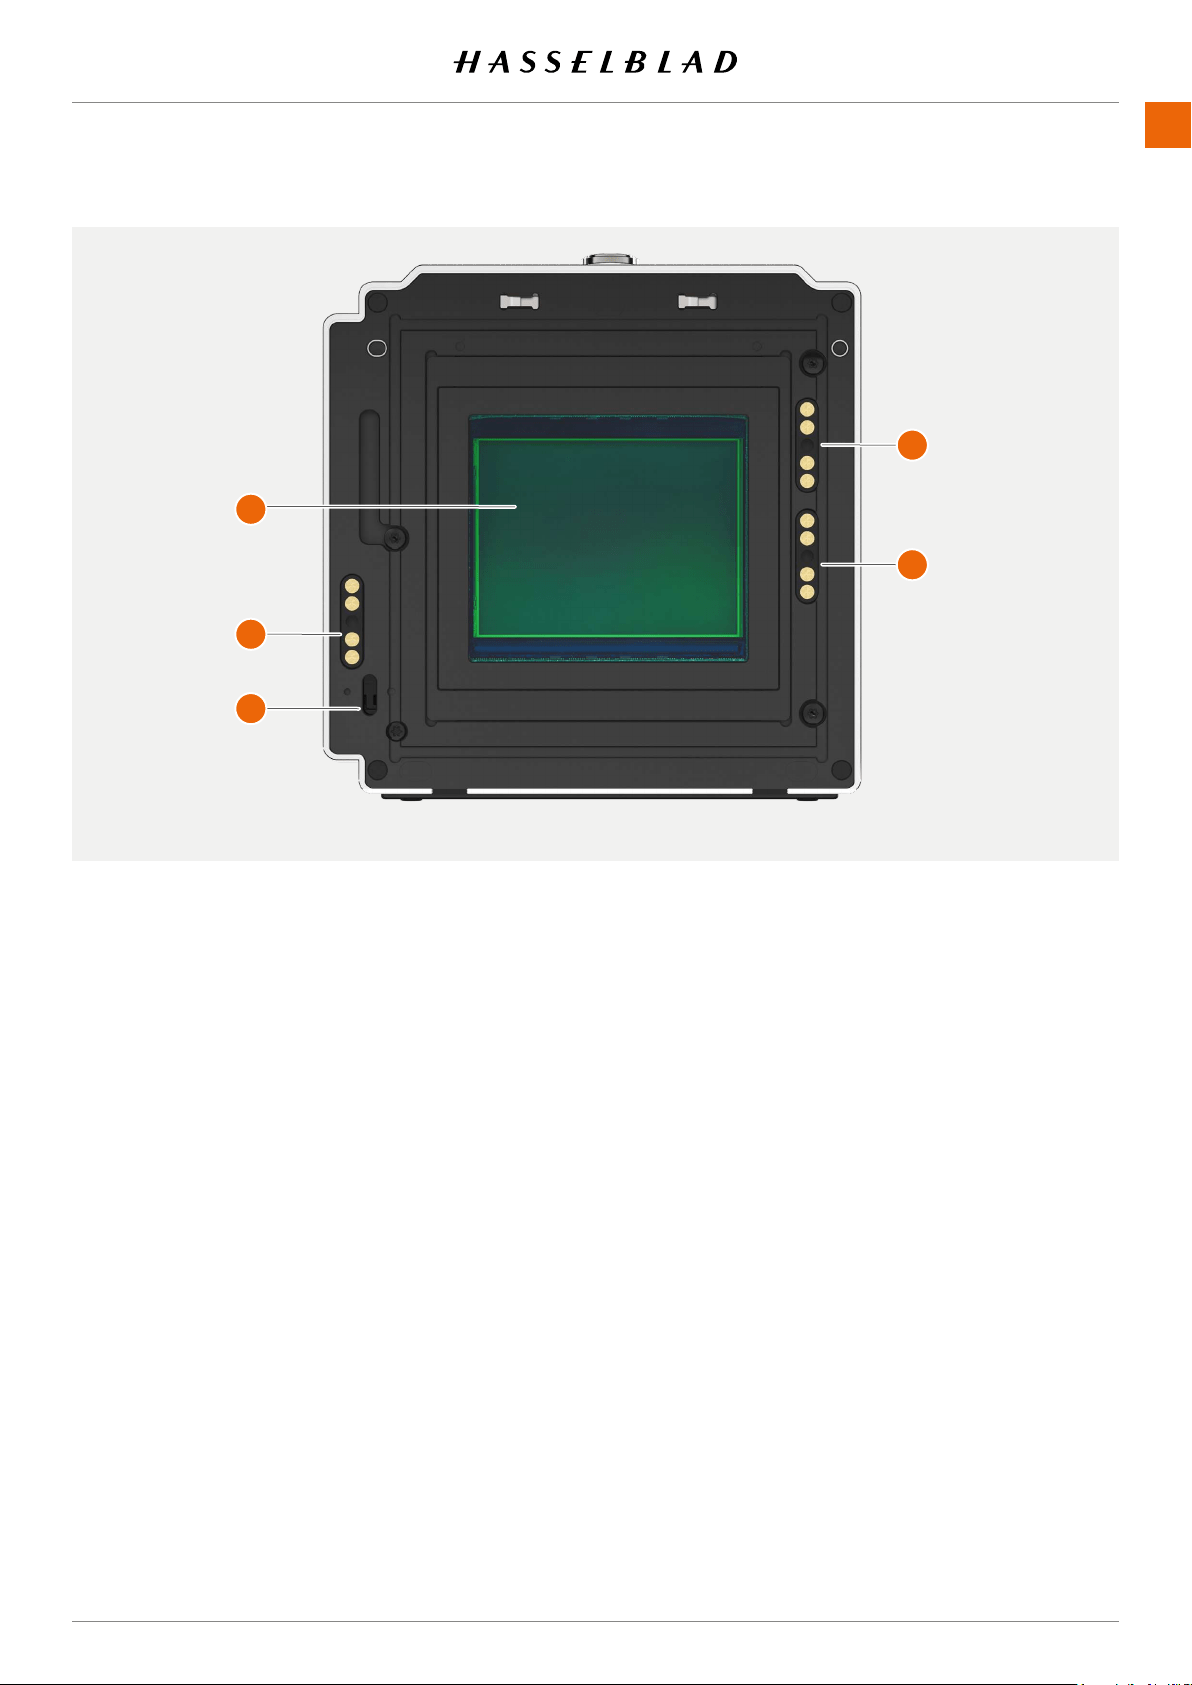
1
Sensor
Please make sure to read the cleaning instructions in the
Appendix on page 155.
2
Contact for 200 Series cameras
Electricalcontactusedwithmodied200Seriescameras.
3
Release Bar sensor
Used to synchronize exposure with the 500, EL, SWC,
unmodied200and2000typecameras.
4
907X Contact
Contact used with the 907X camera body.
5
555 ELD Contact
Contact used with the 555 ELD camera.
Note!
When the CFV II is used on the 907X body, all contacts are
used for body and lens communication.
907X 50C USER GUIDE
1
2
3
4
5
PARTS & CONTROLS
www.hasselblad.comCONTENTS
40
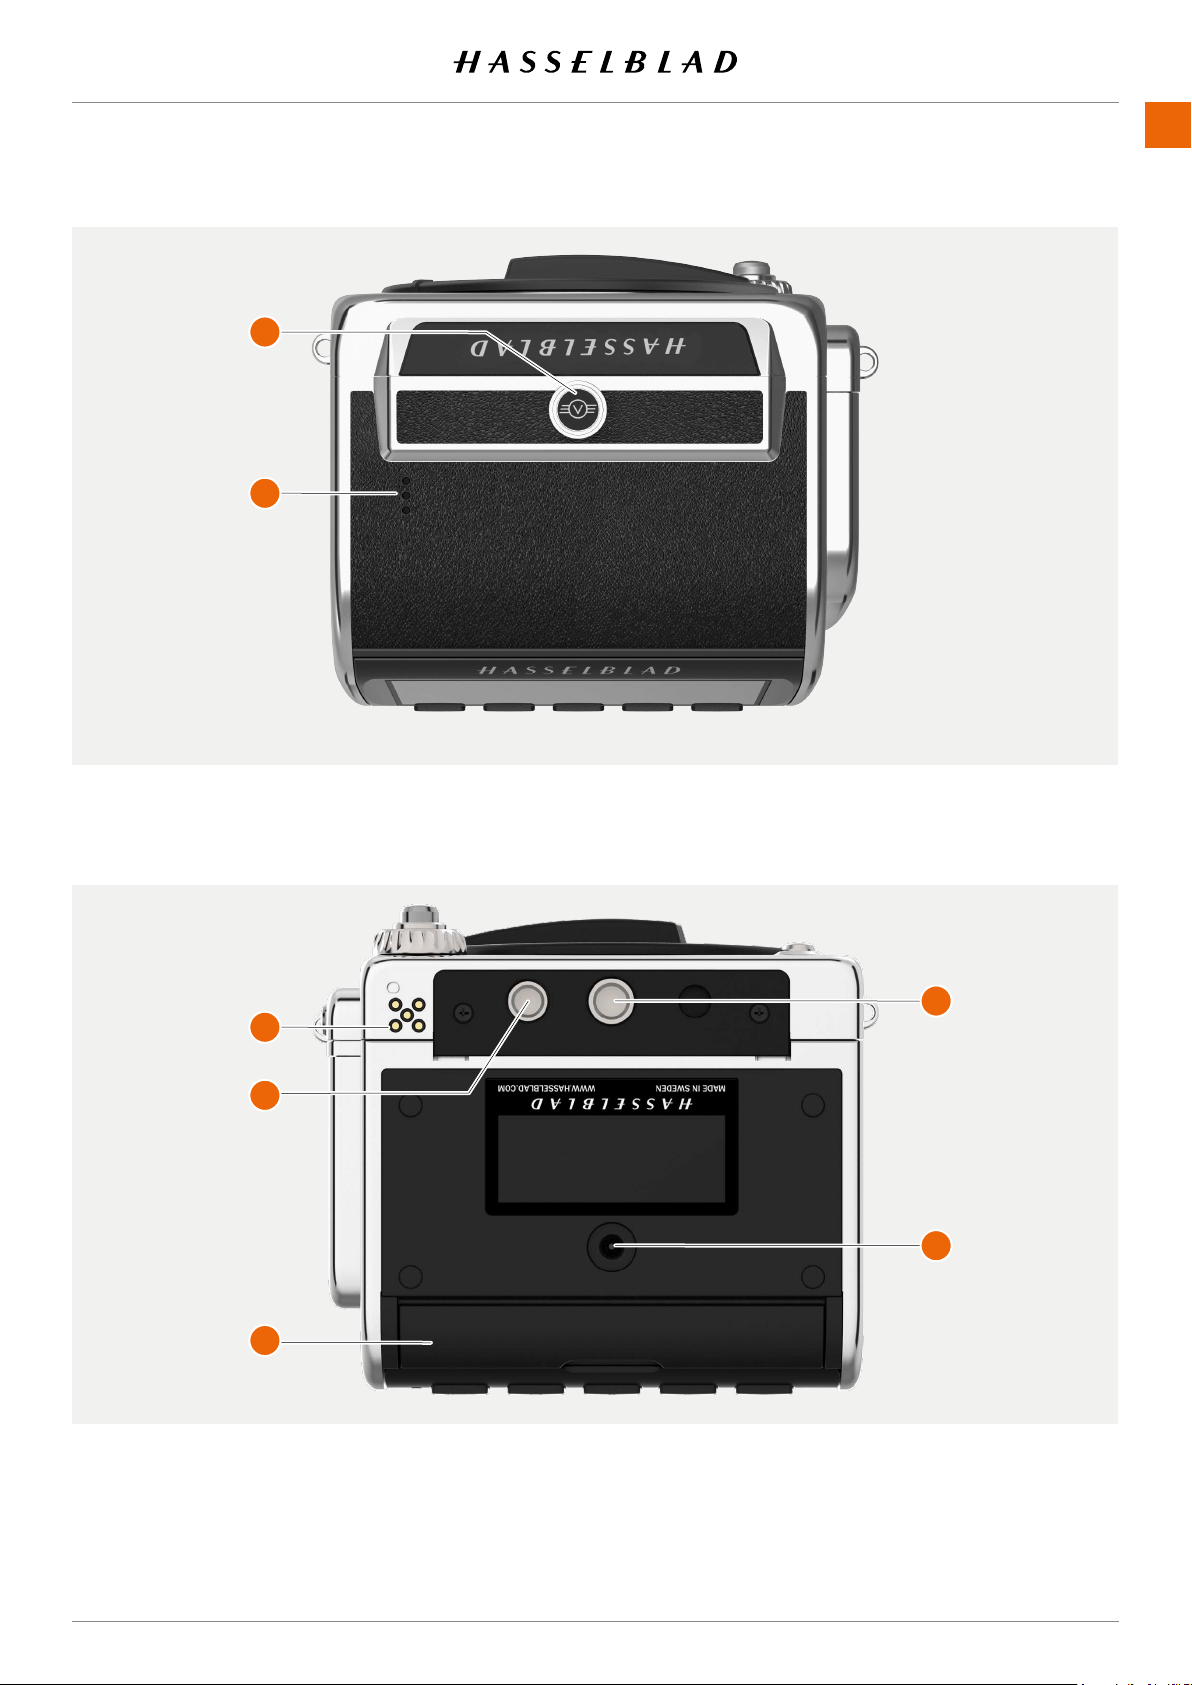
1
Locking button
Make sure that you hold the back and camera
securely. Then slide the locking button to the right
to release the CFV II from the camera.
3
Lid for Connector Ports
Protective rubber lid for connector ports for audio
and sync cables.
4
Control grip lock
Locking hole for the control grip.
5
Control grip connectors
Electrical connectors for the control grip.
2
Speaker
Openings for audio signals.
6
Tripod thread
1/4 inch tripod thread
7
DC power input
Plug for external DC power input.
Spec: 12-24 VDC/35W.
Plug: 3.7/1.3 mm. Positive voltage on center pin. Make
sure polarity is correct not to damage the camera.
907X 50C USER GUIDE
1
2
3
4
5
6
7
PARTS & CONTROLS
www.hasselblad.comCONTENTS
41
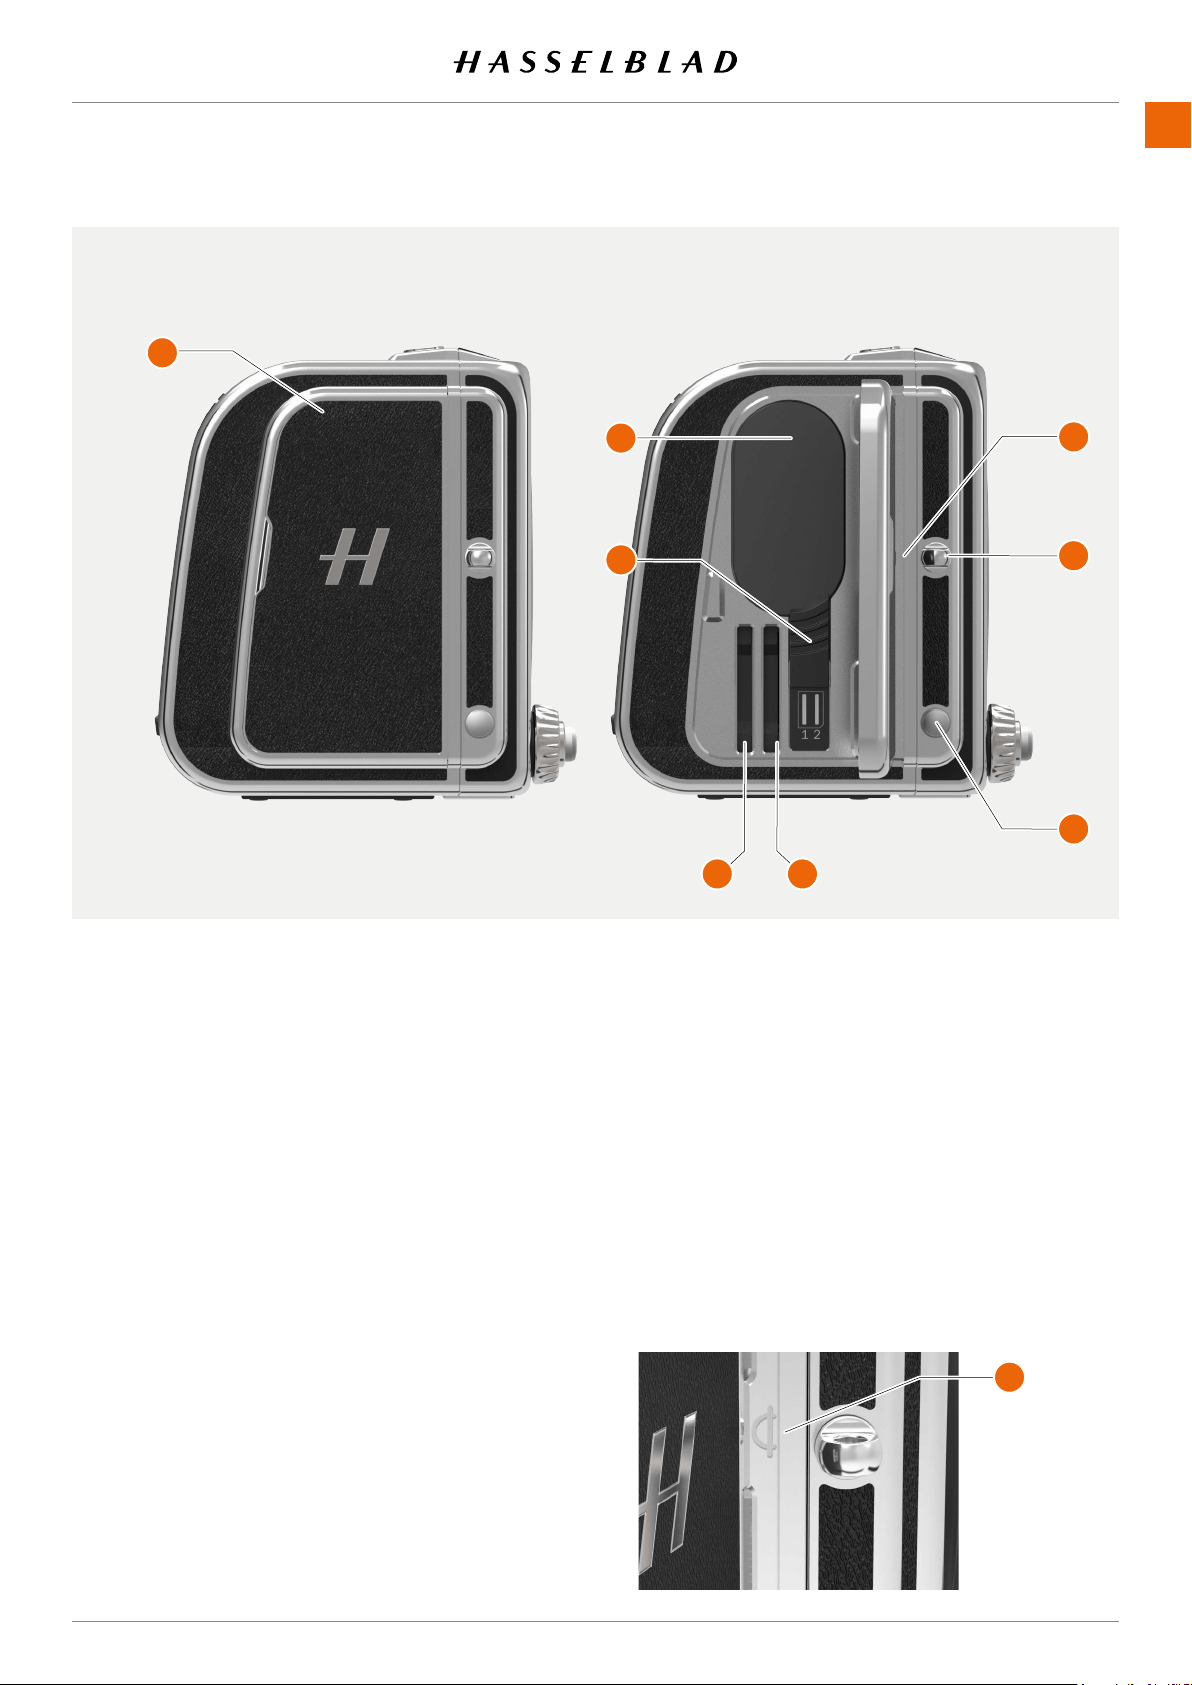
1
Lid
Lid for battery and SD cards
2
Battery
Rechargeable battery.
3
Battery Release
Slide the release down to remove the battery.
4
SD Card 1
Slot for SD card number 1.
5
SD Card 2
Slot for SD card number 2.
6
Image plane Index
Indicates the exact location of the image plane.
Located behind the right strap lug and behind the
battery and SD card lid. See below.
7
Right Strap Lug
Right strap lug for shoulder straps.
8
Shift Button
This button is used to select which of aperture
and shutter speed that is controlled by the control
wheel.
Image plane index
907X 50C USER GUIDE
1
2
3
4 5
6
7
8
A
PARTS & CONTROLS
www.hasselblad.comCONTENTS
42
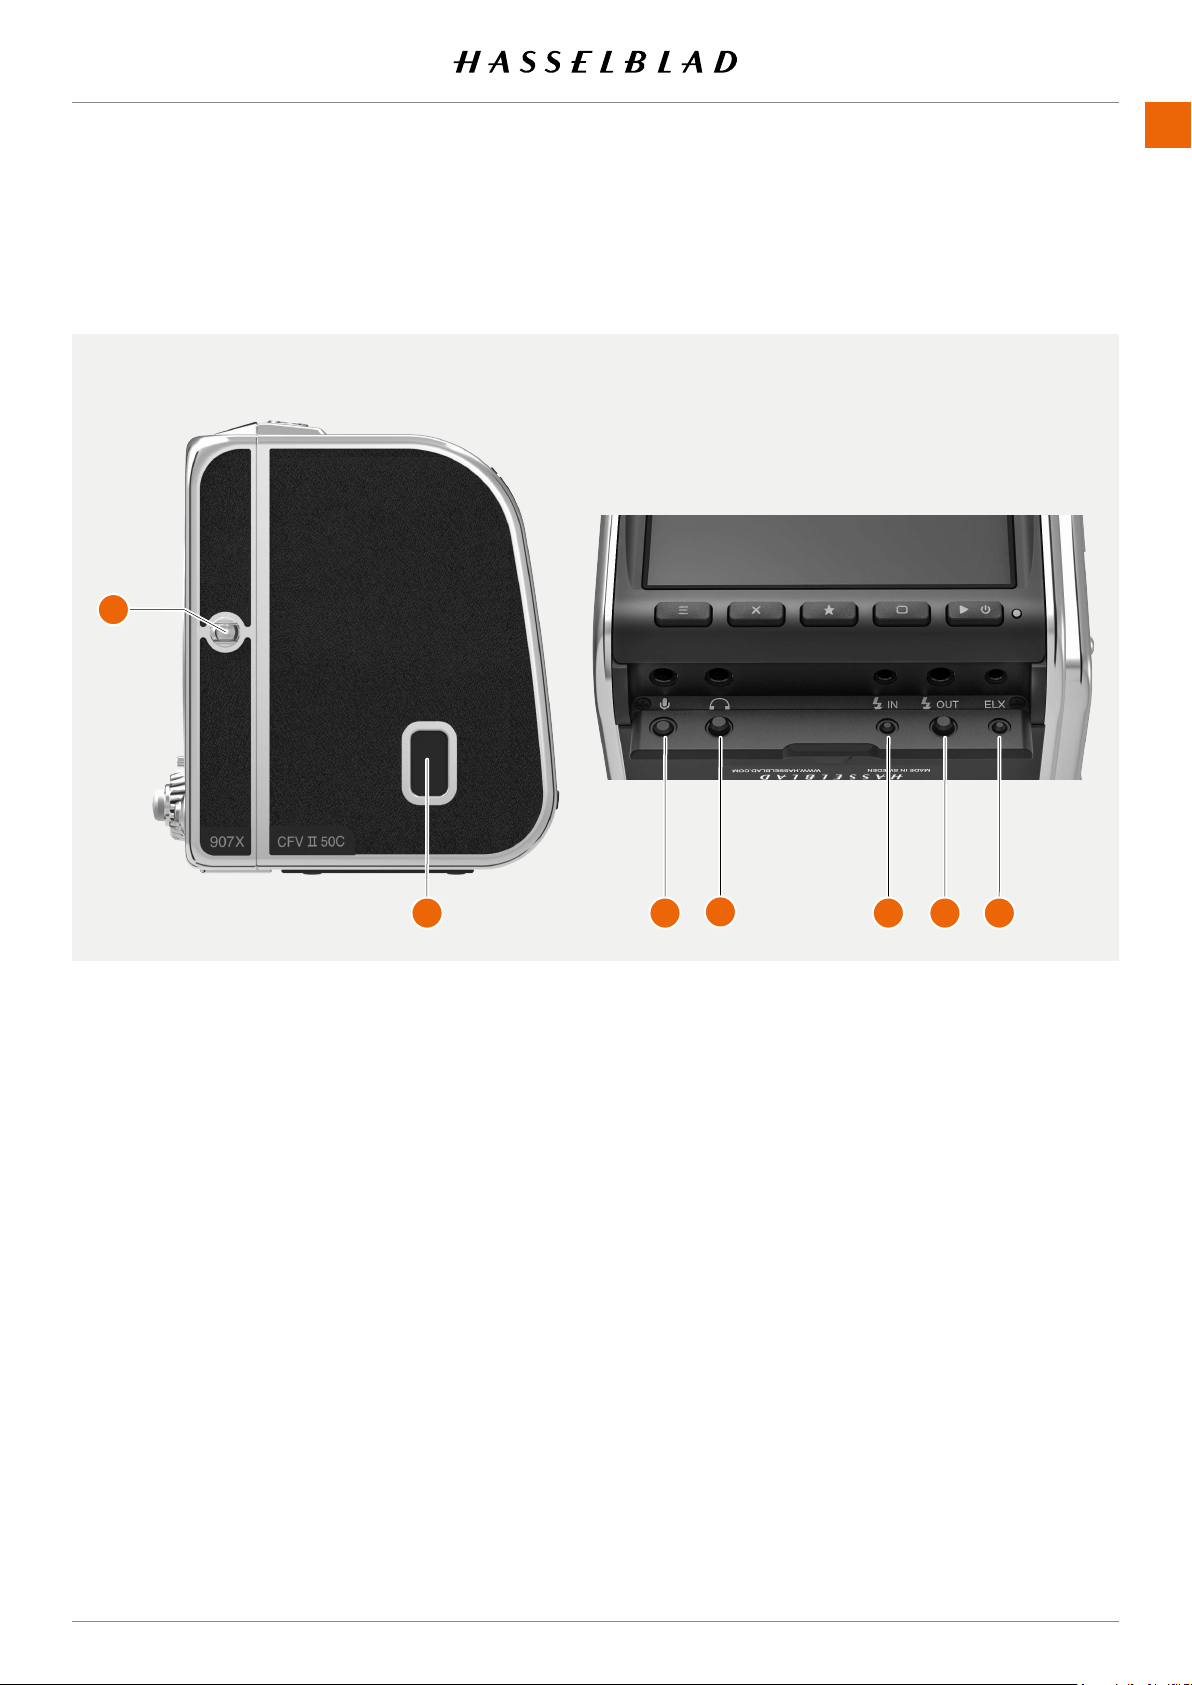
1
Left strap lug
Left strap lug for shoulder straps.
2
USB Port
USB-3 type C for connection to a host computer or
iPad Pro.
3
Microphone
3.5mm stereo input for an external microphone.
This port is also used to connect the Release Cord X
for vibration free remote release of the camera. See
page 152.
4
Headphone
3.5mm stereo output for connection of head-
phones.
5
Flash sync input
For synchronization with mechanical shutters. Use
dedicatedashsyncinputcable.Thisinputisnot
used with the 907X.
6
Flash sync output
Forconnectionofexternalashes.Usededicated
ashsyncoutputcable.
7
ELX output
Connection to an EL-type camera or the Winder
CW. Enables exposure remote control from Phocus.
This output is not used with the 907X.
5.2 PORTS AND CONNECTIONS
907X 50C USER GUIDE
1
2 3
4
5 6 7
PARTS & CONTROLS
www.hasselblad.comCONTENTS
43
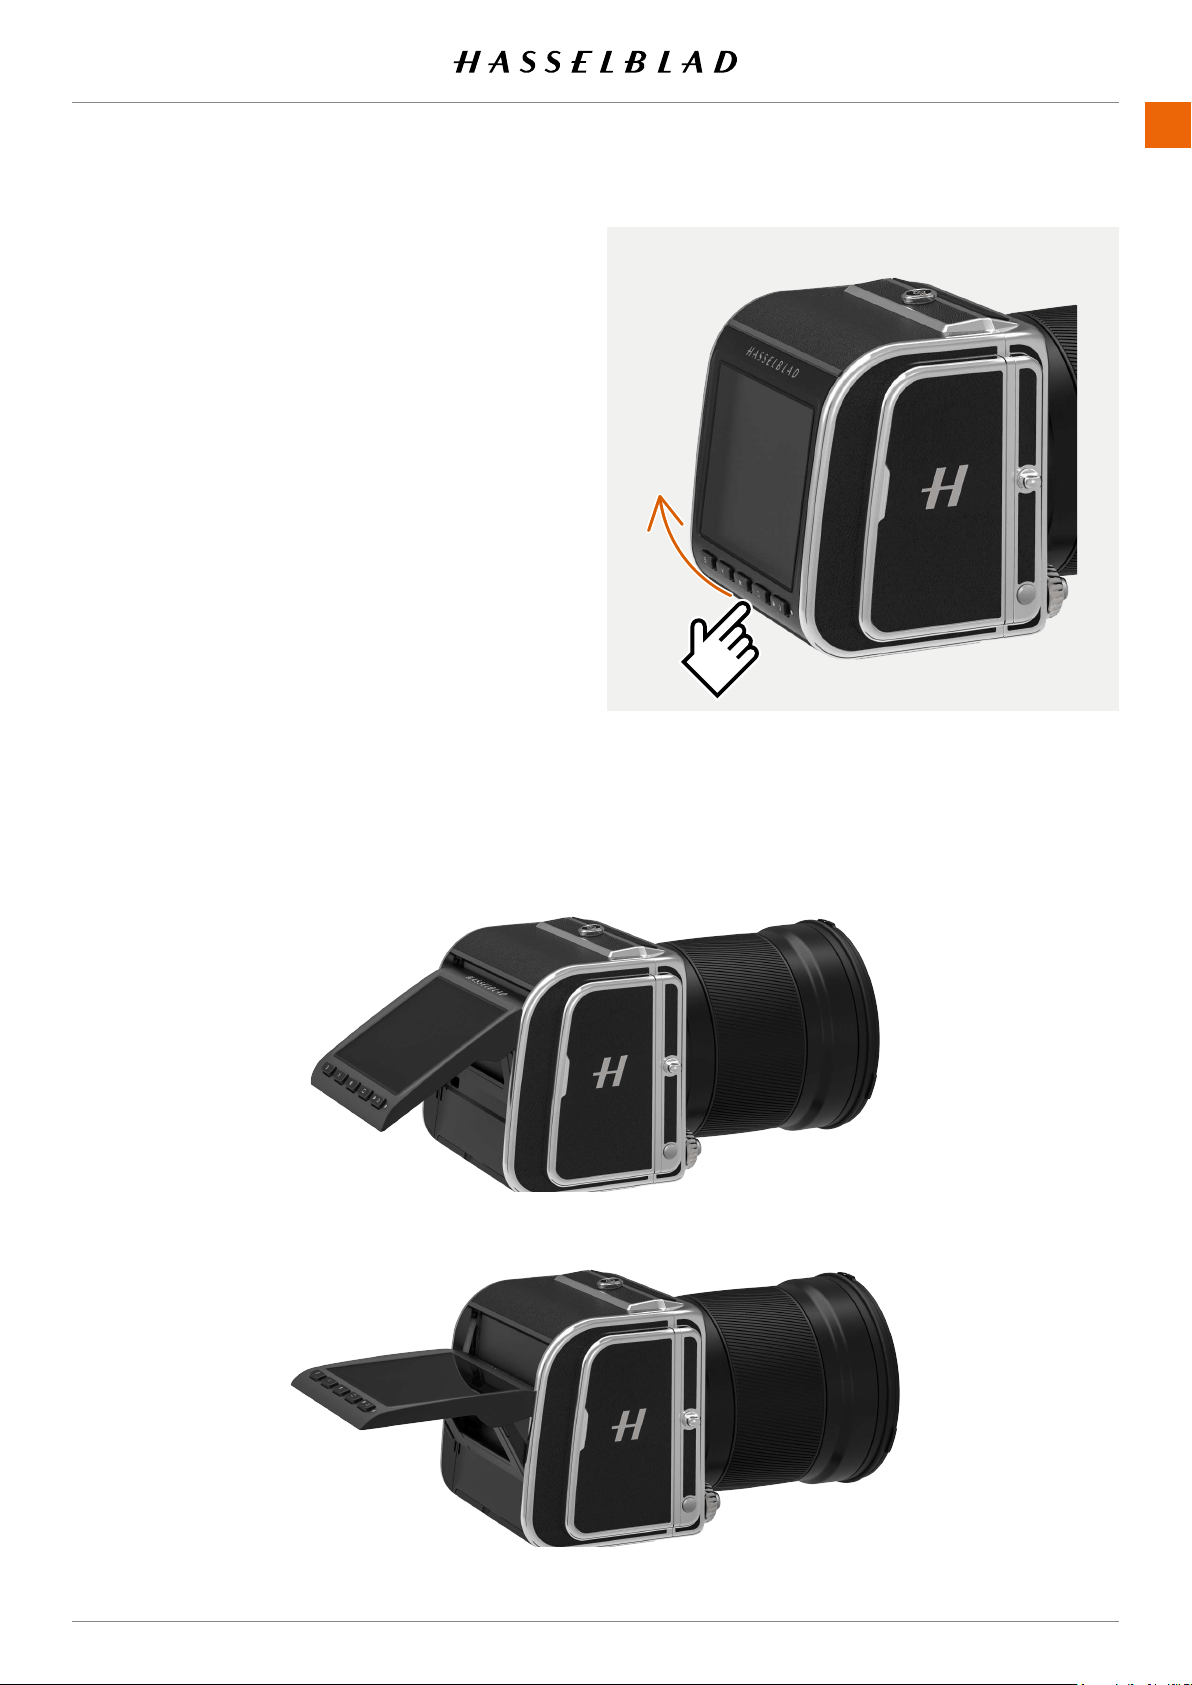
5.3 DISPLAY AND SCREENS
TILT DISPLAY
The display can be tilted 90 degrees up for convenient
operation in many situations. E.g. when shooting from a low
cameraangle.Totiltthedisplay,insertangerinthegroove
at the bottom of the display and tilt the display upwards.
There are click-stops for 45 and 90 degrees, but any angle in
between can be used.
Note!
Always remember to fold the screen to normal position before
transporting the camera.
907X 50C USER GUIDE

6 USING THE 907X
USING THE 907X
www.hasselblad.comCONTENTS
45
6.1 TOUCH DISPL AY
The rear display is touch sensitive and you can use it in the
same way that you navigate on a smartphone. You can also
navigate by using the 5 buttons below the Touch Display and
Scroll Wheel on the Camera.
The display can show a number of different screens, as shown
on the next page, including:
● Live view – Live update with high frame rate
● Browse screen
● Menu screens – Detailed camera settings
● Control Screen – Quick overview and access to most
camera settings
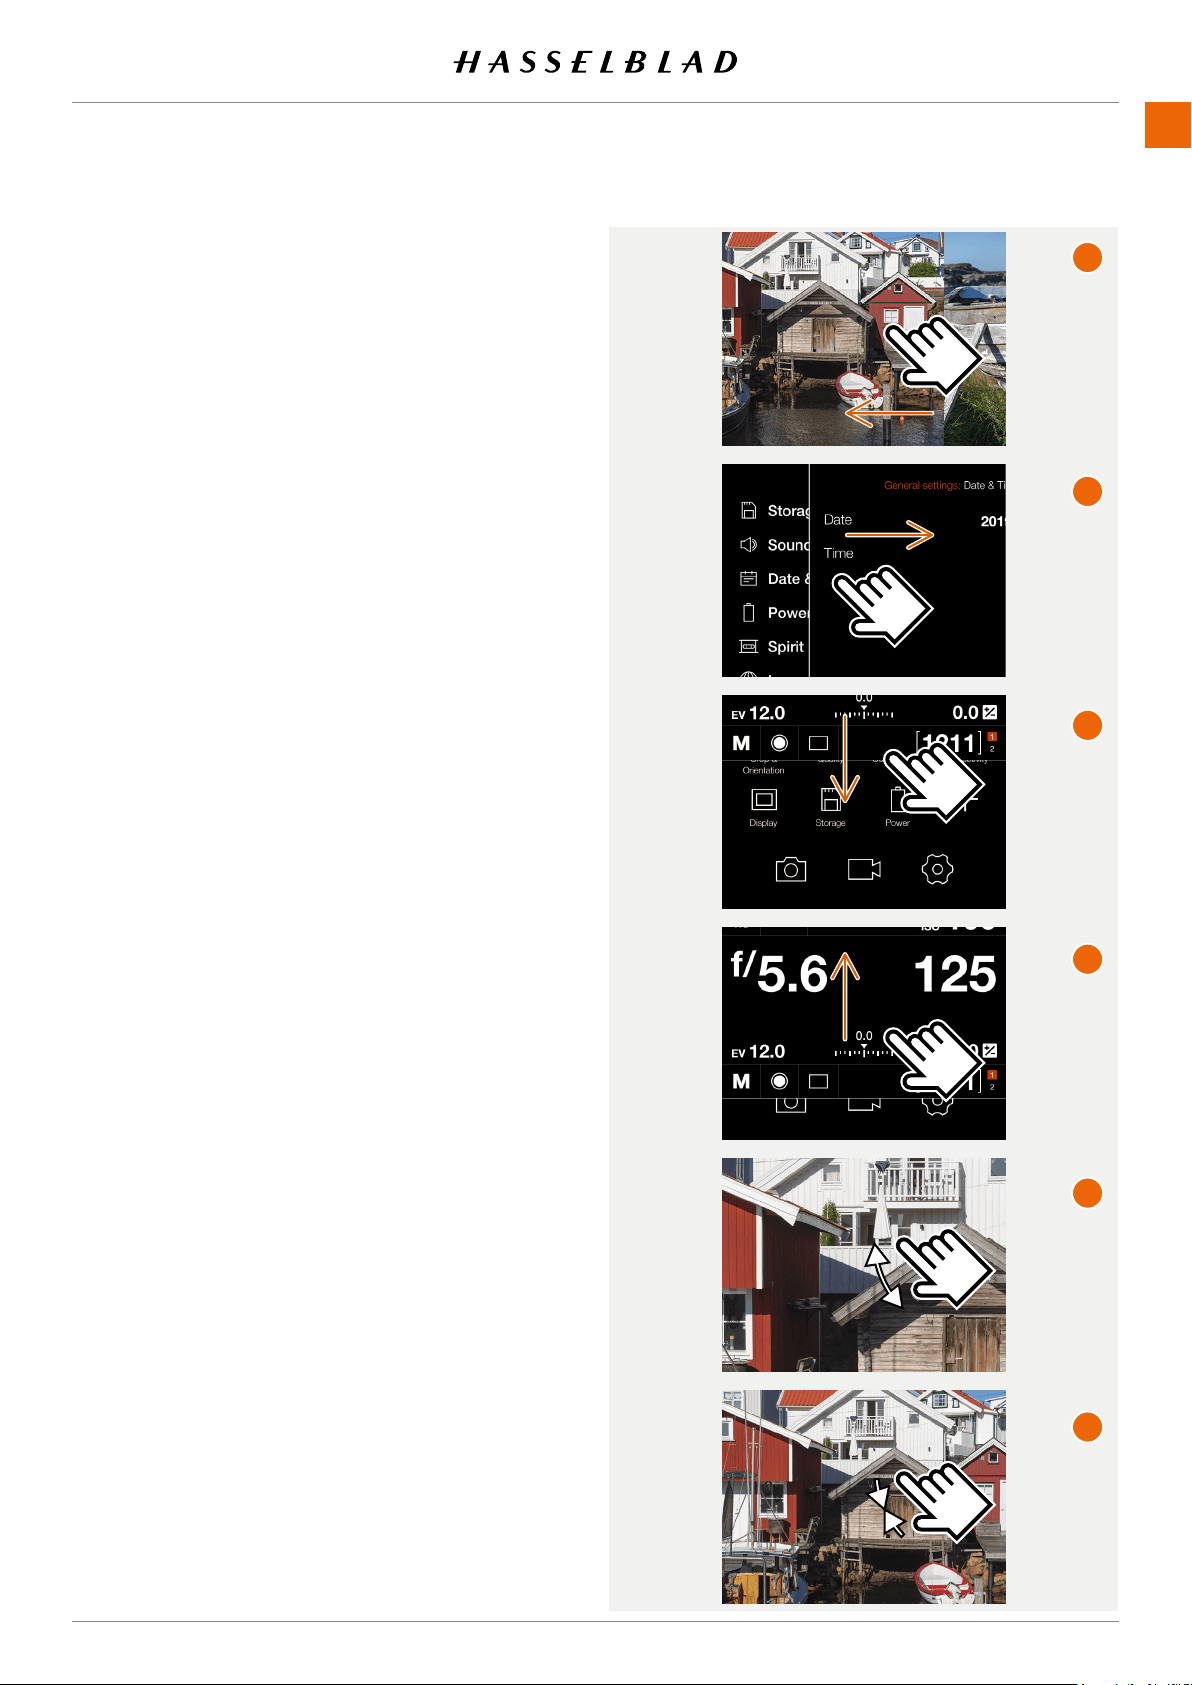
TOUCH DISPLAY NAVIGATION
The following gestures can be used to navigate and control
the camera:
●
Swipe left
Placethengerontherightsideofthescreenand
move to the left
(A)
.
●
Swipe Right
Placethengerontheleftsideofthescreenandmove
to the right
(B)
.
●
Swipe down
Placethengeratthetopofthescreenandmove
down
(C)
.
●
Swipe up
Placethengeratthebottomofthescreenandmove
up
(D)
.
●
Tap
Touchaniconandthenliftthengeragain.
●
Double Tap
Quickly tap the display two times (within 1 second).
●
Press
Placethengeronaniconandthenholdforone
second.
●
Spread
Placetwongersonthedisplayclosetogetherand
move them apart without lifting them from the surface
to zoom in
(E)
.
●
Pinch
Placetwongersonthedisplayapartandmovethem
together without lifting them from the surface to zoom
out
(F)
.
907X 50C USER GUIDE
A
B
C
D
F
E
USING THE 907X
www.hasselblad.comCONTENTS
46
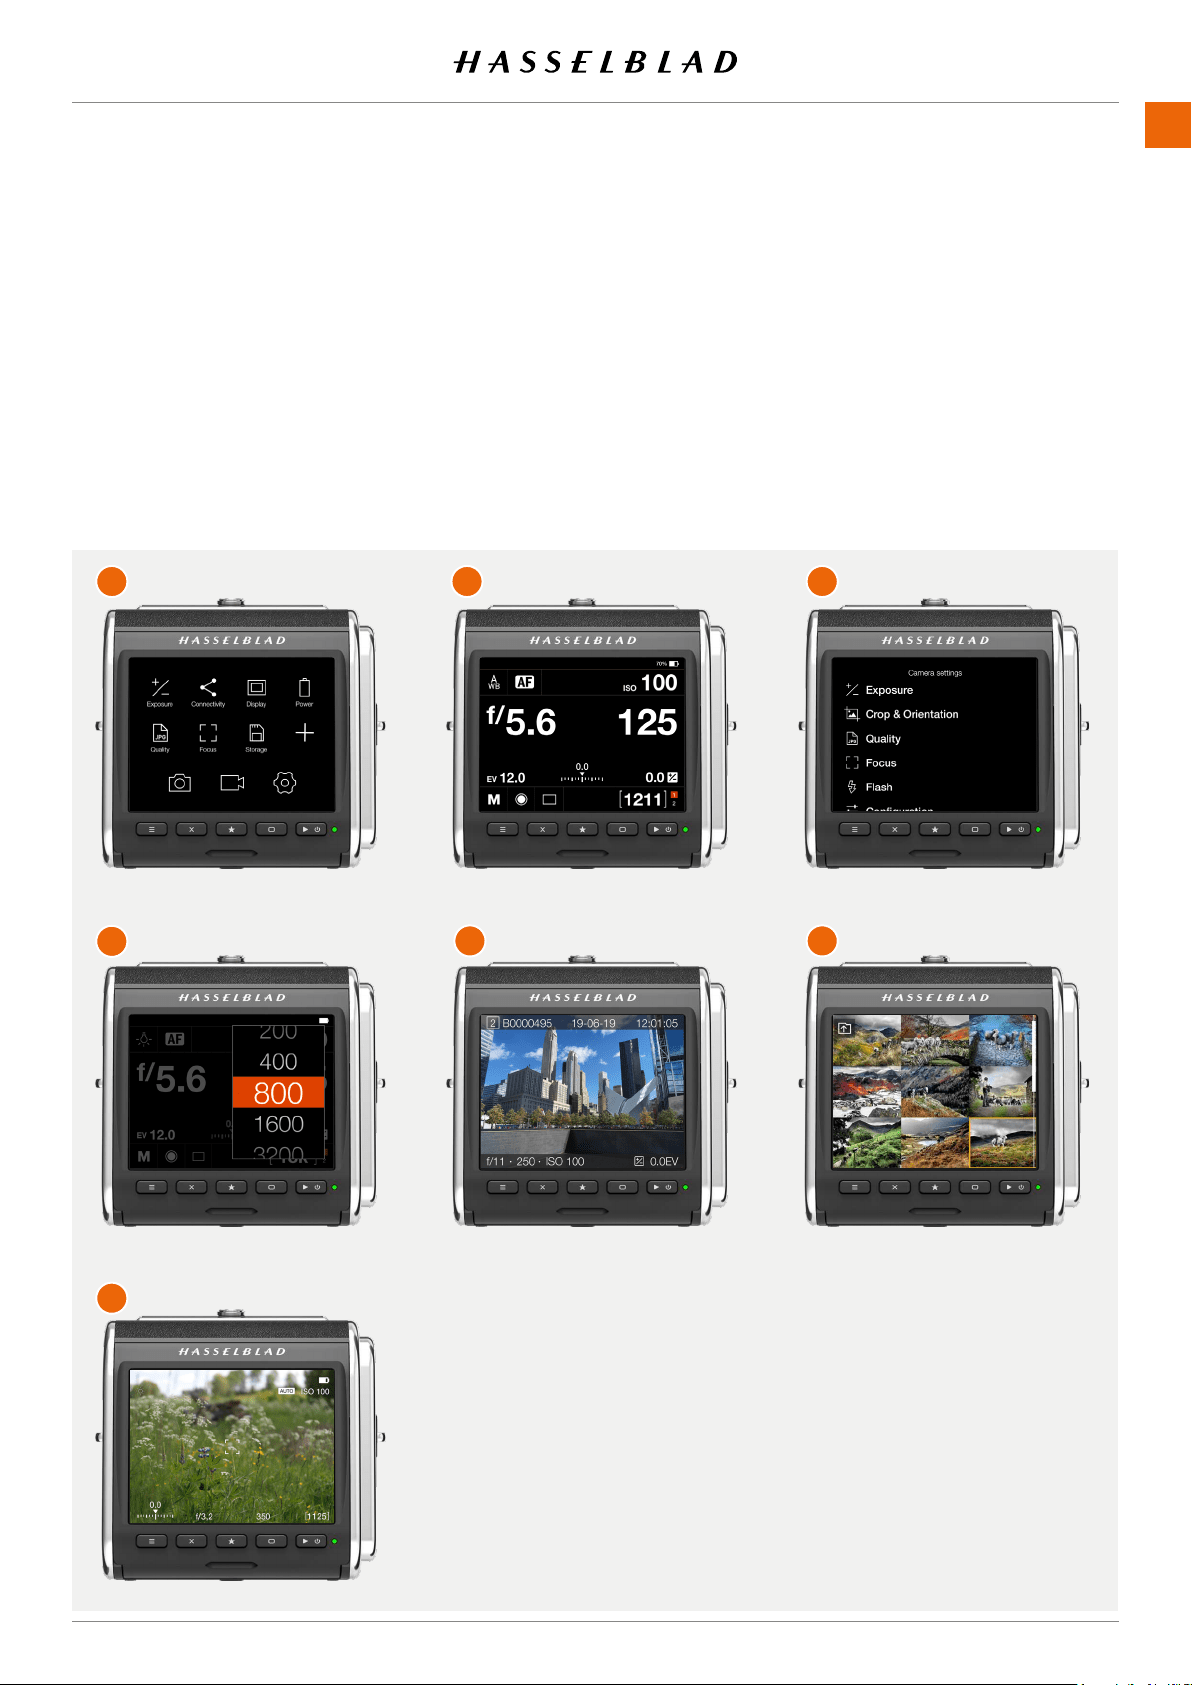
AVAILABLE SCREENS
The rear display can show the following type of screens:
●
Main menu (A)
Menu- and Short-cut icons.
●
Control screen (B)
Status Screen.
●
Menu (C)
Sample menu screen
●
Setting (D)
Sample setting screen.
●
Browse image (1-view) (E)
Preview screen, one image.
●
Browse images (9-view) (F)
Preview screen, 9 images.
●
Live view (G)
Continuously updated live view.
Main menu
Setting screen
Live view screen
Control screen
Browse 1 screen
Menu screen
Browse 9 screen
907X 50C USER GUIDE
A
B
C
D
E F
G
USING THE 907X
www.hasselblad.comCONTENTS
47
907X 50C USER GUIDE
A
1
2
3
4
5
6
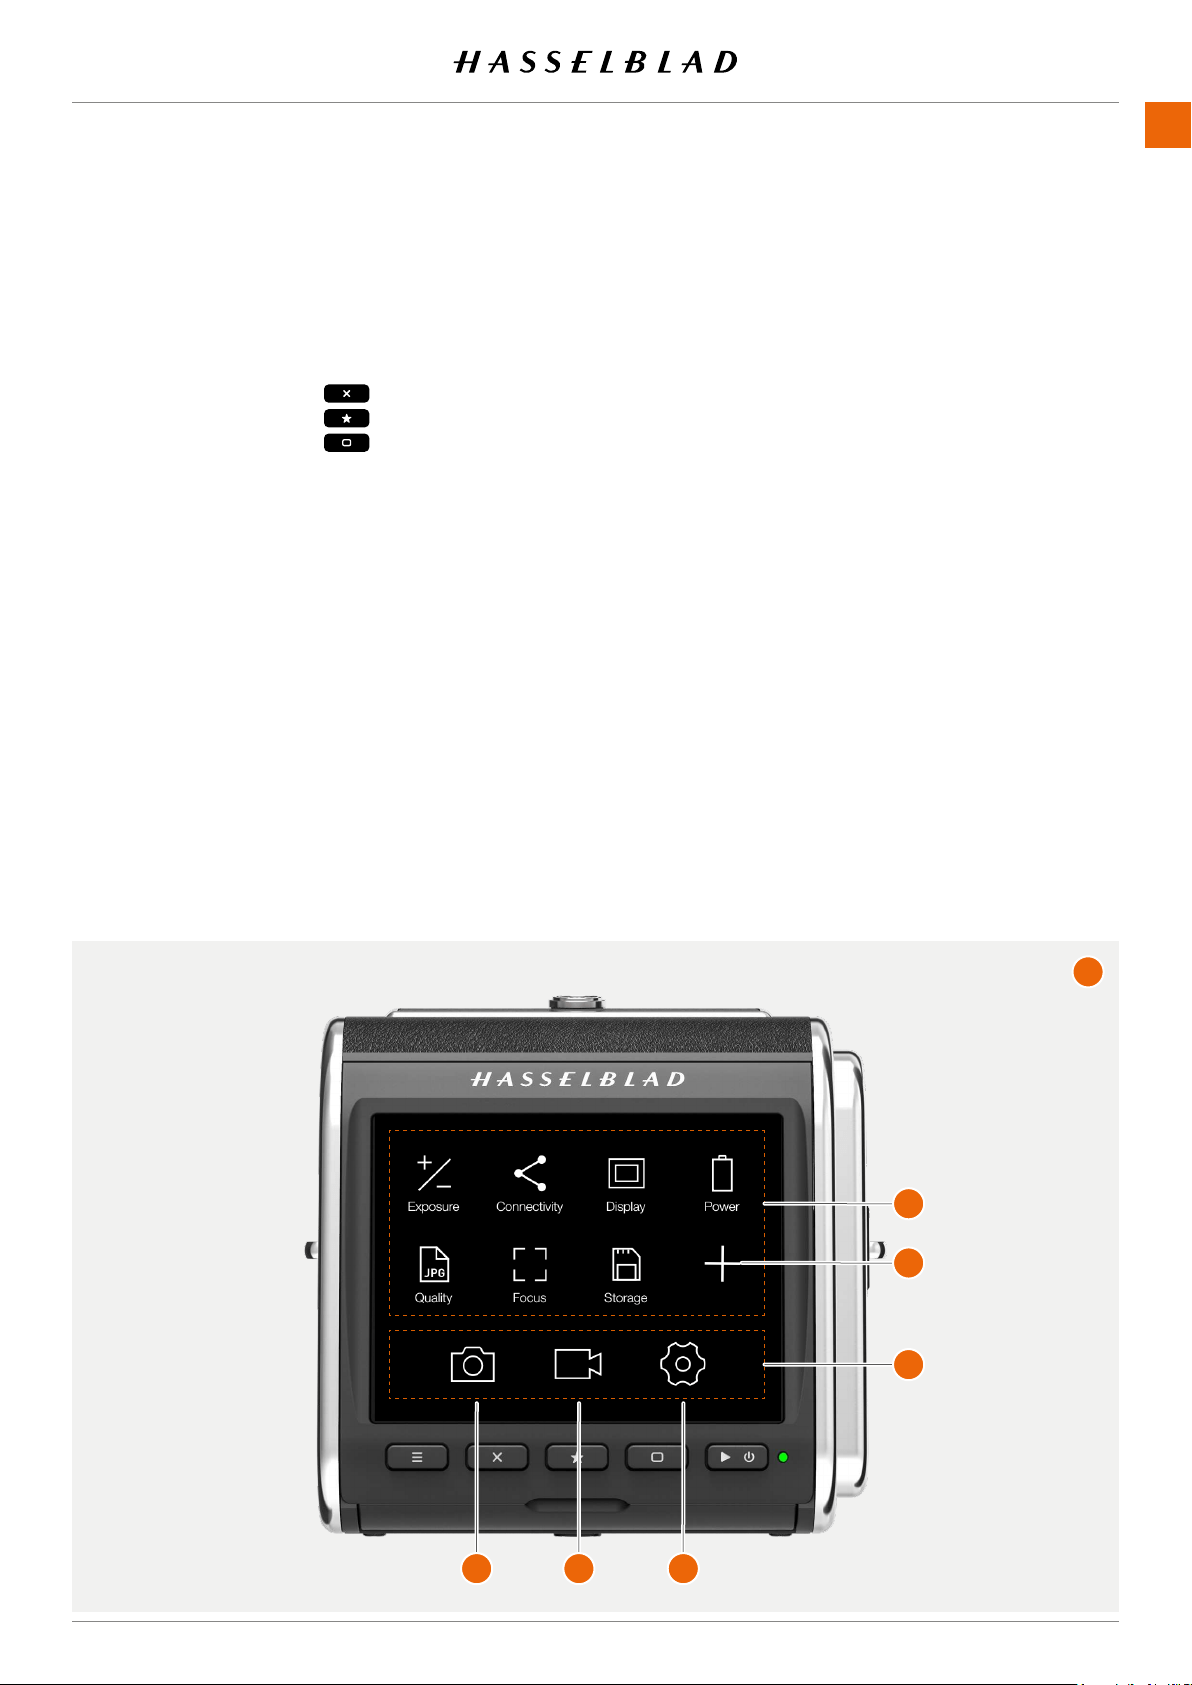
6.2 TOUCH DISPLAY MAIN MENU
MAIN MENU
In the main menu
(A)
there are 3 different main Settings
(4)
:
● Camera settings
(1)
● Video settings
(2)
● General settings
(3)
Theplacementofthese3settingiconsarexedandcannot
be changed.
The icons on the left part of the main menu
(5)
are favourite
shortcuts to functions. They can be replaced and
rearranged. See page 48. Shortcuts in this example:
Exposure
Connectivity
Display
Power
Quality
Focus
Storage
The plus sign
(6)
is used to add a new shortcut.
See detailed description on how to add and remove shortcuts
to your favourite list on the following page.
Exposure
Crop & Orientation
Quality
Focus
Flash
Conguration
Quality (video)
Live View (video)
Connectivity
Display
Live View
Preview
Touch
Storage
Sound
Date & Time
Power
Spirit Level
Language
Service
About
ADD SHORTCUTS TO MAIN MENU FAVOURITES
Tospeedupyourownworkowyoucanaddinthesettings
you use more frequently in the Favourite settings. These
functions will then be displayed on the main menu until you
remove them and replace them with other Favourite settings.
To add, remove or move a shortcut, see the instructions on
the following page
The available shortcuts to add are:
USING THE 907X
www.hasselblad.comCONTENTS
48
907X 50C USER GUIDE
Move shortcut Shortcut moved
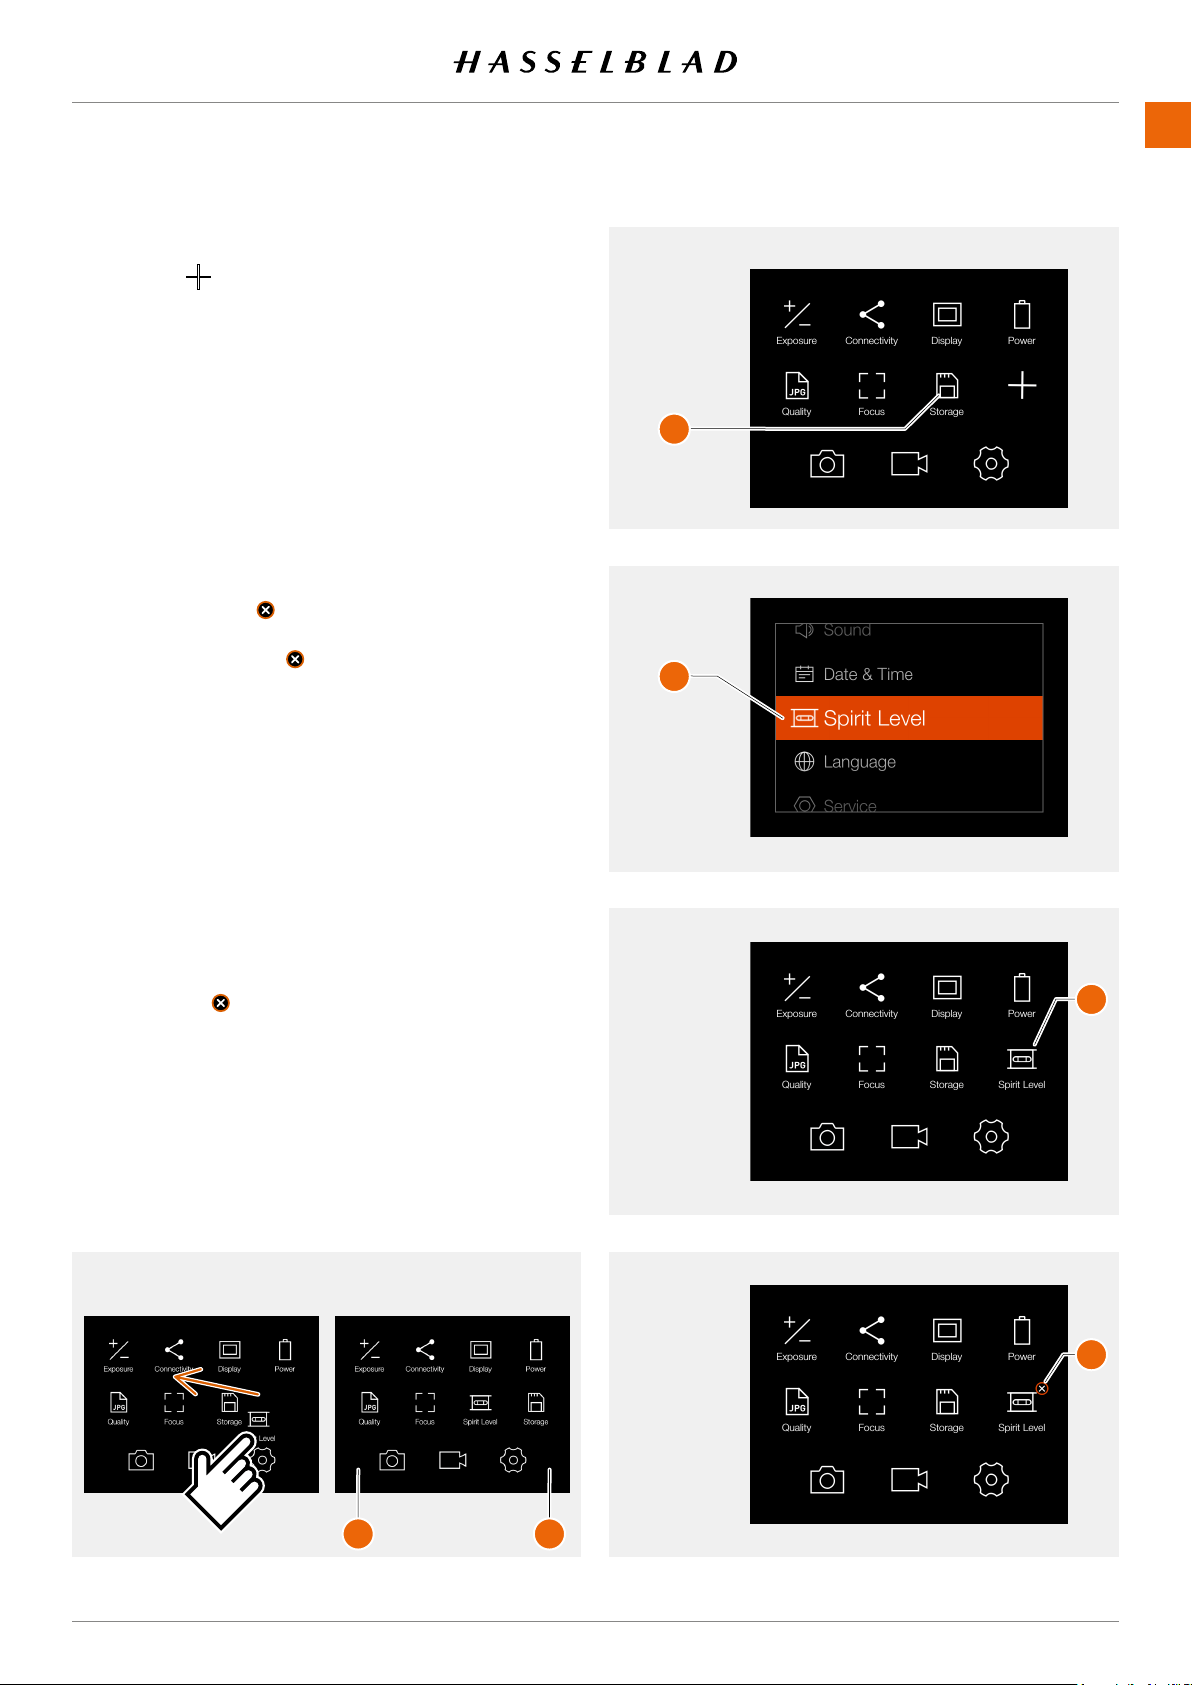
HOW TO ADD SHORTCUTS TO MAIN MENU
1 Select the
icon
(A)
on the main menu.
2 The add favourite pop up screen displays the available
options to add in a scroll list.
3 Select for example Spirit Level
(B)
.
4 The spirit level icon is now displayed on the main menu
and the action is saved in the camera memory. The spirit
level function can be quickly accessed by tapping the icon.
HOW TO REMOVE SHORTCUTS ON THE MAIN
MENU
1 Press and Hold on the icon you would like to remove from
the main menu Favourites. Spirit Level
(C)
in this example.
2 The delete symbol is displayed on the upper right
corner of the selected shortcut
(D)
.
3 Tap the delete symbol
to delete the icon and remove
the function from the main menu favourites.
4 The spirit level icon is no longer displayed in the main
menu favourites list. You can add the same function later at
any time.
5 To return to standard main menu without deleting the
shortcut, tap the lower right
(F)
or left corner
(E)
of the
display.
HOW TO MOVE SHORTCUTS ON THE MAIN
MENU
1 Press and Hold on the icon you want to move until the
close symbol
appears
(D)
.
2 Press and hold the icon and drag it to a new location. Icons
will automatically rearrange.
Main menu
Add favourite pop up screen
Main menu with Spirit Level added
Remove Spirit Level shortcut
A
B
C
D
F E
USING THE 907X
www.hasselblad.comCONTENTS
49
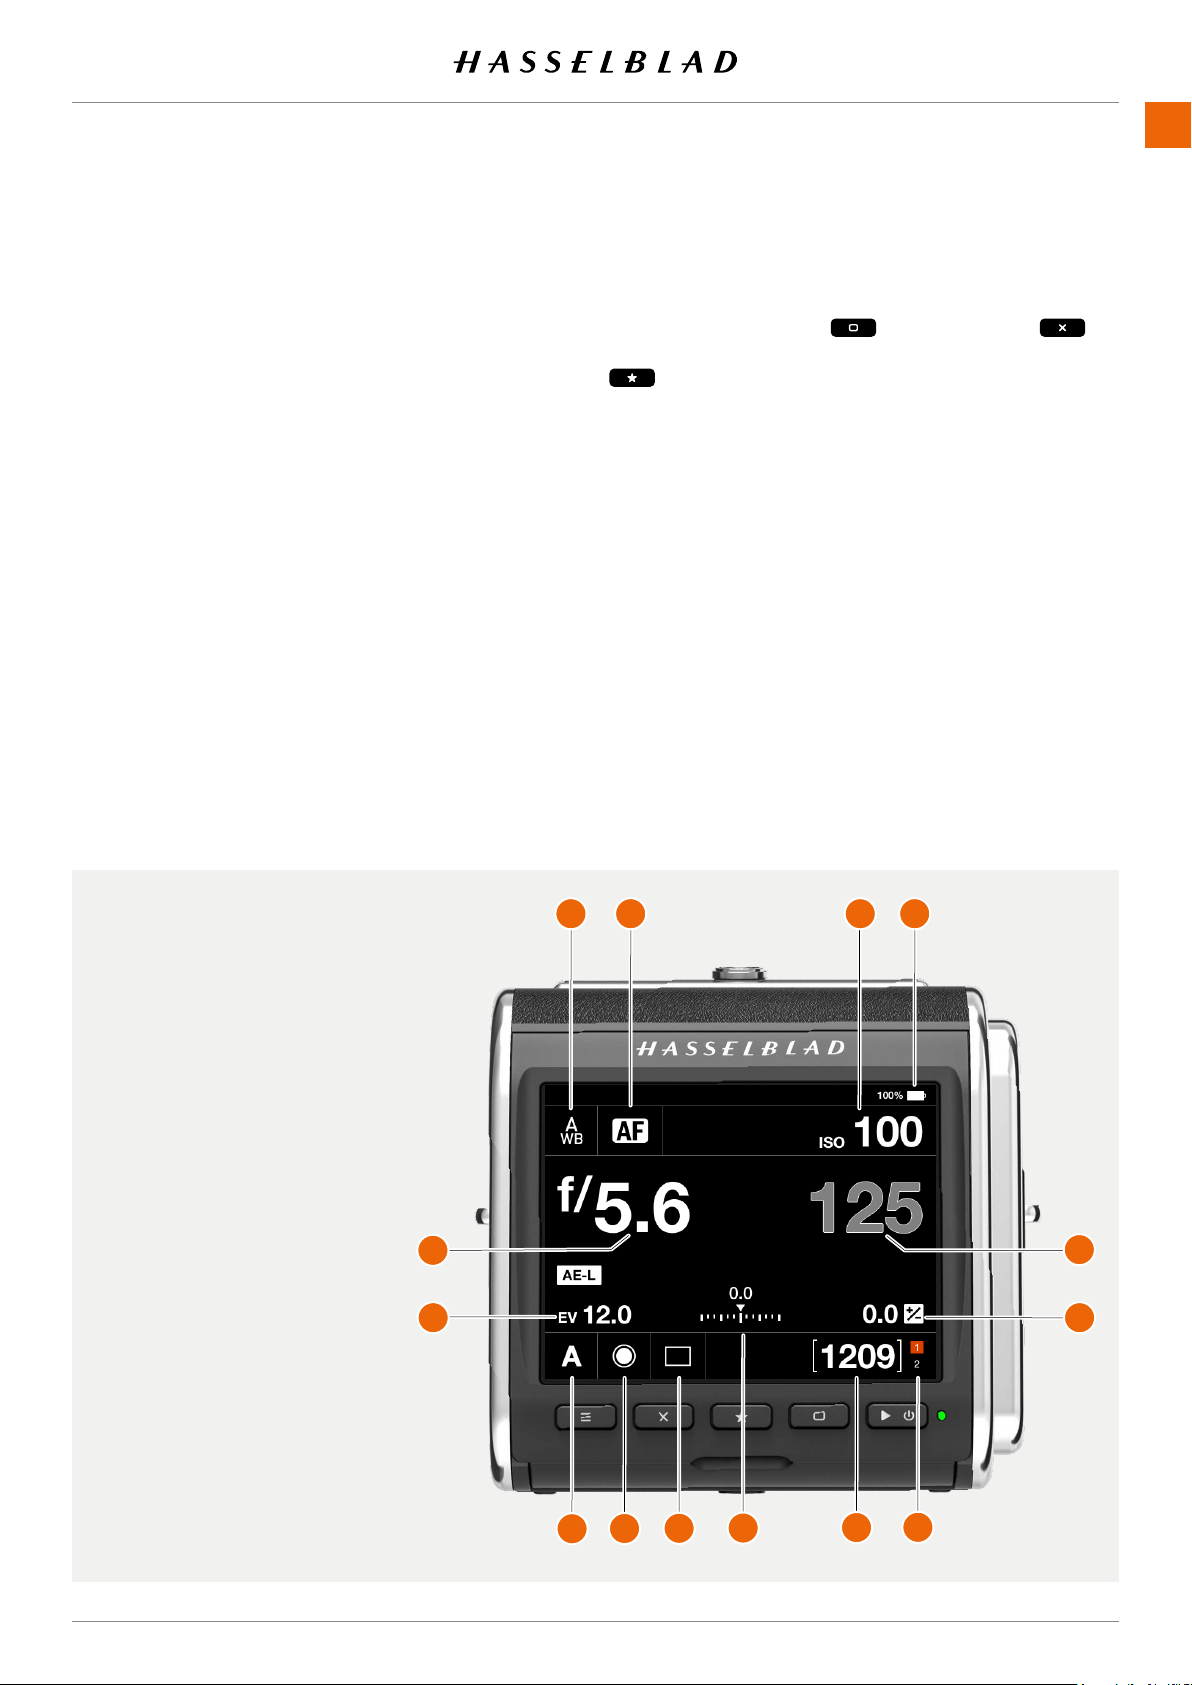
CONTROL SCREEN
This is a status screen showing the actual settings of the
camera. From this screen, you can also change settings
directly.
The control screen can be activated in two ways:
● Form any screen, you can slide in the control screen by
swiping the display from the top.
● Press the menu button until the control screen is shown
(requires 1 or 2 clicks).
From the Control Screen you can directly change the follow-
ing settings:
● White balance
(1)
● Autofocus mode
(2)
● ISO
(3)
● Aperture
(5)
● Shutter speed
(14)
● Exposure mode
(7)
● Light metering mode
(8)
● Drive mode
(9)
● Fixed exposure adjustment
(13)
Change settings using touch
Tap the value to bring up a setting dialogue. See page 51.
Change settings using buttons
Press the rectangle button or the cross button to
highlight the setting you want to change. Press the Star Button
to bring up the setting dialogue.
Use the Rectangle button or the cross button to select new
value. Accept with the Star Button.
The control screen also shows the following status indications:
● Battery status with optional percent value
(4)
.
● Remaining captures on card (free space)
(11)
● Card status
(12).
See more on page 70.
Depending on camera mode and setting, the control screen
can show additional information. This will be explained in
detail later in this user guide.
1 White balance.
2 Autofocus mode.
3 ISO.
4 Battery status (including
optional percentage).
5 Aperture value.
6 EV number.
7 Exposure mode.
8 Light metering mode.
9 Drive mode.
10 Exposure adjustment scale.
11 Remaining captures on card.
12 Card status.
13 Fixed exposure adjustment.
14 Shutter speed.
907X 50C USER GUIDE
7
8
9
10
11
12
13
14
5
6
1
2
3
4
USING THE 907X
www.hasselblad.comCONTENTS
50
907X 50C USER GUIDE
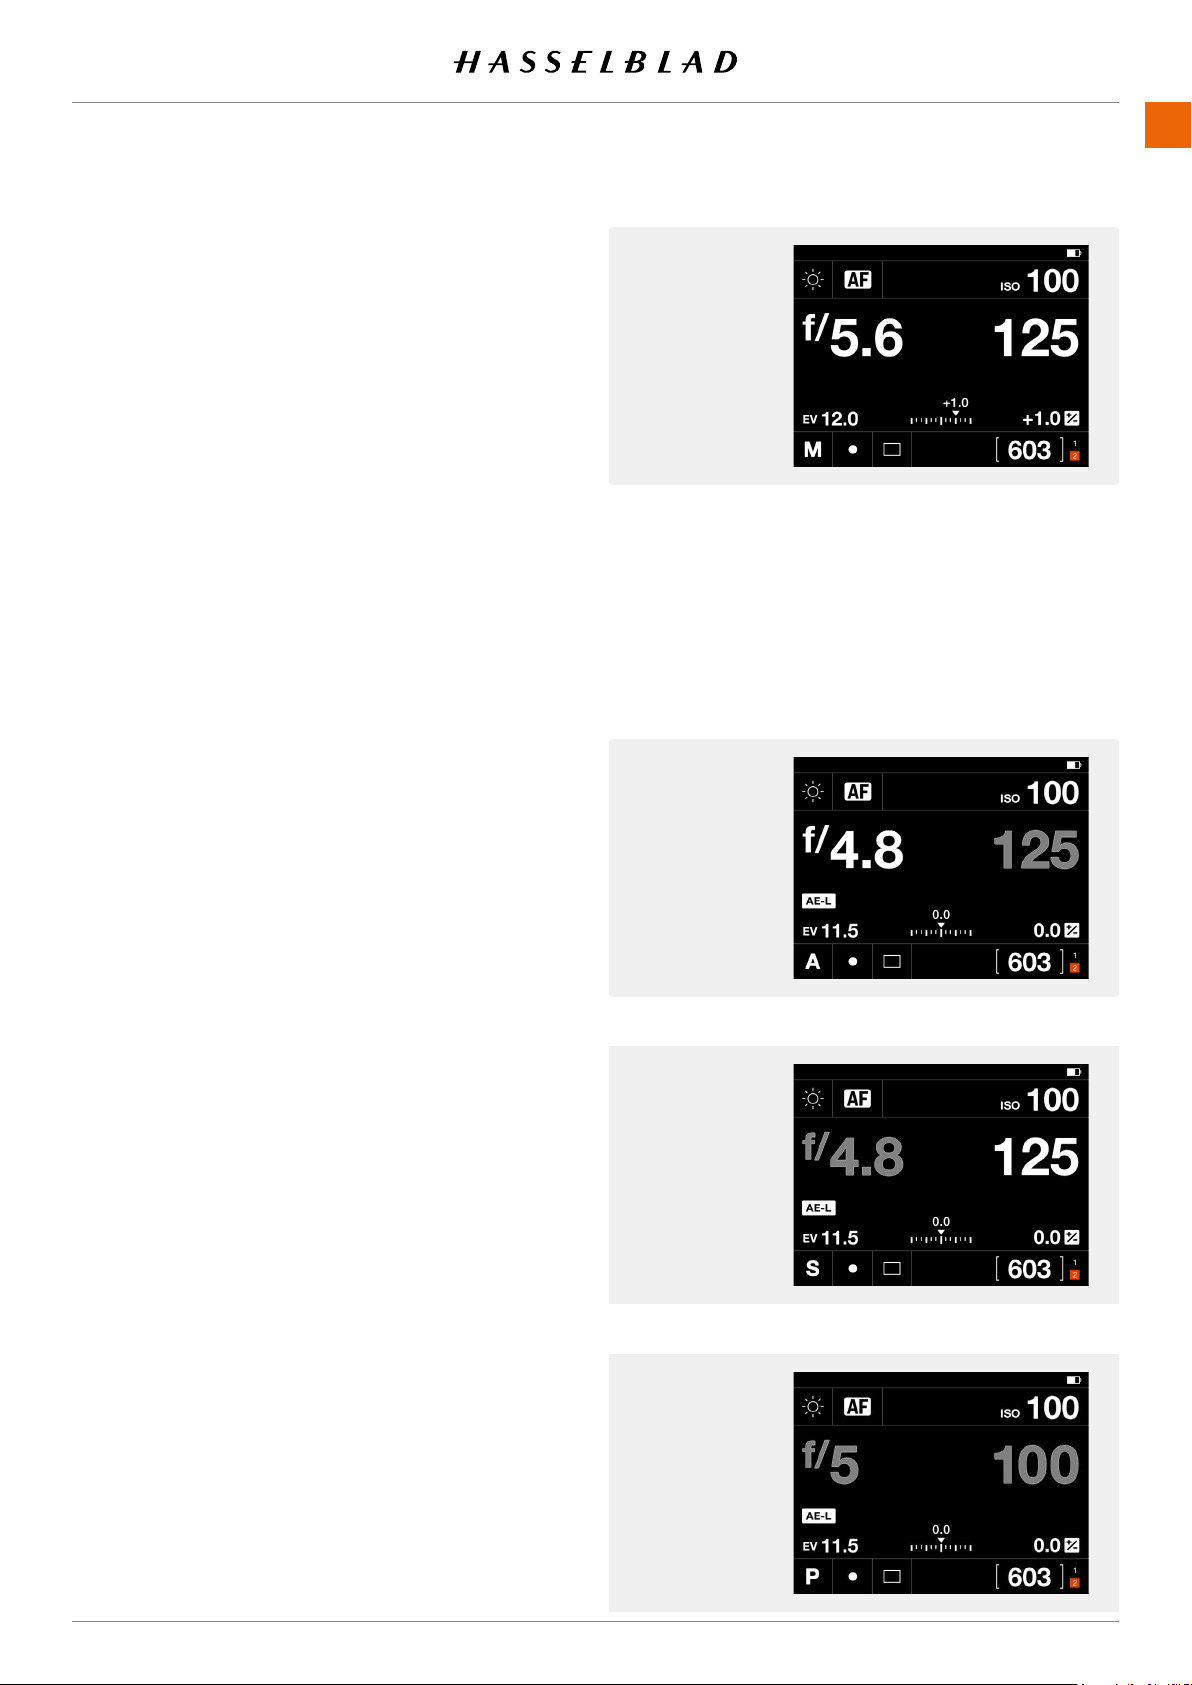
LOCKED EXPOSURE PARAMETERS ON THE
CONTROL SCREEN
When an automatic exposure mode is selected, either
aperture, shutter speed or both are set automatically by the
camera. In this case that value cannot be changed from the
control screen. This is indicated by showing the locked value
in grey color.
Control Screen
Control Screen
A Mode
Shutter Speed is
set automatically.
Control Screen
P Mode
Aperture and
Shutter Speed are
set automatically.
Control Screen
S Mode
Aperture is set
automatically.
A Mode
For Aperture priority
(A)
you can change the Aperture value
but the Shutter value will be automatically set and is therefore
displayed in grey.
S Mode
In Shutter priority
(S)
you can change the Shutter speed
value but the Aperture value will be automatically set and is
displayed in grey.
P Mode
When you select Program Mode
(P)
both Aperture (5) and
Shutter speed (100) are automatically set and displayed in
grey colour indicating that you cannot change them by touch.
Note that you can use the front control wheel to shift aperture
and shutter speed combination.
USING THE 907X
www.hasselblad.comCONTENTS
51
907X 50C USER GUIDE
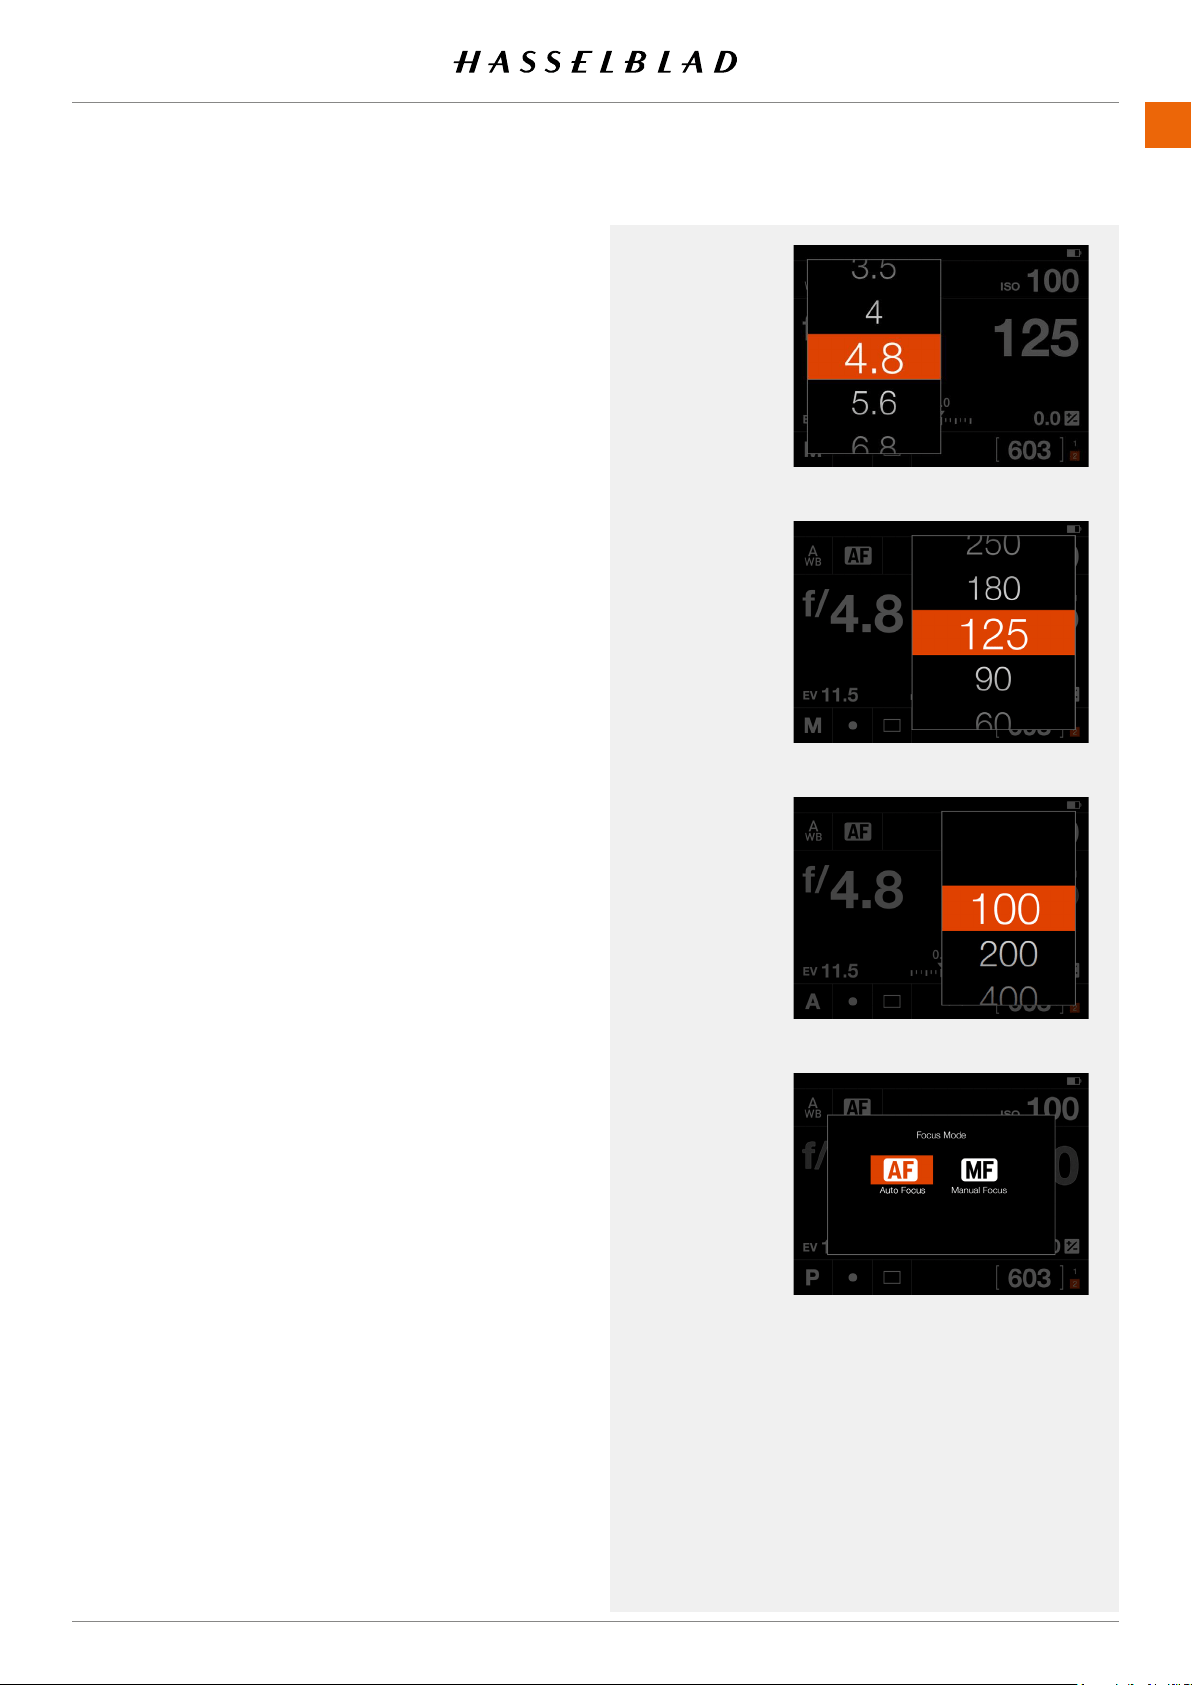
SETTINGS ON THE CONTROL SCREEN
Aperture
- Select Aperture value.
Swipe the list and tap the desired value to select.
Shutter Speed
- Select Shutter speed value.
ISO
- Select ISO value.
Note!
ISO can also be set by touch from the Live View screen.
See page 75.
Focusing
- AF Autofocus.
- MF Manual focus.
Tap the new value to select.
Focusing
ISO
Aperture
Shutter
This chapter continues on the next page.
USING THE 907X
www.hasselblad.comCONTENTS
52
907X 50C USER GUIDE
Settings on the Control Screen
White balance
- Auto white balance AWB.
- Cloudy.
- Shade.
- Daylight.
- Tungsten.
- Fluorescent.
- Flash.
- Manual white balance MWB
- Picker (select white balance from image).
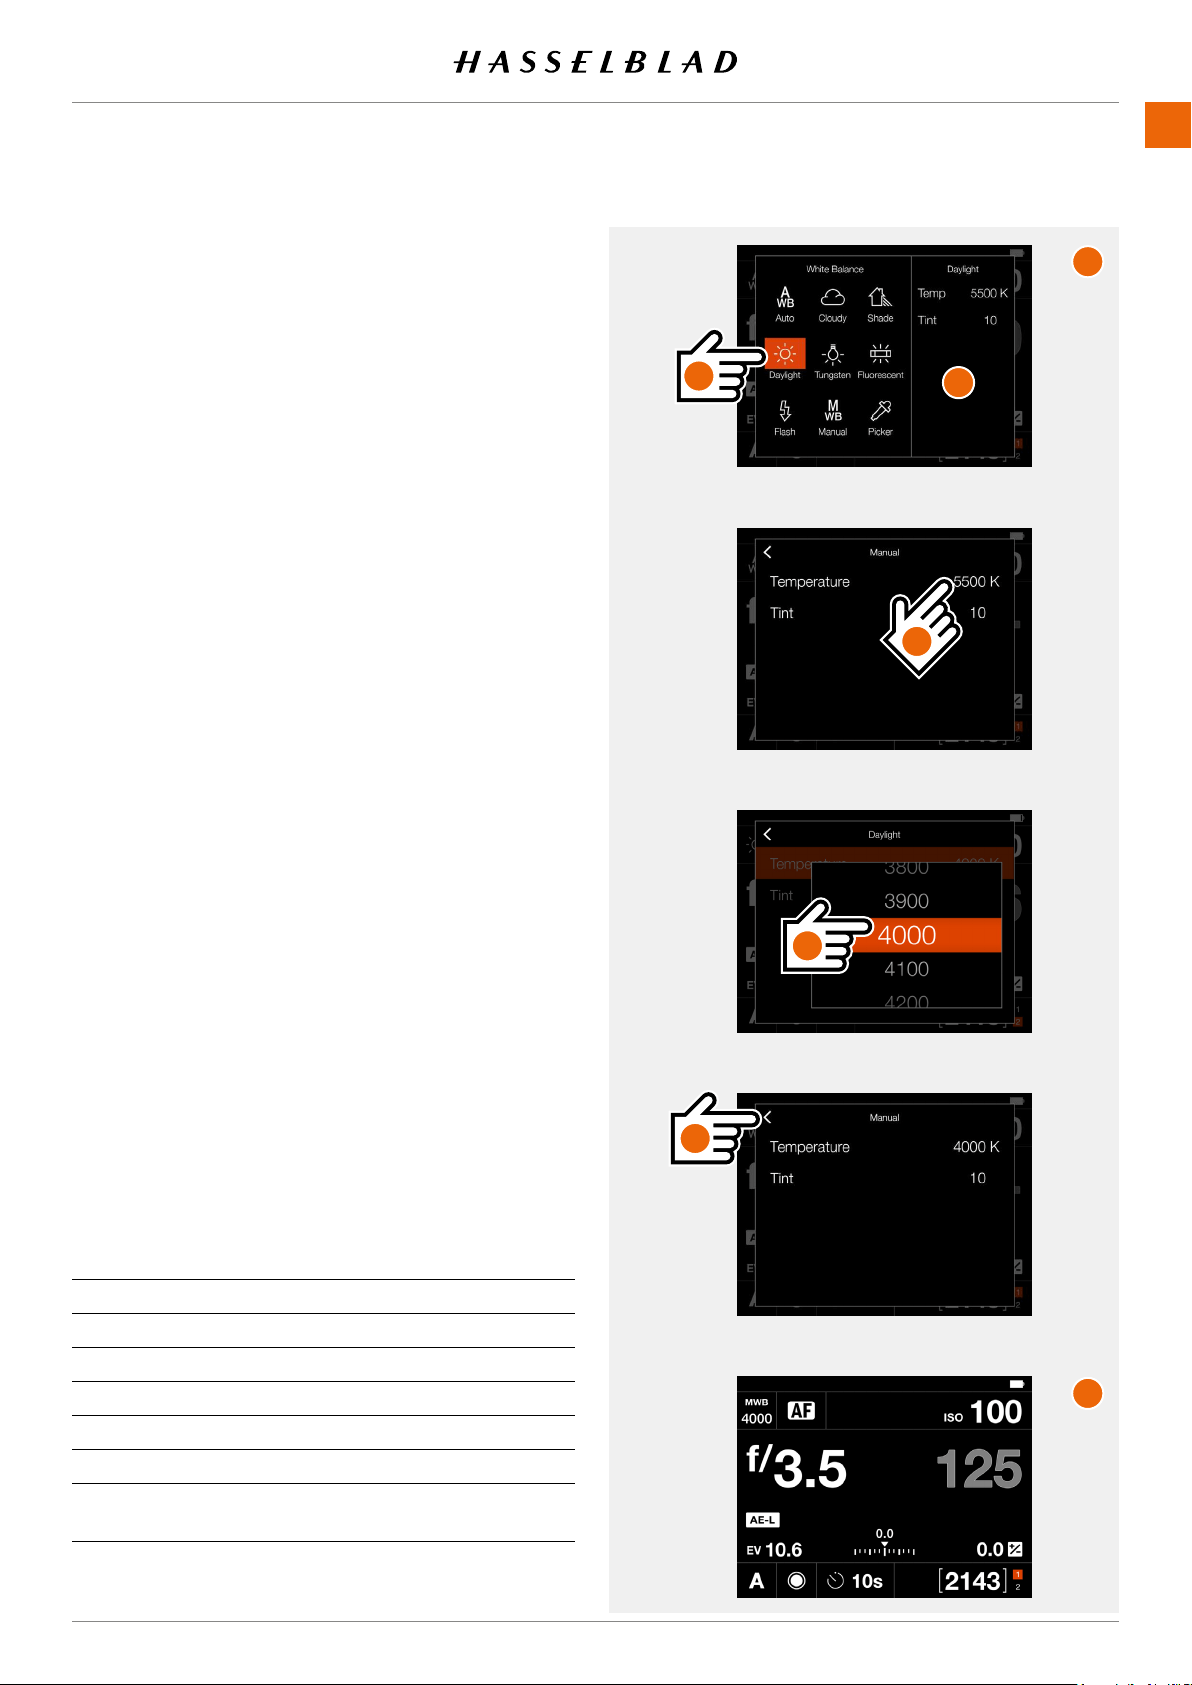
Change white balance preset
On the control screen, tap the white balance icon in the top
left corner. This brings up the white balance setting screen (
1
).
Tap on one of the white balance icons to select it (
A
). The right
frame of the screen (
B
) will show the values for Temperature
and Tint associated with the selected white balance. Tap the
white balance icon again to select it and return to the control
screen.
Setting manual white balance values
From white balance setting screen (
1
), change value for
Temperature or Tint by tapping in the right frame (
B
).
Tap the value (
C
) to change and select a new value from the
list (
D
).
Tap the left arrow (
E
) to return to the white balance setting
screen (
1
). Finally, tap the manual white balance icon again to
select it and return to the control screen (
2
). White balance
has now been set to Manual mode.
Note!
ISO can also be set by touch from the Live View screen. See
page 75.
Continued on the next page.
Temp [ºK] Tint
Cloudy
6500 10
Shade
7500 10
Daylight
5500 10
Tungsten
2850 0
Fluorescent
3800 21
Flash
5500 0
Manual
Variable
2000 to 10000
Variable
-100 to 100
A
B
C
D
E
1
2
USING THE 907X
www.hasselblad.comCONTENTS
53
907X 50C USER GUIDE
Settings on the Control Screen
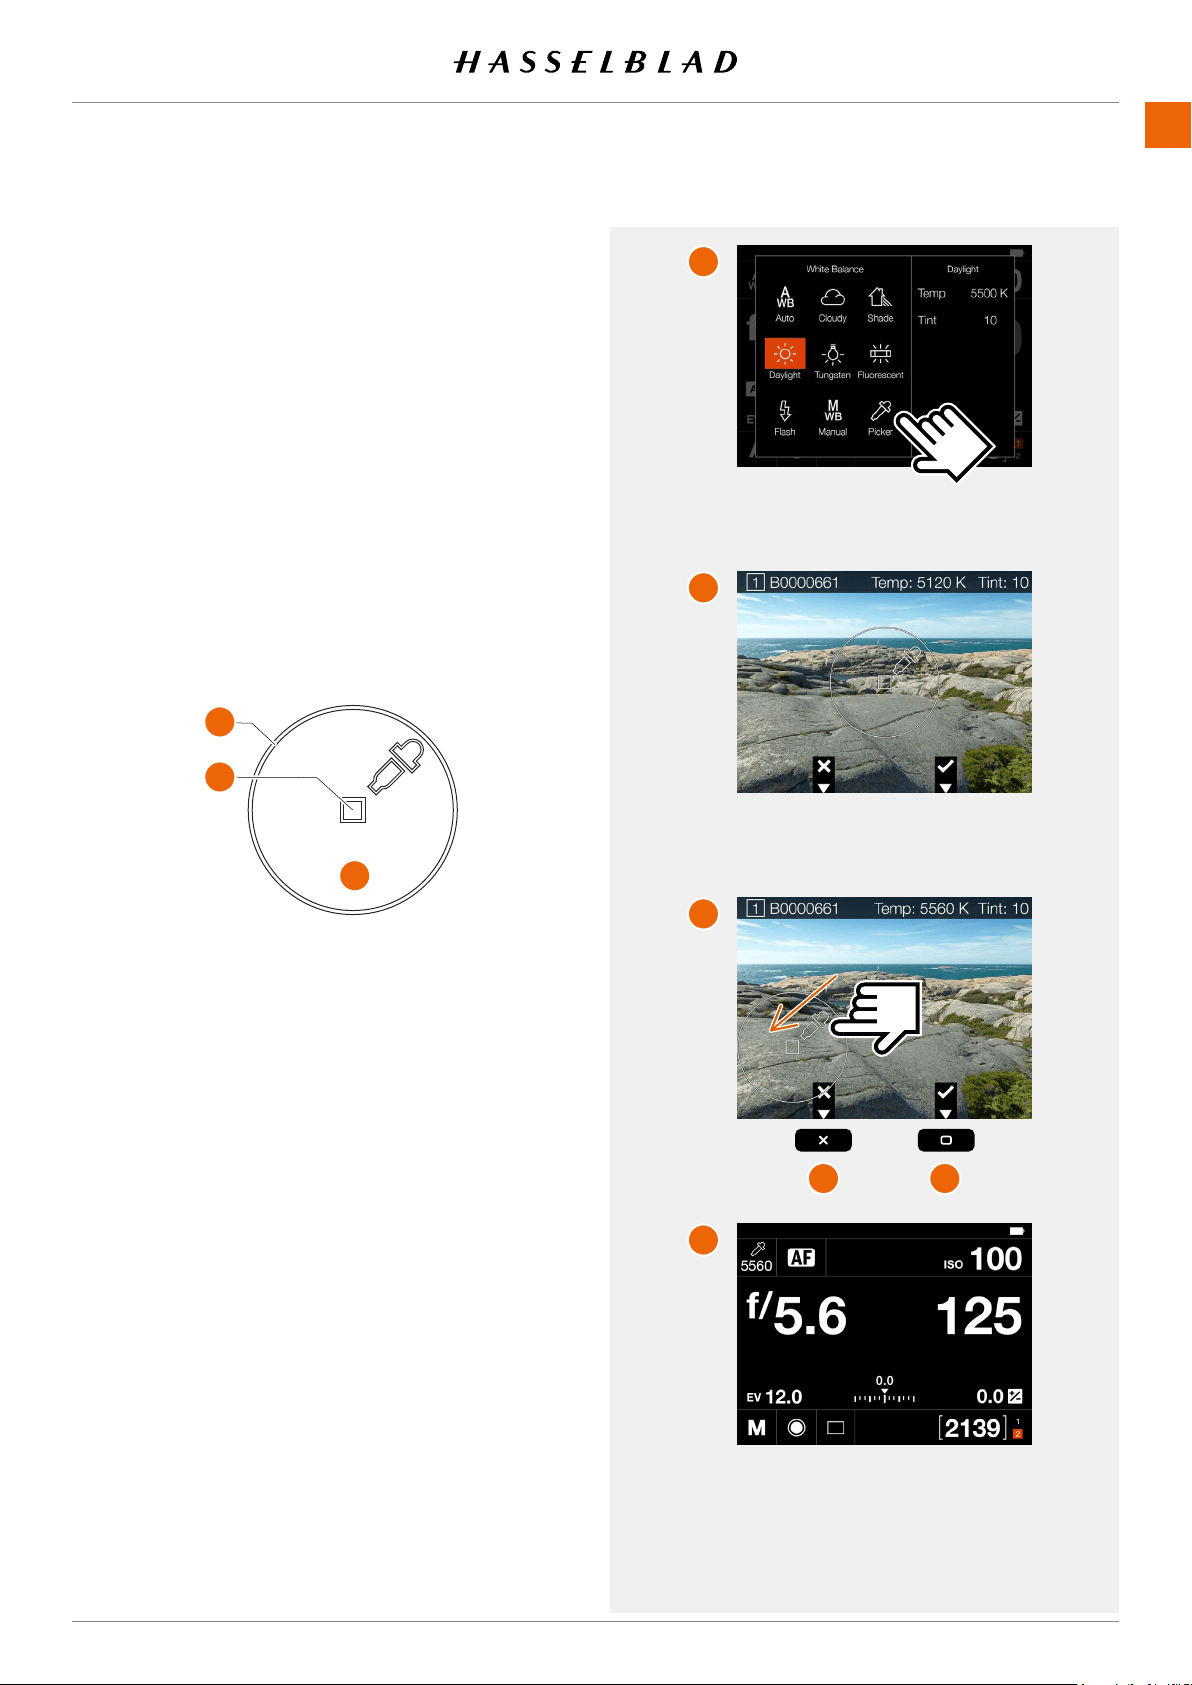
Set White balance from image (Picker)
Tap the white balance icon on the control screen to bring up
the settings screen. Tap the Picker icon (
A
).
The screen will show the last captured image with a white
balance picker tool (
B
).
If the center of the image is not neutral, move the picker tool
by y touching anywhere inside the circle (
1
) and sliding so that
the measuring area (
2
) falls over a neutral area (
C
). The status
bar will show the actual values for Temp and Tint. To accept
these values, press the rectangle button (
5
). To exit without
saving the values, press the cross button (
4
).
The control screen will now show the new value for Temp (
D
)
and it will be used together with Tint for following images.
A
B
C
D
1 Active area for moving the
tool by touch.
2 Active area for calculating
Temperature and Tint.
1
2
3
4 5
Note!
You can change to another image by turning the front scroll
wheel or by swiping the image outside of the picker tool area.
Note!
Youcanne-tunethepositionbytappinginsidethecircle.
E.g., if you tap at point (
3
), the picker will move a small
increment down.
This chapter continues on the next page.
USING THE 907X
www.hasselblad.comCONTENTS
54
907X 50C USER GUIDE
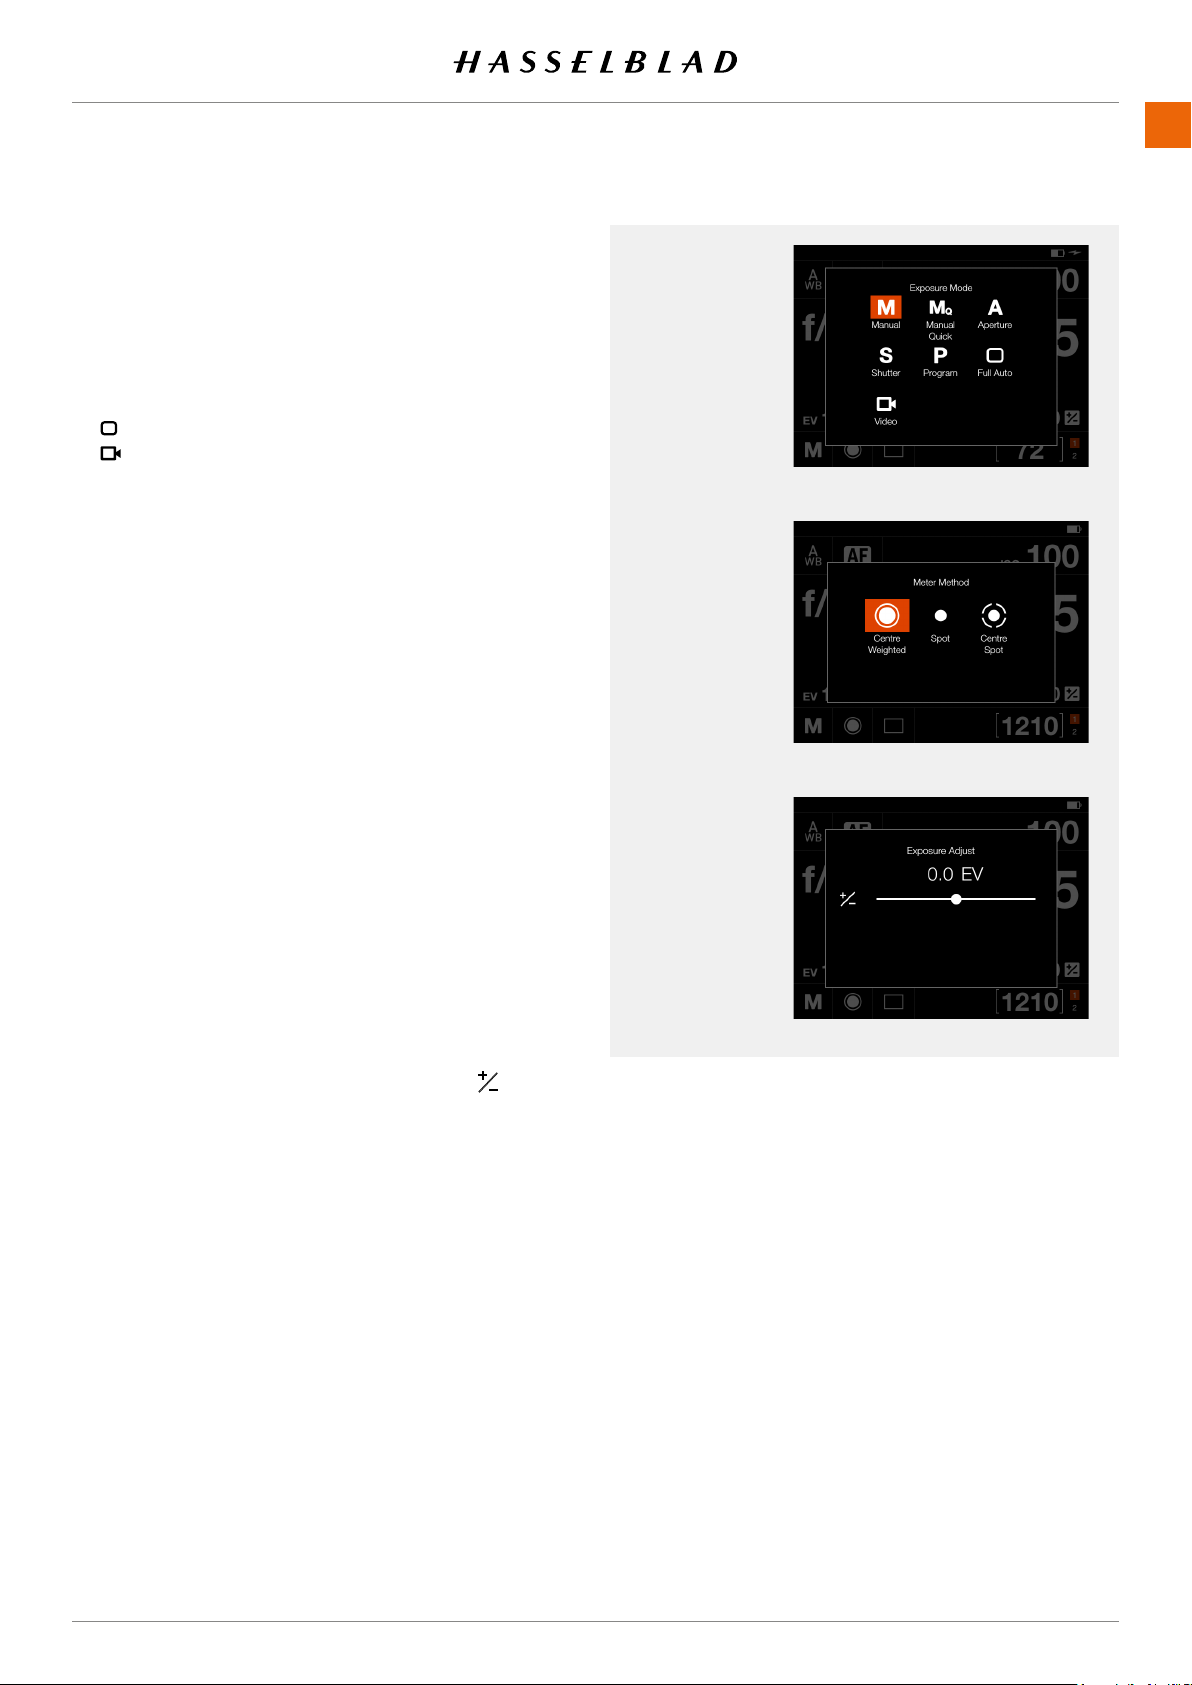
Settings on the Control screen
Exposure Mode
M Manual mode.
A Aperture priority mode.
S Shutter priority mode.
P Program mode.
Full auto
Video
Metering Mode
- Centre weighted.
- Spot.
- Centre spot.
Exposure adjust
- Adjust exposure by sliding right or left.
Tapping the line to the left or right of the dot, will
increase or decrease the value with the value set
in
Main Menu > Camera Settings > Exposure >
Increment Step Size > exposure Adjust
.
Reset the value to zero by double-tapping the icon
to the left of the line.
See also page 68.
Exposure Adjust
Exposure Mode
Metering Mode
USING THE 907X
www.hasselblad.comCONTENTS
55
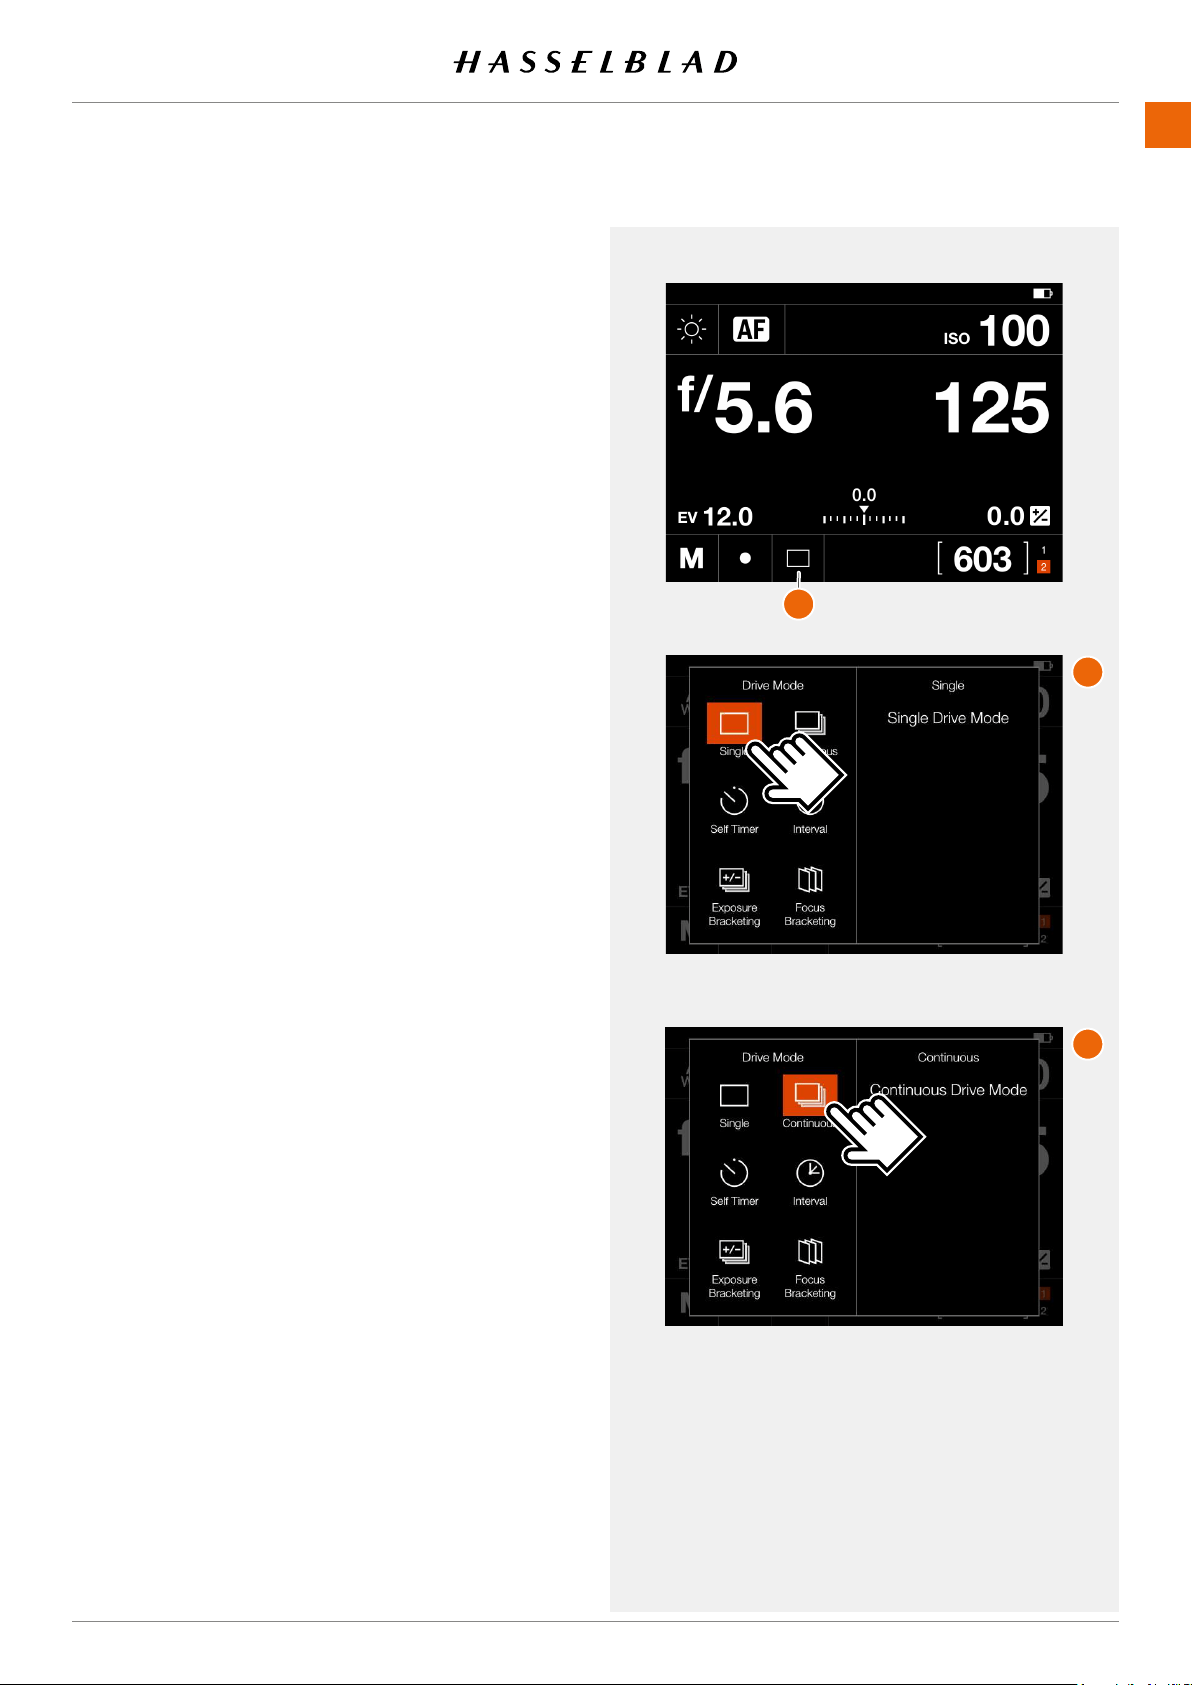
Settings on the Control screen
Drive mode
By tapping the drive mode icon
(A)
on the control screen, you
can select the following drive modes:
●
Single
The camera will only make one exposure regardless
how long the Shutter release button is pressed.
Tap the Single icon again
(B)
to close the dialogue
make it active.
●
Continuous
The camera will make exposures as long as the Shutter
release button is pressed.
Tap the Continuous icon
(C)
again to close the dialogue
make it active.
Continued on the next page.
907X 50C USER GUIDE
Single frame Drive mode
Control Screen
Continuous Drive mode
A
B
C
USING THE 907X
www.hasselblad.comCONTENTS
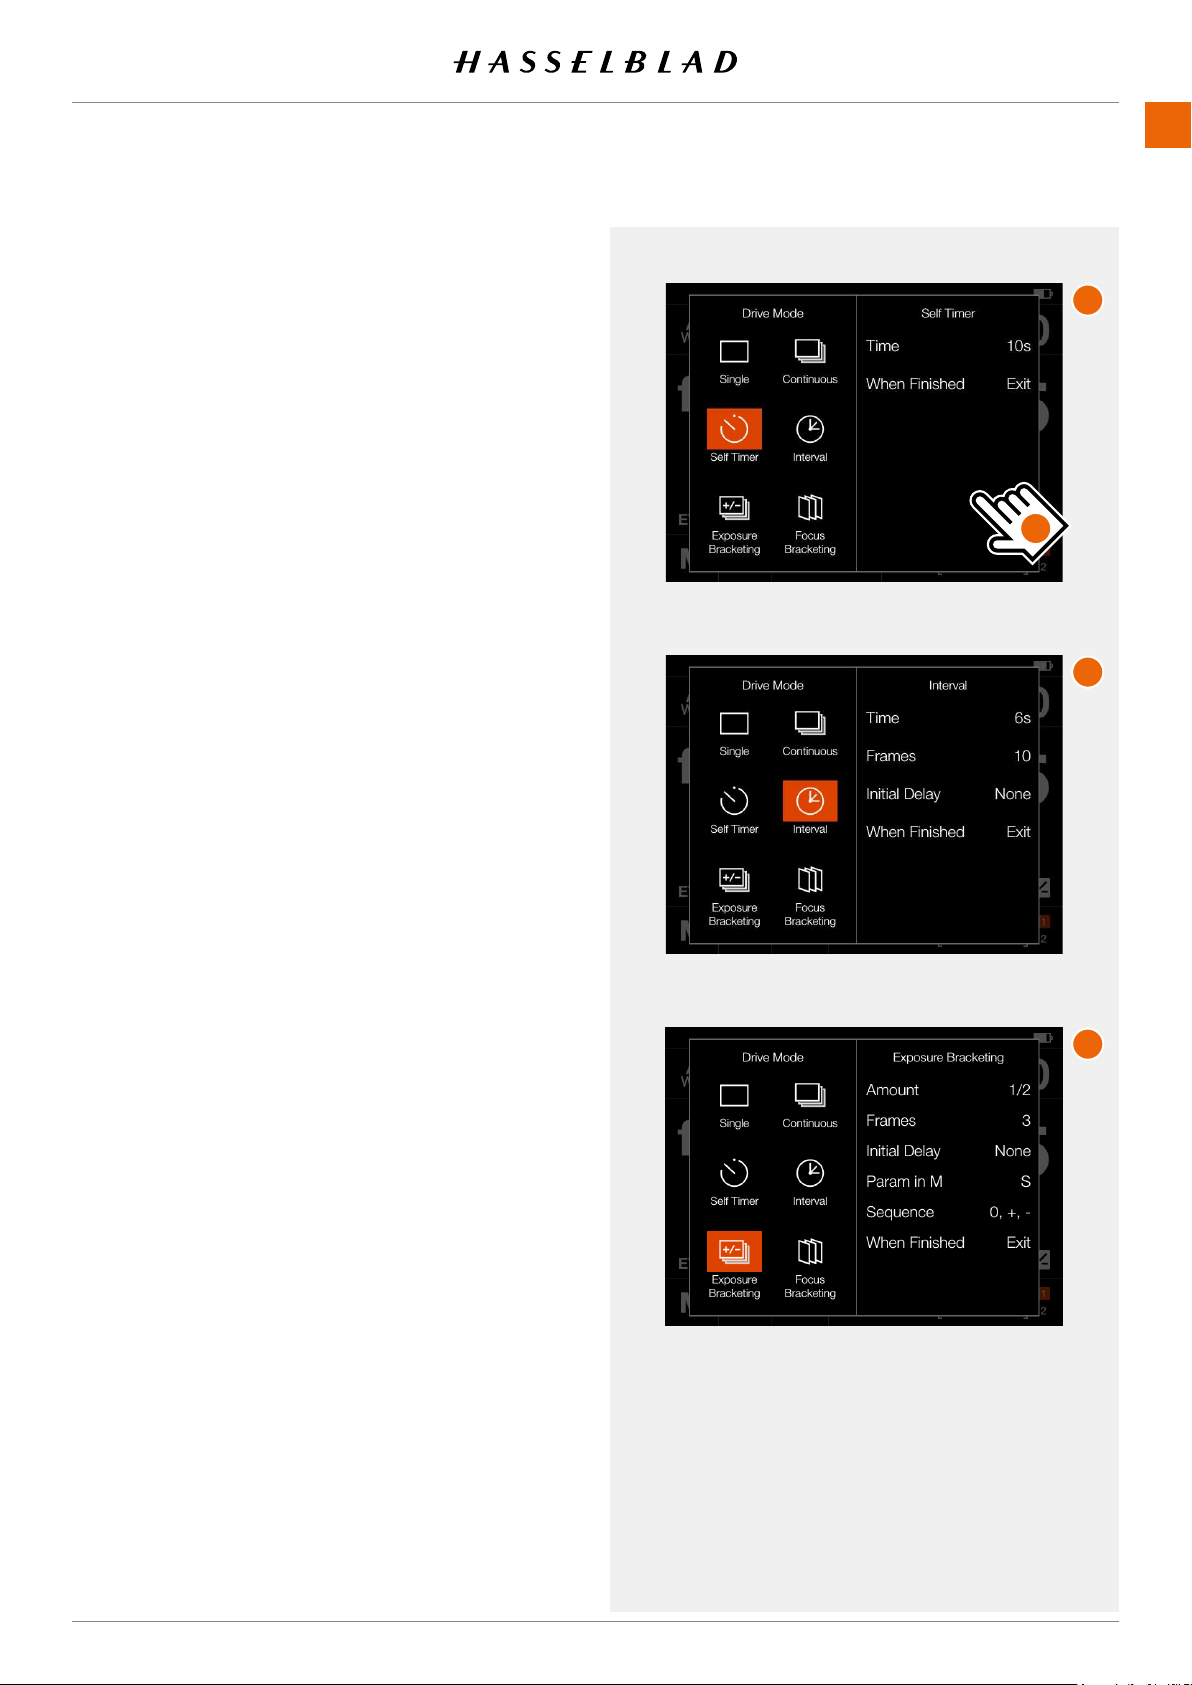
56
907X 50C USER GUIDE
Self Timer
Exposure Bracketing
Interval
●
Self Timer (A)
The camera will wait a pre-set time to make the
exposure after the Shutter release button is pressed.
Time:
Delay between shutter release and exposure.
When Finished:
Determines if the function shall be
active after a completed cycle or not. If set to
Exit
, the
Self Timer is disabled after the exposure.
●
Interval (B)
The camera will make a pre-determined number of
exposures with a pre-set interval time.
Time:
The time between exposures.
Frames:
How many exposures will be made.
Initial Delay:
Delaybetweenshutterreleaseandrst
exposure.
When Finished:
Determines if the function shall be
active after a completed cycle or not.
●
Exposure bracketing (C)
The camera will automatically make a pre-determined
number of exposures with a pre-set exposure adjust-
ment difference between each frame.
Amount:
How much exposure difference between
each exposure.
Frames:
The number of exposures in the sequence.
Initial Delay: A delay between shutter release and the
rstexposure.
Initial Delay:
Delaybetweenshutterreleaseandrst
exposure.
Param in M:
Which of aperture or shutter speed to
change if exposure bracketing is used in manual mode.
Sequence:
Determines which order exposure adjust-
ment is added.
When Finished:
Determines if the function shall be
active after a completed cycle or not.
For
Self Timer
,
Interval
and
Exposure bracketing
the left
part of the panel displays the current setting. If no changes
are required, tap the function icon again to make it active.
To change any of the parameters, tap the right part of the
screen
(D)
. This will bring up the dedicated settings for the
function. See details on the following pages.
A
B
C
D
USING THE 907X
www.hasselblad.comCONTENTS
57
907X 50C USER GUIDE
A
B
C
D
E
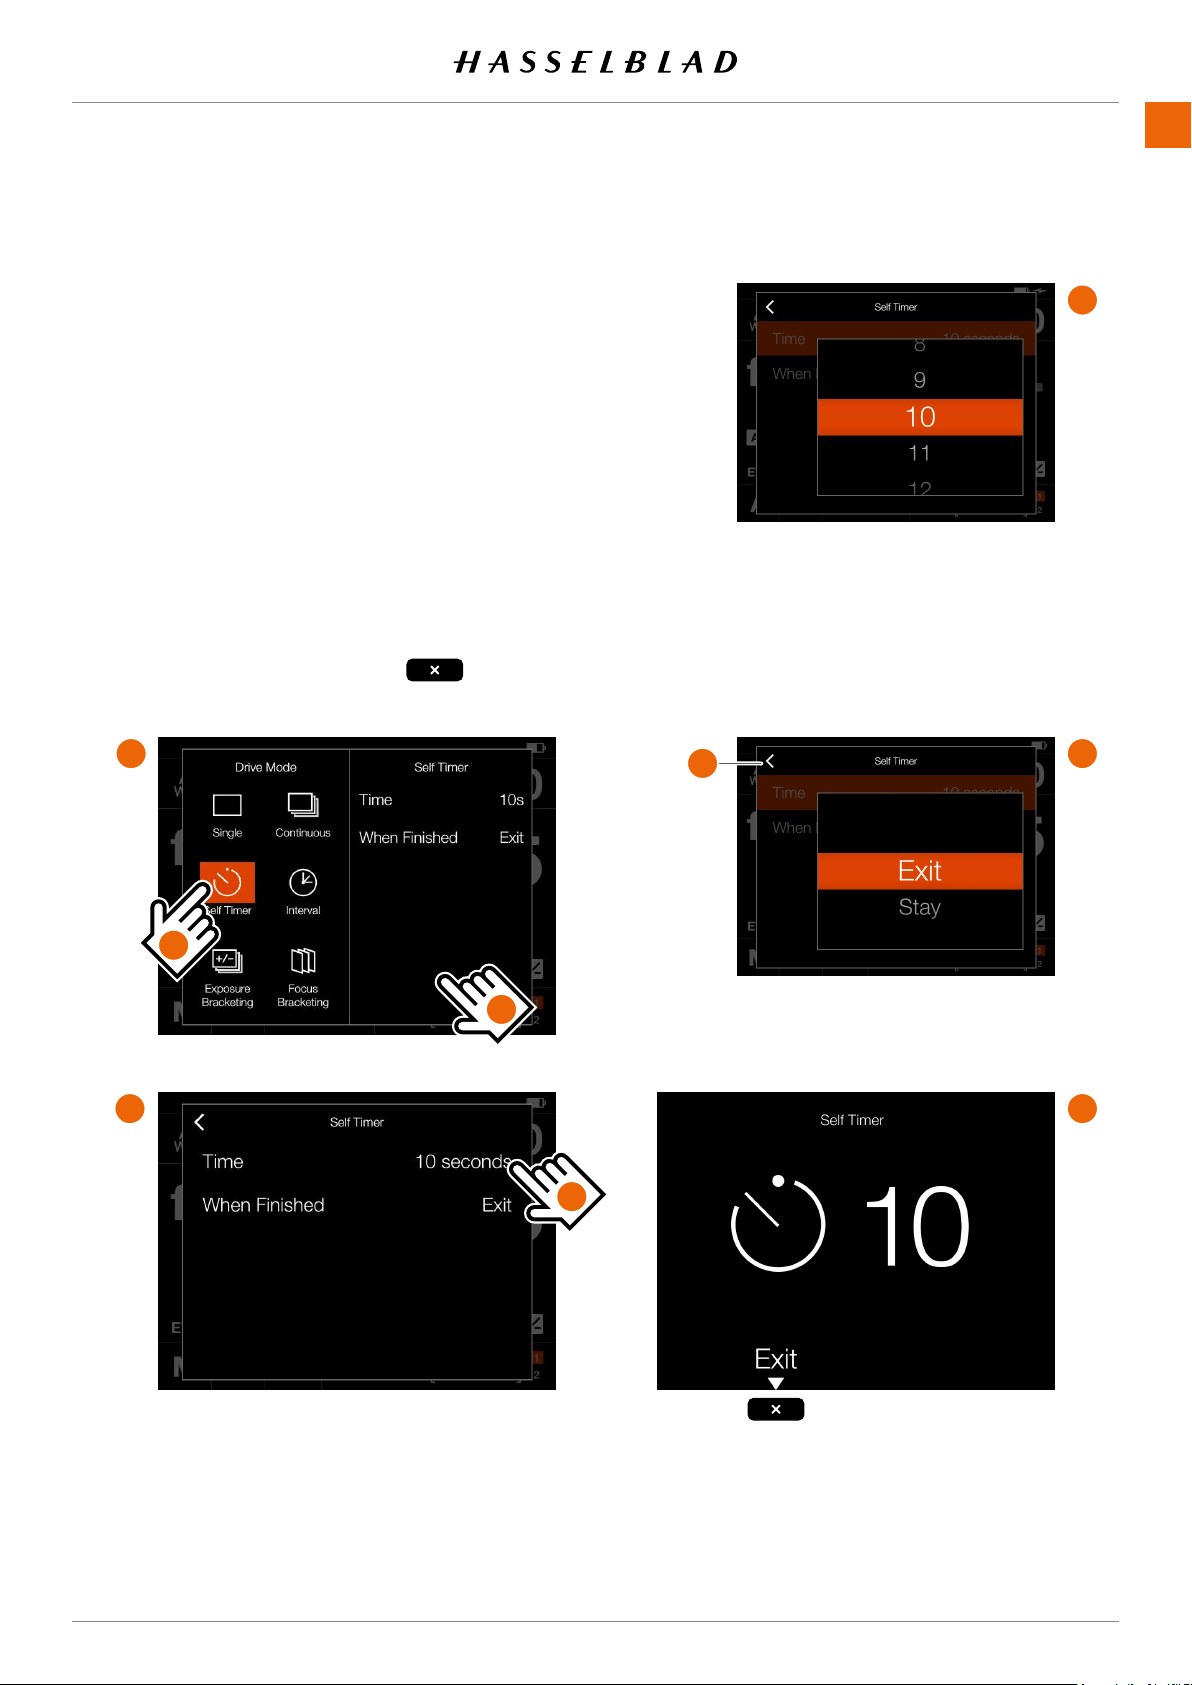
SELF TIMER SETTINGS
On the control screen tap the drive mode icon to bring up the
settings screen
(A)
.
Tap the Self Timer icon
(1)
. To change settings, tap the right
panel
(2)
to show the settings menu
(B)
.
To change any of the settings, tap the value
(3)
to bring up any
of the screens
(E)
or
(F)
.
When the settings are made, tap the left arrow
(4)
to return to
the drive mode settings screen. Finally, tap the Self Timer icon
again to make it active.
When the shutter release is fully pressed, the rear screen
will show the count down screen
(E)
. After the pre-set time is
elapsed, the exposure will be made.
Select
Exit
by pressing the Cross button if you want to
cancel the Self Timer.
1
2
3
4
USING THE 907X
www.hasselblad.comCONTENTS
58
907X 50C USER GUIDE
A
B
C
D
E
F
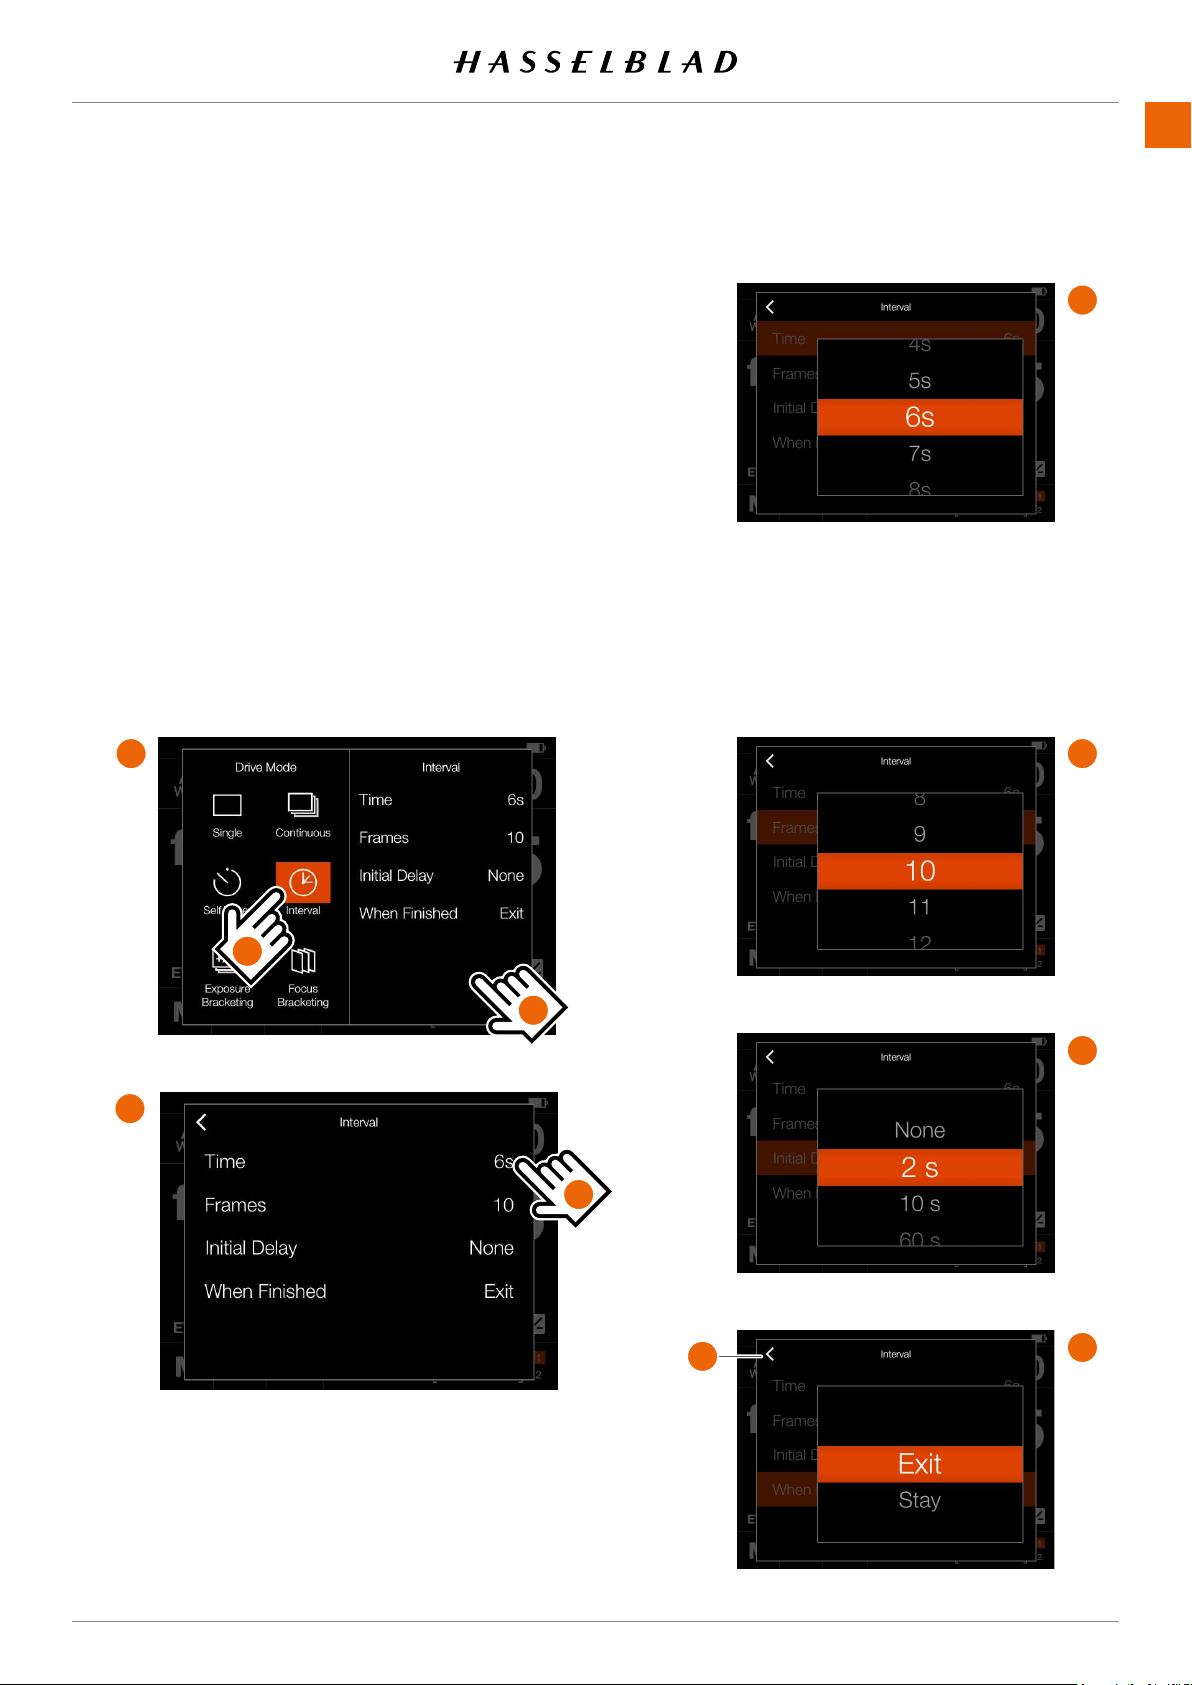
INTERVAL SETTINGS
On the control screen tap the drive mode icon to bring up the
settings screen
(A)
.
Tap the Interval icon
(1)
. To change settings, tap the right
panel
(2)
to show the settings menu
(B)
.
To change any of the settings, tap the value to bring up any of
the screens
(C)
to
(F)
.
When the settings are made, tap the left arrow
(4)
to return to
the drive mode settings screen. Finally, tap the Interval icon
again to make it active.
Continued on the next page.
1
2
3
4
USING THE 907X
www.hasselblad.comCONTENTS
59
907X 50C USER GUIDE
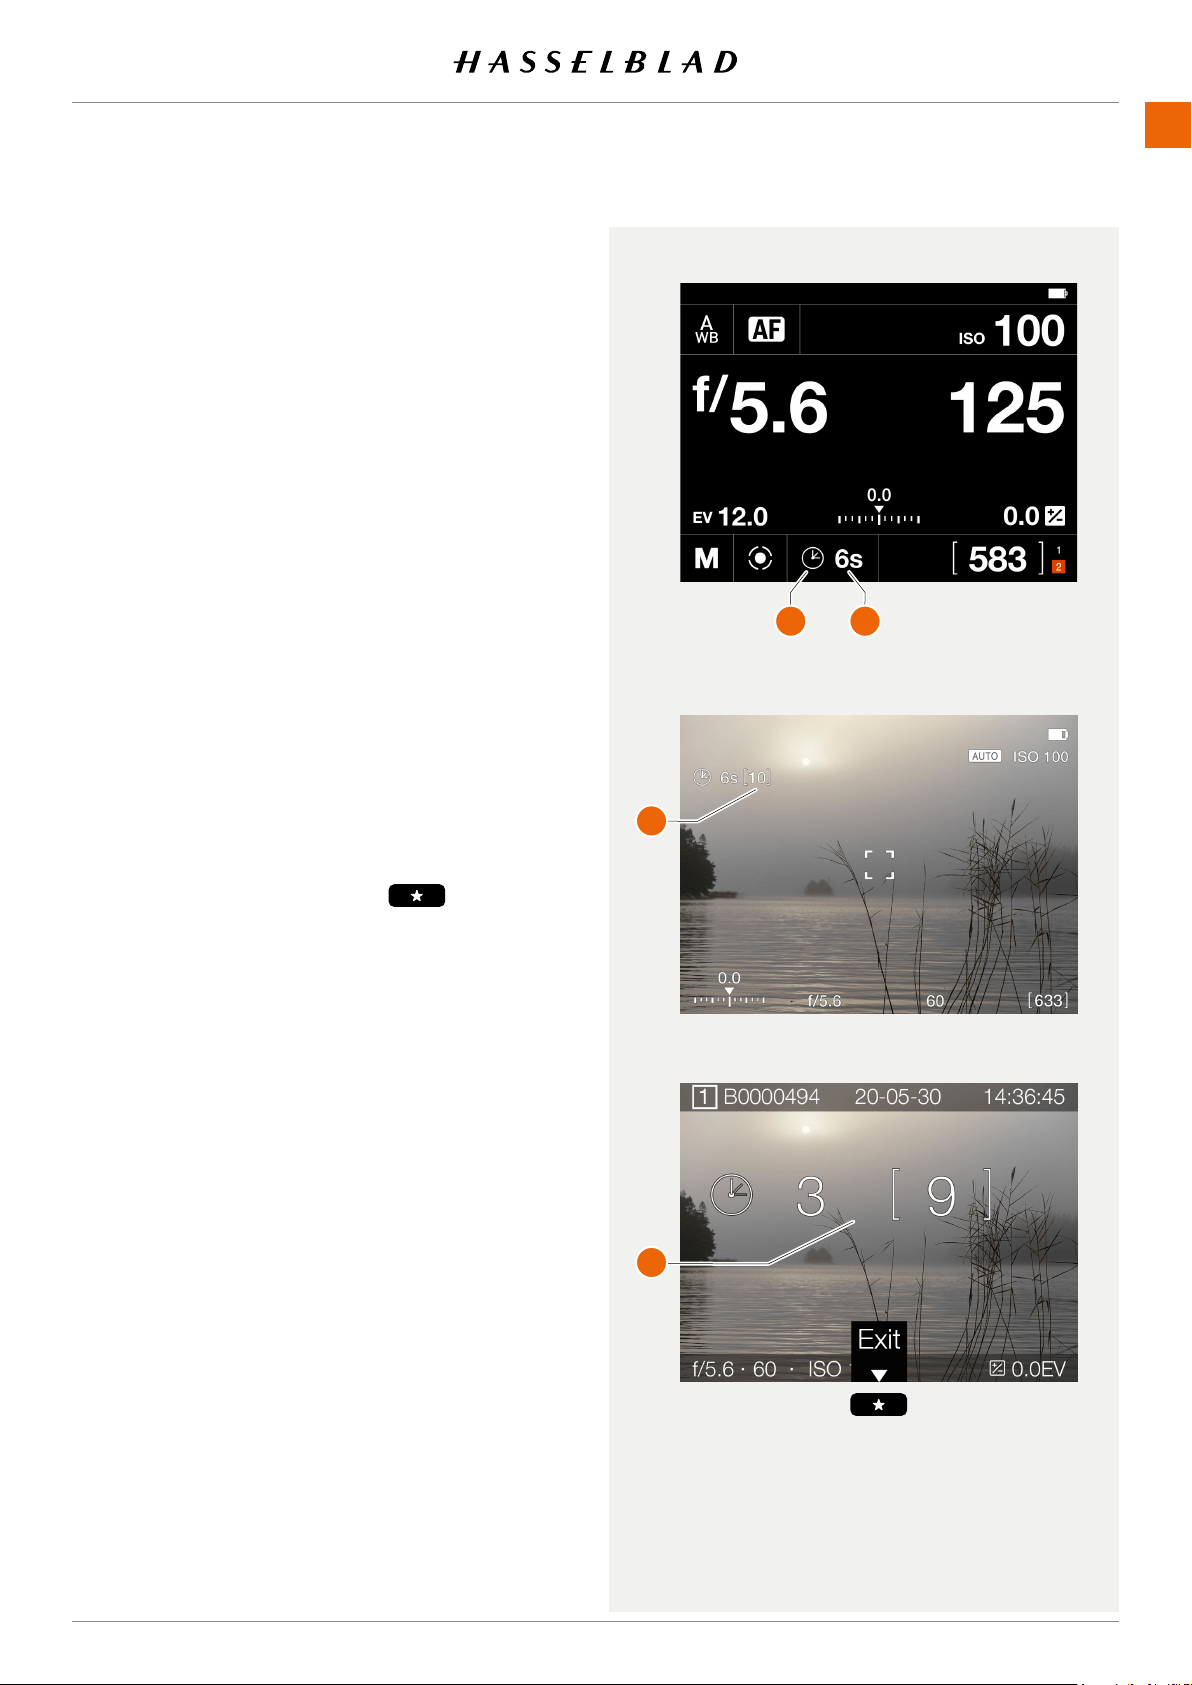
INTERVAL OPERATION
An active and pending Interval Timer, is indicated both on the
control screen and in live view.
the control screen shows the interval icon
(A)
and the interval
time
(B)
. To see all settings, tap the Interval Icon to show the
settings screen as described on the previous page.
Live View and preview screens show the same information
with the addition of remaining number of captures
(C)
and
(D)
.
To start the sequence, press the shutter release. If you have
set an initial delay to prevent camera shake, the camera will
rstwaitthepre-setnumberofsecondsshowingablack
screen with a count-down timer, and then start the Interval
sequence.
After a capture, the image will show up on the rear screen,
together with the Interval information.
To end the sequence before all captures have been made,
select
Exit
by pressing the star button .
Note!
Live view is turned off during an interval sequence.
Note!
The preview can be turned off in the
General Settings >
Preview > Rear Screen
setting.
Note!
During a running interval sequence, you can press the menu
button to activate the control screen to check current status.
Note!
Interval is not supported in Phocus Mobile 2 or when tethered
to Phocus. For tethered operation, use the Capture Sequenc-
er function in Phocus.
Control Screen
Preview Screen after a capture
Live View
A B
C
D
USING THE 907X
www.hasselblad.comCONTENTS
60
907X 50C USER GUIDE
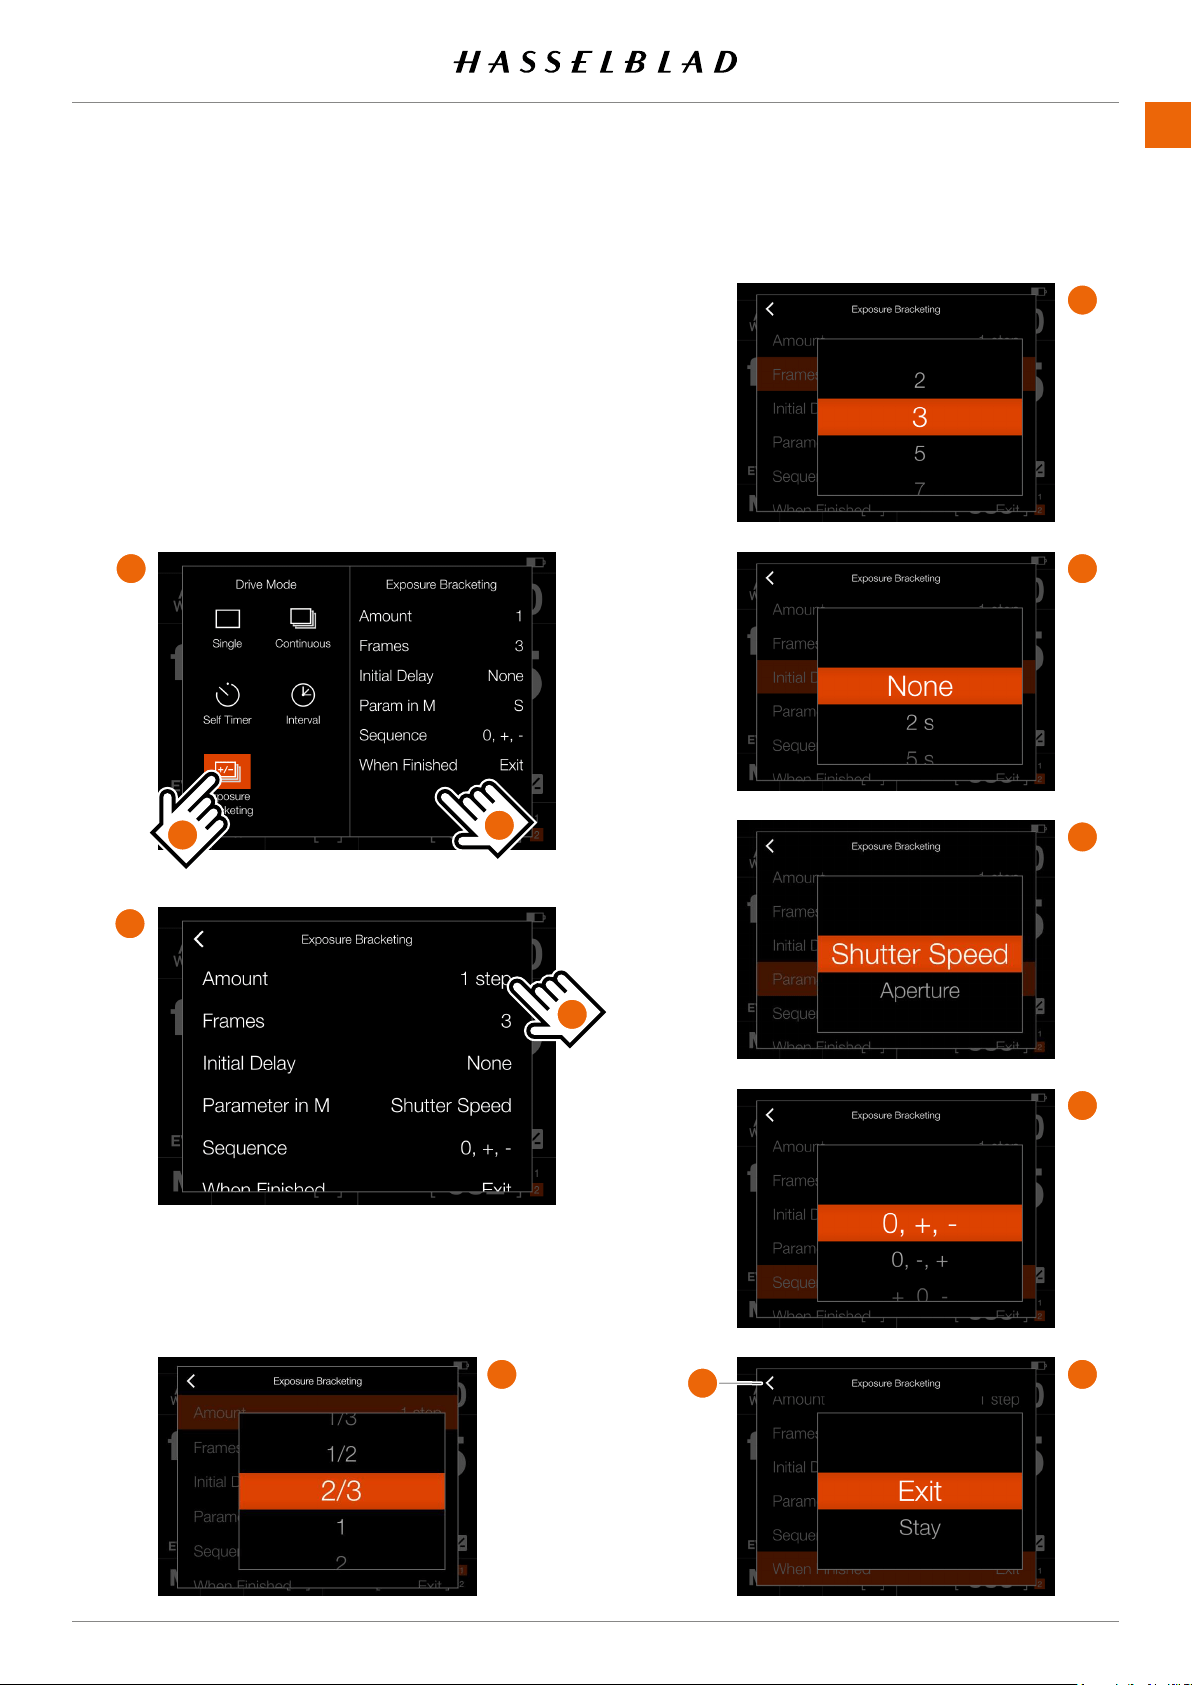
EXPOSURE BRACKETING SETTINGS
On the control screen tap the drive mode icon which brings
up the settings screen
(A)
. Tap the exposure bracketing icon
(1)
. To change settings, tap the right panel
(2)
to show the
settings menu
(B)
. To change any of the settings, tap the value
to bring up any of the screens
(C)
to
(H)
.
When the settings are made, tap the left arrow
(4)
to return
to the drive mode settings screen. Finally, tap the exposure
bracketing icon again to make it active.
A
B
C
D
E
F
G
H
1
2
3
4

USING THE 907X
www.hasselblad.comCONTENTS
61
907X 50C USER GUIDE
3
3
580
1.0 EV
Exposure Bracketing
3
Exposing
Finish Exposure
EXPOSURE BRACKETING OPERATION
An active and pending exposure bracketing function, is
indicated both on the control screen and in live view.
The control screen and live view will show the bracketing
icon and the number of captures in the sequence. To see all
settings, tap the interval icon to show the settings screen as
described on the previous page.
In the example to the right, the exposure bracketing sequence
will use 3 images.
To start the sequence, press the shutter release. If you have
set an initial delay to prevent camera shake, the camera will
rstwaitthepre-setnumberofsecondsshowingablack
screen with a count-down timer, and then start the interval
sequence.
During the exposure bracketing sequence, the rear screen will
show an information overlay, as shown in
(A)
.
To exit from the sequence before it has been completed,
select
Finish Exposure
by pressing the cross button .
After a capture, the last image will show up on the rear screen
LONG EXPOSURE SCREEN
If the shutter speed is 1 second or longer, the long exposure
screen
(B)
will be shown during the exposure.
Press the cross button to cancel the current exposure.
After about 5 seconds the display will be turned off and the
camera will enter a power-save mode.
Note!
Exposure bracketing is not supported in Phocus Mobile 2 or
when tethered to Phocus. For tethered operation, use the
Capture Sequencer function in Phocus.
Note!
Light measurement, focusing and auto white balance are
performedbeforetherstexposureandisappliedtoall
images in the sequence.
Control Screen
Live View
Screen during Bracketing operation
Screen when shutter speed is 1 sec or longer.
A
B
USING THE 907X
www.hasselblad.comCONTENTS
62
907X 50C USER GUIDE
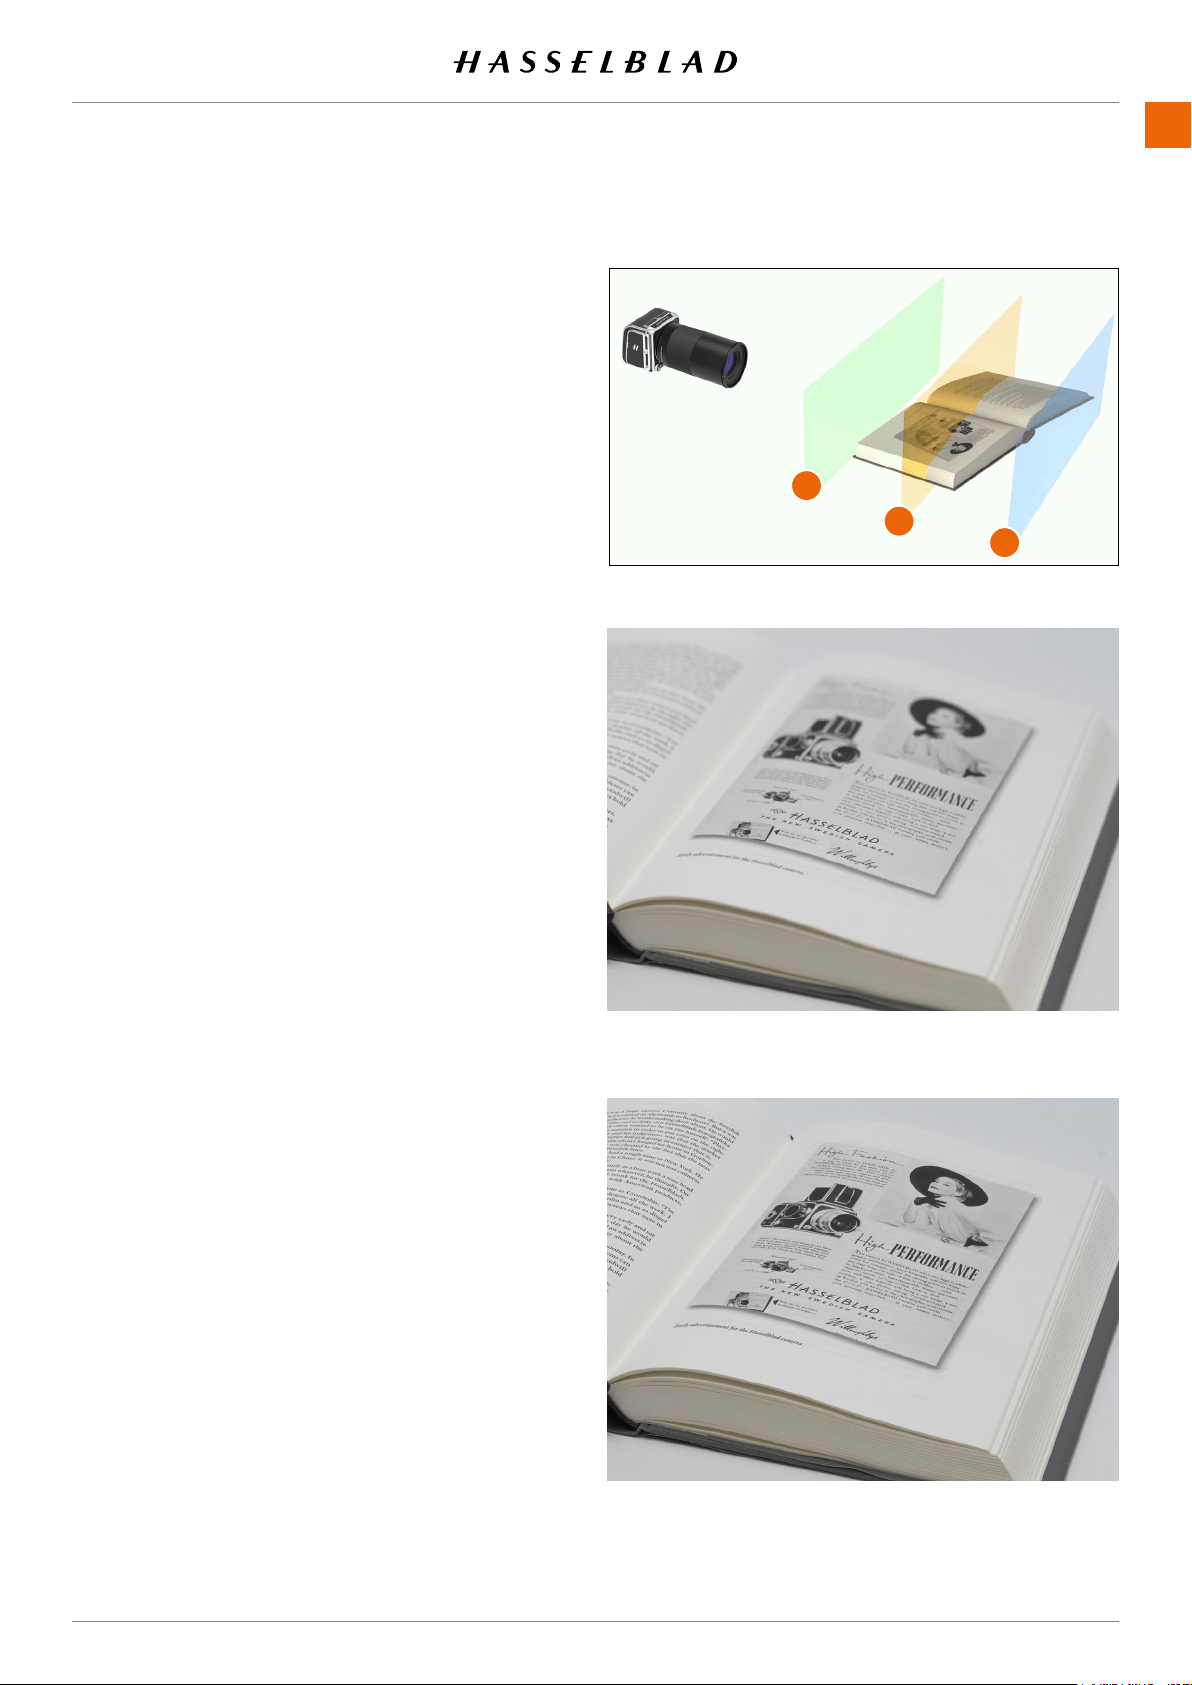
FOCUS BRACKETING
Focus Bracketing can be used for different purposes. The
mostobviousistoachievealargerdepth-of-eldbystacking
images with different focus positions together in post-produc-
tion. You can also use it to pick the best image from a batch.
In Focus Bracketing mode, the camera will automatically
take a pre-set number of images and calculate focus shift
between each capture. The images will be stored on the card
asseparatelesandyoucaneditthemmanuallyorusea3rd
party software (e.g. Helicon Focus™) to merge them together
intoanalstackedimage.
Itisdifculttogivedetailedguidelinesonwhichsettingsto
use, but look at the examples in this section as a starting point
for your own experiments.
The camera offers three different modes in which the images
will be taken.
1
Towards Innity
Set focus manually or by using AF. If AF is used, remember
to deactivate it before starting the sequence. In this
mode, focus should be set on a point (
A
) that is closer to
the camera than the main subject. When the sequence
isstarted,focuswillbeshiftedtowardsinnityuntilthe
sequenceisnishedorthelensreachesinnityposition.
2
Symmetric
In this mode, focus should be set on the main subject (
B
).
Whenthesequenceisstarted,thecamerawillrsttakean
image and then move to a focus point closer to the near
limit and take all the images in the sequence, shifting focus
towardsinnity.Therstimageisanextraexposuremade
to ensure that there is one image of the main subject with
perfect focus.
3
Towards Near Limit
Set focus on a point (
C
) behind the main subject. During
the sequence, the camera will shift focus closer and closer
to the camera. The sequence will stop after the pre-set
number of images has been captured or the lens has
reached near limit.
Single image, XCD 120 f/6.8
Stacked from 40 images. XCD 120, f/6.8, Step = Medium
A
B
C
USING THE 907X
www.hasselblad.comCONTENTS
63
907X 50C USER GUIDE
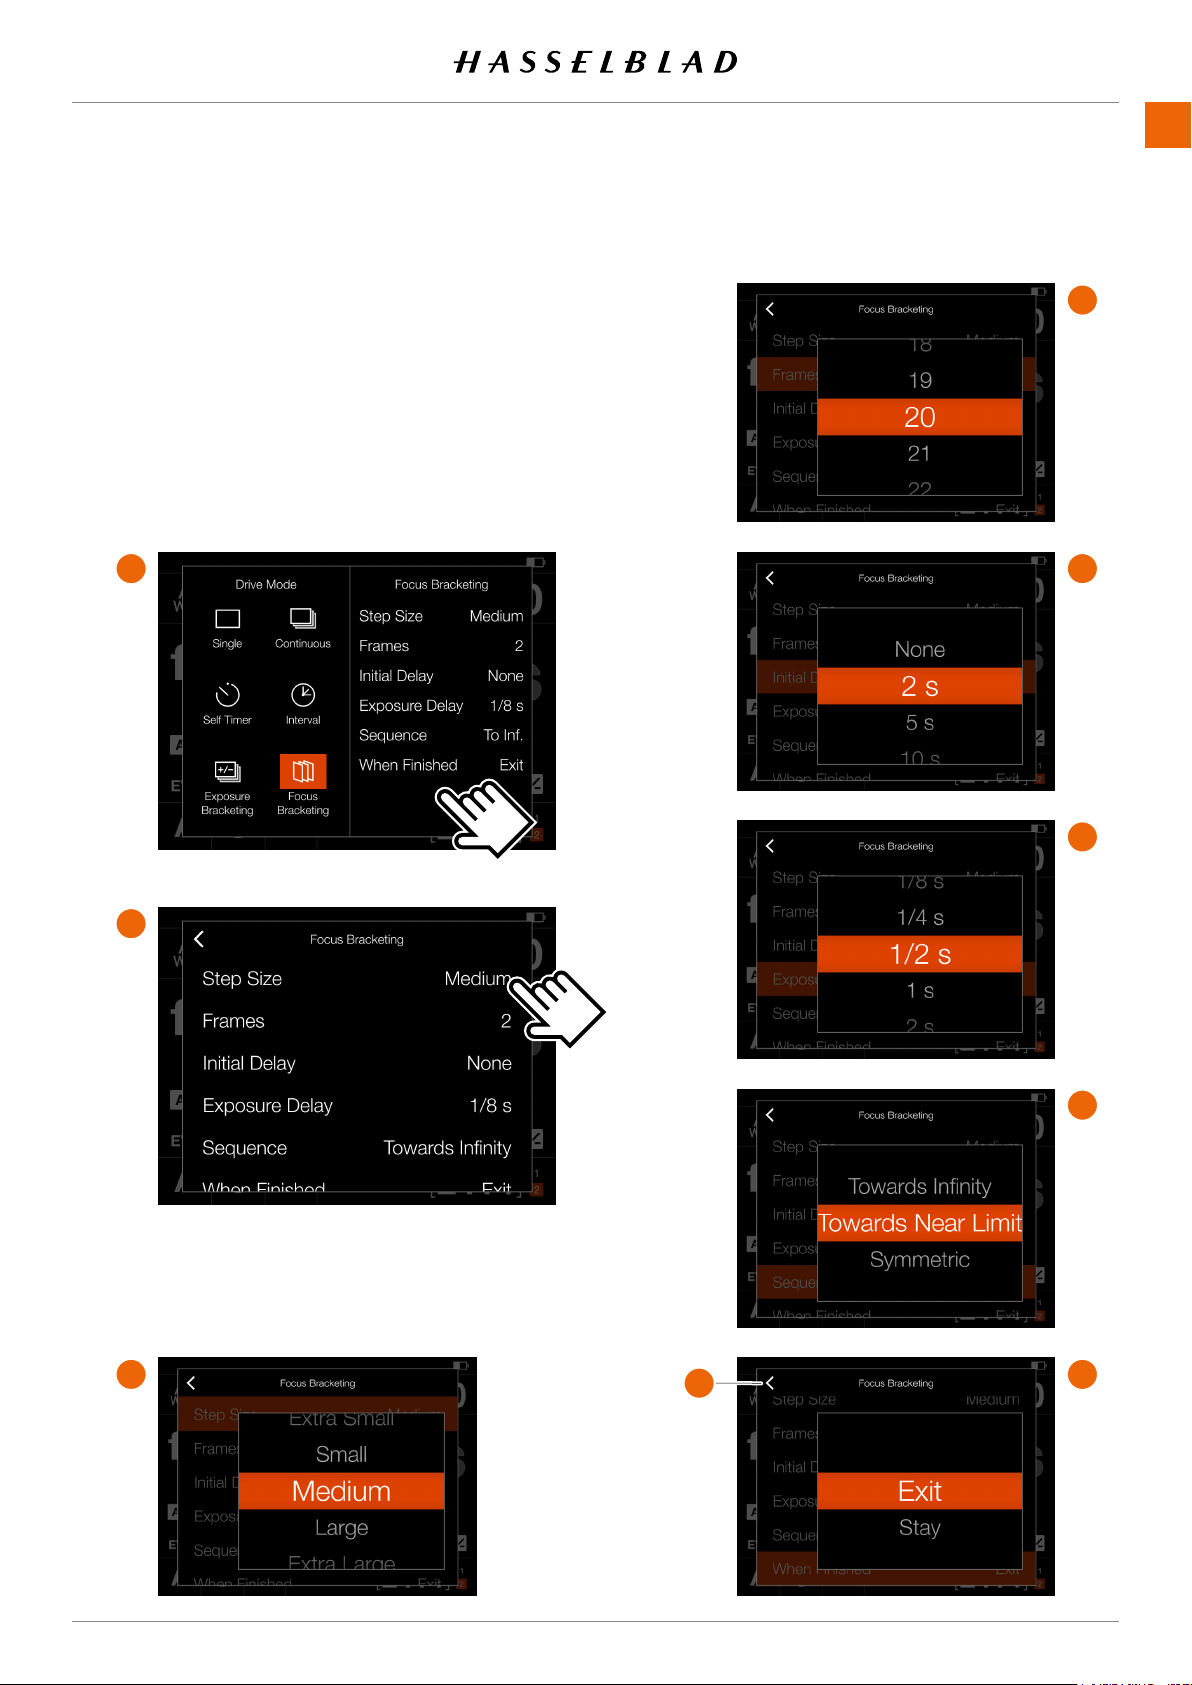
FOCUS BRACKETING SETTINGS
On the Control Screen tap the Drive Mode icon which brings
up the settings screen
(A)
. Tap the Focus Bracketing icon. To
change settings, tap the right panel
(1)
to show the Settings
Menu
(B)
.
To change any of the settings, tap the value
(2)
to bring up any
of the screens
(C)
to
(H)
.
When the settings are made, tap the left arrow
(I)
to return to
the Drive Mode settings screen.
A
B
C
D
E
F
G
I
USING THE 907X
www.hasselblad.comCONTENTS
64
907X 50C USER GUIDE
Control Screen
Live View
1
2
3
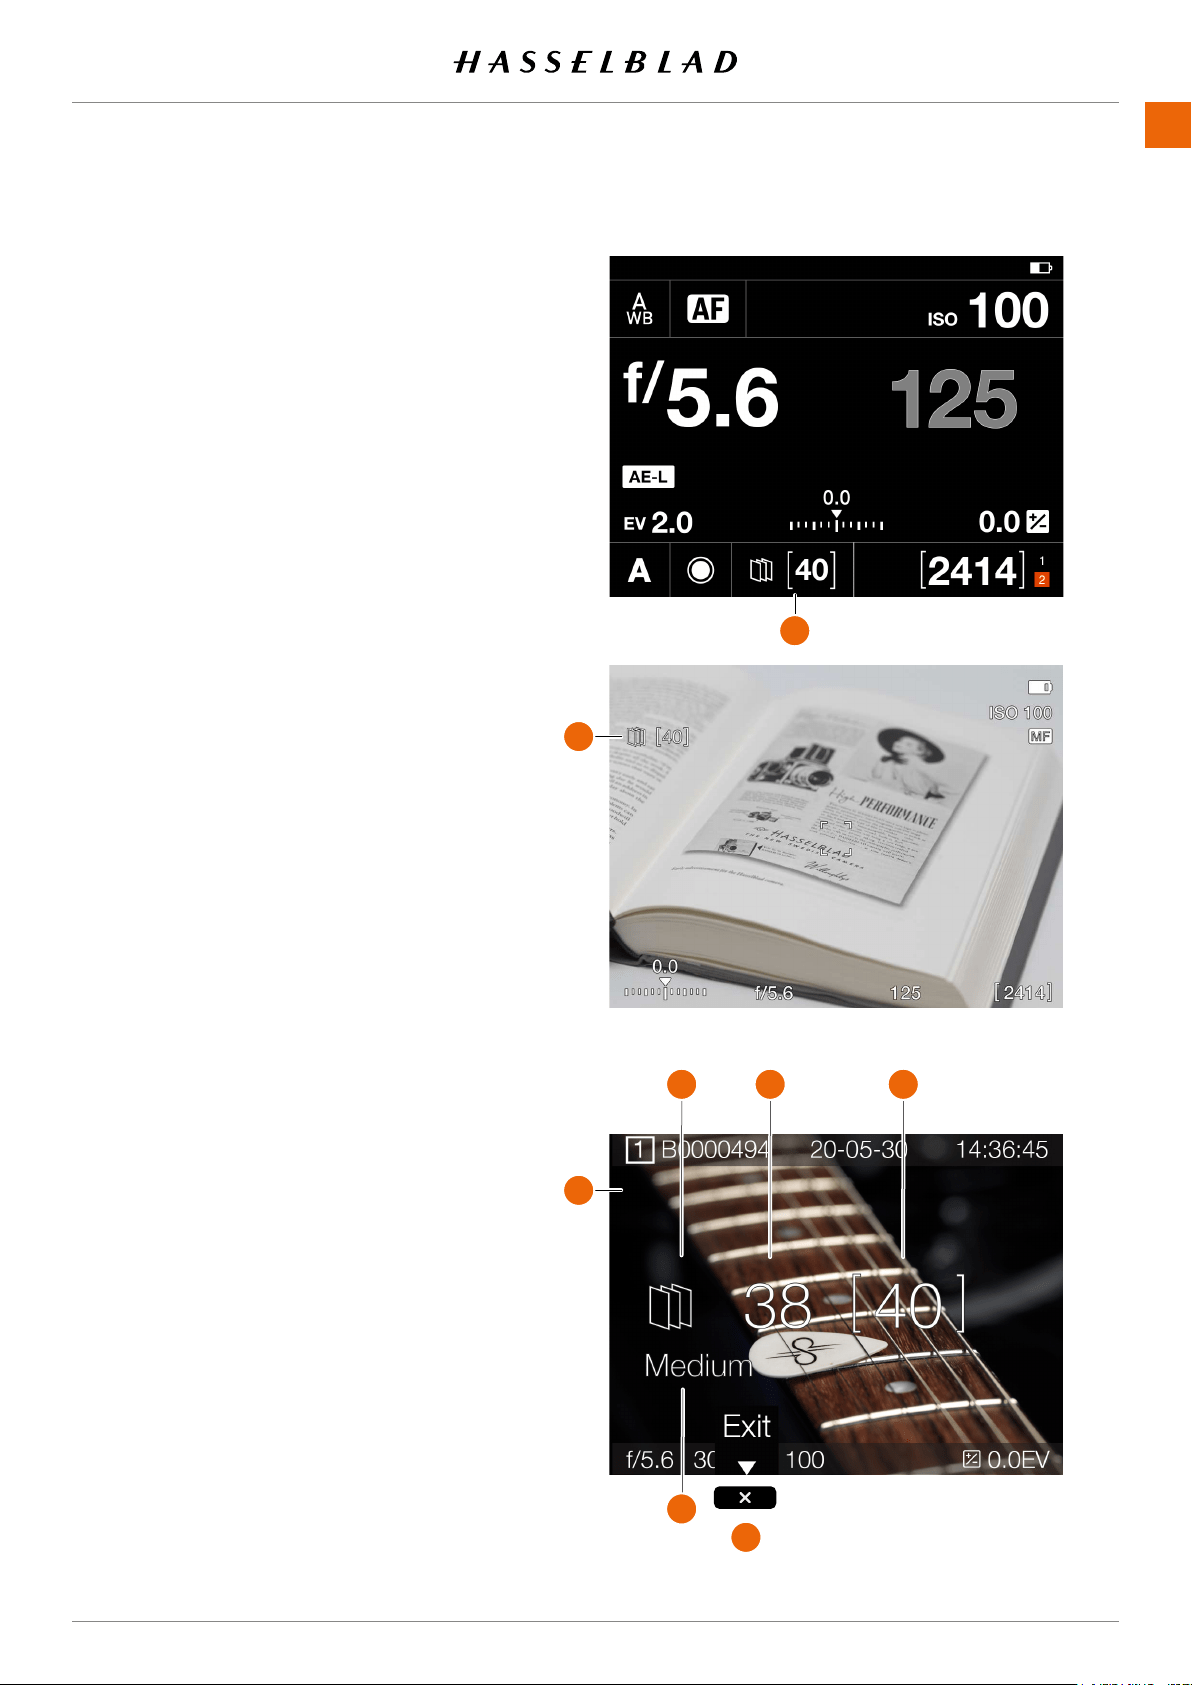
FOCUS BRACKETING OPERATION
An active and pending Focus Bracketing function
is indicated both on the Control Screen and in
Live View (
A
).
In the example on the right, the Focus Bracketing
sequence will take 40 images.
To start the sequence, simply press the shutter
release and all captures will be made automati-
cally. If required, you can set a delay before the
rstcapture.Aseparatedelaycanalsobeset
between frames to minimize vibration or to allow
aashtocharge.
During the Focus Bracketing sequence, the rear
screen and EVF will show the selected Browse
Overlay with an extra information overlay, as
shown in (
B
).
1
Focus Bracketing Icon
2
Remaining captures
3
Number of captures in the sequence
4
Focus adjustment step between captures.
To exit from the sequence before it has been
completed, press the Cross Button (
5
).
After a completed sequence, the last image will
show up on the rear screen.
Note!
The Focus Bracketing function requires a
rmwareupdatefortheLens.Useversion0.5.33
or later for XCD lenses. The XCD 45P requires
version 0.1.24.
Note!
HC/HCD lenses cannot be used for Focus
Bracketing.
Note!
Focus Bracketing is not supported in Phocus
Mobile or when tethered to Phocus.
Note!
Light measurement, focusing and Auto White
Balanceareperformedbeforetherstexposure
and is applied to all images in the sequence.
4
5
A
B
A

USING THE 907X
www.hasselblad.comCONTENTS
65
907X 50C USER GUIDE
STEP SIZE
For high-quality work you should normally select Small or
Medium step size. For less critical work you can also use
Large or Extra Large. Large or Extra Large can also be used in
certain situations when the type of subject allows.
Tondwhatworksbestforyoursituation,weencourageyou
to make experiments.
For this test two different step sizes was used , Small and Extra
Large. In the resulting image from the Extra Large setting,
there are clearly visible unsharp areas. The image using Small
is perfectly sharp in all areas.
Test image. F/5.6. 80 images.
MagniedpartfromimageusingSmallstepsize.
MagniedpartfromimageusingExtraLargestepsize.
Continued on the next page.
USING THE 907X
www.hasselblad.comCONTENTS
66
907X 50C USER GUIDE
Thestepsizeisrelatedtothedepthofeld(DoF)produced
by the camera at a given aperture. This means that the actual
focus shift in the subject will be larger with a higher aperture
number. E.g. f/4 will give a smaller step than f/11. However,
before each exposure, the camera will automatically calculate
the actual step size using the current focus position, focal
length of the lens, aperture and pixel dimensions of the
sensor.
In the subject, the DoF will grow as the focus point is moved
away from the camera. The distribution of the DoF around the
focus point will also be more uneven. The DoF on the far side
of the focus point will grow more than the DoF in front of the
focus point.
As the camera will automatically make all the calculations
for you, the only thing that really needs consideration is how
many images to make in the sequence. In most cases, it is
best to set a number that is too high rather than too low.
The camera will automatically stop when the lens cannot be
focused further or closer.
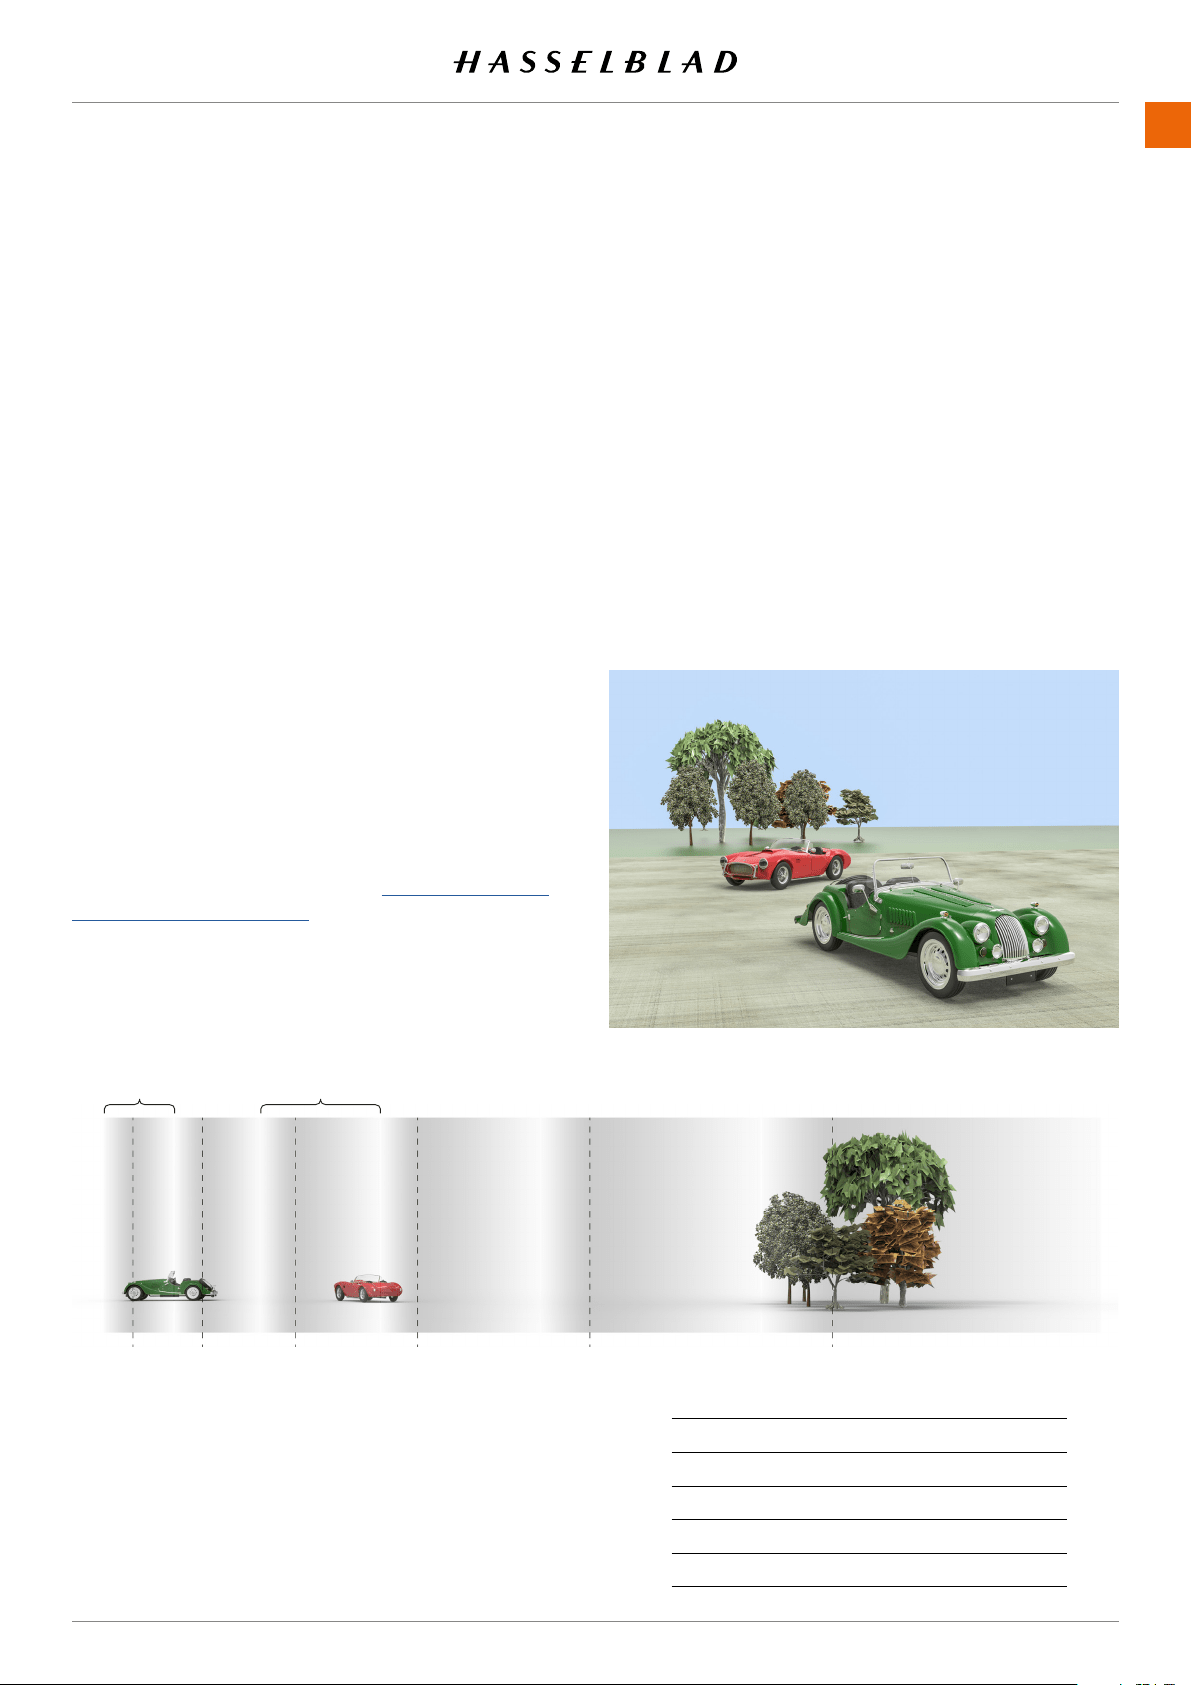
DOF AND STEP SIZE VISUALIZED
To the right is a typical subject where Focus Stacking could be
used.
With step size set to Medium, there will be no unsharp areas
between each image. Please note that DoF is relative and how
itisperceivedgreatlydependsontheviewingmagnication
ofthenalresult.Thecircleofconfusion(CoC)isusedto
determinethedepthofeld,seealso
https://en.wikipedia.
org/wiki/Circle_of_confusion.
The bottom image shows how the DoF will change between
captures and also how the focus step in the subject will
automatically increase as the DoF is increased.
DoF
1
1 2 3 4 5
6
DoF
3
STEP SIZE CoC
Extra Small 1×PP=5,3μm
Small 4/3×PP=7,1μm
Medium 2×PP=10,6μm
Large 4×PP=21,2μm
Extra Large 6×PP=31,8μm
The table to the right shows the actual Circle of
Confusion (CoC) used for the different step sizes.
PP is the Pixel Pitch of the sensor which is the
distance between two adjacent pixels.
USING THE 907X
www.hasselblad.comCONTENTS
67
907X 50C USER GUIDE
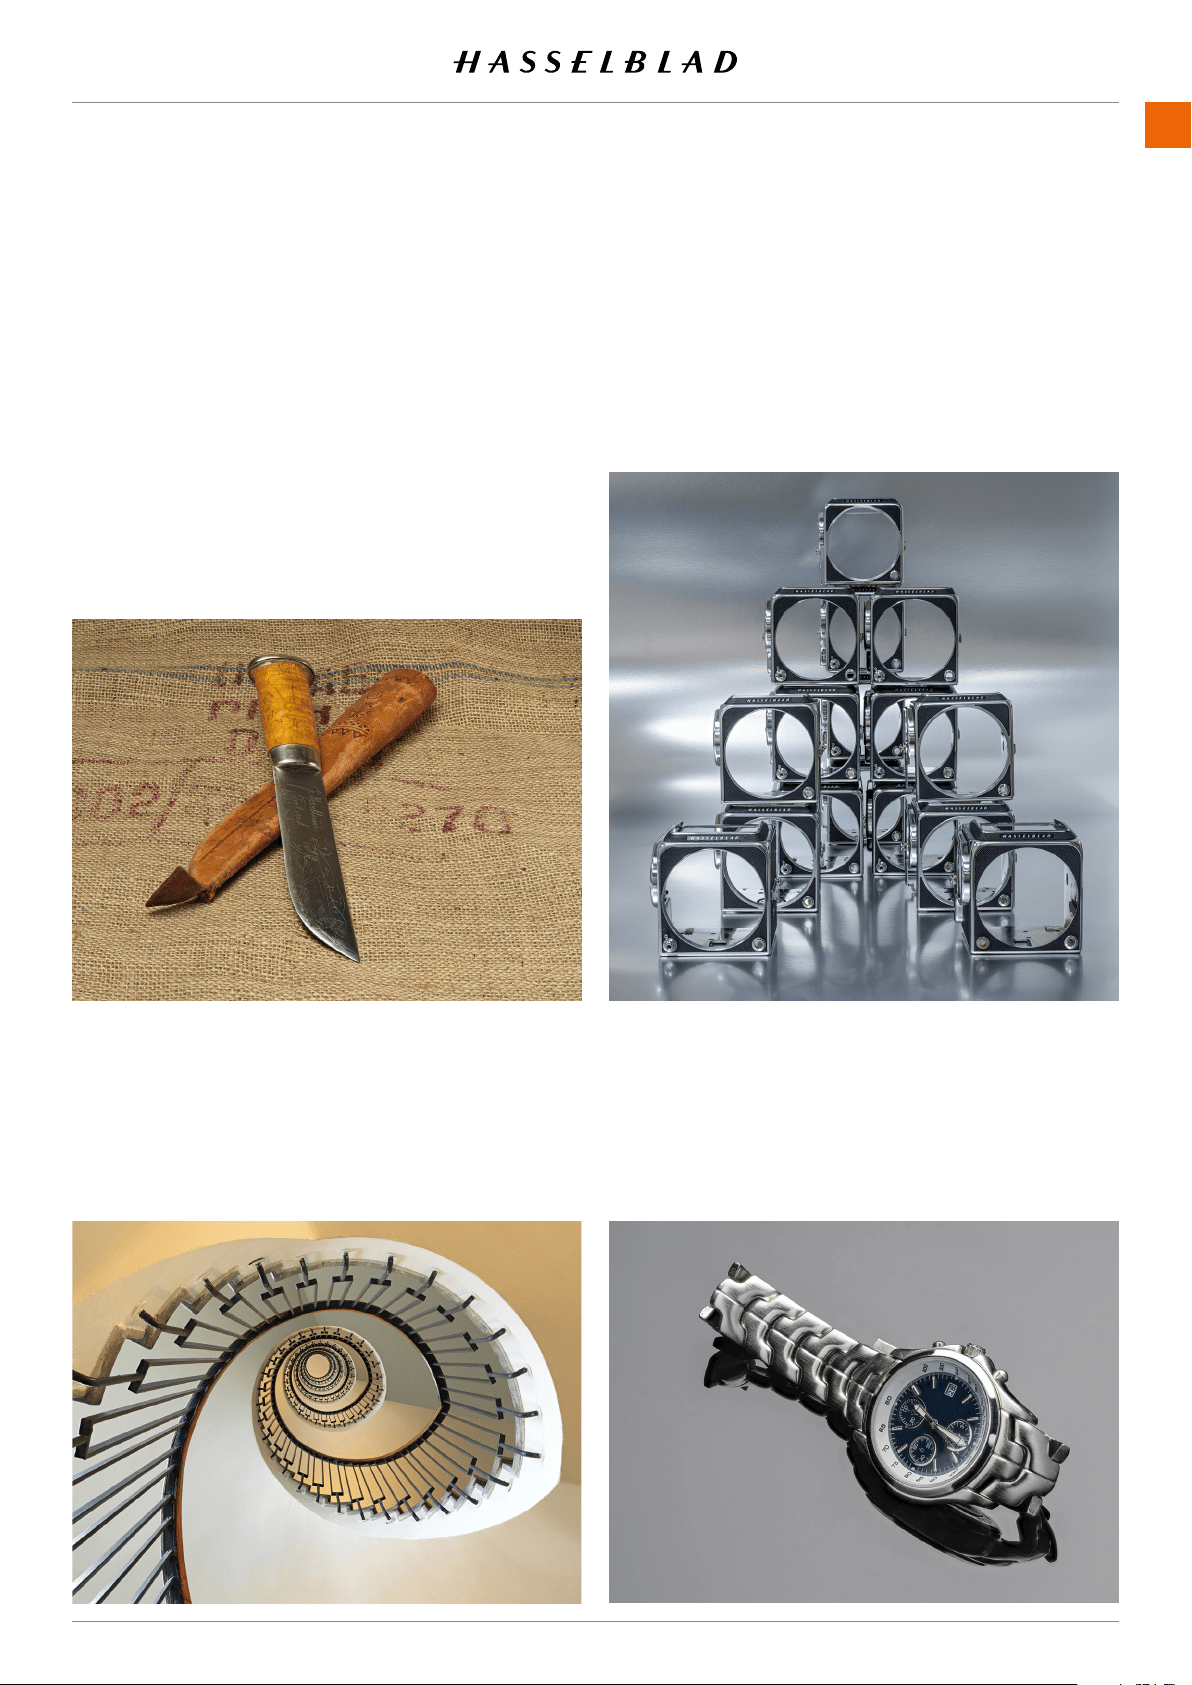
EXAMPLES
This page shows a few examples to give you a starting point
for which settings to use. Best results will always be achieved
from your own experiments.
Use the zoom feature of the PDF reader to study the images
closer.
EXAMPLE 1 – KNIFE
XCD 120 Macro lens.
Subject distance: 80 cm
Aperture: f/8
Number of images: 50
Step Size: Medium
EXAMPLE 2 – SPIRAL STAIRCASE
XCD 35-75 lens @35mm.
Subject distance: 75 cm
Aperture: f/8
Number of images: 15
Step Size: Medium
EXAMPLE 4 – WATCH
XCD 120 Macro lens.
Subject distance: 50 cm
Aperture: f/6.8
Number of images: 80
Step Size: Medium
EXAMPLE 3 – V CAMERA SHELLS
XCD 65 lens.
Subject distance: 120 cm
Aperture: f/8
Number of images: 35
Step Size: Small
USING THE 907X
www.hasselblad.comCONTENTS
68
907X 50C USER GUIDE
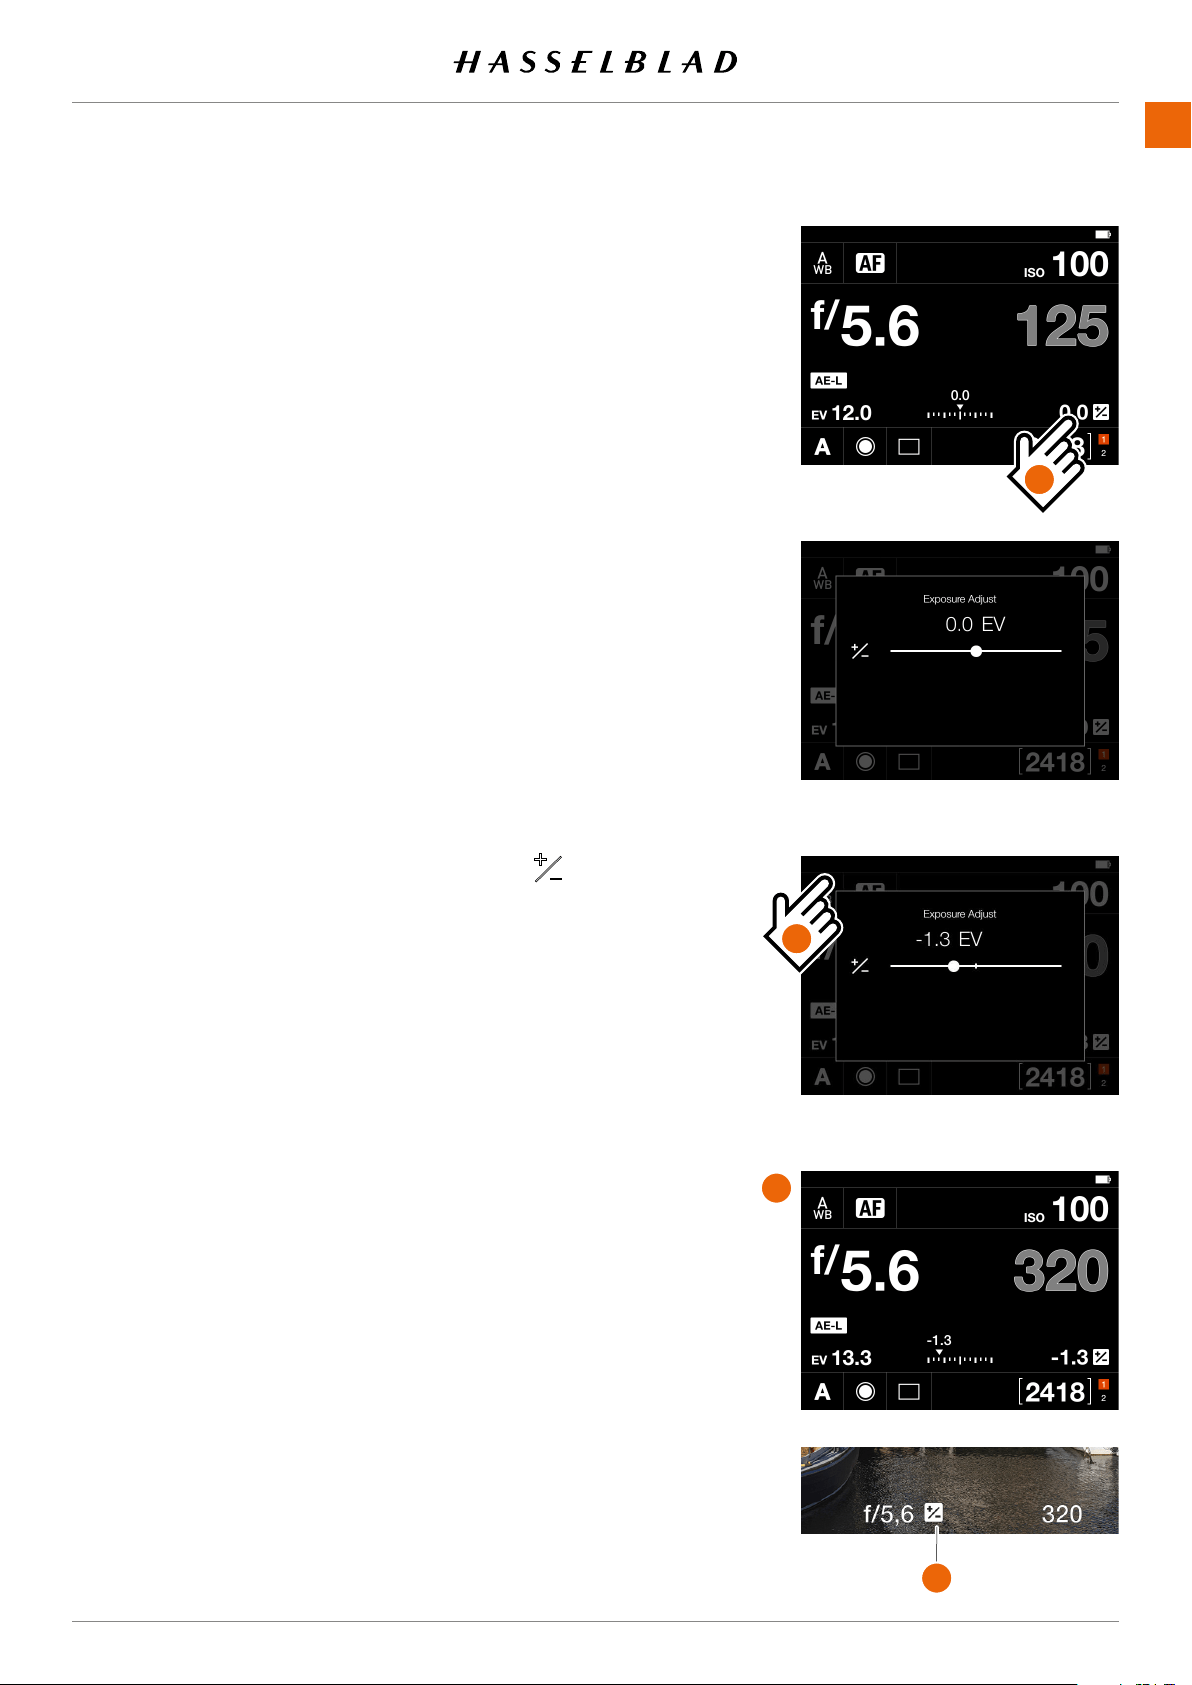
FIXED EXPOSURE COMPENSATION SETTING
Axedexposurecompensationcanbesetbyusingthe
following method.
1 Tap the Exposure adjust setting on the control screen
(A)
.
2 Slide the white dot to the left or right to set the desired
value for exposure compensation.
Tapping the line to the left or right of the dot, will increase
or decrease the value with the value set in
Main Menu >
Camera Settings > Exposure > Increment Step Size >
exposure Adjust
.
Alternatively, you can use the front scroll wheel to set
ashcompensationandtherearscrollwheeltosetxed
compensation.
The setting is saved as soon as it is changed.
3 Tap outside the rectangle
(B)
to return to control screen or
half-press the shutter release to return to live view.
4 The compensation amount is shown on the control screen
(C)
. In live view, a ‘±’ symbol
(D)
is displayed between the
apertureandshutterspeedsettingasconrmationofthe
setting.
Note!
In the adjustment setting screen you can double-tap the
icon to reset the setting to 0.
A
B
C
D
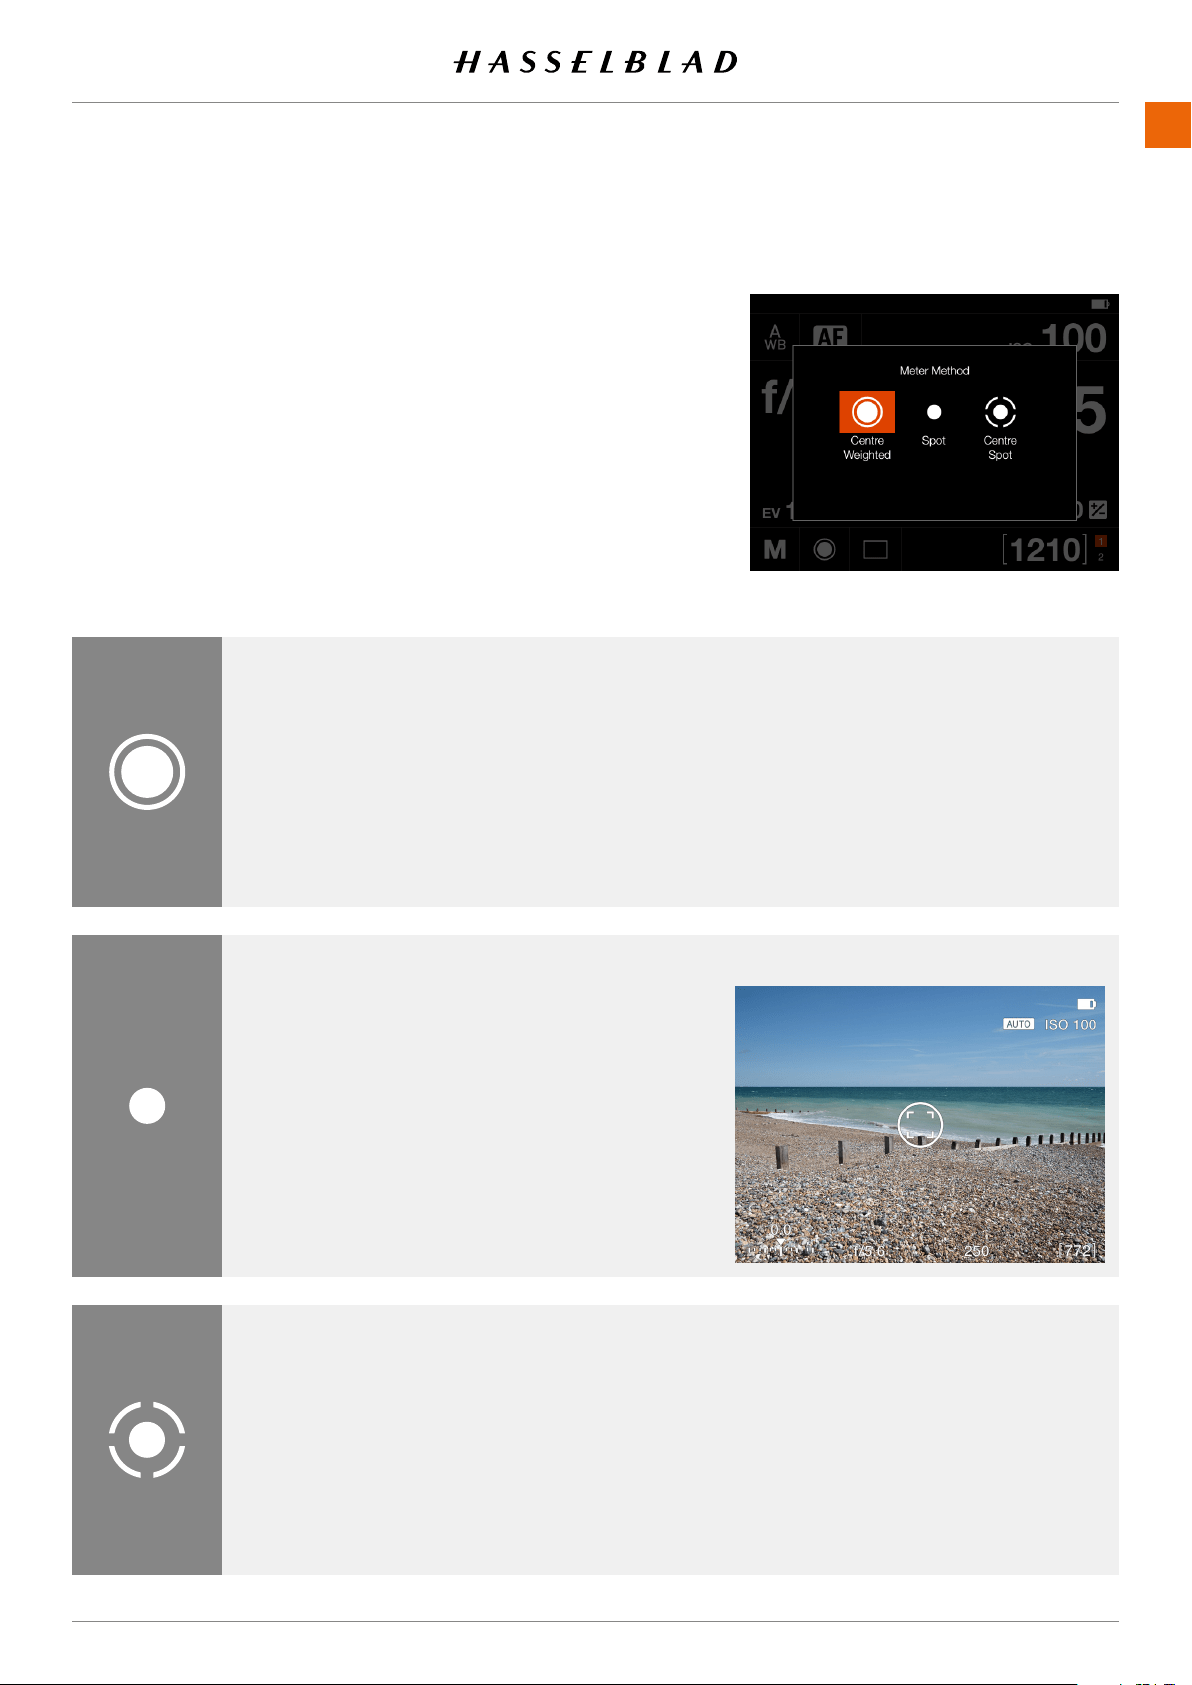
USING THE 907X
www.hasselblad.comCONTENTS
69
907X 50C USER GUIDE
LIGHT METER MODE
The light meter mode can be changed on the control screen.
Tap the desired mode or use the control wheel to select
mode.
Different light metering modes
Therearethreereectivemeteringmodesavailable.
Centre Weighted
.
Spot
.
Centre Spot
.
Centre Weighted
Used for light situations where there is no particular
dominance of light or dark areas across the tonal
range. Takes into account approximately 25% of the
imageseenintheviewnder.
Centre Spot
Emphasizes the central section of the focusing
screen equivalent to approximately 25% of the
image. This provides a balanced assessment and
is a typical choice where the main subject is in the
centre of the image.
Spot
The sensitive area is equivalent to approximately
2.5% of the image area (the central spot on the
viewnderscreen).Anypartsoftheimageoutside
of this area will not affect the exposure reading.
This provides a very accurate measurement of
specictones.Alsoexcellentfortonalcomparison
measurements.
Spot area is marked in live view screen.
The Spot area will follow any movement of the AF
area.
Light Metering ModesSymbol
Metering Modes
Live View with Spot area
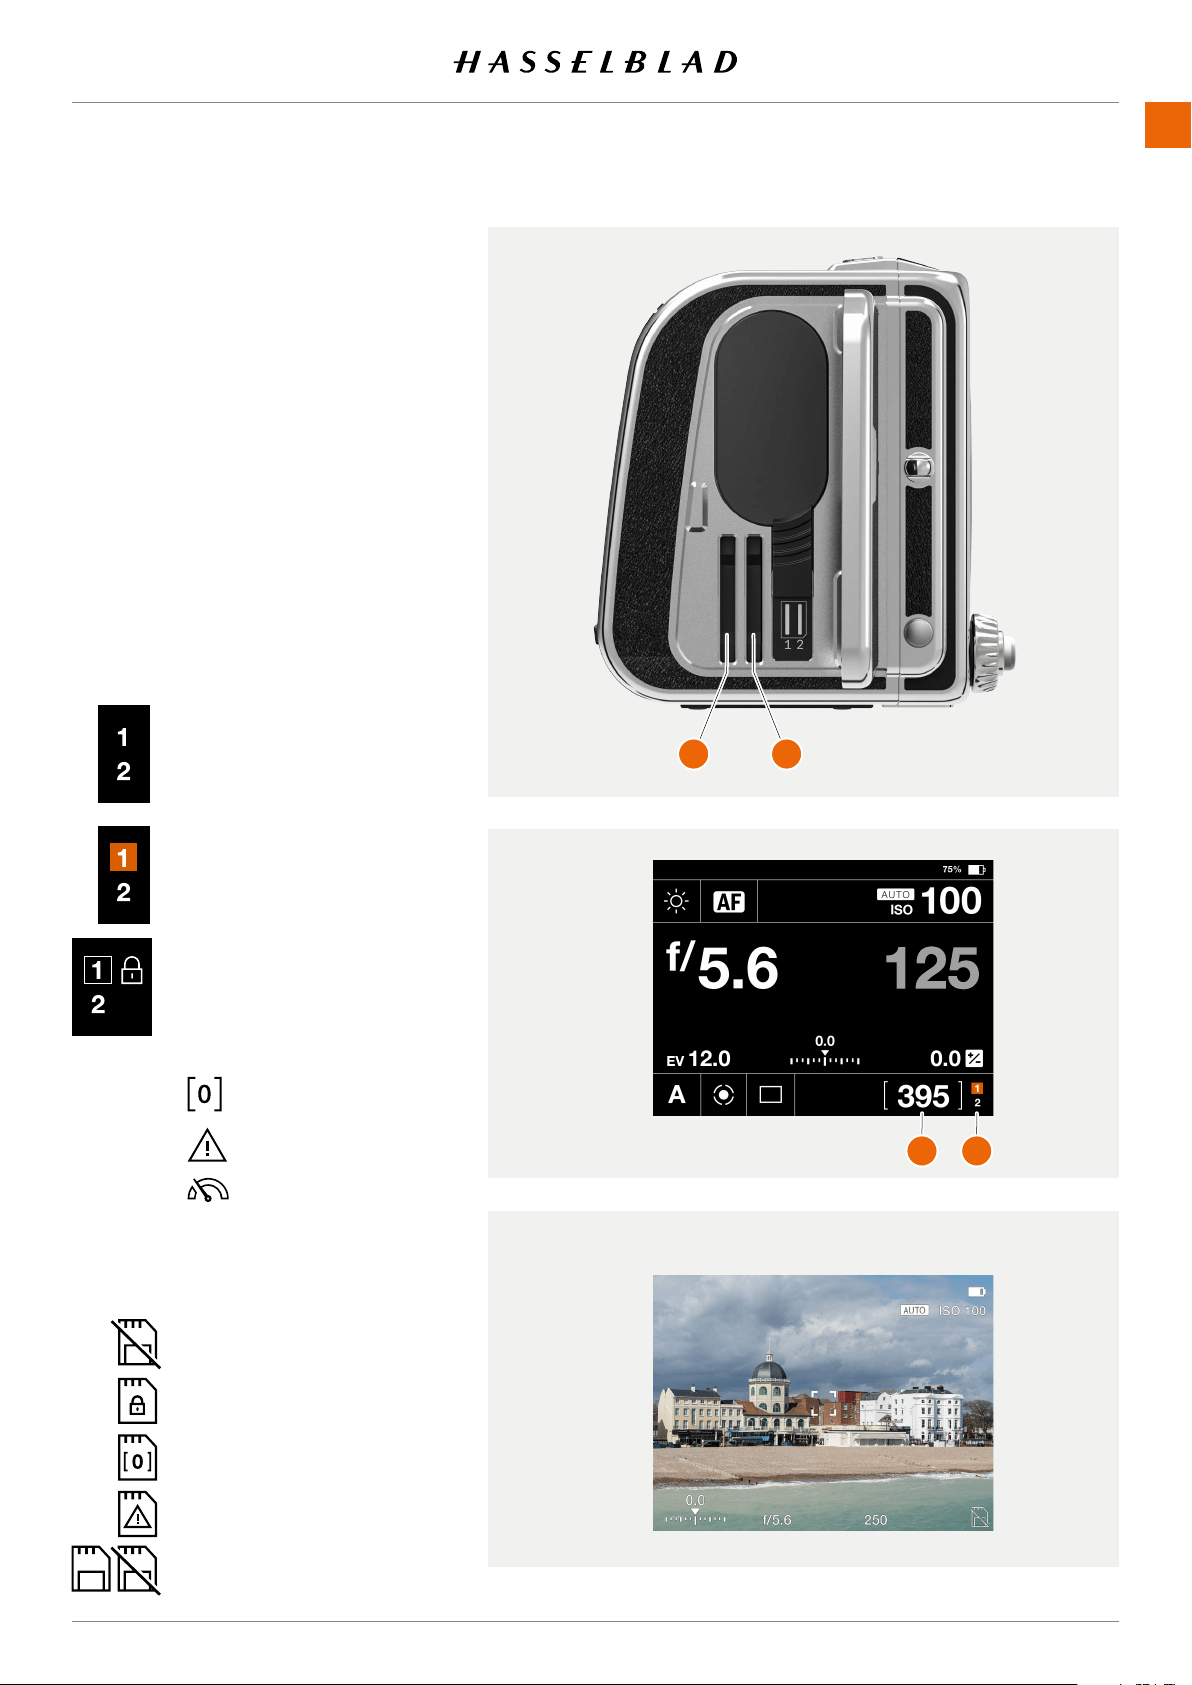
USING THE 907X
www.hasselblad.comCONTENTS
70
907X 50C USER GUIDE
6.3 MEMORY CARDS
The camera uses SD cards only. See next page
for a list of recommended cards.
There are two SD card slots on the camera,
slot no 1
(1)
and slot no 2
(2)
.
Note!
All cards must be formatted in the camera
beforerstuse.
SD Memory card status display
The symbols in the status group
(4)
on the
control screen:
Live View when no card is inserted
No card is inserted.
Card #1 is inserted and is
ready for captures.
The card is full.
Card error.
Card read/write speed
is slow.
Card #1 is inserted and
is locked for captures as
indicated by the secondary
lock icon.
Additional secondary icons:
The card is full.
The card is locked.
No card.
Card error.
Backup mode selected, but
no second card is inserted.
Status group
(3)
normally displays the
remaining captures, but can also show:
1
2
3
4
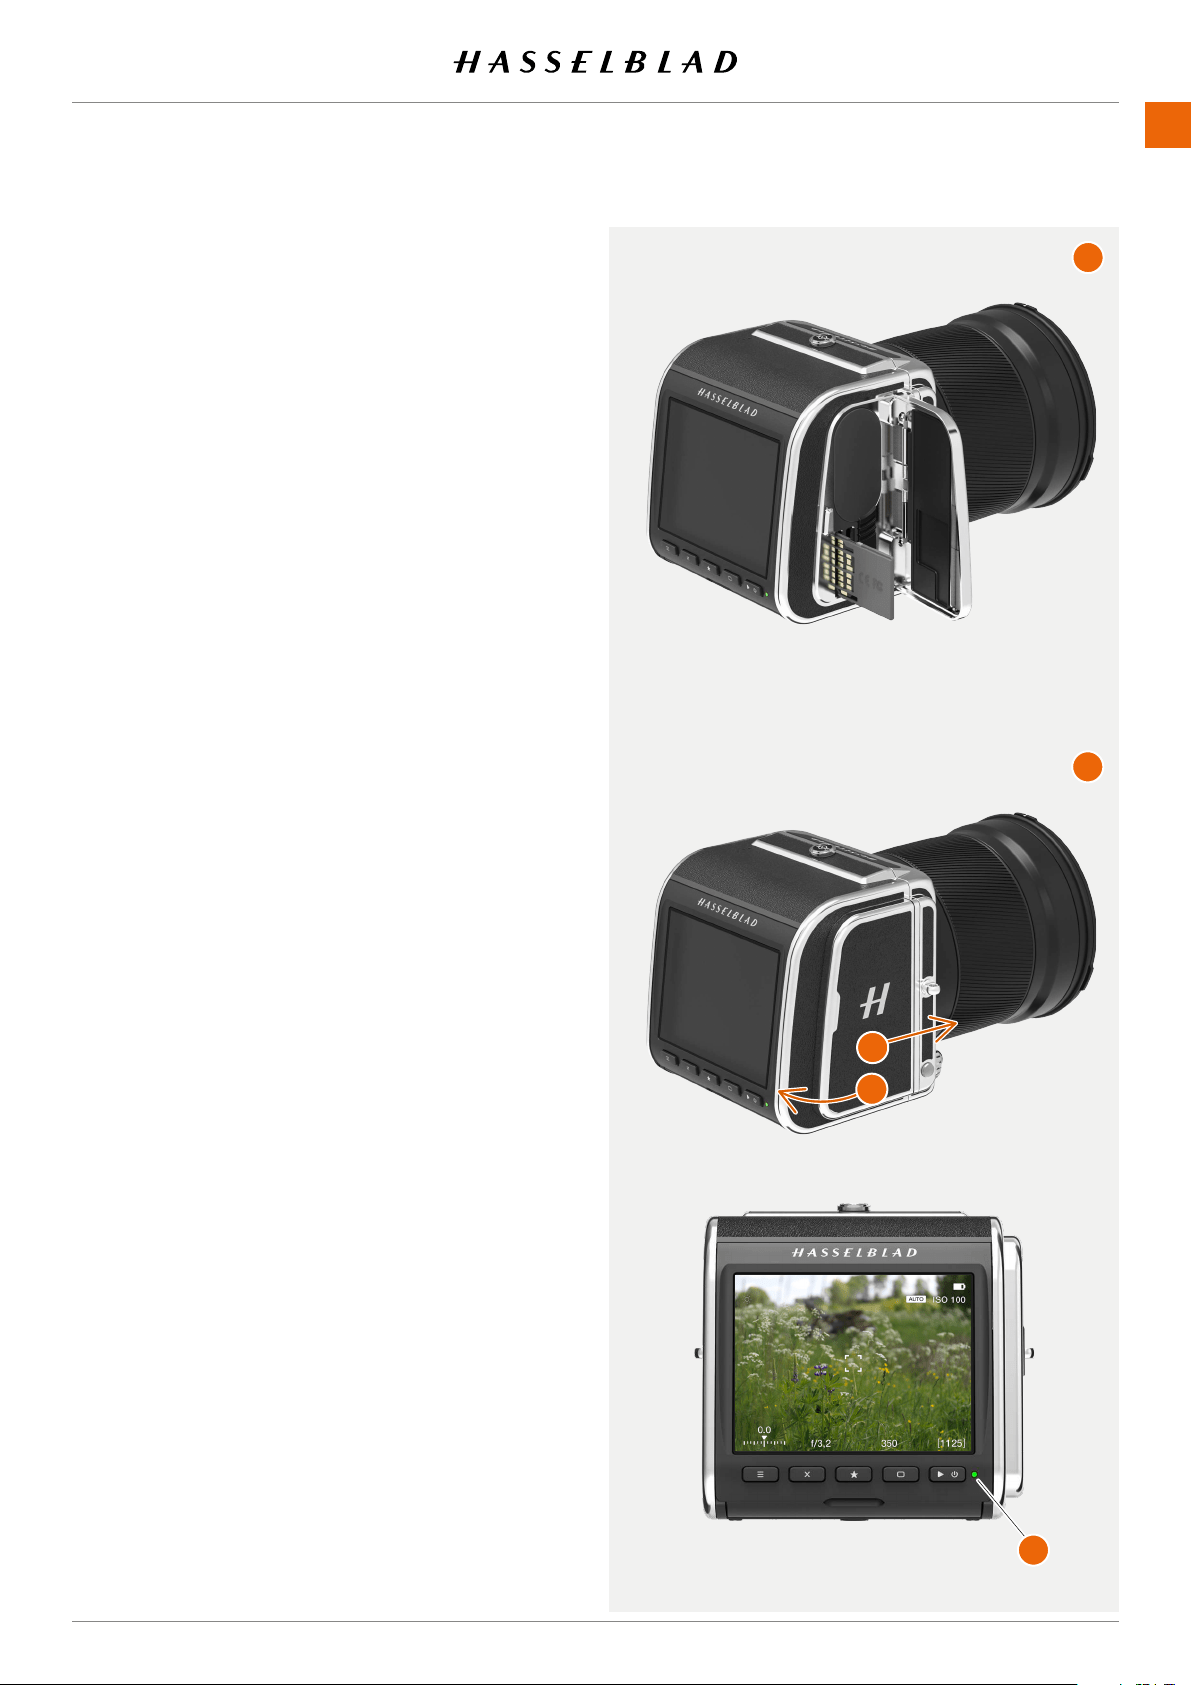
USING THE 907X
www.hasselblad.comCONTENTS
71
907X 50C USER GUIDE
INSERT THE SD MEMORY CARD
Insert SD card
1 Open the battery and SD card lid by sliding it towards the
back of the camera and then rotate it outwards.
2 When the lid is opened, mount the SD card in the SD card
slot no 1 or no 2
(A)
.
3 Close the lid by rotating it inwards and pushing it in place
towards the front of the camera
(B)
to lock it into position.
REMOVE THE SD MEMORY CARD
Note!
Do not remove a memory card from the camera if the Status
LED
(C)
isblinkingasthiscancorruptthelesonthecardand
result in data loss.
Remove SD card
1 Open the Battery and SD card lid
.
2 Press the SD card a little way in and then release it. The SD
card will then move out from the SD card slot.
3 Grab the card and pull it away from the camera.
4 Close the lid by rotating it counter clockwise and pushing
it in place towards the front of the camera to lock it into
position.
RECOMMENDED MEMORY CARDS
For optimal performance, use the following SD memory card
type:
● UHS-II, 260MB/s or faster.
Note!
Avoid using Micro SD/TF memory cards with SD card sets.
Some Sony high-speed G UHS-II SD 300MB/s memory cards
might have poor compatibility, and therefore, might not be
able to write image data properly.
1
2
A
B
C
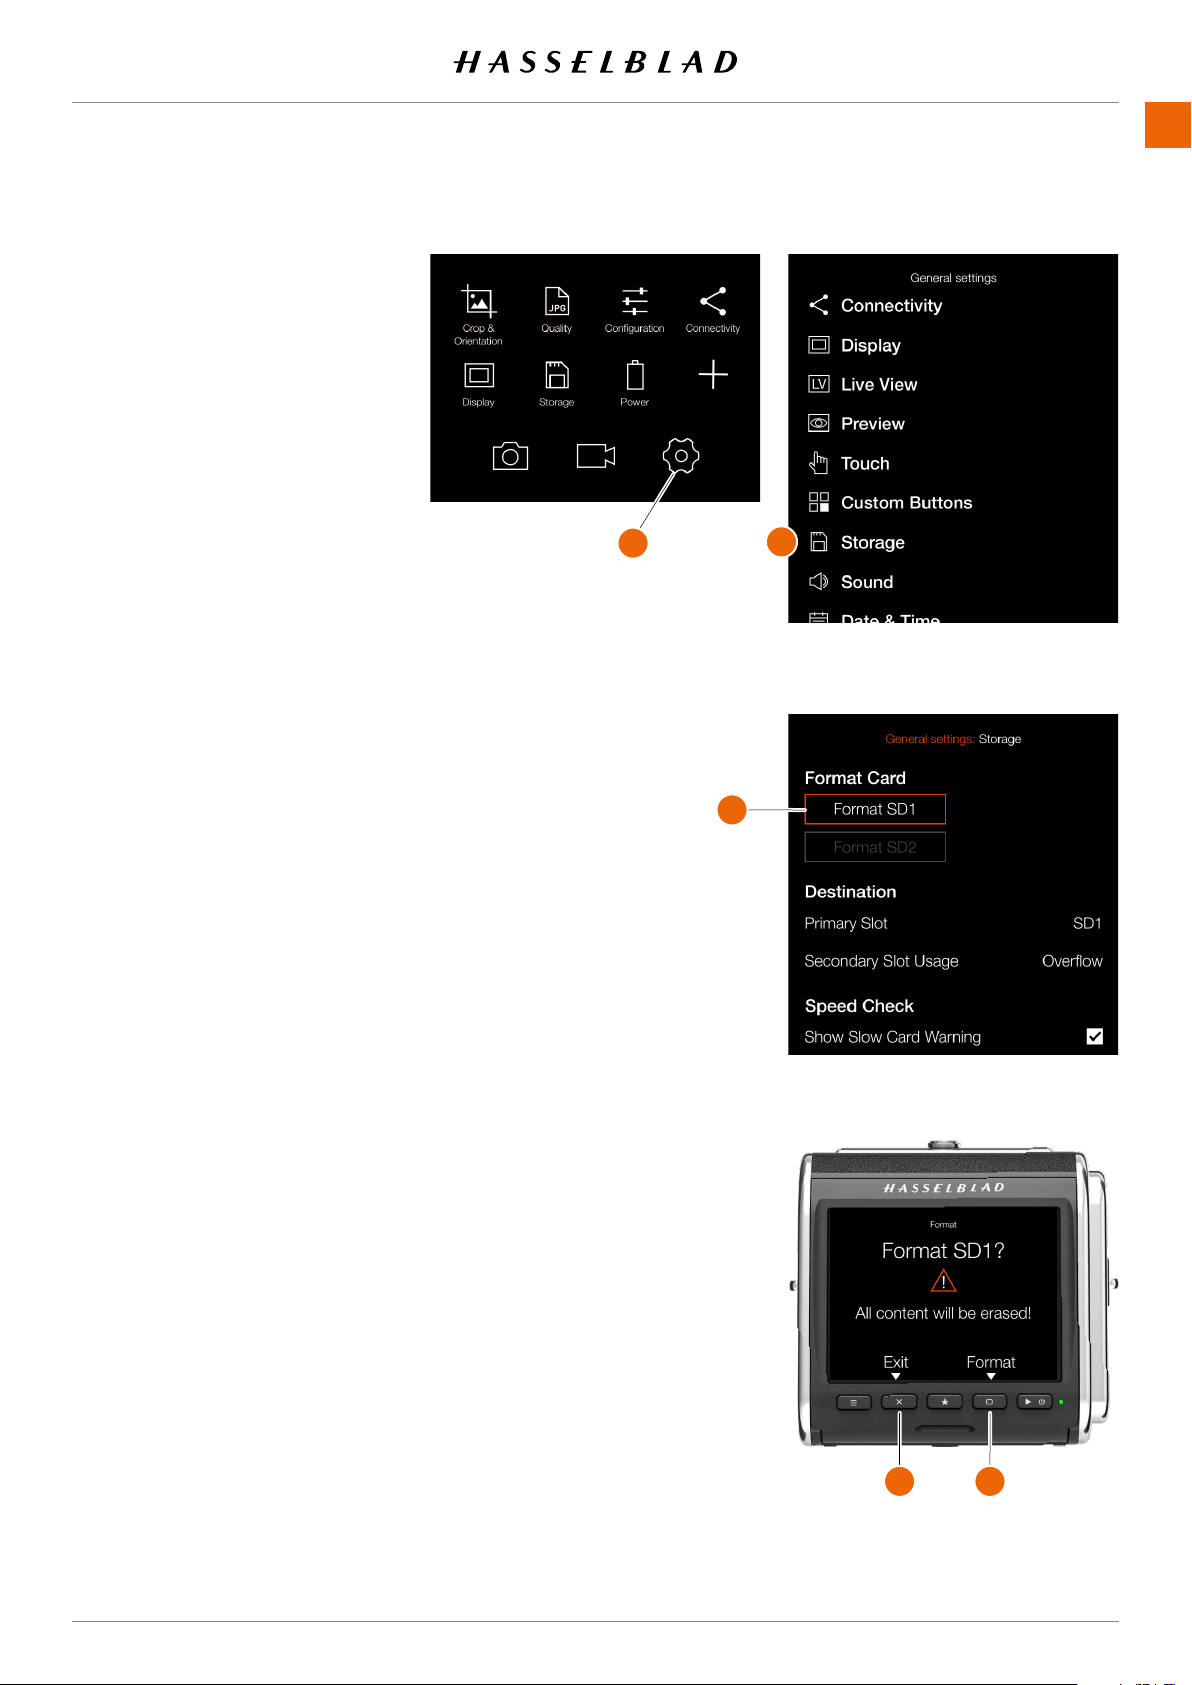
USING THE 907X
www.hasselblad.comCONTENTS
72
General Settings MenuMain Menu
Storage Settings Menu
Format Card dialogue for SD1
907X 50C USER GUIDE
FORMAT SD CARDS
Note!
All SD memory cards should be format-
ted in the camera before using them for
thersttime.
Main Menu > General Settings >
Storage > Format
1 Press MENU.
2 Select the General Settings menu
(A)
.
3 Navigate to Storage
(B)
.
4 Select “Format SD 1”
(C)
or
“Format SD 2”.
5 The Format Card dialogue appears.
6 Toconrm,selectFormatby
pressing the rectangle Button
(D)
.
To exit without formatting, press the
cross button
(E)
.
Note!
The storage shortcut is placed on the
default main menu for easy access to
card formatting. If the storage shortcut
has been removed, see page 48
for more information on how to add
shortcuts.
A
B
C
D E
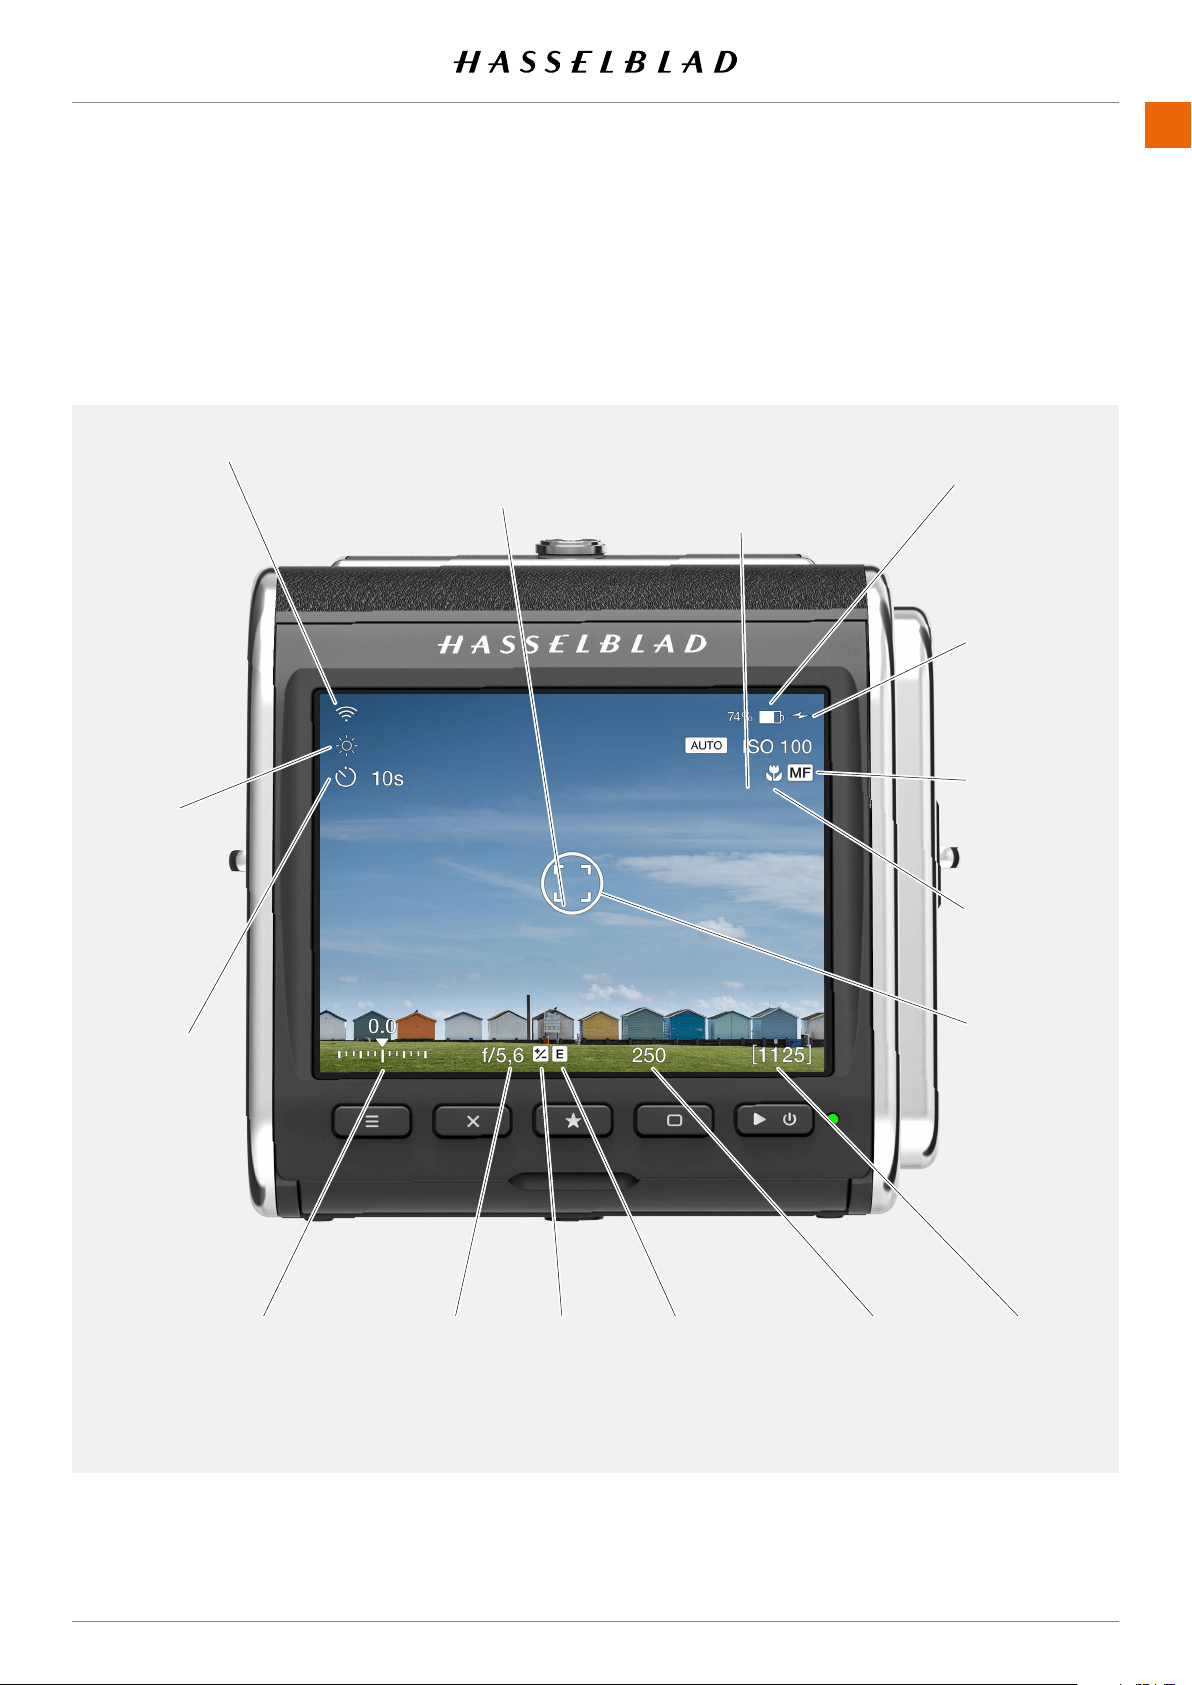
USING THE 907X
www.hasselblad.comCONTENTS
73
907X 50C USER GUIDE
Aperture
(f/5.6)
Power from USB
Shutter speed
(1/250 sec)
Electronic
shutter active
Exposure
adjustment
Exposure compensation
Setting (+0.0 EV)
Remaining
images counter
(1125 left)
Focus mode
(Manual)
AF Scan
range icon
(Near)
Spot metering
area
6.4 LIVE VIEW INDICATIONS
The touch display can show live view including a number
of different indications. This page lists the possible display
information.
Self Timer.
Interval and
Exposure
Bracketing
and Focus
Bracketing
status is also
shown here.
White
balance
setting. Not
shown in
Auto white
balance
mode.
ISO setting
(Auto ISO 100)
Tap to change
value.
Wi-Fi Focus area Indicator
Tap to change
position.
Battery status
(Optional % value)
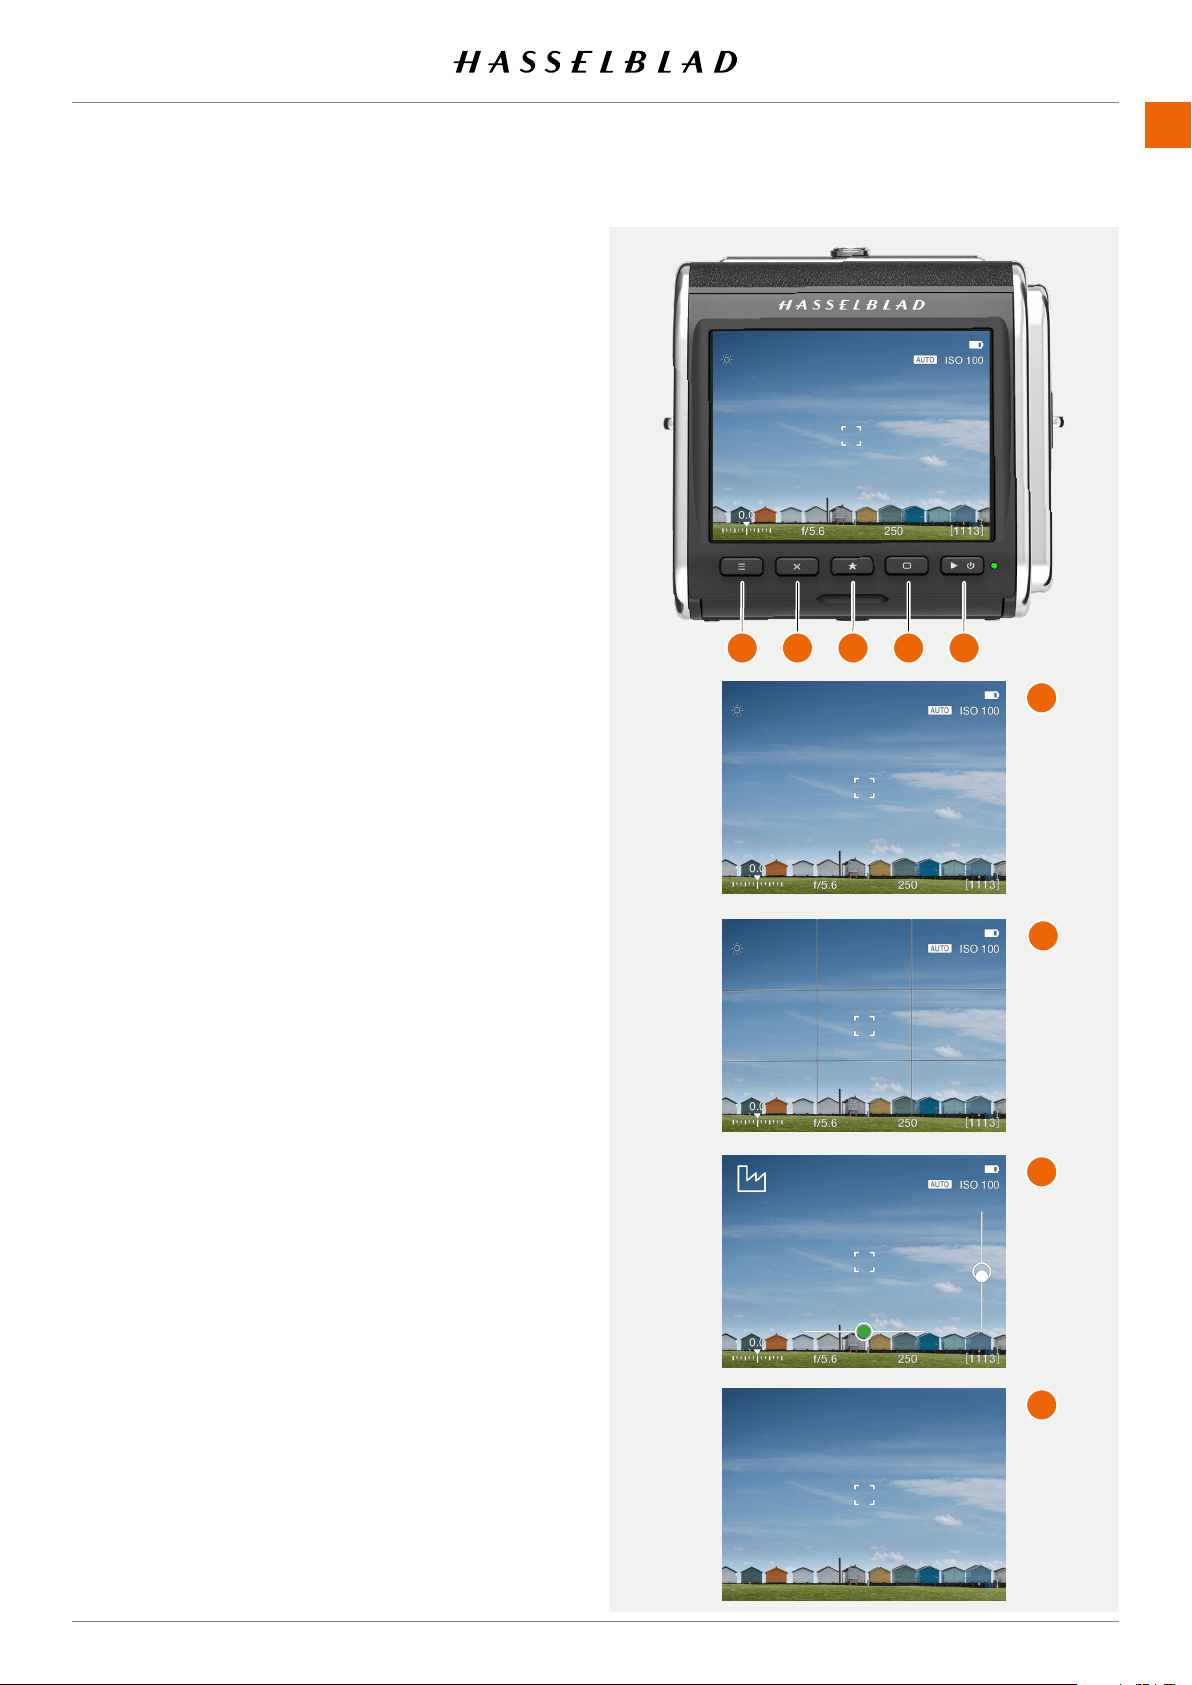
USING THE 907X
www.hasselblad.comCONTENTS
74
907X 50C USER GUIDE
LIVE VIEW OVERLAYS
1 The camera displays live view when you half-press Shutter
release button.
2 Press the rectangle button
(D)
to step to the next overlay.
3 Press button
A
, or
E
, to Exit Live View.
Available Overlays
- Exposure information
(F)
.
- Exposure information + Grid
(G)
.
- Exposure information + Spirit Level
(H)
.
See page 140 for details on spirit level.
- None
(I)
.
ZOOMING IN LIVE VIEW
1 Double tap the touch display, or press the star button
(C)
toZoominto50%or100%tothatspecicarea.Magnica-
tion factor is set in the
Camera Settings > Focus
menu.
2 Double tap or press on the star button again to Zoom out
to display the entire image.
3 You can pan the image when zoomed in by swiping.
Note!
Live view demands higher power consumption than normal
operation. Working with live view will shorten the usage time
of the battery.
A
B
C
D E
F
G
H
I
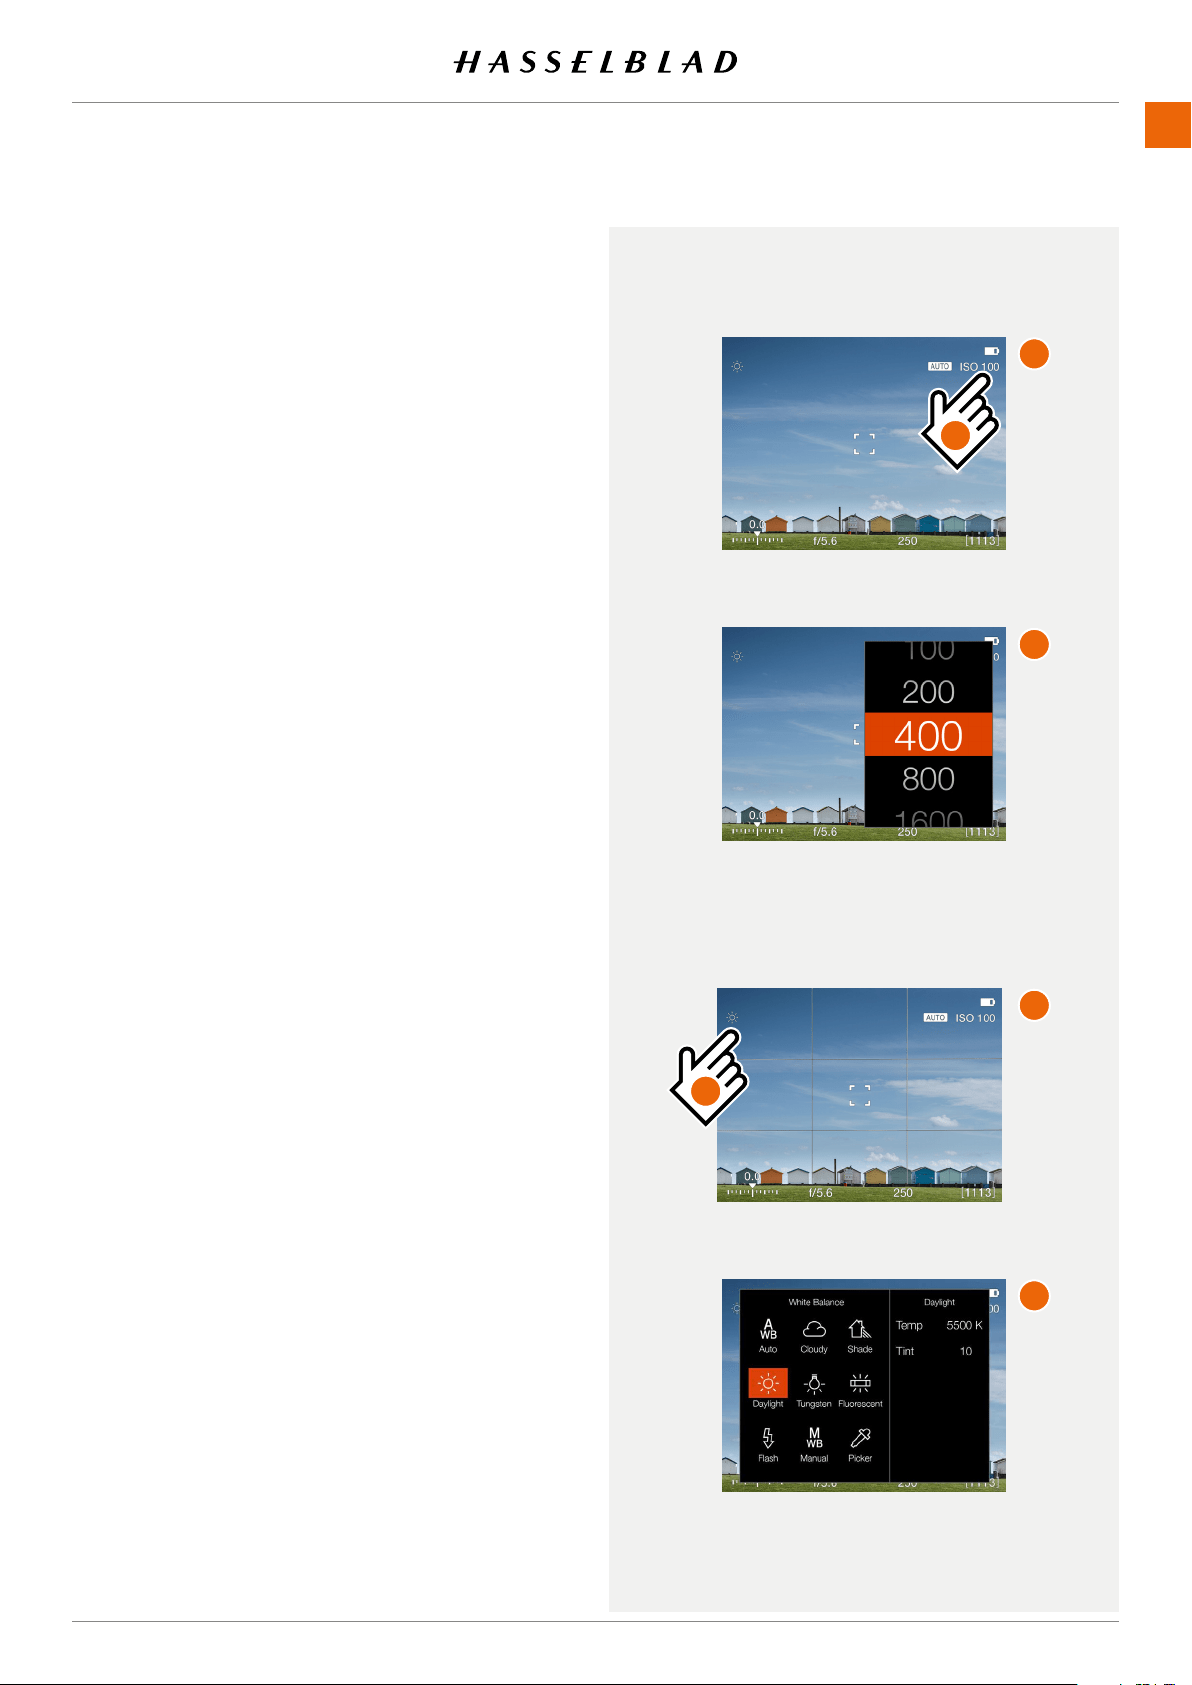
USING THE 907X
www.hasselblad.comCONTENTS
75
907X 50C USER GUIDE
LIVE VIEW SETTINGS
From the live view screens
(A)
and
(C)
where ISO and white
balance is shown, it is possible to directly set new values.
ISO
From the live view screen, tap the ISO
(1)
value to change.
Select a new value from the list
(B)
.
White Balance
From the live view screen, tap the white balance icon
(2)
to
change. See details on page 52.
Even if auto white balance (AWB) is set and no icon is shown,
you can still tap in the upper left corner to bring up the white
balance setting screen
(D)
.
A
B
C
D
1
2
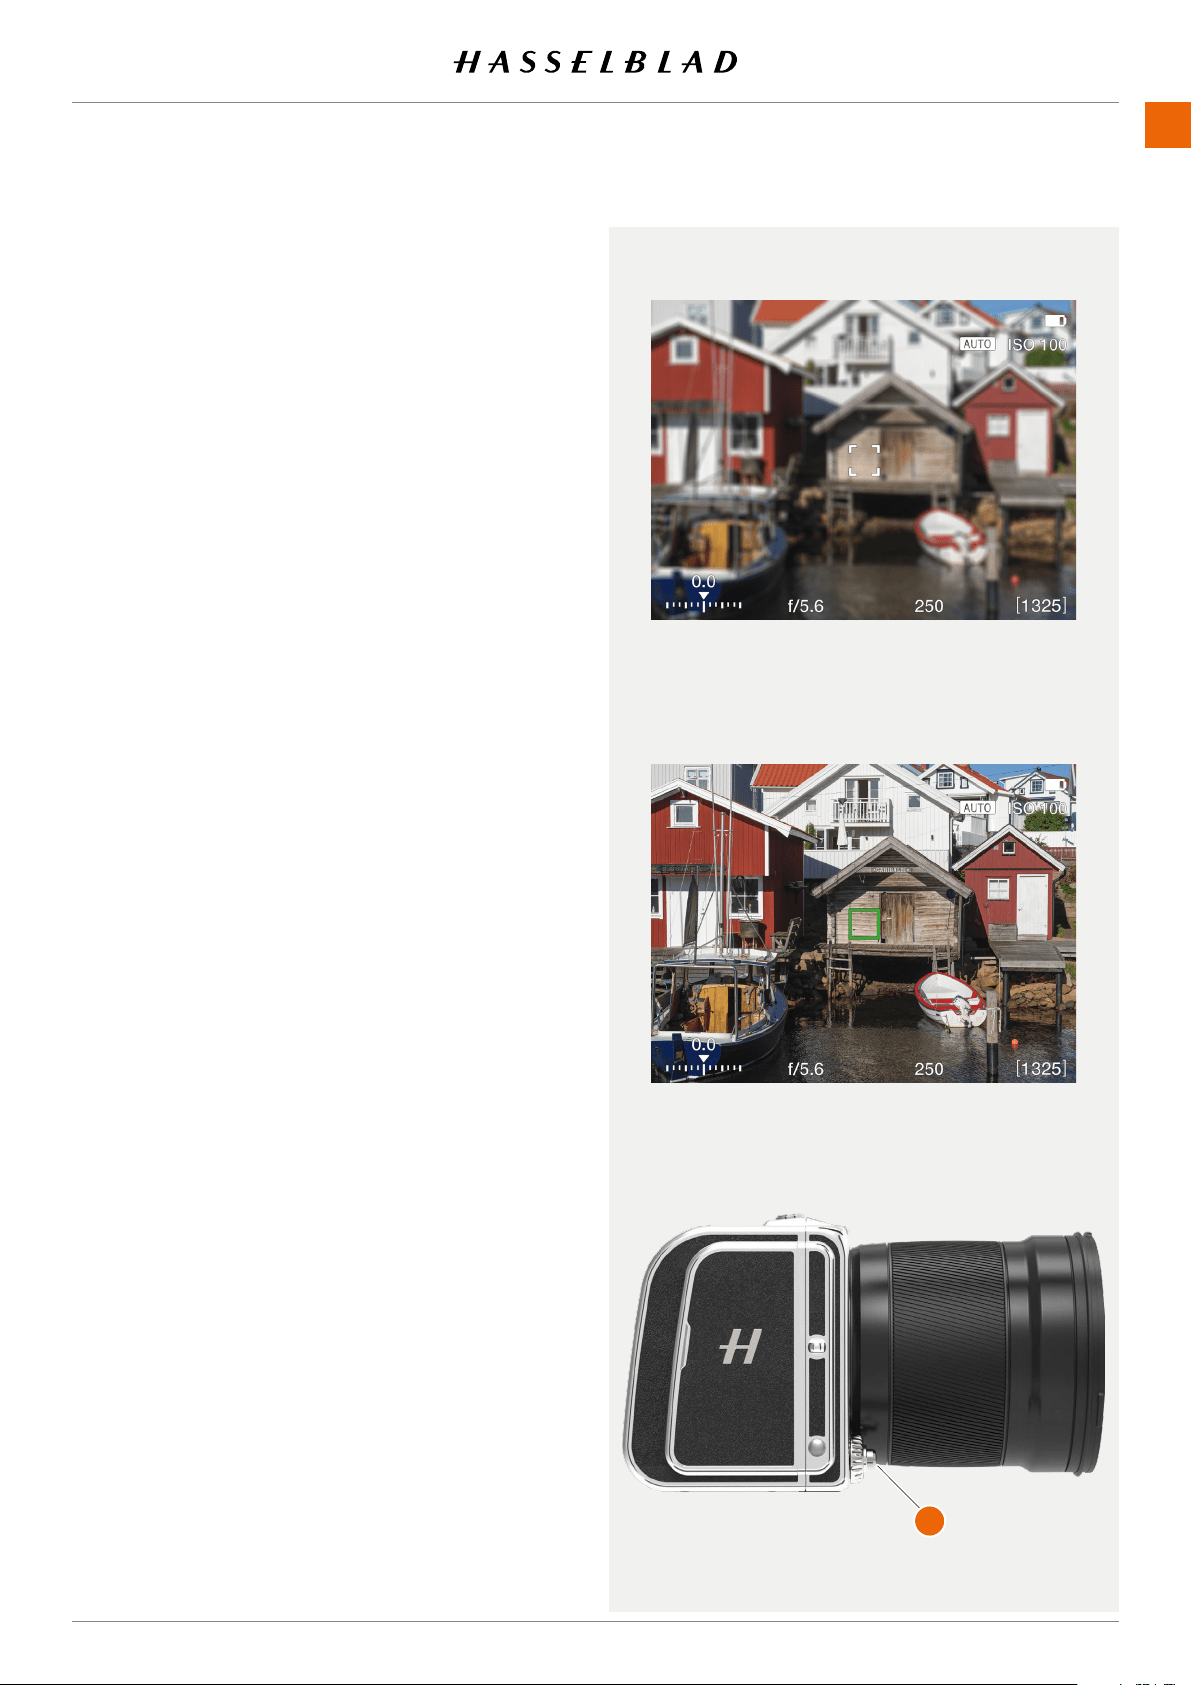
USING THE 907X
www.hasselblad.comCONTENTS
76
907X 50C USER GUIDE
6.5 FOCUSING
AUTOFOCUS
Autofocus is activated by pressing the shutter release to the
half-press position. Focus is determined by maximizing the
contrast within the central marked area.
In AF mode, the shutter release will be blocked until the
camerandstheoptimumfocussetting.Thisensuresthatno
capturesaremadethatarenotnelyfocused.
The lens will focus at one distance and will remain focused at
that distance while pressure remains on the shutter release
button
(A)
.
In this way, you can focus on a object, temporarily positioned
within the focusing zone on the viewing screen and then
without releasing pressure on the shutter release button,
recompose knowing that the focus remains on the object
chosen even though it is now outside the focusing zone.
Releasing the pressure on the shutter release button and
pressing again (half-press) would now change the focus
setting to the distance of the object within the focusing zone.
Depending on situation, the indicated AF area looks different.
See page 77.
Note!
For objects close to the camera and/or with wide-angle lenses
it is better to move the AF point as described on page 80.
Note!
You can select position of the AF point. See page 80.
It is also possible to choose from three different sizes. See
page 120.
Note!
HSystemlenseswhosermwareversionisolderthan18.0.0
have hardware that cannot be updated with AF functionality.
The camera will default to manual focus mode for these
lenses.
Using H System lenses on the 907X camera requires the
optional XH Lens adapter.
Green AF indicator. AF is set correctly.
White AF indicator. AF is idle.
A
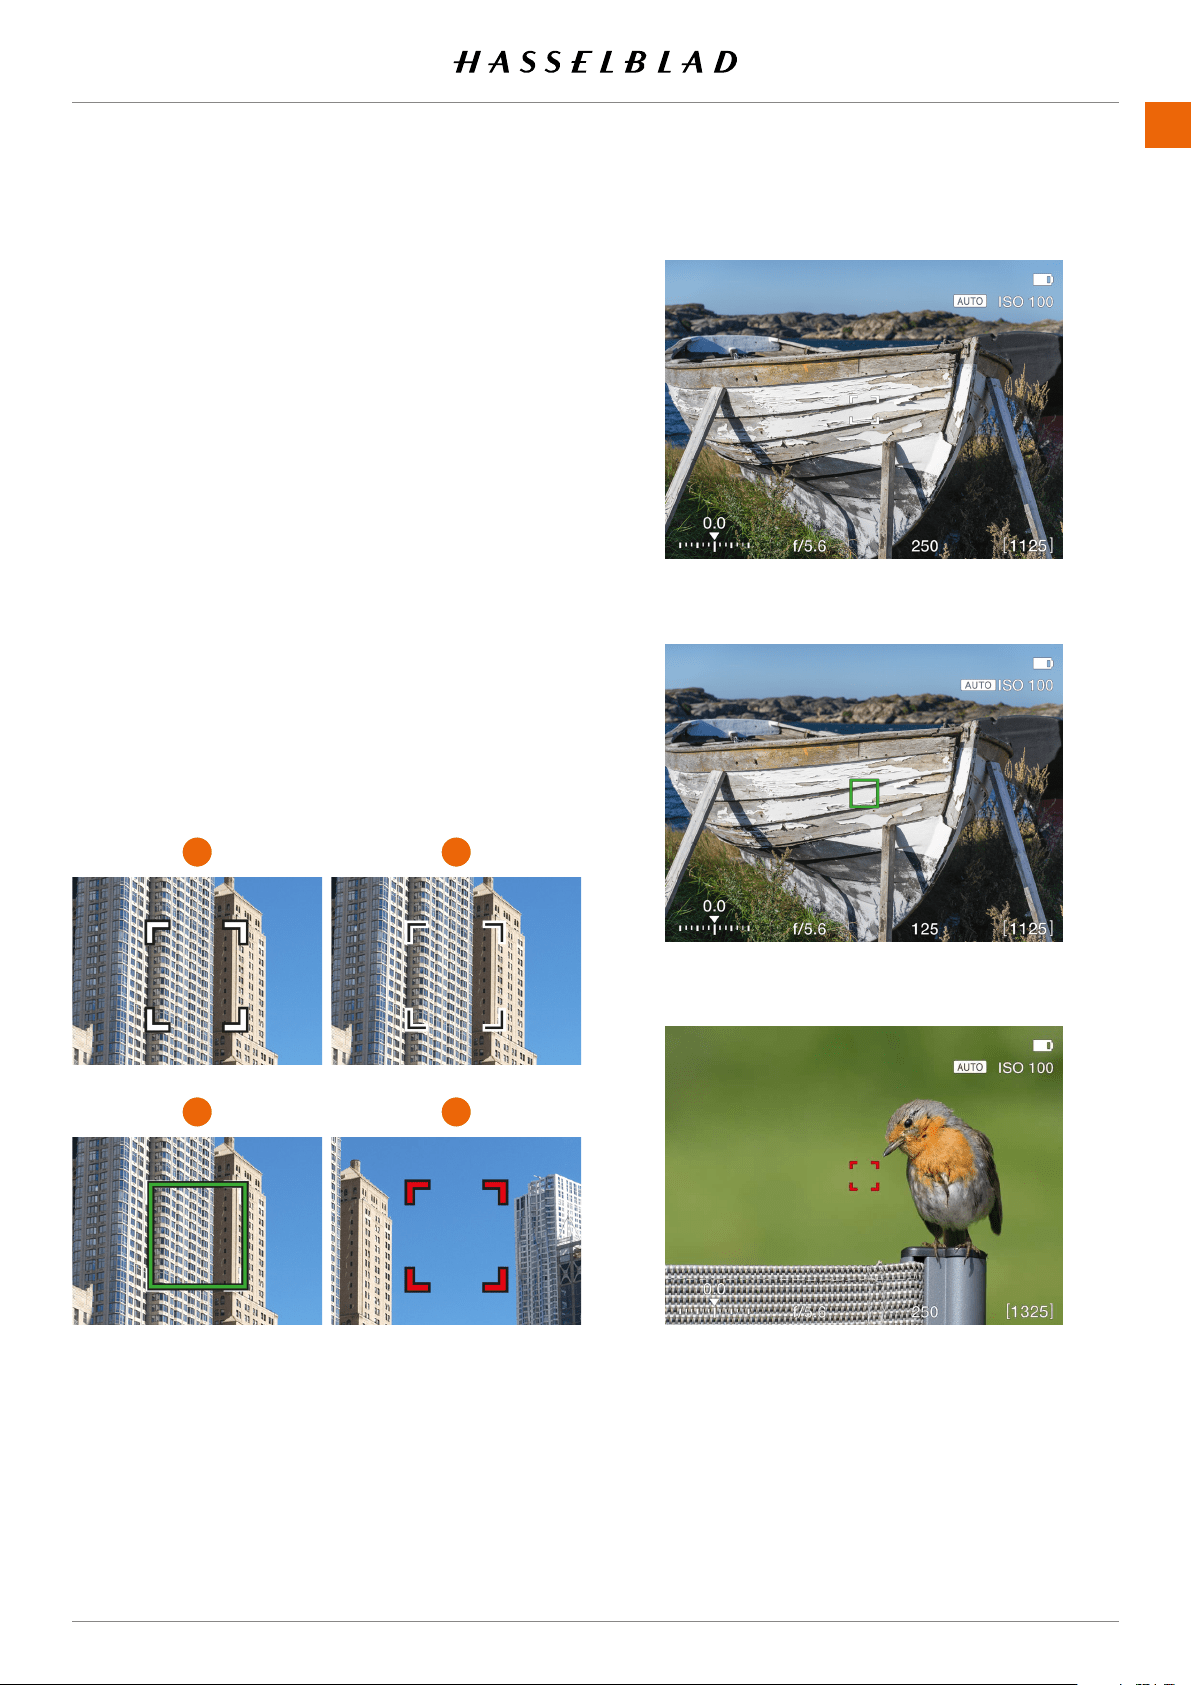
USING THE 907X
www.hasselblad.comCONTENTS
77
907X 50C USER GUIDE
White AF indicator. Normal mode.
Green AF indicator. AF correctly set.
Red AF indicator. AF analysis failed to focus.
The AF indicator in the live view centre indicates status of the
AF system. Start the autofocus function by a soft half-press on
the shutter release Button.
White, black outline
(1)
Normal mode. Autofocus is not analysing the subject.
Black, white outline
(2)
Autofocus is ongoing.
Green
(3)
Autofocus performed and focus is correctly set.
Red
(4)
Autofocus failed to focus and is not correctly set.
AF INDICATIONS
1 2
3 4
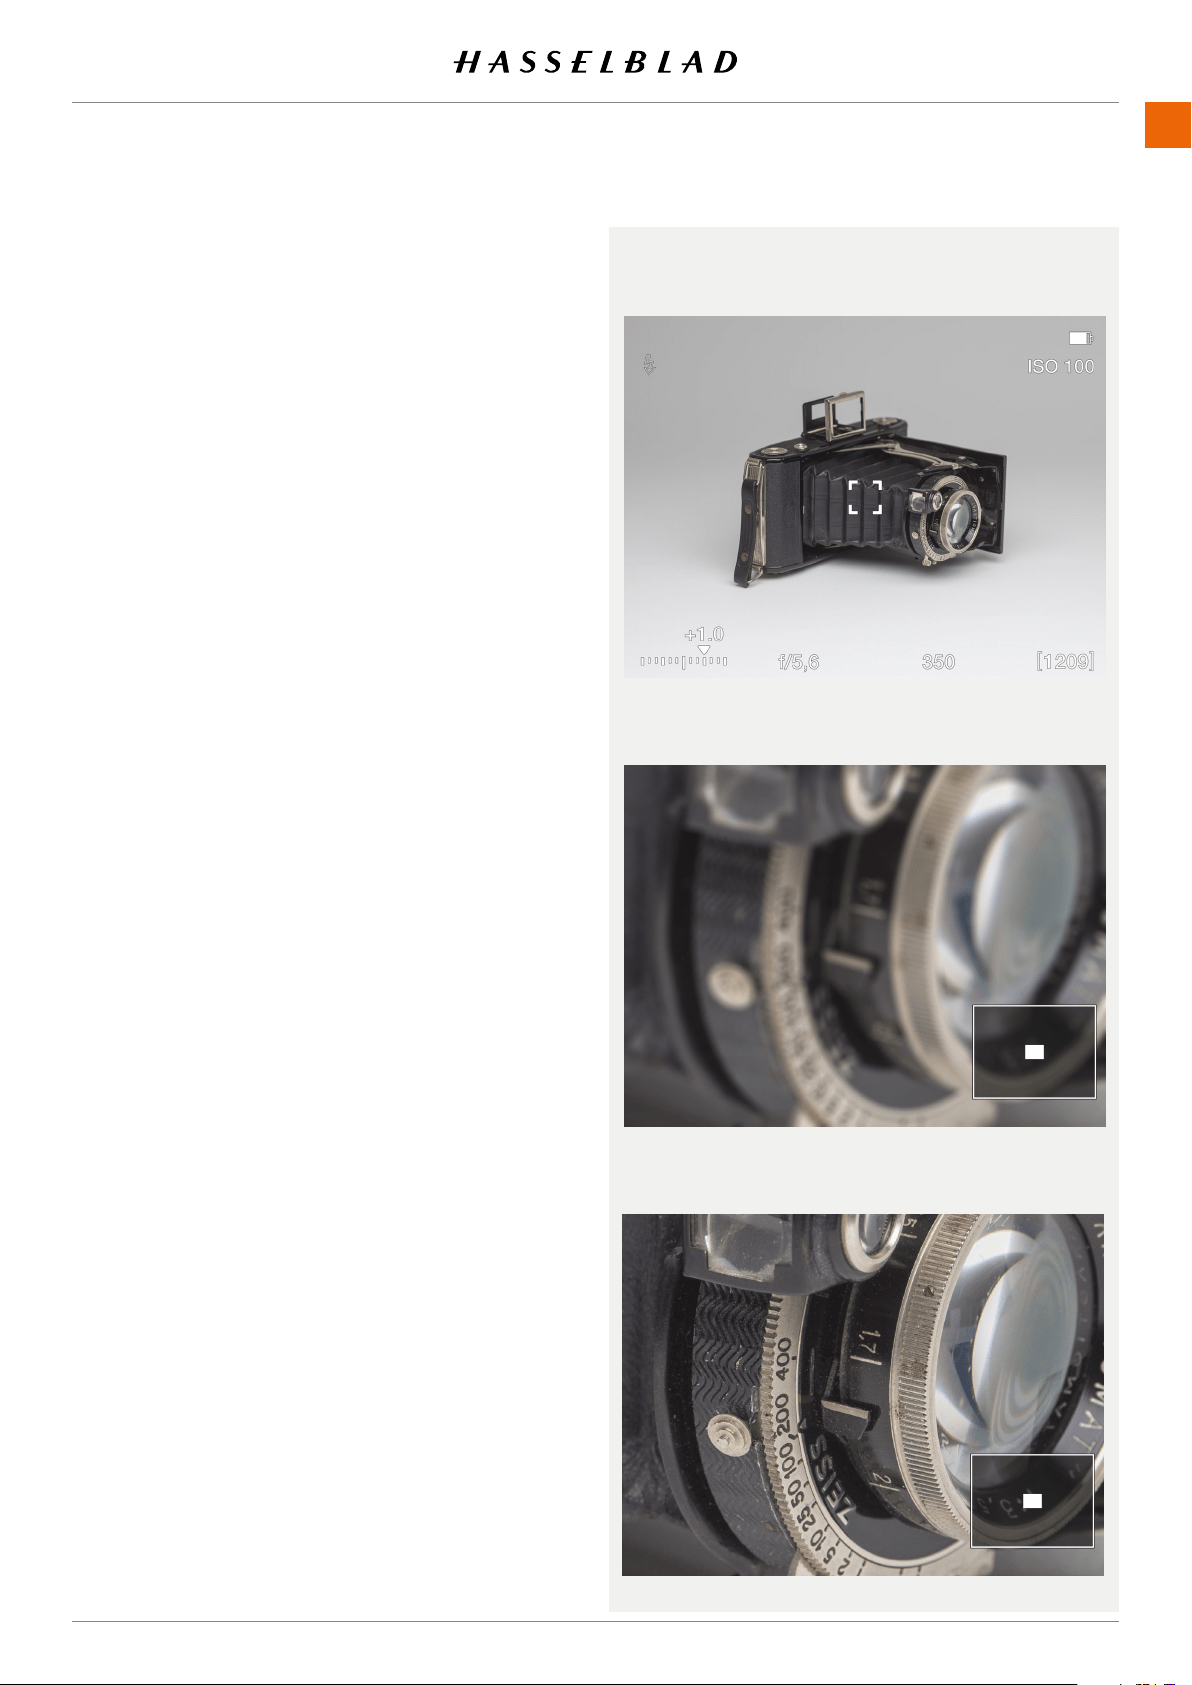
USING THE 907X
www.hasselblad.comCONTENTS
78
907X 50C USER GUIDE
Manual focus setting
Manual focus can be used at any time even in auto focus
mode by rotating the focusing ring on the lens. You can also
switch to manual focus mode (MF) and only use the focusing
ring manually.
Manual focus in live view
1 Double tap the touch display to zoom in to selected Focus
area, or press the star button to zoom in to the image
centre.
2 Adjust focus manually on the Lens.
Note that you have two focus assist options to help you set
focus accurately.
- Auto zoom to 50% or 100%. See page 75.
- Focus peaking (see next page)
In Auto zoom live view will automatically zoom to 50% or
100% when the focus ring is turned. After a few seconds of
inactivity, Live view returns to full image.
3 Double tap or press on the star button again to zoom out
to display the entire capture.
Using these modes will ensure accurate and precise focusing.
Auto zoom is the most accurate and focus peaking is the
fastest to use.
MANUAL FOCUS
Live View
Auto Zoom to 50%. Subject not in focus.
Auto zoom to 50%. Focus set correctly.
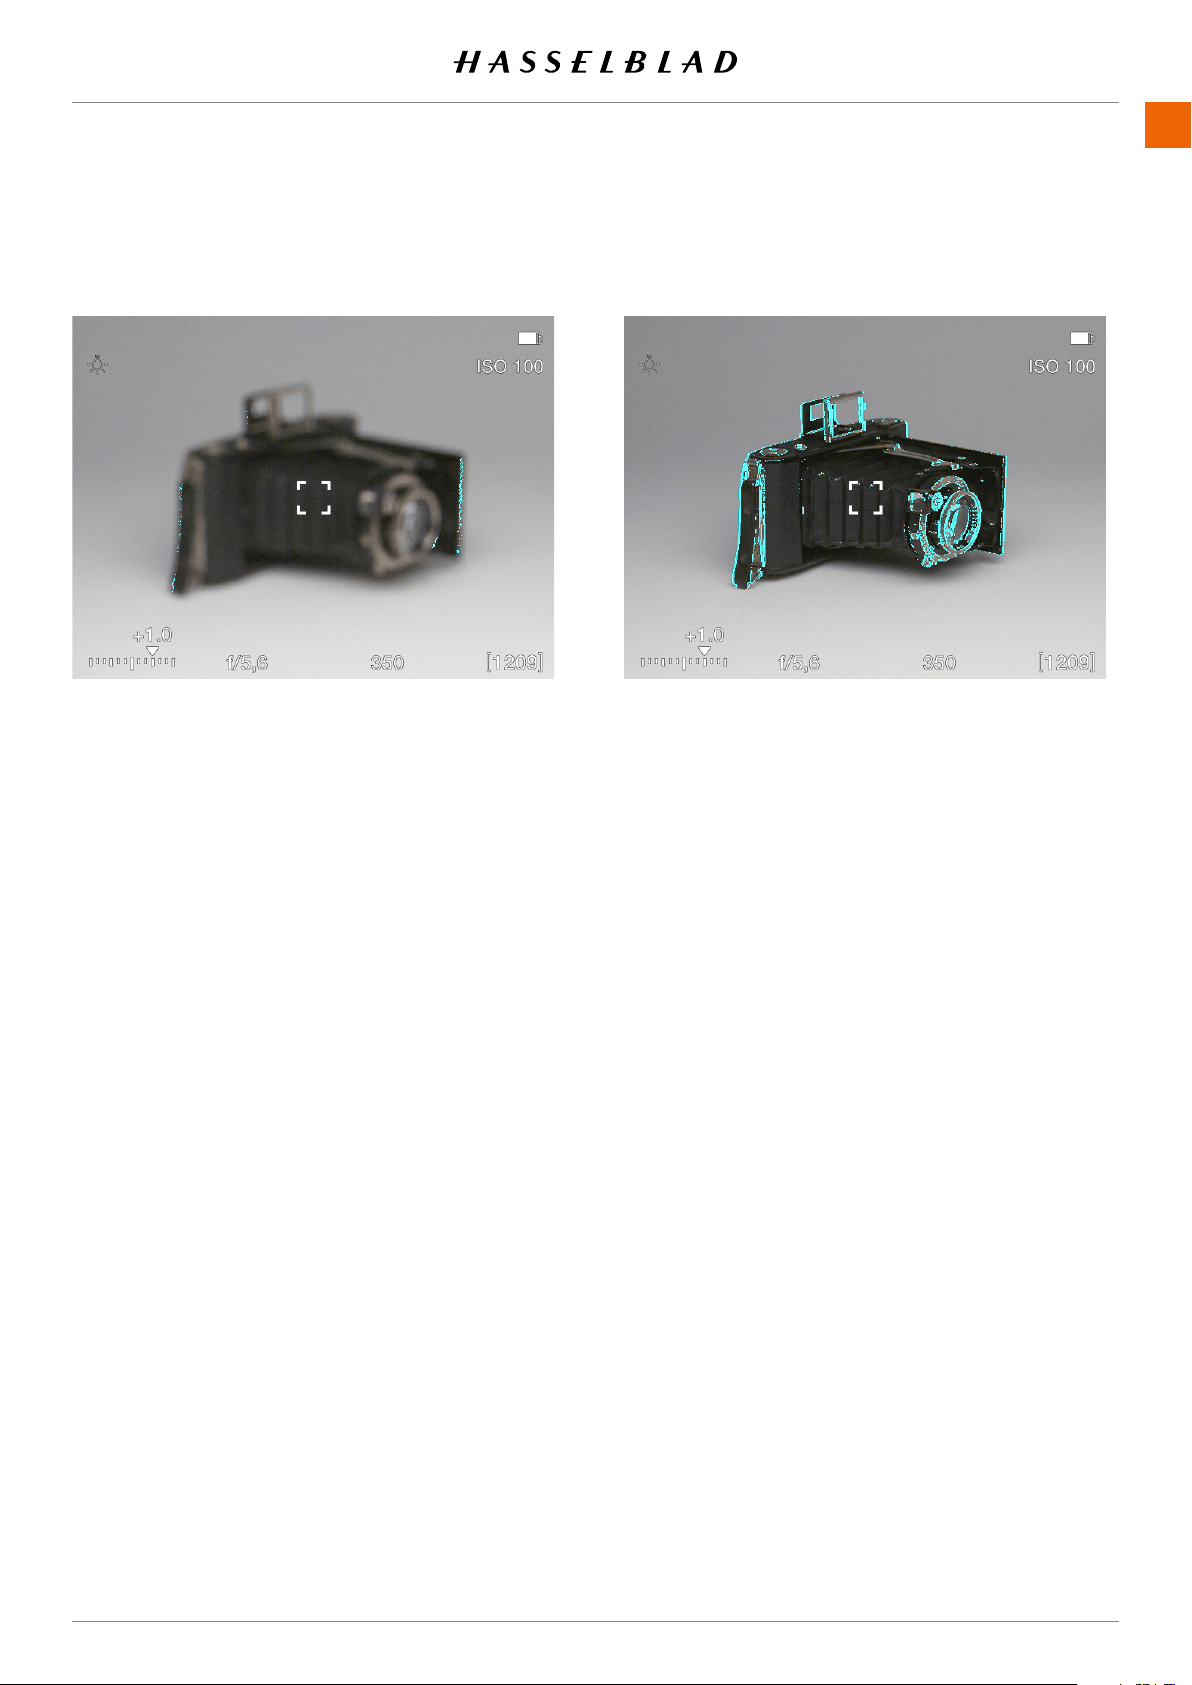
USING THE 907X
www.hasselblad.comCONTENTS
79
907X 50C USER GUIDE
FOCUS PEAKING
How to use Focus peaking
The Focus peaking function is a manual
focus tool to help you identify which
areas of the subject that are in focus.
Focus peaking is not active in auto focus
mode.
When focus peaking is active and you
adjust the focus manually, areas in focus
(orange in this case) moves in depth as
you move the focus position.
See more on Focus settings on page
120.
Subject is not in focus
Main parts of the subject are in focus
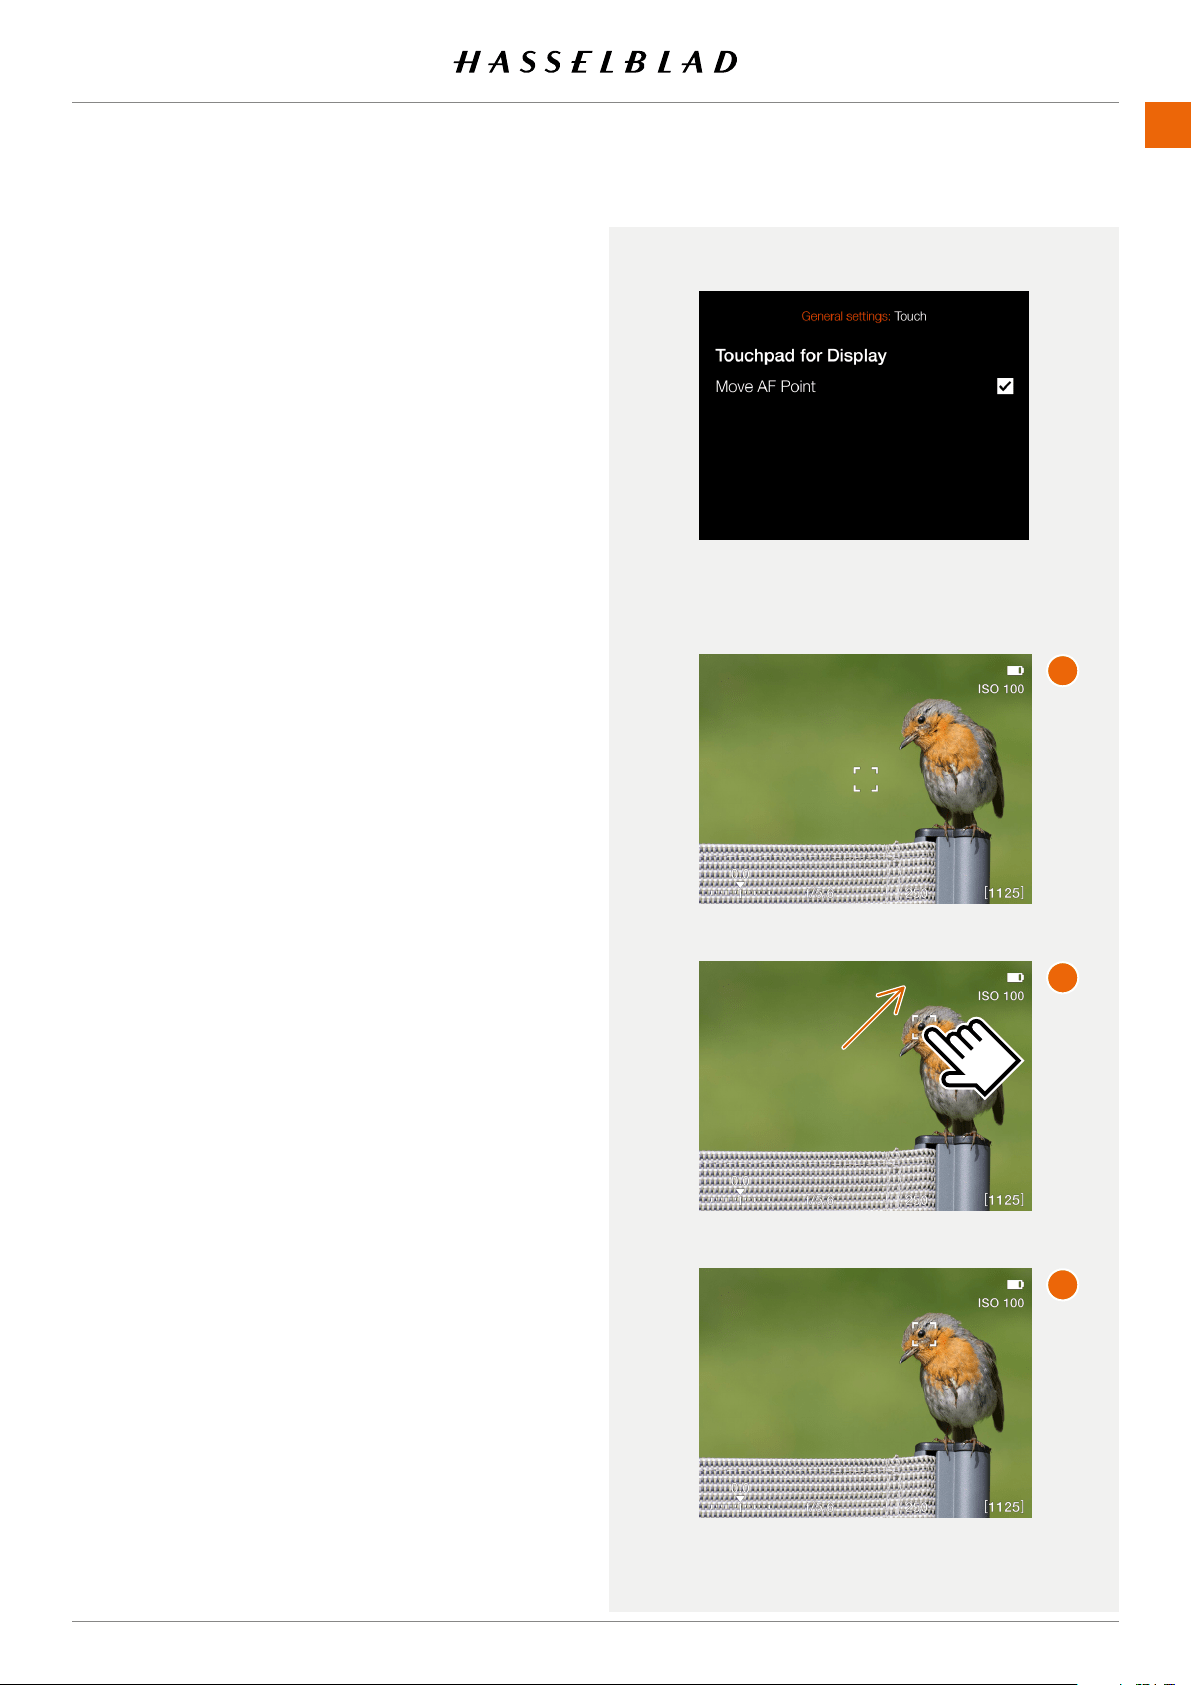
USING THE 907X
www.hasselblad.comCONTENTS
80
907X 50C USER GUIDE
6.6 MOVE AUTOFOCUS POINT
If the setting
Move AF Point
in the
General Settings – Touch
menu is checked it is possible to set the AF point location by
pointing at the area.
Procedure:
1 Activate Live View by half-pressing the shutter release
button. The AF point is in the centre
(A)
.
2 Aim the camera at the subject and tap the new location for
the AF point
(B)
.
3 The AF point will remain in this location until changed
(C)
.
Note!
If spot metering is selected, the sensitive light metering area
will follow the AF point.
Note!
You can set the camera to automatically reset the focus point
to the centre position after each capture, or maintain the
selected position in
Main Menu > Camera Settings > Focus
> Reset Focus Point
. See page 120.
6.7 RESIZE AUTOFOCUS POINT
The autofocus point can be resized in the Focus menu as
described on page 120. See also page 81.
A
B
C
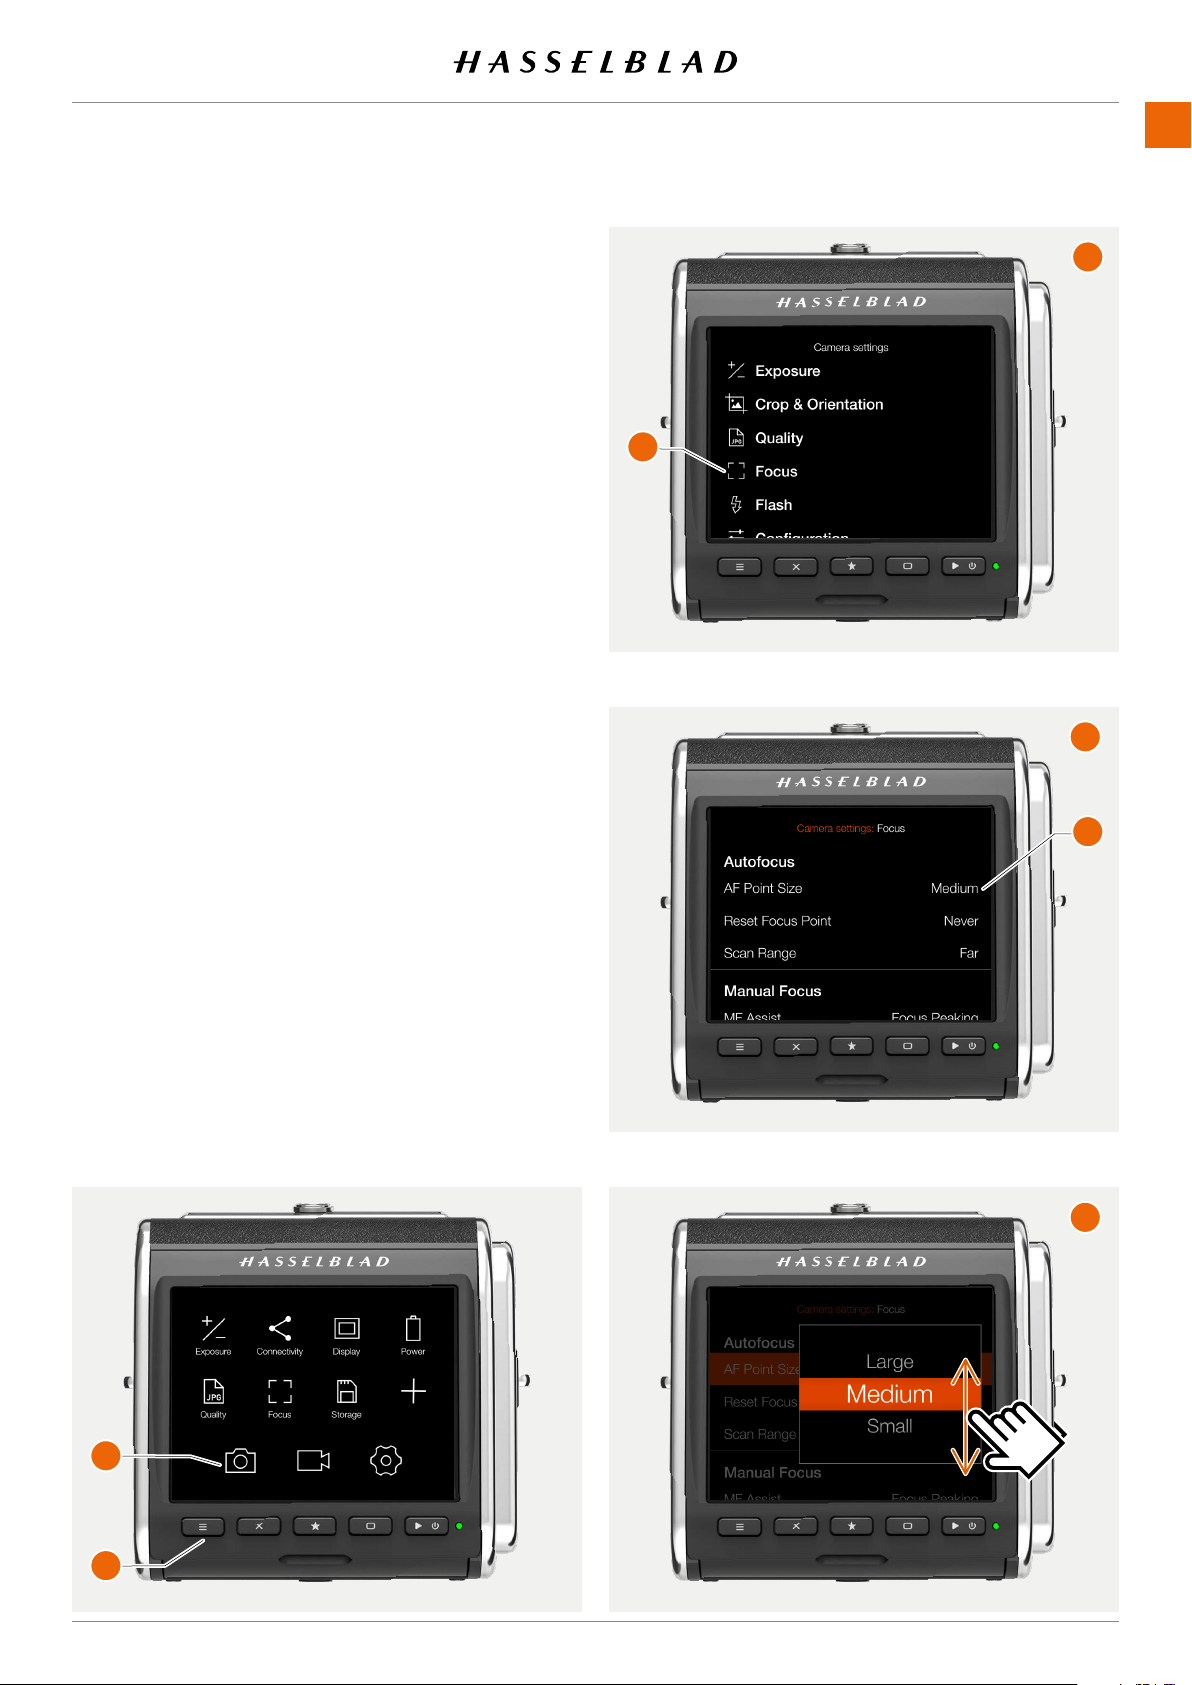
USING THE 907X
www.hasselblad.comCONTENTS
81
MENU SCREEN NAVIGATION
All settings of the camera are available in the menu system
which is entered by clicking one of the three icons at the
bottom of the screen.
You can use the menu system either by using touch or by
using the buttons as described on the next page.
Example using touch
● Press the menu button
(1)
to show the main menu.
● Tap the Camera Settings icon
(2)
● The menu screen for camera settings appears
(A)
.
● Tap Focus
(3)
.
● The camera focus settings screen appears
(B)
● To select AF point size, tap anywhere on this line
(4)
● Select the desired size by swiping the list
(C)
● The display will return to the main menu screen
(A)
● To exit without saving the setting, press the menu
button
(1)
907X 50C USER GUIDE
D
A
B
1
2
3
C
4
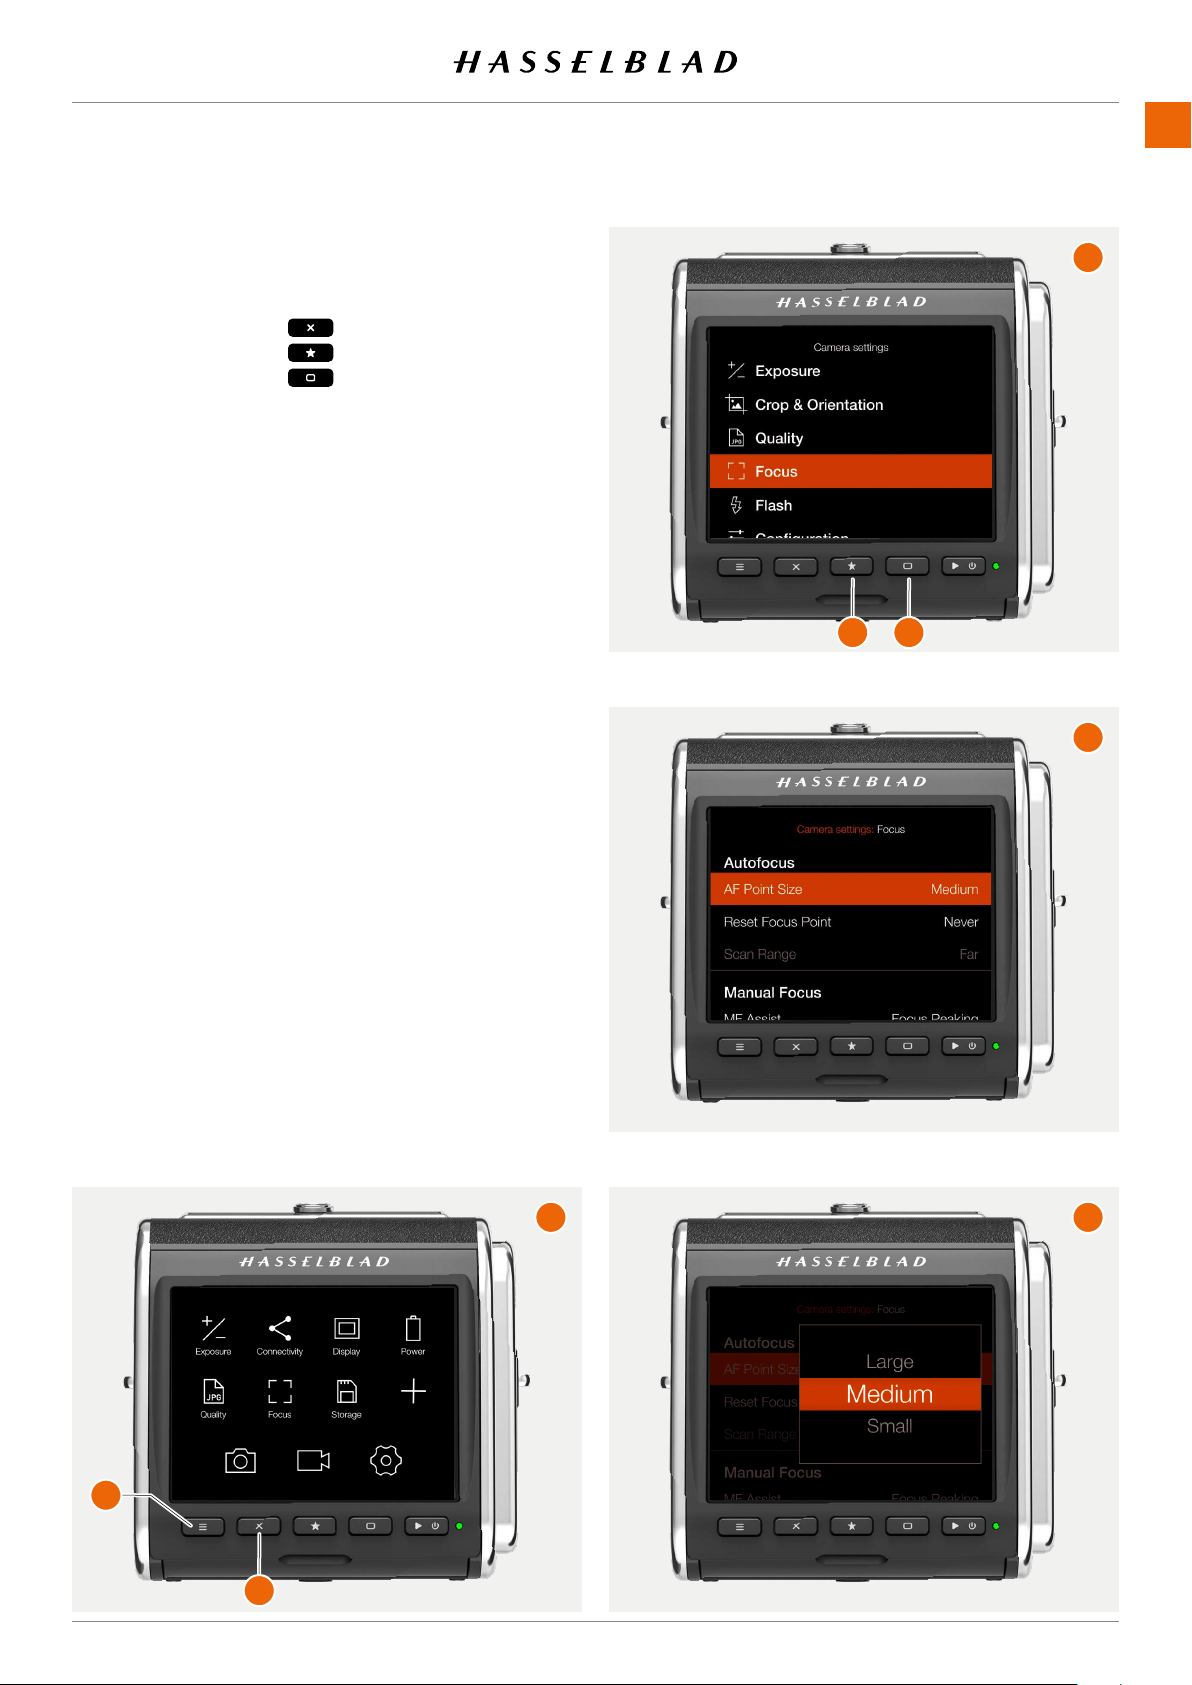
USING THE 907X
www.hasselblad.comCONTENTS
82
Example Using buttons
Three buttons are used for menu navigation:
● Cross button Move selection up
● Star button Enter
● Rectangle button
Move selection down
Use the following procedure:
● Press the menu button
(1)
to show the main menu
(A)
● Press the cross button
(2)
to enter the camera settings
Menu
(B)
.
● Press the rectangle button
(H)
to highlight the item
Focus
.
● Press the star button
(3)
to enter the Focus settings
(C)
.
● Press the rectangle button
(4)
to highlight the middle
item (AF Point Size). Press the star button
(3)
to enter
the setting
(D)
.
● Use the rectangle button
(4)
to move the selection
down and the cross button
(2)
to move up. When the
desired size is selected, press the star button
(3)
to
make the selection.
907X 50C USER GUIDE
A
B
C
D
1
2
3
4
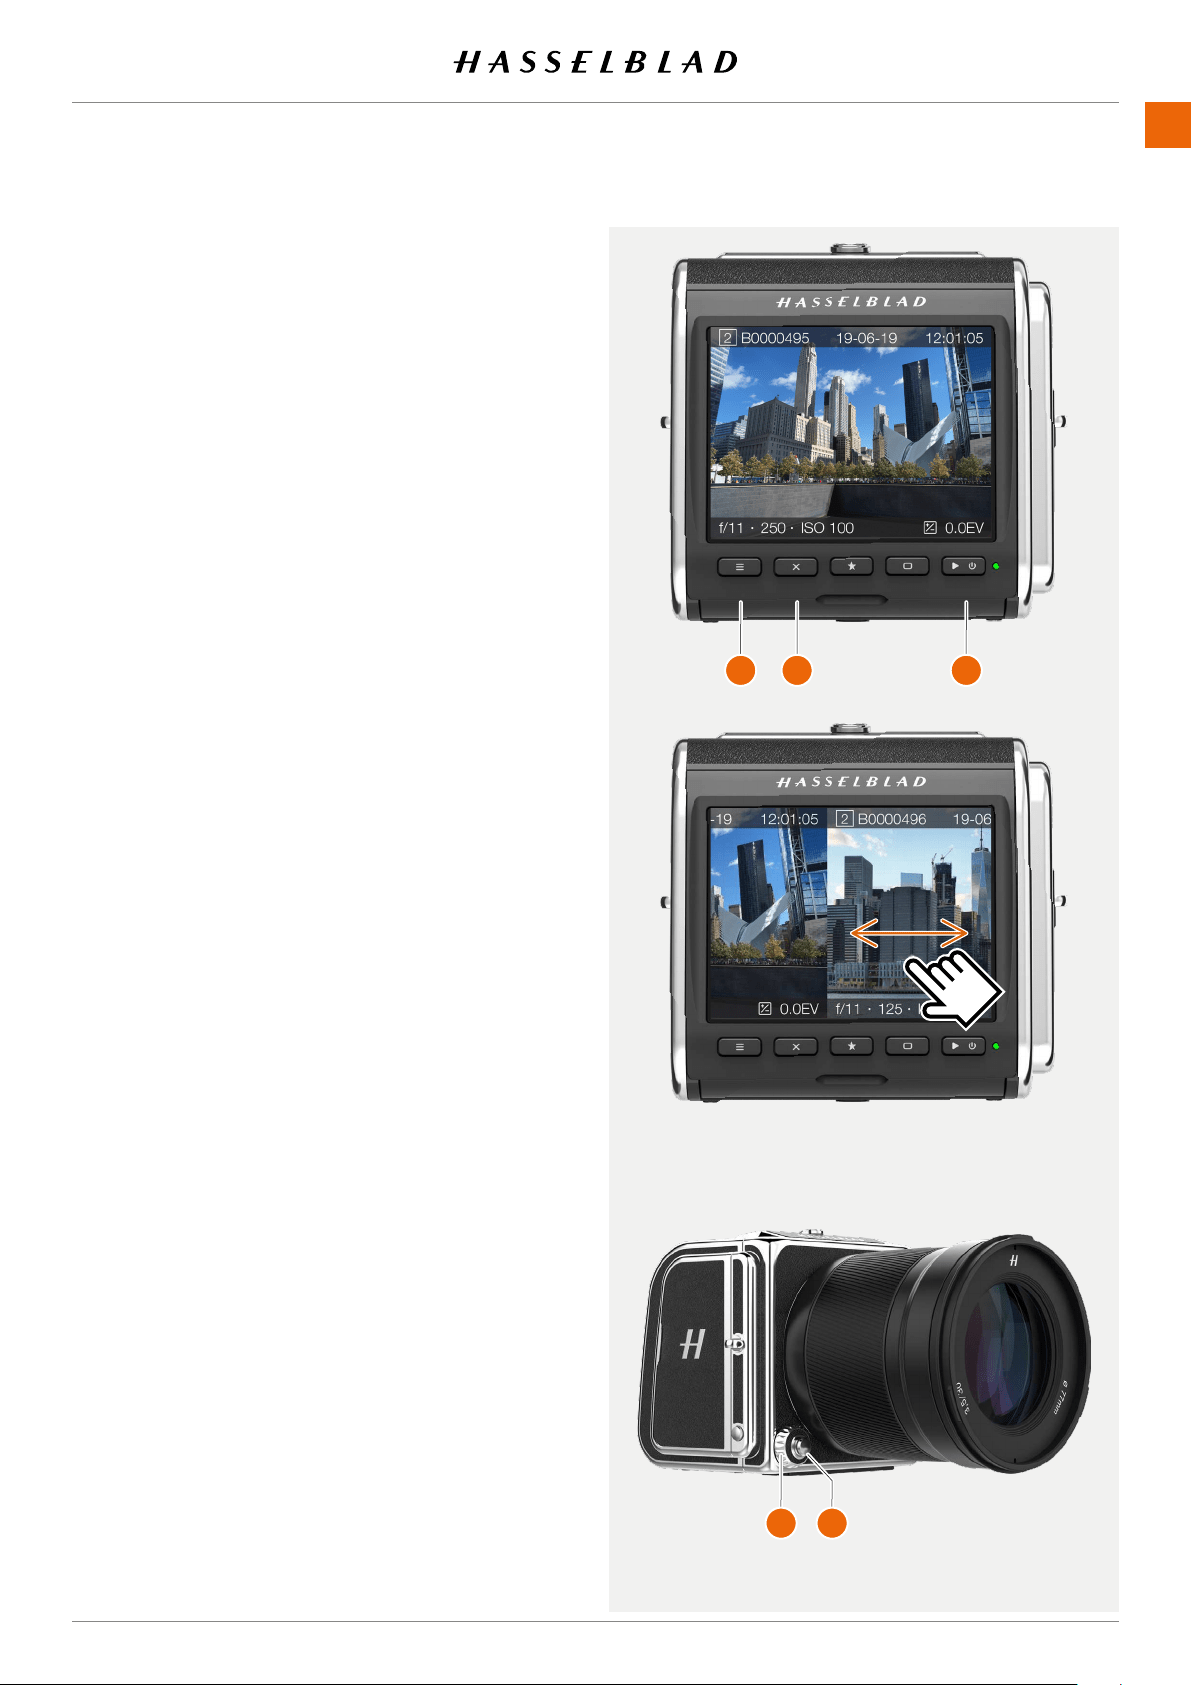
USING THE 907X
www.hasselblad.comCONTENTS
83
907X 50C USER GUIDE
6.8 BROWSING, PREVIEW AND
HISTOGRAM
BROWSING IMAGES
To enter browse mode, short-press the Play/On-Off button
(C)
.
In browse mode, swipe right or left or use the control wheel
(D)
on the camera grip to browse captures in a folder.
Zoom out to folder view to select another folder to browse as
described on page 85.
Press Shutter release button
(E)
to exit browse mode or press
the menu button
(A)
.
Access the delete Image dialogue by pressing the cross
button
(B)
. See page 87.
Continued on the next page.
A
B C
D E
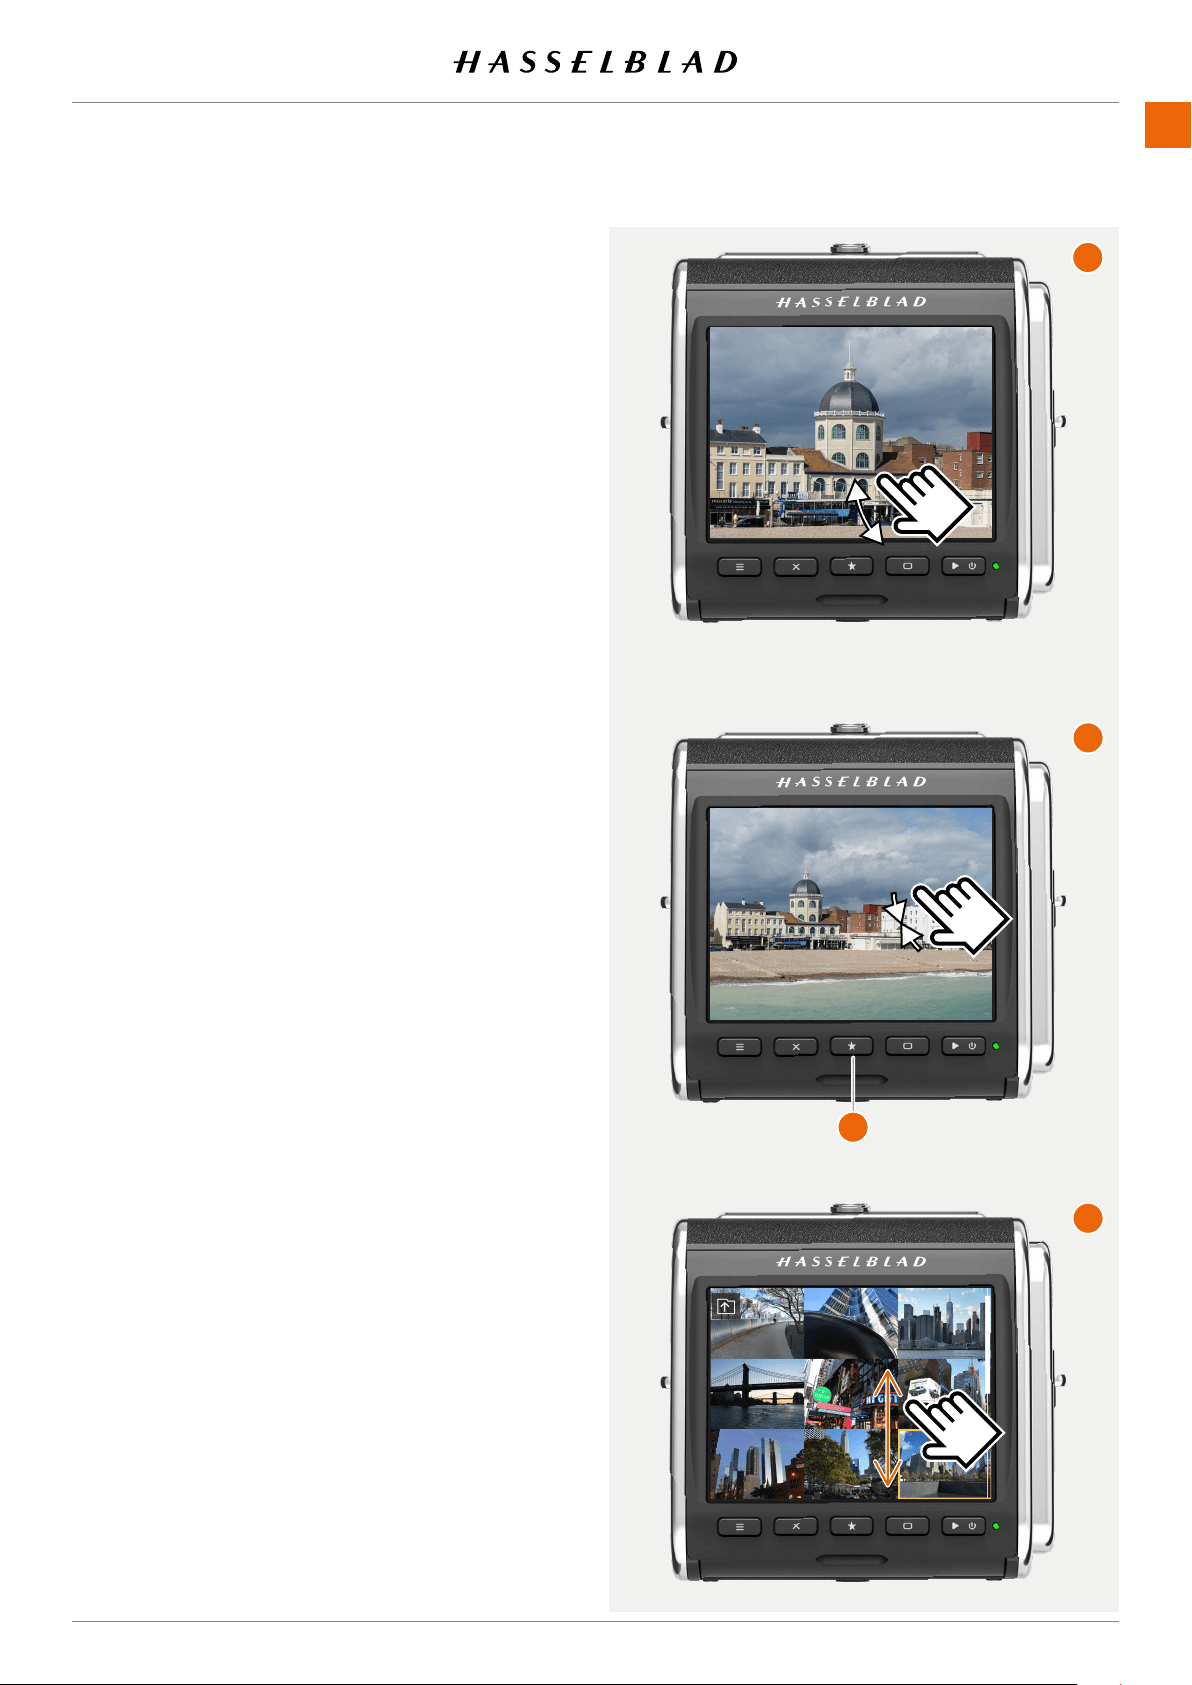
USING THE 907X
www.hasselblad.comCONTENTS
84
ZOOMING
You can zoom in to the preview image in two ways:
● Spread zoom
(A)
,whereyouplacetongerstogether
on the display and then move them apart. This will
create a step-free zoom in effect up 100% (one pixel in
the image = one pixel on the display)
● By double-tapping the display. This will directly zoom
in to 50 or 100%, depending on the setting
Zoom
Level
in the
Camera Settings > Focus
menu. See
page 75.
BROWSING IMAGES – NINE-VIEW
If you Pinch-zoom
(B)
(movetwongerstogetheronthe
screen) , nine images will be shown at the same time. If Image
rating is turned off (see page 125), you can also press the
star button
(1).
To view another image in one-view, just tap the small thumb-
nail. If card contains many images on the card, you can swipe
vertically
(C)
.
907X 50C USER GUIDE
A
B
C
1

USING THE 907X
www.hasselblad.comCONTENTS
85
907X 50C USER GUIDE
SELECT FOLDER TO BROWSE
You can select any of the folders on the card to browse
images.
To select which folder to view, navigate up in the folder
structure until you reach the folder level
(3)
dialogue.
The folder structure is the following:
Memory cards
Folders
9 images
1 image
It is possible to navigate to the card selection dialogue either
using touch or buttons and scroll-wheels.
1 When viewing one image
(1)
Pinch inwards to go to the 9
images view
(2)
.
2 In the 9 images view - Tap the “Folder Up” button
(A)
in the
top left corner to go to folders.
3 In the folders view
(3)
- Select folder by tapping the folder
name.
4 Select the image you want to view from the 9 images view.
The selected image is shown.
SELECT CARD TO BROWSE
You can select SD 1 Card or SD 2 card to browse images.
To select which card to review, navigate up in the folder
structure until you reach the “Select Card to Browse” dialogue
(4)
.
1 Select folder by clicking the folder name (322HASBL)
(5)
.
2 Select the image you want to view from the 9 images view
(6)
.
3 The selected image is shown
(7)
.
A
1 2
3 4
5
7
6
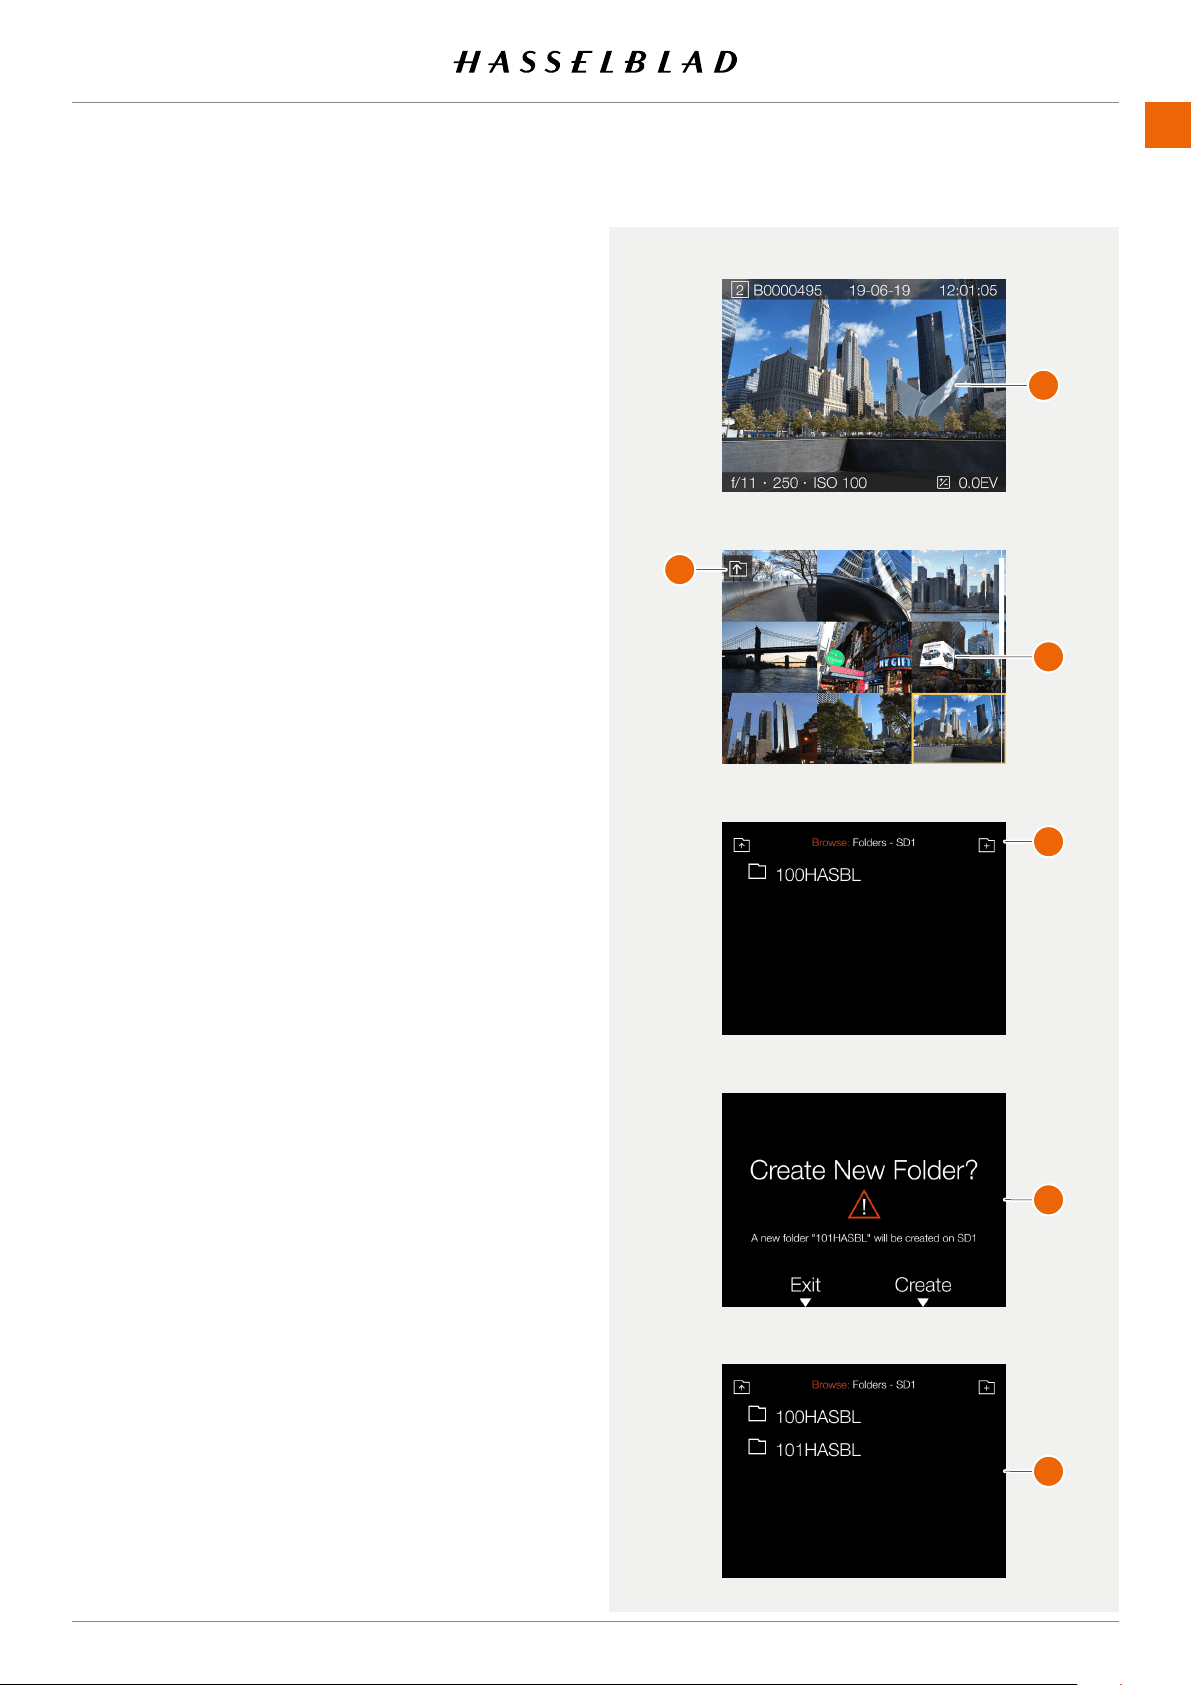
USING THE 907X
www.hasselblad.comCONTENTS
86
907X 50C USER GUIDE
CREATE NEW FOLDER
It is possible to create a new folder on the currently active SD
card. When a new folder is created, all new images will be
stored in that folder. The folder name is auto-generated and
cannot be changed.
It is not possible to store images in a previous folder.
By touch:
1 When viewing one image
(A)
, pinch inwards to go to the 9
images view
(C)
. You can also press the star button.
2 In the 9 images view - Tap the “Folder Up” button
(B)
in the
top left corner to go to folders.
3 In the folders view - tap the “Add folder” button
(D)
in the
top right corner to create a new folder.
4 In the Create Folder dialogue
(E)
, choose
Create
to create
a new folder or
Exit
to skip.
When the new folder (101HASBL) is created, the folder view
(F)
will show the new folder. To view images in the previous
folder (100HASBL), proceed as described on page 85. New
images will automatically be stored in the new folder.
Note!
It is only possible to create a new folder on the currently active
card. When browsing the other card, the “Add Folder” icon
will not be available.
1-view
9-view
Folder view
Folder view
Create folder dialogue
A
B
C
D
E
F
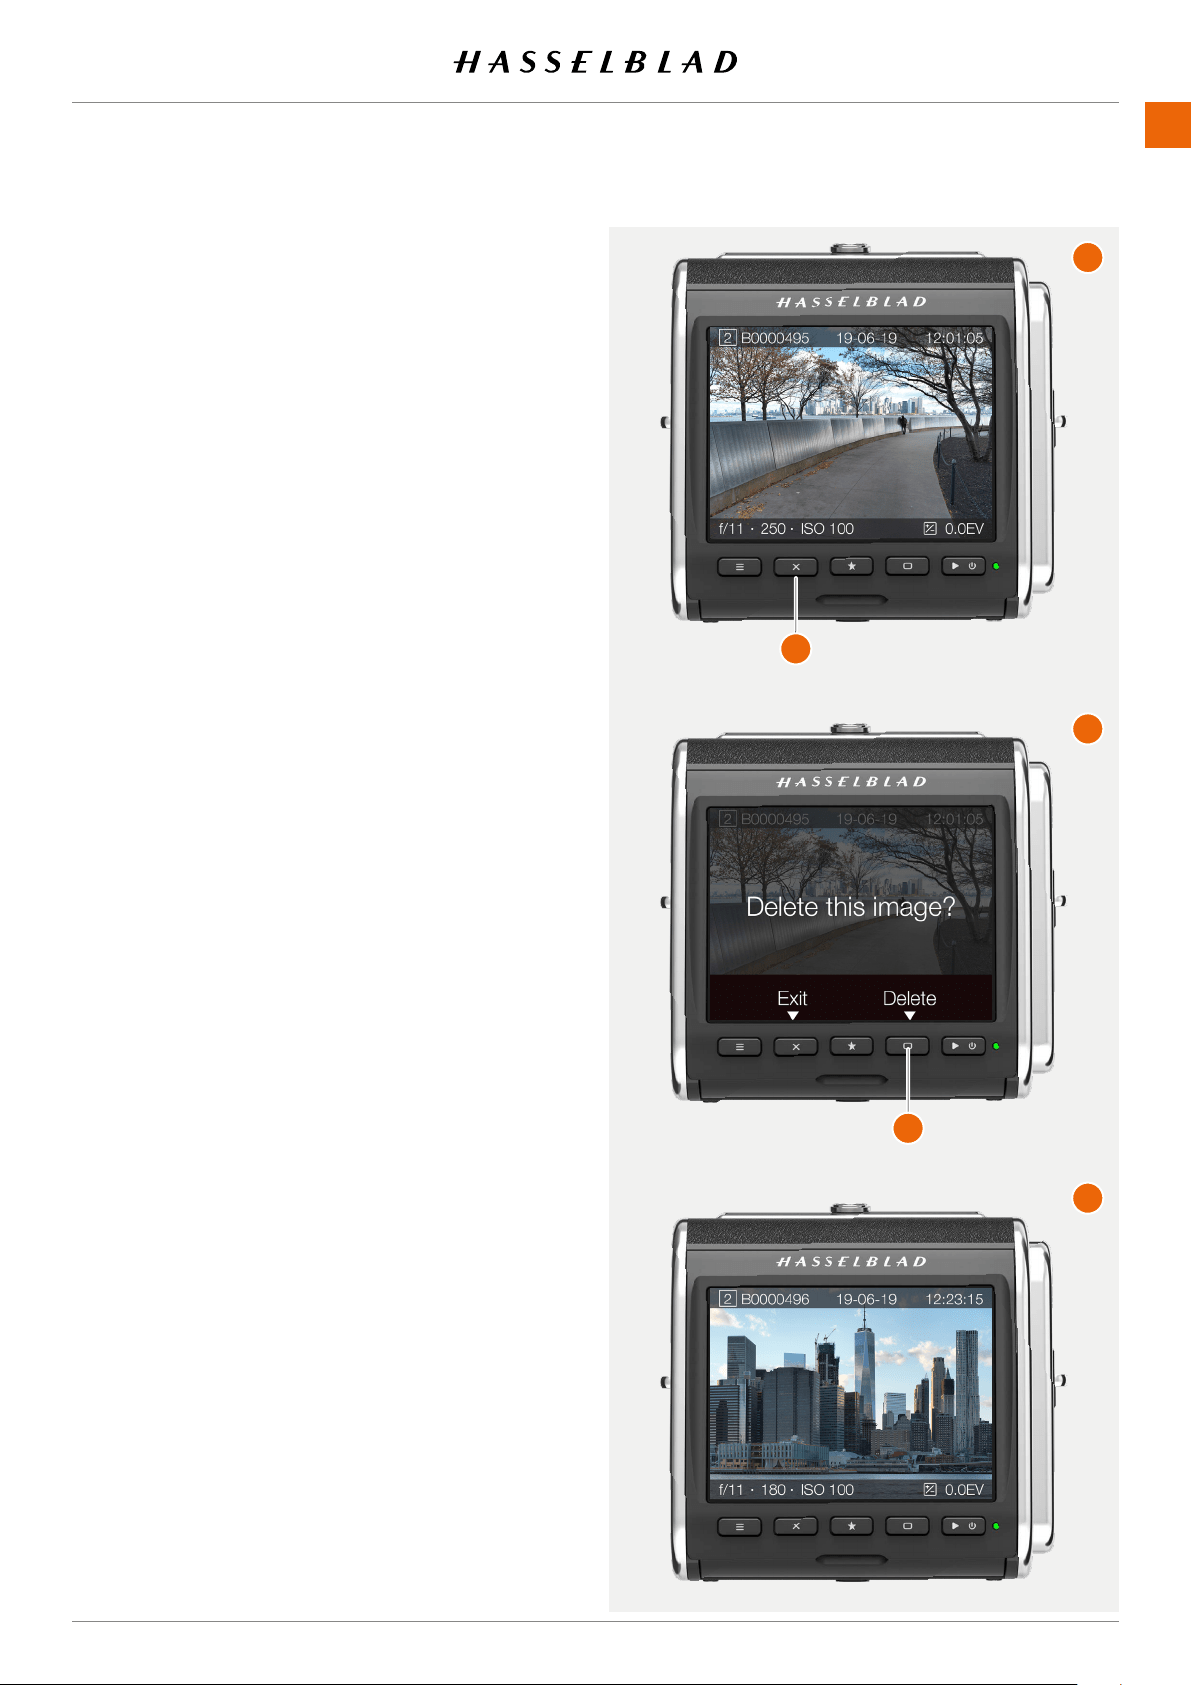
USING THE 907X
www.hasselblad.comCONTENTS
87
DELETE IMAGES
An image can be deleted from the card by pressing the cross
button
(1)
in one view browse mode
(A)
. This will bring up the
delete dialogue
(B)
.
To delete the image, press the rectangle button
(2)
. To exit
the dialogue without deleting the image, press the cross
button
(1)
. This will return to browse mode
(C)
Showing the
next image. If the deleted image was the last captured image,
the previous image is shown.
907X 50C USER GUIDE
A
B
C
1
2
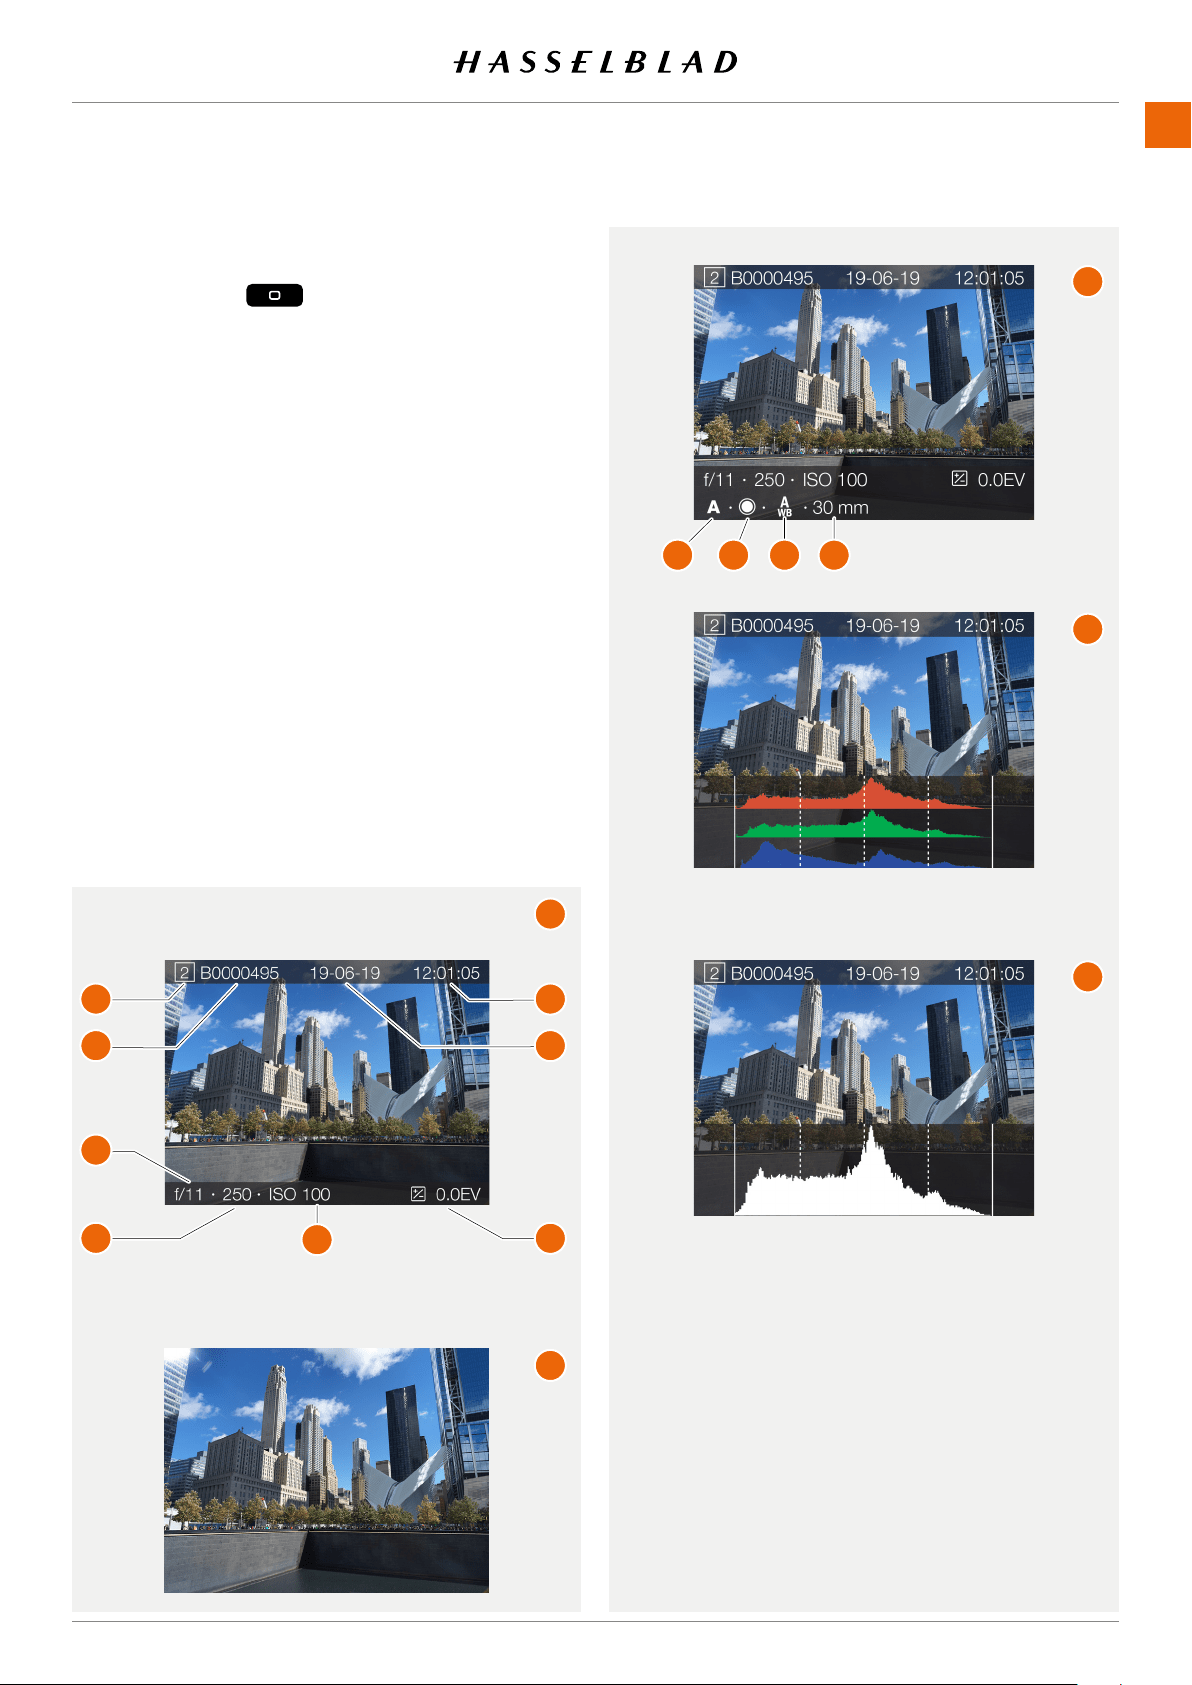
USING THE 907X
www.hasselblad.comCONTENTS
88
BROWSE OVERL AYS
In one-view, you can change information overlay by clicking
the rectangle button
. Continue clicking to step trough
the available options.
The following options are available:
● Standard
(A)
● Full screen
(B)
● Detailed info
(C)
● Separate histogram
(D)
● Luminance histogram
(E)
Information on the screen:
● Active card
(1)
● Image name
(2)
● Aperture
(3)
● Shutter speed
(4)
● ISO
(5)
● Exposure adjustment
(6)
● Capture date
(7)
● Capture time
(8)
● Exposure mode
(9)
● Metering mode
(10)
● White balance
(11)
● Focal length
(12)
907X 50C USER GUIDE
A
B
C
D
E
1
2
3
4
5
6
8
7
9 10 11 12
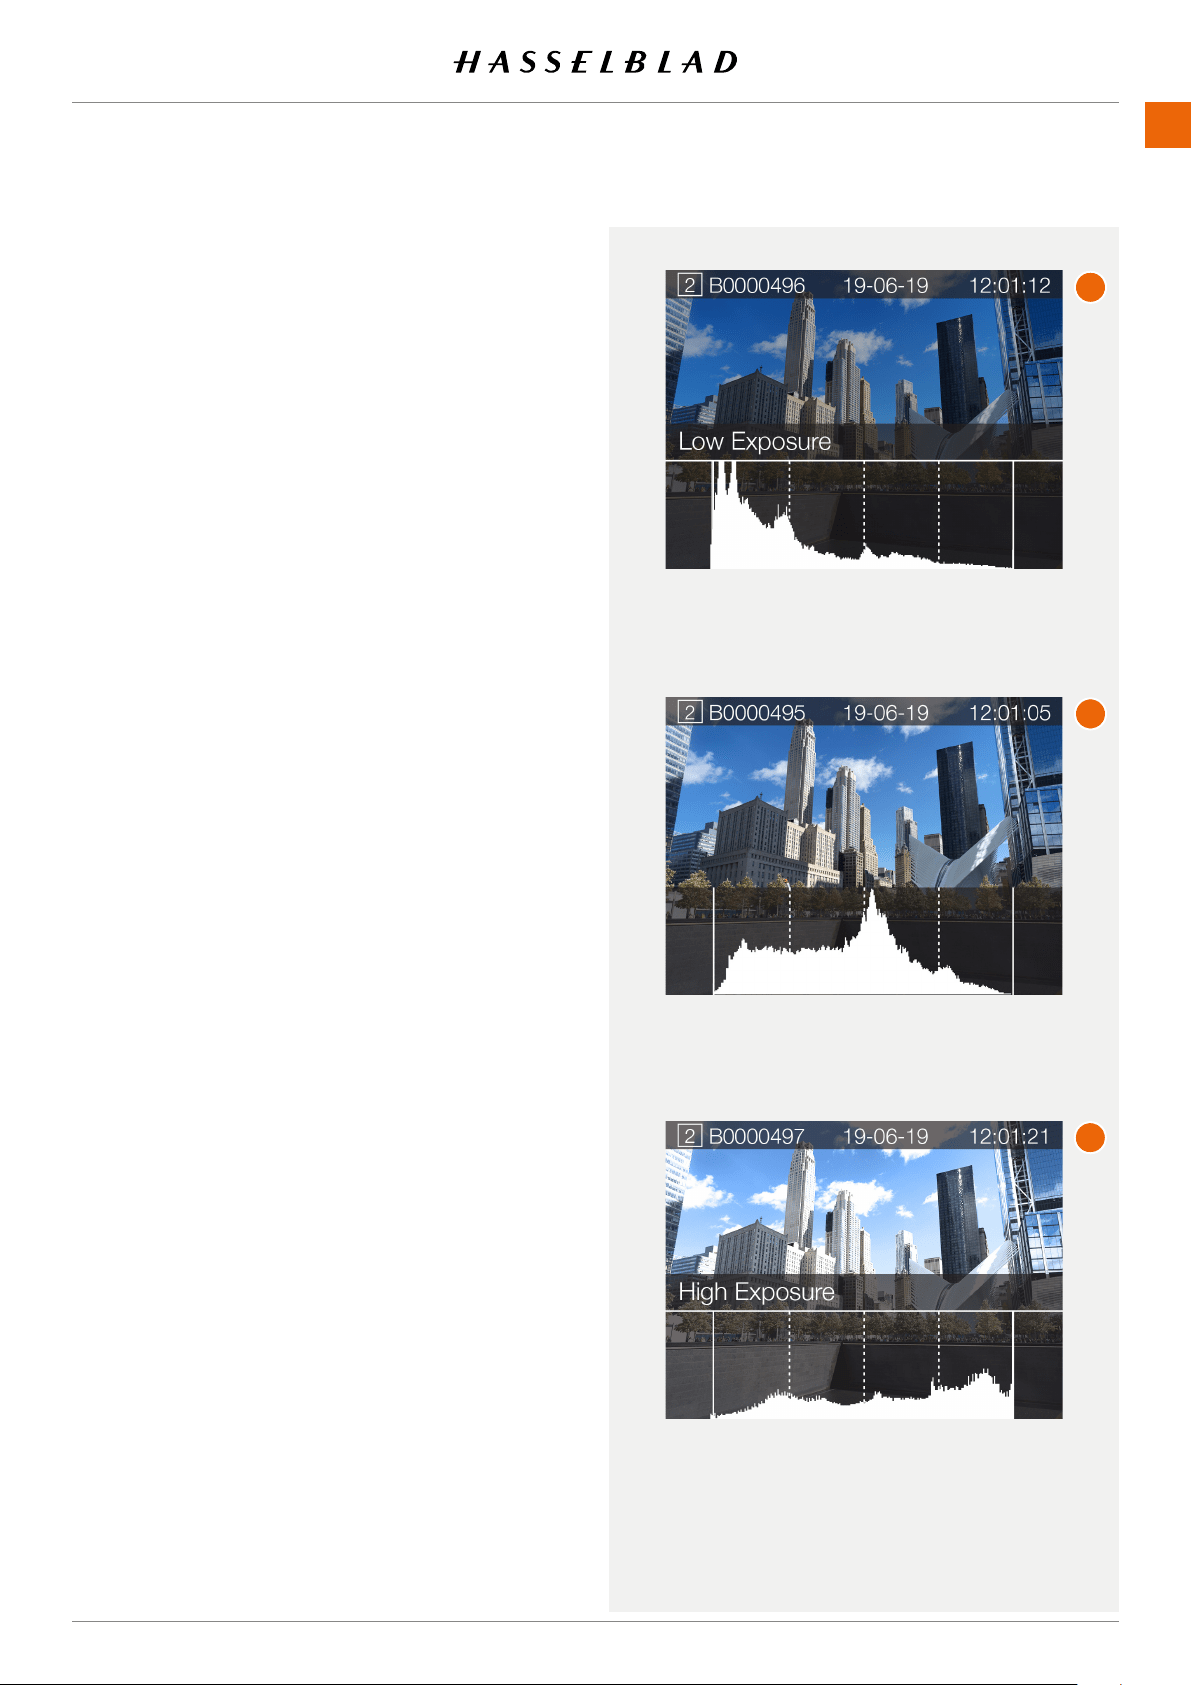
USING THE 907X
www.hasselblad.comCONTENTS
89
907X 50C USER GUIDE
HISTOGRAMS
The histogram provides a graph that indicates the total
number of pixels at each brightness level, with brightness
in range from black on the left to white on the right. It is a
valuable tool for evaluating captures.
A well exposed shot usually has a full range of levels, while
underexposed and overexposed captures tend to show levels
concentrated at the left or right part of the scale.
The histogram is only an indicator that should be interpreted.
There are several situations in which a ‘bad’ histogram will
match an exposure that could be perfect for the intended
effect.
Underexposure (A)
Histogram display concentrated on the left with few pixels
elsewhere indicates a likely underexposure. Many details will
be lost in the shadows.
Even exposure (B)
Histogram display spread across the full range indicates a
likely good exposure. There may still be a few pixels at the
extremes, indicating a few spectral highlights and saturated
shadows, but this is often normal in a good exposure.
Overexposure (C)
Histogram display concentrated on the right with few pixels
elsewhere indicates a likely overexposure. Many details will be
lost in the highlights.
Underexposure
Even exposure
Overexposure
A
B
C
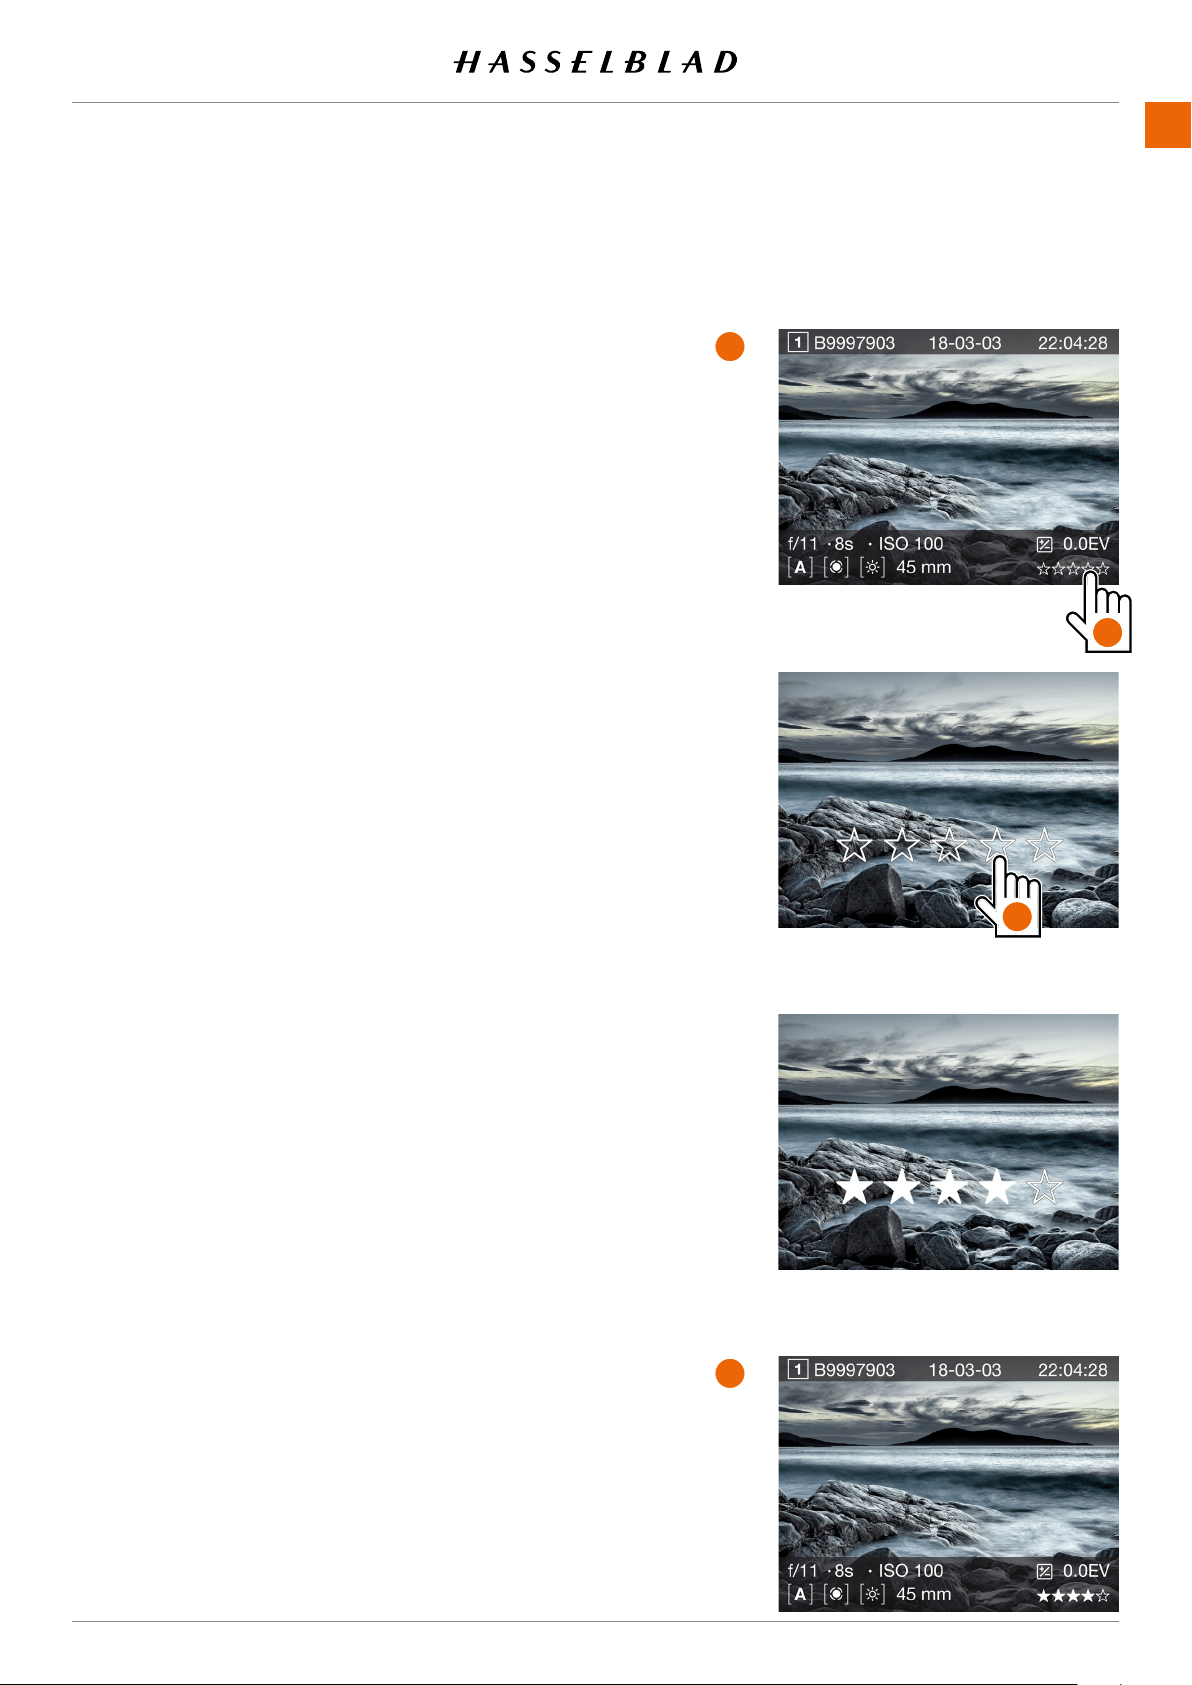
USING THE 907X
www.hasselblad.comCONTENTS
90
6.9 IMAGE RATING
RATING FUNCTION
Images on the memory card, can be rated from 1 to 5 Stars.
Theratingiswrittentothemeta-dataoftheimagele.Use
the following procedure.
1 Make sure that the setting “Image Rating” in the
Camera
Settings > Conguration
menu is checked. See page
125.
2 Press the Play button to enter Browse Mode.
3 Select the Capture Details overlay by pressing the Display
Button or by rotating the rear Scroll Wheel (
A
).
4 In the lower right part, the 5 stars
(B)
show the current
rating.Forimagesthatarenotrated,nostarsarelled.
5 Toratetheimage,tapthevestars(
B
) or press the Star
Button.
6 ThecameraentersRatingMode,showingvelargestars.
If the image has been rated before, it will show the current
rating,otherwise,thevestarswillbeempty.
7 Tap the desired star to change rating. E.g. if you want a
4-star rating, tap the fourth star (
C
). The Rectangle Button
increases rating and the Cross Button decreases rating.
You can also use the rear Scroll Wheel to change rating.
8 To return to Browse Mode (
D
), press the Star Button or the
Browse Button again.
Rating Mode is equivalent to standard Browse Mode, which
means that you can browse to the next image by swiping the
display or using the front Scroll Wheel. Double-tap the screen
to Zoom-in.
You can always go back to a previously rated image and
change rating following the same procedure as above.
Note!
Foranefcientwork-owwhileratingmanyimages,stayin
Rating mode and swipe to the next or previous image. It is
also possible to use the front scroll wheel to go to the next or
previous image while in Rating mode.
Note!
If Image rating is deactivated in the setting
Camera Settings
> Conguration > Image Rating
,thevestarsinBrowse
Mode (
A
) will not be visible.
Note!
If two cards are inserted, only images on the primary card are
rated.
Note!
Videolescannotberated.
Browse mode - Capture Details Overlay
Rating Mode - Unrated
Rating Mode - Rated 4 stars
Browse Mode - Rated 4 stars.
A
B
C
D
907X 50C USER GUIDE
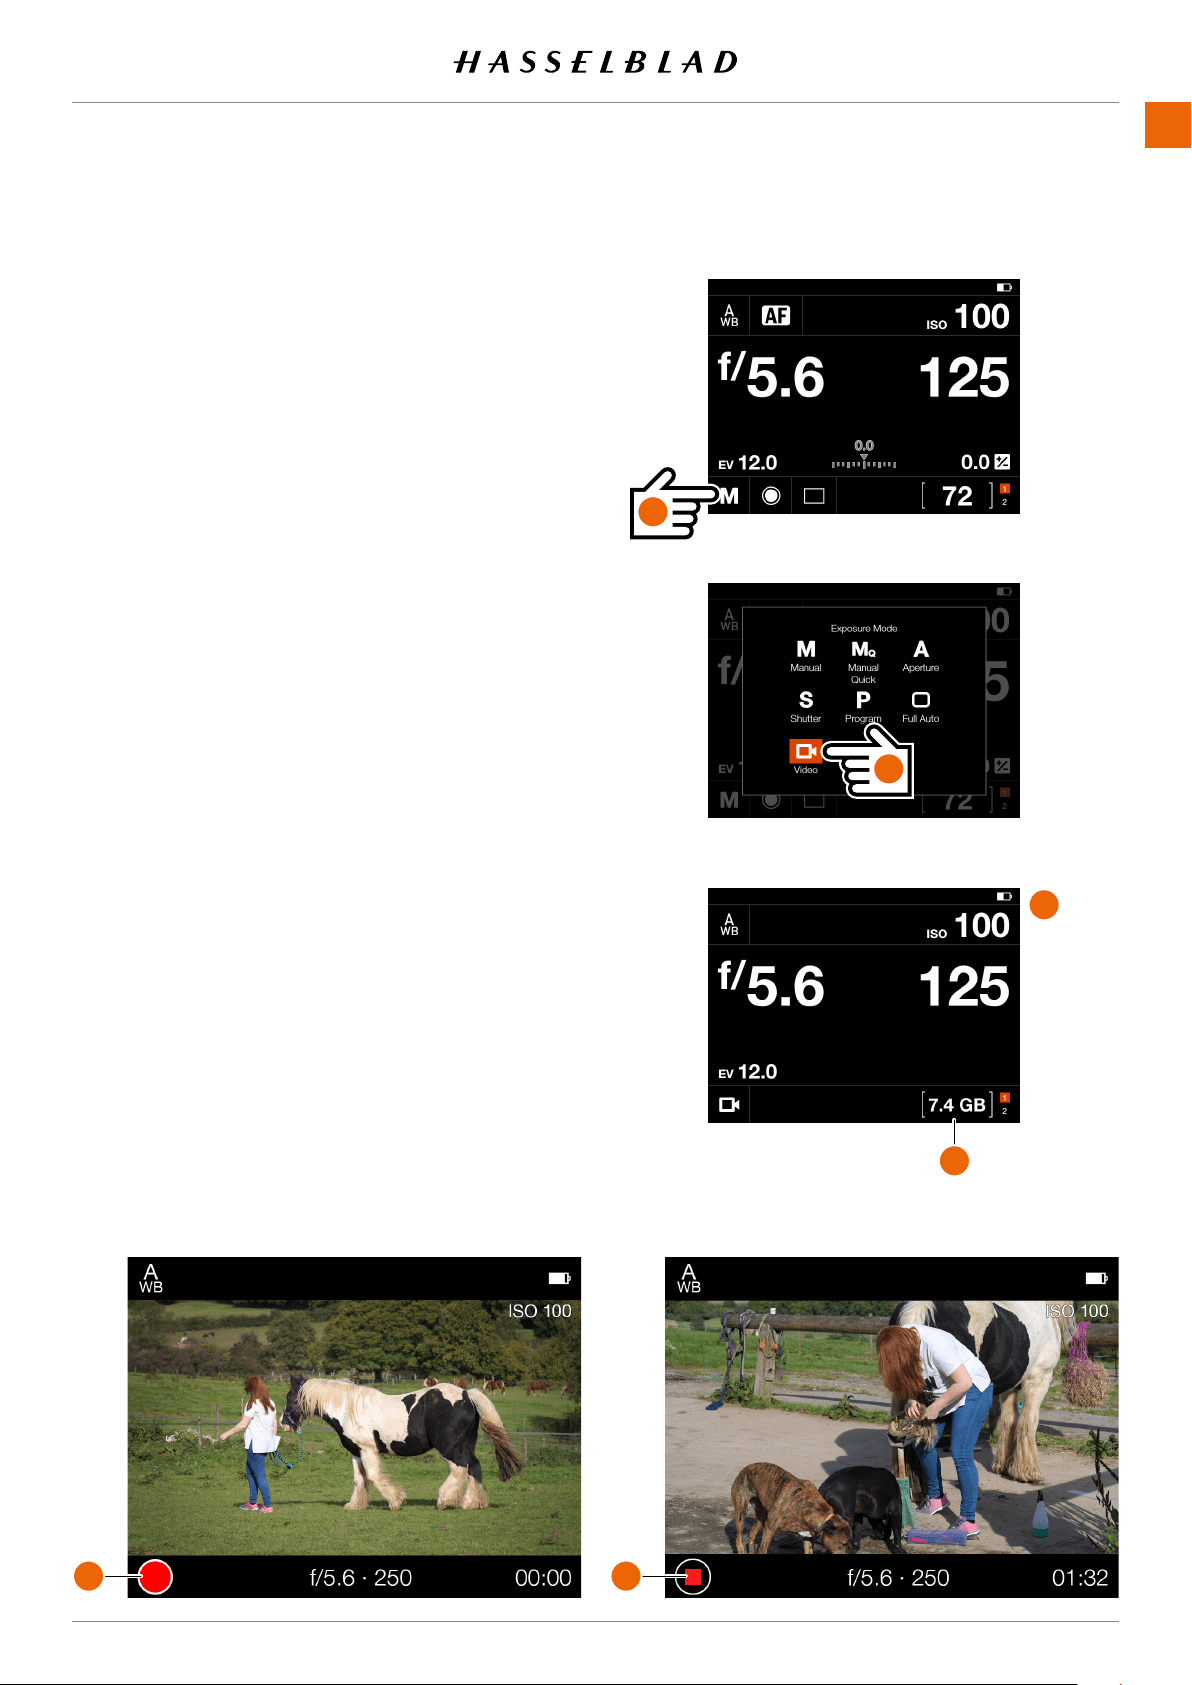
USING THE 907X
www.hasselblad.comCONTENTS
91
907X 50C USER GUIDE
Video Display when capturing videoVideo Live View Screen
E
F
HOW TO RECORD VIDEO
First select Video Settings in the Video Settings Menu. See
page 126.
● For best result, use a stable tripod with the camera
when recording video.
● For best quality of the recorded sound we recommend
using an active microphone.
● The maximum length of one video clip is 29:59
minutes. The number of video clips possible to save,
depends on the capacity of the inserted SD memory
card. Remaining capacity is displayed on the control
screen (
D
).
1 From the Control Screen , tap the Exposure mode icon (
A
).
2 Tap the Video icon (
B
).
1 The Video Control Screen (
C
) is displayed on the Touch
Display.
2 Start the Video Live View by half-pressing the shutter
release button (
A
). If you want to stop Live View without
capturing video, click the Menu button.
3 The Video Live View screen is displayed on the Display.
4 Start Recording by fully pressing the Shutter Release
Button or by tapping the red recording icon (
E
) on the
Touch Display. The recording icon is replaced by a grey
stop icon (
F
) during recording.
5 Stop the Recording by pressing the Shutter Release Button
or by pressing the grey stop icon (
F
) on the Touch Display.
Note!
You can change ISO and White Balance from both Video
Control Screen and Video Live View screen by tapping the
values.
Note!
Video recording is not possible in tethered mode.
6.10 VIDEO RECORDING
Control Screen
Exposure Mode setting
Control Screen in video mode
A
B
C
D
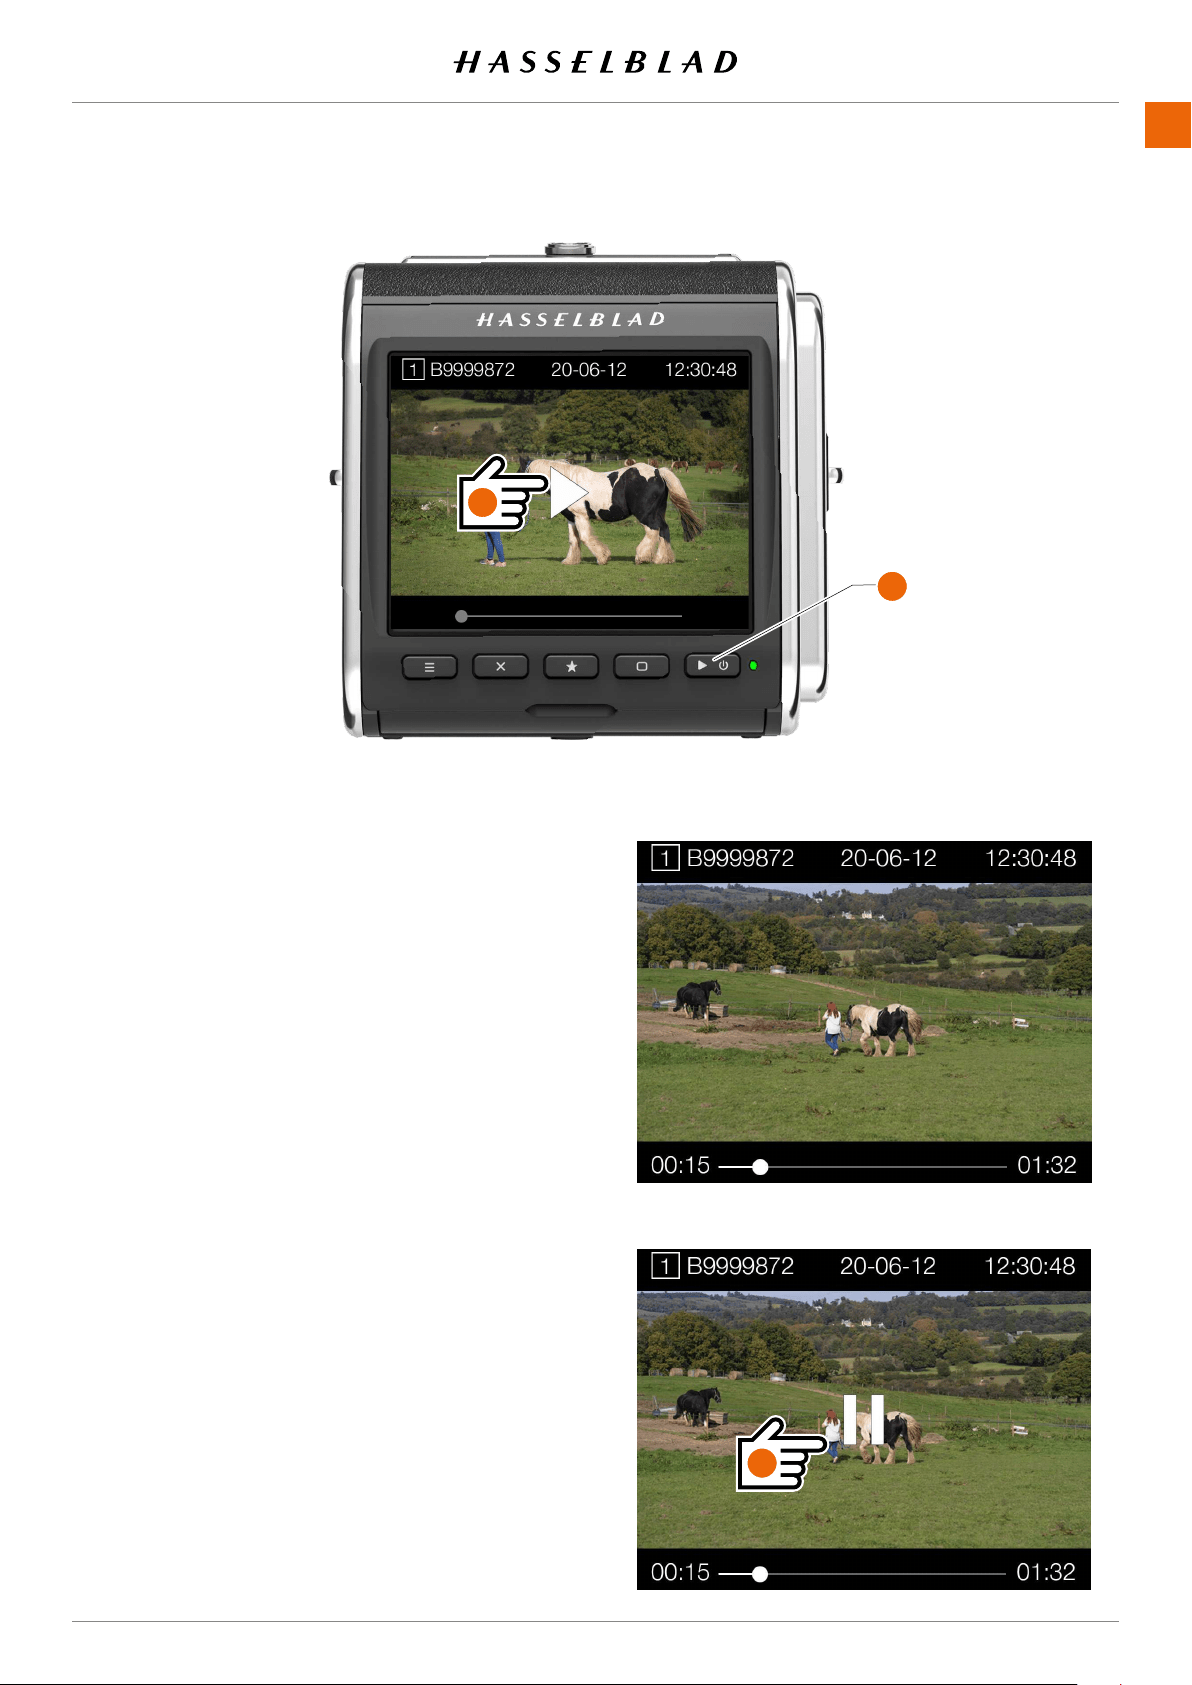
USING THE 907X
www.hasselblad.comCONTENTS
92
907X 50C USER GUIDE
HOW TO VIEW RECORDED VIDEO
1 Press the Browse button (
A
).
2 The recorded videos are displayed with a
preview image and a Play icon.
3 Select video to view.
4 Press the Play icon (
B
) on the Touch Display
(white triangle) to playback the selected Video.
5 To pause the video, tap the screen again. Tap the
pause icon (
C
) to start again.
6 By sliding the white dot in the progress bar to the
left or right, you can fast forward or reverse to
quickly view other parts of the video.
Note!
Videolescannotberated.
Screen during video playback
Screen when video is paused
A
C
B

7 907X CONTROL GRIP
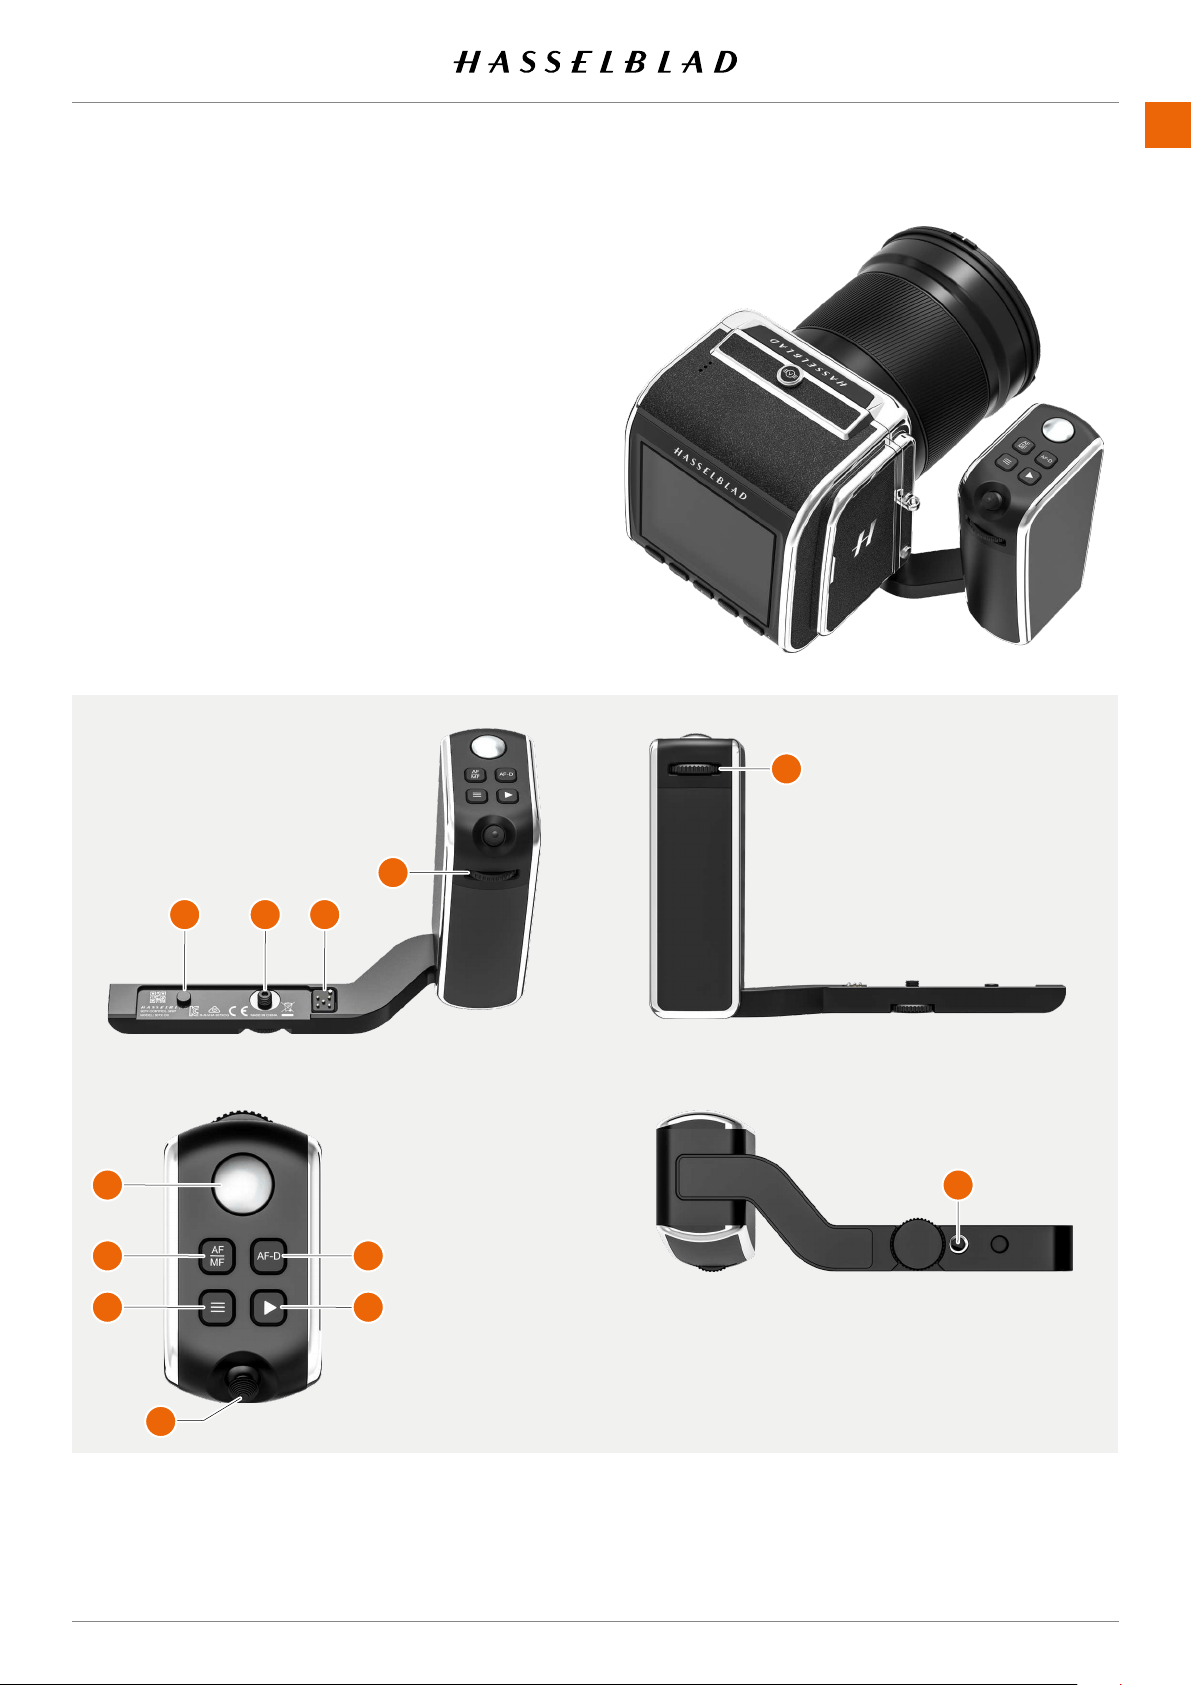
www.hasselblad.com
907X 50C USER GUIDE
CONTENTS
7.1 907X CONTROL GRIP
PARTS AND CONTROLS
1
2
3 Electrical connectors
Rear scroll wheel
5 Front scroll wheel
6 Shutter release button
8 Menu button
10 Browse button
11 AF Drive button
12
1
2
3
6
8
10
11
12
5
Functions of buttons and controls are described on .
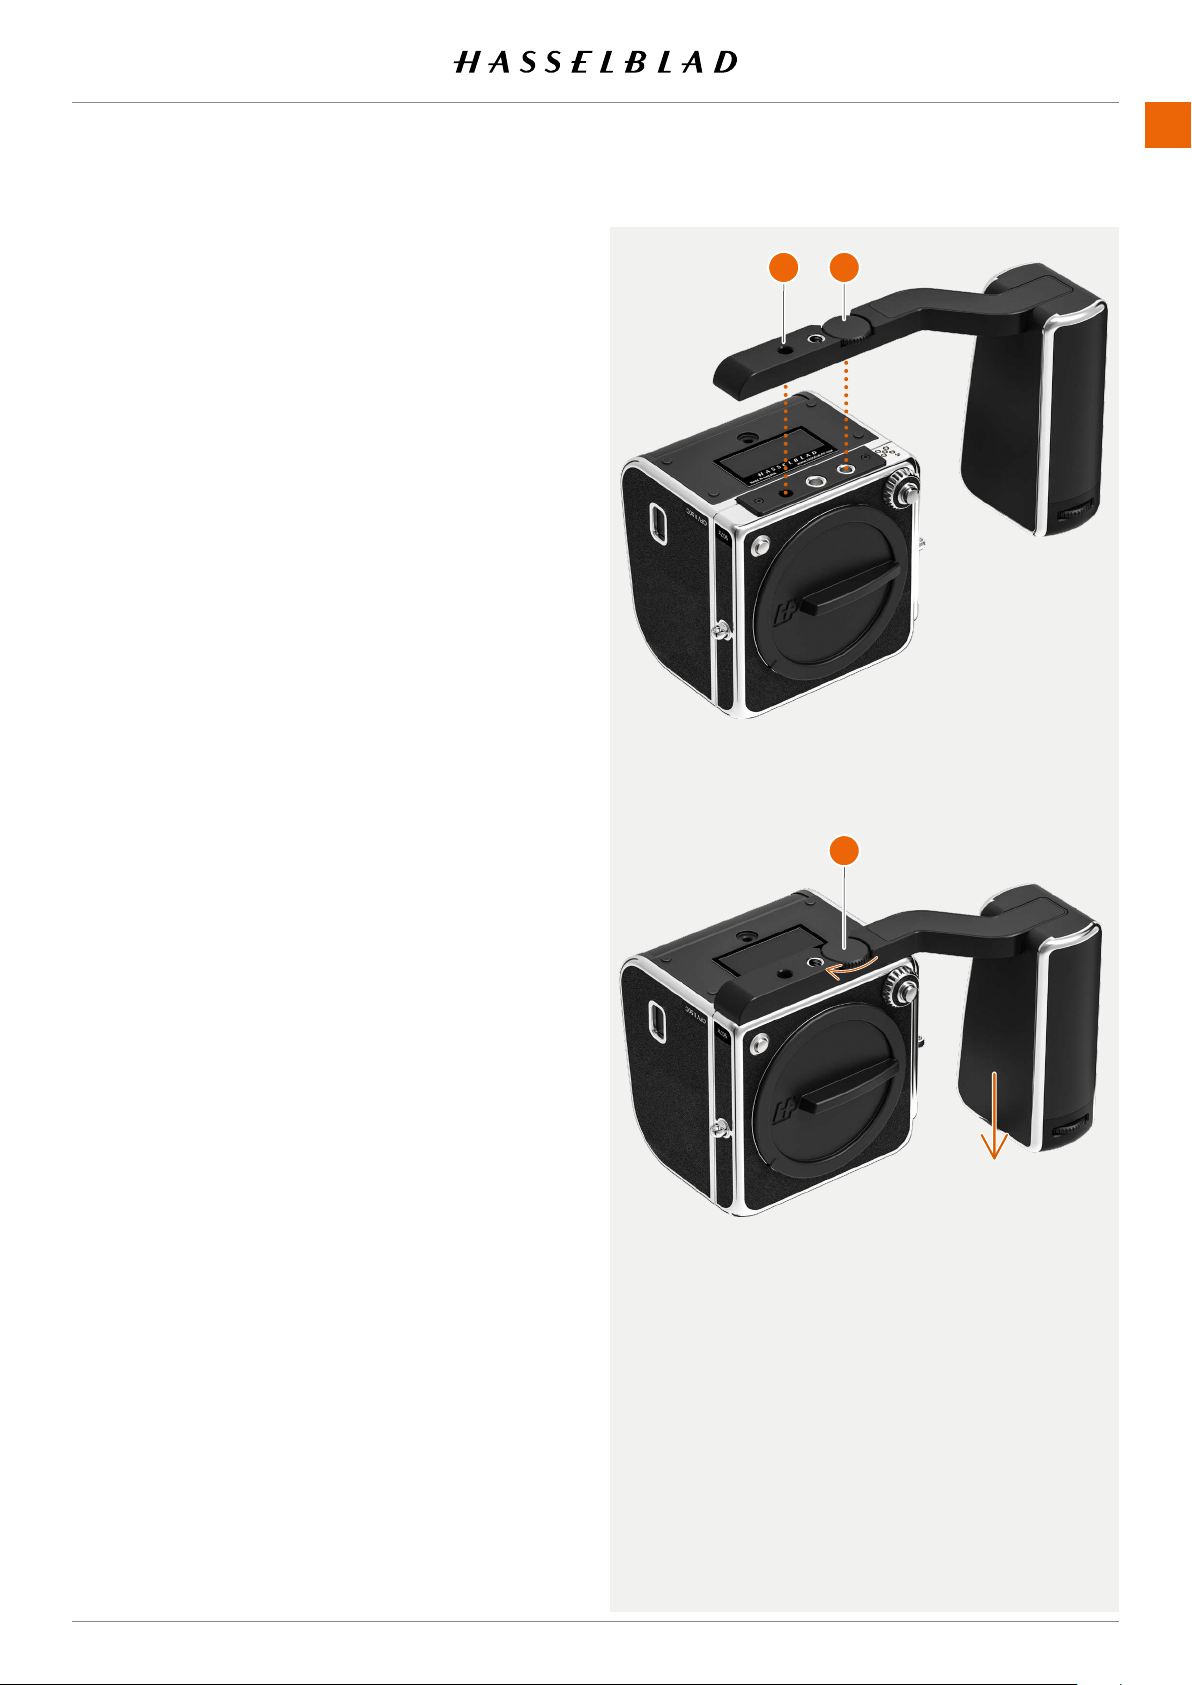
www.hasselblad.com
907X 50C USER GUIDE
CONTENTS
ATTACHING THE CONTROL GRIP
1
A
B
2
3
C
A
B
C
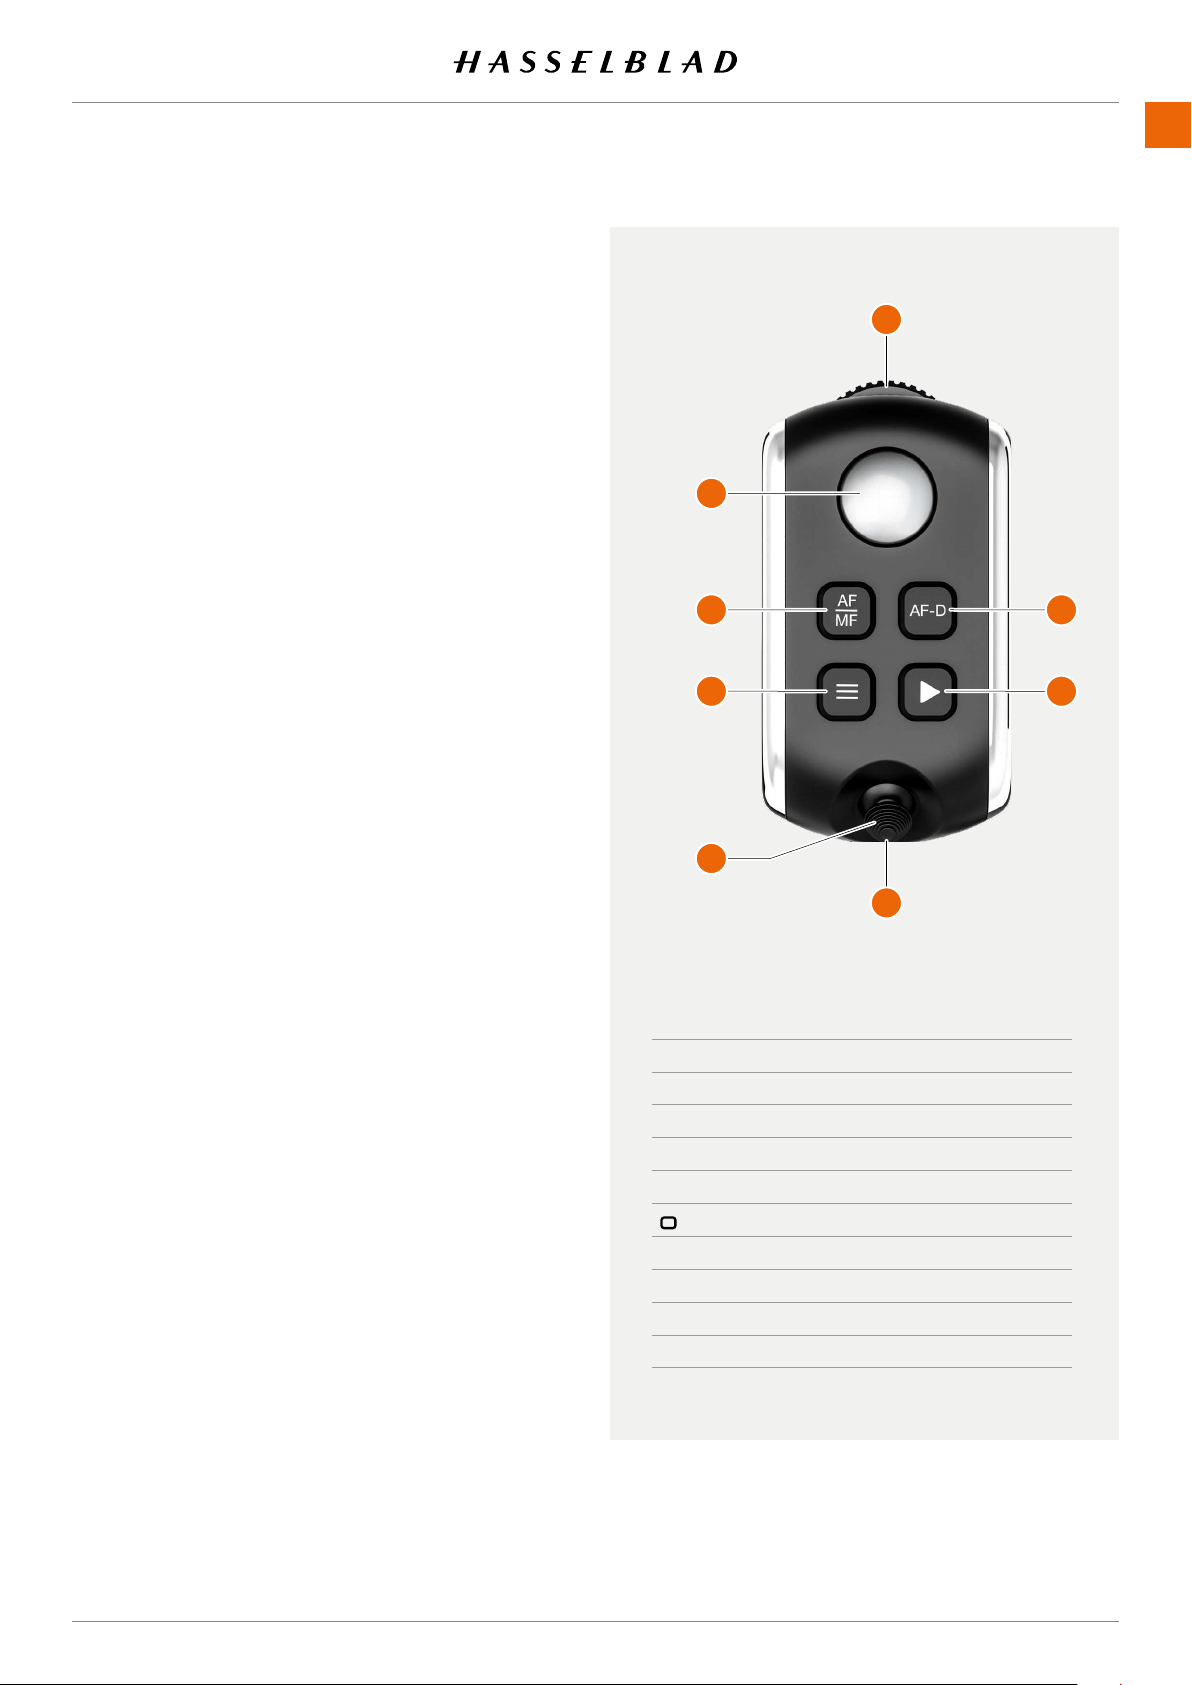
www.hasselblad.com
907X 50C USER GUIDE
CONTENTS
USING THE CONTROL GRIP
Buttons and controls
1
Front scroll wheel
2
Shutter release button
activate the camera, auto focus function and exposure
shutter. The chosen exposure procedure and the self timer
are also activated with this button.
3
AF/MF button
Focus mode.
Menu button
This button opens the Main Menu. If the Main Menu is
5
Joystick
.
6
Rear scroll wheel
Browse button
select folders and media.
8
AF Drive button
Press to start Autofocus and release to stop the Autofocus
function.
Note!
4
7
same time.
Note!
3
,
4
,
7
and
8
different function as described on .
MODE FRONT WHEEL REAR WHEEL
M Aperture Shutter Speed
A Aperture Quick Adjustment
S Shutter Speed Quick Adjustment
P Quick Adjustment
No function No function
Video Aperture Shutter Speed
C1 Depends on Mode
C2 Depends on Mode
C3 Depends on Mode
Note!
thumb for the all buttons.
1
2
3
5
6
8
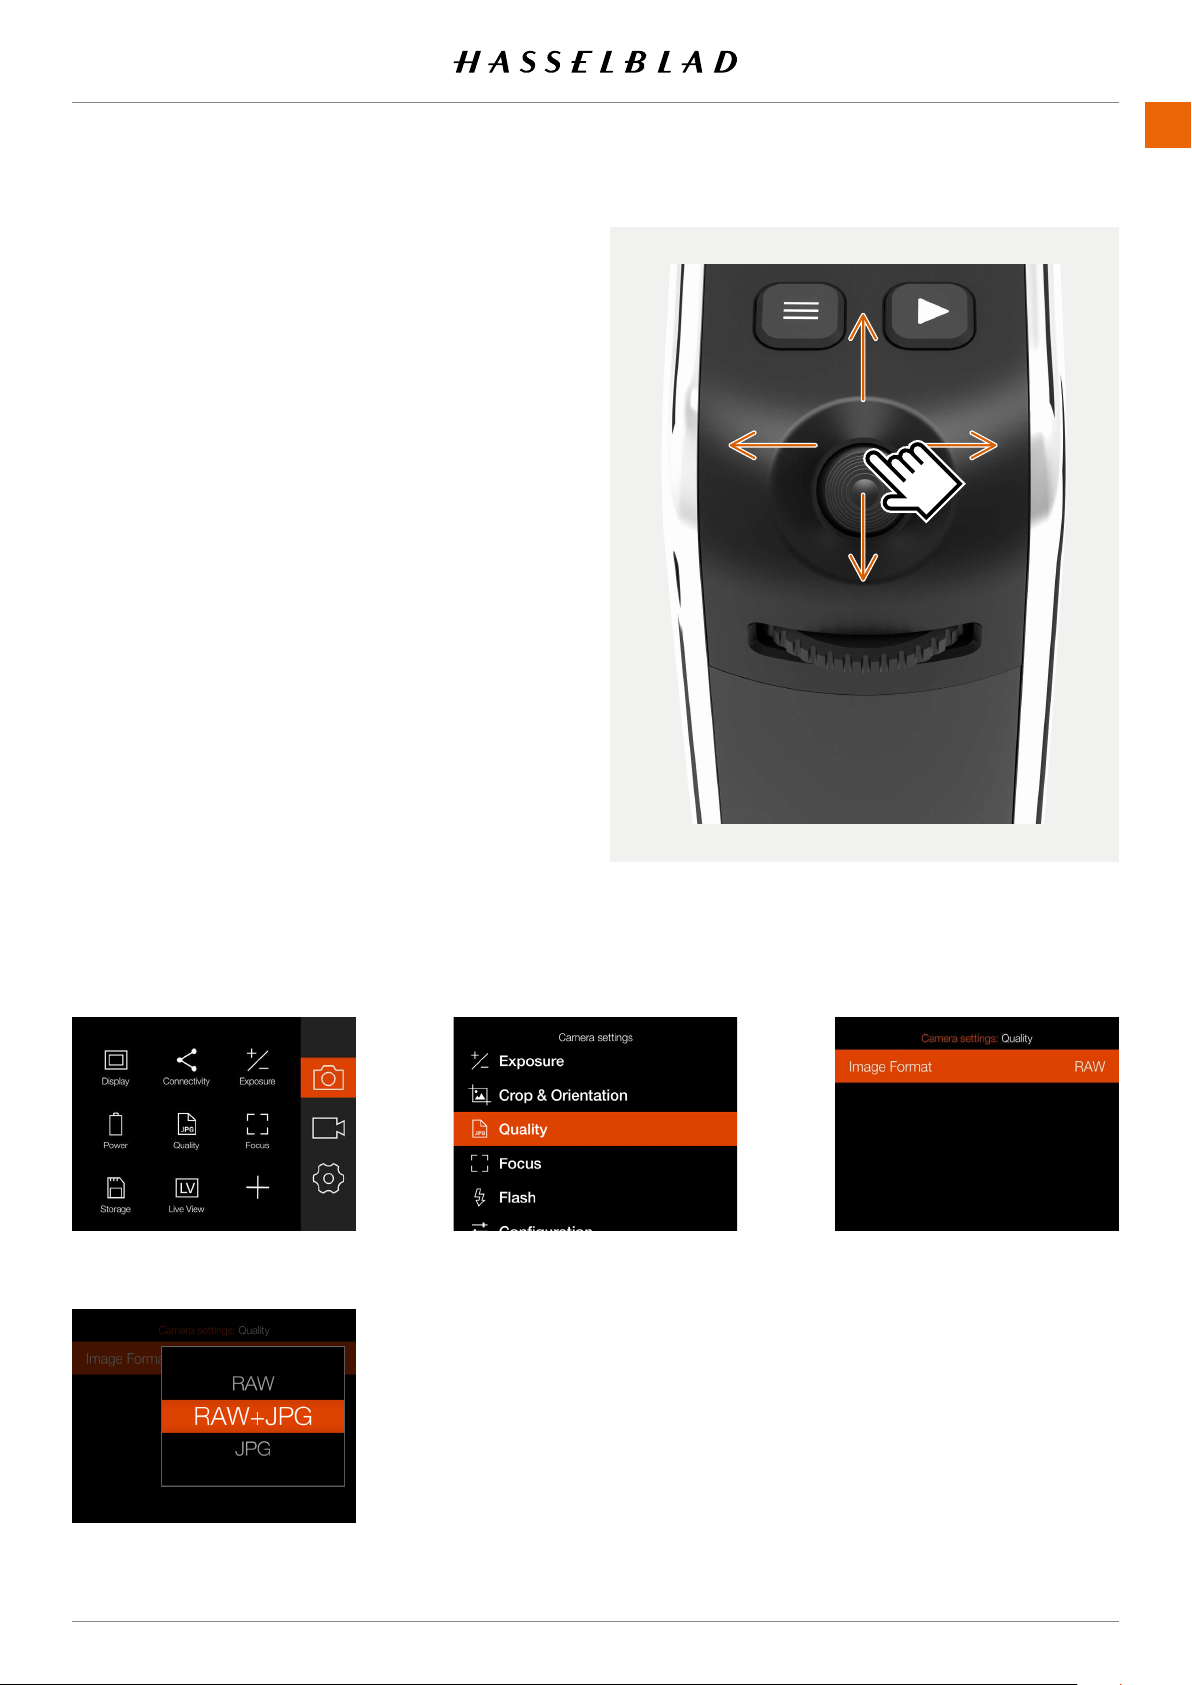
www.hasselblad.com
907X 50C USER GUIDE
CONTENTS
JOYSTICK
Live View mode
-
.
Menu mode
10
Control screen
Browse mode
Menu navigation
-
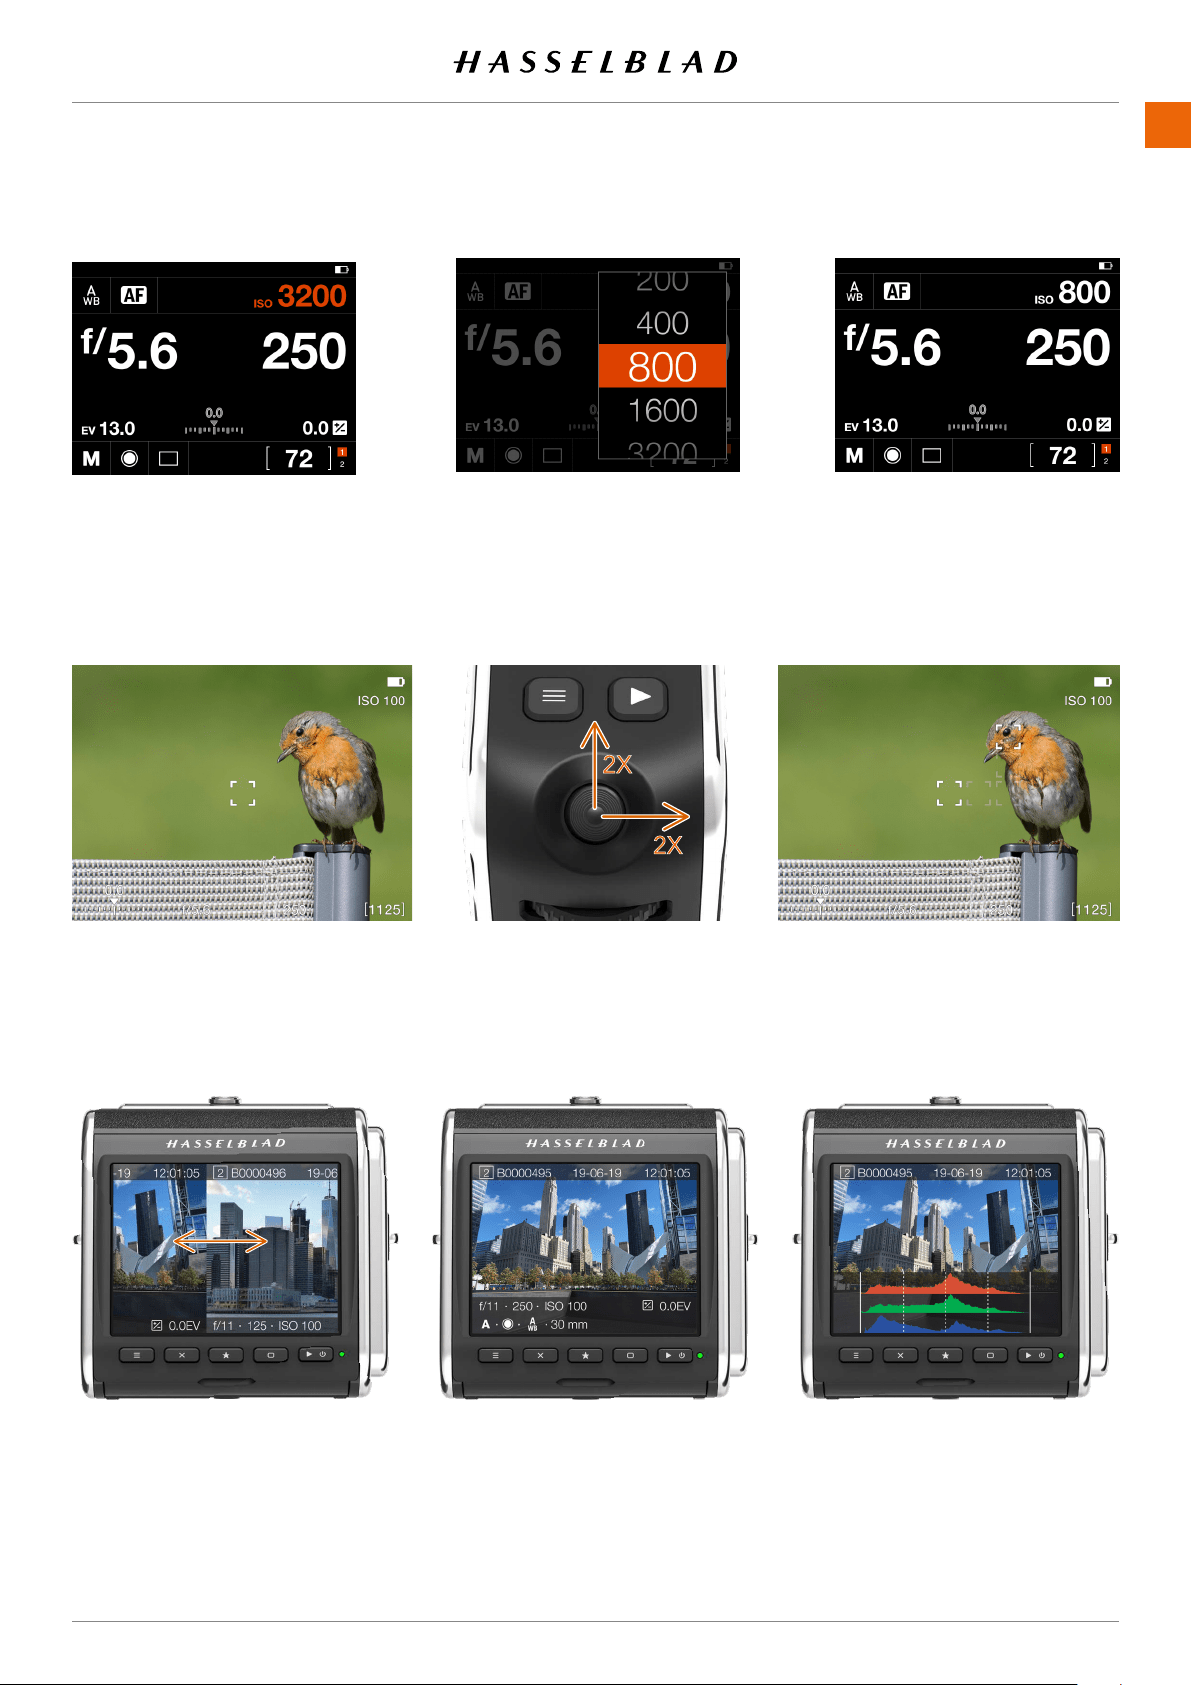
www.hasselblad.com
907X 50C USER GUIDE
CONTENTS
AF area is centered.
in this example.
Move AF area
down to select a new value.
new value.
Control screen setting
Browse images

8 907X OPTICAL VIEWFINDER
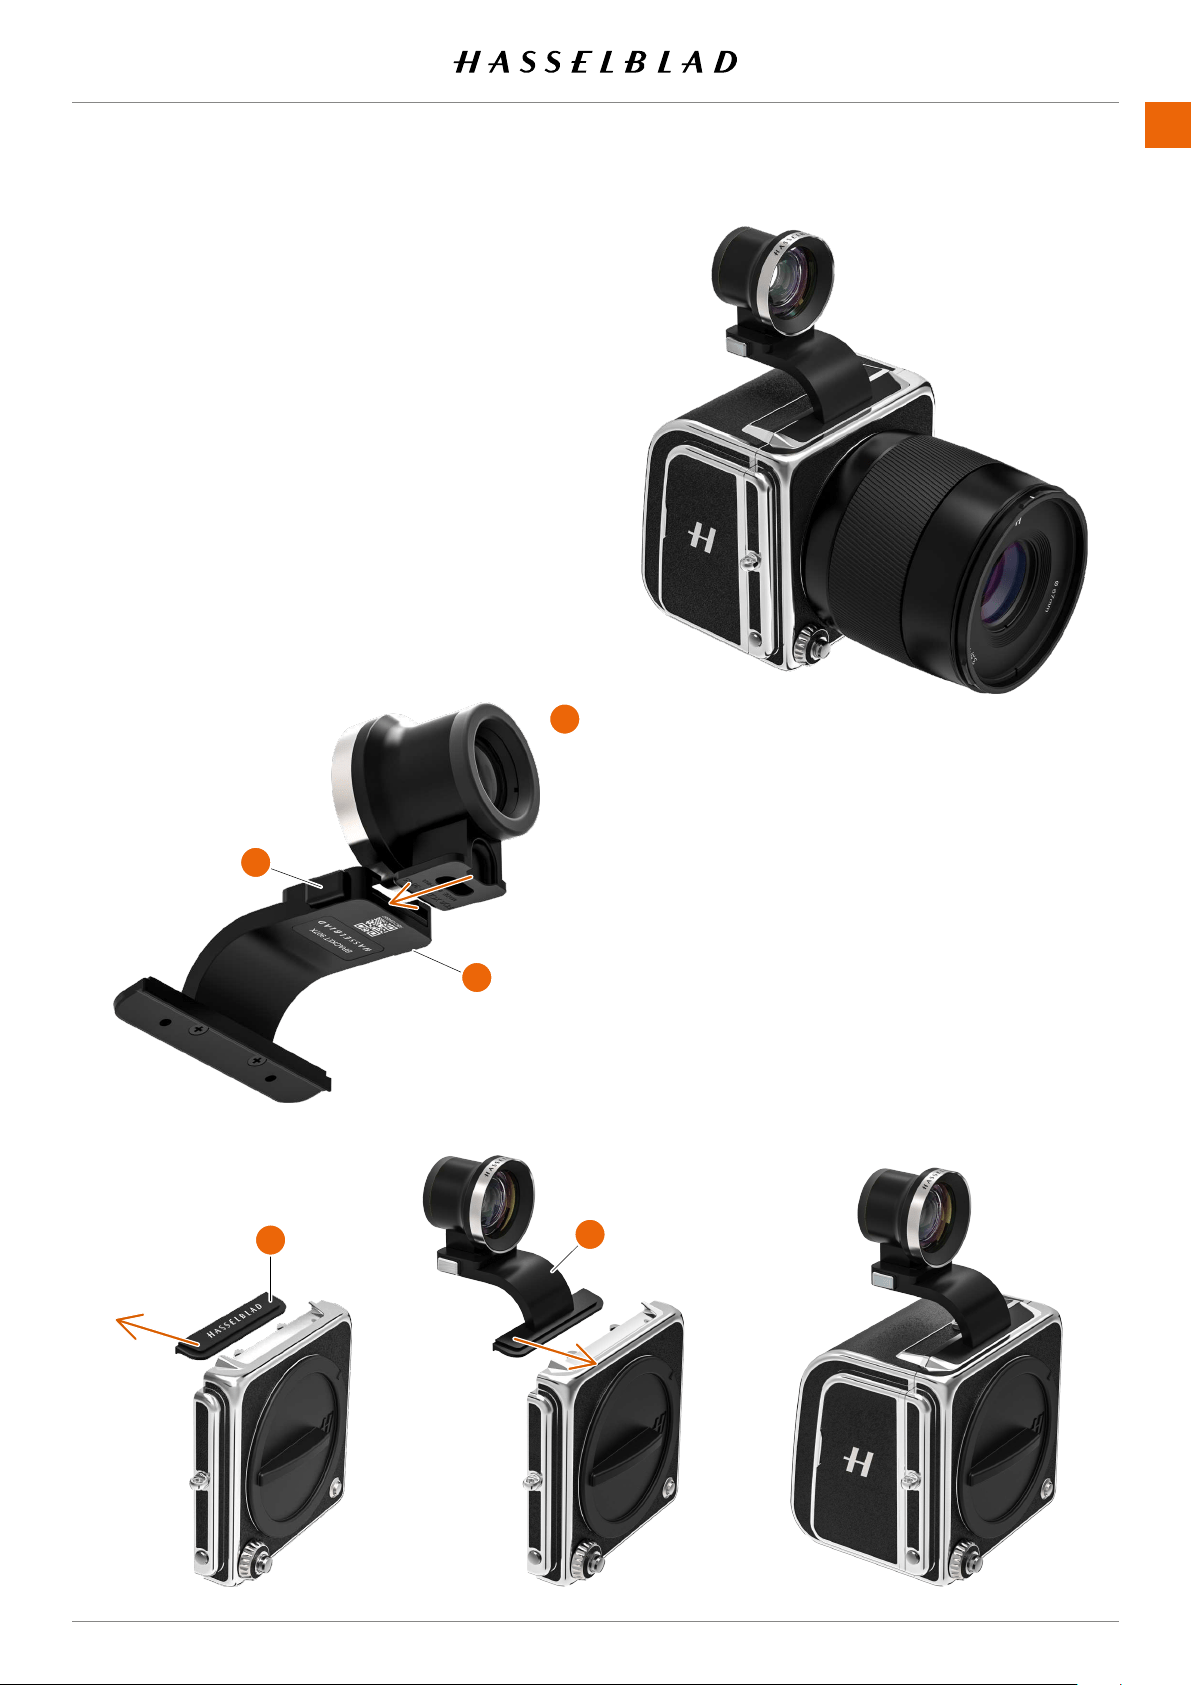
www.hasselblad.com
100
907X 50C USER GUIDE
CONTENTS
8.1 907X OPTICAL VIEWFINDER
ATTACHING TO THE CAMERA
●
A
1
2
OVF.
●
3
●
4
inserted.
● Attach the CFV to secure the OVF.
1
2
A
3
4
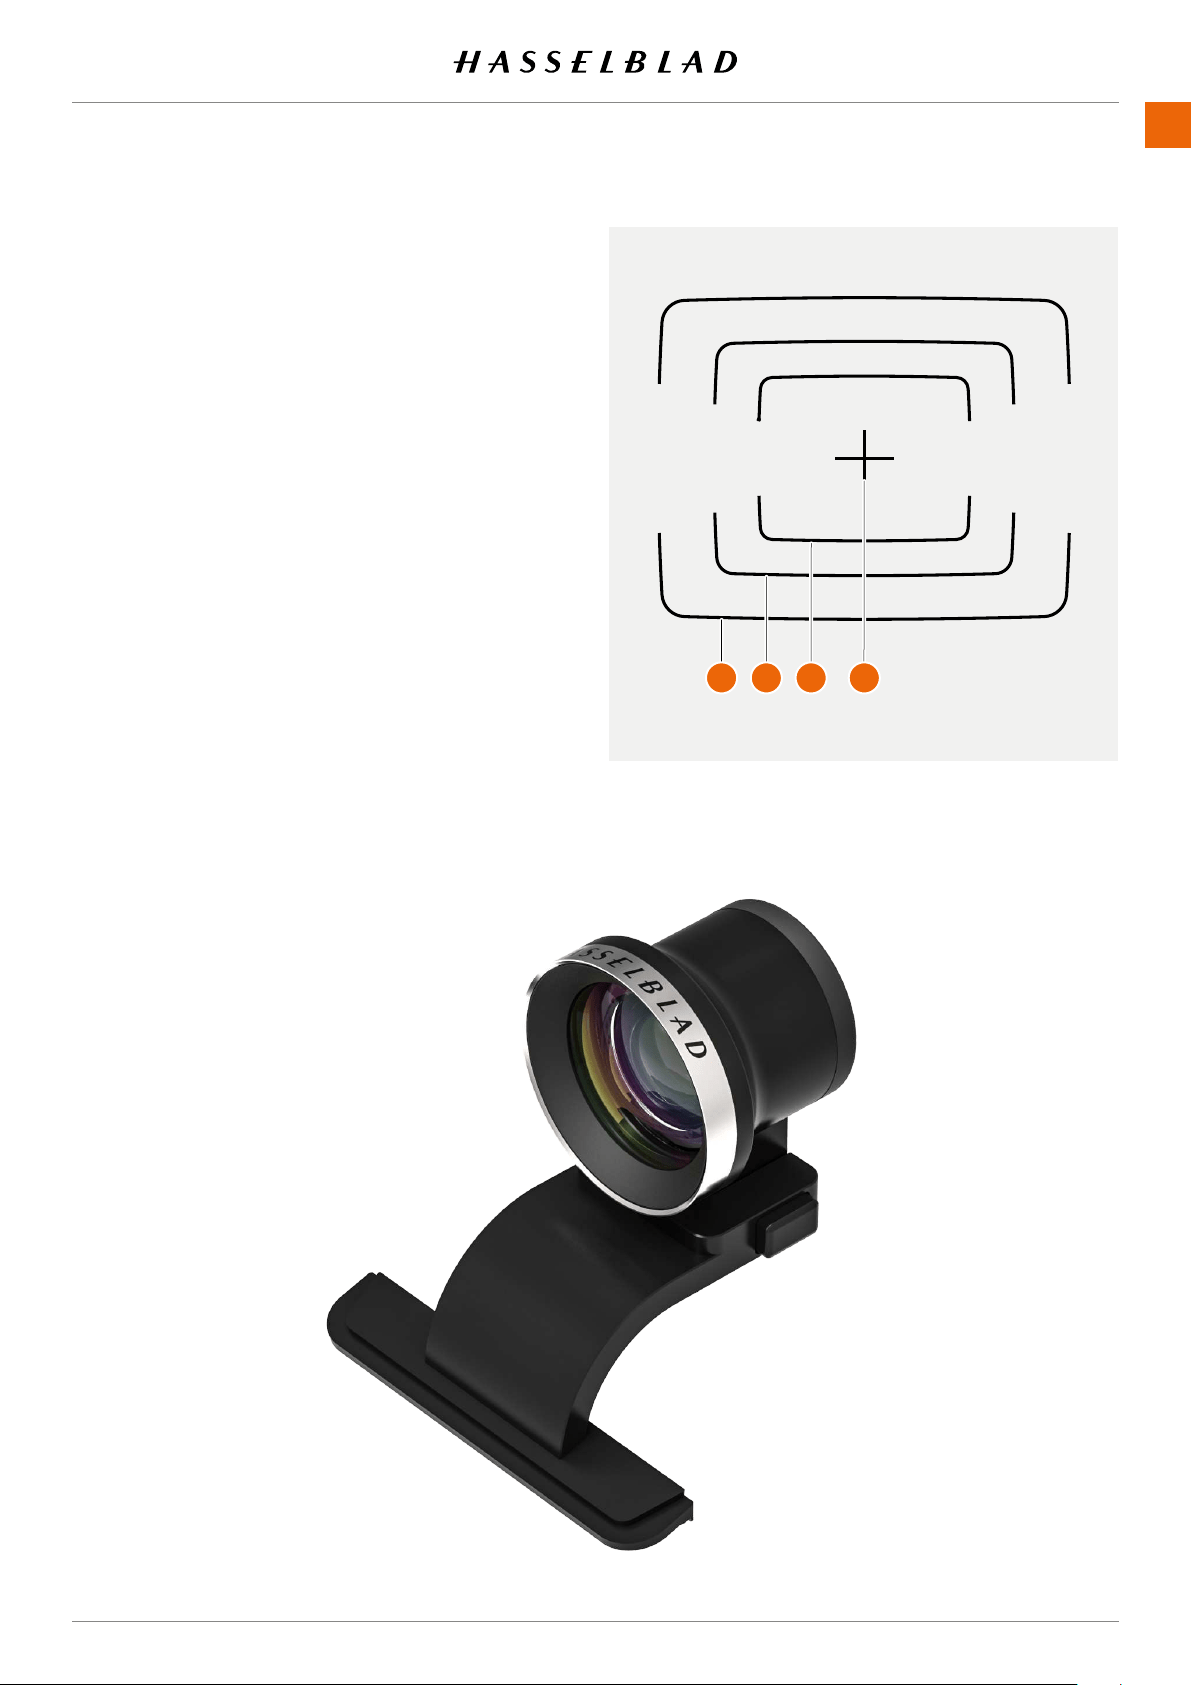
www.hasselblad.com
101
907X 50C USER GUIDE
CONTENTS
OVF MARKINGS
●
1
●
2
●
3
4
Note!
Note!
1
2 3

9 PHOCUS

PHOCUS
PHOCUS
Phocusisaprofessionalimageprocessingandlemanage-
mentapplicationaimedprimarilyatHasselbladRAW3Fle
handling. Phocus is available license-free for both Mac and
Windows.
9.1 PHOCUS OVERVIEW
The image processing engine in Phocus is optimized for
HasselbladRAWles.Ensuringthemaximumqualityfrom
your images. Colours and image details are rendered with
highest possible accuracy.
www.hasselblad.comCONTENTS
103
907X 50C USER GUIDE
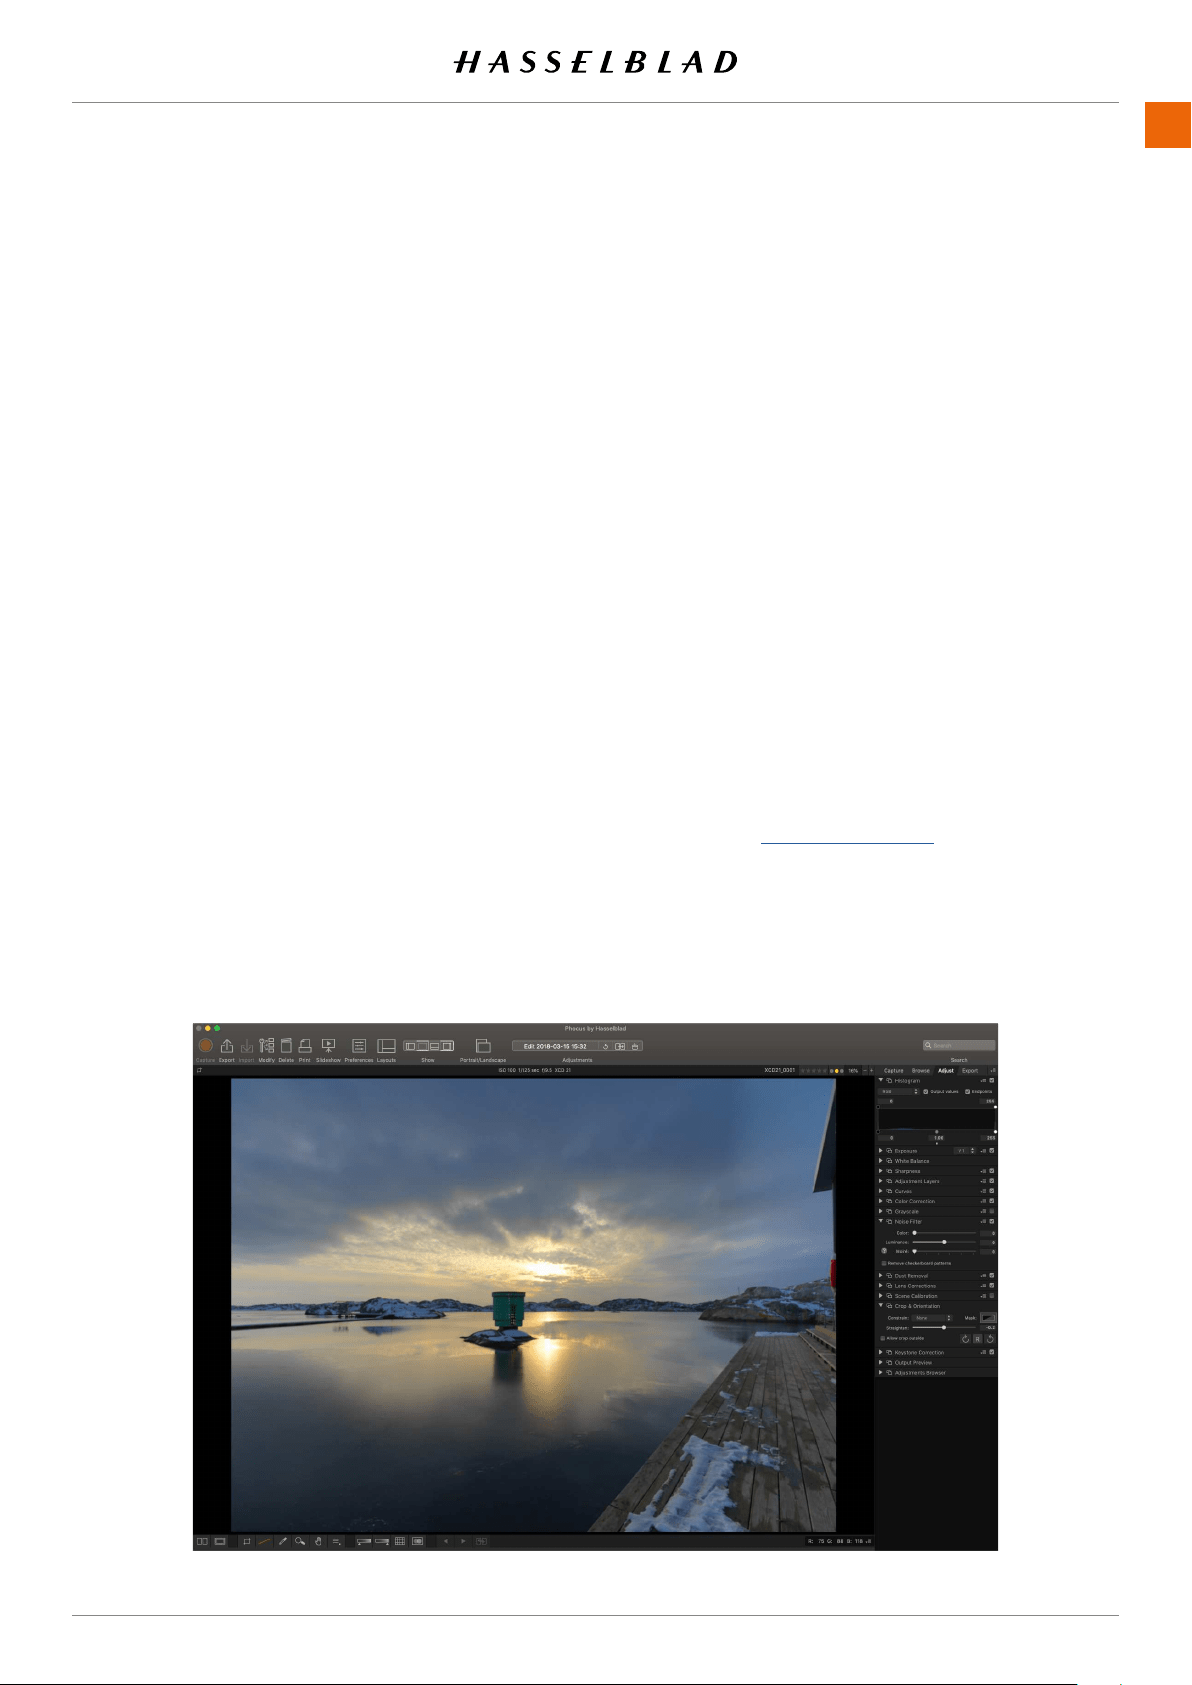
PHOCUS
FEATURES IN PHOCUS
Phocusisfeature-lledwhilestillbeingeasytouse,makingit
easy to achieve amazing results. Some of the powerful tools
and features are:
Natural Colours
Hasselblad’s Natural Colour Solution (HNCS) enables you to
produce outstanding and reliable colours so that skin tones,
specicproductcolours,anddifcultgradationsreproduce
beautifully every time without the need for multiple colour
proles.
Keystone perspective correction
The Keystone tool enables you to perform high quality
perspective corrections directly in Phocus. This can be
done both via a simple guideline interface or manual slider
adjustments. Additionally, the dual-axis correction capability
isextremelyusefulwhencopyingatartwork.
Local adjustments
A number of powerful adjustment tools can be used for local
adjustments of the image, allowing for quick and precise
corrections.
Digital lens correction
Hasselblad’s modern lens design has been optimised for
digital perfection, including full automatic correction of colour
aberration, distortion and light fall off. Phocus makes use of
its detailed knowledge of the lens design and calculates the
optical corrections for every shot at the given distance and
aperture setting, providing perfect images, and an ideal basis
for optimal image rendering and further processing. Hassel-
blad digital lens correction technology works automatically
with all Hasselblad H and X System lenses, even with tilt/shift
movements and with all Carl Zeiss lenses from the classic V
System, using manual settings.
Auto moiré detection
Phocus can now scan your images and automatically detect
moiré interference patterns. You can choose to correct the
interference globally or locally via the local adjustment tool.
Live view functionality – Camera control
In tethered situations, Phocus allows for complete camera
remote control, including exposure settings, focusing and
mirrorcontrol.Theabilitytohaveliveviewgreatlysimplies
tasks such as composing and focusing.
Note!
Read the dedicated user guide for Phocus which can be
downloaded from www.hasselblad.com.
Note!
Phocus is a license free software with unlimited installations
and there is no registration needed.
www.hasselblad.comCONTENTS
104
907X 50C USER GUIDE
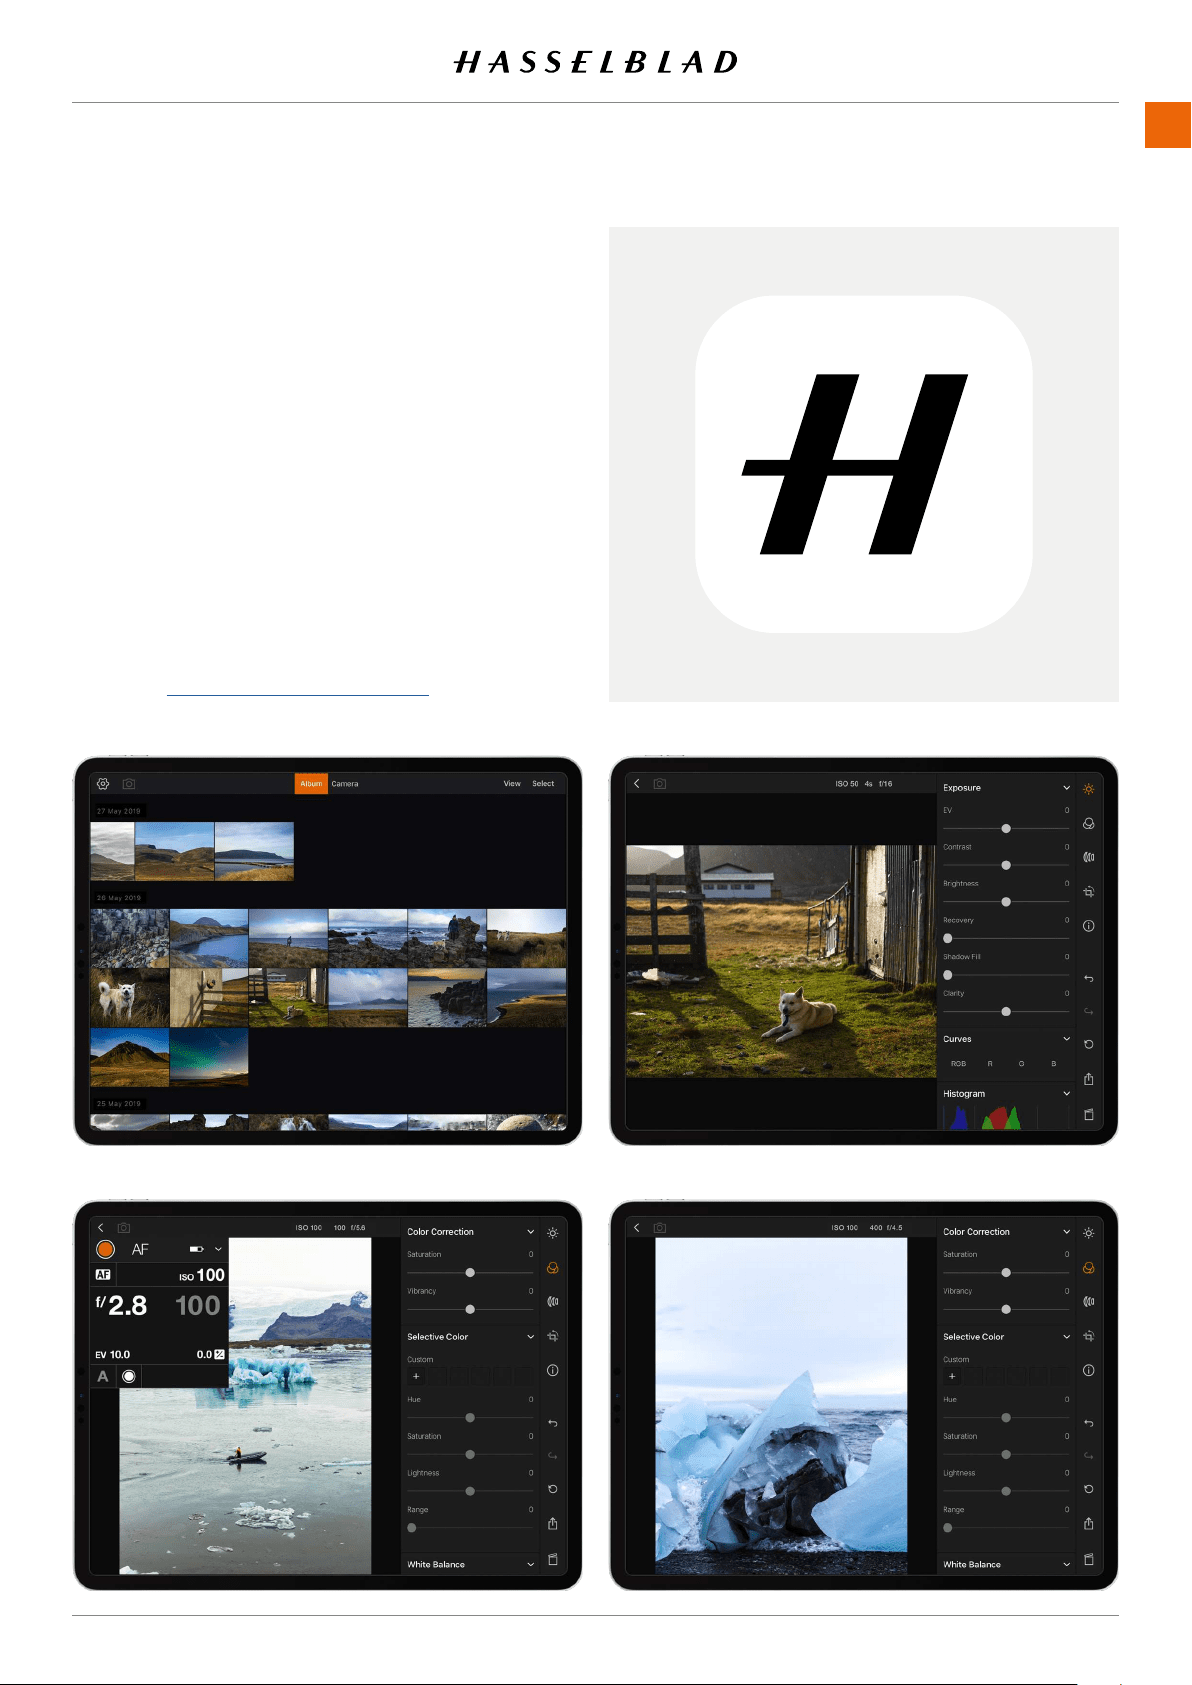
PHOCUS
PHOCUS MOBILE 2
Phocus Mobile 2 is the successor to the original Phocus
Mobile iOS application adding a number of new features.
Most importantly it adds support for both USB and Wi-Fi
connectivity, will let you capture images directly to the iOS
device and provides full quality image editing and export. It
will support both iPhone and iPad but for the image editing
functionality an iPad Pro or one of the most recent iPad Air
models with more than 2GB RAM is required. It will support
the 907X/CFV II 50C as well as the X1D II 50C cameras and
future models - the original Phocus Mobile will still be needed
for the older cameras.
Note!
The 907X/CFV II 50C and X1D II 50C cameras are not compati-
ble with the original Phocus Mobile app.
For further details please refer to the dedicated Phocus User
Guide and hasselblad.com/phocusmobile2.
www.hasselblad.comCONTENTS
105
907X 50C USER GUIDE
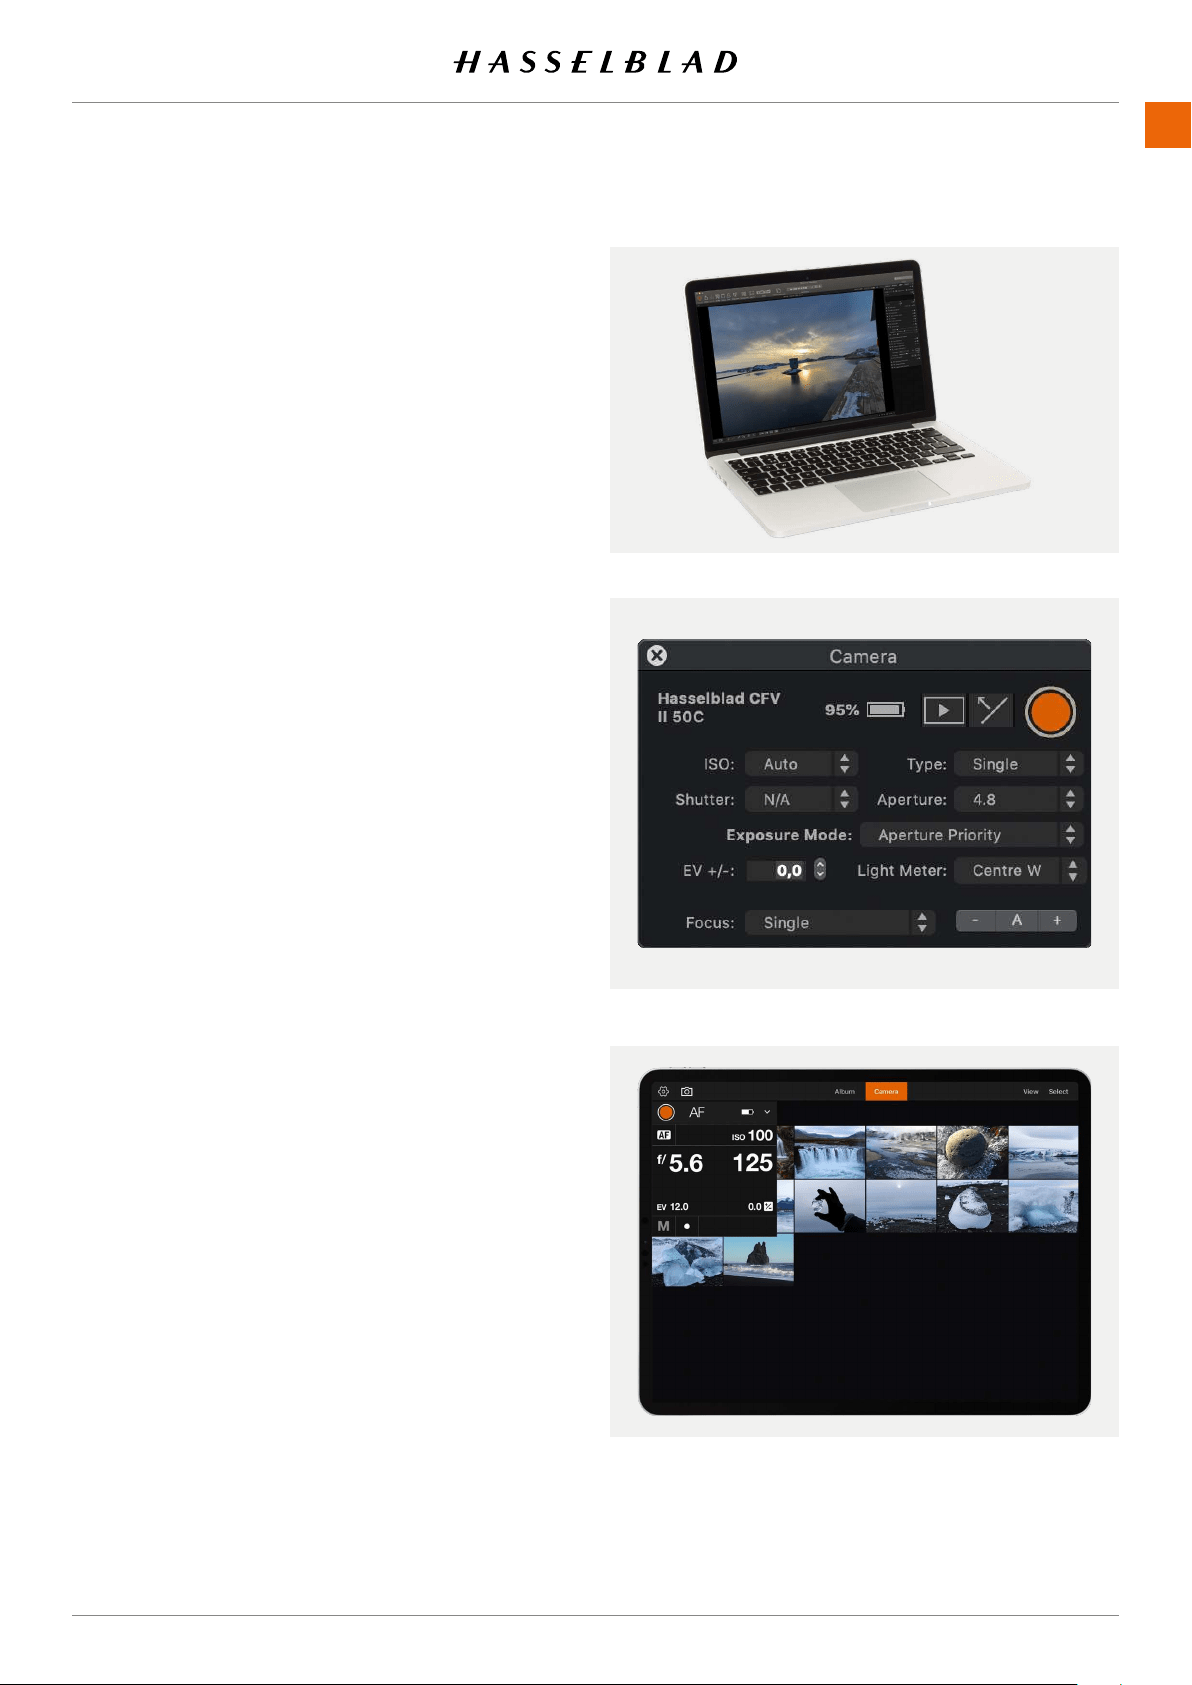
PHOCUS
9.2 CONNECT TO A COMPUTER
1 Connect a USB 3 cable to the USB port on the computer.
2 Connect the USB 3 cable to the USB port on the camera.
When initiating a shot from Phocus, the computer sends a
signal to the camera, which triggers the shutter (and strobe/
ash,ifany).Thecamerathensendsthecaptureoverthe
USB connection to the computer, where it is displayed on the
computerscreenandsavedasa16-bit3Fleinthecurrently
selected folder on the computer hard disk.
Note!
When connected to a computer, the following applies:
● The destination medium and location are controlled
from Phocus.
● All exposure settings, including ISO, aperture and
exposure time, are controlled from Phocus if you
choose to expose from Phocus. In addition extra tools
such as live video, remote focus control are available.
See Phocus user manual for full description.
Note!
Make sure the Tethering mode is set to Mac/PC when con-
necting to a computer. See more on page 121.
9.3 CONNECT TO AN IPAD PRO
USING CABLE
Tethered shooting via a USB cable, is available with an iPad
Pro running Phocus Mobile 2 when using Wi-Fi and cable
connections. A cable connection can be made through the
USB-C port or when using a Lightning to USB 3 adapter. A
USB-C to Lightning cable will also work, but will only give USB
2 speed.
Connect a USB-C to C cable from the camera to the iPad and
start the Phocus Mobile 2 App. See more on the next page.
Note!
Make sure the Tethering mode is set to iOS when connecting
to an iPad using USB. See more on page 121.
When the camera is connected via Wi-Fi to the iPad Pro, both
tethered capture and camera control are supported.
USING WI-FI
Connect the iPad using the procedure described on page
129.
www.hasselblad.comCONTENTS
106
907X 50C USER GUIDE
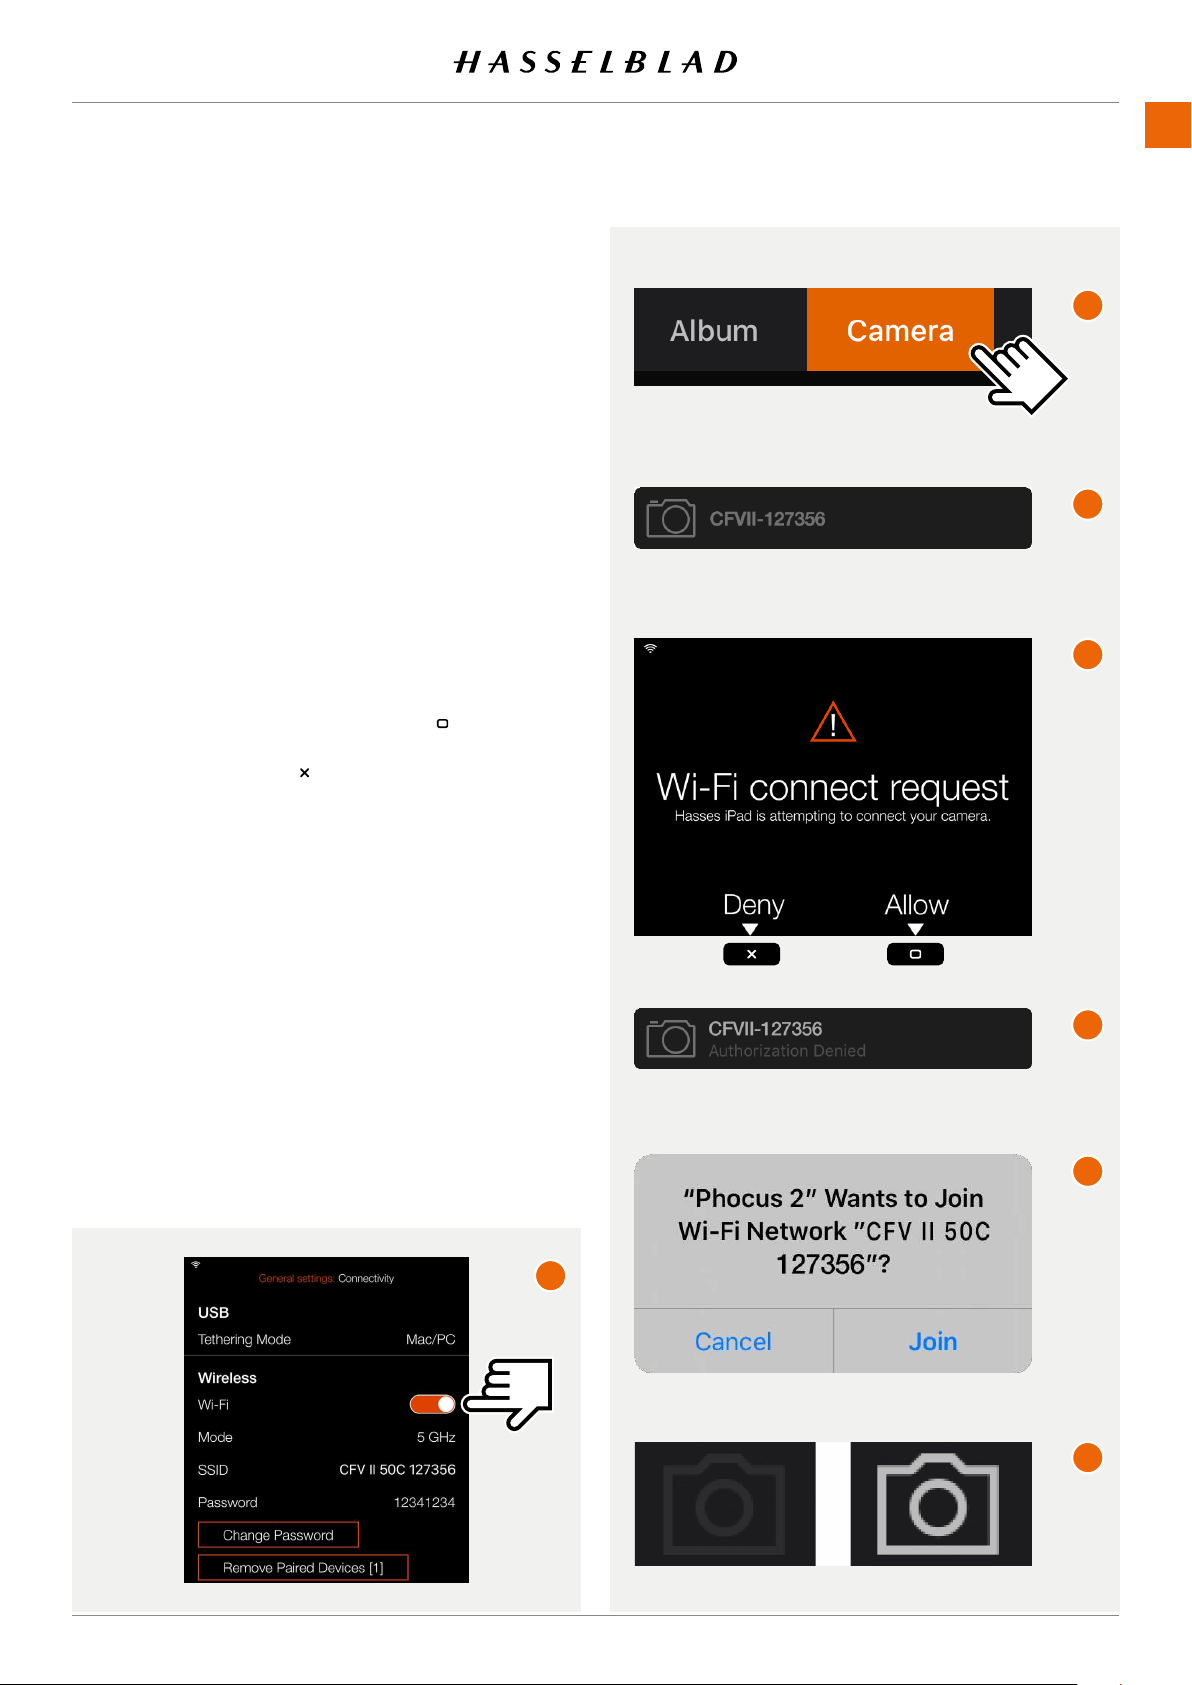
PHOCUS
9.4 CONNECT THE CAMERA TO AN IPAD
PRO OVER WI-FI
The following assumes that Phocus Mobile 2 is installed on a
compatible iPad (iPad Pro or iPad Air 2019). It is available as a
free download from the Apple App Store.
Two methods are available to connect the iPad to the camera.
BLUETOOTH ASSISTED WI-FI CONNECTION
1 Make sure that Bluetooth is activated on the iPad.
2 Start Phocus Mobile 2 on the iPad.
3 Start the camera and activate Wi-Fi
(A)
.
4 In Mobile 2, go to the Camera Tab
(B)
.
5 Mobile2startstosearchforcameras.Whennished,alist
of available cameras will be shown
(C)
.
6 Select your camera from the list.
7 Ifthisisthersttimethecameraisconnectedtothis
iPad, the camera will show the dialogue
(D)
toconrmthe
connection. Press the Rectangle Button ( )toconrmthe
connection. If you want to deny the connection request,
press the Cross Button ( ).
8 The iPad will show the dialogue
(E)
.
9 Ifyouconrmtheconnectionrequest,thecamerawill
automatically send the Wi-Fi password (shown in the
Connectivitymenu)totheiPad.Toconrmthisconnection,
you will have to tap Join in the dialogue
(F)
that appears
on the iPad.
10 When the connection is established, the Camera Icon in
the upper left corner of the App window will change from
grey to white
(G)
.
Note!
Thisprocessissimpliedwhenacamerahasbeenpreviously
connected to this iPad. Then only steps
(A)
,
(B)
and
(F)
are
required.
Also see “Connectivity settings” on page 129.
ConnectedNot connected
www.hasselblad.comCONTENTS
C
D
F
E
G
A
B
107
907X 50C USER GUIDE

MANUAL WI-FI CONNECTION
1 Start the camera and activate Wi-Fi
(A)
. The camera will
now create a Wi-Fi network with the same name as the
SSID
(1)
.
2 Enter the settings on the iPad by tapping the Settings Icon.
3 In the iPad settings dialogue, tap “Wi-Fi”
(B)
.
4 Inthelist“MyNetworks”or“OtherNetworks”youwillnd
the camera network. Tap on it to connect
(C)
.
5 If the camera has not previously been connected to this
iPad, a password dialogue will appear on the iPad
(D)
.
6 Enter the camera password
(2)
.
7 When the camera network is shown directly under Wi-Fi
(E)
a connection is established.
8 Start Phocus Mobile 2 on the iPad.
PHOCUS
www.hasselblad.comCONTENTS
1
2
E
F
G
H
A
108
907X 50C USER GUIDE
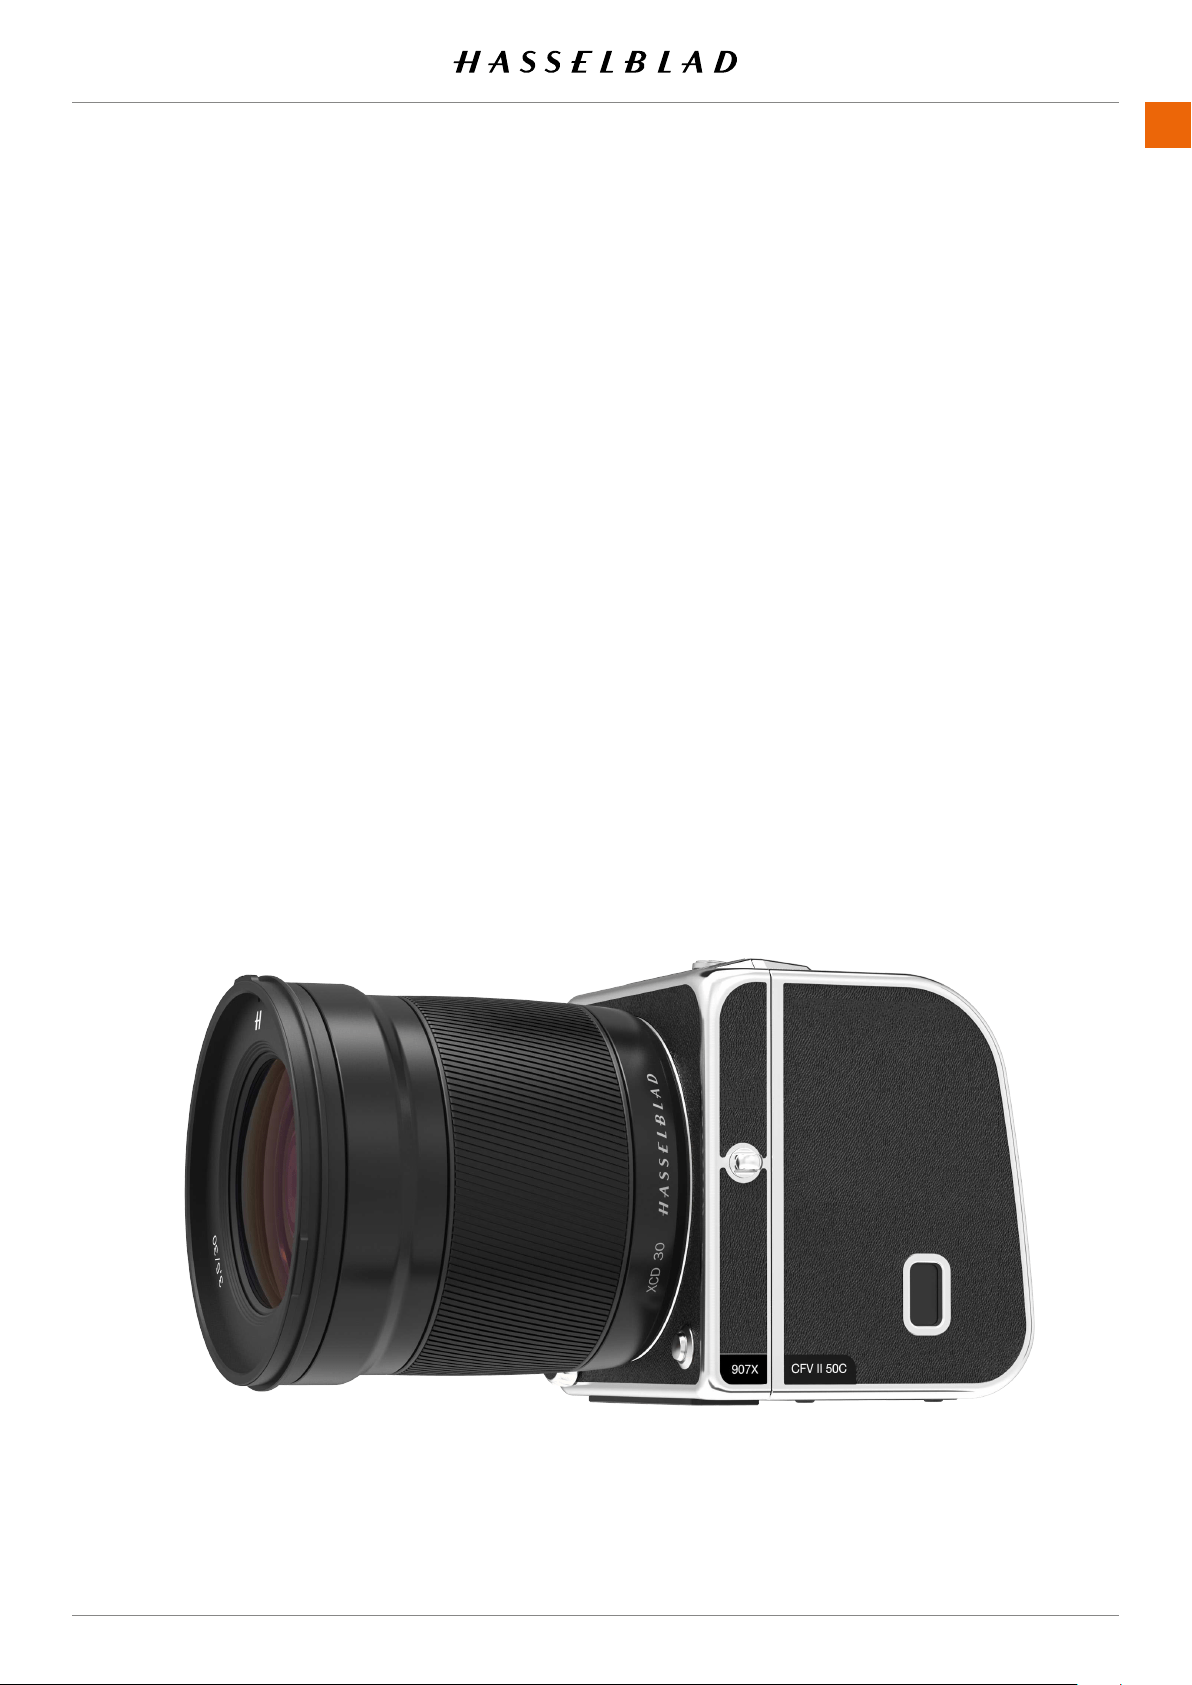
PHOCUS
9.5 PHOCUS AND HASSELBLAD CAPTURE
FILES
Images captured by the camera are stored as Hasselblad RAW
formatlesorJPEGformat.ItispossibletostoreeitherRAW
or JPG or both RAW and JPG simultaneously.
HasselbladRAWlesareinitiallystoredinthe3FRformat
which is a proprietary Hasselblad format for the temporary
storageofcaptures.A3FRlecontainsthecompletedigitized
raw image exactly as it was captured by the camera. 3FR
information requires further computing power (typically by
way of Phocus) to obtain complete development. If developed
inPhocus,3FRlesbecomeHasselblad3Fles–denoted
byeachlenowbearingthesufx“.fff”.Ifdevelopedby
otherRAWprocessors,the3FRlesarenotconvertedto3F
but can be exported directly to TIFF and PSD according to
requirements.
When working tethered to Phocus or Phocus Mobile 2, 3FR
lesareautomaticallyprocessedandstoredintheback-
groundonacomputerappearingas3Flesontheharddisk
readyforselectiveadjustmentandexport.3FRlesstoredon
a SD card can be processed using:
Hasselblad Phocus
Adobe Camera Raw
Adobe Lightroom
Capturelescanbestoredforfutureuseas3FRles(froma
SD card) for later processing in Phocus or other software, or
theycanbestoredas3Fles(asaresultoftetheredshooting
or3FRlesprocessedandconvertedinPhocus).Inallcases
ifyoukeeptheoriginal3FR/3Fles,youwillalsoretainthe
possibility of reprocessing them in the future in later versions
of Phocus or other software to take advantage of eventual
improvements and developments.
www.hasselblad.comCONTENTS
109
907X 50C USER GUIDE

10 SETTINGS
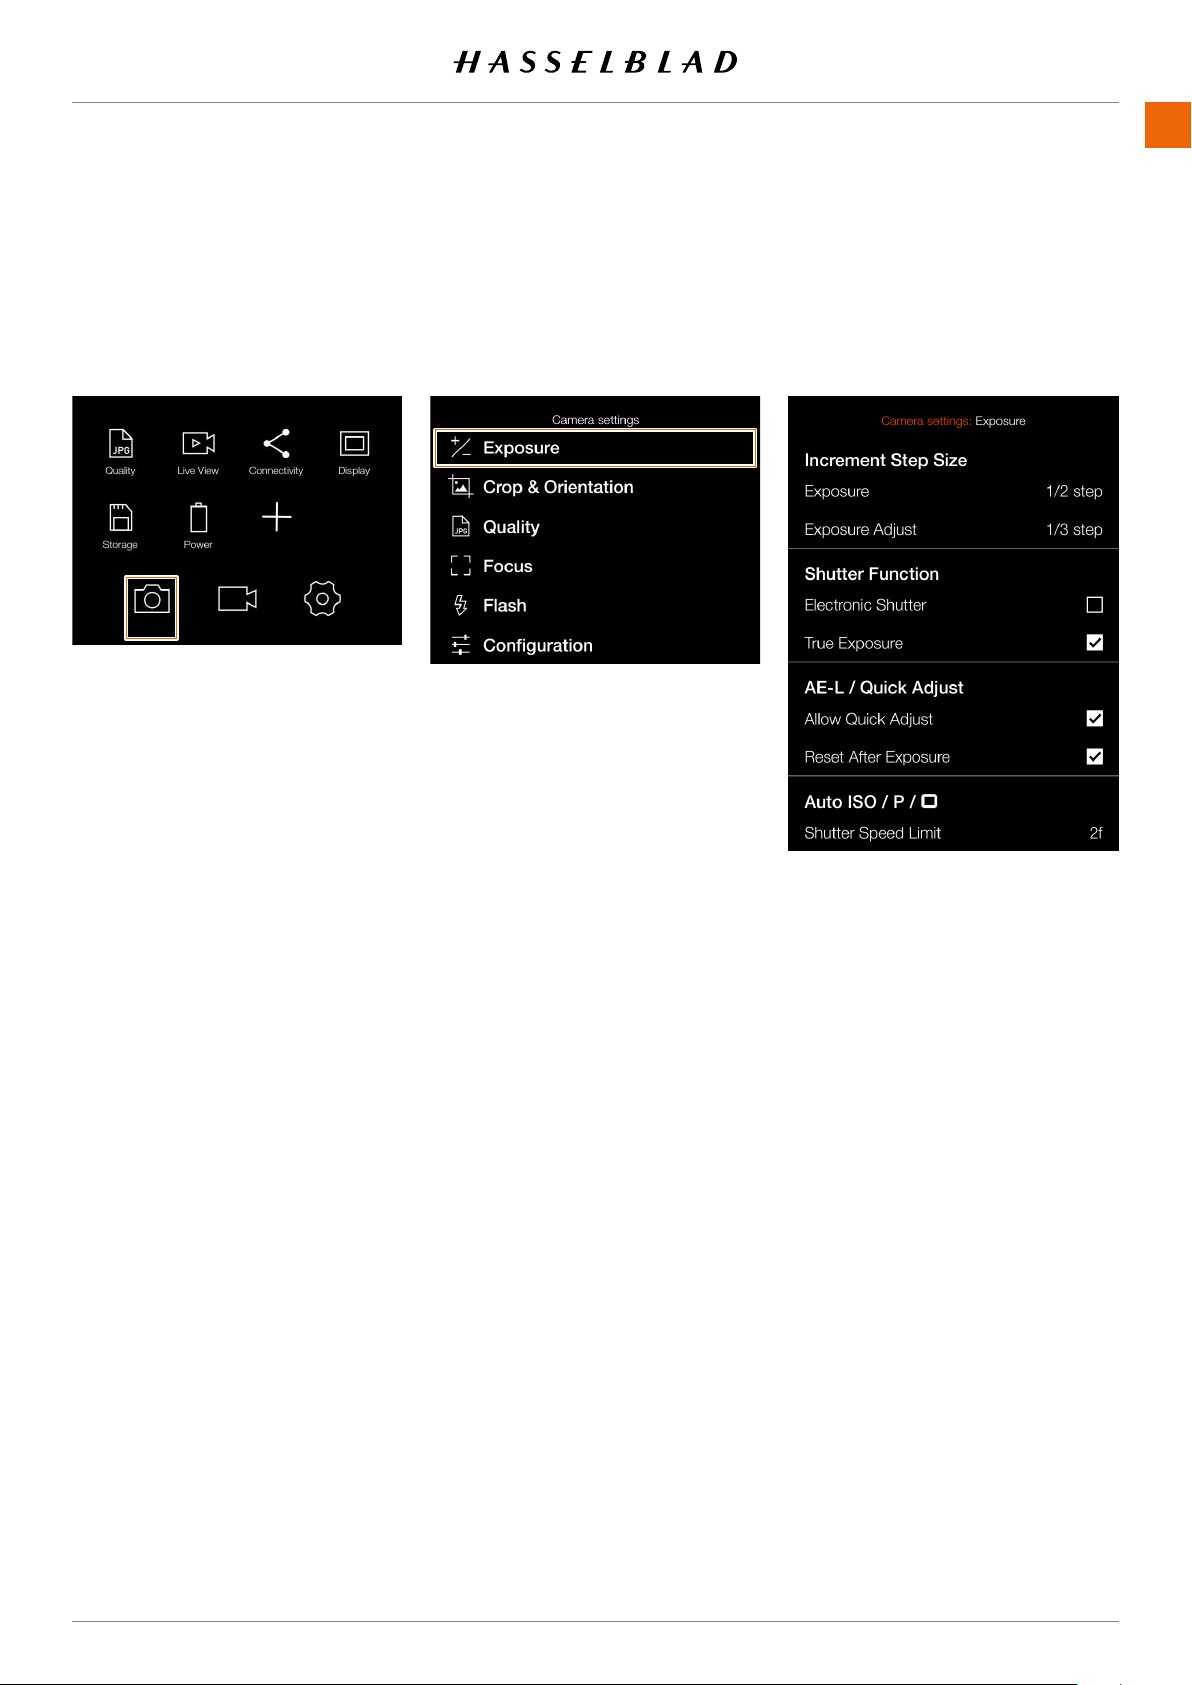
SETTINGS
www.hasselblad.comCONTENTS
111
MAIN MENU > CAMERA SETTINGS >
1 Press the camera icon on the touch
2
Main menu
10.1 THE CAMERA SETTINGS MENU
EXPOSURE
111
907X 50C USER GUIDE
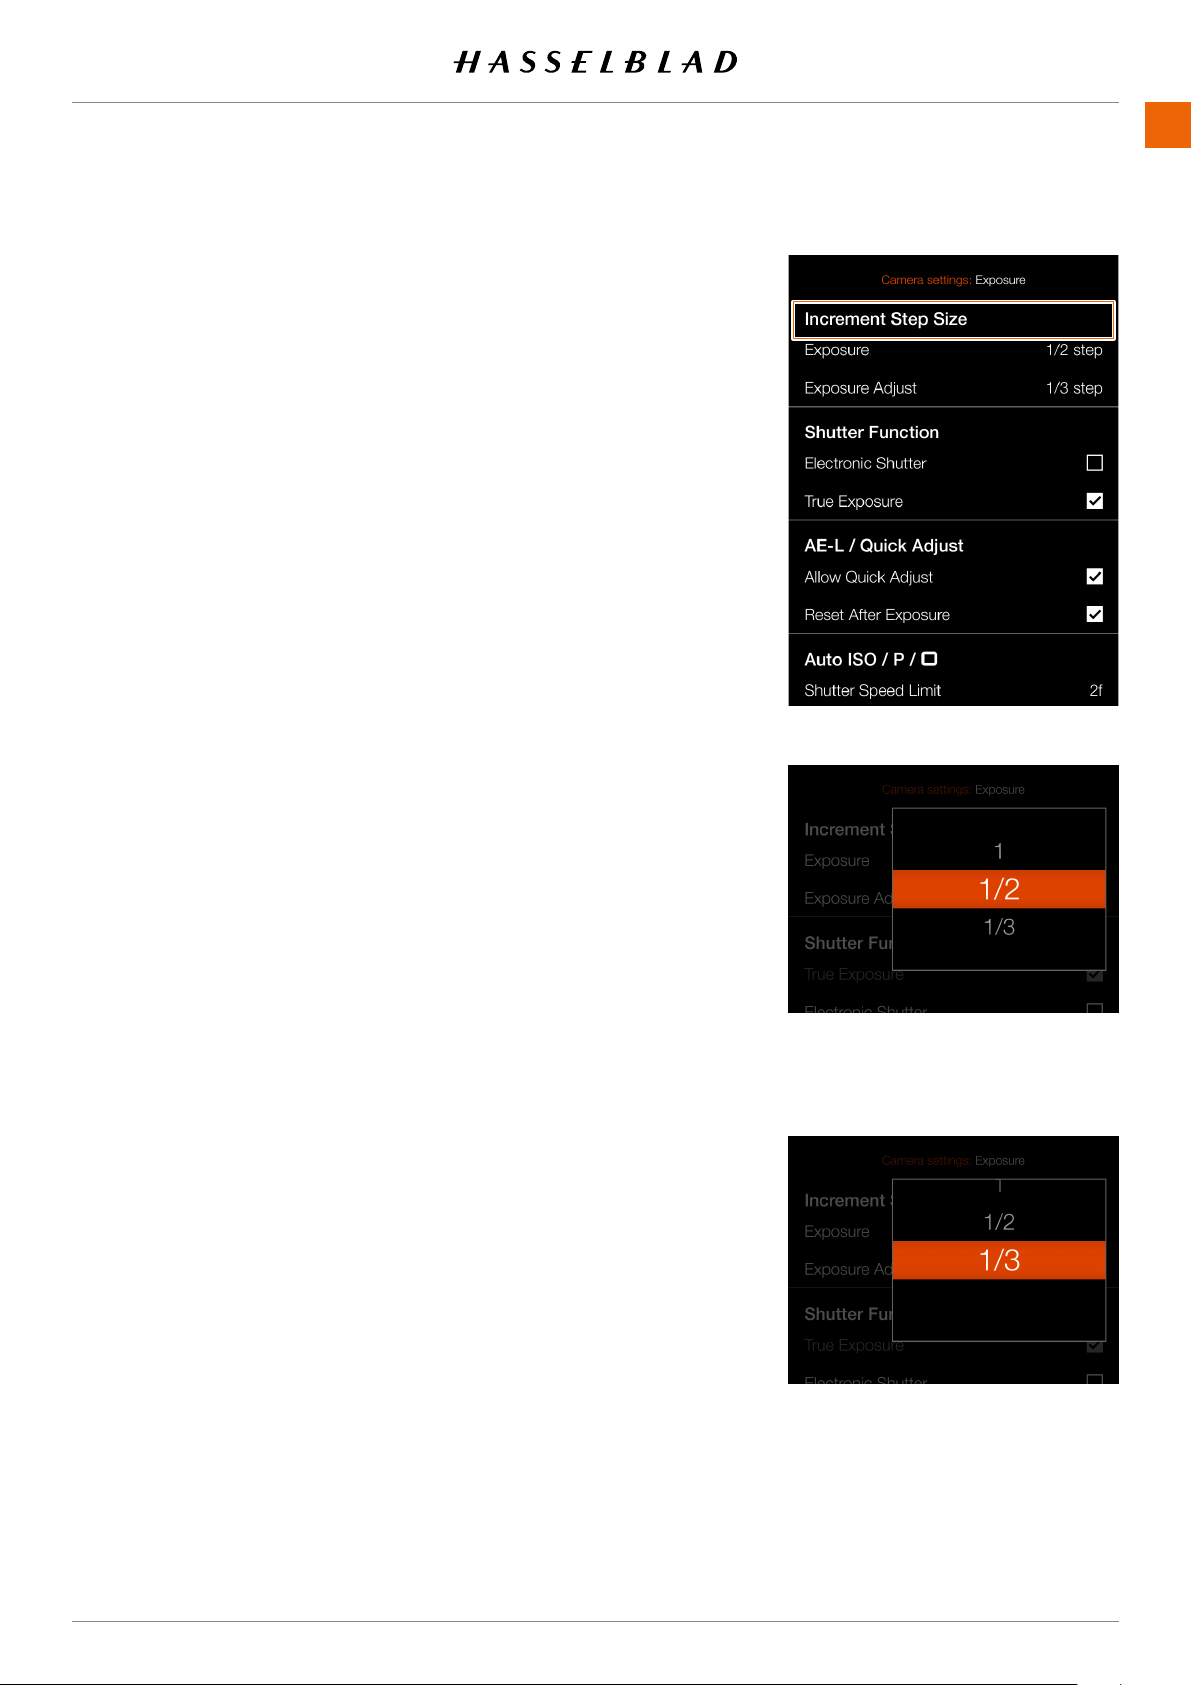
SETTINGS
www.hasselblad.comCONTENTS
112
INCREMENT SETTINGS
-
MENT STEP SIZE
1
2
3
menu.
Exposure Settings:
Select between:
Whole step (1)
Half step (1/2)
Third step (1/3)
Exposure Adjust Settings:
Select between:
Whole step (1)
Half step (1/2)
Third step (1/3)
112
907X 50C USER GUIDE

SETTINGS
www.hasselblad.comCONTENTS
113
SHUTTER FUNCTION SETTINGS
1
2
3
Select Shutter Function.
main menu.
Electronic Shutter
Select
On
or
Off
. If this option is checked, the camera
will disable the lens shutter and use an electronic
shutter in the sensor instead. When electronic shutter
the shutter speed in live view and on control screen.
shutter:
•
the sensor which has a read-out time of approx-
are recommended.
• ISO will be limited to 3200.
•
•
• Flash is disabled.
• Continuous drive is disabled.
• True Exposure is disabled.
True Exposure
Select
On
or
Off
. The check box will be marked with a
Exposure is Off.
Note!
remember to turn off the True Exposure option.
Note!
113
907X 50C USER GUIDE
Control screen with active electronic shutter
Note!
An active electronic shutter is indicated on the control screen
and in live view with an "E" next to the shutter speed.
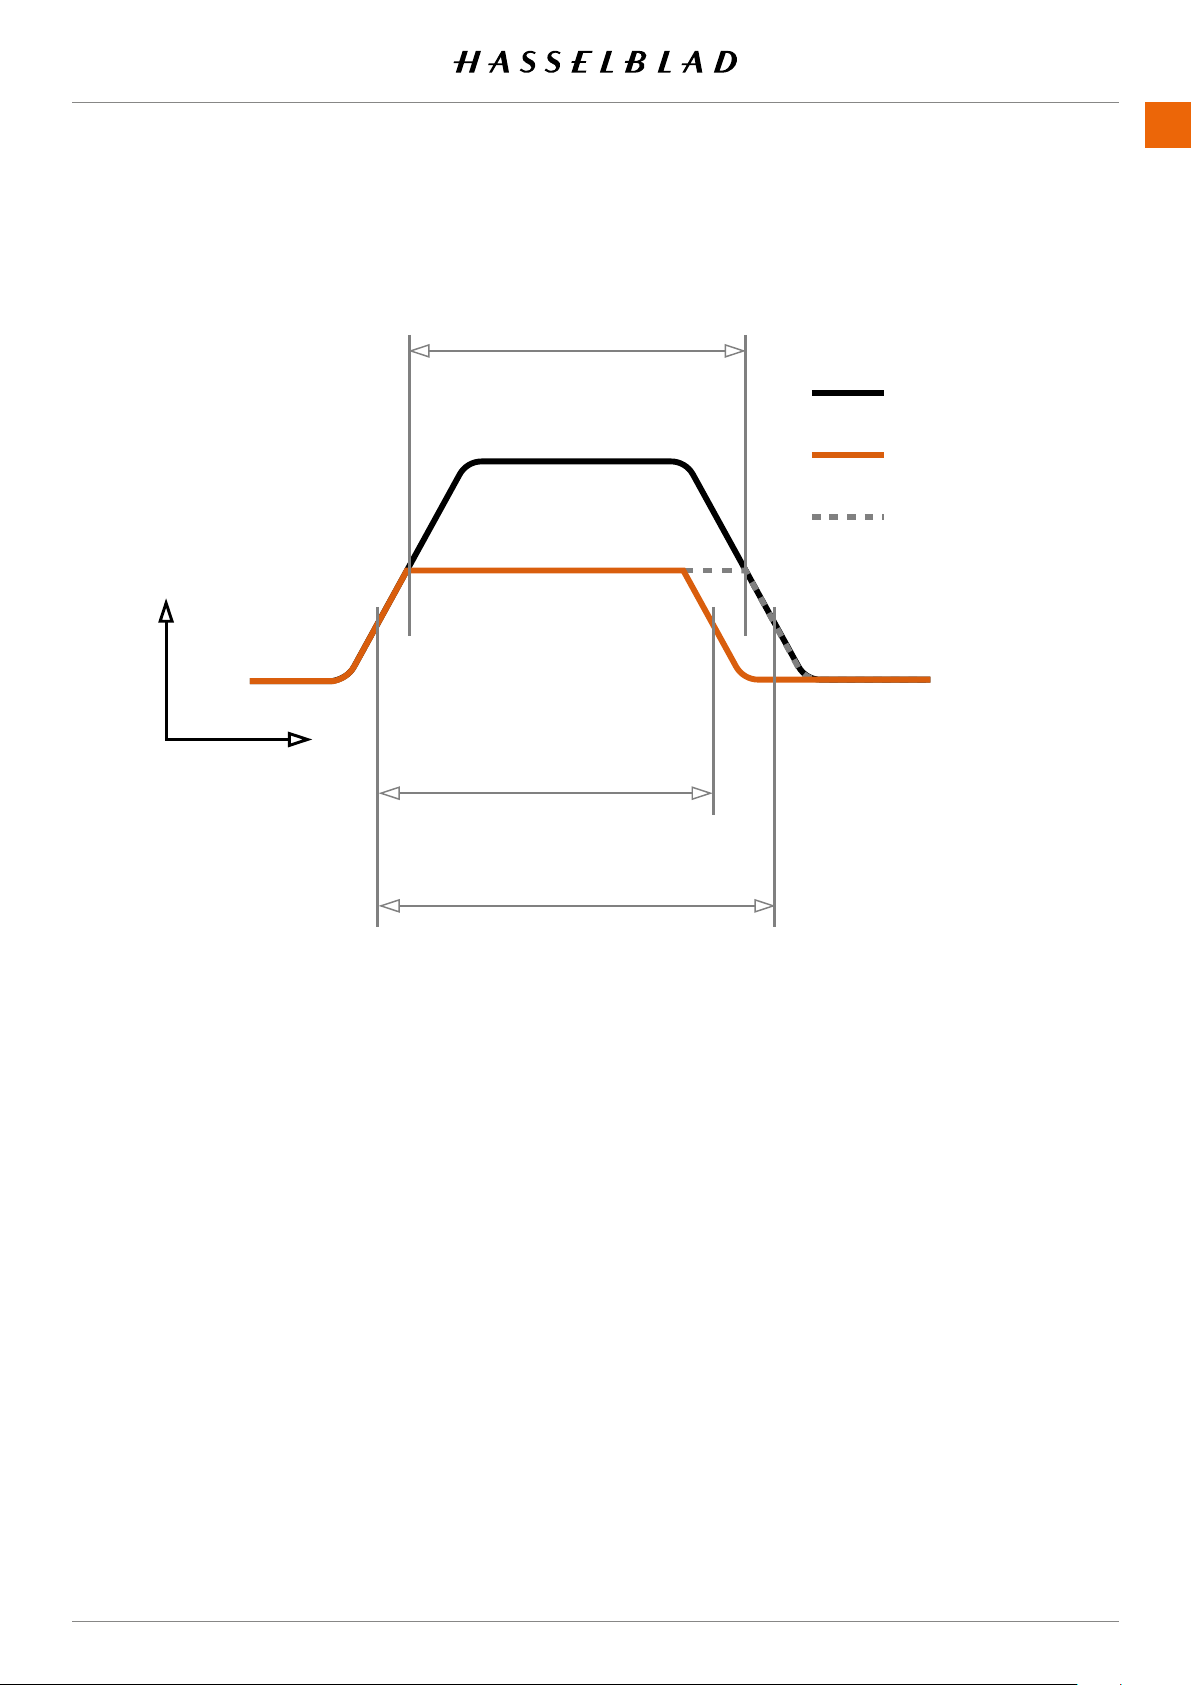
SETTINGS
www.hasselblad.comCONTENTS
TRUE EXPOSURE EXPLAINED
allows the effective shutter speed to remain unaffected when
shutters as opposed to focal plane shutters.
When a lens is stopped down, the effective shutter speed
slow shutter speeds the effect is minimal but at faster speeds,
therefore made to the aperture instead to retain the set expo-
because compensation will result in underexposure. Therefore,
set True Exposure to OFF in
Main Menu > Camera Settings >
Exposure > True Exposure
You can download a complete explanation of this situation
at www.hasselblad.com.
Time
Maximum aperture
Stopped down one stop
with True Exposure ON
Stopped down one stop
with True Exposure OFF
907X 50C USER GUIDE
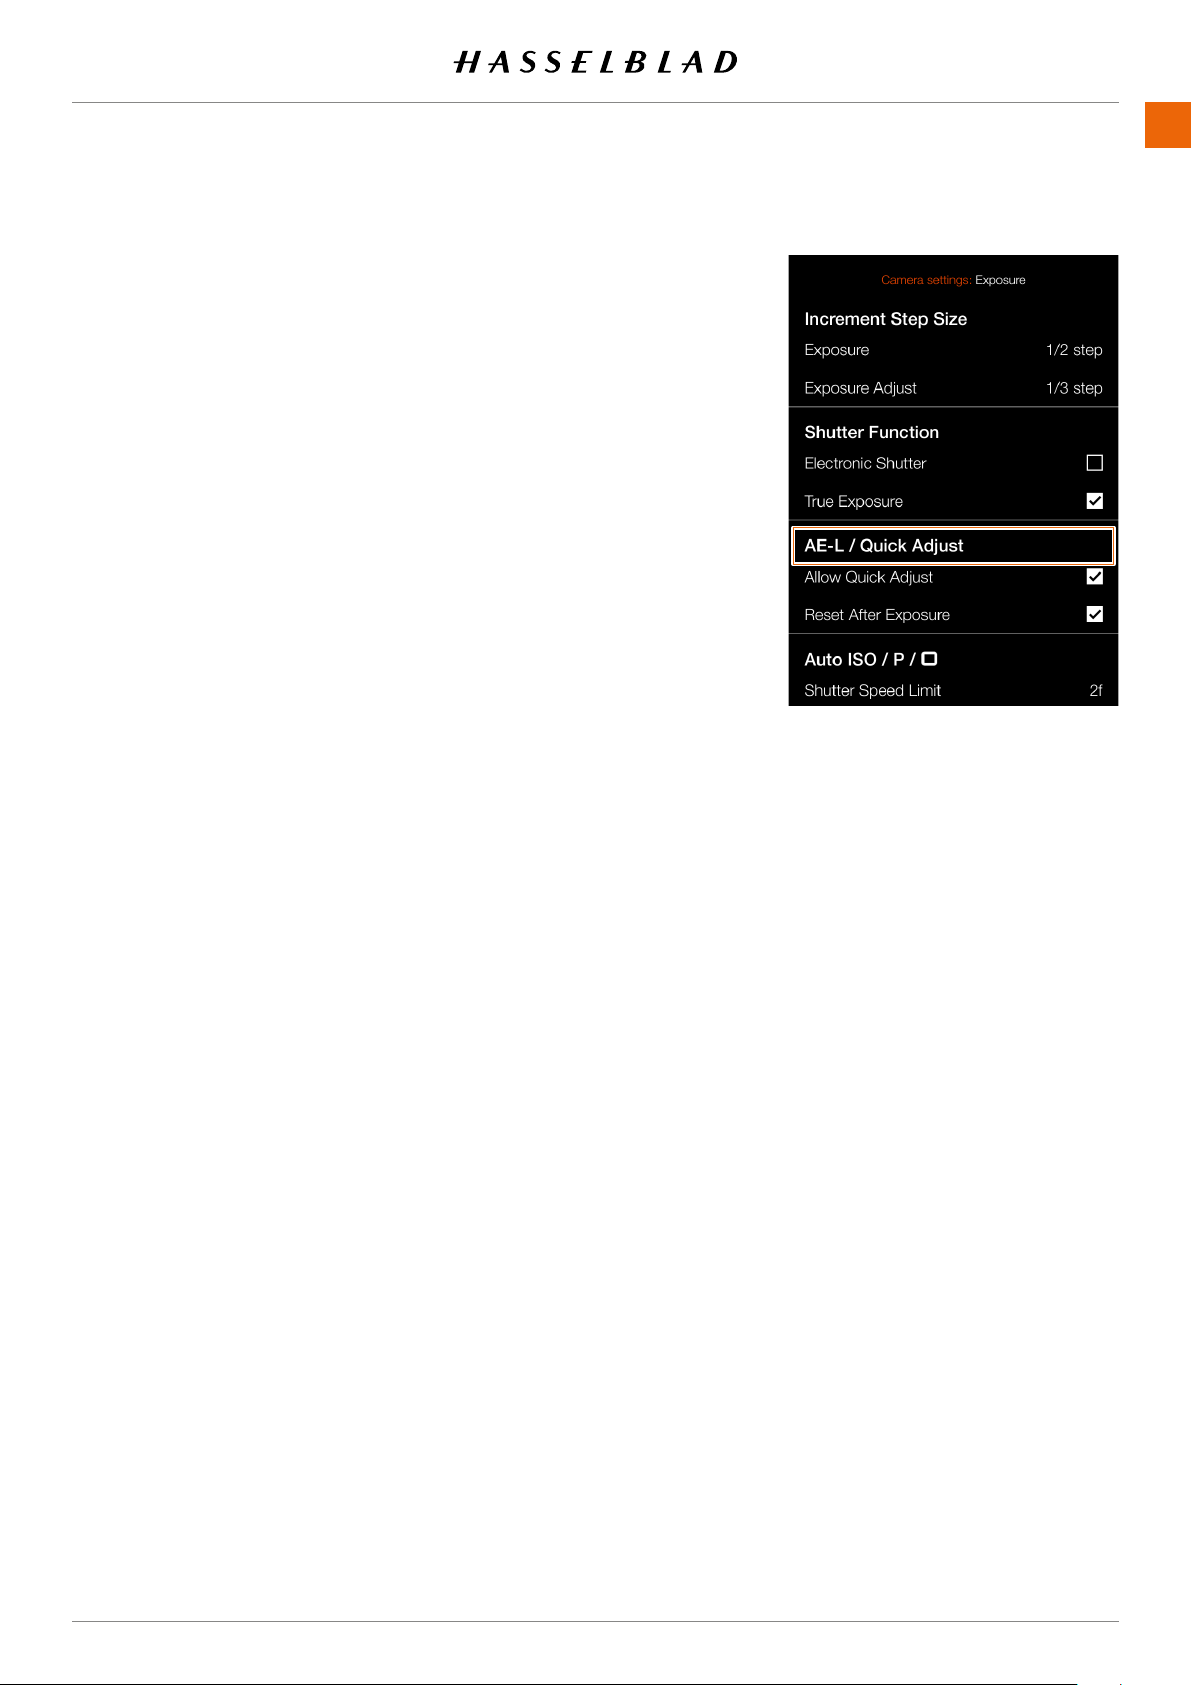
SETTINGS
www.hasselblad.comCONTENTS
115
115
AE-L (AE-LOCK) / QUICK ADJUST
1
2
3
menu.
Allow Quick Adjust
Select
On
or
Off
. The check box will be marked with a
to input a quick exposure adjustment.
Reset After Exposure
Select
On
or
Off
. Controls if a quick exposure adjustment
907X 50C USER GUIDE
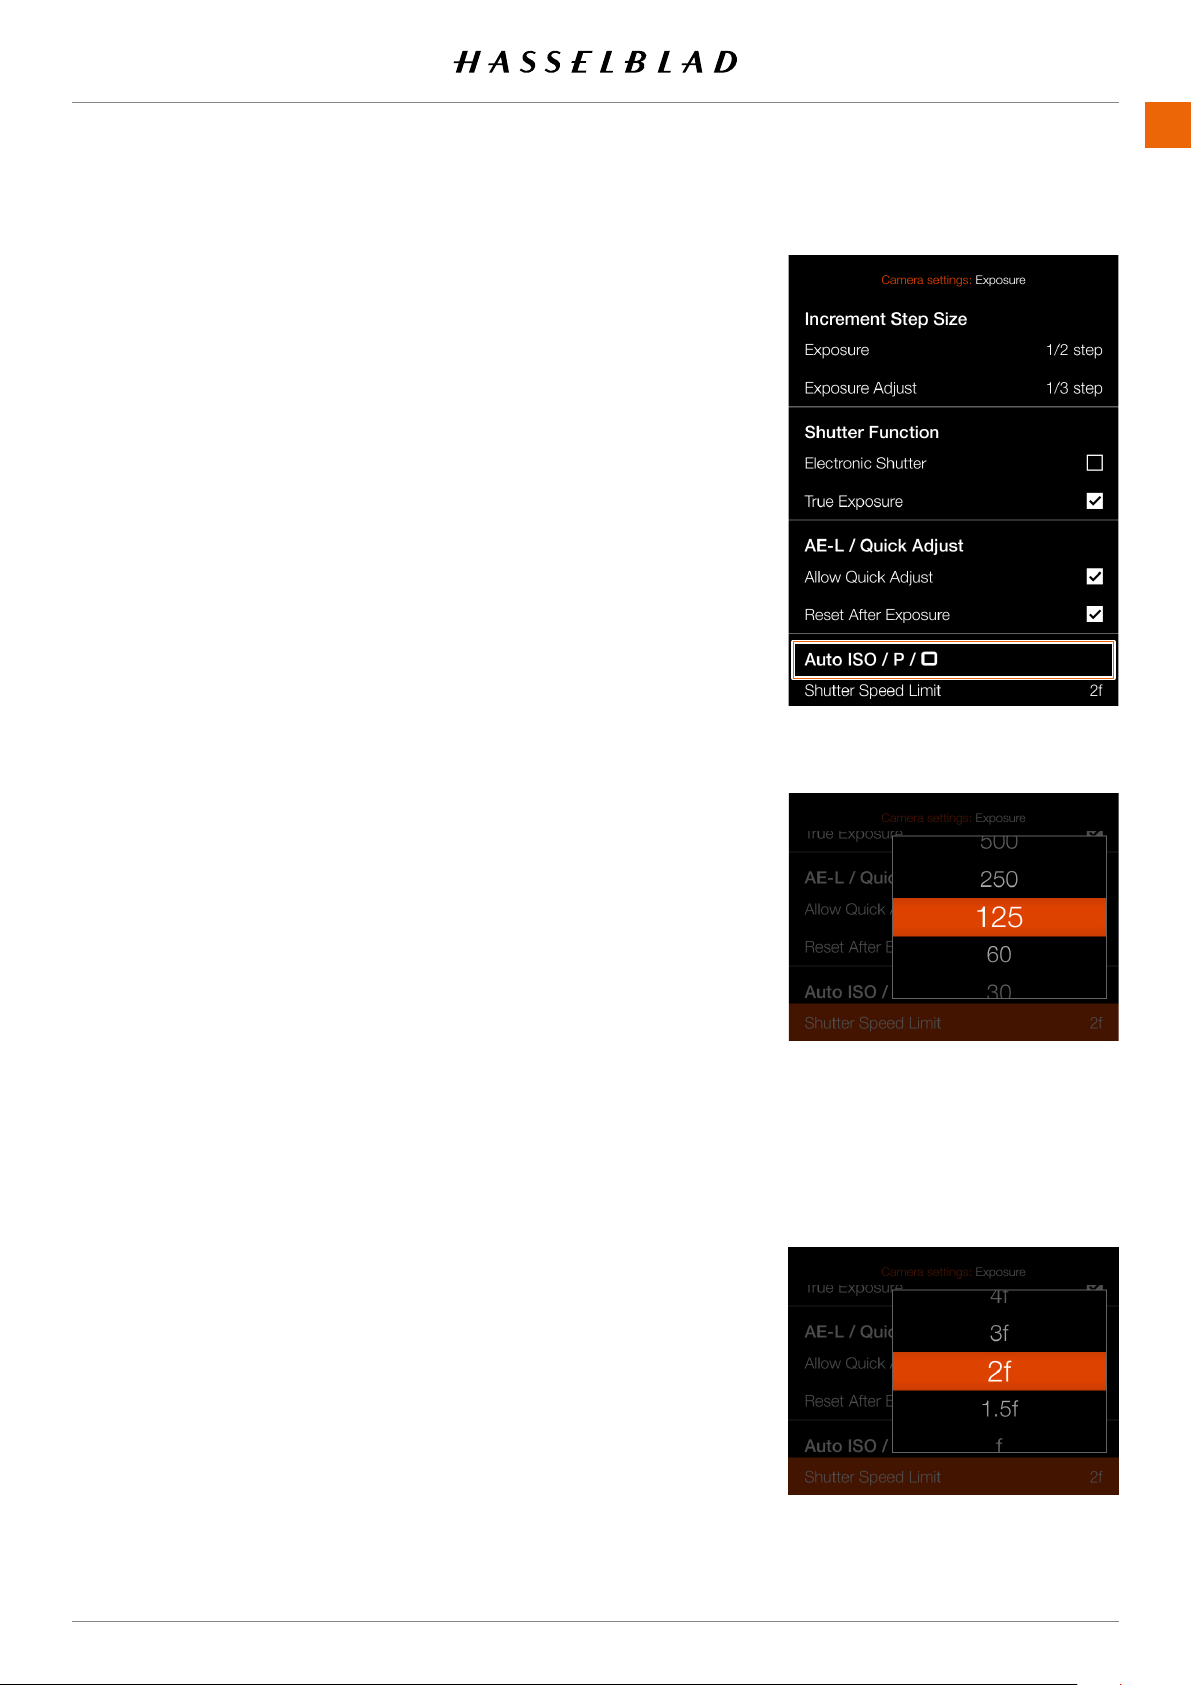
SETTINGS
www.hasselblad.comCONTENTS
116
AUTO ISO / P / FULL AUTO
1
2
3
menu.
Shutter Speed Limit
Auto ISO
: Sets the slowest shutter speed before ISO will
be increased.
P
: If the calculated shutter speed is slower than the set
Speed.
Full Auto
: If the calculated shutter speed is slower than
shutter speed.
Note!
exposure.
Shutter speed limit is set to:
116
907X 50C USER GUIDE
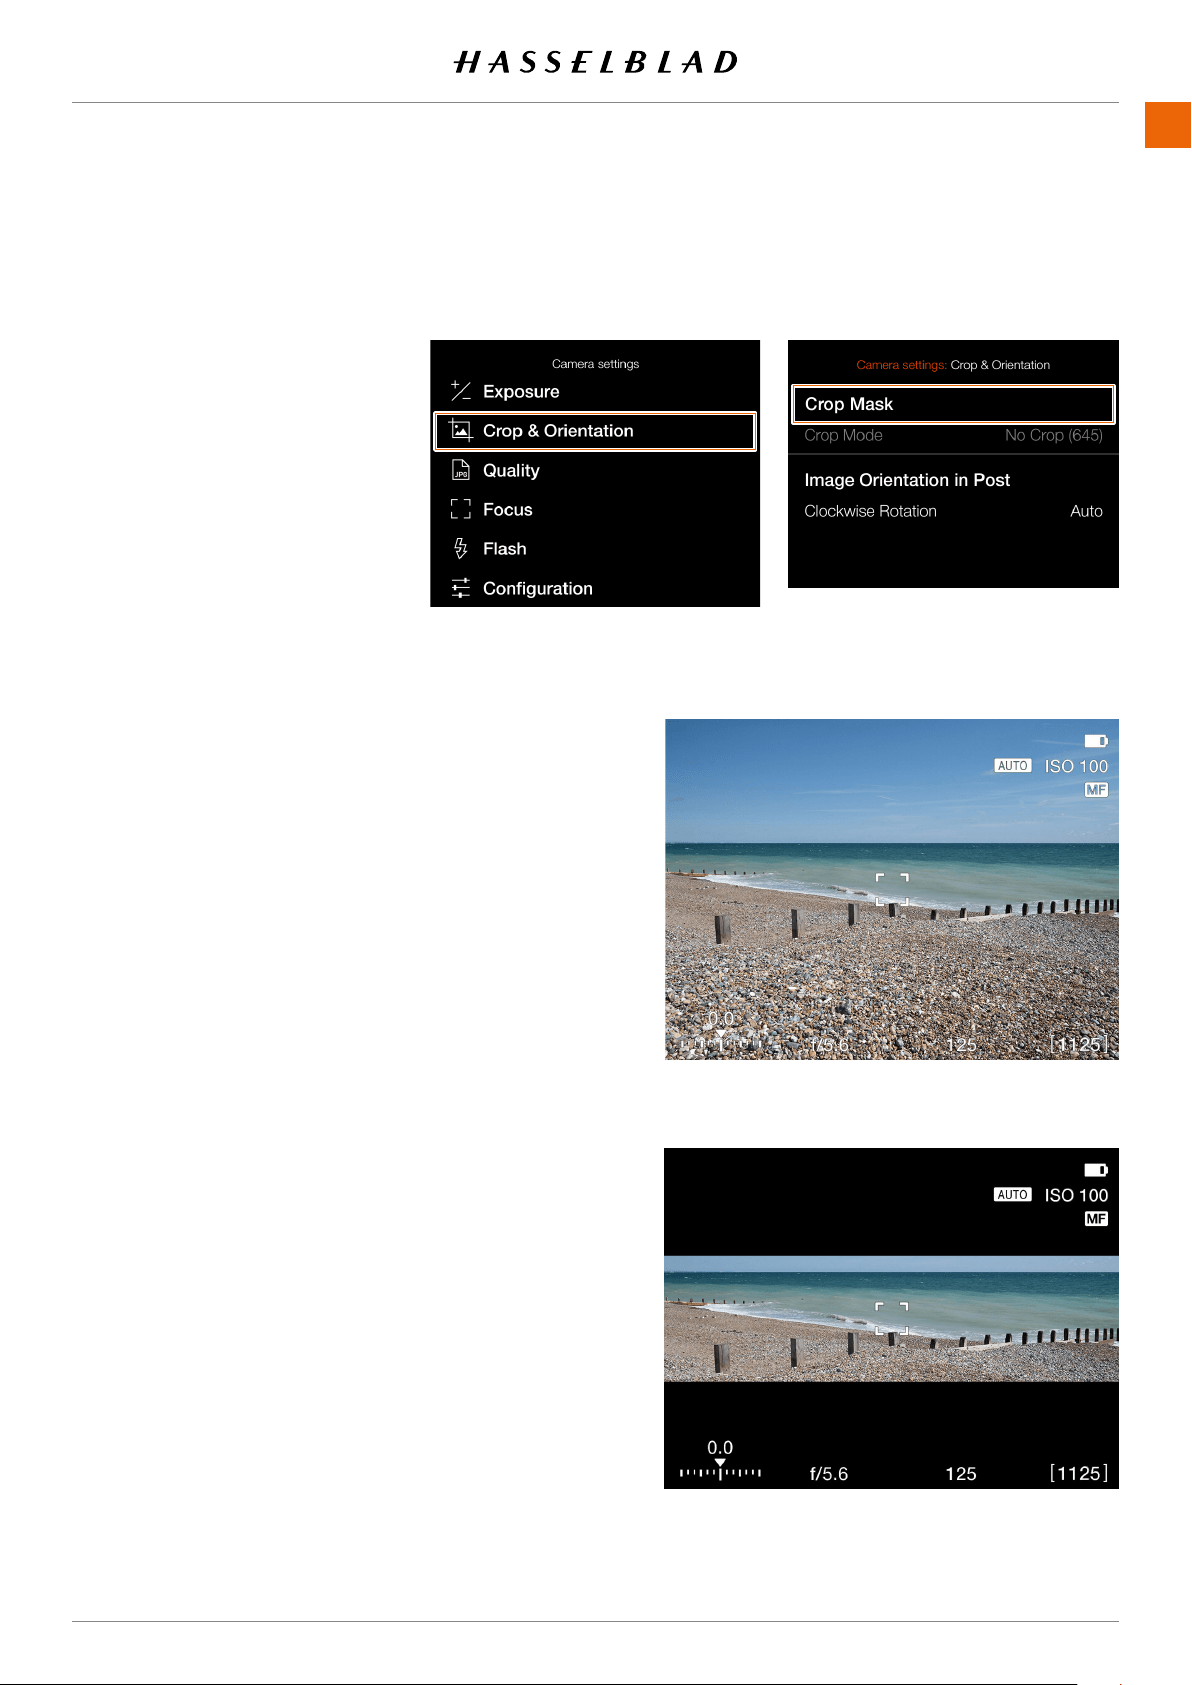
SETTINGS
www.hasselblad.comCONTENTS
CROP & ORIENTATION
MAIN MENU > CAMERA SETTINGS >
CROP & ORIENTATION
1 Press the camera icon on the touch
2
3 Press the Crop & Orientation menu.
Crop Mask
Adds a crop mask to live view and
Phocus, the crop mask can be
Crop Mode Settings:
Notes:
●
● Crop Modes are disabled in USB
tethered mode.
● Crop Modes are not supported
in Phocus Mobile 2.
No Crop
65x24 (XPan)
907X 50C USER GUIDE
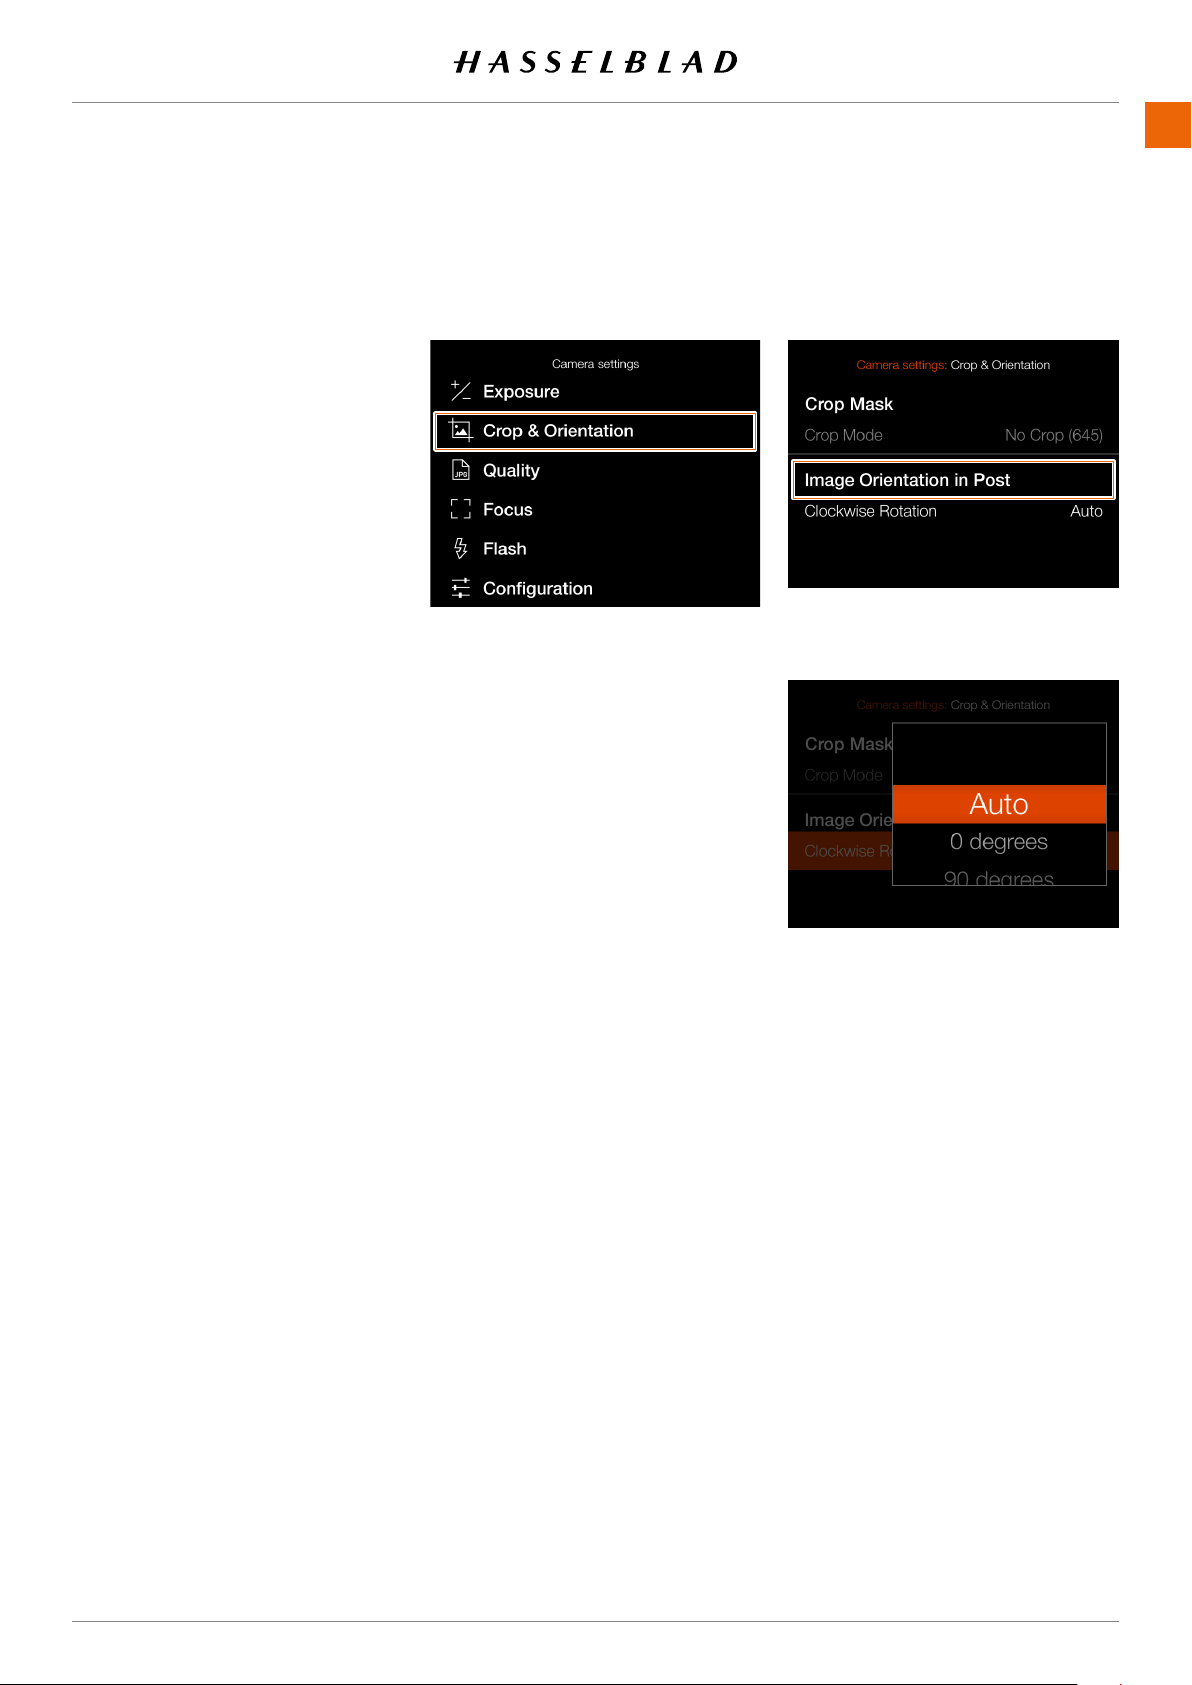
SETTINGS
www.hasselblad.comCONTENTS
118118
IMAGE ORIENTATION
MAIN MENU > CAMERA SETTINGS >
CROP & ORIENTATION
1 Press the camera icon on the Touch
2
3 Press the Crop & Orientation menu.
Image Orientation in Post
Phocus. To avoid unintentional
locked.
Clockwise Rotation Settings:
Select between:
Auto
.
Lock at 0
Lock at 90
Lock at 180
Lock at 270
907X 50C USER GUIDE

SETTINGS
www.hasselblad.comCONTENTS
IMAGE QUALITY SETTINGS
MAIN MENU > CAMERA SETTINGS >
1 Select the camera icon on the touch
2
3
Image Format settings
Select between:
RAW.
RAW + JPG.
JPG.
Note!
907X 50C USER GUIDE
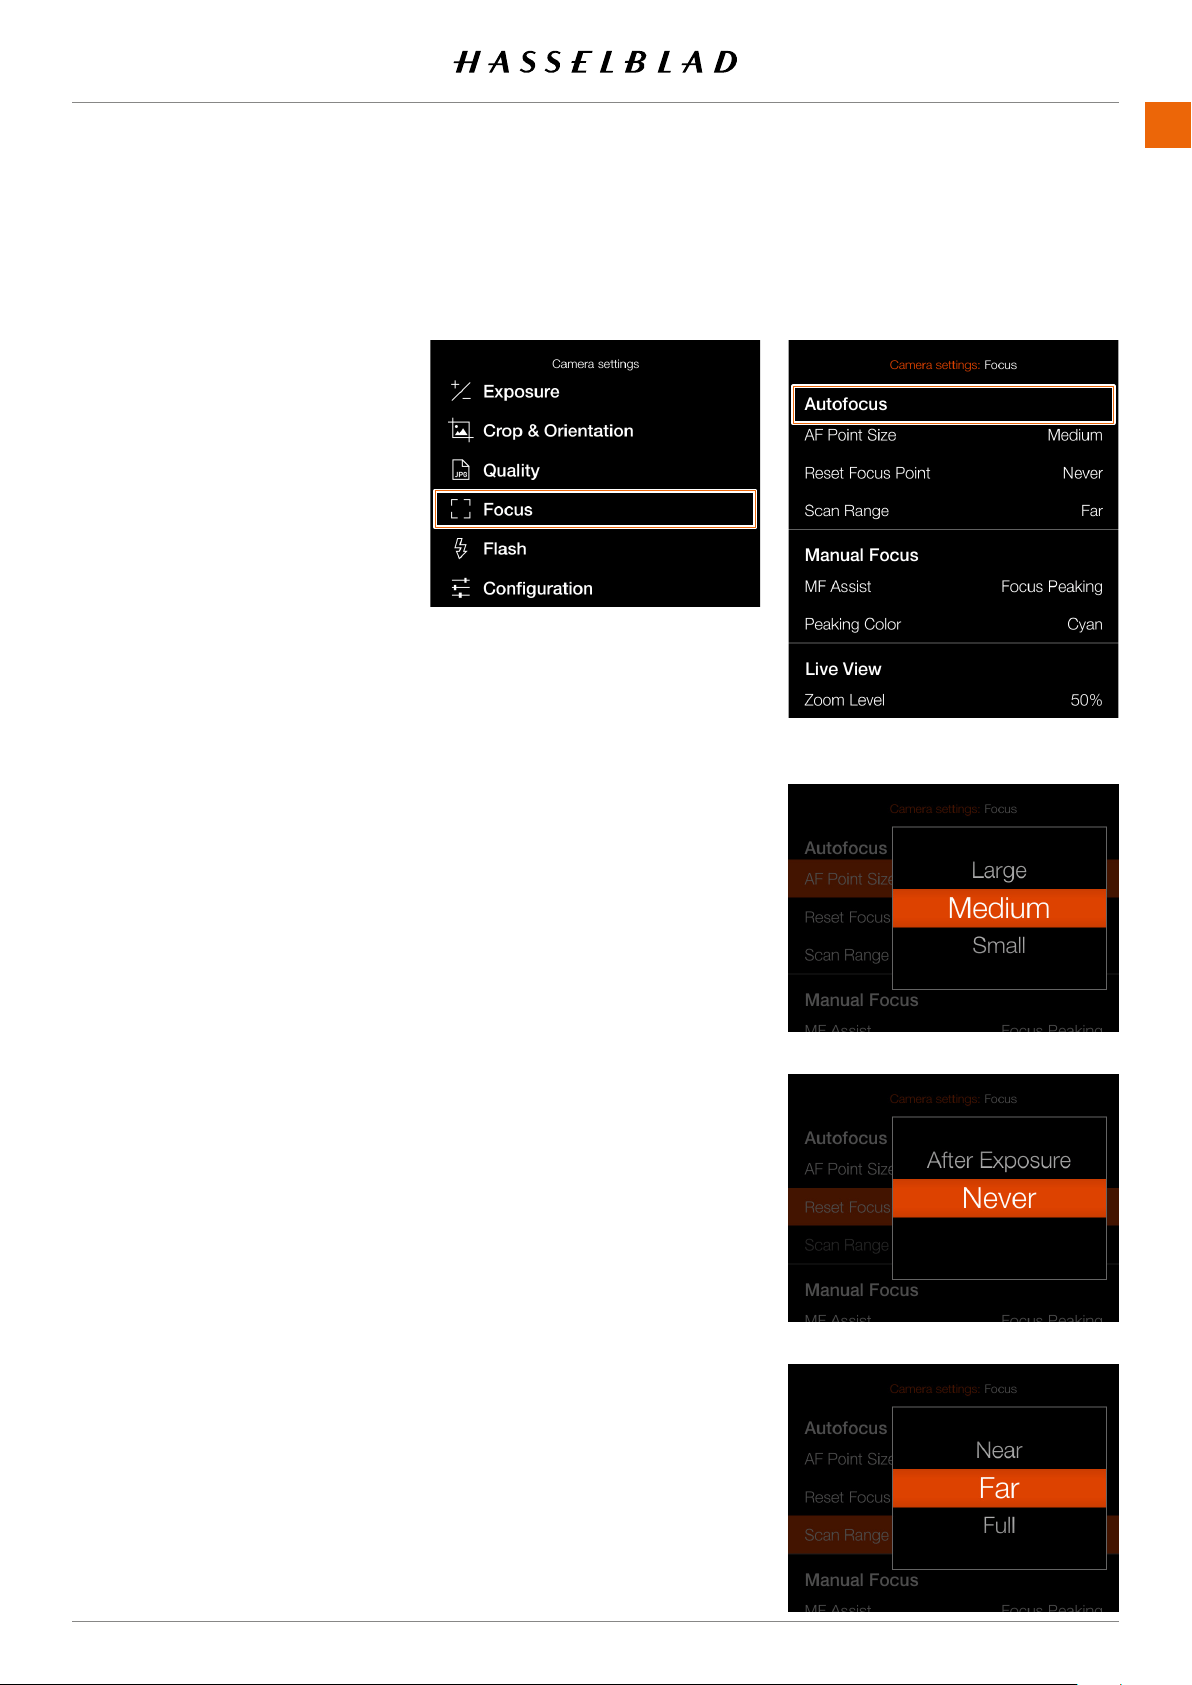
SETTINGS
www.hasselblad.comCONTENTS
120
FOCUS SETTINGS
MAIN MENU > CAMERA SETTINGS >
FOCUS
1 Select the camera icon on the touch
2
3
Autofocus
AF Point Size settings
AF measurements. You can choose
between:
Large
Medium
Small
Reset Focus Point settings
After Exposure
Never.
Autofocus point can be reset to
Never.
See section for more
in-depth information.
Scan Range Settings
For lenses that support this function
Near
Far
Full
Near or Far is selected, AF speed will
be faster.
120
Focus menu
907X 50C USER GUIDE

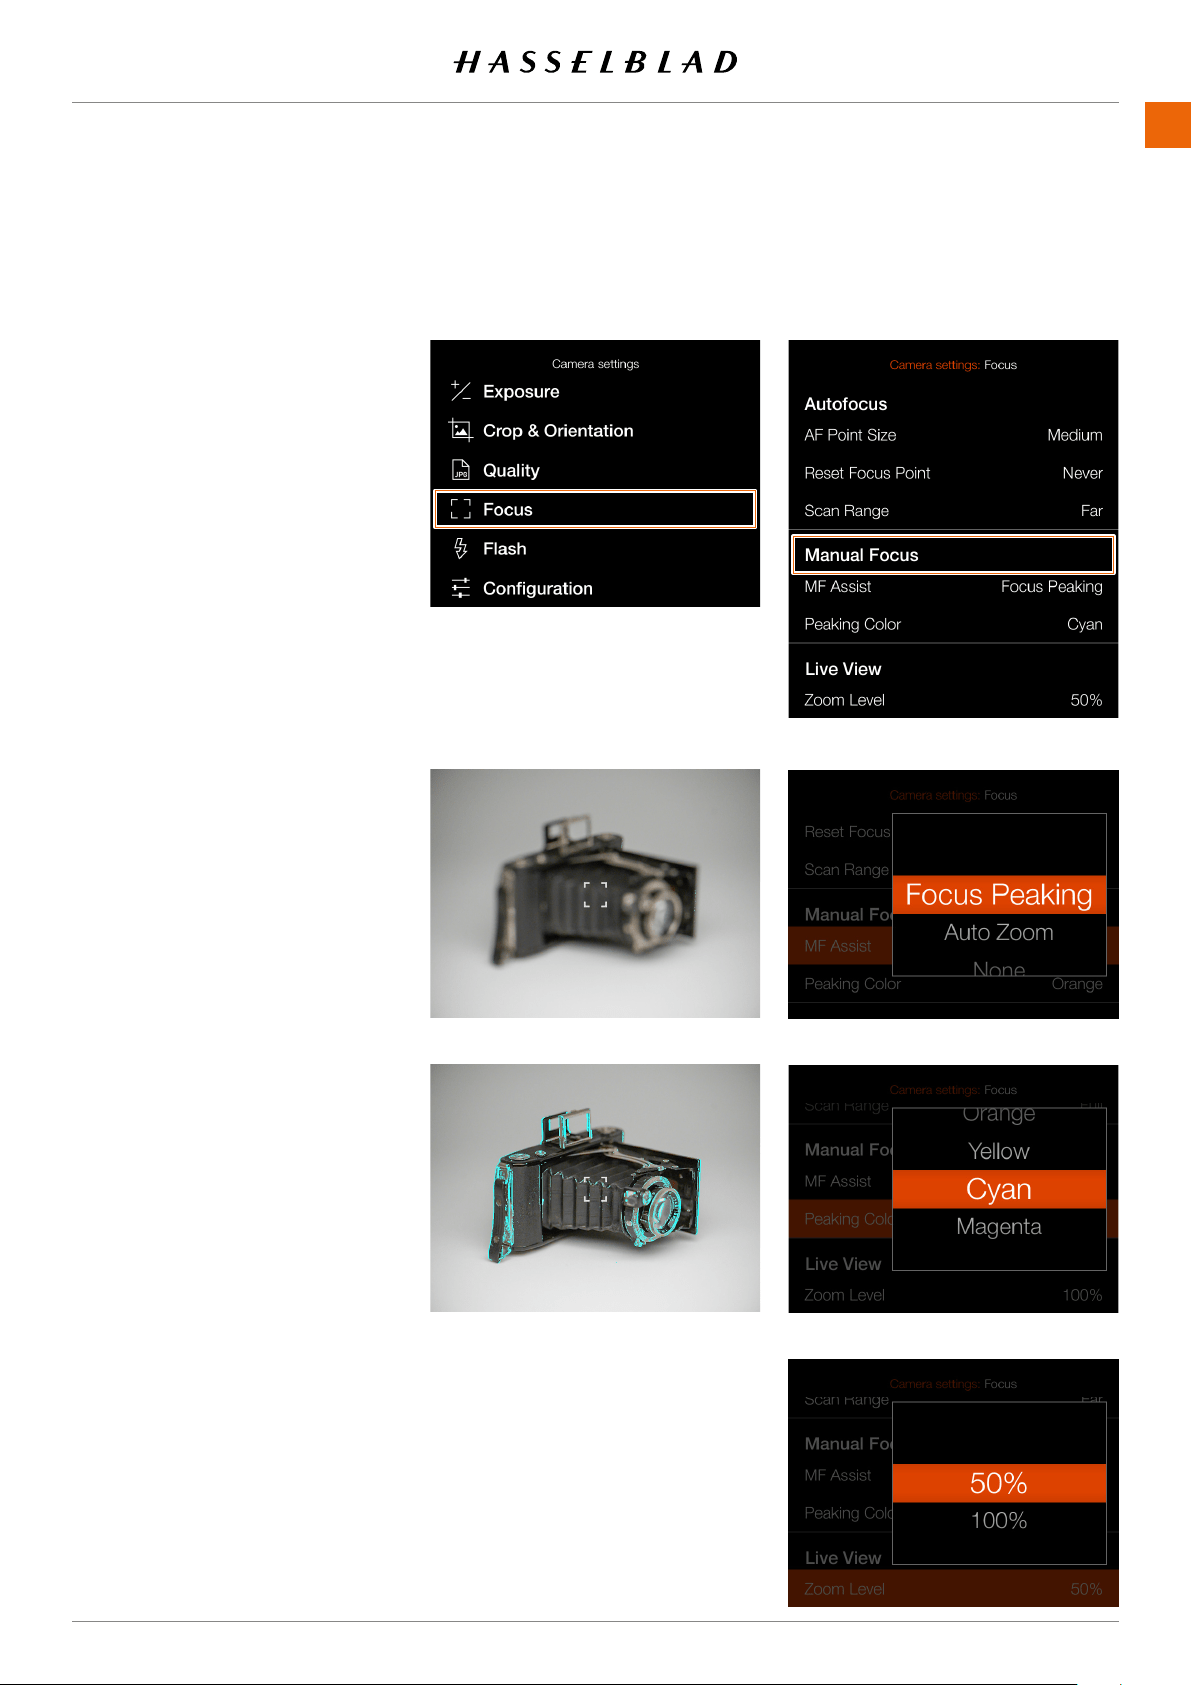
SETTINGS
www.hasselblad.comCONTENTS
122
MAIN MENU > CAMERA SETTINGS >
FOCUS
1 Select the camera icon on the touch
2
3
Manual Focus
MF Assist Settings
Select the manual focus assist mode.
Choose between:
Focus Peaking
See .
Auto Zoom
turned. See .
None
Manual focus assist is turned off.
Peaking Color settings
used. You can choose between:
Orange
Yellow
Cyan
Magenta
Live View
Zoom Level
Select
50%
or
100%.
double-tap the screen, press the Star
Button in live view mode or use the
Subject not in focus
Subject in focus
122
Focus menu
907X 50C USER GUIDE
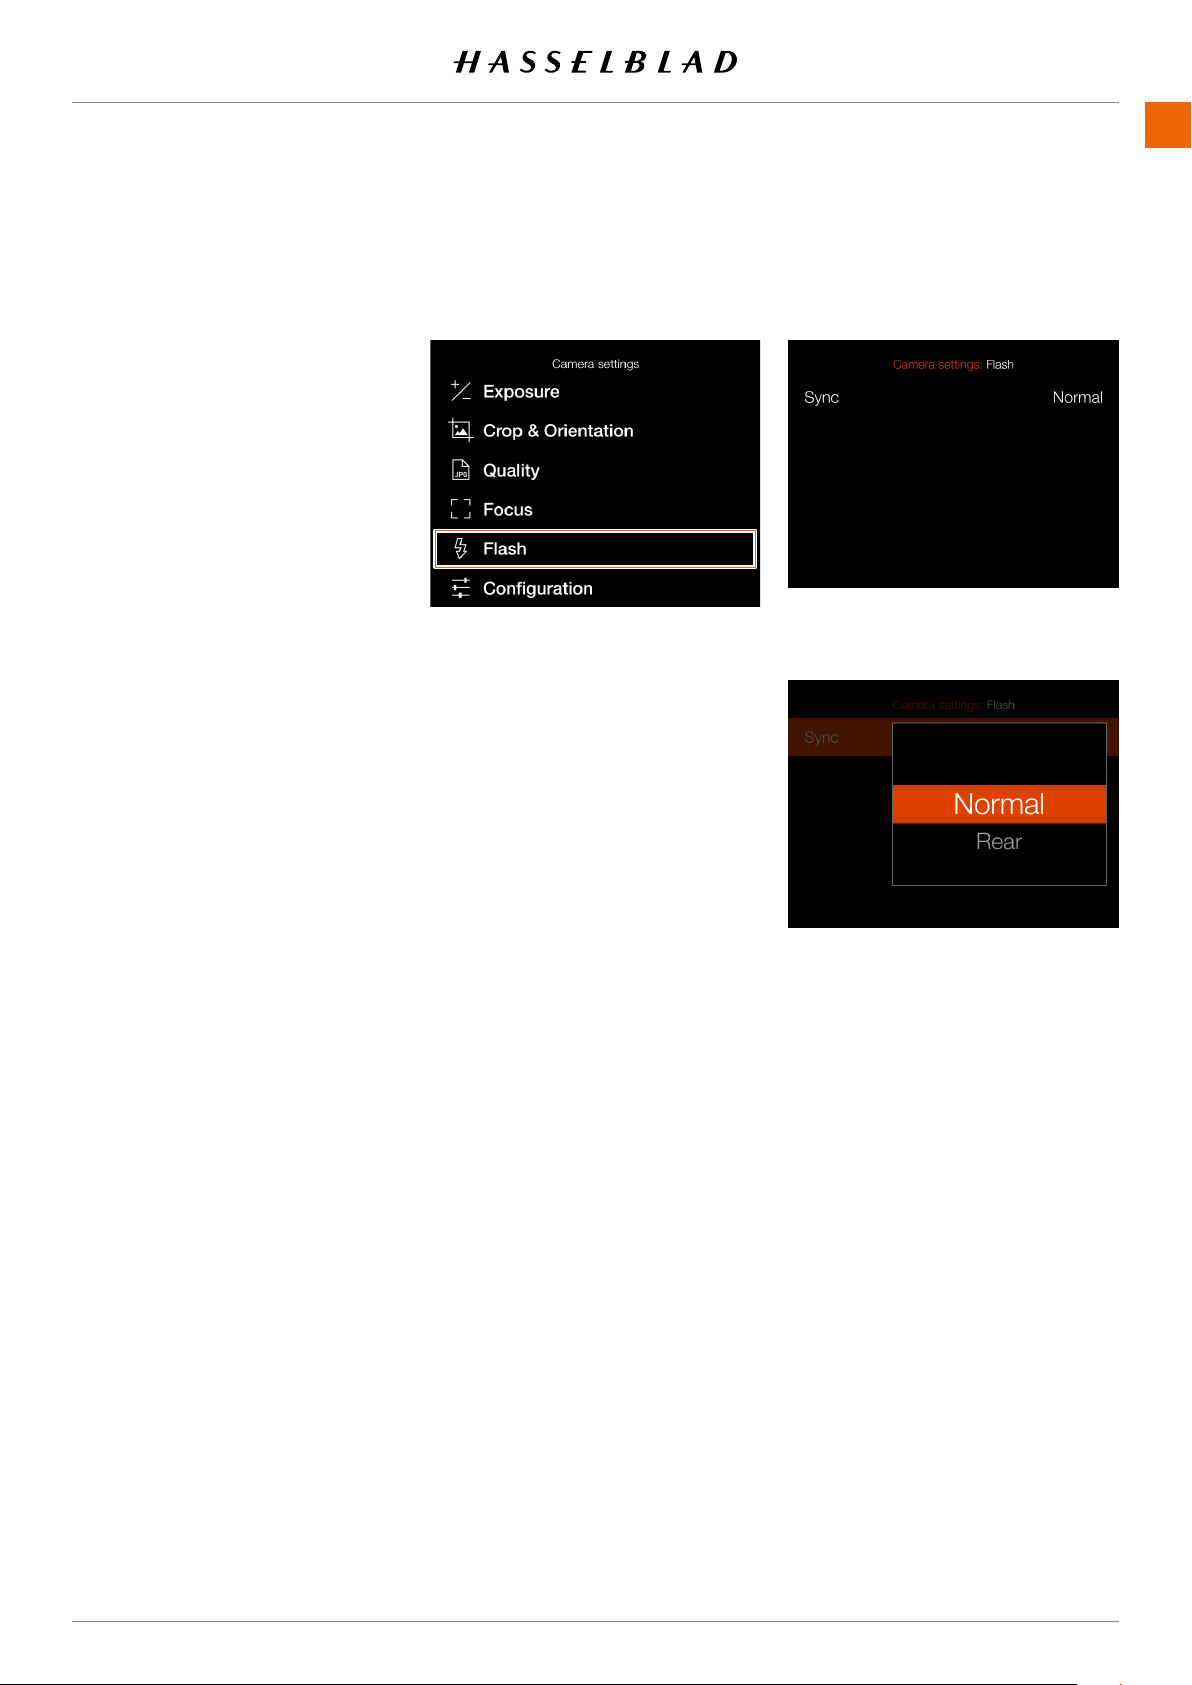
SETTINGS
www.hasselblad.comCONTENTS
123
FLASH SETTINGS
MAIN MENU > CAMERA SETTINGS >
1 Select the camera icon on the touch
2
3
Sync settings
exposure. Select between:
Normal
Rear
123
907X 50C USER GUIDE
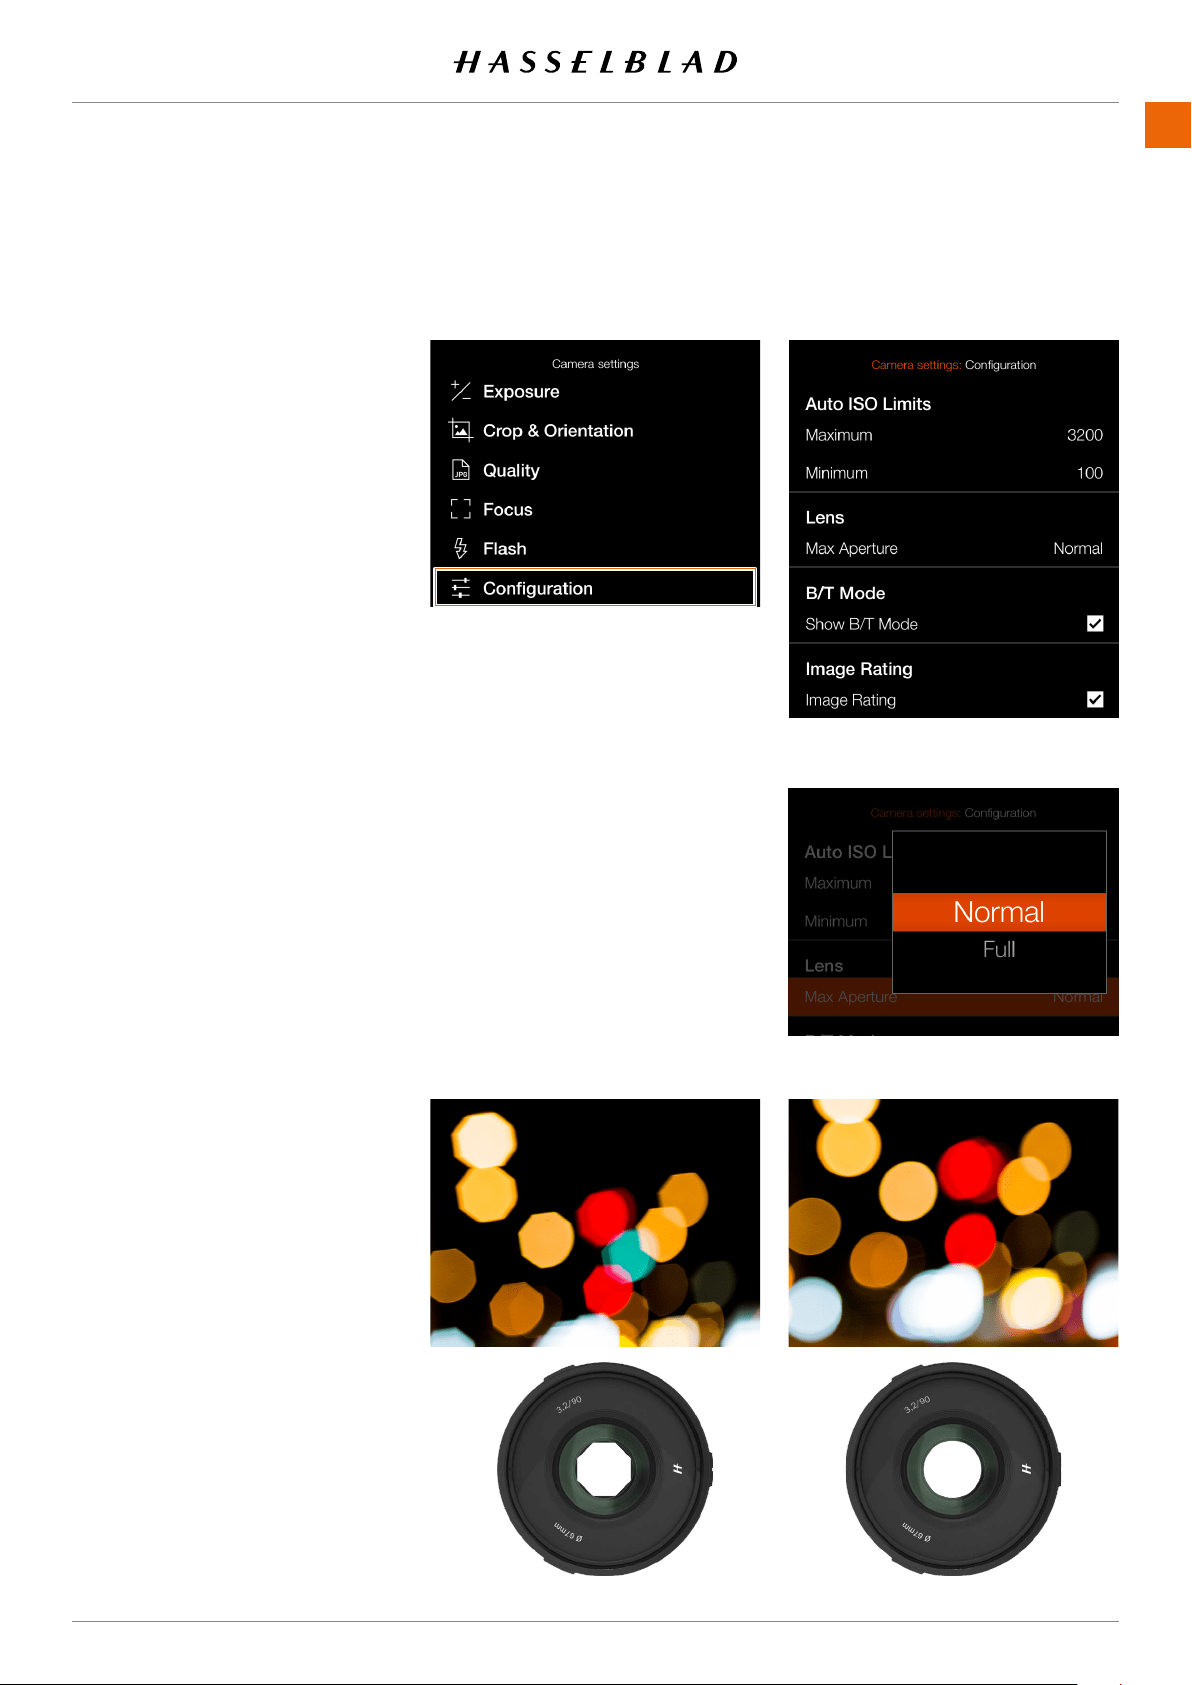
SETTINGS
www.hasselblad.comCONTENTS
MAIN MENU > CAMERA SETTINGS >
CONFIGURATION
1 Select the camera icon on the Touch
2
3
menu
Auto ISO Limits
Maximum Settings
Sets the maximum allowed ISO for
the Auto ISO function.
Minimum Settings
Sets the minimum allowed ISO for the
Auto ISO function.
Lens
Max Aperture Setting
and round aperture at maximum
a smoother look for the out-of-focus
overexposure.
Normal
Full
CAMERA CONFIGURATION SETTINGS
Full
Normal
Normal
Full
907X 50C USER GUIDE
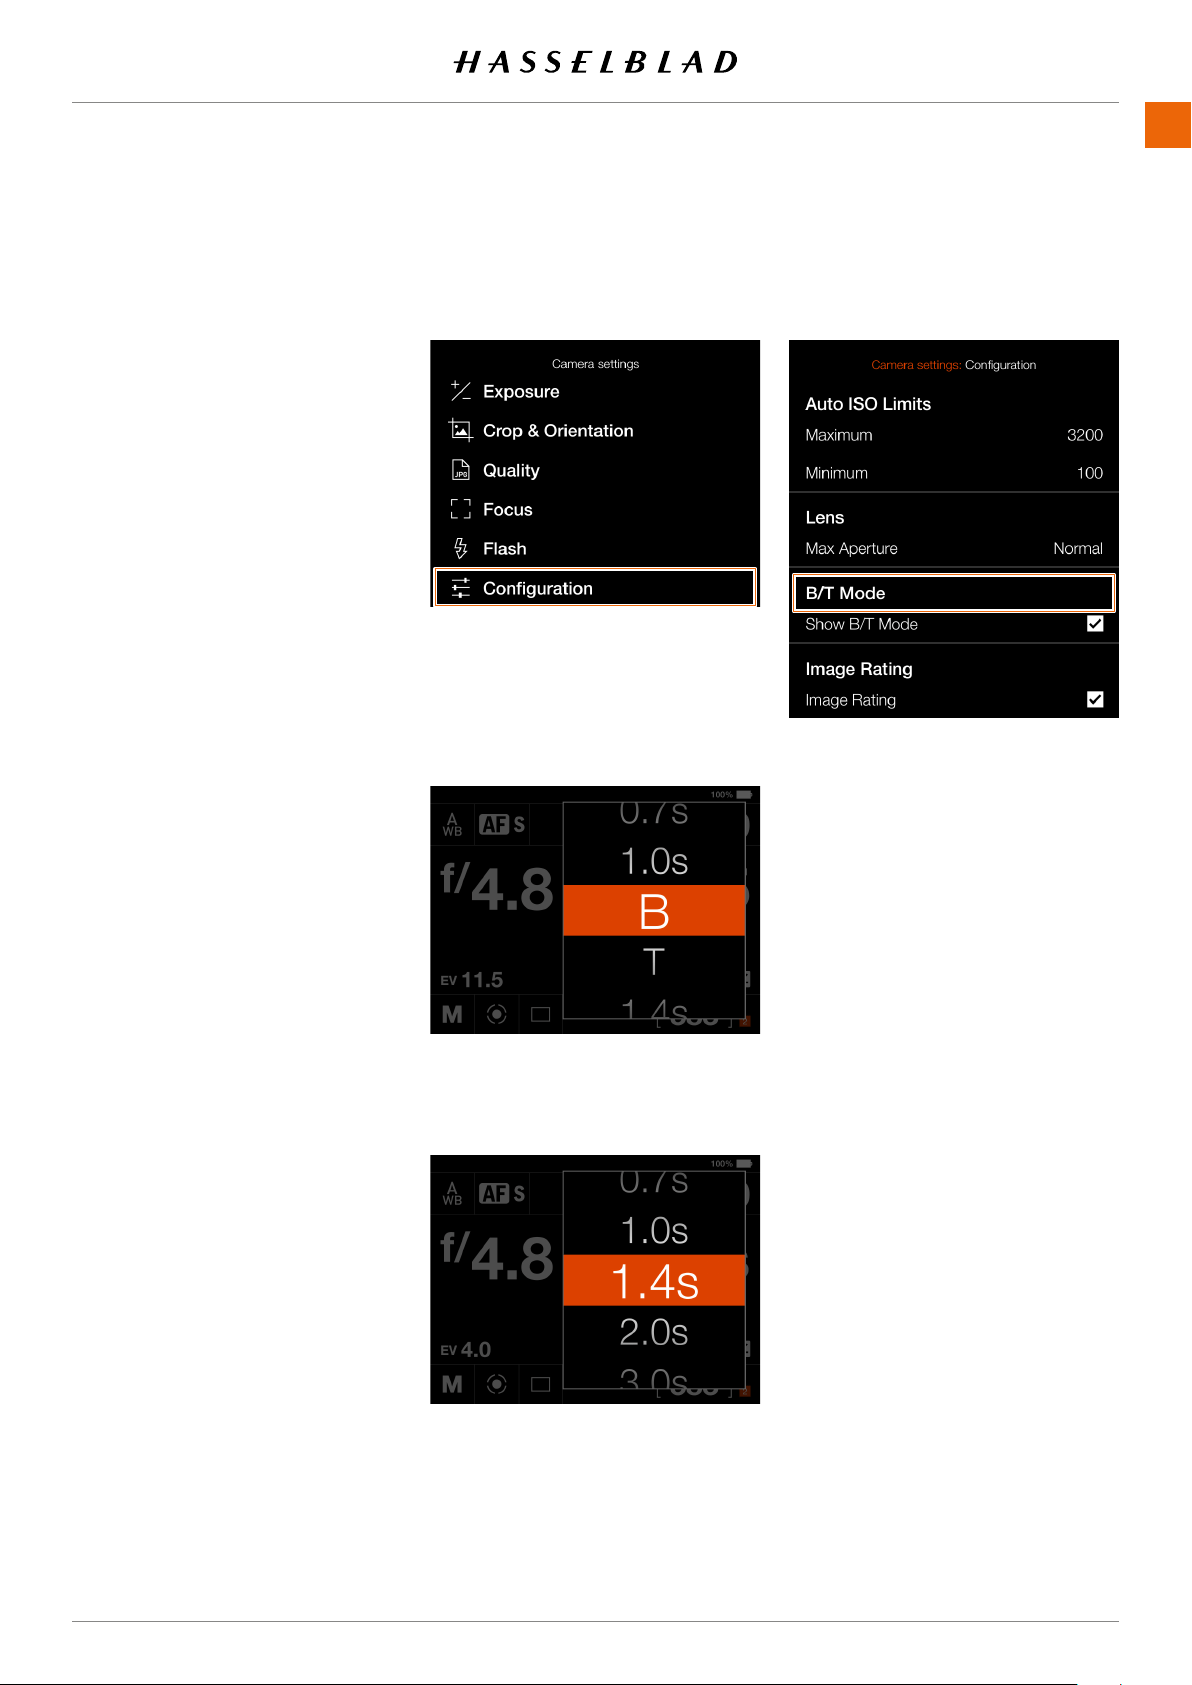
SETTINGS
www.hasselblad.comCONTENTS
125
B/T Mode
Show B/T Mode setting
B and T mode is available in the
list of shutter speeds if the box is
checked.
Image rating
Image Rating
If the box is checked, the star button
mode. See .
125
907X 50C USER GUIDE
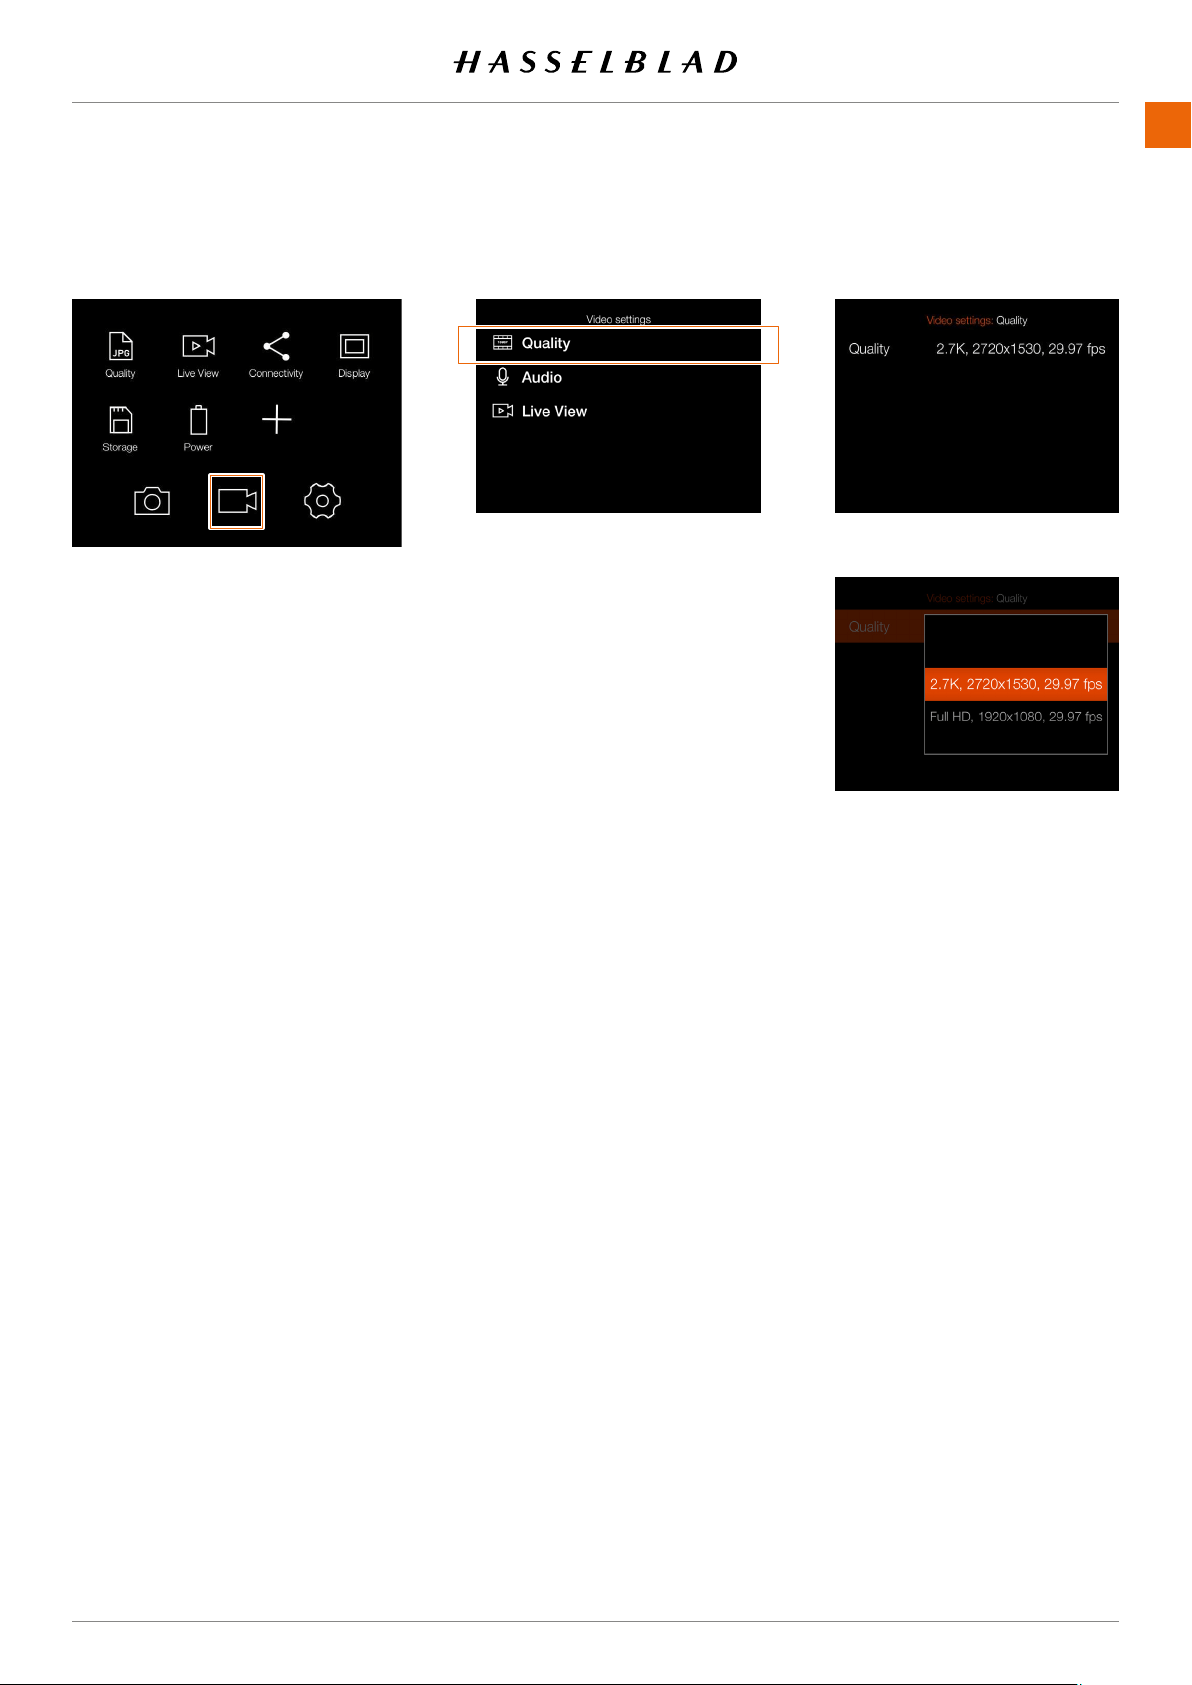
SETTINGS
www.hasselblad.comCONTENTS
126
10.2 VIDEO SETTINGS MENU
Main menu
MAIN MENU > VIDEO SETTINGS
1 Press the Video icon on the Touch
2
3
QUALITY
Resolution
Select between:
2.7K (2720 ⅹ 1530 pixels)
Full HD (1920 ⅹ 1080 pixels)
.
Video icon
Reslution Setting
126
907X 50C USER GUIDE
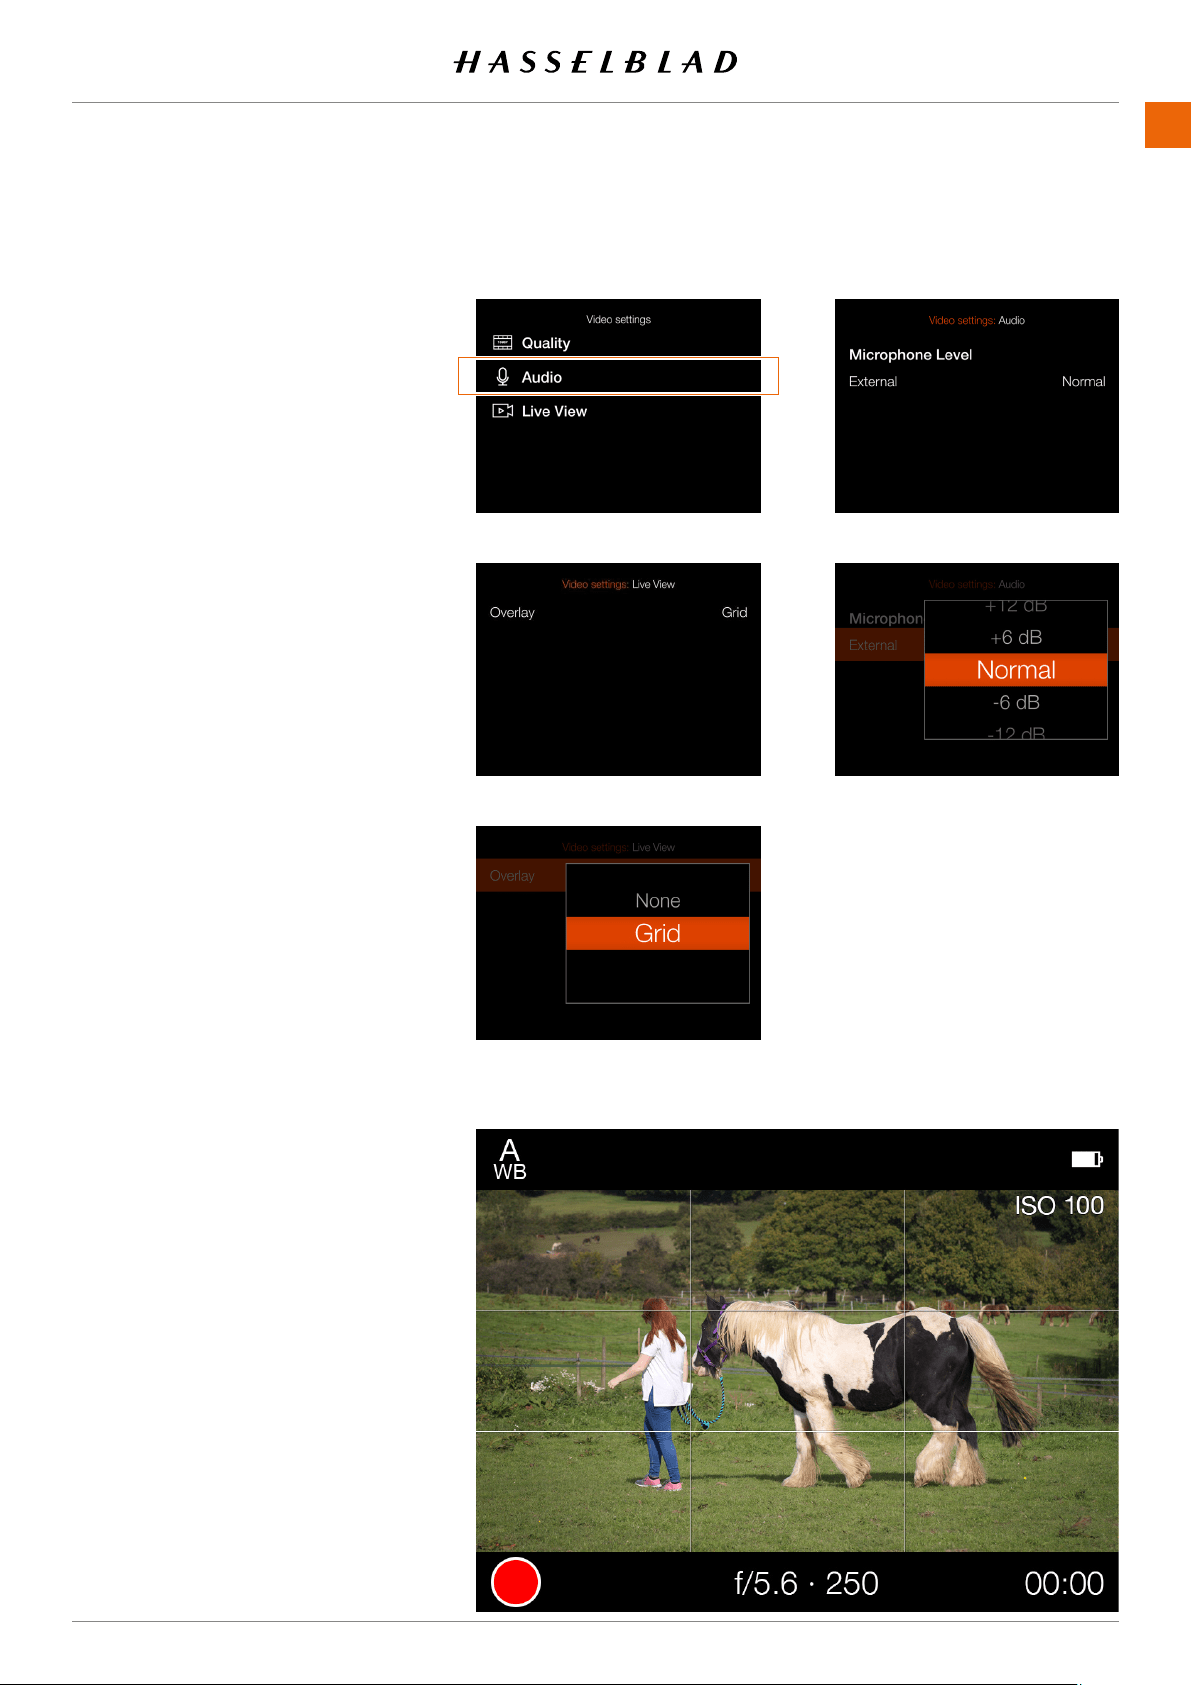
SETTINGS
www.hasselblad.comCONTENTS
Overlay Setting
Live View Settings
Video Live View screen with grid enabled
907X 50C USER GUIDE
Video Settings Menu
AUDIO
Audio Settings
Audio level settings
External
. Selects recording level for
the external microphone.
Select between:
+12 dB, +6 dB, Normal, -6 dB, -12
dB, -18 dB or Mute.
LIVE VIEW
Overlay
Selects the overlay for video Live View
screen. Select between:
None.
Grid.
Displays a 1/3 grid on the Video
Live View screen.
Note!
You can toggle the overlay On or Off by
pressing the Rectangle button while in
Video Live View.
Note!
Video recording is not possible in
tethered mode.

SETTINGS
www.hasselblad.comCONTENTS
128
Main Menu
10.3 GENERAL SETTINGS MENU
1
2
128
907X 50C USER GUIDE
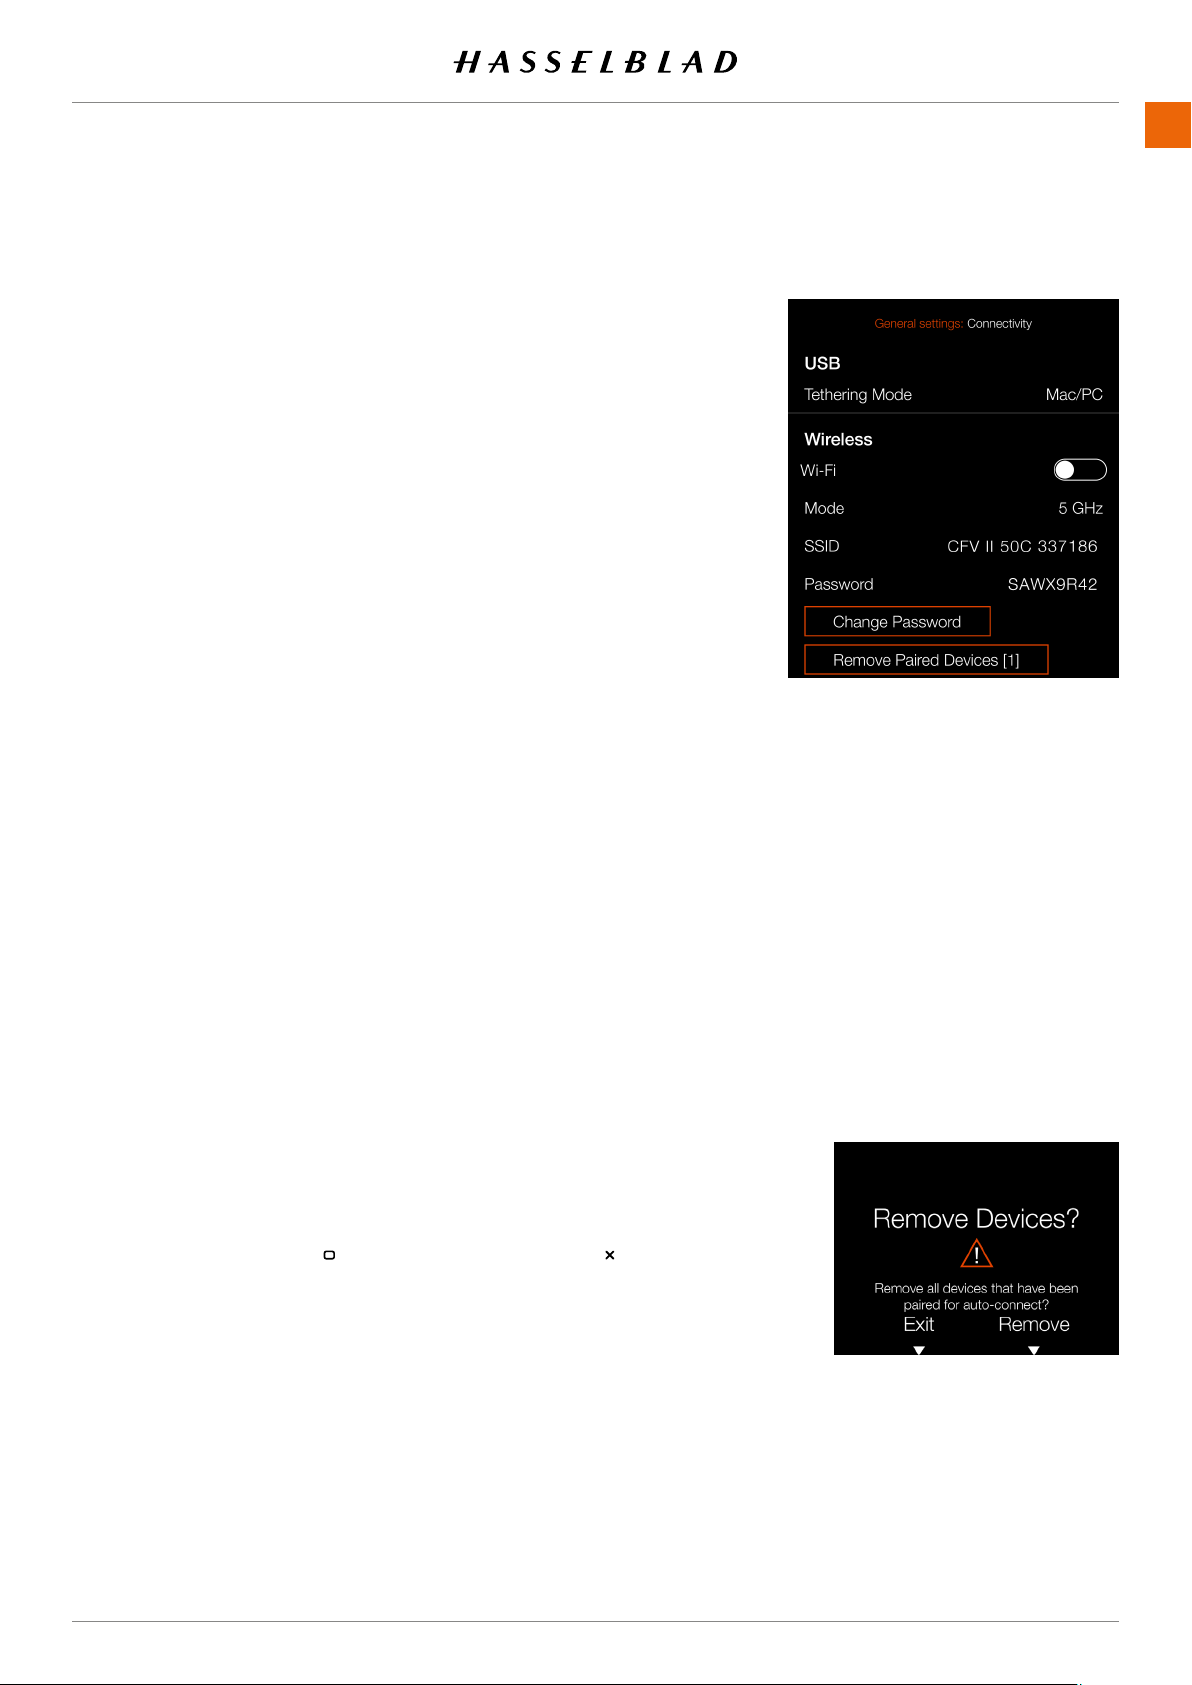
SETTINGS
www.hasselblad.comCONTENTS
CONNECTIVITY SETTINGS
1
2
3
USB Settings
Tethering Mode
If the camera is connected via USB to an iOS device, select
iOS
.
For connection to a computer select
Mac/PC
.
Wireless Settings
Wi-Fi
Select
On
or
Off
.
Mode
Select between
2.4
and
5 GHz
.
SSID
and for more info on connection options.
Password
Use this password to connect via Wi-Fi to the camera.
Change Password
Remove Paired Devices
Removes all devices that have been paired over Bluetooth for
auto-connection with the Phocus Mobile 2 App. The number
within brackets represents the current number of paired devices.
Note!
to normal value.
Note!
Note!
907X 50C USER GUIDE
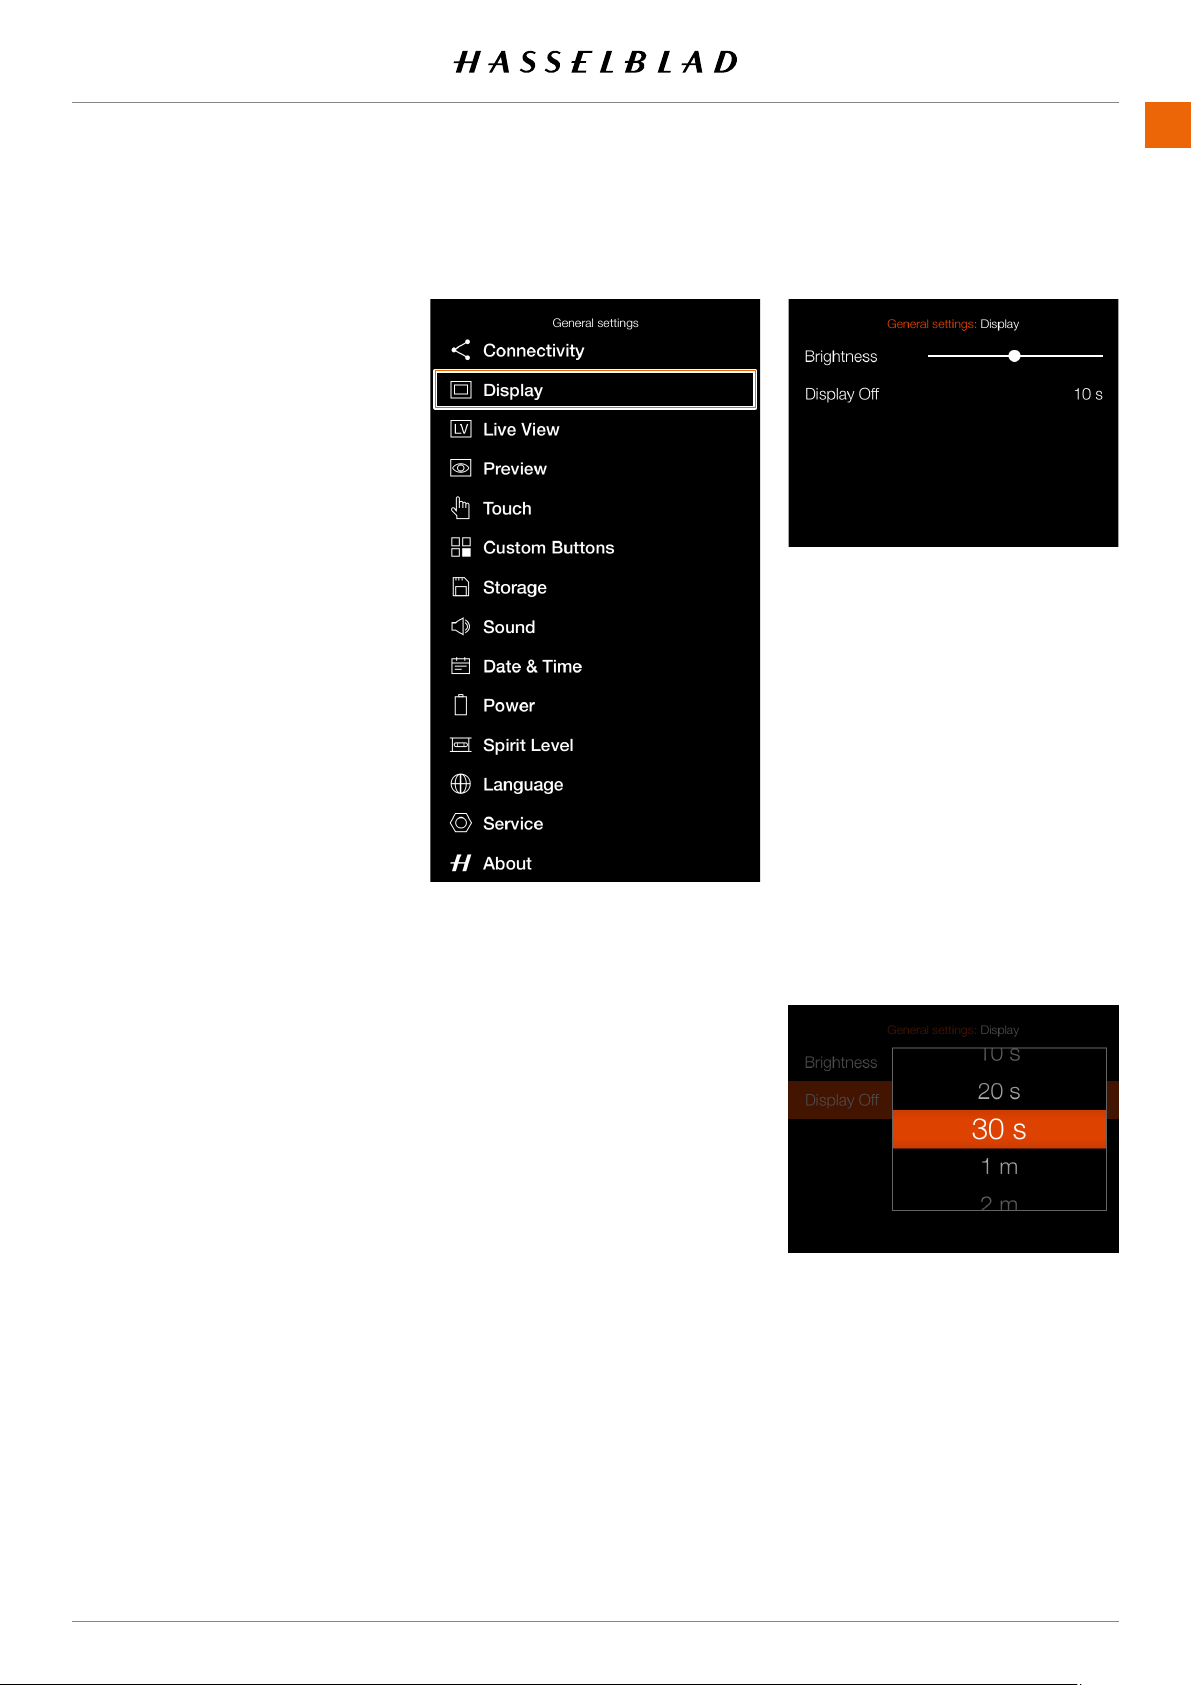
SETTINGS
www.hasselblad.comCONTENTS
130
DISPLAY
1
2
3
1
1
1
Brightness
to the left to make the screen darker
Display Off
be active.
Chose between:
5sec, 10sec, 20sec, 30sec, 1min,
2min, 3min.
130
907X 50C USER GUIDE
Note!

SETTINGS
www.hasselblad.comCONTENTS
131
Note!
have set the Aperture and Shutter to be
mode. It is advised to turn off Exposure
Note!
the subject, the Exposure Simulation is
operate in optimal conditions. When the
LIVE VIEW
1
2
3
1
1
1
Exposure Simulation
A/S/P/Full Auto
will look like. When unchecked, the
exposure adjustments.
M
Check this box to use exposure
simulation in Manual Mode. The
the aperture, shutter speed and ISO
Note!
If Exposure Simulation is active and the
131
907X 50C USER GUIDE
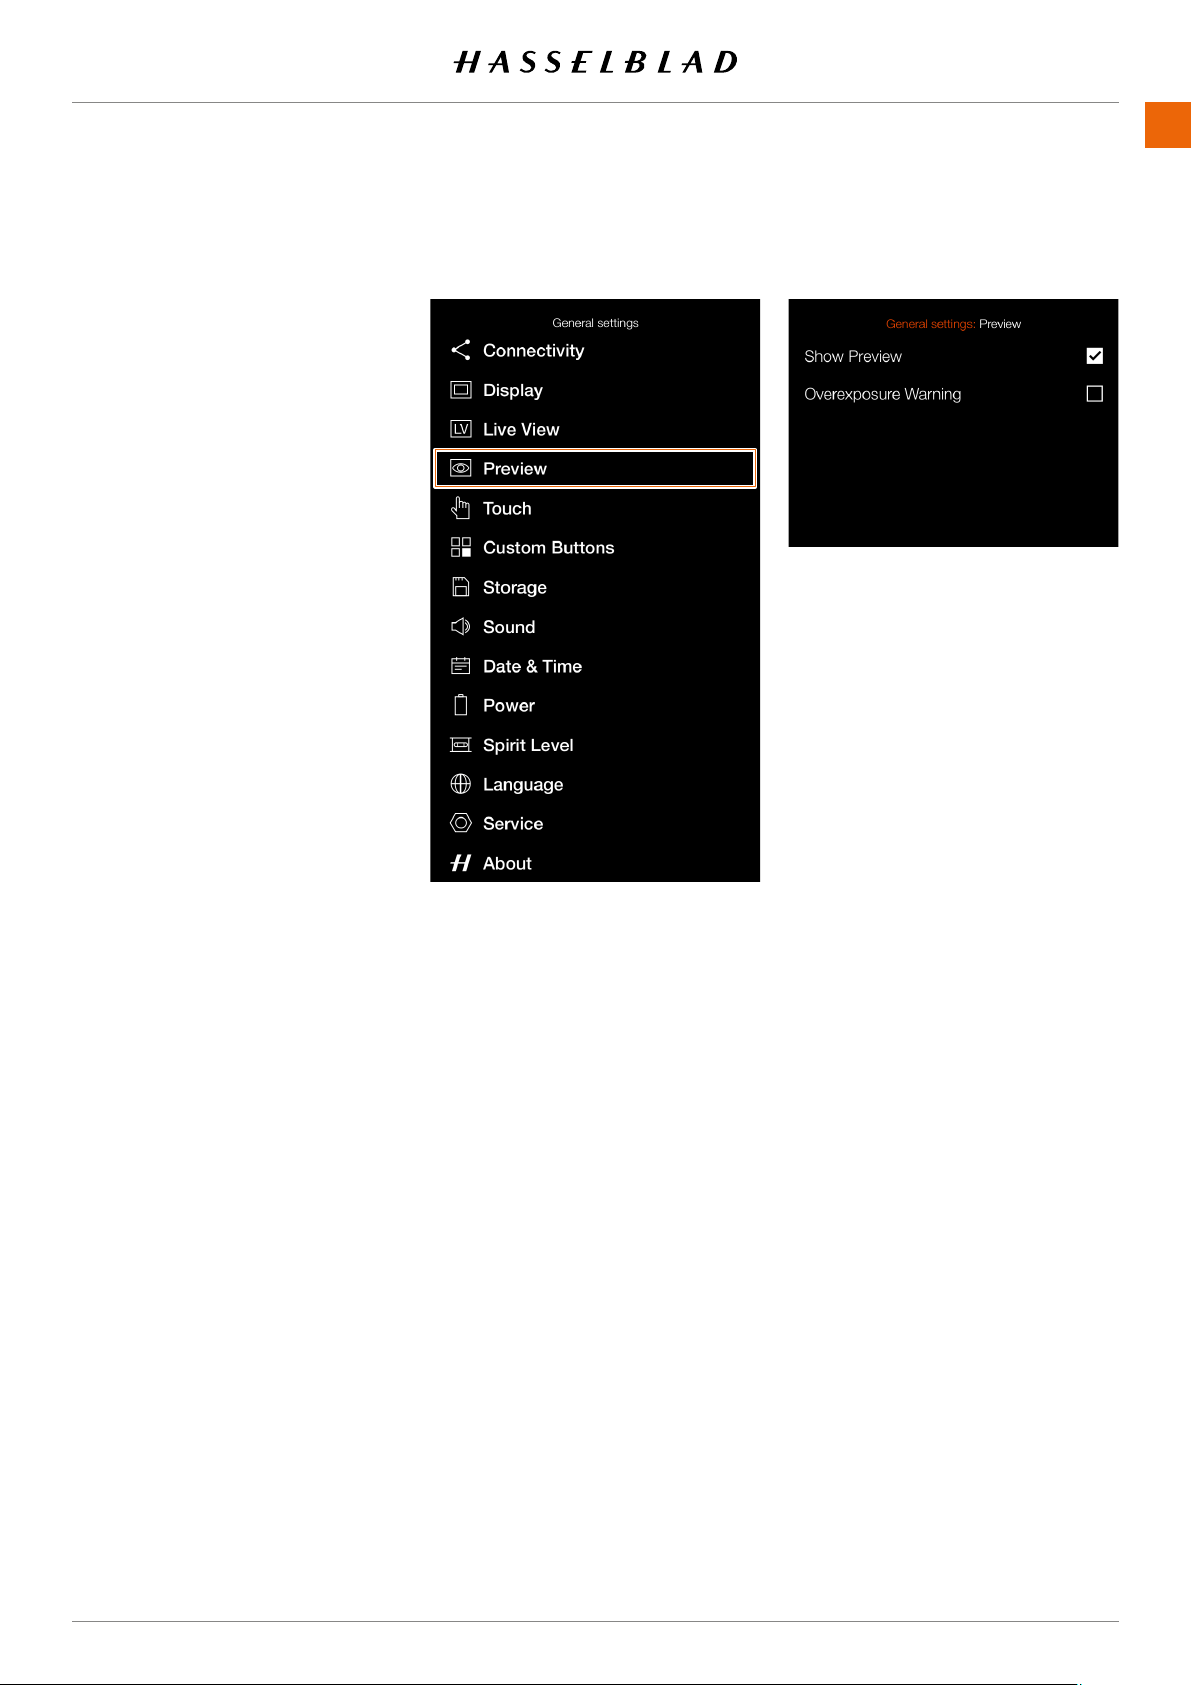
SETTINGS
www.hasselblad.comCONTENTS
132
PREVIEW
PREVIEW
1
2
3 Press the Preview menu.
1
1
1
Show Preview
Check this box to show a preview on
the rear screen after each exposure.
Overexposure Warning
When this box is checked, areas
close to overexposure in the preview
and white.
132
907X 50C USER GUIDE
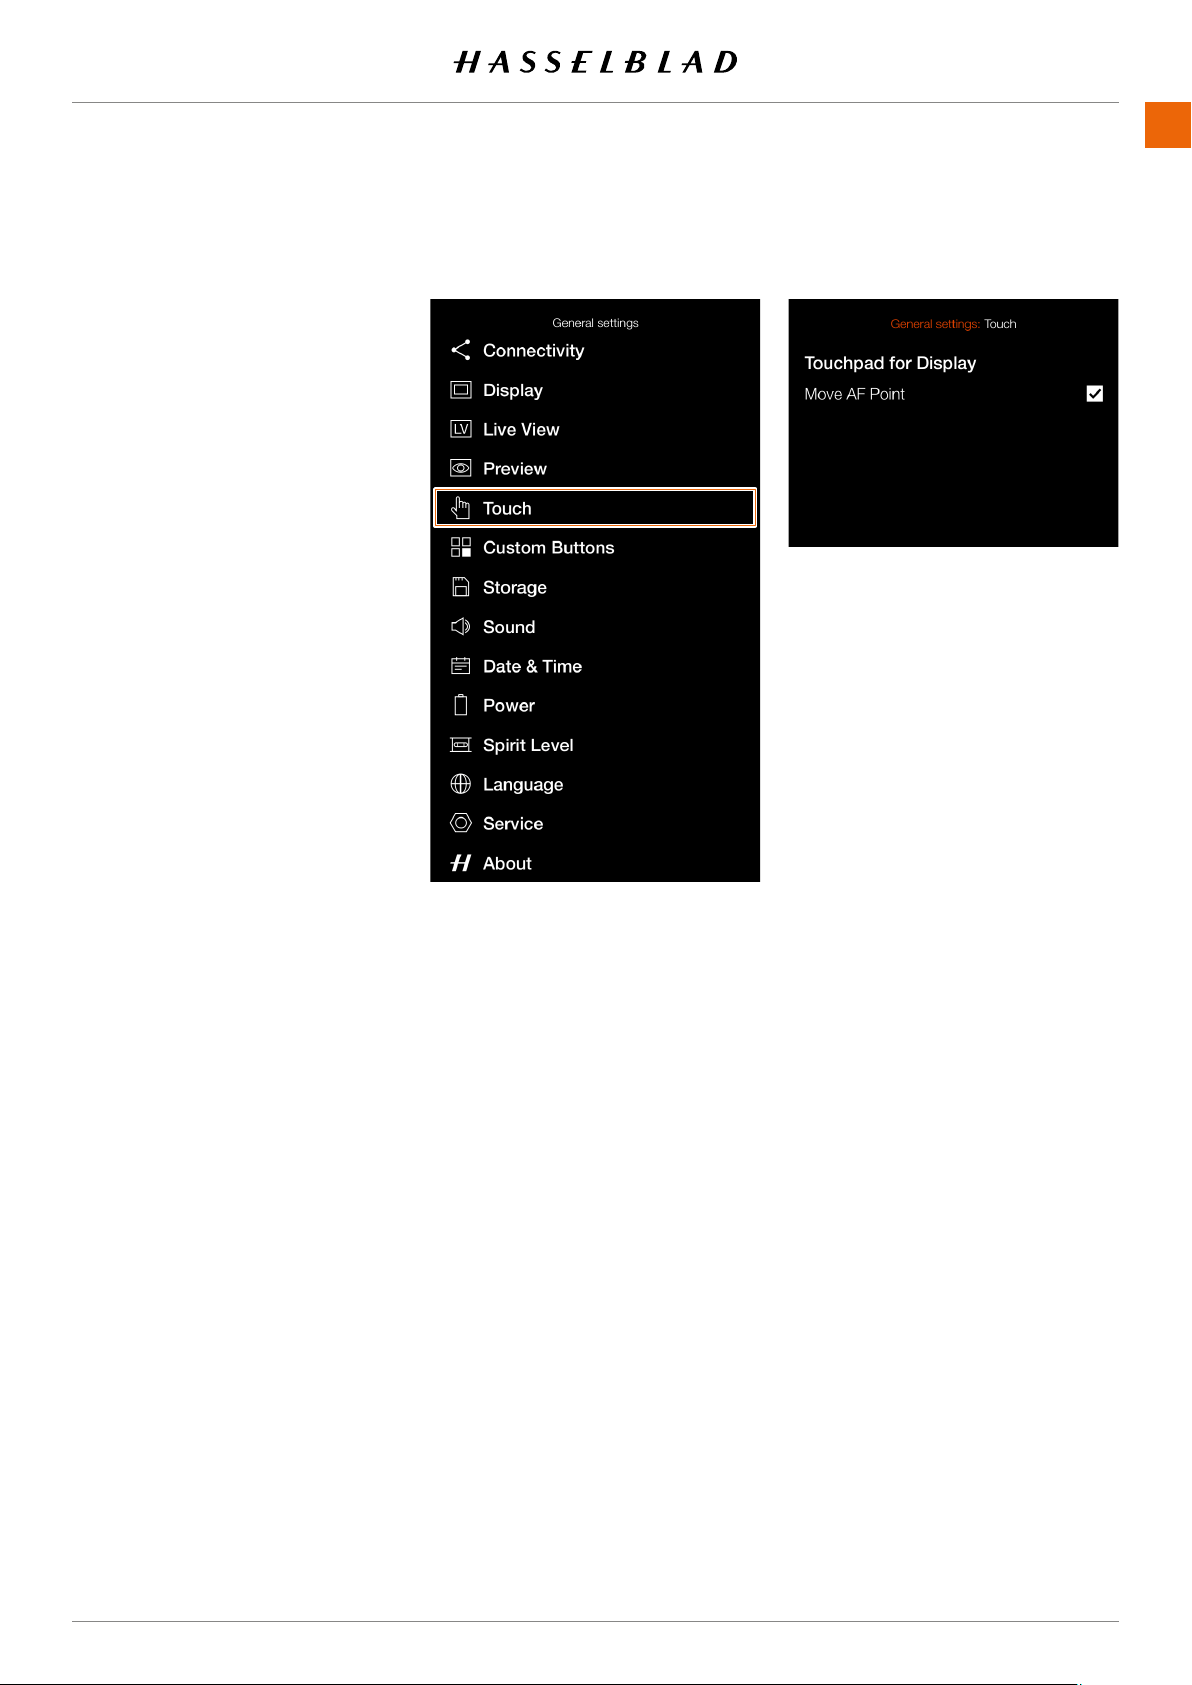
SETTINGS
www.hasselblad.comCONTENTS
133
TOUCH
1
2
3 Press the Touch menu.
1
1
1
Touchpad for Display
Move AF Point
When checked, the AF point can
133
907X 50C USER GUIDE
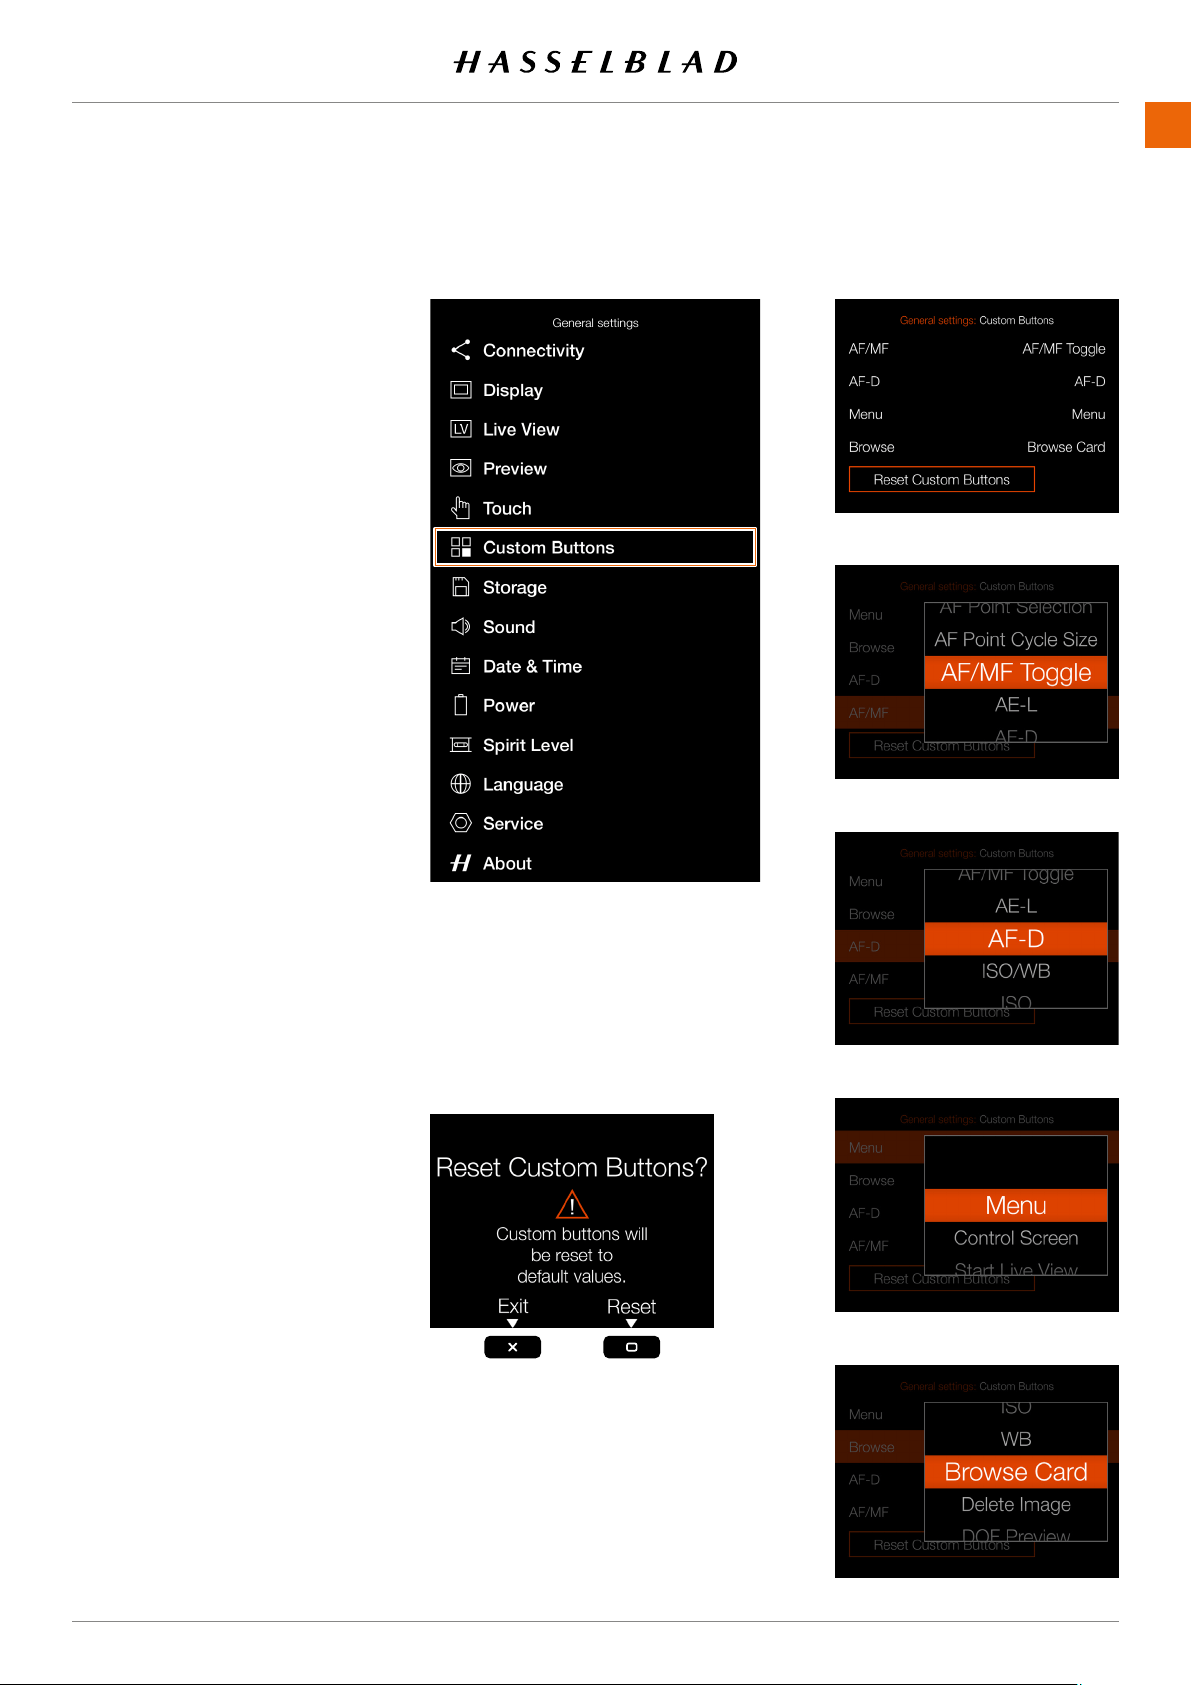
SETTINGS
www.hasselblad.comCONTENTS
CUSTOM BUTTONS
CUSTOM BUTTONS
1
2
3 Press the Touch menu.
1
1
1
Custom Buttons
The Custom Button function allows four
of the buttons on the optional Control
Grip accessory to be re-programmed
to a different function for faster access
to frequently used functions.
AF/MF
Settings for the AF/MF button.
AF-D
Settings for the AF-D button.
Menu
Settings for the Menu button.
Browse
Settings for the Browse button.
Scroll through the list and select the
required function by tapping.
Reset Custom Buttons
Restore button function to factory
default. Pressing this button will
bringupaconrmdialogue.
Press the Rectangle button to
restore the settings to default or
the Cross button to exit without
changing the settings.
907X 50C USER GUIDE
ResetCustomButtonsConrm
Custom Buttons Settings Menu
AF-D button settings
AF/MF button settings
Menu button settings
Browse button settings
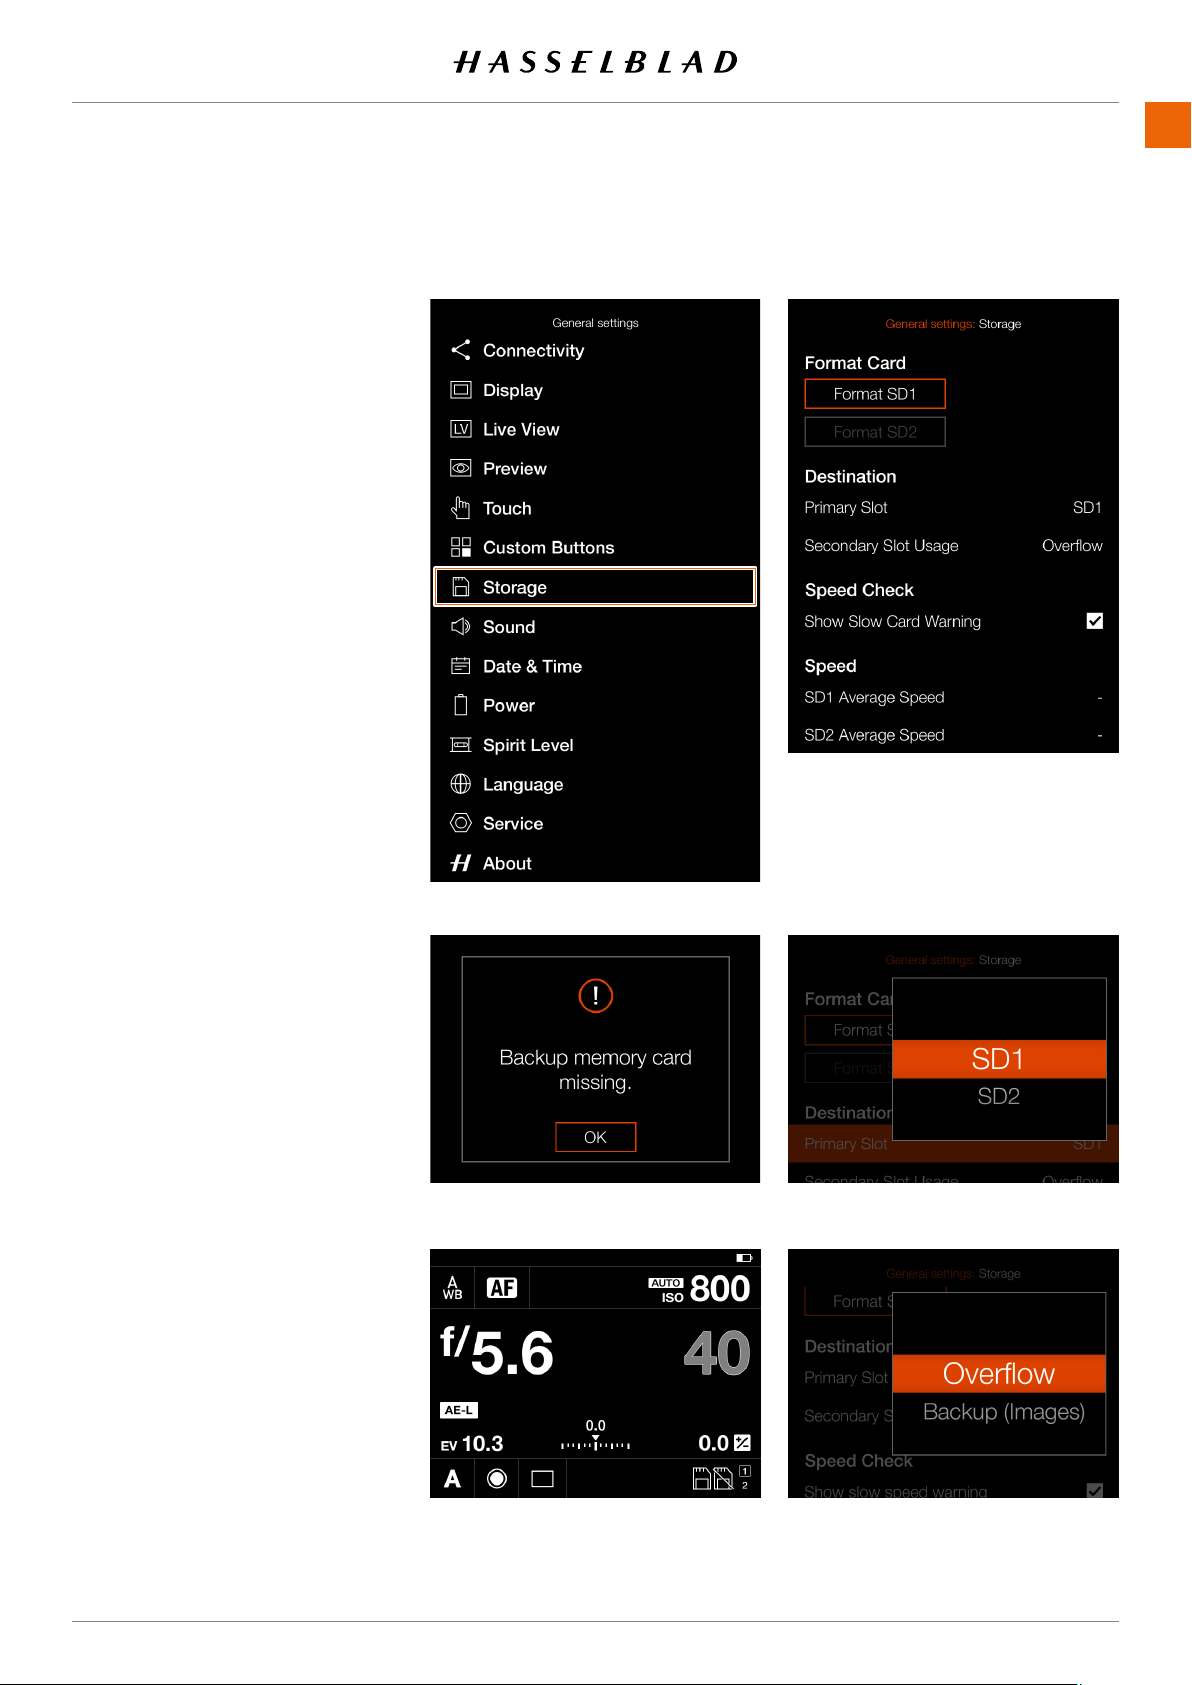
SETTINGS
www.hasselblad.comCONTENTS
135
STORAGE
STORAGE
1
2
3
1
Storage Menu Settings
Format Card
Format SD 1 or Format SD 2.
Image Destination
SD 1
or
SD 2
.
Secondary Slot Usage
Select between:
Overow
or
Backup (Images)
If Backup is selected, the camera will
backed up.
Note!
If Backup is selected and no second card
is inserted, the camera will be blocked
The control screen will show the Backup
frames.
Speed Check settings
If this box is checked, the camera will
check the speed of the card at start-up
to be slow.
Speed
After 10 exposures, a speed value will be
shown for the active SD Card.
135
907X 50C USER GUIDE
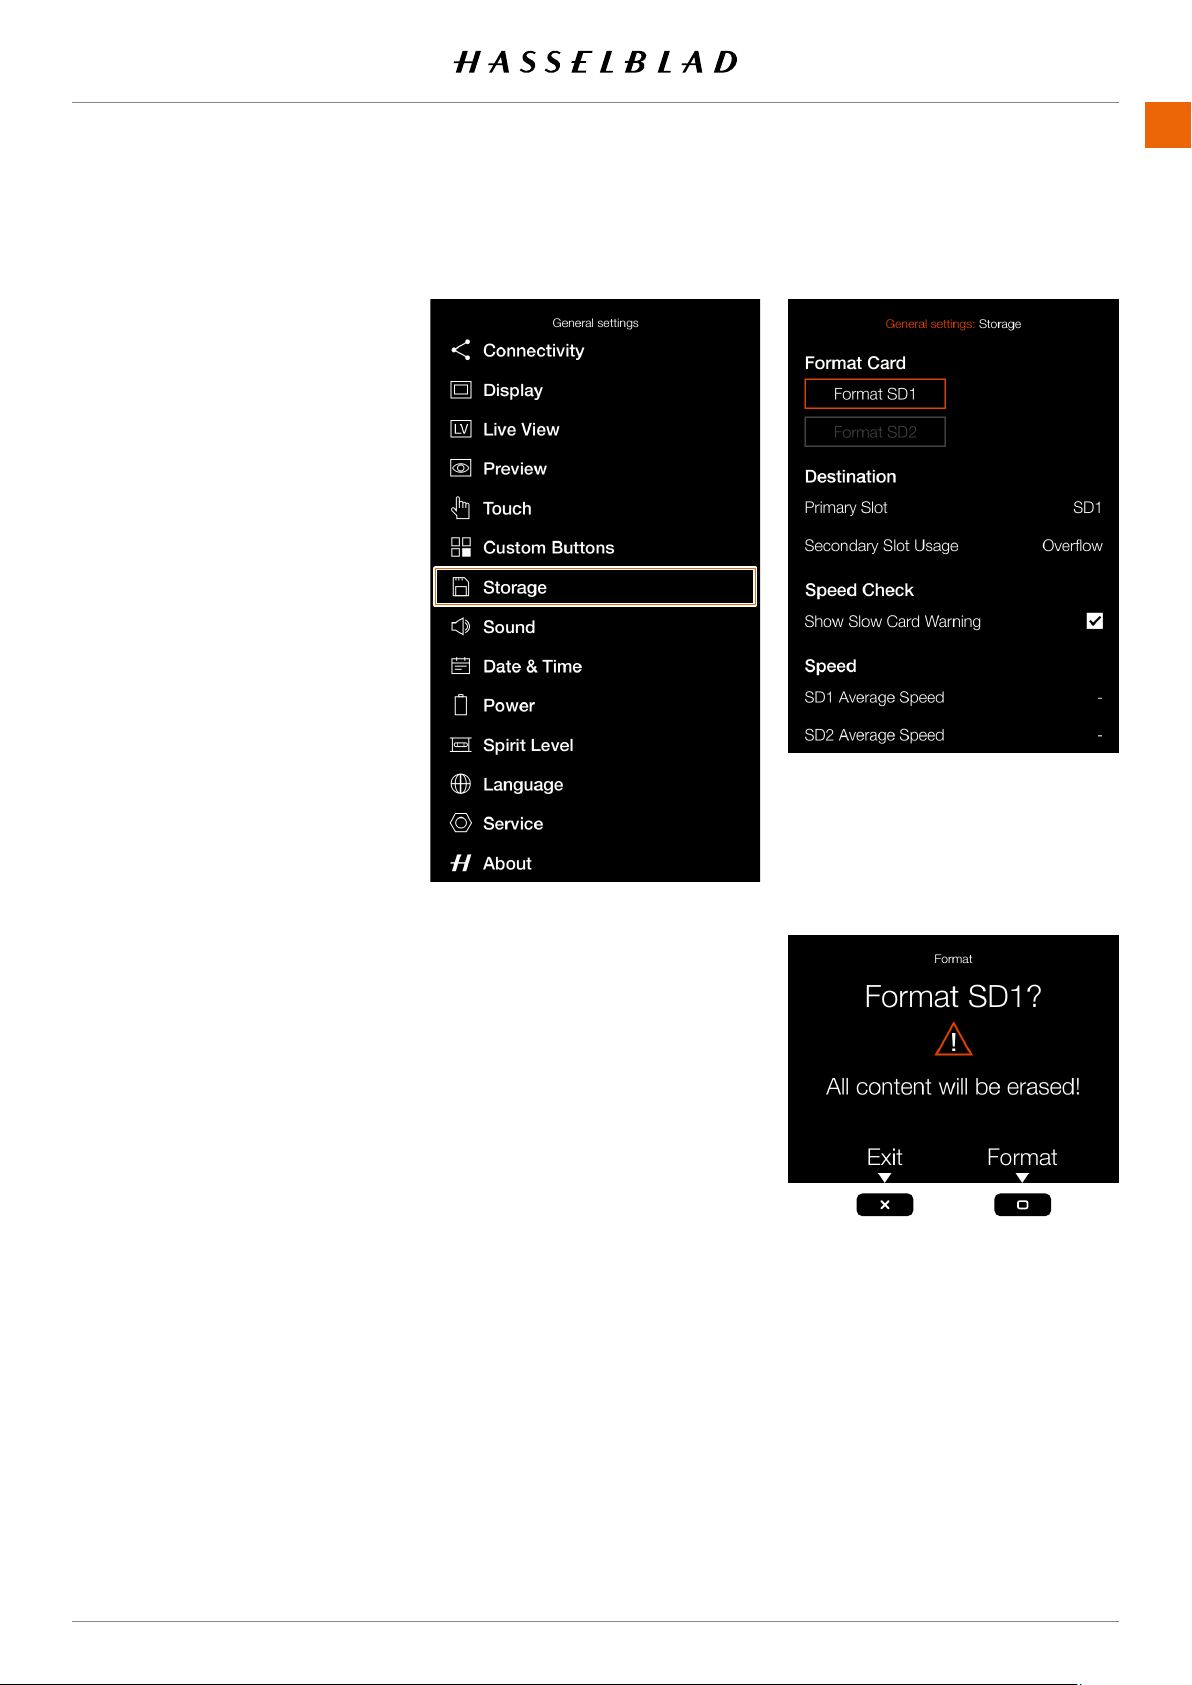
SETTINGS
www.hasselblad.comCONTENTS
136
HOW TO FORMAT A MEMORY
CARD
1 Select card to format,
SD 1
or
SD 2
,
2
appears.
3
the cross button.
136
907X 50C USER GUIDE
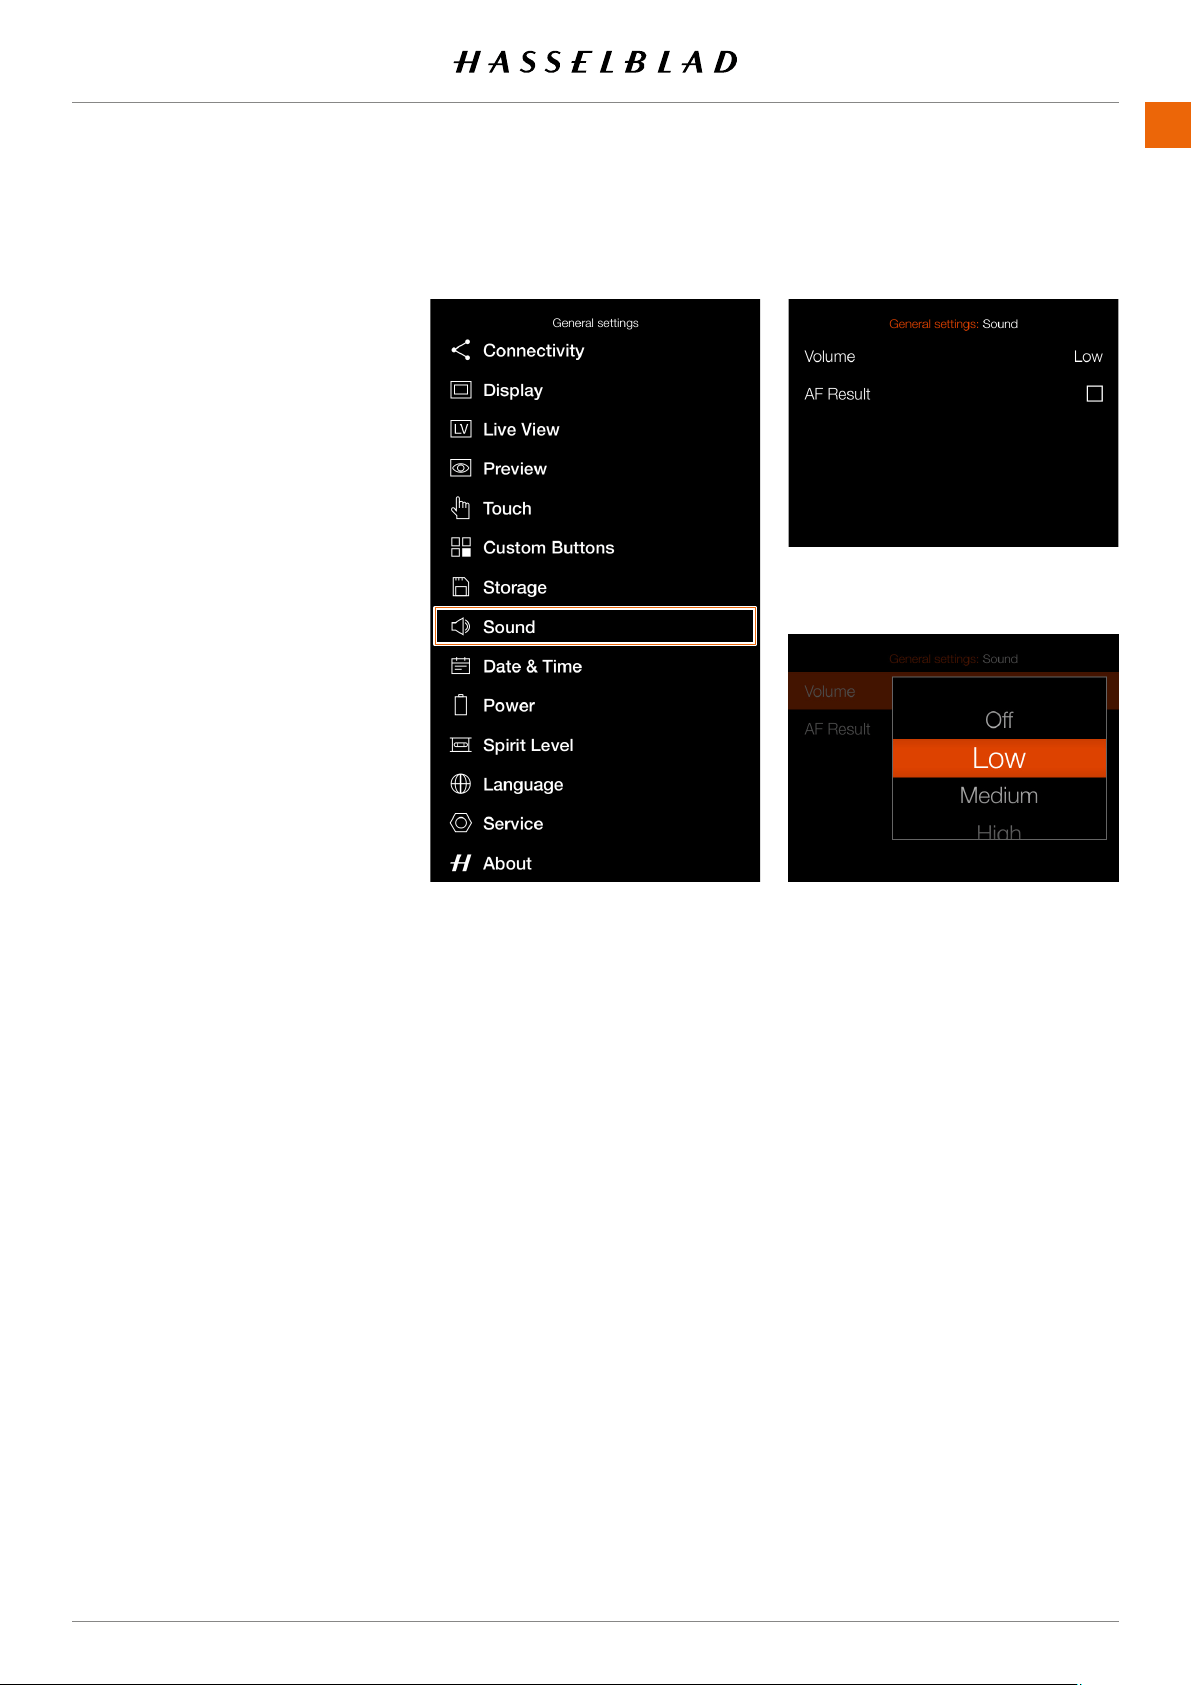
SETTINGS
www.hasselblad.comCONTENTS
SOUND
SOUND
1
2
3 Press the Sound menu.
1
1
Volume
Choose between:
Off, Low, Medium, High
AF Result
When this box is checked, a sound
If AF is successful or not, the camera
907X 50C USER GUIDE

SETTINGS
www.hasselblad.comCONTENTS
138
DATE & TIME
DATE & TIME
1
2
3 Press the Date & Time menu.
1
1
Date and Time menu settings
Date
Time
138
907X 50C USER GUIDE
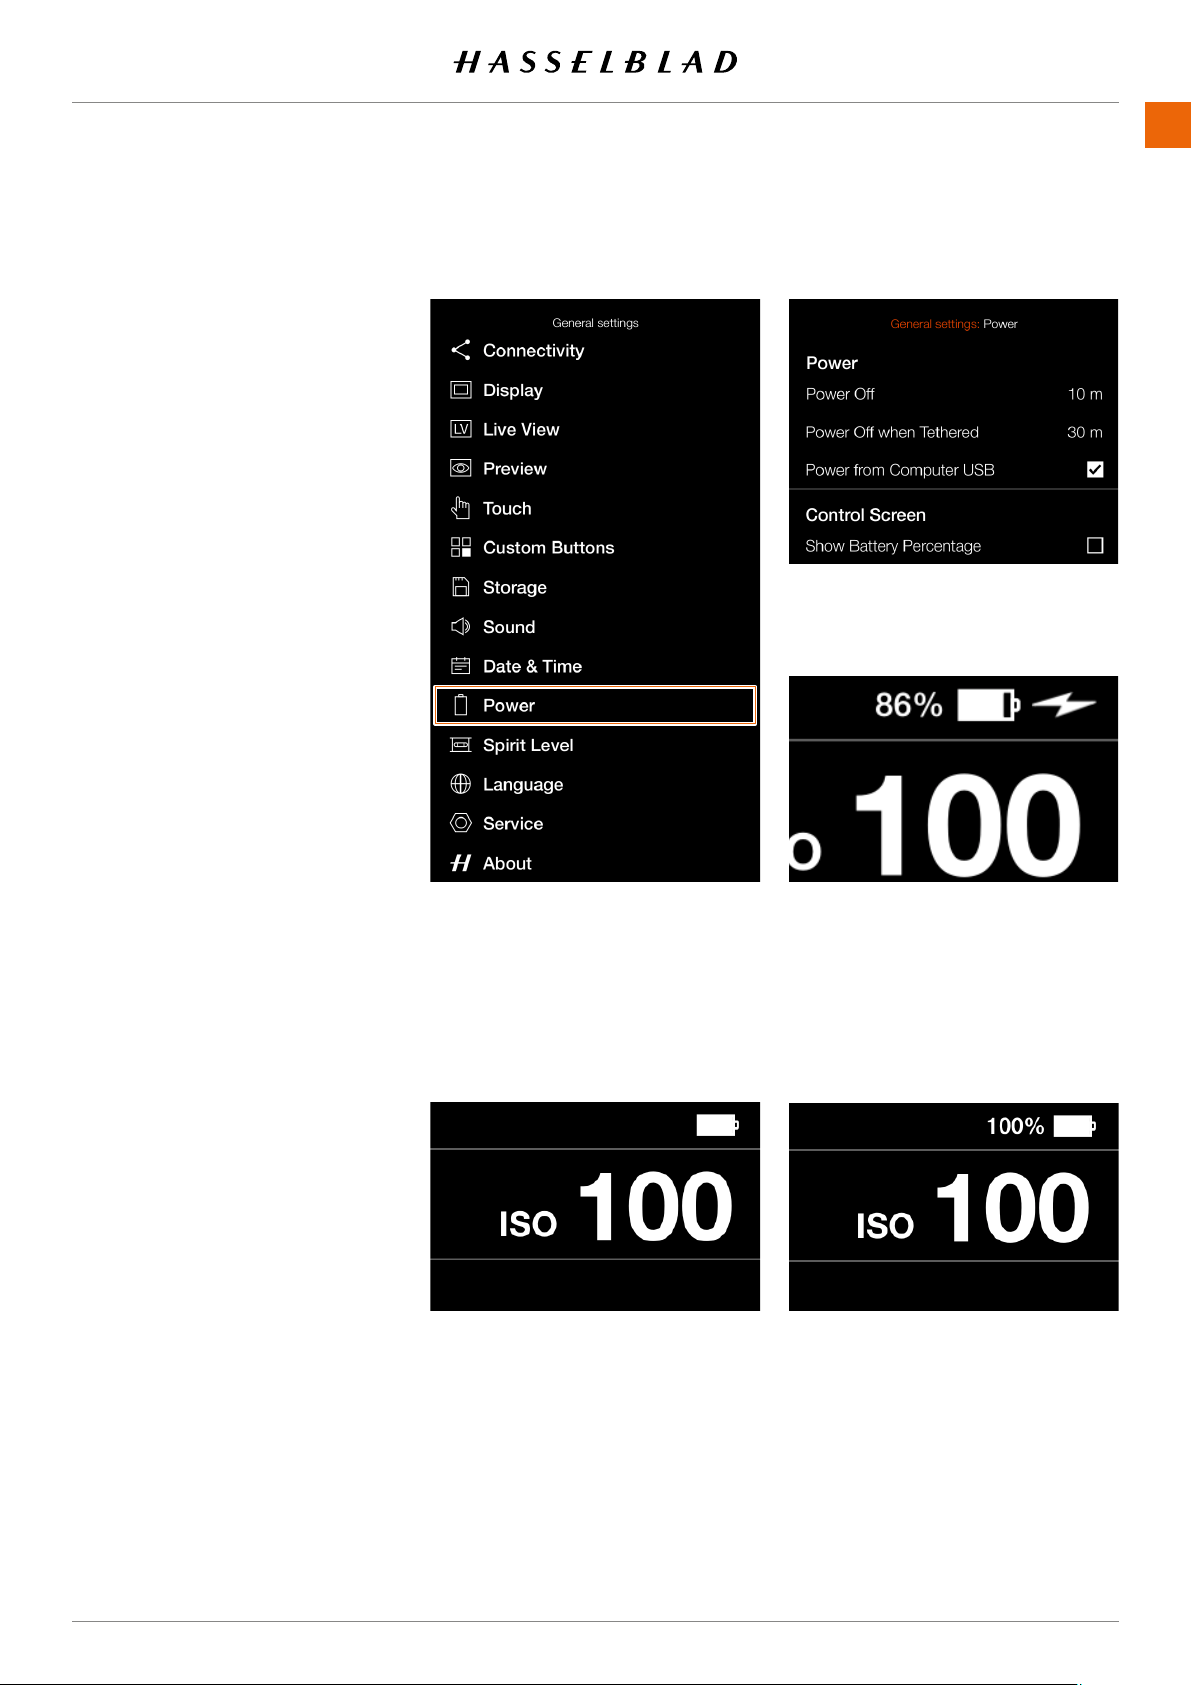
SETTINGS
www.hasselblad.comCONTENTS
POWER
POWER
1
2
3 Press the Power menu.
1
1
Power settings
Power Off
Sets the time before the camera
Choose between:
5 min, 10 min, 30 min, Never.
Power Off when Tethered
Sets the time before the camera
-
ed to a computer.
Choose between:
5 min, 10 min, 30 min, Never.
Power from Computer USB
When checked, the camera will take
power from the USB device. This is
(A)
next to the
Control Screen
Show Battery Percentage setting
When the box is checked, an
Note!
Note!
supported.
Indication of active USB power.
907X 50C USER GUIDE

SETTINGS
www.hasselblad.comCONTENTS
Spirit level when camera is tilted a little
Camera tilted to the left.
Camera tilted up.
Camera tilted down.
SPIRIT LEVEL
The camera is equipped with an accel-
erometer. The accelerometer is used to
measure the tilt of the camera relative to
1
2
3
Note!
B A
907X 50C USER GUIDE
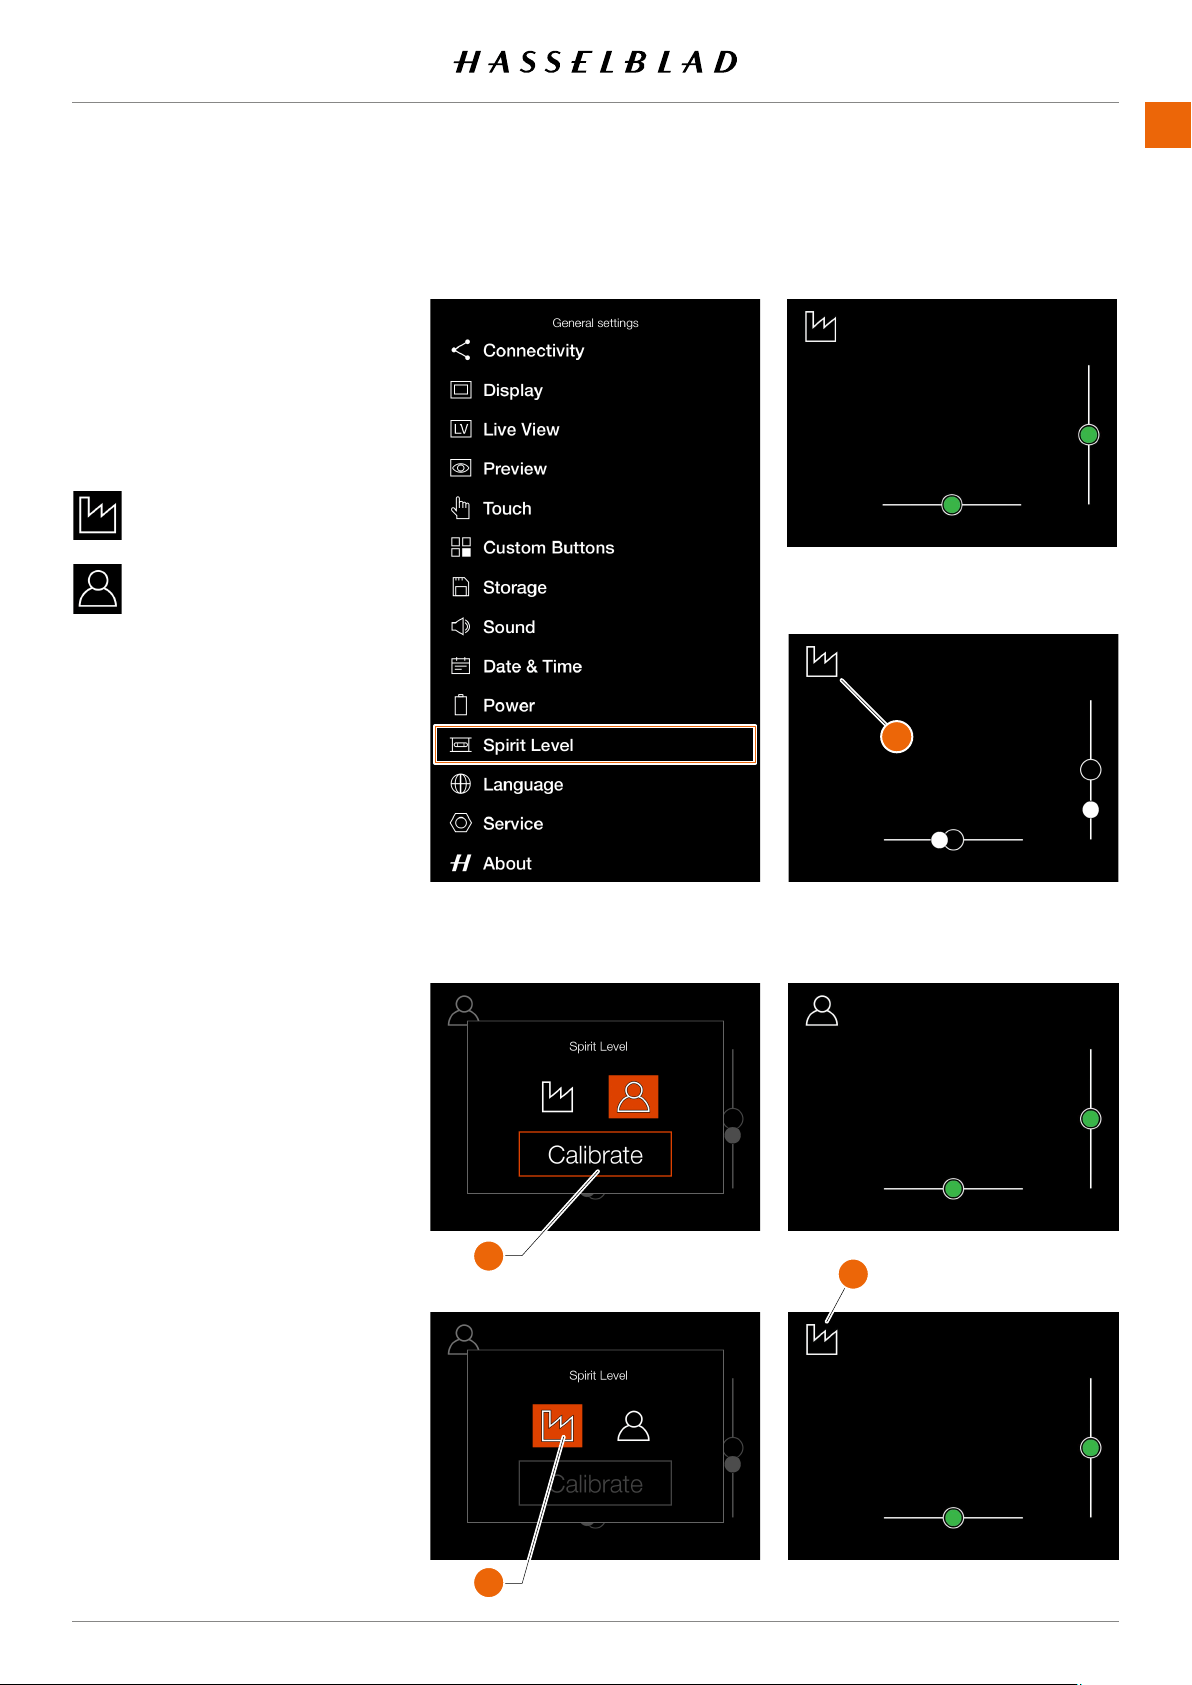
SETTINGS
www.hasselblad.comCONTENTS
CALIBRATE SPIRIT LEVEL
user mode. In user mode, the spirit level
User mode.
How to calibrate Spirit Level
1
2
3
icon.
Press the icon in the top left corner
(A)
.
5
6
Press Calibrate
(B)
.
8 The two white circles are now moved
to their centre position. When in their
How to reset spirit level to factory
calibration
1
2
3
icon.
Press the icon in the top left corner
(A)
.
5
6
(C)
.
(D)
is now
Note!
The calibration stored in the user
Spirit level when camera is tilted a little
A
B
C
907X 50C USER GUIDE
D
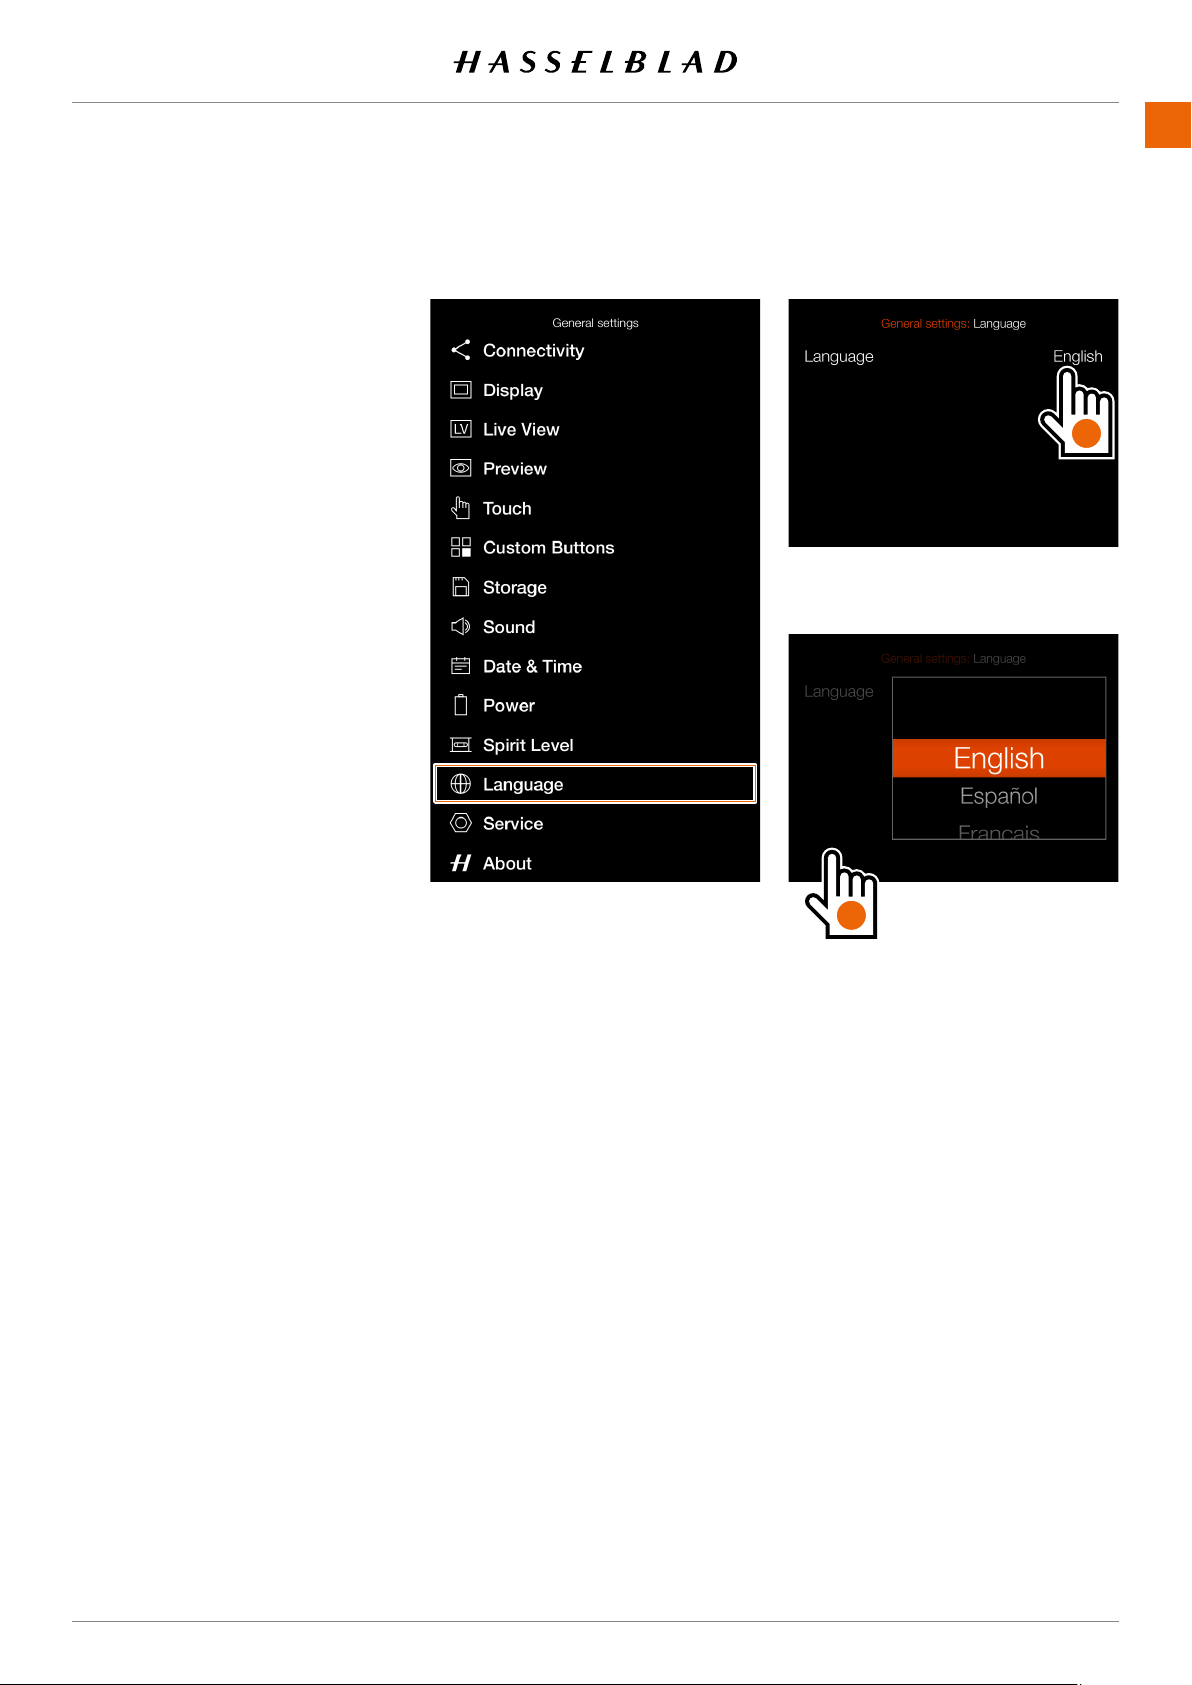
SETTINGS
www.hasselblad.comCONTENTS
LANGUAGE
1
2
3
How to change language
1 Press the menu button.
2
3
5
(A)
and select a
6
tap outside the pop up
(B)
.
Available Languages:
English
Spanish
French
German
Italian
Swedish
Russian
Japanese
SimpliedChinese
Traditional Chinese
Korean
Note!
for a solution.
907X 50C USER GUIDE
B
A
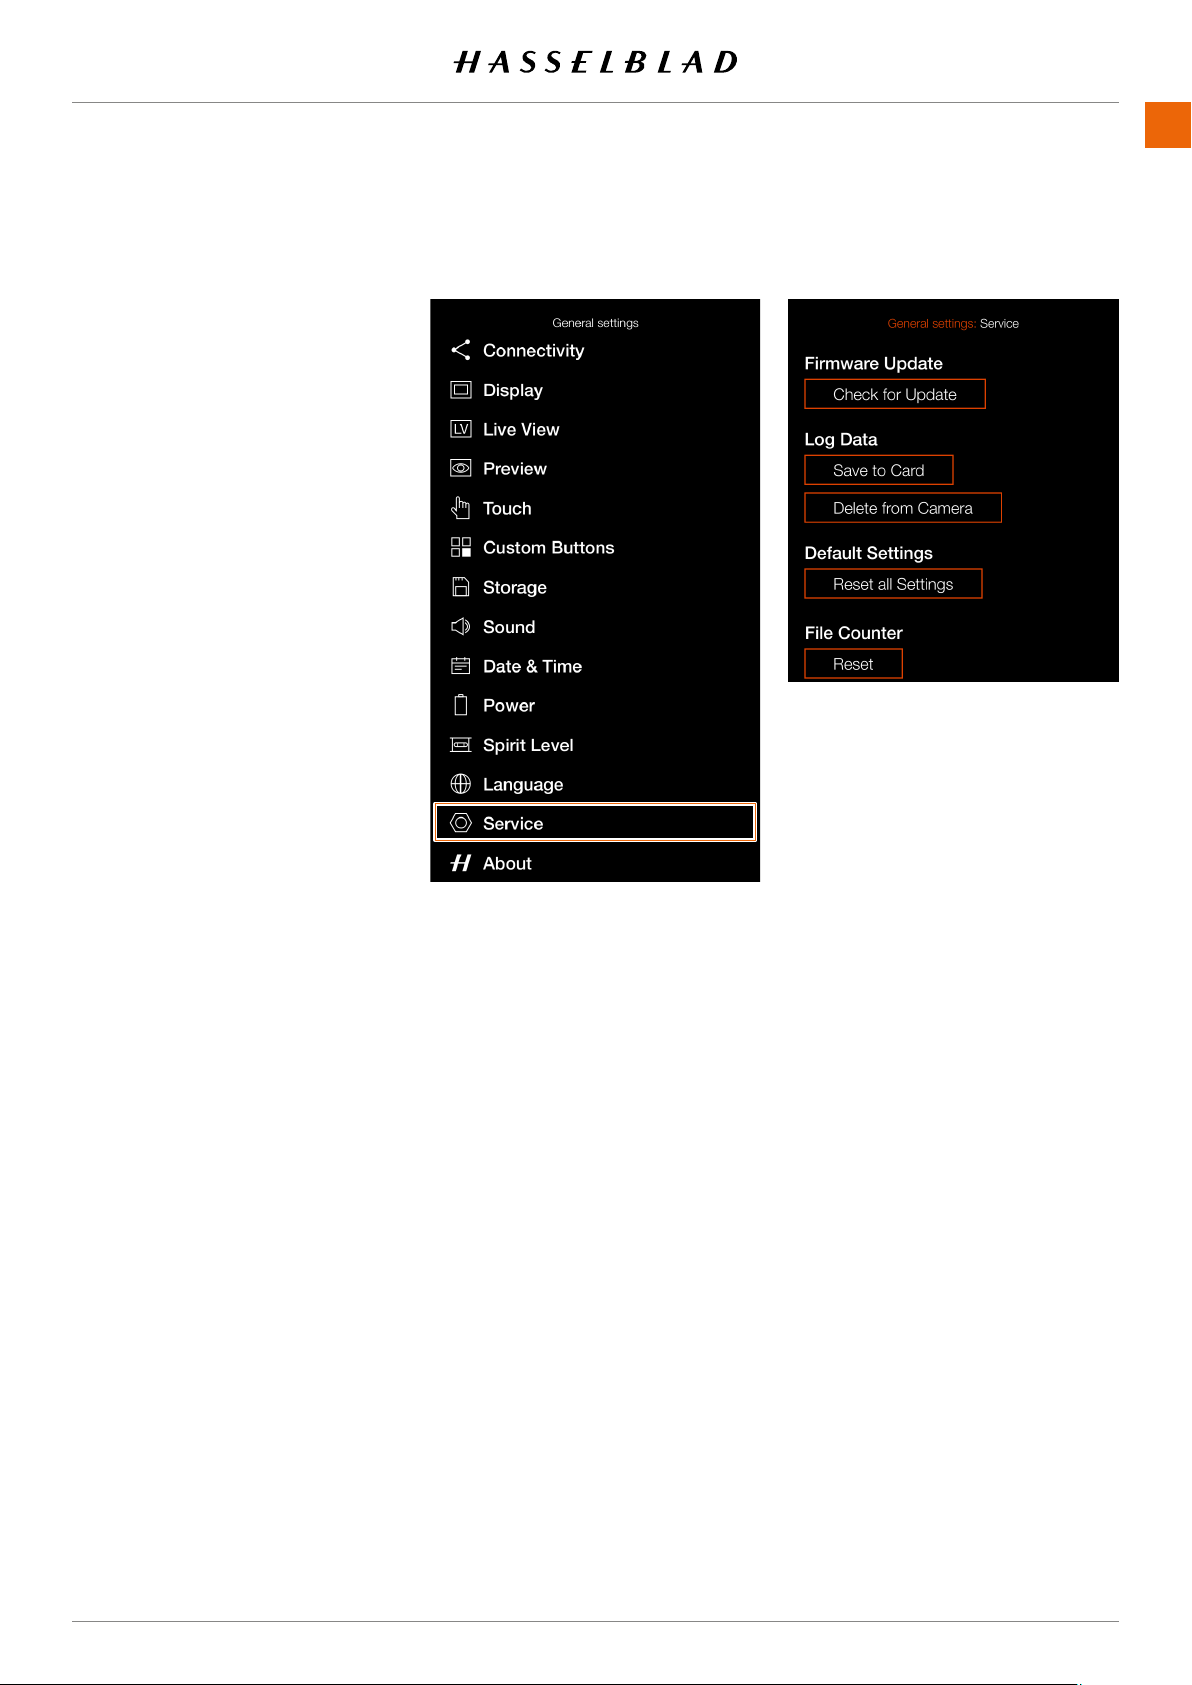
SETTINGS
www.hasselblad.comCONTENTS
SERVICE
SERVICE
1
2
3
icon.
Service menu settings
Firmware Update
See .
Log Data
Press
Save to Card
.
Default Settings
.
File Counter
.
Service menu
907X 50C USER GUIDE
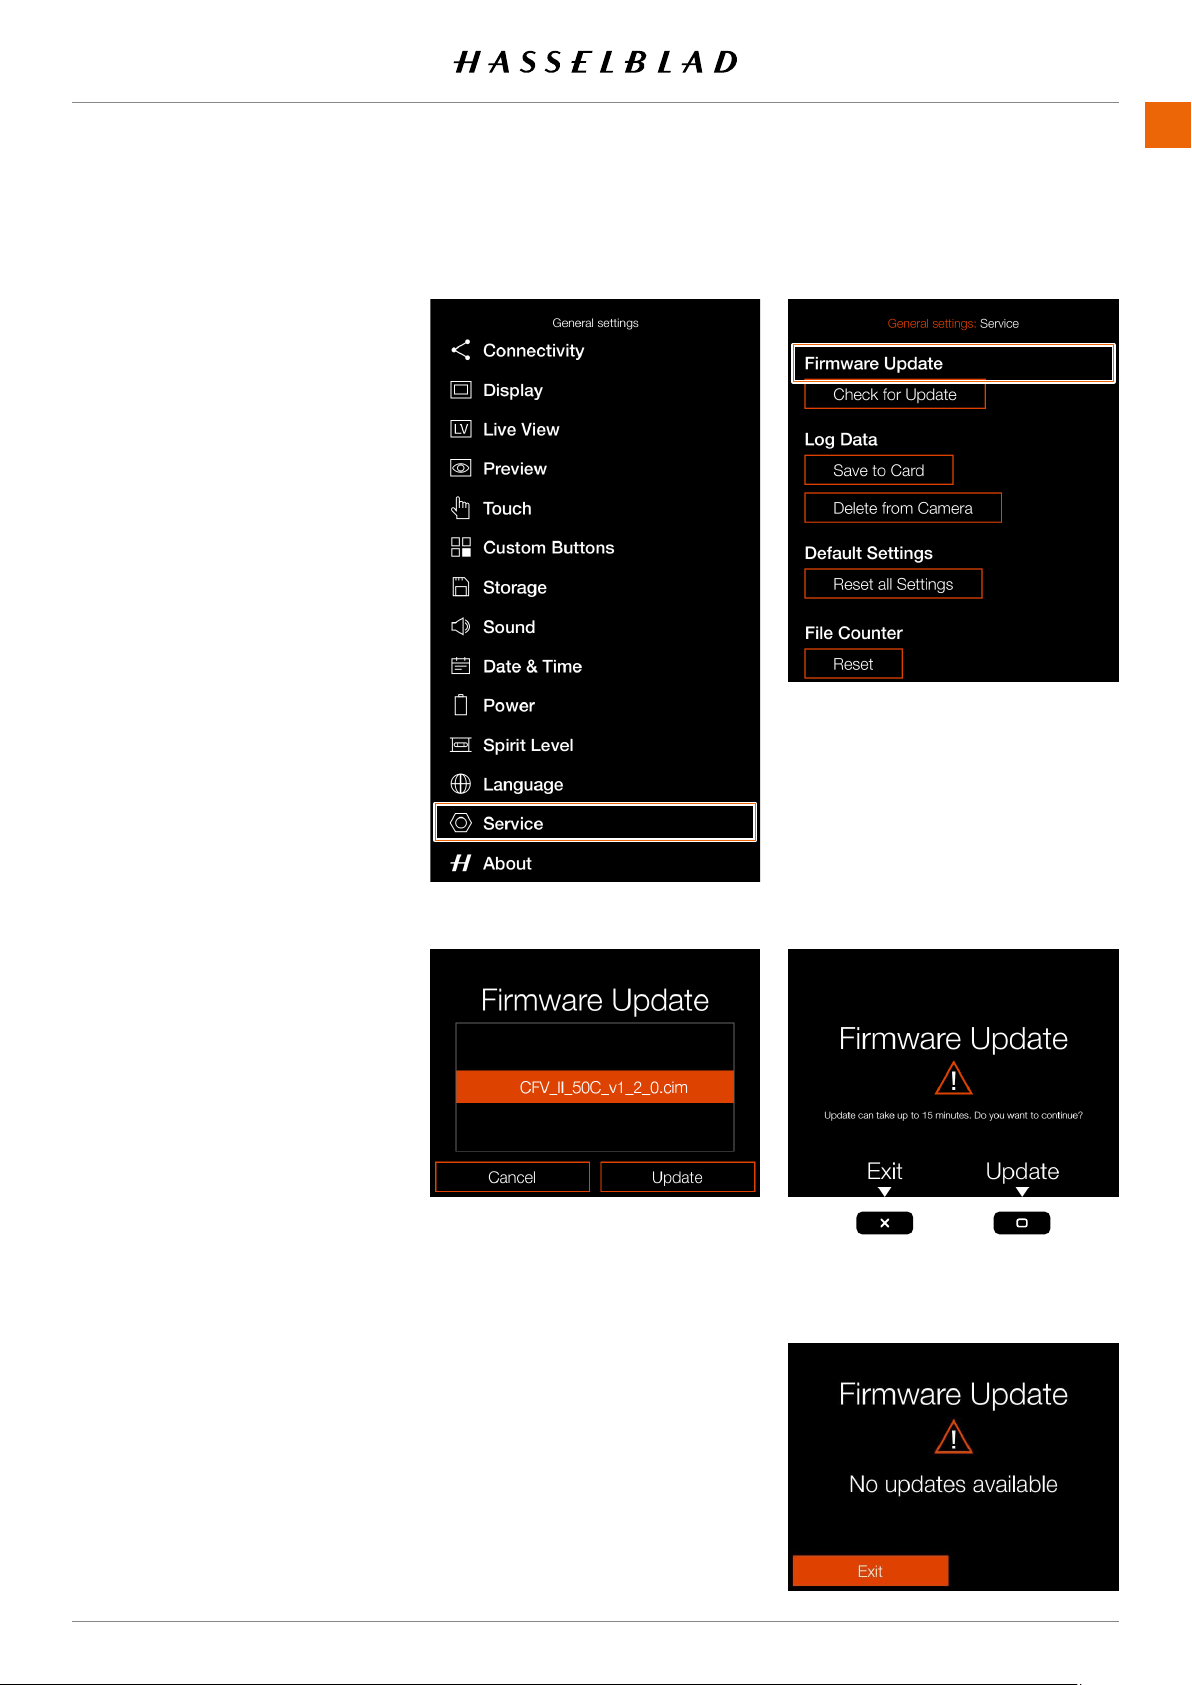
SETTINGS
www.hasselblad.comCONTENTS
FIRMWARE UPDATE
1
2
3 Press the Service menu.
Press the Check for Update button.
5 The camera will now check the
Update rmware procedure
1
www.hasselblad.com.
2
3 Insert the SD card in the camera.
5
Check for Update.
6
number corresponds to the latest
Select Update.
8
update.
10
update process.
11 The update will take several minutes.
12
13
available on the SD card
Service menu
907X 50C USER GUIDE

SETTINGS
www.hasselblad.comCONTENTS
Service menu
LENS FIRMWARE UPDATE
1
2
3 Press the Service menu.
Press the Check for Update button.
5 The camera will now check the
Lens Firmware Update Procedure
1 Attach the lens to the camera.
2
Firmware from www.hasselblad.com.
3
Insert the SD card in the camera.
5
6
Check for Update.
number corresponds to the latest
8 Select Update.
update.
10
11
Update process.
12 The update will take several minutes.
13
available on the SD card
907X 50C USER GUIDE
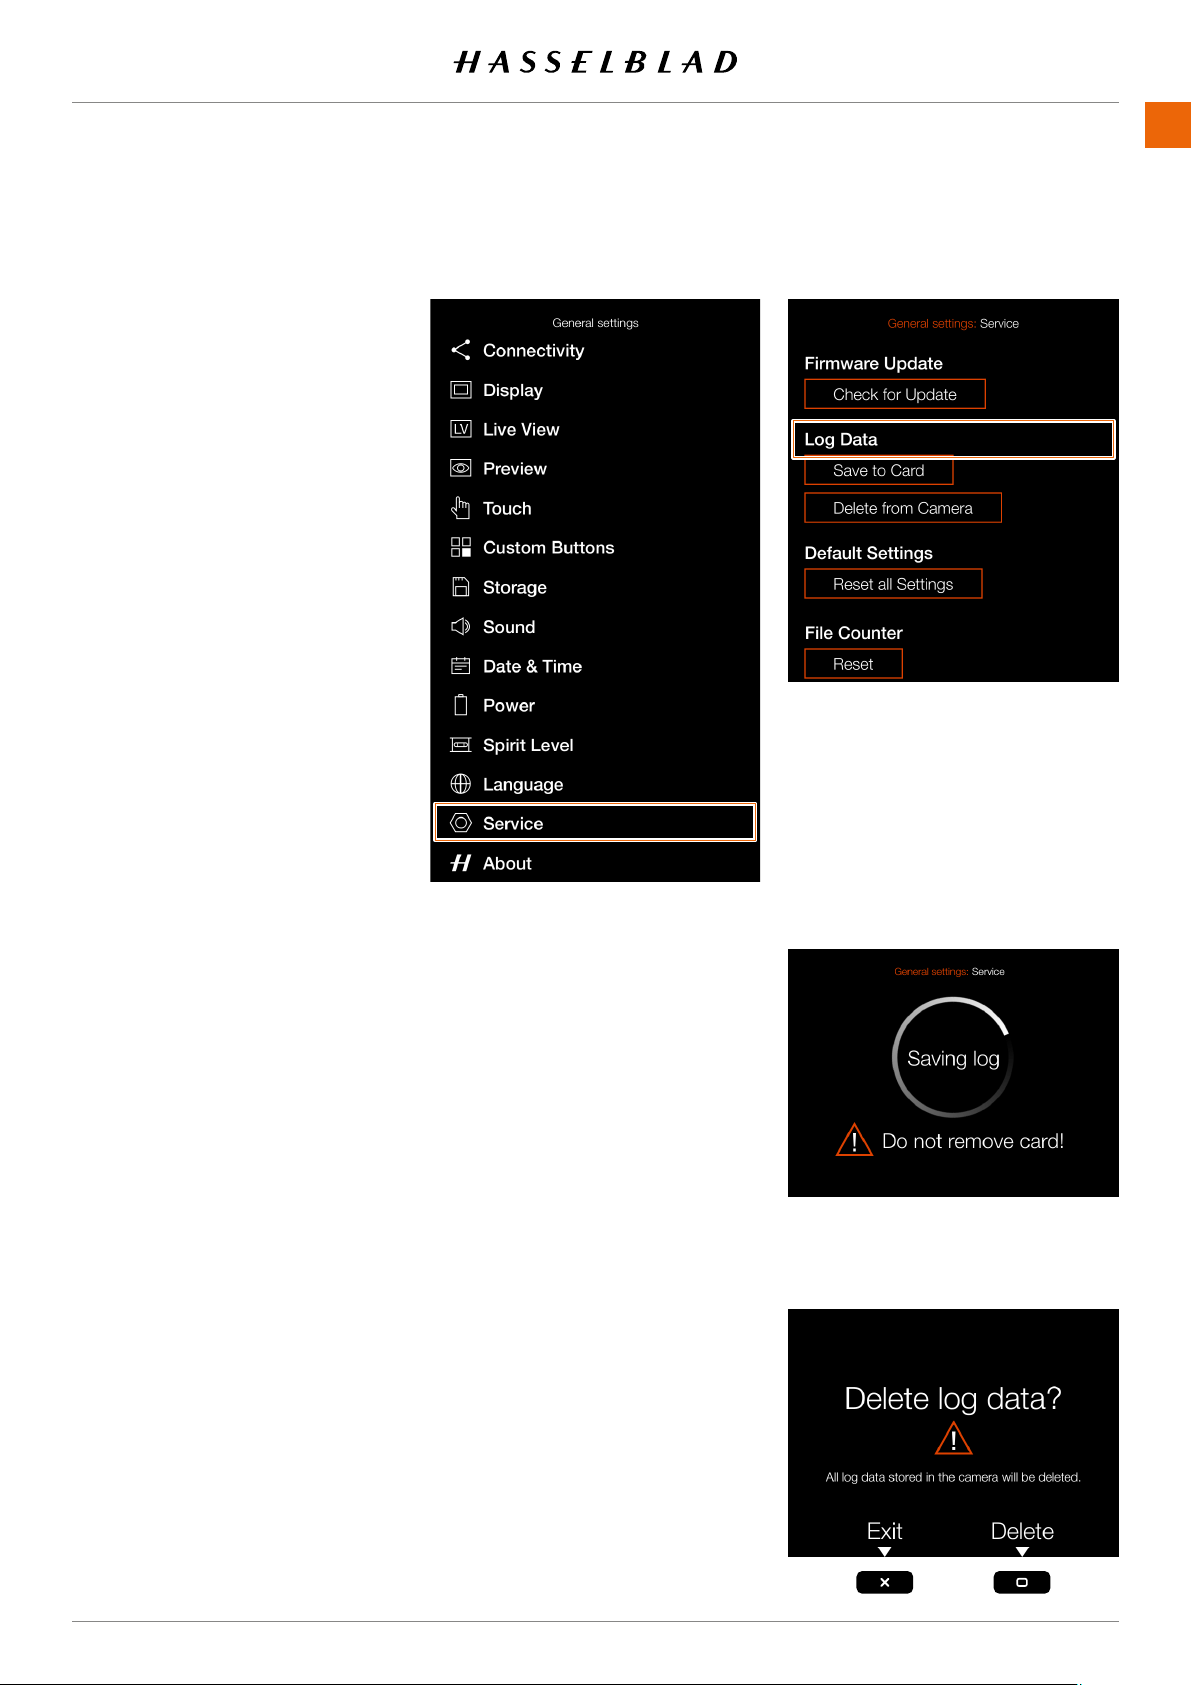
SETTINGS
www.hasselblad.comCONTENTS
Service menu
LOG DATA
1
2
3 Press the Service menu.
Press the
Check for Update
button.
5 The camera will now check the inserted
Log Data settings
Save to Card
Delete from Camera
How to save Log Data:
1 Press MENU.
2
3
5 Press the
Save to Card
button to save
6 Press the menu button to exit.
How to delete Log Data:
1 Press the menu button.
2
3
5 Press the
Delete from Camera
button.
6
Press the menu button to exit.
907X 50C USER GUIDE
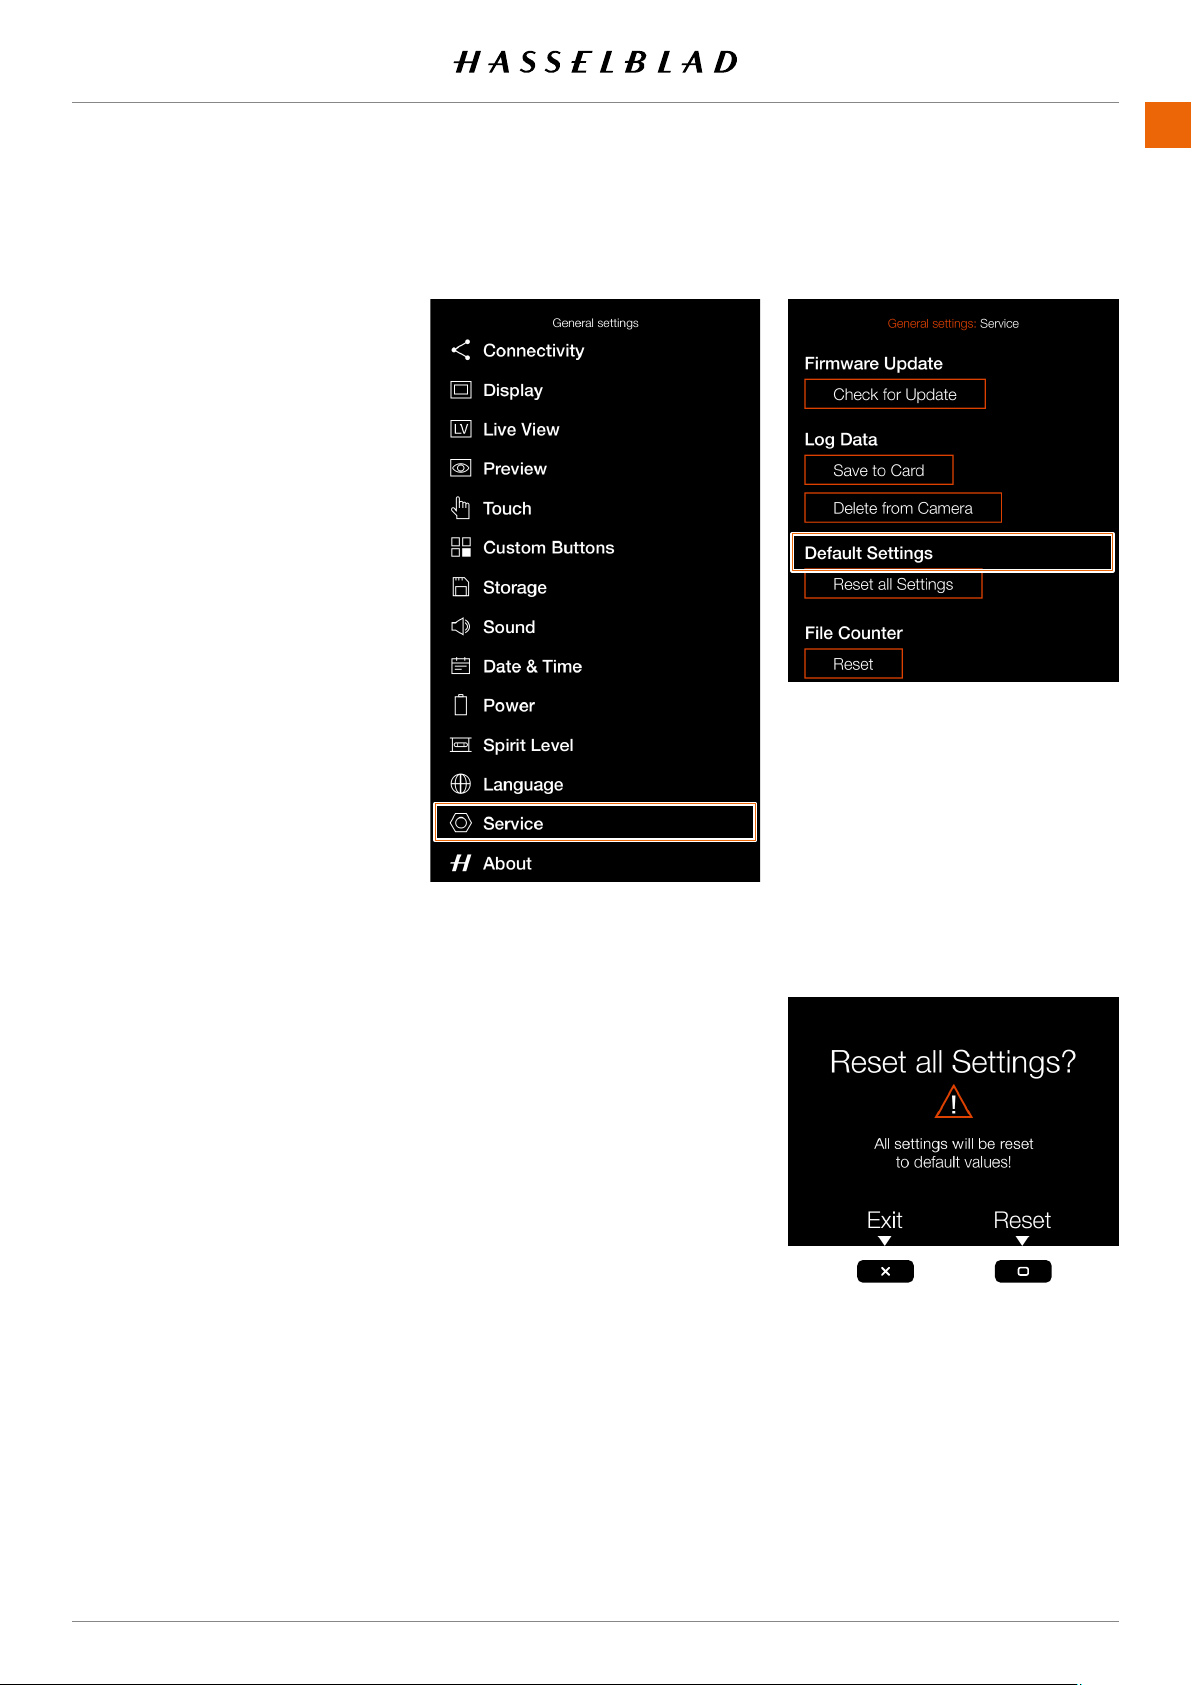
SETTINGS
www.hasselblad.comCONTENTS
Service menu
DEFAULT SETTINGS
1
2
3 Press the Service menu.
Press the
Check for Update
button.
5 The camera will now check the
How to reset all settings to the
default setting:
1 Press the menu button.
2
3
5
6
reset to default values.
Note!
907X 50C USER GUIDE
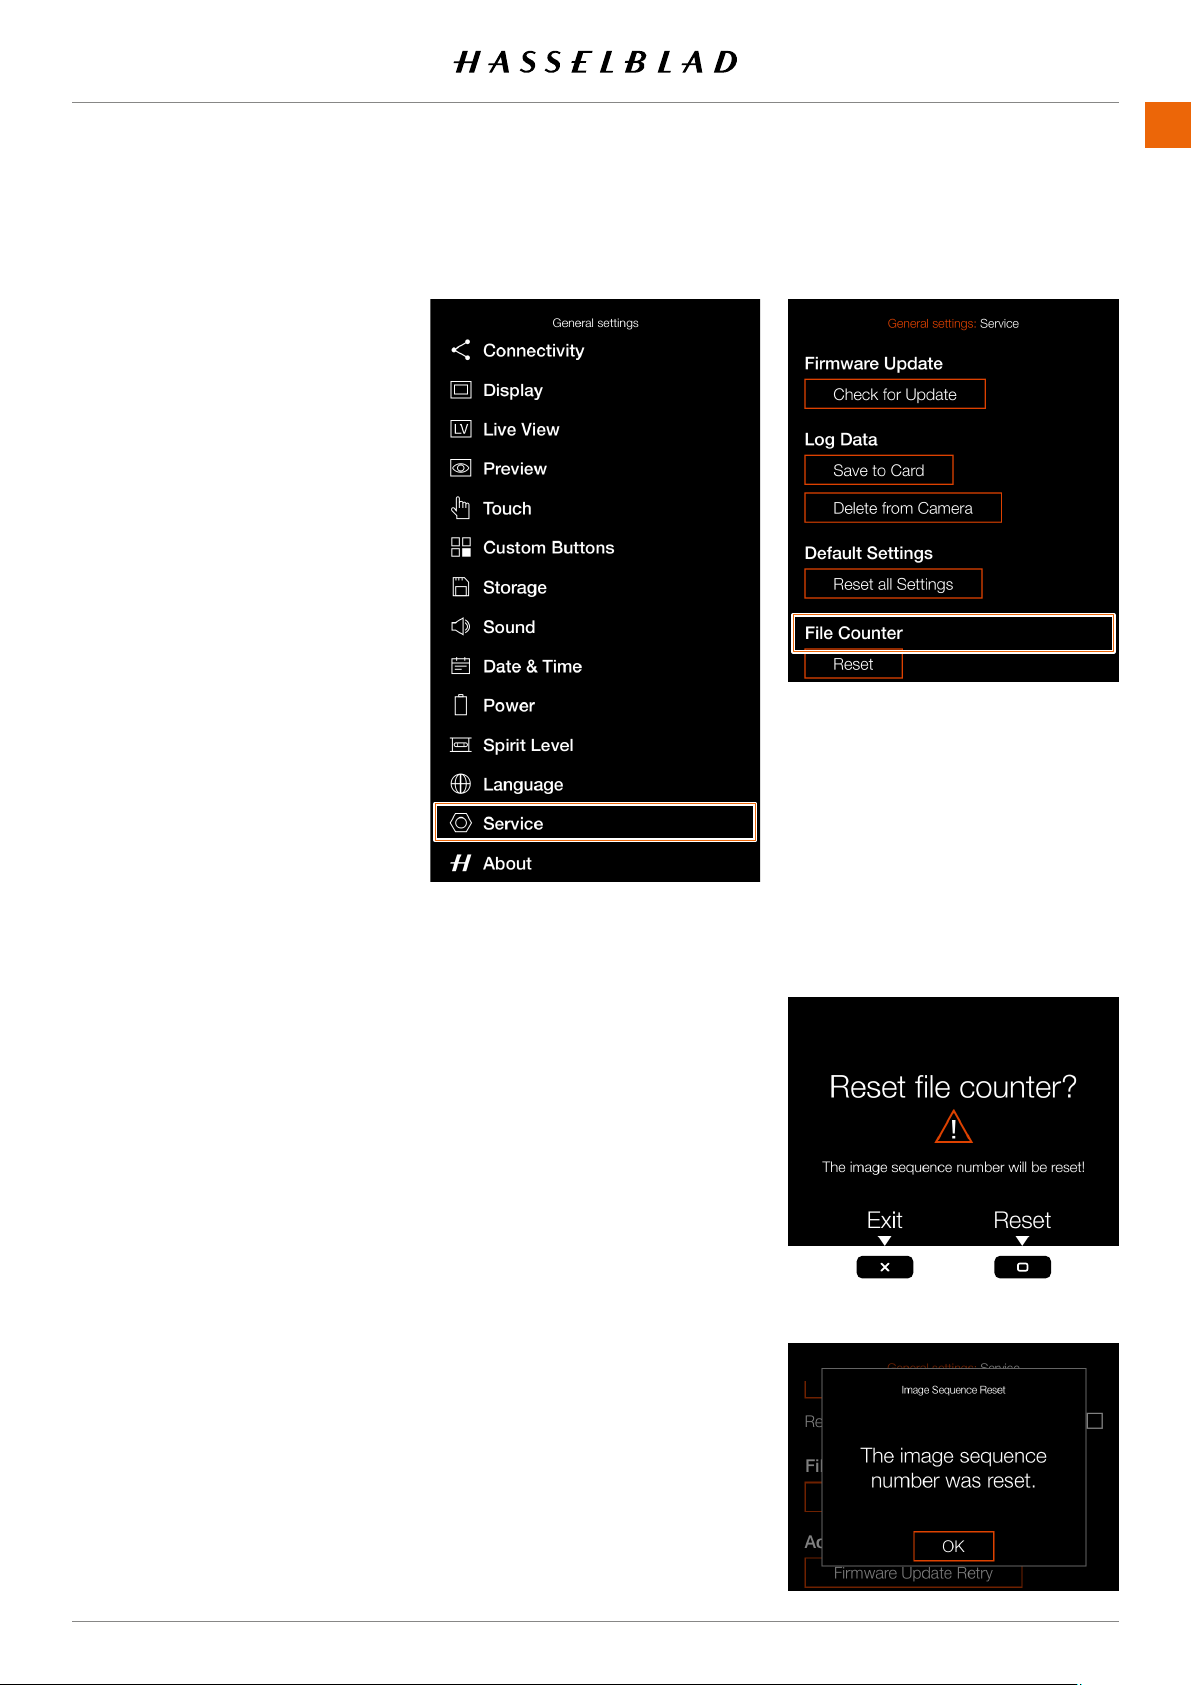
SETTINGS
www.hasselblad.comCONTENTS
Service menu
RESET FILE COUNTER
1
2
3 Press the Service menu.
Select
Reset
under File Counter.
How to reset the le counter:
1 Press the menu button.
2
3
Under File Counter, select Reset.
5 Press OK.
6
will be reset and the next captured
numbered B00000001.
performed, a new folder will be
Note!
A new folder is created if there are
907X 50C USER GUIDE
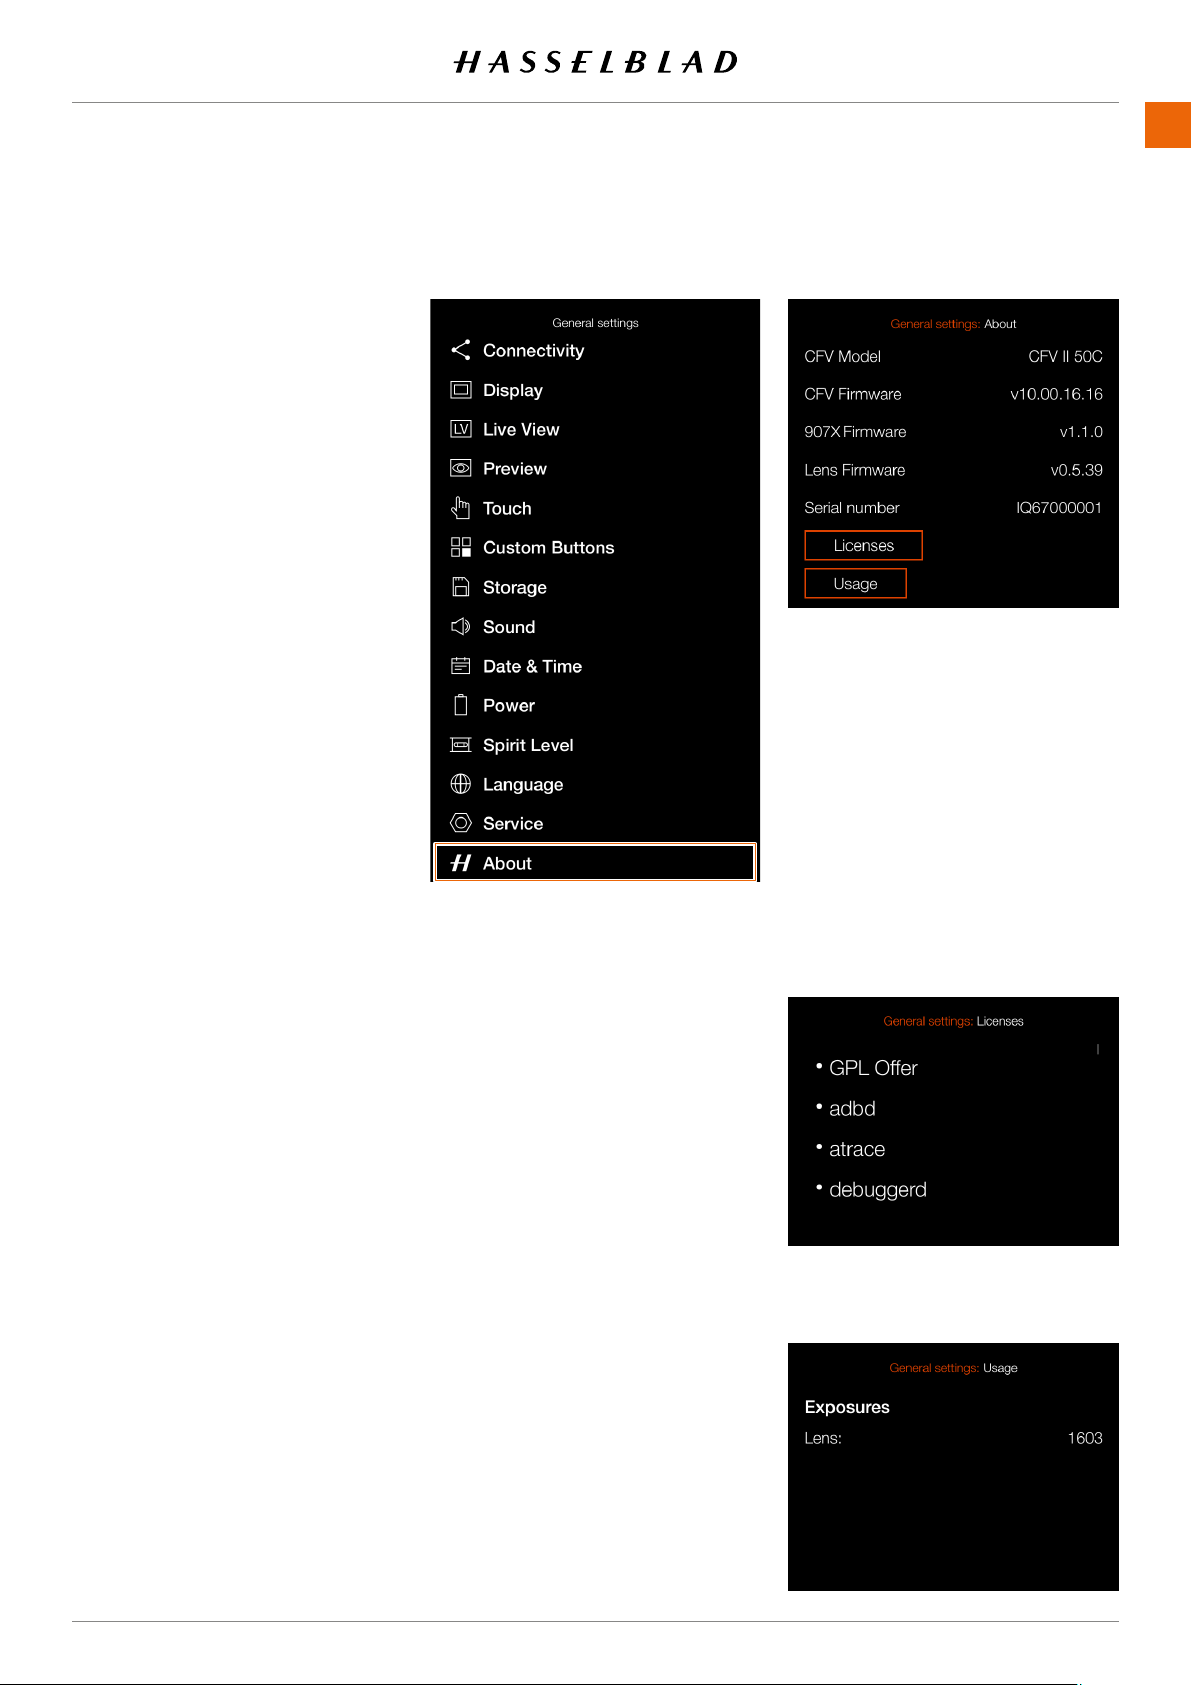
SETTINGS
www.hasselblad.comCONTENTS
ABOUT
ABOUT
1
2
3 Press the About icon.
About Menu Settings
CFV Model
The model name of the attached
CFV.
CFV Firmware
-
907X Firmware
Lens Firmware
in the attached lens.
Serial Number
The serial number of the CFV II.
Licenses
each line for more information.
Usage
About Menu
907X 50C USER GUIDE

11 ACCESSORIES
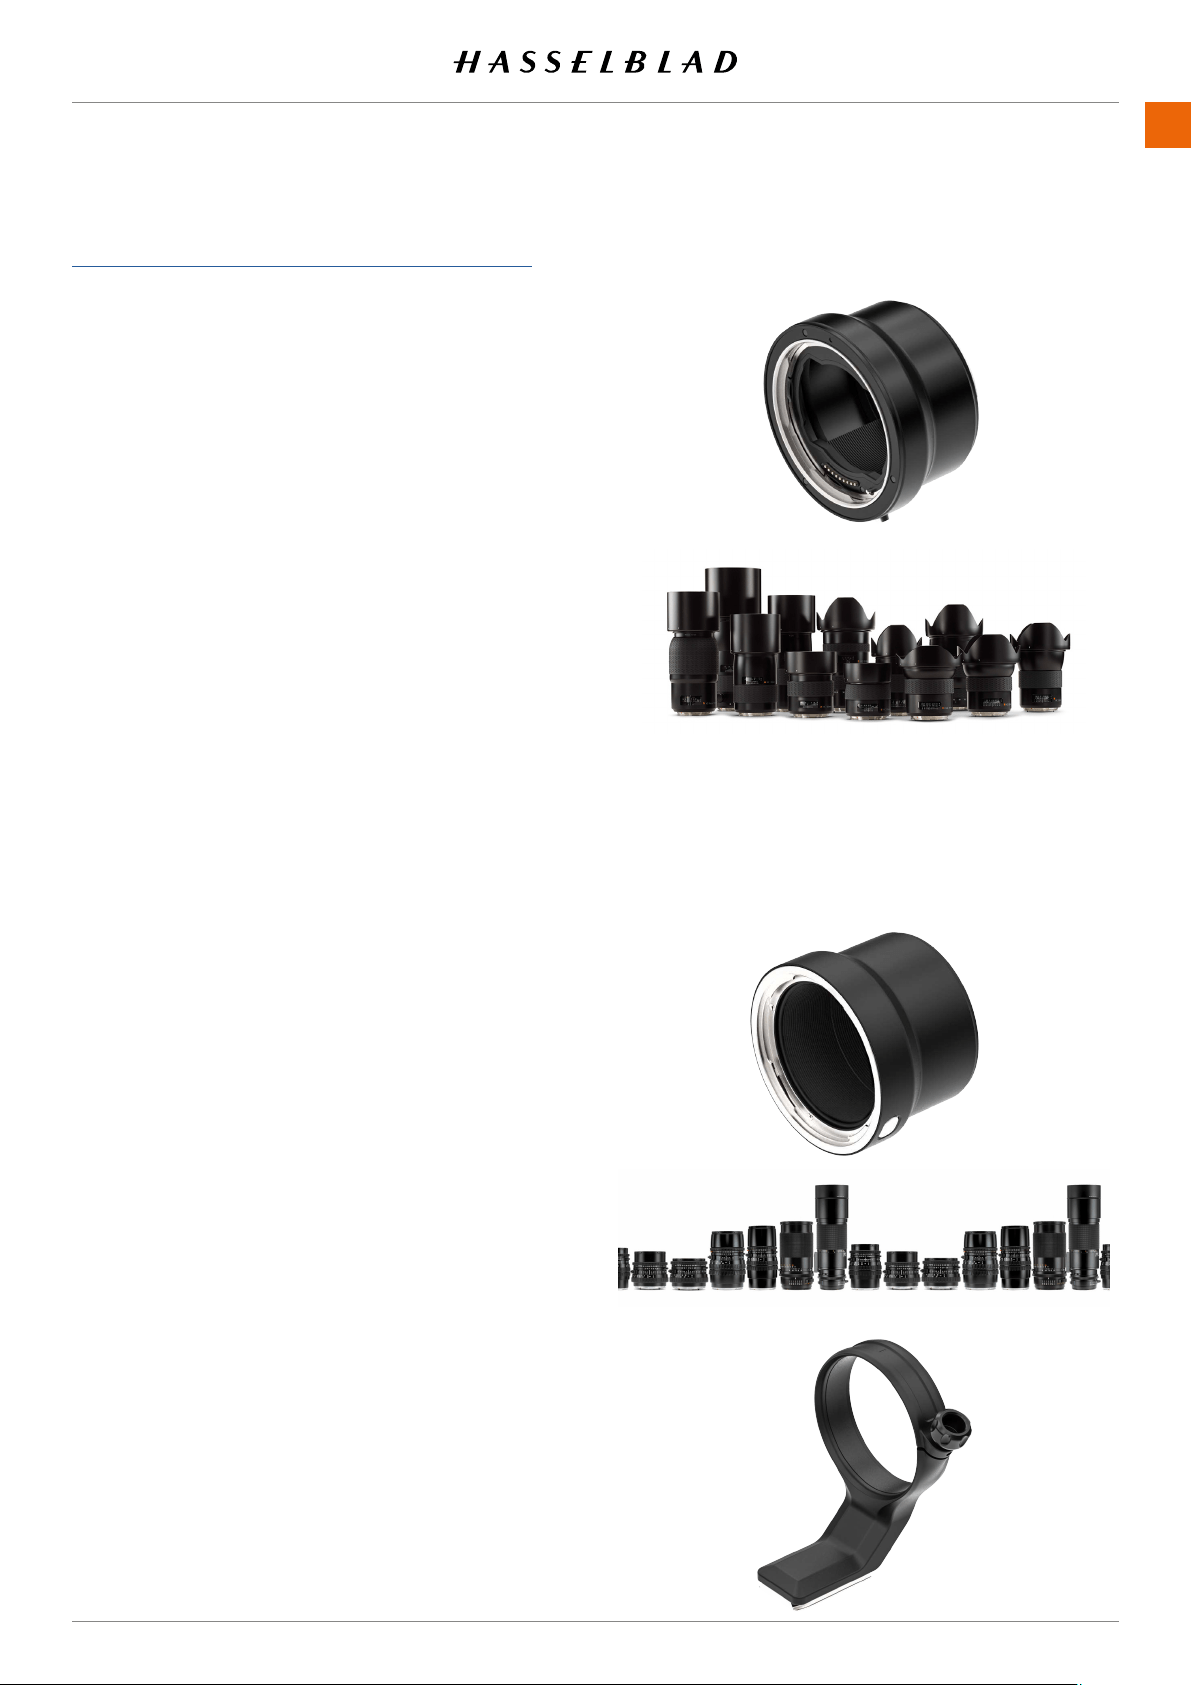
www.hasselblad.com
151
ACCESSORIES
CONTENTS
XH LENS ADAPTER
CP.QT.00000290.01
The XH Lens Adapter can be used to mount an HC or HCD
Lens onto the 907X Camera.
The XH Lens Adapter widens your lens choices to include all
12 H-system HC/HCD lenses, and accessories including a
macro converter and 3 extension tubes.
The HC/HCD lens range includes a 24 mm wide-angle lens,
a 300 mm telephoto lens and a 100 mm f 2.2 lens, delivering
smalldepth-of-eldrangeandabeautiful,smoothBokeh.
Note!
Currently the 907X Camera supports the XH Lens Adapter
with Auto Focus for all HC/HCD Lenses, except the HC 120
Macro. Converters and extension tubes can also be used with
AF.
Note!
OnlyHC/HCDlenseswithrmware18.0.0orlatercanbe
updatedforAFfunctionality.Lenseswitholderrmwarehave
olderhardwareandcannotbeupdatedwiththisrmware.
They can only be used in Manual Focus Mode.
XV LENS ADAPTER
CP.HB.00000241.01
The XV lens Adapter is used to attach Hasselblad V System
lenses to the 907X. Compatible with all V System lenses (C,
CF, CFi, CFE, CB, F and FE)
Note!
This requires the electronic shutter function of the camera to
be activated. See more on page 113.
Note!
You can use Focus Peaking or 100% zoom in to assist manual
focusing.
Note!
Lens corrections for V System lenses are available with Phocus
version 3.4 or later. Note that they have to be manually
selected.
TRIPOD MOUNT RING 75MM
CP.HB.00000217.01
ThetripodmountringisdesignedtottheXH/XVlens
adapters and the X Converter 1.7, giving additional support
when using long or heavy HC/HCD or V System lenses. The
tripodmountringcanbettedto1/4”and3/8”tripodthreads
or the Hasselblad Quick Coupling Plate H.
For a complete list of accessories, see
https://www.hasselblad.com/x-system-accessories/
151
907X 50C USER GUIDE
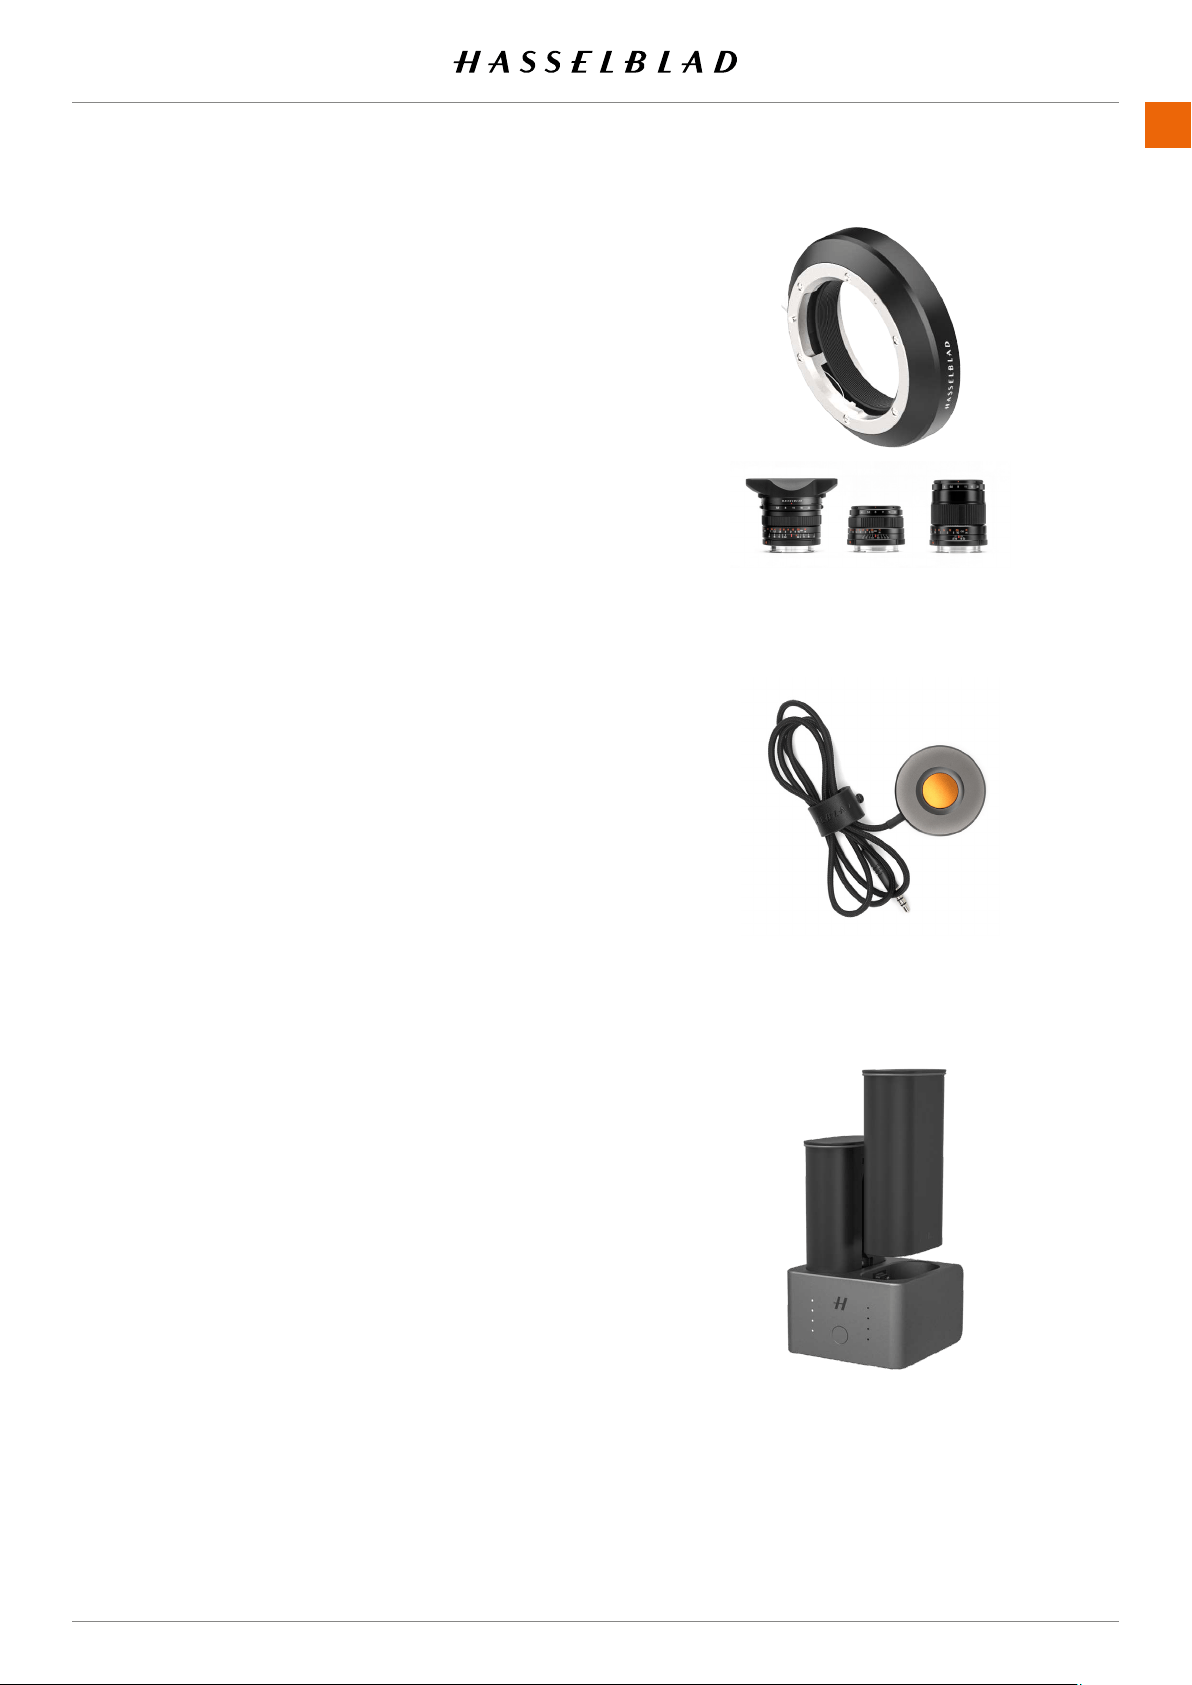
www.hasselblad.com
152
ACCESSORIES
CONTENTS
XPAN LENS ADAPTER
CP.HB.00000036.01
The XPan Lens Adapter is used to attach lenses that was made
for the XPan Camera. Available XPan lenses were 5,6/30mm,
4/45mm and 4/90mm.
Note!
XPan Lenses had no built-in shutter. Consequently, they can
only be used when the electronic shutter of the camera is
activated. See more on page 113.
Note!
You can use Focus Peaking or 100% zoom in to assist manual
focusing.
RELEASE CORD X
CP.HB.00000242.01
The Hasselblad Release Cord X allows for remote shutter
control, helping to eliminate shake or vibration. A durable
cloth-wrapped 90cm (36 inch) cable connects to the micro-
phone input of the 907X and the simple single button opera-
tion allows photographers to keep vibration to a minimum. Its
durable metal construction combined with its slim, ergonomic
designtscomfortablyinthehand.ReleaseCordXcomes
with a small leather carry pouch.
BATTERY CHARGING HUB
CP.HB.00000397.01 (EMEA)
CP.HB.00000395.01 (United Kingdom)
CP.HB.00000392.01 (North America/Japan)
CP.HB.00000396.01 (China)
CP.HB.00000393.01 (South Korea)
CP.HB.00000394.01 (Australia/New Zealand)
Streamlining the battery charging process, the Hasselblad
Battery Charging Hub contains dual slots that support the
simultaneous charging of two batteries. An integrated USB
Type-C connector supports mains power via an included
power supply or from common external USB battery banks
(sold separately). Front-facing LEDs indicate status and
capacity when charging, or users can use the Battery Charg-
ing Hub to check battery levels simply by inserting a battery
and pressing a single button.
152
907X 50C USER GUIDE

12 APPENDIX
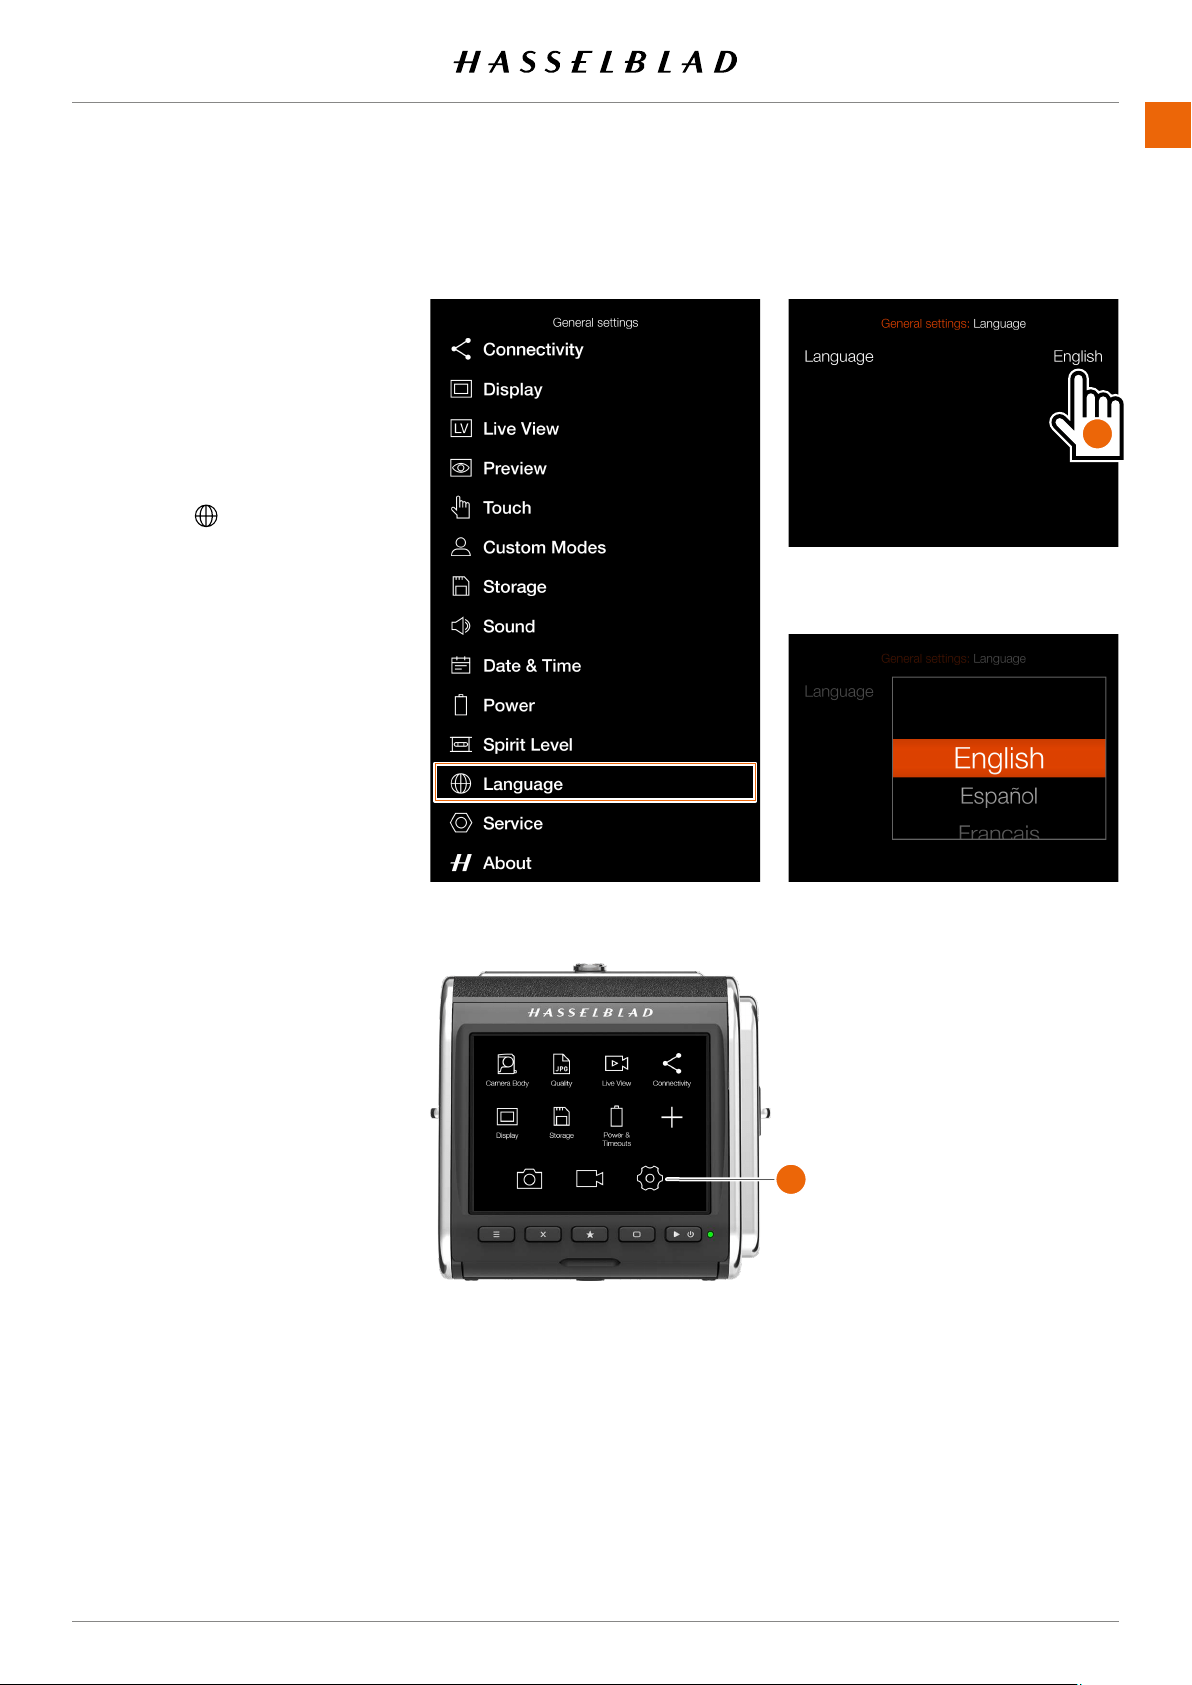
154
APPENDIX
www.hasselblad.comCONTENTS
12.1 CHANGE FROM A FOREIGN
LANGUAGE
MAIN MENU > GENERAL SETTINGS
> LANGUAGE
1 Press the General Settings icon
on the touch display
(B)
.
2 The General Settings menu
appears.
3 Navigate to the menu item with a
Globe icon .
4 Tap the text to the right
(A)
.
5 Scroll down to select your
Language.
Swipe right or press Menu / EXIT
button to get back to main menu.
General Settings Menu
Language Menu
Language Setting
A
907X 50C USER GUIDE
B

155
APPENDIX
www.hasselblad.comCONTENTS907X 50C USER GUIDE
12.2 CLEAN THE SENSOR FILTER
Caution!
Be careful when you attach/remove the components to/from
the camera. This will help prevent damage to the data bus
connections.
Caution!
When you remove the lens, keep foreign objects away from
the camera opening. The camera opening is very sensitive.
This will help prevent damage to the equipment.
Remove the Lens and clean the Sensor
1 Remove USB 3 cable if connected.
2 Press and hold the Lens Release button.
3 Rotate the Lens counter clockwise.
4 Remove the lens.
5 CarefullycleantheoutsidesurfaceofIRlterbyusing
clean compressed air.
Caution!
IfyouusecannedcompressedairtocleantheglassofIRlter,
read the instructions very carefully before use. This will help
preventdamagetothelter.
If compressed air did not remove all the problems and you
still see dust spots in the images, you may have dust either on
theinsideoftheIRlterorontheCMOSitself,pleasecontact
your Hasselblad dealer.
Caution!
DonottrytoremovetheglassIRlterfromthefrontofthe
sensor (due to dust or similar). This will cause damage to the
equipment.
12.3 CLEAN THE LENS GLASS SURFACE
REMOVE DUST
Caution!
Donottouchtheglasssurfacewithyourngers.Thiscan
cause damage to the equipment.
If there is dust on the lens glass, do as follows:
1 Remove the dust with an air blower.
2 If that does not solve the problem, try to remove dust with
a very soft lens brush.
REMOVE SMEAR
Caution!
Donottouchtheglasssurfacewithyourngers.Thiscan
cause damage to the equipment.
If there is smear on the lens glass, do as follows:
1 If you are not sure how to remove the smear, contact your
local Hasselblad Authorized Service Centre.
2 Clean the lens glass with a high quality lens cleaning
solution on a tissue.

156
APPENDIX
www.hasselblad.comCONTENTS907X 50C USER GUIDE
12. 4 ERROR MESSAGES
If any error message is displayed
1 Remove the components from the camera.
2 Attach the components to the camera again.
If the error message is still displayed
1 Remove the battery.
2 Remove any connected USB cable.
3 Wait 10 seconds.
4 Attach the battery again.
The Camera processor is now reset.
If the error message is still displayed
1 Write down the error message.
2 Contact your closest authorized Hasselblad dealer.
12. 5 INFORMATION ABOUT THE 907X
USER GUIDE
The information in this user guide is intended for information-
al use only. The information and the 3D Product Images and
Photos, are subject to change without notice, and should not
be construed as a commitment by Victor Hasselblad AB.
UPDATES
Updates to this user guide will be issued regularly. Please
check www.hasselblad.com for the latest version. If you are
aregistereduser,youwillgetmailnoticationswhenanew
version is available.
3D PRODUCT IMAGES
The Product Images in this user guide were not taken with a
Hasselblad camera. They are produced in 3D as visualization.
They are used for illustrative purposes only and are not
intended to represent the image quality produced by Hassel-
blad cameras.
TRADEMARKS
Hasselblad, Phocus, Phocus Mobile and Phocus Mobile 2 are
trademarks of Victor Hasselblad AB.
Adobe and Adobe Photoshop are trademarks of Adobe
Systems, Inc. Macintosh, Mac OS, iPhone® and iPad® are
trademarks of Apple.
Helicon Focus is a trademark of Helicon Soft.
Sandisk, Panasonic, Toshiba and Sony are trademarks of their
respective corporations.
COPYRIGHT
All text in this user guide copyright © Victor Hasselblad AB.
AllimagesinthisUserGuide,notcreditedtoaspecic
photographer, copyright © Victor Hasselblad AB. The text,
or parts of the texts, in this manual cannot be reprinted or
reused without the written express permission of Victor
Hasselblad AB.
The images in this User Guide cannot be reprinted or reused
without the written express permission of the photographers
who owns the copyright.
Victor Hasselblad AB assumes no responsibility or liability for
any errors or inaccuracies that may appear in this User Guide.
Victor Hasselblad AB assumes no responsibility or liability
for loss or damage incurred during, or as a result of using
Hasselblad software or products.
Copyright © 2020 Victor Hasselblad AB. All rights reserved.