
DANBY PRODUCTS LIMITED, ONTARIO, CANADA N1H 6Z9
DANBY PRODUCTS INC., FINDLAY, OHIO, USA 45840
OWNER’S MANUAL
MANUEL DU PROPRIÉTAIRE
MANUAL DEL PROPIETARIO
www.Danby.com
*
*
AIR FRYER
Owner’s Manual.............................1 - 10
FRITEUSE À AIR
Manuel du propriétaire.................11 - 20
FREIDORA AIRE
Manual del propietario.................21 - 30
MODEL • MODÈLE • MODELO
DBAF03224BD11
2021.10.08

1
Welcome to the Danby family.
We are proud of our quality products and we believe in dependable service. We suggest
that you read this owner’s manual before plugging in your new appliance as it contains
important operation information, safety information, troubleshooting, and maintenance tips
to ensure the reliability and longevity of your appliance.
You are entitled to the warranty coverage as described in the owner’s manual provided with
your new appliance.
1. Please write down your appliance information below. You must keep the original proof
of purchase receipt to validate and receive warranty services.
2. Register your product online and receive a FREE 2 MONTH WARRANTY EXTENSION
after fi lling out a product survey, at www.danby.com/support/product-registration/
Need Help?
1. Read your Owner’s Manual for installation help, troubleshooting, and maintenance
assistance.
2. Visit www.Danby.com to access self-service tools, FAQs and much more by searching
your model number in the search bar.
3. For the Quickest Customer Service, please fi ll out the web form at www.danby.com/
support. Your submission will go directly to an expert on your particular appliance.
Our average response times are between 20 minutes and 2 hours, during EST business
hours.
4. Call 1-800-263-2629 - please note that during peak hours, hold times can exceed one
hour.
Model Number: ____________________________________________________
Serial Number: ____________________________________________________
Date of Purchase: __________________________________________________

2
SAVE THESE INSTRUCTIONS!
SAFETY REQUIREMENTS
• Read all instructions.
• Do not touch hot surfaces. Use handles or knobs.
• To protect against electrical shock do not
immerse the cord, plugs or any other part of the
appliance in water or any other liquid.
• This appliance is not intended for use by
persons (including children) with reduced
physical, sensory or mental capabilities or lack
of experience or knowledge, unless they have
been given supervision or instruction concerning
use of the appliance by a person responsible for
their safety.
• Children should be supervised to ensure that
they do not play with the appliance.
• Unplug from the outlet when not in use and
before cleaning. Allow to cool before putting
on or taking off parts and before cleaning the
appliance.
• Do not operate any appliance with a damaged
cord or plug or after the appliance malfunctions,
or has been damaged in any manner. Consult a
qualifi ed technician for examination, repair or
electrical or mechanical adjustment.
• The use of accessory attachments not
recommended by the appliance manufacturer
may cause injuries.
• Do not use outdoors.
• Do not let the power cord hang over the edge of
a table or counter or to touch a hot surface.
• Do not place the appliance on or near a hot gas
or electrical burner or in a heated oven.
• Extreme caution must be used when moving an
appliance containing hot oil or other hot liquids.
• To disconnect the appliance, turn both the timer
dial and the temperature dial to off, then remove
the plug from the outlet.
• Do not use the appliance for anything other than
its intended use.
Important Safety Information
READ AND FOLLOW ALL SAFETY INSTRUCTIONS
SAFETY REQUIREMENTS
• Make sure the frying basket is locked into the
front of the drawer. Both frying basket handle
tabs must be fully inserted into the grooves on
the top of the basket drawer.
• Always make sure the frying basket drawer is
fully closed with the frying basket handle locked
securely in the drawer while the appliance is in
operation.
• WARNING: The air fryer will not operate unless
the frying basket dryer is fully closed.
• CAUTION: After air frying, the frying basket,
the frying drawer and the cooked foods are hot.
Extreme caution must be used when handling
the hot basket, drawer and cooked food.
• CAUTION HOT SURFACES: This appliance
generates heat and escaping steam during
operation. Proper precautions must be taken to
prevent the risk of burns, fi res or other injury to
persons or damage to property.
• CAUTION: This appliance is hot during
operation and retains heat for some time after
being turned off. Always use oven mitts when
handling hot materials and allow metal parts to
cool before cleaning. Do not place anything on
top of the appliance while it is operating or still
hot.
• All users of this appliance must read and
understand this instruction manual before
operating or cleaning this appliance.
• Do not leave this appliance unattended during
use.
• Do not immerse the power cord in any liquid. If
the power cord of the appliance is damaged it
must be replaced by a qualifi ed technician.
• Keep the power cord out of reach of children
and infants to avoid the risk of electric shock
and choking.

3
SAFETY REQUIREMENTS
• Place the appliance on a fl at, heat-resistant work
area.
• Do not obstruct the air outlet on the back side
and the air inlet on the top.
• Keep the appliance at least 4 inches away from
walls or other objects during operation.
• Always use the frying basket handle to open the
frying basket drawer.
• Do not replace the empty frying basket drawer
without the frying basket into the air fryer
cabinet. Check to make sure the frying basket is
locked into position in the drawer.
• WARNING: After air frying, place the basket
drawer on a fl at, heat-resistant surface before
pressing the basket release button.
• WARNING: Under or over fi lling the frying
basket may damage the air fryer and could
result in serious personal injury.
• Never move a hot air fryer or an air fryer
containing hot food. Allow to cool completely
before moving.
• CAUTION: To prevent plasticizers from
migrating to the fi nish of the counter top or
table top or other furniture, place a non-plastic
coaster or place mat between the appliance and
the counter or table top. Failure to do so may
cause the fi nish to darken. Permanent blemishes
may occur or stains can appear on the cabinet.
FOR HOUSEHOLD USE ONLY.
Important Safety Information
READ AND FOLLOW ALL SAFETY INSTRUCTIONS
GROUNDING INSTRUCTIONS
This appliance must be grounded. Grounding
reduces the risk of electrical shock by providing an
escape wire for the electrical current.
This appliance has a cord that has a grounding
wire with a 3-prong plug. The power cord must be
plugged into an outlet that is properly grounded.
If the outlet is a 2-prong wall outlet, it must be
replaced with a properly grounded 3-prong wall
outlet. The serial rating plate indicates the voltage
and frequency the appliance is designed for.
WARNING - Improper use of the grounding
plug can result in a risk of electric shock.
Consult a qualifi ed electrician or service agent
if the grounding instructions are not completely
understood, or if doubt exists as to whether the
appliance is properly grounded.
Do not connect your appliance to extension
cords or together with another appliance in the
same wall outlet. Do not splice the power cord.
Do not under any circumstances cut or remove the
third ground prong from the power cord. Do not
use extension cords or ungrounded (two prongs)
adapters.
If the power supply cord is damaged, it must be
replaced by the manufacturer, its service agent or
similar qualifi ed person in order to avoid hazard.
Have a qualifi ed electrician install a grounded outlet
near the appliance if the power cord is too short. A
short power supply cord is provided to reduce the
risks resulting from becoming entangled or tripping
over a longer power cord.
SAVE THESE INSTRUCTIONS!

4
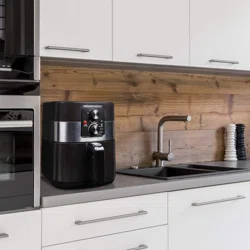
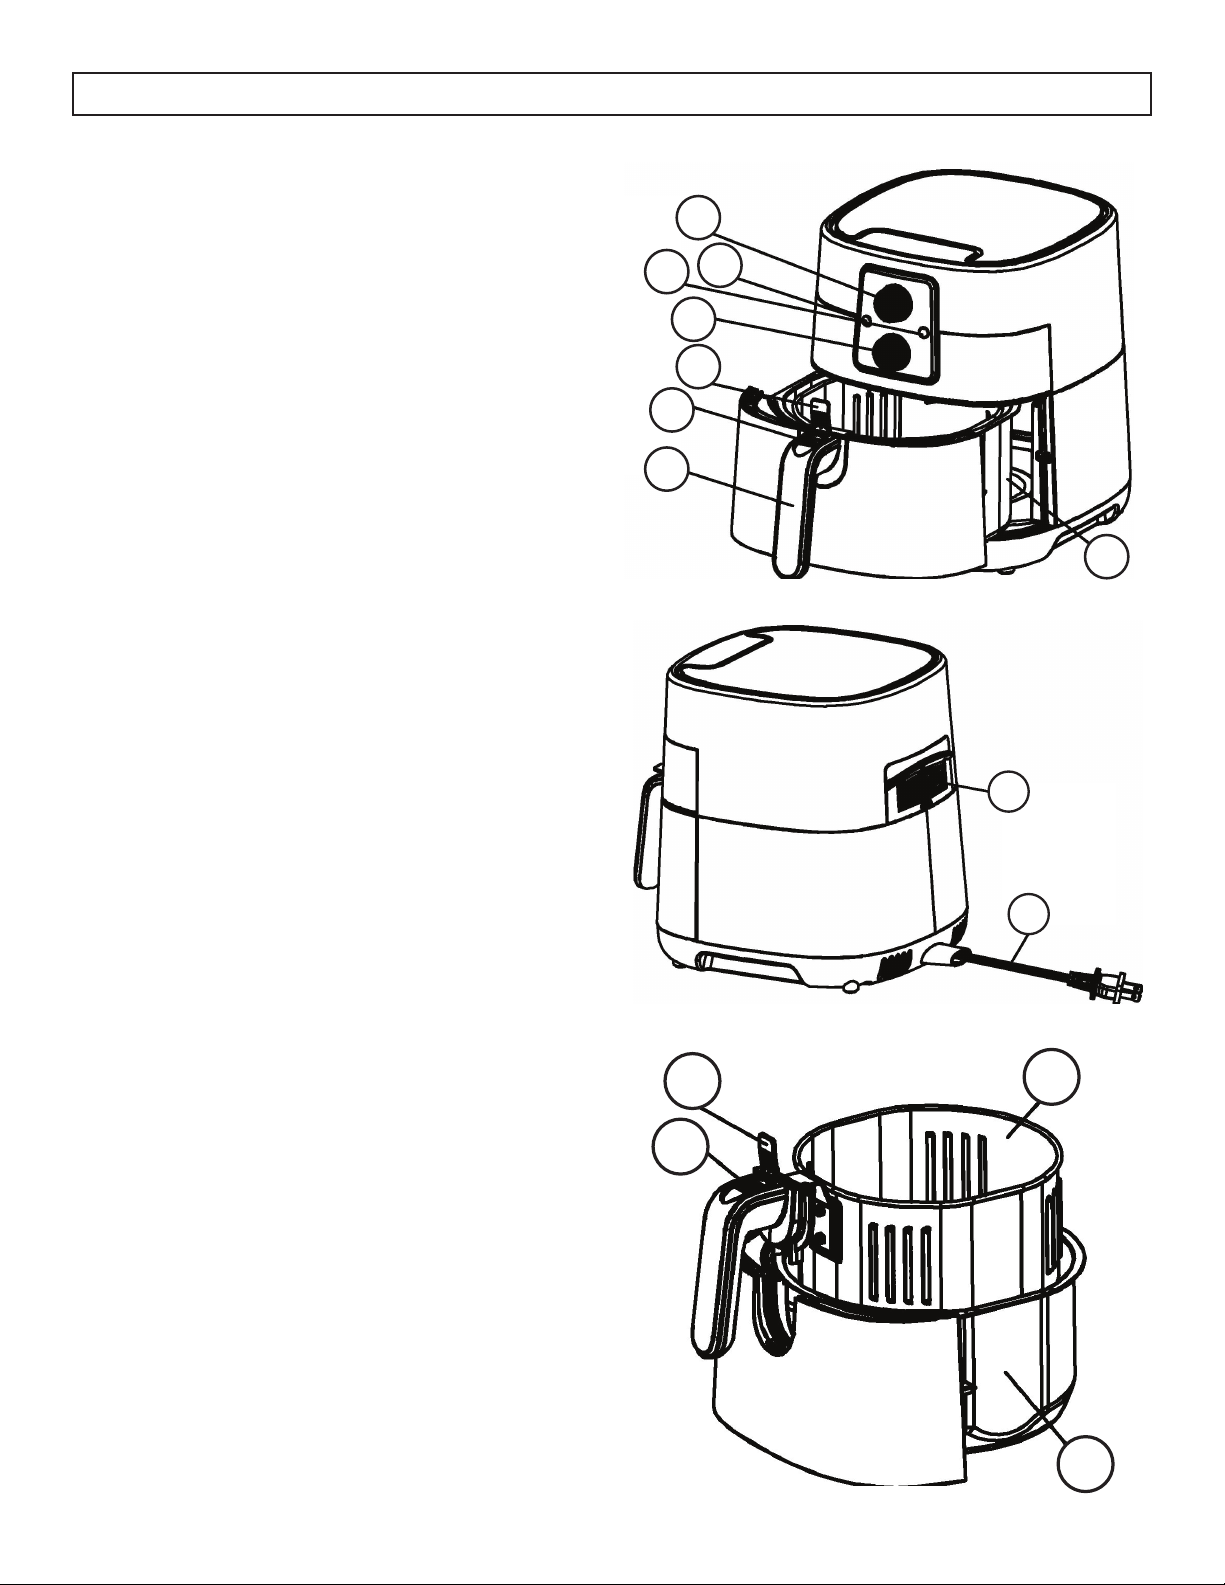
FEATURES
1. Timer dial
2. Red power light
3. Green heat light
4. Temperature control dial
5. Clear button cover
6. Basket release button
7. Frying basket handle
8. Frying basket drawer
9. Air outlet
10. Power cord
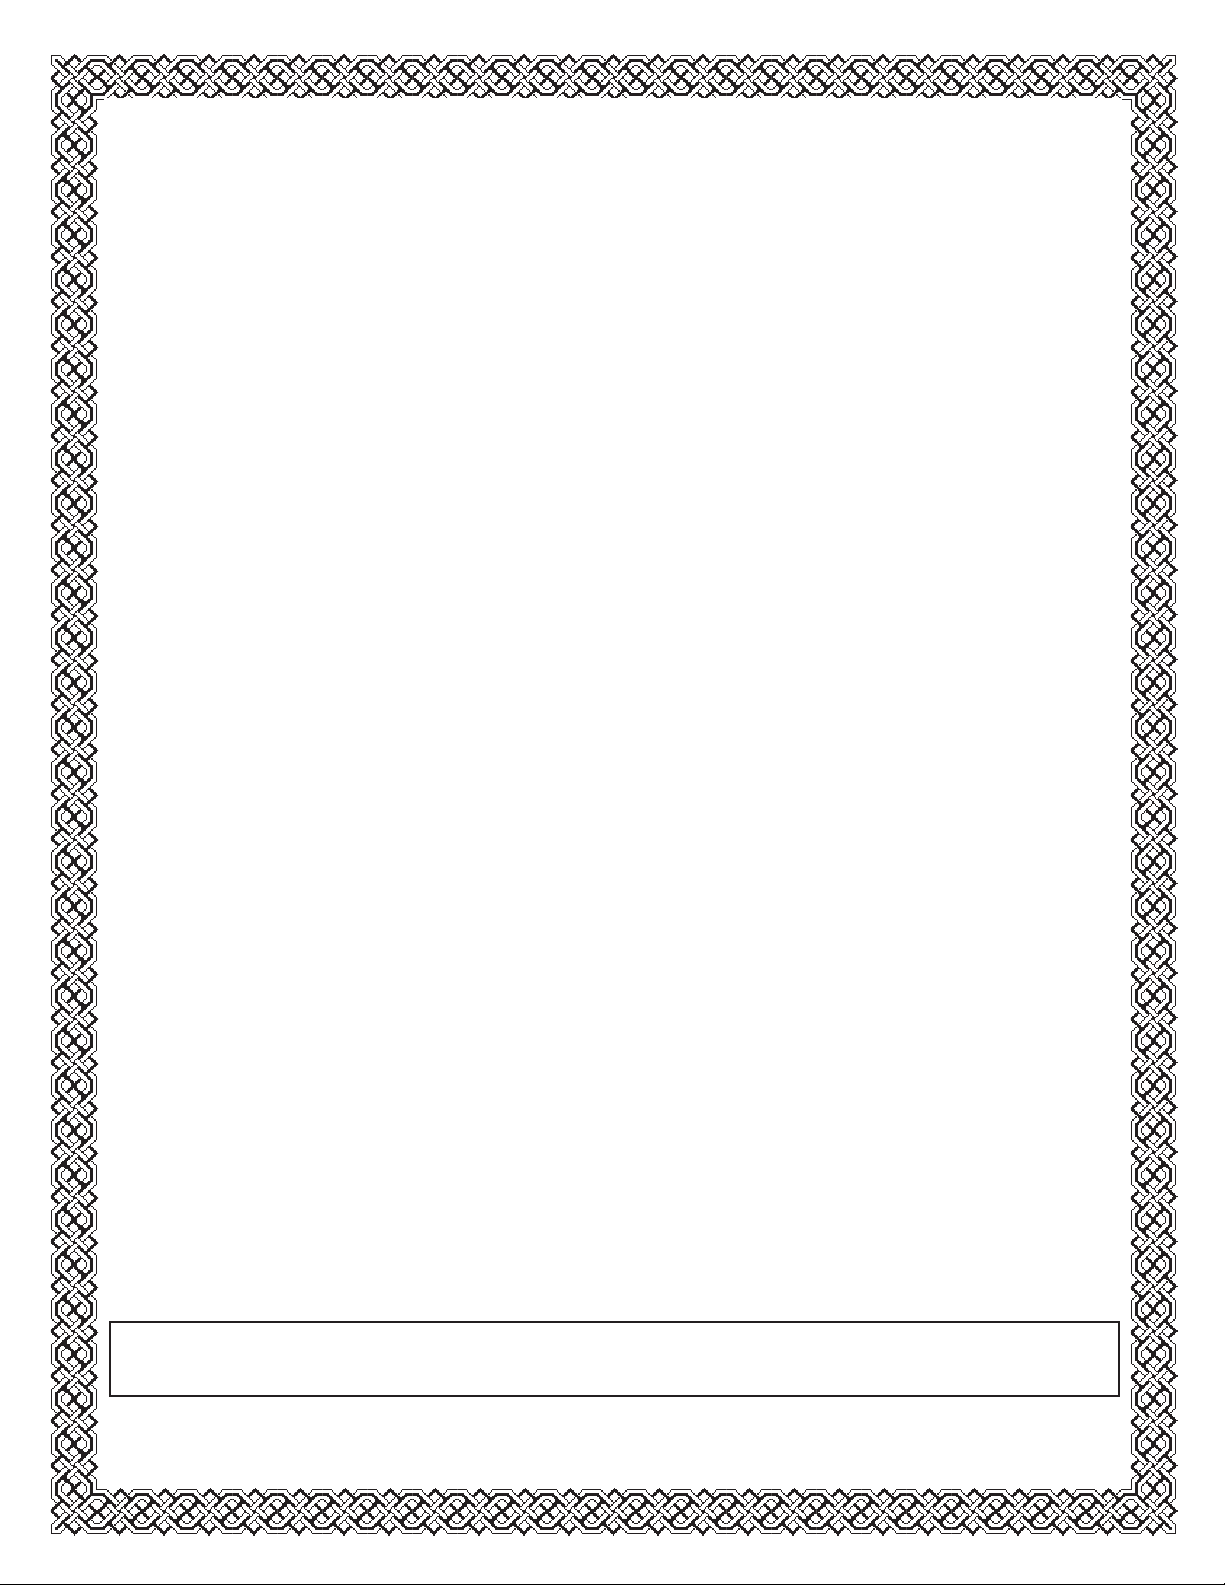
11. Clear button cover
12. Basket release button
13. Fr ying basket
14. Frying basket drawer
OPERATING INSTRUCTIONS
1
2
3
4
5
6
7
8
9
10
11
12
13
14

5
OPERATING INSTRUCTIONS
BEFORE FIRST TIME USE
1. The appliance is shipped with the frying basket
locked into the drawer, inside the cabinet. Firmly
grasp and gently pull the frying basket handle to
open the frying basket drawer and then remove
the drawer from the cabinet and place it on a
fl at, clean work area.
2. Unlock and remove the frying basket from the
drawer. Open the clear button cover to expose
the basket release button and then press the
basket release button while pulling the frying
basket straight up and out of the drawer.
3. Remove all packing material and labels from the
inside and outside of the appliance before use.
Check that there is no packaging underneath or
around the frying basket and drawer.
4. Wash frying basket and drawer in hot, soapy
water.
5. DO NOT IMMERSE THE BODY OF THE
APPLIANCE IN WATER. Wipe the air fryer body
with a damp cloth. Dry all parts thoroughly.
6. Lock the frying basket into the drawer. There
are 2 tabs on either side of the handle. Slide the
handle tabs into the grooves on the top of the
basket drawer. An audible click will be heard as
the handle locks into place.
IMPORTANT: Ensure the clear button cover is over
the basket release button to prevent accidental fryer
basket release.
WARNING: This appliance should not be used to
boil water.
NOTE: During fi rst use the appliance may emit a
slight odor. This is normal.
OPERATING INSTRUCTIONS
1. Place the appliance on a fl at, heat-resistant work
area close to an electrical outlet.
2. Open the frying basket drawer, remove the
drawer from the cabinet and place it on a fl at,
clean surface.
3. Place food into the frying basket. Do not overfi ll
the basket. To ensure proper cooking and air
circulation, never fi ll the frying basket more than
2/3 full. When air frying fresh vegetables, it is
not recommended to add more than 3 cups of
vegetables to the basket.
4. Insert the frying basket drawer into the cabinet.
Always make sure the drawer is fully closed.
5. Plug the power cord into the wall outlet.
6. Turn the temperature control dial to select the
desired cooking temperature. The temperature
can be adjusted at any time. The temperature
range is 280°F to 400°F (140°C to 200°C).
7. Turn the timer dial to select the desired cooking
time. Add fi ve minutes to the cooking time to
account for preheating time if the appliance is
cold. The red power light will illuminate and the
appliance will begin heating.
8. The green heat light will turn on while the
appliance is heating and will turn off once the
set temperature is reached. The green heat light
will cycle on and off with the heating element
during operation to maintain the selected
temperature.
IMPORTANT: The appliance will not begin heating
if the timer button has not been set. The appliance
will not begin heating if the frying basket is not fully
closed.

6
COOKING NOTES
• To ensure even cooking, open the frying basket
halfway through the cooking time. Check, turn
or vigorously shake foods in the frying basket.
• IMPORTANT: When the basket is removed
from the cabinet, the red power light and the
air frying will turn off. Operation will resume
and the timer will continue once the basket is
replaced in the cabinet.
• CAUTION: Make sure the basket is in the locked
position when shaking foods in the basket. To
avoid damage to persons or property, do not
press the basket release button while shaking the
frying basket.
• WARNING: Extreme caution must be used when
handling the hot frying basket and drawer.
Avoid escaping steam from the frying basket
and hot food.
• CAUTION: Always use oven mitts when
handling the hot air frying basket.
• CAUTION: Hot oil can collect in the base of the
drawer. To avoid the risk of burns or personal
injury or to avoid oil contaminating other foods,
always unlock and remove the frying basket
from the drawer before emptying.
• NEVER turn the drawer upside down with the
frying basket attached.
• One beep will sound when the timer reaches 0.
The air fryer will turn off automatically. Both the
red power light and the green heat light will turn
off.
• If additional cooking is needed at the end of the
timer, adjust the temperature if desired and then
set the timer for 5 minute increments until the
food is fully cooked.
OPERATING INSTRUCTIONS
COOKING NOTES
• Allow cooked food to rest for 5 to 10 seconds
before removing the basket drawer from the
cabinet.
• When the air frying is fi nished, remove the
drawer from the cabinet and place it on a fl at,
heat-resistant surface. Then remove the frying
basket from the drawer.
• Shake foods onto the serving area. Promptly
return the frying basket to the drawer and lock
into place. Continue with subsequent batches, if
any.
• IMPORTANT: When cooking is completed, turn
both the temperature dial and the timer dial to 0
and unplug the air fryer when not in use.
• Olive oil spray or vegetable oil work well for air
frying.
• When cooking prepackaged foods, as a general
rule, lower the baking temperature by 25°F and
reduce the cooking time by 30 - 50% depending
on the type of food and amount.
• This appliance can be used to reheat food. Set
the temperature to 280°F for up to 10 minutes.
• Pat food dry before cooking to encourage
browning and avoid excess smoke.
• When cooking high fat foods such as chicken
wings or sausages, it may be necessary to
empty fat from the frying basket between
batches to avoid excess smoke.
• Freshly breaded food items should be cooked in
small batches. Ensure the items are not touching
to allow air fl ow on all surfaces.

7
OPERATING INSTRUCTIONS
AIR FRYING CHART
WARNING: ALWAYS USE A MEAT THERMOMETER TO ENSURE THAT MEAT, POULTRY AND FISH ARE
COOKED THOROUGHLY BEFORE EATING.
The following chart is intended as a guide only. The quantity of food cooked at one time, the thickness or
density of the food and whether the food is fresh, thawed or frozen may alter the cooking time necessary.
To ensure even cooking, open the frying basket halfway through the cooking time. Check, turn or
vigorously shake foods in the frying basket. This chart lists average cooking times and what action should
be taken for best results.
Frying in smaller batches will result in shorter cooking times and higher food quality. Adjust cooking times
and temperatures as desired.
IMPORTANT NOTE: Unless food is prepackaged and oiled, all food should be lightly oiled before air
frying for browned and crispy results. Oil may be sprayed or brushed onto foods. Make sure food is dry
before adding oil. Cut food into smaller pieces to create more surface area and achieve crispier results.
NOTE: Blanching is a term that refers to cooking foods at a lower temperature before the fi nal air fry.
Add 5 minutes to the air frying time to allow the appliance to preheat.
Important Temperature Notes
The USDA recommends that meats should be cooked to the following internal temperatures to ensure food
is cooked thoroughly.
• Beef / lamb: 145°F
• Pork: 160°F
• Poultry: 170 - 180°F
• Reheating poultry: 165°F

8
OPERATING INSTRUCTIONS
AIR FRYING CHART
FOOD TEMPERATURE (°F) COOK TIME (MINS) ACTION
Mixed vegetables (roasted) 400 15 - 20 shake
Broccoli (roasted) 400 15 - 20 shake
Onion rings (frozen) 400 12 - 18 shake
Cheese sticks (frozen) 360 8 - 12 -
Fried sweet potato chips (fresh, hand cut, 1/8 to 1/6 inches thick)
Step 1: Blanch 320 15 shake
Step 2: Air fry 360 10 - 15 shake
French fries (fresh, hand cut, 1/4 to 1/3 inches thick)
Step 1: Blanch 320 15 shake
Step 2: Air fry 360 10 - 15 shake
French fries, thin (frozen, 3 cups) 400 12 - 16 shake
Meatloaf, 1 lb 360 35 - 40 shake
Hamburgers, 1/4 lb, up to 4 360 10 - 14 -
Hot dogs / sausages 360 10 - 15 -
Chicken wings (fresh / thawed)
Step 1: Blanch 320 15 shake
Step 2: Air fry 360 10 shake
Chicken tenders / fi ngers
Step 1: Blanch 360 13 turn over
Step 2: Air fry 400 5 shake
Chicken pieces 360 20 - 30 turn over
Chicken nuggets (frozen) 360 10 - 15 shake
Catfi sh fi ngers (thawed, battered) 400 10 - 15 turn over
Fish sticks (frozen) 400 10 - 15 turn over
Apple turnovers 400 10 -
Donuts 360 8 turn over
Fried cookies 360 8 turn over
Shrimp 360 10 - 18 turn over

MAINTENANCE
This appliance requires very little maintenance. It
contains no user serviceable parts. Do not try to
repair it yourself. Contact a qualifi ed appliance
repair technician if the product requires servicing.
CLEANING
WARNING: Allow the appliance to cool fully
before cleaning.
The appliance should be cleaned regularly for best
performance and long life. Regular cleaning will
also reduce the risk of fi re hazard.
1. Remove the plug from the electrical outlet. Allow
the appliance to cool fully before completing any
cleaning.
2. Wash the basket drawer and frying basket
with hot, soapy water. Do not use metal kitchen
utensils or abrasive cleaners or cleaning
products that may damage the non-stick coating.
3. The frying basket and drawer are dishwasher
safe. For best results, place them in the top rack
of the dishwasher.
4. Wipe the outside of the appliance with a damp
cloth.
CAUTION - Do not use abrasive cleaners, scrubbing
brushes or chemical cleaners as this will damage
the non-stick coating.
LONG-TERM STORAGE
Allow the appliance to completely cool and dry
before placing into storage.
If storing the appliance for long periods of time
make certain that the appliance is clean and free of
food particles.
Store the appliance in a dry location such as on a
table or counter top or cupboard shelf.
Other than recommended cleaning, no further
user maintenance should be necessary. Any other
servicing should be performed by an authorized
service representative.
CARE & MAINTENANCE
9

LIMITED IN-HOME APPLIANCE WARRANTY
This quality product is warranted to be free from manufacturer’s defects in material and workmanship, provided that the unit is used under the normal operating
conditions intended by the manufacturer.
This warranty is available only to the person to whom the unit was originally sold by Danby Products Limited (Canada) or Danby Products Inc. (U.S.A.) (hereafter
“Danby”) or by an authorized distributor of Danby, and is non-transferable.
TERMS OF WARRANTY
Plastic parts, are warranted for thirty (30) days only from purchase date, with no extensions provided.
First Year
During the rst twelve (12) months, any functional parts of this product found to be defective, will be repaired or replaced, at warrantor’s
option, at no charge to the ORIGINAL purchaser.
To obtain
Danby reserves the right to limit the boundaries of “In Home Service” to the proximity of an Authorized Service Depot. Any app liance
Service
requiring service outside the limited boundaries of “In Home Service” , it will be the consumer’s responsibility to transport the appliance (at
their own expense) to the original retailer (point of purchase) or a service depot for repair. See “Boundaries of In Home Serv ice” below.
Contact your dealer from whom your unit was purchased, or contact your nearest authorized Danby service depot, where service
must be performed by a qualied service technician.
If service is performed on the units by anyone other than an authorized service depot, or the unit is used for commercial appli cation, all
obligations of Danby under this warranty shall be void.
Boundaries of
If the appliance is installed in a location that is 100 kilometers (62 miles) or more from the nearest service center your unit must be
In Home Service
delivered to the nearest authorized Danby Service Depot, as service must only be performed by a technician qualied and certif ied for
warranty service by Danby. Transportation charges to and from the service location are not protected by this warranty and are t he
responsibility of the purchaser.
Nothing within this warranty shall imply that Danby will be responsible or liable for any spoilage or damage to food or other c ontents of this appliance, whether due
to any defect of the appliance, or its use, whether proper or improper.
EXCLUSIONS
Save as herein provided, Danby, there are no other warranties, conditions, representations or guarantees, express or implied, m ade or intended by Danby or its
authorized distributors and all other warranties, conditions, representations or guarantees, including any warranties, conditio ns, representations or guarantees
under any Sale of Goods Act or like legislation or statue is hereby expressly excluded. Save as herein provided, Danby shall no t be responsible for any damages
to persons or property, including the unit itself, howsoever caused or any consequential damages arising from the malfunction o f the unit and by the purchase of
the unit, the purchaser does hereby agree to indemnify and hold harmless Danby from any claim for damages to persons or propert y caused by the unit.
GENERAL PROVISIONS
No warranty or insurance herein contained or set out shall apply when damage or repair is caused by any of the following:
1) Power failure.
2) Damage in transit or when moving the appliance.
3) Improper power supply such as low voltage, defective house wiring or inadequate fuses.
4) Accident, alteration, abuse or misuse of the appliance such as inadequate air circulation in the room or abnormal operating con ditions
(extremely high or low room temperature).
5) Use for commercial or industrial purposes (ie. If the appliance is not installed in a domestic residence).
6) Fire, water damage, theft, war, riot, hostility, acts of God such as hurricanes, oods etc.
7) Service calls resulting in customer education.
8) Improper Installation (ie. Building-in of a free standing appliance or using an appliance outdoors that is not approved for out door application).
Proof of purchase date will be required for warranty claims; so, please retain bills of sale. In the event warranty service is required, present this document to our
AUTHORIZED SERVICE DEPOT.
Danby Products Limited
PO Box 1778, Guelph, Ontario, Canada N1H 6Z9
Telephone: (519) 837-0920 FAX: (519) 837-0449
Danby Products Inc.
PO Box 669, Findlay, Ohio, U.S.A. 45840
Telephone: (419) 425-8627 FAX: (419) 425-8629
04/09
1-800-263-2629
Warranty Service
In-home
Transportation charges to and from the service location are not protected by this warranty and are the responsibility of the purchaser.
During the first twelve (12) months, any functional parts of this product found to be defective, will be repaired or
replaced, at warrantor’s option, at no charge to the original purchaser.
Contact the dealer where the unit was purchased, or contact the nearest authorized Danby service depot, where
service must be performed by a qualified service technician. If service is performed on the unit by anyone other
than an authorized service depot, all obligations of Danby under this warranty shall be void.
It is the responsibility of the purchaser to transport the appliance to the nearest authorized service depot.
First 12 months
To obtain service
LIMITED “CARRY IN” WARRANTY
This quality product is warranted to be free from manufacturer’s defects in material and workmanship, provided that the unit is used
under the normal operating conditions intended by the manufacturer.
This warranty is available only to the person to whom the unit was originally sold by Danby Products Limited (Canada) or Danby
Products Inc. (U.S.A.) (hereafter “Danby”) or by an authorized distributor of Danby, and is non-transferable.
TERMS OF WARRANTY
Plastic parts are warranted for thirty (30) days from the date of purchase, with no extensions provided.
Nothing within this warranty shall imply that Danby will be responsible or liable for any spoilage or damage to food or other
contents of this appliance, whether due to any defect of the appliance, or its use, whether proper or improper.
EXCLUSIONS
Save as herein provided, by Danby, there are no other warranties, conditions, representations or guarantees, express or implied, made
or intended by Danby or its authorized distributors and all other warranties, conditions, representations or guarantees, including any
warranties, conditions, representations or guarantees under any Sale of Goods Act or like legislation or statute is hereby expressly
excluded. Save as herein provided, Danby shall not be responsible for any damages to persons or property, including the unit itself,
howsoever caused or any consequential damages arising from the malfunction of the unit and by the purchase of the unit, the
purchaser does hereby agree to indemnify and hold harmless Danby from any claim for damages to persons or property caused by
the unit.
GENERAL PROVISIONS
No warranty or insurance herein contained or set out shall apply when damage or repair is caused by any of the following:
1) Power failure.
2) Damage in transit or when moving the appliance.
3) Improper power supply such as low voltage, defective house wiring or inadequate fuses.
4) Accident, alteration, abuse or misuse of the appliance such as inadequate air circulation in the room or abnormal operating
conditions (ie. extremely high or low room temperature).
5) Use for commercial or industrial purposes (ie. If the appliance is not installed in a domestic residence).
6) Fire, water damage, theft, war, riot, hostility, acts of God such as hurricanes, floods etc.
7) Service calls resulting in customer education.
8) Improper Installation (ie. Building-in of a free standing appliance or using an appliance outdoors that is not approved for outdoor
application, including but not limited to: garages, patios, porches or anywhere that is not properly insulated or climate controlled).
Proof of purchase date will be required for warranty claims; retain bills of sale. In the event that warranty service is required, present
the proof of purchase to our authorized service depot.
Warranty Service
Carry In
Danby Products Limited
PO Box 1778, Guelph, Ontario, Canada N1H 6Z9
Telephone: (519) 837-0920 FAX: (519) 837-0449
Danby Products Inc.
PO Box 669, Findlay, Ohio, U.S.A. 45840
Telephone: (419) 425-8627 FAX: (419) 425-8629
1-800-263-2629
04/17

11
Bienvenue dans la famille Danby.
Nous sommes fi ers de nos produits de qualité et nous croyons en un service fi able. Nous
vous suggérons de lire ce manuel du propriétaire avant de brancher votre nouvel appareil
car il contient des informations de fonctionnement importantes, des informations de
sécurité, des conseils de dépannage et d’entretien pour assurer la fi abilité et la longévité de
votre appareil.
Vous avez droit à la couverture de la garantie décrite dans le manuel du propriétaire fourni
avec votre nouvel appareil.
1. Veuillez noter ci-dessous les informations relatives à votre appareil. Vous devez
conserver la preuve d’achat originale pour valider et bénéfi cier des services de
garantie.
2. Enregistrez votre produit en ligne et recevez une PROLONGATION DE GARANTIE
GRATUITE DE 2 MOIS après avoir rempli une enquête sur les produits, à l’adresse
www.danby.com/support/product-registration/
Besoin d’assistance?
1. Lisez votre manuel du propriétaire pour obtenir de l’aide à l’installation, au dépannage
et à la maintenance.
2. Visitez www.Danby.com pour accéder aux outils en libre-service, aux FAQ et bien plus
encore en recherchant votre numéro de modèle dans la barre de recherche.
3. Pour bénéfi cier du service client le plus rapide, veuillez remplir le formulaire Web à
l’adresse www.danby.com/support. Votre soumission ira directement à un expert de
votre appareil particulier. Nos temps de réponse moyens sont compris entre 20 minutes
et 2 heures, pendant les heures ouvrables EST.
4. Composez le 1-800-263-2629 - veuillez noter que pendant les heures de pointe, les
temps d’attente peuvent dépasser une heure.
Numéro de modèle : _______________________________________________
Numéro de serie : _________________________________________________
Date d’achat : _____________________________________________________

Consignes de sécurité importantes
LIRE ET SUIVRE TOUTES LES INSTRUCTIONS DE SÉCURITÉ
GARDEZ CES INSTRUCTIONS!
EXIGENCES DE SÉCURITÉ
• Lisez toutes les instructions.
• Ne touchez pas les surfaces chaudes. Utilisez
des poignées ou des boutons.
• Pour se protéger contre les chocs électriques, ne
plongez pas le cordon, les fi ches ou toute autre
partie de l’appareil dans l’eau ou tout autre
liquide.
• Cet appareil n’est pas destiné à être utilisé par
des personnes (y compris des enfants) ayant des
capacités physiques, sensorielles ou mentales
réduites ou un manque d’expérience ou de
connaissances, à moins qu’elles n’aient reçu
une supervision ou des instructions concernant
l’utilisation de l’appareil par une personne
responsable de leur sécurité.
• Les enfants doivent être surveillés pour s’assurer
qu’ils ne jouent pas avec l’appareil.
• Débrancher de la prise lorsqu’il n’est pas utilisé
et avant le nettoyage. Laisser refroidir avant
de mettre ou de retirer des pièces et avant de
nettoyer l’appareil.
• N’utilisez aucun appareil avec un cordon
ou une fi che endommagés ou après un
dysfonctionnement de l’appareil ou s’il a
été endommagé de quelque manière que ce
soit. Consultez un technicien qualifi é pour
un examen, une réparation ou un réglage
électrique ou mécanique.
• L’utilisation d’accessoires non recommandés par
le fabricant de l’appareil peut provoquer des
blessures.
• Ne pas utiliser à l’extérieur.
• Ne laissez pas le cordon d’alimentation pendre
du bord d’une table ou d’un comptoir ou
toucher une surface chaude.
• Ne placez pas l’appareil sur ou à proximité
d’un brûleur à gaz ou électrique chaud ou dans
un four chauffé.
• Une extrême prudence doit être utilisée lors du
déplacement d’un appareil contenant de l’huile
chaude ou d’autres liquides chauds.
• Pour débrancher l’appareil, éteignez à la fois
le cadran de la minuterie et le cadran de la
température, puis retirez la fi che de la prise.
• N’utilisez pas l’appareil pour autre chose que
l’usage auquel il est destiné.
EXIGENCES DE SÉCURITÉ
• Assurez-vous que le panier à friture est
verrouillé à l’avant du tiroir. Les deux languettes
de la poignée du panier à friture doivent être
complètement insérées dans les rainures sur le
dessus du tiroir du panier.
• Assurez-vous toujours que le tiroir du panier à
friture est complètement fermé avec la poignée
du panier à friture bien verrouillée dans le tiroir
lorsque l’appareil est en marche.
• AVERTISSEMENT : La friteuse à air ne
fonctionnera que si le panier de séchage est
complètement fermé.
• ATTENTION : Après la friture à l’air libre, le
panier à friture, le tiroir à friture et les aliments
cuits sont chauds. Une extrême prudence doit
être utilisée lors de la manipulation du panier
chaud, du tiroir et des aliments cuits.
• ATTENTION SURFACES CHAUDES : Cet
appareil génère de la chaleur et de la vapeur
s’échappe pendant le fonctionnement. Des
précautions appropriées doivent être prises
pour éviter les risques de brûlures, d’incendies
ou d’autres blessures aux personnes ou de
dommages matériels.
• ATTENTION : Cet appareil est chaud pendant le
fonctionnement et conserve la chaleur pendant
un certain temps après avoir été éteint. Utilisez
toujours des gants de cuisine lorsque vous
manipulez des matériaux chauds et laissez les
pièces métalliques refroidir avant de les nettoyer.
Ne placez rien sur l’appareil lorsqu’il fonctionne
ou qu’il est encore chaud.
• Tous les utilisateurs de cet appareil doivent lire
et comprendre ce manuel d’instructions avant
d’utiliser ou de nettoyer cet appareil.
• Ne laissez pas cet appareil sans surveillance
pendant son utilisation.
• Ne plongez pas le cordon d’alimentation dans
un liquide. Si le cordon d’alimentation de
l’appareil est endommagé, il doit être remplacé
par un technicien qualifi é.
• Gardez le cordon d’alimentation hors de portée
des enfants et des nourrissons pour éviter le
risque de choc électrique et d’étouffement.

Consignes de sécurité importantes
LIRE ET SUIVRE TOUTES LES INSTRUCTIONS DE SÉCURITÉ
GARDEZ CES INSTRUCTIONS!
13
EXIGENCES DE SÉCURITÉ
• Placez l’appareil sur une surface de travail
plane et résistante à la chaleur.
• N’obstruez pas la sortie d’air à l’arrière et
l’entrée d’air sur le dessus.
• Gardez l’appareil à au moins 4 pouces
des murs ou d’autres objets pendant le
fonctionnement.
• Utilisez toujours la poignée du panier à friture
pour ouvrir le tiroir du panier à friture.
• Ne replacez pas le tiroir du panier à friture
vide sans le panier à friture dans l’armoire de
la friteuse à air. Assurez-vous que le panier à
friture est verrouillé en position dans le tiroir.
• AVERTISSEMENT : après la friture à l’air libre,
placez le tiroir du panier sur une surface plane
et résistante à la chaleur avant d’appuyer sur le
bouton de déverrouillage du panier.
• AVERTISSEMENT : Le remplissage insuffi sant ou
excessif du panier à friture peut endommager la
friteuse à air et entraîner des blessures graves.
• Ne déplacez jamais une friteuse à air chaud ou
une friteuse à air chaud contenant des aliments
chauds. Laisser refroidir complètement avant de
déplacer.
• MISE EN GARDE : Pour empêcher les plastifi ants
de migrer vers la fi nition du comptoir ou de la
table ou d’autres meubles, placez un dessous
de verre ou un napperon non plastique entre
l’appareil et le comptoir ou le dessus de
table. Si vous ne le faites pas, le fi ni risque de
s’assombrir. Des défauts permanents peuvent
apparaître ou des taches peuvent apparaître sur
le meuble.
POUR USAGE MÉNAGER
UNIQUEMENT.
INSTRUCTIONS DE MISE À LA TERRE
Cet appareil doit être mis à la terre. La mise à
la terre réduit le risque de choc électrique en
fournissant un fi l d’évacuation pour le courant
électrique.
Cet appareil est doté d’un cordon doté d’un fi l
de mise à la terre avec une fi che à 3 broches. Le
cordon d’alimentation doit être branché dans une
prise correctement mise à la terre. Si la prise est une
prise murale à 2 broches, elle doit être remplacée
par une prise murale à 3 broches correctement mise
à la terre. La plaque signalétique indique la tension
et la fréquence pour lesquelles l’appareil est conçu.
ATTENTION - Une mauvaise utilisation de la prise
de terre peut entraîner un risque de choc électrique.
Consultez un électricien qualifi é ou un agent de
service si les instructions de mise à la terre ne sont
pas complètement comprises, ou s’il existe un doute
quant à savoir si l’appareil est correctement mis à la
terre.
Ne connectez pas votre appareil à des rallonges
ou avec un autre appareil dans la même prise
murale. Ne pas épisser le cordon d’alimentation.
Ne coupez ni ne retirez en aucun cas la troisième
broche de terre du cordon d’alimentation. N’utilisez
pas de rallonges ou d’adaptateurs non mis à la
terre (à deux broches).
Demandez à un électricien qualifi é d’installer une
prise de terre à proximité de l’appareil si le cordon
d’alimentation est trop court.
Un cordon d’alimentation court est fourni pour
réduire les risques de s’emmêler ou de trébucher sur
un cordon d’alimentation plus long.
INSTRUCTIONS D’UTILISATION
14
CARACTÉRISTIQUES
1. Cadran de la minuterie
2. Voyant d’alimentation rouge
3. Voyant de chaleur vert
4. Cadran de contrôle de la température
5. Couvercle de bouton transparent
6. Bouton de déverrouillage du panier
7. Poignée de panier à friture
8. Tiroir panier à friture
9. Sortie d’air
10. Cordon d’alimentation
11. Couvercle de bouton transparent
12. Bouton de déverrouillage du panier
13. Panier à friture
14. Tiroir panier à friture
1
2
3
4
5
6
7
8
9
10
11
12
13
14

15
AVANT LA PREMIÈRE UTILISATION
1. L’appareil est expédié avec le panier à friture
verrouillé dans le tiroir, à l’intérieur de l’armoire.
Saisissez fermement et tirez doucement la
poignée du panier à friture pour ouvrir le tiroir
du panier à friture, puis retirez le tiroir de
l’armoire et placez-le sur une surface de travail
plane et propre.
2. Déverrouillez et retirez le panier à friture du
tiroir. Ouvrez le couvercle du bouton transparent
pour exposer le bouton de déverrouillage
du panier, puis appuyez sur le bouton de
déverrouillage du panier tout en tirant le panier
à friture vers le haut et hors du tiroir.
3. Retirez tout le matériel d’emballage et les
étiquettes de l’intérieur et de l’extérieur de
l’appareil avant utilisation. Vérifi ez qu’il n’y a
pas d’emballage sous ou autour du panier à
friture et du tiroir.
4. Lavez le panier à friture et le tiroir à l’eau
chaude savonneuse.
5. NE PAS IMMERGER LE CORPS DE L’APPAREIL
DANS L’EAU. Essuyez le corps de la friteuse
à air avec un chiffon humide. Séchez
soigneusement toutes les pièces.
6. Verrouillez le panier à friture dans le tiroir. Il y
a 2 languettes de chaque côté de la poignée.
Glissez les languettes de la poignée dans les
rainures sur le dessus du tiroir du panier. Un clic
audible se fera entendre lorsque la poignée se
verrouille en place.
IMPORTANT : Assurez-vous que le couvercle du
bouton transparent se trouve au-dessus du bouton
de déverrouillage du panier pour éviter tout
déverrouillage accidentel du panier de la friteuse.
AVERTISSEMENT : Cet appareil ne doit pas être
utilisé pour faire bouillir de l’eau.
REMARQUE : Lors de la première utilisation,
l’appareil peut émettre une légère odeur. C’est
normal.
MODE D’EMPLOI
1. Placez l’appareil sur un plan de travail plat et
résistant à la chaleur à proximité d’une prise
électrique.
2. Ouvrez le tiroir du panier à friture, retirez le
tiroir de l’armoire et placez-le sur une surface
plane et propre.
3. Placez les aliments dans le panier à friture. Ne
remplissez pas trop le panier. Pour assurer une
bonne cuisson et une bonne circulation de l’air,
ne remplissez jamais le panier à friture à plus
des 2/3. Lorsque vous faites frire des légumes
frais à l’air libre, il n’est pas recommandé
d’ajouter plus de 3 tasses de légumes dans le
panier.
4. Insérez le tiroir du panier à friture dans
l’armoire. Assurez-vous toujours que le tiroir est
complètement fermé.
5. Branchez le cordon d’alimentation dans la prise
murale.
6. Tournez le bouton de réglage de la température
pour sélectionner la température de cuisson
souhaitée. La température peut être ajustée à
tout moment. La plage de température est de
280°F à 400°F (140°C à 200°C).
7. Tournez le cadran de la minuterie pour
sélectionner le temps de cuisson souhaité.
Ajoutez cinq minutes au temps de cuisson
pour tenir compte du temps de préchauffage
si l’appareil est froid. Le voyant d’alimentation
rouge s’allumera et l’appareil commencera à
chauffer.
8. Le voyant de chaleur vert s’allumera pendant
que l’appareil chauffe et s’éteindra une fois la
température réglée atteinte. Le voyant de chaleur
vert s’allumera et s’éteindra avec l’élément
chauffant pendant le fonctionnement pour
maintenir la température sélectionnée.
IMPORTANT : L’appareil ne commencera pas à
chauffer si le bouton de la minuterie n’a pas été
réglé. L’appareil ne commencera pas à chauffer si
le panier à friture n’est pas complètement fermé.
INSTRUCTIONS D’UTILISATION

16
NOTES DE CUISINE
• Pour assurer une cuisson uniforme, ouvrez le
panier à friture à mi-cuisson. Vérifi ez, retournez
ou secouez vigoureusement les aliments dans le
panier à friture.
• IMPORTANT : Lorsque le panier est retiré de
l’armoire, le voyant d’alimentation rouge et
la friture à air s’éteignent. Le fonctionnement
reprendra et la minuterie continuera une fois le
panier remis en place dans l’armoire.
• ATTENTION : Assurez-vous que le panier est
en position verrouillée lorsque vous secouez
les aliments dans le panier. Pour éviter des
dommages aux personnes ou aux biens,
n’appuyez pas sur le bouton de déverrouillage
du panier tout en secouant le panier à friture.
• AVERTISSEMENT : une extrême prudence doit
être utilisée lors de la manipulation du panier
et du tiroir à friture chauds. Évitez de laisser
échapper de la vapeur du panier à friture et des
aliments chauds.
• ATTENTION : Utilisez toujours des gants de
cuisine lorsque vous manipulez le panier de
friture à air chaud.
• ATTENTION : De l’huile chaude peut
s’accumuler dans la base du tiroir. Pour éviter
tout risque de brûlure ou de blessure corporelle
ou pour éviter que l’huile ne contamine d’autres
aliments, déverrouillez et retirez toujours le
panier à friture du tiroir avant de le vider.
• NE JAMAIS retourner le tiroir avec le panier à
friture attaché.
• Un bip retentit lorsque la minuterie atteint 0. La
friteuse à air s’éteint automatiquement. Le voyant
d’alimentation rouge et le voyant de chaleur vert
s’éteignent.
• Si une cuisson supplémentaire est nécessaire
à la fi n de la minuterie, ajustez la température
si vous le souhaitez, puis réglez la minuterie
par incréments de 5 minutes jusqu’à ce que les
aliments soient complètement cuits.
NOTES DE CUISINE
• Laissez reposer les aliments cuits pendant 5 à 10
secondes avant de retirer le tiroir à paniers de
l’armoire.
• Lorsque la friture à l’air est terminée, retirez le
tiroir de l’armoire et placez-le sur une surface
plane et résistante à la chaleur. Retirez ensuite le
panier à friture du tiroir.
• Secouez les aliments sur la zone de service.
Remettez rapidement le panier à friture dans le
tiroir et verrouillez-le en place. Continuez avec
les lots suivants, le cas échéant.
• IMPORTANT : Une fois la cuisson terminée,
tournez le cadran de température et le cadran
de la minuterie sur 0 et débranchez la friteuse à
air lorsqu’elle n’est pas utilisée.
• L’huile d’olive en aérosol ou l’huile végétale
conviennent bien pour la friture à l’air libre.
• Lors de la cuisson d’aliments préemballés, en
règle générale, abaissez la température de
cuisson de 25 °F et réduisez le temps de cuisson
de 30 à 50 % selon le type d’aliment et la
quantité.
• Cet appareil peut être utilisé pour réchauffer
des aliments. Réglez la température à 280°F
pendant 10 minutes maximum.
• Séchez les aliments avant de les cuire pour
favoriser le brunissement et éviter l’excès de
fumée.
• Lors de la cuisson d’aliments riches en graisses
tels que des ailes de poulet ou des saucisses,
il peut être nécessaire de vider la graisse du
panier à friture entre les fournées pour éviter
l’excès de fumée.
• Les aliments fraîchement panés doivent être
cuits en petites quantités. Assurez-vous que les
articles ne se touchent pas pour permettre à l’air
de circuler sur toutes les surfaces.
INSTRUCTIONS D’UTILISATION

INSTRUCTIONS D’UTILISATION
17
TABLEAU DE FRITURE À L’AIR
AVERTISSEMENT: UTILISEZ TOUJOURS UN THERMOMÈTRE À VIANDE POUR VOUS ASSURER QUE LA
VIANDE, LA VOLAILLE ET LE POISSON SONT BIEN CUITS AVANT DE MANGER.
Le tableau suivant n’est conçu qu’à titre indicatif. La quantité d’aliments cuits en une seule fois, l’épaisseur
ou la densité des aliments et le fait qu’ils soient frais, décongelés ou congelés peuvent modifi er le temps de
cuisson nécessaire.
Pour assurer une cuisson uniforme, ouvrez le panier à friture à mi-cuisson. Vérifi ez, retournez ou secouez
vigoureusement les aliments dans le panier à friture. Ce tableau répertorie les temps de cuisson moyens et
les mesures à prendre pour obtenir les meilleurs résultats.
La friture en petites quantités entraînera des temps de cuisson plus courts et une meilleure qualité des
aliments. Ajustez les temps de cuisson et les températures comme vous le souhaitez.
REMARQUE IMPORTANTE: À moins que les aliments ne soient préemballés et huilés, tous les aliments
doivent être légèrement huilés avant d’être frits à l’air libre pour des résultats dorés et croustillants. L’huile
peut être pulvérisée ou appliquée sur les aliments. Assurez-vous que les aliments sont secs avant d’ajouter
de l’huile. Coupez les aliments en plus petits morceaux pour créer plus de surface et obtenir des résultats
plus croustillants.
REMARQUE : Le blanchiment est un terme qui fait référence à la cuisson des aliments à une température
plus basse avant la friture fi nale à l’air libre.
Ajoutez 5 minutes au temps de friture à l’air pour permettre à l’appareil de préchauffer.
Remarque importante sur la température
L’USDA recommande que les viandes soient cuites aux températures internes suivantes pour s’assurer que
les aliments sont bien cuits.
• Boeuf / agneau: 145°F
• Porc: 160°F
• Volaille: 170 - 180°F
• Réchauffer la volaille: 165°F

18
TABLEAU DE FRITURE À L’AIR
NOURRITURE TEMPÉRATURE (°F) TEMPS DE CUISSON (MINS) ACTION
Légumes mélangés (rôtis) 400 15 - 20 agiter
Brocoli (rôti) 400 15 - 20 agiter
Rondelles d’oignons (congelées) 400 12 - 18 agiter
Bâtonnets de fromage (congelés) 360 8 - 12 -
Croustilles de patates douces frites (fraîches, coupées à la main, 1/8 à 1/6 pouces d’épaisseur)
Étape 1 : Blanchir 320 15 agiter
Étape 2 : Frire à l’air libre 360 10 - 15 agiter
Frites (fraîches, coupées à la main, 1/4 à 1/3 pouces d’épaisseur)
Étape 1 : Blanchir 320 15 agiter
Étape 2 : Frire à l’air libre 360 10 - 15 agiter
frites, fi nes (congelées, 3 tasses) 400 12 - 16 agiter
Pain de viande, 1 lb 360 35 - 40 agiter
Hamburgers, 1/4 lb, jusqu’à 4 360 10 - 14 -
Hot-dogs / saucisses 360 10 - 15 -
Ailes de poulet (fraîches / décongelées)
Étape 1 : Blanchir 320 15 agiter
Étape 2 : Frire à l’air libre 360 10 agiter
Filets de poulet / doigts
Étape 1 : Blanchir 360 13 tourner
Étape 2 : Frire à l’air libre 400 5 agiter
Morceaux de poulet 360 20 - 30 tourner
Nuggets de poulet (congelés) 360 10 - 15 agiter
Doigts de poisson-chat (décongelés,
panés)
400 10 - 15 tourner
Bâtonnets de poisson (congelés) 400 10 - 15 tourner
Chaussons aux pommes 400 10 -
Beignets 360 8 tourner
Biscuits frits 360 8 tourner
Crevette 360 10 - 18 tourner
INSTRUCTIONS D’UTILISATION

ENTRETIEN
Cet appareil nécessite très peu d’entretien. Il ne
contient aucune pièce réparable par l’utilisateur.
N’essayez pas de le réparer vous-même. Contactez
un technicien qualifi é en réparation d’appareils si le
produit nécessite une réparation.
NETTOYAGE
AVERTISSEMENT : Laissez l’appareil refroidir
complètement avant de le nettoyer.
L’appareil doit être nettoyé régulièrement pour de
meilleures performances et une longue durée de vie.
Un nettoyage régulier réduira également le risque
d’incendie.
1. Retirez la fi che de la prise électrique. Laissez
l’appareil refroidir complètement avant de
terminer tout nettoyage.
2. Lavez le tiroir du panier et le panier à friture
avec de l’eau chaude savonneuse. N’utilisez
pas d’ustensiles de cuisine en métal ou de
nettoyants abrasifs ou de produits de nettoyage
qui pourraient endommager le revêtement
antiadhésif.
3. Le panier à friture et le tiroir vont au lave-
vaisselle. Pour de meilleurs résultats, placez-les
dans le panier supérieur du lave-vaisselle.
4. Essuyez l’extérieur de l’appareil avec un chiffon
humide.
ATTENTION - N’utilisez pas de nettoyants abrasifs,
de brosses à récurer ou de nettoyants chimiques car
cela endommagerait le revêtement antiadhésif.
19
SOINS ET MAINTENANCE
STOCKAGE À LONG TERME
Laissez l’appareil refroidir et sécher complètement
avant de le ranger.
Si vous rangez l’appareil pendant de longues
périodes, assurez-vous qu’il est propre et exempt de
particules de nourriture.
Rangez l’appareil dans un endroit sec, par exemple
sur une table, un plan de travail ou une étagère
d’armoire.
À part le nettoyage recommandé, aucun autre
entretien par l’utilisateur ne devrait être nécessaire.
Tout autre entretien doit être effectué par un
représentant de service autorisé.
LIMITED IN-HOME APPLIANCE WARRANTY
This quality product is warranted to be free from manufacturer’s defects in material and workmanship, provided that the unit is used under the normal operating
conditions intended by the manufacturer.
This warranty is available only to the person to whom the unit was originally sold by Danby Products Limited (Canada) or Danby Products Inc. (U.S.A.) (hereafter
“Danby”) or by an authorized distributor of Danby, and is non-transferable.
TERMS OF WARRANTY
Plastic parts, are warranted for thirty (30) days only from purchase date, with no extensions provided.
First Year
During the rst twelve (12) months, any functional parts of this product found to be defective, will be repaired or replaced, at warrantor’s
option, at no charge to the ORIGINAL purchaser.
To obtain
Danby reserves the right to limit the boundaries of “In Home Service” to the proximity of an Authorized Service Depot. Any app liance
Service
requiring service outside the limited boundaries of “In Home Service” , it will be the consumer’s responsibility to transport the appliance (at
their own expense) to the original retailer (point of purchase) or a service depot for repair. See “Boundaries of In Home Serv ice” below.
Contact your dealer from whom your unit was purchased, or contact your nearest authorized Danby service depot, where service
must be performed by a qualied service technician.
If service is performed on the units by anyone other than an authorized service depot, or the unit is used for commercial appli cation, all
obligations of Danby under this warranty shall be void.
Boundaries of
If the appliance is installed in a location that is 100 kilometers (62 miles) or more from the nearest service center your unit must be
In Home Service
delivered to the nearest authorized Danby Service Depot, as service must only be performed by a technician qualied and certif ied for
warranty service by Danby. Transportation charges to and from the service location are not protected by this warranty and are t he
responsibility of the purchaser.
Nothing within this warranty shall imply that Danby will be responsible or liable for any spoilage or damage to food or other c ontents of this appliance, whether due
to any defect of the appliance, or its use, whether proper or improper.
EXCLUSIONS
Save as herein provided, Danby, there are no other warranties, conditions, representations or guarantees, express or implied, m ade or intended by Danby or its
authorized distributors and all other warranties, conditions, representations or guarantees, including any warranties, conditio ns, representations or guarantees
under any Sale of Goods Act or like legislation or statue is hereby expressly excluded. Save as herein provided, Danby shall no t be responsible for any damages
to persons or property, including the unit itself, howsoever caused or any consequential damages arising from the malfunction o f the unit and by the purchase of
the unit, the purchaser does hereby agree to indemnify and hold harmless Danby from any claim for damages to persons or propert y caused by the unit.
GENERAL PROVISIONS
No warranty or insurance herein contained or set out shall apply when damage or repair is caused by any of the following:
1) Power failure.
2) Damage in transit or when moving the appliance.
3) Improper power supply such as low voltage, defective house wiring or inadequate fuses.
4) Accident, alteration, abuse or misuse of the appliance such as inadequate air circulation in the room or abnormal operating con ditions
(extremely high or low room temperature).
5) Use for commercial or industrial purposes (ie. If the appliance is not installed in a domestic residence).
6) Fire, water damage, theft, war, riot, hostility, acts of God such as hurricanes, oods etc.
7) Service calls resulting in customer education.
8) Improper Installation (ie. Building-in of a free standing appliance or using an appliance outdoors that is not approved for out door application).
Proof of purchase date will be required for warranty claims; so, please retain bills of sale. In the event warranty service is required, present this document to our
AUTHORIZED SERVICE DEPOT.
Danby Products Limited
PO Box 1778, Guelph, Ontario, Canada N1H 6Z9
Telephone: (519) 837-0920 FAX: (519) 837-0449
Danby Products Inc.
PO Box 669, Findlay, Ohio, U.S.A. 45840
Telephone: (419) 425-8627 FAX: (419) 425-8629
04/09
1-800-263-2629
Warranty Service
In-home
Les frais de transport entre votre domicile et le lieu de l'entretien ne sont pas couverts par la présente garantie et doivent être
acquittés par l'acheteur.
Pendant les premiers douze (12) mois, toutes les pièces fonctionnelles de ce produit qui s’avèrent défectueuses
seront réparées ou remplacées, selon le choix du garant, sans frais à l’acheteur initial.
Contactez le revendeur où l'appareil a été acheté ou contactez le dépôt de service Danby autorisé le plus
proche, où le service doit être effectué par un technicien de service qualifié. Si le service est effectué sur
l'appareil par une personne autre qu'un dépôt de service autorisé, toutes les obligations de Danby en vertu de
cette garantie seront annulées.
Il est de la responsabilité de l'acheteur de transporter l'appareil vers le dépôt de service agréé le plus proche.
Pour obtenir un
service
GARANTIE LIMITÉE « EN ATELIER »
Cet appareil de qualité est garanti exempt de tout vice de matière première et de fabrication, s’il est utilisé dans les conditions normales
recommandées par le fabricant.
Cette garantie n’est offerte qu’à l’acheteur initial de l’appareil vendu par Danby Products Limited (Canada) ou Danby Products Inc.
(É.-U.) (ci-après « Danby ») ou par l’un des ses distributeurs agréés et elle ne peut être transférée.
CONDITIONS
Les pièces en plastique sont garanties pendant trente (30) jours seulement à partir de la date de l’achat, sans aucune prolongation
prévue.
Service sous garantie
En Atelier
Danby Products Limited
PO Box 1778, Guelph, Ontario, Canada N1H 6Z9
Téléphone : (519) 837-0920 Télécopieur : (519) 837-0449
Danby Products Inc.
PO Box 669, Findlay, Ohio, U.S.A. 45840
Téléphone : (419) 425-8627 Télécopieur : (419) 425-8629
1-800-263-2629
02/18
Aucune partie de la garantie ne prévoit implicitement que le fabricant sera tenu responsable des dommages subis par les aliments ou
d’autres types de contenu, qu’ils soient causés par la défectuosité de l’appareil ou par son usage adéquat ou inadéquat.
EXCLUSIONS
En vertu de la présente, il n’existe aucune autre garantie, condition ou représentation, qu’elle soit exprimée ou tacite, de façon
manifeste ou intentionnelle, par Danby ou ses distributeurs agréés. De même, sont exclues toutes les autres garanties, conditions ou
représentations, y compris les garanties, conditions ou représentations en vertu de toute loi régissant la vente de produits ou de toute
autre législation ou règlement semblable. En vertu de la présente, Danby ne peut être tenue responsable en cas de blessures
corporelles ou de dégâts matériels, y compris à l’appareil, quelle qu’en soit les causes. Danby ne peut pas être tenue responsable
des dommages indirects dus au fonctionnement défectueux de l’appareil. En achetant l’appareil, l’acheteur accepte de tenir sans
reproche et de dégager Danby de toute responsabilité en cas de réclamation pour toute blessure corporelle ou tout dégât matériel
causé par cet appareil.
CONDITIONS GÉNÉRALES
La garantie ou assurance ci-dessus ne s’applique pas si les dégâts ou réparations sont dus aux cas suivants :
1) Panne de courant.
2) Dommages subis pendant le transport ou le déplacement de l’appareil.
3) Alimentation électrique incorrecte (tension faible, câblage défectueux, fusibles incorrects).
4) Accident, modification, emploi abusif ou incorrect de l’appareil tel qu'une circulation d'air inadéquate dans la pièce ou des
conditions de fonctionnement anormales (température extrêmement élevée ou basse).
5) Utilisation dans un but commercial ou industriel (à savoir, si l'appareil n'est pas installé dans un domicile résidentiel).
6) Incendie, dommages causés par l’eau, le vol, la guerre, une émeute, des hostilités, ou en cas de force majeure (ouragan,
inondation, etc.).
7) Visites d’un technicien pour expliquer le fonctionnement de l’appareil au propriétaire.
8) Installation inappropriée (par exemple, encastrement d'un appareil autoportant, ou utilisation extérieure d'un appareil non conçu à
cet effet, y compris, mais sans s'y limiter : les garages, les patios, les porches ou ailleurs, qui ne sont pas correctement isolés ou
climatisés).
La preuve de la date d'achat sera requise pour les réclamations de garantie; conserver la facture de vente. Dans le cas où un service
de garantie est requis, présentez la preuve d'achat à notre dépôt de service agréé.
Premiers 12 mois

21
Bienvenido a la familia Danby.
Estamos orgullosos de nuestros productos de calidad y creemos en un servicio
confi able. Le sugerimos que lea este manual del propietario antes de enchufar su nuevo
electrodoméstico, ya que contiene información importante de funcionamiento, información
de seguridad, solución de problemas y consejos de mantenimiento para garantizar la
confi abilidad y longevidad de su electrodoméstico.
Tiene derecho a la cobertura de la garantía como se describe en el manual del propietario
que se proporciona con su nuevo electrodoméstico.
1. Escriba la información de su aparato a continuación. Debe conservar el comprobante
de compra original para validar y recibir los servicios de garantía.
2. Registre su producto en línea y reciba una EXTENSIÓN DE GARANTÍA GRATUITA DE 2
MESES después de completar una encuesta sobre el producto, en
www.danby.com/support/product-registration/
Necesitas ayuda?
1. Lea el manual del propietario para obtener ayuda con la instalación, resolución de
problemas y asistencia de mantenimiento.
2. Visite www.Danby.com para acceder a herramientas de autoservicio, preguntas
frecuentes y mucho más buscando su número de modelo en la barra de búsqueda.
3. Para obtener el servicio al cliente más rápido, complete el formulario web en www.
danby.com/support. Su envío irá directamente a un experto en su dispositivo en
particular. Nuestros tiempos de respuesta promedio son entre 20 minutos y 2 horas,
durante el horario comercial EST.
4. Llame al 1-800-263-2629; tenga en cuenta que durante las horas pico, los tiempos de
espera pueden exceder una hora.
Número de modelo: _______________________________________________
Número de serie: _________________________________________________
Fecha de compra: _________________________________________________

¡GUARDE ESTAS INSTRUCCIONES!
Importantes Instrucciones de Seguridad
LEA Y SIGA TODAS LAS INSTRUCCIONES DE SEGURIDAD
22
REQUERIMIENTOS DE SEGURIDAD
• Lee todas las instrucciones.
• No toque superfi cies calientes. Use manijas o
perillas.
• Para protegerse contra descargas eléctricas,
no sumerja el cable, los enchufes o cualquier
otra parte del aparato en agua o cualquier otro
líquido.
• Este electrodoméstico no está diseñado para
que lo utilicen personas (incluidos niños) con
capacidades físicas, sensoriales o mentales
reducidas o con falta de experiencia o
conocimiento, a menos que hayan recibido
supervisión o instrucciones sobre el uso del
electrodoméstico por una persona responsable
de su seguridad.
• Los niños deben ser supervisados para
asegurarse de que no jueguen con el aparato.
• Desconéctelo del tomacorriente cuando no esté
en uso y antes de limpiarlo. Deje enfriar antes
de poner o quitar piezas y antes de limpiar el
aparato.
• No opere ningún electrodoméstico con un
cable o enchufe dañado o después de que
el electrodoméstico haya fallado o haya sido
dañado de alguna manera. Consulte a un
técnico califi cado para su examen, reparación o
ajuste eléctrico o mecánico.
• El uso de accesorios no recomendados por el
fabricante del aparato puede causar lesiones.
• No lo use al aire libre.
• No deje que el cable de alimentación cuelgue
del borde de una mesa o mostrador o que toque
una superfi cie caliente.
• No coloque el aparato sobre o cerca de un
quemador de gas o eléctrico caliente o en un
horno caliente.
• Se debe tener mucho cuidado al mover un
aparato que contenga aceite u otros líquidos
calientes.
• Para desconectar el aparato, apague tanto
el dial del temporizador como el dial de
temperatura, luego retire el enchufe del
tomacorriente.
• No utilice el aparato para ningún otro fi n que
no sea el indicado.
REQUERIMIENTOS DE SEGURIDAD
• Asegúrese de que la canasta para freír esté
bloqueada en la parte delantera del cajón.
Ambas pestañas del asa de la cesta para freír
deben estar completamente insertadas en las
ranuras en la parte superior del cajón de la
cesta.
• Asegúrese siempre de que el cajón de la cesta
para freír esté completamente cerrado con el
asa de la cesta para freír bloqueada de forma
segura en el cajón mientras el aparato está en
funcionamiento.
• ADVERTENCIA: La freidora no funcionará
a menos que la canasta secadora esté
completamente cerrada.
• PRECAUCIÓN: Después de freír al aire, la cesta
de freír, el cajón de freír y los alimentos cocidos
están calientes. Se debe tener mucho cuidado
al manipular la canasta caliente, el cajón y los
alimentos cocidos.
• PRECAUCIÓN SUPERFICIES CALIENTES:
Este aparato genera calor y escape de vapor
durante su funcionamiento. Se deben tomar las
precauciones adecuadas para evitar el riesgo
de quemaduras, incendios u otras lesiones a
personas o daños a la propiedad.
• PRECAUCIÓN: Este aparato está caliente
durante el funcionamiento y retiene el calor
durante algún tiempo después de apagarlo.
Utilice siempre guantes de cocina cuando
manipule materiales calientes y deje que las
piezas metálicas se enfríen antes de limpiarlas.
No coloque nada encima del aparato mientras
esté funcionando o aún caliente.
• Todos los usuarios de este electrodoméstico
deben leer y comprender este manual de
instrucciones antes de operar o limpiar este
electrodoméstico.
• No deje este aparato desatendido durante su
uso.
• No sumerja el cable de alimentación en ningún
líquido. Si el cable de alimentación del aparato
está dañado, debe ser reemplazado por un
técnico califi cado.
• Mantenga el cable de alimentación fuera del
alcance de niños y bebés para evitar el riesgo
de descarga eléctrica y asfi xia.

23
REQUERIMIENTOS DE SEGURIDAD
• Coloque el aparato en un área de trabajo plana
y resistente al calor.
• No obstruya la salida de aire en la parte
posterior y la entrada de aire en la parte
superior.
• Mantenga el aparato al menos a 4 pulgadas
de las paredes u otros objetos durante su
funcionamiento.
• Utilice siempre el asa de la cesta de freír para
abrir el cajón de la cesta de freír.
• No reemplace el cajón de la canasta de freír
vacío sin la canasta de freír en el gabinete de la
freidora. Verifi que que la canasta para freír esté
bloqueada en su posición en el cajón.
• ADVERTENCIA: Después de freír al aire,
coloque el cajón de la canasta sobre una
superfi cie plana resistente al calor antes de
presionar el botón de liberación de la canasta.
• ADVERTENCIA: Llenar demasiado o demasiado
la canasta para freír puede dañar la freidora y
provocar lesiones personales graves.
• Nunca mueva una freidora de aire caliente o
una freidora de aire que contenga alimentos
calientes. Deje enfriar completamente antes de
mover.
• PRECAUCIÓN: Para evitar que los plastifi cantes
migren al acabado de la encimera o de la
mesa u otros muebles, coloque un posavasos o
tapete individual que no sea de plástico entre el
electrodoméstico y la encimera o la mesa. Si no
lo hace, el acabado puede oscurecerse. Pueden
ocurrir imperfecciones permanentes o pueden
aparecer manchas en el gabinete.
PARA USO DOMÉSTICO
ÚNICAMENTE
¡GUARDE ESTAS INSTRUCCIONES!
Importantes Instrucciones de Seguridad
LEA Y SIGA TODAS LAS INSTRUCCIONES DE SEGURIDAD
INSTRUCCIONES DE PUESTA A TIERRA
Este aparato debe estar conectado a tierra. La
conexión a tierra reduce el riesgo de descarga
eléctrica al proporcionar un cable de escape para
la corriente eléctrica.
Este aparato tiene un cable que tiene un cable de
conexión a tierra con un enchufe de 3 clavijas. El
cable de alimentación debe estar enchufado a un
tomacorriente que esté debidamente conectado a
tierra. Si el tomacorriente es un tomacorriente de
pared de 2 clavijas, debe reemplazarse por un
tomacorriente de pared de 3 clavijas debidamente
conectado a tierra. La placa de clasifi cación de
serie indica el voltaje y la frecuencia para los que
está diseñado el aparato.
ADVERTENCIA - El uso inadecuado del enchufe
con conexión a tierra puede resultar en un riesgo
de descarga eléctrica. Consulte a un electricista
califi cado o agente de servicio si las instrucciones
de conexión a tierra no se comprenden
completamente, o si existen dudas sobre si el
aparato está conectado a tierra correctamente.
No conecte su electrodoméstico a cables de
extensión ni junto con otro electrodoméstico en
el mismo tomacorriente de pared. No empalme
el cable de alimentación. No corte ni retire bajo
ninguna circunstancia la tercera clavija de conexión
a tierra del cable de alimentación. No utilice cables
de extensión o adaptadores sin conexión a tierra
(dos clavijas).
Solicite a un electricista califi cado que instale un
tomacorriente con conexión a tierra cerca del
electrodoméstico si el cable de alimentación es
demasiado corto.
Se proporciona un cable de alimentación corto
para reducir los riesgos de enredarse o tropezarse
con un cable de alimentación más largo.

24
CARACTERÍSTICAS
1. Dial de temporizador
2. Luz de encendido roja
3. Luz de calor verde
4. Dial de control de temperatura
5. Cubierta de botón transparente
6. Botón de liberación de la cesta
7. Asa de la cesta para freír
8. Cajón cesta freidora
9. Salida de aire
10. Cable de alimentación
11. Cubierta de botón transparente
12. Botón de liberación de la cesta
13. Cesta para freír
14. Cajón cesta freidora
1
2
3
4
5
6
7
8
9
10
11
12
13
14
INSTRUCCIONES DE OPERACIÓN

25
ANTES DEL PRIMER USO
1. El aparato se envía con la cesta para freír
bloqueada en el cajón, dentro del armario.
Sujete fi rmemente y tire suavemente del asa de
la canasta para freír para abrir el cajón de la
canasta para freír y luego retire el cajón del
gabinete y colóquelo en un área de trabajo
plana y limpia.
2. Destrabe y extraiga la cesta de freír del cajón.
Abra la tapa del botón transparente para
exponer el botón de liberación de la canasta
y luego presione el botón de liberación de la
canasta mientras tira de la canasta para freír
hacia arriba y hacia afuera del cajón.
3. Retire todo el material de embalaje y las
etiquetas del interior y exterior del aparato antes
de usarlo. Compruebe que no haya ningún
embalaje debajo o alrededor de la cesta y el
cajón para freír.
4. Lave la cesta y el cajón para freír con agua
caliente y jabón.
5. NO SUMERJA EL CUERPO DEL APARATO EN
AGUA. Limpie el cuerpo de la freidora con un
paño húmedo. Seque bien todas las piezas.
6. Bloquee la canasta de freír en el cajón. Hay 2
pestañas a cada lado del mango. Deslice las
pestañas del asa en las ranuras en la parte
superior del cajón de la canasta. Se escuchará
un clic audible cuando la manija se bloquee en
su lugar.
IMPORTANTE: Asegúrese de que la tapa del botón
transparente esté sobre el botón de liberación de la
canasta para evitar que la canasta de la freidora se
suelte accidentalmente.
ADVERTENCIA: Este aparato no debe usarse para
hervir agua.
NOTA: Durante el primer uso, el aparato puede
emitir un ligero olor. Esto es normal.
INSTRUCCIONES DE OPERACIÓN
1. Coloque el aparato en un área de trabajo
plana y resistente al calor cerca de una toma de
corriente.
2. Abra el cajón de la cesta para freír, retire
el cajón del armario y colóquelo sobre una
superfi cie plana y limpia.
3. Coloque la comida en la canasta para freír. No
llene demasiado la canasta. Para garantizar
una cocción y una circulación de aire
adecuadas, nunca llene la canasta para freír
más de 2/3 de su capacidad. Al freír verduras
frescas, no se recomienda agregar más de 3
tazas de verduras a la canasta.
4. Inserte el cajón de la cesta para freír en el
armario. Asegúrese siempre de que el cajón
esté completamente cerrado.
5. Enchufe el cable de alimentación en el
tomacorriente de la pared.
6. Gire el dial de control de temperatura para
seleccionar la temperatura de cocción deseada.
La temperatura se puede ajustar en cualquier
momento. El rango de temperatura es de 280°F
a 400°F (140°C a 200°C).
7. Gire el dial del temporizador para seleccionar
el tiempo de cocción deseado. Agregue cinco
minutos al tiempo de cocción para tener en
cuenta el tiempo de precalentamiento si el
aparato está frío. La luz roja de encendido se
iluminará y el aparato comenzará a calentarse.
8. La luz verde de calor se encenderá mientras el
aparato se calienta y se apagará una vez que
se alcance la temperatura establecida. La luz
verde de calor se encenderá y apagará con el
elemento calefactor durante el funcionamiento
para mantener la temperatura seleccionada.
IMPORTANTE: El aparato no comenzará a
calentarse si no se ha confi gurado el botón
del temporizador. El aparato no comenzará
a calentarse si la cesta para freír no está
completamente cerrada.
INSTRUCCIONES DE OPERACIÓN

INSTRUCCIONES DE OPERACIÓN
26
NOTAS DE COCCIÓN
• Para garantizar una cocción uniforme, abra
la cesta para freír a la mitad del tiempo de
cocción. Revise, dé vuelta o agite vigorosamente
los alimentos en la canasta para freír.
• IMPORTANTE: Cuando se retira la canasta del
gabinete, la luz roja de encendido y la fritura de
aire se apagarán. La operación se reanudará
y el temporizador continuará una vez que se
vuelva a colocar la canasta en el gabinete.
• PRECAUCIÓN: Asegúrese de que la canasta
esté en la posición bloqueada cuando agite
los alimentos en la canasta. Para evitar daños
a personas o propiedad, no presione el botón
de liberación de la canasta mientras agita la
canasta para freír.
• ADVERTENCIA: Se debe tener mucho cuidado
al manipular la canasta y el cajón para freír
calientes. Evite que salga vapor de la cesta para
freír y de los alimentos calientes.
• PRECAUCIÓN: Utilice siempre guantes de
cocina al manipular la canasta de freír con aire
caliente.
• PRECAUCIÓN: El aceite caliente puede
acumularse en la base del cajón. Para evitar
el riesgo de quemaduras o lesiones personales
o para evitar que el aceite contamine otros
alimentos, siempre desbloquee y retire la
canasta de freír del cajón antes de vaciarla.
• NUNCA dé la vuelta al cajón con la canasta
para freír colocada.
• Sonará un pitido cuando el temporizador llegue
a 0. La freidora se apagará automáticamente.
Tanto la luz roja de encendido como la luz
verde de calor se apagarán.
• Si se necesita cocción adicional al fi nal del
temporizador, ajuste la temperatura si lo
desea y luego confi gure el temporizador en
incrementos de 5 minutos hasta que la comida
esté completamente cocida.
NOTAS DE COCCIÓN
• Deje reposar los alimentos cocidos durante 5 a
10 segundos antes de sacar el cajón de la cesta
del gabinete.
• Cuando termine de freír al aire, retire el cajón
del gabinete y colóquelo sobre una superfi cie
plana resistente al calor. Luego retire la canasta
de freír del cajón.
• Agite los alimentos en el área de servicio.
Regrese rápidamente la canasta para freír al
cajón y asegúrela en su lugar. Continúe con los
lotes posteriores, si los hubiera.
• IMPORTANTE: Cuando termine de cocinar, gire
el dial de temperatura y el dial del temporizador
a 0 y desenchufe la freidora cuando no esté en
uso.
• El aceite de oliva en aerosol o el aceite vegetal
funcionan bien para freír al aire.
• Cuando cocine alimentos preenvasados, como
regla general, baje la temperatura de horneado
en 25 ° F y reduzca el tiempo de cocción entre
un 30 y un 50%, según el tipo de alimento y la
cantidad.
• Este aparato se puede utilizar para recalentar
alimentos. Fije la temperatura a 280 ° F por
hasta 10 minutos.
• Seque los alimentos con palmaditas antes de
cocinarlos para favorecer que se doren y evitar
el exceso de humo.
• Cuando cocine alimentos con alto contenido de
grasa, como alitas de pollo o salchichas, puede
ser necesario vaciar la grasa de la canasta para
freír entre lotes para evitar el exceso de humo.
• Los alimentos recién empanizados deben
cocinarse en lotes pequeños. Asegúrese de que
los elementos no se toquen para permitir el fl ujo
de aire en todas las superfi cies.

27
TABLA DE FRITURA AL AIRE
ADVERTENCIA: UTILICE SIEMPRE UN TERMÓMETRO DE CARNE PARA ASEGURARSE DE QUE LA
CARNE, LAS AVES Y EL PESCADO SE COCINAN BIEN ANTES DE COMER.
La siguiente tabla tiene la intención de ser solo una guía. La cantidad de alimentos cocidos a la vez, el
grosor o la densidad de los alimentos y si los alimentos son frescos, descongelados o congelados pueden
alterar el tiempo de cocción necesario.
Para garantizar una cocción uniforme, abra la cesta para freír a la mitad del tiempo de cocción. Revise,
dé vuelta o agite vigorosamente los alimentos en la canasta para freír. Este cuadro enumera los tiempos de
cocción promedio y las medidas que se deben tomar para obtener mejores resultados.
Freír en lotes más pequeños dará como resultado tiempos de cocción más cortos y una mejor calidad de
los alimentos. Ajuste los tiempos y temperaturas de cocción como desee.
NOTA IMPORTANTE: A menos que los alimentos estén preenvasados y engrasados, todos los alimentos
deben aceitarse ligeramente antes de freírlos al aire para obtener resultados dorados y crujientes. El aceite
se puede rociar o cepillar sobre los alimentos. Asegúrese de que la comida esté seca antes de agregar
aceite. Corte los alimentos en trozos más pequeños para crear más superfi cie y lograr resultados más
crujientes.
NOTA: Blanquear es un término que se refi ere a cocinar alimentos a una temperatura más baja antes de
la fritura fi nal.
Agregue 5 minutos al tiempo de fritura al aire para permitir que el aparato se precaliente.
Nota importante sobre la temperatura
El USDA recomienda que las carnes se cocinen a las siguientes temperaturas internas para garantizar que
los alimentos se cocinen completamente.
• Ternera / cordero: 145°F
• Cerdo: 160°F
• Aves de corral: 170 - 180°F
• Recalentar aves de corral: 165°F
INSTRUCCIONES DE OPERACIÓN
28
TABLA DE FRITURA AL AIRE
COMIDA TEMPERATURA (°F) HORA DE COCINAR (MINS) ACCIÓN
Vegetales mixtos (asados) 400 15 - 20 agitar
Broccoli (roasted) 400 15 - 20 agitar
Aros de cebolla (congelados) 400 12 - 18 agitar
Palitos de queso (congelados) 360 8 - 12 -
Chips fritos de camote (frescos, cortados a mano, de 1/8 a 1/6 de pulgada de grosor)
Paso 1: blanquear 320 15 agitar
Paso 2: freír al aire 360 10 - 15 agitar
Papas fritas (frescas, cortadas a mano, de 1/4 a 1/3 de pulgada de grosor)
Paso 1: blanquear 320 15 agitar
Paso 2: freír al aire 360 10 - 15 agitar
Papas fritas, delgadas (congeladas, 3
tazas)
400 12 - 16 agitar
Pastel de carne, 1 libra 360 35 - 40 agitar
Hamburguesas, 1/4 lb, hasta 4 360 10 - 14 -
Perritos calientes / salchichas 360 10 - 15 -
Alitas de pollo (frescas / descongeladas)
Paso 1: blanquear 320 15 agitar
Paso 2: freír al aire 360 10 agitar
Filetes de pollo / dedos
Paso 1: blanquear 360 13 rotación
Paso 2: freír al aire 400 5 agitar
Pedazos de pollo 360 20 - 30 rotación
Nuggets de pollo (congelados) 360 10 - 15 agitar
Dedos de bagre (descongelados,
rebozados)
400 10 - 15 rotación
Palitos de pescado (congelados) 400 10 - 15 rotación
Empanadas de manzana 400 10 -
Rosquillas 360 8 rotación
Galletas fritas 360 8 rotación
Camarón 360 10 - 18 rotación
INSTRUCCIONES DE OPERACIÓN

MANTENIMIENTO
Este aparato requiere muy poco mantenimiento.
No contiene piezas reparables por el usuario. No
intente repararlo usted mismo. Póngase en contacto
con un técnico de reparación de electrodomésticos
califi cado si el producto requiere servicio.
LIMPIEZA
ADVERTENCIA: Deje que el aparato se enfríe
completamente antes de limpiarlo.
El aparato debe limpiarse con regularidad para
obtener el mejor rendimiento y una vida útil
prolongada. La limpieza regular también reducirá
el riesgo de incendio.
1. Retire el enchufe de la toma de corriente. Deje
que el aparato se enfríe completamente antes de
completar cualquier limpieza.
2. Lave el cajón de la cesta y la cesta para freír
con agua caliente y jabón. No utilice utensilios
de cocina metálicos o limpiadores abrasivos
o productos de limpieza que puedan dañar el
revestimiento antiadherente.
3. La cesta y el cajón para freír se pueden lavar en
el lavavajillas. Para obtener mejores resultados,
colóquelos en la rejilla superior del lavavajillas.
4. Limpie el exterior del aparato con un paño
húmedo.
PRECAUCIÓN: no utilice limpiadores abrasivos,
cepillos de fregar o limpiadores químicos, ya que
esto dañará el revestimiento antiadherente.
29
CUIDADO Y MANTENIMIENTO
ALMACENAMIENTO A LARGO PLAZO
Deje que el aparato se enfríe y se seque por
completo antes de guardarlo.
Si almacena el aparato durante largos períodos
de tiempo, asegúrese de que esté limpio y sin
partículas de comida.
Guarde el aparato en un lugar seco, como una
mesa, una encimera o un estante de un armario.
Aparte de la limpieza recomendada, no debería ser
necesario ningún otro mantenimiento por parte del
usuario. Cualquier otro servicio debe ser realizado
por un representante de servicio autorizado.
LIMITED IN-HOME APPLIANCE WARRANTY
This quality product is warranted to be free from manufacturer’s defects in material and workmanship, provided that the unit is used under the normal operating
conditions intended by the manufacturer.
This warranty is available only to the person to whom the unit was originally sold by Danby Products Limited (Canada) or Danby Products Inc. (U.S.A.) (hereafter
“Danby”) or by an authorized distributor of Danby, and is non-transferable.
TERMS OF WARRANTY
Plastic parts, are warranted for thirty (30) days only from purchase date, with no extensions provided.
First Year
During the rst twelve (12) months, any functional parts of this product found to be defective, will be repaired or replaced, at warrantor’s
option, at no charge to the ORIGINAL purchaser.
To obtain
Danby reserves the right to limit the boundaries of “In Home Service” to the proximity of an Authorized Service Depot. Any app liance
Service
requiring service outside the limited boundaries of “In Home Service” , it will be the consumer’s responsibility to transport the appliance (at
their own expense) to the original retailer (point of purchase) or a service depot for repair. See “Boundaries of In Home Serv ice” below.
Contact your dealer from whom your unit was purchased, or contact your nearest authorized Danby service depot, where service
must be performed by a qualied service technician.
If service is performed on the units by anyone other than an authorized service depot, or the unit is used for commercial appli cation, all
obligations of Danby under this warranty shall be void.
Boundaries of
If the appliance is installed in a location that is 100 kilometers (62 miles) or more from the nearest service center your unit must be
In Home Service
delivered to the nearest authorized Danby Service Depot, as service must only be performed by a technician qualied and certif ied for
warranty service by Danby. Transportation charges to and from the service location are not protected by this warranty and are t he
responsibility of the purchaser.
Nothing within this warranty shall imply that Danby will be responsible or liable for any spoilage or damage to food or other c ontents of this appliance, whether due
to any defect of the appliance, or its use, whether proper or improper.
EXCLUSIONS
Save as herein provided, Danby, there are no other warranties, conditions, representations or guarantees, express or implied, m ade or intended by Danby or its
authorized distributors and all other warranties, conditions, representations or guarantees, including any warranties, conditio ns, representations or guarantees
under any Sale of Goods Act or like legislation or statue is hereby expressly excluded. Save as herein provided, Danby shall no t be responsible for any damages
to persons or property, including the unit itself, howsoever caused or any consequential damages arising from the malfunction o f the unit and by the purchase of
the unit, the purchaser does hereby agree to indemnify and hold harmless Danby from any claim for damages to persons or propert y caused by the unit.
GENERAL PROVISIONS
No warranty or insurance herein contained or set out shall apply when damage or repair is caused by any of the following:
1) Power failure.
2) Damage in transit or when moving the appliance.
3) Improper power supply such as low voltage, defective house wiring or inadequate fuses.
4) Accident, alteration, abuse or misuse of the appliance such as inadequate air circulation in the room or abnormal operating con ditions
(extremely high or low room temperature).
5) Use for commercial or industrial purposes (ie. If the appliance is not installed in a domestic residence).
6) Fire, water damage, theft, war, riot, hostility, acts of God such as hurricanes, oods etc.
7) Service calls resulting in customer education.
8) Improper Installation (ie. Building-in of a free standing appliance or using an appliance outdoors that is not approved for out door application).
Proof of purchase date will be required for warranty claims; so, please retain bills of sale. In the event warranty service is required, present this document to our
AUTHORIZED SERVICE DEPOT.
Danby Products Limited
PO Box 1778, Guelph, Ontario, Canada N1H 6Z9
Telephone: (519) 837-0920 FAX: (519) 837-0449
Danby Products Inc.
PO Box 669, Findlay, Ohio, U.S.A. 45840
Telephone: (419) 425-8627 FAX: (419) 425-8629
04/09
1-800-263-2629
Warranty Service
In-home
Durante los primeros doce (12) meses, cualquier parte en buen estado de este producto que resulte defectuosa,
incluyendo cualquier sistema sellado, será reparado o reemplazado, a opción del fabricante, sin cargo para
el comprador original.
Póngase en contacto con el distribuidor donde adquirió el electrodoméstico o póngase en contacto con el
centro de servicio autorizado más cercano de Danby, donde el servicio debe ser realizado por un técnico
cualificado. Si el servicio es realizado por cualquier persona que no sea un depósito de servicio autorizado,
todas las obligaciones de Danby bajo esta garantía serán nulas.
Es responsabilidad del comprador transportar el aparato al centro de servicio autorizado más cercano.
Primeros 12 meses
Para obtener servicio
GARANTÍA LIMITADA “ACARREADO SOLAMENTE”
Este producto de calidad está garantizado contra defectos de fabricación, incluyendo partes y mano de obra, siempre y cuando la
unidad se utilice bajo las condiciones normales de funcionamiento para las que fue diseñado.
Esta garantía está solamente disponible para la persona que haya comprado originalmente esta unidad directamente de Danby
Products Limited (Canada) o Danby Products Inc. (U.S.A.) (en adelante “Danby”) o uno de sus distribuidores autorizados, y no es
transferible.
CONDICIONES DE LA GARANTÍA
Las piezas plásticas, se autorizan por treinta (30) días solamente a partir de la fecha de la compra, sin las extensiones
proporcionadas.
Nada dentro de esta garantía implica que Danby será responsable por cualquier daño que hayan sufrido los alimentos u otros
contenidos de este aparato, ya sea debido a un defecto del aparato, o su uso, adecuado o inadecuado.
EXCLUSIONES
Salvo lo aquí indicado por Danby, no existen otras garantías, condiciones o representaciones, explícitas o implícitas, concretas o
intencionales por parte de Danby o sus distribuidores autorizados y todas las demás garantías, condiciones o representaciones,
incluyendo cualquier garantía, condiciones o representaciones bajo cualquier Acta de Venta de Productos o legislación o estatuto
similar, quedan de esta forma expresamente excluidas. Salvo lo aquí indicado, Danby no serán responsables por ningún daño a
personas o bienes, incluyendo la propia unidad, sin importar su causa, o de ningún daño indirecto causado por el desperfecto de la
unidad, y al comprar esta unidad, el comprador acepta por la presente, indemnizar y proteger a Danby contra cualquier reclamo
por daños a personas o bienes causados por la unidad.
CONDICIONES GENERALES
No se considerará ninguna de estas garantías o seguros cuando el daño o la necesidad de reparación sea el producto de los
siguientes casos:
1) Falla del suministro eléctrico.
2) Daños en tránsito o durante el transporte de la unidad.
3) Alimentación incorrecta, como bajo voltaje, instalación eléctrica defectuosa o fusibles inadecuados.
4) Accidente, modificación, abuso o uso incorrecto del artefacto, tal como insuficiente ventilación del ambiente o condiciones de
operación anormales (temperatura ambiente extremadamente alta o baja).
5) Utilización comercial o industrial (v.g., si el electrodoméstico no está instalado en una vivienda particular).
6) Incendio, daños por agua, robo, guerra, disturbios, hostilidades, actos de fuerza mayor como huracanes, inundaciones, etc.
7) Pedidos de servicio debido a desinformación del usuario.
8) Instalación inadecuada (v.g., instalación de un electrodoméstico independiente o uso de un aparato al aire libre que no esté
aprobado para aplicaciones en exteriores, incluyendo pero no limitado a: garajes, patios, porches o cualquier lugar que no esté bien
aislado o controlado por el clima).
Se requerirá una prueba de la fecha de compra para reclamaciones de garantía; conservar las facturas de venta. En el caso de que
se requiera servicio de garantía, presente el comprobante de compra a nuestro depósito de servicio autorizado.
Servicio de Garantía
Acarreado Solamente
Danby Products Limited
PO Box 1778, Guelph, Ontario, Canada N1H 6Z9
Telephone: (519) 837-0920 FAX: (519) 837-0449
Danby Products Inc.
PO Box 669, Findlay, Ohio, U.S.A. 45840
Telephone: (419) 425-8627 FAX: (419) 425-8629
1-800-263-2629
04/17
Los cargos de transporte desde y hacia el lugar de servicio no están protegidos por esta garantía y son responsabilidad del
comprador.

Printed in China
Imprimé en Chine
Impreso en China
Danby Products Limited, Guelph, ON, Canada N1H 6Z9
Danby Products Inc., Findlay, Ohio, USA 45840
*Trademarks of Danby Products Limited and/or its subsidiaries
* Marques de commerce de Danby Products Limited et / ou de ses filiales
* Marcas comerciales de Danby Products Limited y / o sus subsidiarias