User manual Refrigerator for KitchenAid KFIV29PCMS
Table of contents
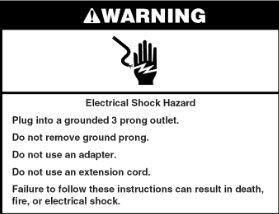
- REFRIGERATOR SAFETY
- Proper Disposal of Your Old Refrigerator
- PARTS AND FEATURES
- What's New Behind the Doors?
- INSTALLATION INSTRUCTIONS
- Unpack the Refrigerator
- Remove the Packaging
- Clean Before Using
- Location Requirements
- Remove and Replace Refrigerator Doors
- Remove Right-Hand Refrigerator Door
- Remove Left-Hand Refrigerator Door
- Replace Right-Hand Refrigerator Door
- Replace Left-Hand Refrigerator Door
- Final Steps
- Remove and Replace Freezer Drawer Front
- Remove Drawer Front
- Replace Drawer Front
- FinalSteps
- Electrical Requirements
- Water Supply Requirements
- Connect the Water Supply
- Connect to Water Line
- Connect to Refrigerator
- Complete the Installation
- Handle Installation and Removal
- Install Handles
- Remove the Handles
- Refrigerator Leveling, Door Closing and Alignment
- FILTERS AND ACCESSORIES
- Water Filtration System
- Install the Water Filter
- The Water Filter Status Light
- Replace the WaterFilter
- Install Air Filter
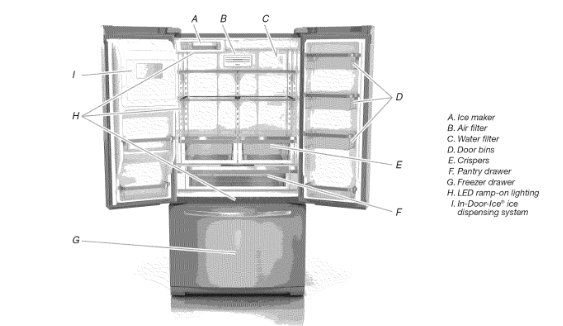
PARTS AND FEATURES
Energy and Normal Operating Sounds
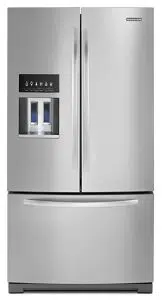
- Your new French Door Bottom Mount refrigerator has been designed to optimize energy efficiency, and better regulate temperatures to match cooling demand. You may notice that it operates differently than your previously owned refrigerator. It is normal for the high-efficiency compressor to run for extended periods of time at varying speeds in order to consume only the energy necessary for optimum efficiency. In addition, during various stages of the cooling cycle, you may hear normal operating sounds that are unfamiliar to you.
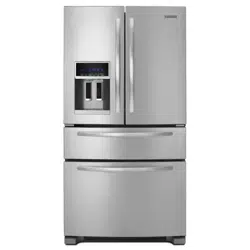
More Storage Space
- The French Door Bottom Mount has the most fresh food storage space available, including a full-width, temperature controlled, pantry drawer perfect for storing veggie trays or party platters.
In-Door-Ice C"_Ice Dispensing System
- The ice storage bin located in the door provides an entire extra shelf of storage space, and the storage bin is removable for easy access to filtered ice.
Dual Evaporator (on some models)
- The refrigerator compartment and freezer compartment have separate evaporators to provide fresh food and frozen food with separate climates. The refrigerator stays cool and humid for the optimum storage of fresh foods while the freezer stays cold and dry. Humidity from the refrigerator does not mix with dry freezer air, so frost is controlled, which reduces freezer burn. Since no air is shared between the refrigerator and freezer, the transfer of food odors and tastes from the refrigerator to the freezer is eliminated.
Water Filter
- NSF®Certified filter reduces chlorine taste and odor, particulates (class I), lead, and mercury. Replacing the water filter every 6 months ensures clean, filtered drinking water.
Air Filter
- An air filter is 15 times more powerful than baking soda at reducing common food odors inside the refrigerator.
Produce Preserver (on some models)
- Ethylene is a natural gas produced by fruits and vegetables to promote ripening. The Produce Preserver absorbs ethylene, to delay the over-ripening of fresh produce. As a result, certain produce items will stay fresh longer.
Water Dispenser with Measured Fill
- The measured fill feature allows you to dispense the desired amount of filtered water.
LED Lighting
- The LED lights do not ever need to be replaced.
Door Alarm
- A helpful alarm sounds when the refrigerator door or freezer drawer is left ajar.
Power Outage Indicator
- If the power should go out while you are away from home, this indicator will let you know that the refrigerator has been without power.
Unpack the Refrigerator
Remove the Packaging
- Remove tape and glue residue from surfaces before turning on the refrigerator. Rub a small amount of liquid dish soap over the adhesive with your fingers. Wipe with warm water and dry.
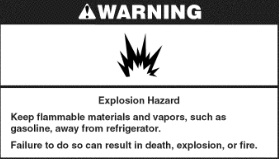
- Do not use sharp instruments, rubbing alcohol, flammable fluids, or abrasive cleaners to remove tape or glue. These products can damage the surface of your refrigerator. For more information, see "Refrigerator Safety."
- Dispose of/recycle all packaging materials.
When Moving Your Refrigerator:
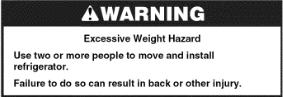
- Your refrigerator is heavy. When moving the refrigerator for cleaning or service, be sure to cover the floor with cardboard or hardboard to avoid floor damage. Always pull the refrigerator straight out when moving it. Do not wiggle or "walk" the refrigerator when trying to move it, as floor damage could occur.
Clean Before Using
- After you remove all of the packaging materials, clean the inside of your refrigerator before using it. See the cleaning instructions in "Refrigerator Care."
Location Requirements
IMPORTANT: This refrigerator is designed for indoor, household use only.
- To ensure proper ventilation for your refrigerator, allow for a 1/2" (1.25 cm) of space on each side and at the top. Allow for a 1" (2.54 cm) space behind the refrigerator. If your refrigerator has an ice maker, allow extra space at the back for the water line connections. When installing your refrigerator next to a fixed wall, leave a 33/4" (9.5 cm) minimum space between the refrigerator and wall to allow the door to swing open.
- NOTE: This refrigerator is intended for use in a location where the temperature ranges from a minimum of 55°F (13°C) to a maximum of 110°F (43°C). The preferred room temperature range for optimum performance, which reduces electricity usage and provides superior cooling, is between 60°F (15°C) and 90°F (32°C). It is recommended that you do not install the refrigerator near a heat source, such as an oven or radiator.
Remove and Replace Refrigerator Doors
- NOTE: Measure the width of your door opening, to see whether or not you need to remove the refrigerator doors to move the refrigerator into your home. If door removal is necessary, see the following instructions.
- IMPORTANT: If the refrigerator was previously installed and you are moving it out of the home, before you begin, turn the refrigerator control OFR Unplug the refrigerator or disconnect power. Remove food and adjustable door or utility bins from doors.
- Gather the required tools and read all instructions before removing doors.
- TOOLS NEEDED: 3/le" hex key wrench and a #2 Phillips screwdriver.

Remove Right-Hand Refrigerator Door
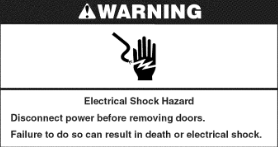
- Unplug refrigerator or disconnect power.
- Keep the refrigerator doors closed until you are ready to lift them free from the cabinet. NOTE: Provide additional support for the refrigerator door while the hinges are being removed. Do not depend on the door gasket magnets to hold the door in place while you are working.
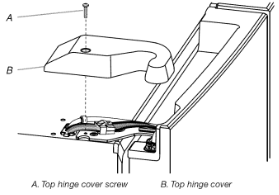
- Using a Phillips screwdriver, remove the cover from the Top Hinge.
- Using the 3/le" hex key wrench, remove the two internal hex head screws from the top hinge, and set aside. NOTE: Do not remove the two Iocator screws. These screws will help you align the hinge when you replace the door.
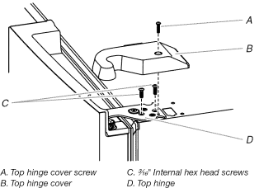
- Lift the refrigerator door from the bottom hinge pin. The top hinge will come away with the door.
Remove Left-Hand Refrigerator Door
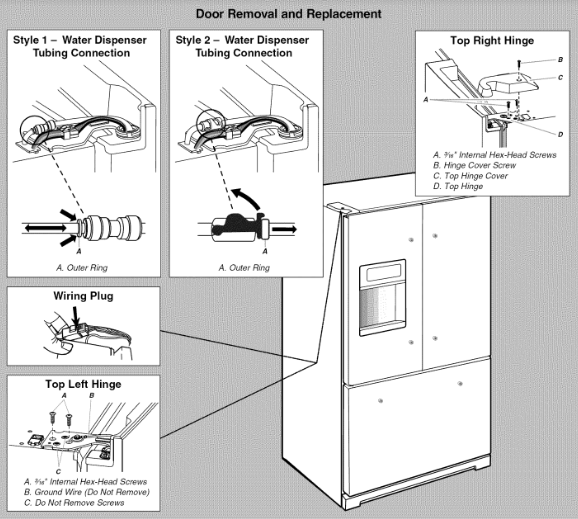
IMPORTANT: The tubing and wiring for the water dispenser run through the left-hand door hinge, so they must be disconnected before removing the door.
- Using a Phillips screwdriver, remove the cover from the top hinge.
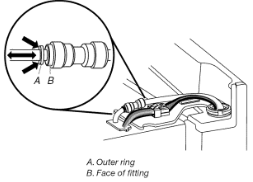
- Disconnect the water dispenser tubing located on top of the door hinge.
Style 1 - Press the outer ring against the face of the fitting and gently pull the dispenser tubing free.
NOTE: The water dispenser tubing remains attached to the left-hand refrigerator door.
Style 2 - Firmly pull up on the clasp. Then, pull the tubing out of the fitting.
NOTE: The water dispenser tubing remains attached to the left-hand refrigerator door.

- Disconnect the wiring plug located on top of the door hinge.
Grasp each side of the wiring plug. With your left thumb, press down to release the catch and pull the sections of the plug apart.
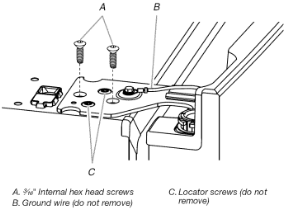
NOTE: Do not remove the green, ground wire. It should remain attached to the door hinge.

- Using the 3/le" hex key wrench, remove the two internal hex head screws from the top hinge, and set aside.
NOTES:
- Provide additional support for the refrigerator door while the hinges are being removed. Do not depend on the door gasket magnets to hold the door in place while you are working.
- Do not remove the two Iocator screws. These screws will help you align the hinge when you replace the door.
- Lift the refrigerator door from the bottom hinge pin. The top hinge will come away with the door.
NOTE: It may not be necessary to remove the bottom hinges and brake feet assemblies to move the refrigerator through a doorway.
- Only if necessary, use a driver with a #2 square bit tip to remove the bottom hinges and a 3/8"nut driver to remove the brake feet screws.
Replace Right-Hand Refrigerator Door
- Set the right-hand door onto the bottom hinge pin.
- Insert the top hinge pin into the open hole in the top of the refrigerator door.
- Using the two 3/le" internal hex head screws, fasten the hinge to the cabinet. Do not tighten the screws completely.
Replace Left-Hand Refrigerator Door
IMPORTANT: Do not intertwine the water tubing and wiring bundles when reconnecting them.
- Set the left-hand door onto the bottom hinge pin.
- Using the two 3/le" internal hex head screws, fasten the hinge to the cabinet. Do not tighten the screws completely.
- Reconnect the water dispenser tubing.
Style 1 - Insert the tubing into the fitting until it stops and the outer ring is touching the face of fitting.
Style 2 - Insert the tubing firmly into the fitting until it stops. Close the clasp around the tubing. The clasp snaps into place between the fitting and the collar.
- Reconnect the electrical wiring. Push together the two sections of the wiring plug.
Final Steps
- Completely tighten the four internal hex head screws (two on the right-hand door hinge and two on the left-hand door hinge).
- Replace both top hinge covers.
Remove and Replace Freezer Drawer Front
- Depending on the width of your door opening, it may be necessary to remove the freezer drawer front to move the refrigerator into your home.
IMPORTANT:
- If the refrigerator was previously installed and you are moving it out of the home, before you begin, turn the refrigerator control OFF, and unplug the refrigerator or disconnect power. Remove food from the freezer drawer.
- Two people may be required to remove and replace the freezer drawer front.
Tool Needed: 1/4"hex driver
Remove Drawer Front
- Open the freezer drawer to its full extension.
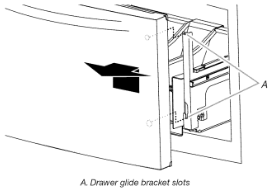
- Remove the two screws at the top, inside the drawer front (one on the left-hand side and one on the right-hand side) that fasten the drawer front to the drawer glides.
- Lift up on the drawer front to release the plastic studs from the drawer glide bracket slots.
- Slide the drawer glides back into the freezer.
Replace Drawer Front
- Pull out the freezer drawer glides to their full extension.
- Holding the drawer front by its sides, align the two plastic studs, located at the bottom, inside the drawer front, with the drawer glide bracket slots.
NOTE: It helps if one person holds the drawer glides steady while another person aligns the drawer front and inserts the studs into the slots.

- Replace and tighten the two screws at the top of the drawer front (one on the left-hand side and one on the right-hand side).
Final Steps
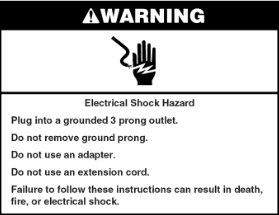
- Plug into a grounded 3 prong outlet.
- Reset the controls. See "Using the Control(s)."
- Return all removable door parts to doors and the food to refrigerator.
Electrical Requirements

Before you move your refrigerator into its final location, it is important to make sure you have the proper electrical connection.
Recommended Grounding Method
A 115 volt, 60 Hz, AC only 15- or 20-amp fused, grounded electrical supply is required. It is recommended that a separate circuit serving only your refrigerator be provided. Use an outlet that cannot be turned off by a switch. Do not use an extension cord.
NOTE: Before performing any type of installation, cleaning, or removing a light bulb, turn Cooling OFF, and then disconnect the refrigerator from the electrical source. When you have finished, reconnect the refrigerator to the electrical source and turn Cooling ON. See "Using the Control(s)."
Water Supply Requirements
- A cold water supply with water pressure between 35 and 120 psi (241 and 827 kPa) is required to operate the water dispenser and ice maker. If you have questions about your water pressure, call a licensed, qualified plumber.
- NOTE: If the water pressure is less than what is required, the flow of water from the water dispenser could decrease or ice cubes could be hollow or irregular shaped.
Reverse Osmosis Water Supply
IMPORTANT: The pressure of the water supply coming out of a reverse osmosis system going to the water inlet valve of the refrigerator needs to be between 35 and 120 psi (241 and 827 kPa).
If a reverse osmosis water filtration system is connected to your cold water supply, the water pressure to the reverse osmosis system needs to be a minimum of 40 to 60 psi (276 to 414 kPa).
- Check to see whether the sediment filter in the reverse osmosis system is blocked. Replace the filter if necessary.
- Allow the storage tank on the reverse osmosis system to refill after heavy use. The tank capacity could be too small to keep up with the requirements of the refrigerator. NOTE: Faucet mounted reverse osmosis systems are not recommended.
- If your refrigerator has a water filter, it may further reduce the water pressure when used in conjunction with a reverse osmosis system. Remove the water filter. See "Water Filtration System."
If you have questions about your water pressure, call a licensed, qualified plumber.
Connect to VVater Line
IMPORTANT: If you turn the refrigerator on before the water is connected, turn the ice maker OFF.
- Unplug refrigerator or disconnect power.
- Turn OFF main water supply. Turn ON nearest faucet long enough to clear line of water.
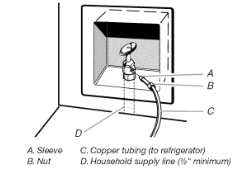
- Use a quarter-turn shutoff valve or the equivalent, served by a 1/2"household supply line.
NOTE: To allow sufficient water flow to the refrigerator, a minimum 1/2"size household supply line is recommended.
- Now you are ready to connect the copper tubing to the shutoff valve. Use 1/4"(6.35 mm) OD soft copper tubing to connect the shutoff valve and the refrigerator.
Ensure that you have the proper length needed for the job. Be sure both ends of the copper tubing are cut square.
Slip compression sleeve and compression nut onto copper tubing as shown. Insert end of tubing into outlet end squarely as far as it will go. Screw compression nut onto outlet end with adjustable wrench. Do not overtighten.
- Place the free end of the tubing into a container or sink, and turn on main water supply to flush out tubing until water is clear. Turn off shutoff valve on the water pipe. NOTE: Always drain the water line before making the final connection to the inlet of the water valve, to avoid possible water valve malfunction.
- Bend the copper tubing to meet the water line inlet, which is located on the back of the refrigerator cabinet as shown. Leave a coil of copper tubing to allow the refrigerator to be pulled out of the cabinet or away from the wall for service.
Connect to Refrigerator
Follow the connection instructions specific to your model.
Style I
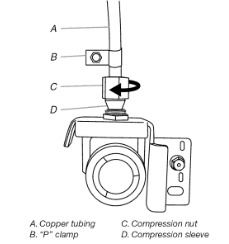
- Remove plastic cap from water valve inlet port. Attach the copper tube to the valve inlet using a compression nut and sleeve as shown. Tighten the compression nut. Do not overtighten. Confirm copper tubing is secure by pulling on copper tubing.
- Create a service loop with the copper tubing. Avoid kinks when coiling the copper tubing. Secure copper tubing to refrigerator cabinet with a "P" clamp.
- Turn on water supply to refrigerator and check for leaks. Correct any leaks.
Style 2
- Unplug refrigerator or disconnect power.
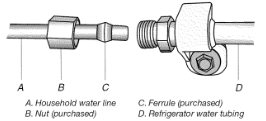
- Remove and discard the short, black plastic part from the end of the water line inlet.
- Thread the nut onto the end of the tubing. Tighten the nut by hand. Then tighten it with a wrench two more turns. Do not overtighten.
NOTE: To avoid rattling, be sure the copper tubing does not touch the cabinet's side wall or other parts inside the cabinet.
- Install the water supply tube clamp around the water supply line to reduce strain on the coupling.
- Turn shutoff valve ON.
- Check for leaks. Tighten any connections (including connections at the valve) or nuts that leak.
- On some models, the ice maker is equipped with a built-in water strainer. If your water conditions require a second water strainer, install it in the 1/4"(6.35 mm) water line at either tube connection. Obtain a water strainer from your appliance dealer.
Complete the Installation
- Plug into a grounded 3 prong outlet.
- Flush the water system. See "Water and Ice Dispensers."
NOTE: Allow 24 hours to produce the first batch of ice. Discard the first three batches of ice produced. Allow 3 days to completely fill the ice storage bin.
Sabbath Mode
Sabbath Mode is designed for those whose religious observances require turning off the lights and dispensers.
In Sabbath Mode, the temperature set points remain unchanged, but the interior and dispenser lights turn off, all sounds and alarms, and the dispenser paddles are disabled.
- To turn on Sabbath Mode, press and hold LIGHT and OPTIONS at the same time for 3 seconds. When the feature turns on, "Sabbath Mode" will appear on the dispenser display.
- To turn off Sabbath Mode, press and hold LIGHT and OPTIONS, at the same time, for 3 seconds. The screen will display the settings as they were before Sabbath Mode was turned on. However, the Max Cool and Max Ice features, will remain off until they are selected again.
NOTES:
- Turning "Cooling Off" will cancel Sabbath Mode
- If a power outage occurs while in Sabbath Mode, Power Outage will not be indicated on the display no matter how long the power was out.
Vacation Hode
In Vacation Mode, the freezer will defrost less often to conserve energy.
- To turn on Vacation Mode, press and hold TEMPERATURE and OPTIONS at the same time for 3 seconds. When the feature turns on, "VAC" will appear on the dispenser display.
- To turn off Vacation Mode, press and hold TEMPERATURE and OPTIONS at the same time, again, for 3 seconds. The screen will display the settings as they were before Vacation Mode was turned on.
NOTES:
- During the first hour after Vacation Mode is turned on, opening and closing the refrigerator door will not affect the setting. After 1 hour has passed, opening and closing the refrigerator door will turn off Vacation Mode.
- While in Vacation Mode, if Max Ice, Max Cool or Sabbath Mode is turned on, it will cancel Vacation Mode.
Door Ajar Alarm
- The Door Ajar Alarm feature sounds an alarm when the refrigerator door(s) or freezer drawer is open for 5 minutes and cooling is turned on. The alarm will repeat every 2 minutes. Close all doors and drawer to turn it off. The feature then resets and will reactivate when either door is left open again for 5 minutes.
- NOTE: To mute the audible alarm while keeping the doors open, such as while cleaning the inside of the refrigerator, press any button on the control panel. The alarm sound will be temporarily turned off, but the Door Ajar icon will still be displayed on the dispenser control panel.
Flush the Water System
Air in the water dispensing system can cause the water dispenser to drip. After connecting the refrigerator to a water source or replacing the water filter, flush the water system.
Flushing the water dispensing system, forces air from the water line and filter and prepares the water filter for use. Additional flushing may be required in some households.
NOTE: As air is cleared from the system, water may spurt out of the dispenser.
- Using a sturdy container, depress and hold the water dispenser paddle for 5 seconds.
- Release the dispenser paddle for 5 seconds. Repeat steps 1 and 2 until water begins to flow.
- Once water begins to flow, continue depressing and releasing the dispenser pad (5 seconds on, 5 seconds off) until a total of 3 gal. (12 L) has been dispensed.
Interior Cleaning
- Unplug refrigerator or disconnect power.
- Hand wash, rinse, and dry removable parts and interior surfaces thoroughly. Use a clean sponge or soft cloth and a mild detergent in warm water. NOTE: Do not use abrasive or harsh cleaners such as window sprays, scouring cleansers, flammable fluids, cleaning waxes, concentrated detergents, bleaches or cleansers containing petroleum products on plastic parts, interior and door liners or gaskets.
- Plug in refrigerator or reconnect power.
Condenser Cleaning
There is no need for routine condenser cleaning in normal home operating environments. If the environment is particularly greasy or dusty, or there is significant pet traffic in the home, the condenser should be cleaned every 2 to 3 months to ensure maximum efficiency.
If you need to clean the condenser:
- Unplug refrigerator or disconnect power.
- Remove the base grille.
- Use a vacuum cleaner with a soft brush to clean the grille, the open areas behind the grille and the front surface area of the condenser.
- Replace the base grille when finished.
- Plug in refrigerator or reconnect power.
The refrigerator will not operate
Check electrical supply Plug the power cord into a grounded 3 prong outlet.
Do not use an extension cord.
Make sure there is power to the outlet. Plug in a lamp to see if the outlet is working.
Reset a tripped circuit breaker. Replace any blown fuses. NOTE: If problems continue, contact an electrician.
TROUBLESHOOTING
The refrigerator will not operate
Check electrical supply
- Plug the power cord into a grounded 3 prong outlet.
- Do not use an extension cord.
- Make sure there is power to the outlet. Plug in a lamp to see if the outlet is working.
- Reset a tripped circuit breaker. Replace any blown fuses. NOTE: If problems continue, contact an electrician.
Check controls
- Make sure the controls are turned on. See "Using the Control(s)."
New installation
- Allow 24 hours following installation for the refrigerator to cool completely.
- NOTE: Adjusting the temperature controls to the coldest setting will not cool either compartment more quickly.
Refrigerator control is in Showroom
- If the refrigerator is in Showroom mode, cooling is turned off mode (on some models) and "Showroom" will be illuminated on the control panel. See "Using the Control(s)" for more information.
The motor seems to run too much
High efficiency compressor and fans
- Larger, more efficient refrigerators run longer at lower, more energy efficient speeds.
The room or outdoor temperature is hot
- It is normal for the refrigerator to work longer under these conditions. For optimum performance, place the refrigerator in an indoor, temperature controlled environment. See "Location Requirements."
A large amount of warm food has been recently added.
- Warm food will cause the refrigerator to run longer until the air cools to the desired temperature.
The lights do not work
Your refrigerator is equipped with LED lighting which does not need to be replaced.
- If there is power to the refrigerator and the lights do not illuminate when a door or drawer is opened, call for service or assistance.
The dispenser light is set to OFF
- On some models, the dispenser light will operate only when a dispenser paddle is pressed. If you want the dispenser light to stay on continuously, see "Water and Ice Dispensers."
Doors have been open longer than 10 minutes
- Close the doors and drawer to reset, and open to resume lighted task.