GEApplia nces.c orn
U
og
0
W
i
|
0
im
i
|
0
ol
In Canada:
www. GEAppliances.ca
Safety Instructions ............................ 2-s
Operating Instructions
Kitchen Timer .......................................... 21
Oven ............................................... 14-35
Adjust Oven Thermostat .............................. 22
Baking or Roasting .................................... 17
Broiling, Broiling Guide ................................ 18
Controls ........................................... 14, 15
Convection Oven ................................. 23-26
Lower Oven Drawer .................................. 35
Preheating ............................................ 17
Probe ................................................. 20
Sabbath Feature ...................................... 33
Self-Cleaning ...................................... 29, 30
Slow Cook,Warming and ProofingFeatures .......... 27, 28
Special Features .................................. 31, 32
Timed Baking and Roasting........................... 19
Warming Drawer ..................................... 34
Surface Units ........................................ 6-13
Cookware .............................................. 7
Griddle ............................................ 12,13
Knob-Controlled Models .......................... 10,11
Touch Pad-Controlled Models ....................... 8,9
Care and Cleaning
Aluminum Foil............................ 3, 5, 16, 34
Control Knobs ......................................... 36
Control Panel ......................................... 36
Glass Cooktop ..................................... 42, 43
Lift-Off Oven Door .................................. 37, 38
Light ............................................... 40, 41
Oven Floor ............................................. 39
Oven Heating Elements ................................ 41
Racks ................................................. 58
Removable Warming Drawer/Lower Oven Drawer Pan.... 59
Storage Drawer ....................................... 59
Surfaces .............................................. 56
Vent................................................... 39
Troubleshooting Tips......................... 44-48
Accessories ........................................ 5o
Consumer Support
Consumer Support .................................... 52
Warranty .............................................. 51
!
Quick Set V,
Quick Set VI and
Next Step Control
Write the model and serial
numbers here:
Model #
Serial #
You can find them on a label
behind the drawer or behind the
lower ovendoor on the front of
the range frame.
@
Printed on
Recycled Paper
Printed in the United States 49-80627-1 01-11 GE
IMPORTANT SAFETY INFORMATION.
READALL INSTRUCTIONS BEFORE USING.
WARNING ]
Read all safety instructions before using the product. Failure to follow these instructions may result in fire, electric shock,
serious injury or death.
ANTI-TIP DEVICE
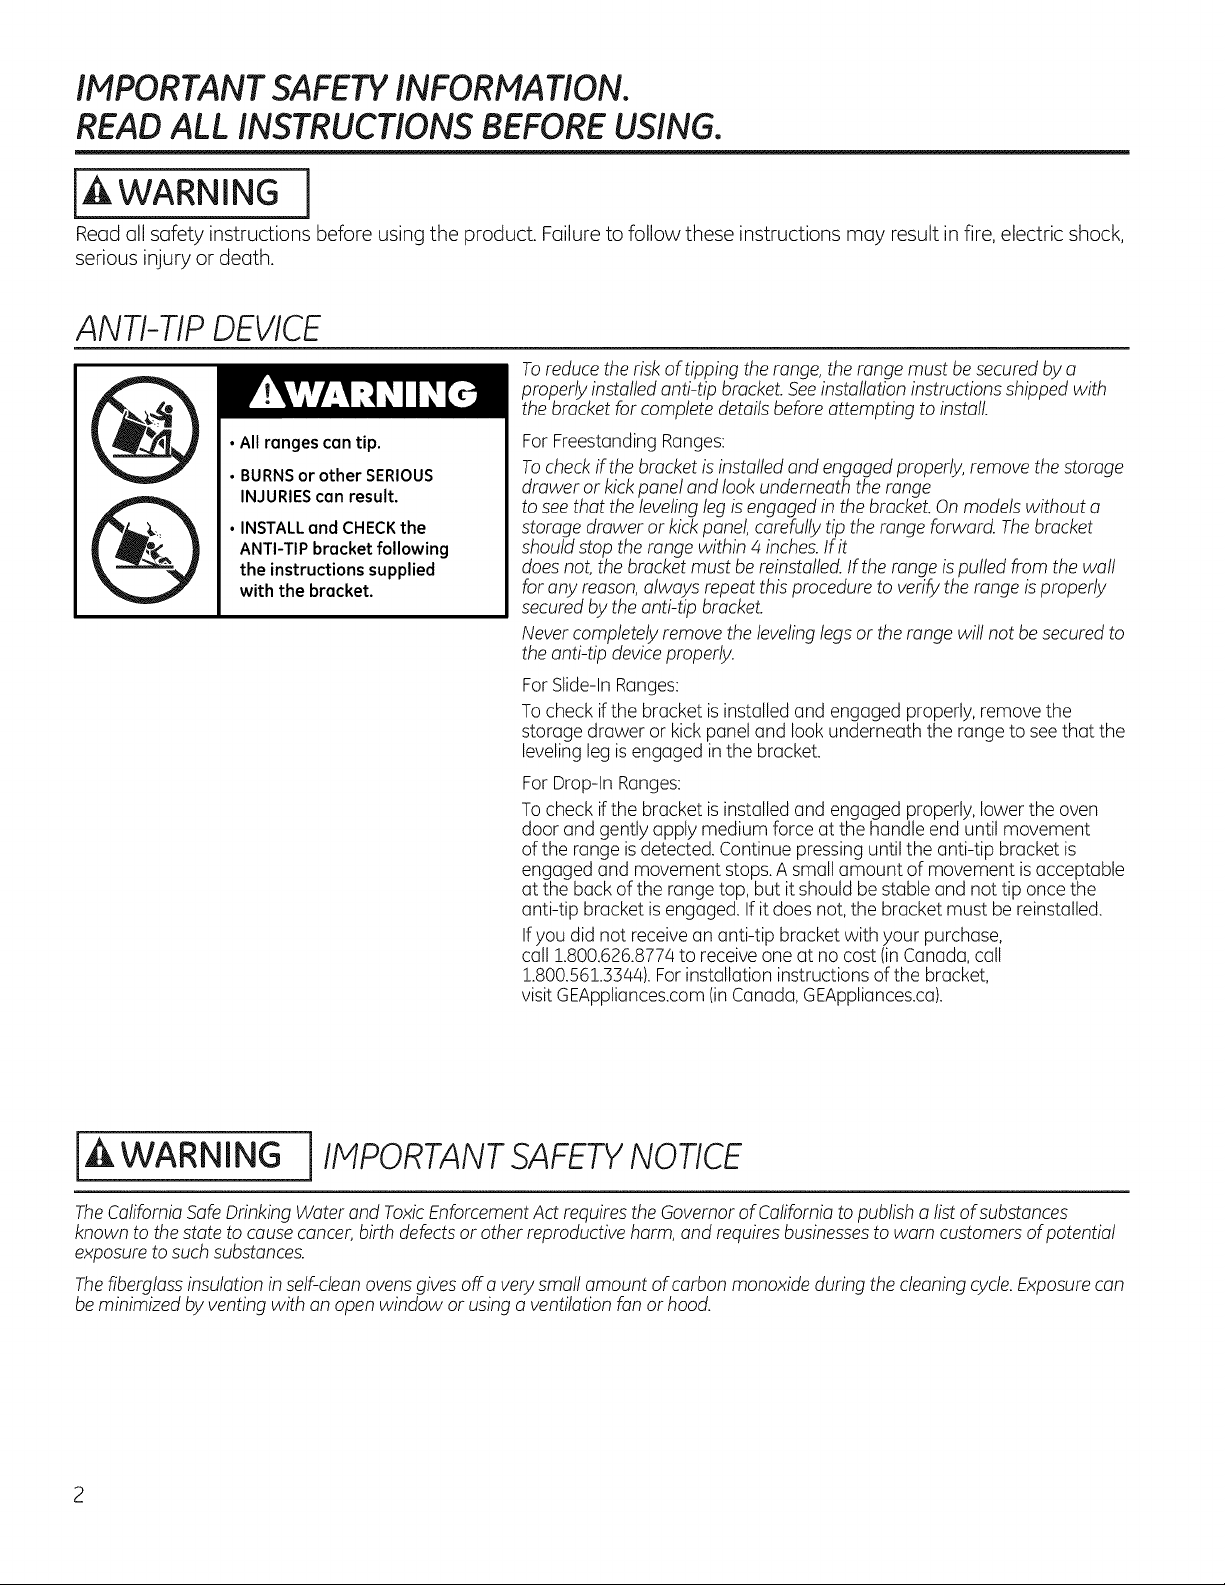
•All ranges can tip.
• BURNS or other SERIOUS
INJURIES can result.
• INSTALL and CHECK the
ANTI-TIP bracket following
the instructions supplied
with the bracket.
Toreduce therisk oftippingtherange, therange must besecured by a
properlyinstalled anti-tip bracket.See installationinstructions shippedwith
the bracket forcompletedetails beforeattempting toinstall
For FreestandingRanges:
Tocheck ifthebracket isinstalledand engaged properly, remove thestorage
drawer or kickpanel and lookunderneaththerange
tosee that theleveling leg is engaged in thebracket. On models without a
storage draweror kick panel, carefully tiptherange forward. The bracket
shouldstop therange within 4 inches.If it
doesnot,thebracketmustbe reinstalled.If therange is pulled from thewall
foranyreason,always repeat this proceduretoverify therange is properly
secured by theanti-tip bracket.
Never completely remove thelevelinglegs or therange willnot be secured to
theanti-tip deviceproperly.
For Slide-In Ranges:
To check if the bracketis installed and engaged properly, remove the
storage drawer or kickpanel and lookunderneaththe range tosee that the
leveling leg is engaged inthe bracket.
For Drop-In Ranges:
To check if the bracketis installed and engaged properly, lowertheoven
door and gently applymedium force at thehandle end untilmovement
ofthe range is detected. Continue pressing until the anti-tip bracket is
engaged and movement stops.A small amount ofmovement is acceptable
at theback oftherange top, butitshouldbe stable and nottiponcethe
anti-tip bracket is engaged.If itdoesnot, thebracket must be reinstalled.
Ifyou did notreceive an anti-tip bracketwith your purchase,
call !.800.626.8774 to receiveone atno cost(in Canada, call
!.800.561.3344). Forinstallation instructionsofthe bracket,
visitGEAppliances.com(in Canada,GEAppliances.ca).
iA WARNING i IMPORTANT SAFETYNOTICE
The CaliforniaSafe Drinking Water and ToxicEnforcement Act requires theGovernor ofCalifornia topublisha list ofsubstances
known to the statetocause cancer, birthdefects or otherreproductiveharm, and requires businessestowarn customersof potential
exposure to such substances.
The fiberglassinsulation in self-cleanovens givesoff a very small amount ofcarbonmonoxide during thecleaningcycle.Exposurecan
be minimizedbyventing with an open window or using a ventilationfanor hood.

GEAppliances.com
j-& WARNING ] GENERAL SAFETYINSTRUCTIONS
Usethis applianceforits intended purposeas describedinthis
Owner'sManual.
Besureyourapplianceis properly installedand grounded
by a qualifiedinstallerin accordance with theprovided
installation instructions.
Do not attempt torepairor replaceanypartof yourrange unless
itisspecificallyrecommended inthis manual. Allother servicing
shouldbetransferred toa qualifiedtechnician.
Beforeperformingany service,unplug therangeor disconnect
thepower supplyatthehouseholddistributionpanel by
removingthe fuse or switching off thecircuit breaker.
Do not leave childrenalone-children shouldnotbe left alone
or unattendedin an area where an applianceis in use.They
shouldnever beallowed toclimb,sit or stand on any partof the
appliance.
CAUTION : Donotstoreitemsofinteresttochildren
abovea rangeor on thebackguard of a range-children climbing
ontherange to reach itemscouldbeseriouslyinjured.
Useonly drypot holders-moist or damppot holderson
hot surfacesmay result in burnsfrom steam.Do notlet pot
holderstouch hot surface unitsor heating elements.Donotusea
towel or otherbulkycloth in place ofpot holders.
Neveruseyourapplianceforwarming or heatingtheroom.
iiiiii_,
iiiiii_,
Do not touch thesurface units,theheatingelementsor
theinteriorsurface of theoven.Thesesurfacesmay be hot
enoughtoburn eventhoughthey are dark in color. During
and after use,do not touch, or let clothing or other flammable
materials contact the surface units,areas nearbythesurface
units or any interior areaoftheoven;allow sufficienttime for
coolingfirst. Othersurfacesoftheappliancemay becomehot
enoughtocause burns.Potentiallyhotsurfacesincludethe
cooktop,areasfacing thecooktop,oven vent opening,surfaces
near the openingand crevicesaround theoven door.
Do notheat unopenedfood containers.Pressurecould build up
and thecontainercould burst,causing an injury.
Do not use aluminumfoiltoline the drip pans. Foilcan trapheat
or melt, resultingin damage totheproductand a shock or fire
hazard.
Avoid scratchingor impacting glass doors,cooktopsor control
panels.Doingso may leadtoglass breakage.Do not cook on a
productwith broken glass.Shock,fireor cuts may occur.
Cookmeat and poultry thoroughly-meat toatleastan internal
temperature ofZ60°Fand poultry toatleastan internal
temperature ofZ80°F.Cookingtothese temperatures usually
protectsagainst foodborneillness.
Do not use aluminumfoiltoline the ovenbottom. Foilcan trap
heat or melt, resultingin damage totheproduct and a shockor
firehazard.
l_a,WARNING
THE RANGE.
] KEEP FLAMMABLE MATERIALS AWAY FROM
Do notstoreor use flammable materials in an oven or near
thecooktop,including paper,plastic,potholders,linens,wall
coverings,curtains, drapesand gasolineor other flammable
vaporsand liquids.
Neverwear loose-fitting or hanging garments while using
theappliance.Thesegarments may ignite if they contact hot
surfaces,causingsevereburns.
iii_,Do not let cooking greaseor other flammablematerials
accumulatein or near therange.Greaseintheoven or onthe
cooktop may ignite.
Cleanventilating hoodsfrequently.Greaseshould not be allowed
toaccumulate onthe hoodor filter.
I^ I
In WARNING I IN THEEVENT OF A FIRE,TAKE THEFOLLOWING
STEPS TO PREVENT THE FIRE FROM SPREADING:
Do notusewater on greasefires. Neverpick up a flaming pan.
Turnthecontrols off.Smothera flaming pan on a surface unit by
coveringthepan completelywith awell-fitting lid,cookie sheet
or flat tray. Usea multi-purposedrychemicalor foam-type fire
extinguisher.
If there is a fire in the oven during baking,smotherthefire by
closingtheoven door and turning theoven off or byusinga
multi-purpose dry chemicalor foam-type fireextinguisher.
Ifthereisa firein theoven during self-clean,turn theoven
off andwait forthe fire togo out. Do not force the door open.
Introductionof fresh air at self-cleantemperatures may leadto
a burstofflame from theoven. Failuretofollow this instruction
may resultin severeburns.
IMPORTANT SAFETY INFORMATION.
READALL INSTRUCTIONS BEFORE USING.
WARNING j COOKTOPSAFETYINSTRUCTIONS
Never leave the surface units unattended at medium or
high heat settings. Boilovers cause smoking and greasy
spillovers that may catch
on fire.
Never leave oil unattended while frying. If allowed to
heat beyond its smoking point, oil may ignite, resulting
in fire that may spread to surrounding cabinets. Use a
deep fat thermometer whenever possible to monitor oil
temperature.
Toavoid oil spillover and fire, use a minimum amount of
oil when shallow pan-frying and avoid cooking frozen
foods with excessive amounts of ice.
Use proper pan size-select cookware having flat
bottoms large enough to cover the surface heating
element. The use of undersized cookware will expose
iiiiiiiiiiii_i;i
iiiiiiiiiiii_i;i
iiiiiiiiiiii_i;i
a portion of the surface unit to direct contact and may
result in ignition of clothing. Proper relationship of
cookware to surface unit will also improve efficiency.
Only certain types of glass,glass/ceramic, earthenware
or other glazedcontainersare suitable for cooktop
service;others may break because ofthesudden
change in temperature.
Tominimize the possibility of burns, ignition of
flammable materials and spillage, the handle of a
container should be turned toward the center of the
range without extending over nearby surface units.
When preparing flaming foods under a hood, turn the
fan on.
j-& WARNING l RADIANT COOKTOP SAFETY INSTRUCTIONS
(some models)
Use care when touching the cooktop. The glass surface
ofthe cooktop will retain heat after the controls have
been turned off.
Do not cook on a broken cooktop. If glass cooktop
should break, cleaning solutions and spillovers
may penetrate the broken cooktop and create a
risk of electric shock. Contact a qualified technician
immediately.
Avoid scratching the glass cooktop. The cooktop can be
scratched with items such as knives, sharp instruments,
rings or other jewelry and rivets on clothing.
Donot place or store items that can melt or catch fire
on the glass cooktop, even when it isnot being used. If
the cooktop isinadvertently turned on,they may ignite.
Heat from the cooktop or oven vent after it isturned off
may cause them to ignite also.
iiiiiiiiiiii_i;i
Use CERAMABRYTE® ceramic Cooktop Cleaner and
CERAMA BRYTE® Cleaning Pad to clean the cooktop.
Wait until the cooktop cools and the indicator light
goes out before cleaning. A wet sponge or cloth on a
hot surface can cause steam burns. Some cleaners
can produce noxious fumes ifapplied to a hot surface.
NOTE:Sugar spills are an exception. They should be
scraped off while still hot using an oven mitt and a
scraper. See the Cleaning the glass cooktop section for
detailed instructions.
Read and follow all instructions and warnings on the
cleaning cream label.
i-& WARNING iCOILCOOKTOPSAFETYINSTRUCTIONS
(some models)
Do not immerse or soak the removable surface units.
Do not put them in a dishwasher. Do not self-clean the
surface units in an oven. Doing so may cause them to
fail, presenting a burn or fire hazard.
Toavoid the possibility of a burn or electric shock, always
be certain that the controls for all surface units are at the
OFFposition and all coils are cool before attempting to lift
or remove a coil surface unit.
i Be sure the drip pans are not covered and are in place.
Their absence during cooking could damage range
parts and wiring.
GEAppliances.com
[ WARNING [OVEN SAFETYINSTRUCTIONS
Stand away from the range when opening the oven
door. Hot air or steam which escapes can cause burns
to hands, face and/or eyes.
Keep the oven vent unobstructed.
Keep the oven free from grease buildup. Grease in the
oven may ignite.
Place oven racks in desired location while oven iscool.
If rock must be moved while oven ishot, do not let pot
holder contact hot heating element in oven.
When using cooking or roasting bags in the oven, follow
the manufacturer's directions.
Pull the oven rack to the stop-lock position when
loading and unloading food from the oven. This helps
prevent burns from touching hot surfaces of the door
and oven walls.
Do not leave items such aspaper, cooking utensils or
food in the oven when not in use. Items stored in on
oven con ignite.
Do not use aluminum foil to line the oven bottom. Foil
can trap heat or or melt, resulting in damage to the
product and a shock or fire hazard.
Never place cooking utensils or any other items on the
oven floor. There isa heating element beneath the oven
floor. Placing items on the oven floor may cause the
oven to overheat, resulting in damage to the oven and
risk of damage or fire to cabinets.
WARNING JSELF-CLEANING OVENSAFETYINSTRUCTIONS
(Some models)
The self-cleaning feature operates the oven at temperatures high enough to burn away food soils in the oven.
Follow these instructions for safe operation.
Before operating the self-clean cycle, remove pans,
shiny metal oven racks and other utensils from the
oven. Only gray porcelain-coated oven racks may be
left in the oven. Do not use self-clean to clean other
parts, such us drip puns or bowls.
Before operating the self-clean cycle, wipe grease and
food soils from the oven. Excessive amount of grease
may ignite, leading to smoke damage to your home.
If the self-cleaning mode malfunctions, turn the oven off
and disconnect the power supply. Have it serviced by o
qualified technician.
Donot clean the door gasket. The door gasket is
essential for a good seal. Care should be taken not to
rub,damage or move the gasket.
Donot use oven cleaners. No commercial oven cleaner
or oven liner protective coating of any kind should be
used in or around any port of the oven.
iA i
WARNING 1WARMING DRAWER/LOWER OVEN DRAWER SAFETY
INSTRUCTIONS(somemode sl
The purpose ofthe warming drawer is to hold hot
cooked foods at serving temperature. Bacteria will grow
in food while it isbelow 140°F. Do not put cold food
in warming drawer. Do not heat food for more than 2
hours. Failure to follow these instructions may result in
foodborne illness.
Do not leave paper products, plastics, canned food or
combustible materials in the drawer. They may ignite.
Donot touch the heating element or the interior surface
of the drawer. These surfaces may be hot enough to
cause burns.
Usecarewhen opening the drawer. Openthedrawer a
crack and lethotair or steamescapebeforeremoving
or replacingfood. Hot air or steamthat escapescan
cause burns to hands,face and/or eyes.
Donot use aluminum foil to line the lower drawer. The
foil will trap heat below, and upset the performance
of the oven. Foil con melt and permanently damage
the drawer bottom. Damage from improper use of
aluminum foil isnot covered by the product warranty.
Formodels with a lass cooktop.
[ _ll, FIRE HAZARD: Never leave the range unattended with the cool<top on medium
WARNING orhighsettings.Keenf/ommob/eitemsawayfromthecool<ton.Turnafro//contro/s
when done cooking. Failure to follow these instructions can result in
fire, serious injury or death.
NOTE:Throughoutthis manua!, features and appearance may vary from your model.
i iil
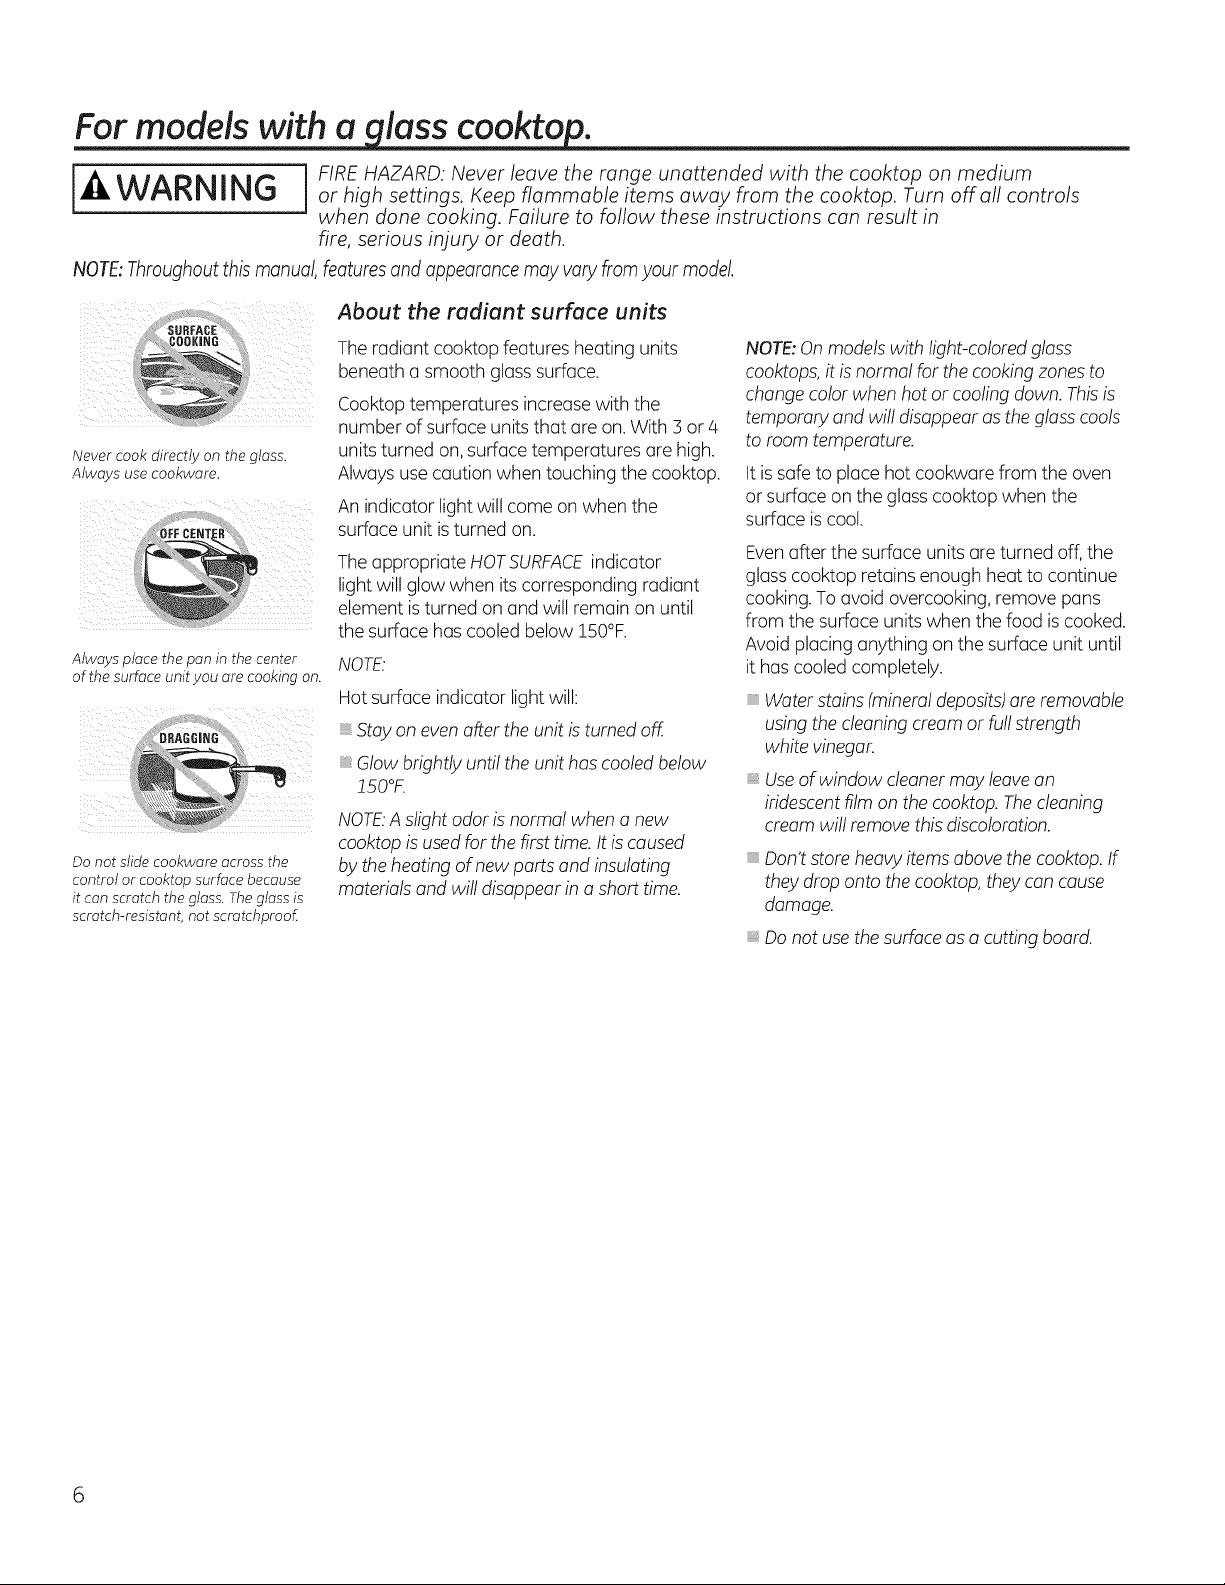
Never cook directly on the glass.
Always usecookware.
Always place the pan in the center
ofthe surface unit you are cooking on.
Donot slide cookware across the
control orcooktop surface because
it can scratch the glass.Theglass is
scratch-resistant, not scrotchproof
About the radiant surface units
Theradiantcooktop features heatingunits
beneatha smooth glass surface.
Cooktop temperatures increase with the
number ofsurfaceunits that are on.With 3 or 4
units turned on, surfacetemperatures are high.
Alwaysusecaution whentouching thecooktop.
An indicator lightwillcome on whenthe
surfaceunitis turned on.
Theappropriate HOTSURFACEindicator
lightwillglowwhen its corresponding radiant
element is turned on and willremain on until
the surfacehascooledbelow !50%.
NOTE."
Hot surface indicator lightwill:
Stay on even after theunitis turnedoff.
Glowbrightly untiltheunithas cooledbelow
150°K
NOTE:A slight odor is normal whena new
cooktopis used forthefirst time.It is caused
by theheatingofnewparts and insulating
materialsand willdisappearin a short time.
NOTE:Onmodels with light-colored glass
cooktops, itis normal forthecooking zones to
changecolorwhenhotor cooling down. This is
temporary and willdisappearas the glass cools
to roomtemperature.
It is safe to placehotcookwarefrom theoven
or surfaceon the glass cooktopwhen the
surface is cool.
Evenafter thesurface units are turned off,the
glass cooktop retains enough heattocontinue
cooking. Toavoidovercooking, remove pans
from thesurfaceunits when thefood is cooked.
Avoidplacinganything on thesurface unituntil
it has cooledcompletely.
Water stains (mineraldeposits)are removable
using thecleaningcream or fullstrength
white vinegar.
Useofwindow cleaner may leavean
iridescent film on thecooktop.The cleaning
cream will remove this discoloration.
Don'tstore heavy items abovethe cooktop. If
they drop ontothecooktop,they can cause
damage.
Do not usethesurface asa cutting board.
Selecting types of cookwure
models. Connon-indu ion GEAppliances.com
The following information will help you choose cookware which will give good performance on glass cooktops. See insert
for cookware to use with induction cooktops.
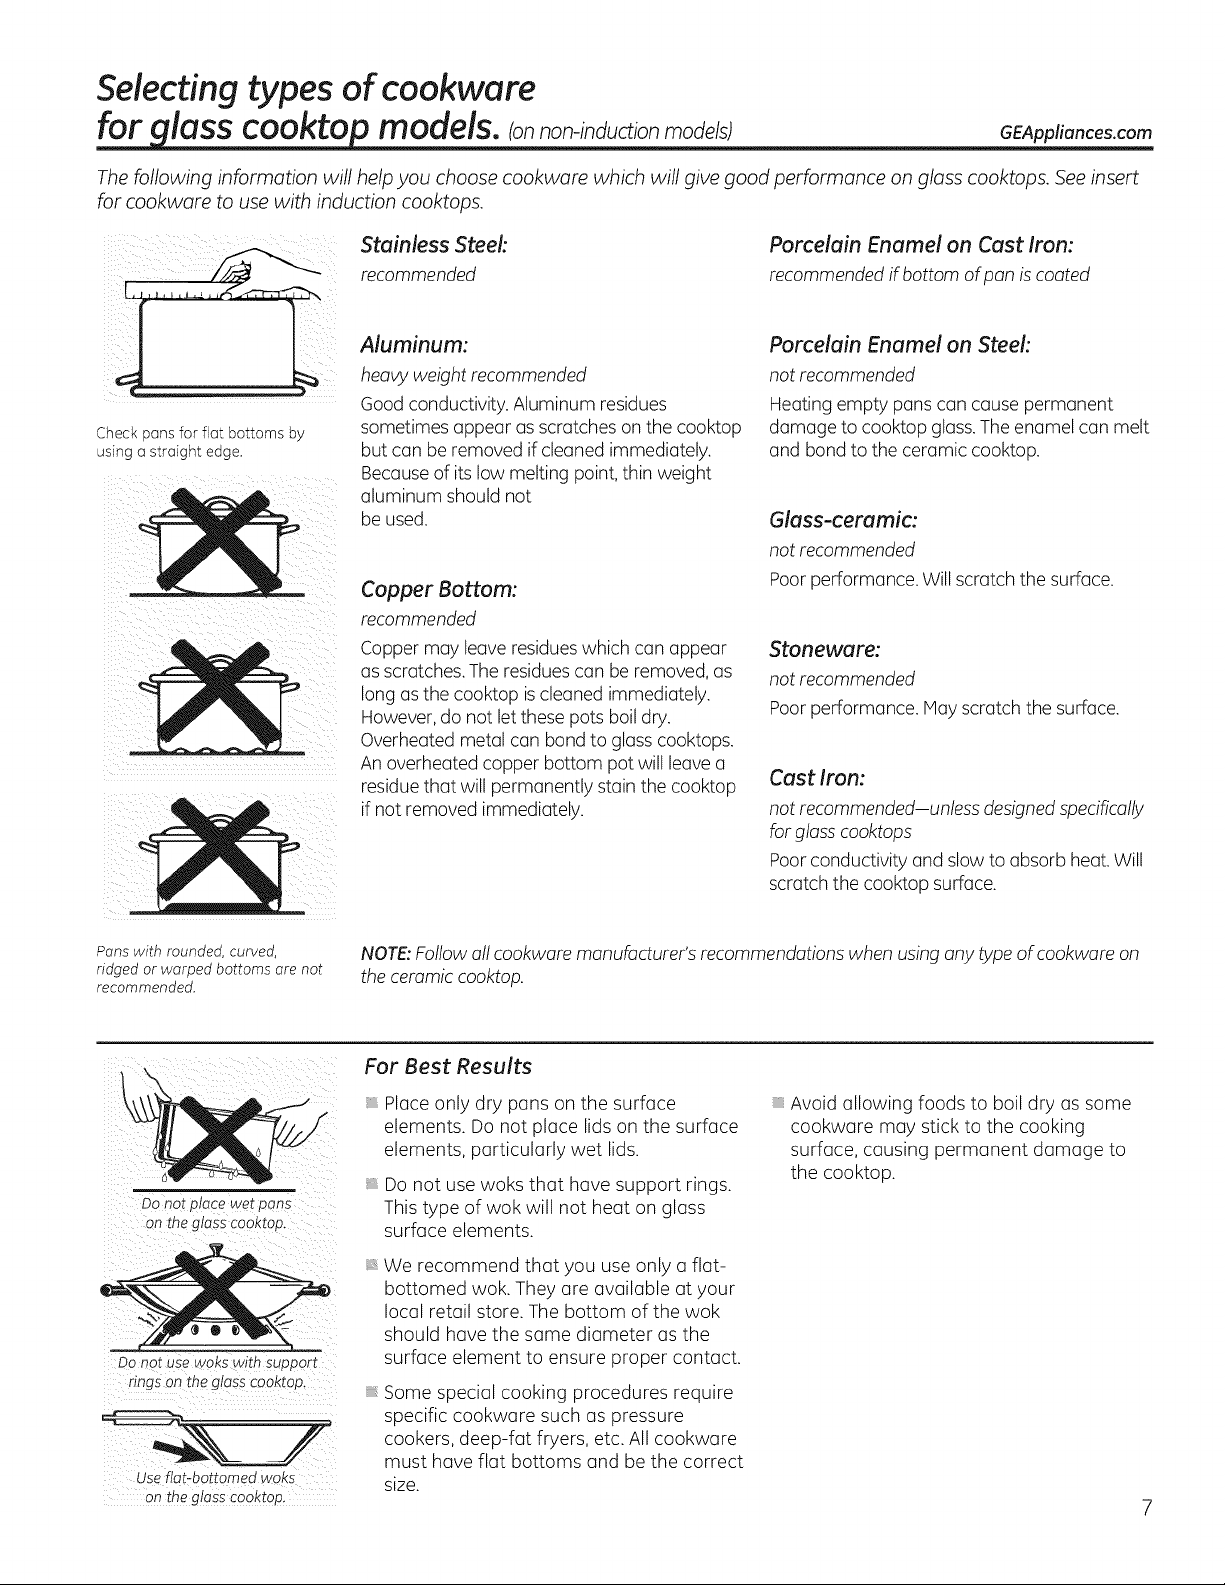
Check pans for flat bottoms by
using ostraight edge.
Stainless Steel:
recommended
Aluminum:
heavy weight recommended
Good conductivity.Aluminum residues
sometimesappear as scratcheson the cooktop
but canbe removed if cleanedimmediately.
Becauseof its lowmelting point, thinweight
aluminum shouldnot
be used.
Copper Bottom:
recommended
Coppermay leave residueswhich canappear
asscratches.Theresidues canbe removed, as
long as the cooktop is cleanedimmediately.
However, do notletthese pots boil dry.
Overheated metal canbond to glass cooktops.
An overheated copper bottom potwill leave a
residue that willpermanently stain thecooktop
ifnot removed immediately.
Porcelain Enamel on Cast Iron:
recommended ifbottom of pan iscoated
Porcelain Enamel on Steel:
not recommended
Heating empty pans can cause permanent
damage to cooktop glass. The enamel can melt
and bond to the ceramic cooktop.
Glass-ceramic:
not recommended
Poor performance. Willscratch the surface.
Stoneware:
not recommended
Poor performance, lay scratch the surface.
Cast Iron:
not recommended-unless designed specifically
forglass cooktops
Poor conductivity and slow to absorb heat. Will
scratch the cooktop surface.
Panswith rounded, curved,
ridged or warped bottoms are not
recommended.
NOTE:Follow all cookware manufacturer's recommendationswhenusinganytype ofcookwareon
theceramic cooktop.
DO not place wet pans
on the glass cooktop.
Use fiat-bottomed woks
Onthe glaSS€ooktop,
For Best Results
_t
Placeonly dry pans on the surface
elements. Do not place lidson the surface
elements, particularly wet lids.
Donot usewoks that have support rings.
This type of wok will not heat on glass
surface elements.
We recommend that you use only a flat-
bottomed wok. They are available at your
local retail store. Thebottom of the wok
should have the same diameter as the
surface element to ensure proper contact.
Somespecial cooking procedures require
specific cookware such aspressure
cookers, deep-fat fryers, etc.All cookware
must have flat bottoms and be the correct
size.
Avoid allowing foods to boil dry assome
cookware may stick to the cooking
surface, causing permanent damage to
the cooktop.
Usingthe surface units--Touch pad-controlled models.
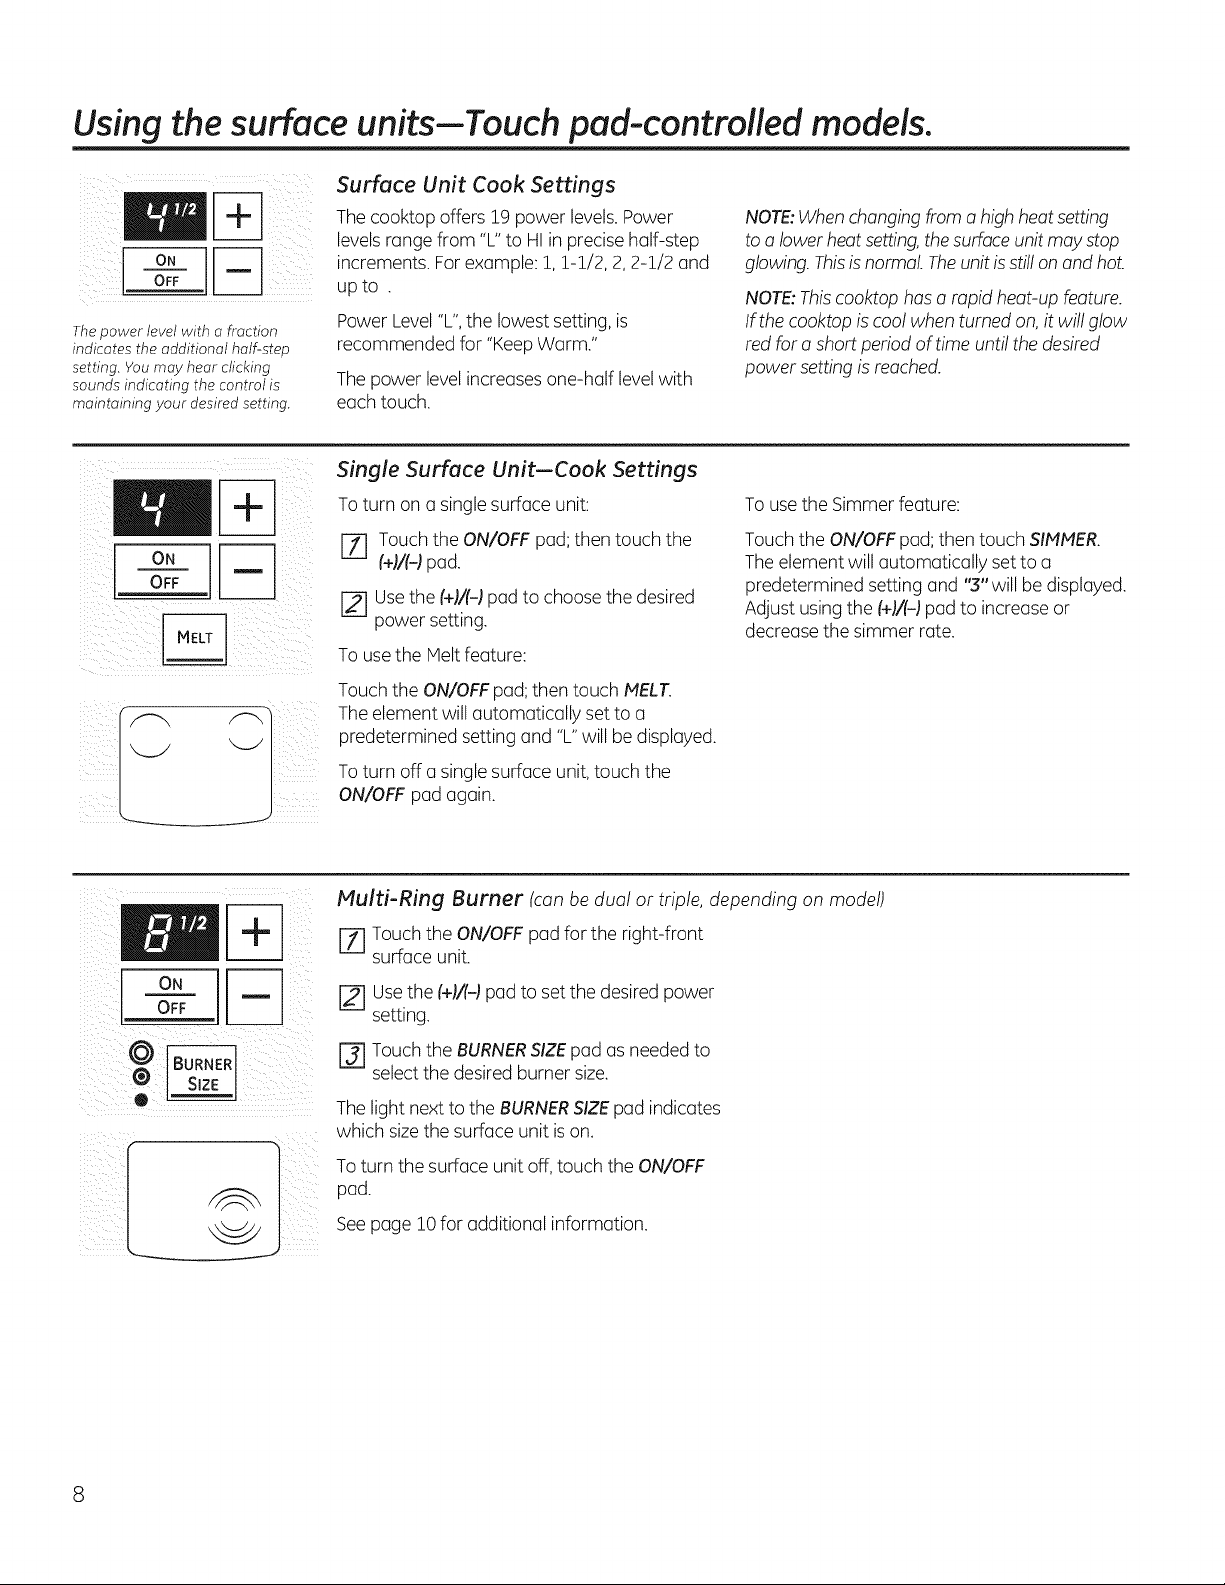
Surface Unit Cook Settings
Thecookopoffers19powerlevelsPower
levels range from "L"to HI inprecise half-step
ON r-_ increments.For example:1, 1-1/2, 2, 2-1/2 and
OFF upto .
PowerLevel"L", thelowestsetting, is
Thepower level with o fraction
indicates the additional half-step recommended for "KeepWarm."
setting. You may hear clicking
sounds indicating the control is The power level increases one-half level with
maintaining your desired setting, each touch.
NOTE:When changing from a high heat setting
to alower heat setting, the surface unitmay stop
glowing. This isnormal. Theunitis stillon and hot.
NOTE:Thiscooktophasa rapid heat-upfeature.
If thecooktopis coolwhenturnedon, itwillglow
red fora short period oftime untilthedesired
powersettingisreached.
oN
OFF
Single Surface Unit--Cook Settings
To turn on a single surface unit:
r-f1 Touch the ON/OFF pad; then touch the
(+1/(-1pad.
[] Usethe (+1/(-1pad tochoose the desired
power setting.
Touse the Melt feature:
Touch theON/OFFpad; then touch MELT.
Theelement willautomatically set to a
predetermined settingand "L"will be displayed.
To turn off e single surface unit,touch the
ON/OFF pad again.
To use the Simmer feature:
Touch theON/OFFpad; then touch SIMMER.
The element will automatically set to a
predetermined settingand "3"willbe displayed.
Adjust usingthe(+F(d pad to increase or
decrease thesimmer rate.
I
®
Multi-Ring Burner (can be dual or triple, depending on model)
[Z] Touch the ON/OFF pad for the right-front
surface unit.
Usethe(+)/(-) pad toset the desired power
setting.
r_ Touchthe BURNERSIZEpad as needed to
select the desired burner size.
The lightnext totheBURNERSIZEpad indicates
which sizethe surfaceunitis on.
To turnthe surfaceunit off, touch the ON/OFF
pad.
Seepage i0 foradditional information.
GEAppliances.com
[A WARNING I OODPOISON HAZARD:Bacteria may grow in food at temperatures below 140°F.
• Always start with hot food. Do not use warm settings to heat cold food.
• Do not warm food for more than 2 hours.
Failure to follow these instructions may result in foodborne illness.
o0o
©@
WARMING ZONE
SELECT
ON
OFF
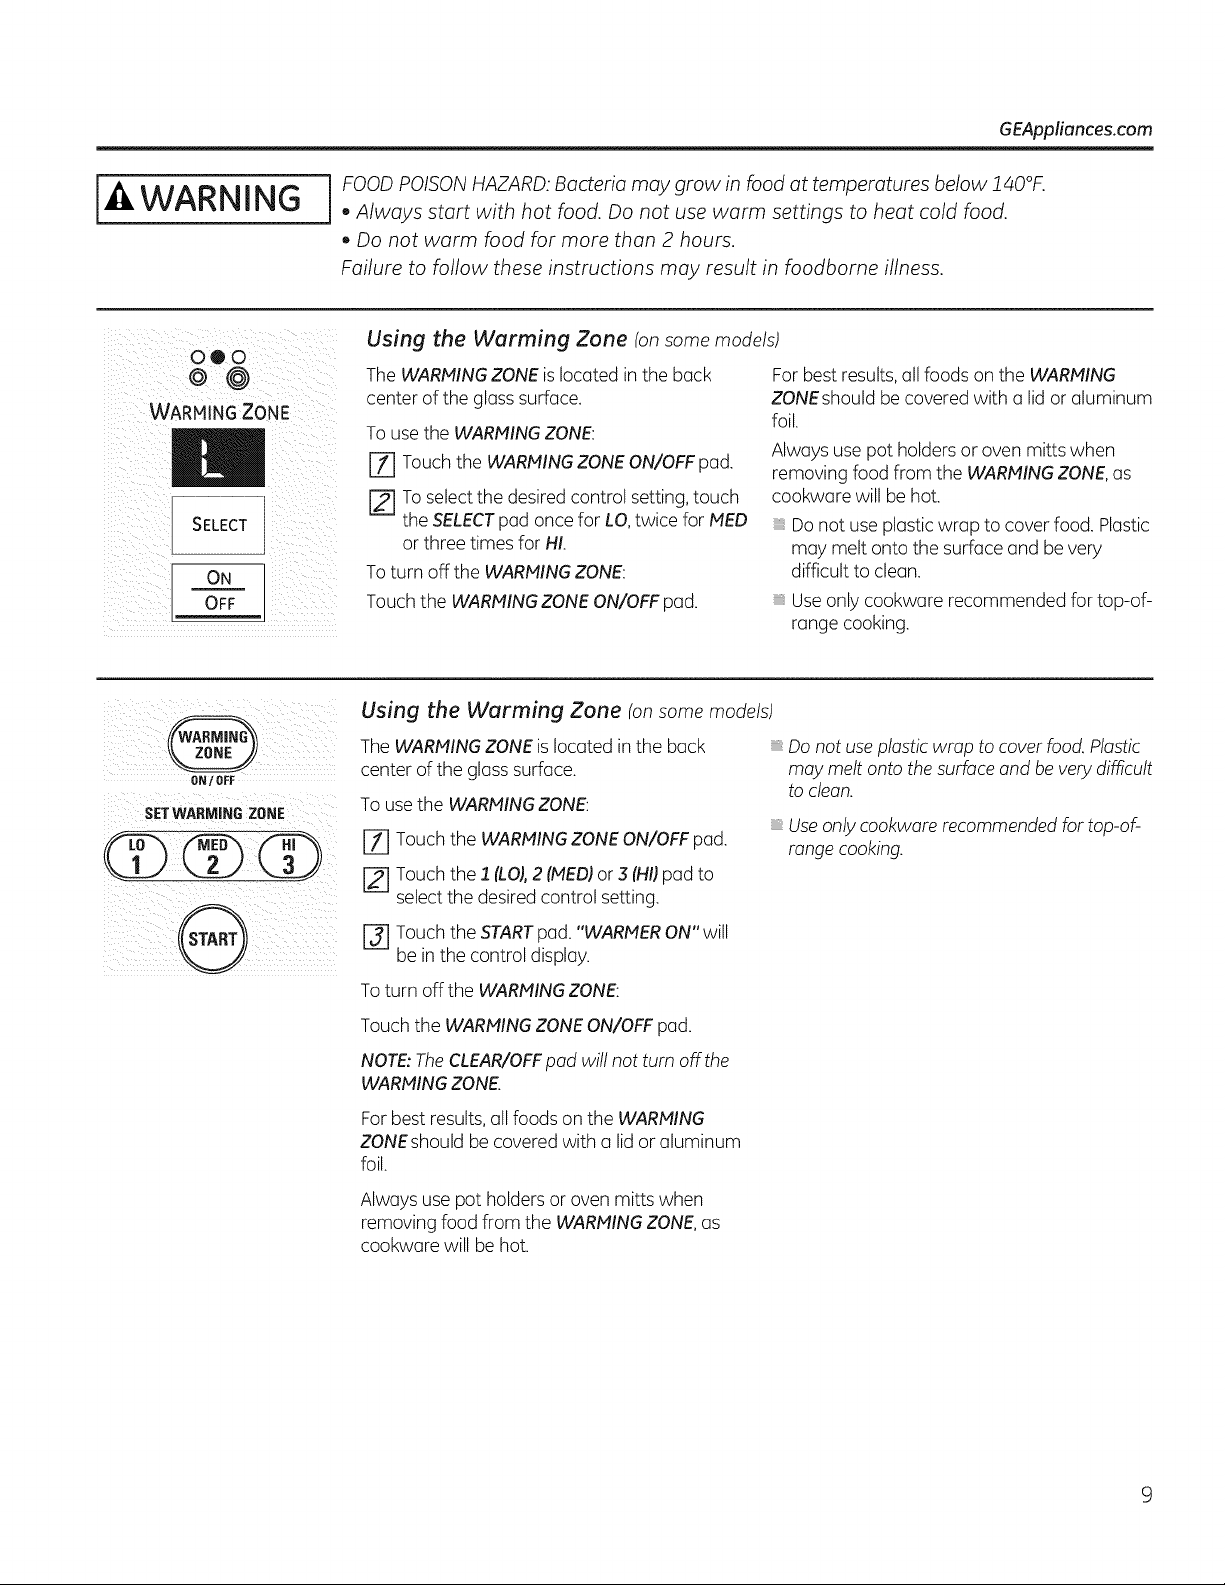
Using the Warming Zone (on some models)
TheWARMINGZONEis located in the back
center oftheglass surface.
Touse the WARMINGZONE:
[Z] Touch theWARMINGZONEON/OFF pad.
[] To select thedesiredcontrol setting, touch
theSELECTpad once for LO,twice forMED
or threetimesfor HI.
Toturn off the WARMINGZONE:
Touch the WARMINGZONE ON/OFFpad.
For best results,all foods on the WARMING
ZONEshould be covered with a lid or aluminum
foil.
Alwaysusepotholdersor oven mitts when
removing foodfrom the WARMINGZONE,as
cookware will be hot.
Do notuseplastic wrap to cover food. Plastic
may melt onto thesurfaceand be very
difficult to clean.
Useonlycookware recommendedfor top-of-
range cooking.
ON/ OFF
SETWARMIN6 ZONE
....
@
Using the Warming Zone (onsomemodels)
The WARMINGZONEis located in the back Do notuse plasticwrap tocover food. Plastic
center oftheglass surface, may melt ontothesurface and bevery difficult
toclean.
To use the WARMINGZONE:
[-_ Touchthe WARMINGZONEON/OFF pad.
Touchthe 1 (LOJ,2 (MEDIor .5(HI)pad to
select the desired control setting.
[-_ Touch the START pad. "WARMER ON" will
be in the control display.
To turn off the WARMING ZONE:
Useonly cookwarerecommendedfortop-of-
range cooking.
Touch the WARMING ZONE ON/OFF pad.
NOTE: TheCLEAR/OFF pad will not turn off the
WARMING ZONE.
For best results,all foods on the WARMING
ZONEshouldbe covered with a lid or aluminum
foil.
Alwaysuse pot holders or ovenmitts when
removing foodfrom the WARMINGZONE,as
cookware willbe hot.
Usingthe surface units-Knob-controlled models.
Throughout this manual, features and appearance may vary from your model.
!i ii s; ili
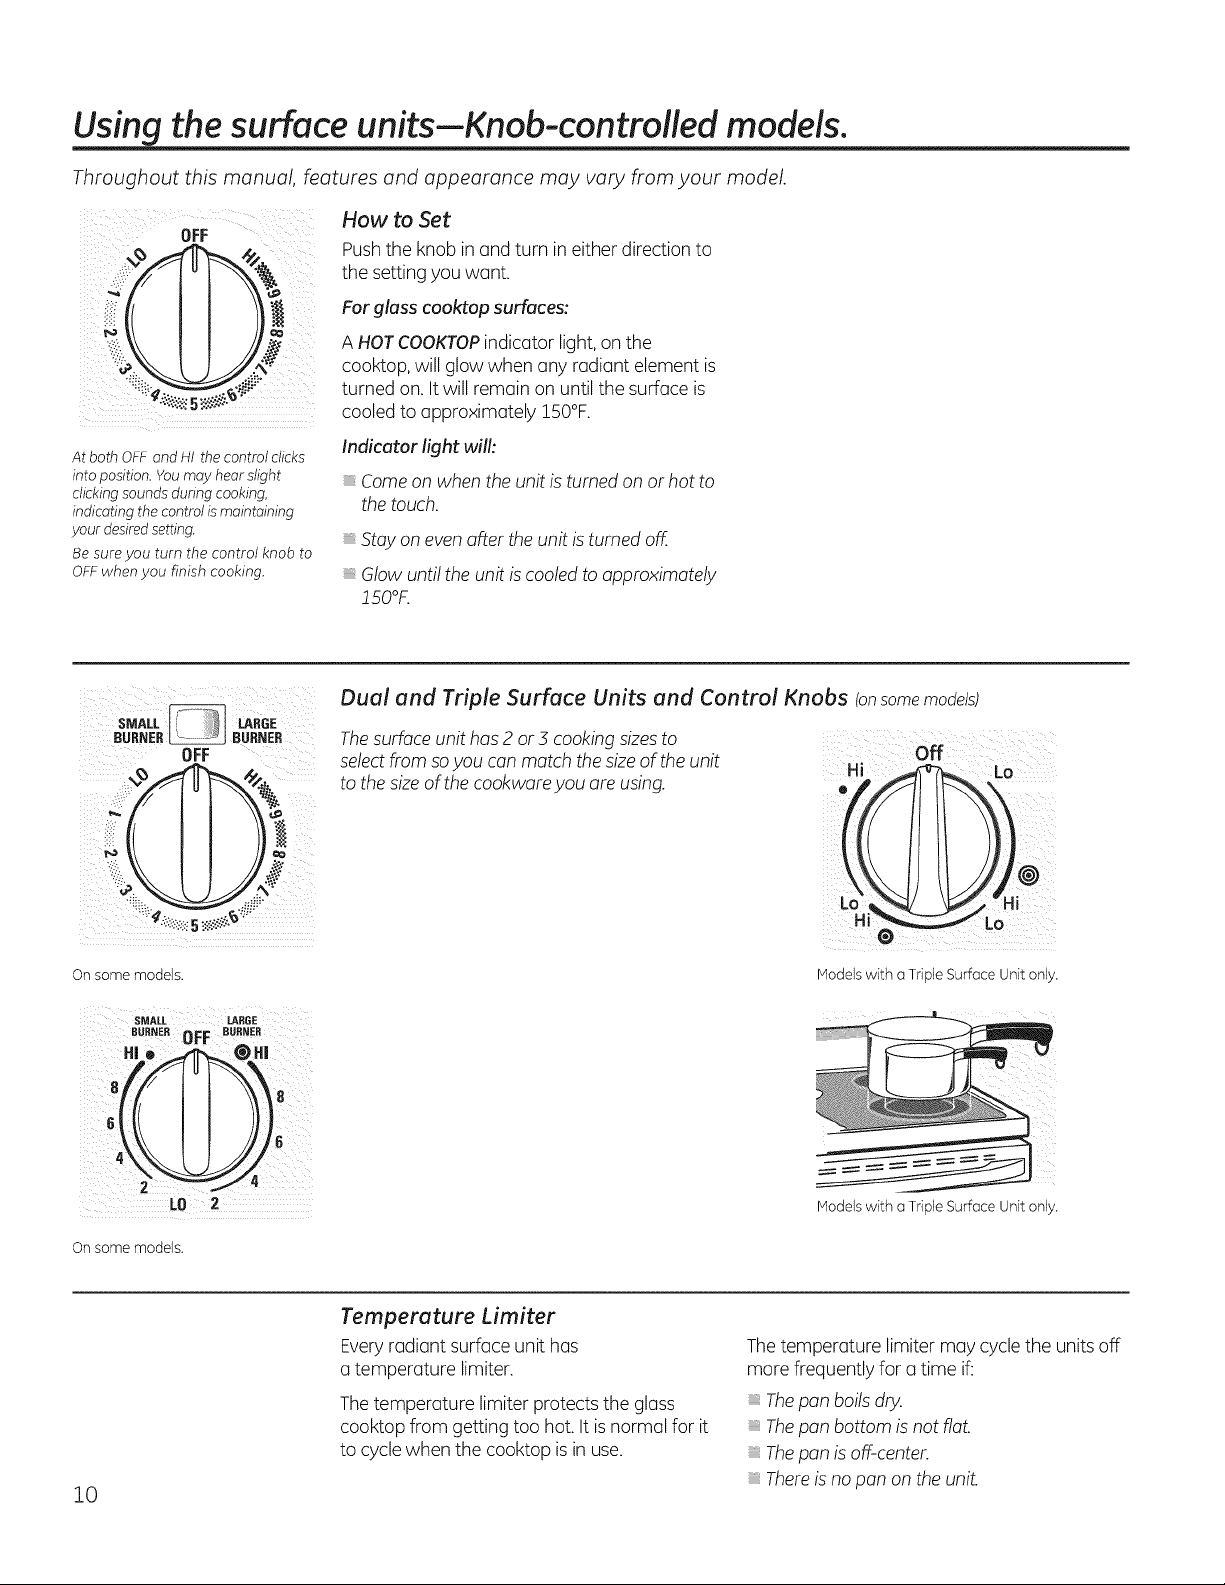
At both OFF and HI the controlclicks
intoposition. Youmay hearslight
clickingsounds during cooking,
indicating the control ismaintaining
your desiredsetting.
Be sure you turn the control knob to
OFFwhen you finish cooking.
How to Set
Pushthe knobin and turn in eitherdirection to
the settingyouwant.
For glass cooktop surfaces:
A HOTCOOKTOPindicator light, on the
cooktop, willglowwhen any radiant element is
turned on.It willremain on untilthesurfaceis
cooled to approximately 150°F.
Indicator light will:
Comeon whenthe unit isturnedon or hotto
thetouch.
Stay on even after theunitis turnedoff.
Glowuntiltheunitis cooledtoapproximately
!50°F.
sMAL!. LARGE
BUR_ER _ BURNER
OFF
On some models.
SMALL LARGE
BURNER OFF BUBNEB
4_\\11/116
LD 2
On some models.
Dual and Triple Surface Units and Control Knobs (onsomemodels)
Thesurface unithas2 or 5 cooking sizesto
select from soyou canmatch the sizeof the unit
tothe size ofthe cookware you are using.
off
Hi _ Lo
o
o
Models with a Triple SurfaceUnit only.
Models with a Triple SurfaceUnit only.
10
Temperature Limiter
Everyradiant surfaceunit has
a temperature limiter.
The temperature limiter protects the glass
cooktopfrom getting too hot. It is normalfor it
to cycle when the cooktopisin use.
The temperature limiter may cyclethe units off
morefrequently fora time if:
Thepan boils dry.
Thepan bottomisnotflat.
Thepan isoff-center.
Thereis no pan on theuniL
Throughout this manual, features and appearance may vary from your model.
Models with a Bridge Burneronly:
FRONT _ BRIDGE
BURNER _/ BURNER
I I
p
4\_Z4
LO LO
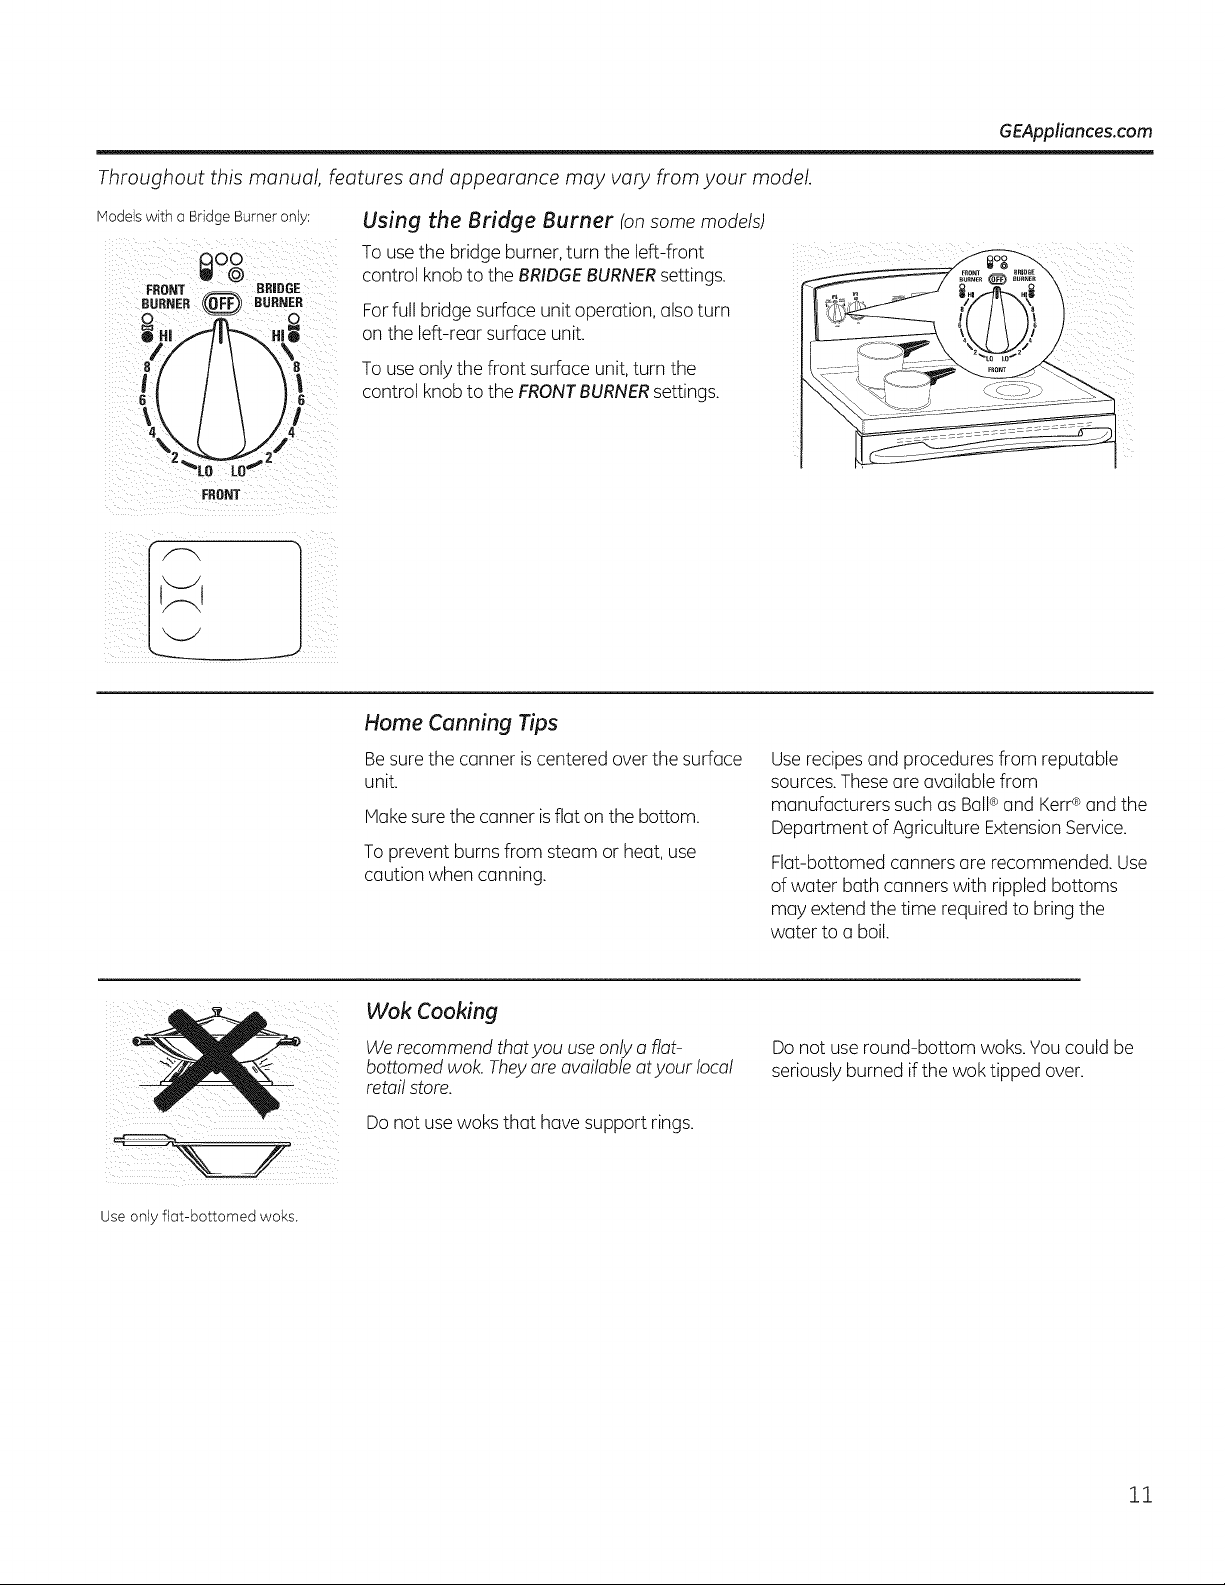
Using the Bridge Burner (onsome models)
Touse the bridge burner, turn the left-front
control knobtothe BRIDGEBURNERsettings.
For fullbridge surfaceunitoperation, also turn
on the left-rear surfaceunit.
Touse onlythefront surfaceunit, turn the
control knobtothe FRONTBURNERsettings.
GEAppliances.com
FRONT
J
Home Canning Tips
Besure the canner iscentered over the surface
unit.
Hake sure the canner isflat on the bottom.
To prevent burns from steam or heat, use
caution when canning.
Userecipes and procedures from reputable
sources.These are availablefrom
manufacturers such asBall®and Kerr®and the
Department ofAgriculture ExtensionService.
Flat-bottomed canners are recommended. Use
ofwater bathcanners with rippled bottoms
may extend the time required to bring the
water to a boil.
Wok Cooking
We recommend that you use only aflat-
bottomed wok. They are available atyour local
retail store.
Donotuse woksthat havesupport rings.
Do not use round-bottom woks.You couldbe
seriouslyburned if thewok tipped over.
Use only flat-bottomed woks.
11
USING THE GRIDDLE.
CAUTION p/aceand remove the griddle when it iscool and all surface units are off. Use oven mitts if
you will touch the griddle while hot. Failure to do so can result in burns.
GRIDDLE CONTROL
°,I= 1OFF
J
J
Beforeusing this cookwarefor thefirsttime,
wash itto make sureitis clean. Thenseason
itlightly,rubbing cooking oil ontothe nonstick
surface.
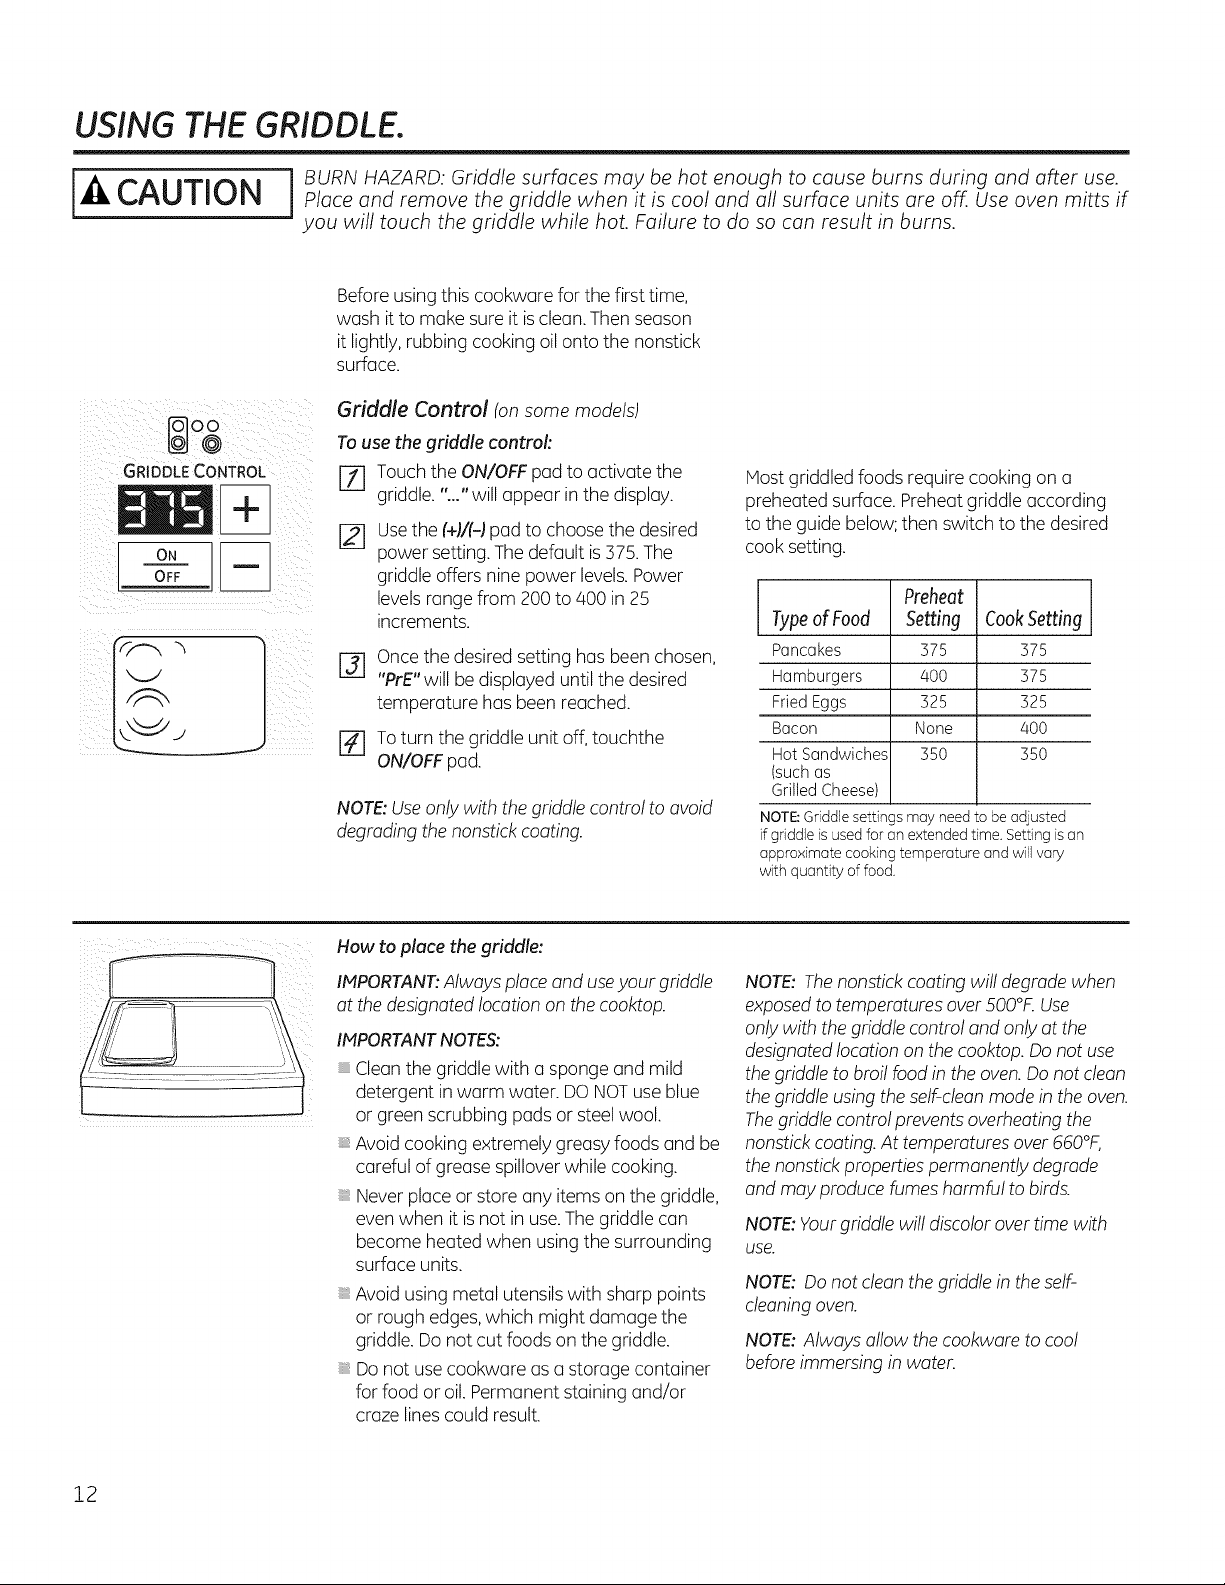
Griddle Control (on some models)
To use the griddle control:
[] Touch the ON/OFF pad to activate the
griddle. "..." will appear in the display.
[]
Usethe (+)#-) pad to choose thedesired
power setting. Thedefault is 375. The
griddle offersnine power levels.Power
levels range from 200 to 400 in 25
increments.
@
Once the desired setting hasbeen chosen,
"PrE"will be displayed until the desired
temperature hasbeen reached.
[_ To turn thegriddle unitoff, touchthe
ON/OFFpad.
NOTE:Useonlywith the griddle control toavoid
degrading thenonstick coating.
Host griddled foods require cooking on a
preheated surface. Preheat griddle according
tothe guide below; then switch to thedesired
cook setting.
Preheat J
TypeofFood Setting CookSetting
Pancakes 375 375
Hamburgers 400 375
Fried Eggs 325 325
Bacon None 400
Hot Sandwiches 350 350
(suchas
Grilled Cheese)
NOTE:Griddle settings may need to beadjusted
if griddleisusedfor an extended time. Settingis an
approximate cooking temperature and will vary
with quantity of food.
How toplaee the griddle:
IMPORTANT'.Alwaysplaceand useyour griddle
atthedesignated location on the cooktop.
IMPORTANTNOTES:
Cleanthe griddle with a spongeand mild
detergent in warm water. DO NOTuse blue
or green scrubbing padsor steel wool,
Avoidcooking extremely greasy foods and be
careful ofgreasespillover whilecooking.
Never placeor store anyitemson the griddle,
even when itis not in use.The griddle can
become heatedwhen using the surrounding
surfaceunits.
Avoidusingmetal utensils with sharppoints
or rough edges,which might damage the
griddle. Donotcut foods on thegriddle.
Do not use cookware as a storage container
for foodor oil. Permanent staining and/or
craze lines couldresult.
NOTE:Thenonstick coating willdegrade when
exposedtotemperatures over 500°£ Use
onlywith thegriddle control and onlyatthe
designated location on thecooktop. Donotuse
thegriddle tobroil foodin theoven.Do notclean
thegriddle using theself-clean modein theoven.
Thegriddle control prevents overheating the
nonstick coating.At temperatures over660°F,
thenonstickproperties permanently degrade
and may producefumesharmful tobirds.
NOTE:Yourgriddle willdiscolor over time with
use.
NOTE:Do notcleanthe griddle in the self-
cleaning oven.
NOTE: Alwaysallow thecookwaretocool
before immersingin water.
12

GEAppliances.com
Preparing Quality Steak, Easy
!. Bring steak to room temperature.
NOTE.Alwaysuse safe foodpracticeswhen handling meat.
2. Season bothsidestotaste and coat with oliveoil or similar.
3.
4.
asl, 2,3:
Preheat theovento BAKEat425°, with theoven rack in center position "C."
Placeyour griddle on thedesignated area of the cooktop and then preheat thegriddle
to 400°F.
CAUTION:The griddle will be VERYHOT!Useoven mitts.
.
6.
7.
8.
Searsteakon eachside for 2 minutes or untilthedesiredbrowning is achieved.
NOTE.Therewillbe "smoke";ensure thereisproper ventilation.
Insert the meat probe that came with your range intothe center ofthe steak,making surethat thetip
of the probe is in the center ofthe steak.
Plugthe probe into the outlet (located on the upper front side ofthe oven),slide the rack buck intothe
oven and close thedoor.
PressPROBEon yourcontrol,enterthe desiredinternal temp, and pressSTART.
.
Allowsteaktofinish cooking inthe oven.Therange control will beep and turnoff when
the steakreaches thedesiredinternaltemperature.
NOTES.
After searing,yoursteakcould possibly alreadybe atthe desired temperature, depending on size,
cut and desireddoneness.
For thinner steaks it may not be possible to achieve u Rare or Medium Rare doneness.
By first searing your meat with a very high heat,you are creating a browning reaction known as theMaillardReaction.
Thisreaction unlocks thefuller, moreintenseflavor from the meat,which occurs when cooking meat ata high heat.
13
Usingtheoven controls.
Throughout this manual, features and appearance may vary from your model. See the control panel below that matches
your model.
OVEN HR : MIN DRAWER
TrueTemp
TIME SETTINGS
OVEN CONTROLS
AUTO RECIPE CONVERSION
SET WARMING ZONE TrueTemp
CONTROL LOCKOUT
TIME CONTROLS
ON/OFF
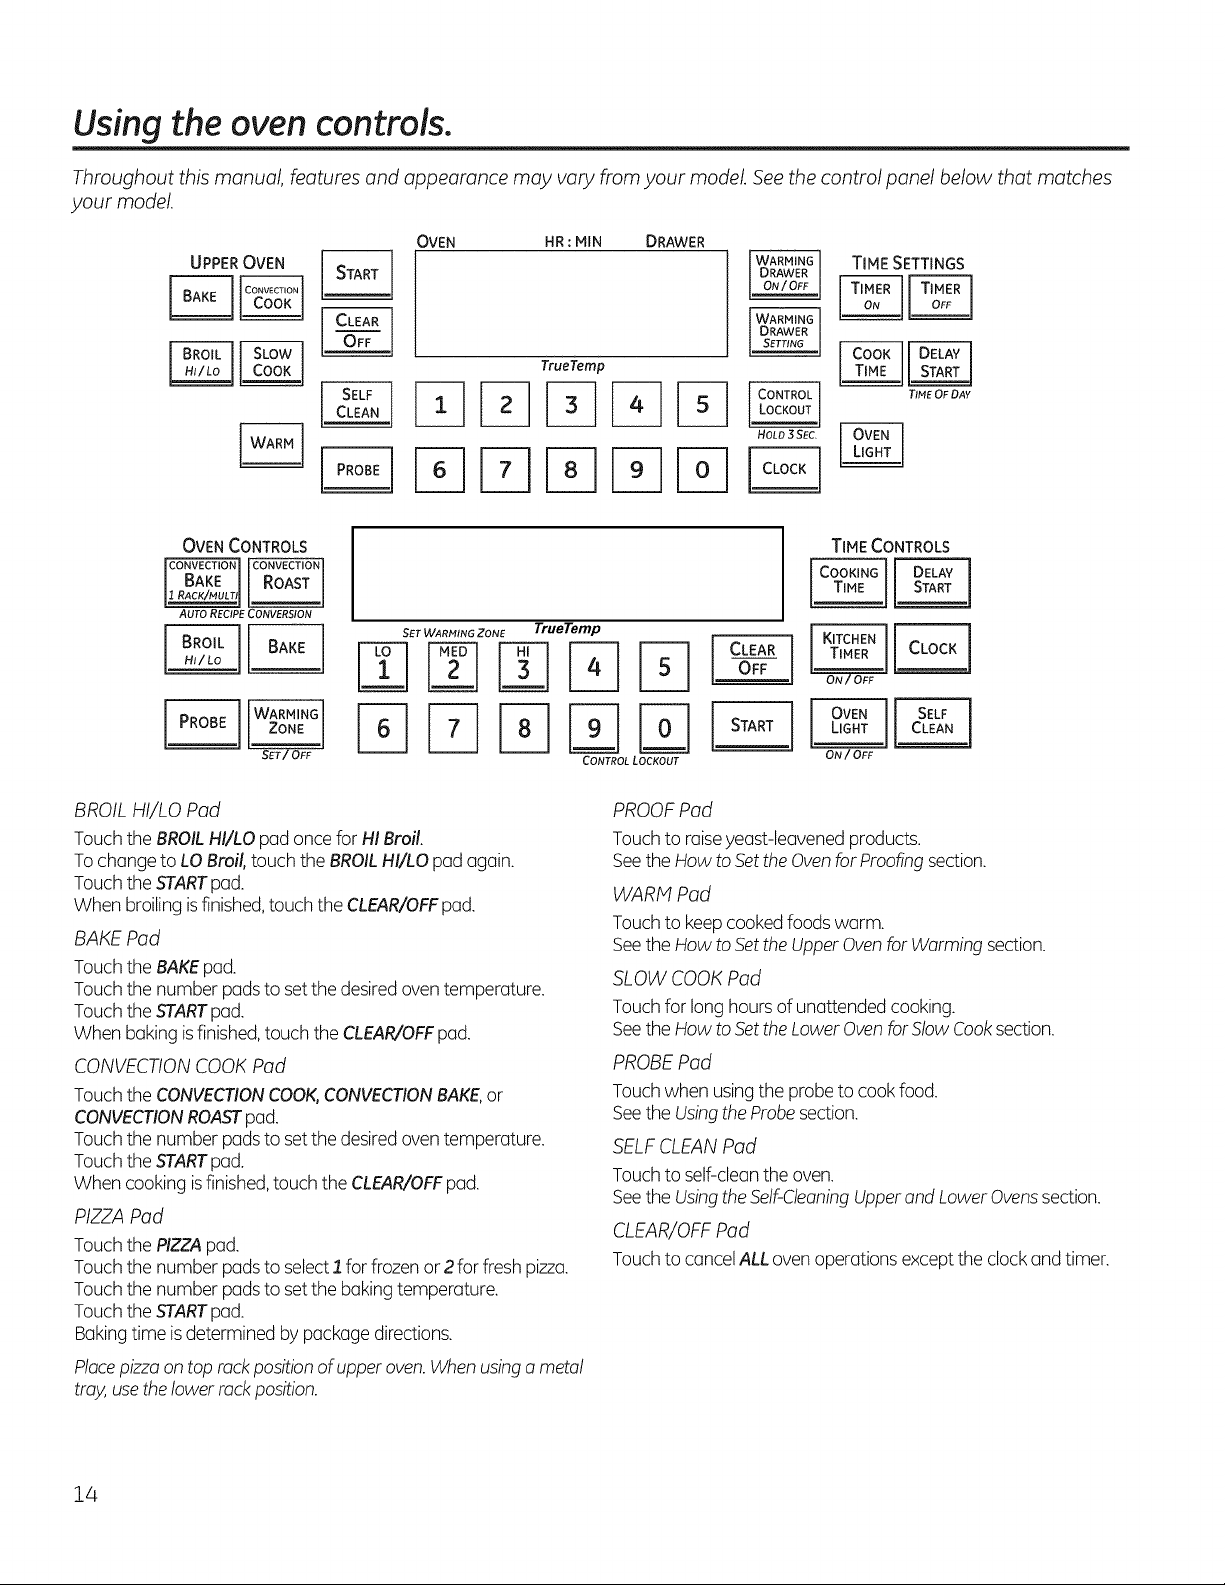
BROIL HI/LO Pad
TouchtheBROILHI/LO pad oncefor HI Broil.
TochangetoLOBroil, touch the BROILHI/LO pad again.
TouchtheSTARTpad.
Whenbroilingisfinished,touch theCLEAR/OFFpad.
BAKE Pad
TouchtheBAKEpad.
Touchthenumberpads toset thedesiredoven temperature.
TouchtheSTARTpad.
Whenbaking isfinished,touch theCLEAR/OFFpad.
CONVECTIONCOOK Pad
TouchtheCONVECTIONCOOK,CONVECTIONBAKE,or
CONVECTIONROASTpad.
Touchthenumberpads toset thedesiredoven temperature.
TouchtheSTARTpad.
When cooking isfinished,touch theCLEAR/OFFpad.
PIZZAPad
TouchthePIZZApad.
Touchthenumberpads toselect1 forfrozenor 2 forfresh pizza.
Touchthenumberpads toset thebaking temperature.
TouchtheSTARTpad.
Bakingtime is determined by package directions.
Placepizza ontoprack positionofupperoven. When usinga metal
tray, usethe lowerrackposition.
PROOFPad
Touchtoraiseyeast-leavened products.
SeetheHow toSetthe Ovenfor Proofingsection.
WARM Pad
Touchtokeep cooked foods warm.
SeetheHow toSetthe Upper Ovenfor Warming section.
SLOWCOOK Pad
Touchforlong hours ofunattended cooking.
SeetheHow toSetthe Lower Ovenfor Slow Cooksection.
PROBEPad
Touchwhenusingthe probetocook food.
SeetheUsingtheProbesection.
SELFCLEAN Pad
Touchtoself-cleantheoven.
SeetheUsingthe Self-CleaningUpper and Lower Ovenssection.
CLEAR/OFFPad
Touchtocancel ALLoven operationsexcept theclock and timer.
14
GEAppliances.com
STARTPod
Must be touched tostartany cooking or cleaning function.
OVEN LIGHTPod
Touchtoturntheoven lights on or off.
TIMERON/OFF Pod(s)/KITCHEN TIMER Pod
Touchtoset thekitchen timer.
SeetheUsingtheKitchenTimersection.
COOK TIME/COOKINGTIME Pod
Touchthis pad and thentouch thenumberpads toset the
amount of time youwant yourfood tocook.The oven will shut off
whenthecookingtime has run out.
DELAYSTARTPod
Usealong with theCOOKTIMEor SELFCLEANpads toset
theoven tostart and stop automatically ata time youset.
CLOCKPod
NOTE:Whensetting times,youare settinghours and minutes only.
Thelowest timeyou can set is one minute.
TouchtheCLOCKpad.
Touchthenumberpads.
Touchthe STARTpad.
Theclock mustbe settothecorrect time of dayfor theautomatic
oven timing functions towork properly.The time ofdaycannot be
changed during a timed baking or self-cleaning cycle.
Ifyour oven wus set for u timed oven operution und u power
outuge occurred, the clock and allprogrammed functions must
be reset. The time of duy will flush inthe displuy when there hus
been u power outuge.
CONTROLLOCKOUT Pod
Yourcontrol willallow youtolock outthetouch pads and the
cooktopsothey cannot be activated whentouched.
To lockthecontrols and cooktop:
Touchand hold theCONTROLLOCKOUTpad for3 seconds.
Theoven displaywillshow "on Loc on."
To unlockthecontrols:
Touchand hold theCONTROLLOCKOUTpad for3 seconds.
TheCONTROLLOCKOUTmodeaffects alltouch pads.
No touch pads will work whenthis feature is activated.
WARMING DRAWER
Thewarming drawerwill keep hot, cookedfoods atserving
temperature.Always startwith hotfood.
TouchtheWARNINGDRAWERpad."WARMERON" and "1"
are lit on thedisplayand "Set" beginstoblink.On thenumber
pads,touch I forLow,2 for Hedium or 3 forHigh.The display"1"
changes correspondingtothenumberpad selected.Thewarming
drawerstarts automatically offer youtouch 1,2 or 3. "WARMER
ON" and thenumberremain lit."Set"stops blinking.Onsome
models,pressSTART.
Onsome models - togglebetween settings by touching the
WARMINGDRAWERpad.
To cancel,touch theWARNINGDRAWERpad.
NOTE:TouchingtheCLEAR/OFFpad does notturnoff the
warming drawer.
WARMING ZONE
Touchtokeep hot, cookedfoodwarm.SeetheUsingthe Warming
Zonesection.
15
Using the oven.
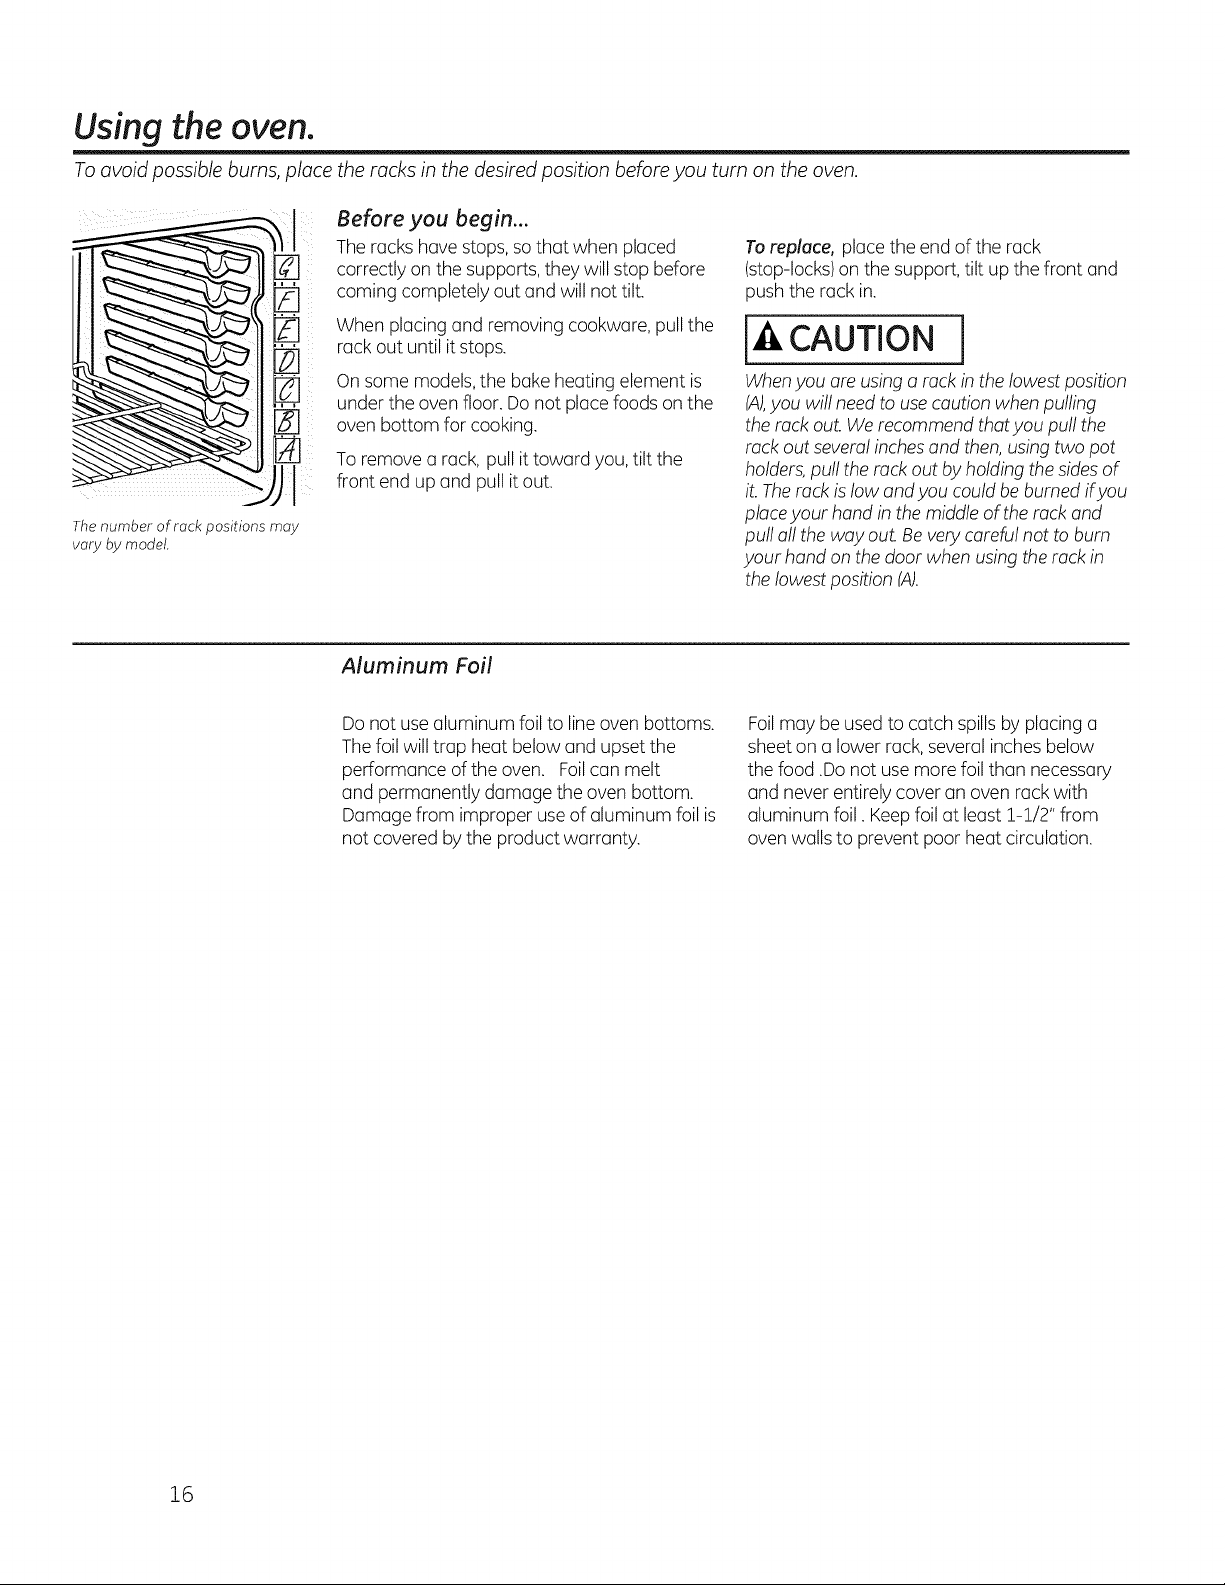
Toavoid possible burns,place the racks in the desiredposition beforeyouturn onthe oven.
Thenumber of rack positions may
vary bymodel.
Before you begin...
The rackshavestops,so that when placed
correctly on the supports, they willstop before
coming completely out and willnottilt.
Whenplacingand removing cookware, pull the
rack outuntil it stops.
On some models,the bakeheatingelement is
under theovenfloor. Donotplacefoods on the
ovenbottom for cooking.
To remove a rack,pull ittoward you, tilt the
front end up and pull itout.
To replace, placetheend ofthe rack
(stop-locks)on the support, tilt up thefront and
pushtherack in.
CAUTION
Whenyou are using a rack in thelowestposition
(A),you willneed to usecaution whenpulling
therack out. We recommendthat you pull the
rack outseveral inchesand then, usingtwo pot
holders,pull therack out by holding the sides of
it. Therack islowand you could be burned ifyou
placeyour hand in themiddleoftherack and
pull all theway out. Be very careful nottobum
your hand on thedoor whenusing therack in
thelowest position (A).
Aluminum Foil
Donotuse aluminum foilto line ovenbottoms.
The foilwilltrap heat belowand upset the
performance ofthe oven. Foilcan melt
and permanently damage theovenbottom.
Damage from improper use of aluminum foil is
notcovered bytheproduct warranty.
Foilmay be used to catchspills byplacinga
sheet on a lowerrack, several inches below
thefood .Do notuse more foil than necessary
and neverentirelycoveran ovenrackwith
aluminum foil. Keepfoil atleast !-!/2" from
ovenwalls to prevent poor heatcirculation.
16
GEAppliances.com
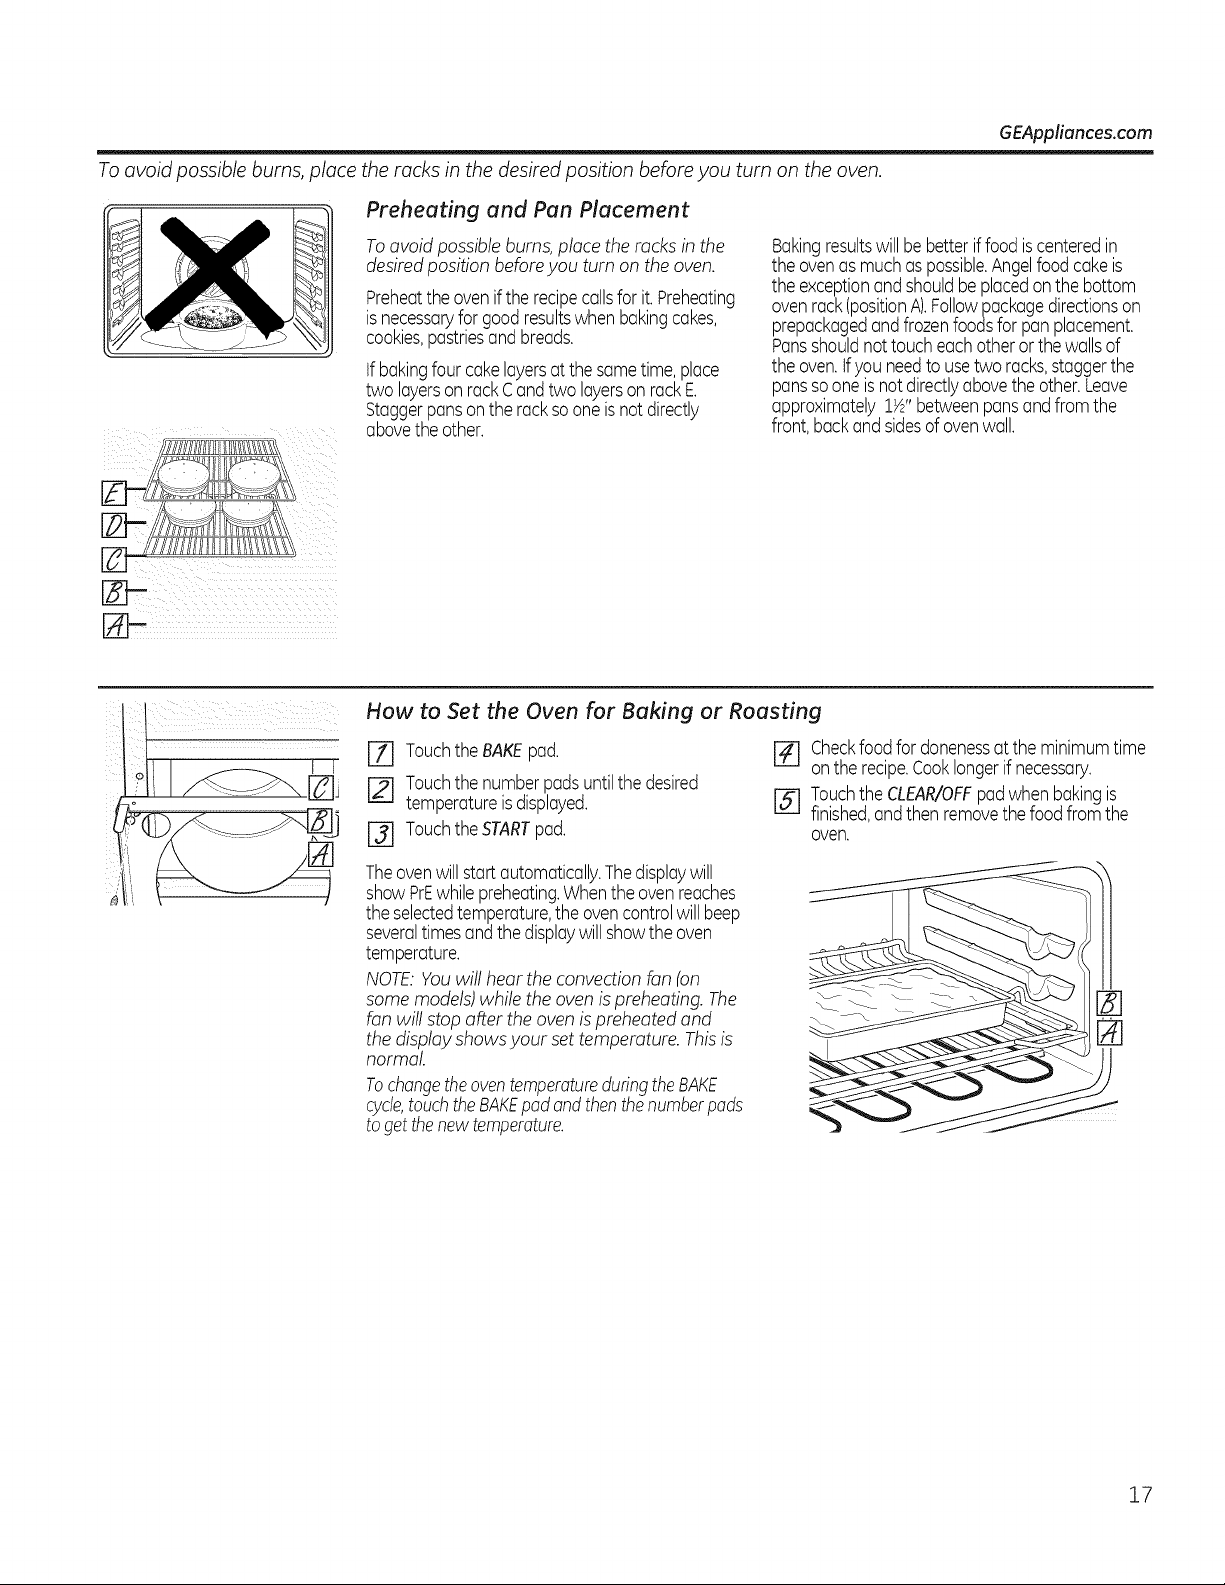
To avoid possible burns, place the racks in the desired position before you turn on the oven.
Preheating and Pan Placement
To avoid possible burns, place the racks in the
desired position before you turn on the oven.
Preheatthe ovenif the recipecallsfor it.Preheating
isnecessaryforgoodresultswhenbakingcakes,
cookies,pastriesandbreads.
if bakingfour cakelayersat the sametime,place
two layerson rackCandtwo layerson rackE.
Staggerpansonthe rack sooneisnot directly
abovethe other.
Bakingresultswill bebetter if foodis centeredin
the ovenas muchas possible.Angelfood cakeis
the exceptionandshouldbe placedonthe bottom
ovenrack(positionA).Followpackagedirectionson
prepackagedandfrozenfoodsfor pan placement.
Pansshouldnot toucheachotheror the wallsof
the oven.tf/ou needtousetwo racks,staggerthe
panssooneis not directlyabovethe other.Leave
approximately1½"betweenpansandfrom the
front,backand sidesof ovenwall.
How to Set the Oven for Baking or Roasting
[Z] Touchthe BAKEpad.
[] Touchthe numberpadsuntilthe desired
temperatureis displayed.
[-31 TouchtheSTARTpad.
[] Checkfoodfordonenessat theminimumtime
onthe recipe.Cooklongerif necessary.
[] Touchthe CLEAR/OFFpadwhenbakingis
finished,andthen removethe food from the
oven.
Theovenwill start automatically.Thedisplaywill
showPrEwhilepreheating.Whenthe ovenreaches
the selectedtemperature,the ovencontrolwill beep
severaltimesandthe displaywill showthe oven
temperature.
NOTE:You willhear theconvection fan(on
some models)whilethe ovenis preheating. The
fanwillstop after theoven is preheatedand
thedisplayshows your set temperature. Thisis
normal
Tochangetheoventemperatureduringthe BAKE
cycle,touchtheBAKEpadand thenthenumberpads
to getthenew temperature.
17
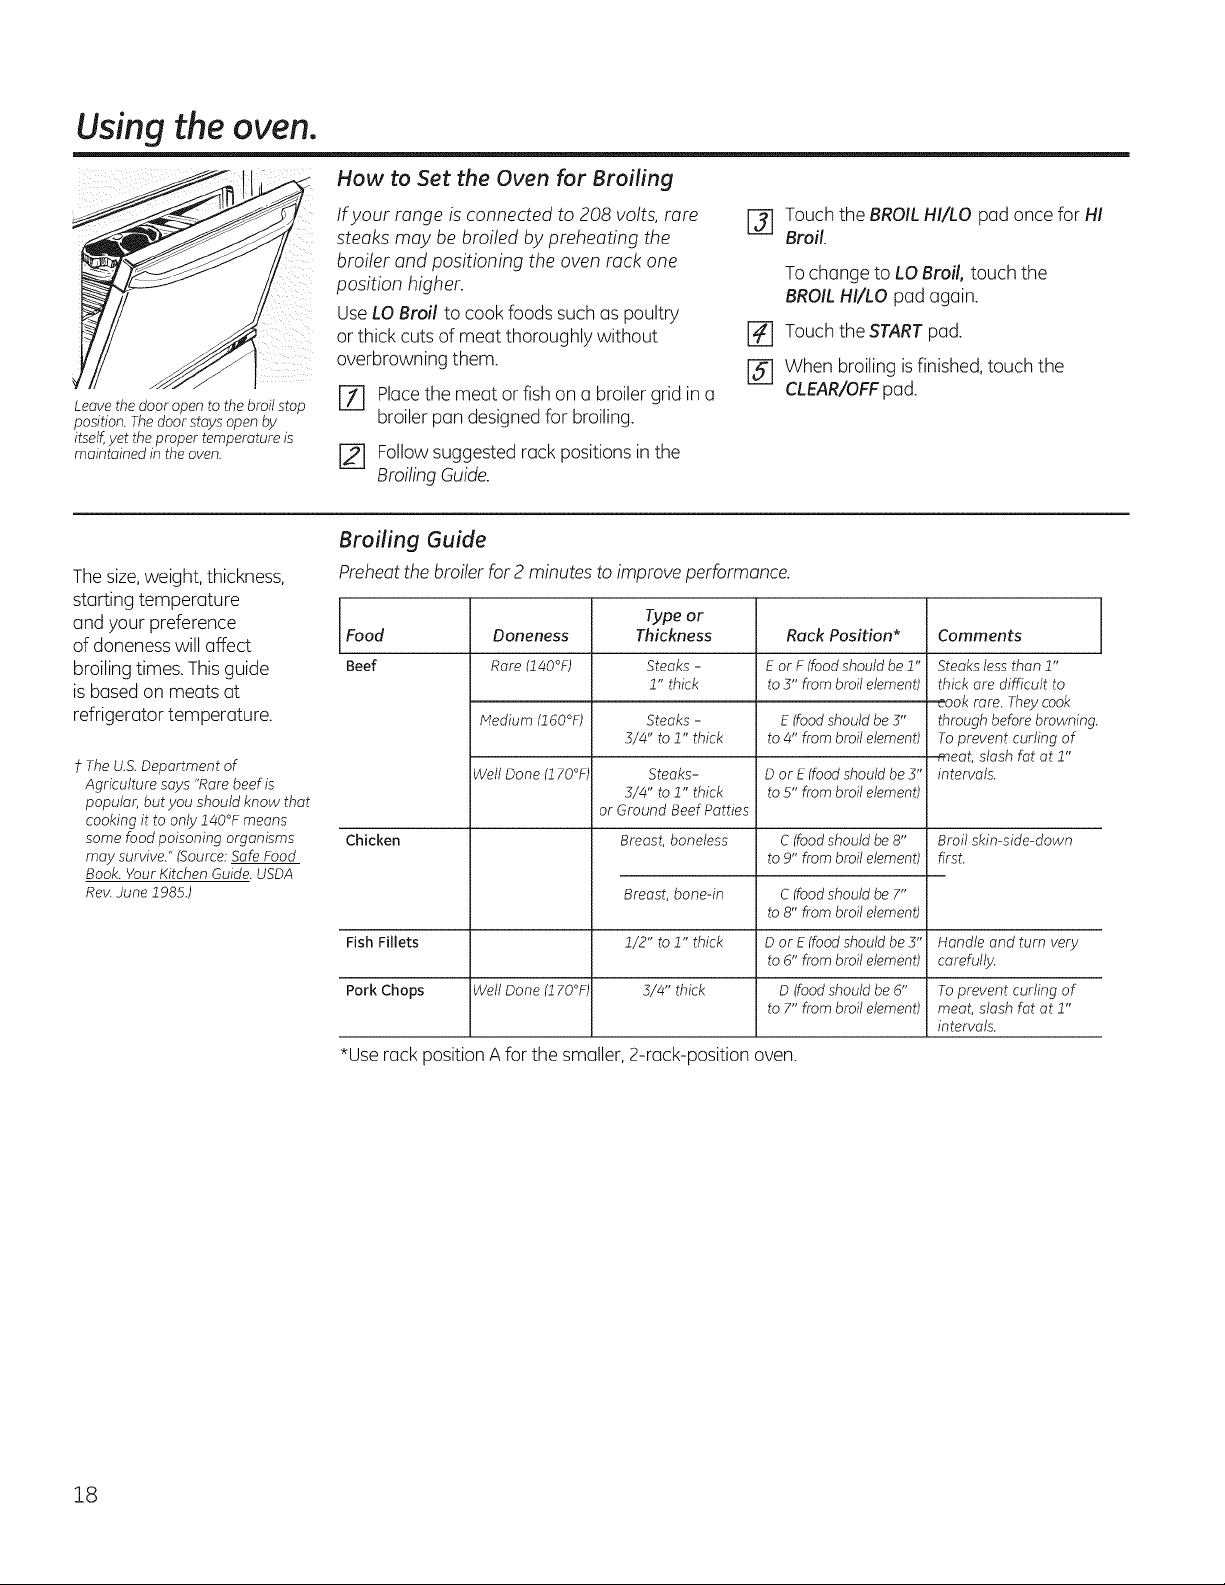
Using the oven.
Leavethe door open to the broilstop
position. Thedoorstays open by
itseff,yet the proper temperature is
maintained in the oven.
How to Set the Oven for Broiling
Ifyour range isconnected to 208 volts, rare
steaks may be broiled bypreheating the
broiler and positioning the ovenrack one
position higher.
Use LOBroil tocook foods such aspoultry
or thick cutsofmeat thoroughly without
overbrowning them.
[Z] Placethemeat or fish on a broiler grid in a
broiler pan designed for broiling.
[] Followsuggestedrack positionsin the
Broiling Guide.
[-_ Touch theBROILHI/LO pad oncefor HI
Broil.
To changeto LO Broil, touch the
BROILHI/LO pad again.
[] Touch theSTARTpad.
[-_ When broiling is finished, touch the
CLEAR/OFFpad.
The size,weight,thickness,
starting temperature
and your preference
ofdoneness willaffect
broiling times.This guide
isbased on meats at
refrigerator temperature.
f TheU.S.Department of
Agriculture says "Rare beef is
popular, but you should know that
cooking it to only140°F means
some food poisoning organisms
may survive."(Source:Safe Food
Book.Your Kitchen Guide. USDA
Rev.June 1985.)
Broiling Guide
Preheat thebroiler for 2 minutestoimprove performance.
Typeor
ThicknessFood
Beef
Doneness
Rare (140°F)
Medium (160°F)
Well Done (170°F,
Rack Position*
E orF (food should be 1"
to5" from broil element)
Comments
Steaks - Steaks less than 1"
1" thick thick are difficult to
_aok rare. They cook
Steaks - E (food should be 3" through beforebrowning
5/4" to 1" thick to4" from broil element) Toprevent curling of
meat, slash fat at 1"
Steaks- Dor E (foodshould be 3" intervals.
5/4" to 1" thick to5" from broil element)
or Ground Beef Patties
Chicken Breast, boneless C(foodshould be 8"
to9" from broil element)
C(food should be 7"
to8" from broil element)
Breast,bone-in
1/2" to 1" thick
5/4" thick
Broil skin-side-down
first.
Fish Fillets Dor E (foodshould be 5" Handle and turn very
to6" from broil element) carefully.
Pork Chops Well Done (170°F, D(foodshould be 6" To prevent curling of
to7" from broil element) meat, slash fat at 1"
intervals.
*Use rack position A forthe smaller, 2-rack-position oven.
18
Usingthe timedbaking and roasting features./onsomemo elsJ GEApp,iancos.com
NOTE: Foods that spoil easily-such as milk, eggs, fish, stuffings, poultry and pork-should not be allowed to sit for more
than 1 hour before or after cooking. Room temperature promotes the growth of harmful bacteria. Be sure that the oven
light is off because heat from the bulb will speed harmful bacteria growth.
i/il ¸
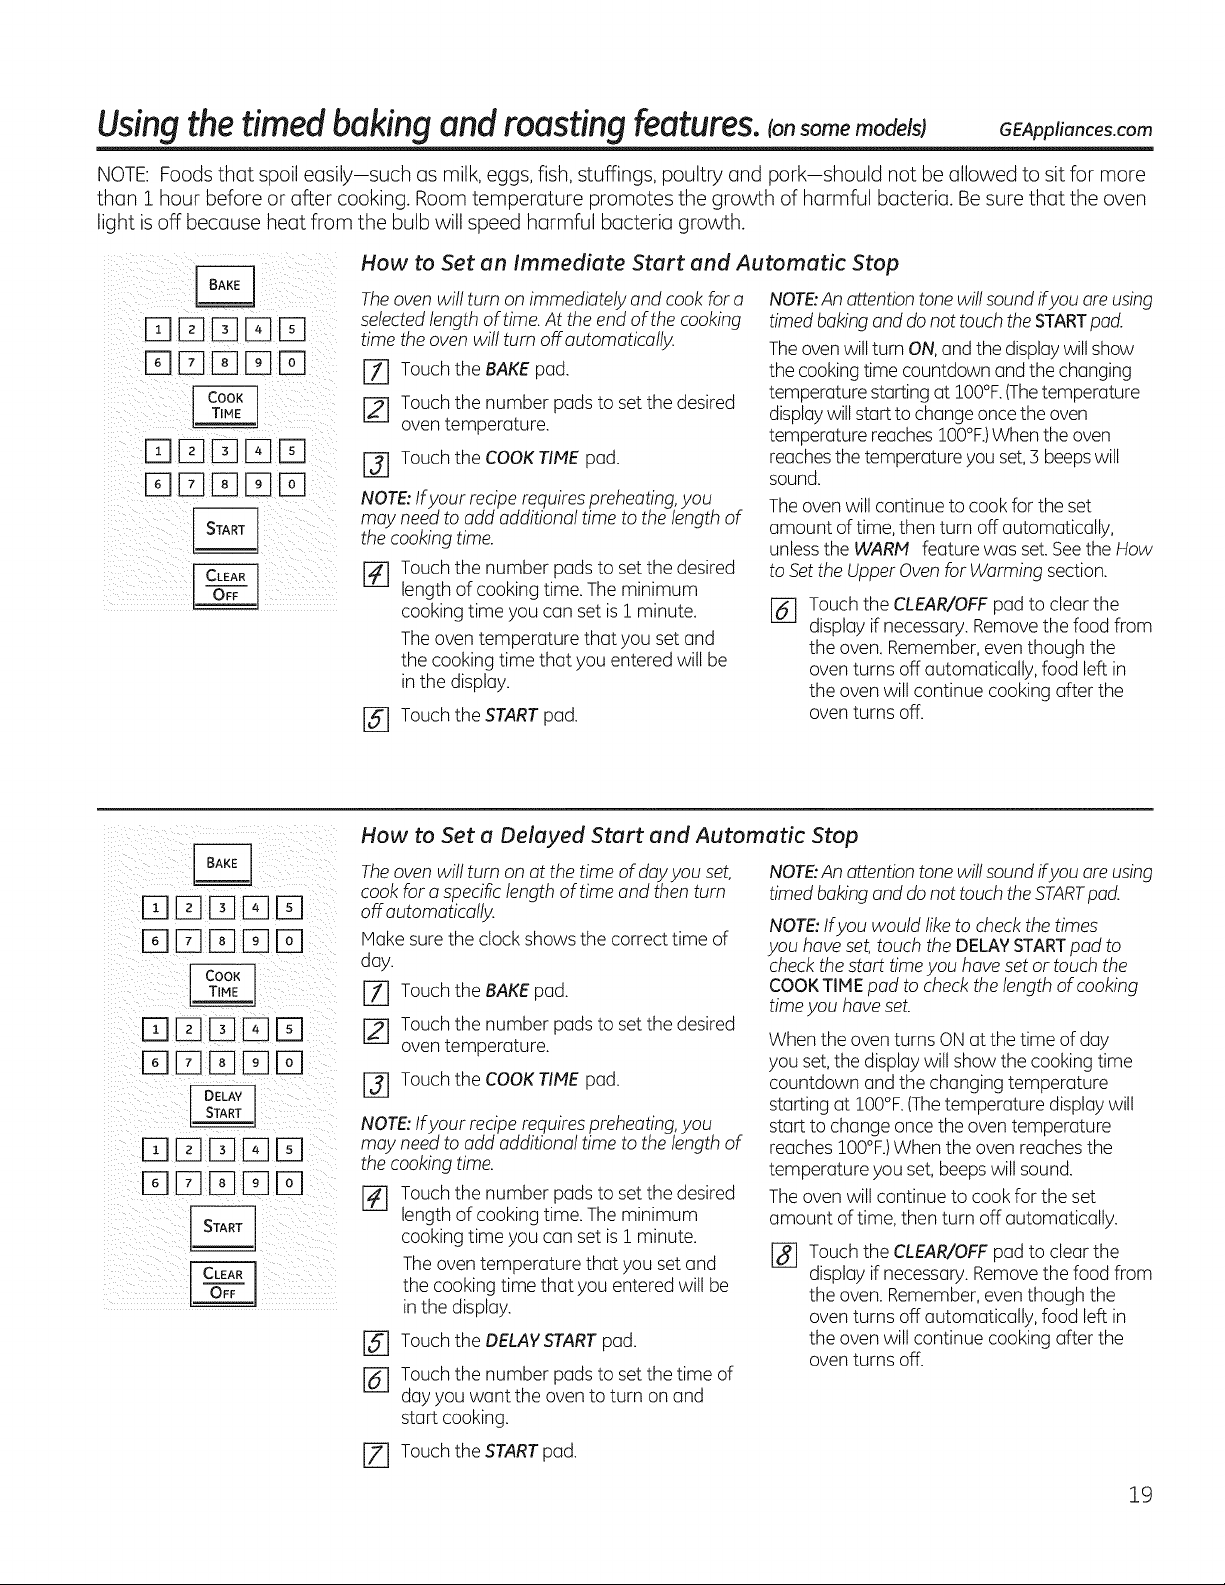
How to Set an Immediate Start and Automatic Stop
The oven willturn on immediately and cook fora NOTE:An attention tone will sound ifyou areusing
selected length of time. At the end of the cooking
time the oven will turn off automatically.
[] Touch the BAKE pad.
[] Touch the number pads to set the desired
oven temperature.
[] Touch theCOOKTIME pad.
NOTE:Ifyour recipe requires preheating,you
may need toadd additionaltime tothelengthof
thecooking time.
r_ Touch thenumber padsto set thedesired
length ofcooking time.The minimum
cooking time you canset is I minute.
The oventemperature that youset and
the cooking time that you enteredwillbe
in the display.
[] Touch the START pad.
timed baking and donottouch the STARTpad.
Theoven will turn ON,and thedisplay will show
thecookingtime countdown and thechanging
temperaturestarting at IO0°F.(Thetemperature
displaywill starttochange once theoven
temperaturereachesIO0°F.)Whentheoven
reachesthetemperature youset,3 beepswill
sound.
The oven willcontinue tocook fortheset
amount of time,thenturn off automatically,
unlessthe WARN feature was set. SeetheHow
toSettheUpper Oven forWarming section.
@ Touch theCLEAR/OFFpad toclearthe
display if necessary. Remove thefoodfrom
theoven. Remember,even though the
oventurns off automatically, food left in
theovenwillcontinue cooking after the
oventurns off.
[][][][]D
How to Set a Delayed Start and Automatic Stop
The oven willturn on atthetime ofdayyou set,
cook fora specificlengthoftime and thenturn
off automatically.
IVlakesure the clockshows the correcttime of
day.
[71 Touch theBAKEpad.
Touch thenumber padsto set thedesired
oventemperature.
r3] Touch theCOOKTIME pad.
NOTE:Ifyour recipe requires preheating,you
may need toadd additionaltime tothelengthof
thecooking time.
Touch thenumber padsto set thedesired
length ofcooking time.The minimum
cooking time you canset is i minute.
The oventemperature that youset and
thecooking time that you enteredwillbe
in the display.
@
@
Touch the DELAY START pad.
Touch the number pads to set the time of
day you want the oven to turn on and
start cooking.
JZ] Touch the START pad.
NOTE:An attention tone will sound ifyou are using
timed baking and donottouch the STARTpad.
NOTE:Ifyou would like tocheck thetimes
you have set, touch theDELAYSTARTpad to
check the start time you haveset or touch the
COOKTIME pad tocheck thelengthofcooking
timeyou haveset.
Whentheoven turns ON atthetime ofday
youset,the display willshow the cooking time
countdown and thechangingtemperature
startingat IO0°F.(Thetemperature display will
starttochange once theoventemperature
reaches IO0°F.)Whentheovenreaches the
temperature youset, beeps willsound.
The ovenwillcontinue tocook for theset
amount oftime,thenturn off automatically.
Touch theCLEAR/OFFpad toclearthe
display if necessary. Remove thefoodfrom
theoven. Remember,even though the
oventurns off automatically, food left in
theovenwillcontinue cooking after the
oventurns off.
19
Using the probe, consomemode sI
For many foods, especially roasts and poultry, internal food temperature is the best test for doneness. Thetemperature
probe takes the guesswork out of roasting by cooking foods to the exact aloneness you want.
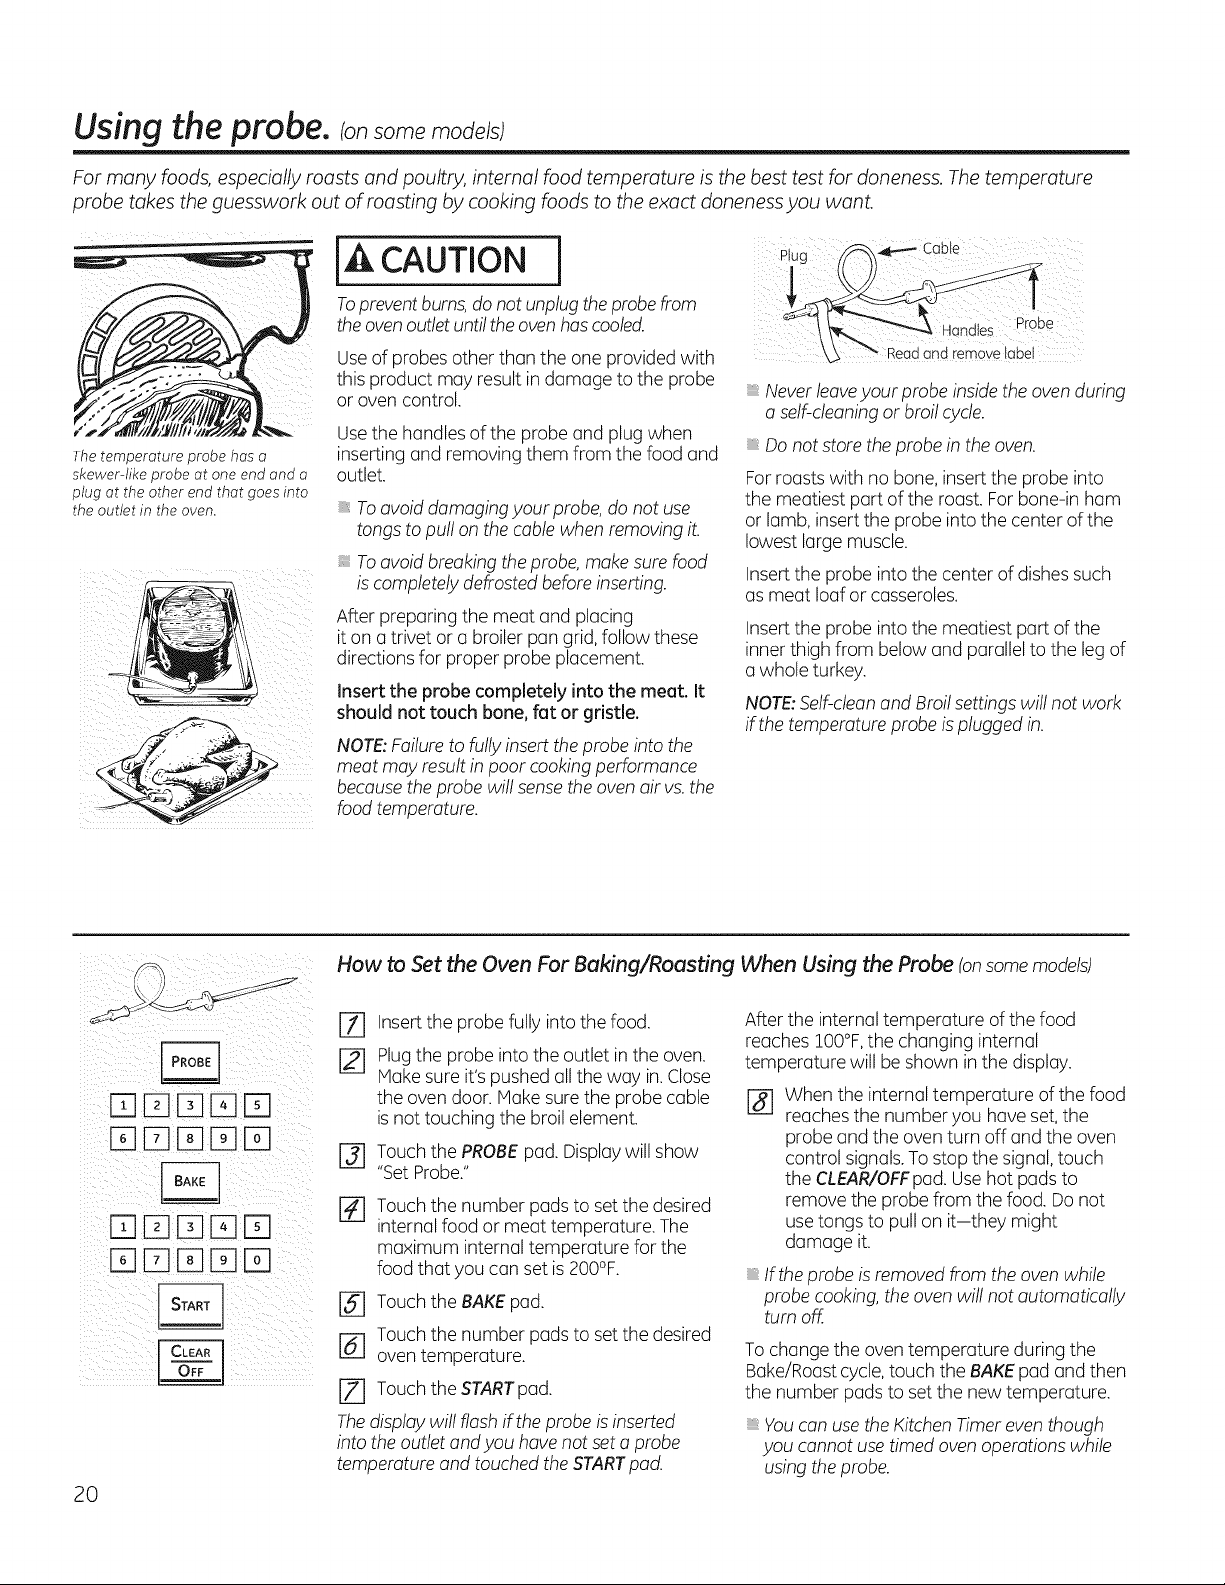
Thetemperature probe has a
skewer-like probe at one end and a
plug at the other end that goes into
the outlet in the oven.
<
iI£ '_J_'_ i!_i!_i!_
[A CAUTION
Topreventburns, do notunplugthe probe from
the oven outlet until the oven hascooled.
Use ofprobesotherthan theone providedwith
this product may result in damage tothe probe
or ovencontrol.
Usethe handles of theprobe and plug when
inserting and removing them from the foodand
outlet.
To avoiddamaging your probe, do notuse
tongs topull on thecablewhenremoving it.
i: To avoidbreaking the probe,make surefood
is completely defrostedbefore inserting.
After preparing the meat and placing
iton a trivet or a broiler pan grid, follow these
directionsfor proper probe placement.
Insert the probe completely into the meet. It
should not touch bone, fat or gristle.
NOTE:Failure tofully insert theprobe intothe
meat may result in poor cooking performance
becausethe probe willsense theoven air vs.the
foodtemperature.
Plug
and remove label
Never leaveyour probe insidetheovenduring
a self-cleaning or broil cycle.
Donot store theprobe in theoven.
For roastswith no bone,insert theprobe into
the meatiest partofthe roast. Forbone-in ham
or lamb, insert the probe intothecenter ofthe
lowest large muscle.
Insert the probe intothecenter ofdishes such
asmeat loafor casseroles,
Insert the probe intothe meatiest partofthe
inner thigh from belowand parallel tothe leg of
a whole turkey.
NOTE:Self-cleanand Broil settings willnotwork
ifthetemperatureprobe is plugged in.
How to Set the Oven For Baking/Roasting When Using the Probe (onsome models)
20
D[][][]D
DD[] D
DD ED
%
Insert theprobe fully into the food.
Plugthe probe intotheoutlet in theoven.
Hake sureit'spushedall theway in.Close
theovendoor.Hake sure the probe cable
isnottouching the broil element.
[-_ Touch thePROBEpad.Displaywillshow
"SetProbe,"
r_ Touch thenumber padsto set thedesired
internalfood or meat temperature. The
maximum internaltemperature for the
foodthat youcanset is 200°F.
[] Touch theBAKE pad.
r_ Touch thenumber padsto set thedesired
oventemperature.
[] Touch theSTARTpad.
The display willflash ifthe probe is inserted
intotheoutlet and you have notset a probe
temperatureand touched theSTARTpad.
After the internaltemperature ofthefood
reaches 100°F,the changing internal
temperature will be shown in the display.
r_ Whenthe internaltemperature of the food
reaches the numberyou haveset,the
probe and theoventurn off and the oven
control signals.Tostop the signal, touch
theCLEAR/OFFpad.Use hotpadsto
remove theprobe from the food. Donot
use tongs to pull on it-they might
damage it.
If the probe is removed from theoven while
probe cooking, the ovenwillnotautomatically
turnoff.
To changethe oven temperature during the
Bake/Roast cycle,touch theBAKE pad and then
the numberpadsto set thenewtemperature.
Youcanuse the Kitchen Nmer even though
you cannot use timed oven operations while
using theprobe.
Usingthe kitchen timer. GEApplioncescom
i¸¸¸¸ i ! i
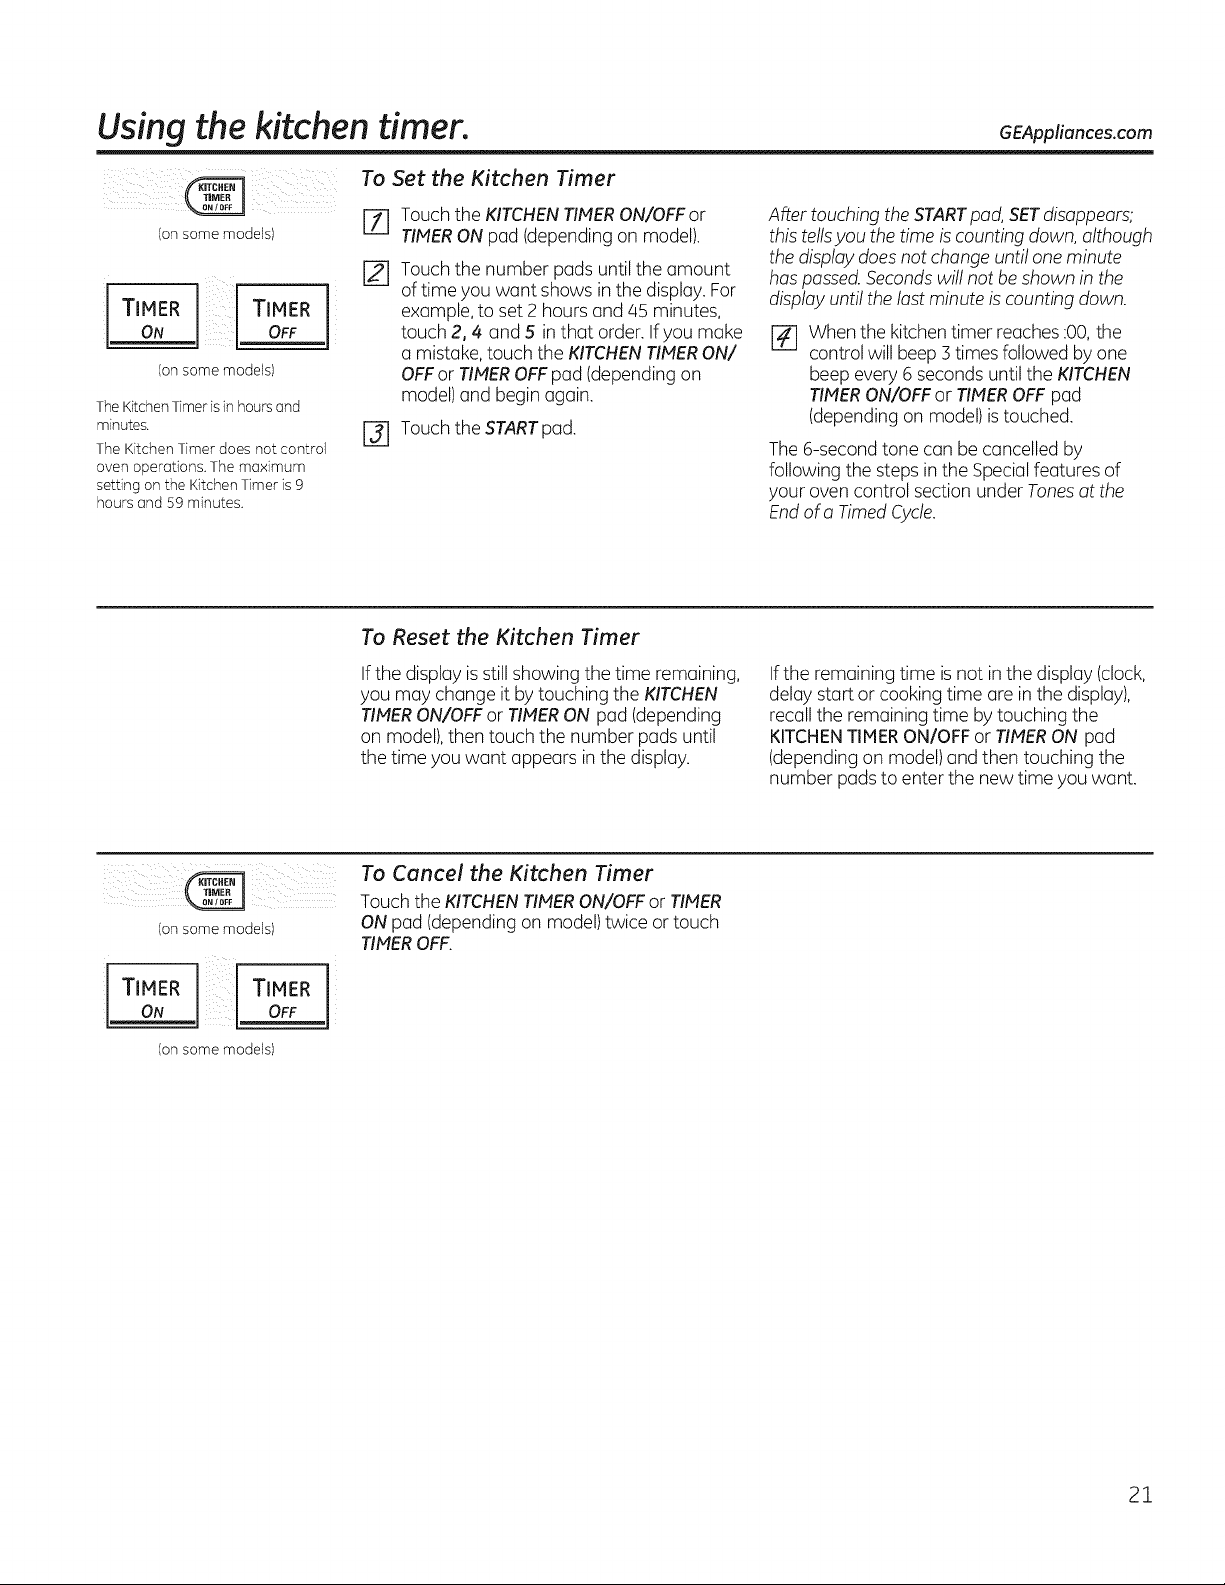
Consome models)
TIMER TIMER
ON OFF
(onsome models)
TheKitchenTimerisinhours and
minutes.
TheKitchen Timer does not control
oven operations, The maximum
setting on the Kitchen Timer is 9
hours and 59 minutes.
To Set the Kitchen Timer
%
[]
Touch theKITCHENTIMERON/OFF or
TIMERONpad (depending on model).
Touch thenumber pads until the amount
oftime youwant showsin the display. For
example, to set 2 hoursand 45 minutes,
touch 2,4 and 5 in that order. If youmake
a mistake, touch the KITCHENTIMERON/
OFFor TIMEROFFpad (depending on
model) and begin again.
r_ Touch the STARTpad.
After touching the STARTpad,SETdisappears;
this tellsyou thetime is counting down, although
thedisplay does notchangeuntilone minute
has passed.Secondswillnotbe shown in the
display untilthelast minute is counting down.
r_ When the kitchen timer reaches :00,the
control willbeep 3 times followed byone
beep every 6 secondsuntil the KITCHEN
TIMERON/OFFor TIMEROFF pad
(depending on model)is touched.
The 6-second tone conbe cancelled by
following the steps in the Specialfeatures of
yourovencontrol section under Tones atthe
Endofa Timed Cycle.
To Reset the Kitchen Timer
If the display is still showing thetime remaining,
youmay change itbytouching the KITCHEN
TIMERON/OFFor TIMERON pad (depending
on model),then touch the number padsuntil
thetime youwant appears in thedisplay.
If the remainingtime is notin the display (clock,
delaystartor cooking time are inthe display),
recalltheremaining time bytouching the
KITCHENTIMERON/OFFor TIMERON pad
(depending on model) and then touching the
number padstoenterthe newtime youwant.
(onsome models)
TIMER TIMER
ON OFF
(onsome models)
1
To Cancel the Kitchen Timer
Touch the KITCHEN TIMER ON/OFF or TIMER
ON pad (depending on model) twice ortouch
TIMER OFF.
21
Adjust the oven thermostat--Do it yourself!
You may find that your new oven cooks differently than the one it replaced. Useyour new oven for a few weeks to become
more familiar with it. If you still think your new oven istoo hot or too cold, you can adjust the thermostat yourself.
Do not usethermometers, such as those found in grocery stores, to check the temperature setting ofyour oven. These
thermometers may vary 20-40 degrees.
NOTE:This adjustment will only affect baking and roasting temperatures; it will not affect broiling or self-cleaning
temperatures. Theadjustment will be retained in memory after a power failure.
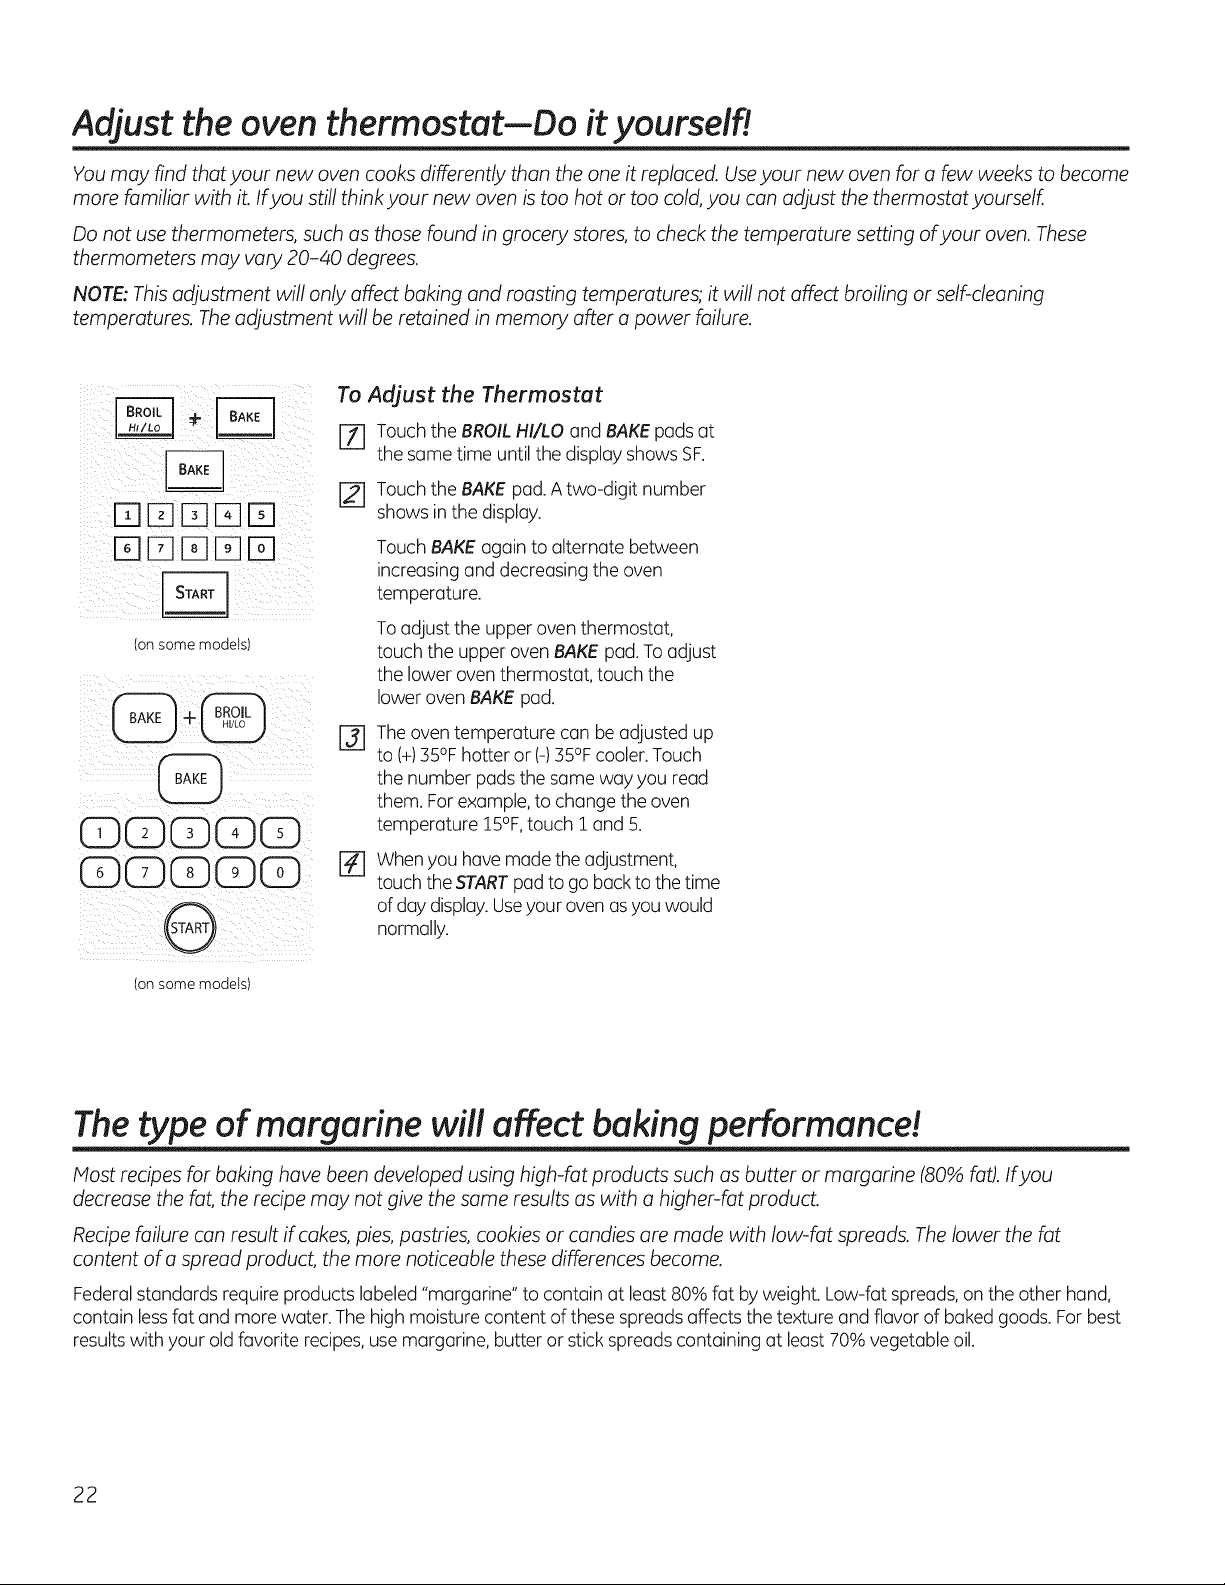
_ii___i_i_ii_[-_ _ _} !i
_f}rqDD [B¸El_
(onsome models)
CDGGGG ¸
CDC)CDGCD
iil l ii i i
(onsome models)
To Adjust the Thermostat
[-_ Touch theBROIL HI/LOand BAKEpads at
thesame time untilthedisplay showsSF.
[_ Touch theBAKE pad. A two-digit number
showsin the display.
Touch BAKEagain to alternate between
increasing and decreasing theoven
temperature.
To adjust theupper oventhermostat,
touch the upper oven BAKE pad. To adjust
the loweroven thermostat, touch the
lowerovenBAKE pad.
@
The oventemperature canbe adjusted up
to(+)35% hotter or (-) 35% cooler.Touch
the number pads the same way you read
them. Forexample,tochange theoven
temperature 15%, touch 1 and 5.
%
When you have madetheadjustment,
touch the STARTpad to go back tothetime
ofdaydisplay.Useyourovenas youwould
normally.
The type of margarine will affect baking performance!
Host recipes for baking have been developed using high-fat products such as butter or margarine (80% @t).If you
decrease the fat, the recipe may not give the same results as with a higher-fat product.
Recipe failure can result if cokes, pies, pastries, cookies or candies are made with low-fat spreads. Thelower the fat
content ofa spread product, the more noticeable these differences become.
Federalstandards require products labeled"margarine" tocontain at least 80% fat byweight.Low-fat spreads, on the other hand,
contain lessfat and morewater.Thehigh moisture content ofthese spreads affectsthe texture and flavor of baked goods. For best
resultswith yourold favorite recipes,usemargarine, butter or stick spreads containing at least 70% vegetable oil.
22
Usinqthe convection oven. somemodelsj
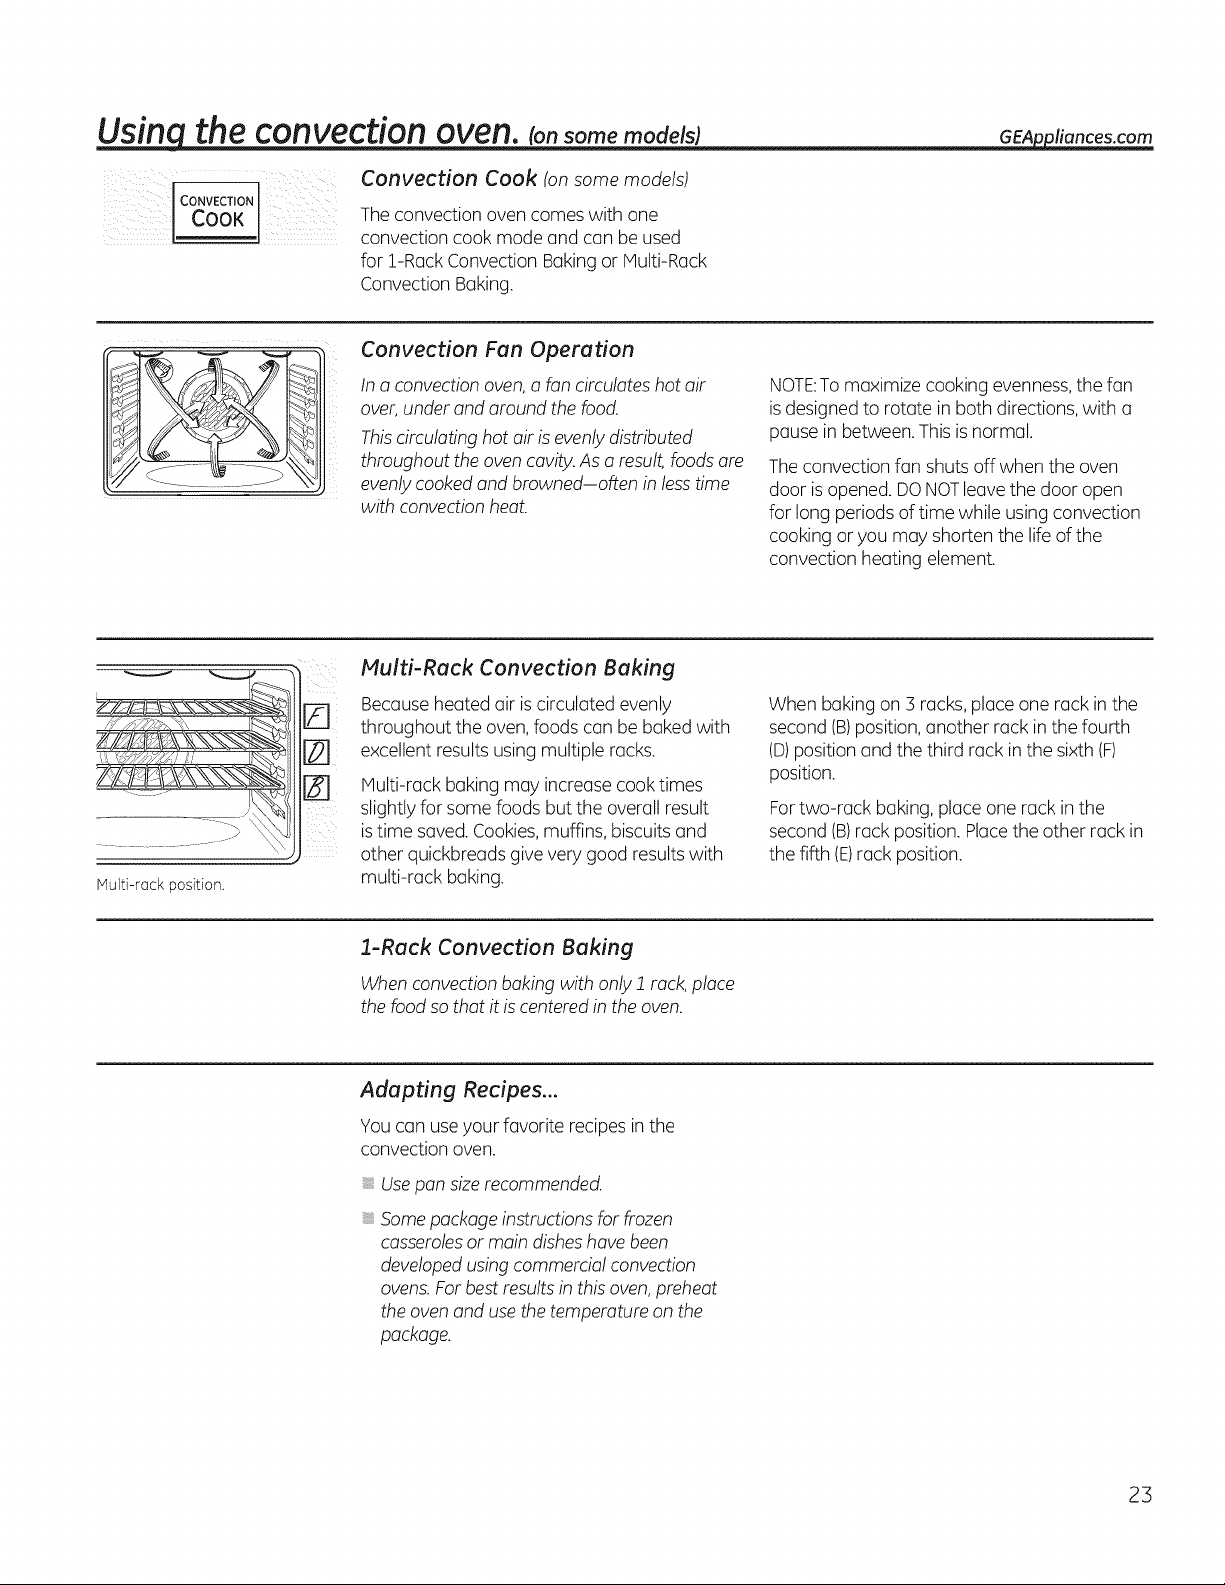
Convection Cook (on some models)
co.vEc.,o.
! cook Theconvectionovencomesw thone
convection cook modeand can be used
for !-Rack Convection Baking or Multi-Rack
Convection Baking.
GEAppliances.com
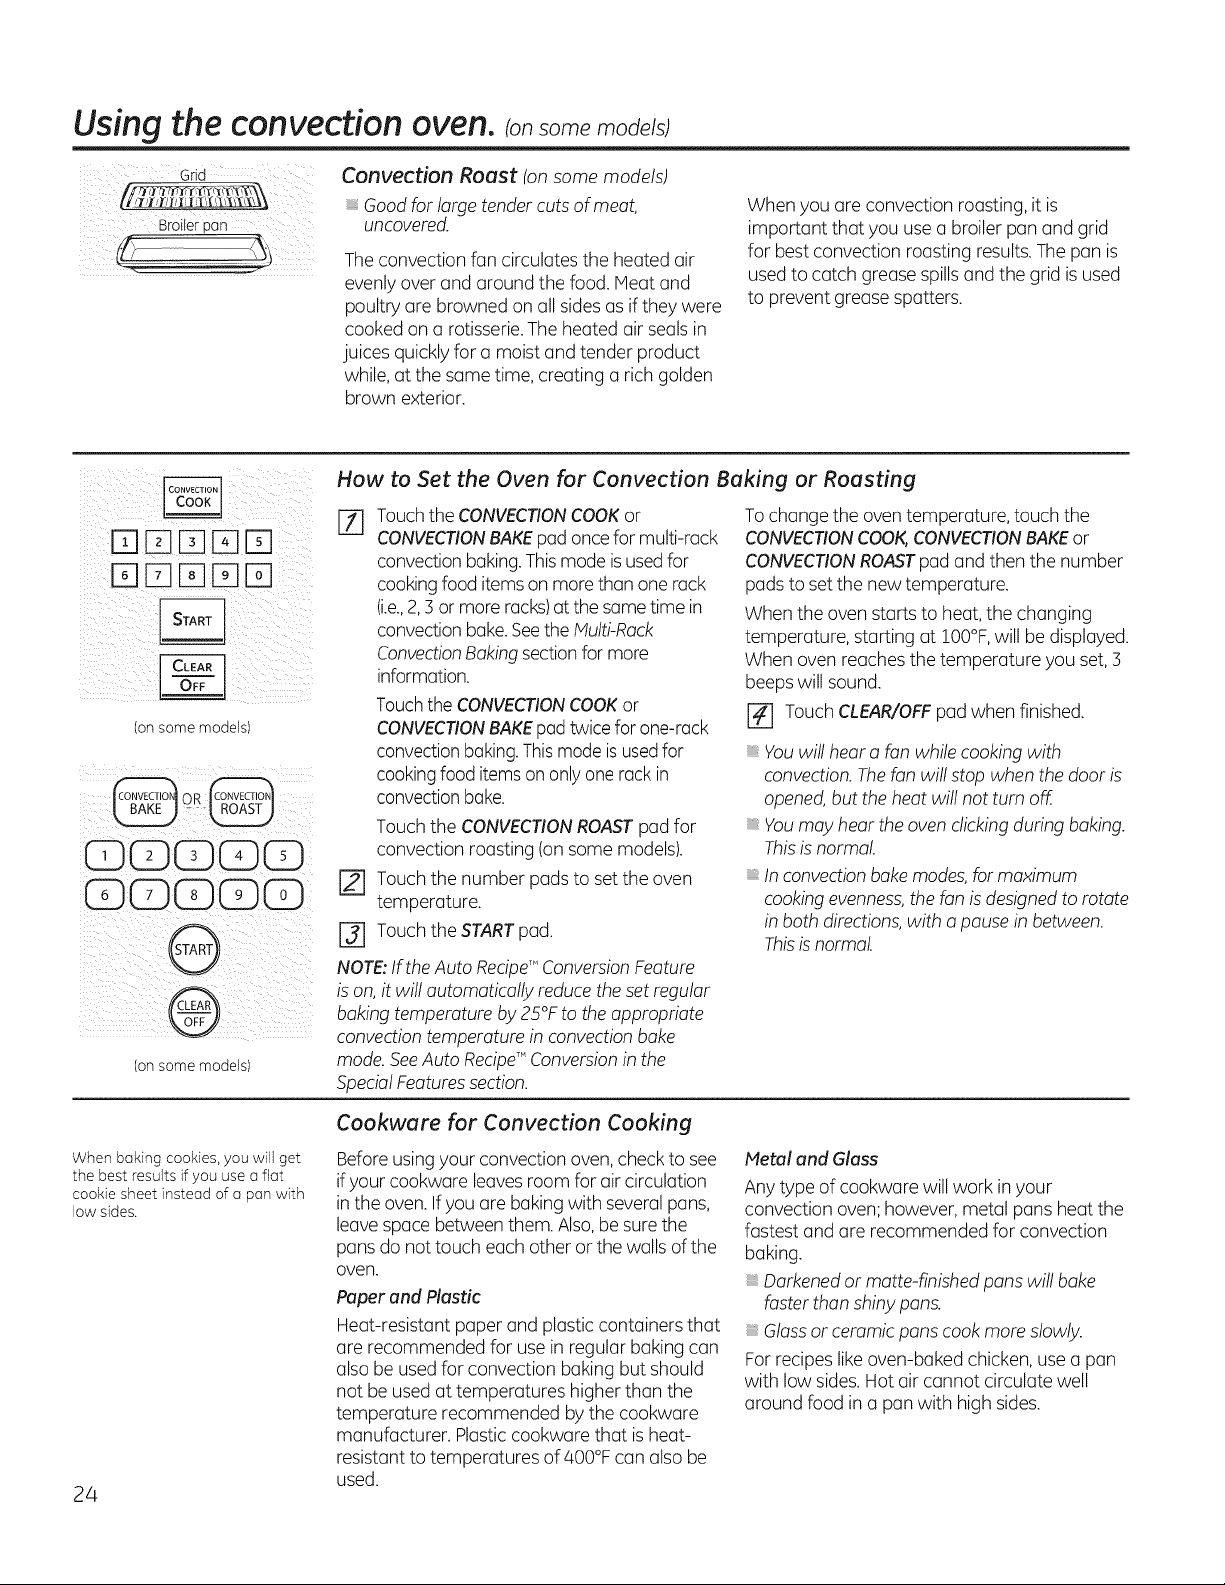
Convection Fan Operation
In aconvection oven, a fan circulates hot air
over, under and around the food.
Thiscirculating hot air isevenly distributed
throughout the oven cavity. As a result, foods are
evenly cooked and browned-often in less time
with convection heat.
NOTE:Tomaximize cooking evenness,thefan
is designedto rotate in both directions,with u
pausein between.Thisisnormal.
The convection funshutsoff whenthe oven
door is opened.DONOTleave the door open
forlong periodsoftime whileusingconvection
cooking or you may shorten the life ofthe
convection heating element.
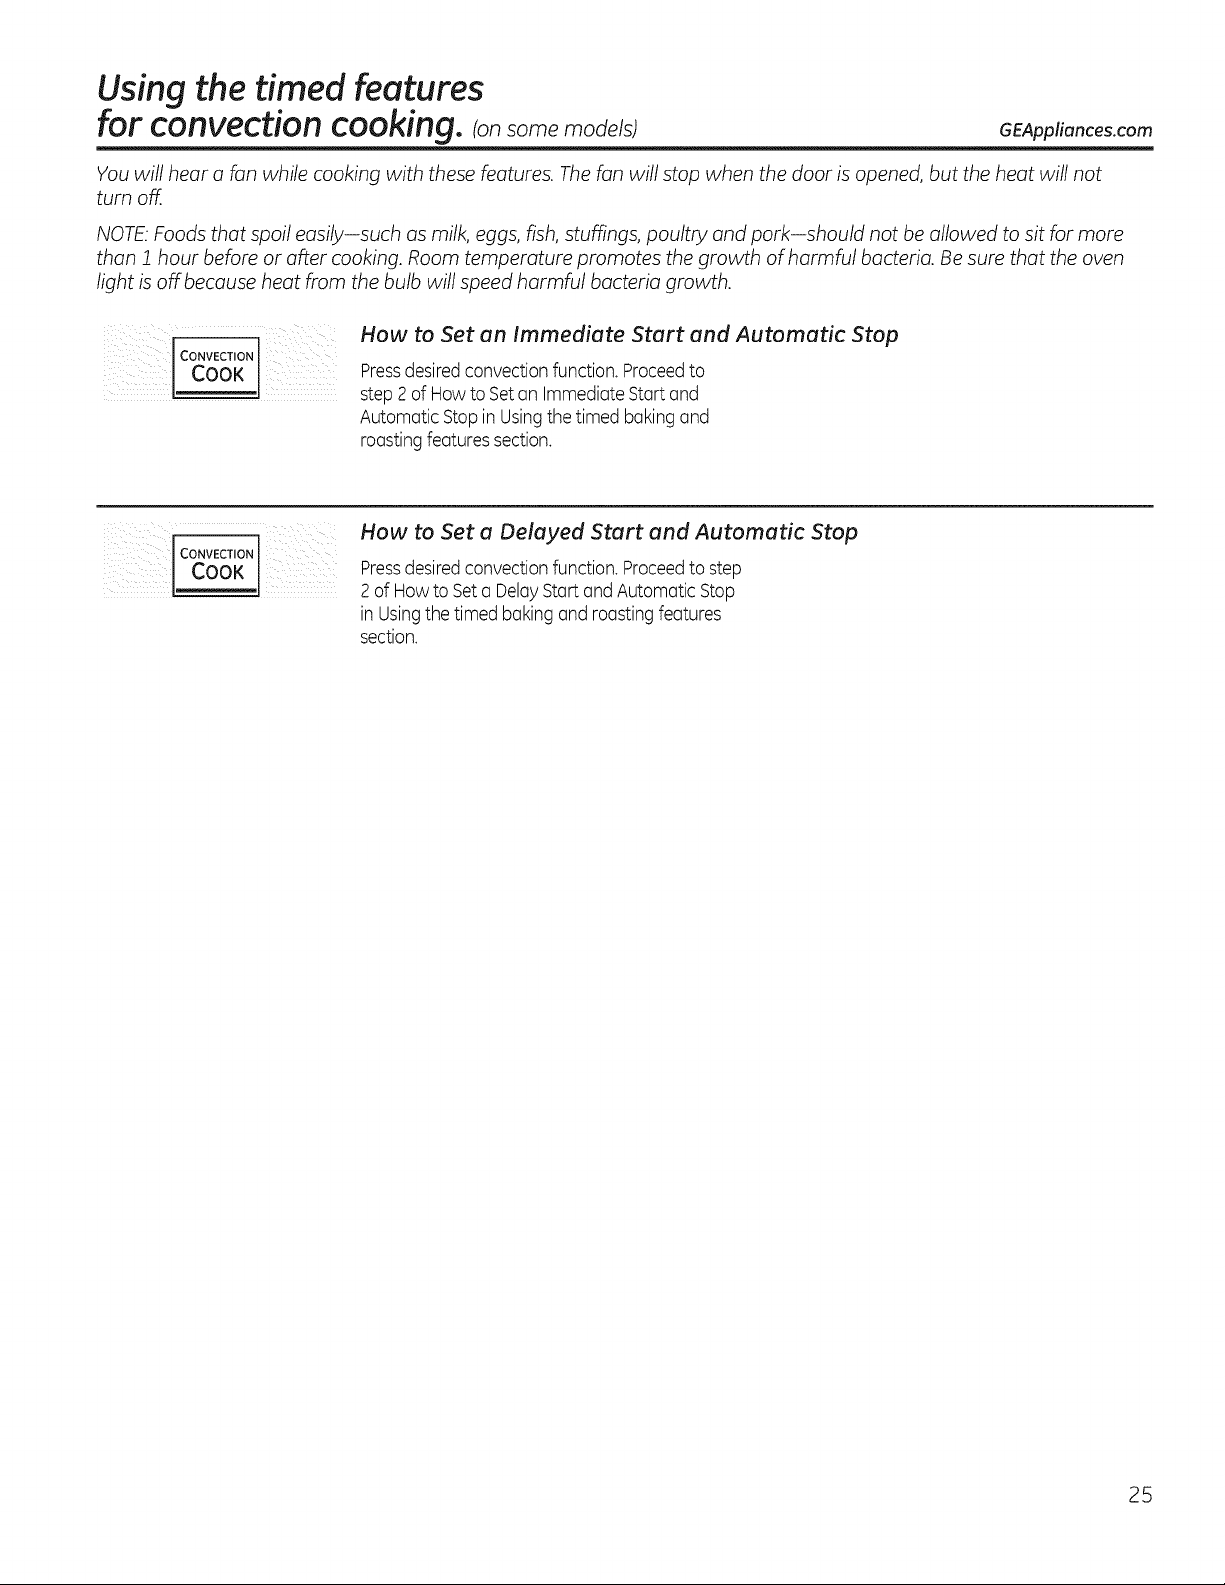
Multi-rack position.
Multi-Rack Convection Baking
[] Because heatedair is circulatedevenly
throughout the oven, foods canbe bakedwith
[] excellentresults usingmultiple racks.
Multi-rack baking may increase cook times
slightlyforsome foods but theoverallresult
is time saved. Cookies,muffins,biscuits and
other quickbreudsgive very good results with
multi-rack baking.
Whenbakingon 3 racks,placeone rack in the
second (B)position, another rack in thefourth
(D)position and thethird rack in the sixth(F)
position.
For two-rack baking, place one rack in the
second (B)rack position. Placethe other rack in
thefifth (E)rack position.
1-Rack Convection Baking
When convection baking with only 1 rack, place
the food so that itis centered inthe oven.
Adapting Recipes...
You can use your favorite recipes inthe
convection oven.
Usepan size recommended.
Somepackage instructions forfrozen
casserolesor maindisheshavebeen
developed using commercial convection
ovens.Forbestresults in this oven, preheat
theoven and use thetemperatureon the
package.
23
Usingtheconvectionoven.Consomemode s
Grid
Broilerpan
Convection Roast (on some models)
Good for large tender cuts of meat,
uncovered.
The convection fancirculates theheated air
evenly overand around thefood. Heat and
poultry are browned on all sides asif they were
cooked on a rotisserie.Theheatedair sealsin
juices quickly for a moistand tender product
while, atthesame time,creating a richgolden
brown exterior.
Whenyou are convection roasting, itis
important that you usea broiler pan and grid
for best convection roasting results.Thepan is
used tocatch greasespills and thegrid is used
to prevent grease spatters.
(onsome models)
oR
iCD(Z)(E)CDCD¸
iC)GGGC)
i i iii
convection baking.Thismodeisused for
cookingfooditemson more thanone rack
(i.e.,2, 3 or moreracks)atthesametime in
convection bake.SeetheMulti-Rack
ConvectionBaking sectionformore
information.
TouchtheCONVECTIONCOOKor
CONVECTIONBAKEpad twicefor one-rack
convectionbaking.Thismodeis usedfor
cookingfooditemson only one rack in
convectionbake.
How to Set the Oven for Convection Baking or Roasting
F-f] Touch the CONVECTIONCOOKor Tochange the oven temperature, touch the
CONVECTIONBAKE pad once for multi-rack CONVECTIONCOOK,CONVECTIONBAKE or
CONVECTIONROAST pad and then the number
pads to set the new temperature.
When the oven starts to heat, the changing
temperature, starting at !O0°F,willbe displayed.
When oven reaches the temperature you set, 3
beeps willsound.
[] Touch CLEAR/OFF pad when finished.
Touch theCONVECTIONROASTpad for
convection roasting (on some models).
r_ Touch thenumber padsto set theoven
temperature.
r_ Touch theSTARTpad.
NOTE:If the Auto RecipeT"ConversionFeature
is on, it willautomatically reduce the set regular
bakingtemperatureby25 F totheappropriate
convection temperaturein convectionbake
(onsomemodels) mode.SeeAuto RecipeT"Conversionin the
SpecialFeaturessection.
Youwillhear a fanwhilecooking with
convection.Thefan willstop whenthedoor is
opened,buttheheatwillnot turnoff.
Youmay hear the ovenclicking during baking.
Thisisnormal.
In convectionbake modes,for maximum
cooking evenness, the fan isdesigned to rotate
in both directions, with a pause in between.
Thisis normal.
When baking cookies, you will get
the best results if you use aflat
cookie sheet instead ofa pan with
low sides.
24
Cookwure for Convection Cooking
Before using yourconvection oven,checktosee
if yourcookware leaves room forair circulation
in theoven. Ifyouare baking with several pans,
leave space between them.Also,be sure the
punsdo nottouch eachotheror thewalls ofthe
oven.
Paper and Plastic
Heat-resistant paper and plasticcontainersthat
are recommended forusein regular bakingcan
also be used for convection bakingbut should
not be used at temperatures higher than the
temperature recommended bythecookware
manufacturer. Plasticcookware that is heat-
resistant to temperatures of 400°Fcanalsobe
used.
Metal and Glass
Any type ofcookware willwork in your
convection oven; however,metal pansheatthe
fastestand are recommended forconvection
baking.
Darkened or matte-finishedpanswillbake
fasterthanshiny pans.
Glassor ceramicpanscook more slowly.
For recipes like oven-baked chicken, use a pan
with low sides.Hot air cannot circulatewell
around food in a pan with high sides.
Usingthe timed features
for convection cooking, consomemode_s_ GEAppliances.com
You will hear a fan while cooking with these features. The fan will stop when the door isopened, but the heat will not
turn off.
NOTE: Foods that spoil easily-such asmilk, eggs, fish,stuffings, poultry and pork-should not be allowed tosit for more
than 1 hour before or after cooking. Room temperature promotes the growth ofharmful bacteria. Be sure that the oven
light isoff because heat from the bulb will speed harmful bacteria growth.
CONVECTION
cook
How to Set an Immediate Start and Automatic Stop
Pressdesiredconvection function.Proceedto
step2 ofHow toSeton ImmediateStartand
AutomaticStop in Usingthe timed bakingand
roostingfeaturessection.
CONVECTION
cook
How to Set a Delayed Start and Automatic Stop
Press desired convection function. Proceed to step
2 ofHowtoSeto DelayStart and Automatic Stop
in Usingthetimed baking and roostingfeatures
section.
25
Usingtheconvectionoven.consomemode s
For best results when roasting
large turkeys and roasts, we
recommend using the probe
included in the convection oven.
D[][][]D
D[][][]D
Tochange the oven temperature
during the Convection Roast cycle,
touch the CONVECTION COOK
pad and then touch the number
pads to set the new desired
temperature.
How to Set the Oven for Convection Roasting when Using the Probe
CAUTION 1-81Whenthe internaltemperature of the
meat reaches thenumberyou haveset,
the probe and theoventurn off and the
Toprevent burns,do notunplug the probe from
theoven outlet untiltheoven hascooled.
EZ]
[]
Placetheovenrack in the position that
centersthefood between thetop and
bottom oftheoven. Insert the probe into
the meat.Make sureit is pushedallthe
way in.
Plugthe probe intotheoutlet in theoven.
Makesureitis pushedall the way in. Close
theovendoor.
ovencontrol signals.Tostop the signal,
touch the CLEAR/OFFpad.Use hotpads
to remove the probe from thefood. Do not
use tongs to pull on it-they might
damage it.
NOTE:If theprobe isremoved from the
ovenwhile probe cooking, theoven willnot
automatically turnoff.
NOTES:
[] Touch the PROBE pad.
r_ Touch the number pads to set the desired
internal meat temperature.
NOTE:The maximum internal temperaturefor
thefood that youcan set is 200°F.
[] Touch theCONVECTIONCOOK pad.
[] Touch thenumber padsto set thedesired
oventemperature.
The display willflash PROBEand theoven
control willsignaliftheprobe is inserted intothe
outlet,andyouhave not set a probetemperature
and pressedthe STARTpad.
Youwillhear a fanwhilecooking with this
feature. Thefanwillstop whenthedoor is
opened,buttheheatwillnot turnoff.
Youcanuse the Kitchen Timer even though
you cannot use timed oven operations.
Never leaveyour probe insidetheovenduring
a self-cleaning cycle.
Do not store the probe in the oven.
Probeis not foruse in Broil or Self-Clean
functions.
Fan only rotates in one direction.
[Z] Touch theSTARTpad.
Whentheovenstarts to heat, theword LO
willbe inthe display.
After theinternal temperature of the meat
reaches !00°F, thechanginginternal
temperaturewillbe shown inthedisplay.
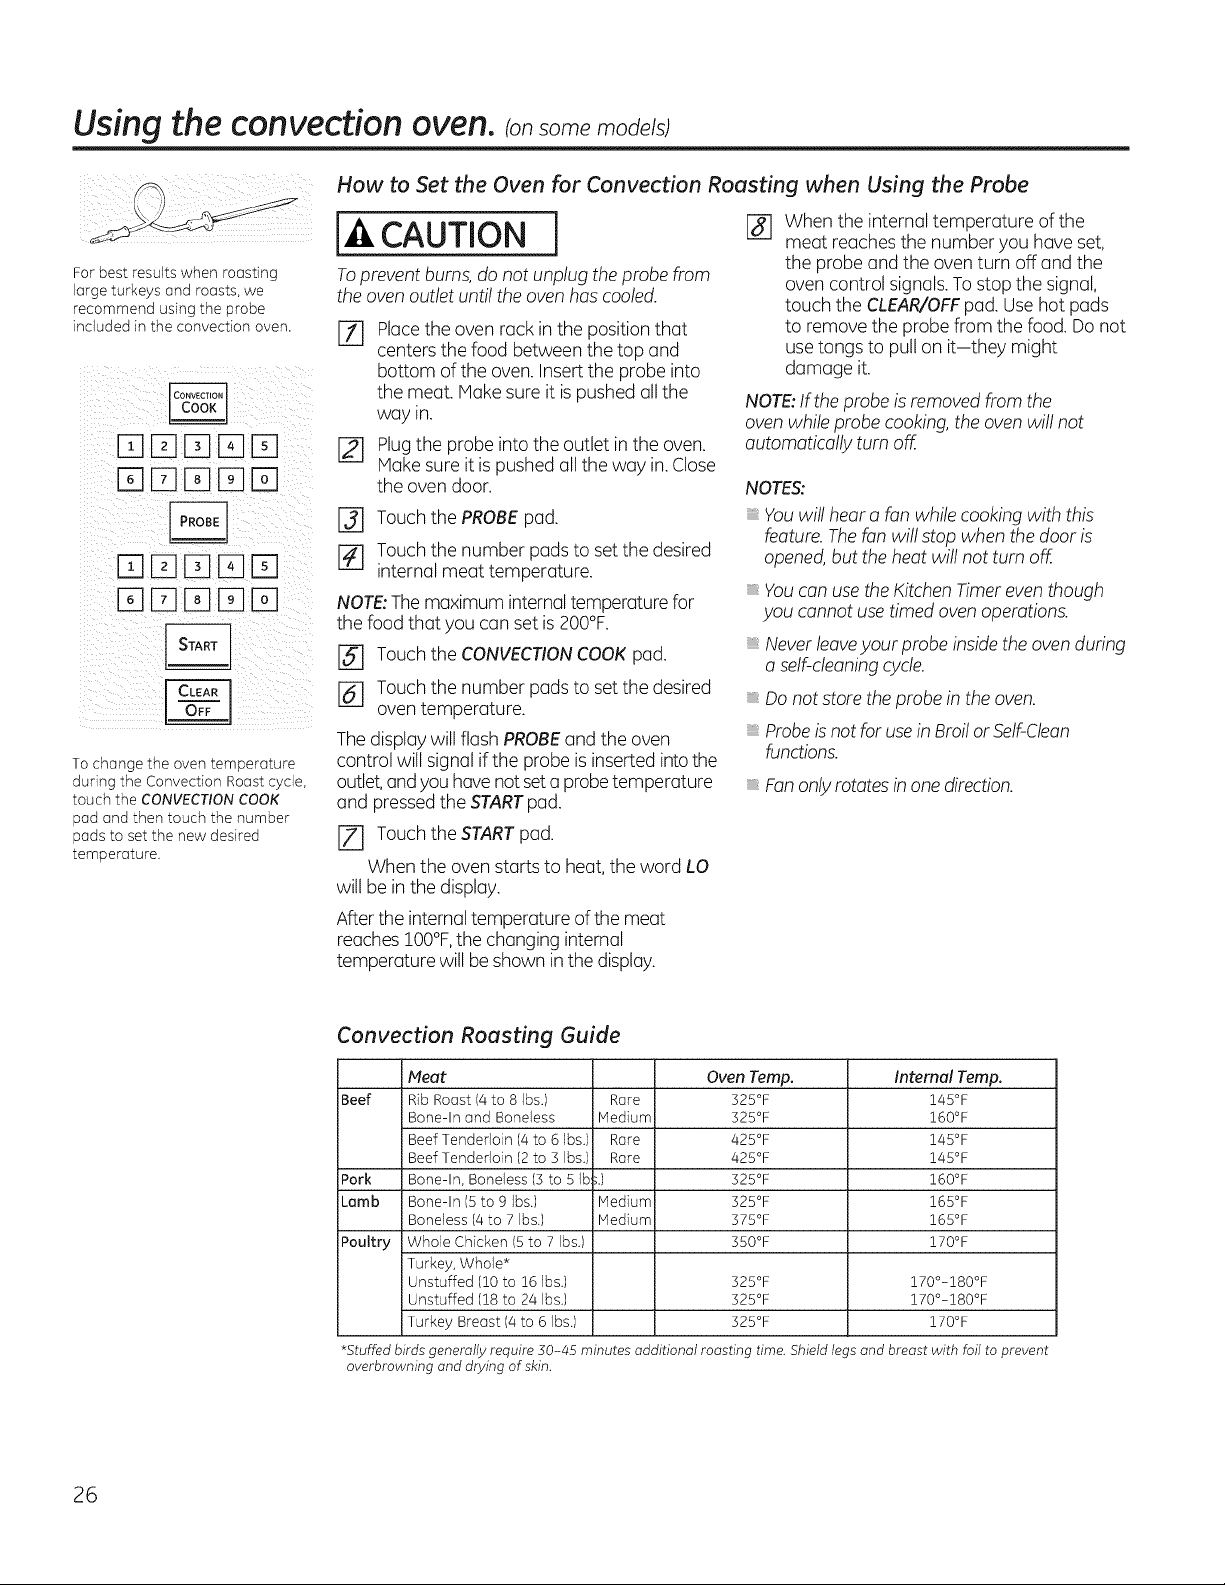
Convection Roasting Guide
Beef
Pork
Lamb
Poultry
Meat Oven Temp.
Rib Roast (4to 8 Ibs.) Rare 325°F
Bone-In and Boneless Medium 325°F
Beef Tenderloin (4to 6Ibs.) Rare 425°F
Beef Tenderloin (2to 3 Ibs.) Rare 425°F
Bone-In, Boneless (3to 5 Ib';.) 325°F
Bone-In (5to 9 ]bs.) Medium 325°F
Boneless (4to 7 Ibs.) Medium 375°F
Whole Chicken 15to 7Ibs.) 350°F
Turkey, Whole*
Unstuffed (10to 16 Ibs.) 325°F
Unstuffed (18to 24 Ibs.) 325°F
Turkey Breast (4to 6Ibs.) 325°F
*Stuffed birds generally require 30-45 minutes additional roasting time. Shield le
overbrowning and doling of skin.
InternalTemp.
145°F
160°F
145°F
145°F
160°F
165°F
165°F
170°F
170°-180°F
170°-180°F
170°F
s and breast with foil to prevent
26
Usingtheslowcook,pizza,warming
and proofing features.
GEAppliances.com
[_AWARNING
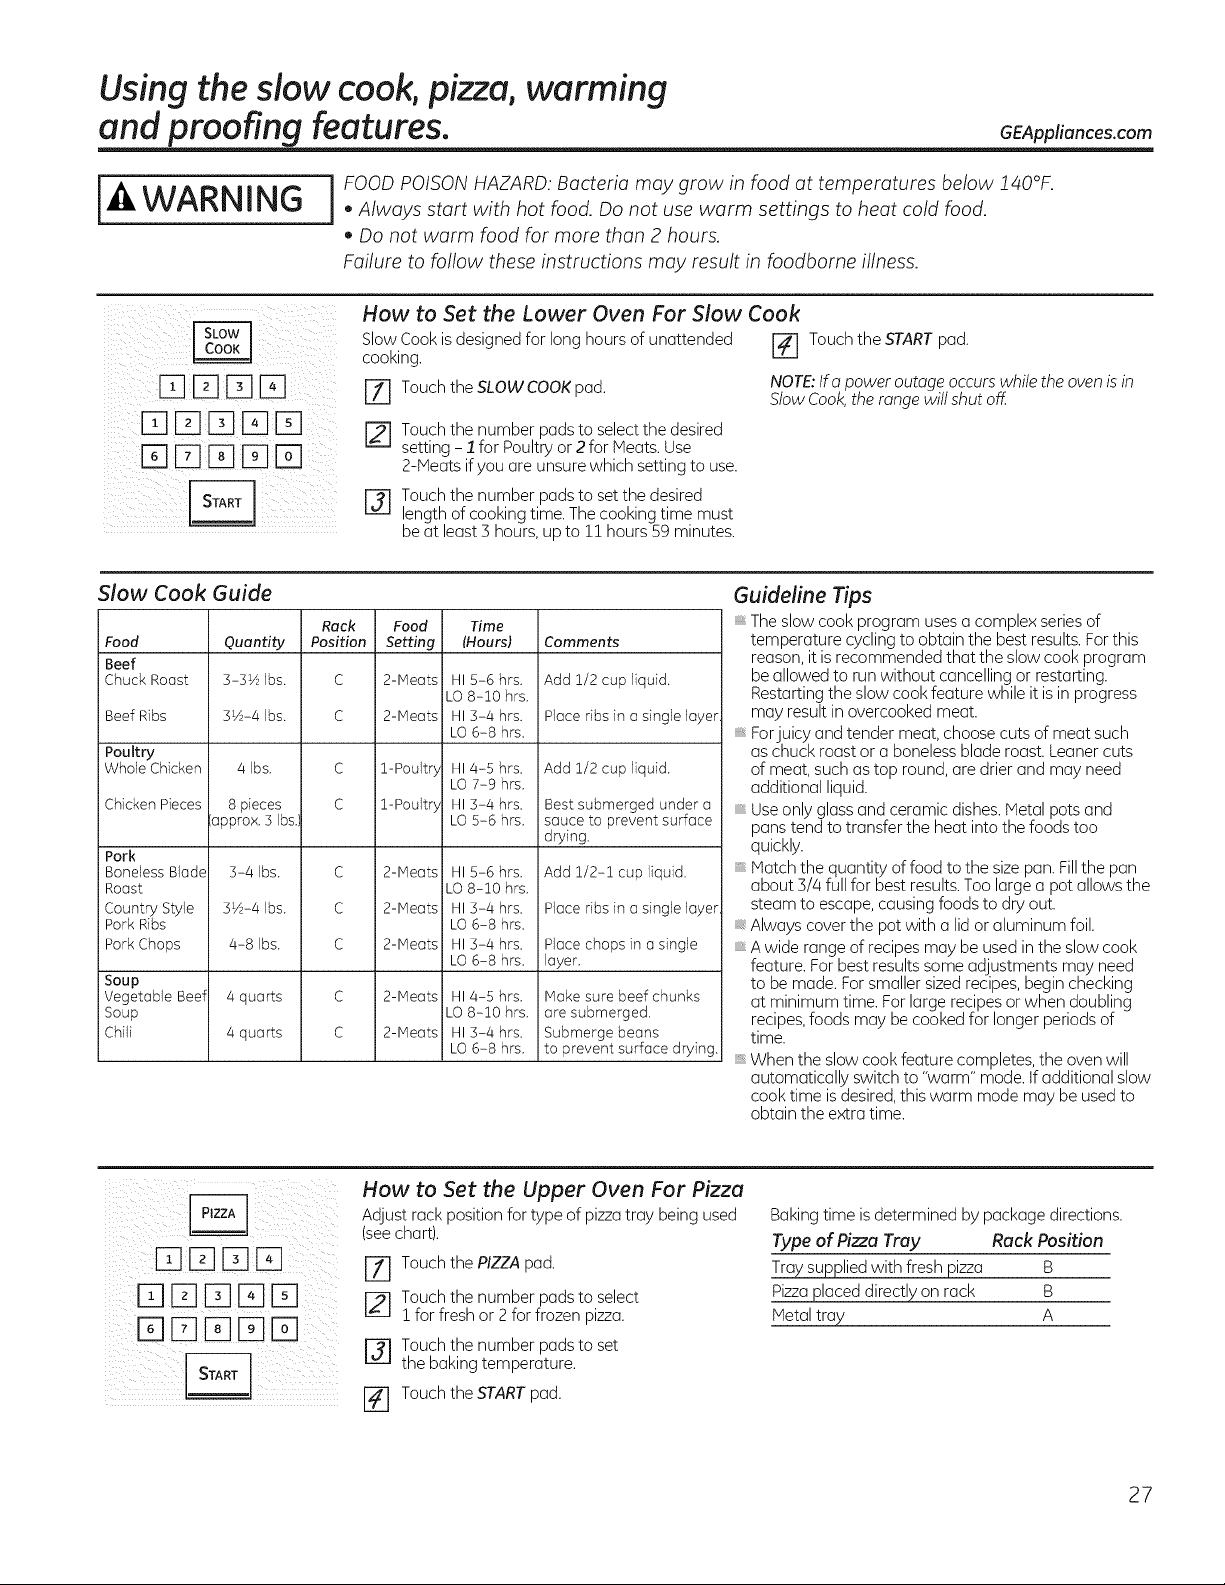
FOOD POISON HAZARD: Bacteria may grow in food at temperatures below 140°E
• Always start with hot food. Do not use warm settings to heat cold food.
• Do not warm food for more than 2 hours.
Failure to follow these instructions may result in foodborne illness.
r-qEEE3rq
-qE3E3EEEE
-qE3E]E3EE
How to Set the Lower Oven For Slow Cook
Slow Cook is designed for long hours of unattended [] Touch the START pad.
cooking.
Z] Touch the SLOW COOKpad. NOTE:Ifapower outage occurs while the oven is in
Stow Cook, the range willshut off.
['_--]Touch the number pads to selectthe desired
setting - 1 for Poultry or 2for Meats. Use
2-Meatsif you areunsure which settingto use.
rj] Touch the number pads to setthedesired
lengthofcooking time. The cooking time must
be at least3 hours, upto !! hours59 minutes.
Slow Cook Guide
Food
Beef
Chuck Roast
Beef Ribs
Poultry
Whole Chicken
Chicken Pieces
Pork
Boneless Blade
Roast
Country Style
Pork Ribs
Pork Chops
Soup
Vegetable Beef
Soup
Chili
Quantity
3-3½ Ibs.
3½-4 Ibs.
4 Ibs.
8pieces
oppro×. 5Ibs.)
3-4 Ibs.
3½-4 Ibs.
4-8 Ibs.
4quarts
4quarts
Rack
Position
C
C
c
c
c
c
c
Food Time
Setting (Hours)
2-Meats HI5-6 hrs.
LO8-10 hrs.
2-Meats HI3-4 hrs.
LO6-8 hrs.
1-Poult5 HI 4-5 hrs.
LO 7-9 hrs.
1-Poult5 HI 5-4 hrs.
LO 5-6 hrs.
2-Meats HI5-6 hrs.
LO 8-10 hrs.
2-Meats HI5-4 hrs.
LO6-8 hrs.
2-Meats HI5-4 hrs.
LO6-8 hrs.
2-Meats HI4-5 hrs.
LO 8-10 hrs.
2-Meats HI5-4 hrs.
LO6-8 hrs.
Comments
i Add 1/2cup liquid.
Place ribs in a single layer
l Add 1/2cup liquid.
Bestsubmerged under a
i sauce to prevent surface
drying,
Add 1/2-1 cup liquid,
Place ribs in a single layer
i Place chops in asingle
Ioyer.
Make sure beef chunks
are submerged.
i Submerge beons
to prevent surface drying.
Guideline Tips
The slow cook program uses a complex series of
temperature cycling to obtain the best results. Forthis
reason, it is recommended that the slow cook program
be allowed to runwithout cancelling or restarting.
Restarting the slow cook feature while it isin progress
may result inovercooked meat.
Forjuicy and tender meat, choose cuts of meat such
as chuck roast or a boneless blade roost. Leaner cuts
of meat, such as top round, are drier and may need
additional liquid.
Use only glass and ceramic dishes. Metal pots and
pans tend to transfer the heat into the foods too
quickly.
Matchthe quantity of food tothe sizepan.Fillthe pan
about 3/4 full for best results.Toolargeapot allows the
steamto escape,causing foods to dry out.
Always cover the pot with a lidor aluminum foil.
A wide range of recipesmay beused in the slow cook
feature. Forbest results some adjustments may need
tobe made.For smallersized recipes, beginchecking
atminimum time. Forlarge recipes orwhen doubling
recipes,foods may becookedfor longer periods of
time.
Whenthe slow cookfeature completes, the oven will
automatically switch to "worm" mode. If additional slow
cooktime is desired,this warm mode may beused to
obtain the extratime.
How to Set the Upper Oven For Pizza
Adjust rock position for type of pizza tray being used
(see chart).
r_ Touch the PIZZA pad.
[21 Touch the number pads to select
! for freshor 2 for frozen pizza.
r_l Touch the number pods to set
the bakingtemperature.
I-_ Touch the STARTpad.
Baking time isdetermined bypackage directions.
Type of Pizza Tray Rack Position
Traysuppliedwith fresh pizza B
Pizzaplaceddirectly on rack B
Metal tray A
27
Using the slow cook, pizza, warming and proofing features.
i_i ii _ i ii I
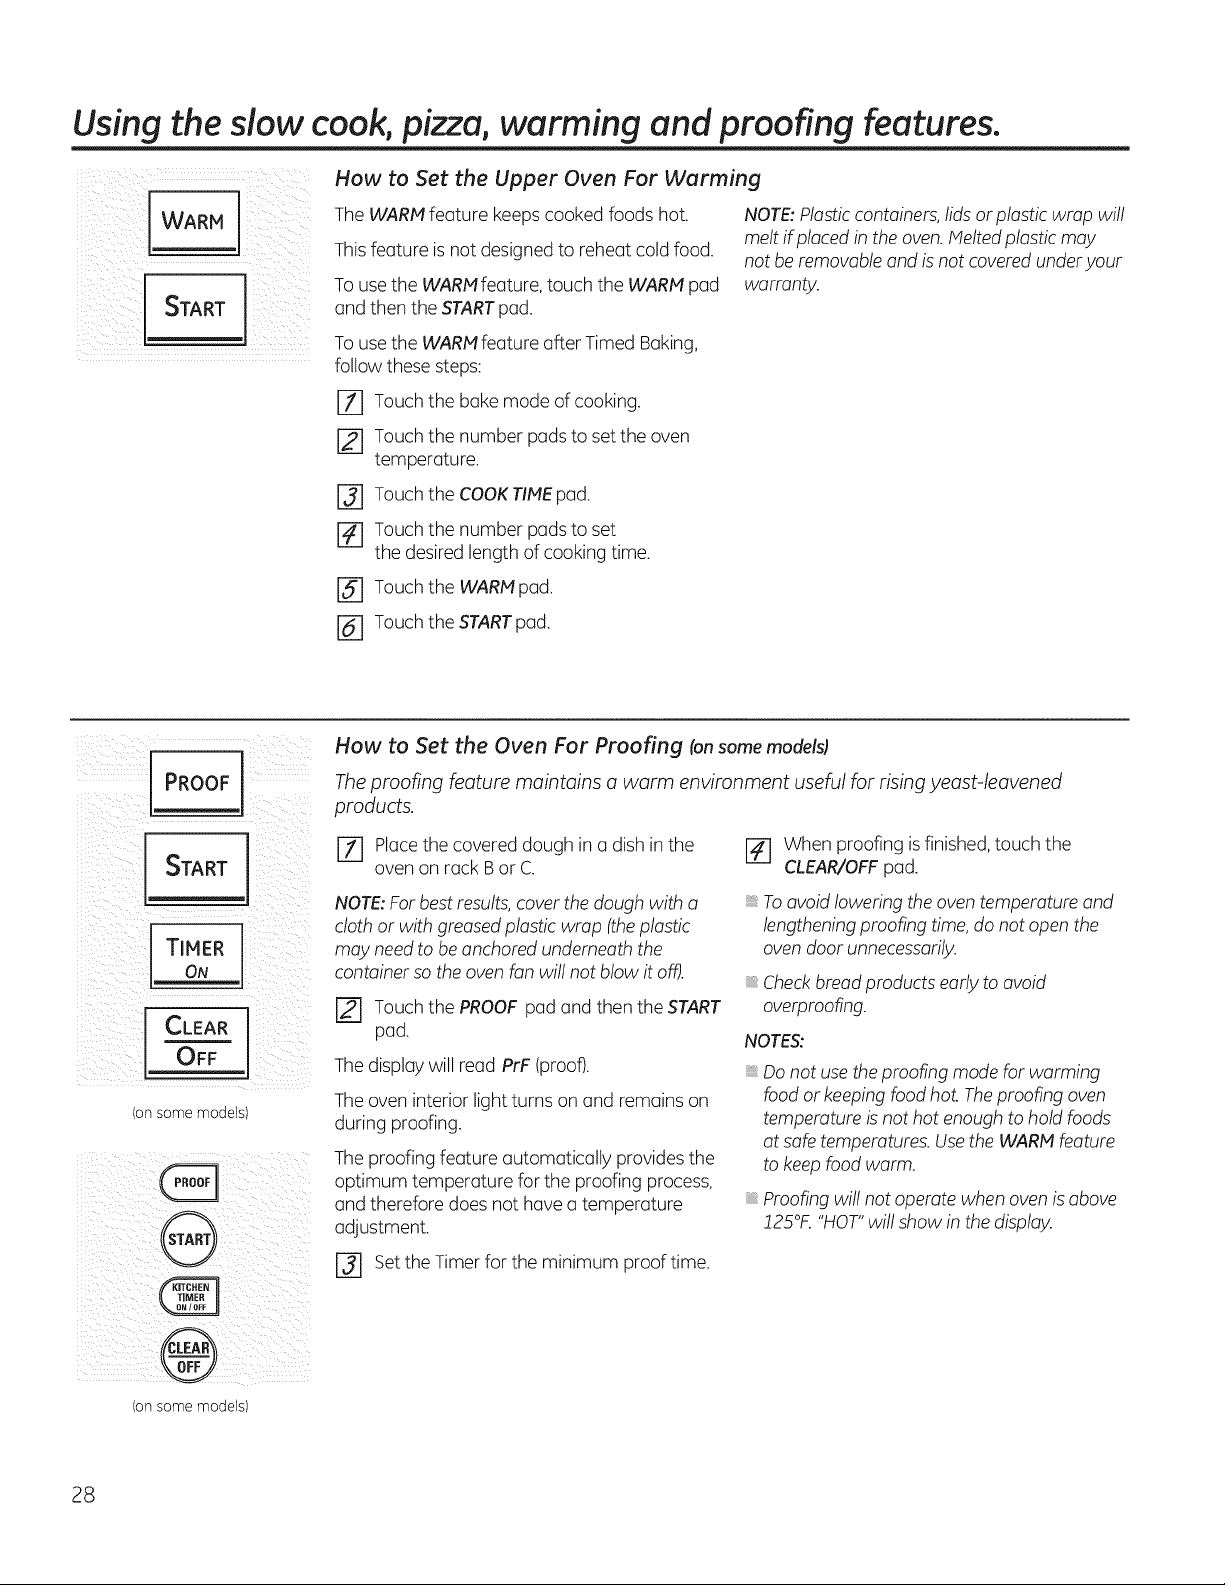
How to Set the Upper Oven For Warming
TheWARMfeature keeps cooked foods hot.
Thisfeature isnotdesigned to reheat cold food.
To use the WARMfeature, touch the WARM pad
and thentheSTARTpad.
To use the WARMfeature after Timed Baking,
follow these steps:
rT] Touch thebakemode ofcooking.
[] Touch thenumber pads toset the oven
temperature.
r_ Touch theCOOKTIMEpad.
[] Touch thenumber pads toset
thedesiredlengthofcooking time.
[] Touch the WARH pad.
NOTE:Plastic containers,lids or plasticwrap will
melt if placedin the oven. Meltedplasticmay
notbe removable and is not covered underyour
warranty.
r6] Touch theSTARTpad.
iil)ii!i _i i PROOF il _iiii i _i
T MER
I
/on some models)
How to Set the Oven For Proofing (onsome models)
Theproofing feature maintains o worm environment useful for rising yeast-leavened
products.
E2_]Place thecovered dough in a dish in the
ovenon rack Bor C.
NOTE:Forbestresults, cover the dough with a
cloth or with greased plasticwrap (theplastic
may needto beanchoredunderneaththe
container sotheoven fanwillnot blowitoff).
r_ Touch thePROOFpad and thentheSTART
pad.
The display willread PrF (proof).
The oveninteriorlightturns on and remains on
during proofing.
The proofingfeature automatically provides the
optimum temperature forthe proofing process,
and therefore doesnothavea temperature
adjustment.
F_ When proofing is finished, touch the
CLEAR/OFFpad.
To avoidloweringtheoven temperature and
lengthening proofing time, do notopen the
oven door unnecessarily.
Checkbread productsearlytoavoid
overproofing.
NOTES:
Do not use the proofing modeforwarming
foodor keeping foodhot. Theproofingoven
temperatureisnothotenough tohold foods
atsafe temperatures. UsetheWARM feature
tokeep foodwarm.
Proofingwillnotoperatewhenovenis above
!25°K "HOT"willshow in thedisplay.
r3] set theTimer forthe minimum proof time.
(onsome models)
28
Usin theself-cleanin u er and lower ovens. GEAppliances.com
Wipe up heavy soil on the oven
bottom.
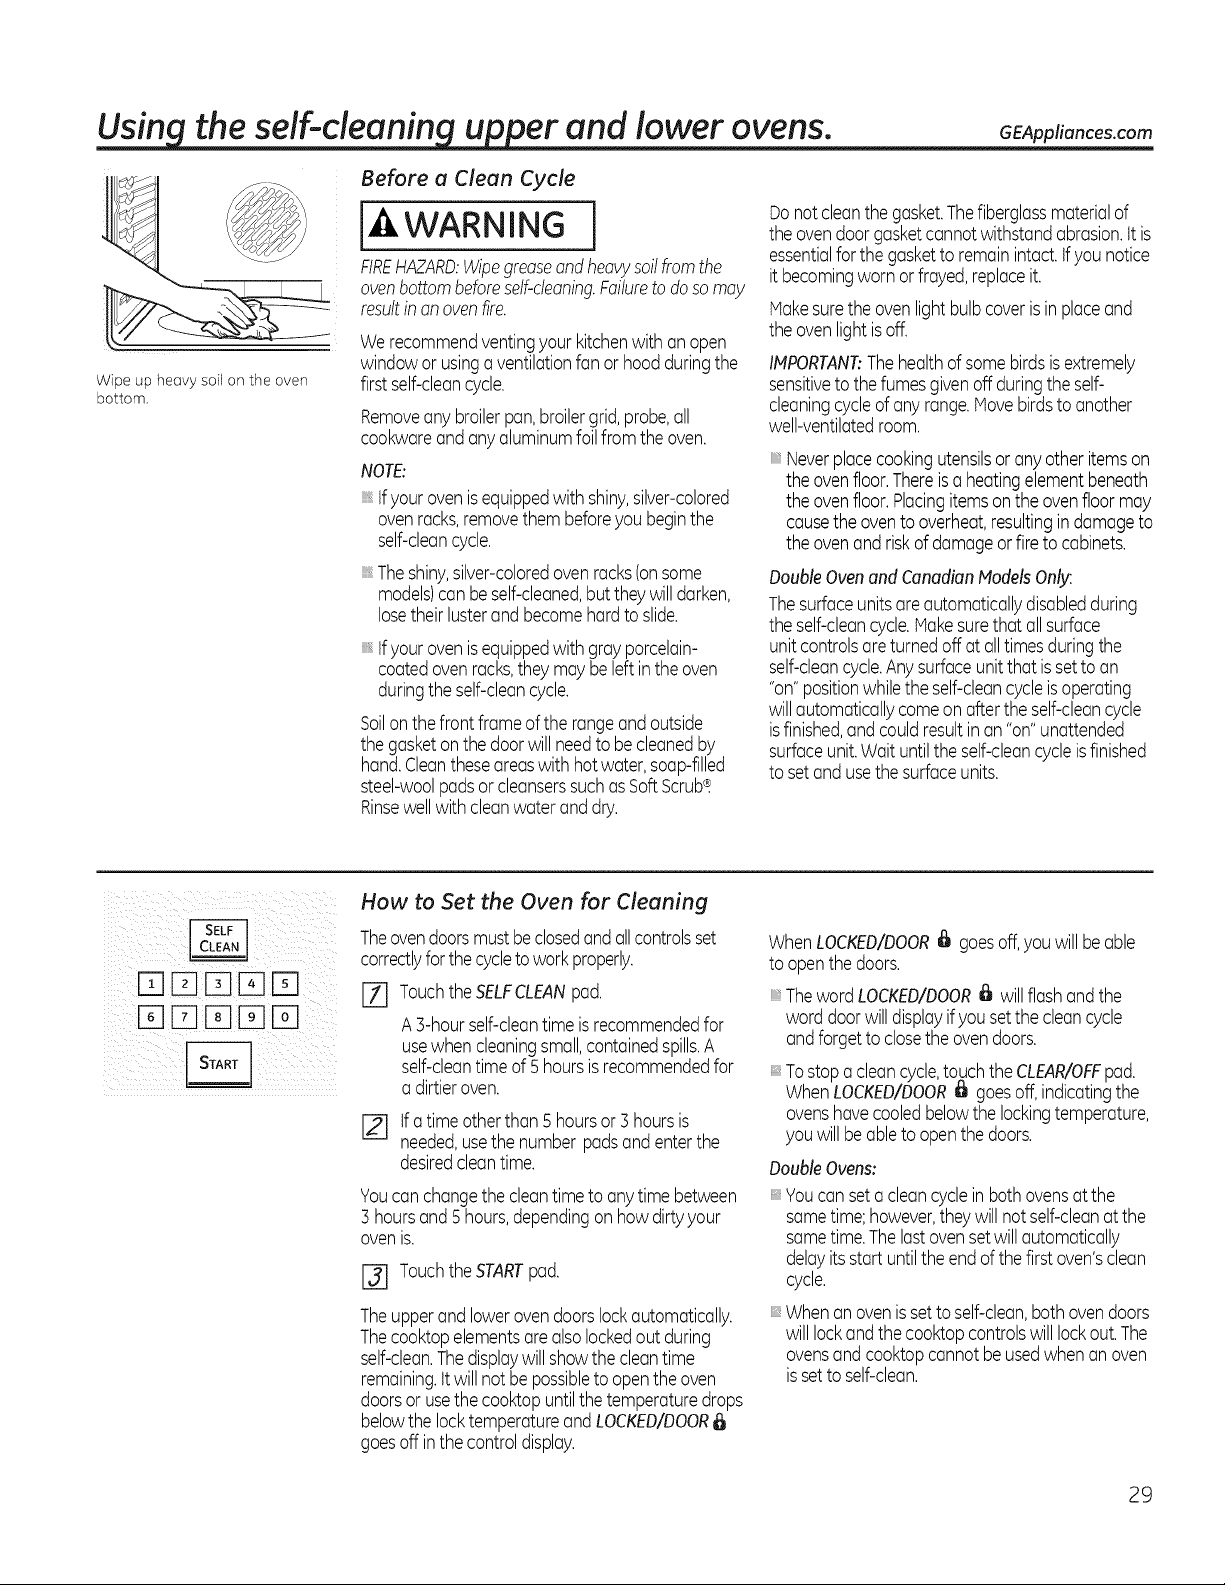
Before a Clean Cycle
[-4,WARNING
FIREHAZARD:Wipegreaseandheavysoilfromthe
ovenbottombeforeself-cleaning.Failuretodoso may
resultinan ovenfire.
Werecommendventingyour kitchenwith anopen
windowor usinga ventilationfan or hoodduringthe
firstself-cleancycle.
Removeany broilerpan,broilergrid,probe,all
cookwareandanyaluminumfoilfrom the oven.
NOTE:
tfyourovenisequippedwith shiny,silver-colored
ovenracks,removethembeforeyou beginthe
self-cleancycle.
Theshiny,silver-coloredovenracks(onsome
models)canbeself-cleaned,butthey will darken,
losetheirlusterandbecomehard to slide.
tfyourovenisequippedwith grayporcelain-
coatedovenracks,theymay be leftinthe oven
duringthe self-cleancycle.
Soilon the front frameof therangeand outside
the gasketonthe door willneedtobecleanedby
hand.Cleantheseareaswith hotwater,soap-filled
steel-woolpadsorcleanserssuchasSoftScrub_.
Rinsewellwith cleanwaterand dry.
Donot cleanthegasket.Thefiberglassmaterialof
the ovendoorgasketcannot withstandabrasion,itis
essentialfor the gaskettoremainintact,tfyounotice
itbecomingworn orfrayed,replaceit.
Makesurethe ovenlightbulbcoveris in placeand
the ovenlightisoff.
IMPORTANT:Thehealthof somebirdsisextremely
sensitiveto the fumesgivenoff duringthe self-
cleaningcycleof any range.Hovebirdsto another
well-ventilatedroom.
Neverplacecookingutensilsor anyotheritemson
the ovenfloor.Thereis a heatingelementbeneath
the ovenfloor.Placingitemsonthe ovenfloor may
causethe oventooverheat,resultingindamageto
the ovenandriskofdamageor fire to cabinets.
DoubleOvenand CanadianModelsOnly:
Thesurfaceunitsareautomaticallydisabledduring
the self-cleancycle.Hakesurethatallsurface
unit controlsareturnedoff atalltimesduringthe
self-cleancycle.Anysurfaceunit that issetto an
"on"positionwhilethe self-cleancycleisoperating
willautomaticallycomeonafter the self-cleancycle
isfinished,andcouldresultin an "on"unattended
surfaceunit.Waituntilthe self-cleancycleisfinished
to setand usethe surfaceunits.
ITIIElE] 13]IEI
I3]FI [] ITIo--I
How to Set the Oven for Cleaning
Theovendoorsmustbeclosedand allcontrolsset
correctlyfor thecycleto workproperly.
[-il TouchtheSELFCLEANpad.
A 3-hourself-cleantime isrecommendedfor
usewhen cleaningsmall,containedspills.A
self-cleantimeof5 hoursisrecommendedfor
a dirtieroven.
[] tfa time otherthan 5 hoursor ] hoursis
needed,usethe number padsandenterthe
desiredcleantime.
Youcanchangethe cleantimeto anytime between
3 hoursand 5hours,dependingon how dirtyyour
ovenis.
I-_ TouchtheSTARTpad.
Theupperand lowerovendoorslockautomatically.
Thecooktopelementsarealsolockedout during
self-clean.Thedisplaywill showthe cleantime
remaining,itwillnot be possibletoopenthe oven
doorsorusethecooktopuntilthe temperaturedrops
belowthe locktemperatureandLOCKED/DOOR
goesoff inthe controldisplay.
WhenLOCKED/DOOR_ goesoff,you will be able
to openthedoors.
ThewordLOCKED/DOOR_ will flash andthe
word doorwilldisplayifyou set the cleancycle
andforgettoclosethe ovendoors.
:: Tostopa cleancycle,touchthe CLEAR/OFFpad.
WhenLOCKED/DOOR_ goesoff,indicatingthe
ovenshavecooledbelowthe lockingtemperature,
you will beableto open thedoors.
Double Ovens:
Youcan seta cleancyclein bothovensat the
sametime;however,they will notself-cleanat the
sametime.Thelastovensetwill automatically
delayitsstart untilthe end ofthe first oven'sclean
cycle.
Whenanovenis settoself-clean,both ovendoors
will lockandthe cooktopcontrolswill lockout.The
ovensand cooktopcannot beusedwhen an oven
issetto self-clean.
29
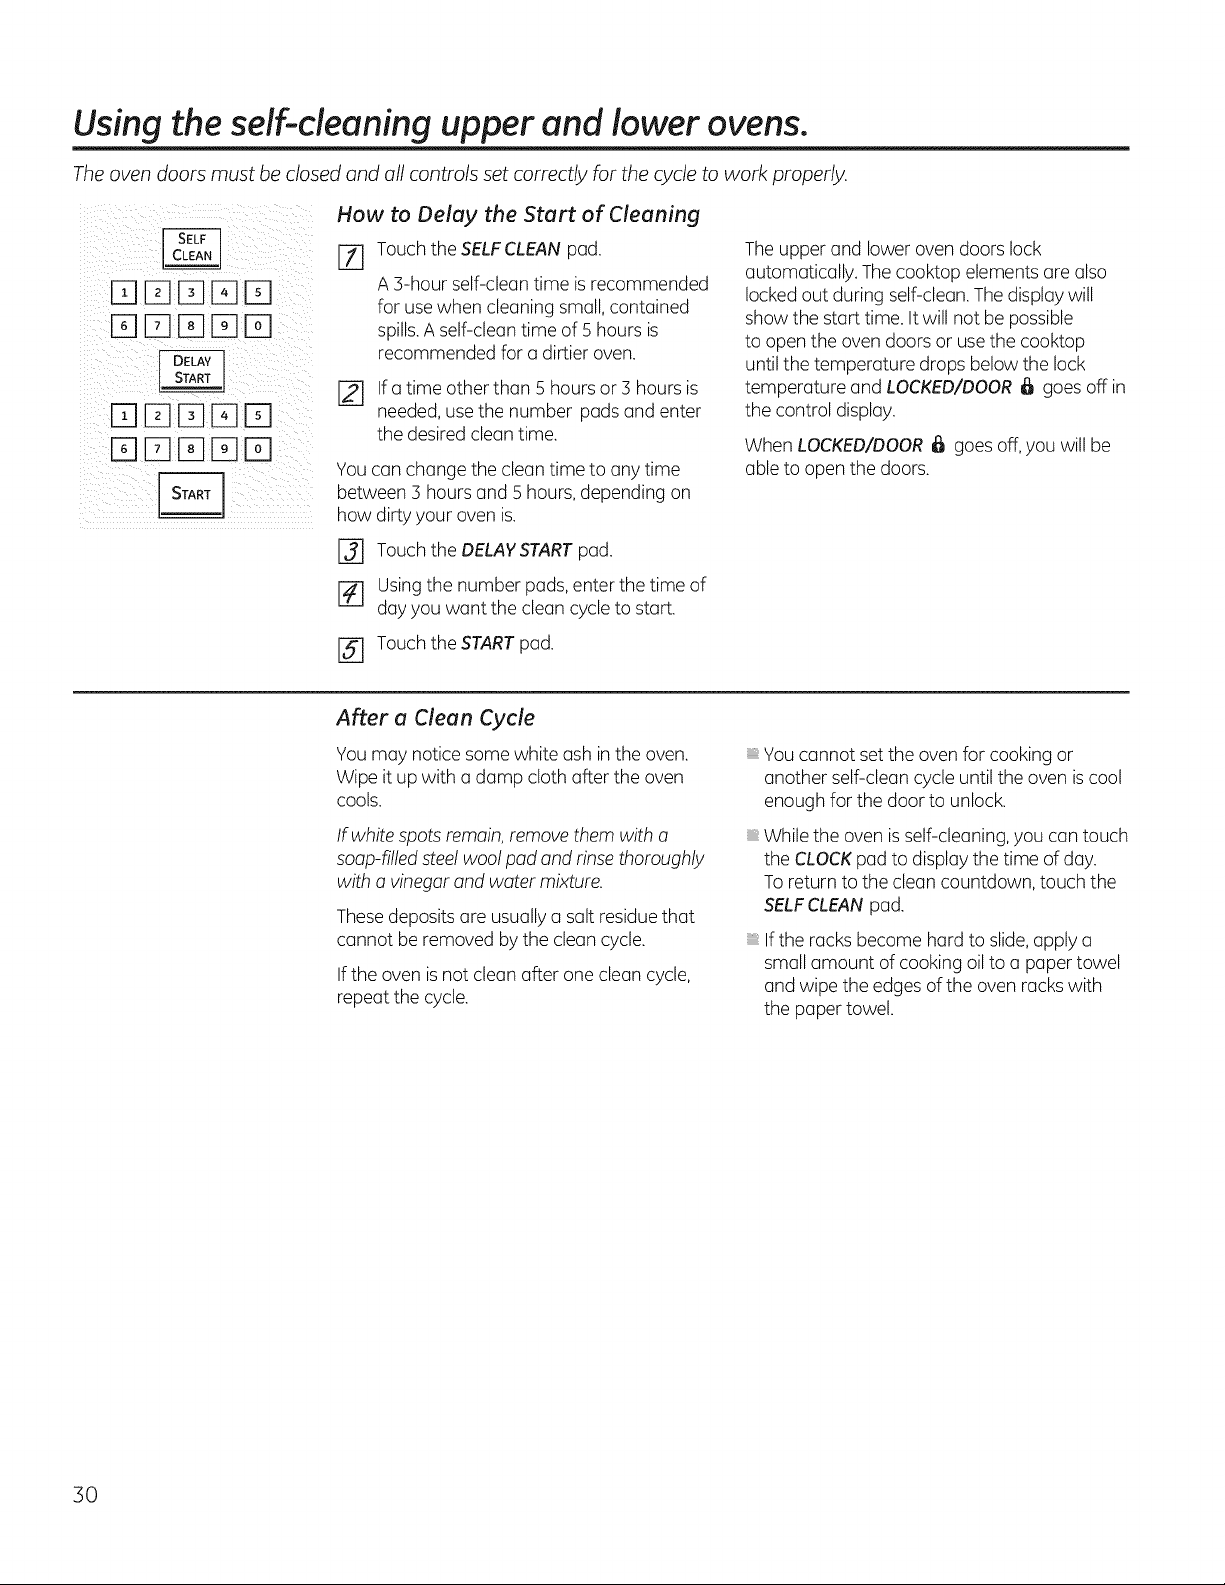
Usingtheself-cleaning upper and lower ovens.
Theoven doors must be closed and all controls set correctly for the cycle to work properly.
[][][][]D
[]DDDD
How to Delay the Start of Cleaning
[Z] Touch theSELFCLEAN pad.
A 3-hour self-clean time is recommended
for use when cleaningsmall, contained
spills.A self-cleantime of 5 hoursis
recommended fora dirtieroven.
Ifa time otherthan 5 hoursor :3hoursis
needed, usethenumber padsand enter
thedesiredclean time.
Youcan changethecleantime to anytime
between 3 hoursand 5 hours, depending on
how dirty your ovenis.
[] Touch theDELAYSTARTpad.
[] Usingthenumber pads, enterthetime of
dayyouwant thecleancycletostart.
The upper and lowerovendoorslock
automatically. The cooktop elementsare also
locked out during self-clean. The display will
show thestart time.It willnot be possible
toopen theovendoorsor use the cooktop
untilthetemperature drops below the lock
temperature and LOCKED/DOOR_ goes off in
thecontrol display.
WhenLOCKED/DOOR_ goesoff, youwill be
able to open the doors.
[] Touch theSTARTpad.
After a Clean Cycle
You may notice some white ashin theoven.
Wipeitup with a damp cloth after the oven
cools.
If white spots remain, remove them with a
soap-filledsteel woolpad and rinse thoroughly
with a vinegarand water mixture.
Thesedeposits are usually a salt residue that
cannot be removed bythecleancycle.
If the ovenis notcleanafter one cleancycle,
repeatthe cycle.
You cannot set the oven for cooking or
anotherself-cleancycleuntiltheoven is cool
enough for thedoor tounlock.
Whiletheoven is self-cleaning, youcantouch
the CLOCKpad to display thetime ofday.
Toreturntothe cleancountdown, touch the
SELFCLEANpad.
If theracksbecome hard toslide,applya
small amount ofcooking oil toa paper towel
and wipethe edges ofthe ovenracks with
the paper towel.
30
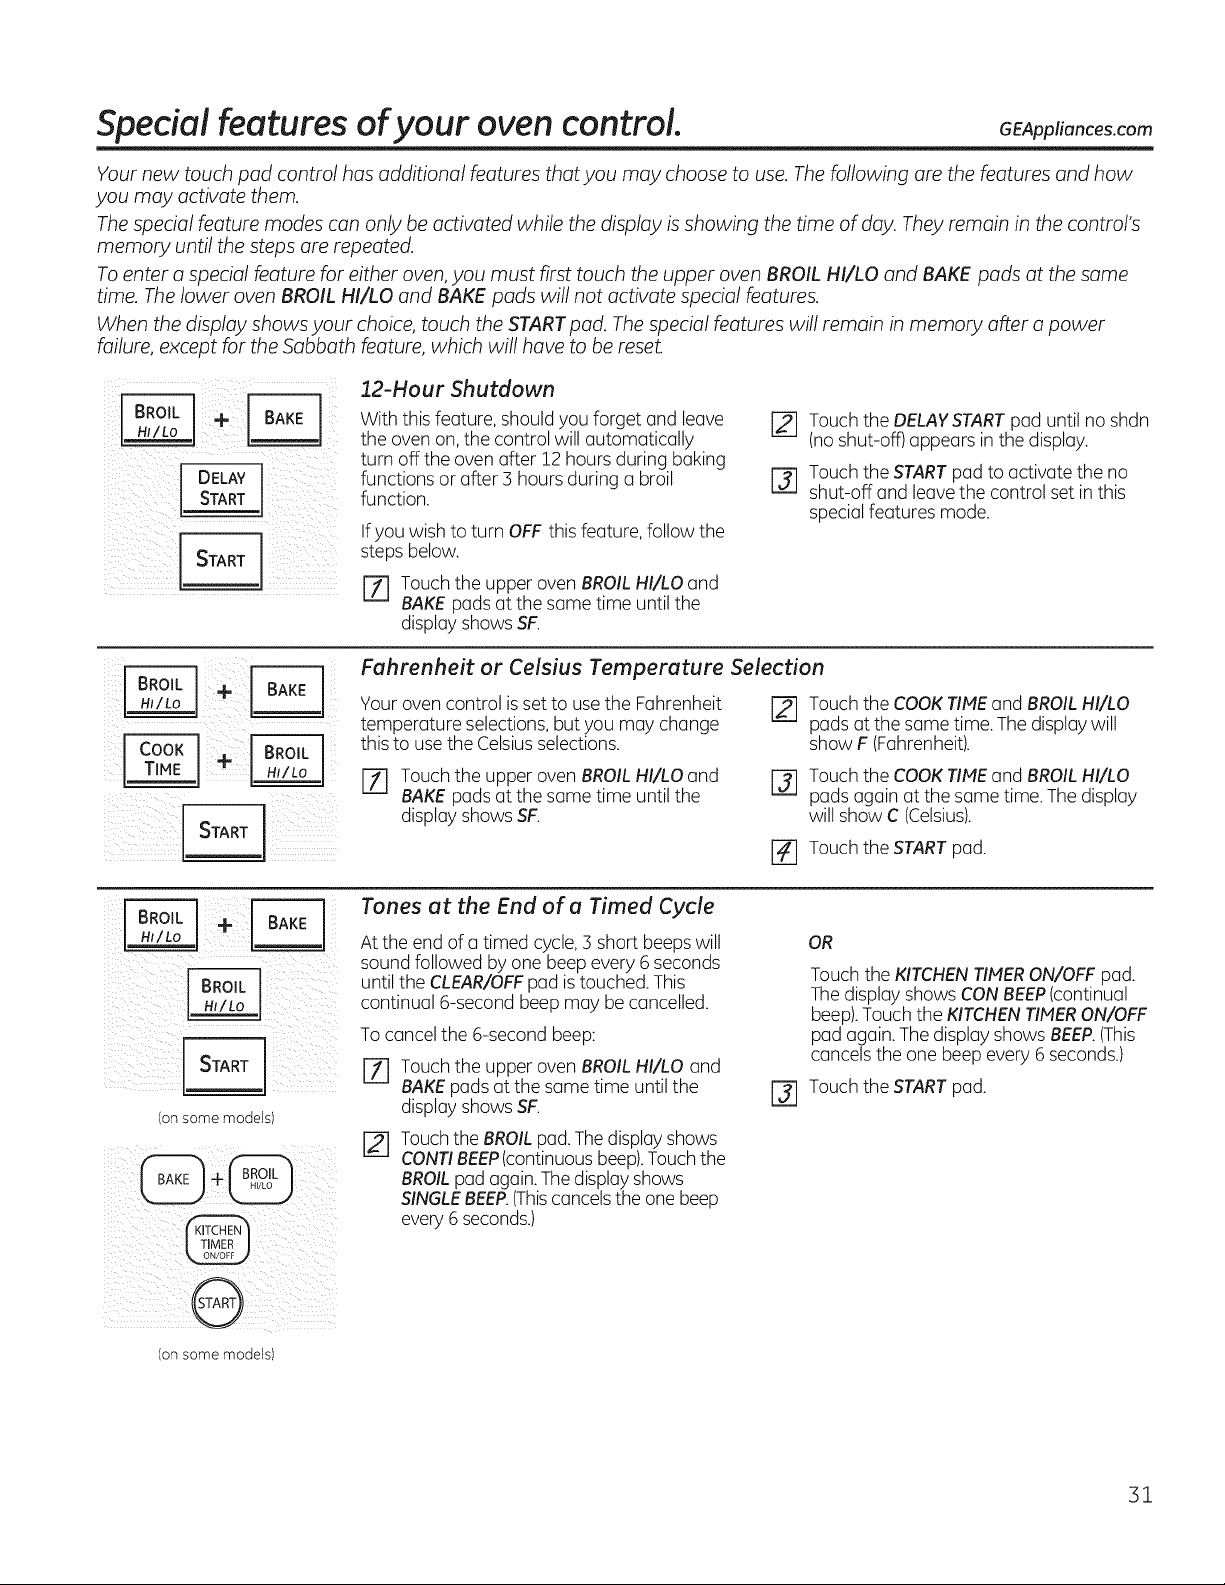
Special features ofyour oven control. GEApp,°.coscom
Your new touch pad control has additional features that you may choose to use. Thefollowing are the features and how
you may activate them.
Thespecial Feature modes can only be activated while the display isshowing the time of day. They remain in the control's
memory until the steps are repeated.
Toenter a special feature for either oven, you must first touch the upper oven BROIL HI/LO and BAKE pads at the same
time. Thelower oven BROIL HI/LO and BAKE pads will not activate special features.
When the display shows your choice, touch the START pad. Thespecial features will remain in memory after a power
failure, except for the Sabbath feature, which will have to be reset.
turn off the ovenafter 12 hoursduring baking
I DElAyl
i i i
i_IIi _iiiii_illii_ _!ii_i_i!_iii_ii
With this feature,shouldyouforget and leave
theovenon, the control willautomatically
functions or after 3 hoursduring a broil
function.
If youwish toturn OFF this feature,follow the
stepsbelow.
r_ Touch theupper ovenBROILHI/LOand
BAKE pads at thesame time untilthe
display showsSF.
[] Touch theDELAYSTARTpad untilno shdn
(no shut-off) appears in the display.
r3] Touch theSTARTpad to activate theno
shut-off and leave thecontrol set in this
special featuresmode.
i Z _ i i i
,_i_i_i_i_:i_iii_i_ii_i_i_IL_ iIII__iiii_iiili
Fuhrenheit or Celsius Temperuture Selection
Your oven control is set to use the Fahrenheit
temperature selections,butyou may change
this to use theCelsiusselections.
[_ Touch theCOOKTIMEand BROILHI/LO
padsatthe same time.The display will
show F(Fahrenheit).
[Z] Touch theupper ovenBROILHI/LOand
BAKE pads at thesame time untilthe
display showsSF.
I-_ Touch theCOOKTIMEand BROILHI/LO
padsagain atthe same time.The display
willshow C(Celsius).
r_ Touch the START pad.
! _ i¸
(onsome models)
Tones ot the End of o Timed Cycle
Attheend of a timed cycle, 3 short beeps will
soundfollowed byone beep every 6 seconds
untilthe CLEAR/OFFpad is touched.This
continual 6-second beep may be cancelled.
To cancel the 6-second beep:
[71 Touch theupper ovenBROILHI/LO and
BAKEpads at thesame time untilthe
display showsSF.
TouchtheBROILpad. Thedisplay shows
CONTIBEEP(continuousbeep).Touch the
BROILpad again. The displayshows
SINGLEBEEP.(Thiscancels theone beep
every 6 seconds.)
OR
Touch theKITCHENlINER ON/OFF pad.
The display showsCONBEEP(continual
beep).Touch the KITCHENlINER ON/OFF
pad again. The display showsBEEP.(This
cancels the one beep every 6 seconds.)
[] Touch the START pad.
(onsome models)
31
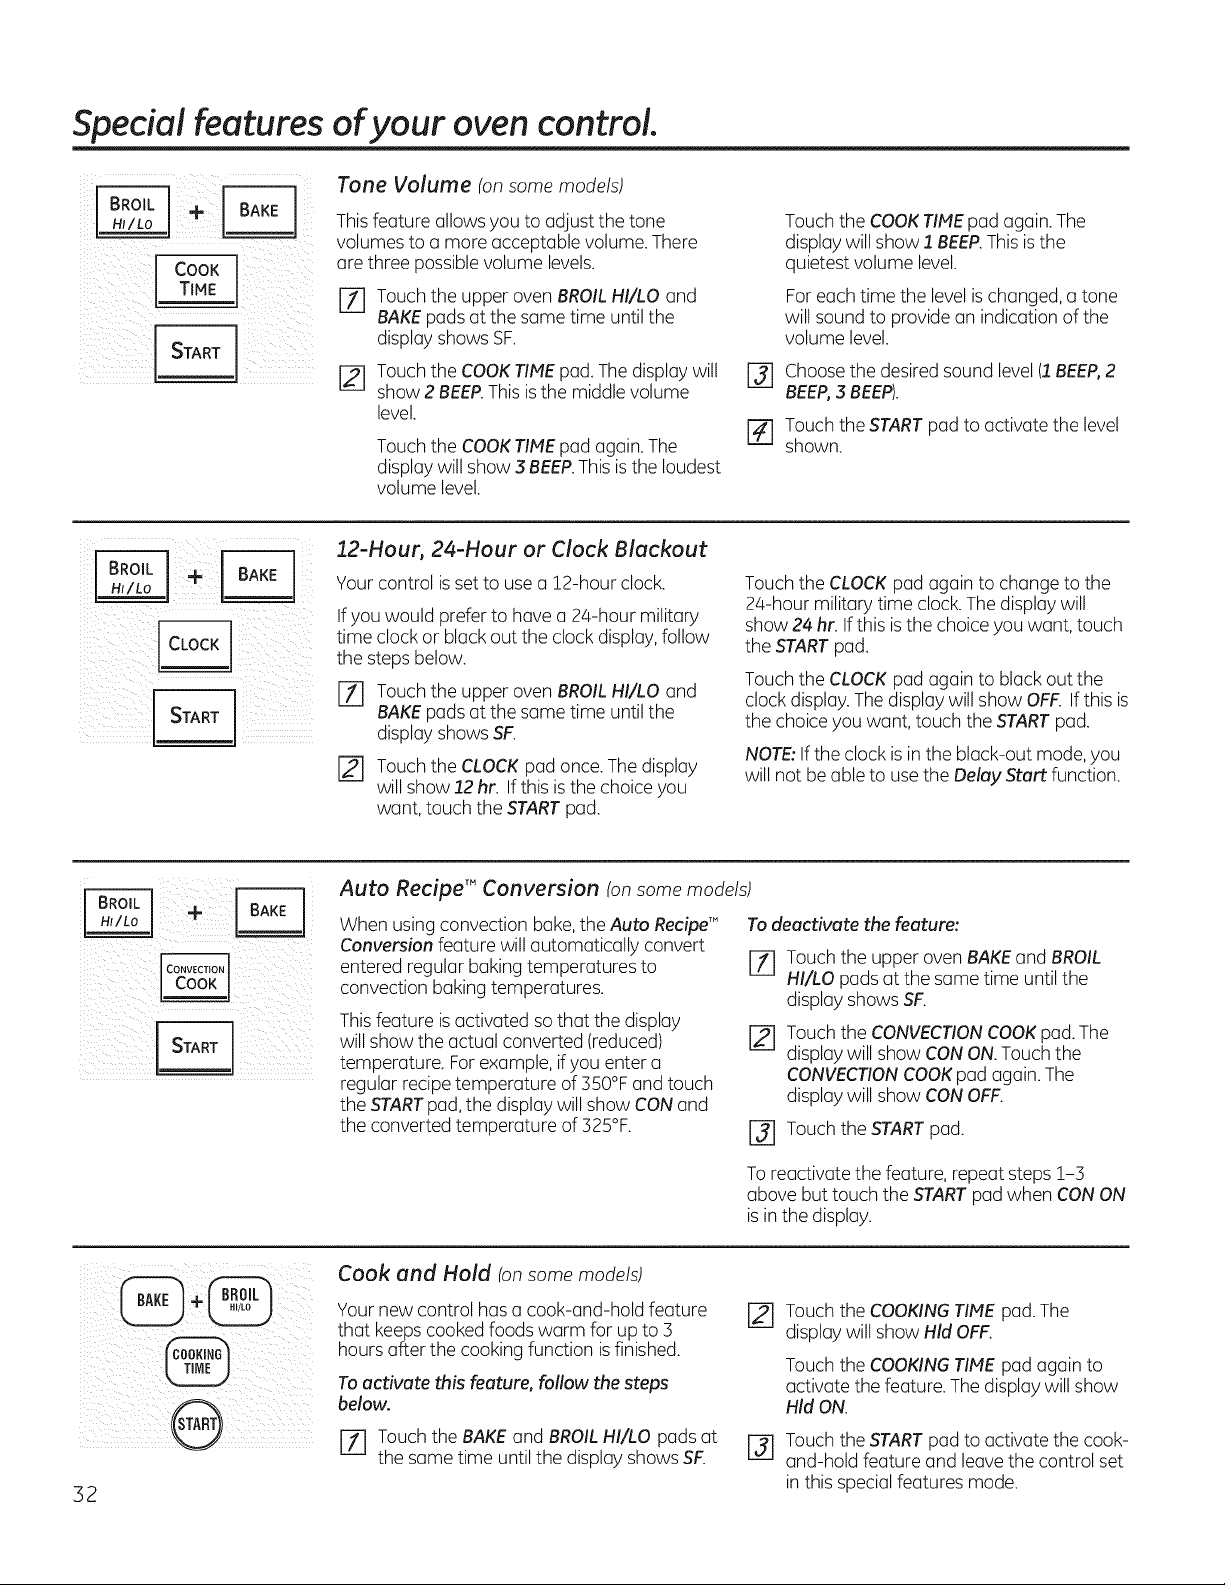
Special features ofyour oven control.
Cook
TIMF
Tone Volume (on some models)
Thisfeature allows you toadjust thetone
volumestoa moreacceptable volume. There
are three possible volume levels.
[Z] Touch theupper ovenBROILHI/LO and
BAKEpads at thesame time untilthe
display showsSF.
r_ Touch theCOOKTIMEpad.The display will
show 2 BEEP.This is the middle volume
level.
Touch theCOOKTIHE pad again. The
display willshow 3 BEEP.This is the loudest
volume level.
@
r#]
Touch theCOOKTIMEpod again. The
display willshow 1 BEEP.This is the
quietestvolume level.
For each time the level is changed, a tone
willsoundto providean indication ofthe
volume level.
Choosethe desired soundlevel (1 BEEF),2
BEEF),3 BEEP).
Touch theSTARTpad to activate thelevel
shown.
22-Hour, 24-Hour or Clock Blackout
Your control is set to use a 12-hour clock.
If youwould preferto haveo 24-hour military
time clockor black outthe clockdisplay,follow
thestepsbelow.
I-_ Touch the upper oven BROIL HI/LO and
BAKE pads at the same time until the
display shows SF.
[]
Touch theCLOCKpad once. The display
willshow !2 hr. If this is the choice you
want,touch theSTARTpad.
Touch theCLOCKpod again to changetothe
24-hour militarytime clock.The display will
show 24 hr.If this is the choice youwant, touch
theSTARTpad.
Touch theCLOCKpad again to black out the
clockdisplay.Thedisplay willshow OFF.If this is
thechoice youwant, touch the STARTpad.
NOTE:Ifthe clockis in the black-out mode,you
willnot be able to use theDelay Start function.
Auto Recipe TM Conversion (on some models)
When usingconvection bake, theAuto Recipe'"
Conversionfeature willautomatically convert
enteredregular bakingtemperatures to
convection bakingtemperatures.
Thisfeature is activated so that the display
will show the actual converted (reduced)
temperature. Forexample,if you entera
regular recipe temperature of350°F and touch
the STARTpad, the display willshow CONand
the convertedtemperature of 325%.
To deactivate the feature:
%
Touch the upper oven BAKE and BROIL
HI/LO pods at the same time until the
display shows SF.
Touch theCONVECTIONCOOKpad. The
display willshow CONON. Touch the
CONVECTIONCOOKpad again.The
display willshow CONOFF.
r_ Touch theSTARTpad.
To reactivate thefeature,repeat steps1-3
abovebuttouch theSTARTpad when CON ON
is in the display.
32
Cook and Hold (onsome models)
Your newcontrol has a cook-and-hold feature
that keeps cooked foods warm for up to 3
hours after the cooking function is finished.
To activate this feature, follow the steps
below.
[] Touch the BAKEand BROILHI/LO padsat
the same time until the display showsSF.
Touch theCOOKINGTIME pad. The
display will show Hid OFF.
@
Touch theCOOKINGTIME pad again to
activate the feature. Thedisplay willshow
Hid ON.
Touch theSTARTpad to activate thecook-
and-hold feature and leave the control set
in this special features mode.
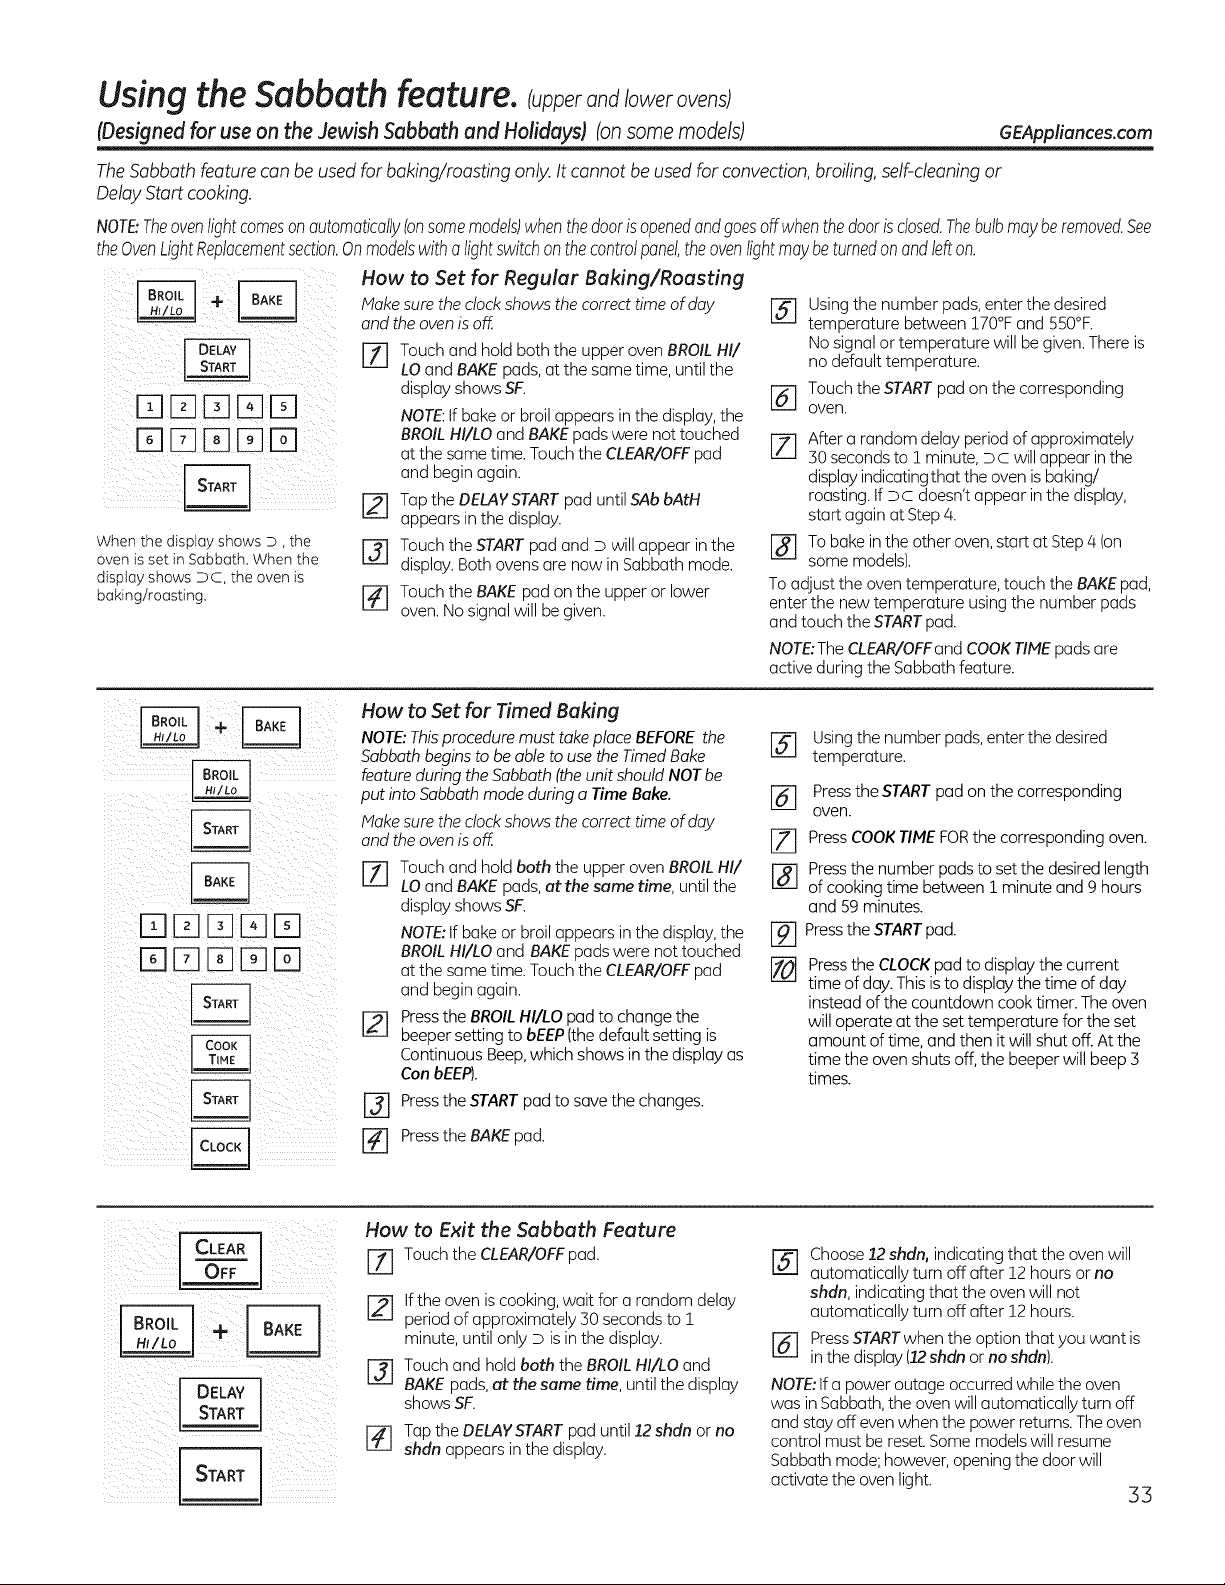
Using the Sabbath feature. Cupperand/owerov ns
IDesigned for useon the JewishSabbath and Holidays) (onsome models) GEAppliances.com
The Sabbath feature can be used for baking/roasting only. It cannot beused for convection, broiling, self-cleaning or
Delay Start cooking.
NOTBTheovenlightcomesonautomaticallyIonsomemodels)whenthedoorisopenedandgoesoff whenthedoorisclosed.Thebulbmayberemoved.See
theOvenLightReplacementsection.Onmodelswitha lightswitchonthecontrolpanel,theovenlightmaybeturnedonandlefton.
i ¸I-q IZ]HIEEFI
ill i i iiiii iiii
When the display shows D, the
oven isset in Sabbath. When the
display shows DC, the oven is
baking/roasting.
How to Set for Regular Baking/Roasting
Hake sure the clock shows the correct time of day
and the oven is off.
[-_ Touch and hold both the upper oven BROIL HI/
LO and BAKE pads, atthe same time, until the
displayshowsSF.
NOTE:If bake or broilappears in the display,the
BROILHI/LO and BAKEpads were nottouched
atthe sametime. Touch the CLEAR/OFFpad
and begin again.
F_ Tapthe DELAYSTARTpad until SAbbAtH
appears in the display.
F_ Touch theSTARTpad and Dwill appear in the
display. Both ovens arenow in Sabbath mode.
[-_ Touch the BAKE pad on the upperor lower
oven. Nosignal will be given.
r_ Using the number pads, enter the desired
temperature between !70°F and 550°F.
No signal or temperature will begiven.Thereis
nodefault temperature.
r_l Touch the STARTpad onthe corresponding
oveR.
After a random delay period of approximately
zlzjj
30 secondsto ! minute, Dc will appearin the
display indicating that the oven is baking/
roasting.If Dc doesn't appear inthe display,
start again atStep 4.
r_To bakeinthe other oven,start atStep 4 (on
some models).
To adjust the oven temperature, touch the BAKEpad,
enter the newtemperature usingthe number pads
and touch theSTARTpad.
NOTE:TheCLEAR/OFFand COOKTIMEpads are
active during the Sabbathfeature.
DDD[]HI
HI[]HIHIHI
How to Set for Timed Baking
NOTE:Thisprocedure must take place BEFOREthe
Sabbath begins to be able to use the Timed Bake
feature during the Sabbath (the unit should NOT be
put into Sabbath mode during a Time Bake.
Make sure the clock shows the correct time of day
and the oven is off.
Touch andhold both the upper oven BROILHI/
LO and BAKE pads, at the sametime, until the
displayshowsSF.
NOTE:If bake or broilappears in the display, the
BROILHI/LO and BAKEpads were not touched
atthe sametime. Touch the CLEAR/OFFpad
and begin again.
[-_ Pressthe BROILHI/LO pad tochange the
beepersettingto bEEP(thedefault setting is
Continuous Beep,which showsin the display as
Con bEEP).
r-_ Press the START pad to save the changes.
r_ Press the BAKE pad.
r_ Using the number pads, enterthe desired
temperature.
r_ Pressthe STARTpad onthe corresponding
oven.
In] PressCOOKTIMEFORthe corresponding oven.
[_ Pressthe number pads to setthedesired length
ofcooking time between 1 minute and 9hours
and 59minutes.
[-9---]Pressthe STARTpad.
[]
Pressthe CLOCKpad to displaythe current
time of day.This is to displaythe time ofday
insteadofthe countdown cooktimer. The oven
will operate atthe set temperature for the set
amount oftime, and then itwill shut off. Atthe
time the oven shuts off,the beeperwill beep3
times.
How to Exit the Sabbath Feature
Z] Touch the CLEAR/OFFpad.
If the oven is cooking,wait for a random delay
period ofapproximately 50secondsto1
minute, untilonly Disinthe display.
Touch andhold both the BROILHI/LO and
BAKE pads, at the sametime, until the display
showsSF.
Tapthe DELAYSTARTpad until12 shdn or no
shdn appears inthe display.
r_ Choose 12 shdn,indicating that the oven will
automatically turn offafter 12 hours orno
shdn, indicating that the oven will not
automatically turn offafter 12hours.
r_ PressSTARTwhen the option that you want is
in the display(12shdn orno shdn).
NOTE:If a power outage occurred while the oven
was in Sabbath,the oven will automatically turn off
and stayoffeven when the power returns.The oven
control must bereset.Somemodelswill resume
Sabbathmode; however, openingthe door will
activatethe oven light.
33
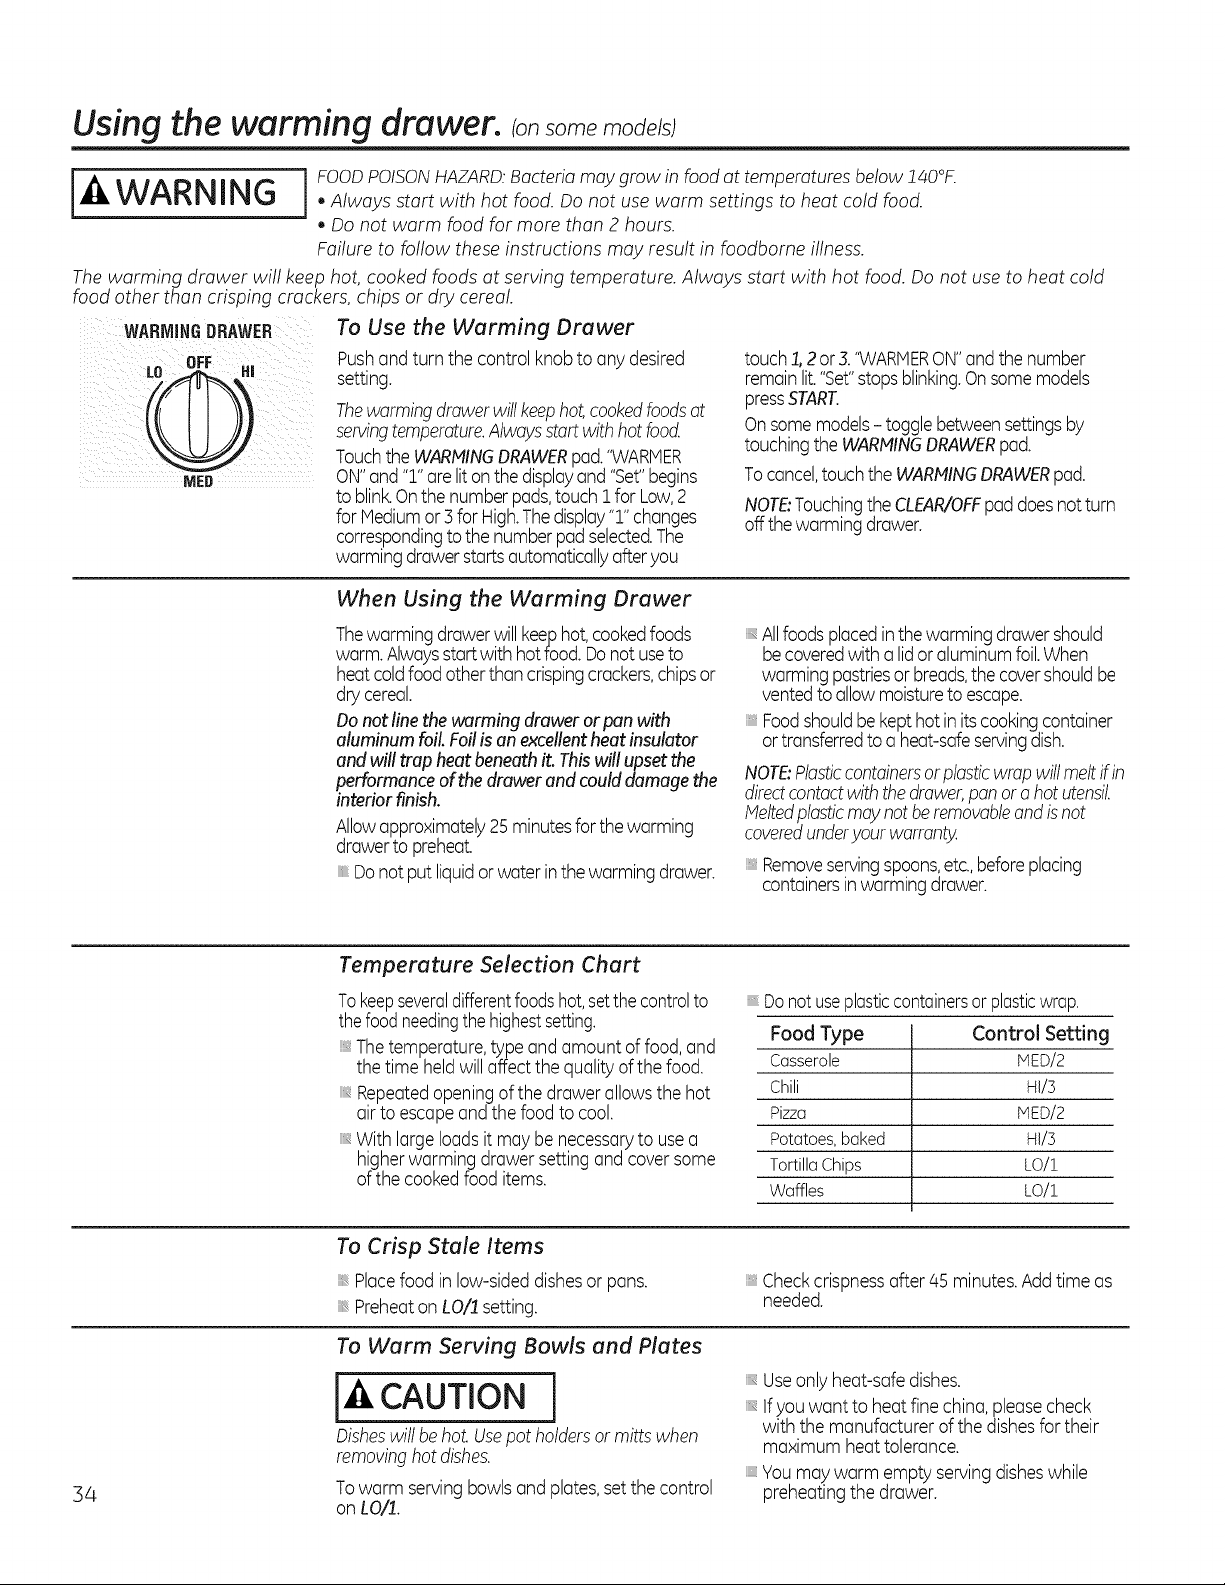
Using the warming drawer, consomemode sl
[_tl, FOODPOISONHAZARD.Bacteriamay grow in foodat temperatures below!40°K
WARNING . AlwaysstartwithhotfoodDonotusewarmsettingstoheatcoldfood
, Do not warm food for more than 2 hours.
Failure to follow these instructions may result in foodborne illness.
Thewarming drawer will keephot, cooked foods at serving temperature. Always start with hot food. Donot use to heat cold
food other than crisping crackers, chips or drycereal.
WARMINGDRAWER To Use the Warming Drawer
Pushand turn thecontrol knob toany desired
setting.
Thewarmingdrawerwill keephot,cookedfoodsat
servingtemperature.Alwaysstart with hot food.
TouchtheWARHINGDRAWERpad."WARMER
ON"and ":]."are litonthedisplayand "Set"begins
to blinkOnthe number pads,touch 1forLow,2
for Hediumor 3 for High.Thedisplay":]."changes
correspondingto the number padselected.The
warmingdrawerstarts automaticallyafteryou
touch1,2 or 3."WARMERON"andthenumber
remainlit."Set"stopsblinking.Onsomemodels
pressSTART.
Onsome models- toggle betweensettingsby
touchingthe WARMINGDRAWERpad.
Tocancel,touchtheWARHINGDRAWERpad.
NOTE:Touchingthe CLEAR/OFFpaddoesnot turn
offthe warming drawer.
When Using the Warming Drawer
Thewarmingdrawerwill keephot, cookedfoods
warm.Alwaysstart with hotfood. Donot useto
heatcold foodother than crispingcrackers,chipsor
dry cereal.
Donotline the warming drawer or pan with
aluminum foil.Foilis an excellent heat insulator
and will trapheatbeneathit. Thiswillupset the
performance of thedrawer and could damage the
interiorfinish.
Allowapproximately25minutesfor the warming
drawertopreheat.
Donot putliquidorwater in the warming drawer.
;;,,Allfoods placedinthe warming drawershould
becoveredwith a lidor aluminumfoil.When
warming pastriesor breads,the covershouldbe
ventedto allow moisturetoescape.
Foodshouldbekept hot in its cookingcontainer
ortransferredto a heat-safeservingdish.
NOTE:Plasticcontainersorplasticwrap will meltif in
directcontactwith thedrawer,pan or a hot utensil
Meltedplasticmay not be removableand isnot
coveredunderyour warranty.
;;_,Removeservingspoons,etc.,beforeplacing
containersin warmingdrawer.
Temperature Selection Chart
To keepseveraldifferentfoodshot,setthe controlto
thefood needingthe highestsetting.
Thetemperature,type andamount offood, and
the time heldwill affect thequality of the food.
Repeatedopeningof thedrawer allows the hot
air to escapeand thefood tocool.
With largeloadsitmay be necessaryto usea
higherwarming drawer setting and coversome
of thecookedfooditems.
;;_,Donotuseplasticcontainersor plasticwrap.
Food Type Control Setting
Casserole HED/2
Chili HI/5
Pizza HED/2
Potatoes, baked HI/5
TortillaChips LO/:]_
Waffles LO/:]_
34
To Crisp Stale Items
;;,,Placefoodin low-sideddishesor pans.
Preheaton LO/! setting.
;;_,Checkcrispnessafter 45 minutes.Add time as
needed.
To Warm Serving Bowls and Plates
CAUTION]
Disheswillbehot. Usepotholdersor mittswhen
removinghotdishes.
Towarm servingbowls and plates,set the control
on LO/!.
Useonlyheat-safedishes.
Ifyouwant to heat fine china, pleasecheck
with themanufacturer of thedishesfor their
maximum heat tolerance.
Youmay warm emptyservingdisheswhile
preheatingthedrawer.
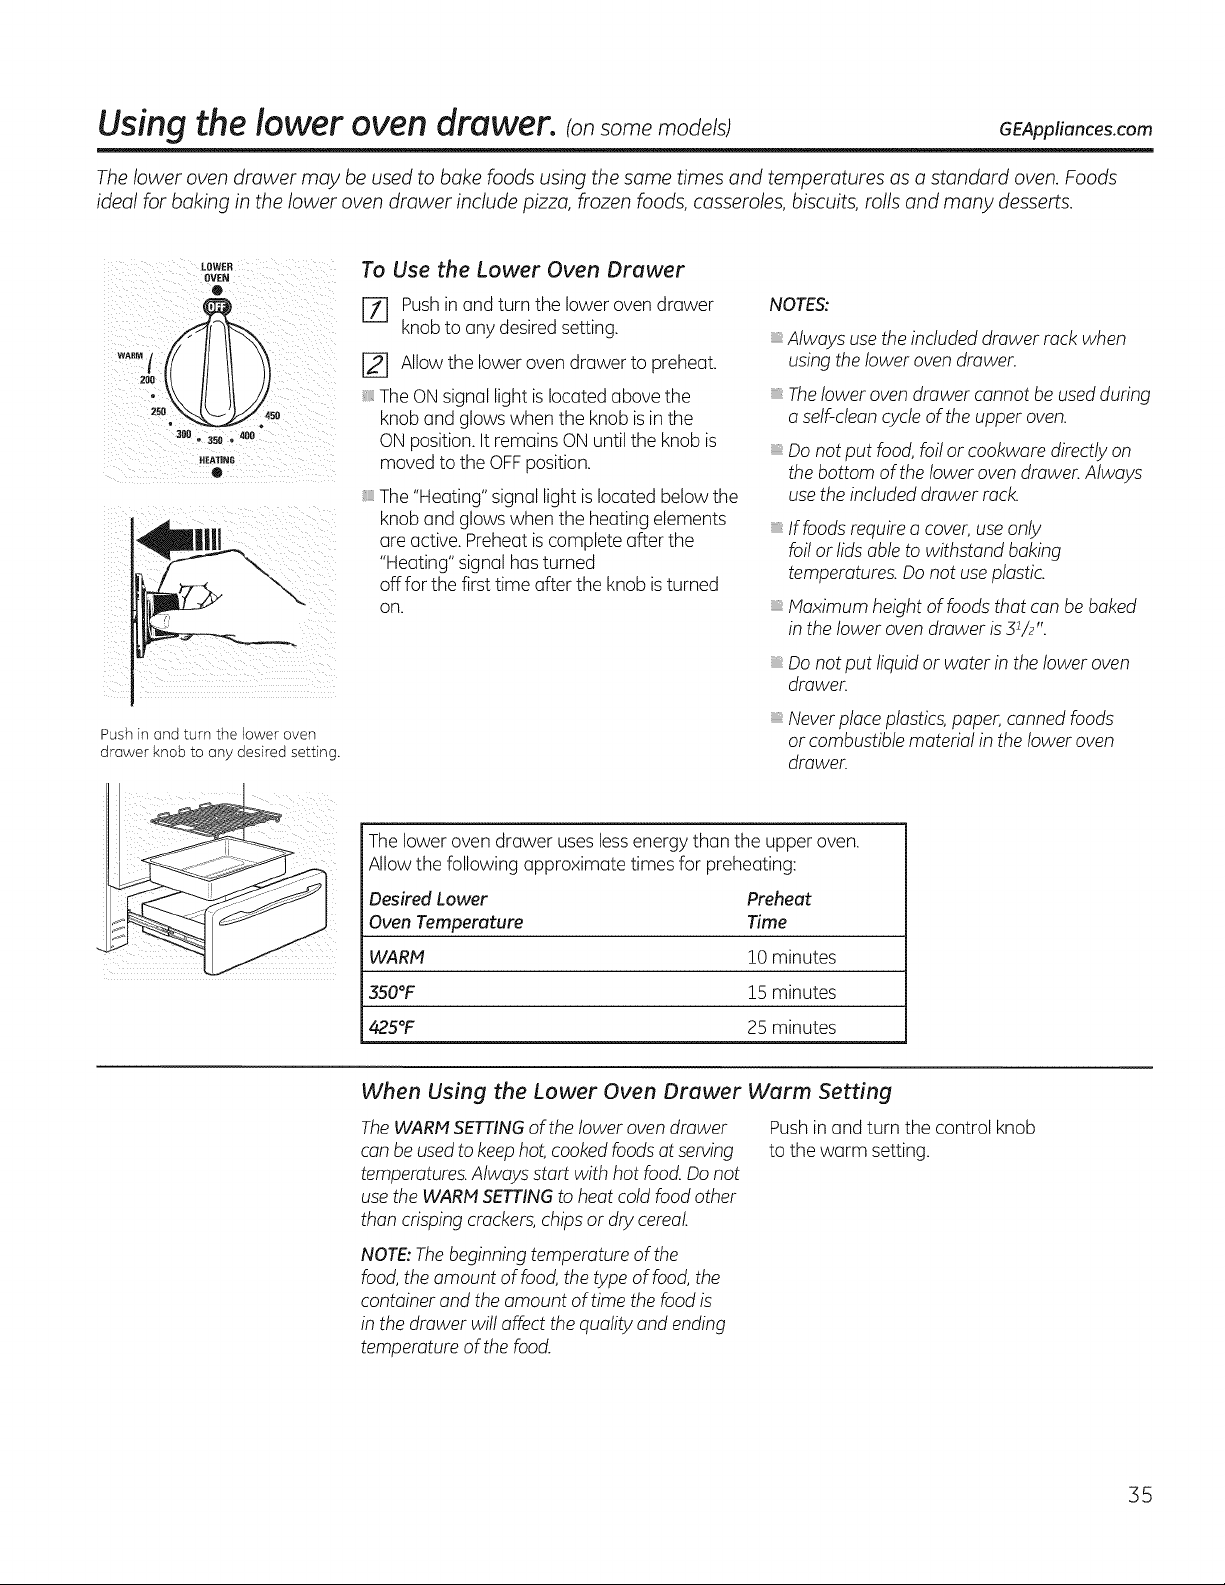
Using the lower oven drawer, ransome models) GEAppliances.com
Thelower oven drawer may be usedto bake foods using the same times and temperatures as a standard oven. Foods
ideal for baking in the lower oven drawer include pizza, frozen foods, casseroles, biscuits, rolls and many desserts.
LOWER
OVEN
O
°=;J°\\ If II/)
300 • 350 • 400
HEATING
®
Pushin and turn the lower oven
drawer knob to any desired setting.
To Use the Lower Oven Drawer
171 Pushin and turn thelowerovendrawer
knobtoanydesired setting.
[] Allow the loweroven drawer topreheat.
The ON signallightis located abovethe
knob and glows when theknobis in the
ON position. It remains ON untiltheknobis
moved tothe OFFposition.
The "Heating"signal lightis located belowthe
knob and glows when theheatingelements
are active. Preheat is completeafter the
"Heating" signalhas turned
off forthefirsttime after theknobis turned
on.
NOTES:
Alwaysuse theincluded drawer rack when
using thelowerovendrawer.
Thelowerovendrawercannot be used during
a self-cleancycle oftheupper oven.
Do notput food, foilor cookware directly on
the bottom ofthelowerovendrawer. Always
usetheincludeddrawer rack.
iiiiiiiiii
iiiiiiiiii
iiiiiiiiii
If foods require a cover, use only
foilor lidsable to withstand baking
temperatures. Do not use plastic.
Maximum height of foods that can be baked
in the lower oven drawer is31/2".
Do notput liquid or water in theloweroven
drawer.
Neverplace plastics,paper,canned foods
or combustible material in theloweroven
drawer.
The lowerovendrawer uses less energythanthe upper oven.
Allow the following approximate timesfor preheating:
Desired Lower Preheat
Oven Temperature Time
WARN 10 minutes
350°F 15 minutes
425°F 25 minutes
When Using the Lower Oven Drawer Warm Setting
The WARN SETTINGoftheloweroven drawer
canbeusedtokeep hot, cookedfoods at serving
temperatures.Alwaysstart with hotfood. Do not
use theWARNSETTINGtoheatcoldfoodother
thancrisping crackers,chips or dry cereal.
Push in and turn thecontrol knob
tothewarm setting.
NOTE:Thebeginning temperatureofthe
food, the amount offood, the type of food, the
container and theamount oftime thefood is
in thedrawer willaffect the quality and ending
temperatureofthefood.
35
Care and cleaning of the range,
Be sure all controls are off and all surfaces are cool before cleaning any part ofthe range.
[ WARNING j fyour range is removed forcleaning, servicingor any reason, be
suretheanti-tip device isreengaged properly when therange is
replaced. Failuretotake this precaution could result in tipping of
therange and cause injury.
How to Remove Protective Shipping Film
Carefullygrasp a cornerof the protectiveshipping
filmwith your fingersand slowlypeelitfromthe
appliance surface. Do not useany sharp items to
removethe film.Removeall of the film beforeusing
the appliance for the first time.
and Packaging Tape
Toensure no damage isdonetothe finishof the
product, the safest wayto remove the adhesive from
packaging tape on newappliances isan application
of a household liquiddishwashingdetergent.Apply
witha soft cloth and allowto soak.
NOTE:Theadhesivemust beremovedfromallparts.
Itcannotbe removedif itisbakedon.
Control Knobs
Thecontrolknobsmaybe removedfor easier
cleaning.
Makesurethe knobsare in theOFFpositionsand
pullthemstraightoff the stemsfor cleaning.
Theknobscanbecleanedin a dishwasherorthey
mayalsobe washedwith soapandwater.Hake
surethe insideof the knobsaredry beforereplacing.
Replacetheknobs,inthe OFFpositiontoensure
properplacement.
Control Panel
Ifdesired,the touchpadsmaybe deactivatedbefore
cleaning.
SeetheControlLockoutinformationin the Usingthe
clockkitchentimerandcontrollockoutsectionin this
manual.
Cleanupsplatterswith a dampcloth.
Youmayalsousea glasscleaner.
Removeheaviersoilwith warm,soapywater.
Donot useabrasivesof any kind.
Reactivatethetouch _adsafter cleaning.
Painted Surfaces
Paintedsurfacesincludethe sidesof therangeand
the door,top of controlpanelandthe drawerfront.
Cleanthesewithsoapand wateror a vinegarand
water solution.
Donot usecommercialovencleaners,cleaning
powders,steelwool or harshabrasiveson any
paintedsurface.
Stainless Steel Surfaces (on some models)
Do not use a steel wool pad; it will scratch the
surface.
To cleanthestainless steelsurface, use warm,
sudsy water or a stainless steelcleaneror
polish.Alwayswipethe surfacein thedirection
ofthegrain. Follow thecleanerinstructionsfor
cleaningthestainless steel surface.
To inquire about purchasing stainless steel
appliancecleaneror polish or tofind the
location ofa dealer nearest you, please callour
toll-free number:
National Parts Center 1.800.626.2002
GEAppliances.com
36
Porcelain Enamel Cooktop (on some models)
Theporcelainenamelfinish is sturdybut
breakableifmisused.This finish is acid-
resistant.However,anyacidic foods spilled
(suchas fruit juices, tomato or vinegar) should
not be permitted toremain on thefinish.
If acids spill on thecooktop whileitishot, use
a drypaper towel or cloth towipe itup right
away.Whenthesurface has cooled, wash with
soapand water. Rinsewell.
For other spills such asfat spatterings,wash
with soapand water or cleansing powders
after thesurface has cooled. Rinsewell. Polish
with a drycloth.
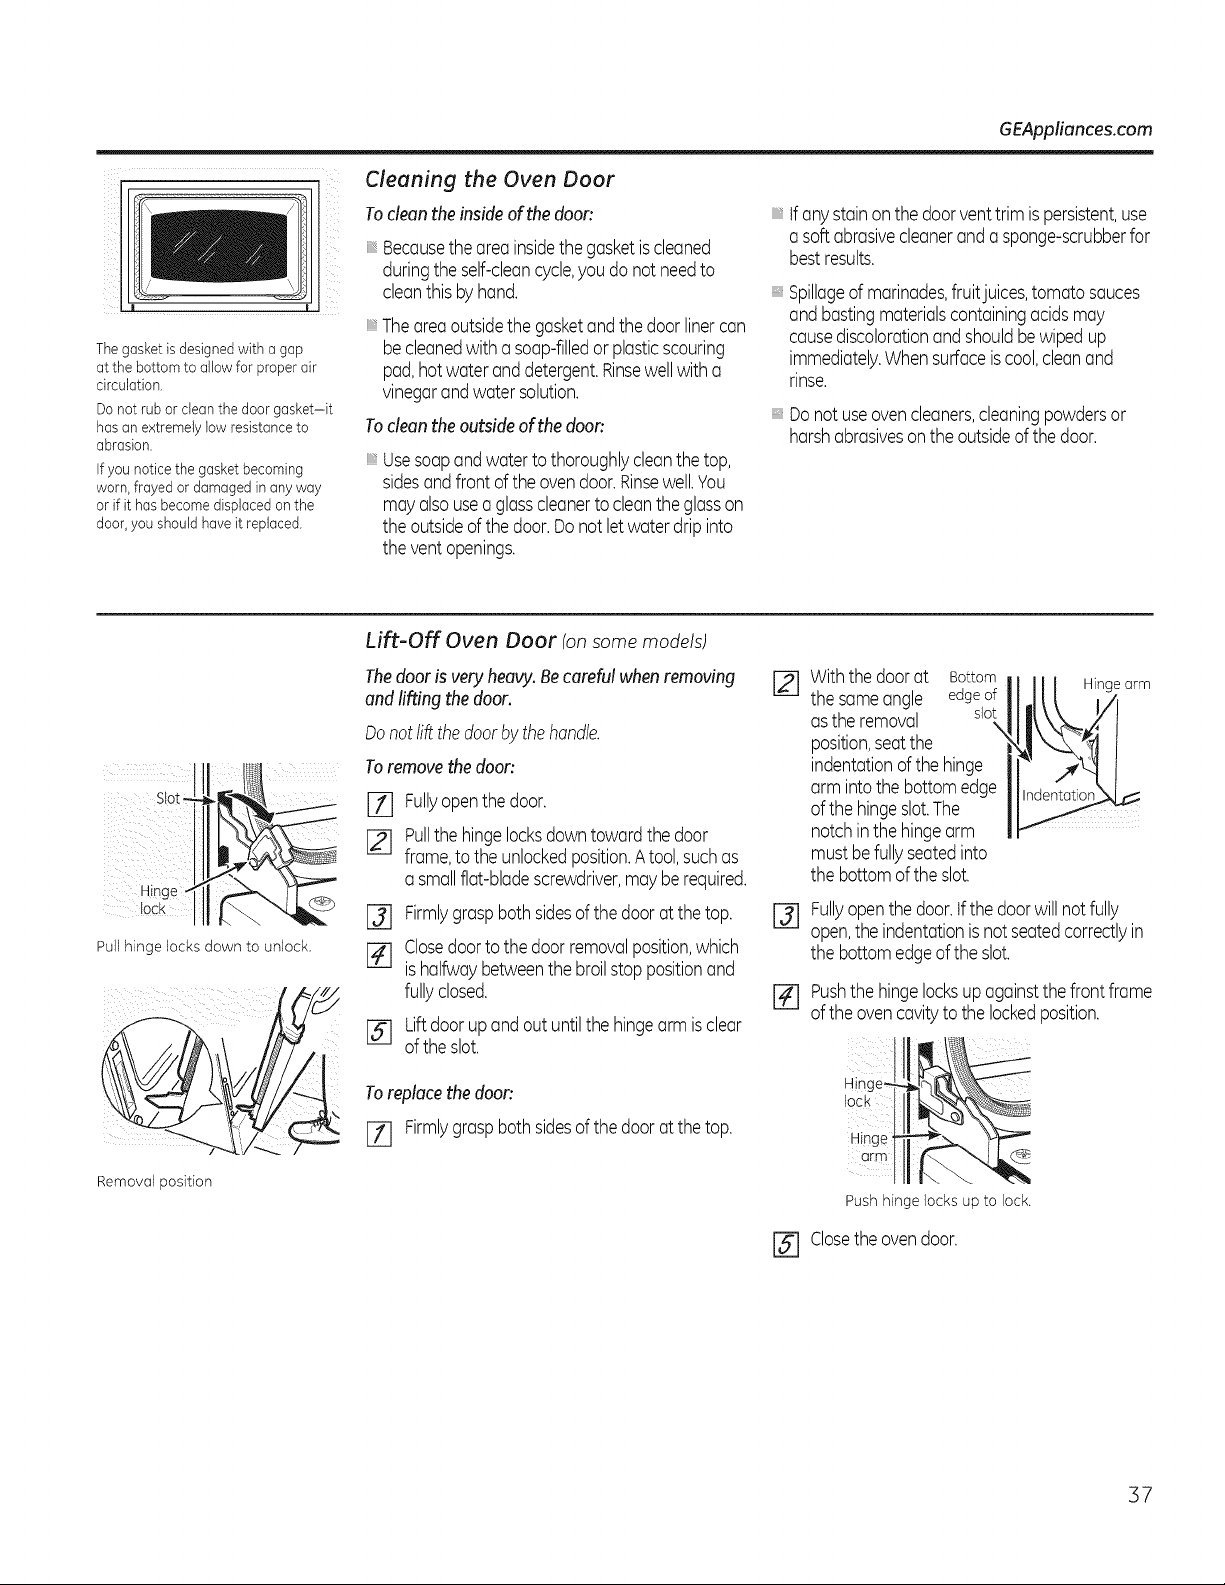
GEAppliances.com
Thegasket isdesigned with a gap
atthe bottomto allow for properair
circulation.
Donot ruborclean the doorgasket-it
hasanextremelylow resistance to
abrasion.
If you notice the gasket becoming
worn,frayed ordamagedin anyway
orif it hasbecomedisplaced on the
door,youshould haveit replaced.
Cleaning the Oven Door
To clean the insideof the door:
Becausethe areainsidethe gasketiscleaned
duringthe self-cleancycle,you do not needto
cleanthis by hand.
Theareaoutsidethe gasketandthe door linercan
becleanedwith a soap-filledor plasticscouring
pad,hotwater anddetergent.Rinsewellwith a
vinegarandwater solution.
To clean the outside of the doon
Usesoapandwatertothoroughlycleanthe top,
sidesand front of the ovendoor.Rinsewell.You
mayalsousea glasscleanerto cleanthe glasson
the outsideof the door.Donot letwater drip into
the ventopenings.
'_tf anystainon the doorventtrim ispersistent,use
a softabrasivecleanerand a sponge-scrubberfor
bestresults.
Spillageof marinades,fruitjuices,tomato sauces
andbastingmaterialscontainingacidsmay
causediscolorationand shouldbewipedup
immediately.Whensurfaceis cool,cleanand
rinse.
': Do notuseovencleaners,cleaningpowdersor
harshabrasiveson the outsideof thedoor.
::: sot_J ¸:::
iii iiii :
Pull hinge locks down to unlock.
Removal position
Lift-Off Oven Door (onsome models)
Thedooris very heavy.Becarefulwhenremoving
andlifting the door.
Donot liftthe door by the handle.
To remove the doon
[] Fullyopenthe door.
[] Pullthehingelocksdowntowardthe door
frame,to theunlockedposition.Atool,suchas
a smallflat-bladescrewdriver,mayberequired.
I-_ Firmlygraspbothsidesof the doorat the top.
[] Closedoorto the door removalposition,which
is halfwaybetweenthebroilstop positionand
fullyclosed.
[] Lift doorup andout untilthe hingearm is clear
of the slot.
To replace the doon
[Z] Firmlygrasp bothsides of the door at the top.
Withthe doorat Bottom Hingearm
the sameangle edgeof
asthe removal slot
\
position,seatthe
indentationof the hinge
arm intothe bottom edge
of the hingeslot.The
notchin the hingearm
must befullyseatedinto
the bottomof the slot.
@
Fullyopen thedoor.tfthe doorwill not fully
open,the indentationisnot seatedcorrectlyin
the bottomedgeof the slot.
[] Pushthehingelocksup againstthefrontframe
of the ovencavityto the lockedposition.
@
Hin_
lock
Hinge
arm
Push hinge locks up to lock.
Closethe ovendoor.
37
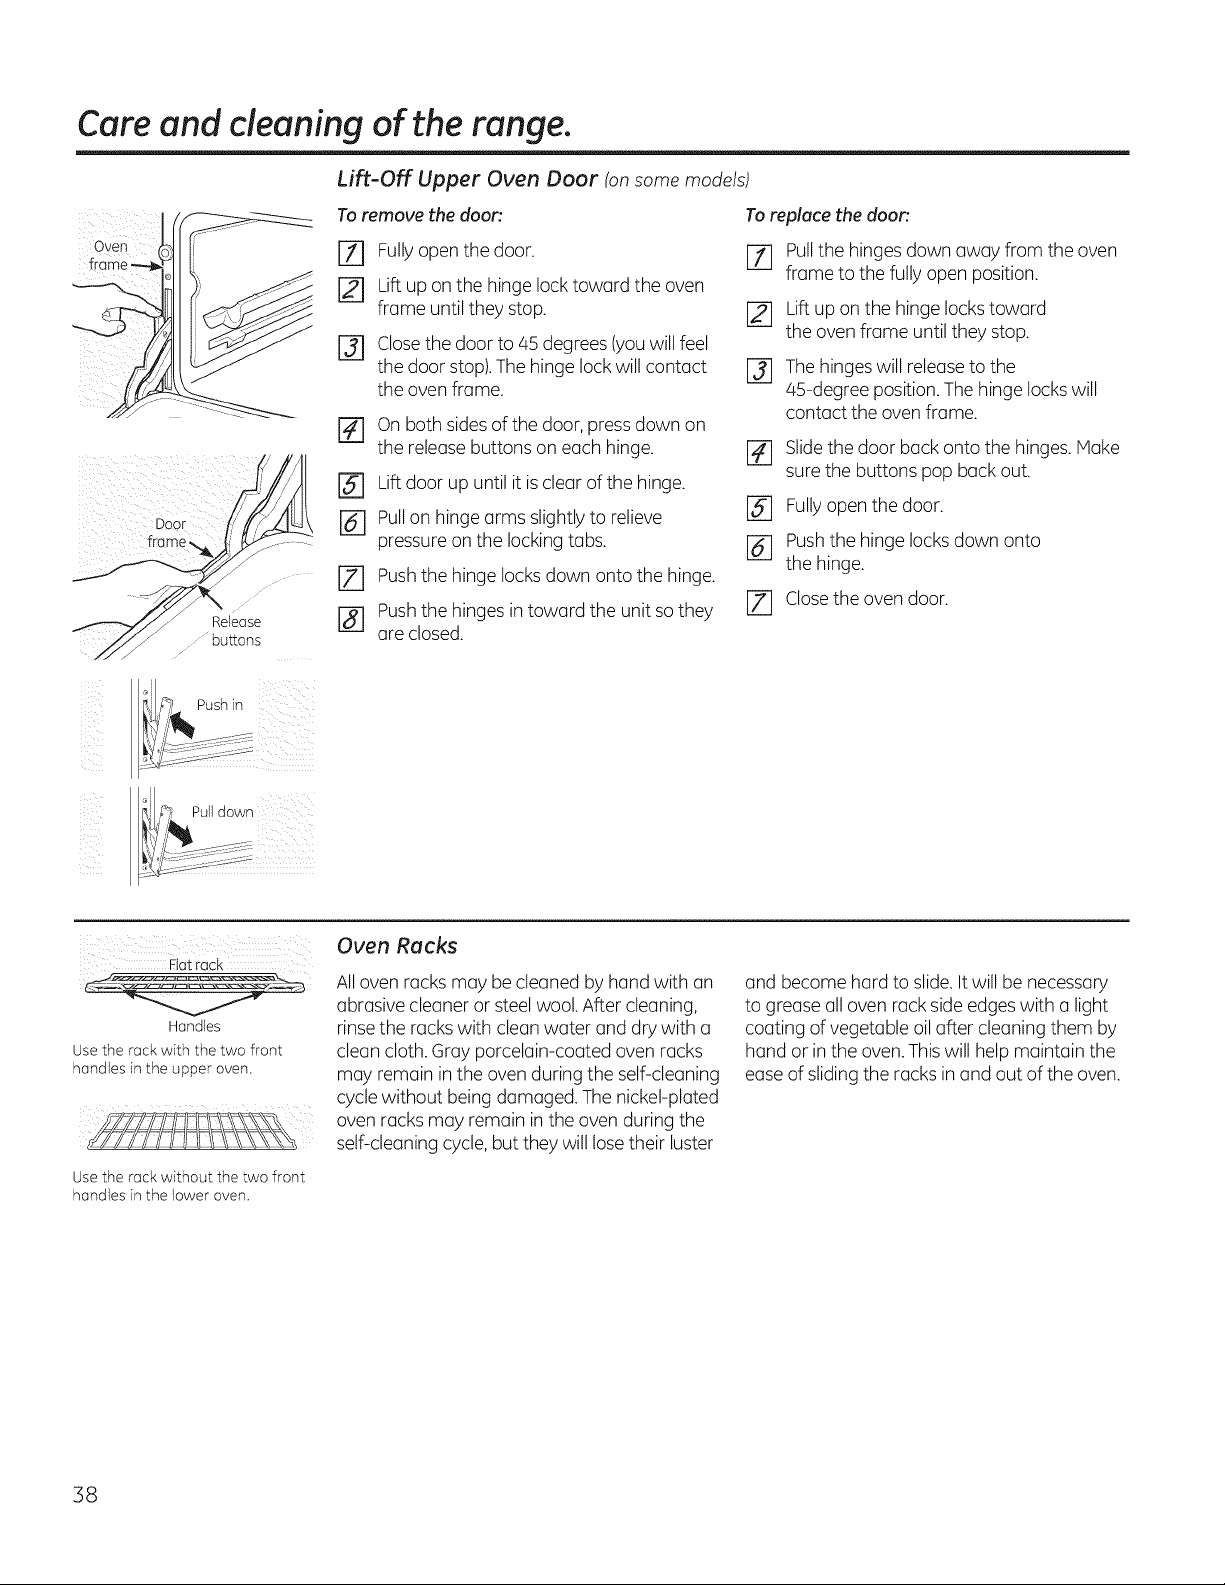
Care and cleaning of the range,
Door
Release
OU_OnS
Lift-Off Upper Oven Door (on some models)
To remove the door',
[Z] Fullyopen thedoor.
r21 Lift up on thehinge lock toward theoven
frame untilthey stop.
r_ Closethedoor to 45 degrees(youwillfeel
the door stop).Thehinge lock willcontact
the oven frame.
r_ on bothsidesofthe door,press down on
the release buttons on each hinge.
r_ Lift door up until itis clearofthehinge.
r_ Pullon hinge arms slightly to relieve
pressureon thelocking tabs.
[] Pushthe hinge locks down onto thehinge.
r_] Pushthe hinges in toward the unitso they
are closed.
To replace the door'.
rT] Pullthe hingesdownaway from theoven
frame to thefully open position.
[] Lift up on thehinge locks toward
the oven frame untilthey stop.
r_ The hingeswillrelease tothe
45-degree position. Thehinge locks will
contact theovenframe.
r_ Slidethedoor back onto thehinges. Make
surethebuttons pop back out.
[] Fullyopen thedoor.
[] Pushthe hinge locks down onto
the hinge.
JZ] Closetheovendoor.
_, i_lPull down
Oven Racks
Fiat rack
2 -- "7,'-_r- 2 : --
Handles
Use the rack with the two front
handles in the upper oven.
All ovenracks may be cleanedbyhand with an
abrasive cleaneror steel wool. After cleaning,
rinse the racks with clean water and drywith a
cleancloth.Gray porcelain-coated oven racks
may remain in theovenduring the self-cleaning
cycle without being damaged. The nickel-plated
ovenracksmay remain in theovenduring the
self-cleaningcycle, butthey willlose their luster
Use the rock without the two front
handles in the lower oven.
and become hard toslide. Itwill be necessary
togreaseall ovenrack side edges with a light
coating ofvegetable oil after cleaningthem by
hand or in theoven.This willhelp maintain the
ease ofslidingtheracksin and out oftheoven.
38
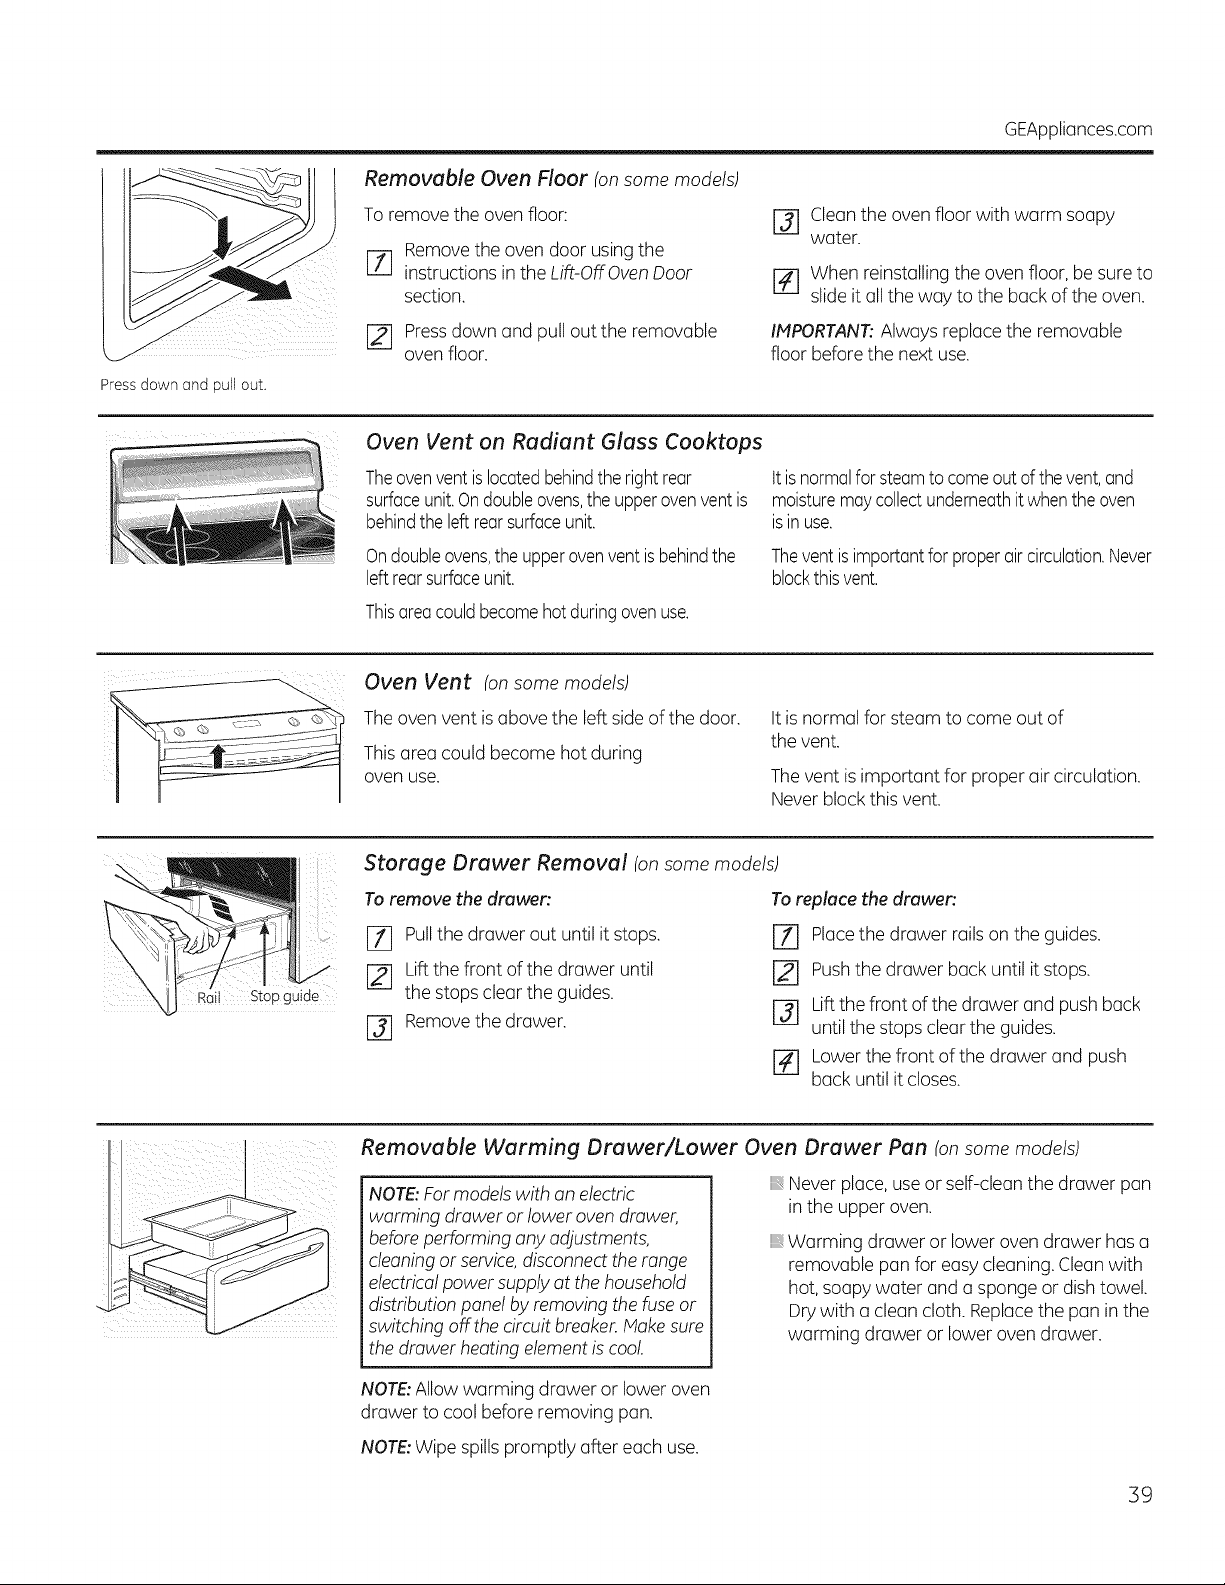
GEAppliances.com
Removable Oven Floor (onsome models)
Toremove the ovenfloor:
Remove theovendoor using the
F_q
instructions in the Lift-Off Oven Door
section.
[] Pressdown and pull outthe removable
oven floor.
r_ Clean theovenfloorwith warm soapy
water.
r4] Whenreinstalling the ovenfloor, be sure to
slide itall theway tothe back oftheoven.
IMPORTANT:Alwaysreplace the removable
floorbeforethe next use.
Pressdown and pull out.
Oven Vent on Radiant Glass Cooktops
Theovenvent islocatedbehindthe right rear
surfaceunit.Ondoubleovens,the upperovenventis
behindthe left rearsurfaceunit.
Ondoubleovens,the upperovenvent isbehindthe
leftrear surfaceunit.
Thisareacould becomehot duringovenuse.
ttis normalfor steamto come out of thevent,and
moisturemaycollectunderneathit whenthe oven
isin use.
Thevent isimportantforproperaircirculation.Never
blockthis vent.
Oven Vent (onsome models)
The ovenvent is abovethe left side ofthedoor.
This area could become hotduring
ovenuse.
It isnormalfor steamto come outof
thevent.
The vent is important for proper air circulation.
Never block this vent.
Rail Stopguide
Storage Drawer Removal (onsome models)
Toremove the drawer'.
r_ Pullthe drawerout until it stops,
Liftthefront ofthedrawer until
thestopscleartheguides.
J-_ Removethedrawer.
To replace the drawer'.
[Z] Placethedrawer rails on the guides.
Pushthedrawer back until it stops.
r_ Liftthefront ofthedrawer and pushback
untilthestopsclear theguides.
r_ Lower thefront ofthedrawer and push
back untilitcloses.
Removable Warming Drawer/Lower Oven Drawer Pan (onsome models)
NOTE:For models with an electric
warming drawer or lower oven drawer,
before performing anyadjustments,
cleaning or service,disconnect the range
electrical powersupply at thehousehold
distributionpanel by removing the fuse or
switching off thecircuitbreaker.Make sure
thedrawer heatingelement iscool.
Never place, use or self-cleanthedrawer pan
in the upper oven.
B Warming drawer or lowerovendrawer hasa
removable pan for easy cleaning. Cleanwith
hot, soapy water and a spongeor dish towel.
Drywith a cleancloth.Replacethe pan in the
warming drawer or lowerovendrawer.
NOTE:Allowwarming drawer or loweroven
drawer tocoolbefore removing pan.
NOTE:Wipespills promptly after eachuse.
39
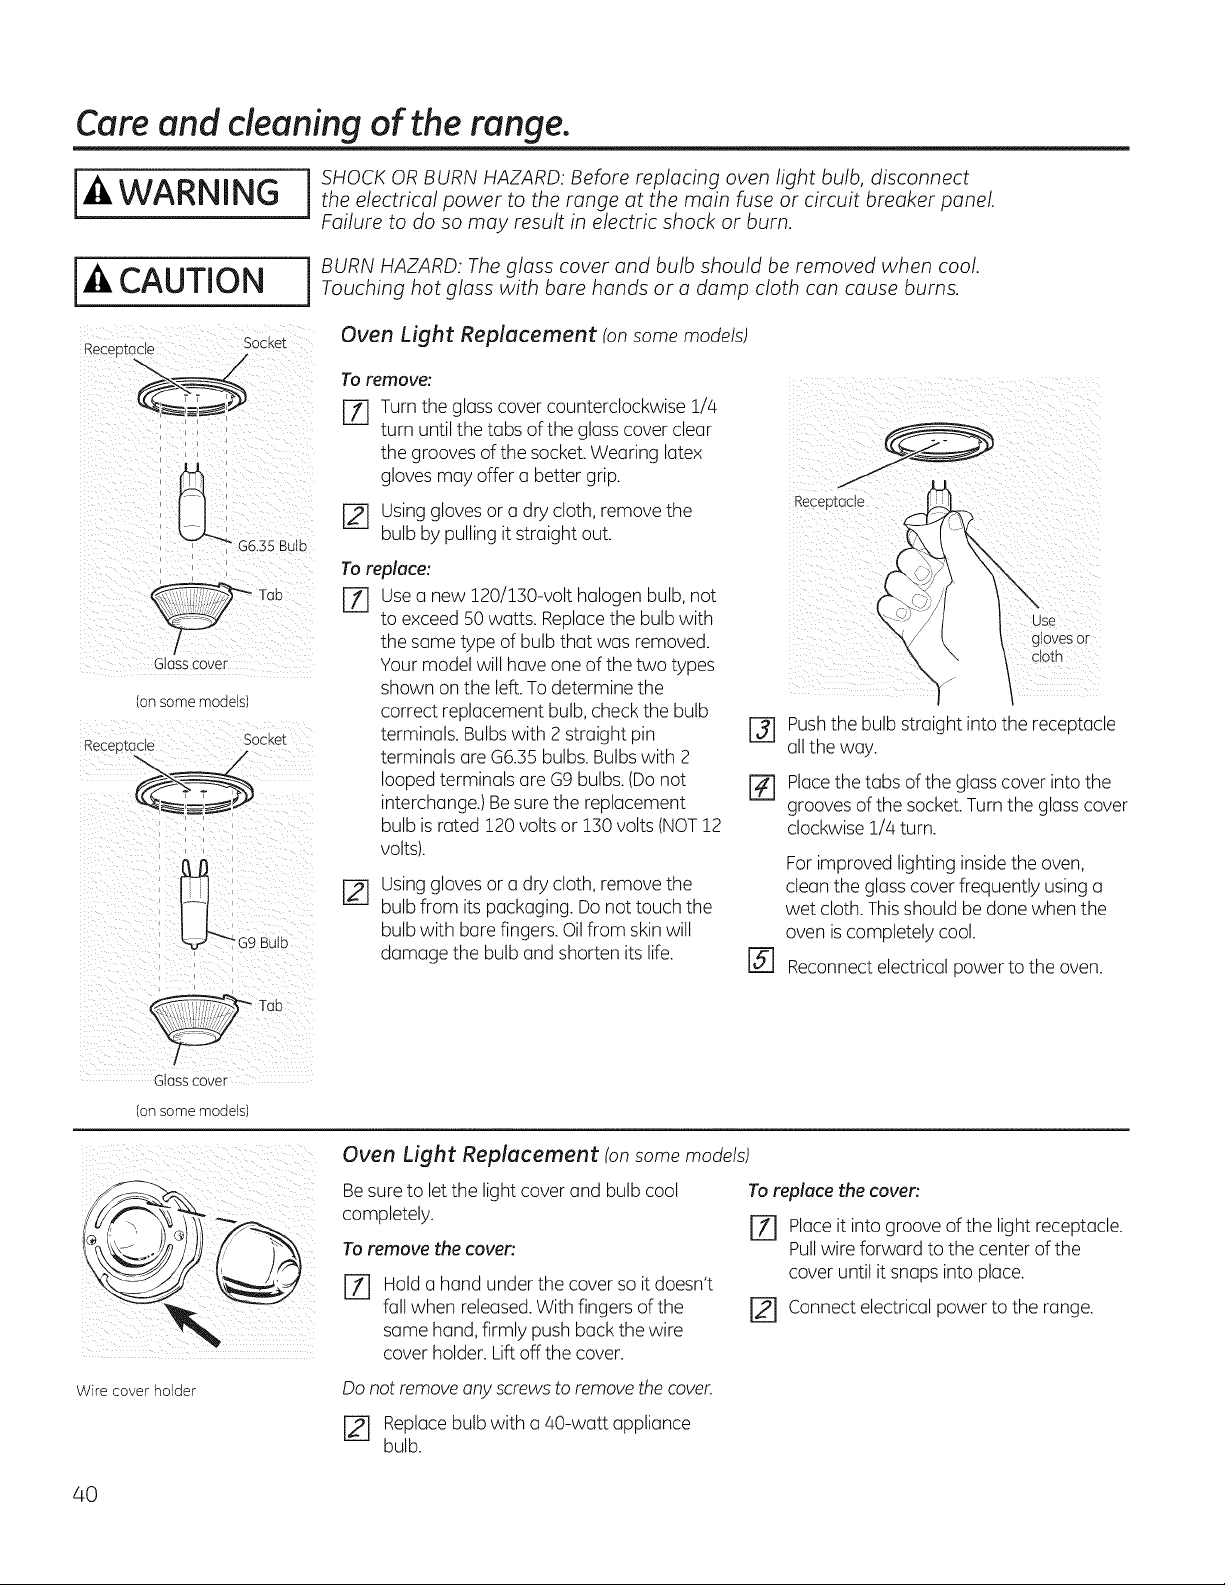
Care and cleaning of the range,
I ] SHOCK OR BURN HAZARD: Before replacing oven light bulb, disconnect
WARNING I theelectricalpowertotherangeatthemainfuseorcircuitbreakerpanel.
Failure to do so may result in electric shock or burn.
I-4,CAUTION
Receo_ac_e Socket
Glass cover
Dnsome moaels
Socket
Receo]:acle
I BURN HAZARD: Theglass cover and bulb should be removed when cool.Touching hot glass with bare hands or a damp cloth can cause burns.
Oven Light Replacement (on some models)
To remove:
[_ Turn the glasscover counterclockwise 1/4
turn untilthetabs oftheglass cover clear
thegrooves ofthesocket. Wearing latex
gloves may offer a better grip.
[] Usinggloves or a drycloth,remove the
bulb bypulling itstraightout.
Toreplace:
[Z] usea new 120/130-volt halogen bulb,not
toexceed 50 watts. Replacethe bulb with
thesame type ofbulb that was removed.
Your modelwillhaveone ofthe two types
shown on the left. To determine the
correct replacement bulb, checkthebulb
terminals. Bulbswith 2 straight pin
terminals are G6.35 bulbs. Bulbs with 2
looped terminals are G9 bulbs. (Do not
interchange.)Besure the replacement
bulb is rated 120 voltsor 130 volts(NOT12
volts).
Usinggloves or a drycloth,remove the
bulb from its packaging.Do nottouch the
bulb with bare fingers. Oil from skin will
damage the bulb and shorten its life.
gtoves 0 r
c!oth
[] Pushthebulb straight intothe receptacle
all theway.
[_ Placethetabs oftheglass cover intothe
grooves ofthe socket.Turntheglass cover
clockwise1/4turn.
@
For improved lighting inside theoven,
cleanthe glass cover frequently usinga
wet cloth. Thisshouldbe done when the
oven is completely cool.
Reconnectelectricalpowerto theoven.
/
Glass cover
(on some models!
_ii_i_ _ _ii:i_:__ i iiiii? i_
Wire cover holder
Oven Light Replacement (on some models)
Be sure to let the lightcover and bulb cool
completely.
To remove thecover:
%
Hold a hand under the cover soitdoesn't
fallwhen released. With fingers ofthe
same hand, firmly pushback thewire
cover holder.Liftoff the cover.
To replace thecover:
j-_ Place itintogrooveofthe lightreceptacle.
Pullwireforward tothe center ofthe
cover untilitsnaps intoplace.
Connectelectricalpowertothe range.
Do not remove any screws to remove the cover.
r_ Replacebulb with a 40-watt appliance
bulb.
40
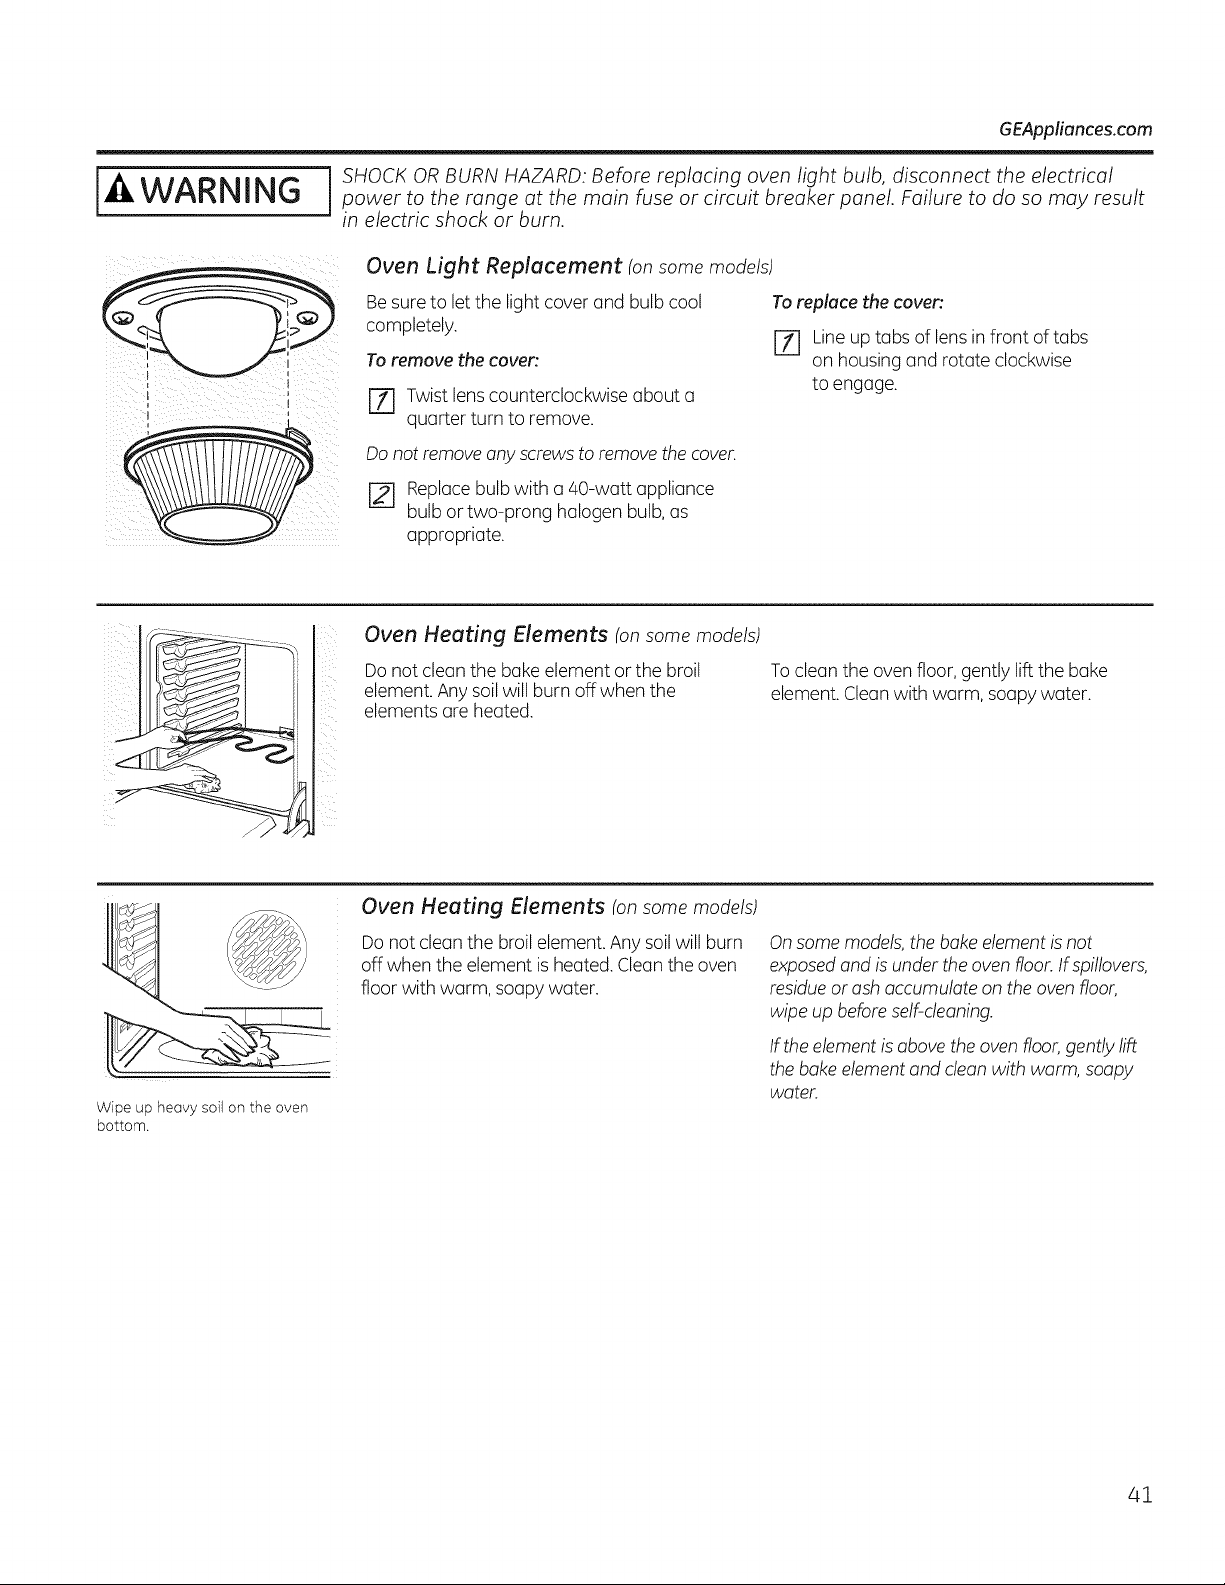
[_AWARNING
GEAppliances.com
SHOCK ORBURN HAZARD: Before replacing oven light bulb, disconnect the electricalpower to the range at the main fuse or circuit breaker panel. Failure to do so may result
in electric shock or burn.
Oven Light Replacement (on some models)
Besuretoletthe lightcover and bulb cool
completely.
Toremove the coven
[Z] Twist lens counterclockwise about a
quarter turnto remove.
Toreplace the coven
[7-1 Line up tabs of lens infront of tabs
on housing and rotate clockwise
to engage.
Do not remove any screws to remove the cover.
[2-1 Replacebulb with a 40-watt appliance
bulb or two-prong halogen bulb, as
appropriate.
Oven Heating Elements (on some models)
Donotclean the bakeelement or the broil
element. Anysoil willburn off whenthe
elementsare heated.
To clean the ovenfloor, gently lift the bake
element. Clean with warm,soapy water.
Wipe up heavy soil onthe oven
bottom.
Oven Heating Elements (on some models)
Donot clean the broil element. Any soilwill burn
off when the element isheated. Clean the oven
floor with warm, soapy water.
Onsome models, the bake element is not
exposed and isunder the oven floor. If spillovers,
residue orash accumulate on the oven floor,
wipe up before self-cleaning.
If the element is above the oven floor, gently lift
the bake element and clean with warm, soapy
water.
41

Cleaning the glass cooktop,consomemodels;
Clean your cooktop after
each spill. Use CERAHA
BRYTE®Ceramic Cooktop
Cleaner.
Normal Daily Use Cleaning
ONLYuse CERANABRYTE®CeramicCooktop
Cleaner on the glass cooktop. Othercreams
may not be as effective.
Tomaintain and protectthe surfaceof your
glasscooktop, follow these steps:
%
Before usingthecooktopfor thefirsttime,
clean it with CERAMABRYTE®Ceramic
CooktopCleaner.This helpsprotectthe
top and makescleanupeasier.
r_ Daily use ofCERAMABRYTE®Ceramic
CooktopCleaner willhelp keep the
cooktop looking new.
r3] Shakethe cleaningcream well. Apply a
few dropsofCERAMABRYTE®Ceramic
Cooktop Cleaner directlyto thecooktop.
[] Usea paper towel or CERAMABRYTE®
Cleaning Padfor Ceramic Cooktops to
clean the entirecooktop surface.
[] Use a dry cloth or paper towel to
remove all cleaning residue. Noneed to
rinse.
NOTE: It isvery important that you DO NOT
heat the cooktop until it has been cleaned
thoroughly.
Use aCERAMABRYTE®Cleaning
Pad for Ceramic Cooktops.
Burned-On Residue
NOTE: DAMAGEtoyour glass surface may
occur if you usescrub pads other than those
recommended.
rT] Allow the cooktop to cool.
[] Spread a few drops of CERAiVlABRY1-E®
CeramicCooktop Cleaner on theentire
burned residue area.
@
Using the included CERAIVlABRYTE®
CleaningPadforCeramicCooktops, rub
the residue area, applying pressure as
needed.
%
@
If any residue remains, repeat
the steps listed above asneeded.
Foradditional protection, after all
residue has been removed, polish the
entire surface with CERAMABRYTE®
CeramicCooktopCleaner and a paper
towel.
\
TheCERAMABRYTE®Ceramic
Cooktop Scraper and all
recommended supplies are
available through our Parts
Center. See instructions under "To
Order Parts" section on next page.
NOTE:Donot use a dull or
nicked blade.
Heavy, Burned-On Residue
%
[21
Allow the cooktop to cool.
Use a single-edge razor blade scraper
at approximately a 45 °angle against
the glass surface and scrape the soil. It
will be necessary to apply pressure to
the razor scraper in order to remove
the residue.
%
After scraping with the razor scraper,
spread a few drops of CERAMABRYTE®
Ceramic CooktopCleaner on the entire
burned residue area.Use the CERAMA
BRYTE®CleaningPadto remove any
remaining residue.
Foradditional protection, after all
residue hasbeen removed, polish the
entire surface with CERAMABRYTE®
Ceramic CooktopCleaner and a paper
towel.
42
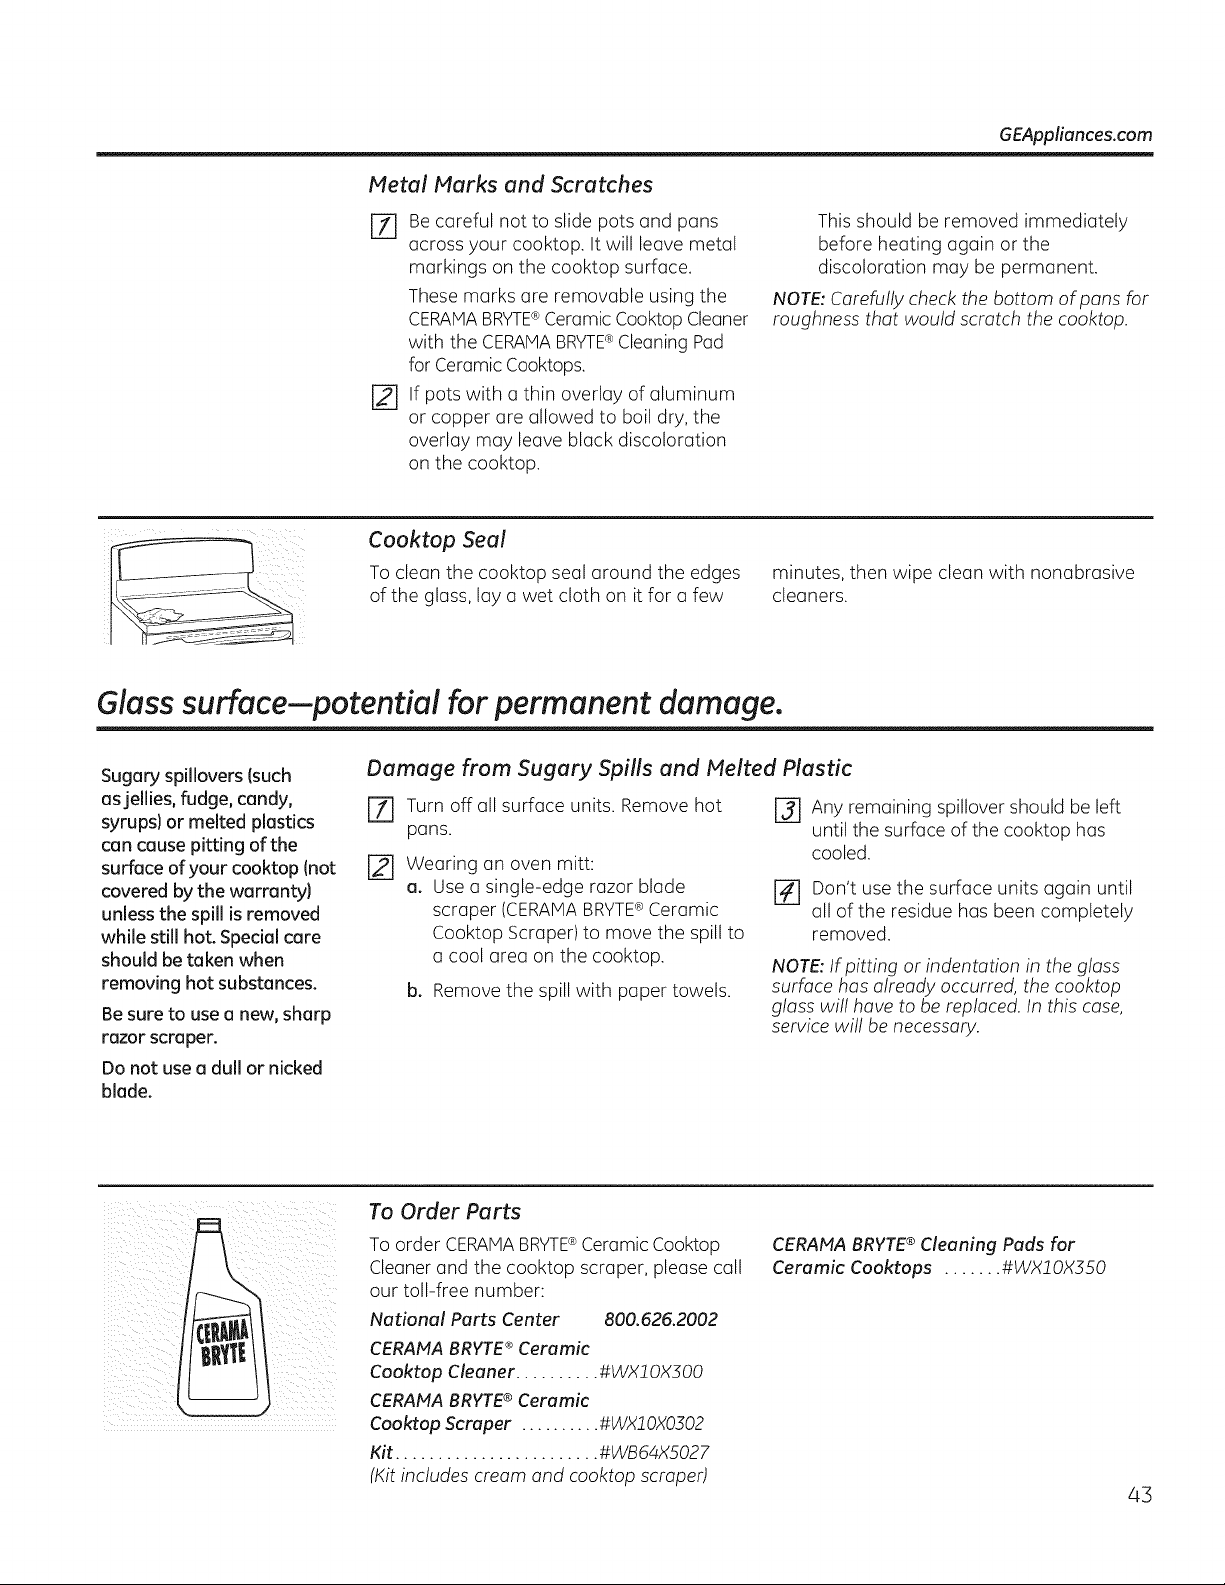
GEAppliances.com
Metal Marks and Scratches
r_ Be careful not to slide pots and pans
across your cooktop. It will leave metal
markings on the cooktop surface,
These marks are removable using the
CERAMABRYTE®Ceramic CooktopCleaner
with the CERAHABRYTE®Cleaning Pad
forCeramicCooktops.
r_ if pots with a thin overlay ofaluminum
or copper are allowed to boil dry, the
overlay may leave black discoloration
on the cooktop.
This should be removed immediately
before heating again or the
discoloration may be permanent.
NOTE: Carefully checkthe bottom ofpans for
roughness that would scratch thecooktop.
Cooktop Seal
To clean the cooktop seal around the edges
ofthe glass,lay a wet cloth on itfor a few
minutes, then wipe clean with nonabrasive
cleaners.
Glass surface--potential for permanent damage.
Sugary spillovers (such
as jellies, fudge, candy,
syrups} or melted plastics
can cause pitting of the
surface ofyour cooktop (not
covered by the warranty}
unless the spill is removed
while still hot. Special care
should be token when
removing hot substances.
Besure to use a new, sharp
razor scraper.
Do not use u dull or nicked
blade.
Damage from Sugary Spills and Melted Plastic
Turn off all surface units. Remove hot
pans.
[] Wearing an oven mitt:
a. Use a single-edge razor blade
scraper (CERAMABRYTE®Ceramic
Cooktop Scraper)to move the spillto
a cool area on the cooktop.
b. Removethe spill with paper towels.
r_ Any remaining spillover should be left
until the surface ofthe cooktop has
cooled.
r_ Don't usethe surface units again until
all ofthe residue hasbeen completely
removed.
NOTE: If pitting or indentation in the glass
surface has already occurred, the cooktop
glass willhave to be replaced. Inthis case,
service will be necessary.
To Order Parts
Toorder CERAMABRYTE®CeramicCooktop
Cleaner and the cooktop scraper, please call
our toll-free number:
National Parts Center 800.626.2002
CERAtfA BRYTE ®Ceramic
Cooktop Cleaner .......... #WX! OXSO0
CERAMA BRYTE®Ceramic
Cooktop Scraper .......... #WX10X0302
Kit ........................ #WB64X5027
(Kitincludes cream and cooktop scraped
CERAMABRYTE® Cleaning Pads for
Ceramic Cooktops ....... #WX!OX550
43
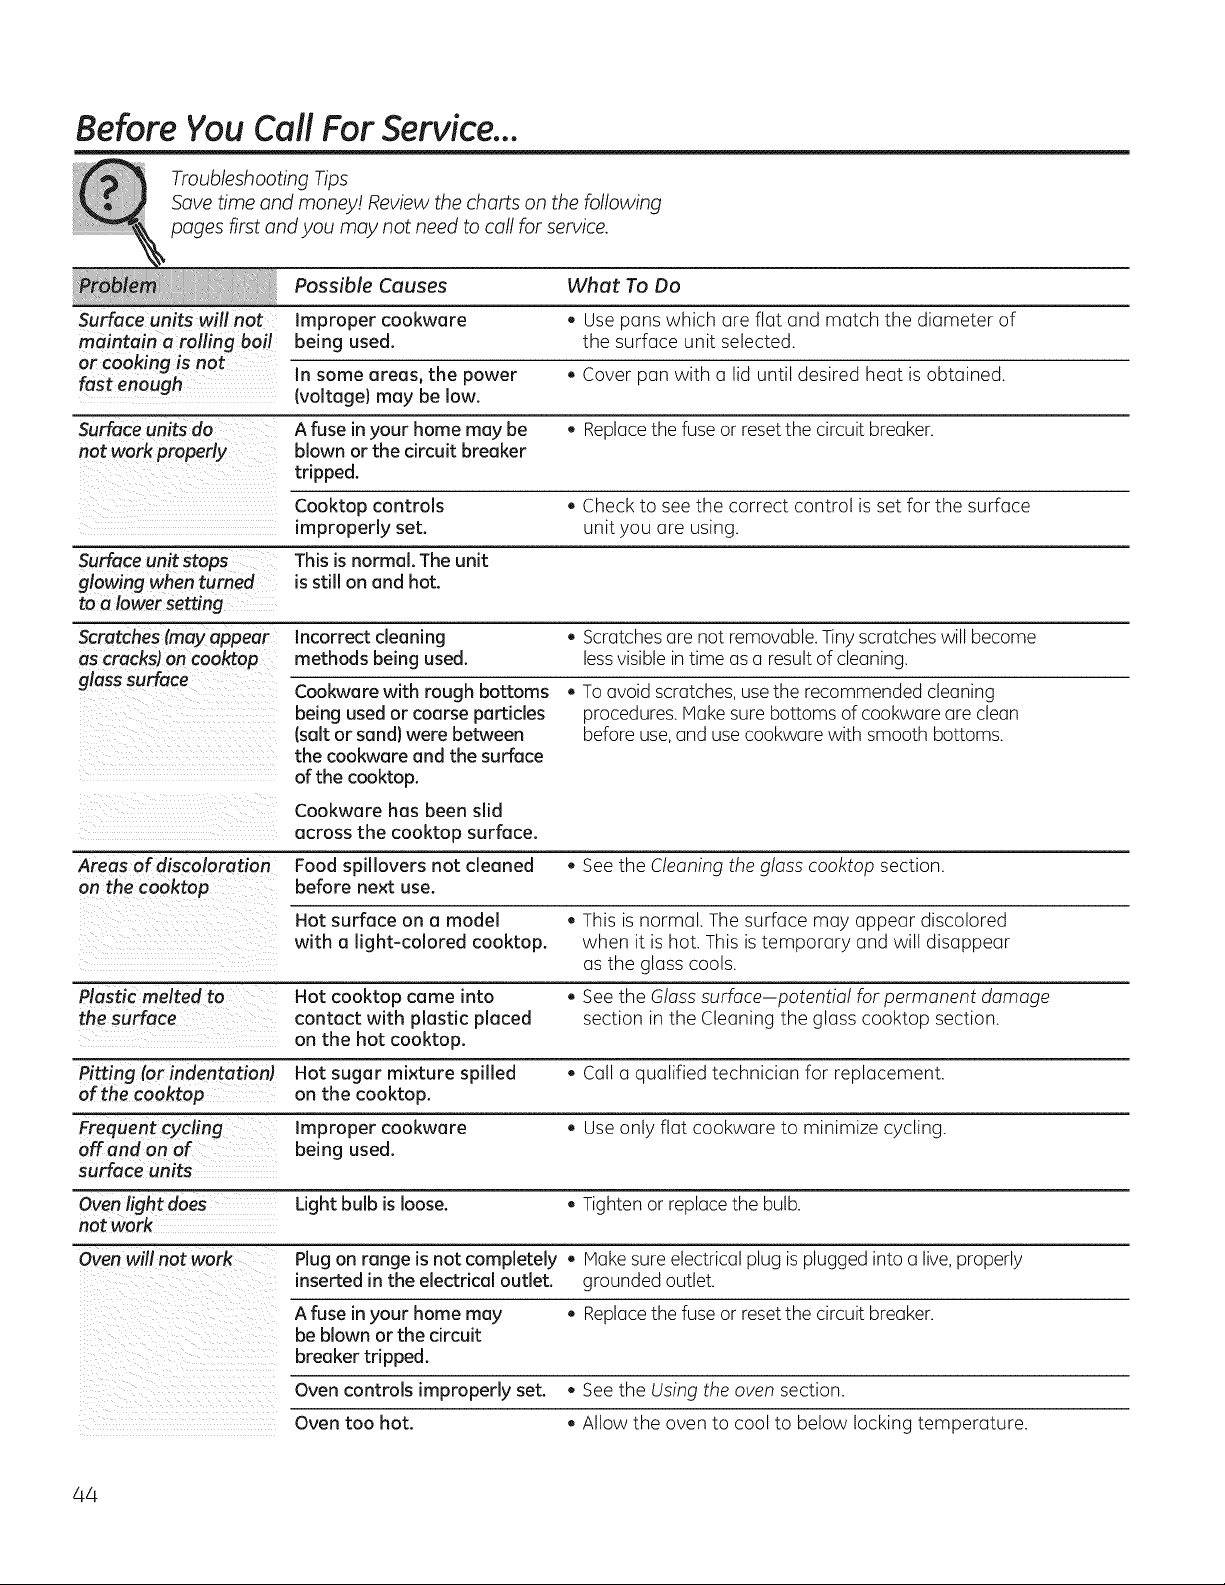
BeforeYou CallFor Service...
Troubleshooting Tips
Savetime and money! Review the charts on the following
pages first and you may not need to call for service.
Possible Causes What To Do
Surface units will not Improper cookware • Use panswhich are flat and match the diameter of
maintain a rolling boil being used. the surface unit selected.
or cooking isnot
In some areas, the power . Cover pan with a lid until desired heat isobtained.
fast enough (voltage} may be low.
Surface units do A fuse in your home may be • Replacethefuse or reset the circuitbreaker.
not work properly blown or the circuit breaker
tripped.
Cooktop controls . Checkto seethe correct control isset for the surface
improperly set. unit you are using.
Surface unit stops This is normal. Theunit
glowing when turned isstill on and hot.
to a lower setting
Scratches (may appear Incorrect cleaning . Scratches are not removable. Tiny scratcheswillbecome
ascracks) on cooktop methods being used. lessvisible in time asa result ofcleaning.
glass surface Cookware with rough bottoms * To avoidscratches, use the recommended cleaning
being usedor coarse particles procedures.Make sure bottoms ofcookware are clean
Isalt or sand}were between beforeuse,and usecookwarewith smooth bottoms.
the cookware and the surface
ofthe cooktop.
Cookware has been slid
across the cooktop surface.
Areas of discoloration Food spillovers not cleaned • See the Cleaning theglass cooktop section.
on thecooktop beforenextuse.
Hot surface on a model . This is normal. Thesurface may appear discolored
with a light-colored cooktop, when it ishot. This is temporary and will disappear
asthe glass cools.
Plastic melted to Hot cooktop came into . See the Glass surface-potential forpermanent damage
the surface contact with plastic placed section in the Cleaning the glass cooktop section.
on the hot cooktop.
Pitting (or indentation) Hot sugar mixture spilled . Calla qualified technician for replacement.
ofthecooktop on the cooktop.
Frequent cycling Improper cookware . Use only flat cookware to minimize cycling.
offend on of being used.
surface units
Oven light does Light bulb isloose. . Tighten or replace the bulb.
not work
Ovenwill not work Plug on range isnot completely . Make sureelectricalplug is plugged intoa live, properly
inserted in the electrical outlet, grounded outlet.
A fuse in your home may * Replacethefuse or reset the circuitbreaker.
be blown or the circuit
breaker tripped.
Oven controls improperly set. * See the Using the oven section.
Oven too hot. * Allow the oven to cool to below locking temperature.
44

GEAppliances.com
Causes What To Do
Food does not bake Oven controls improperly set. • See the Using the oven section.
or roast properly
Rack position is incorrect • See the Using the oven section.
or the rack is not level.
Incorrect cookware or • See the Using the oven section.
cookware of improper
size being used.
Oven thermostat needs , See the Adjust the oven thermostat Do ityourself!
adjustment, section.
Food does not Oven controls improperly set. • Hake sure you touch the BROIL HI/LO pad.
broil properly Improper rack position • See the BroilingGuide.
being used.
Cookware not suited • For best results,use o pan designed for broiling.
for broiling.
Theprobe is plugged • Unplugand remove theprobe from theoven.
into the outlet in the oven.
Ionsome models}
Insome areas the power . Preheatthe broil element for 10 minutes.
Ivoltage) may be low.
. Broil for the longest period oftime recommended
in the Broiling Guide.
Oven temperature Oven thermostat . See theAdjust theoven thermostat Doityourself!
too hot or too cold needs adjustment, section.
Storage drawer Rear drawer support is , Reposition the drawer. See the Storage Drawer
iscrooked on top of the guide rail. Removal instructions in the Careand cleaning ofthe
range section.
Checkto make suredrawer isproperly seated
if removed.
Storage drawer
won't close
Oven door iscrooked
Power cordmay be
obstructingdrawer
inthelowerback
oftherange.
• Repositionthedrawer and power cord. Seethe
Storage Drawer Removalinstructionsin theCare and
cleaning oftherange section.
Rear drawer support is
on top of the guide rail.
, Reposition the drawer. Seethe Storage Drawer
Removal instructions in the Careand cleaning ofthe
range section.
The door isout of position. . Becausethe ovendoor is removable,itsometimesgets out
ofposition during installation. To straighten thedoor,push
down on the high corner.
45
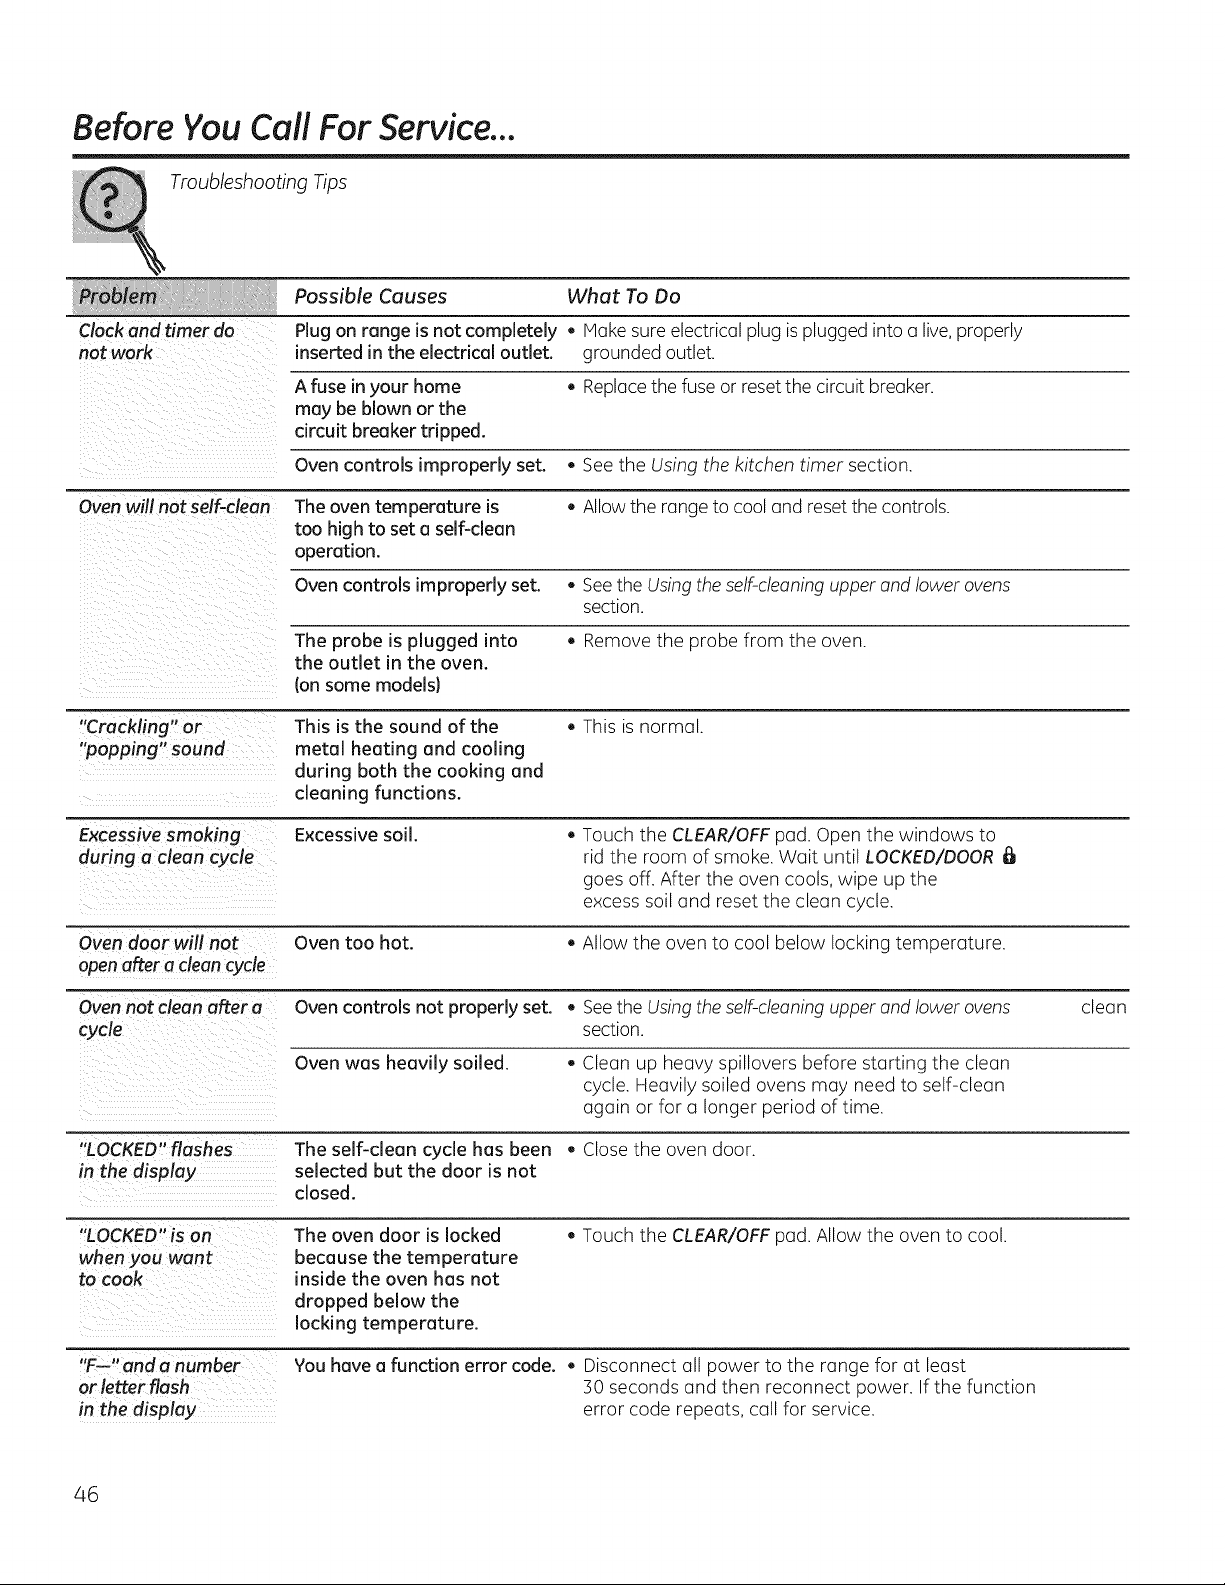
Before You CallFor Service...
Troubleshooting Tips
Possible Causes What To Do
Clock and timer do Plug on range isnot completely , Hake sureelectricalplug is plugged intoa live, properly
not work inserted in the electrical outlet, grounded outlet.
A fuse in your home , Replacethefuse or reset the circuitbreaker.
may be blown or the
circuit breaker tripped.
Oven controls improperly set. , See the Using the kitchen timer section.
Ovenwill not self-clean Theoventemperature is • Allow the range tocooland reset thecontrols.
too high to set o self-clean
operation.
Ovencontrols improperly set. • SeetheUsing the self-cleaning upper and lowerovens
section.
The probe is plugged into , Removethe probe from the oven.
the outlet in the oven.
(on some modelsl
"Crackling" or This isthe sound of the , This is normal.
"popping" sound metal heating and cooling
during both the cooking and
cleaning functions.
Excessive smoking Excessive soil. , Touch the CLEAR/OFFpad. Open the windows to
during a clean cycle rid the room of smoke. Wait until LOCKED/DOOR
goes off. After the oven cools,wipe up the
excess soiland reset the clean cycle.
Oven door will not Oven too hot. , Allow the oven to cool below locking temperature.
openafter a clean cycle
Oven not clean after a Ovencontrols not properly set. • SeetheUsing the self-cleaning upper and lowerovens clean
section.
Oven was heavily soiled. , Clean up heavy spillovers before starting the clean
cycle. Heavilysoiled ovens may need to self-clean
again or for u longer period oftime.
"LOCKED"flashes The self-cleon cycle has been , Close the oven door.
in the display selected but the door isnot
closed.
"L ED" _ --
OCK n_uH The oven door islocked , Touch the CLEAR/OFFpad. Allow the oven to cool.
when you want because the temperature
to cook inside the oven has not
dropped below the
locking temperature.
1, _s r
F-- anda numbe You hovea function error code. , Disconnect all power to the range for at least
or letter flash 30 seconds and then reconnect power. If the function
in the display error code repeats, call for service.
46
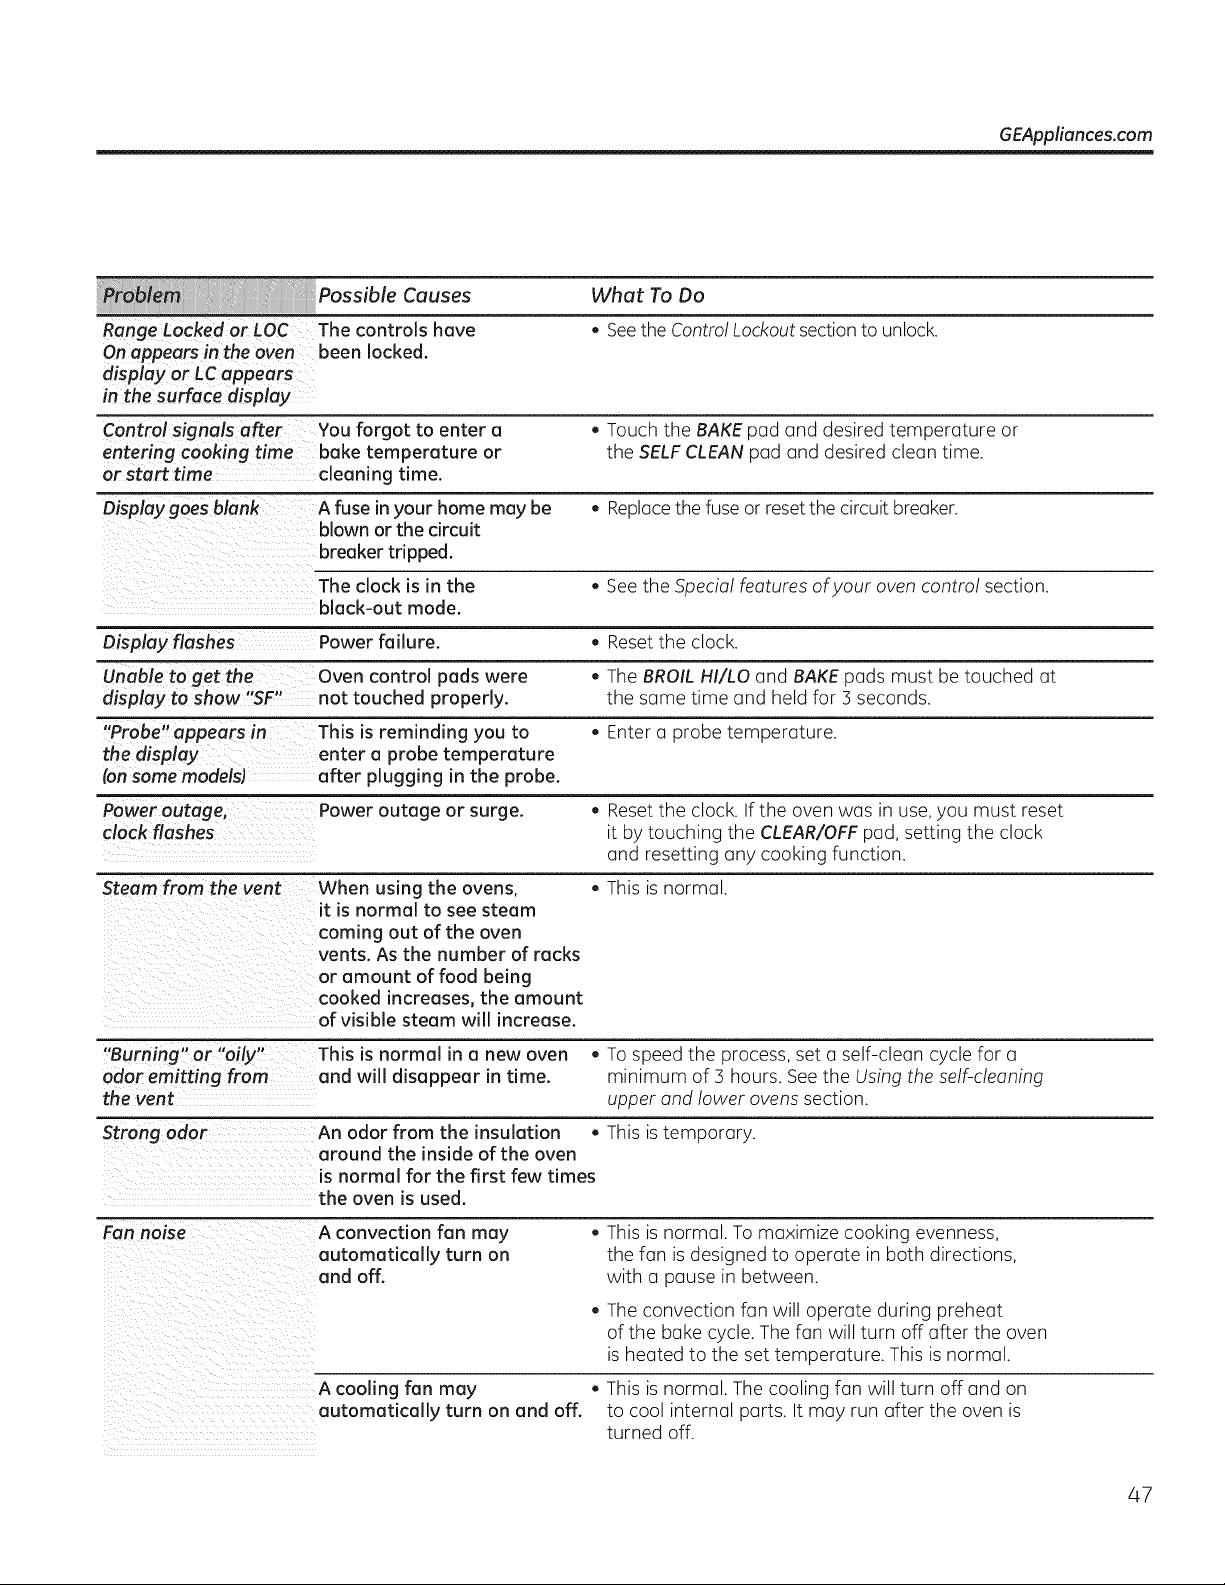
GEAppliances.com
Possible Causes What To Do
Range Locked or LOC The controls have . See the Control Lockout section to unlock.
On appears in the oven been locked.
display or LCappears
in the surface display"
Control signals after You forgot to enter a . Touch the BAKE pad and desired temperature or
entering cooking time bake temperature or the SELF CLEAN pad and desired clean time.
or start time cleaning time.
Display goes blank A fuse inyour home may be . Replace the fuse or reset the circuit breaker.
blown or the circuit
breaker tripped.
The clock is in the . See the Special features ofyour oven control section.
black-out mode.
Display flashes Power failure. . Reset the clock.
Unable to get the Oven control pads were . The BROIL HI/LO and BAKE pads must be touched at
display to show "SF" not touched properly, the same time and held for 3 seconds.
"Probe" appears in This is reminding you to . Enter a probe temperature.
the display enter a probe temperature
(onsome models) after plugging in the probe.
Power outage, Power outage or surge. . Reset the clock. If the oven was in use, you must reset
clock flashes it by touching the CLEAR/OFF pad, setting the clock
and resetting any cooking function.
Steam from the vent When using the ovens, . This isnormal.
it is normal to see steam
coming out of the oven
vents. As the number of racks
or amount of food being
cooked increases, the amount
of visible steam will increase.
"B " " " " " hi
urmng or ally T s is normal in a new oven . To speed the process, set a self-clean cycle for a
odor emitting from and will disappear in time. minimum of 3 hours. See the Using the self-cleaning
the vent upper and lower ovens section.
An odor from the insulation . This istemporary.
around the inside of the oven
is normal for the first few times
the oven is used.
Fan noise A convection fan may . This is normal. Tomaximize cooking evenness,
automatically turn on the fan isdesigned to operate in both directions,
and off. with a pause in between.
Theconvection fan will operate during preheat
of the bake cycle. Thefan will turn off after the oven
isheated to the set temperature. This isnormal.
A cooling fan may . This is normal. Thecooling fan will turn off and on
automatically turn on and off. to cool internal parts. It may run after the oven is
turned off.
47
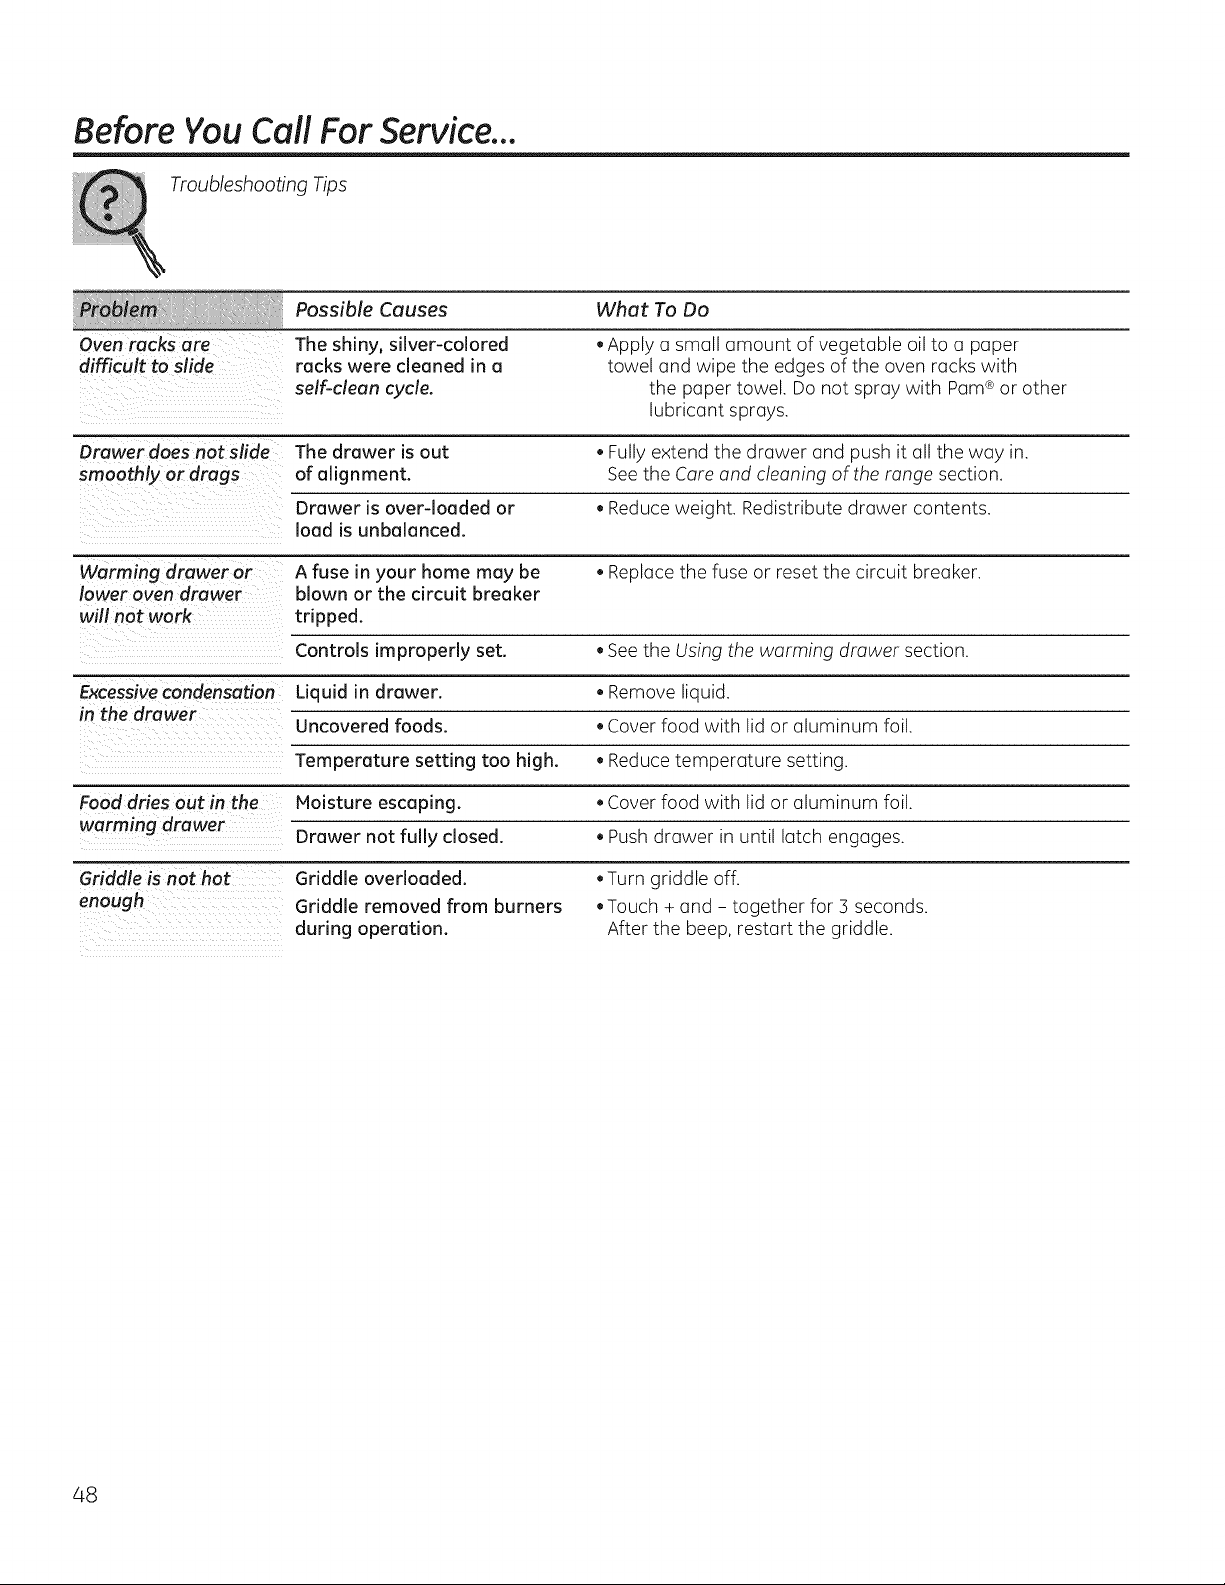
BeforeYou CallFor Service...
Troubleshooting Tips
Possible Causes What To Do
Oven racks are The shiny, silver-colored .Apply a small amount of vegetable oil to a paper
difficult to slide racks were cleaned in a towel and wipe the edgesof the oven racks with
self-clean cycle, the paper towel. Donot spray with Pam®or other
lubricant sprays.
Drawer does not slide The drawer is out *Fully extend the drawer and push it all the way in.
smoothly or drags of alignment. See the Careand cleaning of the range section.
Drawer isover-loaded or *Reduce weight. Redistribute drawer contents.
load is unbalanced.
Warming drawer or A fuse in your home may be • Replace the fuse or reset the circuit breaker.
lower oven drawer blown or the circuit breaker
will not work tripped.
Controls improperly set. . See the Using the warming drawer section.
Excessive condensation Liquid in drawer. • Remove liquid.
in the drawer
Uncovered foods. • Cover food with lid or aluminum foil.
Temperature setting too high. . Reduce temperature setting.
Food dries out in the Moisture escaping. • Cover food with lid or aluminum foil.
warming drawer Drawer not fully closed. . Push drawer in until latch engages.
Griddleisnothot
enough
Griddle overloaded.
Griddle removed from burners
during operation.
.Turn griddle off.
.Touch + and - together for 3 seconds.
After the beep,restart the griddle.
48

Notes. GEAppliances.com
49
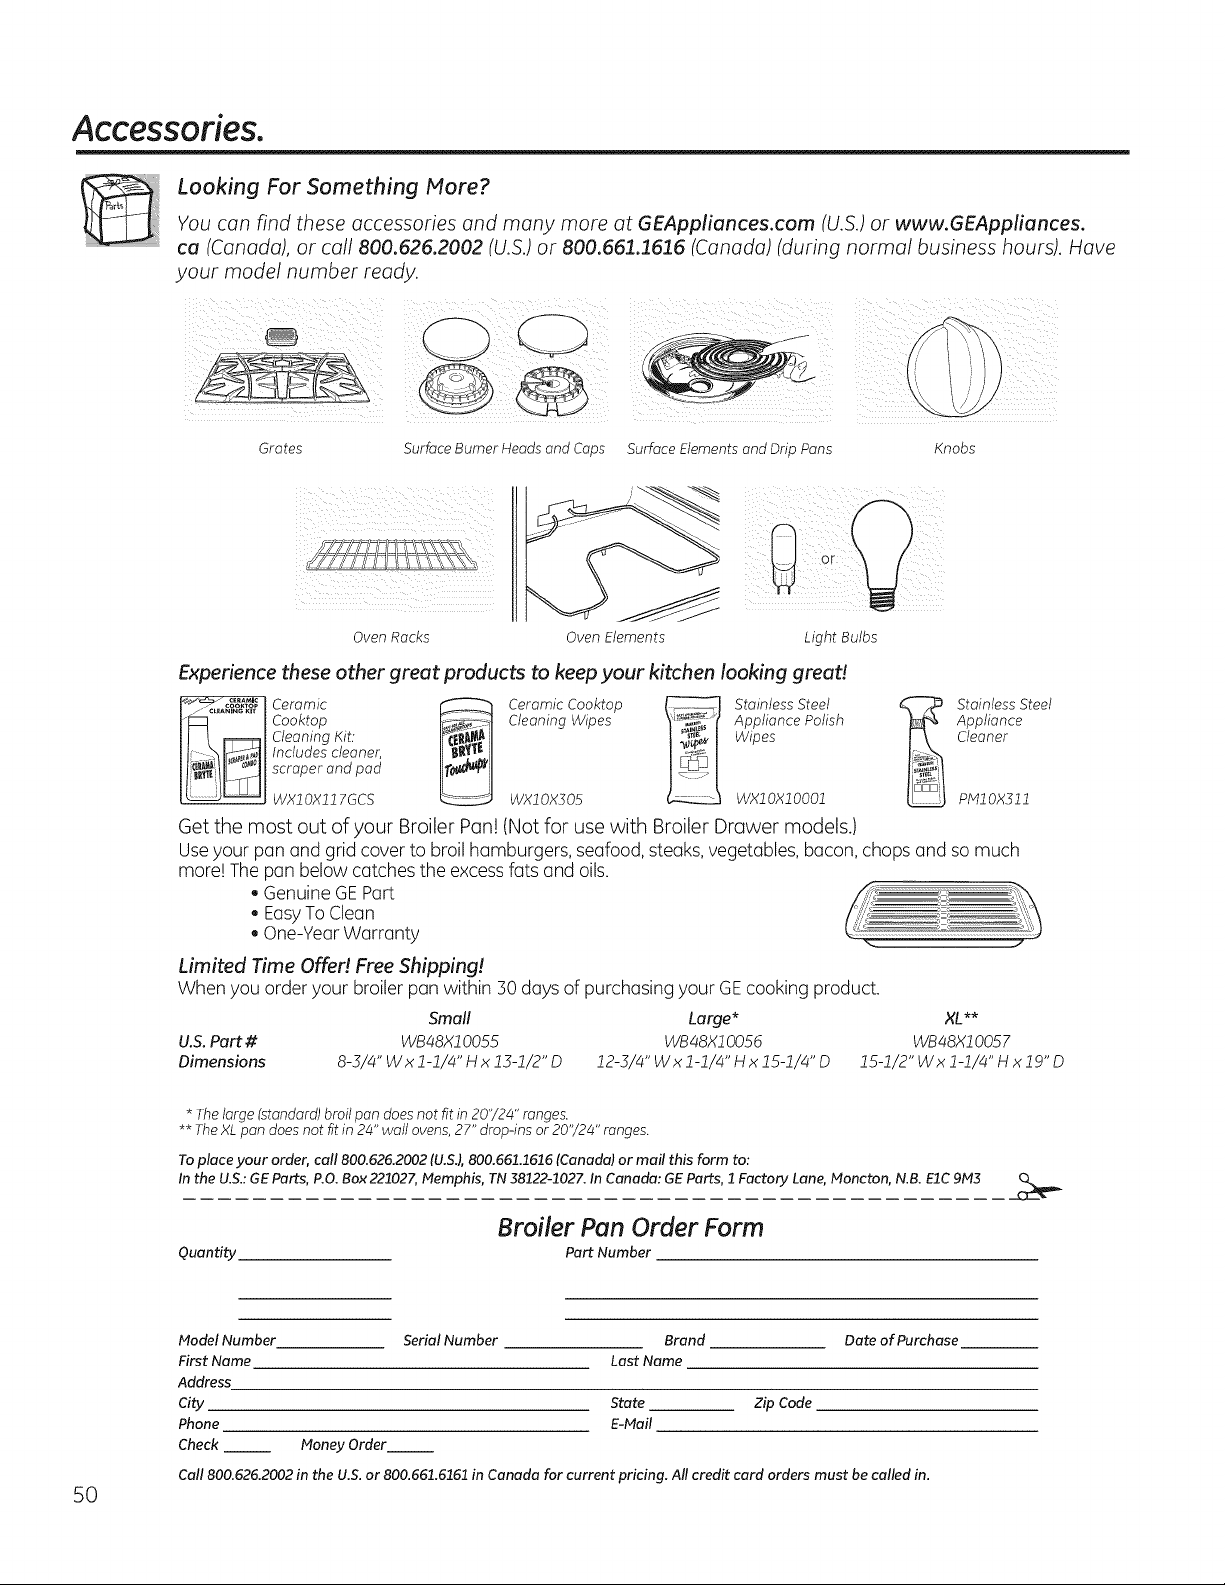
Accessories.
Looking For Something More?
You can find these accessories and many more at GEAppliunces.com (U.S.) or www.GEAppliunces.
ca (Canada), or call 800.626.2002 (U.S.) or 800.661.1616 (Canada) (during normal business hours). Have
your model number ready.
Grates SurfaceBurnerHeadsandCaps
Oven Racks Oven Elements
Light Bulbs
Experience these other great products to keep your kitchen looking great!
Cooktop Cleaning Wipes Appliance Polish
Cleaning Kit. Wipes
Includes cleonec
scraper and pod
WX10Xll 7GCS WX10X305 WX10X10001
Get the most out of your Broiler Pan!(Not for usewith Broiler Drawer models.)
Stainless Steel
Appliance
Cleaner
plVllOX]11
Useyour pan and grid cover to broil hamburgers, seafood, steaks, vegetables, bacon, chops and somuch
more! Thepan belowcatches the excess fatsand oils.
, GenuineGE Part
, EasyTo Clean
, One-YearWarranty
Limited Time Offer! Free Shipping!
When you order your broiler pan within 30 days ofpurchasing your GE cooking product.
Small
U.S.Part # WB48X10055
Large* XL**
WB48X1005d WB48X10057
12-3/4"Wxl-1/4"Hx15-1/4"D 15-1/2"Wxl-1/4"Hxlg"D
Dimensions
8-3/4" Wx 1-1/4" Hx 13-1/2" D
* Thelarge (standard) broilpandoesnot fit in 20"/24" ranges.
** TheXL pan doesnot fit in 24" wallovens, 27" drop-ins or 20"/24" ranges.
To place your order, call 800.626.2002 (U.SJ, 800.661.1616 (Canada) or mail this form to:
In the U.S.: GE Parts, P.O. Box221027, Memphis, TN 38122-1027. In Canada: GE Parts, 1 Factory Lane, Moncton, N.B. EIC 9M3
Quantity
Broiler Pan Order Form
Part Number
t4odel Number
First Name
Address
City
Phone
Check
Money Order
Serial Number Brand Date of Purchase
Last Name
State Zip Code
E-Mail
Call800.626.2002 in the U.S.or 800.661.6161 in Canada for current pricing. Allcredit card orders must be called in.
50
GE Electric RangeWarranty. GEAppliances.com
All warranty service provided by our Factory Service Centers,
or an authorized Customer Care® technician. To schedule service,
visitus on-line at GEAppliances.com, or call 800.GE.CARES
(800.432.2737). Please have serial number
and model number available when calling for service.
Staple your receipt here.
Proof ofthe original purchase
date isneeded to obtain service
under the warranty.
Fromthedoteof the
originai purehase
GE Will Provide:
Anypart ofthe range which fails due to a defect in materialsor workmanship.
During this limited one-year warranty, GEwillalsoprovide, freeof charge, all labor
and in-home service to replace the defective part.
Service trips to your home to teach you how to use
the product.
Improper installation, delivery or maintenance.
Product damage or failure ofthe product ifit isabused,
misused, modified, used for other than the intended
purpose, or usedcommercially.
Damage to the glass cooktop caused byuseof cleaners
other than the recommended cleaning creams and pads.
Damage to the glass cooktop caused byhardened spills
of sugary materials or melted plastic that are not cleaned
according to the directions in the Owner's Manual.
Replacement of housefusesor resetting of circuit breakers.
Damage to the product caused by accident, fire, floods or
acts of God.
Incidental or consequential damage caused bypossible
defects with this appliance.
Damage caused after delivery.
Product not accessible to provide required service.
EXCLUSION OF IMPLIED WARRANTIES--Your sole and exclusive remedy isproduct repair as provided in this Limited
Warranty. Any implied warranties, including the implied warranties of merchantability or fitness for a particular purpose,
are limited to one year or the shortest period allowed by law.
This warranty is extended to the original purchaser and any succeeding owner for products purchased for home
use within the USA. If the product is located in an area where service by a GE Authorized Servicer is not available, you
may be responsible for a trip charge or you may be required to bring the product to an Authorized GEService location for
service. In Alaska, the warranty excludes the cost of shipping or service calls toyour home.
Some states do not allow the exclusion or limitation of incidental or consequential damages. This warranty gives
you specific legal rights, and you may also have other rights which vary from state to state. To know what your
legal rights are, consult your local or state consumer affairs office or your state's Attorney General.
Warranton General Electric Company. Louisville, KY 40225
51
Consumer Support.
GEAppliances Website GEAppliances.com
Have a question or need assistance with yourappliance? Try the GEAppliances Website 24 hoursa day,
anydayoftheyear! Forgreater convenienceand faster service,you cannow download Owner's Manuals,
order parts or evenschedule service on-line.
Schedule Service GEAppliances.com
Expert GErepair service is onlyone step away from your door. Geton-line and schedule your service at
yourconvenienceanyday ofthe year! Or call800.GE.CARES(800./432.2737)during normal business hours.
Real Life Design Studio GEAppliances.com
GEsupportsthe UniversalDesign concept-products, services and environments that can be usedby
people of all ages, sizesand capabilities. Werecognizethe need to design for a wide range of physical and
mental abilities and impairments. For details ofGE'sUniversal Designapplications, includingkitchendesign
ideas for people with disabilities, checkout our Websitetoday. Forthe hearing impaired, please call800.TDD.
GEAC(800.833.4322).
ExtendedWarranties
GEAppliances.com
Purchase a GEextended warranty and learn about special discounts that are availablewhileyourwarranty
is still ineffect.You canpurchase iton-line anytime, or call800.626.2224during normal business hours.
GEConsumerHome Serviceswillstill be thereafter yourwarranty expires.
Parts andAccessories
GEAppliances.com
Individualsqualifiedtoservice their ownappliances canhaveparts or accessoriessent directlytotheir homes
(VISA,MasterCard and Discovercards are accepted). Order on-line today,24 hoursevery dayor byphone at
800.626.2002during normal business hours.
Instructions contained in this manual cover procedures to be performed by any user. Other servicing
generally should be referred to qualified service personnel. Caution must be exercised, since improper
servicing may cause unsafe operation.
Contact Us
GEAppliances.com
If youare notsatisfied with theservice you receive from GE,contact us on our Websitewith all the details
includingyour phone number, or write to: General Manager, Customer Relations
GEAppliances,Appliance Park
Louisville,KY40225
] RegisterYourAppliance GEAppliances.com
Registeryaur new appliance an-line-at your convenience! Timely product registration willallowforenhanced
communication and prompt serviceunder theterms ofyourwarranty, shouldtheneed arise.
You may alsomail in the pre-printed registration card includedin thepacking material.
52

