IN USA CONTACT:
Division of Panasonic Corporation of North America
Panasonic Consumer Electronics Company
One Panasonic Way 2F-3 Secaucus, NJ 07094
IN PUERTO RICO CONTACT:
Panasonic Sales Company
Division of Panasonic Corporation of Puerto Rico, Inc.
San Gabriel Industrial Park 65
th
Infantry Avenue KM9.5
Carolina, Puerto Rico 00630
IN CANADA CONTACT:
AU CANADA, CONTACTER:
Panasonic Canada Inc.
5770 Ambler Drive, Mississauga, Ontario L4W 2T3
(905) 624-5010
Vancouver: (604) 278-4211
Calgary: (403) 295-3955
Toronto: (905) 624-8447
Montréal: (514) 633-8684
En México:
Panasonic de México, S.A de C.V.
México D.F.
Moras 313 Col. Tlacoquemecatl Del Valle Del.
Benito Juarez Mexico, D.F. 03200 Mexico
Tel: 54 88 10 00
Service • Assistance • Accessories
Dépannage
• Assistance • Accessoires
Call 1-800-338-0552 (In USA)
panasonic.com/shavers (In USA)
Call 1-800-467-3405 (In Canada, only for shavers)
Composer 1-800-467-3405 (Au Canada, pour les rasoirs seulement)
No.1 EN ES (U.S.A./CANADA)
Printed in Japan
Imprimé au Japon
R
Operating Instructions
Instrucciones de operación
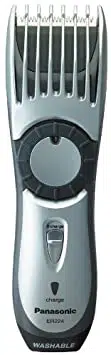
AC/Rechargeable Beard/Hair Trimmer
Recortador de pelo y barba recargable o a CA
Model No. ER224
Modelo No. ER224
B
Please read these instructions completely before use, and save this manual for
future use.
B
Antes de usar el aparato, lea completamente las instrucciones y conserve este
manual para futuras consultas.
P00-18ER224USA06.2.247:16ページ1

32
IMPORTANT SAFETY INSTRUCTIONS
When using an electrical appli-
ance, basic precautions
should always be followed,
including the following : Read
all instructions before using
this appliance.
WARNING
To reduce the risk of burns, fire, electric
shock, or injury to persons:
1.
Do not use this appliance
with damaged blades as
injury may occur.
2.
Close supervision is necessary
when this appliance is used
by, on, or near children or
invalids.
3.Use this appliance only for its
intended use as described in
this manual. Do not use
attachments not recommend-
ed by the manufacturer.
4.
Never operate this appliance if
it has a damaged cord or plug,
if it is not working properly, if it
has been dropped or dam-
aged, or dropped into water.
Return the appliance to a
service center for examina-
tion and repair.
5.Keep the cord away from
heated surfaces.
6.Never drop or insert any
object into any opening.
7.
Do not use outdoors or operate
where aerosol (spray) products
are being used or where oxy-
gen is being administered.
8.
Always attach plug to appli-
ance first, then to outlet. To
disconnect, turn off the switch,
then remove plug from outlet.
SAVE THESE INSTRUCTIONS
DANGER
To reduce the risk of electric shock:
1.Do not reach for an appli-
ance that has fallen into
water. Unplug immediately.
2.Do not use while bathing or
in a shower.
3.Do not place or store appli-
ance where it can fall or be
pulled into a tub or sink. Do
not place in or drop into
water or other liquid.
4.Always charge this appli-
ance in a cool, dry place.
5.
Except when charging, always
unplug this appliance from the
electrical outlet immediately
after using.
6.Unplug this appliance before
cleaning.
7.Use only in dry condition.
8.Do not submerge this appli-
ance in water.
INDEX
ENGLISH Page 02
ESPAÑOL Página 12
P00-18ER224USA06.2.247:16ページ2
54
A
E
B
C
F
G
M
H
I
D
J
K
L
N
O
1
2 3 4
5 6 7
8 9 10
11 12 13
14 15 16
charge
P00-18ER224USA06.2.247:16ページ4
6
This Beard/Hair Trimmer is for the
trimming and care of mustaches,
beards and hair. Trimming length can
be adjusted between 1 to 20 mm. The
trimmer can be operated either from
an AC power source or on its own
rechargeable battery.
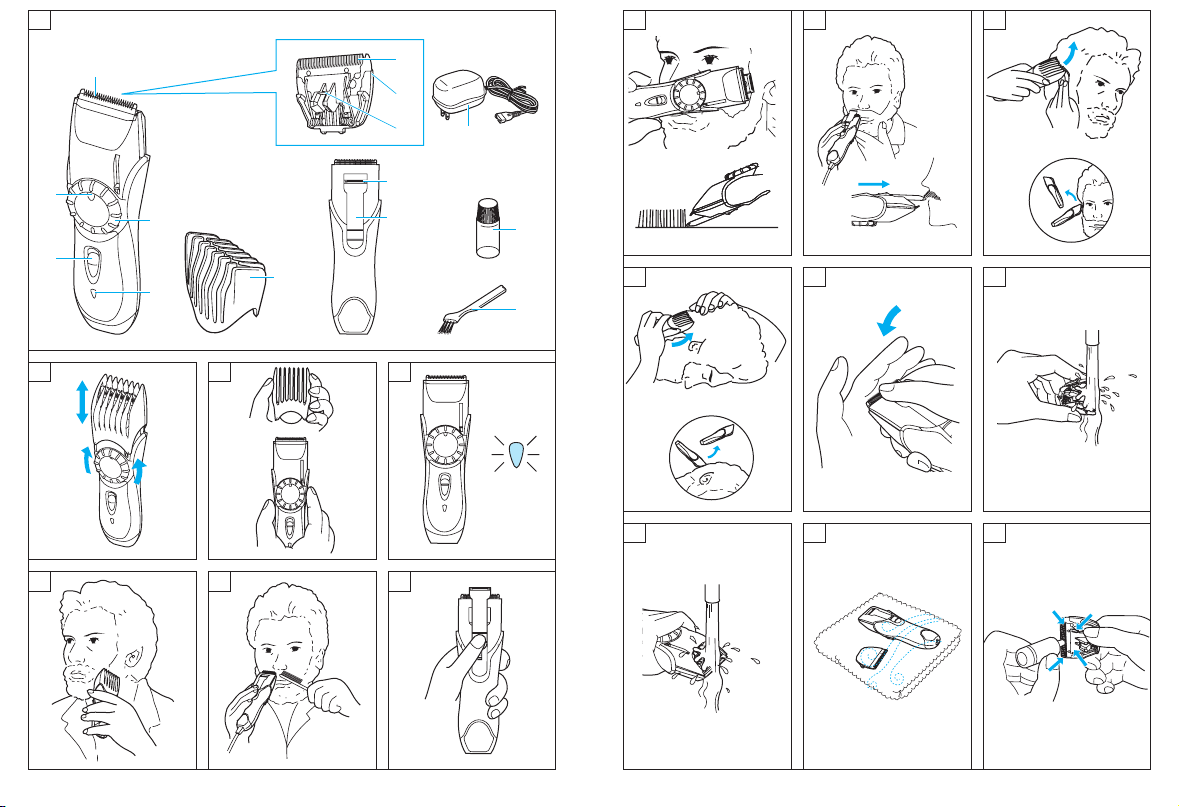
Parts identification
(see fig. 1)
Before use
A Switch
Slide up to turn on, slide down to
turn off.
B Charge Indicator Lamp
Lights when the unit is connected
with the adaptor M to an AC
power source for charging.
C Main Blade
A precision 39 mm-wide blade
which can be used with the comb
attachment F.
D
E Trimming Length Indicator
Indicator Trimming Length
1 1.0 mm (1/32˝)
2 2.0 mm (5/64˝)
• 3.5 mm (5/32˝)
5 5.0 mm (3/16˝)
• 6.5 mm (9/32˝)
8 8.0 mm (5/16˝)
• 9.5 mm (3/8˝)
11 11.0 mm (13/32˝)
• 12.5 mm (1/2˝)
14 14.0 mm (17/32˝)
• 15.5 mm (5/8˝)
17 17.0 mm (21/32˝)
• 18.5 mm (23/32˝)
20 20.0 mm (25/32˝)
• The actual hair length may be
longer than the set trimming hight.
F Comb Attachment for Hair
Use this to control the trimming
length. (see fig. 3)
G Moving Blade
H Stationary Blade
I Cleaning Lever
Push this lever to remove bits of
hair caught between the station-
ary blade and the moving blade.
Quick Adjust Dial
Turn the dial to a higher setting to
raise or lower the comb attach-
ment F to the desired length
(between 1 and 20 mm) (see fig.
2). The comb attachment is locked
in position when the switch is set
to “1”.
J Blade Block
Release to remove the blade
block from the housing to clean
or replace the blade. (see fig. 12)
7
(b)
(c)
(a)
(d)
(e)
(f)
(n)
(o)
(m)
(l)
19
21 22
(h)
(g)
(k)
(j)
(i)
(q)
(p)
20
17 18
P00-18ER224USA06.2.247:16ページ6

K Finishing blade of Mini Trimmer
Use this when finishing the edges
(see fig. 8) and trimming the
moustache.
L Trimmer guide of Mini Trimmer
Slide it up when finishing blade is
used.
M Adaptor
Use this to connect the trimmer
to an AC power source for re-
charging or for AC operation.
N Oil
Lubricate the space between the
stationary and moving blade with
2 or 3 drops of oil after use. (see
fig. 16)
O Cleaning Brush
READ ALL INSTRUCTIONS BE-
FORE USE.
Operation
Charging and cordless trimming
When charging the beard/hair trim-
mer for the first time or when it has
not been in use for more than 6
months, charge it for the activation
for at least 16 hours before use.
Connect the power cord to the beard/
hair trimmer, and plug the adaptor to
an AC outlet.
In some areas, a special plug adap-
tor may be required.
The charge indicator lamp lights up
when the trimmer is being charged.
(see fig. 4)
You can fully charge the trimmer in 8
hours if it seems to be losing speed.
A full charge will supply enough
power for approx. 6 trims (5 minutes
per trim for a normal beard).
AC operation
Connect the AC adaptor to the body
in the same way as for charging, and
set the switch to “1” to use the trim-
mer.
If the trimmer does not operate after
connection as mentioned above, re-
turn switch to “0•charge” position for
1 minute and then set switch back to
“1” position.
Trimming of beard
Place the angled face of the comb
against the skin and cut the beard
by moving the trimmer in all direc-
tions to obtain a uniform cut. (see fig.
5)
With curly facial hair, the comb at-
tachment may not cut all of the hair.
In this case, remove the comb attach-
ment and use a conventional comb
to draw out the remaining uncut, hair.
(see fig. 6)
When shaping the beard, remove the
comb attachment. Place the angled
edge against the skin and make the
border of the beard even.
When finishing the edges (see fig.
8) and trimming the moustache
(see fig. 9)
Use the finishing blade of mini trim-
mer.
Slide the trimmer guide up and then
turn the trimmer on (see fig. 7).
To smooth off a beard surface, run
this blade lightly over the surface.
Cutting of hair
Cut hair to the correct height by mov-
ing the trimmer back against the flow
of the hair.
Cutting around the ears
Cut a little, and then gently separate
the trimmer from the hair (see fig. 10).
Cutting the nape of the neck
Bring the trimmer gently away from
the hair to finish (see fig. 11).
(Do not use the trimmer in an in-
verted position. This can cut hair too
deeply.)
Turn off the trimmer (“0•charge”) be-
fore changing the trim height or re-
moving the attachment.
Hold body of the trimmer with
Panasonic mark upwards, place the
thumb against the blades, and push
them away from the main body. (see
fig. 12)
• If washing in water
1. Rinse off any hairs that are stick-
ing to the blade in running water.
(see fig. 13)
2. Rinse out any hairs that are in-
side the trimmer with running wa-
ter. (see fig. 14)
3. Shake the trimmer 4-5 times gen-
tly, wipe off any water drops from
the trimmer and blade, and then
place it onto a towel with the
“Washable” indicator facing
downward to let it fully dry. (see
fig. 15)
4. Apply a few drops of the oil to the
points indicated by the arrows.
(see fig. 16)
5. Remount the blade on the trim-
mer body.
WARNING: Detach the trimmer from
the AC adaptor before cleaning it in
water.
• If cleaning with brush
1. Remove the blade and brush off
the cut hairs from the blade edge.
2. Use the cleaning brush to brush
off the cut hairs from the trimmer
body and from around the blade.
(see fig. 17)
3. Brush the cut hairs out from be-
tween the stationary blade and
the moving blade. Press down on
the lever for cleaning in order to
Blade Maintenance
The following is the symbol of
washable trimmer. The symbol
means that hand-held part may be
cleaned under water. The trimmer
shall not be used until it has dried.
98
P00-18ER224USA06.2.247:16ページ8

raise the moving blade, and brush
the cut hairs out from between the
blades. (see fig. 18)
4. Apply a few drops of the oil to the
points indicated by the arrows.
(see fig. 16)
5. Remount the blade on the trim-
mer body.
Blade life
Blade life will vary according to the
frequency and length of use. For ex-
ample, using the unit for 10 minutes
every 3 days, the life expectancy is
approximately 3 years. If cutting effi-
ciency is reduced substantially de-
spite proper maintenance, the blades
have exceeded their service life and
should be changed.
The replacement part no. is
WER9602.
Battery life
Battery life will vary according to the
frequency and length of use. If the
battery is charged 3 times a month,
the service life will be approximately
6 years. If the unit is left without be-
ing charged for more than 6 months,
the charge will drain from the battery
and their service life may be short-
ened. Therefore, even when not us-
ing regularly, it is recommended that
the unit be recharged at least once
every 6 months.
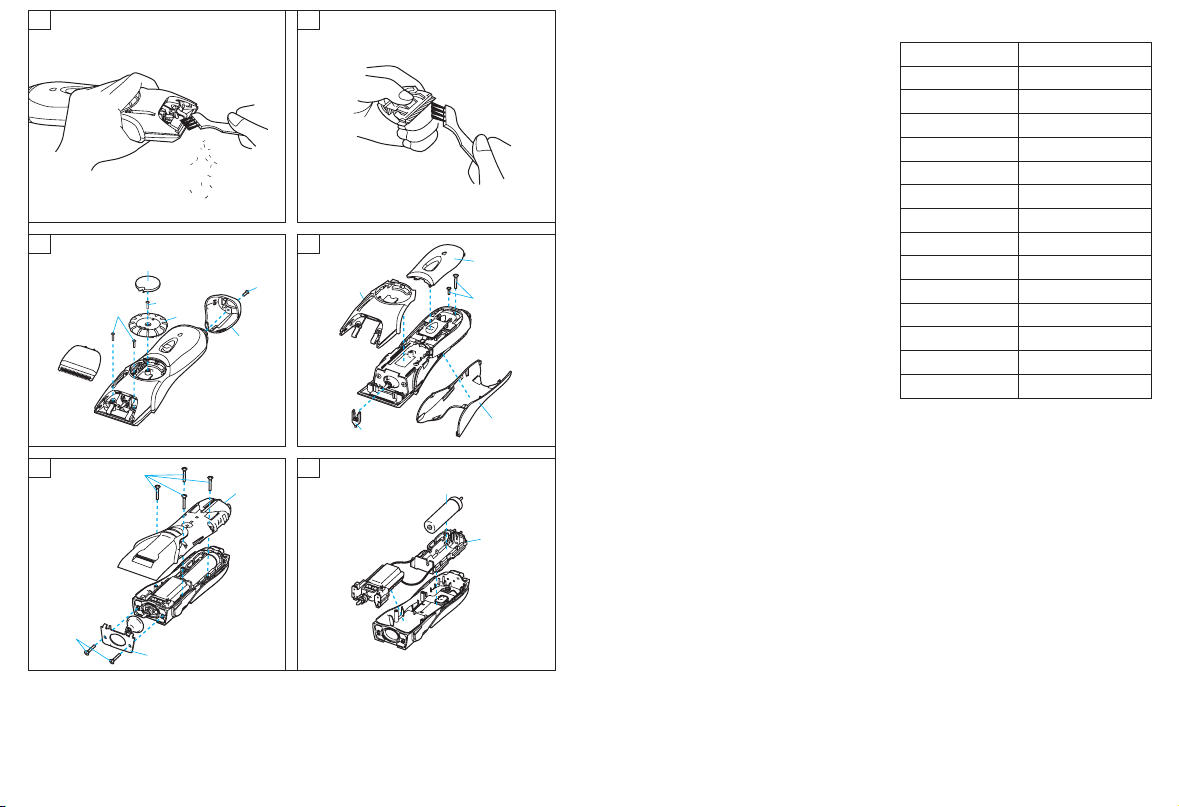
How to remove the built-in re-
chargeable battery before dis-
posal of the trimmer
The battery in this trimmer is not in-
center. The procedure described be-
low is intended only for removal of
the rechargeable battery for the pur-
pose of proper disposal.
Always make sure that the battery
have been removed from the trimmer
before disposing of it.
1. Disconnect the adaptor from the
AC outlet, and remove the power
cord from the trimmer.
2. Remove the blade from the trim-
mer.
Remove the screw (a) and detach
the bottom cover (b). (see fig. 19)
3. Detach the dial cover (c), remove
the screw (d) and disconnect the
dial (e).
4. Remove the two screws (f).
5. Detach the housing (g), front
panel (h) and side panel (i), then
remove the trimmer drive rod (j)
(see fig. 20).
6. Remove the two screws (k).
ATTENTION:
A nickel cadmium battery that
is recyclable powers the product
you have purchased. Please call
1-800-8-BATTERY for information
on how to recycle this battery.
()
replaced at an authorized service
mers. However, the battery may be
tended to be replaced by consu-
7. Remove the two screws (l) and
disconnect the rubber push plate
(m). (see fig. 21)
8. Remove the screws (n) and dis-
connect housing (o).
9. Disconnect the battery chamber
(p) and remove the battery (q).
(see fig. 22)
Attention
• Do not charge the trimmer at tem-
peratures below 0° C (32°F) or
above 40°C (104°F), or where it will
be exposed to direct sunlight, or
other heat sources.
• Do not continue charging for more
than 48 hours. Doing so may dam-
age the battery.
• Clean the housing only with a soft
cloth slightly dampened with water
or soapy water. Never use a caus-
tic cleaner such as benzene or
bleach.
• The trimmer may become warm
during operation and normal re-
charging. This is normal.
Caution
1. Keep out of reach of children.
2. Never tamper with the moving
parts.
3. Do not pick up the trimmer by the
cord. It may become detached,
causing damage or injury.
4. Do not use on animals.
5. Never disassemble the trimmer.
Take it to a qualified serviceperson
when service or repair is required.
6. Do not attempt to use any power
cord or adaptor other than one
specifically designed for this
model. Use only the included AC
adaptor.
7. Do not pull, twist or severely bend
the power cord.
8. Do not wrap the power cord tightly
around the appliance.
9. Dry the trimmer completely be-
fore charging it.
10.Keep the adaptor away from wa-
ter and handle it only with dry
hands.
11.Store the adaptor in a dry area
where it will be protected from
damage.
12.Wash the trimmer in tap water. Do
not use salt water or boiling wa-
ter. Also, do not use cleaning
products that are designed for
toilets, bathrooms or kitchen ap-
pliances. Do not submerge the
trimmer for a long time.
13.Do not take the housing apart as
this can affect the watertight con-
struction.
14.Do not clean with water when the
trimmer is connected to the power
cord.
This product is intended for house-
hold use only.
Specifications
Power source: 120 V AC, 60 Hz
Motor voltage: 1.2 V DC
Charging time: 8 hours
15. This power unit is intended to be
correctly oriented in a vertical
position or floor mount position.
1110
P00-18ER224USA06.2.247:16ページ10

Esta afeitadora es para el afeitado y
el cuidado del bigote, la barba y el
pelo. La longitud de afeitado se pue-
de ajustar entre 1 y 20 mm. La
afeitadora funciona con una toma de
CA o con su propia batería
recargable.
Identificación de los
Antes de usar
componentes
(véase la fig. 1)
A Interruptor
Deslícelo hacia arriba para en-
cender la afeitadora, y hacia aba-
jo para apagarla.
B
Se enciende cuando la unidad se
conecta con el adaptador M a
una toma de CA para cargarla.
C Cuchilla principal
Cuchilla ancha con precisión de
39 mm que puede utilizarse con
el peine accesorio F.
D Selector de ajuste rápido
Gire el selector a una posición
más alta para subir o bajar el pei-
ne accesorio F a la longitud
deseada (entre 1 y 20 mm) (véa-
se la fig. 2). El peine queda blo-
queado cuando el interruptor está
en posición “1”.
E Indicador de la longitud de afei-
tado
Indicador
Longitud de afeitado
1 1,0 mm (1/32˝)
2 2,0 mm (5/64˝)
• 3,5 mm (5/32˝)
5 5,0 mm (3/16˝)
• 6,5 mm (9/32˝)
8 8,0 mm (5/16˝)
• 9,5 mm (3/8˝)
11 11,0 mm (13/32˝)
• 12,5 mm (1/2˝)
14 14,0 mm (17/32˝)
• 15,5 mm (5/8˝)
17 17,0 mm (21/32˝)
• 18,5 mm (23/32˝)
20 20,0 mm (25/32˝)
• La longitud real del pelo puede ser
más larga que la altura de cortada
ajustada.
F Peine para el cabello
Utilícelo para controlar la longitud
de afeitado. (véase la fig. 3)
G Cuchilla rotatoria
H Cuchilla fija
I Palanca de limpieza
Empuje esta palanca para elimi-
nar el pelo atrapado entre la cu-
chilla fija y la cuchilla rotatoria.
Lámpara indicadora de carga
1312
IMPORTANTE PARA SU SEGURIDAD
Al usar un aparato eléctrico,
siempre se debe tomar ciertas
precauciones básicas, incluyen-
do las siguientes:
Lea todas las instrucciones antes
de usar este aparato.
PELIGRO
1.
No trate de agarrar ningún aparato
que haya caído dentro del agua.
Desconéctelo inmediatamente.
2.
No lo utilice mientras toma un baño
o se ducha.
3.
No coloque o guarde el aparato
donde se pueda caer o donde
corra el riesgo de tirarlo a una
bañera o lavamanos. No lo coloque
ni deje caer dentro del agua o
cualquier otro líquido.
4.
Cargue siempre este aparato en un
lugar fresco y seco.
5.
Siempre desconecte este aparato
de la toma de corriente después
del uso, excepto cuando lo esté
cargando.
6.
Desenchufe este aparato antes de
limpiarlo.
7.
Utilícelo sólo en seco.
8.
No sumerja este aparato dentro del
agua.
ADVERTENCIA
Para evitar quemadural, incendios,
descargas eléctricas y lesiones personales:
1.
No lo utilice con cuchillas para el
aparato dañadas, pues esto podría
provocar una lesión.
2.
Es necesaria una supervisión rig-
urosa cuando se utilice el aparato
en o cerca de niños o personas
inválidas.
3.
Use este aparato solamente para
el fin que ha sido diseñado como
se describe en este manual. No
use accesorios que no hayan sido
recomendados por el fabricante.
4.
Nunca use este aparato si tiene el
cable o enchufe de alimentación
dañado, si el aparato no funciona cor-
rectamente o si éste se ha caído, está
dañado o ha caído al agua. Lleve el
aparato a un centro de servicio para
que sea revisado y reparado.
5.
Mantenga el cable alejado de
superficies calientes.
6.
Nunca deje caer o inserte ningún
tipo de objetos por las aberturas del
aparato.
7.
No use la afeitadora al aire libre ni
en lugares donde se estén usando
productos tipo aerosol (pulver-
izadores) o donde se esté adminis-
trando oxígeno.
8.
Siempre conecte primero el enchufe
al aparato, luego al tomacorriente
eléctrico. Para desconectar, desactive
el interruptor, luego desconecte el
enchufe del tomacorriente eléctrico.
CONSERVE ESTAS INSTRUCCIONES
Para evitar descargas eléctricas:
P00-18ER224USA06.2.247:16ページ12

En este caso, retire el peine acceso-
rio y utilice un peine convencional
para eliminar el pelo que quede sin
cortar. (véase la fig. 6)
Cuando dé forma a la barba, retire
el peine accesorio. Coloque el bor-
de angular sobre la piel y nivele el
contorno de la barba.
Cuando acabe los bordes (véase
la fig. 8) y afeite el bigote (véase
la fig. 9)
Utilice la cuchilla de acabado del
minicortapelo.
Deslice la guía de afeitado hacia arri-
ba y después encienda la afeitadora.
(véase la fig. 7)
Para alisar la barba, recorra la su-
perficie suavemente con esta cuchi-
lla.
Cómo cortar el cabello
Corte el cabello a la altura correcta
moviendo el cortapelo hacia atrás y
a contrapelo.
Cómo cortar alrededor de las ore-
jas
Corte un poco y, a continuación, se-
pare suavemente el cortapelo del
cabello (véase la fig. 10).
Cómo cortar en la nuca
Separe el cortapelo del cabello con
suavidad al terminar (véase la fig.
11).
(No utilice el cortapelo en posición
invertida. Así se puede cortar el pelo
con demasiada profundidad.)
Apague el cortapelo (“0 • carga”)
antes de cambiar la altura de corte
o de quitar el accesorio.
Mantenimiento de la cuchilla
El siguiente símbolo indica que la
recortadora es lavable. Significa que
la parte portátil se puede lavar bajo
Sujete el cuerpo de la recortadora
con la marca Panasonic hacia arri-
ba, coloque el pulgar contra las cu-
chillas y empújelas para extraerlas
del cuerpo. (véase la fig. 12)
• Si la lava con agua
1. Aclare la cuchilla con agua del
grifo para eliminar los pelos que
quedan pegados. (véase la fig.
13)
2. Aclare la afeitadora con agua del
grifo para extraer los pelos que
quedan dentro. (véase la fig. 14)
3. Agite la afeitadora 4 o 5 veces
con suavidad, seque las gotas de
agua de la afeitadora y de la cu-
chilla, y después colóquela sobre
una toalla con el indicador
“Lavable” hacia abajo para que se
seque por completo. (véase la fig.
15)
4. Aplique unas gotas de lubricante
en los puntos que indican las fle-
chas. (véase la fig. 16)
5. Vuelva a colocar la cuchilla en el
cuerpo de la afeitadora.
el grifo. Utilice la máquina cortapelo
solamente cuando esté totalmente
seca.
J Botón de bloqueo de la cuchi-
lla
Quítelo para desbloquear la cu-
chilla de la carcasa cuando limpie
o reemplace la cuchilla. (véase la
fig. 12)
K Cuchilla de acabado del
minicortapelo
Utilícela para el acabado de los
bordes (véase la fig. 8) y el afei-
tado del bigote.
L Guía de cortado del
minicortapelo
Deslícela hacia arriba cuando uti-
lice la cuchilla de acabado.
M Adaptador
Utilícelo para conectar la
afeitadora a una toma de corrien-
te alterna para recargarla o para
que funcione de este modo.
N Lubricante
Lubrique el espacio comprendi-
do entre la cuchilla fija y la cuchi-
lla rotatoria con 2 o 3 gotas des-
pués de utilizar la afeitadora.
(véase la fig. 16)
O Cepillo
LEA TODAS LAS INSTRUCCIO-
NES ANTES DE USARLO.
Funcionamiento
Carga y afeitado sin cable
Cuando cargue la afeitadora por pri-
mera vez o cuando haya dejado de
utilizarla durante más de 6 meses,
cárguela para activarla por lo menos
16 horas antes de utilizarla.
Conecte el cable de alimentación a
la afeitadora, y enchufe el adaptador
a una toma de CA.
En algunos lugares puede ser nece-
sario un adaptador especial.
Funcionamiento con CA
Conecte el adaptador de CA al cuer-
po de la afeitadora de igual modo que
para cargarla, y coloque el interrup-
tor en “1” para utilizar la afeitadora.
Si la afeitadora no funciona al enchu-
farla como se describe arriba, vuel-
va a colocar el interruptor en la posi-
ción “0•carga” durante 1 minuto y
después vuelva a la posición “1”.
Afeitado de la barba
Coloque la cara angular del peine
sobre la piel y corte la barba movien-
do la cuchilla en todas las direccio-
nes para obtener un corte uniforme.
(véase la fig. 5)
Con pelo facial rizado, el peine ac-
cesorio puede dejar el afeitado in-
completo.
La lámpara indicadora de carga se
enciende cuando la máquina
cortapelo se está cargando. (véase la
fig. 4)
Puede cargar la máquina cortapelo
completamente en 8 horas cuando
parezca que pierde velocidad.
Una carga completa proporcionará
suficiente energía para unos 6 cortes
(5 minutos por corte para una barba
normal).
1514
P00-18ER224USA06.2.247:16ページ14

toma de CA, y extraiga el cable
de alimentación de la afeitadora.
2. Extraiga la cuchilla de la
afeitadora.
Retire el tornillo (a) y la tapa infe-
rior (b).
3. Separe la cubierta del selector
(c), retire el tornillo (d) y retire el
selector (e).
4. Retire los dos tornillos (f).
5. Separe la carcasa (g), el panel
frontal (h) y el panel lateral (i), a
continuación extraiga la barra de
la afeitadora (j). (véase la fig. 20)
6. Retire los dos tornillos (k).
7. Retire los dos tornillos (l) y retire
el plato de empuje de goma (m).
(véase la fig. 21)
8. Retire los tornillos (n) y retire la
carcasa (o).
9. Retire el compartimento de la ba-
tería (p) y extraiga la batería (q).
(véase la fig. 22)
Atención:
• No cargue la afeitadora en lugares
donde la temperatura sea inferior
a 0 °C (32 °F) o superior a 40 °C
(104 °F), en lugares expuestos di-
rectamente a la luz del sol o cerca
de una fuente de calor.
• No prolongue la carga más de 48
horas. De lo contrario, puede da-
ñar la batería.
• Limpie la carcasa sólo con un paño
suave ligeramente humedecido
con agua o agua jabonosa. Nunca
utilice un limpiador cáustico como
benceno o lejía.
• La afeitadora podría calentarse
durante el funcionamiento y la re-
carga. Es normal.
Precaución:
1. Manténgala fuera del alcance de
los niños.
2. No manipule las partes en movi-
miento.
3. No coja la afeitadora por el ca-
ble. Podría soltarse y provocar
daños.
4. No la utilice con animales.
5. Nunca desmonte la afeitadora.
Llévela al servicio técnico cuan-
do necesite una revisión o repa-
ración.
6. No intente utilizar un cable de ali-
mentación o adaptador que no
sea el que está diseñado
específicamente para este mode-
lo. Utilice solo el adaptador de CA
suministrado.
7. No tire, tuerza o doble con fuer-
za el cable de alimentación.
8. No enrolle con fuerza el cable de
alimentación alrededor del apa-
rato.
9. Seque el cortapelo completa-
mente antes de cargarlo.
10.Mantenga el adaptador alejado
del agua y manipúlelo con las
manos secas.
11.Guarde el adaptador en un lugar
seco y protegido de posibles da-
ños.
12.Lave el cortapelo con agua co-
rriente. No utilice agua salada ni
agua hirviendo. Asimismo, no uti-
ADVERTENCIA: Desenchufe el
adaptador de CA de la afeitadora
antes de limpiarla con agua.
• Si la limpia con el cepillo
1. Extraiga la cuhilla y cepille los
pelos cortados que queden en el
borde de la cuchilla.
2. Utilice el cepillo para cepillar los
pelos cortados que quedan en el
cuerpo de la afeitadora y alrede-
dor de la cuchilla. (véase la fig.
17)
3. Cepille los pelos cortados que
quedan entre la cuchilla fija y la
cuchilla rotatoria. Presione la pa-
lanca hacia abajo para levantar
la cuchilla rotatoria cuado reali-
ce la limpieza, y cepille los pelos
cortados que quedan entre las
cuchillas. (véase la fig. 18)
4. Aplique unas gotas de lubricante
en los puntos que indican las fle-
chas. (véase la fig. 16)
5. Vuelva a colocar la cuchilla en el
cuerpo de la afeitadora.
Duración de la cuchilla
La duración de la cuchilla varía de-
pendiendo de la frecuencia y el tiem-
po de uso. Por ejemplo, si utiliza la
unidad 10 minutos cada 3 días, la
duración es de 3 años aproximada-
mente. Si la eficacia de corte se re-
duce considerablemente aunque se
cuide adecuadamente, las cuchillas
han superado su vida útil y debe
cambiarlas.
El n° de la parte que hay que reem-
plazar es WER9602.
Duración de la batería
La duración de la batería varía de-
pendiendo de la frecuencia y el tiem-
po de uso. Si carga la batería 3 ve-
ces al mes, su vida útil será de 6
años aproximadamente. Si deja la
unidad sin cargar durante más de 6
meses, la carga se vacía y su vida
útil puede reducirse. Por lo tanto,
aunque no la use con frecuencia, se
recomienda que cargue la unidad al
menos una vez cada 6 meses.
Cómo extraer la batería recargable
incorporada antes de desechar la
afeitadora
La batería de esta afeitadora no pue-
de ser sustituida por el usuario. No
obstante, se puede sustituir en un
centro de servicio técnico autoriza-
do. El procedimiento que se descri-
be a continuación sólo sirve para
exponer la forma de extraer la bate-
ría con vistas a desecharla de ma-
nera adecuada.
Asegúrese siempre de extraer la
batería del cortapelo antes de des-
echarlo.
1. Desconecte el adaptador de la
ATENCIÓN:
()
El producto que ha adquirido
funciona gracias a una batería de
níquel-cadmio reciclable. Llame
por favor al 1-800-8-BATTERY
para obtener información sobre el
procedimiento de reciclaje de
dicha batería.
1716
P00-18ER224USA06.2.247:16ページ16

lice productos de limpieza que
estén diseñados para su uso en
aseos, baños o cocinas. No su-
merja el cortapelo durante mucho
tiempo.
13.No extraiga la carcasa puesto
que podría dañar la construcción
estanca.
14.
15.
No limpie el cortapelo con agua
cuando tenga el cable de alimen-
tación conectado.
Este producto está diseñado exclu-
sivamente para uso doméstico.
Especificaciones
Fuente de alimentación: 120 V CA,
60 Hz
Tensión del motor: 1,2 V CC
Tiempo de carga: 8 horas
Este aparato fue diseñado para
permanecer orientado
correctamente un posición vertical
o en posición de instalación en el
suelo.
18
P00-18ER224USA06.2.247:16ページ18