

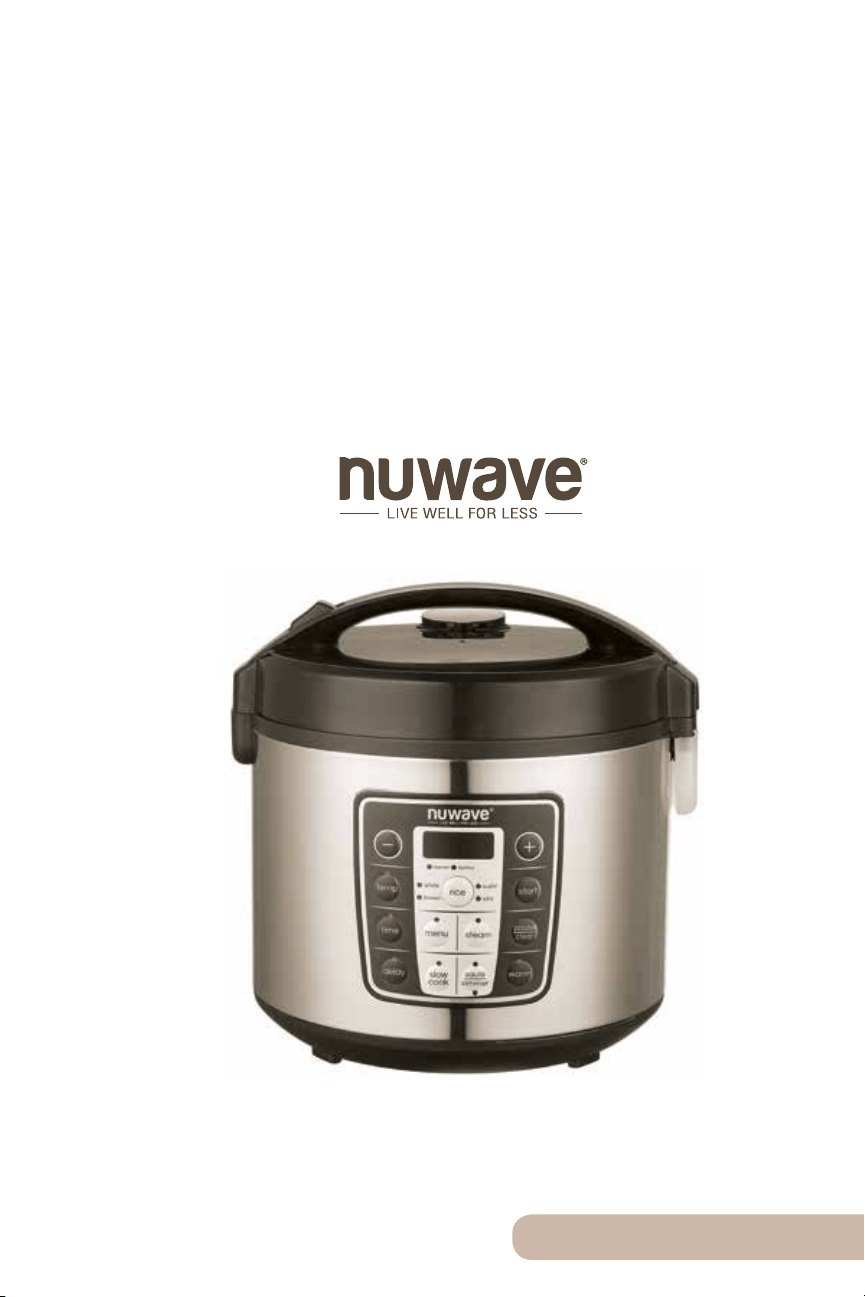
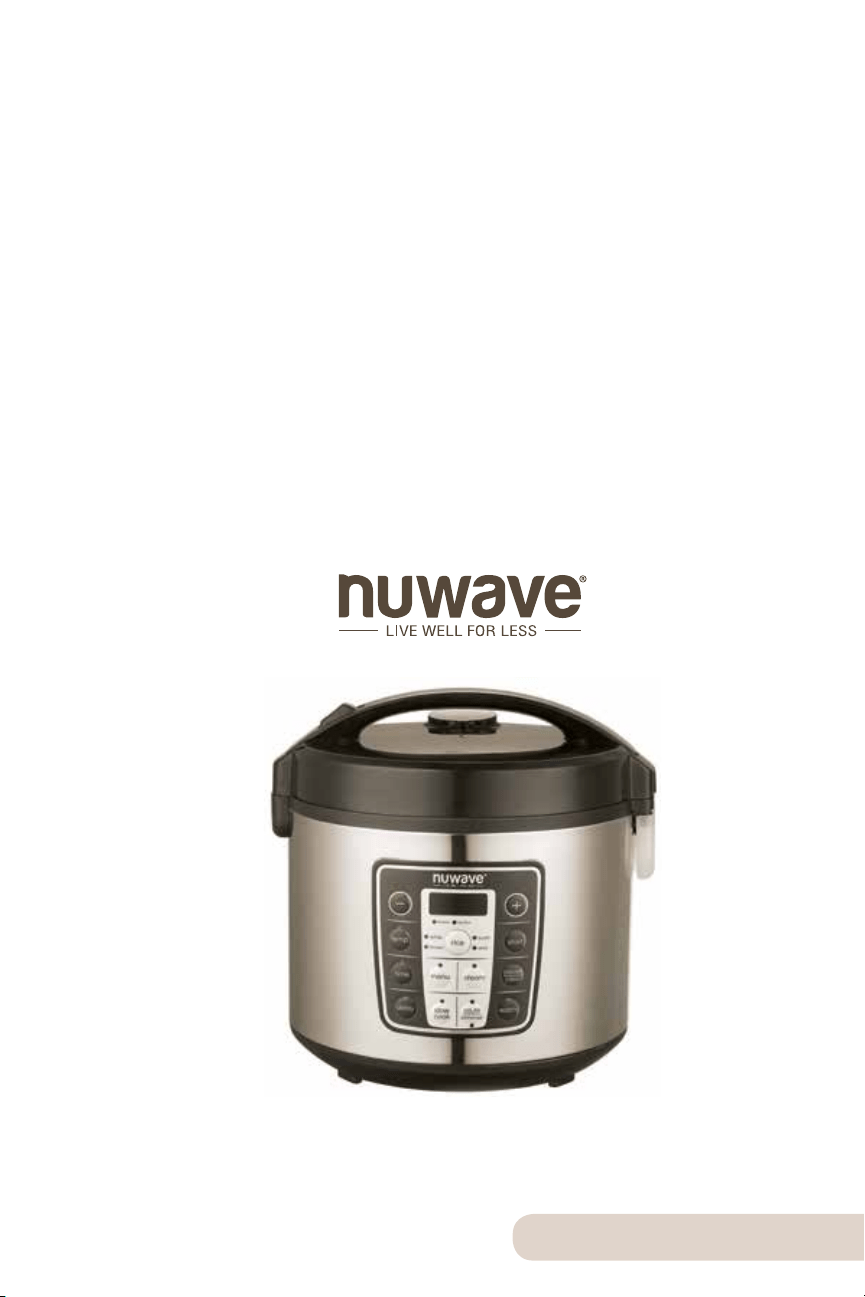
Owner’s Manual & Complete Recipe Book
NuWave Olio
™
Rice & Multi-Cooker
20
Cup
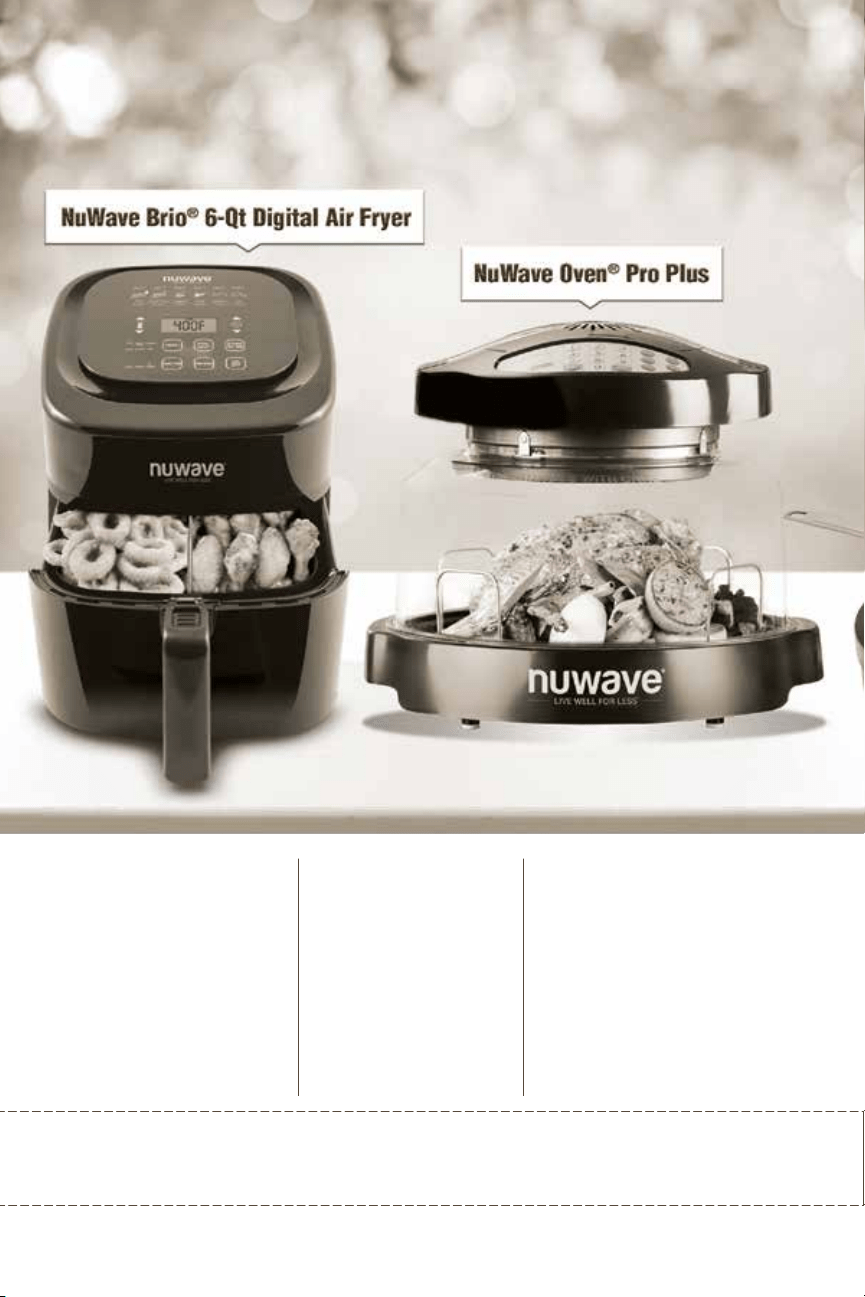
NuWave
Oven
®
Pro Plus
Super-heated air cooks
your food to crispy,
tender perfection.
The digital touch screen
gives you precise
temperature control.
Cook healthier
meals faster and
more efficiently
with Triple Combo
Cooking Power.
NuWave PIC
®
(Precision Induction
Cooktop)
Cook faster, safer,
and more efficiently
than you ever could
on your gas or
electric stovetop.
For more about our innovative products, visit:
NuWave Brio
®
6-Qt
Digital Air Fryer
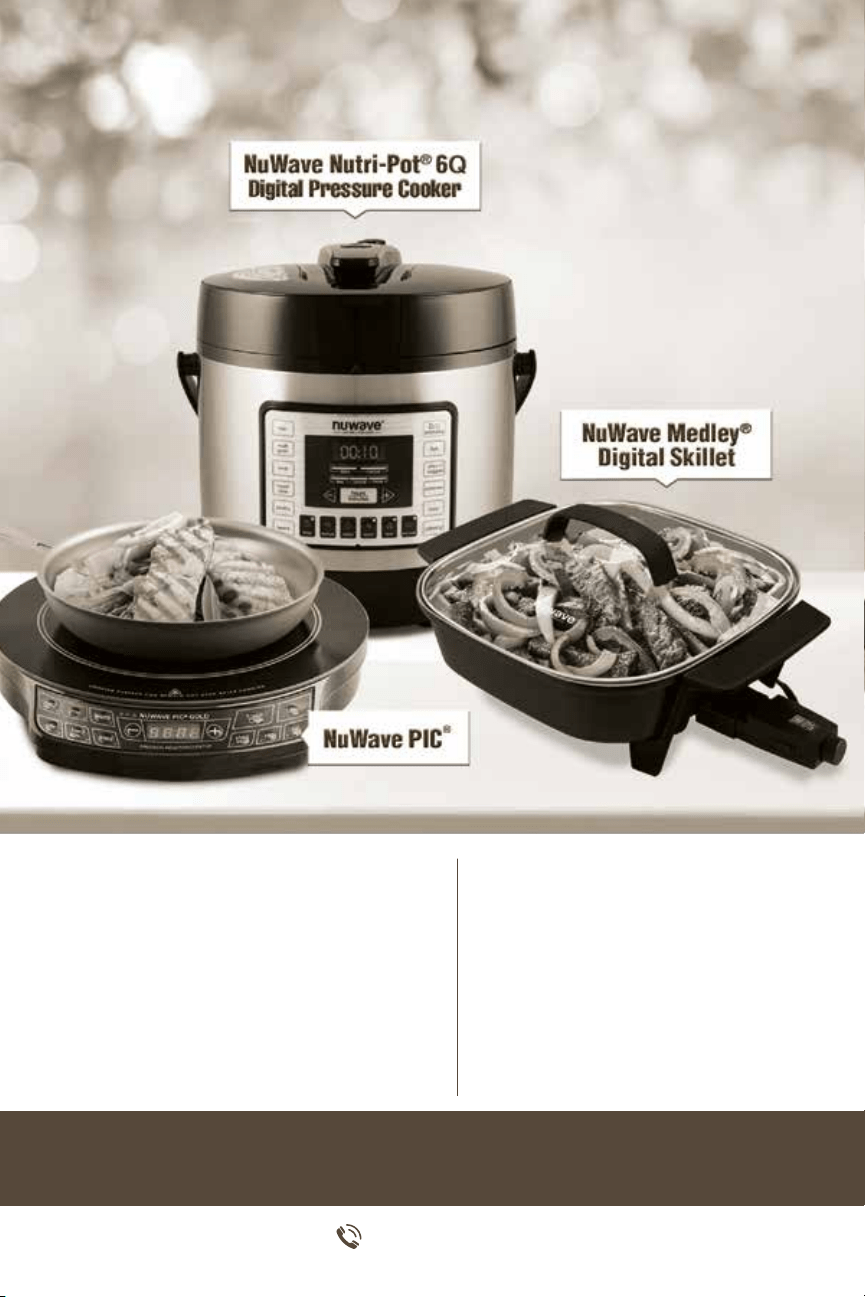
NuWave Nutri-Pot
®
6Q
Digital Pressure Cooker
1-877-689-2838
www.nuwavenow.com
NuWave Medley
®
Digital Skillet
Coated with Duralon
®
Healthy
Ceramic Non-Stick coating for
easy cleanup. Includes a premium,
vented, tempered glass lid.
Easily cook rice, poultry, vegetables
and more all with the press of a
button! The Nutri-Pot’s safety release
valve and hinged lid make for
convenient and safe operation.
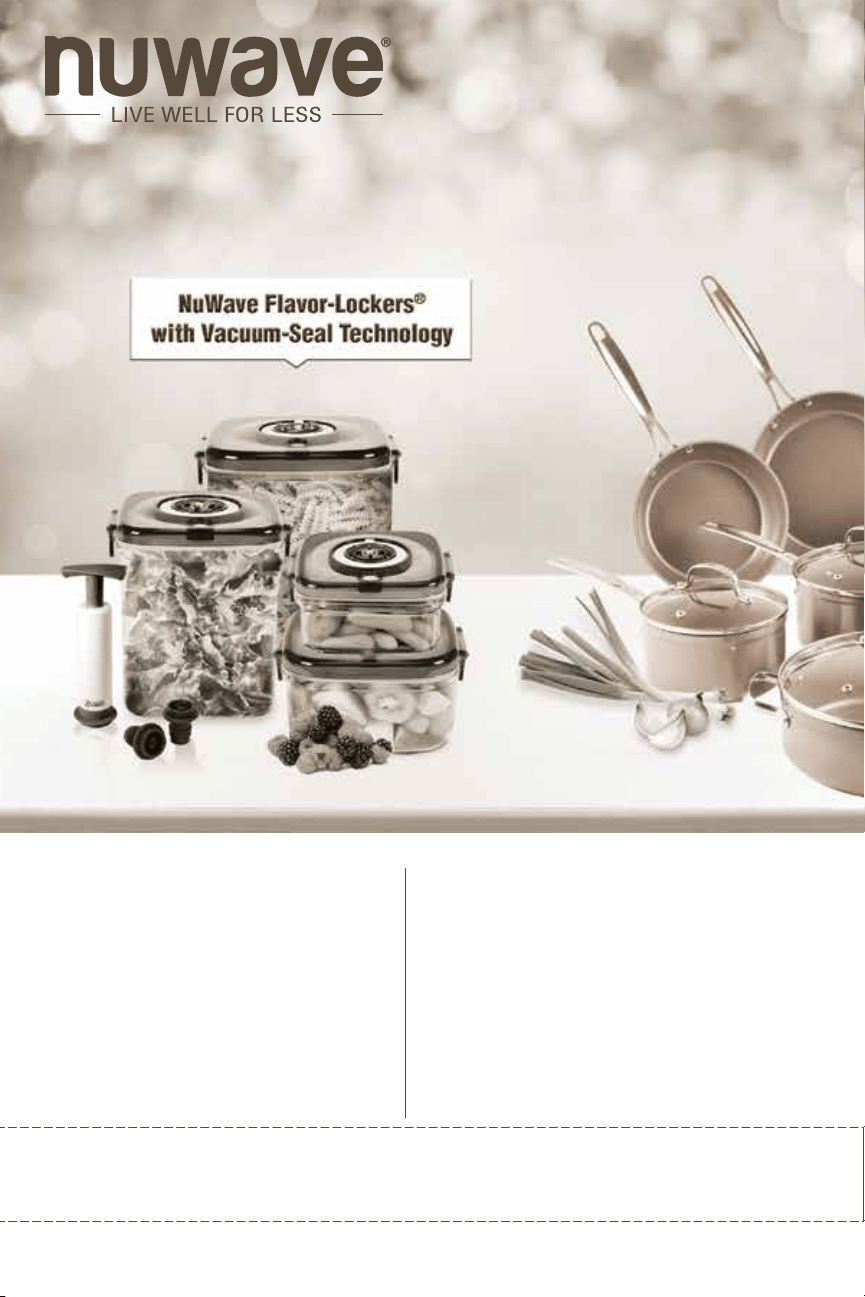
NuWave Flavor-Lockers
®
with Vacuum-Seal Technology
Keep food fresh for up to 21 days!
Slow the growth of mold by removing
trapped oxygen with a few easy pumps.
NuWave Duralon
®
Healthy
Ceramic Non-Stick
Cookware
Coated with Duralon Healthy
Ceramic Non-Stick coating for
easy cleanup, this versatile
cookware is perfect for use in
ovens or on gas, electric, and
even induction cooktops.
For more about our innovative products, visit:

NuWave Nutri-Master
®
Slow Juicer
The Nutri-Master, with a low 48 RPM, is both
incredibly quiet and powerful enough to extract
juice from nuts and hard vegetables.
1-877-689-2838
www.nuwavenow.com

6
Owner’s Manual
TABLE OF CONTENTS
OWNER’S MANUAL
Important Safeguards .................... 8
Additional Safeguards ...............9-10
Parts Descriptions ........................ 11
Operating Instructions .............12-18
Care & Maintenance .................... 19
Troubleshooting ...........................20
Limited Warranty ..................... 21-22
Recipes ........................................... 23
Arancini ........................................ 24
Arroz con Leche ........................... 25
Bone Broth ................................... 25
Boston Cream Pie ........................ 26
Cannellini South with Greens....... 27
Chai Tea .......................................27
Congee ........................................ 28
Creamy Polenta with Zucchini ..... 28
Farro with Roasted Mushrooms ... 29
Fried Rice..................................... 30
Greek Lemon & Chicken Soup
(Avgolemono) ...............................31
Hummus ....................................... 32
Italian Orange & Hazelnut Cake .. 33
Key Lime Pie ................................ 34
Mashed Potatoes ......................... 35
Oatmeal with Maple,
Nuts & Berries .............................. 35
One-Pot Chili................................ 36
One-Pot Pasta Primavera ............ 36
Pastry Cream ............................... 37
Poke Bowl .................................... 37
Puerto Rican Rice ........................ 38
Quinoa Breakfast Bowl ................ 38
Ramen with Crispy Pork Belly...... 39
Rice Cooker Shrimp Boil .............. 40
Salmon Sashimi Bowl .................. 41
Sofrito...........................................42
Spicy California Shrimp Stack...... 43
Spicy Shrimp Bibimbap ................ 44
Sriracha Egg Salad Wrap ............45
Steamed Broccoli with Lemon
& Parmesan ................................. 46
Steamed Whole Fish with Ginger,
Scallions, & Soy Sauce ................ 47
Spanish...........................................48
Manual e Instrucciones ........... 49-63
7
Owner’s Manual
Welcome to NuWave
®
Olio
™
Rice & Multi-Cooker
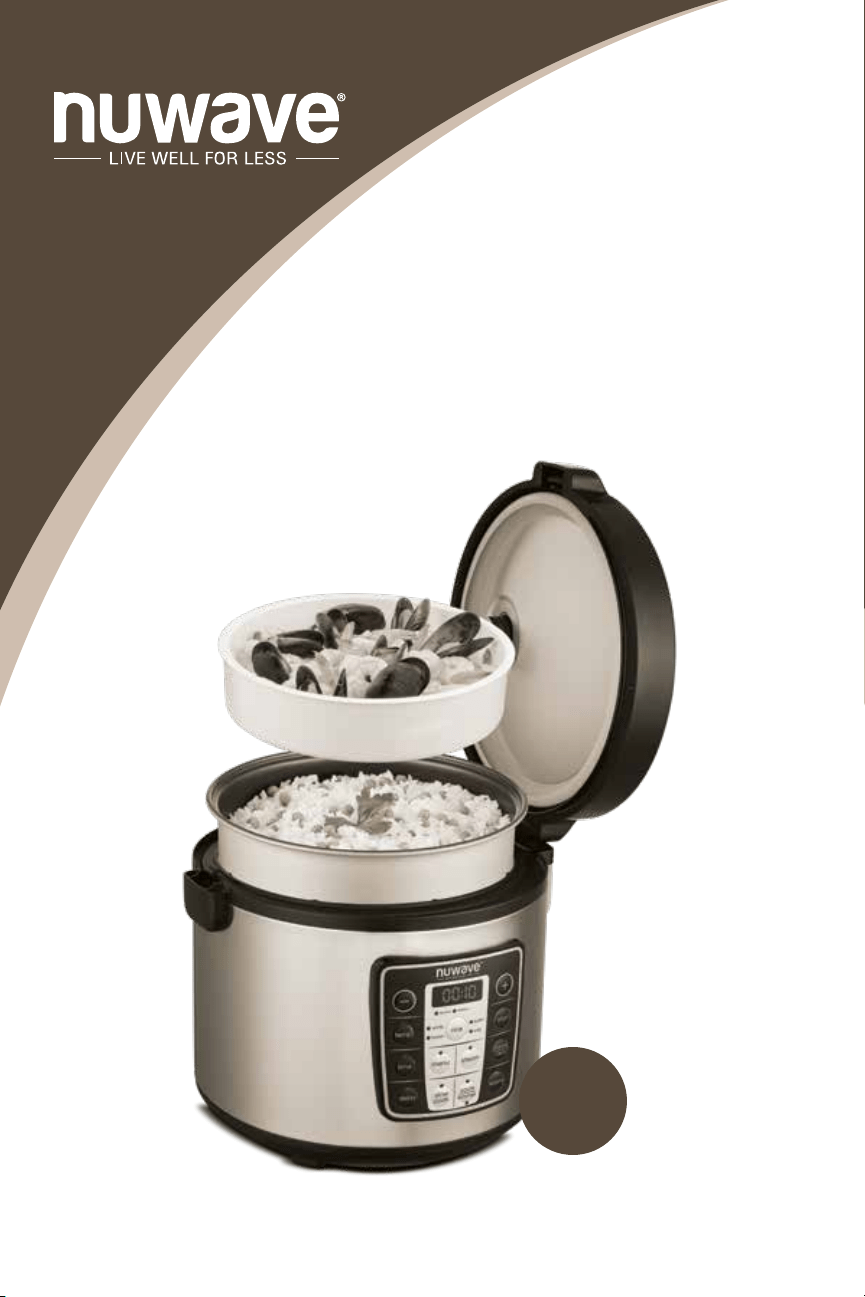
Congratulations on purchasing your NuWave Olio Rice & Multi-Cooker.
This manual contains detailed instructions and images to help you get
started using your rice cooker. It is also lled with great recipes and time-
saving tips to help you prepare delicious gourmet meals in a fraction of
the time. Cooking is fast and easy with the Olio Rice & Multi-Cooker from
NuWave, LLC.
With this versatile rice cooker appliance, you can cook fresh meats and
vegetables at the same time! You can steam, sauté, slow-cook, and bake,
allowing you to save time, energy, and money. The NuWave Olio Rice & Multi-
Cooker is efcient, safe, fast, and easy to clean. And because you can adjust
times and temperatures to best t your recipes, you can make almost any kind
of food without the risk of under or overcooking.
For more revolutionary products
from NuWave, visit us at: www.nuwavenow.com

8
Owner’s Manual
IMPORTANT SAFEGUARDS
READ ALL INSTRUCTIONS
WARNING: When using the Olio, basic safety precautions should always
be followed:
1. To protect against risk of electrical shock, do not immerse cord, plug, or any
part of the main unit in water or any other liquids.
2. Close supervision is necessary when Olio is used by or near children. The
Olio is not intended for use by children, persons with reduced physical,
sensory, or mental capabilities, or those with lack of expertise or knowledge
of this unit.
3. Unplug Olio from outlet when not in use, before putting on or taking off
parts, and before cleaning.
4. Do not operate any appliance with a damaged cord or plug or after the
appliance malfunctions or is dropped or damaged in any manner. Contact
Customer Service at intsales@nuwavenow.com for information on
examination, repair, or adjustment.
5. Do not let cord hang over the edge of table or counter. Do not let cord
contact hot surfaces, including from a stove.
6. NOT INTENDED FOR OUTDOOR USE.
7. Do not place on or near a hot gas, electric burner and or in heated oven.
8. Do not place the unit close to flammable materials and heating units
or wet environments.
9. Alteration or modication of any part of the Nutri-Pot or the use of
attachments not recommended by the manufacturer may cause re, injury,
or damage to property. Use only appropriate replacement parts from
NuWave. Visit www.nuwavenow.com for replacement parts and pieces.
10. Do not lean over the Olio at any time while it is cooking.
11. Steam will release out of the unit while in use. This is normal.
12. In case of overheating, shut it off immediately and let it cool.
13. Never use a towel to clog the gap between the Lid and edge of the Housing.
14. Only use wood or plastic ladle spoons so as not to wear the non-stick
coating in the Inner Pot.
15. Do not attempt to move the unit while it is cooking. Only after the unit cools
down completely can it be moved. Move the unit using the body handles; do
not try to hold in from the Lid handle.
16. Keep manual handy for future reference.

9
Owner’s Manual
ADDTIONAL SAFEGUARDS
SAVE THESE INSTRUCTIONS:
Read and understand the entire manual before using this appliance.
1. The NuWave Olio Rice & Multi-Cooker should not be used for any
medical purposes.
2. The Silicone Gasket creates a seal between Lid and pot. Keep the Gasket
completely clean and free from any cracks or deterioration.
3. Height of ingredients that is to be put into Inner Pot should comply with
“Operating Instructions.”
4. Do not break the Silicone Gasket. Do not replace it with other rubber
gaskets, nor use a tension belt to make it seal.
5. The bottom of the Inner Pot and heating plate should be kept clean.
6. Do not put the Inner Pot on other heat sources.
7. Do not disassemble on your own or try to replace with non-special worn parts.
Electrical Information
This appliance is supplied with a short power cord to reduce the risk
of entanglement or tripping. Extension cords may be used if care is
exercised in their use. If an extension cord is used:
1. The marked electrical rating of the extension cord should be at least
as great as the electrical rating of the appliance.
2. The longer cord should be arranged so that it will not drape over
the countertop or tabletop where it could be pulled on by children or
tripped over unintentionally. The appliance should be operated on
a separate electrical outlet from other operating appliances due to
wattage limitations. Certain models of the appliances may have a
polarized plug (one blade is wider than the other). To reduce the risk
of an electric shock, this plug is intended to fit into a polarized outlet
one way. If the plug does not fit fully into the outlet, reverse the plug.
If the plug still does not fit properly, contact a qualified electrician. Do
not attempt to modify the plug in any way.
SEE CARE & MAINTENANCE BEFORE USE

10
Owner’s Manual
ADDITIONAL SAFEGUARDS (Continued)
Correct Disposal of This Product
This marking indicates that this product should not be
disposed of with other household wastes throughout
the EU. To prevent possible harm to the environment or
human health from uncontrolled waste disposal, recycle it
responsibly to promote the sustainable reuse of material
resources. To return your used device, please use return
and collection systems or contact the retailer where the
product was purchased. They can handle environmentally
safe recycling.
WARNING: Never use the Olio with loose, damaged, or missing parts.
NOTICE: THE FAILURE TO FOLLOW ANY OF THE IMPORTANT SAFEGUARDS,
ADDITIONAL SAFEGUARDS, OR THE INSTRUCTIONS FOR SAFE USE IS A
MISUSE OF YOUR OLIO THAT CAN VOID YOUR WARRANTY AND CREATE THE
RISK OF SERIOUS INJURY.

11
Owner’s Manual
Lid Release Button
Handle
Steam Vent
Lid
Steam Basket
Part #: 33761
Inner Pot
Part #: 33765
Base
Control Panel
Water-Collection Box
Part #: 33764
Measuring Cup
Part #: 33763
Rice Spoon
Part #: 33762
1
2
3
4
5
6
7
8
9
10
11
PARTS DESCRIPTIONSPARTS DESCRIPTIONS
1
2
3
4
5
6
7
8
9
10
11
12
Owner’s Manual
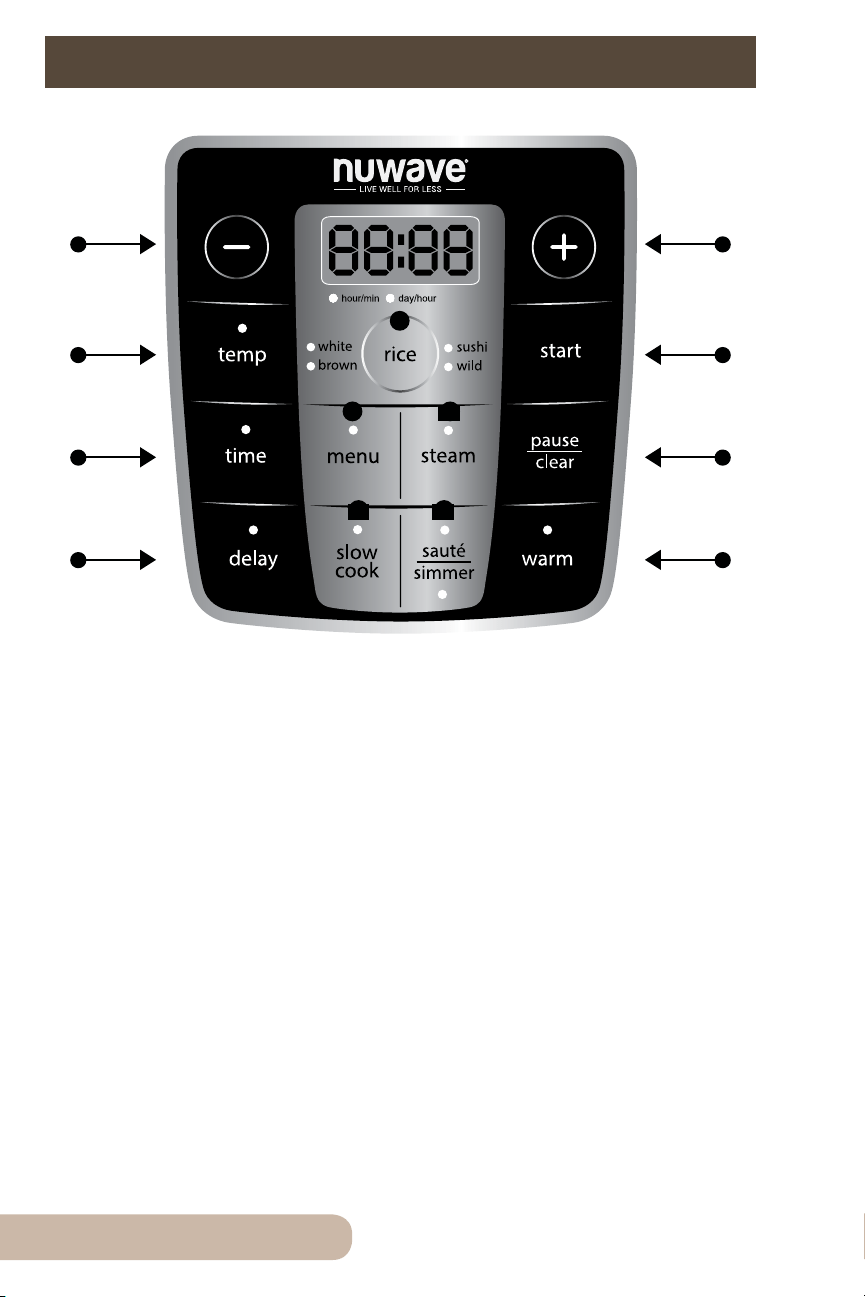
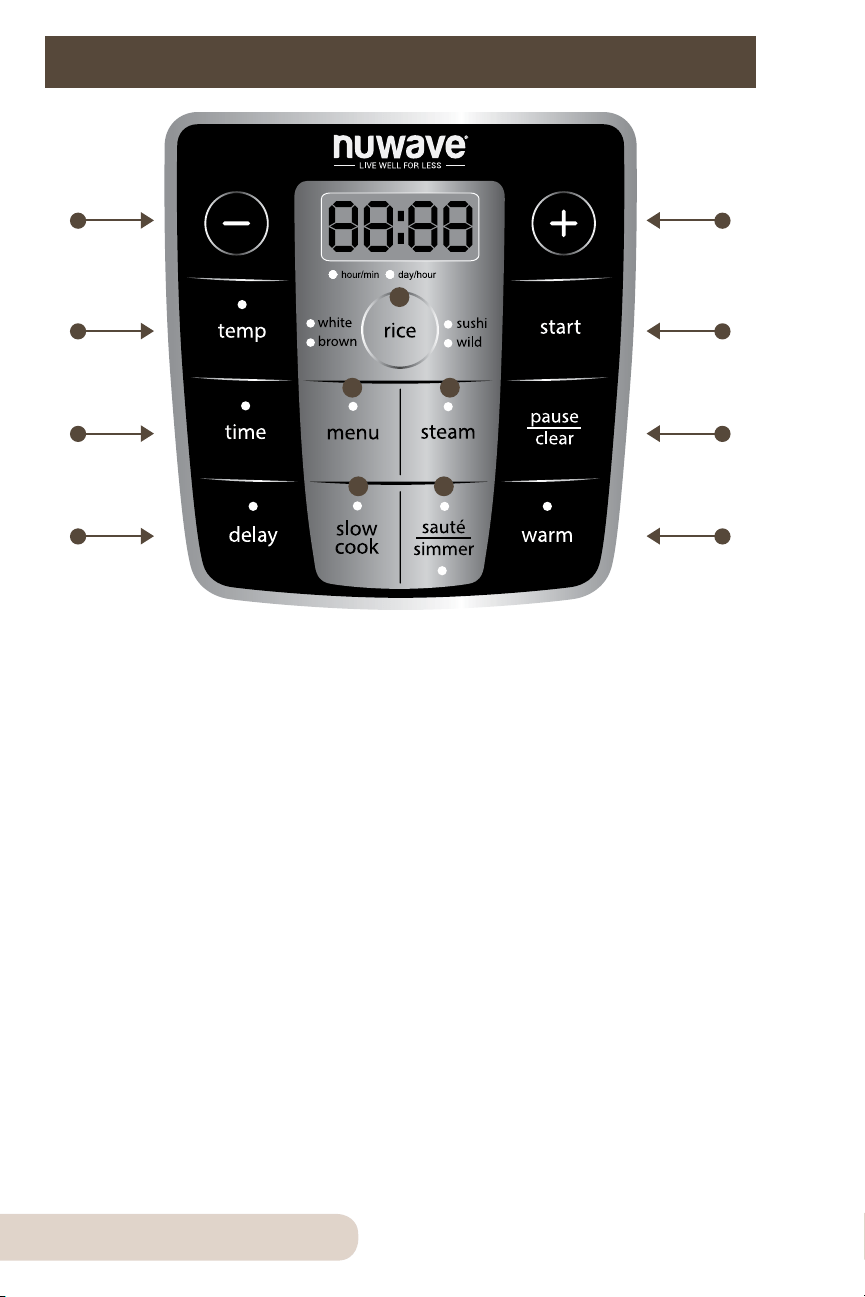
OPERATING INSTRUCTIONS
1 1
2
3
4
5
6
7
8
9
10
11 12
1. Temp/Time: Easily adjust Temperature in 5˚ increments, and 1-minute
increments.
2. Temp: Press the “temp” button and the “+” and “-” buttons to adjust.
3. Time: Press the “time” button and the “+” and “-” buttons to adjust.
4. Delay: Set a particular cook time from 0:01 minute to 24:00 hours.
5. Start: Choose any presets and press “start” to begin.
6. Pause/Clear: Press “pause/clear” any time you want to pause cooking
or clear.
7. Warm: After cooking, keep your food warm until you’re ready to serve.
8. Rice: White, brown, sushi, and wild rice presets.
9. Menu: Lets you choose from 10 preprogrammed presets. See page 16-17.
10. Steam: Used with and without the Steam Basket to steam your favorite
vegetables and meats.
11. Slow Cook: Cooks various recipes at low temperatures.
12. Sauté & Simmer: Go from high temperatures to a steady simmer.

13
Owner’s Manual
Preheating
While the unit reaches the appropriate temperature for the rice function
selected, the display will indicate that it is preheating ( ). Once the unit
reaches the appropriate temperature, it will shift from preheating to the preset
cooking time, then switch to a time countdown.
Preset Guide
1. Press a preset button (Ex: “steam”). The main display will show the default
time for this preset (Ex: “00:30”). The digits to the right of the colon (“:”)
display the minutes and the digits left of the colon display the hours. The
LED above the button will light up.
2. To begin cooking, close the Lid, then press “start”.
3. See temp and time sections for instructions on adjusting the temperature
and time. Cooking times are approximate. Various factors can affect the
cooking times such as altitude, humidity, and outside temperatures.
While the NuWave Olio
™
Rice & Multi-cooker is in
operation, do not touch the appliance’s surface as it may
become very hot, leading to the risk of burns. Inner pot
may retain residual heat after pot has been removed.
Do not remove Inner Pot during cooking process. Push
“pause/clear” button to turn off power before removal.
CAUTION
OPERATING INSTRUCTIONS (Continued)
Delay 0:01-24:00
Temperature 205˚F 100˚F-270˚F
Time 0:30 0:01-99:60
Presets
& Functions
Default Times
Hours:Minutes
Min-Max
Hours:Minutes
Default
Temps
Min-Max
Steam 0:30 0:05-0:45 270˚F 100˚F-270˚F
Slow cook 4:00 2:00-9:00 200˚F 100˚F-270˚F
Sauté 1:00 0:01-1:00 270˚F 100˚F-270˚F
Simmer 0:20 0:01-1:00 200˚F 100˚F-270˚F
Warm 4:00 1:00-99:60 155˚F 100˚F-180˚F

14
Owner’s Manual
Auto Warm Feature
When cooking is complete, the rice cooker will automatically switch to the
“warm” function. The times for auto warm are listed below.
OPERATING INSTRUCTIONS (Continued)
Preprogrammed Presets
Presets
Stage
Default Temp
Fahrenheit
Default Time
Hours:Minutes
Min - Max Time
Hours:Minutes
#1
Reheat
Stage 1 205˚F 0:30 0:10-1:00
Stage 2 140˚F 9:00 9:00
Note: For soups and stews, ll up to ½ capacity.
#2
Dumplings
Stage 1 220˚F 0:20 0:05-0:45
Stage 2 140˚F 6:00 6:00
Note: For frozen, use Steam Basket and 1 cup water.
#3
Braise
Stage 1 270˚F 0:05 0:02-0:20
Stage 2 205˚F 0:60 0:10-3:00
Stage 3 140˚F 6:00 6:00
#4
Pasta
Stage 1 230˚F 0:20 0:10-0:40
Stage 2 140˚F 4:00 4:00
Note: Dry - 8 ounces pasta to 2 cups water or 2½ cups sauce.
#5
Potatoes/
Eggs
Stage 1 210˚F 0:25 0:05-0:45
Stage 2 140˚F 4:00 4:00
Note: Quartered potatoes or whole eggs and cover with liquid.
#6
Custard/
Cheesecake
Stage 1 205˚F 0:25 0:10-2:00
Stage 2 140˚F 2:00 2:00
#7
Slow Braise
Stage 1 270˚F 0:60 0:02-1:00
Stage 2 140˚F 2:00 2:00
Note: Up to 3-pound roast.
#8
Bake
Stage 1 270˚F 0:60 0:35-1:30
Note: ½ box cake mix, pour directly into Inner Pot.
Cooking times are approximate. Various factors can affect the cooking times
such as altitude, humidity, and outside temperatures.

15
Owner’s Manual
OPERATING INSTRUCTIONS (Continued)
Temp
This function lets you manually adjust the cooking temperature.
Directions
1. Press the “temp” button. The LED above “temp” will light up and “205F” will
be displayed and “F” will be ashing. This indicates that you can change the
temperature.
2. Press the “+” or “-” button to increase or decrease the temperature.
Time
This function lets you manually adjust the cooking time.
Directions
1. Press “time”. The LED above time will light up and “0:30” will be displayed.
This indicates that you can change the time.
2. Press the “+” or “-” button to increase or decrease the time.
Pause/Clear
Press “pause/clear” once to pause the unit. Press again to clear out the program.
Data for 10 Presets Continued
Presets
Stage
Default Temp
Fahrenheit
Default Time
Hours:Minutes
Min - Max Time
Hours:Minutes
#9
Oatmeal
Stage 1 215˚F 0:10 0:05-0:45
Stage 2 140˚F 6:00 6:00
Note: 3½ cups oatmeal to 6 cups water.
#10
Beans
Stage 1 215˚F 1:10 0:30-2:00
Stage 2 140˚F 4:00 4:00
Note: Dry - 1 cup kidney beans to 3½ cups water.

16
Owner’s Manual
OPERATING INSTRUCTIONS (Continued)
Rice Ratio
White Rice Brown Rice* Wild Rice Sushi Rice Notes
1 cup 1 cup 1 cup 1 cup
*Spray pot with cooking
spray.
Water
Soaking is not necessary.
1¼ cups 1¼ cups 3 cups 1¼ cups
Rice can vary in consistency and makeup. Here are some tips to help you
achieve your desired results:
If Rice is too Dry or Hard
1. add water and cooking time.
• Ensure cooker is on “warm” function after cooking.
• Add ½ to 1 cup of water to rice. This will help with consistency. Add water
dependent upon dryness of the rice.
2. Stir through while adding water.
3. Close the lid and allow the rice to absorb the water added.
• Press the “+” or “-“ buttons to adjust the warm time.
• Repeat this process as necessary until the rice is soft and moist.
If Rice is too Wet or Soggy
1. Stir with rice with the Rice Spoon with the cooker is in the “warm” function.
• Stir the rice sitting on the bottom of the cooker.
• Stirring will redistribute the rice and release excess moisture.
2. Close the Lid for 10-30 minutes on “warm” function.
• Repeat the stirring process while in “warm” mode to release the excess
moisture until the desired consistency is reached.
Rice
1. Press “rice”. The light next to “white” will illuminate and “0” will be displayed.
2. To change the rice selection, press “rice” again and the appropriate LED will
light up next to the rice functions. Then press “start”.
3. To get out of rice, press “pause/clear”.

17
Owner’s Manual
Steam
With or without the Steam Basket, you can steam your favorite vegetables
and meats.
Directions
1. Press the “steam” button. The LED above steam will be ashing and “0:30”
will be displayed.
2. Press the “+” or “-” button to increase or decrease the time. Press “start”.
Note
• Make sure there is always liquid in the pot. Place Steam Basket in the Inner
Pot and place the food in the Steam Basket.
Slow Cook
This function lets you cook various recipes slowly at low temperatures.
Directions
1. Press the “slow cook” button. The LED above slow cook will be ashing and
“4:00” will be displayed.
2. Press “start” to begin.
3. Press “time”, and press “+” and “-” to adjust the times.
• The minimum time is 2 hours (02:00).
• The maximum time is 9 hours (09:00).
Sauté/Simmer
This function lets you go from the highest temperature to a steady simmer by
pressing one function.
Directions
1. Press “sauté/simmer”. The LED above “sauté” will be ashing and “1:00” will
be displayed. Then press “start”.
2. When you are done sautéing, close the Lid and press “sauté/simmer”
again. The LED below “simmer” will be ashing and “0:20” will be
displayed. Then press “start”.
Delay
This function allows you to set a specic time you would like to start cooking.
Directions
1. Press the “delay” button. The LED above delay will light up and “0:00” will
be displayed.
2. Press the “+” or “-” button to increase or decrease the time.
3. Press the desired function button to continue your program based on
your recipe.
4. Close the Lid and press “start/stop”.
OPERATING INSTRUCTIONS (Continued)

18
Owner’s Manual
OPERATING INSTRUCTIONS (Continued)
Note:
• When utilizing the delay function, it will always be the rst function performed.
Warm
This function will let you manually adjust the time you would like to keep your
food warm.
Directions
1. Press the “warm” button. The LED above warm will be flashing and “4:00”
will be displayed.
2. Press the “+” or “-” button to increase or decrease the time.
3. Press the “start/stop” button to start.
Note:
• The rice cooker will automatically go to this warm function when a desired
preset has completed. See page 16-17 for details.

19
Owner’s Manual
Before First Use:
Wash all accesories and removeable parts in warm soapy water, or in the
dishwasher, top rack only.Wipe surface with a damp cloth or sponge.
Dry thoroughly before use.
IMPORTANT-Do not immerse
unit in water or attempt to cycle
through dishwasher.
After Use:
CAUTION: Make sure unit has cooled completely prior to cleaning.
Wipe the Base and inside of the Base, if necessary, with a clean cloth. Do not
immerse the Base in water or spray any water in it.
• Wash all accesories and removeable parts in warm soapy water, or in the
dishwasher, top rack only. Dry thoroughly before use.
• Wipe surface with a damp cloth or sponge.
• Remove and clean the Water-Collection Box. Wipe with a wet towel and
insert it back to the body of the Olio.
• Always check to make sure parts are not damaged or cracked.
• Use a sponge or non-metallic soft brush to clean the Inner Pot, then wipe
the surface with a clean cloth.
CARE & MAINTENANCE

20
Owner’s Manual
TROUBLESHOOTING
Contact Customer Service if the rice cooker displays
any of these error codes:
Code
Error
E1 E2 E3
Sensor circuit is broken Circuit short Overheat
Two short beeps.
“E1” will be displayed
until the rice cooker
is shut off, or press
“pause/clear” to reset.
Two short beeps.
“E2” will be
displayed until the
rice cooker is shut
off, or press “pause/
clear” to reset.
Two short beeps.
“E3” will be dis-
played until the rice
cooker is shut off,
or press “pause/
clear” to reset.
WARNING
Immediately unplug and contact Customer Service Department
if you experience other problems.
1-877-689-2838 or help@nuwavenow.com

21
Owner’s Manual
TROUBLESHOOTING
The NuWave Olio™ Rice & Multi-Cooker
THE MANUFACTURER WARRANTS
The NuWave Olio Rice & Multi-Cooker, including the Base, Rice Spoon,
Measuring Cup, Water-Collection Box, Inner Pot, Steam Basket, Lid, and all
electrical components are warrantied for 1 year from the date of purchase,
under normal household use, and when operated in accordance with the
Manufacturer’s written instructions.
The Manufacturer will provide the necessary parts and labor to repair any part
of the NuWave Olio Rice & Multi-Cooker at NuWave, LLC Service Department.
After the expiration of the warranty, the cost of the labor and parts will be the
responsibility of the owner.
THE WARRANTY DOES NOT COVER
The Limited Warranty is voided if repairs are made by an unauthorized dealer
and/or the serial number data plate is removed and/or defaced. Normal
deterioration of nish due to use or exposure is not covered by this Warranty.
This Limited Warranty does not cover failure, damages or inadequate
performance due to accident, acts of God (such as lightning), uctuations in
electric power, alterations, abuse, misuse, misapplications, corrosive-type
atmospheres, improper installation, failure to operate in accordance with the
Manufacturer’s written instructions, abnormal use or commercial use. NuWave,
LLC reserves the right to void the Limited Warranty, where allowable by law, for
products purchased from an unauthorized dealer.
TO OBTAIN SERVICE
The owner shall have the obligation and responsibility to: pay for all services
and parts not covered by the warranty; prepay the freight to and from Service
Department for any part or system returned under this warranty; and carefully
package the product using adequate padding material to prevent damage in
transit. The original container is ideal for this purpose. Include in the package
the owner’s name, address, daytime telephone number, a detailed description
of the problem, and your “RGA number.” Call 1-877-689-2838 or email help@
nuwavenow.com to obtain the RGA number (Return Goods Authorization
number). Provide the cooking system model & serial number and proof of date
of purchase (a copy of the receipt) when making claims under this warranty.
MANUFACTURER’S OBLIGATION
The Manufacturer’s obligation under this Limited Warranty is limited, to the
extent allowable by law, to repairing or replacing any part covered by this
Limited Warranty which upon examination is found to be defective under
normal use. The Limited Warranty is applicable only within the continental
United States and only to the original purchaser of the manufacturer’s
authorized channels of distribution. THE LIMITED WARRANTY MAY NOT BE
ALTERED, VARIED OR EXTENDED EXCEPT BY A WRITTEN INSTRUMENT
EXECUTED BY THE MANUFACTURER. THE REMEDY OF REPAIR OR
REPLACEMENT AS PROVIDED UNDER THIS LIMITED WARRANTY IS
EXCLUSIVE. IN NO EVENT SHALL THE MANUFACTURER BE LIABLE
FOR ANY CONSEQUENTIAL OR INCIDENTAL DAMAGES TO ANY
PERSON, WHETHER OR NOT OCCASIONED BY NEGLIGENCE OF THE
MANUFACTURER, INCLUDING WITHOUT LIMITATION, DAMAGES FOR
LOSS OF USE, COSTS OF SUBSTITUTION, PROPERTY DAMAGE, OR

22
Owner’s Manual
LIMITED WARRANTY
OTHER MONEY LOSS.
Some states do not allow the exclusion or limitation of incidental or
consequential damages, so the above limitation exclusions may not apply.
This Limited Warranty gives specic legal rights, and there may also be other
rights which vary from state to state. EXCEPT AS OTHERWISE EXPRESSLY
PROVIDED ABOVE, THE MANUFACTURER MAKES NO WARRANTIES
EXPRESSED OR IMPLIED ARISING BY LAW OR OTHERWISE,
INCLUDING WITHOUT LIMITATION, THE IMPLIED WARRANTIES OF
MERCHANTABILITY AND FITNESS FOR A PARTICULAR PURPOSE TO ANY
OTHER PERSON. READ YOUR OWNER’S MANUAL. IF YOU STILL HAVE
ANY QUESTIONS ABOUT OPERATION OR WARRANTY OF THE PRODUCT,
PLEASE CONTACT NUWAVE, LLC.
READ YOUR OWNER’S MANUAL: If you still have any questions about
operation or warranty of the product, please contact NuWave, LLC at: 1-877-
689-2838 or email
help@nuwavenow.com.

23
Recipes
Recipes
Tips
If using for the rst time, make sure that all parts are included
and in working condition. If for some reason you nd that parts
are missing, please contact our Customer Service Department
at 1-877-689-2838 or via email help@nuwavenow.com.
• Hand-wash or wash accessories in dishwasher.
• Avoid the use of metallic brushes or sponges; this can
damage the non-stick Inner Pot coating.
• Do not wash the Base in the dishwasher. Gently scrub the
Base with a damp cloth and always disconnect Base
from the power source.
• Be sure to t the Water-Collection Box in place before use.

24
Recipes
Arancini Yield: 25 rice balls
Ingredients:
2 tablespoons butter
2 cloves garlic, nely minced
1 onion, nely minced
1½ cups uncooked Arborio (risotto) rice
½ cup white wine
1⅓ cup water
3 eggs
1 cup grated white cheddar cheese
¾ cup grated mozzarella cheese
2 tablespoons fresh Italian-style parsley, nely chopped
Sea salt and pepper to taste
½ cup our
2 cups panko breadcrumbs
Oil for frying
Directions:
1. Press “sauté” and add butter to the rice cooker, followed by onions and
garlic and cook for 5 minutes, or until soft.
2. Add wine and cook until liquid is almost all evaporated.
3. Add rice and chicken broth. Close lid and set to “sushi rice”.
4. Remove rice from rice cooker, cover and refrigerate for 3 hours, or until
completely cooled.
5. Combine cooled rice with 1 egg, cheddar cheese, mozzarella cheese,
freshly chopped parsley, salt, and pepper to taste; set aside.
6. In a separate bowl, mix our, salt, and pepper; set aside.
7. Crack 2 eggs into another bowl and lightly beat; set aside.
8. Add breadcrumbs to third bowl.
9. Measure out a level, packed ice cream scoop of rice mixture and roll
into a ball.
10. Roll rice ball in our, then egg mixture, then coat in breadcrumbs, pressing
to coat.
11. Add 1 inch of oil to a medium saucepan and heat on medium-high heat.
12. Carefully transfer several prepared rice balls into the hot oil and fry, turning
frequently, until golden brown.
13. Once cooked, remove rice balls from oil and drain on paper towels. Repeat
frying process with remaining rice balls.
Tip:
Serve with your favorite marinara sauce.

25
Recipes
Arroz con Leche Serves: 4-6
Ingredients:
1 cup uncooked white rice
2 cinnamon sticks
4 cups water
3 cups evaporated milk
1 (12-ounce) can sweetened condensed milk
1 tablespoon vanilla extract
1 teaspoon ground cinnamon, for garnish
Directions:
1. Place all ingredients in rice cooker.
2. Press “slow cook” and set for 3 hours and cook, adjusting the time as
desired to reach desired consistency.
3. Once ready, transfer rice mixture to serving dishes and sprinkle
with cinnamon.
Bone Broth Yield: 12 cups broth
Ingredients:
3-4 pounds mixed beef bones
2 medium carrots, roughly chopped
3 celery stalks, roughly chopped
2 medium onions, chopped
1 bay leaf
4 sprigs fresh thyme
12 cups water
Directions:
1. Press “sauté” and set the rice cooker to 15 minutes.
2. Place bones into rice cooker and roast until browned, ipping each bone
halfway through cooking time.
3. Place remaining ingredients in rice cooker and cover with water.
4. Close lid, press “slow cook” and set to cook for 8 hours.
5. When done, carefully remove the larger pieces with a slotted spoon and
place them in a strainer over a large bowl to collect the excess broth.
6. Strain the broth that’s still in the rice cooker through a ne mesh sieve or a
strainer that has been lined with cheesecloth.
7. Transfer the strained broth into storage containers and refrigerate. The fat
will oat to the top and will set, making it easier to remove.
Tip:
Beef broth can be stored for 1 month in the freezer or 2 weeks in the refrigerator.

26
Recipes
Boston Cream Pie Serves: 6-8
Cake Ingredients:
1 cup (2 sticks) unsalted butter
1¾ cups sugar
4 large eggs plus 2 large egg yolks
1 tablespoon pure vanilla extract
3 cups cake our
1 tablespoon baking powder
½ teaspoon ne salt
1½ cups buttermilk, divided
Non-stick cooking spray
Pastry cream (to frost). See page 37.
Ganache Ingredients:
8 ounces dark chocolate
½ cup heavy cream
2 tablespoons whole butter
Directions:
1. Bring all cold ingredients up to room temperature.
2. In a large bowl of an electric mixer, beat butter and sugar on high for 6
minutes, or until light and uffy.
3. Beat in 4 eggs plus 2 yolks, one at a time, until combined.
4. Add vanilla to egg mixture; set aside.
5. In another large bowl, whisk together cake our, baking powder, and salt.
6. With mixer on low, add ⅓ of the our mixture to butter mixture to combine.
7. Beat in ¾ cup buttermilk, then another ⅓ of the our mixture followed
by remaining ¾ cup buttermilk and nal the remaining our mixture until just
combined. Scrape down bowl as needed.
8. Spray baking pan with non-stick cooking spray.
9. Pour batter into pan and place pan in rice cooker.
10. Close lid, press “menu” and set to #8 (bake).
11. While cake bakes, add prepare ganache by adding chocolate and heavy
cream to medium saucepan.
12. Heat chocolate mixture on low heat, stirring constantly.
13. Once chocolate is melted, stir in butter until combined; set aside.
14. Once done, remove cake from pot and allow to cool.
15. Once cool, cut cake in half horizontally.
16. Place bottom layer on a serving platter and top with pastry cream.
17. Place top layer of cake on top of pastry cream and frost with prepared
chocolate ganache.

27
Recipes
Cannellini Soup with Greens Serves: 8
Ingredients:
2 tablespoons olive oil
2 medium carrots, sliced
1 large onion, chopped
1 stalk celery, chopped
2 cloves garlic, nely chopped
1 (15-ounce) can cannellini beans, drained
1 (28-ounce) can diced tomatoes, undrained
4 cups vegetable broth
½ teaspoon sea salt, optional
2 teaspoons dried basil
1 teaspoon dried oregano leaves
8 ounces kale, coarsely chopped
Directions:
1. Press “sauté” and add carrots, onion, celery, garlic, and olive oil to rice
cooker and cook for 3-4 minutes.
2. Add beans, tomatoes, broth, basil, oregano, and salt.
3. Close lid, press “menu” and set to #3 (braise).
4. When there is 5 minutes left on the timer, add kale to rice cooker and
continue cooking for an additional 5 minutes.
Chai Tea Serves: 6
Ingredients:
6 cups whole milk
6 tea bags (black or earl grey)
1 teaspoon whole cloves
4 pieces star anise
4 cinnamon sticks
6 cardamom pods
1 teaspoon peppercorns
1 (2-inch) piece square fresh ginger, crushed
2 teaspoons vanilla extract
½ cup raw honey
Directions:
1. Place all ingredients in rice cooker.
2. Close lid, press “menu” and set to #2 (dumplings).
3. Once ready, pour tea through strainer, transfer back to pot and serve.

28
Recipes
Congee Serves: 2-4
Ingredients:
1 cup uncooked sushi rice
1½ quarts water
1 teaspoon grated ginger
2 tablespoons rice wine vinegar
½ teaspoon Chinese ve-spice
Sea salt to taste
¼ cup scallions, thinly sliced
Directions:
1. Combine rice and water in rice cooker.
2. Press “sauté” and let water heat up until it reaches a simmer.
3. Cover, press “slow cook” and set to cook for 1 hour, stirring in regular
intervals and adding more water if necessary.
4. Add remaining ingredients and serve.
Creamy Polenta with Zucchini Serves: 4-5
Ingredients:
4 cups water
1 cup coarsely ground corn meal
2 cloves garlic, chopped
1 cup heavy cream
½ cup Parmesan cheese
2 tablespoons extra virgin olive oil
2 medium zucchini, sliced in medallions
1 (14.5-ounce) can Italian style diced tomatoes
4 ounces cremini mushrooms, sliced
1 yellow pepper, diced
1 cup chopped onion
2 tablespoons Italian parsley, chopped
Directions:
1. Add water, cornmeal, and garlic to rice cooker.
2. Close lid and set to “white rice” setting.
3. Once done, add heavy cream, and Parmesan cheese to rice cooker, stir
to combine.
4. Transfer Polenta to a serving bowl; set aside.
5. Wipe Rice Cooker clean and add in all remaining ingredients.
6. Press “sauté” and cook for 8-10 minutes, or until vegetables are tender.
7. Top Polenta with cooked vegetables and garnish with additional Parmesan
cheese and parsley if desired.

29
Recipes
Farro with Roasted Mushrooms Serves: 4
Ingredients:
1 cup uncooked semi-pearled farro
2 cups water
8 ounces fresh spinach, chopped
Sea salt to taste
¼ cup, plus 1 tablespoon extra-virgin olive oil
½ white onion, diced
2 garlic cloves, crushed
2 sprigs thyme
¼ cup slivered almonds, toasted
8 ounces cremini mushrooms, sliced
2 Roma tomatoes, diced
2 tablespoons fresh lemon juice
Directions:
1. Add farro and water to rice cooker.
2. Press “menu” and set to #10 (beans).
3. Once done, transfer farro to a bowl and set aside.
4. Press “sauté” and add onion, garlic, and 1 tablespoon olive oil to rice cooker.
5. Cook onion for 2-3 minutes or until translucent.
6. Add spinach to rice cooker.
7. Coat mushrooms in remaining olive oil and thyme and add to rice cooker.
8. Continue sautéing for 10-12 minutes, or until mushrooms start to brown.
9. Fold farro into mushroom mixture along with all remaining ingredients
and serve.
Tip:
If you’re using whole grain farro, let it soak for 8 hours, then cook at 205˚F for
35-40 minutes.

30
Recipes
Fried Rice Serves: 6
Ingredients:
2 teaspoons peanut oil
2 large eggs, beaten
2 tablespoons dark sesame oil
2 medium carrots, peeled and chopped
1 medium onion, chopped
1 clove garlic, minced
1 bunch scallions, sliced
½ teaspoon sea salt
2 cups uncooked long grain white rice
2¼ cups chicken broth
2 tablespoons soy sauce
1 cup frozen peas
Directions:
1. Press “sauté” and add peanut oil to rice cooker.
2. Add eggs and cook for about 3 minutes, until eggs are set, lifting the edge
of the eggs to allow uncooked eggs to move under the cooked eggs.
3. Transfer cooked eggs to a cutting board and cut into ½-inch pieces; set aside.
4. Add sesame oil to rice cooker.
5. Add carrots, onions, and garlic and cook for 2-3 minutes, or until onions
are translucent.
6. Add green onions and salt.
7. Add rice, chicken broth, and soy sauce and stir well.
8. Close lid and press “rice” and set rice cooker to white rice.
9. When the rice cooker switches to “warm”, open and stir in the eggs and
frozen peas.
10. Close lid and let set to cook for 5 minutes before serving.

31
Recipes
Greek Lemon & Chicken Soup (Avgolemono) Serves: 8
Ingredients:
1 pound boneless, skinless chicken breasts, cut into 1-inch squares
1 teaspoon extra-virgin olive oil
1 medium white onion, chopped
1 large stalk celery, chopped
1 clove garlic, minced
½ cup uncooked white rice
4 cups chicken stock, salt-free
2 cups water
1 teaspoon sea salt (optional)
½ teaspoon black pepper
¼ cup fresh lemon juice
2 egg yolks
Directions:
1. Press “sauté” and add olive oil and chicken to rice cooker and brown
on all sides.
2. Add onion, celery, garlic, rice, chicken stock, and water.
3. Close lid, press “slow cook” and set to 3 hours, or until rice is cooked.
4. In separate bowl, whisk egg yolks until creamy and light yellow.
5. Mix lemon juice into eggs a little at a time.
6. Press “sauté” and while soup is simmering, slowly add egg mixture to soup
while whisking to help temper the egg.

32
Recipes
Hummus Serves: 6-8
Ingredients:
1 (8-ounce) bag dried garbanzo beans
4 cups water
2 cloves garlic
1 tablespoon lemon juice
3 tablespoon tahini
¼ cup extra-virgin olive oil, divided
½ teaspoon cumin
¼ cup hot water
½ teaspoon crushed red pepper akes
Sea salt and black pepper to taste
⅓ cup pistachios, chopped
Naan or pita bread, cut into triangles
Directions:
1. Place garbanzo beans and water in rice cooker.
2. Close lid and press “menu” and set to #10 (beans).
3. Once garbanzo beans are fully cooked, remove from rice cooker and drain
excess water.
4. Place beans, garlic, lemon juice, tahini, 2 tablespoons olive oil, and cumin
in food processor and blend until smooth.
5. Slowly add hot water to food processor and continue to blend until hummus
reaches desired consistency.
6. Transfer hummus to serving bowl and top with remaining olive oil
and pistachios.
7. Serve with naan or pita bread.

33
Recipes
Italian Orange & Hazelnut Cake Serves: 6-8
Ingredients:
12 orange slices
Non-stick cooking spray
1 box white cake mix
1¼ cups orange juice
⅓ cup olive oil
¼ cup plus 1 tablespoon sweet marsala wine
3 tablespoons grated orange zest, divided
3 eggs
1 cup heavy cream
¼ cup toasted hazelnuts, roughly chopped
Directions:
1. Spray baking pan with non-stick cooking spray.
2. Line baking pan with orange slices; set aside.
3. In large bowl, beat together cake mix, juice, olive oil, ¼ cup wine, 1½
tablespoons orange zest, and eggs until smooth.
4. Carefully pour prepared batter into pan.
5. Place pan in rice cooker, close lid, press “menu” and set to #8 (bake).
6. Once cake is cooked, invert onto a serving platter and let cool.
7. While cake cools, place heavy cream, 1 tablespoon wine and 1½
tablespoons orange zest in large mixing bowl and whisk until soft
peaks form.
8. Cut cake into slices, serve with whipped cream and toasted hazelnuts.

34
Recipes
Key Lime Pie Serves: 6
Ingredients:
Non-stick cooking spray
1 cup graham cracker crumbs
4 tablespoons unsalted butter, melted
1 tablespoon sugar
1 (14-ounce) can sweetened condensed milk
4 egg yolks
½ cup lime juice
⅓ cup sour cream
2 tablespoons lime zest
Directions:
1. Spray rice cooker with non-stick cooking spray.
2. In separate bowl, combine graham cracker crumbs, melted butter, and sugar.
3. Press graham mixture along bottom and sides of a baking pan; set aside.
4. In the bowl of a stand mixture, whip egg yolks until foamy and light yellow.
5. Gradually add sweetened condensed milk to yolks and mix until combined.
6. Add lime juice, sour cream, and lime zest and mix until combined.
7. Pour lime mixture over prepared pie crust and place pan in rice cooker.
8. Close lid, press “menu” and set to #6 (custard/cheesecake).
9. Remove pan from rice cooker and refrigerate for 3 hours to set.
Tip:
To easily remove the pie, line the baking pan with plastic wrap prior to cooking.

35
Recipes
Mashed Potatoes Serves: 4-6
Ingredients:
2 pounds potatoes, peeled and cut into 1-inch cubes
2 cups water
½ cup buttermilk
¼ cup heavy cream
¼ cup unsalted butter, melted
Sea salt and pepper to taste
Directions:
1. Place potatoes and water in rice cooker.
2. Close lid and press “menu” and set to #5 (potatoes/eggs).
3. Once potatoes are fork tender, drain and transfer to a large mixing bowl.
4. Using a handheld mixer, whip potatoes while gradually adding buttermilk,
heavy cream, and butter, adding more liquid if desired.
5. Blend potatoes until uffy, then season with salt and pepper and serve.
Oatmeal with Maple, Nuts & Berries Serves: 6
Ingredients:
3½ cups oatmeal
3 cups almond milk
3 cups apple cider
1 teaspoon cinnamon
½ teaspoon cardamom
½ teaspoon sea salt (optional)
¼ cup pure maple syrup
½ cup pecans, walnuts or almonds, toasted
1½ cups fresh berries
Directions:
1. Place oatmeal, almond milk, apple cider, cinnamon, cardamom, and salt in
Rice Cooker.
2. Press “menu” and set to #9 (oatmeal).
3. Once ready, transfer oatmeal to serving bowls and top with toasted nuts
and berries.

36
Recipes
One-Pot Chili Serves: 6-8
Ingredients:
2 pounds ground beef
1 large onion, chopped
2 cloves garlic, nely chopped
1 (28-ounce) can diced tomatoes, undrained
8 ounces dry kidney beans
1 (15-ounce) can tomato sauce
1 cup water
2 tablespoons chili powder
1½ teaspoons ground cumin
½ teaspoon salt
½ teaspoon pepper
Shredded cheese for garnish
Sour cream for garnish
Scallions for garnish
Directions:
1. Press “sauté”, add ground beef to rice cooker and brown.
2. Add onions and cook for 3-4 minutes, or until translucent.
3. Add all remaining ingredients except garnish ingredients.
4. Close lid and press “menu” and set to #10 (beans).
5. Once ready, serve with shredded cheese, sour cream, and scallions.
One-Pot Pasta Primavera Serves: 4-6
Ingredients:
1 pound dried pasta of choice
1 (24-ounce) jar marinara sauce
2 cups assorted vegetables, chopped
1 cup vegetable stock
Sea salt and fresh cracked black pepper to taste
Shaved Parmesan cheese for garnish
Directions:
1. Combine pasta, sauce, vegetables, and water in Rice Cooker.
2. Close lid, press “menu” and set to #4 (pasta).
3. Once pasta and vegetables are fully cooked, transfer to a serving bowl and
top with salt, pepper, and shaved Parmesan.
Tip:
Tomatoes, zucchini, yellow squash, eggplant, and bell peppers work best with
this dish.

37
Recipes
Pastry Cream Yield: 6 cups
Ingredients:
4 cups whole milk
1 vanilla bean, split and scraped (or 1 tablespoon vanilla extract)
5 eggs
2 egg yolks
1¼ cups sugar
⅓ cup cornstarch
¼ teaspoon sea salt
Directions:
1. Add all ingredients to Rice Cooker and whisk until everything is fully
incorporated.
2. Close the lid, press “menu” and set to #6 (custard/cheesecake) and ensure
the timer is set to 50 minutes.
3. Stir custard every 10 minutes while it cooks.
4. Once pastry cream has thickened, transfer to a medium bowl.
5. Cover with plastic wrap and refrigerate until ready to use.
Poke Bowl Serves: 4
Ingredients:
3 cups uncooked brown rice
4½ cups water
2 tablespoons soy sauce
1 tablespoon rice wine vinegar
1 tablespoon toasted sesame oil
1 teaspoon sesame seeds
½ teaspoon crushed red pepper, optional
1 pound sushi-grade ahi tuna, cubed
2-3 scallions, thinly sliced
1 avocado, peeled and diced
Seaweed salad (optional)
Pickled ginger (optional)
Directions:
1. Place rice and water in Rice Cooker press “rice” and set rice cooker
to brown rice.
2. Once ready, open lid and let rice cool.
3. While rice cools, whisk together soy sauce, vinegar, sesame oil, crushed
red pepper, and sesame seeds in a medium bowl.
4. Gently add tuna and scallions and mix to incorporate.
5. Let tuna sit for 5 minutes to marinate.
6. Add avocado to tuna and gently mix.
7. Scoop rice into bowls and top with poke tuna, seaweed salad, and
pickled ginger.

38
Recipes
Puerto Rican Rice Serves: 8
Ingredients:
2 cups uncooked jasmine rice
3 tablespoons canola oil
2 heaping tablespoons sofrito (see page 42)
1 (4-ounce) can tomato sauce
1 (15-ounce) can gandules (pigeon peas)
1 packet Sazón Goya
®
with Achiote
¼ teaspoon ground cumin
¼ teaspoon ground oregano
Sea salt and pepper to taste
2 cups water or chicken stock
Directions:
1. Rinse rice well; set aside.
2. Press “sauté” and add oil and sofrito to rice cooker, cooking until sofrito
has softened.
3. Add tomato sauce and continue cooking for 2 minutes.
4. Stir in remaining ingredients.
5. Close lid and press “rice” and set rice cooker to white rice.
Quinoa Breakfast Bowl Serves: 4
Ingredients:
2 cups uncooked quinoa
2 cups almond milk
2 cups apple cider
2 tablespoons maple syrup
1 teaspoon cinnamon
½ teaspoon cardamom
½ teaspoon sea salt, optional
1 cup fresh fruit of choice, chopped
½ cup edamame
½ cup pumpkin seeds
¼ cup shredded unsweetened coconut
Directions:
1. Combine quinoa, almond milk, apple cider, maple syrup, spices, and salt
in rice cooker.
2. Close lid and press “rice” and set rice cooker to white rice.
3. Once quinoa is completely cooked, transfer to serving bowls.
4. Top quinoa with fruit, edamame, pumpkin seeds, and coconut.
5. Drizzle with additional maple syrup if desired.

39
Recipes
Ramen with Crispy Pork Belly Serves: 4
Ingredients:
1 pound pork belly, skin removed, and cut into 8 pieces
2 pieces lemongrass
1 piece fresh ginger
3 garlic cloves
2 tablespoons sh sauce
1 tablespoon dark sesame oil
8 ounces dried buckwheat noodles
½ cup edamame
1 cup tofu, cut into ½-inch pieces
1 cup Napa cabbage, shredded
1 tablespoon black sesame seeds
1 tablespoon white sesame seeds
4 soft cooked eggs
Directions:
1. Place pork belly, lemongrass, ginger, garlic cloves, sh sauce, and dark
sesame oil in rice cooker.
2. Press “slow cook” and set rice cooker to cook for 3 hours.
3. Once ready, carefully remove the pork belly; set aside.
4. Drain the broth into a bowl and discard lemongrass, ginger, and garlic.
5. Transfer broth back into Rice Cooker along with noodles.
6. Close lid, press “menu” and set to #4 (pasta). Check doneness halfway
through cooking process.
7. While noodles cook, sear pork belly on your stove until crispy and browned.
8. Divide cooked noodles into serving bowls and pour broth over noodles.
9. Top noodles with remaining ingredients and serve.

40
Recipes
Rice Cooker Shrimp Boil Serves: 6
Ingredients:
1 pound baby red potatoes
12 ounces smoked andouille sausage, thinly sliced
3 ears of corn, cut into cobettes
2 cups water
1 pound of shrimp, deveined (16-20 count)
4 cloves garlic, minced
1 tablespoon Old Bay
®
Seasoning
½ cup melted butter
2 tablespoons Italian parsley, roughly chopped
1 lemon, cut into wedges
Directions:
1. Place potatoes, corn, and andouille sausage in rice cooker, then add water.
2. Press “menu”, set to #5 (potatoes/eggs) and adjust time to 20 minutes.
3. Once done, place shrimp in steamer basket and add basket to rice cooker.
4. Set temperature to 210˚F for 5 minutes.
5. Fold in butter, garlic, and Old Bay
®
Seasoning.
6. Top shrimp boil with parsley and serve with lemon wedges.

41
Recipes
Salmon Sashimi Bowl Serves: 2
Ingredients:
1 cup uncooked sushi rice
2½ cups water
2 tablespoons rice vinegar
1 tablespoon cane sugar
½ teaspoon sea salt
7 ounces fresh sushi grade salmon
½ avocado, sliced
5 pieces dried nori, cut into strips
½ cup cucumber, peeled, seeded, and diced
2 tablespoons soy sauce (optional)
Pinch wasabi (optional)
Pinch toasted sesame seeds (optional)
Directions:
1. Add rice and water to rice cooker, close lid and press “rice” and set rice
cooker to sushi rice.
2. Combine rice vinegar, sugar, and sea salt in small bowl.
3. Heat vinegar mix in microwave for 1 minute, then stir until dissolved.
4. Once rice is cooked, transfer to cookie sheet, pour vinegar mixture over
cooked rice and mix well.
5. Let rice sit until cool.
6. Transfer rice to bottom of serving bowls, then top with salmon, avocado and
cucumber in a decorative pattern.
7. Top each bowl with nori and sesame seed and serve with wasabi and
soy sauce.

42
Recipes
Sofrito Yield: 2 cups
Ingredients:
2 medium onions, cut into large chunks
4 cubanelle peppers or serrano, stemmed and seeded, cut into large chunks
18 cloves garlic
2 bunches cilantro, washed and roughly chopped
4 ripe plum tomatoes, cut into chunks
1 large red bell pepper, cored, seeded and roughly chopped.
Directions:
1. Place onions and peppers a food processor and pulse until coarsely chopped.
2. With the motor running, add all remaining ingredients one at a time through
the feed tube and process until smooth.
3. Season with salt and pepper to taste.
4. Transfer nished sofrito to container and store in refrigerator for up to
3 days or freeze for up to 3 months.
Tips:
Cook dried gandules using #10 (beans) on the Menu option.

43
Recipes
Spicy California Shrimp Stack Serves: 4
Ingredients:
1 cup uncooked sushi rice
1¼ cups water
2 tablespoons rice vinegar
8 ounces cooked shrimp, peeled, and tails removed (16-20 count)
1 cup peeled, seeded, and cubed cucumber
1 avocado, mashed
4 teaspoons soy sauce
4 teaspoons mayonnaise
1 teaspoon Sriracha sauce
4 teaspoons sesame seeds
2 sheets nori, julienned
Directions:
1. Add rice and water to rice cooker, close lid and press “rice” and set rice
cooker to sushi rice.
2. Once done, let rice cool and add vinegar; set aside.
3. Cut shrimp into 1-inch cubes; set aside.
4. In separate bowl, stir together mayonnaise and Sriracha, set aside.
5. Using a measuring cup, layer ¼ cup cucumber, 2 tablespoons avocado, ¼
of the shrimp and ⅓ cup rice.
6. Carefully turn the cup upside down onto a plate. Lightly tap the cup to
dislodge if needed.
7. Sprinkle stack with sesame seeds and julienned nori and top with
Sriracha mayonnaise.

44
Recipes
Spicy Shrimp Bibimbap Serves: 4-6
Ingredients:
6 cups cooked white rice
2 teaspoons sesame oil
2 tablespoons olive oil, divided
4 cloves garlic, minced
⅓ cup soy sauce, divided
2 teaspoons Sriracha sauce
1-2 carrots, julienned
½ cup daikon, julienned
½ cup spinach
1 cup kimchi
½ cup green onions, julienned
4-6 eggs
1 pound shrimp (16-20 count)
½ cup mayonnaise
4 tablespoons chili sauce
Directions:
1. Press “sauté” and add 1 tablespoon olive oil to rice cooker.
2. Add carrots and cook for 8-10 minutes, or until al dente.
3. Coat carrots with 1 teaspoon soy sauce, set aside and repeat cooking steps
with daikon and spinach.
4. Continue to sauté and add sesame oil, followed by garlic and shrimp.
5. Once cooked, remove shrimp from heat and toss with mayonnaise, chili
sauce, and Sriracha.
6. Season shrimp to taste with sea salt; set aside.
7. Fry eggs in a fry pan to desired temperature.
8. Divide rice into bowls.
9. Arrange cooked vegetables, green onion, kimchi, and shrimp on top of rice
and top with cooked egg.

45
Recipes
Sriracha Egg Salad Wrap Serves: 4
Ingredients:
12 eggs
1 cup water
½ cup mayonnaise
2 tablespoons Sriracha sauce
Sea salt and black pepper to taste
½ cup shredded carrot
1 cup shredded Napa cabbage
¼ cup green onion, thinly sliced
3 cups fresh spinach
4 spinach tortillas
Directions:
1. Place eggs and water in rice cooker.
2. Set rice cooker to 250˚F and cook for 20 minutes.
3. Once cooked, let eggs cool and remove shell.
4. In a large bowl, coarsely chop egg, then add mayonnaise, Sriracha, salt,
and pepper.
5. Lay spinach wrap out on at surface.
6. Spread egg salad onto tortillas, leaving 2 inches of space along the edges.
7. Arrange vegetables on top of egg salad.
8. Fold in ends, roll wrap from one end to the other keeping the vegetables
tucked inside.

46
Recipes
Steamed Broccoli with Lemon & Parmesan Serves: 4
Ingredients:
1 cup water
1½ pounds broccoli, cut into 2-inch orets
2 tablespoons extra-virgin olive oil
2 cloves garlic, minced
Pinch crushed red pepper (optional)
½ teaspoon grated lemon zest
Shaved Parmigiano-Reggiano for garnish
Directions:
1. Add water to rice cooker.
2. Add steamer basket to rice cooker and place broccoli in steamer basket.
3. Close lid and press “steam”.
4. While broccoli steams, combine olive oil, crushed red pepper, and lemon
zest in a large skillet and heat on a stove for about 1 minute, until fragrant.
5. Add steamed broccoli to pan and season with sea salt, toss to coat.
6. Transfer to a bowl, garnish with cheese shavings and serve.

47
Recipes
Steamed Whole Fish with Ginger, Scallions, & Soy
Sauce Serves: 2-4
Ingredients:
1 (1½-pound) whole sh, cleaned with head and tail intact
1 piece fresh ginger, peeled and julienned
1 cup water
1 carrot, julienned
½ daikon, julienned
½ cup soy sauce
1 tablespoon rice wine vinegar
1 scallion, julienned
Directions:
1. Place half of the ginger inside the cavity of the sh and place the remaining
ginger on top of the sh.
2. Add water to Rice Cooker and add steamer basket.
3. Place sh and carrots in the steamer basket and close lid.
4. Press “steam” and set time for 18 minutes.
5. While the sh is steaming, stir soy sauce and vinegar together in a small
bowl; set aside.
6. Once sh is ready, carefully remove from the Rice Cooker.
7. Pour prepared sauce over cooked sh and garnish with scallions.
Tip:
Use trout, seabass, or bronzini for this dish.
20
Cup
Manual del Propietario
NuWave Olio
™
Olla Arrocera y Multiusos
49
Manual e Instrucciones
Bienvenidio a NuWave
®
Olla Arrocera y Multiusos Olio
™
Felicidades por la compra de su Olla Arrocera y Multiusos NuWave Olio.
Este libro contiene instrucciones detalladas e imágenes para ayudarle a
comenzar a usar su olla arrocera. También está lleno de excelentes recetas
y consejos para ahorrar tiempo que le ayudarán a preparar deliciosas
comidas gourmet en una fracción de tiempo. Cocinar es rápido y fácil con la
Olla Arrocera y Multiusos de NuWave, LLC.
Cocinar es rápido y fácil con la Olla Arrocera y Multiusos de NuWave, LLC.
Con este versátil aparato de cocción de arroz, puede cocinar carnes frescas y
verduras al mismo tiempo. Puede cocer al vapor, sofreir, cocinar lento y
hornear, permitiéndole ahorrar tiempo, energía y dinero. La Olla Arrocera y
Multiusos NuWave Olio es eciente, segura, rápida y fácil de limpiar. Y, ya
que puede ajustar los tiempos y temperaturas que mejor se adapten a sus
recetas, puede preparar casi cualquier tipo de alimentos sin el riesgo de
cocción insuciente o excesiva.
Para más productos revolucionarios de NuWave,
visítenos en: www.nuwavenow.com

50
Manual e Instrucciones
MEDIDAS DE SEGURIDAD IMPORTANTES
LEA TODAS LAS INSTRUCCIONES
ADVERTENCIA: Al usar el Olio, siempre se deben seguir las precauciones
de seguridad básicas:
1. Para protegerse contra el riesgo de descarga eléctrica, no sumerja el cable,
el enchufe o cualquier parte de la unidad principal en agua u otros líquidos.
2. Es necesaria una supervisión estricta cuando Olio es utilizado por niños
o cerca de ellos. El Olio no está diseñado para ser utilizado por niños,
personas con capacidades físicas, sensoriales o mentales reducidas, o
aquellos con falta de experiencia o conocimiento de esta unidad
3. Desconecte Olio de la toma de corriente cuando no esté en uso, antes de
poner o quitar piezas, y antes de limpiar.
4. No opere ningún artefacto con un cable o enchufe dañado o después de
que el electrodoméstico no funcione correctamente o se caiga o dañe
de cualquier manera. Comuníquese con Servicio al Cliente a intsales@
nuwavenow.com para obtener información sobre el examen, la reparación o
el ajuste.
5. No permita que el cable cuelgue del borde de la mesa o el mostrador. No
permita que el cable entre en contacto con supercies calientes, incluso
desde una estufa.
6. NO DISEÑADO PARA USO AL AIRE LIBRE.
7. No coloque sobre o cerca de un quemador de gas caliente, eléctrico y / o
en horno caliente.
8. No coloque la unidad cerca de materiales inamables y unidades de
calefacción o entornos húmedos.
9. La alteración o modicación de cualquier parte de Nutri-Pot o el uso de
accesorios no recomendados por el fabricante pueden causar incendios,
lesiones o daños a la propiedad. Use solo repuestos apropiados de
NuWave. Visite www.nuwavenow.com para obtener piezas y piezas
de repuesto.
10. No se incline sobre el Olio en ningún momento mientras está cocinando.
11. Steam se liberará de la unidad mientras está en uso. Esto es normal.
12. En caso de sobrecalentamiento, apáguelo inmediatamente y déjelo enfriar.
13. Nunca use una toalla para obstruir el espacio entre la tapa y el borde de
la carcasa.
14. Solo use cucharas de cuchara de madera o plástico para no usar el
recubrimiento antiadherente en el recipiente interno.
15. No intente mover la unidad mientras está cocinando. Solo después de
que la unidad se haya enfriado completamente, puede moverse. Mueva
la unidad usando las manijas del cuerpo; no intente retener el mango
de la tapa.
16. Mantenga el manual a mano para referencia futura.

51
Manual e Instrucciones
MEDIDAS DE SEGURIDAD ADICIONALES
GUARDA ESTAS INSTRUCCIONES:
Lea y comprenda todo el manual antes de usar este dispositivo.
1. El NuWave Olio Rice & Multi-Cooker no debe usarse para propósitos médicos.
2. El Empaque de silicon crea un sello entre la tapa y la olla. Mantenga la
junta completamente limpia y libre de grietas o deterioro.
3. La altura de los ingredientes que se colocarán en el recipiente interno debe
cumplir con las “Instrucciones de funcionamiento”
4. No rompa la junta de silicona. No lo reemplace con otras juntas de goma, ni
use una correa de tensión para sellarlo.
5. La parte inferior de la olla interior y la placa calefactora deben
mantenerse limpias.
6. No coloque el crisol interno en otras fuentes de calor.
7. No desarme por su cuenta ni intente reemplazarlo con piezas desgastadas
no especiales.
Información eléctrica
Este aparato se suministra con un cable de alimentación corto
para reducir el riesgo de enredos o tropezones. Se pueden usar
cables de extensión si se tiene cuidado en su uso. Si se usa un
cable de extensión:
1. La calificación eléctrica marcada del cable de extensión debe ser al
menos tan buena como la clasificación eléctrica del dispositivo.
2. El cable más largo debe colocarse de modo que no cuelgue sobre
la encimera o sobre la mesa donde los niños puedan tirar de él o
tropezarse involuntariamente. El aparato debe operarse en una
toma de corriente separada de otros aparatos operativos debido a
limitaciones de vataje. Ciertos modelos de los dispositivos pueden
tener un enchufe polarizado (una clavija es más ancha que la otra).
Para reducir el riesgo de una descarga eléctrica, este enchufe está
diseñado para encajar en una toma polarizada en una dirección.
Si el enchufe no encaja completamente en la toma de corriente,
invierta el enchufe. Si el enchufe todavía no se ajusta correctamente,
contacte a un electricista calificado. No intente modificar el enchufe
de ninguna manera.
LEA CUIDADO Y MANTENIMIENTO ANTES DEL USO

52
Manual e Instrucciones
Correct Disposal of This Product
Esta marca indica que este producto no se debe eliminar
junto con otros desechos domésticos en toda la UE.
Para evitar posibles daños al medioambiente o a la salud
humana debido a la eliminación incontrolada de residuos,
recíclelo responsablemente para promover la reutilización
sostenible de los recursos materiales. Para devolver
su dispositivo usado, use sistemas de devolución y
recolección o comuníquese con el vendedor donde compró
el producto. Pueden manejar el reciclaje ambientalmente
seguro.
ADVERTENCIA: Nunca use el Olio con partes sueltas, dañadas o faltantes.
AVISO: EL INCUMPLIMIENTO DE CUALQUIERA DE LAS MEDIDAS DE SEGURIDAD
IMPORTANTES, MEDIDAS DE SEGURIDAD ADICIONALES O LAS INSTRUCCIONES
PARA UN USO SEGURO ES UN USO INCORRECTO DE SU Olio QUE PUEDE
ANULAR SU GARANTÍA Y CREAR EL RIESGO DE LESIONES GRAVES.
MEDIDAS DE SEGURIDAD ADICIONALES (Continua)

53
Manual e Instrucciones
CUIDADO & MANTENIMIENTO
Limpieza y cuidado para su Olla Arrocera y Multiusos
NuWave Olio
™
ANTES DE USAR
Limpie la supercie con un paño húmedo o una esponja.
IMPORTANTE: No sumerja la unidad en agua ni intente lavarla
en el lavavajillas. La supercie exterior puede limpiarse usando
cuidadosamente un paño de cocina húmedo o una esponja. Asegúrese de
que la unidad se haya enfriado completamente antes limpiarla.
• Desconecte Olla Arrocera y Multiusos NuWave Olio antes de limpiarla.
• Limpie la base y el interior de la base, si es necesario, con un paño limpio.
No sumerja la base en agua ni rocíe agua en ella.
• Retire y limpie el Recolector de agua. Limpie con una toalla húmeda y vuelva
a colocarlo en el cuerpo del Olla Arrocera y Multiusos NuWave Olio.
• Siempre verique para asegurarse de que las piezas no estén dañadas
o agrietadas.
• Use una esponja o cepillo suave no metálico para limpiar el recipiente
interior, luego limpie la supercie con un paño limpio.

54
Manual e Instrucciones
DESCRIPCIÓN DE LAS PARTES
Botón de Liberación de
la Tapa
Agarradera
Conducto para Vapor
Tapa
Cesta para Vapor
Parte #: 33761
Olla Interna
Parte #: 33765
Base
Panel de Control
Recolector de Agua
Parte #: 33764
Taza Medidora
Parte #: 33763
Cuchara para Arroz
Parte #: 33762
1
2
3
4
5
6
7
8
9
10
11
1
2
3
4
5
6
7
8
9
10
11

55
Manual e Instrucciones
ANTES DE USARSE
1. Lea todas las instrucciones y medidas de seguridad importantes.
2. Retire todos los materiales de embalaje y verique que todos los artículos
hayan sido recibidos en buenas condiciones.
3. Deseche todo el envoltorio de plástico y materiales de embalaje, y
manténgalos alejados de niños.
4. Lave todos los accesorios con agua tibia y jabonosa. Enjuague y
seque completamente.
5. ¡No intente lavar la base en el lavavajillas!
6. Retire la olla interior de la olla y límpiela con agua tibia y jabón. Enjuague y
seque completamente antes de regresar a la cocina.
7. Limpie la base con un paño húmedo.
• No use limpiadores abrasivos o estropajos; no es seguro para usarlos en
recubrimientos antiadherentes.
• Si utiliza el lavavajillas, puede aparecer una ligera decoloración en el
recipiente interior y los accesorios. Esto es solo cosmético y no afectará
el funcionamiento. No intente lavar la base en el lavavajillas.
56
Manual e Instrucciones
INSTRUCCIONES DE FUNCIONAMIENTO
1 1
2
3
4
5
6
7
8
9
10
11 12
1. Temp / Tiempo: ajuste fácilmente la temperatura en incrementos de 5˚ e
incrementos de 1 minuto.
2. Temp: Presione el botón “temp” y los botones “+” y “-” para ajustar.
3. Tiempo: Presione el botón “tiempo” y los botones “+” y “-” para ajustar.
4. Demorrar: Establezca un tiempo de cocción particular de 0:01 minutos
a 24:00 horas.
5. Inicio: Elija cualquier ajuste preestablecido y presione “inicio” para comenzar.
6. Pausa/Borrar: Presione “pause / clear” cada vez que desee pausar la
cocción o borrar.
7. Calentar: Después de cocinar, mantenga la comida caliente hasta que esté
listo para servir.
8. Arroz: Ajustes preestablecidos de arroz blanco, marrón, sushi y arroz
salvaje.
9. Menu: Le permite elegir entre 10 preajustes preprogramados. Ver página 58.
10. Vapor: Utilizado con y sin la Cesta de vapor para preparar al vapor sus
verduras y carnes favoritas.
11. Cocción lenta: Cocina varias recetas a bajas temperaturas.
12. Sofreir /Hervir a fuego lento: Ir de altas temperaturas a un fuego
lento constante.

57
Manual e Instrucciones
INSTRUCCIONES DE FUNCIONAMIENTO (Continúa)
No toque la supercie del aparato mientras la Olla Arrocera
y Multiusos NuWave Olio™ está en funcionamiento, ya
que puede calentarse mucho y ello podría ocasionar
quemaduras. La olla interior puede retener el calor residual
después de que se haya retirado la olla.
No retire la olla durante el proceso de cocción. Presione el
botón “pause/clear” para apagarla antes de quitarla.
PRECAUCIÓN
Precalentamiento
Mientras la unidad alcanza la temperatura adecuada para la función
seleccionada de arroz, la pantalla indicará que está precalentando (Preheat).
Una vez que llegue a la temperatura adecuada, pasará del precalentamiento
al tiempo de cocción preajustado, luego cambiará a una cuenta regresiva
de tiempo.
Guía preestablecida
1. Presione un botón preestablecido (por ejemplo, “steam”). La pantalla
principal mostrará el tiempo predeterminado para este ajuste (Ej: 00:30).
Los dígitos a la derecha de los dos puntos (“:”) muestran los minutos y los
dígitos a la izquierda de los dos puntos muestran las horas. El LED sobre el
botón se encenderá.
2. Para comenzar a cocinar cierre la tapa, luego presione “start”.
3. Consulte las secciones de temperatura y tiempo para obtener instrucciones
sobre cómo ajustarlos. Los tiempos de cocción son aproximados. Varios
factores pueden afectar los tiempos de cocción como altitud, humedad y las
temperaturas exteriores.
Demora 0:01-24:00
Temperatura 205˚F 100˚F-270˚F
Tiempo 0:30 0:01-99:60
Ajustes
y Funciones
Tiempos
predeterminados
Horas: Minutos
Min- Max
Houras:Minutos
Temperaturas
Automáticas
Min - Max
Vapor
0:30
0:05-0:45 270˚F 100˚F-270˚F
Cocción
lenta
4:00
2:00-9:00 200˚F 100˚F-270˚F
Sofreir
1:00
0:01-1:00 270˚F 100˚F-270˚F
Hervir a
fuego lento
0:20
0:01-1:00 200˚F 100˚F-270˚F
Calentar
4:00
1:00-99:60 155˚F
100˚F-180˚F

58
Manual e Instrucciones
INSTRUCCIONES DE FUNCIONAMIENTO (Continúa)
Característica del Calentamiento Automático
Cuando se complete la cocción, la olla arrocera cambiará automáticamente a la
Función “warm”. Los tiempos de calentamiento automático se enumeran
a continuación.
Preajustes preprogramados
Preajustes
Etapa
Temperatura
predeterminada
Fahrenheit
Tiempo
predeterminado
Houras:Minutos
Min-Max
Tiempo
Houras:Minutos
#1
Recalentar
Etapa 1 205˚F
0
:30
0:10-1:00
Etapa
2
140˚F 9:00 9:00
Nota: Para sopas y guisos, llene hasta ½ capacidad.
#2
Albóndigas
Etapa 1 220˚F 0:20 0:05-0:45
Etapa 2 140˚F 6:00 6:00
Nota: congelado, use la canasta de vapor y 1 taza de agua.
# 3
Cocer a fuego
lento
Etapa 1 270˚F 0:05 0:02-0:20
Etapa 2 205˚F 0:60 0:10-3:00
Etapa 3 140˚F 6:00 6:00
#4
Pastas
Etapa 1 230˚F 0:20 0:10-0:40
Etapa 2 140˚F 4:00 4:00
Nota: Seco - 8 onzas de pasta a 2 tazas de agua o 2½ tazas de salsa.
# 5
Papas /
Huevos
Etapa 1 210˚F 0:25 0:05-0:45
Etapa 2 140˚F 4:00 4:00
Nota: patatas cuarteadas o huevos enteros y cúbralo con líquido.
# 6
Natillas / tarta
de queso
Etapa 1 205˚F 0:25 0:10-2:00
Etapa 2 140˚F 2:00 2:00
#7
Guisado lento
Etapa 1 270˚F 0:60 0:02-1:00
Etapa 2 140˚F 2:00 2:00
Nota: asado de hasta 3 libras.
# 8
Hornear
Etapa 1 270˚F
0:60 0:35-1:30
Nota: ½ caja de mezcla de pastel, vierta directamente en la olla.
#9
Avena
Etapa 1 215˚F 0:10 0:05-0:45
Etapa 2 140˚F 6:00 6:00
Nota: 3½ tazas de avena a 6 tazas de agua.
#10
Frijoles
Etapa 1 215˚F 1:10 0:30-2:00
Etapa 2 140˚F 4:00 4:00
Nota: Seco - 1 taza de frijoles a 3½ tazas de agua.

59
Manual e Instrucciones
INSTRUCCIONES DE FUNCIONAMIENTO (Continúa)
Temperatura
Esta función le permite ajustar manualmente la temperatura de cocción.
Instrucciones
1. Presione el botón “temp”. El LED arriba de la temperatura se iluminará
y se mostrará “205F”. “F” parpadeará, esto indicará que puede cambiar
la temperatura.
2. Presione el botón “+” o “-” para aumentar o disminuir la temperatura.
Tiempo
Esta función le permite ajustar manualmente el tiempo de cocción. Instrucciones
Instrucciones
1. Presione “time”. El LED arriba del tiempo se encenderá y aparecerá “0:30”.
Esto indica que puede cambiar el tiempo.
2. Presione el botón “+” o “-” para aumentar o disminuir el tiempo.
Pausa/Borrar
Presione “pause/clear” una vez para pausar la unidad. Presione nuevamente
para borrar el programa.
Proporción de Arroz
Arroz
Blanco
Arroz integral *
Arroz
Salvaje
Arroz para
Sushi
Notas
1 taza 1 taza 1 taza 1 taza
* Rocíe la olla con aceite
en aerosol.
No es necesario remojar
Agua
1¼ tazas 1¼ taza 3 taza 1¼ taza
El arroz puede variar en consistencia y composición. Aquí hay algunos
consejos para ayudarle a lograr los resultados deseados:
Arroz Seco
• Para arroz seco, duro o corrioso, agregue agua y tiempo de cocción
mientras la olla arrocera está en la función “warm” para suavizar el arroz.
Agregar de ½ a 1 taza de agua puede ayudar a la consistencia del arroz
seco, dependiendo de qué tan seco esté. Revuelva mientras agrega
agua. Cierre la tapa y presione “rice” hasta que la luz al lado de “white” se
encienda. Durante la función “warm”, abra la tapa y mezcle el arroz para
vericar su consistencia. Repita este proceso según sea necesario hasta
que el arroz esté suave y húmedo. Presione los botones “+” o “-” para
ajustar el tiempo de calentamiento.

60
Manual e Instrucciones
Arroz Húmedo
• Si el arroz está demasiado empapado, use la cuchara de arroz para
revolver el arroz mientras la olla está en la función “warm”. Al mezclar se
redistribuirá el arroz asentado en la parte inferior y se liberará el exceso
de humedad. Cierre la tapa durante 10-30 minutos en la función “warm”.
Repita el proceso de mezclar en modo “warm” para liberar el exceso de
humedad y hasta que se haya alcanzado la consistencia deseada.
Arroz
Presione “rice”, el LED se encenderá al lado de “white” y se mostrará “0”. Para
cambiar la selección de arroz, presione “Rice” nuevamente y se encenderá el
LED apropiado al lado de las funciones de arroz, luego presione “start”. Para
salir del arroz, presione “pause/ clear”.
Menú
Esta función le permite elegir entre 10 selecciones de menú diferentes que
están predeterminadas en la olla arrocera. Vea Menús Preprogramados en la
página 58.
Instrucciones
1. Presione el botón “menu”. El LED arriba de Menu parpadeará y se
mostrará “0:01”.
2. Presione “start”.
3. Para cambiar el menú, presione “menu” nuevamente para ajustar de 01 a
10 antes de presionar “start”.
Vapor
Puede cocinar al vapor sus verduras favoritas y carnes con o sin la Cesta
para Vapor.
Instrucciones
1. Presione el botón “steam”. El LED sobre el vapor parpadeará y se
mostrará 0:30.
2. Presione el botón “+” o “-” para aumentar o disminuir el tiempo.
Presiona “start”.
Nota
• Asegúrese de que siempre haya líquido en la olla. Coloque la Cesta para
Vapor en la olla y coloque la comida en ella.
Cocción lenta
Esta función le permite cocinar varias recetas lentamente a bajas temperaturas.
Instrucciones
1. Presione el botón “slow cook”. El LED sobre la cocción lenta parpadeará y
se mostrará “4:00”.
2. Presione el botón “start” para comenzar.
3. Presione “time” y presione “+” y “-” para ajustar el tiempo.
• El tiempo mínimo es de 2 horas (02:00).
• El tiempo máximo es de 9 horas (09:00).
INSTRUCCIONES DE FUNCIONAMIENTO (Continúa)

61
Manual e Instrucciones
INSTRUCCIONES DE FUNCIONAMIENTO (Continúa)
Sofreir /Hervir a fuego lento
Esta función le permite pasar de la temperatura más alta a una cocción
constante presionando una función.
Instrucciones
1. Presione el botón “saute/simmer”. El LED sobre “saute” parpadeará y se
mostrará “1:00”. A continuación presione “start”.
2. Cuando haya terminado de saltear o sofreir, cierre la tapa y presione
“saute/simmer” de nuevo. El LED debajo de “saute/simmer” parpadeará y
se mostrará “0:20”. Luego presione “start”.
Demorar
Esta función le permite establecer un horario especíco en el que le gustaría
comenzar a cocinar.
Instrucciones
1. Presione el botón “delay”. El LED arriba de delay se iluminará y se
mostrará “0:00”.
2. Presione el botón “+” o “-” para aumentar o disminuir el tiempo.
3. Presione el botón de función deseado para continuar su programa de
acuerdo a su receta.
4. Cierre la tapa y presione “pause/clear”.
Nota:
Cuando se utiliza la función de Demora, siempre será la primera
función ejecutada.
Calentar
Esta función le permitirá ajustar manualmente el tiempo que le gustaría
mantener su comida caliente.
Instrucciones
1. Presione el botón “warm”. El LED de arriba parpadeará y se
mostrará “4:00”.
2. Presione el botón “+” o “-” para aumentar o disminuir el tiempo.
3. Presione el botón “pause/clear” para comenzar.
Nota:
• La olla arrocera pasará automáticamente a esta función cuando algún
menú deseado haya terminado. Ver página 58 para más detalles.

62
Manual e Instrucciones
GUÍA DE SOLUCIÓN DE PROBLEMAS
Comuníquese con Servicio al Cliente si la arrocera muestra alguno de
estos códigos de error:
Codigo
Error
E1 E2 E3
El circuito del
sensor está
descompuesto
Corto Circuito Sobrecalentamiento
Dos pitidos cortos.
“E1” se mostrará
hasta que se
desconecte la olla
arrocera o presione
“pause/clear”
para reiniciar.
Dos pitidos cortos.
“E2” se mostrará
hasta que se
desconecte la olla
arrocera o presione
“pause/clear”
para reiniciar.
Dos pitidos cortos.
“E3” se mostrará hasta
que se desconecte
la olla arrocera o
presione “pause/clear”
para reiniciar.
ADVERTENCIA
Desenchufe de inmediato y comuníquese con el Departamento
de Servicio al Cliente si enfrenta a otros problemas.
1-877-689-2838 o help@nuwavenow.com
La Olla Arrocera y Multiusos NuWave Olio™
EL FABRICANTE GARANTIZA
La Olla Arrocera y Multiusos NuWave Olio incluyendo la Base, la Cuchara para Arroz,
Taza Medidora, Recolector de Agua, Olla Interior, Cesto para Vapor, la Tapa y todos
los componentes eléctricos están garantizados por 1 año a partir de la fecha de
compra, bajo un uso doméstico normal y siempre que se hayan manejado de acuerdo
a las instrucciones por escrito del Fabricante. El Fabricante proporcionará las partes
necesarias y mano de obra para reparar cualquier parte de la Olla Arrocera y Multiusos
NuWave Olio en el Departamento de Servicio de NuWave, LLC. Una vez vencida la
garantía, el costo de mano de obra y las partes será responsabilidad del propietario.
LA GARANTÍA NO CUBRE
La Garantía Limitada se invalida si la reparación es hecha por un distribuidor no
autorizado o si la placa del número de serie es retirada o maltratada. El deterioro
normal del acabado, por uso o exposición, no está cubierto por esta Garantía.
Esta Garantía Limitada tampoco cubre fallas, daños o desempeño inadecuado por
accidentes, desastres naturales (como relámpagos), variaciones en la potencia eléctrica,
alteraciones, abuso, mal uso, ambientes corrosivos, instalación inadecuada, o falla en
la operación de acuerdo con las instrucciones escritas por el Fabricante, uso no normal
GARANTÍA LIMITADA

63
Manual e Instrucciones
GARANTÍA LIMITADA (Continúa)
o comercial. NuWave, LLC se reserva el derecho de invalidar la Garantía Limitada,
donde lo permita la ley, a los productos que hayan sido comprados a distribuidores
no autorizados.
PARA OBTENER EL SERVICIO
El propietario tendrá la obligación y responsabilidad de: Pagar por todos los servicios y
partes no cubiertas por la garantía; Prepagar el envío hacia y desde el Departamento
de Servicio para cualquier parte o sistema devuelto bajo esta garantía; Empacar
cuidadosamente el producto utilizando el material de relleno adecuado para prevenir
cualquier daño durante el tránsito. El empaque original es ideal para este propósito.
Incluya en el empaque el nombre del propietario, dirección, teléfono durante el día, una
descripción detallada del problema y su “número RGA”. Llame al 1-877-689-2838 o
escriba a help@nuwavenow.com para obtener el RGA (Número de Autorización de
Devolución del Producto). Proporcione el modelo del producto, el número de serie y
comprobante de la fecha de compra (una copia del recibo) cuando reclame su garantía.
OBLIGACIONES DEL FABRICANTE
La obligación del Fabricante bajo esta Garantía Limitada está limitada, hasta lo permitido
por ley, a reparar o reemplazar cualquier parte cubierta por esta Garantía Limitada
cuya revisión muestre que el defecto es por uso normal. La Garantía Limitada aplica
únicamente en los Estados Unidos y sólo para el comprador original en los canales de
distribución autorizados por el fabricante. LA GARANTÍA LIMITADA NO PUEDE SER
ALTERADA, CAMBIADA O EXTENDIDA EXCEPTO POR UN INSTRUMENTO POR
ESCRITO REALIZADO POR EL FABRICANTE. LA SOLUCIÓN DE REPARACIÓN
O REEMPLAZO INCLUIDA EN ESTA GARANTÍA ES EXCLUSIVA. EN NINGÚN
CASO EL FABRICANTE SERÁ RESPONSABLE DE NINGÚN DAÑO RELEVANTE O
FORTUITO A ALGUNA PERSONA, SEA O NO OCASIONADO POR LA NEGLIGENCIA
DEL FABRICANTE, INCLUYENDO, SIN LÍMITE, DAÑOS POR PÉRDIDA POR
USO, COSTOS POR REEMPLAZO, DAÑO A LA PROPIEDAD, U OTRAS
PÉRDIDAS MONETARIAS.
Algunos estados no permiten la exclusión o limitación de daños relevantes o fortuitos,
así que la exclusión mencionada podría no aplicar. Esta Garantía Limitada proporciona
derechos legales especícos y podría haber otros derechos que varíen entre estado
y estado. EXCEPTO POR LO QUE YA SE EXPRESÓ DE FORMA DIFERENTE,
EL FABRICANTE NO GARANTIZA EXPRESA O IMPLÍCITAMENTE POR LEY U
OTRAS, INCLUYENDO SIN LIMITACIONES, LAS GARANTÍAS IMPLÍCITAS DE
COMERCIALIZACIÓN Y EJERCICIO PARA UN PROPÓSITO PARTICULAR A
CUALQUIER OTRA PERSONA. LEA EL MANUAL DEL USUARIO. SI TUVIERA
ALGUNA DUDA SOBRE EL FUNCIONAMIENTO O LA GARANTÍA DEL PRODUCTO,
CONTACTE A NUWAVE, LLC.
LEA SU MANUAL DEL USUARIO: Si tuviera alguna duda sobre el funcionamiento o la
garantía del producto, contacte a NuWave, LLC al: 1-877-689-2838 o escriba a help@
nuwavenow.com.
Item No. BM 33701
Rev. 07 AA
05-10-18
Model: 33701 120V, 60Hz, 700 Watts
For patent information please go to: www.nuwavenow.com/legal/patent
Designed & Developed in USA by:
NuWave, LLC
1795 N. Buttereld Road
Libertyville, IL 60048, U.S.A.
Customer Service:
help@nuwavenow.com • www.nuwavenow.com
Made in China
©2018 NuWave, LLC • All Rights Reserved.
www.nuwavenow.com
FOR HOUSEHOLD USE ONLY
You can also visit www.nuwavenow.com to learn more about the revolutionary
products developed by the makers of the NuWave Oven line, the NuWave
Precision Induction Cooktop line, NuWave Duralon
®
Cookware, ALSET
®
LED
lighting, and other great accessories.