User Gudie Ariens A173K22 96146000300 Lawn Mower
SAFE HANDLING OF GASOLINE
Use extreme care in handling gasoline. Gasoline is extremely flammable and the vapors are explosive.
• Extinguishall cigarettes, cigars,pipes and other sources of ignition.
• Use only an approvedcontainer.
• Never remove gas cap or add fuel with the engine running. Allow engine to cool before refueling.
• Never refuelthe machine indoors,
• Never store the machine or fuel container where there is an open flame, spark orpilotlightsuch as a water heater or on other appliances.
Never fill containersinside a vehicle, on a truck or trailerbed witha plastic liner, Always place containerson the ground away from your vehicle beforefilling.
• Remove gas-powered equipment from the truck ortrailer and refuel it on the ground. If this is not possible,then refuel such equipmentwith a portable container, rather than from a gasoline dispenser nozzle.
• Keep the nozzle in contact withthe rim of the fuel tank orcontainer opening at all times untilfueling is complete. Do not use a nozzle lock-opendevice. ° If fuel is spilled on clothing,change clothingimmediately.
• Never overfillfuel tank. Replace gas cap and tighten securely
ASSEMBLY
TO REMOVE MOWER FROM
- Remove loose parts included with mower,
- Cut downtwo end corners of carton and lay end panel down flat,
- Remove allpacking materials except paddingbetween upper and lower handle and padding holdingoperator presence controlbar to upper handle.
- RoUlawn mower out of carton and check carton thoroughlyfor additional loose parts.
HOW TO SET UP YOUR MOWER
IMPORTANT: Unfold handle carefully so as not to pinch ordamage controlcables.
- Raise handles untillower handle section locksinto place in mowingposition.
- Remove protectivepadding, raise upper handle section into place on lower handle and tighten both handle knobs.
- Remove handle padding holding operator presence control bar to upper handle.
- Your lawn mower handle can be adjusted for your mowing comfort. Refer to "ADJUST HANDLE" in the Service and Adjustments section of this manual.
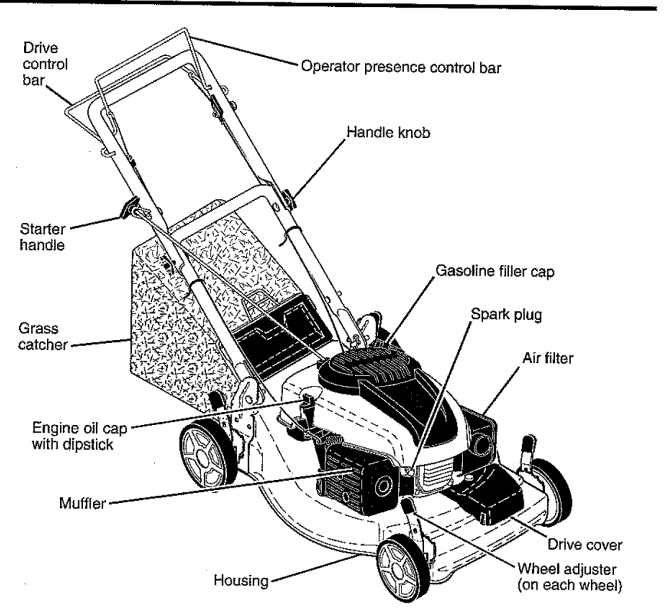
Operator MOWING
- POSITION control bar
- Upper
- UP handle
- Handle knob
- Lower handle
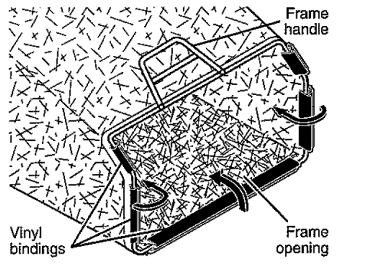
TO ASSEMBLE GRASS CATCHER
- Put grass catcher frame into grass bag with rigid part of bag on the bottom.
- Make sure the frame handle is outside of the bag top.
- Slip vinyl bindings over frame,
NOTE: If vinyl bindings are too stiff, hold them in warm water for a few minutes, If bag gets wet, let it dry before using.
OPERATION
TO ADJUST CUTTING HEIGHT
- Raise wheels for low cut and lowerwheels for highcut, adjust cutting heightto suit your requirements. Medium positionis best for most lawns.
- To change cutting height, squeeze adjuster lever toward wheel. Move wheel upordownto suit yourrequirements. Be sure all wheels are in the same setting.
NOTE:
- Adjuster is properly positioned when plate tab inserts into hole in lever.
- Also, 9-position adjusters (if so equipped) allow lever to be positioned between the plate tabs.
- LEVERBACKWARD Platetab
TO LOWERMOWER
- Liftthe rear door of the lawn mower and place the grass catcherframe side hooksonto the door pivot pins.
- The grass catcher is secured to the lawn mowerhousingwhen the rear door is lowered onto the grasscatcher frame.
CAUTION:
- Do not runyour lawn mower withoutmulcher plate or plug, clipping deflector or approved grass catcher in place. Never attemptto operate the fawnmowerwith the rear door removed or proppedopen.
TO EMPTY GRASS CATCHER
- Lift up on grass catcher usingthe frame handle.
- Remove grass catcher with clippings from under lawn mower handle.
- Empty clippings from bag.
NOTE:
- Do not drag the bag when emp7 tying; itwillcause unnecessarywear.
- Grass catcher frame
TO CONVERT MOWER
- Your lawn mower was shipped ready to be used as a mulcher. To convert to bagging:
- Open rear door and remove mulcher plug. Store mulcher plug in a safe place.
- You can now install grass catcher or optional clipping deflector.
- To convert to mulching operation, install mulcher plug into rear discharge opening of mower.
CAUTION:
- Do not run your lawn mower without mulcher plug, clipping deflector or approved grass catcher in place. Never attempt to operate the lawn mower with the rear door removed or propped open.
BEFORE STARTING ENGINE
ADD OIL
- Your lawnmower is shipped without oil in the engine. For type and grade of oil to use, see "ENGINE" in the Maintenance section of this manual.
A CAUTION:
- DO NOT overfill engine with oil, or it will smoke heavily from the muffler on startup.
- Be sure Iawnmower is level.
- Remove oil dipstick from oil fill spout.
- You receive a container of oil with the unit. Slowly pour the entire container down the oil fill spout into the engine.
NOTE:
- initialoil fill requires only t8 oz. due to residual oil inengine from the manufacturers 100% quality testing. When changing oil you may need 20 oz.
- Insert and tighten dipstick.
IMPORTANT:
- Check oil level before each use. Add oil if needed. Fill to full line on dipstick.
- Change the oil after every 25 hours of operation or each season, You may need to change the oil more often under dusty, dirty conditions. See "TO
- CHANGE ENGINE OIL" in the Maintenance section of this manual.
TO STOP ENGINE
- To stop engine, release operator presence control bar.
TO START ENGINE
NOTE:
- Due to protectivecoatingson the engine, a small amount of smoke may be present during the initial use of the product and should be considered normal.
NOTE:
- Your engine is equipped with an automatic choke system. No priming or choking is required before starting.
- To start engine, hold operator presence control bar down to the handle and pull starter handle quickly. Do not allow starter rope to snap back.
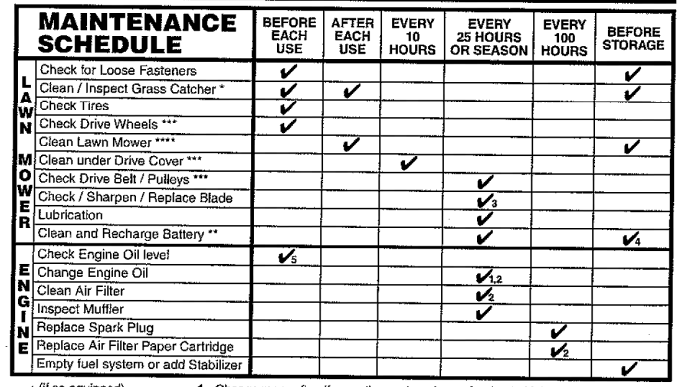
MAINTENANCE
[imgae]
GENERAL RECOMMENDATIONS
- The warranty on this lawn mower does not cover items that have been subjected to operator abuse or negligence.
- To receive full value from the warranty, operator must maintain unit as instructed in this manual. Some adjustments will need to be made periodically to properly maintain your unit. At least once a season, check to see if you should make any of the adjustments described in the Service and Adjustments section of this manual.
- At least once a year, replace the spark plug, clean or replace air filter element and check blade for wear. A new spark plug and clean/new air filter element assure proper air-fuel mixture and help your engine run better and last longer.
LAWN MOWER
- Always observe safety rutes when performing any maintenance.
TIRES
- Keep tires free of gasoline, oil, or insect control chemicals which can harm rubber.
- Avoid stumps, stones, deep ruts, sharp objects and other hazards that may cause tire damage.
DRIVE WHEELS
- Check front drive wheels each time before you mow to be sure they move freely.
- The wheels not turning freely means trash, grass cuttings, etc. are in thedrive wheel area and must be cleaned to free drive wheels.
- If necessary to clean the drive wheels, be sure to clean both front wheels.
- Remove hubcaps, locknuts & washers.
- Remove wheels from wheel adjusters.
- Remove any trash or grass cuttings from inside the dust cover, pinionand/ or drive wheel gear teeth.
- Put wheels back in place.
NOTE:
- If after cleaning, the drive wheels do not turn freely, contact a qualified service center.
BLADE CARE
- For best results, blade must be kept sharp. j_eplace a bent or damaged blade.
- CAUTION= Use only a replacement blade approved bythe manufacturer ofyour mower.
- Using a blade not approved by the manufacturer of your mower is hazardous, could damage your mower and void your warranty.
TO REMOVE BLADE
- Disconnect spark plug wire from spark plug and place wire where it cannot come in contact with plug.
- Turn lawn mower on its side. Make sure air filter and carburetor are up.
- Use a wood block between blade and mower housing to prevent blade from turning when removing blade bolt.
NOTE
- Protect your hands with gloves and/or wrap blade with heavy cloth.
- Remove blade bolt by turning counterclockwise.
- Remove blade & attaching hardware bolt, lock washer & hardened washer).
TO REPLACE BLADE
- Position blade on the blade adapter aligning the two (2) holes in the blade with the raised lugs on the adapter.
- Be sure the trailing edge of blade (opposite sharp edge) is up toward the engine.
- Install the blade bolt with the lock washer and hardened washer into blade adapter and crankshaft.
- Use block of wood between blade and lawn mower housing and tighten the blade bolt, turning clockwise.
- RecommendedUghteningtorque:35-40ff.lbs.
IMPORTANT:
- Blade bolt is heat treated.
- If bolt needs replacing, replace onIy with approved bolt shown inthe Repair Parts section of this manual.
TO SHARPEN BLADE
- We do not recommend sharpening the blade - but if you do, be sure the blade is balanced. Care should be taken to keep the blade balanced. An unbalanced blade will cause eventual damage to mower orengine.
- The blade can be sharpened with a file or on a grinding wheel+ Do not attempt to sharpen while on the mower.
- To check blade balance, drive a nail into a beam or walt. Leave about one inchof the straight nail exposed. Place center hole of blade over the head of the nail. tf b[ade is balanced, it shouldremain in a horizontal position, If either end of the blade moves downward, sharpen the heavy end until the blade is balanced.
GRASS CATCHER
- The grass catcher may be hosed with water, but must be dry when used.
- Check your grass catcher often for damage or deterioration. Through normal use it will wear. If catcher needs replacing, replace only with approved replacement catcher shown in the Repair Parts section of this manual. Give the lawn mower model number when ordering.
GEAR CASE
- To keep your drive system working properly,the gear case and area around the drive should be kept clean and free of trash build-up. Clean under the drive cover twice a season.
- The gear case is filled with lubricant to the proper level at the factory+ The only time the lubricant needs attention is if service has been performed on the gear case.
- If lubricant is required, use only Texaco
- Starplex Premium 1 Grease, Part No.
- Do not substitute.
CLEANING
TO CHANGE ENGINE OIL
- Before tipping lawn mower to drain oil, empty fuel tank by running engine until fuel tank is empty.
- Disconnect spark plug wire from spark plug and place wire where it cannot come in contact with plug.
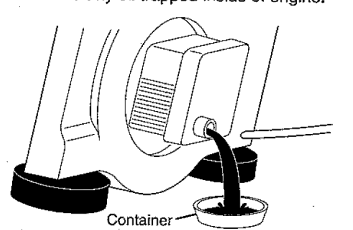
- Remove engine oil cap; lay aside on a clean surface.
- Tip lawn mower on its side as shown and drain oil into a suitable container.
- Rock iawn mower back and forth to remove any oil trapped inside of engine.
- Continue adding smatl amounts of oil, rechecking the dipstick until oil level settles at FULL. DO NOT overfill,or engine wilt smoke heavily from the muffler on startup.
- Always be sure to retighten oil dipstick before starting engine.
- Reconnect spark plug wire to plug.
AIR FILTER
- Your engine willnot run properly and may be damaged by using a dirty air filter.
- Replace the air filter every 100 hours of operation or every season, whichever occurs first. Service air cleaner more often under dusty conditions.
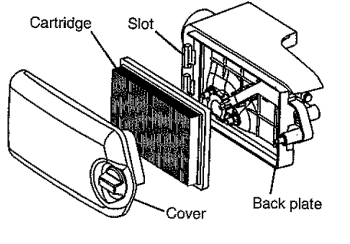
TO CLEAN AIR FILTER
- Remove cover,
- Carefully remove cartridge.
- Clean by gently tapping on a flat surface. If very dirty, replace cartridge.
- CAUTION: Petroleum solvents, such as kerosene, are not to be used to clean cartridge, They may cause deterioration of the cartridge, Do not oil cartridge. Do not use pressurized air to clean or dry cartridge.
- Install cartridge, then repYacecover.
- Cartridge
- Back plate
- Wipe off any spilled oil from lawn mower or side of engine,
- Slowly pour oil down the oil fill spout, stopping every few ounces to check the oil level with the dipstick.
- Stop adding oil when you reach the
- FULL mark on the dipstick. Wait a minute to allow oil to settle
MUFFLER
- Inspect and replace corroded muffler as it could create a fire hazard and/or damage.
SPARK PLUG
- Replace spark plug at the beginning of each mowing season or after every 100 hours of operation, whichever occurs first. Spark plug type and gap setting are shown in the "PRODUCT SPECIFICATIONS" section of this manual.
CLEANING
IMPORTANT: For best performance, keep mower housing free of built-grass and trash. Clean the underside of your mower after each use.
CAUTION: Disconnect spark plug wire from spark plug and place wire where it cannot come in contact with plug.
- Clean the underside of your lawn mower by scraping to remove build-up of grass and trash.
- Clean engine often to keep trash from accumulating. A clogged engine runs hotter and shortens engine life.
- Keep finished surfaces and wheels free of all gasoline, oil, etc.
- We do not recommend using a garden hose to clean lawn mower unless the electrical system, muffler, air filter and carburetor are covered to keep water out. Water in engine can result in shortened engine life.
CLEAN UNDER DRIVE COVER
- Clean under drive cover at least twice a season. Scrape underside of cover with putty knife or similar tool to remove any build-up of trash or grass on underside of drive cover
ADJUST
TO ADJUST HANDLE The handle can be mounted in a high or low position. The mounting holes in the bottom of lower handle are off center for raising or lowering the handle. 1. Remove upper handle and wire tie(s) securing cable(s) to lower handle, 2, Remove hairpin cotters from lower handle bracket mounting pin. 3, Squeeze lower handle in to remove it from mounting pins. 4. Turn lower handle over to raise or lower handle. 5. Squeeze lower handle in and position holes onto mounting pins on handle bracket. 6, Reassemble upper handle and all parts removed from lower handle.
ENGINE SPEED
- Your engine speed has been factor# set.
- Do not attempt to increase engine speed or it may result in personal injury. !f you believe that engine is running too fast or too slow, take your mower to a qualified service center for repair and adjustment.
CARBURETOR
- Your carburetor is not adjustable. If your engine does not operate properly due to suspected carburetor problems, take your lawn mower to a qualified service center for repair and/or adjustment.
IMPORTANT.
- Never tamper with the engine governor, which is factory set for proper engine speed. Overspeeding the engine above the factory high speed setting can be dangerous, If you think the engine-governed high speed needs adjusting, contact a qualified service center, which has proper equipment and experience to make any necessary adjustments.
TROUBLESHOOTING
Does not start
1.Dirtyair filter
2. Out of fuel.
3. Stale fuel,
4. Water in fuel.
5. Spark plugwire is disconnected.
6. Bad spark plug.
7. Loose blade or broken blade adapter,
8. Control bar in released position.
9. Control bar defective.
10.Fuel valve lever (if so equipped) in OFF position.
11.Weak battery (if equipped).
12. Disconnected battery connector (if equipped).
13. Blown fuse (if equipped).
1. Clean!replace air filter
2. Fill fuel tank.
3, Empty fuel tank and refill tank with fresh, clean gasoline.
4. Empty fuel tank and refill tank with fresh, clean gasoline,
5. Connect wire to plug.
6. Replace spark plug.
7. Tighten blade bolt or replace blade adapter.
8. Depress control bar to handle
9. Replace control bar.
10.Turn fuel valve lever to the ON position.
11.Charge battery.
12.Connect battery to engine. 13.Replace fuse.
Loss of power
1. Rear of lawn mower housing or cutting blade dragging in heavy grass.
2. Cutting too much grass.
3. Dirty air filter.
4. Buildup of grass, leaves, and trash under mower.
5. Too much oil in engine.
6. Walking speed too fast.
1, Raise cutting height.
2. Raise cutting height.
3. Clean/replace air filter,
4. Clean underside of mower housing,
5. Check oil level.
6, Cut at slower walking speed,
Poor cut - uneven
Buildup of grass, leaves and trash under mower.
1. Replace blade. Tighten blade bolt.
2. Set all wheels at same height.
3, Clean underside of mower housing.
Excessive vibration
1. Worn, bent or loose blad
e. 2. Bent engine crankshaft.
1. Replace blade. Tighten blade bolt.
2. Contact a qualified service center.
Starter rope hard to pull
1. Engine flywheel brake is on when control bar is released.
2. Bent engine crankshaft.
3, Blade adapter broken.
4. Blade dragging in grass.
1. Depress control barto upper handle before pulling starter rope.
2. Contact a qualified service center.
3. Replace blade adapter.
4. Move lawn mower to cut grass or to hard surface.
Hard to push
1. Grass is too high or wheel height istoo low.
2. Rear of lawn mower housing or cutting blade dragging in grass.
3. Grass catcher too full.
4. Handle height position not right for you.
1. Raise cutting height.
2. Raise rear of lawn mower housing one (1) setting higher.
3. Empty grass catcher.
4. Adjust handle height to suit.
Loss of drive or slowing of drive speed
1. Belt wear.
2. Belt off of pulley.
3. Drive cable worn or broken.
4. "Loose" drive control system.
1. Check/replace drive belt.
2, Check/reinstall drive belt.
3. Replace drive cable,
4. Adjust drive control.