Loading ...
Loading ...
Loading ...
Setting the Warming Zone Control:
1. Push in & turn the knob in either
direction to the desired setting (See
Fig 1). The temperatures are
approximate & are designated by HI,
MED & LO. However, the control can
be set at any position between HI &
LO for different levels of warming.
2. When ready to serve, turn the Warming
Zone control knob to OFF. The
Warming Zone will remain warm until
the indicator light turns OFF.
Warming Zone Temperature Selection -
Refer to the Warming Zone
Recommended Food Settings Table
(Refer to Fig. 2). tfa particular food is not
listed, start with the medium level & then
adjust as needed. Most foods can be kept
at serving temperatures when using the
MED (medium)level.
[0
@
ti_t@_ Wa0m £
Eerie
Fig. 1
Warming Zone Recommended Food Settings Table
Food Item Heating Level
Breads/Pastries LO (Low)
Casseroles LO (Low)
Dinner Plates with Food LO (Low)
Eggs LO (Low)
Gravies LO (Low)
Meats MED (Medium)
Sauces MED (Medium)
Soups (cream) MED (Medium)
Stews MED (Medium)
Vegetables MED (Medium)
Fried Foods HI (High)
Hot Beverages HI (High)
Soups (liquid) HI (High)
Fig. 2
Unlike the surface elements, the Warming Zone will not glow
red when it is HOT. Always use potholders or oven mitts when removing food
from the Warming Zone. Cookware & plates will be HOT.
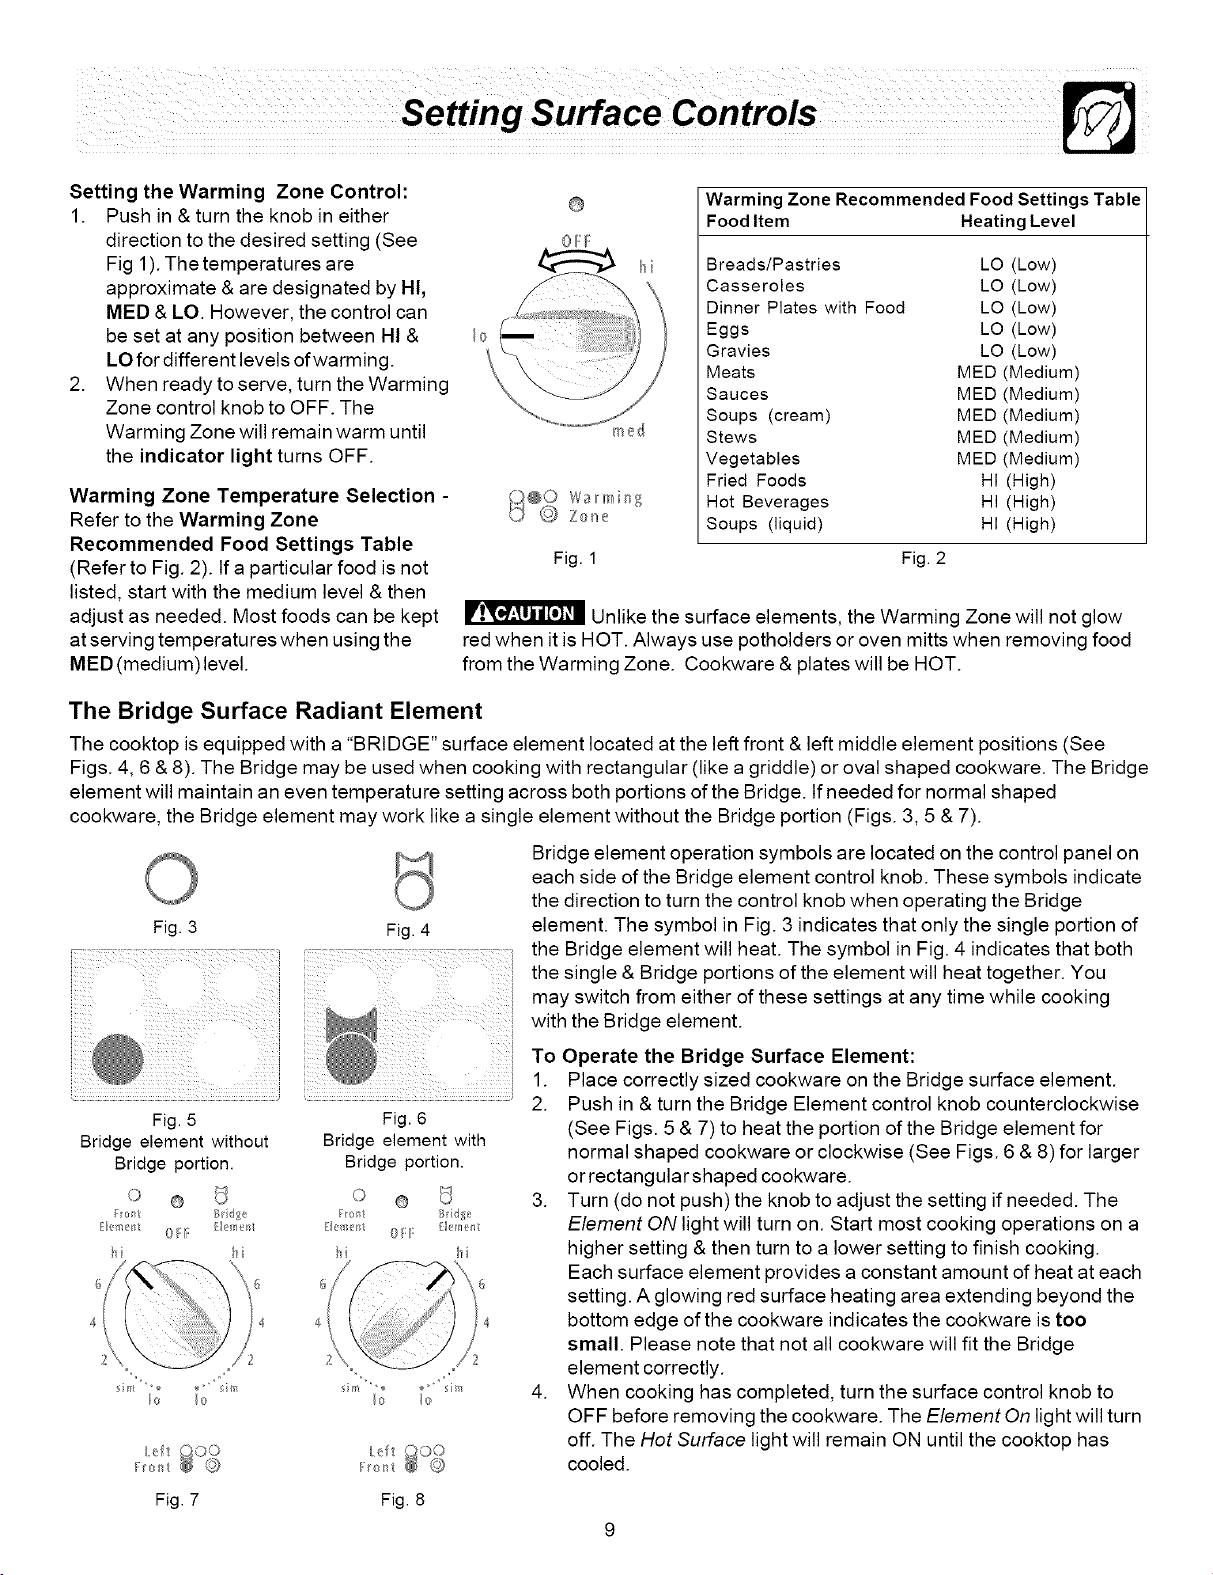
The Bridge Surface Radiant Element
The cooktop is equipped with a "BRIDGE" surface element located at the left front & left middle element positions (See
Figs. 4, 6 & 8). The Bridge may be used when cooking with rectangular (like a griddle) or oval shaped cookware. The Bridge
element will maintain an even temperature setting across both portions of the Bridge. tf needed for normal shaped
cookware, the Bridge element may work like a single element without the Bridge portion (Figs. 3, 5 & 7).
Fig. 3 Fig. 4
Fig. 5 Fig. 6
Bridge element without Bridge element with
Bridge portion. Bridge portion.
0 @ 0 @
Fol_ B_d_e Fol! B_d_"
¢
,'1 4
10 1o 10 1o
9tit GO0 9tit GO0
Bridge element operation symbols are located on the control panel on
each side of the Bridge element control knob. These symbols indicate
the direction to turn the control knob when operating the Bridge
element. The symbol in Fig. 3 indicates that only the single portion of
the Bridge element will heat. The symbol in Fig. 4 indicates that both
the single & Bridge portions of the element will heat together. You
may switch from either of these settings at any time while cooking
with the Bridge element.
To Operate the Bridge Surface Element:
1. Place correctly sized cookware on the Bridge surface element.
2. Push in & turn the Bridge Element control knob counterclockwise
(See Figs. 5 & 7) to heat the portion of the Bridge element for
normal shaped cookware or clockwise (See Figs. 6 & 8) for larger
or rectangularshaped cookware.
3. Turn (do not push) the knob to adjust the setting if needed. The
Element ON light will turn on. Start most cooking operations on a
higher setting & then turn to a lower setting to finish cooking.
Each surface element provides a constant amount of heat at each
setting. A glowing red surface heating area extending beyond the
bottom edge of the cookware indicates the cookware is too
small. Please note that not all cookware will fit the Bridge
element correctly.
4. When cooking has completed, turn the surface control knob to
OFF before removing the cookware. The Element On light will turn
off. The Hot Surface light will remain ON until the cooktop has
cooled.
Fig. 7 Fig. 8
Loading ...
Loading ...
Loading ...