2
IMPORTANT SAFETY INFORMATION
DANGER!
•
FLAMMABLE LIQUIDS: Never use or store flammable liquids near the grill, or
use flammable liquids to light the grill.
•
OUTDOOR USE ONLY: Do not operate the grill indoors or in enclosed spaces
as carbon-monoxide poisoning may occur.
DANGER!
•
HIGH VOLTAGE ELECTRICITY: Plug the grill into an earthed AC power outlet
with safety switch fitted in the house power box.
•
DISCONNECT POWER: Always disconnect the power supply (unplug) before
completing servicing of the grill.
WARNING!
•
FOLLOW INSTRUCTIONS: Assemble and use this grill ONLY in accordance with
the instructions in this manual.
WARNING!
•
SAFE DISTANCE: During operation keep the grill a MINIMUM of 1m overhead
clearance and 0.3m side/rear clearance from any wall or combustible
material.
•
HOT SURFACES: This grill will be extremely hot during operation and for some
time after turning off. Take care to avoid burns.
•
CHILDREN: Never leave the grill unattended when young children are present.
CAUTION!
•
PELLET STORAGE: Always store wood pellets in a dry location, away from heat
or ignition sources.
•
CLEANING: Keep the grill clean in line with the instructions in this manual.
A dirty grill can result in dangerous grease fires.

3
ZPG-450A Wood Pellet Smoker Grill
Owner Manual
www.zgrills.com.au
3
© Z Grills Australia Pty Ltd - 2019
ZG06.02.01 V1.8 10-2019
Contents
1. Operating Guidelines
4
2. Quick Reference Guide
5
3. Technical Specifications
6
4. Food Minimum Cooked Temperatures
6
5. Cleaning the Grill
7
6. Controller Operation
8
7. Error Codes
8
8. Main Grill Components
9
9. Unpacking & Assembly Instructions
10
10. Wiring Diagram
13
11. Spare Parts List
14
12. Initial Startup Instructions
15
13. New Grill Burn In
15
14. Normal Operation
16
15. Manual Operation
17
16. Troubleshooting
18
17. Grill Repair Instructions
20
18. Limited Product Warranty
21

4
1. Operating Guidelines
• For convenient and safe assembly, use at least two people to assemble.
• DO NOT use the grill in any enclosed area, it is for outdoor use only.
• DO NOT use your grill outside on rainy days, it must not get wet.
• DO NOT store or use combustible materials or liquids near the grill.
• DO NOT move your grill while operating or while it is hot. Wait until the
grill is completely cold.
• DO NOT place heavy objects on top of the hopper lid as it could tip over.
• Keep children away while the grill is in use.
• Parts of your grill will become very hot so take care as serious burns
could result.
• Always keep the Pellet Hopper dry. The wood pellets will expand, break
apart and even jam the Auger feed system if they get wet or are exposed
to high humidity. Store pellets in air tight containers and only pour as
much as required for your cooking into the hopper.
• Maintain a safe distance between your grill and any combustible
materials.
• If a grease fire occurs, turn the controller OFF and leave the lid CLOSED
until the fire is extinguished. DO NOT unplug the power cord. DO NOT
throw water on it. DO NOT try to smother the fire.
• Clean and maintain your grill after each use.
• Only use wood pellets which are made specifically for BBQs and no larger
than 6mm in diameter.
• Use of heat-resistant gloves when operating this grill.
• Cover the Grease Tray with heavy-duty aluminum foil before use to make
it easier to clean. Replace the foil regularly and clean any grease in the
drain to reduce the chance of grease fires.
• Make sure the power cord is disconnected before performing any service
or maintenance.
• Never put water into the Pellet Hopper or Fire-pot.
• Never add pellets into the Fire-pot whilst the grill is operating.
If the hopper runs out of pellets, let the grill cool down and repeat INITIAL
STARTUP INSTRUCTIONS.
• Take care when pushing the grill around as it can tip over when pushed on
uneven ground, especially if the Hopper is full of pellets.
• Lock the rear wheels if on sloping or uneven surfaces.
5
2. Quick Reference Guide
INITIAL STARTUP PROCEDURE
•
The Initial Startup Procedure must be completed before first use and each
time after the grill runs out of wood pellets.
NEW GRILL BURN IN
•
It is important to complete a 45 minute HIGH temperature BURN IN before
cooking any food on a new Z Grills.
NORMAL STARTUP PROCEDURE
•
Turn the power ON and set the controller to SMOKE.
•
Keep the lid OPEN until smoke appears and the “roaring” fire sound is heard.
•
Turn the Temperature Dial to the desired setting.
•
Wait 10 minutes, or until the temperature is reached before putting food in.
NORMAL SHUTDOWN PROCEDURE
•
After cooking, always turn the Temperature Dial to SHUT DOWN CYCLE and let
the grill cool down.
•
Do not turn OFF or disconnect the power until the fan has stopped running.
•
Turning OFF before shutdown has been completed could cause a Hopper fire.
GREASE FIRE
•
Turn the grill OFF and leave the Grill Lid CLOSED until the fire is out.
•
Do NOT apply water or try to smother the flames.
•
Clean the grill regularly to avoid grease fires.
PELLET USAGE RATE
•
Low and Slow (<107
o
C) 0.3~0.5kg/hour
•
High temperatures (>176
o
C) 0.8~1kg/hour
•
Depends on type of pellet used and outside temperature, wind and sunlight
6
•
When cooking meat and fish use food probes to monitor the internal temperature.
•
Minimum temperatures must be reached to kill bacteria ensuring the meat is safe
to eat. It can also indicate how well cooked it is.
•
Below chart is provided as a reference only.
•
Check online for more detailed temperature values for the specific food you are
cooking. The below temperatures are just a reference guide only.
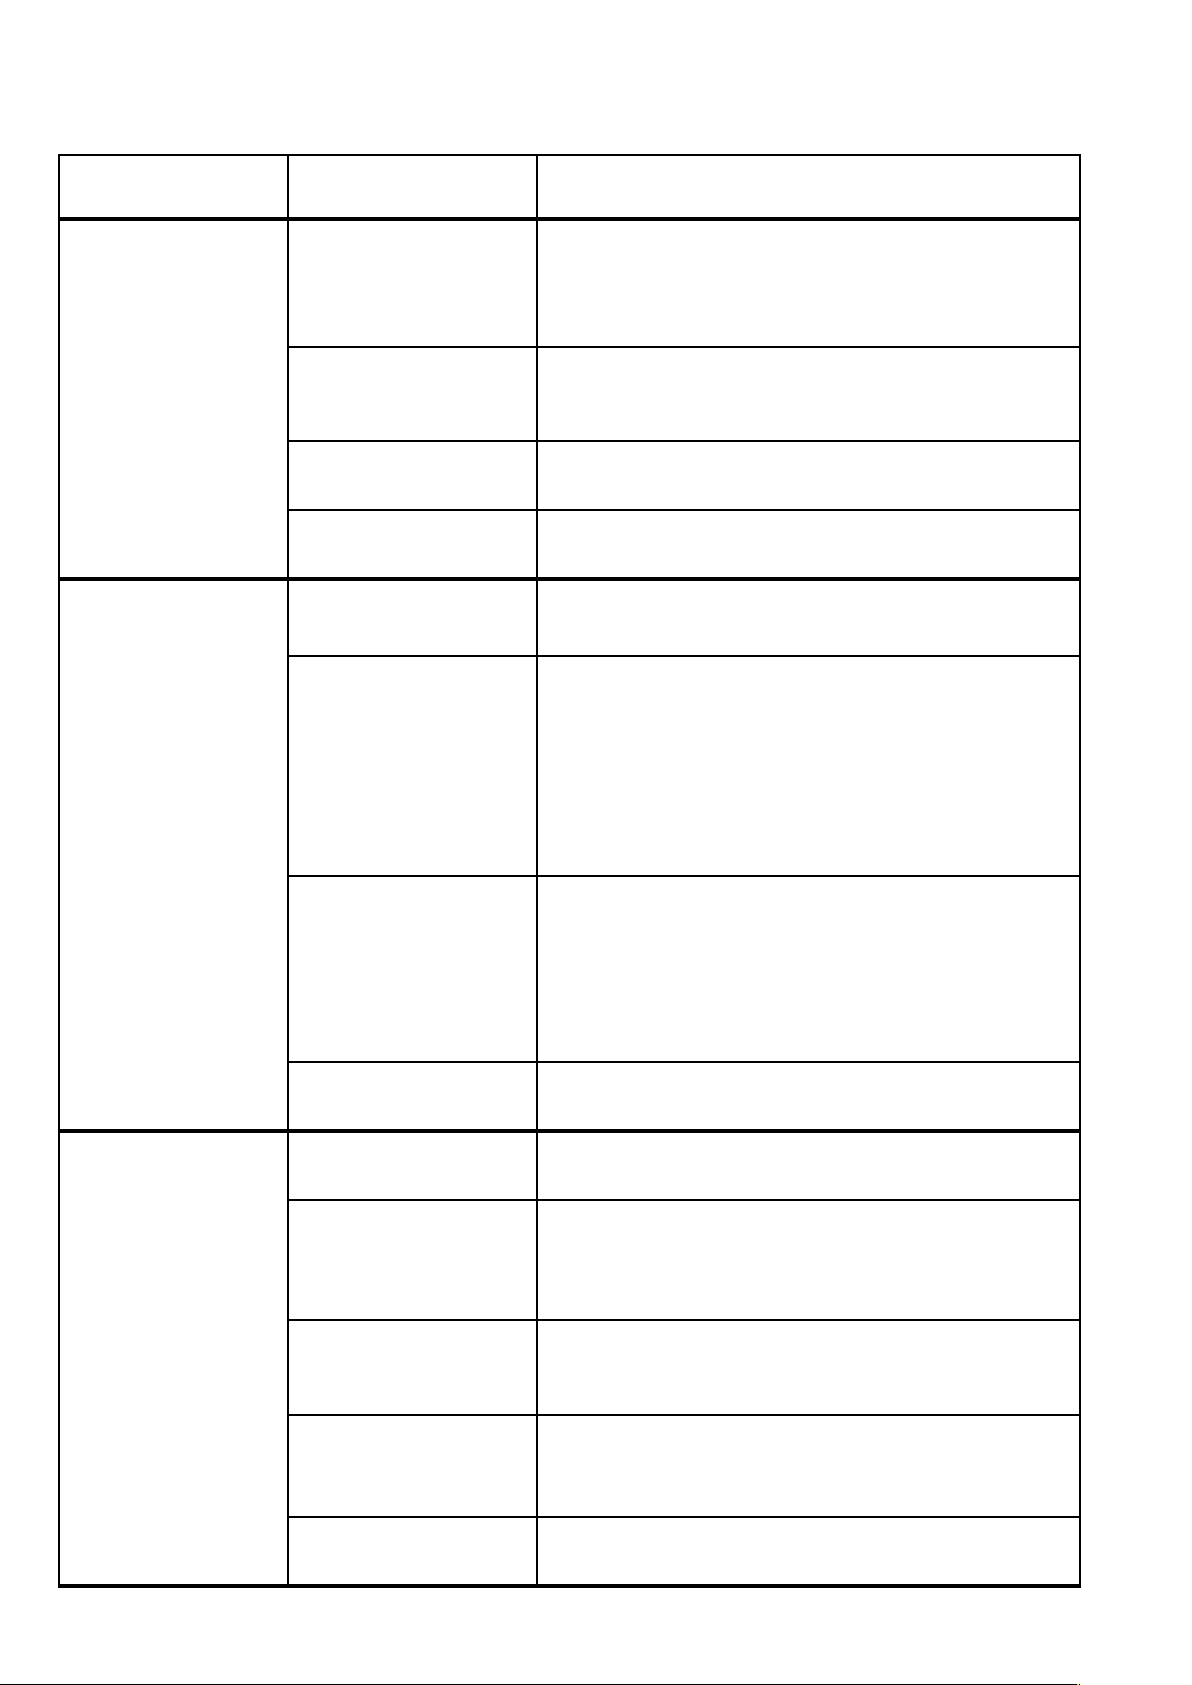
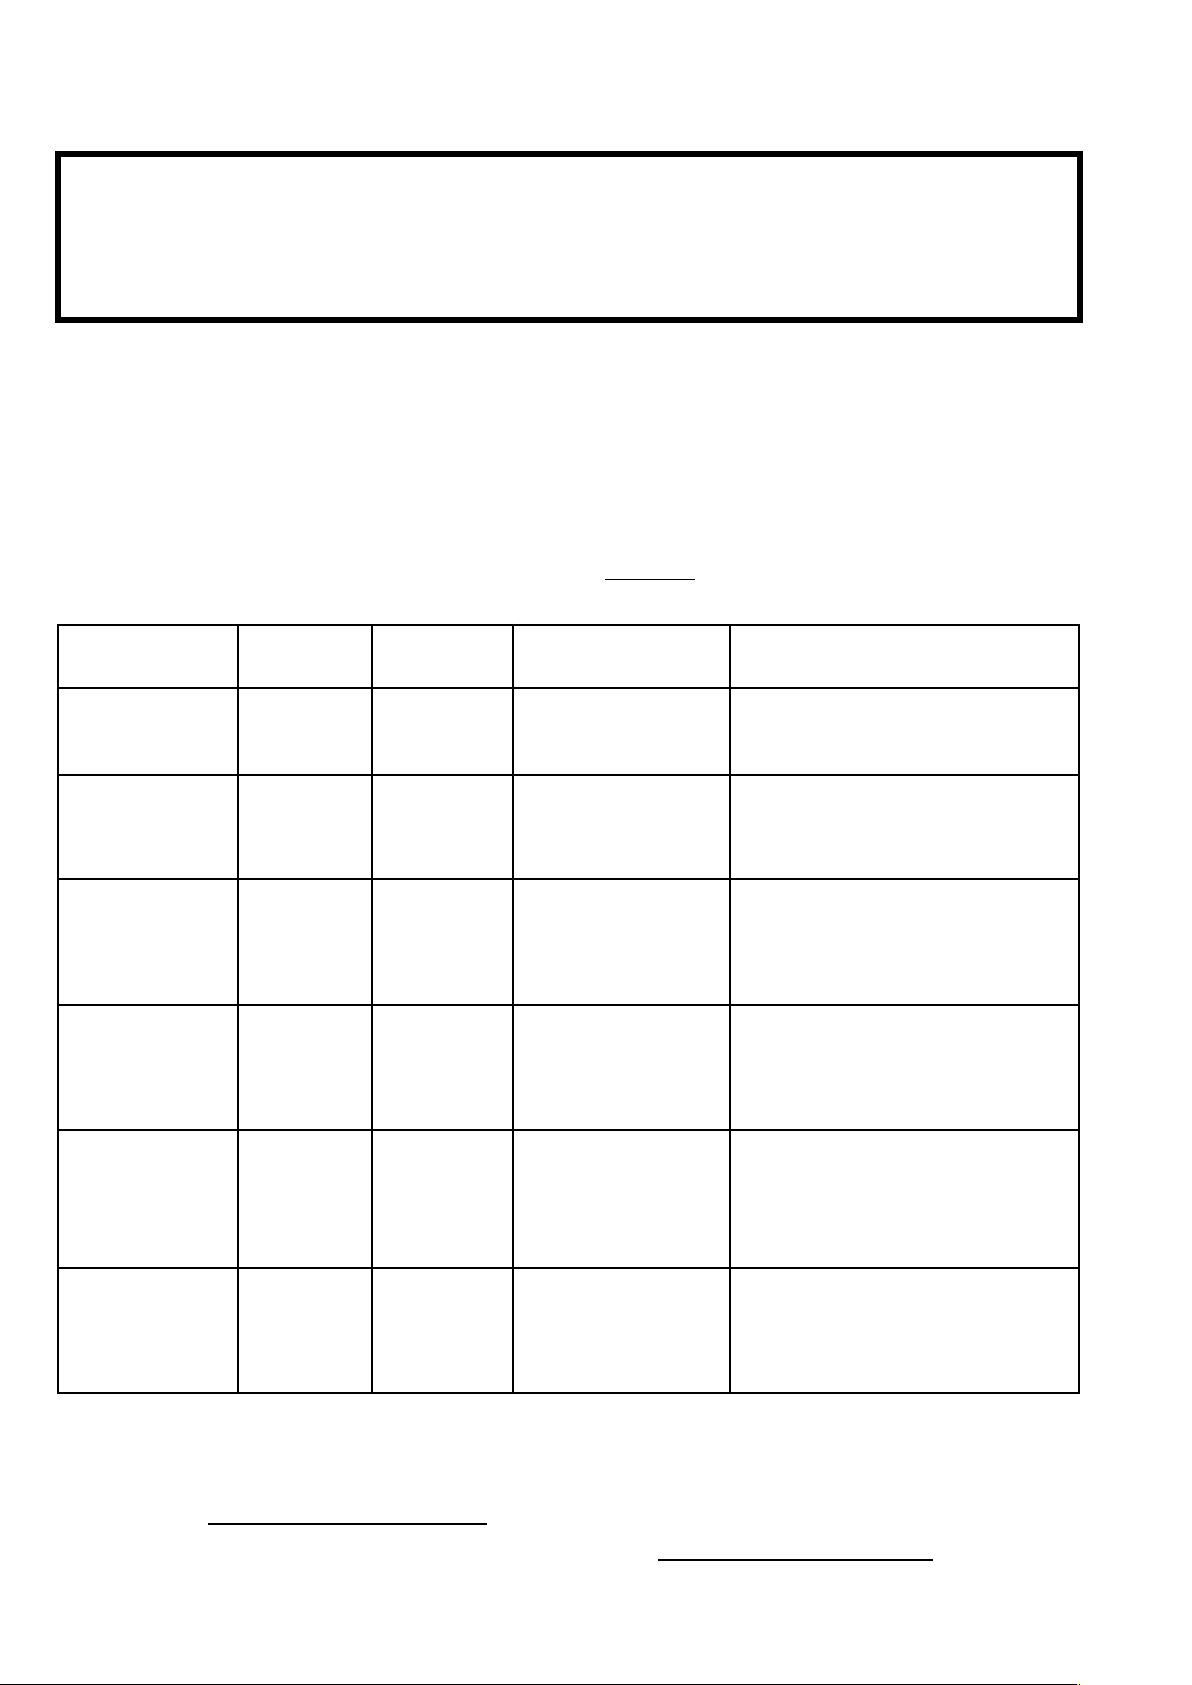
4. Food Minimum Temperature Chart
Minimum Safe Internal Temperatures
Beef & Veal (Whole cuts)
63
o
C
Lamb (Whole cuts)
63
o
C
Pork (Whole cuts)
63
o
C
Minced Beef
72
o
C
Sausages
74
o
C
Fish
63
o
C
Poultry
74
o
C
3. Technical Specifications
Grill Model
ZPG-450A
Main Grill Rack
390 x 550 mm (0.214m
2
)
Small Grill Rack
150 x 560 mm (0.084m
2
)
Total Grilling Area
0.298 m
2
(462 square inches)
Power Supply
240VAC 50Hz
Max Power Usage
300W
Hopper Capacity
7 kg
Assembled Dimensions
1150 wide x 710 deep x 1250 mm tall

7
5. Cleaning the Grill
Clean the Grill after each use, as accumulation of grease, ash and soot can increase
the risk of a grease fire and result in inefficient operation.
Grease Tray, Drain & Bucket
•
Remove foil from the Grease Tray and wipe off any surface grease.
•
Clean out the the V-shaped drain and spout to the Grease Bucket. This is easiest
to do while the grill is still warm (but not hot). Be careful!
•
Dispose of any grease in the Grease Bucket and wash clean with warm soapy
water.
Grilling Racks
•
Use a wood scraper or other gentle material to scrape off any large chunks.
•
Do NOT use a stainless steel wire brush as it can damage the ceramic coating.
•
Using a wet cloth while the grill racks are still hot can remove the majority of the
grease (use tongs or wear gloves).
•
Do NOT use acidic or strong chemical cleaners as they may damage the grill rack
ceramic coating.
Fire Pot and Chimney
•
Ash in the Fire-pot and the base of the Grill Drum can be vacuumed out. Only
vacuum when the grill is cold, switched OFF and unplugged from power supply.
•
Once every 4-5 uses, remove the Chimney Cap and clean with warm soapy water.
Scrape any soot from the chimney with a non-metallic object and wipe clean with
BBQ wipes.
Grill Surfaces
•
Wipe down the inside and outside of the Grill with BBQ cleaning wipes, or warm
soapy water and moist (not too wet) cloth.
•
Cover the grill with the protective cover when not in use, especially if stored
outdoors. The Grill must not be exposed to rain.
•
Gently clean the Temperature Sensor in the grill periodically to ensure accurate
temperature readings.
Food Temperature Probes
•
Food probes must be scrubbed thoroughly after each use with hot soapy water to
avoid food contamination. Avoid immersing the entire cable in water.
Wood Pellets
•
Wood pellets can absorb moisture if sitting for an extended period of time in the
hopper. They may not burn properly and if very moist can even cause the auger to
become blocked. Always store wood pellets in an air tight bag or container.
•
Scoop out wood pellets in the hopper and run the Grill until all pellets are depleted
if not planning to use the grill for several weeks.
8
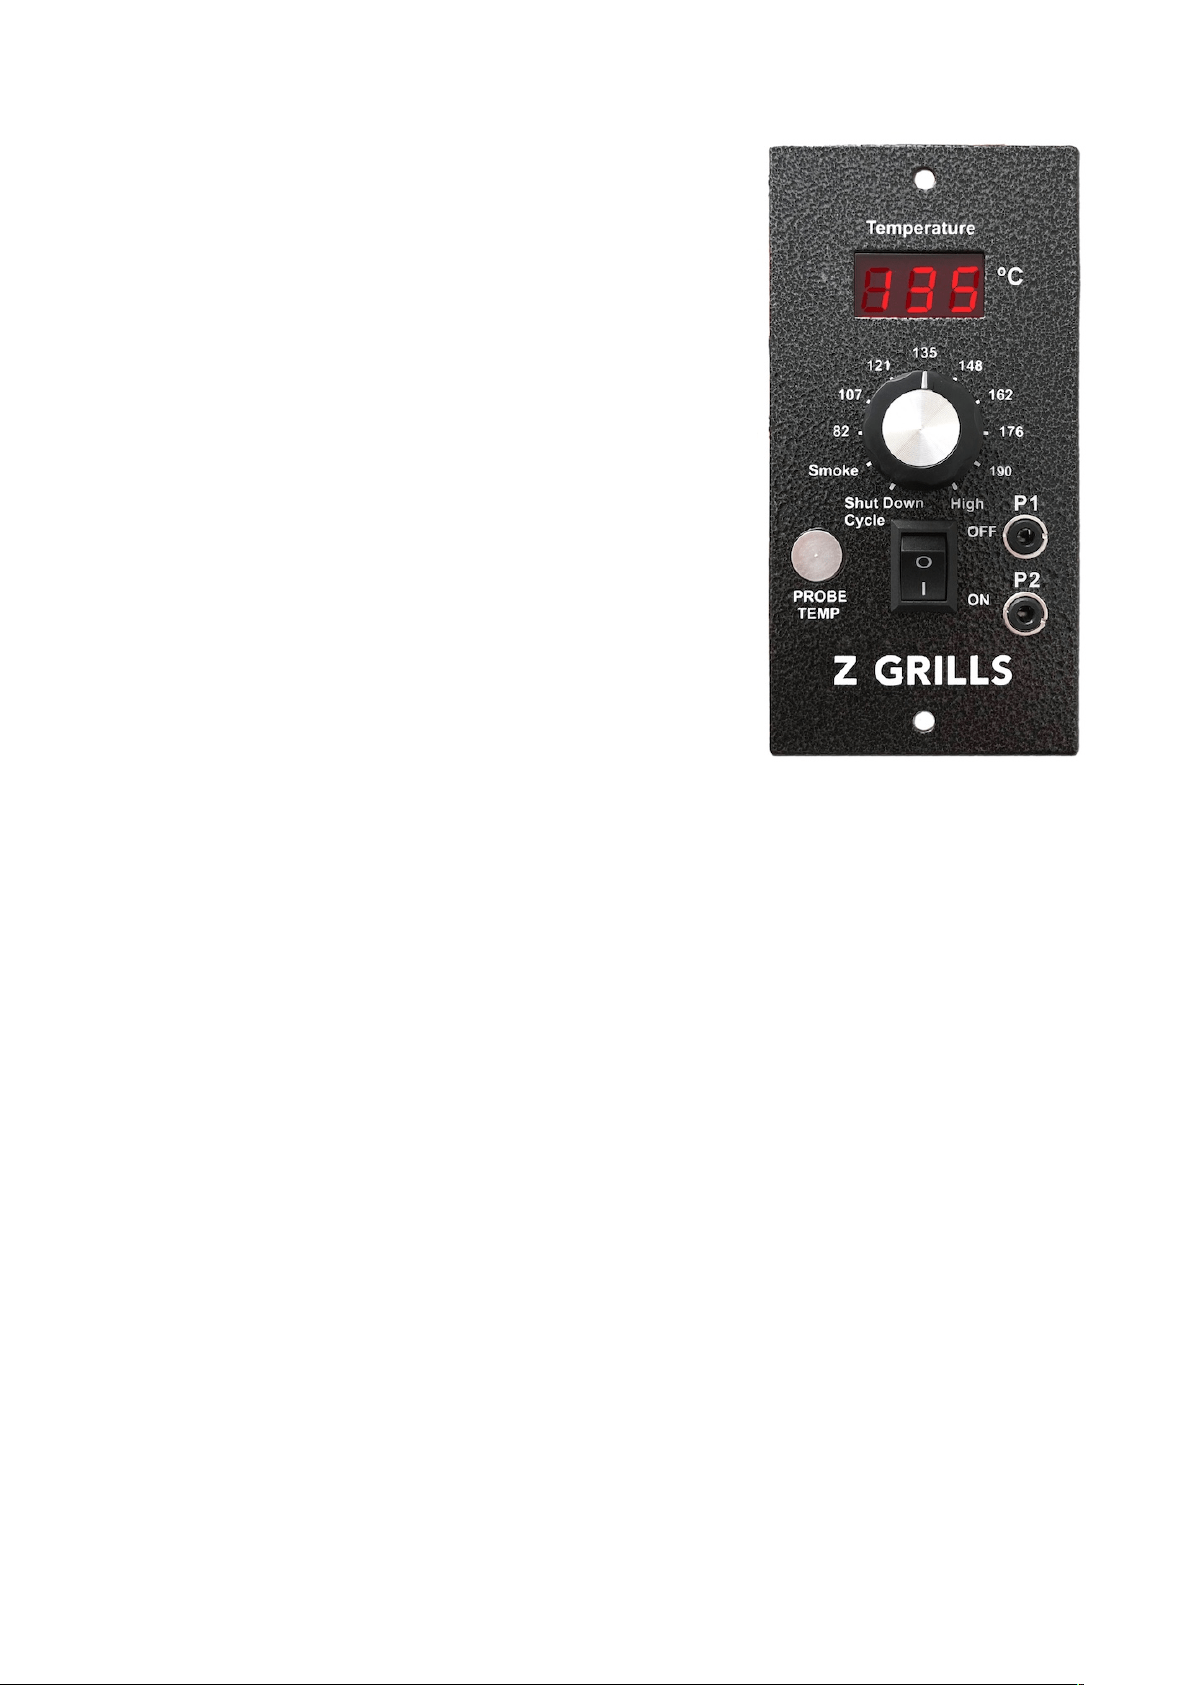
6. Controller Operation
The Controller monitors the Temperature Sensor inside the
Grill and turns on/off the Auger Motor and sets the Fire-pot
Fan speed. It can take some time for temperatures to
stabilise at the desired setting. Avoid frequently adjusting
the temperature or opening the lid.
The Grill internal temperature and two food temperature
probes can also be monitored on the display.
Controller Dial Settings
•
Shut Down Cycle: Safe shutdown after operation.
•
Smoke: Low temperature operation with maximum
amount of smoke. Smoke will appear in cycles.
•
82 ~ 190
o
C: Target temperature settings
•
High: 232
o
C maximum operating temperature
PROBE TEMP Button
•
Default display is the current Grill Temperature
•
Press the PROBE TEMP button to cycle through:
Grill Temperature ➤ PROBE 1 ➤ PROBE 2
Error codes will be displayed on the controller screen. All operation will cease when
there is an Error, so the problem must be solved before the grill can operate normally.
Check the Troubleshooting section for more detailed information as well.!
Er1 = Temperature Sensor Failure
•
Check to ensure the Temperature Sensor cable plug is properly connected.
•
Check sensor cable connection on the controller board blue terminal block.
Er2 = Controller System Error
•
Reset the controller by following these steps:
•
Switch the Grill OFF and turn to Shut Down Cycle position
•
Switch Grill back ON and then turn to SMOKE to start normal operation
•
Error will display if Dial is already turned to a temperature when switching on.
LEr = Low Temperature Error. Grill internal temperature below 65
o
C for 20min
•
Grill may have run out of pellets or the Ignition Rod is not operating.
HEr = High Temperature Error. Grill internal temperature above 287
o
C
•
Turn to Shut Down Cycle position and switch the Grill OFF
•
Open the Grill Lid then switch the Grill back ON and turn to SMOKE position
•
Wait until the controller display has dropped below 90
o
C, then close the Grill Lid
and turn to the desired temperature.
•
High temperature error can also occur in hot weather when the grill in the direct
sun. Open the Grill Lid and move it into the shade to reduce the temperature.
7. Error Codes
9
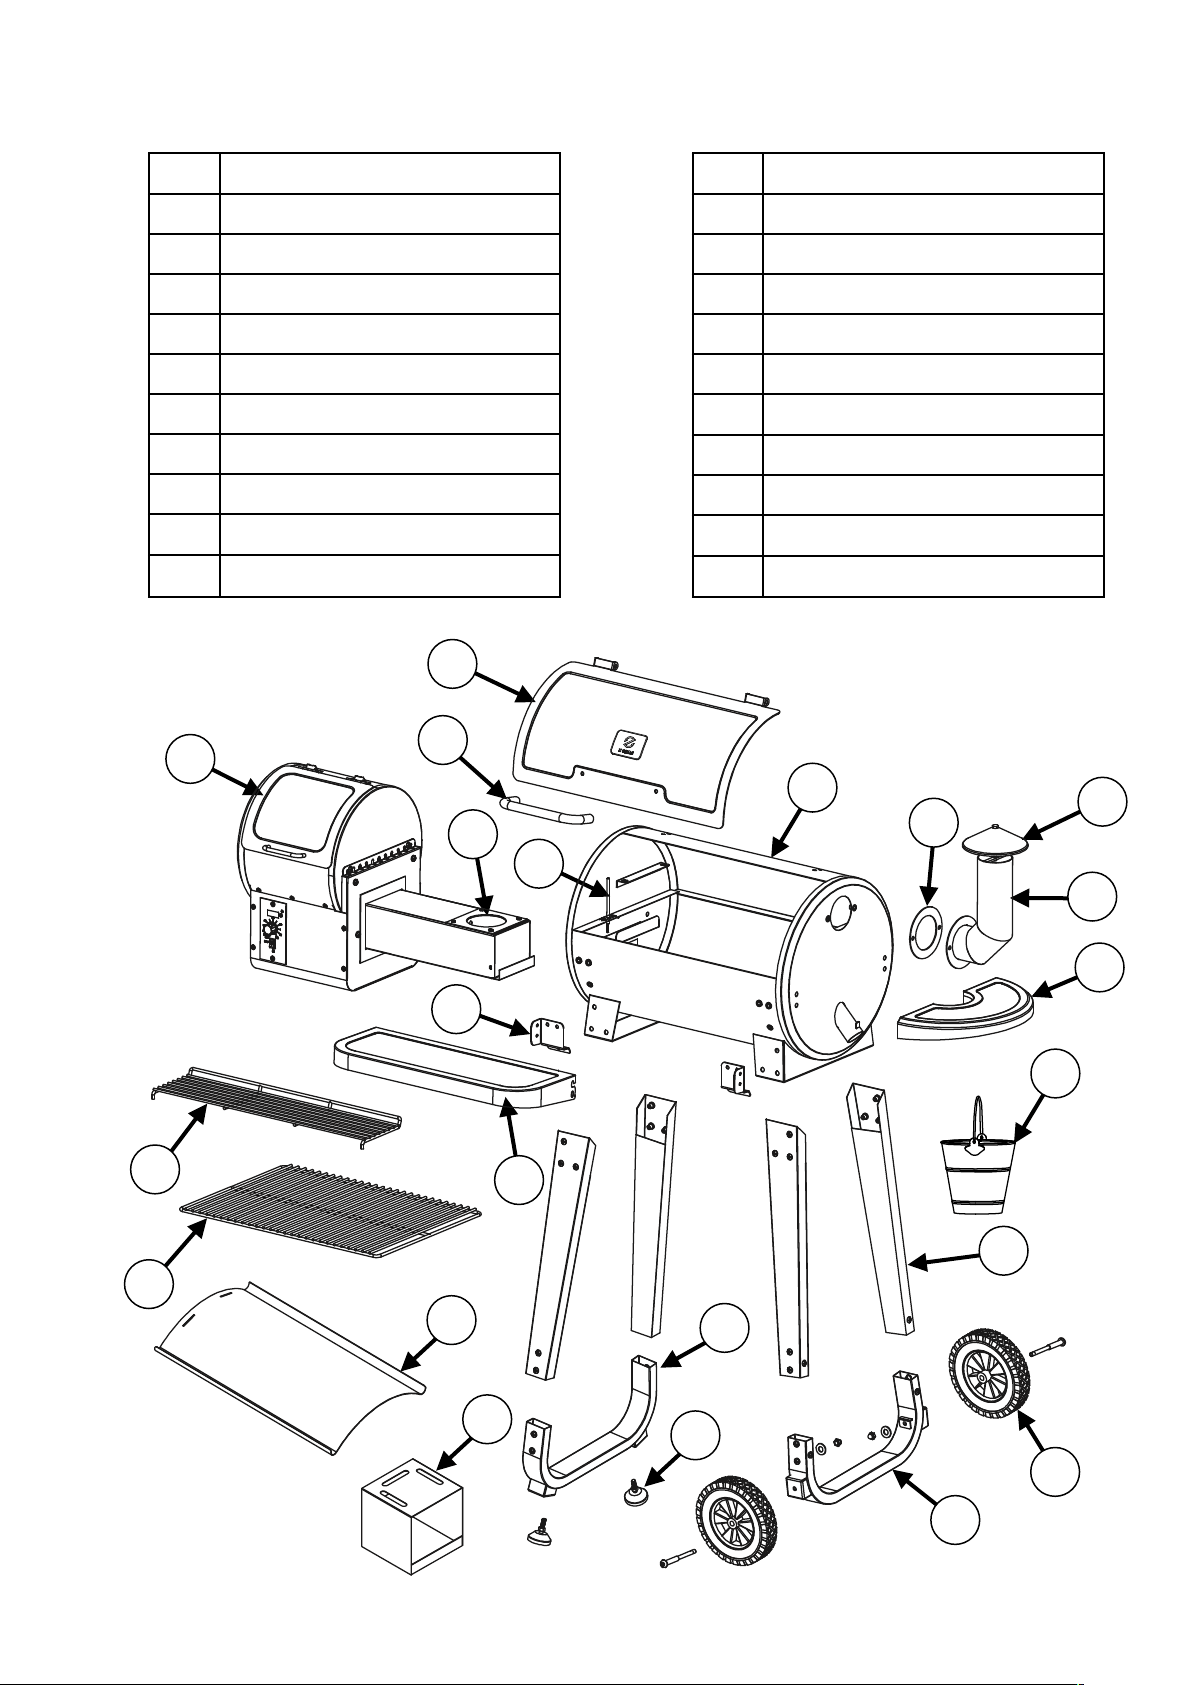
8. Main Grill Components
1
Hopper Assembly
2
Fire Pot
3
Grill Temperature Sensor
4
Grill Lid Handle
5
Grill Lid
6
Grill Drum
7
Chimney Gasket
8
Chimney Cap
9
Chimney Stack
10
Side Shelf
11
Grease Bucket
12
Legs
13
Wheels
14
Right Leg Base
15
Foot Pad
16
Left Leg Base
17
Heat Baffle
18
Grease Tray
19
Front Shelf
20
Front Shelf Bracket
21
Small Grill Rack
22
Main Grill Rack
9
1
3
4
5
6
7
8
11
10
12
13
14
16
15
17
18
22
21
19
2
20
10
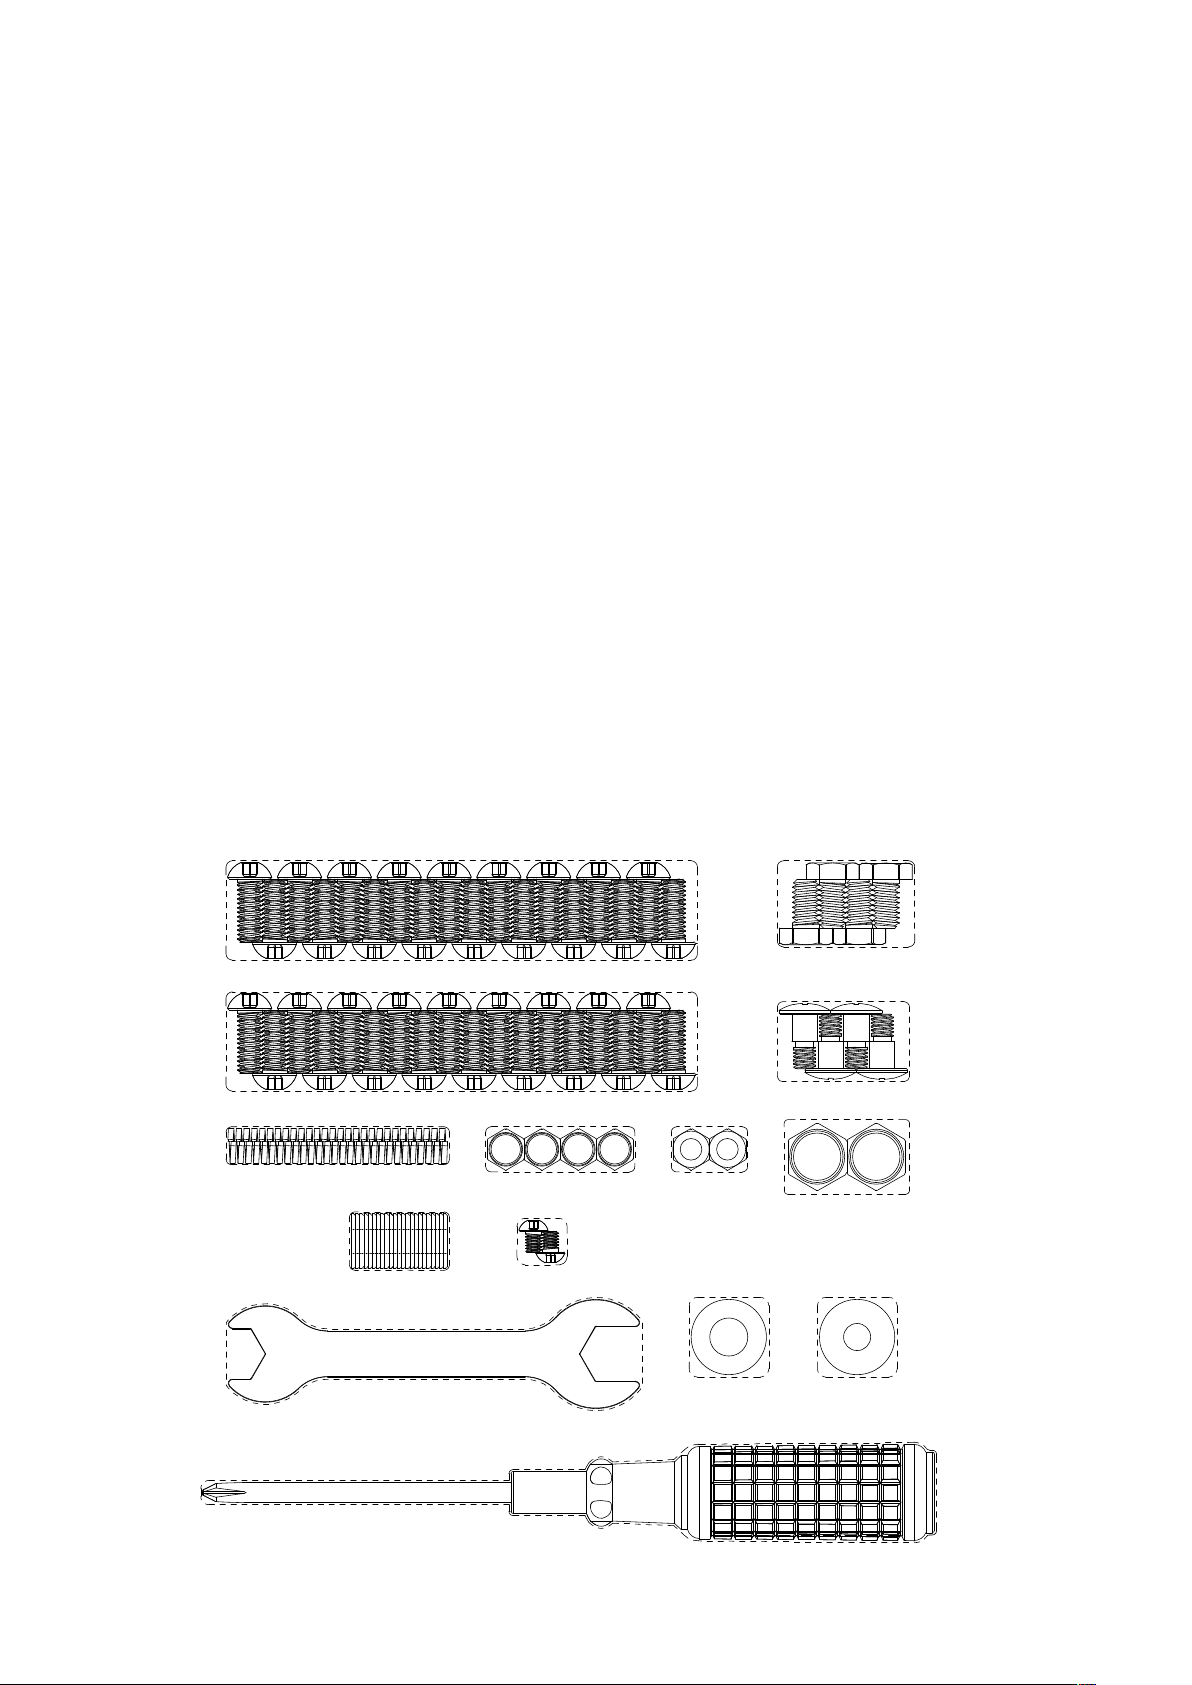
9. Unpacking & Assembly Instructions
A
C
M
H
D
E
J
F
I G
L
K
B
The box and some of the components are heavy.
2 people are required to safely complete the assembly process.
Unpacking
•
Do not place painted metal components directly on bricks or concrete as it may
scratch the paint. Lay down a sheet of cardboard to sit them on.
•
It is recommended to unpack all components and lay them out flat before
beginning assembly.
Assembly Process
•
Follow the step by step assembly instructions on the following pages.
•
Wear gloves when handling the Grease Tray as it has a light layer of oil to prevent
rusting and may have sharp edges.
Tools and Fasteners
•
All the required fasteners (nuts and bolts) and tools are provided together with the
grill in the shrink-wrapped package. Note the number code beside each
component as it is referred to in the assembly instructions.
•
If using your own electric screwdriver, use a low speed, low torque setting to avoid
damaging screw threads. Always start the thread by hand before using the
electric screwdriver.
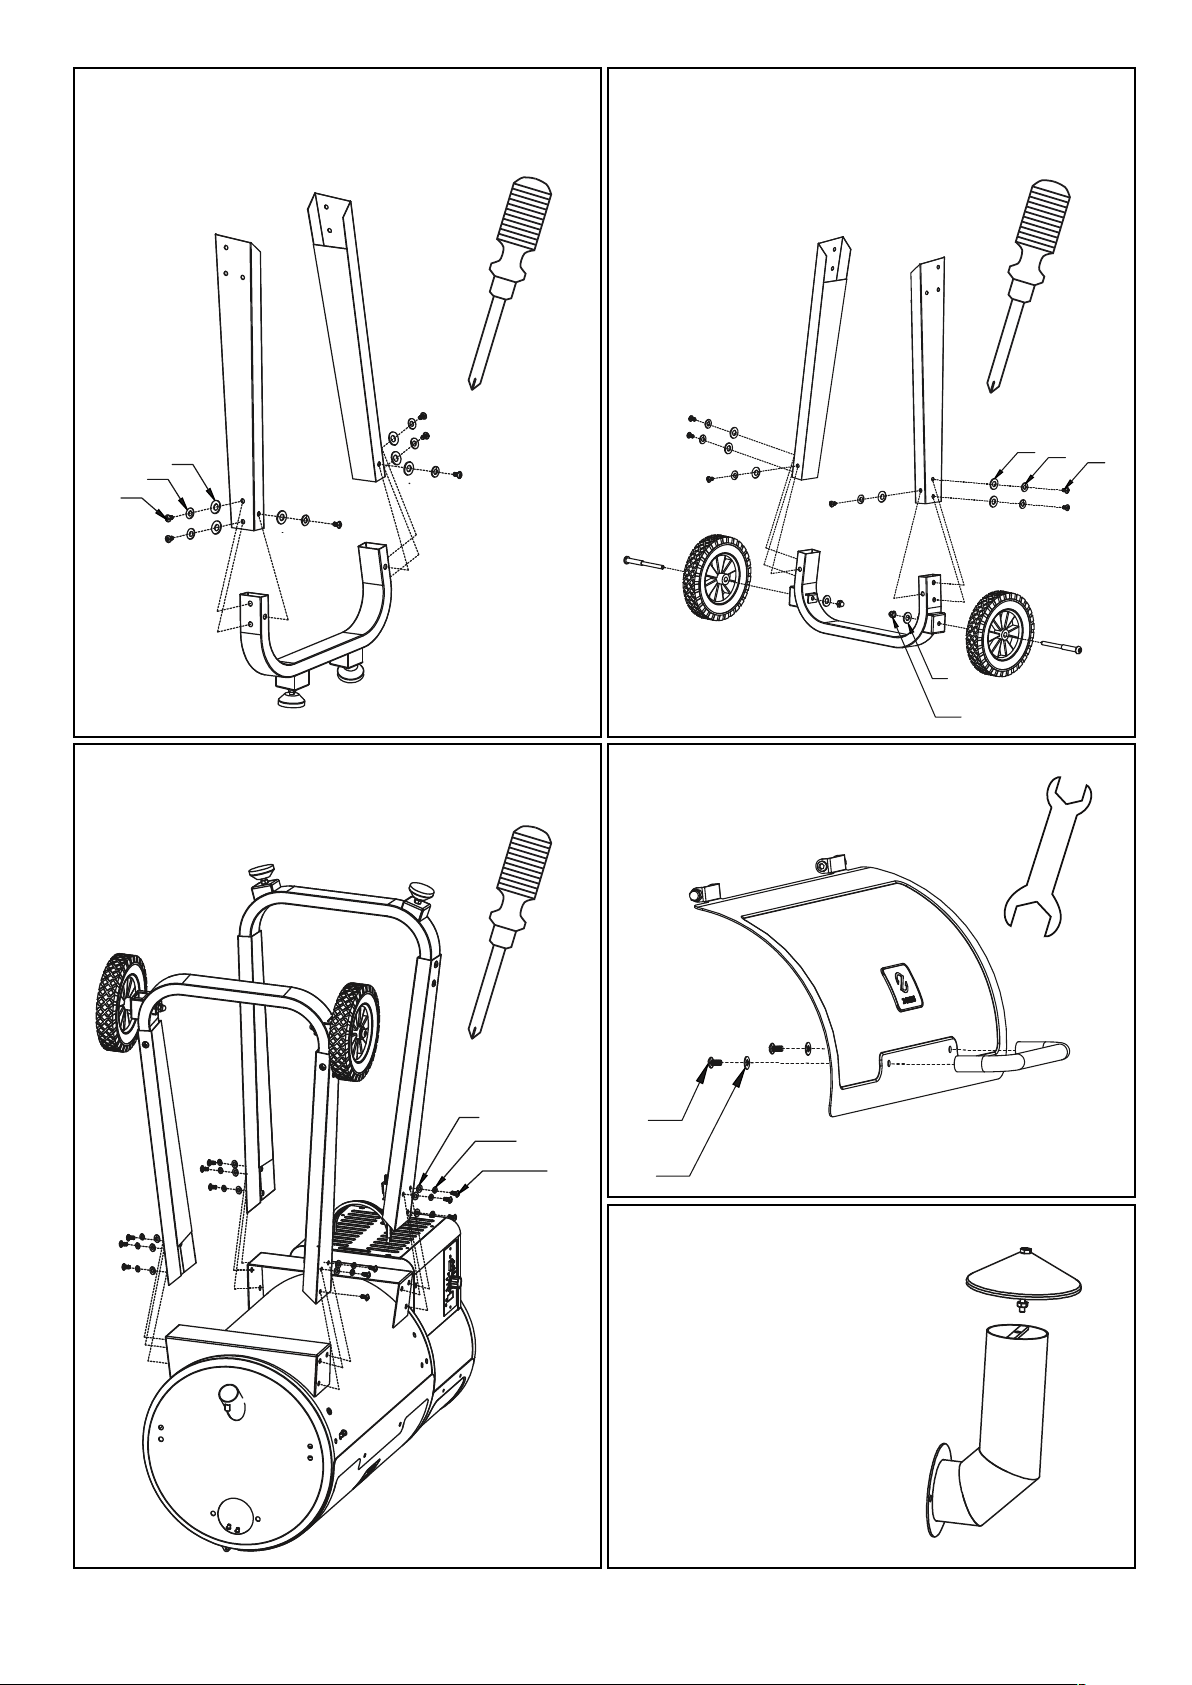
11
STEP 2 - REAR (WHEEL) LEGS
STEP 1 - FRONT (FEET) LEGS
B
E
J
B
E
J
STEP 3 - LEGS to DRUM
STEP 4 - DRUM LID HANDLE
A
G
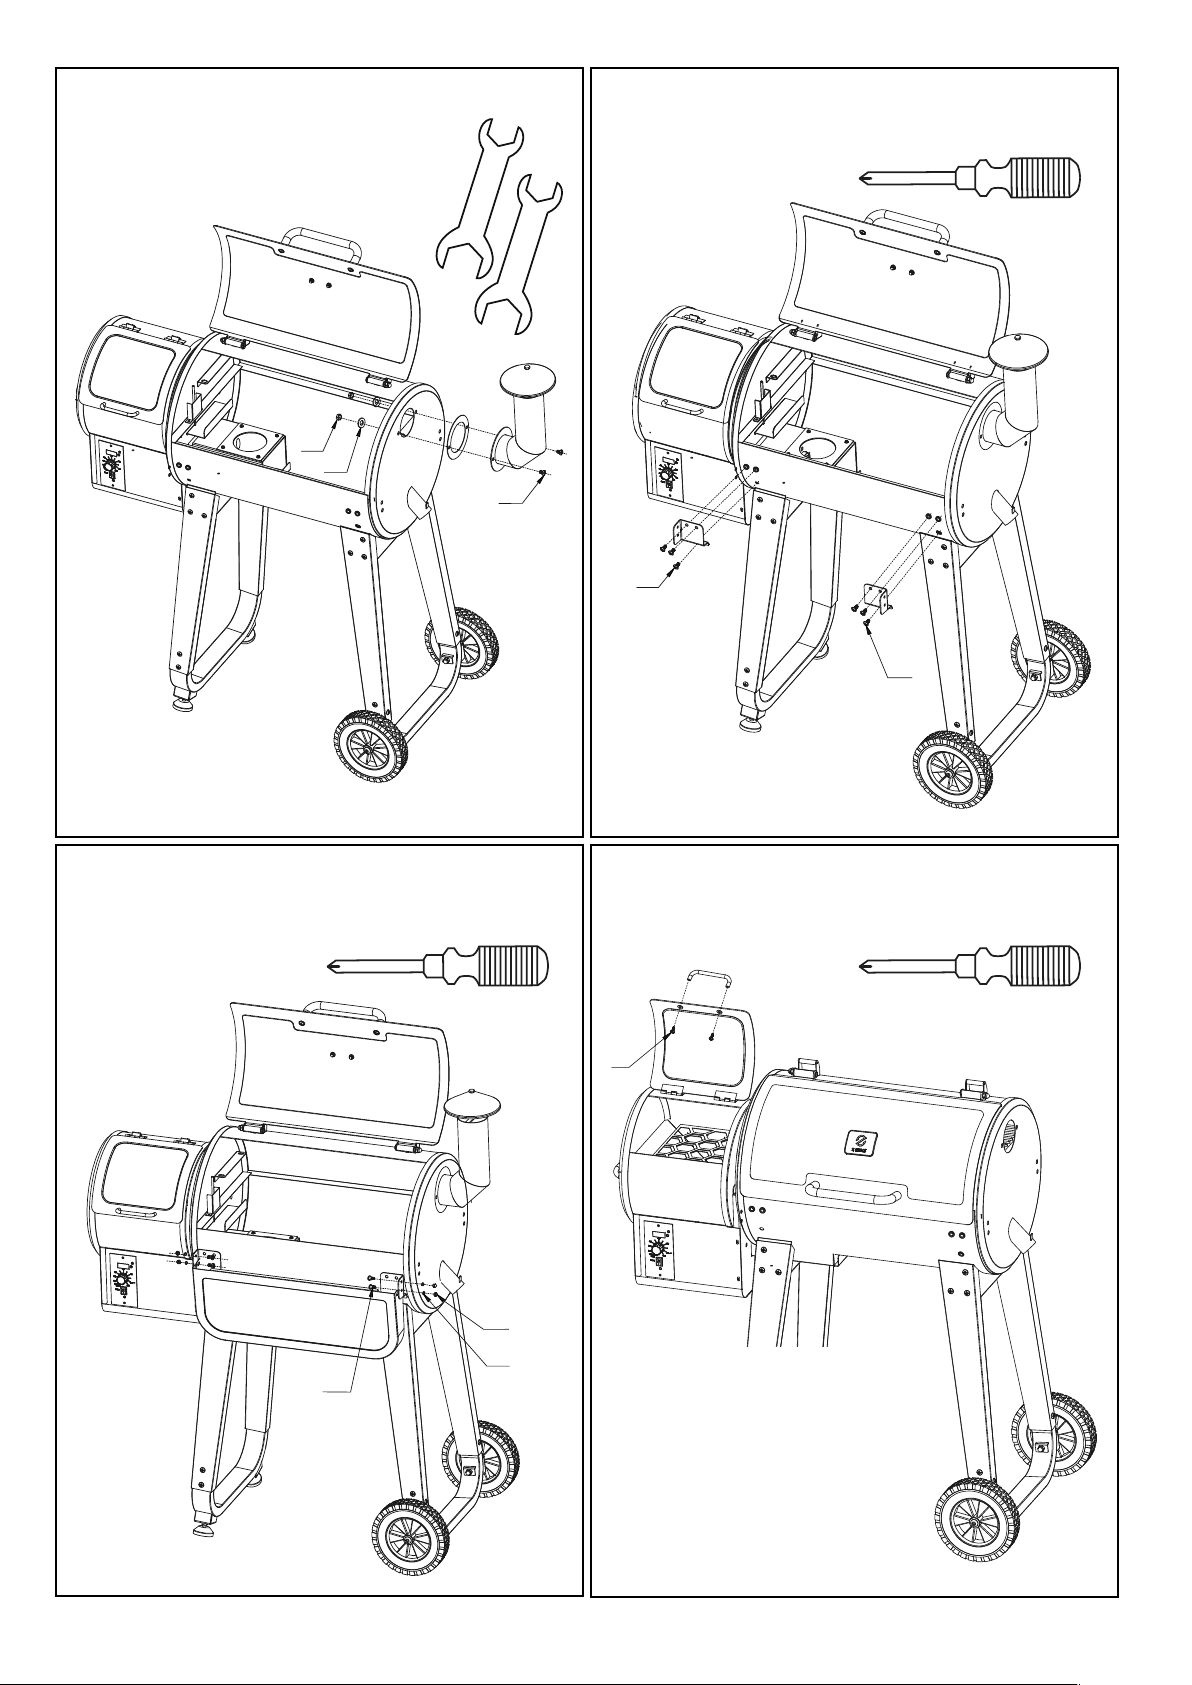
STEP 5 - CHIMNEY CAP
TIP:
Carefully align the bolt
thread into the Chimney
Stack, then rotate the
whole Cap until tight.
Fasteners: 12 x B, 12 x E, 12 x J
Fasteners: 2 x A, 2 x G
Fasteners: 6 x B, 6 x E, 6 x J
Fasteners: 6 x B, 6 x E, 6 x J, 2 x I, 2 x M
B
I
M
E
J
12
H
G
A
STEP 6 - CHIMNEY TO DRUM
Fasteners: 2 x A, 2 x G, 2 x H
STEP 7 - FRONT SHELF BRACKETS
Fasteners: 6 x B
B
B
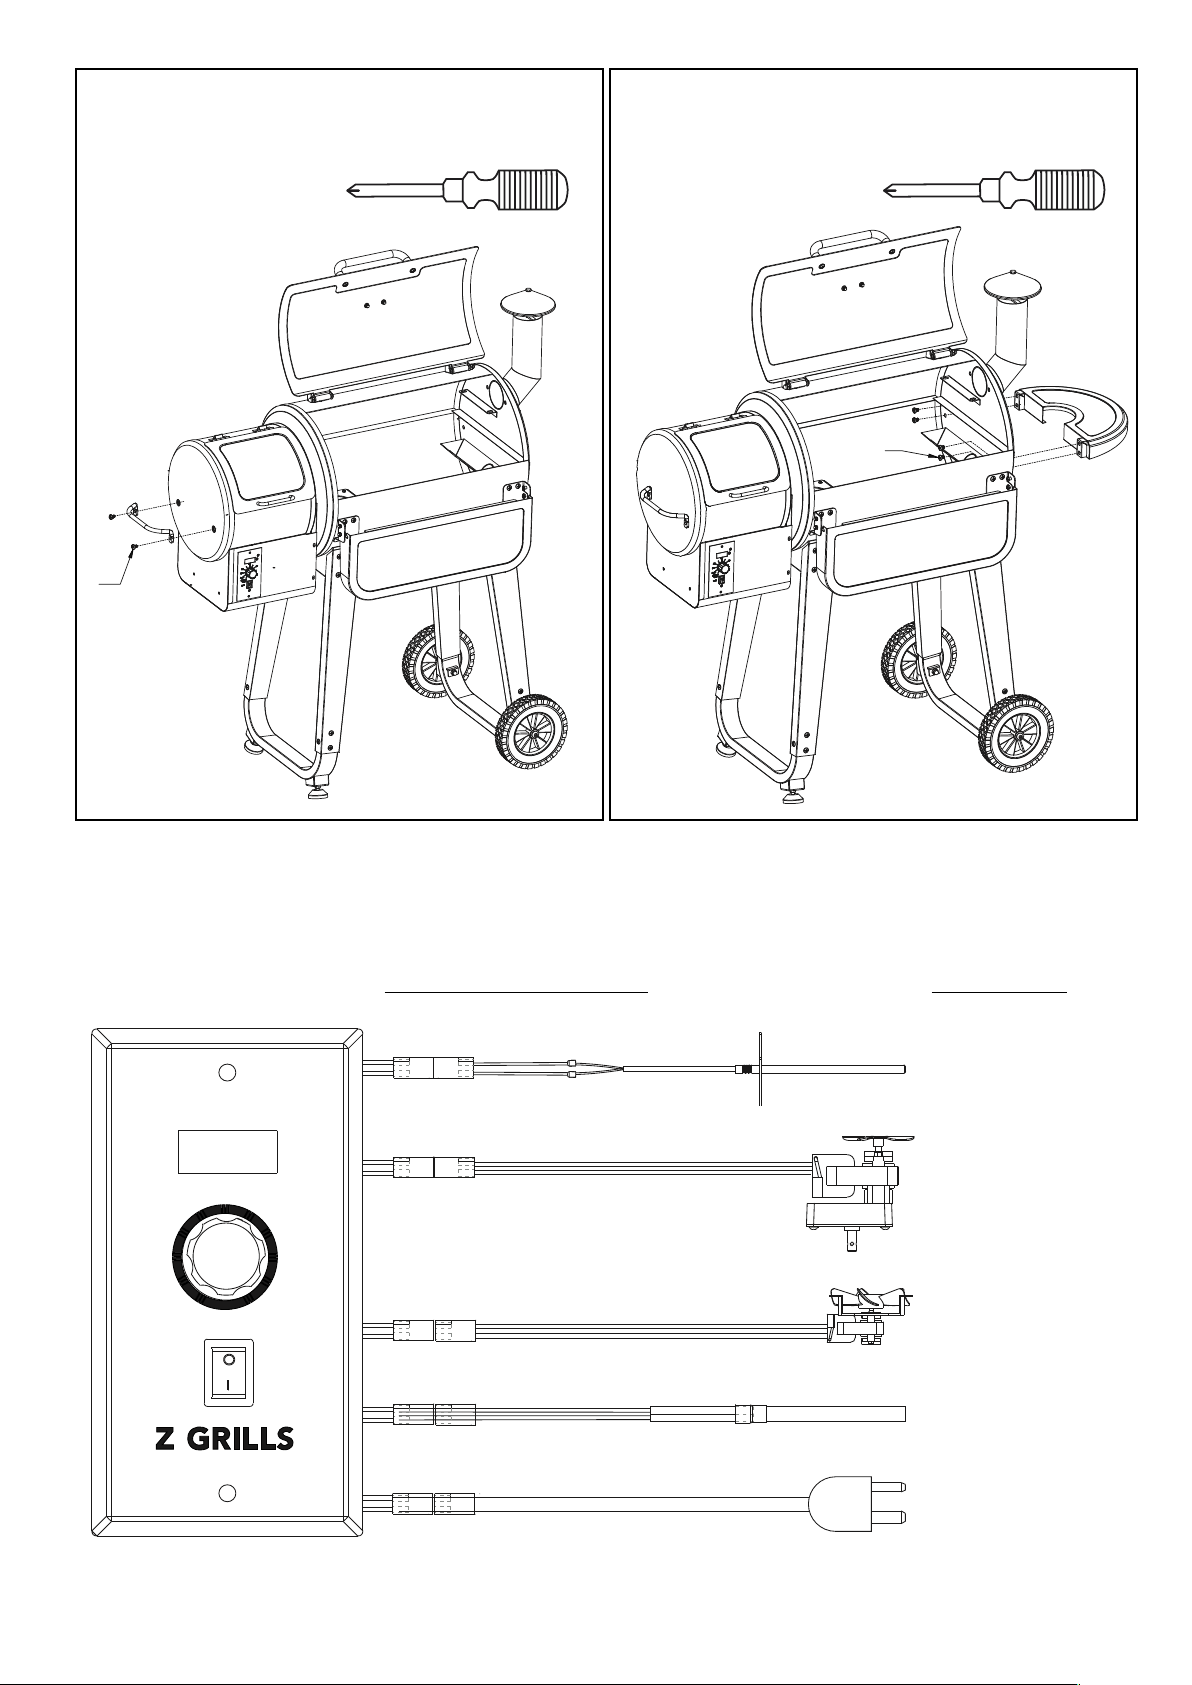
STEP 8 - FRONT SHELF
Fasteners: 4 x C, 4 x D, 4 x E
STEP 9 - HOPPER HANDLE
Fasteners: 2 x F
C
D
E
F
TIP:
Cover the Hopper opening
with a piece of cardboard to
prevent screws accidentally
dropping down into the
Hopper and Auger.
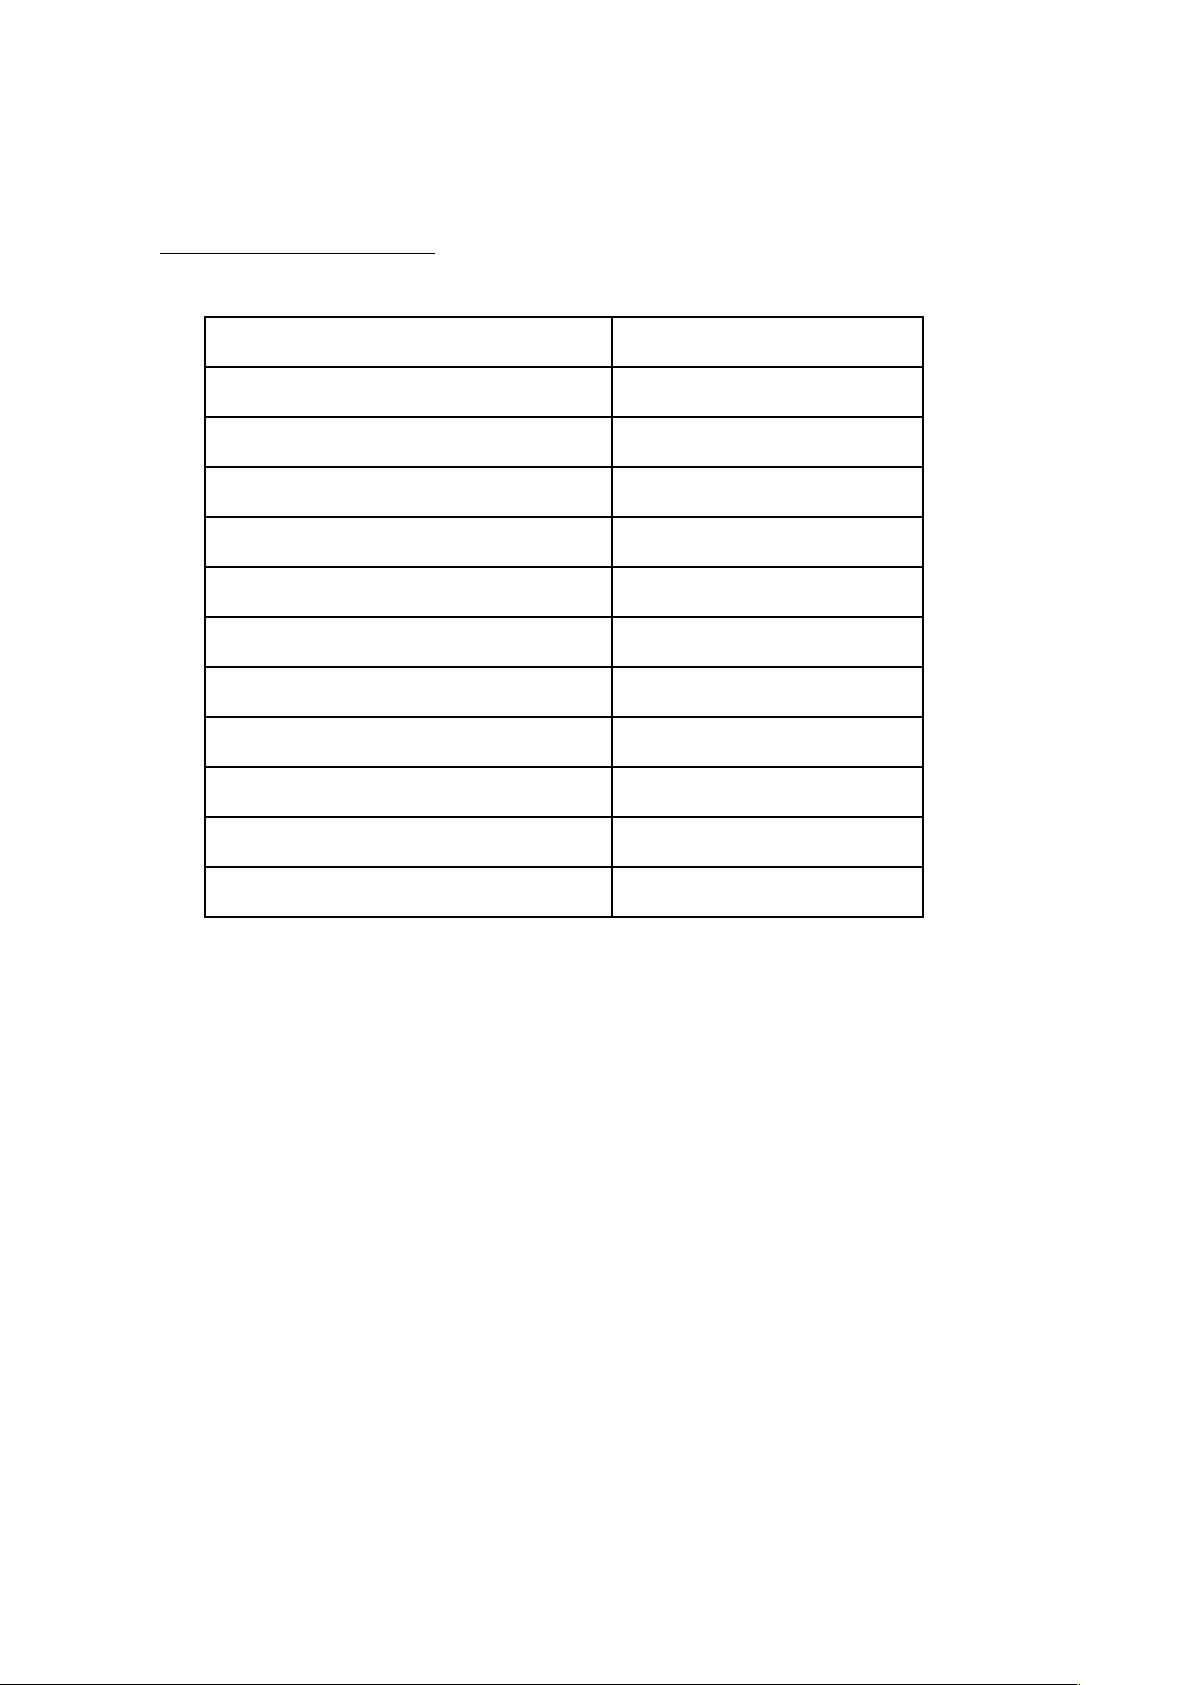
10. Wiring Diagram
BLACK, WHITE | BROWN, BLUE, GREEN/YELLOW
240V AC 50Hz
RATED INPUT
IGNITION ROD
(200 WATT)
PURPLE, WHITE | GREY, GREY
ORANGE, WHITE | ORANGE, ORANGE
RED, WHITE | BLACK, BLACK
TEMPERATURE
SENSOR
AUGER MOTOR &
COOLING FAN
(25 WATT)
FIRE POT FAN
(25 WATT)
TERMINAL BLOCK | GREY, GREY
Electrical Wire Colours
Component
13
STEP 10 - SIDE HANDLE
Fasteners: 2 x B
B
STEP 11 - SIDE SHELF
Fasteners: 4 x B
B
11. Spare Parts List
If a component is damaged, lost or just worn out through normal use, spares may be
available. Please refer to the chart below for most common spare components.
Contact suppor[email protected] to order spare parts.
Component Description
Part Name
Grill Temperature Sensor
ZG-450-TSENSOR
Controller Board
ZG-CONT
Fire Pot Fan
ZG-FPFAN
Ignition Rod
ZG-IROD
Auger
ZG-AUGER
Auger Motor
ZG-AMOTOR
Heat Baffle
ZG-450-HBAFF
Grease Tray
ZG-450-GTRAY
Hopper & Auger Assembly
ZG-450-HA-ASS
Small Grill Rack
ZG-450-SGRACK
Main Grill Rack
ZG-450-MGRACK
14

15
12. Initial Startup Instructions
Follow the initial startup process before first use, and each time after the grill
runs out of wood pellets.
13. New Grill Burn-In
1. Remove Grill Racks, Grease Tray and Heat Baffle from the Grill.
2. Open the Pellet Hopper Lid and check to ensure there are no foreign objects in the
Hopper or Auger. Open the Grill Lid as well.
3. With the power switch in the OFF position, plug in the power cord to 240V grounded
10 Amp power supply.
4. With the Controller Dial in the Shut Down Cycle position, switch the grill ON and
then turn the Temperature Dial to SMOKE position.
5. Check the following:
✓
Confirm the Auger is rotating (it turns very very slowly and will stop/start)
✓
Hold you hand above the Fire-pot to confirm air flow
✓
Look to see if the Ignition Rod turns a dull red (very hot) colour in 2-4min.
DO NOT TOUCH THE IGNITION ROD - IT WILL CAUSE SERIOUS BURNS
6. Pour some Pellets into the Hopper (1-2 kg is sufficient)
7. Turn the Dial to HIGH and wait for the Pellets to slowly feed through the long tube
into the Fire-pot. This will take 7-8 minutes.
8. As soon as Pellets begin to drop into the Fire-pot turn the Dial to SMOKE and wait
until the Pellets ignite and come to full flame.
9. Turn the Dial to SHUT DOWN CYCLE and let the grill cool down. The fan will
continue to run for around 10min. Do not switch OFF the Grill or disconnect the
power until the fan has stopped running.
10. Place the Heat Baffle, Grease Tray and Grill Racks back into the Grill. The grill is
now ready to completing the New Grill Burn-In (first time use), or normal cooking.
This process runs the grill at the highest temperature setting (burning pellets) to burn
off any surface oils on the metal components and remaining odour from the paint.
This must be completed before cooking any food. The smoke will have an oily odour,
so avoid breathing in the smoke or completing the Burn-In near an open window.!
1. Open the Grill Lid and make sure the Heat Baffle, Grease Tray (no foil) and Grill
Racks are all placed inside
2. With the Controller Dial on Shut Down Cycle, switch the power ON
3. Turn the Dial to SMOKE position
4. Once you see smoke and hear the “roaring” sound of the fire, close the Grill Lid
5. Turn the Dial to HIGH and run the Grill for at least 45 minutes
6. Turn the Dial to Shut Down Cycle and let the grill cool down and turn itself OFF
which will take 10-15 minutes.
7. Wipe down the Grill Racks with a moist cloth before cooking.

16
14. Normal Operation
How Many Pellets to Pour into the Hopper?
1. The Grill only uses as many Pellets from the Hopper as required to maintain the
desired temperature and so WILL NOT use ALL the pellets in the Hopper each time
the Grill operates.
2. Don’t fill the Hopper up fully each time it gets low. Instead, add slightly more than is
likely to be required for the planned cooking time. Low temperature cooking uses
0.3 ~ 0.5kg per hour. High temperature cooking can use up to 1kg per hour.
3. Leaving pellets sitting for a long time (weeks) in the Hopper can result in poor
burning results as the pellets can absorb moisture. Very moist pellets can even
clog up the Auger. It is best to keep the pellets in an air tight bag or container, and
just add as many as required for each cook.
4. If not planning to use the grill for several weeks or more, scoop out most of the
pellets and store them in an air-tight container. Run the Grill on high until all
remaining pellets in the Hopper are used up. The Grill will automatically turn OFF
with LEr (low temperature error) once the pellets run out. This is ok and won’t harm
the Grill.
5. If the Hopper is totally empty, follow the Initial Startup Instructions to feed pellets
through the Auger Tube into the Fire-pot. As soon as Pellets drop into the Fire-pot,
turn the Controller Dial to SMOKE and startup as normal.
Startup Procedure
1. Open the Grill Lid
2. With the Controller Dial on Shut Down Cycle, switch the power ON
3. Turn the Dial to SMOKE position
4. Once you see lots of smoke and hear the “roaring” sound of the fire, close the Grill
Lid and turn the Dial to the desired temperature setting
5. Wait at least 10 minutes for the grill to heat up before placing in food
6. Avoid opening the Grill Lid too frequently as temperature will be lost
7. The Grill will gradually reach the desired setting. Do not worry if it cycles above/
below the desired setting as this is normal operation.
Shutdown Procedure
1. Turn the Controller Dial to SHUT DOWN CYCLE
✓
The Auger will stop turning and no more pellets will be delivered to the Fire-pot
✓
The Fan will run for 5-20 minutes until all pellets in the Fire-pot burn to ash
2. Once the Fan has stopped, turn the power switch OFF and disconnect power supply
3. If during operation power is accidentally turned OFF, or if there is a power outage:
✓
If power immediately comes back on: Switch the grill back ON and turn the Dial
to the desired temperature setting to continue normal operation.
✓
If no power for more than 30seconds: Open the Grill lid, switch the grill back
ON and turn the Dial to Smoke. Once there is smoke or it is clear that fire is
burning, turn the Dial to SHUT DOWN CYCLE (if turning off), or turn to the
desired temperature setting (if still cooking).

17
15. Manual Operation
Changing from High to Low Temperature Setting
1. If the Grill has been operating at a high temperature and is then set to a lower
temperature, the Grill will take a long time to cool down as fire in the Fire-pot will
keep producing heat.
2. It is much faster to simply turn the Dial to Shut Down Cycle which will stop any
more pellets being delivered to the Fire-pot. Once the Grill has cooled down
sufficiently follow the normal Startup Procedure.
Temperature Cycling
1. Pellets are delivered to the Fire-pot by the Auger when the temperature is below the
temperature setting.
2. Once the new pellets ignite, the temperature will rise and can initially exceed the
temperature setting.
3. The temperature can swing as much as 20
o
C either side of the dial setting,
especially during the first hour of operation, after any temperature setting changes
or if the lid is opened for several minutes. This is normal.
4. Because the heat is indirect this temperature cycling will not adversely effect the
cooking of food.
5. The Grill Temperature is measured at the left side of the Grill toward the top of the
Grill drum, and so temperatures on the main grill rack may be 10-15
o
C lower.
If there is a problem with the operation of the Ignition Rod, please order a replacement
by contacting the Z Grills Australia team at www.zgrills.com.au. Before ordering a
replacement ignition rod, make sure the problem isn’t just an ash filled Fire-pot!
It is possible to manually operate the grill without using the Ignition Rod, as outlined
below:
1. Switch the Grill OFF and disconnect from power supply.
2. Remove the Hopper bottom cover to access the wiring. Unplug the Ignition Rod
(Purple/White wires). Refer to section Wiring Diagram for more information.
3. Replace the Hopper bottom cover and connect power supply.
4. Place Wood Pellets in the Hopper and Remove the Grill Racks, Grease Pan and
Heat Baffle.
5. Pour 1/2 cup of wood pellets into the Fire Pot.
6. Place a fire-lighter cube into the Fire-pot or squirt a small amount of firelighting gel
onto the pellets. DO NOT use alcohol, petrol or any other flammable liquids. Never
add any firelighting gel to an already lit fire.
7. Carefully light the pellets with a long match or long reach fire lighter.
8. Once there is fire in the Fire-pot turn the Grill ON and turn to the desired
temperature setting.
9. Carefully replace the Heat Baffle, Grease Tray and Grilling Racks.
18
16. Troubleshooting
Problem
Reason
Investigation/Solution
Grill not turning on.
Controller display not
showing any numbers.
No fan or auger
operating noises.
NO POWER
Check power supply to the grill. Power requirement is standard
residential 10Amp 240V AC.
If using a portable power supply, ensure minimum 400Watt power
supply (240V AC).
BLOWN FUSE
Disconnect power supply to grill, remove 2 screws in controller
panel and check if fuse is blown. Replace with new fuse type 3A
M205 Slow Blow Fuse 5x20mm.
WIRING NOT CONNECTED
Check to ensure that all wiring plugs are connected to the circuit
board.
CONTROLLER FAILURE
If the power supply is confirmed and the controller LCD display is
not lighting up, it may be faulty and need to be replaced.
LEr Error
or
No smoke or fire
NO PELLETS
Check to ensure there are pellets in the hopper.
Ensure Initial Startup procedure has been completed.
AUGER MOTOR FAILURE
Remove all pellets from the hopper (use vacuum to clean
thoroughly) so the Auger can be clearly seen.
Turn the Grill ON and turn the Dial to SMOKE setting and check to
see if Auger is rotating.
If Auger is not rotating after several minutes, it may be a faulty
Auger motor or control board. Note the Auger rotates very very
slowly (~1.6RPM)
Contact Z Grills Australia customer support for replacement parts.
IGNITION ROD FAILURE
With the Grease Tray and Heat Baffle removed, turn the Dial to
SMOKE setting so pellets are fed into the Fire-pot. Watch for
signs of smoke and the ignition rod to turn a dull red colour.
If no smoke appears the Ignition Rod may have failed.
Contact Z Grills Australia customer support for a replacement
part.
TOO MUCH ASH
Clean out the ash from the Fire-pot and refer to Cleaning
Instructions.
Incorrect Grill
Temperature
DIRTY TEMP SENSOR
Clean the Grill Temperature Sensor to ensure accurate
temperature readings.
CONTROLLER FAULT
If the temperature is consistently different to the setting on the
Temperature Dial the controller may be faulty.
It is normal for the Grill Temperature to cycle above and below the
setting by as much as 20
o
C, especially during the initial heat up
phase.
TOO MUCH ASH
Accumulated ash around the Ignition Rod can prevent or delay
ignition of the wood pellets results in high temperatures when
they finally ignite. Vacuum out the Fire-pot after each use.
WEATHER TOO HOT
During hot, sunny weather the grill may exceed the temperature
setting. Place the Grill in a shaded area.
Open the lid to allow the temperature to drop.
LID OPEN TOO MUCH
Avoid opening the lid too often or for too long as this will cause
larger temperature swings.
19
Problem
Reason
Investigation/Solution
HEr High Temperature
Error on Controller
Display
OPERATING WITH GRILL
LID OPEN FOR TOO LONG
resulting in FIRE POT TOO
FULL OF PELLETS
If the grill is operated with the lid open for an extended period of
time the set temperature will not be reached and too many pellets
may be delivered into the Fire-pot. Once the lid is shut the
temperature can shoot up to very high levels (too many pellets
burning) causing a high temperature error.
Switch the grill OFF and turn the Controller Dial to Shut Down
Cycle. Immediately turn the power switch back ON, open the lid
and set to SMOKE. Wait until the “roaring” sound is heard, close
the lid and set to the desired temperature. Avoid opening the lid
for longer than required to manage your cooking.
Excess or discoloured
smoke
or
Grill not able to reach
desired temperature
MOIST PELLETS
Empty the Hopper of wood pellets.
Run the Grill on HIGH to push out remaining pellets in the Augur
tube.
Turn the Dial to Shut Down Cycle.
Once cooled down, vacuum out the Hopper and Fire-pot.
Pour in dry pellets (only as many as required for cooking) and then
follow the Initial Startup Instructions.
Noisey Auger
LONG PELLETS
Occasional clunking and squeaking sounds are normal and are
due to the Auger breaking through longer pellets.
Smoke appearing from
the Pellets in Hopper
WOOD DUST in AUGER
TUBE and HOPPER
or
HIGH TEMP OPERATION
WITH LID OPEN
Fine wood dust can accumulate in the bottom of the wood pellet
feed tube that the Auger pushes the pellets through. This dust
can slowly burn back up towards the Hopper causing smoke to
appear from the Hopper. It is very unlikely to cause an actual fire
in the hopper.
Another reason can be operating at High temp setting with lid
frequently opened. As the target temperature cannot be reached,
too many pellets are fed into the fire-pot filling it up and causing
some burn back into the auger feed tube.
Immediately Follow This Procedure:
•
DO NOT pour any water into the Hopper
•
Open the Lid of the Grill and Hopper
•
Turn the Dial to Shut Down Cycle.
•
Empty all pellets from the Hopper, removing the protective guard
if required. Remove enough pellets so the Auger is visible.
•
Carefully remove the Grill Rack and Grease Tray, so you can see
if there is fire in the Fire-pot.
•
If there is fire in the Fire-pot turn the Dial to HIGH. If the fire has
gone out, turn the Dial to Smoke, wait for ignition of the pellets
then turn to High. This will push all remaining pellets out of the
Auger feed tube into the Fire-pot.
•
Keep running until all pellets have been emptied from the Auger
feed pipe.
•
Turn the Dial to Shut Down Cycle.
•
Wait until the Grill turns off.
•
Disconnect the power and complete cleaning as outlined below.
Clean the Grill
•
Once the unit has fully shut down and is cool, vacuum out all
pellets, dust and ash in the Hopper, Fire-pot and Grill Drum.
Future Prevention
•
Avoid pouring the wood dust from the bottom of bags of pellets
into the Hopper!
•
Every 15-20kg of pellet usage, let the grill fully run out of pellets,
so the Auger feed tube is empty. Then “Clean the Grill” as
outlined above.
•
After each use, vacuum out the Fire-pot and Grill drum area of
ash.
20
17. Grill Repair Instructions
Component
Time
Difficulty
Spare Parts
Tools Required
Fuse
5 min
!
3A M205 Slow Blow
Fuse 5 x20mm *
✓ Phillips head screw driver
✓ Wire snips or scissors
Temperature
Sensor
5 min
!
ZG-450-TSENSOR
✓ Phillips head screw driver
✓ Pliers or small socket/spanner
set
Control Board
20-30 min
!!
ZG-450-CONT
✓ Phillips head screw driver
✓ Wire snips or scissors
✓ Pliers
Fire Pot Fan
20-30 min
!!
ZG-FPFAN
✓
Phillips head screw driver
✓
Wire snips or scissors
✓
Pliers
Ignition Rod
30-40 min
!!!
ZG-IROD
✓ Phillips head screw driver
✓ Wire snips or scissors
✓ Wide Pliers or Small socket
set
Auger Motor
30-40 min
!!!
ZG-AMOTOR
✓ Phillips head screw driver
✓ Wire snips or scissors
✓ Pliers
* This is standard type of fuse widely available from electrical suppliers and retailers.
DANGER!
•
HIGH VOLTAGE: Unplug the grill from electric power supply before completing
any repairs. Only plug into power once all repairs are complete and covers
back in place.
• All key components can be replaced DIY by a “handy person”. !
• If a handy person is not available to complete the repairs, a BBQ repair shop,
mechanical or electrical equipment repairer should be able to complete the work.!
• Do not complete any repair work yourself unless suitably experienced and
confident to do so. !
• Refer to the table below for estimated time, difficulty, parts and tools required. !
• How to repair videos are available on our website.
Questions?
•
Send a product support request on our website. (BEST OPTION)
•
Contact Z Grills Australia customer support at suppor[email protected]

21
This ZPG-450A Electric Pellet Smoker BBQ has been certified to the following standards:
Low Voltage Directive 2014/35/EU, Electromagnetic Compatibility 2014/30/EU, EN
60335-1:2012+A11:2014, EN 60335-2-9:2003/A13:2010/AC:2012, EN 55014-1:2017, EN
55014-2:2015, EN 61000-3-2:2014, EN 61000-3-3:2013
Certificate No.: I/ISETC.000920190319
Issued: 19/03/2019 Expiry Date: 18/03/2024
Made in China by Jiangsu Z Grills Technology Co., Ltd
18. Limited Product Warranty
Manufacturer’s Limited Warranty Policy
Z Grills Australia Pty Ltd (Z Grills) provides a 3 years parts warranty from the date of purchase by
the original owner.
This warranty applies to defects in all materials and workmanship.
During the warranty period, Z Grills will at its option repair or replace defective parts or units.
This limited warranty does not apply to painted components, the fire pot or fabric grill cover.
Z Grills takes every precaution to utilise materials that inhibit rust including the use of high-
temperature paint where advisable. Even with these safeguards, the protective coating can be
compromised by various substances and conditions beyond Z Grills' control. Humid
environments, high temperatures, chlorine, insecticide, salt and disinfectant are some of the
substances that can affect paint and metal coatings. For these reasons, rust or oxidisation is not
covered under this limited warranty.
During normal use and cleaning the ceramic coated grill racks may become cracked or chipped
resulting in exposed metal that may show signs of rust. This is normal and is not covered under
this limited warranty.
Z Grills shall not be liable for transportation charges, labor costs or export duties.
Z Grills shall not be liable if you fail to install, operate, clean or maintain your grill in accordance
with this owners' manual instructions.
Misuse, abuse, alteration and natural disasters are not included in this warranty.
Z Grills goods come with guarantees that cannot be excluded under the Australian Consumer Law.
You are entitled to a replacement or refund for a major failure and compensation for any other
reasonably foreseeable loss or damage. You are also entitled to have the goods repaired or
replaced if the goods fail to be of acceptable quality and the failure does not amount to a major
failure.
Warranty Claim Process
•
Contact Us on the Z Grills website and select Product Support for enquiry type.
•
If you use the same email address that was used to purchased the grill online we
will be able to find your purchase records. If you used a different address, or did
not purchase online please provide proof of purchase (email or photo).
•
Describe as clearly as possible the issue you are having and upload a photo of the
problem if relevant.
•
If within the 3 year parts warranty period, and confirmed to be a product fault, a
replacement component will be shipped to you free of charge.
•
If outside the 3 year parts warranty period, or not confirmed as a product fault, you
will be able to purchase a replacement part.