Loading ...
Loading ...
Loading ...
24. Reinstall the dryer door by sliding it
onto the hinge pins.
Avoid allowing the four plastic
bushings to fall off the hinge pins.
If any fall off, reinstall them on the
hinge pins prior to reinstalling the
dryer door.
reinstall
the
dryer
door
25. Reinstall the hinge cover plate
removed in step 4. Insert and
tighten the 4 screws holding the
hinge cover plate in place.
reinstall
four
screws
and
tighten
securely
26. Install the plastic cover plate over
the original hinge position at the
right hand side of the dryer door
opening. Insert and tighten the
two screws holding the plate in
place.
27. Test that the door opens and
closes properly. The door should
latch securely. The hinge reversal
process is complete.
Minimum Distances
Important information concerning
minimum distances:
Depending on the location of the
exhaust air connection, an
additional minimum distance of
51/2inch (14 cm) must be provided
on this side, the side the
connection is on, for
ducts/brackets (see page 19).
Benefits of maintaining greater
distance (clearances) than the
minimum shown include:
• more air cools the dryer, keeps
the dryer from overheating, and
improves drying performance.
• reduction of the risk of mold
formation behind the appliance.
• reduced noise transmission
• facilitation of installation and
service.
If the dryer is installed in a small
room, the doors of the room must
be fitted with vents of the specified
minimum size. Refer to the
following illustrations of enclosed
installations for additional
information.
Allow additional clearance for
door, wall and window molding
where necessary.
Installation Types
Observe the following minimum
clearances between the dryer and
adjacent surfaces for all installation
types.
Minimum Installation Clearances
A Sides 0.25in.(6.4mm)
B Top 0.25in.(6.4mm)
C Rear* 5.25in.(13.4cm)
D Front 0,50in,(12,8mm)
* as closeto wall asventingor water
connectionwill allow If installedwith a
washer,the larger rearclearancefor dryer
ventingis requiredfor the laundrypair
Units are designed so that the
dryer can be stacked on top of the
washer using one of the stacking
kits shown on page 19.
Units are designed to allow for
under-counter installation See
required dimensions in under
counter installation section on
page 12.
Height measurements shown in this
section are with the dryer feet at
minimum extension (turned in all the
way up against the base of the dryer).
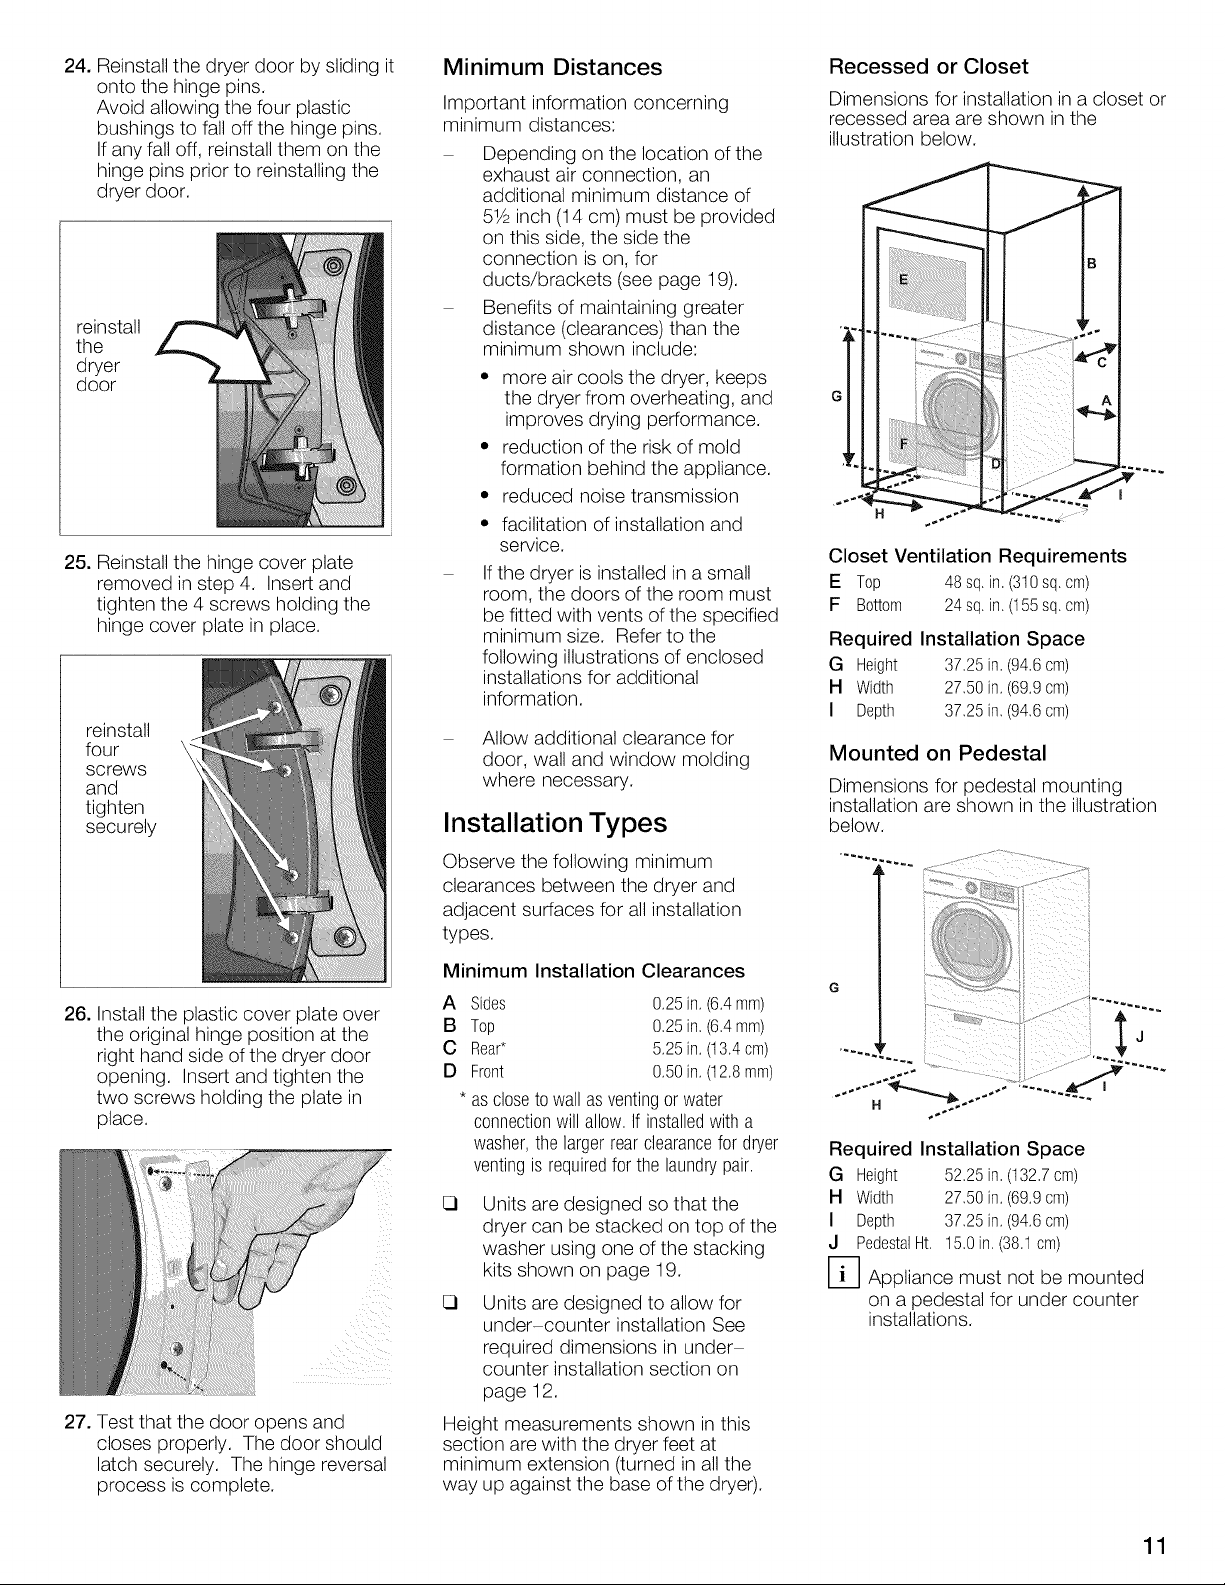
Recessed or Closet
Dimensions for installation in a closet or
recessed area are shown in the
illustration below.
Closet Ventilation Requirements
E Top 48 sq. in. (310sq. cm)
F Bottom 24 sq, in, (155sq, cm)
Required Installation Space
G Height 37.25 in. (94.6cm)
H Width 27.50 in, (69.9cm)
I Depth 37.25in. (94.6cm)
Mounted on Pedestal
Dimensions for pedestal mounting
installation are shown in the illustration
below.
Required Installation Space
G Height 52.25in.(132.7cm)
H Width 27.50in.(69.9cm)
I Depth 37.25in,(94,6cm)
J PedestalHt, 15,0in.(38.1cm)
D Appliance must not be mounted
on a pedestal for under counter
installations.
11
Loading ...
Loading ...
Loading ...