Przewodnik użytkownika
On t he f irst page you will
find t he illust rat ions relat ing
t o t he t ext . Keep t he f irst
page open as you read t he
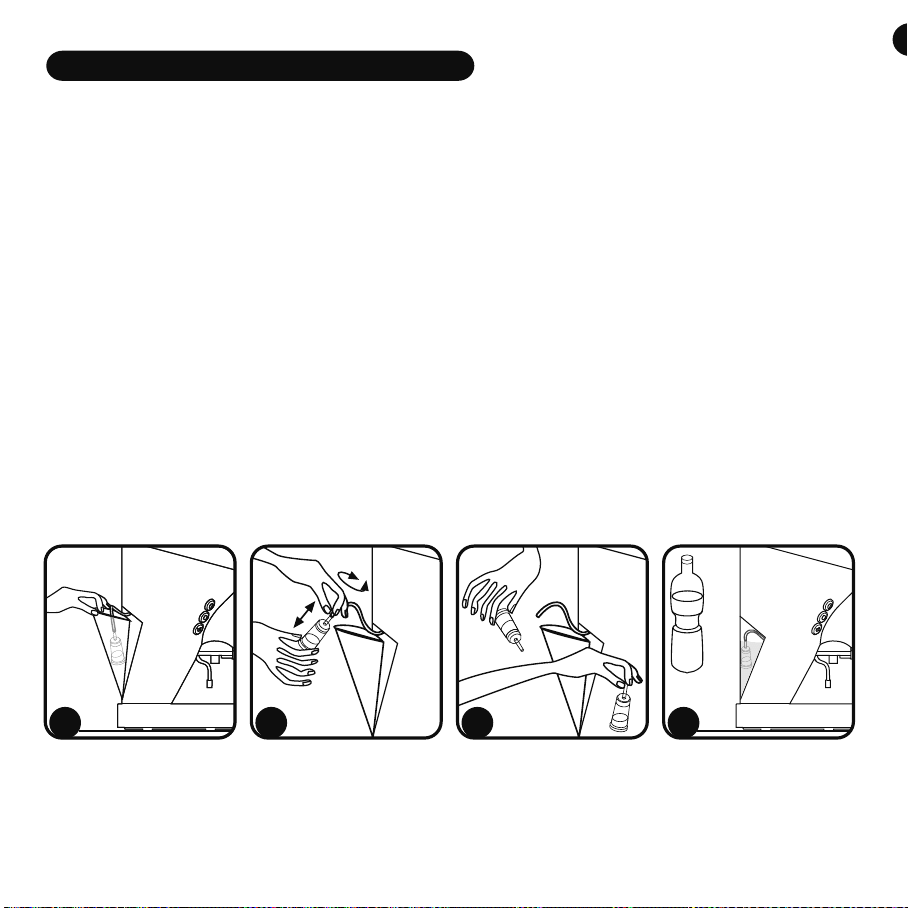
inst ruct ions f or use.
IMPORTANT NOTICES
Dear Cust omer,
Diva, t he cof fee machine, enables you t o make espresso and normal cof fee using eit her pods
or ground cof fee. Like all domest ic appliances, t his coff ee-making machine must be used
wit h care and at t ent ion t o prevent accident al burns and prevent damage t o t he machine.
BEFORE STARTING UP THE MACHINE, CAREFULLY
READ ALL THE INSTALLATION INSTRUCTIONS, USE
AND MAINTENANCE AND THE SAFETY NOTICES.
Do
not use the machine unless you are thoroughly familiar with the instructions.
WARNING
No liabilit y is accept ed f or damage due t o:
- incorrect use or use ot her t han f or it s int ended purpose
- repairs carried out by unaut horized st af f
- use of non-original spare part s or accessories
Instructions for use
For furt her inf ormat ion, or in case of problems t hat have not been suff icient ly addressed in
t he present inst ruct ions, cont act Cust omer Care at CASA BUGATTI .
SAVE THESE INSTRUCTIONS
f or use and remember t o pass t hem on
t o t hose who will use t he machine af t er you. If t he inst ruct ions are lost bef ore you use t he
machine, request t he inst ruct ion booklet from Cust omer Care at CASA BUGATTI or send an
e-mail t o diva@casabugatti.it.
1
1
2
3
4
5
6
8
9
6
7
8
1
1
1
1
1
1
2
2
2
2
2
2
Pag. 1 5
Indice
1
1
2
3
4
5
6
8
9
6
7
8
1
2
1
1
1
6
1
5
1
9
1
8
2
0
2
2
2
1
2
3
2
4
17

18
Page 29 The best espresso cof fee
Page 32 Warrant y
Contents
Set t ing up t he machine
Cof f ee wit h pods
Ground coff ee
Using st eam
Preparing cappuccino
Cleaning and maint enance
Descaling
Troubl eshoot ing
Page 19 Technical feat ures
Page “ Machine cont rols and part s
Page “ Accessories
Page 20/ 21 Import ant saf eguards
Page 22 Inst allat ion and st art ing up
Page 23/ 29 Advice and recommendat ions on use
Page 23
Page “
Page 24/ 25
Page 26
Page 27/ 28
Page 28/ 29
Page 30
Page 30/ 31

19
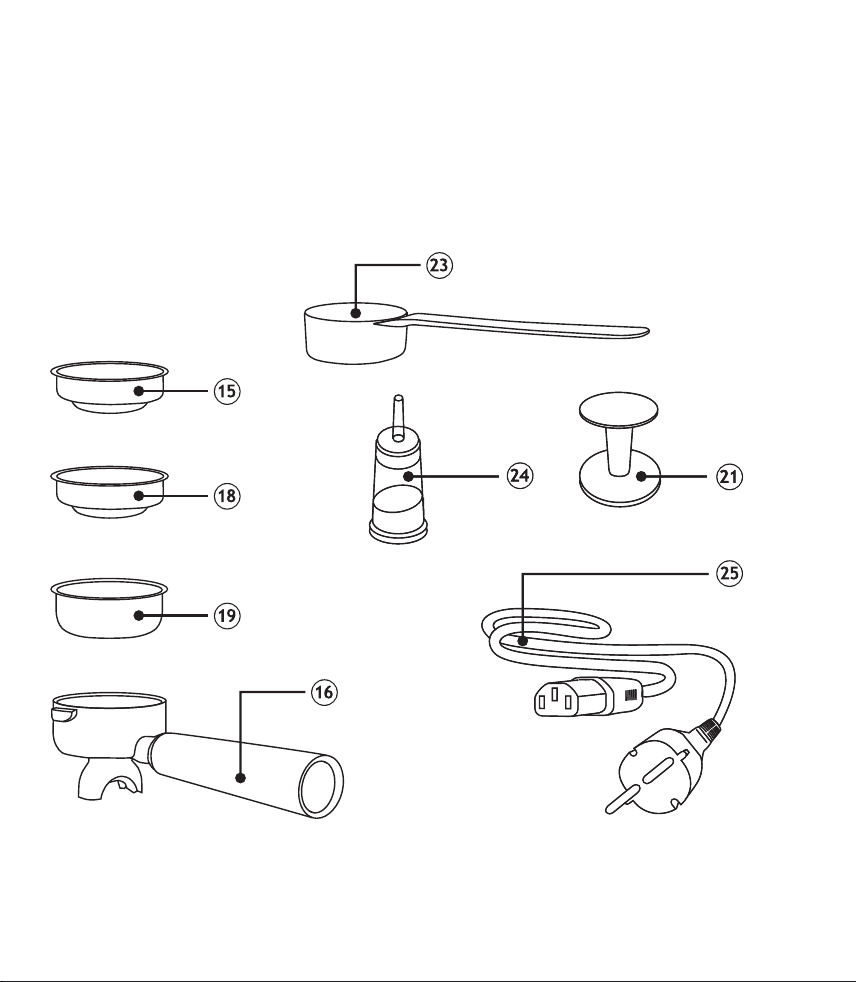
Filt er f or pods
Filt er-hol der unit for powder cof f ee and pods
Filt er f or 1-cup dose
Filt er f or 2-cup dose
15
16
18
19
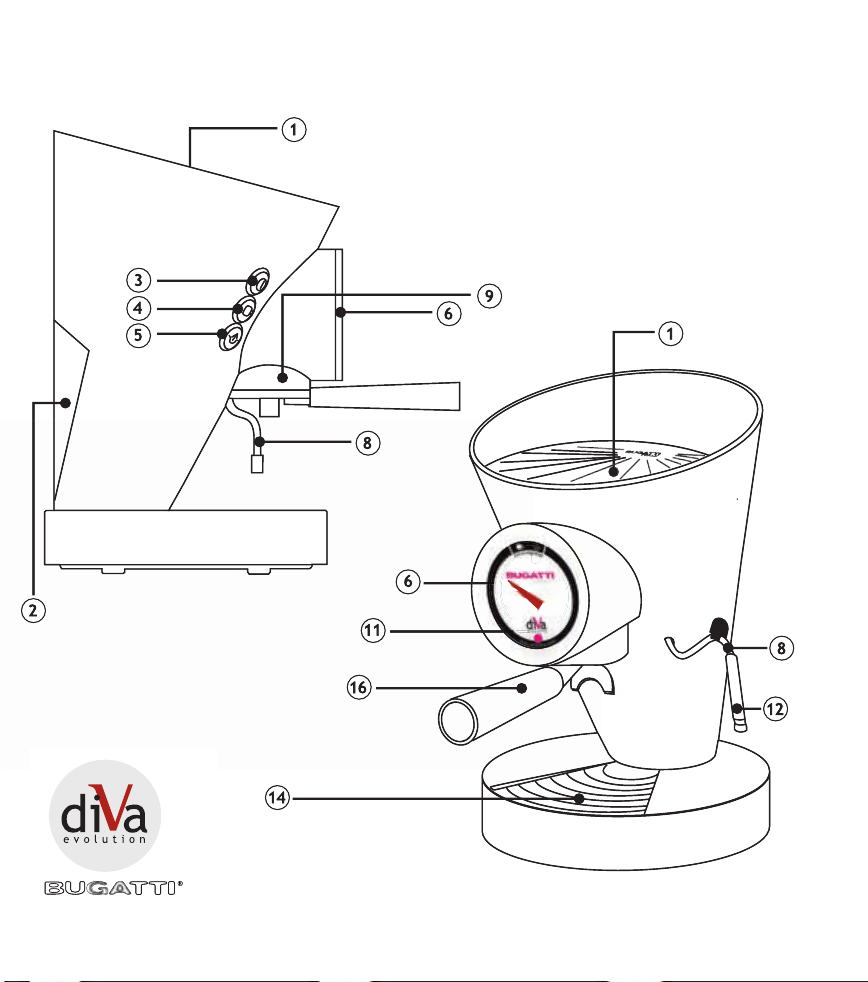
St eam nozzle
Brewing unit
St eam knob
Power-ON light
Removable st eam nozzle prot ect ion
Drip grid
8
9
10
11
12
14
Surf ace for warming cups
Wat er t ank
On – of f swit ch
Cof f ee delivery swit ch
St eam swit ch
Thermomet er
Filt er-hol der unit
1
2
3
4
5
6
16
Pressing t ool for powder cof f ee
Dosing spoon
sweet er f ilt er/ ant i-limest one (ionic exchange resins)
Elect rical wire wit h plugs
21
23
24
Technical features
See rat ing plat e underneat h machine
See rat ing plat e underneat h machine
Diamet er approximat el y 240 x h. 365 mm
Solid cast aluminium and st ainless st eel 18/ 10
About 6, 5 Kg
Approximat ely 1. 2 met res
15 bar, el ect rico-vibrat ing
Approximat el y 0,25 lit res
Mechanical t hermomet er wit h Bourdon coil wit h analogue reading
Manual
Manual
Approximat ely 0,8 lit res
Appr ox i m at e l y 3 minut es
Built in
Prot ect ion class I
See rat ing plat e underneat h machine
- 89/ 336 CEE - cCSAus-cUL
As per at t ached warrant y inf ormat ion
Power supply
Power rating
Dimensions
Solid cast
Weight
Lengt h of power supply cable
Pump
Boiler capacity
Temperature control
Quantity programming
Steam delivery
Tank capacity
Heating up time
Thermal overload protection
Insulation
Approvals
Conformity
War rant y
Accessories
Machine controls and parts
25

20
IMPORTANT SAFEGUARDS
CAREFULLY READ ALL INSTRUCTIONS. THE
APPLIANCE MUST BE USED ONLY BY ADULTS WHO
HAVE BEEN TRAINED IN ITS USE.
1. To protect against fire, electric shock and inj ury to person
DO NOT IMMERSE PARTIALLY
OR TOTALLY ANY PART OF THE CORD, PLUGS, OR
THE MACHINE ITSELF IN WATER OR IN OTHER LIQUID.
CAUTION: HOT SURFACES, DANGER OF BURNS.
Do not touch
hot surfaces. Use handles or knobs. Be very careful when touching very hot parts such as the hot water/ steam pipe (use a
protective glove): DANGER OF BURNS! Steam and hot water can cause burns. Never direct the j et of steam or hot water
towards parts of t he body.
2.
HOUSEHOLD USE ONLY.
Do not use appliance for other than intended use.
Do not make any t echnical modificat ions as t hese may cause risks and will void t he warrant y.
3. Cl ose supervision is necessary when any appliance is used near children.
The appl iance is not t o be used by chil dren or persons wit h reduced physical, sensory or ment al capabilit ies,
or l ack of experience and knowledge, unless t hey have been given supervision or inst ruct ion. The appliance
must be used only by adult s who know how t o use it in accordance wit h t hese inst ruct ions.
4. Never t ouch live elect rical part s. They may cause elect ric shocks and serious inj uries. Connect t he machine
t o a wall socket having t he appropriat e volt age. The volt age must correspond t o t hat indicat ed on t he rat ing
plat e underneat h t he machine. Make sure that the socket you are using is earthed (grounded).
ooooo
5. Figure A: elect rical wire wit h plug A short det achable power-supply wire is provided in order t o reduces
risks such as get ent angled or t rip over a longer cord. Longer det achable wires and ext ent ion cables are
availabl e and can be used by aut horized elect ricians f ollowing t he saf et y st andards. DO NOT USE convert ers
for plugs.
If a l onger cable can be used:
a)Elect ric charact erist ics of t he det achable wire or of t he ext ent ion cable must be t he same of t he ones
show on t he rat ing plat e at t ached under t he base of t he product .
b)t he ext ension of t he cabl e must be t hree wires/ poles and must be grounded. A long wire or an ext ension
cable NEVER can be visibl e; It can result at t ract ive for children.
c)Do not place on or near a hot gas or elect ric burner or in a heat ed oven.
d)Do not use out doors. Do not l et cord hang over edge of t able or count er, or t ouch hot surfaces.
21
Do not operat e any appliance wit h a damaged cord or plug or af t er t he appliance malfunct ions, or has been damaged
in any manner. Ret urn t he appliance t o t he nearest aut horized service f acil it y f or examinat ion, repair or adj ust ment .
The use of accessory at t achment s is not recommended by t he appliance manufact urer as t hey may result in fire,
el ect ric shock or inj ury t o t he user.
e)if cables or pl ugs are damaged must be replaced by t he producer or by t he aut horized service f acilit y or by a qualified
person in order t o prevent any risk.
IMPORTANT SAFEGUARDS
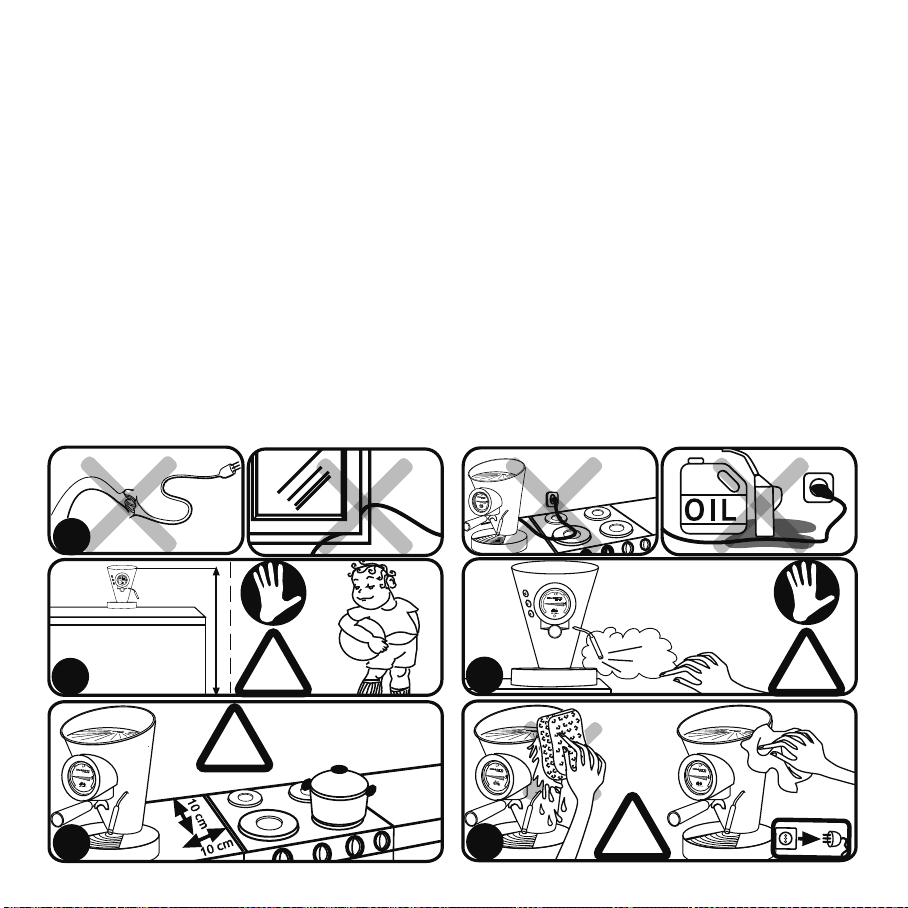
6. Figure B: Make sure t hat children cannot play wit h t he machine. Children should not t o use, operat e or
play near t he appliance. The machine must be posit ioned so t hat t he cups warming surf ace on t he t op (1) is
at a minimum height of 1. 20 met ers above t he f loor.
7. Place t he machine on a flat surf ace, making sure t hat t he suct ion feet adhere firml y t o t he support surf ace
so t hat t he machine cannot be overt urned. Hot wat er or st eam may escape: danger of burns! Do not use t he
machine in environment s below 5 ° C. Do not pl ace t he machine on very hot surf aces or near open f lames.
8. Figure C:
Do not direct t he j et of st eam or hot wat er t owards part s of t he body. Be very caref ul when
t ouching very hot part s such as t he hot wat er/ st eam pipe (use a prot ect ive glove).
9.
Figure D: To ensure t hat t he machine works correct ly, place it on a level surf ace in an adequat ely light ed
and hygienic environment wit h an easily accessible elect rical socket . Keep t he machine at least 100 mm (4
inches) away f rom t he wall s.
10. Figure E:
Unplug from out let when not in use and bef ore cleaning. Allow t o cool bef ore put t ing on or
t aking of f part s, and bef ore cleaning t he appliance. The appliance must be cleaned wit h a f reshly dampened
non-abrasive cl ot h soaked wit h a few drops of neut ral non-corrosive det ergent (never use solvent s).
11. In t he event of faul t s, defect s or suspect ed f ault s af t er a fall, immediat ely unplug f rom t he socket . Never
st art up damaged appliances. The repairs must be carried out by t he Service Cent re of CASA BUGATTI . Cont act
your dealer and/ or cont act Cust omer Care at CASA BUGATTI or send an e-mail t o diva@casabugatti.it.
In t he event of f ire, use carbon-dioxide (CO2) ext inguishers. Do not use wat er or powder ext inguishers.
A
i
t
a
l
i
a
n
e
s
p
r
e
s
s
o
d
e
s
i
g
n
-
s
t
a
r
s
/
a
n
d
r
e
a
s
s
e
e
g
a
t
z
Á
!
C
!
E
!
D
i
t
a
l
i
a
n
e
s
p
r
e
s
s
o
d
e
s
i
g
n
-
s
t
a
r
s
/
a
n
d
r
e
a
s
s
e
e
g
a
t
z
!
B
1, 2m
22
The original packaging has been designed f or dispat ch by post . Keep it in case you need t o ret urn t he machine
t o t he supplier. Bef ore inst all ing t he machine, comply wit h t he import ant saf eguards indicat ed on page 20, 21.
Connecting to power supply. Always attach plug to appliance first, then plug cord into the wall outlet.
To disconnect, turn all controls OFF, then remove plug from wall outlet. Be aware electric power can
kill. Strictly comply with safety regulations.
The coffee machine must be connected, with the Casa Bugatti original electrical wire (25) to a wall
socket with a voltage as specified on the rating plate underneath the machine. Make sure that the socket
you are using is earthed (grounded).
Never use f ault y or damaged power cords.
We do not recommend using an ext esion cord wit h t he appliance. This may damage t he appliance and void
t he warrant y.
Never allow live parts to come int o contact with water: may cause short circuit!!! Steam and hot water
can cause burns. Never direct t he j et of steam or hot water t owards parts of the body. Handle the
steam/ hot water pipe with care: risk of burns (use a protective glove)!
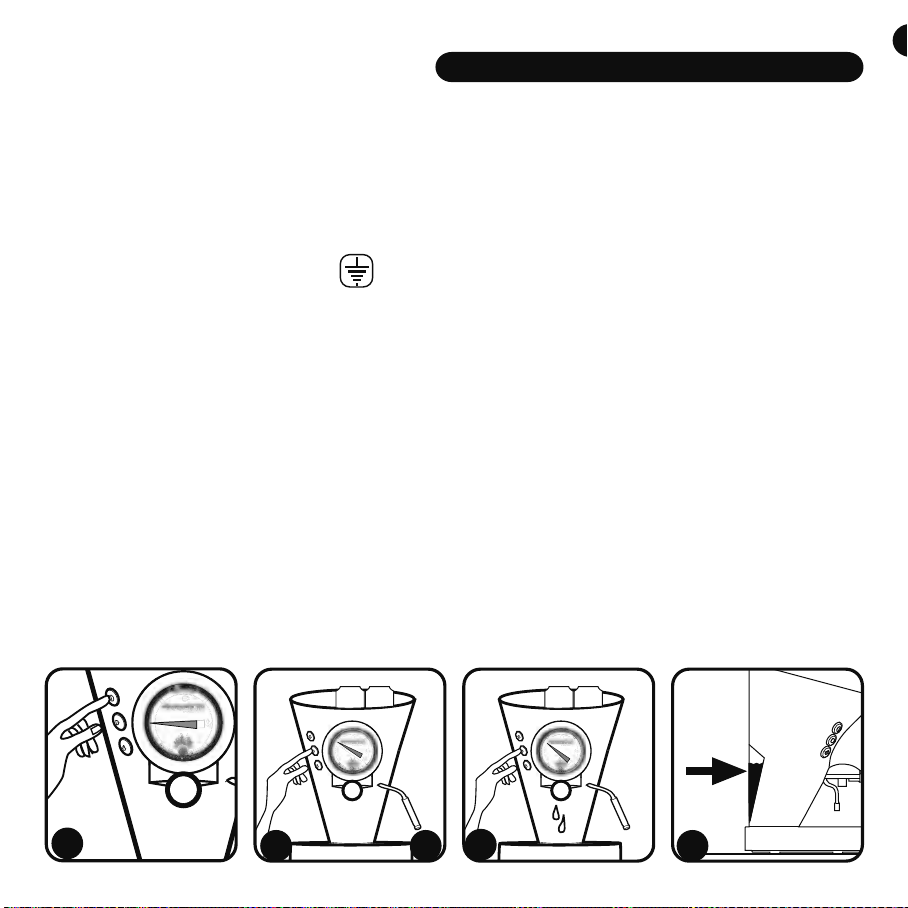
Do not st art up t he machine wit hout f irst fil ling t he t ank wit h wat er. Take care t o insert it caref ully in it s
seat .
1) When st art ing up t he machine, push t he swit ch (3) t o light up t he light (11) on t he t hermomet er, which
will show t hat t he machine is on and t hat t he heat er resist ance is heat ing up.
2) Press t he cof f ee delivery swit ch (4) t o f acilit at e pump priming.
3) Keep t he cof fee-delivery swit ch (4) pressed unt il wat er f lows out f rom t he brewing unit (9).
4) Turn of f t he cof f ee delivery swit ch 4 : t he operat ion has f inished.
5) Always make sure that t here is water in the tank (2) and that the suction pipe is correctly inserted.
Warning: t he pump will be irreparabl y damaged if t he machine operat es wit hout wat er even f or a short
period.
6) Every t ime you add wat er int o t he t ank (2), remember t o empt y t he wast e wat er t ank locat ed under t he
drip grid (14).
Installation and starting up
i
t
a
l
i
a
n
e
s
p
r
e
s
s
o
d
e
s
i
g
n
-
s
t
a
r
s
/
a
n
d
r
e
a
s
s
e
e
g
a
t
z
®
1
5
i
t
a
l
i
a
n
e
s
p
r
e
s
s
o
d
e
s
i
g
n
-
s
t
a
r
s
/
a
n
d
r
e
a
s
s
e
e
g
a
t
z
2
i
t
a
l
i
a
n
e
s
p
r
e
s
s
o
d
e
s
i
g
n
-
s
t
a
r
s
/
a
n
d
r
e
a
s
s
e
e
g
a
t
z
3
4
i
i
i
i
i
i
i
t
t
t
t
a
a
a
a
a
l
l
i
i
i
a
a
n
n
n
e
e
e
e
e
e
e
s
s
s
p
p
p
p
r
e
s
s
s
s
s
o
o
o
o
d
d
d
e
e
s
s
s
i
g
g
g
n
n
n
n
-
s
t
t
t
a
a
a
a
r
r
s
s
s
s
/
/
a
a
a
a
a
a
a
n
n
n
d
d
d
r
r
e
e
e
a
a
a
a
a
s
s
s
s
s
e
e
e
e
e
g
g
g
a
t
t
z
z
z
z
z
i
i
i
i
i
t
t
t
t
t
t
t
a
a
a
l
l
l
l
i
i
i
a
a
a
a
a
n
n
n
n
e
e
e
s
s
s
s
p
p
p
p
p
r
r
e
e
e
s
s
s
o
o
o
o
d
e
e
s
s
i
i
i
g
g
n
n
-
-
s
s
s
t
t
t
a
a
a
a
a
r
s
/
/
a
n
d
r
e
a
s
s
e
e
e
e
g
g
g
a
a
a
a
a
a
a
t
t
t
z
i
i
i
i
i
i
i
i
i
i
t
t
t
t
t
a
a
a
a
a
a
a
l
l
l
l
l
l
i
i
i
i
i
a
a
a
a
a
a
a
n
n
n
n
n
e
e
e
s
s
s
s
s
p
p
p
p
p
r
r
r
r
e
e
e
e
e
e
e
s
s
s
ss
s
s
s
s
s
s
o
o
o
o
o
o
o
dd
e
e
ss
i
i
i
i
gg
g
n
n
n
-
s
s
s
t
t
aa
rr
r
s
s
/
a
n
d
d
r
e
e
a
a
s
s
s
e
e
e
e
e
e
e
g
g
a
t
t
t
t
t
z
z
z
z
®
®
®
e
e
e
e
e
a
d
d
r
p
r
r
n
n
n
a
n
s
s
s
/
/
/
s
e
23
Advice and recommendations for use
Setting up the machine.
The f irst t ime t hat DIVA is used or if it is used af t er a l ong period of inact ivit y:
1) Fill t he t ank (2) wit h cold wat er.
2) Connect t he appliance t o a wall socket in st rict compliance wit h t he import ant saf eguards specif ied on
page 20, 21.
3) Swit ch on t he machine by means of t he swit ch (3); t he red light on t he t hermomet er wil l light up (11)
4) Load t he wat er syst em: open t he st eam t ap by t urning t he knob (10) count erclockwise and t hen press
t he cof fee-delivery swit ch (4). When wat er leaves t he st eam nozzl e (8) shut t he t ap by t urning t he st eam
knob (10) clockwise. Wait f or a f ew minut es so t hat wat er runs out of t he brewing unit (9) and t hen st op
wat er f lowing out by using t he coffee-delivery swit ch (4) t o swit ch of f t he pump.
5) Wait f or t he hand of t he t hermomet er (6) t o reach posit ion in t he range shown by t he coffee cup symbol
on t he t hermomet er (6) dial.
6) The machine is ready for use.
DiVa is provided wit h one fil t er-holder unit (16) wit h a fil t er f or ESE pods (15), one f ilt er f or ground cof f ee
for 1 cup (18) and one fil t er f or ground cof f ee for 2 cups (19)
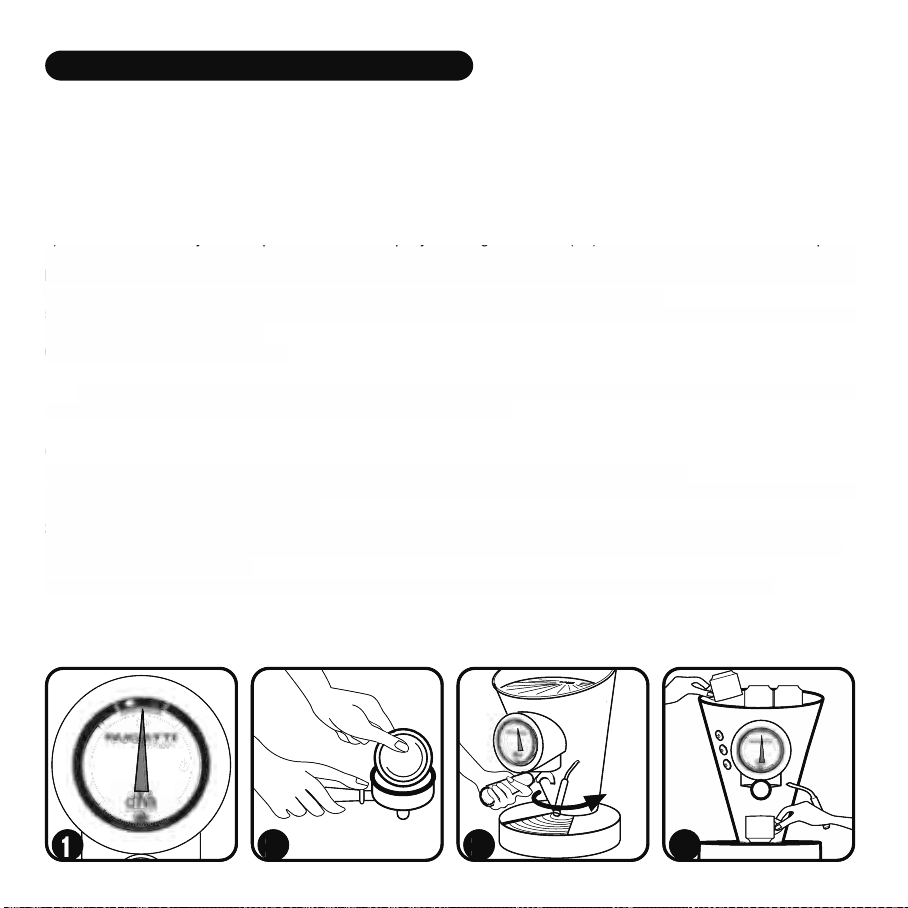
Coffee with pods.
1) Make sure t hat t he t hermomet er hand is in t he posit ion of t he cof f ee cup symbol.
2) Place t he filt er (18) in t he filt er-holder unit (16) t o pour one cup of cof f ee and place a pod in it , t aking
care t o place it perf ect ly in it s seat .
3) Insert t he f il t er-holder unit (16) int o t he seat of t he brewing unit (9) and f ix it by rot at ing t he handle
t o t he right t o about t he cent re of t he machine (handle must be rot at ed unt il correct pressure f or a seal
during del ivery is reached).
4) Take one dry and warm cof f ee cups f rom t he cup-warming surf ace and place t hem under t he
spout of t he f ilt er holder.
i
t
a
l
i
a
n
e
s
p
r
e
s
s
o
d
e
s
i
g
n
-
s
t
a
r
s
/
a
n
d
r
e
a
s
s
e
e
g
a
t
z
®
1 2
i
t
a
l
i
a
n
e
s
p
r
e
s
s
o
d
e
s
i
g
n
-
s
t
a
r
s
/
a
n
d
r
e
a
s
s
e
e
g
a
t
z
43
23
)yppyg() p
t
h
e co
ff
ee-
d
e
l
ivery swit c
h
(4). W
h
en wat er
l
eaves t
h
e st eam nozz
l
e (8) s
h
ut t
h
e t ap
b
y t urning t
h
e st eam
k
no
b
(10) c
l
oc
k
wise. Wait
f
or a
f
ew minut es so t
h
at wat er runs out o
f
t
h
e
b
rewing unit (9) an
d
t
h
en st op
wat er
fl
owing out
b
y using t
h
e co
ff
ee-
d
e
l
ivery swit c
h
(4) t o swit c
h
o
ff
t
h
e pump
.
5) Wait
f
or t
h
e
h
an
d
o
f
t
h
e t
h
ermomet er (6) t o reac
h
posit ion in t
h
e range s
h
own
b
y t
h
e co
ff
ee cup sym
b
o
l
o
n t
h
e t
h
ermomet er (6)
d
ia
l.
6) T
h
e mac
h
ine is rea
d
y
f
or use
.
DiVa is provi
d
e
d
wit
h
one
f
i
l
t er-
h
o
ld
er unit (16) wit
h
a
f
i
l
t er
f
or ESE po
d
s (15), one
f
i
l
t er
f
or groun
d
co
ff
ee
f
or 1 cup (18) an
d
one
f
i
l
t er
f
or groun
d
co
ff
ee
f
or 2 cups (19)
Coffee wit
h
p
o
d
s.
1) Ma
k
e sure t
h
at t
h
e t
h
ermomet er
h
an
d
is in t
h
e posit ion o
f
t
h
e co
ff
ee cup sym
b
o
l.
2
) P
l
ace t
h
e
f
i
l
t er (18) in t
h
e
f
i
l
t er-
h
o
ld
er unit (16) t o pour one cup o
f
co
ff
ee an
d
p
l
ace a po
d
in it , t a
k
ing
c
are t o
pl
ace it
p
er
f
ect
ly
in it s seat
.
3) Insert t
h
e
f
i
l
t er-
h
o
ld
er unit (16) int o t
h
e seat o
f
t
h
e
b
rewing unit (9) an
d
f
ix it
b
y rot at ing t
h
e
h
an
dl
e
t o t
h
e rig
h
t t o a
b
out t
h
e cent re o
f
t
h
e mac
h
ine (
h
an
dl
e must
b
e rot at e
d
unt i
l
correct pressure
f
or a sea
l
d
uring
d
e
l
ivery is reac
h
e
d
)
.
4) Ta
k
e one
d
ry an
d
warm co
ff
ee cups
f
rom t
h
e cup-warming sur
f
ace an
d
p
l
ace t
h
em un
d
er t
h
e
sp
out o
f
t
h
e
f
i
l
t er
h
o
ld
er
.
1
2
2
4
4
4
3
3
i
i
i
i
i
i
i
i
i
i
tt
t
t
aa
a
a
l
l
l
ii
a
a
a
nn
e
e
e
e
e
e
e
e
s
s
s
s
s
p
p
p
p
p
p
r
r
r
e
e
s
s
s
ss
s
o
o
o
o
d
d
d
d
e
e
e
s
s
s
i
i
i
g
g
g
n
n
n
n
n
n
n
-
-
s
s
s
s
t
t
t
a
a
a
a
a
r
r
r
s
s
/
/
/
/
a
a
a
a
a
n
n
n
d
d
d
d
d
d
d
r
r
e
e
aa
s
s
s
s
s
s
s
e
e
e
e
e
e
e
e
e
g
g
g
g
g
g
a
a
a
a
a
t
t
t
t
t
t
z
z
z
z
z
®
®
®
®
1
i
i
i
i
i
i
t
t
t
t
t
t
a
a
a
a
l
l
l
l
i
i
a
a
a
a
a
n
n
n
e
e
e
s
s
p
p
r
r
r
e
e
e
e
s
s
s
s
s
s
s
o
o
o
o
d
d
e
e
e
s
s
i
i
i
g
n
-
s
s
s
t
t
a
a
a
a
a
a
a
r
r
s
s
/
/
a
n
n
d
r
r
e
a
s
s
s
e
e
e
e
e
e
e
e
g
g
g
g
g
g
a
a
t
t
t
z
z
24
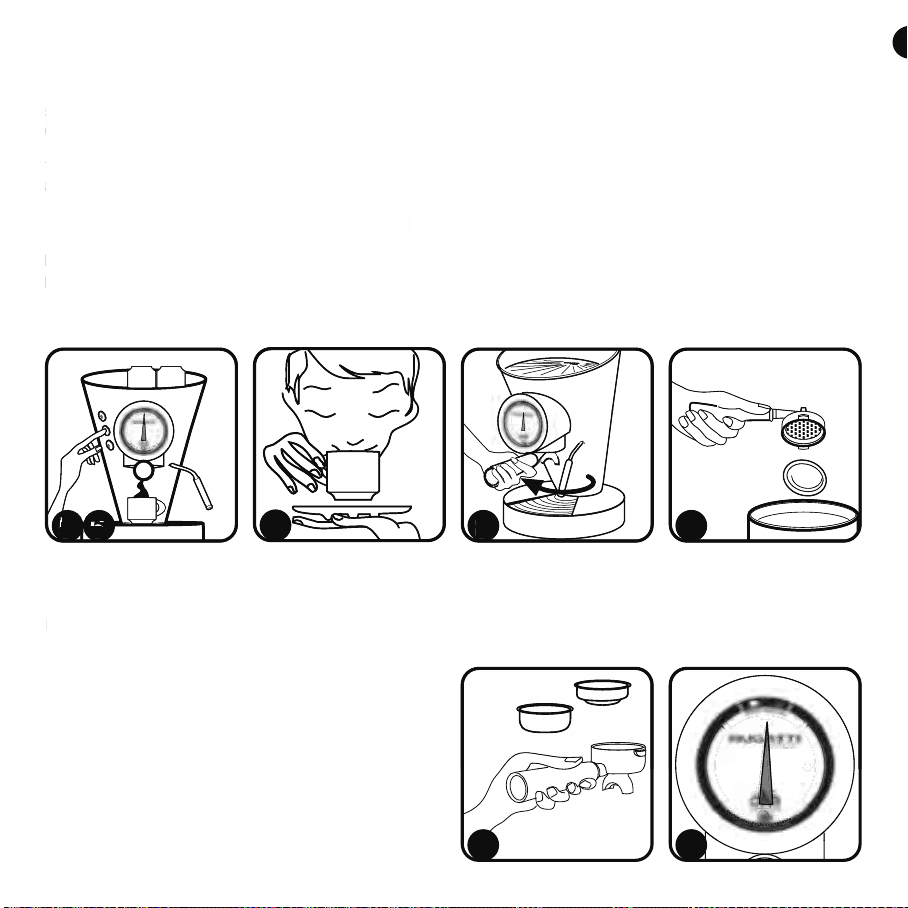
5) Press t he but t on (4) t o st art delivery of t he cof f ee.
6) Then press t he but t on (4) again t o st op delivery of t he cof f ee: you can decide what t ype of coffee t o
enj oy: “ rist ret t o” , “ espresso” , “ l ungo” or . ..
7) Serve t he cof fee immediat ely t o f ully enj oy it s aroma.
8) Remove t he filt er-holder unit (16) f rom t he brewing unit (9) by t urning t he handl e t o t he l eft .
9) Remove t he cof f ee powder and place it in t he l it t er bin.
10) The machine is ready t o make a new cof f ee.
11) At t he end of each cycle we suggest t o leave insert ed t he f ilt er unit -holder (16) int o t he seat of t he
brewing unit (9) : t he filt er remain warm and ready t o make a new cof f ee at t he correct t emperat ure. (see
pict ure 3)
12) WARNING: frequently check the level of water in the tank (2). Do not operate the appliance without
water!
Ground coffee.
1) Place t he filt er (18) in t he filt er-holder unit f or ground cof f ee (16) t o pour one cup of cof f ee.
Place t he f ilt er (19) in t he filt er-holder unit f or ground cof fee (16) t o pour t wo cups of coffee.
2) Make sure t hat t he t hermomet er hand is in posit ion of t he cof f ee cup symbol.
7
9
i
t
a
l
i
a
n
e
s
p
r
e
s
s
o
d
e
s
i
g
n
-
s
t
a
r
s
/
a
n
d
r
e
a
s
s
e
e
g
a
t
z
5 6
i
t
a
l
i
a
n
e
s
p
r
e
s
s
o
d
e
s
i
g
n
-
s
t
a
r
s
/
a
n
d
r
e
a
s
s
e
e
g
a
t
z
®
21
i
i
i
i
i
i
t
t
t
t
t
a
a
a
a
a
a
l
l
l
l
i
i
i
i
a
a
a
a
n
n
n
n
n
e
e
e
e
e
e
e
e
e
s
s
s
p
p
p
p
p
p
p
p
r
r
r
e
e
e
ss
s
s
s
s
s
s
o
o
o
o
d
d
d
e
e
s
s
s
s
i
i
i
g
g
g
n
n
n
-
s
s
s
t
t
t
a
a
a
a
a
rr
s
s
s
/
/
/
/
/
/
a
a
n
n
d
r
r
r
e
e
e
a
a
s
s
s
e
e
e
e
e
e
e
e
e
e
e
g
g
g
g
g
g
g
a
a
a
a
a
t
t
t
t
tt
z
z
z
z
z
z
2
2
8
5) Press t
h
e
b
ut t on (4) t o st art
d
e
l
ivery o
f
t
h
e co
ff
ee
.
6) T
h
en press t
h
e
b
ut t on (4) again t o st op
d
e
l
ivery o
f
t
h
e co
ff
ee: you can
d
eci
d
e w
h
at t ype o
f
co
ff
ee t o
e
n
j
o
y
:
“
rist ret t o
”
,
“
es
p
resso
”
,
“ l
un
g
o
”
or . .
.
7) Serve t
h
e co
ff
ee imme
d
iat e
l
y t o
f
u
ll
y enj oy it s aroma
.
8) Remove t
h
e
f
i
l
t er-
h
o
ld
er unit (16)
f
rom t
h
e
b
rewing unit (9)
b
y t urning t
h
e
h
an
dl
e t o t
h
e
l
e
f
t
.
9
)
Remove t
h
e co
ff
ee pow
d
er an
d
p
l
ace it in t
h
e
l
it t er
b
in
.
10
)
T
h
e mac
h
ine is rea
d
y t o ma
k
e a new co
ff
ee
.
11
)
At t
h
e en
d
o
f
eac
h
cyc
l
e we suggest t o
l
eave insert e
d
t
h
e
f
i
l
t er unit -
h
o
ld
er
(
16
)
int o t
h
e seat o
f
t
h
e
b
rewing unit
(
9
)
: t
h
e
f
i
l
t er remain warm an
d
rea
d
y t o ma
k
e a new co
ff
ee at t
h
e correct t emperat ure.
(
see
p
ict ure
3)
12
)
WARNING: frequent
l
y c
h
ec
k
t
h
e
l
eve
l
of water in t
h
e tan
k
(
2
)
. Do not operate t
h
e app
l
iance wit
h
out
water
!
Groun
d
coffee
.
1) P
l
ace t
h
e
f
i
l
t er (18) in t
h
e
f
i
l
t er-
h
o
ld
er unit
f
or groun
d
co
ff
ee (16) t o pour one cup o
f
co
ff
ee
.
P
l
ace t
h
e
f
i
l
t er (19) in t
h
e
f
i
l
t er-
h
o
ld
er unit
f
or groun
d
co
ff
ee (16) t o pour t wo cups o
f
co
ff
ee
.
2
) Ma
k
e sure t
h
at t
h
e t
h
ermomet er
h
an
d
is in posit ion o
f
t
h
e co
ff
ee cup sym
b
o
l.
7
7
9
9
9
5
5
5
5
5
6
6
6
6
6
i
i
i
i
i
i
i
t
t
t
t
a
a
a
a
a
a
l
l
l
l
l
i
i
i
a
a
a
a
a
n
n
n
e
e
e
s
s
p
p
p
p
r
r
r
r
e
e
e
e
s
s
s
s
s
s
s
s
o
o
o
d
d
e
e
e
e
s
s
i
i
i
g
n
n
-
-
s
s
t
t
a
a
a
a
r
s
/
/
a
n
n
d
r
e
a
s
s
s
e
e
e
e
e
g
g
g
a
a
t
t
z
®
®
8
8
8
25
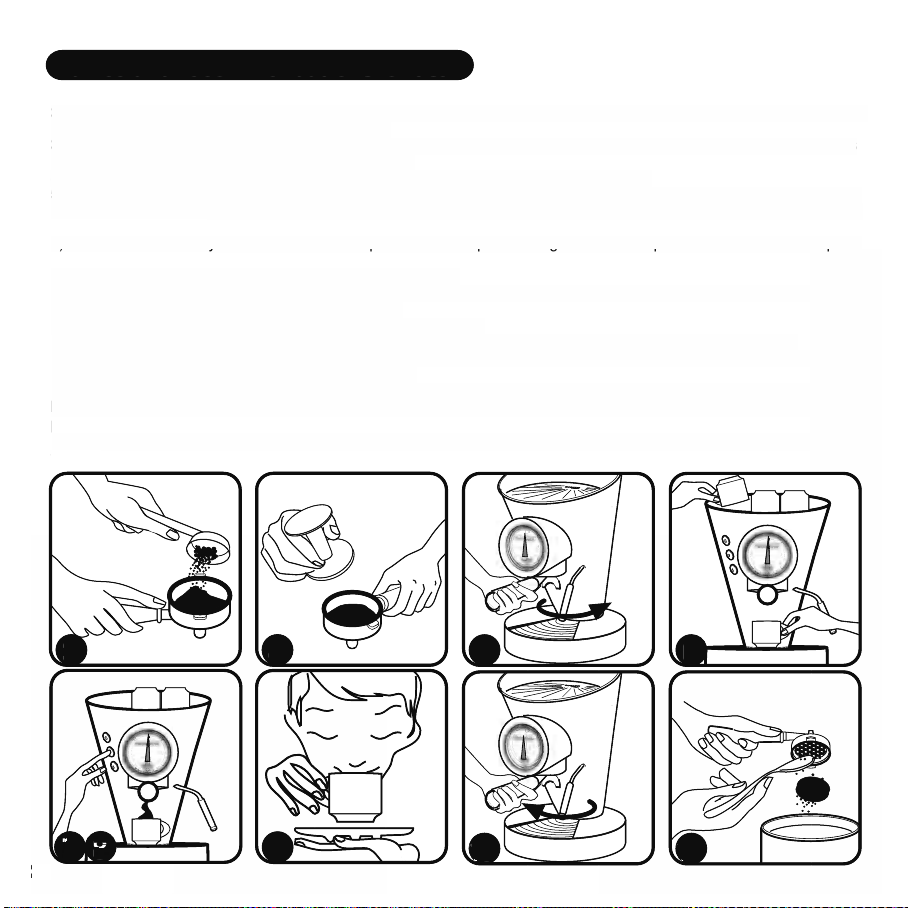
3) Take t he filt er-holder unit f or ground coffee (16) insert t he fil t er (18) f or one coffee or t he f ilt er (19)
for t wo cof f ees, according t o requirement s.
3) Pour t he ground cof f ee wit h t he appropriat e measure (23): one measure for one cof f ee or t wo measures
for t wo cof f ees, according t o t he chosen f il t er.
4) Level t he cof f ee powder inside t he f ilt er wit h t he appropriat e pressing t ool.
5) Insert t he f il t er-holder unit (16) int o t he seat of t he brewing unit (9) and f ix it by rot at ing t he handle t o
t he right t o about t he cent re of t he machine (handl e must be rot at ed unt il correct pressure f or a seal during
del ivery is reached).
6) Take one or t wo dry and warm cof f ee cups f rom t he cup-warming surf ace and place t hem under t he spout
of t he f ilt er holder.
7) Press t he but t on (4) t o st art delivery of t he cof f ee.
8) Then press t he but t on (4) again t o st op delivery of t he cof f ee: you can decide what t ype of cof f ee t o
enj oy: “ rist ret t o” , “ espresso” , “ lungo” or ...
9) Serve t he cof fee immediat ely t o f ully enj oy it s aroma.
10) Remove t he f ilt er-holder unit (16) f rom t he brewing unit (9) by t urning t he handl e t o t he lef t .
11) Remove t he cof f ee powder and place it in t he lit t er bin. ( See chapt er: Cleaning and Maint enance)
12) The machine is ready t o make a new cof f ee.
13) At t he end of each cycle we suggest t o leave insert ed t he filt er unit -holder (16) int o t he seat of t he
brewing unit (9) : t he filt er remain warm and ready t o make a new cof f ee at t he correct t emperat ure. (see
pict ure 5)
14) WARNING: frequently check the level of water in the tank (2). Do not operate the appliance without
water!
Advice and recommendations for use
1 1
9
i
t
a
l
i
a
n
e
s
p
r
e
s
s
o
d
e
s
i
g
n
-
s
t
a
r
s
/
a
n
d
r
e
a
s
s
e
e
g
a
t
z
6
3
4
i
t
a
l
i
a
n
e
s
p
r
e
s
s
o
d
e
s
i
g
n
-
s
t
a
r
s
/
a
n
d
r
e
a
s
s
e
e
g
a
t
z
7
8
5
10
3) Ta
k
e t
h
e
f
i
l
t er-
h
o
ld
er unit
f
or groun
d
co
ff
ee (16) insert t
h
e
f
i
l
t er (18)
f
or one co
ff
ee or t
h
e
f
i
l
t er (19)
f
or t wo co
ff
ees, accor
d
in
g
t o re
q
uirement s
.
3) Pour t
h
e groun
d
co
ff
ee wit
h
t
h
e appropriat e measure (23): one measure
f
or one co
ff
ee or t wo measures
f
or t wo co
ff
ees, accor
d
in
g
t o t
h
e c
h
osen
f
i
l
t er
.
4) Leve
l
t
h
e co
ff
ee pow
d
er insi
d
e t
h
e
f
i
l
t er wit
h
t
h
e appropriat e pressing t oo
l.
5) Insert t
h
e
f
i
l
t er-
h
o
ld
er unit (16) int o t
h
e seat o
f
t
h
e
b
rewing unit (9) an
d
f
ix it
b
y rot at ing t
h
e
h
an
dl
e t o
t
h
e rig
h
t t o a
b
out t
h
e cent re o
f
t
h
e mac
h
ine (
h
an
dl
e must
b
e rot at e
d
unt i
l
correct pressure
f
or a sea
l
d
uring
d
e
l
ivery is reac
h
e
d
).
6)
Ta
k
e one or t wo
d
ry
an
d
warm co
ff
ee c
up
s
f
rom t
h
e c
up
-warmi
ng
sur
f
ace an
d
p
l
ace t
h
em un
d
er t
h
e
sp
out
Advice and recommendations for use
A
2
25
)y ppgp p
of
t
h
e
f
i
l
t er
h
o
ld
er.
7)
Press t
h
e
b
ut t on
(4
)
t o st art
d
e
l
iver
y
o
f
t
h
e co
ff
ee
.
8) T
h
en press t
h
e
b
ut t on (4) again t o st op
d
e
l
ivery o
f
t
h
e co
ff
ee: you can
d
eci
d
e w
h
at t ype o
f
co
ff
ee t o
e
n
j
o
y
:
“
rist ret t o
”
,
“
es
p
resso
”
,
“ l
un
g
o
”
or ..
.
9) Serve t
h
e co
ff
ee imme
d
iat e
l
y t o
f
u
ll
y enj oy it s aroma
.
10) Remove t
h
e
f
i
l
t er-
h
o
ld
er unit (16)
f
rom t
h
e
b
rewing unit (9)
b
y t urning t
h
e
h
an
dl
e t o t
h
e
l
e
f
t .
11) Remove t
h
e co
ff
ee pow
d
er an
d
p
l
ace it in t
h
e
l
it t er
b
in. ( See c
h
apt er: C
l
eaning an
d
Maint enance
)
12) T
h
e mac
h
ine is rea
d
y t o ma
k
e a new co
ff
e
e.
13) At t
h
e en
d
o
f
eac
h
cyc
l
e we suggest t o
l
eave insert e
d
t
h
e
f
i
l
t er unit -
h
o
ld
er (16) int o t
h
e seat o
f
t
h
e
b
rewin
g
unit
(
9)
: t
h
e
f
i
l
t er remain warm an
d
rea
d
y
t o ma
k
e a new co
ff
ee at t
h
e correct t e
mp
erat ure.
(
see
p
ict ure 5)
14
)
WARNING: frequent
l
y c
h
ec
k
t
h
e
l
eve
l
of water in t
h
e tan
k
(
2
)
. Do not operate t
h
e app
l
iance wit
h
out
wa
te
r!
1
1
1 11 11 1
9
9
6
6
3
3
4
4
4
7
7
7
7
7
7
8
8
8
8
8
5
5
10
1
101010
i
i
i
i
t
t
a
a
a
l
l
i
i
i
a
a
a
n
n
n
e
e
e
e
e
e
s
s
p
p
p
p
p
r
r
r
r
r
e
e
s
s
s
s
s
s
s
s
o
o
o
d
d
d
e
e
ss
i
i
g
g
g
g
g
g
n
n
-
s
s
s
s
t
t
a
a
a
a
r
r
r
r
s
s
/
/
/
a
n
d
d
r
e
a
s
s
s
e
e
e
e
e
e
g
g
g
g
a
t
t
z
z
i
i
i
i
t
t
t
t
a
a
a
a
l
l
i
i
i
i
a
a
a
n
n
n
n
n
n
e
e
e
e
s
s
s
s
s
s
p
p
p
p
r
r
r
e
e
e
s
s
s
s
s
s
s
o
o
d
d
d
d
e
e
s
s
s
i
i
g
g
n
n
-
s
s
t
t
a
a
r
r
r
s
s
s
s
/
/
a
a
a
n
n
d
d
d
d
d
r
r
e
e
e
a
a
s
s
s
s
e
e
e
e
e
g
g
g
a
a
t
z
z
z
26
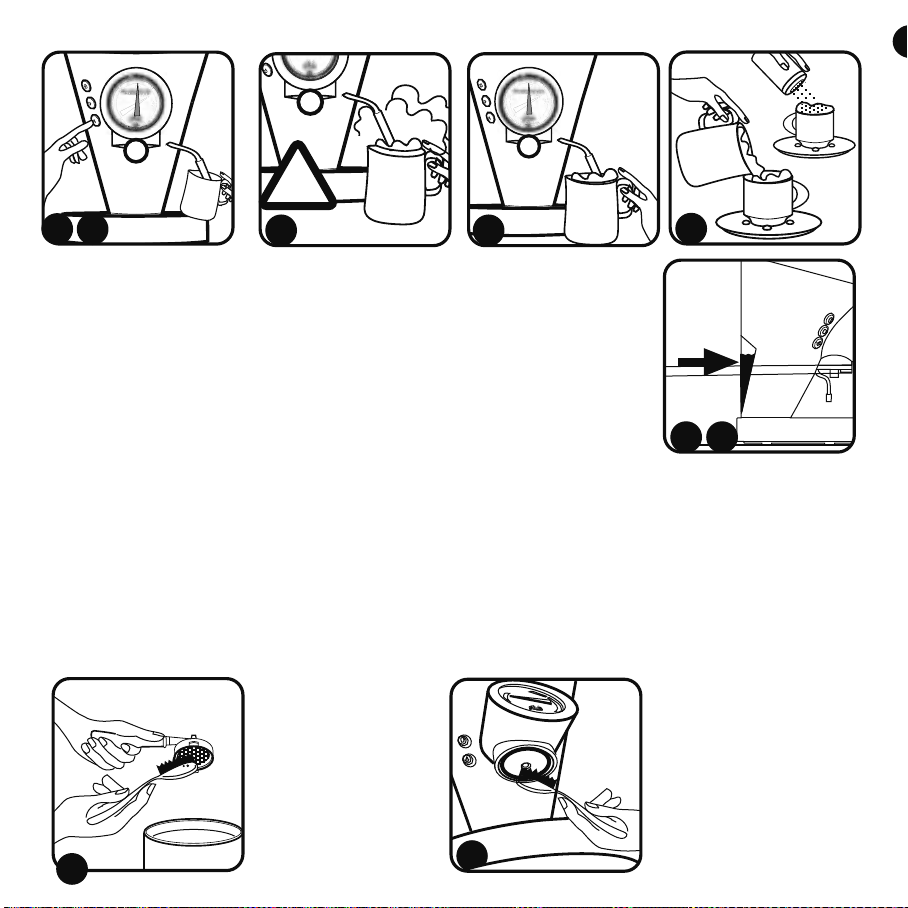
Use of steam to heat water for tea and infusions.
Do not touch hot surfaces. Handle only with grips or anti-heat gloves every hot surface.
Be careful also at the steam/ hot water tube(see image“ C” ): DANGER OF BURNS! Steam
and hotwater can burn. Never point the steam and t he hot water directly on the body.
1) Swit ch on t he machine by pressing t he general on/ of f but t on(3)
2) Ensure t hat t he t emperat ure point er is in t he posit ion of t he cof f ee cup
3) Move t he st eam t ube(8)in a usef ul posit ion and put t he bucket under t he t ube immersing it in t he wat er
4) Push t he st eam but t on (5) and in a few second t he st eam will st art coming out t he t ube(8)
5) The st eam coming out t he t ube (8) will heat t he wat er f or a perf ect t ea or infusion.
6) Push t he st eam but t on(5) t o st op t he st eam. Be caref ul: bef ore removing t he bucket from t he t uble wait
some seconds t o permit t he st eam st ops coming out .
7) Remove t he bucket f rom t he st eam t ube.
8) Use t he hot wat er f or t ea or inf usion.
9) The st eam f unct ion can be repeat ed following again t he point s of t his paragraph. The machine is always
ready t o prepare cof f ee
10) Every t ime you ref ill t he wat er t ank (2), remember of empt y t he drip grid (14)
11) Be careful: f requent ly check t he wat er level in t he wat er t ank (2). Never use t he machine if t he
wat er t ank (2) is empt y.
i
t
a
l
i
a
n
e
s
p
r
e
s
s
o
d
e
s
i
g
n
-
s
t
a
r
s
/
a
n
d
r
e
a
s
s
e
e
g
a
t
z
1
2
i
t
a
l
i
a
n
e
s
p
r
e
s
s
o
d
e
s
i
g
n
-
s
t
a
r
s
/
a
n
d
r
e
a
s
s
e
e
g
a
t
z
®
!
i
t
a
l
i
a
n
e
s
p
r
e
s
s
o
d
e
s
i
g
n
-
s
t
a
r
s
/
a
n
d
r
e
a
s
s
e
e
g
a
t
z
i
i
i
i
t
t
t
t
t
a
a
a
a
a
a
l
l
l
l
i
i
i
i
i
i
a
a
a
a
a
a
n
n
n
n
n
e
e
e
e
e
e
s
s
s
s
s
s
p
p
p
p
p
p
p
r
r
r
r
e
e
e
e
e
e
s
s
s
s
s
s
s
s
s
o
o
o
o
d
d
d
e
e
e
s
s
i
i
g
g
g
g
n
n
n
n
-
s
s
t
t
a
a
a
a
r
r
s
s
s
/
/
a
a
n
d
d
r
e
a
a
s
s
s
s
s
e
e
e
e
e
e
g
g
g
g
a
a
t
t
t
z
z
z
z
z
3
i
t
a
l
i
a
n
e
s
p
r
e
s
s
o
d
e
s
i
g
n
-
s
t
a
r
s
/
a
n
d
r
e
a
s
s
e
e
g
a
t
z
1110
5
4
i
i
i
i
i
i
i
t
t
t
t
t
t
a
a
a
a
l
l
l
i
i
i
i
a
a
a
a
n
n
n
e
e
e
e
s
s
s
s
p
p
p
p
p
r
r
r
r
e
s
s
s
s
s
o
o
o
d
d
d
d
e
e
e
s
s
s
i
i
i
i
g
g
g
g
n
n
n
n
-
s
s
s
t
t
a
a
a
r
r
s
s
/
/
/
a
n
d
r
e
a
s
s
e
e
e
e
e
e
e
e
g
g
g
a
a
a
t
t
z
i
i
i
i
i
i
i
i
tt
t
t
t
t
a
a
a
a
a
l
l
l
i
i
i
i
a
a
a
n
n
n
n
n
n
e
e
e
e
s
s
s
s
s
s
s
p
p
p
p
p
p
r
rr
r
r
r
e
e
e
e
e
ee
s
s
s
s
s
s
s
s
s
s
s
s
o
o
o
d
d
d
d
ee
e
e
s
s
s
s
s
i
i
i
g
g
g
g
g
n
n
-
s
s
s
t
t
t
t
a
a
a
r
r
r
r
r
s
s
s
/
/
a
a
n
d
r
e
a
s
s
s
e
e
e
e
e
e
e
e
g
g
g
g
g
a
a
a
a
a
t
t
z
z
z
i
i
i
i
i
i
t
t
t
t
a
a
a
l
l
i
i
a
a
a
n
e
e
e
e
e
e
s
s
s
p
p
p
p
r
r
e
e
e
ss
s
s
s
s
s
oo
d
d
d
d
d
d
e
e
e
e
e
s
s
s
s
s
i
i
i
g
g
n
n
n
n
-
s
s
t
t
t
a
a
a
a
r
r
r
r
s
s
s
/
/
/
/
a
n
n
d
d
d
r
e
a
a
s
s
s
s
e
e
e
e
e
e
g
g
g
g
a
a
a
t
t
t
t
t
z
z
z
z
z
®®
®
®
®
®
27
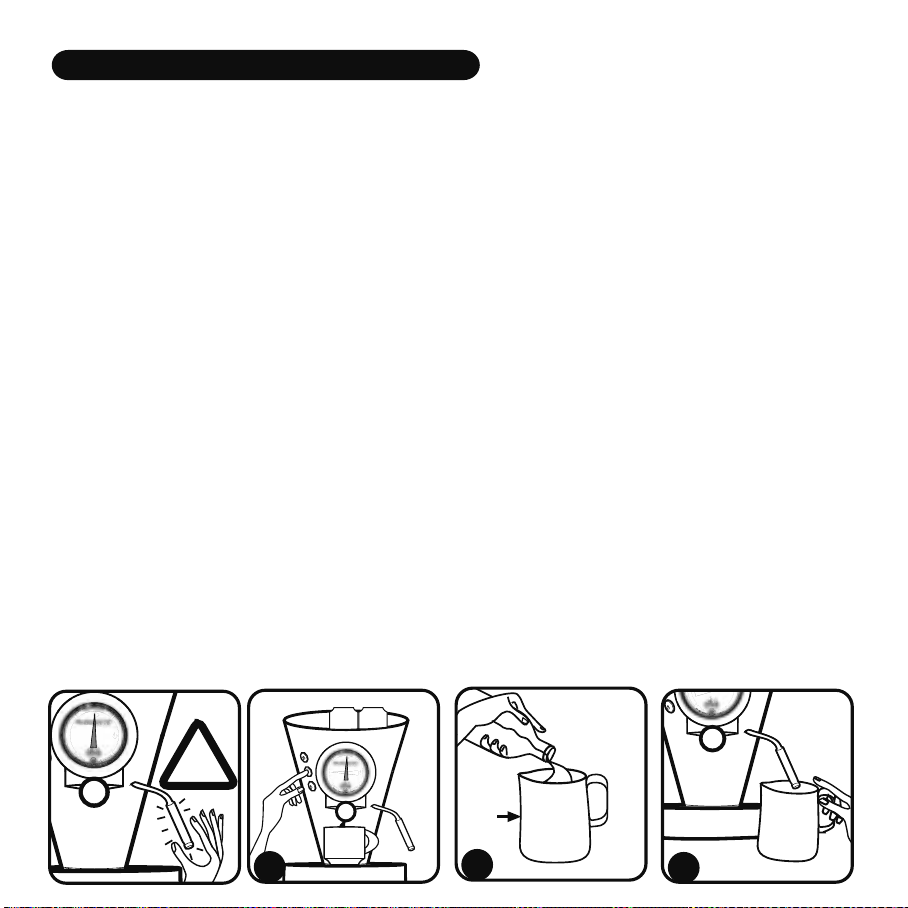
Use of steam to prepare milk for Cappuccino.
Do not touch hot surfaces.Handle only with grips or anti-heat gloves every hot surface.Be careful also
at t he steam/ hot water tube (see immage “ C” ): DANGER OF BURNS! Steam and hot water can burn.
Never point the steam and t he hot water directly on the body.
To prepare t he It alian Cappuccino f ollow carefully t he order of t hese operat ions:
1) Prepare in one or more Bugat t i cups (t he number corresponds t o t he drinks you want t o prepare)t he
espresso cof fee f ol lowing t he inst ruct ions you f ind in t he previous pages.
2) Pour t he cold milk in t he bucket reaching 1/ 3(max 1/ 2) of it s vol ume. Preferably use f resh ful l-cream
milk. The high f at cont ent s (3. 5-4%) of t he f ul l-cream mil k give t ast e t o t he Cappuccino. For a good frame
up is advisable t he use of a high prot ein cont ent milk (3. 2-3. 5%), which make your Cappuccino creamy.
3) Move t he st eam t ube(8) in a usef ul posit ion and put t he bucket under t he t ube immersing it in t he milk
(around half cent imet er under t he mil k level). The bucket must be in not t oo t hick st ainless st eel in order
t o f eel t he int ernal t emperat ure;t he right shape of t he bucket is t runcat ed cone. The size of t he bucket
must correspond t o t he quant it y of mil k you want t o heat .
4) Ensure t hat t he t emperat ure point er is in t he posit ion of t he cof f ee cup.
5) Push t he st eam but t on (5) and in a few seconds t he st eam will st art coming out t he t ube(8).
6) The st eam coming out t he t ube will blow in t he milk and t he f oam will rise t he milk l evel. Keeping t he
final part of t he st eam t ube ALWAYS in t he milk,slowly lower t he bucket . As soon as t he t emperat ure reaches
35° -37° C, t hat is when t he t emperat ure of t he bucket goes over t he t emperat ure of your hand, you feel
lit t l e hot and st art s t he second phase. This phase is import ant t o make t he cream dense wit h shiny
surf ace. Keeping t he t ube int o t he milk,incline t he bucket t o creat e a whirl. St op t he st eam coming out
when t he milk reaches 65° -67° C. You realize t he bucket reaches t his t emperat ure because it is t oo hot
and you cannot keep it in hand.
7) When t he foam is enough push t he st eam but t on (5) t o st op t he st eam. Be careful:bef ore removing t he
bucket f rom t he t ube wait some seconds t o permit t he st eam st ops coming out .
8) Remove t he bucket f rom t he st eam t ube. To bet t er dense t he foam and remove any air bubble move
t he bucket creat ing a whirl in t he milk cont ained in t he bucket .
9) Add t he mil k t o t he espresso coffee already ready in t he cups(image 9). Pour t he milk cups modulat ing
t he flow (more int ense in t he first phases) and moving t he cups t o obt ain t he drawing desired. If you want
you can use cocoa powder on you Cappuccino.
Advice and recommendations for use
max
2
i
t
a
l
i
a
n
e
s
p
r
e
s
s
o
d
e
s
i
g
n
-
s
t
a
r
s
/
a
n
d
r
e
a
s
s
e
e
g
a
t
z
1
i
t
a
l
i
a
n
e
s
p
r
e
s
s
o
d
e
s
i
g
n
-
s
t
a
r
s
/
a
n
d
r
e
a
s
s
e
e
g
a
t
z
i
i
t
t
a
a
a
l
l
l
i
i
a
a
n
n
n
n
e
e
e
e
ee
s
s
s
p
p
rr
e
e
s
s
s
s
o
o
d
d
d
d
e
e
s
s
s
s
i
i
g
g
g
n
-
s
s
s
s
s
s
t
t
t
t
t
a
a
a
a
a
a
a
a
r
r
s
s
s
s
/
/
a
a
a
n
n
n
n
d
d
d
d
d
r
r
r
e
e
e
a
a
a
a
a
s
s
s
s
s
e
e
e
e
e
e
g
g
g
g
g
g
g
g
a
a
a
a
t
t
t
t
t
t
z
z
z
3
i
t
a
l
i
a
n
e
s
p
r
e
s
s
o
d
e
s
i
g
n
-
s
t
a
r
s
/
a
n
d
r
e
a
s
s
e
e
g
a
t
z
®
!
i
i
i
i
i
i
i
i
i
i
t
t
t
a
a
a
a
a
l
i
a
a
a
n
n
ee
e
e
e
e
s
s
s
p
p
p
p
rr
e
e
e
s
s
s
s
o
o
o
o
d
d
d
e
e
e
s
s
s
s
s
s
i
i
i
g
n
n
-
s
s
t
t
t
t
a
a
r
s
s
/
a
a
nn
d
d
d
r
r
r
e
e
e
a
a
s
s
s
e
e
e
e
e
e
g
g
a
a
a
a
t
t
tt
z
i
i
i
i
i
i
i
t
t
t
t
t
a
a
a
a
l
l
i
i
i
i
a
a
a
a
a
a
n
n
n
n
n
e
e
e
e
e
e
e
e
s
s
s
s
p
p
p
p
p
p
r
r
r
e
e
e
e
e
s
s
s
s
s
s
s
s
s
o
o
o
o
o
o
d
d
d
d
d
e
e
e
s
s
s
s
i
i
g
g
g
n
n
n
-
-
-
-
s
s
s
t
t
t
t
t
a
a
r
r
r
r
s
s
s
/
/
/
/
a
a
a
n
n
d
d
d
d
d
d
r
e
e
a
a
aa
s
s
s
s
s
e
e
e
e
e
e
e
e
e
g
a
a
a
t
t
t
z
z
z
z
z
z
z
®
®
®
®
®
28
Un ottimo espresso
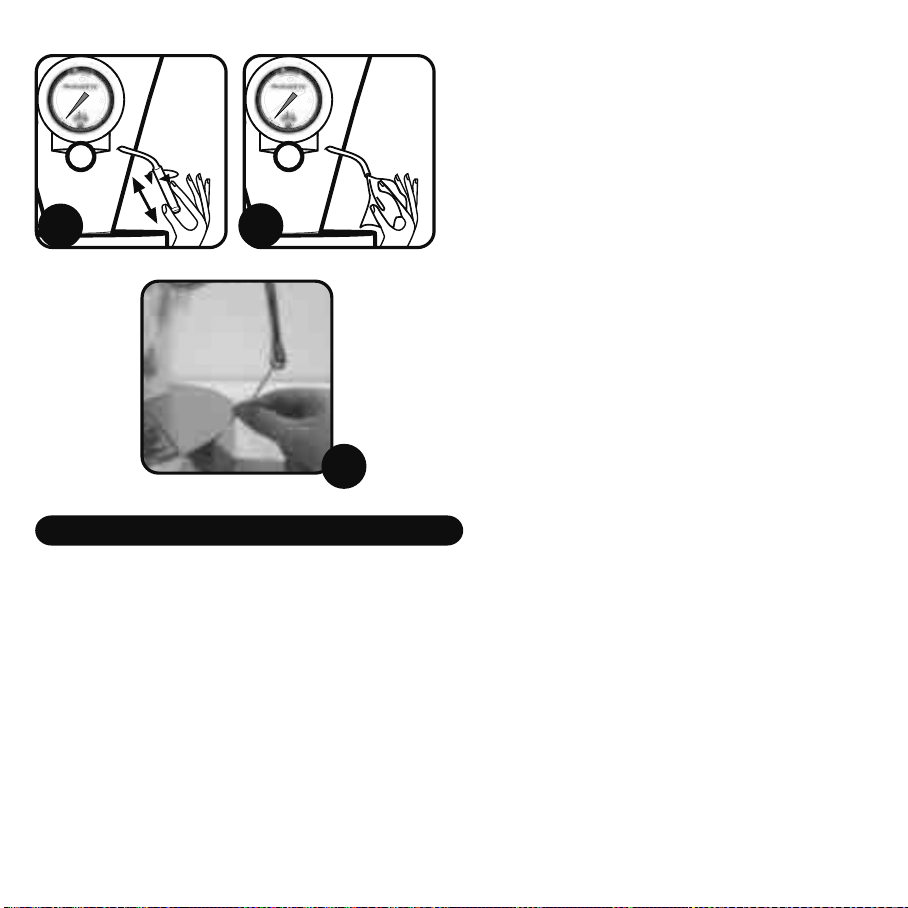
Cleaning and maintenance
Do not touch hot surfaces. Handle only with grips or anti-heat gloves every hot surface. Be careful also at the
steam/ hot water tube (see image “ C” ): DANGER OF BURNS! Steam and hot water can burn. Never point the
steam and t he hot water directly on the body.
Before cleaning the machine, turn the main switch to the OFF position and remove the plug from the
socket. Wait for the machine to cool. The appliance must be cleaned with a freshly dampened non-
abrasive cloth soaked with a few drops of neutral non-corrosive detergent (never use solvents). After
using the machine always clean the filter and filter holders and wipe the stainless-steel surface of the
filter holedr and of the brewing unit with a damp cloth.
H
H) Cleaning f ilt ers f or
ground cof f ee: Ensure t hat
t he holes in t he f ilt er are
free f rom cof f ee grounds.
If necessary,clean t hem
w i t h a sm al l br ush.
L
L)Cleaning t he brewing unit
(9)and it s gasket . Regularly
cl ean t he gasket under t he
brewing unit (9) wit h a wet
brush(Figure L) in order t o
remove all coffee residues.
The gasket must be
cl eaned all t he t ime.
1312
10)The st eam f unct ion can be repeat ed f ollowing again t he point s of t his paragraph.
The machine is always ready t o prepare coffee.
11) To cl ean t he t ube (8) see t he f ollowing chapt er: “ Cl eaning and maint enance”
12) Every t ime you ref ill t he wat er t ank (2), remember empt y t he drip grid (14)
13) Be careful: f requent ly check t he wat er level in t he wat er t ank(2). Never use
t he machine if t he wat er t ank (2) is empt y.
9
i
t
a
l
i
a
n
e
s
p
r
e
s
s
o
d
e
s
i
g
n
-
s
t
a
r
s
/
a
n
d
r
e
a
s
s
e
e
g
a
t
z
i
i
i
i
i
i
i
i
t
t
a
a
a
a
l
l
i
i
i
a
a
a
n
n
n
n
e
e
e
e
e
e
e
e
s
s
s
p
p
p
p
p
r
r
r
r
r
e
e
e
e
s
s
s
s
s
s
s
o
o
o
o
o
o
d
d
d
e
e
s
s
i
i
i
g
g
n
n
-
s
s
t
t
t
t
a
a
r
s
/
/
a
a
n
n
d
d
d
r
r
e
e
e
a
a
s
s
s
e
e
g
g
g
a
a
a
a
a
t
t
t
z
z
z
6
i
t
a
l
i
a
n
e
s
p
r
e
s
s
o
d
e
s
i
g
n
-
s
t
a
r
s
/
a
n
d
r
e
a
s
s
e
e
g
a
t
z
Á
7
!
i
i
i
i
tt
a
l
i
a
n
n
n
e
e
e
e
e
e
e
e
s
s
s
p
p
p
p
p
r
r
r
r
e
e
ss
s
s
o
d
d
e
e
e
e
s
s
s
i
g
g
g
g
nn
n
n
-
-
-
s
s
s
t
a
a
r
s
s
s
/
/
/
a
a
a
a
a
n
n
d
d
d
d
d
r
r
e
e
e
e
a
a
s
s
s
s
s
s
s
s
s
e
e
e
e
g
a
t
t
z
Á
Á
i
t
a
l
i
a
n
e
s
p
r
e
s
s
o
d
e
s
i
g
n
-
s
t
a
r
s
/
a
n
d
r
e
a
s
s
e
e
g
a
t
z
5
4
i
i
i
i
i
i
i
i
i
i
t
t
a
a
a
a
a
l
l
i
i
i
i
a
a
a
n
n
n
e
e
e
e
e
e
e
e
e
e
e
e
s
s
s
s
p
p
p
p
r
r
r
e
e
e
s
s
s
s
s
s
s
s
o
o
d
d
d
d
e
e
e
e
e
e
e
e
s
i
i
g
g
g
g
g
g
n
n
n
-
-
s
s
t
t
t
t
a
a
a
a
r
r
r
s
s
s
s
s
/
/
/
a
a
a
n
d
d
d
r
e
a
ss
s
s
s
s
e
e
e
e
e
e
e
e
e
e
e
g
g
g
a
a
a
a
tt
z
z
z
z
z
29
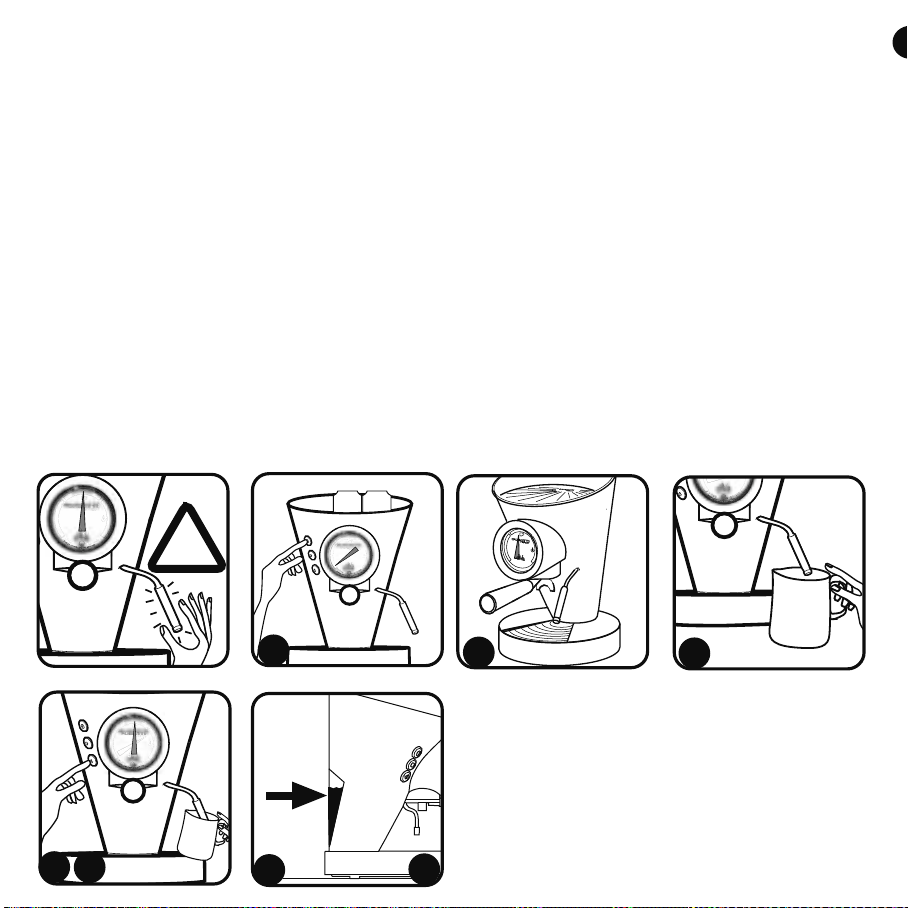
M1/ M2/ M3) To clean t he st eam t ube (8) f rom any
milk residuals be caref ul t o wait enough t ime t o
give t he t ube t he possibilit y t o cool down. Wit h a
wet sponge remove any milk residuals on t he st eam
t ube (8). Free t he hole of t he st eam t ube (8)wit h a
t oot hpick (image M3). Swit ch on t he machine pushing
on t he on/ of f but t on (3). Ensure t hat t he
t emperat ure point er is in t he posit ion of t he cof f ee
cup. To clean t he st eam t ube (8) place t he empt y
bucket under t he st eam t ube. Push during 5/ 6
seconds t he st eam but t on (5) t o permit t he st eam
coming out . Push again on t he st eam but t on(5) t o
st op t he st eam coming out . Be careful: before
removing t he bucket from t he t ube (8) wait some
seconds t o permit t he st eam st ops coming out .
To be excellent, espresso coffee must have the following features:
1) The serving of ground cof f ee must be seven grams (t o t he nearest half gram).
2) The t emperat ure of t he wat er leaving t he machine must be 88° C (give or t ake 2° C depending on t he
t ype of cof f ee blend).
3) The t emperat ure of espresso cof f ee must be 67° C.
4) Wat er-delivery pressure must be 9 at mospheres
5) Percolat ion t ime, i. e. t he t ime t hat coffee t akes t o pass t hrough t he nozzl e int o t he cup must be 25
seconds (give or t ake t wo seconds).
6) There must be 25 millilit res of coffee in t he cup. (give or t ake t wo and half mil lil it res).
To obtain an excellent Italian espresso as served at the bar, BUGATTI recommends using BUGATTI
coffee, either powder or in pods. This coffee is exclusively roasted in a wood- burning oven, especially
for diVa.
The best espresso coffee
i
t
a
l
i
a
n
e
s
p
r
e
s
s
o
d
e
s
i
g
n
-
s
t
a
r
s
/
a
n
d
r
e
a
s
s
e
e
g
a
t
z
®
i
t
a
l
i
a
n
e
s
p
r
e
s
s
o
d
e
s
i
g
n
-
s
t
a
r
s
/
a
n
d
r
e
a
s
s
e
e
g
a
t
z
®
M1
M2
i
i
i
ii
i
i
i
i
i
t
t
t
t
a
a
a
a
l
l
l
i
i
i
i
a
a
a
n
n
n
e
e
e
e
e
e
e
e
e
s
s
s
s
p
p
p
p
p
p
r
r
r
e
e
e
e
s
s
s
s
s
s
s
s
o
o
o
o
o
d
d
d
d
e
e
s
s
i
i
g
g
g
n
n
n
-
s
s
s
t
t
t
a
r
r
r
s
s
s
/
/
/
a
a
n
n
d
d
d
r
r
e
e
a
a
a
a
s
s
s
s
s
e
e
e
e
e
e
e
e
g
g
g
g
a
a
a
t
t
t
z
z
z
z
®
®
®
®
®
®
i
i
i
ii
i
i
i
i
i
t
t
t
t
a
a
a
a
a
a
l
l
l
l
i
i
i
i
a
a
a
n
n
n
e
e
e
e
e
e
e
s
s
s
p
p
p
p
r
r
r
e
e
e
e
s
s
s
s
s
s
s
s
s
o
o
o
o
d
d
d
d
e
e
e
s
s
i
i
i
g
g
g
n
n
n
-
s
s
s
t
t
a
r
r
s
s
s
/
/
a
a
a
n
n
d
d
r
r
e
e
a
a
s
s
s
s
s
s
s
e
e
e
e
e
e
g
g
g
g
a
a
t
t
t
t
z
z
z
z
®
®
®
®
M3
30
2 31 4
0 , 0 . . . %
Descaling
DiVa has been built wit h t he best mat erials available on t he market t oday. Caref ul and accurat e processing
and t he use of t he innovat ive ion exchange f ilt er enable t he hardest wat er t o be fil t ered.
The ion exchange filt er should be changed about every 3 t o 4 mont hs if t he hardness of wat er is around 20
t o 25 F° . We suggest t o use dist illed wat er. You can get a new f ilt er f rom your ret ail er or f rom Cust omer
Care at CASA BUGATTI. The ion exchange filt er (24) is housed inside t he t ank and is connect ed t o t he pump
suct ion pipe. To replace t his f ilt er (24), f ollow t hese simple inst ruct ions:
1) Remove t he wat er t ank (2).
2) Wit h one hand t ake t he filt er (24) and wit h t he ot her hand pull and rot at e alt ernat ely clockwise and
count erclockwise t he suct ion pipe near t he fit t ing f ixed t o t he filt er in such a way t hat t he pipe becomes
det ached.
3) Take t he original new CASA BUGATTI f il t er (24) and fit t he suct ion pipe ont o t he pipe f it t ing by exert ing
pressure and alt ernat ely t urning cl ockwise and count erclockwise so t hat t he pipe slides down over t he
ent ire lengt h of t he pipe fit t ing.
4) Again insert t he pipe wit h t he f ilt er int o t he t ank and carefully refit t he t ank f illed wit h f resh wat er ont o
t he machine.
5) In order t o prolong t he working lif e of t he Diva, we recommend using wat er t hat is low in sodium wherever
t his is possible.
N.B. : do not use descaling products with the Diva .
Advice and recommendations for use
31
T r o u b l e Possible cause So l u t i o n
Power-ON light does
not light up.
Machine is not powered.
Check correct connect ion of power supply cable t o t he
wall socket and t o t he machine.
Check t hat t here is elect ricit y in your syst em.
No coffee delivery.
Pump is noisy.
No wat er in t he t ank (2).
Tank is not correct in it s
seat .
Fill t he wat er t ank (2) wit h f resh wat er. Posit ion
it correct ly in it s seat . WARNING : frequently check the
level of water in the tank (2)
Steam switch (5) is ON.
Cof f ee t ast es burnt .
Fol low procedure at point 6) in sect ion “ Using st eam” ,
page 26, t o bring up t he machine t o t he ideal t emperat ure
for cof f ee again.
Wat er drops on t he drip
grille.
Normal discharge, due t o t he fact t hat drops of cof f ee
should f inish out of t he shower f ilt er hol der (15)
a. Make sure t he st eam but t on (5) is t urned on and wait
t hat t he point er of t he t hermomet er (6) is in t he sect or
of st eam.
b. Clean t he side hole of t he st eam nozzle prot ect ion
(12) wit h a t oot hpick, t hen wash it t horoughly inside and
out side (see t he cleaning and maint enance chapt er).
During t he milk f rot hing
we cannot get t he t ypical
of cappuccino f rot h.
a. The poi nt er of t he
t hermomet er has not yet
reached t he sect or of
st eam
b. The st eam nozzle (8)
and it s prot ect ion (12) are
blocked
a. Leave t he cups on t he warmer plat e (1) or rinse t hem
wit h hot wat er before use wit h t he coffee machine
b. Leave t he fil t er-holder unit (16) in t he seat of t he
brewing unit (9) so t hat it is always hot and ready for a
new cof fee at t he correct t emperat ure
c. Please call t he court esy service of f ice or send an e-mail
t o Bugat t i at diva@casabugat t i. it t o book t he assist ance.
Please not e t hat t he heat ing el ement is considered as
expendable mat erial and t heref ore is out side t he
prot ect ion of t he warrant y (The warrant y prot ect s t he
original defect ive component s t hat are f ault y f rom it s
origin due t o manuf act uring f ault s).
Cof f ee is not hot a. The cups are cold
b. The fil t er-holder (16)
unit is cold
c. The heat ing el ement of
t he boil er is damaged
a. Regul arly cl ean t he gasket under t he brewing unit (9)
wit h a wet brush (Figure L) in order t o remove all cof f ee
residues. The gasket must be cleaned all t he t ime (See
sect ion cleaning and maint enance).
b. Place t he pod in t he cent er of t he f il t er (15)
c. Put int o t he f ilt er "1cup" (18) no more t han 7 grams
or one cup of t he measuring cup (23) of ground coff ee.
Put 2 cups int o t he f ilt er (19) no more t han 14 grams or
t wo cups of measuring cup (23) of ground coff ee.
d. Pl ease call t he court esy service of f ice or send an e-mail
t o Bugat t i at diva@casabugat t i. it t o book t he assist ance.
Please not e t hat t he gasket s are considered as expendable
mat erial and t heref ore is out side t he prot ect ion of t he
warrant y (The warrant y prot ect s t he original defect ive
component s t hat are f ault y f rom it s origin due t o
manuf act uring f ault s).
Leaking of wat er bet ween
t he f ilt er-holder unit (16)
and t he brewing-unit (9)
a. There is cof fee powder
residue on t he gasket of
t he brewing-unit (9) and
/ or on t he edge of t he
fil t er-holder (16)
b. If you're making a
cof fee wit h t he ESE pods:
t he pod is not posit ioned
correct ly in t he middle of
t he f ilt er basket (15)
c. If you ar e m aki ng
cof fee wit h t he ground
cof fee: t here is t oo much
cof fee in t he f ilt er you are
using: f ilt er (18) t o 1 cup
or f ilt er (19) f or t wo cups.
d. The seal of t he
distribut ion unit (9) is
worn-out

32
WARRANTY
1) A warrant y is deemed t o be t he replacement or repair f ree of charge of t he part s making up t he appliance
t hat are faul t y f rom it s origin due t o manuf act uring faul t s.
2) In t he event or irreparable or repeat ed f ault s having t he same origins, at t he manuf act urer’ s sole discret ion,
t he machine will be replaced.
3) The warrant y does not cover damage due t o: incorrect or faul t y use, def ect s caused by accident al breakages
or carelessness, f ail ure t o observe inst ruct ions and warnings, incorrect inst allat ion and maint enance,
maint enance and/ or modif icat ions operat ed by unaut horised personnel . Use of non-original spare part s,
carriage and any ot her circumst ance t hat cannot be ascribed t o manufact uring f ault s, and any all claims not
envisaged by l aw are excluded.
4) The warrant y does not cover damage due t o improper use and in part icul ar t o non-domest ic use.
5) The manufact urer accept s no liabilit y f or any direct or indirect harm or inj ury t o persons, t hings and
domest ic animals t hat may arise from f ailure t o abide by all t he saf et y regulat ions cont ained in t his manual,
especially f ailure t o abide by t he inst ruct ions on inst allat ion, use and maint enance of t he machine.
6) Any repl acement or repair shall not int errupt t he warrant y period.
The replacement of expendable mat erials such as f ilt ers, seals, resist ance, et c, is not covered by t he warrant y.
7) To exercise t he above right s, t he cust omer must have ret urned t he at t ached card duly f illed in: Warrant ies
t hat miss even one of t he f ollowing part s shall not be t aken int o considerat ion: sender’s address, ret ailer’ s
st amp, number and/ or dat e of receipt of payment .
SERVICE CENTRE
In t he event of a machine f ault , cont act an aut horised BUGATTI dealer, who will ret urn t he machine t o t he
manufact urer.
The purchaser is responsible f or all carriage and/ or dispat ch cost f or all repairs not covered by warrant y.
Where possible, keep t he appliance’s original packing.
IMPORTANT INFORMATION FOR CORRECT DISPOSAL OF THE PRODUCT IN ACCORDANCE WITH EC
DIRECTIVE 2002/ 96/ EC.
At t he end of it s working lif e, t he product must not be disposed of as urban wast e.
It must be t aken t o a special local aut horit y dif f erent iat ed wast e collect ion cent re or t o a
dealer providing t his service. Disposing of a household appliance separat el y avoids possible
negat ive consequences f or t he environment and healt h deriving from inappropriat e disposal and
enables t he const it uent mat erials t o be recovered t o obt ain significant savings in energy and
resources. As a reminder of t he need t o dispose of household appliances separat el y, t he product
is marked wit h a crossed-out wheel ed dust bin.