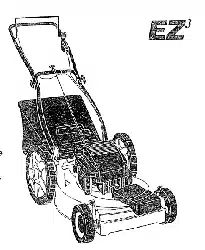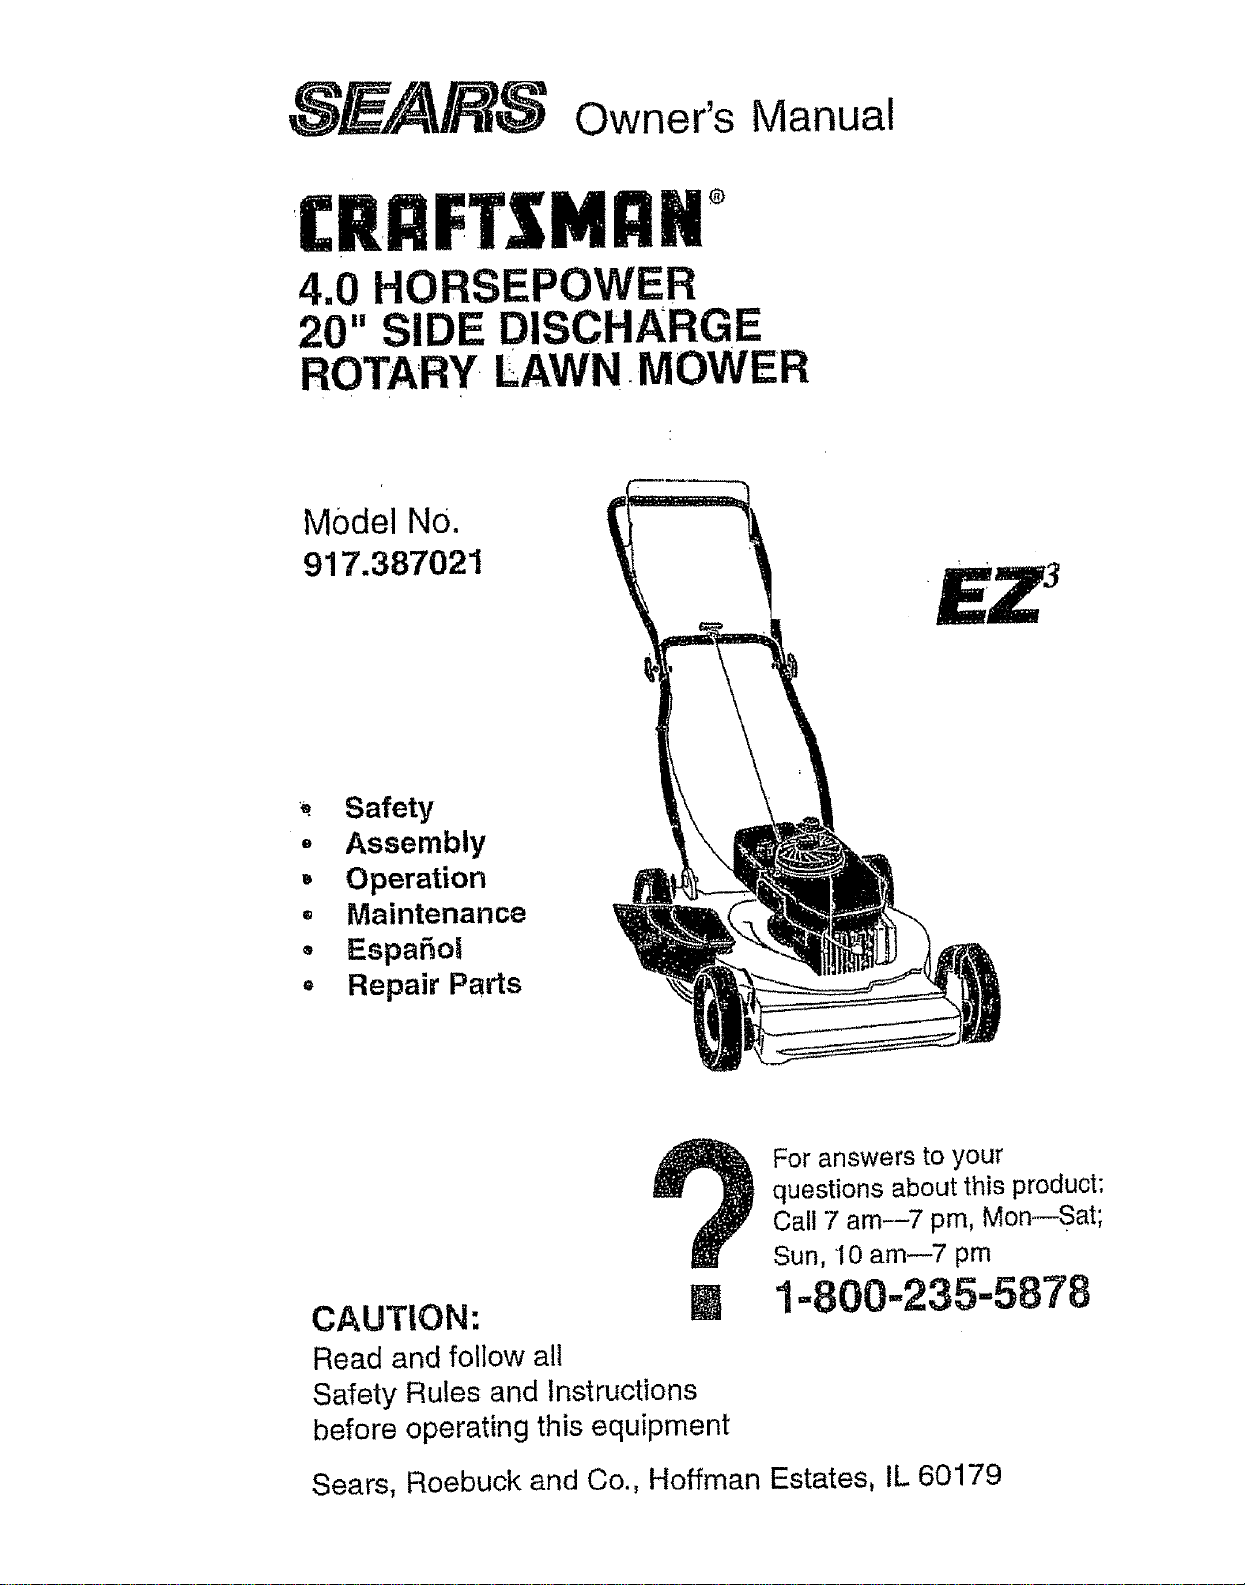
____-_ Owner's Manual
I:RnFTSMRH°
4.0 HORSEPOWER
20" SIDE DISCHARGE
ROTARY LAWN MOWER
Model NO.
917.387021
•_ Safety
- Assembly
,, Operation
,_ Maintenance
- EspaSol
o Repair Parts
'7
CAUTION:
Read and follow all
Safety Rules and Instructions
before operating this equipment
For answers to your
questions about this product:
Call 7 am--7 pro, Mort---Sat;
Sun, 10 am--7 pm
1=800-235-5878
Sears, Roebuck and Co., Hoffman Estates, IL 60179
Warranty 2 Product Specifications 11
Safety Rules 2 Service and Adjustments t3
Assembly 4 Storage 14
Operation 6 Troubleshooting 15
Maintenance Schedule 10 Repa!r+Pads + 32
Maintenance _ !0 Parts Ordering Back Cover
LIMFFED TWO YEAR WARRANTY ON CRAFTSMAN POWER MOWER
For two years from date of purchase, when this Craftsman Lawn Mower is maintained,
lubricated, and tuned up according to the operating and maintenance instructions in the
owner's manual, Sears will repair free of charge any defect in material or workmanship.
If this Craftsman Lawn Mower is used for commercial or rental purposes, this warranty
applies for only 90 days from the date of purchase.
This Warranty does not cover:
', Expendable ffems which become worn during normal use, such as rotary mower
blades, blade adapters, belts, air cleaners and spark plug.
o Repairs necessary because of operator abuse or negligence, including bent crank-
shafts and the failure to maintain the equipment according to the instructions con-
tained in the owner's manual+
Warranty service is available by returning the craftsman power mower to the nearest
sears service center/department in the united states.']"his warranty applies only while
this product is in use in the united states.
This Warranty gives you specific legal rights, and you may also have other rights which
vary from state to state,
SEARS, ROEBUCK AND CO., D/817 WA, HOFFMAN ESTATES, ILLINOIS 60179
TRAINING:
• Read this operator's manual carefully+
Become familiar with the controls and
know how to operate your mower
properly. [.,earnhow to quickly stop
mower+
o Do not allow children to use your mower.
Never allow adults to use mower without
proper instructions+
° Keep the area of operation clear of all
persons, especially small children and
pets+
• Use mower only as the manufacturer
intended and as described in this manual
• Do not operate mower ifit has been
dropped or damaged in any manner.
Always have damage repaired before
using your mower.
- Do not use accessory attachments that
are not recommended by the manufac-
lurer+ Use of such attachments may be
hazardous.
o "rhe blade turns when the engine is
running.
PREPARATION:
, Always thoroughlycheck the area to be
mowed and clear it of all stones, sticks,
wires, bones, and other foreign objects.
These objects wilt be thrown by the blade
and can cause severe injury,,
- Always wear safety glasses or eye
shields when starting and while using
your mower+
• Dress properly. Do not operate mower
when barefoot or wearing open sandals.
Wear only solid shoes with good traction
when mowing.
• Check fuel tank before starting engine,
Do not fill gas tank indoors, when the
engine is running or when the engine is
2
•hot, A low.[he engine to coo for severat o Never cut .qrass by pulling the mower
,._nute_bef_re_flllln_ t)_ gas tank;'Otean."i_, _:"tow_r_s y_u:.l_o_ _l'os_ the face of
off any spilled gasoline before starting the slopes, never up and down or you might
engine.
• Always make wheel height adjustments
before starting your mower. Never
attempt to do this while the engine is
running,
, Mow only in daylight or good artificial
light.
OPERATION:
• Keep your eyes and mind on your mower
and the area being cut. Do not tet other
interests distract you°
• Do not mow wet or slippery grass. Never
mn while operating your mower..Always
be sure of your footing _ keep a firm
hold on the handles and walk.
- Do not put hands or feet near or under
rotating parts. Keep clear of the discharge
upening at all times.
° Always stop the engine whenever you
leave or are not usir_g your mower, or
before crossing driveways, walks, roads,
and any gravel--covered areas.
° Never direct discharge of mafedat toward
bystanders nor allow anyone near the
mower while you are operating it,
o Before clean!ng, ins{3ectmg, or repairing
your mower, stop the engine and make
absolutely sure the Bladeand all moving
parts have:,stopped.'Then disconnect the
spark plug wii'e and keep it away from the
spark plug to prevent accidental starting.
° Do not continue to run your mower if you
hit a foreign object, Follow the procedure
outlined above, then repair any damage
before restarting and operating you
mowe ro
Do not change fhe governor settings or
overspeed the engine_ Engine damage or
personal injury may result.
- Do no1operate your mower if it vibrates
abnormally. Excessive vibration is an
indication of damage; stop the engine,
safely check for the cause of vibration
and repair as required.
o Do not run the engin e indoors. Exhaust
fumes are dangerous.
lose your footing. Do not mow exces-
sively steep slopes_ Use caution when
operating the mower on uneven terrain
or when changing directions ._ maintain
good footing_
• Never operate your mower without
proper guards, plates, grass catcher or
other safety devices in place.
MAINTENANCE AND STORAGE:
. Check the blade and the engine mount-
ing bolts often to be sure they are
tightened properly.
• Check all bolts, nuts and screws at
frequent intervals for proper tightness to
be sure mower is in safe working
condition:
, Keep all safety devices in place and
working.
° To reduce fire hazard, keep the engine
free of grass, leaves or excessive grease
and oil.
• Check grass catcher often for detedora-
lion and wear and replace worn bags.
Use only replacement bags that are;
recommended by and comply with ;
specifications Ofthe manufacturer of your
mower.
Always keep a sharp blade on your
:mower,
• Allow engine to cool before storing in any
enclosure.
• Never store mower with fuel in the tank
inside a building where fumes may reach
an open flame or an ignition source such
as a hot water heater, space heater,
clothes dryer, elco
CAUTION: Always disconnect spark plug
wire and place wire where it cannot contact
spark plug in order to prevent accidental
starting when setting up, transporting,
adjusting or making repairs.
WARNING
The engine exhaust from this product
contains chemicals known to the State:of
California tOcause cancer, birth defects, or
other reproductive harm.
These accessories were available when this lawn mower was produced, They are also
available at most Sears retail outlets and service centers, Most Sears stores can also
order repair parts for you, when you provide the model number of your lawn mower,
Some of these accessories may not apply to your lawn mower:
LAWN MOWER PERFORMANCE
CLIPPING DEFLECTOR
FOR REAR DISCHARGE LAWN MOWERS
GRASS CATCHERS
FOR
REAR DISCHARGE
LAWN MOWERS
MULCHER _TS
GRASS CATCHERS
FOR
SIDE DISCHARGE
LAWN MOWERS
...... STABILIZER
GAS CANS
LAWN MOWER MAINTENANCE
,_, ,,
MUFFLERS AIR FILTERS SPARK PLUGS
BELTS BLADES
,BLADE ADAPTERS
ENGINE OIL
Read these instructionsand this manual in
its entirety before you attempt to assemble
or operate your new lawn mower. Your
new lawn mower has been assembled at
the factory with the exception of those
parts left unassembled for shipping
purposes. All parts such as nuts, washers,
bolts, etc,, necessary to complete the
assembly have been placed in the parts
bag. To ensure safe and proper operation
of your lawn mower, all parts and hard_
ware you assemble must be tightened
securely, Use the correct tools as 'neces-
sary to ensure proper tightness.
TO REMOVE LAWN MOWER FROM
CARTON
• Remove loose parts inctuded with
mower.
• Cut down two end corners of carton and
lay end panel down fiat,
• Remove all packing materials except
padding between upper and lower
4
handle and padding holding operator
presence control bar to upper handle.
• Roll lawn mower out of carton and check
carton thoroughly for additional loose
pads.
HOW TO SET UP YOUR LAWN
MOWER
TO UNFOLD HANDLE
iMPORTANT: Unfold handle carefully so
as not to pinch or damage control cables.
Operator presence
control bar
Upper handle
Lift up
Lower handle "_
Mowing
position
• Raise handles until lower handle section
locks into place in mowing position.
• Remove protective padding, raise upper
hat, die section into place on lower
handle and tighten both handle knobs.
° Remove handle padding holdidg
operator presence contro{, bar to upper
handle.
Your lawn mower handle can be
adjusted for your mowing comfort.
Refer to "Adjust Handle" in the Service
and Adjustments section of this manual.
J .....
KNOW YOUR LAWN MOWER ....... "
READ THIS oWNEF{'S MANtJAL AND SAFETY RULES BEFORE OPfERAT NG YOUR LAWN
MOWER. Compare the illustrations with your lawn mower tofamiliarize yourself with the '_
!ocation of vadouscont_9lsand adJusfmen!st _save thisi_anua! for future reference.
These symbols may appear on your lawn mower or in literature supplied with the
product. L.eam and understand their meaning.
CAUTION ENGtN_ ENGINE FAST BLOW CHOKE FUEL O_L bANGER, KEEP HANDB
OR WARNING ON OFF , AND FEET AWAY
Engine zone
presence
control cable control bar
Upstop bracket
Starter handle
Handle knob
Cable clip
Engine oil cap Gasoline fill cap
with dipstick
Primer
Discharg e
guard Housing
Mulcher
plate
MEETS CPSC SAFETY REQUIREMENTS
Sears rotary walk-behind power lawn mowers conform to the safety standards of the American
National Standards Institute and the U,S. Consumer Product Safety Commission. The blade
turns when the engine is running,
Operator presence control bar- must be
held down to the handle to start the engine,
Release to stop the engine.
Primer - pumps additional fuel from the
Wheel adjuster
(on each wheel)
carburetor to the cylinder for use when starting
a cold engine,
Starter handle - used for starting the engine,
Muleher plate- Located at the discharge
opening must be removed when converting to
bagging or discharging operation.
Theoperationofanylawnmowercan resultJn
foreignobjectsthrown into the eyes, which can
result in severe eye damage. Always wear
safety glasses or eye shields while operating
your lawn mower or performing any adjust-
merits or repairs. We recommend a wide
vision safety mask over the spectacles or
standard safety glasses.
ENGINE SPEED
The engine speed Was set at the factory for
optimum performance. Speed is not adjust-
able. =
ENGINEZONEC0m OL
CA!.I.'FtON; Federal regulations require an
engine-control to be ins_led or} this tawn
mower in order to minimize the risk of blade
contact injury, DO not under any circumstances
attempt to defeat the luncUon of the operator
control,The blade turns when the engine ts
nJnning.
• Your lawn mower is equipped with an
operator presence controj bar which
requires the operator to be positioned
behind the lawn mower handteto start and
operate the lawn mower.
Lower Wheels for
High Cut
Raise Wheels for
Low Cut
Plate Tab
_Lsver
TO ADJUST CUTTING HEIGHT
• Raise wheels forlow cut and lower wheels
for high cut.
• Adjust cutting height to suit your require-
ments, Medium position is bestfor most
lawns_
° To change cutting height, squeeze adjuster
levertoward wheel, Move wheel up or
down to suit your requirements, Be sure atl
wheels are in the same setting,
NOTE: Adjuster is propedy positioned when
plate tab inserts into hole in lever. Also, 9-
position adjusters (ifso equipped) allow lever
to be positioned between theplate tab&
Your lawn mower has been sn_ppeo reaoy _or
mulching operation. To convert to discharging
or bagging operation:
TO CONVERT TO DISCHARGING MOWER
Your mower is shipped ready to be used as a
mulcher, To convert to bagging or discharging:
° Lilt discharge guard and remove mulcher
plate.
• Mower can now be used for side discharg-
ing or optionalgrass catcher can be
attached,
• To ret_m to mulching operation, simply
:reinstall mulcher plate as Shown.
CAUTION: Do notrun yoQriawn mower
without discharge guard, approved grass
catcher or mutcher plate in place,
Tab
Discharge guard
Mulcher
Plate
BEFORE STARTING ENGINE
OIL
Your lawn mower is shipped without oil in
the engine.
, Be sure mower is level and area around
oil {ill iS clean.
° Remove engine oil cap w!dipstick and fill
to the full line on the dipstick,
° Use 20 ozs. of oil, For type and grade
of oil to use, see "ENGINE" in Customer
Responsibilities section of this manual.
• Pour oil stowly, Do not over fill,
° Check oil level before each use. Add oil
if needed. Fill to full line on dipstick,
• To read proper level, tighten engine oll
cap each time.
° Reinstall engine oil' cap and tighten,
° Chat_ge the oil after every 25 hours of
operation or each season. You may
need to change the oil more often under
dusty, dirty conditions.
GAS
° Fill fuel tank. Use fresh, clean, regular
unleaded gasoline with a minlmqm of 87
octane. Do not mix oil with gasoline.
Purchase fuel in quantities that can be used
within 30 days to assure fuel freshness.
6
"WARNING: Experience indicates that alcohol
blended fuels (called gasohol or us!ng ethanol
or methanol) can attract moisture which leads
to separation and [ormaUonof acids during
storage. Acidic gas can damage the fuel
system of an engine while in storage. To avoid
engine problems, thefuel system should be
emptied beforestorage of 30 days or longer
Drain the fueltank, start the engine and let it
run until fuellines and carburetor are empty.
Use fresh fuel next season. See Storage
instructions for additional information.Never
use engine or carburetor cleaner products in
rue!tank or permanent damage may occuc
..f-"" - ----_ Gasoline
Engine;oil-__ fi,ler t_ap
TO START ENGINE
• To start a cold engine, push primer:five
(5) timesbefore tryihg to start. Use a
firm push, This step is not Usually
necessary when starting an engine
which has already run for a few minutes.
• Hold ope[ator presence control bar
down to the handle and puff starter
handle quickly. Do not aIIow starter
rope to snap back_
o To stop engine, release operator
presence control bar.
NOTE: In cooler we_atherit may be
necessary to repeat #timing steps, in
warmer weather over priming may cause
flooding and engine Will not start. If you do
flood engine, wait a few minutes before
attempting to start and do not repeat
priming steps.
MOWING TIPS
• Under certainconditions, such as very tall
grass; itmay be necessary to raise the
height of cut to reduce pushing effort and to
keep from overloading the engine and
leaving clumps of grass clippings.
° For extremely heavy cutting, reduce the
width of cut by overlapping previousiy cut
path and mow slowly..
• For side discharge lawn mowers, cutting in
a counter-clockwise direction, starting at the
outside ofthe area to be cut,spreads grass
clippings more evenly and putsless load on
the engine. To keep clippings off of
walkways, flower beds; etc., make the first
cuts{na clockWise direction.
. Pores incloth grass catchers can become
filledwith dirt and dust with use and
catchers will collect less grass. To prevent
this, regularlyhose catcher offwith water
and iet dry before using°
° Keep top of engine around starter dear and
clean of grass clippings and chaff, This will
he!pengine airflow and extend enginelife.
MULCHING MOWING TIPS
IMPORTANT: For best performance, keep
mower housing free ofbuilt-up grass and
trash.Clean underside of mower housingafter
each use.See "CLEANING" in CUSTOMER
RESPONSIBILITIES section of this manual
• The special mulching btade wili recut the
grass clippings many times and redu_
them in sizeso that as they fall onto the
lawn they Willdisperse Intothe grass and
not be noticed° Also, the mulched grass Wil!
biodegrade quickly to provide nutrientsfor
the lawn. Always mulch with your highest :
engine (blade) speed as _liS Wi{{ provide the
best recurringaction:of the blades.
• Av6idcuttingyoUr lawn when it iswet',.Wet!
grass tends to form clumps and interferes
with the mulching action. The best tir_teto
mow your lawn is the early aftemoonJ At
this time the grass has dried and the newly
cu_.areawill not be exposed to thedirect
SUn;
• Forbest results, adjust the awn mower
cutting height so that the lawn mower;cuts
off only thetop one4hird of the grass blades.
Ifthe lawn is overgrown itwilebe necessary
to _se the height ofcut to reduce pushing
effortand to keep:from overloading the
engineand leaving clumps of mulched
grass, Forextremely heavy mulching_ :
reduceyour width of Cut,mow slowly and
raisethe rear of the lawn mower one wheel
adjuster setting highei"than the front;
• Certain types of grass and grass conditions
may requirethat an area be mulched a
second timeto completely hide the :
clippings. When doing a second cut, mow
across or perpendicular to the firstcut path.
° Change your cutting pattem from week to
week. Mow north to south one Weekthen
change to east to west the nextweek. This
wi!!help prevent matting and graining of the
lawn.
Max 1,3
7
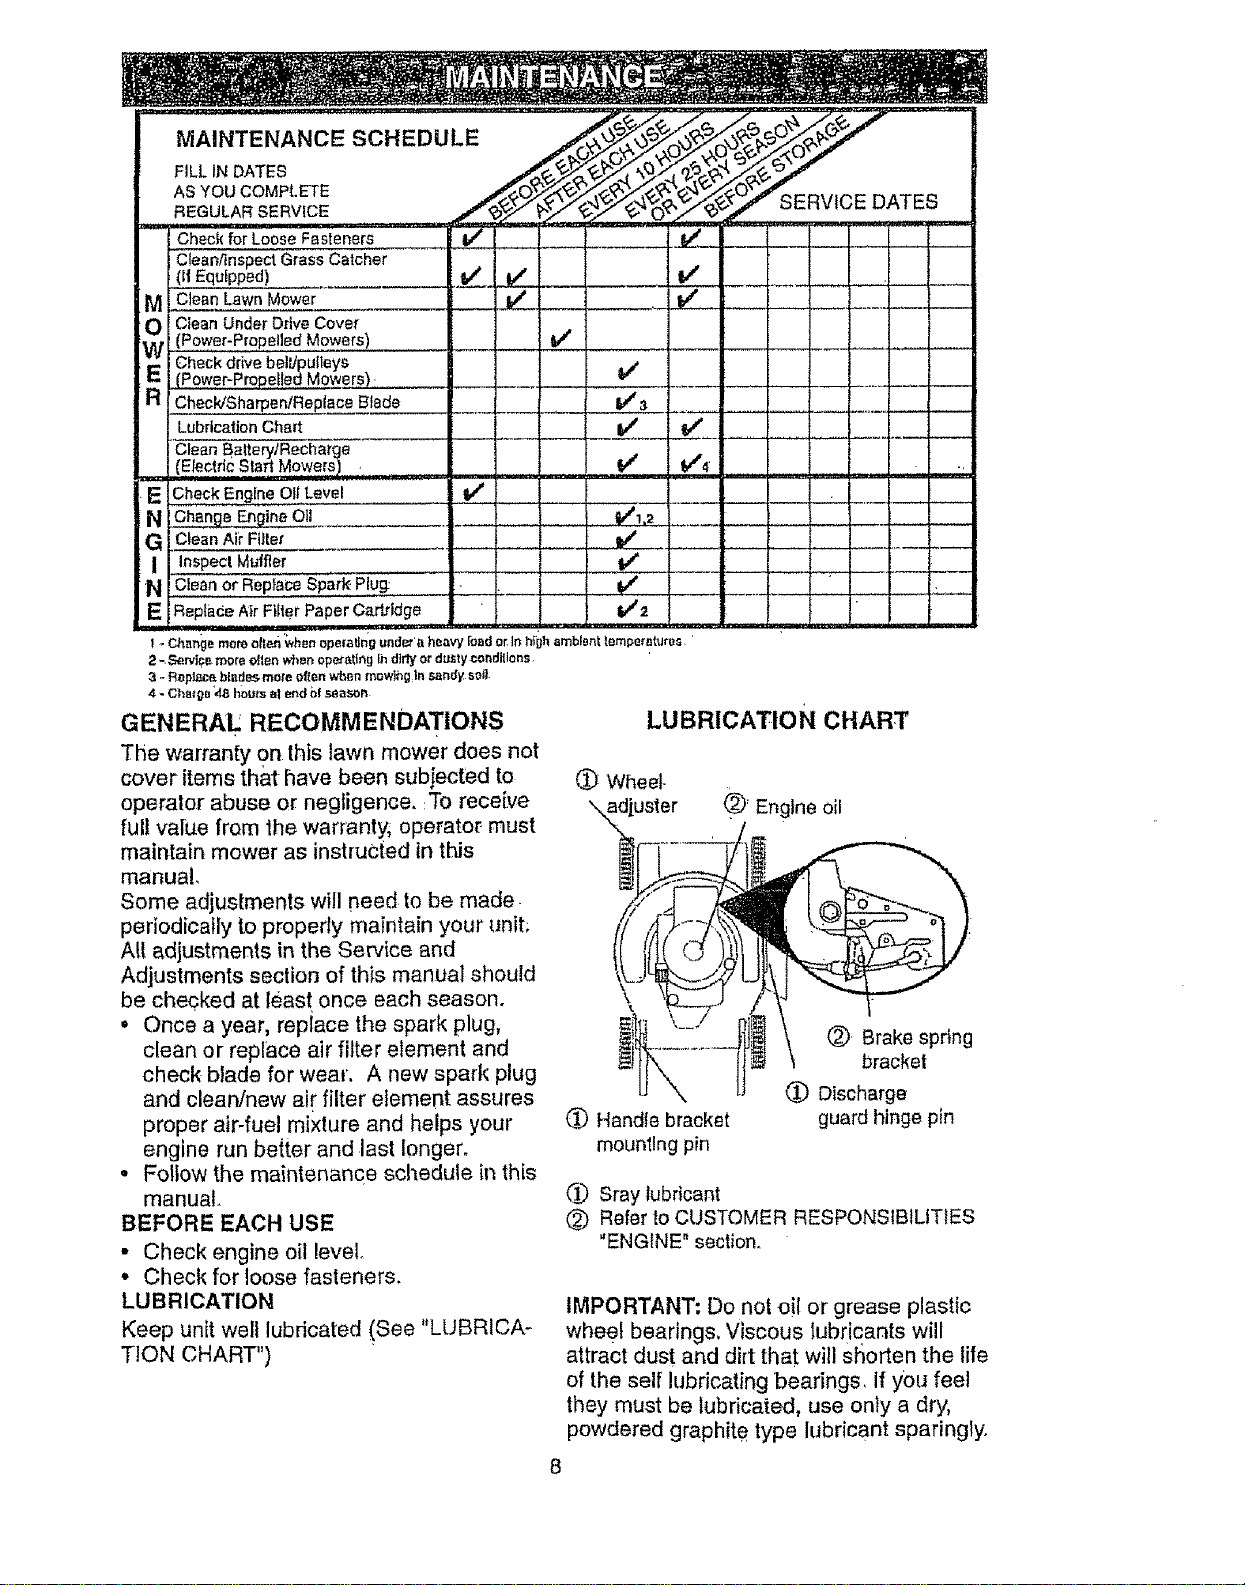
Check forLoose Fasteners
Clean/inspect Grass Catcher
(If Equipped)
i CteanLawn Mower
Clean Under Drive Cover
(Power-Propelled Mowers) .......
Check drive belL/pulleys
[Power-Pro#oiled Mowers):.......
!R ChecldSharpen/Replace Blade
Lubrication Chart
Clean Batte_lRecharge
(Electric Start Mowers/. ,,,
E Check Engine Oil.Level
N ,_e o_l
G Clean Air Filter
l Inspecl Mt,_lfler .
N Clean or ReplaCe Spark Plug:
E Repiade Air Filter Paper Cartridge
..... .Iv'
v'
v"
v'3
v'
t,/4¸
, , 91"_1_-
, v'
v"
V ,
.........v'2...........
liit i i , i l'1'u!'Hl', ,
! ,,Change more often _'hen ope[aUng unde_',_heavy Ib_d o_ In h_ghambient tempe_ro_ '
2,-.Series more _ien whDnoperating fh dirty or d_ty t_ondillons
3 .. RepL_ blndes.more ofien when mowing tn ,_ndy soil.
4 - Cha_gB "48 hours al end o! season
GENERAL RECOMMENDATIONS
The warranty On this lawn mower does not
cover items that have been subiected to (_ Wheel-
operator abuse or negligence. :To recei.ve ",,adjuster
full value from the warranty, operato_ must ",
maintain mower as instructed in this
manual.
Some adjustments will need to be made.
periodically to properly maintain your unit;
All adjustments in the Service and
Adjustments section of this manual should
be checked at least once each season. \
• Once a year, replace the spark plug,
clean or replace air filter element and
check blade for wear. A new spark plug
and clean/new air filter element assures
proper air-fuel mixture and helps your
e '
ngme run borer and last longer.
• Follow the maintenance schedule in this
manual.
BEFORE EACH USE
• Check engine oil level.
• Check for loose fasteners.
LUBRICATION
Keep unit well lubricated (See "LUBRICA-
TION CHART")
(_ Handie bracket
mounting pin
LUBRICATION CHART
_): Engine oil
(_) Brake spring
bracket
(_ Discharge
guard hinge pin
IMPORTANT: Do not oil or grease plastic
wheel bearings. Viscous lubricants will
attract dust and dirt that will shorten the life
of the self lubricating bearings, If you fee!
they must be lubricated, use only a dry,
powdered graphite type lubricant sparingly.
(J_ Sray lubricant
_) Refer to CUSTOMER RESPONSIBILITIES
"ENGINE" section.
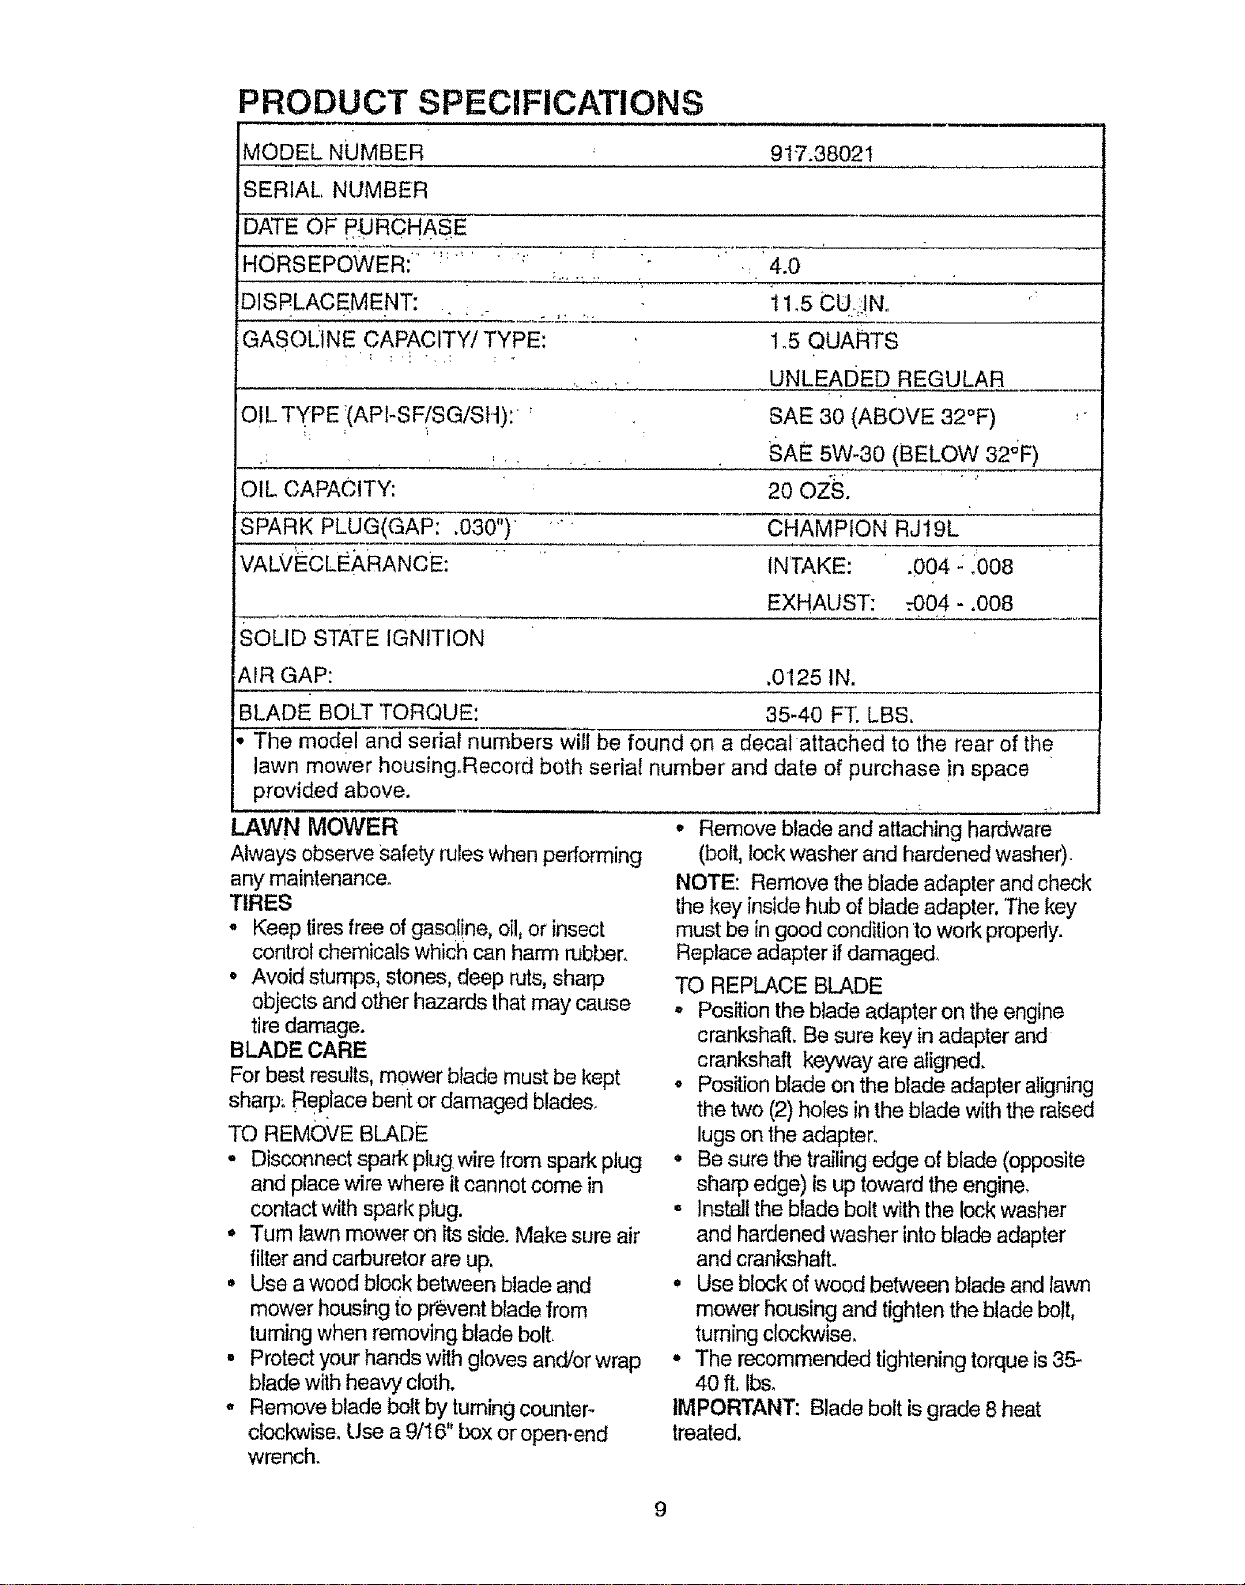
PRODUCT SPECIFICATIONS
MODEL NUMBER 917.38021
SERIAL, NUMBER
DATE OF .P,URCHASE
HORSEPOWER: .... !_.,. t._. . =
DISPLACEMENT:
GASOL_INE CAPACITY/TYPE:
OIL TYPE _(API-S FiSG/SH):
• = .
OIL CAPACITY:
SPARK PLUG(GAP: .030")
VALVF:CLEARANCE: "
-: 4.0
1,5CUJN.
1.5 QUARTS
,_.. ,. UNLEADED REGULAR
SAE 30 (ABOVE 32°F)
SAE 5W-30 (BELOW 32'_F)
20 OZS.
.... CHAMPION RJ19L
INTAKE: .004 -:_008
EXHAUST: .-004 - .008
SOLID STATE IGNITION
AIR GAP: ,0125 IN.
BLADE BOLT TORQUE: 35-40 FT. LBS.
The model and serial numbers will be found on a decal attached to the rear of the
lawn mower housing.Record both serial number and date of purchase !n space
provided above.
LAWN MOWER
Always observe Safety rules when performing
any maintenance.
TIRES
. Keep tires free of gasoline , oil, or insect
control chemicals which can harm rubber..
• Avoid stumps, stones, deep ruts, sharp
objects and other hazards that may cause
tire damage.
BLADE CARE
For best results, mower blade must be kept
sharp; Replace bent or damaged blades.
TO REMOVE BLADE
• Disconnect spark plug wire from spark plug
and place wire where it cannot come in
contact with spark plug.
• Turn lawn mower on its side. Make sure air
filter and carburetor are up,
• Use a wood block between blade and
mower housing to prevent blade from
tuming when removing blade bolt.
• Protect your hands with gloves and/or wrap
blade with heavy" cloth.
• Remove blade bolt by turning counter-
clockwise, Use a 9/I6" box or open.end
wrench.
• Remove blade and attaching hardware
(bolt, lock washer and hardened washer).
NOTE: Remove the blade adapter and check
the key inside hub of blade adapter, 'The key
must be in good condition to work properly.
Replace adapter if damaged.
TO REPLACE BLADE
• Position the blade adapter on the engine
crankshaft. Be sure key in adapter and
crankshaft keyway are aligned.
• Position blade on the blade adapter aligning
the two (2) holes in the blade with the raised
lugs on the adapter.
• Be sure the trailing edge of blade (opposite
sharp edge) is up toward the engine,
,, Insta]I the blade bolt with the lock washer
and hardened washer into blade adapter
and crankshafL
° Use block of wood between blade and lawn
mower housing and tighten the blade bolt,
turning clockwise,
° The recommended tightening torque is 35-
40 ft, Ibso
IMPORTANT: Blade belt is grade 8 heat
treated,

NOTE:Wedonotrecommendsharpening
blade-butifyoudo,besurethebladeis
balanced+ Crankshaft
Blade keyway
bO_d "TFa_ing Blade
\ washer edge . adapter "
Lock washer
TO SHARPEN BLADE
Care should be taken to keep the blade
balanced. Anlunbalanced blade wllt cause
eventgal damage to lawn mower or
engine. +
• The: blade can be sharpened with a file
or on a grinding wheel. Do not attempt
to sharpen while on the mower.
° To _heck bl!ade balance, drive a nail into
a beam or Wall. Leave about one inch of
the straightinail exposed. Place center
hole of blade over the head of the nail.
If blade iS b_lanced, it should remain in
a h0rizontai position° If either end of the
blade moves downward, sharpen the
heavy end Until the blade is balanced.
GRASS CATCHER
(If purchased _s an accessory)
° Thelgrass catcher may be hosed with
water, but must be dry when used.
° Check your grass catcher often for
damage or deterioration. Through
normal use it will wear. If catcher needs
replacing, replace only with a manufac-
turer approved replacement catcher.
Give the lawn mower model number
when ordering,
ENGINE
LUBRICATION
Use only high quality detergent oil rated
with API service classification SF, SG of'
SH. Select the oil's SAE viscosity grade
according to your expected operating
temperature.
NOTE: Although multi-viscosity oils
(5W30, t0W30 etc.) improve starting in
cold weather, these multi-,viscosity oils will
result in increased oil consumption when
used above 32°F.
_' SAE V!BCOS[TY GRADES ]
Check your engine oil level more fre-
quently to avoid possible engine damage
from running low on oil.
Change the oil after every25 f_ours of:
oPera!i_n or _atlea.st 6n_e _ yearif the
lawn mower is n0tused :fdr 25 hout:s in
one year. ' :
Check the crankcase oil level before
stairting the engine an d after bach five (5)
. hours 0f:cdfltinu0Us use: Tighten 0i! p!ug
securely each time you check the o11level
TO CHANGE ENGINE 0IL
NOTE: Before tipping lawn mower to drain oil,
dra!n fuel tank by running engine until fuel:tank
is empty.
• DiscOnnect spark plug wire from spark plug
and place wire where it cannot come in
contact with spark plug.
• Remove engine oil cap; lay aside on a clean
surface.
• Tip lawn mower on its side as shown and
drain oil into a suitable container. Rock lawn
mower back and forth to remove any oil
trapped inside of engine.
• Wipe off any spilled oil on Iawn mower and
on side of engine,
• Fill engine with oil, Fill only to the "FULL"
ine on the dipstick. DO NOT OVER FILL
•RepIace engine oil cap.
• Reconnect spark plug wire to spark plug.
Container
AIR FILTER
Your engine will not run properly and may be
damaged by using a dirty air filter,
Replace the air filter every year, more often if
you mow in very dusty, dirty conditions, Do no1
wash air filter.
TO CHANGE AIR FILTER
• Remove the air filter by turning counter-
clockwise to the stop and pulf away from
collar.
° Remove filter from inside of cover.
o Clean the inside of the cover and the collar
to remove any dirt accumulation
• Insert new filter into cover.
t0

' • Put air fitter cover and filter into collar
aligning the tab with the sloto
° Push in on cover and turn clockwise to
tighten,
Co!tar Clip
"['urn
;ounter-
'lse
tOremove
Air filter ':i: ._:'_
Tab Turn clbckw se
' Air' filier cover _'- io t!gh!grl
MUFFLER
lnspec,t and replace corr0ded rduif{er as it
could create a fire hazard andl01-damage,
SPARK PLUG
Change your spark plug each year _9 make
your engine start easter and run better. Set
spark plug gap at .030 inch.
CLEANING
IMPORTANT: Forbest performance, keep
mower housing free of built-up gr&ssand
trash.Cleafl the underside of yo_Jrmower after
each use..
CAUTION: Disconnect spark plug wire from
spark plug and place wire where it cannot
come incont_t with the _park plug.
• Clean the underside of your lawn mower by
scraping to remove build-up of grass and
trash.
• Clean engine often to keep irash from
accumulating, A clogged engine funs hotter
and shortens engine life.
• Keep finished,surfacesand wheels freeof
all gasoline, oil,etc_
o We dp not recommend using a garden
hose to Cleanlawn mower unless the
electrical system, muffler; air filter and
carburetor are covered to keep water ouL
Water inengine can result inshortened
engine life.
CAUTION: BEFORE PERFORMINGANY
SERVICE OR ADJUSTMENTS"
- Release control bar.
° Make sure the blade and all moving
parts have completely stopped.
, Disconnect spark plug wire from spark
plug and place where it cannot come
in contact with plug.
LAWN MOWER
TO ADJUST CUTTING HEIGHT
See "TO ADJUST CUTTING HEIGHT" in the
Operation section of this manual.
REAR DEFLECTOR
The rear deflector, attached between the rear
wheels of your mower, is provided to minimize
the possibility that objects will be thrown out of
the rear of the mower into the operator
mowing position. If the deflector becomes
damaged, itshould be replaced,
DISCHARGE GUARD
The discharge guard attached to the dis-
charge opening of your lawn mower, is
provided to prevent the possibility of injury
resulting from objects being thrown out of the
discharge opening into the operator mowing
position. If the discharge guard becomes
damaged, it should be replaced.
TO ADJUST HANDLE
Your lawn mower handle can be raised or
lowered for your mowing comfort. Four
(4) positions are available: high, medium
high, medium low and low. Handles are
shipped mounted in the medium low
position.
• To change from medium low to medium
high position, the upper and lower
handle sections wilt have to be turned
over.
• Remove the cable clips.
° Remove the controls and operator
presence control bar from the upper
handle_
• Remove the starter rope guide from the
lower handle.
• Remove hairpin cotters.
° Disconnect the lower handle from the
handle brackets.
° Turn the handle over and reassemble
the hairpin cotters that have been
removed.
° Reassemble the starter rope guide.
• Reassemble the controls and the
operator presence control bar to the
upper handle.
CAUTION: The operator presence
control bar must pivot freely to permit
blade/brake engagement when control bar
is released, Do not overtighten the
fasteners holding the controls to the upper
11handleo
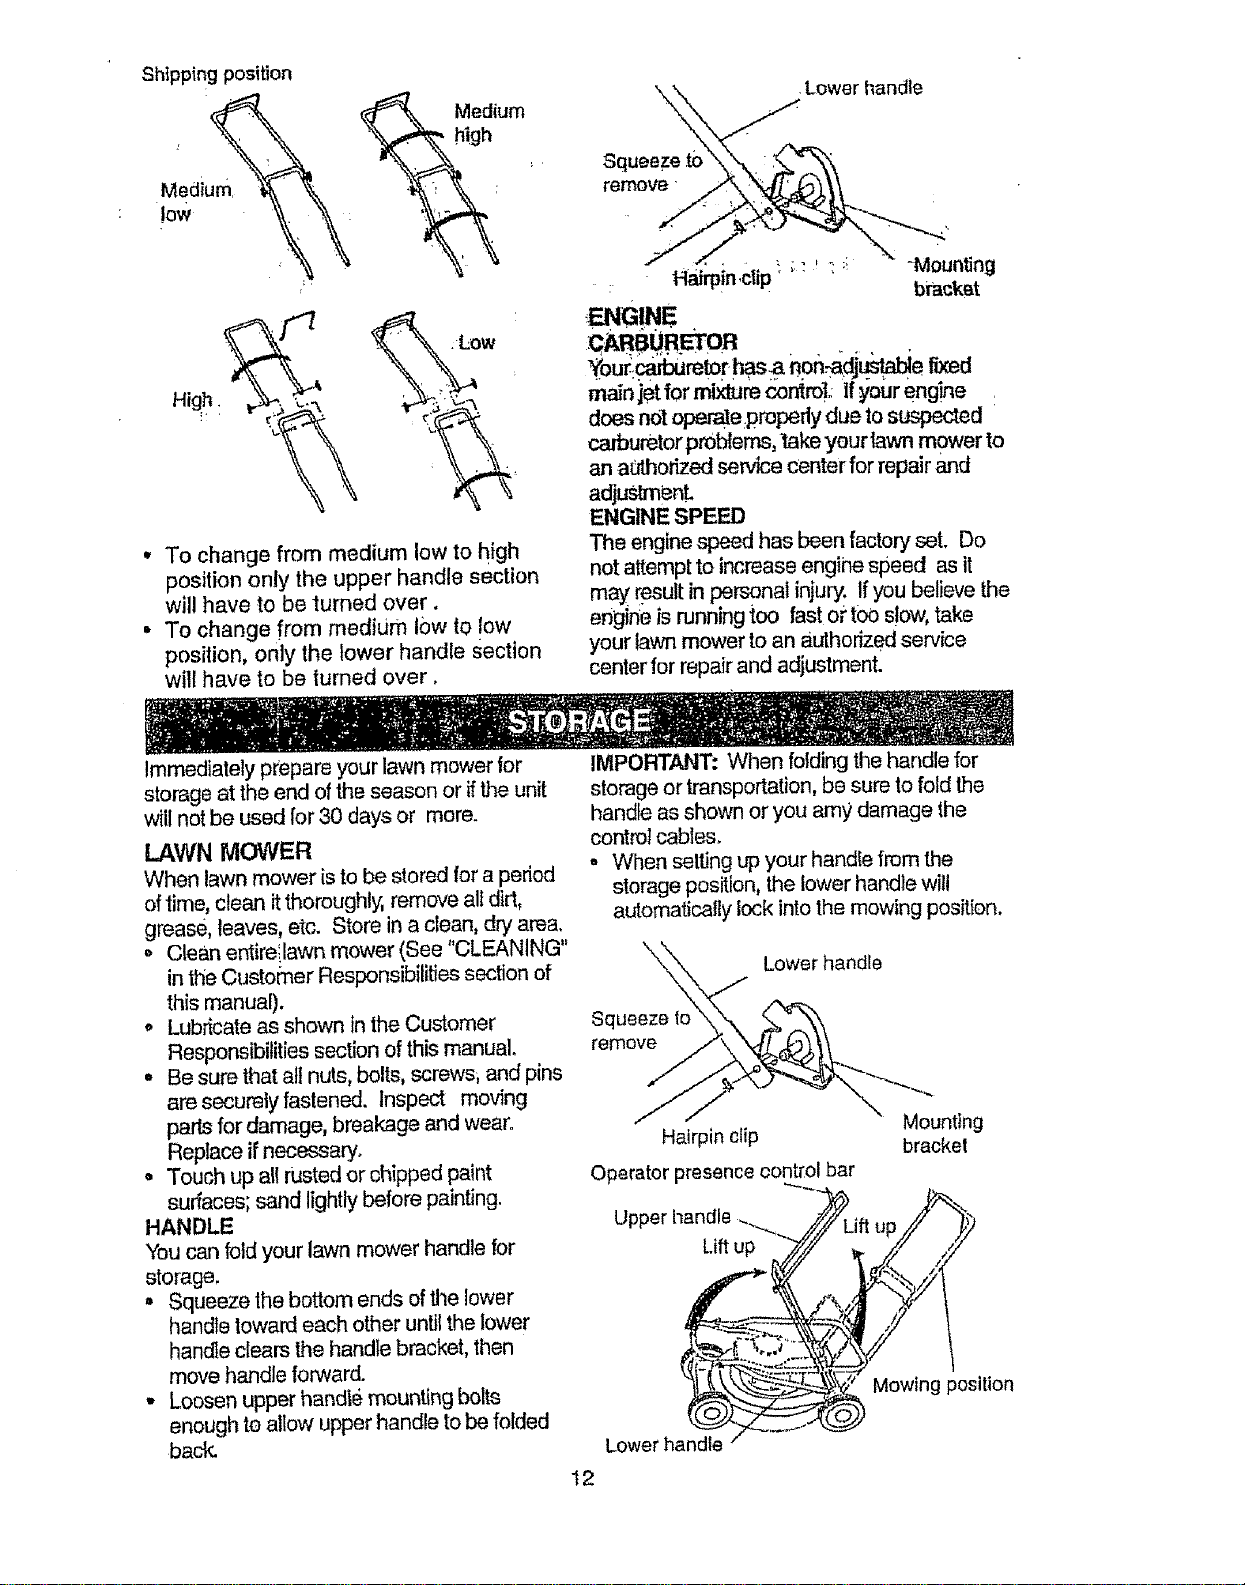
Shipping position
Medium
low
High.
_X Medium
• To change from medium low to high
position only the upper handle section
will have to be turned over.
• To change from medium 10wto low
position, only the lower handle Section
will have to be turned over.
•Lower handle
Squeeze to
remove
, , - ;i "Mounting
HairPin,ctip' " ' bracket
F.NGINE
mainjet for mixture control, If your eng!ne :
does notOl:e.ra!eproperly due to suspected
carburetor problems, take your lawn mower to
an aathorized service center for repair and
adjustment.
ENGINE SPEED
The enginespeed has been factory set. Do
not attempt to increase engine speed as it
may result in personal injury. If you believe the
engine is running too fast oi"too s!ow,take
your lawn mower to an authorized service
center for repair and adjustment.
Immediately prepare your lawn mower lor
storage at the end ofthe season or ifthe unit
will not be used for 30 days or more.
LAWN MOWER
When lawn mower is to be stored for a period
of time, clean itthoroughly, remove alt dirt,
grease, leaves, etc. Store in a clean, dry area.
• Clean entireilawn mower (See "CLEANING"
in the Customer Responsibilities section of
this manual).
o Lubricate as shown in the Customer
Responsibilities section of this manual.
° Be sure that all nuts, bolts, screws_ and pins
are securely fastened. Inspect moving
parts for damage, breakage and wear.
Replace if necessary.
• Touch up all rusted or chipped paint
surfaces; sand lightly before painting.
HANDLE
You can fold your lawn mower handle for
storage.
° Squeeze the bottom ends of the lower
handle toward each other until the lower
handte clears the handle bracket, then
move handle forward.
• Loosen upper handI6 mounting bolts
enough te allow upper handle to be folded
back.
IMPORTANT: When folding the handle for
storage or transportation, be sure to fold the
handle as shown or you amy damage the
control cables.
° When setting up your handle from the
storage position, the lower handle will
automatically lock into the mowing position.
Lower handle
Squeeze to
remove
Hairpin clip
Operator presence control bar
Uppel
Lift up
Mounting
bracket
Mowing position
Lower handle
12
ENGINE
FUEL SYSTEM
IMPORTANT: It is important to prevent
gum deposits from forming in essential fuel
system parts such as carburetor, fuel filter, fuel
hose, or tank during storage. Also, experience
indicates that alcohol blended fuels (called
gasohot or using ethanbl or methanol) can
attract moisture which leads to separation and
formation of acids during storage Acidic gas
can damage the fuel system of an engine
while instorage•
• Drain the fuel tank.
• Start the engine and:let it run until the fuel
lines and carburetor are empty•
. Never use engine or_carburetor cleaner
products in the fuel tank or permanent
damage may occur.:
• Use fresh fuel next season:
NOTE: Fuel stabilizer is an acceptable
altemative in minimizing the formation of fuel
gum deposits during st brage. Add stabilizer to
gasoline in fue! tank or _torage container.
Always follow the mix ra]io found on stabilizer
container. Run engine!at toast 10 minutes
after adding stabilizer tO allow the stabilizer to
reach the carburetor• Donor drain the gas
tank and carburetor ifUsing fuelstabilizer.
ENGINE OIL
Drain oil (with engine warm) and replace with
clean engine oilo (See "ENGINE" in the
Customer Responsibilities section of this
manual)•
CYLINDER
= Remove spark plug.
' o Pour one ounce (29 ml) of oil through spark'
plug hole intocylinder.
o Pull starter handle slowly a few times to
distribute oil.
= Replace w_thnew spark plugo
OTHER
• Do not store gasoline from one season to
another.
• Replace your gasoline can if yourcan starts
to rust. Rust and/or dirt in your gasotine will
cause problems.
• If possible, store your unit indoors and cover
it to give protection from dust and dirt.
° Cover your unit with a suitable protective
cover that does not retain moisture. Do not
use plastic, Plastic cannot breathe which
allows Condensation to form and will 5ause
your unit to rust°
IMPORTANT: Never cover mo_er whil#
engine and exhaust areas are s!ilt wa_j,
CAUTION: Never store the lav_n mower with
gasoline in the tank inside a butldlng where
fumes may reach an open flam_ or spa it€
Allow the engine to cool before storing i_]any •
enclosure,
TROUBLESHOOTING CHART
PROBLEM
Does not start
CAUSE
° Dirty air filter.
• Out of fuel.
, Stale fuel.
• Water infuel
° Spark plug wire is
disconnected,
• Bad sparkplug.
• Loose blade or broken blade
adapter.
° Control bar in released
position.
• Control bar defective.
CORRECTION
• Clean/replace air fiJter_
• Fill fuel tank.
• Drain tank and refill with
fresh clean fiJeL
° Drain fuel tank and
carburetor and refill tank
with fresh gasoline.
• Connect wire to plug.
• Replace spark plug,
• Tighten blade bolt or
replace blade adapteL
° Depress control bar to
handle•
• Replace control bar°
13
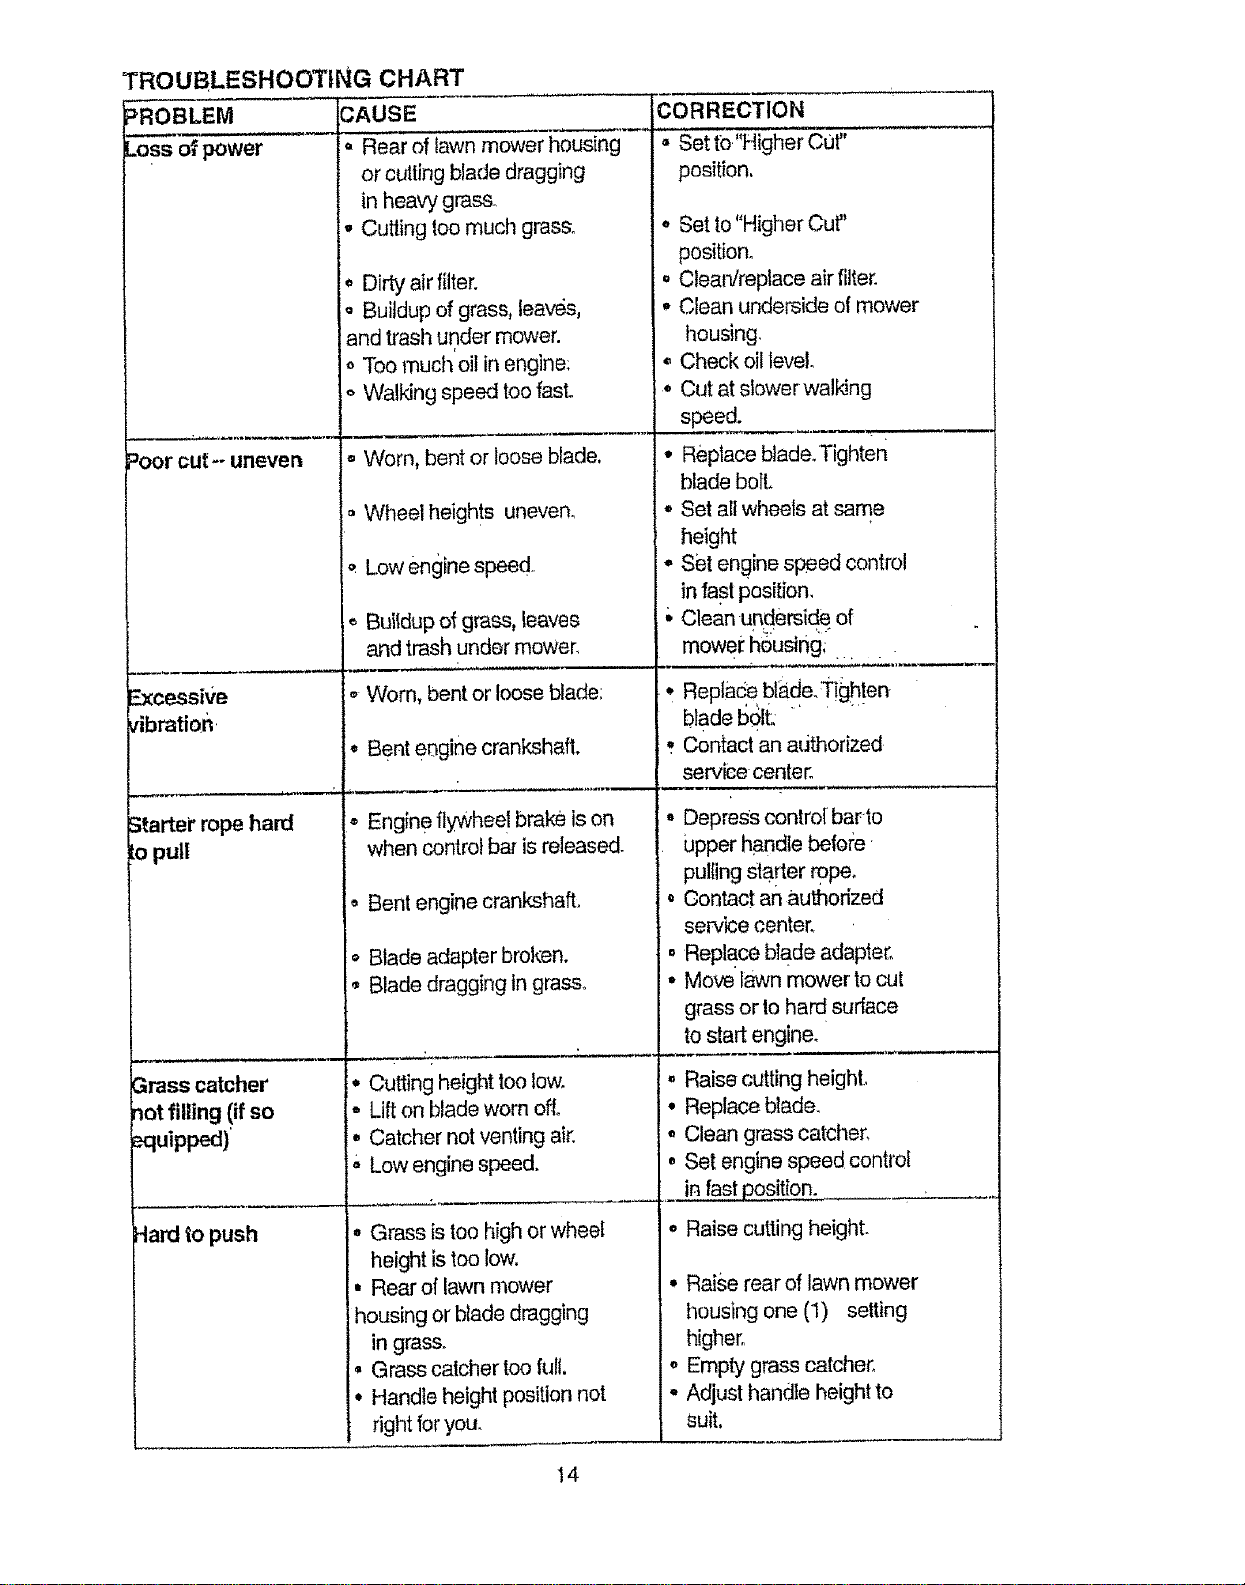
TROUBLESHOOTING CHART
:_ROBLEM CAUSE
Loss of power o Rear of lawn mower housing
or cutting blade dragging
Poorcut-unsven
Excessive
vibration.
S_arterrope hard
to pull
Grass catcher
not filling {if so
__uipped)
-lard to push
in heavy grass°
,, Cutting too much grass.
* Dirty air filter.
o Buildup of grass, leaves,
and trash under mower.
o Too much oil in engine;
o Walking speed too fast.
- Worn, bent or loose blade.
= Wheel heights uneven,
Low engine speed.
,_Buitdup of grass, leaves
and trash under mower.
,, Worn, bent or loose blade;
° Bent eogine crankshaft.
- Engine flywheel brake is on
when control bar is released.
, Bent engine crankshaft.
:o Blade adapter broken.
Blade dragging in grass.
Cutting height too low.
Lift blade worn off°
on
Catcher not venting air.
,, Low engine speed.
* Grass is too high or wheel
height is too low.
, Rear of lawn mower
housing or blade dragging
in grass.
° Grass catcher too full,
° Handle height position not
right for you.
CORRECTION
• Set tO"Higher CUt"
position,
• Set to"Higher Cut"
position.
° Clear_'replace air filter.
° Clean underside of mower
housing.
• Check oil level.
• Cut at slower walking
speed.
• Replace blade_Tighten
blade boll
• Set all wheels at same
height
• set engine speed control
in fast position,
;, Clean underside of
mower housing;.,
° Replace btade.t'ighten
blade bolt:
; Contact an authorized
service center.
° Depress control barto
Upper handle before
pulling Starter rope°
• Contact an authorized
service center,
, Replace blade adapter,
- Move lawn mower to cut
grass or to hard surface
to start engine.
• Raise cutting height.,
• Replace blade.
• Clean grass catcher,
. Set engine speed control
in fast position.
° Raise cutting height.
• Raise rear of lawn mower
housing one (I) setting
higher.
o Empty grass catcher.
° Adjust handfe height to
suit,
14
CRAFTSMAN Model No, 917.387020
Garantia 17 Especificaciones del Producto 25
Reglas de Seguridad 17 Servfcto y Adjustes 27
Montaje 19 Almacenamtento 28
Operaci6n 20 ldentificaci6n de problemas 30
Mantenimiento 24 Partes de repuesto Vea eI manual
Programa de Mantenimiento 24 ingles de! due5o
Orden de Partes Contratapa
GARANTIA LIMITADA DE DOS ANOS PARA LA SEGADORA A MOTOR CRAFTSMAN
For dos (2) aSos, a parlJrde la fecha de compra, cuandoesta Segadora Craftsman se mantenga, lubdque
y afine seg6n las instrucciones pam la operad6n y el mantenimtento en el manual de! due5o,Sears
reparar&gratis rode defecto en el material y famane de obra.
Si laSegadom Cra[tsman se usa pare fines comerclales o de ardendo, esta garantfa s6b se aplicaper
novenLa(90) dfas a partJrde la fecha de compra.
Esta Gamntfa no cubre:
• Arb'cutosque se desgastan durante el use normaltales come lascuchiltas segadoras rotatorias, los
adaptadores de la cuchi!la, )ascorreas, los filtros de alre y las bujtas.
• Reparadones necesadas debfda al abuse o ala negligencia del eperador, indLry_ndosea los
¢ig0eSalesdoblados y ata falta de mantenlmiento del equipo segt_nlasinstmccionesque se incluyen
en e!manual del due_o,
EL SERVICIQ DE GARANT[A ESTADISPONIBLE ,eldevolver la segadpra a motor Craftsman al centrol
depar#'nentode aarvicto Sears mas cercano an los eateries unido& Esta garantfa se aplica solamente
mienlras elproducto esteen use en los estados unities. '
Esta Garant[a le otorga derechos legales especfficos, y puede qua tambt_ntenga otros detaches qua
var[an de estado a estado.
Sears, Roebuck and Co., DI817WA, Hoffrnan Estates, IL 60179 USA
Los estandraresde segundad exigen lapresencla
del operator enlos controles para reducir a un
mtnirno el tiesgo de lesionarse. Su unidad viene
equipada con dichos controles, FOrn[ngun molJvo
tratadal eliminar lafunci6n de los controles qua
exJgentapresencia del operador.
ENTRENAMIENTO,
,, Lea este manual dal operador
culdadosamente Famlliadcese con los
controles yaprenda a operar su segadora en
forms adecuada Aprenda a parar su segadora
r&pldamente
,, No pen-nitaque los niSosusen su segadora.
Nunca permita que los adultos operen la
segadora sin contar con las insln_ciones
adecuadas.
,, Mantenga e[#,teade operaci6n despeiada
de genre, especialmente de nifos pequeSos
yde animates dom&stico&
• Use la segadora so[amente para losfines_ :
propuestos per el fabricante y segt3nlas •
explicaciones descritas en este manual,
• No opera lasegadara si se ha cal'do o daSado en
cualqulera forma, Siemp_e repare losdaSos
antes de usaria.
o No use accesorios qua no hayan sldo
recomendados per el fabricante. El use de dichos
acceserbs puede ser pellgroso.
= La cuchi!la glra cuando e!motor est&
funcfonando.
PREPARACION:
= Siempre revise cuidadosamente el _rea que sa
va a segar y desp_je{ade todas tas piedras,
palos, alambres, huesos y otros obietos
extremes.Estos objetos ser,_nlanzadoscon ta
cuchilla ypueden produclr tesiones graves.
,, Siempre use anteojos de seguridad o protectores
de ojoscuando arranque y durante el tiempo
que use tasegador&
:_ 15
.... i ....
,, Vistaee en torrnaadecuada,,No opera la
segadora sin zapatoso con sandalJas
mientras qua el motor est,. funcionando,
. Siegue slempre durante el die o con buena
luz artificial.
OPERACION;
- Mantenga sus oios y su monte en la
segadora yen el &tea qua se est& corlando,
No permita qua otros intereses to distraigano
• No corle c#sped mojado o resbaJoso Nunca
corra mlentras est6 operando su segadora.
Siempre asegurese de mantener el equllibrio
- rnantenga el mango agarrado firmemente y
camine.
° No ponga los manos o los pies cerca odebajo
de Jaspartes rotatorias. Mant_ngase
alejado de ta abertura de descarga en todo
momento.
° Siempre pare el motor cuando se vaya
ocuando no est_ usando su segadora, o
antes de atravesar tas entradas pare autos_
los senderos, caminos y _reas cLiblertas de
riplo,
• Nunca dirija la descarga del material hacia
los espectadores ni permits a nadfe cerca de
la segadora mientras fa est_ operando.
,, Antes de limpiar, tnspeccionar o de reparar !
a segadora, pare e!'motor y est_
completamente seguro de qua la cuchilia y
qua todas los partes que se mueven se
hayan detenido Luego, desconecte el'
alambre de la bujfa y mant_nga!o alejad0 de
_.stapara evitar el arranque pot accldente
• No contin['Je hactendo t'uncionarsu seg&dora
si le pegs a un obje_ extrafio_ slg8 et
procedimiento descrito antedormente, luego
repare cualquler da_o antes de voIver a
arrancar y de operar su segadora:/.
, No cambie los ajustes det regulador o
hagaque el motor ands a una velocidad
excesiva. Se pueden producir daSos en el
motor y Iesiones personales. "
• No opera su segadora si vibra fuera de lo
normal. La vibraciOn excesiva es una
indicacf6n de dafio; pare el motor, revise en
forma segura la cause de la vibraci6n y hags
los reparactones ssgQn sea necesario_
• No haga funcionar el motor en
recintoscerrados. L#s gases de escape son
pellgrosos_
o Nunca code el c_sped tirando ia segadora
haeia usted. Stegue a trav#s de la cara de
los pendientes, nunca hacia ardba o hacia
abajo pues puede perder el equitibrioo No
stegue pendtenles demasiado empinadaso
Tonga cuidado cuando opere la segadora en
terreno disparejo o cuando cambis de
direcclOn ,- maritenga un buen equilil_do.
o Nunca opera ]a segadora sin los
protecciones adecuadas, las planchas, el
recogedor de c_sped y otros dlsposltivos de
seguddad en su [ugar
MANTENIM1ENTO Y ALMACENA#IEN-
TO:
o Revise la cuchilJa y/os pernos de montaje
del motor a menudo, pare asegurarse qua
est_n aptetados en la forms adecuada.
• Revise todos los pemos, tuercas y tomillos a
intervalos frecuentes, pare verificar si asian
apretados en forms adeeuada, y
asegurarseque la segadora se erlcuentra en
condiciones de funcionamiento seguro
o Manlenga todos los dJsposltivos de seguddad
en su lugar y listos pare funcionar,
o Pare reduclr el peligro de incendio,
mantenga el motor sin c6sped, hojas y grasa
o aceile en exceso_
o Revise el recogedor de c_sped a menudo
pare verificar s] hay deter_Oroy desgaste _,
cambia las bolsas desgastadas. Use
solamente/as bolsas de repuesfo
recomendadas por el fabricante de su
segadora o que _umplen con las
especificaciones de 6sle.
o Siempre mantenga una cuchJllaafilada en su
segadora,
,, Siempre permits que el mo!or,se enfrfe
antes de guardada en cualquier recinto
cerrado.
. Nunca guards ta segadora con combustible
on el estanque dentro de un edificio endonde
los gases pueden alcanzar una llama
exPuesta o una fuente de _ignici6n,tel como el
caientador de agua, ia eslu_ de
calefacd6n, la sea;adorede rope, etc
PRECAUCiON: Siempre desconecte el
alambre de la bujia y p6ngalo donde no pueda
entrar en contacto con la buj[a, pare evitar el
arranque por accidents, durante la preparactSn,
el transpode, el ajuste o cuando se hacen
reparaciones.
PRECAUCION; Es conocido por el Estado de
California que }os gases de escape de! motor de
este productor contlenen qufmicos los cuales a
cierlos nlveles, pueden ocasionar, c_ncer,
defectos de nacimiento, y otros dafios at slstema
reproduclivo,
16
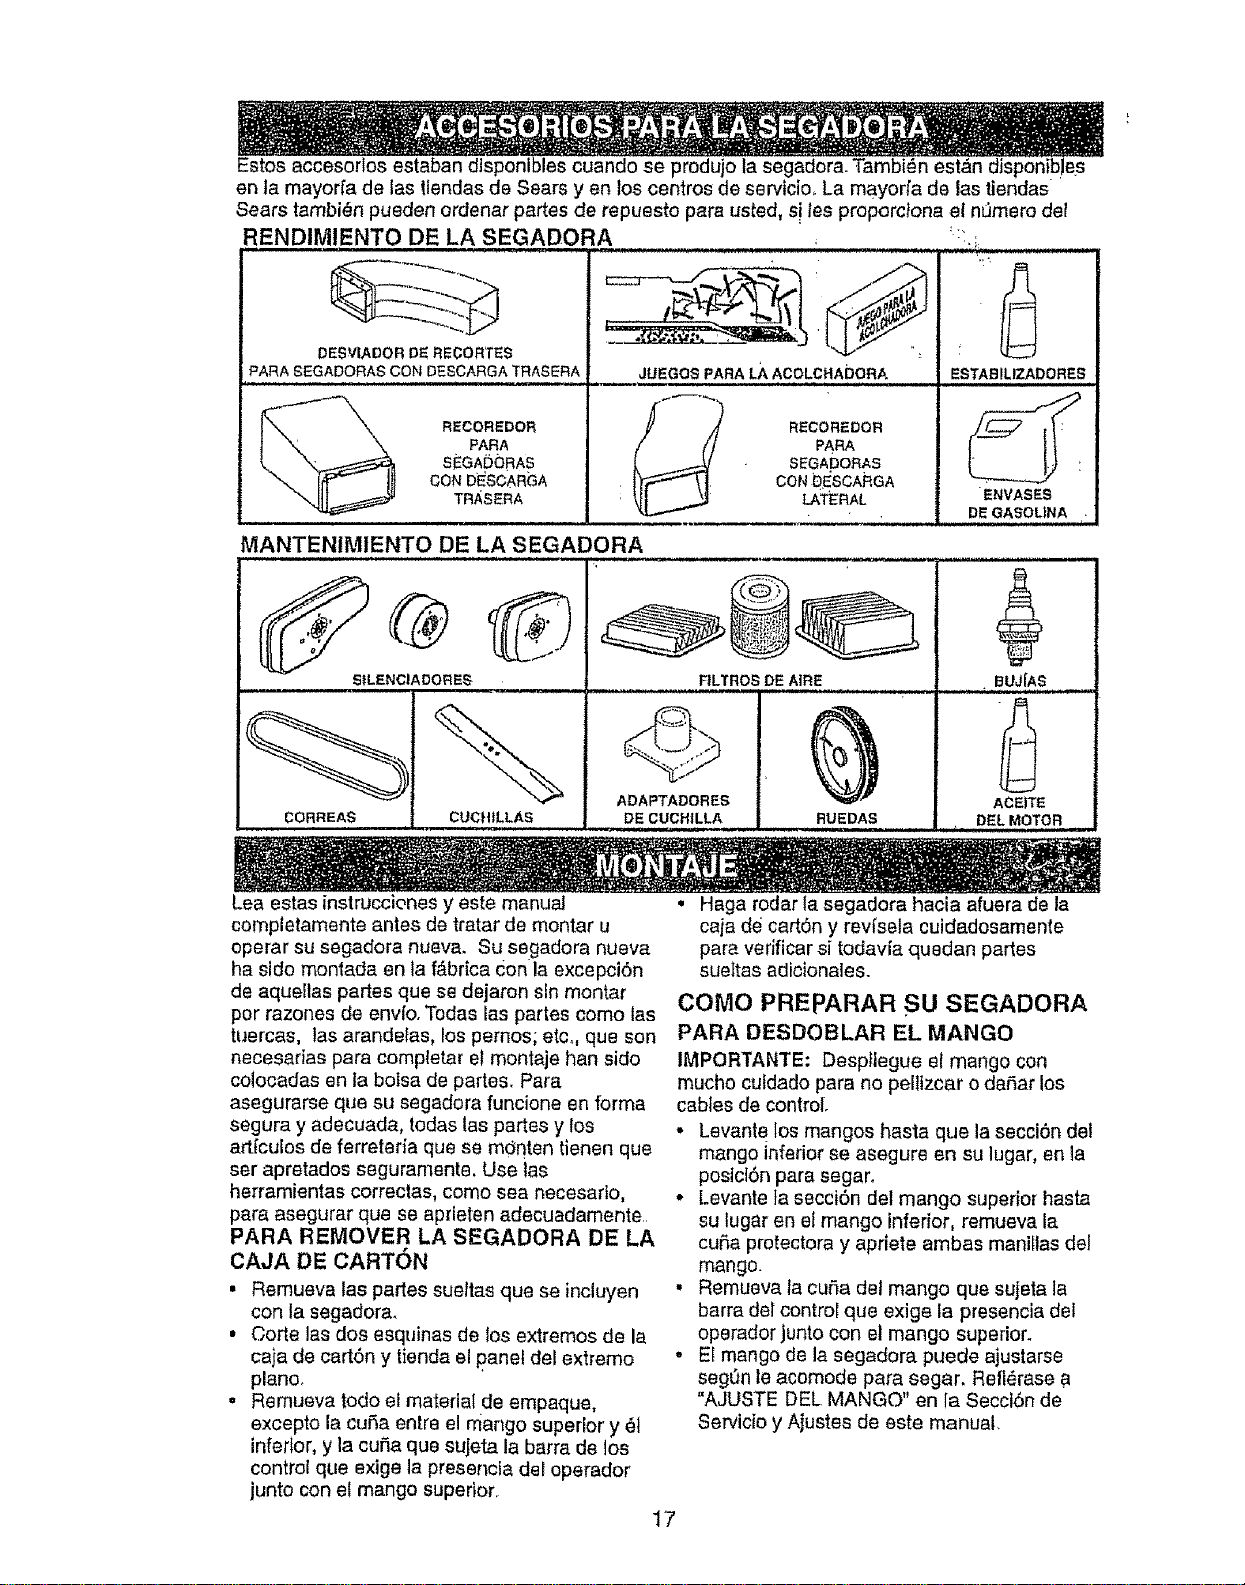
Estos accesorlos estaban disponibles cuando se produjo ta segadora. Tambi_n est_n disponibJes
en la mayorfa de las tlendas de Sears yen los centros de servicio_ La mayoda de tas tiendas
Sears tambi_n pueden ordenar partes de repues_o pare us_ed,s! tes preporc}ona eI n5mero de{
H
DESVIADOR D_ RECORTES
_ARA SEGADORAS CON DESCARGA TRASERA
RENDIMIENTO DE LA SEGADORA
_ J_UEGOBPARA LA A,CpL,,CHAbpRA
RECOREDOR
PARA
BEGApORAS
CON _SCARGA
L_TtRAL
RECOREDOR
PARA
SEGA00BAS
GON DESCARGA
TRASERA
MANTENIMIENTO DE LA SEGADORA
SfLENCIADOF_E_ FiLTROS DE AIRE
CORREAS I
CUCHtLLAS
i
ADAPTADORES
DE CUCH|LLA
,
RUEDAS
ESTABILIZADORES ,
ENVASES
DE GASOL)NA /
6
• BUJ{AS
ACE1TE
• DEL MOTOR
Lea estas instrucciones y este manual
cempletamente antes de tratar de montar u
operar su segadora nueva. Su se(:jadora nueva
ha side montada en la f&br{ca don la excepcibn
de aqueltas partes que se dejaren sin montar
per razones de envfooTodas las partes come las
tuercas, las arande_as, los pemos; etco,qua son
necesarias para completar el montaje hen side
colocadas en la bolsa de partes. Pare
asegurarse qua su segadera funcione en forma
segura y adecuada, todas las partes y los
art[culos de ferreteria qua se m_nten tienen qua
ser apretados seguramente. Use las
herramientas correctas, come sea necesarto,
pare asegurar qua se aprteten adecuadamente..
PARA REMOVER LA SEGADORA DE LA
CAJA DE CART6N
• Remueva las partes sueltas que se incluyen
con la segadora.
, Corte las dos esquinas de los extremes de la
caja de cartSn y tienda el panel de! extreme
plane.
, Remueva rode el material de empaque,
excepto la curia entre el mango superior y _1
inferior, y la curia qua sujeta la barra de los
control que exige la presencia dei operador
junto con el mango superior_
• Haga rodar la segadora hacia afuera de la
caja de cart(_n y rev{sela cuidadosamente
pare vedficar si todavla quedan partes
suettas adioionales.
COMe PREpARAR SU SEGADORA
PARA DESDOBLAR EL MANGO
IMPORTANTE: Despflegue el mango con
touche culdado para no pelltzcar o daf, ar los
cables de control
• Levante los mangos haste qua la secci6n del
mango inferior se asegure en su lugar, en la
postciSn para segar.
• Levante ta secciSn dal mango superior hasta
su lugar en ef mango inferior, remueva la
cuSa protectora y apriete ambas maniIlas del
mango.
• Remueva la cuSa del mango qua sujeta la
barra del control que exige la presencia del
operador junto con et mango superior.
• EI mango de la segadora puede ajustarse
segOn le acomode pare segar. RettZ_rasea
"AJUSTE DEL MANGO" en {a SecciSn de
Servicio y Ajustes de este manual.
17
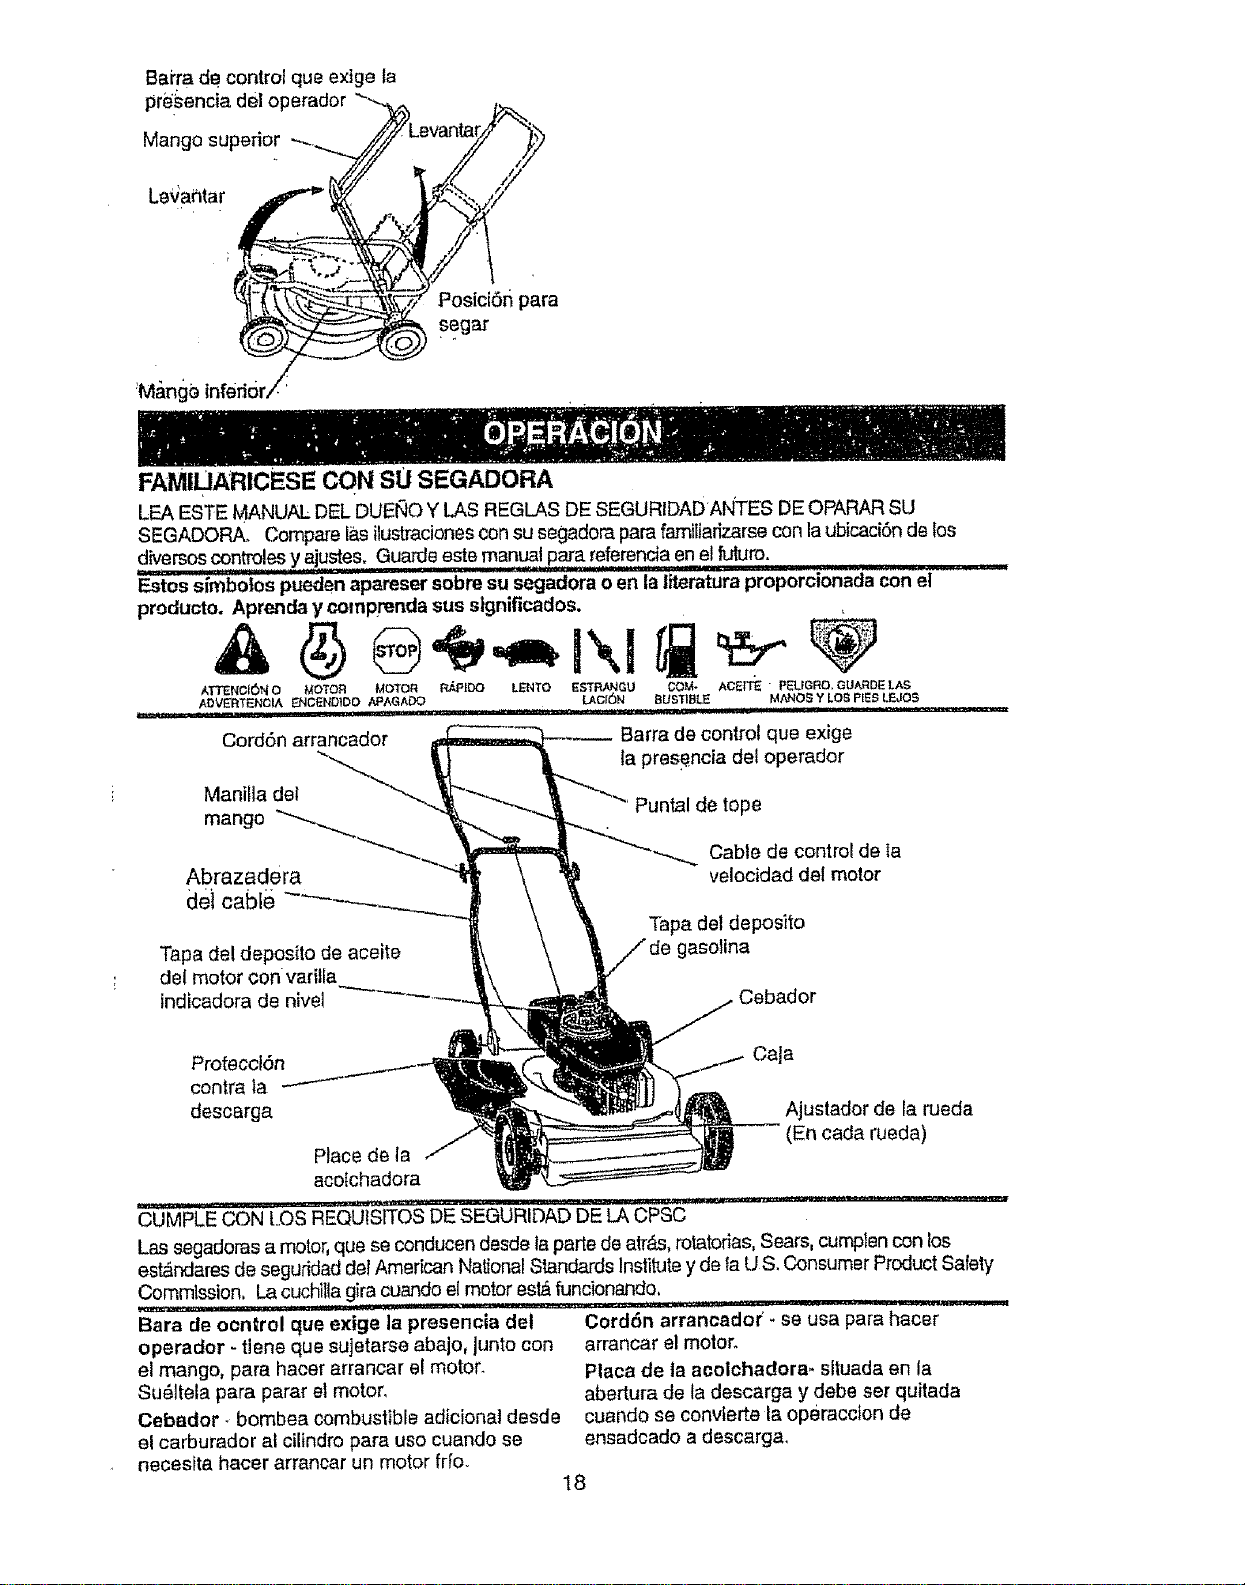
Bai'ra de control que exige la
pre_encia de! operador
Mango superior
Leqahtar
Posici6n para
S?gar
FAMILIARICESE CON SU SEGADORA
LEA ES'FEMANUAL DEL DUENO Y LAS REGLAS DE SEGURIDADANTES DEOPARAR SU
SEGADORA_ Compare IEsilustraciones con su segadora para familiarizarse con la ubicaci6n de los
diversos controles y ajustes. Guards este m.an_!.para.referenda en el futuro.
ii :,11
Estos slmbolos pueden apareser sobre su segadora o en ta literatura proporclonada con el
producto. Aprenda y comprenda sus significados.
ATTENOION O MOTOR MOTOR R_p|DO LENTO ESTRANGU OOM- ACEf"f_ PELIGR{3, GUAFtDE LAS
ADVERTENCIA FJNCENDtDO APAGA_O LACI6N 8US1HBLE MANOS Y LoS PIES LIEJOS
z _ .......... _ '111 i , ii i I I I ii jllllj iiiii iiiii ! i1'1 ii i i
Cord6n arrancador Barra de control que exige
ta pres_ncia del operador
Manilla del
mango
Abrazadera
det cable
Tapa de! deposito de aceite
del motor con varitla
tndicadora de nlvel
Cable de control de la
velocidad del motor
Tapa del deposito
ina
Cebador
Protecci6n Caja
contra ta
descarga Ajustador de la rueda
(En cada rueda)
Place de la
acotchadora
.................. ..=:===.._
CUMPLE CON LOS REQUtSITOS DE SEGURI[')AD DE LA CPSC
Las segadoras a motor, que se conducen desde la parle de alr&s, rotatorias, Sears, cumplen con los
est&nclaresde seguridad del American National Standards Institutey de fa US. Consumer Product Safety
Commission, La cuchilla gira cuando el motor est_ funcionando,
......... UUl.lllll i IIIIIII II ..... i L,± ,,, .,1 '1 • --
Bara de ocntrol que exige ]a presencia dot Cord6n arrancador' * se usa para hacer
operador - tlene que sujetarse abajo, junto con
el mango, para hater arrancar e! motor.
Su6lteta para parar el motor,
Cebador. bombea combustible adicionat desde
el carburador al cilindro para uso cuando se
necesita hacer arrancar un motor frfo.
arrancar el motor.
P|aca de la acolchadora- situada en la
abertura de la descarga y debe ser quitada
cuando se convlerte la operacclon de
ensadcado a descarga.
18
La operaci6n de cualquler segadora puede hacer
que salten objetos extrafios dentro de sus ojos, Io
que puede producir dafios graves en &stos,
Stempre use anteojos de seguddad o protecd6n
papalos ojos rnientras opere susegadora o cuando
hagaajustes o repataciones. Recomendamos una
mascara de segu_dad de_st6n amp]ia,pare uso
espejuelos o anteojos de seguridad eslandarteo
COMO USAR SU SEGADORA
VELOCIDAD DEL MOTOR
; >,
La velcddad del moor se est,_bleCi6;enla_{brica
pareun _er_limien[o6p!imo_ La velo61dadhOse
puedeajustar.
CONTROL DE ZONA DEL MOTOR
PRECAUCI6N: Las regulaciones federales
e_iger_!qde'seinsta!e unc0hirol paraelmotor
en est_ segadora p&raI_dudr aun minimo el
r_esg0de lesionarse debido al contacto con la
cuchilta, Potningt_rim0tivo trate de'eliminar
ta funci6n del control del operador, La cuchilla
gira cuando el motor estA functonando_
• Su segadora vtene equipada con unabarra de
conlrot que exige la presencta del operador, Io
que requiere que el operador est6 delr_.sdet
mango de ta segadora I_arahaceda arrancar y
operadao
PARA AJUSTAR LA ALTURA DE CORTE
• Levante las ruedas pal;ael code bajo y baje tas
nJades pare el corte alto.
• Ajuste ta altura de corte para que se acomode a
sus requlsitos,,La posici6n del medio es la mejor
pare la mayorfa de los c&spedes,
•Para cambtar, la attura de code, empuje ta
palanca del ajustador hacia la rued& Mueva la
nJedahacla arfiba o hada abajo de modo que
se acomode a sus requisltos. Aseg0rese que
todas tas ruedas queden IguaJmenteajustadas.
ATENCI6N: El ajustador esta correctamente
colocado cuando lasorejas de fa ptaca esf_n
insertadas en el agujeto del mango, Tambi_n,los
ajustes de 9 posiclones (siequlpado) pe_niten que
el mango pueda ser movido entre {asorejas de la
place+
PARA CONVERTIR A SEGADORA
DESCARGABLE
Su segadora es enviada pare usarse como
acolchador& Para conver_rta a una operaci6nde
Pare un corte alto, Orejas dRta
baJelas ruedas place
Mango
Para un corte bajo,
tevante las ruedas
ensacado o de descarga:
Levante la proteccibn con{ra la descarga y
remueva la plancha acolchadora,,
• Ahora la segadora se puede usar con descarga
lateral o sele puede adjuntar el recogedorde
c_sped opcional,
° Pare velvet ala operact6n de acolchamien_o,
simplemente vue{va a instalar la plancha
acolchadora segon se muesLr&
PRECAUCION: No haga funcionar la
segadora sin la protecci6n c0ntrala de_.argai
el recogedor de c_sped 0 la plancha
ac01chadora,aprobados, en su lugar.
descarga
ANTES DE HACER ARRANCAR EL
MOTOR
ACEITE
Su segadora rue enviada sin aceite en el mdtor,.
o Aseg0rese que la segadora est_ nivelada_y que
el _rea alrededor detdep6s'_ode aceite est6
limpi&
= Remueva lalapa del dep6sito de _ceite del
motor con la vadlla tndic.adorade nivel y r_ilene
haste la ifnea de Ileno en'_sta,
= Use 20 oz. de aceite. Pare el t_poy la cati_ladvea
"MOTOR" en la.seccf_n de las
"Responsabilidades del Ciiente" elneste manual
° Vac[e etaceite lentamente. No 1otlene
demasiado_
= Revise el nivel det aceite antes de cada uso,
Agregue aceite stes necesar_o.Uene has[a la
lfneade Ilenoen la vadtta indlcadora de nive!.
°Para leer el ntveladecuado, apdete la tape del
dep6stto de aceite del motor cada vez, '
• Vuelva a instalar la tapa del dep6sito del _ceite
apfi_tet&
- Cambie etaceite despu_s de 25 horas de
operaci6n o una vez por temporada. Puede
necisitar cambiar el acette m_,sa menudo
cuando lascondiclones son polvorosas o suclas.
GASOLINA
• Llene et estanque de combustible. Use
gaso!lna regular, sin p!omo, nueva y limpia
con el mfnimo de 87 octanos. No mezcle el
aceite con la gasoline° Pare asegurar que fa
gasoltna utlltzada sea fresca compre
estanques los cuales puedan set utttlzados
durante los prlmeros 30 dfas,
ADVERTENCIA: La experiencla ha indicado
que los combustibles mezclados con alcohol
(conocidos como gasohol, o el uso de etanol o
metanot} pueden atraer la humedad, la qua
conduce a la separaci6n y formacl6n de _cidos
durante el almacenamiento. La gasoline acfdica
puede dafter el sistema del combustible de un
motor durante el almacenamiento, Pare evltar
19
los probiemas con el motor, se debe vaciar el
sistema del combustible antes de guardarlo per
un pert'ode de 30 dias o re&s. Vacie et estanque
def combusttbfel haga arrancar el motor y
h&galo funcionar hasta que los {{neasdel
combustible y el carburador queden vacfos_ La
pr6xima temporada use combustible nuevo.
Vea las lnstruccfones Para El Almacenamiento :
papa m&sinformaci6n, Nunca use pr0duc_tosde,
limpleza para el motor apara el carbura_d.0req
el estanque del combustible pues se Pbeden
productr daSos permanentes,
Tape del
...t->_'_"f- relfbnad0r de
Tape ee! .._qL;_-_D_.._\ gas01ina
dopes,ode
acette con z.'_-. 7i
indtcadora de %_ "_lT'_!_l l!I
PARA HACER ARRANCAR EL MOTOR
• Pare hater a[rancar un motor frfo, empuje el
cebador ctnco (5) veces antes de tratarlo,
Empuje #rmemente. Este paso normalmente no
es necesario cuando se hace arrancar un motor
qua ya ha eslado funcionando per unos cuantos
minutes
• SuJetela barra de controles que exigen la
presenda del operador abajo en el mango y tire
el mango det arrancador r,_pidamente.No
permita que el cord6n arrancador se devuelva
abruptamente.
, Pare parer el motor, suelte la barra de controles
qua exigen la presencia del operador_
AVISO: En climas m_s fdos puedequa sea
necesado repetir los pesos del cebado. En climas
m&scalurosos etcebar demasiado pueda productr
el ahogo y el motor no vaa arrancar.,Si se ahoga et
motor espere unos cuantos minutes antes de tratar
de hacedo arrancar y no repi_ los pesos def
cebado.
CONSEJOS PARA SEGAR
. BaJociedas condiciones, tel come c#sped muy
alto, puede ser necesario el elevar la altura del
corte para reducir etesfuerzo necesado pare
empujar la segadora y pare evitar sobrecargar el
motor, dejando montones de r_cortesde c_sped_
• Pare un code muy pesado, reduzcael ancho del
corte pasando parcialmente per enclma del lugar
anteriormente corlado y siegue lenlamente.
,, Si Ias segadoras de descarga lateralcortan en
una direcci6n contrada a Ias manillas del reloj,si
se em-pleza en la portede aflJeradel _ea que
se va a cortar,se repartir&nlos recortesdel
c_sped an forma m&s parole y el motor se
cargar,_menos. Pare evitar qua los recedes
caigan en los senderos, an los flores,etc. haga
los pdmeros cortes en la direcci6n de las maniilas
de] reloi.
. Los pores en toe recogedores de cesped de teia
pueden }lenarse con mugre y polvo con e!use y
los recogedores recaudar&n manes c_sped+
20
Pare evitar _sto, rocfe el recogedorcon la
ma_nguerade agua, regularmante,'y dejelo
secarse antes de usarlo..
o Mantenga Ia parle Superior del motor, alrededor
del arrancador, despejada y sih recedes de
5_sped y paja. Esto ayudar& el flujo del alre dot
motor y extender& IaduraciSn 6ste
CONSF-.JOS PARA SEGAR Y ACOLCHAR
IMPORTANTEi [_a_raobtener el imejor rendlmtehi5 '
mantenga ta caja de !asegad0.r.a,sin acumulaci6n
de cesped y basua, bee "LIMP!EZA" an la secci6n
"RESPONSABILIDADES DEL CLtENTE" de este
manual.
° La cuchllla acQIchadoraespecial vaa vol?er a :
cedar losrecortes de c6sped rnuchas veces, 5,
los reduceen tamaSo, de mode qua st se caen
en el c6sped se van a dispesar entre _ste y no
se van a rioter. Tambi_n, el c6sped acolchado se
va a deshacer r&pidamente entregando
substancias nutdtivas para el C6sped.Siempre
acolche con Ia veloddad del motor (cuchilta)m_s
alia, pues as[ se obtendr_ la major acci6n de
recede de las cuchilbs°
- E_vitecarter el c_sped cuando est_ mojado. El
c_sped mejado tiende a former montones e
interliere con laacci6n de acobhado La major
hera"pare segar el c_sped es temprano en la
tarde. A esahera _sle se ha secado y el &rea
recl_n codada no quedar& expuesta al sot
directo°
•Para obtener los mejores resutlados, ajuste la
allure del corte de la segadora de mode que _sta
code solamente el tercio superior de fas hojas de
c_sped. En el case de que el cesped haya
crecido demaslado, puede ser nece_'-arioel
elevar laaltura del corte pare redudr el esfuerzo
necesado pare empuiar la segadora y pare evitar
sobrecargar et motor, dejando montones de
recedes de c_spe& Pare un aoslchamiento muy
pesado, reduzca el ancho del code pasando per
enctma del lugar anterio_ente cortado y stegue
lentamente.
• Ciertos tiposde casped y sus condiciones
pueden exigir que un Area tonga qua ser
acolchada per segunda vez para esconder
completamente los recede& Cuando se haga el
segundo code, siegue atravesado o en forma
perpendicular a fa pasada del primer corteo
• Cambie su patr6n de code de semana a
semana. Siegua de norte a sur una semana y
luego cambie de este a cesta la pr6xima
semana, Esto evitar__que el c_sped se enrede y
cambie de dlreccl6n.
Max 1/3
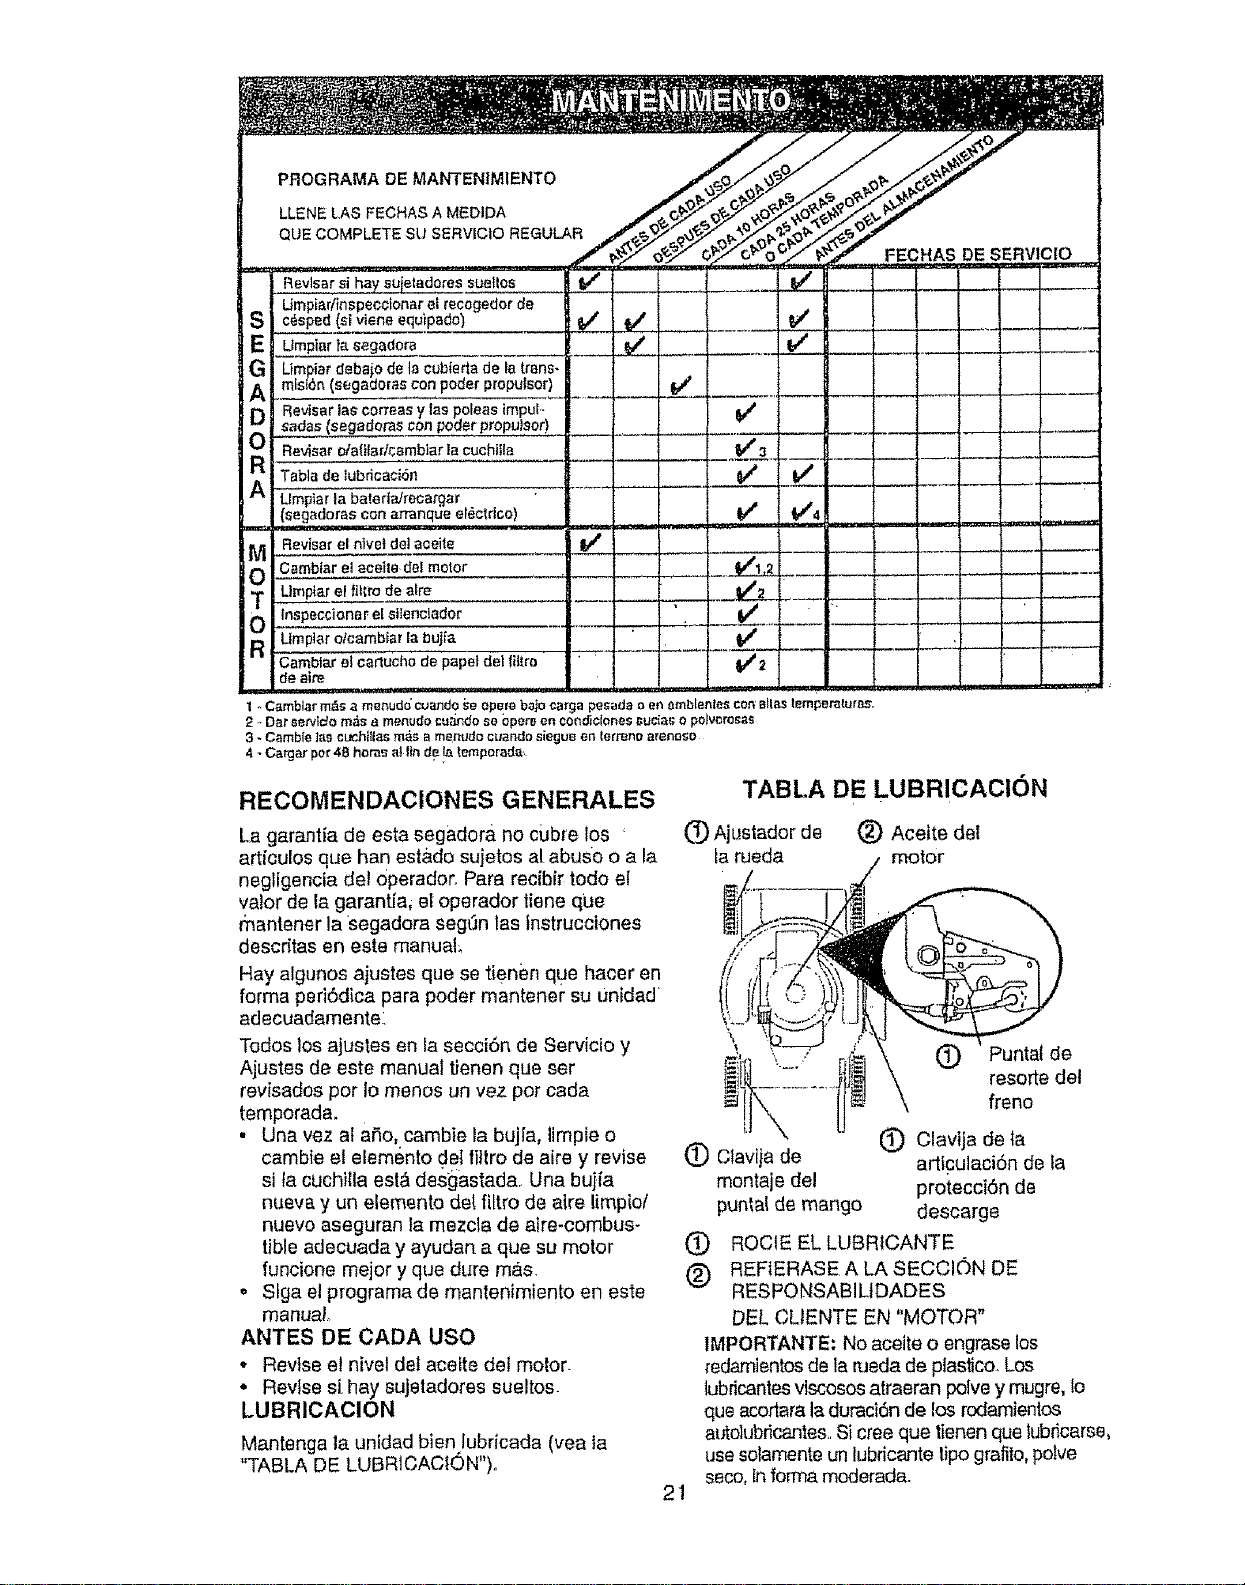
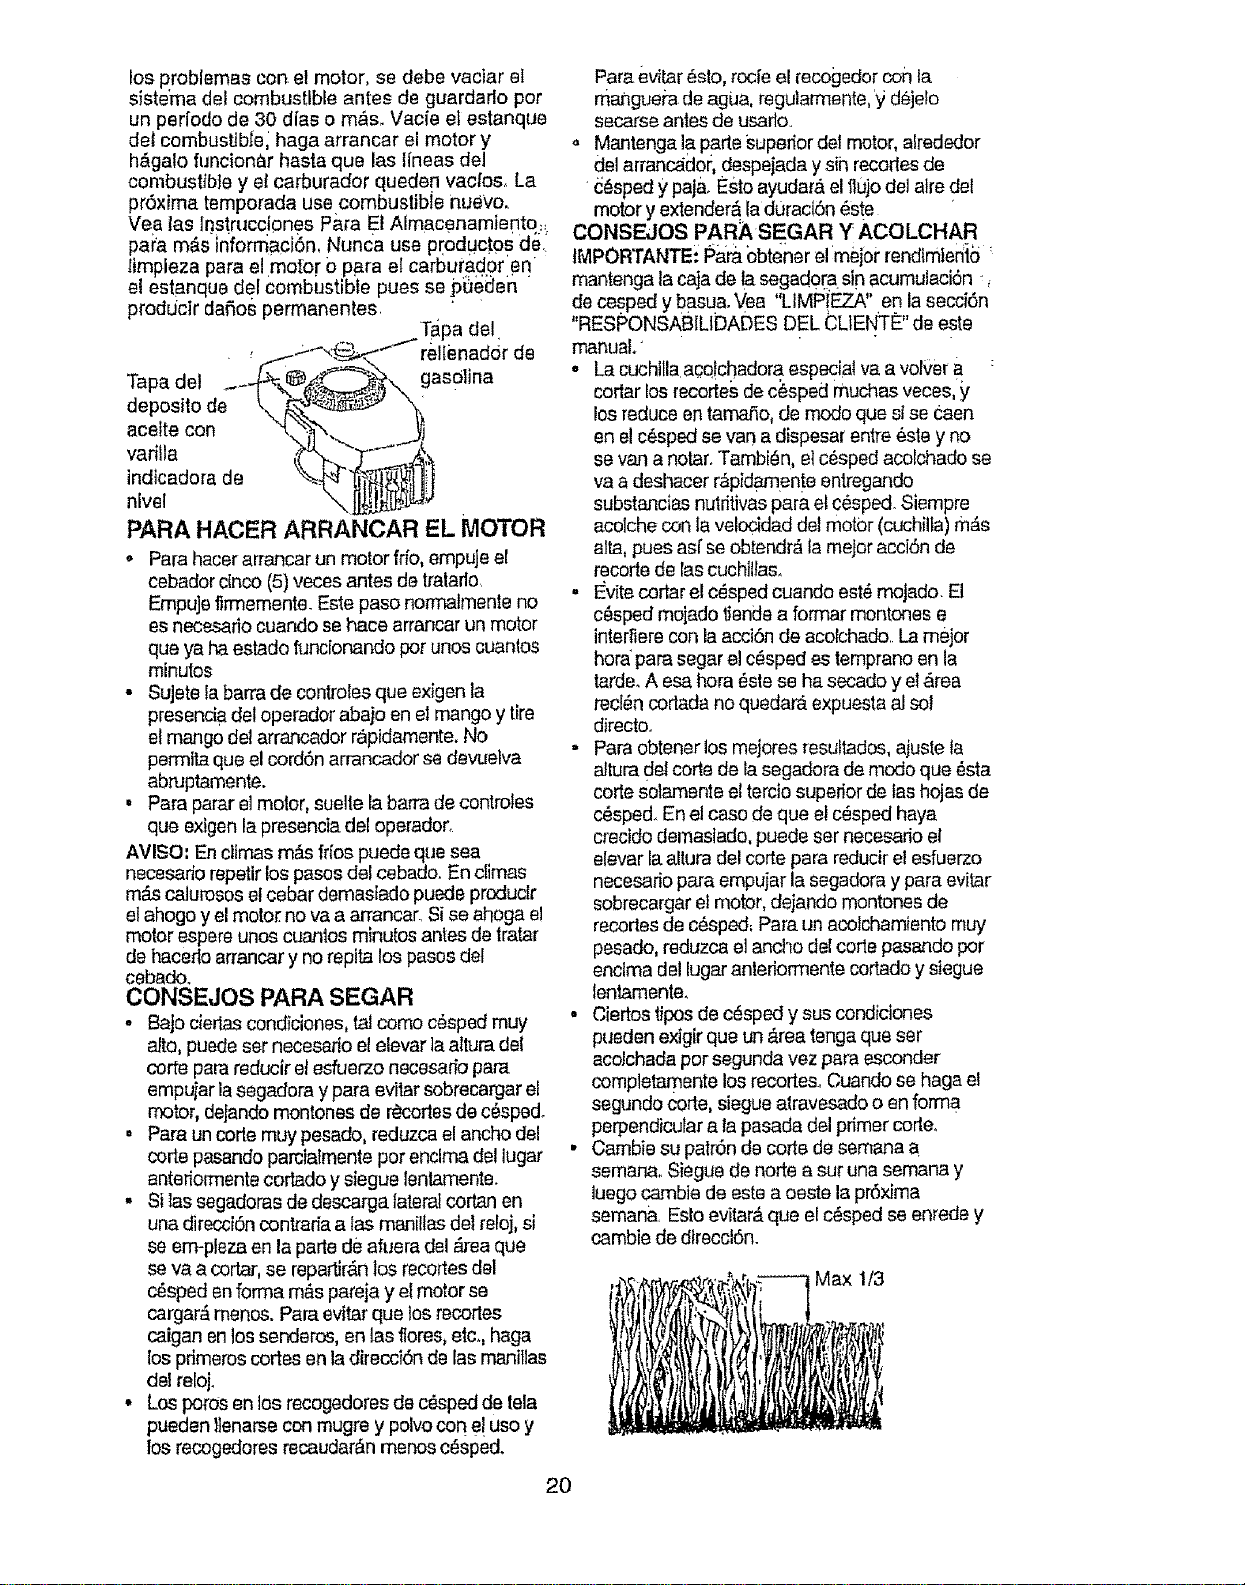
PROGRAMA DE MANTENIMIENTO
LLENE LAS FECHAS A MEDIDA
QUE COMPLETE SU SERVICIO REGULAR
Revlsar si hay sujetadores suettos
Umpiadinspeccionar et recogedor de
c_sped (st viene equipado)
Ltmpiarta segadera
Limpiar debajo de la cubferta de la trans-
mlsi6n(segadoras con poder propulsor)
Revisar tas correas y las poleas impul,-
peder p
Revisar otafilarlcambiar Ia cuchtfla
Tabla de lubdoaoiSn
Umpiar la bateria./recargar
(segadoras con arranque el_ctrico)
Revisar el nlve{ de{ aoeite
Camblar el eceite de! motor
Llmptar ef fitlro de afra
lnspecciona_ eEstlenciader
Umptar otcambiar la bujfa
Cambiar el cartucho de papal del liltro
de aire
4 - Cargar por48 hor_s a|ltn de!a tr,,,mporada-
RECOMENDACIONES GENERALES
La garantia de esta segadora no cubre los •
articulos que han estado sujetos at abuso o a la
negligencia del operador, Para recibir todo el
valor de la garanffa, el operador tiene qua
mantener la segadora segSn tas tnstrucciones
descdtas en este manual
Hay algunos ajustes que se tienen que hacer en
forma peri6dlca para poder mantener su unidad
adecuadamente:.
Todos los ajustes en la secciSn de Servicio y
Ajustes de este manual tlenen queser
revisados por Io menos un vez pot cada
temporada.
• Una vez at aso, cambie la buj[a, limpie o
cambie el elemento deI _tro de aire y revise
si Facuchitla est_ desgastad& Una buiia
nueva y un elemento det [iltro de alre limpio/
nuevo aseguran la mezcla de atre-combus-
tible adecuada y ayudan a que su motor
funcione mejor y qua dure mas.
o Stga el programa de mantenimiento en este
manuat
ANTES DE CADA USO
• Revise el nivel det aceite dei motor.
• Revise s[ hay sujeladores sueltos.
LUBRICAOION
Mantenga la unidad bien lubricada (yea la
"TABLA DE LUBRICACtON")o
TABLA DE LUBRICACION
(_) Ajustador de (_) Aceite det
la rueda motor
21
\
(_ Clavija de
montaje del
puntaLde mango
(_ Puntalde
resorte del
freno
(_ Clavija de ta
arttculaci6n de la
protecci6n de
descarge
(!) ROCIE EL LUBRtCANTE
(_) REFIERASE A LA SECCION DE
RESPONSABIUDADES
DEL CUENTE EN "MOTOR"
1MPORTANTE: No aceite o engrase los
redamientosde ta naedade plas_ico Los
lubdcantesvlscosos atraeran polve y mugre, io
que acortara la duraci6n de los rodamientos
autolubr_cantes..Si cree que tienen que lubr_carse,
use solamente un lubricante lipo grafito, potve
seco, Informa moderada.
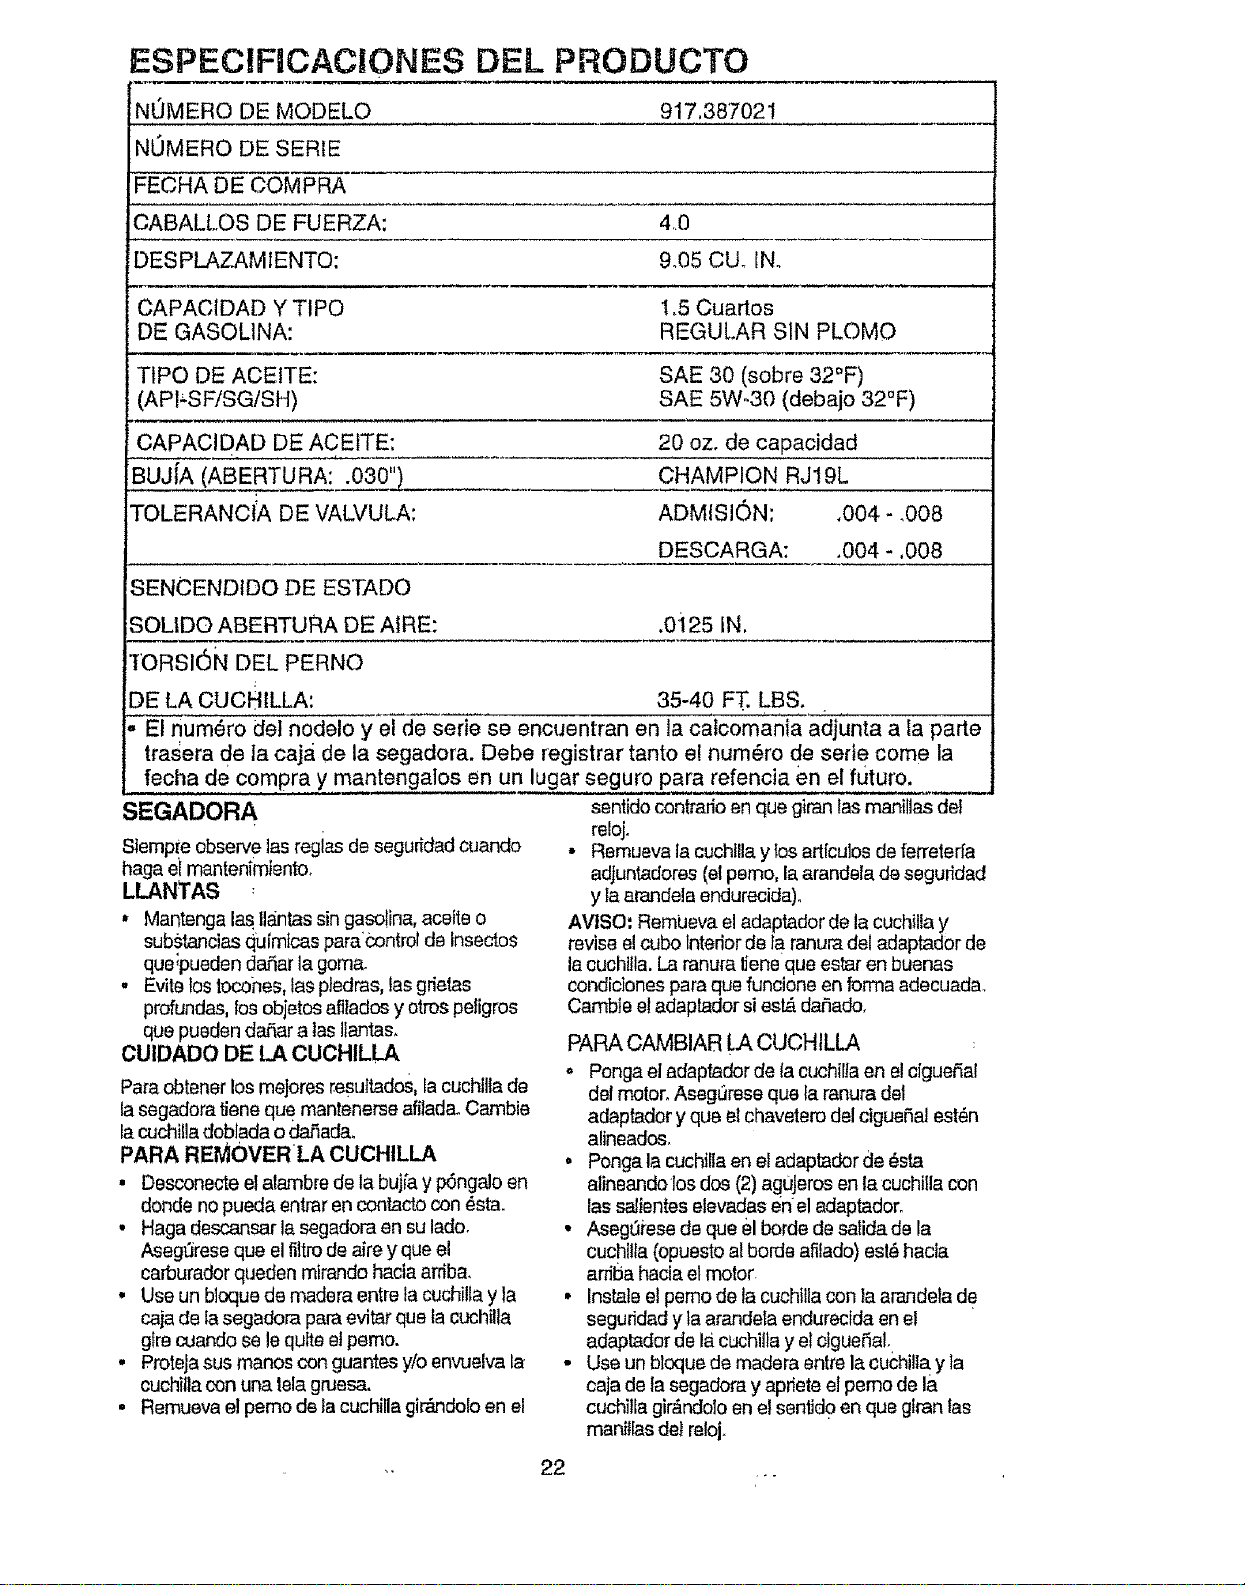
ESPECIFICACIONES DEL PRODUCTO
NOMERO DE MODELO 917,38702!
NOMERO DE SERIE
FECHA DE COMPRA
OABALLOS DE FUERZA: 4.0
DESPLAZAMIENTO: &05 CU. fN.
CAPACIDAD Y TIPO 1.5 Cuartos
DE GASOLINA: REGULAR SIN PLOMO
TIPO DE ACEITE: SAE 30 (sobre 32°F)
(API_SF/SG/SH) SAE 5Wo30 (debajo 32°F)
CAPACIDAD DE ACEtTE:
BUJ[A (ABERTURA: .030").
i
TOLERANCIA DE VALVULA:
20 oz. de capacidad
CHAMPION RJ19L
ADMISION; ,004 - ,008
DESCARGA: .004 - ,008
SENCEND{DO DE ESTADO
.0125 iN,
SOUDO ABERTURA DE AiRE:
TORSI6N DEL PERNO
DE LA CUCHILLA: 35-40 FT. LBS. _ _
El num_ro del nodelo y el de serie se enCuentran en la calcomania adjunta ala parte
trasera de la caja de la segadora. Debe registrar tanto e! num_ro de sad e come la
fecha de compra y mantengalos en un lugar seguro para refencia en el futuro,
SEGADORA
Slemp[e observelas regias de seguridad cuando
haga er mantenimtento.
LLANTAS
• Mantenga 12 Ila_tas singaso!ina, aceite o
substancias quimicas pare control de insectos
que;pueden dafiar la gomao
• Evite lostocones, ias pJedras,laegrietas
profundas, los objetos afilados y otros petigros
qua pueden daSar alas ilantas.
CUIDADO DE LA CUCHILLA
Pare obtener los me}ores resu_tados,ia cuchilta de
la segadora _ene que mantenerse afiladaoCarnbie
racuchilla doblada o dat_ada.
PARA REMOVERLA CUCHILLA
• Desconecte el atambre de ta bujfay pOnga!oen
donde no pueda entrar en contacto con _sta.
• Haga descansar le segadora en su lado.
Aseg_iresequa el filtro de aire y qua el
carburador queden mtrando hacia arrib&
• Use un bloque de madera entre la cuchilla y la
caia de la segadora pare evitar qua la cuchilla
gtrecuando se !equite el pemo.
• Proteja sus manes con guantes y/o envuelva la
cuchilla con una tela gruesa.
• Remueva e! pemo de tacuchilla girAndolo en el
sentido contrario en qua giran las manillas del
reloj,
* Remueva la cuchtllay {osart[culos de ferreterfa
adjuntadores (el perno, la arandela de seguridad
y Iaarandela endurecida),
AVlSO: RemLJevael adaptador de la cuchilla y
revise elcubo lntedor de la ranura del adaptador de
la cuchllla. La mnura lJenequa estar en buenas
condidones para que funcione en forma adecuada,
Cambie el adaptador si asia daSado,
PARA CAMBIAR LA CUCHILLA
,, Ponga el adapfador de {acuch{Uaen el ciguet_al
del motor^Asegurese qua la ranura del
adaptador y qua el chavetero del ctgueSal est_n
alineados.
• Ponga la cuchilla en el adaptador de _sta
alineandolos dos (2) ag,JJerosen la cuchilla con
las salientes elevadas err el adaptador.
• Aseg_ii'esede clueel horde de saticlade la
cuchilta (opuesto al borde afilado) esl_ hacia
ardtSahacla el motor.
• Instalset perno de la cuchilla con la arandefa de
segundad y la arancfetaendurectda en el
adaptador de la cuchii_ay el clgueSal,,
• Use un bloque de madera entre la cuchilla:y ta
caja de ta segadora y apr_eteel pemo de la
cuchi!la gir&ndoloen el sentid0 en qua glran las
manit[asdel reloj.
,. 22 __
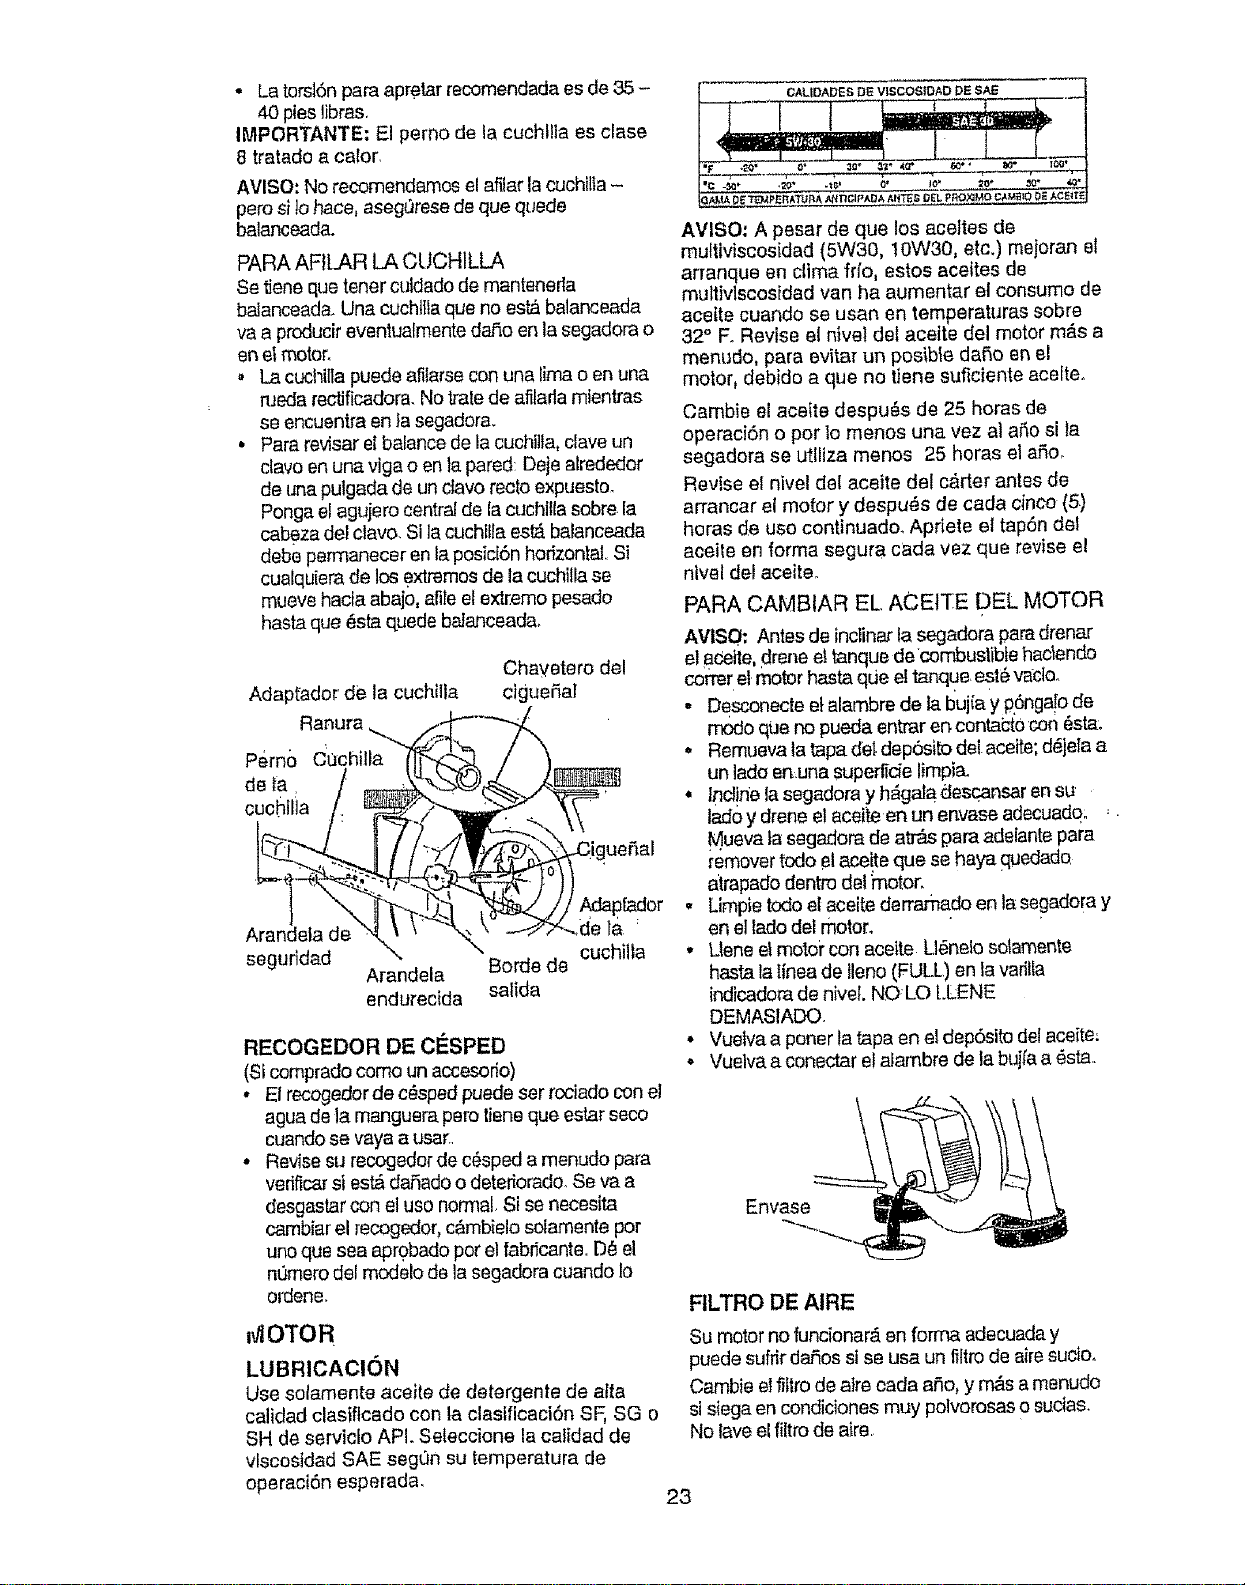
• La torsl6n para apretar recomendada es de 35 -
40 pies libras,
IMPORTANTE: El perno de la cuchitla es clase
8 tratado a calor,
AVISO: No recomendamos el afitar la cuchilfa-
pare si tohace, asegt)rese de qua quede
balanceada.
PARA AFILAR LA CUCHILLA
Se tJenequa tener cutdado de mantenerla
balanceada. Una cuchtIla qua no est& balanceada
vaa producir eventualmente dat% en la segadora o
en ei motor.
o La cucNlia puede afilarse con una lima o en una
nJedareclificadora. Notratede afilarlamientras
se encuentra en la segadera.
•Para revisarel balance de la cuchltia, clave un
dave en una riga o en la pared: Deje alrededor
de una putgada de un ctavo recto expuesto.
Ponga el agujero central de la cuchitla sabre la
cabeza del clave. Si la cuchflla asia batanceada
debe parmanecer en laposici6n horizontal,,Si
cualquiera de los extremes de la cuchitlase
mueve hacta abajo, afileel ext[emo pesado
hasta que _sla quede balanceada.
Adaptador de la cuchllta
Ranura ... ./_..>_,.
Paine C_chitla /]'_-"
segufidad
Arandela
endurecida
Chayetero del
cigue_a!
iguehal
\ _-..de la
cuchilta
Borde de
salida
RECOGEDOR DE ClaSPED
(Si comprado coma un accesorlo)
• El recogedor de e#sped puede ser rociado conel
ague de la manguera pare tiene qua ester seco
cuando se vaya a user..
• Reviseeu recogedor de c_sped a menudo pare
vedficarsi esfA daSado o deteriorado, Se va a
desgastar con el usa norma!, Si senecesita
cambiar el recogedor, c&mbielo solamente par
uno qua sea apr0bado par el fabricante. D_ el
nQmerodal modelo de ]asegadora cuando Io
ordene.
,_OTOR
LUBRIOAClON
Use solamente aceite de detergente de alta
calidad clastftcado con la claslficaci6n SF, SG o
SH de servicfo API. Seleccione la catidad de
vfseosidad SAE segQn su temperatura de
operaci6n esperada,
AVISO: A pesar de qua los aceltes de
mufttviscosidad (5W30, 10W30, etc.) mejoran el
arranque en clima fib, estos acettes de
multiviscosidad van ha aumentar el consume de
aceite cuando se usan en temperaturas sabre
32° FoRevise el nivej del aceite del motor mAs a
menudo, para evitar un posible dafio en el
motor, debido a qua no tiene suficiente acefteo
Cambie el aceite despu_s de 25 hares de
operaci6n o per to menos una vez al aria si la
segadora se utilize manes 25 hares el aSo.
Revise el nivel de! aceite del carter antes de
arranear el motor y despu_s de cada cinco (5)
hares de usa continuado. Apriete el tap6n del
aceite en farina segura cada vez qua revise el
nivel del aceite_
PARA CAMBIAR EL ACEITE DEL MOTOR
AVISO: Antes de inclinar la segadera para drenar
el8Ceite,drene el tanque decombustible haclendo
correr el.motor hasta que ettanque, eel6 vactoo
• Desconecle etalambre de fabujia y p6nga!ode
n-,3doqua no pueda entrar en contactocon _sta.
- Remueva la tapa de_dep6sib del.aceite;d_jeta a
un lade enuna superlfcie limpia.
,, tad!lie la segadora y h_gala descansar en su
lade y drene et aceite en un envase adecuadq: '
M.ueva tasagadora de atr'&spare adelante pare
remover rode e!aceite qua se haya quedado
_itrapadodentro det _notor.
• Limpie rode el aceite derrarnado en la segadora y
en el lade del motor.
• Lleneel motoi"con acelte U_nelo solamente
haste la tinea de llano (FULL) en la varifia
indicadorade nivel. NO:LO [.LENE
DEMASIADO
• Vuefva a pener la fapa en el dep6sito delaceite;
,, Vuelva a conectar el alambre de la buj_aa _sta.
Envase
RLTRO DE AIRE
Su motor no tuncionar,_en forrna adecuada y
puede sufrir daSos si se usa un filtrode aimsudo.
Cambie el fittrode alre eada are, y mAs a menudo
si siege en condiciones muy polverosas o sudas.
No lave el filtro de aire
23
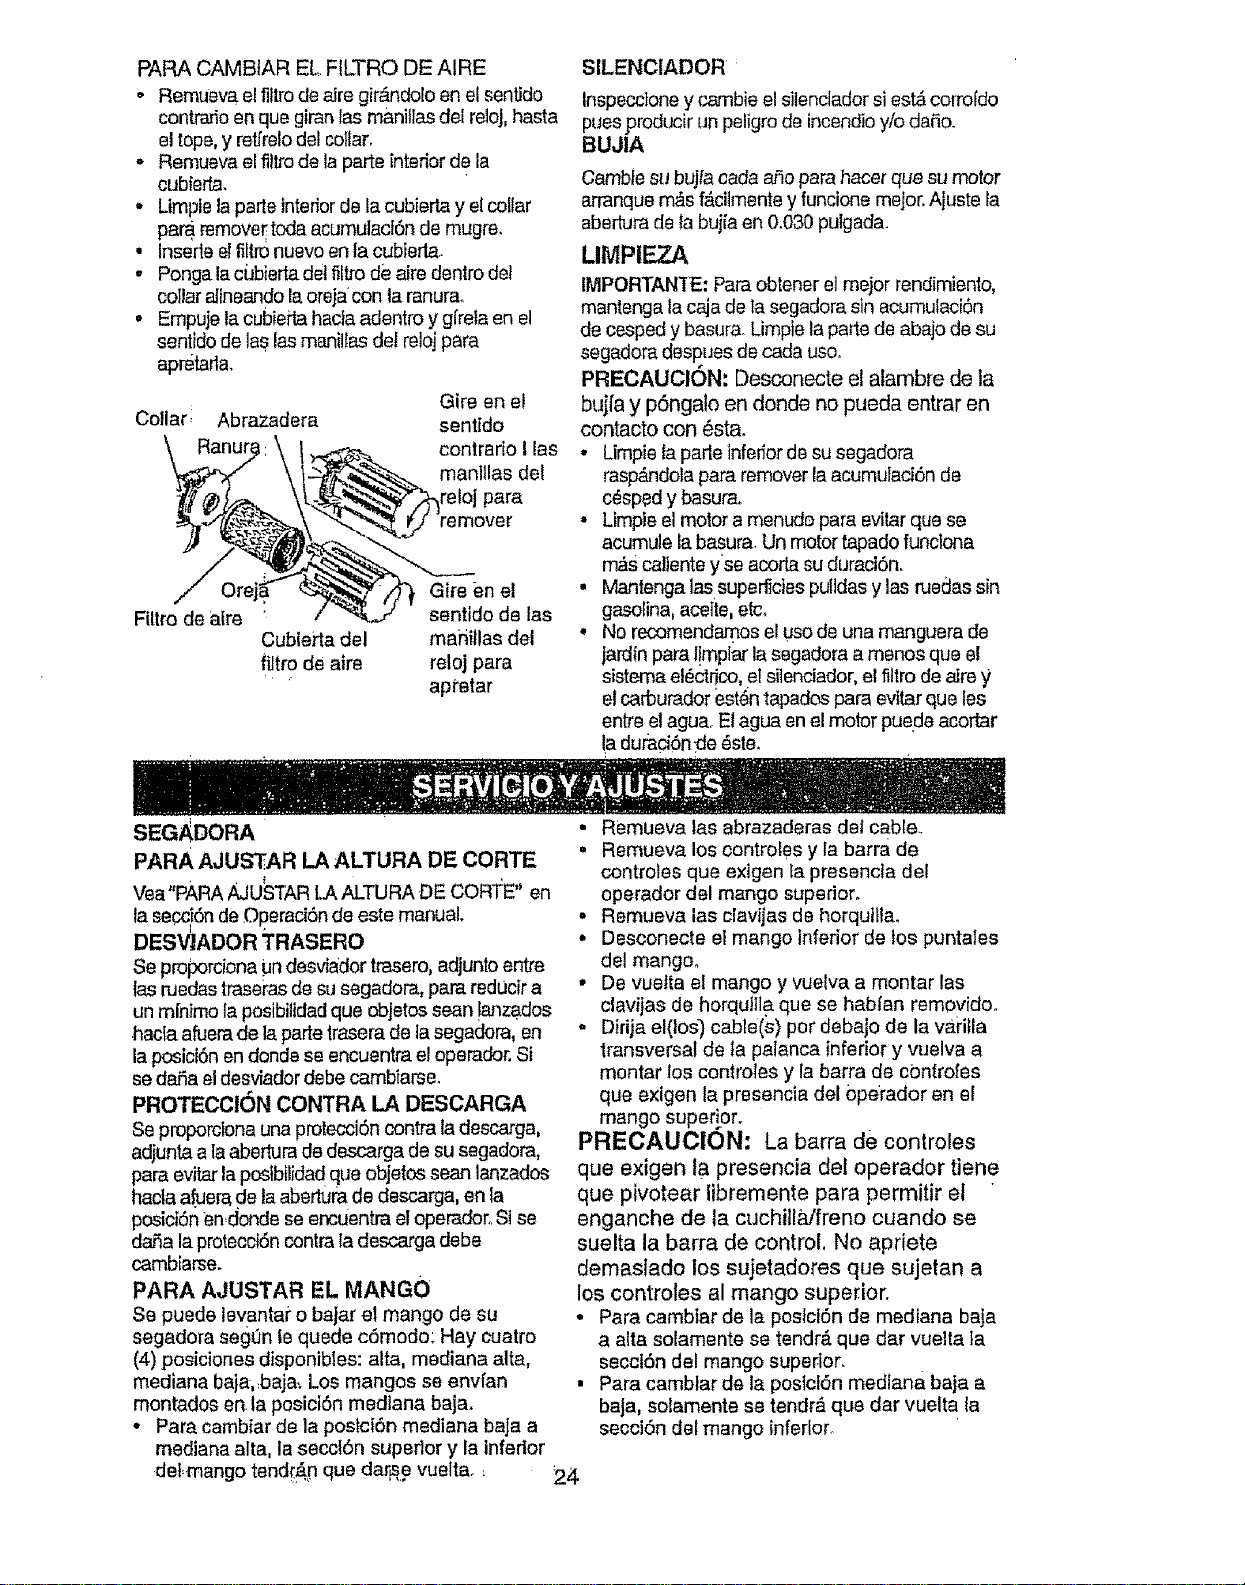
PAPA CAMBtAR EL FILTRO DEAIRE
o Remueva el flltrode aire gir_ndolo en el sentido
contrario en qua giran las manillas del reloJ,hasta
el tope, y retfrelo del collar.
o Remueva el fillrode la parte interior de la
cubierla.
- Limpletaparle interiorde la cubierta y el collar
paN remove_toda acumulacI6n de mugre.
• Insedeel filtronuevo en fa cubterla.
- Pongala ciJbierla del filtro de aire dentro del
collar aitneando la oreja con la ranura_
• Empuje la cubiei'tahacta adentro y gt'rela en el
sentido de las las manillas det reloj pare
apretarta.
Collar Abrazadera
Gire en e!
sentido
contrario I las
manlllas del
remover
FUtrode atre
Git'e en et
sentido de las
Cubierta del maiiillas del
filtro de aire reloj para
" ' apratar
SlLENCIADOR
inspeccione y cambie el sitenclador siest& corrofdo
puesproducir un peligro de incendio y/o dafio.
BUJIA
Camble su bujfa cada abe pare hacer qua su motor
arranque m&s f&cilrnentey funcione major,Ajuste la
abertum de la bujfaan 0.030 putgada.
LIMPIEZA
IMPORTANIE: Pare obtener el major rendimlento,
mantenga la caja de la segadora sin acumulaci6n
de cesped y basura. Limpie la parle de abajo de su
segadore despues de cada use.
PRECAUCI6N: Desconecte el alambre de la
buji'ay p6ngalo en donde no pueda entrar en
contacto con _sta.
• Limpiela parle inferior da su segadora
rasp&ndola pare remover la acumulaciSn de
c_sped y basura.
• Limple el motor a menudo pare evitar qua se
acumule la basura. Un motor tapado funclona
m_s caliente y'se acorla su duractSn.
• Mantenga las superlicies pulidas y las ruedas sin
gasolina, aceite, etc.
• No recomendan?osel use de una manguera de
jardin para I!mplar la segadom amanes qua el
sistema e!_ctrioo, el silenciador,el filtro de aire y
el carburador est_n tapados pare evitar qua les
entre e!agua. El agua en el motor puede acortar
la duraciOnde _ste.
SEGADORA
PARA AJUS3T_:ARLA ALTURA DE CORTE
Vea"PARA AJUSTAR LA ALTURA DE COR'I;E" en
la secci6n de Operaci6n de este manual.
DESVIADOR TRASERO
Se proporciona _n desviador trasero, adjunto entre
las ruedas trasei_asde su segadora, pare redUcira
un minimo la pos bilidad qua obJetossean !anzados
hacla afuera de la parle traserade la segadora, en
la posici6n en donde se encuentra el operador. St
se daSa eldesviador debe cambiarse.
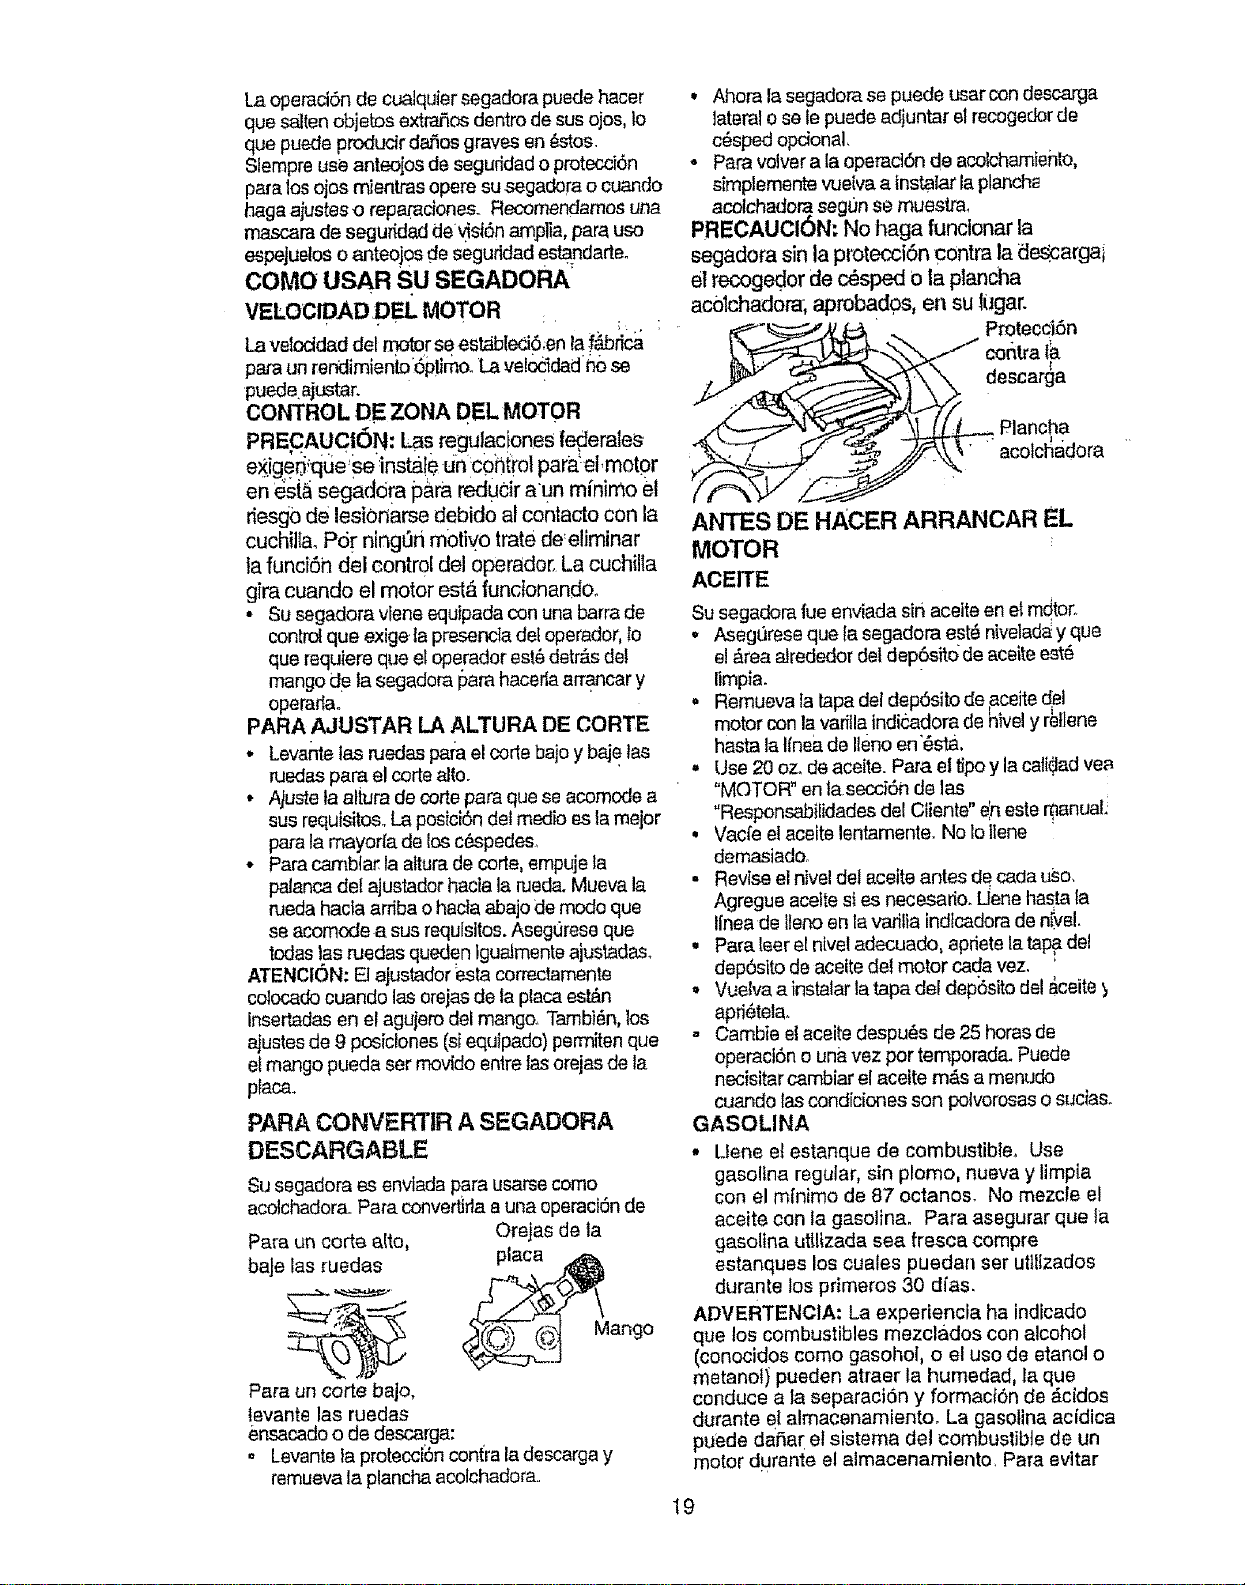
PROTECCION CONTRA LA DESCARGA
Se proporcionauna protecciOncontra la descarga,
adjunta ala aberlura de descarga de su saga(tom,
pare evitar la posibilidadque objetos sean lanzados
hacla afuerade la aberlul:ade descarga, en la
posici6n endonde se encuentra el operador..Si se
dafia la proteccf6n centre la descarga debe
cambiarse.
PARA AJUSTAR EL MANGO
Se puede lavantar o bajar et mango de su
segadora segt3n le quede c6modo: Hay cuatro
(4) posiciones disponibles: alta, mediana alia,
mediana baja,_baja, Los mangos se envi'an
montados en.la posiciOn medlana baja.
• Pare cambtar de la poslci6n mediana baja a
mediana alta, la secclOn superior y la inferior
def,mango tendt_n que dar,s,evuelta.
24
• Ramueva las abrazaderas def cable..
• Remueva los eontroles y la barra de
controles qua exigen fa presencta del
operador del mango superior.
,, Remueva las clavijas de horquilla.
• Desconecte el mango inferior de los puntales
del mango°
° De vuelta el mango y vuelva a reenter las
clavijas de horquill a que se habian removidoo
• Dirija el(los) cable(s) per debajo de la vafilla
lransversal de ta palanca inferior y wJelva a
reenter lee controles y la barra de c0ntrofes
qua exigen la presencia del 0parader an el
mango superior.
PRECAUCION: La barra de controles
qua exigen la presencia det operador tiene
qua pivotear libremente para permitir el
enganche de la cuchilhw'freno cuando se
suelta la barra de control, No apriete
demastado los sujetadores qua sujetan a
los controles al mango superior.
• Pare cambiar de la poslctOn de mediana baja
a alta solamente se tendr& que dar vuelta la
secct6n del mango superior.
• Pare camblar de la poslci6n medfana baja a
baJa, solamente se tendr& qua dar vuelta la
secci6n del mango inferior°
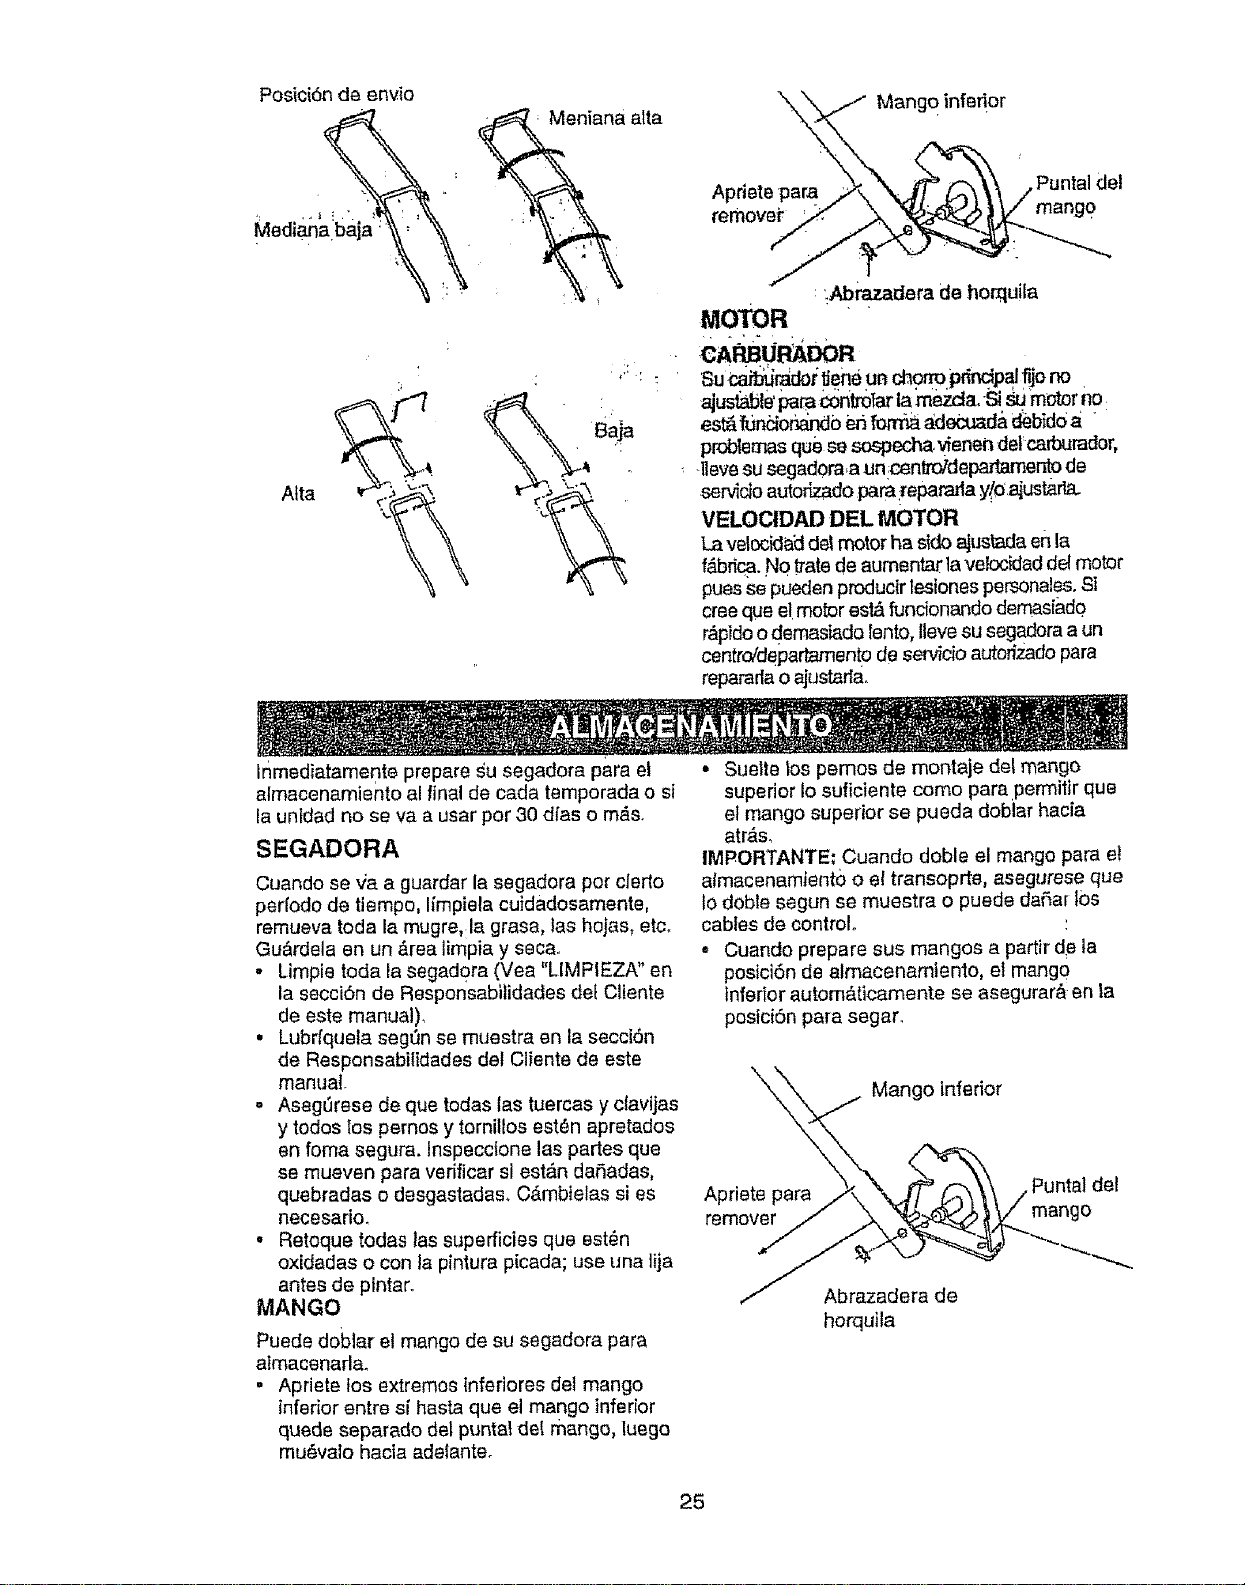
Posici6ndeenvio
Alta
Menianaalia
Mangoinferior
Apdetepare
remover
:::Abrazaderadeho u!la
MOTOR
Su _rado/tJene un chgrm,pr_ndpal' fijono .
ajust_le' para Mntm_ar la mezcta, Si su motor no
est_r_ion_d0 enforma a.decuada,debid0a "
probtemas qua se sospecha,_enen defcarburador,
Ileve su segad0ra,a un!centro/departamento de
servido autodzado para:[epararla y/o ajust_
VELOCIDAD DEL MOTOR
La velocida'ddel motor ha side ajusl_da en la
f_brica. No tTatede aumantar la ve!ocldad del motor
puesse pueden produc{r lestonespersonals. Si
cree qua el motor es_ funcionando demasfad0
r&pidoo demasiado lento, Ileve su segadora a un
centro/deparlamento de senficio autoffzado para
repararla o aj_Jstarla.
Inmediatamente prepare su segadora pare el
almacenamiento al final de cada temporada o si
la untdad no se va a user per 30 d_'aso m&s.
SEGADORA
Cuando se va a guarder la segadora per clerto
perfodo de tiempo, Ifmpiela cuidadosamente,
remueva toda la mugre,:la grasa, las hejas, etc,
Gu&rdela an un area limpia y seca,.
- Limpie toda la segad0ra (Vea "LIMPIEZA" en
la secci6n de Responsabilidades dei Clients
de este manual),
• Lubrfquela seg_n se muestra en la secci6n
de Responsabilidades del Clients de este
manual.
= Asegfirese de qua redes ias tuercas y ciavtjas
y todos ios parries y tornillos est_.n apretados
en foma segura. Inspeccione las partes que
se mueven para verificar sl est_n daSadas,
quebradas o desgastadas. C&mblelas si es
necesarioo
° Retoque redes las superficies qua est_n
oxidadas o con la pintura picada; use una lija
antes de p[ntar.
MANGO
Puede doblar et mango de su segadora para
aimacenarla.
o Apriete los extremes inferiores del mango
inferior entre sf hasta que el mango inferior
quede separado del punta! dei mango, luego
mu6valo hacia adefanteo
• Suelte los pemos de montaje del mango
superior Io suficiente come pare permifir qua
et mango superior se pueda doblar hacia
atr&s.
IMPORTANTE: Cuando doble el mango pare et
aimacenamient5 o el transoprte, asegurese qua
1odoble segun se muestra o puede daSar 10s
cables de control.
• Cuando prepare sus mangos a partir de la
posici_Snde elmacenamtenlo, et mango
inferiorautom_ticamente se asegurar_, en la
posici6n para segaro
Mango inferior
Apriete para del
remover o
Abrazadera de
horquila
25
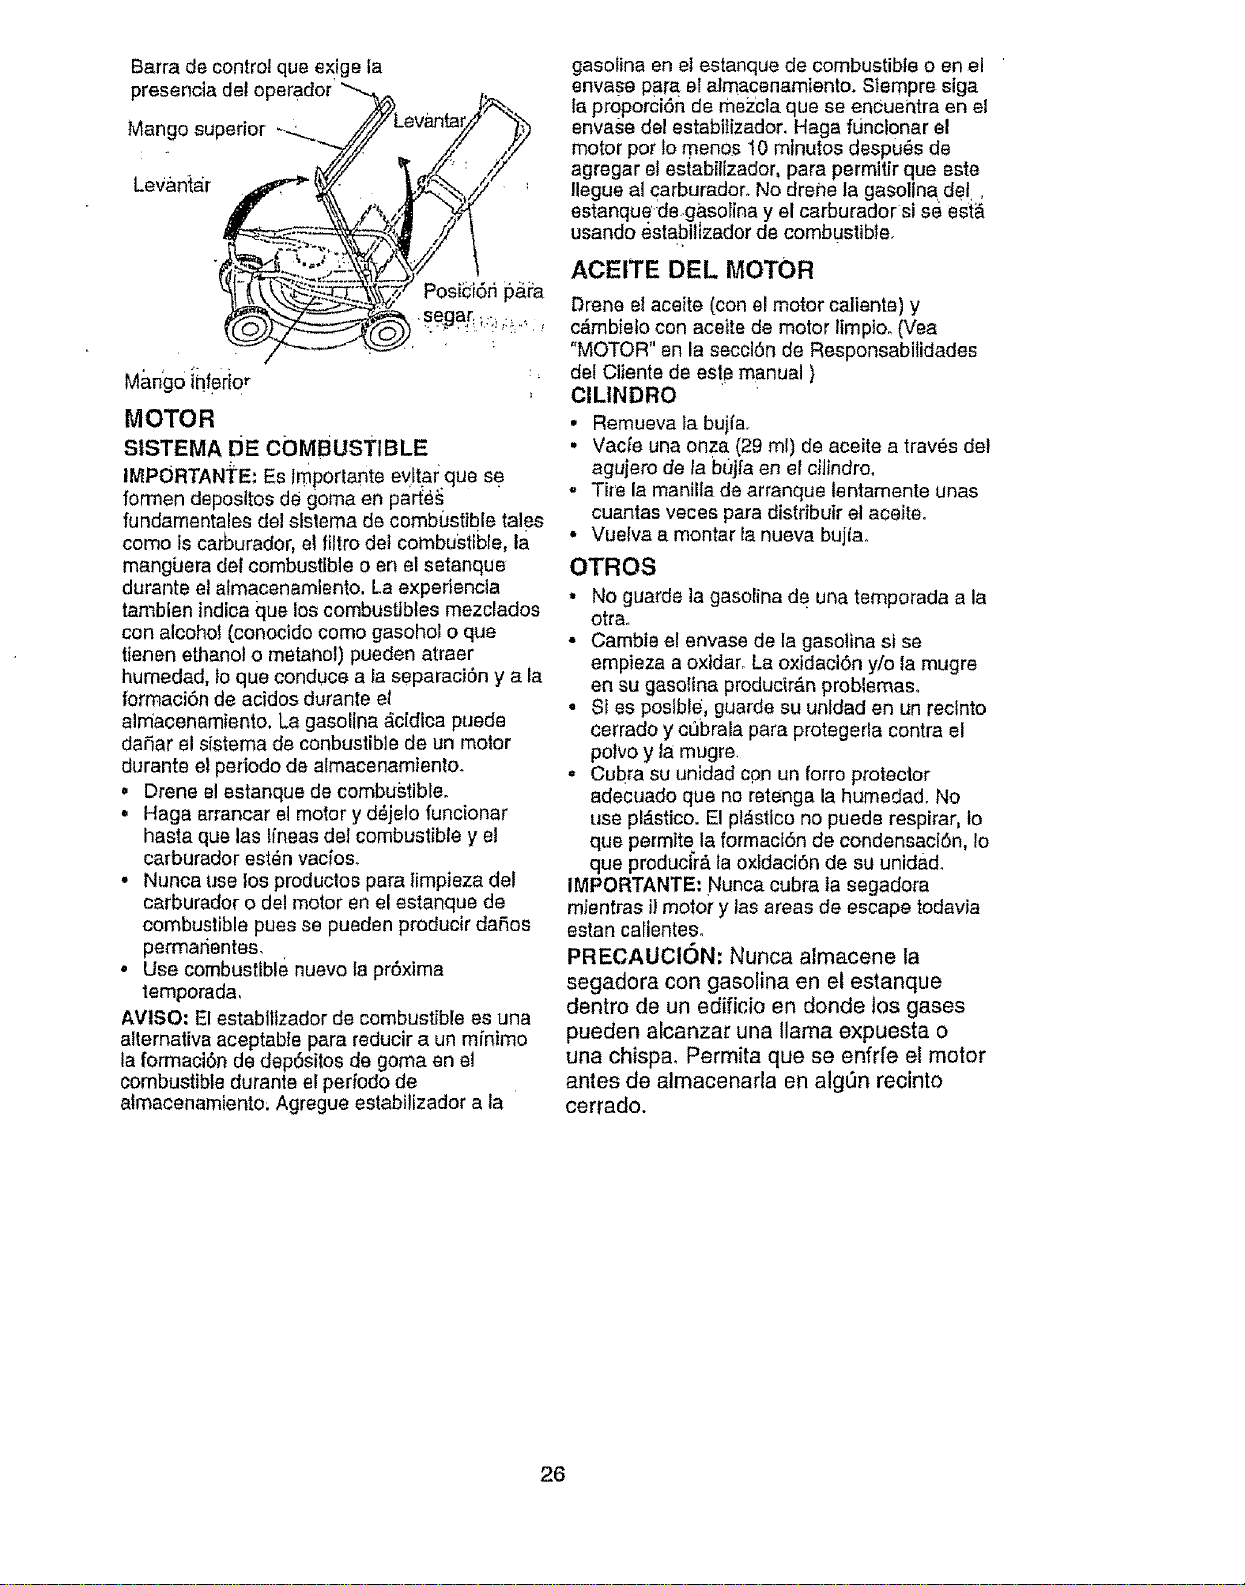
Barra de control qua exige la
presencia del operador _ ,,
Mango superior-._..JLevany'P_?
.. . . " ,!t_y
¢
Mingo inferio, '_
I
MOTOR
SISTEMA DE COMBusTIBLE
IMPORTANtE: Es lriportante eyl.ar que se
furman deposltos de goma en par_ei
fundamantales del slstema de combLtstible tales
come is carburador, et fltro dei combu_sfb{e, la
mangbera del combustible o en el setanque
durante el a{macenamlento, La experiencia
tamblen indica qua los combustibles mezclados
con alcohol (conocido come gasohol o qua
tlenen ellanol o metanol) pueden atraer
humedad, Io qua conduce a la separaci6n y a la
formaci6n de acidos durante el
almacenamiento, La gasolna i,c{dfca puede
dafiar el s{stema de conbustible de un motor
durante el periodo de almacenamtento.
o Drone el estanque de combustible.
° Haga arrancar el motor y d6je!o funcionar
hasta qua las fneas del combustible y el
ca[burador est6n vacfos.
° Nunca use los productos para lmpieza del
carburador o del motor en el estanque de
combustible pues se pueden producir darius
permanentes,
° Use combustible nuevo la pr6xima
temporada,
AVtSO: El establizador de combustible es una
alternative aceptable para reducir aun minimo
la formaci6n de dep6sitos de goma en el
combustible durante el periodo de
almacenamiento; Agregue estabitzador a fa
gasolina en el estanque de combustible o en el
envase para et atmacenamiento. Stempre sign
la proporci6n de meZcta qua se enCueiltra en el
envase del estabilizador, Haga funclonar el
motor per 1omeno.s 10 mtnutos despu6s de
agregar el estabilizador, para permttir qua este
Ilegue al carburadoro No drone la gasollna de[,
estanque"de.g_solna y el carburador si se est,.
usando estabihzadorde combustible.
ACEITE DEL MOTOR
Drone el aceite (con el motor caliente) y
c6mbielo con aceite de motor limpioo (Vea
"MOTOR" en la seccl6n de Responsabilidades
del Ctente de esle manual )
ClLINDRO
• Remueva la bujla.
• Vacle una onza (29 ml) de aceite a trev6s de!
agujero de la b_]jla en el ctindro,
° Tire la manila de arranque fentamente unas
cuantas veces para distfibuir el aceite.
• Vuelva a montar la nueva bujfa.
OTROS
• No guarde la gasolina de una temporada a la
otra,.
• Camble e! envase de la gasotina si se
empieza a oxidar. La oxldaci6n y/o la mugre
en su gasotna produc_r£,nproblemas.
• Si es poslble, guarde su unfdad en un reclnto
cerrado y c_brala para protegerla contra el
polvo y la mugre.
• Cubra su unidad con un forro protector
adecuado qua no retenga la humedad. No
use pl£stico. El pl£stico no puede respirar, 1o
que permite la formacl6n de condensact6n, 1o
qua produci'r£ la oxtdact6n de su unidad.
IMPORTANTE: Nunca cubra la segadora
mientras il motor y Ins areas de escape todavia
estan calentes.
PRECAUCI6N: Nunca almacene la
segadera con gasolina en el estanque
dentro de un edificio en donde los gases
pueden alcanzar una llama expuesta o
una chispa. Permita que se enfrl'e el motor
antes de almacenarla en algOn recinto
cerrado.
26
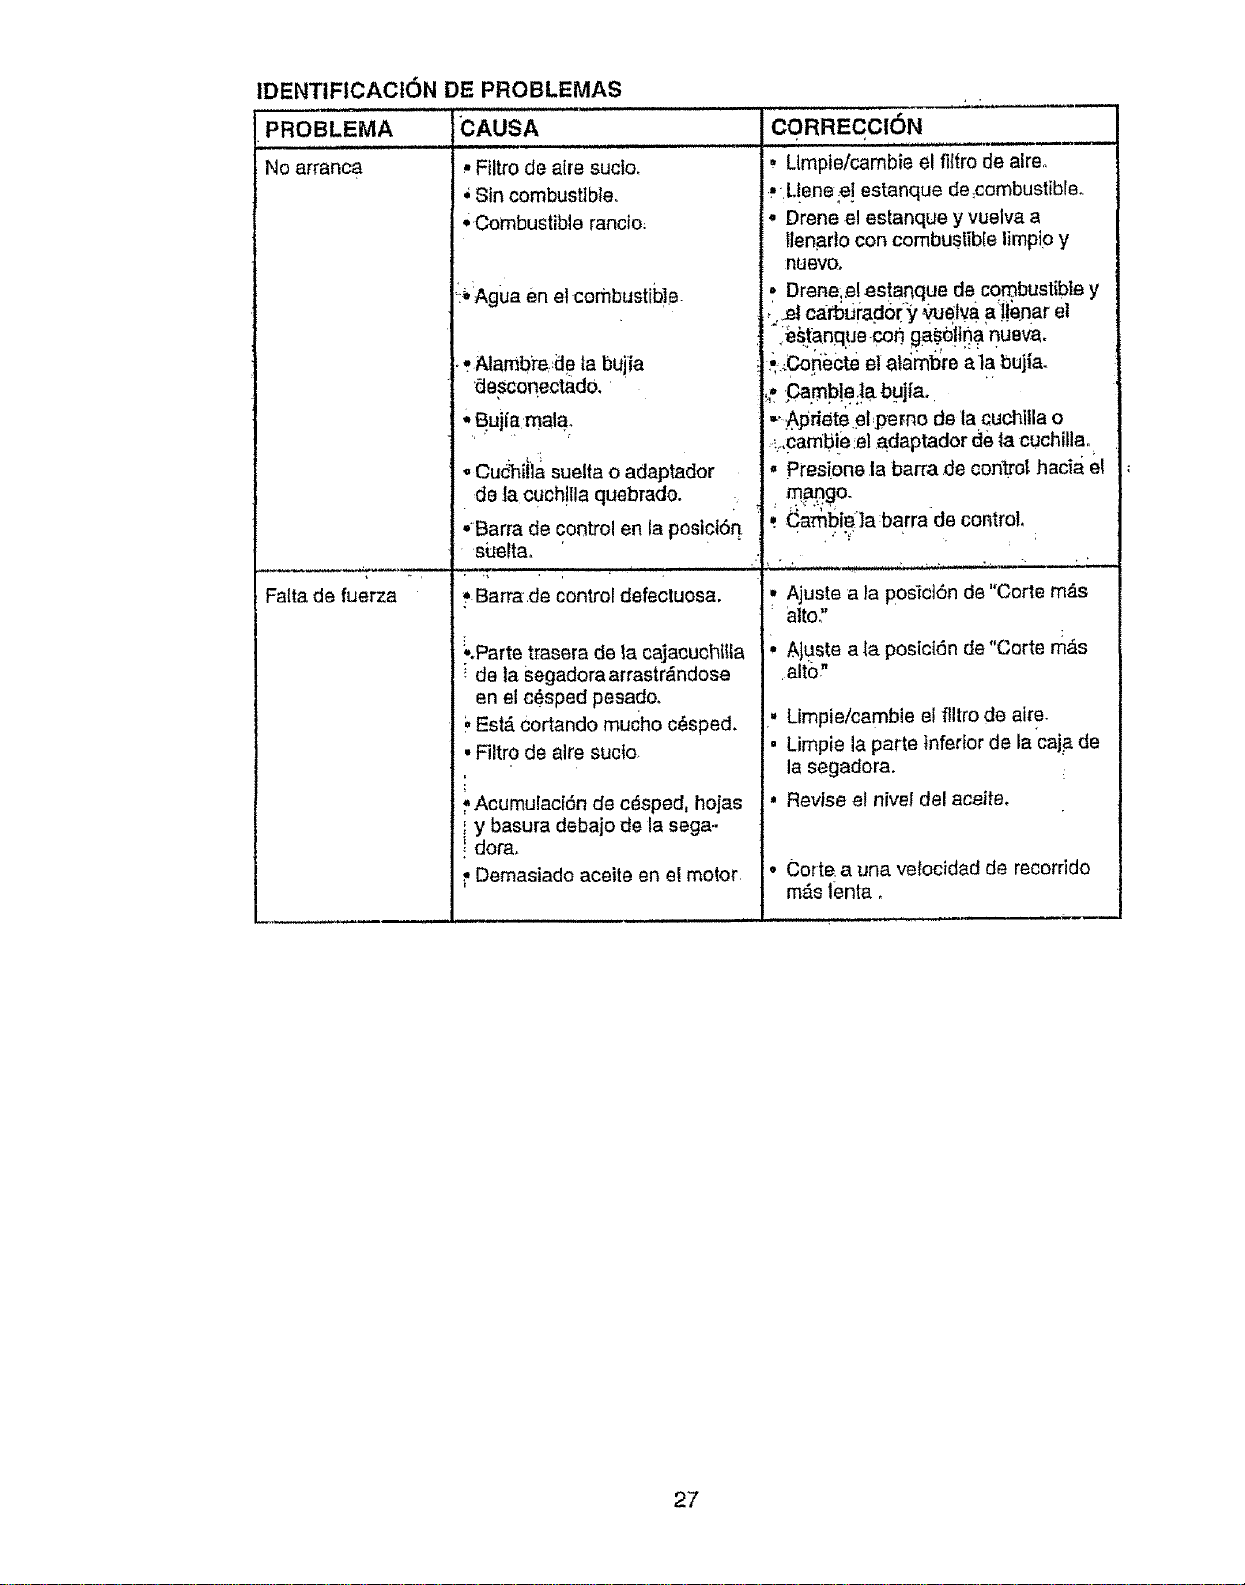
IDENTIFICACtON DE PROBLEMAS
PROBLEMA CAUSA
.................. ,i ill,,
No arrano_
Fatta de fuerza
, ,i ,
, Filtro de alre suclo.
Sin combustible.
*Combustible rancto,
:_,:Aguaen el cembustib]e.
• Namb_e..:dela bujia
de,sconectad0.
' Bujl'amatao
,, : , ' "t
• Cuc_i!la suelta o adaptador
de la cuch!lla quebrado.
•Barra de control en la posicl6 q
si_elta.
. i , ,
• ,4 , • ,
_ Barrade control defecluosa.
!oParte t_asera de la cajacuchitta
CORRECCION ..........................
Umpie!cambie e! _tro de alreo
.L!ene;e! estanque de,combustible.
• Drene el estanque y vuelva a
llenarlo con combustTb[e limpio y
nUevo,
=.Drer_e_.e!estanque de combustibley
•_elcar'0urad0r:y-yu_iva a!!e.nar el
"ibstanqye-coh ga_e!t_a nueva.
_,,.Co_ecteel atam'oreala bujia.
_t;Cam.b!e:!abujfa.
=':Apriete eFpemo de la ¢uchllla o
"_,camb!e:el.adaptador de la ouchillao
• Presione la barra de con_o! haci_ el
, m_an...g°.
: Camblg ]a barra de contro!,
...... ,,iJ .,i ',l
,, Ajuste a la pos_ci6n de "Corte m_.s
" alto."
• AJuste a _aposict6n de "Carte m_s
de la segadora arrastr_ndose
en el c_sped pesado.
Est,. Cortando muoho c6sped.
•Filtro de alre suc!o
fAcumulacf6n de cdsped, hojas
y basura debajo de la sega-
! dora_
t Demasiado aceite en e! motor
•alto"
• Limpie/camble el flltro de aire.
• Limpie la parte inferior de la cain,de
la segadora.
• Revise el nivet del aceite.
o Corte a una ve{ocidad de recorrido
m&s tenta,
27

PROBLEMA.
Vial corte -disparejo
Vibraci6n excesiva
t;
o
Cord6n arrancador
diffcii de tlrar
Recogedor de c_sped
no se liana (si viene
equipado)
Dlficil de empujar
CAUSA
Cuchilla desgastada, doblada o
suettao
Altura de las ruedas dispareja_
Ve!ocidad del motor lenta,
• ,/_.cumulact6n de c_sped, hojas
basura debajo de fa segador&
• Cuchilla desgastada, doblada d
sUelt&
CigueBat del motor doblado.,
r
• El frenodel volante del mo{(Jr
est_aptiea_do cuando se suelta
ia barra de control
• CigueRai del motor dobIado.
• Adaptador de la cuchil/a
quebrado,
• La cuchilla se arrastra en el
cOsped.
m ' n
Altura de corte demasiado
bajao
Levantamiento de la cuchilla
desgastado.
Recogedor sin ventilacibn de
aire.
Velocidad del motor lent&
El c_sped es_ demasiado alto
o la altura de fa rueda dema-
slado baja_
Parte trasera de la caja/cuchilla
de la segadora arrastr_ndose
en el c_sped.
Recogedor de c_sped dema-
stado llano.
Posicl6n de la altura del mango
no adecuada para usted,
°
m
CORREC-C_N
Cambie la cuchilla Aprlete el
pemo de la cuchtlla.
Ajuste todas las ruedas a la
mlsma attur&
P6ngase en contacto con su
centro de servicio autorizado
m_s cercano
L,Jmpie:la parte inferior de la caja
de la segadora,
Cambte'ta cuchlHa Apriete et
pemO de la cuchilla,
P6ngase en contacto con su
centro de servlcto autorlzado
m_s cercano,
Presione ta barra de control
hacia et mango superior antes de
ttrar et cord6n arrancador.
Pdngase en contacto con su
centro de servicio autorizado
m_s cercano.
Cambie el adaptador de la
cuchilla,
Mueva la segadora a un lugar en
donde el c_sped ha sido cortado
o a una superficie tirme para
hacer arrancar e! motor r
Eteve la al[ura de code,
Cambie la cuchitlas,
Limpie el recogedor de c6sped,
Ajuste el control de la velocidad
del motor a la posici6n rapida
Ele_'e ra altura de cot°e,.
EIeve ta parle trasera de la caja
la segadora (I) un iugar m&s alto.
Vacfe el recogedor de c#sped.
Ajuste la altura del mango de
modo qua le acomode,
28

29
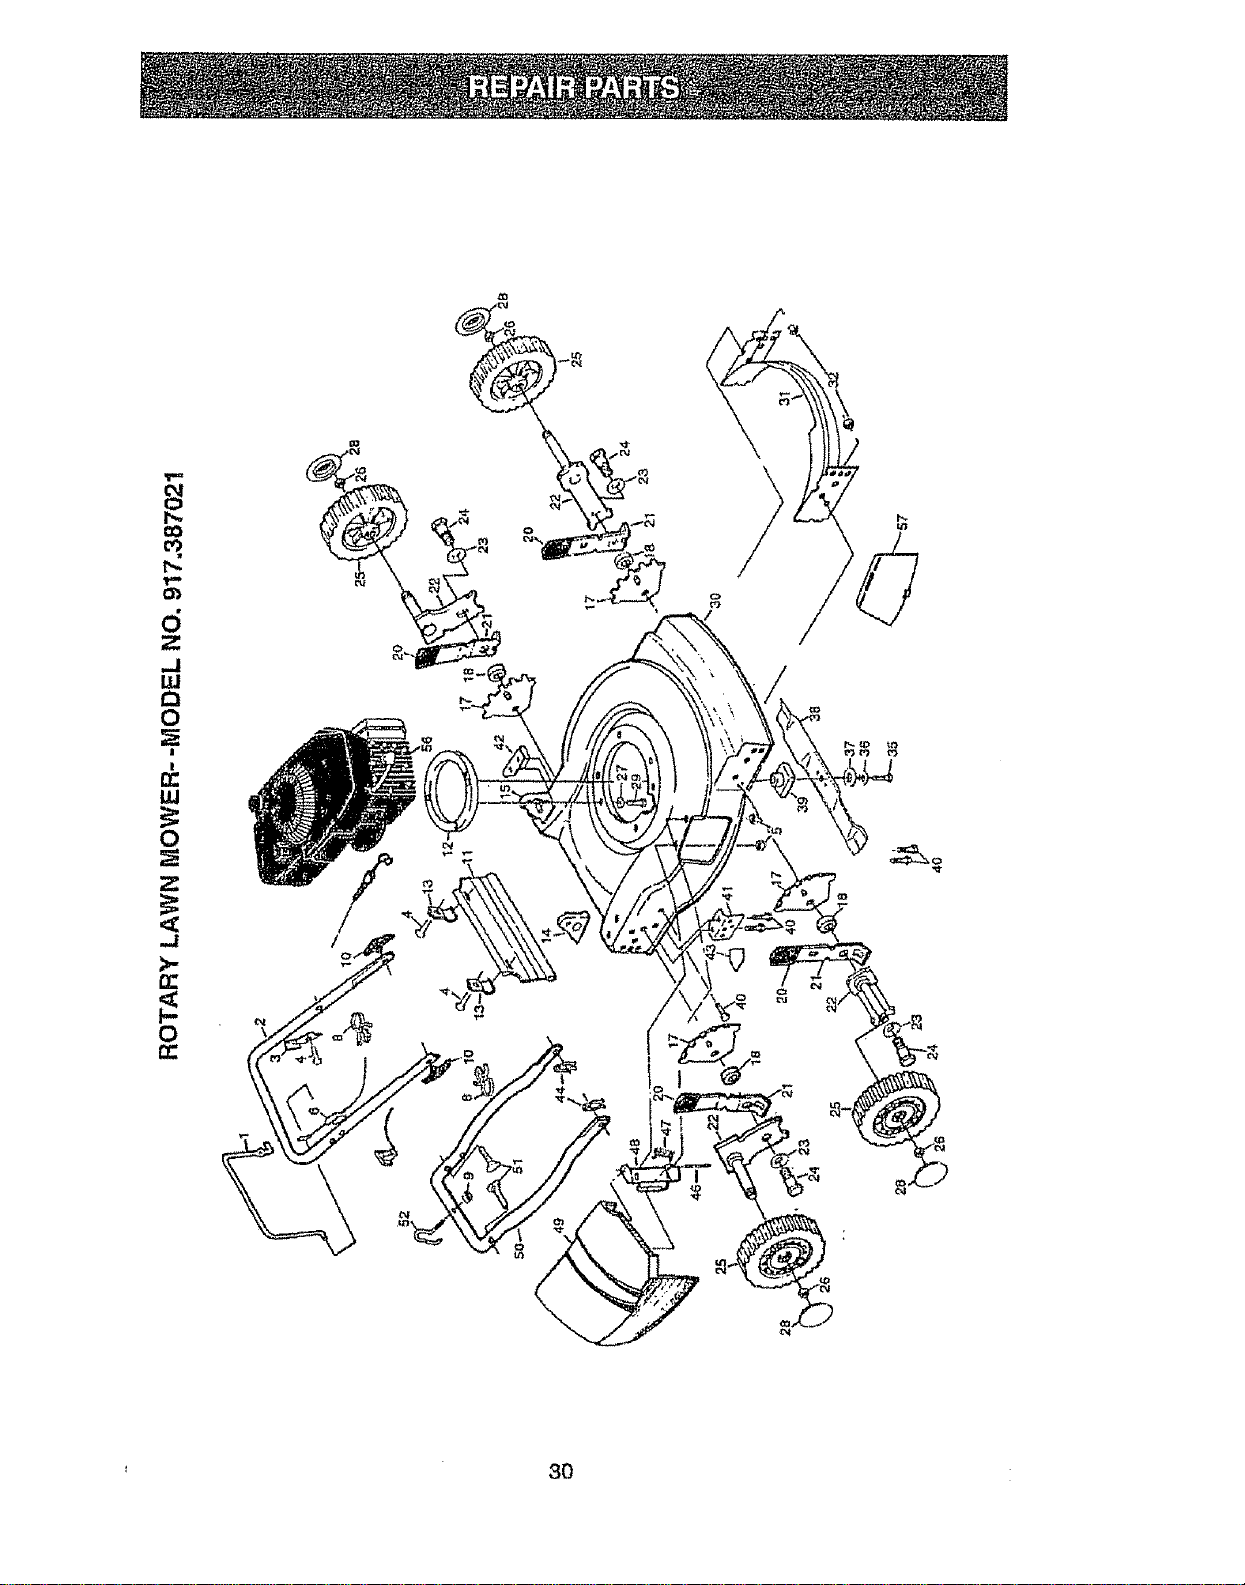
d
2:
,,.J
£=I
0
/I
II
W
0
Z
-t
0
' 3O

Q
I',.
I',,,
O)
d
Z
,.,I
ILl
0
0
I
I
z
,.I
>,
0
z
0
m
ILl
0
2
n
n-
O
O9
UJ
p-
_tO
_z
_d
mm
X
6
I= 0'}
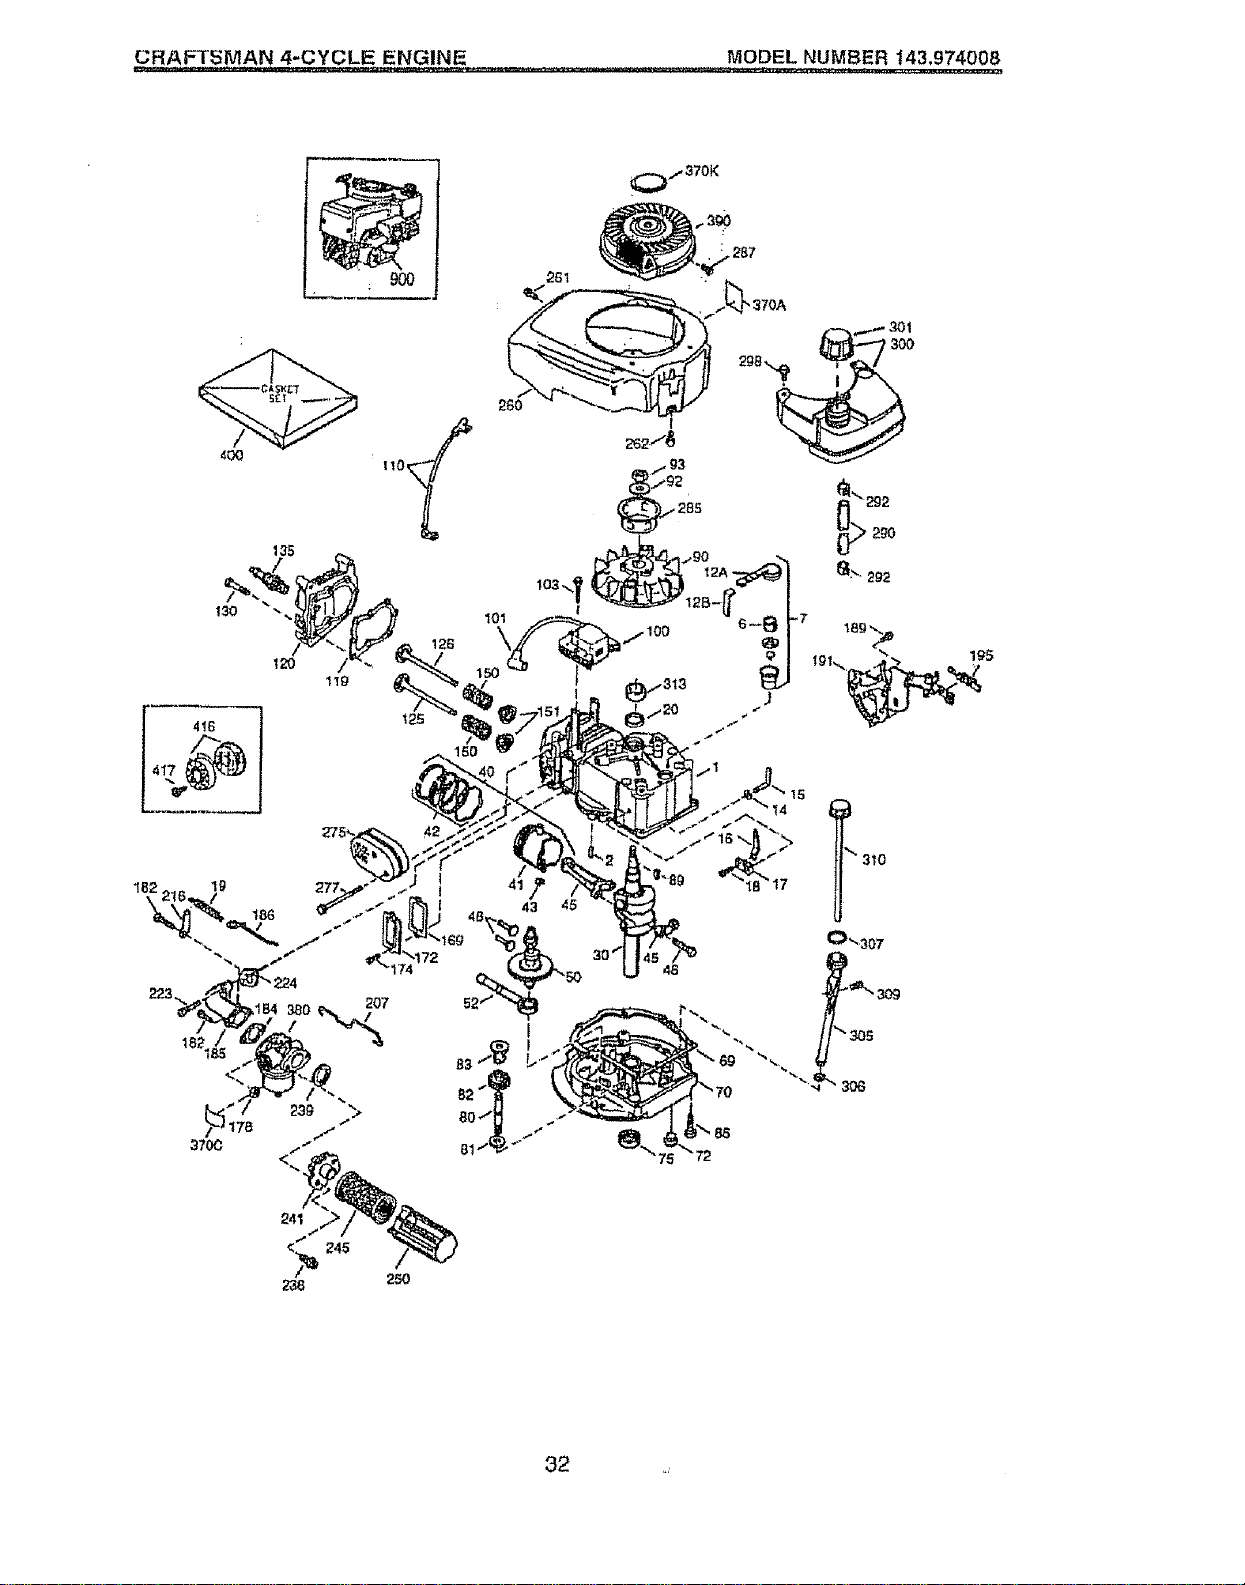
CRAFTSMAN ,q-CYCLE ENGINE MODEL NUMBER t43,974008
9OO
130
416
241
245
2 _,
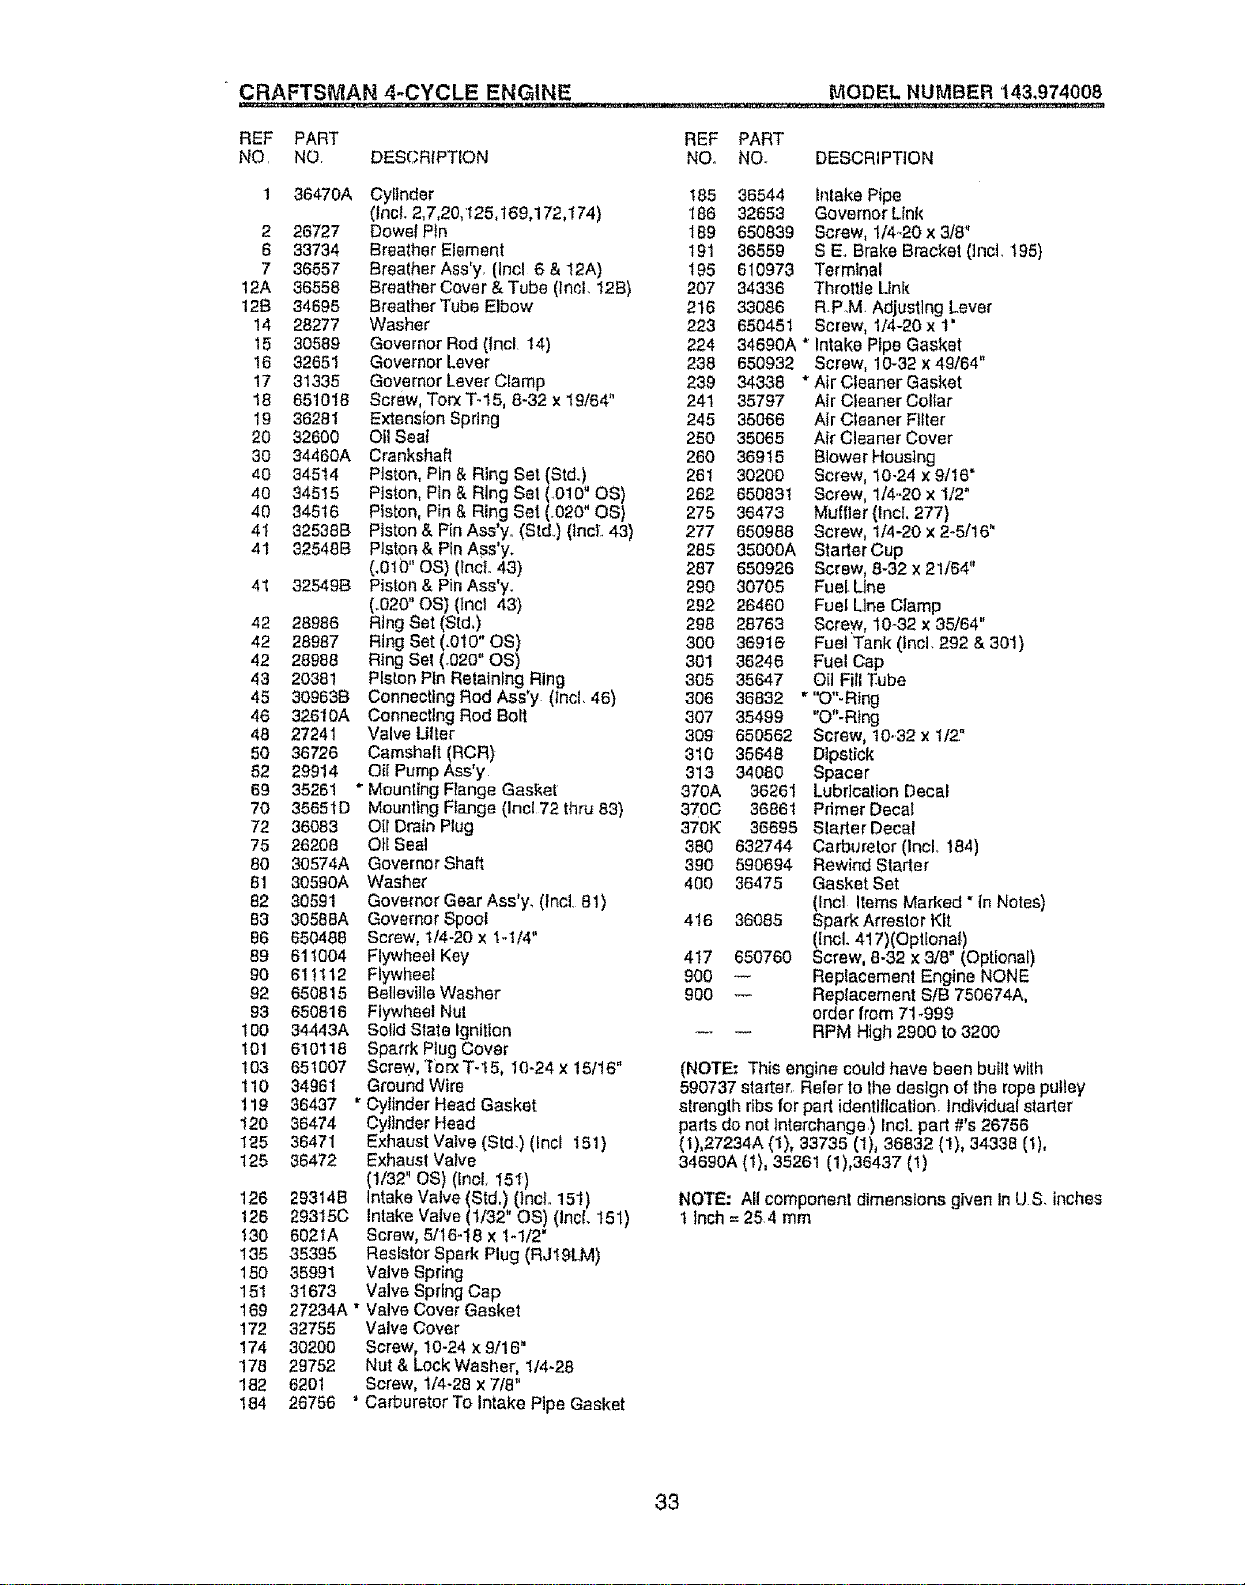
CRAFTSMAN 4-CYCLE ENGINE MODEL NUMBER '143,974008
REF PART REF PART
NO, NO, DESCRfPTION NO, NOv DESCRIPTION
2
6
7
12A
12B
14
15
16
17
18
19
20
30
40
4O
40
41
41
41
42
42
42
43
45
46
48
50
52
69
70
72
75
8O
81
82
83
86
89
90
92
93
! 00
101
t03
110
1!9
120
1'25
125
126
126
130
135
180
151
169
172
174
178
182
!84
36470A Cylinder 185 36544 Intake Pipe
(incl. 2,7,20,125,169,172,174) t86 32653 GovernorUnk
26727 Dowel Pin ]89 650839 Screw, 1/4..20x 3/8"
33734 Breather Element 191 36559 S E. Brake Bracket (]ncL 195)
36557 Breather Ass'y. (Incl 6 & 12A) 195 610973 Terminal
36558 Breather Cover & Tube (lncl. 128) 207 34336 Throttle Unk
34695 Breather Tube Elbow 216 33086 R.PM. Adjusting Lever
28277 Washer 223 650451 Screw, I/4-20x 1'
30589 Governor Rod 0ncL 14) 224 34690A * Intake Pipe Gasket
32651 Governor Lever 238 650932 Screw, 10-32 x49164"
31335 Governor Lever Clamp 239 34338 * AirCleaner Gasket
651018 Screw, TorxT-15, 8-32 x I9/64" 241 35797 Air Cleaner Col_ar
36281 Extension Spring 245 35066 Air Cleaner Filter
32600 Oit Seat 250 35065 A_rCleaner Cover
34460A Crankshaft 260 36915 B]owerHoustng
34514 Piston, Pin & Ring Set (Std.) 261 30200 Screw, 10-24 x 9/16"
34515 Piston, Ptn& Ring Set (.010" OS) 282 650831 Screw, 1/4.-20x 1/2"
34516 Piston, Pin & Ring Set (.020" OS} 275 36473 Muffler (lncL 277)
32538B Piston & Fin Ass'y.. (Std.) (lncL 43) 277 650988 Screw, 1/4-20 x 2-5/16"
32548B Plston&PInAss'y. 285 35000A StaderCup
(.010" OS) (lncL 43) 287 650926 Screw, 8-32 x 21/64"
325498 Piston & Pin Ass'y. 290 30705 Fuel. Line
(.020" OS) (lncl 43) 292 26460 Fuel Line Clamp
28986 Ring Set (Std.) 298 28763 Screw, 10-32 x 35/64"
28987 Ring Set (.010" OS) 300 36916 Fuel Tank (lncl. 292 & 301)
28988 Ring Set (_020'*OS) 301 36246 Fuel Cap
20381 Piston Pin Retaining Ring 305 35647 O[I Fill Tube
309838 Connecting Rod Ass*y (lncl. 46) 306 38832 ""O"-Rtng
32610A Connecting Rod Bolt 307 35499 "O"-Ring
27241 Valve Utter 309 650562 Screw, 10-32 x 1t2°
36726 Camshalt (RCR) 310 35648 Dipstick
29914 Oil Pump Ass'y 313 34080 Spacer
35261 " Mounting Flange Gasket 370A 36261 Lubrication Decal
35651D Mounting FIange (Inc172thru 83) 370C 36861 Primer Decal
36083 Oil Drain Plug 370K 36695 Slader Decal
26208 O1[Seal 380 632744 Carburetor (IncL 184)
30574A Governer Shaft 390 590694 Rewind Slader
3059OA Washer 400 36475 Gasket Set
30591 Governor Gear Ass'y. (lncl. 81) (Incl Items Marked "In Notes)
30588A Governor Spool 416 36085 Spark Arreslor Kit
650488 Screw, 1/4-20 x I-1/4" (Incl. 417)(Optional`)
61t004 Flywheel Key 417 650760 Screw, 8-32 x 3/8" (Optional)
61!112 Flywheel 960 -- Replacement Engine NONE
650815 Bellevil_e Washer 900 _ Replacement StB 750674A,
650816 Flywheel Nut order from 71-999
34443A Solid State Ignition RPM High 2900 to 3200
610118 Sparrk Plug Cover
651007 Screw, Torx T-t 5, I0-24 x 15116" (NOTE: This engine could have been built with
34961 Ground Wire 590737 starter. Refer to lhe design of the rope pulley
36437 "Cylinder Head Gasket strength ribsfor par{ identlflcatlon. Individual starter
36474 Cylinder Head parts do net Interchange.) Incl. part #'s 26756
36471 Exhaust Valve (Std.) (Inel 151) (t),27234A (1), 33735 (1), 36832 (1), 34338 (I),
36472 Exhausl Valve 34690A (f), 35261 (1)o36437 (1)
(1/32" OS) (InoL 151)
293t48 Intake Valve (Std,) ()ncl. 15t) NOTE: All component dimensions given In U.S inches
29315C Intake Valve (1/32" OS) (IncL 15t) t Inch = 254 mm
602fA Screw, 511648 x 1-1f2"
35395 Resistor Spark Plug (RJIgLM)
35991 Valve Spring
31673 Valve Spring Cap
27234A" Valve Cover Gasket
32755 Valve Cover
30200 Screw, 10-24 x 9/'16"
29752 Nut & Lock Washer, 1/4-28
6201 Screw, 1/4-28 x 7/8"
26758 ' Carburetor To Intake Pipe Gasket
33
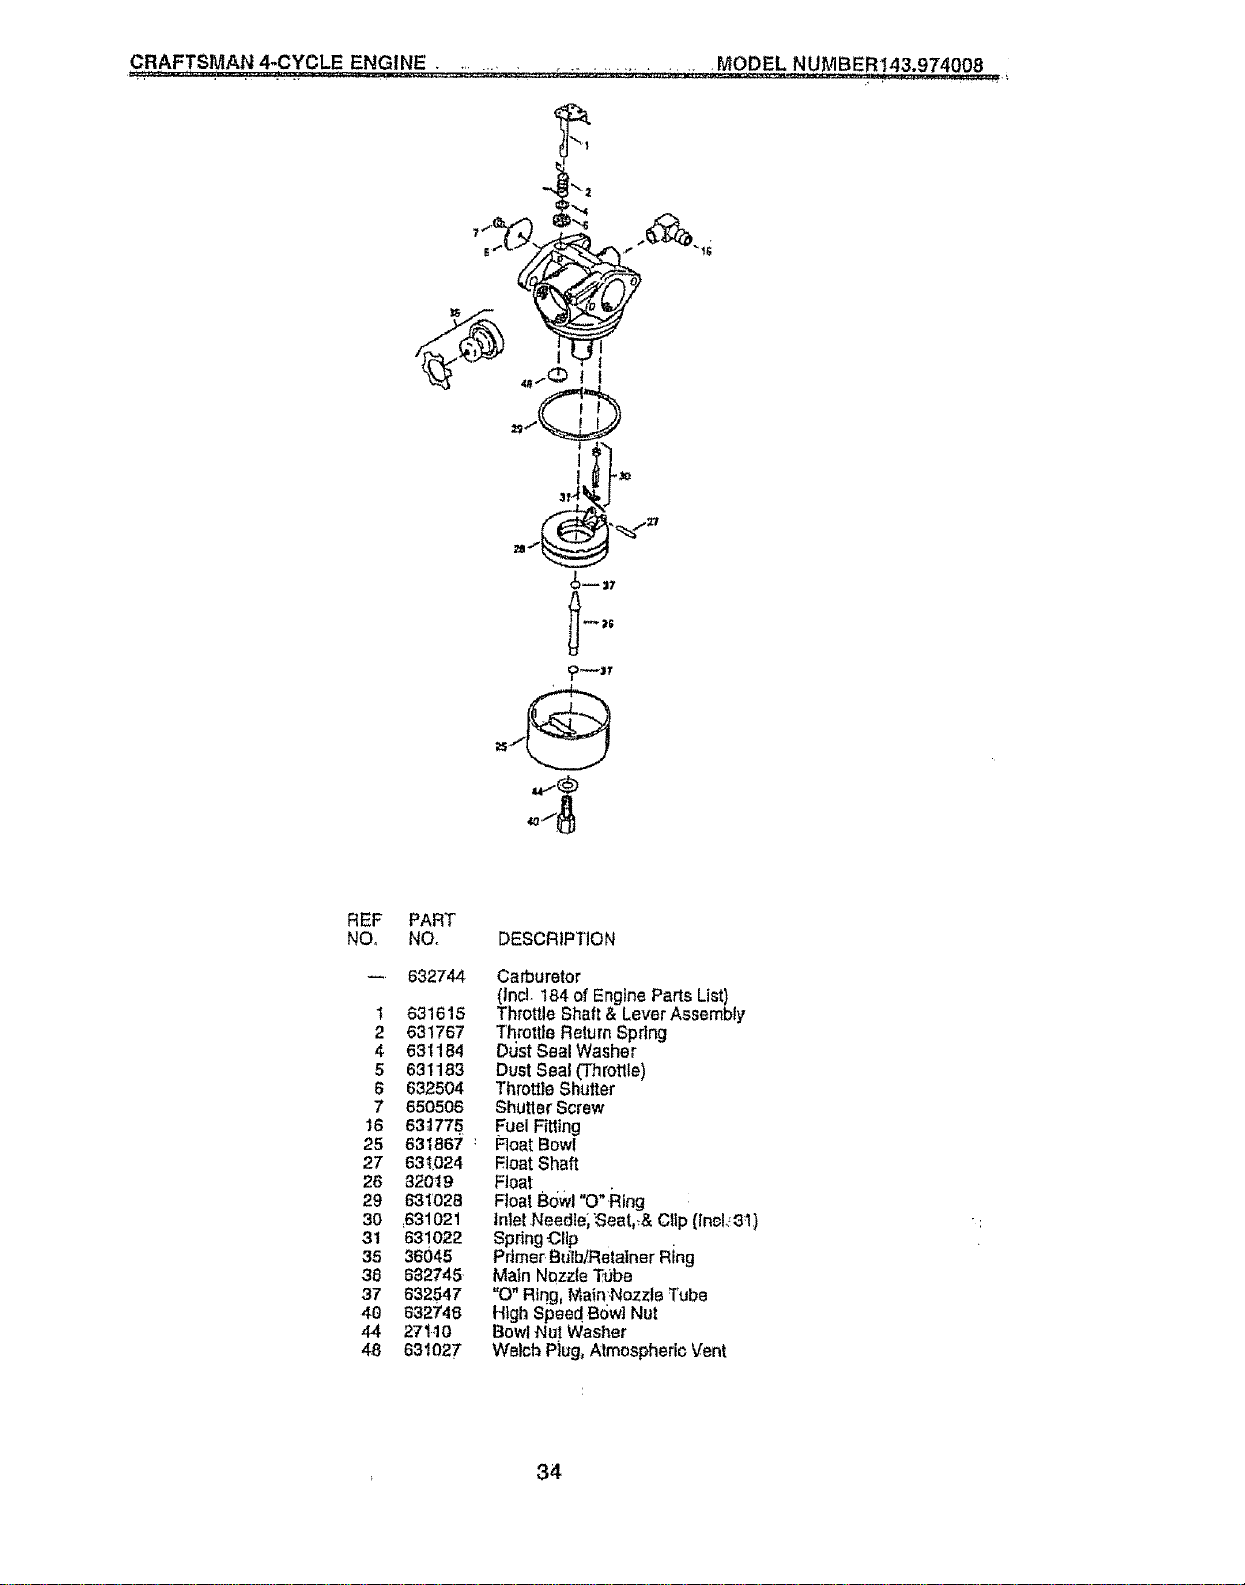
CRAFTSMAN 4-CYCLE ENGINE ......................... MODEL NUMBER143.974008
,}
_iI6
_JT
REF
NO,
1
2
4
5
6
7
16
25
27
26
29
30
31
35
38
37
40
44
48
PART
NO. DESCRIPTION
632744 Carburetor
(lnc!, 184 of Engine Parts List)
631615 Throttle Shaft & Lever Assembly
631767 Throttle Return Spring
631184 Dust Seal Washer
631183 Dust Seal (Throtlle)
632504 Throttle Shutter
650508 Shutter Screw
63;1775 Fuel Fitting
631867 : Roar Bowl
63_.024 Float Shaft
32019 Float
631028 Float BoWl "O" Ring
=631021 tnletNeedle;'Seat,,-& Clip (In¢I_8!)
631022 Spring CEIp
36045 Pdmer, B,JIb/Retatner Ring
532745 Maln Noz-z{eT'Jbe
532547 "O" Ring, MainNozzle Tube
832746 High Speed B0wt Nut
27110 Bowl Nut Washer
631027 Welch Rug, Atmospheric Vent
34
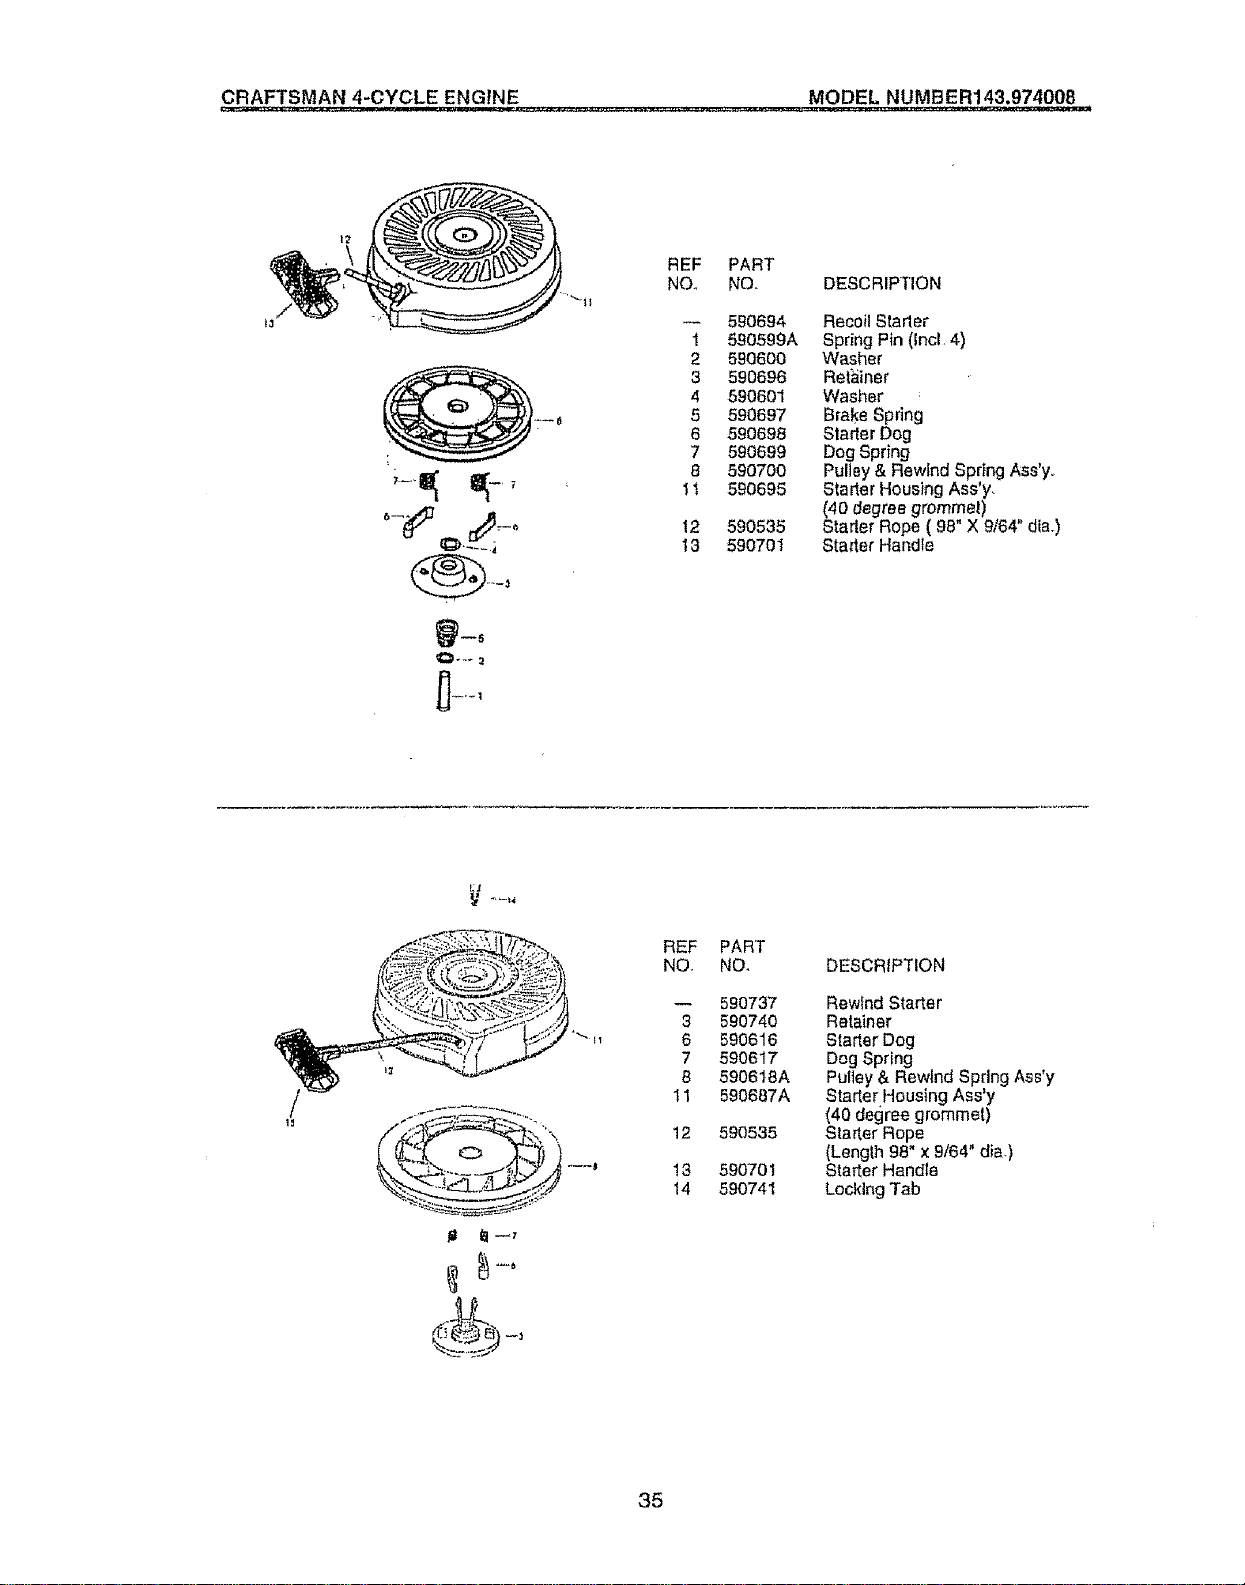
CRAFTSMAN 4-CYCLE ENGINE MODEL NUMBER143,974008
REF PART
NO,, NO. DESCRIPTION
590694 Recoil Starter
1 590599A Spring Pin (Incl 4)
2 590600 Washer
3 590696 Retainer
4 590601 Washer
5 590697 Brake Spring
6 590698 Starter Dog
7 590699 Dog Spring
8 590700 Pultey & Rewind Spring Ass'y,,
11 590695 Starter Housing Ass'y,
(40 degree grommet)
12 590535 Starter Rope ( 98" X 9164"dla.)
13 590701 Starter Handle
/
REF PAR']"
NO. NO. DESCRIPTION
-- 590737 Rewind Starter
3 590740 Retainer
6 590616 Starter Dog
7 590617 Dog Spring
8 590618A Pulley & Rewind Spring Ass'y
11 590687A Starter Housing Ass'y
(40 degree grommet)
12 590535 Starter Rope
(Length 98" x 9/64" din.)
! 3 590701 Starter Handle
14 590741 Locking Tab
35
For the repair or replacement parts you need
delivered directly to your home
Call 7 am - 7 pro, 7 days a week
1-800-366-PART
(1,-800.366-7278)
Para ordenar pieza s con entrega a
domicilio ,,-1-800-659-7084
F0_in--_h0usemajor brand repair service
Call 24 hours .aday, 7 days a Week
1-800-4-REPAIR
(1-800-473..7274)
Para pedir eervicio de reparac|6n a
domlcilio - 1-800-676-5811
For the location of a Sears Parts and
Repair Center in your area
Call 24 hours a day, 7 days a week
1-800-488=1222
For information on purchasing a Sears
Maintenance Agreement or to inquire
about fan existing Agreement
Call 9 am - 5 pro, Monday-Saturday
1-800--827=6655
When requesting service or ordering
parts, always provide the following
information:
= Product Type , Part Number
• Model Number • Part Description
America's Repatr Spectattsts
Pdnted in U.S.A,