
Operator's Manual
CP.AFTSMFIN°
2.6 cu. in./42cc 2'Cycle
GASOLINE CHAIN SAW
Model No.
358.352681
@
- 18 in. Bar
WARNING:
Read and follow all Safety Rules and Operating
Instructions before first use of this product.
For answers to your questions about this product:
Call 7 am-7 pm, Mon.-Sat., or 10 am-7 pm, Sun.
• 1-800-235-5878 I.ou.s,,.,oda,oOon,.o,_,mo_
Sears, Roebuck and Co., Hoffman Estates, IL 60179 USA
53008729603/02/98
Warranty 2 Storage !6
SafetyRules 2 TroubleShootingChart 17
Assembly 5 PartsList 19
Operation 6 Spanish 22
Maintenance 11 Parts& Ordering Back
Service and Adjustments 14
FULL ONE YEAR WARRANTY ON CRAFTSMAN ® GAS
CHAIN SAW
For one year from the date of purchase, when this Craftsman Gas Chain Saw is
maintained, lubricated and tuned up according to the operator's manual, Sears
wilt repair, free of charge, any defect in materiat or workmanship.
This warranty excludes the bar, chain, spark plug and air filter, which are
expendable parts and become worn during normal use.
Ifthis Chain Saw is used for commercial purposes, this warranty applies for onty
90 days from the date of purchase. If this Chain Saw is used for rental purposes,
this warranty applies for only 30 days from the date of purchase.
WARRANTY SERVICE IS AVAILABLE BY RETURNING THIS CHAIN SAW TO
THE NEAREST SEARS SERVICE CENTER IN THE UNITED STATES.
This warranty gives you specific legal rights, and you may also have other rights
which vary from state to state.
Sears, Roebuck and Co., D/817 WA, Hoffman Estates, IL 60179
WARNING: Always disconnect spark
plug wire when making repairs except
for carburetor adjustments, Because a
chain saw is a high.speed woodoutting
too_,careless or improper use of this
tool can cause serious injury.
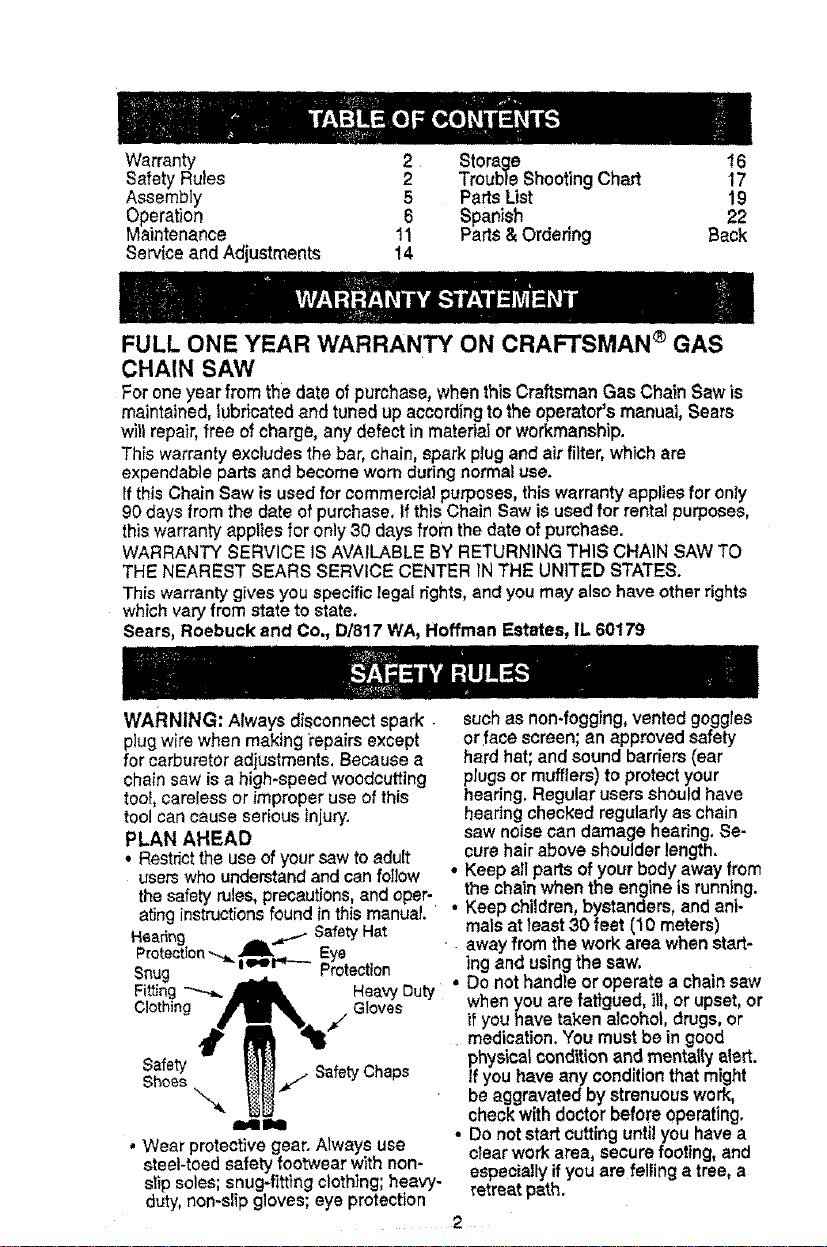
PLAN AHEAD
• Restrict the use of your saw to adult
users who understandand can foIlow
the safety rules,precautions,and oper-
ating instructions found in this manual. "
Heating _ _ SafetyHat .
Protectbn_ .I. _ Eye
Snug i_r"--- Protection
Fitting -----._ HeavyDuty "
Clothing ,_ Gloves
Sho_sSafety ,f. SafetyChaps
mAIIll
• Wear protective gear. Always use
steel-toed safety footwear with non-
s!ip soles; snug-fitting clothing; heavy-
duty; non-slip gloves; eye protection
such as non-fogging, vented goggles
or face screen; an approved safety
hard hat; and sound barriers (ear
ptugs or mufflers) to protect your
hearing. Regular users should have
hearing checked regularly as chain
saw noise can damage hearing. Se-
cure hair above shoulder length.
• Keep all parts of your body away from
the chain when the engine is running.
Keep children, bystanders, and ani-
mals at least 30 feet (10 meters)
away from the work area when start-
ing and using the saw.
Do not handle or operate a chain sew
when you are fatigued, ill, or upset, or
if you have taken alcohol, drugs, or
medication. You must be in good
physical condition and mentally alert.
If you have any condition that might
be aggravated by strenuous work,
check with doctor before operating.
• Do not start cutting until you have a
ctear work area, secure footing, and
especially ifyou are felling a tree, a
retreat path.
2
OPERATEYOUR SAW SAFELY
• Do not operate with one hand. Seri-
ous injuryto the operator, helpers, or
bystanders may result from one-
handed operation. A chain saw is in-
tended for &vo-handed use.
• Operate the chain saw only in a well-
ventilated outdoor area.
• Do not operate saw from a ladder or
in a tree, unless you are specifically
trained to do so.
• Make sure the chain will not make
contact with any object while starting
the engine. Never try to start the saw
when the guide bar is in a cut,
• Do not put pressure on the saw, es-
pecially at the end of the cut. Doing
so can cause you to Iose control
when the cut is completed.
• Stop engine before setting saw down.
• Hand carry saw onty when engine is
stopped. Carry with muffler away from
body; guide bar & chain projecting be-
hind you; guide bar preferably cow
ered with a scabbard.
MAINTAIN YOUR SAW IN GOOD
WORKING ORDER
• Have all chain saw service performed
by a quatified service dealer except
the items listed in the maintenance
section of this manual
• Make certain the saw chain stops
moving when the throtIle trigger is re-
leased. For correction, refer to "Car-
buretor Adjustments.*
• Keep the handles dry,clean, and free
from oi_or fuel mixture.
• Keep caps and fasteners securely
tightened.
• Use only Craftsman accessories and
replacement parts as recommended.
Never modify your saw.
HANDLE FUEL WITH CAUTION
• Do not smoke while handling fuel or
while operating the saw.
° Eliminate al! sources of sparks or flame
in areas where fuel is mixed or poured.
•• Mix and pour fuel in an outdoor area
and use an approved, marked con-
tainer for all fuel purposes. Wipe up
all fuel spills before starting saw.
• Move at least 10 feet (3 meters) from
fueling site before starting.
• Turn the engine off and let saw cool in
a non°combustibJe area, not on dry
leaves, straw, paper, etc. SIowty re-
move fuel cap and refuel unit. '
• Store the unit and fuel in a cool, dry
well ventilated space where fuel va-
pors cannot reach sparks or open
flames from water heaters, electric
motors or switches, furnaces, etc.
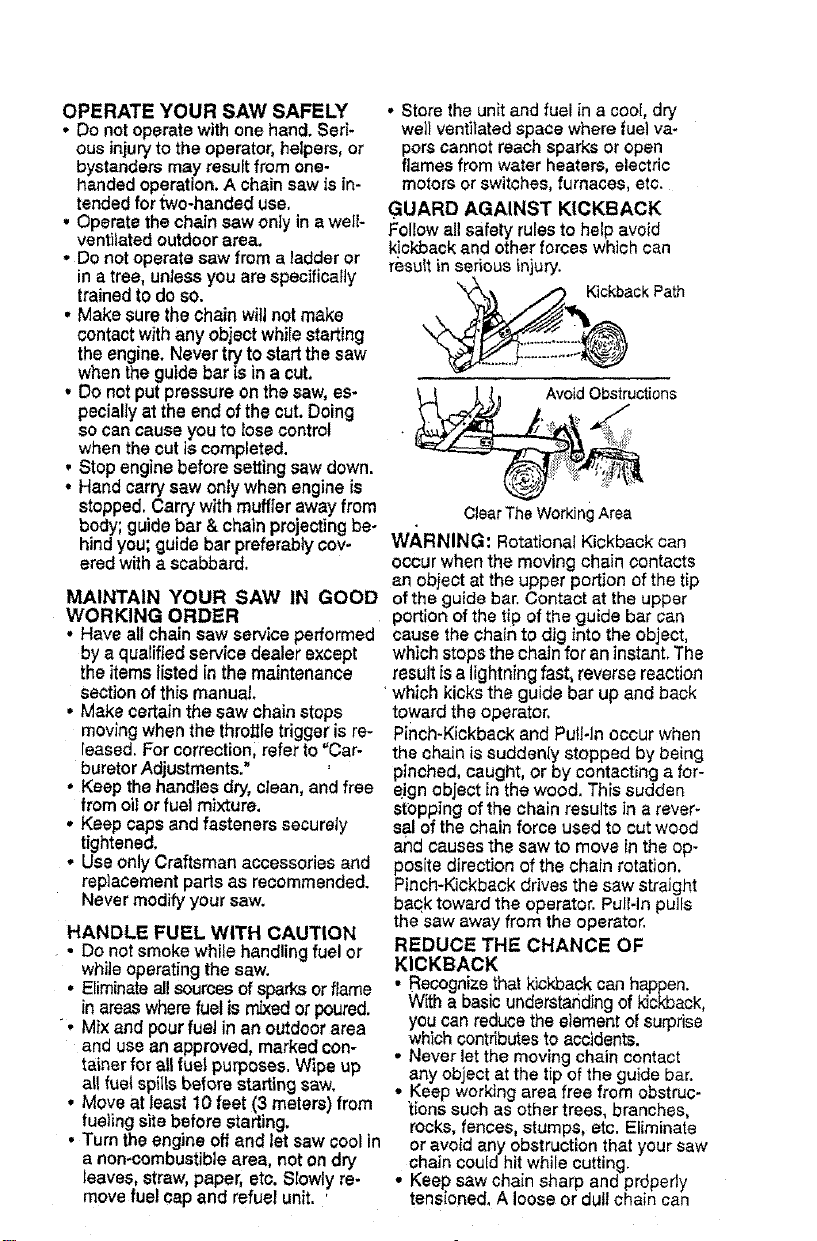
GUARD AGAINST KICKBACK
Follow all safety rules to help avoid
kickback and other forces which can
result in serious injury.
"_ _ KickbackPath
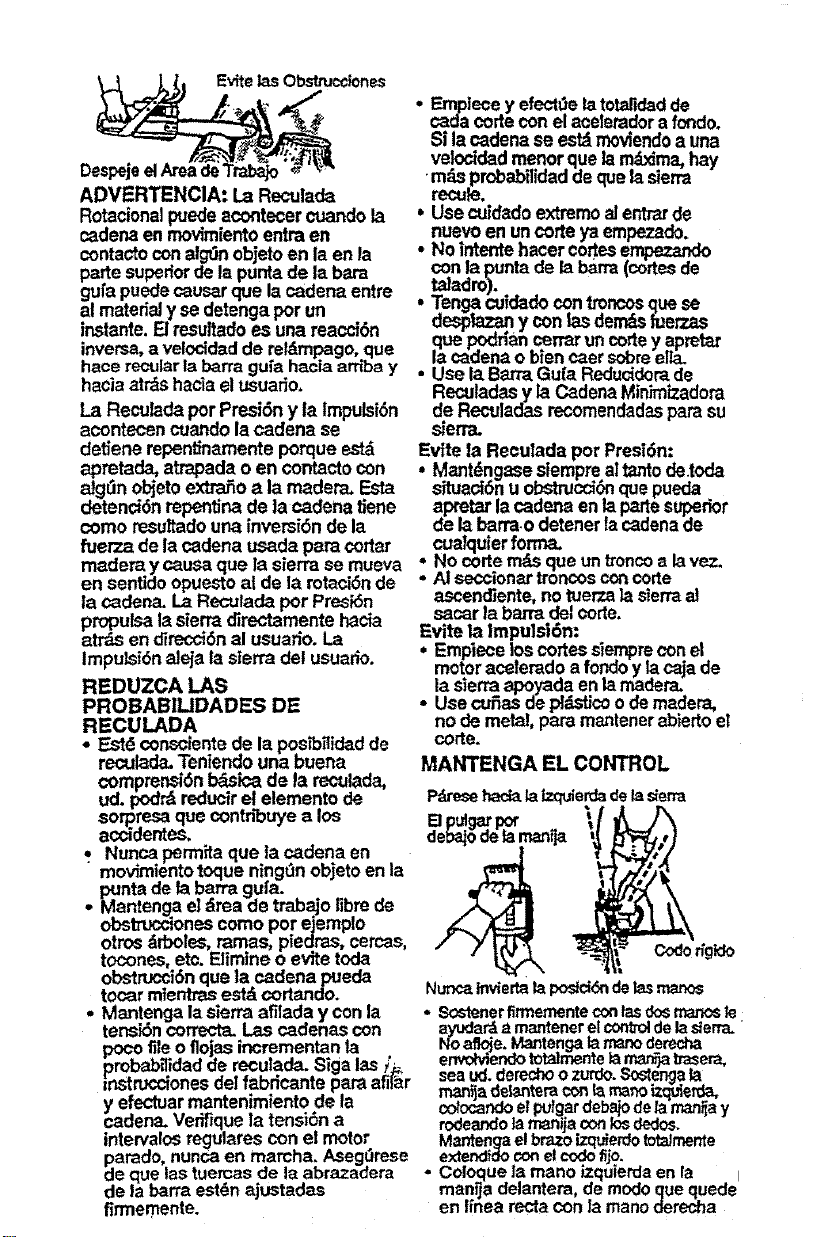
AvoidObstructions
ClearThe WorkingArea
WAR NIN G' Rotational Kickback can
occur when the moving chain contacts
an object at the upper portion of the tip
of the guide bar. Contact at the upper
portion of the tip of the guide bar can
cause the chain to dig into the object,
which stops the chain for an instant. The
result isa lightning fast, reverse reaction
which kicks the guide bar up and back
toward the operator.
Pinch-Kickback and Pull-in occur when
the chain is suddenly stopped by being
pinched, caught, or by contacting a for-
eign object in the wood. This sudden
stopping of the chain results in a rever-
sal of the chain force used to cut wood
and causes the saw to move in the op-
posite direction of the chain rotation.
Pinch-Kickback drives the saw straight
back toward the operator, Pull-In pulls
the saw away from the operator.
REDUCE THE CHANCE OF
KICKBACK
• Recognize that kickback can happen.
With a basic understat_ding of kickback,
you can reduce the element of surprise
which contributesto accidents.
• Never let the moving chain contact
any object at the tip of the guide bar.
• Keep working area free from obstruc-
tions such as other trees, branches,
rocks, fences, stumps, etc. Eliminate
or avoid any obstruction that your saw
chain could hit while cutting.
• Keep saw chain sharp and prdperly
tensioned, A loose or dull chain can
increasethechanceofkickback.FoF
lowmanufacturer'schainsharpening
and maintenance instructions. Check
tension at regular intervals, but never
with engine running, Make sure bar
clamp nuts are securely tightened.
• Begin and continue cutting at full
speed, If the chain is moving at a
slower speed, there is greater chance
of kickback occurring.
• Use extreme caution when reentering
acut.
Do not attempt cuts starting with the
i tip of the bar
(plunge cuts).
Watch for shifting logs or other forces
that could close a cut and pinch or fall
into chain,
, Use the specified Reduced-Kickback
Guide Bar and Low-Kickback Chain.
Avoid Pinch-Kickback:
• Be extremely aware of situations or
obstructions that can cause material
to pinch the top of or otherwise stop
the chain.
• Do not cut more than one tog at a
time.
• Do not twist saw as bar is withdrawn
from an undercut when bucking.
Avoid Pull-In:
• Always begin cutting with the eng!ne
at fult speed and the saw housing
ag2inst wood.
• Use wedges made of p/astie or wood,
Never use metal to hold the cut open.
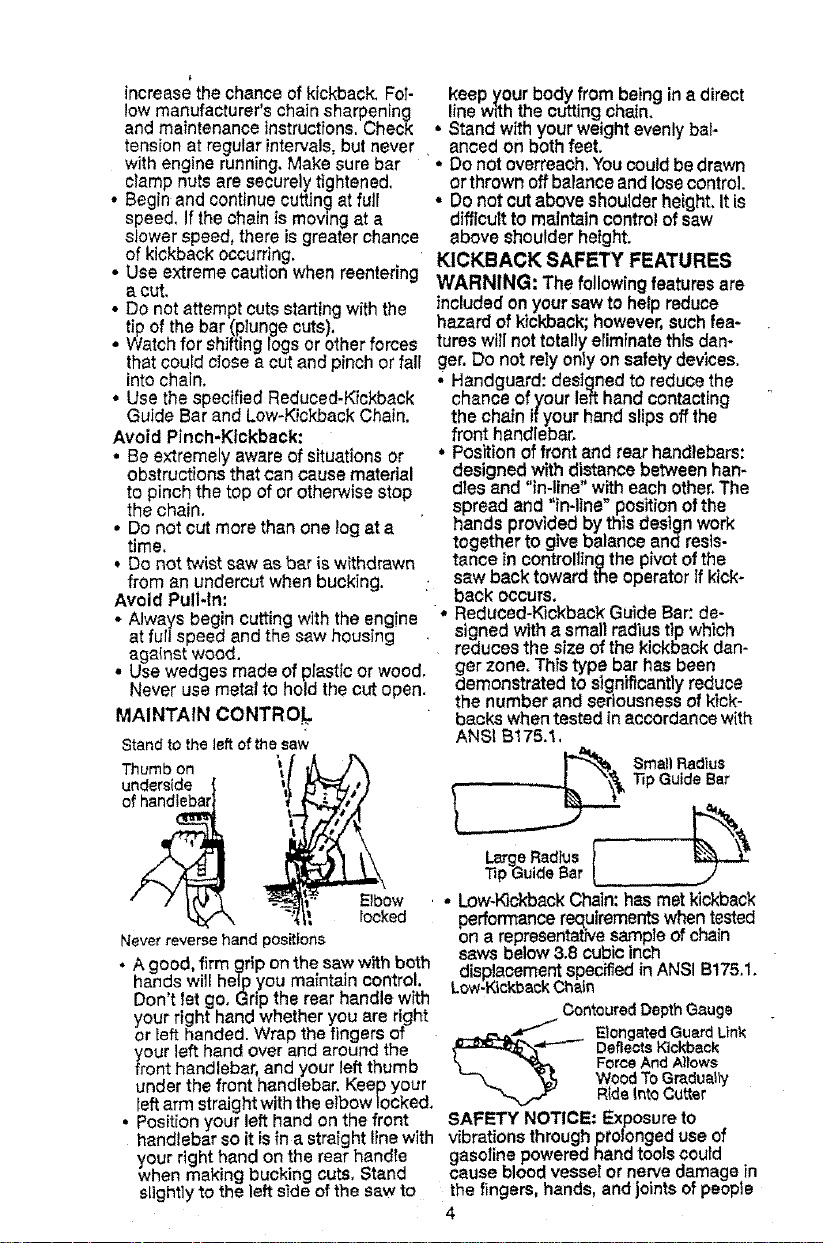
MAINTAIN CONTRO_
Standto the leftof the saw
Thumb on '_/ , A
underside _,_, ",'_L,._I
of handlebar "tj _._,'/_
Neverreversehand positions
• A good firm grip on the saw w_th beth
hands will heip you maintain control.
Don t Iet go. Grip the rear handle with
your right hand whether you are right
or [eft handed. Wrap the fingers of
your left hand over and around the
front handlebar, and your left thumb
under the front handlebar, Keep your
left arm straight with the elbow locked,
• Position your left hand on the front
handlebar so it is in a straight line with
your right hand on the rear handIe
when making bucking cuts, Stand
slightly to the left side of the saw to
keep _our body from being in a direct
line with the cutting chain,
• Stand w_thyour weight evenly bal-
anced on both feet.
• Do not overreach, You could be drawn
or thrown off baPanceand lose control.
• Do not cut above shoulder height, It is
difficult to maintain control of saw
above shoulder height.
KICKBACK SAFETY FEATURES
WARNING: The following features are
included on your saw to help reduce
hazard of kickback; however, such fea-
tures wi/l not totally etiminate this dan-
ger. Do not rely only or_safety devices.
• Handguard: designed to reduce the
chance of your left hand contacting
the chain if your hand slips off the
front handlebar,
• Position of front and rear handlebars:
designed with distance between han-
dles and "in-line" with each other. The
spread and "in-line" position of the
hands provided by this design work
together to give balance and resis-
tance in controllingthe pivot of the
saw back toward the operator If kick-
back occurs,
• Reduced-Kickback Guide Bar: de-
signed with a smal! radius tip which
reduces the size of the kickback dan-
ger zone, This type bar has been
demonstrated to significantly reduce
the number and seriousness of kick-
backs when tested in accordance with
ANSI B175.1,
SmallRadius
r .._ _'_ 13pGuideBar
e adtusf"
TipGuideBar _ j/
• Low-Kickback Chaini has met kickback
performance requirements when tested
on a representative sample of chain
saws below 3.8 cubic inch
displacement specked in ANSI Bt75.1.
Low-KickbackChain
ContouredDepthGauge
,_..,,_m,._ E}ongatedGuardLink
DeflectsKickback
ForceAndA]_lows
WoodToGradually
Rideinto Gutter
SAFETY NOTICE: Exposure to
vibrations through prolonged use of
gasoline powered hand tools could
cause blood vessel or nerve damage in
the fingers, hands, and joints of people
4
proneto circulation disorders or
abnormal swelling. Prolonged use in
cold weather has been linked to blood
vessel damage in otherwise healthy
people, tf symptoms occur such as
numbness pa_n loss of strength,
change in skin color or texture, or loss
of feeling inthe fingers, hands, or joints,
discontinue the use of this tool and
seek medical attention. An
anti-vibration system does not
guaranteethe a,_oidance of these
problems. Users who operate power
tools on a continual and regular basis
must ctoseiy monitor their physical
condition and the condition of this tool.
CHAIN BRAKE If this saw is to be used
for commercla_ logging, you must order
and install a chain brake to comply with
Federal OSHA F{egulationsfor Com-
mercial Logging. Contact your Sears
Service Center or call t-800-235-5878.
SPARK ARRESTOR: Your saw is
equipped with a temperature limiting
muffler and spark arresting screer_
which meets the requirements of
California Codes 4442 and 4443. All
U.S. forest land and the states of
California, idaho, Maine, Minr_esota,
New Jersey, Oregon, and Washington
require by law that many intema_
combustion engines be equipped with a
spark arrestor screen. I_you operate a
Chain saw in a state or locale where
such regulations exist, you are legally
responsible for maintaining the
operating condition of these parts,
Fa{lure to do so is a violation of the law.
Refer to Customer Responsibilities
chart in the MAINTENANCEsection.
STANDARDS: This chain saw is listed
by Underwriters Laboratories, Inc. in
accordance with American National
Standards for Gasoline-Powered Chain
Saws Safety Requirements (ANSI
B175.1-1991),
CARTON CONTENTS
Check carton contents against the fol-
lowing list.
Model 358.352681
• Chain Saw (fully assembled)
• Bar tool
• Chain
• Carrying Case
• Gloves
• Gas Can
° Bar & Chain Lube
° 2-cycle engine oif
• Examine parts for damage. Do not
use damaged parts.
• if you need assistance or find that
parts are missing or damaged, please
calt 1-800-235-5878.
NOTE: it is normal to hear the fue! tilter
rattle in an empty fuel tank.
Your unit has been factory tested and
the carburetor precisely adjusted. As a
result you may smell gasoline or find a
drop of oil/fuel residue on the muffler
when you unpack the unit.
ASSEMBLY
Your saw is fully assembled; no
assembly is necessary.
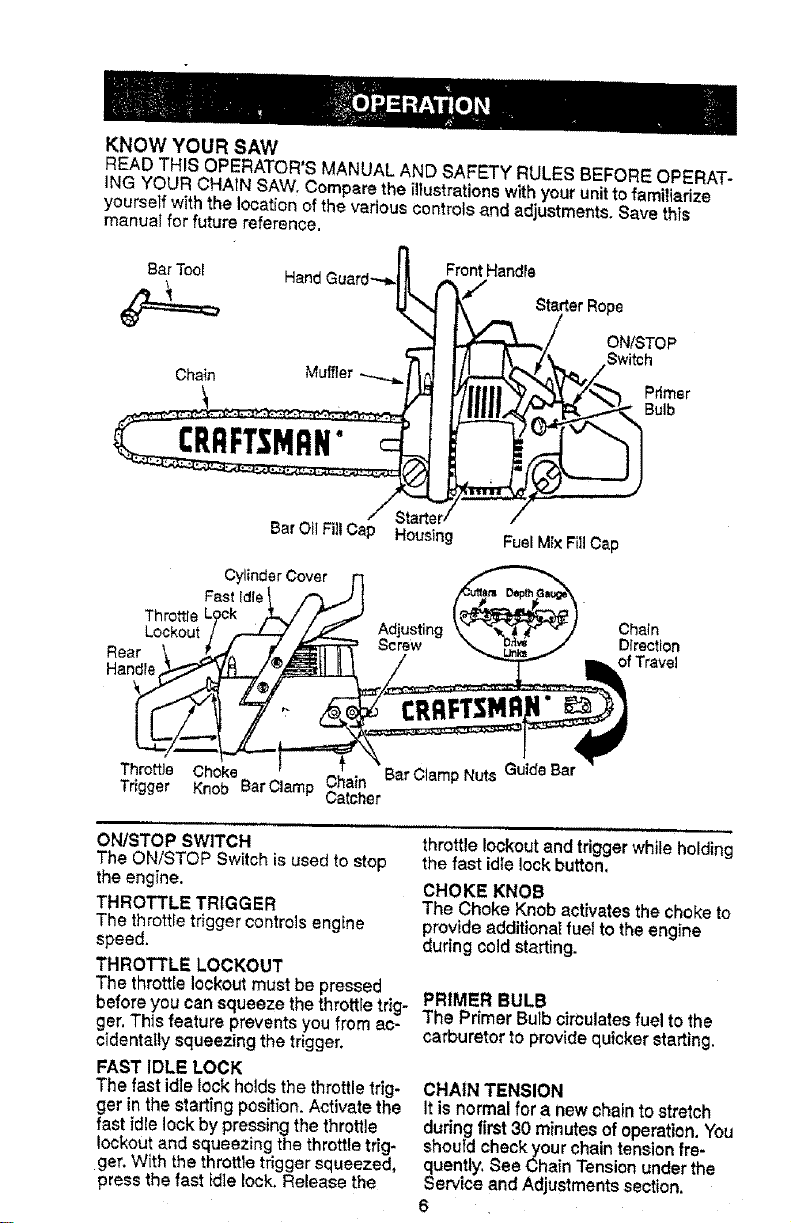
KNOW YOUR SAW
READ THIS OPERATOR'S MANUAL AND SAFETY RULES BEFORE OPERAT-
ING YOUR CHNN SAW. Compare the illustrations with your unit to familiarize
yourself with the location of the various controls and adjustments. Save this
manual for future reference,
B_ Toot HandGuard,-,.._"_ l_r°; HandFe
I_===== U"_ k" Starter Rope
-1 I/t I",,.t",,,_ switch
_ 9 .-Bu,b
CRAFTSM N"
Bar OilFill Cap Housing FuelMix Fill Cap
CylinderCover r _-,.
Throttle Lock _ / /" _ . |_ / , .
LookoutI,-,,-,Z-2"/_ A=_i_,t,,",<__ "_,._ "/ C?_L%-
Handle_,J-E:L-,/_T__lcL_ / ___qlk
Throttle Choke. Chain Bar Clamp Nuts
Tdgger Knob uarClamp Catcher
ON/STOP SWITCH
The ON/STOP Switch is used to stop
the engine.
THROTTLE TRIGGER
The throttle trigger controls engine
speed.
THROTTLE LOCKOUT
The throttle lockout must be pressed
before you can squeeze the throttle trig-
ger. This feature prevents you from ac-
cidentally squeezing the trigger.
FAST IDLE LOCK
The fast idle lock holds the throttle trig-
ger in the starting position. Activate the
fast idle lock by pressing the throttle
lockout and squeezing the throttle trig-
ger. With the throttle trigger squeezed,
p_e_sthe last tdle lock. Release the
throttle lockout and trigger while holding
the fast idle lock button,
CHOKE KNOB
The Choke Knob activates the choke to
provide additionaI fuel to the engine
during cold starting.
PRIMER BULB
The Primer Bulb cirCulatesfuel to the
carburetor to provide quicker starting.
CHAIN TENSION
It is normal for & new chain to stretch
during first 30 minutes of operation. You
should check your chain tension fre-
quently, See Chain Tension under the
Service and Adjustments section.
6
BEFORE STARTING ENGINE
WARNING; Be sure to read the fuel
handling information in the safety rules
section of this manual before you begin.
if you do not understand the fuel han-
dling information do not attempt to fuel
your unit. Seek help from someone that
does understand the information or call
the customer assistance help line at
1-800-235-5878.
GUIDE BAR AND CHAIN OIL
The chain citer provides continuous lu-
brication to the chain and guide bar, Be
sure to fill the bar oil tank when you fill
the fuel tank (Capacity = 6.8 fl, oz.).
For maximum guide bar and chain life,
we recommend you use Craftsman
chain saw bar oil. if Craftsman bar oil is
net available, you may use a good
grade SAE 30 oil until you are able to
obtain Craftsman brand. The oil output
is automatically metered during opera-
tion, Your saw will use approximately
one tank of bar oil for every tank of fuel
mix. Always fill the bar oil tank when
you fill the fuel tank.
FUELING ENGINE
This engine is certified to operate on
unleaded gasoline, Before operation,
gasoline must be mixed with a good
quality 2-cycle air-cooled engine 0il. We
recommend Craftsman.brand oil, Mix
gasoline and oil at a ratio of 40:1 (A
40:1 ratio is obtained by mixing 3:2
ounces of oil with 1gallon of unleaded
gasoline). DO NOT USEautomotive oil
or boat oil. These oils will cause engine
damage. When mixing fuel foltow the
instructions printed on the container,
Once oil is added to the gasoline,
shake container momentarily to assure
that the fuel is thoroughly mixed.
Always read and follow the safety rules
reiating to fuel before fueling your unit.
IMPORTANT
Experience indicates thatalcoho_blended
fuels (calted gasohof or using ethanol or
methanol) can attract moisture which
leads to separation and formation of
acids during storage. Acidic gas can
damage the fuel system of an engine
while in storage.
To avoid engine problems, the fuel sys-
tem should be emptied before storage for
30 days or longer. Drain the gas tank,
start the engine and let it rununtit the fuel
lines and carburetor are empty. Use fresh
fuel next season. See STORAGEinstruc-
tions for addltJonalinformation.
Never use engine orcarburetor c_eaner
products in the fuel tank or permanent
damage may occur.
See the STORAGEsection for addit{onal
information.
STOPPING YOUR ENGINE
• Move On/Step switch to STOP,
• If engine does not stop, pull choke
knob out fully.
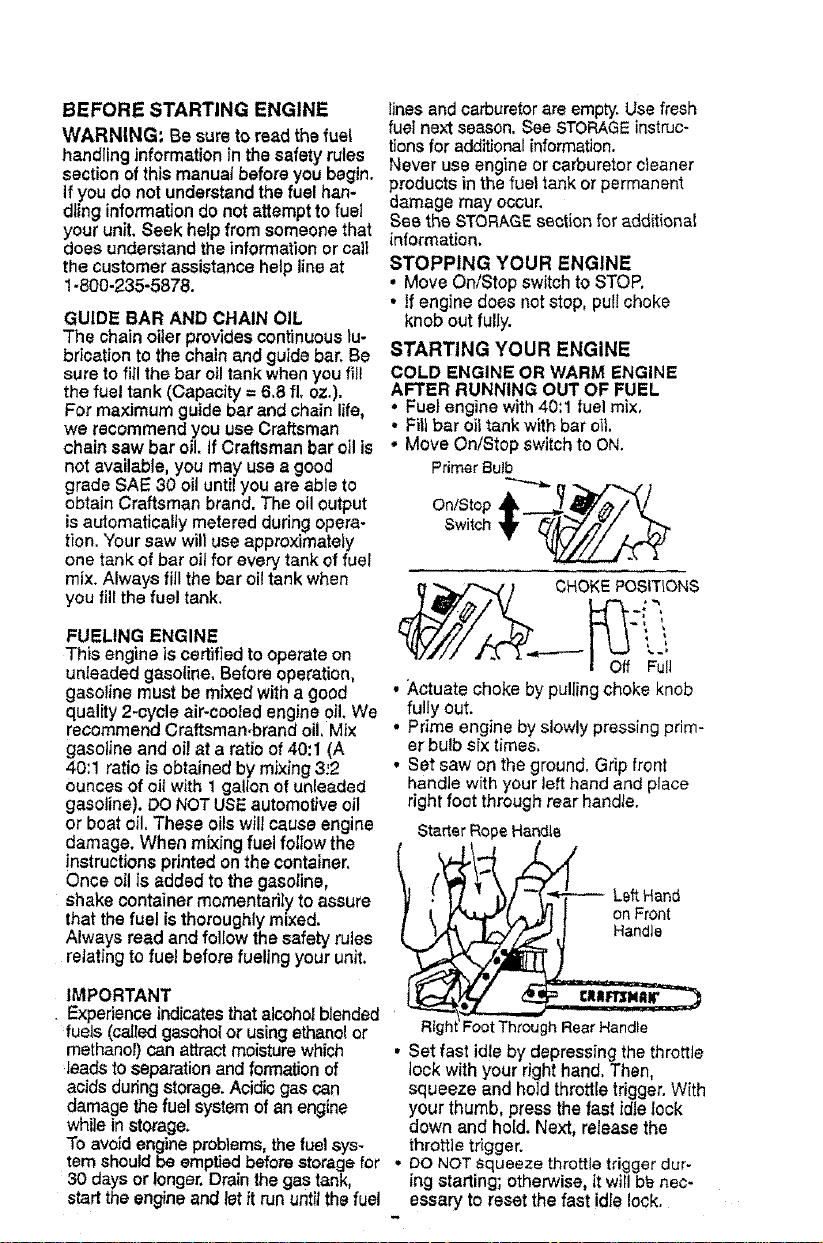
STARTING YOUR ENGINE
COLD ENGINE OR WARM ENGINE
AFTER RUNNING OUT OF FUEL
• Fuel engine with 40:1 fuel mix,
• Fill bar oii tank with bar oil
, Move On/Stop switch to ON.
PrimerBulb
Switch
CHOKEPO_ITIONS
| Off Full
• Actuate choke by pulling choke knob
fully out.
° Prime engine by slowly pressing prim-
er bulb six times,
• Set saw on the ground. Grip front
handle with your Jefthand and place
right foot through rear handle.
Starter RopeHandle
Right
FootThrou hRearHandle
• Set fast idle by depressing the throttle
lock with your right hand, Then,
squeeze and hold throttle trigger. With
your thumb, press the fast idle lock
down and hold. Next, release the
throttle trigger.
• f30 NOT squeeze throttle trigger dur-
ing starting; otherwise, it will bb nec-
essary to reset the fast idle lock.
NOTE; when pulling the starter rope,
do not use the full extent of the rope.
Do not let starter rope snap back. Hold
handle. Let rope rewind slowly.
• Pull starter rope handle firmly and
quickly with your fight hand until the
engine attempts to start, but no more
than 5 pulis. Then, push in choke
knob fully. Resume pulling handle un-
til engine starts.
* Above 40°F, allow engine to run for
approximately 5 seconds. Then
squeeze and release throttle trigger to
allow engine to idle.
• Below 40_F, allow engine to warm up
for 30 seconds to 1 minute with choke
at partial position. Push choke knob in
to the OFF position; then squeeze and
release throttle trigger to allow engine
to idle.
• To stop engine, move On/Stop switch
to the STOP position.
STARTING A WARM ENGINE
DO NOT use the choke to start a warm
engine or flooding and hard starting
may occur.
o Move On/Stop switch to ON.
- Set fast idle lock.
, Be sure choke is in the OFF position,
. With saw on ground, grip front handle
with left hand and place your fight foot
through rear handle.
, Pull starter rope handle until engine
starts.
, Squeeze and release throttle trigger
to return engine to idle speed.
DIFFICULT STARTING OR
STARTING A FLOODED ENGINE
The engine may be flooded ffit has not
started after 10 pulis. Flooded engines
can be cleared of excess fuel with the
following procedure:
• Engage the fast idle lock,
• Verify that the On/Stop switch is in the
ON position.
• Push choke knob to the OFF position.
• With saw on ground, grip front handle
with left hand and place right foot
through rear handle,
. Pull starter rope handle until engine
starts.
• Starting could require many pulis de-
pending on how badly the unit is
flooded. If engine still fails to start, re-
fer to the TROUBLESHOOTINGchart or
call 1-800-235-8878.
OPERATING TIPS
- Check chain tension before first use
and after 1minute of operation. See
Chain Tension in the Maintenance
section,
• Cut wood only. Do not cut metal, plas-
tics, masonry, non-wood building ma-
terials, etc,
• Stop the saw if the chain strikes a for-
eign object, inspect the saw and re-
pair parts as necessary.
. Keep the chain out of dirt and sand.
Even a small amount of dirtwill quick-
ly dull a chain and increase the possi-
bility of kickback.
• Practice cutting a few small logs using
the following steps. This will help you
get the ffeeI" of using your saw before
you begin a major sawing operation.
• Squeeze the throttle trigger and al-
low the engine to reach full speed
before cutting.
• Begin cuttingwith the saw frame
against the tog.
Keep the engine at full speed the
i entire you are cutting.
time
Allow the chain to cut for you. Exert
only light downward pressure.
• Release the throttle trigger as soon
as the cut is completed, allowing the
engine to idle. If you run the saw at
full throttle without a cuttingload,
unnecessary wear can occur.
• To avoid losing oontrot when cut is
complete, do not put pressure on
sat,' at end of cut.
, Stop engine before settingsaw down.
TREE FELLING TECHNIQUES
WARNING: Check for broken or dead
branches which can fall white cutting
causing serious injury. Do not cut near
buildings or electrical wires if you do not
knowthe direction of tree fall, nor cut at
night since you will not be able to see
well, nor during bad weather such as
rain, snow, or strong winds, etc.
• Carefully plan your sawing operation
in advance,
• Clear the work area. You need a clear
area all around th_ tree so you can
have secure footing.
• Study the natural conditions that can
cause the tree to fall in a particular
direction. These conditions include:
• The wind direction and speed.
• The lean of the tree. The lean of a
tree might not be apparent due to
uneven or sloping terrain. Use a
plumborleveitodeterminethedi-
rectionoftreelean.
Weightandbranchesononeside.
Surroundingtreesandobstacles.
• Lookfordecayandrot.Ifthetrunkis
rotted,itcansnapandfalltowardthe
operator.
• Make sure there is enough room for
the tree to fall Maintain a distance of
2-1/2tree lengths from the nearest
person or other objects. Engine noise
can drown out a warning tail
• Remove dirt, stones, toose bark,
halts, staples, and wire from the tree
where cuts are to be made.
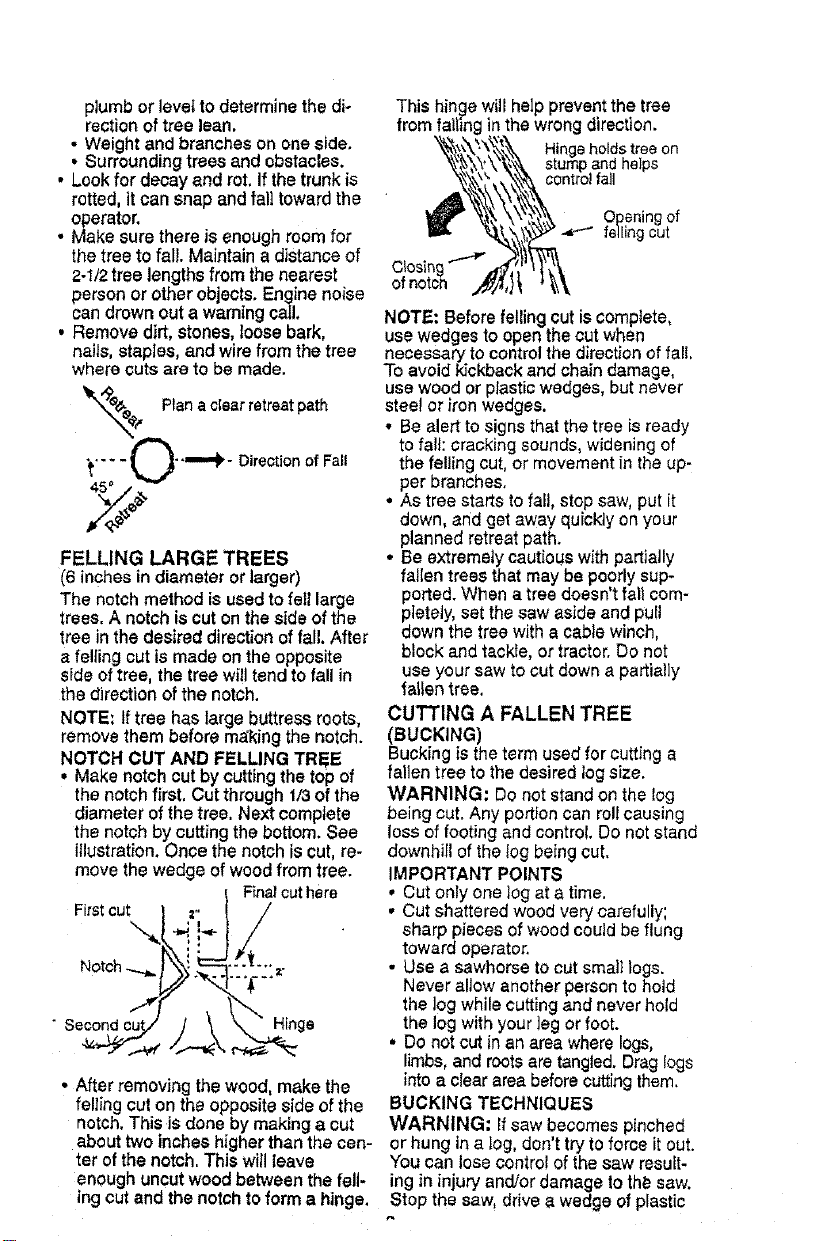
_"_. Plana clear retreatpath
"_-eb- .,,,,,_- Directionof Fall
45° ..,
FELLING LARGE TREES
(6 inches in diameter or larger)
The notch method is used to feII large
trees, A notch is cut on the side of the
tree in the desired direction of fall. After
a feliing cut is made on the opposite
side of tree, the tree will tend to fall in
the direction of the notch.
NOTE: tf tree has large buttress roots,
remove them before making the notch.
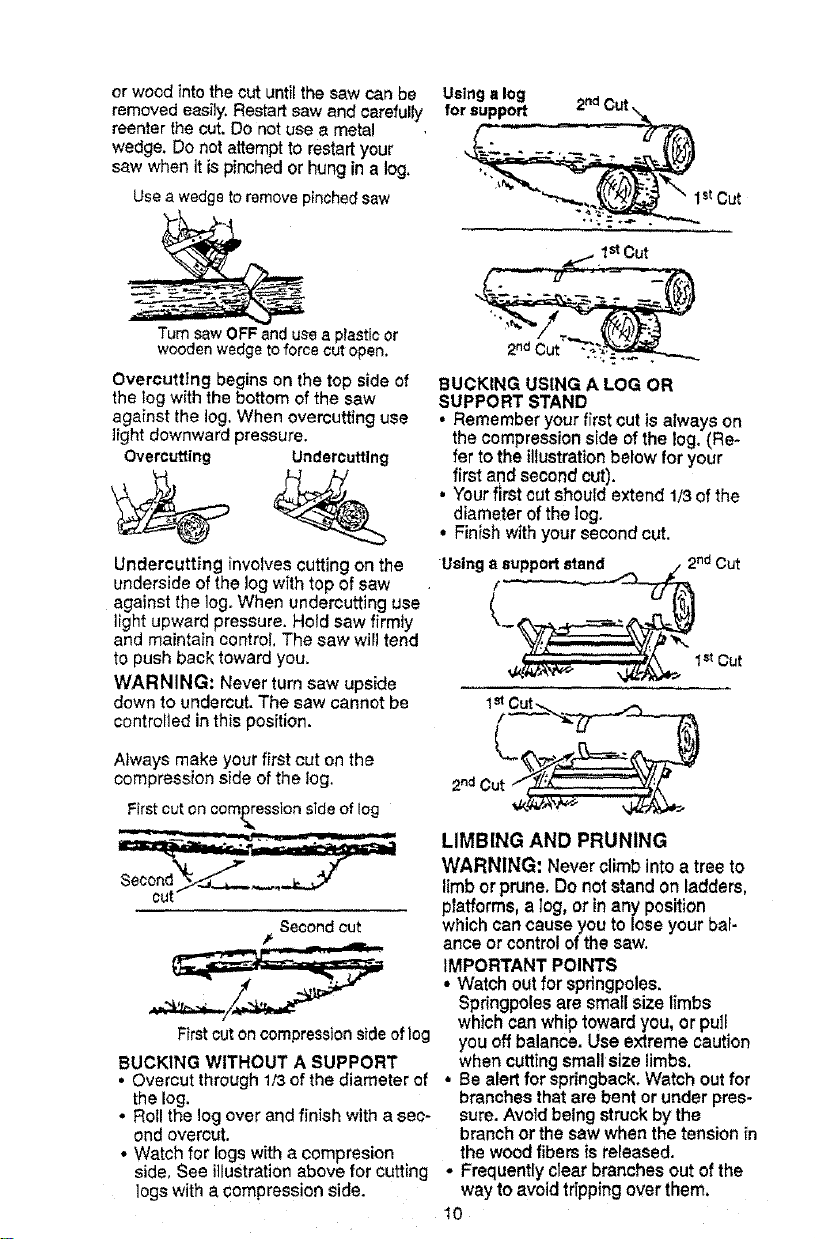
NOTCH OUT AND FELLING TREE
• Make notch cut by cutting the top of
the notch first, Cut through 1/3 of the
diameter ofthe tree. Next complete
the notch by cutting the bottom. See
illustration. Once the notch is cut, re-
move the wedge ofwood from tree.
Fina!cuthere
Firstcut
-\
Hinge
. After removing the wood, make the
felling cut on the opposite side of the
notch, This is done by making a cut
about two inches higher than the cen-
ter of the notch. This wiil leave
enough uncut wood between the felt-
ing cut and the notch to form a hinge.
This hinge will help prevent the tree
in the wrong direction.
Hinge holds tree on
stump and helps
contro_ fall
Opening of
felling cut
NOTE: Before felling cut iscomplete,
use wedges to open the cut when
necessary to control the direction of fall,
To avoid kickback and chain damage,
use wood or ptastic wedges, but never
steel or iron wedges.
• Be alert to signs that the tree is ready
to fall: cracking sounds, widening of
the fetiing cut, or movement in the up-
per branches,
• As tree starts to fall, stop saw, put it
down, arid get away quickly on your
planned retreat path.
• Be extremely cautioL_swith partially
fallen trees that may be poorly sup-
ported. When a tree doesn't fall com-
pletely, set the saw aside and pult
down the tree with a cable winch,
block and tackle, or tractor, Do not
use your saw to cut down a partially
fallen tree,
CUTTING A FALLEN TREE
BBUCKING)
ucking is the term used for cutting a
fallen tree to the desired log size,
WARNING: Do not stand on the log
being cut. Any portion can roll causing
loss of footing and control. Do not stand
downhill of the tog being cut.
IMPORTANT POINTS
• Cut only one log at a time.
• Cut shattered wood very carefully;
sharp pieces of wood could be flung
toward operator.
• Use a sawhorse to cut small logs.
Never altow another person to hold
the log while cuttingand never hold
the log with your leg or foot.
• Do not cut in an area where logs,
limbs, and roots are tangled. Drag logs
into a clear area before cutting them.
BUCKING TECHNIQUES
WARNING: Ifsaw becomes pinched
or hung in a log, don't try to force it out.
You can lose control of the saw result-
ing in injury and/or damage to the saw.
Stop the saw, drive a wedge of plastic
orwood into the cut until the saw can be
removed easily. Restart saw end carefully
reenter the cut. Do not use a metal
wedge. Do not attempt to restart your
saw when it is pinched or hung in a log.
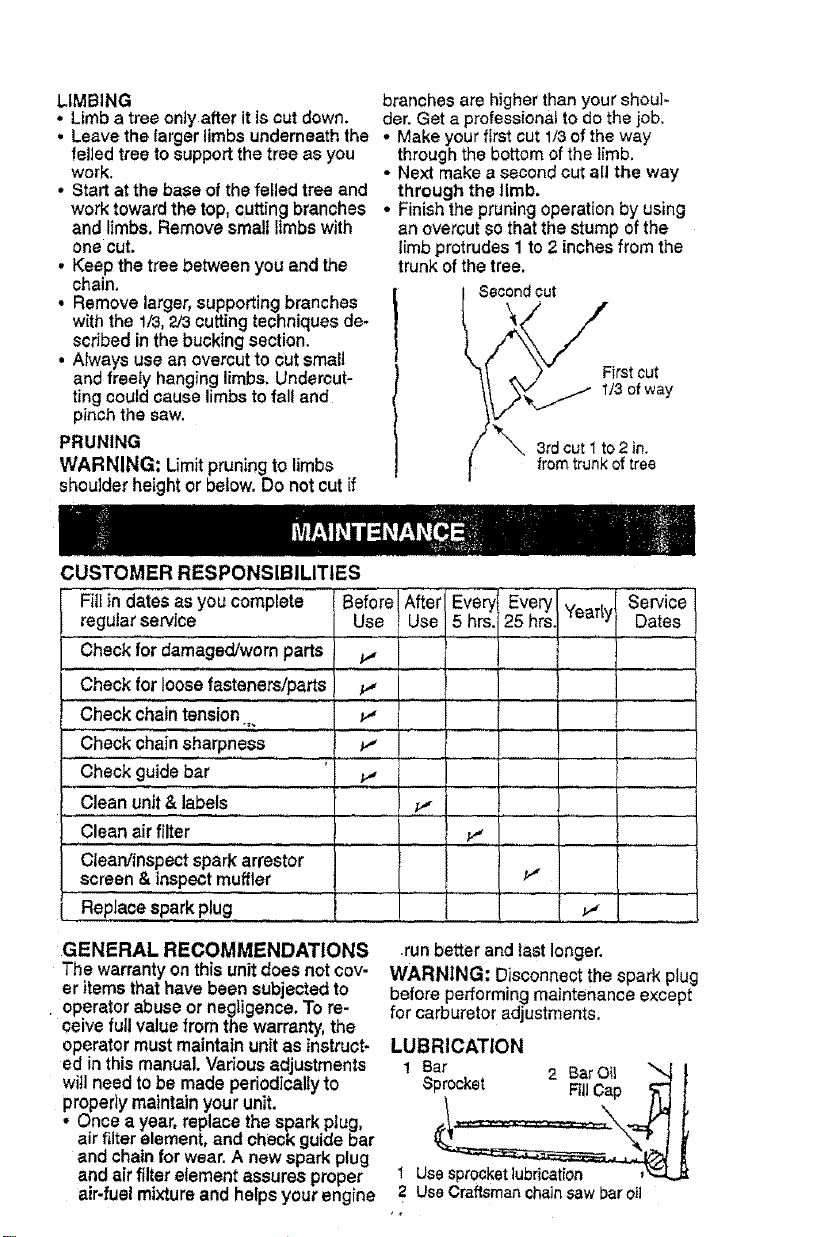
Use awedgeto removepinchedsaw
Using a log
for support
2nd (
1stCut
1stCut
"TurnsawOFFand use a p_astioor
woodenwedgeto force cutopen.
OvercuttIng begins on the top side of
the leg with the bottom of the saw
against the log, When overcutting use
light downward pressure.
OverCutting Undercutting
Undercutting involves cutting on the
underside of the log with top of saw .
against the log. When undercutting use
light upward pressure. Hold saw firmly
and maintain control. The saw will tend
to push back toward you.
WARNING: Never turn saw upside
down to undercut,The saw cannot be
controlled in this position.
2ndCut
SUCKING USING A LOG OR
SUPPORT STAND
• Remember your first cut is always on
the compression side of the leg. (Re-
fer to the illustrationbelow for your
first and second cut).
• Your flrst cut shOUldextend 1/3of the
diameter of the tog.
• Finish with your second cut,
Usinga_ ndCut
Always make your first cut on the
compression side of the log.
Firstcut on compression sfde of log
2ndCut
LIMBING AND PRUNING
WARNING: Never climb into a tree to
limb or prune. Do not stand on ladders,
pTafforms, a log, or in any position
Secondcut which can cause you to lose your bal-
_' ance or control of the saw.
IMPORTANT POINTS
• Watch out for springpoles,
Springpoles are smaII size limbs
which can whip toward you, or pull
Firstcut on compression sideof log you off balance. Use extreme caution
BUCKING WITHOUT A SUPPORT when cuttingsmall size limbs.
• Overout through 1/3 of the diameter of • Be alert for sprlngback. Watch out for
the log. branches that are bent or under pros-
• Roll the logover and finish with a sac- sure. Avoid being struck by the
end overcut, branch or the saw when the tension {n
• Watch for logs with a compresion the wood fibers is released.
side, See illustrationabove for cutting • Frequently clear branches out of the
logswith a compression side. way to avoid tr;pping over them.
t0
LIMBING branches are higher than your shoul-
• Limb a tree ontyafter it is cut down. der. Get a professional to do the job.
• Leave the larger limbs underneath the • Make your first cut 1/3of the way
felled tree to support the tree as you through the bottom of the limb,
work. - Next make a second cut all the way
• Start at the base of the foiled tree and through the limb.
work toward the top, cutting branches • Finish the pruning operation by using
and limbs. Remove small limbs with
one cut.
• Keep the tree between you and the
chain.
• Remove larger, supporting branches
with the 1/3,2/3 cutting techniques de-
scribed in the bucking section.
• Always use an overcut to cut smait
and freeiy hanging limbs. Undercut-
tingcould cause limbs to fall and
pinch the saw.
PRUNING
WARNING: Limit pruning to limbs
shoulder height or below. Do not cut if
CUSTOMER RESPONSIBILITIES
an overcut so that the stump of the
limb protrudes 1 to 2 inches from the
trunk of the tree,
"__i_xx_ Firstcut
Fill in dates as you complete Before After Every]
regular service Use Use 5 hrs.
Check for damaged/worn parts
Check for loose fasteners/parts
Check chain tension
Check chainsharpness
Check guide bar
Clean unit & labels
Clean air filter
Cfean/fnspect spark arrestor
screen & inspect muffler
Replace spark plug
Every] Yearly
25 hrs.
Service
Dates
,,,1 , :
/!
GENERAL RECOMMENDATIONS
The warranty onthis unitdoes not cov-
eritemsthathavebeen subjectedto
• operatorabuseor negligence.To re-
ceivefull valuefrom thewarranty,the
operatormustmaintainunitas instruct-
edinthismanual. Variousadjustments
willneed tobe madeperiodicallyto
properlymaintainyourunit.
• Once a year,replacethesparkplug,
air filter element,andcheckguidebar
and chainfor wear.A newsparkplug
and air filter elementassures proper
air-fuelmixtureand heipsyourengTne
.run better and last longer.
WARNING: Disconnect the spark plug
before performing maintenance except
for carburetor adjustments,
LUBRICATION
1
Be'°c'e'^" FillCap
S r "" 2 BarOil
1 Us_
2 UseCraftsmancha;nsaw baroil
CHECK FOR DAMAGED OR
WORN PARTS
Replacement of damaged/worn parts
should be referred to your Sears Ser-
vice Center.
NOTE: It is normal for a small amount
of oil to appear under the saw after en-
gine stops. Do not confuse this with a
leaking oil tank.
• On!Stop Switch - Ensure On/Stop
switch functions properly by moving
the switch to the "Stop" position.
Make sure engine stops; then restart
engine and continue.
o Fuet Tank - Do not use saw if fuel
tank shows signs of damage or leaks.
• Oil Tank - Do not use saw if oii tank
shows signs of damage or leaks.
CHECK FOR LOOSE
FASTENERS AND PARTS
• Bar Clamp Nut
• Chain
- Muffler
• Cylinder Shield
• Air Fitter
• Clutch Drum/Sprocket
• Handle Screws
• Vibration Mounts
• Starter Housing
• Handguard
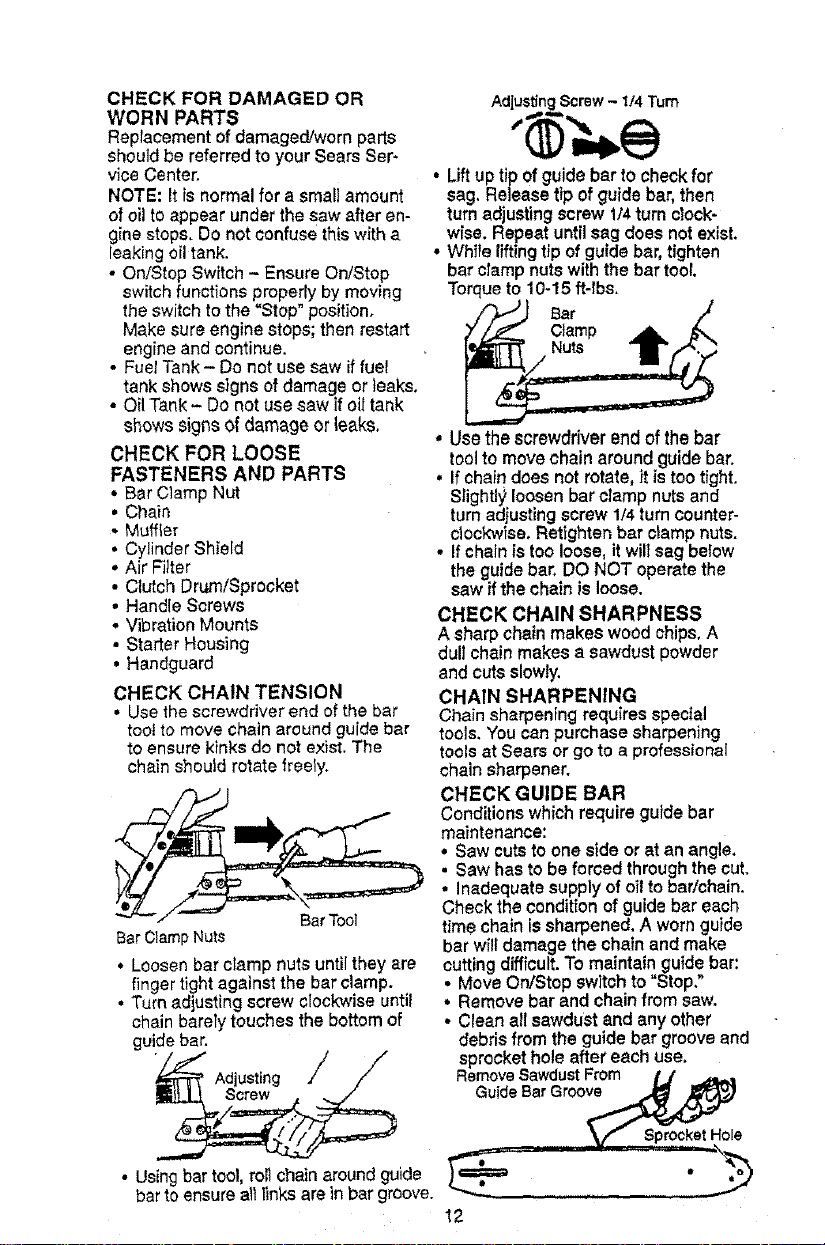
CHECK CHAIN TENSION
° Use the screwdriver end of the bar
tool to move chain around guide bar
to ensure kinks do not exist The
cha;n shoutd rotate freely
BarTool
BarClampNuts
° Loosen bar ciamp nuts until they are
finger tight against the bar clamp.
° Turn adjusting screw clockwise until
chain barely touches the bottom of
guide bar
Adjusting /
Screw
Adjusting Screw - t/4 Turn
• Lift up tip of guide bar to check for
sag. Release tip of guide bar, then
turn adjusting screw 1/4 turn clock-
wise. Repeat until sag does not exist.
° While lifting tip of guide bar, tighten
bar clamp nuts with the bar tool.
Torque to 10-15 ff-lbs.
t
Clamp _ b_.
• Use the screwdriver end of the bar
tool to move chain around guide bar
• If chain does not rotate, it is too tight.
SIightlyloosen bar cTampnuts and
turnadjusting screw 1/4 turncounter-
clock'wise_ Retighten bar clamp nuts.
° If chain is too loose, it wilt sag befow
the guide bar. DO NOT operate the
saw if the chain is loose.
CHECK CHAIN SHARPNESS
A sharp chain makes wood chips. A
duff chain makes a sawdust powder
and cuts slowly.
CHAIN SHARPENING
Chain sharpening requires special
tools. You can purchase sharpening
tools at Sears or go to a professional
chain sharpener.
CHECK GUIDE BAR
Conditions which require guide bar
maTntenanee:
• Saw cuts to one side or at an angle
• Saw has to be forced through the cut
° Inadequate supply of oil to bar/chain
Check the condition of guide bar each
time chain is sharpened, A worn guide
bar will damage the chain and make
cutting difficult To maintain guide bar:
• Move OnlStop switch to "Stop."
• Remove bar and chain from saw.
• Clean all sawdust and any other
debris from the guide bar groove and
sprocket hole after each use.
RemoveSawdustFrom iJ -
GuideBar Grc_,_
V Sprocket Hole
• Using bar tool. roll chain around guide
bar to ensure all links are in bar groove.
12
• Addlubricanttosprocket hole after
each use.
• Burring of guide bar rails is s normal
process of rail wear. Remove these
burrs with a fiat rite.
• When rail top is uneven, use a flat file
to restore square edges and sides.
FileEdges and
sidesSquare
Worn Groove Correct Groove
Replace guide bar when the groove is
were, the guide bar is bent or cracked,
or when excess heating or burring of
the rails occurs. If replacement is nec-
essary, use only the guide bar specified
for your saw in the repair parts list or on
the decal located on the chain saw.
CLEAN UNIT & LABELS
• Clean the unit using a damp cloth with
a mild detergent.
• Wipe off unit with a clean dry cloth.
CLEAN AIR FILTER
A dirty air filter decreases the life and
performance of the engine and in-
creases fuel consumption and harmful
emissions. Always clean your air filter
after I5 tanks of fue! or5 hours of op-
eration, whichever comes first. Clean
more frequently in dusty conditions. A
used air filter can never be completely
cleaned. It is advisable to replace your
air filter with a new one after every 50
hours of operation, or annually, which.
ever comes first. To clean tilter" '
• Loosen 3 screws on cylinder cover.
• Remove cylinder cover.
• Remove air fifter.
= Clean the air filter using hot soapy
water. Rinse with clean cool water,
Air dry completely before reinstalling,
• Lightly oil air filter before installing to
improve the efficiency of air filter. Use
2-cycle engine oil or motor oil (SAE
30), Squeeze excess oil from filter.
• Reinstall air filter.
• Reinstall cylinder cover and 3 screws
(15-20 in-lbs,).
CylinderCover
Air Filter Screws
f
Cylinder
Cover
INSPECT MUFFLER AND SPARK
ARRESTOR SCREEN
As the unit is used, carbon deposits
build up on the muffler and spark
arrestor screen, and must be removed
to avoid creating a fire hazard or affect-
ing engine performance.
Replace the spark arrestor screen if
breaks occur.
Muffler Diffuser
Spark
Arrestor
Muffler
Body
Mufllar
Cove r
Screws
/
CLEANING THE SPARK
ARRESTOR SCREEN
Cleaning is required every 25 hours of
operation or annually, whichever comes
first,
• Loosen and remove the 2 muffler cev-
er screws.
• Remove the muffler cover (cover
snaps off muffler body).
• Remove muffler diffuser and spark
arrestor screen assembly: Notice the
orientation of these parts for reassem-
bling.
- Clean the spark arrestor screen with a
wire brush. Replace screen if breaks
are found,
• Replace any broken or cracked rout-
tier parts,
• Reinstall diffuser and spark arrestor
screen assembly with round holes
facing up,
• Reinstall muffler cover and 2 screws
(7-8 ft-lbs),
REPLACE SPARK PLUG
The spark plug should be replaced
each year to ensure the engine starts
easier and runs better. Ignitiontiming is
fixed and nonadiustable.
• Loosen 3 screws on cylinder Cover.
• Remove the cylinder cover.
• Pull off the spark plug boot.
• Remove spark plug from cylinder and
discard.
• Replace with Champion CJ7Y spark
plug and tighten with a 3/4 inch socket
wrench (10-12 ft-lbs). Spark plug gap
should be .025 in.
Reinstall the spark plug boot.
Reinstall the cylinder cover and 3
screws (15-20 fn-lbs).
Scrsws,_...__ Cy[{nder
Spsrk_'4, _€_,.. _,_ Cover
CHAIN REPLACEMENT
CAUTION: Wear protective groves
when handling chain, The chain is
sharp and can cut you even when it is
not moving.
it is normal for a new chain to stretch dur-
ing the first I5 minutes ofoperation.You
should recheck your chaintensionfie-
quentlyand adjustthe chaintension as
required.See Chain Tensionsection.
• Move On/Stop switch to the Stop
position.
• Replace the old chain when it be-
comes worn or damaged.
• Use only the Low-Kickback replace-
ment chain specified in the repair
parts list. The correct replacement bar
and chain is also specified on a decal
located on the chain saw.
• See your Sears Service Center to re-
place and sharpen in'dividualcutters
on your chain.
• Remove bar clamp nuts.
• Remove bar clamp.
• Remove the old chain.
Bar
Clamp
\
Bar
ClampNuts
* Turn adjusting screw by hand coun-
terclockwise until adjusting pin just
touches the stop.
• Slide guide bar behind clutch drum
until guide bar stops against clutch
drum sprocket,
• Carefully remove new chain from
package. Hold chain with the drive
links as shown.
Cutters Dep_ Gauge
Ddve Links
* Place,chain over and behind clutch.
• Fit bottom of drive tinks between teeth
in sprocket nose.
° Fit chain drive links intobar groove.
. Pull guide bar forward untilchain fs
snug in guide bar groove.
* Now, install bar clamp making sure
the adjusting pin is positioned in the
lower hole in the guide bar.
Lower
Hole
Adiusting Guide Bar
Pin
this point.
Install bar clampnuts andfingertight-
en only. Donot tighten anyfurther at
BarC]arnpNuts
CHAIN ADJUSTMENT
See "Chain Tension" in Maintenance
section.
14
CLEAN FUEL FILTER
To clean fuel filter, drain your unit by
running dry of fuel, remove fuel cap!re-
tainer assembly from tank. Pult filter
from tank and remove from line. Clean
with mild detergent and rinse. Dry thor-
oughly, reassemble.
CARBURETOR ADJUSTMENT
WARNING: The chain will be moving
during most of this procedure. Wear
your protective equipment and observe
alf safety precautions. During the low
speed mixture adjustment recheck idle
speed after each turn of the screw. The
chain must not move at idle speed,
Carburetor adjustment is criticaland if
done improperly can permanently dam-
age the engine as well as the carbure-
tor, If you require further assistance or
are unsure about performing this proce-
dure, call our customer assistance help
line at 1-800-235-5878.
Otd fuel, a dirty air tilter, dirty fuel filter,
or flooding may give the impression of
an improperly adjusted carburetor.
Check these conditions before adjust-
ing the carburetor.
The carburetor has been carefully set at
the factory, Adjustments may be neces-
sary if you notice any of the following
conditions:
• Chain moves at idle. See "Idle Speed"
under adjusting procedure.
• Saw will not idle, See "Idle Speed"
and "Low Speed Mixture"under, ad-
justing procedure.
° Engine dies or hesitates when it
should accelerate. See "Acceleration
Check" under adjusting procedure.
• Loss of cutting power. See High
Speed Mixture H" under adjusting
procedure.
There are three adjustment screws on
the carburetor. They are labeled H, L,
and ToThey are located in the area }ust
above the pdmer bulb.
CARBURETOR PRESETS
When making adjustments, do not force
the plastic limiter caps beyond the
stops or damage will occur.
If carburetor presets are not needed,
proceed to "idle Speed-T."
. Turn both mixture screws counter-
clockwise until they stop.
• Turn the idle speed screw clockwise
until it stops. Now turn counterclock-
wise 4.1/2 full turns.
Start motor, let it run for 3 minutes, and
proceed to the adjustment section. If
engine does not start, refer to trouble-
shooting chart or call 1-800-235-5878.
If engine performance is acceptable at
the preset positions and there _sno
chain movement at idle, no further ad-
justment is necessary.
ADJUSTING PROCEDURE
Idle Speed-T
Allow engine to idle, Adjust speed until
engine runs without chain movement or
stalling,
• Turn clockwise to increase engine
speed if engine staIIs or dies.
• Turn counterclockwise to decrease
speed.
No further adjustments are necessary if
chain does not move at idle speed and
if performance is satisfactory.
Low Speed Mixture-I.
Allow engine to idle. Then accelerate
the engine and note performance. If en-
gine hesitates, bogs down, or smokes
during acceleration, turn mixture screw
clockwise in 1/16-turn increments until
performance issatisfactory, Repeat this
procedure as necessa_i for proper ad-
justment. After completIng adjustments,
check for acceleration and chain move-
ment at idle. Reset if necessary.
High Speed Mixture-H
DO NOT operate engine at full throttle
for prolonged periods while mak;ng ad-
justments. Damage to the engine can
occur. Make a test out. Based on per-
formance of the saw while cutting, ad-
just the high speed mixture setting in
1/16-turn increments as fol]o,,vs:
• Clockwise until saw has good power in
the cut with no hesitation. Do not adjust
by sound or speed, but judge by how
well the saw performs in the cut.
° Counterclockwise if the saw has
speed, but dies in the cut or lacks
power in the cut.
After completing adjustments, check for
acceleration and chain movement at
idle. Reset if necessary.
Acceleration Check
If the engine dies or hesitates instead of
accelerating, turn the Iow speed mixture
adjustment counterclockwise until you
have smooth acceleration with no chain
.movement at idle. Recheck and adjust as
necessary for acceptable performance.
Prepareyourunitforstorageattheend
of the season or if itwiU not be used for
30 days or more.
WARNING:
• Allow the engine to ¢ooi, and secure
the unit before stodng or transporting.
• Store chain saw and fuet in a well
ventilated area where fuel vapors
cannot reach sparks or open flames
from water heaters, etectric motors or
switches, furnaces, etc.
• Store chain saw with all guards in
place and position chain saw so t_at
any sharp object cannot accidentally
cause injury.
° Store chain saw well out ofthe reach
of children.
EXTERNAL SURFACES
If your chain saw is to be stored for a
period of time, clean it thoroughly be-
fore storage, Store in a clean dry area.
• Lightly oil external metal surfaces and
guide bar.
• Oil the chain and wrap it in heavy pa-
per or cloth.
FUEL SYSTEM
Under Fueling Engine in the Operating
Section of this manual, see message
labored IMPORTANT regarding the use
of gasohol in your chain saw,
Fuel stabilizer is an acceptable alterna-
rive in minimizing the formation of fuel
gum deposits duringstorage. Add stabi-
lizer to the gasoline in the fuel tank or
fue! storage container. Follow the mix
instructionsfound on stabilizercontain*
ors. Run engine at least 5 minutes after
adding stabilizer.
CRAFTSMAN 40:1, 2-cycle engine oi!
(air cooled) is especially blended with
fuet stabilizer, ff you do not use this
Sears oil, you can add a fuel stabilizer
to Four fuel tank.
ENGINE
• • Remove spark plug and pour I tea-
spoon of40:1,2-cycle engine oi!(air
cooled) through the spark ptug open-
ing. Slowly putlthe starter rope 8 to
10 times to distribute oil.
• Replace spark plug with new one of
recommended type and heat range.
• C_ean air filter.
• Check entire unit for loose screws,
nuts, and bolts. Replace any dam-
aged, broken, or worn parts,
• At _,hebeginning of the next season,
use only fresh fuel having the proper
gasoline to oil ratio.
OTHER
• Do not store gasoline from one sea-
son to another.
° Replace your gasotine can if it starts
to rust.
16
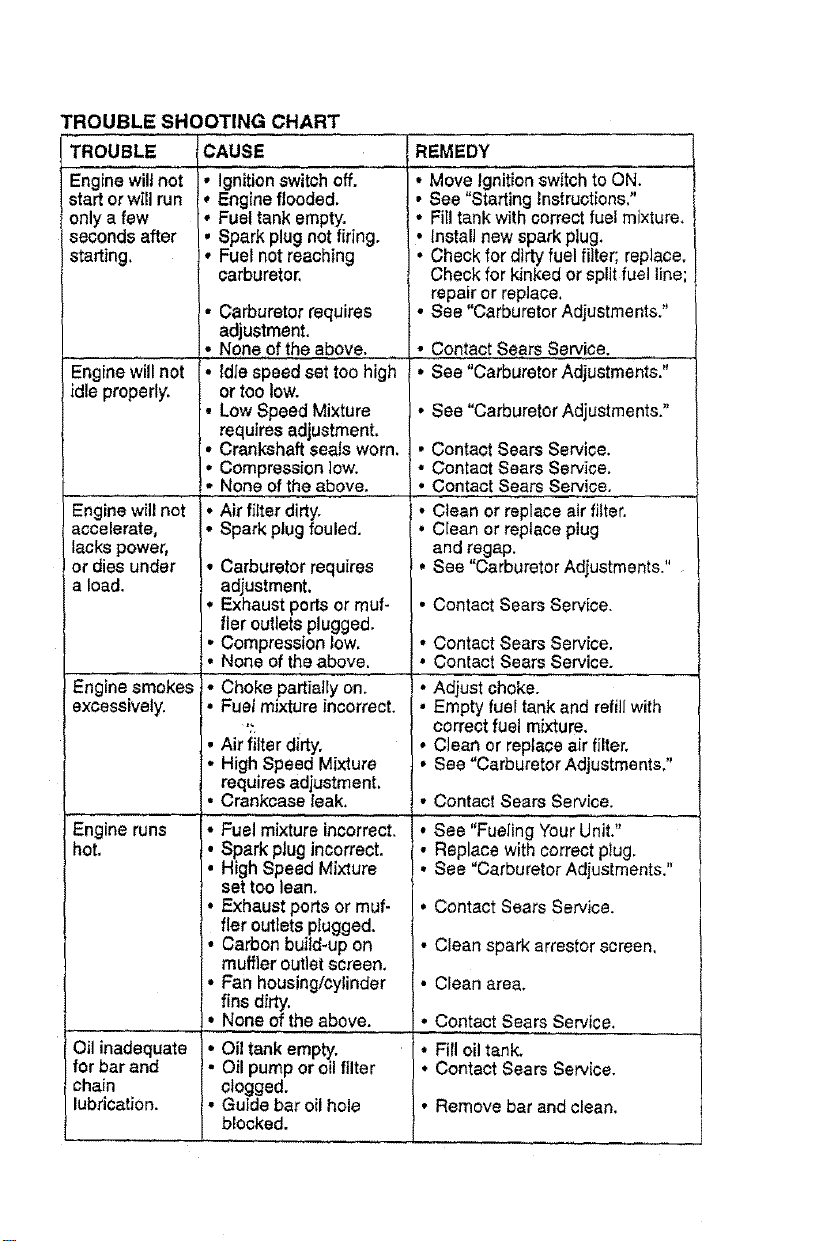
TROUBLE SHOOTING CHART
TROUBLE CAUSE REMEDY
Engine wilt not
start or will run
only a few
seconds after
starting.
• Ignitionswitch off.
, Engineflooded.
* Fueltank empty.
Sparkplug not firing.
Fuelnotreaching
carburetor.
Enginewillnot
idle properly.
Engine will not
accelerate,
lacks power,
or dies under
a load.
! Engine smokes
excessively.
Engine runs
hot.
Oil inadequate
for bar and
chain
lubrication.
Carburetor requires
adjustment,
None 0f the above....
Idle speed set too high
or too low.
Low Speed Mixture
requires adjustment.
Crankshaft seals worn.
Compression low.
None of the above.
• Air fiiter dirty.
• Spark plug fouled.
• Carburetor requires
adjustment.
, Exhaust ports or muf-
fler outlets plugged.
• Compression low,
• None of the above,
• Choke partially on.
Fuel mixture incorrect.
Air filter dirty.
• High Speed Mixture
requires adjustment.
• Crankcase leak.
• Fuel mixture incorrect.
• Spark plug incorrect.
• High Speed Mixture
set too lean.
• Exhaust ports or muf-
fler outIets plugged.
• Carbon build-upon
muffler outlet screen.
• Fan housing/cylinder
fins dirty.
• None of the above.
Oil tank empty.
Oil pump or oil filter
clogged.
• Guide bar oil hole
blocked.
• Move Ignition switch to ON.
• See Starting Instructions."
• Filltank with correct fuel mixture.
• install new spark plug.
• Check for dirty fuel filter; replace.
Check for kinked or split fuel line;
repair or replace.
• See "Carburetor Adjustments."
• Contact SearsService.
• See "CarburetorAdjustments."
• See "CarburetorAdjustments."
• Contact Sears Service.
• Contact Sears Service.
• Contact Sears Service.
Clean or replace air filter.
Clean or replace plug
and regap.
See "Carburetor Adiustments."
• Contact Sears Service.
• Contact Sears Service.
• Contact Sears Service.
• Adjust choke.
• Empty fueFtank and refill with
correct fuel mixture.
• Clean or replace air filter.
• See "Carburetor Adjustments."
• Contact Sears Service.
See "Fueling Your Unit."
• Replace with correct plug.
• See "Carburetor Adjustments."
. Contact Sears Service.
• Clean spark arrestor screen.
• Clean area.
• Contact Sears Service.
• Fill oil tank.
• Contact Sears Service.
• Remove bar and clean.
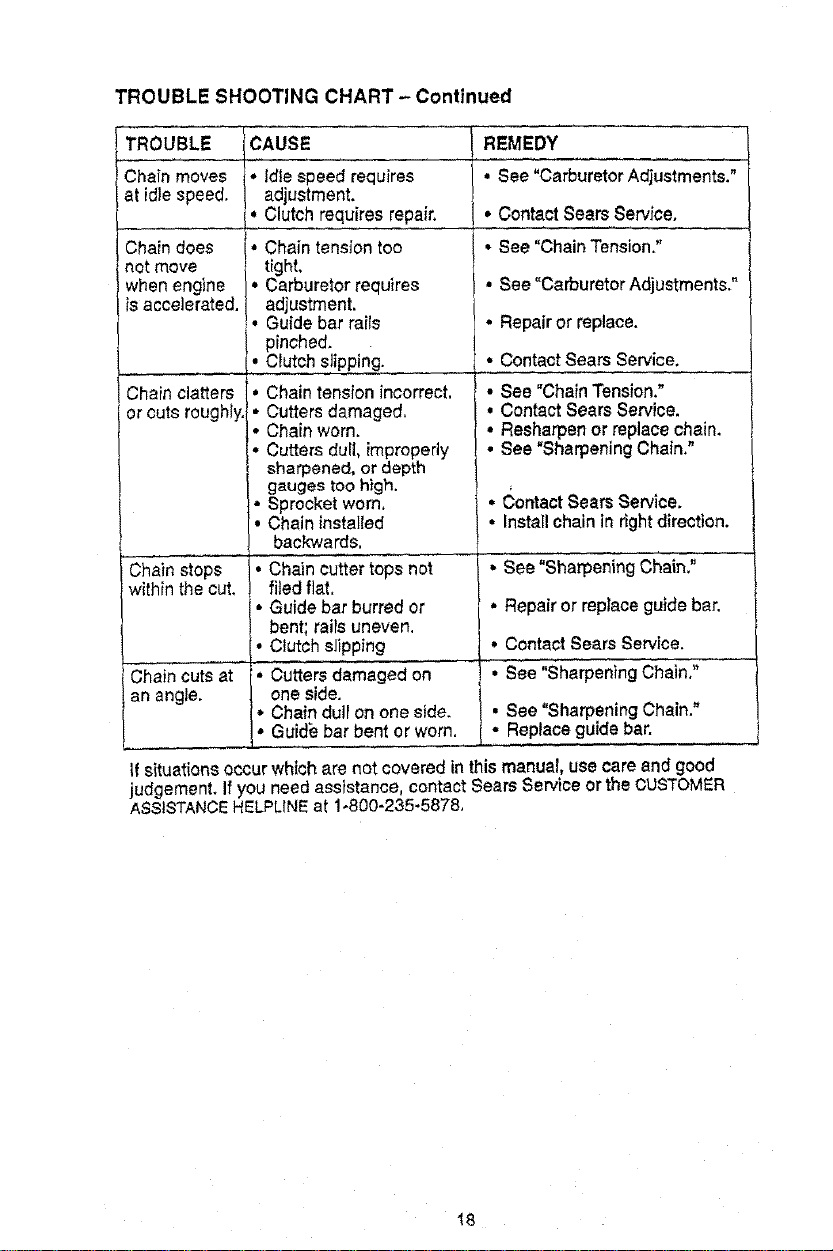
TROUBLE SHOOTING CHART - Continued
_ROU BL_ lq _ _ A us_ l "_MEOY .............. .......
Chain moves • idle speed requires • See "Carburetor Adjustments."
at idle speed / adjustment,
!. Clutch requires repair • Contact Sears Service,
Chain does
not move
when engine
is accelerated
Chainclatters
or cuts roughly
Chain stops
within the cut,
Chain cuts at
an angle
Chain tension too
tight,
Carburetor requires
adjustment
Guide bar rails
pinched
Clutch slipping
• Chain tension incorrect
• Cutters damaged
• Chain worn
• Cutters dull, improperly
sharpened, or depth
gauges too high
• Sprocket worn
• Chain installed
backwards
Chain cutter tops not
flied flat
Guide bar burred or
bent; rails uneven
Clutch slipping
Cutters damaged on ......
one side.
Chain dull on one side.
• Guid_ bar bent or worn.
• See "Chain Tension"
•See "Carburetor Adjustments."
• Repairor replace.
• ContactSears Service.
• See "ChainTension."
• Contact SearsService.
• Resharpenor replacechain.
• See "SharpeningChain."
• Contact Sears Service.
• Install chain in rightdirection.
•Sea"sharpening hai ."
• Repair or replace guide bar.
• Contact Sears Service.
• See 'Sharpening Chain"
• See "Sharpening Chain."
• Replace guide bar
If situations occur which are not covered inthis manual, use care and good
judgement. If you need assistance, contact Sears Service or the CUSTOMER
ASSISTANCEHELPLINEat 1-800-235-5878,
18
Gerantfa 22 S.ervicloy Aiustes 36
Reg]as de Seguridad 22 /umacenamlento 38
Mo_taje. 26 Tabla Dia_ 40
Uso 27 Repuestos y Encargos Cordratapa
Mantenimiento 33
GARANTIA COMPLETA DE UN A_IO PARA LA SIERRA
DE CADENA'A GASOLINA CRAFTSMAN®
Porun_ a ¢ootardela fectmde compra,siempreque estaSierrade Caderma Gas_ina
O-aftsrrenest@manter_da,k_dcada y a_ustadade acuerdoal manualde!usual, Semrs
rep_a_ gratu_amentecuaIquierdefectode materiafesoma_ deobra.
Estagamntfa ex_uye laban_ lac_dena, lat_ra y etfittmde a_re,cluesonatt=*cu_s
f_ng_'blesy se gastandumnteelfundonamientonormal.
Si se usa esta Sierra de Cadena a Gasolina para prop6sitos comerciales, esta
garanffa tendrd validez de g0 dJ'ascontados a parttr de fa fecha de compra. _i se
usa esta Sierra de Cadena a Gasolina paraprop6sitos de afquiler, esta garantfa
tendrd valtdez de 30 d_'ascontados a partir de la fecha de compra.
EL SERVtCIO BAJOGARANT1AESTAA SU DISPOSICION CONSOLODEVOLVERLA
SIERRA DE CAD_ At.CENTRO DE SERVtCIO SEARS MASCERCANOF.J'_LOS
ESTADOSUNIDOS.
Estagarantia le confierederech_ jurfdJcose_cos; adem_ ud.podrdtenetotros
,derechosclue vadan entre es1_dos.
Seem, Roebuck and C,o.,D/817 WA, Hoffman Estates,It. 60179
ADVERTENCIA: Desconi_te
siempreel cable dela bu|faai rep_J'ar
el sparato,exceptoen el casode
a_ustesal carburador,Debidoa que I_s
derms de cadena soninstmmentos
paracortarmaderaa aRavelocidad, el
usodescuidadooindebidode esta
herramlentapuedecausargraves
hertde_.
PIENSE ANTES DE PROCEDER
. Ltrr_eel uso de tas_emaa aquellos
ust.m.dosaduttosquecornprend_ty
I)U_ implernentattodaslas
prec_uclones,regtasde segurld_de
insbucctonesde usoque se encuentranen
estemanual.
Zap_tosde PantOmlteras
Seguddad f de Seguridad
. Use equipoprotector.SiempreusecaIz_do
de segurfdado:>npuntasde aceroysue_s
ant_deslizantes;,mpaajustadaalcuerpo;
guanteSgruesosdeusotndustda_
an'3-deslize_es;protecc_nde ojostales
comogabsdeseguddadquenosela
cara;cas¢oduroaprobado; yban_ra de
sonido(tapon_ de ofdou orejeras
anti-sonido)paraprotegerla_ Los
quausansierrasde fue=a habitu_mente
deborahhacerserevisarla
frecuentementeyaque el_ delas
sierrasdecadenapuededer_r losofdos.
_ elcabe,oporendmadelnWeJ
loshombros,_ para talefectost
fuemnecesado.
• _ todaslaspaxtesdelcuerpo
a/e|adesde lacadormsiempmqueelmotor
est_ea fw_ionan_ento.
- Mar_ngaa los rdSos,espec_doresy
anirn_Jesa tP,a distar_a m_nimade 10
metros(30pies)deldreade traba_oo
cuar_o estdhaciendoarrancar yuso
elmotor.
• No;eva'denioperelas sierrasdecadena
cuandoestdfatigado,enfem_o,ar_iosoo_
ha tornado_Jc_ho],drogaso remed_os.Es
inprescindibteque ud.est_en buenas
cond'_:_onesflsicasyalerlarnent_n_nte.
Siud.sufrede cuaJqutercono3ci6nque
pueda _ coneltraba_ arduo,
ases6reseconsum_ico.
• No pongaenmarchalasierrasin tenerun
dmade b'abajodespejada,una superficie
establep_a pararsey,si estdderrubando
drbo_es,uncarnk_ predeterrr_nadode
ret_zx::er_.
USE LA SIERRA OBSERVANDO
TODOS LOS PROCEDIMIENTOS
DE SEGURIDAD
" Mantengalasd_ _ en las nk_
sten_reque e_e_ P._t6en maJd-_ El
usodel_to €onunaso_ manopuede
CaUSergravesheddasaJUSua_o,a los
asL_tentesoa k_s_ Las
si_ decadenaesldnd'_se_%_spara
quese lasuseconla_dos rnanosentodo
• H_ga _ de la sie,rrade cadena
•_Jcamente entugamsextedoreslien
• Nohagausode Iasiena desde las
e_eras port_blesnik_ d.rboles,amenos
quetengaelentrenaraientoespecfficopara
f'_a.cetlo.
e *
Asegm'esede cluelacadena novaFaa
hacercont_ctocc_ ning0nobjetoantesde
porteren rnarchaelmotor. Nuncai_ente
hacer_ lasierraconla baffagu_a
denbode untorte.
• No apliquepresi6na la siena, especi_-
mente alfinal deltorte. La applicaci6n
pr_"._ puedecausarquesepierda
contro_a_completarseel corte.
• Pare etmotorantesde apoyarla sierraen
• r_ng_ _ado.
Cuandobastadelasierraen lama_.
t_ga_oOnicamentecon elmotorpa_cIo.
U_ve_aco, el_'lenciadorapartadodel
¢uerpoy_'laloamay cadenaI'_c_ atr_Ls,con
la barradepreferenc_acu_erta pot una
funda. 23
MANTENGA LA SIERRA EN
BUENAS CONDICIONES DE
FUNCIONAMIENTO .
Lleve/a sierrade c_der_a un proveedor
sen,,l¢lomenosaqudlosproce_ur_entos
F_adosen[asecx;i6nde manten_l_ientode
estemanoaL
• Aseg0resede queta_dena se detenga
porcc_npte_ocuandose suelt_elga_'llo,
Pa_ hac=ercormcdones,yea los"AJustes
a_.
• _Mante_ lasmaturessecas,limpiasy
I=_resoa =ce_ ode meT.dade
combus_'ble.
- Mantengalastapasy los_adores blen
t_u,_e
. =
repuestosCraftsmanmcome.nclados.
Nur_ m_l'_que laderra.
MANEJE EL C(3MBUSTIBLE CON
EXTREMO CU1DADO
• NOfumer_entraskab_a conel
_[e nicuandoesldhactendo uso
de h sierra.
• EIi_ todasb.sposibtesfue_es de
chbpaso llamasen b.sdreasdondese
mezc_ ovierteel oomb_e.
- Mezcleyviertaelcombu_'bleafueray use
siemprerecip_enteaprobadopara
combu_es ymarcadocomotaL Umple
todos losden'amesde con_us_bleantes
de ponerelaparatoen mamha.
• Al_jese a pot Iomenos 3 raetms (I0 pies )
oe =ugarde aba_.edmlentoantesde poner
elmolocen_
• _ elmotorydeje que las_errase
enmeen unluga,rtibrede substancias
_'bles yno sobrehojassecas, paja,
• Guatdeelapamto y el_'ble enun
_c_p. _, _ y _ venti_=_o
oo_e losvaporesdelcombustibleno
pJed,3rle_ encontactoconc_Lspas_
llamasabiertasprovenientesde
te_, .motoresointermpt_res
el_tticos, caleta_lorescentrales,etc,
PROTEJASE CONTRA LAS
REGULADAS
Ud. debe seguir todas las precauc_onese
i_pnes desegu_ad paraayud_r
a evitar ms recula_s y las dem_Ls
fuerzas que pueden _ graves
heddas,
Trayectoriade la
culada
Evite las Obstmcciones
Despejq
ADVERTENCIA: La Reculada
Rotacionalpuede_contecer cuandola
cadenaenmovimientoentraen
contactoconalg0n objetoen la enla
portesuperiordela puntade la bara
gufapuedecausarque lacadena entre
almaterial yse detengaper un
instante.Elresultadoes una reacci6n
inversa,a velcoidadde reldmpago,que
hacerecularlabarragufahaciaardbay
haciaatr'_shada elusuario.
La RecuTadaper Presi6ny la Impulsf6n
acontecen cuandolacadena se
defienerepentinamenteporqueestd
apretada,atrapadaoen contactocon
aJg_nobjetoextmSoa la madera. Esta
detenci6nrepent|node la cadenatiene
come resultadouna inversi<Sndela
fuer-z_de la cadenausada para cortar
madera y causaque ls sierrase mueva
en sentidoopuestoal de la rotaciSnde
ta cadena. LaReculadaper Presi6n
pmpulsalasierradirectamentehacia
atrds endirecoi6nal usuado.La
ImpuLsi6naJejala s_erradel usuario.
REDUZCA LAS
PROBABIUDADES DE
RECULADA
• F..stdconsciente de lapos_llidadde
reculada.Teniendounabuena
comprenal6nb_sicF,de la recu!ada,
ud.I_odr_reducirel elementooe
* Emptecey efect_elatotalidadde
¢aclacodecon elacete_dor a rondo.
St lac_denase estdmovfendea una
ve!octdadmenorque h md.,dma,hay
•masprohabtlidaddecluela sierra
recute.
. Use culdadoextremeal entmrde
nuevoen uncorteyaempezado.
• No intentehacercortes empezando
conlapuntadela l_rra (cortesde
ta]adm).
, Tengacuidadocontroncosquese
despot., y con_asdemosfuerzas
queWan cerraruncortey apretar
lacaoenaobiencaersobreella.
• UselaBarraGufaRedudderade
Reculadasy laCadenaMinim_zadora
deReculadasrecomendadasparasu
,_erra.
Evtte la Reculada per Presi6n:
, Mantdngasestemprea!t_to deIoda
situact6nu obstrucci_cluepueda
apretar lacadenaen la portesuperior
deh barra.odetenerlac_denade
cualquierforma.
; Nocorte re{is queuntroncoa laveT.
AI secotonartroncosconcorte
a._cendlente,no tuerzah sierraal
sacarla ban'adelcorte.
Evite la lmpulsi6m
* Empieceloscortes siemprecon el
motoraceleradoa rondoy lacajade
lasierra_q}oyadaenla madera.
• Usecuriosdep_dsticoodemadera,
no demeW, para mantenerabiertoet
corte.
MANTENGA EL CONTROL
P_b'eseh_ latzquierdade lasierra
sorpresaque contribuyea los B p=ulg_per \{_)__
acoidentes, de_o detamanila
..Nun= permitaque la.cadena en
• movimiento toquentngunobjetoenla
puntadeta barragufa.
Mantengaeldrea de trabajolibrede
obstnJc_onescome per ejemplo
otros_rboles, ramas, piedras,cemas, Codefgtdo
tocones,etc.Eiimineo evttetoda
obstrucci6nque la c_dena pueda
tocar mtentrasestdcortando. Nt.mc_tnviertaI_posfci_tdelosn-_Lr_Os
• Mantengalasierra afiladaycon la . Sostenerfirmementecon/asdos_te
tensh_ncorrecta.Loscadenas con ayudar_a mantenerelcon,aoldelasierra.
pocofileoflojasincrementanla I,feafloje.Ma_tengab _ derecha
probab_dadde reculada.Siga last'._. envoMendototalmente=aman_b-asera,
=nstmccionesde!f_bricante paraafloat seaud.derechooz.urn.Sostenga_a:
m_a de_ter?con_r_o _eroa,
y efectuarmanten=miento de la cdocan_o.e_puzgaroeba_ode/aman_ay
cadena.Verifiquela tensiona rc_eanco_amantjaconk_sdedos.
intervalosregulatescon el motor MantengaelbrazeL_ie_o tota_mente
par'ado,nuncaen marcha.Aseg0rese exter_id_oconetcodefijo.
de que lostuercasae la abrazaaera - Coloque|a mane izquierdaenla
de |a ban'aest_najustadas manijadelantem,demodecluequede
firmemente, en I_nearectacon|a manederecha
en la man_akasera_cuandoest_
haciendocodesde seccionarniento,
Pdreselevementehacialaizquierda
dela sierrapapa=evitarqueel cueq_o
est6en ffneadirectaconlacaaena.
o Pdreseconelpesocrjst_buido
igua]menteentrelos dospies..
o No se extienoaexcP_._vamente.La
sierrapuede_pu]smio o empuj.adoy
ud.puedeperaere=equ=_)rioyel
controlde las_enm.
oNo torte anna delniveldelos
hombres,puedstoquetoma cr_ci!
mantenerelcontro!delasierra.
DISPOSFfiVOS DE SEGUR|DAD
cOWrRA LAS RECULADAS
ADVERTENC|A: Lossiguientos
dLsposith,osha_s_doincluidosenla
s_errapara ay_dara reducirelriesgo
de reculadas,sinembargo,taJes
implementosnopuedeneliminar
tota]menteestareacct6npeligrosa.No
se conffeexclus'rvamenteenlos
o3spositivosdeseguridad.
* ProtectordeMano,diseSadopare
reducirlapmbabilidadquesumano
izqu_erdaentreencontactoconI_
ca_ena, sllamanose desprendede
iamanta deta_era.
• La Pos=ci6ndelas man_asdetantera
y tmsera,diseSadascond'_anda
entrelasman_asy *enffnea"launa
conla otra.Laseparaci6ny la
cotoc_ci6nenffnea que estedise_o
proveese comb_nanparadar
"equilibdo_ resisten_iaparscontrolar
la propuls_6ndela sierrahaciael
usuariosi aconteceunarecutada.
* BarraGufaRed_.'cidoradeRecu_adas,
dJser_adaconp_ntaderadiopequer'toque
reduceeltamaz3ode]azonadepeligro.
_.s_etipodebarraha demostradoque
reduce.Signif_;ath,amente]acantidady
laserieaaddelasreculadoscuando
ha sido exam]nado de acuerdo COn
ANSI(AmericanNat_onatS_
lr_tute, Inc.) B175.1. •
Pur_adeRadio
z=___ PequeSoBatmGu[a
PuntadeRadioGrandeBar_Gui'a
• LasCadenasMinimizadorasde
Reculadashart_echo los
requisitosderendimientoenpruebas
conunamuestrarepresentativade
sierrasaecadenacon
desplazarnientode menos de 3,8
pulgadas,comose espec_ca en
ANSIB175.1.
CadenaML_rniz_doradeRecub,da_
._c=,_.__ Marc_dord'eProfu_did_d
Des'_alaFuerzaoe
"_ _ Reacck_y Permitequela
Madem
GraduaJmentea laOJchilJa
AVI$O DESEGURIDAD- Etestar
expue_oalas vibmcioensa tray,s de!
usopro=ongadodeherramientasde
fuerzaa gaso_inapuedecausarda_os
a losvasossa_gu_neosoa losneMos
delosdcdos,_ manosy ]as
coyunturasenaquella_spersonasque
_nen pro_nsidad a lostrastomosde
lacirculac_6no alas hinchazones
anorm_es..F.Jusoprolong.adoen
t_empomona sidoasociaaoconda_os
losvasossangu[neosde personas
que pototrapartese encuentranen
perfectoestadodesslud.Si ocurren
s_ntomastaJescomoel
entumecimiento,el dolor,lafalta de
fuecza,loscambiosenel colorola
texturadetapielofalta desentidoen
losdedos,las manoso lascoyunt,jras,
parede usaresta mdquina .
inmediatamenteyprocureatencion
m_dica.Los sistemasdeantl-vibraci6n
no garanttzanque se evitentales
problemas.Losusuadosque hecen
usocont_nuoy prolonganoode las
herramientesdefuerzaaeben fiscalizar
atentamente su estadofrsicoy el
estadode1aparato,
FRENO DE CADENA S|estasierraha
de usamepare eltumbadocomercial
de drboles,ud.deber&encargare
i_-'talarunfrenode cadenapare
curnplirconlosRegtamentosFederales
del OSHA pare elTumbadoComercial
deArboles.Entreen contactocon
e! Servicio SearsoIlameal
1-800-235-5878:;-
REJILLA ANTICHISPA: Susierra
vieneequipadacon si{enclador
limffadorde temperaturay con rejilla
antichispaque'cumple conlos
requisitosdelos _gos deCalifornia
4442 y4443. Tode-slastierras
CONTENIDO DE LA CAJA
forestadasfederales,m_s los e_tados
de C_difomia,Idaho, Maine, Minnesota,
NuevaJersey,Oreg6n yWashington,
requieren porleyque muchosmotores
decombusti6nintemaest_nequipados
conretie antichispa.Si ustedusauna
sierra Decadena dondeexistentales
reglamentos,ustedtienela
responsabtlidadjurfdicade mantener
estaspiezesencorrecto estadode'
funclonarniento.De Iocontrario,estar_
eninfracci6nde laIey.Veala tablede
RESPONSABILIDADES DEL USUARIO ala
se_3g_,de MAfNTENIMIENTO.
PADRONES: Estesierradecadena
constaenlaIista de Underwr_ers
Laboratories,Inc., de acuerdoa los
RequisitosNacionales de Seguridad
Estadounidensespare Sierrasde
Cadenaa Gaso_na(ANSI
B175.1-1991),
Use la siguiente lista pare ver_car el
contenido.
Modelo 358.352681
• Sierra de cadena (completamente
monlada)
, Herdenta de la barra
• Cadena
• Estuche de transporte
, Guantes
•Lata para gasoline
• Barray cadena lubricaciSn
• Mezcla de combustibtelaceite
• Vefifiquequenohayapiezasdafiad_L_..No
usepiezasd_ad_.s.
• Sinocedtaayudaod faltal plezaso
encuentmpiezasdaSadas,favorde]]arnar
aJ1-800-_878.
AViSO: Esnormalotre!go)peteodel
filtrode combust_le enel tanquevacfo.
Suapamtoha sido puestoa pruebaen
laf_bticay se le ha ajustado con
precisi6nel carburador.Como
resultado,es pos_le que se sienta un
olora gasotinao quese encuentreuna
gotaderesiduode ace_teo
combustilbeen el silenciadoral
desempecarel aparato.
MONTAJE
Elaparatovienecompletamente
armadey no hay necesidadde
montaje.
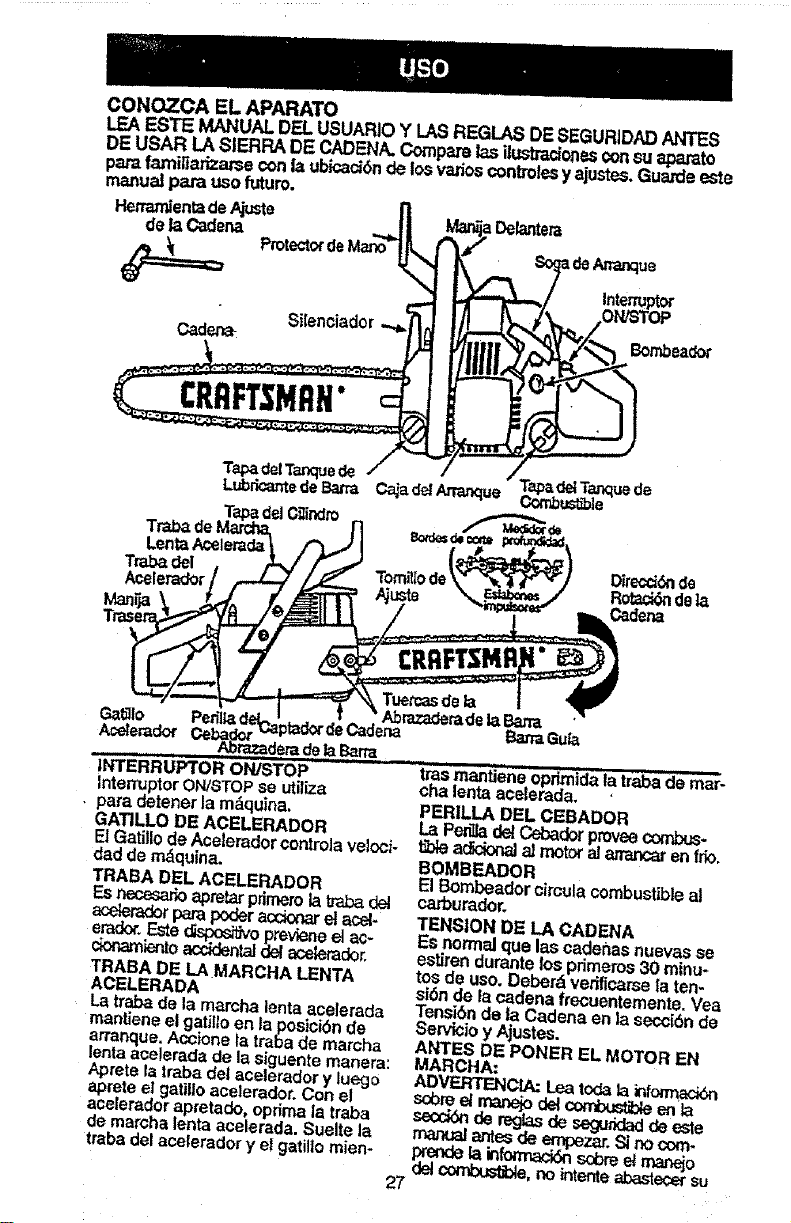
CONOZCA EL APARATO
LEAESTE MANUALDELUSUAR)OY LhJSREGL&-,SDESEGURIDADANTES
DE USAR LA SIERRA DE CADENA. Comic, las ilustmdones consu apa:rato
pare fa_niliadzame con b ubicaci6nde los vanes controlesy ajustes, uuaroe eme
rm_uat pa.m use mturo,
HetramientadeAjuste =Dela,'ltera
de b,Caderkl
Silenciador
C,ader_ Bombeador
CRRR'$MItN"
TapadelTanquede
Lubr_edeBa_ Cajadel_ue Tapa.delTanquede
P_,o_us_bie
Tapade C,ilil'_d_ _ _,_
Traba*1 , /J"V" / _ TemPlede__) DlrecdcT_rlde
Acelerador/ _ ._ =ustB _F._=_ / Rotad<_de b.
_1o" Pen'_ladr' I t Abrazaderadela,Batm '
-Abrazaderade1_Barra
iNTERRUPTeR' ON/STOP '" tins man'_ene opdmida ta traba"'de'mar-
InterrupterON(STOPse t.lt[l[za, ¢ha lenta acelerada. '
• para detener la m_quina. PERILLA DEL CEBADOR
GATILLO DE ACELERADOR La Pen3a delCebador ptovee _-
El Gatiilode Acetemdor controla veicci- t_oleaddonal ai motora]_ entrio.
dad de mdquina. BOMBEADOR
TRABA DEL ACELERADOR El Bombeador circuta combustible al
Es necesa,5oapretar ptimero la trabadel carburador.
ac_erador para poder acck:_ el acel- TENSION DE LA CADENA
erador.Este#_tSosiflvoprevieneel ac- ESnormal que las cadenas nuevas se
cionamientoaccidentaJdel acelerador, estiren dumnte los primeros 30 minu-
TRABA DE LA MARCHA LENTA tos de use. Deberd verificarse la ten-
ACELERADA si6n de la cadena frecuentemente. Vea
La ttaba de la marcha lenta ac,elerada Tensi6n de b Cadena en la secci6n de
mantiene elgatille en la poslci6n de Sewi_io y Ajustes.
arranque. Accione la traba de marcha ANTES DE PONER EL MOTOR EN
lenta acelerada de la siguente manera: MARCHA:
Aprete la traba delaceterador y luego ADVERTENCIA: Lea todala infonnaci6n
aprete el gatilloacelerador. Con e! scbm el m_ del _ enla
acelerador apfetado, optima la traDa _ de reglasde seguddadde este
de marcha lenta acelerada. Suelte la manual antesde empezar.S[no corn.
trabadel acelerador y e! gatillo mien- prendeta inf_ sobree{ m_o
det cornbusffd_,no intente a,bastecersu
27
apamto. Procureayudadea]gu}enque
comprenda]ainformaci6noIlameal
teldfonodeayuda aJconsumtdoral
1-800-23.5-5878.
ACEITE PARABARRAY LA CADENA
El lubricadorde lacadenaprovee
lubdcaci6ncontinuaa lacadenay a la
barragufa.Nose oMde deIIenarel
tanquedeace_teparabafrasiempre
quelleneeltanquedecombustible
(Capacldad=6,8ft.oz.).Paraobtenerla
mdxlma prolongaci6ndela,,'idadela
baray la cadena, recomendamosque
useelacetteparabatrasdesierrade
cadenaCraftsman.Si elaceite
Craftsmannoestddispondible,puede
usameun ace!toSAE 30 debuena
calidadhannaobtenerelaceite marca
Craftsman.Lacant!daddelubricaci6n
es medida automdt_camenteduranteel
funcionamiento delasierra.La storm
usar_rods omanos untanquede
aceite parala barrapercadatanquede
combu_'ble.Siemprelleneeltanque
deaceitede!a barracuandollene el
tanquedecombu_ble.
ABASTEC1MIIZNTODEL MOTOR
Estemotorest,. hab=litadop_'a
funcionar congasolinasinplomo.
Antes deusar,se deberdmezclarla
gasot_nacon un aceite debuena
cat,dadparamotoresde2 tiempps
enfriadosa alre. Recomendamosel
ace!tomama Craftsman.Mezclela
gaso_inaconet aceite enlaproporci6n
de 40:1. (Se obtieneuna pmpomi6nde
40.1 mezdande 3,2 onzesdeaceite
concadagal6nde gasotinasinplomo).
NOUSE acefte paraautomdvilesni
1Sarabarcos. Estosaceitesd_ardn el
motor.AImezdar elcombu_ble, siga
lasinstruccionesimpresasenel
recipiente.Una vez quehayaafiadido
elace{tea la gasolina,agileet
recipientebrevemente paraasegurar
que elcombustibleest_completamente
mezclado. Leasiemprey sigalas
reglasdeseguridadque tienenquevet
conel combustibleantesdeabastecer
elaparato.
IMPORTANTE
Laexperienciaindicaque los
combustiblesmezc}adosconalcohol
(losllamados gasoholo los que
contienenetanolo metanol)pueden
atraerhumedad,lo que puedecausar
la separaci6ny laformact6ndede!dos
durante elalmacenamiento.La
gasolinaacfdicapuededaSarel
ststemade combustiblede!motor
duranteel almacena,mianto.
Para evitarpromblemasconelmotor,
deberd vaciarseelststemade
combustible antesdealmacenarel
aparatopor30 dfasomn,_m.Vacfeel
tanquede combustJb!e,pongaelmotor
en marehay d@eloenmarcha hasta
que Iresl!neasdecombustJ'bley el
carDurac_orquedenvacfos.Cuande
vaya a usarelaparatonuevamente,
use combu_'blefresco.Vea !as
instruccionesdeALMACENAMIENTO
para obtenerrodsinformaciones.
Nunca useproductosde iJmpjezade
motorooadouradoren eltanquede
combu._'bleya que hacedopuede
provocardafiospermanentes.
Vea ta seccl6nde ALMACENAMIENTO
para rods informactones.
PARA PARAR EL MOTOR
, Coloqueelinterrupt0ren la posici6n
STOP.
• Si el motornose detiene,tire la
pedlladel cebadera sum_r_dma
extensi6n,
PARA PONER EL MOTOR EN
MARCHA
MOTOR FR10 O MOTORCALIENTE
DESPUES DEQUEDAR SIN
COMBUSTIBLE
- Lleneel tanquede ace_tedebarra
usandoel aceite correspondiente.
- Lleneeltanquecon lamezcla40:1
decombust_le.
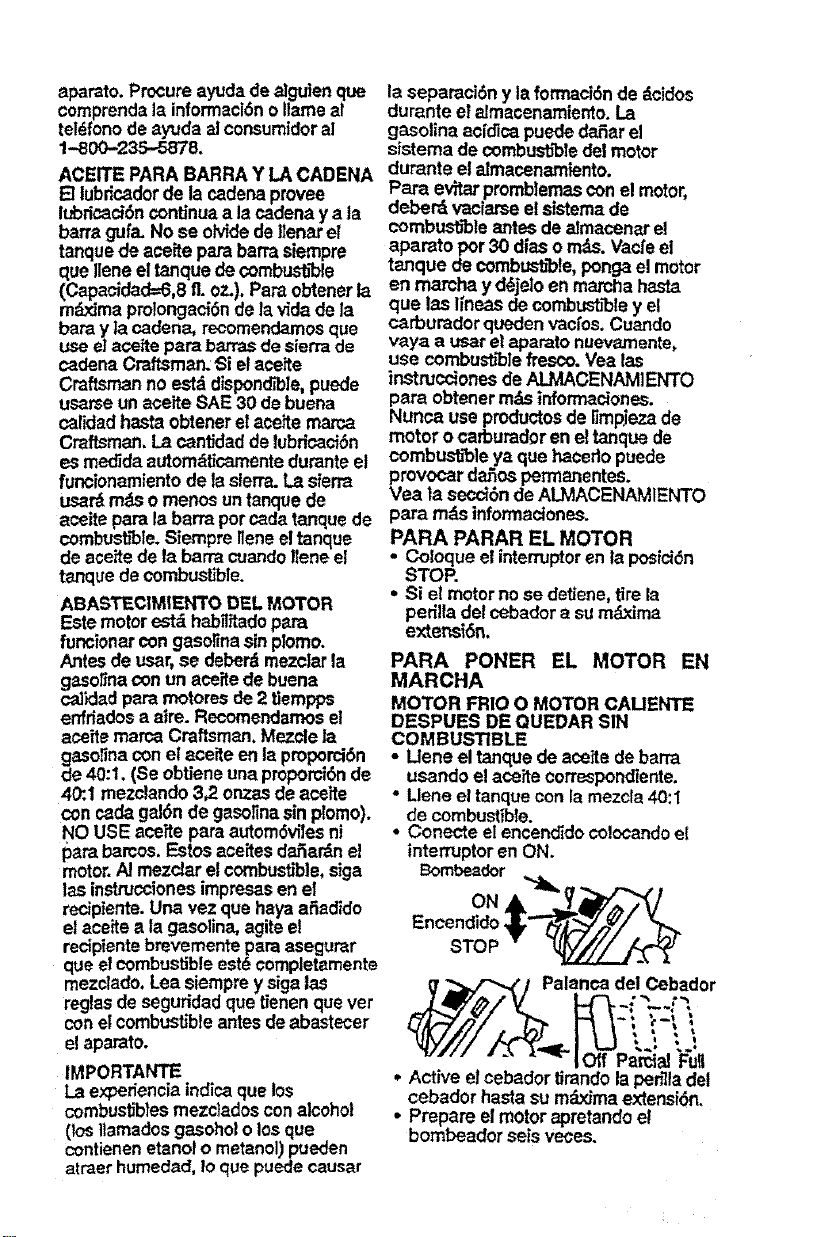
• Conecte elencendidoco_ocandoe[
interruptoren ON.
Bombesdor
STOP--_
_qsPalancadel Cebador
IL,'_ I-'al'_lal PUll
• Active el eebadortirando lapenlladel
cebadorhastasumdxJmaextensi6n.
• Prepare elmotorapretandoel
bombeador seisveces.
• Co|oque Iasiena enelsuelo.
Sostenga_amanija de}anteraconta
rnanoizquierday coloqueelpie
derechoatravesandoel interiorde la
manija trasera.
• Ac!_vela marcha lenta aoelerada
apretando la traba del acelerador con ,
la mano dered3a. Luego,aprete eJ
gatilloaceleradory mant4ngalo
apretado. Conel pulgaroptimala
traba de lamamha lenta acelerada y
mant_ngala oprimida.Pot_ltimo,
suelte etacelerador.
• NOAPRETEELA,CELERADORduranteel
acranque; deottornodo, ser_ necesado
activarnuevamentelatmbadela
lentaacelerada.
AVI$O: Al tironeardela sogade
an'anque,nuncauselaextensi6n
completa dela soga.Tampoco
permitaque la sogase rebobine sola;
al contrafio,sostengalamanija y
haga quese rebobinelentamente.
,, "fironeedelasogaconla rnanoderecha
hastaqueelmotorinte_teanance;,pero
norn_sde 5 veces.Luegoempujela
periElade_cebadorhastalaposici6npa;-
ciaLConlJn0etironeandode la sogahas-
taque etmotorarranque.
• Si laternperatraambientees supedor
a 5_0 (40°F), deje el motor en
mamhaunos5 segundos.Aprete y
suelte el acelerador paradejarel
motor enmarcha |enta.
• Con|atemperatureambientepot
•debajo de 5°C, dejeel motor en
mammaentre 30 segundosy un
minuto pare quese caliente,conel
cebadorenla posicibnpamiaL
Despu_s empuje|apefiltadel
cebadorhastala posiciSnOFF ypot
ti_timoapretey suelteel acelerador
para dejarelmotoren marchalente_
• Parepararelmotor,coloqueel
interruptoren STOP.
PARAPONER EN MARCHA EL
MOTOR CALIENTE
NO USE el cebadorpara porteren
marcha e!motorcaliente;deIo
contrarbel motorse puedeahogaro
ponersedificitdehacer arrancar.
. Cok:>queel interruptoren ON.
. Accione la trabade la marchalenta
aceIerada.
• Aseg_rese que el cebadorest_enla
pusici6nOFR
• Conlasienaen elsue|0,sujetela
man[ja delanteraconlame=no
tzquierdaycoloqueelpiederecho
atmvese._doel interiordela man_ja
tmsera.
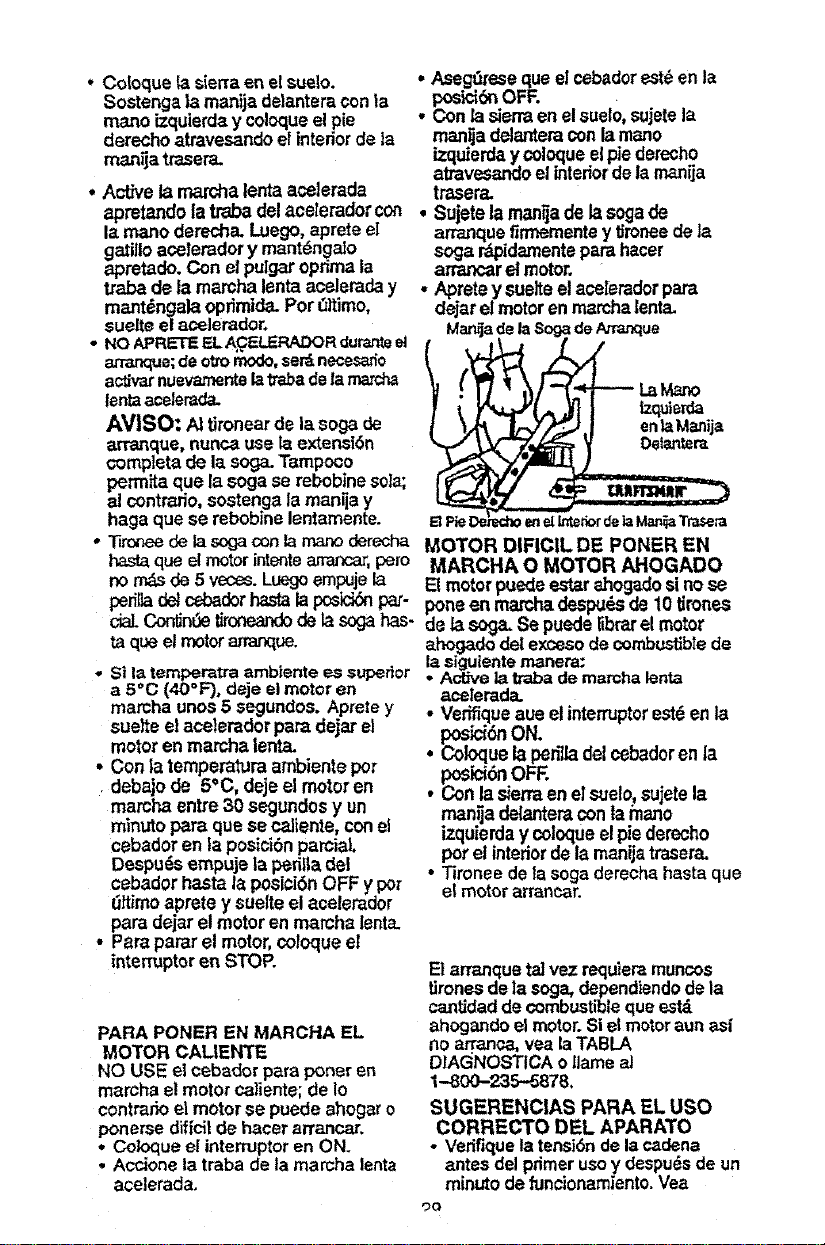
Sujetela manijadelasogade
an'anquefirmementey lJmneede la
soga r_pidamenteparahacer
a_r el motor.
• Apretey suelteel aceleradorpare
dejar el motoren marcha|enta.
MarciadelaSogadeAmanque
MOTOR DIFICIL DE PONER EN
MARCHA O MOTOR AHOGADO
El motorpuedeest,_rahogadosinose
pone en marchadespu_ de 10tirone-s
de la soga.Se puedeIibrarel motor
ahogadode|excesodec_rnbu_blede
la siguienternanera:
• Active la traba demarchalenta
acelerada.
• Verffiqueaue elinterruptorest6enla
.posici_ON.
Coloquelapon'Iladelcebadorenla
• posici6nOFF.
Conla sienaenelsuelo,sujetela
manija delanteraconta hlano
izquierda y coIoque el piederecho
pot et interiorde la manijatrasera.
• Tironee de tasoga dereoha hasta que
el motor arrancar.
E1arranqueta]vez requiemmuncos
fironesde _asoga,dependiendode la
cantidadde combustiblequee.st_
ahogandoelmotor.SiB!motoraunasi
no atTanca,yea laTABLA
DIAGNOSTICA oblameai
1-800-235-5878.
SUGERENC|AS PARA EL USO
CORRECTO DEL APARATO
• Verifique latensi6ndelacadena
antesde|primerusoy despu6sdeun
minuto defuncionamiento.Vea
'_o
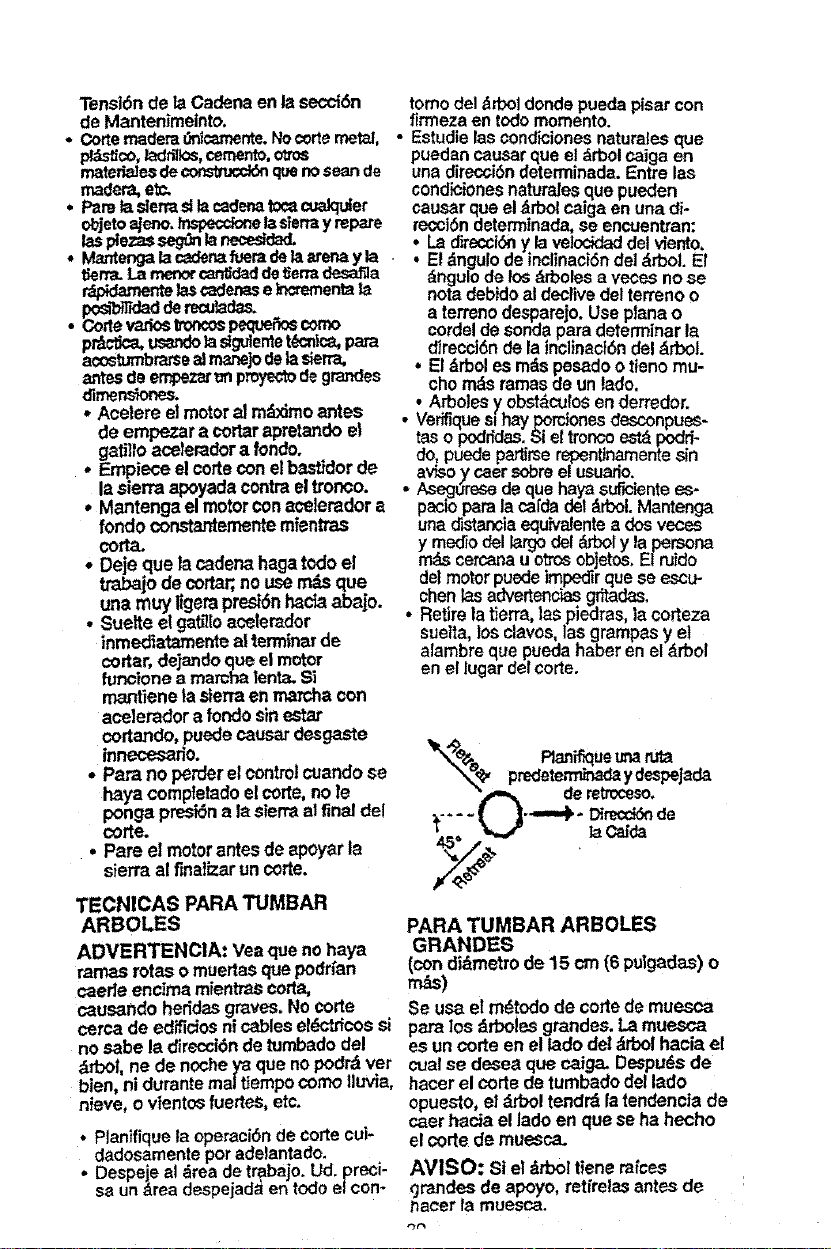
Tensi6nde laCadenaenlasecci6n
de Mantenimeinto.
• Cortemademt;'r_c_mente.Nocortemetal,
p_dstico,tadnlk_s,cemer_o,otms
materiaJes de _ que no $ean de
rnadera,etc.
• ParelasierraslIscadena_ cuaJqu_er
objetoajeno,h_pecctonelasierray repate
laspiezaSseg0nlanecesldad.
• M._._engaiace_der_fueradela_ena y la
tien'a.La_ cantidadde_erraoe.sa_a
r_rrte lascadet.se_,cmmenta
po_'b_T_adderecu_adas.
• Cortevadostmrmospequefioscorno
pr_ct_ us_-_o__eme t_ para
acos_mbrs_seeJmeJ_]odelasierra,
antesdeen'p.zar_ proyectodegrar_es
dimenslones.
•Acelere e]motoratmd_mo antes
de empezara cortarapretandoel
gatil/oacelemdora fondo.
• Empieceelcorteconelba,,_Jdorde
lasierraapoyadaeontraeltronco.
• Mantangaelmotorconaceleradora
fondo constantementemientms
coda.
• Deje quelacadenahagatodoel
trabajodecortar;,nousem=ftsque
unamuyltgeraprest6nhada abajo.
• Suelteel gat_ltoacelerador
inmed_alamenteatterm!natde
co=tar,dejandoqueelmotor
funcione a mamh_tenta.Si
mantienelasierraen rnamhacon
aceleradora rondosinestar
cortando,puedecausardesgaste
innecesado.
• Para no perfferelcontrolcuandose
hayacomptaladoelcorte,nole
pongapresi6na lasierraa!finaldel
corte.
• Pareel motorantesde apoyarla
sierraal finaffzaruncode.
TECN1CAS PARA TUMBAR
ARBOLES
ADVERTENC1A: Veaque no haya
ramasrotasomuertasquepodrt'an
caedeenclmamientrascoda,
causandoheridasg_ves. No code
cercade edificios nicableseldctr_cossi
nosabe ladirecct6nde tumbadodel
drbof,ne de nochey_que nopodrdver
bien,ni durantereal tJempocomoIluvia,
nieve,ovientosfuertes, etc.
• Planifique la operaci6n de corte cui-
dadosamente por adelantado.
• Despeje al drea de tmbajo. Ud. preci-
sa un Area despejad_en todo el con-
tomo del &rbol donde pueda pisar con
firmeza en todo momento.
- Estudle las condiciones natura!es que
puedan causar que et drbolcaiga en
una direcci6n determinada. Entre las
condictonesnaturaIes que pueden
causar que el drbol caiga en una di-
recci6n determtnada, se encuentran:
• La direcci_ y lave!ocidaddel viento.
• , El dngulode inolinacidnde! drbo;. EI
dngulo de !osdrboles a veess no se
nota debido al decffve del terreno o
a terreno desparejo. Use plana o
cordel de sonda para determtnar la
direcci6n de la tnclineot6ndel _rbol.
• El _rbol es rods pes_do o tieno mu-
cho m_s ramas de un lado.
• Arboles _ obst_culos en derredor.
• Verifiques, hayj_rctones desconpues-
tas o podr_das.Si eltroncoestd podri-
do, puede pa_rse repentJnamentesin
av_o y caer sobreel usuado.
• Aseguresede que haya sufictentees*
paciop_m la ca[da del &rbol. Mantenga
una d_tancia equiva_entea dos veces
ymed_odellargodel drboly lapersona
rods cercana u otms objetos.El nJido
del motor puede impedir que _e escu-
•chen las advertendas g_adas.
Retire ta tierra, las piedras, la codeza
sueita, los clavos, las gramp_ y el
alambre que pueda haber en el drbol
en el lugar de! code.
'_e Plan_ue =_ ruta
"X_, predete_ydespejada
deretroceso.
....( 1-4--'+-
45° _ ]aCa_a
PARA TUMBAR ARBOLES
GRANDES
(condi&metrode 15 cm (6 pulgadas)o
Se us_el m_todo decodede muesca
p_u-alosdrboies grandes.Lamuesca
esun corteen el/ado de!drbol hacia el
cualse deseaque caiga_Despu_sde
hacerelcortedetumbadodellado
opuesto, el drboltendrdla tendenciade
c_erhaciael ladoen quese hahecho
el cortede muesca.
AVISO: si eldrbol tieneraices
,_randesde apoyo,reffrelasantes de
_acer lamuesca.
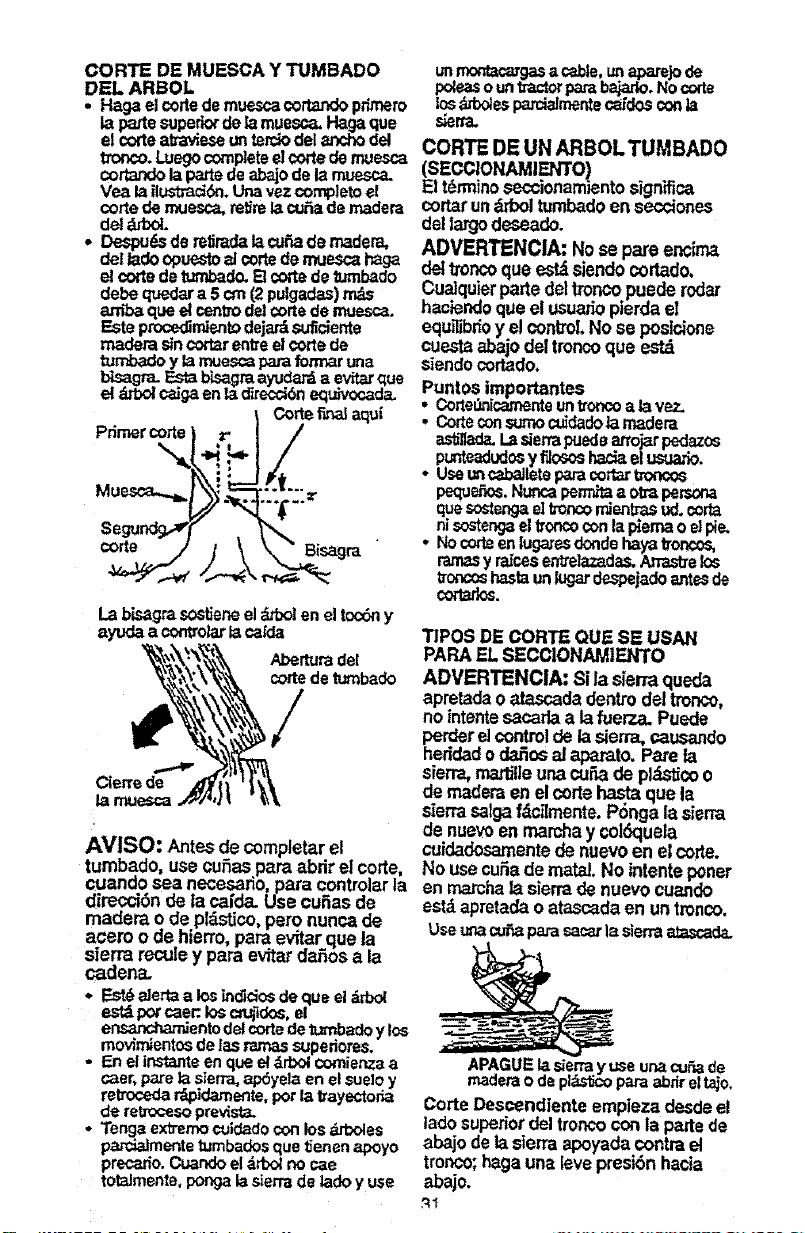
CORTE DE MUESCA Y TUMBADO unmont_caygas a _e, un apare]o _e
DEL ARBOL po_asoun_ctor parebajado.No c_le
. Haga el codede muescacortazx_ pdmero tc__d_despa_c_rnentec_'doscon]a
la pastesupedo_de lamuesc_ Haga que s_rra.
elcorteatravleseunterdooelanchodel CORTE DE UN ARBOLTUMBADO
t_"_. Luegocompleteelcortede muesca (SECCIONAMIENTO)
cortandolaparte de aJ_jode la muesca.
El t6rmino seccionamiento s}gn'_ca
Yea lail_racK)n. Unave.zcon_pletoel
cortede muesc_ retirelact_a de madera cortarun _.rboltumbado en seccfones
det_ubot. de! largo deseado.
• DeSpu_ de relirada lacubade madera,
de!_ cpuesto_Icorede mues_ haga
elcodede tumbado.Elcortede turnbado
debe quedara 5 cm (2 putgadas)m_
am'baque el cenl_odel cortede muesca.
Este pmcedindentodejar_su_ciente
n'_dera s_ncortarentreel cortede
tumbadoy lamuescaparaformatuna
btsagra.Esta bL_graayudar_a ev_ gue
el _ c_ en _ direcd6nequb/ocada.
Cortefinalaqu[
Pdmer cotte
Segurdg_
"/,.
La bisagra sost_eneel d,,bolen el toc_ny
ayuda a conjoint I_ca_da
Aberturadel
cortede tumb_do
C_errede
la muesca
AVISO: Antes de completar el
tumbado, use cuSas pare abdr el corte,
cu_ndo sea necesado, para controlar la
direcc_Sn de ta cafda. Use cutlas de
mader_ o de p_stJco, pero nunc_ de
acem o de hierro, para evitar que la
sierra recu_ey para evit_r daSos a la
cadena.
•, ESt_ale_laa losindiciosde que el drbol
estdpot caen losc_dos, el
ensand'k_ento de!codedetumbadoy los
mov_mientosde las rama_supedores.
- En el instanteen que el_rbol co_enza a
caer,pare_ s_er_ ap_yelaen el sueloy
rebocedar_pidamente,porla bayectoda
de retrocesoprev_sta.
- Tenga exlz_mocuidadocon los,_ooles
pam_lmente bJmbadosque t_enenapoyo
precado.Cuandoeldrt_ no c_e
tot_dmente,pongalas_errade tadoy use
ADVERTENCIA: Nosepare encima
de_bonco que est_ siendo cortado.
Cualquierpartedel tronco puederodar
h_ciendo que el usuado pierda el
equ_bdo y el conbol, No se postr.,ione
cuesta abajo del tronco que estd
siendocortado.
Puntos importantes
Co_le_'_icamenteunl_oncoa lavez.
• Cortecon_mo c_dadob n'_dem
ast_llada.L_sierrapuedearro_r pedazos
• punteadudo_y flosos hac_ elusuado.
Useuncaba]letepapacottertroncos
pequeSos.Nuncapem-_ a otzapersona
quesostengaeltroncordenbasud,c_rta
n_soster_ eltmncoo0nlap[ern_o e_pie,
• Nocorteen luga_esdondehaya tron¢os,
ramasy ra_cesen_elaz_las. Anast_elos
tr_:os hastaunlug_rdespejadoamesde
cortaf_0s.
TIPOS DE CORTEQUESE USAN
PAPA ELSECCIONAMIENTO
ADVERTENCIA: Sila sierra queda
apretadao atascadadentrodeltronco,
no intentesacadaa lafuerza. Puede
perderelcontroldelasiena,causando
her_dadod_os _Iapa.mto.Paret_
sierra,mattilleuna¢_JF',adepldsticoo
de maderaen elcortebasraquela
s_errasalgaf_cilmente.P6ngalasiena
de nuevoenmarchay col_luela
cuidadosamentedenuevoen elcode.
No usecuSade mat_. No intenteponer
enmarcha_ sierradenuevocuando
estdapretadaoatascadaen untronco.
Useuna_ patasacarlasierraa!ascad_
APAGUElasierray useun_cuF_de
maderao de pl_ para abdreltaro.
Corte Descendiente empieza desde el
lado supedor del tronco con la parte de
abajo de la sierra apoyada contra el
tronco; haga una leve presi_n hacta
abajo.
Corte descendiente
CorteAseendiente empiezadesdeel
ladoinfedordeltroncoconlapartede
am'hadela sierraapoyadacontrael
tmnco;hagauna levefuerza hacia
arr_a. Sujete lasierrafirmementepara
mantenerelcontrolLasierratendrdla
tendenciadeempujaratusuariohacia
art"as. "_
ADVERTENCIA: Nuncainviertala
sierrapapahacercortesascendientes.
Nose puedecontrolarlasierradeesa
forma.
SECCIONAMIENTO USANDO
Corte ascendiente TRONCO O CABALLETE DE APOYO
• Recuerdeclueetpdmercorteslemprees
de]ladocompresibnadosde!tronco.(',lea
_us'cad6n cluedgue el pdmeroy segundo
corte.)
• E]primercortedeberdextendersepot 1/3
deldi_'neVodeltronco.
• Ten'nineporel segt.'/_ocolle.
Haga siempre elprimercortedellado
delb'oncoque estdbajo compresiSn.
Primercortedelladodelb'orx:ob_o compresi6n
/_Segundocorte
Conc_beJletecomoapoyo 2do corte
._- let corte
PARA CORTAR RAMAS g PODAR
ADVERTENClA: Nuncetrepe a los
drboles pare cortar mm_s o pare podar.
No se pare sobre escaJeras,
plataformas,troncos ni en ninguna
posici6n que podffa causade que
plerda el equzl_do o el contro! de la
sierra.
primercortedel ladode! troncob_jocompresi6n.
SECCIONAMIENTO GIN APOYO
• Haga elcortedescendtenteatmvesando
unterciodel d_netro+
• Hagarodard _'oncoytermtneconotto
codedescendiente.
: Tengaculdadoespedalmenteconlos
tmr,,coscompresi6nadode unlado.Ve_tta
iiustmcidnanteriorparecortartmncos
pr_ionados de unlado.
Usode tronco SegundoCode
corno_ooyo
PdmerCorte
r Code
PUNTO$ IMPORTANTES
- Tengacuk_do conlas _ delgadas
t_o pmsk_n,Elmaterial de pc>co_meb'o
puedeenredameen lacadena,dandoun
latJgazoatusuadoohac_endoque pterdael
equ_l_brio.Useex_emo cuidadoal cortar
_snas pequeSas+
• F_.st__JertaconttalosreboteS.Tenga
cuidadoalcortarram,asdob_d_s o l_jo
presi_ paraevitarser go_peadoporla
rarnao tasierracuandose sueltela tensicfm
en las l_brasde madera.
• Despeje frecuenternentelas minas
acumuladas pare nole hagantropez_'.
PARA CORTAR RAMAS
, Corte_s _ del_ 0rl{camet_te
despu6sde queseto haya lumbado.
• Deje lasmme_ _ guresasdei:_jodel
_rboi tumbadopareque _poyen+elamo=
mien_asud.b'ab_
• Empieceporl_base deldrbo_tumbado.y"
vayat_',',',',',',',','_ajandohactael_ope,cortandoms
rarnaS.Cortelas rama_pequet_Lsde un
dosocone.
• Mantengael_'oncodeldrbo!entreud. y la
c_dena.
oRetiretasramas rodsgrar_es ylas _ . Despu_ haga un segundo corte
de apoyo con lat_:nica de untercioydos atravesando compie_mente la
tercios descdtaen la secctSnde lama.
secci_'_lliento.
* Use siempretintortedescenc_entepara
cottart"amaspequeF,asy _ que
cuelganlibremente.Loscortesacendientes
pod=fanhacer qua lasramascaigany
apretenla sierra.
PARA PODAR
ADVERTENC|A: Pode t_nk:amente
ha,stalaalturadethombre,Nocorte las
ramasquequeden m_sarrasquelos
hombrosoConsigaa unprofesiona]
para efecturaJ'es_.trabajo..
• Haga el primercode enforma
ascendiente atravesando t/3 del
didmetrode la rama.
• Finalice ]a maniobra de podar dando
un corte do manera que el toc6n de la
rama sobresalga de I a 2 pulgadas
desde el tronco de! _rboL'
r_>ocorte
_ercorte
"_ Temertorte de
2.5 aScmdel
t_oncode!drbol
RESPONSABIL1DADES DEL
USUARIO
Anote_f_comple_ ' Ant_diiPespu_: _i C.a_uaJ._d_
elservlcio de rutina Usar de horas hot-as ment_ Servicio
....Usat
no ...................
zassueltas
Verifiqu e la tensiSn de la cadena _'
: .... .,. l J,,,.,
Verifique el filo de la cadena p,,
,,LJ , ,,
Limpie el aparato y las placas
Limpie el filtro de abe ......... " ;.....
_tsmpiee inspeccionelarejillaanti-
pase inspeccioneel p,,
si]enciado_"
RECOMENDACIONES
GENERALES "
L_ garantfade esteapa_tonocubre
losart_culosque hansidosometidosal
abuso oa la negligenc'mdeparledel
usuario.Parapoder rem'birelvalor total
de la gara_tia, el usuario deber_hacer
el rnantenimientotal comese indica en
esle manual.Hard falta hacer varies
ajustesperiSo3cospara mantener el
aparato adecuadamente.
• Unavez:pot a_, ca_e I_buj{ay el
elementodel_ de airee inspeccionela
batm gu_ y la CadeP.apara verqueno
est6ngastadas.E1reernplazode labuj_ay
de!elementodel_o de eke aseguraun_
mezda corre_a deaire ycombu,,_bley
ay_a a queel motorma.'d_eme|oryque
durerods.
ADVERTENCIA: Desconecte la bujfa
antes de hacer cualquier
33
mantentmiento,conla excepci6nde los
ajustes al cmburador.
LUBRICACION
2 Tapa_ IX ,-,
1 Engranaje Tan_.eede_X"_
de hab_,,= _ce_eoela _ !
1 Lubdcedorde engranajes
2 Aceiteparabarrade sierrade
cadenaOa_ i
VER1FIQUE QUE NO HAYA
P1EZAS DA_ADAS O GASTADAS
E1cambto de piezas daSadas o
gastadas deber_ set efectuado pot el
Centro de Servicio Sears.
AVISO: Es normalque aparezcauna
pequeSa cantidad de aceite debajo de
la siena despu_s de parar el motor. No
confunda esto con p_rdidas de! tanque
de aceite.
• lnterruptor-Aseg_resequed tnten'uptor
est_fundor.,andocorrectamente ,
coloc_-,doloenlaposlci6nSTOP.
AsegOmsede clueel motorse Paya
detenidopotc_mpleto,luegopongael
motoren rnarchanuevamentey cor_0e.
• Tara:_ede_le-Deje de usarla
sierrasthayse_des de daSoso fugasdel
• tanque de combustib!e.
TanquedeAceite-Deje deusarlasierra si
eltanquedeace_teda sei'.,alesde daSoo
fugas.
VERIRQUE QUE NO HAYA
'RJADORES O P1EZAS SUELTAS
• Tuercade laAbraz_derade lal_rra
• Cadena
• ,_lendader
. ProtectordelCirmdm
• Filtrode Aire
• Ciiindroydientesde engran_e del
embrague
• To_s de lasM_nijas
• _adores Anti-Vibmd6n
• Ca_adelArr_'que
• Protecto¢de Mano
VERIFIQUE LA TENSION DE LA
CADENA
• Useta p.mtadestom|l_adorade la
hen-amientade ajustede lacadenapara
Pacerrotarta'cadenaporhal:_raguf_.
ver_candeque no haya dobleoesen la
c_der_ La c_denadeber_roar
libremente.
i
HerramJenta
Tuerc_sdela deAjustede
Abrazadem , la Cadena
delaBana
• A11o]elastuercasde la abra_aderade ha
bamabasraque_n t_ _ _
si selas hublemajustado contrahabarra
conlosdedos tlnicamente.
Gireeltom_o de ajuste a la derecha(ene!
serdidode_reloj)basraquehacaderka
openastoquehasuperfideinferiorde la
ban'agu_a.
Use la hermmienta de la cadena para
hacer rotar la cadena para asegurarse
que todos lOSestabones estdn en la
ranum de la barra.
..--J_/_ Torero de /
• Levr_te lapuntade labarraparacontrotar
laseparaci6nentrehaharm yhacader_.
SueRehabarray gtreeltomtllode a_
114de vueRea laderecha(en el_ del
reloj).Repitaeste pasobasraquenohaya
rr_s sepamct6n. 1/4.de Vue_a
Tomff,ode Ajuste "_lb@
• ManteniendohapunIade taban_
levan_da, aju_tel_stuerce.sde la
abrazaderaconla hen'amlentade ajustede
tacadena.Aplique torsl6nde 10 a 15
i_bras-pie, o
!Tuercas )
raz dem t .P'x
• UselapLmtadestomilladomde ha
herramten_apardhacer rotarlacadenapot
tabarr_
• St_ puedehater rotorhacadena,estd
dema_ado aJustada.Aflojelevementelas
tuercasde haabrazaderay gireeltorniflo
de ajusteI/4 de vueltehaciahaL,qu_erda
(encontradelsent_dodet re!oj),vuelcaa
ajustar las tuerc_sde haabrazadera.
• Silacadenaest_d_masiadofloja,,sela
verd separadade la parteinferiorde [a
ban-a.NO HAGAFUNCIONARla sierrasi
la cadenaestdfloja.
VERIFIQUE SI LA CADENA ESTA
AFILADA
Las cadenas afiladasproducentrocitos
demadera. Las cadenasdesafiladas
producenpoivode aserdny cortan
lentamente.
AFILACION DE LA CADENA
LaafilaciSndela cadenarequiem
herramientas_a]es. Se puede
comprarlasherramientasenSearso
Ilevarla cadenaa un espeda_stade
INSPECC|ONE LA BARRA
Condidones que requieren que se
haga ma_tenimtento a la barra:
* La sierracortapara unladeoen _mgufo.
• Hay que fo_rla para queaVavieseel
code.
, Cantidadlnadecuada de lub_t_ en |a
ban_ y _acader_..
Verifique la con_don de la bana cada
vez que haga afilar la cadena. I.as
barras gastadas daSan la cadena y
toman d_f{c_el trabajo de cortar. Pa,ra
mantener la barra gufa:
,_Coloqueelinterrupteren'_op. ". .
. Retirela batra y la cadenaoe_apa_m_
• Umpie todoelaserflny..c_uier et_..
escombrode laranurade la oarray oe!
odfl_o delengranaIedespu_sdec_dause.
RetireelAse_n de _a
RanL_ade laBarra _ ,t_ _
ifOdfidO del F.J_ran_ie
"'D."
- _da lubricante alodficiodelengran_e
despu_s de carlauso.
• LOsdeles de tabaz_ desarrol_
protuberanciasaJga.,_cse. Sdquetascon
una lima plana.
* $1rasuperficiesuperiordelnelest_
desnive_da,useurtalimapla.,_para
resmurarlaformacuadmda.
F.ncuadmk_s_rdes
conu=_Lima
Ra_ura Ranura
¢orrec_ gastada
Cambie|a barrasi lar'_ura est_
gastada,sila barra estdtorcidao
resquebmjadaosihaycaJentamiento
excesivooformacionde
protuberandasenlos.deles, Sies
nece_rio cambiarla oarr_ use
exclusivamentetdbarragufa
especificadaparasus_erraen|alista
de repuestos,especificadatambi_nen
_acalcoma_faderepuestodebartay
cadena quese encuentraeniasierra.
LIMPIE EL APARATO Y t.AS
PLACAS
. Ump_eel apamto usandou_trapoh_medo
con detergente_Jave.
• Sequeel apace _onuntr_0onmpioy
SeO0.
LIMPIE EL FILTRO DE AIRE
El filtro de a_re sucio disrninuir_ la vida
Otlly el rendimiento det motor e
incrementard el _onsurno de
combustibley la producci6n de
contaminantes. Umpie slempreel filtro
de aim despuds de 15 taz_ues de
combu.st_bleo 5 horas de uso, el que
acontezca primero, Umpielo con rods
frecuencia en condiciones muy
polvodentas. Los fi_os us_dos nunca
quedan totalmente limpios. Se
aconseja reemplazar al fllttode aim per
uno nuevo despu_,s de cada 50 hems
de use o anualmente, Io que acontezca
primero, Para limpiar el fl_O:
Afloje los 3 torniltosen latapadelcilindro.
: Retire latapa deldlindro.
Retire el filtmde atie.
• Ltmp_eel fittro de aimcon_guacaJiente_,
jat:x_. F_uague bien conegua clara yfda.
S_,queloa| aim totaJmerde_ntesde
reinstaJado,
• CotoqueunapequeF_acaned deaceiteal
fi_roantesde insta_do. Useaceitepara
motoresde 2 tiemposo aceitede motores
SAE 30. Escurrabienet excesode aceite
apretandoelfllb'oparamejorarlaefidencia
delfittmde aJre.
• Reinstateelfiltrode aide.
35
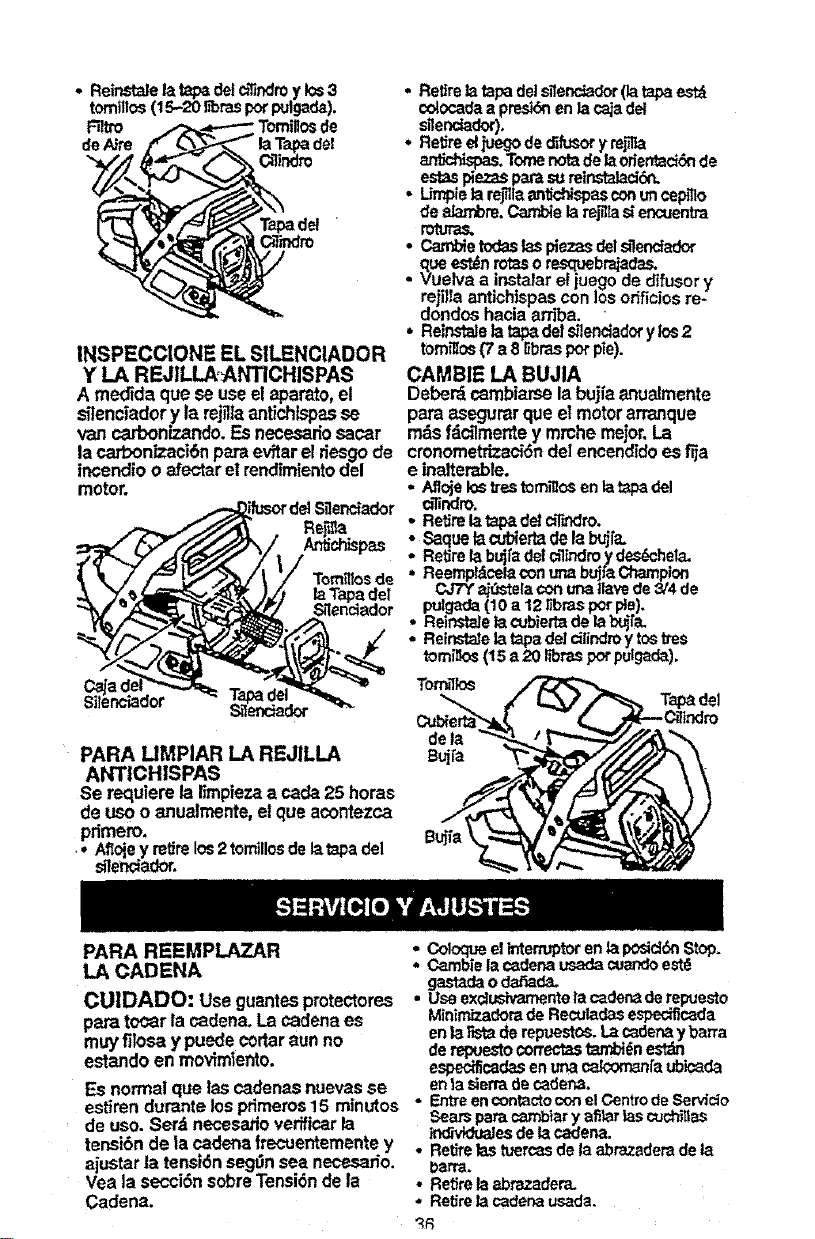
o Reinstalelatapadetci_ndroy los3
tomlllos(15-20 _brespotpulgad_).
_tro TomiNosde
deA_re laTapadel
Oli_m
INSPECCIONE EL SILENCIADOR
Y LA REJILLAo_NTICHISPAS
A medida que se use el apamto, el
_lenciador y la rej_la antichtspas se
van carbonlzando. Es necesario sac_r
la carbonizaoi6n para evRar el riesgo de
incendio o afectar el rendimientodel
motor.
An_chisp_
Tom_tosde
laTapadeI
_lendador
PARA UMPIAR LA REJILLA
ANTICHISPAS
Se requiemla I_mpiezaa cada25 horas
deusoo anualrnente,elque acontezca
pfimero.
* Aflojey retirelos2tomillosdelatapadel
dlendador.
. Reffrelatape dets_ler,c_or (latapaest_
cotocadaa presk_ en laca_adel
s_lendader).
• Retireeljuegode dffusoryrejilta
ant_hL_s. Tomer_ta de I_orientaci6nde
estasp_ezasparasUreinstabd<_q.
. Ump_elare_la_n_",ispasconuncel_llo
de _bm. CanOe lam_la s_encuenba
roturas,
Cambietodas_ plezasde;s_end_r
que est_nmt_ oresquebr-_a_
Vuelva a instalar ef iuego de difusor y
rejilla antlchfspas con los odficiosre-
dondos hacia arriba.
• ReinstaleJatapadets_lenciadoryk_s2
toreros(7 a 8 _braspotpie).
CAMBIE LA BUJIA
Deber_ cambiarse la bu_faanualmente
para asegurarqueet motorarranque
rn_sfddlmente y mmhe meior.La
cronometrizaci6n del encendido es fija
e inalterable.
• Aflojelosb-estommosenla_ del
alindro.
- Retirelatap_ delc_T_qdro.
• S_quelacubiertade la bujia.
• Retire/a bHia de!c_lindroydes_chela.
Reemp_celaconur_ bujtaChampion
CJTY_tela, conunaIP_vede 3/4 de
• pulgada(10 a 12_ibrasp_rpie).
Reiost_e _t cubiedadelabu_[a.
• Reinstatelatapa de! cilindm)'tostres
tomi_)s(15a 20 itbrespot pulg'ada).
To_los
PARA REEMPLAZAR
LA CADENA
CUIDADO: Useguantesprotectores
paratocar lacadena.Lacadenaes
muy filosay puedecortaraun no
estandoen movimtento.
Es normalque lascadenasnuevasse
estirendurantelosprlmeros15 m|nutos
deuso.Serd necesatioverificarla
tensi6ndela cadenafrecuentementey
_|ustar latenst6nseg0nsea necesario.
Vea la secci6nsobreTensi6nde la
Cadena.
. Coloque elIntermptorenla podd6nStop.
Cambiela c_denausadacuandoest6
• g_ o daf_d_
Use exd_nte lac_der_ derepuesto
M_nimtzadorade ReoJladesespedfic_da
enla W_ade repuestos.Lac_de_ ybar_a
de repuestocorrectastamb_n est_
especiflcadasen unacak;oman_aubi_da
en lasierrade cadena.
• EntreencontactoconelCentrode Servicio
Seam paracambiary afitarlasc_c:hi_as
_rn_es delacadena.
• Retirelas tuercasde laabra.zaderede ta
barra.
• RetirelaabrezaderzL
• Retirela cadenausada.
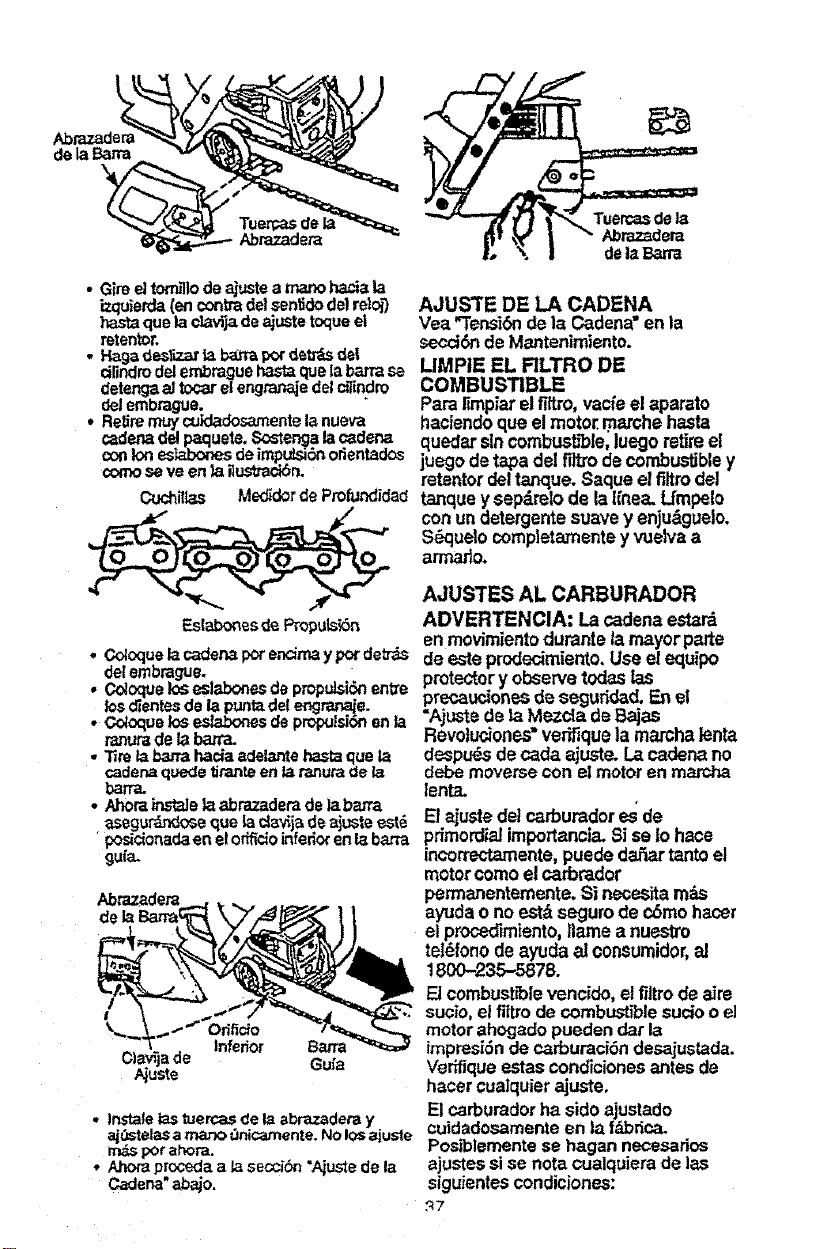
dela_rra
• G_reel torm'llode ajustea manohacia la
izquierda(encontradelsen_dodelreloj)
hastaquela cla_ de ajustetoqueel
retentor.
• Ha9_ desk.at la _ pordeU'&sde!
dlindrodelembraguehas_ quelabatrasa
detengaaJto,at etengranajedelc_lindro
delembmgue.
• Retiremuycuidadosamentelanueva
¢adenadetpa.quete.Sostengalac_der_
conIones_bones de impu_si6norientados
cornoseve en la _uslzaciSn.
Cuchil_a,s Med_dorde Profundidad
Eslabonesde Propu!skSn
• Ooloquela cadena pot encitnay pot"det_.s
delembmgue.
• Ooloqueloseslabonesde propulsiSnentre
los d_entesde la puntade{engrave.
• O:_Oquelos _es de propulsiSnen la
ra_urade labarra.
• Tireta ba_a hada adelante basraquela
cadenaquedetiranteen Jatanuta de _a
I_rra.
• Ahora instaJela abra_dera de la barra
asegu_,dose que la c{a_jade aj_te est_
•posic_onadaeneloffficio inferioren t,abana
9ufa-
Abraz_der_
de la
•]nstafe tastuercas de laabrazaderay
aj_ste]asamanot_nicamente.Nolosa|uste
ra_ pot ahora.
° Ahoraprocedaa _ section "Ajuste de la
Cadena"abajo.
AJUSTE DE LA CADENA
Vea '3"ensi6n de la Cadena" en la
secci6n de Mantenimiento.
LIMPIE EL FILTRO DE
COMBUSTIBLE
Pare limpiar el fiRre, vacfe el aparato
haciendo que el motor, mar€he basra
quedar sin ¢ombusb'ble, luego retire el
juego de tapa del firm de combustible y
retentor del tanque. Saque el filtro del
tanque y sepdrelo de la Enea. Umpelo
con un detergents suave y enju,_guelo.
S6queto completamente y vuelva a
armado.
AJUSTI=S AL CARBURADOR
ADVERTENCIA: La cadena estar&
en movimiento dumnte la mayor parts
de este prodecimiento. Use el equipo
protectory observe todas las
precaucJones de segudd_d. E_ el
"Ajuste de la Mezda de Bajas
Revoiudones"veriflquela marchalenta
despu_s de c_da ajuste. La cadena no
debe moverse con el motor en marcha
]enta.
El ajuste de! carburador es de
primordial importancia_ 8i se Io haco
incorrectamente, puede da.£_ tanto el
motor como el carbrador
permanentemente. Si nocesRa m&s
ayuda o no est_ seguro de c6mo hacer
el procedimiento, Ilame a nuestro
td_fono de ayuda aJconsumidor, al
1800-235-5878.
El combust_le vencido, el filtro de aim
sucio, el fiRrode combustible sucio o el
motor ahogado pueden dar la
impresi6n de carburaciSn desajuslade.
Verifique estas condioiones antes de
hater cuaiquier ajuste,
El carburador ha side ajustado
cuidadosamente en la f_brica.
Posiblemente se hagan necesados
ajustes si se nota cualquiera de las
siguientes condiciones:
,_7
• Lacadenasemueveconelmotoren
marchaTenta.Vea"MarchaLentaT"bajo
prodecim_entodea_uste,
- Laslerranoamtaaarnrchalenta=Vea
"MarchaLentat"*y"MezctadeBajas
Re--e9 L'.
• Elmotorsepareoseahogacuandodebe
aceleP..r.Vea"Verif_caciSndela
Acelemct_'.
• Bajadepotencladecode.Vea"Mezdade
Ntas Revoluck_esH"bajoet
proced_mtentodeajuste.
Hay tres tornillosde ajusteend
carburador.Est_nmarcadoscon"H',
"I-"y 'q_. Estdnubicadosarribadel
bombeador.
PUNTOS DE PRECAL1BRAC1ON
AI hcer ajustesno fuerce lastapes
Iimitadorasde pl,C_.sticorodsall_delos
retentores o puedehaberdafios.Sino
se necesitanlospuntosde
precalibract6n,paseala secci6n
"Marcha Lenta-T."
• Gtrelos dostom,losdeajustedemezclaa
latzqu_erda(encontradese_dode!reich')
hastequeseparerL
• Gireeltorerodemarchalentaaladerecha
(enelsent_o_delteloj)hastequese
detenga_Ahor'agfretohacialaizqL_erda4
vueltasy rnema.
Pongael motoren mamhay d6jelo en
mamha pot3 minutos, luegoprocedaa
la seccibnde ajustes.Si elmotorno
arranca, vea la TableDiagnbs'ticao
Ilame a! 1-800-235-5878. Siel
funcionamiento del motores aceptable
con las posicionesantedores y la
cadena nose mueve enmamhalenta,
nohard faltahacerm_ ajustes.
PROCEDIM1ENTO DE AJUSTE
Marcha Lenta-T
.Deje el motorenmarchalenta.Ajuste
lasrevolucioneshastaque elmotorse
msntengaen mamhasinquela cadena
se muevao que elmotorse ahogue.
Gireeltomllloala derecha(enelsen_do
delrelo_)pareaumei't_ttastevol,ador_essi
elmotorseahogao_ pare.
• Gireeltorontoala izqulerda(encontradel
sentidodel reloj)p_ bajarlas
revoluciones.
No hate fettaningdnotroajustesila
cadena nose mueveen marchalenta y
si el rendimiento es satisfactofio.
Mezola pare Bajas Revoluclones-L
Deje elmotorenmamhalenta.Luego
acelereel motorytomenotedet
funcionamiento.Siel motorse ahoga,o
acelerabienot_rgahumoal acelerar,
gireeltomillode ajusteala derecha
(enelsentidodelreloi)enincrementos
de 1116devueltaOntcamentehaste
obtener unfunclonamiento
satL_factorio.Repitaesteprocedimiento
lasveces quesea necesario.Repita
este procedfmientolas vecesque sea
necesado pare obtenermndlmiento
salJsfactodo.Despu_sdecompleter
estosajustes,vedf'_luelaaceleraci6ny
el movimiento de lacadenaen marcha
lenta.Ajuste nuevamentestes
ne_esado.
Mezclapara Altas Revoluclones-H
NO HAGAFUNCIONARELMOTOR
conelacelerador a rondopormucho
t_empoal hacerlosajustesya que
puededafterelmotor.Haga uncortede
prueba.13asadeenelfunoionamiento
delasierraduranteetcotte, aju._eel
tomi!lopare lamezctadealtas
revolucionespor inctementos des61o
1/16 devuelta,¢omosede_allaa
continuaci6n:
° Aladerecha(enelsen_o delre}oj)haste
que_asierratengabuenapotenciaatcotter
s_nhesitadones.Nohagalosajustespotet
so_o n{pot_s revoluciones,stnoperel
buentunclonam_en'toa_cott_.
, Ala i.zquierda(encorrtradelsentJdodel
reloj')s_la _en'a_enerev_udonesaltas
peruse pareolefattapotendaatcotter.
Despu_sde completerlos aju_tes,
verifiquela acelerad6ny e!movimiento
de la cadena en rnarchalenta.Ajuste
nuevamentesies necesario.
Ye_flcacl6n de la Aoeleraci6n
Siel motorse pareohes'_aenvez de
acelerar,gireeltomil!o de ajuste de ta
mezda pare ba_asrevoludones ala
izquierda(encontrade!senttdodel
relo_hasteconsegutrunaaceleraci6n
parejasin mov_mientode!acadenaen
mamhalenta.Verifiquenuevamentey
hagalos a_ustesnecesariospara
consegutrun funcionamiento
aceptable.
qR
Prepare e! aparato para guardado a]
final de la temporada o si no se Io va a
usar Dot n_s do 30 dfas o rods.
ADVERTENCIA:
, Oejeque el motorse en_e y l_jebienel
aparatoa.qtesde gua,'da_oode
GuaJdelasierray el_le en
un[ocalbienverdiladodondelosVaporos
de combuslJblenopuedanentraren
contactocon d-£spasnlllarrk_sabiertas
prover_enP.sde k_stermotanques, los
motoreso interruptoreseX_ldcos,
caJefactore.scen_es, etr,.
• Guatde elaparato con todoslos
protectoresen su Jugarycoloqueel
apamtode modoquet_ pieza_filose.sno
puedancausa.rheddasper accidente.
• Guan:teetapamtoI_en fueradelaJcance
de losr_5os.
SUPERFICIES EXTERNAS
St va a guardax el aparato durante
mucho tiempo, limpielo r_gurosamente
pdmero. Gudrdelo en un lugar limpio y
• Ap]_queuna peque_ cantJdadde aceltea
las super_es externasmet_cas y a b
bamagufa_
• Lubriquela cadenay envu(_lvalaen pal:el
gmesoot_
S!STEMA DE COMBUSTIBLE
Vea el mensaje marcade •
'1MPORTANTE", que se refiere al uso
de combustibles con mezcla de alcohol
en su aparalo, en la sec_Sn de U$o,
bajoAbastecimiento del Motor.
Los estabi/izadores de combustible son
una attemativa aceptable para
minimizar la formac_6n de dep6sRos de
goma durante el aJmacenamiento.
ASada estabgLzadora la gasolina en el
tanque de combustible o en el
recipiente de aJmacenado de
combustible. Siga las instrucciones de
mezda que se encuentran en los
envases de estabil_zador.Ponga el
motor en marcha y d_jelo en marcha
unos 5 minutosdespuds de ponede
estabil_.ador.
E! aceRe CRAFTSMAN 40:1 pare
motores de 2 tiempos (enfriados a aJre)
viene mezclado con estab]lizador de
combusb'b|e.Si no usa este aoeite de
Seam,entoncespuedeaSadirun
estabillzador a] tanque de combustible.
MOTOR
• Re,re labujfayviertauna cuchar-,_ de
lasdet_ deaceite40:1paramotoresde 2
tiempos(enfdadosa _re)potlaaberl_ara
parela]:_Jjle_Timneelentamente de la
sogade arranque8 a10 vecespare
dL_Jn'bu_rd ac_e.
• ReemplacelabujfaconotradellJpoy dela
gamade cak>rreco_ndados.
• LLmpieelfiltro deaire.
,, _ne todoel_pa,mtoparaved_ar que
noh_yatornglos,luerca=ntpemossueRos.
Can'_e todaslaspiezasd,_-_adas,
quebradaso gastadas.
• A[pfindpk>de laprS,_dmatemporada,use
exdushramentecombu_ble nuevocon la
proporci_ correctadegasolinaa aceite.
OTRO
• No guardegasotinade unatempomdaa a/
pr6xb'_.
• Cambieel rec_pientede ga.solinasise
empiezaa o)ddar.
39
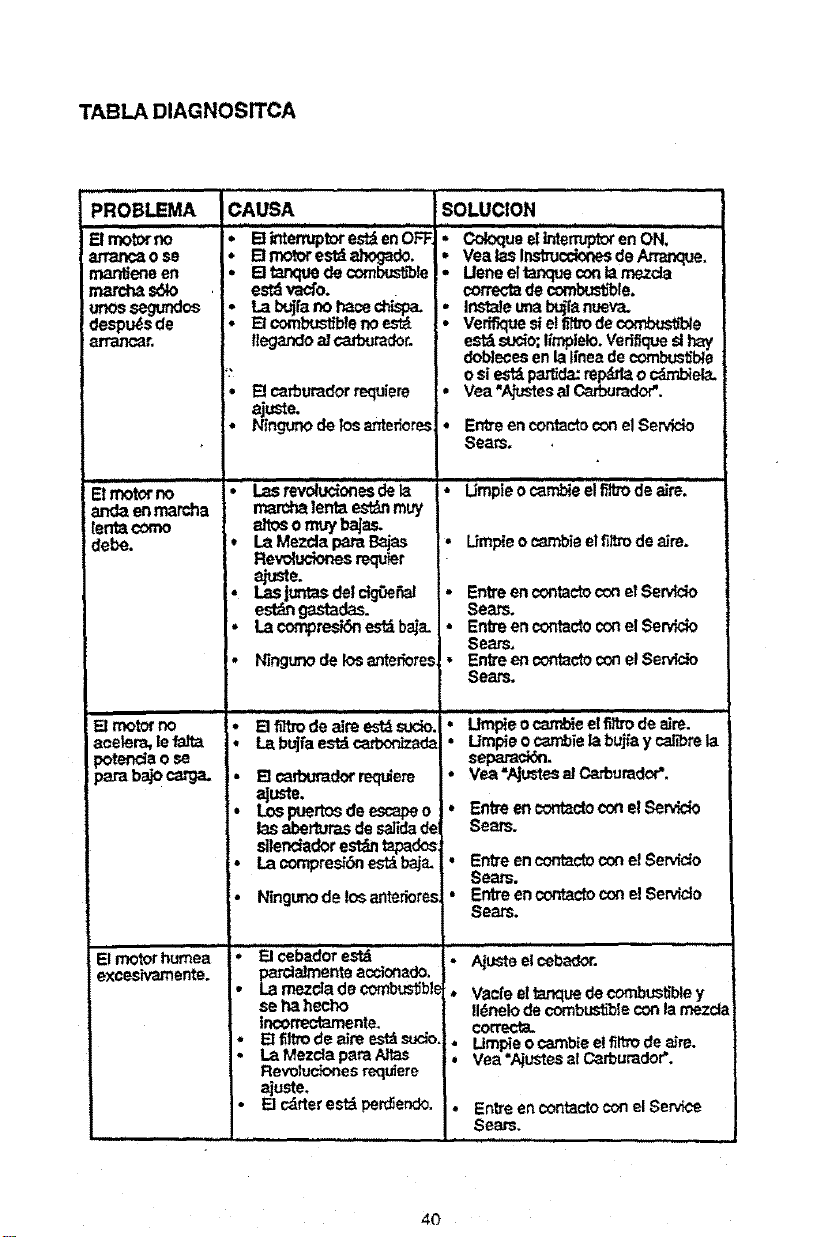
TABLA DIAGNOSITCA
PROBLEMA
Elmotorno
mantleneen
n-_rchaS@,o
unos_os
despu_sde
i a_r.
Elmotorno
anda enrnarcha
{entacomo
debe.
El motorno
acelera, lefa.Ra
CAUSA SOLUCION
• a en c.o uoel e,ON,
• El_ est_ehog_do. • Vea lasInstruccionesdeAmanque.
" e_vacf _EltanqUeodecombu_'b,e . Uene e,tanqueconlamezcla
. cortecla de co_b_t'bfe.
: La t_jCanohacecl';Lspa. Inst_JeunaI_fa nueya.
El combusl_'l_eno_ : Vedfiquesietfitlmde corrbus_'ble
tlegancloafcafourador, est_sucio;ltmpielo.Vedfiqued hay
doblecesen laltneade cornbustil_e
" o sies_ pa.,lJda:mp_da o c_'bie_
• El carburadorrequiere • Vea "AjustesalCarburador'.
ajuste.
. Ning'_o de k_santeriores• EntTeen contactoconel Servicio
Seam,
• L_ revoludonesde
n'mchalentaest_ mw
_€osornuybaJas.
• I._Mezcla para Bajas
Revo_ucionesmquTer
ajuste.
,. Lasj,,mtasdelctg0e_ • Entreencontactocc_etSerHdo
. est_ g'astadas Sears.
La compresi_es_ b_ja.• Entreen contactocc_el Servicto
Seam_
p• Ningunode losanter_ores• Entreen contactoconelServicio
Sears,
* Umpieocarnbieelfirm deaJre.
. Umpieo eatableelfi_aode aim,
• Elfi_odeaJreesfdsucio. • _pieocambieetfii_odeaJre.
• L_ bujfaestd_da • Umpie ocambielabujiay calibrela
potendaose
=parabajOc_rga. • Elcarbumdorrequlere
a]uste.
• Lc_puertosdeesca_o
lasaberturasdesalldade
sltendadorest_ tapados
• Lacompres_6nest_bai_L
separaci_,
• Vea"AjustesalCad_umdcx".
• Entre en contac_oconelServido
Sears.
• Enl_eencontactoconet Servic{o
Seam.
Elmotorhumea
excesivamente.
• Ningunode los antedores • Entrean cont_ctocon e!Servido
Sears.
• FJceb_dorest_ * A_usteelcebador.
parctaJmenteaccionado.
• La mezda de combus_bl_. Vact*eel tanquedecombustibley
se hahecho II_nelode combus_'b_econlamezd_
tncormctamente, correcta.
. Elfilb'ode aim _ suclo , Umpieo cambteelfiltmde a_re.
• La Mezda paraArras • Vea "A_ustes_l C_rburador'.
Revo_uc_'msrequiere
e_uste.
• Elcdrterestdper_endo. • EntreencontactoconelSe_
Sears,
......i ...................
40
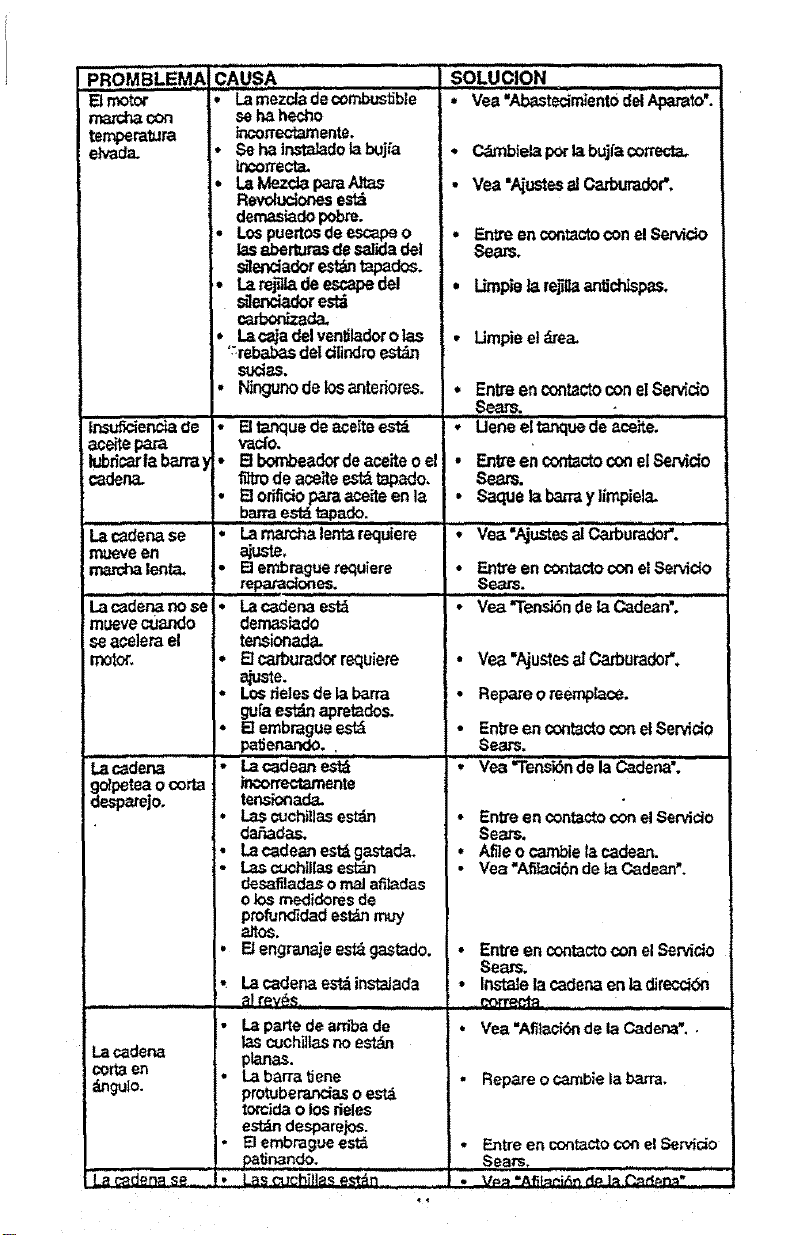
PROMBLEMA
Elmotor
rm_d_ con
temperatura
e_-ada.
|nsuficienc_ade
ac_e para
lul_ri_laI_
_den_
La c_dena se
m_/e erl
ma.mha lenta.
La cadenano se
rmuevecua_o
se acelerael
motor.
La.c_dena
go_peteao corta
desparejo.
Lacadena
cortaen
dngulo.
CAUSA
• Lamezcla decombus_bIe
se hahecho
incorrectamente.
• Se ha ir_"taladolabujfa
Inconecta.
• LaMezcla paraA._as
Revoluctonesesld
demasiadopobreo
• Lospuertosde escapeo
las aberturasde salidadel
silendadorest_ tapados.
,. t.=re_ deescaped_
_enciador est_
c_bor_zada.
• L_ ¢ajadelventJladoro las
":rebabasdeldlindro
SUCiaS.
• Ningunode losanteriores.
• B tanquede e.ceiteest_
vacfo.
• B borrbeadorde aceite o el
de aceiteestd.tapado.
• B orificio_ aceiteen la
bamaest_tapado.
• Larnard_a,lent_requiere
a_uste.
• [] embraguerequiere
repatactoites.
• Lacadenaest_
dema.siado
tensionada.
• Elc_urador requiere
e_ste.
• Los delesde labarra
gu[aes_ apretados.
• Elembraguees_
paSenando..
• La cadeanest_
ir,correctamente
tensionada.
• Lascuchillasest_
dar3ada.s.
• Lac_dean es_ ga_,lada.
• Lascochlllas est_
desafiladasor_J afi_d_
olos medidoresde
p_ofundidadest_
altos.
• Etengran_e est_gastado.
La cadenaest_ instaJada
al rev_s.
• Laparte de arriba de
tascuchillasno est_
ptanas.
• Labarrat_ene
protuberar_as oesta
torcidao los deles
estdndespare_os.
- []ernbragueest_
• Lasc'_chillas_.st_n
s0LU6i0N ...........
• Vea "Al:_tecimlentodeiApa_to_.
° Cdmbfelapotta bujfacorrect_
• Vea "A_ustesal Ca_burador'.
• EntreencontactoconelServicio
* LLmpieI_rejilb,antich_sp_s.
• Umpie el_re_
° Entre en contactocon elServicio
Sears.
• Uene elta_ue de aceite.
• Entreencon_ctoconelServido
Seers.
• SaqueI_ban_y lirnpiela.
• Ve_'.NustesalCarbura_r'.
• Entre en cont_ctocon et,._ervtdo
Sears.
• Vea _l'ensi6n de la Cade,_m'.
• Ve_'Ajustes a_P-.,_ourador'.
• Repareo reemp_ce.
• Entreen cont_ctoconet Ser_cio
Sears.
• Yea _ensi6n de laC_dena'.
• Entre en contactocon elServicio
Seam.
• Afi]eo cambielar_dean.
• Vea "Afi_cibn de _ Cadean'.
• Entreen contactoconelServicio
Sears.
• Ins'ale la caden_en 1_direccibn
. (_orr_%--_1:l.........................,•
• Yea "Afil_ci_nde laCader_'..
• Repare o cambie la bana.
* Entre en cont_cto con el Servicio
Sears.
Lac_denRse
For the repair or replacement parts you need
delivered directly to your home
Call 7 am - 7 pro, 7 days a week
1-800-366-PART
(1-800-366-7278)
Para ordenar piezas con entrega a
domicilio - 1-800-659-7084
For in-house major brand repair service
Call 24 hours a day, 7 days a week
1-800-4-REPAIR
(1-800-473-7247)
Para pedir servicio de reparaci6n a
domicilio - 1-800-676-5811
For the location of a Sears Parts and
Repair Center in your area
Call 24 hours a day, 7 days a week
1-800-488-1222
For information on purchasing a Sears
Maintenance Agreement or to inquire
about an existing Agreement
Call 9 am - 5 pm, Monday-Saturday
1-800-827-6655
When requesting service or ordering
parts, always provide the following
information:
• Product Type • Part Number
• Model Number • Part Description
SW/4R8
America's Repair Specialists

