
Instruction Manual
2.6 cu.in./42cc 2-Cycle
GASOLINE CHAIN SAW
Model No.
358.360880 - 18 in. Bar
• Safety
• Assembly
• Operation
• Maintenance
• Parts List
• s a0o, '----=
For Occasional Use Only
®
WARNING:
Read and follow all Safety Rules and Operating
Instructions before first use of this product.
i_ For answers to your questions about this product:
Call 7 am-7 pm, Mon-Sat; Sun, 10 am-7 pm
• 1-800-235-5878 _.oo_listed are CentraI Time)
Sears, Roebuck and Co., Hoffman Estates, IL 60179 U.S.A.
530164096 8/1/03
Warranty 2 Storage 18
Safety Rules 2 Troubleshooting Table 19
Assembly 6 Emissions Statement 20
Operation 7 Parts List 22
Maintenance 13 Spanish 24
Service and Adjustments 17 Parts & Ordering Back Cover
FULL ONE YEAR WARRANTY ON CRAFTSMAN ® GAS CHAIN SAW
For one year from the date of purchase, when this Craftsman Gas Chain Saw is
maintained, lubricated and tuned up according to the instruction manual, Sears
will repair, free of charge, any defect in material or workmanship.
This warranty excludes the bar, chain, spark plug and air filter, which are
expendable parts, and become worn during normal use.
If this Gas Chain Saw is used for commercial or rental purposes, this warranty
applies for 30 days from the date of purchase.
WARRANTY SERVICE ISAVAILABLE BY RETURNING THIS CHAIN SAW TO THE
NEAREST SEARS STORE OR SERVICE CENTER IN THE UNITED STATES.
This warranty gives you specific legal rights, and you may also have other rights
which vary from state to state.
Sears, Roebuck and Co., D/817 WA, Hoffman Estates, IL 60179
WARNING: Always disconnect
spark plug wire when making repairs
except for carburetor adjustments. Be-
cause a chain saw is a high-speed
woodcutting tool, special precautions
must be observed to reduce risk of ac-
cidents. Careless or improper use of
this tool can cause serious injury.
PLAN AHEAD
, Restrict the use of your sawto adult
users who understand and can fol-
low the safety rules, precautions,
and operating instructions found in
this manual.
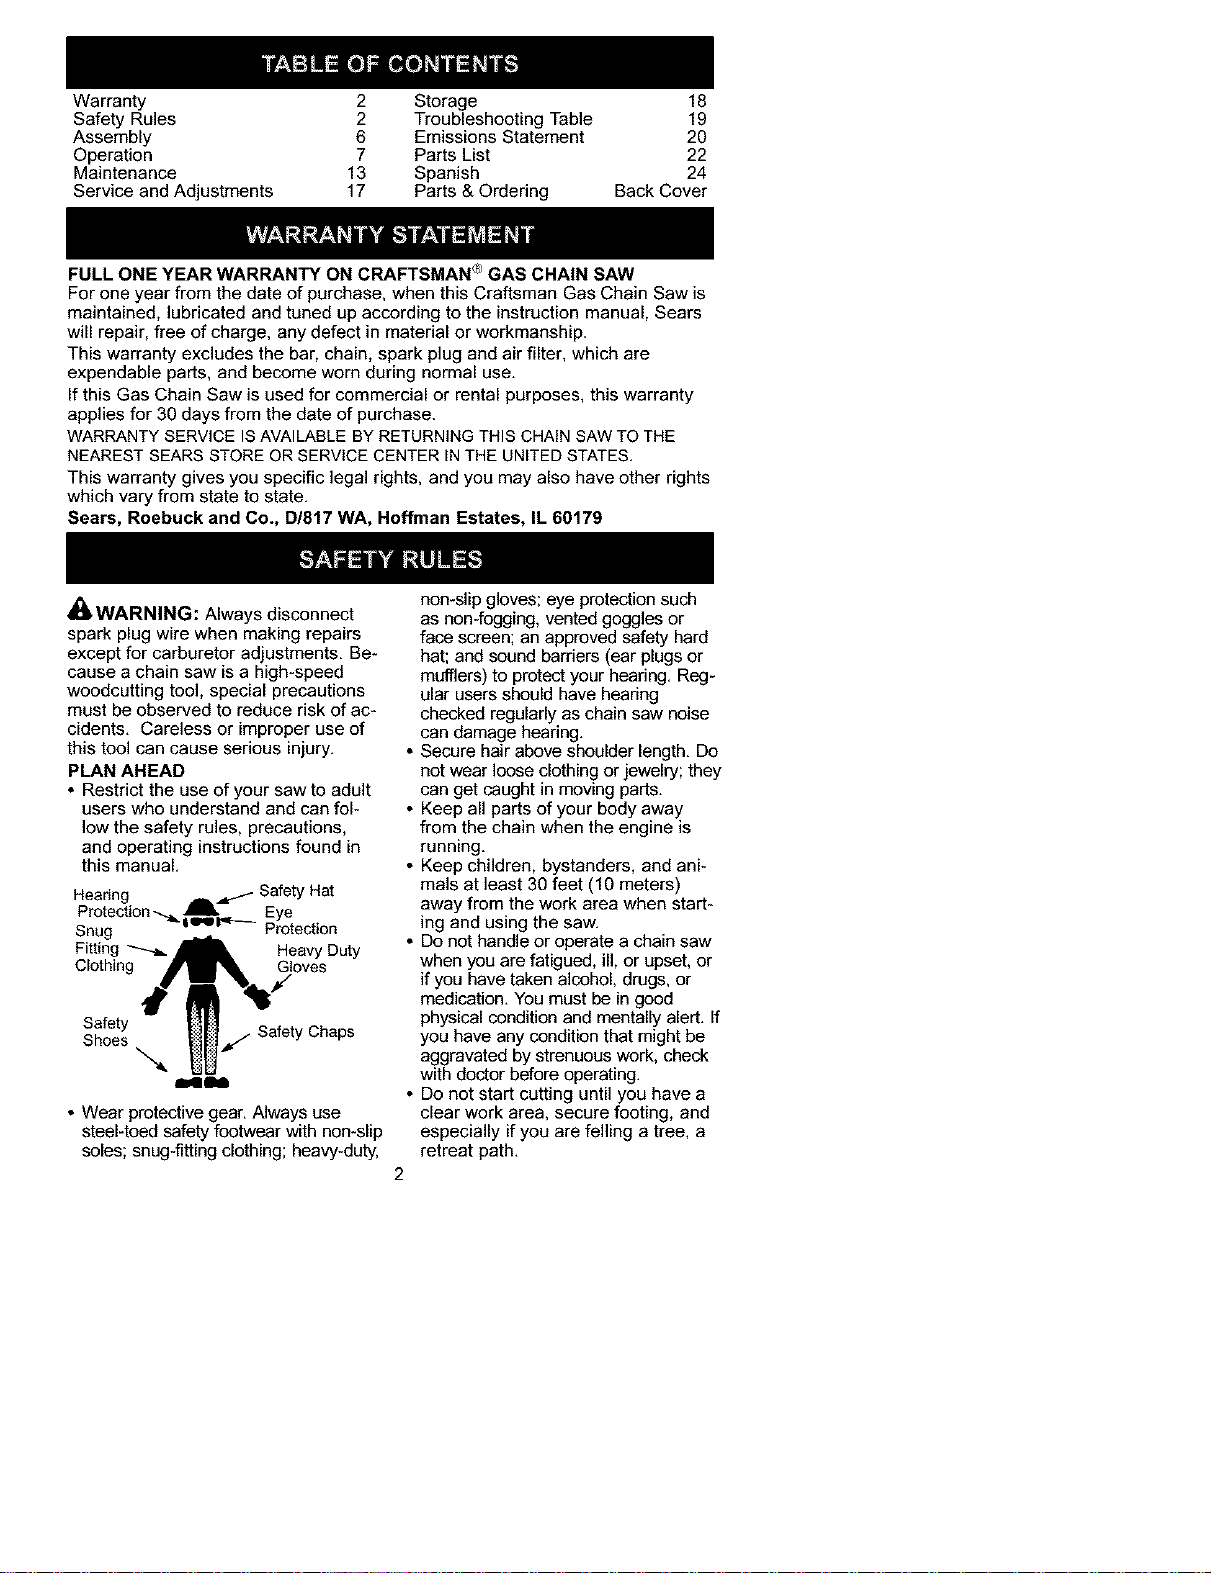
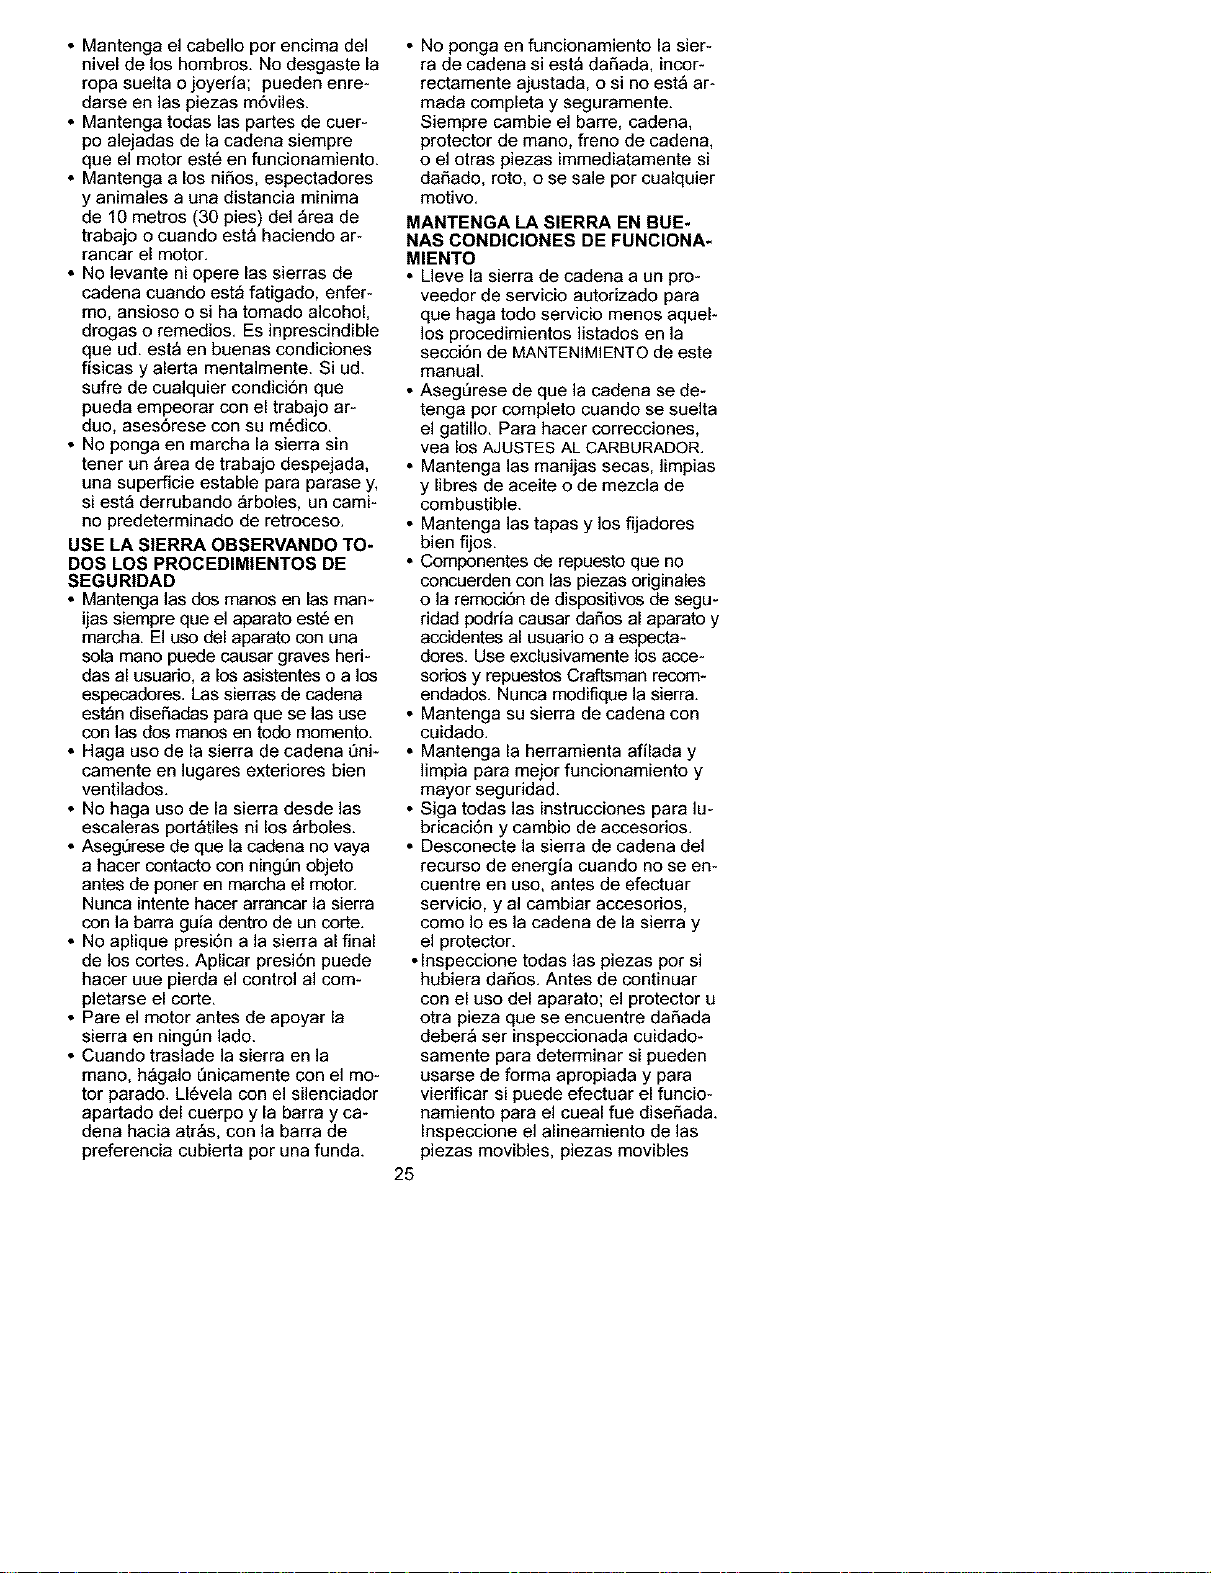
Hearing ,_- Safety Hat
Protection-_. _ Eye
Snug _'_i I, wl_--_ Protection
Fi_toitl.gl__ _ H_aVYsDuty
Safety 4 _ _J_ _l_/
Shoes _,_U----_"_"J j Safety Chaps
a4111m
• Wear protective gear. Always use
steel-toed safety footwear with non-slip
soles; snug-fitting clothing; heavy-duty,
non-slip gloves; eye protection such
as non-fogging, vented goggles or
face screen; an approved safety hard
hat; and sound barriers (ear plugs or
mufflers) to protect your hearing. Reg-
ular users should have hearing
checked regularly as chain saw noise
can damage hearing.
• Secure hair above shoulder length. Do
not wear loose clothing or jewelry; they
can get caught in moving parts.
• Keep all parts of your body away
from the chain when the engine is
running.
• Keep children, bystanders, and ani-
mals at least 30 feet (10 meters)
away from the work area when start-
ing and using the saw.
• Do not handle or operate a chain saw
when you are fatigued, ill, or upset, or
if you have taken alcohol, drugs, or
medication. You must be in good
physical condition and mentally alert. If
you have any condition that might be
aggravated by strenuous work, check
with doctor before operating.
• Do not start cutting until you have a
clear work area, secure footing, and
especially if you are felling a tree, a
retreat path.
2
OPERATE YOUR SAW SAFELY
• Do not operate with one hand. Seri-
ous injury to the operator, helpers, or
bystanders may result from one-
handed operation. A chain saw is in-
tended for two-handed use.
. Operate the chain saw only in a well-
ventilated outdoor area.
. Do not operate saw from a ladder or
in a tree.
. Make sure the chain will not make
contact with any object while starting
the engine. Never try to start the saw
when the guide bar is in a cut.
. Do not put pressure on the saw, es-
pecially at the end of the cut. Doing
so can cause you to lose control
when the cut is completed.
. Stop engine before setting saw down.
. Hand carry saw only when engine is
stopped. Carry with muffler away
from body; guide bar & chain project-
ing behind you; guide bar preferably
covered with a scabbard.
. Do not operate a chain saw that is
damaged, improperly adjusted, or not
completely and securely assembled.
Always replace bar, chain, hand
guard, chain brake, or other parts im-
mediately if they become damaged,
broken, or are otherwise removed.
MAINTAIN YOUR SAW IN GOOD
WORKING ORDER
• Have all chain saw service per-
formed by a qualified service dealer
except the items listed in the MAiNTE-
NANCE section of this manual.
• Make certain the saw chain stops
moving when the throttle trigger is
released. For correction, refer to
CARBURETOR ADJUSTMENTS.
• Keep the handles dry, clean, and
free from oil or fuel mixture.
• Keep caps and fasteners securely
tightened.
• Nonconforming replacement compo-
nents or the removal of safety devices
may cause damage to the unit and
possibleinjury to the operator or by-
standers. Use only Craftsman acces-
sories and replacement parts as rec-
ommended. Never modify your saw.
• Maintain chain saw with care.
• Keep unit sharp and clean for better
and safer performance.
• Follow instructions for lubricating and
changing accessories.
• Check for damaged parts. Before fur-
ther use of the chain saw, a guard or
other part that is damaged should be
carefully checked to determine that it
will operate properly and perform its
intended function. Check for alignment
of moving parts, binding of moving
parts, breakage of parts, mounting and
any other conditions that may affect its
operation. A guard or other part that is
damaged should be properly repaired
or replaced by a Sears Service Center
unless otherwise indicated elsewhere
in the instruction manual.
• When not in use, chain saws should
be stored in a dry, high or locked-up
place out of the reach of children.
• When storing saw, use a scabbard or
carrying case.
HANDLE FUEL WITH CAUTION
• Do not smoke while handling fuel or
while operating the saw.
• Eliminate all sources of sparks or
flame in areas where fuel is mixed or
poured.
• Mix and pour fuel in an outdoor area
and use an approved, marked con-
tainer for all fuel purposes. Wipe up
all fuel spills before starting saw.
• Move at least 10 feet (3 meters) from
fueling site before starting.
• Turn the engine off and let saw cool
in a non-combustible area, not on
dry leaves, straw, paper, etc. Slowly
remove fuel cap and refuel unit.
• Store the unit and fuel in a cool, dry
well ventilated space where fuel va-
pors cannot reach sparks or open
flames from water heaters, electric
motors or switches, furnaces, etc.
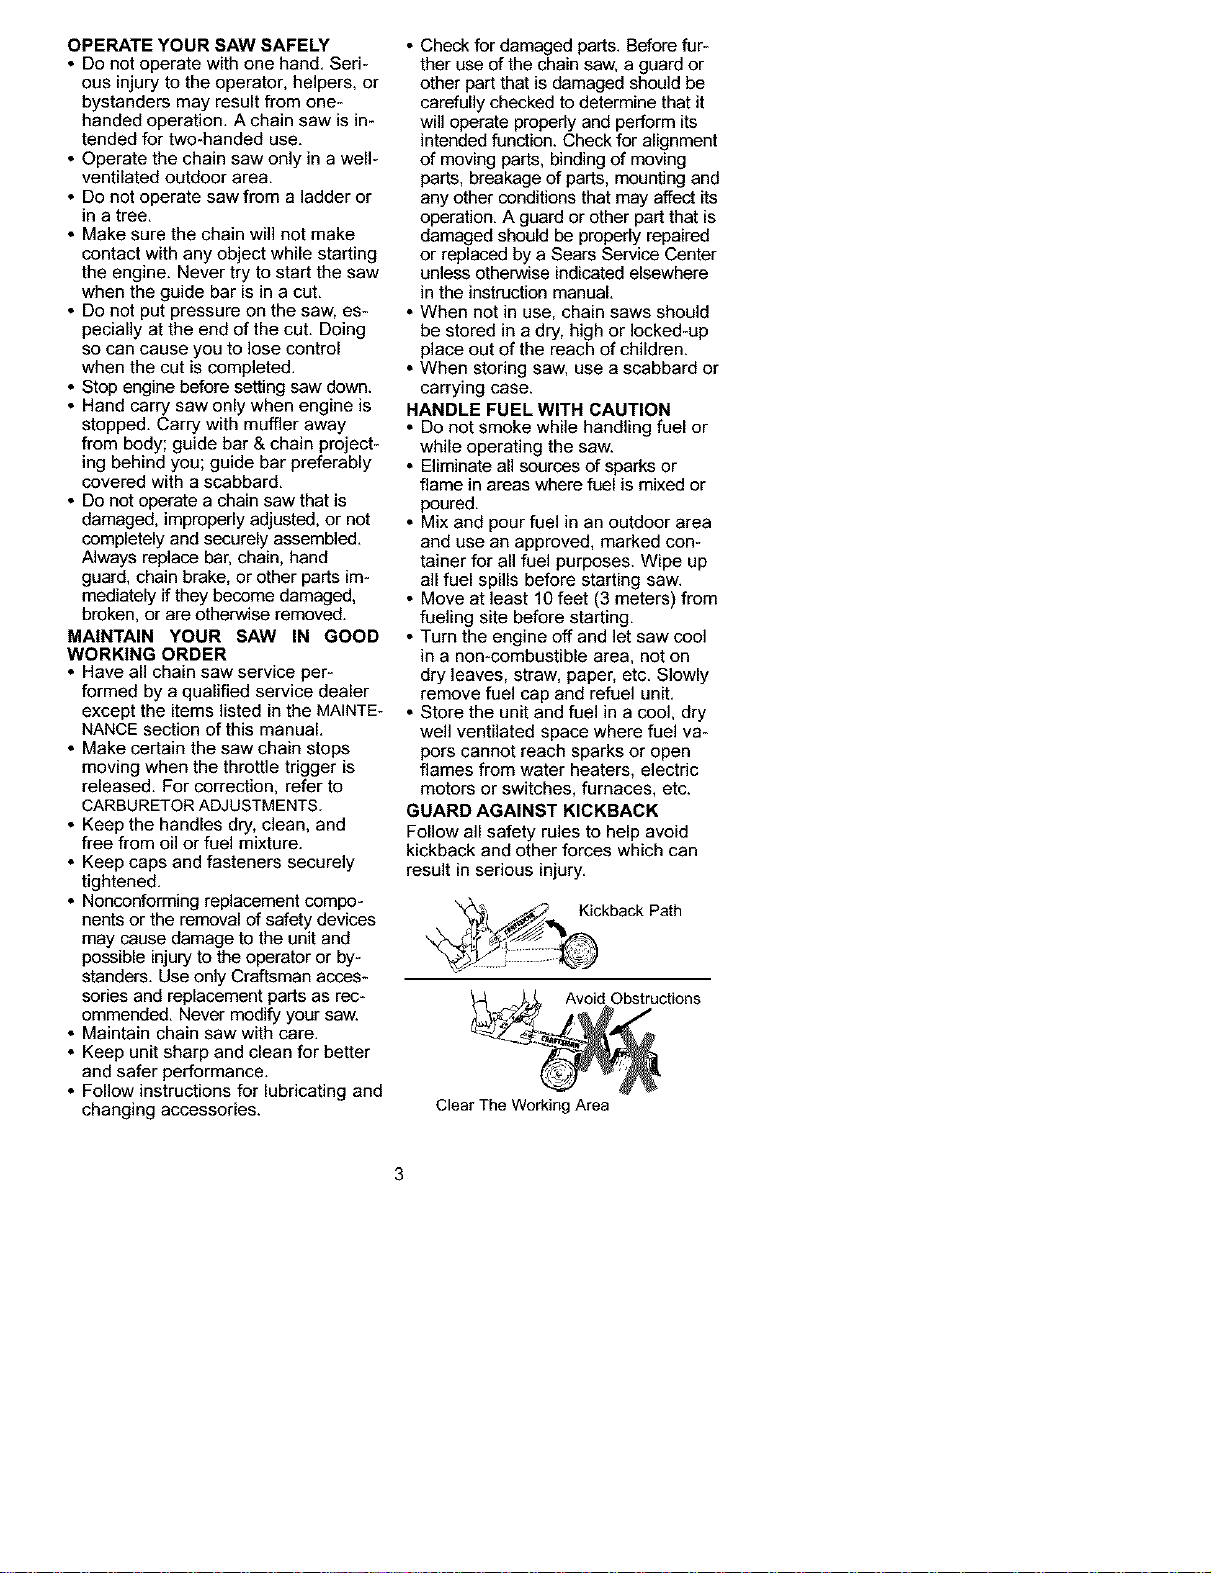
GUARD AGAINST KICKBACK
Follow all safety rules to help avoid
kickback and other forces which can
result in serious injury.
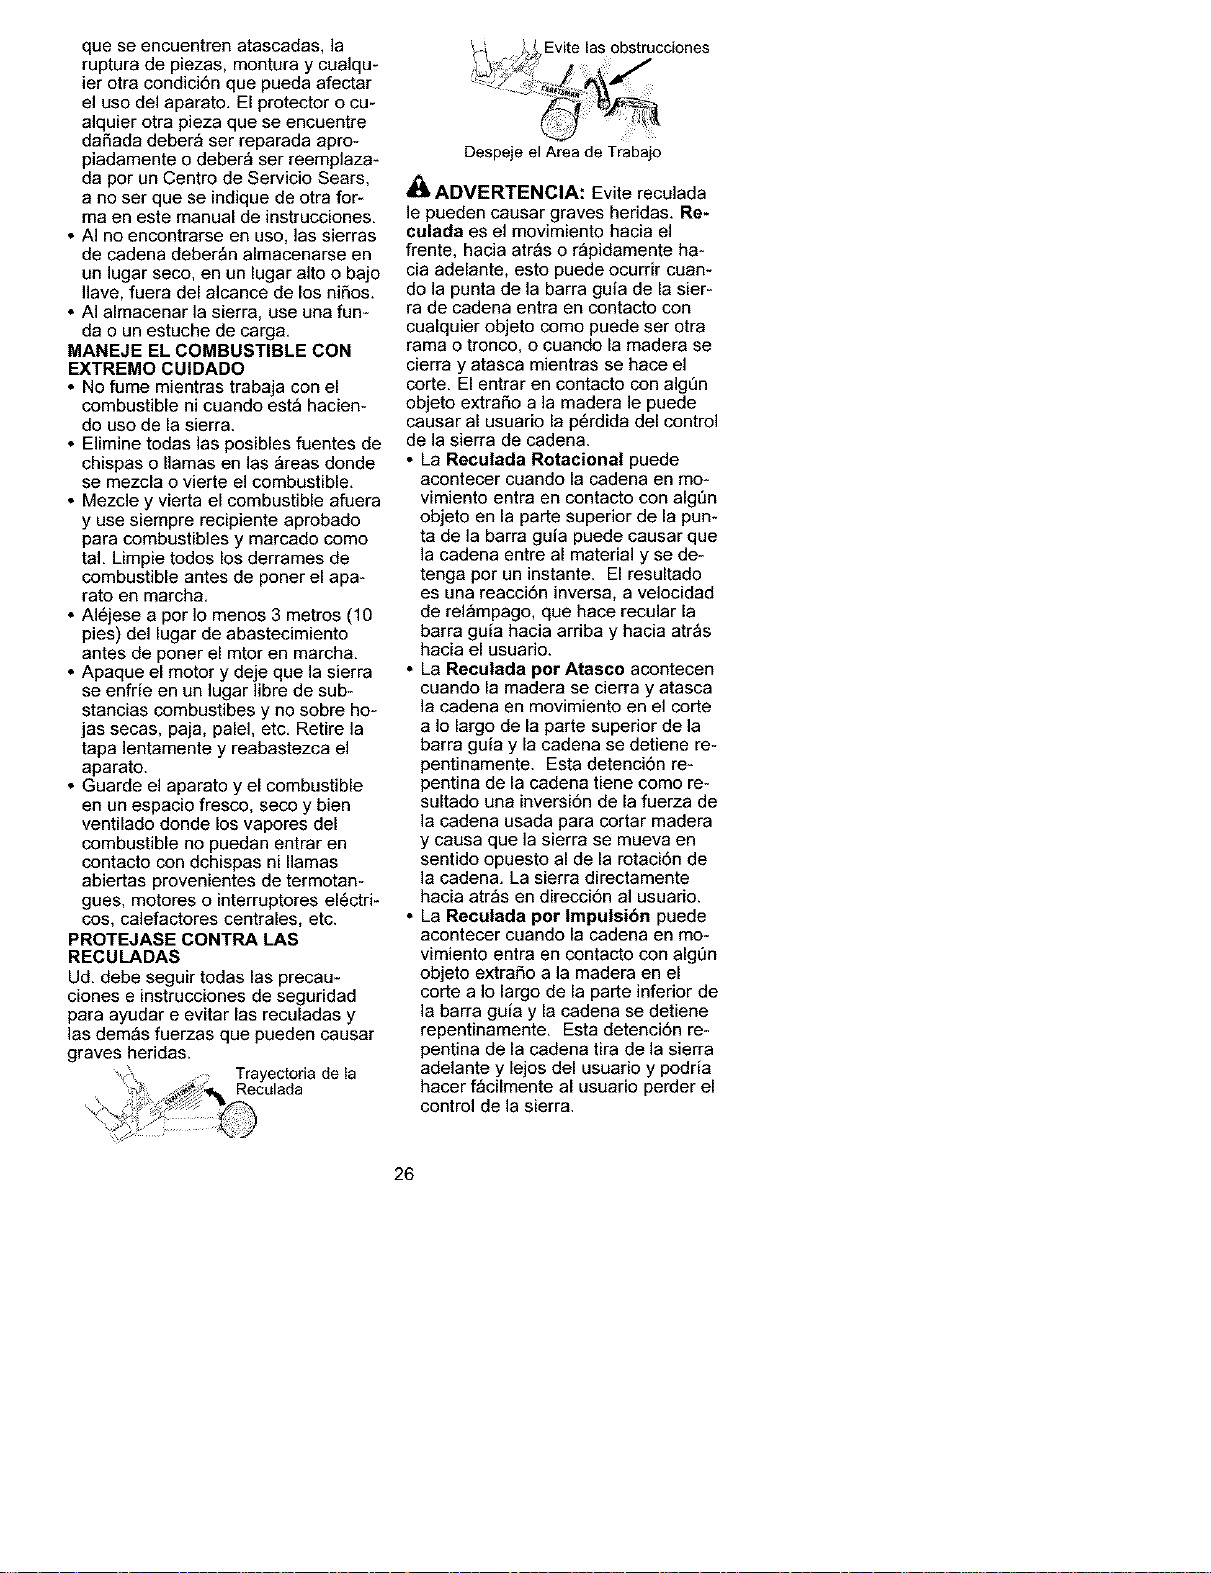
kback Path
_ Avoid Obstructions
Clear The Working Area

WARNING:Avoidkickbackwhich
canresultinseriousinjury.Kickback
is the backward, upward or sudden for-
ward motion of the guide bar occurring
when the saw chain near the upper tip
of the guide bar contacts any object
such as a log or branch, or when the
wood closes in and pinches the saw
chain in the cut. Contacting a foreign
object in the wood can also result in
loss of chain saw control.
• Rotational Kickback can occur
when the moving chain contacts an
object at the upper tip of the guide
bar. This contact can cause the
chain to dig into the object, which
stops the chain for an instant. The
result is a lightning fast, reverse
reaction which kicks the guide bar up
and back toward the operator.
• Pinch-Kickback can occur when the
the wood closes in and pinches the
moving saw chain in the cut along
the top of the guide bar and the saw
chain is suddenly stopped. This sud-
den stopping of the chain results in a
reversal of the chain force used to
cut wood and causes the saw to
move in the opposite direction of the
chain rotation. The saw is driven
straight back toward the operator.
• Pull4n can occur when the moving
chain contacts a foreign object in the
wood in the cut along the bottom of
the guide bar and the saw chain is
suddenly stopped. This sudden stop-
ping pulls the saw forward and away
from the operator and could easily
cause the operator to lose control of
the saw.
REDUCE THE CHANCE OF
KICKBACK
• Recognize that kickback can happen.
With a basic understanding of kick-
back, you can reduce the element of
surprise which contributes to acci-
dents.
• Never let the moving chain contact
any object at the tip of the guide bar.
• Keep working area free from obstruc-
tions such as other trees, branches,
rocks, fences, stumps, etc. Eliminate
or avoid any obstruction that your saw
chain could hit while cutting.
• When cutting a branch, do not let the
guide bar contact another branch or
other objects around it.
• Keep saw chain sharp and properly
tensioned. A loose or dull chain can
increase the chance of kickback. Fol-
low manufacturer's chain sharpening
and maintenance instructions. Check
tension at regular intervals, but never
with engine running. Make sure chain
brake nuts are securely tightened.
• Begin and continue cutting at full
speed, if the chain is moving at a
slower speed, there is greater chance
of kickback occurring.
• Use extreme caution when reentering
a cut.
• Do not attempt cuts starting with the
• tip of the bar (plunge cuts).
Watch for shifting logs or other forces
that could close a cut and pinch or fall
into chain.
• Use the specified Reduced-Kickback
Guide Bar and Low-Kickback Chain.
Avoid Pinch-Kickback:
• Be extremely aware of situations or
obstructions that can cause material
to pinch the top of or otherwise stop
the chain.
• Do not cut more than one log at a
time.
• Do not twist saw as bar is withdrawn
from an undercut when bucking.
Avoid Pull-In:
• Always begin cuttingwith the engine
at full speed and the saw housing
against wood.
• Use wedges made of plastic or wood.
Never use metal to holdthe cut open.
MAINTAIN CONTROL
Stand to the left of the saw
Thumb on _!.___
underside
-_ t" Elbow
locked
Never reversehand _ositions
• A good, firm grip on the saw with both
hands will help you maintain control.
Don't let go. Grip the rear handle with
your right hand whether you are right
or left handed. Wrap the fingers of
your left hand over and around the
front handlebar, and your left thumb
under the front handlebar. Keep your
left arm straight with the elbow locked,
• Positionyourlefthandonthefront
handlebarsoitisinastraightlinewith
yourrighthandontherearhandle
whenmakingbuckingcuts.Stand
slightlytotheleftsideofthesawto
keepyourbodyfrombeinginadirect
linewiththecuttingchain.
• Standwithyourweightevenlybal-
ancedonbothfeet.
• Donotoverreach.Youcouldbedrawn
or thrown off balance and lose control.
• Do not cut above shoulder height. It is
difficult to maintain control of saw
above shoulder height.
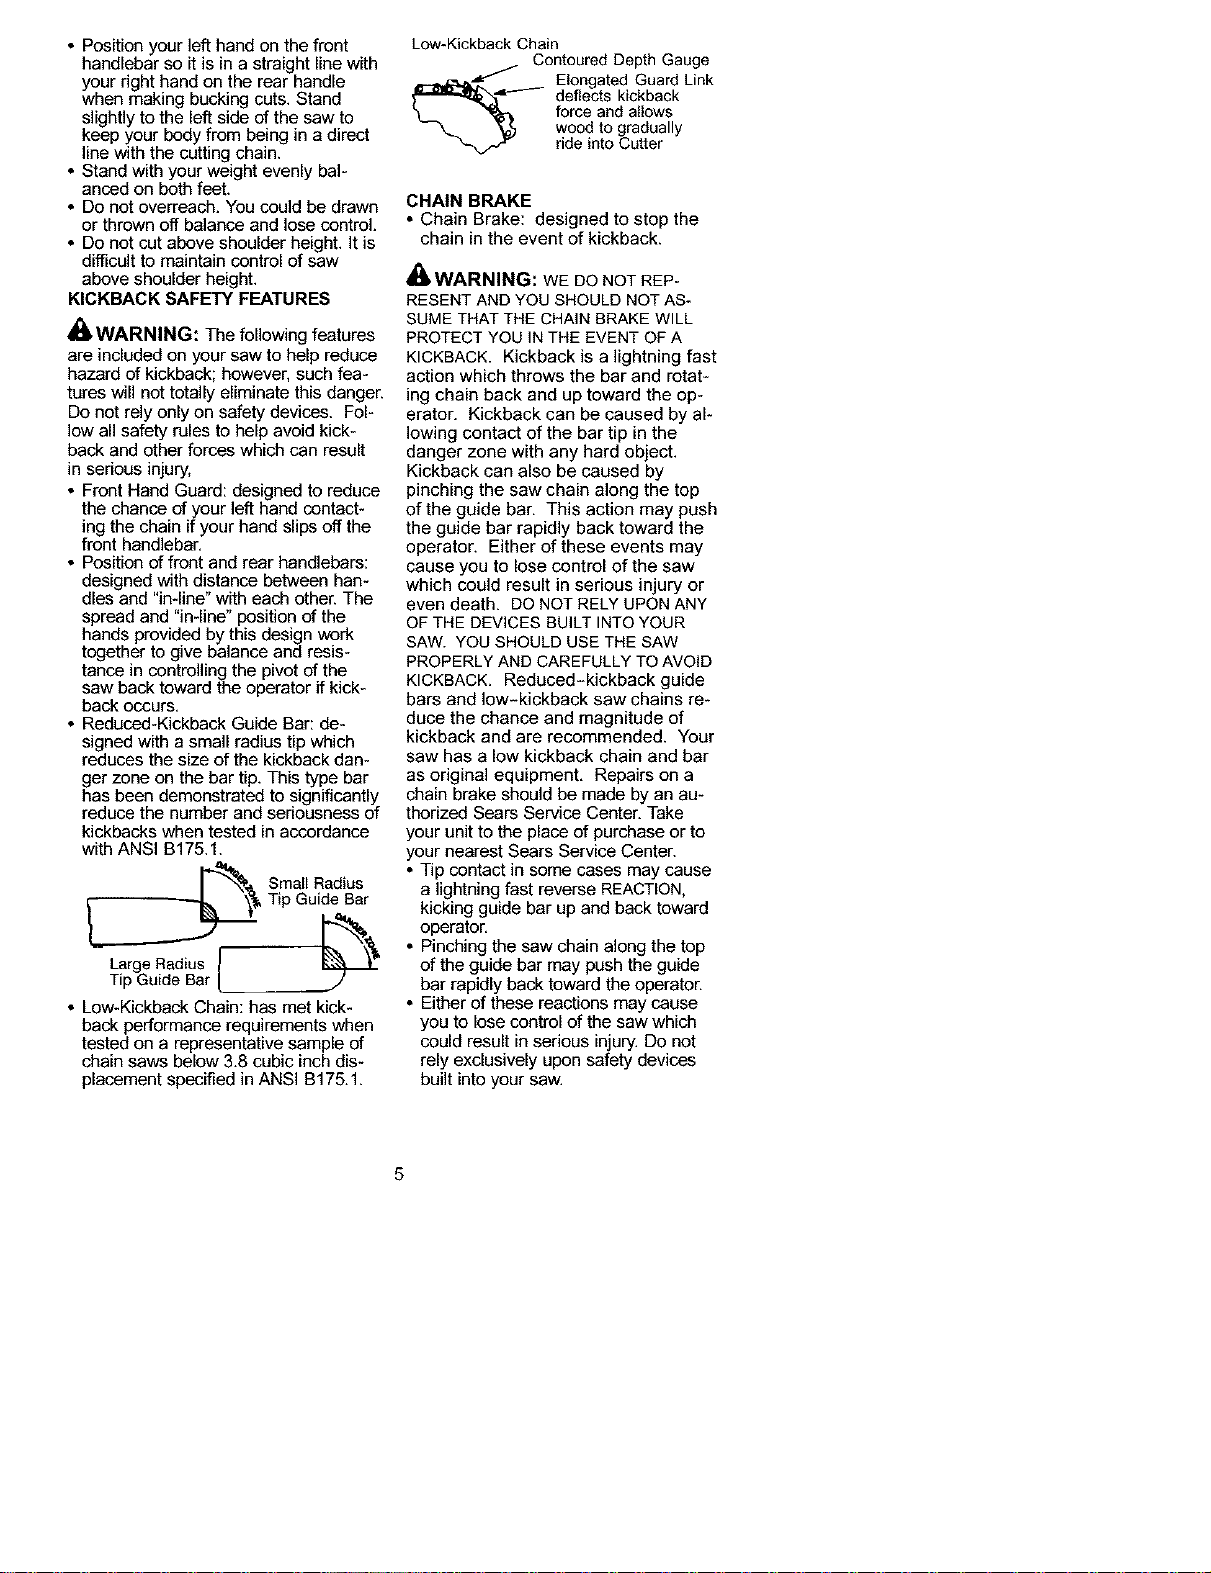
KICKBACK SAFETY FEATURES
WARNING: The following features
are included on your saw to help reduce
hazard of kickback; however, such fea-
tures will not totally eliminate this danger.
Do not rely only on safety devices. Fol-
low all safety rules to help avoid kick-
back and other forces which can result
_nsenous _njury,
• Front Hand Guard: designed to reduce
the chance of your left hand contact-
ing the chain if your hand slips off the
front handlebar.
• Position of front and rear handlebars:
designed with distance between han-
dles and "in-line" with each other. The
spread and "in-line" position of the
hands provided by this design work
together to give balance and resis-
tance in controllingthe pivot of the
saw back toward the operator if kick-
back occurs.
• Reduced-Kickback Guide Bar: de-
signed with a small radius tip which
reduces the size of the kickback dan-
ger zone on the bar tip. This type bar
has been demonstrated to significantly
reduce the number and seriousness of
kickbacks when tested in accordance
with ANSI B175.1.
LargeRadius
Tip Gude Bar L
• Low-Kickback Chain: has met kick-
back performance requirements when
tested on a representative sample of
chain saws below 3.8 cubic inch dis-
placement specified in ANSI B175.1.
Low-Kickback Chain
Contoured Depth Gauge
__ longated Guard Link
deflects kickback
force and allows
wood to gradually
ride into Cutter
CHAIN BRAKE
• Chain Brake: designed to stop the
chain in the event of kickback,
411.WARNINL_: WE DO NOT REP-
RESENTAND YOU SHOULD NOTAS-
SUME THAT THE CHAIN BRAKE WILL
PROTECT YOU IN THE EVENT OF A
KICKBACK. Kickback is a lightning fast
action which throws the bar and rotat-
ing chain back and up toward the op-
erator. Kickback can be caused by al-
lowing contact of the bar tip in the
danger zone with any hard object.
Kickback can also be caused by
pinching the saw chain along the top
of the guide bar. This action may push
the guide bar rapidly back toward the
operator. Either of these events may
cause you to lose control of the saw
which could result in serious injury or
even death. DO NOT RELY UPONANY
OF THE DEVICES BUILT INTO YOUR
SAW. YOU SHOULD USE THE SAW
PROPERLYAND CAREFULLY TO AVOID
KICKBACK. Reduced-kickback guide
bars and low-kickback saw chains re-
duce the chance and magnitude of
kickback and are recommended. Your
saw has a low kickback chain and bar
as original equipment. Repairs on a
chain brake should be made by an au-
tborized Sears Service Center. Take
your unit to the place of purchase or to
your nearest Sears Service Center.
• Tip contact in some cases may cause
a lightning fast reverse REACTION,
kicking guide bar up and back toward
operator.
• Pinching the saw chain along the top
of the guide bar may push the guide
bar rapidly back toward the operator.
• Either of these reactions may cause
you to lose control of the saw which
could result in serious injury. Do not
rely exclusively upon safety devices
built into your saw.
SAFETY NOTICE: Exposure to vibra-
tions through prolonged use of gasoline
powered hand tools could cause blood
vessel or nerve damage in the fingers,
hands, and joints of people prone to
circulation disorders or abnormal swell-
ing. Prolonged use in cold weather has
been linked to blood vessel damage in
otherwise healthy people. If symptoms
occur such as numbness, pain, loss of
strength, change in skin color or texture,
or lossof feeling in the fingers, hands, or
joints, discontinue the use of this tool
and seek medical attention. An anti-vi-
bration system does not guarantee the
avoidance of these problems. Users
who operate power tools on a continual
and regular basis must closely monitor
their physical condition and the condition
of this tool.
CHAIN BRAKE: If this saw is to be
used for commercial logging, a chain
brake is required and shall not be re-
moved or otherwise disabled to comply
with Federal OSHA Regulations for
Commercial Logging.
SPARK ARRESTING SCREEN: Your
saw is equipped with a temperature lim-
iting muffler and spark arresting screen
which meets the requirements of Califor-
nia Codes 4442 and 4443. All U.S. for-
est land and the states of California, Ida-
ho, Maine, Minnesota. New Jersey.
Oregon, and Washington require by law
that many internal combustion engines
be equipped with a spark arresting
screen. If you operate a chain saw in a
state or locale where such regulations
exist, you are legally responsible for
maintaining the operating condition of
these parts. Failure to do so is a viola-
tion of the law. Refer to Customer Re-
sponsibilities chart in the MAINTENANCE
section.
STANDARDS: This chain saw is listed
by Underwriters Laboratories, Inc. in ac-
cordance with American National Stan-
dards for Gasoline-Powered Chain
Saws Safety Requirements (ANSI
B175.1-2000).
WARNING: Before using chain
saw. ensure all fasteners are secure.
CARTON CONTENTS
Check carton contents against the fol-
lowing list.
Model 358.360880
Chain saw (fully assembled)
Chain adjustmenttool (Bar tool)
2-cycle engine oil
Carrying case
Extra chain
Gloves
Log carrier
Hearing protection
Bar and chain lube
Examine parts for damage. Do not use
damaged parts.
If you need assistance or find that parts
are missing or damaged, please call
1-800-235-5878.
NOTE: It is normal to hear the fuel filter
rattle in an empty fuel tank.
Your unit has been factory tested and
the carburetor precisely adjusted. As a
result you may smell gasoline or find a
drop of oil/fuel residue on the muffler
when you unpack the unit.
ASSEMBLY
Your saw is fully assembled; no
assembly is necessary.
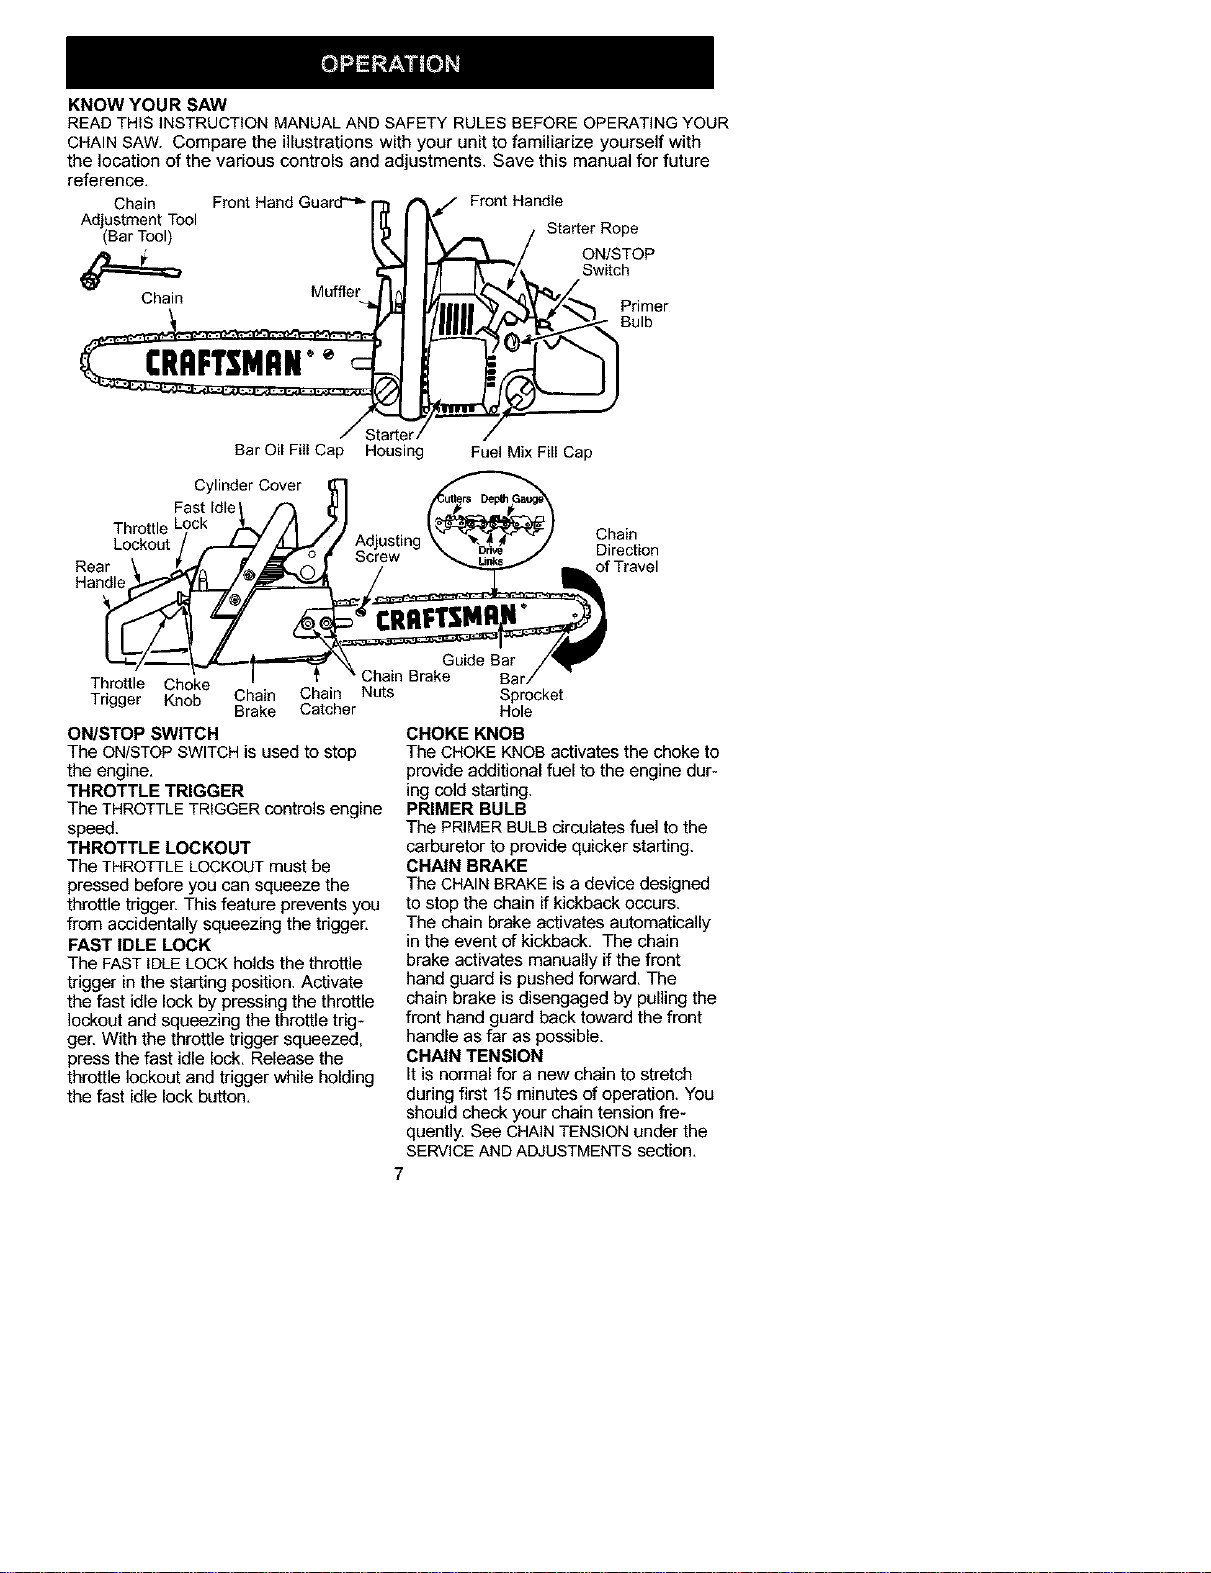
KNOW YOUR SAW
READ THiS INSTRUCTION MANUAL AND SAFETY RULES BEFORE OPERATING YOUR
CHAIN SAW. Compare the illustrations with your unit to familiarize yourself with
the location of the various controls and ad ustments. Save this manual for future
reference.
Chain Front Hand Guard"_ I-_ t"_,z / Front Handle
Adjustment Tool I II I I_- _
(BarTool) I'_ I I\ _ / _tarterKope
_j) _- kkl I _ / ON/STOP
Sw,tch
Chain Muffler IIJ.--lb,,t
Primer
Bulb
Bar Oil Fill Cap Housing Fuel Mix Fill Cap
Cylinder Cover
Fast Idle
Throttle
Adjusting Chain
Direction
of Travel
Throttle Choke
Trigger Knob Chain Chain Nuts
Brake Catcher
ON/STOP SWITCH
The ON/STOPSWITCH is used to stop
the engine.
THROTTLE TRIGGER
The THROTTLE TRIGGERcontrols engine
speed.
THROTTLE LOCKOUT
The THROTTLE LOCKOUTmust be
pressed before you can squeeze the
throttle trigger. This feature prevents you
from accidentally squeezing the trigger.
FAST IDLE LOCK
The FAST IDLELOCK holds the throttle
trigger in the starting position. Activate
the fast idle lock by pressing the throttle
lockout and squeezing the throttle trig-
ger. With the throttle trigger squeezed,
press the fast idle lock. Release the
throttle lockout and trigger while holding
the fast idle lock button.
Brake
Sprocket
Hole
CHOKE KNOB
The CHOKE KNOB activates the choke to
provide additional fuel to the engine dur-
ing cold starting.
PRIMER BULB
The PRIMER BULBcirculatesfuel to the
carburetorto provide quicker starting.
CHAIN BRAKE
The CHAINBRAKE is a device designed
to stop the chain if kickback occurs.
The chain brake activates automatically
in the event of kickback, The chain
brake activates manually if the front
hand guard is pushed forward, The
chain brake is disengaged by pulling the
front hand guard back toward the front
handle as far as possible,
CHAIN TENSION
It is normal for a new chain to stretch
during first 15 minutes ofoperation. You
should checkyour chain tension fre-
quently. See CHAINTENSIONunder the
SERVICEANDADJUSTMENTS section,
7
Ira.WARNING:Muffler is very hot
during and after use. Do not touch the
muffler or allow combustible material
such as dry grass or fuel to do so.
BEFORE STARTING ENGINE
_WARNING: Be sure to read the
fuel handling information in the safety
rules section of this manual before you
begin. If you do not understand the
fuel handling information do not at-
tempt to fuel your unit. Seek help from
someone that does understand the in-
formation or call the customer assis-
tance help line at 1-800-235-5878.
GUIDE BAR AND CHAIN OIL
The bar and chain require lubrication.
The chain oiler provides continuous lu-
brication to the chain and guide bar. Be
sure to fill the bar oil tank when you fill
the fuel tank (Capacity = 6.8 fl. oz.).
Lack of oil will quickly ruin the bar and
chain. Too little oil will cause overheat-
ing shown by smoke coming from the
chain aod/or discoloration of the bar.
For maximum guide bar and chain life,
we recommend you use Craftsman
chain saw bar oil. If Craftsman bar oil is
not available, you may use a good
grade SAE 30 oil until you are able to
obtain Craftsman brand. The oil output is
automatically metered during operation.
Your saw will use approximately one
tank of bar oil for every tank of fuel mix.
Always fill the bar oil tank when you fill
the fuel tank.
FUELING ENGINE
_WARNING: Remove fuel cap
slowly when refueling.
This engine is certified to operate on
unleaded gasoline. Before operation,
gasoline must be mixed with a good
quality synthetic 2-cycle air-cooled en-
gine oil. We recommend Craftsman
brand synthetic oil. Mix gasoline and
oil at a ratio of 40:1. A 40:1 ratio is ob-
tained by mixing 3.2 ounces of oil with
1 gallon of unleaded gasoline. In-
cluded with this saw is a 3.2 ounce
container of Craftsman brand synthetic
oil. Pour the entire contents of this con-
tainer into 1gallon of gasoline to
achieve the proper fuel mixture.
DO NOT USE automotive oil or boat oil.
These oils will cause engine damage.
When mixing fuel, follow instructions
printed on the oil container.
Once oil is added to the gasoline,
shake container momentarily to assure
that the fuel is thoroughly mixed. Al-
ways read and follow the safety rules
relating to fuel before fueling your unit.
IMPORTANT
Experience indicates that alcohol
blended fuels (called gasohol or using
ethanol or methanol) can attract mois-
ture which leads to separation and
formation of acids during storage. Acidic
gas can damage the fuel system of an
engine while in storage. To avoid engine
problems, the fuel system should be
emptied before storage for 30 days or
longer. Drain the gas tank, start the en-
gine and let it run until the fuel lines and
carburetor are empty. Use fresh fuel
next season. See STORAGE instructions
for additional information.
Never use engine or carburetor clean-
er products in the fuel tank or perma-
nent damage may occur.
See the STORAGE section for addition-
al information.
CHAIN BRAKE
Ensure chain brake is disengaged by
pulling the front hand guard back to-
ward the front handle as far as pos-
sible. The chain brake must be disen-
gaged before cutting with the saw.
_WARNING: The chain must not
move when the engine runs at idle
speed. If the chain moves at idle
speed, refer to CARBURETOR ADJUST-
MENT within this manual. Avoid con-
tact with the muffler. A hot muffler can
cause serious burns.
STOPPING YOUR ENGINE
, Move ON/STOP switch to the STOP
position.
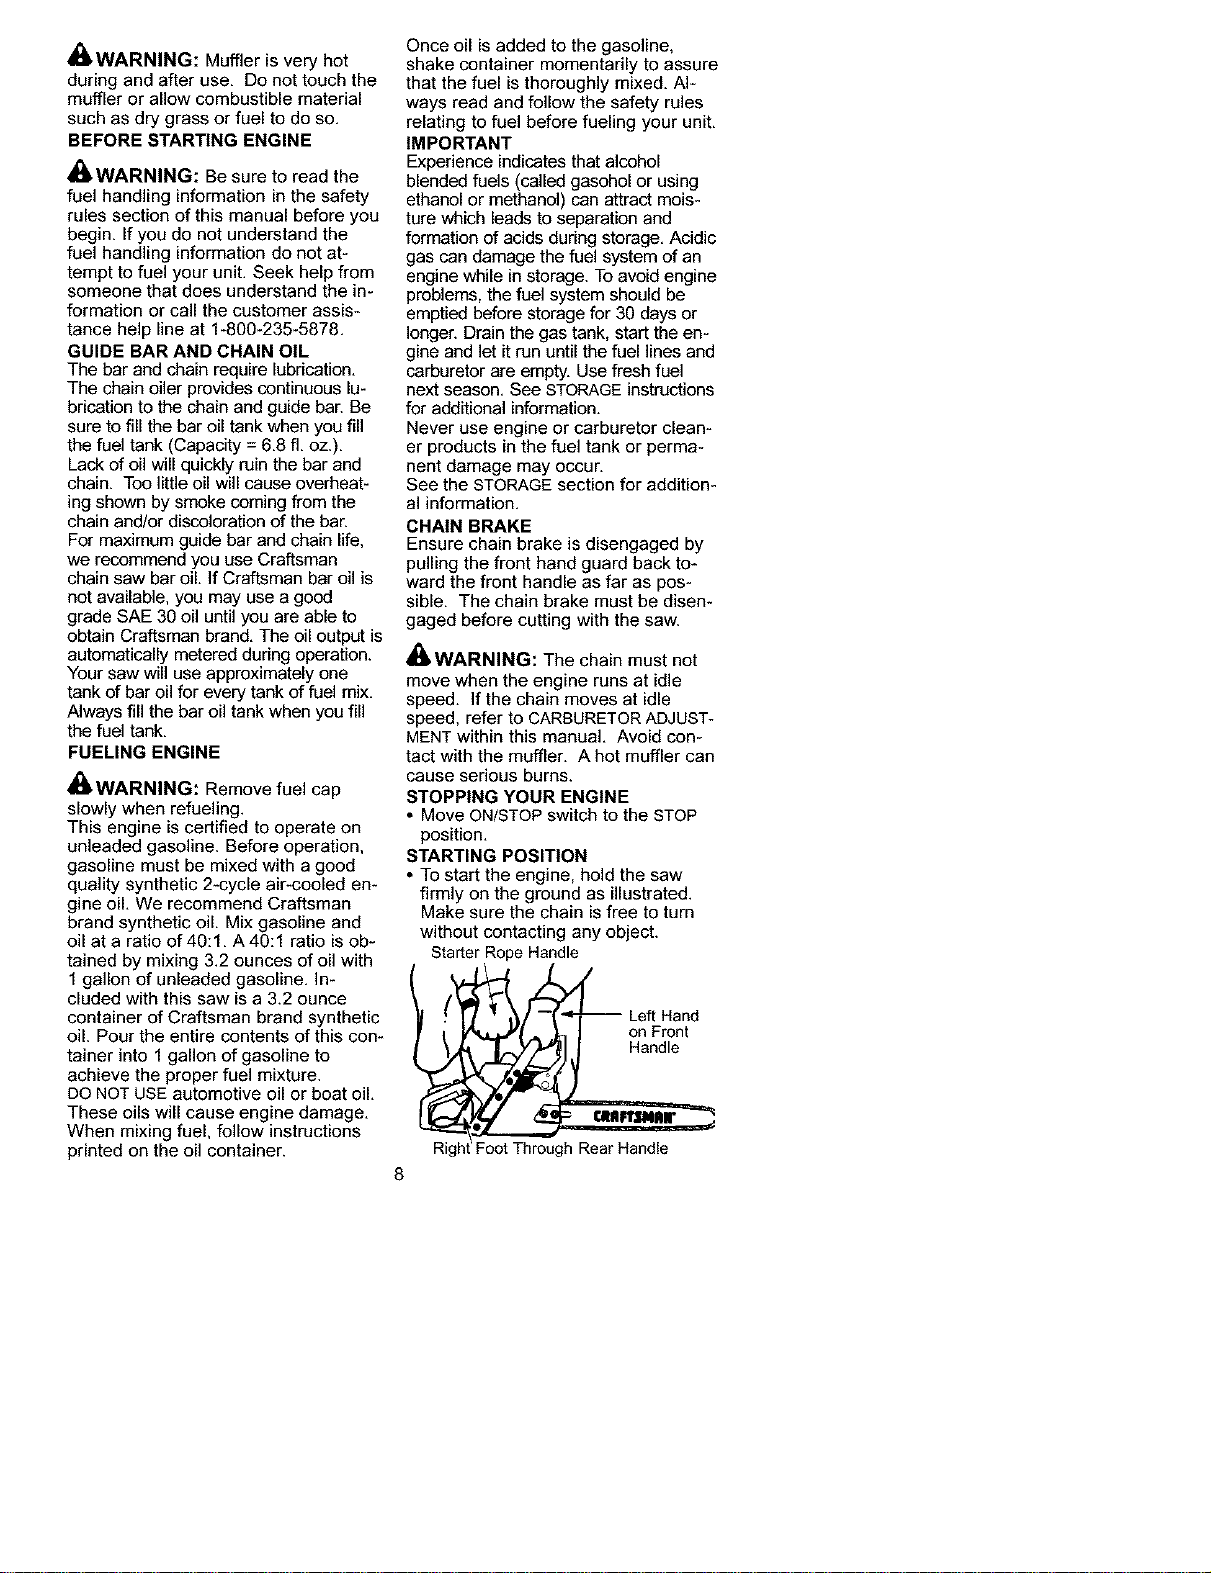
STARTING POSITION
* To start the engine, hold the saw
firmly on the ground as illustrated.
Make sure the chain is free to turn
without contacting any object.
Starter Rope Handle
Rig
Foot Throu h RearHandle
IMPORTANTPOINTS TO REMEMBER
When pulling the starter rope, do not
use the full extent of the rope as this
can cause the rope to break. Do not
let starter rope snap back. Hold the
handle and let the rope rewind slowly.
NOTE: DO NOT attempt to cut material
with the fast idle lock button in the
locked position,
STARTING A COLD ENGINE (or a
warm engine after running out of
fuel)
1, Move ON/STOP switch to ON posi-
tion,
2, Pull choke knob out to the full ex-
tent,
3, Slowly press the primer bulb 6
times,
Primer Bulb _,,,:j
ON/STOP
Switch, _S/_
CHOKE POSITIONS
Choke _--_ _'t
Kn°bl OLJ
4, Squeeze and hold throttle trigger,
With thumb press fast idle lock
down; then release throttle trigger.
5, Sharply pull the starter rope handle
5 times with your right hand. Then.
proceed to the next step.
NOTE: If the engine sounds as if it is
trying to start before the 5th pull, stop
pulling and immediately proceed to the
next step.
6, Fully push in choke knob (to the
OFF position); pull the starter rope
until the engine starts.
7. Allow the engine to run for approxi-
mately 5 seconds. Then, squeeze
and release the throttle trigger to
allow engine to return to idle
speed.
STARTING A WARM ENGINE
1, Fully push in choke knob (to the
OFF position).
2, Move ON/STOP switch to ON posi-
tion,
3, Slowly press primer bulb 6 times,
4, Squeeze and hold throttle trigger,
With thumb press fast idle lock
down; then release throttle trigger.
5, Sharply pull starter rope with your
right hand until the engine starts.
6. Squeeze and release the throttle
trigger to return engine to idle speed.
DIFFICULT STARTING (or starting a
flooded engine)
The engine may be flooded if it has not
started after 10 pulls,
Flooded engines can be cleared of ex-
cessfuel by followingthe warm engine
starting procedure listed above, insure
the ON/STOPswitch is in the ON position,
Starting could require many pulls de-
pending on how badly unit is flooded,
If engine still fails to start, refer to the
TROUBLESHOOTING TABLE or call
1-800-235-5878,
CHAIN BRAKE
WARNING: If the brake band is
worn too thin it may break when the
chain brake is triggered. With a broken
brake band, the chain brake will not stop
the chain. The chain brake must be re-
placed if any part is worn to less than
0.020 inch (0.5 ram) thick. Repairs on a
chain brake should be made by your
Sears Service Center. Take your unit to
the place of purchase or to the nearest
Sears Service Center.
• This saw is equipped with a chain
brake. The brake is designed to stop
the chain if kickback occurs.
• The inertia-activated chain brake is
activated if the front hand guard is
pushed forward, either manually (by
hand) or automatically (by sudden
movement).
• If the brake is already activated, it is
disengaged by pulling the front hand
guard back toward the front handle
as far as possible.
• When cutting with the saw, the chain
brake must be disengaged.
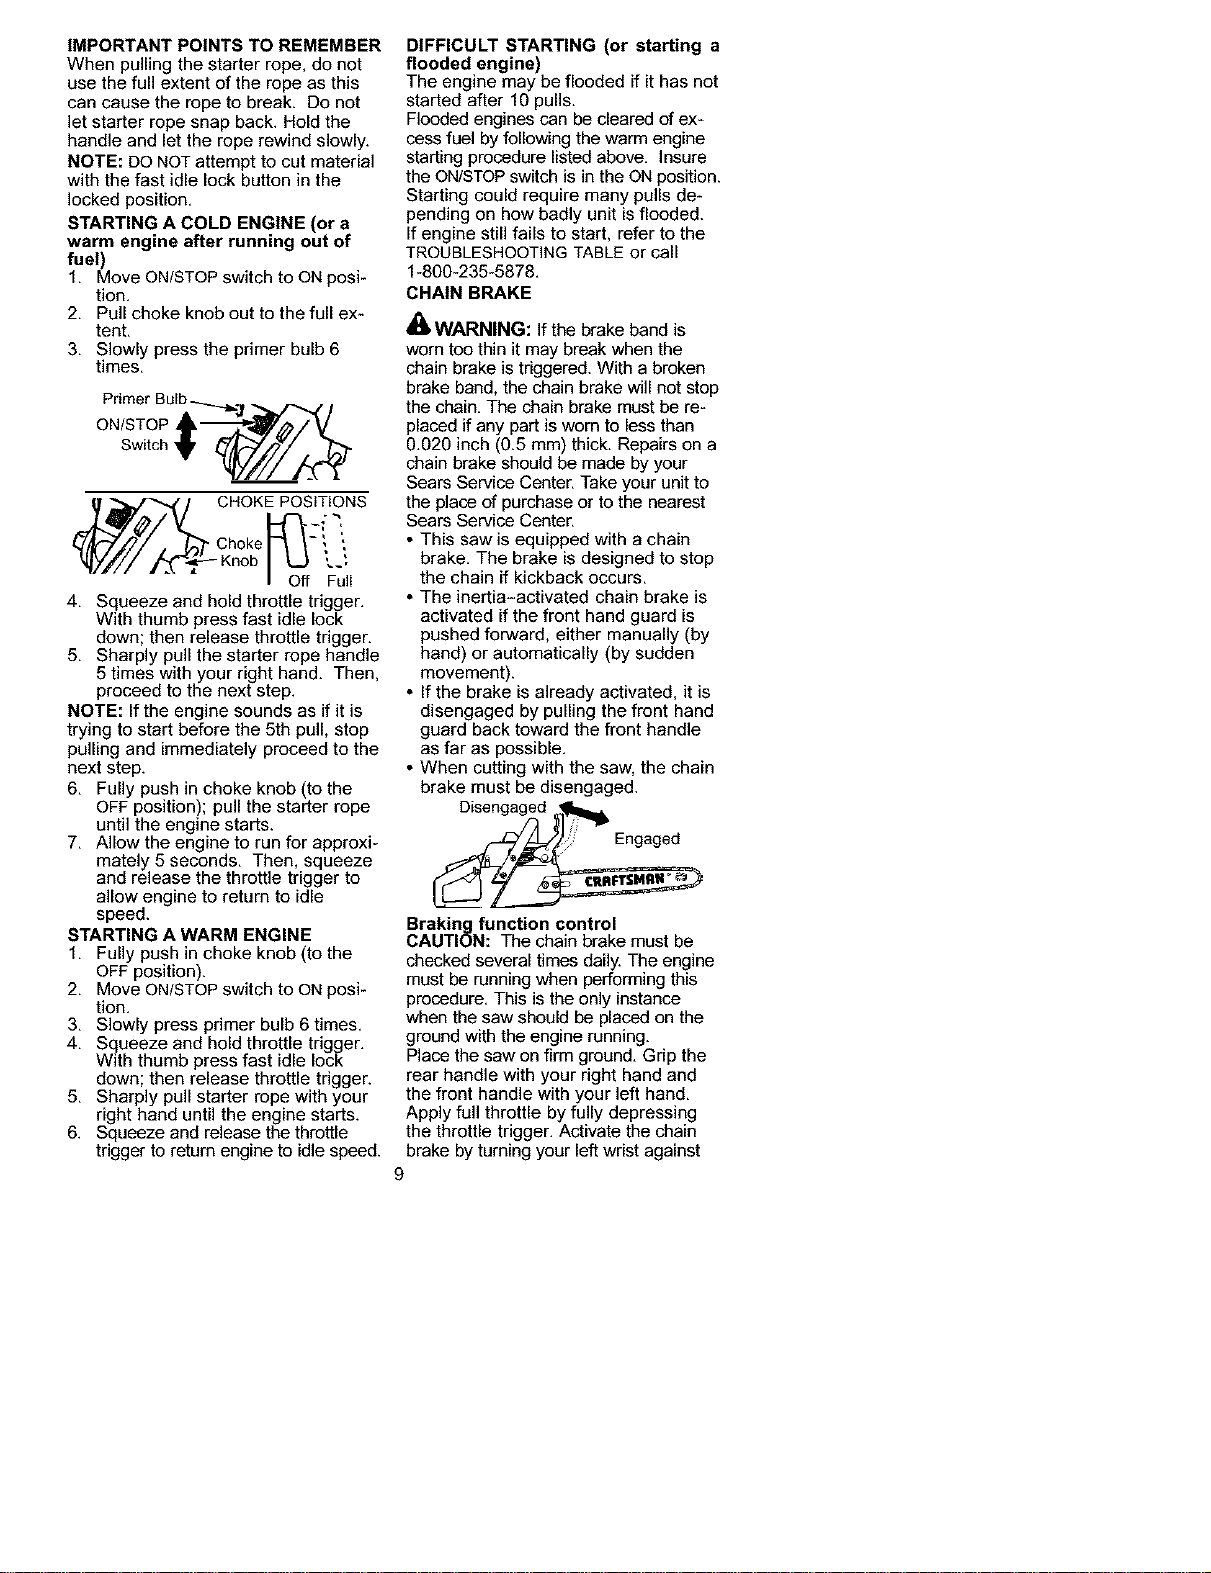
Oiseogege.
Braking function control
CAUTION: The chain brake must be
checked several times daily, The engine
must be running when performing this
procedure, This is the only instance
when the saw should be placed on the
ground with the engine running,
Place the saw on firm ground, Grip the
rear handle with your right hand and
the front handle with your left hand,
Apply full throttle by fully depressing
the throttle trigger, Activate the chain
brake by turningyour left wristagainst
the hand guard without releasing your
grip around the front handle. The chain
should stop immediately.
Inertia activating function control
_WARNING: When performing the
following procedure, the engine must
be turned off.
Grip the rear handle with your right hand
and the front handle with your left hand.
Hold the chain saw approximately 14"
(35 cm) above a stump or other wooden
surface. Release your grip on the front
handle and let the tip of the guide bar
fall forward and contact the stump.
When the tip of the bar hits the stump.
the brake should activate.
OPERATING TIPS
• Check chain tension before first use
and after 1 minute of operation. See
CHAIN TENSION in the MAINTENANCE
section.
• Cut wood only. Do not cut metal,
plastics, masonry, non-wood building
materials, etc.
• Stop the saw if the chain strikes a
foreign object. Inspect the saw and
repair parts as necessary.
• Keep the chain out of dirt and sand.
Even a small amount of dirt will
quickly dull a chain and increase the
possibility of kickback.
• Practice cutting a few small logs us-
ing the following steps. This will help
you get the "feel" of using your saw
before you begin a major sawing op-
eration.
• Squeeze the throttle trigger and al-
low the engine to reach full speed
before cutting.
• Begin cutting with the saw frame
against the log.
• Keep the engine at full speed the
entire time you are cutting.
• Allow the chain to cut for you. Exert
only light downward pressure.
• Release the throttle trigger as soon
as the cut is completed, allowing
the engine to idle. If you run the
saw at full throttle without a cutting
load, unnecessary wear can occur
to the chain, bar and engine. It is
recommended that the engine
not be operated for longer than
30 seconds at full throttle.
• To avoid losing control when cut is
complete, do not put pressure on
saw at end of cut.
• Stop engine before setting saw down.
TREE FELLING TECHNIQUES
41_WARNING: Check for broken or
dead branches which can fall while
cutting causing serious injury. Do not
cut near buildings or electrical wires if
you do not know the direction of tree
fall, nor cut at night since you will not
be able to see well, nor during bad
weather such as rain, snow, or strong
winds, etc. If the tree does make con-
tact with any utility line, the utility com-
pany should be notified immediately.
• Carefully plan your sawing operation
in advance.
• Clear the work area. You need a
clear area all around the tree so you
can have secure footing.
• The chain saw operator should keep
on the uphill side of the terrain as the
tree is likely to roll or slide downhill
after it is felled.
• Study the natural conditions that can
cause the tree to fall in a particular
direction. These conditions include:
• The wind direction and speed.
• The lean of the tree. The lean of a
tree might not be apparent due to
uneven or sloping terrain. Use a
plumb or level to determine the di-
rection of tree lean.
• Weight and branches on one side.
• Surrounding trees and obstacles.
• Look for decay and rot. If the trunk is
rotted, it can snap and fall toward the
operator.
• Make sure there is enough room for
the tree to fall. Maintain a distance of
2-1/2 tree lengths from the nearest
person or other objects. Engine
noise can drown out a warning call.
• Remove dirt, stones, loose bark,
nails, staples, and wire from the tree
where cuts are to be made.
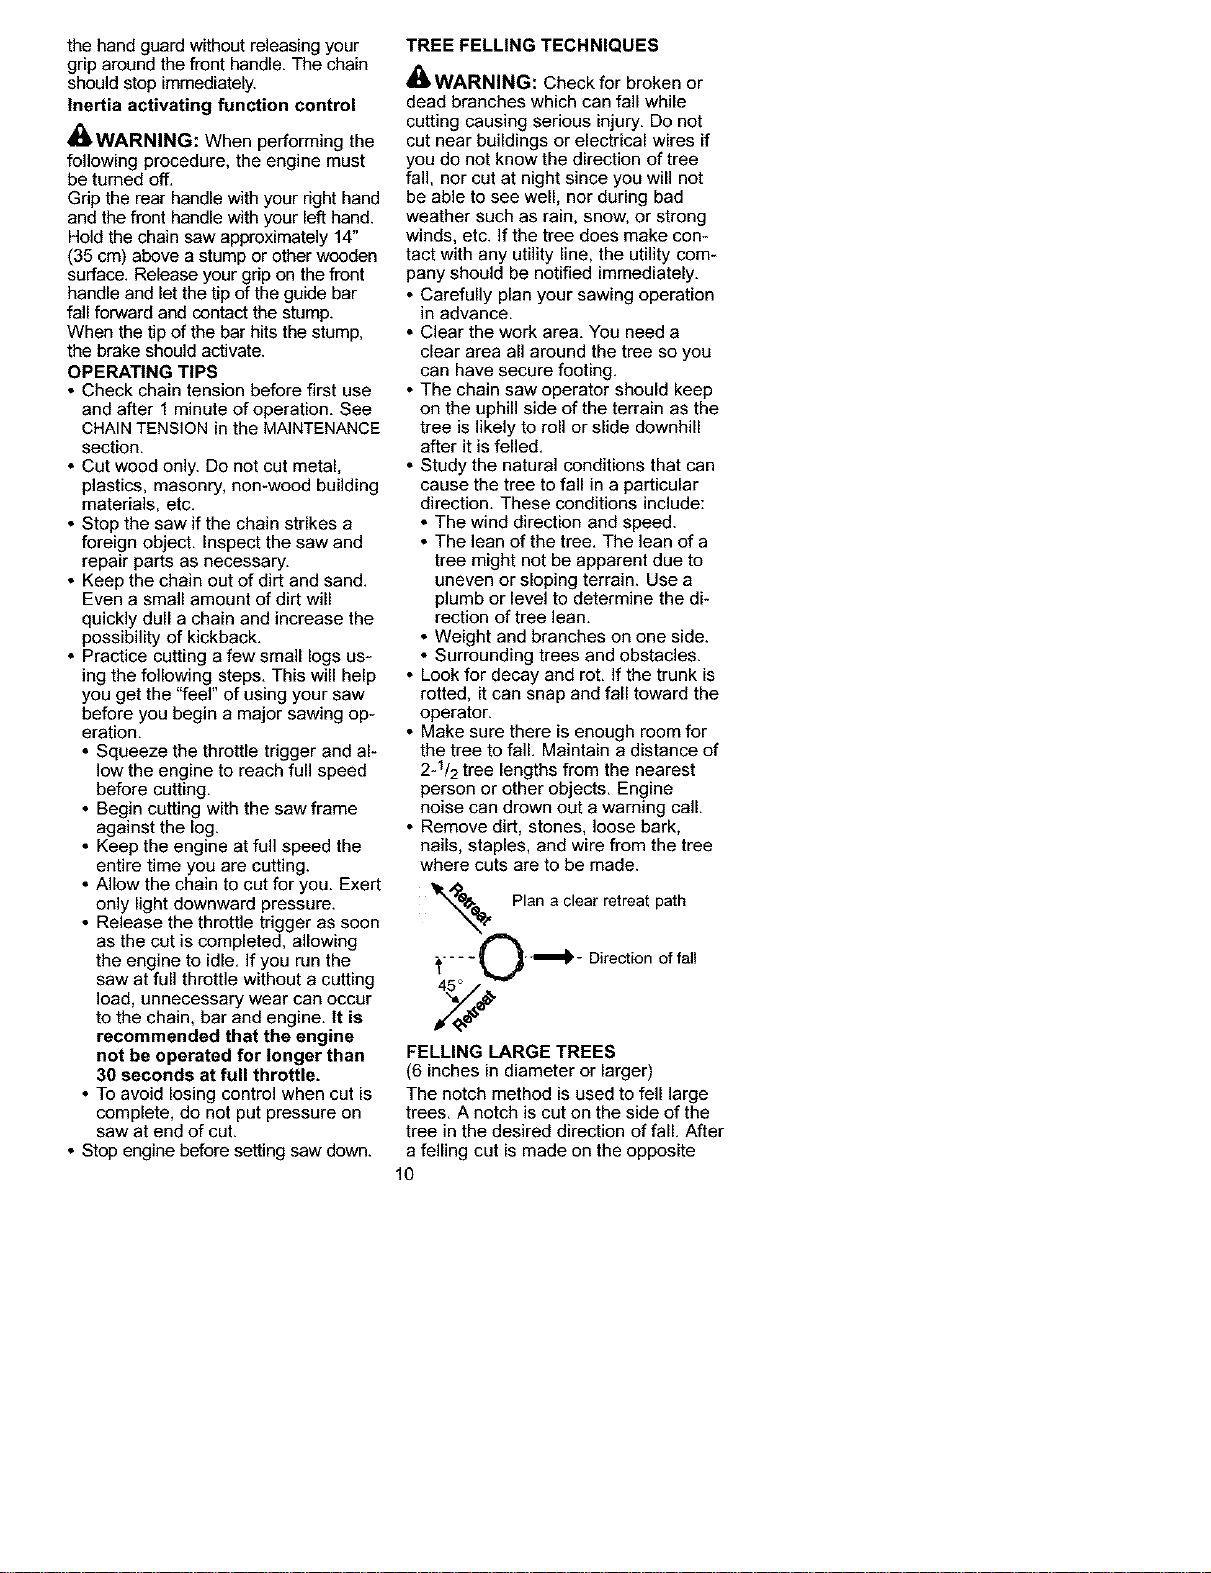
Plan a clear retreat path
;_.... O"_ - Direction of fall
FELLING LARGE TREES
(6 inches in diameter or larger)
The notch method is used to fell large
trees. A notch is cut on the side of the
tree in the desired direction of fall After
a felling cut is made on the opposite
10
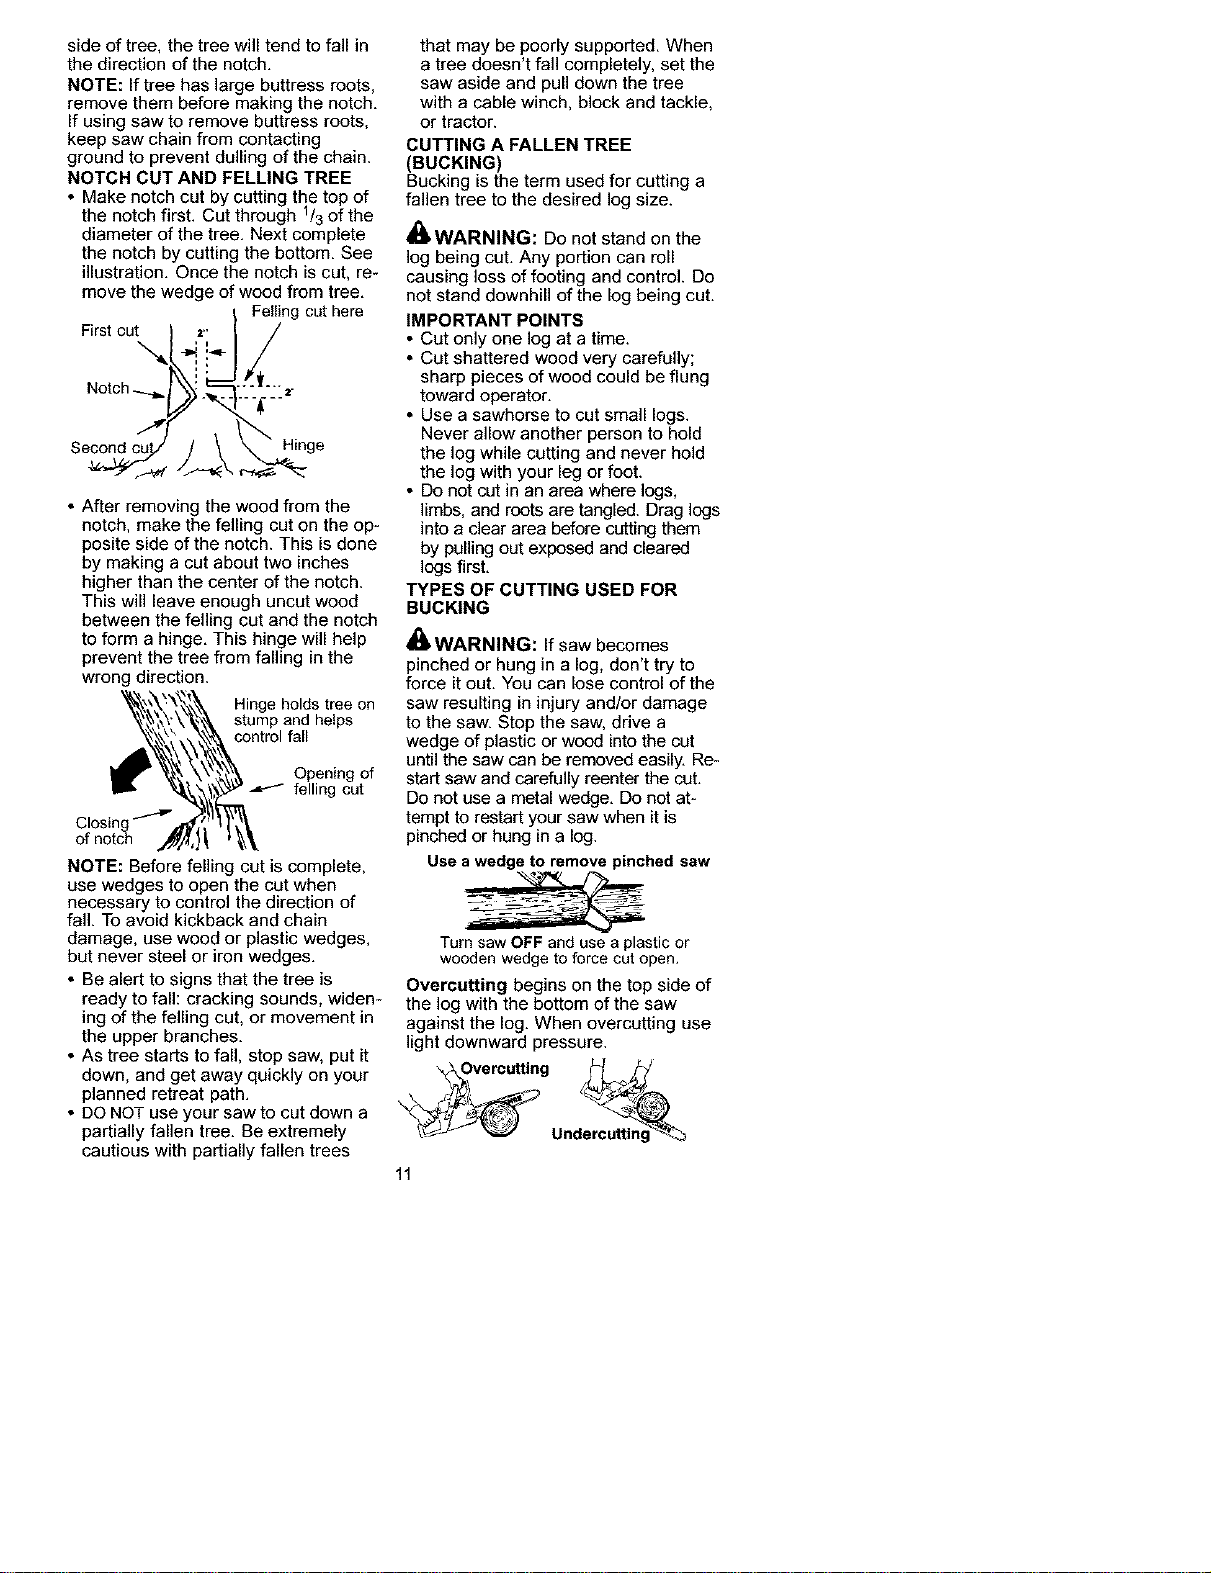
sideoftree,thetreewilltendtofallin
thedirectionofthenotch.
NOTE:Iftreehaslargebuttressroots,
removethembeforemakingthenotch.
Ifusingsawtoremovebuttressroots,
keepsawchainfromcontacting
groundtopreventdullingofthechain.
NOTCH CUT AND FELLING TREE
• Make notch cut by cutting the top of
the notch first. Cut through 1!3of the
diameter of the tree. Next complete
the notch by cutting the bottom. See
illustration. Once the notch is cut, re-
move the wedge of wood from tree.
Felling cut here
Firstcut._[ _.._="l_e-
Notch-_._.___ .__. ,'_'_,'i-4
Secor_; / \ _ge
• After removing the wood from the
notch, make the felling cut on the op-
posite side of the notch. This is done
by making a cut about two inches
higher than the center of the notch.
This will leave enough uncut wood
between the felling cut and the notch
to form a hinge. This hinge will help
prevent the tree from falling in the
wrong direction.
Hinge holds tree on
stump and helps
control fall
Opening of
felling cut
NOTE: Before felling cut is complete,
use wedges to open the cut when
necessary to control the direction of
fall. To avoid kickback and chain
damage, use wood or plastic wedges,
but never steel or iron wedges.
• Be alert to signs that the tree is
ready to fall: cracking sounds, widen-
ing of the felling cut, or movement in
the upper branches.
• As tree starts to fall, stop saw, put it
down, and get away quickly on your
planned retreat path.
• DO NOT use your saw to cut down a
partially fallen tree. Be extremely
cautious with partially fallen trees
that may be poorly supported. When
a tree doesn't fall completely, set the
saw aside and pull down the tree
with a cable winch, block and tackle,
or tractor.
CUTTING A FALLEN TREE
(BUCKING)
Bucking is the term used for cutting a
fallen tree to the desired log size.
_WARNING: Do not stand on the
log being cut. Any portion can roll
causing loss of footing and control. Do
not stand downhill of the log being cut.
IMPORTANT POINTS
• Cut only one log at a time.
• Cut shattered wood very carefully;
sharp pieces of wood could be flung
toward operator.
• Use a sawhorse to cut small logs.
Never allow another person to hold
the log while cutting and never hold
the log with your leg or foot.
• Do not cut in an area where logs,
limbs, and roots are tangled. Drag logs
into a clear area before cutting them
by pulling out exposed and cleared
logsfirst.
TYPES OF CUTTING USED FOR
BUCKING
4re.WARNING: If saw becomes
pinched or hung in a log, don't try to
force it out. You can lose control of the
saw resulting in injury and/or damage
to the saw. Stop the saw, drive a
wedge of plastic or wood into the cut
until the saw can be removed easily. Re-
start saw and carefully reenter the cut.
Do not use a metal wedge. Do not at-
tempt to restart your saw when it is
pinched or hung in a log.
Use a wedge to remove pinched saw
Turn saw OFF and use a plastic or
wooden wedge to force cut open.
Overcutting begins on the top side of
the log with the bottom of the saw
against the log. When overcutting use
light downward pressure.
_vercu.ing L_j_i
11

Undercutting involves cutting on the
underside of the log with top of saw
against the log. When undercutting
use light upward pressure. Hold saw
firmly and maintain control. The saw
will tend to push back toward you.
_,WARNING, Never turn saw up-
side down to undercut. The saw can-
not be controlled in this position.
Always make your first cut on the com-
pression side of the log. The compres-
sion side of the log is where the pres-
sure of the log's weight is
concentrated.
First cut on com_pressionside of log
Second cut
#
First cut on compression side of log
BUCKING WITHOUT A SUPPORT
• Overcut through 1/3of the diameter
of the log.
• Roll the log over and finish with a
second overcut.
• Watch for logs with a compression
side to prevent the saw from pinch-
ing. See illustration above for cut-
ting logs with a compression side.
BUCKING USING A LOG OR
SUPPORT STAND
• Remember your first cut is always on
the compression side of the log. (Re-
fer to the illustration betow for your
first and second cut).
• Your first cut should extend 1/3of the
diameter of the log.
• Finish with your second cut.
Using a log for support
2nd Cut -_
'% . 1stCut
,_.._ st Cut
Using a support stand
1st Cut
,,,
2 nd Cut __
LIMBING AND PRUNING
_,WARNING: Be alert for and guard
against kickback. Do not allowthe mov-
ing chain to contact any other branches
or objects at the nose of the guide bar
when limbing or pruning. Allowing such
contact can result in serious injury.
_,WARNING: Never climb into a
tree to limb or prune. Do not stand on
ladders, p_atforms, a log, or in any po-
sition which can cause you to lose
your balance or control of the saw.
IMPORTANT POINTS
• Watch out for springpoles.
Springpoles are small size limbs
which can whip toward you, or pull
you off balance. Use extreme cau-
tion when cutting small size limbs.
• Be alert for springback from any
branches that are bent or under
pressure. Avoid being struck by the
branch or the saw when the tension
in the wood fibers is released.
° Frequently clear branches out of the
way to avoid tripping over them.
LIMBING
• Limb a tree only after it is cut down.
• Leave the larger limbs underneath
the felled tree to support the tree as
you work.
• Start at the base of the felled tree
and work toward the top, cutting
branches and limbs. Remove small
limbs with one cut.
12
• Keepthetreebetweenyouandthe
chain.
• Removelargerbrancheswiththe
cuttingtechniquesdescribedin
BUCKINGWITHOUTASUPPORT.
• Alwaysusean overcut to cut small
and freely hanging limbs. Undercut-
ting could cause limbs to fall and
pinch the saw.
PRUNING
_WARNING: Limit pruning to limbs
shoulder height or below. Do not cut if
branches are higher than your shoul-
der. Get a professional to do the job.
• Make your first cut 1/3of the way
through the bottom of the limb. This
cut will make the limb sag so that it
falls easily on the second cut.
• Next make the second cut an over-
cut all the way through the limb.
• Finish the pruning operation by using
an overcut so that the stump of the
limb protrudes 1to 2 inches from the
trunk of the tree.
SeC_d cut
irst cut
1/3of way
Third cut 1 to 2
inches from trunk
of tree
CUSTOMER RESPONSIBILITIES
_WARNING: Disconnect the spark plug before performing maintenance
except for carburetor adjustments,
Fill in dates as you complete Before After Every Every Service
regular service Use Use 5 hrs. 25 hrs. Yearly Dates
Check for damaged/worn parts _'
Check for loose fasteners/parts _'
Check chain tension _'
Check chain sharpness ,_"
Check guide bar ,_"
Check fuel mixture level ,_"
Check guide bar and chain oil ,_"
inspect and clean unit & decals ,_"
Check chain brake ,_"
Clean guide bar groove _'
Clean air filter ,_"
Clean/inspect muffler and spark
arresting screen _"
Replace spark plug and fuel filter ,_"
GENERAL RECOMMENDATIONS
The warranty on this unit does not cov-
er items that have been subjected to
operator abuse or negligence. To re-
ceive full value from the warranty, the
operator must maintain unit as instruct-
ed in this manual. Various adjustments
will need to be made periodically to
properly maintain your unit.
• Once a year, replace the spark plug,
air filter element, and check guide bar
and chain for wear. A new spark plug
and air filter element assures proper
air-fuel mixture and helps your engine
run better and last longer.
13
CHECK FOR DAMAGED OR
WORN PARTS
Contact Sears Service Center for re-
placement of damaged or worn parts.
NOTE: It is normal for a small amount
of oil to appear under the saw after en-
gine stops, Do not confuse this with a
leaking oil tank.
• ON/STOP Switch - Ensure ON/STOP
switch functions properly by moving
the switch to the STOP position.
Make sure engine stops; then restart
engine and continue.
• Fuel Tank - Do not use saw if fuel
tank shows signs of damage or
leaks,
• Oil Tank - Do not use saw if oil tank
shows signs of damage or leaks.
CHECK FOR LOOSE
FASTENERS AND PARTS
• Chain Brake Nuts
Chain
Muffler
Cylinder Shield
Air Filter
Handle Screws
Vibration Mounts
Starter Housing
Front Hand Guard
CHECK CHAIN TENSION
WARNING: Wear protective
gloves when handling chain. The
chain is sharp and can cut you even
when it is not moving,
Chain tension is very important,
Chains stretch during use. This is es-
pecially true during the first few times
you useyour saw, Always check
chain tension each time you use and
refuel your saw,
1, Use the screwdriver end of the
chain adJustment tool (bar tool) to
move chain around guide bar to
ensure kinks do not exist. The
chain should rotate freely.
_ I ChainAdjusbnont
v"_l" ,='_'" Adjusting Tool
u_s Screw" (Bar T_._I)
2, Loosen chain brake nuts until they
are finger tight against the chain
brake,
3, Turn adjusting screw clockwise un-
til chain solidly contacts bottom of
guide bar rail.
4. Using bar tool, roll chain around
gbuidebarto erasure all links are in
ar groove.
5. Lift up tip of guide bar to check for
sag. Release tip of guide bar, then
turn adjusting screw until sag does
not exist.
6. While lifting tip of guide bar, tighten
chain brake nuts securely with the
bar tool.
/ZL/) Ohm,,,Br, A /-.
I_F-_#" Nuts _ ..,4:
7, Use the screwdriver end of timebar
tool to move chain around guide bar,
8, If chain does not rotate, it is too
tight, Slightly loosen chain brake
nuts and loosen chain by turning
the adjusting screw counterclock-
wise. Retighten chain brake nuts,
g, If chain istoo loose, it will sag be-
Iow the guide bar. DONOT operate
the saw if the chain is loose.
Z_
41WARNING: If the saw is operated
with a loose chain, the chain could
jump off the guide bar and result in se-
rious injury.
CHECK CHAIN SHARPNESS
A sharp chain makes wood chips, A
dull chain makes a sawdust powder
and cuts slowly. See CHAIN SHARP-
ENINGin timeSERVICEANDADJUST-
MENTSsection.
CHECK GUIDE BAR
Conditions which require guide bar
maintenance:
• Saw cuts to one side or at an angle.
• Saw has to be forced through the cut,
• Inadequate supply of oil to barlchain.
Check the condition of guide bar each
time chain is sharpened. A worn guide
bar will damage the chain and make
cutting difficult.
14
After each use, ensure ON/STOP
switch is in the STOP position, then
clean all sawdust from the guide bar
and sprocket hole,
To maintain guide bar:
• Move ON/STOP switch tOSTOP.
• Loosen and remove chain brake
nuts and chain brake, Remove bar
and chain from saw.
• Clean the oil holes and bar groove
after each 5 hours of operation,
S_wdust F_rn_
Rerrlovo
O,,Ho,os
• Burring of guide bar rails is a normal
process of rail wear. Remove these
burrs with a flat file.
• When rail top is uneven, use aflat file
to restore square edges and sides.
"_-- Filo R"il Edg{_._--I,-[1 [1
arid Sides { U
Square I I
Worn Gr_vo CorrectGr_x)v_
Replace guide par when the groove is
worn, the guide bar is bent or cracked,
or when exce3s heating or burring of the
rails Occurs.If replacement is necessary,
use only the guide bar specified for your
saw in the repair parts list or on the de-
cal located on the chain saw.
CHECK FUEL MIXTURE LEVEL
• See FUELING ENGINE under the OP-
ERATIONsection.
LUBRICATION
BarO, "4 I
FIllCap_ I
• See GUIDE BARAND CHAIN OIL un-
der the OPERATION section.
INSPECT AND CLEAN UNIT AND
DECALS
• After each use, inspect complete unit
for loose or damaged parts. Clean
the unit and decals using a damp
cloth with a mild detergent,
• Wipe off unit with a clean dry cloth.
CHECK CHAIN BRAKE
• See CHAIN BRAKE in the OPERATION
section,
CLEAN AIR FILTER
A dirty air filter decreases the life and
performance of the engine and in-
creases fuel consumption and harmful
emissions. Always clean your air filter
after 15 tanks of fuel or 5 hours of Op-
eration, whichever comes first. Clean
more frequently in dusty conditions. A
used air filter can never be completely
cleaned. It is advisable to replace your
air filter with a new one after every 50
hours of operation, or annually, which-
ever comes first. To clean filter:
1. Loosen 3 screws on cylinder cover.
2. Remove cylinder cover.
3. Remove air filter.
4. Clean the air filter using hot soapy
water. Rinse with clean cool water.
Air dry completely before reinstal-
ling.
5. Lightly oil airfilter before installing
to improve the efficiency of air filter.
Use 2-cycle engine oil or motor oil
(SAE 30). Squeeze excess oil from
filter.
6. Reinstall airfilter.
7. Reinstall cylinder cover and 3
screws. Tighten securely.
Air Filtor
INSPECT MUFFLERAND SPARKAR-
RESTING SCREEN
zt
,#_lkWARNING: The muffler on this
product contains chemicals known to
the State of California to cause cancer.
As the unit is used, carbon deposits
build up on the muffler and spark ar-
resting screen, and must be removed
to avoid creating a fire hazard or af-
fecting engine performance.
Replace the spark arresting screen if
breaks occur.
CLEANING THE SPARK
ARRESTING SCREEN
Cleaning is required every 25 hours of
operation or annually, whichever
comes first.
15
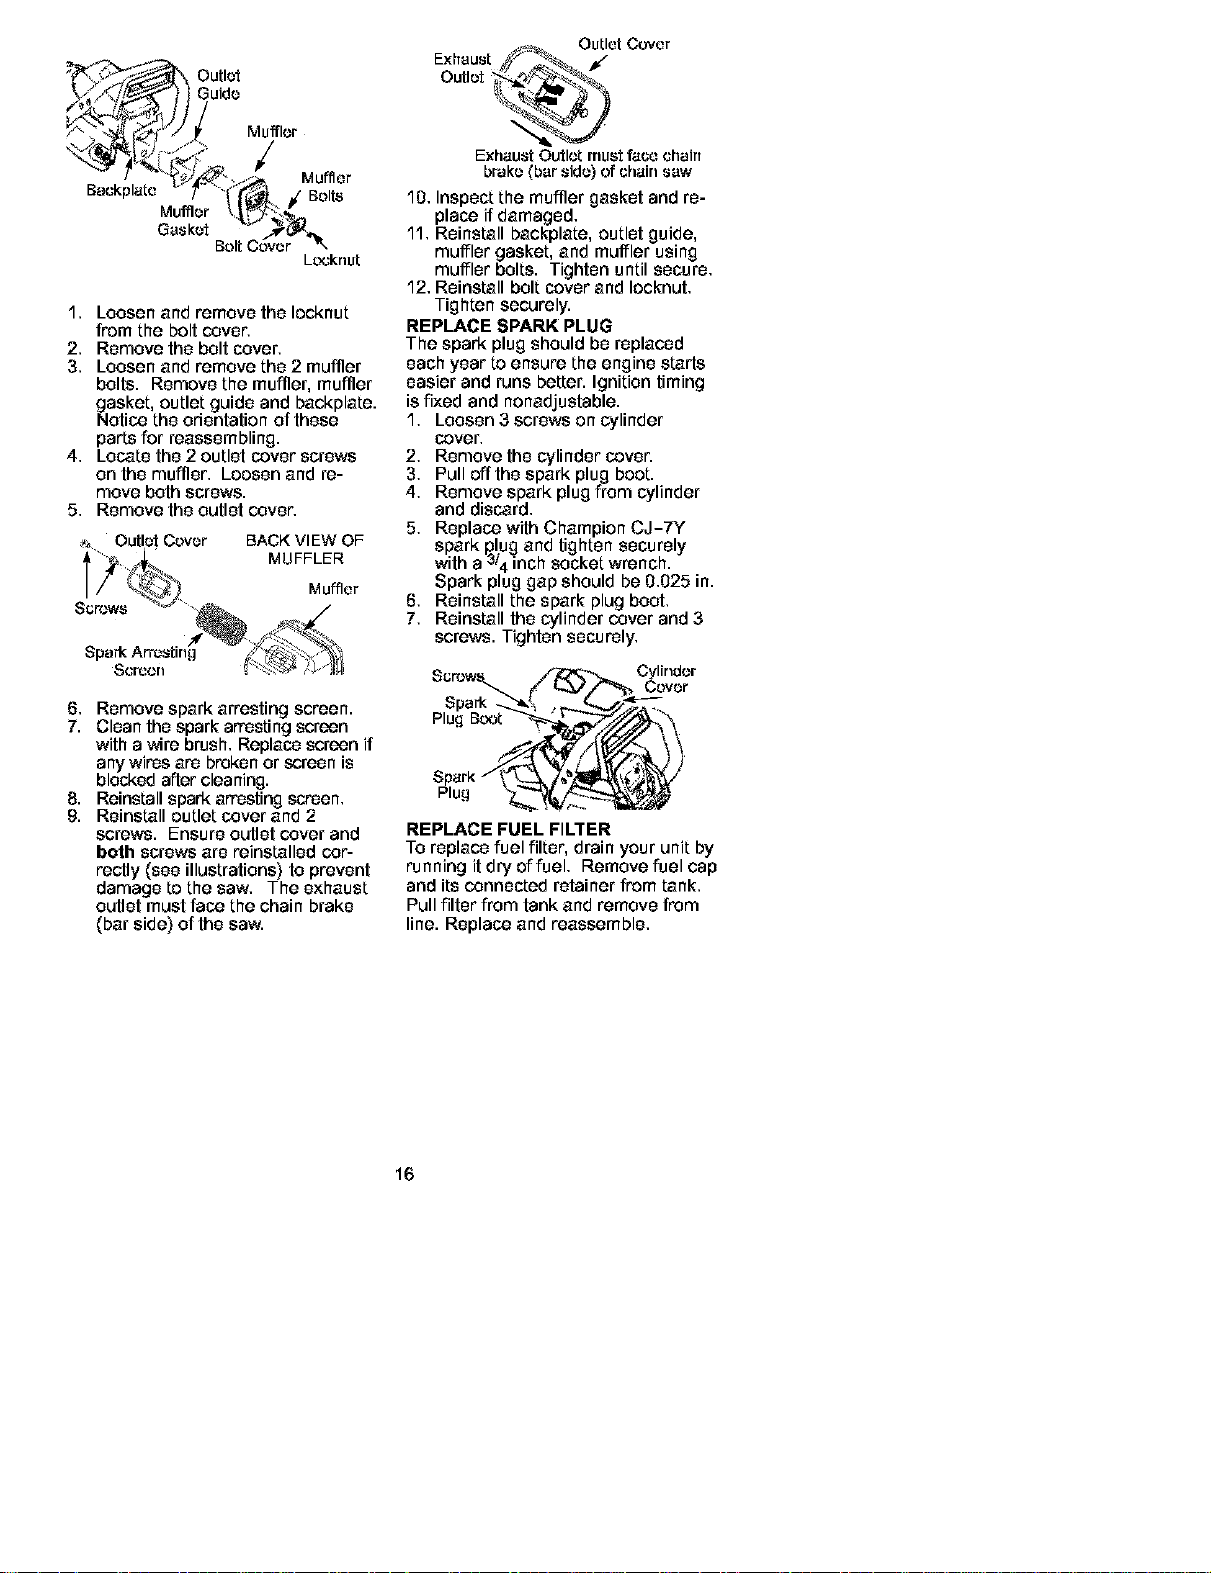
Outlet
Guide
Muffler
/
Backpl_te _' "'I'j"_.p/ Bolts
Muffler t,| _¢_ L,_
Bolt Cover ",
L_,_knut
"1, Loosen and remove the Iocknut
from the bolt cover,
2, Remove the bolt cover,
3, Loosen and remove the 2 muffler
bolts. Remove the muffler, muffler
gNasket,outlet guide and backplata.
otice the orientation of these
parts for reassembling.
4, Locate the 2 outlet cover screws
on the muffler, Loosen and re-
move both screws.
5, Remove the outlet cover,
Outlet Cover BACK Vl EW OF
MUFFLER
Muffler
6, Remove spark arresting screen.
7. Clean the spark arresting screen
with a wire brush, Replace screen if
any wires are broken or screen is
blocked after cleaning.
8. Reinstall spark arresting screen,
9. Reinstall outlet cover and 2
screws. Ensure outlet cover and
both screws are reinstalled cor-
rectly (see illustrations) to prevent
damage to the saw, The exhaust
outlet must face the chain brake
(bar side) of the saw.
.,_. Outlet Cover
Exhaust Outlet mustf_ce chain
brake (bar side) of chain saw
"10,Inspect the muffler gasket and re-
place if damaged,
"1"1,Reinstall backplate, outlet guide,
muffler gasket, and muffler using
muffler bolts. Tighten until secure,
"12,Reinstall bolt cover and Iocknut,
Tighten securely.
REPLACE SPARK PLUG
The spark plug should be replaced
each year to ensure the engine starts
easier and runs better. Ignition timing
is fixed and nonadjustable.
1, Loosen 3 screws on cylinder
cover,
2, Remove the cylinder cover.
3, Pull offthe spark plug boot.
4, Remove spark plug from cylinder
and discard,
5, Replace with Champion CJ-TY
spark plug and tighten securely
with a 3i4 inch socket wrench.
Spark plug gap should be 0,025 in.
6, Reinstall the spark plug boot,
7, Reinstall the cylinder cover and 3
screws. Tighten securely,
Piu,qB_t_ ['-,,_F_/_
REPLACE FUEL FILTER
TO replace fuel filter, drain your unit by
running it dry of fuel, Remove fuel cap
and its connected retainer from tank,
Pull filter from tank and remove from
line. Replace and reassemble,
16
_WARNING: Disconnect the spark
plug before performing maintenance,
service, or adjustments except for car-
buretor adjustments,
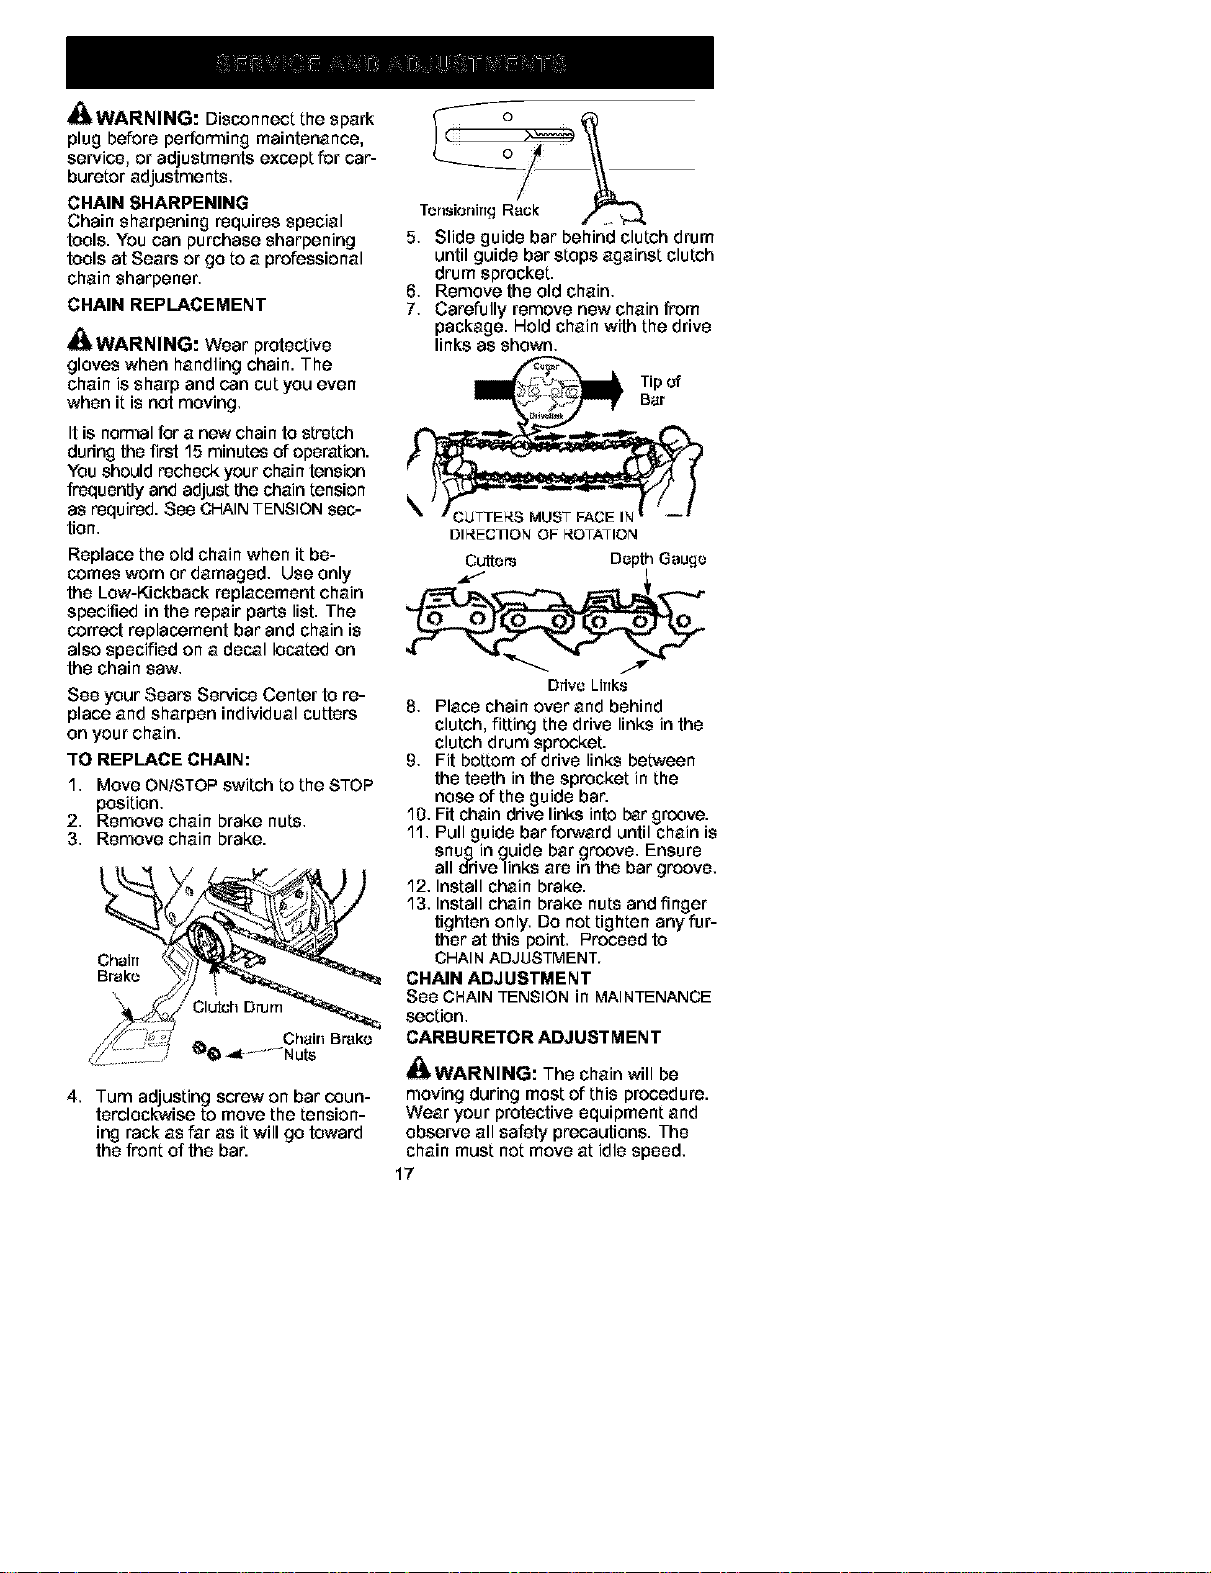
CHAIN SHARPENING
Chain sharpening requires special
tools. You can purchase sharpening
tools at Sears or go to a professional
chain sharpener,
CHAIN REPLACEMENT
WARNING: Wear protective
gloves when handling chain. The
chain is sharp and can cut you even
when it is not moving,
It is normal for a new chain to stretch
during the first 15 minutes of operation.
You should recheck your chain tension
frequently and adjust the chain tension
as required. See CHAINTENSIONsec-
tion,
Replace the eld chain when it be-
comes worn or damaged, Use only
the Low-Kickback replacement chain
specified in the repair parts list. The
correct replacement bar and chain is
also specified en a decal located on
the chain saw,
See your Sears Service Center to re-
place and sharpen individual cutters
on your chain,
TO REPLACE CHAIN:
1, Move ON/STOP switch tOthe STOP
position,
2, Remove chain brake nuts,
3, Remove chain brake.
Chairt
Bvak_
Clutch Drum
4, Turn adjusting screw on bar coun-
terclockwise to move the tension-
ing rack as far as it will go toward
the front of the bar.
5, Slide guide bar behind clutch drum
until guide bar stops against clutch
drum sprocket.
6, Remove the old chain,
7, Carefully remove new chain from
package. Hold chain with the drive
links as shown,
DIRECTION OF ROTATION
Driv_ Lirtk_
8, Place chain overand behind
clutch, fitting the drive links in the
clutch drum sprocket.
9, Fit bottom of drive links between
the teeth in the sprocket in the
nose of the guide bar.
10, Fit chain drive links into bar groove.
11, Pull guide bar forward until chain is
snug in guide bar groove, Ensure
all drive/inks are in the bar greove,
12, Install chain brake.
13, Install chain brake nuts and finger
tighten only, Do not tighten any fur-
ther at this point, Proceed to
CHAIN ADJUSTMENT.
CHAIN ADJUSTMENT
See CHAIN TENSION in MAINTENANCE
section,
CARBURETOR ADJUSTMENT
_WARNING: The chain will be
moving during most of this procedure.
Wear your protective equipment and
observe all safety precautions. The
chain must notmove at idle speed,
17
Thecarburetorhasbeencarefullyset
at the factory. AdJustments may be
necessary if you netice any of the fol-
lowing conditions:
• Chain moves at idle. See IDLE
SPEED-] adjusting procedure.
• Saw will not idle. See IDLE $PEED-T
adjusting procedure.
Idle Speed-T
Allow engine to idle. Ifthe chain
moves, idle is tee fast. If the engine
stalls, idle is tee slow. Adjust speed
until engine runs without chain move-
ment (idle tee fast) or stalling (idle tee
slow). The idle speed screw is located
in the area above the primer bulb and
is labeled T.
• Turn idle screw (T) cleckwise to in-
crease engine speed.
• Turn idle screw (T) ceunteroleckwise
to decrease engine speed.
If you require further assistance or are
unsure about performing this proce-
dure, contact your Sears Service Cen-
ter or call eur customer assistance
help line at 1-800-235-5878.
_II, WARNING: Perform the following
steps after each use:
• Allow the engine to ceel, and secure
the unit before storing or transport-
ing.
• Store chain saw and fuel in a well
ventilated area where fuel vapors
cannot reach sparks or open flames
from water heaters, electric motors or
switches, furnaces, etc.
• Store chain saw with all guards in
place and position chain saw so that
any sharp object cannot accidentally
cause injury.
• Store chain saw well out of the reach
of children.
SEASONAL STORAGE
Prepare your unit for storage at the
end of the season or if it will net be
used for 30 days er more.
If your chain saw is te be stored for a
period of time:
• Clean saw thoroughly befere storage.
• Store in a clean dry area.
• Lightly ell external metal surfaces
and guide bar.
• Oil the chain and wrap it in heavy pa-
per er cloth.
FUEL SYSTEM
Under FUELING ENGINE in the OPERA-
TION section of this manual, see mes-
sage labeled IMPORTANT regarding
the use of gasohol in your chain saw.
Fuel stabilizer is an acceptable alter-
native in minimizing the formation of
fuel gum deposits during storage. Add
stabilizer to the gasoline in the fuel
tank or fuel storage container. Follow
the mix instructions found on stabilizer
containers. Run engine at least 5 min-
utes after adding stabilizer.
Craftsman 40:1, 2-cycle engine oil (air
cooled) is especially blended with fuel
stabilizer. If you do not use this Sears
oil, you can add a fuel stabilizer to your
fuel tank.
ENGINE
• Remove spark plug and pour 1tea-
spoon ef +0:1, 2-cycle engine ell (air
coeled) through the spark plug open-
ing. Slowly pull the starter rope 8 to
10 times to distribute oil.
• Replace spark plug with new one of
recommended type and heat range.
• Clean air filter.
• Check entire unit for loose screws,
nuts, and bolts. Replace any dam-
aged, broken, or worn parts.
• At the beginning of the next season,
use only fresh fuel having the proper
gasoline to oil ratio.
OTHER
• Do not store gasoline from one sea-
son to another.
• Replace your gasoline can if it starts
to rust.
18
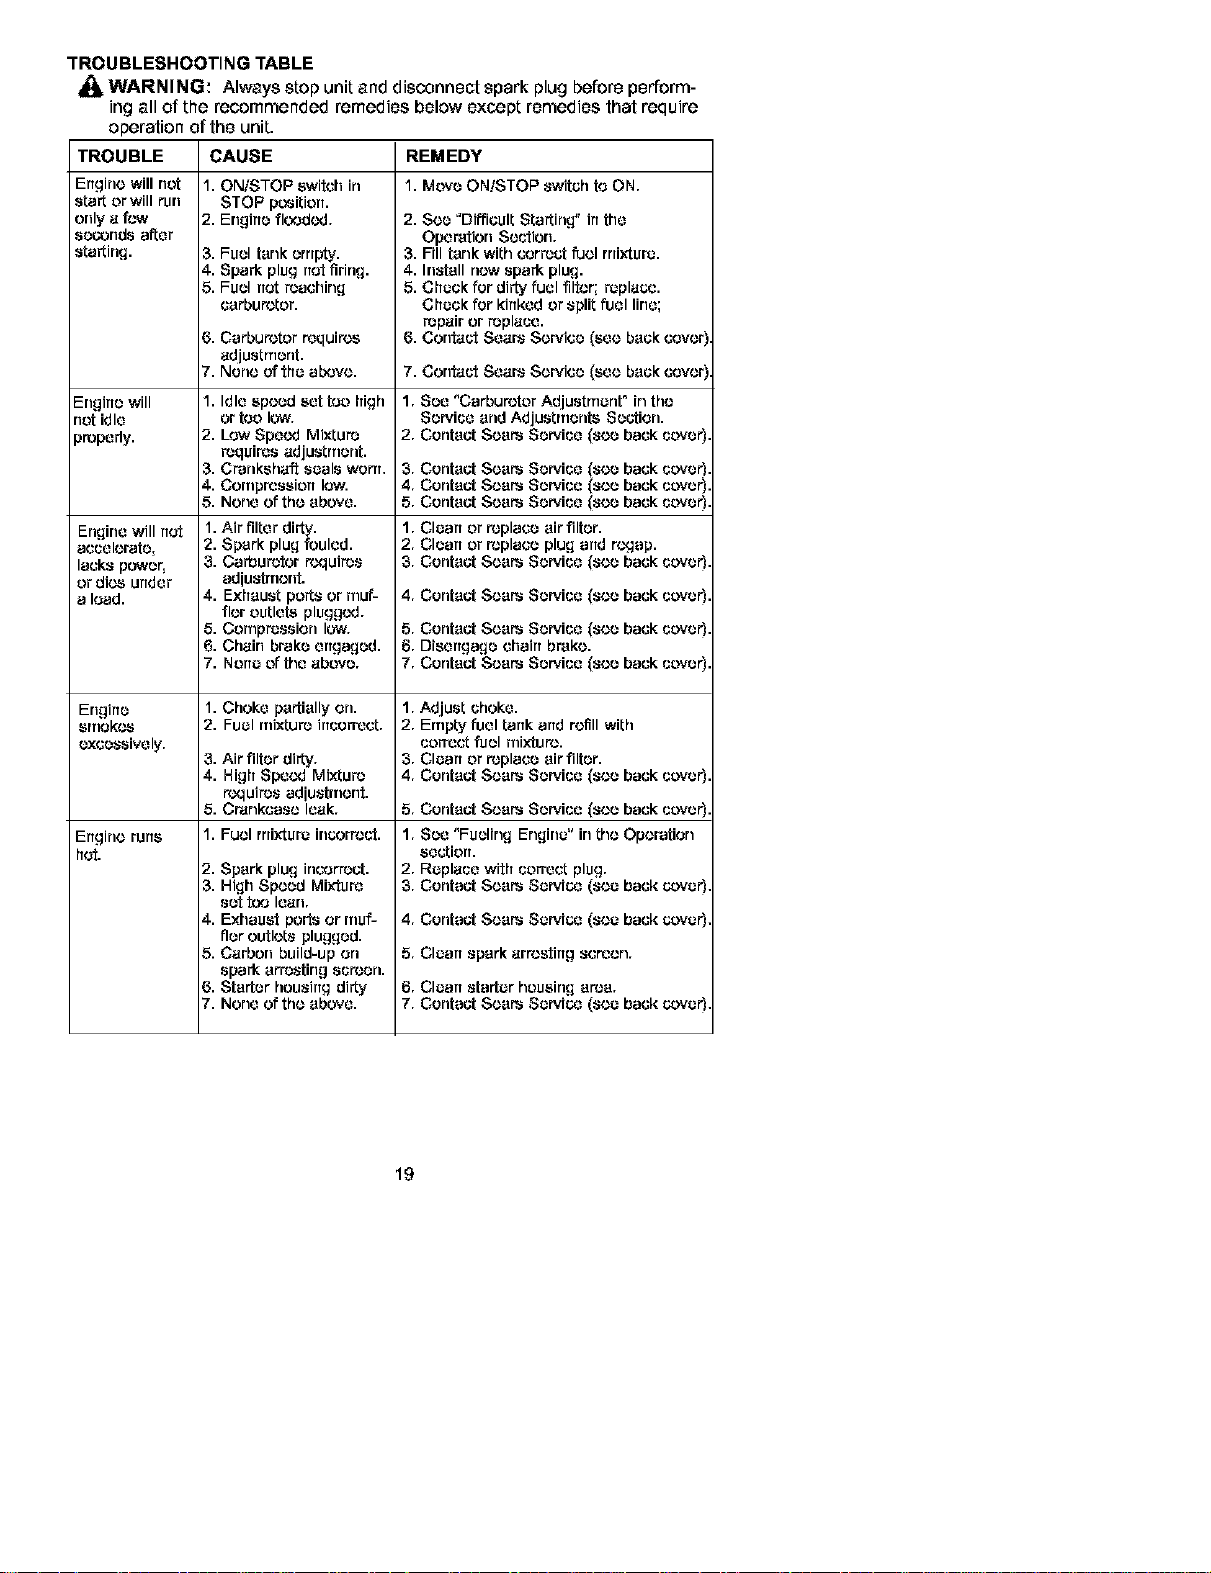
TROUBLESHOOTING TABLE
WARNING: Always slop unitand disconnect spark plug before perform-
ing all of the recommended remedies below except remedies that require
TROUBLE REMEDY
1. Move ON/STOP switch to ON.Errgino will not
start or will run
only _ low
seconds after
starting.
=-ngirre will
not idle
prepedy.
Enginewill rtol
acuelorate_
lacks power,
or di_ under
a load.
Engine
8rT1ok_
excessively.
ErTgino rurT_
hot.
operation of the unit.
CAUSE
1. ON/STOP switch in
STOP position.
2. Engirreflooded.
3. Fuel tank empty.
4. Spark plug not firing.
5. Fuel not reaching
carburotor.
6. Carburetor requiros
_djustrnent.
7. Neno of the aL_vo.
1. Idle spoed set too high
or too low.
2. Low Speed Mixture
requires _djustment.
3. Crankshaft seals WenT.
4. CornpressiorT low.
5. None of tho above.
1. Air filter dirty.
2. Spark plug fouled.
3. Carburetor requires
adiustrnorrt.
4. Exhaust ports or muf-
flor outlets plugged.
5. Compression low.
6. Chain brake engaged.
7. NOrTeof the _bove.
1. Choke partially on.
2. Fuel rrtixture irTuerFect.
3. Air filter dirty.
4. High Speed Mixture
requires adlustrnorrt.
5. Crankcaso le_k.
1. Fuol rnixtur_ incorrect.
2. Spark plug incorT_ct.
3. High Spoed Mixture
set t_ le_rl.
4. Exhaust ports or muf-
tier outlots plugged.
5. C_rbon build-up on
spark arresting sctoen.
6. Starter houslrtg dirty
7. None of tho above.
2. Sue "Difficult Starting" irtthe
Operation Suction.
3. Fill tank with correct fuol rrdxture.
4. Install now spark plug.
5. Check for dirty fuel flltor; repl_.
Check for kinked or split fuel line;
repair or replace.
6. Contact Se_rs Sowice (seo back eovor
T. Contact Se_rs Sowice (seo back eovor
1. See "Carburetor Adjustment" in tho
Service and Adjustments Section.
2. Contact Soars Service (sue back cover)
3. Contact Soars Service (sue back cover)
4. Contact Soars Service (sue back cover)
5. Contact Soars Service (sue back cover)
1. Clean or roplace air filter.
2. Clean or roplace plug and r_ap.
3. Contact Soars Service (sue back cover)
4. Contact Soars Service (sue back cover)
5. Contact Soars Service (sue back cover)
6. Disengage chain brako.
7. Contact Soars Service (sue back cover)
1. Adjust choke.
2. Empty fuel tank and refill with
CO.oct fuel mixtuto.
3. Clean or toplace air filter.
4. Contact Soars Service (sue back cover)
5. Contact Soars Service (sue back covert
1. See "Fueling Engine" in tho OpoFation
8ectiort.
2. Replace with CUrt'oct plug.
3. Contact Soars Servi_ (sue back cover)
4. Contact Soars Servi_ (sue back _ver)
5, Glean spark _rrostirtg sot'con.
6. Oleart starter housing aroa.
7. Contact Soars Servi_ (sue back cover)
19

TROUBLESHOOTING TABLE - Continued
TROUBLE
Oil inadequato
for bar and
chain
lubrication.
CAUSE
1. Oil tank empty.
2. 0il pump oroil filter
uK_,ged.
3. Guide bar oil hole
bl_,;ked.
REMEDY
1. Fill oil tank.
2. Contact Soars Service (8oe back cover)
3, Ramevo bar and clearT.
Chairt mayas at 1. Idle spec'd requiras 1. Set., "Carburator AdjustmertC in the
idle spoed, adjustment. Service arid Adjusbnents Section.
2. Clutch requiras repair. 2. Contact Soars Sarvice (soa back covar)
Chain dot_ not 1. ChairT torlsiorl t_ 1. Set.' "Chock Chain Tension" irTthe
move wherr en- tight. MaintormrTue Saurian.
girle is auceler- 2. Carburetor raquitt_ 2. Contact Soars Service (8oe back cover)
ate& adjustmertt.
3. Guide bar mils 3. Rapair or replace.
pinched.
4. Clutch slipping. & Contact Soars Service (soe back cover)
5r Chain brake erTgaged. 5r Disorlgage chain brake.
Chain clatters 1. Chairt tonsion incorract.
or cuts roughly.
2. Cuttats damaged.
3. ChairT worn.
4. Cutters dull, irnpreperly
sharporled, or depth
gauges too high.
5. Spreckot worrT.
6. ChairT installc'd
backwards.
1. See "Check Chairt Tonsion ° in the
Maintonartue Soution.
2. Contact Soars Service (8oe back cover)
3. Rasharpan or raplaue chain.
& See "ChairT Sharponing" in the
Service arid Adjustments Section.
5. Contact Soars Service (sac back cover)
& Install chain in right diroution.
ChairT stops 1. Chain cuttar tops not 1. See "ChairT Sharponing" in the
withirTthe cut. filc'd flat. Service arrd Adjustments Section.
2. Guide bar burred or 2. Rapair or replace guide bar.
bantu rails uneven.
3. Clutch slipping. 3. Contact Soars Service (soe back cover)
Chain cuts at 1. Cuttars darrlaged on 1. Set., "Chain SharpenirTg" irTthe
art anglo, ono sido. Service and Adjustments Section.
2. ChairT dull art one side. 2. See "ChairT Sharponing" in the
Service arid Adjustments Section.
3. Guide bar bont or worrT. 3. Raplaue guide bar.
If situations occur which are not covered in this manual, use care and good
judgement. If you need assistance, contact Sears Service or the CUSTOMER
ASSISTANCE HELPLINE at 1-800-235-5878.
YOUR WARRANTY RIGHTS AND OB-
LIGA'FIONS: The U,S, Environmental
Protection._zjency/CaliforniaAir IRe-
sources Board and Sears, Roebuck and
Co., US,A., are pleased to explain the
emissions control system warranty on
your year 2002-2004 small off-road en-
gine. In California, all new small off-road
engines must be designed, built, and
equipped to meet the State's stringent
anti-smog standards. Sears must war-
rant the emission control system on your
small off-road engine for the pefieds of
time listedbelow pro,iided there has
been no abuse, neglect, or improper
maintenance of your small off-road en-
gine engine. Your emission control sys-
tem includes parts such as the car'ouro-
for and the ignition system. Where a
warrantable condition exists, Sears will
repair your small off-road engine engine
at no cost to you. Expenses covered un-
der warranty include diagnosis, parts
and labor. MANUFACTURER'S WAR-
RANTY COVERAGE: Ifany emissions
related part on your engine (as listed un-
20
derEmissionsControlWarrantyParts
List) is defective or a dofsot in the mate-
dais or workmanship of the engine
causes ttmefailure of such an emission
related part, the part "willbe repaired or
replaced by Sears. OWNER'S WAR-
RAN'I'Y RESPONSIBILITIES: As ttme
small off-road engine engine owner, you
are responsible for ttmeperformance of
the required maintenance listed in your
instruction manual. Sears recommends
that you retain all receipts cevedng
maintenance on your small off-road en-
gine, but Sears cannot deny warranty
solely for the lack of receipts or for your
failure to ensure the performance of all
scheduled maintenance. As the small
off-road engine engine owmer, you
should be aware that Sears may deny
you warranty coverage if your small off-
read engine engine or a part of it has
failed due to abuse, neglect, improper
maintenance, unappreved modifications,
or the use of parts not made or ap-
proved by the original equipment
manufacturer. You are responsible for
presenting your small off-read engine to
a Sears authorized repair center as
soon as a problem exists. Warranty re-
pairs should be completed in a reason-
able arr_ountof time, eotto exceed 30
days. If you have any questions regard-
ing your warranty dghts and responsibili-
ties, you should contact your nearest
authorized service center or call Sears
at 1-800-469_4663. WARRANTY COM-
MENCEMENT DATE: The warranty pe-
dod begins on the date the small off-
read engine is porchssed. LENGTH OF
COVERAGE: This warranty shall be for
a period of two years from the initial date
of purchase. WHAT IS COVERED: RE-
PAIR OR REPLACEMENT OF PAR'IS.
Repair or replacement of any warranted
part will be perfom'_ed at no charge to
the owner at an approved Sears Service
Center. Ifyou have armyquestions re-
garding your warranty dghts and respon-
sibilities, you should contact your near-
est authorized service center or call
Sears at 1-800-469_4663. WARRANTY
PERIOD: Any warranted part which is
not scheduled for replacement as re-
quired maintenance, or which issched-
uled only for regular inspection to the
effect of _repair or replace as necessary"
shall be warranted for 2 years. Any war-
ranted part which is scheduled for re-
placement as required maintenance
shall be warranted for the period of time
up to ttmefirst scheduled replacement
pointfor that part. DIAGNOSIS: The
o_er shall not be charged for diagnos-
tic labor which leads to the determina-
tion that a warranted part is defective if
the diagnostic work is performed at an
approved Sears Service Center. CON-
SEQUENTIAL DAMAGES: Sears may
be liable for damages to other engine
components caused by ttmefailure of a
warranted part still under warranty.
WHAT IS NOT COVERED: All failures
caused by abuse, neglect, or improper
maintenance are not covered. ADD-ON
OR MODIFIED PARTS: The use of
add-ea or modified parts can be
grounds for disallov#=nga warranty claim.
Sears is not liable to cover failures of
warranted parts caused by the use of
add-on or modified parts. HOW TO
FILE A CLAIM: If you have any ques-
tions regarding your warranty dghts and
responsibilities, you should contact your
nearest authorized service center or call
Sears at 1-800-469_4663. WHERE TO
GET WARRANTY SERVICE: Warranty
services or repairs shall be provided at
all Sears Service Centers. Call
1-800-469_663. MAINTENANCE, RE-
PLACEMENT AND REPAIR OF EMIS-
SION RELATED PAR'IS: Any Sears ap-
proved replacement part used in the
perfom'_anceof any warranty mainte-
nancoor repair on emission related
partswill be provided without charge to
the owner ifthe part is under warranty.
EMISSION CONTROL WARRANTY
PARTS LIST: Carburetor, IgnitionSys-
tem: Spark Plug (covered up to mainte-
nancoschedule), Ignition Module, M_-
ller includingcatalyst. MAINTENANCE
STATEMENT: Timeowner is responsible
for the perfom'_anceof all required main-
tenanco as defined in the instruction
manual.
This engine is certified to be emissions compliant for the following use:
[] Moderate (50 hours)
[] Intermediate (125 hours)
[]Extended (300 hours)
21
Declaraci6ndeGarantia 24 AImacenamiento 44
ReglasdeSeguridid 24 TablaDiagn6stica 45
Montaje 29 Declaraci6ndeEmision 47
Uso 30 ListadePiezas 22
Mantenimiento 38 RepuestosyEncargosContratapa
ServicioyAjustes 42
GARANTIA COMPLETA DE UN ANO PARA LA SIERRA DE CADENA A
GASOLINA CRAFTSMAN®
Por un aSo a contar de la fecha de compra, siempre que esta Sierra de Cadena a
Gasolina Craftsman est6 mantenida, lubricada y ajustada de acuerdo al manual
de instrucciones, Sears reparar_ gratuitamente cualquier defecto de materiales o
mano de obra.
Esta garantia excluye la barra, la cadena, la bujia y el filtro de aire, que son
articulos fungibles y se gastan durante el funcionamiento normal.
Si se usa esta Sierra de Cadena a Gasolina para prop6sitos comerciales o de
alquiler, esta garantia tendr_ validez de 30 dias contados a partir de la fecha de
compra.
EL SERVICIO BAJO GARANTIA ESTA A SU DISPOSICION CON SOLO DEVOLVER LA
SIERRA DE CADENA AL TIENDA DE SEARS O CENTRO DE SERVIC]O SEARS MAS
CERCANO EN LOS ESTADOS UNIDOS.
Esta garantia le confiere derechos juridicos especfficos; adem_a ud. podr_ tener
otros derechos que var_an entre estados.
Sears, Roebuck and Co., D/817 WA, Hoffman Estates, IL 60179
_ ADVERTENCIA: Desconecte
siempre el cable de la bujia al reparar
el aparato, excepto en el caso de
ajustes al carburador. Debido a que
]as sierras de cadena son instrumen-
tos para cortar madera a alta veloci-
dad, deben observarse precauciones
de seguridad especiales para reducir
el riesgo de accidentes. El uso des-
cuidado o indebido de esta herramien-
ta puede causar graves heridas.
PIENSE ANTES DE PROCEDER
* Limite el uso de la sierra a aquellos
usuarios adultos que comprendan y
puedan implementar todas las pre-
cauciones, reglas de seguridad e in-
strucciones de uso que se encuen-
tran en este manual.
24
Protecci6n de Oidos Casco Duro
Protecci6n
Ropa Ajustada Guantes
• de Uso
Industrial
Zapatos de
Seguridad _= de Seguridad
"_m41N
Use equipo protector. Siempre use
calzado de seguridad con puntas de
acero y suelas anti-deslizantes; ropa
ajustada al cuerpo; guantes gruesos
de uso industrial anti-deslizantes;
protecci6n de ojos tales como gafas
de seguridad gue no se la cara; cas-
co duro aprobado; y barrera de soni-
do (tapones de o(do u orejeras anti-
sonido) para proteger la audici6n.
Los que usan sierras de fuerza ha-
bitualmente deber_n hacerse revisar
]a audici6n frecuentemente ya que el
ruido de las sierras de cadena
puede daSar los oidos.
• Mantengaelcabelloporencimadel
niveldeloshombros.Nodesgastela
ropasueltaojoyeria;puedenenre-
darseenlaspiezasm6viles.
• Mantengatodaslaspartesdecuer-
poalejadas de la cadena siempre
que el motor est6 en funcionamiento.
• Mantenga a los niSos, espectadores
y animales a una distancia minima
de 10 metros (30 pies) del _rea de
trabajo o cuando est_ haciendo ar-
rancar el motor.
• No levante ni opere las sierras de
cadena cuando est_ fatigado, enfer-
mo, ansioso o si ha tomado alcohol,
drogas o remedios. Es inprescindible
que ud. est_ en buenas condiciones
fisicas y alerta mentalmente. Si ud.
sufre de cualquier condici6n que
pueda empeorar con el trabajo ar-
duo, ases6rese con su m6dico.
• No ponga en marcha la sierra sin
tener un _rea de trabajo despejada,
una superficie estable para parase y,
si est_ derrubando _rboles, un carol-
no predeterminado de retroceso.
USE LA SIERRA OBSERVANDO TO-
DOS LOS PROCEDIMIENTOS DE
SEGURIDAD
• Mantenga las dos manos en las man-
ijas siempre que el aparato est6 en
marcha. El uso del aparato con una
sola mano puede causar graves heri-
das al usuario, a los asistentes o a los
especadores. Las sierras de cadena
est_n dise5adas para que se las use
con las dos manos en todo momento.
• Haga uso de la sierra de cadena Oni-
camente en lugares exteriores bien
ventilados.
• No haga uso de la sierra desde las
escaleras port,tiles ni los _rboles.
• Asegt_rese de que la cadena no vaya
a hacer contacto con ningQn objeto
antes de poner en marcha el motor.
Nunca intente hacer arrancar la sierra
con la barra guia dentro de un corte.
• No aplique presi6n a la sierra al final
de los cortes. Aplicar presi6n puede
hacer uue pierda el control al com-
pletarse el corte.
• Pare el motor antes de apoyar la
sierra en ningt]n lado.
• Cuando traslade la sierra en la
mano, h_galo enicamente con el mo-
tor parado. LI6vela con el silenciador
apartado del cuerpo y la barra y ca-
dena hacia atr_s, con la barra de
preferencia cubierta por una funda.
• No ponga en funcionamiento la sier-
ra de cadena si est_ daSada, incor-
rectamente ajustada, o si no est_ ar-
mada completa y seguramente.
Siempre cambie el barre, cadena,
protector de mano, freno de cadena,
o el otras piezas immediatamente si
da_ado, roto, o se sale por cualquier
motivo.
MANTENGA LA SIERRA EN BUE*
NAS CONDICIONES DE FUNCIONA*
MIENTO
• Lleve la sierra de cadena a un pro-
veedor de servicio autorizado para
que haga todo servicio menos aquel-
los procedimientos listados en la
secci6n de MANTENIMIENTO de este
manual.
• AsegDrese de que la cadena se de-
tenga por completo cuando se suelta
el gatillo. Para hacer correcciones,
vea los AJUSTES AL CARBURADOR.
• Mantenga las manijas secas, limpias
y libres de aceite o de mezcla de
combustible.
• Mantenga las tapas y los fijadores
bien fijos.
• Componentes de repuesto que no
concuerden con las piezas originales
o la remoci6n de dispositivos de segu-
ridad podria causar daffos al aparato y
accidentes al usuario o a especta-
dores. Use exclusivamente los acce-
sorios y repuestos Craftsman recom-
endados. Nunca modifique la sierra.
• Mantenga su sierra de cadena con
cuidado.
• Mantenga la herramienta afilada y
]impia para mejor funcionamiento y
mayor seguridad.
• Siga todas las instrucciones para lu-
bricaci6n y cambio de accesorios.
• Desconecte la sierra de cadena del
recurso de energia cuando no se en-
cuentre en uso, antes de efectuar
servicio, y al cambiar accesorios,
como Io es la cadena de la sierra y
el protector.
• Inspeccione todas las piezas por si
hubiera daSos. Antes de continuar
con el uso del aparato; el protector u
otra pieza que se encuentre daffada
deber_ ser inspeccionada cuidado-
samente para determinar si pueden
usarse de forma apropiada y para
vierificar si puede efectuar el funcio-
namiento para el cueal fue diseffada.
Inspeccione el alineamiento de las
piezas movibles, piezas movibles
25
que se encuentren atascadas, la
ruptura de piezas, montura y cualqu-
ier otra condici6n que pueda afectar
el uso del aparato. El protector o cu-
alquier otra pieza que se encuentre
dafiada deber_ ser reparada apro-
piadamente o deber_ ser reemplaza-
da por un Centro de Servicio Sears,
a no ser que se indique de otra for-
ma en este manual de instrucciones.
• AI no encontrarse en uso, las sierras
de cadena deber_n almacenarse en
un lugar seco, en un lugar alto o bajo
Ilave, fuera del alcance de los nifios.
• AI almacenar la sierra, use una fun-
da o un estuche de carga.
MANEJE EL COMBUSTIBLE CON
EXTREMO CU|DADO
• No fume mientras trabaja con el
combustible ni cuando est_ hacien-
do uso de la sierra.
• Elimine todas las posibles fuentes de
chispas o llamas en las _reas donde
se mezcla o vierte el combustible.
• Mezcle y vierta el combustible afuera
y use siempre recipiente aprobado
para combustibles y marcado como
tal. Limpie todos los derrames de
combustible antes de poner el apa-
rato en march&
• AI6jese a por 1omenos 3 metros (10
pies) del lugar de abastecimiento
antes de poner el rotor en march&
• Apaque el motor y deje que la sierra
se enfrie en un lugar libre de sub-
stancias combustibes y no sobre ho-
jas secas, paja, palel, etc. Retire la
tapa lentamente y reabastezca el
aparato.
• Guarde el aparato y el combustible
en un espacio fresco, seco y bien
ventilado donde los vapores del
combustible no puedan entrar en
contacto con dchispas ni llamas
abiertas provenientes de termotan-
gues, motores o interruptores el6ctri-
cos, calefactores centrales, etc.
PROTEJASE CONTRA LAS
RECULADAS
Ud. debe seguir todas las precau-
clones e instrucciones de seguridad
para ayudar e evitar las reculadas y
]as demos fuerzas que pueden causar
graves heridas.
Despeje el Area de Trabajo
ADVERTENClA: Evite reculada
]e pueden causar graves heridas. Re-
culada es el movimiento hacia el
frente, hacia atr_s o r_pidamente ha*
cia adelante, esto puede ocurrir cuan-
do la punta de la barra guia de la sier-
ra de cadena entra en contacto con
cualquier objeto como puede ser otra
rama o tronco, o cuando la madera se
cierra y atasca mientras se hace el
corte. El entrar en contacto con algQn
objeto extrafio a la madera le puede
causar al usuario la p6rdida del control
de la sierra de cadena.
• La Reculada Rotacional puede
acontecer cuando la cadena en mo-
vimiento entra en contacto con algQn
objeto en la parte superior de la pun-
ta de la barra guia puede causar que
]a cadena entre al material y se de-
tenga por un instante. El resultado
es una reacci6n inversa, a velocidad
de rel_mpago, que hace recular la
barra guia hacia arriba y hacia atr_s
hacia el usuario.
• La Reeulada per Ataseo acontecen
cuando la madera se cierra y atasca
]a cadena en movimiento en el corte
a Io largo de la parte superior de la
barra guia y la cadena se detiene re-
pentinamente. Esta detenci6n re-
pentina de la cadena tiene como re-
sultado una inversi6n de la fuerza de
]a cadena usada para cortar madera
y causa que la sierra se mueva en
sentido opuesto al de la rotaci6n de
]a cadena. La sierra directamente
hacia atr_s en direcci6n al usuario.
• La Reculada pot Impulsi6n puede
acontecer cuando la cadena en mo-
vimiento entra en contacto con algt]n
objeto extrafio a la madera en el
corte a Io largo de la parte inferior de
]a barra guia y la cadena se detiene
repentinamente, Esta detenci6n re-
pentina de la cadena tira de la sierra
adelante y lejos del usuario y podria
hacer f_cilmente al usuario perder el
control de la sierra.
26

REDUZCA LAS PROBABILIDADES
DE RECULADA
• Est6 consciente de la posibilidad de
reculada. Teniendo una buena com-
prensi6n b_sica de la reculada, ud.
podr_ reducir el elemento de sorpre-
sa que contribuye a los accidentes.
• Nunca permita que la cadena en mo-
vimiento toque ningt]n objeto en la
punta de la barra guia.
• Mantenga el _rea de trabajo libre de
obstrucciones como por ejemplo
otros _rboles, ramas, piedras, cer-
cas, tocones, etc. Elimine o evite
toda obstrucci6nes comp por ejem-
plo otros _rboles, ramas, piedras,
cercas, tocones, etc. Elimine o evite
toda obstmcci6n que la cadena pue-
da tocar mientras est_ cortando.
• AI cortar una ram& no deje la barra
guia entrar en contacto con otra
rama o otros objetos alrededor.
• Mantenga la sierra afilada y con la
tensi6n correct& Las cadenas con
poco file o flo asincrementan la pro-
bab dad de recu ada. S ga as n-
strucciones del fabricante para afilar
y efectuar mantenimiento de la cade-
na. Verifique la tensi6n a intervalos
regulares con el motor parado, nun-
ca en marcha. AsegDrese de que las
tuercas de la freno de cadena est6n-
parado, nunca en marcha.
AsegDrese de que las tuercas de la
freno de cadena est6n ejustadas fir-
memente.
• Empiece y efectDe la totalidad de
cada corte con el acelerador a fort-
do. Si la cadena se est_ moviendo a
una velocidad menor que la m_xima,
hay m_s probabilidad de que la sier-
ra recule.
• Use cuidado extremo al entrar de
nuevo en un corte ya empezado.
• No intente hacer cortes empezando
con la punta de la barra (cortes de
taladro).
• Tenga cuidado con troncos que se
desplazan y con las demos fuerzas
que podrian cerrar un corte y apretar
la cadena o bien caer sobre ella.
• Use la barra Guia Reducidora de
Reculadas y la Cadena Minimizado-
ra de Reculadas recomendadas
para su sierra.
Evite la Reculada por Presibn:
• Mant6ngase siempre al tanto de
toda situaci6n uobstrucci6n que
pueda apretar la cadena en la parle
superior de la barra o detener la ca-
dena de cualquier forma.
• No corte m_s que un tronco a la vez.
• AI seccionar troncos con corte as-
cendiente, no tuerza la sierra al sa-
car la barra del corte.
Evite la Impulsibn:
• Empiece los cortes siempre con el
motor acelerado a rondo y la caja de
la sierra apoyada en la madera.
• Use cuSas de pl_stico o de madera,
no de metal, para mantener abierto
el corte.
MANTENGA EL CONTROL
P&rese hacia la izquierda de la sierra.
Nunca invierta
la posici6n d_
las manos
4 _i Codo rigido
El pulgar por debajo de la manija
• Sostenga fuertemente la sierra con
]as dos manos mientras est6 en mar-
cha el motor y no afloje. Sostener fir-
memente puede neutralizar las recu-
]adas y ayudade a mantener el
control de la sierra. Sostenga la
manija delantera con la mano iz-
quierda, colocando el pulgar debajo
de la manija y rodeando la manija
con los dedos. Mantenga la mano
derecha envolviendo totalmente la
mani a trasera, sea ud. derecho o
zurdo. Mantenga e brazo zqu erdo
totalmente extendido con el codo
fijo.
• Coloque la mano izquierda en la
manija delantera, de modo que
puede en linea recta con la mano
derecha en la manija trasera, cuan-
do est6 haciendo cortes de seccio-
namiento. Nunca invierta la posici6n
de las manos para ningt]n tipo de
corte.
• P_rese con el peso distribuido igual-
mente entre los dos pies.
• No se extienda excesivamente, la
sierra puede impulsarlo o empujarlo
y ud. puede perder el quililibrio y el
control de la sierra.
• No corte arriba del nivel de los hom-
bros, puedsto que toma dificil man-
tener el control de la sierra.
27
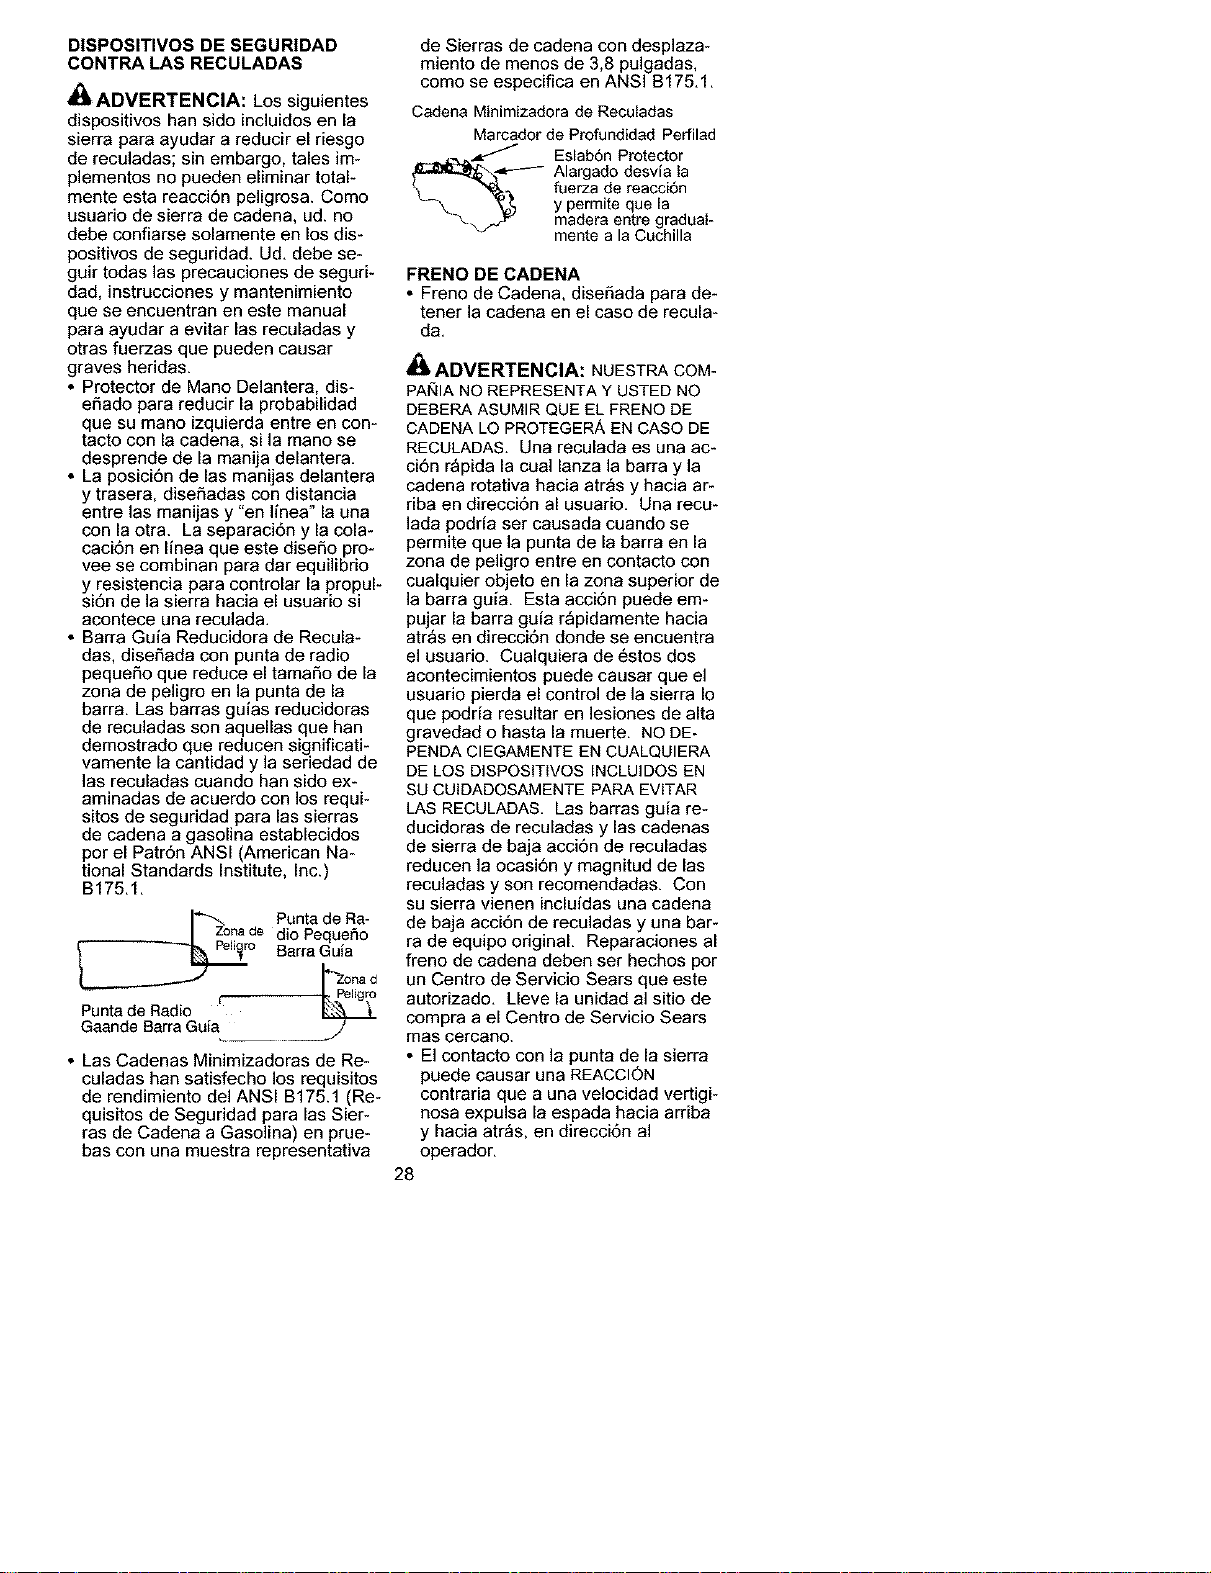
DISPOSITIVOS DE SEGURIDAD
CONTRA LAS RECULADAS
ADVERTENCIA: Los siguientes
dispositivos han side incluidos en la
sierra para ayudar a reducir el riesgo
de reculadas; sin embargo, tales im-
plementos no pueden eliminar total-
mente esta reacci6n peligrosa, Come
usuario de sierra de cadena, ud. no
debe confiarse solamente en los dis-
positivos de seguridad. Ud. debe se-
guir todas las precauciones de seguri-
dad, instrucciones y mantenimiento
que se encuentran en este manual
para ayudar a evitar las reculadas y
otras fuerzas que pueden causar
graves heridas.
* Protector de Mano Delantera, dis-
eSado para reducir la probabilidad
que su mano izquierda entre en con-
tacto con la cadena, si la mane se
desprende de la manija delantera.
. La posici6n de las manijas delantera
y trasera, diseSadas con distancia
entre las manijas y "en linea" la una
con la otra. La separaci6n y la cola-
caci6n en linea que este diseSo pro-
vee se combinan para dar equilibrio
y resistencia para controlar la propul-
si6n de la sierra hacia el usuario si
acontece una reculada.
. Barra Guia Reducidora de Recula-
das, diseSada con punta de radio
pequeSo que reduce el tamaSo de la
zona de peligro en la punta de la
barra. Las barras guias reducidoras
de reculadas son aquellas que ban
demostrado que reducen significati-
vamente la cantidad y la seriedad de
las reculadas cuando han side ex-
aminadas de acuerdo con los requi-
sitos de seguridad para las sierras
de cadena a gasolina establecidos
por el Patr6n ANSI (American Na-
tional Standards Institute, Inc.)
B175.1.
_d Puntade Ra-
e dio Pequef_o
BarraGuia
_ZonadZona d
Puntade Radio r
Gaande BarraGuia
4__ _/"
* Las Cadenas Minimizadoras de Re-
culadas hart satisfecho los requisites
de rendimiento del ANSI B175.1 (Re-
quisitos de Seguridad para las Sier-
ras de Cadena a Gasolina) en prue-
bas con una muestra representativa
de Sierras de cadena con desplaza-
miento de menos de 3,8 pulgadas,
como se especifica en ANSI B175.1.
Cadena Minimizadora de Reculadas
Marcador de Profundidad Perfilad
_..____ Eslabdn Protector
Alargado desvia la
fuerza de reacci6n
y permite que la
madera entre gradual-
mente a la Cuchilla
FRENO DE CADENA
° Freno de Cadena, dise_ada para de-
tener la cadena en el caso de recula-
da.
,_ADVERTENClA: NUESTRA COM-
PAI_IIANO REPRESENTA Y USTED NO
DEBERA ASUMIR QUE EL FRENO DE
CADENA LO PROTEGERA EN CASe DE
RECULADAS. Una reculada es una ac-
ci6n r_pida la cual lanza la barra y la
cadena rotativa hacia atr_s y hacia ar-
riba en direcci6n al usuario. Una recu-
lada podria ser causada cuando se
permite que la punta de la barra en la
zona de peligro entre en contacto con
cualquier objeto en la zona superior de
la barra guia. Esta acci6n puede em-
pujar la barra guia r_pidamente hacia
atr_s en direcci6n donde se encuentra
el usuario. Cualquiera de 6stos dos
acontecimientos puede causar que el
usuario pierda el control de la sierra Io
que podria resultar en lesiones de alta
gravedad o hasta la muerte. NO DE-
PENDA ClEGAMENTE EN CUALQUIERA
DE LOS DISPOSlTIVOS INCLUIDOS EN
SU CUIDADOSAMENTE PARA EVITAR
LAS RECULADAS. Las barras guia re-
ducidoras de reculadas y las cadenas
de sierra de baja acci6n de reculadas
reducen la ocasi6n y magnitud de las
reculadas y son recomendadas. Con
su sierra vienen incluidas una cadena
de baja acci6n de reculadas y una bar-
ra de equipo original. Reparaciones al
freno de cadena deben ser hechos per
un Centro de Servicio Sears que este
autorizado. Lleve la unidad al sitio de
compra a el Centro de Servicio Sears
mas cercano.
* El contacto con la punta de la sierra
puede causar una REACClON
contraria que a una velocidad vertigi-
nosa expulsa la espada hacia arriba
y hacia atr_s, en direcci6n al
operador.
28
• Si la cadena queda atrapada per la
parte superior de la espada, 6sta
puede rebotar bruscamente hacia el
operador.
• Cualquiera de estas dos reacciones
puede provocar la p6rdida del con-
trol de la motosierra y causar una
grave lesi6n. No confie exclusiva-
mente en los dispositivos de seguri-
dad que incorpora su sierra.
AVISO DE SEGURIDAD: El estar ex-
puesto alas vibraciones a trav6s del
uso prolongado de herramientas de
fuerza a gasolina puede causar daSos
a los vases sanguineos o a los nervios
de los dedos, las manes y las coyuntu-
ras en aquellas personas que tienen
propensidad a los trastomos de la cir-
culaci6n o alas hinchazones anor-
males. El uso prolongado en tiempo
frio ha side asociado con daSos a los
vases sanguineos de personas que
por otra parte se encuentran en per-
fecto estado de salud. Si ocurren
sintomas tales come el entumecimien-
to, el dolor, la falta de fuerza, los cam-
bios, en el color o la textura de la piel o
falta de sentido en los dedos, las man-
os o las muSecas, deje de usar la
m_quina inmediatamente y procure
atenci6n m6dica. Los sistemas de
anti-vibraci6n no garantizan que se
eviten tales problemas. Los usuarios
que hacen uso continuo y prolongan-
do de las herramientas de fuerza de-
ben fiscalizar atentamente su estado
fisico y el estado del aparato.
FRENO DE CADENA: Siesta sierra
ha de usarse para el tumbado comer-
cial de _rboles, un freno de cadena se
requiere y no ser_ quitado ni ser_ lisia-
do de otra manera conformarse con
las Regulaciones Federales del OSHA
para el tumbado comercial de _rboles.
REJILLA ANTICHISPA: Su sierra
viene equipada con silenciador limita-
dor de temperatura y con rejilla anti-
chispa que cumple los requisitos de
los C6digos de California 4442 y 4443.
Todas las tierras forestadas federales,
m_s los estados de California, Idaho,
Maine, Minnesota, Nueva Jersey,
Washington y Oregbn, requieren por
ley que muchos motores de combus-
ti6n interna est6n equipados con rejilla
antichispa. Si usted usa una sierra de
cadena en un estado y otra Iocalidad
deride existen tales reglamentos,
usted tiene la responsabilidad juridica
de mantener estas piezas en correcto
estado de funcionameinto. De Io con-
trario, estar_ en infraccibn de la ley.
Refiera a la carta de RESPONSABILIDA-
DES DEL USUARIO en la secci6n del
MANTENIMIENTO.
PADRONES: Este sierra de cadena
consta en la lista de Underwriters Lab-
oratories, Inc. de acuerdo a los Requi-
sitos Nacionales de Seguridad Esta-
dounidenses para Sierras de Cadena
a Gasolina (ANSI B175.1-2000).
Z'A
nADVERTENCIA: Antes de usar
la sierra de cadena, asegure todos los
fijadores se encuentren bien ajusta-
dos.
CONTENIDO DE LA CAJA
Use la siguiente lista para verificar el
contenido:
Modelo 358.360880
, Sierra de cadena (completamente
armada)
Herramienta de ajuste de la cadena
Aceite de motor de 2-ciclos
Estuche para transporte
Cadena adicional
Guantes
Transportador de liSos
Protecci6n para los oidos
Barra y cadena lubricaci6n
Verifique las piezas en caso de averia.
No use piezas que se encuentren
daSadas.
Si necesita ayuda, faltan piezas o en-
cuentra piezas daSadas, favor Ilamar
al 1-800-235-5878.
AVISO: Es normal oir el golpeteo del
filtro de combustible en el tanque
vacion.
Su aparato ha sido puesto a prueba en
la f_brica y se le ha ajustado con preci-
si6n el carburador. Como resuitado, es
posible que se sienta un olor a gasolina
o gue se encuentre una gota de residuo
de aceite o combustible en el silenciador
al desempacar el aparato.
MONTAJE
El aparato viene completamente arma-
do y no hay necesidad de montaje,
29
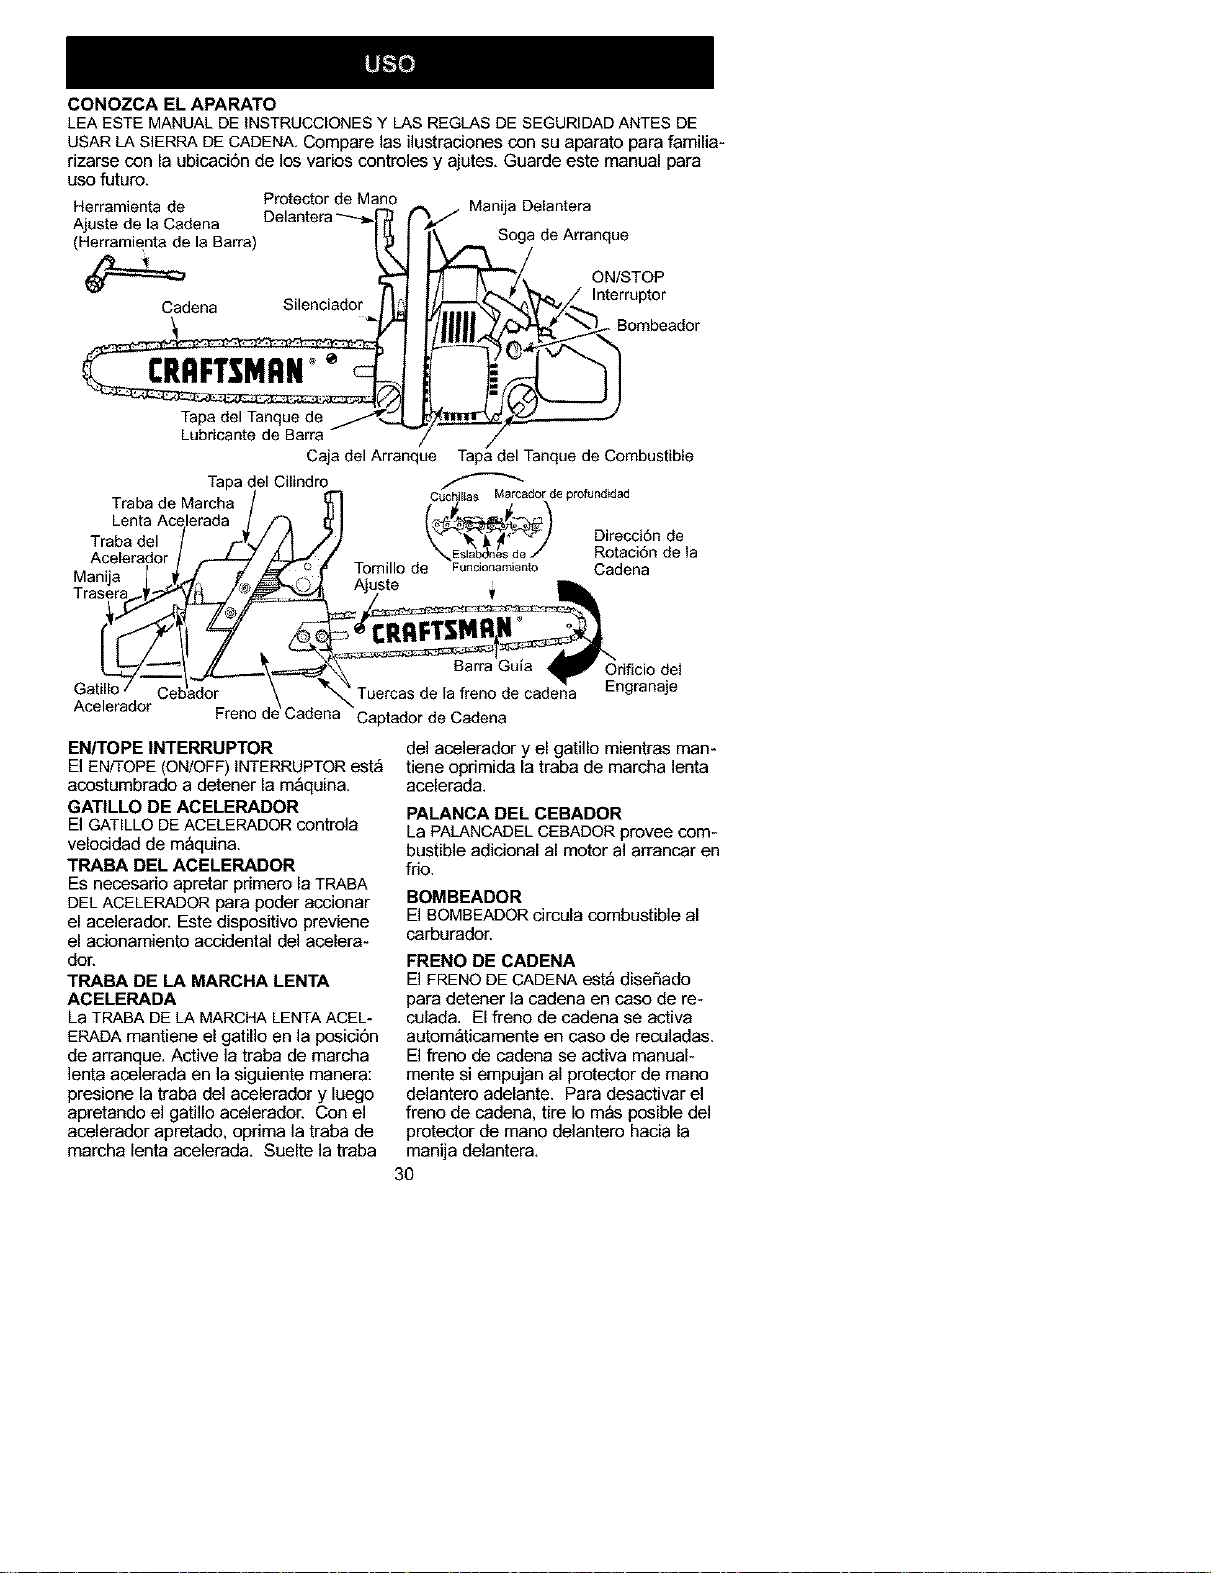
CONOZCAELAPARATO
LEAESTE MANUALDE INSTRUCCIONESY LAS REGLASDE SEGURIDADANTES DE
USAR LA SIERRA DE CADENA. Compare las ilustraciones con su aparato para familia-
rizarse con la ubicaci6n de los varios controles y ajutes, Guarde este manual para
uso futuro.
Herramienta de Protector de Mano Manija Delantera
Ajuste de la Cadena Delantera _---_
(Herramienta de la Barra) ! Soga de Arranque
ON/STOP
Tapa del Tanque de /,_
Lubricante de Barra "
Caja del Arranque Tape del Tanque de Combustible
EN/TOPE INTERRUPTOR
El ENFFOPE(ON/OFF)INTERRUPTORest_
acostumbrado a detener la m_quina.
GATILLO DE ACELERADOR
El GATILLODEACELERADOR controla
velocidad de m_quina.
TRABA DEL ACELERADOR
Es necesario apretar primero la TRABA
DEL ACELERADORpara poder accionar
el acelerador. Este dispositivo previene
el acionamiento accidental del acelera-
dot.
TRABA DE LA MARCHA LENTA
ACELERADA
La TRABA DE LA MARCHALENTAACEL*
ERADA mantiene el gatillo en la posici6n
de arranque. Active la traba de marcha
lenta acelerada en la siguiente manera:
presione la traba del acelerador y luego
apretando el gatillo acelerador. Con el
acelerador apretado, oprima la traba de
marcha lenta acelerada. Suelte la traba
del acelerador y el gatillo mientras man-
tiene oprimida la traba de marcha lenta
acelerada.
PALANCA DEL CEBADOR
La PALANCADELCEBADORprovee com-
bustible adicional al motor al arrancar en
frio.
BOMBEADOR
El BOMBEADORcircula combustible al
carburador.
FRENO DE CADENA
El FRENO DECADENA est_ diseSado
para detener la cadena en caso de re-
culada. El freno de cadena se activa
autom_ticamente en caso de reculadas.
El freno de cadena se activa manual-
mente si empujan al protector de mano
delantero adelante. Para desactivar el
freno de cadena, tire Io m_s posible del
protector de mano delantero hacia la
manija delantera.
3O
Tapa del Cilindro
Traba de Marcha _ [Cuc_,ilias M_rcadordeprofundidad
Lenta Acelerada /m ff I !_¢f_3_/
/ / /_ _' t \'_'_'_J'_J Direcci6n de
Traba del ,.
Aceerador / _ ' LL.// _Es_b_'nersde/" Rotacion de la
M hi' r I [ _ _-_ff Tomillo de Funcionamiento Cadena
a Ja y. A'u
Get i°aI '
Acelerador Freno de Cadena Captador de Cadena
TENSION DE LA CADENA
Es normal que las cadenas nuevas se
estiren durante los primeros 15 minutos
de uso. Deber_ verificarse la tensi6n de
la cadena frecuentemente. Vea TEN-
SION DE LA CADENAen la secci6n de
SERVlCIO YAJUSTES.
_ADVERTENClA: El silenciador
es extremadamente caliente durante
el uso y despu6s de usar el aparato.
No toque el silenciador ni permita que
el material combustible tal como gaso-
lina o hierba seca hagan contacto.
ANTES DE PONER EL MOTOR EN
MARCHA:
d_ADVERTENCIA: Lea toda la in-
formaci6n sobre el manejo del com-
bustible en la secci6n de reglas de se-
guridad de este manual antes de
empezar. Si no comprende la informa-
ci6n sobre el manejo del combustible,
no intente abastecer su aparato. Pro-
cure ayuda de alguien que comprenda
]a informaci6n o Ilame al tel6fono de
ayuda al consumidor al
1-800-235-5878.
ACEITE PARA BARRA Y LA CADE-
NA
La barra y la cadena requieren lubrica-
ci6n. El libricador de la cadena provee
]ubricaci6n continua a la cadena y a la
barra guia No se olvide de Ilenar el
tanque de aceite para barra siempre
que Ilene el tanque de combustible
(Capacidad = 6,8 fl. oz.). La falta de
aceite arruinar_ la barra y la cadena
r_pidamente. El uso de demasiado
poco aceite causar_ exceso de calen-
tamiento que ser_ detectable por el
humo proveniente de la cadena y/o
por la descoloraci6n de la barra. Para
obtener la m_xima prolongaci6n de la
vida de la bara y la cadena, recomen-
damos que use el aceite para barras
de sierra de cadena Craftsman. Si el
aceite Craftsman no est_ dispondible,
puede usarse un aceite SAE 30 de
buena calidad hasta obtener el aceite
marcha Craftsman. La cantidad de lu-
bricaci6n es medida autom_ticamente
durante el funcionamiento de la sierra.
La sierra usar_ m_s o menos un tan-
que de aceite para la barra por cada
tanque de combustible. Siempre Ilene
el tanque de aceite de la barra cuando
]]ene el tanque de combustible.
ABASTECIMIENTO DEL MOTOR
ADVERTENClA: Remueva la
tapa del tanque de combustible lenta-
mente al reabastecer combustible.
Este motor est_ habilitado para funcio-
nar con gasolina sin plomo. Antes de
comenzar con el uso, se deber_ mez-
clar la gasolina con un aceite de sint6ti-
co de buena calidad para motores de 2
tiempos enfriados a aire. Recomenda*
mos el aceite de sint6tico de la marca
Craftsman. Mezcle la gasolina con el
aceite en la proporci6n 40:1. Se obtiene
una proporci6n de 40:1 mezclando 3.2
onzas de aceite con cada gal6n de ga-
solina sin plomo. Se incluye con esta
sierra un recipiente de 3,2 onzas de
aceite de sint6tico de la marca Crafts-
man. Adiera el contenido entero de
este recipiente en 1gal6n de gasolina
para alcanzar la mezcla apropiada del
combustible. NO USEaceite para au-
tom6viles ni para barcas. Estos aceites
daSar_n el motor.AI mezclar el combus-
tible, siga las instrucciones impresas en
el recipiente de aceite. Una vez que
haya aSadido el aceite a la gasolina,
agite el recipiente brevemente para
asegurar que el combustible est6 com-
pletamente mezclado. Lea siempre y
siga las reglas de seguridad que tie-
nen que ver con el combustible antes
de abastecer el aparato.
IMPORTANTE
La experiencia indica que los combus-
tibles mezclasdos con alcohol (los Ila-
mados gasohol o los que contienen eta-
nolo metanol) pueden atraer humedad,
] oque puede causar la separaci6n y la
formaci6n de _cidos durante el almace-
namiento. La gasolina acidica puede
daSar el sistema de combustible del mo-
tor durante el almacenamiento.
Para evitar promblemas con el motor,
deber_ vaciarse el sistema de combus-
tible antes de almacenar el aparato por
30 dias o m_s. Vacie el tanque de com-
bustible, ponga el motor en marcha y
d6jelo en marcha hasta que la lineas de
combustible y el carburador queden
vacios. Cuando vaya a usar el aparato
nuevamente, use combustible fresco.
Vea la instrucciones de ALMACENAMIEN-
TO para obtener m_s informaciones.
31
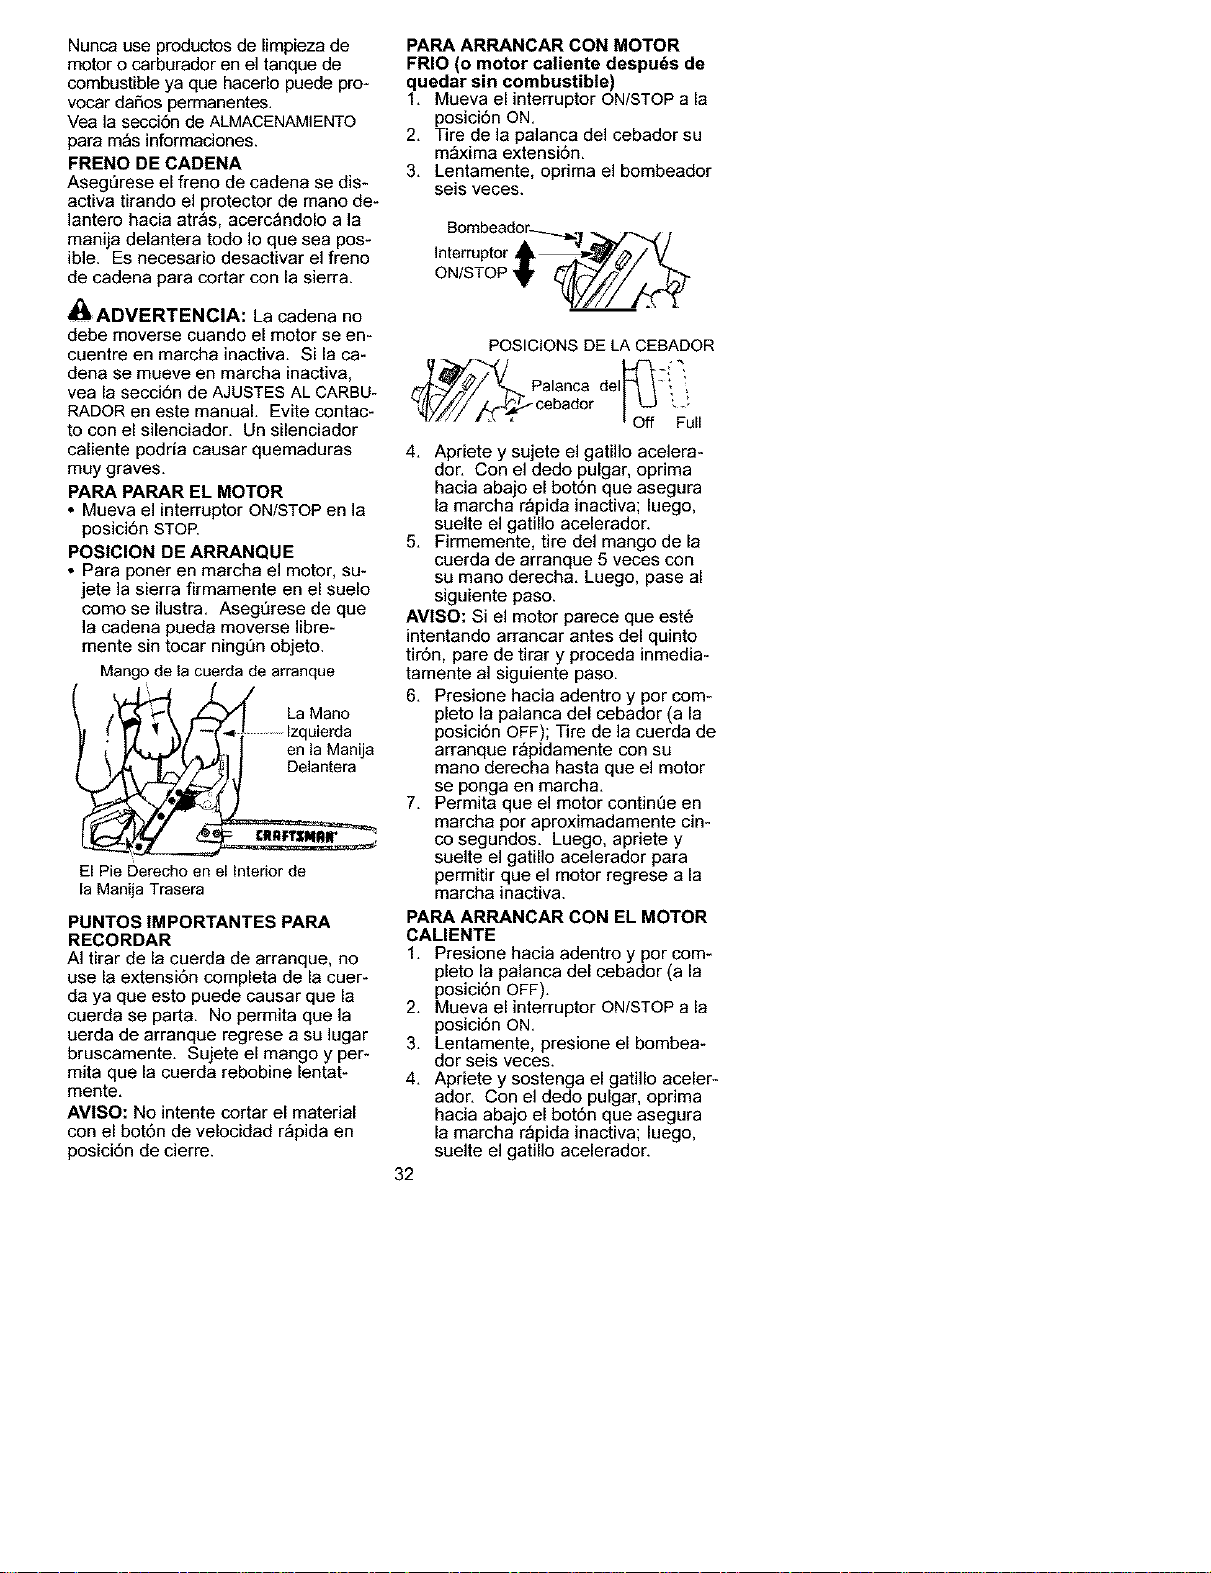
Nuncauseproductosdelimpiezade
motorocarburadoreneltanquede
combustibleyaquehacerlopuedepro-
vocardafiospermanentes.
Yealasecci6ndeALMACENAMIENTO
param_sinformaciones.
FRENO DE CADENA
AsegQrese el freno de cadena se dis-
activa tirando el protector de mano de-
lantero hacia atr_s, acerc_ndolo a la
manija delantera todo Io que sea pos-
ible. Es necesario desactivar el freno
de cadena para cortar con la sierra.
Z_
nADVERTENClA: La cadena no
debe moverse cuando el motor se en-
cuentre en marcha inactiva. Si la ca-
dena se mueve en marcha inactiva,
vea la secci6n de AJUSTES AL CARBU-
RADOR en este manual. Evite contac-
to con el silenciador. Un silenciador
caliente podria causar quemaduras
muy graves.
PARA PARAR EL MOTOR
• Mueva el interruptor ON/STOP en la
posici6n STOP.
POSICION DE ARRANQUE
• Para poner en marcha el motor, su-
jete la sierra firmamente en el suelo
como se ilustra. Asegt_rese de que
la cadena pueda moverse libre-
mente sin tocar ningt_n objeto.
Mango de la cuerda de arranque
J,"_Y_ ._ _rl t en la Manija
El Pie Derecho en el interior de
la Manija Trasera
PUNTOS IMPORTANTES PAPA
RECORDAR
AI tirar de la cuerda de arranque, no
use la extensi6n completa de la cuer-
da ya que esto puede causar que la
cuerda se part& No permita que la
uerda de arranque regrese a su lugar
bruscamente. Sujete el mango y per-
mita que la cuerda rebobine lentat-
mente.
AVISO: No intente cortar el material
con el bot6n de velocidad r_pida en
posici6n de cierre.
PARA ARRANCAR CON MOTOR
FRIO (o motor caliente despu6s de
quedar sin combustible)
1, Mueva el interruptor ON/STOP a la
posici6n ON.
2. Tire de la palanca del cebador su
m_xima extensi6n.
3. Lentamente, oprima el bombeador
seis veces.
Bombeado[_f
]nterruptor * _,_t'_/-----_
ON'STOP t _,_sT, t/t,_
POSICIONS DE LA CEBADOR
del * t <+
4. Apriete y sujete el gatillo acelera-
dor. Con el dedo pulgar, oprima
hacia abajo el bot6n que asegura
la marcha r_pida inactiva; luego,
suelte el gatillo acelerador.
5. Firmemente, tire del mango de la
cuerda de arranque 5 veces con
su mano derecha. Luego, pase al
siguiente paso.
AVISO: Si el motor parece que est6
intentando arrancar antes del quinto
tir6n, pare de tirar y proceda inmedia-
tamente al siguiente paso.
6. Presione hacia adentro y por com-
pleto la palanca del cebador (a la
posici6n OFF); Tire de la cuerda de
arranque r_pidamente con su
mano derecha hasta que el motor
se ponga en march&
7. Permita que el motor continQe en
marcha por aproximadamente cin-
co segundos. Luego, apriete y
suelte el gatillo acelerador para
permitir que el motor regrese a la
marcha inactiva.
PARA ARRANCAR CON EL MOTOR
CALIENTE
1. Presione hacia adentro y por com-
pleto la palanca del cebador (a la
posici6n OFF).
2. Mueva el interruptor ON/STOP a la
posici6n ON.
3. Lentamente, presione el bombea-
dor seis veces.
4. Apriete y sostenga el gatillo aceler-
ador. Con el dedo pulgar, oprima
hacia abajo el bot6n que asegura
la marcha r_pida inactiva; luego,
suelte el gatillo acelerador.
32
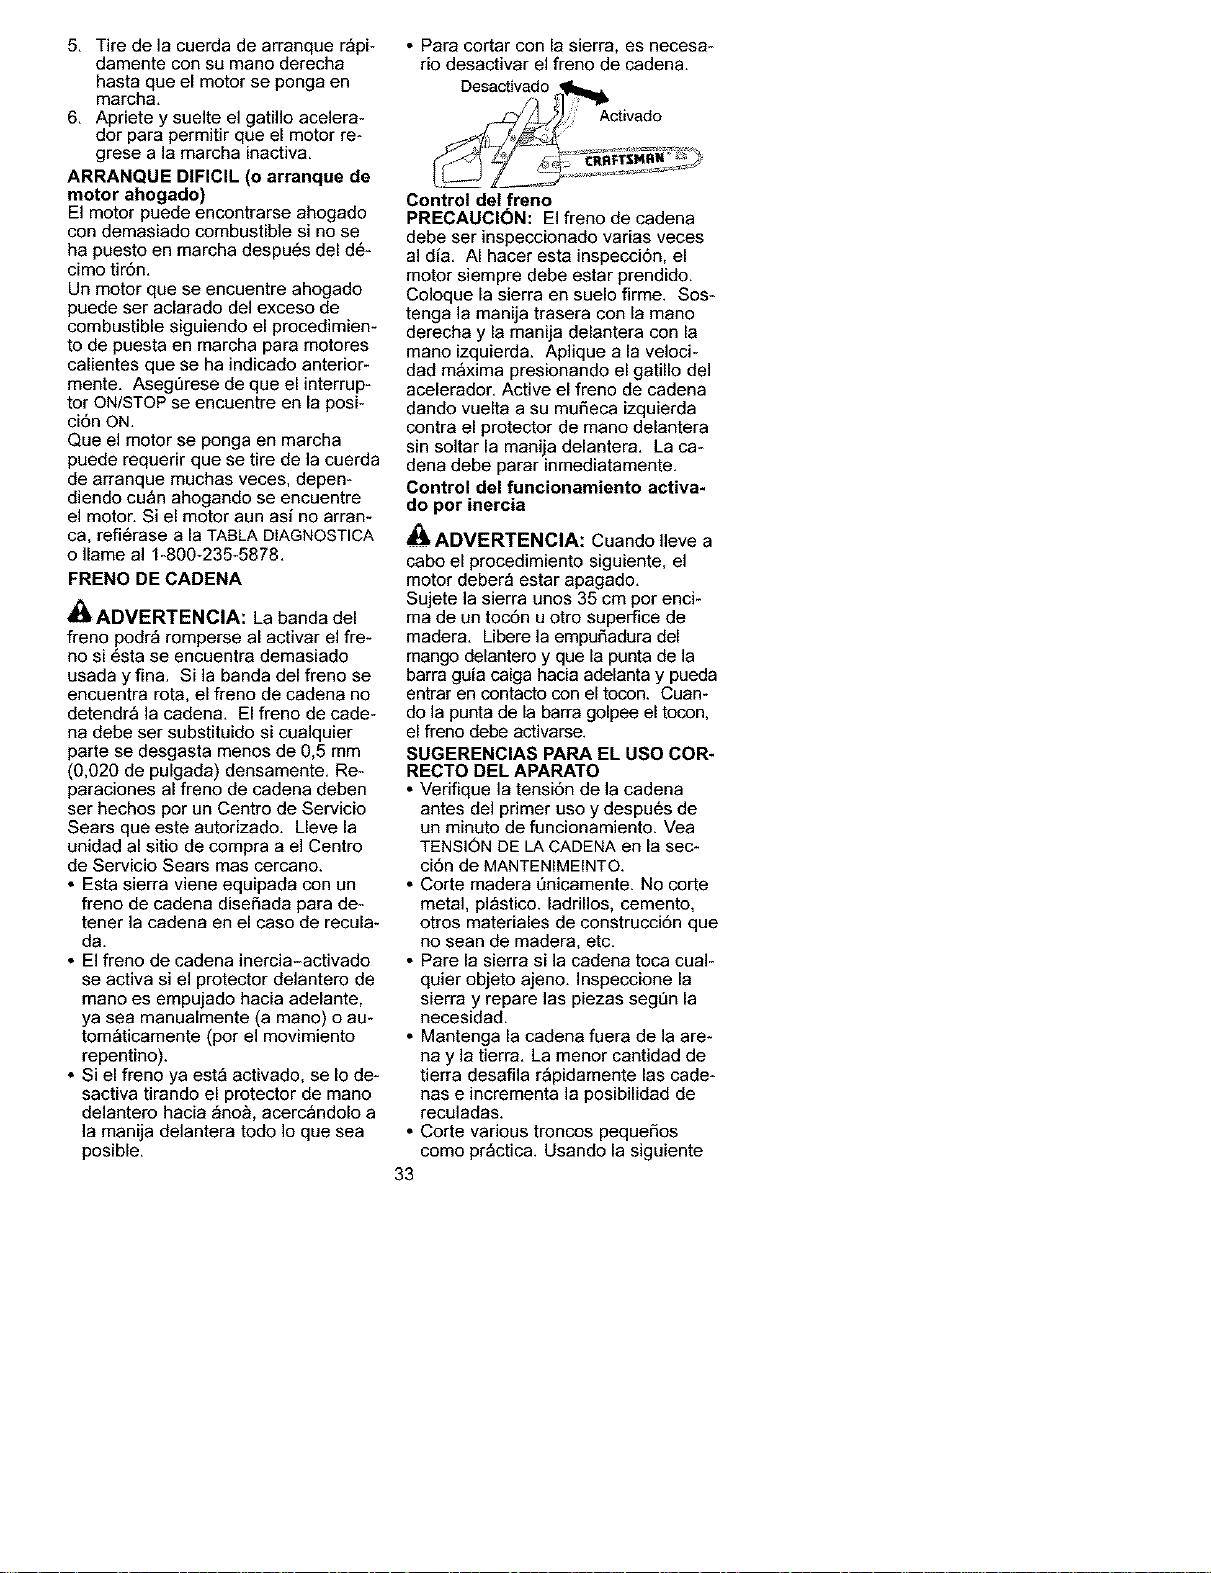
5, Tiredelacuerdadearranquer_pi-
damenteconsumanoderecha
hastaqueelmotorsepongaen
marcha,
6, Aprieteysuelteelgatilloacelera-
dorparapermitirqueelmotorre-
gresealamarchainactiva,
ARRANQUE DIFICIL (o arranque de
motor ahogado)
El motor puede encontrarse ahogado
con demasiado combustible si no se
ha puesto en marcha despu6s del d6-
cimo tir6n.
Un motor que se encuentre ahogado
puede ser aclarado del exceso de
combustible siguiendo el procedimien-
to de puesta en marcha para motores
calientes que se ha indicado anterior-
mente. Aseg_rese de que el interrup-
tor ON/STOP se encuentre en la posi-
ci6n ON,
Que el motor se ponga en marcha
puede requerir que se tire de la cuerda
de arranque muchas veces, depen-
diendo cu_n ahogando se encuentre
el motor, Si el motor aun asi no arran-
ca, refi6rase a la TABLA DIAGNOSTICA
o Ilame al 1-800-235-5878,
FRENO DE CADENA
d_ADVERTENClA: La banda del
freno podr_ romperse al activar el fie-
no si 6sta se encuentra demasiado
usada y fina. Si la banda del freno se
encuentra rota, el freno de cadena no
detendr_ ]a cadena. El freno de cade-
na debe ser substituido si cualquier
parte se desgasta menos de 0,5 mm
(0,020 de pulgada) densamente. Re-
paraciones al freno de cadena deben
ser hechos por un Centro de Servicio
Sears que este autorizado. Lleve la
unidad al sitio de compra a el Centro
de Servicio Sears mas cercano.
• Esta sierra viene equipada con un
freno de cadena diseSada para de-
tener la cadena en el caso de recula-
da.
• El freno de cadena inercia-activado
se activa si el protector delantero de
mano es empujado hacia adelante,
ya sea manualmente (a mano) o au-
tom_ticamente (por el movimiento
repentino).
• Si el freno ya est_ activado, se Io de-
sactiva tirando el protector de mano
delantero hacia _no_, acerc_ndolo a
la manija delantera todo Io que sea
posible.
• Para cortar con la sierra, es necesa-
rio desactivar el freno de cadena.
Control del freno
PRECAUCI6N: El freno de cadena
debe ser inspeccionado varias veces
al dia. AI hacer esta inspecci6n, el
motor siempre debe estar prendido.
Coloque la sierra en suelo firme. Sos-
tenga la manija trasera con la mano
derecha y la manija delantera con la
mano izquierda. Aplique a la veloci-
dad maxima presionando el gatillo del
acelerador. Active el freno de cadena
dando vuelta a su mu_eca izquierda
contra el protector de mano delantera
sin soltar la manija delantera. La ca-
dena debe parar inmediatamente.
Control del funcionamiento activa*
do pot inercia
_ADVERTENClA: Cuando Ileve a
cabo el procedimiento siguiente, el
motor deber_ estar apagado.
Sujete la sierra unos 35 cm por enci-
ma de un toc6n u otro super[ice de
madera. Libere la empuSadura del
mango delantero y que la punta de la
barra guia caiga hacia adelanta y pueda
entrar en contacto con el tocon. Cuan-
do la punta de la barra golpee el tocon,
el freno debe activarse.
SUGERENCIAS PAPA EL USO COR-
RECTO DEL APAPATO
• Verifique la tensi6n de la cadena
antes del primer uso y despu6s de
un minuto de funcionamiento. Vea
TENSION DE LA CADENA en la sec-
ci6n de MANTENIMEINTO.
• Corte madera t]nicamente. No corte
metal, pl_stico, ladrillos, cemento,
otros materiales de construcci6n que
no sean de madera, etc.
• Pare la sierra si la cadena toca cual-
quier objeto ajeno. Inspeccione la
sierra y repare las piezas segt]n la
necesidad.
• Mantenga la cadena fuera de la are-
na y la tierra. La menor cantidad de
tierra desafila r_pidamente las cade-
nas e incrementa la posibilidad de
reculadas.
• Corte various troncos peque#os
como pr_ctica. Usando la siguiente
33
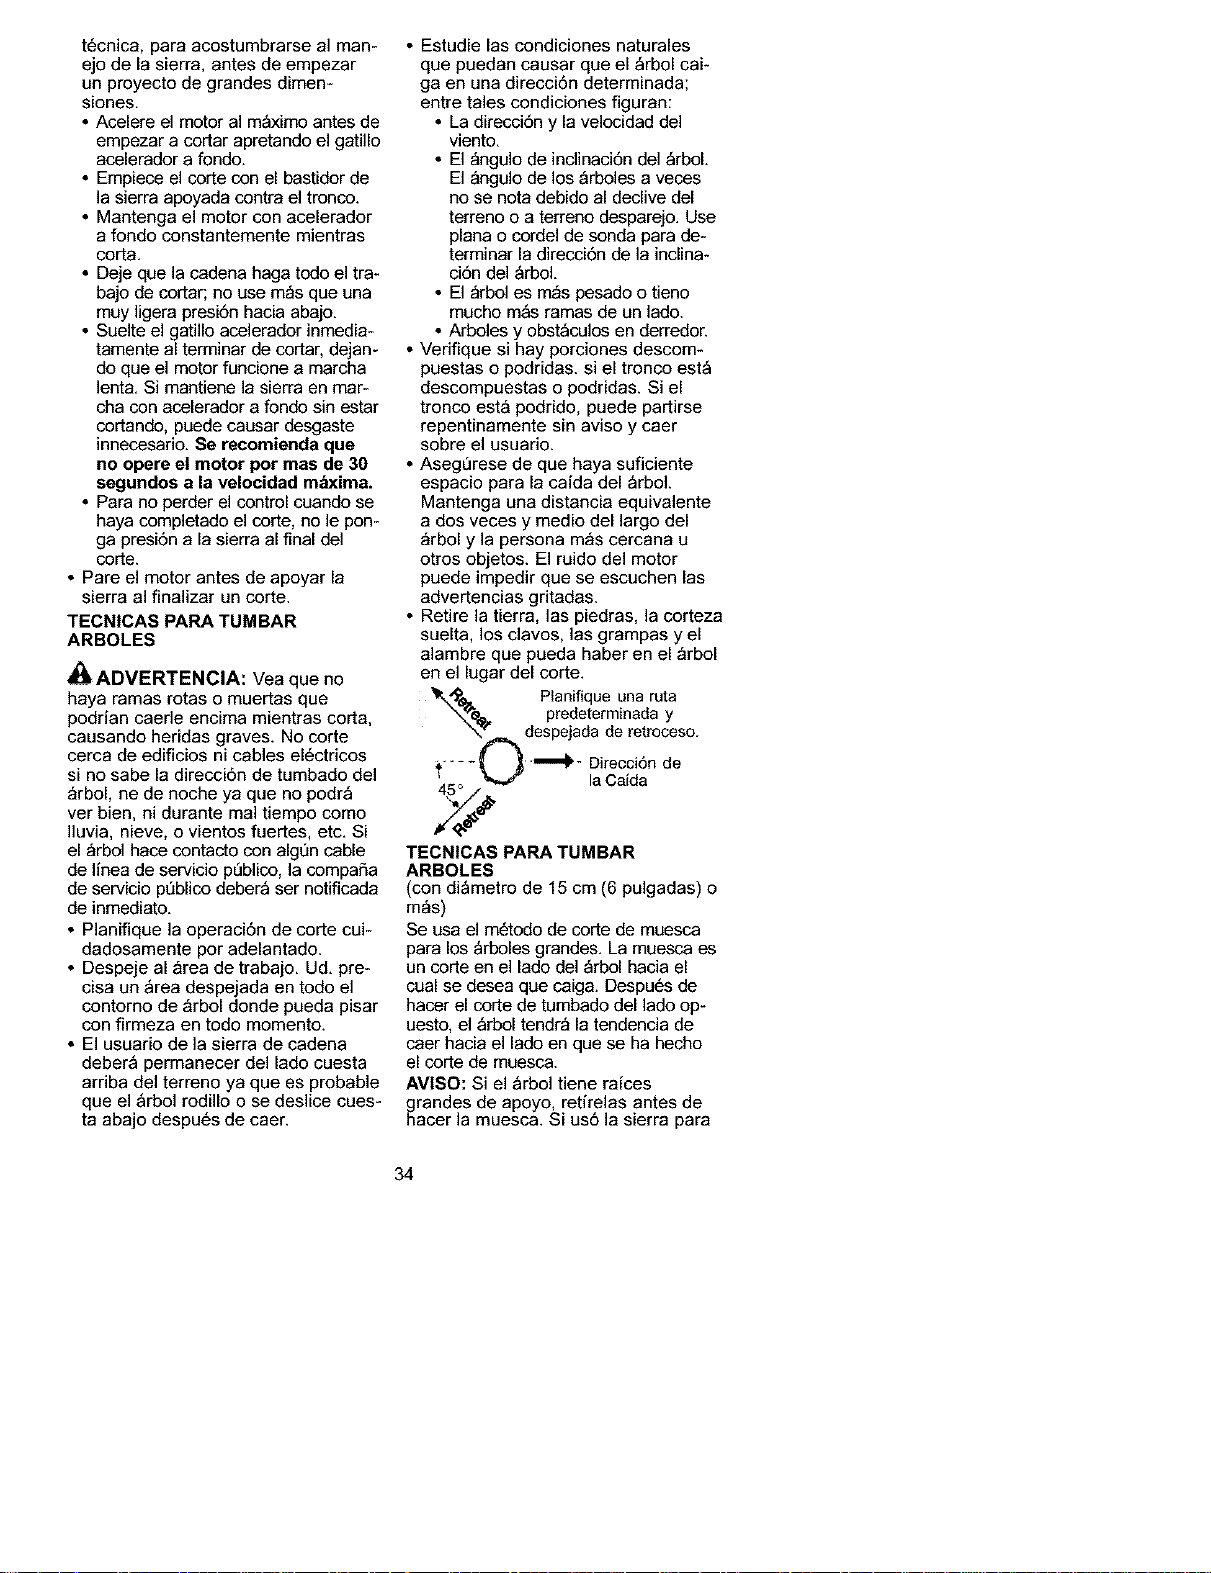
t6cnica,paraacostumbrarsealman-
ejodelasierra,antesdeempezar
unproyectodegrandesdimen-
siones.
•Acelereelmotoralm_ximoantesde
empezaracortarapretandoelgatillo
aceleradorafondo.
• Empieceelcorteconelbastidorde
lasierraapoyadacontraeltronco.
• Mantengaelmotorconacelerador
afondoconstantementemientras
corta,
• Dejequelacadenahagatodoeltra-
bajodecortar;nousem_squeuna
muyligerapresi6nhaciaabajo,
• Suelteelgatilloaceleradorinmedia-
tamenteal terminar de cortar, dejan-
do que el motor funcione a marcha
lent& Si mantiene la sierra en mar-
cha con acelerador a fondo sin estar
cortando, puede causar desgaste
innecesario. Se recomienda que
no opere el motor por mas de 30
segundos a la velocidad mbxima.
• Para no perder el control cuando se
haya completado el corte, no le pon-
ga presi6n a la sierra al final del
corte.
• Pare el motor antes de apoyar la
sierra al finalizar un corte.
TECNICAS PARA TUMBAR
ARBOLES
_ADVERTENCIA: Vea que no
haya ramas rotas o muertas que
podrian caerle encima mientras corta,
causando heridas graves. No corte
cerca de edificios ni cables el6ctricos
si no sabe la direcci6n de tumbado del
_rbol, ne de noche ya que no podr_
ver bien, ni durante real tiempo como
Iluvia, nieve, o vientos fuertes, etc. Si
el _rbol hace contacto con alg6n cable
de linea de servicio p_blico, la compa5a
de servicio p6blico deber_ ser notificada
de inmediato.
• Planifique la operaci6n de corte cui-
dadosamente per adelantado.
• Despeje al _rea de trabajo. Ud. pre-
cisa un _rea despejada en todo el
contorno de _rbol donde pueda pisar
con firmeza en todo momento.
• El usuario de la sierra de cadena
deber_ permanecer del lado cuesta
arriba del terreno ya que es probable
que el _rbol rodillo o se deslice cues-
ta abajo despu6s de caer.
• Estudie las condiciones naturales
que puedan causar que el _rbol cai-
ga en una direcci6n determinada;
entre tales condiciones figuran:
• La direcci6n y la velocidad del
viento.
• El _ngulo de inclinaci6n del _rbol.
El _ngulo de los _rboles a veces
no se nota debido al declive del
terreno o a terreno desparejo. Use
plana o cordel de sonda para de-
terminar la direcci6n de la inclina-
ci6n del _rbol.
• El _rbol es m_s pesado o tieno
mucho m_s ramas de un lado.
• Arboles y obst_culos en derredor.
• Verifique si hay porciones descom-
puestas o podridas, si el tronco est_
descompuestas o podridas. Si el
tronco est_ podrido, puede partirse
repentinamente sin aviso y caer
sobre el usuario.
• Aseg_rese de que haya suficiente
espacio para la caida del _rboL
Mantenga una distancia equivalente
a dos veces y medio del largo del
_rbol y la persona m_s cercana u
otros objetos. El ruido del motor
puede impedir que se escuchen las
advertencias gritadas.
• Retire la tierra, las piedras, la corteza
suelta, los clavos, las grampas y el
alambre que pueda haber en el _rbol
en el lugar del corte.
_',.'_e_. Planifique una ruta
"_e.l,. predeterminada y
\" despejada de retroceso.
_, { _ """"_- Direcci6n de
" _ laCaida
TECNICAS PAPA TUMBAR
ARBOLES
(con dibmetro de 15 cm (6 pulgadas) o
m_s)
Se usa el m6todo de corte de muesca
para los _rboles grandes. La muesca es
un corte en el lado del _rbol hacia el
cual se desea que caiga. Despu6s de
hacer el corte de tumbado del lado op-
uesto, el _rbol tendr_ la tendencia de
caer hacia el lade en que se ha hecho
el corte de muesca.
AVlSO: Si el _rbol tiene raices
ghrandes de apoyo, retirelas antes de
acer la muesca. Si us6 la sierra para
34
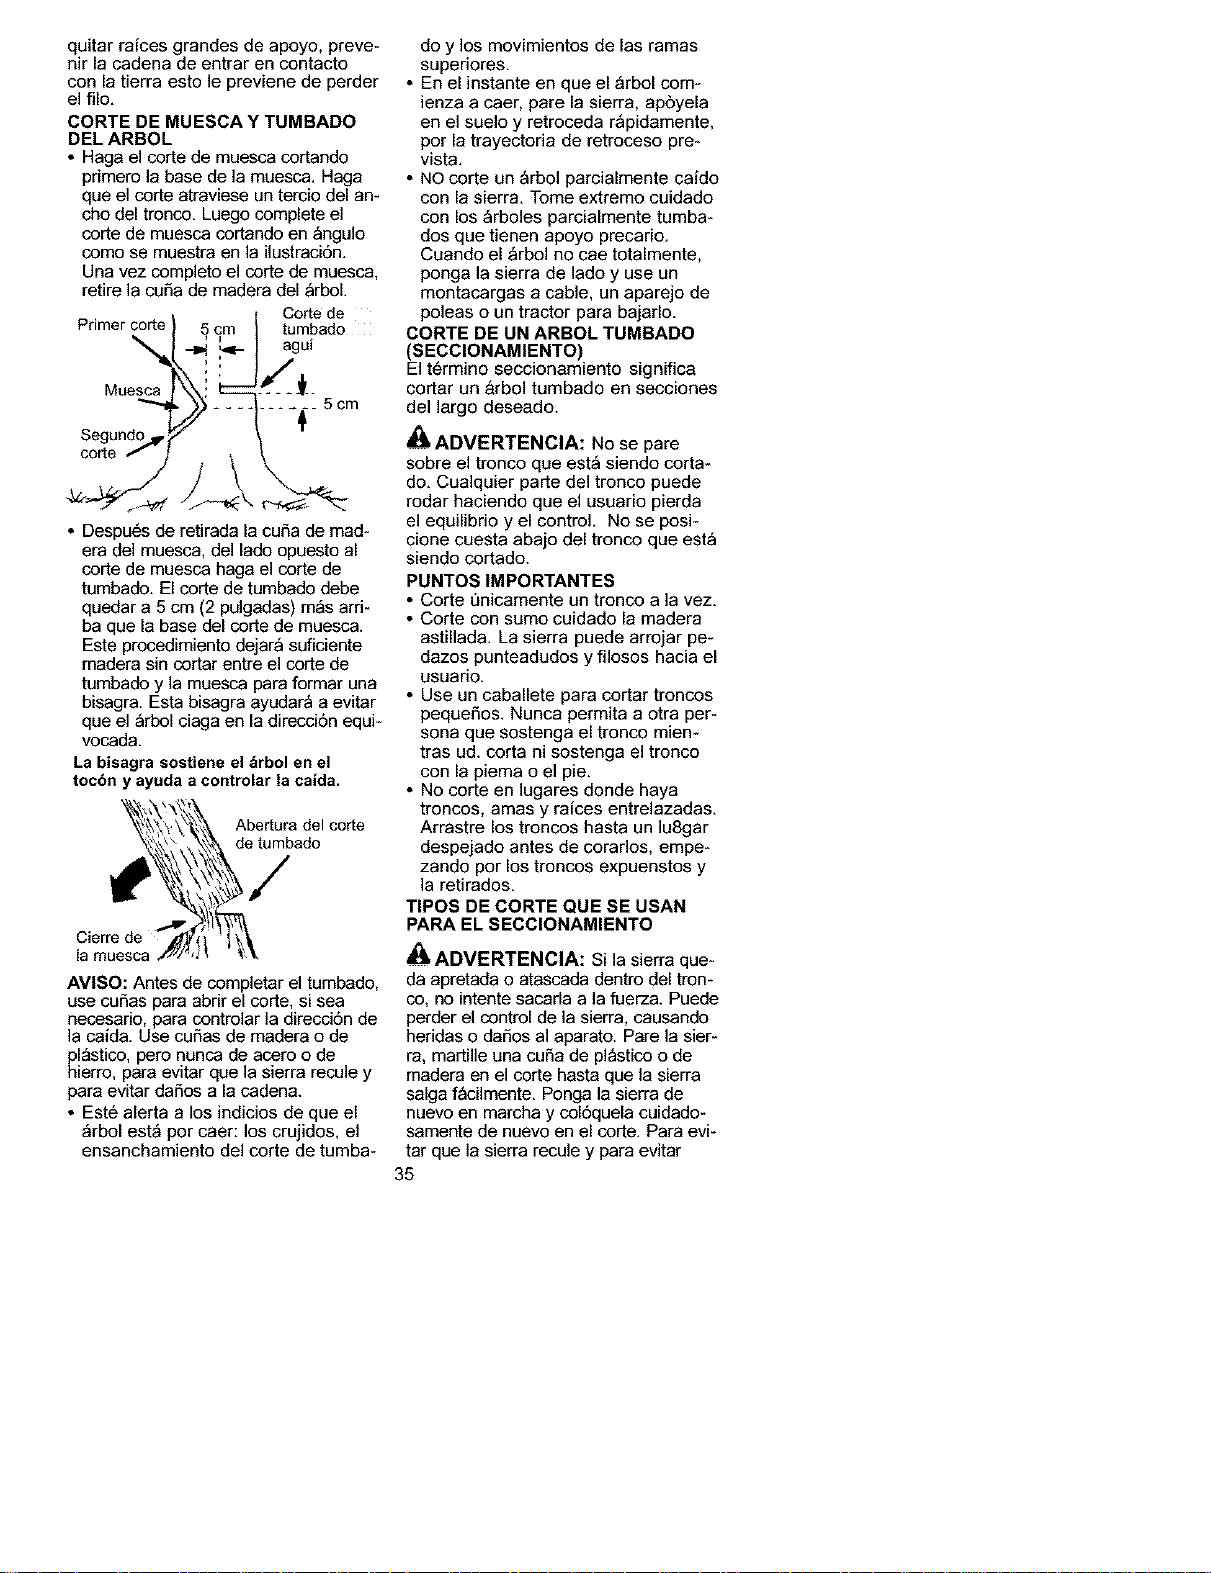
quitarraicesgrandesdeapoyo,preve-
nirlacadenadeentrarencontacto
conlatierraestoleprevienedeperder
elfilo.
CORTEDEMUESCAYTUMBADO
DELARBOL
• Hagaelcortedemuescacortando
pnmerolabasedelamuesca.Haga
queelcorteatraviese un terdo del an-
cho del tronco. Luego complete el
corte de muesca cortando en _ngulo
como se muestra en la ilustrad6n.
Una vez completo el corte de muesca,
retire la curia de madera del _rboL
! Corte de
Primer corte 5 cm tumbado
.-_ L,q- agui
Muesc.._a -_--
Segon o,,
cor[e _
• Despuds de retirada la curia de mad-
era del muesca, del lado opuesto al
corte de muesca haga el corte de
tumba0o. El corte de tumbado debe
quedar a 5 cm (2 pulgadas) m_s ard-
ba que la base del corte de muesca.
Este procedimiento dejar_ sufidente
madera sin cortar entre el corte de
tumbado y la muesca para formar una
bisagra. Esta bisagra ayudar_ a evitar
que el _rbol ciaga en la direcci6n equi-
vocada.
La bisagra sostiene el &rbol en el
tocbn y ayuda a controlar la caida.
Abertura del corte
de tumbado
{amuesca
AVI80: Antes de completar el tumbado,
use cutlas para abnr el corte, si sea
necesano, para controlar la direccibn de
]a caida. Use curias de madera o de
pl_stico, pero nunca de acero o de
hierro, para evitar que la sierra recule y
para evitar darios a la cadena.
• Est6 alerta a los indicios de que el
_rbol est_ por caer: los crujidos, el
ensanchamiento del corte de tumba-
do y los movimientos de las ramas
superiores.
• En el instante en que el _rbol com-
ienza a caer, pare la sierra, apbyela
en el suelo y retroceda r_pidamente.
por la trayectoria de retroceso pre-
vista.
• NO corte un _rbol parcialmente caido
con la sierra. Tome extremo cuidado
con los _rboles parcialmente tumba-
dos que tienen apoyo precario.
Cuando el _rbol no cae totalmente,
ponga la sierra de lado y use un
montacargas a cable, un aparejo de
poleas o un tractor para bajarlo.
CORTE DE UN ARBOL TUMBADO
(SECCIONAMIENTO)
El t6rmino seccionamiento significa
cortar un &rbol tumbado en secciones
del largo deseado.
_ADVERTENCIA: No se pare
sobre el tronco que est_ siendo corta-
do. Cualquier parte del tronco puede
rodar haciendo que el usuario pierda
el equilibrio y el control. No se posi-
cione cuesta abajo del tronco que est_
siendo cortado.
PUNTOS IMPORTANTES
• Corte t_nicamente un tronco a ]a vez.
• Corte con sumo cuidado la madera
astillada. La sierra puede arrojar pe-
dazos punteadudos y filosos hacia el
usuario.
• Use un caballete para cortar troncos
pequerios. Nunca permita a otra per-
sona que sostenga el tronco mien-
tras ud. corta ni sostenga el tronco
con la piema o el pie.
• No corte en lugares donde haya
troncos, amas y raices entrelazadas.
Arrastre los troncos hasta un lu8gar
despejado antes de corados, empe-
zando por los troncos expuenstos y
]a retirados.
TIPOS DE CORTE QUE SE USAN
PARA EL SECClONAMIENTO
A
_ADVERTENCIA: Si la sierra que-
da apretada o atascada dentro del tron-
co, no intente sacarla a la fuerza. Puede
perder el control de la sierra, causando
heridas o dafios al aparato. Pare la sier-
ra, martille una curia de pl_stico o de
madera en el corte hasta que la sierra
salga f_cilmente. Ponga la sierra de
nuevo en marcha y colbquela cuidado-
samente de nuevo en el corte. Para evi-
tar que la sierra recule y para evitar
35
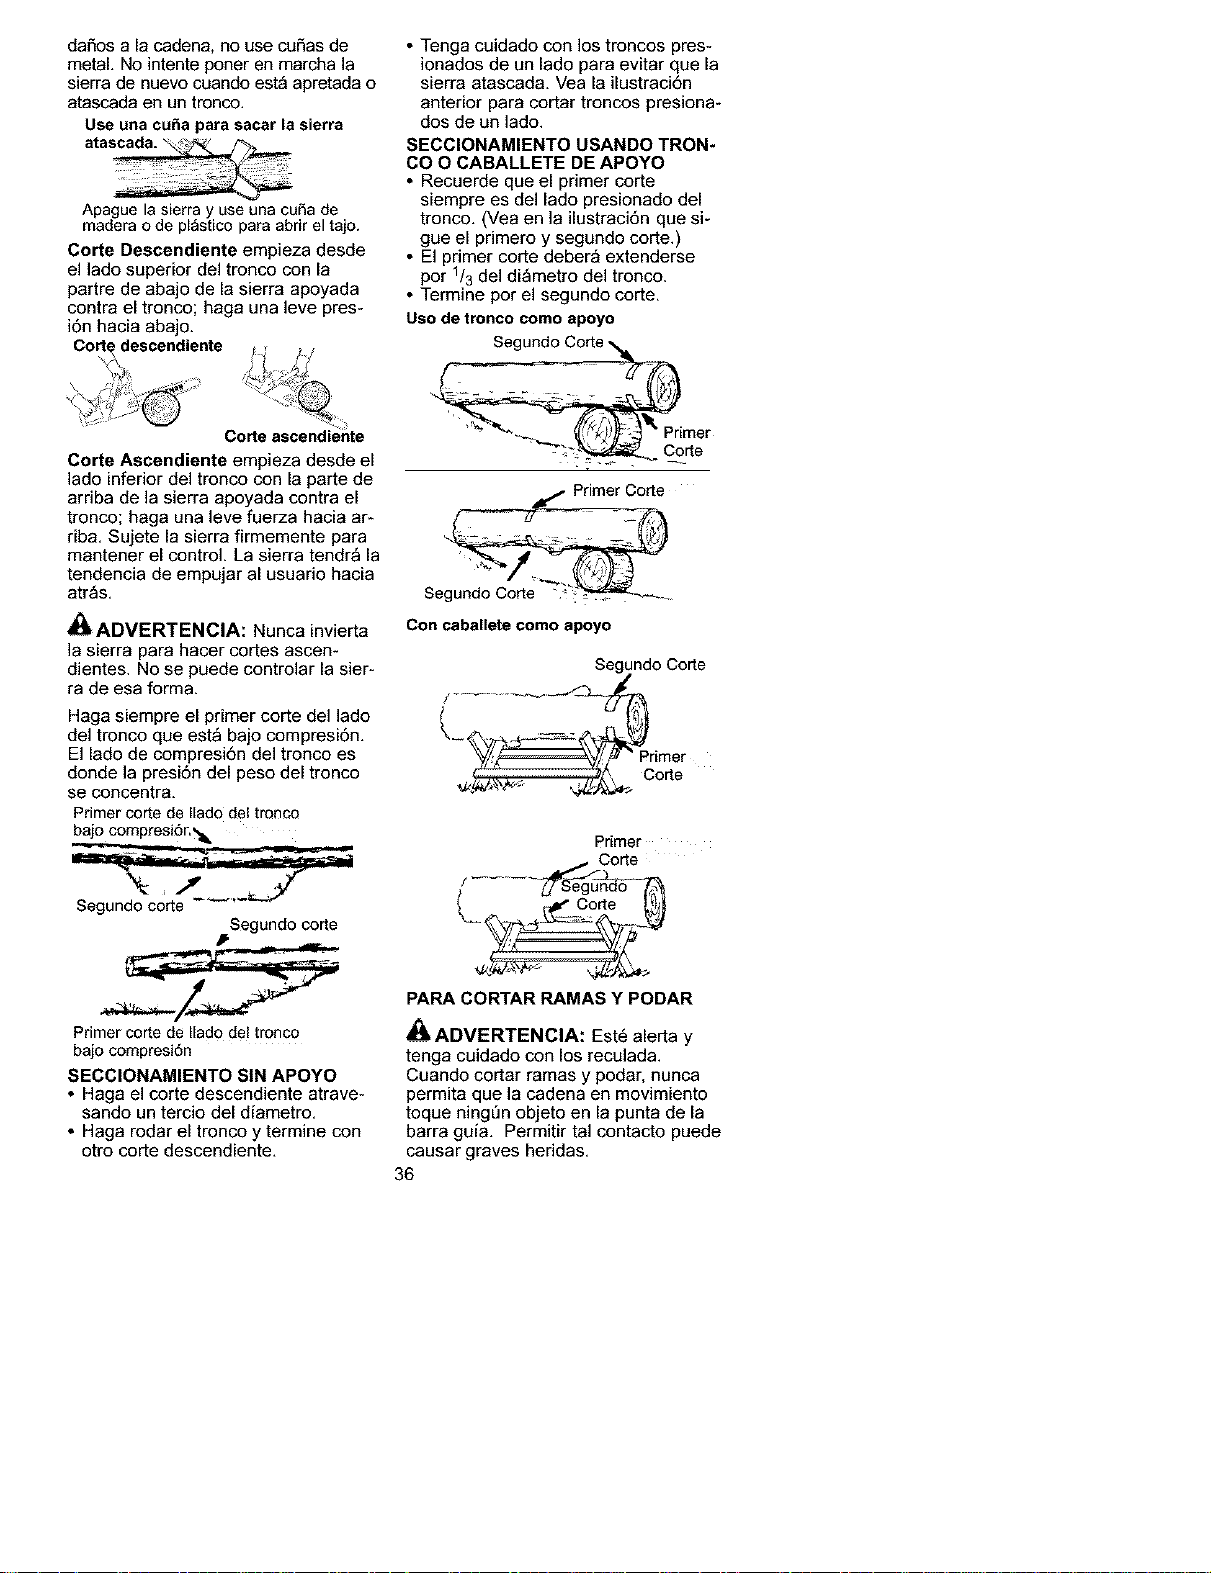
daSos ala cadena, no use cuSas de
metal, No intente poner en marcha la
sierra de nuevo cuando est_ apretada o
atascada en un tronco,
Use una cuba para sacar la sierra
Apague le sierra y use una cuSa de
medera o de plastico pare abrir el tejo.
Corte Descendiente empieza desde
el lado superior del tronco con la
partre de abajo de la sierra apoyada
contra el tronco; haga una leve pres-
i6n hacia abajo.
Corte ascendi
Corte Ascendiente empieza desde el
lado inferior del tronco con la parte de
arriba de la sierra apoyada contra el
tronco; haga una leve fuerza hacia ar-
rib& Sujete la sierra firmemente para
mantener el control, La sierra tendr_ la
tendencia de empujar al usuario hacia
atr_s,
ADVERTENCIA: Nunca invierta
la sierra para hacer cortes ascen-
dientes. No se puede controlar la sier-
ra de esa form&
Haga siempre el primer corte del lado
del tronco que est_ bajo compresi6n.
El lado de compresi6n del tronco es
donde ]a presi6n del peso del tronco
se concentra.
Primer corte de Ilado del tronco
bejo compresi_r,_
Segundo co_e
Primercorte de Ilado del tronco
bajo compresi6n
SECClONAMIENTO SIN APOYO
, Haga el corte descendiente atrave-
sando un tercio del diametro,
, Haga rodar el tronco y termine con
otro corte descendiente,
, Tenga cuidado con los troncos pres-
ionados de un lado para evitar que la
sierra atascada, Vea la ilustraci6n
anterior para cortar troncos presiona-
dos de un lado,
SECClONAMIENTO USANDO TRON*
CO O CABALLETE DE APOYO
, Recuerde que el primer corte
siempre es del lado presionado del
tronco, (Vea en la ilustraci6n que si-
gue el primero y segundo corte,)
, El primer corte deber_ extenderse
por 1/3 del di_metro del tronco.
, Termine por el segundo corte.
Uso de tronco come apoyo
'% Primer
Con caballete como apoyo
Segundo Co_e
Co_e
Primer
Corte
/......
PARA CORTAR RAMAS Y PODAR
_ADVERTENCIA: Est6 alerta y
tenga cuidado con los reculada.
Cuando cortar ramas y podar, nunca
permita que la cadena en movimiento
toque ningDn objeto en la punta de la
barra guia. Permitir tal contacto puede
causar graves heridas.
36
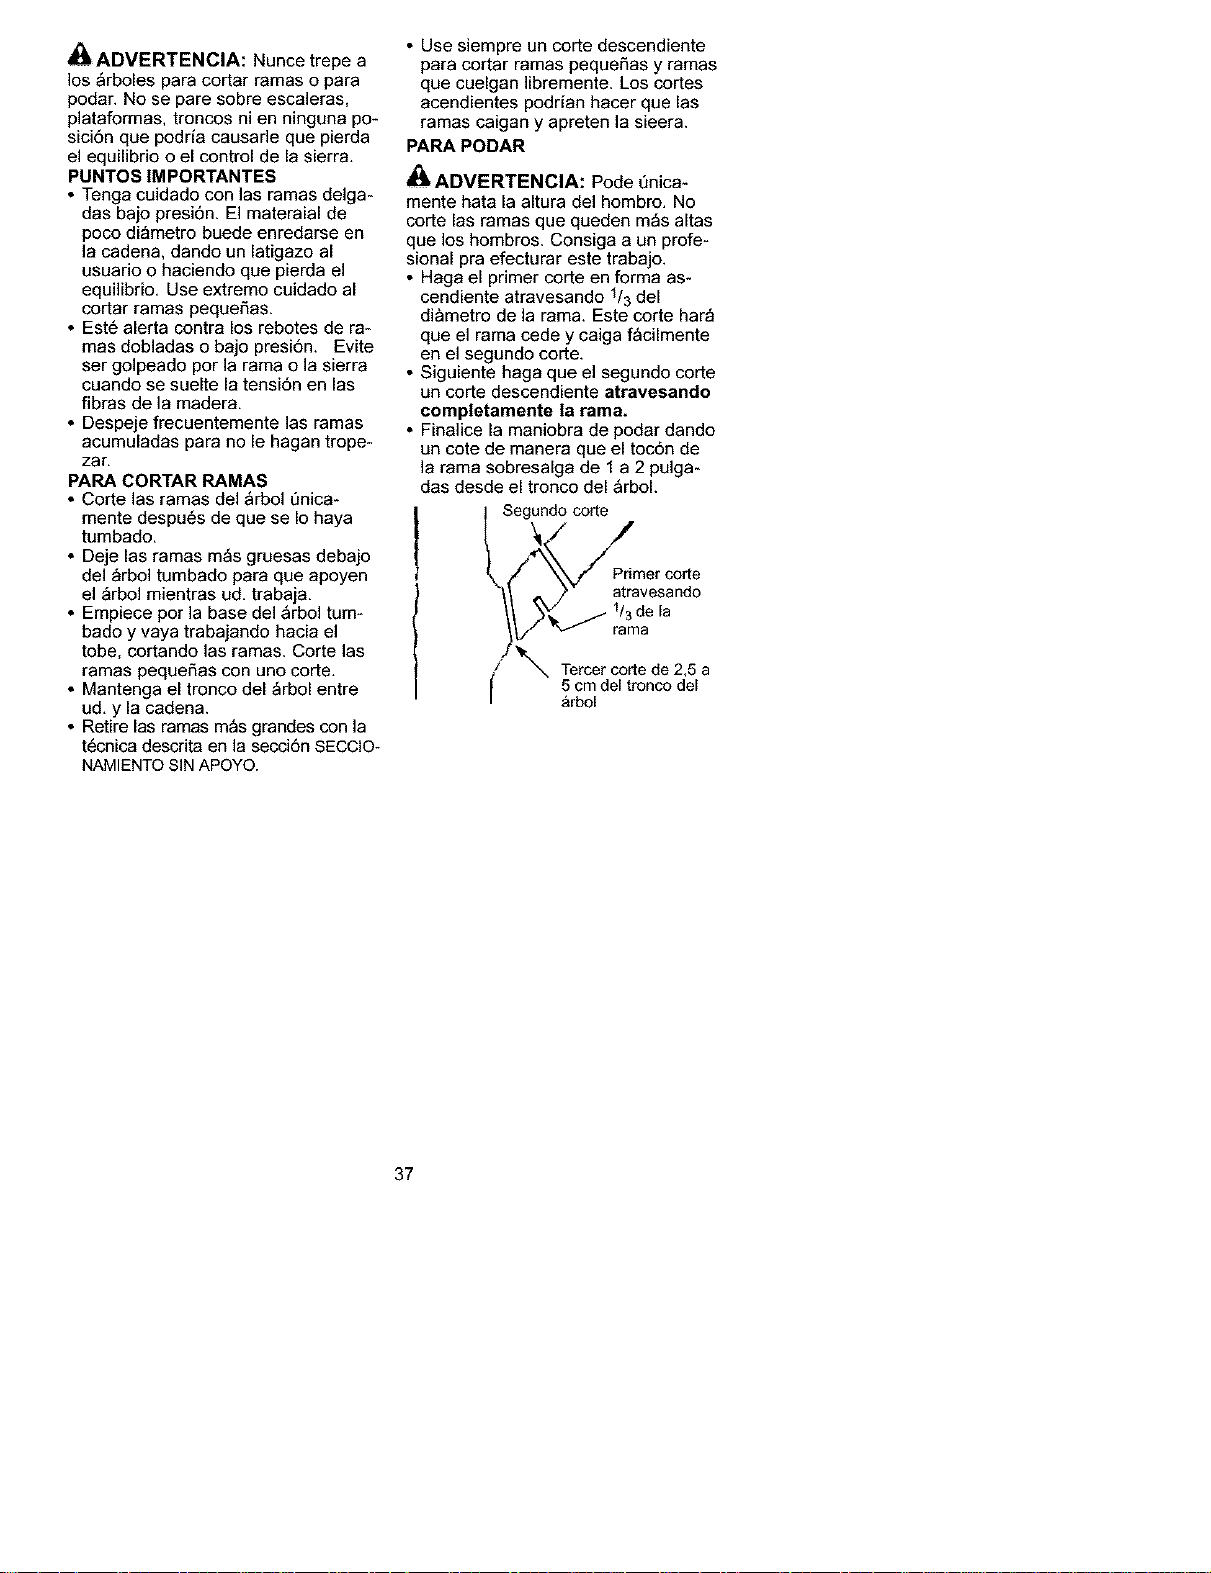
z_
_ADVERTENCIA: Nunce trepe a
los _rboles para cortar ramas o para
podar. No se pare sobre escaleras,
plataformas, troncos ni en ninguna po-
sici6n que podda causade que pierda
el equilibrio o el control de la sierra.
PUNTOS IMPORTANTES
• Tenga cuidado con las ramas delga-
das bajo presi6n. El materaial de
poco di_metro buede enredarse en
]a cadena, dando un latigazo al
usuario o haciendo que pierda el
equilibrio. Use extremo cuidado al
cortar ramas pequeSas.
• Est6 alerta contra los rebotes de ra-
mas dobladas o bajo presi6n. Evite
ser golpeado por la rama o la sierra
cuando se suelte la tensi6n en las
fibras de la madera.
• Despeje frecuentemente las ramas
acumuladas para no le hagan trope-
zar,
PARA CORTAR RAMAS
• Corte las ramas del _rbol _nica-
mente despu6s de que se Io haya
tumbado,
• Deje las ramas m_s gruesas debajo
del _rbol tumbado para que apoyen
el _rbol mientras ud. trabaja.
• Empiece por ]a base del _rbol tum-
bado y vaya trabajando hacia el
tobe, cortando las ramas. Corte las
ramas pequeSas con uno corte.
• Mantenga el tronco del _rbol entre
ud. y la cadena.
• Retire las ramas m_s grandes con la
t6cnica descrita en la secci6n SECCIO-
NAMIENTOSIN APOYO.
• Use siempre un corte descendiente
para cortar ramas pequeSas y ramas
que cuelgan libremente. Los cortes
acendientes podrian hacer que las
ramas caigan y apreten la sieera.
PARA PODAR
ADVERTENClA: Pode t_nica-
mente hata la altura del hombro. No
corte las ramas que queden m_s altas
que los hombros. Consiga a un profe-
sional pra efecturar este trabajo.
• Haga el primer corte en forma as-
cendiente atravesando 1/3del
all,metro de la rama. Este corte har_
que el rama cede y caiga f_cilmente
en el segundo corte.
• Siguiente haga que el segundo corte
un corte descendiente atravesando
completamente la rama.
• Finalice la maniobra de podar dando
un cote de manera que el toc6n de
la rama sobresalga de 1a 2 pulga-
das desde el tronco del _rbol.
Segundo corte
_P_ met corte
atravesando
_ "/ 1/3 de la
V v rama
/ _ Tercer corte de 2,5 a
f 5 cmdel tronco del
arbol
37
RESPONSABILIDADES DEL USUARIO
ADVERTENCIA: Desconecte la bujfa antes de hacer cualquier
mantenimiento, con la excepci6n de los ajustes al carburador.
Antes Despues Cada Cada
Anote las fechas al completar de de 5 25 Anual-
el servicio de rutina Usar Usar horas horas mente
Verifiique que no haya piezas ,i
daSadas/gastadas
Verifique que no hay fijadorre
3iezas sueltas
Vedfique la tensi6n de la cadena ,!
Verifique el filo de la cadena .,t,
Inspeccione la barra guia
Vedfique el nivel de la mezcla de[ .,t,
combustible
Inspeccione [a barra y vedfique _,
del aceite de la cadena
Inspeccione y limpie el aparato
y las placas
Inspeccione el freno de cadena
Limpie el ranura de la barra _"
Limpie el filtro de aire '1"
Limpie e inspeccione la rejilla anti-
chispas e inspeccione el silenciador,
Cambie la bujfa y la filtro de
combustible '1"
Fechas
de
Servicio
RECOMENDACIONES GENERALES
La garantfa de este aparato no cubre
los articulos que han sido sometidos al
abuso o a la negligencia de parte del
usuario. Para poder recibir el valor total
de la garantia, el usuario deber_ hacer
el mantenimiento tal como se indica en
este manual. Har_ falta hacer varios
ajustes peri_:iicos para mantener el
aparato adecuadamente.
• Una vez por aSo, cambie la bujia y el
elemento del filtro de aire e inspec-
clone la barra gufa y la cadena para
ver que no est6n gastadas. El reem-
plazo de la bujia y del elemento del
filtro de aire asegura una mezcla cor-
recta de aire y combustible y ayuda a
que el motor marche mejor y que dure
m_s.
VERIFIQUE QUE NO HAYA
PIEZAS DANADAS 0 GASTADAS
Entre en contacto con el Centro de
Servicio Sears para el reemplazo de
piezas daSadas o desgastadas,
AVISO: Es normal que aparezca una
pequeSa cantidad de aceite debajo de
]a sierra despu6s de parar el motor. No
confunda esto con p6rdidas del tan-
que de aceite.
• Interruptor ON/STOP -AsegL)rese que
el interruptor est6 funcionando cor-
rectamente coloc_ndolo en la posi-
ci6n STOP.
• Tanque de Combustible-No use
sierra si hay se_ales de da_os o fu*
gas del tanque de combustible.
• Tanque de Aceite-No use sierra si el
tanque de aceite da seSales de daSo
o fugas.
VERIFIQUE QUE NO HAYA
FIJADORES O PIEZAS SUELTAS
• Tuercas del Freno de Cadena
• Cadena
• Silenciador
• Protector del Cilindro
• Filtro de Aire
• Tomillos de las Manijas
• Fijadores Anti-Vibraci6n
• Caja del Arranque
• Protector de Mano Delantera
38
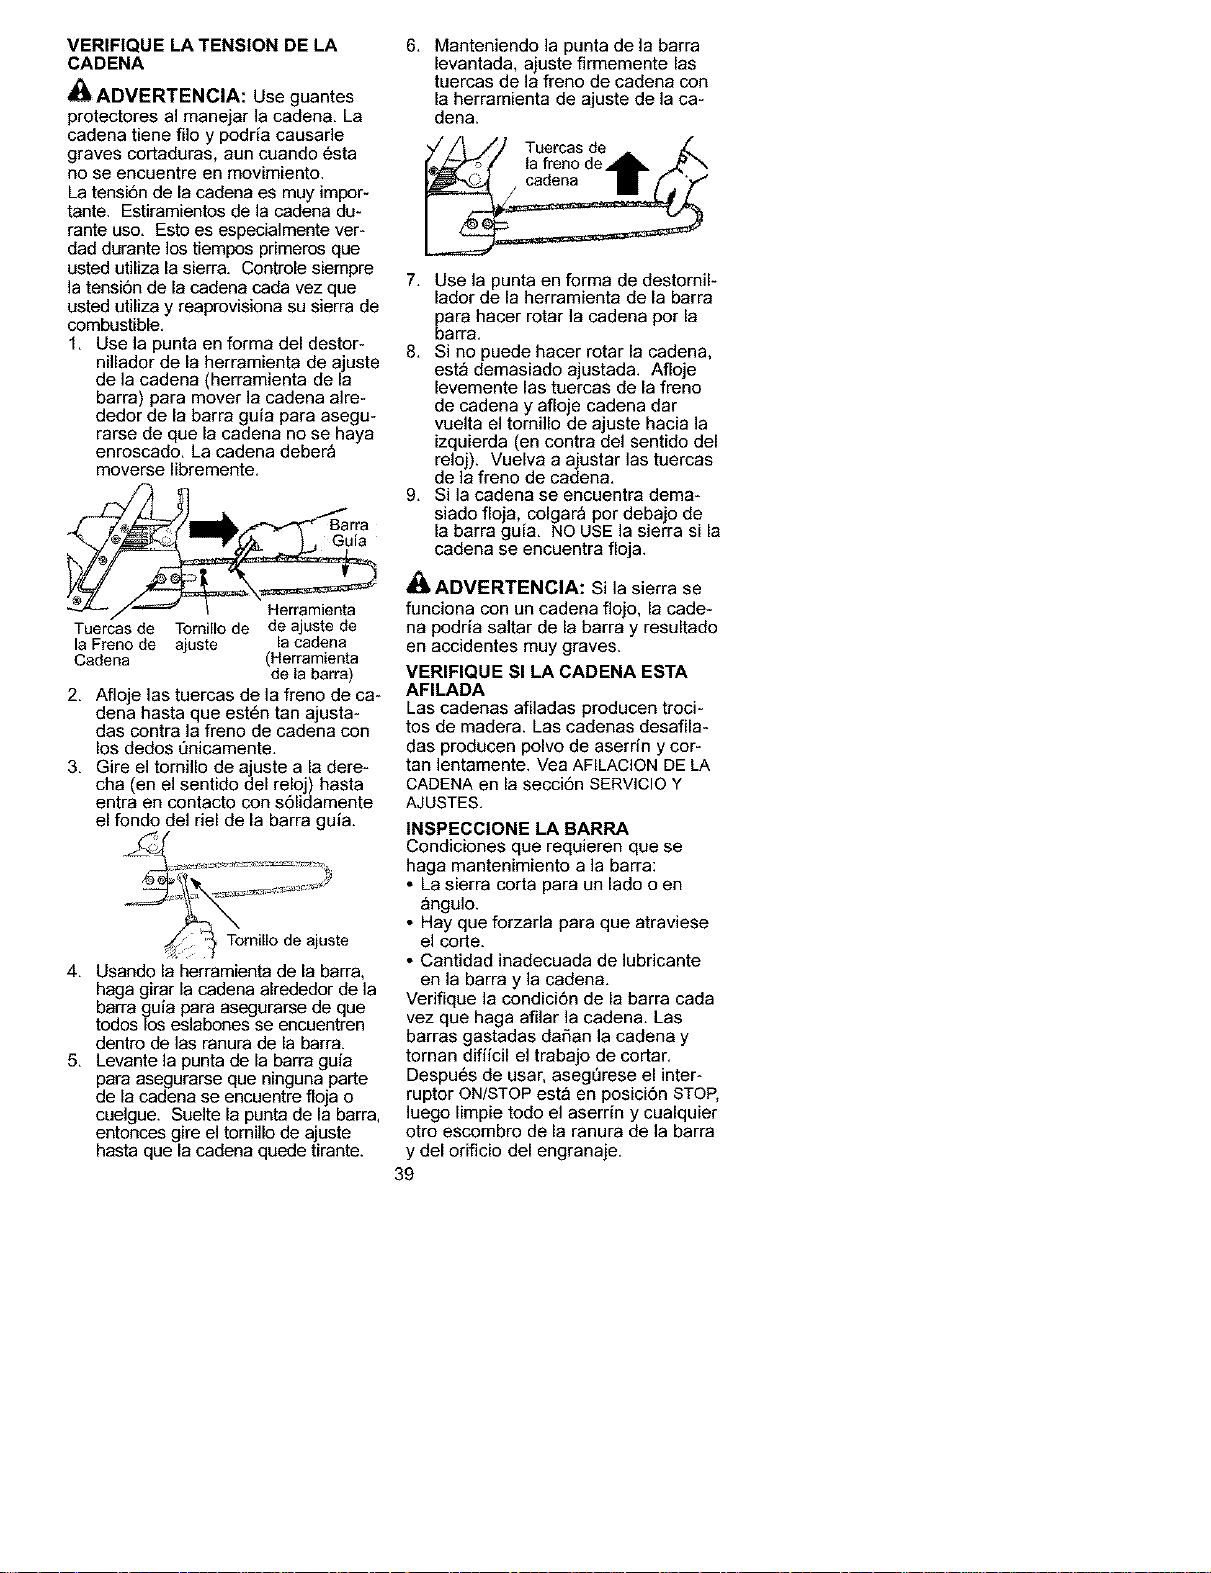
VERIFIQUE LA TENSION DE LA
CADENA
_ADVERTENCIA: Use guantes
protectores al manejar la cadena. La
cadena tiene filo y podria causade
graves cortaduras, aun cuando 6sta
no se encuentre en movimiento.
La tensi6n de la cadena es muy impor-
tante. Estiramientos de la cadena du-
rante uso. Esto es especialmente ver-
dad durante los tiempos primeros que
usted utiliza la sierra. Controle siempre
]a tensi6n de la cadena cada vez que
usted utiliza y reaprovisiona su sierra de
combustible.
1. Use la punta en forma del destor-
nillador de la herramienta de a uste
de a cadena (herram enta de a
barra) para mover la cadena alre-
dedor de la barra guia para asegu-
rarse de que la cadena no se haya
enroscado. La cadena deber_
moverse libremente.
Tuercas de Tornillo de de ajuste de
la Freno de ajuste la cadena
Cadena (Herramienta
de la barra)
2. Afloje las tuercas de la freno de ca-
dena hasta que est6n tan ajusta-
das contra la freno de cadena con
los dedos 6nicamente.
3. Gire el tornillo de a uste a la dere-
cha (ene sent do de re o ) hasta
entra en contacto con s61idamente
el fondo del riel de la barra guia.
4. Usando la herramienta de la barra,
haga girar la cadena alrededor de la
barra guia para asegurarse de que
todos los eslabones se encuentren
dentro de las ranura de la barra.
5. Levante la punta de la barra guia
para asegurarse que ninguna parte
de la cadena se encuentre floja o
cuelgue. Suelte la punta de la barra,
entonces gire el tornillo de ajuste
hasta que la cadena quede tirante.
6. Manteniendo la punta de la barra
levantada, ajuste firmemente las
tuercas de la freno de cadena con
la herramienta de ajuste de la ca-
dena.
Tuercas de
,a,rooo0o-,-f',
7. Use la punta en forma de destornil-
lador de la herramienta de la barra
para hacer rotar la cadena por la
barra.
8. Si no puede hacer rotar la cadena,
est_ demasiado ajustada. Afloje
levemente las tuercas de la freno
de cadena y afloje cadena dar
vuelta el tornillo de ajuste hacia la
izquierda (en contra del sentido del
reloj). Vuelva a ajustar las tuercas
de la freno de cadena.
9. Si la cadena se encuentra dema-
siado flo a, colgar_ por deba o de
a barraguia. NO USE a serra s a
cadena se encuentra floja.
A
_ADVERTENClA: Si la sierra se
funciona con un cadena flojo, la cade-
na podria saltar de la barra y resultado
en accidentes muy graves.
VERIFIQUE SI LA CADENA ESTA
AFILADA
Las cadenas afiladas producen troci-
tos de madera. Las cadenas desafila-
das producen polvo de aserdn y cor-
tan lentamente. Vea AFILACION DE LA
CADENA en la secci6n SERVICIO Y
AJUSTES.
INSPECCIONE LA BARRA
Condiciones que requieren que se
haga mantenimiento a la barra:
• La sierra corta para un lado o en
_ngulo.
• Hay que forzarla para que atraviese
el code.
• Cantidad inadecuada de lubricante
en la barra y la cadena.
Verifique la condici6n de la barra cada
vez que haga afilar la cadena. Las
barras gastadas dafian la cadena y
tornan difiicil el trabajo de cortar.
Despu6s de usar, asegDrese el inter-
ruptor ON/STOP est_ en posici6n STOP,
luego limpie todo el aserrin y cualquier
otro escombro de la ranura de la barra
y del orificio del engranaje.
39
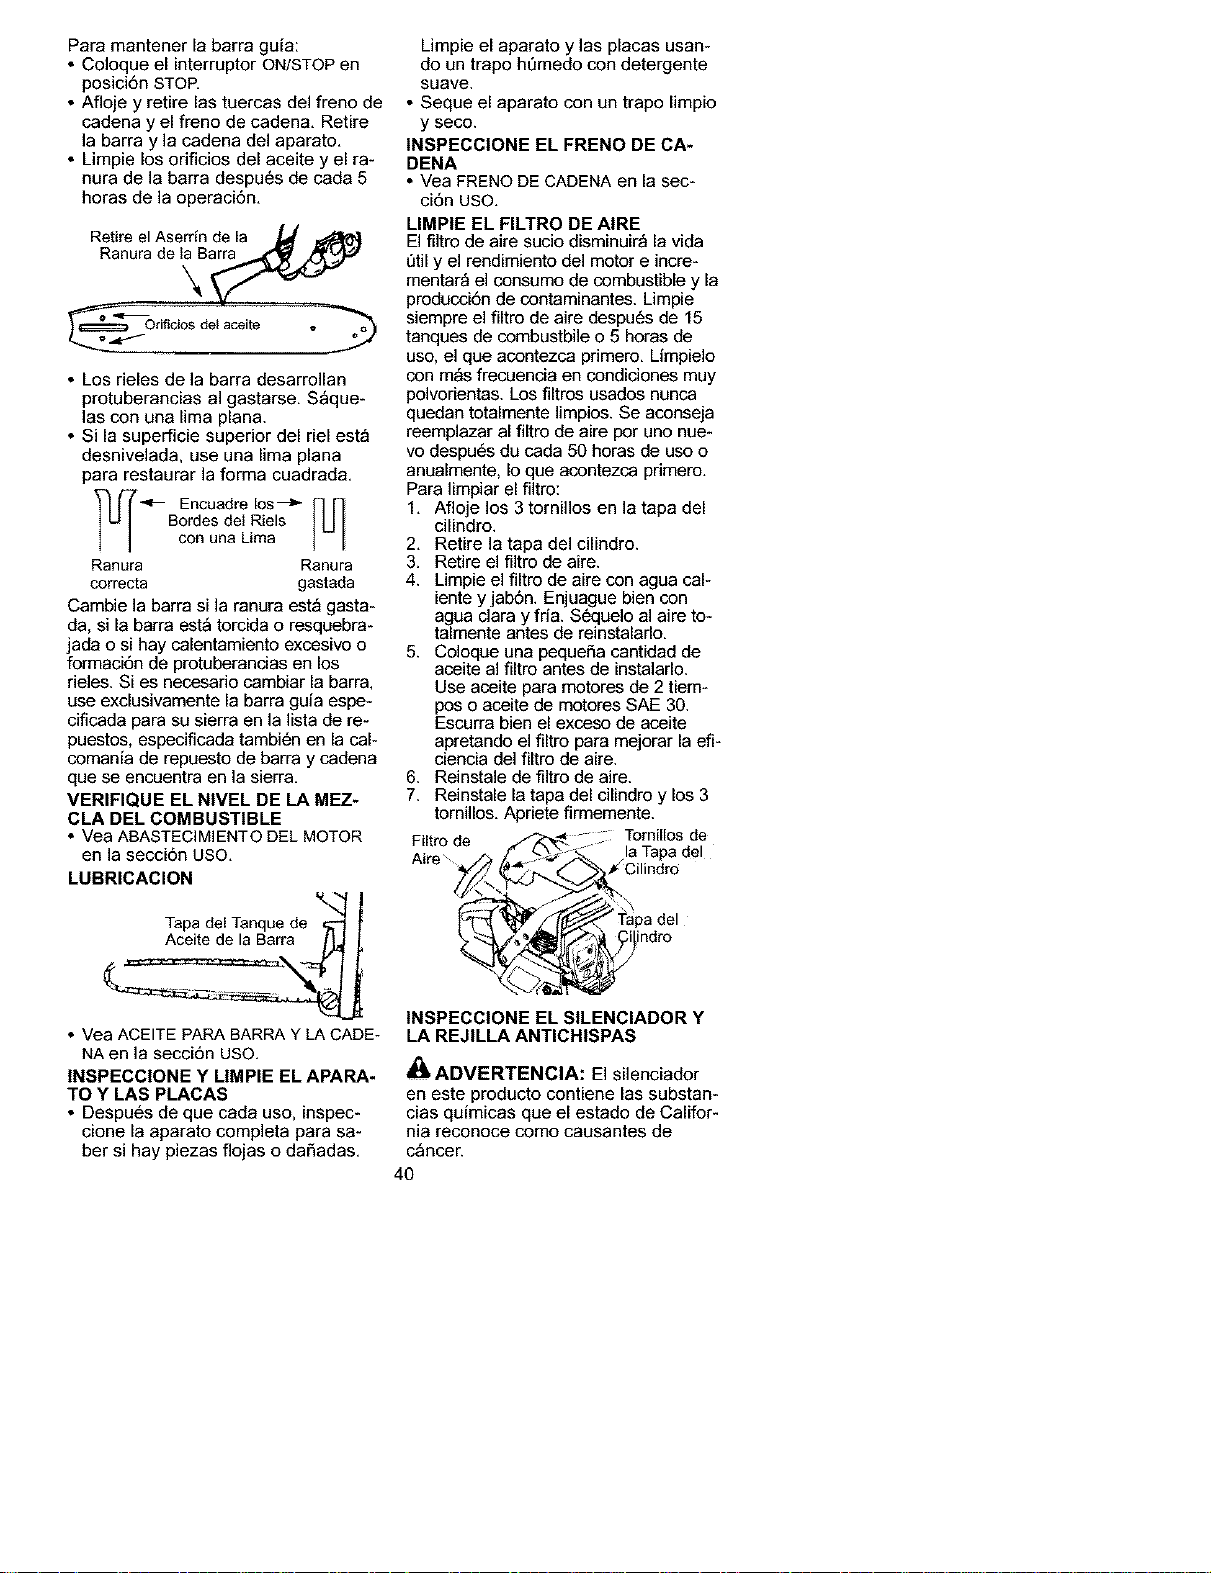
Para mantener la barra guia:
* Coloque el interruptor ON/STOP en
posici6n STOP.
* Afloje y retire las tuercas del freno de
cadena y el frene de cadena. Retire
la barra y la cadena del aparato.
* Limpie los orificios del aceite y el ra-
nura de la barra despu6s de cada 5
horas de la eperaci6n.
Retire el Aserrin de la ,_
Ranura de la Barra
_,---_--_'_Orificios del aceite e o
• Los rieles de la barra desarrollan
protuberancias al gastarse. S_que-
las con una lima plana.
• Si la superficie superior del riel est_
desnivelada, use una lima plana
para restaurar la forma cuadrada.
r_ Encuadre los_ _'_
Bordesdel Riels
con una Lima
Ranura Ranura
correcta gastada
Cambie la barra si la ranura est_ gasta-
da, si la barra est_ torcida o resquebra-
jada o si hay calentamiento excesivo o
formaci6n de protuberancias en los
rieles. Si es necesario cambiar la barra.
use exclusivamente la barra guia espe-
cificada para su sierra en la lista de re-
puestos, especiflcada tambi6n en la cal-
comania de repuesto de barra y cadena
que se encuentra en la sierra.
VERIFIQUE EL NIVEL DE LA MEZ-
CLA DEL COMBUSTIBLE
° Vea ABASTECIMIENTO DEL MOTOR
en la secci6n USO.
LUBRICACION
Tapadel Tanquede _'_ 1
Aceite de la Barra_
• Vea ACEITE PARA BARRA Y LACADE-
NA en la secci6n USO.
INSPECCIONE Y MMPIE EL APARA-
TO Y LAS PLACAS
• Despu6s de que cada use, inspec-
clone la aparato completa para sa-
ber si hay piezas flejas o daSadas.
Limpie el aparato y las placas usan-
do un trapo ht_medo con detergente
suave.
* Seque el aparate con un trapo limpio
y seco.
INSPECCIONE EL FRENO DE CA-
DENA
* Vea FRENO DE CADENA en la sec-
ci6n USO.
LIMPIE EL FILTRO DE AIRE
El filtro de aire sucio disminuir_ la vida
t_tily el rendimiento del motor e incre-
mentar_ el consumo de combustible y la
producci6n de contaminantes. Limpie
siempre el filtro de aire despu6s de 15
tanques de combustbile o 5 horas de
uso, el que acontezca primero. Limpielo
con m_s frecuencia en condiciones muy
polvorientas. Los filtros usados nunca
quedan totalmente limpios. Se aconseja
reemplazar al flltro de aire por uno nue-
vo despu6s du cada 50 horas de uso o
anualmente, Io que acontezca primero.
Para limpiar el flltro:
1. Afloje los 3tornillos en la tapa del
cilindro.
2. Retire la tapa del cilindro.
3. Retire el filtro de aire.
4. Limpie el filtro de aire con agua cal-
iente y jab6n. Enjuague bien con
agua clara y fria. SL'quelo al aire to-
talmente antes de reinstalarlo.
5. Coloque una pequeSa cantidad de
aceite al filtro antes de instalarlo.
Use aceite para motores de 2 tiem-
pos o aceite de motores SAE 30.
Escurra bien el exceso de aceite
apretando el filtro para mejorar la eft-
ciencia del filtro de aire.
6. Reinstale de filtro de aire.
7. Reinstale la tapa del cilindro y los 3
tornillos. Apriete firmemente.
Filtro de
Aire
Tomillos de
del
ndro
INSPECCIONE EL SILENCIADOR Y
LA REJILLA ANTICHISPAS
_ADVERTENCIA: El silenciador
en este producto contiene las substan-
cias quimicas que el estado de Califor-
nia reconoce come causantes de
c_ncen
4O
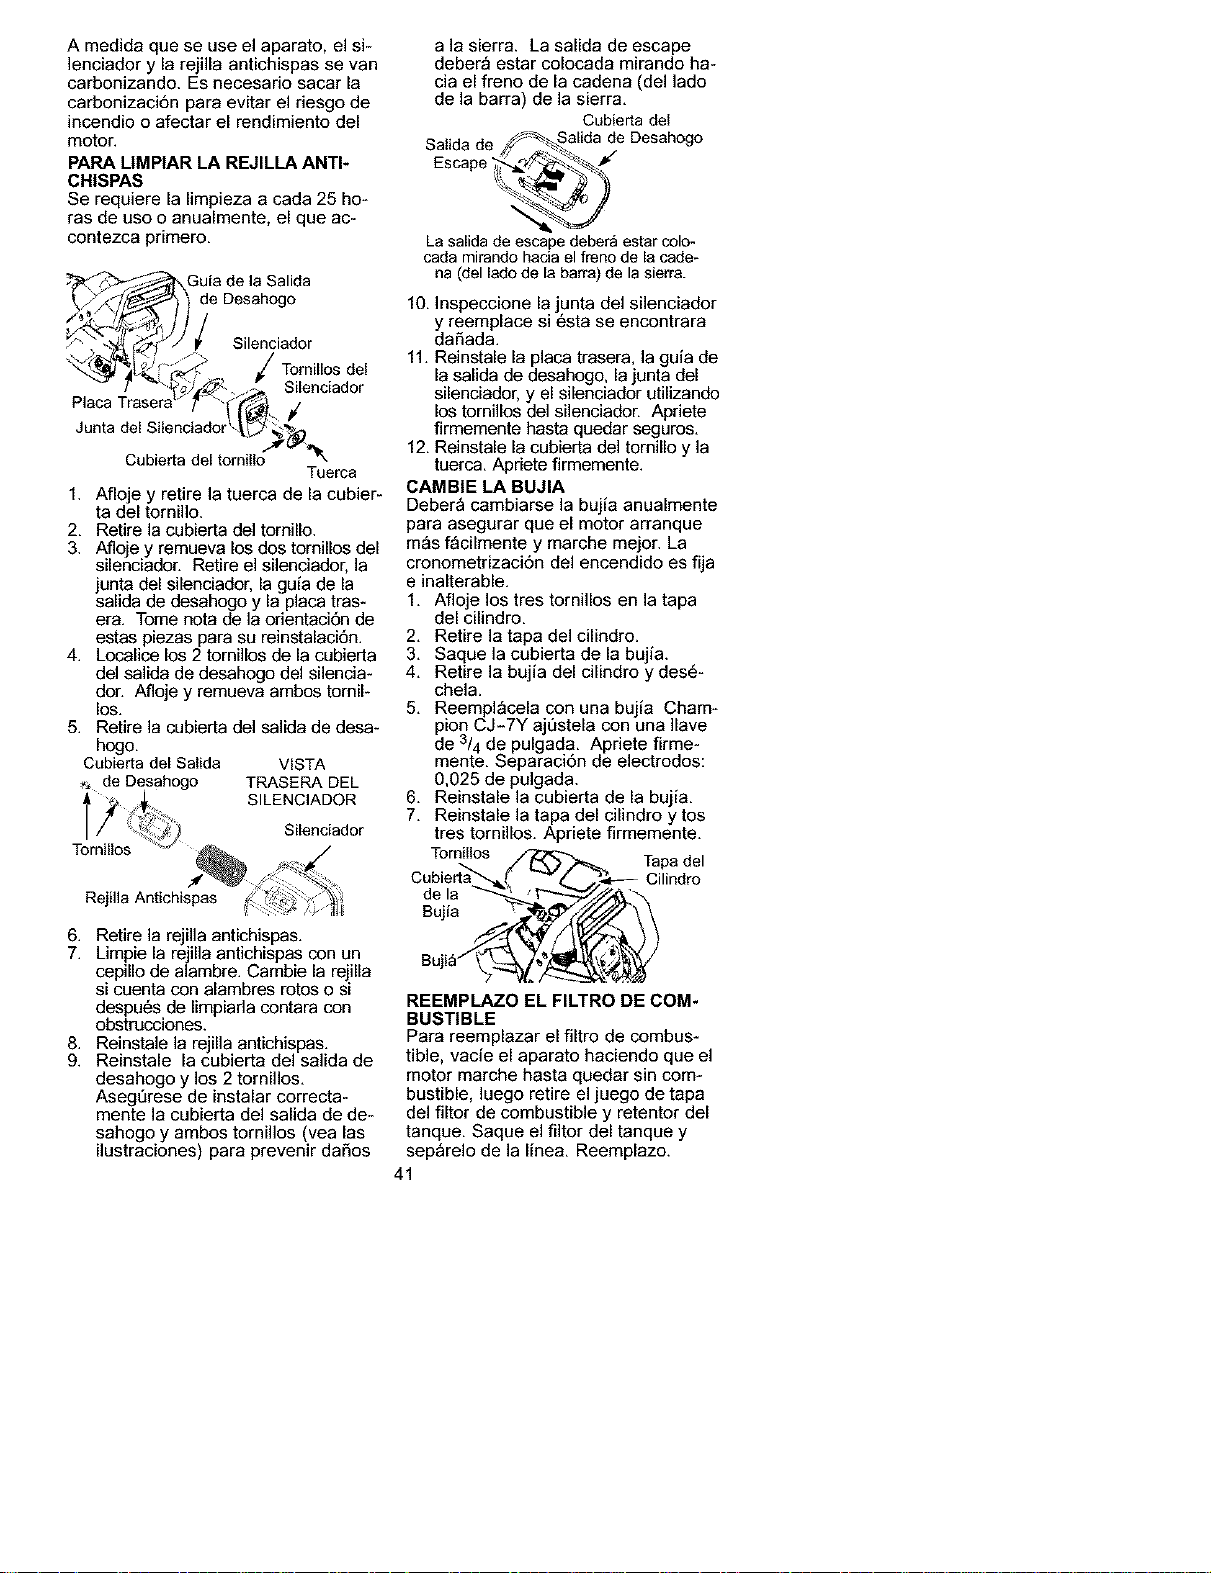
Amedidaqueseuseelaparato,elsi-
]enciadorylarejillaantichispassevan
carbonizando.Esnecesariosacarla
carbonizacienparaevitarelriesgode
incendiooafectar el rendimiento del
motor.
PARA LIMPIAR LA REJILLA ANTI-
CHISPAS
Se requiere la limpieza a cada 25 ho-
ras de uso o anualmente, el que ac-
contezca primero,
Guia de la Salida
de Desahogo
Silenciador
l
x Tomillos
__J_4SJz"_- / _ Silenciador
Placa Traserat/_'_'-
Junta del Silenciadori_'*._
Cubierta del tornillo
Tuerca
1. Afloje y retire la tuerca de la cubier-
ta del tornillo.
2. Retire la cubierta del tornino.
3. Afloje y remueva los dos torninos del
silenciador. Retire el silenciador, la
unta del silenciador, la guia de la
sa da de desahogo y a p aca tras-
era. Tome nora de la orientacien de
estas piezas para su reinstalacien.
4. Localice los 2 tornillos de la cubierta
del salida de desahogo del silencia-
don Afloje y remueva ambos tornil-
los.
5. Retire la cubierta del salida de desa-
hogo,
Cebierta del Salida VISTA
_. de Desahogo TRASERA DEL
SILENCIADOR
Silenciador
Tornillos
Rejilla Antichispas
6. Retire la rejilla antichispas.
7. Limpie la rejilla antichispas con un
cepino de alambre. Cambie la rejina
si cuenta con alambres rotos o si
despues de limpiarla contara con
obstrucciones.
8. Reinstale la rejilla antichispas.
9. Reinstale la cubierta del salida de
desahogo y los 2 tornillos.
Aseg0rese de instalar correcta-
mente la cubierta del salida de de-
sahogo y ambos tornillos (yea las
ilustraciones) para prevenir daSos
a la sierra. La salida de escape
deber_ estar colocada mirando ha-
cia el freno de la cadena (del ]ado
de la barra) de la sierra.
Cubierta del
SaIH d /J_alida de Desahogo
ua e _ ._,_.
Escape _"
Lasalida de escapedeber_ estarcolo-
cada mirandohaciael frenode la cade-
na (dellado de la barra)de lasierra.
10. Inspeccione la junta del silenciador
y reemplace si 6sta se encontrara
daSada.
11. Reinstale la placa trasera, la guia de
la salida de desahogo, la junta del
silenciador, y el silenciador utilizando
los tornillos del silenciador. Apriete
firmemente hasta quedar seguros.
12. Reinstale la cubierta del tornino y la
tuerca. Apriete firmemente.
GAMBLE LA BUJIA
Deber_ cambiarse la bujia anualmente
para asegurar que el motor arranque
m_s f_cilmente y marche mejor. La
cronometrizacien del encendido es fija
e inalterable.
1. Afloje los tres tornillos en la tapa
del cilindro.
2. Retire la tapa del cilindro.
3. Saque la cubierta de la bujia.
4. Retire la bujia del cilindro y dese-
chela.
5. Reempl_cela con una bujia Cham-
pion CJ-7Y aj0stela con una Ilave
de 3/4 de pulgada. Apriete firme-
mente. Separacien de electrodos:
0.025 de pulgada.
6. Reinstale la cubierta de la bujia.
7. Reinstale la tapa del cilindro y tos
tres tornillos. Apriete firmemente.
Tornillos Tapa del
Cilindro
de la
Bujia
REEMPLAZO EL FILTRO DE COM-
BUSTIBLE
Para reemplazar el filtro de combus-
tible, vacie el aparato haciendo que el
motor marche hasta quedar sin com-
bustible, luego retire el juego de tapa
del filtor de combustible y retentor del
tanque. Saque el filtor del tanque y
sep_relo de la linea, Reemplazo.
41
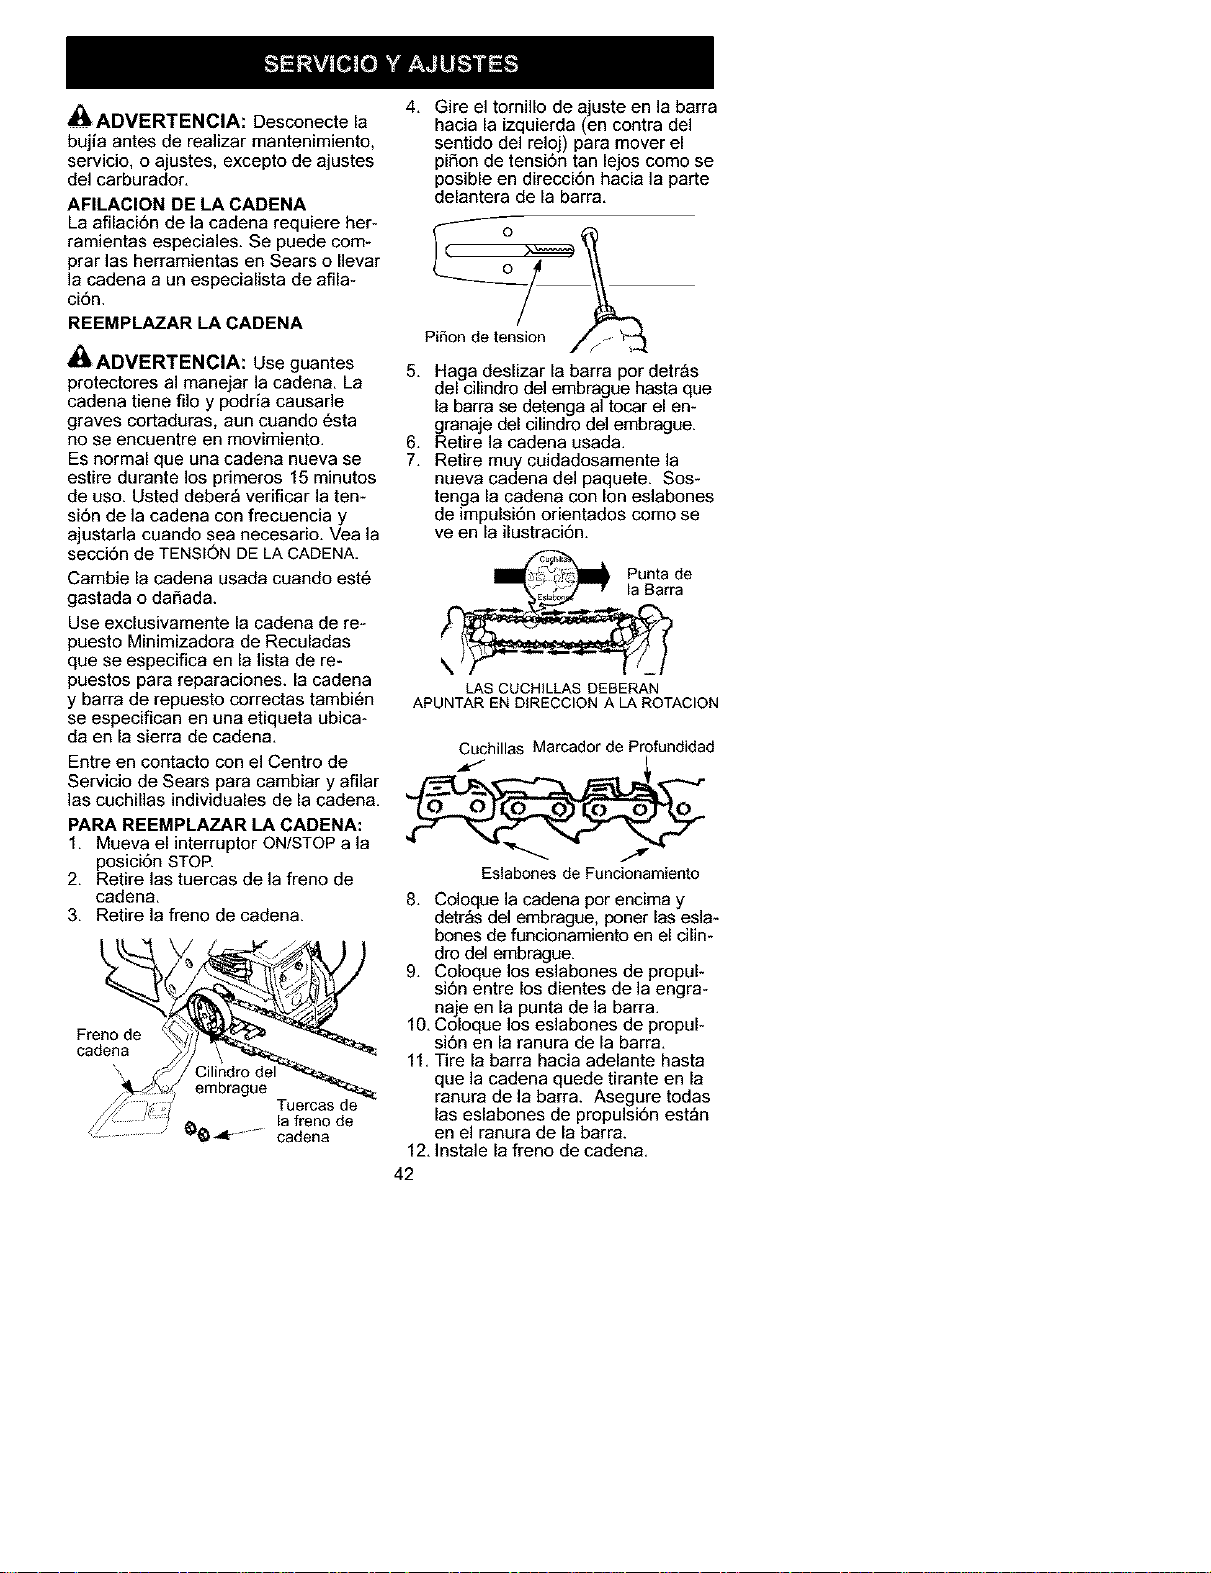
ADVERTENCIA: Desconecte la
bujia antes de reaiizar mantenimiento,
servicio, o ajustes, excepto de ajustes
del carburador.
AFILACION DE LA CADENA
La afilaci6n de la cadena requiere her-
ramientas especiales. Se puede com-
prar las herramientas en Sears o Ilevar
]a cadena a un especialista de afila-
ci6n.
REEMPLAZARLACADENA
_ADVERTENClA: Use guantes
protectores al manejar la cadena. La
cadena tiene flo y podda causarle
graves certaduras, aun cuando 6sta
no se encuentre en mevimiente.
Es normal que una cadena nueva se
estire durante los primeros 15 minutos
de use. Usted deber_ verificar la ten-
si6n de la cadena con frecuencia y
ajustarla cuando sea necesarie. Vea la
secci6n de TENSION DE LA CADENA.
Cambie la cadena usada cuande est6
gastada e daSada.
Use exclusivamente la cadena de re-
puesto Minimizadera de Reculadas
que se especifica en la lista de re-
puestos para reparaciones, la cadena
y barra de repuesto correctas tambi6n
se especifican en una etiqueta ubica-
da en la sierra de cadena.
Entre en contacto con el Centro de
Servicio de Sears para cambiar y afilar
las cuchilas individuales de la cadena.
PARA REEMPLAZAR LA CADENA:
1. Mueva el interruptor ON/STOP a la
posici6n STOP.
2. Retire las tuercas de la freno de
cadena.
3. Retire la freno de cadena.
/_: )._/ Tuercas de
i/_1 ___ _ la freno de
................ _ _r ....... cadena
4. Gire el tornillo de ajuste en la barra
hacia la izquierda (en contra del
sentido del reloj) para mover el
piSon de tensi6n tan lejos como se
posible en direcci6n hacia la parte
delantera de la barra.
Pifion de tension _'/_
5. Haga deslizar la barra per detr_s
del cilindro del embrague hasta que
la barra se detenga al tocar el en-
granaje del cilindro del embrague.
6. Retire la cadena usada.
7. Retire muy cuidadosamente la
nueva cadena del paquete. Sos-
tenga la cadena con Ion eslabones
de impulsi6n orientados como se
ve en la ilustraci6n.
LAS CUCHILLAS DEBERAN
APUNTAR EN DIRECCION A LA ROTACION
Cuchillas Marcador de Profundidad
Eslabones de Funcionamiento
8. Coloque la cadena per encima y
detr_s del embrague, poner las esla-
bones de funcionamiento en el cilim
dro del embrague.
9. Coloque los eslabones de propuk
si6n entre los dientes de la engra-
naje en la punta de la barra.
10. Coloque los eslabones de propuk
si6n en la ranura de la barra.
11. Tire la barra hacia adelante hasta
que la cadena quede tirante en la
ranura de la barra. Asegure todas
las eslabones de propulsi6n est_n
en el ranura de la barra.
12. Instale la freno de cadena.
42
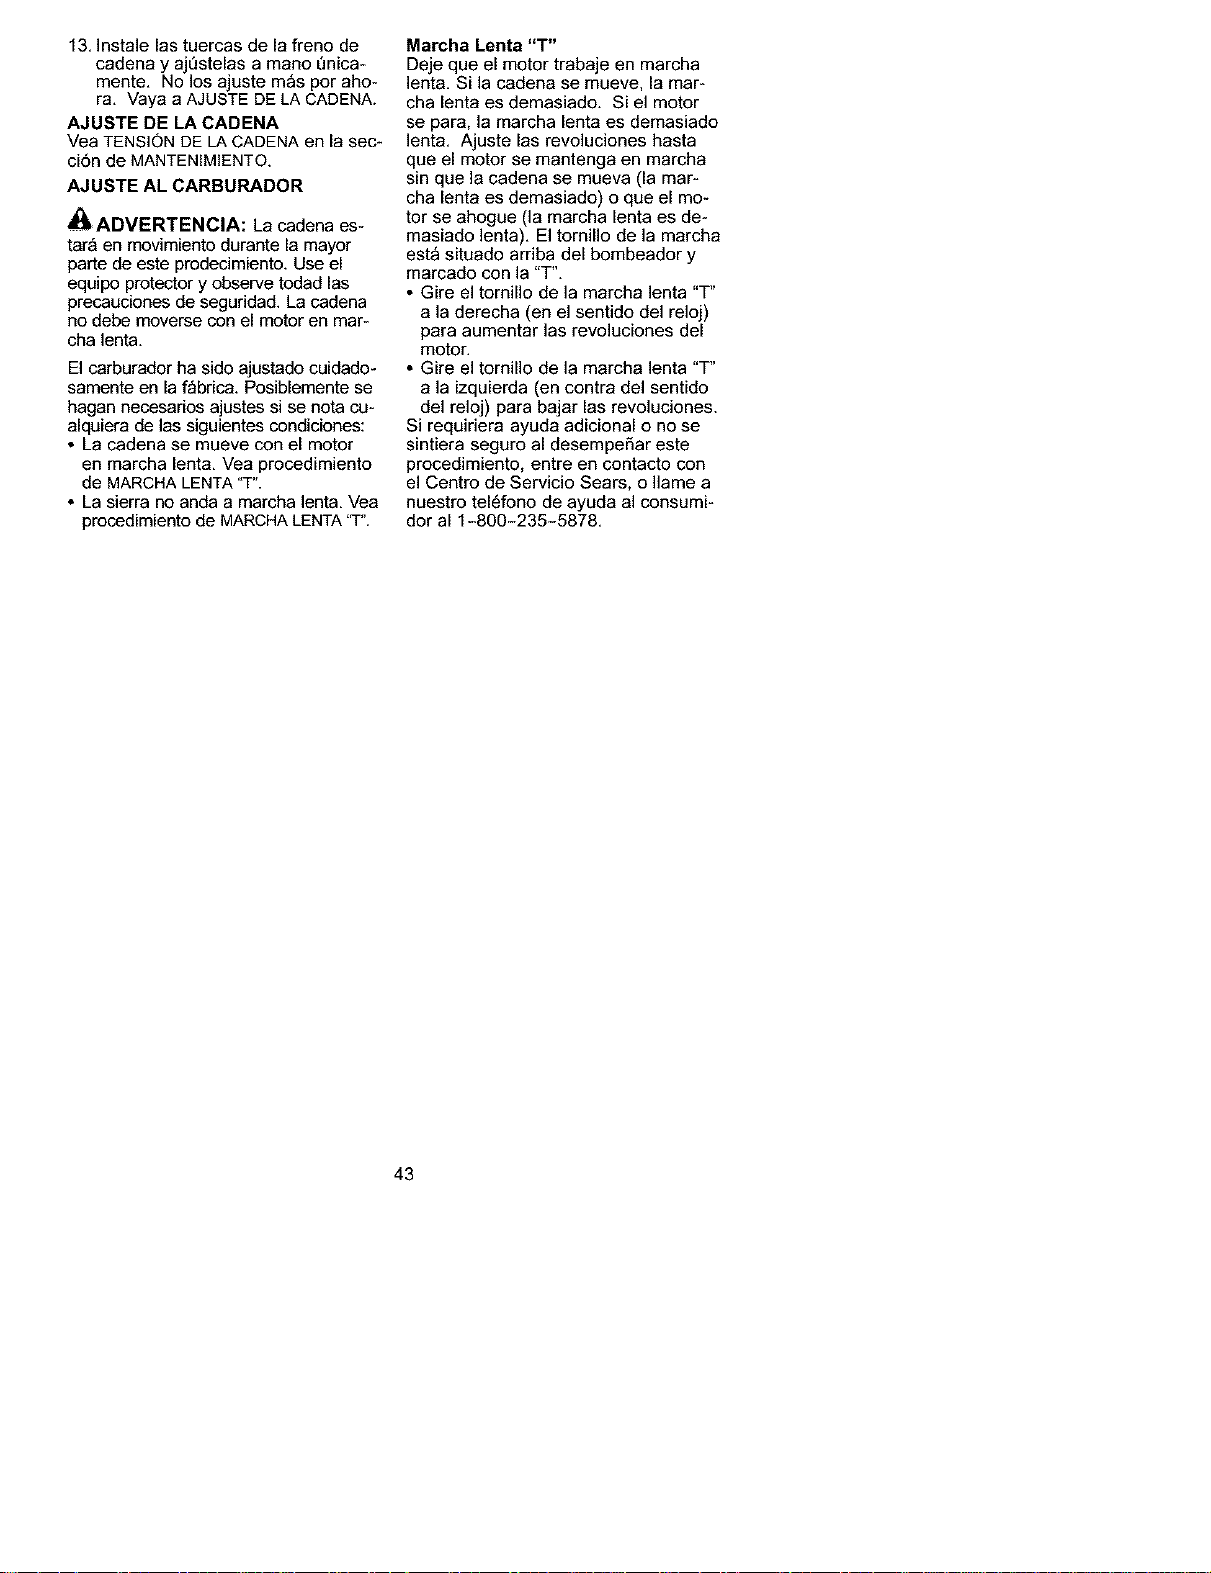
13.Instalelastuercasdelafrenode
cadenayaj_stelasamano_nica-
mente.Nolosajustem_sporaho-
ra. Vaya a AJUSTE DE LA CADENA.
AJUSTE DE LA CADENA
Vea TENSION DE LACADENA en la sec-
ciSn de MANTENIMIENTO.
AJUSTE AL CARBURADOR
_ADVERTENCIA: La cadena es-
tar_ en movimiento durante la mayor
parte de este prodecimiento. Use el
equipo protector y observe todad las
precauciones de seguridad. La cadena
no debe moverse con el motor en mar-
cha lenta.
El carburador ha sido ajustado cuidado-
samente en laf_brica. Posiblemente se
hagan necesarios ajustes si se nota cu-
alquiera de las siguientes condiciones:
, La cadena se mueve con el motor
en marcha lenta. Vea procedimiento
de MARCHA LENTA"T".
, La sierra no anda a marcha lenta. Vea
procedimiento de MARCHALENTA"T".
Marcha Lenta "T"
Deje que el motor trabaje en marcha
]enta. Si la cadena se mueve, la mar-
cha lenta es demasiado. Si el motor
se para. la marcha lenta es demasiado
lenta. Ajuste las revoluciones hasta
que el motor se mantenga en marcha
sin que la cadena se mueva (la mar-
cha lenta es demasiado) o que el mo-
tor se ahogue (la marcha lenta es de-
masiado lenta). El tornillo de la marcha
est_ situado arriba del bombeador y
marcado con la "m".
, Gire el tornillo de la marcha lenta "T"
a la derecha (en el sentido del reloj)
para aumentar las revoluciones del
motor.
, Gire el tornillo de la marcha lenta "T"
a la izquierda (en contra del sentido
del reloj) para bajar las revoluciones.
Si requiriera ayuda adicional o no se
sintiera seguro al desempeSar este
procedimiento, entre en contacto con
el Centro de Servicio Sears. o Ilame a
nuestro tel6fono de ayuda al consumi*
dor al 1-800-235-5878.
43
z_
a_IIADVERTENCIA: Realice los si-
guientes pasos despu6s de cada uso:
• Deje que el motor se enfrie y fije
bien el aparato antes de guardado o
de transportarlo.
• Guarde la sierra y el combustible en
unlocal bien ventilado donde los va-
pores de combustible no puedan en-
trar en contacto con shispas ni lla-
mas abiertas provenientes de los
termotanques, los motores o inter-
ruptores el6ctricos, calefactores cen-
trales, etc.
• Guarde el aparato con todos los pro-
tectores en su lugar y coloque el
aparato de modo que las piezas filo-
sas no puedan causar heridas por
accidente.
• Guarde el aparato bien fuera del al-
cance de los nifios.
ESTAClONAL ALMACENAJE
Prepare el aparato para guardado al
final de la temporada o si no se Io va a
usar por m_s de 30 dias o m_s.
Siva a guardar el aparato durante un
periodo largo:
• Limpie la sierra a conciencia antes
del almacenaje.
• Almac6ne en un lugar limpio y seco.
• Aplique una pequefia cantidad de
aceite alas superficies externas
met_licas y a la barra guia.
• Lubrique la cadena y envu61vala en
papel grueso o en tela.
SISTEMA DE COMBUSTIBLE
Vea el mensaje marcado IMPOR-
TANTE, que se refiere al uso de com-
bustibles con mezcla de alcohol en su
aparato, en la secci6n de USO, bajo
ABASTECIMIENTO DEL MOTOR. Los es-
tabilizadores de combustible son una
alternativa aceptable para minimizar la
formaci6n de dep6sitos de goma du-
rante el almacenamiento.
Afiada estabilizador a la gasolina en el
tanque de combustible o en el reci-
piente de almacenado de combustible.
Siga las instrucciones de mezcla que
se encuentran en los envases de esta-
bilizador. Ponga el motor en marcha y
d6jelo en marcha unos 5 minutos des-
pu6s de ponerle estabilizador.
El aceite Craftsman 40:1 para motores
de 2 tiempos (enfriados a aire) viene
mezclado con estabilizador de com-
bustible. Si no usa enste aceite de
Sears, entonces puede afiadir un esta-
bilizador al tanque de conmbustible.
INTERIOR BEL MOTOR
• Retire la bujia y vierta una cuchara-
da de las de t6 de adceite 40:1 para
motores de 2 tiempos (enfriados a
aire) por la abertura para la bujia. Ti-
ronee lentamente de la soga de ar-
ranque 8 a 10 veces para distribuir el
aceite.
• Reemplace la bujia con otra del tipo
y de la gama de calor recomenda-
dos.
• Limpie el filtro de aire.
• Examine todo el aparato para verifi-
car que no haya tornillos, tuercas ni
pernos sueltos. Cambie dotas las
piezas dafiadas, quebradas o gasta-
das.
• AI principio de la pr6xima temporada,
use exclusivamente combustible
nuevo con la proporci6n correcta de
gasolina a adeite.
OTRO
• No guarde gasolina de una tempora-
da a la pr6xima.
• Cambie el recipiente de gasolina si
se empieza a oxidar.
44
TABLA DIAGNOSTICA
ADVERTENClA: Siempre apague el aparato y desconecte la bujia antes
de hacer cualquiera de las reparaciones recomendadas a continuaci6n ex-
cepto reparaciones que requieran que el aparato est6 en operaci6n.
PROBLEMA
El motor no
arranca o se
mantiene en
marcha s61o
unos segundos
despu6s de ar-
rancar.
El motor no
anda en
marcha lenta
como debe.
El motor no
acelera, le falta
)otencia o se
para bajo car-
ga.
El motor
humea
excesiva-
mente.
CAUSA
1. El interruptor est_ an
posicion STOP.
2. El motor est_ ahogado.
3. El tanque de
combustible est_ vacio.
4. La bujia no hace chispa.
5. El combustible no est_
Ilegando al carburador.
6. El caburador requiere
ajuste.
7. Ninguno de los
anteriores.
1. Las revoluciones de la
marcha lenta estan muy
altos o muy bajas.
2. La Mezcla para Bajas
Revoluciones requier
ajuste.
3. Las juntas del cigL_efial
est&n gastadas.
4. La compresion est_
baja.
5. Ninguno de los
anteriores.
1. El filtro de aire est&
sucio.
2. La bujia esta
carbonizada
3. El carburador requiere
ajuste.
4. Los puertos de escape
o las aberturas de
salida del silenciador
est&n tapados.
5. La compresion est_
baja.
6. La freno de cadena es
activado.
7. Ninguno de los
anteriores.
1. El cebador est_
parcialmente accionado.
2. La mezcla de combus-
tible se ha hecho
3. El filtro de aire est&
sucio.
4. La mezcla para Altas
Revoluciones requiere
ajuste.
5. El c&rter est_ perdiendo.
SOLUCION
1. Coloque el interruptor en ON.
2. Vea "Arranque Dificil" en la
secci6n Uso.
3. Llene el tanque con la mezcla
correcta de combustible.
4. Instale una bujia nueva.
5. Verifique si el filtro de
combustible esta sucio;
limpielo. Verifique si hay
dobleces en la linea de
combustible o si est_ partida:
reparla o c&mbiela.
6. Entre en contacto con el Servicio
Sears (yea parte trasera del manual)
7. Entre en contacto con el Servicio
Sears (yea parte trasera del manual)
1. Vea "Ajuste al Carburador" en la
secci6n Servicio y Ajustes.
2. Entre en contacto con el Servicio
Sears (yea parte trasera del manual)
3. Entre en contacto con el Servicio
Sears (yea parte trasera del manual)
4. Entre en contacto con el Servicio
Sears (yea parte trasera del manual)
5. Entre en contacto con el Servicio
Sears (yea parte trasera del manual)
1. Limpie o cambie el filtro de aire.
2. Limpie o cambie la bujia y
calibre la separacion.
3. Entre en contacto con el Servicio
Sears (yea parte trasera del manual)
4. Entre en contacto con el Servicio
Sears (yea parte trasera del manual)
5. Entre en contacto con el Servicio
Sears (yea parte trasera del manual)
6. Desactive el freno de cadena.
7. Entre en contacto con el Servicio
Sears (yea parte trasera del manual)
1. Ajuste el cebador.
2. Vacie el tanque de combustible
y II_nelo de combustible con la
mezcla correcta.
3. Limpie o cambie el filtro aire.
4. Entre en contacto con el Servicio
Sears (yea parte trasera del manual)
5. Entre en contacto con el Servicio
Sears (yea parte trasera del manual)
45
PROMBLEMA
El motor
marcha con
temperatura el-
vada.
TABLA DIAGNOSTICA (continuado)
CAUSA
1. La mezcla de combus-
tible se ha hecho
2. Se ha instalado la bujia
3. La Mezcla para Altas
Revoluciones est&
demasiado pobre.
4. Los puertos de escape
o Ins aberturas de
salida silenciador est_n
tapados.
5. Acumulaci6n del carbon.
en el rejilla antichispas.
6. Caja del arranque sucio.
7. Ninguno del antedicho,
SOLUCION
1, Vea "Abastecimiento del
Aparato" en la seccion Uso.
2, C&rnbiela por la bujla correct&
3. Entre en contacto con el Servicio
Sears (yea parte trasera del manual
4. Entre en contacto con el Servicio
Sears (yea parte trasera del manual
5, Vea "Para Limpiar la Rejilla
Antichispas" en la secci6n
Mantenimiento.
6. Limpie el area.
7. Entre en contacto con el Servicio
Sears (yea parte trasera del manual
Insuficiencia 1. El tanque de aceite 1. Llene el tanque de aceite,
de aceite esta
para lubricar 2. El bombeador de aceite 2. Entre en contacto con el Servicio
la barra y ca- o el filtor de aceite est_ Sears (yea parte trasera del manual)
dena. tapado,
3. El orificio para aceite en 3. Saque la barra y limpiela,
la barra est& tapado,
La cadena se 1. La marcha lenta 1. Vea "Ajuste al Carburador" en
mueve en mar- requiere ajuste, la secci6n Servicio y Ajustes.
cha lent& 2. El embrague reauiere 2. Entre en contacto con el Servicio
reparaciones. Sears (yea parte trasera del manual)
1. La cadena esta
demasiado tensionada.
2. El carburador requiere
ajuste.
3. Los deles de la barra
guia est&n apretados,
4. El deslizarse de embrague
5. La freno de cadena es
activado.
1. La Cadena est&
incorrectamente
tensionada,
2. Las cuchillas estan
daSadas.
3. La cadena esta gastada.
4. Las cuchillas est&n
desafiladas o mal
afiladas o los medidores
de profundidad estan muy
altos.
5. Engranaje desgastada.
La cadena no
se mueve
cuando se
acelera el
moto_
La cadena
golpetea o
corta despa-
rejo.
6. La cadena instalado hacia
atr_s.
1, Vea "Verifique la Tensi6n de la
Cadena" en la secci6n Manteni-
miento.
2. Entre en contacto con el Servicio
Sears (yea parte trasera del manual
3, Repara o reemplace,
4, Entre en contacto con el Servicio
Sears (yea parte trasera del manual
5, Desactive el freno de cadena.
1, Vea "Verifique la Tensi6n de la
Cadena" en la secci6n Manteni-
miento.
2. Entre en contacto con el Servicio
Sears (yea parte trasera del manual
3. Afile o cambie la cadena,
4. Vea "Afilaci6n de la Cadena" en
la secci6n Servicio y Ajustes.
5. Entre en contacto con el Servieio
Sears (yea parte trasera del manual
6. Instale el cadena en la direcei6n
derecha,
46

TABLA DIAGNOSTICA (continuado)
CAUSAPROMBLEMA
Parade del
cadena dentro
del corte.
La cadena cor-
taen _ngulo.
1. La parte de arriba de
las cuchillas no est&n
planas.
2. La berra tiene
protuberancias o est_
torcide o los deles
estan desparejos.
3. El embrague est& 3.
patinando.
1. Las cuchillas est&n 1.
daSadas pot un lado.
2. Cadena no esta 2.
afilada.
3. Barra guia esta doblada 3.
o desgastada.
SOLUCION
1. Vea "Afileci6n de la Cadena" en
la secci6n Servicio y Ajustes.
2, Repara o reemplace la
barra guia.
Entre en contacto con el Servicio
Sears (vea parte trasera del manual).
Vea "Afilaci6n de la Cadena" en
la secci6n Servicio y Ajustes.
Vea "Afilacidn de la Cadena" en
la secci6n Servicio y Ajustes.
Reemplace la barra guia.
Si acontencen situaciones no previstas en este manual, actue con cautela y use
buen criterio. Si necesita ayuda, entre en contacto con el Centro de Servicio
Sears o Ilame al TELEFONO DE AYUDA AL CONSUMIDOR al 1-800-235-5878.
SUS DERECHOS Y OBLIGACIONES
DE GARANTIA: La Agencia de Protec-
ci6n Ambiental de los Estados Unidos,
]a Junta de Recursos Ambientales de
California y Sears, Roebuck and Co.,
U.S.A., se complacen en explicar la ga-
rantia con la que cuenta el sistema de
control de emisi6n en su motor pe-
queSo, modelo 2002-2004, para uso
fuera de carretera. En California, todos
los motores pequef_os para uso fuera
de carretera deben ser diseSados,
construidos y equipados para satisfacer
]as rigurosas normas antihumo que 13o.
see el estado. Sears deber_ garantizar
el sistema de control de emisi6n en su
m_quina de motor pequeSo para uso
fuera de carretera por los periodos de
tiempo que explicamos a continuaci6n y
con la condici6n de que su m_quina de
motor pequeSo para uso fuera de car-
retera no haya sufrido ningt_n tipo de
abuso, negligencia o mantenimiento in-
apropiado. Su sistema de control de
emisi6n incluye piezas tales como el
carburador y el sistema de ignici6n.
Donde exista una condici6n que re-
quiera reparaci6n bajo garantia. Sears
reparar_ gratis su motor pequeSo para
uso fuera de carretera. Los gatos cu-
biertos bajo la garantia incluyen el
diagn6stico, las piezas y labor.
CUBIERTA DE GARANTIA DEL FAB-
RICANTE: Si cualquier pieza relaciona-
da con el sistema de emisi6n de su mo-
tor (como hemos enumerado en la lista
de piezas de control de emisi6n bajo
garantia) se encontrara defectuosa o
defectos en el material o en la labor del
motor causaran que tal pieza comenza-
ra a fallar, la pieza ser_ reparada o re-
emplazada por Sears. GARANTtA DE
RESPONSABILIDAD DE DEL DUENO:
Como dueSo de una m_quina de motor
pequeSo para uso fuera de carretera,
usted ser_ responsable por el manten-
imiento adecuado en los periodos pre-
viamente programados y enumerados
en su manual de instrucciones. Sears
recomienda que guarde todos los reci-
bos que indiquen que se ha de-
sempeSado mantenimiento en su
m_quina de motor pequeSo para uso
fuera de carretera, pero Sears no podr_
negar el servicio bajo garantia Dnica-
mente a causa de la falta de recibos o
por el incumplimiento de su parte en
asegurarse que el mantenimiento pro-
gramado haya sido desempeSado.
Como dueSo de una m_quina de motor
pequeSo para uso fuera de carretera,
usted deber_ contar con el conocimien-
to de que Sears puede negar la cubierta
bajo garantia si su m_quina de motor
peque£_opara uso fuera de carretera o
alguna pieza de la misma ha dejado de
funcionar debido al abuso, negligencia,
mantenimiento inapropiado, modifica-
clones no aprobadas o el uso de piezas
que no hayan sido fabricadas o aproba-
das por el fabricante original del equipo.
Es responsabilidad suya el Ilevar su
47
m_quinademotorpequefioparauso
fueradecarreteraauncentroderepa-
raci6nautorizadoSearstanpronto
comosepresenteelproblema.Lasre-
paracionesbajogarantfadeber_nser
completadasenunperiododetiempo
razonable,quenoexcedalos30dias.
Sicuentaustedconalgunapreguntaen
relaci6nasusderechosyresponsabili-
dadesdegarantia,usteddeber_com-
unicarseconsucentrodeservicioauto-
rizadom_scercanooIlamaraSearsal
1-800-469-4663.FECHADELCOM-
IENZADE LA GARANTtA: El periodo
de garantia comienza en la fecha de
compra de la m_quina de motor pe-
queSo para uso fuera de carretera. DU-
RACION DE LA GARANTIA: Esta ga-
rantia cuenta con un periodo de
duraci6n de dos aSos comenzando en
la fecha inicial de compra. QUE
CUBRE LA GARANTIA: REPARA-
ClON O REEMPLAZO DE PIEZAS. La
reparaci6n o el reemplazo de cualquier
pieza garantizada ser_n desempeSados
y ofrecidos al dueSo sin costo alguno en
un Centro de Servicio Sears. Si cuenta
usted con alguna pregunta en relaci6n a
sus derechos y responsabilidados de
garantia, usted deber_ comunicarse con
su centro de servicio autorizado robs
cercano o namar a Sears al
1-800-469-4663. PERIODO DE GA-
RANTIA: Cualquier pieza garantizada
que no est6 programada para ser reem-
plazada como parte del mantenimiento
requerido, o que est6 programada eni-
camente para inspecci6n regular para
efectos de "reparaci6n o reemplazo si
fuera necesario" deber_ garantizarse
por un periodo de dos amos.Cualquier
pieza garantizada que est6 programada
para ser reemplazada como parte del
mantenimiento requerido deber_ estar
garantizada por el periodo de tiempo
que comienza en la fecha de compra
inicial hasta la fecha del primer reempla-
zo programado para dicha pieza. DIAG-
NOSTICO: No se deber_ cobrar al
dueSo ning_n tipo de cargos por la labor
de diagn6stico la cual determine que
una pieza garantizada se encuentra de-
fectuosa si el trabajo de diagn6stico ha
sido desempeSado por un Centro de
Servicio Sears. DANOS POR CONSE-
CUECIA: Sears podr_ ser responsable
de dafios ocurridos a otras piezas del
motor causados por la falla de una pie-
za garantizada que se encuentre bajo el
periodo de garantia. QUE NO CUBRE
LA GARANTIA: Todas las fallas causa-
das por el abuso, negligencia o manten-
imiento inaQropiado no est_n cubiertas.
PIEZAS ANADIDAS O MODIFICADAS:
El uso de piezas aSadidas o la modifica-
ci6n de piezas podr_n servir como base
para que se anule la reclamaci6n de ga-
rantia. La garantia de Sears no se re-
sponsabiliza por el real funcionamiento
debido al uso de piezas aSadidas o de
piezas modificadas. COMO ENTABLAR
UNA RECLAMAClON: Si cuenta usted
con alguna pregunta relacionada con
sus derechos y responsabilidados de
garantia, usted deber_ entrar en contac-
to con su centro de servicio autorizado
mbs cercano o llamar a Sears al
1-800-469-4663. DONDE OBTENER
SERVIClO DE GARANT|A: Servicio o
reparaciones bajo garantia deber_n ser
provistas en todos los Centros de Servi-
cio Sears. Por favor comuniquese al
1-800-469-4663. MANTENIMIENTO,
REEMPLAZO Y REPARACION DE
PIEZAS RELACIONADAS CON LA
EMISION: Cualquier pieza de repuesto
Sears aprobada y utilizada en el de-
sempeSo de cualquier servicio de man-
tenimiento o servicio de reparaci6n bajo
garantia de piezas relacionadas con la
emisi6n ser_ provisto sin costo alguno al
duefio si la pieza se encuentra bajo ga-
rantia. LISTA SE PIEZAS DE CON-
TROL DE EMISION GARANTIZADAS:
Carburador, Sistema de Ignici6n: Bujia
(cubierta hasta la fecha de mantenimi-
ento programada), M6dulo de Ignici6n,
Silenciador incluyendo el Catalizador.
DECLARAClON DE MANTENIMIEN-
TO: El duefio es responsable de adqui-
rir todo el mantenimiento requerido
como 1odefine en el manual de instruc-
ciones.
Se certifica este motor para satisfacer los requisitos de emisi6n para los uso
siguientes:
[] Moderado (50 horas)
[] Intermedio (125 horas)
[] Extend|do (300 horas)
48

