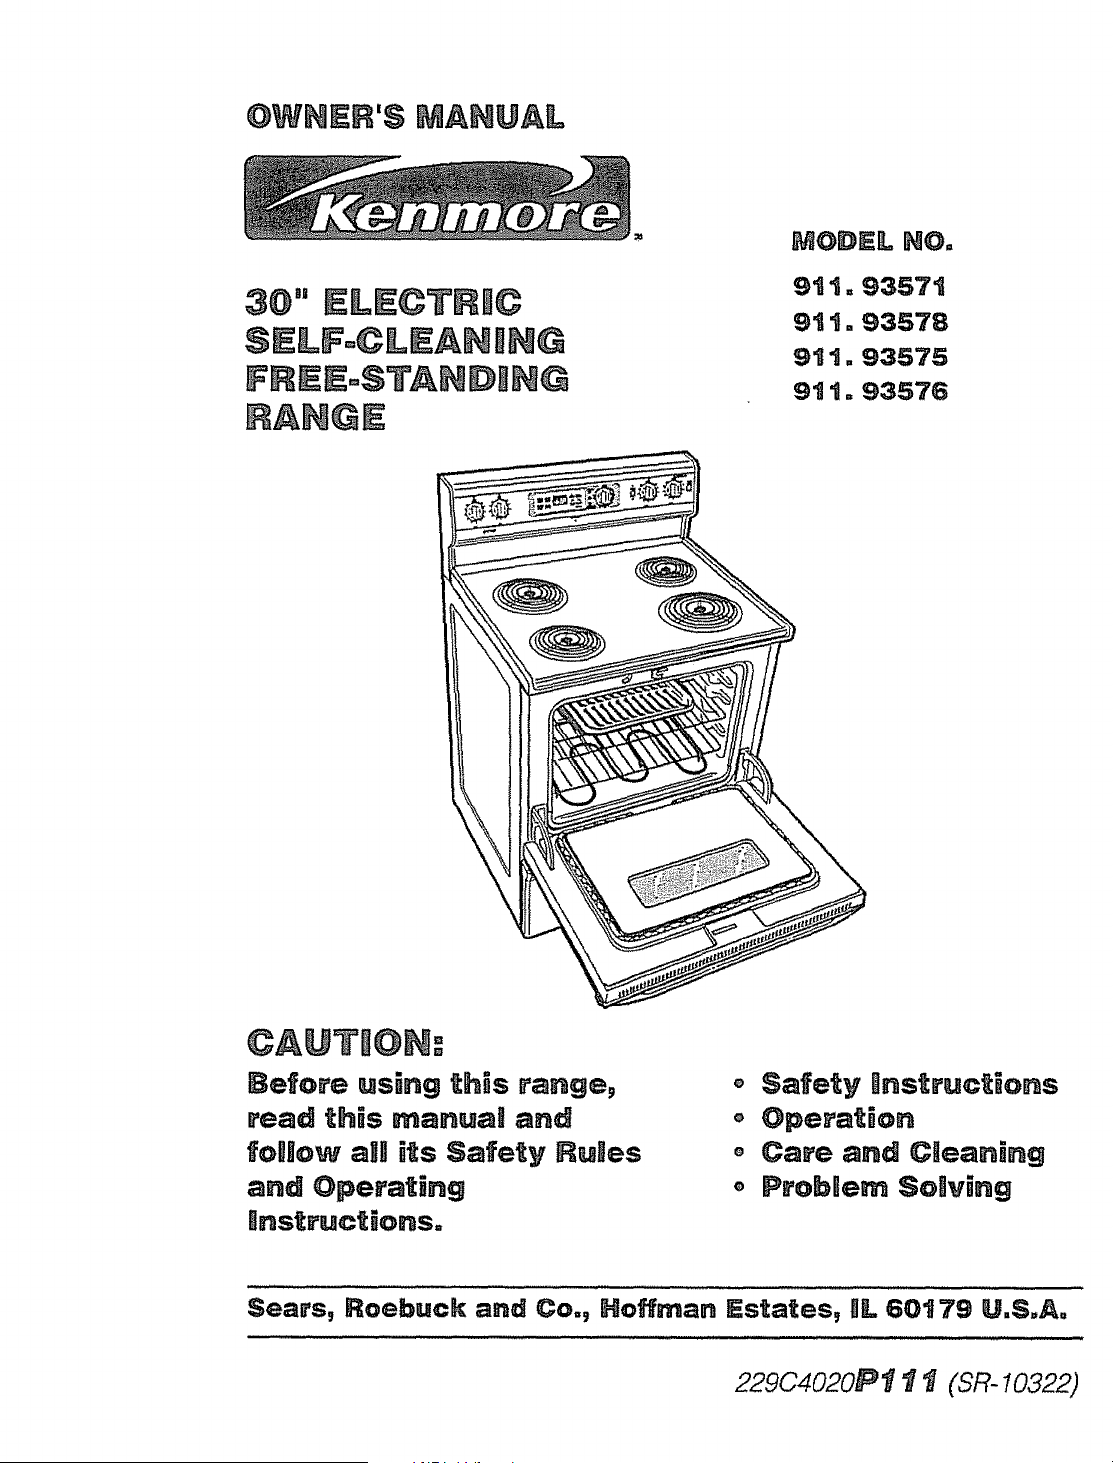
OWNER'S MAHUAL
RAN@[
MOD_L HO°
911=93571
9tl.93578
9tl.93575
91to93575
Before using this range,
read th_s manua_ a.d
foHo_ allH its Safety RuJes
and Operati.g
Rnstruct[ons.
o Safety I]nstruc_L_ons
o Operation
o Care and C_eanBng
ProbRem Solving
Sears, Roebuck and Co., Hoffman Estates, EIL60179 U.S,Ao
229C4020PI I "l (SR-10322)
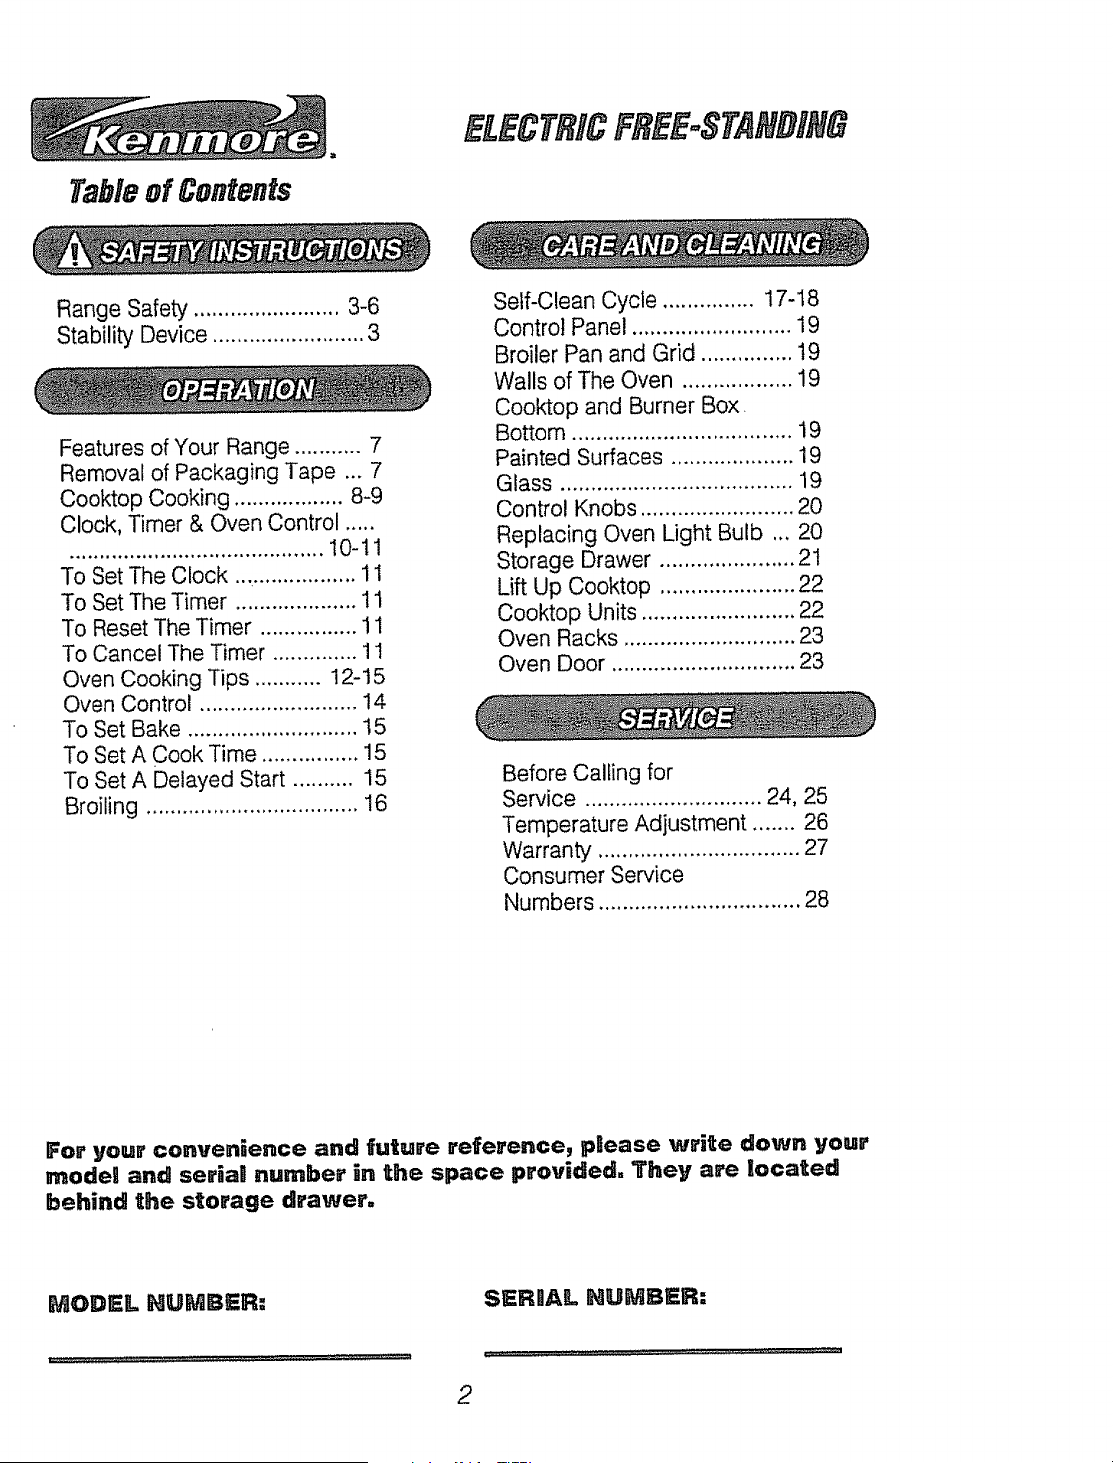
Tableof Contents
Range Safety ........................ 3-6
Stability Device ......................... 3
ELECTRICFREEoSTANDIN6
Features of Your Range ........... 7
Removal of Packaging Tape ... 7
Cooktop Cooking .................. 8-9
Clock, Timer & Oven Control .....
.......................................... 10-11
To Set The Clock .................... 11
To Set The Timer .................... 11
To Reset The Timer ................ 11
To Cancel The Timer .............. 11
Oven Cooking Tips ........... 12-15
Oven Control .......................... 14
To Set Bake ............................ 15
To Set A Cook Time ................ 15
To Set A Delayed Start .......... I5
Broiling ................................... 16
Self-Clean Cycle ............... 17-18
Control Panel .......................... 19
Broiler Pan and Grid ............... !9
Walls of The Oven .................. 19
Cooktop and Burner Box
Bottom .................................... 19
Painted Surfaces .................... 19
Glass ...................................... 19
Control Knobs ......................... 20
Replacing Oven Light Bulb ,., 20
Storage Drawer ...................... 21
Lift Up Cooktop ...................... 22
Cooktop Units ......................... 22
Oven Racks ............................ 23
Oven Door .............................. 23
Before Calling for
Service ............................. 24, 25
Temperature Adjustment ....... 26
Warranty ................................. 27
Consumer Service
Numbers ................................. 28
For your convenience and future reference, pBease write down your
model and seria! number in the space provided. They are located
behind the storage drawer°
MODEL NUMBER: SERnAL NUMBER:
2
SAVE THESe= JHSTRUCTnOH$
]Read ailg i.st_uctio.s before using this appaianceo When using
gas or electr_can appliances, basic safety precautions shoul]d
be fonl]owed, incBuding the following:
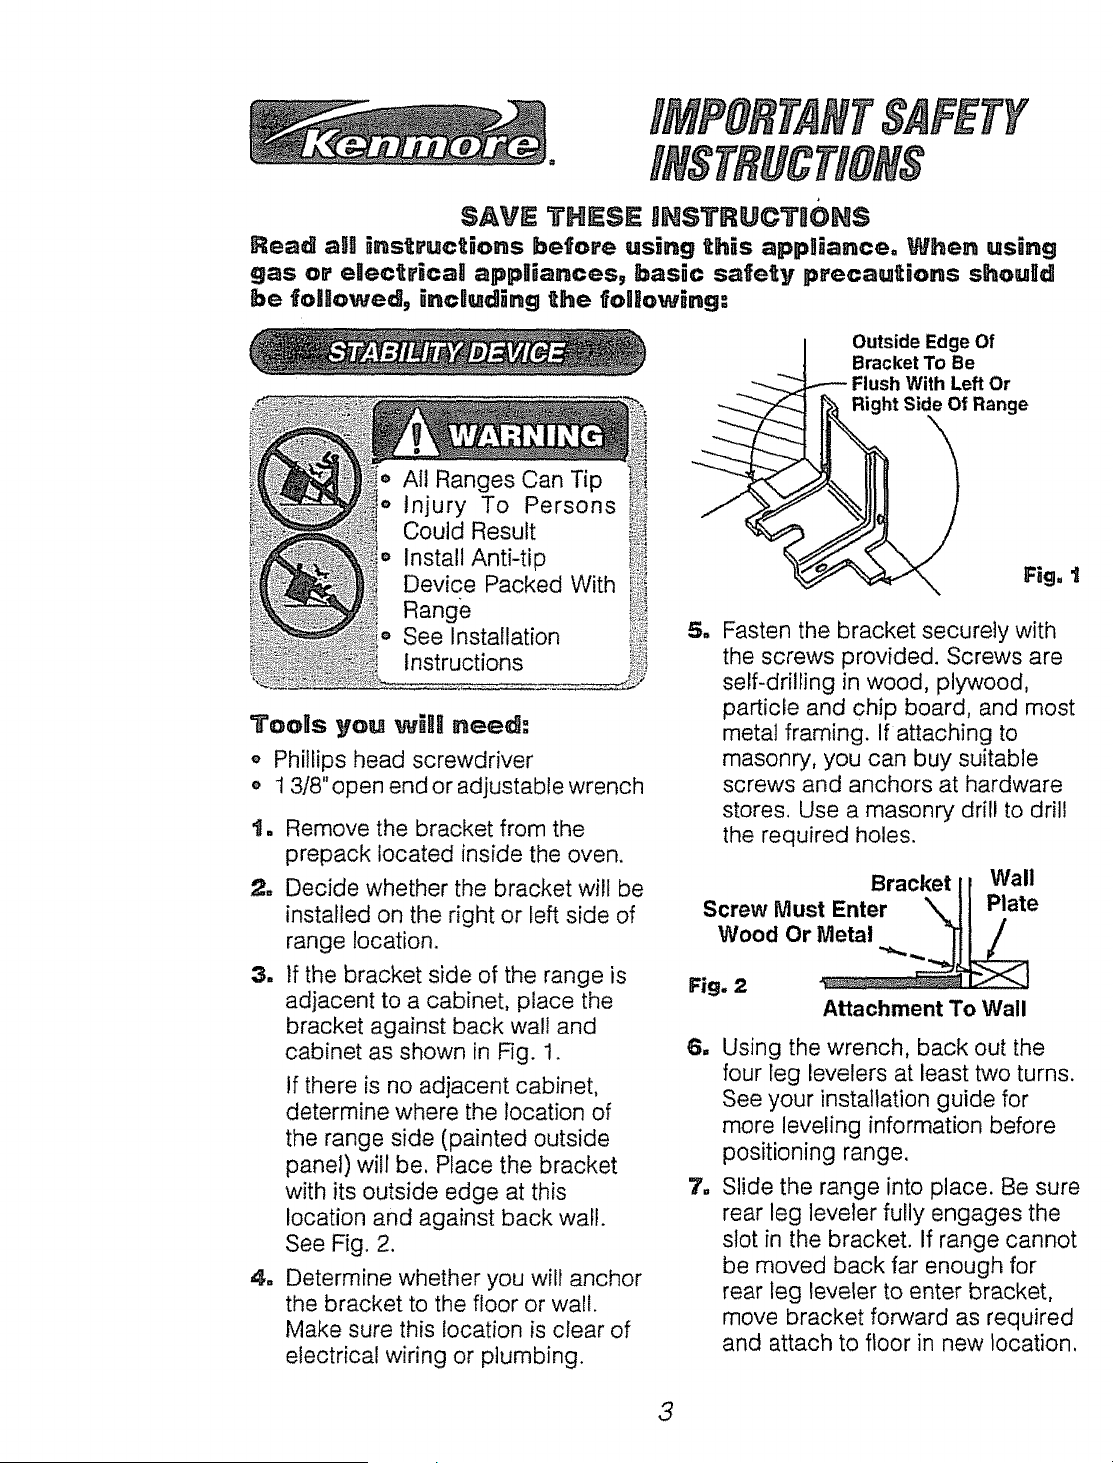
Outside Edge Of
Bracket To Be
With Left Or
Right Side Of Range
Fig, t
Tools you wiH1 need".
,, Phillips head screwdriver
_, 1 3/8" open end or adjustable wrench
tm
u
=
Remove the bracket from the
prepack located inside the oven.
Decide whether the bracket will be
installed on the right or left side of
range location.
if the bracket side of the range is
adjacent to a cabinet, place the
bracket against back wall and
cabinet as shown in Fig. 1.
if there is no adjacent cabinet,
determine where the location of
the range side (painted outside
panel) will be. Place the bracket
with its outside edge at this
location and against back wall.
See Fig. 2.
Determine whether you will anchor
the bracket to the floor or wall.
Make sure this location is clear of
electrical wiring or plumbing.
Fasten the bracket securely with
the screws provided. Screws are
self-drilling in wood, plywood,
particle and chip board, and most
metal framing. If attaching to
masonry, you can buy suitable
screws and anchors at hardware
stores. Use a masonry drill to drill
the required holes.
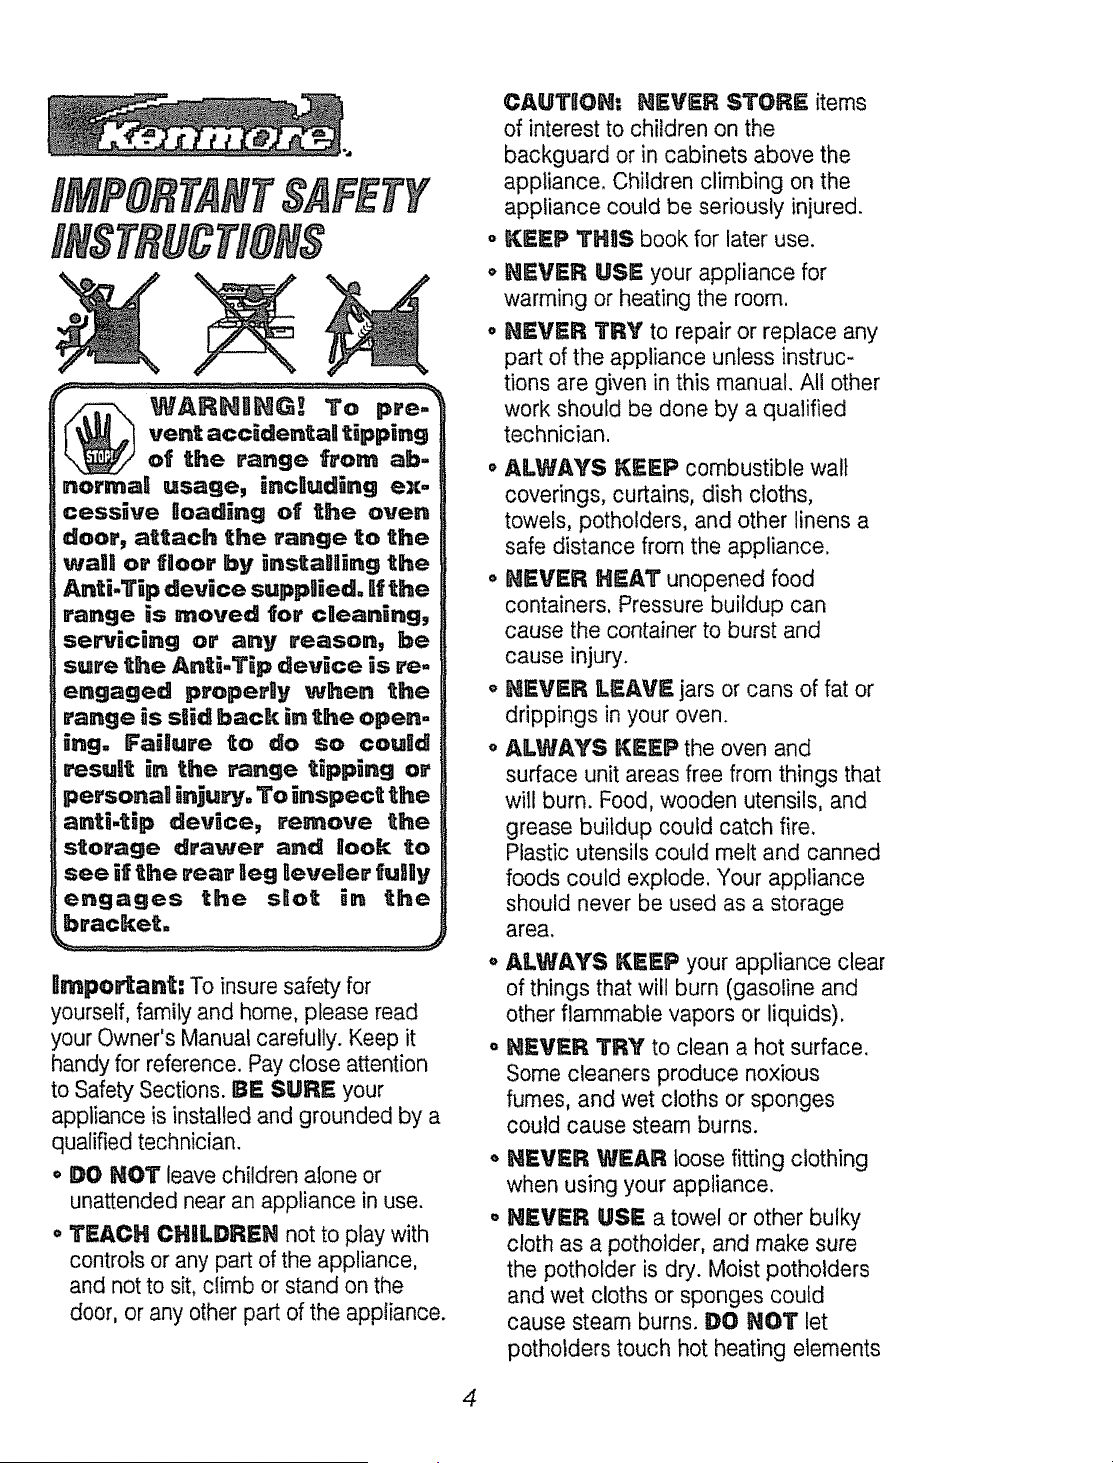
Bracket Wall
Screw Must Enter Plate
Wood Or Metal
Fig. 2
Attachment To Wall
6, Using the wrench, back out the
four leg levelers at least two turns.
See your installation guide for
more leveling information before
positioning range.
7, Slide the range into place. Be sure
rear leg leveler fully engages the
slot in the bracket. If range cannot
be moved back far enough for
rear leg leveler to enter bracket,
move bracket forward as required
and attach to floor in new location.
3
..Gz¸
vent accidental tipping
of the range from ab
normal usage, including ex-
cessive ioad_ng of the oven
door, attach the range to the
wall or floor by _nstallling the
Anti.Tip device suppllied. If the
range is moved foe' cleaning,
ser'eic_ng or any reason, be
sure the £nti.T_p device _s re.
engaged properly when the
range _s slid back in the open-
_ng, Failure to do so could
e_sult in the range tipping o,'
personal injue_r° To _nspect the
anti.tip device, remove the
storage drawer and look to
see if the rear leg aeveler fullly
engages the slier _n the
bracket,
_mpo,_ant: To insure safety for
yourself, family and home, please read
your Owner's Manual carefully. Keep it
handy for reference. Pay close attention
to Safety Sections. BE SURE your
appliance is installed and grounded by a
qualified technician.
• DO NOT leave children alone or
unattended near an appliance in use.
o TEACH CHILDREN not to play with
controls or any part of the appliance,
and not to sit, climb or stand on the
door, or any other part of the appliance.
a
o
CAUTBON: NEVER STORE: items
of interest to children on the
backguard or in cabinets above the
appliance, Children climbing on the
appliance could be seriously injured.
KEEP THIS book for later use.
NEVER USE your appliance for
warming or heating the room.
NEVER TRY to repair or replace any
part of the appliance unless instruc-
tions are given in this manual. All other
work should be done by a qualified
technician.
o ALWAYS KEEP combustible walt
coverings, curtains, dish cloths,
towels, potholders, and other linens a
safe distance from the appliance.
o NEVER HEAT unopened food
containers, Pressure buildup can
cause the container to burst and
cause injury.
o NEVER LEAVE jars or cans of fat or
drippings in your oven.
o ALWAYS KEEP the oven and
surface unit areas free from things that
will burn. Food, wooden utensils, and
grease buildup could catch fire.
Plastic utensils could melt and canned
foods could explode. Your appliance
should never be used as a storage
area.
o ALWAYS KEEP your appliance clear
of things that will burn (gasoline and
other flammable vapors or liquids).
o NEVER TRY to clean a hot surface.
Some cleaners produce noxious
fumes, and wet cloths or sponges
could cause steam burns.
NEVER WEAR loose fitting clothing
when using your appliance.
NEVER USE a towel or other bulky
cloth as a potholder, and make sure
the potholder is dry. Moist potholders
and wet cloths or sponges could
cause steam burns. DO HOT let
potholders touch hot heating elements
4
o DO NOT touch heating elements,
surfaces near them, or interior oven
surfaces. These may be hot enough to
cause burns even though they are
dark in color. During and after use, do
not touch or let clothing or flammable
material contact the elements or hot
surfaces until they have had time to
coo!. Other surfaces near the oven
vent openings, oven door and
window, and cooktop surfaces may
also be hot enough to cause burns.
• ONLY SOME kinds of glass or
ceramic cookware can be used for
cooktop cooking. Make sure the
cookware you choose to use is
designed for cooktop cooking without
breaking due to the sudden tempera-
ture change.
o ALWAYS USE care when touching
cooktop elements. They will retain
heat after the range has been turned
off.
o NEVER BLOCK the oven air vent
under the right rear element.
o COOKWARIE USED for cooktop
cooking should be flat on the bottom
and large enough to cover the heating
area being used. Undersized utensils
expose the heating element and may
result in direct contact or ignition of
clothing.
• ALWAYS USE drip bowls to prevent
wiring and component damage. Do
not use aluminum liners or foil in drip
bowls. Improper use may result in risk
of electrical shock or fire.
NEVER LEAVE surface units
unattended at high settings. Boilovers
result in smoking or greasy spills
which could catch fire.
ALWAYS TURN utensil handles
inward and away from other surface
units to reduce the risk of burns,
ignition, unintended contact, and
spillage.
NEVER put heating elements in
water.
PLACE OVEN RACKS in the
desired position while the oven is
cool. If racks must be moved while
oven is hot, do not let potholder
contact the hot oven element.
o AFTER BROIILIING, always take
the broiler pan and grid out of the
oven and clean them. Leftover
grease in the broiler pan could catch
fire the next time you use your oven.
o ALWAYS USt_ care when opening
the oven door. Let hot air and steam
escape before moving foods.
° _EVER USr_ aluminum foil to line the
oven bottom. Improper use of foil could
result in the risk of electrical shock and
fire.
5
o CLEAN ONLY the parts listed in this
manual. Follow all cleaning
instructions. Be sure to remove broiler
pan and grid before the self-clean
cycle.
° NEVER RUB, move or damage the
door gasket on self-cleaning ranges.
o NEVER "tRY to clean utensils,
cookware, removable parts, or broiler
pan and grid in the self-clean cycle.
o DO _OT USE oven cleaners - No
commercial oven cleaner or protective
coating of any kind, should be used in
or around any part of the oven.
,, NEVER force the latch handle open
while oven is hot.
RMPORTAHT SAFETY
HOTnCE-w
The CaRifornia Safe Drinking
Water and Toxic Enforcement
Act requires the governor of
California to pubnish a B_st of
substances known to the state
to cause bieCh defects or other
reproductive harm and requires
businesses to warn their cus-
tomers of potentiai exposure to
such substances, The fibergl;ass
insu|ation _n a self-cleaning oven
wii! give off a very sma01i amount
of carbon monoxide during the
cleaning cycl;e. Exposure can be
minimized by venting with an
open door or window or using a
venUIlation fan or hood.
the drip tbowRs _ith
al;uml;num fol;i. Foi!
can baock the normal; heat
fUo_ and damage the range.
AMways use cookwaFe and
woks that are ftlat on the
bottom and the same size
as the cooking ellement
being used. Cook_are
should not exlLend more
than t" beyond the edge of
the cooking egement.
READ A_I_ _H#I_RSTANE)
TH_S _FOR_AT_OH NOW -_
_e sure everyone _n you,' home
knows _ha_ to do _n case of f_lre.
Neve_ use _ate_ on a grease
f_e; i_ w_l;_ only spread the
Haines.
COO_TOP GREAS_ F_R5:
Never p_c_ up a f_am_ng pan,..
1. Turn off the surface elements.
2. Smother the flame with a tightly
fitting lid, Use baking soda or a dry
chemical, foam, or halon type
extinguisher.
OVEN F_RE:
Do no_ _J to mo_e ILhe pan. e
1. C_ose the oven door and turn
controls off.
11
tf fire continues, carefully open the
door, throw baking soda on the fire,
or use a dry chemical, foam, or
halon type extinguisher.
6
OPERATION
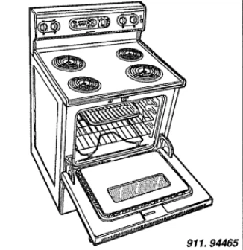
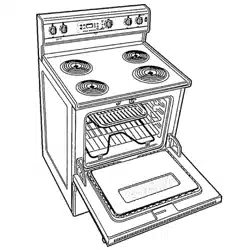
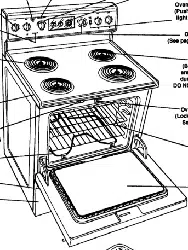
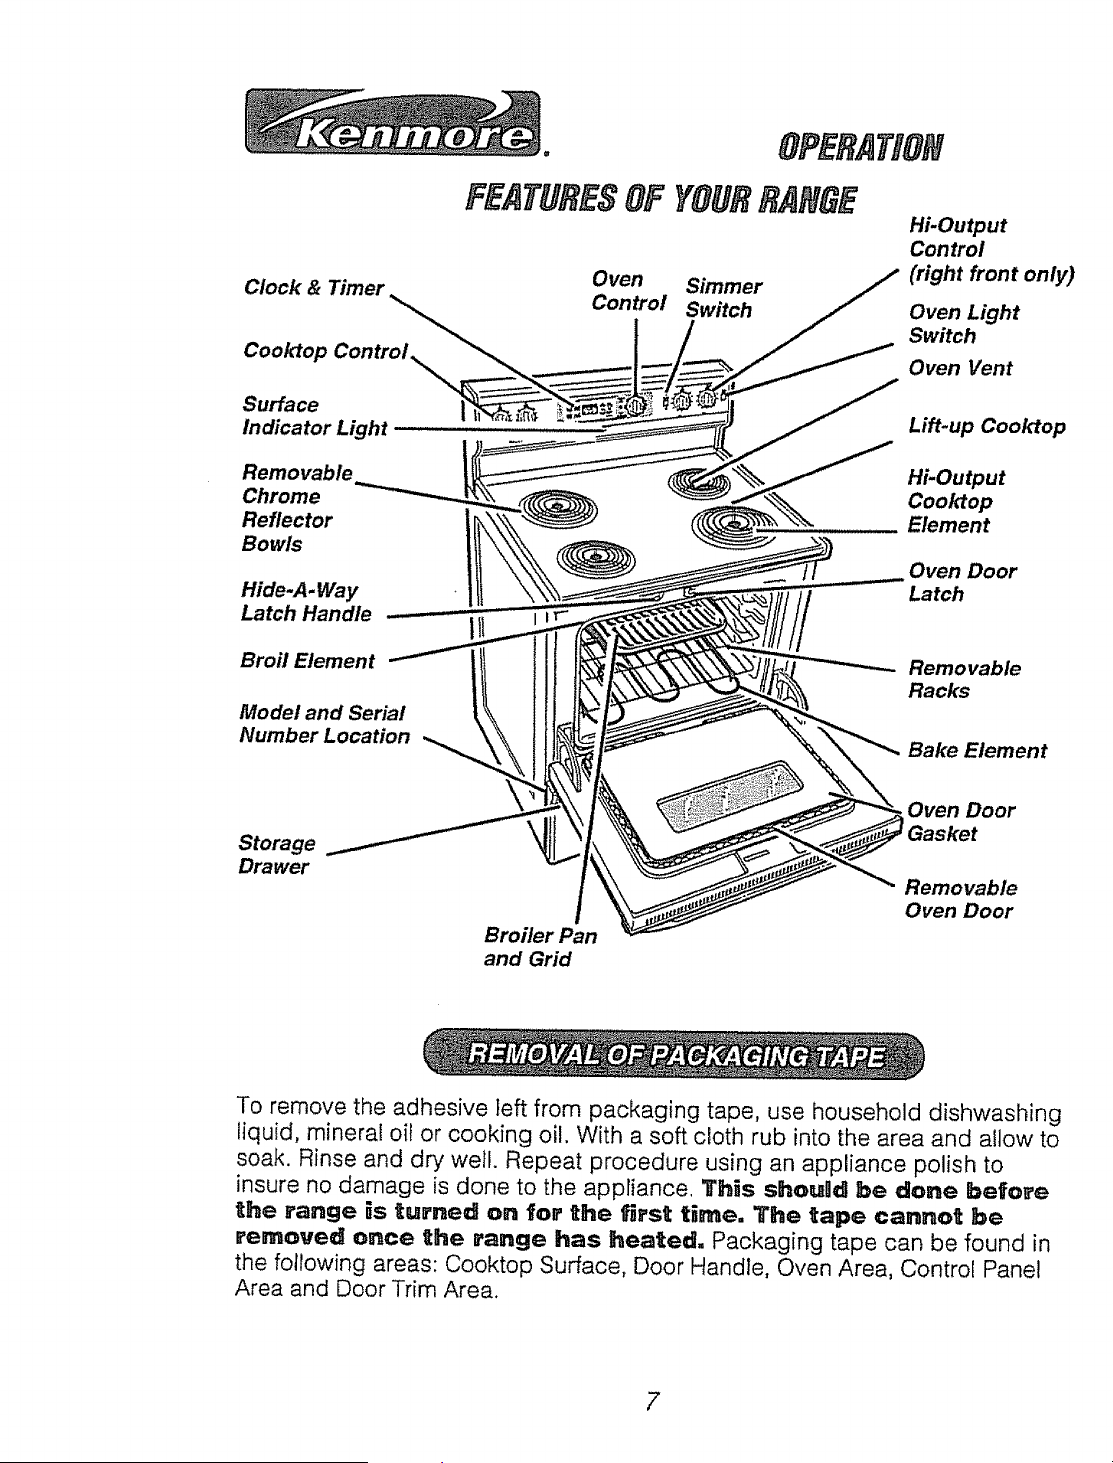
FEATURESOFYOURRANGE
Clock & Timer Oven Simmer
Control Switch
Cooktop Control,
Surface
Indicator Light
Hi-Output
Control
(right front only)
Oven Light
Switch
Oven Vent
Lift-up Cooktop
Removable Hi-Output
Chrome Cooktop
Reflector Element
Bowls
Hide-A.Way
Latch Handle
Broil Element
Model and Serial
Number Location
Oven Door
Latch
Removable
Racks
Bake Element
Storage
Drawer
Broiler Pan
and Grid
Oven Door
Removable
Oven Door
To remove the adhesive left from packaging tape, use household dishwashing
liquid, mineral oil or cooking oil. With a soft cloth rub into the area and allow to
soak. Rinse and dry well. Repeat procedure using an appliance polish to
insure no damage is done to the appliance. 3'his shougd be done before
the range is turned on for the first time. The tape cannot be
removed once the range has heated, Packaging tape can be found in
the following areas: Cooktop Surface, Door Handle, Oven Area, Control Panel
Area and Door Trim Area.
7

OPERATION
Coo op Cooking
The sign near each control knob
shows you which element is turned
on by that knob.
Water-bath or pressure canners and
large diameter pots extending more
than 1" beyond the edge of the
cooktop element may be used for
canning. Howevelt', do not use large
diameter canners, pots or pans for
anything other than boiling water.
Most syrup or sauce mixtures, and all
types of frying, cook at temperatures
much higher than boiling water, Such
temperatures could eventually harm
the cooktop surfaces surrounding the
surface units.
O0 O0
LEFT RIGHT
REAR REAR
HB
LO
Used for quick starts, such as
bringing water to a boil.
Used for slow boiling and
sauteing.
Used for steaming foods or
keeping cooked foods at
serving temperature.
t o Push down to turn _1_,
the knob.
2. Set on or between
marks for
0_
desired heat. "°
tm
m
3o
m
Be sure the canner is centered
over the element.
Make sure the canner is flat on the
bottom.
Use recipes and procedures from
reputable sources. These are
available from manufacturers such
as Ball@ and Kerr@, and the
Department of Agriculture Exten-
sion Service,
Use caution while canning, to
prevent burns from steam or heat.
When any surface unit is on, the
surface unit indicator light will be on.
8
a
OPERAT#ON
Coo op Cooking
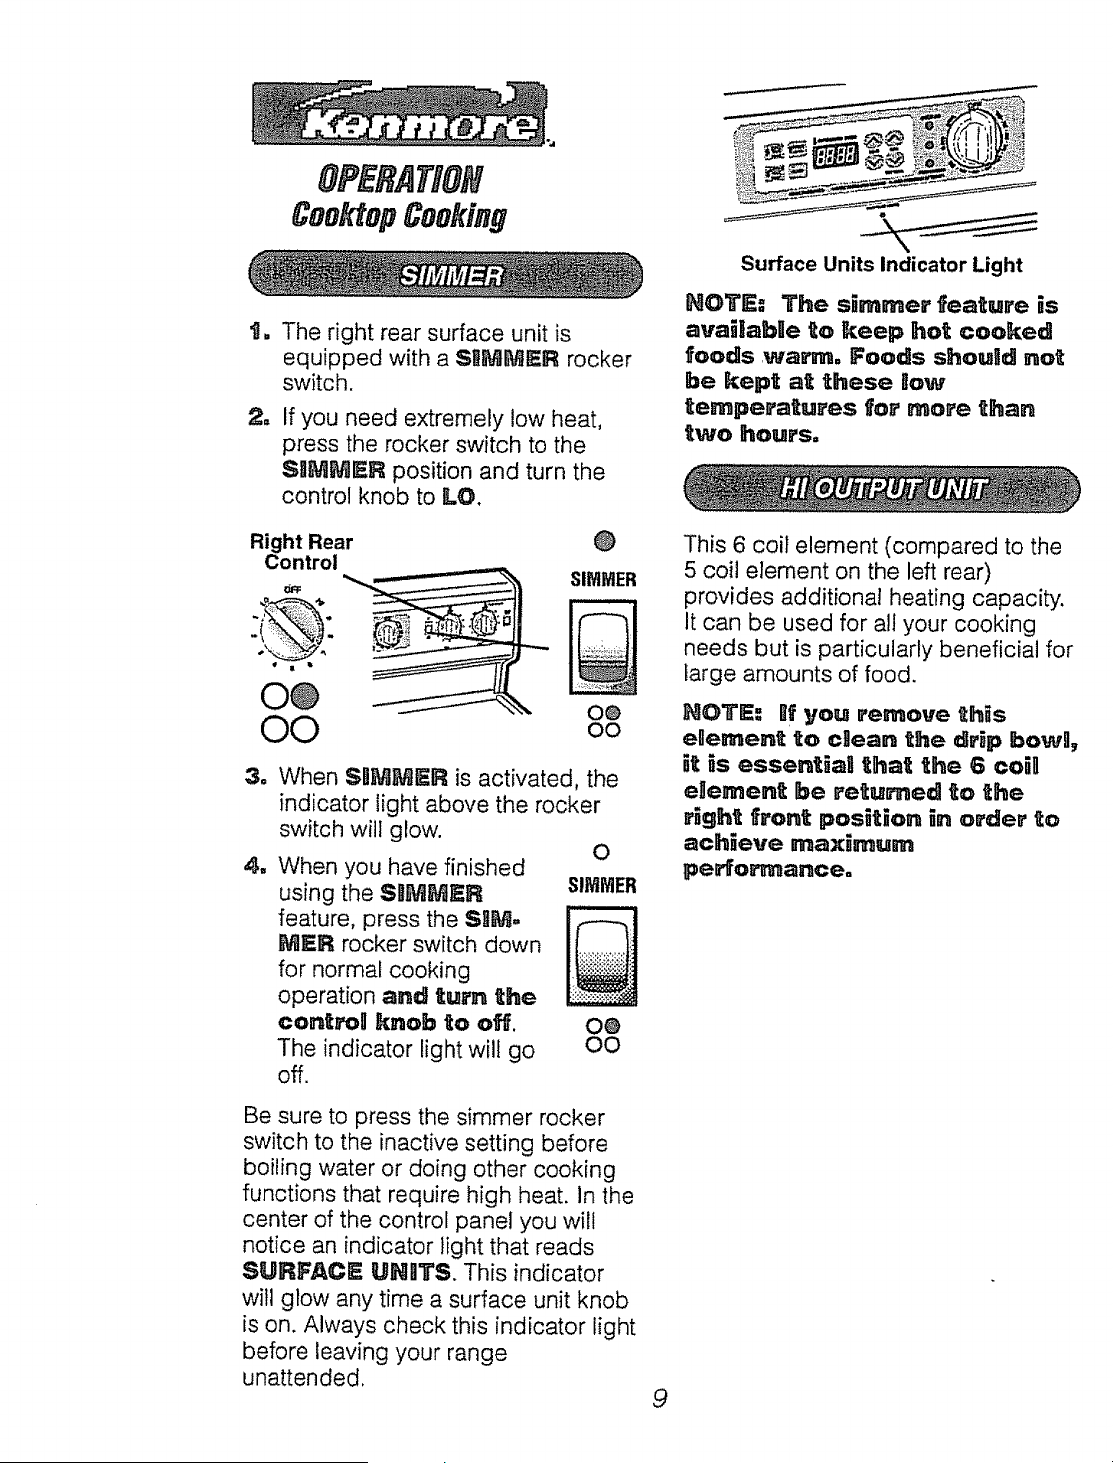
The right rear surface unit is
equipped with a SliMMER rocker
switch.
If you need extremely low heat,
press the rocker switch to the
SlIMMeR position and turn the
control knob to LO.
Surface Units Indicator Light
IROTE_= The s_mmer feature _s
available to keep hot cooked
foods warm= Foods shoulid not
be kept at these now
temperatures for more than
two hours=
Right Rear @
Control
,_ '_.__ SIMiVIE_
O@ oe
OO oo
o
m
When SLIMMER is activated, the
indicator light above the rocker
switch will glow.
O
When you have finished
using the SaMMER
feature, press the SLIM=
MER rocker switch down
for normal cooking
operation and turn the
centroll knob to off. 00
The indicator light wilt go OO
off.
SIMMER
This 6 coil element (compared to the
5 coil element on the left rear)
provides additiona! heating capacity.
It can be used for all your cooking
needs but is particularly beneficial for
large amounts of food.
NOTE. = Bf you remove this
egement to cLIean the drip bow9,
_t is essentiaU that the 6 coil
eBement be returned to the
right front posit_on in order to
achieve maximum
pe_o_ance=
Be sure to press the simmer rocker
switch to the inactive setting before
boiling water or doing other cooking
functions that require high heat. In the
center of the control panel you will
notice an indicator light that reads
SURFAC_ UNIITS. This indicator
will glow any time a surface unit knob
is on. Always check this indicator light
before leaving your range
unattended.
9
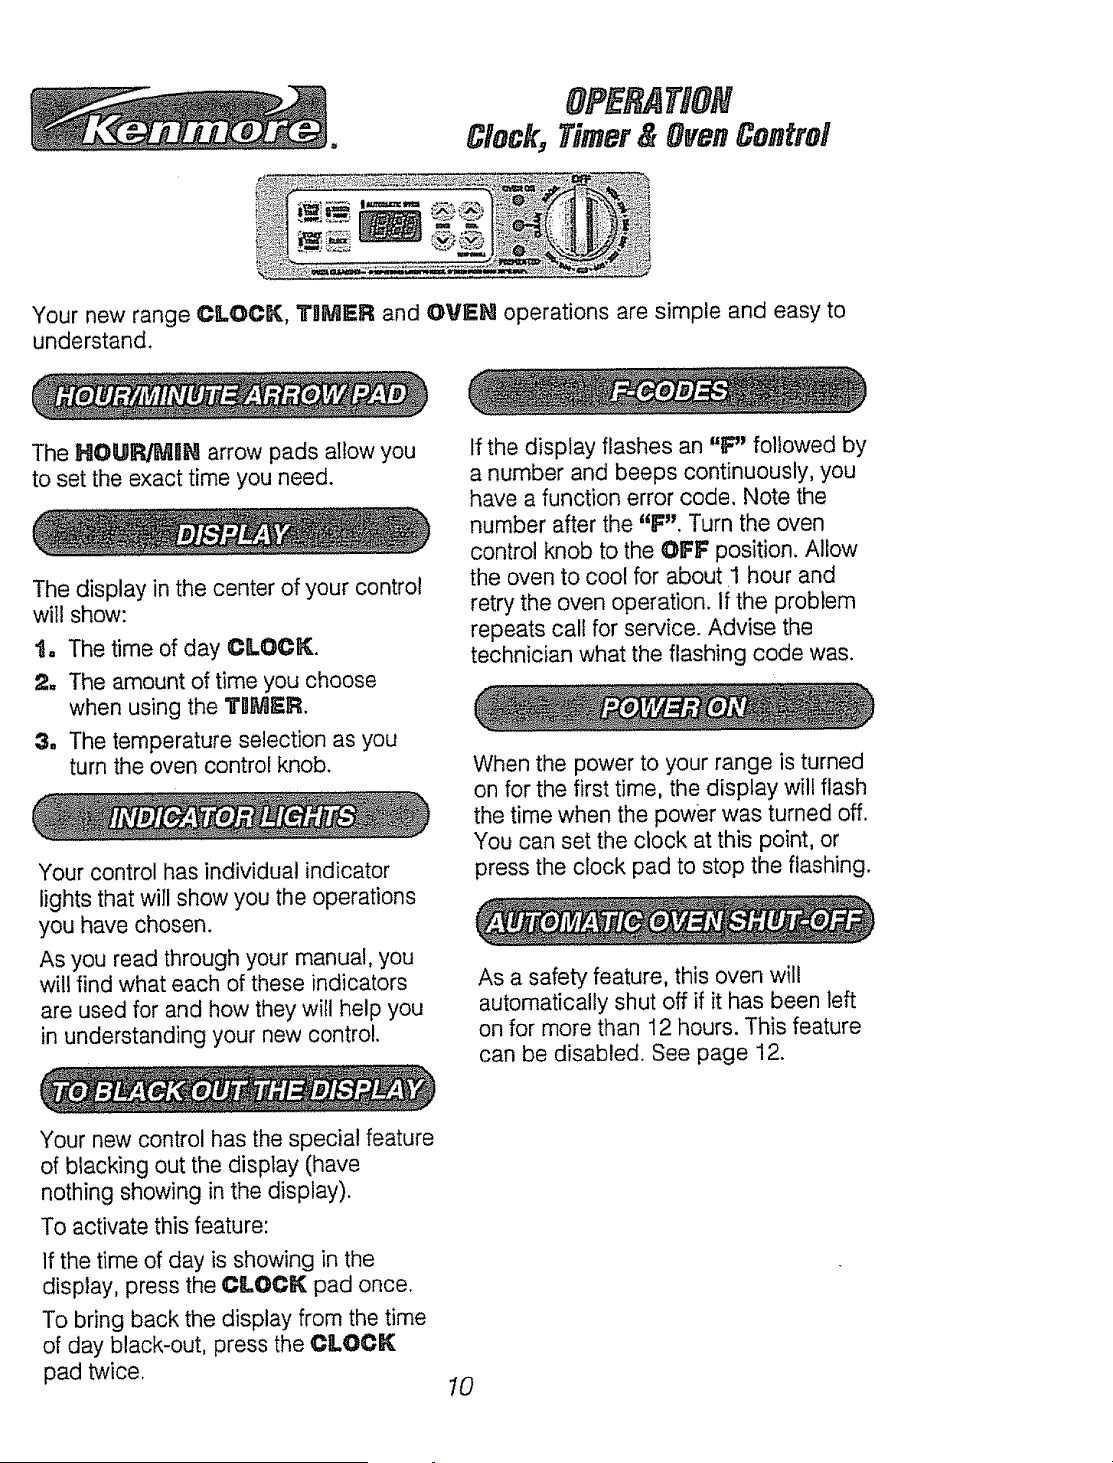
OPERATION
Clock, Timer& OvenControl
Your new range CLOCK, 3"gMER and OVEN operations are simple and easy to
understand,
The HOUR,_IJN arrow pads a11owyou
to set the exact time you need.
The display in the center of your control
will show:
t. The time of day CLOCK.
2. The amount of time you choose
when using the 3"IIMER,
8. The temperature selection as you
turn the oven control knob,
Your control has individual indicator
lights that will show you the operations
you have chosen.
As you read through your manual, you
will find what each of these indicators
are used for and how they will help you
in understanding your new control.
If the display flashes an "_' followed by
a number and beeps continuously, you
have a function error code. Note the
number after the "F". Turn the oven
control knob to the OFF position. Allow
the oven to coot for about I hour and
retry the oven operation. If the problem
repeats call for service. Advise the
technician what the flashing code was.
When the power to your range is turned
on for the first time, the display will flash
the time when the power was turned off.
You can set the clock at this point, or
press the clock pad to stop the flashing.
As a safety feature, this oven will
automatically shut off if it has been left
on for more than 12 hours. This feature
can be disabled. See page 12.
Your new control has the special feature
of blacking out the display (have
nothing showing in the display).
To activate this feature:
If the time of day is showing in the
display, press the Cg.OCK pad once.
To bring back the display from the time
of day black-out, press the CLOCK
pad twice.
10
OPERATION
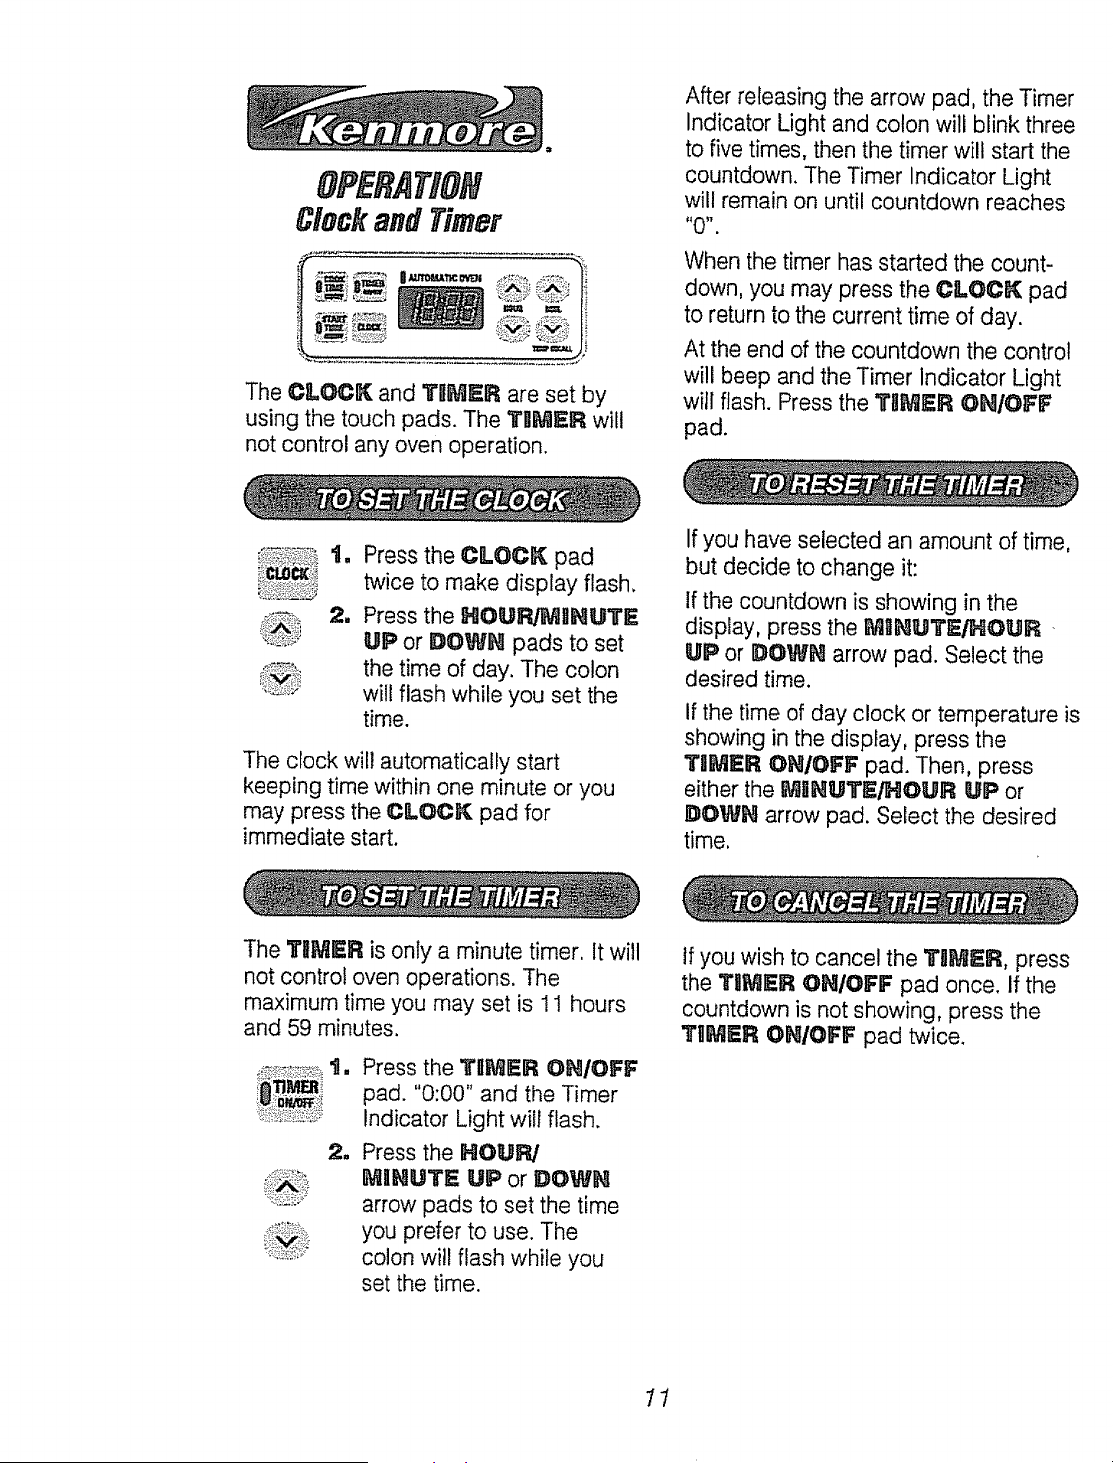
ClockandTimer
The CLOC_ and T_ER are set by
using the touch pads. The TIIMER will
not control any oven operation.
After releasing the arrow pad, the Timer
Indicator Light and colon will blink three
to five times, then the timer will start the
countdown. The Timer Indicator Light
will remain on until countdown reaches
When the timer has started the count-
down, you may press the CLOCK pad
to return to the current time of day.
At the end of the countdown the control
will beep and the Timer indicator Light
will flash. Press the TH_ER ONIOFF
pad.
2_
Press the CLOC_ pad
twice to make display flash.
Press the HO_R/_NUTE
UP or _OWN pads to set
the time of day. The colon
will flash while you set the
time.
The clock will automatically start
keeping time within one minute or you
may press the O&OCK pad for
immediate start.
If you have selected an amount of time,
but decide to change it:
If the countdown is showing in the
display, press the _IIH_TE/HO_ -
_P or #O_ arrow pad. Select the
desired time.
if the time of day clock or temperature i._
showing in the display, press the
TH_ER ON/OFF pad. Then, press
either the _Ii_IUTE/_O_R _P or
DOW_ arrow pad. Select the desired
time.
The TIIMER is only a minute timer. It will
not control oven operations. The
maximum time you may set is 1! hours
and 59 minutes.
Press the TH_ER OHIOFF
pad. "0:00" and the Timer
Indicator Light will flash.
Press the _OUR/
_II_UTE _ or DOW_
arrow pads to set the time
you prefer to use. The
colon will flash while you
set the time.
Ifyou wish to cancel the Tg_ER, press
the THME_ O_/OFF pad once. if the
countdown is not showing, press the
TH_ER O_'_/OFF pad twice.
1I
OPEP TION
OvenCookingTips
Preheating is bringing the oven
temperature up to the temperature
you will be using during baking. Let
the oven preheat thoroughly when
recipes call for preheating.
It is normal to have some odor when
using your oven for the first time. To
help eliminate this odor, ventillate
the room by opening a window
or using a ven_ hood,
gMPORTAHT: Never cover the oven
bottom or oven rack with aluminum
foil. Improper use can cause poor
heat flow, poor baking results, and
may damage the oven finish.
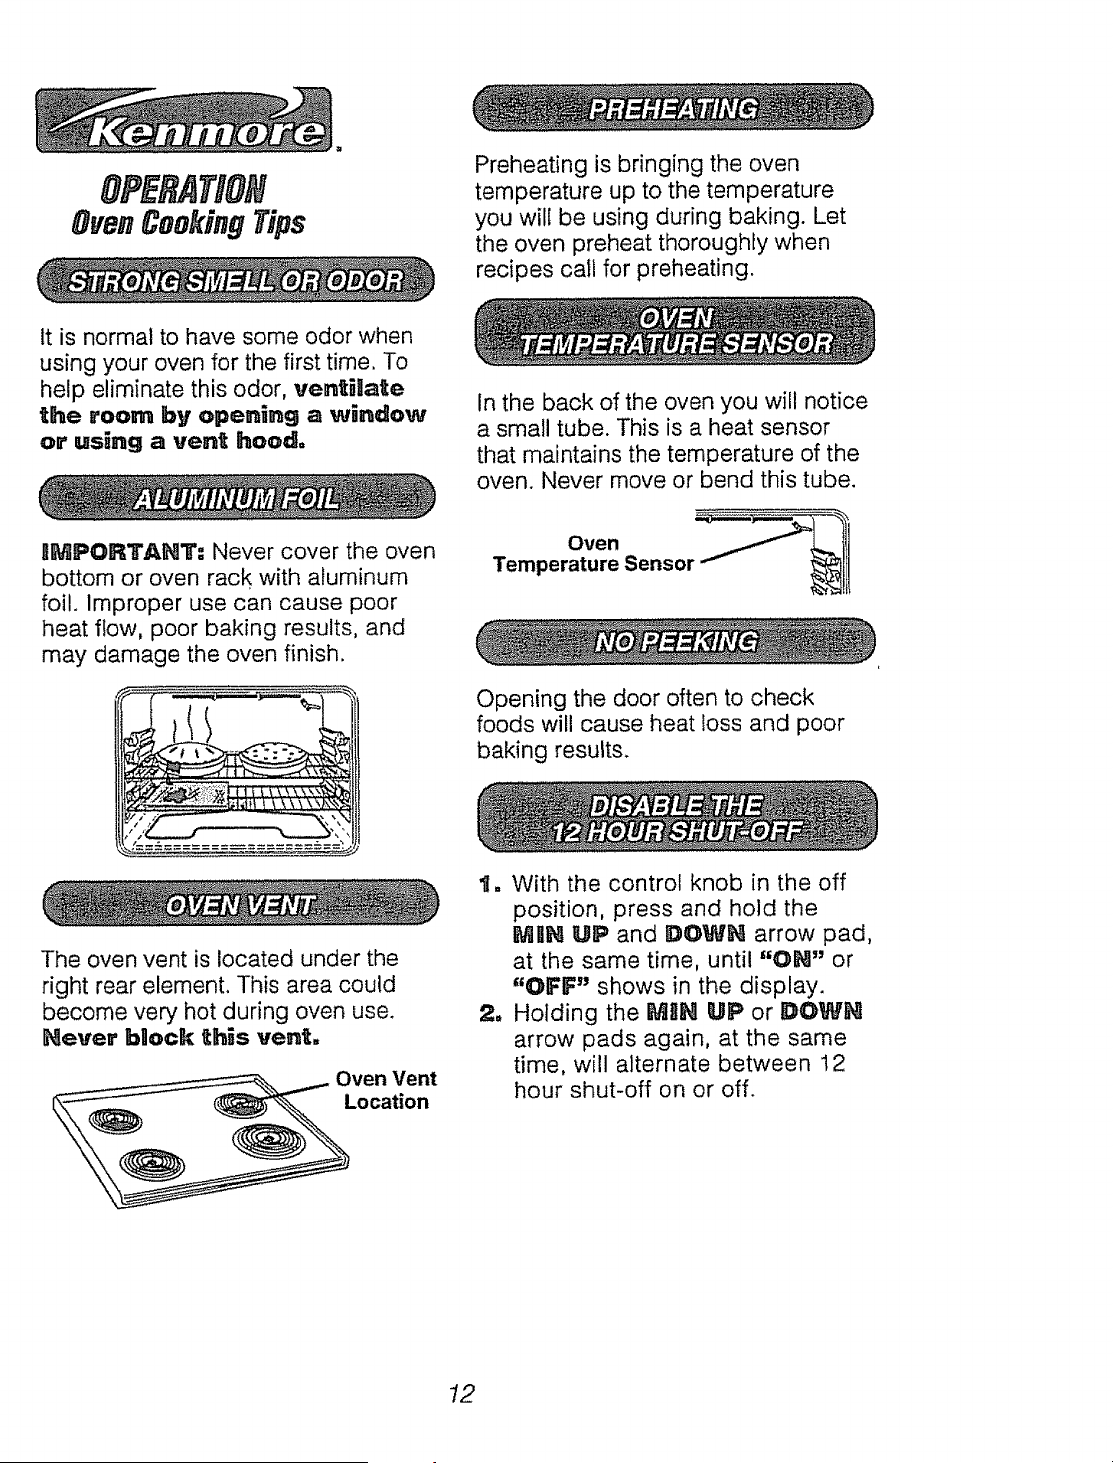
In the back of the oven you will notice
a small tube. This is a heat sensor
that maintains the temperature of the
oven. Never move or bend this tube.
Ove°
Temperature Sensor
Opening the door often to check
foods will cause heat loss and poor
baking results.
The oven vent is located under the
right rear element. This area could
become very hot during oven use.
Never block tth_s vent,
Oven Vent
Location
11, With the control knob in the off
position, press and hold the
MIN UP and DOWN arrow pad,
at the same time, until "ON" or
"OFF" shows in the display.
2, Holding the MitN UP or DOWI_
arrow pads again, at the same
time, will alternate between 12
hour shut-off on or off.
12
OPERATION
OvenCookingTips
FLAT COOKUE SHEETS, without
sides, allow air to circulate all around
the cookies for even browning.
SHUNY PANS reflect heat, and are
perfect for cakes and quick breads
that need a light brown crust.
GLASS, DARK NON-STBCK OR
DARKEHED BY AGE
BAIEIEWARE, absorb heat, and can
be used for yeast breads, pie crust or
foods that need a brown crust. The
oven temperature, when using these
pans, should be reduced by 25°F.
If baking with more than one pan,
place the pans so each has at least !
to 1 1/2" of air space around it. Place
pans so one is not directly above the
other.
The Oven Temperature Sensor
continuously senses and controls
the temperature inside the oven. To
keep a constant set temperature,
the elements will cycle or turn on
and off during cooking.
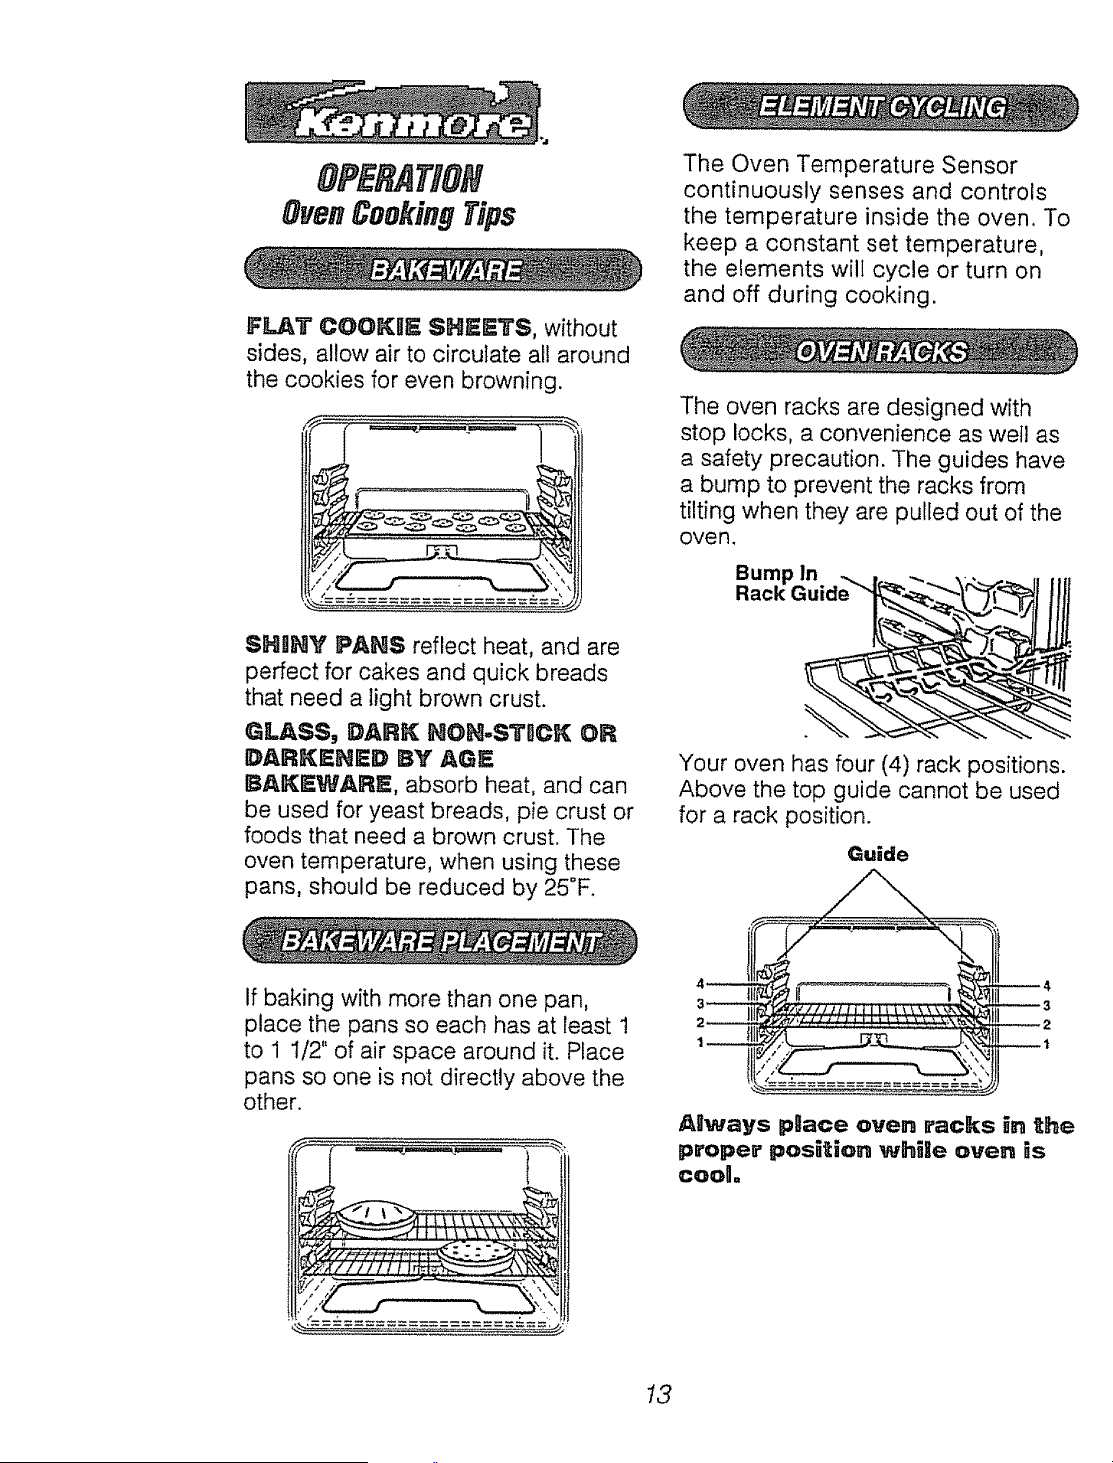
The oven racks are designed with
stop locks, a convenience as wel! as
a safety precaution. The guides have
a bump to prevent the racks from
tilting when they are pulled out of the
oven.
Bun_
Your oven has four (4) rack positions.
Above the top guide cannot be used
for a rack position.
Guide
A_ways pgace oven packs in the
proper position wh_le oven _s
cooU,
13
OFEP TION
OvenCookingTips
o CLEAN Indicator Light-- tums on
for self-clean. If the CLEAN
Indicator Light flashes, you should
check for one of the following:
1. The door handle is latched during
a baking function;
2, The door handle is not latched
during a self-clean function.
You may feel that your new oven
cooks differently than the oven it
replaced. We recommend that you
use your new oven a few weeks to
become more familiar with it,
following the times given in your
recipes as a guide. See Do It
Yourself Adjustment in the back of
this manual to make the adjustment if
you fee! your oven is too hot or too
cool for your cooking preference.
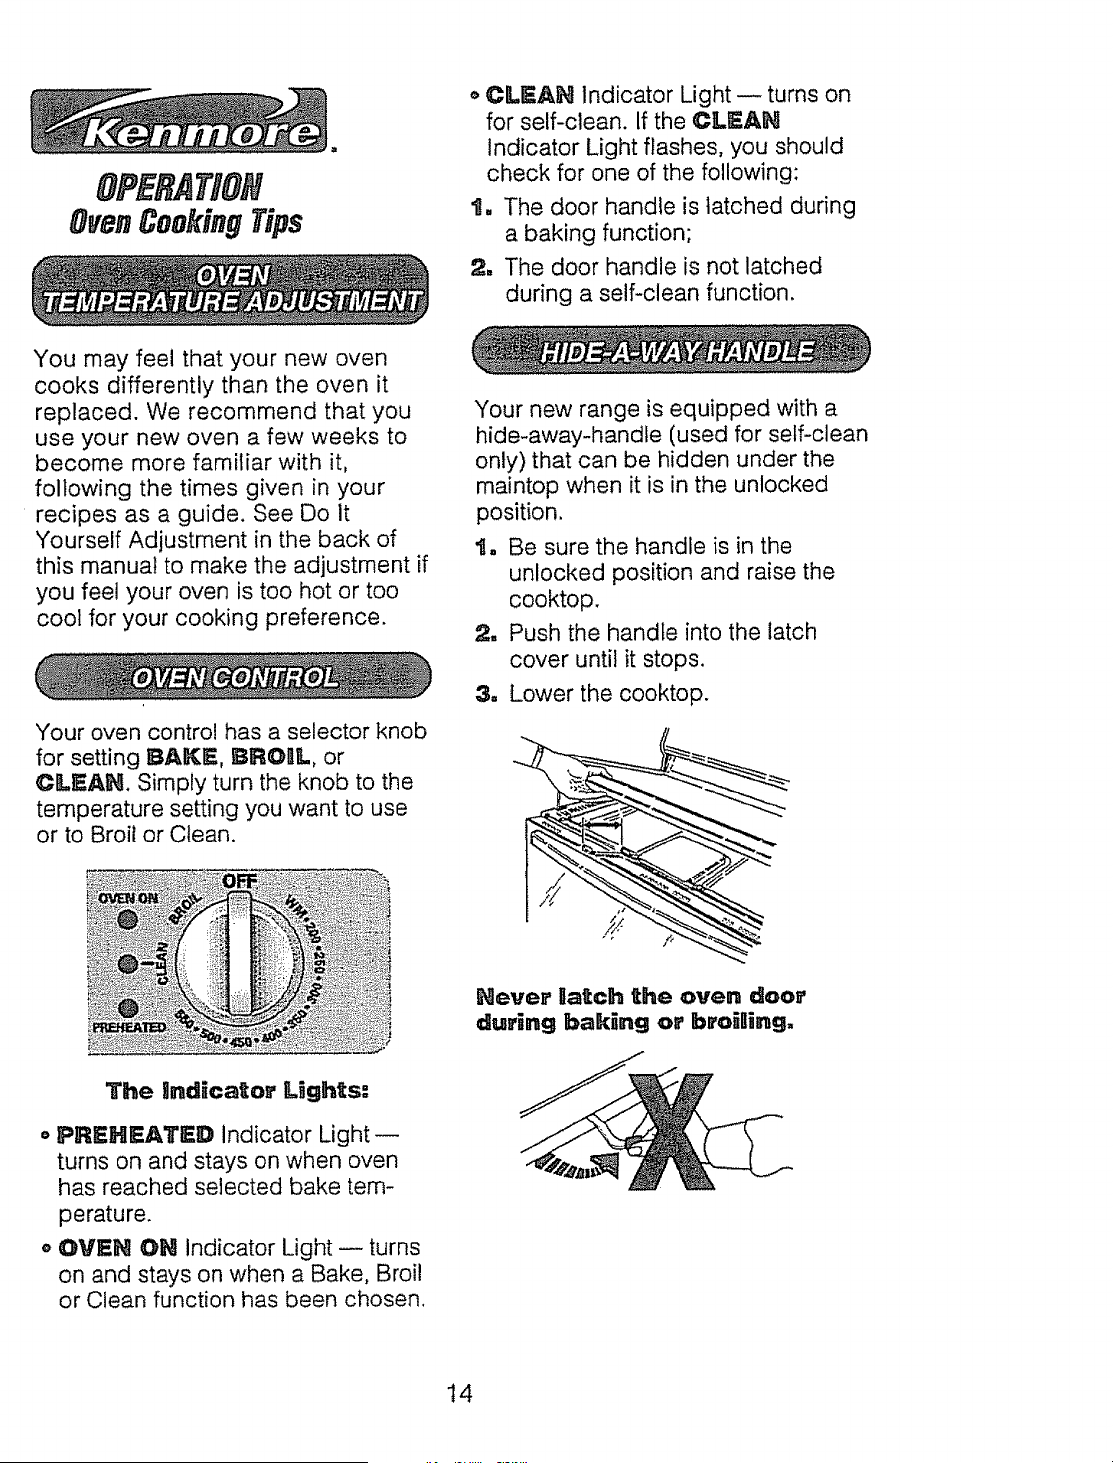
Your oven control has a selector knob
for setting BAKE, BRORL, or
CLEAN. Simply turn the knob to the
temperature setting you want to use
or to Broil or Clean.
Your new range is equipped with a
hide-away-handle (used for self-clean
only) that can be hidden under the
maintop when it is in the unlocked
position.
t, Be sure the handle is in the
unlocked position and raise the
cooktop.
2, Push the handle into the latch
cover until it stops.
3. Lower the cooktop.
Hever gatch the oven door
during baking or broiling,
The Indicator Lights:
o PREHEATED Indicator Light
turns on and stays on when oven
has reached selected bake tem-
perature.
o OVEN ON Indicator Light -- turns
on and stays on when a Bake, Broil
or Clean function has been chosen.
14
OPERATION
OvenCookingTips
=
When the set amount of cooktime has
reached zero, a tone wilt sound and
the COOK TIIME and OVEN ON
indicator lights wilt blink until the oven
control knob is turned to the OFF po-
sition.
t, Turn the OVEN COHTROL KHOB
to selected temperature from WM to
550°F. As the knob turns the control
display will show the changing tem-
peratures. When the display shows
your selected temperature release the
control knob. The temperature will re-
main in the display for 5 seconds then
return to the time of day. To recall the
temperature display press the minute
down arrow pad,
2, The "OVEN ON" indicator light will
glow.
3. When the oven has reached the se-
lected temperature, a series of short
tones will sound, and the "PRE,.
HEATED" and "OVEN ON" indica-
tor lights will glow.
4, The "PREHEATED" and "OVEN
ON" indicator lights will remain on un-
til baking is complete and the control
knob is turned to the OFF position.
t, Make sure the correct time of day is
showing in the display.
2, Press the COOK TIIME ON/OFF
pad.
3. Press the HOUR and/or MOHUTE
UP or DOWN arrow pad, to set how
long you want foods to cook.
4, Turn the Oven Control Knob to the
baking temperature you want to use.
The Oven On and Automatic Oven
indicator lights will glow. When the
temperature reaches the temperature
you have selected, the Preheated
indicator light will glow.
t, Make sure the correct time of day is
showing in the display.
2, Press the COOK TIIME ON/OFF pad.
3. Press the HOUR and/or MIINUTE UP
or DOWN arrow pad, to set how long
you want foods to cook.
4. Press the START TIIME ON/OFF
pad.
5. Press the HOUR and/or MRNUTE UP
or DOWN arrow pad to set the time of
day you want the oven to turn on.
6. Turn the OVEN CONTROL KNOB to
the baking temperatureyou want to
use. The oven on indicator light will
blink when the AUTOMATItC OVEN
times are set, but a temperature is not
selected.
7. The START TI1ME and AUTOMATIIC
OVEN indicator lights will glow.
8. When the start time is reached the oven
will automatically turn on and start
cooking.
9o When the temperature inside the oven
reaches the selected temperature the
PREHEATED indicator light will glow,
10,, When baking is finished the Cooktime
and Oven On Indicator Lights will blink
until the control knob is turned off.
NOTE: After pressing the Cook Time or
Start Time pads, if you hesitate before
pressing the Hour/Minute pads, the display
will blink 5 times and return to the time of
day. if this happens just press again the
Time pad you were setting to continue.
Cook Time, Clock, Timer, Sta_ Time
can be recalled by pressing the desired
pad once. Press the UP or DOWN arrow
pads if a time change is desired.
15
Broiling is cooking by direct heat
from the upper element. The oven
door should remain open to the broil
stop position during broiling.
It is not necessary to preheat the
oven when broiling. Use the broiler
pan and grid that came with your
range. Both are designed for proper
drainage of fat and liquids.
Bf foill _s used it must
be molded tightgy to
the grid and s_its cut
into the foil to _atch
those of the grid, This al-
Rows fa_s and lliqu_ds to
drain _nto the broilier pan,
preventing fh'e and exces-
sive smoke.
Ailways remove the pan and
grid from the oven, Storing
or forgetting a
soiged broi]ler pan in __
the oven is a poten-
tiall smoke or fire
hazard°
The U.S. Department of Agriculture
notes that meat cooked rare is
popular, but meat cooked to only
I40°F (rare) means that some food
poisoning organisms may survive.
The closer you place foods to the
broil element, the faster foods brown
on the outside yet remain red to pink
in the center.
Moving meats away from the element
will allow the meat to cook to the
center while browning on the outside,
Cook side 1 at least 2 minutes longer
than side 2. If your oven is connected
to 208 volts, you may want to use a
higher rack position and/or broil
foods longer.
The size, weight, thickness, starting
temperature and your preference of
the doneness of the meat will affect
broiling. This chart is based on meats
at refrigerator temperature.
FOOD
Steak 1" thick
Ground beef
patties
1" thick
Pork Chops-l/2"
thick
Fish (fi!!ets).
Chicken (pieces)
RACK
POSITION
3
3
3
3
2
TOTAL
...."rIME (MIN.)
9-11
16-18
27-29
11-13
45-55
t, Set the OVEN COETROL
KNOB to BROQL.
2. The "OVEN OH" indicator light
will glow.
3, When broiling is finished, turn the
OVEN CONTROL EHOB to the
"OFF" position.
16
SelfoC/eaningCycle
CARE NIN6
tto Remove the broiler pan and grid,
oven racks, utensils and any foil
that may be in the oven.
2, Soil on the front frame, I" inside
the oven, and outside the door
gasket will need to be cleaned
by hand.
Front Frame
Door Liner
Clean these areas with hot water,
soap-filled steel wool pads or
cleansers such as Soft Scrub@ to
remove any soil. Rinse well with clean
water and dry.
3, Wipe up any heavy spillovers on
the oven bottom.
4, Do not clean the door gasket. The
fiberglass material of the oven
door gasket cannot withstand
abrasion. It is essential for the
gasket to remain intact. If you
notice it becoming worn, frayed or
displaced on the door, it should be
replaced.
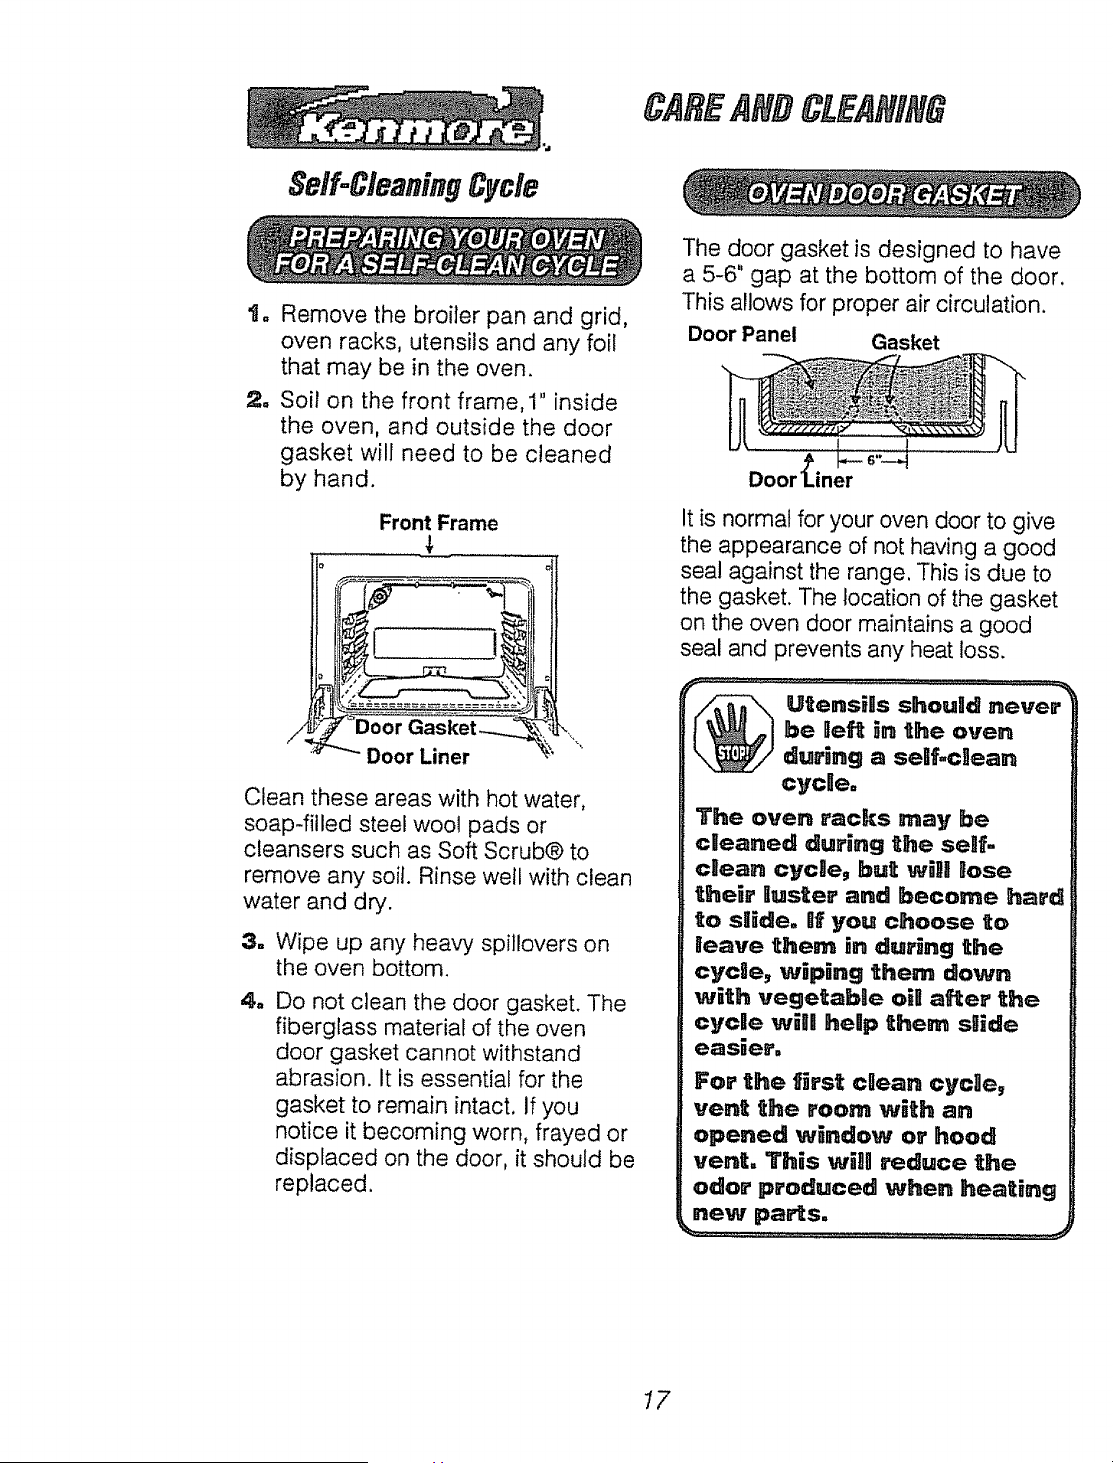
The door gasket is designed to have
a 5-6" gap at the bottom of the door.
This allows for proper air circulation.
Door Panel Gasket
It is normal for your oven door to give
the appearance of not having a good
seal against the range. This is due to
the gasket. The location of the gasket
on the oven door maintains a good
seal and prevents any heat loss.
_ ten.sills should never
be teft Jr, the oven"
during a se_f=clean
cycl]e=
The oven racks may be
cleaned during the self.
cllean, cyclle, but wiJl lose
their luster and become hard
to slide, nf you choose to
leave Utem 5n.during the
cyclte, wiping them down
with vegetabae oil after the
cycle will! help them sHide
eas_er,
For the first clean cycle,
vent the room with an
opened window or hood
vent, Th_s wHl_ a'educe the
odor produced when heating
new parts,
17
t, For best results, follow the steps in
PREPARING YOUR OVEN,
2, If your handle is hidden, lift the
cooktop and pull the handle out as
far as it will go.
3, Slide the handle to the right. Do not
force the handle, tf it does not slide
easily, you have not pulled it out
from the latch cover as far as it
will go, Repeat Step 2.
4, Turn the oven control knob to
"CLEAN". The "CLEAN", "AU-
TOMATItC OVER", "COOK
TOME", and "OVI_H ON" indica-
tor lights wilt glow.
5, The handle will lock when high tem-
peratures are reached inside the
oven.
w
The clean cycle lasts 4 hours and
20 minutes, This includes a cool
down time. You may change this
clean time from 3 hours up to 5
hours and 59 minutes by pressing
the HOUR and!or MIINUTE UP or
DOWH arrow pad, while the colon
is flashing.
When the clean cycle has started, you
may press the CLOCK pad to return
the display to the time of day. By
pressing the COOK 3"IIUE pad you
can return to the remaining clean time.
=
When the cycle is finished, the
"OVER OR" and "CLEAR" indi-
cator lights will flash, until the oven
control knob is turned to the off po-
sition.
8. When the temperature has cooled,
the door handle will easily slide to
the left.
18
tm
For best results, follow the steps
in tPREPARn_IG YOUR OV'_H.
2, If your handle is hidden, lift the
cooktop and pull the handle out as
far as it wilt go.
3, Slide the handle to the right. Do
not force the handle. If it does not
slide easily, you have not pulled it
out from the latch cover as far
as it will go. Repeat Step 2.
4, Turn the oven control knob to
"CLI_AH". The "CLEAH" and
"OVEH OH" indicator lights will
glow.
5, To delay the start of the clean
cycle press the START T_I_E
OH/OIFF pad.
6, Press the HOUR and/or
MIINUTE UP or DOWH',_ arrow
pad to set the time of day you
want the oven to start cleaning au-
tomatically. The "OVEH OH" in-
dicator light is off until the start
time is reached.
R
When the cycle is finished the
"OVEH OH" and "CLEAH" indi-
cator lights will flash. Turn the
oven control knob to the off posi-
tion and unlock the door.
Turn the oven control knob to the off
position. Wait (approx. 1 hour) before
attempting to open the door. The indi-
cator light will not blink if the cycle is
interrupted.
If any white spots remain, wipe with a
damp cloth or sponge, or scrub them
with a soap-filled steel wool pad and
rinse thoroughly.

CAREANDCLEANING
Cleaning
CLEAH_NG MATERnALS
o Dishwashing detergent
o Warm water
o Soft cloth
Do no_ use abrasive clleaners_
industrialt clleaners, or blleach,
CLEAHING MATERIIALS
o Dishwashing detergent
o Warm water
o Soap-filled steel wool pad
o Commercial oven cleaner
TO CLEAH
Allow the pan to soak. Sprinkle the
grid with dishwashing detergent and
cover with a damp cloth or paper
towel and let stand. Scour as needed.
Wash, rinse, and dry well. You may
also place both the pan and grid in
the dishwasher.
Clean only as touch up between
clean cycles. Use dishwashing liquid,
warm water or soap-filled steel wool
pad. Rinse well after cleaning and
dry,
HEVER USE OVEH CLEANERS
I]N OR AROUND AHY PART OF
THE OVI_Ho
When cleaning, be sure not to bend
or displace the temperature sensor
located on the back wall of the oven.
CL_ANliHG MATERBALS
o Dishwashing detergent
• Warm water
o Paper towel
• Ammonia
o Abrasive cleaner
o Scouring pad
TO CLEAN
Clean after each use. If acidic foods
(hot fruit filling, milk, tomatoes,
sauerkraut or sauces with vinegar or
lemon juice) spill, use a dry paper
towel to wipe up as much as possible.
When surface has cooled thoroughly
clean cooktop.
CLEANIIHG MATERIALS
o Dishwashing detergent
o Warm water
o Paper towels
TO CLEAN
Do not use oven cleaners, cleansing
powder, or harsh abrasives. If
marinades, tomato sauce, basting
materials, etc., should spill, wipe up
as much as possible. When surfaces
have cooled thoroughly clean painted
areas.
TO CLEAN
For everyday cleaning, use glass
cleaner and a paper towel. For
stubborn soil, use paste of baking
soda and water. Rinse thoroughly.
19
CAREAN##L NIf G
RemovableParts
CLEAHaHG MATERSALS
° Dishwashing detergent
o Warm water
o Soft cloth
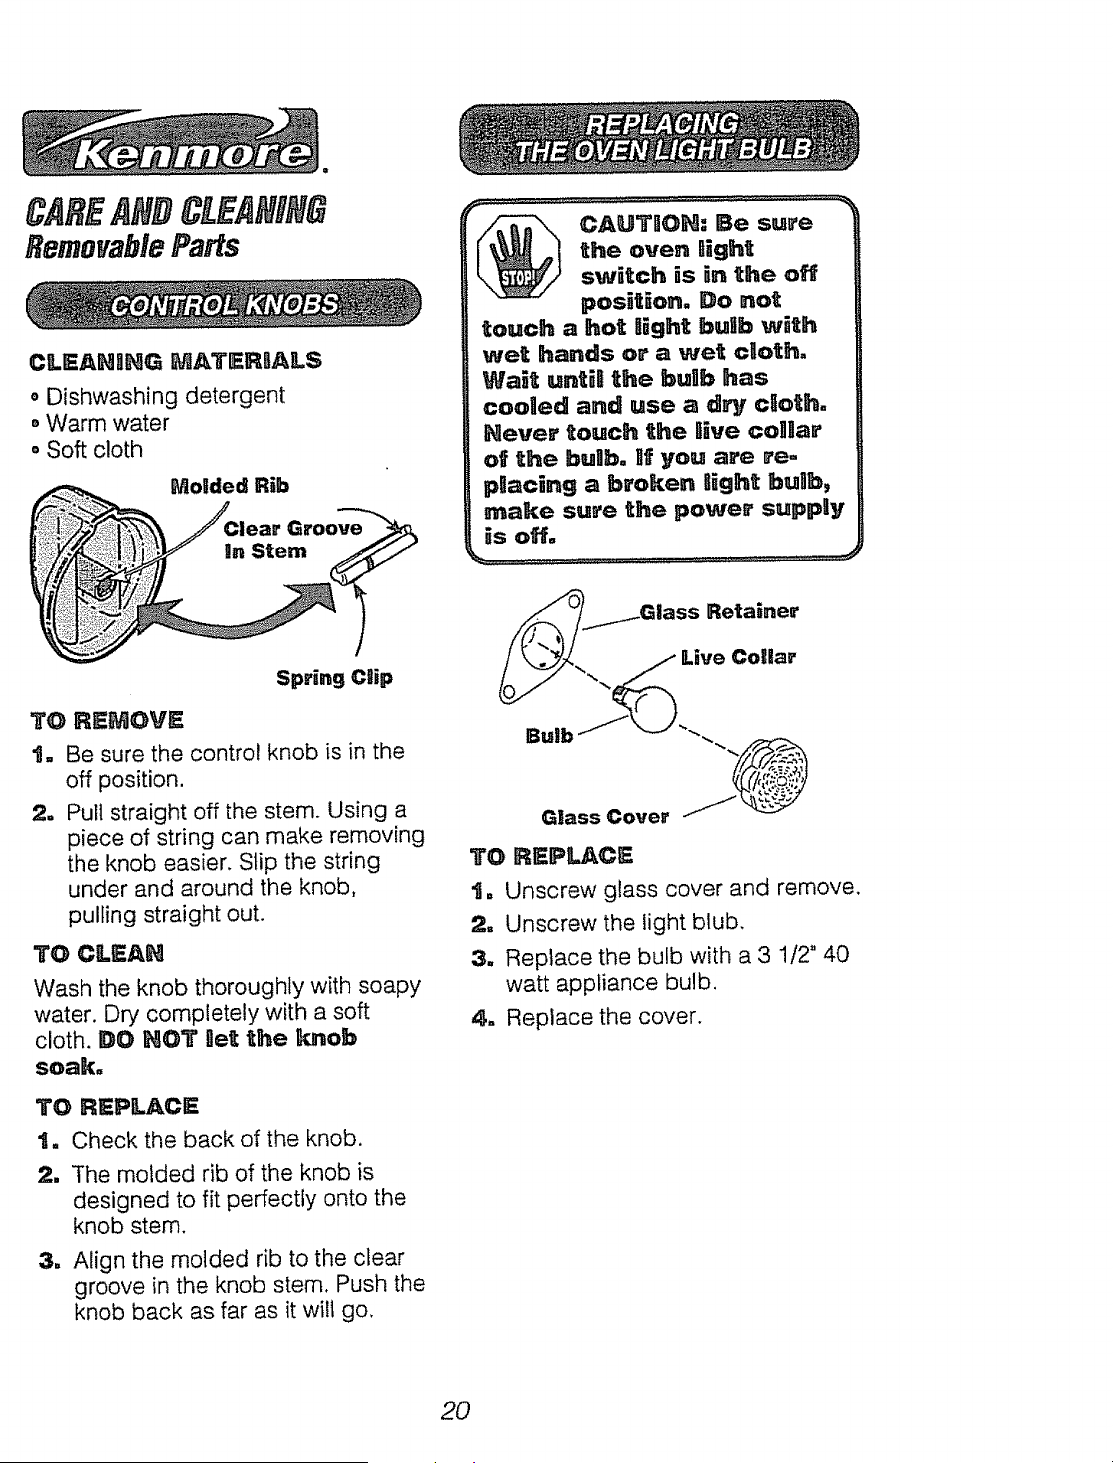
Moided Rib
Spring Cg[p
T@ REMOVE
=
2.
Be sure the control knob is in the
off position.
Pull straight off the stem. Using a
piece of string can make removing
the knob easier. Slip the string
under and around the knob,
pulling straight out.
TO CLEAN
Wash the knob thoroughly with soapy
water. Dry completely with a soft
cloth. DO NOT let the knob
soak°
TO REPLACE
1, Check the back of the knob.
2, The molded rib of the knob is
designed to fit perfectly onto the
knob stem.
3, Align the molded rib to the clear
groove in the knob stem. Push the
knob back as far as it will go.
Retainer
t, Unscrew glass cover and remove.
2, Unscrew the light blub.
3, Replace the bulb with a 3 1/2" 40
watt appliance bulb.
4, Replace the cover.
2O

CAREANDCL ANING
RemovableParts
C1LEANII_G I_ATERgAILS
o Dishwashing detergent
_,Damp cloth
o Warm water
TO REMOVE
t, Pull the drawer out until it stops.
2, Lift the front of the drawer until the
stop guide of the drawer clears the
stop guide on the base rail.
Stop Guide
3, Lift the drawer up and over the
drawer stop.
TO CLEAH
Wipe the inside and outside with
warm soapy water and a damp cloth
or sponge. Do not use harsh abra-
sives or scouring pads on the drawer.
TO REPLACE
tR
Lift the front of the drawer stop
and lower the stop of the drawer
through the opening of the base
raE
2, Lower the front of the drawer and
push back the drawer until it
stops.
3, Lift up on the front of the drawer
until the stop guide of the drawer
clears the stop guide of the base
rail. Slide the drawer into place.
_ AUTIOH: The drawer
gives you space for
keeping cookware and
bakeware. Plastics and
fgarnmable _ater_ags should
not be kept Jn _h_s drawer.
Do not overload the storage
drawer, gf the drawer _s too
heavy, it may sn_p off the
base rain when opened.
21
CARE NIN6
RemovableFarts
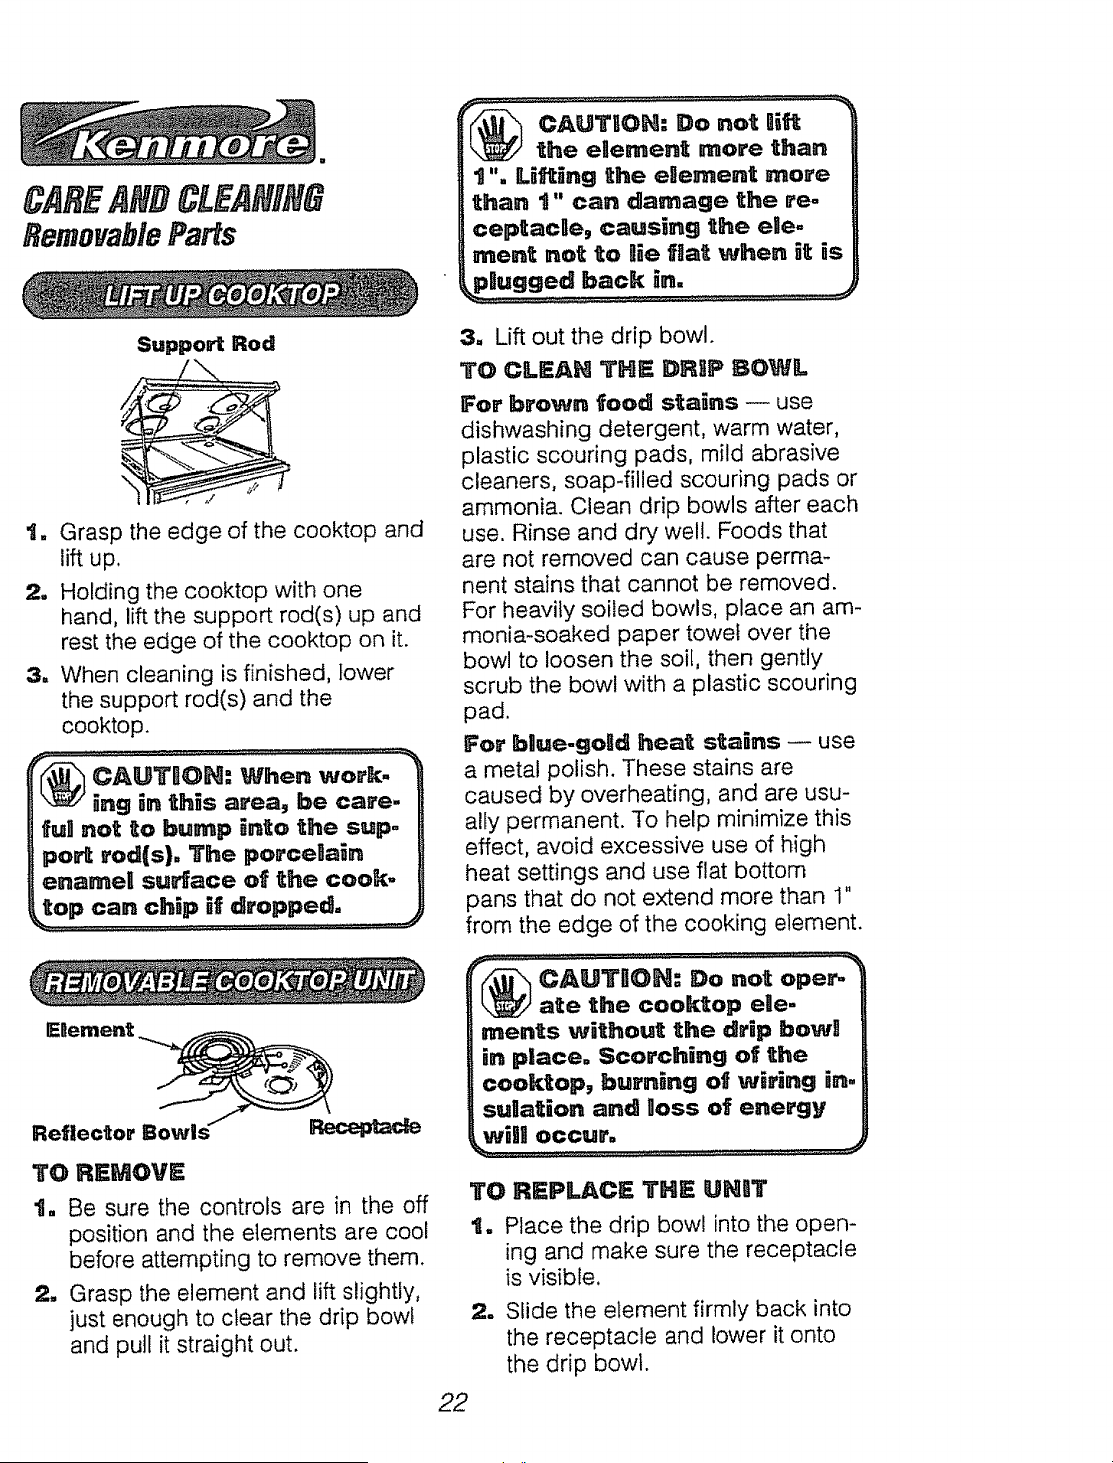
Suppo_ Rod
_-_ CAUTUON: Do not ._
the enement more than
t % Li_ing the eRement more
than 1" can damage _he re-
ceptacUe, causing t_e el]e-
enent not to aie f_at when it is
2_
.
Grasp the edge of the cooktop and
lift up.
Holding the cooktop with one
hand, lift the support rod(s) up and
rest the edge of the cooktop on it.
When cleaning is finished, lower
the support rod(s) and the
cooktop.
CAUTION: When work.
_J ing in thes a_ea, be care-
tfu_ not to bump into the sup=
po_ rod(s}. The porceRain
enameU surface of _he cook-
TO RF=MOVE
1, Be sure the controls are in the off
position and the elements are cool
before attempting to remove them.
2, Grasp the element and lift slightly,
just enough to clear the drip bowl
and pull it straight out.
3, Lift out the drip bowl.
TO CLEAN THE DRSP BOWL
For _rown _ood s_a[ns _ use
dishwashing detergent, warm water,
plastic scouring pads, mild abrasive
cleaners, soap-filled scouring pads or
ammonia. Clean drip bowls after each
use. Rinse and dry welt. Foods that
are not removed can cause perma-
nent stains that cannot be removed.
For heavily soiled bowls, place an am-
monia-soaked paper towel over the
bowl to loosen the soil, then gently
scrub the bowl with a plastic scouring
pad.
For _lue-go_d heat stains -- use
a metal polish. These stains are
caused by overheating, and are usu-
ally permanent. To help minimize this
effect, avoid excessive use of high
heat settings and use flat bottom
pans that do not extend more than 1"
from the edge of the cooking element.
ate _he coo_op e_e
t ents wi_hou_ _he drip bowll
,n place. Scorching o_._he
cook_op, burning of wrong _n=
sulla_ion and _oss of energy
w,|! occur.
TO REPLACE THI_ UHI]T
t, Place the drip bowl into the open-
ing and make sure the receptacle
is visible.
2, Slide the element firmly back into
the receptacle and lower it onto
the drip bowl.
CA AND NIN8
RemovablePants
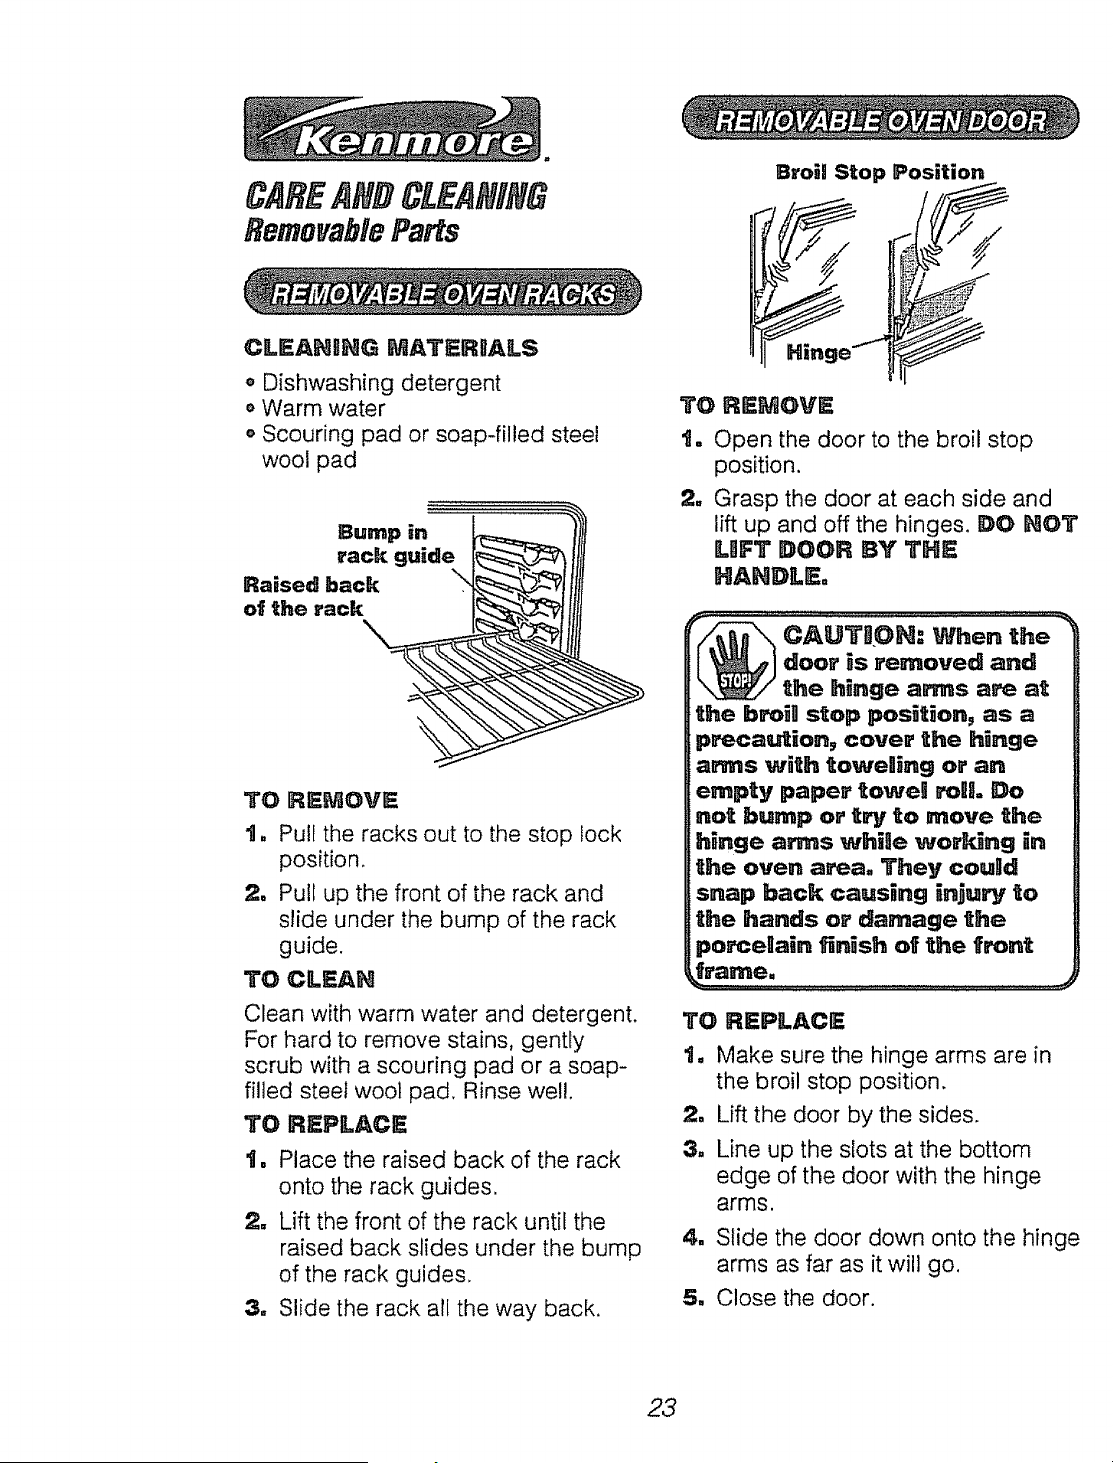
CLEANaHG MATERIALS
. Dishwashing detergent
o Warm water
o Scouring pad or soap-filled steel
wool pad
Bump _n
rack guide
Raised back
of the rack
TO REMOVE
t. Pull the racks out to the stop lock
position.
2. Pull up the front of the rack and
slide under the bump of the rack
guide,
TO CLEAH
Clean with warm water and detergent.
For hard to remove stains, gently
scrub with a scouring pad or a soap-
filled steel wool pad, Rinse well,
TO REPLACE
t. Place the raised back of the rack
onto the rack guides,
2. Lift the front of the rack until the
raised back slides under the bump
of the rack guides,
3. Slide the rack all the way back.
TO
u
BroW! Stop Position
11"i-.efi
RSMOVE
Open the door to the broil stop
position,
Grasp the door at each side and
lift up and off the hinges. DO NOT
ILIIFT DOOR BY THE
HANDLE.
door is removed and H
the h_nge arms are at H
the brownstop position, as a
ip_=ca_._ion, cover the hinge
iaeons w"th towellSng or an
iempty paper toweli roRL Do
!not bump or try to move the
ihinge arms while wor_Jng in
!the oven area. They could
isnap back caus,ng _njury to
the hands or damage the
porcelain finish of the front
TO REPLACE
t. Make sure the hinge arms are in
the broil stop position.
2. Lift the door by the sides.
3. Line up the slots at the bottom
edge of the door with the hinge
arms,
4. Slide the door down onto the hinge
arms as far as it will go,
5. Close the door.
23
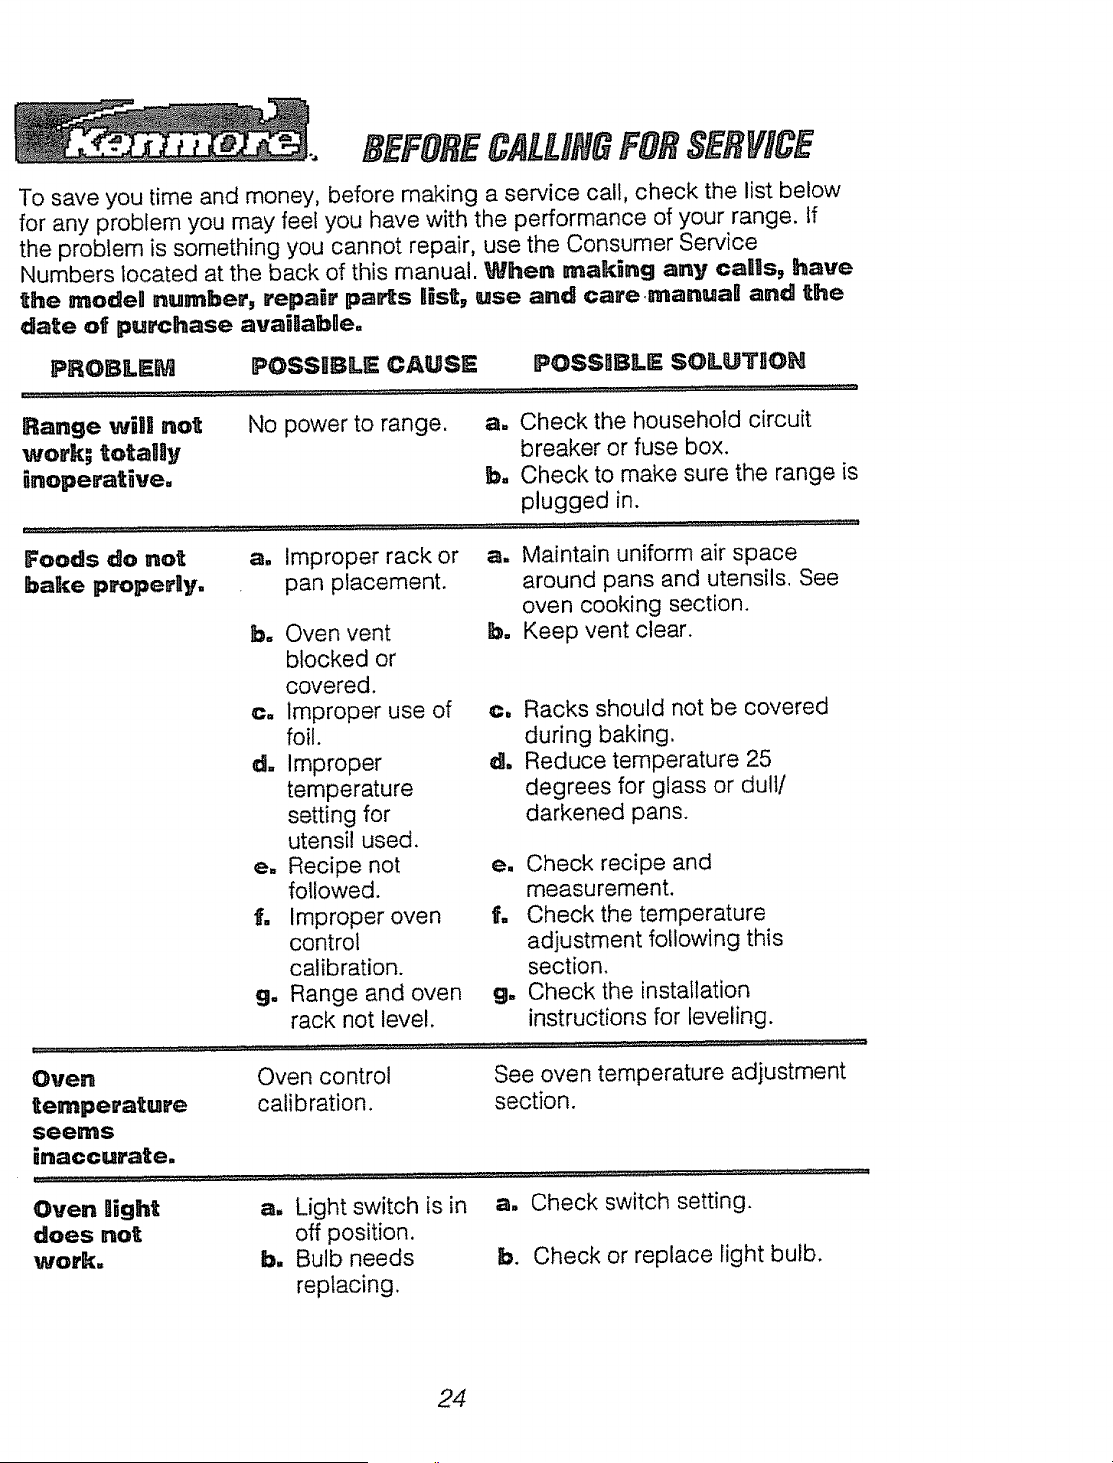
aEFORECALUN8FORSERVICE
To save you time and money, before making a service call, check the list below
for any problem you may feet you have with the performance of your range. If
the problem is something you cannot repair, use the Consumer Service
Numbers located at the back of this manual. When making any calls, have
the rnodell number, repair pads ll_st, use and care.rnanuall and the
date of purchase avaiWablle.
PROI!3L=M POSSIBLE CAUSE POSSliBLE SOLUTIIOH
Range willl not No power to range, a. Check the household circuit
werlk._ tetaggy breaker or fuse box.
_neperat_ve. b. Check to make sure the range is
plugged in.
Foods do not
bake proper0y,
a_
Improper rack or
pan placement.
b. Oven vent
blocked or
covered.
c. Improper use of
foil.
d. Improper
temperature
setting for
utensil used.
e. Recipe not
followed.
f. Improper oven
control
calibration.
g. Range and oven
rack not level.
a. Maintain uniform air space
around pans and utensils. See
oven cooking section.
b. Keep vent clear.
c. Racks should not be covered
during baking.
do Reduce temperature 25
degrees for glass or dull/
darkened pans.
e. Check recipe and
measurement.
f. Check the temperature
adjustment following this
section.
g, Check the installation
instructions for leveling.
Oven Oven control See oven temperature adjustment
temperature calibration, section.
seems
inaccurate.
Oven B_ght a. Light switch is in a. Check switch setting.
does not off position.
work. b. Bulb needs b. Check or replace light bulb.
replacing.
24
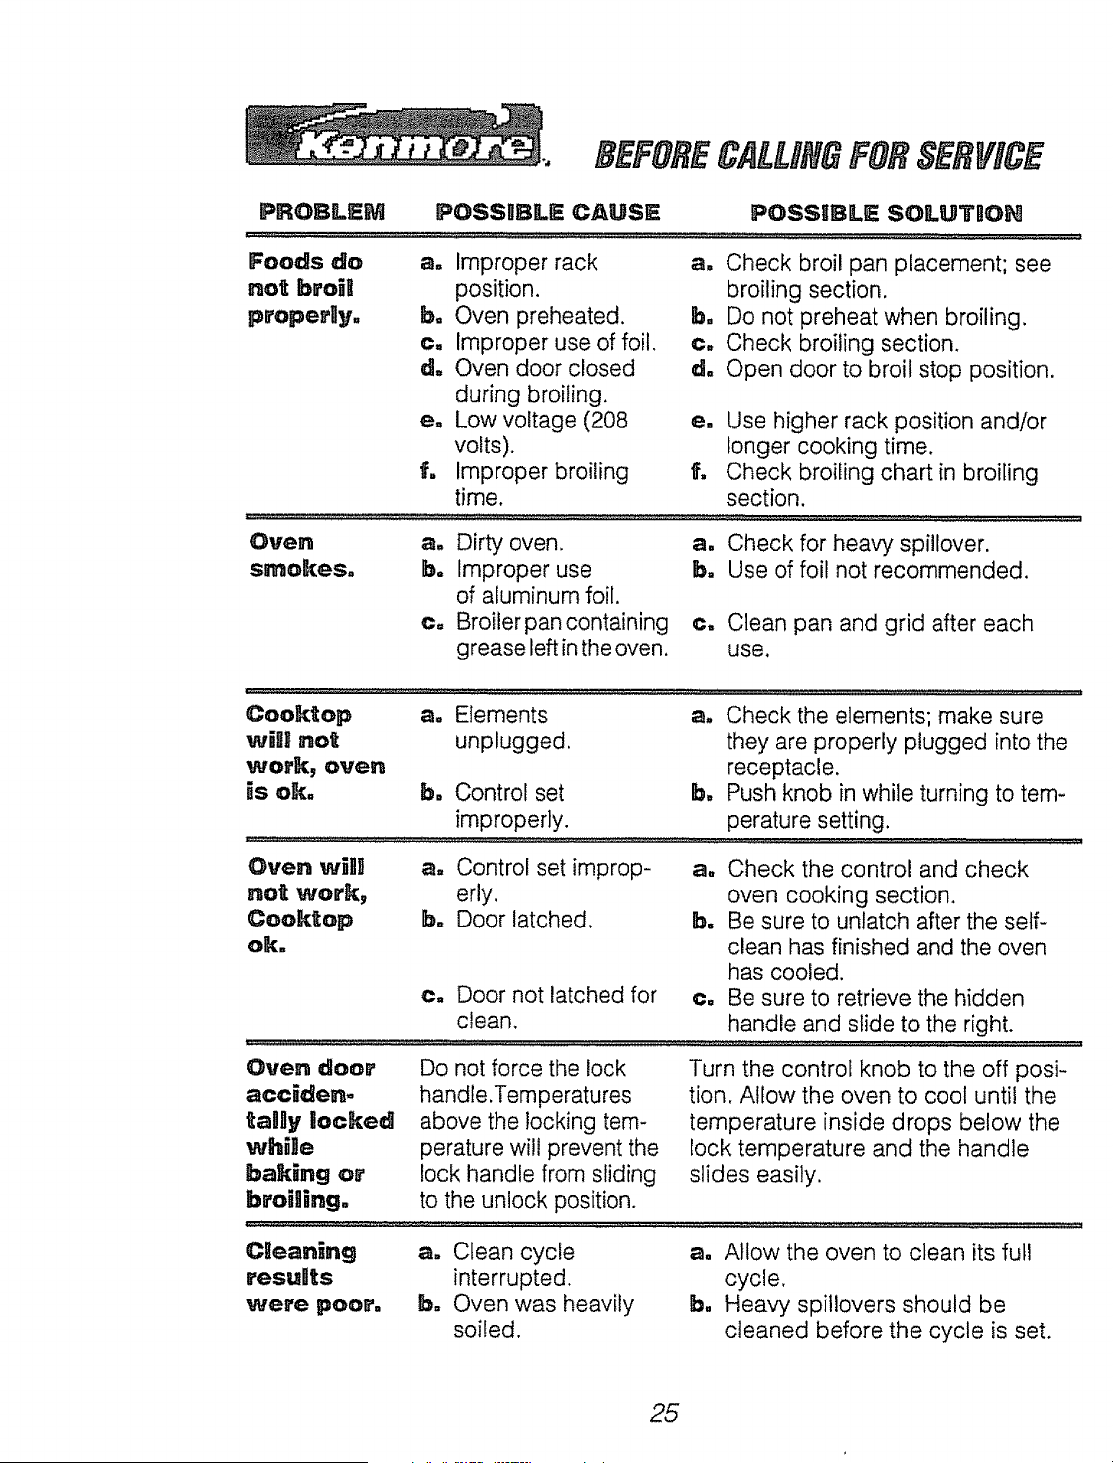
.. BEFORECALUNGFORSERVICE
PROBLEM POSSIBLE CAUSE POSSIIBLE SOLUTItON
Foods do
not bro_B
properlly.
ao Improper rack
position.
b, Oven preheated.
¢, Improper use of foil.
d, Oven door closed
during broiling.
e, Low voltage (208
volts).
f, Improper broiling
time.
a, Check broil pan placement; see
broiling section.
b, Do not preheat when broiling.
e, Check broiling section.
d, Open door to broil stop position.
e, Use higher rack position and/or
longer cooking time.
f, Check broiling chart in broiling
section.
Oven
smokes°
a Dirty oven.
lb, Improper use
of aluminum foil.
e, Broiler pan containing
grease left in the oven.
a Check for heavy spillover
b Use of foil not recommended
¢ Clean pan and grid after each
use.
Cooktop ao Elements
wiI! not unplugged
_tOtk_ oven
6s ok. b, Control set
improperly.
a, Check the elements; make sure
they are properly plugged into the
receptacle.
b, Push knob in while turning to tem-
perature setting.
Oven will8 a, Control set improp-
not work, erly.
Ceoktop b, Door latched.
Ok:,
Cm Door not latched for
clean.
a, Check the control and check
oven cooking section.
b, Be sure to unlatch after the self-
clean has finished and the oven
has cooled.
¢, Be sure to retrieve the hidden
handle and slide to the right.
Oven door
accHden-
taBy aocked
whBe
baking or
bro_ling.
Do not force the lock
handle.Temperatures
above the locking tem-
perature wi!! prevent the
lock handle from sliding
to the unlock position.
Turn the control knob to the off posi-
tion. Allow the oven to cool until the
temperature inside drops below the
lock temperature and the handle
slides easily.
Clleaning
resugts
were poor,
a, Clean cycle
interrupted.
b, Oven was heavily
soiled.
a, Allow the oven to clean its full
cycle
b Heavy spillovers should be
cleaned before the cycle is set
"DO#TYOURSELF"
TEMPERATURE
ADJUSTMENT
You may feel that your new oven
cooks differently than the oven it
replaced. We recommend that you
use your new oven a few weeks to
become more familiar with it, following
the times given in your recipes as a
guide.
If you think your new oven is too hot
(burning foods) or not hot enough
(foods are undercooked) you can
adjust the temperature yourself. The
appearance and texture of foods is a
better indicator of oven accuracy than
an oven thermometer, to check the
temperature setting of your new oven.
These thermometers can vary by 20-
40 degrees. In addition, the oven door
must be opened to read these
thermometers. Opening the door will
change the temperature of the oven.
To decide how much to change the
temperature, set the oven
temperature 25 degrees higher (if
foods are undercooked) or 25
degrees lower (if foods are burning)
than the temperature in your recipe,
then bake. The results of this "test"
should give you an idea of how much
the temperature should be changed.
ta
m
While the control knob is in the off
position, press and hold, at the
same t_me, the HOUR UP and
DOWN arrow pads for 4 seconds
until the display shows a two digit
number.
Press the HOUR UP arrow pad to
increase the temperature from the
original setting up to +35 ° F hotter.
or
Press the HOUR DOWH arrow
pad to decrease the temperature
from the original setting down to
-35 ° F cooler.
8, When this adjustment has been
made the display will return to the
time of day.
This adjustment will remain in memory
until these steps are repeated and a
new temperature is selected. It will
remain in memory even after a power
failure.
This adjustment will not affect the Broil
or Clean temperatures.
26
RANGEWARRANTY
FULLOHEYEARWARRAHTYONTHEFUNCTIOHINGOFALLPARTSEXCEPTGLASS
PARTS
If,withinoneyearfromthedateof installation,anypart,otherthan aglasspart,failsto function
properlyduetoa defectin materialorworkmanship,Searswill repairor replaceit, freeofcharge.
FULL30-DAYWARRA_JTYOHGLASSPARTSANDFINISHOFPORCELAIBEHAtViEL,
PAINTEDORBRIGHTMETALFINISHEDPARTS
If,within30daysfromthedateofinstallation,anyglasspartorthefinishonanyporcelainenamel,
paintedor brightmetalpartisdefectivein materialorworkmanship,Searswilt replacethepart,free
of charge.
FULL9g-DAYWARRANTYOHiVIECHANICALADJUSTMENTS
For90 daysfromthedateof installation,Searswill provide,freeof charge,anymechanical
adjustmentsnecessaryfor properoperationof the range,exceptfor normalmaintenance.
If the rangeissubjectedto otherthanprivatefamilyuse,theabovewarrantycoverageis effectivefor
only 90 days.
WARRANTYSERVICEISAVAILABLEBYCONTACTINGTHENEARESTSEARSSERVICECENTER/
DEPARTMENTINTHEUNITEDSTATES
This warrantyapptiesonly whilethis productis in usein theUnitedStates.Thiswarrantygivesyou
specificlegalrights,and you mayalso haveotherrightswhich varyfrom stateto state.
SearsRoebuckandCo.Dept.817WAHoffmanEstates,IL60179
'To fu_hez add to the vaRue of your Range,
Buy a Seazs Maintenance Agreement.
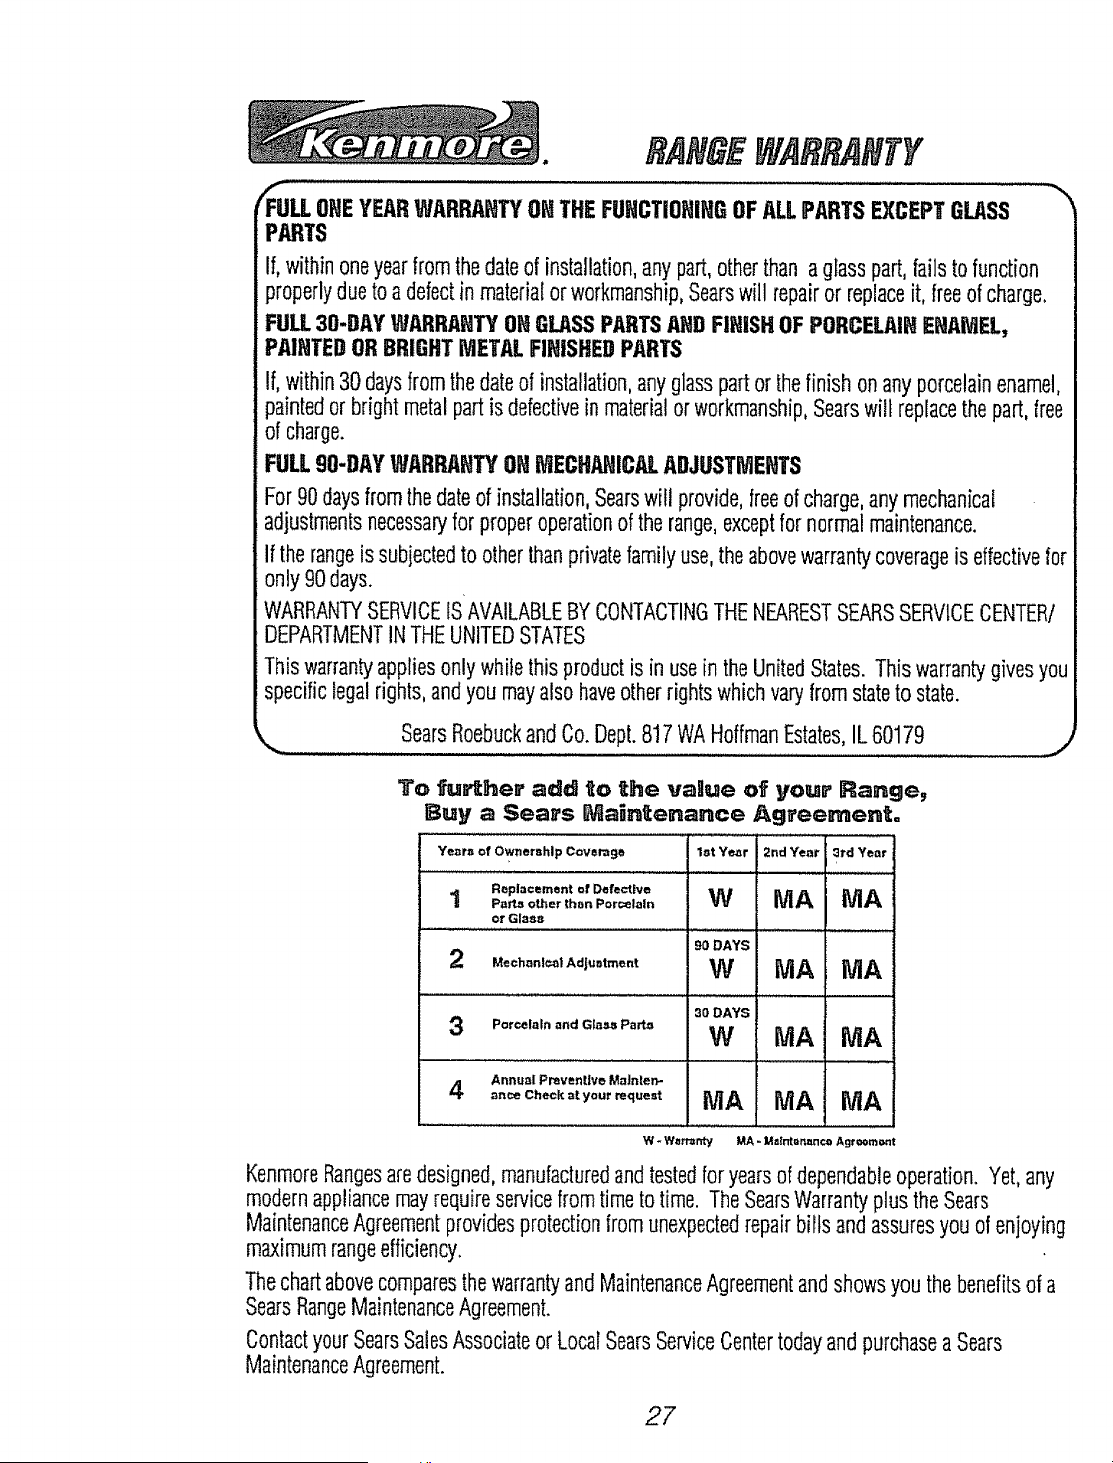
Years of Ownership Coverage Ist Year 2nd Year 3rd Year
Replacement of DefeCtive
1 Pa_otherthanPorcelaln W IVlA tViA
or Glass
90 DAYS
2 .o_h°n_=lA,,Juotm_.,W MA iViA
30 DAYS
Annual Pmventlve MaJnten-
4 °,=,_,eck.',,you,,,,,_,,ea_MA MA iVlA
W - Warl-_nty MA - Ma_ntor'_n¢o Agr oomo_!
KenmoreRangesaredesigned,manufacturedandtestedforyearsofdependableoperation.Yet,any
modernappliancemayrequireservicefromtimetotime. TheSearsWarrantyplustheSears
MaintenanceAgreementprovidesprotectionfromunexpectedrepairbiItsandassuresyouofenjoying
maximumrangeefficiency.
ThechartabovecomparesthewarrantyandMaintenanceAgreementandshowsyouthebenefitsofa
SearsRangeMaintenanceAgreement.
ContactyourSearsSalesAssociateorLocalSearsServiceCentertodayandpurchaseaSears
MaintenanceAgreement.
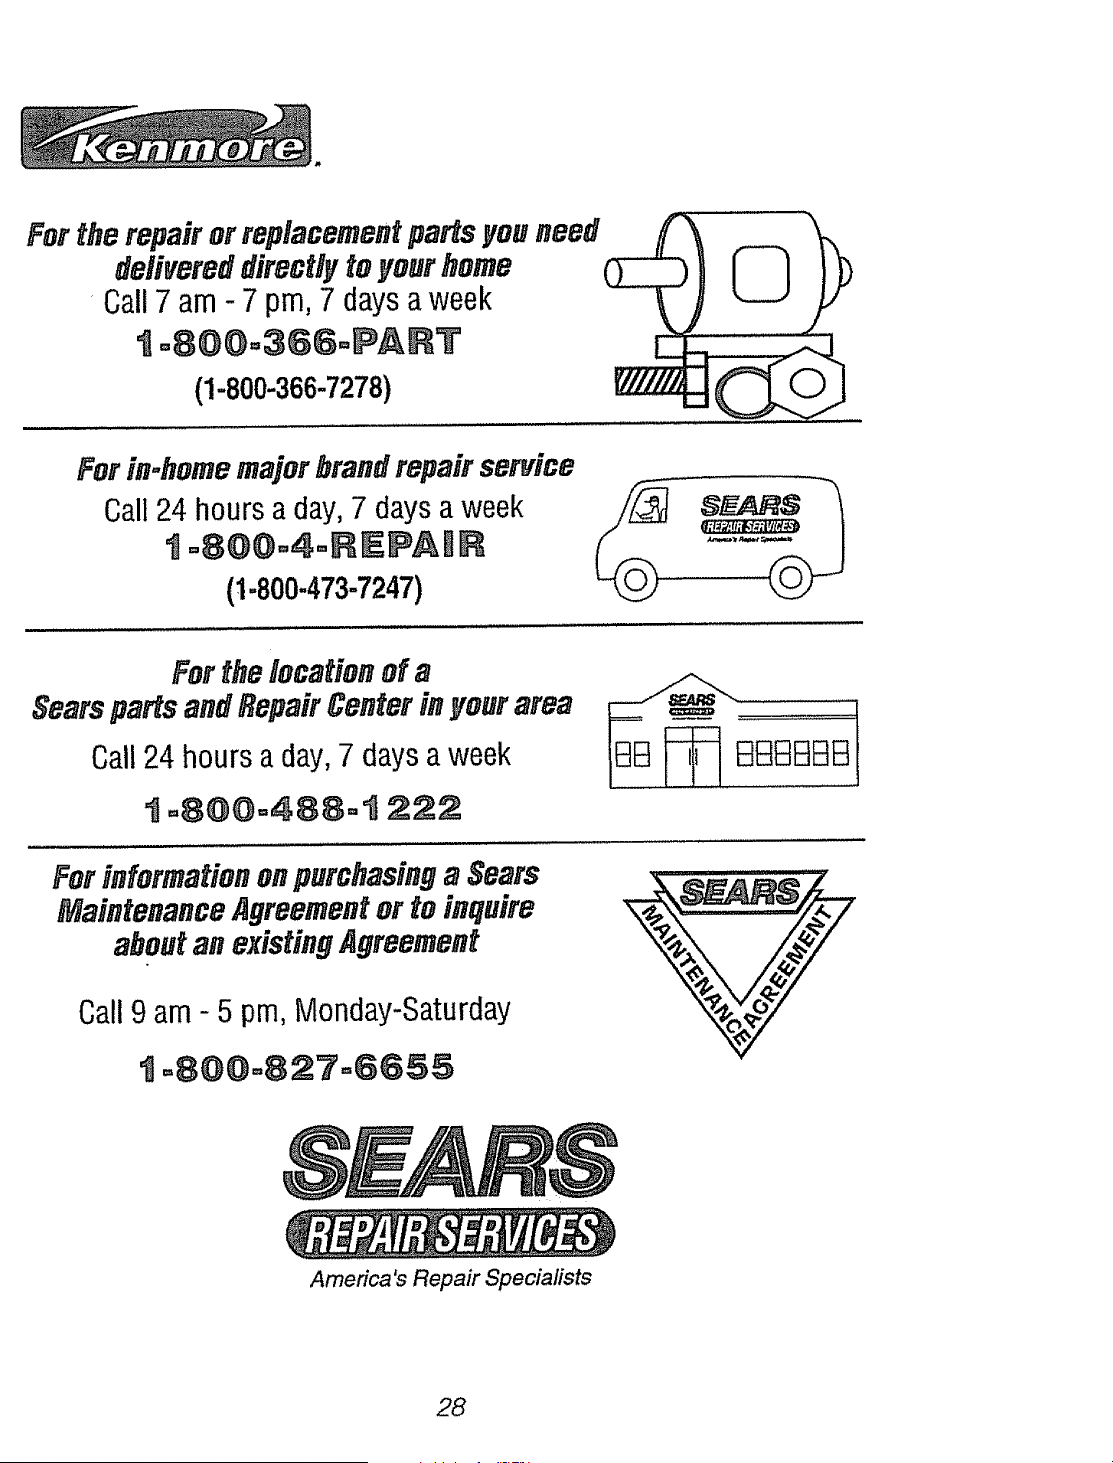
For the repair or replacementparts you need
delivered directly to your home
Call 7 am - 7 pm, 7 daysa week
I °800-366°PART
(1-800-366-7278)
For in-homemajor brandrepair service
Call 24 hours a day, 7 days a week
t =800=4=REPAIR
(t -800-473-7247)
For the location of a
Searsparts and RepairCenter in your area
Call 24 hours a day, 7 days a week
1_=800=488=_1222
For information on purchasinga Sears
MaintenanceAgreementor to inquire
aboutan existing Agreement
Call 9 am - 5 pro, Monday-Saturday
t -800-827=6655
America's Repair Specialists
28
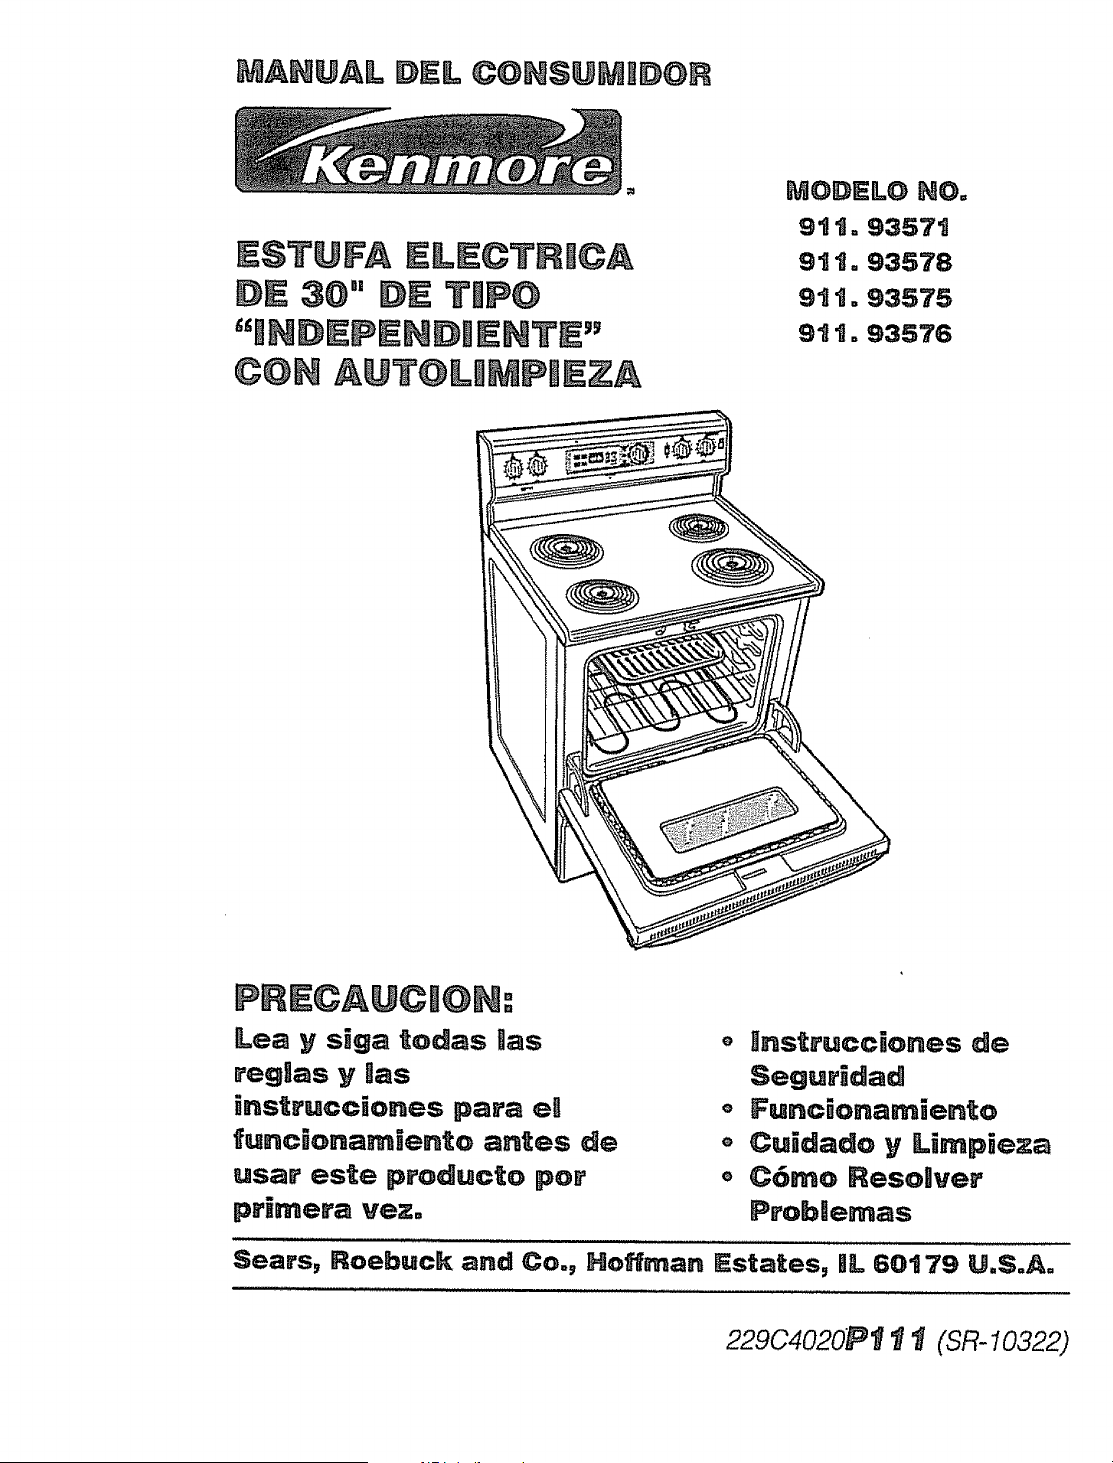
MANUAL DEL @ON$@MHDOR
EST@FA ELECTRJ©A
D_ 30" DE TmFO
©¢N A@T@ MPREZA
MODELO HO_
91t.9357t
9tt.93578
9tt.93575
91to93576
Lea y siga todas las
regBas y aas
instrucciones para el
funcBenamiento antes de
usar este producto pot
primera vez=
Hnstrucc[ones cue
Seguridad
o FuncionamJento
o Cuidado y Limpieza
e C6mo Resonver
Probmemas
Sears, Roebuck and Co., Hoffman IEstates, ill 60t 79 U.S°A°
229C4020Pt 1 t (SR- 10322)
Indice
ESTUFA
E[ECTRICAIHDEPEHBIENTE
Seguridad en el uso de
la estufa .................................... 3-6
Dispositivo contra volcaduras ..... 3
Caractefisticas de la estufa ......... 7
C6mo sacar la cinta
de empaque ................................ 7
C6mo cocinar en la cubierta .... 8-9
Reloj, Cron6metro y Nuevo Control
.............................................. !0-11
C6mo poner el reloj ................... 11
C6mo programar el cron6metro 11
CSmo reprogramar et
cron6metro ................................ 11
Para cancelar el cron6metro ..... 11
Consejos para cocinar en
el homo ................................. 12-15
Control del homo ....................... 14
C6mo hornear ............................ 15
To set a cook time ..................... 15
To set a delayed start ................ 15
C6mo asar a la parfilla .............. 16
El ciclo de autolimpieza ....... 17-18
Panel de control ........................ 19
Cacerola y parrilla para asar a
la parrilla .................................... 19
Paredes del horno ..................... 19
Cubierta y fondo de la caja
del quemador ............................ 19
Superficies pintadas .................. 19
Vidrio .......................................... 19
Perillas de control ...................... 20
C6mo reemptazar el foco de la
luz del homo .............................. 20
Cajon de almacenamiento ........ 21
Cubierta Levantable .................. 22
Unidades de la
superficie ................................... 22
Parrillas del homo ...................... 23
Puerta del homo ........................ 23
Antes de Ilamar para un
servicio ................................ 24, 25
Ajustes de temperatura ............. 26
Garantia ..................................... 27
N_3meros para servicios del
consumidor ................................ 28
Para su convenJenc_a y referencJa futura, pot favor escriba el nQmero d
modeBo y de serie en eR espacio que se le provee. Est_n ub_cados detr:_
de0 cajon de a,macenamJento.
HUMERO DE MODELO:
HUMERO DE SERUE=
GUARDS ESTAS INSTRUCCIONES
flea todas ias inslrucciones antes de usar este aparato. Cuando use
aparatos a gas o eR_clricos, se deber[an seguir pFecauc[ones de seguFidad,
incluyendo !o siguiente:
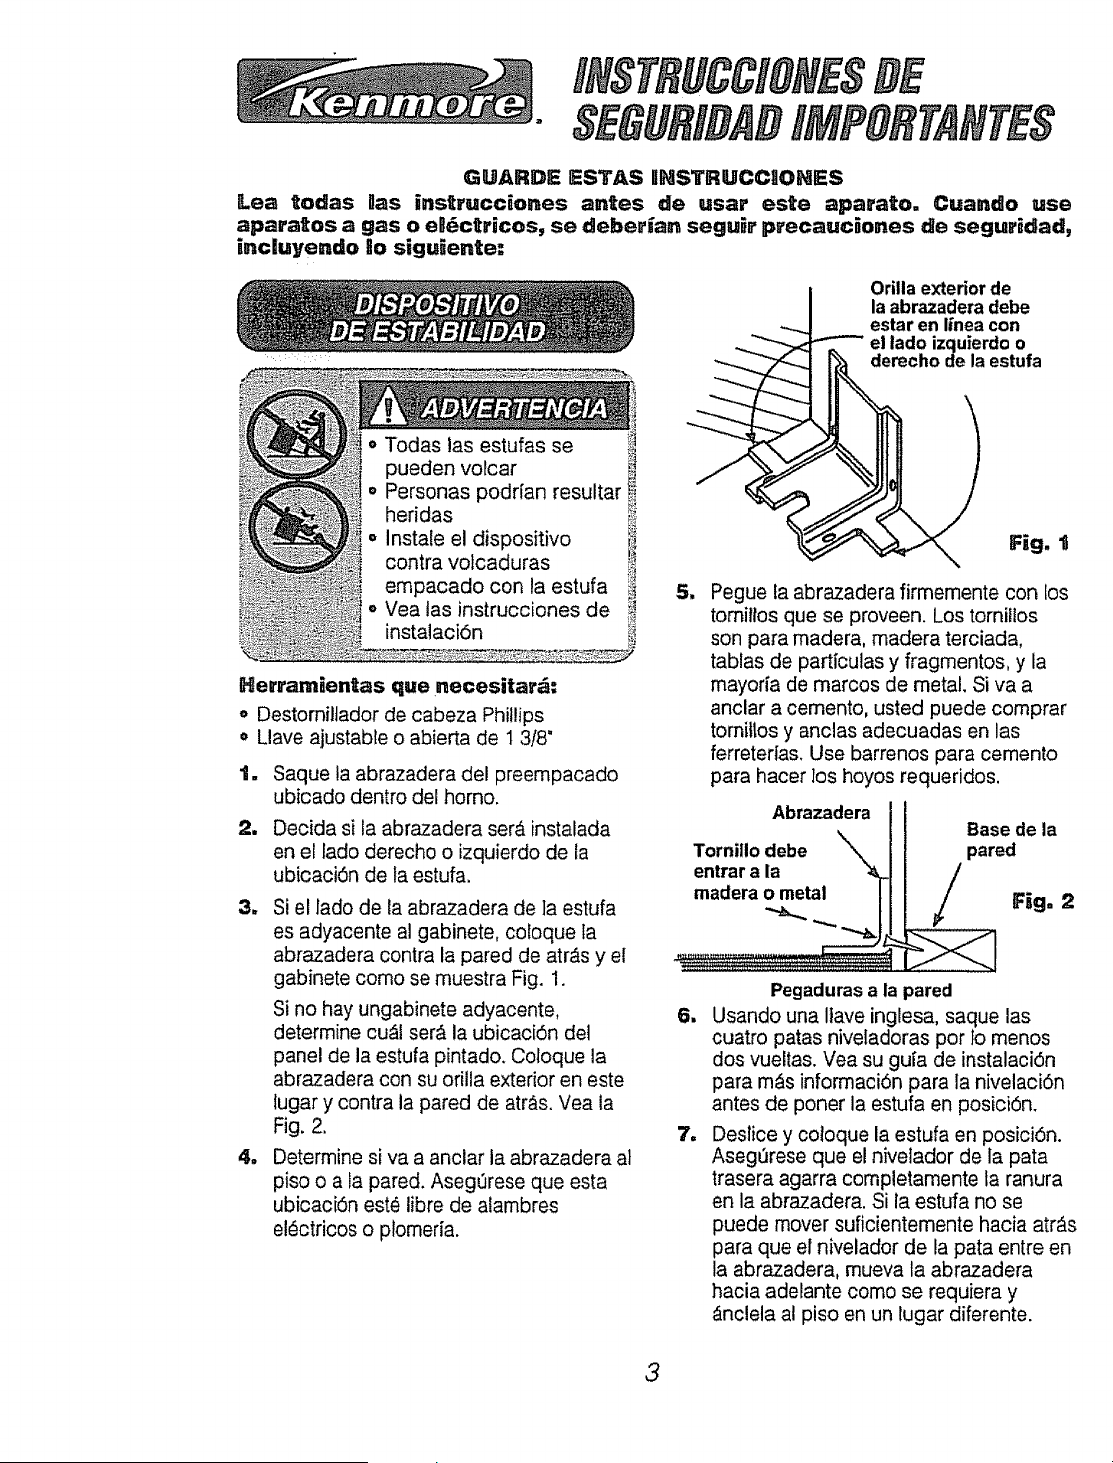
Orilla exterior de
la abrazadera debe
estar en linea con
el lado izquierdo o
derecho de la estufa
o Instale el dispositivo _
contra volcaduras
empacado con la estufa
° Vea las instrucciones de
heridas
Herramientas que necesitaF_:
° Destomillador de cabeza Phillips
o Llave ajustable o abierta de 1 3/8"
_B
2.
Saque la abrazadera del preempacado
ubicado dentro del homo.
Decida si la abrazadera ser& instalada
en el lado derecho o izquierdo de ta
ubicaci6n de la estufa.
3. Si el lado de la abrazadera de ]a estufa
es adyacente al gabinete, coloque ta
abrazadera contra la pared de atr_s y el
gabinete como se muestra Fig. 1.
Si no hay ungabinete adyacente,
determine cu_l ser;_ la ubicaci6n de]
panel de la estufa pintado. Coloque la
abrazadera con su ofilla exterior en este
lugar y contra la pared de atr&s. Vea la
Fig. 2.
4. Determine si va a anclar la abrazadera al
piso o a la pared. Asegt3rese que esta
ubicacbn este libre de alambres
el_ctricos o plomeria.
Fig, I
511
Pegue la abrazadera firmemente con los
tomillos que se proveen. Los tornillos
son para madera, madera terciada,
tablas de particulas y fragmentos, y la
mayoria de marcos de metal. Siva a
anclar a cemento, usted puede comprar
tornittos y anclas adecuadas en las
ferreterias. Use barrenos para cemento
para hacer los hoyos requeridos,
Abrazadera
Tornitlo debe NN_
entrar a la
madera o metal
6ll
Base de la
pared
Fig. 2
Pegaduras a la pared
Usando una Ilave ingles& saque las
cuatro patas niveladoras por to menos
dos vueltas. Vea su gula de instalaci6n
para m_s informaci6n para la nivelacbn
antes de poner la estufa en pos[ci6n.
Deslice y coloque la estufa en posici6n.
Asegt3rese que el nivelador de la pata
trasera agarra completamente la ranura
en la abrazadera, Si la estufa no se
puede mover suficientemente hacia arras
para que el nivelador de la pata entre en
la abrazadera, mueva la abrazadera
hacia adelante como se requiera y
_nclela al piso en un lugar diferente.
3
gMPORTANTE: Para garantizar su
seguridad, la de su familia y la de su
hogar, per favor lea su Manual del
Consumidor cuidadosamente.
Mant_ngalo a la mane para referencias.
Ponga mucha atenci6n alas secciones de
seguridad. ASEGURESE que su estufa
sea instalada per un tecnico especializado
y que haga tierra adecuadamente.
o INIO DEJE a los nines sin vigilancia
cerca de una estufa que se est_ usando.
- SNSEI_E A LOS NONOS a no jugar
con los controles o cualquier parte de la
estufa y no sentarse, subirse o pararse
sobre la puerta de este aparato o de
cualquier otra parte de la estufa.
o PRECAUCgON: NUNCA GUARDS
artlculos que sean de interns para los
nifios en el panel trasero o en los
gabinetes sobre la estufa. Los niSos quc
se suban sobre la estufa podrian
resultar gravemente heridos.
o GUARDS ESTE libro para un use
future.
o NUNCA USE su estufa para entibiar o
calentar una habitaci6n.
o NU_ICA IrRATE de reparar o
reemplazar una parte de la estufa a
menos que las instrucciones se den en
este manual. Todo otro trabajo deberia
ser hecho per un tecnico especializado
,, S_EMPRE _AHTEHGA los
revestimientos combustibles de tas
paredes, cortinas y otros paros a una
distancia prudente de la estufa.
o NUHCA CA_-SENII'E contenedores de
alimentos cerrados. El aumento de la
presi0n podria causar que el contened(
explore y cause heridas.
° NUNCA deje frascos o latas de grasa,
goteaduras sobre o cerca de la estufa.
o SIIE_PRE _A_3"E_GA el ,_rea de la
estufa despejada de cosas que se
poddan quemar. La acumulaci6n de
comida y grasa y los utensilios de
madera se podrian incendiar. Los
utensitios de plastico se podrian derreti
y las comidas en conservas poddan
explotar. Su homo nunca se debeda
usar para almacenar cosas.
o SgE_PRE _AHTEHGA la estufa
despejada de cosas que se podrlan
quemar (gasolina y otros vapores y
Iiquidos inftamables).
° NUNCA trate de limpiar las superficie. _
calientes. Algunos limpiadores
producen vapores nocivos y los paSos
las esponjas mojadas podrian causar
quemaduras per vapor.
o HU_CA USE ropa suetta cuando us_
la estufa.
o _U_CA USE una toalla u otro paso
abultado come agarradera y asegt_res_
que ia agarradera est_ seca. Las
agarraderas h_3medas y los pa_os y
esponjas majadas podrian causar
quemaduras por vapor. NO PER_I_3",e
que las agarraderas toquen las zonas
para cocinar calientes.
4
_, NO TOQUE las superficies para calentar
as superficies cerca de elias o las
superficies interiores. Estas podrian estar
suficientemente calientes para quemar
aunque se vean de color oscuro. Durante y
despues del uso, no toque o permita que la
ropa o materiales inflamables hagan
contacto con las superficies calientes hasta
que hayan tenido tiempo de enfriarse. Las
otras superficies cerca de ias ventanillas de
ventitaci6n del homo, puertas, ventanas y
las superficies para cocinar tambien
podrian estar suficientemente calientes
para causar quemaduras.
• SOLO C_ERTAS clases de utensilios de
vidrio o cer_mica se pueden usar para
cocinar en la cubierta. AsegOrese que los
utensilios que seleccione est&n diseSados
para cocinar sobre la cubierta sin
quebrarse debido a los sQbitos cambios
de temperatura.
° S]IEMPRE "rENGA cuidado cuando
toque los elementos de la cubierta.
Retendr_n calor despues de que la estufa
se haya apagado.
o HUNCA OBSTRUYA la ventilaci6n del
homo bajo el elernento derecho de atr_s.
• LAg OLLAS QUE SE USEH para
cocinar en la cubierta deberian ser de
rondo piano y Io suficientemente grandes
para cubrir el area que se est,. utilizando.
Los utensilios que son demasiado
pequenos exponen el efemento calentador
y podria causar un contacto directo o el
incendio de la ropa.
o SIIEMPRE USE los recipientes para
derrames para evitar daSos a los
alambrados y a los componentes. No use
forros de aluminio o de papel de aluminio
sobre los recipientes. El uso inadecuado
de estos podria resultar en un riesgo de
golpe de corriente o incendio.
o NUNCA DE,lIE las unidades de
superficie sin vigilancia a temperaturas
altas. Los derrames podrian resultar en
humo o en derrames de grasa que se
podrian incendiar.
• SIEMPRE COLOQUE las agarraderas
(manillas) de las ollas hacia adentro y lejos
de las otras unidades de la superficie para
reducir el riesgo de quemaduras,
encendido, un contacto y derrame
accidental.
o NUNCA coloque los elementos
calentadores en agua.
COLOQUE LAS PARRDLLAS DEL
HORNO en la posici6n deseada
mientras el homo est_ frio. Si las parrillas
se deben mover mientras el homo est_
caliente, no permita que la agarradera
haga contacto con el quemador caliente
del horno.
° DESPUES DE ASAR A LA
PARRULLA, siempre saque la cacerola y
la parrilla para asardel homo y limpielas.
Los sobrados de grasa en la cacerola
para asar podrian incendiarse la pr6xima
vez que usted use el horno.
° SIIEMPRE TENGA cuidado cuando
abra la puerta del horno. Deje que el aire
ca]iente y el vapor escapen antes de
mover los alimentos.
NUNC,(I UTIlUCE pape] de aluminio
para cubrir el fondo del horno. El uso
incorrecto del papel de aluminio podria
resultar en el riesgo de un golpe de
corriente e incendio.
5

o LIMPIE SOILAMEHTE las partes que se
listan en este manual. Siga todas las
instrucciones para la limpieza. AdegOrese
de sacar la cacerola y la parrilla para asar
antes del ciclo de autolimpieza.
o NUNCA FR_EGUE, mueva, o da_e e]
sello de la puerta en las estufas con
autolimpieza.
o HUNCA TRATE de limpiar los utens[lios,
ollas, partes removibles o la cacerola y la
parrilla para asar en el ciclo de
autolimpieza.
• NO US;: limpiadores para homos - No se
deber_a usar ninguna clase de limpiador
para homos o cremas protectoras dentro o
alrededor de cualquier parte del homo,
o HUNCA FUERCE la manilla del cerrojo a
la posici6n de abierto mientras el homo
est_ caliente.
;ADVERTEHCaA DE
SEGURIIDAD BMPORTAHTEZ
California Safe Drinking Water and
Toxic Enforcement Act requiere que
el gobemador de California publique
una mista de substancias que el
estado sepa que producen defectos
de nacimiento u otros da_os
reporductivos y requiere que los
hombres de negocios adviertan a
sus clientes del contacto potencial
a tales substancias. El aislante de
libra de vidrio en e! homo con
autolimpieza emiUr_ una muy
peque_a cantidad de mon6xido de
carbono durante el ciclo de
autolimpieza. El contacto se puede
minimizar ventilando con una puerta
o ventana abierta o usando un
ventilador o una campana de
venUlaci6n,
PRECAUCION: Hunca
forte _os rec_p_entes
para derrames con
paper de aUuntinio. El] papei
de a_unt_nio puede obstruis' e,
paso normaU del canor y
da_ar Ba estufa. Siempre
utimice oHas y woks de rondo
pnano y dleg misnto tama_o
dell eltemento que se eslt_
usando. ,-as u_ens_os no se
_elbeP+an e_ende_ m_s a_]_
de + "dell borne de+ e+emento
pava coc+naro
;LEA Y COMPREHDA
EST_ IIHFORMAC_ON AHORA!
Aseg_tese que todos en su hogar
sepan qu_ hace_ en caso de
_ncen_o. Nunca use agua sob_e ul
_ncendio de g_asa, esto so_antente
exttende_ _as Hamas.
IINCENDIlO DE GRASA EI_ _-A
CUB!IERTA=
Nunca gevante una oHa en Hamas.,
% Apague los elementos de la superfick
2. Sofoque la llama con una tapa
apretada, soda para cocinar o con un
extintor qutmico, a espuma o "halon".
FUEGO EN EL HORHO:
;No _a_e de move_ _a cace_o_a!
'Q. Cierre la puerta del homo y apague
los controls.
m Si el incendio continea,
cuidadosamente abra la puerta, arroj
soda para cocinar sobre el fuego, o
use un extintor de qui'mico seco,
espuma o "halon".
6
OPERACION
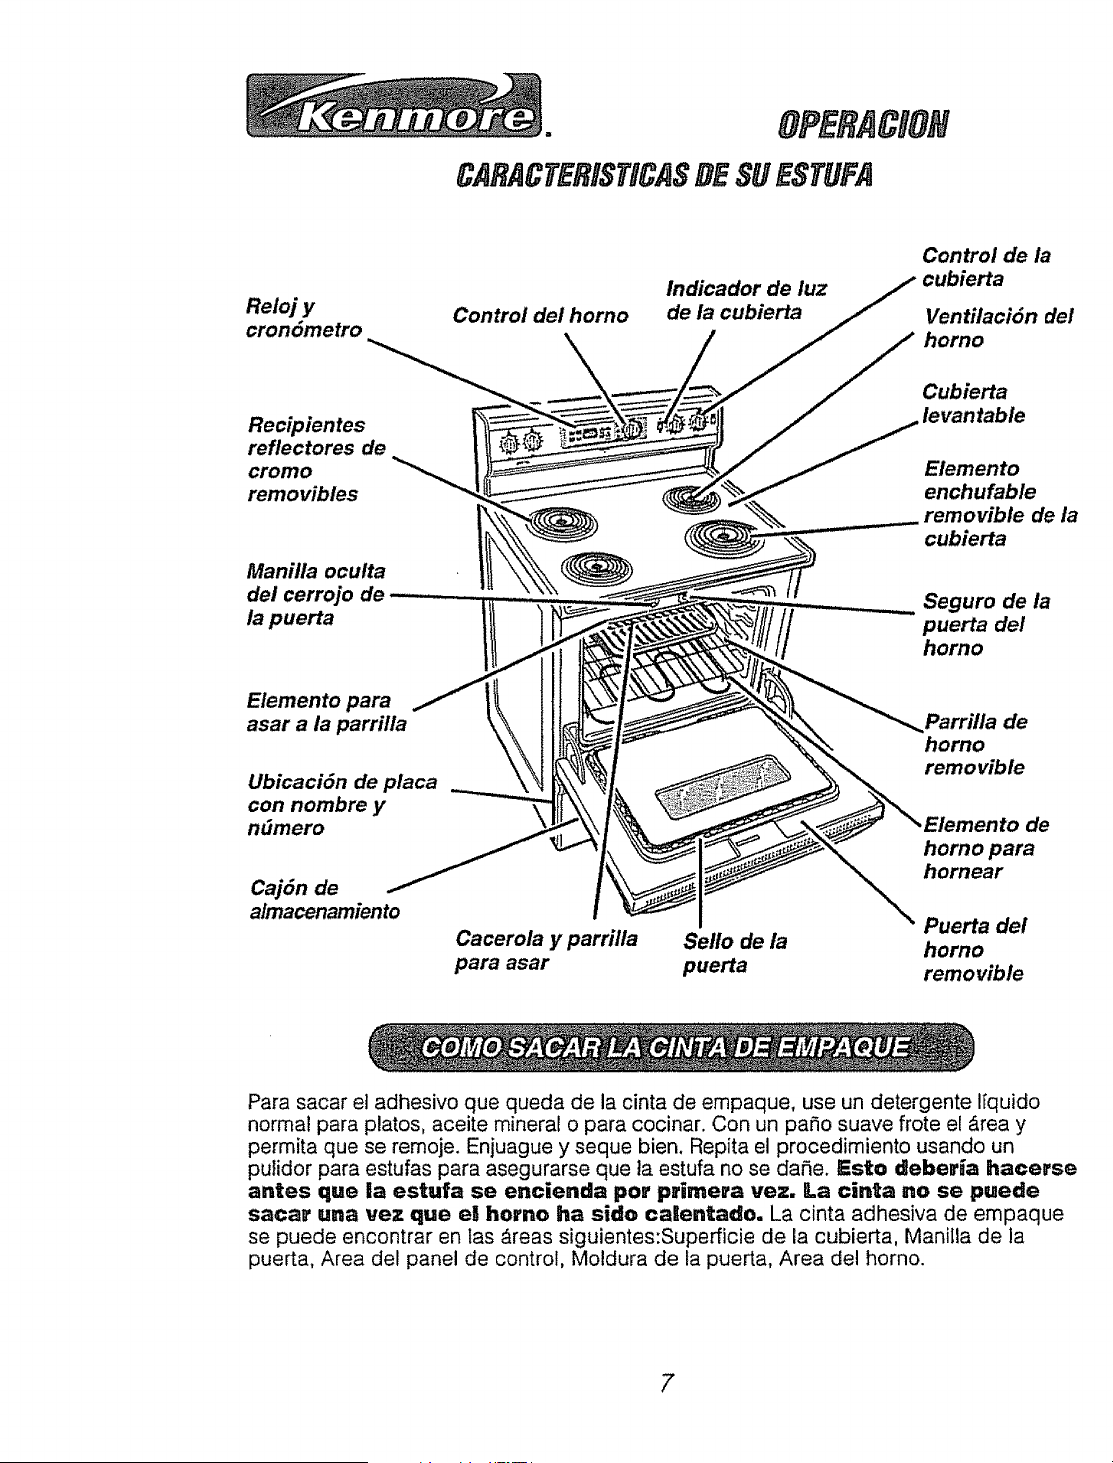
CAflACFERISFICASDESUESTUFA
Reloj y
cron6metro
Recipientes
reflectores de
cromo
removibles
Maniila oculta
del cerrojo de
la puerta
Control del homo
\
lndicador de luz
de la cubierta
Control de la
Ventilaci6n de/
homo
Cubierta
ievantable
Elemento
enchufable
removible de la
cubierta
Seguro de la
puerta del
homo
Elemento para
asar a la parrilla
Ubicaci6n de placa
con nombre y
ndmero
CajSn de
almacenamiento
Parrilla de
homo
removible
de
homo para
hornear
Puerta de!
Cacerola y parrilla Sello de la homo
para asar puerta removible
Para sacar ei adhesivo que queda de la cinta de empaque, use un detergente I[quido
normal para platos, aceite mineral o para cocinar. Con un paso suave frote el Area y
permita que se remoje. Enjuague y seque bien. Repita el procedimiento usando un
pulidor para estufas para asegurarse que la estufa no se dane. Esto dteber[a hacea'se
antes que la estufa se encienda pot primera vez. La cin_a no se puede
sacar una vez que el homo ha sido calentado. La cinta adhesiva de empaque
se puede encontrar en [as _reas siguientes:Superficie de la cubierta, Manitla de la
puerta, Area del panel de control, Moldura de la puerta, Area del horno.
7
OPERACION
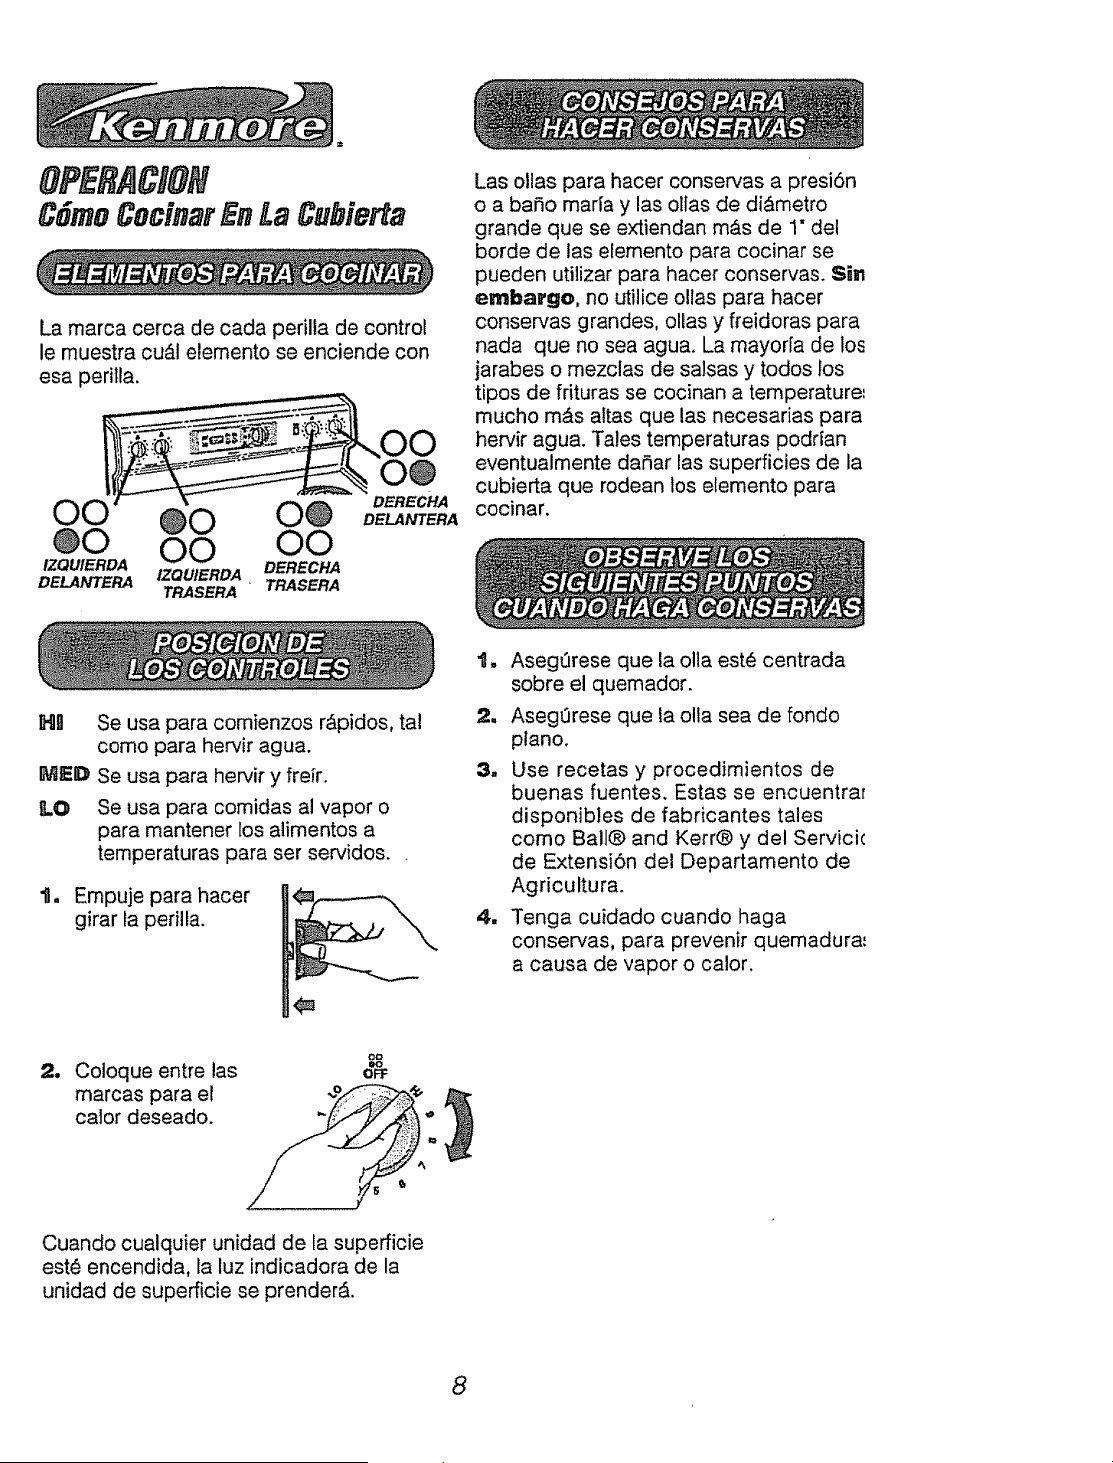
C6moCocinarEn La Cubierta
La marca cerca de cada perilla de control
le muestra cu_.l elemento se enciende con
esa perilla,
Las ollas para hacer conser'¢as a presi6n
o a bano maria y las ollas de di&metro
grande que se extiendan m&s de 1" del
borde de las elemento para cocinar se
pueden utiiizar para hacer conservas. Si.
embargo, no utilice ollas para hacer
conservas grandes, ollas y freidoras para
nada que no sea agua. La mayoria de los
jarabes o mezclas de salsas y todos los
tipos de frituras se cocinan a temperature_
mucho mAs altas que las necesarias para
hervir agua. Tales temperaturas podrian
eventualmente daNar las superficies de la
cubierta que rodean los elemento para
cocinar.
DELANTERA IZQUIERDA DERECHA
TRASERA _ TRASERA
HIi Se usa para comienzos r&pidos, ta!
como para hervir agua.
MED Se usa para hervir y frel'r.
LO Se usa para comidas al vapor o
para mantener los alimentos a
temperaturas para ser servidos..
t. Empuje para hacer
girar la perilla.
1. Asegt_rese que la olla est_ centrada
sobre el quemador.
2. AsegOrese que la olla sea de fondo
piano.
3. Use recetas y procedimientos de
buenas fuentes. Estas se encuentrar
disponibles de fabricantes tales
como Ball@ and Kerr@ y del Servici(
de Extensi6n del Departamento de
Agricultura.
4. Tenga cuidado cuando haga
conservas, para prevenir quemadura,'
a causa de vapor o calor,
oo
2. Coloque entre las "°oF
marcas para el
calor deseado.
Cuando cualquier unidad de la superficie
est_ encendida, la luz indicadora de la
unidad de superficie se prender&.
8

OP RACION
CGmoCodnarSobmLa
CubierfaRadiante
to
2_
La unidad de la superficie posterior
izquierda est_ equipada con un
interruptor para cocinar a FUEGO
LENTO.
Si usted necesita un calor
extremadamente bajo, empuje el
interruptor a la posici6n para FUEGO
LD=NT@ y haga girar la perit]a de control
a LO (BAJO}.
Contro! posterior
[zquierdo
_'-+.. "_" SIMMER
+o °o
OO oo
3. Cuando el FUEGO Ln:NTO es
activado, la fuz indicadora sobre el
interruptor se encender&
4. Cuando haya terminado de o
usar la funci6n de FUEGO mmmm
LENTO, empuje el
interruptor para FUEGO
LENTO a la funci6n para
cocinar normal y coloque oo
oo
8a perilla de contro0 en
la posici6n de apagado+ La luz
indicadora se apagar_.
Asegerese de empujar el interruptor para
fuego lento para deactivar la posicidn antes
de hervir agua o utilizar otra funciOn para
cocinar que requiera un calor alto, En e! lado
derecho det panel de control usted notar_ una
luz indicadora que dice UNIIDADES DE
SUPERFICIE (SURFACE UNITS), Este
indicador se encender_ cada vez que una pe-
rilla de la unidad de superficie este
encendida. Siempre revise esta luz indicadora
antes de dejar su estufa sin supervisi6n.
9
_ _',_'7", 'J_'_!:_
Luz indicadora de unidades de superficie
NOTA: La fuego lento se puede
utilizar para mantener tibios los
alimentos que ban sido coc+nados a
tempePa_uras alias, e-as comidas no
se deber_an mantene_ a es_as bajas
_emperatu_as pot m_s de dos bolas=
Este elemento de 6 espirales (comparado
con el posterior izquierdo de 5 espirales)
provee una capacidad para calentar
adicional. Se puede usar para todas las
necesidades de cocina pero es
especialmente beneficial para grandes
cantidades de comidas.
_OTA: S+ usted saca es_e
elemen_o para ++mp+ar el rec+p+en_e
para derrames, es esenc_al que ell
e_emen_o de 6 espirales sea
colocado nuevamen_e en _a
posic_n _on_al de_echa para
ob_ener un func_onam_en_o
m=_mo.
OFERACION
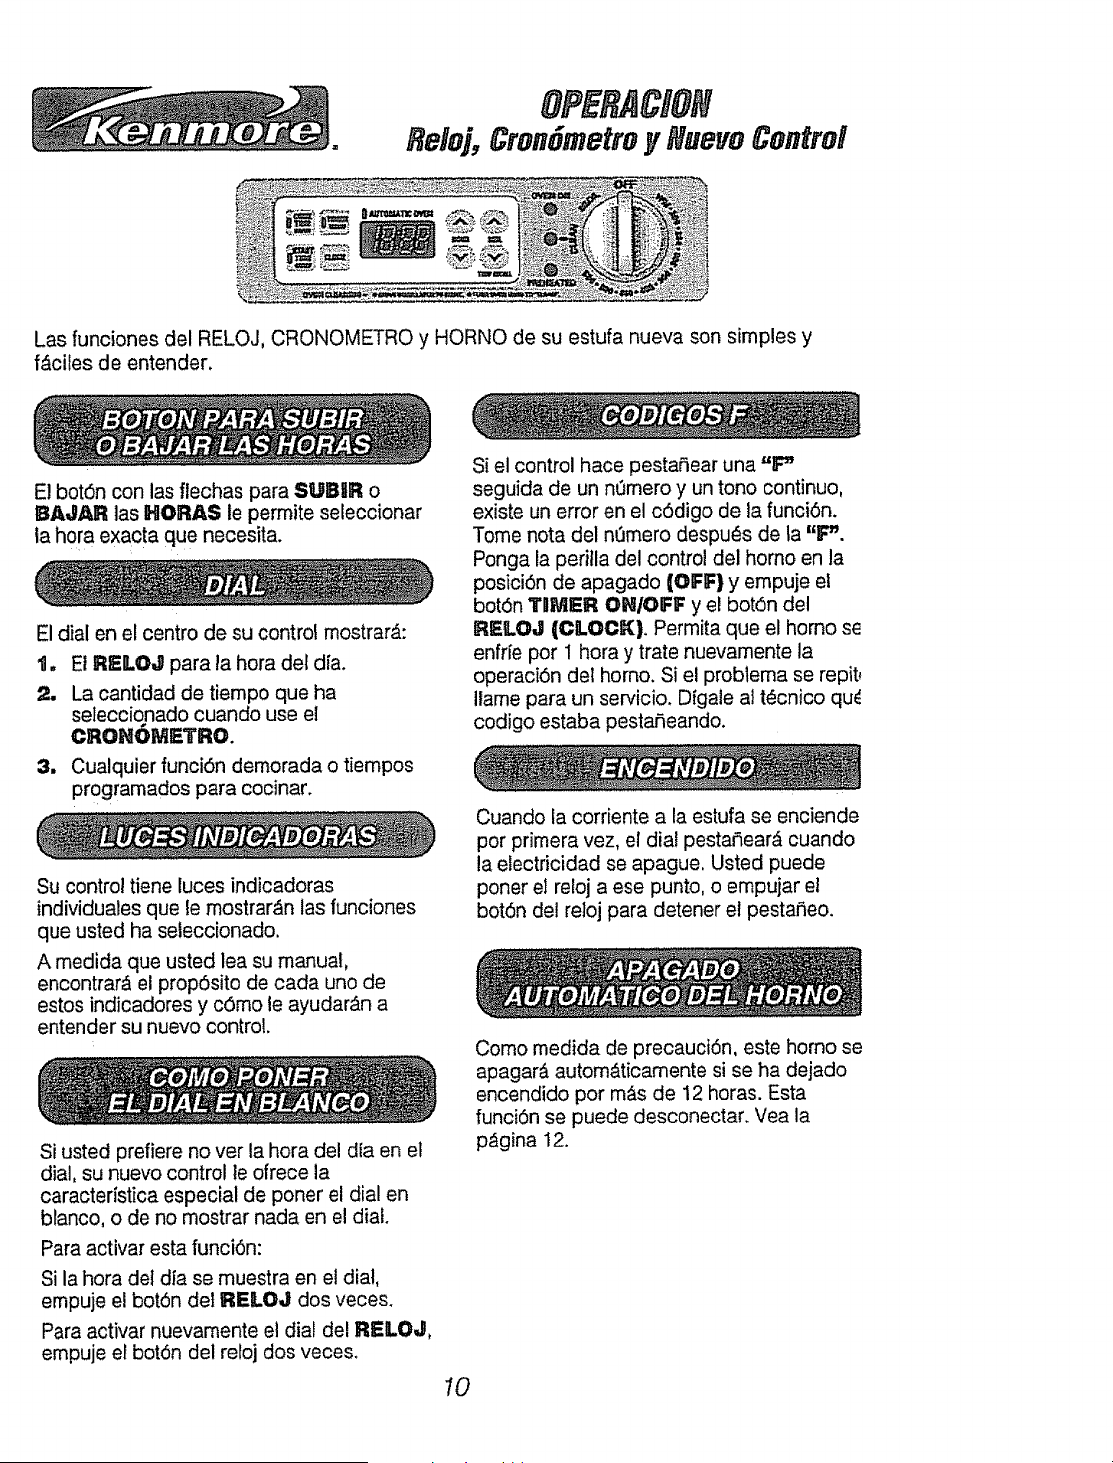
Reloj, Cron6rnetroYHuevoContro!
Las funciones del RELOJ, CRONOMETRO y HORNO de su estufa nueva son sirnples y
f_.ciles de entender.
El bot6n con las flechas para SUBIIR o
18AJ_ tas HORAS te perrnite seleccionar
ta hora exacta que necesita.
El dial en el centro de su control mostrarA:
t, El RELOJ pars la hora del d[a.
2, La cantidad de tiernpo que ha
seteccionado cuando use el
CRON(_IVP=TRO.
3. Cualquier funci6n dernorada o tiempos
programados para cocinar.
Su control tiene luces indicadoras
individuales que le rnostrar,'_n las funciones
que usted ha seleccionado.
A medida que usted lea su manual,
encontrar_ el prop6sito de cada uno de
estos indicadores y c6rno le ayudar_n a
entender su nuevo control.
Si usted prefiere no ver la hora del dta en el
dial, su nuevo control le ofrece la
caracteristica especial de poner el dial en
blanco, o de no mostrar nsds en el dial.
Para activar esta funci6n:
Si la hora det d_a se muestra en el dial,
empuje el bot6n del RELOJ dos veces.
Para activar nuevarnente el dia! del RELOJ,
empuje el bot6n del reloj dos veces.
Si el control hace pestafiear una "_
seguida de un n0mero y un tono continuo,
existe un error en el c6digo de la funci6n.
Tome nota del nt3rnero despues de la %".
Ponga la peritla del control del homo en la
posici6n de apagado (OFF} y ernpuje el
bot6n "filMER ON/OFF y el bot6n del
R_LOJ (CLOCK). Permita que el homo se
enfrie por I hora y trate nuevarnente Is
operaci6n del homo. Si el probtema se repit,
Itame para un servicio. Digale at tecnico qu_
codigo estaba pestarheando.
Cuando la corriente a la estufa se enciende
por primera vez, el dial pestaSear& cuando
la electricidad se apague. Usted puede
porter el reloj a ese punto, o ernpujar el
bot6n del reloj para detener el pestafieo.
Como medida de precauci6n, este homo se
apagar_, autom&ticarnente si se ha dejado
encendido por rn&s de 12 horas. Esta
funci6n se puede desconectar. Vea la
p&gina 12.
I0

OPERACIOH
Reloj y Cron6metro
El RELOJ y el CRONOME'IrRO se
PCrograman usando los botones. El
ROHOME"tRO no controlar_, ninguna
operaci6n del homo.
Despu_s de soltar e! bot6n con la flecha,
la luz indicadora del cron0metro y los dos
puntos pestaSear_.n tres veces y el
cron6metro empezar_, ia cuenta hacia
atr_s. La luz indicadora del crondmetro
permanecer_, encendida hasta que la
cuenta llegue a "0".
Cuando el cron6metro empiece la cuenta,
usted podria apretar el botdn del RELO,,II
para volver a la hora presente det dia.
AI final de la cuenta el control empezar& a
sonar y la [uz indicadora del cron0metro
empezar_, a pestafiear. Empuje el bot6n
'filMER OH/OIFF (BOTON DEL
CRONOMETRO).
G
@
1. Empuje el bot6n (CLOCK)
RELOJ para que el dial
pestaSear.
m
Empuje el bot6n con las
flechas para SUB_R o
B3A,,Jill las HORA o los
Minutos para poner fa hora
del dia. Los dos puntos
pestaSear&n mientras usted
est#, poniendo la hora.
El reloj empezar& a dar la hora dentro de
un minuto ousted puede empujar el bot6n
del RF..LOJ para un comienzo inmediato.
El CronSmetro es sSIo un cron6metro en
minutos y no controlar_ las operaciones
del homo. La cantidad de tiempo m&xima
que puede programar es 11 horas y 59
minutos.
@
Empuje el bot6n TIIMER OH/
OFF (CROHOMETRO),
Mostrar_, "0:00" y la luz
indicadora del cron6metro
empezar_, a pestanear.
Empuje los botones con las
flechas para SUBIR o
BAJAR los MINUTOS para
programar la cantidad de
tiempo deseada. Los dos
puntos pestaa_ear&n mientras
usted est_ programando el
tiempo.
11
Si usted ha seleccionado una cantidad de
tiempo, pero decide cambiarlo:
Si la cuenta se muestra en el dial, empuje
el bot6n de los MINUTOS o de la HORA
con ]as flechas hacia ARRliBA o hacia
ABAJO. Si la hora del dia o la
temperatura se ve en el dial, empuje el
botdn TOMER OHIOFF. luego, empuje el
bot6n con la flecha para SUB6R o
IlZA,J,A,R la HORA o los MDNu'ros.
Seleccione la cantidad de tiempo
deseada.
Si desea cancelar el CRONOMIE'rRO
("rlIMER), empuje el bot6n 'I'BMER O_/
OFF una vez. Si la cuenta no se muestra,
empuje el bot6n TOMER ONIOFF dos
veces.
OPERACION
ConsejosParaCocinarEnE!
Homo
Es normal sentir un poco de olor cuando
El precalentamiento es subir la temperatura
del homo a la temperatura que va a usar
cuando homee. Permita que el homo se
precaliente bien cuando las recetas
requieren precalentamiento.
use su homo por primera vez. Para ayudar
a eliminar este olor, ventile la
habitaci6n abriendo una ventana o
us_ndo una campana de
venUIlac_6n.
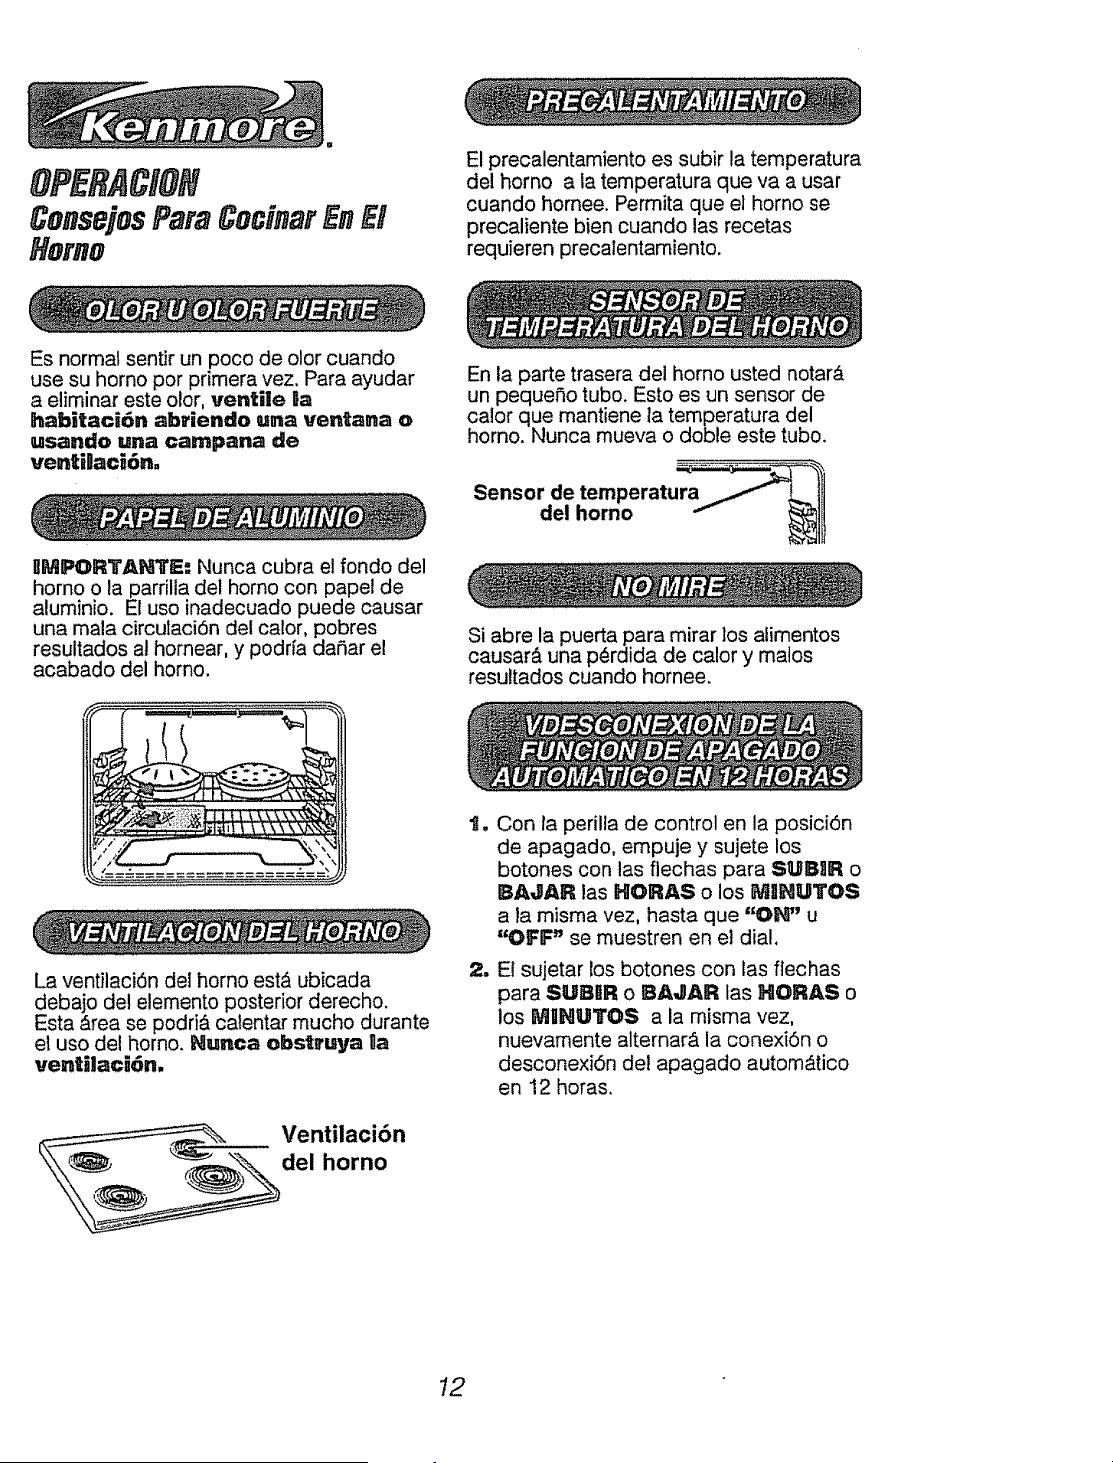
En la parte trasera del homo usted notarY.
un pequefio tubo. Esto es un sensor de
calor que mantiene la temperatura del
horno. Nunca mueva o doble este tubo.
IIMPORTANTE: Nunca cubra el fondo del
horno o la parrilla del homo con papel de
aluminio. El uso inadecuado puede causar
una mala circulaci6n del calor, pobres
resultados al homear, y podria daSar el
acabado del homo.
La ventilaci6n del homo est& ubicada
debajo del elemento posterior derecho.
Si abre la puerta para mirar los alimentos
causar_, una perdida de calory malos
resultados cuando hornee.
Esta Area se podri& calentar mucho durante
el uso del horno. Hunca obstruya Oa
ventilac_6n.
lw
m
Con la perilla de control en la posici6n
de apagado, empuje y sujete los
botones con las flechas para SUBIIR o
IBAJAR las HORAS o los MIHUTOS
a la misma vez, hasta que "OH" u
"OFF" se muestren en et dial.
E1sujetar los botones con las flechas
para SUBBR o BAJAR las HORAS o
los MIINUTOS a la misma vez,
nuevamente alternarA la conexi6n o
desconexi6n del apagado autom_tico
en 12 horas.
12
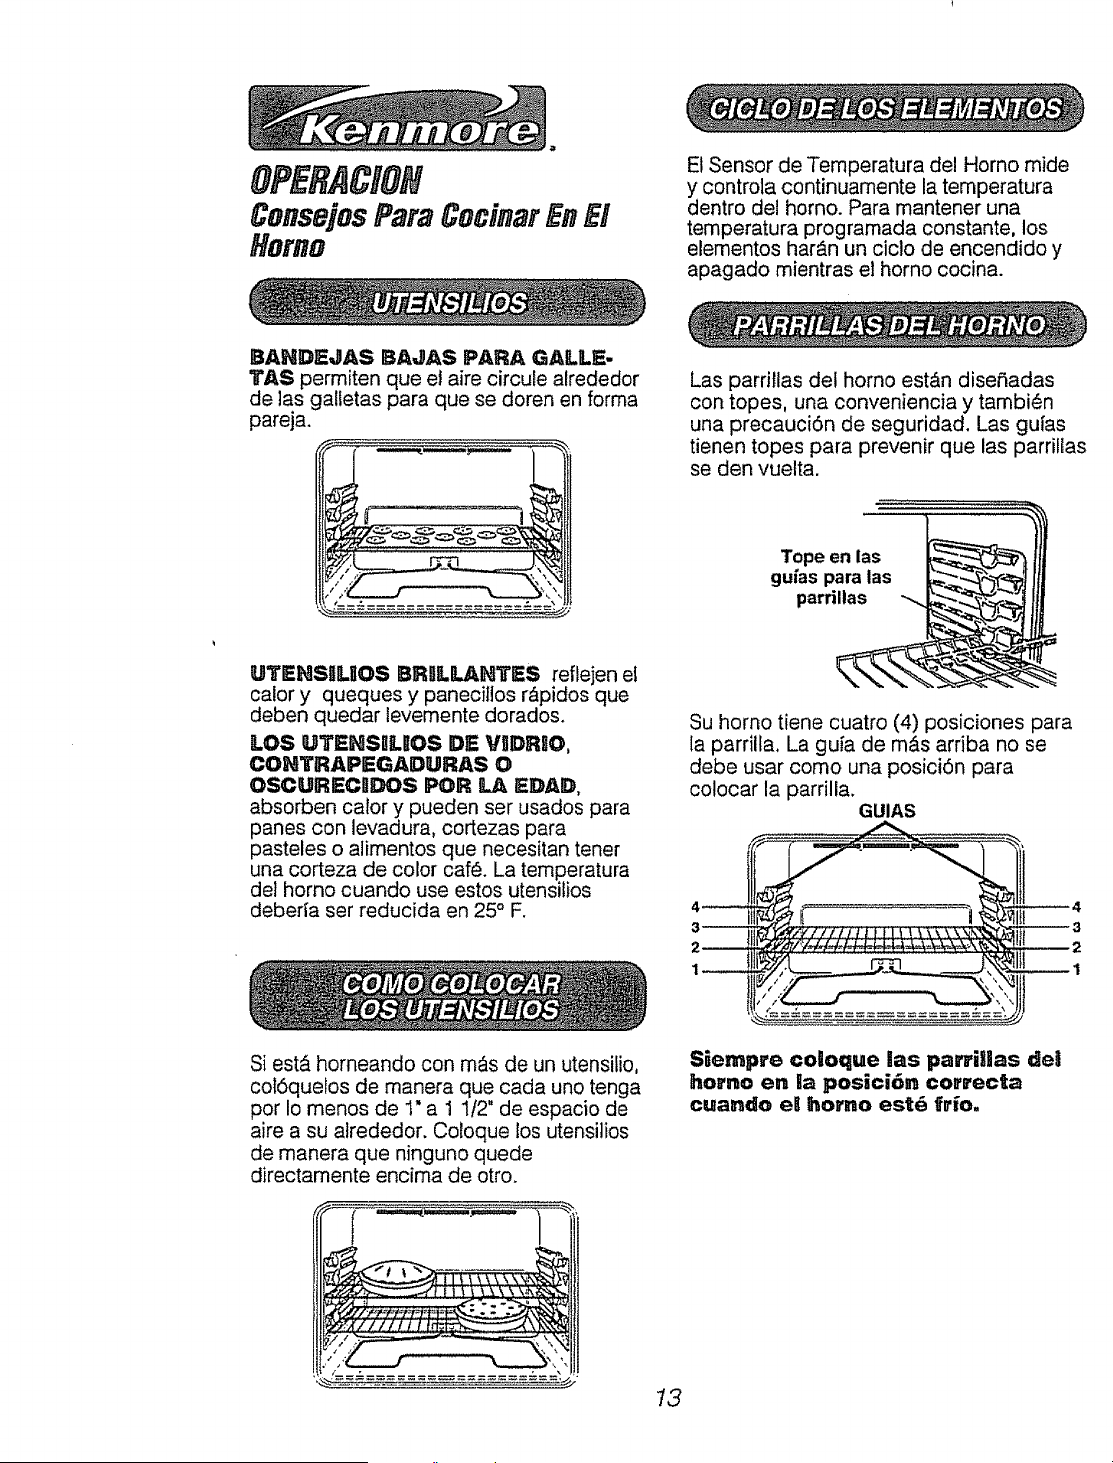
OPERACION
ConsejosParaCocinarEnEl
Homo
El Sensor de Temperatura del Homo mide
y controla continuamente la temperatura
dentro del horno. Para mantener una
temperatura programada constante, los
elementos har_.n un ciclo de encendido y
apagado mientras e] homo cocina.
BANDEJAS BAJAS PAR/), GALLE.
TAS permiten que et aire circule alrededor
de ]as galietas para que se doren en forma
parela.
ILIITEHSIIUOS BRBLL&HTES reflejen el
calor y queques y paneciilos r_pidos que
deben quedar levemente dorados.
LOS UTENSBLIOS DE VBDR90,
COHTRAPIEGADURAS O
OSCURECIIDOS POR LA EDAD,
absorben calory pueden ser usados para
panes con levadura, cortezas para
pasteles o alimentos que necesitan tener
una corteza de color car& La temperatura
del homo cuando use estos utensilios
deberia ser reducida en 25° F.
Las parrillas del homo est&n dise5adas
con topes, una conveniencia y tambi_n
una precauci6n de seguridad. Las guias
tienen topes para prevenir que las parrillas
se den vuelta.
Tope en las
guias para las
pard,as
Su homo tiene cuatro (4) posiciones para
la parrilla. La guia de m&s arriba no se
debe usar como una posici6n para
colocar la parrilla.
GUIAS
4_ _ ............. "_"_-----" ..... "........._'
3_
2_
_4
_3
_2
Si est_i horneando con m_s de un utensilio,
col6quelos de manera que cada uno tenga
por Io menos de 1" a 1 112"de espacio de
aire a su alrededor. Coloque los utensitios
de manera que ninguno quede
directamente encima de otro.
Siempre coloque las parriHas dei
homo en la posici6, correcta
cuando el homo est_ frio.
13
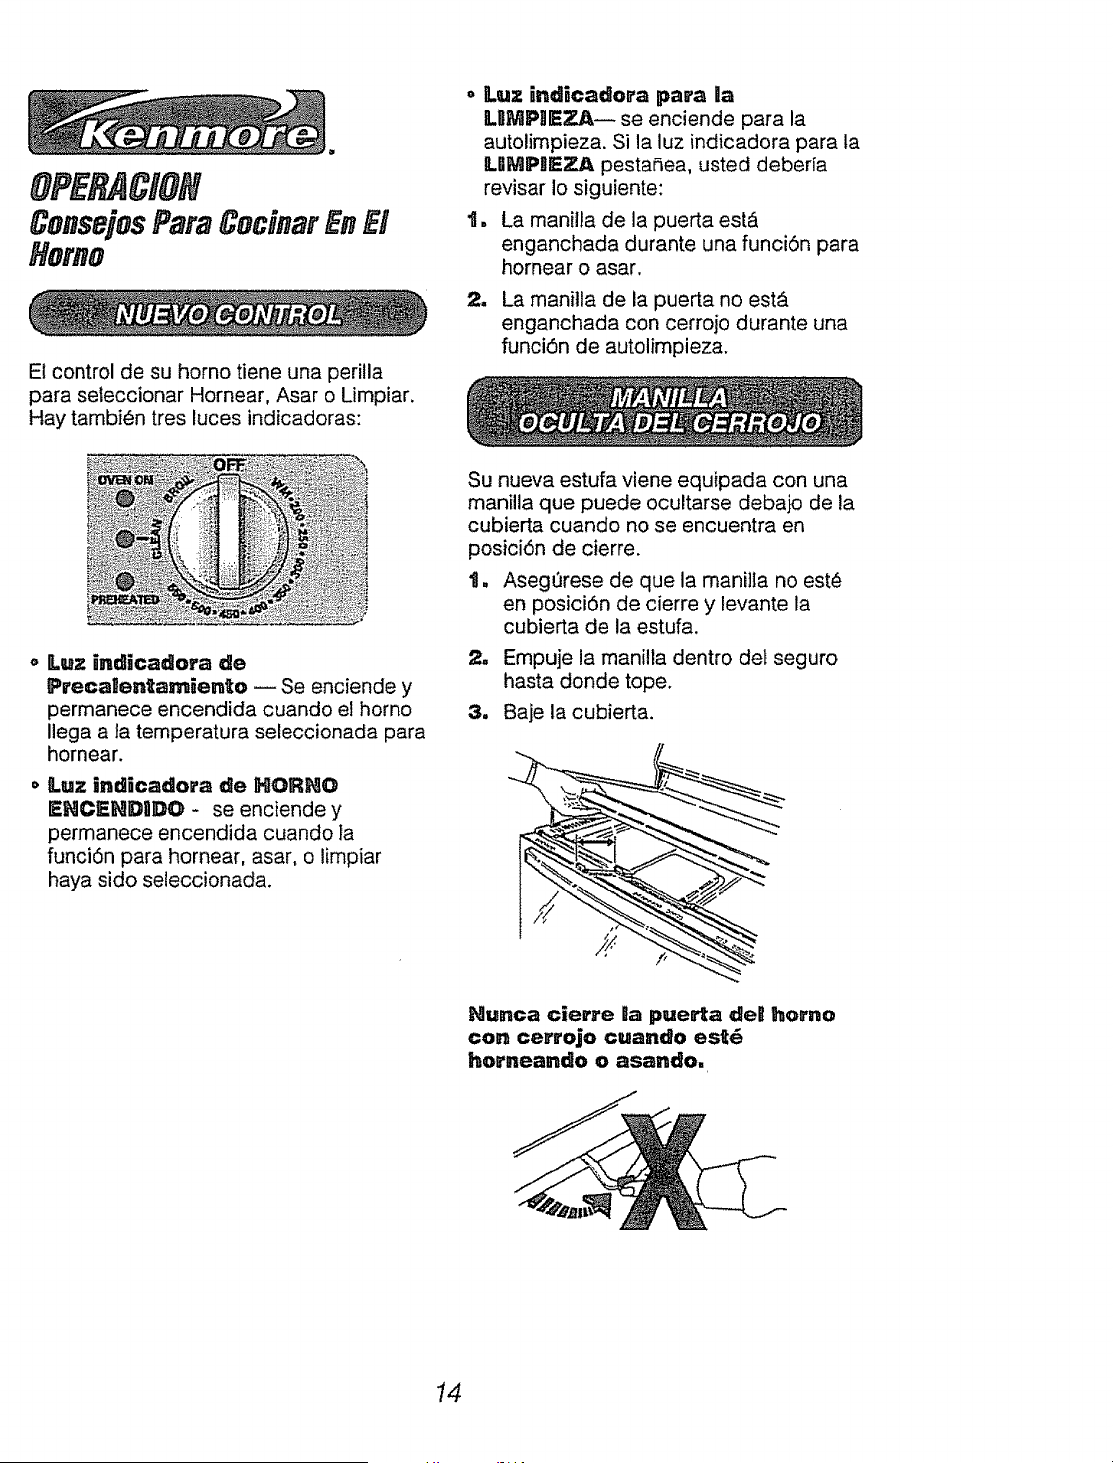
OP ACIOH
ConsejosParaCodnarEnE!
Homo
El control de su horno tiene una perilla
para seleccionar Hornear, Asar o Limpiar.
Hay tambi_n tres luces indicadoras:
o Luz Jnd[cadora para la
LRMPIIE_I-- se enciende para la
autolimpieza. Si la luz indicadora para la
LIIMPne=ZA pestaSea, usted debeda
revisar Io siguiente:
1. La manilla de la puerta est,,
enganchada durante una funciSn para
hornear o asar.
2. La manilla de la puerta no est&
enganchada con cerrojo durante una
funci6n de autolimpieza.
o Luz ind_cadora de
Precalentamiento _ Se enciende y
permanece encendida cuando el homo
Ilega a la temperatura seleccionada para
hornear.
o Luz ind[cadora de HORNO
EHCEHDnDO - se enciende y
permanece encendida cuando la
funci6n para hornear, asar, o limpiar
haya sido seleccionada.
Su nueva estufa viene equipada con una
manilla que puede ocultarse debajo de la
cubierta cuando no se encuentra en
posici6n de cierre.
t. Asegerese de que la manil]a no est_
en posici6n de cierre y levante la
cubierta de la estufa.
2. Empuje la manitla dentro del seguro
hasta donde tope.
8. Baje la cubierta.
Nunca cierre Ba puee_a de! homo
con cerrojo cuando est6
horneando o asando.
14
OFERACION
ConsejosparaCodnarEn El
Homo
1, De vuelta la peritla OVEH COHTROL a
la temperatura deseada de tibio WM
hasta 550 ° F. A medida que la perilla
gira, e! dial del control mostrar_ los
cambios de temperatura. Cuando el dial
muestre la temperatura que usted
seleccion6, suelte la perilla del control.
La temperatura perrnanecer_ en el dial
pot 5 segundos y luego volver& a la hora
del dia. Para vet nuevamente el dial de la
temperatura, empuje el bot6n con la
flecha hacia abajo.
2. La luz indicadora HORNO
EHCEND,DO (OVEN ON) se
encender&
3, Cuando el homo haya alcanzado la
temperatura seleccionada las luces
"PREHEATED" y "OVEN OH" se
encender&n. Ponga la comida en el
homo.
m Las luces indicadoras de "PRE-
HEATED" y "OVEN ON"
perrnanecer_n encendidas hasta que el
horneado haya terminado y la perilla de
control se haya puesto en la posici6n de
apagado (OFF).
1, Asegerese que el reloj est6 mostrando la
hora correcta det dia.
2. Empuje el bot6n COOK TilME OH/OFF.
3, Empuje los botches con las flechas para
SUBIIR o BAaAR las HORAS y/o los
MI_NUTOS para programar la cantidad
de tiempo para cocinar.
4, Haga girar la PERIL&,A DE COHTRO&'
DE&, HORHO para seleocionar la
temperatura que desea usar. Cuando la
temperatura dentro del homo Ilegue a la
temperatura que usted ha seleccionado
la luz de precalentamiento se encender&
I5
#
Cuando se termine de hornear, et control
sonar_ y la luz indicadora de Homo
Autom&tico pestariear&n hasta que la pe-
rilla de control det homo se coloque en la
posici6n de APAGADO (OFF}.
1, Asegt3rese que el reloj est_ mostrando la
hora correcta del dia.
2, Empuje el bot6n COOK TIIME OHIOFF.
3, Empuje los botones con las flechas para
SUISIR o IBAaAR las HORAS y/o los
MIIHUTOS para programar la cantidad
de tiempo para cocinar,
4, Empuje el bot6n START TIME OH/OFF.
5. Empuje los botones con ias flechas para
SUBIIR o BA,JAR tas HORAS y/o los
MBHUTOS para programar la hora en
que desea que el homo se encienda.
6, Haga girar la PERBUJ_. DE CONTROL,
DE&' HORNO para seleccionar la
temperatura que desea usar. La luz
indicadora de homo encendido
pestaCtear_ cuando los tiempos sean
programados en AUTOMATnC OVEN
(HORNO tIUTOMATWCO), pero una
temperatura no es seleccionada.
7, Las lutes indicadoras de START TgME
(HORA DE COMIIENZO) y AUTO-
MATIC OVEN se encender_n.
8, Cuando se ilegue a la hora de comienzo,
et homo se encender& automAticamente y
empezar_, a cocinar.
9, Cuando la temperatura dentro del homo
Ilegue a la temperatura que usted ha
seleccionado la luz de precalentamiento
se encender&
IO,Cuando se termine de hornear, el control
sonar& y la luz indicadora de Homo
Autom_tico pesta_Sear_,hasta que la pe-
rilla de control del homo se cotoque en la
posici_n de APAGADO {OFF).
NolrA: Despu_s de empujar los botones
Cook Time o Start Time, si usted vacila antes
de empujar los botones Hour/Minute, el dial
pesta,fiear_ 3 veces y volver_ a la hora del
dia. Si esto sucede, simplemente empuje el
bot6n Time que estaba programando
nuevamente para continuar. COOK TIME,
CLOCK, TIMER, o START TIME se pueden
ver si empuje et bot6n deseado una vez.
Empuje los botones con las flechas para
SUBIR o BAJAR si desea cambiar una
cantidad de tiempo.
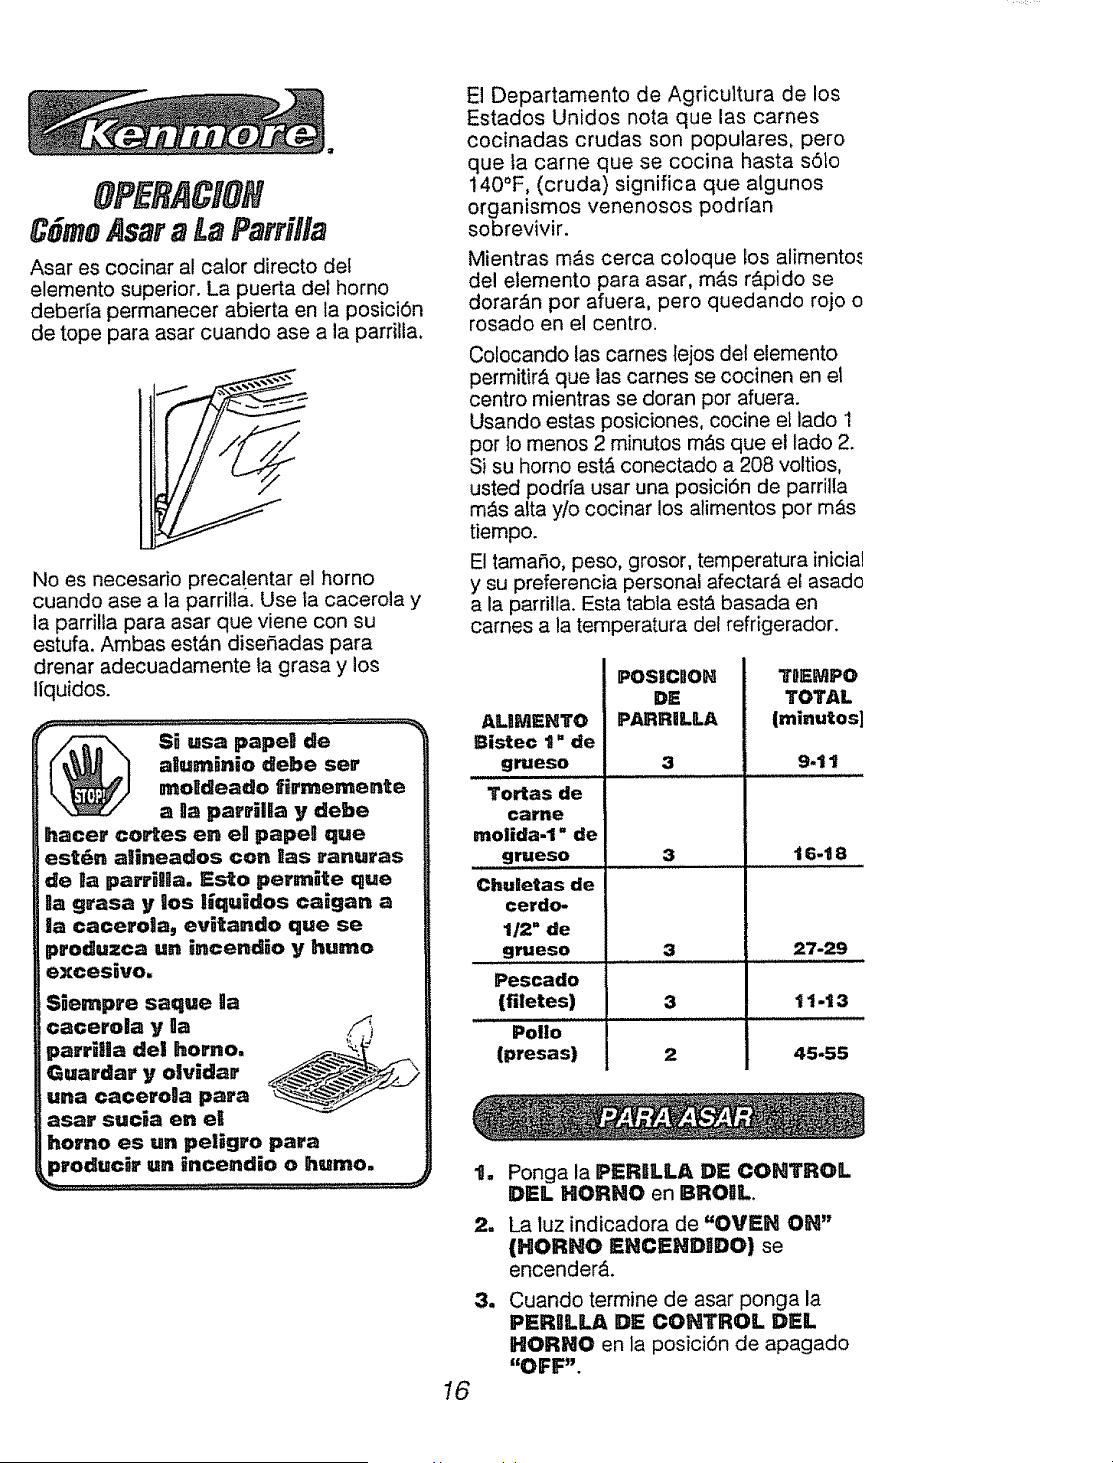
OPEflACIOH
C6moAsar a La Parrilla
Asar es cocinar al calor directo det
elemento superior. La puerta del homo
deber[a permanecer abierta en la posici6n
de tope para asar cuando ase a la parrilla.
No es necesario preca!entar el horno
cuando ase a la parrilla. Use la cacerola y
la parrilta para asar que viene con su
estufa. Ambas est&n dise_adas para
drenar adecuadamente la grasa y los
liquidos.
S_ usa papeH de
alum[nio debe set
_oldeado firmemente
a 0a parrilla y debe
hacer cortes en eg papeg que
est_n a]ineados con las ranuras
de la pan, iltia. Esto permSte que
la grasa y los liquidos caigan a
ia cacerola, ev6tando que se
produzca un incend[o y humo
excesUvo.
Siempre saque ia
cacerola y ga
parrilla de! homo.
Guardar y oNvi_ar
una caceroga para
asar sucia en el
homo es un peligro para
producir un incendio o humo.
El Departamento de Agricultura de los
Estados Unidos nota que las carnes
cocinadas crudas son populates, pero
que la came que se cocina hasta s6to
140°F, (cruda) significa que algunos
organismos venenosos poddan
sobrevivir.
Mientras mAs cerca coloque los alimento.,
del elemento para asar, m_.s r__pido se
dorar_n por afuera, pero quedando rojo o
rosado en el centro.
Colocando las carnes lejos del elemento
permitirA que las carnes se cocinen en el
centro mientras se doran pot afuera.
Usando estas posiciones, cocine el lado 1
por Io menos 2 minutos mAsque el lado 2.
Si su homo est& conectado a 208 voltios,
usted podr[a usar una posiciSn de parrilla
m_.s alta y/o cocinar los alimentos pot mAs
tiempo.
El tamano, peso, grosor, temperatura inicia!
y su preferencia personal afectar& el asado
a la parrilla. Esta tabla estA basada en
cames a la temperatura del refrigerador.
AUMENTO
Bistec t" de
grueso
Tortas de
came
molidla-I" de
grueso
Chuletas de
cerdo-
112" de
gmeso
Pescado
(filetes)
Polio
(presas)
POSICBON
DE
PARRILLA
3
3
TOEMPO
TOTAL
(minutosl
9-11
t6-18
3 27-29
3 11-t3
2 45-55
2.
16
a
Ponga la PERBLLA DE COKTROL
DEL HORNO en BROIL
La luz indicadora de "OVEH OH"
(HORNO ENCENDIDO) se
encender&
Cuando termine de asar ponga la
PERIILLA DE CONTROL DElL
HORNO en ]a posici6n de apagado
"OFF"
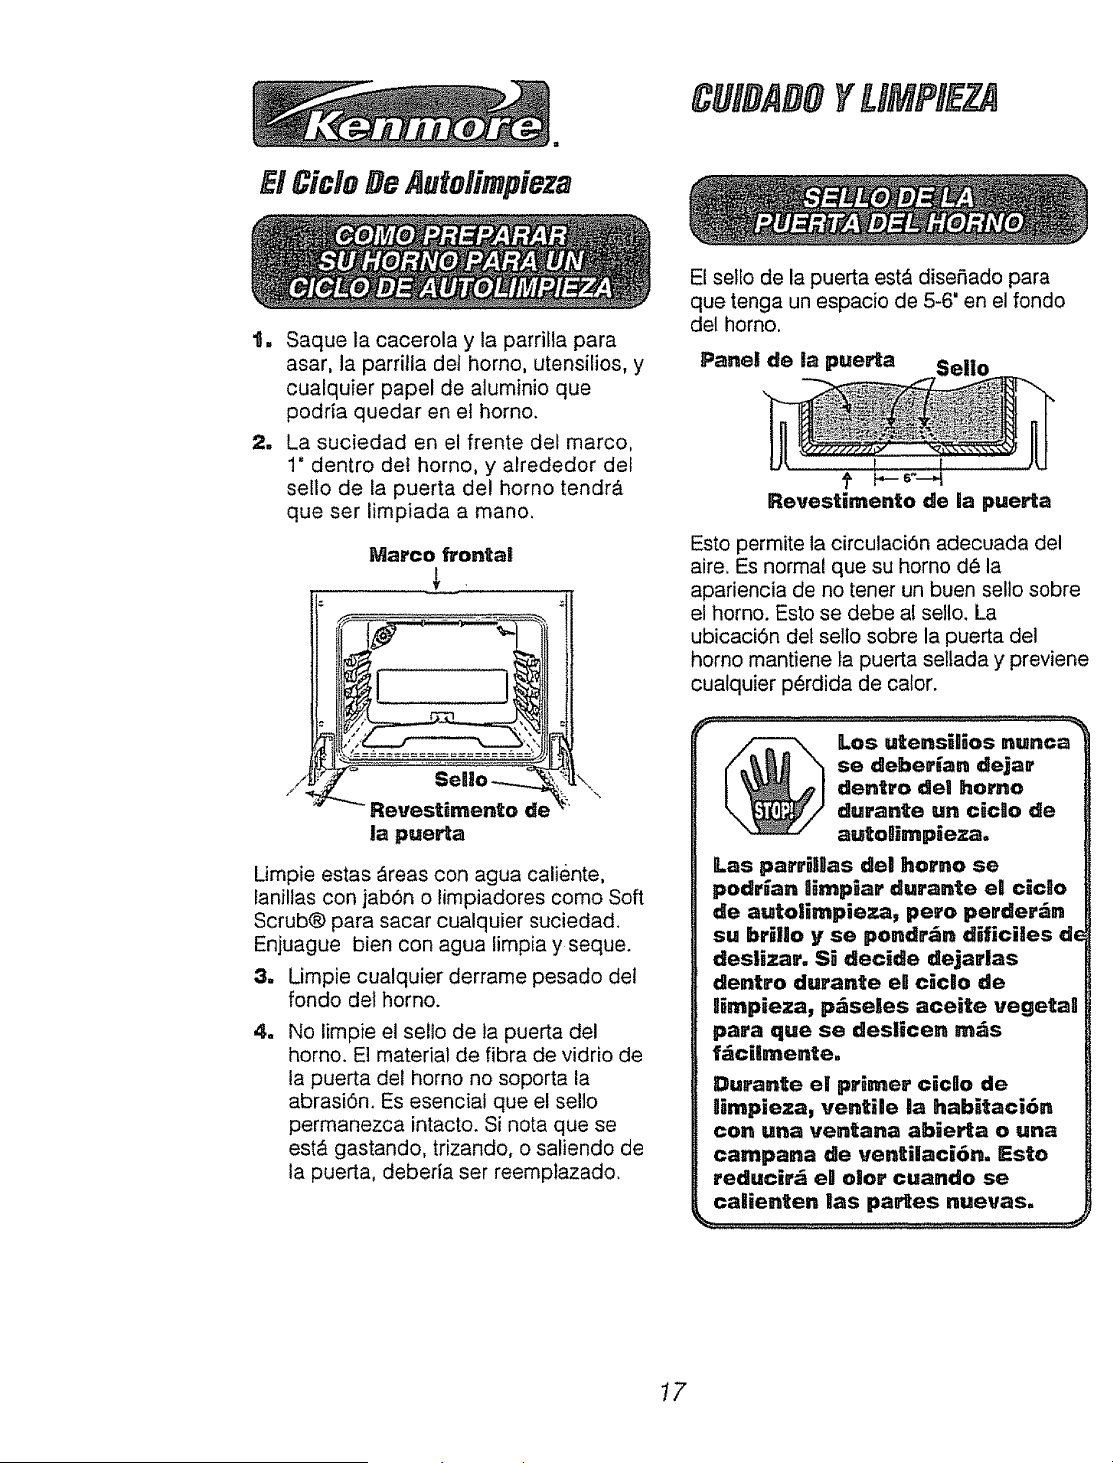
CUIDADOYUMPIE
E! CicloDe Autolirnpieza
t, Saque la cacerola y la parrilla para
asar, la parrilla def homo, utensilios, y
cualquier papel de aluminio que
podria quedar en el horno.
2, La suciedad en el frente del marco,
1" dentro det homo, y alrededor del
sello de la puerta del homo tendr_.
que ser limpiada a mano.
Marco fronta!
-
-_ Revest[mento de
la puerta
L\
Umpie estas _reas con agua caliente,
laniltas con jab6n o limpiadores como Soft
Scrub® para sacar cualquier suciedad.
Enjuague bien con agua limpia y seque.
3, Limpie cualquier derrame pesado del
rondo del horno.
4_
No limpie el selio de la puerta del
horno. El material de fibra de vidrio de
la puerta del homo no soporta la
abrasi6n. Es esencial que el sel]o
permanezca intacto. Si nota que se
est& gastando, trizando, o saliendo de
la puerta, deberia ser reemplazado.
El seflo de la puerta est& dise5ado para
que tenga un espacio de 5-6" en el rondo
del homo.
Panel de la puerta Sello
Esto permite la circulaci6n adecuada del
aire. Es normal que su homo d6 la
apariencia de no tenet un buen selto sobre
el homo. Esto se debe al sello. La
ubicaciSn del sello sobre la puerta del
homo mantiene ta puerta sellada y previene
cualquier p_rdida de calor.
t7
CUIBADOYLIMPIE7
El CicleDe Aulofimpieza
t, Para mejor resultado, siga los pasos
para PREPARAR SU HORN{).
2. Si la maniI[a no se re, levante la cubierta
superior y tire la manilla Io m_s afuera
posible.
3, Corra la manilla hacia la derecha. No
fuerce la manilla. Si no corre f&cilmente,
usted no la ha tirado lo m#,s atuera
posible desde ta cubierta. Repita el paso
2.
11
D_ vuelta la perilla de control a
"CLEAN" (U_PIIEZA). Las luces
indicadoras del CERRO,JO DE LA
PUERTA (LOCK DOOR) y de
HORHO EHCEHDIIDO (OVEN OH)
se encender_,n.
5, La manilla se enganchar& cuando se
llegue afas altas temperaturas dentro
del hormo.
6, El ciclo de limpieza dura 4 horas y 20
minutos, esto incluye un periodo de
enfriamiento. Usted puede cambiar esta
cantidad de tiempo para la limpieza
desde 3 horas hasta 5 horas y 59
minutos empujando los botones con las
flechas para SUBIR o BA,IAR la
HORA y/o los MIINUTOS, mientras los
dos puntos est_.n pestafieando..
Cuando el ciclo de limpieza hay aempezado,
usted puede empujar el bot6n CLOCK para
que et dial muestre la hora del dia. Si empuja
el bot6n COOKTIME usted puede ver el
tiempo de limpieza que queda.
7, Cuando et ciclo de timpieza es
completado, las luces indicadoras de
"OVEN Oil" (HORNO ENCENDIDO)
y "CLEAN" (LIIMPIEZA) pesta_ear&n
hasta que la perilla de control se
coloque en posici6n de apagado.
8, Cuando la temperautra se haya enfriado,
la manilla se deslizar_ f_.cilmente hacia
ta izquierda.
18
t. Para mejor resultado, siga los pasos
para PREPARAR SU HORHO.
2, Si su manija no se ve, levante la cubiert_
superior y tire la manilia Io m_s afuera
posible.
3, Corra la mani!la hacia la derecha. No
fuerce la manitla. Si no corre f&cilmente,
usted no la ha tirado Io m_s afuera
posible desde la cubierta. Repita el pas
2.
4, D6 vuelta la perilla de control a
"CLEAN" (LIMPIEZA). Las luces
indicadoras del "CLEAN" (LIIMPIEZ_
y de HORNO ENCENDIIDO (OVEN
ON) se encender_n.
5, Para demorar et comienzo de un ciclo d
limpieza, empuje el bot6n START
TaME ON/OFF.
6, Empuje et bot6n con la flecha para
SUBIIR o BAJAR la HORA o los
I_]Ii_U'I'OS para programar ]a hora de!
dia en que desea que el homo ernpiece
a limpiarse autom_ticamente. La luz
indicadora "OVEN OH" (HORNO
ENDCENDIDO) estar_, apagada hast;
que se llegue a la hora de comienzo.
7, Cuando el ciclo termine, ias luces
indicadoras de "OVEN ON" y
"CLEAN" pestaP,ear,_n. Coloque la pe-
rilla de control del homo en la posici6n
de apagado y desenganche la puerta.
D_ vuelta la perilta de control del horno a la
posici6n de apagado (OFF). Tendr_ que
esperar a que ta temperatura de[ homo bajc
a menos de la temperatura de cierre (aprox
1 hora) antes de tratar la puerta. Las luces
indicadoras no pestafiar_n se el ciclo de
limpieza es interrumpido.
Si quedan manchas blancas, limpielas con
un patio o esponja rnojada, o fri_guelas co_
una ianilla de acero con jab6n y enjuague
bien.
CUIDADOYLIMPIE
Limpieza
]P_ATERIALES DE LOMPnEZA
o Detergente I[quido para platos
o Agua tibia
o PaSo suave
No use limpadores ab_asSvos,
gimpaadores industriaaes, o
bUanquedores (cloro|°
MATERBALES DE LgMP_EZA
o Detergente para platos
• Agua tibia
o Toalia de papel seca
• PaRo seco
° Limpiadores abrasivos
o Lanillas para fregar
COMO L0_PgAR
Limpie despues de cada derrame. Si
alimentos ,_cidos (tales como nellenos de
fruta, leche, tomates, chucrut o salsas con
vinagre o jugo de lim6n) se derraman
sobre, use una toatla de papel seca para
limpiarlos to mejor posible. Cuando la
superficie se enfrie, lave y enjuague bien,
MATERUALES DE LgMPgEZA
o Detergente iiquido para platos
o Agua tibia
° Lanilias de acero con jab6n
o Limpiador comerciat para hornos
COMO LOMPBAR
Permita que la cacerola se remoje. Ponga
detergente para platos sobre la parrilla
Y
cubra con un paso o una toalia h0meda
por un taro. Ffiegue a medida que sea
necesafio, Lave, enjuague, y seque bien.
Usted tambi_n podfia poner la cacerota y
ta parrilla en la ]avadora de platos.
MATERIALES DE UMPREZA
o Detergente para piatos
o Agua tibia
o Toalla de papel
COMO LOMPOAR
No use lirnpiadores para hornos, polvos
para limpiar, o abrasivos fuertes. Si salsas
para sasonar, salsa de tomates,
materiales para batidos, etc., se
derraman, limpielos Io m_s posible.
Cuando las superficies se enfr[en limpie
bien las superficies pintadas.
Limpie solamente para retocarlas entre
ciclos de limpieza. Use detergentes
liquidos para platos, agua tibia, o lanillas
de acero con jab6n. Enjuague bien
despu#s de limpiar y seque.
NUNCA USE LBMPOADORES PARA
HORNOS DENTRO O ALREDEDOR
DE CUALQUIER PARTE DEL
HORNO,
Cuando limpie, asegQrese de no doblar o
mover el sensor de la temperatura
ubicado en la pared trasera del horno.
PARA UMPBAR
Para limpieza diaria, use un timpiador para
vidrios y yna toalfa de papel. Para
suciedad pesada, use una pasta de soda
para hornear y agua. Enjuague bien.
19
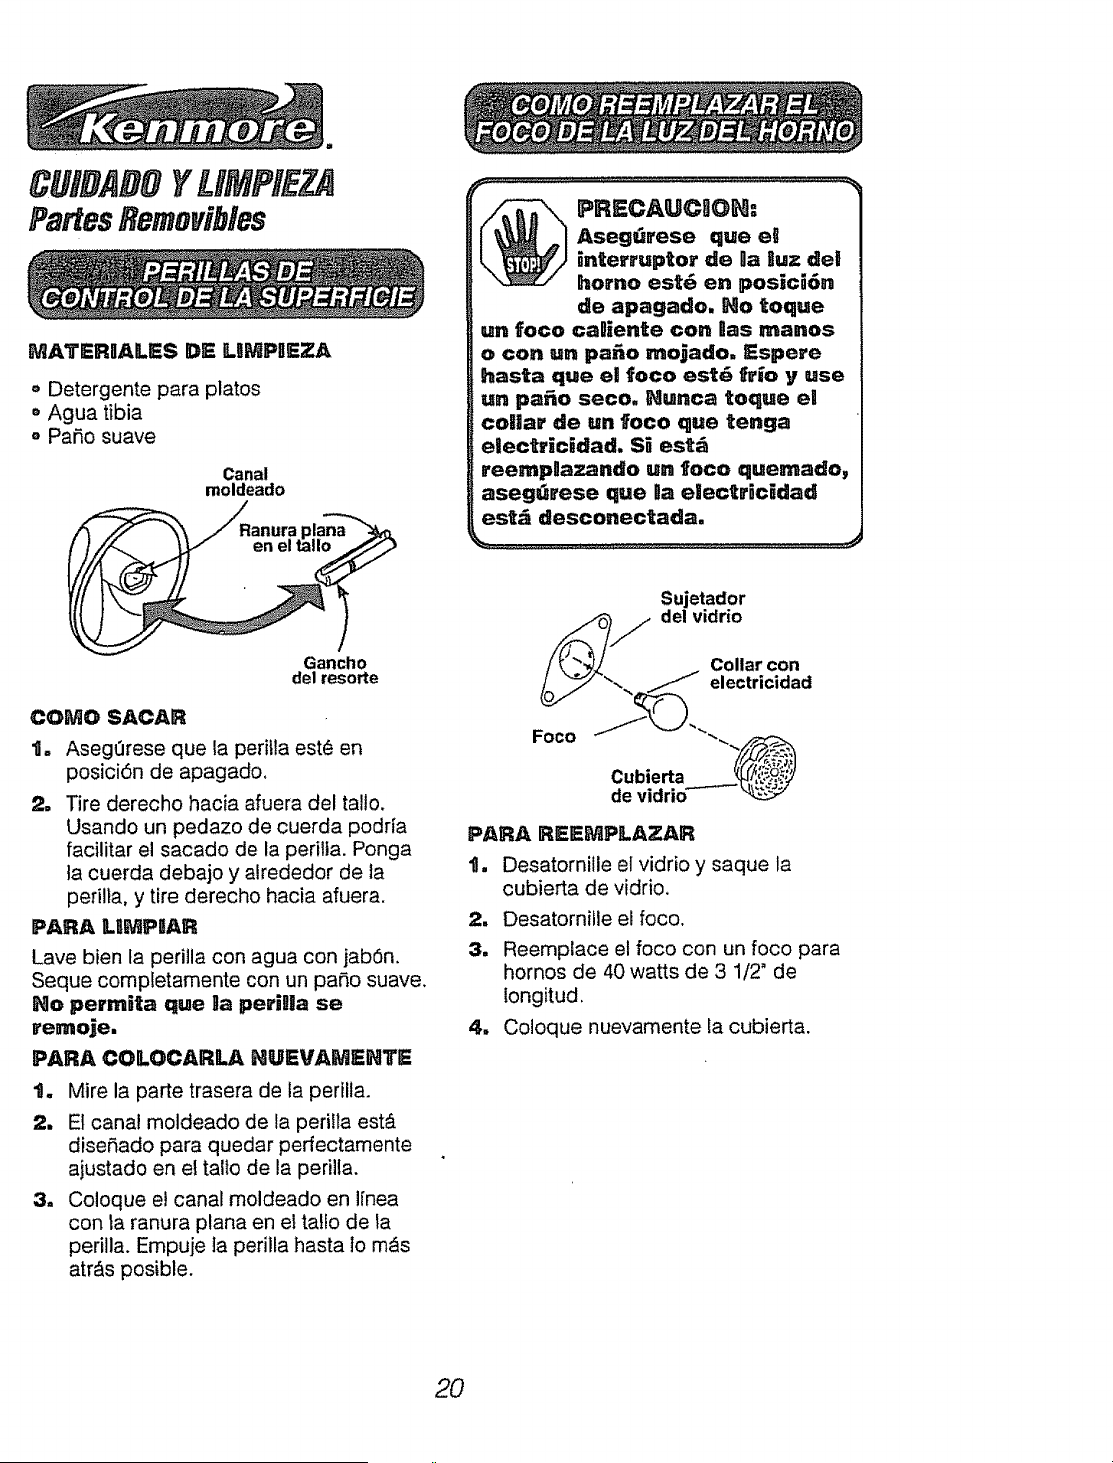
CUIDADOYUMPIET
PartesRemovibles
MATERIIALES DE UMPIIEZA
o Detergente para platos
o Agua tibia
o Palio suave
Canal
moldeado
Gancho
del resorte
COMO SACAR
t, Asegerese que la perilla est¢ en
posici6n de apagado,
2, Tire derecho hacia afuera del tallo.
Usando un pedazo de cuerda podrfa
facilitar el sacado de la peri!ta. Ponga
la cuerda debajo y alrededor de Ia
perilia, y tire derecho hacia afuera.
PARA LUMPRAR
Lave bien la peri]la con agua con jab6n.
Seque completamente con un paso suave,
No permita que _a periHa se
remoje.
PARA COLOCARLA NUEVAMEHTE
t, Mire la parte trasera de la perilla.
2, E] cana! moldeado de la peri!la estA
diseSado para quedar perfectamente
ajustado en el talto de la perilla.
3, Coloque et canal moldeado en l[nea
con la ranura plana en el ta!lo de la
perilla. Empuje ia perilla hasta Io m_s
atrAs posible.
Sujetador
del vidrio
Collar con
electricidad
Foco
Cubierta
de
PAR,& REEMPLAZAR
1, Desatornille el vidrio y saque la
cubierta de vidrio.
2, Desatornille el foco.
3, Reemplace el foco con un foco para
hornos de 40 watts de 3 1/2" de
longitud,
4, Coloque nuevamente la cubierta.
20
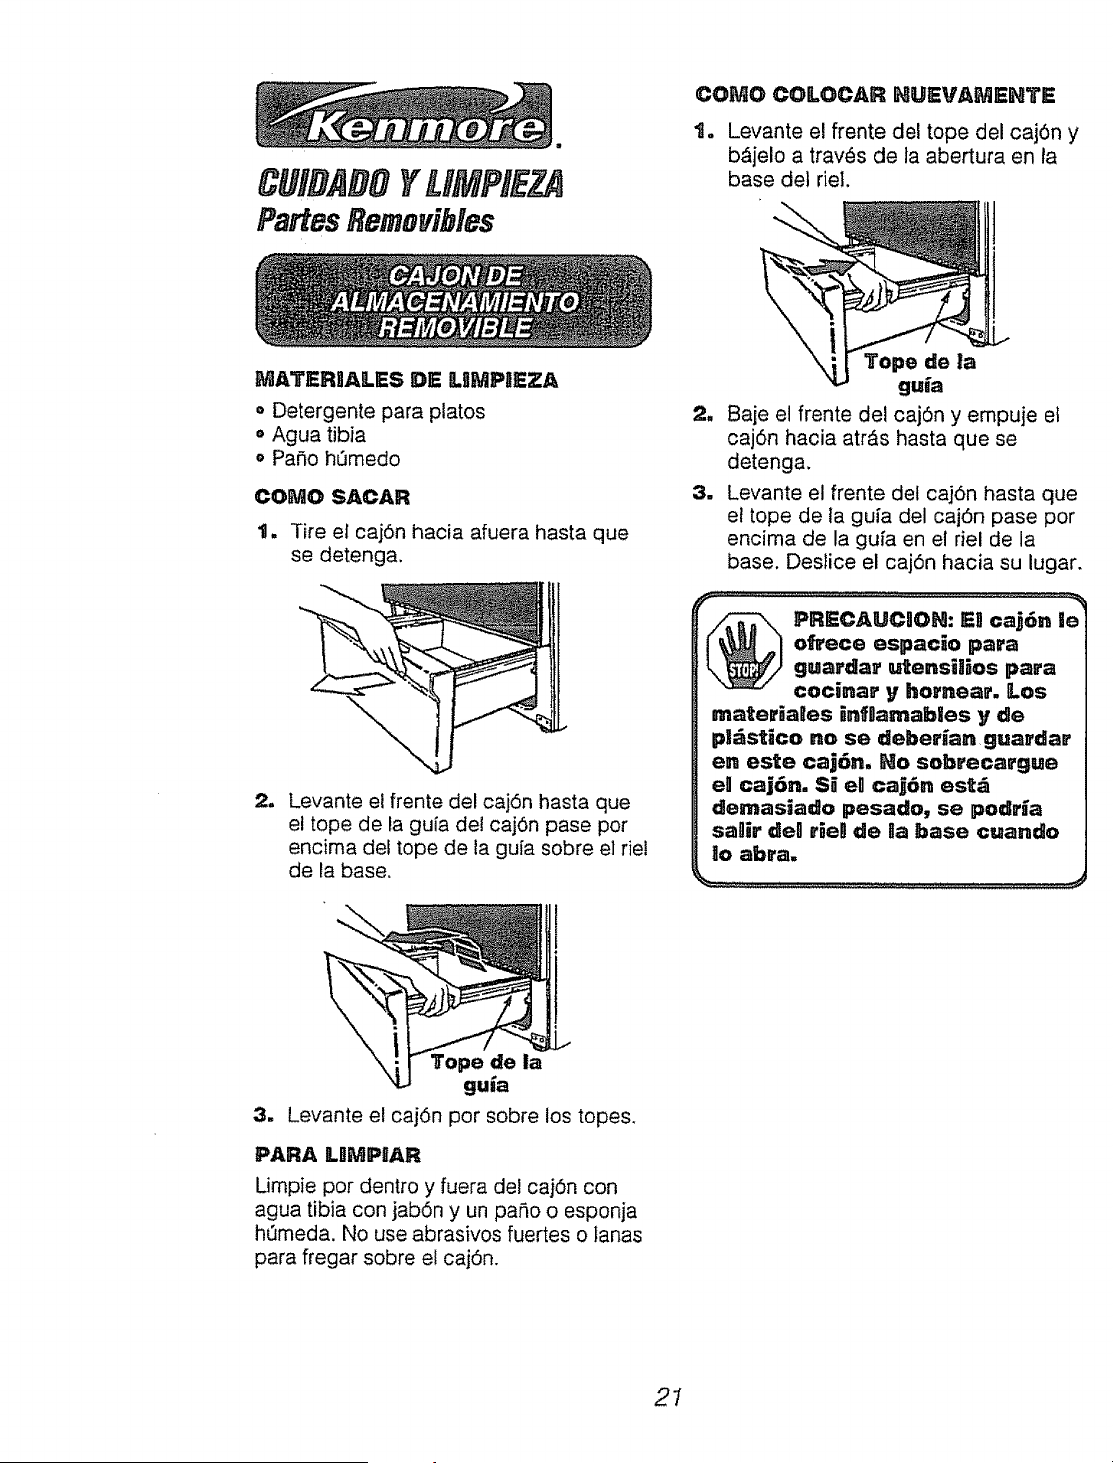
CUIDADOYUMPIE
Parte$Remevibles
COMO COLOCAR HUEVAMEHTE
t. Levante el frente del tope del caj6n y
b_jelo a tray, s de la abertura en ta
base del riel.
MATERaALES DE UMPaEZA
• Detergente para platos
• Agua tibia
° Pa6o hQmedo
COMO SACAR
il. Tire el caj6n hacia afuera hasta que
se detenga.
2_
Levante e! frente del caj6n hasta que
el tope de la guia del caj6n pase pot
encima del tope de la guia sobre e] riel
de la base.
#
e
Tope de |a
guia
Baie el frente del cajOn y empuje et
cajOn hacia atr&s hasta que se
detenga.
Levante el frente det caj6n hasta que
et tope de la guia del caj6n pase por
encima de la guia en el riel de la
base. Deslice el cajOn hacia su lugar.
PRECAUCUON: Eg caj6n le
ofrece espacio para
guardar uCensi_ios para
cocinar y hornear, Los
materiales _nfDamabies y de
pD_stico no so deber_an,guardar
en este caj6n, No sobrecargue
el caj6n, S_ eg caj6n est_
demasiado pesado, se podria
sagir de0 rieg de _a base cuando
Do abra.
de la
gu_a
3. Levante el caj6n por sobre los topes.
PARA LIIMPaAR
Limpie por dentro y fuera del caj6n con
agua tibia con jab6n y un paso o esponja
hQmeda. No use abrasivos fuertes o lanas
para fregar sobre el caj6n.
21
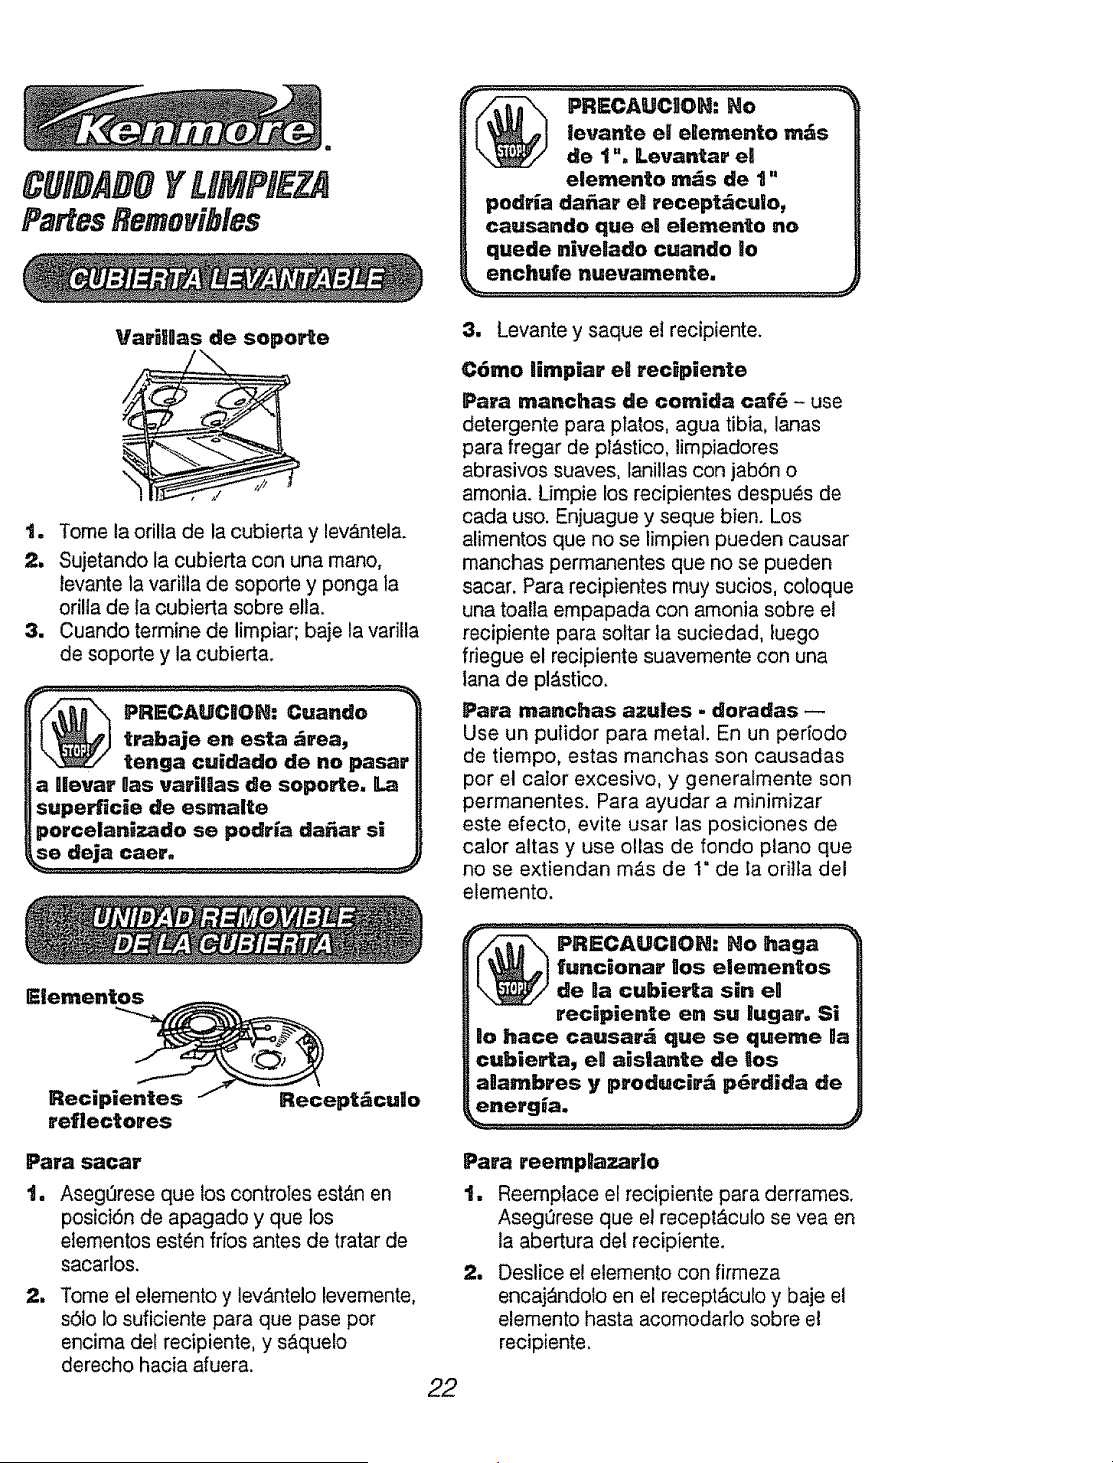
CUIDADOYUMPtEZ
Partes flemovibles
PREOAUC_OH: Ho
levante e| eRemento rn_s
de 1 ". Levantar ea
elemento m;_s de 1"
podr_a da_ar e_ Fecept_culo,
causando que e| elemento no
quede hive|ado cuando |o
enchufe nuevamente.
VariHas de sopo_e
t, Tome la orilla de la cubierta y lev_ntela.
2. Sujetando la cubierta con una mano,
levante la variila de soporte y ponga la
ori!la de la cubierta sobre ella.
3, Cuando termine de limpiar; baje la vafilla
de soporte y la cubierta.
PRECAUCBOH: Cuando
trabaje en esta _rea,
tenga cuidado de no pasar
a lievar OasvariUas de sopoe_e.
superl_cJe de esmalte
porcelanJzado se podria da_ar si
3. Levante y saque el recipiente.
Cemo |impiar e! recipiente
Pae'a manchas de cornida caf_ - use
detergente para platos, agua tibia, lanas
para fregar de pl_stico, limpiadores
abrasivos suaves, lanillas con jab6n o
amonia. Limpie los recipientes despu_s de
cada uso. Enjuague y seque bien. Los
alimentos que no se limpien pueden causar
manchas permanentes que no se pueden
sacar. Para recipientes muy sucios, coloque
una toalla empapada con amonia sobre el
recipiente para soltar la suciedad, luego
friegue el recipiente suavemente con una
lana de pl_.stico.
IPara manchas azules - doradas
Use un putidor para metal. En un periodo
de tiempo, estas manchas son causadas
por el cator excesivo, y generalmente son
permanentes. Para ayudar a minimizar
este efecto, evite usar las posiciones de
calor altas y use ollas de fondo piano que
no se extiendan m&s de 1" de Ia ori]ta del
elemento.
reflectLoe'es
_ PRECAUCBOH: Ho haga
funcionar gos elementos
de Ua cubie_a sin eg
recipJente e. su lugm'o Si
Io hace causar_ que se queme ga
cubie_a, eg aislantLe de Uos
anambres y producir;_ p_rdida de
Para sacar
_a
AsegOrese que los controles est&n en
posici6n de apagado y que los
elementos est_n frios antes de tratar de
sacarlos.
2m
Tome el elemento y lev_ntelo levemente,
s6!o Io suficiente para que pase por
encirna def recipiente, y s_que!o
derecho hacia afuera.
Papa reempga=ar]o
1, Reemplace el recipiente para derrames.
Asegerese que el recept_culo se vea en
la abertura del recipiente.
2. Deslice el elemento con firmeza
encaj_ndolo en el recept_culo y baje el
elemento hasta acomodaflo sobre el
recipiente.

CUIDABOYUMPIE7J2
ParfesRemovibles
MATERnALES DE LBMPJEZA
= Detergente
a Agua tibia
o Lanas para fregar o lanilla de acero con
jab6n
Tope
en la
guia
Parte trasera
levantada de la
parr_RRa
COMO SACAR
1, Tire ias perrillas hasta la posici6n de
tope.
2, Levante el frente de la parfilla y
desffcela bajo el tope de la guia para
las parrillas.
PARA UMPIAR
Limpie con agua tibia y detergente. Para
sacar manchas duras, ffiegue levemente
con lana para fregar o con una lanilia de
acero con jabSn. Enjuague bien.
PARA COLOCAR NUEVAMEHTE
1, Coloque la parte levantada de atr&s de
la parrilla sobre las guias.
2. Levante et frente de la parrilla hasta
que la parte levantada de atr#,s se
deslice por debajo del tope de las
guias.
3, Deslice la parri!la hasta atr&s.
Posici6n de tope para asar a la parrtlla
PARA SACAR
lm
2.
Abra la puerta hasta la posiciSn para
asar a la parrifla.
Tome la puerta de cada lado, lev&ntela
y s_,quela de las bisagras. NO
LEVAHTE LA PUERTA DE LJl
MAHIILL_=
_ PRECAUCOOH: Cuando la
puerla se saca y aos brazos
de las bisagras est_n en |a
posici6n de tope para asar
a 0a parrii|a, come precauci6n
cubra gos brazos de gas bisagras
:con toallas o con un roUo de toagas
vac{o. No pase a Igevar o trate de
mover los brazos de Jas b_sagras
mientras est_ trabajando en el _irea
del homo. Se podria, devogver
violentamente y causarle heridas
en gas manes o da_ar eB acabado
de porcelana en ea frente deR
marco.
PARA COLOCARLA HUEVAMEHTE
t. Aseg_rese que los brazos de las
bisagras est&n en la posici6n de tope
para asar a la parrilla.
2. Levante la puerta de ambos lados.
3. Coloque en linea las ranuras en la
orilla del fondo de[ horno con los
brazos de las bisagras.
4. Deslice la puerta hacia abajo sobre los
brazos de las bisagras Io m_ts posible.
5. Cierre la puerta.
23
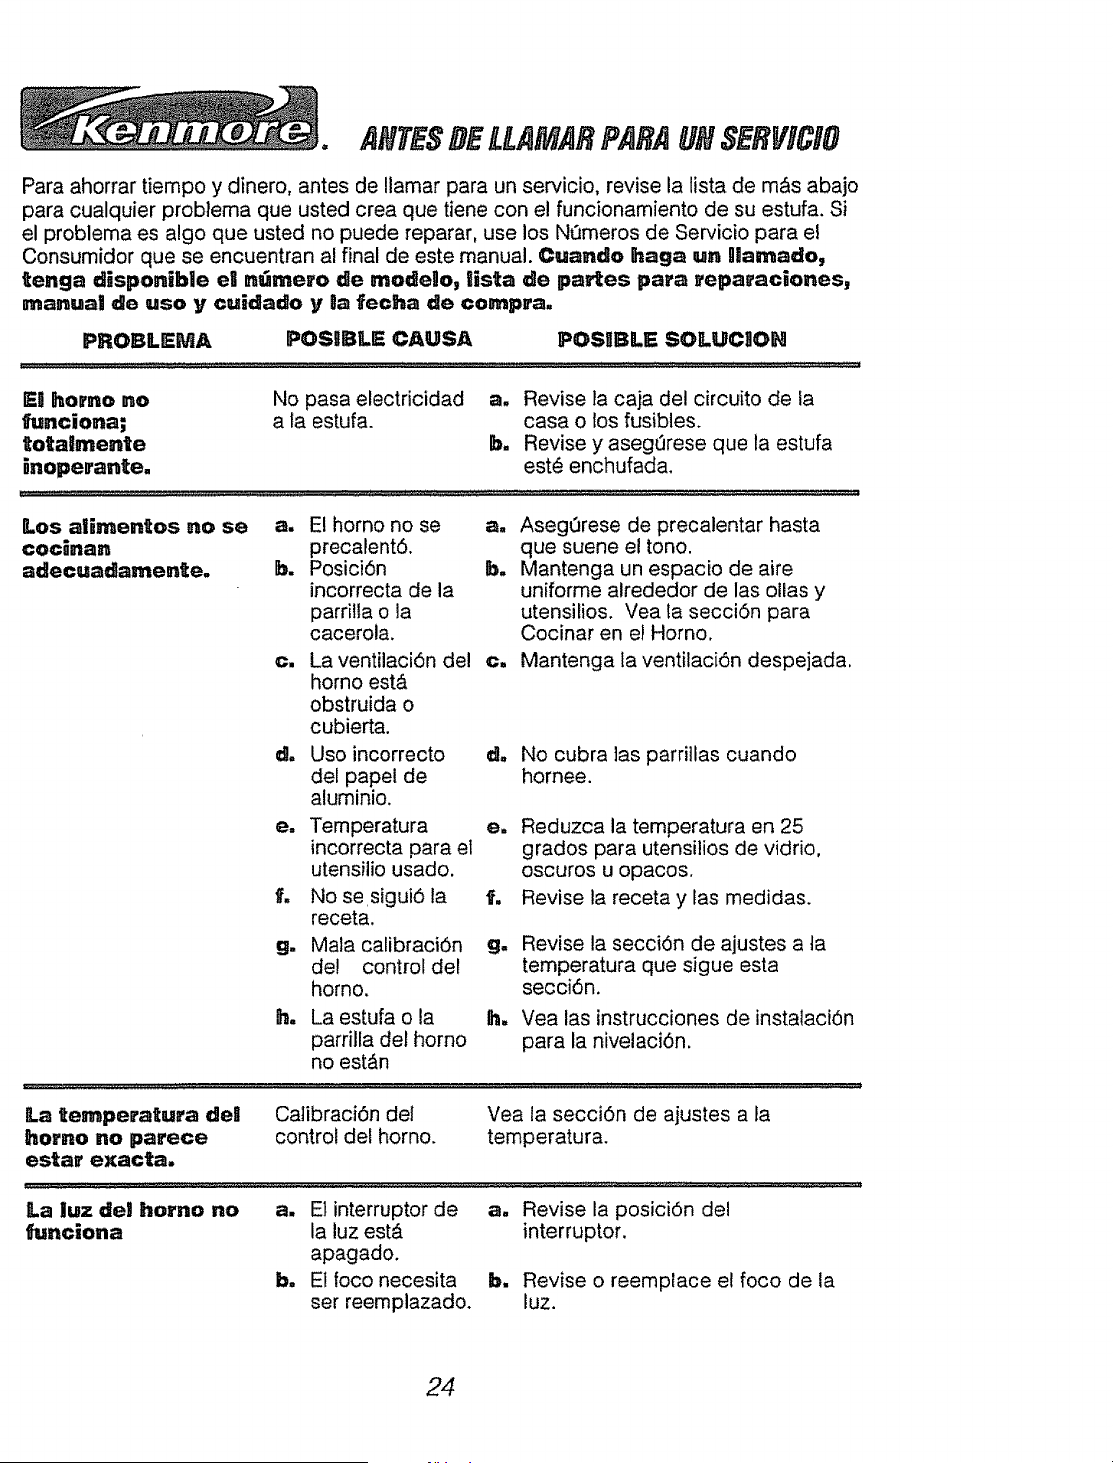
ANTESDELLAMARPARAUNSERV#CIO
Para ahorrar tiempo y dinero, antes de Ilamar para un servicio, revise la lista de m&s abajo
para cualquier prob]ema que usted crea que tiene con el funcionamiento de su estufa. Si
el problema es algo que usted no puede reparar, use los Nemeros de Servicio para el
Consumidor que se encuentran al final de este manual. Cuando haga un Hamado,
tenga disponib|e el nQmero de modego, lista de pa_es para reparaciones,
manua! de uso y cuidado y 8a fecha de compra_
PROBLEMA POSIBLE CAUSA POSIIBLE SOLUCJOH
Ell &omo no No pasa electricidad a, Revise la caja del circuito de la
funciona; a la estufa, casa o los fusibles.
totallmente b, Revise y asegtlrese que la estufa
_noperante. est_ enchufada.
Los a|imentos no se
cocinan
adecuadarnente.
a. E! homo no se
precalent6.
b. Posici6n
incorrecta de la
parrilla o la
cacerola.
¢, La ventilaci6n del
homo est&
obstruida o
cubierta.
a. AsegOrese de precalentar hasta
que suene el tono.
bo Mantenga un espacio de aire
uniforme alrededor de las ollas y
utensilios. Yea la secci6n para
Cocinar en el Horno.
c. Mantenga fa ventilaci6n despejada,
d, Uso incorrecto
del papel de
aluminio.
d, No cubra ias parrillas cuando
hornee.
ell
f_
g.
Temperatura
incorrecta para el
utensilio usado.
No se sigui6 la
receta.
Mala calibraciOn
de! control del
horno.
e. Reduzca la temperatura en 25
grados para utensilios de vidrio,
oscuros u opacos.
f. Revise la receta y las medidas.
g. Revise la secci6n de ajustes a ta
temperatura que sigue esta
secci6n.
h, La estufa o la h, Yea las instrucciones de instalaci6n
parrilla del homo para la nivelaci6n.
no est&n
,,,,,, .: ............................................................................................................................ -.L ................................................... ±
La temperatue'a (Je!
homo no parece
estar exacta.
Calibraci6n del
control del horno.
Yea ia secciOn de ajustes a la
temperatura.
ILa luz de! homo no
funciona
a, El interruptor de ao Revise la posiciOn del
la luz est,. interruptor.
apagado.
b. El foco necesita b, Revise o reemplace el foco de la
ser reemplazado, luz.
24
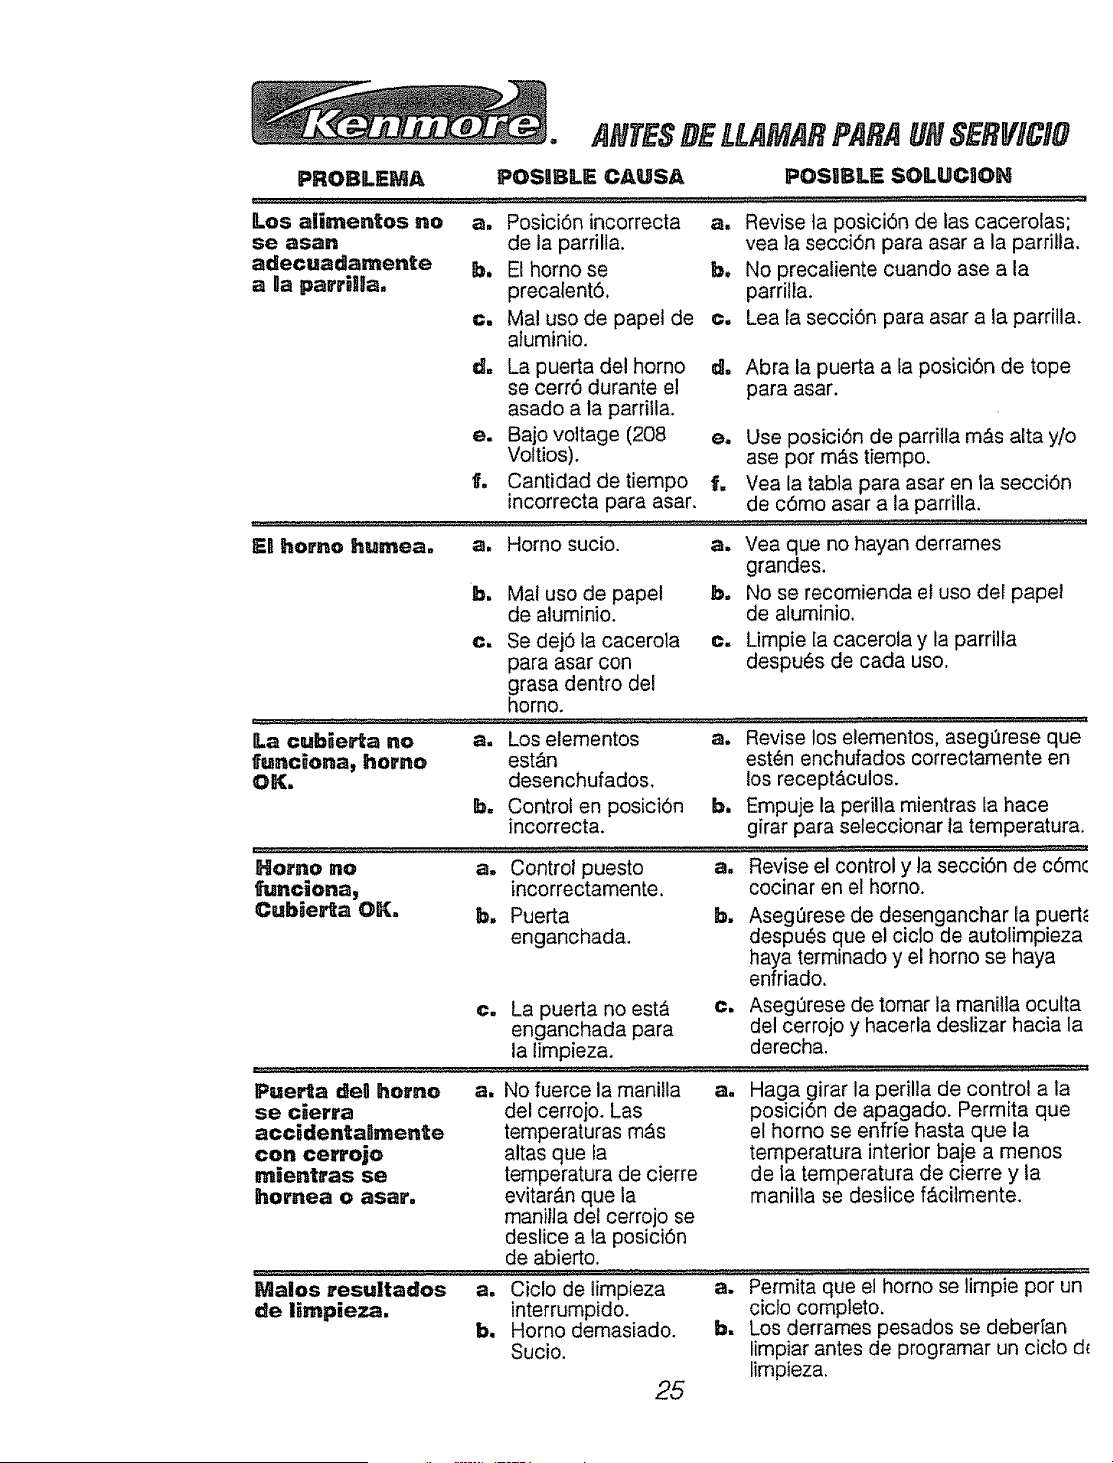
ANT SDELLAMARPARAUNSEBViClO
PROBLEMA POSaBLE CAUSA POSBBLE SOILUCBOH
Los aiimentos no
se asa_
adecuadamente
a lla parriHa,
a. Posicidn incorrecta a,
de la parrilla.
b. El homo se b,
precalent&
c. Mal uso de papel de c.
aluminio.
d. La puertadel homo do
se cerr5 durante el
asado a la parrilla.
e. Bajo voltage (208 e,
Vottios).
f, Cantidad de tiempo f,
incorrecta para asar.
Revise ta posici6n de las cacerolas;
vea ]a secci6n para asar a la parrilla.
No preca]iente cuando ase a la
parrilla.
Lea la secci6n para asar a la parrilla.
Abra la puerta a la posicidn de tope
para asar.
Use posici6n de parri]la m,_s alta y/o
ase por m&s tiempo.
Vea la tabta para asar en la seccidn
de c6mo asar a la parrilla.
ER homo humea, a, Homo sucio, a, Yea que no hayan derrames
b, Mal uso de papel
de aluminio.
¢, Se dej6 la cacerola
para asar con
grasa dentro del
homo.
grandes.
b, No se recomienda el uso del papel
de atuminio.
e, Limpie [a cacerola y la parrilla
despues de cada uso.
ILa cub_e_a no
func_ona, homo
OK,
a#
bw
HoFno Blo a.
fulitcionay
Los elementos a, Revise los elementos, asegerese que
est&n est6n enchufados correctamente en
desenchufados, los recept_culos.
Control en posiciOn b, Empuje la perilla mientras la hace
incorrecta, girar para seleccionar ta temperatura.
' Controi'"Pu-esto................................a:-Revise el _c0ntiol y ]a Secci6n de c6-m(
incorrectamente, cocinar en el homo.
Cubierta OK.
bm
Cm
Pue_a
enganchada.
La puerta no est&
enganchada para
la limpieza.
b, Asegerese de desenganchar ]a puert_
despu6s que el ciclo de autolimpieza
haya terminado y el homo se haya
enfriado.
¢, AsegQrese de tornar la maniiIa oculta
del cerrojo y hacerla deslizar hacia la
derecha.
Pue_a deO hor.o a, No fuerce la manilla a,
se c_erra del cerrojo. Las
acc_dentallmen_e temperaturas m_s
con cerrojo altas que la
m_ent_as se temperatura de cierre
hornea o asar. evitar_.n que la
manilla del cerrojo se
deslice a la posici5n
de abierto.
Malos _esultados a, Ciclo de limpieza a, Permita que el homo se limpie por un
_e Hmpieza, interrumpido, ciclo completo.
b, Homo demasiado, b, Los derrames pesados se debedan
Sucio. limpiar antes de programar un ciclo d_
limpieza.
Haga girar la perilla de control a la
posici6n de apagado. Permita que
el homo se enfrie hasta que la
temperatura interior baje a menos
de la temperatura de cierre y la
manitla se des]ice f_cilmente.
AJUSTESDE
TEMPEP TURA-
"HAGALOSUSTEDMISMO"
Usted podrfa pensar que su nuevo homo
cocina diferentemente al homo que
reemplaz6. Recomendamos que use su
homo nuevo unas pocas semanas para
que se familiarice con _1, siguiendo los
tiempos que se dan en las recetas como
una gufa.
Si cree que su nuevo homo est_
funcionando demasiado caliente (quema
la comida) o no calienta Io suficiente (la
comida no queda bien cocida) usted
mismo puede ajustar la temperatura. La
apariencia y la textura de los alimentos
son mejores indicadores de la exactitud
de un homo que un term6metro barato,
para controlar la posici6n de la
temperatura de su nuevo homo. Estos
term6metros pueden variar entre 20-40
grados. AdemAs, la puerta se tiene que
abrir para leer estos term6metros. Abrir la
puerta cambiarA la temperatura del horno.
Para decidir en cu_,nto cambiar la
temperatura, suba la temperatura del
homo en 25 grados (si los alirnentos no
quedan bien cocidos) o baje la
temperatura en 25 grados (si Ia comida se
quema) de la temperatura de la receta,
luego hornee, Los resultados de esta
"prueba" le deberian dar una idea de
cuAnto se deberfa cambiar la temperatura.
1, Mientras la perilla de control est& en la
posisi6n de APAGADO (OFF), empuje
y sujete, a la misma vez, por 4
segundos, los botones con las flechas
para SUBIR y BAJAR la HORA
hasta que el dial muestre un n_mero
de dos dfgitos.
2, Empuje el bot6n con la flecha para
SUBBR la HORA para aumentar la
temperatura de la posici6n original en
35 ° F.
O
Empuje el bot6n con la flecha para
BA,JAR la HORA para disminuir la
temperatura de la posici6n original en
35 ° F.
3. Cuando este ajuste haya sido hecho el
dial volver_, a la hora del dfa.
Este ajuste permanecer_, en la memoria
hasta que estos pasos sean repetidos y
una nueva temperatura sea seleccionada.
Permanecer_. en la memoria incluso
despu6s de un corte de corriente.
Estos ajustes no afectar_n las
temperaturas para Asar y Limpiar.
26

6ARANfiADELA£STUFA
_TODO UN ANO DE GARANTgA COMPLETA PARA LAS FUHCRONES DE _
TODAS LAS PARTES EXCEPTO LAS DE VJDRRO
Si, dentro del lapso de un a_o a partir de la fecha de instalaci6n, cualquier parte que
no sea de vidrio funciona mal debido a un defecto en el material o en la mano de
obra, Sears ta reparar& o la reemplazar_, sin costo alguno.
GARAHT_A TOTAL DE 30 DgAS PARA LAS PARTES DE V_DRIO Y EL
ACABADO DE ESMALTE PORCELANaZADO, PARTES DE METAL
PDHTADO O BRILLAHTIE
Si, dentro de los treinta dias posteriores a la instalaci6n, cualquier parte de vidrio o el
acabado de cualquier esmalte porcelanizado o parte de metal pintado o britlante
tiene defectos en el material o mano de obra, Sears reemplazar_, la parte sin costo
alguno.
GARAHTIIA TOTAL DiE 90 DIIAS IEN AJUSTiES MiECANICOS
Durante 90 dias a partir de la fecha de instalaci6n, Sears proporcionar_, sin costo
alguno, cualquier ajuste mec_nico necesario para la correcta operacidn de la estufa,
exceptuando el mantenimiento normal.
Si la estufa est& sujeta a otro uso que no sea el privado familiar, la cobertura de la
garantia mencionada arriba serb. efectiva s61o durante 90 dias.
EL SERVICIO DE GARANT1A ESTA DISPONIBLE CON SOLO PONERSE EN
CONTACTO CON EL CENTRO O DEPARTAMENTO DE SERVtCtO SEARS MAS
CERCANO EN LOS ESTADOS UNIDOS,
Esta garantia se aplica s61o cuando este producto se use en los Estados Unidos.
Esta garant[a le brinda derechos legales especfficos, y tambi_n puede tenet otros
derechos que vartan de un estado a otto.
Sears, Roebuck and Co., Dept. 8t7 WA, Hoffman Estates, IL 60179
Para Ampg_ar iE0VaBor De Su Estufa,
Compre Un Contrato De Ittantenimiento Sears.
AEoa de cobertura de t_ propledad ler aF,o 2" aF,o 3er a_o
que no aean de potcelana o vldrio
90 DAYS
2 Ai.o.,.,_._oo G AM AN
30 DAYS
3 P_rt.._po,=l°°,,yvid.o G AM Air1
/_ Revioi6n anua! do mantenimiento
AN AM AN
G - Gar_nUe AM * ,_n_r=o de Iv_ttt _rtbrtle nto
Las estufas Kenmore est&n diseC_adas, fabricadas y probadas para brindarle ahos de
operaci6n confiable. Sin embargo, cualquier aparato moderno puede requerir de algL3n
servicio de vez en cuando. La garantia Sears, adem&s del contrato de Mantenimiento
Sears, te brinda protecci6n contra cuentas de reparaciones inesperadas y le asegura qu_
disfrute de la m&xima eficiencia de la estufa.
La tabla de arriba compara el contrato de Garantia y de Mantenimiento y le muestra los
beneficios de tener un Contrato de Mantenimiento para su estufa Sears.
PSngase en contacto con su vendedor de Sears o con el centro de servicio Sears de ia
Iocafidad hoy mismo y compre un contrato de Mantenimiento Sears.
27

I ears se comp,ace en ofrecer a sus clieettes
serveceo de reparacgon de aparatos
electrodom_sticos y eUectr6nicos de todas las
B_t_rCaS.
En Sears usted puede co.tar con operadores en
espa_ol a Yes que puede Hamar s_n cargo aRgunoo
Para servic;o de reparac[6n a domiciqjo,
Llame 24 horas al d[a, 7 d[as a la semana
t 80@-676o581 t
Para om'denm' piezas con entrega a domic_lio,
Llame de 7 am a 7 pro, 7 d[as a la semana
t
28