Please read through this manual carefully before use
IMPORTANT SAFEGUARDS AND TIPS
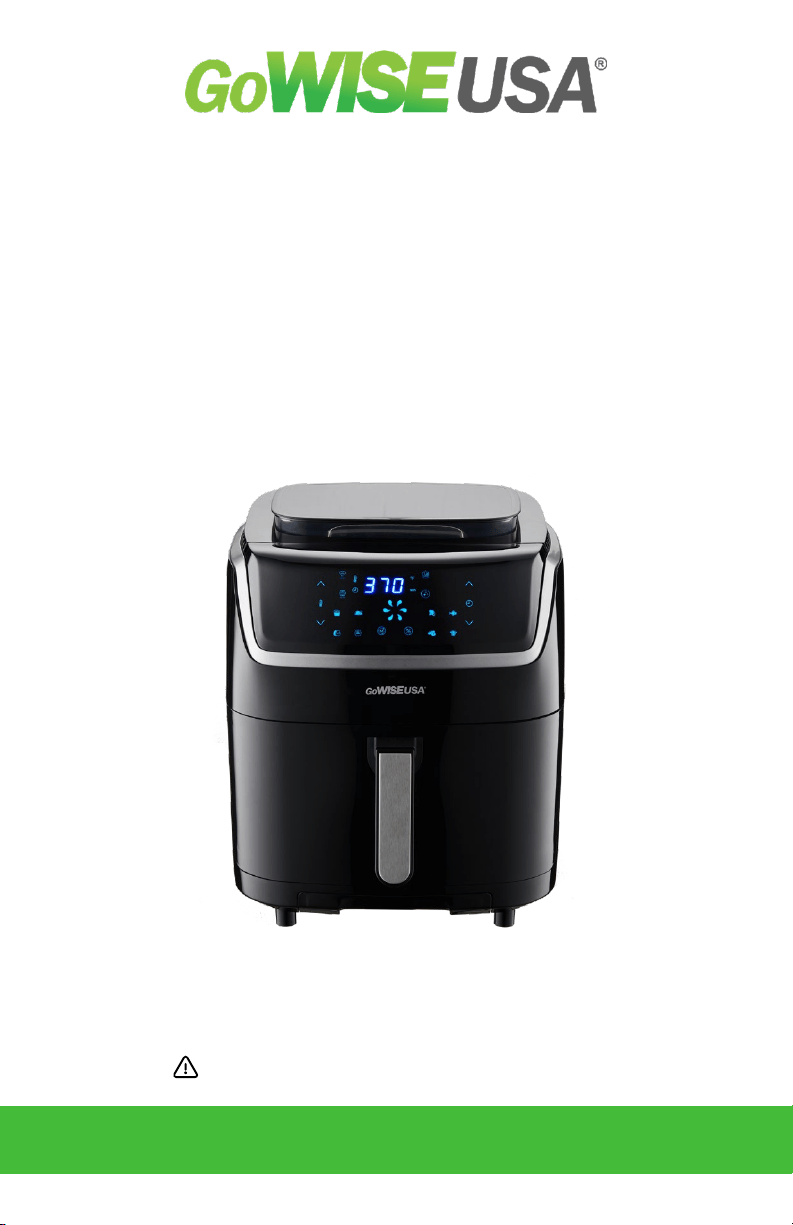
STEAM AIR FRYER
USER MANUAL
Model No.: GW22991
WWW.GOWISEUSA.COM

2
THANK YOU FOR YOUR PURCHASE!
Join
Contact Our Customer Care Team
Register Your Product
Specifications
Explore
the GoWISE Community on
Facebook, Instagram, Twitter, and
Pinterest for updates, tips, and
great deals!
855-233-9199
support@gowiseusa.com
Live Chat at gowiseusa.com
M-F 8:30am - 4:00pm MST
www.gowiseproducts.com/apps/
product-registration
(The serial number is normally
underneath the product. Please
check there first.)
Voltage: 120V, 60Hz
Watts: 1700W
Capacity: 7 Qt
Temp. Range: 180F-400F
recipes on our recipe App or
www.gowiseproducts.com/blogs/
recipes

Register Your Product.....................................
Specifications....................................................
Important Safeguards....................................
Electromagnetic Fields (EMF)...............
Product Structure.............................................
Control Display..................................................
Cooking Presets Reference............................
Cooking Guide....................................................
Internal Temperature Chart...................
Tips.......................................................
Set Up and Using Your Steam Air Fryer......
Before First Use.....................................
The Basket and Crisper Tray...................
The Water Tank.....................................
The Water Tray......................................
Using Your Steam Air Fryer.....................
Steam Mode..........................................
Combo Mode.........................................
Cleaning Your Steam Air Fryer.....................
Self Cleaning.........................................
Troubleshooting................................................
Warranty............................................................
2
2
4
5
6
7
8
9
9
9
10
10
10
11
11
12
14
15
16
16
17
18
TABLE OF CONTENTS

4
IMPORTANT SAFEGUARDS
HOUSEHOLD USE ONLY • READ ALL INSTRUCTIONS BEFORE USE
1. 1. READ THE ENTIRE MANUAL
BEFORE ATTEMPTING TO
OPERATE.
2. 2. Keep the box and packing
material for storage.
3. 3. DO NOT PLACE the appliance on
stove top surfaces.
4. 4. This appliance has a polarized
plug (one prong is wider than
the other). This plug is intended
to fit into a polarized outlet only
one way. TO AVOID ELECTRIC
SHOCK, DO NOT force the plug
into the outlet if it does not fit. If
the plug does not fit fully into the
outlet, reverse the plug. If it still
does not fit, contact a qualified
electrician. DO NOT ATTEMPT to
modify the plug in any way.
5. 5. DO NOT immerse the power
cord, plug, or any part of the
appliance in water or any other
liquids to avoid electric shock.
6. 6. DO NOT use the appliance if
the plug, the power cord, or the
appliance itself is damaged in
any way.
7. 7. ALWAYS keep the power cord
away from hot surfaces.
8. 8. DO NOT go to any unauthorized
person to replace or fix the
appliance.
9. 9. DO NOT plug the appliance in or
operate the appliance with wet
hands.
10. 10. DO NOT connect the appliance
to an external timer switch or
separate remote control system.
11. 11. DO NOT PLACE the appliance
against a wall or any other
appliances. Leave at least five
inches of free space along the
back, sides, and above the
appliance.
12. 12. DO NOT PLACE anything on top
of the appliance.
13. 13. DO NOT PLACE the appliance on
or near combustible materials,
such as a tablecloth or curtain.
14. 14. DO NOT USE the GoWISE Steam
Air Fryer for any purpose other
than described in this manual.
15. 15. NEVER OPERATE the appliance
unattended.
16. 16. This appliance is NOT INTENDED
FOR USE by persons with
reduced physical, sensory, or
mental capabilities or persons
with a lack of experience and
knowledge unless they are
UNDER THE SUPERVISION of a
responsible person or have been
given proper instruction to use
the appliance. This appliance
is NOT INTENDED FOR USE
by children. Make sure that the
appliance is out of reach of
children, especially when it is
operating.
17. 17. Keep all the ingredients within
the basket to prevent any contact
with the heating elements. DO
NOT OVERFILL the basket.
18. 18. DO NOT fill the basket with oil.
Filling the basket with oil is a fire
hazard.

IMPORTANT SAFEGUARDS
HOUSEHOLD USE ONLY • READ ALL INSTRUCTIONS BEFORE USE
19. 19. DO NOT COVER OR BLOCK
the air inlet and outlet while the
appliance is in operation. Doing
so prevents even cooking and
may damage the unit or cause it
to overheat.
20. 20. DO NOT touch the inside of the
appliance while it is operating.
21. 21. While air frying, hot air is released
through the air outlet openings.
Keep your hands and face at a
safe distance from the steam and
from the air outlet opening. BE
CAUTIOUS of hot steam and air
when you remove the basket from
the appliance. Any accessible
surface may become hot during
use.
22. 22. IMMEDIATELY UNPLUG the
appliance if you see dark smoke
coming out of the appliance. Wait
for the smoke emission to stop
before you remove the basket
from the appliance.
23. 23. ENSURE that the appliance
is placed and operated on a
horizontal, even, stable, and
noncombustible surface.
24. 24. This appliance is designed for
HOUSEHOLD USE ONLY. It is
not safe to use in environments,
such as staff kitchens, farms,
motels, and other non-residential
environments.
25. 25. If the GoWISE Steam Air Fryer is
used improperly, for professional
or semi-professional purposes, or
if it is not used according to the
instructions in this user manual,
the warranty becomes invalid,
and the manufacturer will not be
held liable for damages.
26. 26. ALWAYS unplug the appliance
after use.
27. 27. ALWAYS wait 30 minutes for the
appliance to cool down before
handling, cleaning, or storing.
28. 28. The base of the GoWISE Steam
Air Fryer vents heat during the
cooking process. Artificial stone
countertops are not heat-
resistant. It is the end user’s
responsibility to verify the heat
capacity of their countertops.
We recommend using a silicone
pad or spare, non-artificial tile to
protect your counters from heat
damage. The care and use of
countertops is the responsibility
of the end user.
29. 29. Over time, wear and tear is
normal for the basket and crisper
tray and will need to be replaced
from time to time. Please contact
GoWISE Customer Care or visit
our website gowiseproducts.com
to purchase these parts.
5
Electromagnetic Fields (EMF)
This appliance complies with all
standards regarding Electromagnetic
Fields (EMF). Under proper handling,
the appliance is safe to use based on
available scientific evidence.
SAVE THESE
INSTRUCTIONS
6
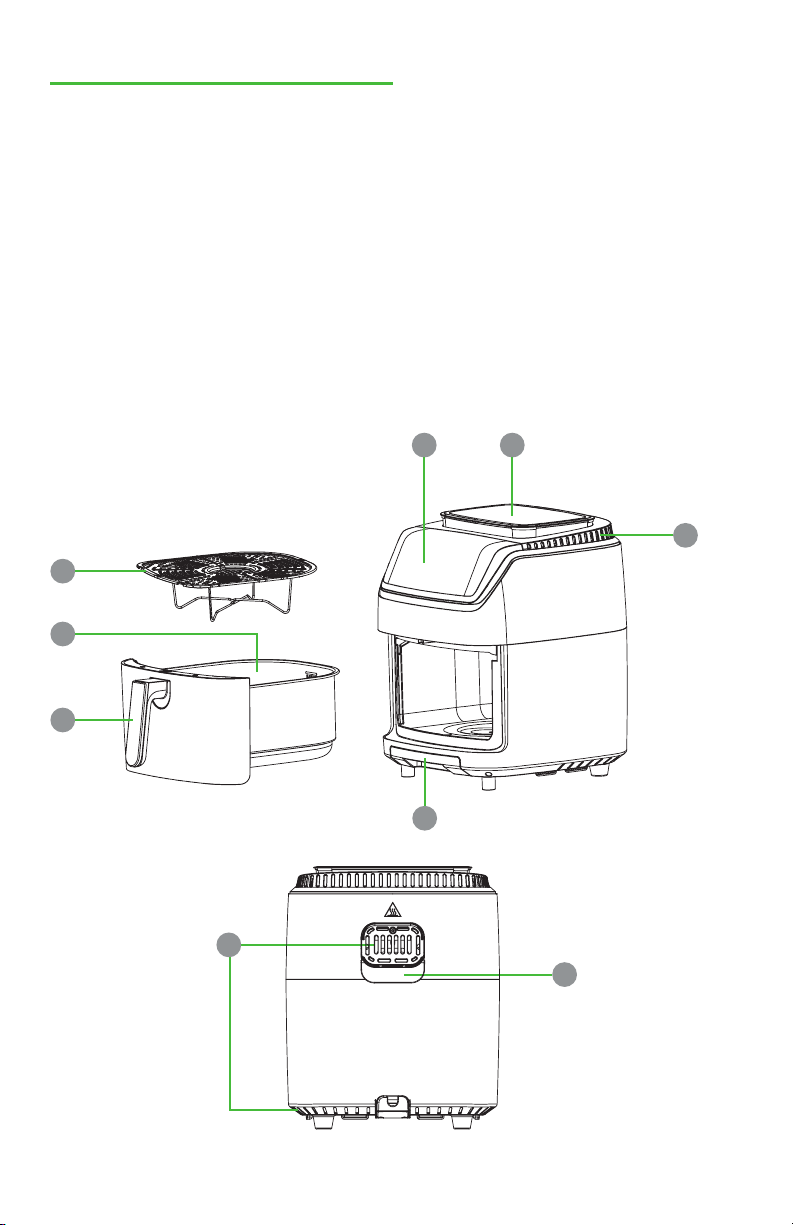
PARTS
PRODUCT STRUCTURE
1. Water Tank
2. LCD Control Display
3. Air Inlet
4. Crisper Tray
5. Basket
6. Handle
7. Water Tray
8. Air Outlet
9. Condensation Collector
4
3
9
2 1
6
7
8
5
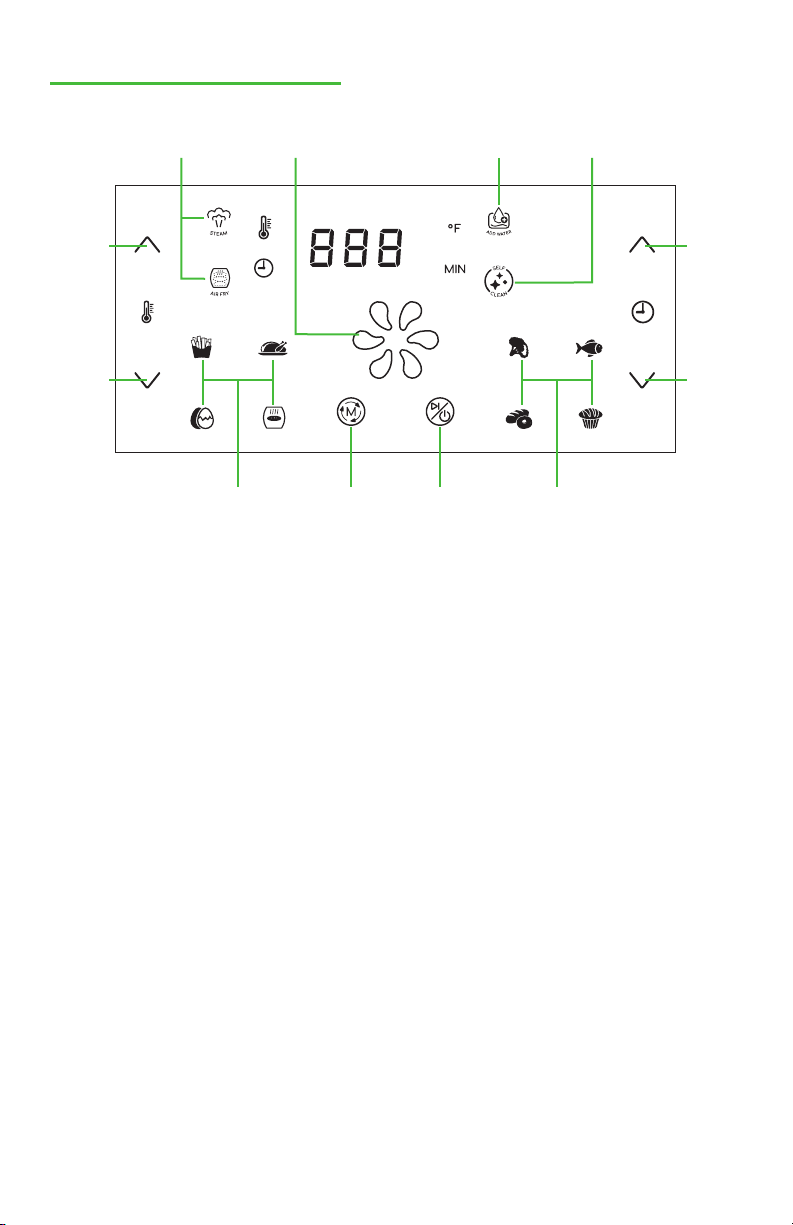
ADD WATER: Illuminates and beeps
when the water level in the water
tank is low.
AIR FRY: Illuminates when in Air Fry
mode. This mode cooks your food
with hot air.
STEAM: Illuminates when in Steam
mode. This mode cooks your food
with hot steam.
HEATING: The fan icon will illuminate
throughout the cooking cycle to
indicate that the heating element is
running.
CONTROL DISPLAY
OPERATING BUTTONS INDICATORS
TEMP +
MODE
INDICATORS
HEATING
INDICATOR
ADD WATER
INDICATOR
TIME +
TEMP - TIME -
POWER/
START/
PAUSE
SELF-CLEAN
BUTTON
MODE
BUTTON
PRESET
BUTTONS
PRESET
BUTTONS
7
POWER/ START/PAUSE: Powers the
unit on and off; starts and pauses the
cooking process. Before pressing this
button, ensure that the basket and
water tank are inserted into the unit.
MODE: Switches between Air Fry,
Steam and Combo mode. When
the unit is in combo mode, the Air
Fry and Steam icons will both be on.
Press Mode button to switch between
modes to see and adjust cooking
times and temperature.
UP & DOWN arrows: Increase or
decrease temperature and time.
SELF-CLEAN: Starts the self-
cleaning function of the unit to clean
limescale build-up.
8
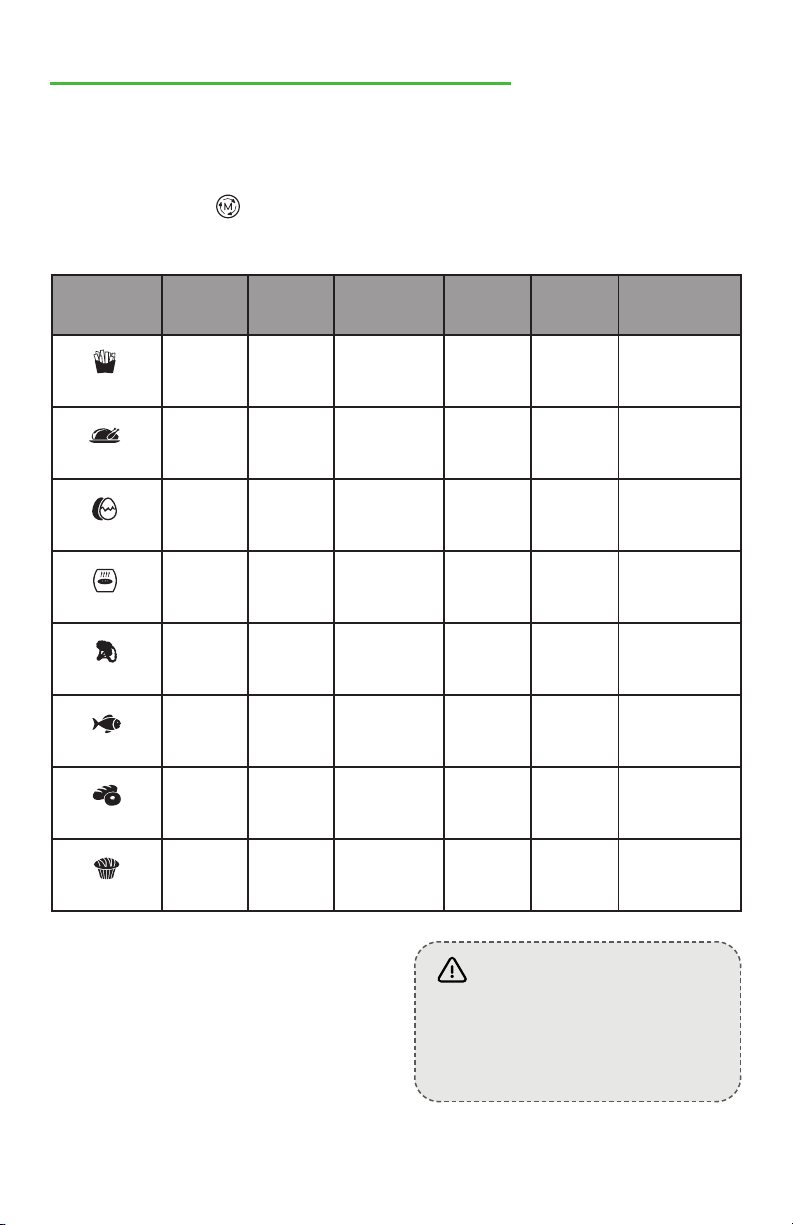
This Steam Air Fryer is equipped with a full touchscreen display with one-touch
cooking presets. Each preset is set with a default time and temperature for
Steam and Air Fry mode. To select a preset and mode, press the associated
icon and press the (MODE) button until the desired cooking mode displays
on the screen. See default settings for each preset along with their adjustable
ranges in the chart.
Preset
Steam
Temp
Steam
Time
Steam
Range
Air Fry
Temp
Air Fry
Time
Air Fry
Range
Fries/Potato
212F 20 min 1-60 mins 400F 18 min
1-60 mins,
180°F – 400°F
Chicken
212F 30 min 1-60 mins 350F 20 min
1-60 mins,
180°F – 400°F
Eggs
212F 18 min 1-60 mins 250F 16 min
1-60 mins,
180°F – 400°F
Broil
N/A N/A N/A 400F 10 min
1-60 mins,
180°F – 400°F
Vegetable
212F 10 min 1-60 mins 320F 12 min
1-60 mins,
180°F – 400°F
Fish
212F 10 min 1-60 mins 350F 10 min
1-60 mins,
180°F – 400°F
Bread/Bagel
212F 4 min 1-60 mins 380F 14 min
1-60 mins,
180°F – 400°F
Bake
212F 40 min 1-60 mins 310F 30 min
1-60 mins,
180°F – 400°F
COOKING PRESETS REFERENCE
NOTES:
a. a. Temperature is not adjustable in
Steam mode for all presets.
b. b. Temperature can be adjusted in
Air Fry mode.
c. c. The preset “Broil” is only available
in Air Fry mode.
WARNING
Never use a cooking vessel filled
with cooking oil or any other
liquid with this unit! Fire Hazard
or personal injury could result.

9
INTERNAL TEMPERATURE CHART
This chart should be used to check the temperature of cooked meats. Always
review the USDA Food Safety Standards.
Food Type
Internal
Temperature
Beef + Veal
Ground
Steaks, Roasts: medium
Steaks, Roasts: rare
160°F (70°C)
160°F (70°C)
145°F (63°C)
Chicken + Turkey
Breasts
Ground, Stuffed
Whole bird, legs, thighs, wings
165°F (75°C)
165°F (75°C)
165°F (75°C)
Fish + Shellfish Any type 145°F (63°C)
Lamb
Ground
Steaks, Roasts: medium
Steaks, Roast: rare
160°F (70°C)
160°F (70°C)
145°F (63°C)
Pork
Chops, Ground, Ribs, Roasts
Fully cooked Ham
160°F (70°C)
140°F (60°C)
TIPS
• Small ingredients usually require
shorter cooking times compared
to larger ingredients.
• Shaking smaller ingredients
midway through the cooking
process will ensure the
ingredients cook more evenly and
have a better end result.
• Adding a very little amount of
oil to fresh potatoes will give it a
crispier result.
• Do not prepare extremely oily or
greasy ingredients in the air fryer.
• Snacks that can be prepared in
a traditional oven can also be
prepared in the air fryer.
• The recommended amount of
fries to allow for a crispy result is
17.5 oz.
• Pre-made dough requires a
shorter cooking time than home-
made dough.
• When making cake, quiche or
ingredients with batter, use a
baking pan or oven dish in the
basket.
COOKING GUIDE
10
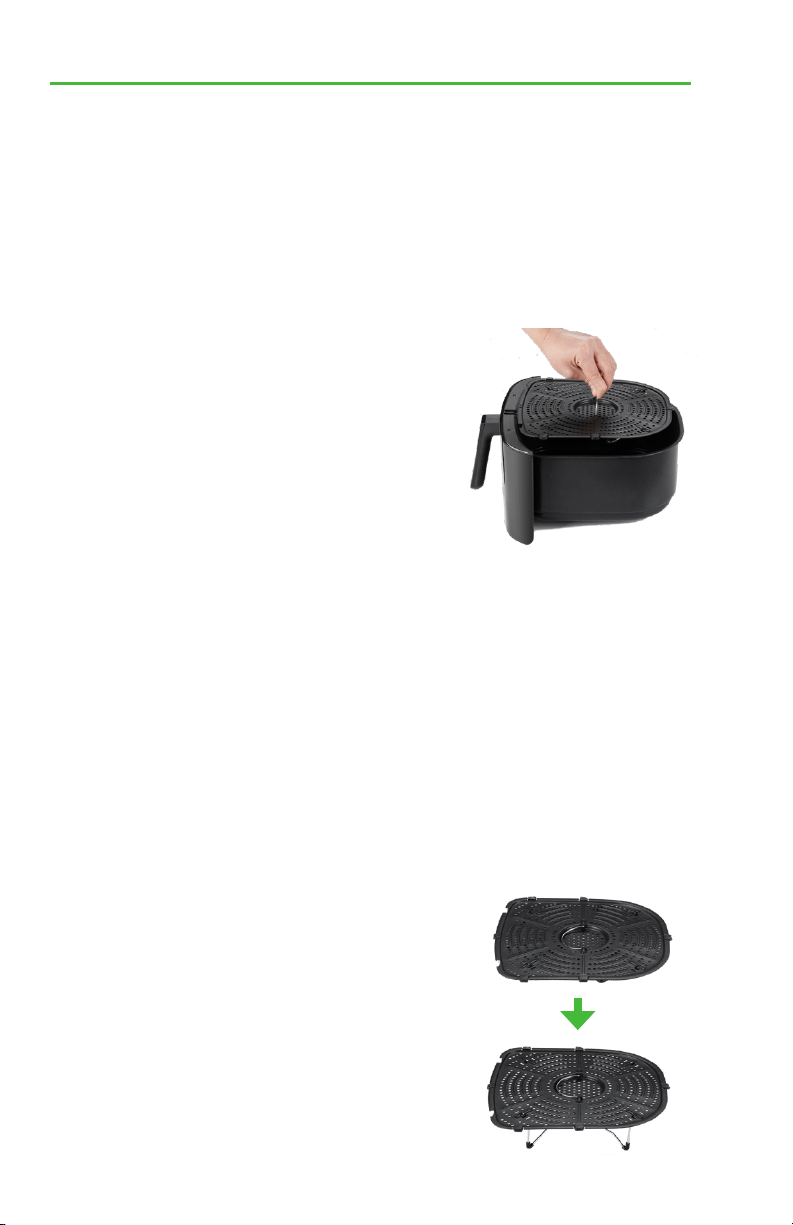
THE BASKET AND CRISPER TRAY
Using the Basket and Crisper
Tray
1. 1. Grab the handle in the middle of
the crisper tray and insert it into
the basket. Ensure there is a tight
fit.
SET UP AND USING YOUR STEAM AIR FRYER
NOTES:
a. a. The crisper tray comes with
retractable legs that can be used
for broiling and steaming.
b. b. Turn the tray over and pull out
the legs and insert the crisper
tray into the basket.
2. 2. Insert the basket into the steam
air fryer. The steam air fryer will
not turn on unless the basket is
inserted properly.
BEFORE FIRST USE
1. 1. Remove all packaging materials,
stickers, and labels.
2. 2. Clean the basket and crisper tray
with hot water, soap, and a non-
abrasive sponge.
3. 3. Wipe the inside and outside of
the appliance with a clean cloth.
4. 4. Set the unit to 350°F for about 5
minutes. This process will burn off
any remaining residue left from
the manufacturer. There may be
a slight burning smell which will
dissipate after a few minutes.
5. 5. Your new GoWISE USA Steam
Air Fryer is now ready for use!
CAUTION: DO NOT fill basket with oil
or lard. The appliance uses rapid air
circulation to fry.
11
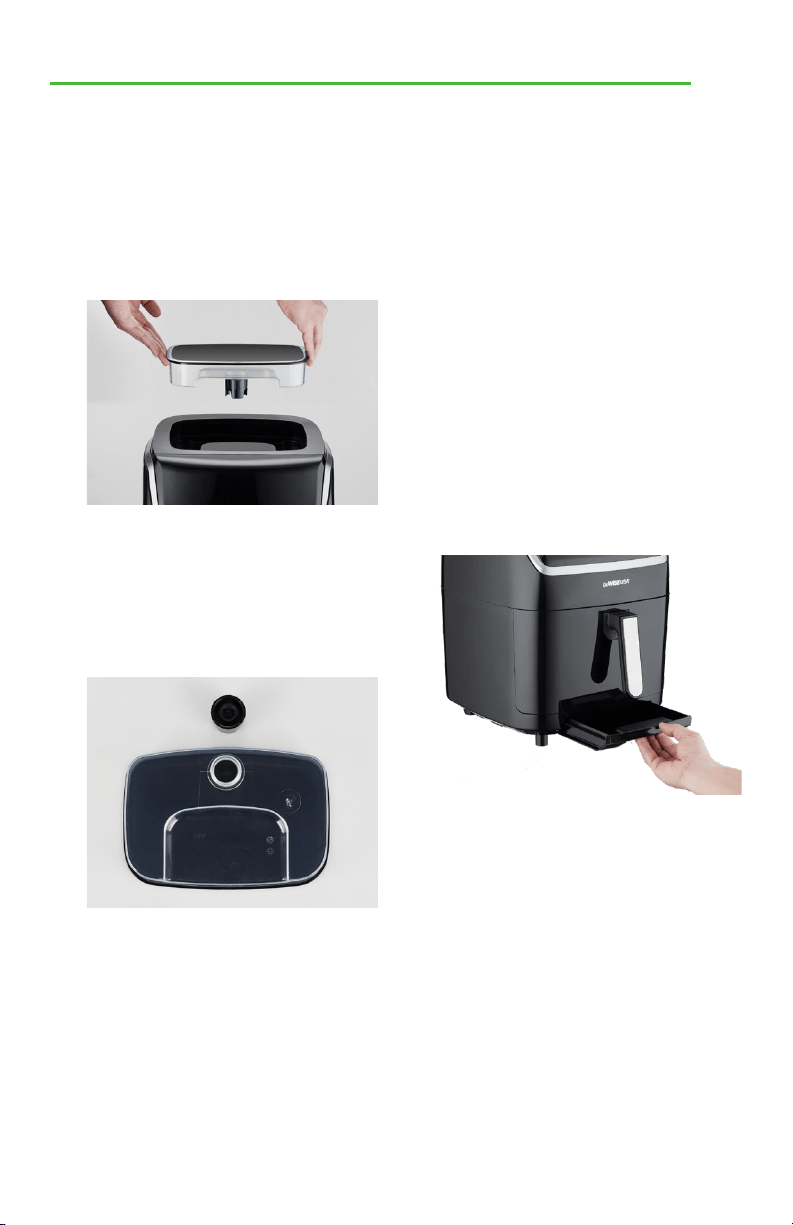
THE WATER TANK THE WATER TRAY
Using the Water Tank for
Steaming
Inserting and Draining the Water
Tray
1. 1. Remove the water tank from the
top of the steam air fryer.
SET UP AND USING YOUR STEAM AIR FRYER
The water tray is located at the
bottom of the steam air fryer and is
used to collect the excess water from
Steam mode.
1. 1. Check the water tray halfway
through the cooking cycle to
ensure it does not overflow.
2. 2. Empty the water tray and place
it firmly into the bottom of the
appliance.
2. 2. Turn the water tank over and fill
it with water. NOTE: The water
tank’s capacity is 4.5 cups and it
is recommended to fill the water
tank to its full capacity.
3. 3. Close and tighten the cap on the
water tank. Insert the water tank
to the top of the steam air fryer
completely.

SET UP AND USING YOUR STEAM AIR FRYER
12
USING YOUR STEAM AIR FRYER
400°F. Hold down the “ “ or
“ “ arrows to move through
time and temperature quicker.
NOTE: To choose a preset, press
the icon of the desired preset
and the steam air fryer will set
to time and temperature of that
preset. You can also adjust the
time and temperature of the
selected preset by using the “ “
and “ “ arrows. See page 8 for
reference on cooking presets.
7. 7. Once you have set the time
and temperature or selected a
cooking preset (optional), press
the button to start the
cooking cycle. The fan icon will
illuminate to indicate that the
steam air fryer is heating and the
fan is circulating.
8. 8. If you would like to make
changes at any time during the
cooking cycle, such as increasing
temperature, adding more time
or changing to a new preset,
press the button, make your
adjustments, and press the
button to resume.
9. 9. You may need to shake the
ingredients midway through the
cooking cycle to ensure even
cooking. Pull the basket out of
the steam air fryer by the handle
(the unit will automatically power
down), gently and carefully
shake the ingredients inside the
basket. Slide the basket back into
the steam air fryer by carefully
aligning the track inside the unit
with the rim of the basket. The
1. 1. Place the steam air fryer on a
flat and even surface. DO NOT
PLACE THE UNIT ON A SURFACE
THAT IS NOT HEAT RESISTANT.
DO NOT PLACE THE UNIT ON
STOVE TOP SURFACES.
2. 2. Plug your steam air fryer into a
grounded wall socket.
3. 3. Grab the handle in the middle
of the crisper tray and place
it in the basket. DO NOT FILL
THE BASKET WITH OIL OR ANY
OTHER LIQUID.
4. 4. Place the ingredients in the
basket and then slide the basket
back into the appliance. The
(POWER) button on the LCD
display should light up.
5. 5. The steam air fryer should be in
Air Fry mode by default.
a. a. Press the (MODE) button
to switch Air Fry mode to
Steam mode. The STEAM
icon will illuminate.
NOTE: The temperature for
Steam mode is set to 212°F
and cannot be changed.
b. b. Press the button again
to switch to Combo mode.
NOTE: The AIR FRY and
STEAM icons will both
illuminate on the panel.
6. 6. Adjust the time and temperature
as needed using the “ “ or “ “
arrows. Time can be adjusted in
1-minute increments between
1-60 minutes. Temperature
can be adjusted in 5-degree
increments between 180°F to

USING YOUR STEAM AIR FRYER
13
steam air fryer will resume the
cooking cycle.
10. 10. If you need to turn the unit off
before the end of the cooking
cycle, hold down the button
for 3 seconds. The display will
read OFF and the fan may
continue to run up to 20 seconds.
11. 11. Slide the basket out of the steam
air fryer and place it on a pot
holder.
NOTE: Oil from the ingredients
will gather in the bottom of the
basket. Be careful when sliding
the basket out of the unit.
12. 12. To remove the ingredients, use
silicone tipped tongs, or carefully
pour ingredients out of the basket
onto a plate.
SET UP AND USING YOUR STEAM AIR FRYER
To order replacement parts please
contact our Customer Care Team.
855-233-9199
support@gowiseusa.com
Live Chat at gowiseusa.com
M-F 8:30am - 4:00pm MST
NOTES:
a. a. Rapid Air Technology reheats
the air inside the unit instantly.
Therefore, removing the basket
of the steam air fryer for a brief
period of time will not interrupt
the cooking process.
b. b. If using tongs or any other cooking
utensils, make sure to use non-
abrasive, non-metal tongs to
avoid scratching the ceramic
coating on the basket and the
crisper tray.

NOTES:
a. a. All presets (except Broil) are set
with a time and temperature for
Steam mode. To select a preset,
press the icon of the desired
preset and the steam air fryer
will set to time and temperature
of that preset. You can also
adjust the time of the selected
preset by using the “ “ and
“ “ arrows. See page 8 for
reference on cooking presets.
b. b. If the water tank does not
have enough water or runs out
of water during the cooking
cycle, the “ADD WATER” icon
will illuminate on the panel
and the steam air fryer will
beep continuously. Press the
button and remove the water
tank to fill with water.
8. 8. If you need to turn the unit off
before the end of the cooking
cycle, hold down the button
for 3 seconds. The display will
read OFF and the fan may
continue to run up to 20 seconds.
9. 9. Slide the basket out of the steam
air fryer and place it on a pot
holder.
10. 10. To remove the ingredients, use
silicone tipped tongs, or carefully
pour ingredients out of the basket
onto a plate.
14
STEAM MODE
1. 1. Fill up the water tank with water.
The water tank’s capacity is 4.5
cups and it is recommended to fill
the water tank to its full capacity.
2. 2. Insert the water tank and
basket into the steam air fryer
completely. The (POWER)
button should illuminate on the
control panel.
3. 3. Insert the water tray into the
bottom of the steam air fryer.
4. 4. Press the button to turn on
the steam air fryer. The steam
air fryer will be in default mode.
Press the (MODE) button
to switch to Steam mode. The
STEAM icon will illuminate.
5. 5. Adjust the time needed using the
“ “ or “ “ arrows. Time can be
adjusted in 1-minute increments
between 1-60 minutes. Hold
down the “ “ or “ “ arrows to
move through time quicker.
NOTE: The temperature for
Steam mode is set at 212°F and
cannot be adjusted.
6. 6. Once you have set the time
or selected a cooking preset
(optional), press the button
to start the cooking cycle. The fan
icon will illuminate to indicate that
the steam air fryer is heating.
7. 7. If you would like to make changes
at any time during the cooking
cycle, such as adding more time
or changing to a new preset,
press the button, make your
adjustments, and press the
button to resume.
SET UP AND USING YOUR STEAM AIR FRYER

fryer will beep continuously. Press
the button and remove the
water tank to fill with water.
7. 7. If you would like to make
changes at any time during the
cooking cycle, such as increasing
temperature, adding more time
or changing to a new preset,
press the button, make your
adjustments, and press the
button to resume.
8. 8. If you need to turn the unit off
before the end of the cooking
cycle, hold down the button
for 3 seconds. The display will
read OFF and the fan may
continue to run up to 20 seconds.
9. 9. Slide the basket out of the steam
air fryer and place it on a pot
holder.
10. 10. To remove the ingredients, use
silicone tipped tongs, or carefully
pour ingredients out of the basket
onto a plate.
15
COMBO MODE
1. 1. Fill up the water tank with water.
2. 2. Insert the water tank and
basket into the steam air fryer
completely. The button
should illuminate on the control
panel.
3. 3. Press the button to turn on
the steam air fryer. The steam
air fryer will be in Air Fry mode
by default. The AIR FRY icon will
illuminate on the panel.
4. 4. Once you have set your settings
for Air Fry mode, press the
button and the steam air fryer
will switch to Steam mode. The
STEAM icon will illuminate on the
panel. If desired, adjust the time
as needed using the “ “ or
“ “ arrows for Steam mode.
Time can be adjusted in 1-degree
increments.
NOTE: The temperature for
Steam mode is set at 212°F and
cannot be adjusted.
5. 5. Once you have set the time
for Steam mode, press the
button again and the STEAM and
AIR FRY icons will both illuminate
on the display.
6. 6. Press the button to start the
cooking cycle. The steam air fryer
will start cooking in Steam mode
then it will automatically switch to
Air Fry mode.
NOTE: If the water tank does not
have enough water or runs out of
water during the Steam cycle, the
“ADD WATER” icon will illuminate
on the panel and the steam air
SET UP AND USING YOUR STEAM AIR FRYER
NOTES:
a. a. Rapid Air Technology reheats
the air inside the unit instantly.
Therefore, removing the basket
of the steam air fryer for a brief
period of time will not interrupt
the cooking process.
b. b. If using tongs or any other cooking
utensils, make sure to use non-
abrasive, non-metal tongs to
avoid scratching the ceramic
coating on the basket and the
crisper tray.

CLEANING YOUR STEAM AIR FRYER
Clean the unit after every use.
It is recommended to empty the
water tank after each use if the
steam air fryer is not used often.
1. 1. Unplug the unit. ALWAYS WAIT
UNTIL THE UNIT HAS COOLED
TO A SAFE TEMPERATURE
BEFORE HANDLING.
2. 2. Wipe the outside of the unit with
a damp cloth.
3. 3. Wash the basket and crisper
tray with hot water, soap and a
non-abrasive sponge. You can
remove any stuck-on food by
using a degreasing liquid soap.
For any hard-to-remove food,
soak the basket and crisper tray
in hot water.
4. 4. Clean the inside of the appliance
with a lightly dampened, non-
abrasive sponge or cloth. Be
careful not to get the inside of
the appliance too wet and never
submerge in water.
5. 5. Scrub the heating element with
a cleaning brush to remove any
food debris.
16
Self Cleaning
The steam air fryer features a self-
cleaning function to clean limescale
out of the water tank after about 20
hours of use. We recommend using
the self-cleaning function after every
use if the appliance is not used often.
1. 1. Mix ½ ounce of vinegar and 2
cups of water thoroughly.
2. 2. Add the mixture to the water
tank. Insert the water tank in the
steam air fryer.
3. 3. Insert the basket into the
appliance and the steam air fryer
should turn on.
4. 4. Press the SELF CLEAN button
and the machine will begin the
self-cleaning process.
5. 5. Once the self-cleaning process is
complete, the steam air fryer will
automatically turn off.
6. 6. Remove the water tank and rinse
out the water tank with water. Fill
the water tank with water and
insert the water tank into the
steam air fryer. Press the SELF-
CLEAN button. This will help flush
out the vinegar and remove any
odd taste from the steam air
fryer. Repeat this step if you think
it is necessary.

TROUBLESHOOTING
If your GoWISE Steam Air Fryer
displays any error codes, please
contact our Customer Care Team.
855-233-9199
support@gowiseusa.com
Live Chat at gowiseusa.com
M-F 8:30am - 4:00pm MST
Problem Possible Cause Solution
The appliance is not
turning on
The appliance is not
plugged in
Plug the appliance into a grounded
wall socket.
You have not set the
timer
Set the timer using the control display to
the correct time on the appliance.
The basket is not
pushed into the unit
Push the basket into the unit (see pg. 12).
Food is not cooked
The basket has
been overfilled with
ingredients
Place smaller batches of ingredients in the
basket. Smaller batches are fried
more evenly.
The set temperature is
too low
Increase the temperature to the
required setting.
Food is cooked unevenly
Ingredient positioning
or overflow
Ingredients that lay on top or across from
each other (e.g. fries) need to be shaken
midway through cooking.
Fried snacks are not
crispy after frying
Some snacks are
crispier when
traditionally fried
Cook oven snacks or lightly brush some oil
onto the snacks for a crispier result.
Basket does not slide
into the fryer properly
Overfilled basket
Do not fill the basket beyond the
MAX fill indicator line.
White smoke comes out
of the fryer
It is normal for white
smoke to appear
when prepping greasy
ingredients
When frying greasy ingredients, a large
amount of oil will leak into the basket. The
oil produces white smoke and the basket
may heat up more than usual. This does
not affect the appliance or end food result.
The basket is still greasy Clean the unit properly after each use.
Fresh fries are fried
unevenly in the fryer
Potatoes are not fresh
Use fresh potatoes and place them in the
freezer for 30 minutes before air frying to
help them stay firm during frying.
Potato sticks have not
been rinsed properly
prior to frying
Make sure to rinse the potato sticks
properly to remove the starch
prior to frying.
17

WARRANTY
18
GoWISE USA warrants all products against defects in materials and
workmanship for one (1) year effective from the date of purchase.
GoWISE USA will replace any products that are found to be defective
due to manufacturer flaws based on eligibility. Refunds issued by
GoWISE USA must be purchased directly from GoWISE USA and are
only available to the original purchaser within the first 30 days. We do
not issue refunds for items bought by thirdparty retailers.
This warranty extends only to personal use and does not extend to
products that has been used for commercial, rental or any other use
this product was not intended for. There are no warranties other than
the warranties expressly set forth with each product.
This warranty is non-transferrable. GoWISE USA is not responsible
in any way for any damages, losses, or inconveniences caused by
equipment failure by user negligence, abuse, or use noncompliant with
the user manual or any additional safety, use, or warnings included in
the product packaging and manual.
This warranty only covers purchases within the 48 contiguous states
of United States of America. For purchases made outside the 48
contiguous states, such as AK, HI, PR, or Canada, we will replace the unit
under the one-year warranty upon receipt of a proven defect by video
or picture. However, the replacement will only ship to a freight forwarder
or address within the 48 contiguous United States. The consumer is
responsible for arranging shipment outside of the 48 contiguous states.
GoWISE USA assumes no liability for damage caused using this product
other than for its intended use or as instructed in the user manual.
Some states do not allow this exclusion or limitation of incidental or
consequential losses, so the foregoing disclaimer may not apply to you.
This warranty gives you specific legal rights and you may also have
other rights which may vary from state to state.
ALL EXPRESSED AND IMPLIED WARRANTIES INCLUDING THE
WARRANTY OF MERCHATIBILITY, ARE LIMITED TO THE PERIOD OF
THE LIMITED WARRANTY.
NOTE: General Warranty excludes refurbished / auction items.
This warranty does not cover products that are purchased in the
following conditions:
• Open Box • Like New • Used • Renewed

WARRANTY
19
Additional 60-Days Warranty
You can extend your 1-year warranty by an additional 60 days. Log onto
www.gowiseproducts.com/apps/ product-registration and register
your product within the first 14 days of your purchase for the extended
warranty.
DEFECTIVE PRODUCTS & RETURNS
If your product is defective within the 1-year warranty period, please
email our Customer Care Team at support@gowiseusa.com. To expedite
your issue, please provide the 4 items below:
1. 1. Copy of the invoice, order information, or gift receipt showing the
date of purchase
2. 2. Serial number, usually found on a sticker located on the bottom
on back of the unit
3. 3. Picture or video of the issue or defect that you are experiencing
4. 4. Shipping address information
Authorized Retailers:
Amazon
GoWISE USA
WayFair
Houzz
Home Depot
etailz
MorningSave.com
Bed Bath & Beyond
Jet.com
Walmart.com
Macy’s
kroger.com
weightwatchers.com

• To ensure the correct use of
this appliance, read these
instructions carefully and
thoroughly.
• Please keep this manual for
future reference.
• Thank you for purchasing this
GoWISE USA Steam Air Fryer.
WWW.GOWISEUSA.COM
855-233-9199
support@gowiseusa.com
Live Chat at gowiseusa.com
M-F 8:30am - 4:00pm MST