www.klarstein.com
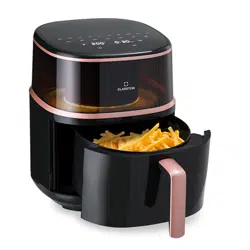
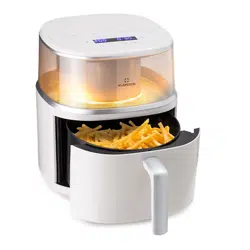
AIR BLOOM
Heißluftfritteuse mit Dampfgaren
Air Fryer with Steam Cooking
Friteuses à air chaud et cuisson
vapeur
Freidoras de aire caliente con coc-
ción al vapor
Friggitrice ad aria con cottura a
vapore
10040495
10040496
10040497


3
DE
Sehr geehrter Kunde,
wir gratulieren Ihnen zum Erwerb Ihres Gerätes. Lesen Sie
die folgenden Hinweise sorgfältig durch und befolgen Sie
diese, um möglichen Schäden vorzubeugen. Für Schäden,
die durch Missachtung der Hinweise und unsachgemäßen
Gebrauch entstehen, übernehmen wir keine Haftung.
Scannen Sie den folgenden QR-Code, um Zugriff auf die
aktuellste Bedienungsanleitung und weitere Informationen
rund um das Produkt zu erhalten.
Sicherheitshinweise 5
Geräteübersicht 7
Verwendungshinweise 8
Verwendung 10
Reinigung und Wartung 16
Fehlerbehebung 17
Spezielle Entsorgungshinweise für Verbraucher in Deutschland 19
Hinweise zur Entsorgung 21
Hersteller & Importeur (UK) 21
INHALT

4
DE
TECHNISCHE DATEN
Artikelnummer 10040495, 10040496, 10040497
Stromversorgung 220–240 V ~ 50-60 Hz
Nennleistung 1500 W
Topfgröße 7,5 l
Fassungsvermögen des
Wassertanks
300 ml
5
DE
SICHERHEITSHINWEISE
Allgemeine Hinweise
• Waschen Sie das Gehäuse niemals mit ießendem Wasser ab, um die
elektrischen Komponenten nicht zu beschädigen.
• Lassen Sie kein Wasser oder andere Flüssigkeiten in das Gerät eindringen, um
einen Stromschlag zu vermeiden.
• Kinder ab 8 Jahren, psychisch, sensorisch und körperlich eingeschränkte
Menschen dürfen das Gerät nur benutzen, wenn sie vorher von einer für
sie verantwortlichen Aufsichtsperson ausführlich mit den Funktionen und
den Sicherheitsvorkehrungen vertraut gemacht wurden und die damit
verbundenen Risiken verstehen.
• Prüfen Sie vor der Benutzung die Spannung auf dem Typenschild.
Schließen Sie das Gerät nur an Steckdosen an, die der Spannung des Geräts
entsprechen.
• Verwenden Sie dieses Produkt nicht, wenn der Stecker, das Netzkabel oder
das Produkt beschädigt ist.
• Falls das Netzkabel oder der Stecker beschädigt sind, müssen sie vom
Hersteller, einem autorisierten Fachbetrieb oder einer ähnlich qualizierten
Person ersetzt werden.
• Achten Sie darauf, dass Kinder nicht mit dem Gerät spielen.
• Fassen Sie den Stecker oder das Bedienfeld nicht mit nassen Händen an.
• Stellen Sie dieses Produkt nicht auf oder neben Tischdecken, Vorhänge und
andere brennbare Materialien.
• Lassen Sie um das Gerät herum mindestens 10 cm Platz zu allen Seiten.
Stellen Sie keine Gegenstände auf das Gerät.
• Lassen Sie das Gerät während des Gebrauchs nicht unbeaufsichtigt.
VORSICHT
Verbrennungsgefahr! Bei Öffnen der Ofentür kann heißer Dampf austreten.
Halten Sie einen Sicherheitsabstand ein, um ein Verbrühen zu vermeiden.
• Stecken Sie keine Fremdkörper in die Geräteöffnungen.
• Verwenden Sie zur Reinigung keinen Dampfreiniger.
• Vergewissern Sie sich, dass das Gerät ausgeschaltet ist, bevor Sie die Lampe
austauschen, um einen Stromschlag zu vermeiden.
• Das Gerät darf nicht in einen Schrank eingebaut werden, da es sich sonst
überhitzt.

6
DE
Hinweise zum sicheren Gebrauch
VORSICHT
Verbrennungsgefahr! Während des Gebrauchs wird das Gerät heiß. Achten Sie
darauf, dass Sie die Heizelemente im Inneren des Ofens nicht berühren und
benutzen Sie Ofenhandschuhe.
• Ziehen Sie vor der Reinigung den Stecker aus der Steckdose und lassen Sie
das Gerät komplett abkühlen.
• Installieren Sie das Gerät auf einer trockenen, achen Oberäche und lassen
Sie um das Gerät herum mindestens 10 cm Platz in alle Richtungen, damit die
Luft ausreichend zirkulieren kann.
• Schließen Sie das Gerät nicht an Steckdosen an, an die bereits andere
Küchengeräte angeschlossen sind.
• Stellen Sie das Gerät nicht in die Nähe von brennbaren Gegenständen.
Installieren Sie es weit entfernt von Fenstervorhängen, Türvorhängen,
Tapeten und ähnlichen Gegenständen, um einen Brand zu verhindern. Stellen
oder legen Sie keine Gegenstände auf das Gerät.
• Reinigen Sie die Türscheibe des Ofens mit einem weichen und feuchten Tuch.
Verwenden Sie keine Scheuermittel oder Metallschaber, da sie die Oberäche
zerkratzen.
• Schließen Sie das Gerät nicht an externe Zeitschaltuhren oder ferngesteuerte
Steckdosen an.
• Prüfen Sie vor dem Gebrauch, ob Ihr Kochgeschirr für dieses Produkt geeignet
ist. Wir empfehlen Ihnen hitzebeständige Glasbehälter oder Keramikbehälter
zu benutzen. Befüllen Sie den Behälter maximal auf zwei Drittel.
• Überfüllen Sie nicht den Wassertank. Orientieren Sie sich beim Befüllen an der
MAX-Markierung im Tank.
• Stellen Sie keine Behälter auf die geöffnete Ofentür.
• Erhitzen Sie keine Lebensmittel in einem versiegelten Behälterww, da
der Behälter sonst explodieren kann. Füllen Sie die Lebensmittel vor der
Erwärmung in ein hitzebeständiges Gefäß um.

7
DE
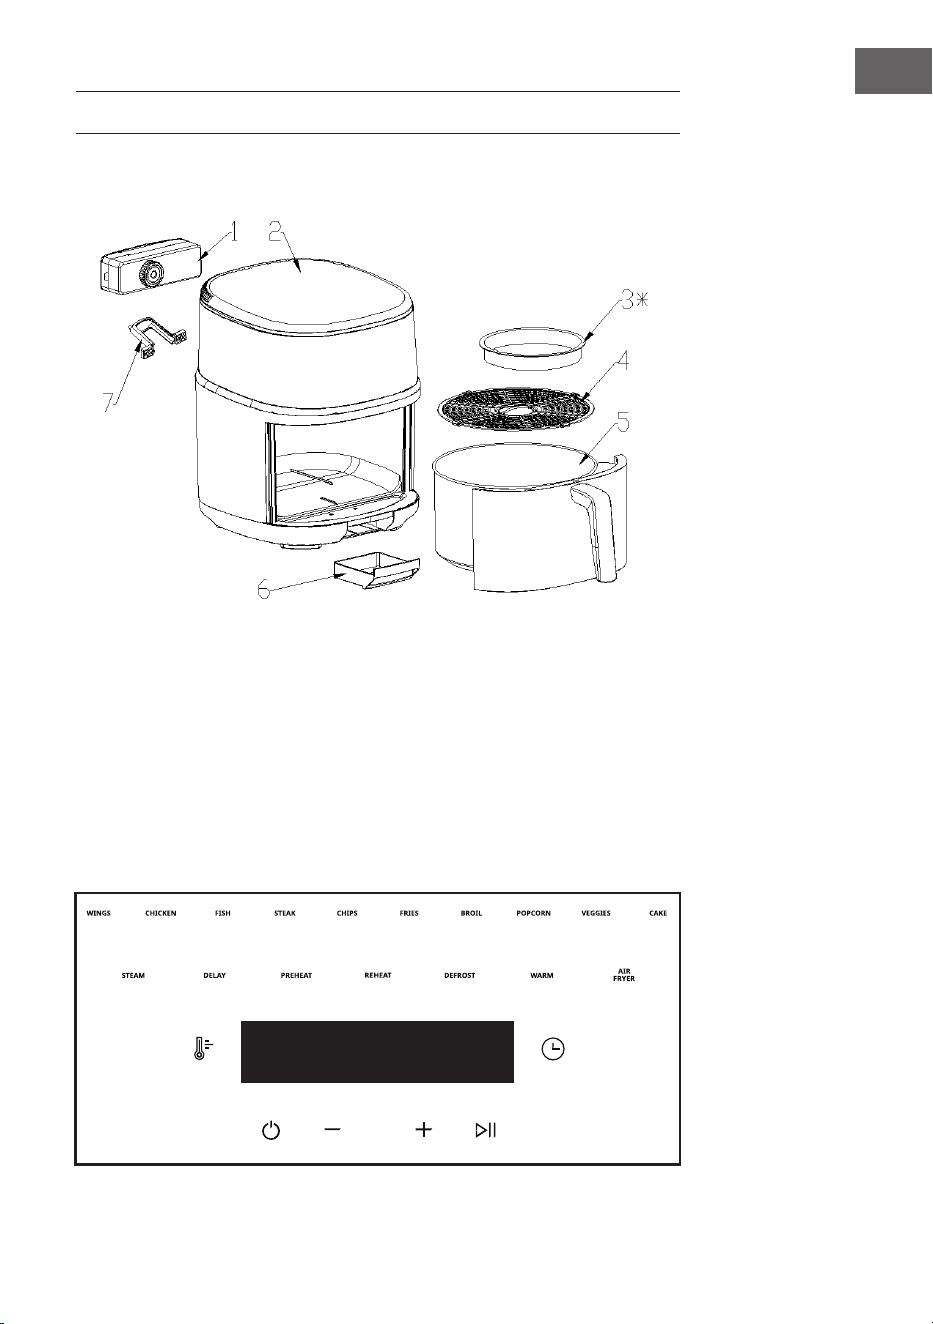
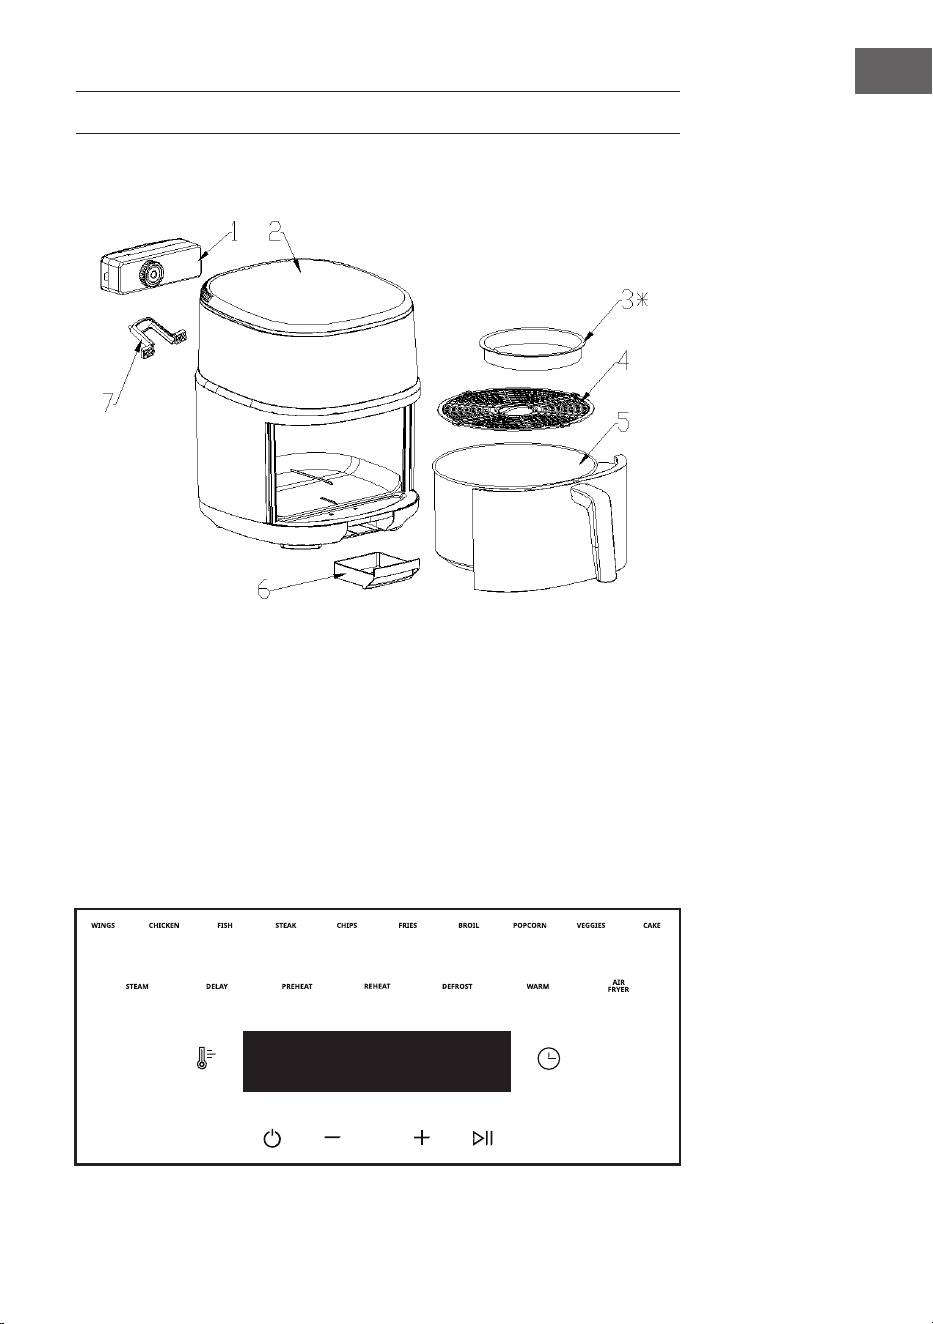
GERÄTEÜBERSICHT
Teile des Geräts
1 Wassertank
2 Gehäuse
3 Kuchenform (optional)
4 Frittiereinsatz
5 Topf
6 Abtropffach
7 Abstandshalter
Intelligentes Bedienfeld

8
DE
VERWENDUNGSHINWEISE
1. Entnehmen Sie das Gerät aus der Verpackung und bringen Sie den
Abstandshalter an der Rückseite des Geräts an. Stellen Sie das Gerät auf eine
stabile und ebene Oberäche. Halten Sie einen Mindestabstand von 20 cm
zur Rückseite und 10 cm zu den Seiten ein, um eine ausreichende Belüftung
zu gewährleisten. Achten Sie darauf, dass sich Vorhänge, Wandbehänge
und andere leicht brennbaren Materialien in sicherer Entfernung zum Gerät
benden.
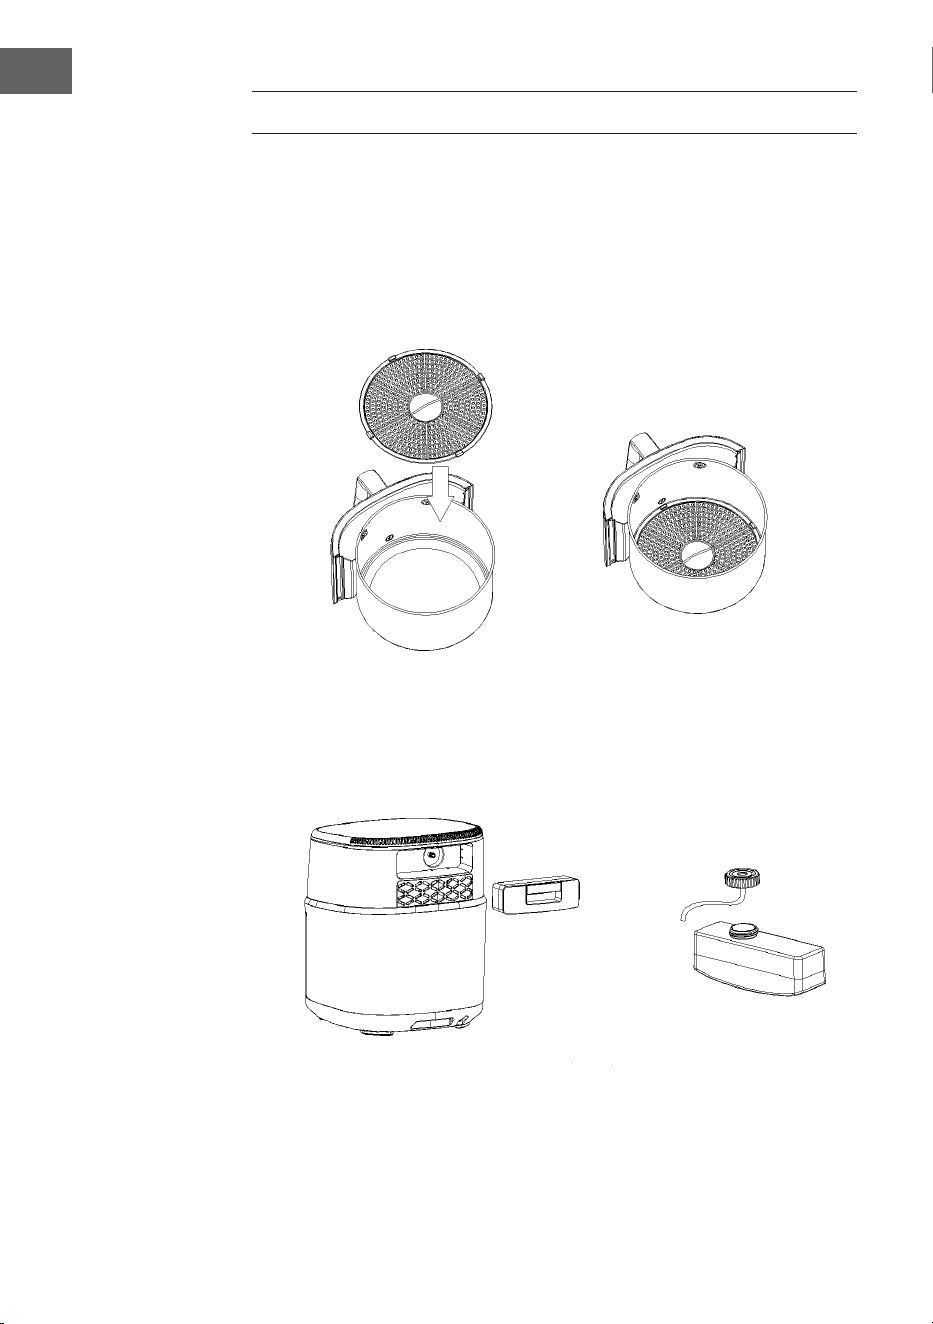
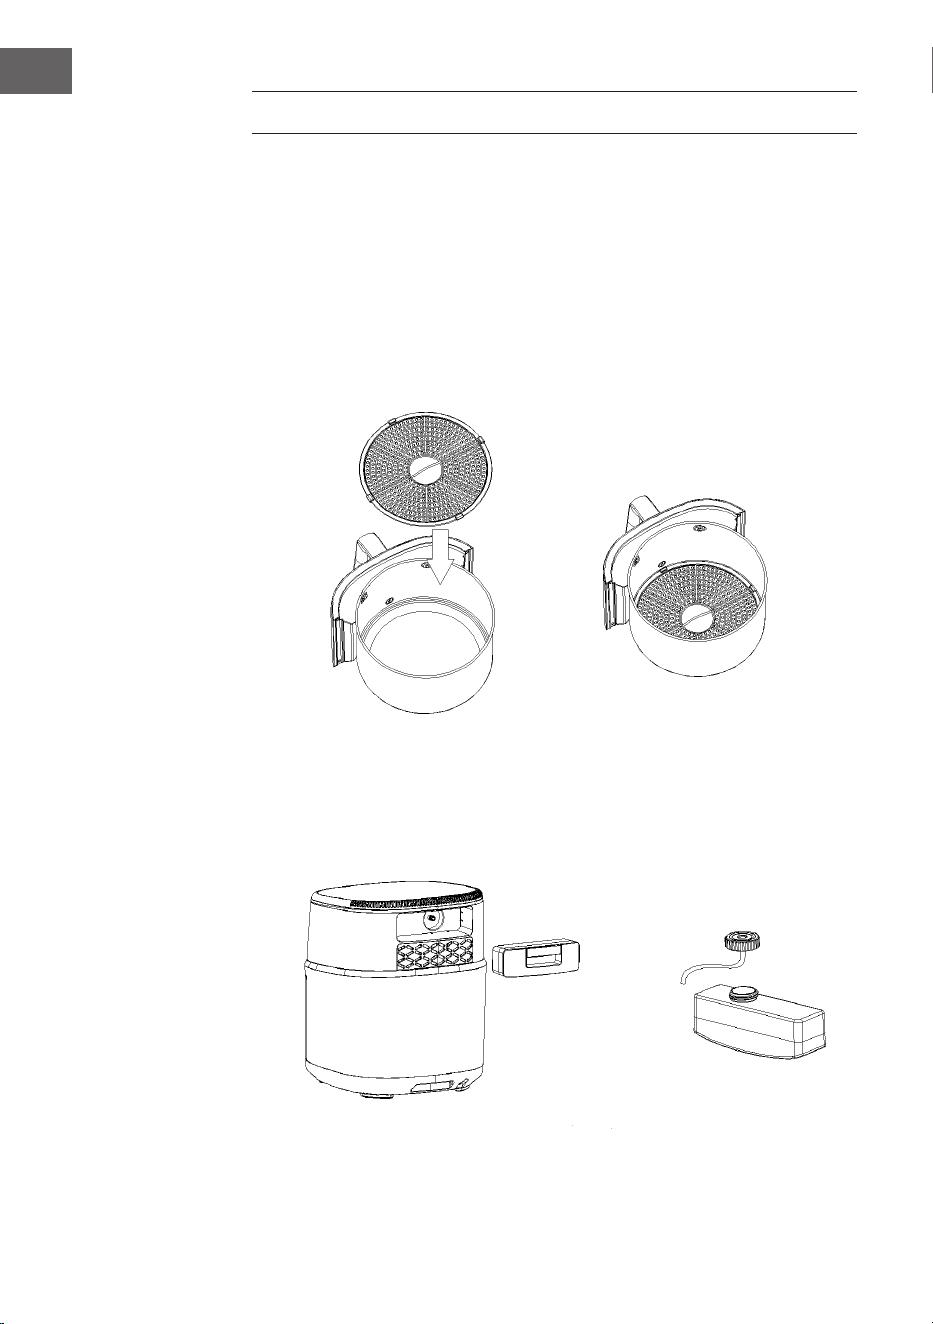
2. Setzen Sie nach dem Herausziehen des Topfes den Frittiereinsatz ach in den
Topf ein (siehe Abbildung unten).
3. Legen Sie die Lebensmittel auf den Frittiereinsatz und schieben Sie
anschließend den Topf in das Gehäuse zurück.
4. Entnehmen Sie den Wassertank, befüllen Sie diesen mit Wasser und
verschließen Sie diesen anschließend wieder. Setzen Sie den Wassertank
wieder im Gehäuse ein (siehe Abbildung unten).

9
DE
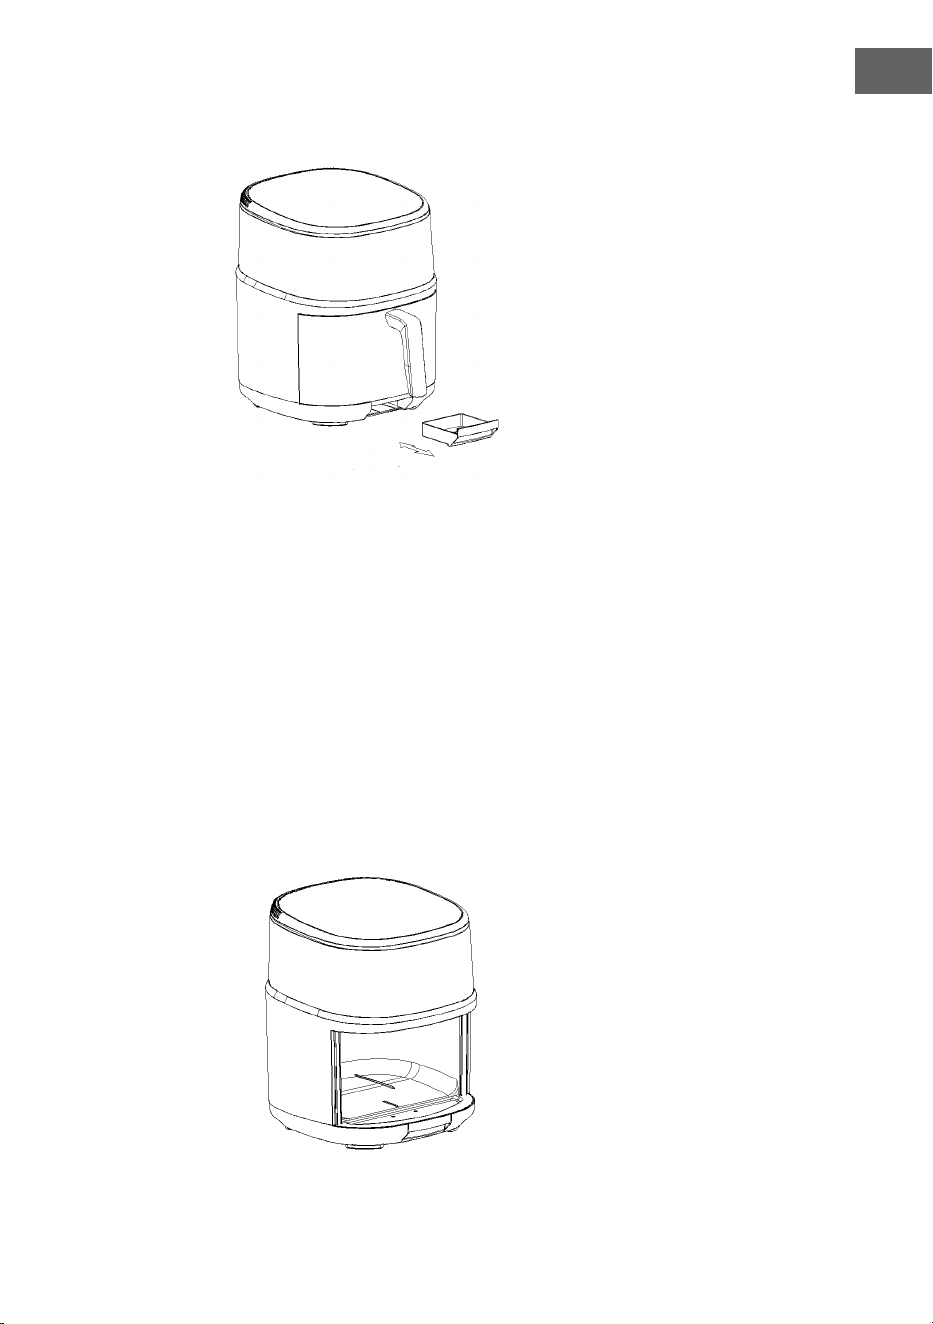
5. Entnehmen Sie das Abtropffach, überprüfen und entleeren Sie dieses und
setzen Sie es anschließend wieder im Gehäuse ein (siehe Abbildung unten).
Hinweise
• Für unterschiedliche Zubereitungsoptionen wird unterschiedliches Zubehör
benötigt.
• Entnehmen Sie nach der Zubereitung den Frittiereinsatz, das Gitter und die
Kuchenform, mit Handschuhen oder anderer Schutzausrüstung, aus dem
Topf.
• Befüllen Sie den Topf nicht vollständig mit Lebensmitteln und achten Sie
darauf, dass zur obersten Kante des Topfes ein Mindestabstand von 30
mm eingehalten wird. Es ist wichtig, dass die Luft im Geräteinneren richtig
zirkulieren kann. Außerdem kann es vorkommen, dass Lebensmittel sich nach
dem Erhitzen, abhängig von der jeweiligen Situation, ausdehnen.
• Das Gerät kann nur dann richtig funktionieren, wenn der Topf sich richtig im
Gerät bendet. Sollte dies nicht der Fall sein, wird auf dem Bildschirm „OPEN“
angezeigt.
• Verwenden Sie in der Nähe der in der Abbildung unten gezeigten Stelle keine
magnetischen Objekte während das en Sie das Gerät an, um Verletzungen zu
vermeiden.
• Stellen Sie sicher, dass sich das Ansaugrohr an der Unterseite des
Wassertanks bendet.

10
DE
VERWENDUNG
Vor der ersten Benutzung
1. Entfernen Sie das gesamte Verpackungsmaterial, befestigen Sie den
Abstandshalter und platzieren Sie das Gerät auf einer stabilen, horizontalen
Oberäche.
2. Reinigen Sie den Topf, den Frittiereinsatz, die Kuchenform und anderes
Zubehör mit heißem Wasser, Flüssigspülmittel und einem weichen Schwamm.
3. Befüllen Sie den Wassertank mit Wasser (es wird die Verwendung von
destilliertem oder puriziertem Wasser empfohlen).
4. Reiben Sie das Geräteinnere und das Geräteäußere mit einem Tuch ab.
5. Geben Sie bei der ersten Verwendung des Geräts keine Lebensmittel in den
Topf. Befüllen Sie den Wassertank mit puriziertem Wasser. Verwenden Sie
die voreingestellte Funktion „Fish“ (Fisch) und lassen Sie diese durchlaufen
(mit gleichzeitig aktivierter Dampffunktion). Bei der ersten Verwendung
kann ein leichter Rauchgeruch auftreten. Dies ist normal und kein Grund zur
Beunruhigung.
Verwendung
Wenn das Gerät eingeschaltet wird, ertönt ein Piepton. Die Lichter der
Digitalanzeige und der Anzeigeleuchten blinken kurz auf und gehen anschließend
aus. Lediglich die Anzeigeleuchte blinkt langsam auf, was bedeutet, dass sich
das Gerät im Standbymodus bendet. Legen Sie die Zutaten in den sauberen
Topf und schieben Sie den Topf in das Gehäuse. Befüllen Sie den Wassertank mit
Wasser. Stecken Sie den Netzstecker in die Steckdose und drücken Sie die Taste .
Die Digitalanzeige leuchtet auf. Wählen Sie mit dem Funktionsregler, abhängig
von den gewählten Lebensmitteln, die gewünschte Funktion, Zubereitungszeit
und Temperatur aus. Drücken Sie die Taste
⏯, um die Zubereitung automatisch zu
starten.
Hinweis: Dieses Gerät verwendet das Prinzip der Lichtwellenröhrenheizung zum
Erhitzen, und die Beleuchtung des Geräts kann nicht vom Nutzer reguliert werden.
Funktionsauswahl
1. Wenn die Taste gedrückt wird, leuchten alle Lichter des Bedienfeldes auf,
was bedeutet, dass sich das Gerät nun in der Funktionsauswahl bendet.
2. Wählen Sie das Funktionsmenü aus. Die entsprechende
Funktionsmenüleuchte leuchtet auf. Drücken Sie zum Starten der Zubereitung
die Taste
⏯.

11
DE
Beschreibung der Tastensymbole
Symbol Nahrungsmittel/
Funktion
Symbol Nahrungsmittel/
Funktion
WINGS Flügel VEGGIES Gemüse
CHICKEN Huhn CAKE Kuchen
FISH Fisch DELAY Verzögerung
STEAK Steak PREHEAT Vorheizen
CHIPS Chips REHEAT Aufwärmen
FRIES Pommes frites DEFROST Abtauen
BROIL Grill WARM Erhitzen
POPCORN Popcorn
AIR
FRYER
Heißluftgaren
Hinweis
• Die Hauptfunktionstaste kann direkt ausgeführt werden. Sollte sich das Gerät
im Standbymodus benden, muss zunächst die Taste
⏯ gedrückt werden,
damit die Funktionstaste funktioniert.
• Die zusätzliche Funktionstaste kann nicht allein verwendet werden. Es handelt
sich dabei um eine Zusatzfunktion für die Hauptfunktion und kann nur in
Kombination mit dieser verwendet werden.
• Das Gerät enthält eine Vielzahl an Kombinationen von voreingestellten
Kombinationen von Zubereitungszeit und Temperatur, abhängig von den
gewählten Lebensmitteln.
12
DE
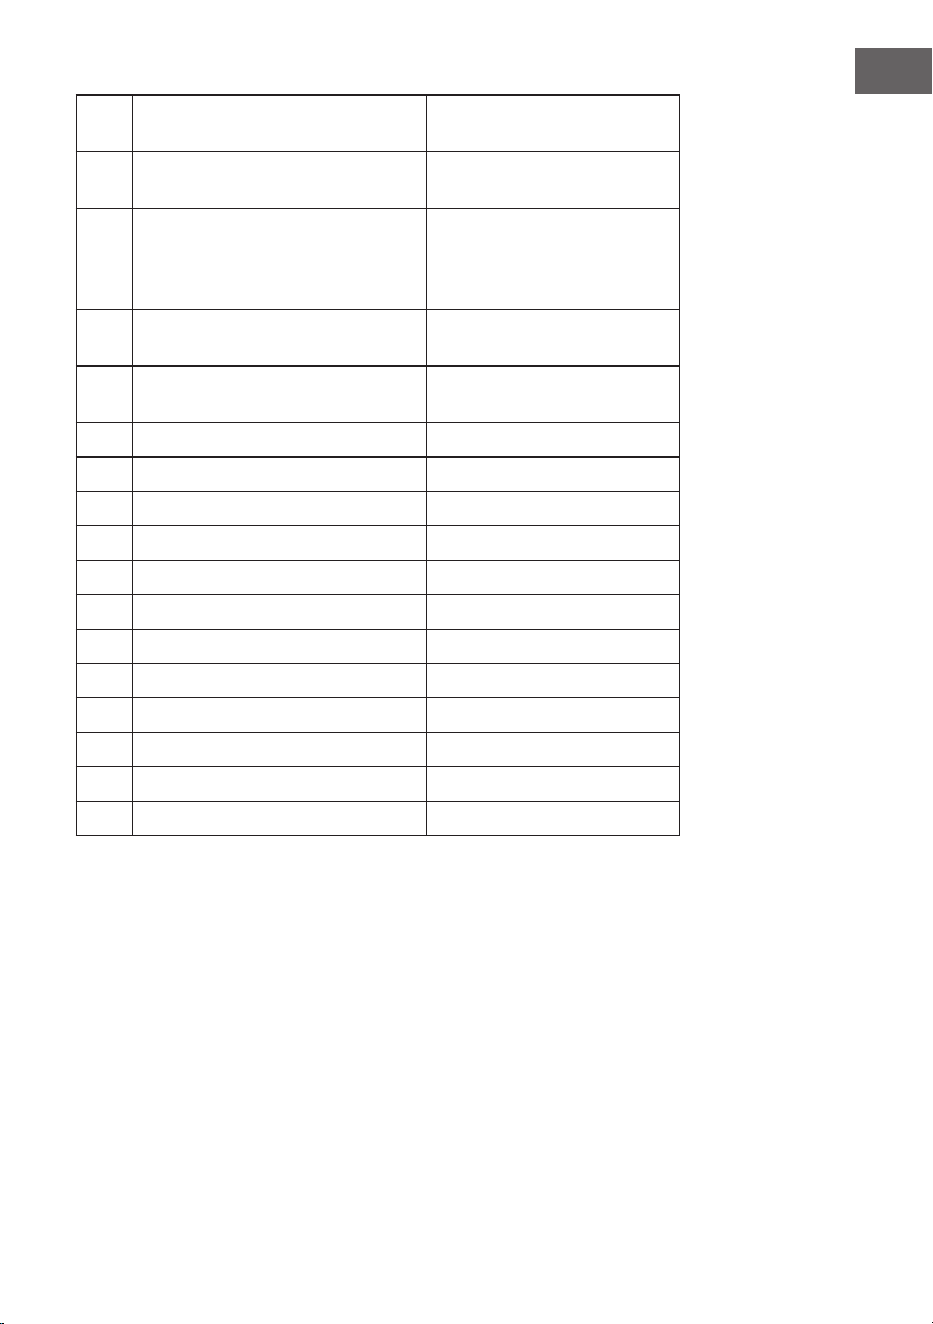
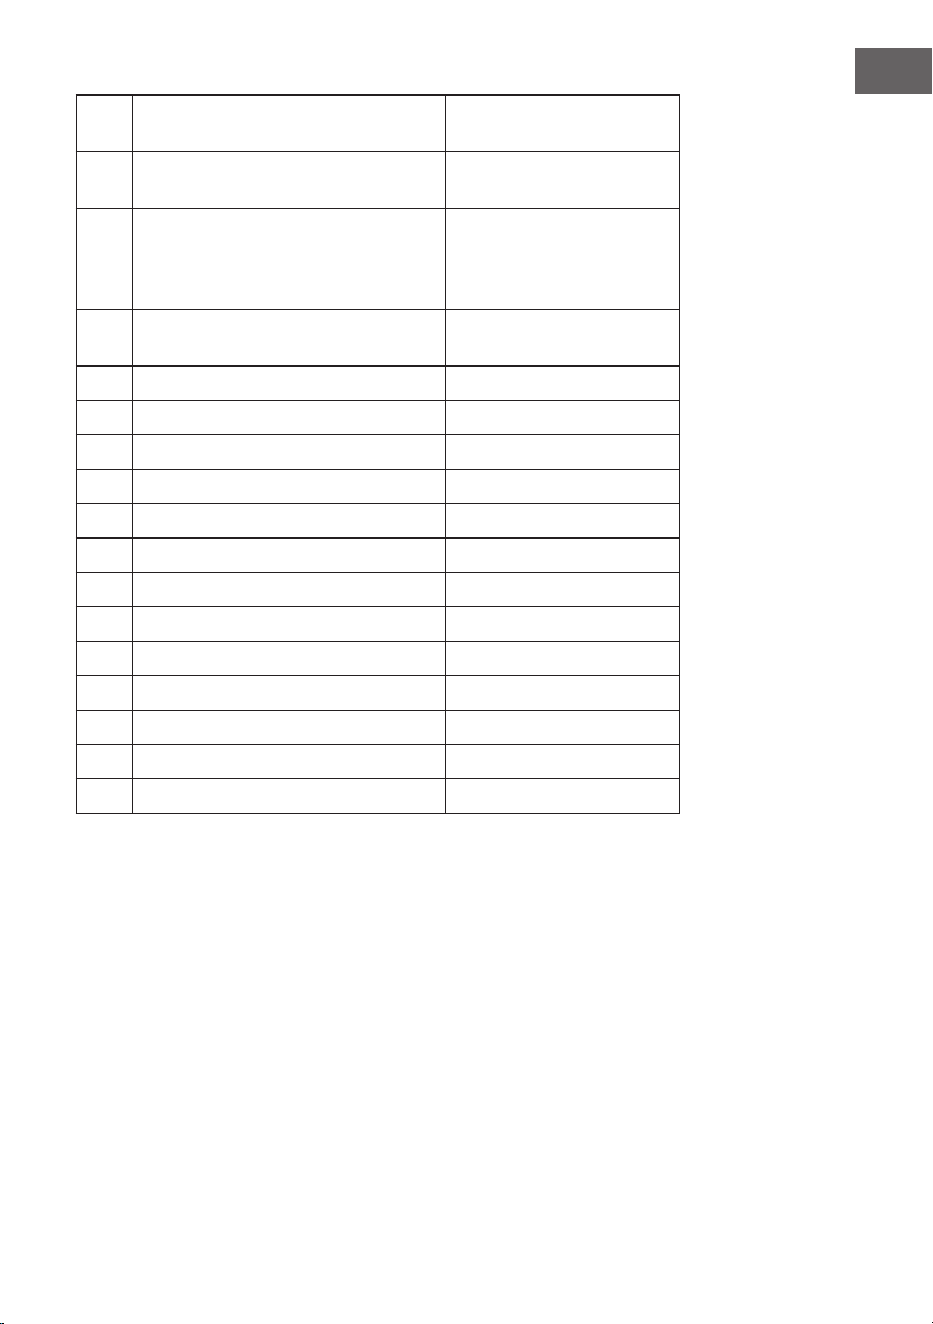
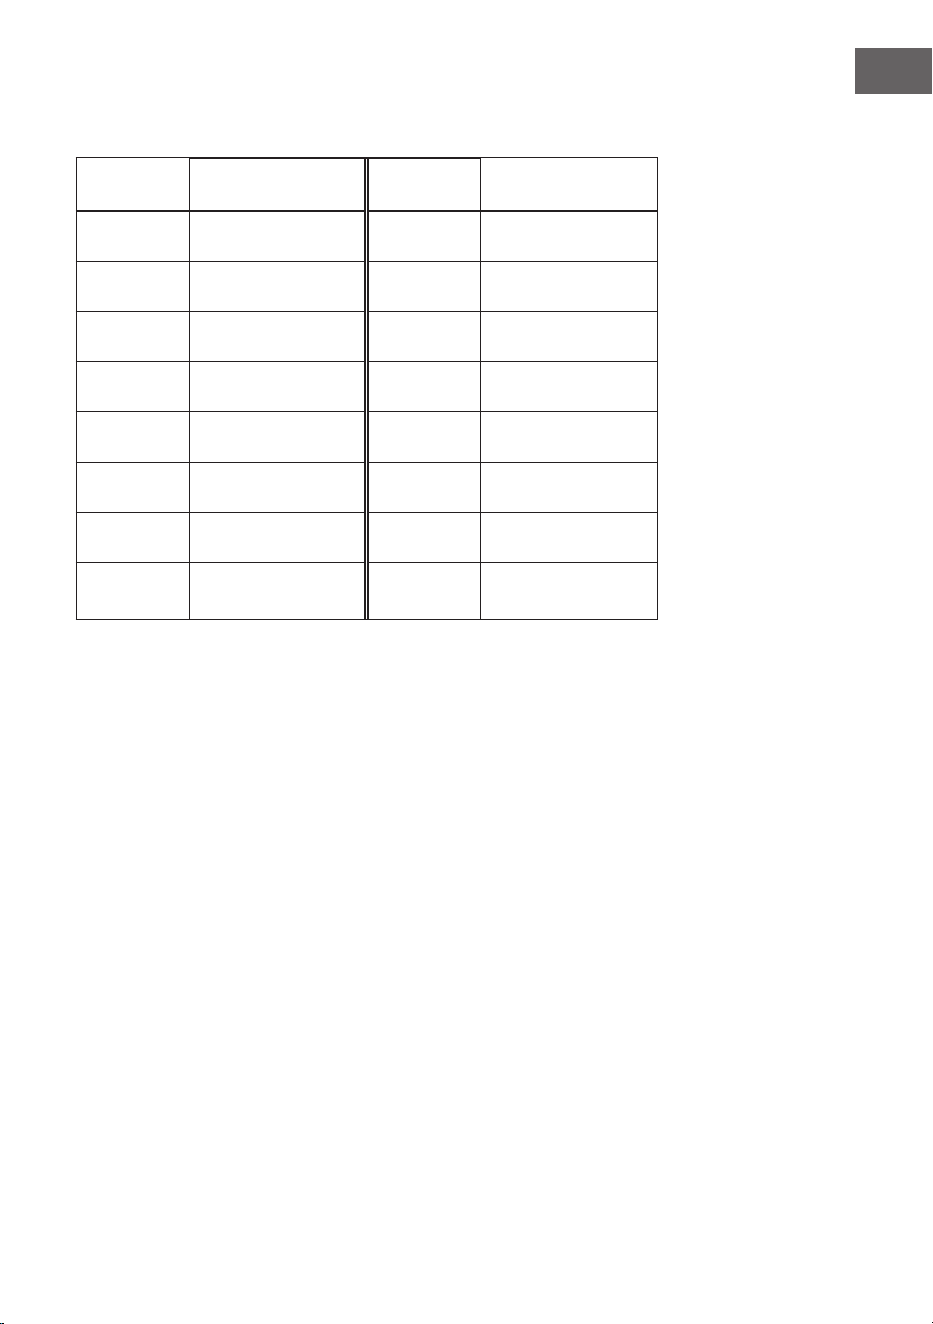
Nr. Funktionstaste Eingestellte
Temp. (°C)
Empfohlene
Temp. (°C)
Voreinge-stellte
Zeit (min)
Em-pfohlene
Zeit (min)
1 WINGS 190 50-200 15 1-60
2 CHICKEN 200 50-200 30 1-60
3 FISH 200 50-200 14 1-60
4 STEAK 200 50-200 12 1-60
5 CHIPS 180 50-200 10 1-60
6 FRIES 200 50-200 25 1-60
7 BROIL 190 50-200 40 1-60
8 POPCORN 200 50-200 25 1-60
9 VEGGIES 70 40-70 480 1-480
10 CAKE 140 50-180 35 1-60
11 DELAY - 50-200 60 10-540
12 PREHEAT 200 50-200 5 1-60
13 REHEAT 100 80-200 5 1-30
14 DEFROST 45 40-80 30 1-60
15 WARM 65 40-80 30 1-480
16 AIR FRYER 200 70-200 30 1-60
Hinweis
• Die oben genannten Einstellungen sind Richtwerte. Es wird nicht garantiert,
dass dies die beste Einstellung für von Ihnen verwendeten Zutaten ist, da
diese in Ursprung, Form, Größe und Marke variieren können. Passen Sie die
Einstellungen der jeweiligen Situation an. Je größer die Lebensmittelmenge,
desto mehr Zeit wird für die Zubereitung benötigt.
• Während der Zubereitung den Topf herauszuziehen und die Lebensmittel
zu wenden kann dazu beitragen, dass die Lebensmittel gleichmäßiger und
besser zubereitet werden.
• Wenn die Zutaten nicht gar genug sein sollten, geben Sie diese wieder in den
Topf zurück und bereiten Sie diese mit angepasster Zeiteinstellung weiter zu.
• Marinade sollte vollständig in die Lebensmittel eingezogen sein, um einen
besseren Geschmack zu erreichen.
• Wenn Sie einen höheren Feuchtigkeitsgehalt der Lebensmittel erreichen
möchten, wählen Sie die Dampffunktion aus.
13
DE
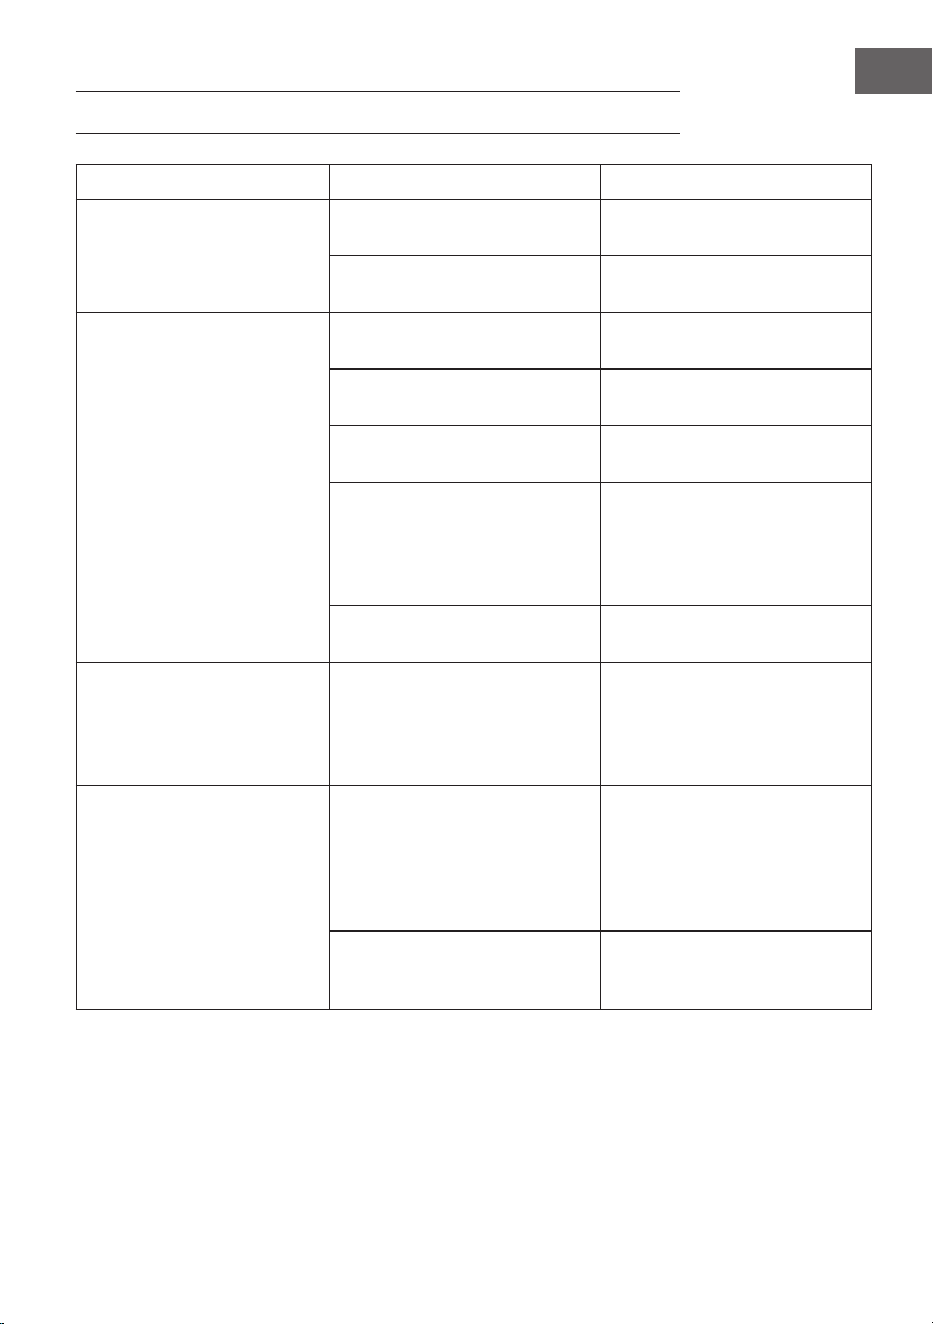
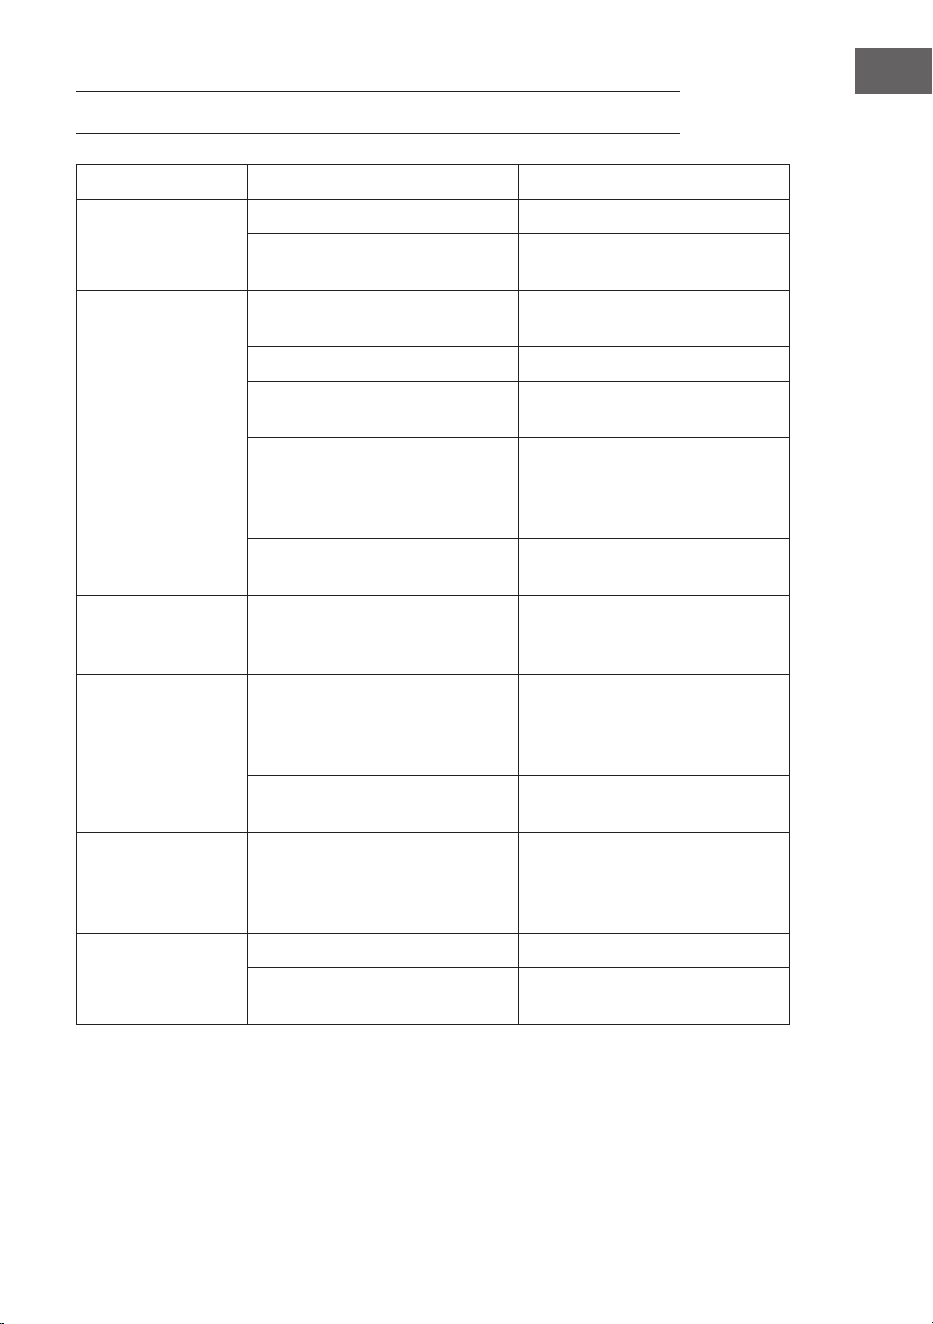
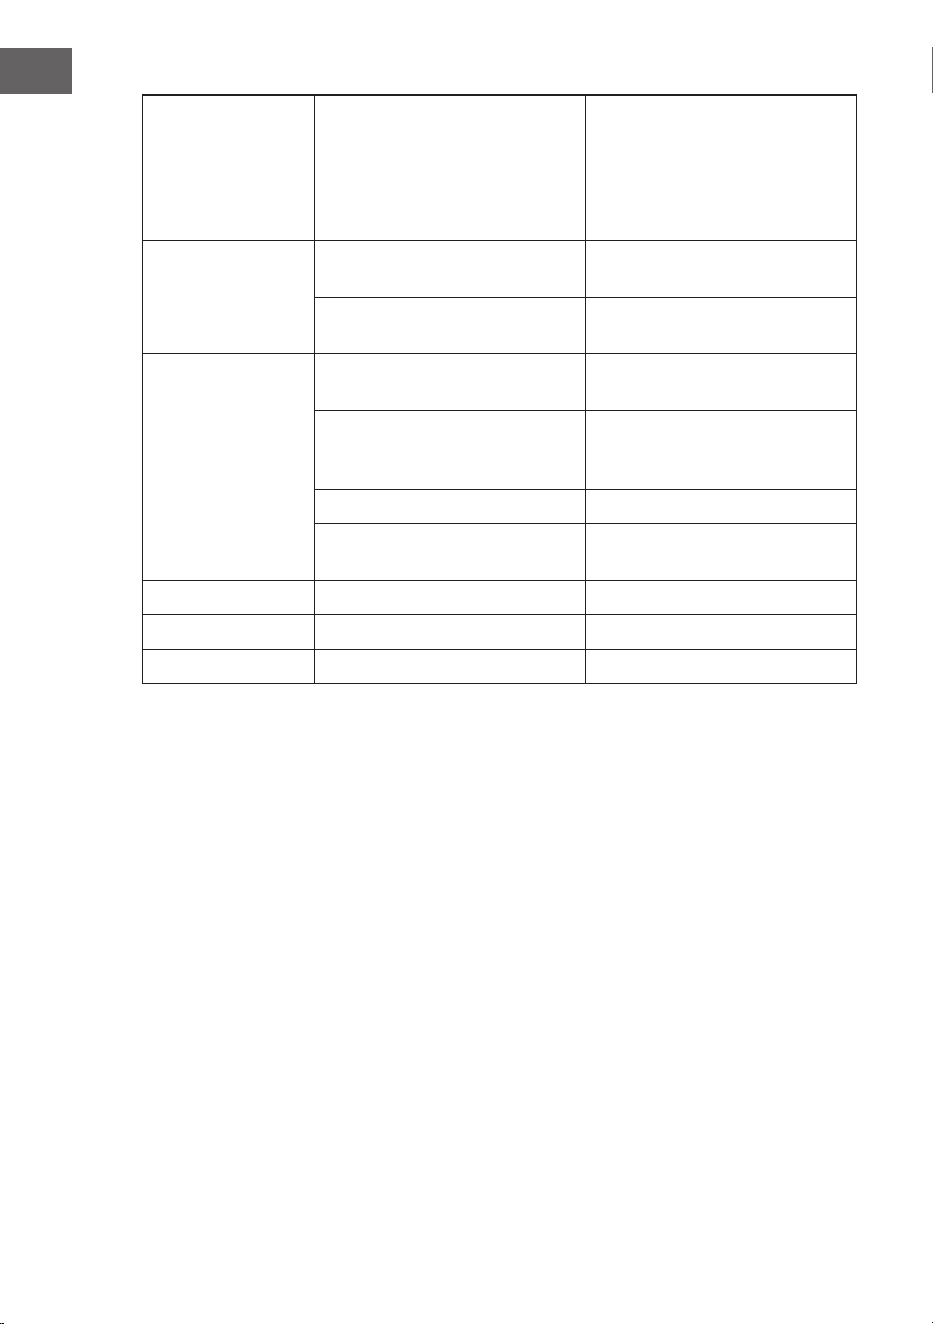
Nr. Steuerung der Dampffunktion Hinweise
1 -nach 5 min Start der Dampffunktion
-Abschaltung in der letzten Minute
-
2 - nach 7 min Start der Dampffunktion
- Abschaltung für eine Minute
- 2 min nach Drehung Start
- Abschaltung in der letzten Minute
Drehung nach der Hälfte der
Zeit
3 nach 8 min Start der Dampffunktion
-
4 nach 5 min Start der Dampffunktion
-
5 nach 5 min Start der Dampffunktion -
6 -
7 nach 5 min Start der Dampffunktion -
8 - -
9 - -
10 - -
11 - -
12 - -
13 - -
14 - -
15 - -
16 - -

14
DE
Zeit- und Temperatureinstellung
Die Temperatur und die Zeit jeder Funktion kann entsprechend angepasst
werden (siehe Tabelle oben), ganz nach dem individuellen Geschmack und dem
gewünschten Gargrad. Wenn Sie die Tasten
oder drücken, leuchtet die
entsprechende Anzeigeleuchte auf. Drücken Sie anschließend zur Anpassung von
Zeit oder Temperatur die Tasten
oder . Sobald ein Piepton erklingt hört die
Leuchtanzeige auf zu blinken.
Hinweis: Die Betriebszeit- und -temperatur kann während des Betriebszustands
angepasst werden.
Dampffunktion
Nachdem eine Hauptfunktion ausgewählt wurde, kann die Dampffunktion
zusätzlich ausgewählt werden, um einen gewissen Feuchtigkeitsanteil in den
Lebensmitteln zu erhalten.
Hinweis:
• Bei der Dampffunktion handelt es sich um eine Zusatzfunktion, welche nicht
allein verwendet werden kann.
• Der Dampfanteil wurde den verschiedenen Funktionen entsprechend
eingestellt. Es handelt sich um ein festgelegtes Sprühverfahren, welches nicht
angepasst werden kann.
• Stellen Sie vor der Verwendung der Dampffunktion sicher, dass sich
ausreichend Wasser im Wassertank bendet.
• Die Dampftemperatur ist sehr hoch und der Verdampfungseffekt seht gut.
Es kann daher sein, dass Sie den Dampf visuell nicht wahrnehmen werden
(der Dampfeffekt kann abhängig von der im Wassertank bendlichen
Wassermenge beurteilt werden).
• Die eingestellte Temperatur wird durch die Verwendung der Dampffunktion
weder erhöht noch gesenkt.
Warnung bei niedrigem Wasserstand
Wenn das Symbol
aufblinkt, weist dies darauf hin, dass das Wasser im
Wassertank aufgefüllt werden muss. Sobald der volle Wassertank wieder in das
Gerät eingesetzt wurde, erlischt das Symbol.
Hinweise
• Wenn die Dampffunktion nicht zusätzlich eingestellt wurde, wird auch bei
niedrigem Wasserstand im Wassertank nicht gewarnt. Dies hat keinen Einuss
auf den Betrieb des Geräts.
• Es wird empfohlen, den Wassertank mit destilliertem oder puriziertem
Wasser zu befüllen.
• Stellen Sie sicher, dass kein Wasser auf oder in das Gerät gelangt.

15
DE
Pausenfunktion
Wenn Sie während der Zubereitung die Taste
⏯ drücken, wird die Zubereitung
automatisch unterbrochen. Die Anzeigeleuchte der zuvor ausgewählten Funktion
leuchtet weiterhin auf. Die Digitalanzeige zeigt „READY“ und
⏯ blinkt. Sobald Sie
erneut die Taste
⏯ drücken, wird die Zubereitung fortgesetzt.
Hinweis
• Wenn im Pausenzustand länger als 10 Minuten lang keine Taste gedrückt
wird, wird das Gerät automatisch in den Standbymodus versetzt.
• Während und unmittelbar nach der Zubereitung sind der Topf und das
verwendete Zubehör sehr heiß und können nicht mit der bloßen Hand
berührt werden.
• Wenn Sie den Topf während des Betriebszustands herausziehen, wird die
Zubereitung sofort pausiert.
Automatisches Starten
Dieses Gerät verfügt über eine Funktion, mithilfe die Zeit, nach welcher das Gerät
gestartet werden soll, festgelegt werden kann. Passen Sie die Kochfunktion an und
drücken Sie anschließend die Taste DELAY. Stellen Sie die gewünschte Zeit ein und
drücken Sie, damit das Gerät zu dieser Zeit gestartet wird, die Taste
⏯.
Hinweis
• Wenn die Zeit bis zum automatischen Starten festgelegt wurde, sind alle
Tasten, mit Ausnahme der Tasten und
⏯ blockiert.
• Diese Funktion kann nicht für das Auftauen und das Warmhalten verwendet
werden.
Vorheizen
Wählen Sie diese Funktion in Abhängigkeit von den Anforderungen aus. Drücken
Sie, wenn sich keine Lebensmittel im Topf benden, im Standbymodus die Taste
PREHEAT . Drücken Sie anschließend die Taste
⏯. Das Gerät wird nun vorgeheizt.
Sobald ein Alarmton erklingt, ist der Vorheizvorgang abgeschlossen. Entnehmen
Sie den Topf, legen Sie die bereits vorbereiteten Lebensmittel hinein und
schieben Sie den Topf wieder in das Gerät hinein. Der Betrieb wird anschließend
automatisch gestartet.
Hinweis: Die Vorheizfunktion und die Funktion zum automatischen Starten können
nicht gleichzeitig verwendet werden. Diese Funktion kann nicht gleichzeitig mit
den Funktionen Auftauen und Warmhalten verwendet werden.
Abgeschlossene Zubereitung
1. Sobald ein Piepton erklingt, ist die Zubereitung abgeschlossen. Nach 60
Sekunden Kühlungszeit, zeigt der Bildschirm „END“ an und ein mehrfaches
Piepen erklingt.
2. Ziehen Sie den Topf heraus und stellen Sie diesen auf einer stabilen, ebenen
Oberäche ab.

16
DE
3. Entnehmen Sie das zubereitete Essen und legen Sie dieses auf einen Teller
oder sonstiges Geschirr.
4. Drücken Sie nach der Zubereitung die Taste und ziehen Sie den Netzstecker
aus der Steckdose.
Hinweis
• Berühren Sie den Topf oder das Zubehör nicht mit bloßen Händen, um
Verbrennungen zu vermeiden.
• Entnehmen Sie den Topf am besten erst dann aus dem Gerät, wenn sich
dieser vollständig abgekühlt hat.
• Drehen Sie den Topf nicht um, da das Fett dann herauslaufen könnte.
REINIGUNG UND WARTUNG
Reinigung der Geräteoberäche
Reinigen Sie das Gerät und das Zubehör nach jeder Verwendung. Halten Sie das
Gerät sauber.
Hinweis
• Ziehen Sie vor der Reinigung den Netzstecker aus der Steckdose und lassen
Sie das Gerät vollständig abkühlen.
• Reiben Sie die Geräteoberäche mit einem feuchten Tuch ab.
• Tauchen Sie das Netzkabel, den Netzstecker und das Gehäuse nicht in Wasser
oder andere Flüssigkeiten ein. Andernfalls kann dies zu Schäden am Gerät,
Bränden, Stromschlägen und/oder Personenschäden führen.
Lagerung
Beachten Sie Folgendes:
• Ziehen Sie den Netzstecker aus der Steckdose und lassen Sie das Gerät vor
dem Einlagern vollständig abkühlen.
• Stellen Sie sicher, dass alle Gerätebestandteile sauber und trocken
sind. Lagern Sie das Gerät an einem trockenen, sauberen Ort ohne
Umwelteinüsse.
17
DE
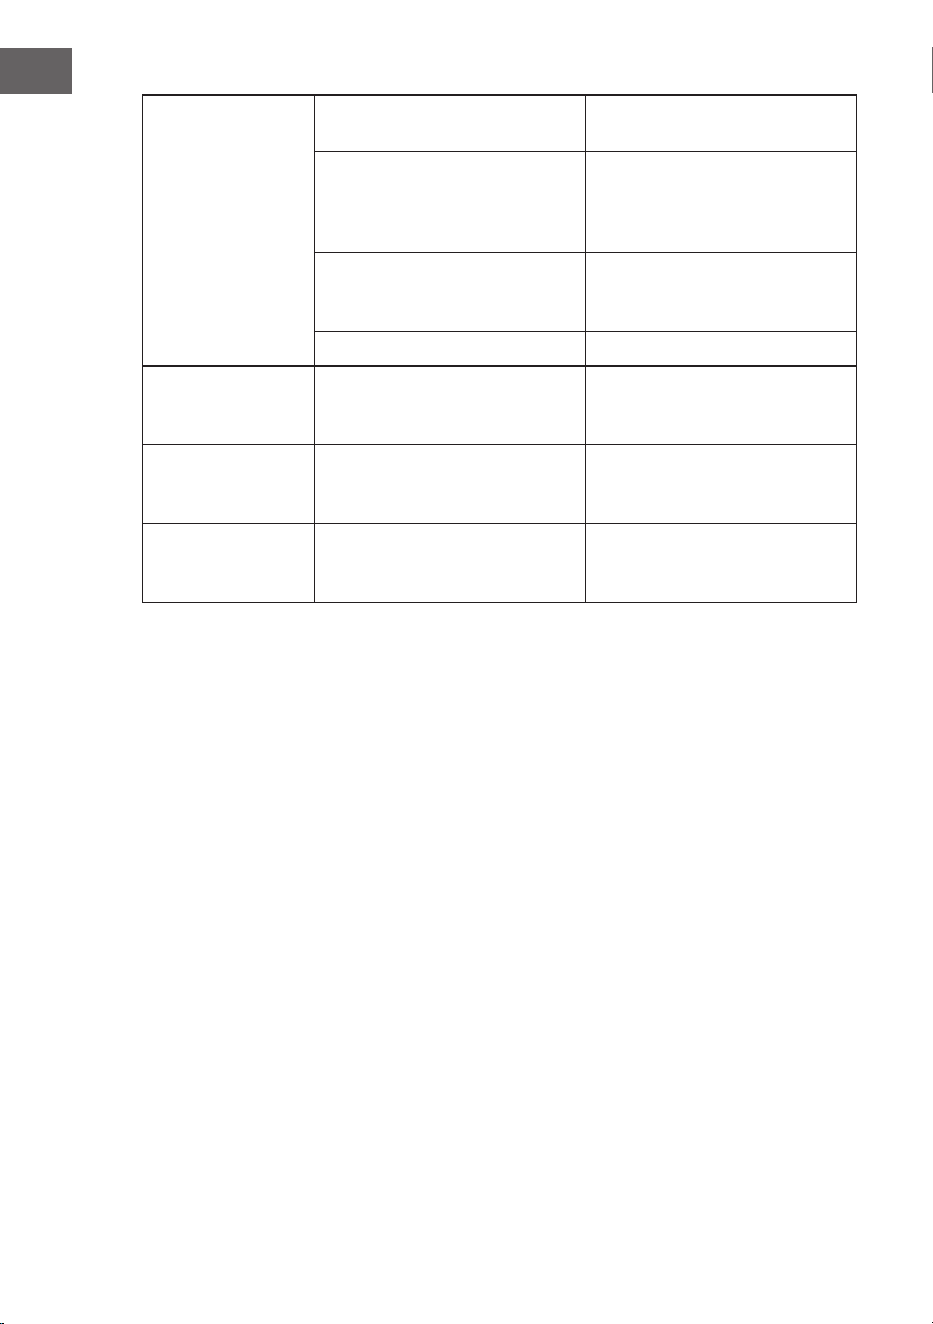
FEHLERBEHEBUNG
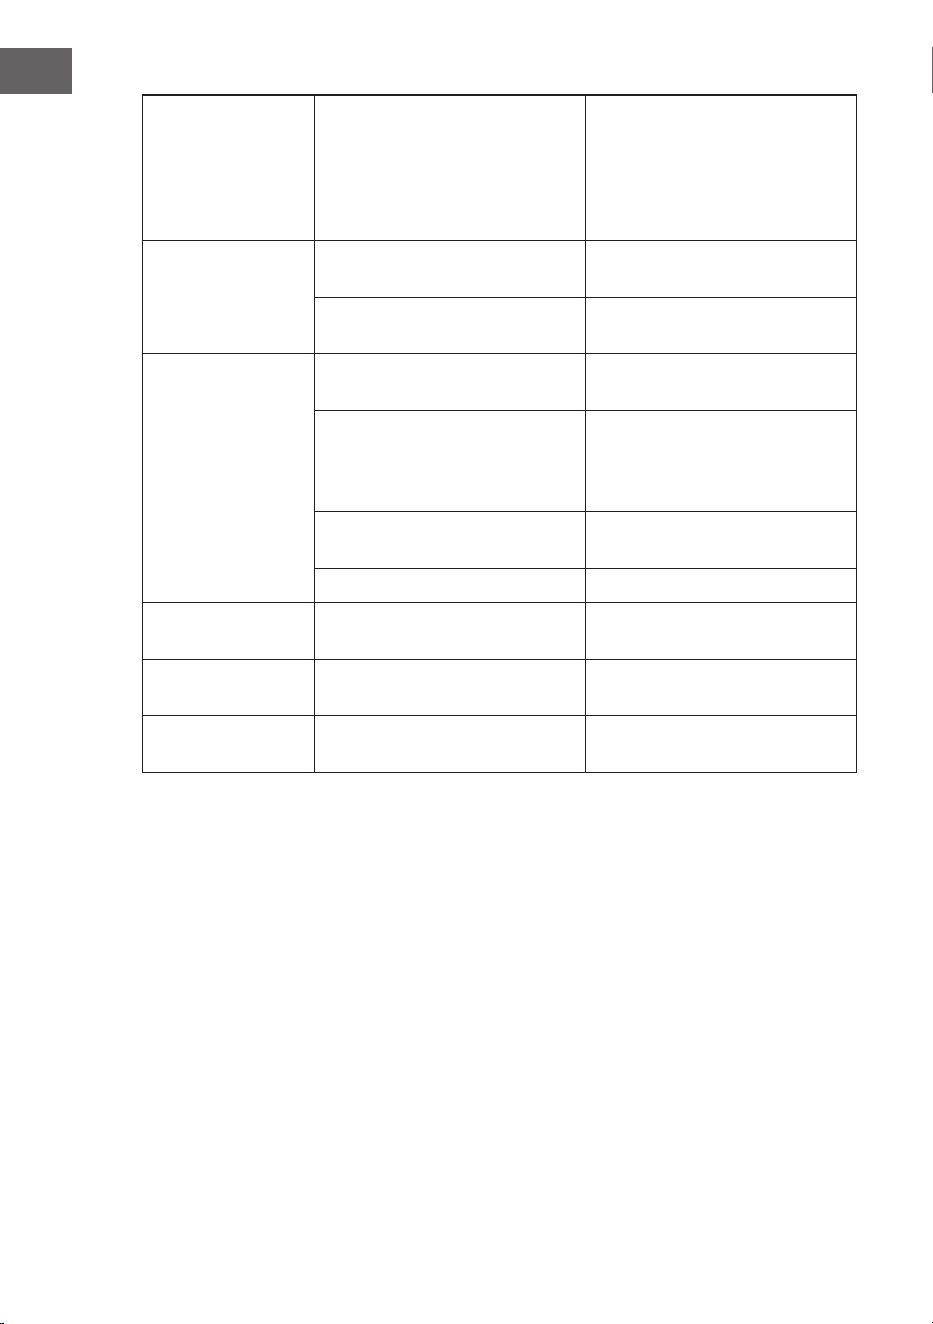
Problem Mögliche Ursache Lösung
Das Gerät funktioniert nicht. Das Gerät ist nicht eingesteckt. Stecken Sie den Netzstecker in die
Steckdose.
Der Topf wurde nicht richtig
eingesetzt.
Setzen Sie den Topf richtig in das
Gehäuse ein.
Die Lebensmittel sind nicht gar. Die Lebensmittel sind zu groß/
dick.
Platzieren Sie kleinere Portionen/
dünnere Scheiben im Topf.
Zu kurze Zubereitungszeit. Passen Sie die Zubereitungszeit
an.
Zu niedrige
Zubereitungstemperatur.
Passen Sie die
Zubereitungstemperatur an.
Zu viele Lebensmittel im Topf. Befüllen Sie den Topf maximal
bis zu 4/5 von dessen
Gesamtkapazität. Zwischen den
Lebensmitteln sollten sich Lücken
benden.
Die Lebensmittel wurden nicht
vollständig aufgetaut.
Lassen Sie die Lebensmittel
vollständig auftauen.
Die Lebensmittel sind
ungleichmäßig zubereitet.
Einige Lebensmittel müssen
während der Zubereitung
regelmäßig gewendet werden.
Ziehen Sie während der
Zubereitung den Topf alle 5 – 8
Minuten aus dem Gerät heraus
und wenden Sie die darin
bendlichen Lebensmittel.
Weißer Rauch kommt aus dem
Topf.
Fetthaltige Lebensmittel werden
zubereitet.
Die Zubereitung fetthaltiger
Lebensmittel führt zu einer
großen Menge an austretendem
Öl. Das Öl produziert bei hohen
Temperaturen weißen Rauch. Dies
ist normal.
Im Topf benden sich
Ölrückstände von der letzten
Verwendung.
Stellen Sie vor der Verwendung
sicher, dass der Topf sauber ist.
18
DE
Die Pommes sind
nicht knusprig.
Dies hängt mit dem Wasser-
und Ölgehalt der Lebensmittel
zusammen.
Stellen Sie sicher, dass die
Pommes vor dem Frittieren
trocken sind und schneiden Sie
diese nicht zu dick. Vor dem
Frittieren empehlt es sich, das
Gerät vorzuheizen.
Der Wassertank
leckt.
Der Deckel des Wassertanks ist
lose.
Ziehen Sie den Wassertankdeckel
fest.
Der Wassertank ist kaputt. Kontaktieren Sie für Ersatzteile
den Kundendienst.
Während der
Dampffunktion
wird kein Dampf
produziert.
Die Ansaugleitung im Wassertank
ist verkehrt herum.
Platzieren Sie die Ansaugleitung
am Boden des Wassertanks.
Der Dampf kann unsichtbar sein.
Düsenblockade.
Überprüfen Sie, ob der
Wasserstand im Wassertank sich
während der Verwendung der
Dampffunktion verändert.
Die Wasserpumpe ist kaputt. Wenden Sie sich an den
Kundendienst.
The water pump doesn't work. Please contact after-sales service.
Fehlercode E01 Offener Stromkreis im NTC-
Sensor.
Wenden Sie sich an den
Kundendienst.
Fehlercode E02 Kurzschluss im NTC-Sensor Wenden Sie sich an den
Kundendienst.
Fehlercode E03 PCB-Kommunikationsfehler Wenden Sie sich an den
Kundendienst.

19
DE
SPEZIELLE ENTSORGUNGSHINWEISE FÜR
VERBRAUCHER IN DEUTSCHLAND
Entsorgen Sie Ihre Altgeräte fachgerecht. Dadurch wird gewährleistet, dass die
Altgeräte umweltgerecht verwertet und negative Auswirkungen auf die Umwelt
und menschliche Gesundheit vermieden werden. Bei der Entsorgung sind
folgende Regeln zu beachten:
• Jeder Verbraucher ist gesetzlich verpichtet, Elektro- und
Elektronikaltgeräte (Altgeräte) sowie Batterien und Akkus
getrennt vom Hausmüll zu entsorgen. Sie erkennen die
entsprechenden Altgeräte durch folgendes Symbol der
durchgestrichene Mülltonne (WEEE-Symbol).
• Sie haben Altbatterien und Altakkumulatoren, die nicht vom Altgerät
umschlossen sind, sowie Lampen, die zerstörungsfrei aus dem Altgerät
entnommen werden können, vor der Abgabe an einer Entsorgungsstelle vom
Altgerät zerstörungsfrei zu trennen.
• Bestimmte Lampen und Leuchtmittel fallen ebenso unter das Elektro- und
Elektronikgesetz und sind dementsprechend wie Altgeräte zu behandeln.
Ausgenommen sind Glühbirnen und Halogenlampen. Entsorgen Sie
Glühbirnen und Halogenlampen bitte über den Hausmüll, sofern sie nicht das
WEEE-Symbol tragen.
• Jeder Verbraucher ist für das Löschen von personenbezogenen Daten auf dem
Elektro- bzw. Elektronikgerät selbst verantwortlich.
Rücknahmepicht der Vertreiber
Vertreiber mit einer Verkaufsäche für Elektro- und Elektronikgeräte von
mindestens 400 Quadratmetern sowie Vertreiber von Lebensmitteln mit einer
Gesamtverkaufsäche von mindestens 800 Quadratmetern, die mehrmals im
Kalenderjahr oder dauerhaft Elektro- und Elektronikgeräte anbieten und auf dem
Markt bereitstellen, sind verpichtet,
1 bei der Abgabe eines neuen Elektro- oder Elektronikgerätes an einen Endnutzer
ein Altgerät des Endnutzers der gleichen Geräteart, das im Wesentlichen die
gleichen Funktionen wie das neue Gerät erfüllt, am Ort der Abgabe oder in
unmittelbarer Nähe hierzu unentgeltlich zurückzunehmen und
2 auf Verlangen des Endnutzers Altgeräte, die in keiner äußeren Abmessung
größer als 25 Zentimeter sind, im Einzelhandelsgeschäft oder in unmittelbarer
Nähe hierzu unentgeltlich zurückzunehmen; die Rücknahme darf nicht an den
Kauf eines Elektro- oder Elektronikgerätes geknüpft werden und ist auf drei
Altgeräte pro Geräteart beschränkt.

20
DE
• Bei einem Vertrieb unter Verwendung von Fernkommunikationsmitteln
ist die unentgeltliche Abholung am Ort der Abgabe auf Elektro- und
Elektronikgeräte der Kategorien 1, 2 und 4 gemäß § 2 Abs. 1 ElektroG, nämlich
„Wärmeüberträger“, „Bildschirmgeräte“ (Oberäche von mehr als 100 cm²)
oder „Großgeräte“ (letztere mit mindestens einer äußeren Abmessung
über 50 Zentimeter) beschränkt. Für andere Elektro- und Elektronikgeräte
(Kategorien 3, 5, 6) ist eine Rückgabemöglichkeit in zumutbarer Entfernung
zum jeweiligen Endnutzer zu gewährleisten.
• Altgeräte dürfen kostenlos auf dem lokalen Wertstoffhof oder in folgenden
Sammelstellen in Ihrer Nähe abgegeben werden: www.take-e-back.de
• Für Elektro- und Elektronikgeräte der Kategorien 1, 2 und 4 bieten wir auch die
Möglichkeit einer unentgeltlichen Abholung am Ort der Abgabe. Beim Kauf
eines Neugeräts haben Sie die Möglichkeit, eine Altgerätabholung über die
Webseite auszuwählen.
• Batterien können überall dort kostenfrei zurückgegeben werden, wo sie
verkauft werden (z. B. Super-, Bau-, Drogeriemarkt). Auch Wertstoff- und
Recyclinghöfe nehmen Batterien zurück. Sie können Batterien auch per Post
an uns zurücksenden. Altbatterien in haushaltsüblichen Mengen können Sie
direkt bei uns von Montag bis Freitag zwischen 08:00 und 16:00 Uhr unter der
folgenden Adresse unentgeltlich zurückgeben:
Chal-Tec Fulllment GmbH
Norddeutschlandstr. 3
47475 Kamp-Lintfort
• Wichtig zu beachten ist, dass Lithiumbatterien aus Sicherheitsgründen vor der
Rückgabe gegen Kurzschluss gesichert werden müssen (z. B. durch Abkleben
der Pole).
• Finden sich unter der durchgestrichenen Mülltonne auf der Batterie zusätzlich
die Zeichen Cd, Hg oder Pb ist das ein Hinweis darauf, dass die Batterie
gefährliche Schadstoffe enthält. (»Cd« steht für Cadmium, »Pb« für Blei und
»Hg« für Quecksilber).
Hinweis zur Abfallvermeidung
Indem Sie die Lebensdauer Ihrer Altgeräte verlängern, tragen Sie dazu bei,
Ressourcen ezient zu nutzen und zusätzlichen Müll zu vermeiden. Die
Lebensdauer Ihrer Altgeräte können Sie verlängern, indem Sie defekte Altgeräte
reparieren lassen. Wenn sich Ihr Altgerät in gutem Zustand bendet, könnten Sie
es spenden, verschenken oder verkaufen.

21
DE
HINWEISE ZUR ENTSORGUNG
Wenn es in Ihrem Land eine gesetzliche Regelung
zur Entsorgung von elektrischen und elektronischen
Geräten gibt, weist dieses Symbol auf dem Produkt oder
auf der Verpackung darauf hin, dass dieses Produkt
nicht im Hausmüll entsorgt werden darf. Stattdessen
muss es zu einer Sammelstelle für das Recycling von
elektrischen und elektronischen Geräten gebracht
werden. Durch regelkonforme Entsorgung schützen
Sie die Umwelt und die Gesundheit Ihrer Mitmenschen
vor negativen Konsequenzen. Informationen zum
Recycling und zur Entsorgung dieses Produkts,
erhalten Sie von Ihrer örtlichen Verwaltung oder Ihrem
Hausmüllentsorgungsdienst.
HERSTELLER & IMPORTEUR (UK)
Hersteller:
Chal-Tec GmbH, Wallstraße 16, 10179 Berlin, Deutschland.
Importeur für Großbritannien:
Berlin Brands Group UK Limited
PO Box 42
272 Kensington High Street
London, W8 6ND
United Kingdom


23
EN
Dear Customer,,
Congratulations on purchasing this device. Please read the
following instructions carefully and follow them to prevent
possible damages. We assume no liability for damage
caused by disregard of the instructions and improper use.
Scan the QR code to get access to the latest user manual
and more product information.
Safety Instructions 25
Product Description 27
Product Instructions 28
Operation 30
Cleaning and Maintenance 36
Troubleshooting 37
Disposal Considerations 39
Manufacturer & Importer (UK) 39
CONTENTS

24
EN
TECHNICAL DATA
Item number 10040495, 10040496, 10040497
Power supply 220–240 V ~ 50-60 Hz
Power rating 1500 W
Pot capacity 7.5 l
Water tank capacity 300 ml
25
EN
SAFETY INSTRUCTIONS
General information
• Never wash the cabinet with running water to prevent damage to the
electrical components.
• To prevent electric shock, do not allow water or other liquids to enter the unit.
• This device may be only used by children 8 years old or older and persons with
limited physical, sensory and mental capabilities and / or lack of experience
and knowledge, provided that they have been instructed in use of the device
by a responsible person who understands the associated risks.
• Before use, check the voltage on the device‘s sticker. Only connect the device
to sockets that correspond to the voltage of the device.
• Do not use this product if the plug, power cord, or product is damaged.
• If the power cord or plug is damaged, it must be replaced by the
manufacturer, an authorized service centre, or a similarly qualied person.
• Do not allow children to play with the product.
• Do not handle the plug or control panel with wet hands.
• Do not place this product on or near tablecloths, curtains, or other
combustible materials.
• Allow at least 10 cm of space around the product on all sides. Do not place any
objects on top of the unit.
• Do not leave the unit unattended during use.
CAUTION
Danger of burns! Hot steam may escape when the oven door is opened. Keep a
safe distance to avoid scalding.
• Danger of burns! Hot steam may escape when the oven door is opened. Keep
a safe distance to avoid scalding.
• Do not insert any foreign bodies into the openings of the appliance.
• Do not use a steam cleaner for cleaning.
• Make sure that the appliance is switched off before replacing the lamp to
avoid electric shock.
• Do not install the unit in a cabinet, as it may overheat.

26
EN
Instructions for safe use
CAUTION
Danger of burns! The appliance becomes hot during use. Take care
not to touch the heating elements inside the oven and use oven
gloves.
• Before cleaning, unplug the appliance from the wall outlet and allow it to cool
completely.
• Install the appliance on a dry, at surface and leave at least 10 cm of space
around the appliance in all directions so that the air can circulate suciently.
• Do not plug the appliance into an outlet that is already connected to other
kitchen appliances.
• Do not place the appliance near ammable objects. Install it away from
window curtains, door curtains, wallpaper, and similar objects to prevent re.
Do not place or place any objects on the unit.
• Clean the door panel of the stove with a soft and damp cloth. Do not use
abrasives or metal scrapers as they will scratch the surface.
• Do not connect the unit to external timers or remotely controlled power
sockets.
• Before use, check that your cookware is suitable for this product. We
recommend that you use heat-resistant glass containers or ceramic
containers. Fill the container to a maximum of two thirds.
• Do not overll the water tank. When lling, use the MAX mark in the tank as a
guide.
• Do not place any containers on the open oven door.
• Do not heat food in a sealed container, otherwise the container may explode.
Transfer the food into a heat-resistant container before heating.
27
EN
PRODUCT DESCRIPTION
Product components
1 Water tank
2 Housing
3 Cake plate (optional)
4 Frying basket slices
5 Pot
6 Water tray
7 Partition wall block
Intelligent control panel
28
EN
PRODUCT INSTRUCTIONS
1. After unpacking, the user fastens the partition wall block to the back of the
machine. Place the machine on a stable horizontal surface. Leave not less than
20 cm in the back and not less than 10 cm on both sides of the space, and
pay attention to keep away from curtains, wall cloth and other combustible
materials.
2. After pulling out the pot body, the frying basket slices should be placed in the
pot at (see below).
3. Put The food on the frying basket slices, and then push the pot into the
housing.
4. Take out the water tank, ll it with water and tighten the water tank lid, put it
into the housing (see below).
29
EN
5. Take out the water tray, check and empty it, and then install it back to the
housing (see below).
Notes
• Different cooking options, different accessories.
• After cooking, remove the frying basket slices, rack and cake plate from the
pot with gloves or other anti scald tools.
• Do not ll the pot with food fully, keep to a minimum of 30 mm distance
from the top edge of the pot. It is necessary to keep the internal air owing
smoothly, and the food may become bigger after heating, depending on the
actual situation.
• Only when the pot door is closed can the machine work properly, or the
display will show “OPEN”.
• Do not use other magnetic objects close to the location shown in picture
below and turn the machine on to avoid injury.
• Make sure the suction pipe is at the bottom of the water tank.

30
EN
OPERATION
Before rst use
1. Remove all packaging materials, fasten the partition wall block, place the
machine on a stable horizontal surface.
2. Clean the pot, frying basket slices, cake plate and other accessories with hot
water, liquid detergent and non-abrasive sponge.
3. Fill the tank with water (recommend use distilled or puried water).
4. Wipe the inside and outside of the appliance with a cloth.
5. First use, please don't put any food in the pot, ll the tank with puried water.
Use the preset function - “sh” to run one cycle with steam function at the
same time, which time may smell a slight smell and smoke, don’t worry, it’s a
normal phenomenon.
Product operating instructions
When the power is turned on, there will have a "Bi" sound, the digital screen and
all indicator lights icker and turn off, only the button indicator light ashes
slowly, indicating that the appliance is power on state (the power on state is the
standby mode).
Put the ingredients in the clean pot, and put the pot into the housing. Fill the
tank with water. Plug in the power plug. Press button, the digital screen lights
up. The user can choose proper function buttons, cooking time and temperature
according to the food materials and preferences, just press
⏯ button to cooking
automatically.
Note: This machine uses the principle of light wave tube heating to cook, and the
lighting in the appliance can not be controlled by human.
Menu function selection
1. Press button, all lights on the control panel light up, means enter the
function selection interface.
2. Select the function menu, the corresponding function menu indicator will light
up, press
⏯ button to start work.

31
EN
Main function gure description
Symbol Food/
Function
Symbol Food/
Function
WINGS chicken wings VEGGIES vegetable
CHICKEN chicken CAKE cake
FISH sch DELAY delay time
STEAK steak PREHEAT preheat
CHIPS crisps REHEAT reheat
FRIES chips DEFROST defrost
BROIL potatoes WARM warming
POPCORN popcorn
AIR
FRYER
air frying
Notes
• The main function button can be executed directly, that is, the rst time to
enter the standby state can be pressed, can no longer do other operations,
just press
⏯ button, the machine can run the corresponding function.
• The additional function button can not be used alone. It is an additional option
for the primary function and must be used in conjunction with the primary
function.
• We provide a combination of different cooking time and cooking temperature
to meet your pursuit of food. Below is our menu combination, you can also
change the cooking time and temperature according to the actual needs.
32
EN
No. Function button Preset
Temp (℃)
Time adjust
(min)
Preset
time (min)
Adjust
time (min)
1 WINGS 190 50-200 15 1-60
2 CHICKEN 200 50-200 30 1-60
3 FISH 200 50-200 14 1-60
4 STEAK 200 50-200 12 1-60
5 CHIPS 180 50-200 10 1-60
6 FRIES 200 50-200 25 1-60
7 BROIL 190 50-200 40 1-60
8 POPCORN 200 50-200 25 1-60
9 VEGGIES 70 40-70 480 1-480
10 CAKE 140 50-180 35 1-60
11 DELAY - 50-200 60 10-540
12 PREHEAT 200 50-200 5 1-60
13 REHEAT 100 80-200 5 1-30
14 DEFROST 45 40-80 30 1-60
15 WARM 65 40-80 30 1-480
16 AIR FRYER 200 70-200 30 1-60
Notes:
• The above settings are all directional, we cannot guarantee the best setting
of your ingredients when the origin, shape, size and brand of ingredients
are different; You can set it according to the actual situation, the larger the
amount of food you cook, the longer time it takes.
• During cooking some food, pulling out the pot and turning over the food can
help to cook more evenly and cook better.
• If the ingredients are not well cooked enough, it can be put back to the pot
directly and cooked with an appropriate time.
• Marinate food should penetrate into the interior of the food, to taste better
and more delicious.
• If you want the ingredients increase moisture to meet the different taste, can
select the "steam" function button.
33
EN
No. Steam function control Remarks
1 - 5 min start steaming
- Stop steaming at the last 1 min
-
2 - 7 min start steaming
- next 1 min stop steaming
- Steam starts 2 minutes after spinning.
- Stop steaming at the last 1 min.
Start spinning at half time
3 - 8 min start steaming
-
4 - 5 min start steaming -
5 - 5 min start steaming -
6 -
7 - 5 min start steaming -
8 - -
9 - -
10 - -
11 - -
12 - -
13 - -
14 - -
15 - -
16 - -

34
EN
Time and Temperature Setting
The temperature and time of each function can be adjusted within the
corresponding adjustable range (as shown in the table above) according to the
user's taste and food condition, press
or button, the corresponding light
ashes, then press
or to adjust the time or temperature; then, there will
have a buzzer sound and the indicator stops ashing.
Note: Can adjust the time and temperature during working.
Steam Function
After selecting the main function, if the user want to keep a certain amount of
water in the food according to the needs of food taste, and the taste is delicious
and not irritation, the steam auxiliary function can be chosen.
Notes:
• The steam function is additional function, can not steam food alone.
• The amount of steam for each functional has been set, it is xed gap spraying
and cannot be adjusted.
• Some function cannot be used with steam function.
• Make sure there is water in the tank when cook with steam.
• The steam temperature is very high, the atomization effect is very good, the
user may not be able to see the steam visually (can judge the steam effect
based on the amount of water in the tank).
• The set temperature will not increase or decrease due to use the steam
function.
Water shortage alarm
The
light is ashing which reminder the user to add water into the water tank.
When the water tank full of water and it is put back to its position, the alarm is
released.
Notes
• If there is no additional steam function, the water tank without water will not
alarm and will not affect the work.
• Recommend use distilled or puried water to ll the water tank.
• Make sure the water does not drip onto the surface or inside of the appliance.
Pause function
During cooking, press
⏯ button, the cooking will stop automatically, the function
light that is being executed will remain light on, the screen display will keep the
data when it is suspended, the “READY”and the
⏯ button ashes. Press ⏯ again to
resume work.

35
EN
Notes
• If do not operate for more than 10 minutes in the pause state, the appliance
will return to the power on state automatically.
• During cooking or nish cooking, the pot and its utensils and food are too hot
to be touched by hand.
• During working, pull out the pot directly will enter the pause state.
Reservation
This product has reservation function, the user selects and adjusts the cooking
function, press DELAY button, and preset the time, then press the
⏯ button to start
the appointment.
Notes
• In the reservation state, other buttons are locked and cannot be operated,
except the and the
⏯ button.
• You cannot use reservation function with defrosting and heat preservation at
the same time.
Pre-heat
Choose this function based on the user needs. If there are no food in the pot and
in standby mode, press the PREHEAT button, after pressing the
⏯ button, it will
enter the preheating state. When you hear the alarm sound, preheat is completed,
take out the pot, put the prepared ingredients into the pot, and close the door
again to start working automatically.
Note: Preheating and reservation functions cannot be used at the same time. You
cannot use preheating function with reheating, defrosting, and heat preservation
at the same time.
Cooking done
1. There is a “Bi” sound means cooking nish. After 60 seconds of cooling, the
screen display “END” and with “Bi-Bi-Bi-Bi”sounds, means cooking done.
2. Pull out the pot and place it on a stable horizontal surface.
3. Take out the cooked food and put on the plate or tableware.
4. After cooking, press the power button to turn off the power and unplug the
power cord from the socket.
Notes
• When taking out the pot or utensil, don't touch them to avoid scalding.
• Better take out the pot after cooling completely, which is also good for the
appliance.
• Do not turn the pot upside down, as there will be extra grease dripping out.

36
EN
CLEANING AND MAINTENANCE
Cleaning the appliance surface
Clean the appliance and accessories after every use, keep the appliance clean.
Notes
• Unplug from the outlet and let the appliance cool down before cleaning.
• Wipe the appliance surface with soft moist cloth.
• Do not immerse the power cord, plug and the appliance’s body into water or
other liquid, it may cause damage of appliance, re, electric shock or injury to
persons.
Storage
Please pay attention to the following
• Unplug the appliance and allow it to cool completely before storing.
• Make sure all parts are clean and dry, assemble all parts and then place it in
dry, clean, no corrosive environment.
37
EN
TROUBLESHOOTING
Problem Possible cause Solution
Appliance does not
work.
The appliance is not plugged in. Make sure plug into the socket.
The pot is out of its place. Please put the pot into the
housing closely.
Food is not
completely cooked.
The food are too large/thick. Place smaller and thin batches of
food into the pot.
The cooking time is too short. Adjust the cooking time.
The cooking temperature is too
low.
Adjust the cooking temperature.
Too much food in the pot. The food cannot more than 4
/ 5 of the pot, and do not put
overstuffed, should leave a gap
between the ingredients.
The food is not defrosting
completely.
Defrosting the food completely.
Food is cooked
unevenly.
Some food need to be turn over
constantly during cooking.
During cooking, pulling out the
pot and turning over the food for
every 5-8mins.
White smoke is
coming out of the
pot.
Cooking greasy foods will cause
a lot of oil oozing. This oil will
produce white smoke with high
temperature.It’s normal.
Residual oil in the pot from last
time.
Make sure the pot is clean before
and after each use.
French fries are not
cooked crispy.
It depends on the water and oil
content of ingredients.
Make sure the chips are dry
before frying and don't cut the
chips too thick. Can preheat the
pot before frying.
Water tank leaking. The lid of the water tank is loose. Tighten the water tank lid.
The water tank is broken. Please contact customer service
for replacement.
38
EN
There are no stem
released when use
steam function.
The suction pipe in the water tank
is upturned.
Place the suction pipe at the
bottom of the tank.
Steam may not be visible. Conrm whether the water in the
water tank is signicantly reduced
by using the cleaning function to
work for a few minutes.
The nozzle blockage. Remove the nozzle for cleaning,
and ensure that small holes on the
nozzle are unblocked.
The water pump doesn't work. Please contact after-sales service.
Display shows Error
Code “E01”
There is an open circuit in NTC
sensor.
It may be loose or disconnected,
please contact professional after-
sales service.
Display shows Error
Code “E02”
There is an short circuit in NTC
sensor.
Maybe the NTC sensor is
damaged, please contact
professional after-sales service.
Display shows Error
Code “E03”
The PCB communication error. Maybe the wire installation
wrong or broken, please contact
professional after-sales service.
39
EN
DISPOSAL CONSIDERATIONS
If there is a legal regulation for the disposal of electrical
and electronic devices in your country, this symbol on the
product or on the packaging indicates that this product
must not be disposed of with household waste. Instead,
it must be taken to a collection point for the recycling
of electrical and electronic equipment. By disposing of
it in accordance with the rules, you are protecting the
environment and the health of your fellow human beings
from negative consequences. For information about the
recycling and disposal of this product, please contact your
local authority or your household waste disposal service.
This product contains batteries. If there is a legal
regulation for the disposal of batteries in your country,
the batteries must not be disposed of with household
waste. Find out about local regulations for disposing
of batteries. By disposing of them in accordance with
the rules, you are protecting the environment and the
health of your fellow human beings from negative
consequences.
MANUFACTURER & IMPORTER (UK)
Manufacturer:
Chal-Tec GmbH, Wallstrasse 16, 10179 Berlin, Germany.
Importer for Great Britain:
Berlin Brands Group UK Limited
PO Box 42
272 Kensington High Street
London, W8 6ND
United Kingdom


41
FR
Cher client, chère cliente,
Toutes nos félicitations pour l’acquisition de ce nouvel
appareil. Lisez attentivement les indications suivantes et
suivez-les pour éviter d'éventuels dommages. Nous ne
saurions être tenus pour responsables des dommages
dus au non-respect des consignes et à la mauvaise
utilisation de l’appareil. Scannez le QR-Code pour obtenir
la dernière version du mode d'emploi ainsi que d'autres
informations concernant le produit.
Consignes de sécurité 43
Aperçu de l'appareil 45
Conseils d'utilisation 46
Utilisation 48
Nettoyage et maintenance 54
Résolution des problèmes 55
Informations sur le recyclage 57
Fabricant et importateur (GB) 57
SOMMAIRE

42
FR
FICHE TECHNIQUE
Numéro d'article 10040495, 10040496, 10040497
Alimentation 220-240 V ~ 50-60 Hz
Puissance nominale 1500 W
Taille de la casserole 7,5 l
Capacité du réservoir d'eau 300 ml

43
FR
CONSIGNES DE SÉCURITÉ
Consignes générales
• Ne lavez jamais le boîtier à l'eau courante an de ne pas endommager les
composants électriques.
• Pour éviter toute décharge électrique, ne laissez pas d'eau ou d'autres liquides
pénétrer dans l'appareil.
• Les enfants à partir de 8 ans et les personnes souffrant de handicaps
mentaux, sensoriels et physiques ne peuvent utiliser l'appareil que s'ils ont été
parfaitement familiarisés avec les fonctions et les précautions de sécurité par
une personne responsable et s'ils comprennent les risques associés.
• Vériez la tension indiquée sur la plaque signalétique avant utilisation.
Connectez l'appareil uniquement à des prises qui correspondent à sa tension.
• N'utilisez pas ce produit si la che, le cordon d'alimentation ou le produit est
endommagé.
• Si le cordon d'alimentation ou la che sont endommagés, ils doivent être
remplacés par le fabricant, une entreprise spécialisée agréée ou une personne
de qualication similaire.
• Veillez à ce que les enfants ne jouent pas avec l'appareil.
• Ne touchez ni le panneau de commande ni la che avec les mains mouillées.
• Ne placez pas ce produit sur ou à côté de nappes, de rideaux ou d'autres
matériaux inammables.
• Laissez un espace d'au moins 10 cm de tous les côtés autour de l'appareil. Ne
posez aucun objet sur cet appareil.
• Ne laissez jamais l'appareil en fonctionnement sans surveillance.
ATTENTION
Risque de brûlure! De la vapeur chaude peut s'échapper à l'ouverture de la porte
du four. Maintenez une distance de sécurité an d'éviter de vous ébouillanter.
• N'insérez aucun objet dans les ouvertures de l'appareil.
• N'utilisez pas de nettoyeur à vapeur pour le nettoyage.
• Assurez-vous que l'appareil est éteint avant de remplacer la lampe an d'éviter
tout risque d'électrocution.
• L'appareil ne doit pas être encastré dans une niche car il risquerait de
surchauffer.

44
FR
Consignes pour une utilisation en toute sécurité.
ATTENTION
Risque de brûlure! Pendant l'utilisation, l'appareil devient chaud. Veillez à ne pas
toucher les éléments chauffants à l'intérieur du four et utilisez des gants de four.
• Avant le nettoyage, débranchez la che de la prise et laissez l'appareil refroidir
complètement.
• Installez l'appareil sur une surface sèche et plane et laissez au moins 10 cm
d'espace autour de l'appareil dans toutes les directions pour que l'air puisse
circuler susamment.
• Ne branchez pas l'appareil sur une prise multiple déjà utilisée par d'autres
appareils électroménagers.
• N'installez pas l'appareil à proximité d'objets inammables. Installez-le loin
des voilages, des rideaux de porte, du papier peint et d'autres objets similaires
an d'éviter tout incendie. Ne posez et ne laissez aucun objet sur cet appareil.
• Nettoyez la vitre de la porte du four avec un chiffon doux et humide. N'utilisez
pas de produits abrasifs ou de grattoirs métalliques, car ils rayeraient la
surface.
• Ne connectez jamais l'appareil à une minuterie externe ou à une prise
télécommandée.
• Avant d'utiliser ce produit, vériez que votre ustensile de cuisine est adapté à
ce produit. Nous vous recommandons d'utiliser des récipients en verre ou en
céramique résistants à la chaleur. Remplissez le récipient au maximum aux
deux tiers.
• Ne remplissez pas trop le réservoir d'eau. Lors du remplissage, reportez-vous
au repère MAX du réservoir.
• Ne placez pas de récipients sur la porte ouverte du four.
• Ne réchauffez pas d'aliments dans un récipient scellé, car le récipient pourrait
exploser. Transférez les aliments dans un récipient résistant à la chaleur avant
de les réchauffer.
45
FR
APERÇU DE L'APPAREIL
Pièces de l'appareil
1 Réservoir d'eau
2 Boîtier
3 Moule à gâteau (facultatif)
4 Insert à friture
5 casserole
6 Bac d'égouttage
7 Entretoise
Panneau de commande intelligent
46
FR
CONSEILS D'UTILISATION
1. Retirez l'appareil de son emballage et xez l'entretoise à l'arrière de l'appareil.
Placez l'appareil sur une surface plane et stable. Maintenez une distance
minimale de 20 cm à l'arrière et de 10 cm sur les côtés an de garantir une
ventilation susante. Veillez à ce que les rideaux, les tentures murales et
autres matériaux facilement inammables se trouvent à une distance sûre de
l'appareil.
2. Après avoir retiré la casserole, placez l'insert de friture à plat dans la casserole
(voir illustration ci-dessous).
3. Placez les aliments sur l'insert de friture et replacez ensuite la casserole dans
le boîtier.
4. Retirez le réservoir d'eau, remplissez-le d'eau et refermez-le ensuite. Remettez
le réservoir d'eau en place dans le boîtier (voir illustration ci-dessous).

47
FR
5. Retirez le bac d'égouttement, vériez et videz-le, puis remettez-le en place
dans le boîtier (voir illustration ci-dessous).
Remarques
• Différents accessoires sont nécessaires pour les différentes options de
préparation.
• Après la préparation, retirez l'insert de friture, la grille et le moule à gâteau de
la casserole en portant des gants ou un autre équipement de protection.
• Ne remplissez pas complètement la casserole d'aliments et veillez à respecter
une distance minimale de 30 mm par rapport au bord supérieur de la
casserole. Il est important que l'air puisse circuler correctement à l'intérieur de
l'appareil. En outre, il peut arriver que les aliments se dilatent en chauffant, en
fonction de la situation.
• L'appareil ne peut fonctionner correctement que si la casserole est
correctement placée dans l'appareil. Si ce n'est pas le cas, l'écran ache «
OPEN ».
• N'utilisez pas d'objets magnétiques à proximité de l'endroit indiqué dans
l'illustration ci-dessous pendant l'utilisation de l'appareil an d'éviter toute
blessure.
• Assurez-vous que le tuyau d'aspiration se trouve en bas du réservoir d'eau.

48
FR
UTILISATION
Avant la première utilisation
1. Retirez tout le matériel d'emballage, xez l'entretoise et placez l'appareil sur
une surface stable et horizontale.
2. Nettoyez la casserole, l'insert à friture, le moule à gâteau et les autres
accessoires avec de l'eau chaude, du liquide vaisselle et une éponge douce.
3. Remplissez le réservoir d'eau (il est recommandé d'utiliser de l'eau distillée ou
puriée).
4. Essuyez l'intérieur et l'extérieur de l'appareil avec un chiffon.
5. Lors de la première utilisation de l'appareil, ne mettez pas d'aliments dans
la casserole. Remplissez le réservoir d'eau avec de l'eau puriée. Utilisez la
fonction préréglée « Fish » (poisson) et faites-la déler (avec la fonction vapeur
activée en même temps). Une légère odeur de fumée peut se dégager lors de
la première utilisation. C'est normal et il n'y a pas lieu de s'inquiéter.
Utilisation
Lorsque l'appareil est mis en marche, un bip sonore retentit. Les lumières de
l'achage numérique et des voyants clignotent brièvement avant de s'éteindre.
Seul le voyant lumineux clignote lentement, ce qui signie que l'appareil est
en mode veille. Placez les ingrédients dans la casserole propre et faites glisser la
casserole dans le boîtier. Remplissez le réservoir d'eau. Rebranchez la che dans
la prise et appuyez sur la touche pour allumer l'appareil. Le voyant numérique
s'allume. En fonction des aliments choisis, sélectionnez la fonction, le temps de
préparation et la température souhaités à l'aide du bouton de commande des
fonctions. Appuyez sur la touche
⏯ pour commencer la cuisson. automatiquement
Remarque : cet appareil utilise le principe du chauffage par tube à bre optique, et
l'éclairage de l'appareil ne peut pas être réglé par l'utilisateur.
Sélection des fonctions
1. Lorsque l'on appuie sur la touche tous les voyants du panneau de
commande s'allument, ce qui signie que l'appareil est maintenant en mode
de sélection des fonctions.
2. Sélectionnez le menu des fonctions. Le voyant de menu de fonction
correspondant s'allume. Pour démarrer la préparation, appuyez sur la touche
⏯.
49
FR
Description des icônes des touches
Symbole Aliment/
Fonction
Symbole Aliment/
Fonction
WINGS ailes de poulet VEGGIES Légumes
CHICKEN Poulet CAKE Gâteau
FISH Poisson DELAY Différé
STEAK Steak PREHEAT Préchauffage
CHIPS Chips REHEAT Réchauffer
FRIES Frites DEFROST Décongélation
BROIL Gril WARM Chauffer
POPCORN Popcorn
AIR
FRYER
Cuisson à l'air chaud
Remarque
• La touche de fonction principale est accessible directement. Si l'appareil est en
mode veille, appuyer d'abord sur la touche
⏯ pour que la touche de fonction
fonctionne.
• La touche de fonction supplémentaire ne peut pas être utilisée seule. Il s'agit
d'une fonction supplémentaire pour la fonction principale et ne peut être
utilisée qu'en combinaison avec celle-ci.
• L'appareil contient une multitude de combinaisons prédénies de temps de
préparation et de température, en fonction des aliments choisis.

50
FR
N° Touche de fonction Temp. ré-
glée (°C)
Temp. recom-
mandée (°C)
Durée par
défaut (min)
Durée re-
commandée
(min)
1 WINGS 190 50-200 15 1-60
2 CHICKEN 200 50-200 30 1-60
3 FISH 200 50-200 14 1-60
4 STEAK 200 50-200 12 1-60
5 CHIPS 180 50-200 10 1-60
6 FRIES 200 50-200 25 1-60
7 BROIL 190 50-200 40 1-60
8 POPCORN 200 50-200 25 1-60
9 VEGGIES 70 40-70 480 1-480
10 CAKE 140 50-180 35 1-60
11 DELAY - 50-200 60 10-540
12 PREHEAT 200 50-200 5 1-60
13 REHEAT 100 80-200 5 1-30
14 DEFROST 45 40-80 30 1-60
15 WARM 65 40-80 30 1-480
16 AIR FRYER 200 70-200 30 1-60
Remarque
• Les paramètres ci-dessus sont donnés à titre indicatif. Il n'est pas garanti
qu'il s'agisse du meilleur réglage pour les ingrédients que vous utilisez, car
leur origine, leur forme, leur taille et leur marque peuvent varier. Adaptez les
paramètres à chaque situation. Plus la quantité d'aliments est importante,
plus le temps de préparation est long.
• Retirer la casserole et retourner les aliments pendant la préparation peut
contribuer à une préparation plus homogène et de meilleure qualité.
• Si les ingrédients ne sont pas assez cuits, remettez-les dans la casserole et
continuez à les préparer en adaptant le temps de cuisson.
• La marinade doit être complètement absorbée par les aliments pour obtenir
un meilleur goût.
• Si vous souhaitez obtenir une teneur en humidité plus élevée des aliments,
sélectionnez la fonction vapeur.

51
FR
N° Contrôle de la fonction vapeur Remarques
1 - la fonction vapeur démarre après
5 min
- Arrêt à la dernière minute
-
2 - la fonction vapeur démarre après
7 min
- Arrêt pendant une minute
- Début 2 min après la rotation
- Arrêt à la dernière minute
Rotation à mi-cuisson
3 - la fonction vapeur démarre après
8 min -
4 - la fonction vapeur démarre après
5 min -
5 la fonction vapeur démarre après 5
min
-
6 -
7 - la fonction vapeur démarre après
5 min
-
8 - -
9 - -
10 - -
11 - -
12 - -
13 - -
14 - -
15 - -
16 - -

52
FR
Réglage de la température et de la durée
La température et la durée de chaque fonction peuvent être adaptées en
conséquence (voir tableau ci-dessus), selon les goûts de chacun et le degré de
cuisson souhaité. Lorsque vous appuyez sur les touches
ou , le voyant
correspondant s'allume. Ensuite, pour ajuster la durée ou la température, appuyez
sur les touches
ou . Dès qu'un bip retentit, le voyant lumineux cesse de
clignoter.
Remarque : la durée et la température de cuisson peuvent être ajustées pendant le
fonctionnement.
Fonction vapeur
Après avoir sélectionné une fonction principale, il est possible de sélectionner
en plus la fonction vapeur an de conserver un certain taux d'humidité dans les
aliments.
Remarque :
• La fonction vapeur est une fonction supplémentaire qui ne peut pas être
utilisée seule.
• Le pourcentage de vapeur a été réglé par rapport aux différentes fonctions. Il
s'agit d'une méthode de pulvérisation xe qui ne peut pas être adaptée.
• Avant d'utiliser la fonction vapeur, assurez-vous qu'il y a susamment d'eau
dans le réservoir d'eau.
• La température de la vapeur est très élevée et la vaporisation est très ecace.
Il se peut donc que vous ne perceviez pas visuellement la vapeur (l'effet de
la vapeur peut être évalué en fonction de la quantité d'eau présente dans le
réservoir d'eau).
• La température réglée n'est ni augmentée ni diminuée par l'utilisation de la
fonction vapeur.
Avertissement de niveau d'eau bas
Si le symbole
clignote, cela indique que le réservoir d'eau doit être rempli. Dès
que le réservoir d'eau plein a été remis en place dans l'appareil, le symbole s'éteint.
Remarques
• Si la fonction vapeur supplémentaire n'a pas été réglée, aucun avertissement
n'est émis même si le niveau d'eau du réservoir est bas. Cela n'a aucune
inuence sur le fonctionnement de l'appareil.
• Il est recommandé de remplir le réservoir d'eau avec de l'eau distillée ou
puriée.
• Assurez-vous qu'il n'y a pas d'eau sur ou dans l'appareil.

53
FR
Fonction pause
Si vous appuyez sur la touche
⏯ pendant la préparation pour l'interrompre
automatiquement. Le témoin lumineux de la fonction précédemment sélectionnée
reste allumé. L'achage numérique indique « READY » et
⏯ clignote. Dès que
vous appuyez à nouveau sur la touche
⏯ , la préparation se poursuit.
Remarque
• Si aucune touche n'est actionnée pendant plus de 10 minutes en mode pause,
l'appareil passe automatiquement en mode veille.
• Pendant et immédiatement après la préparation, la casserole et les
accessoires utilisés sont très chauds et ne peuvent pas être touchés à main
nue.
• Si vous retirez la casserole pendant le mode de fonctionnement, la
préparation est immédiatement mise en pause.
Démarrage automatique
Cet appareil dispose d'une fonction qui permet de dénir l'heure à laquelle
l'appareil doit démarrer. Ajustez la fonction de cuisson et appuyez ensuite sur la
touche DELAY. Réglez l'heure souhaitée et, pour que l'appareil démarre à cette
heure, appuyez sur la touche
⏯.
Remarques
• Lorsque la durée avant le démarrage automatique est dénie, toutes les
touches, à l'exception des touches et
⏯, sont bloquées.
• Cette fonction ne peut pas être utilisée pour la décongélation et le maintien
au chaud.
Préchauffage
Sélectionnez cette fonction en fonction des besoins. Lorsqu'il n'y a pas d'aliments
dans la casserole, appuyez sur la touche PREHEAT en mode veille. Appuyez ensuite
sur la touche
⏯. L'appareil préchauffe maintenant. Dès qu'une alarme retentit, le
processus de préchauffage est terminé. Retirez la casserole, placez-y les aliments
préparés au préalable et replacez la casserole dans l'appareil. L'appareil démarre
ensuite automatiquement.
Remarque : la fonction de préchauffage et la fonction de démarrage automatique
ne peuvent pas être utilisées simultanément. Cette fonction ne peut pas être
utilisée pour la décongélation et le maintien au chaud.
Préparation terminée
1. Dès qu'un bip retentit, la préparation est terminée. Après 60 secondes de
refroidissement, l'écran ache « END » et un bip sonore retentit plusieurs fois.
2. Retirez la casserole et posez-la sur une surface stable et plane.
3. Retirez les aliments préparés et posez-les sur une assiette ou un autre
ustensile.

54
FR
4. Une fois la préparation terminée, appuyez sur la touche, et retirez la che
d'alimentation de la prise.
Remarque
• Ne touchez pas la casserole ou les accessoires à mains nues an d'éviter les
brûlures.
• Il est préférable de ne retirer la casserole de l'appareil que lorsqu'elle a
complètement refroidi.
• Ne retournez pas la casserole, car la graisse pourrait s'écouler.
NETTOYAGE ET MAINTENANCE
Nettoyage des surfaces de l'appareil
Nettoyez l'appareil et les accessoires après chaque utilisation. Gardez l'appareil
propre.
Remarque
• Avant le nettoyage, débranchez la che de la prise et laissez l'appareil refroidir
complètement.
• Essuyez la surface de l'appareil avec un chiffon humide.
• Ne plongez pas le cordon d'alimentation, la che ou l'appareil dans l'eau
ou dans d'autres liquides. Dans le cas contraire, cela peut entraîner des
dommages à l'appareil, des incendies, des décharges électriques et/ou des
blessures corporelles.
Stockage
Respectez les points suivants :
• Débranchez la che de la prise et laissez l'appareil refroidir complètement
avant de le ranger.
• Assurez-vous que tous les composants de l'appareil sont propres et secs.
Stockez l'appareil dans un endroit sec, propre et à l'abri des inuences
environnementales.

55
FR
RÉSOLUTION DES PROBLÈMES
Problème Cause possible Solution
L'appareil ne fonctionne pas. L'appareil n'est pas branché. Branchez la che dans la prise.
La casserole n'a pas été installée
correctement.
Placez correctement le récipient
dans le boîtier.
Les aliments ne sont pas cuits. Les aliments sont trop gros/épais Placez des portions plus petites/
des tranches plus nes dans la
casserole.
Temps de préparation trop court. Ajustez le temps de préparation.
Température de préparation trop
basse.
Ajustez la température de
préparation.
Trop d'aliments dans la casserole. Remplissez la casserole au
maximum jusqu'aux 4/5 de sa
capacité totale. Les aliments
doivent être espacés.
Les aliments n'ont pas été
complètement décongelés.
Laissez les aliments décongeler
complètement.
Les aliments sont préparés de
manière inégale.
Certains aliments doivent être
retournés régulièrement pendant
la préparation.
Pendant la préparation, retirez
la casserole de l'appareil toutes
les 5 à 8 minutes et retournez les
aliments qui s'y trouvent.
Une fumée blanche sort de la
casserole.
Vous préparez des aliments gras. La préparation d'aliments gras
entraîne une grande quantité
d'huile qui s'échappe. L'huile
produit une fumée blanche à
haute température. Cela est
normal.
Il y a des résidus d'huile de
la dernière utilisation dans la
casserole.
Vériez la propreté de l'appareil
avant de l'utiliser.
56
FR
Les frites ne sont
pas croustillantes.
Cela est lié à la teneur en eau et
en huile des aliments.
Assurez-vous que les frites
sont sèches avant de les faire
frire et ne les coupez pas trop
épaisses. Avant de faire frire, il
est recommandé de préchauffer
l'appareil.
Le réservoir d'eau
fuit.
Le couvercle du réservoir d'eau est
desserré.
Serrez le couvercle du réservoir
d'eau.
Le réservoir d'eau est
endommagé.
Contactez le service clientèle pur
obtenir des pièces de rechange.
Aucune vapeur n'est
produite pendant la
fonction vapeur.
La conduite d'aspiration dans le
réservoir d'eau est à l'envers.
Placez le tuyau d'aspiration au
fond du réservoir d'eau.
La vapeur peut être invisible.
Blocage de la buse.
Vériez si le niveau d'eau dans le
réservoir d'eau change pendant
l'utilisation de la fonction vapeur.
La pompe à eau est cassée. Contactez le service client
La pompe à eau ne fonctionne
pas.
Veuillez contacter le service après-
vente.
Code erreur E01 Circuit ouvert dans le capteur NTC. Contactez le service client
Code erreur E02 Court-circuit dans le capteur NTC Contactez le service client
Code erreur E03 Erreur de communication PCB Contactez le service client

57
FR
INFORMATIONS SUR LE RECYCLAGE
Si la mise en rebut des appareils électriques et
électroniques est réglementée dans votre pays, ce
symbole sur le produit ou sur l'emballage indique qu'il
ne doit pas être éliminé avec les ordures ménagères.
Vous devez l'acheminer vers un point de collecte pour
le recyclage des appareils électriques et électroniques.
En respectant des règles de recyclage, vous protégez
l'environnement et la santé de vos semblables des
conséquences négatives. Pour plus d'informations sur
le recyclage et la mise au rebut de ce produit, contactez
votre autorité locale ou votre service d'élimination des
déchets ménagers.
FABRICANT ET IMPORTATEUR (GB)
Fabricant :
Chal-Tec GmbH, Wallstraße 16, 10179 Berlin, Allemagne.
Importateur pour la Grande Bretagne :
Berlin Brands Group UK Limited
PO Box 42
272 Kensington High Street
London, W8 6ND
United Kingdom


59
ES
Estimado cliente:
Le felicitamos por la adquisición de este producto. Lea
atentamente el siguiente manual y siga cuidadosamente
las instrucciones de uso con el n de evitar posibles
daños. La empresa no se responsabiliza de los daños
ocasionados por un uso indebido del producto o por
haber desatendido las indicaciones de seguridad.
Escanee el siguiente código QR para obtener acceso
al manual de usuario más reciente y otra información
sobre el producto.
Indicaciones de seguridad 61
Descripción general del aparato 63
Indicaciones de uso 64
Utilización 66
Limpieza y mantenimiento 72
Reparación de anomalías 73
Indicaciones sobre la retirada del aparato 75
Fabricante e importador (Reino Unido) 75
CONTENIDO

60
ES
DATOS TÉCNICOS
Número de artículo 10040495, 10040496, 10040497
Alimentación 220–240 V ~ 50-60 Hz
Potencia nominal 1500 W
Tamaño de la olla 7,5 l
Capacidad del depósito de
agua
300 ml

61
ES
INDICACIONES DE SEGURIDAD
Indicaciones generales
• No lave nunca la carcasa con agua corriente para no dañar los componentes
eléctricos.
• No permita que entre agua u otros líquidos en la unidad para evitar una
descarga eléctrica.
• Los niños mayores de 8 años y las personas con discapacidad física, sensorial
o psíquica pueden utilizar el aparato si han sido previamente instruidos por
una persona responsable sobre el funcionamiento del mismo y conocen las
funciones, las indicaciones de seguridad y los riesgos asociados.
• Compruebe el voltaje en la placa de características antes de utilizarlo. Conecte
el aparato a tomas de corriente que se adecuen a su tensión.
• No utilice este producto si el enchufe, el cable de alimentación o el producto
están dañados.
• Si el cable de alimentación o el enchufe están dañados, deberán ser
sustituidos por el fabricante, una empresa autorizada o una persona
cualicada.
• No permita que los niños jueguen con el aparato.
• No toque ni el enchufe ni el panel de control con las manos mojadas.
• No coloque este producto sobre o cerca de manteles, cortinas y otros
materiales combustibles.
• Deje al menos 10 cm de espacio alrededor de la unidad en todos los lados. No
coloque ningún objeto sobre el dispositivo.
• No deje el aparato sin supervisión durante su funcionamiento.
ATENCIÓN
¡Peligro de quemaduras! El vapor caliente puede salir al abrir la puerta del
horno. Mantenga una distancia de seguridad para evitar quemaduras.
• No introduzca objetos extraños en las aberturas de la unidad.
• No utilice un limpiador de vapor para la limpieza.
• Asegúrese de que la unidad está apagada antes de sustituir la lámpara para
evitar una descarga eléctrica.
• La unidad no debe instalarse en un armario, ya que se sobrecalentará.

62
ES
Notas sobre el uso correcto
ATENCIÓN
¡Peligro de quemaduras! El aparato se calienta durante su uso. Tenga cuidado de
no tocar los elementos calefactores de en el interior del horno y utilice guantes
de cocina.
• Desenchufe el aparato y deje que se enfríe totalmente antes de limpiarlo.
• Instale el aparato en una supercie seca y plana y deje al menos 10 cm de
espacio alrededor del aparato en todas las direcciones para que el aire pueda
circular sucientemente.
• No conecte el aparato a tomas de corriente a las que ya estén conectados
otros aparatos de cocina.
• No coloque el aparato cerca de objetos inamables. Instálelo lejos de las
cortinas de las ventanas, las cortinas de las puertas, el papel pintado y otros
objetos similares para evitar incendios. No coloque ningún objeto sobre la
unidad.
• Limpie el cristal de la puerta del horno con un paño suave y húmedo. No
utilice limpiadores abrasivos o rascadores de metal, ya que rayarán la
supercie.
• No conecte el aparato a temporizadores externos ni a tomas de corriente con
mando a distancia.
• Antes de utilizarlo, compruebe que su batería de cocina es adecuada para
este producto. Le recomendamos que utilice recipientes de vidrio resistentes
al calor o recipientes de cerámica. Llene el recipiente hasta un máximo de dos
tercios.
• No llene demasiado el depósito de agua. Llene hasta la marca MAX del
depósito.
• No coloque ningún recipiente sobre la puerta abierta del horno.
• No caliente los alimentos en un recipiente cerrado, de lo contrario el
recipiente podría explotar. Transera los alimentos a un recipiente resistente
al calor antes de calentarlos.

63
ES
DESCRIPCIÓN GENERAL DEL APARATO
Partes de la unidad
1 Depósito de agua
2 Carcasa
3 Molde para tartas (opcional)
4 Inserto para freír
5 Olla
6 Escurridor
7 Separador
Panel de control inteligente

64
ES
INDICACIONES DE USO
1. Saque la unidad del embalaje y coloque el espaciador en la parte posterior de
la unidad. Coloque el aparato en una supercie plana y estable. Mantenga una
distancia mínima de 20 cm hacia atrás y 10 cm hacia los lados para garantizar
una ventilación suciente. Asegúrese de que las cortinas, los adornos de
pared y otros materiales fácilmente combustibles estén a una distancia segura
del aparato.
2. Después de sacar la olla, introduzca el inserto de fritura plano en la olla (véase
la ilustración siguiente).
3. Coloque los alimentos en el inserto para freír y luego empuje la olla hacia la
carcasa.
4. Retire el depósito de agua, llénelo de agua y vuelva a cerrarlo. Vuelva a
colocar el depósito de agua en la carcasa (véase la ilustración siguiente).
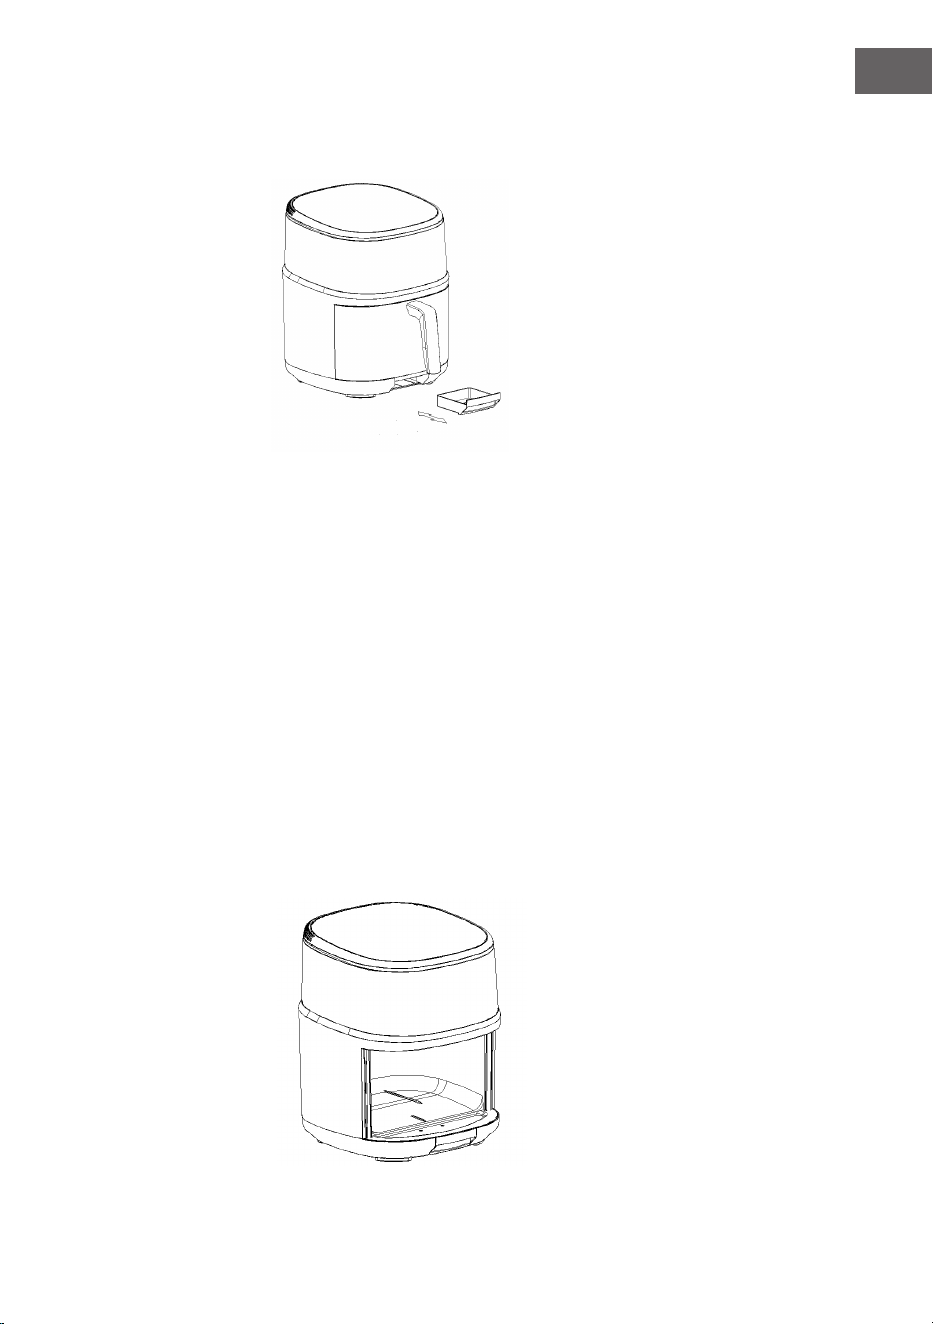
65
ES
5. Retire la bandeja de drenaje, compruébela y vacíela, y vuelva a colocarla en la
carcasa (véase la ilustración siguiente).
Notas
• Se necesitan diferentes accesorios para diferentes opciones de preparación.
• Después de la preparación, retire el inserto para freír, la rejilla y el molde de la
sartén, usando guantes u otro equipo de protección.
• No llene la maceta completamente con alimentos y asegúrese de que hay
una distancia mínima de 30 mm hasta el borde superior de la maceta. Es
importante que el aire dentro de la unidad pueda circular correctamente.
Además, los alimentos pueden expandirse después de calentarse,
dependiendo de la situación.
• El aparato sólo puede funcionar correctamente si la olla está bien colocada en
el aparato. Si no es así, aparece en la pantalla "OPEN".
• No utilice objetos magnéticos cerca de la ubicación mostrada en la ilustración
siguiente mientras la unidad esté encendida para evitar lesiones.
• Asegúrese de que el tubo de entrada está en el fondo del depósito de agua.

66
ES
UTILIZACIÓN
Antes del primer uso
1. Retire todo el material de embalaje, je el espaciador y coloque la unidad en
una supercie estable y horizontal.
2. Limpie la olla, el inserto para freír, la tartera y otros accesorios con agua
caliente, detergente líquido y una esponja suave.
3. Llene el depósito de agua (se recomienda el uso de agua destilada o
puricada).
4. Limpie el interior y el exterior de la unidad con un paño.
5. No introduzca alimentos en la olla cuando utilice el aparato por primera vez.
Llene el depósito de agua con agua puricada. Utilice la función "Pescado"
preestablecida y hágala funcionar (con la función de vapor activada al mismo
tiempo). Puede haber un ligero olor a humo cuando se utiliza por primera vez.
Es normal y no debe preocuparse.
Utilización
Cuando se enciende el aparato, suena un pitido. Las luces de la pantalla digital
y los indicadores luminosos parpadean brevemente y luego se apagan. Sólo el
indicador luminoso parpadea lentamente, indicando que la unidad está en
modo de espera. Coloque los ingredientes en la olla limpia y deslice la olla en
la carcasa. Llene el depósito de agua con agua. Enchufe la clavija en la toma de
corriente y pulse el botón . El indicador digital se enciende. Utilice el mando
de las funciones para seleccionar la función, el tiempo de preparación y la
temperatura deseados, según el alimento seleccionado. Pulse el botón
⏯ para
iniciar la preparación automáticamente.
Nota: Este aparato utiliza el principio de calefacción por tubo de ondas de luz para
calentar y la iluminación del aparato no puede ser regulada por el usuario.
Selección de funciones
1. Al pulsar el botón, todas las luces del panel de control se encienden,
indicando que la unidad está ahora en la selección de funciones.
2. Seleccione el menú de funciones. El indicador luminoso del menú función se
enciende. Pulse el botón para iniciar la preparación
⏯.

67
ES
Descripción de los símbolos clave
Símbolo Alimentos/
Función
Símbolo Alimentos/
Función
WINGS ALITAS VEGGIES Verduras
CHICKEN Pollo CAKE Bizcocho
FISH Pescado DELAY Espera
STEAK Filete PREHEAT Precalentamiento
CHIPS CHIPS REHEAT Calentar
FRIES Patatas fritas DEFROST Descongelación
BROIL Grill WARM Calentar
POPCORN Palomitas
AIR
FRYER
Cocción con aire
caliente
Indicaciones
• La tecla de función principal se puede ejecutar directamente. Si el aparato está
en modo de espera, es necesario pulsar primero la tecla
⏯ para que la tecla de
función funcione.
• La tecla de función adicional no puede utilizarse sola. Se trata de una función
adicional para la función principal y sólo puede utilizarse en combinación con
ella.
• El aparato contiene una variedad de combinaciones preestablecidas de
tiempo y temperatura de preparación, en función del alimento seleccionado.
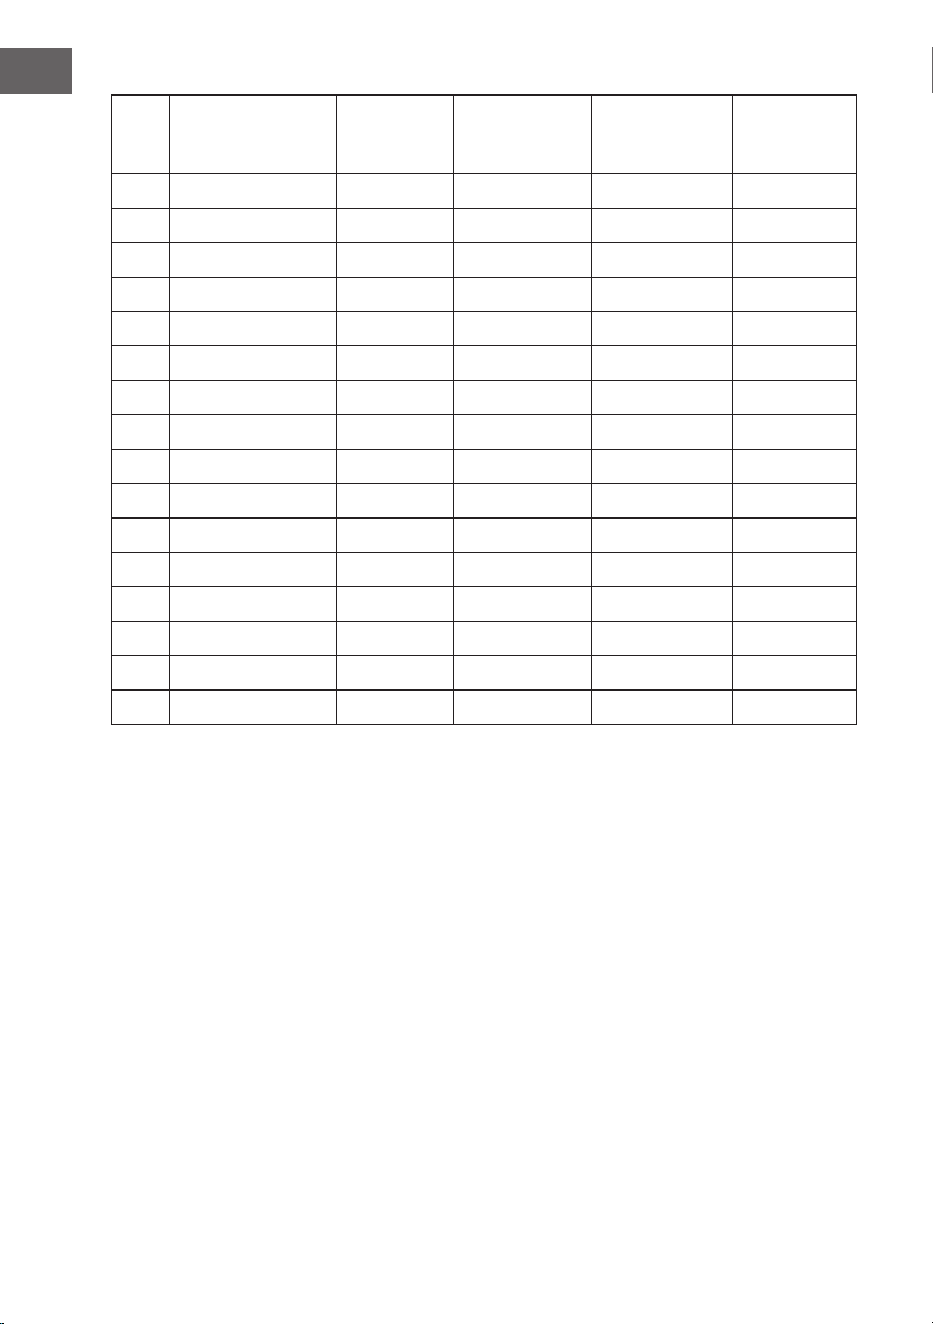
68
ES
Núm Teclas de control Temperatu-
ra ajustada
(°C)
Temperatura
recomendada
(°C)
Tiempo prees-
tablecido (min)
Tiempo re-
comendado
(min)
1 WINGS 190 50-200 15 1-60
2 CHICKEN 200 50-200 30 1-60
3 FISH 200 50-200 14 1-60
4 STEAK 200 50-200 12 1-60
5 CHIPS 180 50-200 10 1-60
6 FRIES 200 50-200 25 1-60
7 BROIL 190 50-200 40 1-60
8 POPCORN 200 50-200 25 1-60
9 VEGGIES 70 40-70 480 1-480
10 CAKE 140 50-180 35 1-60
11 DELAY - 50-200 60 10-540
12 PREHEAT 200 50-200 5 1-60
13 REHEAT 100 80-200 5 1-30
14 DEFROST 45 40-80 30 1-60
15 WARM 65 40-80 30 1-480
16 AIR FRYER 200 70-200 30 1-60
Indicaciones
• Los ajustes anteriores son indicativos. No se garantiza que esta sea la mejor
conguración para los ingredientes que utilice, ya que pueden variar en
cuanto a su origen, forma, tamaño y marca. Adapte los ajustes a la situación
respectiva. Cuanto mayor sea la cantidad de alimentos, más tiempo se
necesitará para su preparación.
• Sacar la olla y girar los alimentos mientras se cocinan puede ayudar a que la
comida se cocine más uniformemente y mejor.
• Si los ingredientes no están sucientemente cocidos, devuélvalos a la olla y
continúe la cocción ajustando el tiempo.
• El adobo debe ser absorbido por completo por los alimentos para obtener un
mejor sabor.
• Si quiere conseguir un mayor contenido de humedad en los alimentos,
seleccione la función de vapor.
69
ES
Núm Control de la función de vapor Notas
1 -después de 5 minutos, inicio de la
función de vapor
-Cierre en el último momento
-
2 -después de 7 minutos, inicio de la
función de vapor
- Apagar durante un minuto
- 2 minutos después de la rotación
Inicio
-Cierre en el último momento
Rotación después de la mitad
del tiempo
3 -después de 8 minutos, inicio de la
función de vapor -
4 -después de 5 minutos, inicio de la
función de vapor -
5 -después de 5 minutos, inicio de la
función de vapor
-
6 -
7 -después de 5 minutos, inicio de la
función de vapor
-
8 - -
9 - -
10 - -
11 - -
12 - -
13 - -
14 - -
15 - -
16 - -

70
ES
Ajuste del tiempo y la temperatura
La temperatura y el tiempo de cada función pueden ajustarse en consecuencia
(véase la tabla anterior), según el gusto individual y el nivel de cocción deseado. Al
pulsar los botones
o , se enciende el indicador luminoso correspondiente. A
continuación, pulse los botones
o para ajustar el nivel de potencia. En cuanto
suena un pitido, el indicador luminoso deja de parpadear.
Nota: El tiempo de funcionamiento y la temperatura se pueden ajustar durante el
estado de funcionamiento.
Función de vapor
Después de seleccionar una función principal, se puede seleccionar
adicionalmente la función de vapor para mantener una cierta cantidad de
humedad en los alimentos.
Aviso:
• La función de vapor es una función adicional que no se puede utilizar por sí
sola.
• El porcentaje de vapor se ha ajustado según las diferentes funciones. Es un
método de pulverización jo que no se puede adaptar.
• Antes de utilizar la función de vapor, asegúrese de que hay suciente agua en
el depósito de agua.
• La temperatura del vapor es muy alta y el efecto de vaporización es muy
bueno. Por lo tanto, es posible que no se note el vapor visualmente (el efecto
del vapor se puede juzgar en función de la cantidad de agua en el depósito).
• La temperatura ajustada no aumenta ni disminuye al utilizar la función de
vapor.
Aviso de bajo nivel de agua
Cuando el símbolo
parpadea, indica que es necesario rellenar el agua del
depósito. En cuanto el depósito de agua está lleno, el símbolo se apaga.
Notas
• Si la función de vapor no se ha ajustado adicionalmente, no hay ninguna
advertencia aunque el nivel de agua en el depósito de agua sea bajo. Esto no
afecta al funcionamiento de la unidad.
• Se recomienda llenar el depósito de agua con agua destilada o puricada.
• Asegúrese de que no entre agua en la unidad.

71
ES
Función de pausa
Si pulsa el botón
⏯ durante la preparación, ésta se interrumpe automáticamente.
El indicador luminoso de la función previamente seleccionada permanece
encendido. La pantalla digital muestra "READY" y
⏯ parpadea. En cuanto vuelva a
pulsar elbotón
⏯, la preparación continúa.
Indicaciones
• Si no se pulsa ningún botón durante más de 10 minutos en el modo de pausa,
la unidad pasa automáticamente al modo de espera.
• Durante la preparación e inmediatamente después, la olla y los accesorios
utilizados están muy calientes y no pueden tocarse con la mano desnuda.
• Si se extrae la olla durante el estado de funcionamiento, la preparación se
detiene inmediatamente.
Arranque automático
Esta unidad tiene una función para ajustar la hora después de la cual la unidad
debe arrancar. Ajuste la función de cocción y luego pulse el botón DELAY. Ajuste la
hora deseada y pulse el botón
⏯ para poner en marcha el aparato a esa hora.
Indicaciones
• Cuando se ha ajustado el tiempo hasta el arranque automático, se bloquean
todas las teclas excepto las de y
⏯.
• Esta función no se puede utilizar para la descongelación y el mantenimiento
del calor.
Precalentamiento
Seleccione esta función en función de las necesidades. Cuando no haya comida
en la olla, pulse el botón PREHEAT en modo de espera. A continuación, pulse
el botón
⏯. El aparato está ahora precalentado. En cuanto suene la alarma, el
proceso de precalentamiento habrá nalizado. Retire la olla, coloque la comida ya
preparada dentro y vuelva a introducir la olla en el aparato. El funcionamiento se
inicia automáticamente.
Nota: La función de precalentamiento y la función de arranque automático no
pueden utilizarse al mismo tiempo. Esta función no puede utilizarse al mismo
tiempo que las funciones de descongelación y mantenimiento del calor.
Preparación completa
1. En cuanto suene un pitido, la preparación habrá nalizado. Después de 60
segundos de enfriamiento, la pantalla muestra "END" y suena un pitido
múltiple.
2. Saque la olla y colóquela en una supercie estable y plana.
3. Saque la comida preparada y colóquela en un plato o en otra vajilla.
4. Tras la preparación, pulse el botón y desconecte el enchufe de la toma de
corriente.

72
ES
Indicaciones
• No toque la olla o los accesorios con las manos desnudas para evitar
quemaduras.
• Es mejor no sacar la olla del aparato hasta que se haya enfriado
completamente.
• No ponga la olla al revés, ya que la grasa podría salirse.
LIMPIEZA Y MANTENIMIENTO
Limpieza de la supercie del aparato
Limpie el aparato después de cada uso. Mantenga el aparato limpio.
Indicaciones
• Desenchufe el enchufe del aparato y deje que se enfríe totalmente antes de
limpiarlo.
• Frote la supercie de la unidad con un paño húmedo.
• No sumerja el cable de alimentación, el enchufe y la carcasa en agua u otros
líquidos. Si no lo hace, puede dañar la unidad, provocar un incendio, una
descarga eléctrica y/o lesiones personales.
Almacenamiento
Tenga en cuenta lo siguiente:
• Desenchufe el aparato de la red eléctrica y deje que se enfríe completamente
antes de guardarlo.
• Asegúrese de que todos los componentes de la unidad están limpios y secos.
Guarde el dispositivo en un lugar seco.
73
ES
REPARACIÓN DE ANOMALÍAS
Problema Posible causa Solución
El aparato no funciona. El aparato no está enchufado. Introduzca el cable de
alimentación en la toma de
corriente.
La olla no estaba bien insertada. Inserte el bote correctamente en
la carcasa.
La comida está poco hecha. La comida es demasiado grande/
espesa.
Colocar las porciones más
pequeñas/rebanadas más nas
en la olla.
Tiempo de preparación Ajuste el tiempo de preparación.
Temperatura de preparación
demasiado baja.
Ajuste la temperatura de
preparación.
Demasiada comida en la olla. Llene la olla hasta un máximo
de 4/5 de su capacidad total.
Debe haber espacios entre los
alimentos.
Los alimentos no se han
descongelado completamente.
Deje que los alimentos se
descongelen completamente.
La comida está preparada de
forma desigual.
Algunos alimentos necesitan ser
girados regularmente durante su
preparación.
Durante la preparación, saque la
olla del aparato cada 5 - 8 minutos
y dé la vuelta a los alimentos en
su interior.
Sale humo blanco de la olla. Se preparan alimentos grasientos. La preparación de alimentos
grasos provoca una gran cantidad
de aceite que se escapa. El aceite
produce humo blanco a altas
temperaturas. Se trata de un
fenómeno normal.
Hay residuos de aceite en la olla
desde el último uso.
Limpieza: Asegúrese de que el
aparato está limpio antes de
utilizarlo.
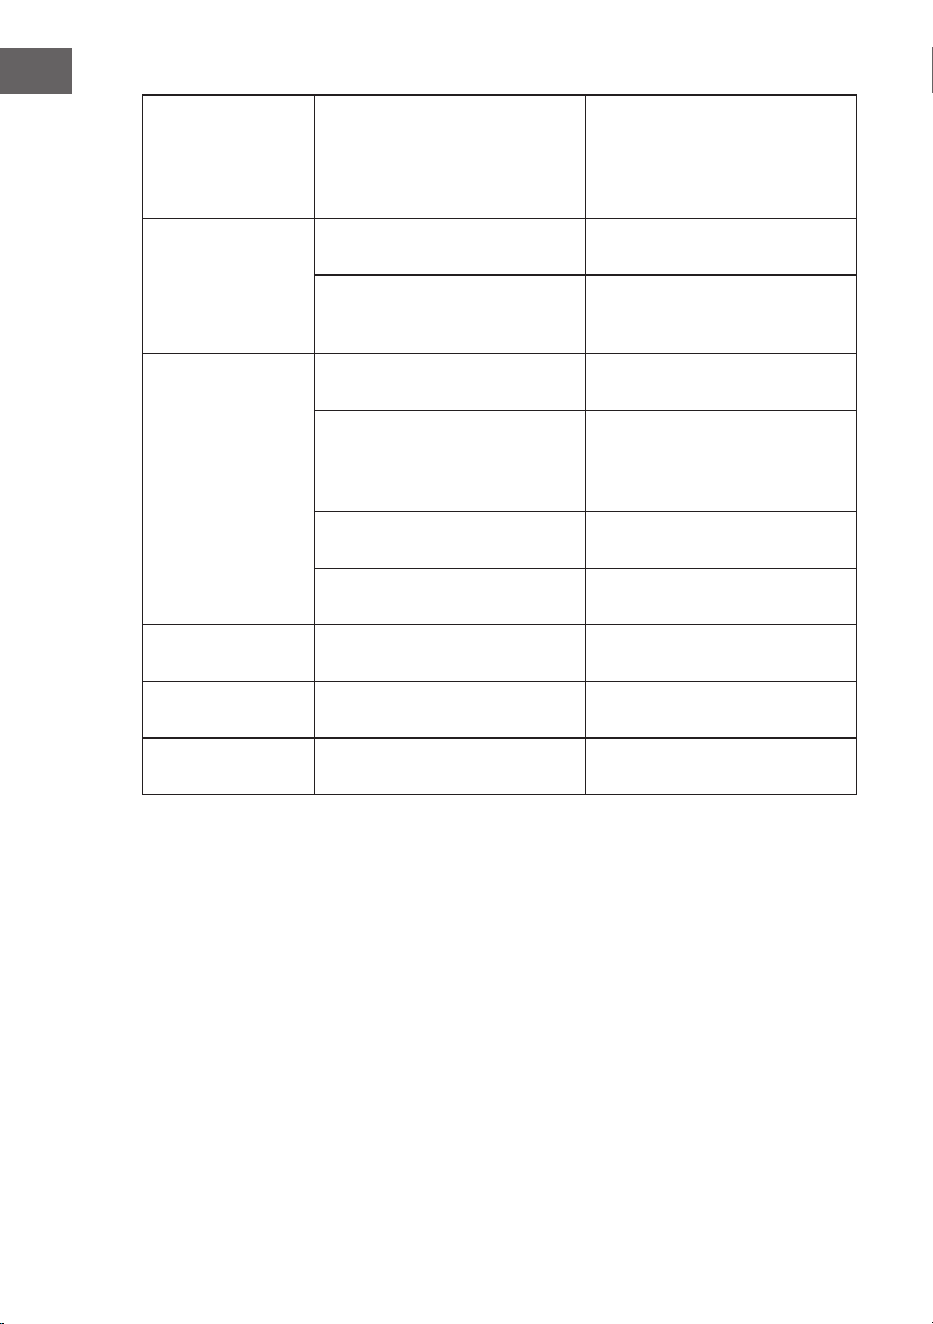
74
ES
Las patatas fritas no
están crujientes.
Esto está relacionado con el
contenido de agua y aceite de los
alimentos.
Asegúrese de que las patatas
fritas estén secas antes de freírlas
y no las corte demasiado gruesas.
Se recomienda precalentar el
aparato antes de freír.
El tanque de agua
tiene una fuga.
La tapa del depósito de agua está
suelta.
Apriete la tapa del depósito de
agua.
El tanque de agua está roto. Póngase en contacto con el
servicio de atención al cliente para
obtener piezas de repuesto.
No se produce vapor
durante la función
de vapor.
El tubo de entrada en el depósito
de agua está al revés.
Coloque el tubo de aspiración en
el fondo del depósito de agua.
El vapor puede ser invisible.
Obstrucción de la boquilla.
Compruebe si el nivel de agua
en el depósito de agua cambia
mientras se utiliza la función de
vapor.
La bomba de agua está rota. Contacte con el servicio de
atención al cliente.
La bomba de agua no funciona. Póngase en contacto con el
servicio postventa.
Código de error E01 Circuito abierto en el sensor NTC. Contacte con el servicio de
atención al cliente.
Código de error E02 Cortocircuito en el sensor NTC Contacte con el servicio de
atención al cliente.
Código de error E03 Error de comunicación de la PCB Contacte con el servicio de
atención al cliente.

75
ES
INDICACIONES SOBRE LA RETIRADA DEL APARATO
Si en su país existe una disposición legal relativa a la
eliminación de aparatos eléctricos y electrónicos, este
símbolo estampado en el producto o en el embalaje
advierte de que no debe eliminarse como residuo
doméstico. En lugar de ello, debe depositarse en un
punto de recogida de reciclaje de aparatos eléctricos y
electrónicos. Una retirada de aparatos conforme a las
leyes contribuye a proteger el medio ambiente y a las
personas a su alrededor frente a posibles consecuencias
perjudiciales para la salud. Para obtener información más
detallada sobre el reciclaje de este producto, póngase
en contacto con su ayuntamiento o con el servicio de
eliminación de residuos domésticos.
FABRICANTE E IMPORTADOR (REINO UNIDO)
Fabricante:
Chal-Tec GmbH, Wallstraße 16, 10179 Berlín, Alemania.
Importador para el Reino Unido:
Berlin Brands Group UK Limited
PO Box 42
272 Kensington High Street
London, W8 6ND
United Kingdom


77
IT
Gentile cliente,
la ringraziamo per l'acquisto del dispositivo. La
preghiamo di leggere attentamente le seguenti istruzioni
per l'uso e di seguirle per evitare possibili danni. Non ci
assumiamo alcuna responsabilità per danni scaturiti da
una mancata osservanza delle avvertenze di sicurezza e
da un uso improprio del dispositivo. Scansionare il codice
QR seguente, per accedere al manuale d’uso più attuale e
per ricevere informazioni sul prodotto.
Avvertenze di sicurezza 79
Descrizione del dispositivo 81
Istruzioni per l'uso 82
Utilizzo 84
Pulizia e manutenzione 90
Risoluzione dei problemi 91
Avviso di smaltimento 93
Produttore e importatore (UK) 93
INDICE

78
IT
DATI TECNICI
Numero articolo 10040495, 10040496, 10040497
Alimentazione 220–240 V ~ 50-60 Hz
Potenza nominale 1500 W
Dimensioni del contenitore
di cottura
7,5 l
Capacità del serbatoio 300 ml

79
IT
AVVERTENZE DI SICUREZZA
Avvertenze generiche
• Non lavare mai l'alloggiamento con acqua corrente per evitare di danneggiare
i componenti elettrici.
• Non lasciare che acqua o altri liquidi penetrino nel dispositivo, in modo da
evitare scosse elettriche.
• Bambini a partire da 8 anni e persone con limitate capacità siche, psichiche
e sensoriali possono utilizzare il dispositivo solo se sono stati istruiti da
una persona responsabile della loro sicurezza sulle modalità d'uso e sulle
procedure di sicurezza e comprendono i rischi associati.
• Prima dell'utilizzo, controllare la tensione sulla targhetta del dispositivo.
Collegare il dispositivo solo a prese elettriche con tensione corrispondente a
quella indicata.
• Non usare questo prodotto se la spina, il cavo di alimentazione o il prodotto
stesso sono danneggiati.
• Se il cavo di alimentazione o la spina sono danneggiati, devono essere
sostituiti dal produttore, da un'azienda tecnica autorizzata o da una persona
con qualica equivalente.
• Assicurarsi che i bambini non giochino con il dispositivo.
• Non toccare la spina o il pannello di controllo con le mani bagnate.
• Non posizionare questo prodotto sopra o vicino a tovaglie, tende e altri
materiali inammabili.
• Lasciare almeno 10 cm di spazio intorno a tutti i lati del dispositivo. Non
poggiare oggetti sopra al dispositivo.
• Non lasciare il dispositivo privo di supervisione mentre è in funzione.
ATTENZIONE
Pericolo di ustioni! Quando si apre lo sportello del dispositivo può fuoriuscire
vapore bollente. Mantenere una distanza di sicurezza per evitare ustioni.
• Non inserire corpi estranei nelle aperture del dispositivo.
• Non usare pulitori a vapore per la pulizia del dispositivo.
• Assicurarsi che il dispositivo sia spento prima di sostituire la lampada per
evitare scosse elettriche.
• Il dispositivo non deve essere installato in un armadio per evitare il
surriscaldamento.

80
IT
Indicazioni per un utilizzo sicuro
ATTENZIONE
Pericolo di ustioni! Il dispositivo diventa estremamente caldo durante l'uso. Fare
attenzione a non toccare gli elementi riscaldanti all'interno del dispositivo e usare
guanti da forno.
• Prima della pulizia, staccare la spina e lasciar raffreddare completamente il
dispositivo.
• Installare il dispositivo su una supercie piana e asciutta e lasciare almeno
10 cm di spazio in tutte le direzioni in modo che l'aria possa circolare
sucientemente.
• Non collegare il dispositivo a prese elettriche, a cui sono già collegati altri
elettrodomestici da cucina.
• Non posizionare il dispositivo vicino a oggetti inammabili. Installarlo lontano
dalle tende di porte e nestre, da carta da parati e da oggetti simili per evitare
incendi. Non poggiare o conservare oggetti sopra al dispositivo.
• Pulire lo sportello del dispositivo con un panno morbido inumidito. Non usare
detergenti abrasivi o raschietti metallici per evitare gra sulla supercie.
• Non collegare assolutamente il dispositivo a timer esterni o a prese elettriche
con comando a distanza.
• Prima dell'uso, assicurarsi che le stoviglie siano adatte a questo prodotto. Si
consiglia di utilizzare contenitori di vetro resistenti al calore o di ceramica.
Riempire il contenitore di cottura no a un massimo di due terzi.
• Non riempire eccessivamente il serbatoio dell'acqua. Fare riferimento
all'indicazione MAX nel serbatoio.
• Non mettere contenitori sullo sportello del dispositivo aperto.
• Non riscaldare alimenti in un contenitore sigillato, altrimenti potrebbe
esplodere. Trasferire gli alimenti in un contenitore resistente al calore prima
di scaldarli.

81
IT
DESCRIZIONE DEL DISPOSITIVO
Componenti del dispositivo
1 Serbatoio dell'acqua
2 Alloggiamento
3 Teglia per torte (opzionale)
4 Inserto per friggere
5 Contenitore di cottura
6 Vaschetta di gocciolamento
7 Distanziatore
Pannello di controllo intelligente

82
IT
ISTRUZIONI PER L'USO
1. Togliere il dispositivo dall'imballaggio e installare il distanziatore sul lato
posteriore. Posizionare il dispositivo su una supercie piana e stabile.
Mantenere una distanza minima di 20 cm dalla parte posteriore e di 10 cm
dai lati per garantire una ventilazione suciente. Assicurarsi che tende,
tappezzerie e altri materiali facilmente inammabili si trovino a distanza di
sicurezza dal dispositivo.
2. Dopo aver tolto il contenitore di cottura, posizionare l'inserto per friggere al
suo interno (v. illustrazione qui sotto).
3. Posizionare gli alimenti sull'inserto per friggere e riposizionare il contenitore
di cottura nell'alloggiamento.
4. Rimuovere il serbatoio, riempirlo d'acqua e richiuderlo. Riposizionare il
serbatoio dell'acqua nell'alloggiamento (v. illustrazione qui sotto).

83
IT
5. Rimuovere la vaschetta di gocciolamento, controllarla, svuotarla e rimetterla
nell'alloggiamento (v. illustrazione qui sotto).
Note
• In base alle opzioni di preparazione sono necessari diversi accessori.
• Dopo la preparazione, rimuovere l'inserto per friggere, la griglia e la teglia,
indossando guanti da forno o altre protezioni.
• Non riempire completamente il contenitore di cottura con gli alimenti e
assicurarsi che ci sia una distanza minima di 30 mm dal bordo superiore. È
importante che l'aria all'interno del dispositivo possa circolare correttamente.
Inoltre, in base alle diverse situazioni, gli alimenti possono espandersi dopo il
riscaldamento.
• Il dispositivo può funzionare in modo adeguato solo se il contenitore di
cottura è posizionato correttamente. In caso contrario, sullo schermo compare
"OPEN".
• Non utilizzare oggetti magnetici nelle vicinanze del punto indicato
nell'illustrazione qui sotto mentre il dispositivo è acceso per evitare lesioni.
• Assicurarsi che il tubo di aspirazione sia sul fondo del serbatoio.

84
IT
UTILIZZO
Prima del primo utilizzo
1. Rimuovere tutto il materiale di imballaggio, installare il distanziatore e
posizionare il dispositivo su una supercie stabile e orizzontale.
2. Pulire il contenitore di cottura, l'inserto per friggere, la teglia e gli altri
accessori con acqua calda, detergente liquido e una spugna morbida.
3. Riempire il serbatoio con acqua (si raccomanda l'uso di acqua distillata o
puricata).
4. Pulire l’interno e l’esterno del dispositivo con un panno.
5. Durante il primo utilizzo, non mettere alimenti nel contenitore di cottura.
Riempire il serbatoio con acqua puricata. Impostare la funzione predenita
"Fish" (pesce) e attivarla (con la funzione a vapore attivata allo stesso tempo).
Al primo utilizzo può comparire un leggero odore di fumo. È normale e non è
motivo di preoccupazione.
Utilizzo
Quando il dispositivo è acceso, viene emesso un segnale acustico. Le luci del
display digitale e le spie lampeggiano brevemente e si spengono. Solo la spia
lampeggia lentamente, indicando che il dispositivo è in modalità standby. Mettere
gli ingredienti nel contenitore di cottura pulito e posizionarlo nell'alloggiamento.
Riempire il serbatoio d'acqua. Inserire la spina nella presa e premere . Il display
digitale si accende. Usare la manopola delle funzioni per selezionare la funzione,
la durata di preparazione e la temperatura desiderate, in base all'alimento
selezionato. Premere
⏯ per avviare la preparazione automatica.
Nota: questo dispositivo sfrutta il principio di riscaldamento con tubo a onde
luminose e l'illuminazione non può essere regolata dall'utente.
Selezionare la funzione
1. Quando si preme il tasto , tutte le luci sul pannello di controllo si accendono,
indicando che il dispositivo è pronto per la selezione della funzione.
2. Selezionare il menu delle funzioni. La spia corrispondente al menu delle
funzioni si accende. Premere
⏯ per avviare la preparazione.

85
IT
Descrizione dei simboli dei tasti
Simbolo Alimento/
Funzione
Simbolo Alimento/
Funzione
WINGS Alette VEGGIES Verdura
CHICKEN Pollo CAKE Torta
FISH Pesce DELAY Ritardo
STEAK Bistecca PREHEAT Preriscaldare
CHIPS Chips REHEAT Riscaldare
FRIES Patatine fritte DEFROST Scongelare
BROIL Grill WARM Scaldare
POPCORN Popcorn
AIR
FRYER
Cottura ad aria calda
Nota
• Il tasto per la funzione principale può essere premuto direttamente. Se il
dispositivo è in modalità standby, bisogna prima premere il tasto
⏯ per
attivare il tasto della funzione.
• Il tasto per la funzione aggiuntiva non può essere usato da solo. Questa
è una funzione aggiuntiva a quella principale e può essere usata solo in
combinazione con essa.
• Il dispositivo contiene una varietà di combinazioni preimpostate di durata e
temperatura di preparazione, a seconda dell'alimento selezionato.
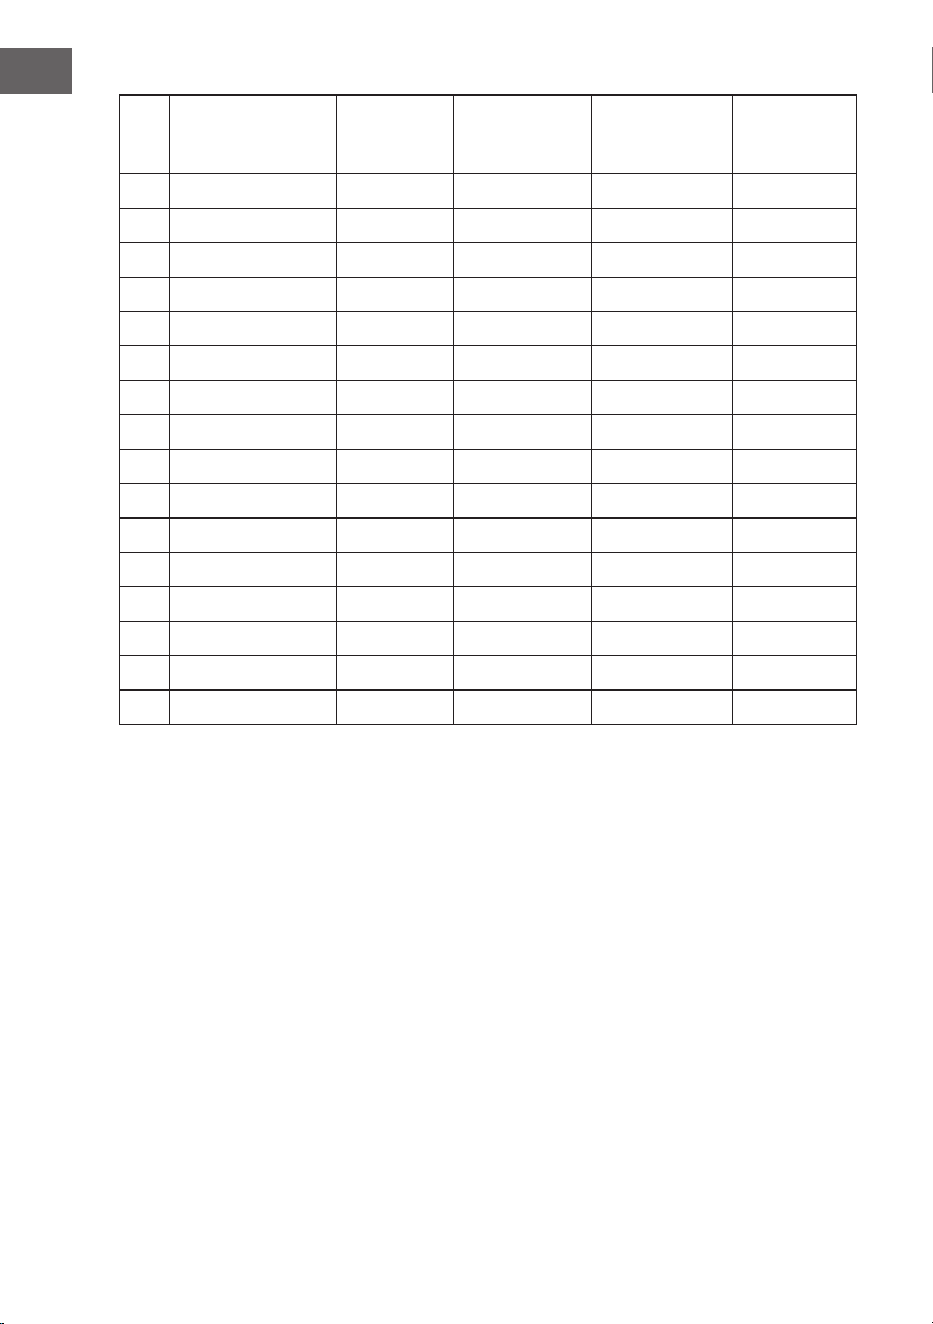
86
IT
N. Tasto funzione Temperatu-
ra imposta-
ta (°C)
Temperatura
consigliata (°C)
Durata prede-
nita (min.)
Durata consi-
gliata (min.)
1 WINGS 190 50-200 15 1-60
2 CHICKEN 200 50-200 30 1-60
3 FISH 200 50-200 14 1-60
4 STEAK 200 50-200 12 1-60
5 CHIPS 180 50-200 10 1-60
6 FRIES 200 50-200 25 1-60
7 BROIL 190 50-200 40 1-60
8 POPCORN 200 50-200 25 1-60
9 VEGGIES 70 40-70 480 1-480
10 CAKE 140 50-180 35 1-60
11 DELAY - 50-200 60 10-540
12 PREHEAT 200 50-200 5 1-60
13 REHEAT 100 80-200 5 1-30
14 DEFROST 45 40-80 30 1-60
15 WARM 65 40-80 30 1-480
16 AIR FRYER 200 70-200 30 1-60
Nota
• Le impostazioni descritte in precedenza rappresentano solo valori indicativi.
Non è garantito che questa sia l'impostazione migliore per gli ingredienti
in uso, dato che possono variare per origine, forma, dimensione e marca.
Regolare le impostazioni in base alla situazione. Maggiore è la quantità di
alimenti, più tempo è necessario per la preparazione.
• Tirare fuori il contenitore e girare gli alimenti durante la cottura può aiutarli a
cuocere meglio e più uniformemente.
• Se gli ingredienti non sono abbastanza cotti, rimetterli nel contenitore e
continuare la cottura con l'impostazione della durata aggiornata.
• Per dare sapore, la marinata dovrebbe essere completamente assorbita dagli
alimenti.
• Per ottenere maggiore umidità negli alimenti, selezionare la funzione a
vapore.
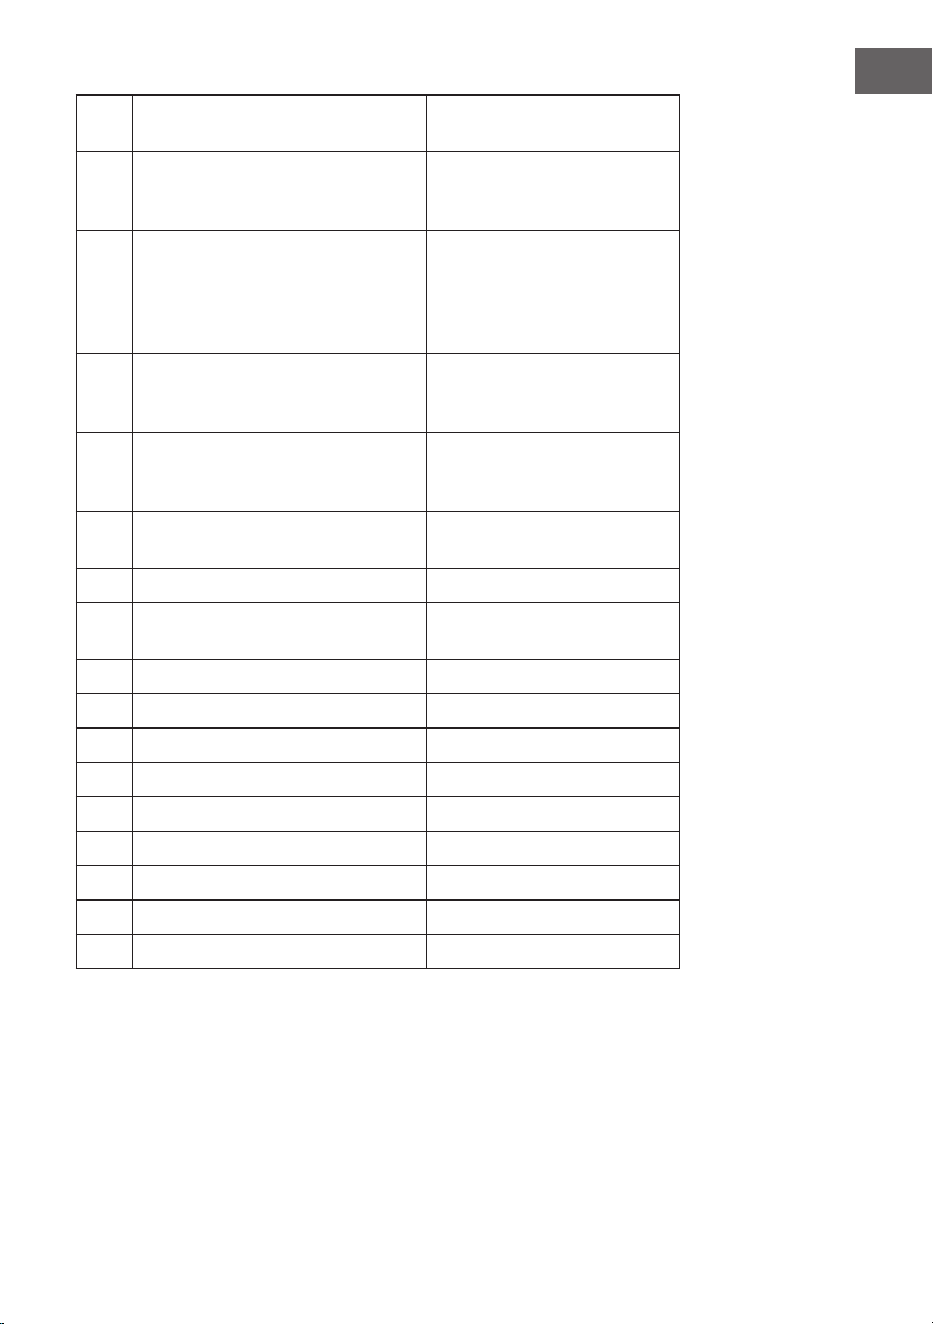
87
IT
N. Controllo della funzione a vapore Note
1 -dopo 5 min. avvio della funzione a
vapore
-Spegnimento all'ultimo minuto
-
2 -dopo 7 min. avvio della funzione a
vapore
- Spegnimento per un minuto
- 2 min. dopo aver girato avvio
-Spegnimento all'ultimo minuto
Girare dopo la metà della
durata di cottura
3 dopo 8 min. avvio della funzione a
vapore -
4 dopo 5 min. avvio della funzione a
vapore -
5 dopo 5 min. avvio della funzione a
vapore
-
6 -
7 dopo 5 min. avvio della funzione a
vapore
-
8 - -
9 - -
10 - -
11 - -
12 - -
13 - -
14 - -
15 - -
16 - -

88
IT
Impostazione della durata e della temperatura
La temperatura e la durata di ogni funzione possono essere regolate (v. la tabella
sopra) in base alle preferenze individuali e al livello di cottura desiderato. Quando
si premono i tasti
o , si accende la spia corrispondente. Premere i tasti
o
per impostare durata o temperatura. Non appena viene emesso un segnale
acustico, la spia smette di lampeggiare.
Nota: la durata e la temperatura di funzionamento possono essere regolate
mentre il dispositivo è in funzione.
Funzione a vapore
Dopo aver selezionato una funzione principale, la funzione a vapore può essere
selezionata in aggiunta per mantenere una certa quantità di umidità negli
alimenti.
Nota:
• La funzione a vapore è una funzione aggiuntiva che non può essere usata da
sola.
• La percentuale di vapore è stata impostata in base alle diverse funzioni. Si
tratta di un metodo di erogazione sso che non può essere modicato.
• Prima di usare la funzione a vapore, assicurarsi che ci sia abbastanza acqua
nel serbatoio.
• La temperatura del vapore è molto alta e l'effetto di vaporizzazione è ottimo.
Per questo motivo il vapore potrebbe non essere visibile (l'effetto del vapore
può essere giudicato a seconda della quantità d'acqua nel serbatoio).
• La temperatura impostata non viene né aumentata né diminuita utilizzando la
funzione a vapore.
Avviso in caso di basso livello dell'acqua
Quando il simbolo
lampeggia, indica che è necessario aggiungere acqua nel
serbatoio. Non appena il serbatoio pieno è stato reinserito nel dispositivo, il
simbolo si spegne.
Note
• Se non viene impostata la funzione a vapore, non viene emesso alcun avviso
anche se il livello dell'acqua nel serbatoio è basso. Questo non inuisce sul
funzionamento del dispositivo.
• Si consiglia di riempire il serbatoio con acqua distillata o puricata.
• Assicurarsi che non nisca acqua sopra o dentro al dispositivo.

89
IT
Funzione di pausa
Se si preme il tasto
⏯ durante la preparazione, questa viene automaticamente
interrotta. La spia della funzione precedentemente selezionata rimane accesa. Il
display digitale mostra "READY" e
⏯ lampeggia. Non appena si preme nuovamente
il tasto
⏯ , la preparazione continua.
Nota
• Se non si preme alcun tasto per 10 minuti, il dispositivo passa
automaticamente in modalità standby.
• Durante e subito dopo la preparazione, il contenitore di cottura e gli accessori
utilizzati sono molto caldi e non possono essere toccati a mani nude.
• Se si estrae il contenitore di cottura a dispositivo in funzione, la preparazione
viene messa in pausa immediatamente.
Avvio automatico
Questo dispositivo permette di programma un avvio temporizzato. Impostare
la funzione di cottura e poi premere il tasto DELAY. Impostare l'ora desiderata e
premere il tasto
⏯ per avviare il dispositivo a quell'ora.
Nota
• Quando il tempo no all'avvio automatico è stato impostato, sono bloccati
tutti i tasti tranne e
⏯.
• Questa funzione non può essere usata per scongelare e tenere in caldo.
Preriscaldare
Selezionare questa funzione a seconda delle esigenze. Quando non ci sono
alimenti nel contenitore di cottura, premere il tasto PREHEAT in modalità standby.
Premere poi il tasto
⏯. Il dispositivo viene preriscaldato. Non appena suona un
allarme, il processo di preriscaldamento è completato. Rimuovere il contenitore di
cottura, mettere gli alimenti preparati all'interno e riposizionarlo nel dispositivo. Il
dispositivo viene avviato automaticamente.
Nota: le funzioni di preriscaldamento e di avvio automatico non possono
essere usate allo stesso tempo. Questa funzione non può essere usata
contemporaneamente alle funzioni per scongelare e tenere in caldo.
Preparazione terminata
1. Non appena viene emesso un segnale acustico, la preparazione è terminata.
Dopo 60 secondi di raffreddamento, lo schermo mostra "END" e vengono
emessi diversi segnali acustici.
2. Togliere il contenitore di cottura e metterlo su una supercie stabile e piatta.
3. Togliere gli alimenti pronti e metterli su un piatto o su un vassoio.
4. Dopo la preparazione, premere il tasto e staccare la spina dalla presa.
Nota
• Non toccare il contenitore di cottura o gli accessori a mani nude per evitare

90
IT
ustioni.
• È meglio non togliere il contenitore di cottura dal dispositivo nché non si è
raffreddato completamente.
• Non capovolgere il contenitore di cottura, altrimenti potrebbe fuoriuscire il
grasso.
PULIZIA E MANUTENZIONE
Pulire le superci del dispositivo
Pulire il dispositivo e gli accessori dopo ogni utilizzo. Tenere pulito il dispositivo.
Nota
• Prima della pulizia, staccare la spina e lasciar raffreddare completamente il
dispositivo.
• Pulire la supercie con un panno inumidito.
• Non immergere cavo di alimentazione, spina e alloggiamento in acqua o altri
liquidi. In caso contrario, il dispositivo potrebbe subire danni o potrebbero
risultare incendi, scosse elettriche e/o lesioni personali.
Stoccaggio
Prestare attenzione a quanto segue:
• Staccare la spina e lasciar raffreddare completamente il dispositivo prima di
metterlo via.
• Assicurarsi che tutti i componenti del dispositivo siano puliti e asciutti.
Conservare il dispositivo in un luogo asciutto, pulito e al riparo dagli agenti
atmosferici.

91
IT
RISOLUZIONE DEI PROBLEMI
Problema Possibile causa Soluzionet
Il dispositivo non funziona. La spina del dispositivo non è
collegata.
Inserire la spina nella presa
elettrica.
Il contenitore di cottura non è
posizionato correttamente.
Inserire correttamente il
contenitore nell'alloggiamento.
Gli alimenti non sono cotti. Gli alimenti sono troppo grandi/
spessi.
Mettere nel contenitore di cottura
porzioni più piccole/fette più
sottili.
Durata di preparazione
insuciente.
Regolare la durata di
preparazione.
Temperatura di preparazione
troppo bassa.
Regolare la temperatura di
preparazione.
Troppi alimenti nel contenitore di
cottura.
Riempire il contenitore no a un
massimo di 4/5 della sua capacità
totale. Ci dovrebbero essere degli
spazi vuoti tra gli alimenti.
Gli alimenti non sono stati
completamente scongelati.
Lasciare che gli alimenti si
scongelino completamente.
Gli alimenti non sono cotti in
modo uniforme.
Alcuni alimenti devono essere
girati regolarmente durante la
preparazione.
Durante la preparazione, togliere
il contenitore di cottura dal
dispositivo ogni 5-8 minuti e girare
gli alimenti all'interno.
Esce fumo bianco dal
contenitore di cottura.
Sono in preparazione dei cibi
grassi.
La preparazione di cibi grassi
porta alla fuoriuscita di una
grande quantità di olio. Ad alte
temperature, l'olio produce
fumo bianco. Questo è del tutto
normale.
Ci sono residui d'olio nel
contenitore di cottura dall'ultimo
utilizzo.
Prima di utilizzare il dispositivo,
assicurarsi che sia pulito.
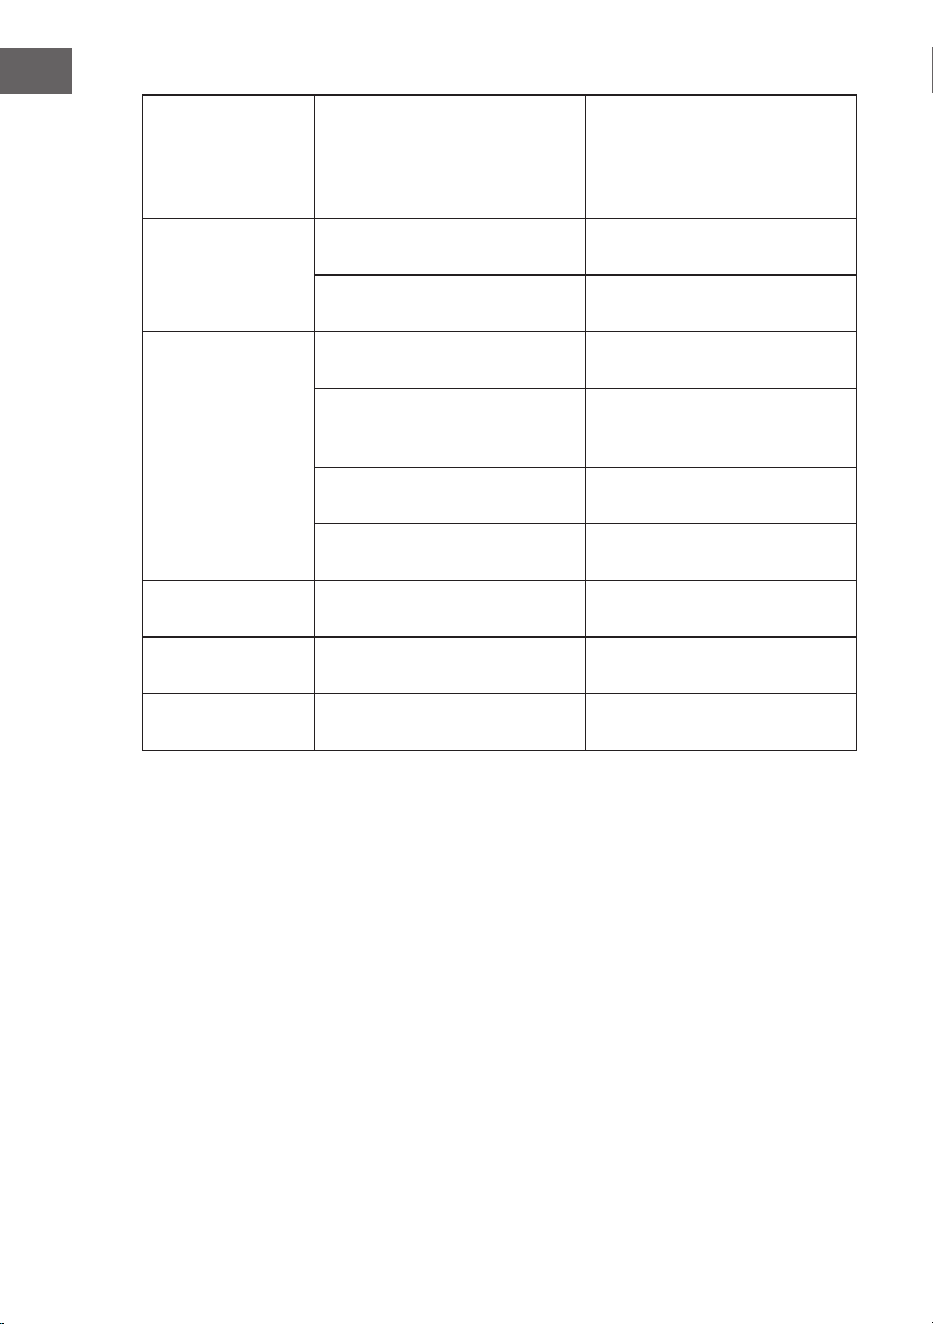
92
IT
Le patatine non sono
croccanti.
Questo è legato al contenuto di
acqua e olio nell'alimento.
Assicurarsi che le patatine siano
asciutte prima di friggerle e
non tagliarle troppo spesse. Si
raccomanda di preriscaldare il
dispositivo prima di friggere.
Il serbatoio
dell'acqua perde.
Il coperchio del serbatoio
dell'acqua è allentato.
Chiudere saldamente il coperchio
del serbatoio.
Il serbatoio è rotto. Contattare il servizio di assistenza
ai clienti per pezzi di ricambio.
Non viene prodotto
vapore durante la
funzione a vapore.
Il tubo di aspirazione nel serbatoio
dell'acqua è al contrario.
Posizionare il tubo di aspirazione
sul fondo del serbatoio dell'acqua.
Il vapore può essere invisibile.
Blocco dell'ugello.
Controllare se il livello dell'acqua
nel serbatoio cambia mentre si
usa la funzione a vapore.
La pompa dell'acqua è guasta. Rivolgersi al servizio di assistenza
ai clienti.
La pompa dell'acqua non
funziona.
Rivolgersi al servizio di assistenza
ai clienti.
Codice di errore E01 Circuito aperto nel sensore NTC. Rivolgersi al servizio di assistenza
ai clienti.
Codice di errore E02 Corto circuito nel sensore NTC Rivolgersi al servizio di assistenza
ai clienti.
Codice di errore E03 Errore di comunicazione del PCB Rivolgersi al servizio di assistenza
ai clienti.

93
IT
AVVISO DI SMALTIMENTO
Se nel vostro Paese sono vigenti regolamenti legislativi
relativi allo smaltimento di dispositivi elettrici ed
elettronici, questo simbolo sul prodotto o sull'imballaggio
indica che non è consentito smaltire questo prodotto nei
riuti casalinghi. Il dispositivo deve invece essere portato
in un centro di raccolta per il riciclaggio di dispositivi
elettrici ed elettronici. Lo smaltimento conforme tutela
l'ambiente e salvaguarda la salute del prossimo da
conseguenze negative. Informazioni riguardanti il
riciclaggio e lo smaltimento di questo prodotto sono
disponibili presso l'amministrazione locale o il servizio di
smaltimento dei riuti.
PRODUTTORE E IMPORTATORE (UK)
Produttore:
Chal-Tec GmbH, Wallstraße 16, 10179 Berlino, Germania.
Importatore per la Gran Bretagna:
Berlin Brands Group UK Limited
PO Box 42
272 Kensington High Street
London, W8 6ND
United Kingdom