Loading ...
Loading ...
Loading ...
6 PowerXL Duo NutriSealer™
Instructions For Use
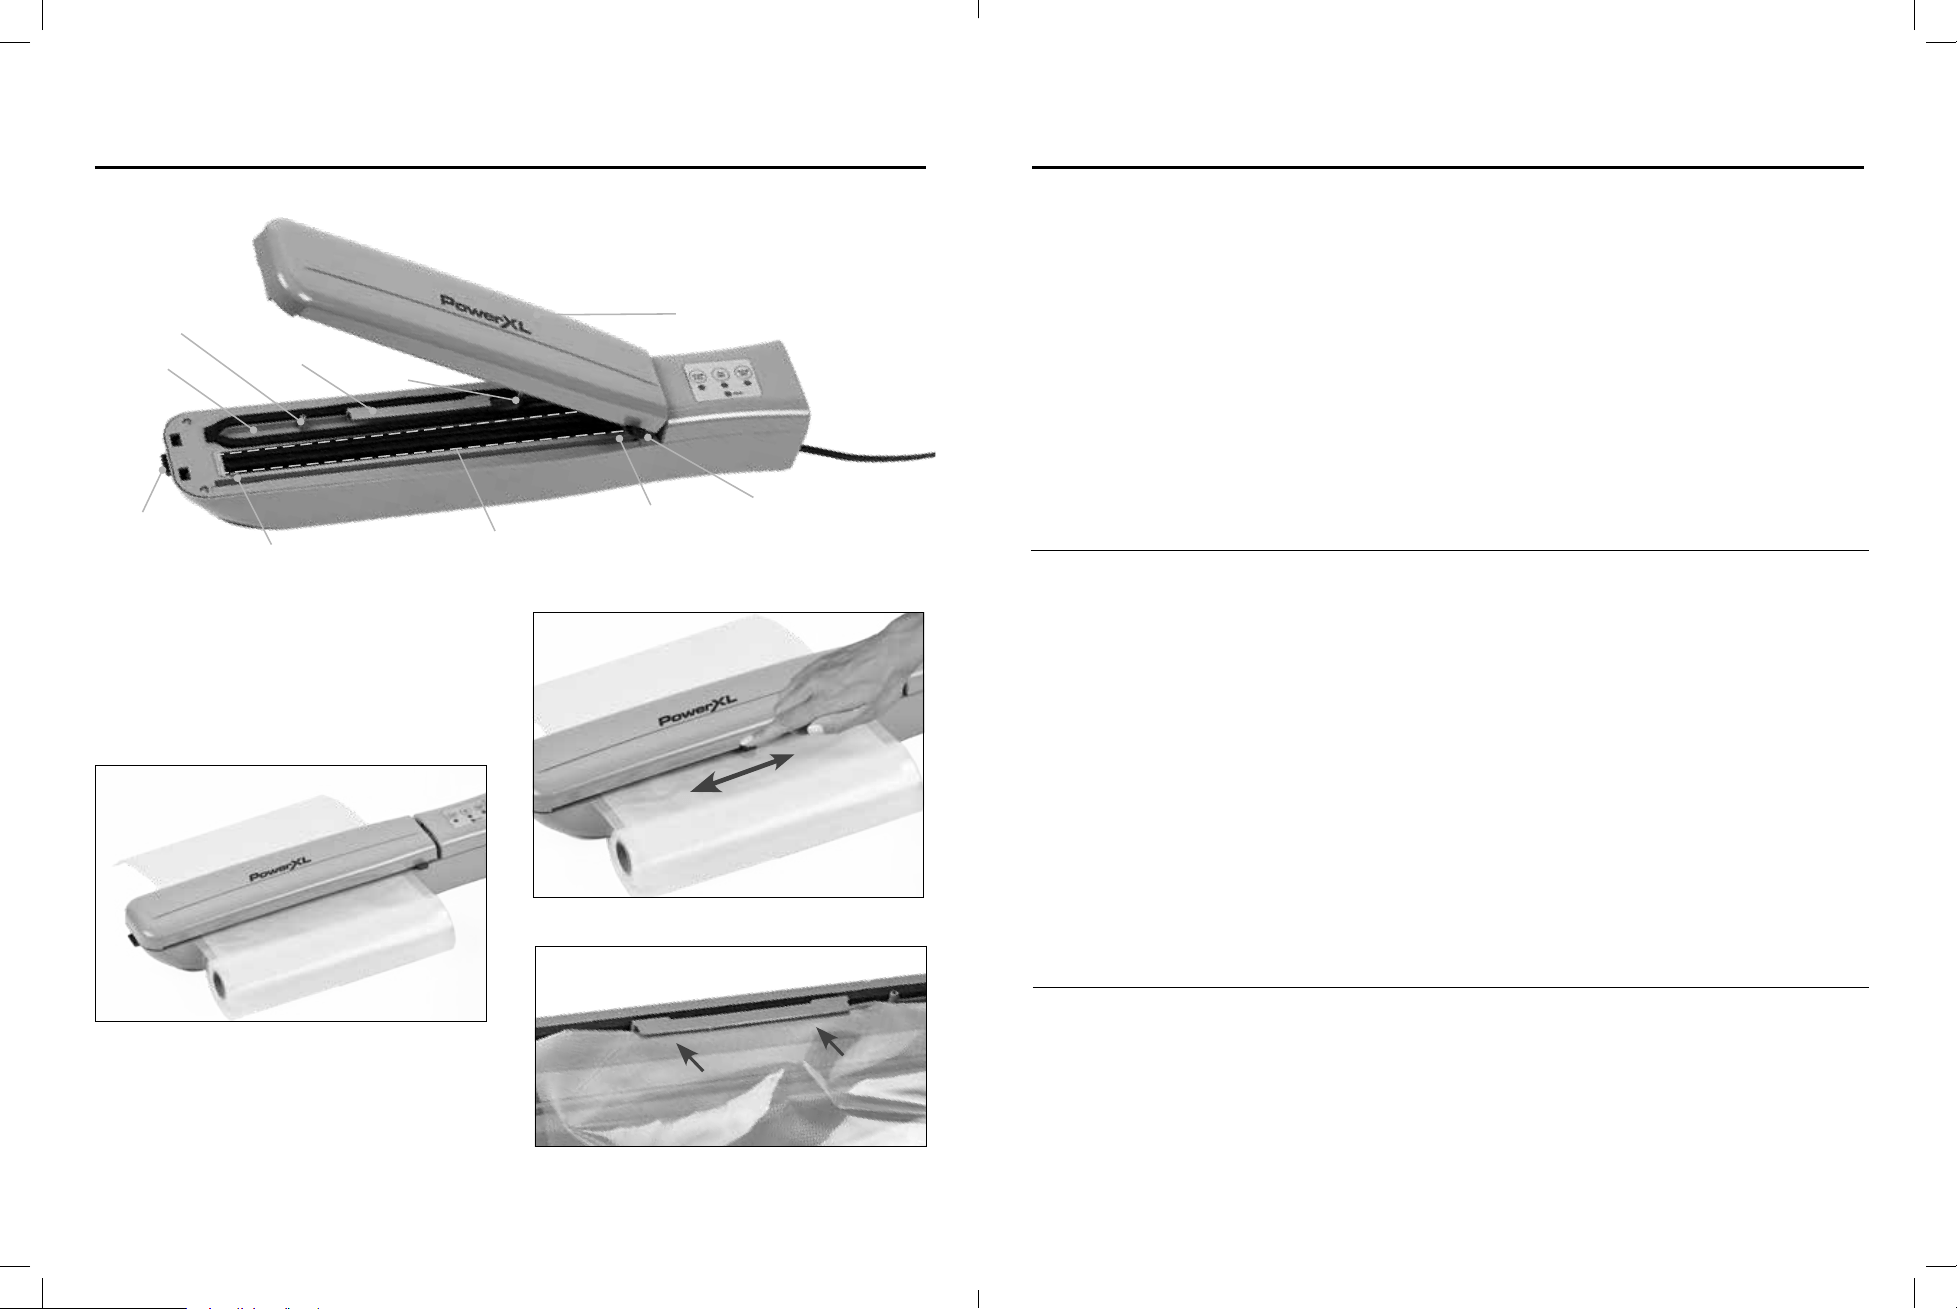
Fig. A
Fig. B
Fig. C
Sealing Arm
Dual Sealing Platform
Bag Cutter
Alignment
Guide
Alignment
Guide
Alignment Bar
Tab
Vacuum
Port
Vacuum
Channel
Air Release
Port
Latch Lock
Button
Fig. D
PowerXL Duo NutriSealer™ 7
Instructions For Use
Making & Sealing a Bag from the Resealable Roll
1. Press the Latch Lock Button to open the Sealing Arm.
2. Pull a length of bag from the roll large enough to t
the contents being sealed. Include at least 3 inches of
empty space in the bag to allow enough space for the
material to be sealed and the bag to seal tightly.
3. Place the length of bag material on the Sealing
Platform. Align the edges of the bag material with the
Alignment Guide.
4. Close the Sealing Arm and press down on the Sealing
Arm near the Latch Lock Button until the Sealing Arm
clicks into place. Only a little pressure applied to the
end of the Sealing Arm is required to lock the Sealing
Arm (see Fig. B).
5. Starting at one end of the Sealing Arm, slide the
Bag Cutter all the way to the other side of the
Sealing Arm to cut the bag material to your desired
length (see Fig.C). Always return the Bag Cutter to
one end of the appliance before cutting.
6. Plug the Sealer into a power outlet. The Power
Indicator on the Control Panel will illuminate.
7. Press the Seal Only Button to seal the bottom of the
bag. The light next to the selected button will illuminate.
When the bag is sealed, the light will turnoff.
8. Open the Sealing Arm to remove the bag. It is now
ready for lling and sealing.
Vacuum Sealing Bags from the Resealable Roll
1. Plug the Sealer into a wall outlet. The Power Indicator
on the Control Panel will illuminate.
2. Press the Latch Lock Button to open the Sealing Arm.
3. Pre-seal one edge of a bag. Fill the bag with the desired
contents. Avoid overlling the bag; leave at least 3 inches
of at bag material between the bag contents and the top
of the bag. Additional space might be required to vacuum
and seal properly if the item being sealed is thick.
4. Place the bag on the Sealing Platform. Center the bag
between the Alignment Guide and slide the topedge
of the bag underneath the Alignment Bar Tab with the
textured side of the bag facing down (see Fig. D).
5. Close the Sealing Arm and press down on the Sealing
Arm near the Latch Lock Button until the Sealing Arm
clicks into place. Only a little pressure applied to the
end of the Sealing Arm is required to lock the Sealing
Arm (see Fig. B).
6. Press the Seal Only Button to seal a bag without
vacuum sealing, or press the Vacuum & Seal Button
to vacuum seal the bag. The light next to the selected
button will illuminate when pressed and then turn off
when the sealing cycle is complete. The appliance will
vacuum most of the air out of the bag and automatically
seal your bag.
7. Allow 10 seconds between Vacuum Sealing.
CAUTION: Continuously sealing within a short period
of time will cause the appliance to enter sleepmode
for until the appliance cools (1–2minutes).
NOTE: The appliance should only be opened when
lying on a at surface. Vacuum sealing bags containing
liquid might cause the vacuum channel to contain
residual liquid.
Vacuum Sealing Delicate Foods
When sealing delicate foods, such as pastries and breads,
do not fully vacuum seal the bag. Otherwise, the food
might be damaged by the process. Instead, remove only
some of the air from the bag before sealing:
1. Push the Vacuum & Seal Button to start the vacuum-
sealing process.
2. When some of the air has been removed from the
bag, press the Vacuum & Seal Button again to stop the
vacuum-sealing process.
3. Press the Seal Only Button to nish sealing the bag.
Loading ...
Loading ...
Loading ...