For repair - in your home - of all major brand appliances,
lawn and garden equipment, or heating and cooling systems,
no matter who made it, no matter who sold it !
For the replacement parts, accessories and
owner's manuals that you need to do-it-yourself.
For Sears professional installation of home appliances
and items like garage door openers and water heaters.
1-800-4-MY-HOME ® Call anytime, day or night
(1-800-469-4663) (U.S.A. and Canada)
www,sears,com www,sears,ca
Our Home
For repair of carry-in items like vacuums, lawn equipment,
and electronics, call anytime for the location of the nearest
Sears Parts & Repair Service Center
1-800-488-1222 (U.S.A.) 1-800-469-4663 (Canada)
www,sears.com www,sears.ca
To purchase a protection agreement on a product serviced by Sears:
1-800-827-6655 (U.S.A.)
Para pedir servicio de reparaci6n
a domicilio,y para ordenar piezas:
1-888-SU-HOGAR®
(1-888-784--6427)
iii: www_:iiill i°msea _S
1-800-361-6665 (Canada)
Au Canada pour service en frangais:
1-800-LE-FOYERuc
(1-800-53343937)
www.sears.ca
TM
® Registered Trademark / ' Trademark of KCD IP, LLC in the United States, or Sears Brands, LLC in other countries
Tfq
® Marca Registrada / ' Marca de Fabrica de KCD IP, LLC en Estados Unidos, o Sears Brands, LLC in otros paises
MD
McMarque de commerce / ' Marque depos6e de Sears Brands, LLC
Use & Care Guide
Manual de Uso y Cuidado
English/ Espaiol
Kerlmol"e °
Co act
%o p cto
_s
Modes iJ,4od_,os : 25594293
u,',)3 ,,>is u,',//
P/N 134779000B (0807)
Sears Brands Management Corporation
Hoffman Estates, JL60179 U.S.A.
www, kenmore.com
WWW.Sea rs+com
6/8/10
When installed, operated and maintained according to all supplied instructions, if this
appliance fails due to a defect in material and workmanship within one year from the date
of purchase, call 1-800-4-MY-HOME® to arrange for free repair.
Thiswarranty applies for only R0 days from the date of purchase if thisproduct isever used for
other than private household purposes.
This warranty covers only defects in material and workmanship. Sears will NOT pay' for:
1.Expendable itemsthat can wear out from normaluse,including but not limited to nlters,
belts, light bulbs,and bags.
2.A service technician to instructthe userincorrect product installation, operation or
maintenance.
3.A service technician to clean or maintain thisproduct.
4. Damage to or failure of this product if it isnot installed,operated or maintained
according to the all instructionssupplied with the product.
5. Damage to or failure of this product resultingfrom accident, abuse,misuseor usefor
other than itsintended purpose.
B.Damage to or failure of thisproduct caused by the useof detergents, cleaners,chemicals
or utensilsotherthan those recommended in all instructionssupplied with the product.
Z Damage to or failure of parts or systemsresultingfrom unauthorized modifications made
to this product.
DiscMmer of impJiedwarranties; Jimitafion of remedies
Customer'ssole and exclusive remedy under thislimited warranty shallbe product repair as
provided herein.Implied warranties, including warranties of merchantability or fitnessfor a
particular purpose,are limited to one year or the shortest period allowed by Jaw.Searsshall
not be liable for incidental or consequentialdamages. Somestates and provinces do not allow
the exclusion or limitation of incidental or consequential damages, or limitation on the duration
of implied warranties of merchantability or fitness,sotheseexclusions or limitationsmay not
apply to you.
Thiswarranty applies only while this appliance isusedinthe United Statesor Canada.
Thiswarranty gives you specific legal rights,and you may also haveother rights which vary
from stateto state.
Sears Brands Management Corporation, Hoffman Estates, IL 60179
Sears Canada Inc., Toronto, Ontario, Canada MSB 2C3
Congratulations on making a smart purchase. Yournew Kenmore®product isdesigned and
manufactured for years of dependable operation. Butlike all products, it may require
preventive maintenance orrepair from time to time. That'swhen having a Master
Protection Agreement can save you money and aggravation. TheMaster Protection
Agreement also helps extend the life of your new product.
Here's what theAgreement includes:
Parts and labor needed to help keep products operating properly under normal
use, not just defects. Our coverage goes weJJbeyond the product warranty. No
deductibles, nofunctional failure excluded from coverage--real protection.
[] Expert service by a force of more than 10,000 authorized Sears service
technicians, which means someone you cantrust will be working on your product
[] Unlimited service calls and nationwide service, asoften asyou want us,
whenever you want us.
[] "No-lemon'*guarantee - replacement of your covered product if four or
more product failures occur within twelve months.
[] Product replacement if your covered product can't be fixed.
[] Annual Preventive Maintenance Check at your request - no extra charge.
[] Fast help by phone - we call it Rapid Resolution - phone support from a
Sears representative on all products. Thinkof usasa "talking owner's manual.**
[] Power surge protection against electrical damage due to power fluctuations.
[] $250 Food Loss Protection annually for any food spoilage that isthe result of
mechanical failure of any covered refrigerator or freezer.
[] Rental reimbursement if repair of your covered product takes longer than
promised.
[] 10°/0 discount off the regular price of any non-covered repair service and related
installed parts_
Once you purchase the Agreement, a simple phone call isall that ittakes for you to schedule
service. You can call anytime day or night,orschedule a service appointment online.
The Master Protection Agreement isa riskfree purchase. If you cancel for any reason
during the product warranty period, we will providea full refund, or a prorated refund
anytime after the product warranty period expires. Purchaseyour Master Protection
Agreement today!
Some limitations and exclusions apply. For prices and additional
information in the U.S.A. call 1-800-827-6655.
Coverage in Canada varies on some items. For fuji details call
Sears Canada at 1-800-361-6665.
Sears installation Service
ForSears professional installation of home appliances, garage door openers, water
heaters, and other major home items,in the U.S.A.or Canada call 1-800-4-MY-HOME®.
6/8/10
6
8
DANG
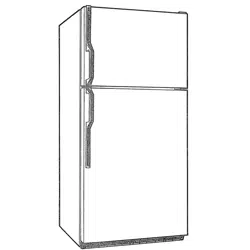
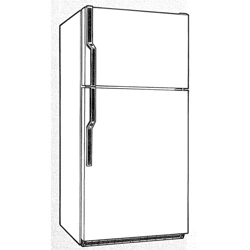
Riskof child entrapment. Beforeyou throw away your old refrigerator,
take off the doors. Leavethe shelvesinplace sothat children may
not easily climb inside.
CFC/HCFC DISPOSAL
Yourold refrigerator may havea cooling systemthat usedCFCsorHCFCs
(chlorofluorocarbonsor hydrochlorofiuorocarbons).CFCsandHCFCsare believedto harm
stratosphericozoneif releasedto theatmosphere.Other refrigerantsmay alsocauseharm
to theenvironmentif releasedto theatmosphere.
Ifyouare throwingaway yourold refrigerator,makesurethe refrigerantisremovedfor
proper disposalby aqualifiedtechnician.Ifyouintentionallyreleaserefrigerant,you may
be subjectto finesand imprisonmentunderprovisionsof environmentallegislation.
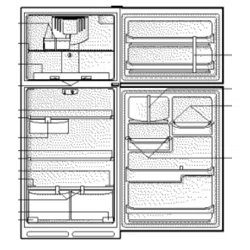
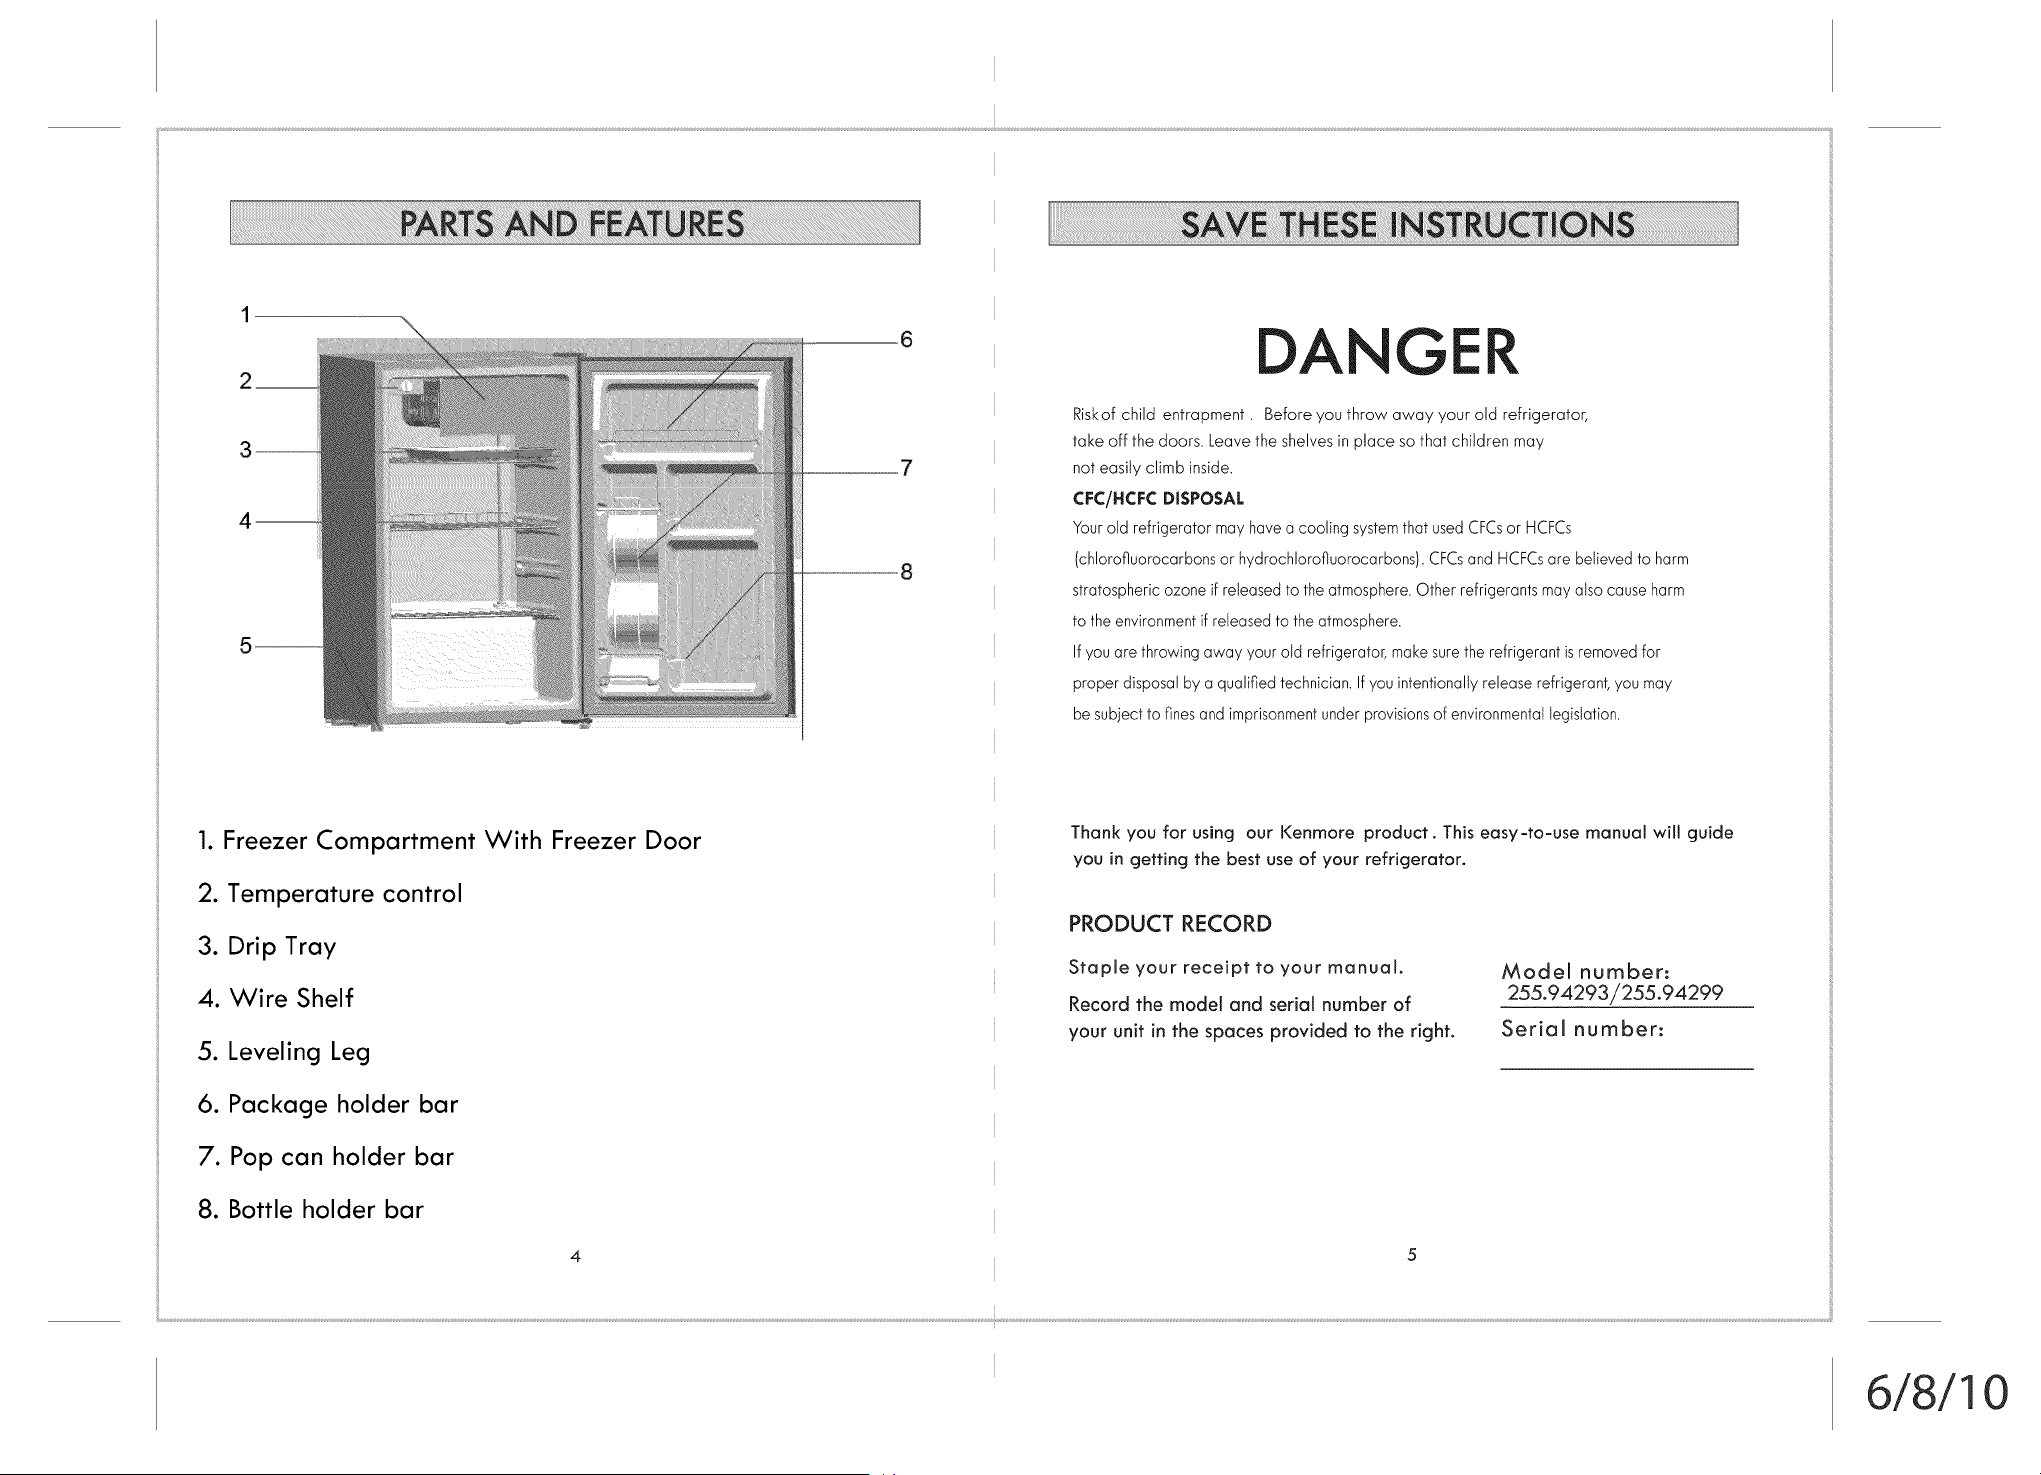
1. Freezer Compartment With Freezer Door
2. Temperature control
3. Drip Tray
4. Wire Shelf
5. Leveling Leg
6. Package holder bar
7. Pop can holder bar
8. Bottle holder bar
Thank you for using our Kenmore product. This easy-to-use manual will guide
you in getting the best use of your refrigerator.
PRODUCT RECORD
Staple your receipt to your manual.
Record the model and serial number of
your unit in the spaces provided to the right.
Model number:
255.94293/255.94299
Serial number:
6/8/10
Unpacking Your Refrigerator
1, Remove all packaging material. This includes the foam base and all adhesive
tape holding the refrigerator accessories inside and outside. Slide out and
remove the plastic or foam guard used to protect the compressor from shipping
damage due to vibration and shock.
2. Inspect and remove any remaining packaging, tape or printed materials
before powering on the refrigerator.
3. Check to be sure you have all accessories and parts listed in the Parts and
Features section.
Proper Air Circulation
To ensure that your refrigerator works at the maximum efficiency it was
designed for, you should install it in a location where there is proper air
circulation, plumbing and electrical connections.
The following are recommended clearances around the refrigerator :
Sides ...................3/4 inches (19mm)
Top......................2 inches (50mm)
Back .................. 2 inches (50mm)
Electrical Requirements
Make sure there is a suitable power outlet (115volts, 15amps) with
proper grounding to power the refrigerator.
WARNING: NEVER cut off the third grounding prong in order to
no effective grounding for the refrigerator and may result in serious
accommodate a two prong outlet. This is a dangerous practice since it provides
injury from electrical shock.
Installation
Your refrigerator is designed for freestanding installation ont4 It should not be
recessed or built-in. Place the refrigerator on a floor strong enough to support it fully
loaded. When moving the refrigerator, never tilt it by more than a 45 degrees angle. This
could damage the compressor and the sealed system.
tf the refrigerator has been tilted more than 45 degrees, let it stand in an upright
position for at least 24 hours prior to plugging it into the power source. This
will allow the refrigerant to settle and reduce the possibility of a malfunction in
the cooling system.
Plug the refrigerator into an exclusive, properly installed grounded wall outlet,
Do not under any circumstances cut or remove the third (grounding) prong from
the power cord. See the WARNING in Electrical Requirements on the previous
page. Any questions concerning power and/or grounding should be directed
toward a certified electrician or a Sears or other qualified service dealer
After plugging the appliance into a wall outlet, allow the unit to cool down for
2-3 hours before placing food into the refrigeraton
Installation Limitations
Do not install your refrigerator in any location not properly insulatedor
heated, suchas a garage,etc.Your refrigerator was not designedto operate intemperature
settingsbelow 55° Fahrenheit.Select a suitable location for the refrigerator on a hard
evensurface away from direct sunlightor heatsources suchas radiators, baseboard heaters,
cooking appliances, etc.
7
6/8/10
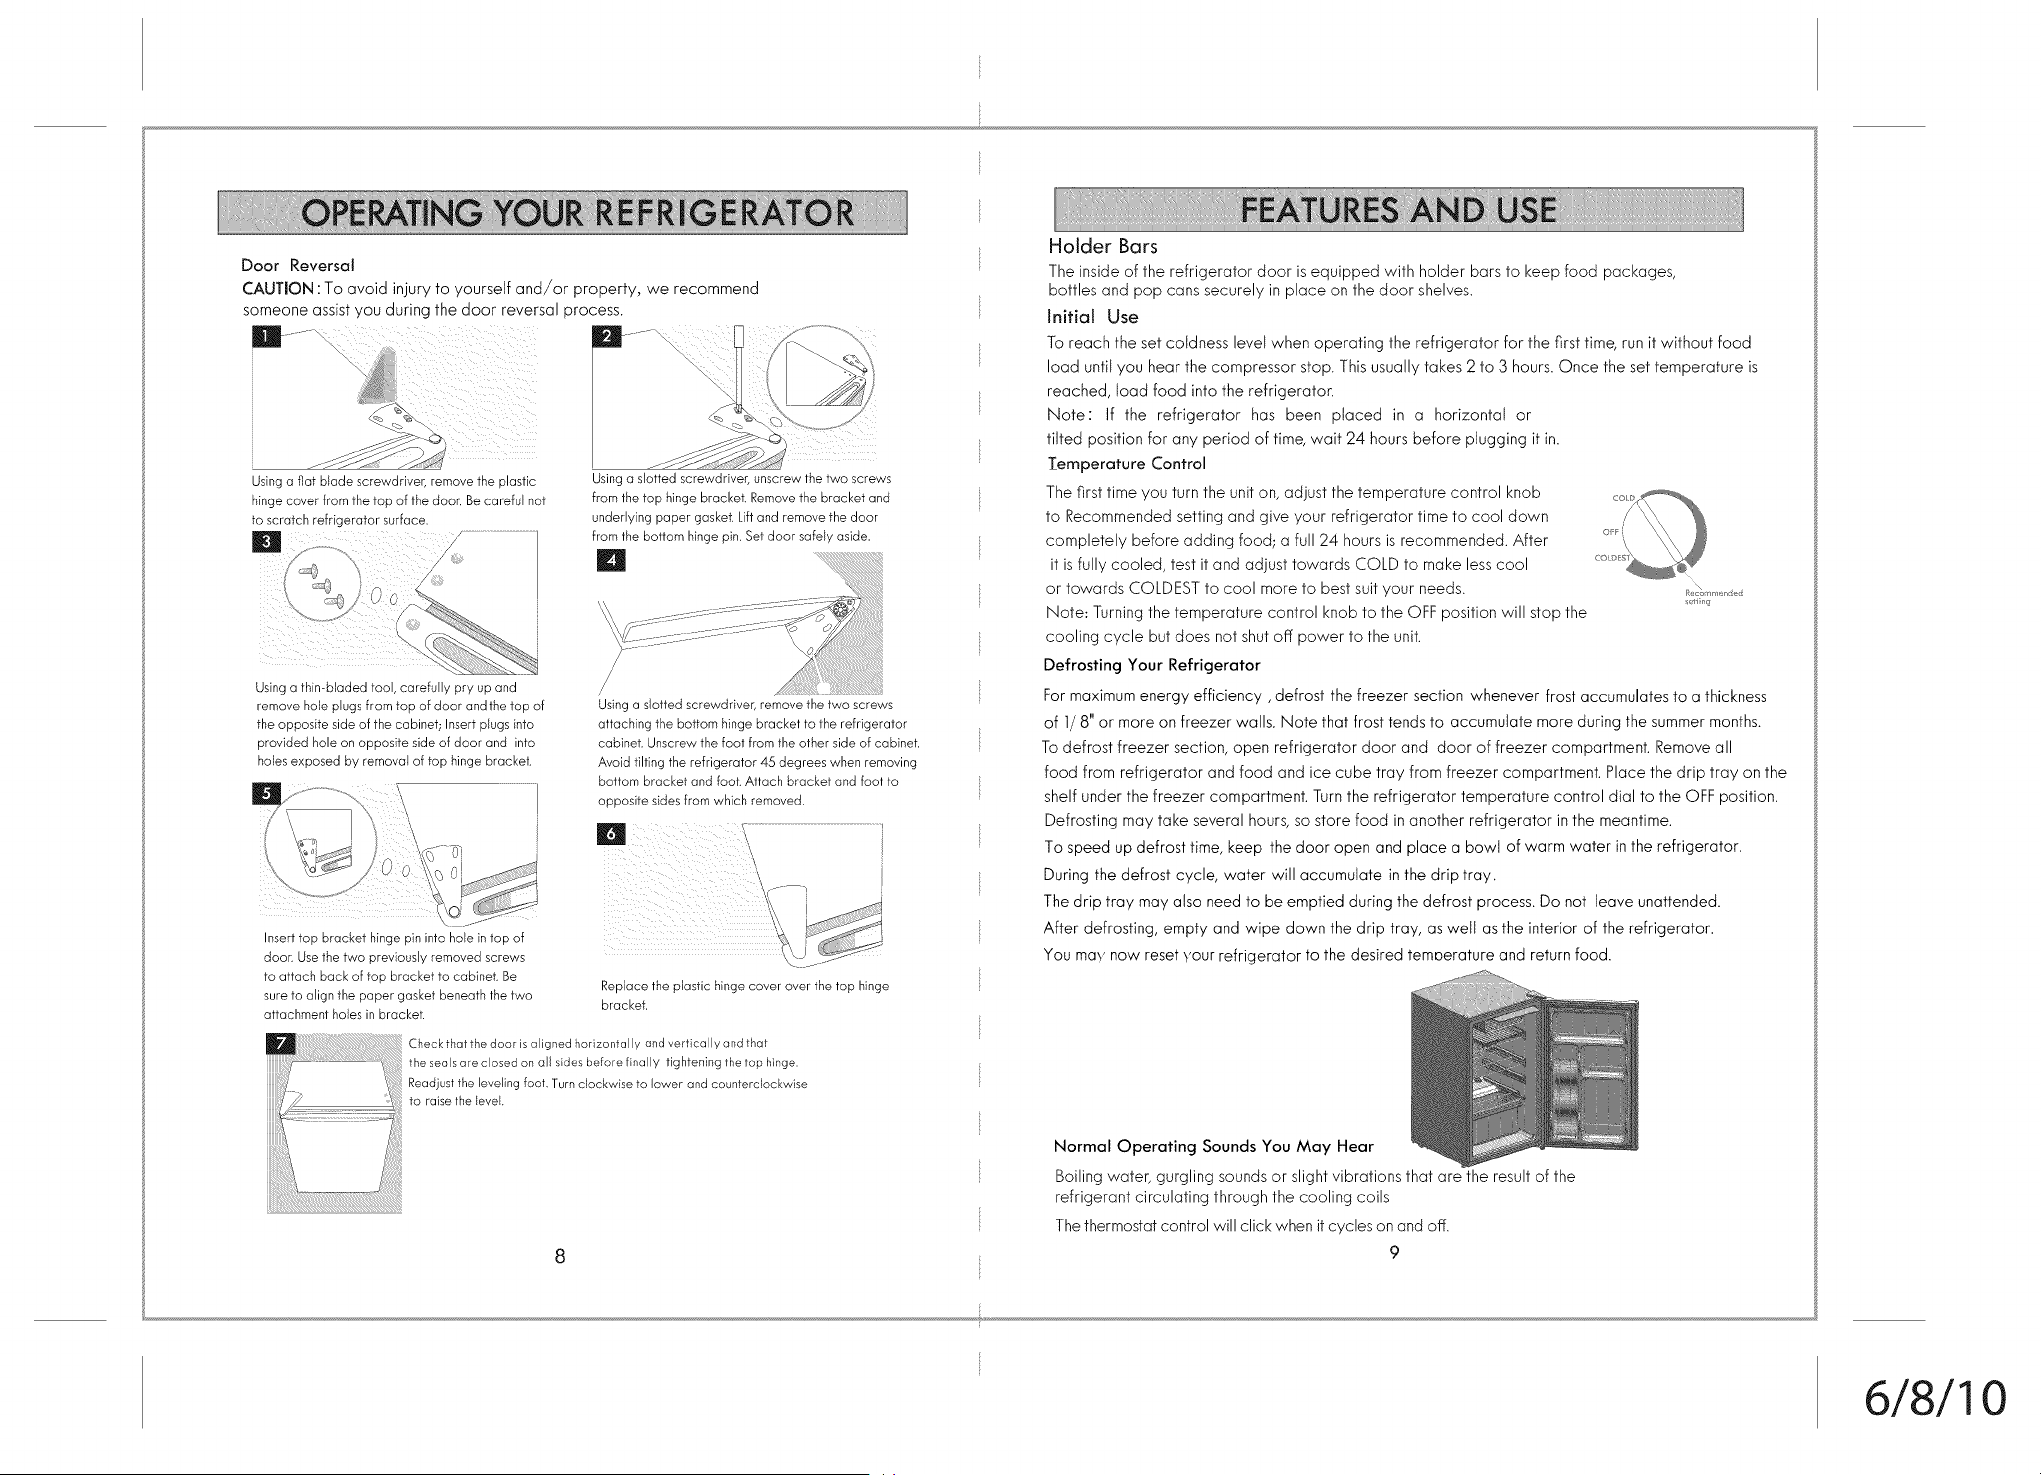
Door Reversal
CAUTION : To avoid injury to yourself and/or property, we recommend
someone assist you during the door reversal process.
Using a fiat blade screwdriver, remove the plastic
hinge cover from the top of the door. Be careful not
to scratch refrigerator surface.
Using a slotted screwdriver, unscrew the two screws
fromthetop hingebracket.Removethebracketand
underlyingpapergasket.Liftandremovethedoor
fromthebottomhingepin.Setdoor safelyaside.
IN
Using a thin-bladed tool, carefully pry up and
remove hole plugs from top of door andthe top of
the opposite side of the cabinet; Insert plugs into
provided hole on opposite side of door and into
holes exposed by removal of top hinge bracket.
', 0 0 tsO! ,
door.Usethetwo previouslyremovedscrews
toattach backof top bracketto cabinet.Be
sureto alignthepapergasketbeneaththetwo
attachmentholesinbracket.
/
Using a slotted screwdriver, remove the two screws
attaching the bottom hinge bracket to the refrigerator
cabinet. Unscrew the foot from the other side of cabinet.
Avoid tilting the refrigerator 45 degrees when removing
bottom bracket and foot. Attach bracket and foot to
opposite sides from which removed.
Check that the door is aligned horizontally and vertically and that
the sealsare closed on all sides before finally tightening the top hi_,ge.
Readjustthe levding foot. Turn clockwise to lower and counterclockwise
to raise the levek
8
Holder Bars
The inside of the refrigerator door is equipped with holder bars to keep food packages,
bottles and pop cans securely in place on the door shelves.
Initial Use
To reach the set coldness level when operating the refrigerator for the first time, run it without food
load until you hear the compressor stop. This usually takes 2 to 3 hours. Once the set temperature is
reached, load food into the refrigerator.
Note: If the refrigerator has been placed in a horizontal or
tilted position for any period of time, wait 24 hours before plugging it in.
Temperature Control
The first time you turn the unit on, adjust the temperature control knob
to Recommended setting and give your refrigerator time to cool down
completely before adding food; a full 24 hours is recommended. After
it is fully cooled, test it and adjust towards COLD to make less cool
or towards COLDEST to cool more to best suit your needs. ........d_
s _,g
Note: Turning the temperature control knob to the OFF position will stop the
cooling cycle but does not shut off power to the unit.
Defrosting Your Refrigerator
For maximum energy efficiency, defrost the freezer section whenever frost accumulates to a thickness
of 1/8" or more on freezer walls. Note that frost tends to accumulate more during the summer months.
To defrost freezer section, open refrigerator door and door of freezer compartment. Remove all
food from refrigerator and food and ice cube tray from freezer compartment. Place the drip tray on the
shelf under the freezer compartment. Turn the refrigerator temperature control dial to the OFF position.
Defrosting may take several hours, so store food in another refrigerator in the meantime.
To speed up defrost time, keep the door open and place a bowl of warm water inthe refrigerator.
During the defrost cycle, water will accumulate in the drip tray.
The drip tray may aiso need to be emptied during the defrost process. Do not leave unattended.
After defrosting, empty and wipe down the drip tray, as well as the interior of the refrigerator.
You may now reset your refrigerator to the desired temoerature and return food.
Normal Operating Sounds You May Hear
Boiling water, gurgling sounds or slight vibrations that are the result of the
refrigerant circulating through the cooling coils
The thermostat control will click when it cycles on and off.
9
6/8/10
Cleaning and Maintenance
WARNING: To avoid electric shock, always unplug your refrigerator before
cleaning. Ignoringthiswarning may result in death or injury.
CAUTION: Before using cleaning products, always read and understand the cleaning processes.
explained in this manual. Follow cleaning product manufacturers_s instructions and warnings to avoid
personal injury or product damage.
General Cleaning
Prepare a cleaning solution of ] to 2 tablespoons of baking soda mixed with warm water. Usea
sponge or soft cloth, dampened with the cleaning solution, to wipe down your refrigerator.
Rinse with dean warm water and dry with a soft cloth.
Do not use harsh chemicals, abrasives, ammonia, chlorine bleach, concentrated detergents,
solvents or metal scouring pads. Some of these chemicals may dissolve, damage and/or discolor your
refrigerator.
Door Gaskets
Clean door gaskets every three months according to the instructions described above in General
Cleaning.
Gaskets must be kept dean and pliable to ensure a proper seal.
Petroleum jelly applied lightly on the hinge side of gaskets will keep the
gaskets pliable and ensure agood seal.
Power Interruptions
Occasionally there may be power interruptions due to thunderstorms or other causes. Remove the
power cord plug from the AC outlet when a power outage occurs. When power has been restored
after a prolonged outage, inspect all food for spoilage. Clean the inside of the refrigerator and
freezer compartment before reuse.
Vacation and Moving Care
For long vacations or absences, unplug the unit, empty food from both compartments, move
the temperature dial to the OFF position and clean the door gaskets according to the General
Cleaning section. Prop door open, so air can circulate inside. When moving, always move the
refrigerator verticall% Do not move unit when in a horizontal position, as possible damage to the
sealed system could occur.
10
Refrigerator does
not operate
Food temperature
appears too warm
Food temperature
is too cold
Refrigerator runs
too frequently
Check if the temperature control is in the Off postion.
Check if refrigerator is plugged in.
Check if there is power at the AC outlet by checking the circuitbreaker.
Allow time for recently added warm food to reach fresh food
or freezer temperature.
Check gaskets for proper seal.
Adjust temperature control to colder setting.
Reduce the frequency of door openings.
tf temperature control setting is too cold, adjust to a warmer setting
and allow several hours for temperature to adjust.
This may be normal to maintain constant temperature during high
temperature and humid days.
Doors may have been opened frequently or for an extended period
of time.
Check gasket for proper seal.
Check to see if doors are completely closed.
Moisture build-up on
interior or exterior
of the refrigerator
Refrigerator
has an odor
Refrigerator door
does not shut
properly
This is normal during high humidity periods.
Reduce prolonged or frequent door openings.
Check door gaskets for proper seal.
Interior needs cleaning.
Foods improperly wrapped or sealed are giving off odors.
Level the refrigerator.
See Door Reversal section for description of door attachment features.
Check for blockages created by food containers, shelves, etc.
11
6/8/10
12 13
6/8/10
Cuando se instala, maneja y mantieneseg0ntodas las instruccionessuministradas,si
este aparato falla debido a undefecto del material o par la maria de obra dentro de
unaBo desde la fecha de compra, Ilameal "1-800-4-MY-HOME® para acordar una
reparaci6n gratuita. Estagaranfia se aplica s61odurante 90 dias desde la fecha de
compra si este producto jamRsse ha utilizado de otra manera que para prop6sitos
privados del hogar.
Esta garantia cubre s6la defectas en el material a par la mona
de abra. Sears no pagar_:
1.Arficulos sujetos a desgaste que pueden desgastarse par el usa normal, inclusive
pero no limitado a filtros,correas, bombillas y balsas.
2. Unt_cnico de servicio para instruiral usuariosabre la correcta instalaci6r
operaci6n o mantenimientodel producto.
3. Unt_cnico de servicio para limpiar o mantener este producto.
4. DaBosa o fallos de este producto si no seinstala, maneja o mantienesegun
lastodas las instruccionessuministradascon el producto.
5. DaBosofallos de este producto resultantesde unaccidente, abuso, maltrato
o usa para unafinalidaddistinta a la que est6 destinado.
6. DaBosa o fallos de este producto causados par el usade detergentes,
limpiadores, sustanciasqdmicas o 0tilesdistintosde los recomendados en las
instruccionessuministradascon el producto.
7.Da_oso fallos de piezas o sistemasresultantesde modificaciones no
autorizadas hechas a este producto.
DenegacJ6n de garanfias implicitas; limitaci6n de reparacJones
La0nica y exclusiva reparaci6n para el cliente bajo esta garanfia limitada ser6
la reparaci6n del producto seg0nse dispone en este documento. Lasgaranfias
implicitas, incluyendogaranfias de comercializaci6n o salud para unprop6sito
en particular, se limitan a unaBoo el periodo mrs corto permitido par la ley.
Sears noser6 responsable de da_os casualesni consecuentes.Algunos estados
y provincias no permiten la exclusi6nni la limitaci6n de da_os casuales o
consecuentes,o la limitaci6n en la duraci6n de garanfias implicitas de
comercializaci6n o salud, asique estas exclusioneso limitaciones pueden noser
aplicables a usted.
Estagaranfia s61oseaplica cuando este aparato se utiliza en EstadosUnidoso
Canad& Estagaranfia le da derechos legales espedficos, y ustedtambi@npuede
tener arras derechos que varian dependiendo del estado.
Sears Brands Management Corporation, Haffman Estates, IL 60179
Sears Canada inc., Toronto, Ontario, Canada MSB 2C3
Felicidades par hacer una compra inteligente. Sunuevo producto Kenmore® est6 dise_ado y
fabricado para a_os de funcionamiento fiable. Perocomotodos los productos, puede necesitar
mantenimiento preventivo o reparaciones de vez en cuando. Que escuando tener unAcuerdo
de Protecci6n Maestra le puede ahorrar dinero y evitar irritaciones. ElAcuerdo de Protecci6n
Maestra tambi@nle ayuda a extender la vida de sunuevo producto. Aqui est6 Io que incluye el
Acuerdo:
Piezas ? maria de obra necesariaspara ayudar a mantener los productos funcionando
apropiadamente bajo usa normal, nos61olosdefectos. Nuestra cobertura va m6s aJJ_de Ja
garanfJa det producto. Sinfranquicias, sinfa!los funcionales excluidos de la cobertura protecci6n
verdadera.
[] Asistencia de expertos par una fuerza de mrs de 10.000 t_cnicas de servicio autarizados
par Sears, Ioque significa que alguien en queconfia trabajar6 en suproducto.
[] Llamadas itimitadas de asistencia y asistencia par todo et paB, tan a menudo coma Io
desee y siempreque ustedIo desee.
[] Garantia par repetici6n de faJJos - sustituci6nde suproducto cubierto si se groducen
cuatro o m6sfallos del producto dentro de dace meses.
[] Susfituci6n deJ producto si suproducto cubierto no puede repararse.
[] Comprobaci6n anuaJ de Manfenimiento Preventivo seg0nsu petici6n - sin recargo.
[] Ayuda r_pida par teJ_fono - la Ilamamos ResolucJ6n R6pida - apoyo par tel6fono de un
representante de Searsen todos los productos. Pienseen nosotroscoma un"manual de usuario parlante".
[] Protecci6n par subidas de tensJ6n contra daBosel6ctricos debidos a fluctuaciones de energia.
[] $250 de Protecci6n par la P@dida de Alimentos anualmente par cualquier putrefacci6n
de alimentos que seael resultado de fallos mec6nicos de cualquier frigorifico o congelador cubierto
[] Reembolso de alquiler si la reparaci6n de su producto cubierto tarda m6sde Io prometido.
[] 10°/0 de descuento del precio regular de cualquier servicio de una reparaci6n no cubierta
y las piezasinstaladas relacionadas.
Unavez que ustedcompra elAcuerdo, unasimple Ilamada telef6nica estodo Io necesario para
planificar la asistencia. PuedeIlamar en cualquier momenta,dia o noche,o planificar online una
cita de asistencia.
ElAcuerdo de Protecci6n Maestra esuna compra sin riesgo. Si lacancela par
cualquier raz6n durante el periodo de garanfia del producto, le proporcionamos
unreembolso total, o un reembolso prorrateado en cualquier momentadespu6s
de que termine el periodo de garanfia del producto, jCompre suAcuerdo de
Protecci6n Maestra hay!
Se aplican aJgunas limitaciones y exclusiones. Para obtener precios y adicional
informacJ6n en los EE.UU. flame aJ 1-800-827-6655.
La cobertura en Canad6 var_a en aJgunos art_culos0 Para obtener todos los
detaJles Ilame aSears Canad6 en eJ1-800-361-6665.
Servicio de InstaJacJ6n de Sears
Parauna instalaci6n profesional de Searsde aparatos del hogar,sistemasde
apertura de puertas de garaje, calentadores de agua y arras arficulos principales
del hogar,en EEUUo CanadR Ilamea 1-800-4-MY-HOME®.
3
6/8/10
2
PELIGRO
7
8
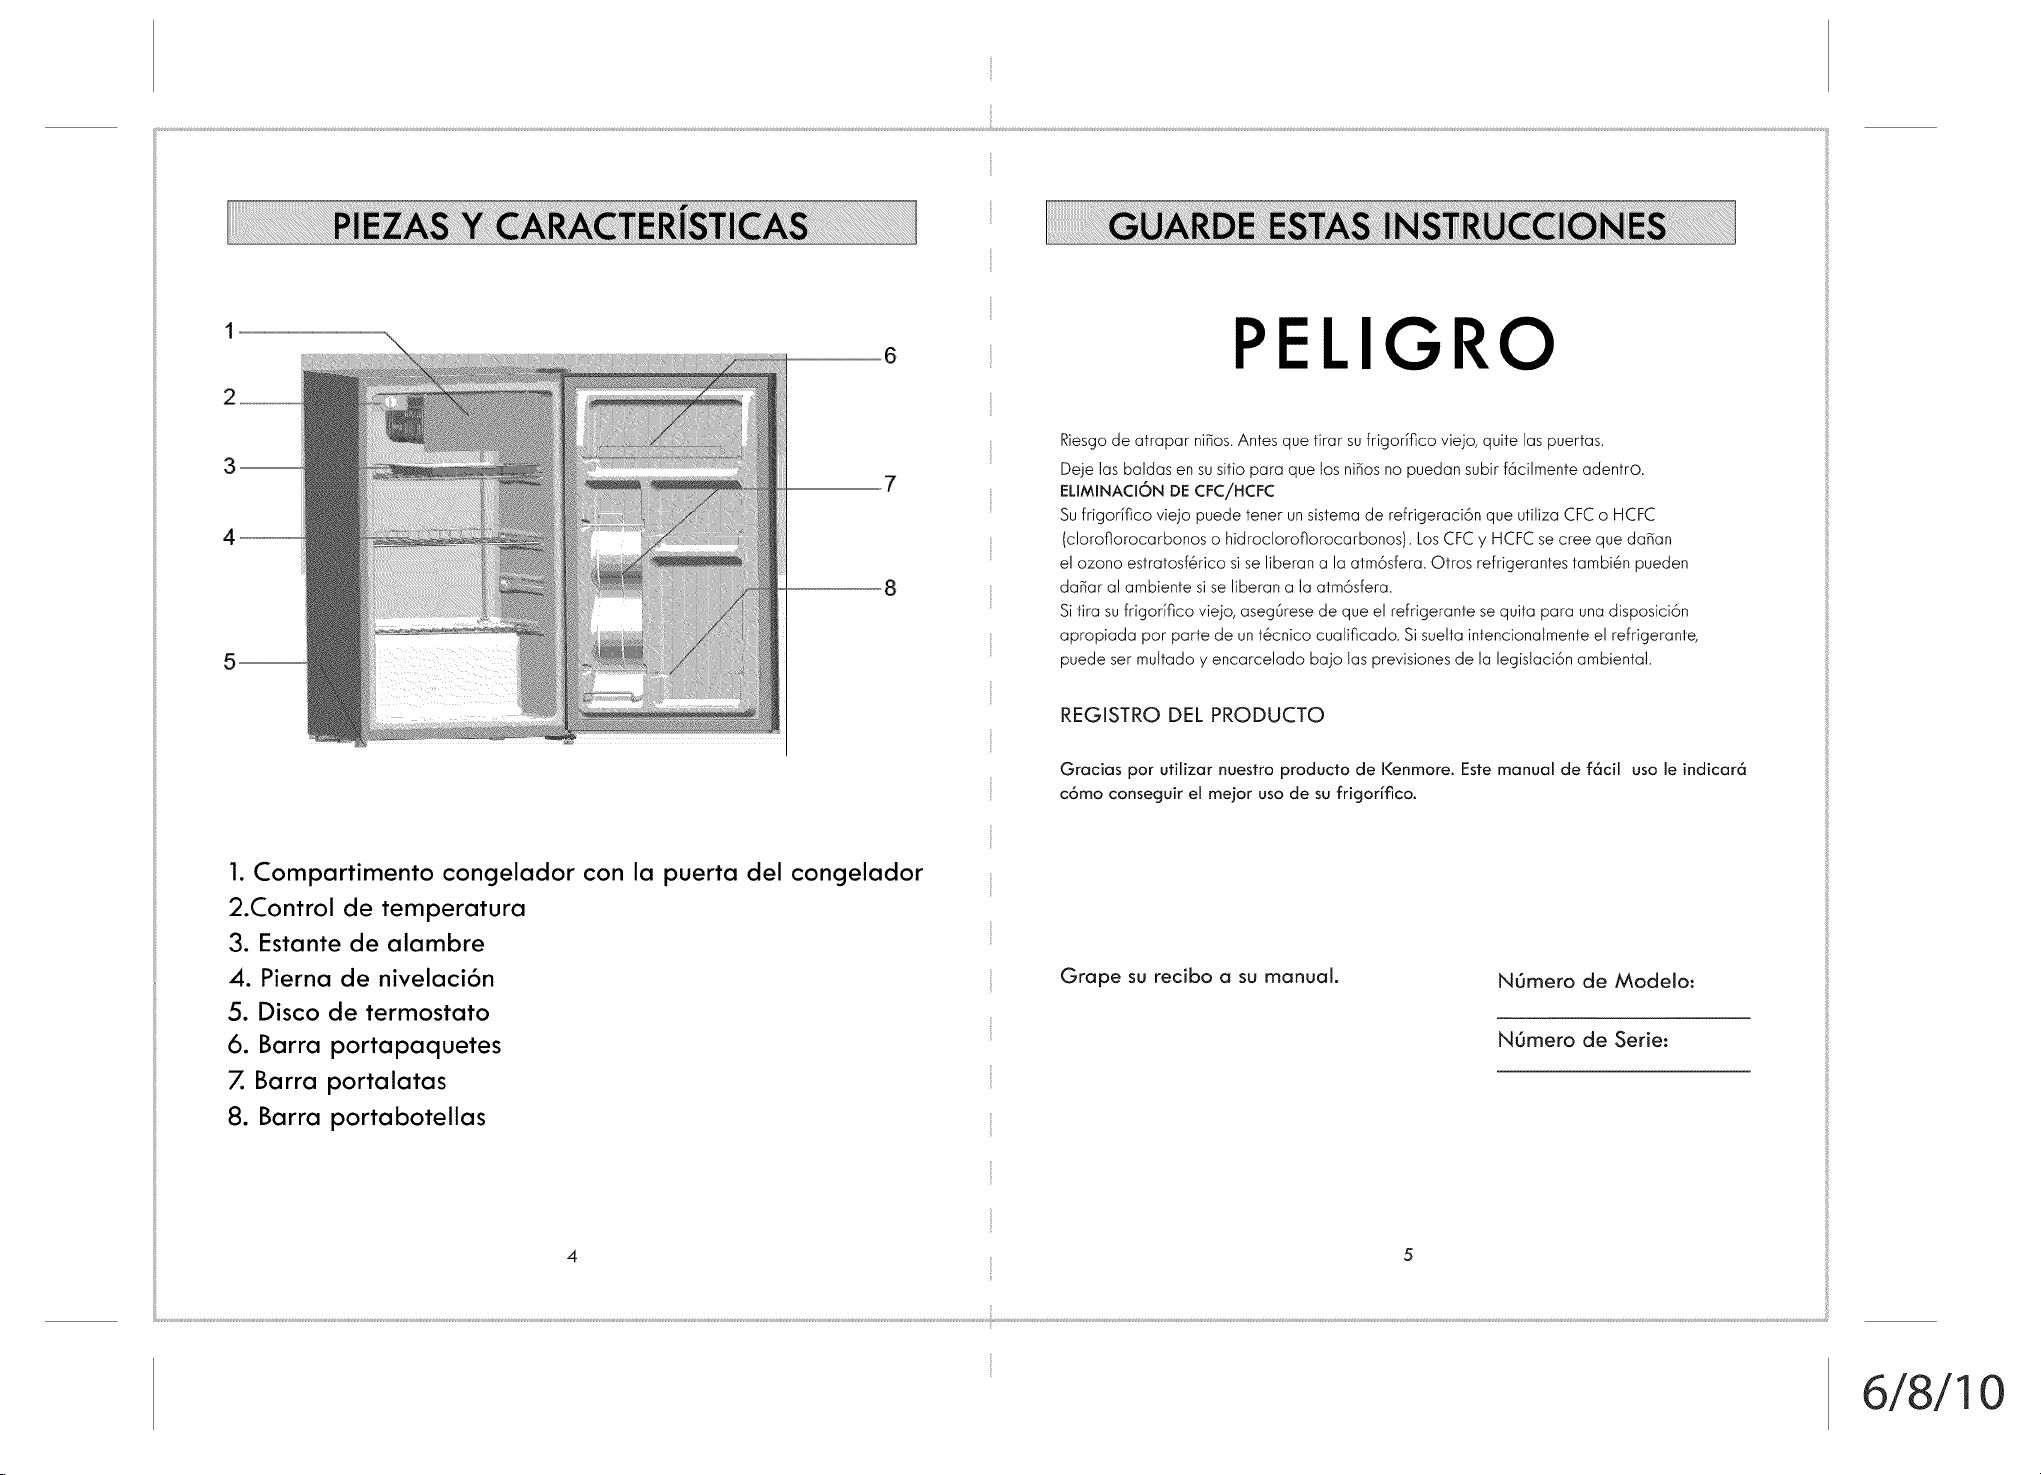
1. Compartimento concjelador con la puerta del congelador
2.Control de temperatura
3. Estante de alambre
4. Pierna de nivelaci6n
5. Disco de termostato
6. Barra portapaquetes
7. Barra portalatas
8. Barra portabotellas
4
Riesgode atrapar nifios.Antes quetirar sufrigorffico viejo, quite las puertas.
Deje las baldas en susitio para que los nifiosno puedan subir f6cilmente adentro.
ELIMINACI6N DECFC/HCFC
Sufrigor_fico viejo puede tenet un sistemade refrigeraci6n que utiliza CFCo HCFC
(cloroflorocarbonos o hidroclorofiorocarbonos). LosCFC y HCFCsecree que daBan
el ozono estratosf@ricosiseliberan a la atm6sfera. Otros refrigerantes tambi6n pueden
da_ar al ambiente siseliberan a la atm6sfera.
Sitira su frigorifico viejo, aseg6resede que el refrigerante se quita para unadisposici6n
apropiada por parte de unt@cnicocua{ificado. Sisuelta intencionalmente el refrigerante,
puede ser multado y encarcelado bajo {as previsionesde la legislaci6n ambiental.
REGISTRO DEL PRODUCTO
Gracias par utilizar nuestro producto de Kenmore. Este manual de f6cil usa le indicar6
c6mo conseguir el melor uso de su frigorifico.
Grape su recibo a su manual.
NOmero de ModeJo:
NOmero de Serie:
6/8/10
Desembale el Fdgorffico
1. Quite todo el material de embalaje. Estoincluye la base de espuma
y la cinta adhesiva que mantienelos accesorios del frigodfico dentro y fuera.
Deslice afuera y quite et protector de p!6stico o espuma que seutiliza para
proteger el compresor de da_os enet envfodebidos a vibraciones y golpes.
2. Inspeccione y quite cualquier embalaje, cinta o materiales impresos
resfantesantes de enchufar el frigorffico.
3. AsegOresede que tiene todos losaccesorios y Diezasenumerados en
la secci6n de Piezasy Caracterfsticas.
Circulaci6n adecuada de Aire
Paragarantizar que sufrigorffico trabaja con la maxima eficiencia con la que
ruediseBado,sedebe instalaren una posici6n en la que haya una adecuada
circulaci6n de aire,tuberias y conexiones el&ctricas. A continuaci6n seindican
los espacios libres recomendados alrededor del frigorifico:
Lados:3/4 pulgadas (19mm)
Partesuperior: 2 pulgadas (50mm)
Partede arras:2 pulgadas (50ram)
Requisitos el6ctricos
AsegOresede que hay una toma de corriente conveniente (115voltios, 15amperios)
con toma de tierra apropiada para alimentar el frigorifico
Eviteel uso de adaptadores de trespuntas,y nunca corte la tercera punta de tierra
para adaptado a unenchufe de dos puntas.Estaesunapr6ctica peligrosa ya que
no proporciona una conexi6n a tierra efectiva para el frigorifico y puede tenet como
resuttado peligros de descargas.
Instalaci6n
Sufrigorifico est6 dise_ado para una instalaci6n no empotrada. No debe
empotrarse ni incrustarse.Coloque el frigorifico en unsuelo suficientemente
fuerte como para apoyarlo completamente cargado. AI mover etfrigodfico,
nuncaIo incline m6sde un6ngulo de 45 grados. Estopodrla da_ar el compresor
y et sistemasellado.
Siet frigorifico seha inctinado m6s de 45 grados, d_jelo en unaposici6n vertical
duranfe pot to menos24 horas antesde enchufarlo en la fuente de alimentaci6n.
Estopermitir6 al refrigerante asentarse y reducir la posibilidad de una disfunci6n
det sistemade refrigeraci6n.
Enchufeel frigorifico en unatoma de corriente exclusiva,apropiadamente instalada
con toma de tierra. Bajo ningunacircunstancia corte niquite tatercera patilla (tierra)
det cable de alimentaci6n. Cualquier pregunta con respecto a taalimenfaci6n y/o la
conexi6n a tierra debe dirigirse a unelectricista certificado o hacia Searsu otro
comerciante cualificado de servicio. Despu&sde enchufar el aparato en unatoma de
corriente de la pared, deje que la unidad seenfrfe durante 2-3 horas antesde colocar
alimentos enel frigorifico
Limitaciones de la instalaci6n
No instalesufrigodfico en ning0nlugar no aislado apropiadamente o
caliente, como ungaraje etc. Sufrigorifico norue dise_ado para funciona a
temperaturapor debajo de 55° FahrenheitSeleccione unaposici6n conveniente
para el frigorifico en unasuperficie dura lejos de la luzdirecta del sol o fuentes
de cator, como radiadores, calentadoras de z6calo,aparatos de cocina, etc.
6/8/10
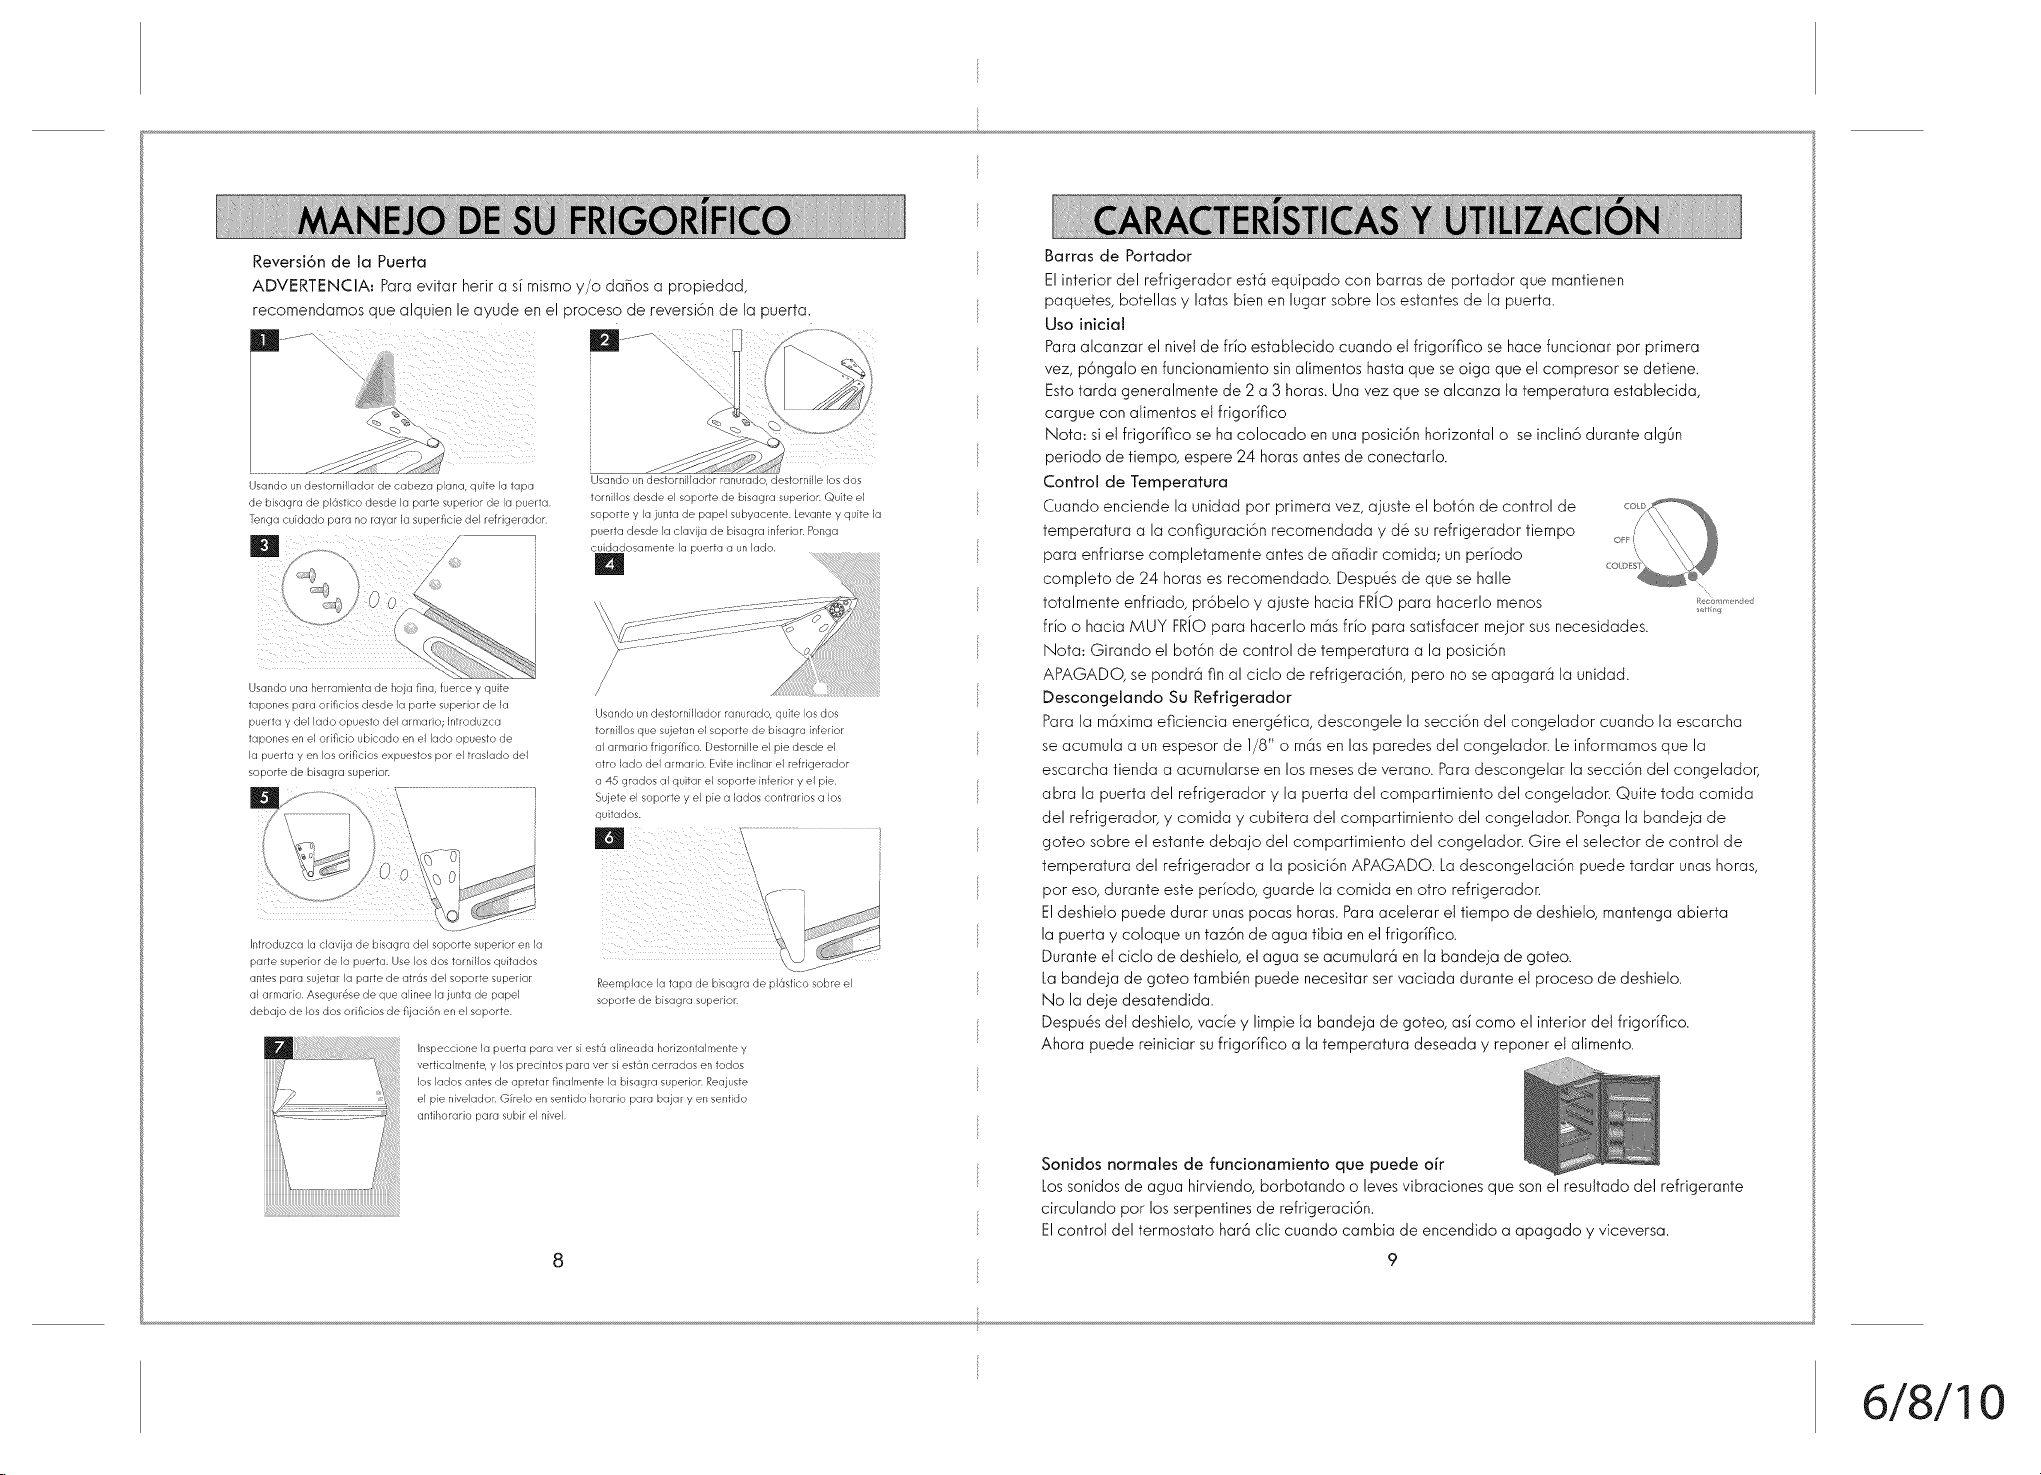
Reversi6n de la Puerta
ADVERTENCIA: Para evitar herir a si mismo y/o daBos a propiedad,
recomendamos que alquien le ayude en el proceso de reversi6n de la puerta.
Usando un destornillador de cabeza plana, quite la tapa
de bisagra de p16stico desde la parte superior de la puerta
Tenga cuidado para no rayar la superficie del refrigerador
Ell
Usando un destornillador ranurado, destornille los dos
tornillos desde el soporte de bisagra superion Quite el
soporte y la junta de papel subyacente LewJnte y quite la
puerta desde la claviia de bisagra inferion Ponga
cuidadosamente la puerta a un lado
m
Usando una herramienta de hoia fina, fuerce y quite
tapones para orificios desde la parle superior de la
puerta y del lado o )uesto del armario; Introduzca
tapones en el orificio ubicado en el lado opuesto de
la puerta y en los orif'cios expuestos por el traslado del
soporte de bisagra superion
00 0
Introduzca la clavija de bisagra del soporte superior en la
parte superior de la puerta Use los dos tornillos quitados
antes para suietar la parte de atr6s del soporte superior
al armario Asegur@se de que alinee la iunta de papel
debaio de los dos orificios de fijaci6n en el soporte
Usando un destornillador ranurado, quite los dos
tornillos que sujetan el soporte de bisagra inferior
al armario frigorifico Destornille el pie desde el
otro lado del armario Evite inclinar el refrigerador
a 45 grados al quitar el soporte inferior y el pie
Su]ete el soporte y el pie a lados contrarios a los
quitados.
Reemplace la tapa de bisagra de pl6stico sobre el
soporte de bisagra superio_
Inspeccione la puerta para ver si est6 alineada horizontalmente y
verticalmente, y los precintos para ver si estan cerrados en todos
los lados antes de apretar finalmente la bisagra superion Reajuste
el pie niveladon Girelo en sentido horario para bajar y en sentido
antihorario para subir el nivel
Barras de Portador
Elinterior del refrigerador est6 equipado con barras de portador que mantienen
paquetes, botellas y latas bienen lugar sobre los estantesde la puerta.
Uso inicial
Paraalcanzar el nivetde frlo estabtecido cuando elfrigorifico se hace funcionar por primera
vez, p6ngato en funcionamientosinalimentoshastaque se oiga que el compresor sedetiene.
Estotarda generalmente de 2 a 3 horas.Unavezque sealcanza la temperatura establecida,
cargue con alimentoset frigorifico
Nora: siel frigorifico sehacolocado en una posici6n horizontal o seindin6 durante algOn
periodo de tiempo, espere24 horasantesde conectado.
Control de Temperatura
Cuando enciende la unidad por primera vez, ajuste el bot6n de control de
temperatura a la configuraci6n recomendada y d@surefrigerador tiempo
para enfriarse completamente antes de a_adir comida; un periodo
completo de 24 horasesrecomendado. Despu@sde que se halle
totalmente enfriado, pr6belo y ajuste hacia FR/Opara hacerlo menos '_'..........._"_
_® ig
frio o hacia MUY FR/Opara hacerlo m6sfrio para satisfacer mejor susnecesidades.
Nora: Girando el bot6n de control de temperatura a la posici6n
APAGADO, se pondr6 fin al ciclo de refrigeraci6n, pero noseapagar6 la unidad.
Descongelando Su Refrigerador
Parala m6xima eficiencia energ@ica,descongele la secci6n del congelador cuando la escarcha
seacumula a un espesorde 1/8" o m6sen las paredes del congelador. Leinformamosque la
escarcha tienda a acumularse en los mesesde verano. Paradescongelar la secci6n del congelador,
abra la puerta del refrigerador y la puerta del compartimiento del congelador. Quite toda comida
del refrigerador, y comida y cubitera del compartimiento del congelador. Pongala bandeja de
goteo sobre el estante debajo del compartimiento del congelador. Gire el selector de control de
temperatura del refrigerador a la posici6nAPAGADO. Ladescongelaci6n puede tardar unashoras,
pot eso, durante este periodo, guarde la comida en otro refrigeradon
Eldeshielo puede durar unaspocas horas. Paraacderar et tiempo de deshido, mantengaabierta
la puerta y coloque untaz6n de agua tibia en el frigorifico.
Duranteel ciclo de deshielo,el agua seacumular6 en la bandeja de goteo.
Labandeja de goteo tambi6n puede necesitar setvaciada durante el procesode deshielo.
No la deie desatendida.
Despu6sdel deshielo, vac_ey lirnpiela bandeja de goteo, aslcomo el interior det frigor_fico.
Ahora puede reiniciar sufrigorifico a latemperatura deseada y reponer el alimento.
Sonidos normales de funcionamiento que puede oir
Lossonidos de agua hirviendo, borbotando o leves vibraciones que son el resuttado del refrigerante
circulando por los serpentines de refrigeraci6n.
Elcontrol del termostato har6 clic cuando cambia de encendido a apagado y viceversa.
9
6/8/10
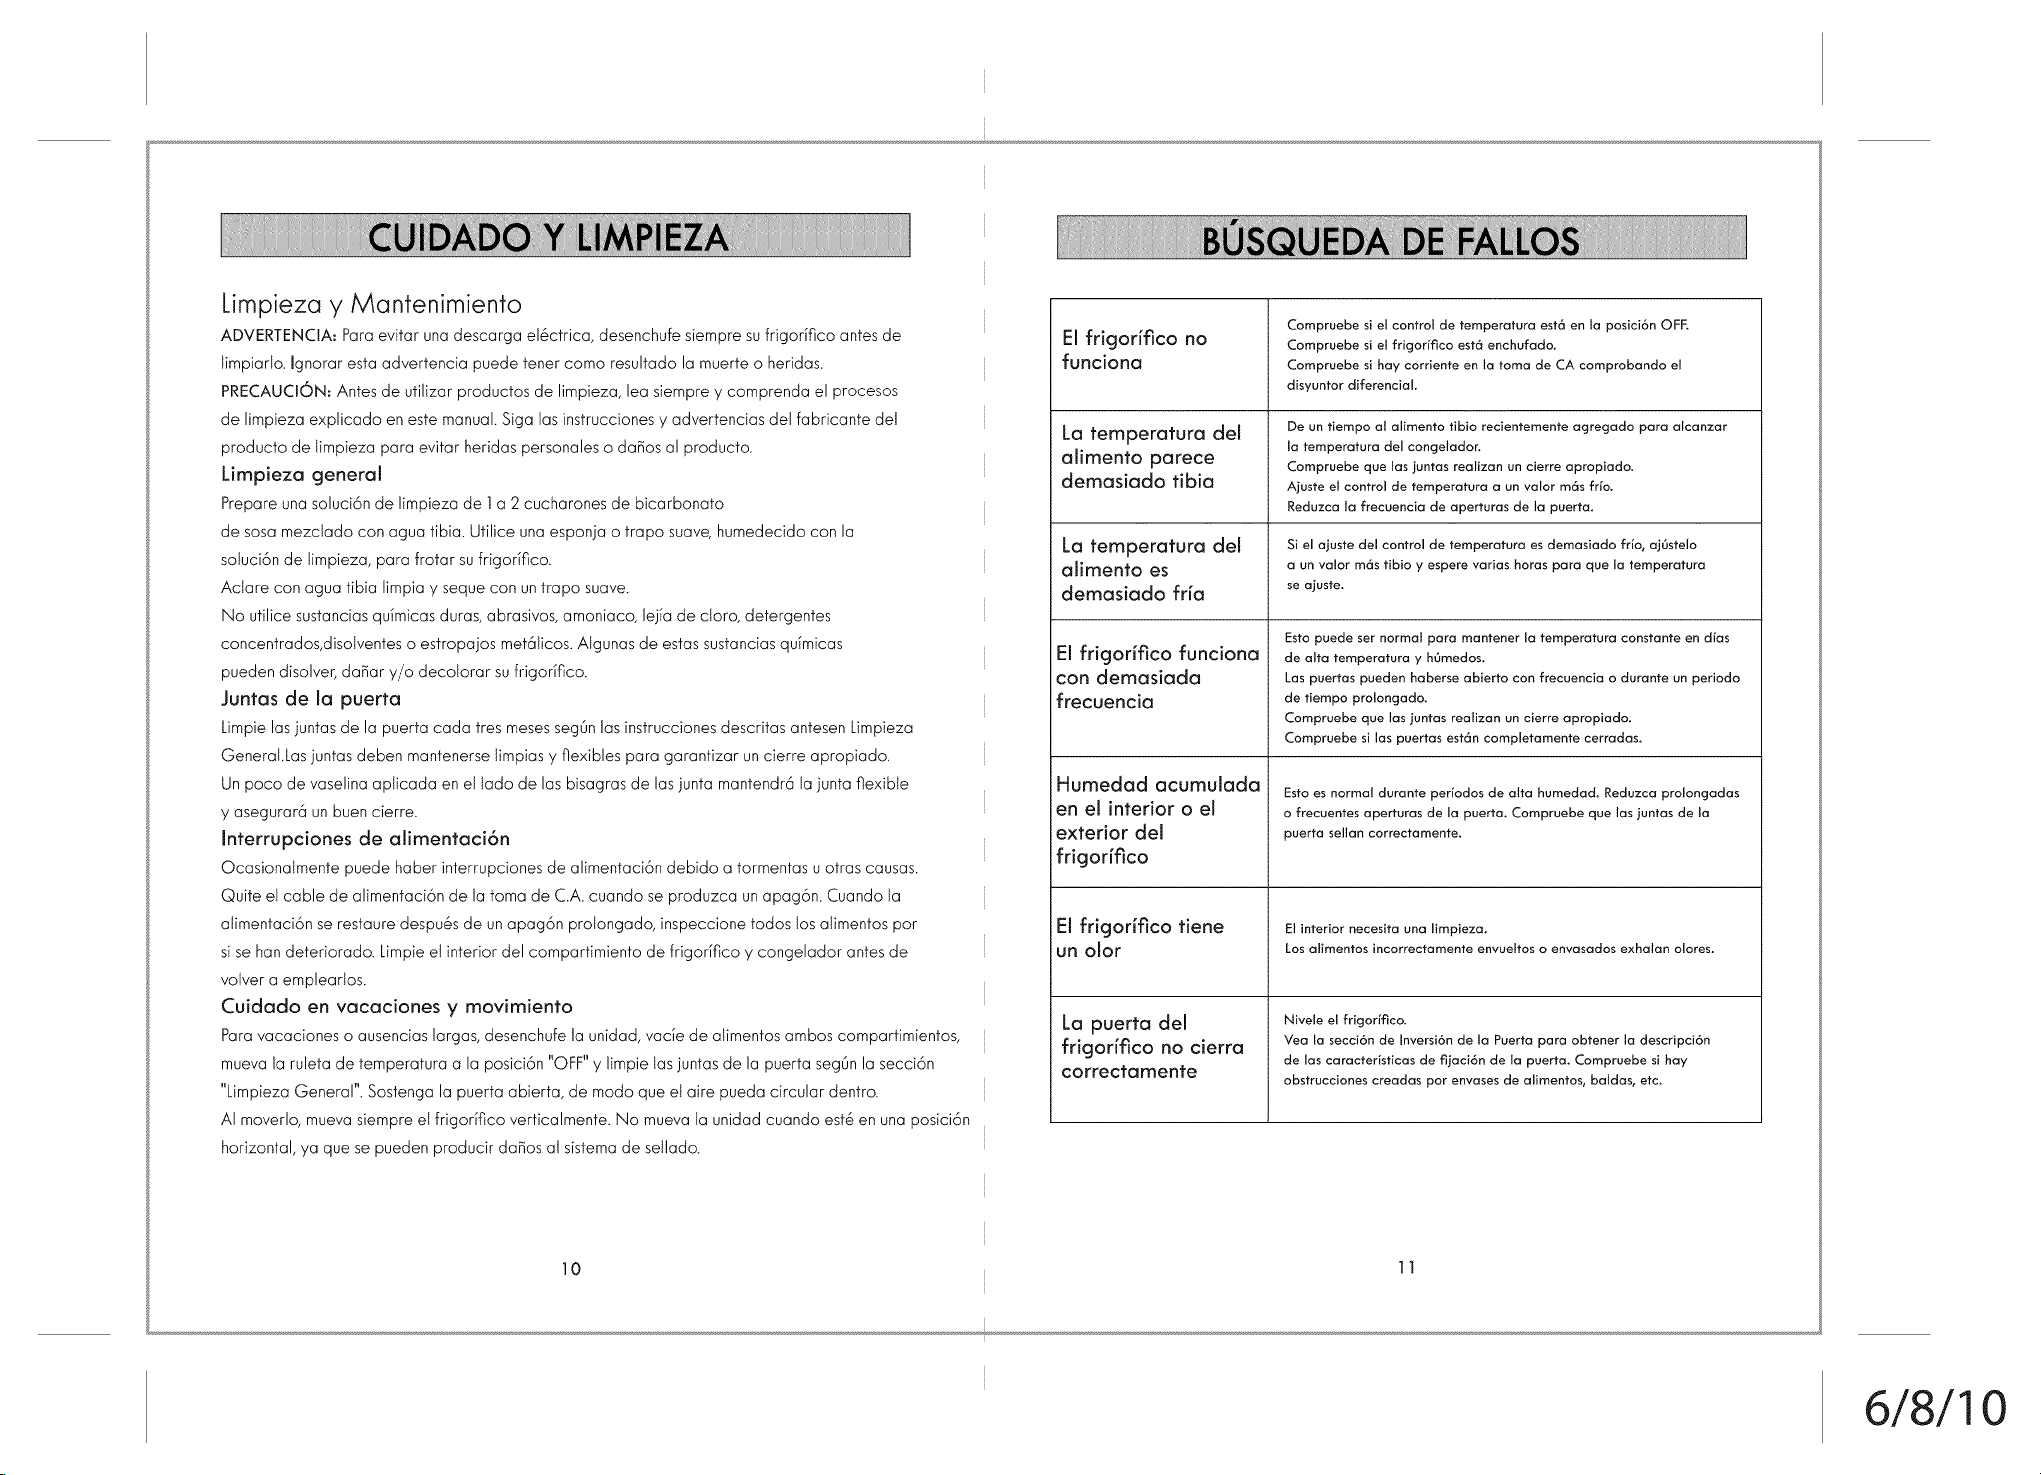
Limpieza y Mantenimiento
ADVERTENCIA: Paraevitar una descarga el6ctrica, desenchufesiempre sufrigorifico antesde
limpiarlo_Ignorar esta advertencia puede tener como resultado la muerte o heridas.
PRECAUClQN: Antesde utilizar productos de limpieza, lea siempre y comprenda el procesos
de limpieza explicado en estemanual. Siga las instruccionesy advertencias det fabricante del
producto de limpieza para evitar heridas personales o daBosal producto.
Limpieza general
Prepare unasoluci6n de limpieza de 1a 2 cucharones de bicarbonato
de sosamezclado con agua tibia. Utilice unaesponja o trapo suave,humedecido con la
soluci6n de limpieza, para frotar su frigorfflco.
Aclare con agua tibia limpia y seque con untrapo suave.
No utilice sustanciasqulmicas duras,abrasivos,amoniaco, lejla de cloro, detergentes
concentrados,disolventes o estropajos met61icos.Algunas de estassustanciasqulmicas
pueden disolver,da_ar y/o decolorar sufrigorlflco.
Juntas de la puerto
Limpielas juntasde la puerta cada tres mesessegOnlasinstruccionesdescritas antesen Limpieza
GenerakLasjuntas deben mantenerselimpias y fiexibles para garantizar uncierre apropiado.
Un poco de vaselina aplicada enel lado de las bisagrasde lasjunta mantendr6 la junta flexible
y asegurar6 unbuen cierre.
Interrupciones de alimentaci6n
Ocasionalmente puede haber interrupciones de alimentaci6n debido a tormentas u otras causas.
Quite et cable de alimentaci6n de la toma de C.A.cuando seproduzca unapag6n. Cuando la
atimentaci6n serestaure despu@sde unapag6n protongado, inspeccione todos los alimentos pot
sise handeteriorado. Limpieet interior del compartimiento de frigorifico y congelador antesde
volver a emplearlos.
Cuidado en vacaciones y movimiento
Paravacaciones o ausenciaslargas, desenchufela unidad, vacie de atimentosambos compartimientos,
mueva la ruleta de temperatura a la posici6n "OFF"y limpie las juntasde la puerta seg6nla secci6n
"Limpieza General". Sostengala puerta abierta, de modo que etaire pueda circular dentro.
AI moverlo, muevasiempreel frigoriflco verticalmente. No muevata unidad cuando est6 en unaposici6n
horizontal, ya que se pueden producir daBosal sistemade setlado.
10
El frigorifico no
funciona
La temperatura deJ
aiimento parece
demasiado tibia
La temperatura del
alimento es
demasiado fria
El frigorffico funciona
con demasiada
frecuencia
Humedad acumulada
en el interior o el
exterior del
frigorifico
El frigor[fico tiene
un oJor
La puerta del
frigorifico no cierra
correcta mente
Compruebe si el control de temperatura est6 en la posici6n OFF.
Compruebe si el frigorifico est6 enchufado.
Compruebe si hay corriente en la toma de CA comprobando el
disyuntor diferencial.
De un tiempo al alimento tibio recientemente agregado para alcanzar
la temperatura del congelador.
Compruebe que los juntas realizan un cierre apropiado.
Ajuste el control de temperatura a un valor m6s frio.
Reduzca la frecuencia de aperturas de la puerto.
Si el ajuste del control de temperatura es demasiodo fr[o, aj0stelo
a un valor m6s tibio y espere varias horas para que la temperatura
se ajuste,
Esto puede ser normal pora mantener la temperotura constante en dlos
de alto temperatura y h0medos.
Las puertas pueden haberse abierto con frecuencia o durante un periodo
de tiempo proJongado.
Compruebe que las juntas realizan un cierre apropiadoo
Compruebe si los puertas est6n completamente cerradas.
Esto es normal durante perlodos de alta humedad. Reduzca prolongadas
o frecuentes aperturas de la puerta. Compruebe que los juntas de Ja
puerto sellon correctomente.
El interior necesita una Jimpieza.
Los aJimentos Jncorrectamente envue[tos o envasados exhalan o[ores.
Niveie el frigorlfico.
Vea la secci6n de [nversi6n de la Puerta para obtener la descripci6n
de las caracterlsticas de fijaci6n de la puerta. Compruebe si hay
obstrucciones creadas por envases de alimentos, baldas, etc.
11
6/8/10
12 13
6/8/10