Lucid AIR TOURING
Product's Documents
Below are documents related to this product, you can read online or download:
- Owner's manual - (English) Read Online | Download pdf
User Manual Lucid AIR PURE
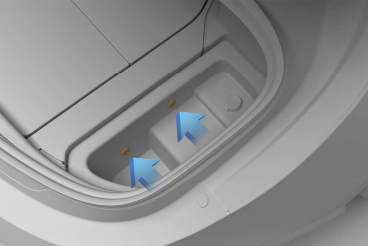
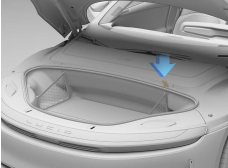
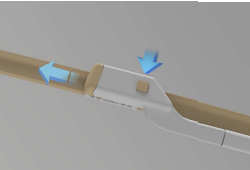
In order to be able to access some of the serviceable components on your vehicle, the under hood rear apron must be removed.
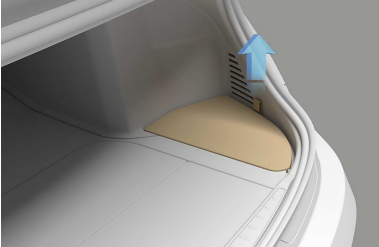
Removing the panel

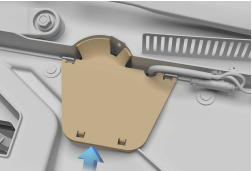
Installing the access panel
Installation is the reverse of the removal procedure.
The emergency responder cut loop label must be visible after the maintenance panel is installed.
Low brake fluid warning indicator
If the fluid in the brake reservoir drops below the recommended level, the brake warning icon will be displayed on the Instrument Cluster. This will be accompanied by a notification message
WARNING: If the low brake fluid notification displays while driving, stop as soon as safety permits by gently applying the brakes. Do not continue driving. Contact a Lucid Service Center immediately.
Checking the fluid level
Check the brake fluid level with the vehicle on level ground.
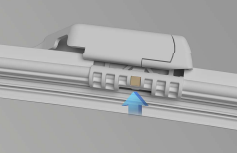
1. Remove the under hood rear apron. See Under Hood Rear Apron.
2. Remove the brake reservoir cover
3. Check the fluid level visually by looking at the outside marks on the side of the reservoir without removing the filler cap.

The brake fluid level should always be between the MIN and the MAX marks. Note: Although brake fluid level drops slightly during normal use as a result of brake pad wear, it should not drop below the MIN mark. Excessive or frequent fluid loss may indicate a leak in the system.
Topping off brake fluid
To top off the fluid:


CAUTION: Brake fluid will damage painted surfaces. Immediately soak up any spills with an absorbent cloth and wash the affected area with a mixture of car shampoo and water
Replacing brake fluid
The brake fluid should be replaced every 2 years or every 24,000 miles, whichever comes sooner
Cluster. This will be accompanied by a notification message.
Operate the washers periodically to check that the nozzles are clear and properly directed. If a washer jet performs poorly, see Cleaning Washer Jets.
Topping off washer fluid
WARNING: In temperatures below 4°C (39°F), use a washer fluid with deicer. In cold weather, using a washer fluid without deicer can cause the fluid to freeze on contact with the windshield, impairing visibility.
Note: Some national or local regulations restrict the use of Volatile Organic Compounds (VOCs). VOCs are commonly used as antifreeze in washer fluid. Use a washer fluid with limited VOC content only if it provides adequate freeze resistance for all climates in which you drive.

CAUTION: Washer fluid can damage painted surfaces. Wipe up any spills immediately with an absorbent cloth and wash the affected area with water.
Checking the Wiper Blades
CAUTION: Only use cleaning products that have been approved for use on automotive glass and rubber. Inappropriate products may cause damage, smearing, or increased glare on the screen.

You should periodically check and clean the wiping edge of the wiper blade. Clean the blade edge using a soft cloth or sponge, and isopropyl (rubbing) alcohol or windshield washer fluid.Also, check the blade rubber for cracks, splits, or roughness. If any damage is found, replace the blade immediately to prevent damage to the glass.
Replacing Wiper Blades
Note: For optimum performance, replace the wiper blades at least every year.
Life expectancy of wiper blades can vary, depending on geographical area and frequency of use. Poor wiper blade performance can result in “chattering” (that is, skipping across the glass), or leaving behind marks, streaks of water, or wet spots. If any of these conditions are present, clean the wiper blades or replace them as needed.
Replacing the front wiper blades
1. Open the hood. See Hood Opening and Closing.
2. Lift the wiper arm away from the windshield.
3. Depress the locking tab while sliding the wiper blade away from the arm and remove.
4. Installation of the new wiper blade is the reverse of removal. You should be able to hear and feel it click into place on the wiper arm.
5. Gently lower wiper blade back on to the windshield.
If a washer jet nozzle becomes clogged with debris or build-up, its performance can be reduced. There are several methods for removing any blockage:
- Dip a small, soft-bristled brush (such as an old toothbrush) in warm water and scrub in and around the nozzle to clear away any dirt or debris.
- Use a can of compressed air to blow a concentrated stream of air into the clog to loosen it, and to blow away any debris from the nozzle.
- For more serious clogs, slide a thin piece of wire into the nozzle to clear any blockages.
Your vehicle has two cabin air filters installed that prevents pollen, industrial fall-out, road dust, and other particles from entering the vehicle via the vents.
The cabin air filters should be replaced every year or every 12,000 miles, whichever comes sooner. Failure to replace the air filters will result in reduced air flow into the vehicle.
Note: To gain the maximum benefit of the cabin air filters, it is suggested the filters are changed prior to the pollen season.
Note: To gain the maximum benefit of the cabin air filters, it is suggested the filters are changed prior to the pollen season.
Cleaning the Exterior
Your vehicle should be washed regularly to preserve the finish and maintain its overall appearance.
To protect the paint surfaces, wash your vehicle as soon as possible:
- When mud, dust, soot, or dirt builds up on the surface
- After driving on coastal roads or winter roads treated with salt
- When corrosive contaminants such as tree sap, bird droppings, or bugs collect on the surface
- After a rainfall to prevent possible damage from acid rain
Environmental: It is illegal to pollute drains, rivers, and waterways. Some cleaning products contain chemicals that are hazardous to the environment. Used toxic chemicals must be disposed of at authorized waste disposal sites only. Always take precautions to prevent fluids from spilling.
Hand washing
CAUTION: Avoid using rough or tightly napped cloths (such as washing mitts) on the vehicle, as these can be abrasive enough to damage the finish.
CAUTION: Avoid washing your vehicle in direct sunlight. Water and cleansers dry faster on a hot surface and can leave water spots or stains.
When washing your vehicle by hand, follow these steps:
- Rinse the entire vehicle first to remove as much excess dirt and dust as possible and reduce the risk of scratches from washing.
- Wash using a clean, soft cloth or sponge and cold or lukewarm water mixed with a mild car soap.
- Rinse your cleaning tools often to avoid rubbing debris into the finish, especially if your vehicle is exceptionally dirty
- Do not aim water hoses directly at window, door, or hood seals, or through wheel apertures onto brake components.
- After washing, rinse the vehicle thoroughly with clean, cool water until all the soap has been removed.
- To avoid leaving water spots on the finish, dry the vehicle thoroughly with a chamois or cotton cloth.
Removing tar spots
CAUTION: Do not use acidic, abrasive, or petroleum-based cleansers, as these can damage the vehicle’s paint and the plastic or metal parts.
You can use denatured alcohol to remove tar spots and stubborn grease stains from paint.
After cleaning, immediately wash the area with soapy water to remove the alcohol.
Automatic car washes
CAUTION: Do not use a car wash that applies cleansers containing acid. Acid can react with the plastic in some vehicle components and damage them. Always check with your car wash to confirm that acid is not used.
CAUTION: Leave the windshield wipers in the off position while in a car wash to avoid damaging them.
Lucid recommends using only touch-free automated car washes that do not bring brushes or other cleaning tools in direct contact with the vehicle body.
Note: Vehicle or paint damage caused by using an automatic car wash will not be covered under the vehicle warranty.
Pressure washers
CAUTION: Do not use a pressure washer with a circular jet or bristle attachment, as it could damage the surface finish of components.
CAUTION: Pressure washers that have a pressure exceeding 1,200 PSI (82 bar) can damage or even remove vehicle paint if used improperly.
CAUTION: Do not use a hot or steam pressure washer with a temperature exceeding 120°F (48°C), as this could remove paint and surface protection from exterior parts.
Keep the nozzle at least 12 inches (30 cm) from the surface of the vehicle. Always keep the nozzle moving and do not concentrate the spray on a single area.
Do not aim the pressure washer at any of the following:
- Door and window seals
- Roof seals
- Ventilation intakes
- Plastic trim components
- Electrical components
- Exterior cameras or sensors (see ADAS Component Locations)
- Tires and brake system components
Note: Vehicle or paint damage caused by using a pressure washer will not be covered under the vehicle warranty.
Underbody maintenance
If salt has been used on the roadways (such as during winter months), thoroughly remove all traces of road salt. Use a hose to rinse salt from the underside of the vehicle.
Flush away accumulations of mud in areas where debris easily collects (such as wheel arches and panel seams).
Wheels
CAUTION: Do not use chemical-based wheel cleaners, as these can damage the finish of the wheel.
Wash the wheels with warm, fresh water containing a good quality wash and wax shampoo. Thoroughly rinse the wheels to remove any soap residue.
Windshield, windows, and mirrors
CAUTION: Mirror glass is particularly susceptible to damage. Do not use abrasive cleaning compounds.
You should regularly clean all windows inside and out using a window cleaning solution. An automotive glass cleaner is recommended.
After washing your vehicle with washing or waxing products, clean the outside of the windshield with glass cleaner.
Wiper blades
You should clean wiper blades using isopropyl (rubbing) alcohol or windshield washer fluid. Do not use petroleum-based cleaners.
Regular waxing helps to protect the paint surfaces from harsh elements and maintain their appearance. After the first year, Lucid recommends polishing your vehicle before reapplying wax. Polishing removes built-up residue and keeps the surface of the finish even.
The exterior paint should be regularly checked for damage. Any minor scratches or chips should be repaired as soon as possible using touch-up paint (contact Lucid for recommendations).
Body repairs should only be performed by a body shop approved by Lucid. Contact a Lucid Service Center for assistance in locating an approved body shop near you.
To preserve the cosmetic appearance of the body when the vehicle is not being used, you may wish to use a car cover.
General cleaning
To maintain the look and appearance of the interior of your vehicle, you should inspect and clean the interior frequently.
For general cleaning, it is recommended that materials and surfaces should be cleaned using a non-solvent based cleaning (wet) wipe, and dried with a microfiber cloth.
If possible, try to wipe up spillages and clean marks as soon as they happen. This will reduce the need for more extensive cleaning in the future.
Note: It is advisable that you test all cleaners on a concealed area before use.
Interior glass and mirrors
Use an alcohol-based commercial glass cleaner and a soft cloth (such as microfiber) to clean any glass or mirrored surfaces
Displays
Display screens should only be cleaned using a soft, lint-free cloth designed for cleaning screens and monitors.
Before cleaning the display screens, use the Pilot Panel to enable screen cleaning mode to prevent accidental operation of vehicle controls. Select > Displays > Displays & Accessibility > SCREEN CLEANING MODE.
Airbags
Seats
For cloth seats:
- If necessary, gently vacuum the seats first to remove any loose dust, dirt, or debris.
- Use a soft, colorless cloth moistened with warm water and (if necessary) nondetergent soap. Wipe gently in a circular motion. Allow the seats to air dry after cleaning.
For leather and artificial leather seats:
- To clean, use a soft, colorless cloth moistened only with warm water. Do not use polishes, oils, cleaning fluids, solvents, or detergents.
- Avoid vacuuming. Instead, use your moistened cleaning cloth to gently remove any loose particles.
- Avoid vacuuming. Instead, use your moistened cleaning cloth to gently remove any loose particles.
Seat belts
WARNING: Never allow any substance to enter a seat belt mechanism, as this can negatively affect its performance in an impact.
Extend the seat belt and clean using a cloth moistened only with water. Do not use any type of detergent or chemical cleaning agent. Allow the belts to air dry while extended, away from direct sunlight if possible.
Chrome and metal surfaces
Do not use abrasive cleansers, rough cloths, or polish, as these materials can damage the finish of these surfaces.
Plastic materials
WARNING: Do not use polish or wax cleaner on the upper surfaces of the dashboard. Polished surfaces are reflective and may interfere with the driver's view, resulting in an accident.
You should clean heavily-soiled plastic surfaces using warm water and a non-detergent soap, then wipe clean with a soft cloth.
Carpets and floor mats
Vacuum the carpets and mats thoroughly before cleaning to remove excess dirt and debris.
Avoid over-wetting the carpets. A diluted upholstery cleaner can be used on heavily soiled areas.
Remove floor mats before cleaning to ensure that they dry properly afterwards. Clean using a microfiber cloth and water or a mild textile cleanser. Spot-test any cleansers first to ensure they will not leave stains. Dry the mat thoroughly before reinstalling
Using genuine Lucid floor mats can extend the life of your vehicle’s carpet and make it easier to clean. Mats should be maintained with regular cleaning and replaced if they become worn or damaged.
Floor mats should be inspected periodically to ensure they are properly installed. Lightly pull on the mat to check that it is securely fastened. Depress each foot pedal fully and reinstall the mats if any interference is felt.
Light Source Replacement
Note: There are no user-serviceable or replaceable bulbs installed on your vehicle.
All the exterior and interior lighting modules use LED technology in place of traditional filament bulbs. If a lighting module fails to operate, please contact a Lucid Service Center to have it replaced.
Fuse Box Locations
There are three fuse boxes in your vehicle: one under the hood, one in the cabin, and one in the trunk.
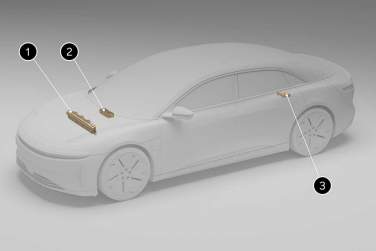
1. Front power distribution fuse box
2. Cabin fuse box
3. Rear power distribution fuse box
Replacing a Fuse
Your vehicle uses a number of fuses to protect the electrical system from damage caused by short circuiting or overloading. Fuses are a one-time protection device and must be replaced each time the corresponding circuit is overloaded.
Using the fuse information shown on the following pages, identify the fuse protecting the affected circuit. Use the fuse puller within the fuse box to remove the required fuse.
A break in the wire inside the fuse indicates that the fuse has blown. Always replace a fuse with one of equal current and voltage rating.
Front fuse box

Pull back the fastener on the sides of the fuse box to release the cover and open.
Cabin fuse box
The cabin fuse box is located in the front passenger’s footwell.
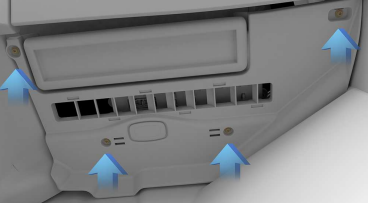
Remove the four star screws securing the close-out panel in place. Lower the panel to access the fuse box.
Rear fuse box
Remove the right-hand floor panel.
Remove the two push pins securing the underfloor storage box in place. Remove the storage box to access the rear fuse box.