
Loading ...
Loading ...
Loading ...
7
6
AU: foodsaver.com.au 1300 881 861
NZ: foodsaver.co.nz 0800 786 232
FoodSaver
®
VS2198 Model
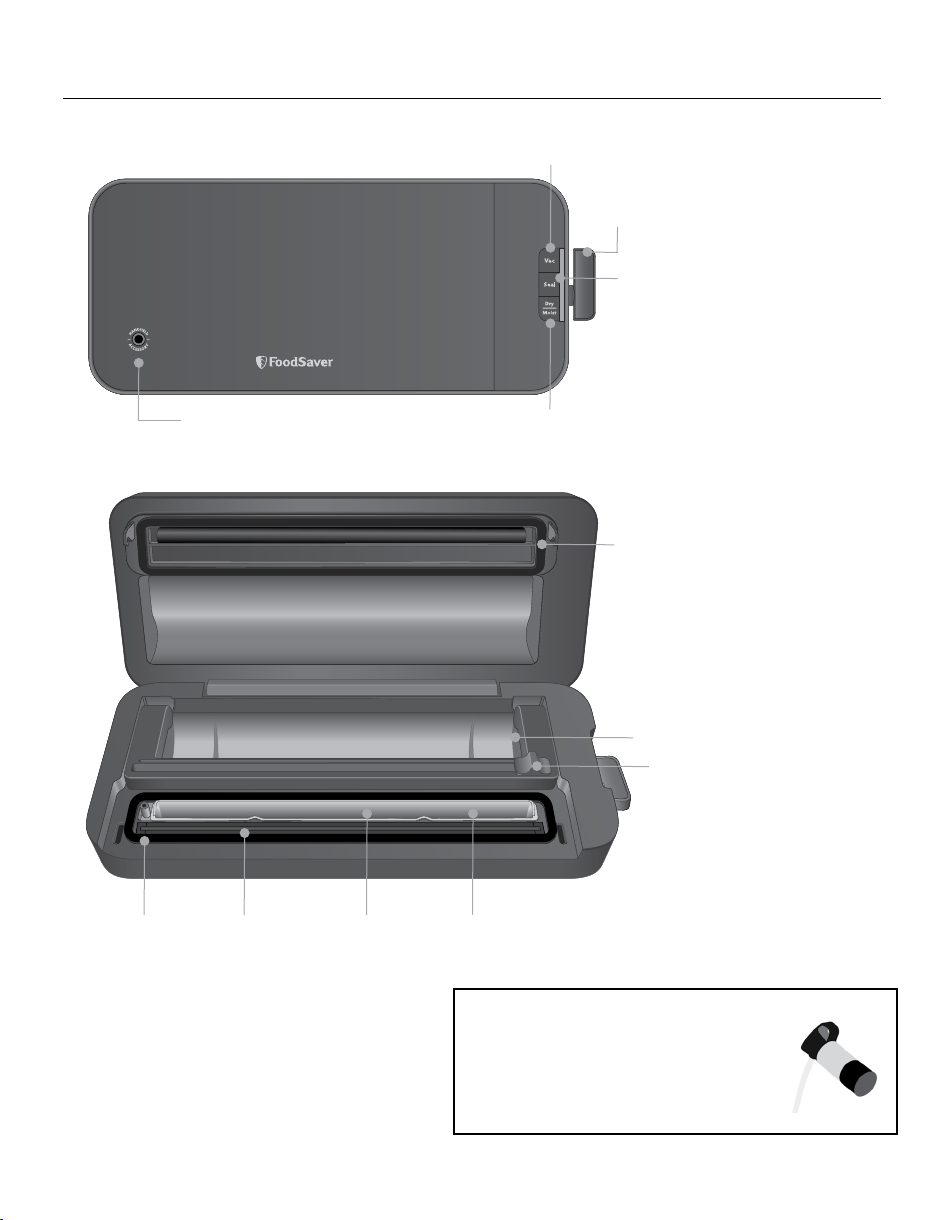
A. Vacuum Button
C. Seal Button
D. Dry/Moist Mode
B. Easy Lock Latch
Rotate up to open
E. Accessory Port
F. Upper Foam Gasket
G. Roll Storage
H. Cutter Bar
I. Lower Foam
Gasket
J. Extra Wide
Sealing Strip
K. Vacuum
Channel
L. Removable Drip
Tray
Handheld Sealer Hose
1. Use with FoodSaver
®
Zipper Bags and
Containers
1
Seal Indicator Light
Flashes when sealing process is engaged and becomes constant when sealing process is finished.
2
Vacuum Indicator Light
Flashes when vacuum cycle is engaged and becomes constant when vacuum cycle is finished.
3
Seal Button
This button has three uses:
1. Press to create a seal when making bags from a FoodSaver
®
Roll.
2. Press to immediately stop the vacuum process and begin sealing the bag. This prevents
crushing delicate items such as bread, cookies and pastries.
3. Press to create a seal on multilayer film bags (such as a potato chip bag) to keep food
sealed airtight.
4
Vacuum Button
This button has three uses:
1. Press to vacuum seal food airtight. Motor will continue to run until bag is fully vacuumed, then
will automatically seal.
2. Press to pause vacuum process at any point.
3. Press to use the Handheld Sealer Hose.
4
Dry/Moist Mode Button
For optimal vacuuming and sealing of moist or juicy foods, press the Dry/Moist Food Settings Button
until the Moist Indicator Light is illuminated. Choose the Dry Food Setting for foods without liquid.
The user-friendly, intuitive control panel makes it easy
for you to get the most out of your FoodSaver
®
System:
Vacuum Button
Seal Button
Dry/Moist Mode
Loading ...
Loading ...
Loading ...