ol=ggtlo,leegt_
Ow er's
instructions
Register your product at www.samsung.com/globa!/register
important Warranty Information
Regarding Television Format
Viewing
Standard screen format tclevis[ons (4:3, the aspect ratio of the screen width to height) are
primarily dcsigned to vicw standard fomlat full-motion video. The images displa),cd on
them should primarily be in the standard 4:3 ratio foi-mat and constantly moving.
Displaying stationary graphics and images on screen, such as the dark top and bottom
lettcrbox bars (wide screcn picturcs), should be limitcd to no morc than 15% of the total
tclev[sion viewing pcr weck.
Widc scrcen format tclcvisions (16:9, the aspect ratio of the screen width to hdght) are
primarily &'signed to vicw widc screcn format full-motion vidco. The imagcs displaycd on
them should pmnarily be in the wide screen 16:9 ratio fommt, or expanded to fill the
screcn if your model offers this feature, and constantly moving. Displaying stationary
graphics and images on scrccn, such as the dark sidc-bars on non-expanded standard
fommt tclevision video and programming, should be lmfitcd to no more than 15% of the
total tclevision viewing per week.
Additionally, vicwing othcr stationary images and text such as stock market reports, video
game displays, station logos, web sitcs or computer graphics and patterns, should be
lmfitcd as described above for all tclevisions. Displaying any stationary images that e.weed
the above guidelines can cause uneven aging qf picture tubes (CRTs) that leave subtle, but
permanent burned-in Ghost images in the television picture. To avoid this, vary the
programming and images, and primarily display full screen moving images, not
stationa O, patterns or dark bars. On television models that oftcr picture sizing features,
use these controls to view the different fommts as a full scn'en picture.
Be careful in the selection and duration of television formats used for viewing. Uneven CRT
aging as a resuh of format selection and use, as well as other burned-in images, is not
covered by your Samsung lmfited warrant):
English- 2
A Guide to Digital TV
What is Digital Television?
Digital television (DTV) is a new wa), of transnfitting high quality video and audio to
vourj TV set. Using DTV, broadcasters can transmit high defnition TV (HDTV) images,
Dolby Digital surround audio, and new services such as multicasting (transmitting more
than one program on the same TV channel) and datacasting (providing electronic
program guides and interactive television). Several of these services can be combined into
a single digital broadcast.
Digita| Television Services
Digital Picture Quality
DTV programs are transnfitted in hvo clillcrent formats. The frst is Standanl Dcfnition
Television (SDTV) and the second is High Defimtion Television (HDTV).
SDTV program tormats include 480-fne interlaced (480i) and 480-fne progressive
(480p) video. 480i programs are essentially a digital version of ocwcurrent analog TV
programs, while the 480p tormat otters improved image detail over 480i. Some 480p
programs are broadcast in widescreen and are comparable to progressive-scan DVD
movies in image qualit>
HDTV program tormats include 1080-fne interlaced (10801) and 720-fne progressive
(720p). Both HDTV tormats are always broadcast in widescreen, and otter nluch higher
picture ¢luality than SDTV
Dolby Surround Sound
With DTV, you can listen to a variety of Dolby Digital audio fommts front Dolby
Surround 2.0 to Dolby Digital 5.1 surround, using your home audio system. Many
HDTV programs are now broadcast with Dolby Digital 5.1 soundtracks.
interactive Communications and Datacasting
DTV will allow you to interact with your television; choosing programs from a detailed
program guide, ordering products on-line while watching TV, and accessing ancillary
data about a program.
English- 3
How to View Digita| Television
There are three ways to watch DT_Z The first is to use an integrated digital TV; one with
a bui|t-in digital te|evision tuner. The second is to connect an external DTV set-top
receiver to a DT_Uready television or monitor. This type of TV or monitor will have
wideband component video and stcrco audio inputs. _km can also watch DTV signals
with personal computer (PC) tuner cards and computer monitors.
integrated TVs versus DTV-ready TVs and monitors
The advantage of an integrated DTV set is that it can tune both analog and digital TV
channels at the same time. All you need to do is add an external antenna and you an"
ready to watch DT_
However, integrated DTV sets are not as common as DT_Uready TVs and monitors.
If you already own a DTV-ready TV with component video inputs, you can er\ioy DTV
broadcasts by simply adding a low-cost DTV set-top receiver and antenna.
NOTE
This television receiver supports the copy protection system regulated by DTLA (Digital
Transmission Licensing Administrator). It should be noted that copy protected content may
not be viewable depending on your particular connections.
English- 4
Q&A
3. is the antenna I use for existing TV reception good enough for DTV?
Over-the-air (OTA) digital TV broadcasOng uses the same channels as analog TV and
works well with many existing TV antennas. However, DTV broadcast channel
assignments are different than analog channels. Ybu should find outt whether your
local DTV broadcasts are on _ff-iF(channels 2-13) or UHF (channels 14-69) to see if
you need a different antenna.
If your DTV channels are on UHF and you already get good UHF reception, your
present antenna ma)" work fine. The same holds true for VHF DTV reception. Note
that in some markets, both VHF and UHF channels are used for DTV broadcasts.
k\)u can find out the latest DTV channel assignments for your area by browsing selected
Internet web sites such as wwx<titantxcom, and ww_,<fcc.gov
2. How difficult is it to receive DTV signals indoors?
Thisdepends on whether your local DTV stations are runmng full power or not and
how close your location is to the transmission tower. DTV receivers do not recluire as
much signal as analog TV receivers to produce high-quality images and sound.
Once the DTV signal level exceeds a certain threshold at the receiver, the digital video
and audio data is decoded at the same ¢luality it was originally encoded tor broadcast.
This is a big advantage tor DTV over analog TV - there is no noise, ghosting, static, or
scratchy audio.
3. How can IIconnect an antenna in my townhouse, co-operative
apartment, condominium, or apartment?
The Federal Comnlunications Commission's OTARD Rule (part of the
Tcleconmmnications Act of 1996) allows residents of condonliniums, townhouse, or
members of neighborhood associations to putt up outtside antennas for reception of
broadcast TV signals as long as those antennas are not located in common areas and
are no more than 12" in height.
Residents of rental units (apartments, etc) an" not covered by the OTARD rules and
will have to use indoor antennas to receive DTV broadcasts. It is possible that the
landlord of an apartment complex can provide broadcast DTV signals via a master TV
antenna system to each apartment.
4. Can I connect my DTV set-top receiver to my cable TV service?
Cable TV systems use a different method for transmitOng digital TV programs that is
currently incompaoble with broadcast DTV set-top receivers. So you will soil need to
use an outtdoor or indoor antenna to receive OTA broadcast DTV programs.
The good news is that you won't have to pay a monthly or pe>program charge to
watch OTA DTV and HDTV programs. They're in'e, unlike subscription satellite TV or
prenlium cable T_,_All you need is an antenna and a DTV set-top receiver to et'\joy
clear, sharp widescreen images and high-quality audio.
English - 5
I CONTENTS I
Chapter 1- Your New TV ................................ 8
List of Foatures .......................................................................................... S
Checking Accessories ................................................................................ 8
Familiarizing Yourself with the TV............................................................. 9
Control Buttons .............................................................................. 9
Connection Jacks (Side) ................................................................ 10
Connection Jacks (Rear) ............................................................... 11
Remote Control ............................................................................ 12
Chapter 2: |nsta||ation ................................. 13
Connecting VHF and UHF Antcnnas ....................................................... 13
Antennas with 300-ohm Flat Win Leads ...................................... 13
Antennas with 75-ohm Round Leads ............................................ 14
Separate VHF and UHF Antennas ................................................. 14
Connecting Cable TV .............................................................................. 15
Cable without a Cable Box ........................................................... 15
Connecting to a Cable Box that Descrambles All Channels ........... 15
Connecting to a Cable Box that Descrambles Some Channels ....... 16
Connecting a VCR ................................................................................... 17
Connecting a Second VCR to Record from the TV ........................ 18
Connecting a CamcoMer ......................................................................... 18
Connecting a DVD Player ........................................................................ 19
Connecting to Y, PB,PR................................................................. 19
Connecting to Regular Audio and Video Jacks .............................. 19
Connecting a Digital kudio System ......................................................... 20
Connecting to an Analog Amplifier .......................................................... 20
Installing Batteries in the Remote Control ................................................ 21
Chapter 3: Operation .................................... 22
Turning the TV On and Off ..................................................................... 22
Plug & Play Feature ................................................................................. 22
Viewing the Menus and On-Screen Displays ............................................ 25
Viewing the Menus ....................................................................... 25
Viewing the Display ...................................................................... 25
Selecting a Menu Language ...................................................................... 26
Selecting the Antenna Input .................................................................... 26
Memorizing the Channels ........................................................................ 27
Selecting the Video Signal Soun'e ................................................. 27
Storing Channels in Memory ........................................................ 28
Adding and Erasing Channels .................................................................. 30
Changing Channels ................................................................................. 31
Using the Channel Buttons ........................................................... 31
Using the Number Buttons ........................................................... 31
Using the -" Button in DTV mode ............................................... 31
Using the PRE-CH Button to Select the Previous Channel ............ 31
Labelling the Channels ............................................................................ 32
Picture Control ........................................................................................ 33
Using Automatic Picture Settings .................................................. 33
Customizing the Picture ............................................................... 34
Resetting the Picture Settings to the Factory Detauhs .................... 35
contintiM...
English - 6
CONTENTS I
Chapter 3: Operation .................................... 36
Sound (2ontrol ......................................................................................... 36
Adjusting the Volume ................................................................... 36
Using the MUTE Button ............................................................... 36
Using Automatic Sound Settings ................................................... 37
Custonfizing the Sound ................................................................ 38
Setting the Clock ..................................................................................... 39
Viewing an External Signal SOUl'Ce........................................................... 40
SetOng the Signal Soun'e .............................................................. 40
Assigning Names to External Input Mode ..................................... 41
Chapter 4: Special Features ......................... 42
Free Tuning (2hannels .................................................................... 42
Checking the Digital-Signal Strength ............................................. 43
Changing the Screen Size ........................................................................ 44
Digital Noise Reduction ........................................................................... 45
Tilt .......................................................................................................... 46
Using the R.Surf Feature .......................................................................... 47
Choosing a Multi-Channel Sound (MTS) track .............................. 48
Choosing a Multi-Channel Sound (MTS) track .............................. 49
Extra Sound Settings (auto Volume, Pseudo Stereo, or TLu'boPlus) ......... 50
SetOng the On/Off Timer ......................................................................... 51
SetOng the Pref('rred Opoon ......................................................... 52
Setting the Sleep Timer ............................................................................ 53
Viewing Closed Captions (On-Screen Text Message) ..................... 54
Viewing Closed Captions (On-Screen Text Message) ..................... 56
Setting the Blue Screen Mode .................................................................. 58
Setting the On/Off Melody ....................................................................... 59
Using the V-Chip ..................................................................................... 60
How to Enable/Disable the RaOng Controls .................................. 60
How to Change Your Password ..................................................... 61
How to Set up Restrictions Using the 'TV Parental Guidelines"... 62
How to Set up Restrictions using the Movie Ratings:
G, PG, PG-13, R, NC-17, X .......................................................... 63
Important Notes About Parental Locks ......................................... 64
How to Set up RestricOons Using Canadian English". ................ 65
How to Set up Restrictions Using Canadian French". .................. 66
Using the V-Chq_ for Digital channel ....................................................... 67
Chapter 5: Troubleshooting ......................... 6g
Identifying Problems ............................................................................... 69
Appendix ....................................................... 70
Cleaning and Maintaining Your TV .......................................................... 70
Using Your TV in Another Country ......................................................... 70
Specifications .......................................................................................... 70
English - 7
Your NEW TV
List of Features
Y\+ur TV is designed wRh the latest technolog}t This TV is a high-performance umt that
includes the following special features:
• Easy-to-use remote control
• Easy-to-use on-screen menu system
• Automatic timer to turn the TV on and off
• Ac!)ustable picture and sound settings that can be stored in the TV_ memory
° Automatic channel tuning %1"up to 181 channels
• A special filter to reduce or eliminate reception problems
° A built-in multi-channel sound decoder tot stereo and bilingual listening
• Built-in, dual channel speakers
° A special sleep timer
• V-Chip tunction
° Capable of receiving Analog and Digital TV broadcasts
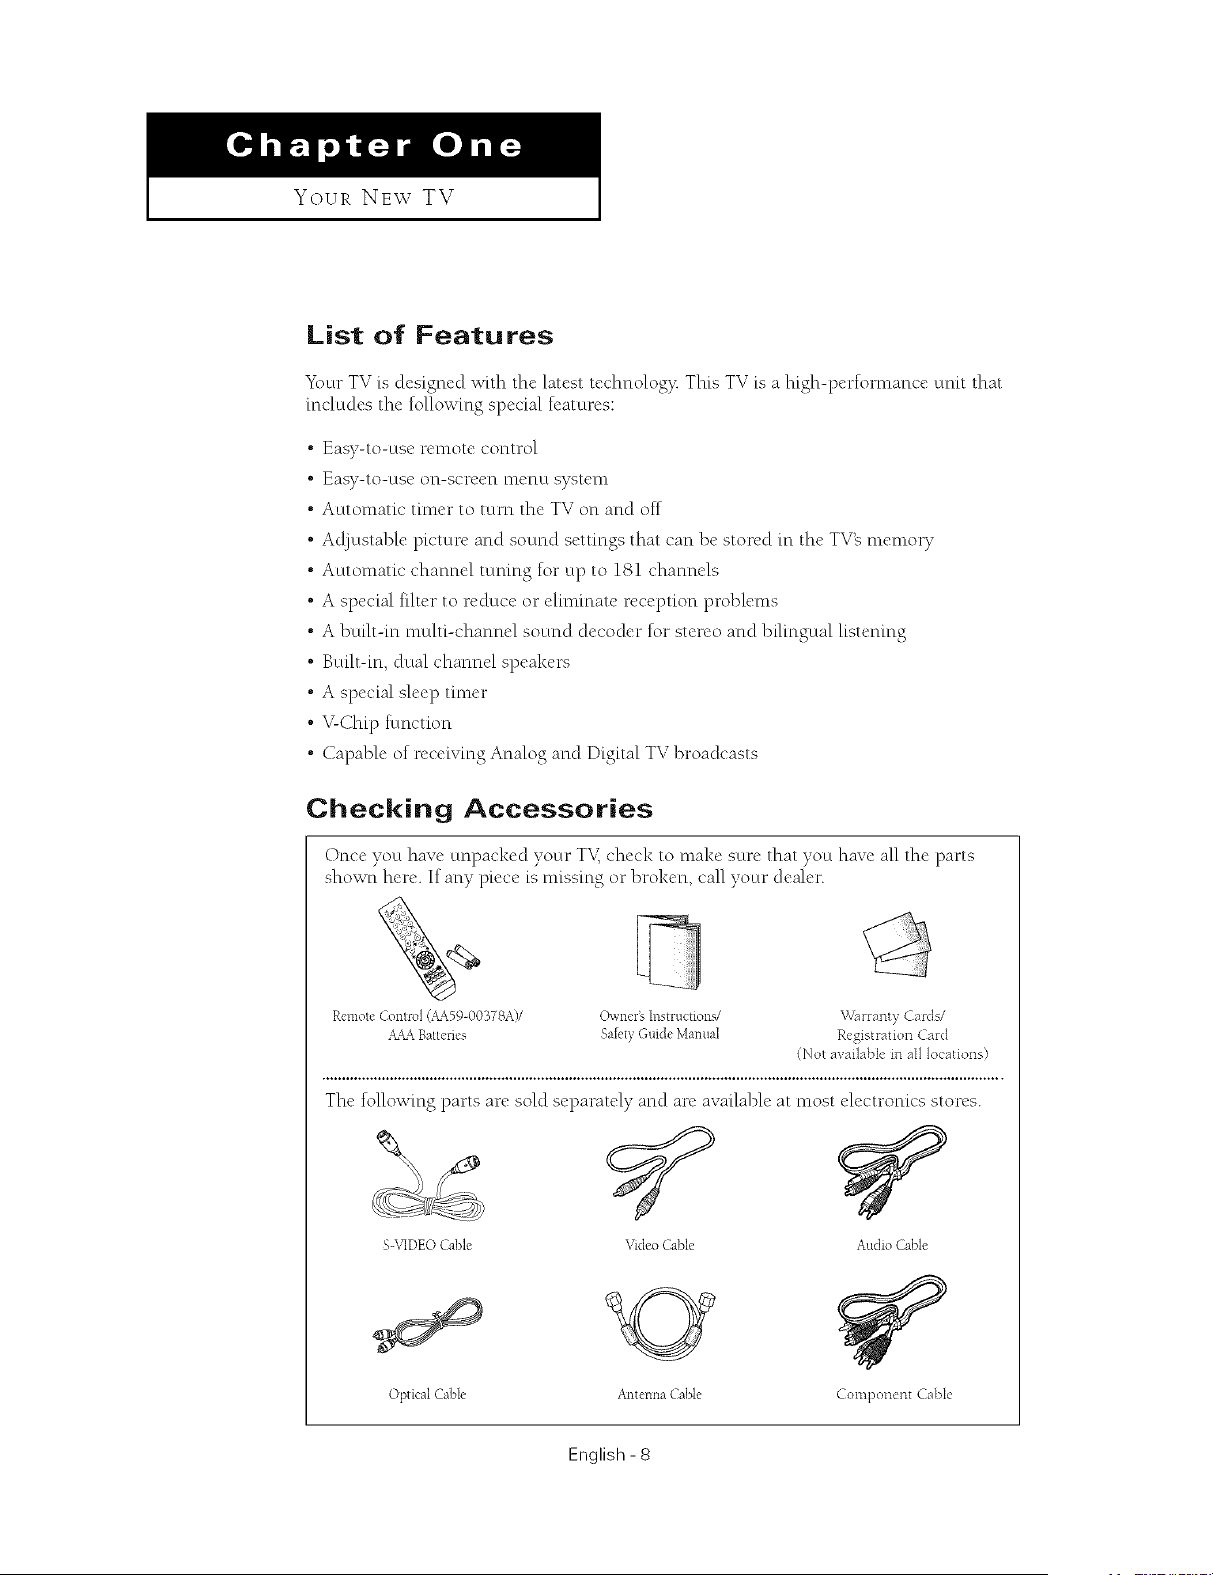
Checking Accessories
Once you have unpacked your TV,check to make sure that you have all the parts
shown here. If any piece is missing or broken, call your dealer.
Remote Control (+_59-00378A)/ Owners Instructions/
_&&_Battenes Sa[{,tyGuide Mamlal
Warranty Cards/
Registration Car([
(Not avai]abIe in aI1 locations)
The tollowing parts are sold separately and are available at most electronics stores.
S \qDEO Cable Video Cable Audio Cable
Optical Cable Antenna Cable Component Cable
English- 8
Your NE\V TV I
Familiarizing Yourself with the TV
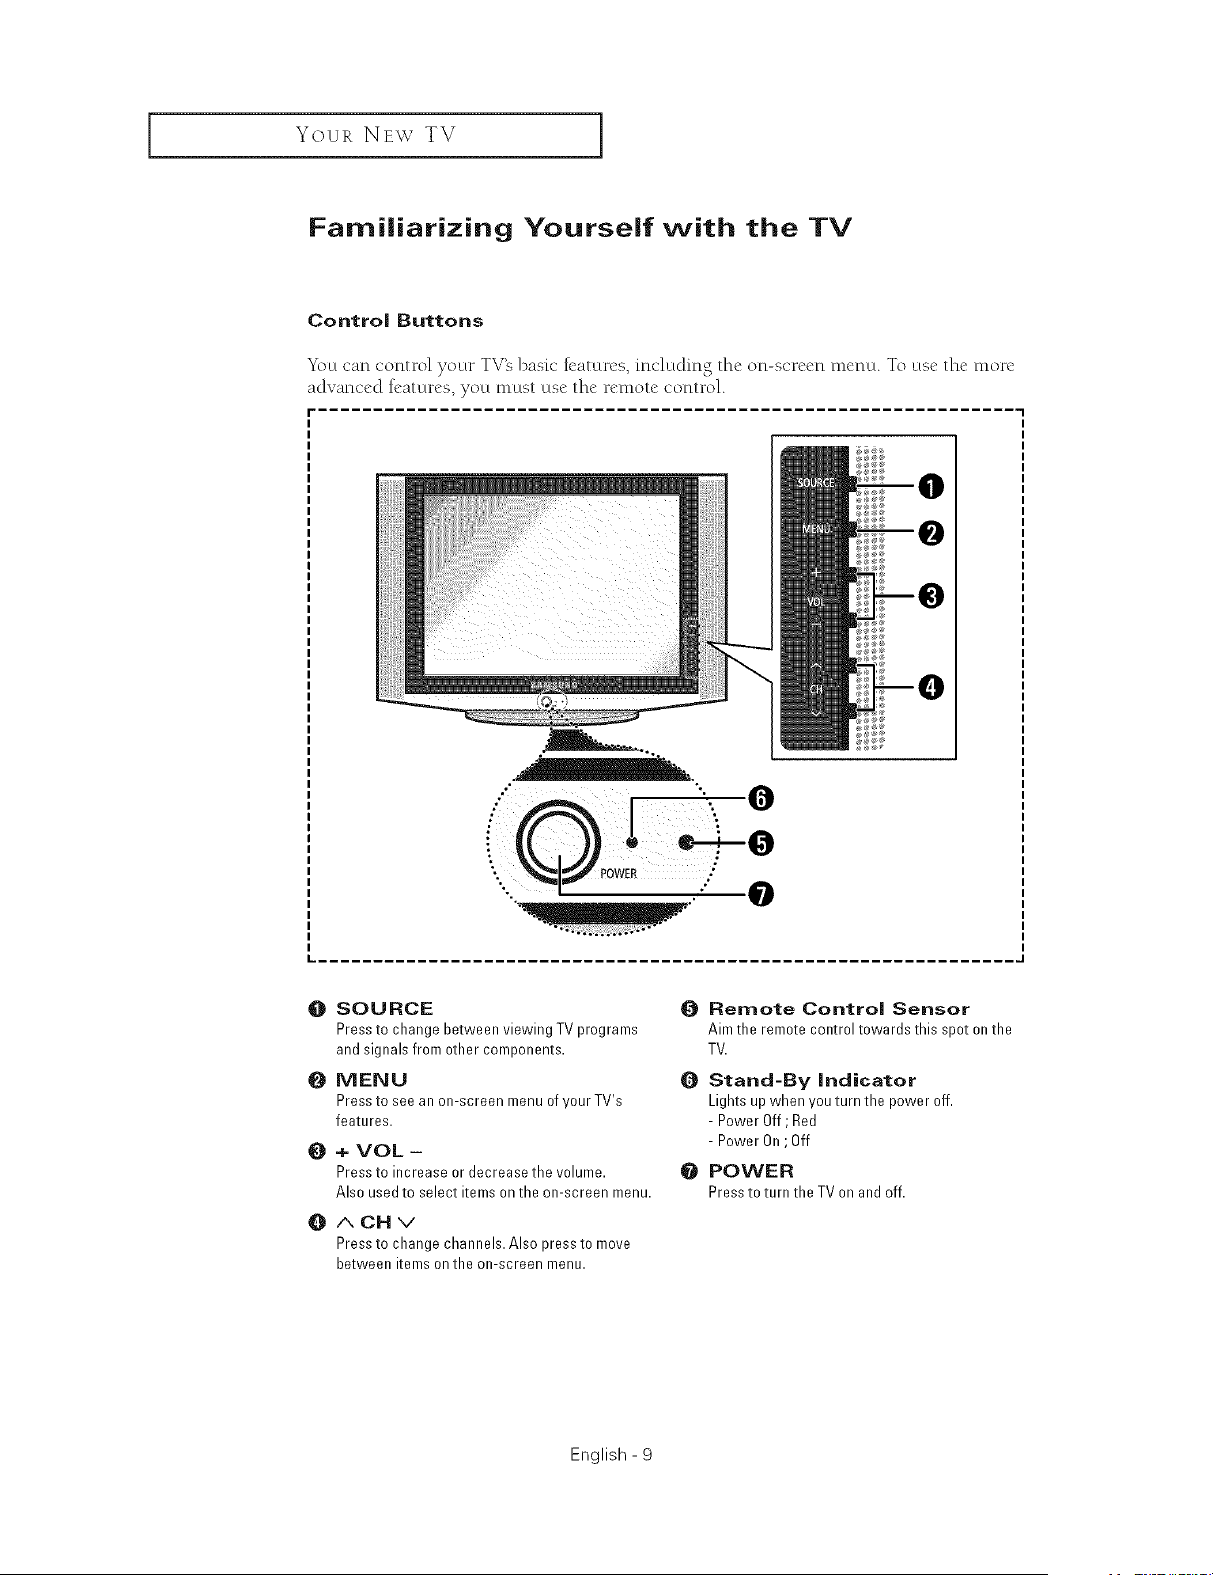
Control Buttons
_2)u can control your TV_ bask" k'aturcs, including thc on-scrccn mcnu. To use thc morc
advanced R'aturcs, you must usc thc rcmotc control.
f
O SOURCE
Press to change between viewing TV programs
and signals from other components.
O MENU
Press to see an on-screen menu ofyourTV's
features.
0
O
+ VOL -
Press to increase or decrease the volume.
Also used to select items on the on-screen menu.
ACHv
Press to change channels. Also press to move
between items on the on-screen menu.
Remote Control Sensor
Aim the remote control towards this spot on the
TV.
Stand-By indicator
Lights up when you turn the power off.
- Power Off; Red
- Power On;Off
e POWER
Press to turn the TV on and off.
English - 9
Your NEw TV ]
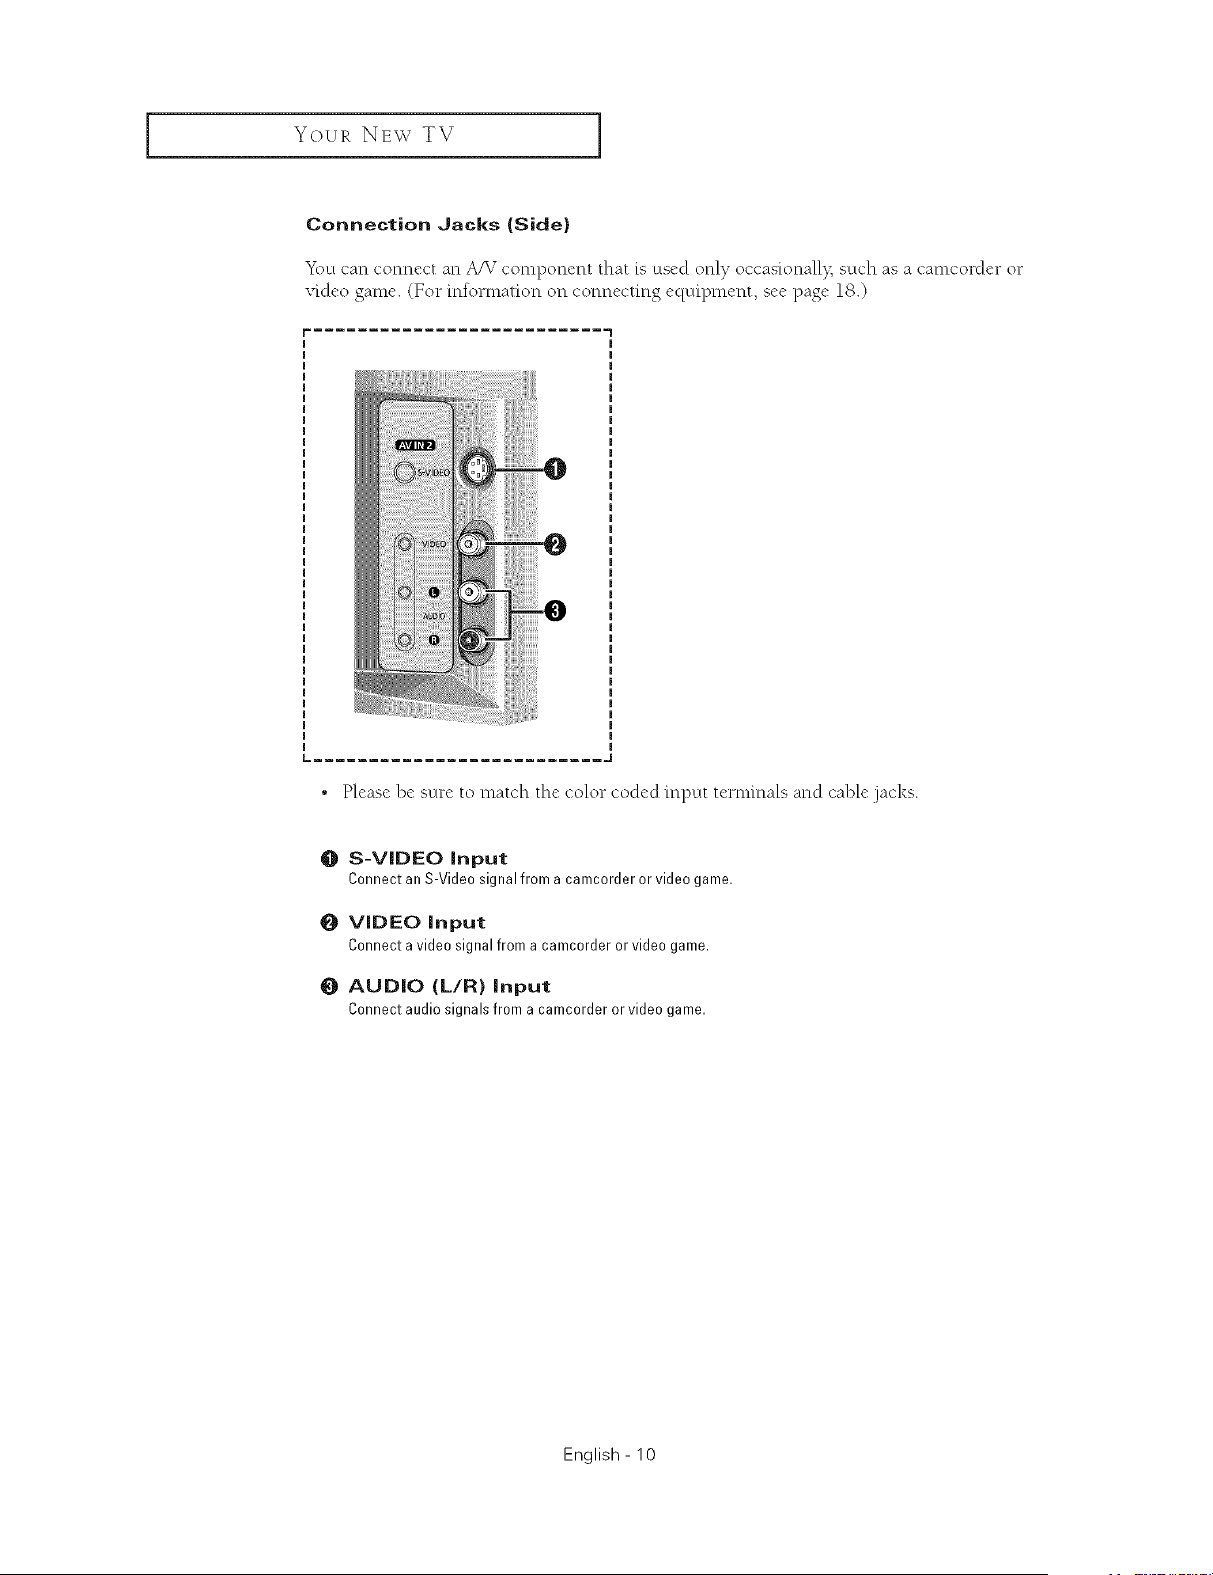
Connection Jacks (Side)
_\_u can connect an A/V component that is used only occas[onall% such as a camcorder or
video game. (For information on connecting equipment, see page 18.)
[= .......................... ,,J
, Please be sure to match the color coded input terminals and cable .jacks.
O S-VIDEO Input
Connect an S-Video signal from a camcorder or video game.
O VIDEO Input
Connect a video signal from a camcorder or video game.
0 AUDIO (L/R} Input
Connectaudiosignalsfrom a camcorderorvideogame.
English - 10
Your NEW TV I
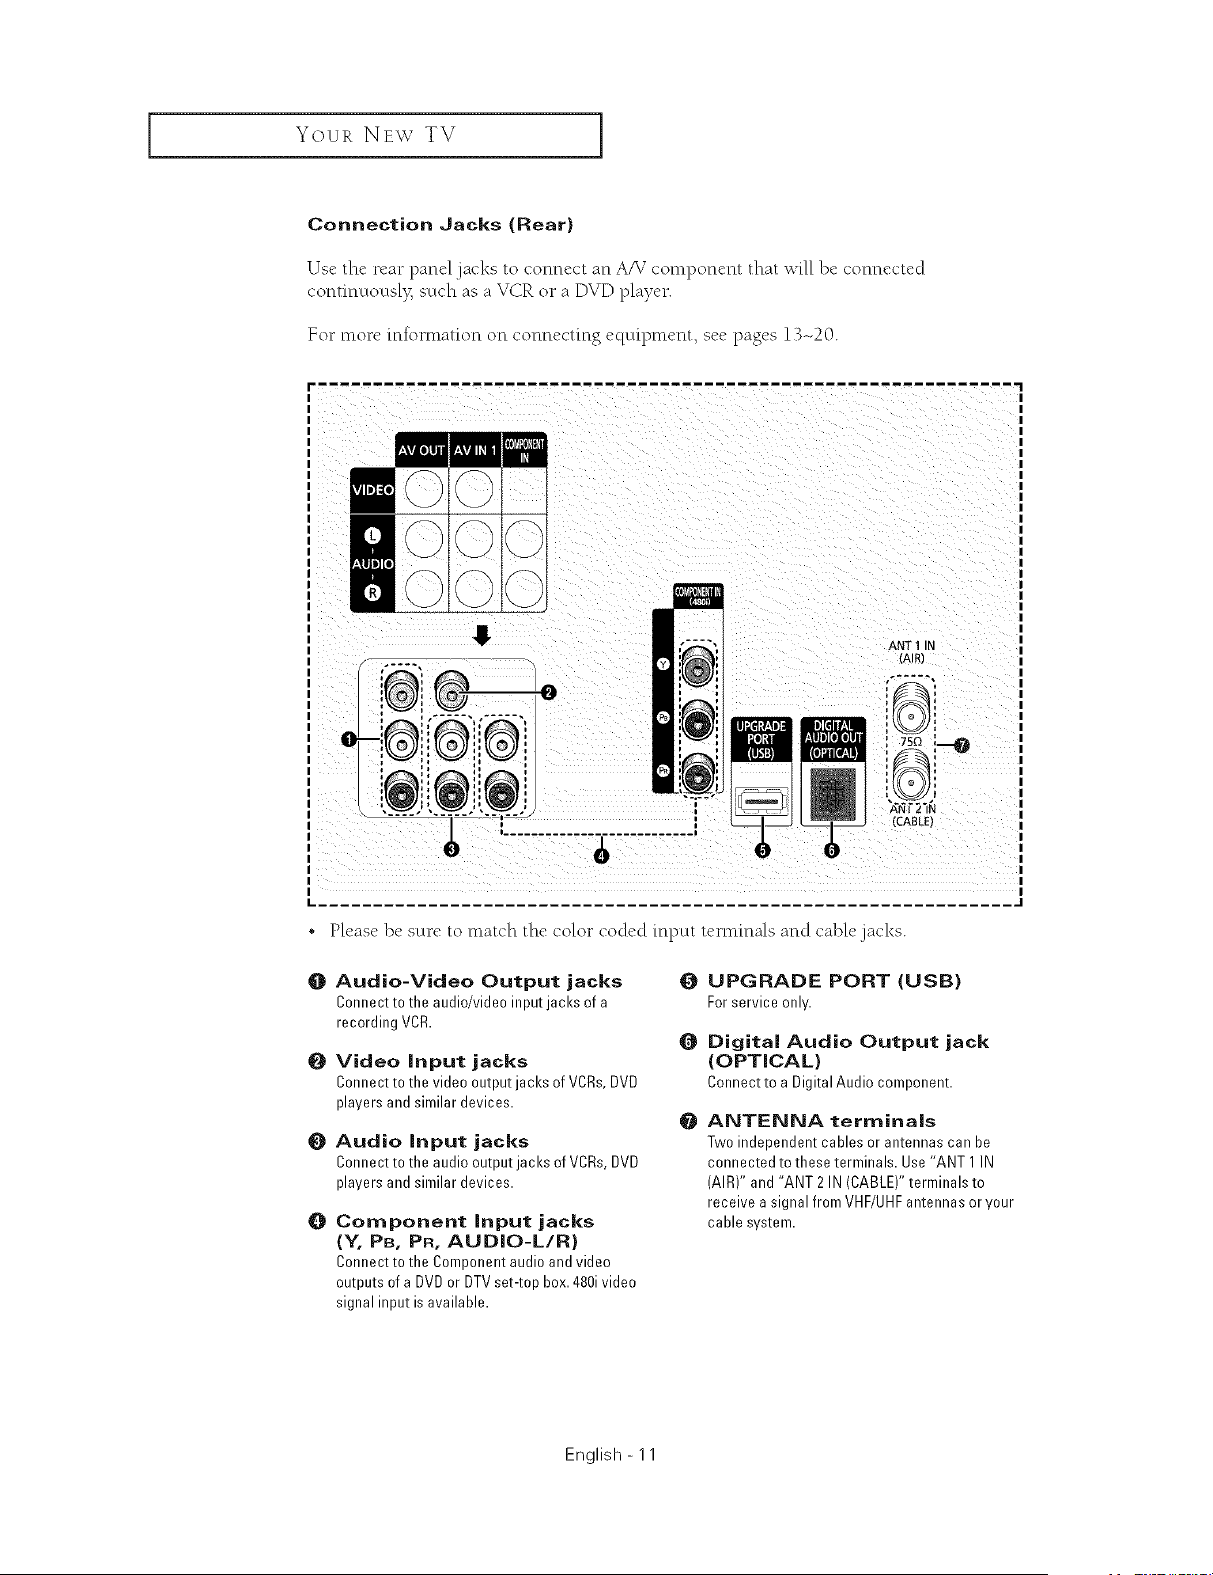
Connection Jacks (Rear)
Us(" the rear panel jacks to connect an A_ 7component that will be connectcd
continuousl> such as a VCR or a DVD player.
For more information on connecting equipment, see pages 13-20.
0
f
, I
i ........................... i
ANT 1 IN
{AIR)
i
i
i
I 1
{CABLE}
• Please be sure to match the color coded input te*-mmals and cable.jacks.
O
O
O
O
Audio-Video Output jacks
Connect to the audio/video input jacks of a
recording VCR.
Video input jacks
Connect to the video output jacks of VCRs, DVD
players and similar devices.
Audio input jacks
Connect to the audio output jacks of VCRs, DVD
players and similar devices.
Component input jacks
(Y, PB, PR, AUDIO-L/R)
Connect to the Component audio and video
outputs of a DVD or DTV set-top box. 480ivideo
signal input is available.
O
Q
@
UPGRADE PORT (USB)
Forserviceonly.
Digital Audio Output jack
(OPTICAL)
Connectto a DigitalAudiocomponent.
ANTENNA terminals
Two independent cables or antennas can be
connected to these terminals. Use"ANT 1 IN
(AIR)" and "ANT 2 IN (CABLE)" terminals to
receive a signal from VHF/UHF antennas or your
cable system.
English - 11
Your NEw TV ]
Remote Control
_\_ctcan use the remote control up to about 23 feet from the T_£When using the remote,
always point it directly at the TX£
• This is a special remote control for the visually impaired, and has Braille points on the
Power, Channel and V{>lun,ebuttons.
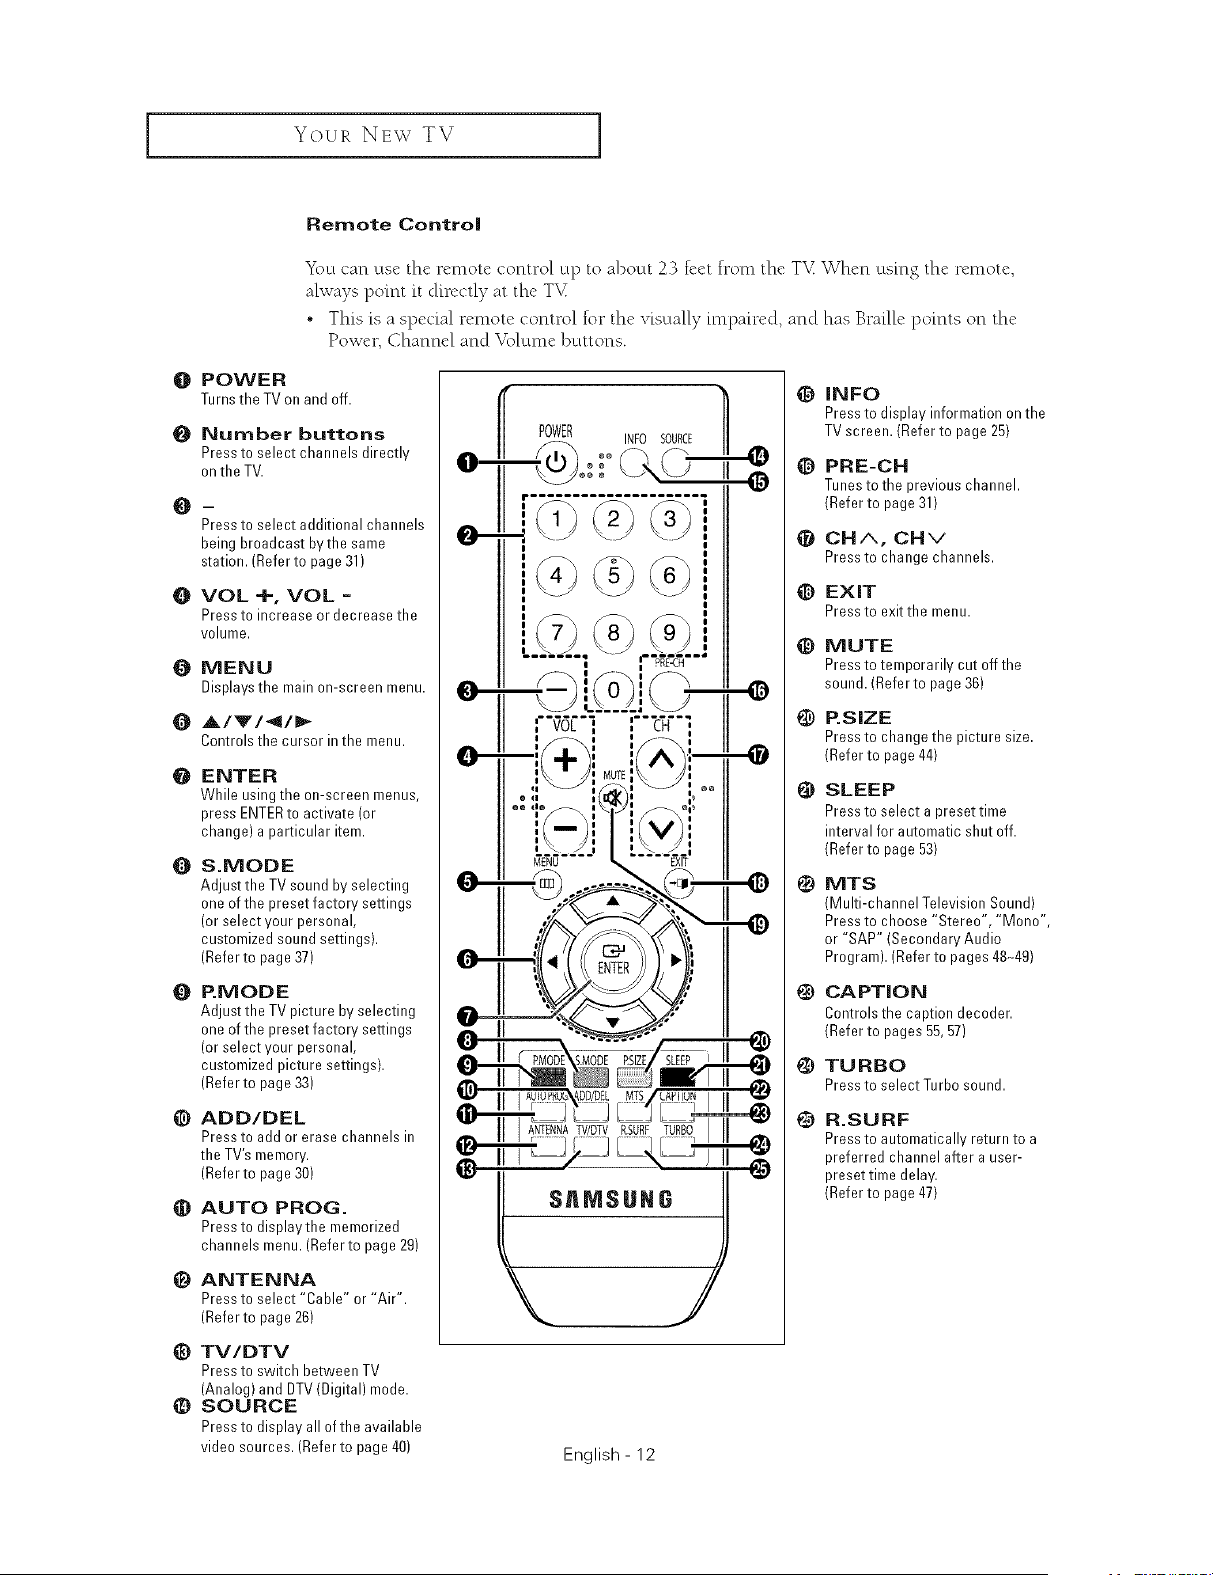
O POWER
TurnstheTVon andoff.
{} Number buttons
Press to select channels directly
on the TV.
m
Press to select additional channels
being broadcast bvthe same
station. (Referto page 31)
O VOL+,VOL=
Press to increase or decrease the
volume.
O MENU
Displays the main on-screen menu.
{) A/'V'/4/_
Controlsthe cursorinthe menu.
@
ENTER
While using the on-screen menus,
press ENTERto activate (or
change) a particular item.
O
&MODE
Adjust the TV sound by selecting
one of the preset factory settings
(or select your personal,
customized sound settings).
(Refer to page 37)
O
EMODE
Adjust the TV picture by selecting
one of the preset factory settings
(or select your personal,
customized picture settings).
(Refer to page 33)
@ ADD/DEL
Press to add or erase channels in
the TV's memory.
(Refer to page 30)
_) AUTO PROG.
Press to displaythe memorized
channels menu. (Referto page 29)
e
ANTENNA
Press to select "Cable" or "Air".
(Refer to page 26)
_) TV/DTV
Press to switch between TV
(Analog} and DTV (Digital) mode.
_) SOURCE
Press to display all of the available
video sources. (Referto page 40)
POWER _ INF0 SOURCE
-@o:: II
English - 12
_]) INFO
Press to display information on the
TV screen. (Refer to page 25)
@ PRE-CH
Tunesto the previous channeh
(Refer to page 31)
CHA, CHv
Press to change channels.
_) EXIT
Press to exit the menu.
_) MUTE
Press to temporarily cut off the
sound. (Refer to page 36)
G
@
@
@
@
P.SIZE
Press to change the picture size.
(Refer to page 44)
SLEEP
Press to select a preset time
interval for automatic shut off.
(Refer to page 53)
MTS
(Multi-channel Television Sound)
Press to choose "Stereo", "Mono",
or "SAP" (Secondary Audio
Program). (Refer to pages 48q9)
CAPTION
Controls the caption decoder.
(Refer to pages 55,57)
TURBO
PresstoselectTurbosound.
R.SURF
Press to automatically return to a
preferred channel after a user-
preset time delay.
(Refer to page 47)
INSTALLATION
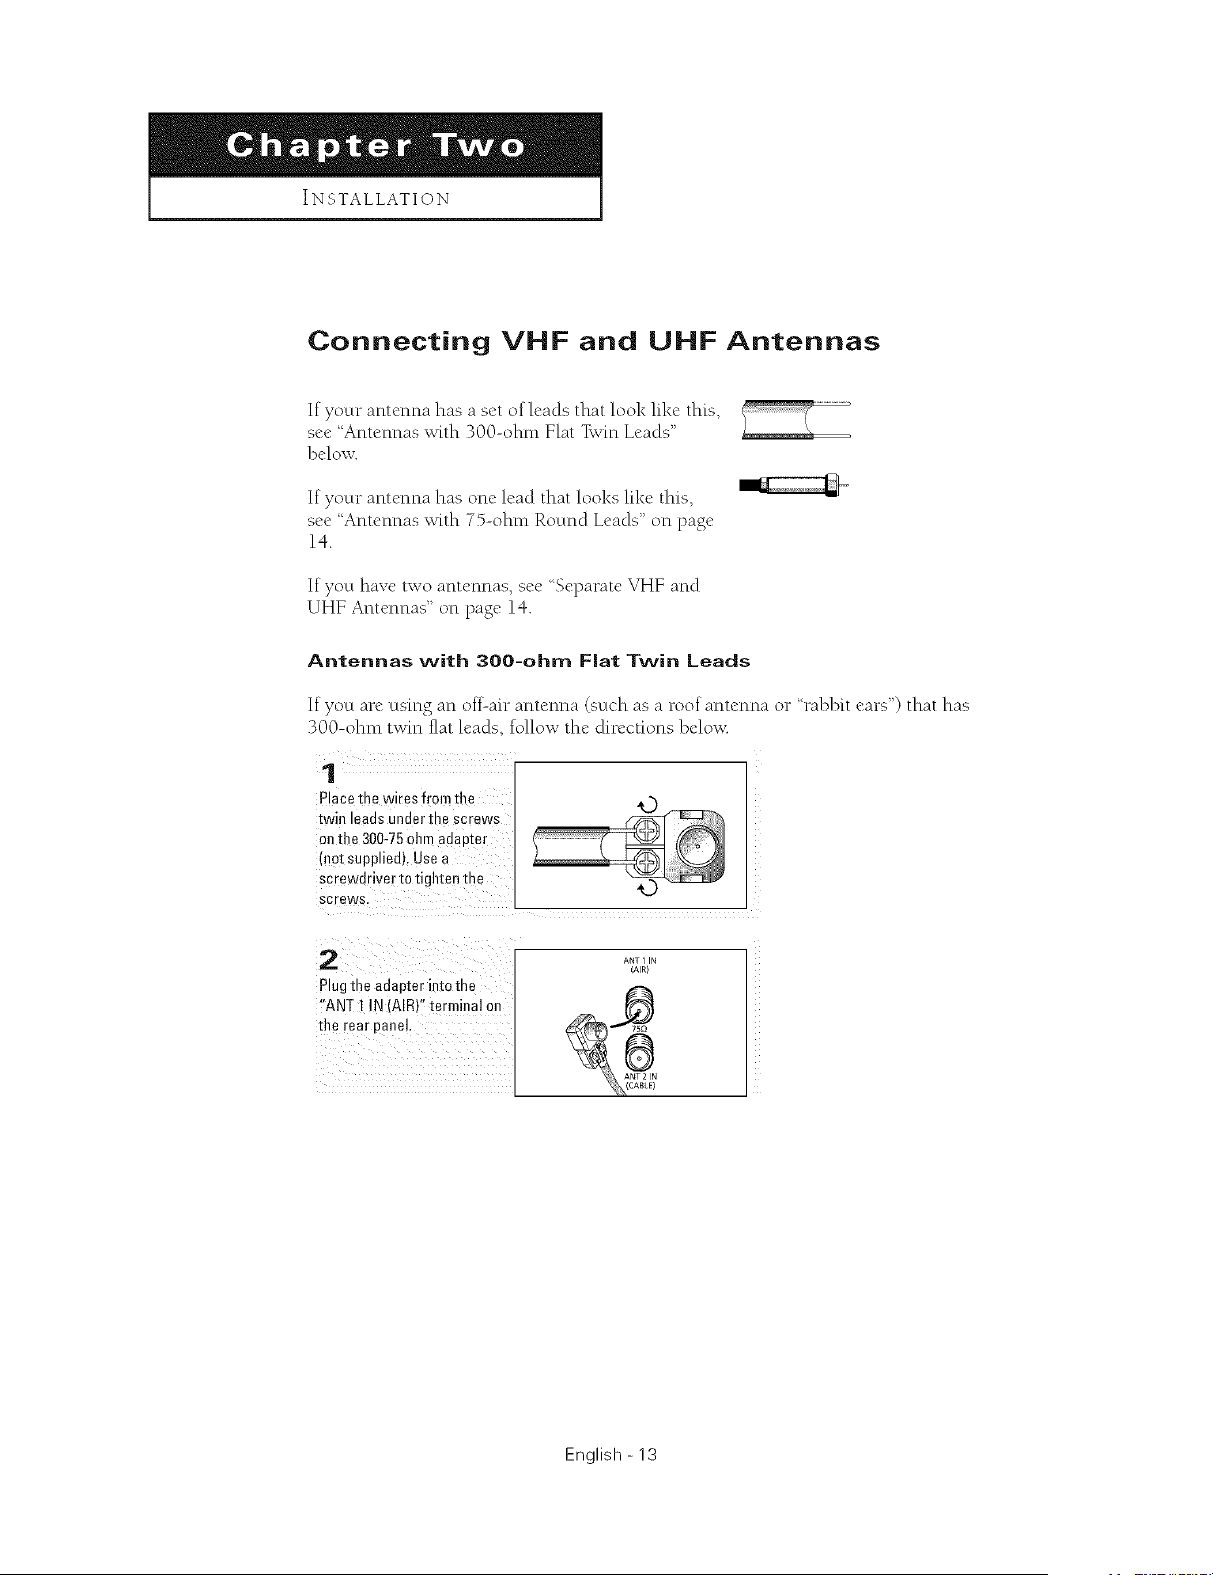
Connecting VHF and UHF Antennas
If your antenna has a set of leads that look like this,
see Antennas with 300-ohm Flat "FwmLeads"
below.
If your antenna has one lead that looks like this,
see 'Antennas with 7%ohm Round Leads" on page
14.
If you have two antennas, see Separate VHF and
UHF Antennas" on page 14.
Antennas with 300-ohm Fiat Twin Leads
If you are using an oil-air antenna (such as a roof antenna or rabblt ears") that has
300-ohm twin fiat leads, follow the directions belov<
1
Placethe wires from the
twin leads under tne screws
on fl-e 300-75oha- aaau_er
mot supplied). Use a
screwdriver to tighten the
screws.
2
Plugthe adapter into the
"ANT I IN (AIR}" terminal on
the rear eaneL
ANT 1 IN
(AIR)
English - 13

INSTALLATION ]
Antennas with 75-ohm Round Leads
1 A/'Z,a_'N ]
Plug the antenna lead into
1
the I"ANT ! !N (AIR)'I terminal
on the rear panel
(CABLQ
Separate VHF and UHF Antennas
If you have two separate antennas for your TV (one VHF and one UHF), you must
combine the two antenna signals before connecting the antennas to the T_ This
procedure requires an optional combine>adapter (available at most electronics shops).
Connect both antenna leads
to the combiner.
2
Plug the Combiner into the
"ANT I IN (AIR}Ifterminal on
the rear #aneL
ANT 2 IN
(CASLn
English - 14
INSTALLATION [
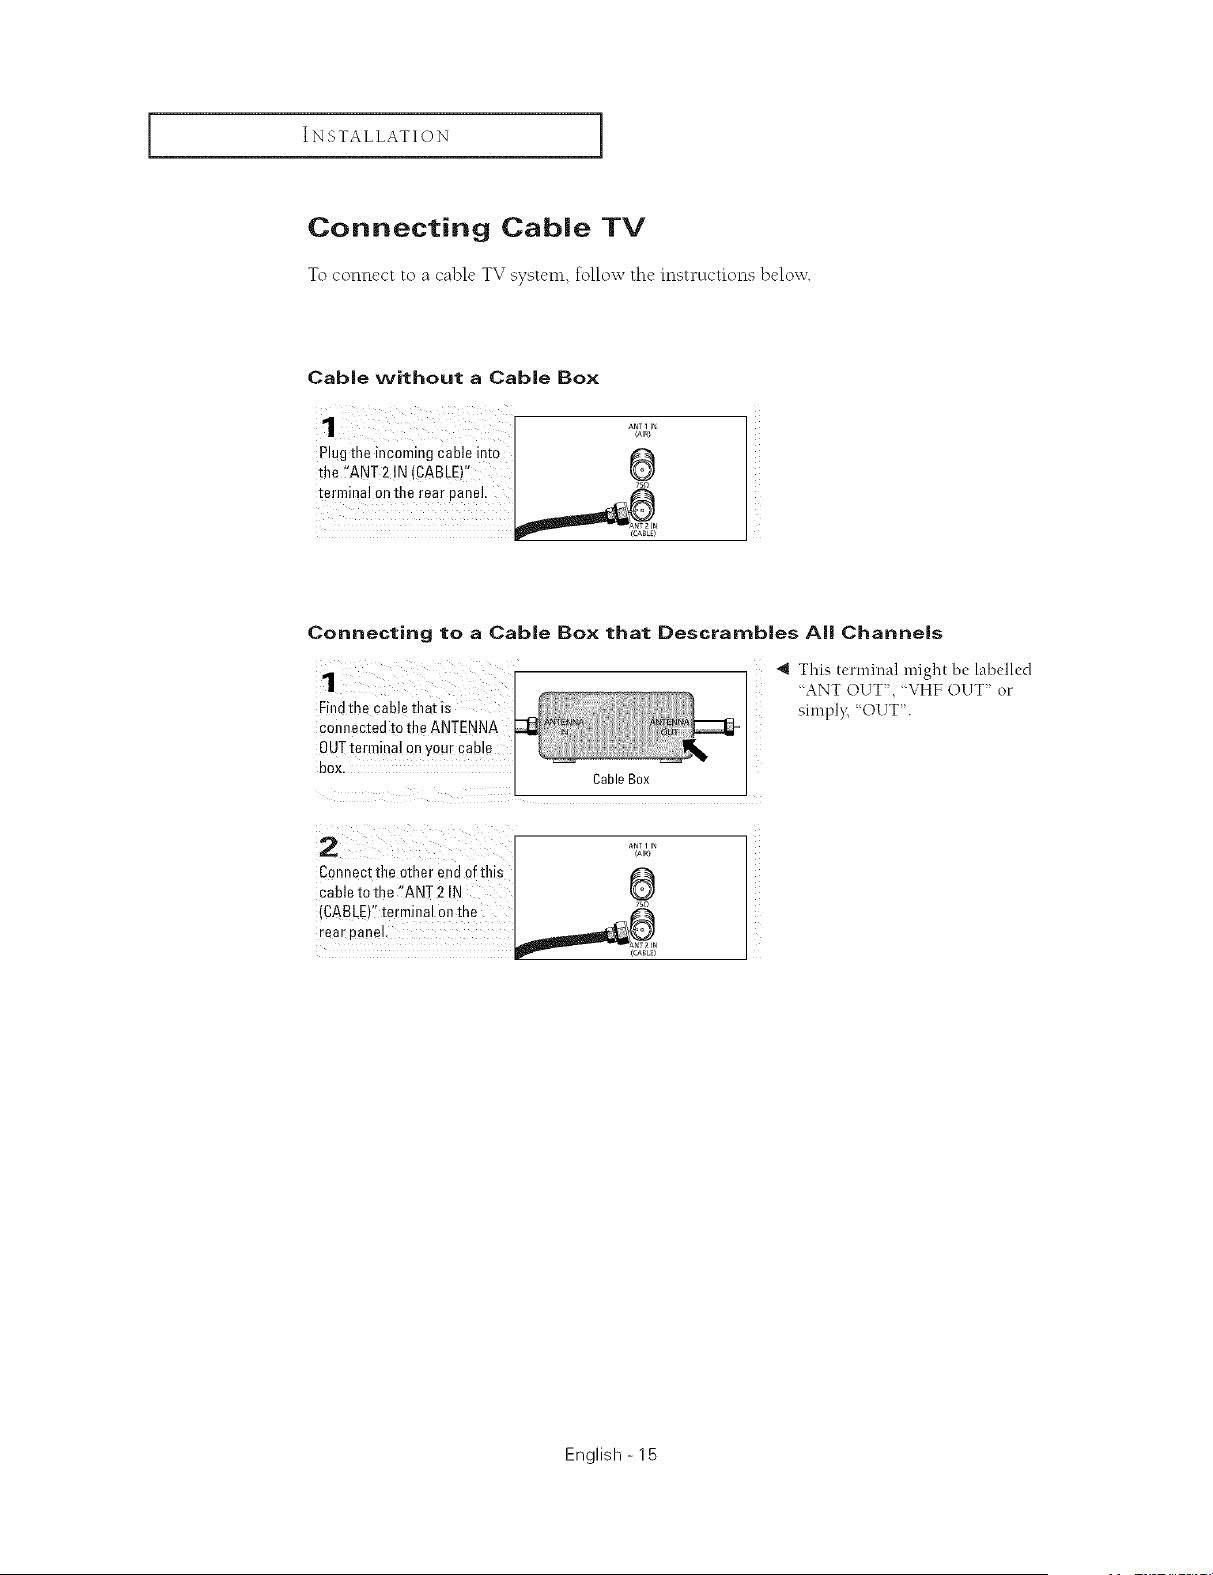
Connecting Cable TV
To connect to a cable TV system, follow thc instructions below.
Cable without a Cable Box
Plug the incoming cable into
the _!ANT2 !N (CABLE)"
terminal onthe rear panel,
Connecting to a Cable Box that Descramb|es Alll Channels
1
Findthe cabl_ that is
connected to the ANTENNA
0UTterminal or your came
BOX
4 This terminal might be labelled
"ANT OUT", 'VHF ()(.IT" or
simply, 'OUT.
Cable Box
_MI
Connect the other end of this
cable to the "ANT 2 IN
{CABLE)" [ermmal on me _°
rear eanel. _1_1_1_ _
English - 15
INSTALLATION ]
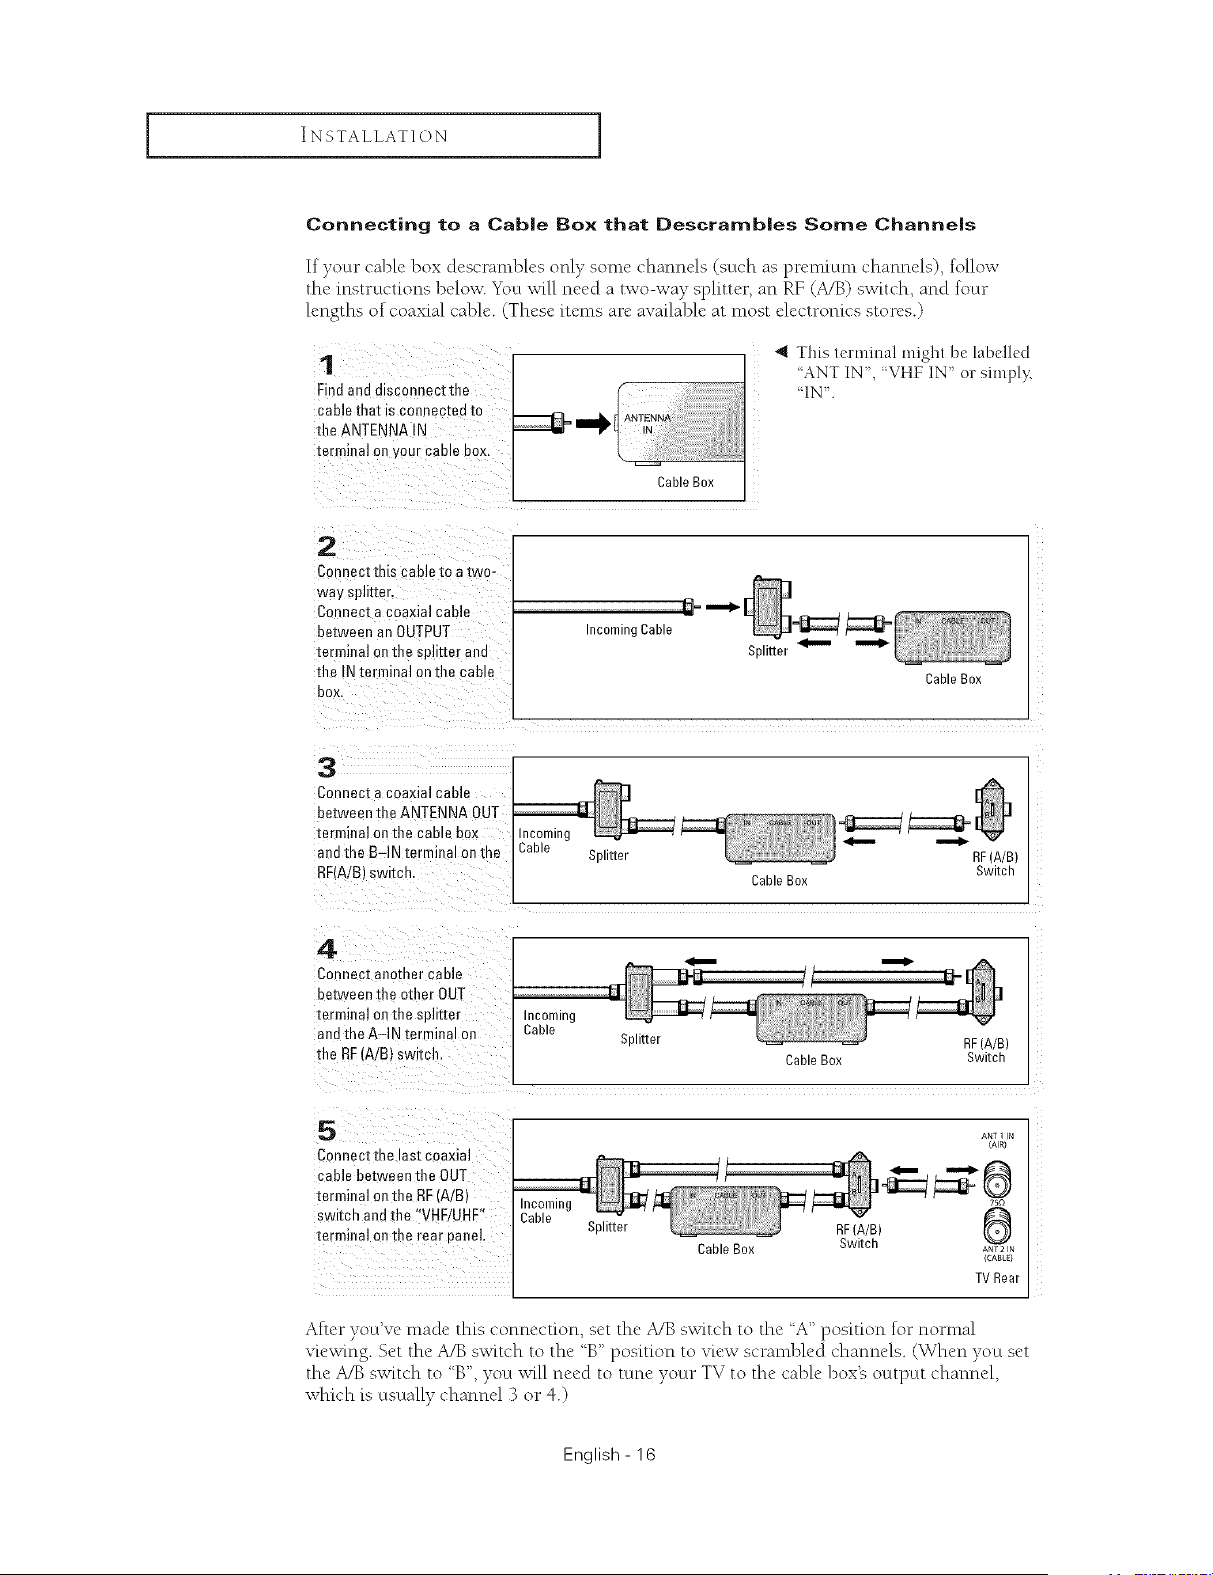
Connecting to a Cab|e Box that Descramb|es Some Channels
If your cable box descrambles only some channels (such as premium channels), follow
the instructions below. You will need a two-way splitter, an RF (A/B) switch, and four
lengths of coaxial cable. (These items are available at most electronics stores.)
1
Find and disconnectthe
cable that is connec_ea to
the ANTENNA IN
terminal on your came BOX.
_1_ ANTENNA
,N
CableBox
4 This terminal might be labelled
'ANT IN,'VHF1N orsimply,
'IN.
2
Connect this cable to a two-
way splitter.
Connect a coaxial cable
between an OUTPUT
terminal on the splitter and
the IN terminal on the cable
box
3
Connect a coaxial cable
between the ANTENNA OUT
terminal ontbe cable box
ane the B-IN tE"minal on the
RRA!B) ewltcn.
Incoming Cable
Splitter
,,_
Cable Box
;able
Splitter
Cable Box
RF(A/B)
Switch
4
Connec] aeomer cable
be.tweenthe other OUT
terminal on the el: tter
and the A-IN terminal oe
the RF (A/B} sw tch.
incoming
Cable
Splitter
RF (A/B)
Cable Box Switch
ANT 1 N
ConnectthE ast coaxial
cable between the OUT
terminal on the RF'A/B} incoming
switch and the 'VHF/UHF" Cable
terminal on the rear panel Splitter RF(A/B)
CableBox Switch A_2 N
(CABLe}
TVRear
After you've made this connection, set the A/B switch to the A" position lotnomml
viewing. Set the A/B switch to the 'B" position to view scrambled channels. (When you set
the A/B switch to 'B", you will need to tune your TV to the cable box% octtput channel,
which is usually channel 3 or 4.)
English - 16
INSTALLATION [
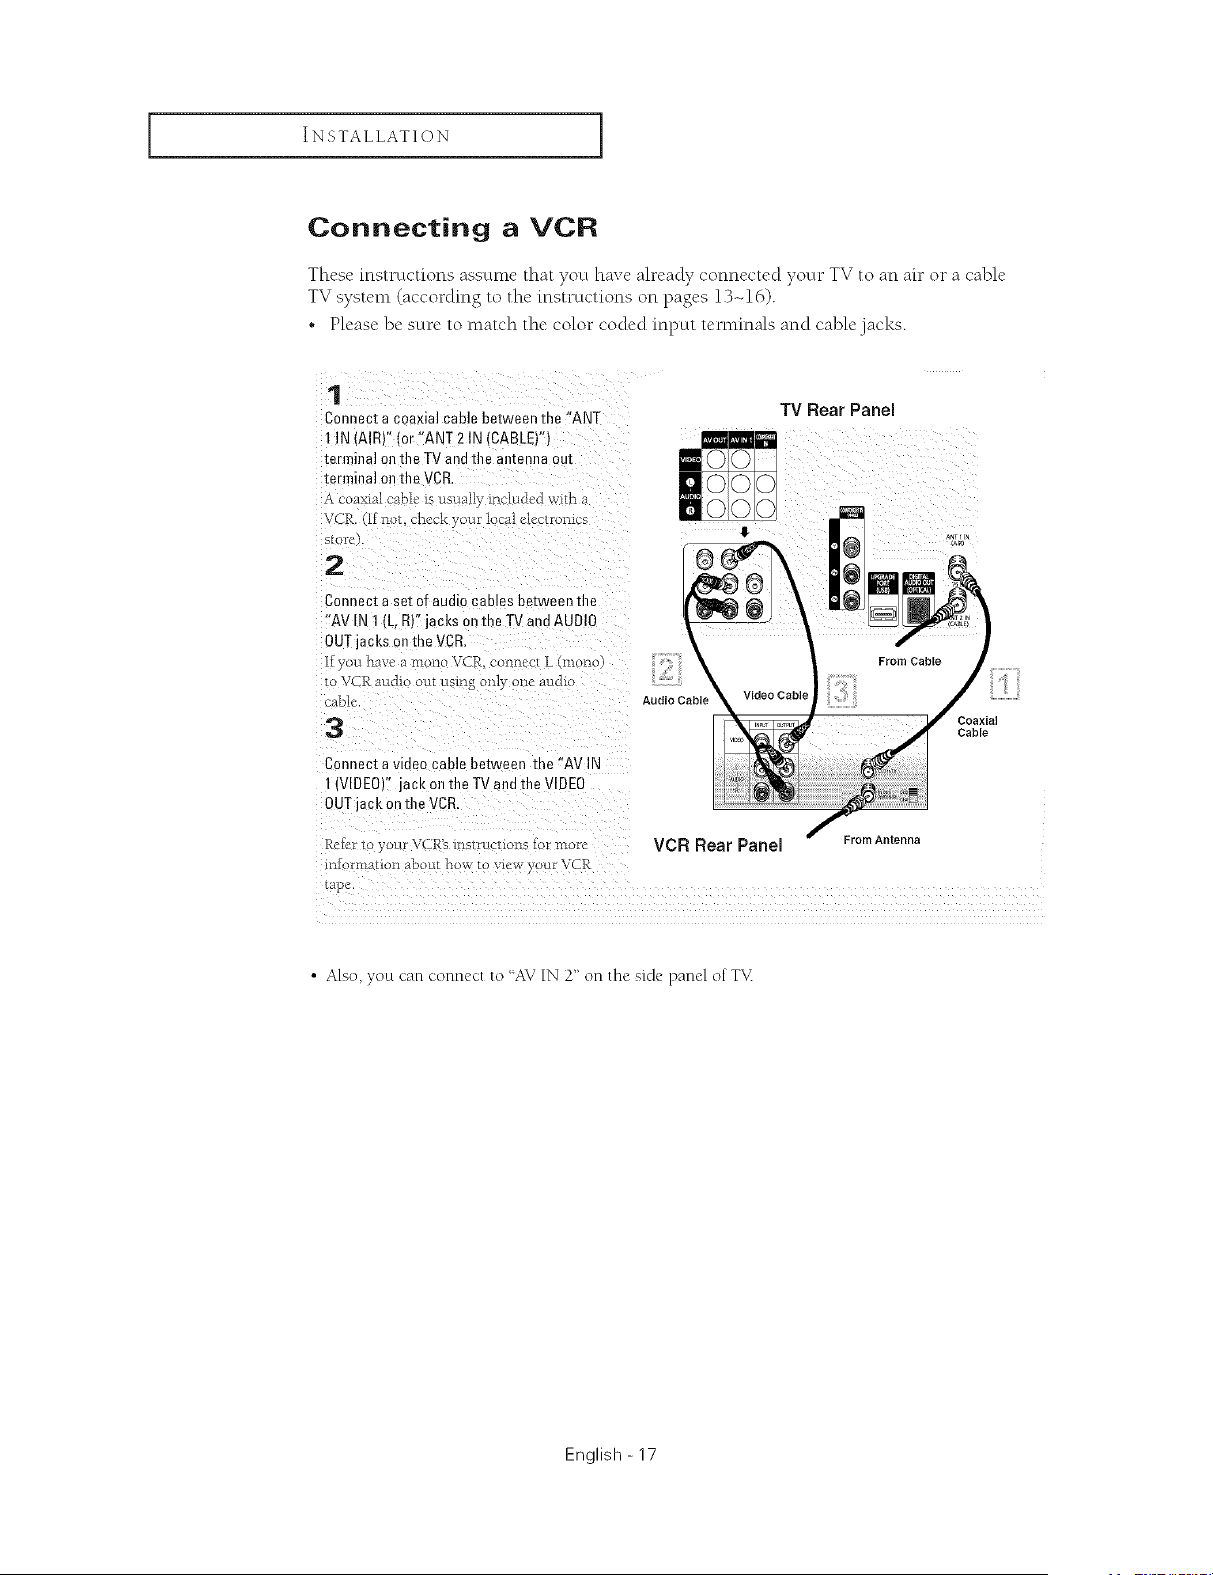
Connecting a VCR
These instructions assume that you have already connected your TV to an ah" or a cable
TV system (according to the instructions on pages 13-16).
• Please be sure to match the color coded input tet-minals and cable jacks.
1
Connect a coaxial cable between the "ANT
1 IN (AIRV lor "ANT 2 IN (CABLE)")
terminal ell the TV and the antenna out
terminal on the VCR
,_ _oa>ual cable' is usually inc-lu&,d wid_
V( R [1 llot, cl_eckyour I cai ele 2[foillus
s[ofo
2
Connect a set of audm cames between the
"AV IN t (L. R)" jacks on the T_/and AUDIO
OUTjacks on the VCR.
fyou haw, a molto VCR. col_nc,ct L (mono
1o VCR attdio out using only one audk
-able
3
Connect a video cable between the "AV IN
I {VIDEO)" jack on the TV and the VIDEO
OUTjack on the VCR,
Audio Cable
TV Rear Panel
From Cable
Coaxia
Cable
Rcler t your VCR'< lns/ruclLons 1or i',aore VCR Rear Panel From Antenna
i*_f rmafion abou_ how m wew, our VCR
lap_,
• Also, yoLtcan connect to "AV IN 2" on the side panel of T_<
English - 17
INSTALLATION ]
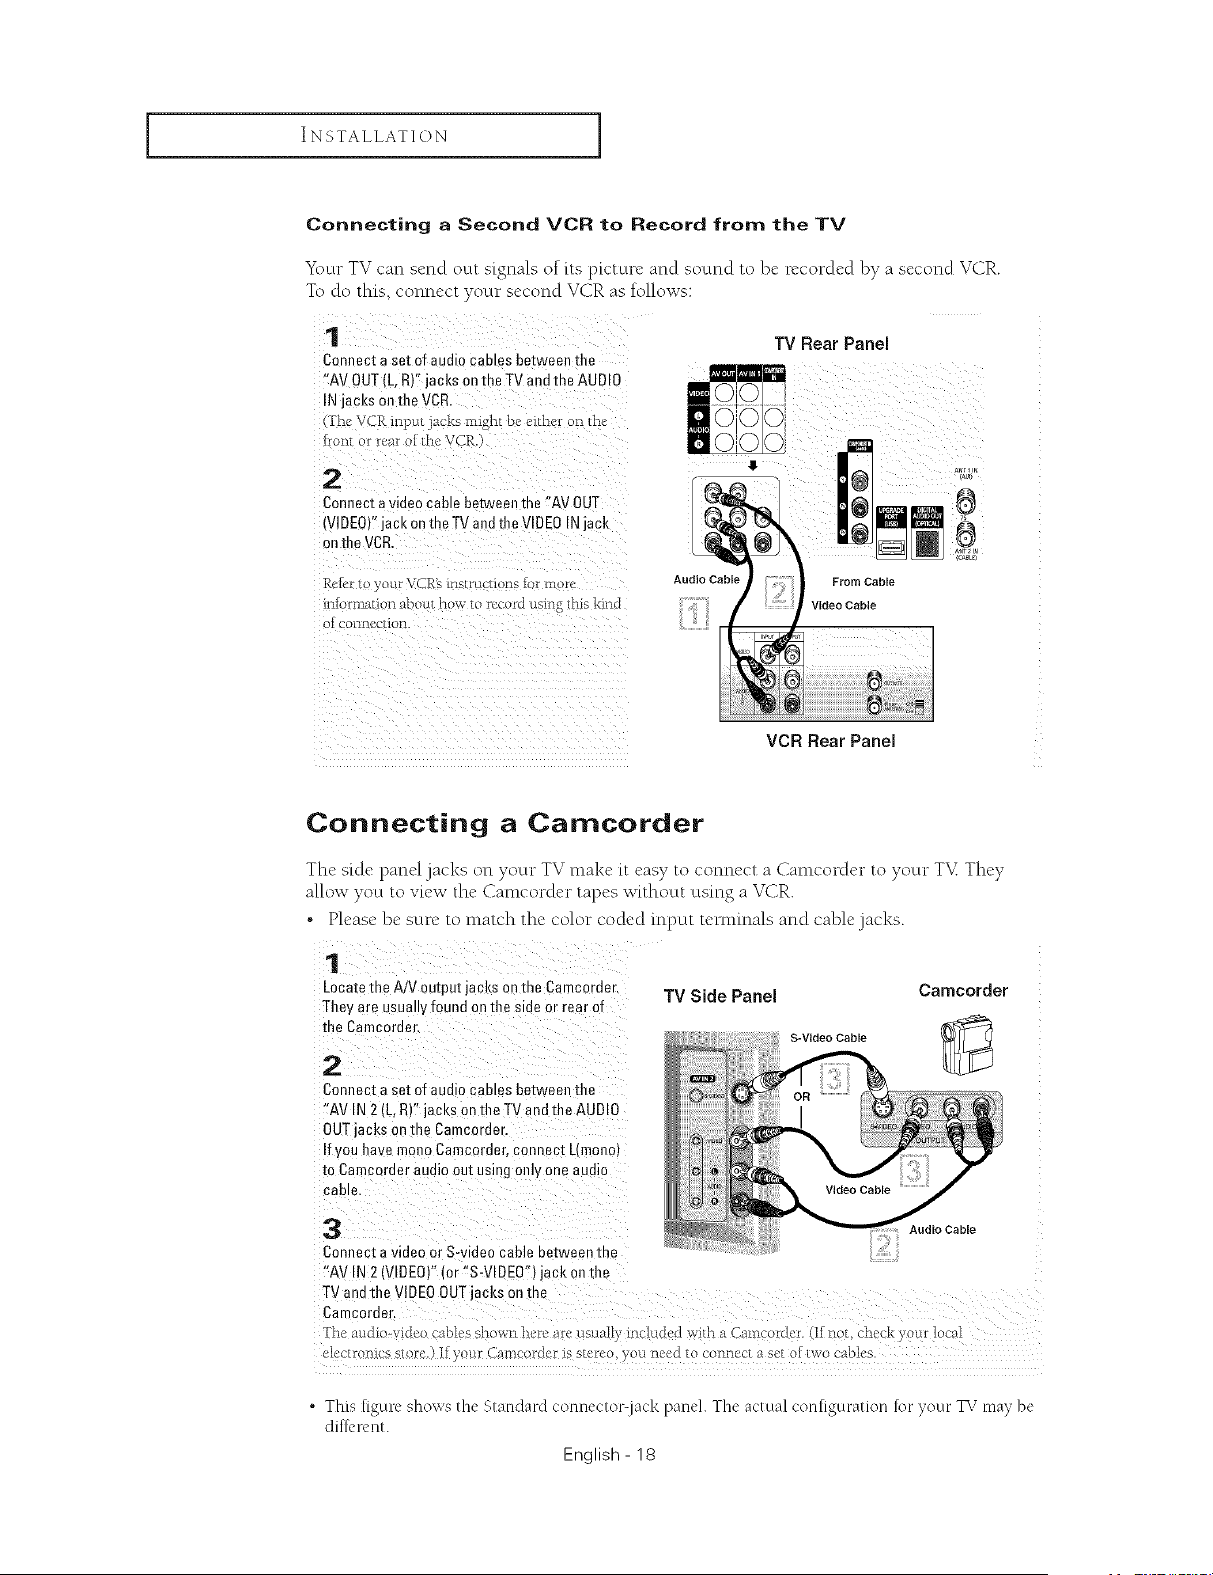
Connecting a Second VCR to Record from the TV
7
Y\ ur T_ can send octt signals of its picture and sound to be recorded by a second VCR.
To do this, connect your second VCR as follows:
1
Connect a set of audio cames between the
"AV OUT (L, R)" jacks on the TV and the AUDIO
IN jacks on the VCR.
The VCR inpu_ a ks might be, c.ither on t[_"
front or rear ot 1he Vale
2
Connect a video cable betwee" the "AV OUT
(VIDEO)"jack on the TV and the VIDEO IN jack
on the VCR
Rel_,rto your VCR'sinstru uons 1ormoru
iniormati_n about how to record usil_g this kind
OI COI_[]CU/IOll.
TV Rear Panel
Fr
ii
Audio Cable
From Cable
Video Cable
VCR Rear Panel
a_, i la
8
aN_
,C_LE
Connecting a Camcorder
The"skle panel jacks on your TV make {t easy to connect a Camcorder to your T%%They
allow you to view the Camcorder tapes without using a VCR.
• Please be sure to match the color coded input tet-minals and cable jacks.
Locatethe AiV output jacks on the Camcordec
They are usually found on the side or rear of
Connect a set of audio cables between the
"AV IN 2 (L, R)" jacks on tile TV end the AUD !O
OUTjacks o0the Camcerder.
If you have men0 Camcorder, connect L(mono)
to Camcerder audio out using only one audio
Cable.
Connect a video or S-video cable between the
"AV IN 2 (VIDEO)" (or %-VlDEW) jack on the
TV Side Panel
S-Video Cable
Camoorder
Audio Cable
electronl{e store.) !.Fyour Cameorder is stereo, )ou need to connect a set or two cables.
• This [igure shows the Standard connector lack paneh The actual con[iguration rot your TV ma) be
dil:l_'renl.
English - 18
INSTALLATION [
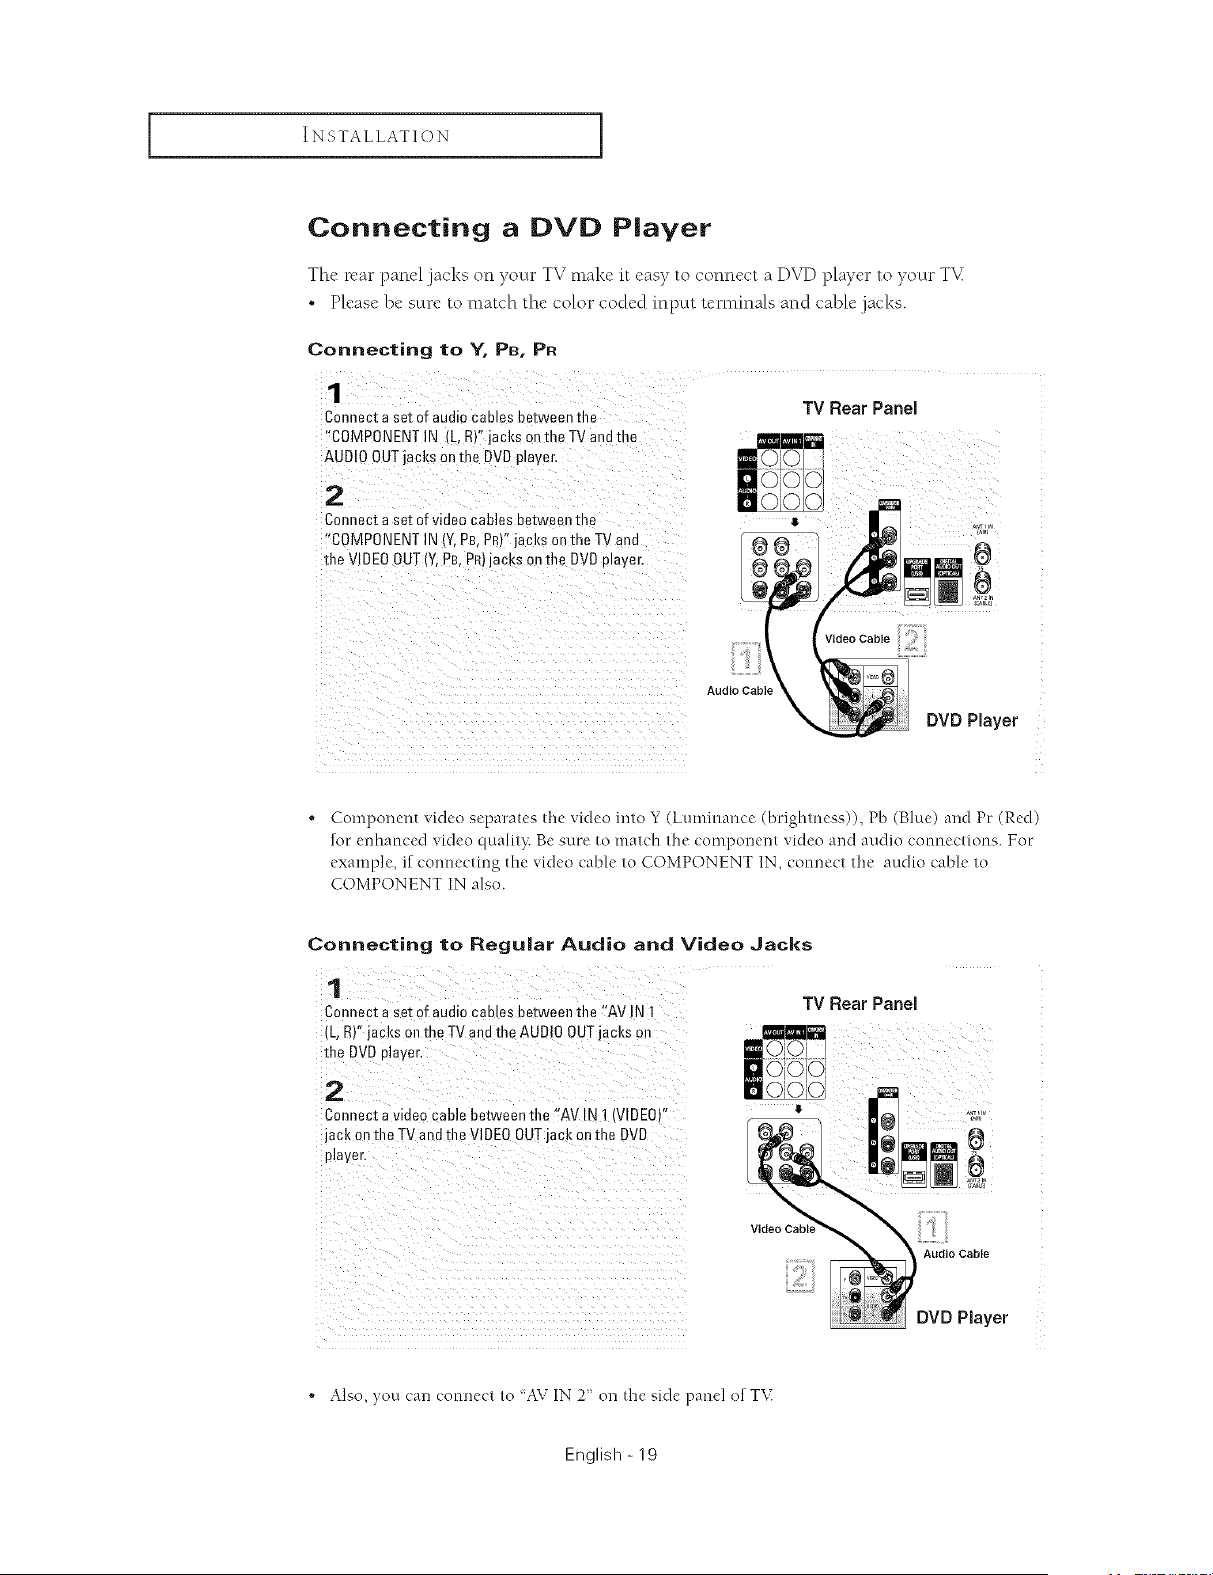
Connecting a DVD Player
The rear panel jacks on your TV make it easy to connect a D_vq)player to your T_<
• Please be sure to match the color coded input terminals and cable .jacks.
Connecting to Y, PB, PR
1
Connecta set of audiocablesbetweenthe
"COMPONENTIN (L,R)"jacksonthe TVandthe
AUDIOOUTjacksonme DVDplayer,
2
Connecta set ofvideo canes betweenme
"COMPONENTIN IY.P£,PR'"jacks onthe TVand
the VIDEOOUT(Y,PB,PR)jacksonthe E)VDplayer,
TV Rear Panel
V,de0CableCi
Audio CabR
DVD Player
. Component video separates the video into Y (Luminance (bdghmess)), Pb (Blue) and Pc (Red)
fur enhanced video quali_}: Be sure to match the component video and audio connections. For
example, if connecting the video cable to COMPONENT IN, connect It_e audio cable to
COMPONENT IN also.
Connecting to Regular Audio and Video Jacks
Connect a set of audio cables between the eAV !N 1
(L;R)" jacks 0n the TV and the AUD!O OUT acks on
the DVD player,
Connect a video cable between the !!AV IN 1 (VIDEO)"
jack on the TV and file V!DEOOUTjack on the DVD
TV Rear Panel
_ _i i ii_ ii_i_i_iiii_i_i_i_i_i_i_i_i_i_i_i_i_i_i_i_i_
1711ii i iili _ _ _ _ _ _ _ _ _ _ _ _ _ _ _ _ _ _ _ _ _ _ _
Video CabLe
Audio Cable
DVD Player
• Also, you can connect to 'AV IN 2' on the side panel of T\(
English - 19
INSTALLATION ]
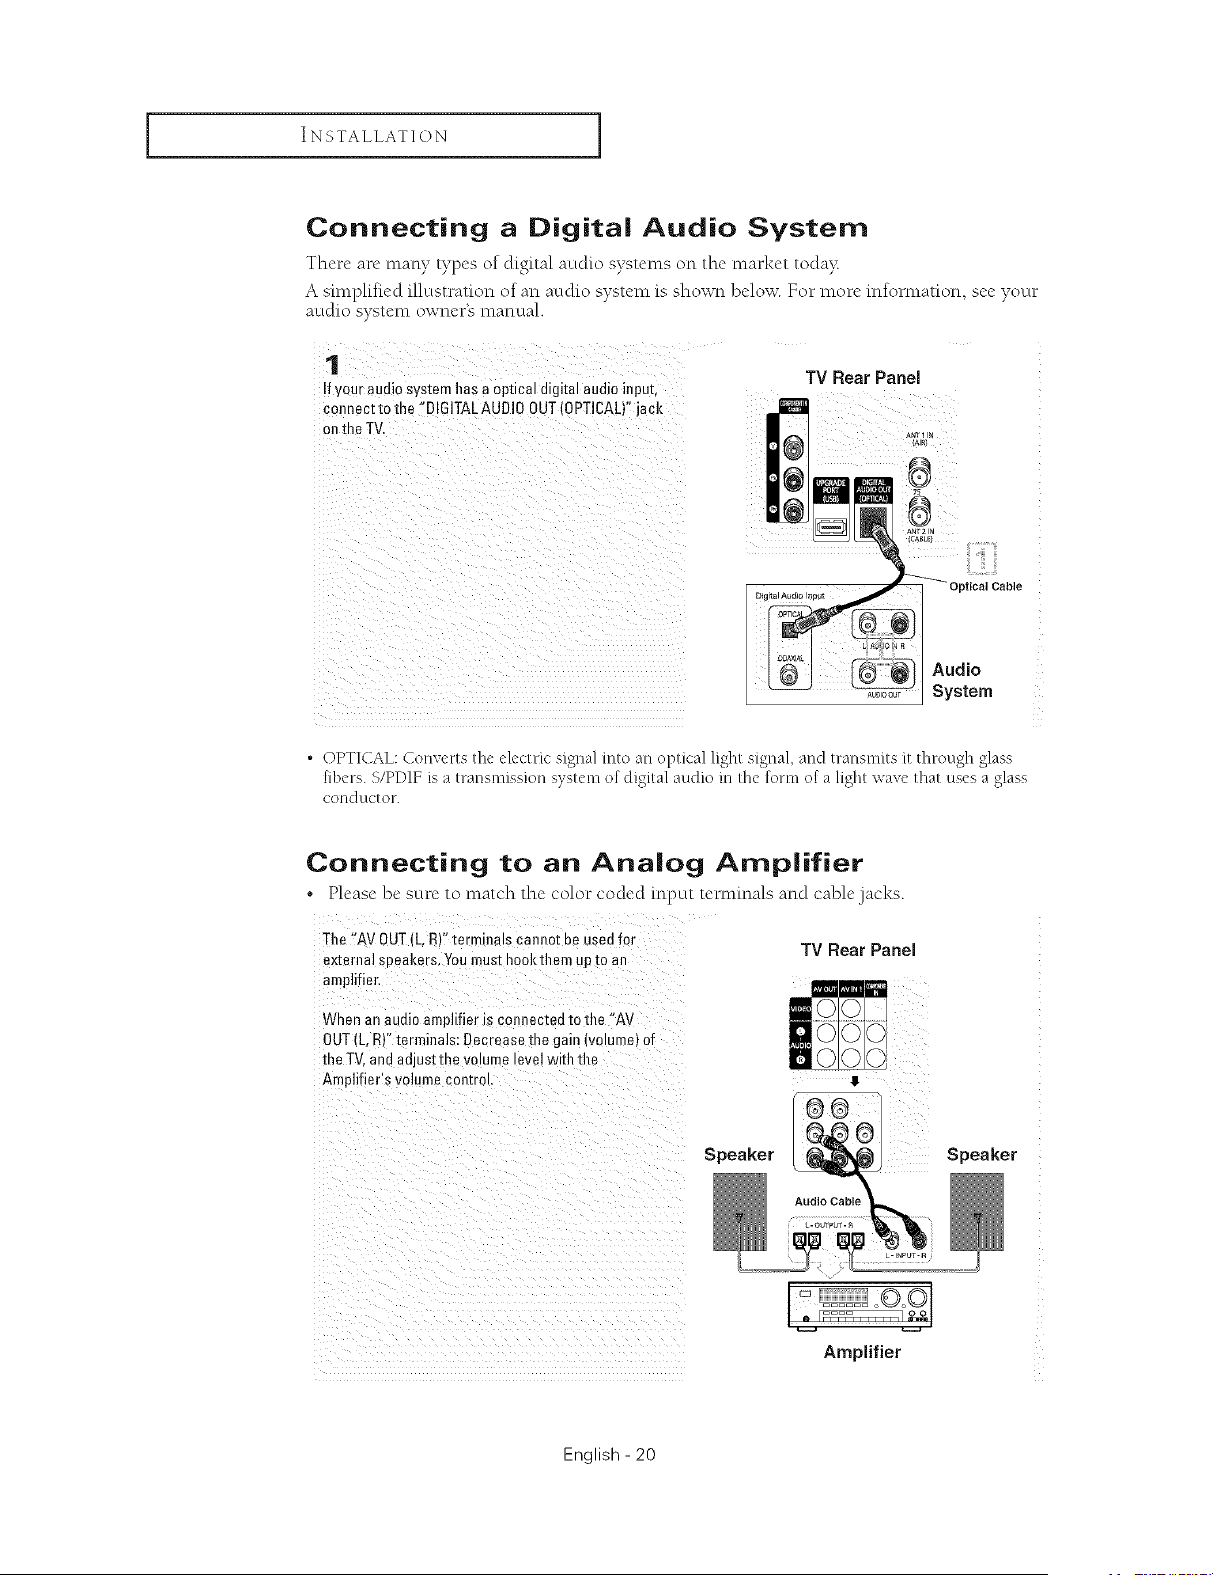
Connecting a Digital Audio System
Thcre arc many types/)f digital audh) systems/m the market t/)da)_
A sm_plifk.d illustrati/m/)f an audio system is shown below. For more infomlation, see your
audio system owner's manual.
TV Rear Panel
!f youraudiosystemhas aoptical digitalaudioinput,
¢0nnect to the ::BI61TALAUDI00UT(0PT!CAL)"jack
ICABLF}
Digital Audao In_u_ Optical Cable
_ System
. OPTICAL: Converts the electric signal into an optical light signal, and transmits g:through glass
fibers. S/PDIF is a transmission system o[ digital aucl[o in lhe 1:o1"1llof a light wave lhat uses a glass
COLIC] gtC[ O1".
Connecting to an Analog Amplifier
* Please be sure to match the color coded input tet-minals and cable jacks.
The "AV OUT (L, R)" terminals cannot be used for
external seeakers. Youmust hookthem up [o an
amplifier,
When an audio amplifier is comlectea to the "AV
OUT [L. RY'terminals: Decrease the gain (volume] of
the TV.and adjust the volume level with the
Amplifier's volume control
TV Rear Panel
Speaker Speaker
i i
Amplifier
English - 20
INSTALLATION [
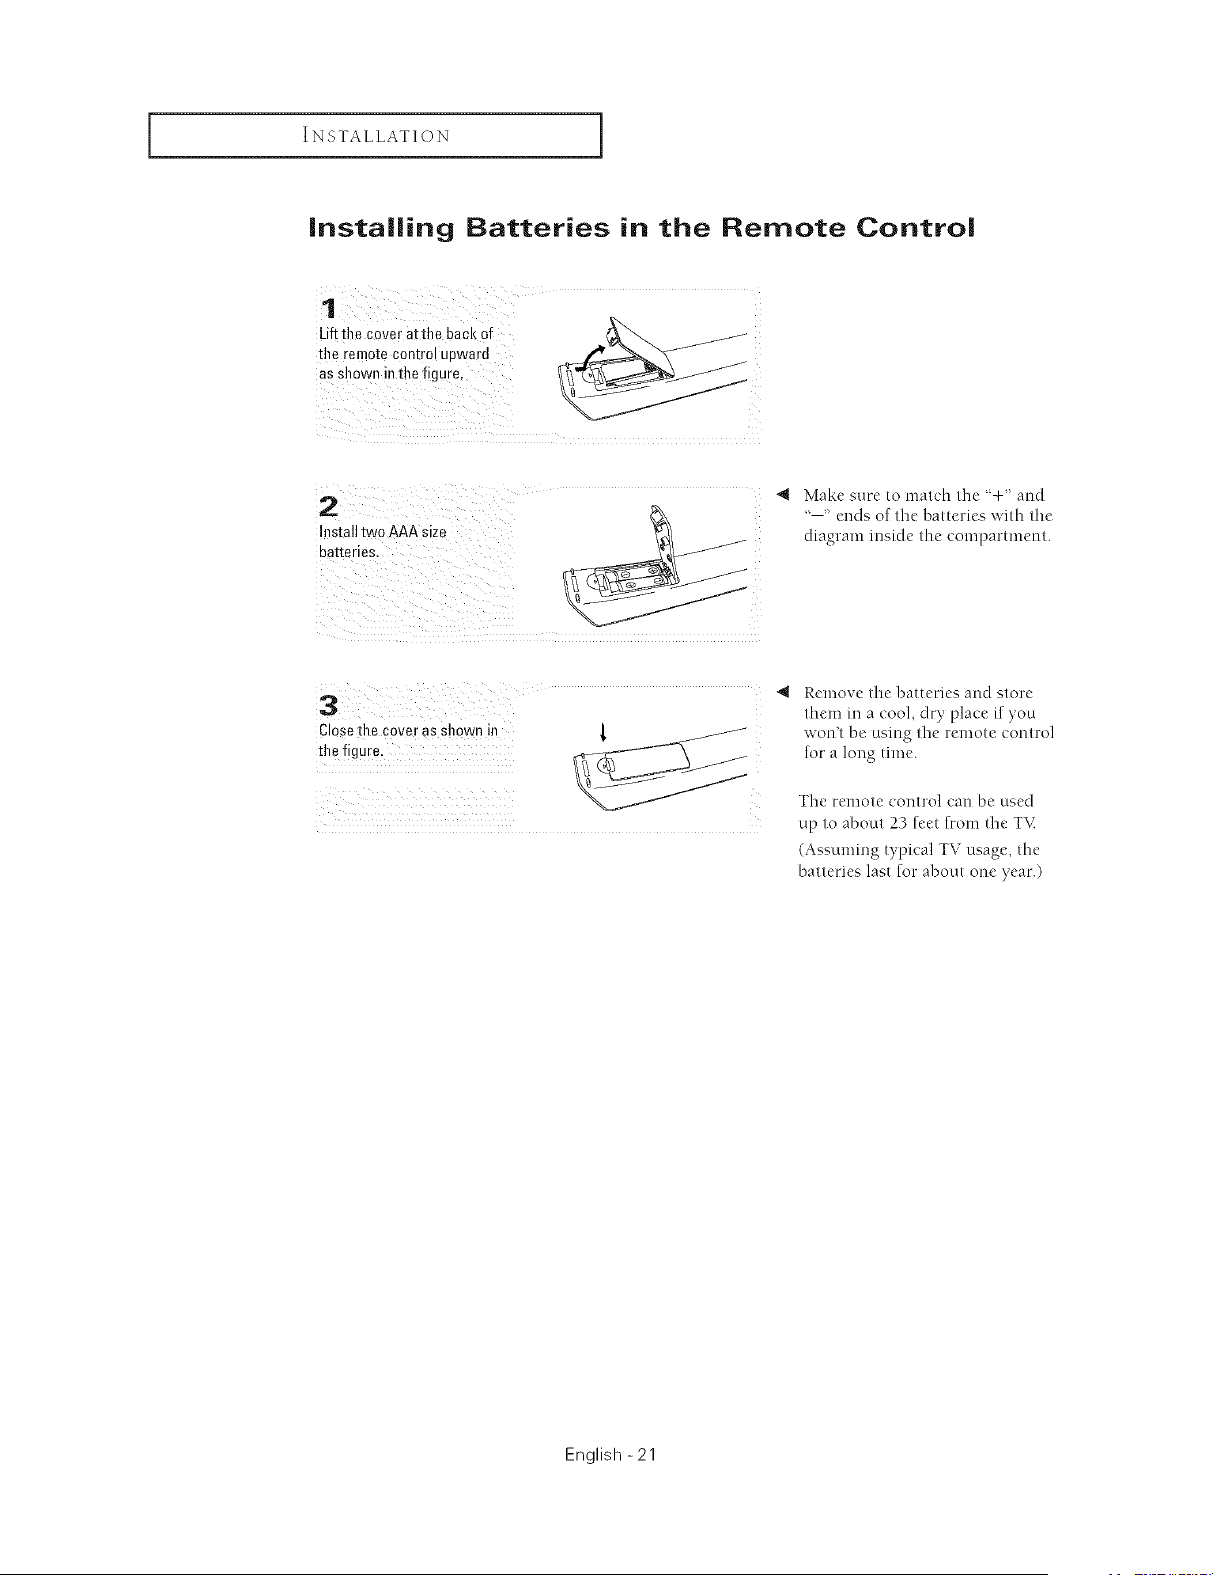
installing Batteries in the Remote Control
1
Uf**hecoveratth0backof
*he remotecontrolupward
asshowninthe figure,
2 , Makesur_'tomat,'ht'l_:÷' aud
'--' ends of tile batteries with tile
Installtwo AAA size diagram inside fine compartment.
batteries,
4 Remove tile batteries auclstore
them in a _ool, dry place if you
Close tile cover as shown in { /
the figure,
won't be using tile ]'emote control
for a long time.
Tile remote control can be used
up to about 23 feet from tile TV
(Assuming typical TV usage, the
batteries last for about one year.)
English -21
OPERATION
Turning the TV On and Off
Press the POWER button on the remote control.
You can a!s0 use the POWER button on the front pane!.
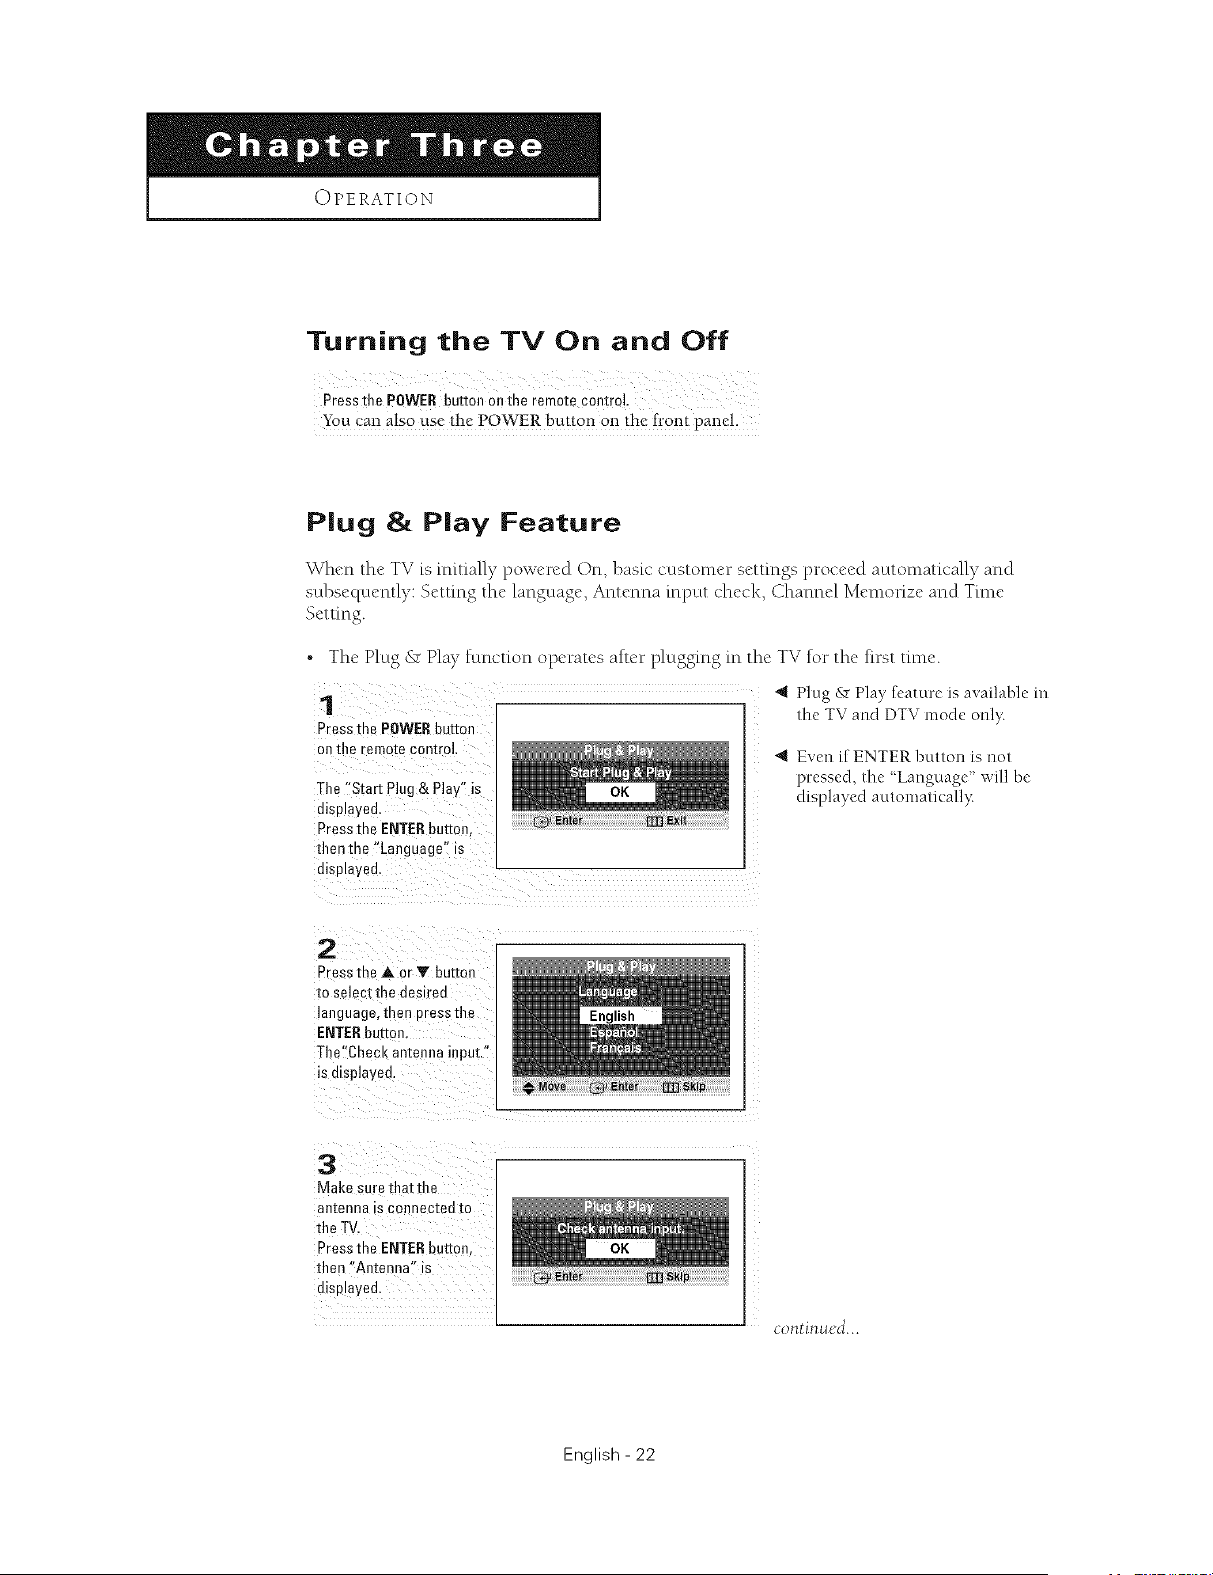
P|ug & P|ay Feature
When the TV is initially powered On, basiccustomer settings proceed automatically and
subsequently: Setting the language, Antenna input check, Channel Memorize and Tm_e
Setting.
• The Plug & Play function operates alter plugging in the TV for the first time.
1
Press me POWERbutton
on the remote control
The "Start Plug & Play" is
disulayed.
Press the ENTERbutton.
then the "Language" is
displayed.
4 Plug & Play feature is available in
the TV and DTV mode only.
"_ Even if ENTER button is not
p_:essed, the _Language" will be
displayed automatk ally:
2
Press the A or Y button
to select the desired
language, then Dressthe
ENTERbutton
The'Chec _ antenna input."
is c splayed.
3
Make sure that the
an[enna is connecl:ed to
the TV.
Press the ENTERbutton.
then "Antenna" is
displayed.
continued...
English - 22
OPERATION I
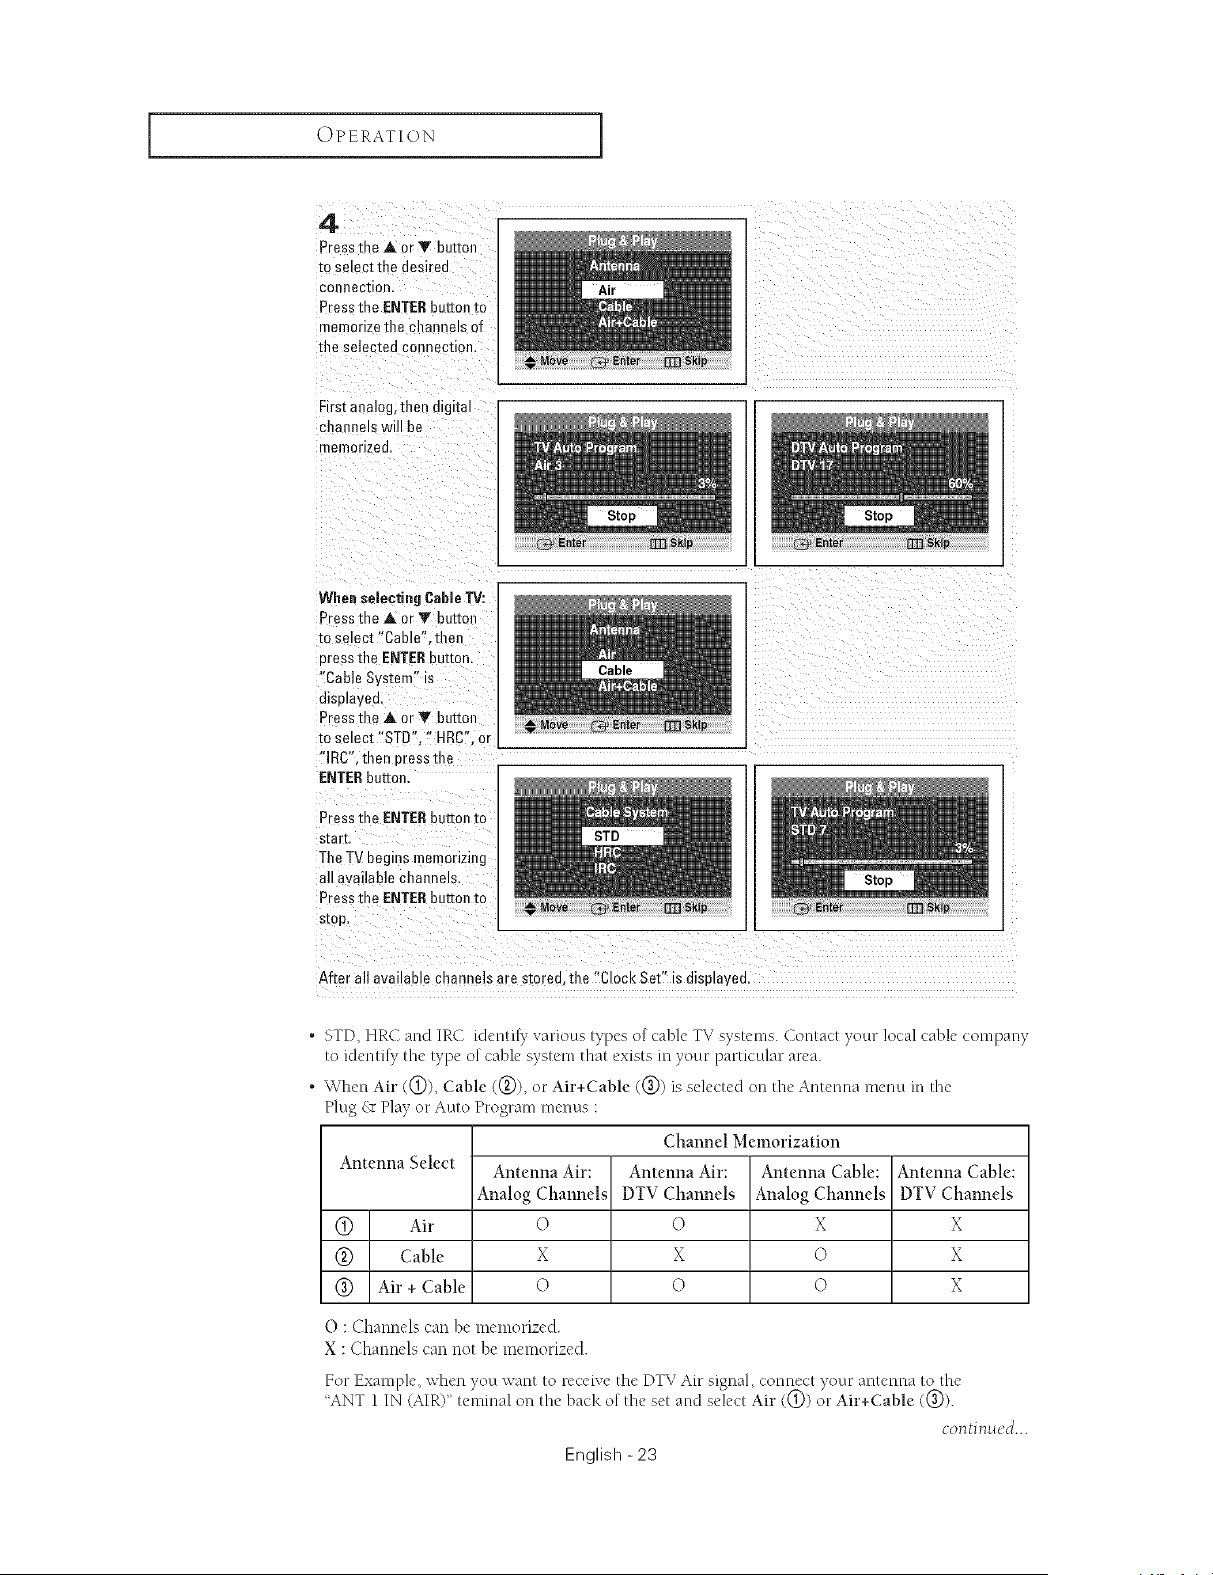
4
Press [r .=_ or Y buttor
to select tl" _=desired
conlleclion,
Press the ENTERbutton to
memorize the channels of
tile selected connection
First analog, then digital
channels will be
memorized.
When selecting Cable TV:
Press the A or "_' Bettor
to select "Cable". ther
cress the ENTERbuEon.
"Cable System" is
displaved
Press me A or Y bettor
to select "STD". " HRC". or
"]RC". men 3ress the
ENTER button.
Press the ENTERbutton to
start.
TheTV beg usmemorizing
all available channels.
Press the ENTERbutton to
stop.
After all available channels are smree.the "Clock Set" is dispmvea.
• STD, HRC and IRC identily various types of cable TV systems. Contact your local cable company
to identfly the type of cable system that exists m your particular area.
, When Air (@), Cable ((_)), or Air+Cable ((_)) is selected on the Antenna menu in the
Plug _ Play or Auto Program menus :
Channel Memorization
Antenna Select Antenna Air: Antenna Air: Antenna Cable: Antenna Cable:
Analog Channels DTV Channels Analog Channels DTV Channels
@ Air 0 0 X X
(_) Cable X X O X
@ Air + Cable O O O X
O : Channels can be memorized.
X : Channels can not be memorized.
For Example, when ),outwant to receive the DTV Air signal, connect your antenna to the
"ANT 1 IN (AIR)" teminal on the bac!<o[ the set and select Air ((_)) o" Air+Cable (0)
continued...
English -23
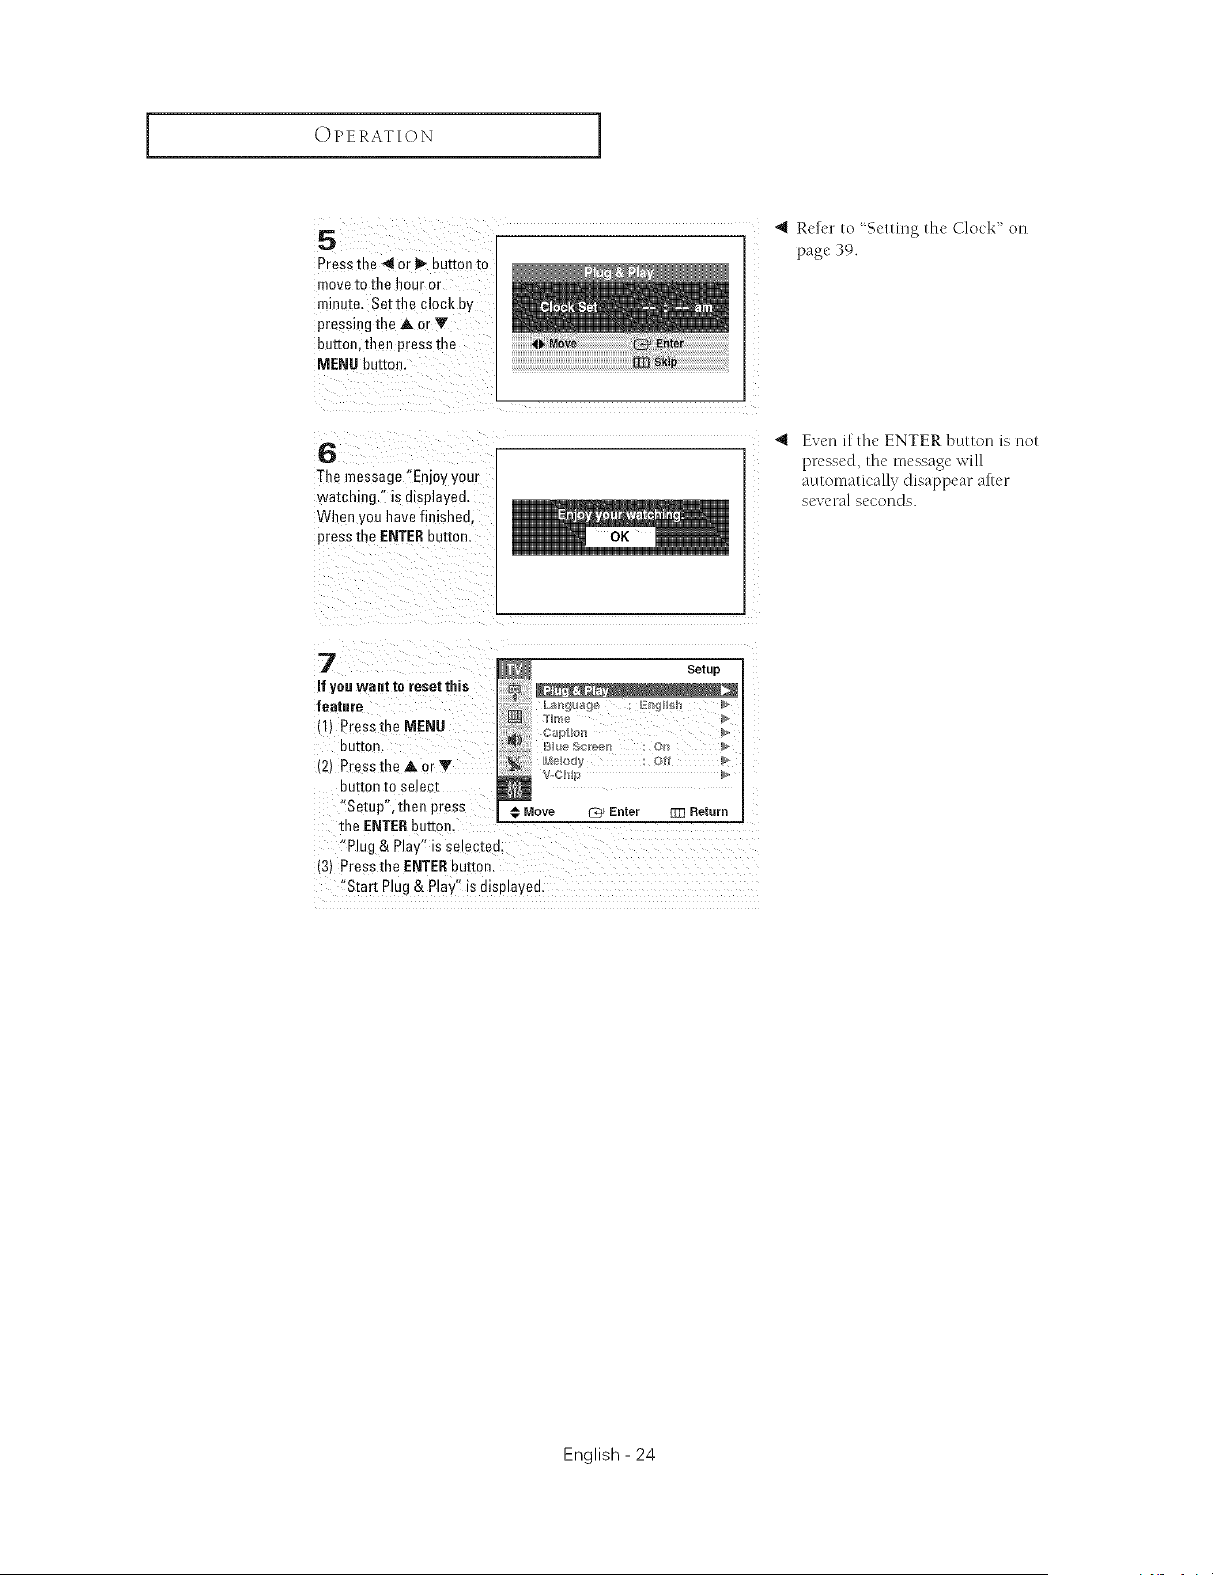
OPERATION 1
5
Pressthe 4or _ button to
mo_atothe hour or
minute. Setthe clock by
pressing the at or V
button, then press me
MENU buEon.
4 Refer to 'Setting the Clock" on
page 39.
6
The message "Enjoy your
watch ng." is displayed.
Wl_an you have finisheu.
press the ENTERbuttar
Even if the ENTER button is not
pressed, the message will
automatically disappear after
several seconds.
7
if yes want to reset this
feature
(I} Pressthe MENU
DU[[OF
(2} Press the at or V
DUEORto se ecl
Setup", than press € Move _ Enter 1_3 Return
the ENTERbutton.
"Plug & Play" is selectec
13) Pressthe ENTERbutton
"Start Plug& Play" is displayea.
English - 24
OPERATION I
Viewing the Menus and On-Screen Disp|ays
Viewing the Menus
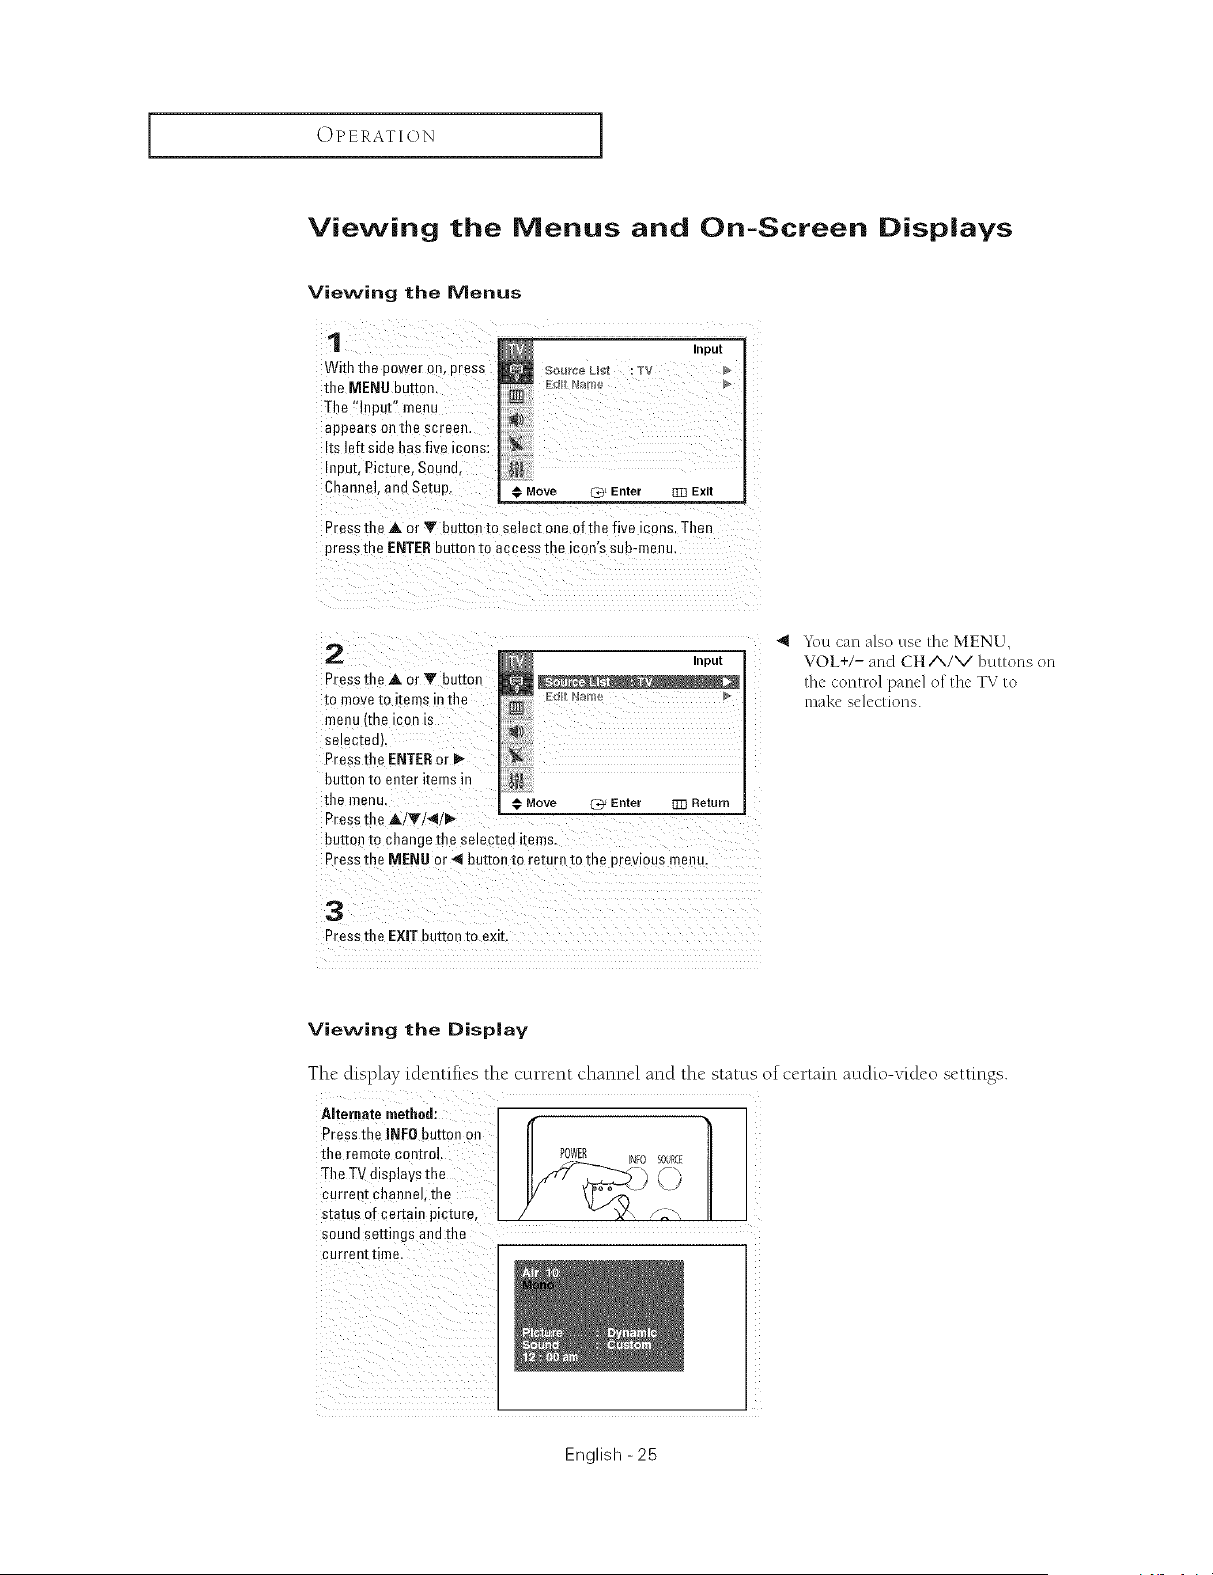
1
With the Dower on. Dress
the MENU button
The "Input" menu
appears Ollthe screen.
Its left side has five icons:
Inout. Picture. Sound.
Channel. and Setup.
Input
Move (_ Enter ]33 Exit
Press the A or Y button to select one of the five icons Then
press me ENTERbutton to access the icon's sub-menu.
2
Press the A or T button
[o move[o iema nflle
manu tree icon is
selec[eoL
Presathe ENTERor
buttoe to eeter items in
the menu
Press the A/Y/_I/_.
button [o change the selected items.
Press the MENU or 41button to return to me orevlous menu.
3
Press the EXIT button to exit.
4 '*\)ucan also use the MENU,
VOL+/- and CHA/V buttons on
the control panel of the TV to
mal<_"selections.
Move C_ Enter 33:1Return
Viewing the Display
The display identifies the current channel and the status of certain audio-video settings.
ARernate methed: I /_
Press the INFO butto_?oJ!
II
the remote control. I POWER INFOSOURCE
TheTVdisplavetha _" f!
current channel, the ) L
status of certain picture, / - X> /_,
sound settings and 1ha
current timel
English -25
OPERATION ]
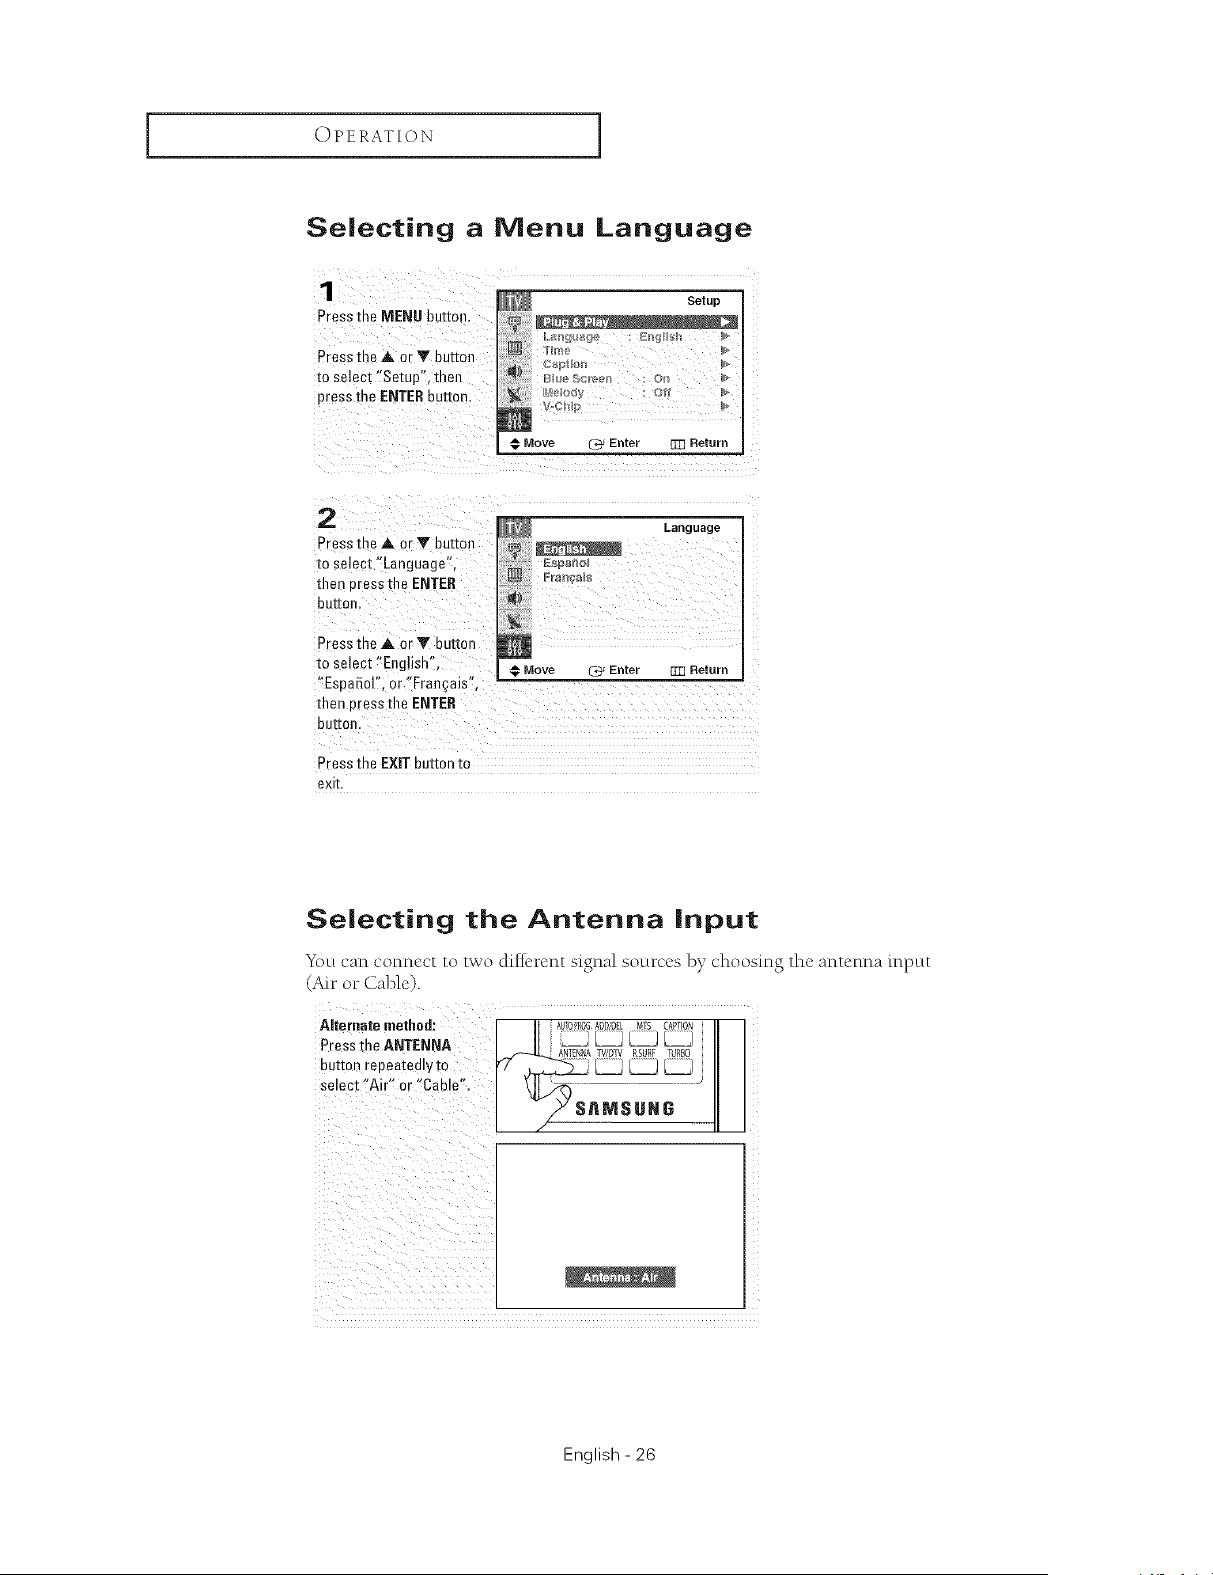
Selecting a Menu Language
Presslqe MENUbuEon.
Press the A or Y button
m select "Setup", then
press the ENTERbuttor
Setup
Csptl,a_
€ Move ['3' Enter 1_ Return
2
Pressthe*torTbu#on
xoselect"Language',
then oressthe ENTER
bu_or
Press the at or Y button
to select "English" € Move 2_ Enter
"EsaaSd". or "Fran_ais",
then Dressthe ENTER
but[or
Language
g]] Return
Press the EXIT button to
exit.
Selecting the Antenna input
_\_u can connect to two different signal sources by choosing the antenna input
(Air or Cable).
Alternate method: A0_0_R0aADD/OiLMrs C@TION
Pressthe ANTENRA ] _ I_A_ _
button repeatedlyto [7 _ _ _ _
Se'oot :Ai<o<iCab,i:;I
] / snMsa,e
i i
i i
English - 26
OPERATION I
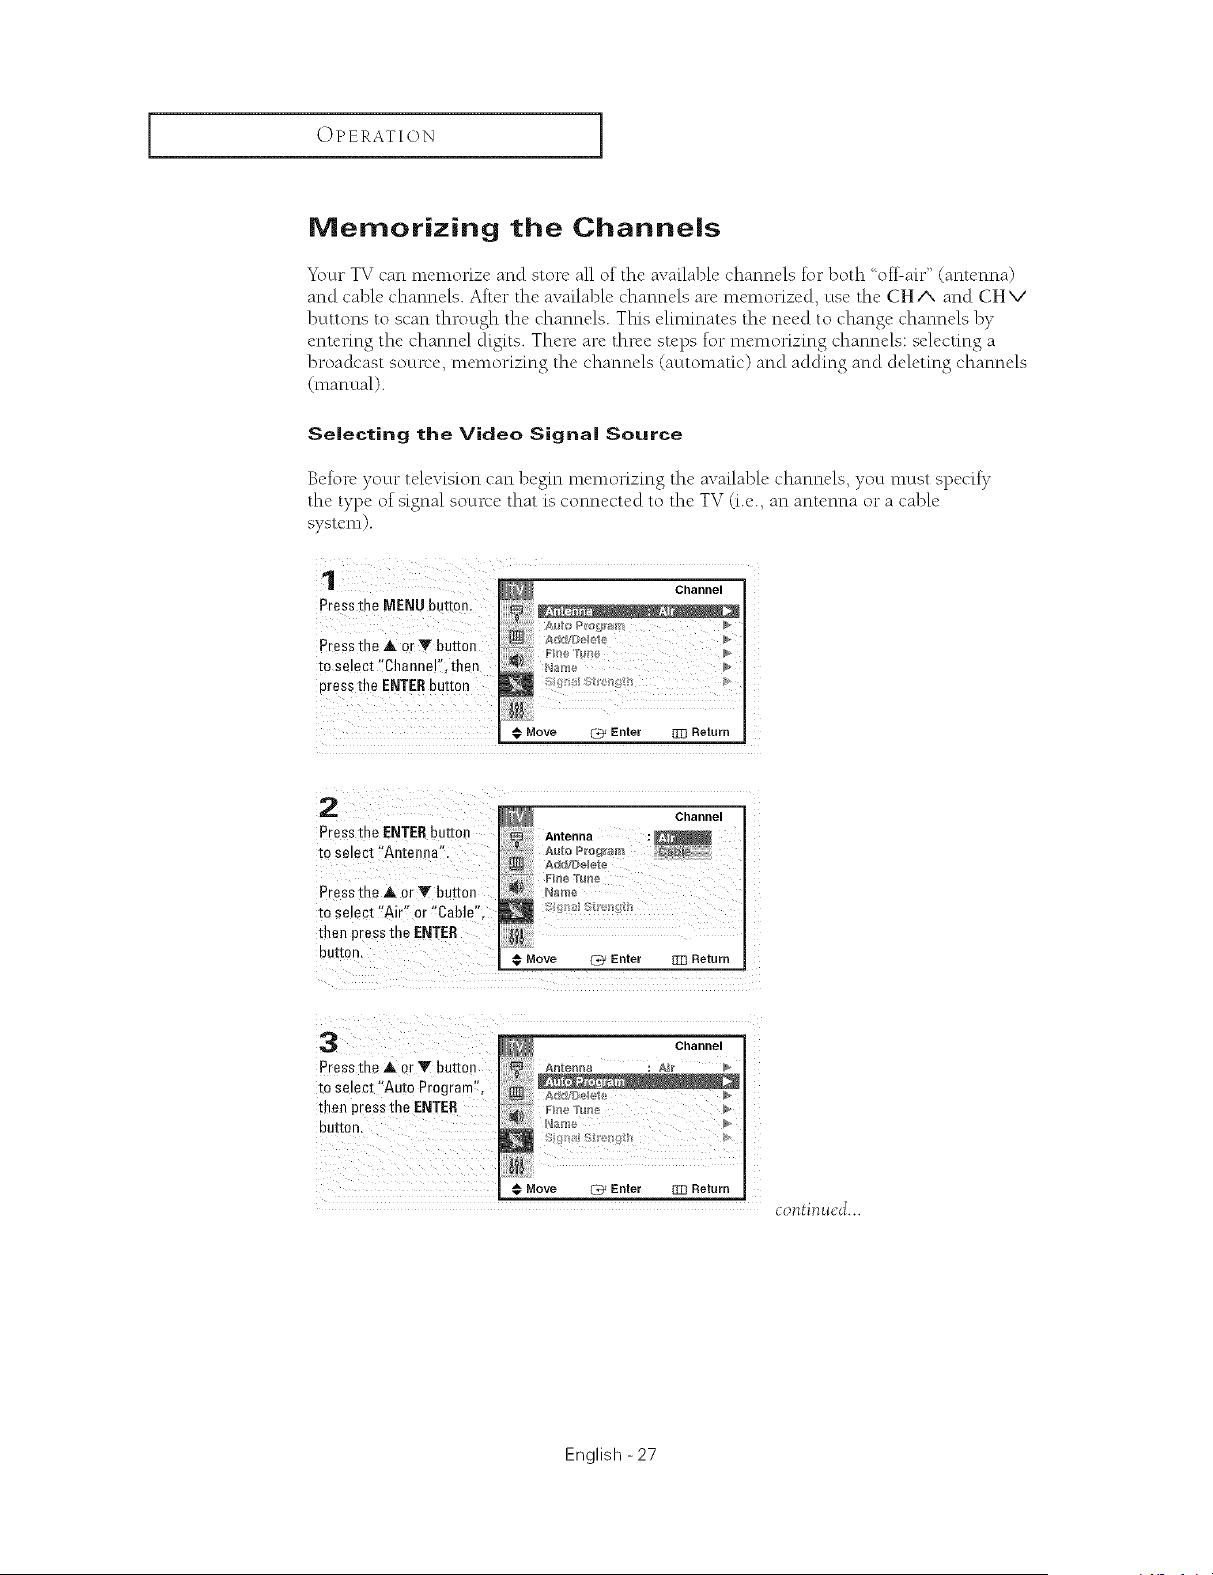
Memorizing the Channels
Your TV can nlemorize and store all of the available channels for both 'off-air" (antenna)
and cable channels. After the available channels are memorized, use the CH A and CH V
buttons to scan through the channels. This eliminates the need to change channels by
entering the channel digits. There are three steps for nlemodzing channels: selecong a
broadcast SOUR'e,memorizing the channels (aMtomaOc) and adding and deleting channels
(manual).
Selecting the Video Signal Source
Before your television can begin memorizing the available channels, you must spedfy
the type of signal source that is connected to the TV (i.e., an antenna or a cable
system).
¸¸¸1¸¸¸¸¸¸ /
Pressthe MENUbutton.
Pressthe at OrY button
to select %hanneF; then
Press the ENTERbutton
Channel
Move C_ Enter {Z] Return
2
Press the ENTERbutton
to select "Antenna"
Pressthe at or _" button
1:oselect "Air" or "Cable".
then press me ENTER
BUr[On,
Channel
Antenna
A_fo P_ogr_m
€ Move {7_ Enter Z13Return
3
Press [r .=at or T button
m select "Auto Program",
then press me ENTER
De[Ton,
Channel
€ Move U_ Enter TR Return
continued...
English -27
OPERATION ]
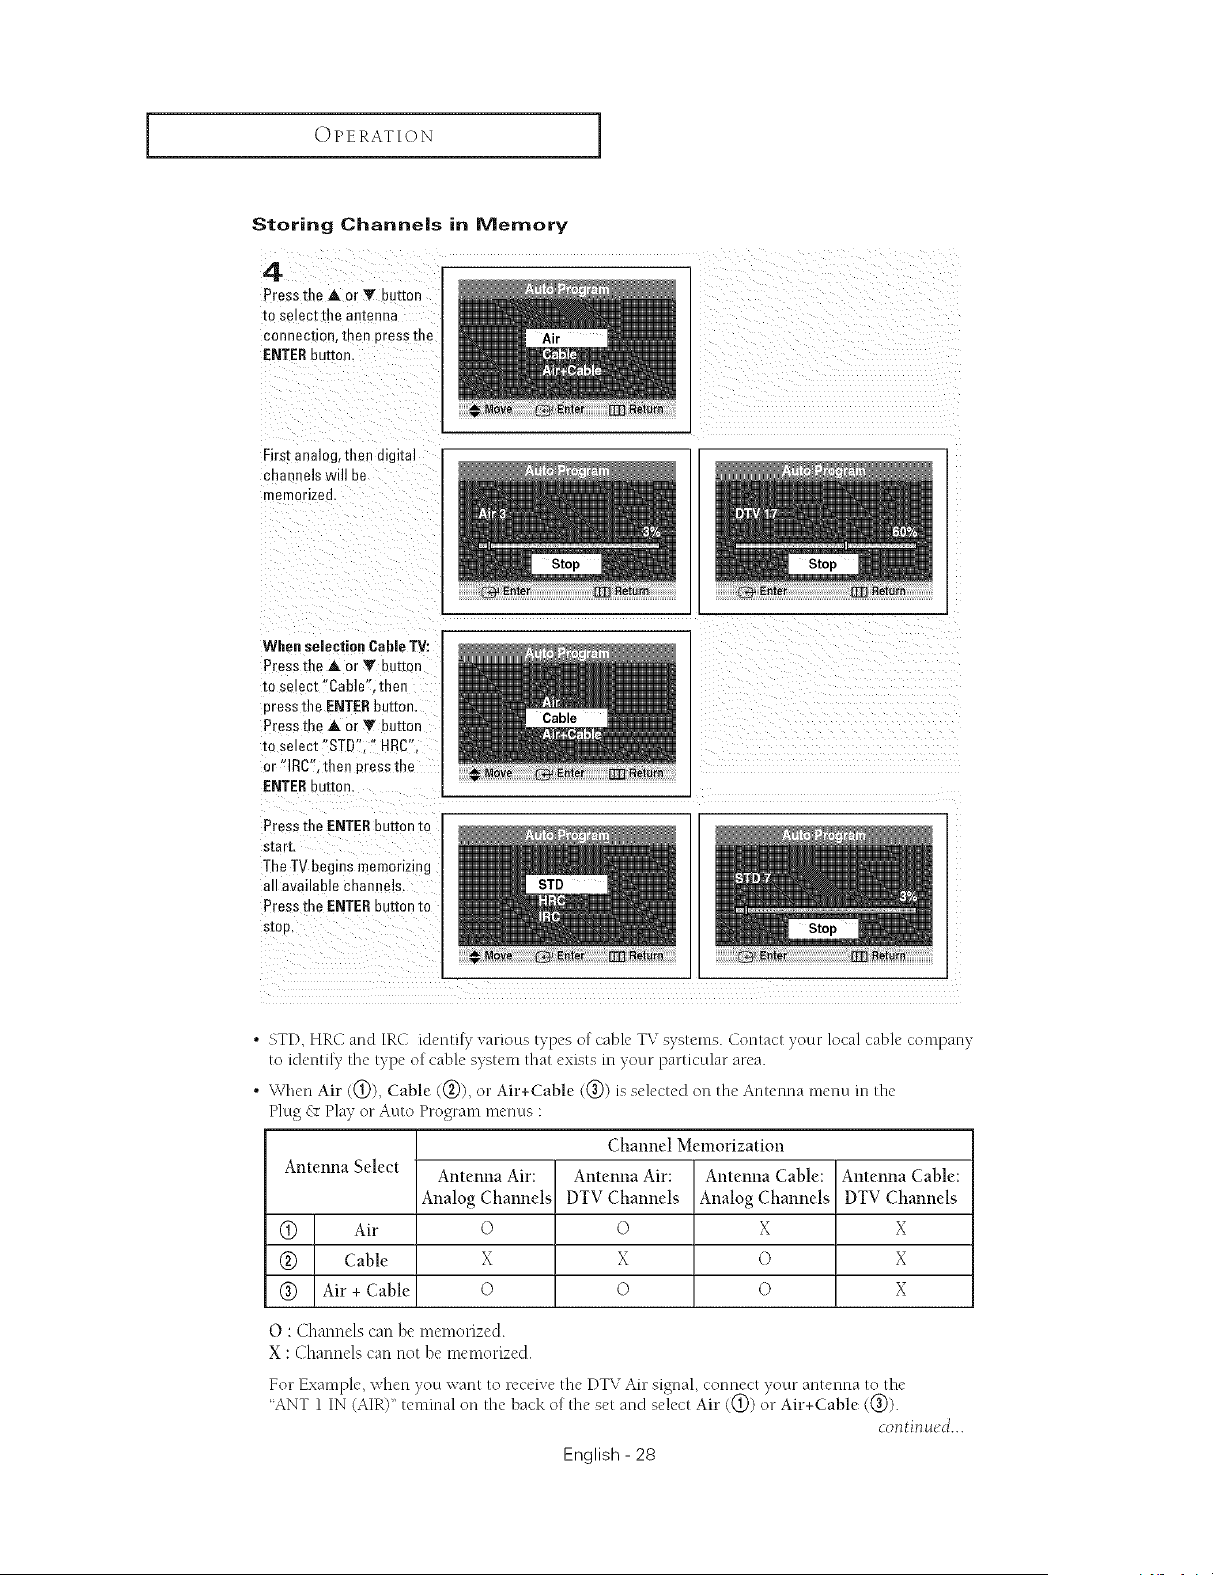
Storing Channe|s in Memory
4
PresstheAorYbu_o_
to selectthe an[enna
connec[ion, then Dressthe
ENTERbu_on,
First analog, then digital
cnannels will be
memorized.
When selection Cable TV:
Pressthe&orYbu_o_
to select"Cable'.then
uress the ENTERbutton.
PressmeAorYbu_o_
to select"STD _ "" 4RC".
or "lRC".then press me
ENTERhuron.
Pressthe ENTERbuttontc
s[arr,
TheTV begins memorizing
all a_ailable channels.
Pressthe ENTERbuttonto
SIOD,
iii_i i i iI iii i_i_i_i_i_i_i_i_
_ii_/_ i _ i_iiii_i_iiiiiiiiiiiiiiiiiii_
• STD, HRC and IRC identify various types of cable TV systems. Contact your local cable company
to identily the type of cable system that exists in your particular area.
• When Air (@), Cable (@), on Air+Cable (@) is selected on the Antenna menu in the
Plug & Play or Auto Program menus :
Channel Memorization
Antenna Select Antenna Air: Antenna Air: Antenna Cable: Antenna Cable:
Analog Channels DTV Channels Analog Channels DTV Channels
@ Air © © X X
@ Cable X X O X
@ Air + Cable O O O X
O : Channels can be memorized.
X : Channels can not be memorized.
For Example, when }ou want to receive the DTV Air signal, connect }oun antenna to the
"ANT 1 IN (AIR)" teminal on lhe back of the set and select Air ((_)) on Air+Cable ((_)).
continued...
English - 28
OPERATION [
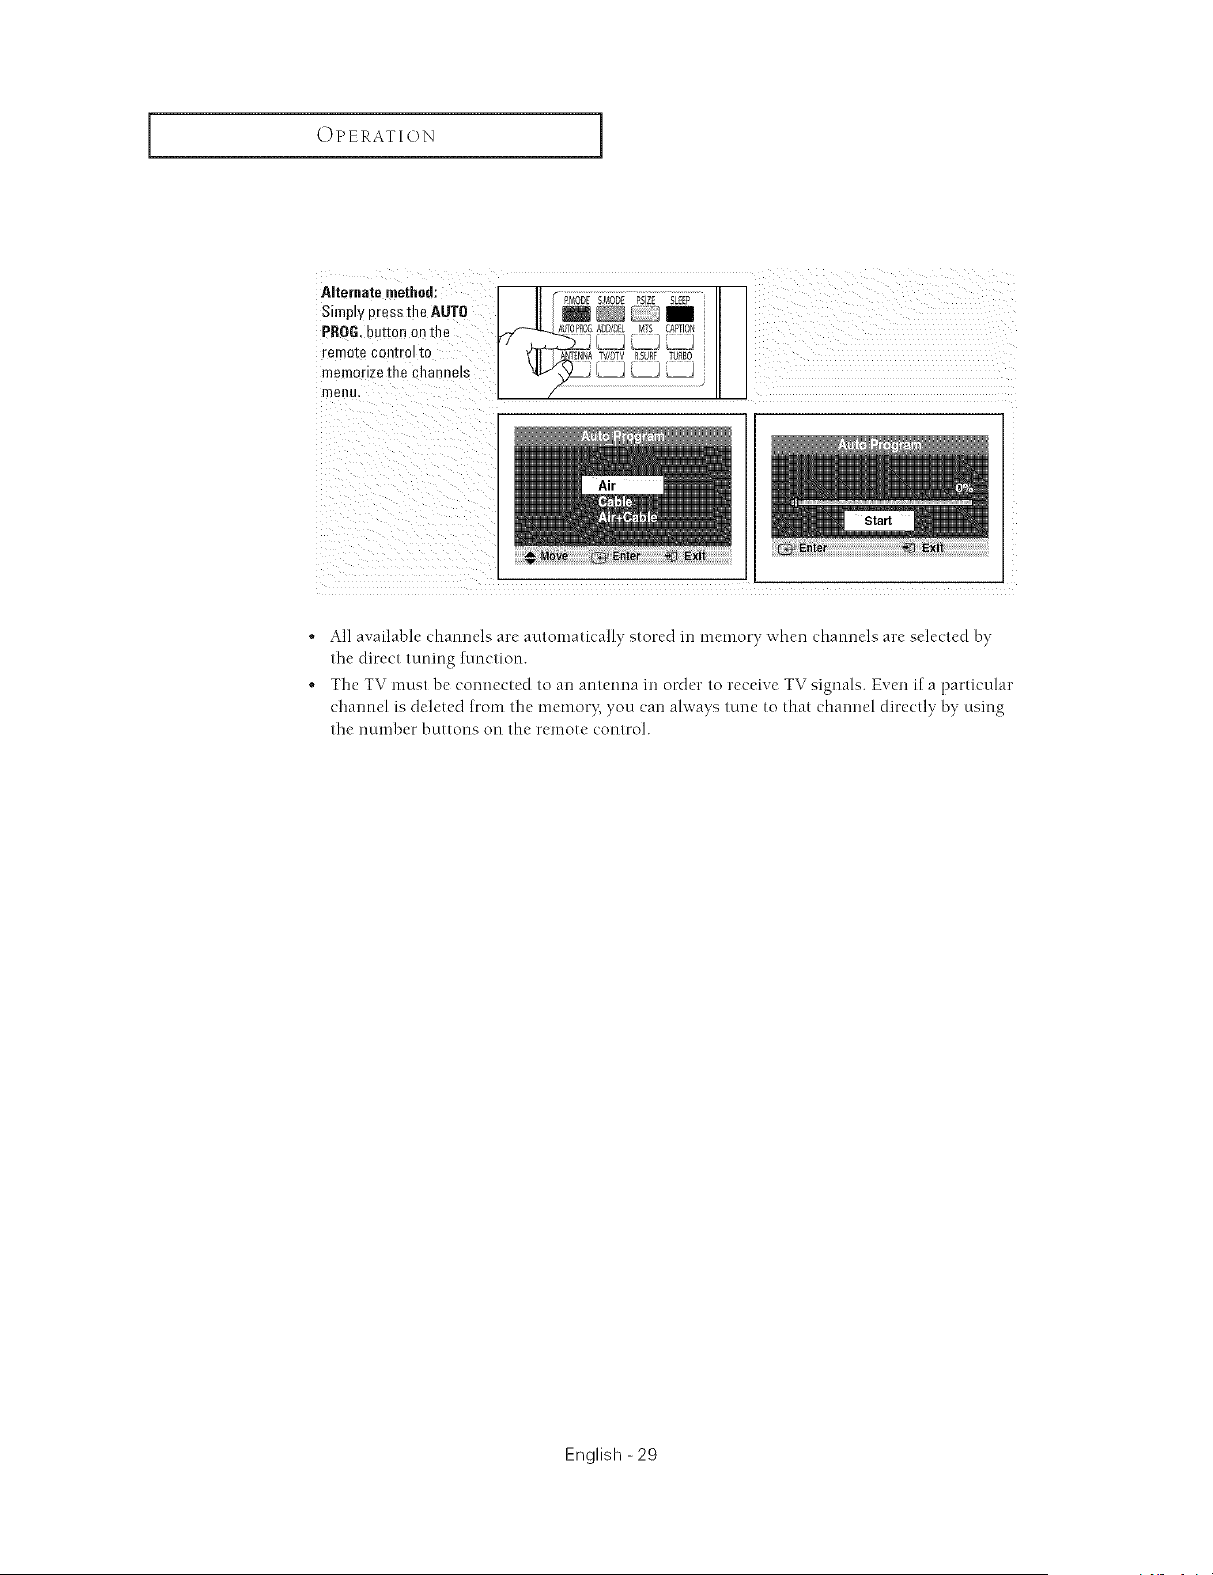
Alternate method:
Simply nress the AUTO
PROB. button or the
remo[e control 1c
merr 3rlz£ the channels
reel]u,
, All available channels are atltomatically stored m memory when channels are selected by
the direct tuning function.
, The TV must be connected to an antenna m order to receive TV signals. Even if a particular
channel is deleted trom the memory, you can always tune to that channel directly by using
the number buttons on the remote control.
English -29
OPERATION ]
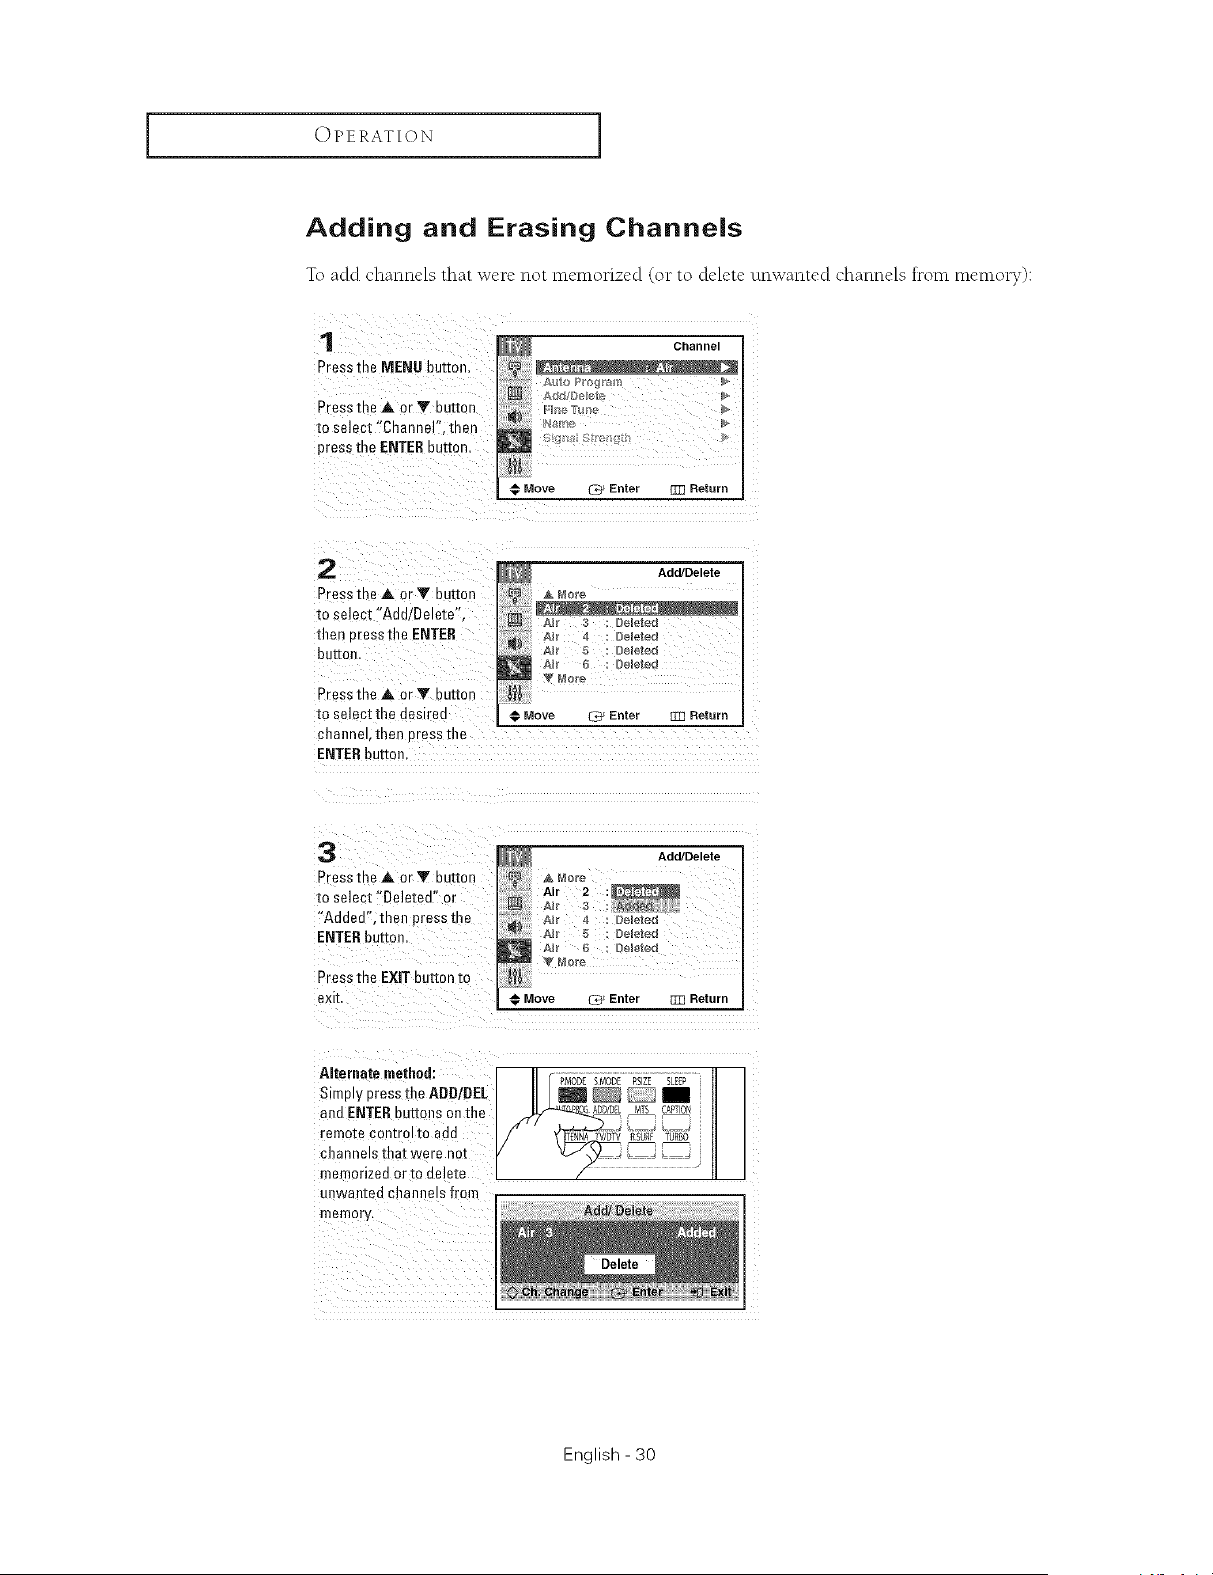
Adding and Erasing Channels
To add channels that we_e not memorized (o__to delete unwanted channels from memory):
1
Press the MENU button.
Press me A or Y button
to select "Channel", then
press the ENTERbutton.
Channel
be_e To_
Move 3' Enter m3 Return
2
PresstheA. orYbu_on
to select"Add/Delete".
tllen oressthe ENTER
butter
Press the A or Y eurmn
to select the desired
channeh men Dressdie
ENTERbutton.
Add/Delete
& Note
g&8_ d _ De_e_e_
_) A_r 4 : Ddeted
A_r 5 : Ddeted
Move _ Enter _ Return
3
Pressthe_,.orVbutton
to select _Deleted" or
"Added",mer pressme
ENTERbutton.
Press the EXIT button to
exk
Add/Delete
A_r 4 : De_e_ed
A# 5 : Deleted
A_r 6 : D _eted
r4o_e
Move _ Enter _ Return
Alternate method:
Simp=ypress the ADB/DEL
and ENTERbuttons on the
remote control to add
channels that were nm
memorized orto delete
unwanted channels from
memor'_
PMOD[ SMODE PSZE SLEEP
ADD/D_ MTS CAPTON
ENNA W/DTV RSURF TURBO
Add/Delete
English - 30
OPERATION [
Changing Channe|s
Using the Channel Buttons
Pressthe CH,z\ or CHV buttelt to changechannels,
W'hen you press CH A o1"CH V, the TV changes channels in sequence. You will see all the
channels that the TV has memorized. (The TV must have memorized at least three (hannels.)
You ,,','ill not see (hannels that ,,','ere either erased or not memorized.
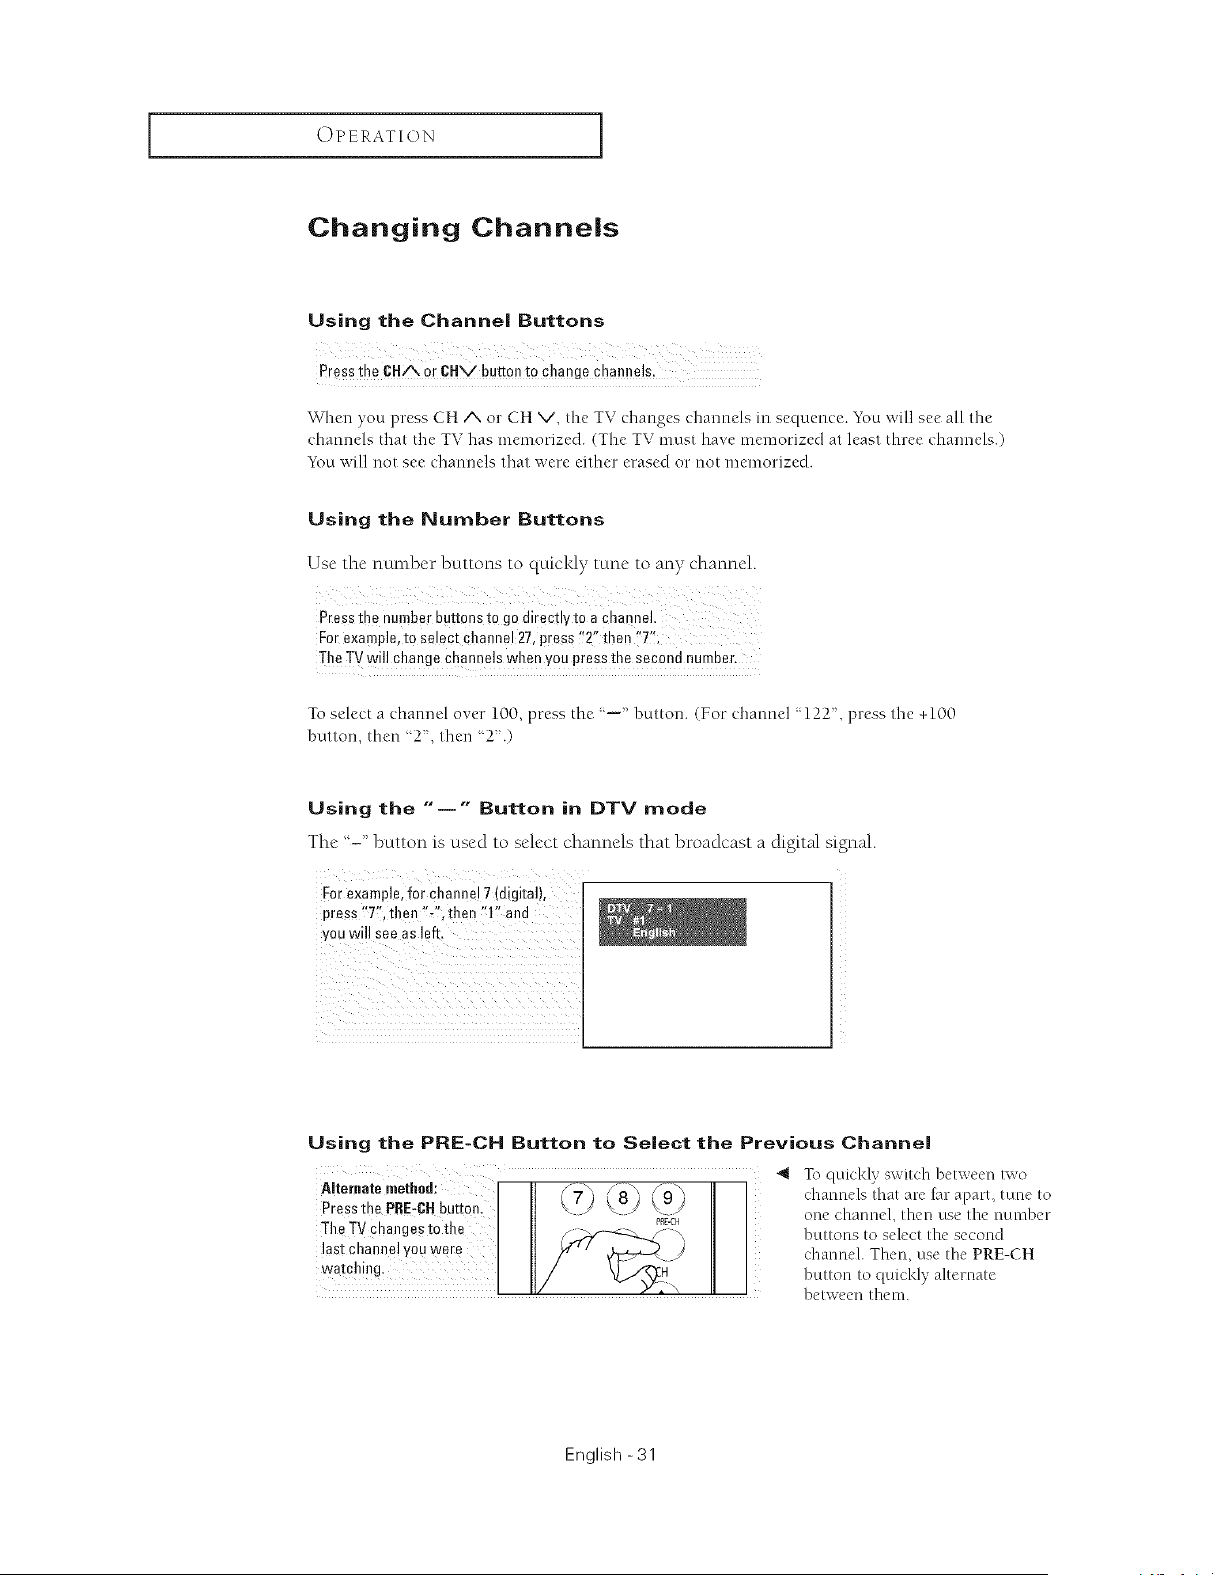
Using the Number Buttons
Use the number buttons to quickly tune to any channel.
Press the number buttons to go direct!y tO a cha0neh
For example, tO select channel 27,press !!2" then !'7'!:
The TV will change channels when you press the secend number.
TO select a channel over 100, press the .... button. (For channel "122, press the +100
button, then '2. then '2'.)
Using the "--" Button in DTV mode
The "-" button is used to select channels that broadcast a digital signal.
For example, for channel 7 (digital),
eress "T'. then "-". then "1" and
you will see as left.
Using the PRE-CH Button to Select the Previous Channe|
Alternatemethed:
Pressthe PRE-CHbutton.
Th_TYChangestotbe
last channelyeaWerg
watching,
"_ _l\_quickly _,witch between lsvo
channels that are Jar apart, tune to
one channel, then use tile number
buttons to select the second
channel. Then, use the PRE-CH
button to quickly alternate
between them.
English -31
OPERATION ]
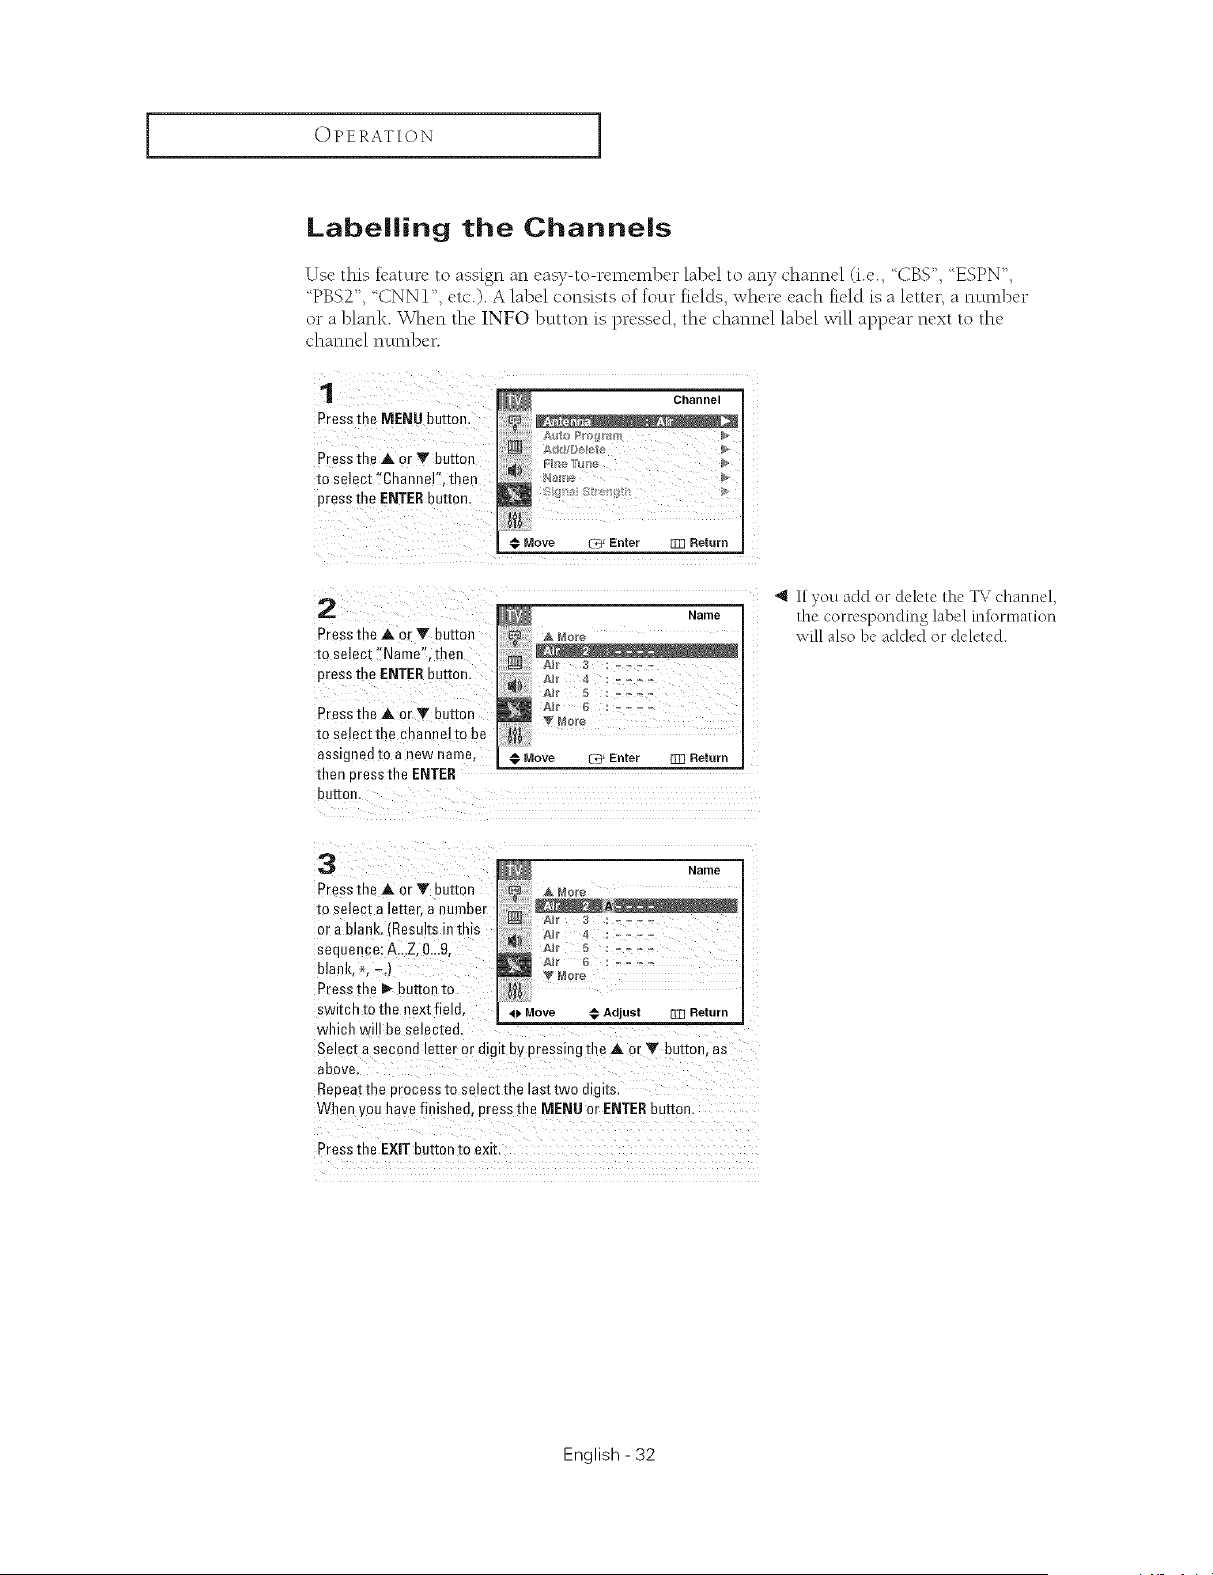
Labelling the Channels
Use this feature to assign an easy-to-remember label to any channel (i.e., CBS", ESPN",
PBS2", CNN 1", etc.). A label consists of four fields, where each field is a letter, a number
or a blank. When the |NFO button is pressed, the channel label will appear next to the
channel number.
1
Press th_ MENU button.
Press the _, or Y button
to select "Channel '. then
press me ENTERbutton
Channel
Y
Move _ Enter Rqq Return
2
Press the A o_Y button
to select "Name". then
press the ENTERbutton
Press the A or T button
to select the channelto be
assigned to a new na1118,
then Dressthe ENTER
buttor
_i Name
A More
Air 5 :
@ Move _ Enter Rqq Return
_l If you add or delete the TV channel,
the corresponding label m[ormation
wi]] also be added or deleted.
3
Presethe & or Y button
to selec[ a letter, a number
or a manK. (Results in this
sequence: A..,Z. 0..,9.
blank, *. -.,
Preseme I_ button to
ewltcn to the next field.
which wi be selected,
Name
ABr _ :
o Move ,@ Adjust []Z] Return
Select a secona letter or digit by press ng the A or Y button, as
above.
Reeeat the 3rocessm se ect the last two d gks
When you have finished, eress the MENU or ENTERbutton,
Press the EXIT button to exit,
English - 32
OPERATION I
Picture Contro|
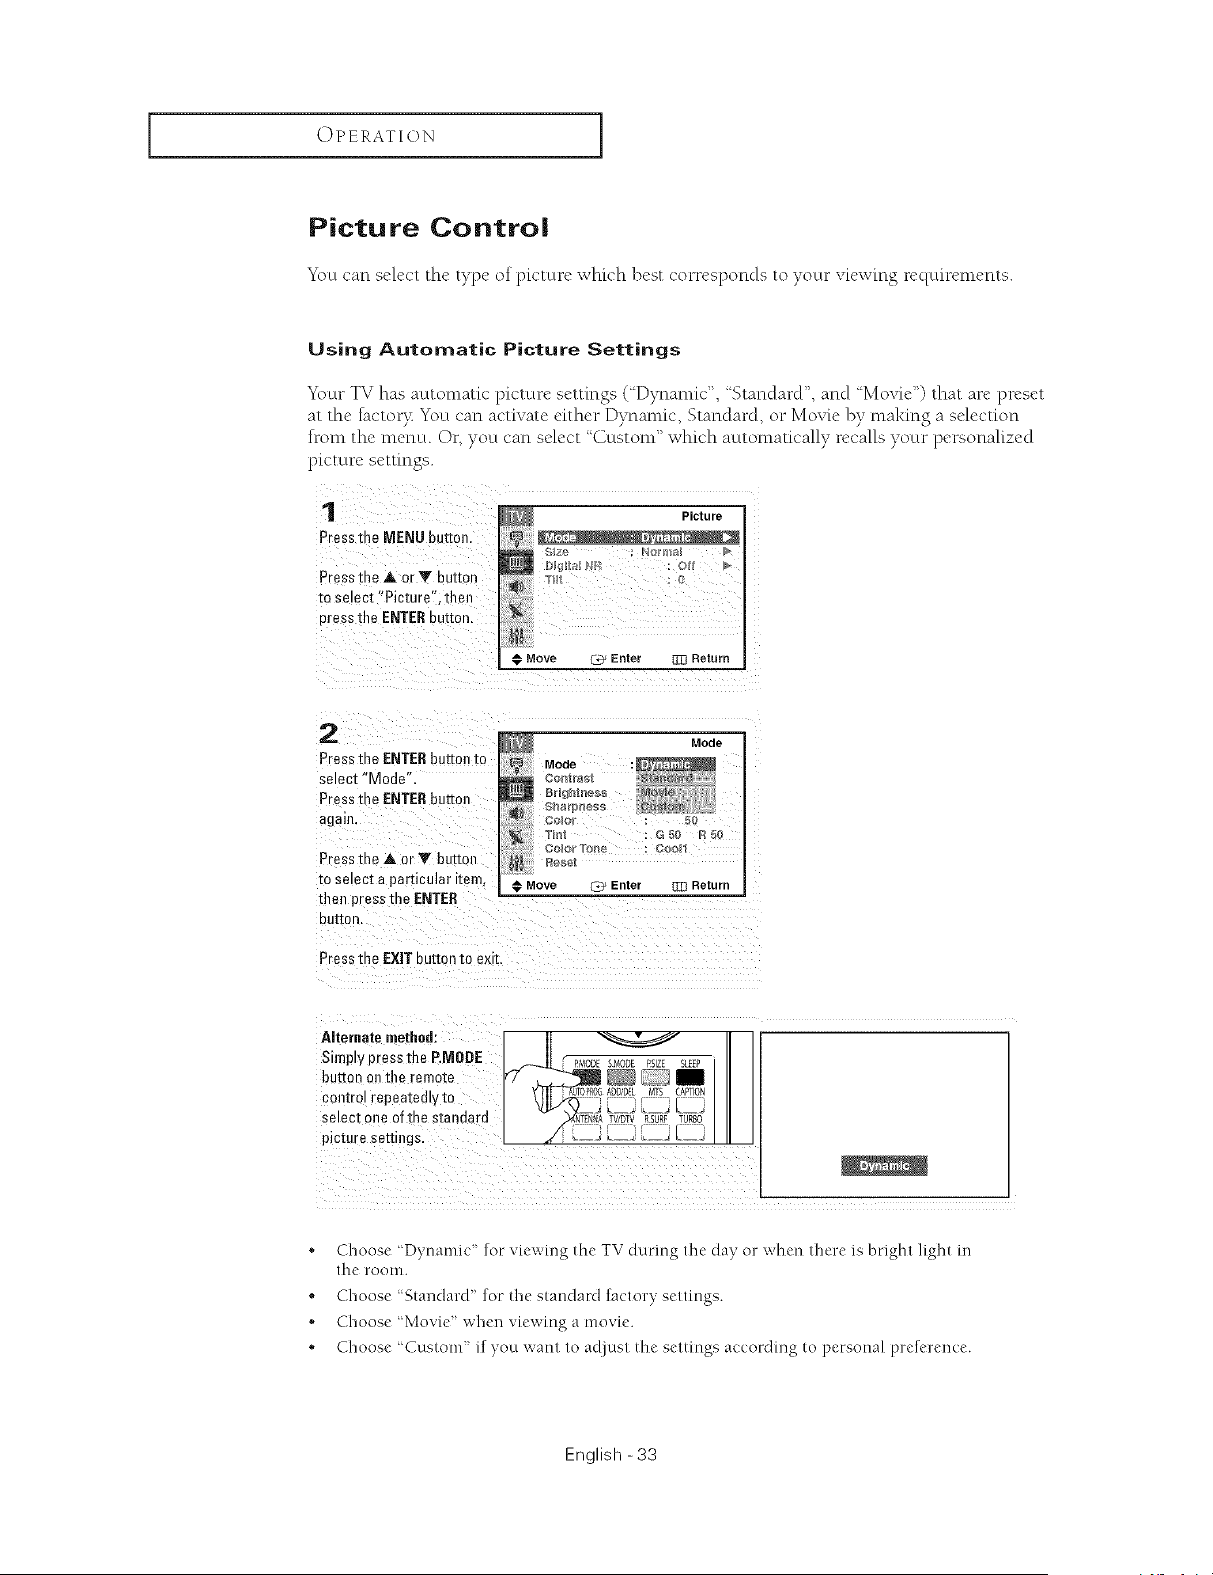
_)u can select the type of pk'ture whk'h best corresponds to your viewing requirements.
Using Automatic Picture Settings
Your TV has automatic picture settings (_Dynamic", 'Standard", and Movie") that are preset
at the factor}: You can activate either Dynamic, Standard, or Movie by making a selecoon
from the menu. Or, you can select '%ustom" which automatically recalls your personalized
picture setOngs.
1
Press me MENU button
Presethe at orY bu[[or,
m select "Picture". then
press the ENTEReuEon.
Picture
€ Move C_ Enter ]]] Return
2
Preesme ENTER button to
select "Mode
Press me ENTER button
again.
Press me at or T beEor
m se_ec[e particular item,
then press the ENTER
eeIron,
Mode
Mode
;slot " 50
€ Move @* Enter _]3 Return
Press me EXIT button m exE.
Alternatemethed:
Simpw press the P.MODE
buttor, on the remote
con[ro repeatedlv to
select one of the standard
picmre seltlllqs.
|
UTO#20GI_DDIDt Mr CAPTON
NKN_A P¢/DTV RSURF URBO
t :t _L
Choose 'Dynamic" for viewing the TV during the day or when there is bright light in
the" l-ooln.
" Choose '%tandard" for the staHdaM factory settiHgs.
• Choose 'Movie" when viewing a movie.
• Choose ' Custonl ' if you want to adjust tlne settings according to personal preference.
English -33
OPERATION ]
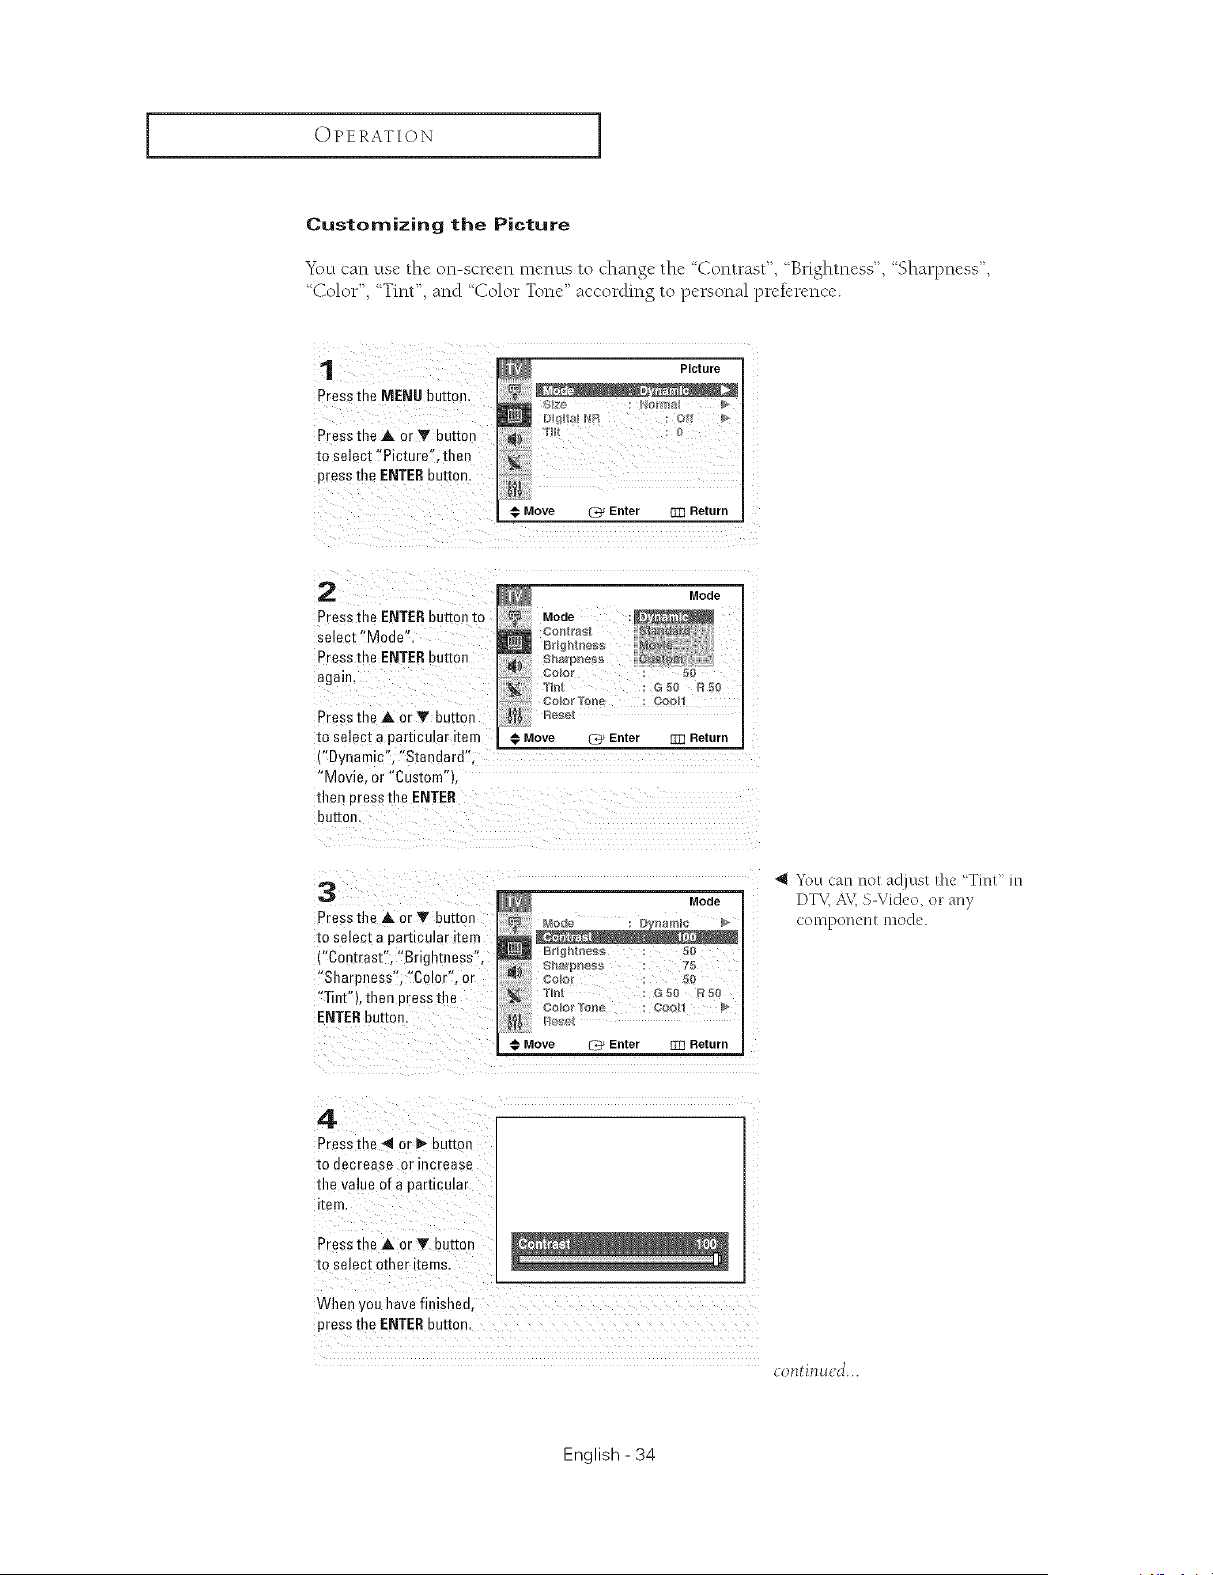
Customizing the Picture
You can use the (m-screen menus to chan,_e_ the '_Contrast", Brightness", '_Sharpness',
Color", :'Tint", and :'Color Tone" according to personal pretcrence.
1
Press the MENU button.
Press the A or Y button
to select "Picture" titan
press the ENTERbutton
._Move _ Enter [m Return
2
Press the ENTERbutton to
select "Mode"•
Press the ENTERbutton
again.
Press me A or V button
to select a particular item
{"Dynamic", "Stan Jard".
"Movie or "Custom"1
then cress the ENTER
button
3
Press the _ or _ button
to select a particular item
("Contrast", "Brightness".
"Sharpness", "Color", or
"Tint"L than cress the
ENTERbutton.
Mode
N
T_n_ : G eo R ee
@ Move 7_ Enter _ Return
"*\m can not adjust the _TinU in
DTV,AV,SWideo, on an}
contponenl mode.
4
Pressme _l o- _ button
_oeecrease or increase
tl_evalue of a parucumr
item
Press the _ or Y burton
to select other Terns.
When ,rou _avefinished.
press me ENTERbutton
continued...
English - 34
OPERATION I
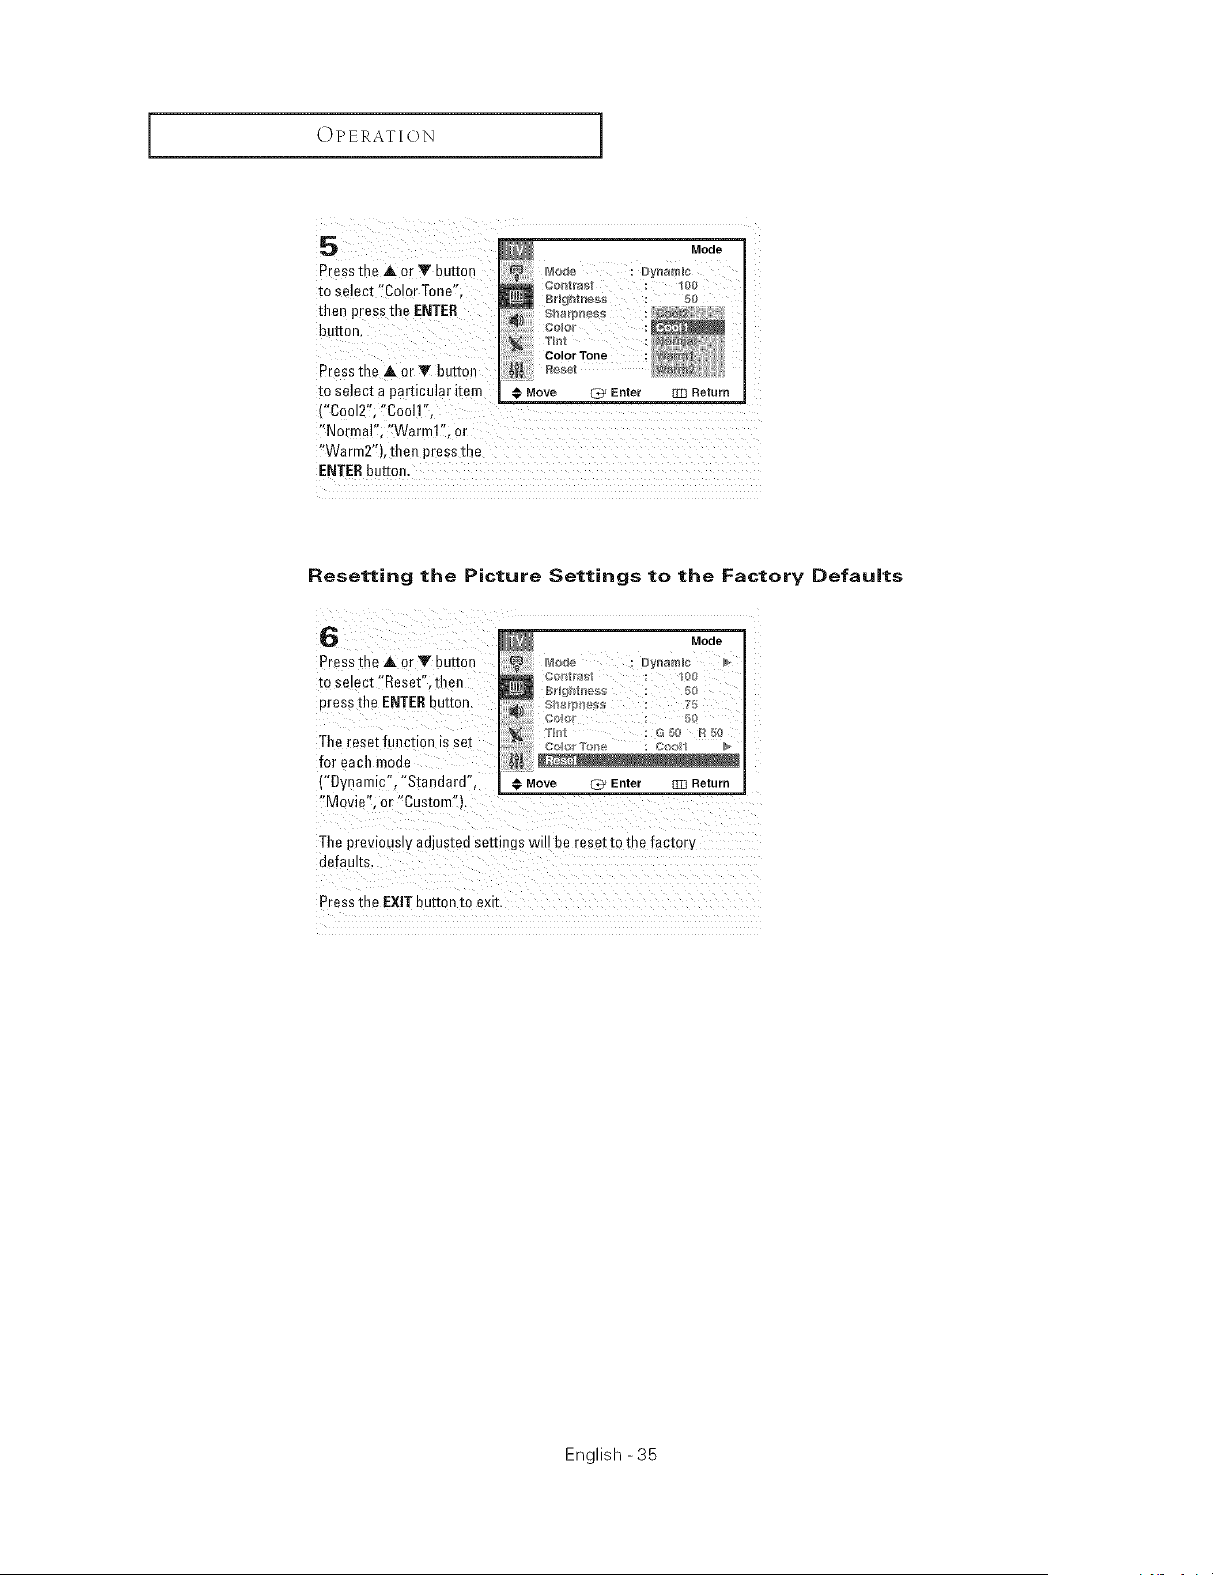
5
PreSsthe at OrT button
to select '!Color Tone';
than press the ENTER
button
Press the at er Y button ges_t
to select a particular item # Move _ Enter
{"Co012'!; "Cool1'<,
"Normal"; '{Warm1!'; or
!'Warm2'), then press the
ENTERbutton.
Resetting the Picture Settings to the Factory Defau|ts
6
Pressthe at or Y button
to smect 'Reset". then
oress the ENTERDuemn.
The reset funct on IS eel
for each moue
("Dynamic". "Standard",
"Movie". or "Custom" }.
Mode
Move (_ Enter _3 Return
The previously adjusted settings w be reset to tne factory
defaults.
Press the EXIT button to exit.
English -35
OPERATION ]
Sound Control
Adjusting the Volume
Press the VUL+ or VOL - buttons to iecrease or decrease the
VOIUIIIB,
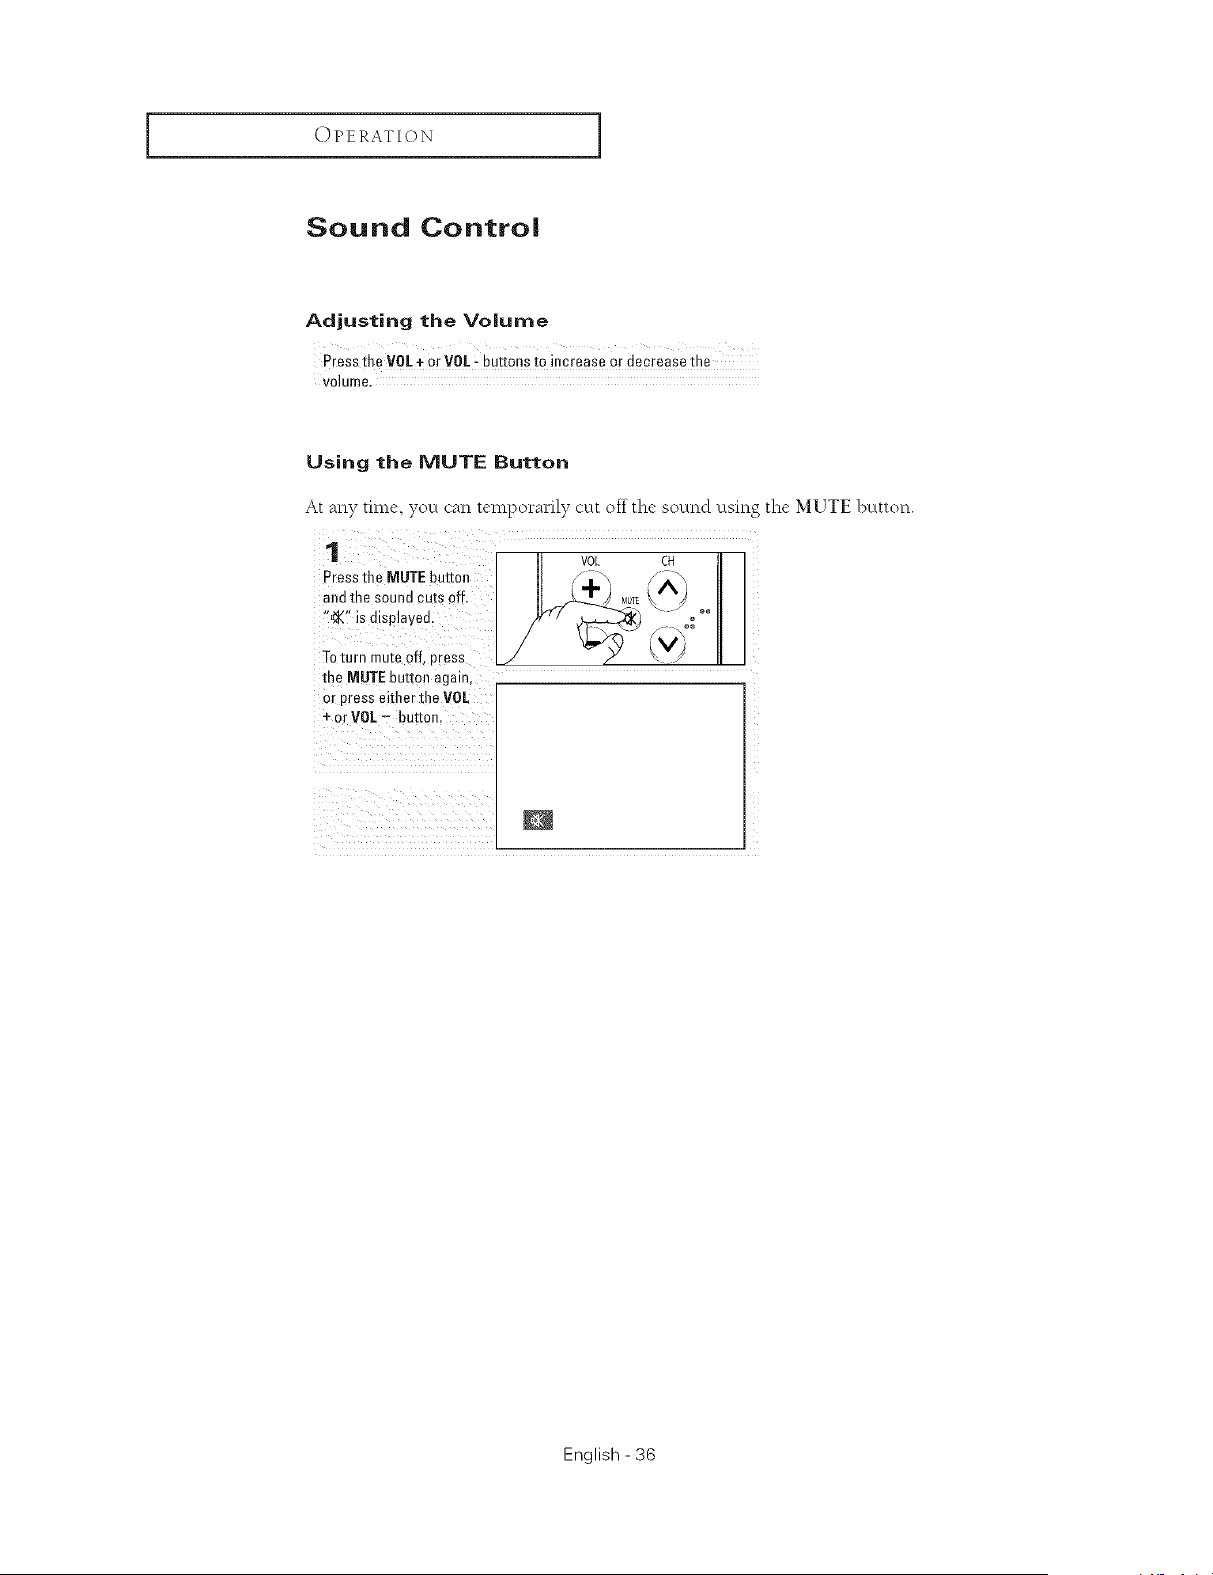
Using the MUTE Button
At any tin*e, yo/.t can temporarily cut off the sound using the MUTE button.
1
Press tile MUTE button
and the sound cuts off.
"eX" is dlspiavee.
Toturn mute off Dress
me MUTE buttoe again,
or press either file VOL
+ or VOL- button.
VOL CH J
It :+, /A _
/_ ,\°°
U
English - 36

OPERATION I
Using Automatic Sound Settings
Y\mr TV has automatic sound settings (%tandard", '_Music", '_Movie",and Speech") that are
preset at the factory You carl activate either Standard, Music, Movie or Speech by making a
selection front the menu. Or, you can select "Custom," which automatically recalls your
person_flized sound settings.
1
Press the MENU butter
Press the A. or Y buttoJl
to select "Sound", then
uress the ENTERDuemn,
Jl_ Sound
Move _ Enter 333 Return
2
Press me ENTER button to
se=ec_"Mode",
Pressthe A (rV button
to setec[ a particular item,
then press the ENTER
DO[tOn,
Press tl_a EXIT button to
exit.
Sound
Mode
l'urbo Pl_5 : Ol
€ Move (_ Enter 333 Return
Alternate method: 1
Press the S.MODE button
on the remote control
repeatedly to select one
of the standard sound
seeings
, Choose "Standard' for the standard factory settings.
• Choose 'Music' when watching lnusic videos or concerts.
• Choose 'Movie' when watching movies.
, Choose '%pooch' when watching a show that is mostly dialog (i.e., news).
• Choose 'Custom' to recall your personalized settings.
English -37
OPERATION ]
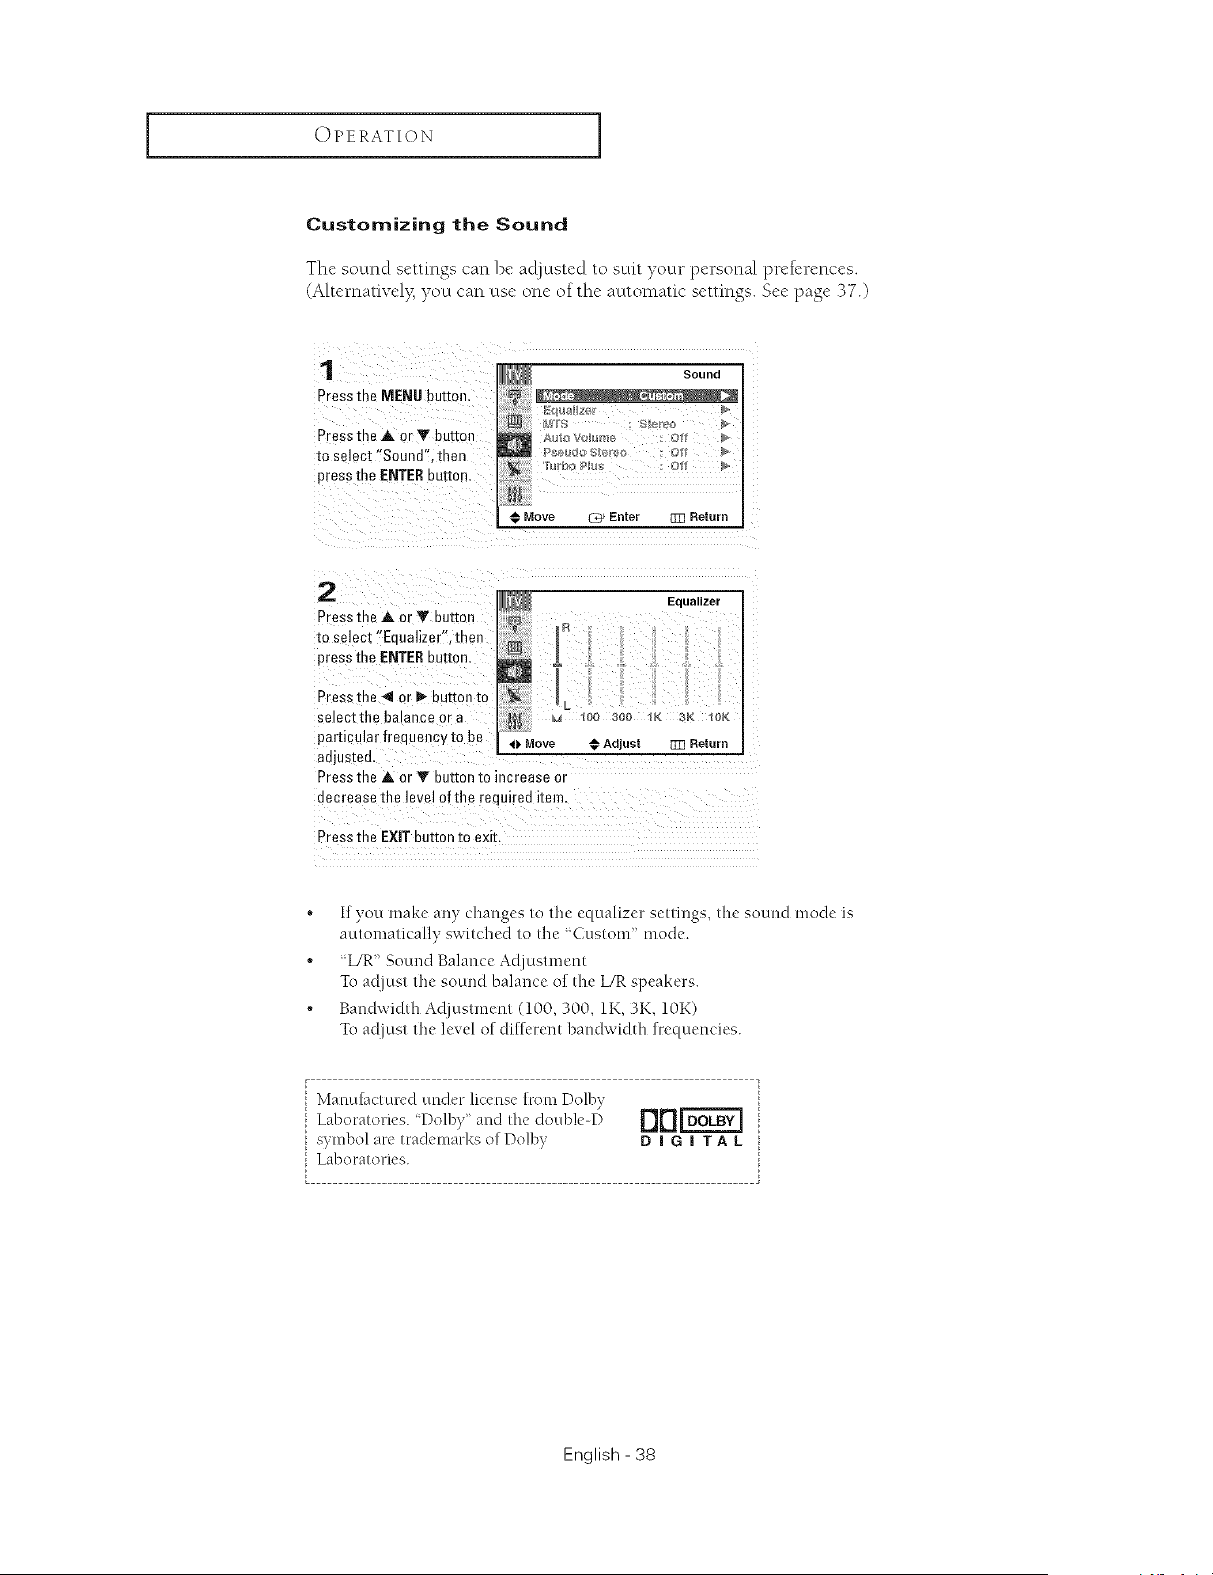
Customizing the Sound
Thc sound scttings can bc acljusted to suit your pcrsonal prck'rcnccs.
(Alternativel> you can use one of the automatic settings. See page 37.)
1
Pressthe MENUbutton.
Press the A or Y button
to select "Sound". then
press the ENTERbu[to_
_ Sound
a
€ Move _ Enter m3 Return
2
PresstheA or V button
to select "Enualizer',then
pressthe ENTERbutton
Pressrun 4 or _ buttOll [0
select the balance or
particular frequencyto be
adjusteo
Pressthe _, orY button to increase or
I R Equalizer
100 300 1K 3K 1OK
o Move @ Adjust [mReturn
eecrease the level of the renuired item.
Press the EXIT button to exit.
• If you make any changes to the equalizer settings, the sound mode is
automatically switched to the 'Custom' mode.
, "IJR' Sound Balance Adjustment
Tu adjust the sound balance of the L/R speakers.
• Bandwidth Adjustment (100,300, 1K, 3K, 10K)
Tu adjust the level of different bandwidth frequencies.
Manu[actured under license £rom Dolbv
Laboratories. 'Doll)y" and the double-D
symbol are trademarks of Dolby
Laboratories.
rlrlrc vl
DIGITAL
English - 38
OPERATION I
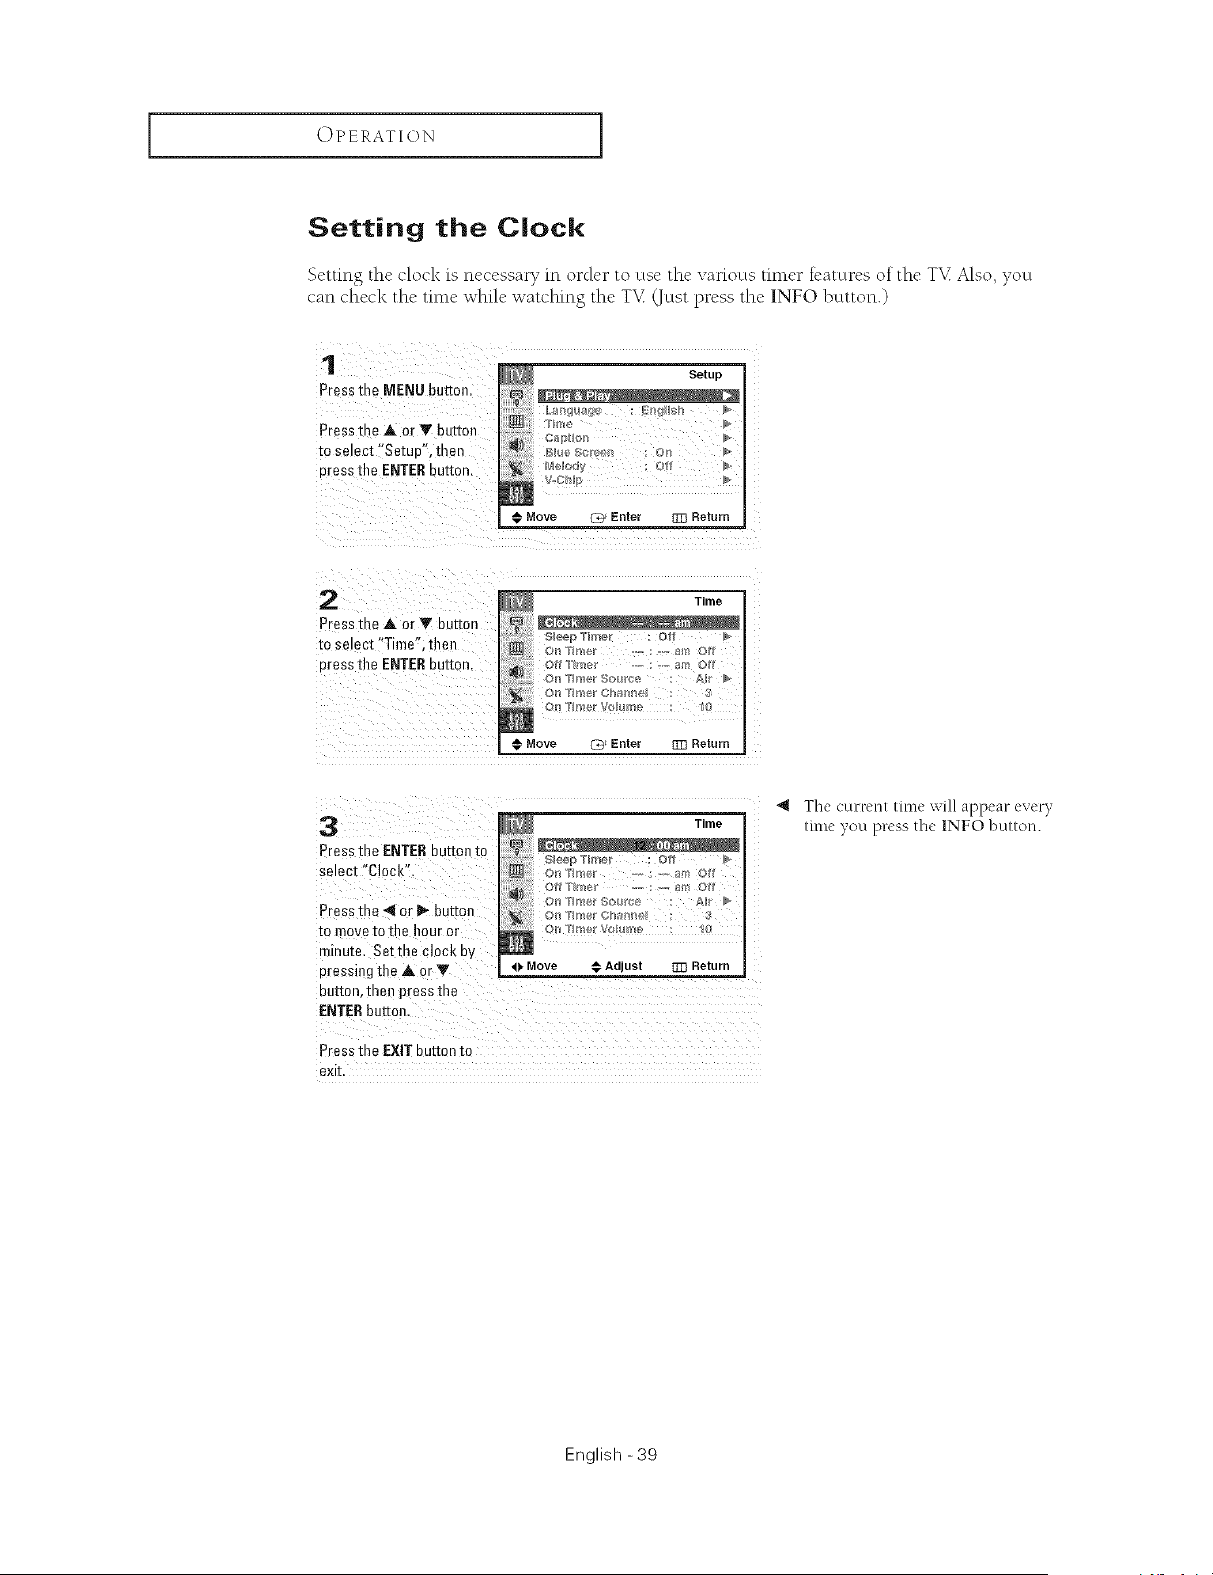
Setting the Clock
Setting the clock is necessary m orck, r to use thc various timer features of thc T_ Also, you
can check the time while watching the T_ (Just press the INFO button.)
1
Press the MENU button
Press the A or Y button
to select "Setuo'. then
Dressthe ENTERDuEon.
Setup
N
@) :_J
€ Move C_ Enter _3 Return
2
Press me A or Y button
[o se=ect"Time". then
oress the ENTERouEon.
Time
2 _ P
€ Move (_ Enter _3 Return
Time
PresetheENTERbutton*o
p
ili ii!i On _ll]@r OlgI@ : All +
Pressthe _ or I_ button iili;i_ii!i:!!:!i;!iii!on _1,_+_ch=nnel /
to move to the hour or
@I_ IIH@[ Vol_Ime : IO
minute. Setthe clock by
pressing the A or _ 4t, Move € Adjust lit Return
=- ,.
button, then press the
"_ The current time will appear ever)
time you press the INFO button.
Pressthe EXIT button to
exit,
English -39
OPERATION ]
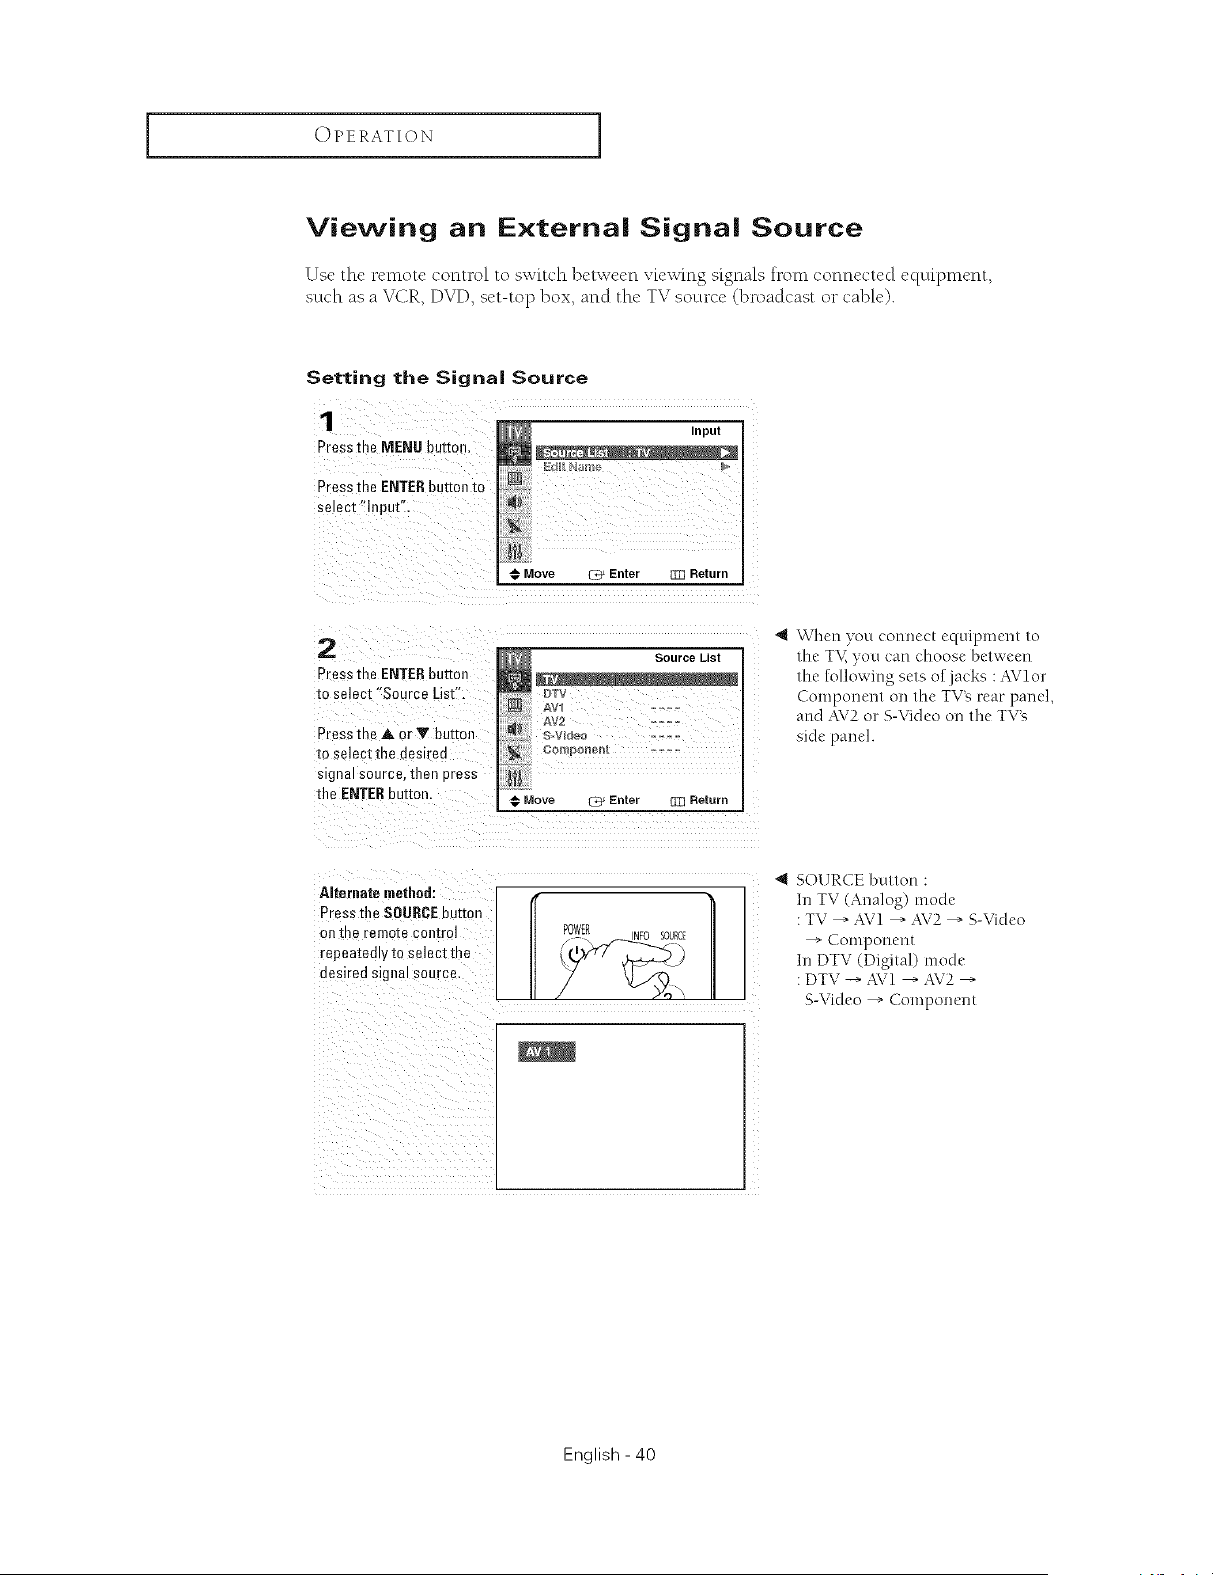
Viewing an E×terna| Signa| Source
Use the remote control to switch betwcen v_cwing s_gnals h>m connectcd cquipmcnt,
such as a VCR, DVD, set-top box, and the TV source (broadcast or cable).
Press tee MENU button.
Press the ENTERbutton to
select "Input".
Inpul
Move _ Enter _ Return
2
Pressthe ENTERbutton
to selec[ "SourceList".
Press the a, or Y button
to select the desirea
signal source, then Dress
the ENTERbutton.
Source Llsl
DTV
&V1 .......
Move _ Enter []Z] Return
41 When you connect equipment to
the TK you can choose between
the following sets of jacks :AVlor
Component on tile TV_ rear panel,
and AV2 or S-Video on the TVN
side panel.
Alternate method:
Press the SOURCEbutton
OR[Re remo[e control
repeatedly to select the
desired signal source.
4 SOURCE button :
In TV (Analog) mode
: TV --" AV1 --, AV2 --, S-Video
--> COlllpollent
In DTV (Digital) mode
: DTV -+ AV1 --_AV2 --_
S-Video -" Component
English - 40
OPERATION I
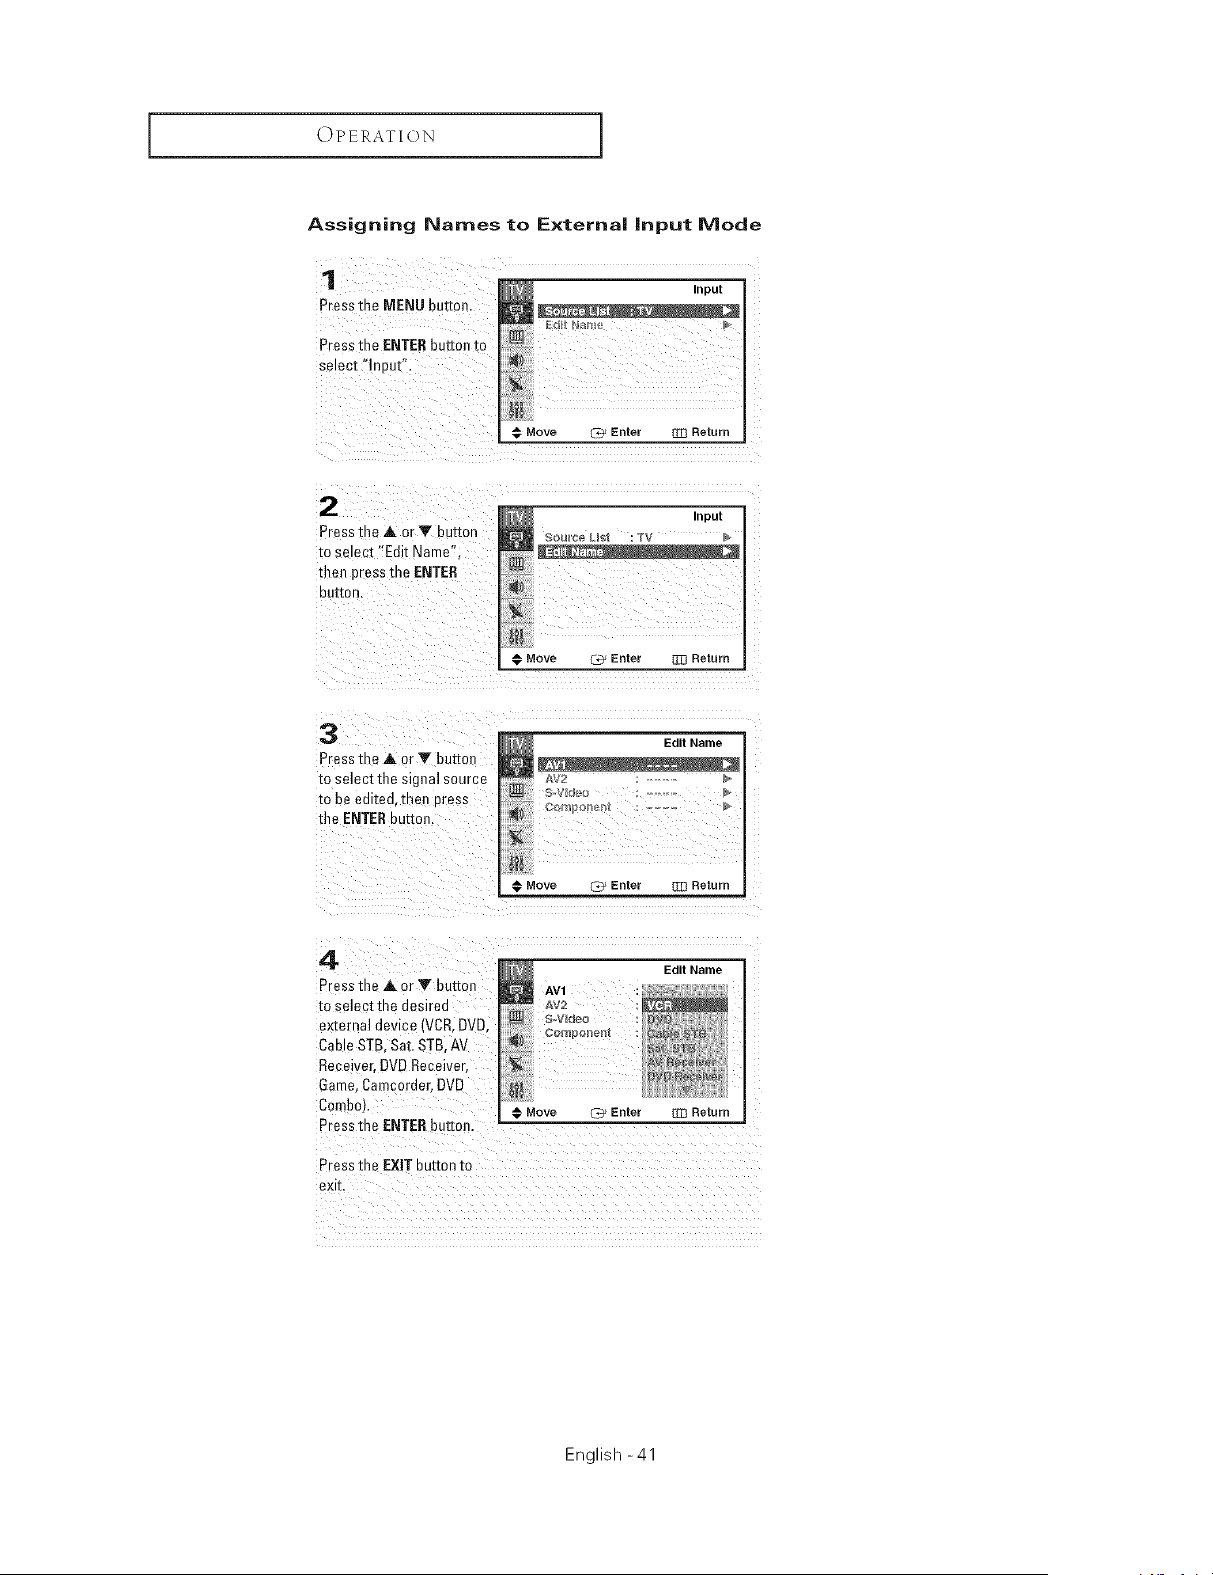
Assigning Names to E×terna| |nput Mode
1
Press me MENU button
Press the ENTERbutton zc
select "Inapt"
@ Move L_ Enter Z]3 Return
Presst_AorTbuRon
to select "Edit Name".
then pressthe ENTER
DU_OR,
Move _ Enter _ Return
3
Press the A or Y button
to select the signal source
to be eal[eo, men Dress
file ENTERbutton.
€ Move Q* Enter _ Return
4
Pressthe akor Y button
to selec[ me desired
external device (VCR,DVD,
Cab e STB. Sat. STB.AV
Receiver. DVDReceiver,
Game, Camcorder.DVD
Combol.
Press me ENTERbutton.
Press me EXIT bu[mn tc
exk.
EdltName
AV1
&V2
_V_de_
English -41

SPECIAL FEATURES
Fine Tuning Channels
Thc Fmc Tuning function lets you manually ad]ust the TV_ tuner if you havc difficulty
tuning channels.
1
Press the MENU button,
Press the A or Y button
to select "Channel". then
press me ENTERbutton,
Channel
Add/DeUe_
Move ¢Z_ Enter El] Return
2
PresstheAorYbuRon
[o select"Fine Tune"
then Dressthe ENTER
bu_or
Press me 4 or D,,butto_
[o aojust the fine tuning.
Tostore the fine tunir g
seeing inthe TV's
memow, press the MENU
buttor
Toreset the fine tuning to
"0". select "Reset" by
pressing the A or V
buttor then pressme
ENTERbutton,
Press the EXIT button to
exk
"q The syn'd)o] " * " will appear
nexl to the name o[ the
channels you have adjusted.
English - 42
SPECIAL EEATURES I
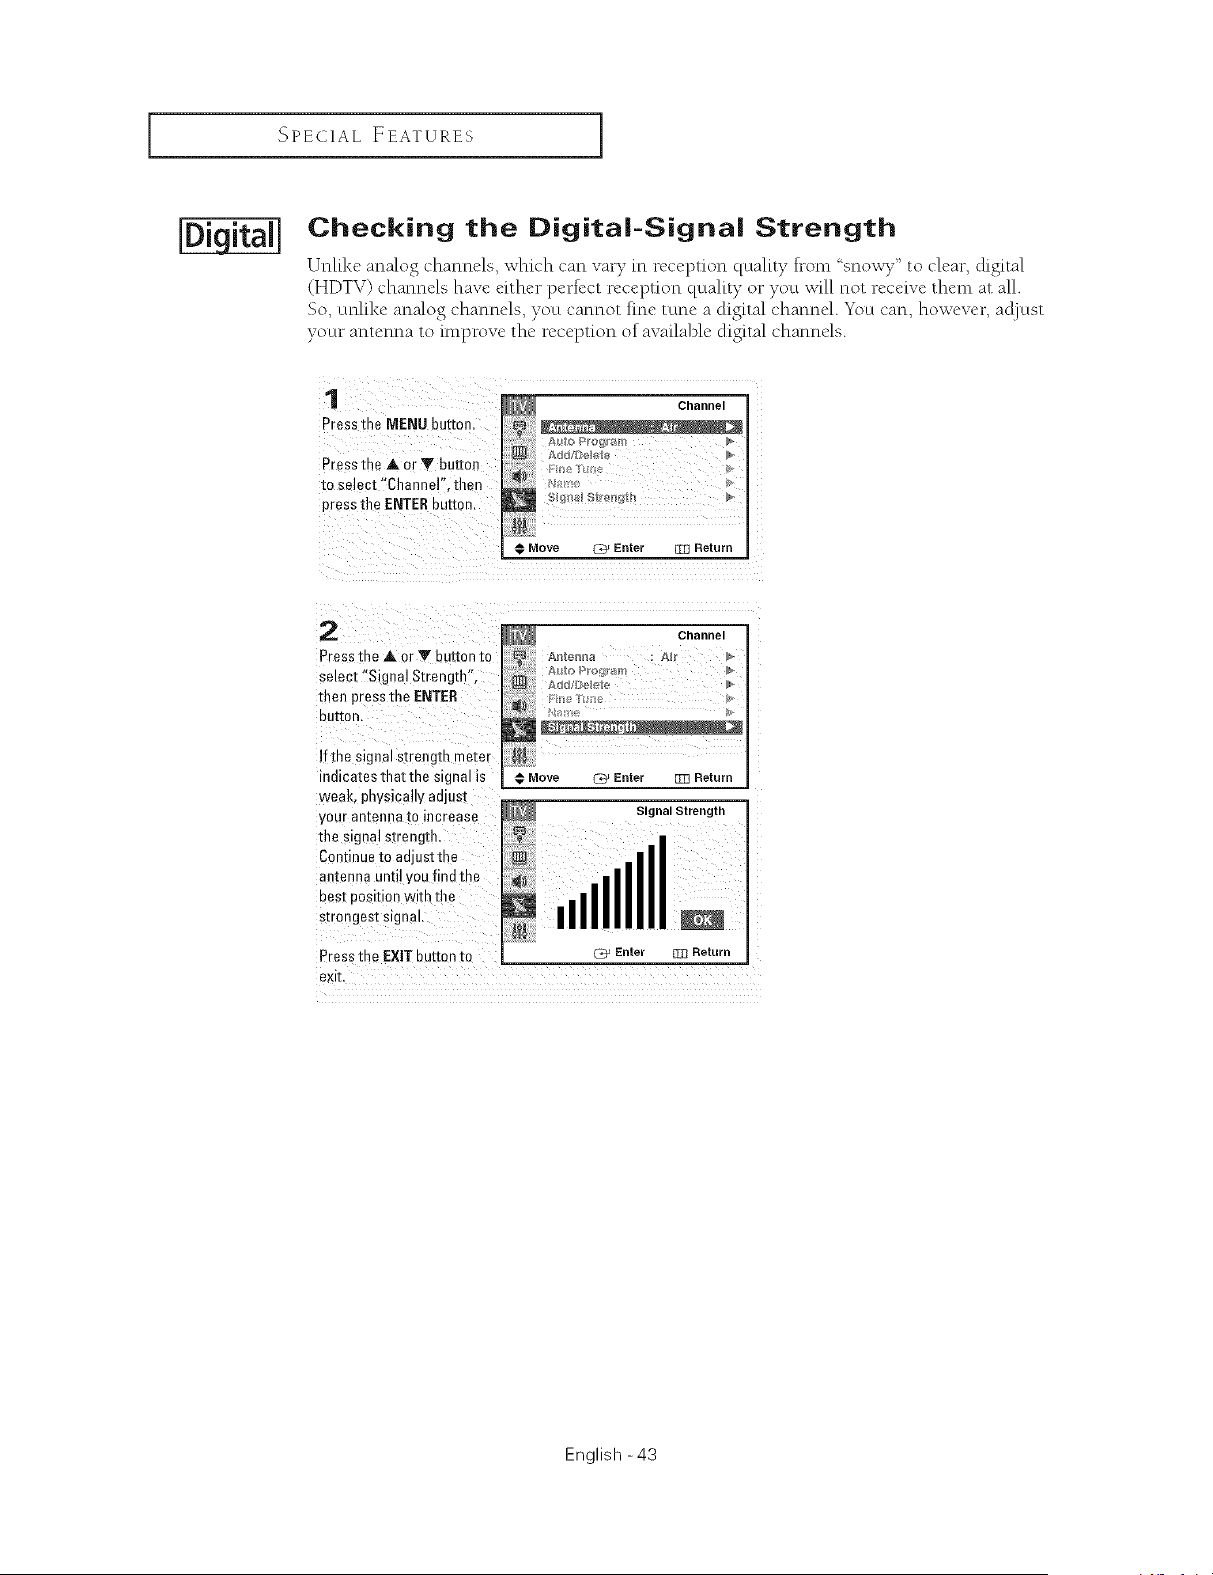
Checking the Digita|=Signa| Strength
Unlike analog channels, which can vary in reception quality from ' snox_ e' to clear, digital
(HDTV) channels have either perfect reception quality or you will not receive them at all.
So, uNike analog channels, you cannot fine tune a digital channel. You can, however, acljust
your antenna to improve the reception of awtilable digital channels.
1
Pres_the MENU button.
Pressthe A. or Y button
to select "Channel". then
press the ENTERbuttar
Channel
a
€ Move _ Enter _ Return
2
Press me ,& or Y button m
smect "Signal Strength".
thee press the ENTER
eat[on,
If the signal strength meter
ndicates that the signal is
weak, physically adjusl
your antenna io increase
the signal strength,
Continue to adjust the
antenna until you find the
Des[ eositlon with the
strongest signal,
Press the EXIT button to
exit.
Channel
Move _q_ Enter 11_ Return
Signal Strength
lull
C_Enter [mRetum
English -43
SPECIAL EEATURES ]
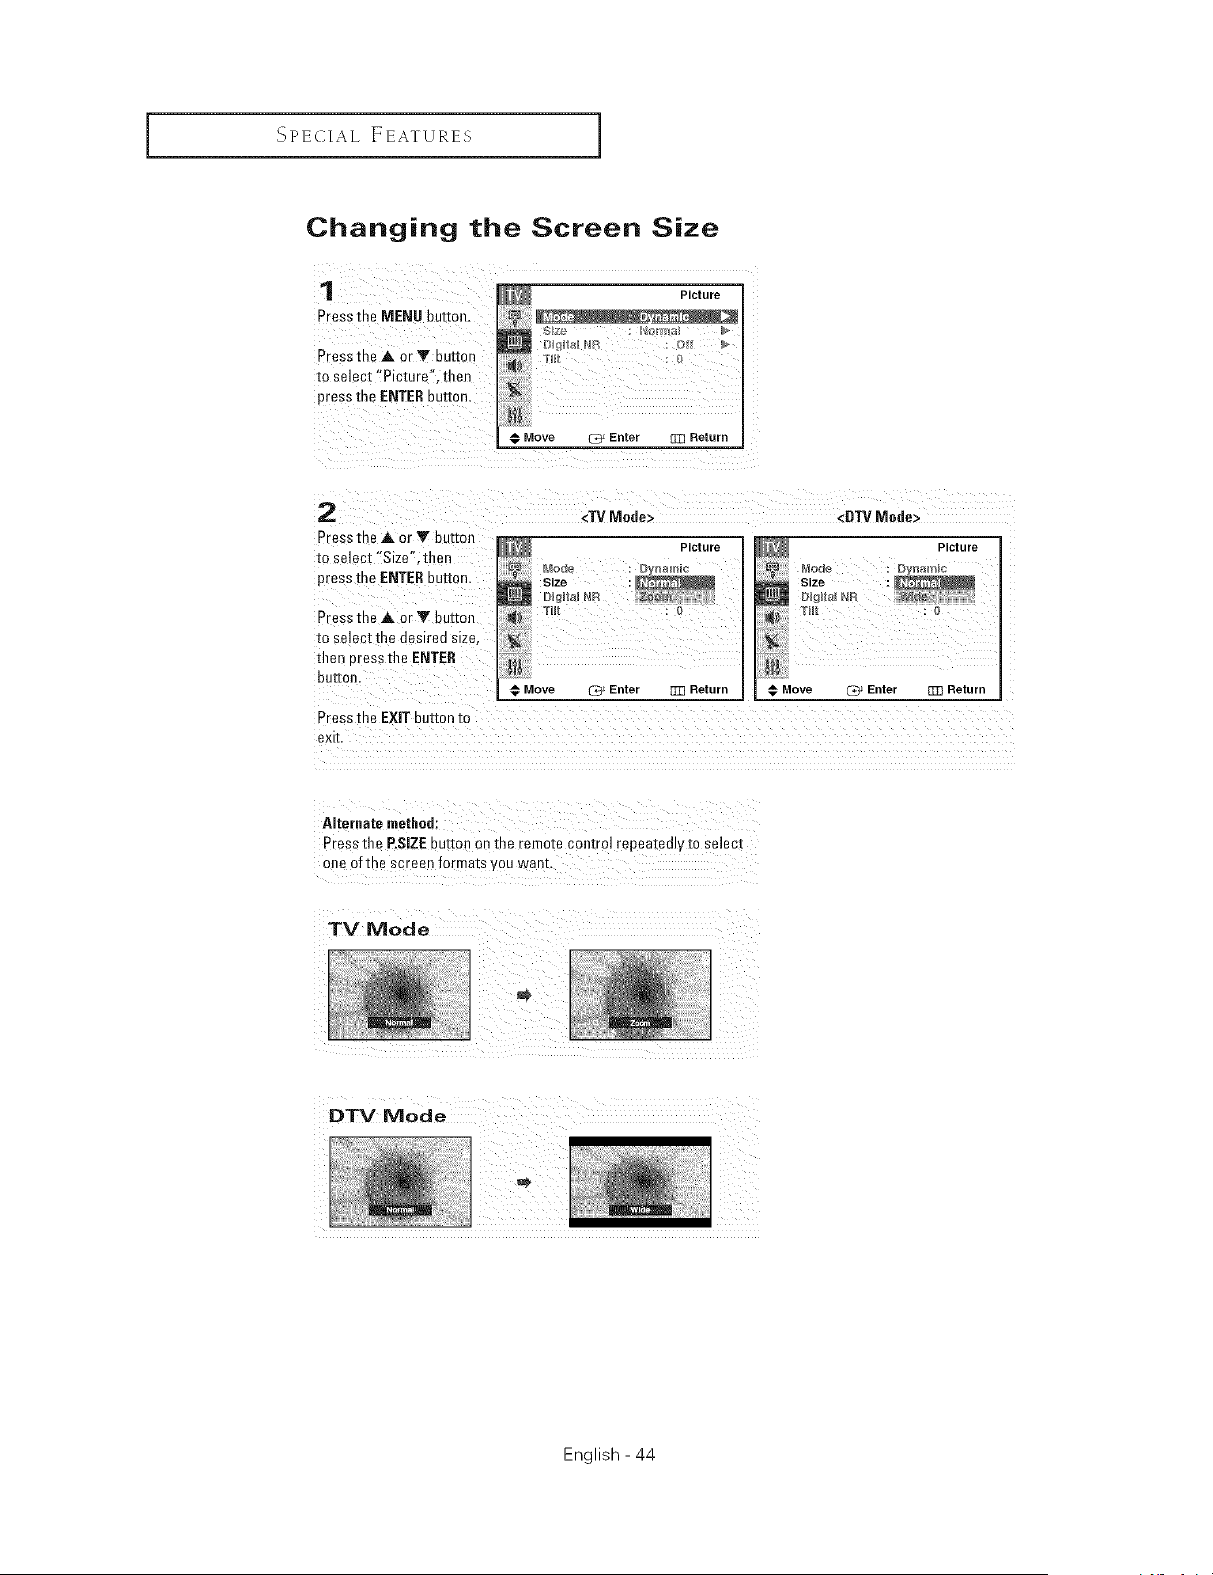
Changing the Screen Size
1
Press the MENU button.
Press theA or V button
to select "Picture". then
press the ENTERbuttor
Picture
Move _ Enter [m Return
2
Pressme ,& or Y button
to select "Size". then
press the ENTERbutton
<TV Mode> <DTV Mode>
Picture _ Picture
Size
DIgst_l N[4
Hit
Press the _. or Y button _ _
select the desired size.
to
tllen eress the ENTER _
buttor
Move _, Enter [m Return _ Move ._, Enter m3 Return
Press the EXIT button to
exit
Press the P.SEE button en the remote control repeatedlv to select
one ofthe screen formats you waat.
TV B/lode
English - 44
SPECIAL EEATURES I
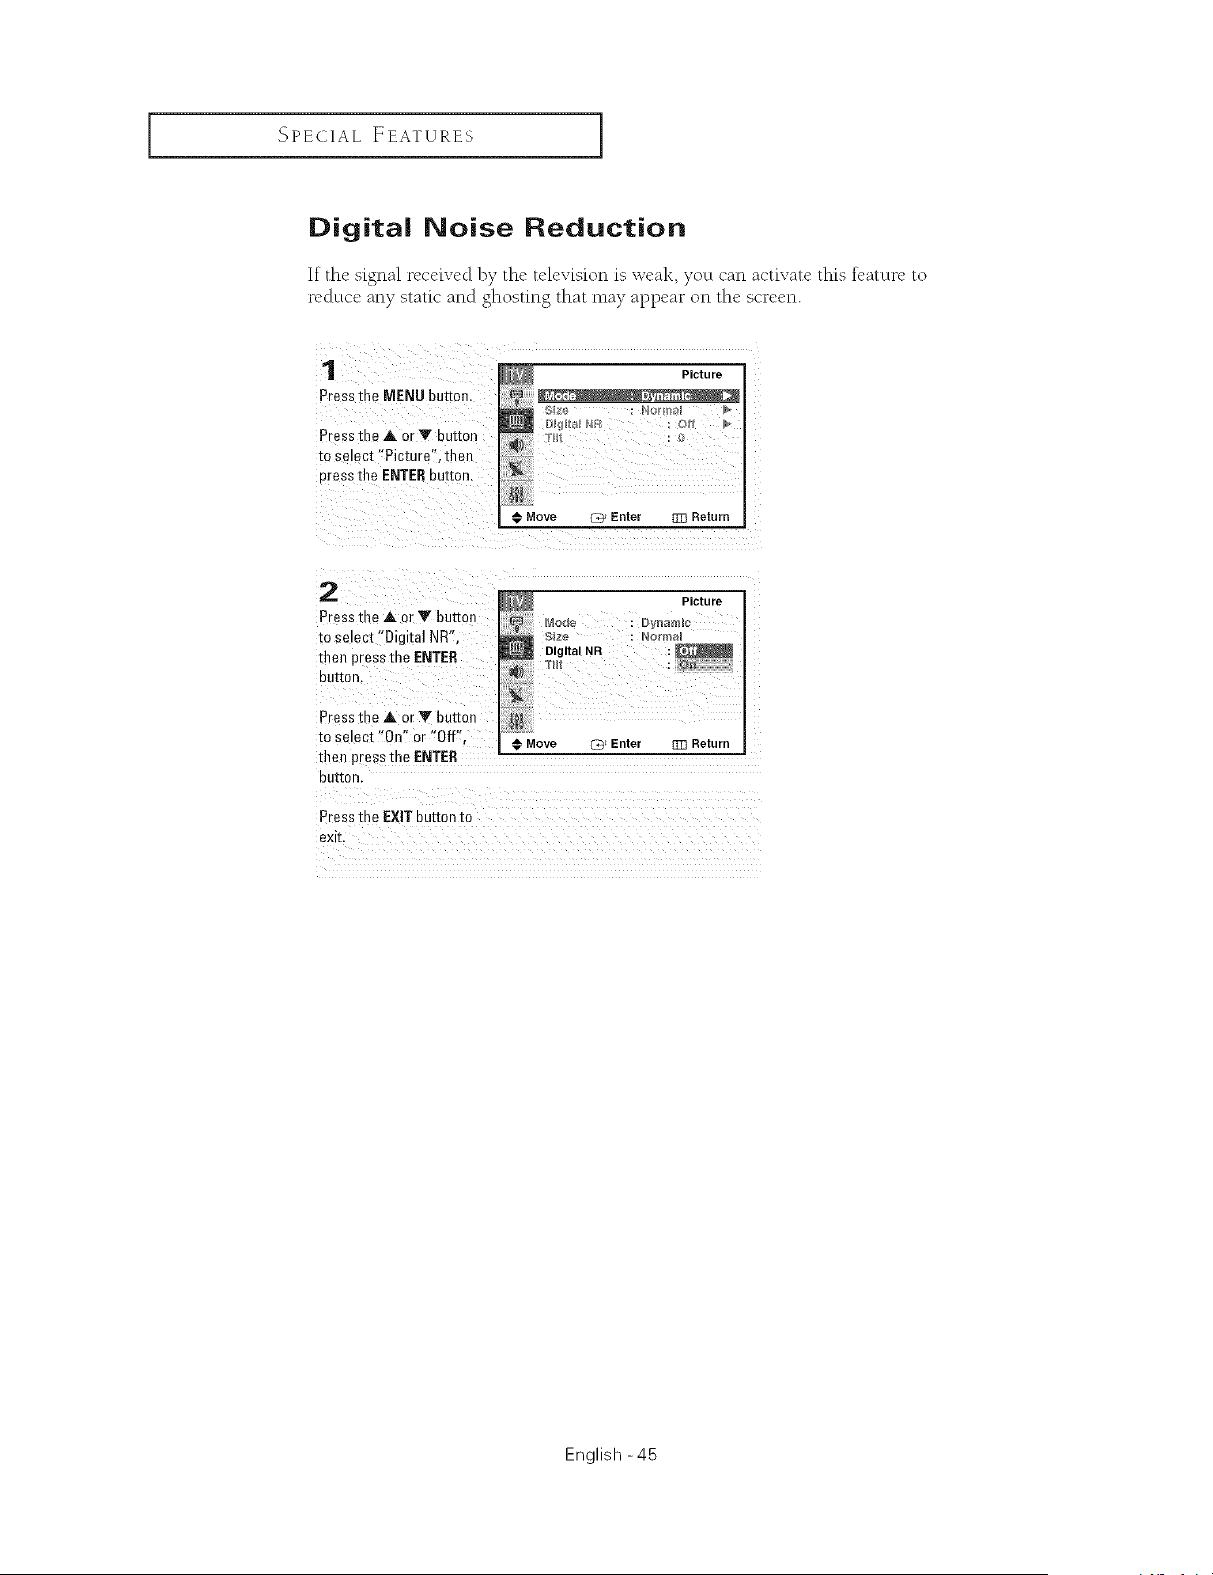
Digital Noise Reduction
If thc skgna] recckvcd by the tclcvksion is weak, you can activatc thks feature to
reduce any static and ghosting that may appea_ _ on the screen.
1
Press me MENU button
Pres _the A or '_' button
_o selec[ "Picture". then
cress the ENTEReuEon,
Picture
C_ Enter 333 Return
2
Press me A or Y button
m select Digital NR'.
then press the ENTER
euI[on
Press the A or T button
to se ect "On" or "Off".
then press the ENTER
DUI[On.
Press tne EXIT button to
eXI]L
@ Picture
S_ze : Norma_
Dl_,to,.R :
Move G0 _Enter _3 Return
English -45
OPERATION ]
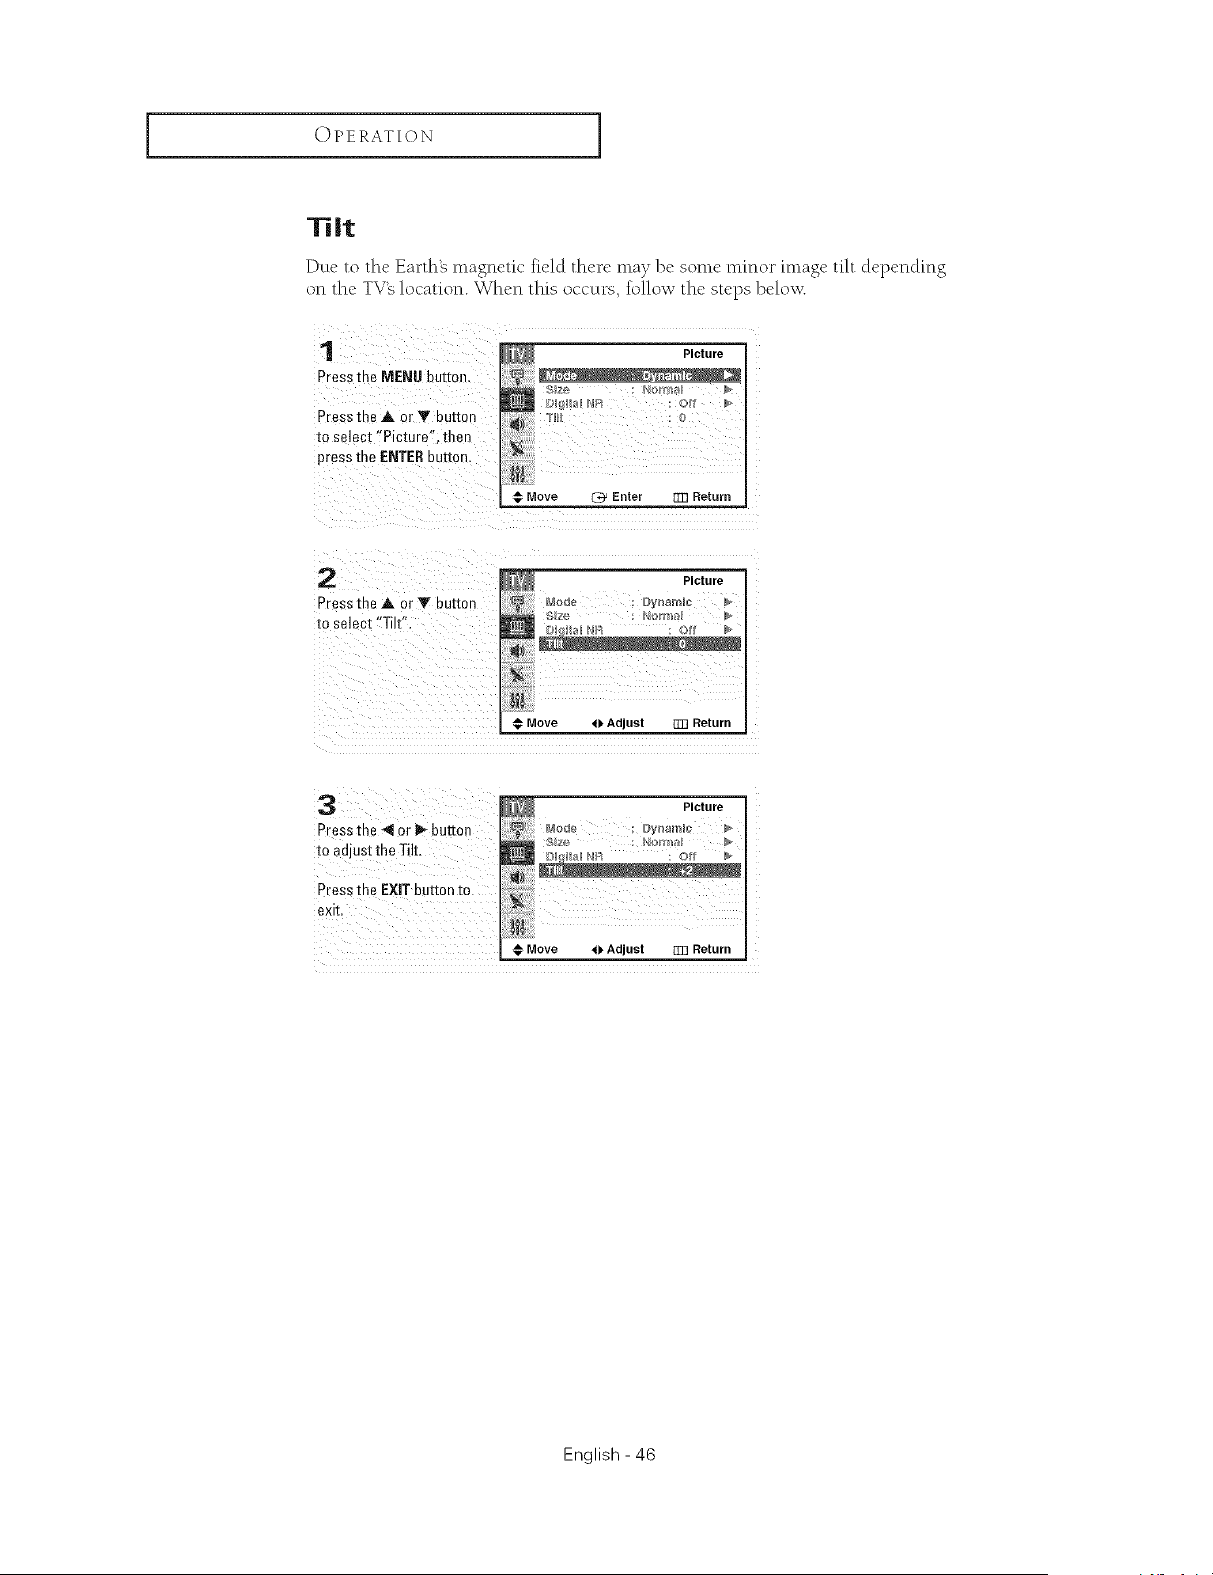
Tilt
Due to the Earthg magnetic field there may be some minor image tilt depending
on the TV_ location. When this occurs, follow the steps belo_
1
Press the MENU button.
Pressthe A or V bu[mn
to select "Picture". then
press the ENTERbu[[o_
@ Move C_ Ente_ rrrlReturn
2
PresstheAor_'bu_on
to select"Tilt".
Picture
N
Move 4_ Adjust EI] Return
3
Press the _ OrI_ button
to adjust the Tilt.
Pressthe EXIT button to
exit,
Picture
Mode Dynamic
€_ Move _ Adjust [113Return
English - 46
SPECIAL EEATURES I
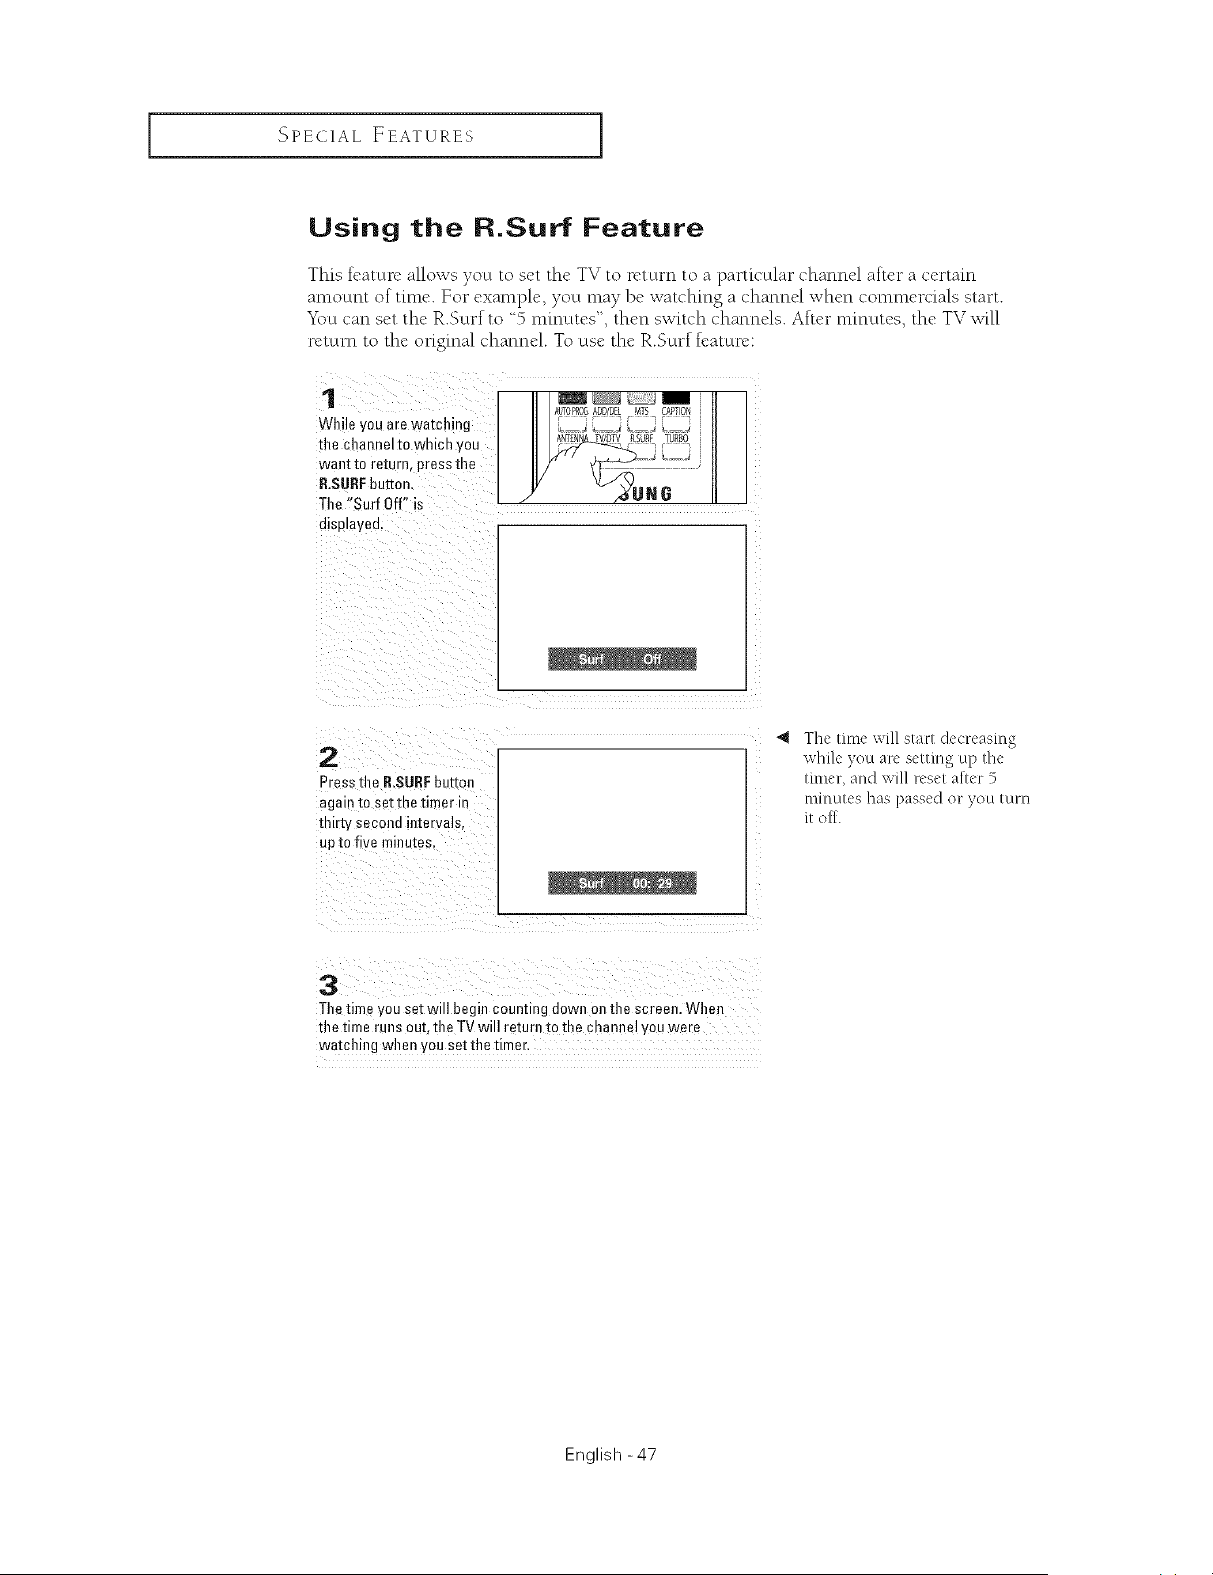
Using the R.Su Feature
This feature allows you to set the TV to return to a particular channel after a certain
amount of time. For example, you may be watching a channel when commercials start.
Yi_ucan set the R.Surf to 5 minutes", then switch channels. After minutes, the TV will
return to the original channel. To use the R.Surf feature:
1
While you are watching
tire channelto which you
wan[ m return, press [Re
R.SURFburton.
Tile "Surf Off' is
displayed.
ALTOPROGADD/DEL MTS CAP'ON
r
Aaron TV/DTV_SURFTU£BO
T_ j
_¢UR8
2
Press tt e R.SURFbuttm
again to set the timer in
thirty second intervals.
up to five minutes
The time will start decreasing
while you arc setting up the
timer, and will reset alter 5
minutes has passed or you turn
it o_[.
3
The time you set will begin counnng down on the screen. When
the time runs ouL the TV will return [o the channel you were
watching when you set the timer.
English -47
SPECIAL EEATURES ]
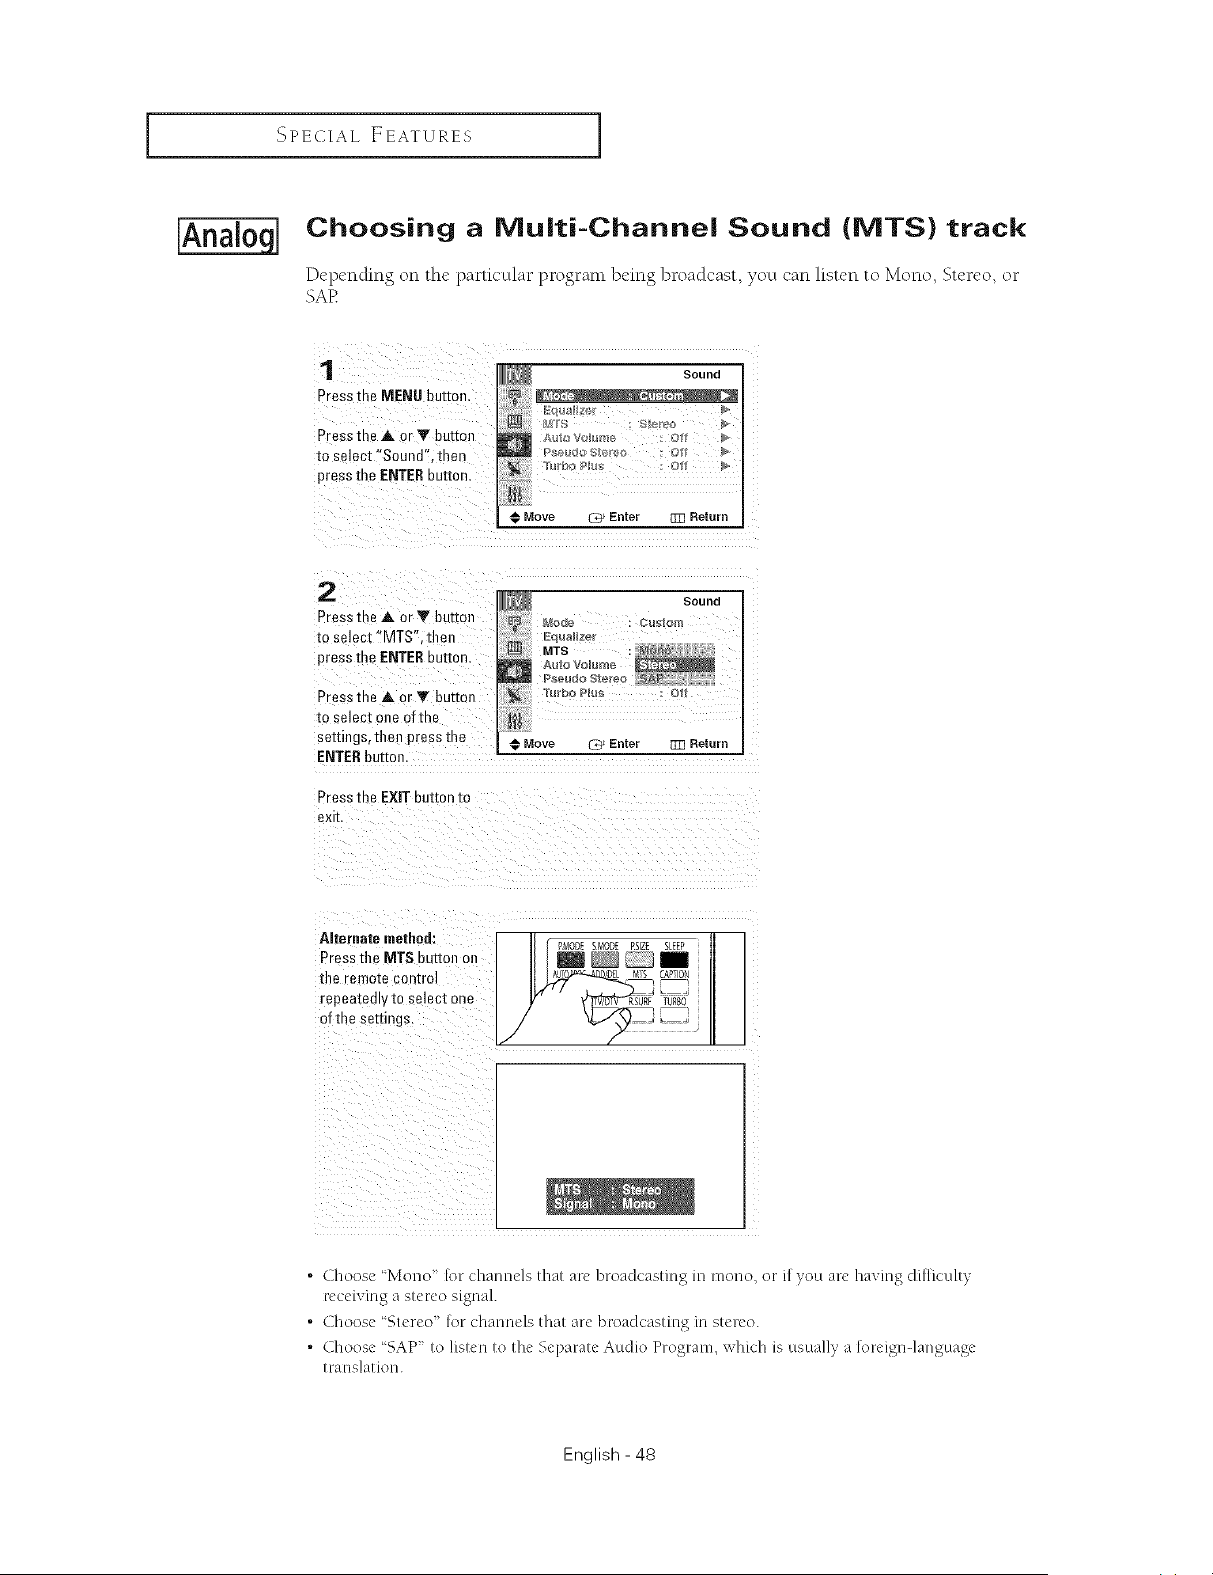
Choosing a IVlu|ti-Channe| Sound (MTS) track
Depending on the particular progranl being broadcast, you can listen to Mono, Stereo, or
SAE
1
Press the MENU button.
Press the A or Y button
to select "Sound". tnen
press the ENTERbutton
J_ Sound
kqu_llze_
M _S " Stereu
Move L@ Enter {_3 Return
2
Pressthe A orY button
re select "MTS". tllen
press the ENTERburror
Press the ,tk or Y button
to select one ofthe
sezdngs,then press me
ENTERbutton.
Press the EXIT button to
exff
Move _ Enter {_3 Return
Alternate method: _,_ PI_ODEst,_or_E'sz_ i
Press the MT$ button on _
the remote control _ _EL MIS i CAPTI@
of the settings, • •
. Choose "Mono" [or channels that are broadcasting in mono, or if you are having diMculty
receiving a stereo signal.
. Choose "Stereo' for channels that are broadcasting in stereo.
. Choose "SAP to listen to the Separate Audio Program, which is usually a loreign-language
translation.
English - 48

SPECIAL EEATURES I
Choosing a IVluiti-Channei Sound (MTS) track
The digital-TV transmission system is capable of simultaneous transmission of many audio
tracks (for example, simultaneous translations of the program into foreign languages).
The availability of these additional 'multitracks" depends upon the program.
1
Press [he MENU button
Press the at or V auttoJl
to select "Sound". ther
Dressthe ENTERuuEon.
Sound
Move C_ Enter 333 Return
2
Press the at or V outtoJl
to select "MTS'.then
Dressthe ENTERbutton.
Press the at or Y buttml
to select the language
you want, then press me
ENTERbutton.
Press tl__ EXIT button to
exit.
Alternate methed:
Press the MTS button on
the remote control to
sten in a languageother
than the favorite
language.
l_lmmpg_gl
English -49
SPECIAL EEATURES ]
Extra Sound Settings (Auto Volume,
Pseudo Stereo, or Turbo Plus)
The following sound settings can be acDusted to suit your personal preferences
Auto Volume
Each broadcasting station has its own signal conditions, which can make it necessary
to aclluSt the vohtme every time the channel is changed. Auto _bhtme" lets you
automatically acljust the volume of the desired channel by lowering the sound octtput
when the modulation signal is high or by raising the sound octtput when the
modulation signal is low
Pseudo Stereo
Pseudo Stereo" converts a monaural sound signal into two identical left and right
channels. Once the Pseudo Stereo" is set to 'On" or 'Off', the setting applies to the
sound effects such as 'Standard", ' Music", 'Movie" and 'Speech".
Turbo Plus
Turbo Plus" emphasizes the bass and trebh h'equencies to add fullness to the sound.
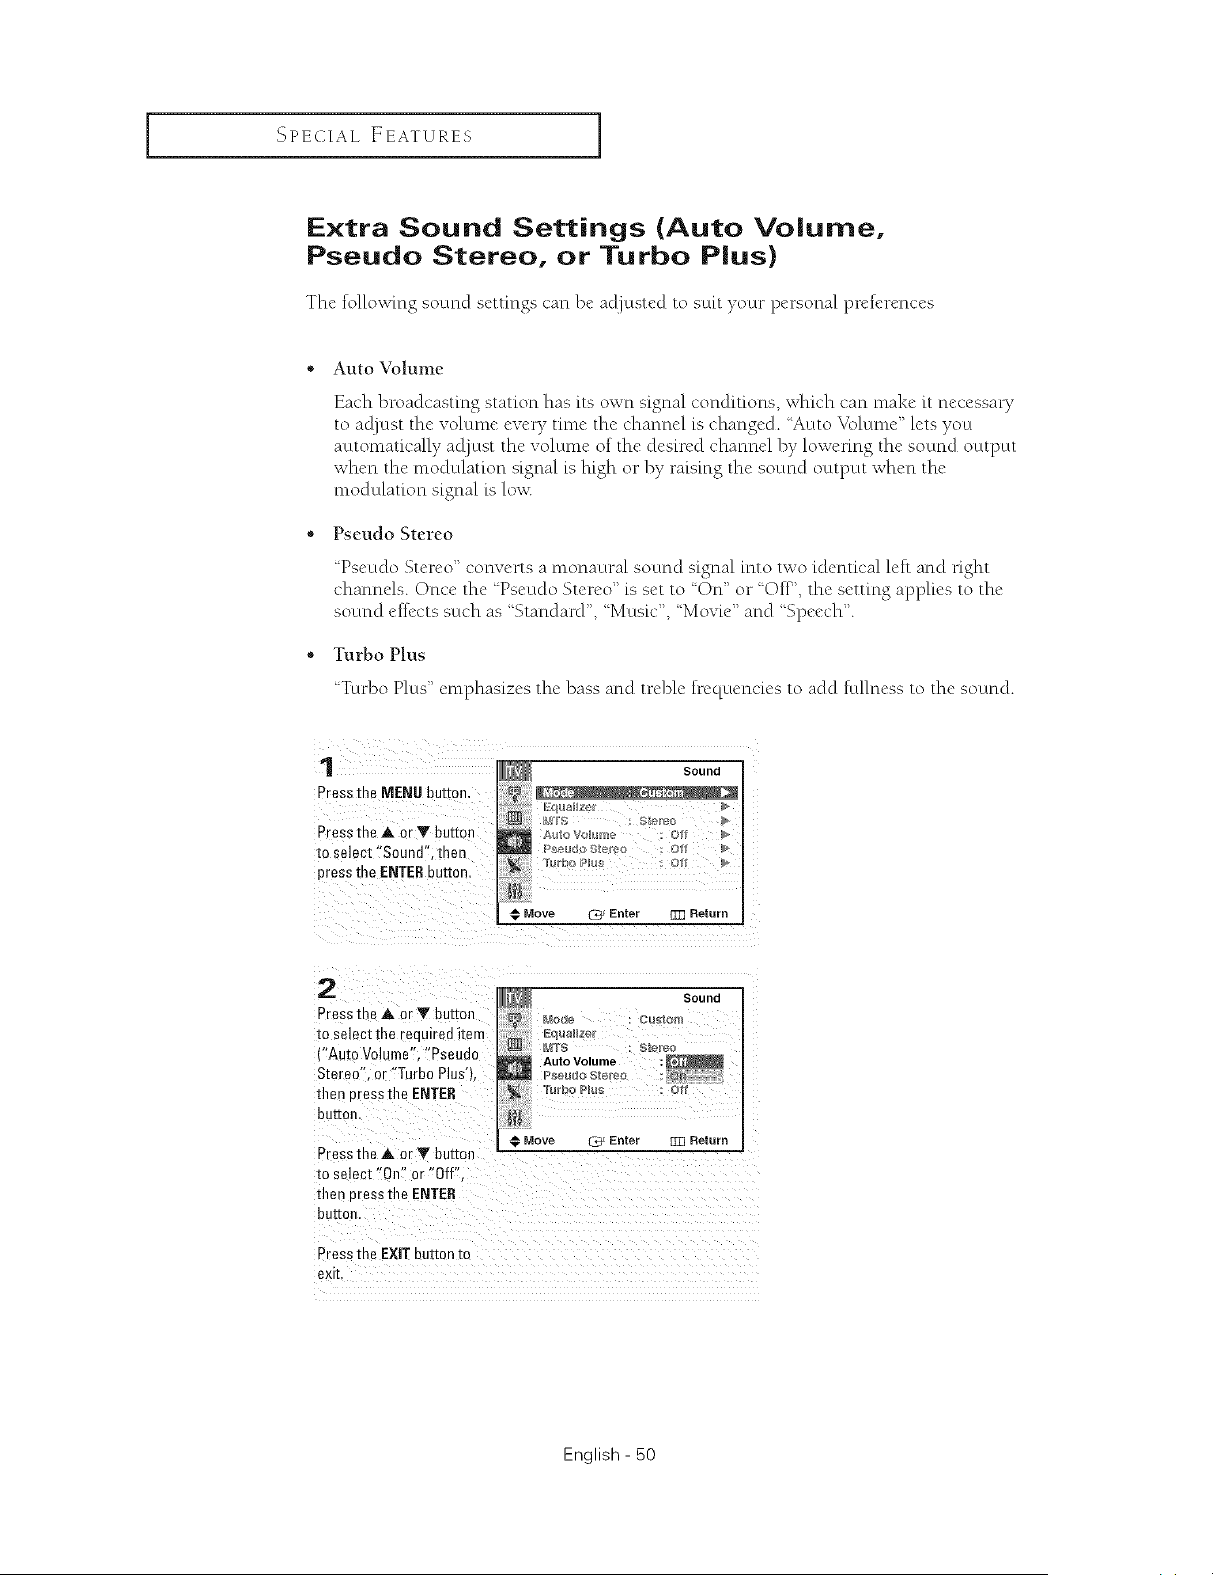
1
Press the MENU button.
Pressthe A. or Y button
m select "Sound", men
press the ENTERbutto_
Sound
Rlrbo Plu, : Ot
Move _ Enter B]] Return
2
Press me A or V button
to select the required item
("Auto Volume". "Pseudo
Stereo = or "Turbo Plusq
then uress the ENTER
button,
Sound
Eqlalzel
w u o = Sl_r÷_
Auto Volume
[UI'DO PlUg : C
li
€ Move % Enter g]] Return
Press the _, or Y button ---
to select "On" or "Off".
titan uress the ENTER
buttor
Press me EXITDuIt0nm
exit
English - 50
SPECIAL FEATURES I
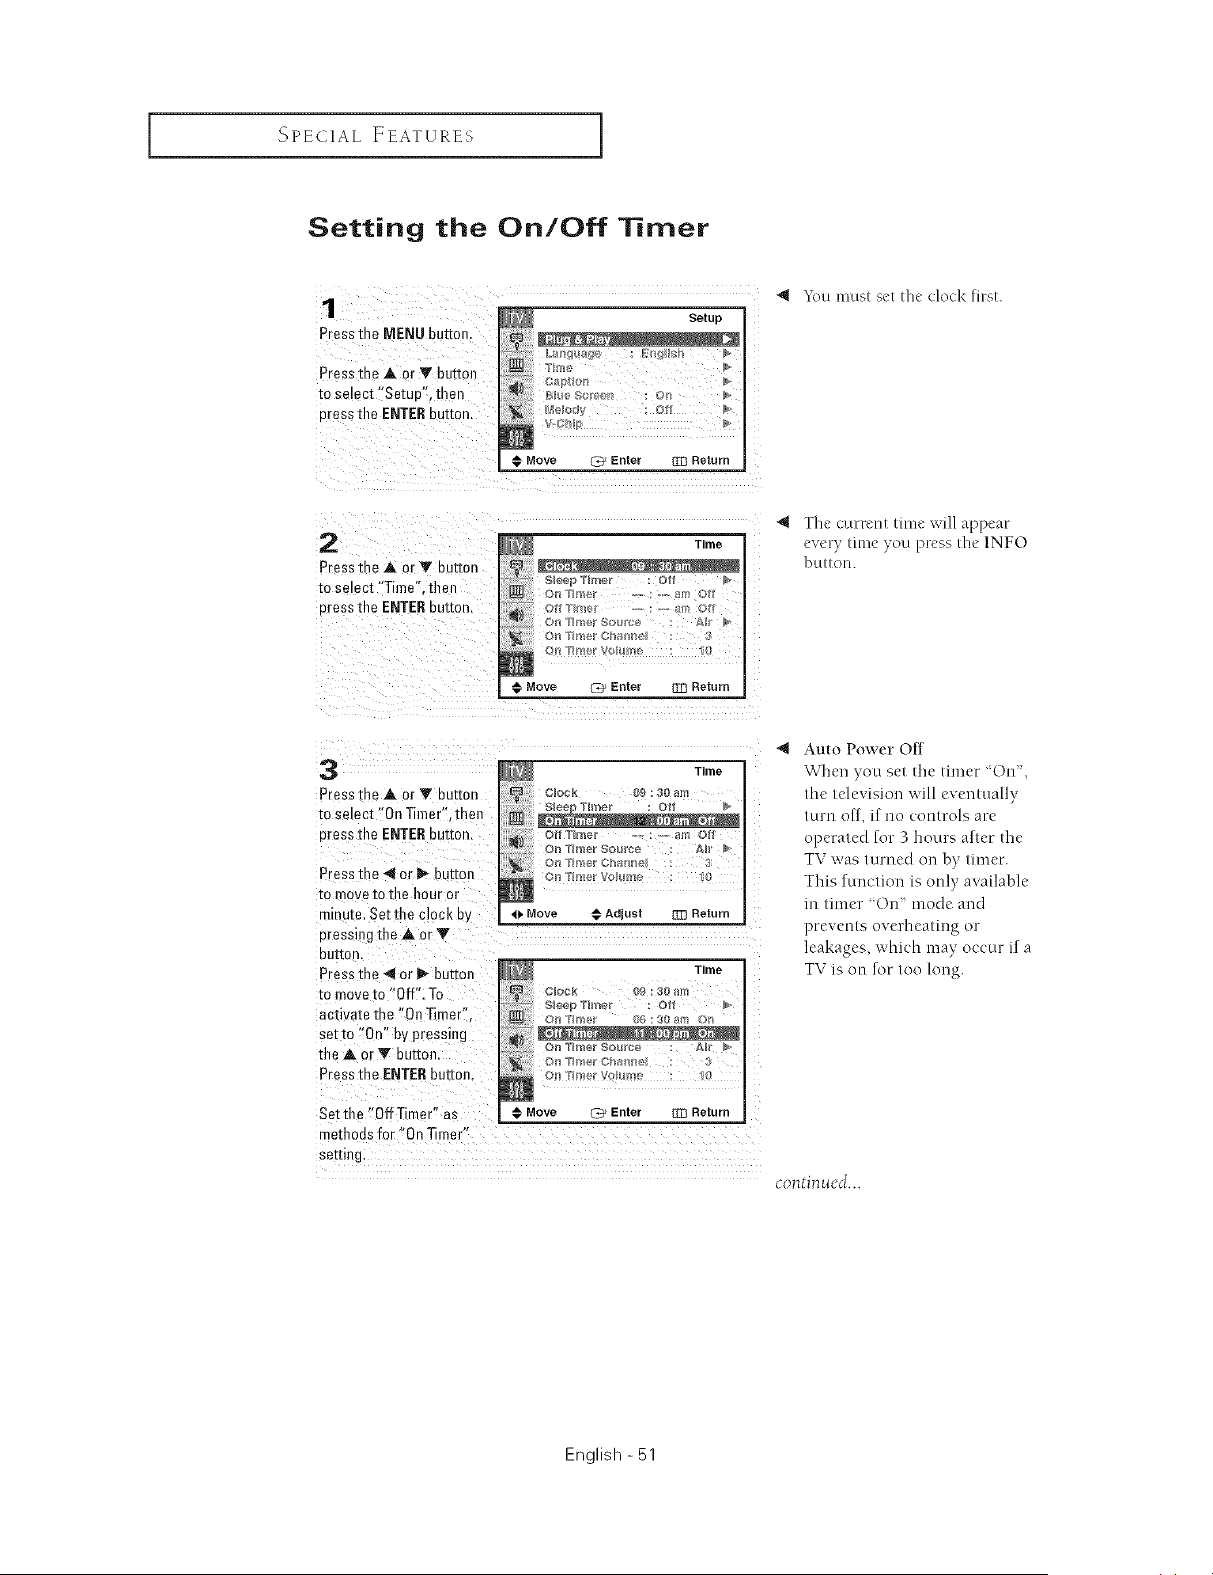
Setting the On/Off Timer
1
Press the MENU button
Press the A or '!v butter
to select "Setuo", then
cress the ENTEReuEon,
Setup
o' 9 '!?- : ,_ _
_ Blue Scrca_ )n
VC
Move (_3_Enter Zl] Return
k%u must set the clock first.
2
Pressthe ,A. or T button
to select "Time". then
eress the ENTERou_mn,
Time
p :
_ Tnrle_ cn_ni_l : 3
€ Move C_ Enter Tn Return
"_ The current time will appear
every time you press the 1NFO
butlou.
3
Press m _ _ or '!_ button
m select "On Timer'.then
Dressthe ENTEReu_mn,
Press the -'_or _ button
mrnove to the hour or
mlnJte. Setthe clock b'_
Dressirg the A or
euI[on,
Press me _1or _ button
to move to "Off". To
activate the "On Timer".
setto "On" by pressing
the _ orY button,
Press the ENTERbutton,
Setthe "0ffTimer" as
Time
_m
S_e T_m÷r :Oti
N
O_t tlg_f_@r ,, : -_,_ all/ OH
4b Move @ Adjusl ]ZI Return
Time
CIOCR O_ ue ar4
Sleep "l'h_/er :Ott I
€ Move _ Enter Z_] Return
me_hodsfor "On Timer"
seeing.
Auto Power Off
Wqlen you set the timer "On",
the television will eventually
turn off, if no controls are
operated for 3 hours alter the
TV was turned Oll by timer.
This function is only available
m timer '011 mode and
prevents overheating or
leakages, which may occur if a
TV is on for too long.
continued...
English - 51
SPECIAL EEATURES ]
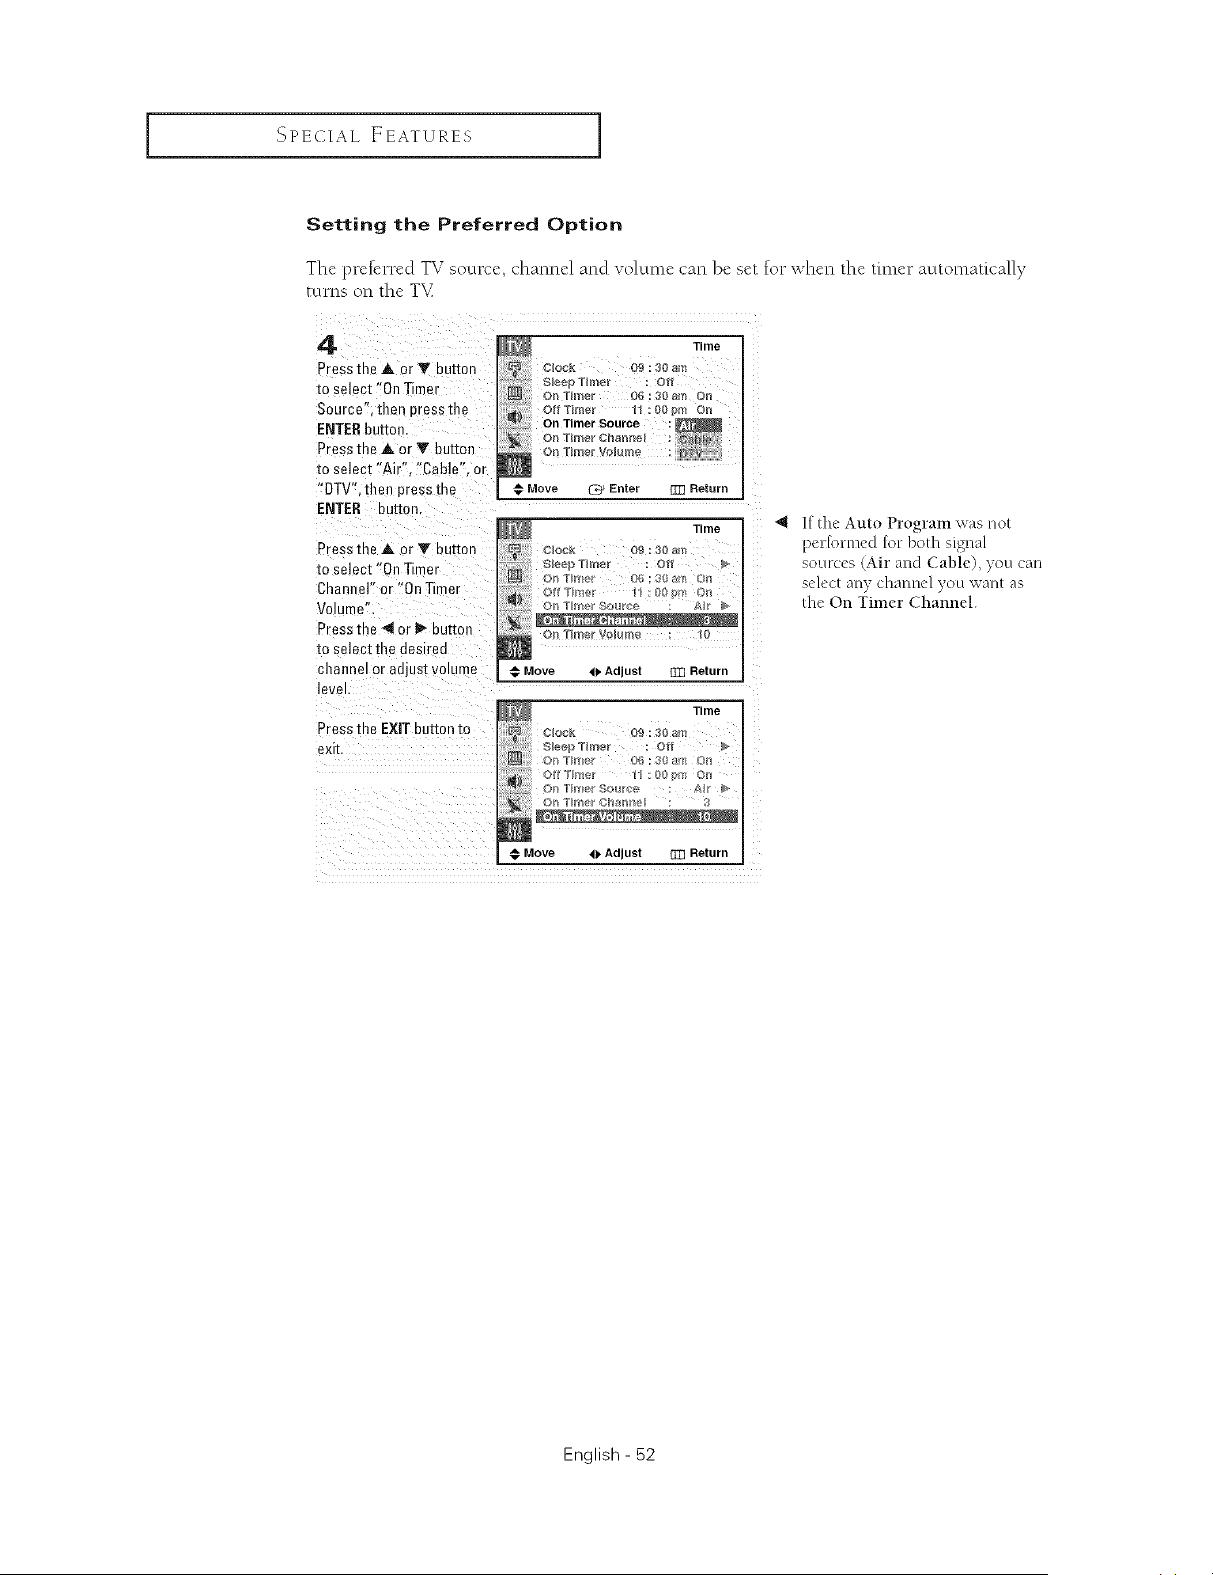
Setting the Preferred Option
Thc preferred TV socux:c, channel and volume can bc set for when the timer automatk'ally
turns on the T'v_
4
Press the A or Y button
to select "On Timer
Source" allen oressthe
ENTER button.
Press the _, or Y button
to select "Air" "Cable". or
"DTV', then press the
ENTER euuon.
Press the _ or Y buuon
to select "On Timer
Chant el" or "On Timer
Volume"
Press the 4 or I_ button
to selec[ me desireo
channel or adjust volume
evel.
Press the EXIT button to
exit
Time
Clock 09 : 30 am
On Timer Vo_ me 10
Move <1. Adjust [m Return
Move ,I), Adjust []Z_ Return
4 If the Auto Program svasnot
per[ormed [or both signal
sources (Air and Cable), you can
select any channel you want as
the On Timer Channel.
English - 52
SPECIAL EEATURES I
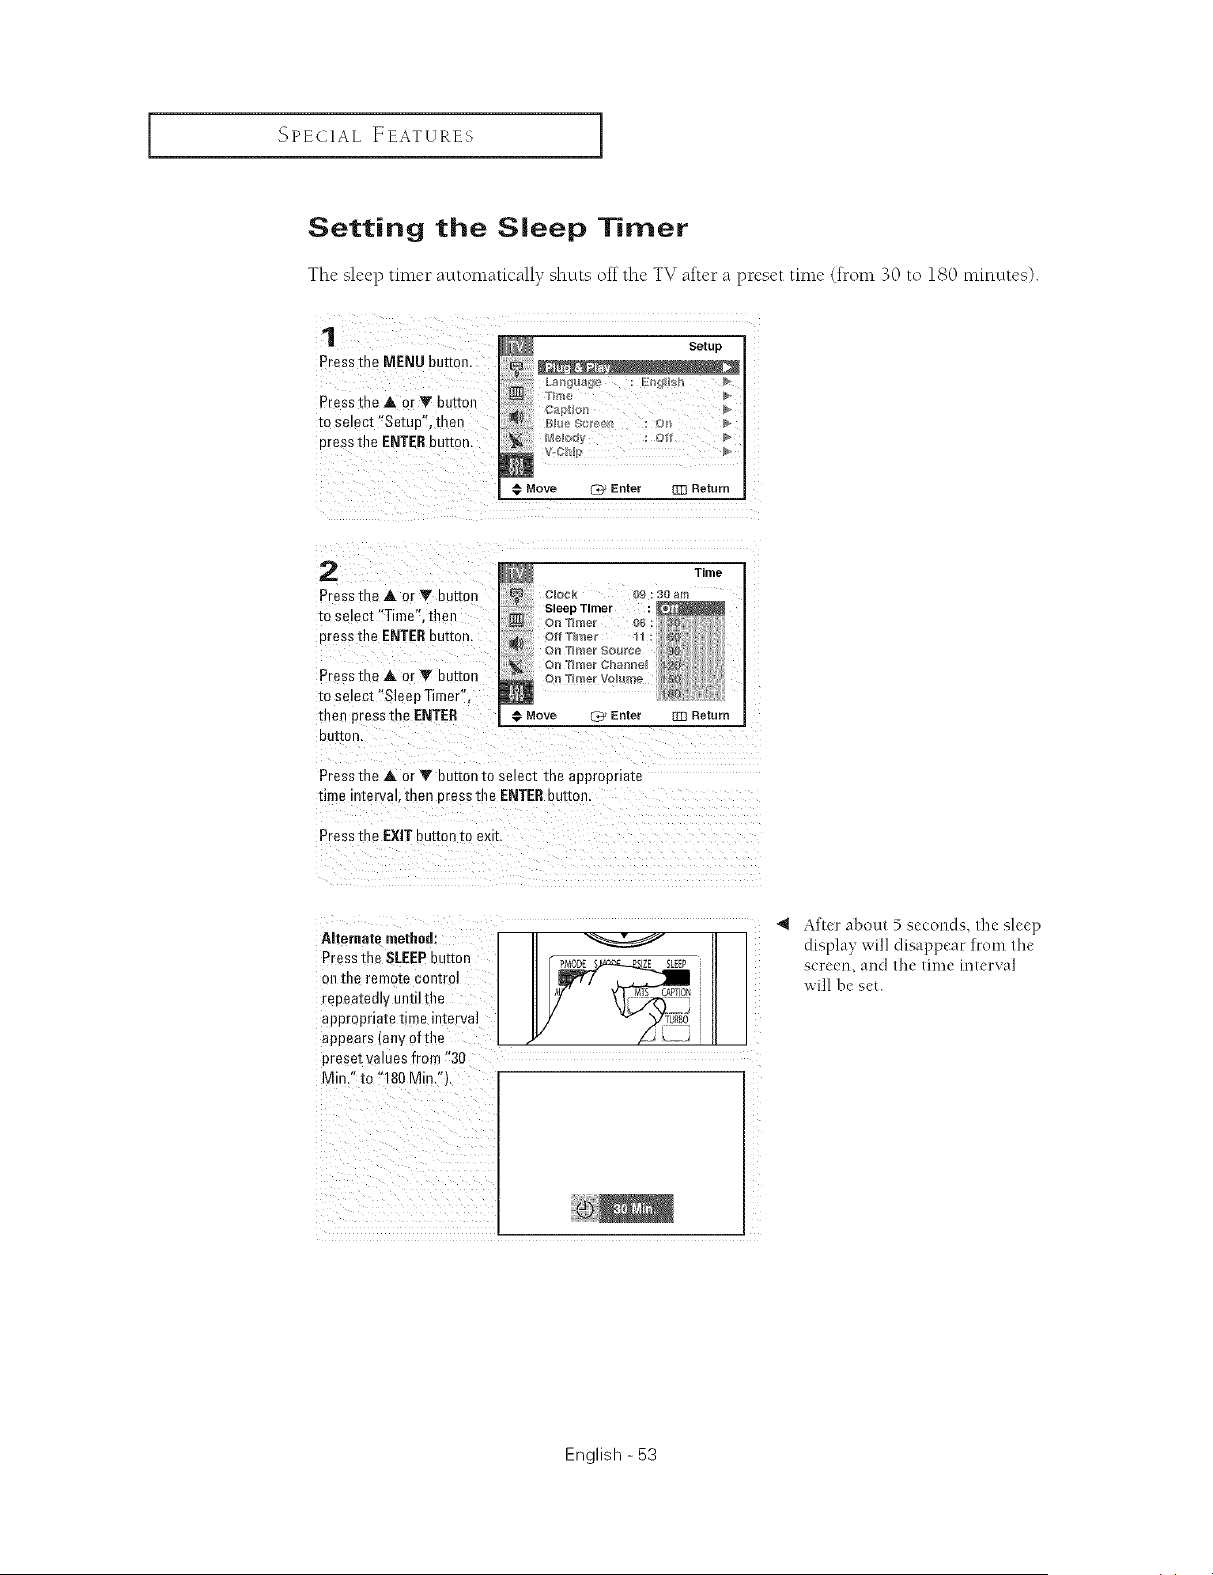
Setting the Sleep Timer
The sleep fime_ _ automatically shuts off the TV afte__ a p_'eset time (trom 30 to 180 mmutos).
1
Press me MENU kut_on
Presstl __ A or V butter
m selec[ "Setup", then
cress the ENTERbutton.
Setup
ii) CSPH_Fn
CUl
€ Move @ Enter 33] Return
2
Pressthe A or T button
mse ect "Time". then
oress the ENTERouEon.
Press the A or V button
m se act "Sleep Timer".
then press the ENTER
out[on.
Time
€ Move C_ Enter TR Return
Pressthe A or Y button to semcr rne appropriate
time a[er\ ak men E"essthe ENTERbutter
Pres _the EXIT button m exit.
Alternate methed:
Press the SLEEPbutton
oil the remote con[re]
repeatedly until the
appropnate time interval
appears (any of tile
preset w ues from "30
Min."to "180 M n."t.
PMO9_ M_c_Jk--PS ZE SLEEP
__A _; MTS CA_ToRBoON_.
4 After about 5 seconds, the sleep
display will disappear from the
screen, and the time interval
will be set.
English - 53
SPECIAL, EEATURES ]
IAnalog
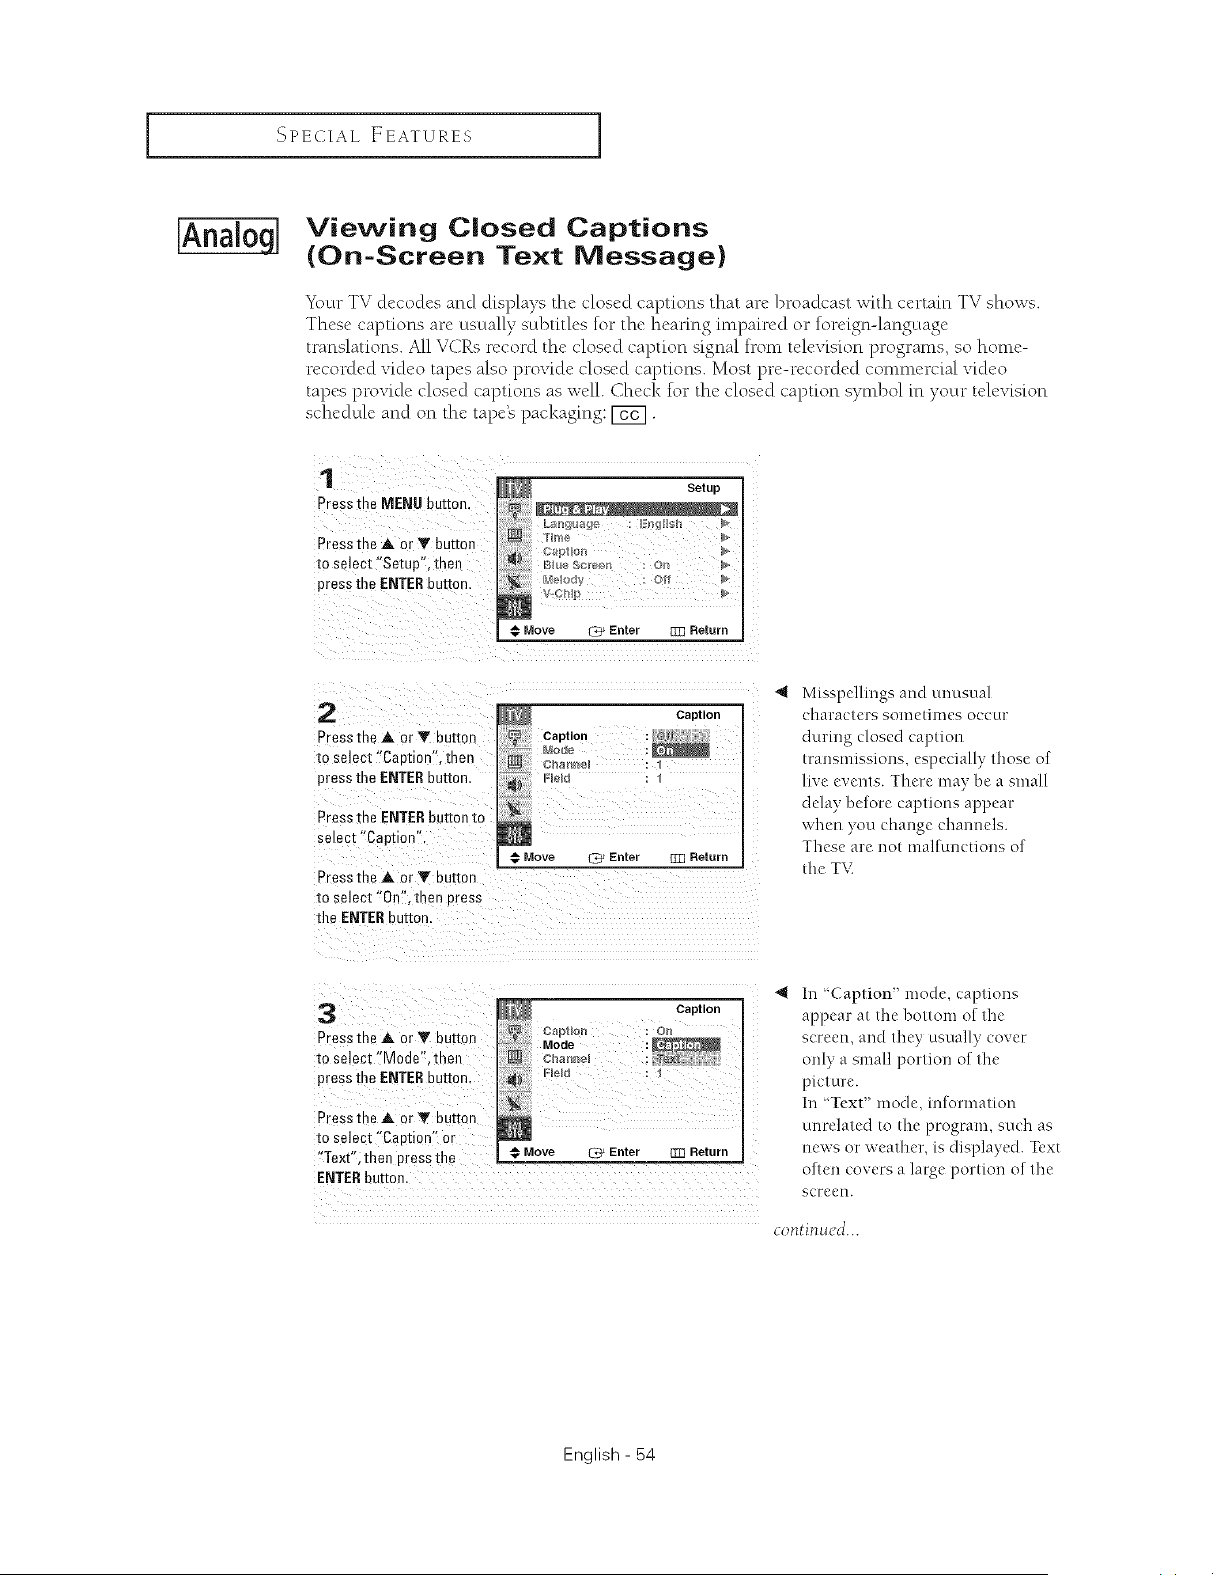
Viewing Closed Captions
(On=Screen Text Message)
Yi_ur TV decodes and displays the closed captions that are broadcast with certain TV shows.
These captions are usually subtitles for the hearing impaired or foreign-language
translations. All VCRs record the closed caption signal from television programs, so home-
recorded video tapes also provide closed captions. Most pre-recorded commercial video
tapes provide closed captions as well. Check fo__the closed caption symbol in your television
schedule and on the tape_ packaging: [7_].
1
Pressme MENUbutton.
Press the A. or Y button
[o select "Setup", then
press the ENTERbutto_
Setup
€ Move Z:_ Enter []33 Return
2
PressmeA orV button
lo select "Caetion".then
Dressthe ENTERbuttor
Press the ENTERbutton to
select "Caption".
PressmeAorYbu_on
to select'0n".men Dress
the ENTERhuEon.
Caption
Caption
€ Move _ Enter [m Return
Misspellings and unusual
characters sometimes occur
during closed caption
transmissions, especially those of
live events. There may be a small
delay before captions appear
when yon clnange channels.
These are not malfunctions of
the TV.
3
Pressthe A or Y button
m select "Mode".then
pressthe ENTERbutton
PressmeAorYbutton
to select"Caption" or
"Text" then eressthe
Caption
:
€ Move _ Enter Rqq Return
ENTERbutton,
In 'Caption" mode, captions
appear at the bottom of the
screen, and they usually cover
only a small portion of the
picture.
In 'Text" mode, information
unrelated to tile program, such as
news or weather, is displayed. Text
often covers a large portion of the
screen.
continued...
English - 54
SPECIAL EEATURES I
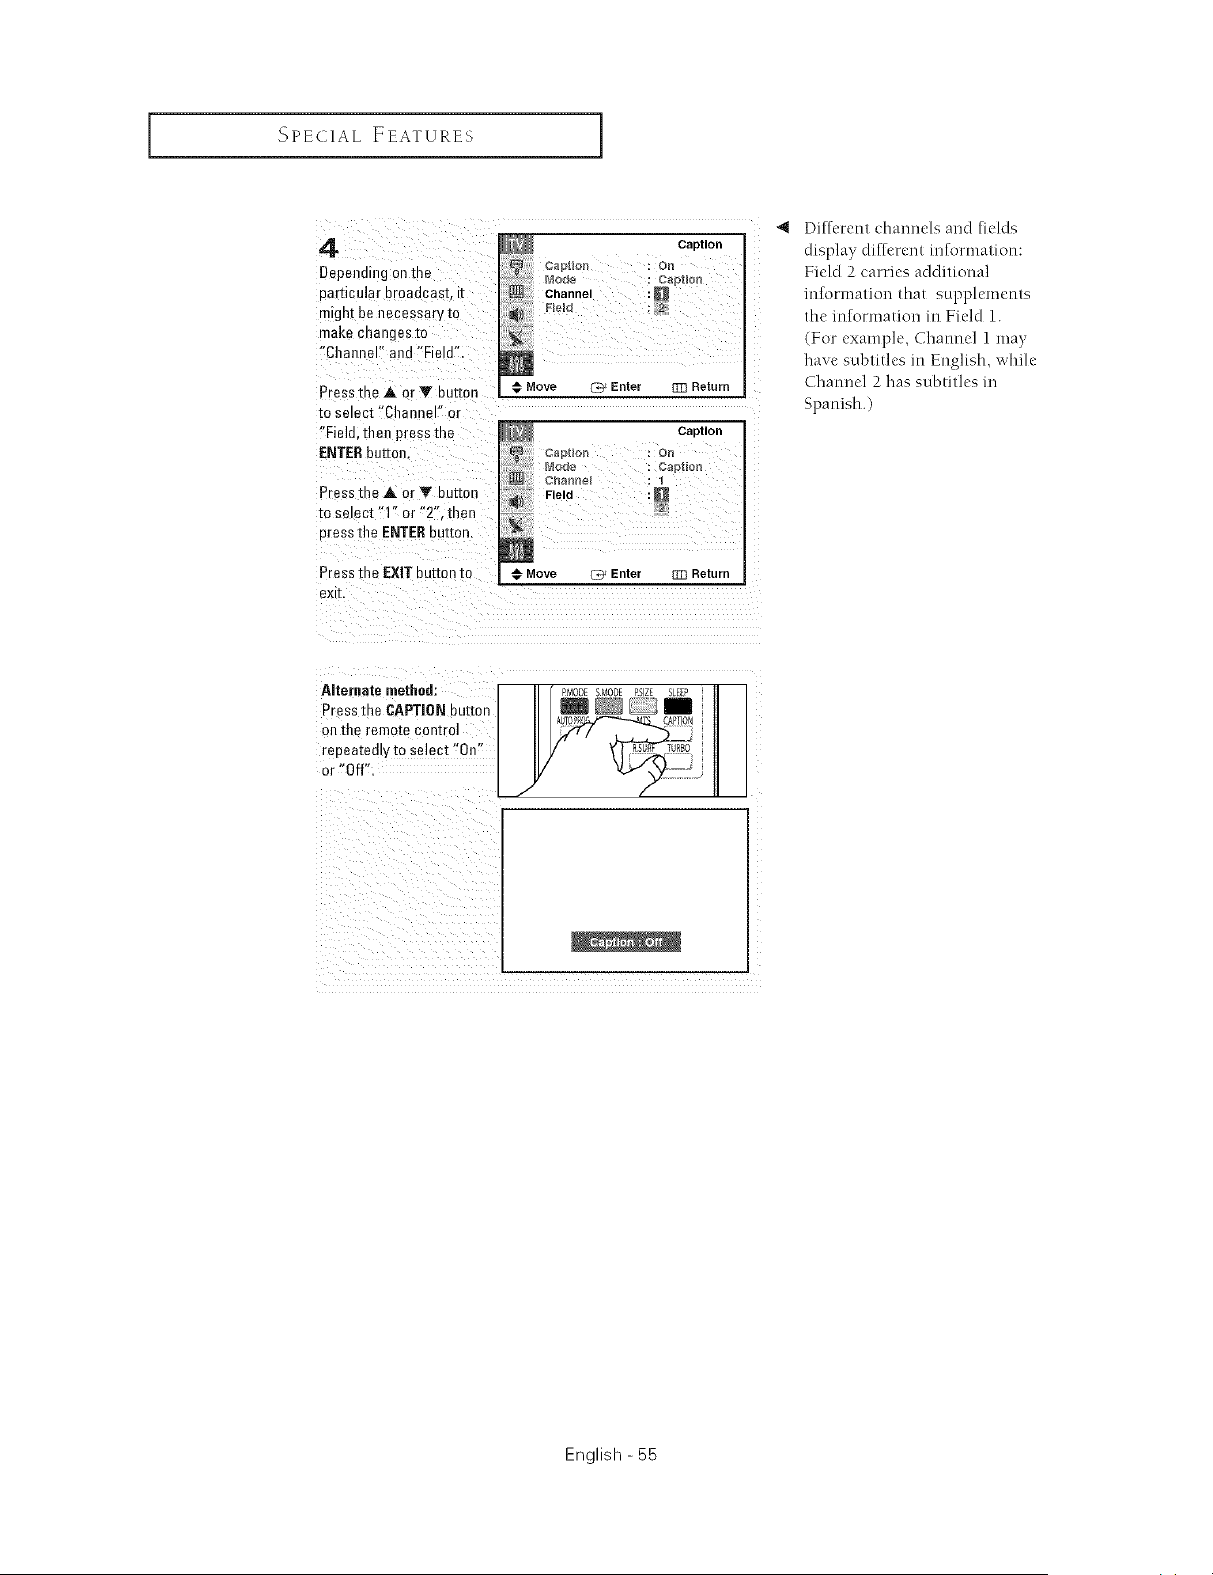
4
Depend ng ontne
narticular broae :asL E
m_ghtbe necessary to
make enanges re
"Channel" ana "Field",
Pressthe ,A. or _' button
to select "Char _el" or
"Field. then press the
ENTERbutton
Pressthe A or V button
re se oct "1" or "2",then
uress tile ENTERButton.
Caption
r2apHon : Ol'_
_ ..... Mode : Captk_n
Channel :_
€ Move LTY Enter g]] Return
Caption
L Mode : C_ption
Chan_e_ : 1
,_ Feld :
Press the EXIT button m # Move _ Enter rrrl Return
exit,
"_ Different clnannels and fields
display diflcrent infi)rmation:
Field 2 carries additional
reformation that supplements
the information in Field 1.
(For example, Channel 1 may
have subtitles in English, while
Channel 2 has subtitles in
Spanish.)
Alternate method:
Press me CAPTION _utmn
on the remoze control
repeatedly to select "On"
or "Off".
A_ PMODE SMODE RSZE SLEEP
AUTOPR CAPTON
NRSO
English - 55
SPECIAL EEATURES ]
Viewing Closed Captions
(On-Screen Text Message)
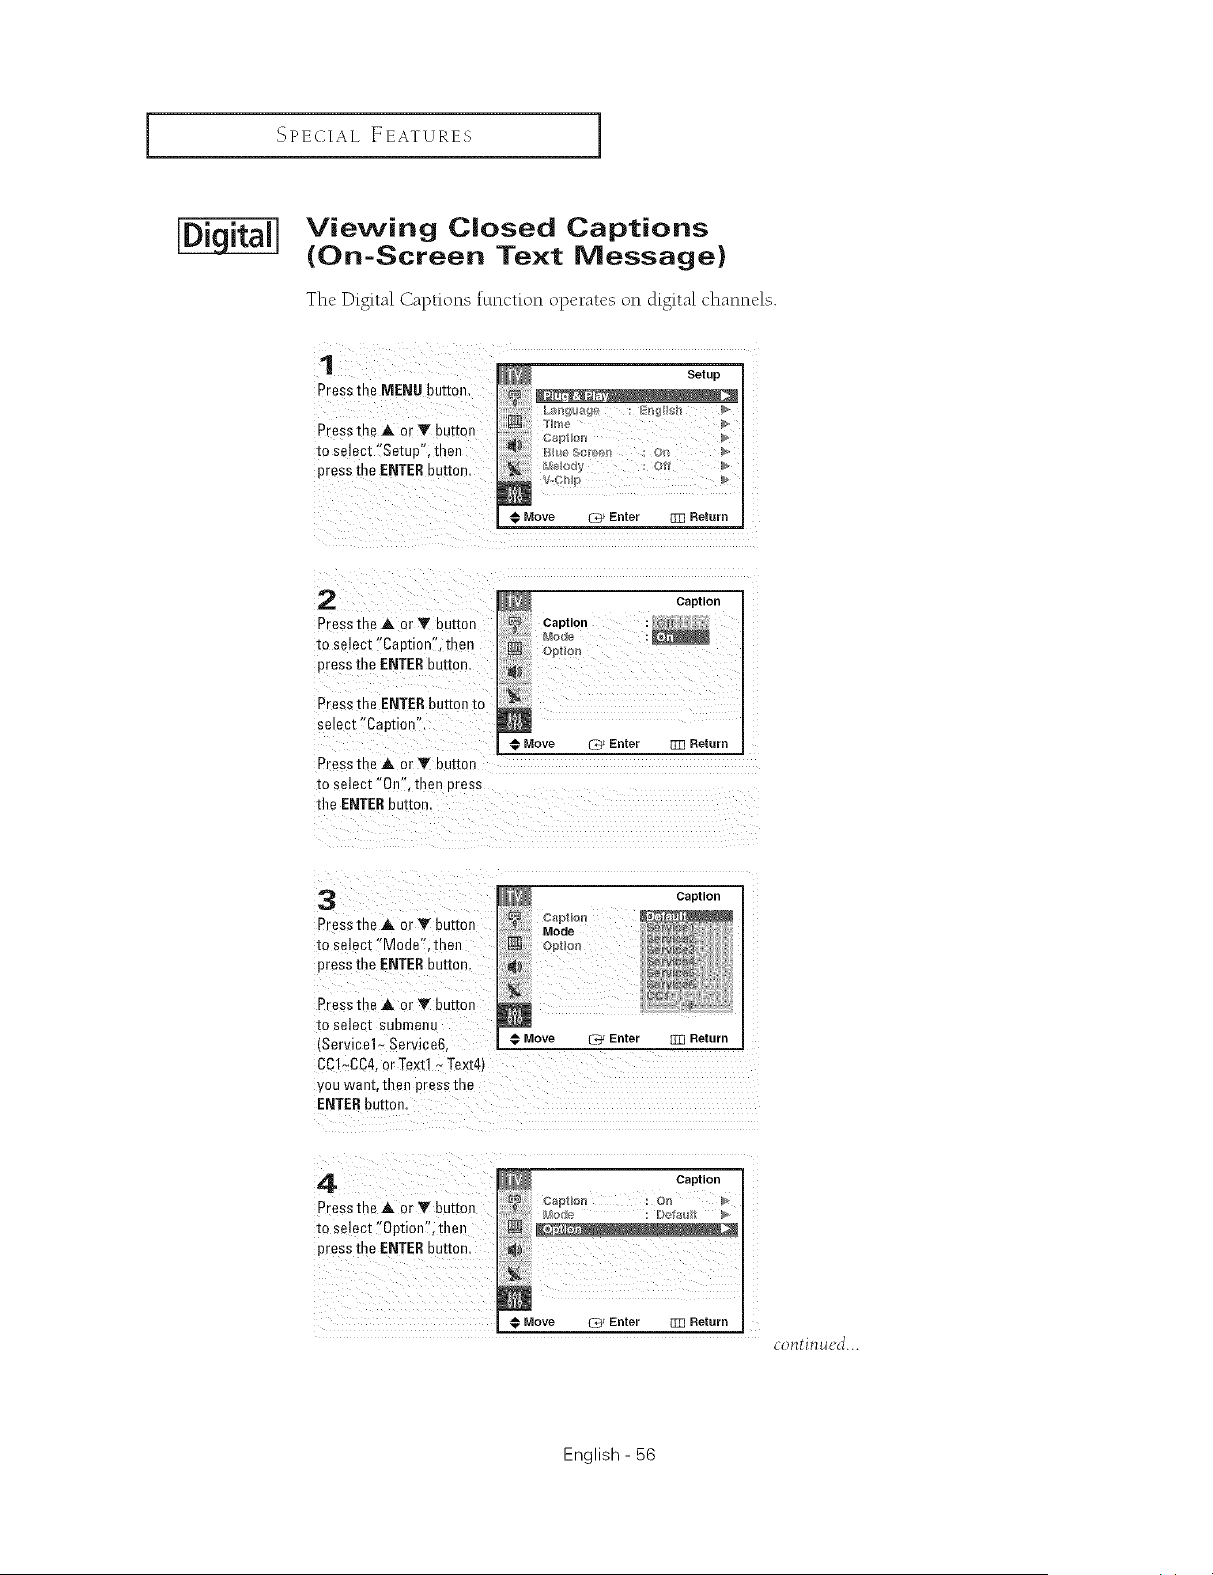
The Digital Captions function operates on digital channels.
1
Press the MENU button,
Press the A or V button
to select "Setup", then
press the ENTERbuttor
€ Move _ Enter _ Return
2
Press the A or V bu[mn
to select "Caation", then
press the ENTERbu[[ar
Press the ENTERbutton to
setect "Caption".
Pressthe ,& or Y bu[mn
to select "Oil". then Brass
tile ENTERbutton.
_{ Caption
Caption : _
Mode :
Cpt_on
Move _D* Enter _ Return
3
Press the A or T button
tc select "Mode". then
press the ENTERbut[or
Press the A or Y button
to select suamenu
Service1- Service6
Caption
@ Move _*_ Enter [m Return
CC1_CC4,or Text1~ Text4t
you want. then press me
ENTERbutton.
4
Pressme A. or Y bu_mn
to select "Option", then
press the ENTERbuttor
Caption
[]
N
Move _ Enter _ Return
contimtcJ...
English - 56
SPECIAL EEATUXES I
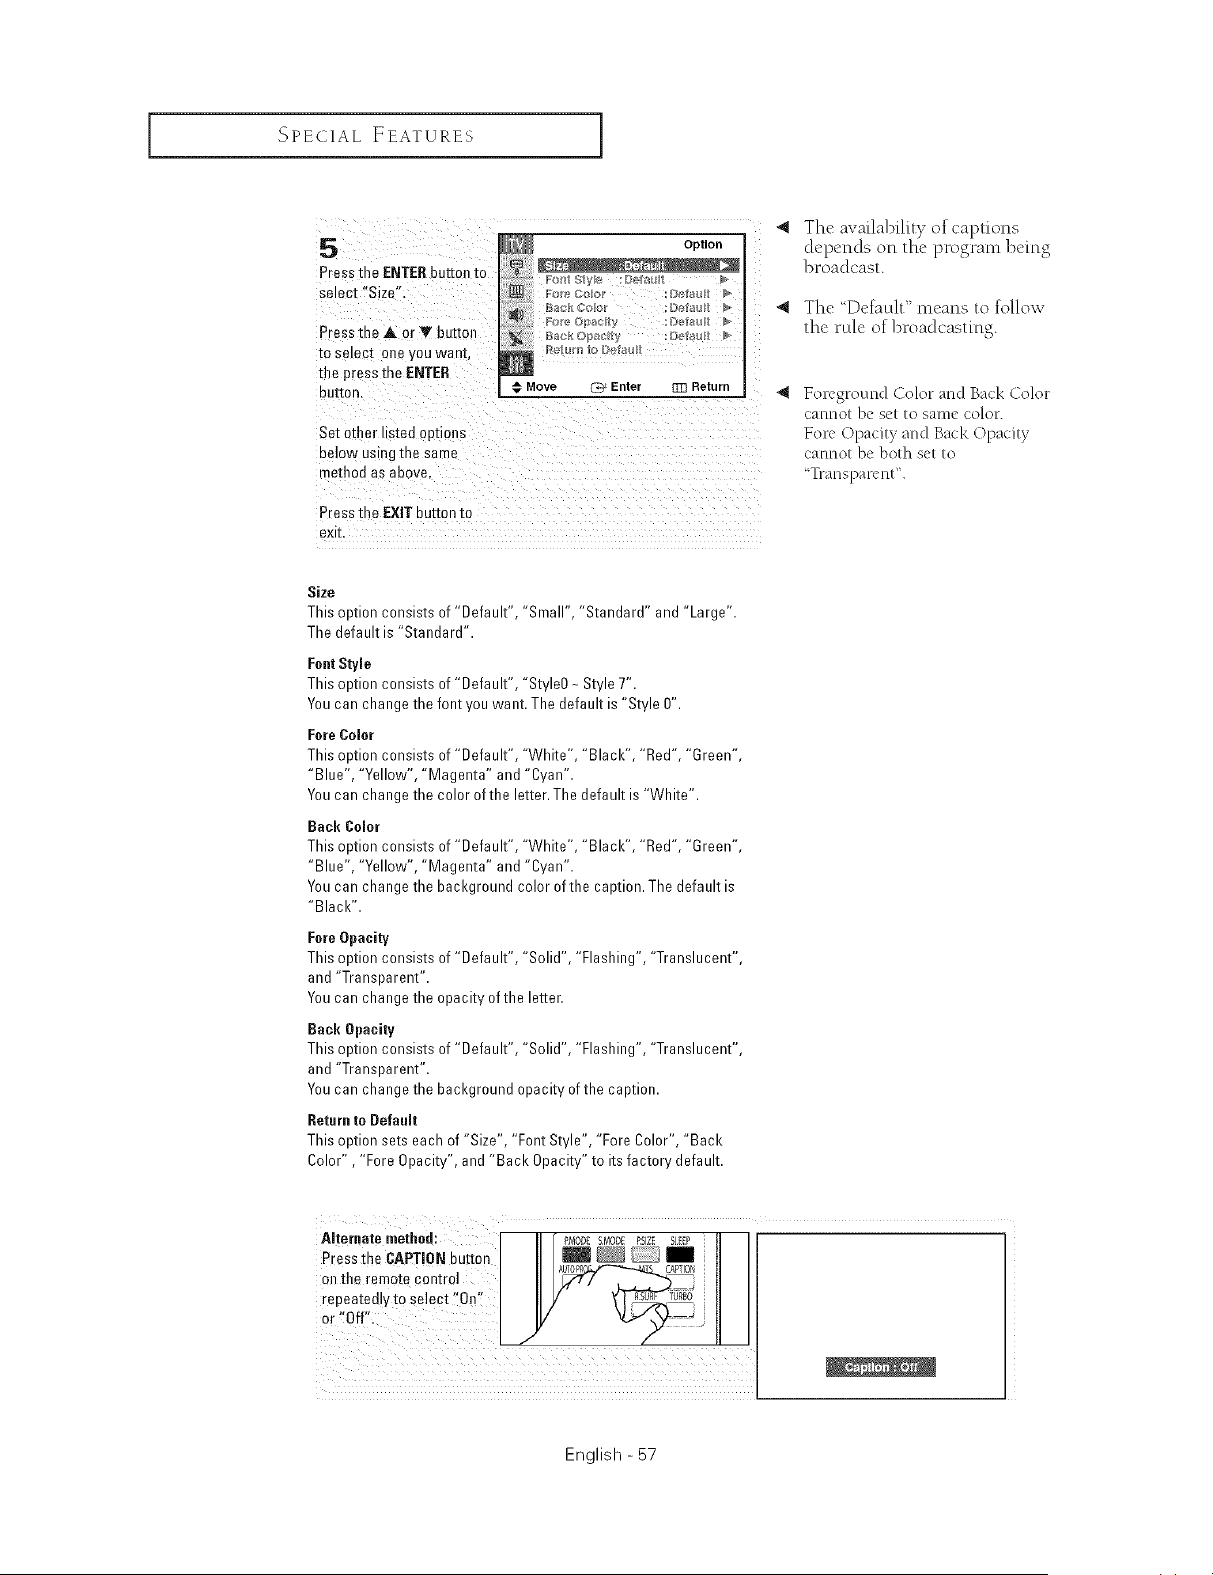
5
Press the ENTERbutton re
semct "Size".
Press me A or V butter
to selec[ are you wan[,
the press the ENTER
euKon,
Option
_ ro_e- Opalcltv :I._,elau #
Move L73 Enter _ Return
Set other listed options
below using me same
method as above.
Press the EXIT button to
exk.
41 The availabil[tv_ of captions
depends on the program being
broadcast.
4 The Detault" means to follow
the rule of broadcasting.
Foreground Color and Back Color
cannot be set to same color.
Fore Opacity and Back Opacity
cannot be both set to
"l_-ansparcnt'L
Size
This option consists of "Default", "Small", "Standard" and "Large".
The default is "Standard".
Fant Style
This option consists of "Default", "StyleO_ Style T'.
You can change the font you want. The default is "Style 0".
FareBaler
This option consists of "Default", "White", "Blacl<", "Red", "Green
"Blue", "Yellow", "Magenta" and "Cyan".
You can change the color of the letter. The default is "White".
Back Baler
This option consists of "Default", "White", "Blacl<", "Red", "Green
"Blue", "Yellow", "Magenta" and "Cyan".
You can change the background color of the caption. The default is
"Blacl<".
FareOpacity
This option consists of "Default", "Solid", "Flashing", "Translucent"
and "Transparent".
You can change the opacity of the letter.
Back Opacity
This option consists of "Default", "Solid", "Flashing", "Translucent"
and "Transparent".
You can change the background opacity of the caption.
Return to BefaaR
This option sets each of "Size", "Font Style", "Fore Color", "Back
Color", "Fore Opacity", and "Back Opacity" to its factory default.
.,,e..ateoet.ad:I "r i " I
Press the CAPTION button
on the remote control I II Ill
repeatedly to Select "0,!:: 7 _u_°i
I
English - 57
SPECIAL, EEATURES ]
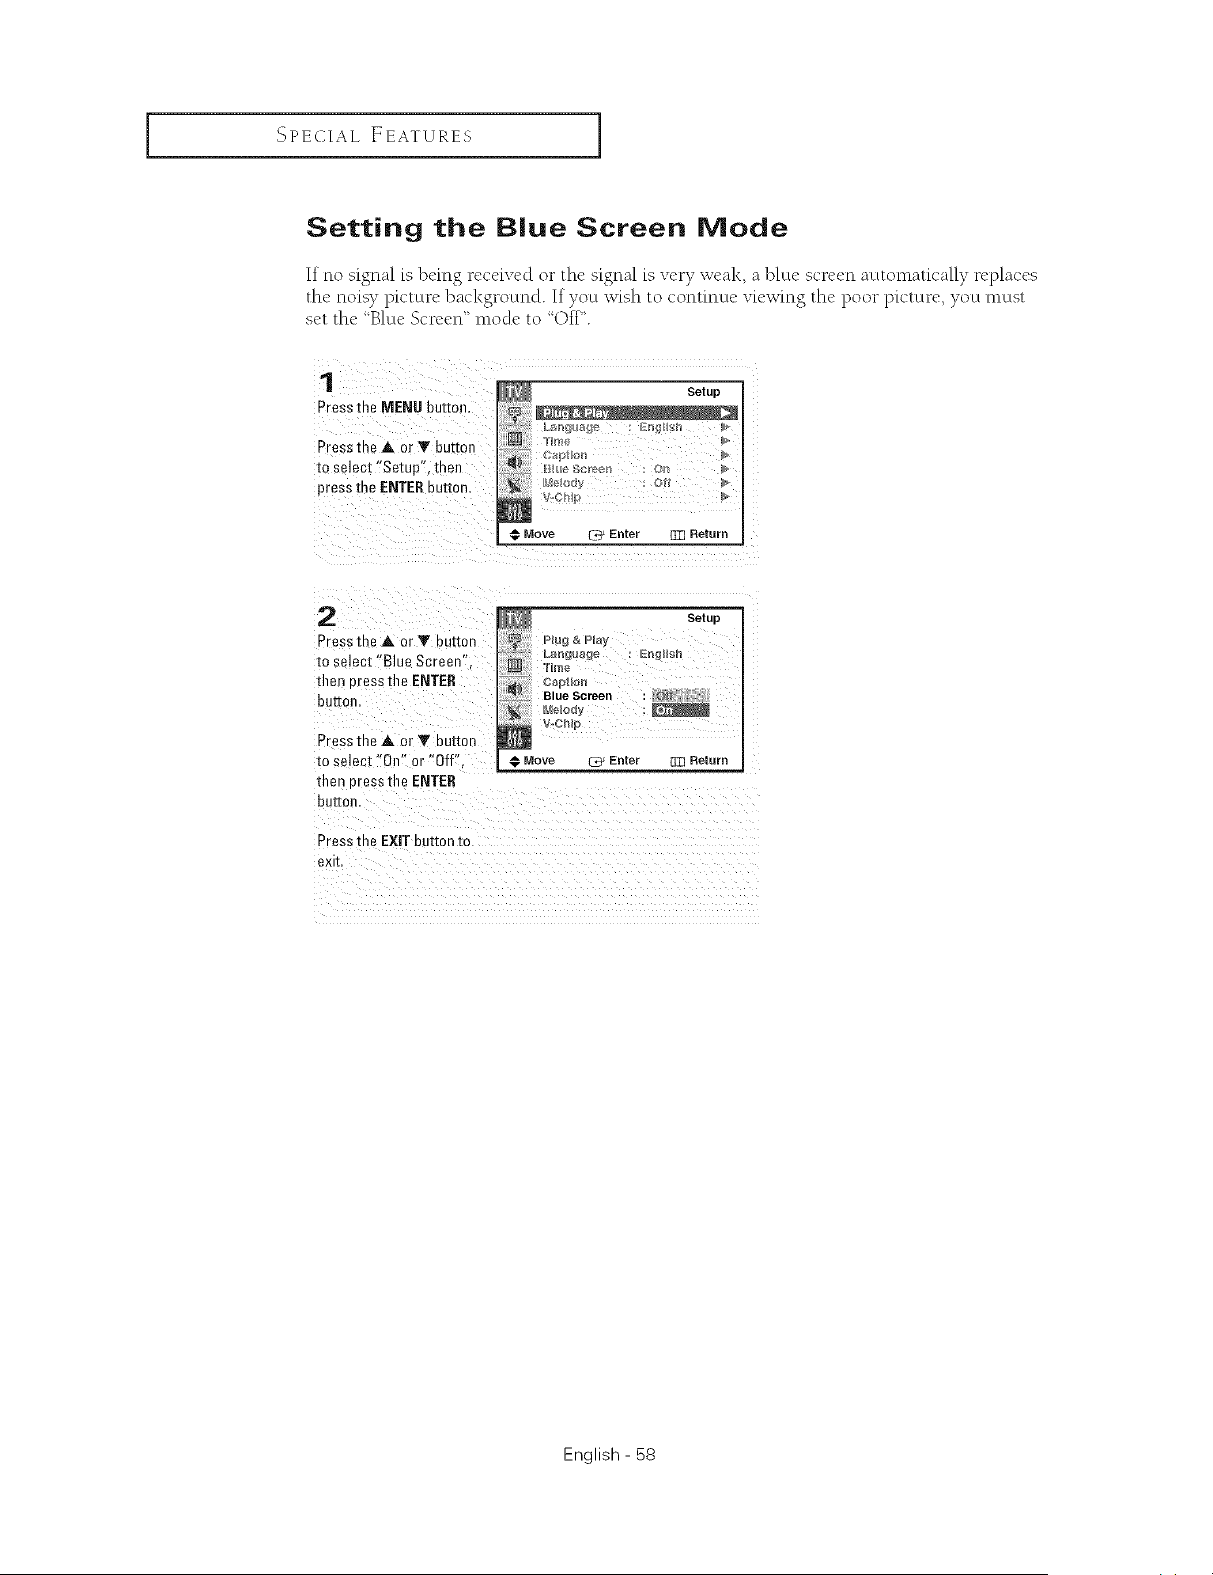
Setting the Blue Screen Mode
If no signal is lx.mg rccdved or the signal is very weal<, a l_lLtc scr_'_'L1auttomatically replaces
the noisy picture 1)ackgroutncl. If),out wish to continue viewing the poor p[ctur(', ),out must
set the "Blue Scrcen" mode to "Off".
1
Press the MENU buttoe.
Press the A or Y button
to select "Setup", then
press the ENTERbu[[o_
Setup
Move -_ Enter El3 Return
2
Pressthe A or Y JuKon
to se]ect "Blue Screen"
then cress the ENTER
butter
PresstheAorYbu_on
to select "On" or "Off".
then eressthe ENTER
bu_on.
Press the EXIT bu[[on to
exk
Plug & Play
Setup
Time
t_+={.2i'iIp
Move _ Enter 133 Return
English - 58
SPECIAL EEATURES I
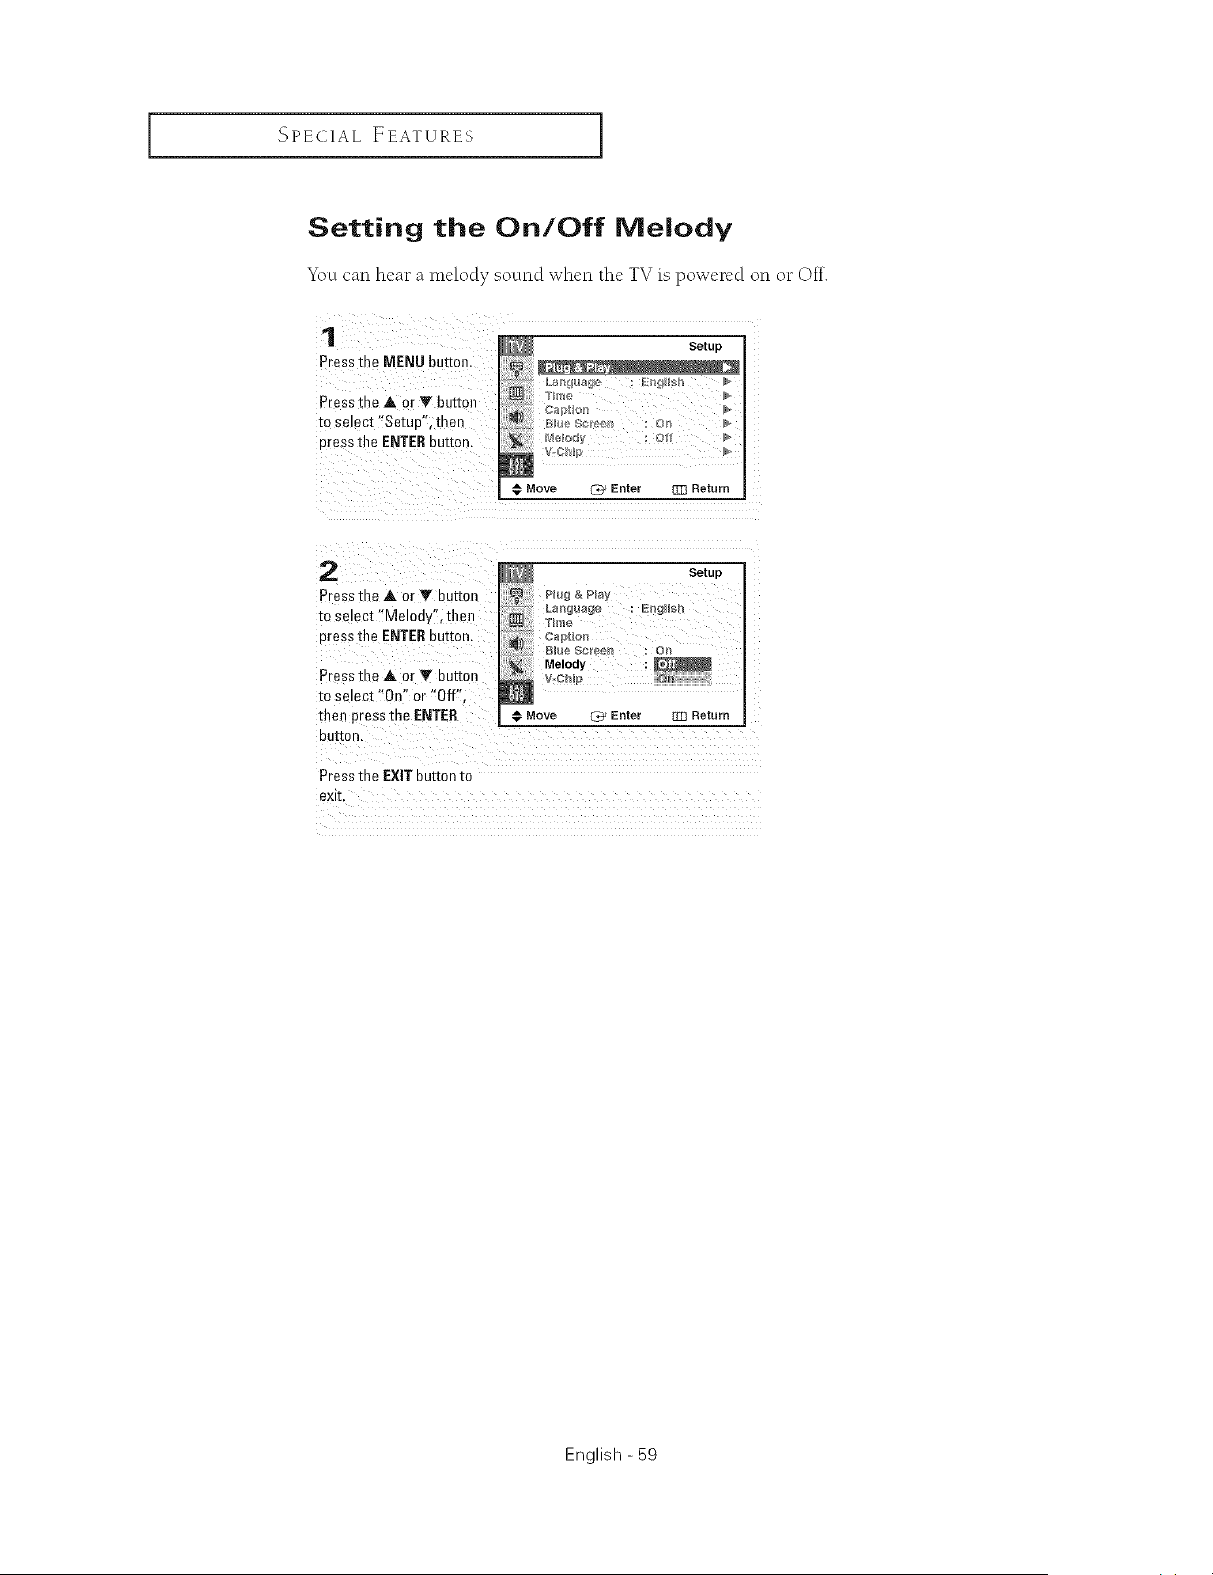
Setting the On/Off Melody
You carl hea_ _a melody sound when the TV is powered on o__ Ott.
1
Press me MENU button
Pressthe A. or V buttor
to setec[ "Setup', then
Dresstile ENTERDue[on.
Setup
Hme
€ Move _ Enter _ Return
2
Pressthe A or T button
to select "Melody", thel
cress the ENTEReuEon.
Press [ne A or Y button
to se ect "On" or "Off".
thee press the ENTER
eeI[on,
Press the EXIT button to
eXE,
Setup
Hug & Play
Blue SC[_€_1 : 0
Move _ Enter TR Return
English - 59
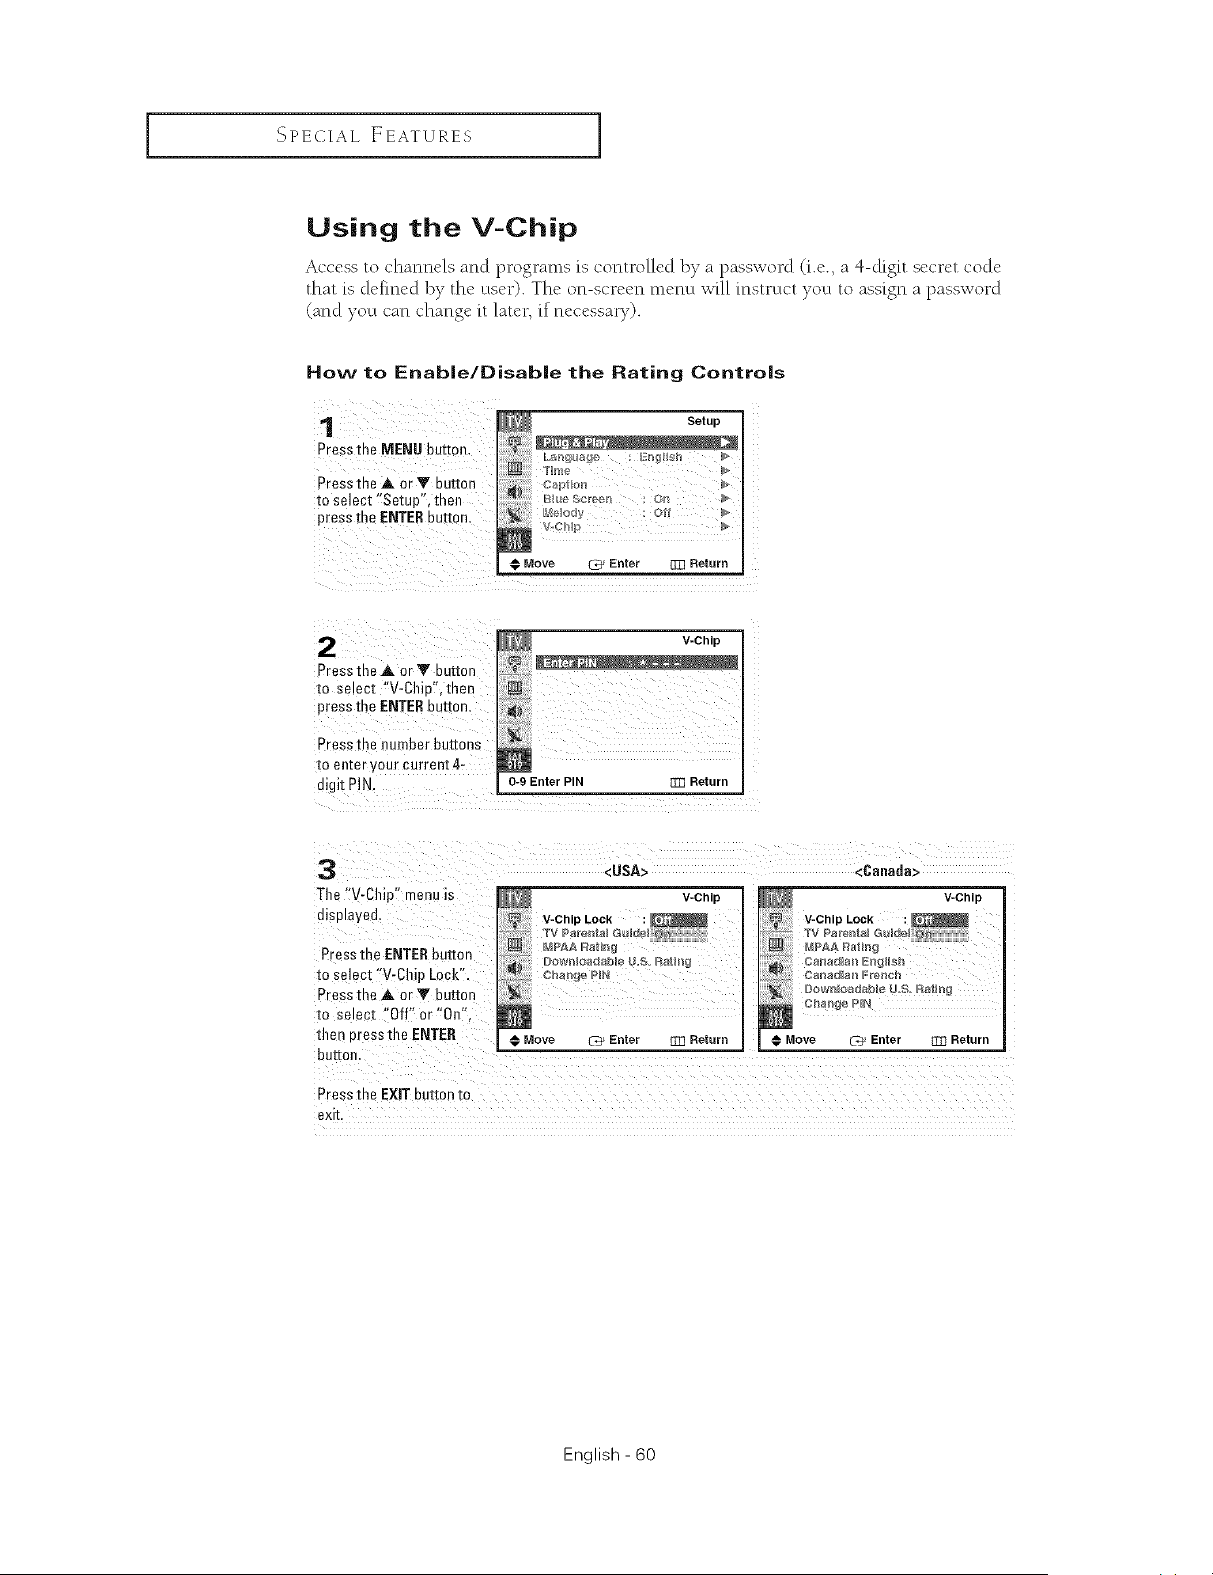
SPECIAL EEATURES ]
Using the V=Chip
Access to channels and programs is controlled by a password (i.e. a 4-digit secret code
that is ck'fined by the utscr). The on-screen menu will instruct )rout to assign a password
(and)rout can change it later, if nec_'ssar7).
How to Enable/Disable the Rating Controls
1 _ Setup
Press the MENU button.
Pressthe A orY button captb_
to select 'ISetup', then _uu_scr_,_u : on
press the ENTERbutton, l_'l_._lo_y : o_
I; Move _ Enter BZ] Return
2
Press tne A. or Y bu[mn
to select "V-Chiu',then
press the ENTERbutton.
Press the number buttons
to enter your current 4-
digit PIN.
V-Chip
0-9 Enter PIN rm Return
3
The "V-Chip" menu is
displayed.
Pressme ENTERbutto_
to select "V-Chip Lock".
Press the _. or Y button
to select "Off"or"On".
[len Dressthe ENTER
<USA>
V-Chip
V-Chip Lock
,_ TV P_re_al Gu_d,
MPAA Raln_
# Move
bur[or
Enter RTI Return
<6anata>
V-Chip
IV_PAA Ra_mk
canadla_Pr_r_gl_
Move C_ Enter [[T_ Return
Press the EXiT button to
exk
English - 60
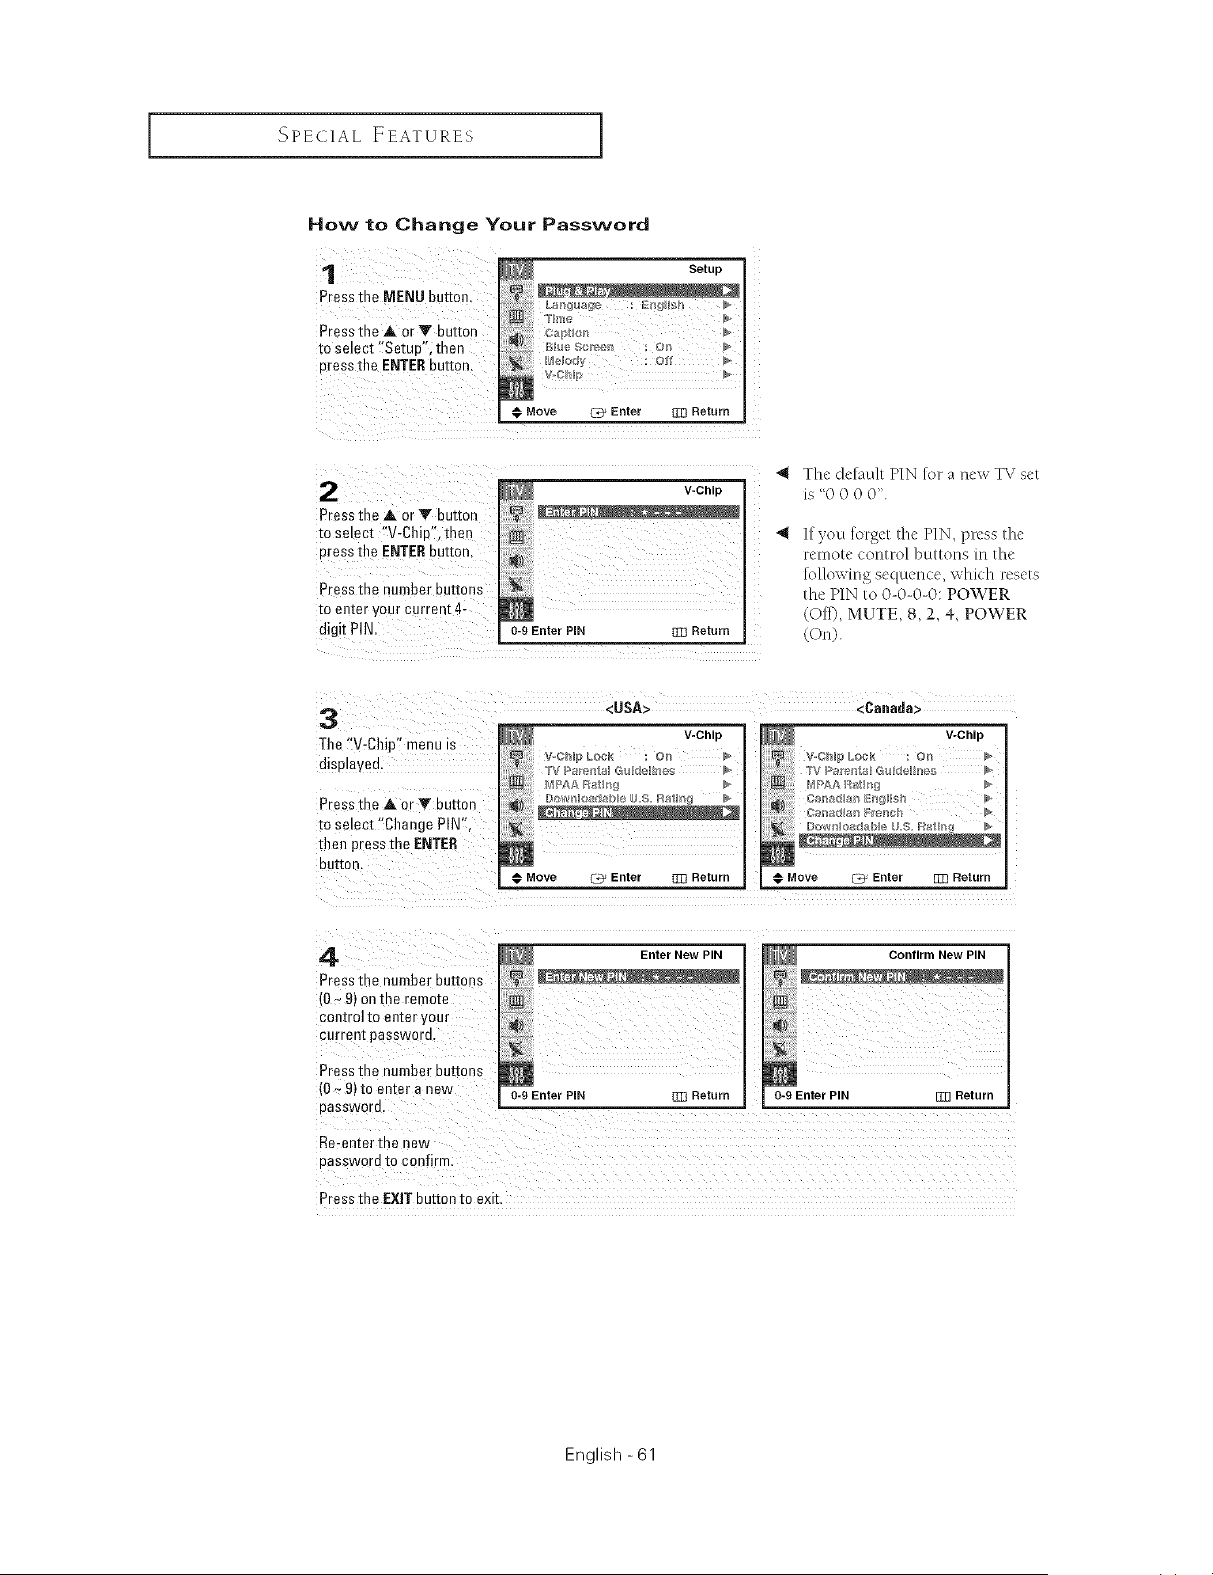
SPECIAL FEATURES I
How to Change Your Password
1
Pressthe MENU button
Pressthe ,A. orV button
m select "Setue'. then
uress the ENTERbutton.
Setup
Chl
€ Move C_ Enter 333 Return
Pressme ,_. or Y button
_o select "V-Chiu'. then
uress the ENTEReu_[on.
Press the number BUttons
to enter your current 4-
digit PIN.
V-Chip
0-9 Enter PIN t33 Return
"_ The delault PIN lot a new TV sel
is " )
liven lnrget lhe PIN press/he
remote control bn/lons in the
Iollowing sequence which reset_
the PIN to 0 0-0-0: POWER
Off0. MUTE. 8.2. _+.POWER
OnL
3 -- <USA>
The "V-Chip" menu is _ V-Chip
displageu, v-,cml LOCK : Or_
Pressme Aor Y button
m select "Change PIN",
then press the ENTER
BUttOn,
Move Ct_ Enter 333 Return
<Canada>
V-Chip
@ Move C_ Enter [_3 Return
4
Press me number buttons
,0 _ 9] onme remote
COflIro] [o elKer your
currenl password.
Press the number BUttOnS
(0 ~91[o enter a new
eassworu.
Re-enter me new
eassword to confirm
Press the EXIT button to exit.
Enter New PIN
Confirm New PIN
0-9 Enter PIN E_ Return
English -61
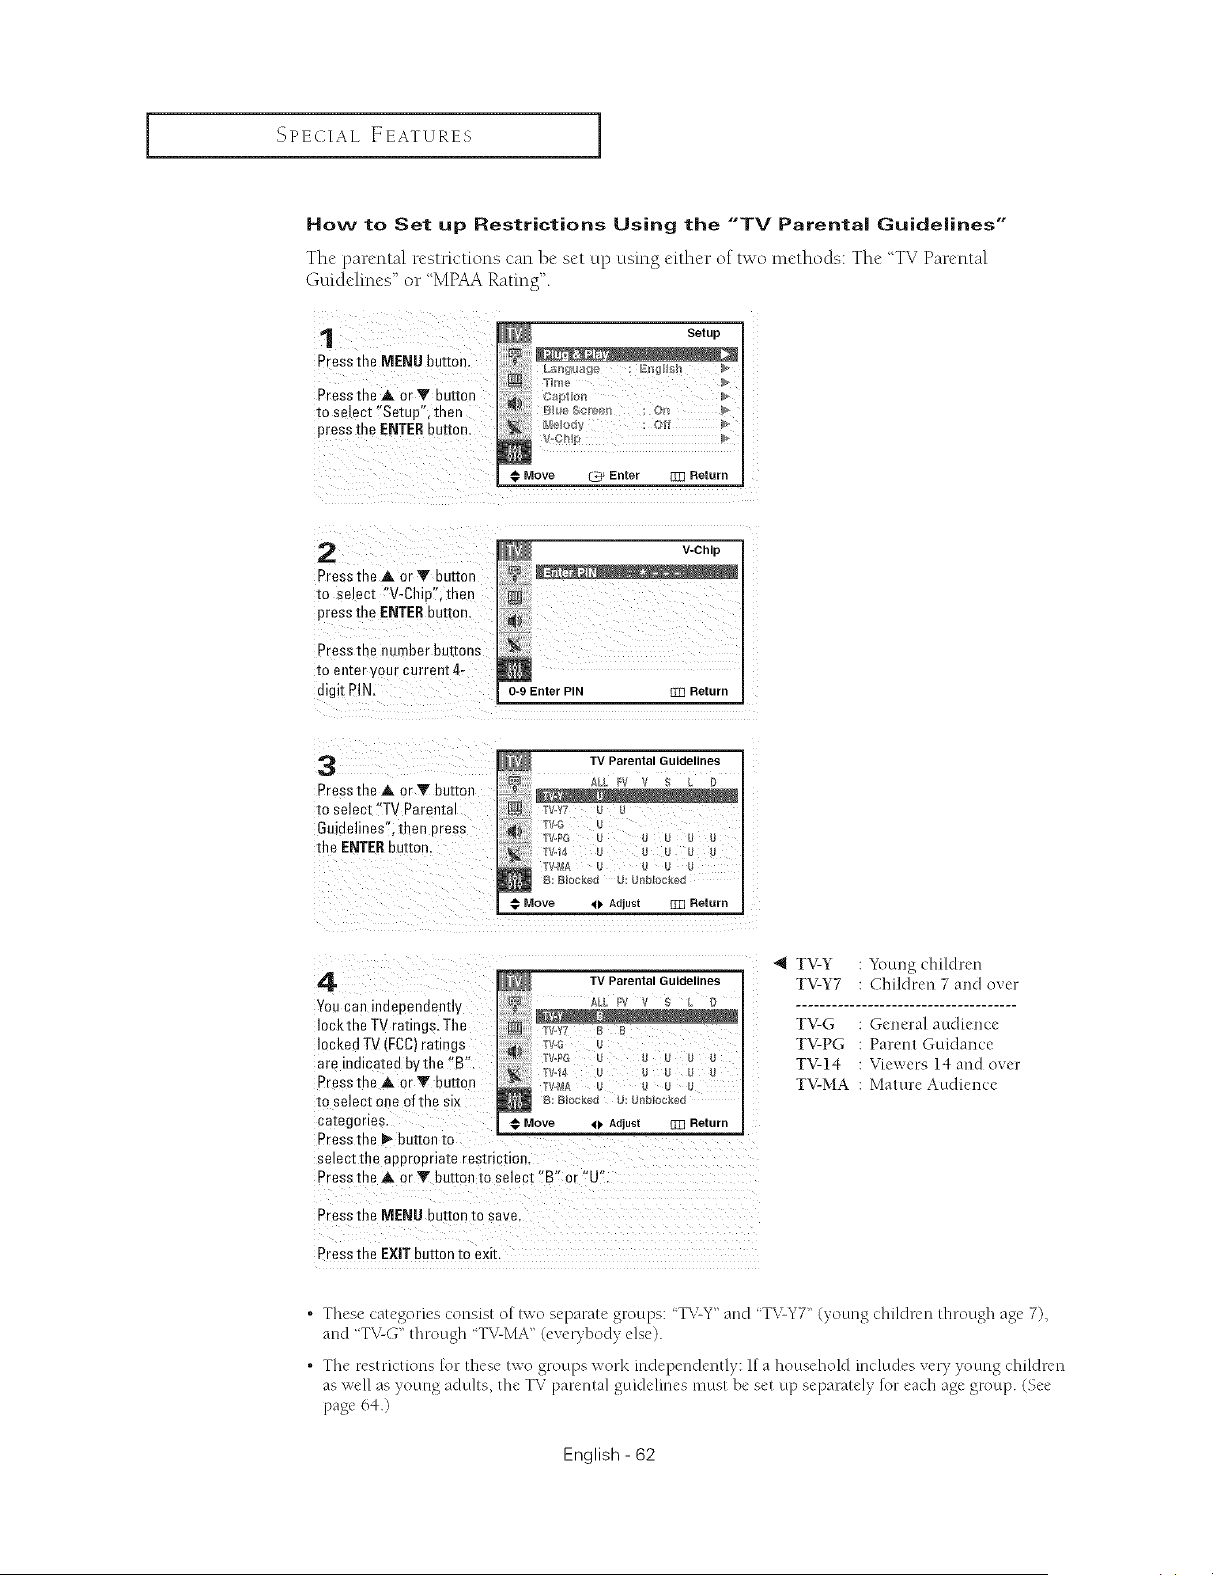
SPECIAL EEATURES ]
How to Set up Restrictions Using the "TV Parental Guidelines"
Thc parental restrictions can be set up using either of two methods: The TV Parental
Guidelincs" or "MPAA Rating".
1
Press the MENU buEon.
Pressthe A or V button
to select "Setup", then
press the ENTERbuttor
i Setup
ON
Move _ Enter 1]]] Return
2
Press the A. or Y button
to se ect "V-ChiB'.then
press the ENTERbutton
Press the _umber buttons
[o enter your current 4-
digit PIN.
V-Chip
0-9 Enter PIN _ Return
3
Press the A or Y button
to select "TV Paren[a
GDidelines'.then Dress
the ENTERbuEon.
TV Parental Guidelines
rv.Y7 . _
Tv.G
I"V.PG U U U U U
rv4_A
e: Blocked u: U[_blocke(
Move 41, Adlust []]] Return
4
Youcan indeoendently
3ckthe TV ratings• The
3cked TV (FCC)ratings
are indicated by the "B'.
Pressthe A orY buttc _
to select one of the six
ca[egorles.
TV Parental Guidelines
rV.Yl B [
rV,,PG U .....
B: Blocked U: U[_bloc_e{
Move _ Adjust _ Return
Press the 1_ button to
select the aoorooriaie restriction.
Press the A or Y button [o select "B" o" "U"
Press the MEN LIbutton to save.
Press the EXIT uuII0n to exk.
4 TV-Y : Young children
TV-Y7 : Children 7 and over
TV-G : General audience
TV-PG : Parent Guidance
TV-14 : Viewers 14 and over
TV-MA : Mature Audience
o
o
These categories consist of two separate groups: "T'vCY"and "T\cY7 '' (young children through age 7),
and "TV-G" through "TV-MA" (eve Tbod) e st)
The restrictions for these two groups Vvofk independently: If a household includes very )oung children
as well as young adults, the TV parenlal guklelmes !liusI be Ski up separalely for each age group. (Set
[)age 64 )
English - 62

SPECIAL FEATURES I
How to Set up Restrictions using the Movie Ratings:
G, PG, PG-13, R, NC-17, X
Thc Movic rating system uscs the Motion Picturc Association ofAmcrica (MPAA)
system, and its main application is %r movies.
Whcn the Rating Control is on, thc TV will automatically block any programs that arc
coded with ol_jecrionable ratings (tither MPAA or T_URatings).
Preasthe MENU button.
Pressthe A 0rY button
to select "Setup", then
press _he ENTERbutton.
2 _ v-c.,p
Preaatha _k or Y button "' '- °_
to select "V-chipf!;then
Press the ENTERbutton_
Press the number buttons
M
to enter your current 4,
digit P!N, 0-9 Enter PIN rm Return
3
Preaathe A or Y button
to select "MPAA Rating",
then press the ENTER
auKon,
MPAA Rating
4
Youcan independently
ockthe mowe ramlgs.
The lacked movie ratings
are indicated bythe "13"
MPAA Rating
PG S
PG-13 e
_j_ n a
NC-17 £
NR g
Press tE _=A or Y Bur[on B: B_oc_eu U: er_b[ocKed
to selac[ one ofthe € Move <1, Adjust 333 Return _
ca[egoriea, then press the
buKor
Press m .=A or Y button to select "B" or "U"
Press [he MENU BuEon m save
Press the EXIT button to exit.
English - 63
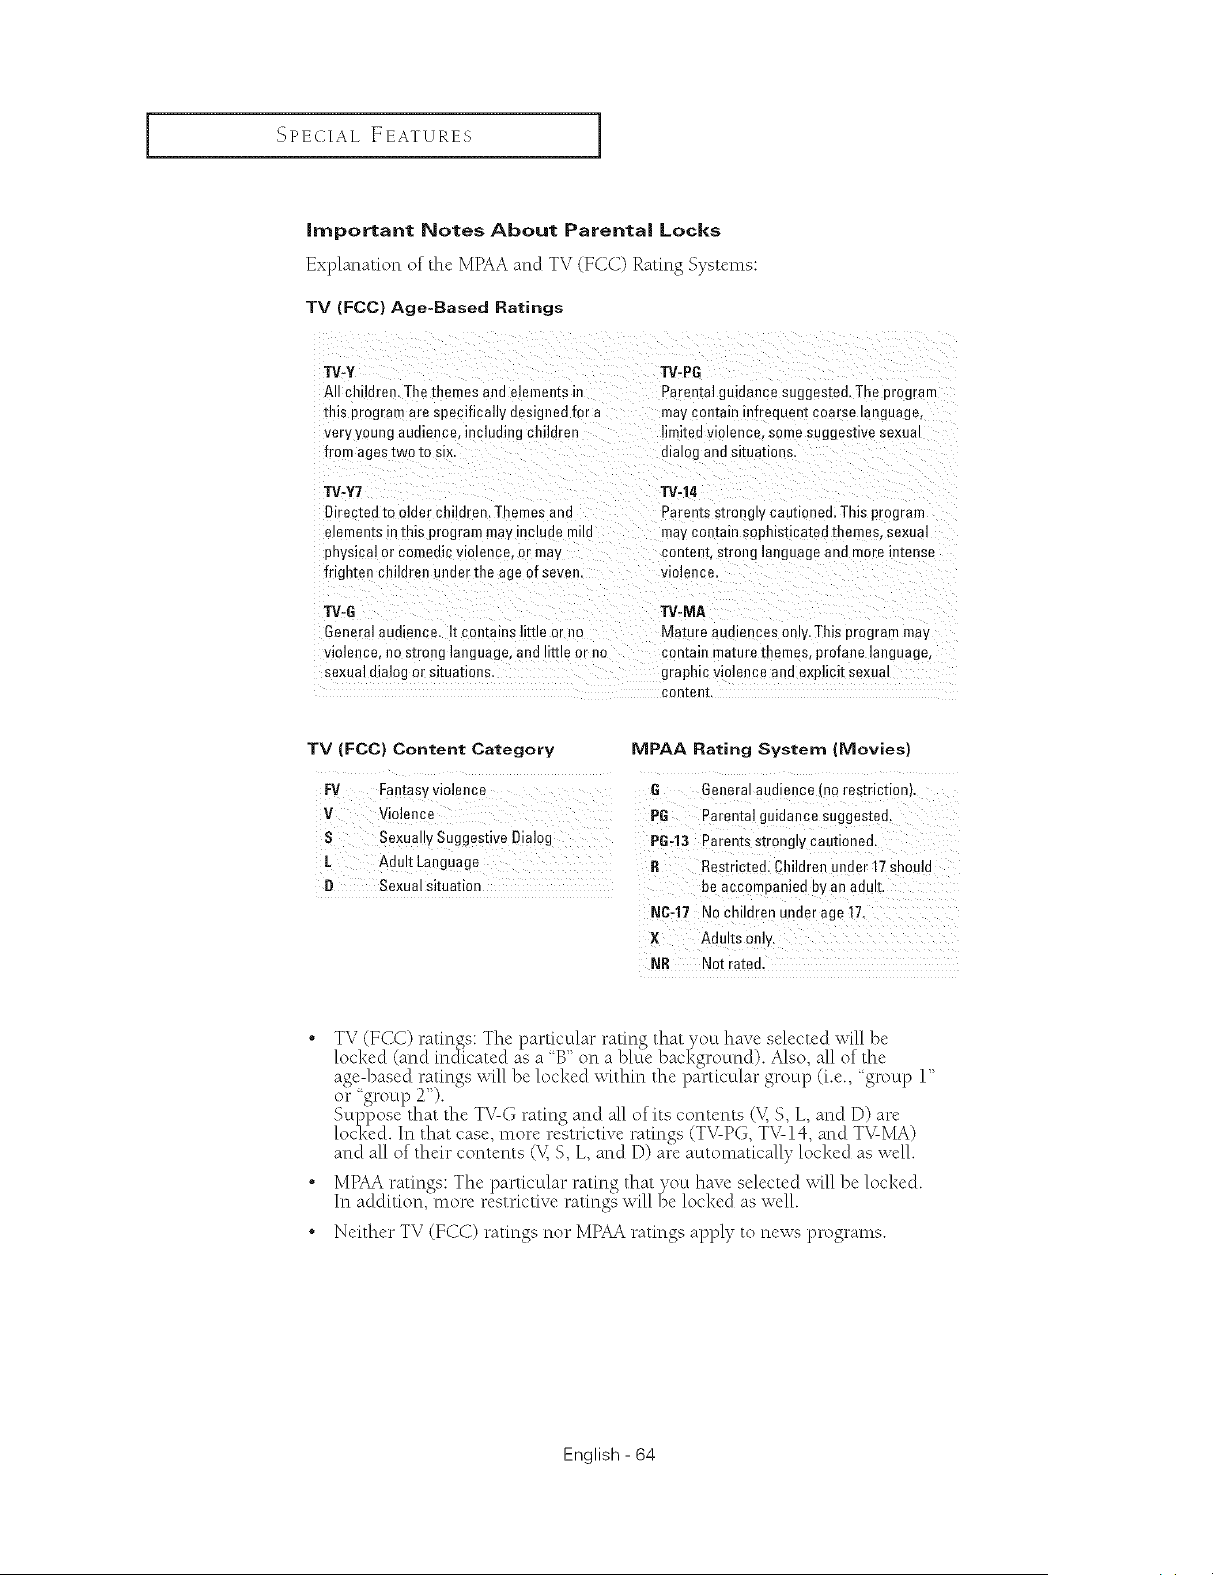
I SPECIAL EEATURES I
Important Notes About Parental Locks
Explanation of the MPAA and TV (tiCC) Rating Systems:
TV (FCC) Age-Based Ratings
W-Y TV-PG
All ch Idren. Tile themes and elements ir Parental guidance suggested. The program
this program are specifically designed for a may con[am nfrequen_ coarse language,
very youn£ audience, including children limitec violence, some suggestive sexua
from ages [wo ro six. malog and situations.
TV-Y7
Directed to older chi] Jren. Themesand
elemems in this program may include m,a
pnysical or comedie violence, or may
frighter children under the age of seven.
W=14
Parents strongly cautioned. This program
may contain soph=sticatedthemes, sexua
content, s[rong language and more m[ense
violence.
W=6
GenEral audience. It conta ns lime or no
violence, no strong language, and me or no
sexual dialog or situations.
TV-MA
Mature audiences only. This program ma,_
contain ma[ure themes, profane language,
graphic violence and explicit sexual
con[eRE
TV (FCC) Content Category IWPAA Rating System (Movies)
Fy Faetasy violence G General audience (no restriction).
V Violence PG Parental guidance Suggested.
S Sexually Suggestive Dia!og P643 parents strongly cautioned.
[" Adult Laaguag e R Restricted. Children under 17 should
D Sexual situation be accompanied by an adult.
NCr!7 NO children underage 17.
X Adults onh/.
NR Not rated.
• TV (FCC) ratings: The particular rating that you have selected will be
locked (and indicated as a 'B" on a blue background). Also, all of the
age-based ratings will be locked within the particular group (i.e., group 1"
or 'group 2").
Suppose that the T_-G rating and all of its contents (V, S, L, and D) are
lod<ed. In that case, more restrictive ratings (TV-PG, TV-14, and TV-MA)
and all of their contents (_ S, L, and D) are automatically locked as well.
• MPAA ratinvs:_,The particular ratin___,that _7_u have selected _•[ll be locked.
In addition, more restrictive ratings will f)e locked as well.
• Neither TV (FCC) ratings nor MPAA ratings apply to news programs.
English - 64
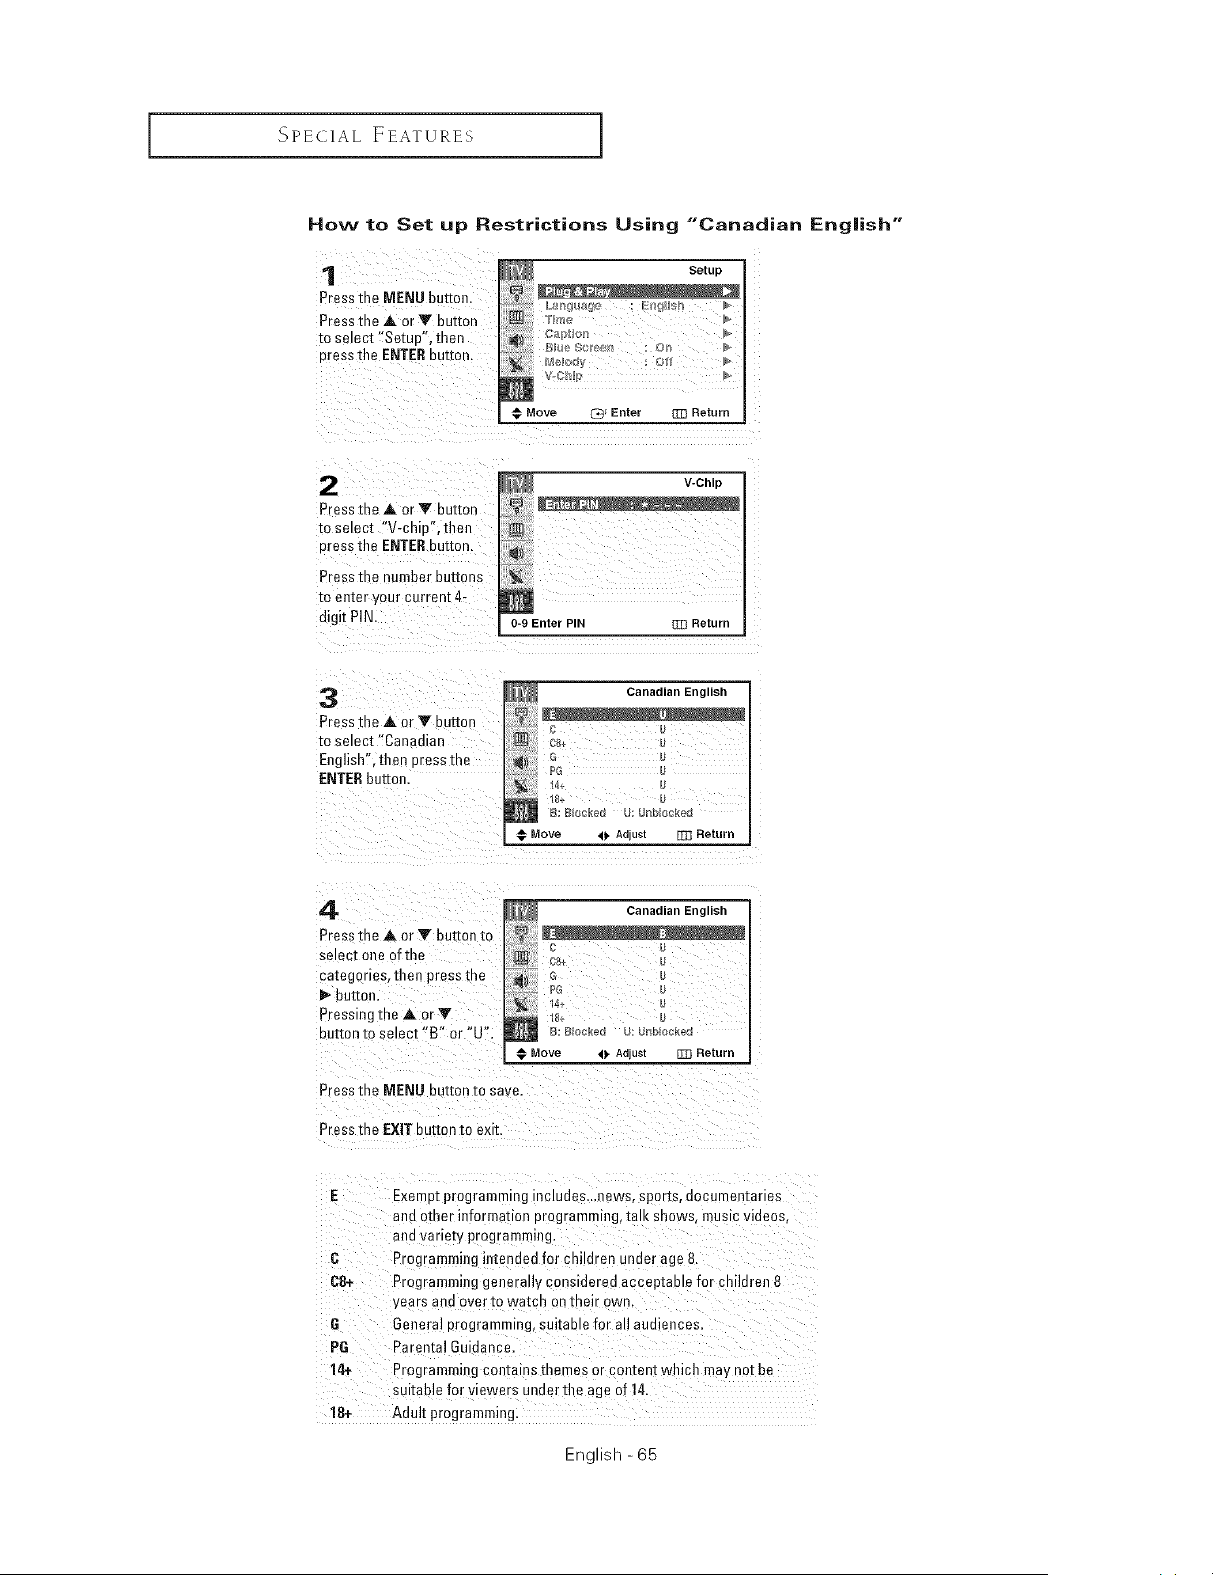
SPE(ilAE EEATURES I
How to Set up Restrictions Using "Canadian English"
Setup
Press me MENU button
Press the ,& or V button .....
to setect "Setue'. then
cress the ENTERBurton. _, _+,_±_,H
Move _ Enter :]:]3 Return
V-Chip
Press the A or Y button
to select "V-chip'.then
cress the ENTEReu_[on. _ii
Press the number buttons
to en[er your current 4-
digit PIN. o-9 Enter PIN :m Return
3
Press the A or Y button
to select "Canadlar
English", then press me
ENTERbutton,
_ Canadian English
9
C U
G U
PG U
18+ U
B: B_OCk_d U: URblocked
@ Move _11. AdlU$t _ Return
4
Press [he A or Y button [o
select one of th
ca[egortes, then press the
i_ buttor
Pressing the A or Y
eu[[onto select "B" or "U",
Canadian English
08+ U
5ii) o
_G u
18:+Blocked : Ur_b,:cked
Move 4_ AGIUel Z]3 Return
Pressme MENU buEon to save
Press the EXIT button to exit.
E Exempt prograrnm ng includes_.news, sports, aocumen[arles
and other infc°mauon programr ng talk snows, music videos.
and variety programming.
C Programming intended for chl dren under age 8.
68+ Programrning generally considered acceptable for children 8
years ana over to watch on their own.
G General programming, sukable for all auc ences.
P6 Parental GLdance.
14+ Pogrammmg con_amsmemes or cantent which ma'_ not be
suitable for viewers unaer the age of 14.
18+ Adult programming.
English -65
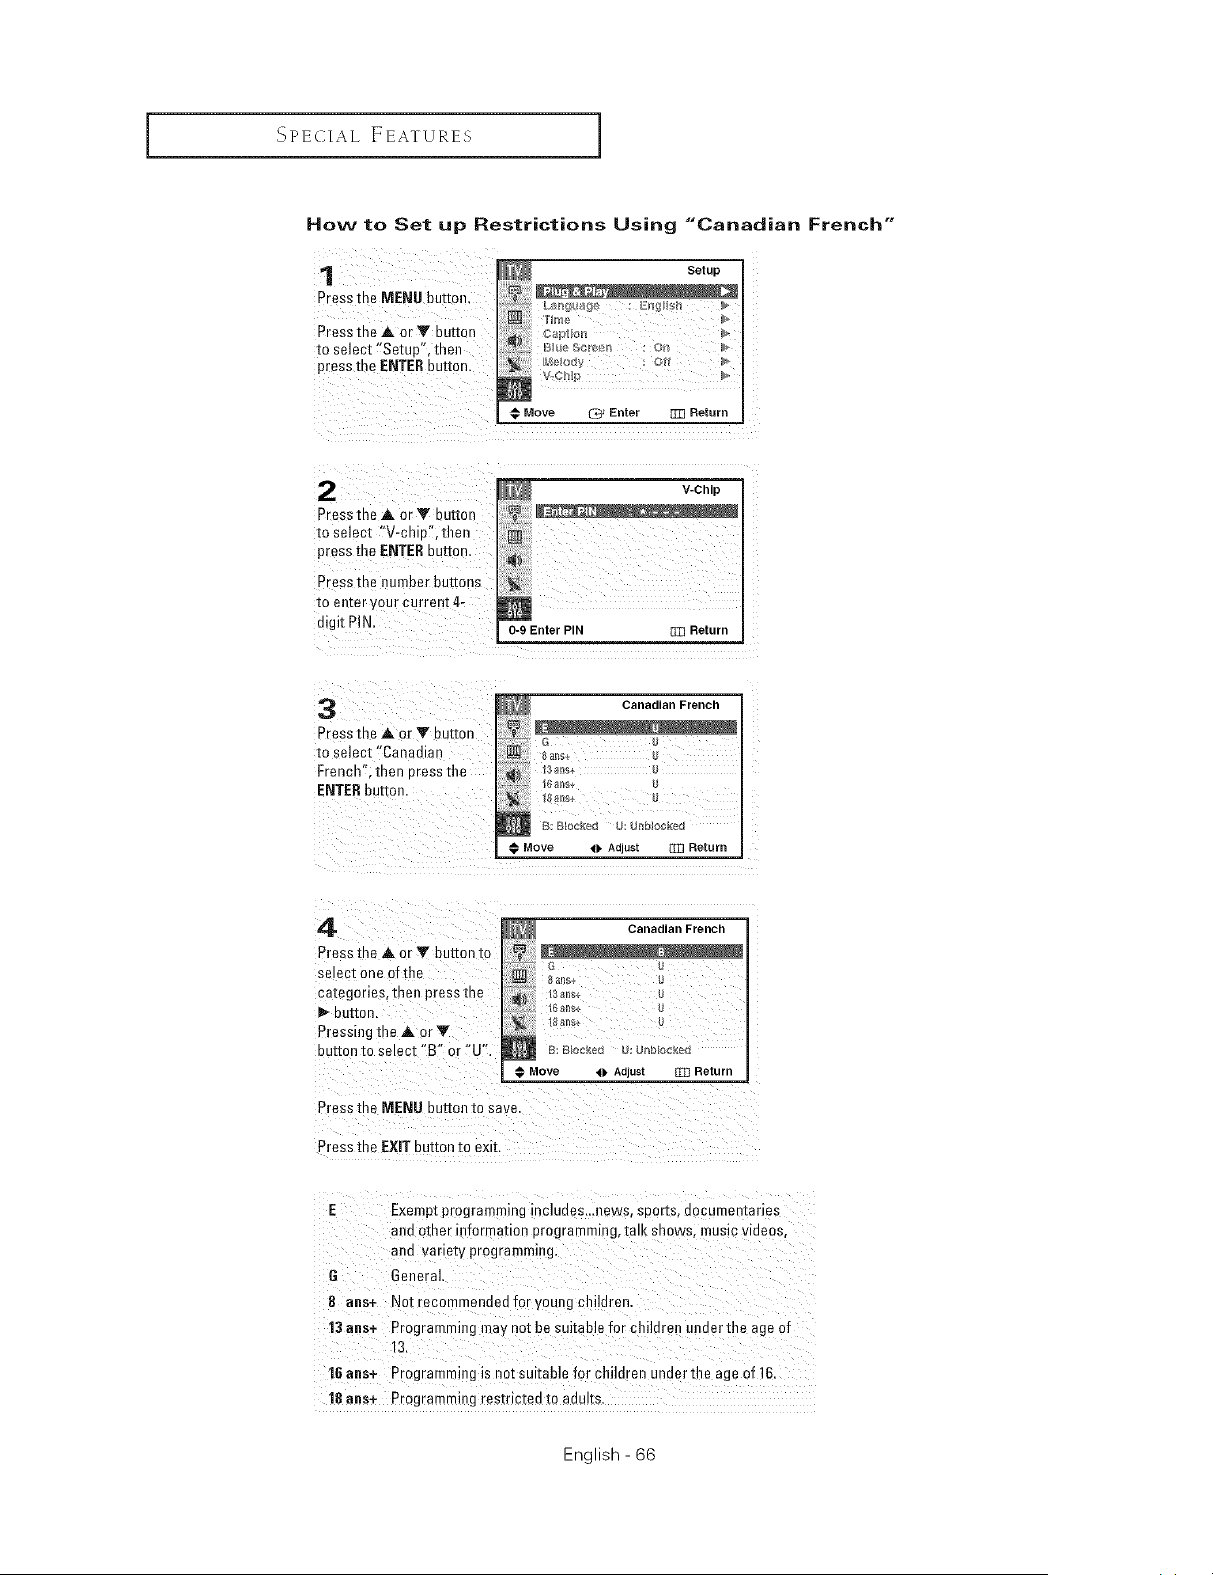
SPECIAL EEATUXES ]
How to Set up Restrictions Using "Canadian French"
1
Press the MENU button.
Pressthe _, cry buttc 1
to select "Setup". then
press the ENTERbutton
Setup
LIb_e
BV_e Sc_@e_l
Move _z_ Enter [_3 Return
Press the A. or Y bu[mn
to select "V-chiu'.then
press the ENTERbutton
Press tne number buttons
tOemer your current 4-
digit PiN
V-Chip
m
0-9 Enter PIN [m Return
3
Press the a, 3r Y button
to select "Canadtan
French". men cress the
ENTERbutton.
Canadian French
B: _loo_ed _J: t_nMocke_
Move 41, AOlUS[ _I] Return
4
Press the A or Y button [o
setect one ofthe
ca[egories, then press me
but[on.
Pressing the A cry
BUr[On 1:Oselecl "B" or "U'.
&_ Canadian French
18_ns+ U
] B: Blocked U: _rlbocked
Move _1, Adjust [_] Return
Pressthe MENU _uEonto save.
Press the EXIT ouEon no ext[.
E Exemp_programming mcludes...news, soor;s, nocumen[anes
and other information programming, tatK snows, music videos.
ana varte_y programming.
G General
8 ane+ Not recommended for young children.
13 ans+ Programming may not be suitable for children under the age of
13.
16 aria+ Programming i_ nat suitable for children under the age of 16
18 ans+ Programming resme[ee [o adults.
English - 66
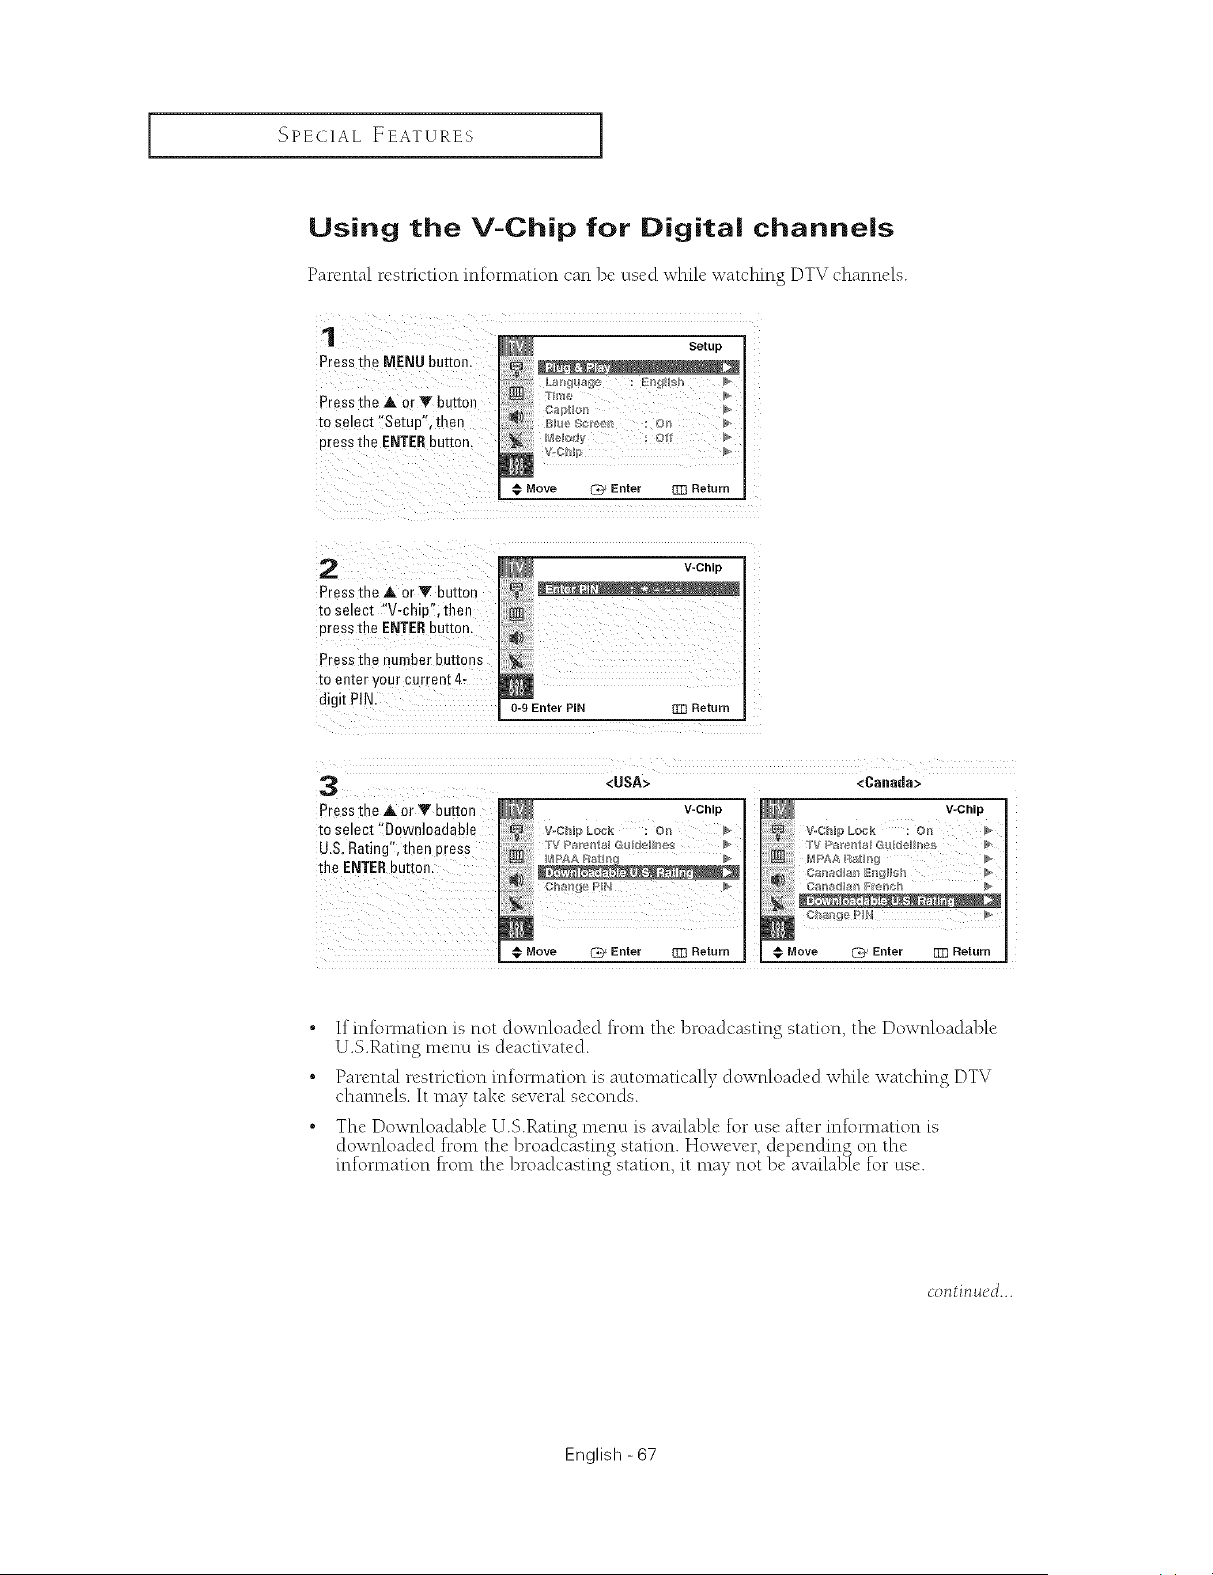
SPELIIAE EEATUXES I
Using the V-Chip for Digital channels
Pa_'ental _estdction infomiation can be used while watching DTV channels.
1
Press the MENU button
Pressthe at or V buttor
to select "SetutY', then
Dresstile ENTERbutton.
Setup
€ Move I_ Enter ]33 Return
2
Pressthe at or V BuEon
m select "V-chie".then
uress the ENTERBUt[On,
Press me number buttons
to ellier VOLr current 4-
digit PIN.
V-Chip
0-9 Enter PiN ZD Return
3
Press [r _ at or V button
to selec[ "Downloadable
U,S, Rating',then Dress
the ENTERbutton,
<USA>
V-Chip
v-cn_p
€ Move _[ Enter ]33 Return
<Canada>
V-Chip
VoChlp Lock :On
_4 Par_n_l Gu de,In £, b
Move [Z}' Enter El] Return
• If infl)rmation is not downloaded from the broadcasting station, the Downloadable
U.S.Rating t'net'lu is deacuvated.
• Parental resti-iction infomiation is automatically downloaded while watching DTV
channels. It may take several seconds.
• The Downloadable U.S.Rating menu is available for use after infomlation is
downloaded from the broadcasting station. However, depending on the
mfomlation from the broadcasting station, it may not be availa]_ie for use.
continued...
English - 67
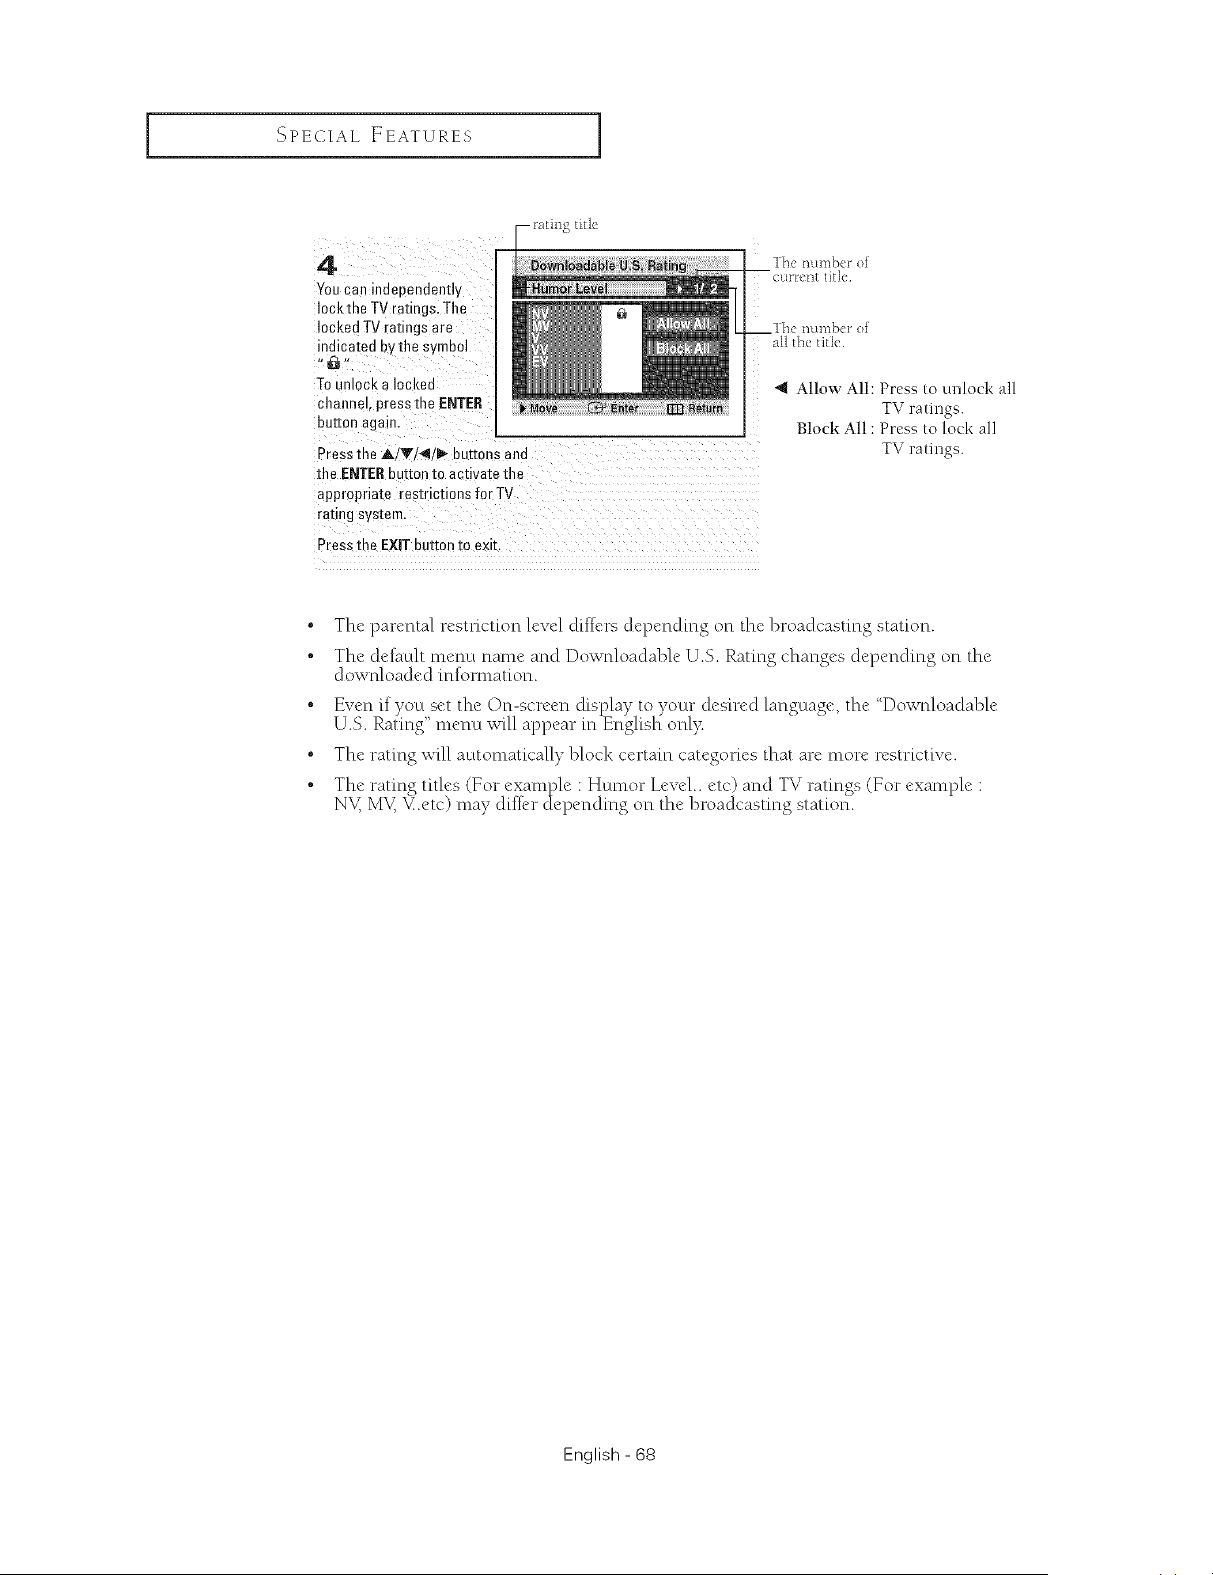
SPECIAL, EEAYURES ]
f_[ii]_EL[It
4
Youcan independently
3ckthe IV ratings. Tile
3eked TV raungs are
_dicated by the symbol
Tounlock a Iockea
channe4 press the ENTER
button agam,
Press the A!Ti4!_ buttons and
the ENTERb iron to acuva_etile
appropriate resmcfions for TV
ranng system.
Press the EXiT button to exit,
*_ Allow All: Press to unlock all
TV ratings.
Block All : Press to lock all
TV ratings.
• The parental restriction level differs depending on the broadcasting station.
• The default menu name and Downloadable U.S. Rating changes depending on the
dowNoaded information.
° Even if you set the On-screen display to your desired language, the "Downloadable
U.S. Rating' menu will appear in English onl)<
° The rating will automatically block certain categories that are more restrictive.
J _ • g• The rating titles (Fcr example : Humor Level.. etc) and T_ ratin_s (For example :
N\_ MK V.etc) may differ ctepending on the broadcasting station.
English - 68
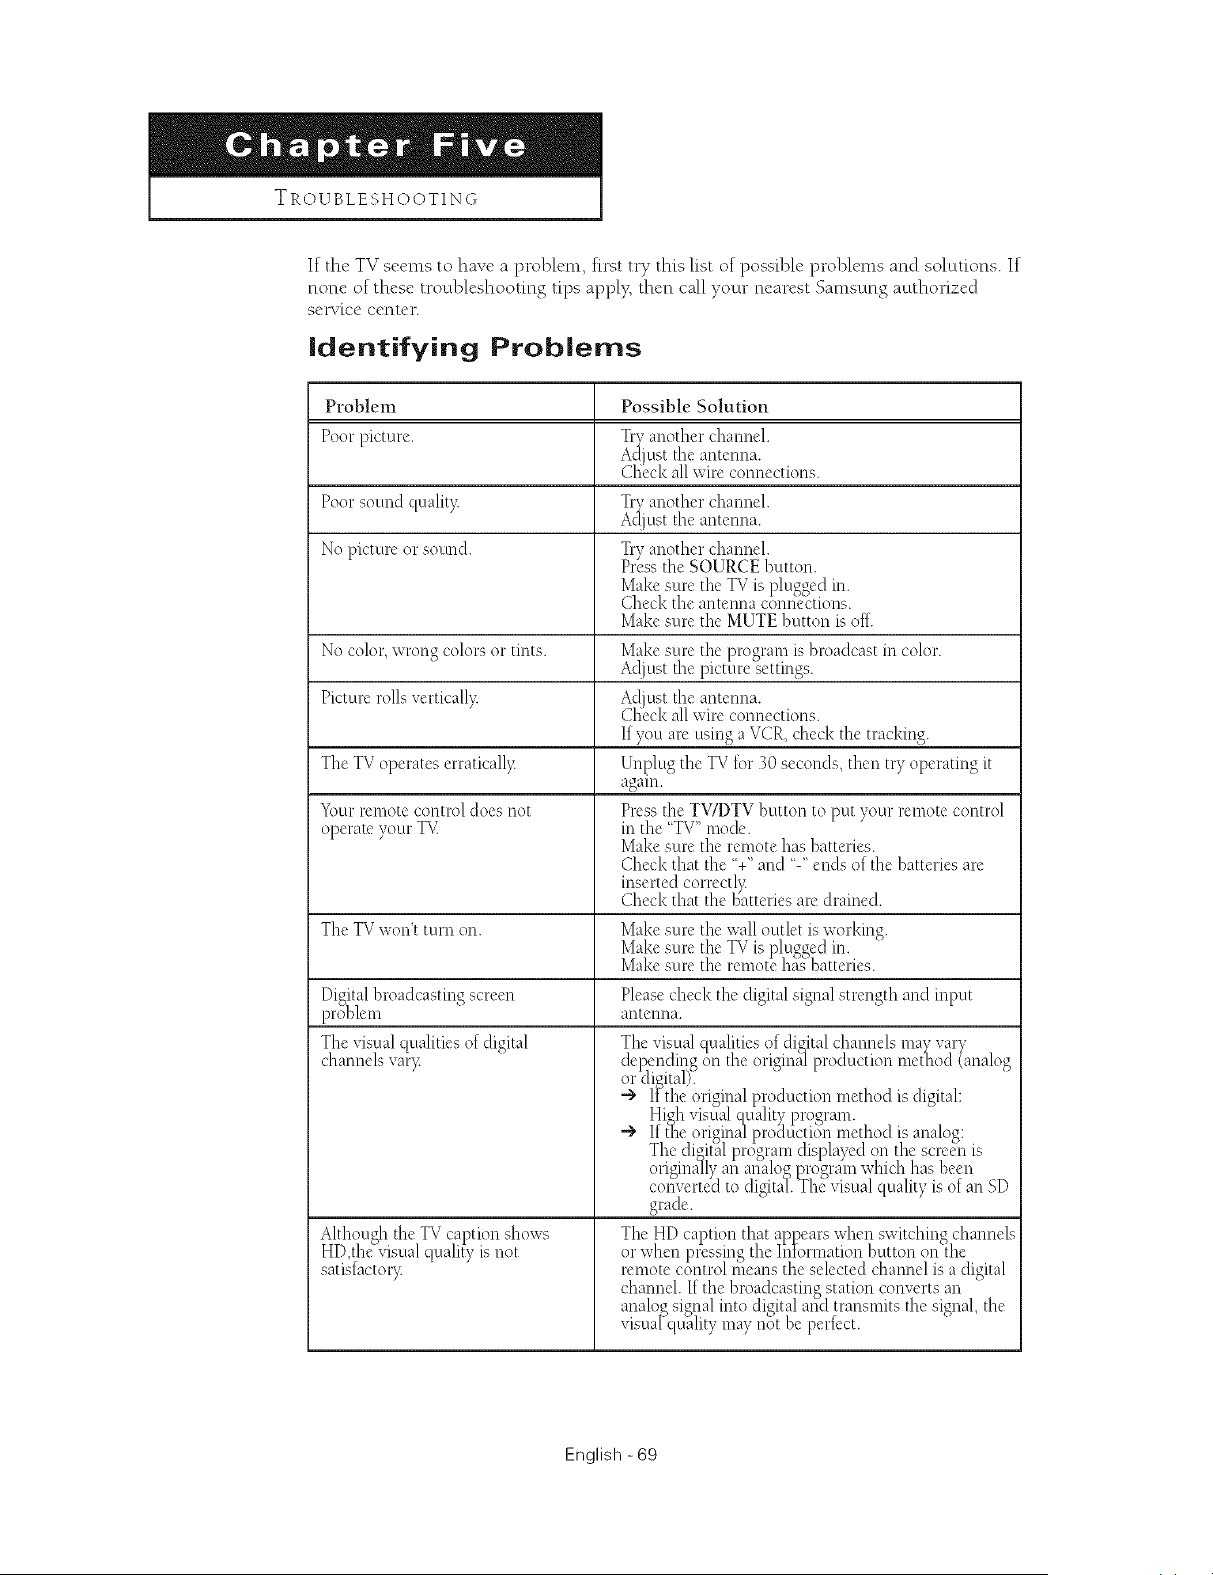
TROUBLESHOOTING
If the TV seems to have a problem, first try this list of possible problems and solutions. If
none of these troubleshooting tips apply, then call your nearest Sanasung authorized
SeFvico cerltoR
identifying Problems
Problem Possible Solution
Poor picture. Tryanother chamlel.
Adjust the antenna.
Cl{eckall wire connections.
Poor sotmd quality. Tryanother channel.
k(_jLlst the antenna.
No picture or sound. Tryanother channel.
Pr3ss the SOURCE button.
Make sure the TVis plugged in.
Check the antenna connections.
Make sure the MUTE button is off.
No color,wrong colors or tints. Make sure the program is broadcast in color.
At!justthe picture settings.
Picture rolls verticall> Adjust the antenna.
Check all wire connections.
Ifyou are using a VCR, check the tracking.
The TVoperates erraticall3: Unplug the TVtor 30 seconds, then try operating it
agam.
Yourremote control does not Press the TWDTV button to put your remote control
operate your TV in the 'TV" mode.
Make sure the remote has batteries.
Check that the %" and '-" ends of the batteries are
inserted correc@
Check that the batteries are drained.
3
The T\' w( n t tc m on. Make sure the wall outlet is working.
Make sure the TVis plugged in.
Make sure the remote ha_ batteries.
Pleasecheck the digital signal strength and input
antetma.
Digitalbroadcasting screen
problem
The visual qualities of digital
channels var)_
Althouoh the TV ca )tion shows
HD,th_'r'_dsual quali_y is not
satisfactor)_
The visual qualities of digital channels may xary
depending on the originfllproduction method (analo_
or*digitall. " "
-> I_the original production method is digital:
High visual quality program.
grade.
The HD caption that appears when switching channels
or when )ressino the Intommtion button on the
" l "" D , " /
remote control means the selected channel is a chgltal
) S' o ' '
cl_annel.If the bn adca un> stauon converts an
analoo sional into digitaland transmits the signal the
. D- D _ . < '
vtsua[quahty may not be pertect.
English -69
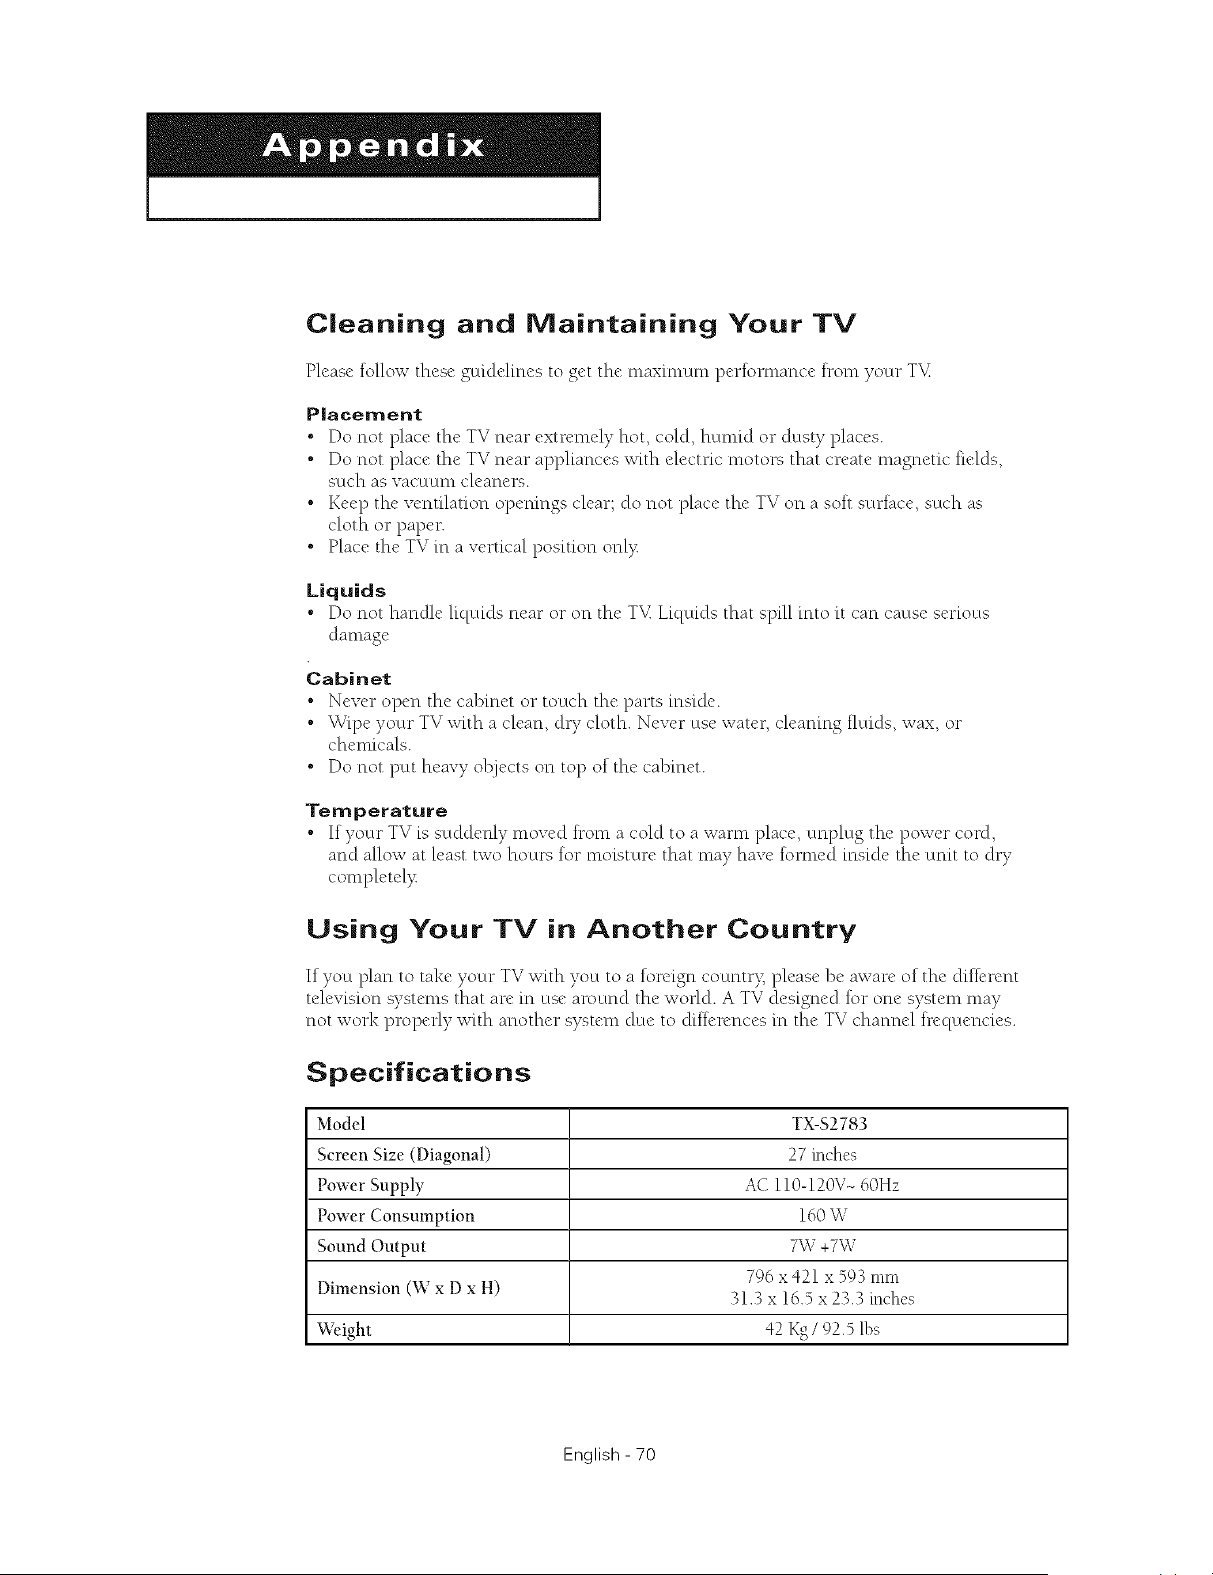
Cleaning and Maintaining Your TV
Please follow these guidelines to get the maximum perlormance trom your T_
Placement
• Do not place the TV near extremely hot, cold, humid or dusty places.
• Do not place the TV near appliances with electric motors that create magnetic tields,
such as vacuum cleaners.
• Keep the ventilation opemngs clear; do not place the TV on a soh surlace, such as
cloth or paper.
• Place the TV in a vertical position onl}:
Liquids
• Do not handle liquids near or on the T . Ltqcuds that spill into it can cause serious
dama,,e
Cabinet
• Never open the cabinet or touch the parts inside.
• Wipe your TV with a clean, dry cloth. Never use water, cleaning tluids, wax, or
chemicals.
• Do not putt heavy olEjects on top of the cabinet.
Temperature
• If your TV is suddenly moved trom a cold to a warn1 place, unplug the power cord,
and allow at least two hours lot moisture that may have tormed inside the unit to dry
completel}:
Using Your TV in Another Country
If you plan to take your TV with you to a foreign countr?_ please be aware of the dillerent
z 7 _.
television systems that are in use around the v, orld. A T_ designed lot one system may
not work properly with another system due to differences in the TV channel trequencies.
Specifications
Model TX-$2783
Screen Size (Diagonal) 27 inches
Power Supply AC 110-120V- 60Hz
Power Consmnption 160 W
Sound Output 7W +7W
796 x421 x 593 mm
Dimension (W x D x H) 31.3 x !6.5 x 23.3 inches
Weight 42 Kg/92.5 lbs
English - 70


Contact SAIVISUNG WORLD-WIDE
If you have any questions or comments relating to Samsung products, please contact the SAMSUNG
customer care center.
CANADA
1-800-SAMSUNG (7287864)
PANAMA 800-7287
U.S.A 1-800-SAMSUNG (7287864)
Aa
Samsung Electronics Canada Inc., Customer Service
55 Standish Court Mississauga, Ontario LSR 4B2
Canada
www.samsung.com/ca
Samsung Electronique Canada Inc., Service & la Clientele
55 Standish Court Mississauga, Ontario L5R 4B2
Canada
www.samsung.com/latin N/A
Samsung Electronics America, Inc.
www.samsung.com 105 Challenger Road
Ridgefield Park, NJ 07860-0511
AA68-03783A-02