Loading ...
Loading ...
Loading ...
%XUU
Copper pipe
Spare reamer
Pipe cutter
3-2. FLARING WORK
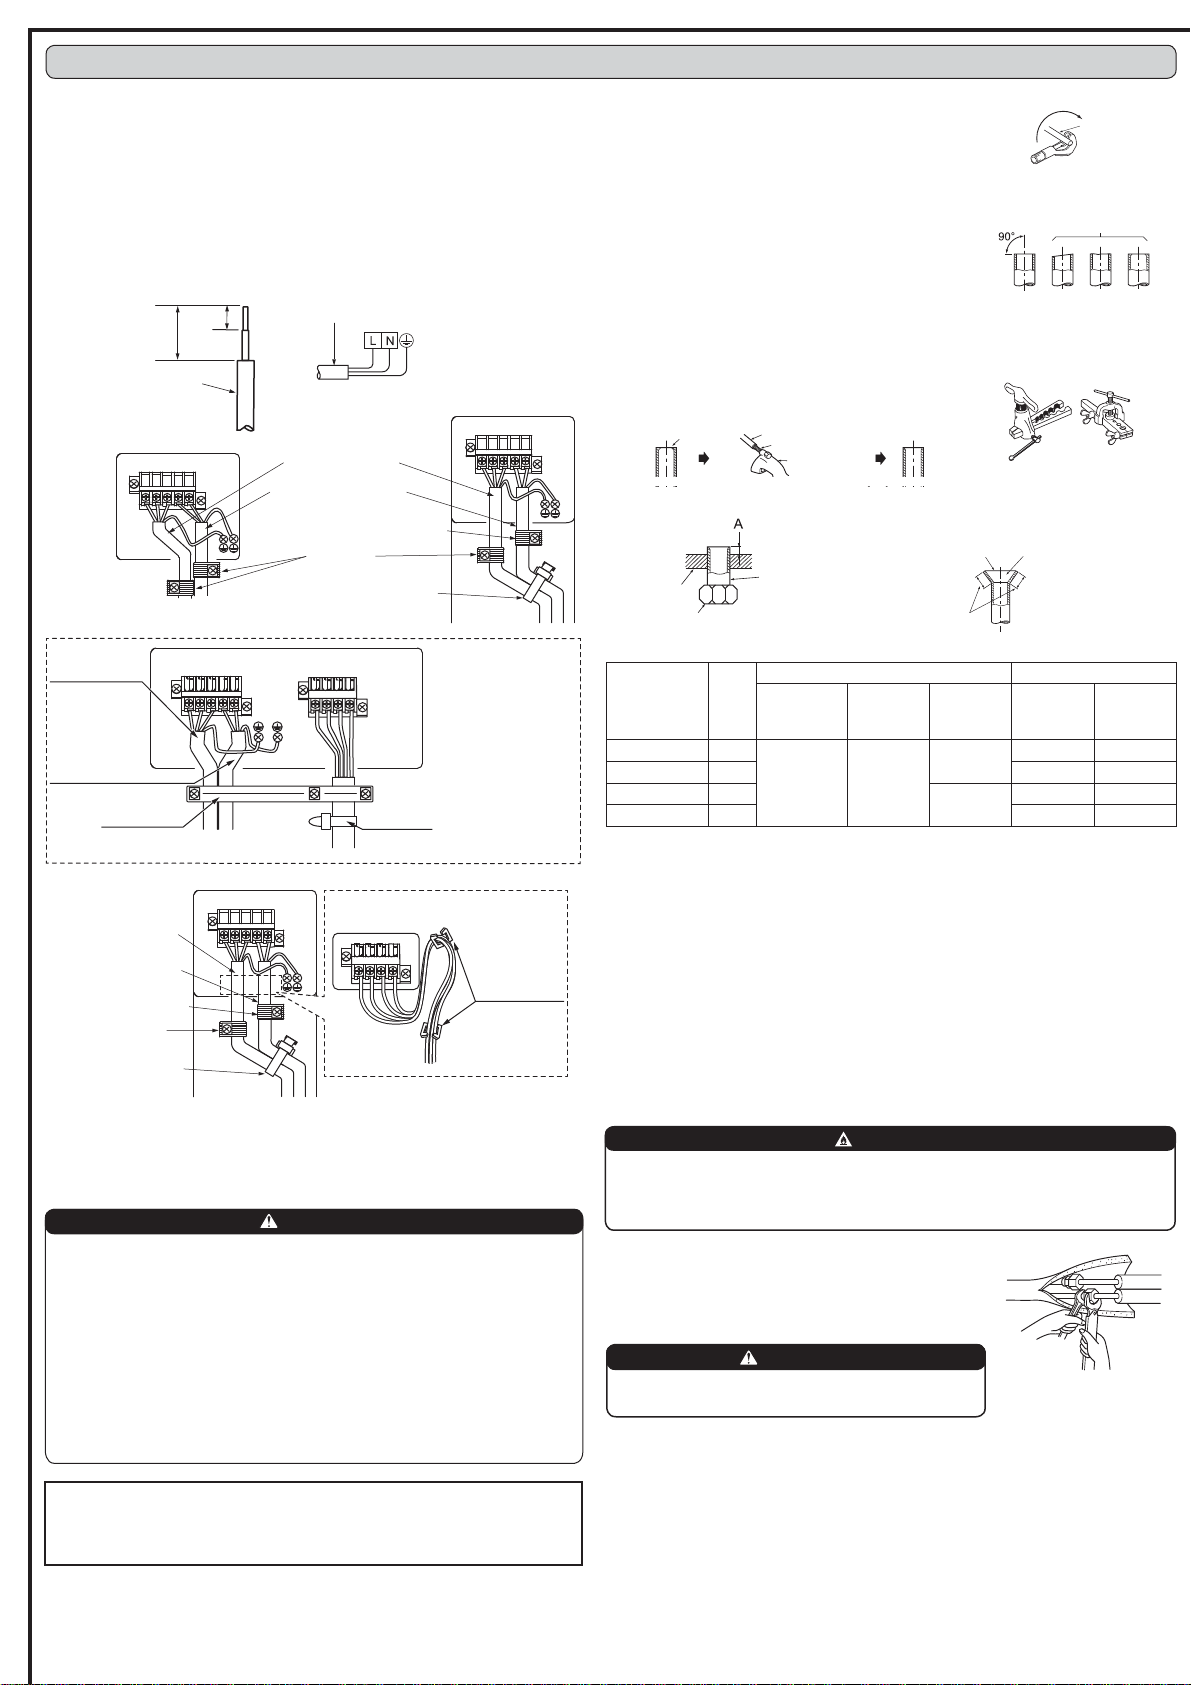
1) Cut the copper pipe correctly with pipe cutter. (Fig. 1, 2)
2) Completely remove all burrs from the cut cross section
of pipe. (Fig. 3)
3XWWKHHQGRIWKHFRSSHUSLSHWRGRZQZDUGGLUHFWLRQ
as you remove burrs in order to avoid to let burrs drop
in the piping.
5HPRYHÀDUHQXWVDWWDFKHGWRLQGRRUDQGRXWGRRUXQLWV
then put them on pipe having completed burr removal.
1RWSRVVLEOHWRSXWWKHPRQDIWHUÀDULQJZRUN
4) Flaring work (Fig. 4, 5). Firmly hold copper pipe in the
dimension shown in the table. Select A mm from the table
according to the tool you use.
5) Check
&RPSDUHWKHÀDUHGZRUNZLWK)LJ
,IÀDUHLVQRWHGWREHGHIHFWLYHFXWRIIWKHÀDUHGVHF-
WLRQDQGGRÀDULQJZRUNDJDLQ
3-3. PIPE CONNECTION
)DVWHQÀDUHQXWZLWKDWRUTXHZUHQFKDVVSHFL¿HGLQWKHWDEOH
:KHQIDVWHQHGWRRWLJKWÀDUHQXWPD\EUHDNDIWHUDORQJSHULRGDQGFDXVHUHIULJHUDQWOHDN-
age.
%HVXUHWRZUDSLQVXODWLRQDURXQGWKHSLSLQJ'LUHFWFRQWDFWZLWKWKHEDUHSLSLQJPD\UHVXOW
in burns or frostbite.
Indoor unit connection
Connect both liquid and gas pipings to indoor unit.
$SSO\DWKLQFRDWRIUHIULJHUDWLRQRLO-RQWKHÀDUHGHQGVRIWKHSLSHV'RQRWDSSO\UHIULJHUD-
tion oil on screw threads. Excessive tightening torque will result in damage on the screw.
)RUFRQQHFWLRQ¿UVWDOLJQWKHFHQWHUWKHQWLJKWHQWKH¿UVWWRWXUQVRIÀDUHQXW
8VHWLJKWHQLQJWRUTXHWDEOHDERYHDVDJXLGHOLQHIRULQGRRUXQLWVLGHXQLRQMRLQWVHFWLRQDQG
WLJKWHQXVLQJWZRZUHQFKHV([FHVVLYHWLJKWHQLQJGDPDJHVWKHÀDUHVHFWLRQ
Pipe diameter
(mm)
Nut
(mm)
A (mm) Tightening torque
Clutch type
tool for R32,
R410A
Clutch type
tool for
R22
Wing nut
type tool
for R22
1P NJIFP
¡´ 17
0 to 0.5 1.0 to 1.5
1.5 to 2.0
13.7 to 17.7 140 to 180
¡´ 22 34.3 to 41.2 350 to 420
¡´ 26
2.0 to 2.5
49.0 to 56.4 500 to 575
¡´ 29 73.5 to 78.4 750 to 800
Copper
pipe
Good
7LOWHG8QHYHQ%XUUHG
No good
Fig. 1
Fig. 2
Clutch type
Flaring tool
Fig. 4
Fig. 3
Smooth all
around
Even length
all around
Inside is shin-
ing without any
scratches.
Flare nut
'LH
Fig. 5 Fig. 6
3. OUTDOOR UNIT INSTALLATION
Copper pipe
Wing nut type
WARNING
When installing the unit, securely connect the refrigerant
pipes before starting the compressor.
3-1. CONNECTING WIRES FOR OUTDOOR UNIT
1) Open the service panel.
2) Loosen terminal screw, and connect indoor/outdoor unit connecting wire (A) from
WKHLQGRRUXQLWFRUUHFWO\RQWKHWHUPLQDOEORFN%HFDUHIXOQRWWRPDNHPLVZLULQJ)L[
the wire to the terminal block securely so that no part of its core is appeared, and no
external force is conveyed to the connecting section of the terminal block.
3) Firmly tighten the terminal screws to prevent them from loosening. After tightening,
SXOOWKHZLUHVOLJKWO\WRFRQ¿UPWKDWWKH\GRQRWPRYH
4) Connect power supply cord (K).
5)
Fix indoor/outdoor unit connecting wire (A) and power supply cord (K) with the cord clamp.
6) Close the service panel securely.
0DNHHDUWKZLUHDOLWWOHORQJHUWKDQRWKHUV0RUHWKDQPP
)RUIXWXUHVHUYLFLQJJLYHH[WUDOHQJWKWRWKHFRQQHFWLQJZLUHV
%HVXUHWRDWWDFKHDFKVFUHZWRLWVFRUUHVSRQGHQWWHUPLQDOZKHQVHFXULQJWKHFRUG
and/or the wire to the terminal block.
35 mm
15 mm
Lead wire
Power supply cord (K)
Outdoor unit connection
Connect pipes to stop valve pipe joint of the outdoor unit in
the same manner applied for indoor unit.
)RUWLJKWHQLQJXVHDWRUTXHZUHQFKRUVSDQQHUDQGXVHWKH
same tightening torque applied for indoor unit.
3-4. INSULATION AND TAPING
1) Cover piping joints with pipe cover.
2) For outdoor unit side, surely insulate every piping including valves.
3) Using piping tape (G), apply taping starting from the entry of outdoor unit.
6WRSWKHHQGRISLSLQJWDSH*ZLWKWDSHZLWKDGKHVLYHDJHQWDWWDFKHG
:KHQSLSLQJKDYHWREHDUUDQJHGWKURXJKDERYHFHLOLQJFORVHWRUZKHUHWKHWHPSHUDWXUH
and humidity are high, wind additional commercially sold insulation to prevent condensa-
tion.
Terminal block
Terminal block
Cord clamp
Power supply cord (K)
Indoor/outdoor unit
connecting wire (A)
$OZD\V¿[WKHSRZHU
supply cord on this side.
Insert the end of the cable
tie in the rectangle hole.
<AP25, 35, 42>
$39*'!
<AP50>
$39*'!
This unit has demand response capability which is compliant with AS/NZS 4755.3.1.
To activate this function, you need to make a contract with remote agents such as elec-
WULFVXSSO\FRPSDQ\WKHQWKLVXQLWVKRXOGEHFRQQHFWHGWR'HPDQGUHVSRQVHHQDEOLQJ
GHYLVH'5(')RUIXUWKHULQIRUPDWLRQFRQVXOW\RXUGHDOHU7KLVXQLWVXSSRUWV'HPDQG
5HVSRQVH0RGHV'50V'50'50DQG'50
CAUTION
7RSUHYHQWPDOIXQFWLRQFDXVHGE\QRLVHURXWHWKHFRUGFRQQHFWLQJWKLVXQLW
to DRED and the power supply cord as parallel as possible.
'RQRWFRQQHFWWKHGHPDQGFRQWUROWUDQVPLVVLRQFDEOHWRWKHWHUPLQDOEORFN
for power supply.
'RQRWSXOOH[WUHPHO\EHQGRUDSSO\VWURQJSUHVVXUHRQWKHZLUHWRSUHYHQW
failure.
'RQRWVFUHZ'5('WRRXWGRRUXQLW
'RQRWSXW'5('LQRXWGRRUXQLW
6HFXUHHOHFWULFDOZLULQJDERYHFODPS
'RQRWJHW'5('ZLUHFDXJKWLQWKHVHUYLFHSDQHO
6HFXUHWKHSRZHUVXSSO\FRUGLQGRRURXWGRRUXQLWFRQQHFWLQJZLUHDQG'5('
wire with the Cable clamp and Cable strap.
WARNING
7RDYRLGULVNRI¿UHÀDUHFRQQHFWLRQVKRXOGEHLQVWDOOHGRXWGRRUV
5HXVDEOHPHFKDQLFDOFRQQHFWRUVDQGÀDUHGMRLQWVDUHQRWDOORZHGLQGRRUV
:KHQFRQQHFWLQJWKHUHIULJHUDQWSLSLQJE\EUD]LQJUDWKHUWKDQXVLQJÀDUHFRQQHFWLRQV
complete all brazing prior to connecting indoor unit to outdoor unit.
1 2 3 C
Terminal block
Cable clamp
Cable strap
The tip should be
pointed to the left side.
'50
'50
'50
C : COMMON
Power supply
cord (K)
Indoor/outdoor
unit connecting
wire (A)
AS/NZS4755 terminal block
1 2 3 C
Terminal block
Cord clamp
Power supply cord (K)
Indoor/outdoor unit
connecting wire (A)
$OZD\V¿[WKHSRZHU
supply cord on this side.
Insert the end of
the cable tie in the
rectangle hole.
Wire saddle
'50
'50
'50
C : COMMON
AS/NZS4755
terminal block
Loading ...
Loading ...
Loading ...