204025-01
3. Attach the cover plate to the junction box (Apply silicon
caulk between cover plate and junction box for a raintight
seal). Keep the fixture horizontal (within +/- 4°) so the bulb
inside is horizontal. If the bulb is not horizontal, the bulb
may darken or shatter and fail prematurely.
4. Loosen the side bolt connected to the arm to aim the fixture
up and down.
Bulb Installation and Relamping
Important: Use a clean glove or cloth when handling the
new bulb. Use isopropyl (rubbing) alcohol to clean the bulb
if it is touched with your bare hands.
1. When relamping, turn power off and let the fixture cool.
2. Remove glass cover and remove the old bulb by pushing
the bulb towards the right until the left side of the bulb is
clear of the left socket.
3. To insert the new bulb push the bulb into the right socket
so the bulb is properly seated in the sockets.
4. Re-install the glass cover.
5. Reconnect the power.
Quartz Halogen Floodlight
Model 5503 - 300 Watts
Model 5505 - 500 Watts
Fixture Installation Instructions
To avoid Electrical Shock:
The Heath
®
/Zenith Quart Halogen Floodlight disperses light over a wide area. It includes a halogen lamp, attaches to a
standard threaded junction box cover plate and is for use with 120 VAC.
FOR PROPER INSTALLATION AND OPERATION, PLEASE READ THESE INSTRUCTIONS CAREFULLY.
To Avoid Fire Or Burn Hazards:
• Allowxturetocoolbeforetouching.Thebulbandthextureoperateathightemperatures.
• Keepxtureatleast2”fromcombustiblematerials.Donotaimatobjectscloserthan3feet.
• Usealampthatdoesnotexceedthemaximumratingsforyourmodel.
Maximum ratings are: 5503 - 300 Watts; 5505 - 500 Watts.
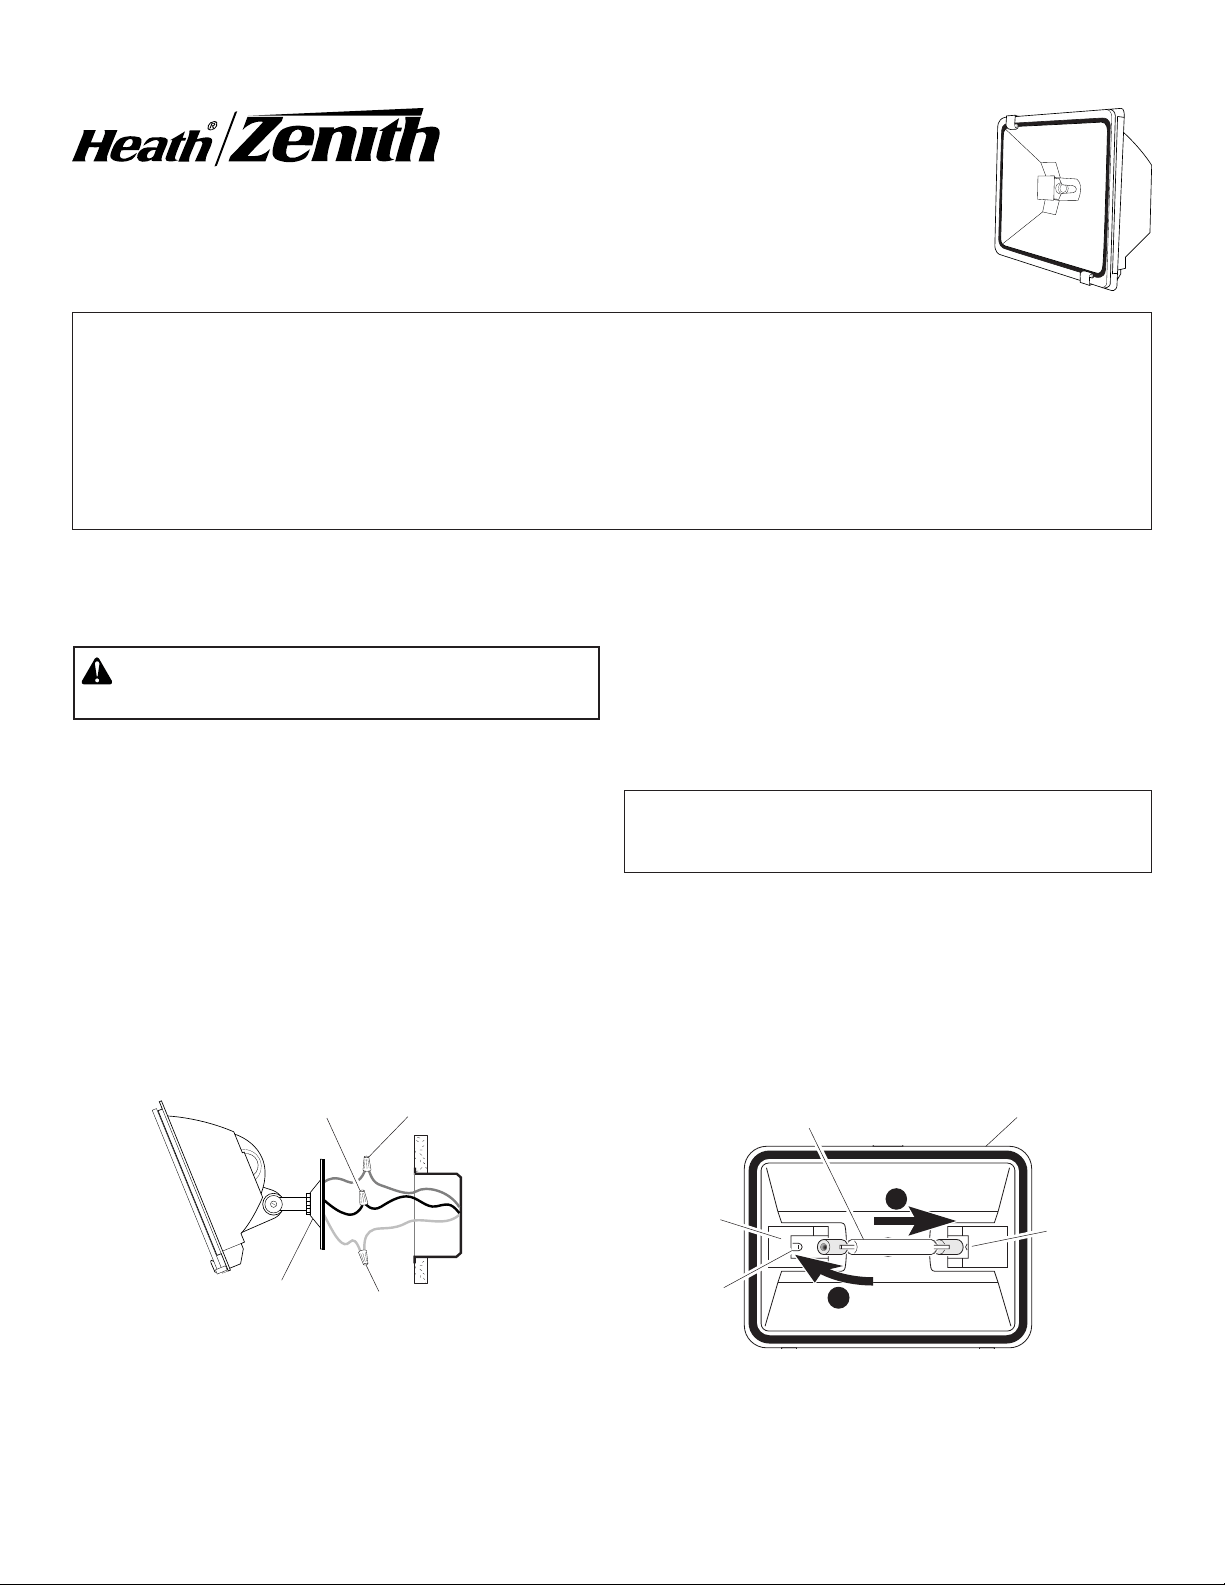
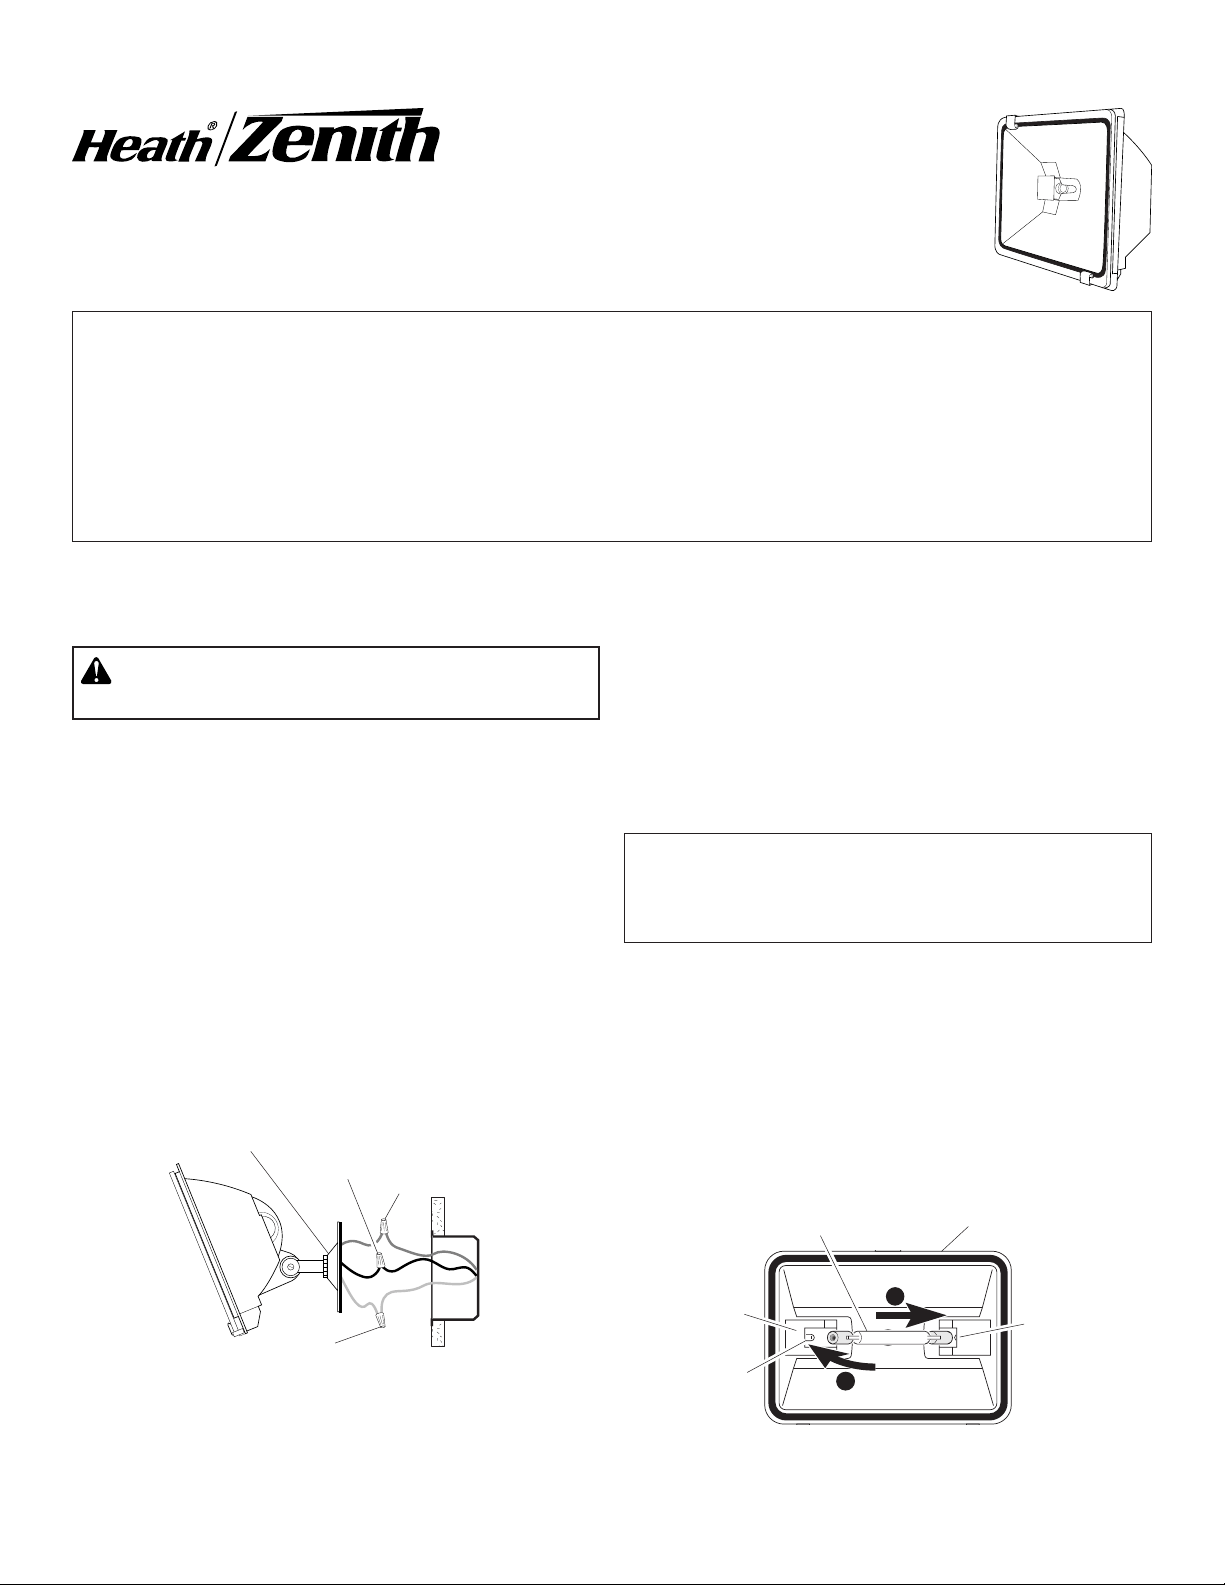
WIRING FIXTURE
(Product May Vary from Illustration)
White to White
Black to Black
Fixture ground to
junction box ground.
Cover Plate
No Service Parts Available for this Product
© 2012 HeathCo LLC 204025-01A
WARNING: Turn power off at the circuit breaker or
fuse.
• Followallwarningslistedonxture.
• Groundingandinstallationsmustcomplywithlocalcodes
and the National Electric Code.
• Thisproductshouldbemountedonagroundedjunction
box and must be used with a threaded cover plate.
• Permanentlymountthexturetoabuildingorpole.
Fixture is designed for WALL MOUNT ONLY (see illus-
tration below).
1. Thread aiming arm through the cover plate (not included)
and tighten the locknut. Apply silicon caulk for a raintight
seal.
2. Connect the lamp wires to the power source wiring. Secure
with wire connectors.
Left Socket
Right Socket
Contact
Bulb
Lamp Head
1
2
204025-01
3.
Fije la placa cubertora a la caja de empalme (Aplique calafa-
teo de silicona entre la placa cubertora y la caja de empalme
para obtener un sellado impermeable). Coloque la tapa en
la caja de empalme. Mantenga el aparato horizontal (dentro
de +/- 4°) de manera que la bombilla de adentro esté hori-
zontal. Si la bombilla no está horizontal, se puede negrear
o astillarse y dejará de funcionar prematuramente.
4. Afloje la tuerca lateral conectada al brazo para apuntar el
aparato hacia arriba o hacia abajo.
Instalación de la bombilla y cambio de lámpara
Importante: Cuando vaya a colocar la nueva bombilla use
un guante limpio, una tela o la espuma que viene con el
producto. Use alcohol etílico para limiar la bombilla si la
ha tocado con sus manos desprotegidas.
1. Cuando cambie la lámpara, apague la energía y deje que
el aparato se enfríe.
2. Quite la cubierta de vidrio y quite la bombilla vieja empu-
jándola hacia la derecha hasta que la parte izquierda de
la bombilla se haya salido del receptáculo izquierdo.
3. Para coloca la nueva bombilla, empújela hacia dentro del
receptáculo derecho de manera que la bombilla quede
correctamente asentada en los receptáculos.
4. Reinstale la cubierta de vidrio.
5. Reconecte la energía.
Faro Halógeno de Cuarzo
El Faro Halógeno de Curzo Heath
®
/Zenith dispersa la luz a través de una área grande. Tiene una Lámpara de halógeno,
se la coloca en una tapa roscanda estándar de caja de empalme y se la usa con 120 VCA.
Para su correcta instalacion y funcionamiento, por favor lea cuidadosamente estas instrucciones.
Para evitar pellgros de fuego o de quemazón:
• Dejequeelartefactoseenfríeantes de tocarlo. La bombilla y el artefacto funcionan a altas temperaturas.
• Mantengaelartefactoporlomenosa51mmlejosdematerialescombustibles.Noloapuntehaciaobjetosqueestén
más cerca de 1 m.
• Useunalámparaquenoexcedalapotencianominalmáximadesumodelo.
Las potencias nominales máximas son: 5503 – 300 vatios; 5505 – 500 vatios.
Instrucciones para la instalación del artefacto
Para evitar el shock eléctrico:
Modelo 5503 - 300 Vatios
Modelo 5505 - 500 Vatios
CABLEADO DEL APARATO
(El producto puede ser diferente al de la ilustración)
Blanco a
Blanco
Negro a
Negro
Alambre a tierra de la
caja de empalme al cable
desnudo del aparato
Placa Cubertora
No hay piezas de servicio disponibles para este producto
© 2012 HeathCo LLC 204025-01 S
ADVERTENCIA: Desconecte la energía en el corta-
circuito.
• Obedezcatodaslasprecaucioneslistadasenesteaparato.
• Latomadetierraylainstalacióndebencumplirconlos
códigos locales y con el Código Eléctrico Nacional.
• Esteproductodebesermontadosobreunacajadeem-
palme conectada a tierra y se lo debe usar con una tapa
roscada.
• Montepermanentementeelartefactoenundeciooenun
poste.
El artefacto está diseñado para ser MONTADO SÓLO
EN PARED (vea la ilustración de abajo).
1. Pase el brazo de apuntar por la tapa (que no se incluye) y
ajuste la contratuerca. Aplique calafateo de silicona para
obtener un sellado impermeable.
2. Conecte los alambres de la lámpara a los alambres de la
fuente de energía. Asegúrelos con conectores de alambre.
1
2
Enchufe
izquierdo
Enchufe
derecho
Contacto
Bombilla
Cabezal de la lámpara
204025-01
3. Fixez la plaque de couverture à la boîte de jonction (appli-
quez un trait de calfeutrant au silicone entre la plaque et la
boîte pour assurer l’étanchéité). Fixez la plaque de couver-
ture à la boîte de jonction. Assurez-vous que le luminaire
est horizontal (± 4°) pour que l’ampoule soit horizontale.
Si l’ampoule n’est pas horizontale, elle pourrait noircir ou
se fendiller et brûler prématurément.
4. Desserrez le boulon latéral du bras de manière à orienter
le luminaire vers le bas et vers le haut.
Installation et remplacement des ampoules
Important : Utilisez un gant ou un chiffon propre pour
remplacer les ampoules. Utilisez de l’alcool isopropylique
(à friction) pour nettoyer l’ampoule si celle-ci a été touchée
à mains nues.
1. Pour le remplacement des ampoules, coupez l’alimenta-
tion et laissez refroidir le luminaire.
2. Enlevez la lentille de verre et la vieille ampoule en pous-
sant celle-ci vers la droite jusqu'à ce que le côté gauche
de l'ampoule soit dégagé de la douille gauche.
3. Pour insérer une nouvelle ampoule, poussez celle-ci dans
la douille de droite de manière que l’ampoule soit correc-
tement assise dans les douilles.
4. Replacez la lentille de verre.
5. Rétablissez l’alimentation.
Projecteur halogène au quartz
Mode d’installation du projecteur
Pour éviter les chocs électriques :
• Mettez le disjoncteur hors tension ou enlevez le fusible
du circuit d’éclairage.
• Observertouslesavertissementsapparaissantsurlelu-
minaire.
• Lamiseàlaterreetl’installationdoiventêtreconformes
aux exigences du Code canadien de l’électricité.
• Celuminairedevraitêtremontésuruneboîtedejonction
miseàlaterreetdoitêtreutiliséavecuneplaquedecou-
verture filetée.
• Montezleluminaireenpermanencesurunbâtimentou
un poteau.
Ce luminaire est conçu pour être INSTALLÉ AU MUR
SEULEMENT (voir l’illustration plus loin).
1. Insérez le bras d'orientation dans la plaque de couverture
(non incluse) et serrez l'écrou de blocage. Appliquez un
calfeutrant au silicone pour assurer l’étanchéité.
2.Connectezleslsduluminaireaucâblaged’alimentation.
Fixez les connexions avec des serre-fils.
Le projecteur halogène au quartz Heath
®
/Zenith éclaire une grande surface. Il comprend une ampoule halogène, se fixe
à une plaque de couverture pour boîte de jonction standard filetée et est conçu pour le 120 VCA.
LIRESOIGNEUSEMENTLESDIRECTIVESAVANTD’ENTREPRENDREL’INSTALLATION.
Pour éviter les risques de brûlure ou d’incendie:
•Laissezrefroidirleprojecteuravantdeletoucher.L’ampouleetleprojecteurfonctionnentàhautetempérature.
•
Gardezleprojecteuràaumoins51mmdematériauxcombustibles.Nelepointezpasversdesobjetssituésàmoins
de 1 m.
•
Utilisez une ampoule qui n’excède pas la puissance maximum recommandée pour votre modèle.
Puissance maximum recommandée : 5503 – 300 W; 5505 – 500 W
Modèle 5503 - 300 Watts
Modèle 5505 - 500 Watts
Câblage du Luminaire
(Le produit pourrait être différent de l’illustration)
blanc /blanc
noir / noir
Mise à la terre de l’appareil
à la mise à la terre de la
boîte de jonction
Plaque de couverture
Aucune pièce de rechange n’est disponible pour ce produit
© 2012 HeathCo LLC 204025-01 F
1
2
Contact
Douille de
Gauche
Douille de
Droite
Ampoule
TêtedeLampe

204025-01
TWO YEAR LIMITED WARRANTY
Thisisa“LimitedWarranty”whichgivesyouspeciclegalrights.Youmayalsohaveotherrightswhichvaryfromstatetostateorprovincetoprov-
ince.
For a period of two years from the date of purchase, any malfunction caused by factory defective parts or workmanship will be corrected at no charge
to you.
Not Covered - Repair service, adjustment and calibration due to misuse, abuse or negligence, light bulbs, batteries, and other expendable items are
not covered by this warranty. Unauthorized service or modification of the product or of any furnished component will void this warranty in its entirety. This
warranty does not include reimbursement for inconvenience, installation, setup time, loss of use, unauthorized service, or return shipping charges.
This warranty covers only HeathCo LLC assembled products and is not extended to other equipment and components that a customer uses in con-
junction with our products.
THISWARRANTYISEXPRESSLYINLIEU OFALLOTHERWARRANTIES, EXPRESSORIMPLIED, INCLUDINGANYWARRANTY,REPRE-
SENTATION OR CONDITION OF MERCHANT ABILITY OR THAT THE PRODUCTS ARE FIT FOR ANY PARTICULAR PURPOSE OR USE, AND
SPECIFICALLYINLIEUOFALLSPECIAL,INDIRECT,INCIDENTAL,ORCONSEQUENTIALDAMAGES.
REPAIR OR REPLACEMENT SHALL BE THE SOLE REMEDY OF THE CUSTOMER AND THERE SHALL BE NO LIABILITY ON THE PART OF
HEATHCO LLCFORANYSPECIAL,INDIRECT,INCIDENTAL,ORCONSEQUENTIALDAMAGES,INCLUDINGBUTNOTLIMITEDTOANYLOSS
OF BUSINESS OR PROFITS, WHETHER OR NOT FORESEEABLE. Some states or provinces do not allow the exclusion or limitation of incidental
or consequential damages, so the above limitation or exclusion may not apply to you.
Please keep your dated sales receipt, it is required for all warranty requests.
GARANTÍA LIMITADA A 2 AÑOS
Estaesuna“GarantíaLimitada”queledaaUd.derechoslegalesespecícos.Ustedpuedetambiéntenerotrosderechosquevaríandeestadoa
estado o de provincia a provincia.
Por un período de 2 años desde la fecha de compra, cualquier mal funcionamiento ocasionado por partes defectuosas de fábrica o mano de obra
será corregido sin cargo para Ud.
No cubierto - Servicio de reparación, ajuste y calibración debido al mal uso, abuso o negligencia, bombillas, baterías, u otras partes fungibles no
están cubiertas por esta garantía. Los Servicios no autorizados o modificaciones del producto o de cualquier componente que se provee invalidarán
esta garantía en su totalidad. Esta garantía no incluye reembolso por inconveniencia, instalación, tiempo de instalación, perdida de uso, servicio no
autorizado, o costos de transporte de retorno.
Esta garantía cubre solamente los productos ensamblados por HeathCo LLC y no se extiende a otros equipos o componentes que el consumidor
usa junto con nuestros productos.
ESTAGARANTÍAESTÁEXPRESAMENTEENLUGARDEOTRASGARANTÍAS,EXPRESADASOSOBREENTENDIDAS,INCLUYENDOCUAL-
QUIERGARANTÍA,REPRESENTACIÓNOCONDICIÓNDECOMERCIABILIDADOQUELOSPRODUCTOSSEADAPTENPARACUALQUIER
PROPÓSITOOUSOENPARTICULAR,YESPECIFICAMENTEENLUGARDETODOSLOSDAÑOSESPECIALES,INDIRECTOS,INCIDENTALES
Y CONSECUENTES.
LAREPARACIÓNOELREEMPLAZODEBERÍASERLAÚNICASOLUCIÓNDELCLIENTEYNOHABRÁRESPONSABILIDADPORPARTEDE
HEATHCO LLCPORCUALQUIERDAÑOESPECIAL,INDIRECTO,INCIDENTALOCONSECUENTE,INCLUIDOSPERONOLIMITADOSACUAL-
QUIERPÉRDIDADENEGOCIOOGANACIASSEANONOPREVISIBLES.Algunosestadosoprovinciasnopermitenlaexclusiónolimitaciónde
daños incidentales o consecuentes, de modo que la limitación o exclusión arriba indicada puede que no se aplique a Ud.
Por favor guarde su recibo de venta fechado; se lo requiere para cualquier solicitud de garantía.
GARANTIE LIMITÉE DE 2 ANS
Ils’agitd’une«Garantielimitée»quivousconfèredesdroitsjuridiquesspéciques.Vouspouvezégalementjouird’autresdroits,variablesd’une
province à l’autre.
Pendant une période de 2 ans à compter de la date d’achat, toute anomalie de fonctionnement imputable à un vice de matériau ou de main-d’oeuvre
sera corrigée gratuitement.
Exclusions de la garantie - Réparations, réglage et calibrage dus à une mauvaise utilisation, un mauvais traitement ou à la négligence. Les ampou-
les, les piles et des autres articles non durables ne sont pas couverts par cette garantie. Le service non autorisé ou la modification du produit ou d’un
ou l’autre de ses composants fournis invalidera totalement la présente garantie. Cette garantie n’inclut pas le remboursement pour le dérangement,
l’installation, le réglage, la perte d’utilisation, le service non autorisé ou les frais d’expédition pour le renvoi de la marchandise.
La garantie ne couvre que les produits assemblés HeathCo LLC et ne s’étend pas aux autres équipements et composants que le client pourrait utiliser
conjointement avec nos produits.
CETTEGARANTIETIENTEXPRESSÉMENTLIEUDETOUTESAUTRESGARANTIES,EXPLICITESOUIMPLICITES,YCOMPRISDETOUTE
GARANTIEDEREPRÉSENTATIONOUDECONDITIONDECONVENANCEÀLACOMMERCIALISATIONOUÀL’EFFETQUELESPRODUITS
CONVIENNENTÀUN BUTOUÀUNE UTILISATIONPARTICULIÈRE,ETSPÉCIFIQUEMENTDETOUSDOMMAGESSPÉCIAUX,DIRECTS,
INDIRECTS OU SECONDAIRES.
LE REMPLACEMENT OU LA RÉPARATION CONSTITUENT LE SEUL RECOURS DU CLIENT ET HEATHCO LLC NE POURRA ÊTRE TENUE
RESPONSABLEDETOUSDOMMAGESSPÉCIAUX,DIRECTS,INDIRECTSOUSECONDAIRES,YCOMPRIS,SANSS’YLIMITER,LESPERTES
COMMERCIALES ET PERTES DE PROFIT, QU’ELLES SOIENT PRÉVISIBLES OU NON. Certaines provinces n’autorisent pas l’exclusion ou la
limitation des dommages indirects ou secondaires, et la limitation ou l’exclusion ci-dessus pourrait ne pas s’appliquer à vous.
Veuillez conserver le reçu portant la date d'achat; vous en aurez besoin pour toutes vos demandes liées à la garantie.