OWNER'S MANUAL
MANUAL DE INSTRUCCIONES
OVERLOCK 3J4D
MODEL 16642
MODELO
SEARS, ROEBUCK AND CO.
Dear Customer:
You have just invested in a very fine overlock. Belore using your new Kenmore machine, please pause tor
a moment and caretully read this booklet which contains instructions on how to operate and care tot your
machine.
Specific instructions are given on threading, tension adjustments, cleaning, oiFing, etc. This will help you
obtain the best sewing results and avoid unnecessary service expense lor conditions beyond our control.
Advice on the operation and care of your machine is always available at your nearest Sears Retail Store.
Please remember, if you have questions about your machine, always mention the model number and
serial number when you inquire.
Kenmore Overtook
Record in space provided below the model number and serial
number of this appliance. The model number and serial number
are located on the nomenclature plate, as identified on Page 3 ot
this booklet.
Model No. 385. Serial No.
Retain these numbers lor future reterence.
SEARS, ROEBUCK AND CO.
Esnmado cliente:
Usted acaba de mvertir en una m6quina de "overtock'. Antes de utilizar su nueva maquina Kenmore, por
favor, detengase un momento y iea cuidadosamente esle manual, el cual contiene ilzstrttcciones sobre ¢6mo
manejar y cuidar ]a maq!ana.
Se dan instrucciones especificas sobre enhebrado, ajustes de tension, limpieza, engrase, etc. Esto le ayudara a
obtener ttnos resultodos de costTtra 6ptimos y a evttar costos de servtcio mnecesartos debidos a situaciones rods
anti de nnestro control
En eI aImacdn Sears rods cercano siempre se pueden obtener consejos para et manejo y cuidado de ia mdquina.
Por favor, rectterde, si tiene preguntas acerca de ia mdquina, menctone siempre el nffmero de modelo y el
mbnero de serie cuando se ponga en contacto con nosotros.
Maquina de "overlock" Kenmore
Anote en el espacio que se proporciona a continuacidn et
nfimero de modelo y ei mimero de serie de este aDarato
electrodomdstico. El mhnero de modelo y ei nt_mero de serie
est6n ubicados en la placa de nomenctantra, segtbl se tndica
en Ja p6gina 4 de este manual
No. de modelo 385. No. de serte
Conserve estos m_meros para referencia filtnra.
IMPORTANT SAFETY
INSTRUCTIONS
Your sewing machine is designed and constructed only for HOUSEHOLD use.
Read all instruction before using this sewing machine.
DA NG ER -To reducetheriskofelectricshock:
!. An appliance should never be left unattended when plugged in. Always
unplug this appliance from the electric outlet immediately after using
and before cleaning,
2. Always unplug before relamping. Replace bulb with same type rated
15 Watts.
3. Do not reach for the appliance that has fallen into water. Unplug
immediately
4. Do not place or store appliance where it can tall or be pulled into a tub
or sink. Do not place in or drop into water or other liquid.
WA RN ING --To reduce the risk of burns, fire, electric shock,
or injury to persons.
1. Do not atlow to be used as a toy. Close attention is necessary when this
appliance is used by or near children.
2. Use this appliance only for its intended use as described Jn this manual.
Use only attachments recommended by the manufacturer as contained in
this manual.
3.
Never operate this appliance if it has a damaged cord or plug, if it is not
working properly, if it has been dropped or damaged, or dropped into
water. Return the appliance to the nearest authorized dealer or service
center for examination, repair, electrical or mechanical adjustment.
4. Never operate the appliance with any air opening blocked. Keep
ventilation openings oi the sewing machine and loot controller tree from
accumulation of lint, dust, and loose cloth.
5. Never drop or insert any object into any opening.
6. Do not use outdoors,
7. Do not operate where aerosol (spray) products are being used or where
oxygen is being administered.
8. To disconnect, turn all controls to the off (-O") position, then remove
plug from outlet.
9. Do not unplug by pulling on cord. To unplug, grasp the plug, not the
cord.
10.
11.
Keep fingers away from all moving parts. Special care ts required
around the sewing machine need]e_
Always use the proper needle plate, The wrong plate can cause the
needle to break.
12. Do not use bent needles.
13.
14.
Do not pull or push labric while stitching.
It may deflect the needle causing it to break.
Switch the sewing machine off (*'O °') when making any adiustment in
the needle area, such as threading needle, changing needle, threading
bobbin, or changing presser loot, and the like.
15. Always unplug the sewing machine from the electrical outlet when
removing covers, lubricating, or when making any other adjustments
mentioned in the instruction manual.
SAVE THESE INSTRUCTIONS
INSTR UCCIONES DE SEGURIDAD
IMPORTANTES
Esta nmquina de coser est6 diseiiada y constrmda t_tnicamente para usa
domdsnco. Lea todas tas instruceiones attics de ttsar esta mdqttttta de eoser.
PELIGRO -Para redueir el riesgo de sacudidas eldetrwas:
1. Nmlca se debe dejar desatendido un aparato electrodomdsnco cuando Oste se
eneuen ire en ehufado. Desen chafe stempre este aparato electrodomdsneo det
tomacorrlente eldetnco mmediatamente despu6s de usarto y antes de limpiario.
2, Desenelntfe stempre el aparato antes de cambiar la bombitta. Cambie ta
bombilla nsando ann det nusmo npo con mm eapactdad nominal de 15 vatios_
3. No recoja el aparato si dste se cae agua. Desenehfffelo mmediatamente.
4. No eoioque ni guarde el aparato donde pueda eaer en tma bafiera o iavabo.
No fo ponga ni to deje eaer en agua o en otro liqutdo.
ADVERTENCIA - _ara redncir el r,esgo de quemaduras,
ineendio, sacudidas eldctrtcas o &,stonesalas personas:
1. No permita que el aparato se utilice coma jugnete. Es neeesarto prestar
mneha alenciOn enando este aparato es utilizado par nifios o cttando se
utiti_a cerca de dstos.
2. Utilice este aparato timcamente para el usa para el que rite diseflado, tal
conlo se describe en este nlattaat. Utifiee ttnicatnente accesortos
reeomendados par ei fabrieante segt'tn se indica en este nmmtaL
,
Nanca haga fimcionar e! aparato st nene m_ cable onn enchufe dafiado, si no
funetona adecnadamente, si se ha caido o dafiado, o st se ha caido at agaa.
Devuetva el aparato al distribmdor o centro de servtcto atttortzado mils
proximo para revtsarlo, reparario o realizar ajnstes eldctricos o mec6mcos.
4. Nunca haga fiatctonar et aparato con atguna abertura de ventilaci6n
bloqneada. Mantenga ias aberntras de ventilaci6n de la mdqutna de coser y
ef pedal libres de acunmlaei6n de pelusa, polvo y tela suetta.
5. Nunea deje caer nt mtrodazea ntngt_tn objeto en ningtma abertura.
6. No utilice et aparato al atre libre.
7o No haga fimctonar et aparato donde se esten utilizando prodaetos de aerosoI
(ptdverizador) o donde se est_ admtnistrando oxigeno.
8. Para desconectar el aparato, ponga todos los controies en la posiei6n de
apagado ("0") y iuego saaue el enchufe del tomaeorriente.
10.
No desenehufe el aparato t_rando del cable. Para desenchufario, agarre et
enchnfe y no et cable.
Mantenga los dedos alejados de las pieza moviles, Se reqmere ctadado espe
ctai alrededor de la aguja de ia mdqnina de coser.
11. Utilice stempre ta pinta de agajas adecaada. Una ptaca meorrecta paede
hacer que fa aguja se rompa.
12. No utilice agajas dobladas.
13. No tire de la teia m la emptqe nuentras case. Esto podrfa desvtar ia agtqa y
llaeer clue dsta se rompa.
I4. Apague la maqmna de coser (postei6n "O" ) al reatizar cualqaier ajuste en et
area de ia agtqa, tat coma enhebrar la aguja, eambiar ia aguja, ensartar la
bobina o cantbiar el prensatelas, y cosas similares.
15. Desencht_e siempre ia maquma de coser det tomacorriente electrlco caando
qmte las tapas, at engrasar o at reafizar arras ajustes menctonados en e!
mannal de instrttcciones.
CONSERVE ESTAS INSTR UCCIONES
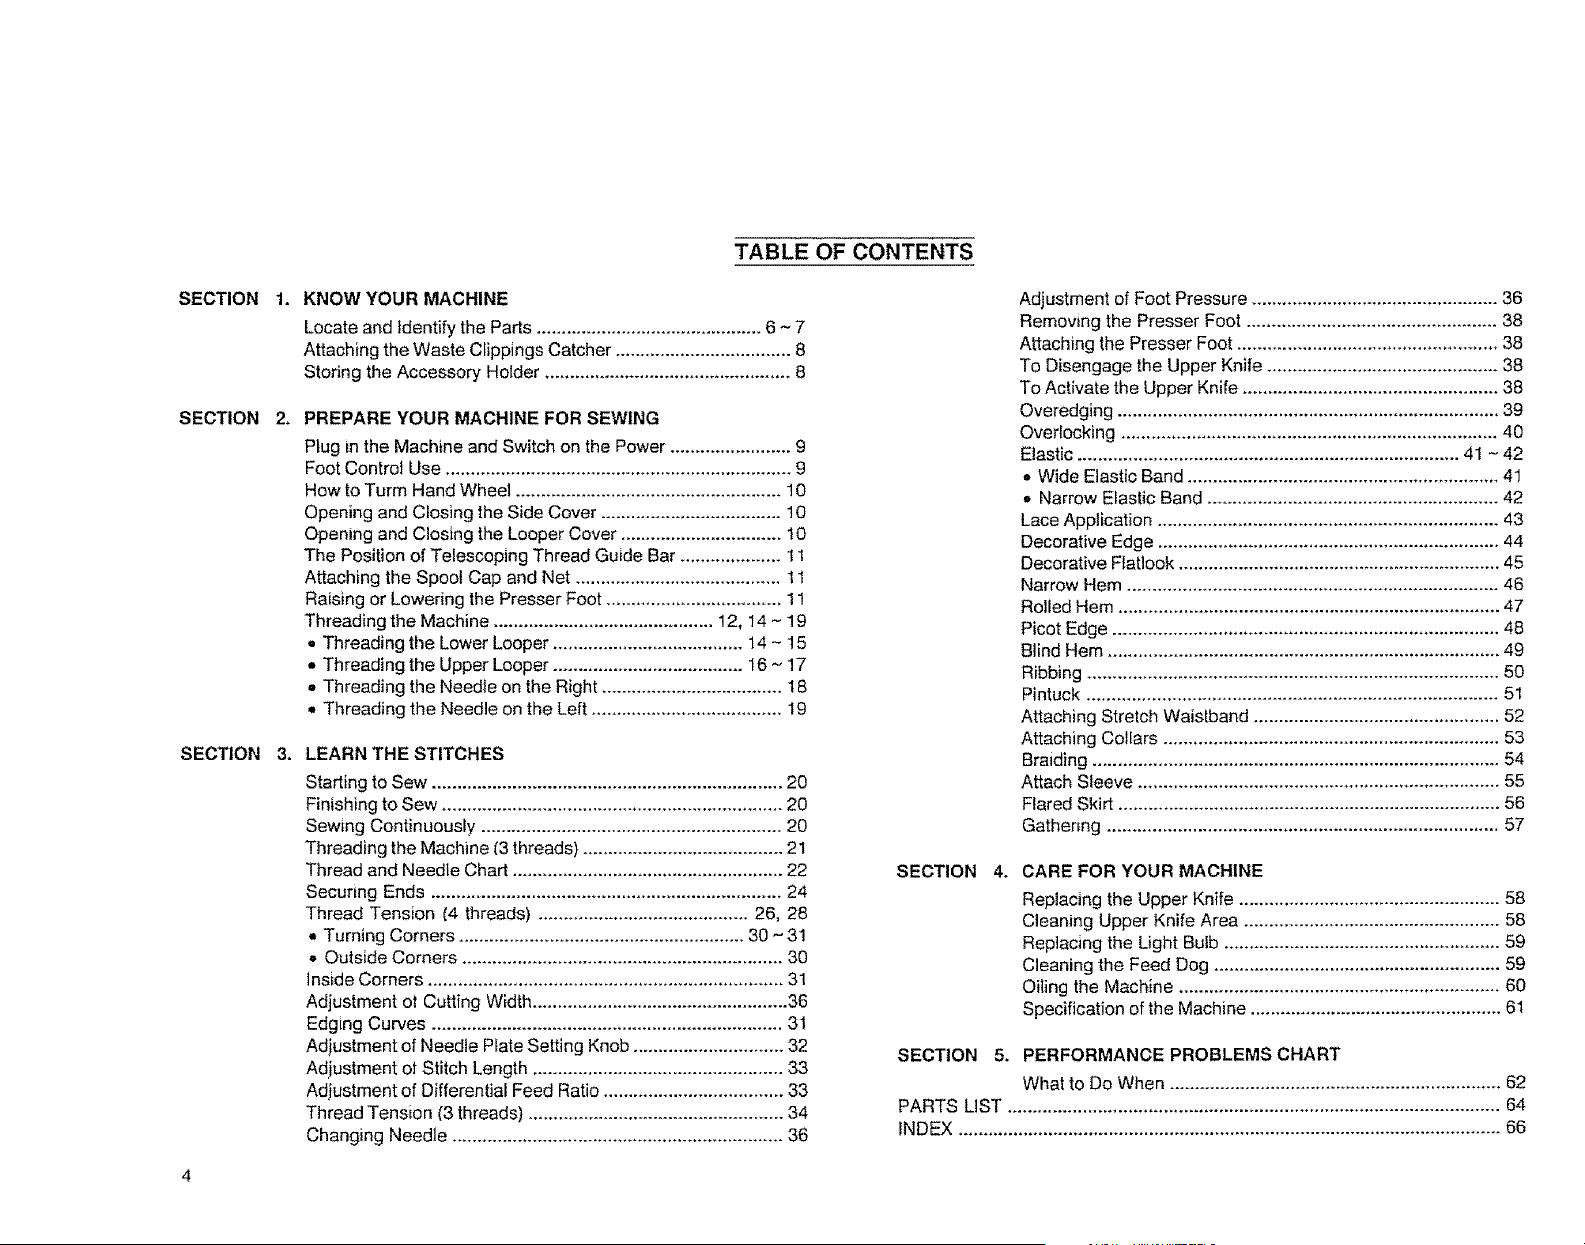
TABLE OF CONTENTS
SECTION
SECTION
1.
2.
KNOW YOUR MACHINE
Locate and Identify the Parts ............................................. 6 ~ 7
Attaching the Waste Clippings Catcher ................................... 8
Storing the Accessory Holder ................................................. 8
SECTION 3.
PREPARE YOUR MACHINE FOR SEWING
Plug in the Machine and Switch on the Power ........................ 9
Foot Control Use ..................................................................... 9
How to Turm Hand Wheel ..................................................... 10
Opening and Closing the Side Cover .................................... 10
Opening and Closing the Looper Cover ................................ 10
The Position of Telescoping Thread Guide Bar .................... 11
Attaching the Spool Cap and Net ......................................... 1t
Raising or Lowering the Presser Foot ................................... 11
Threading the Machine ............................................ 12, 14 - 19
• Threading the Lower Looper ...................................... 14 - 15
• Threading the Upper Looper ...................................... I6 ~ 17
= Threading the Needle on the Right .................................... 18
_,Threading the Needle on the Left ...................................... 19
LEARN THE STITCHES
Starting to Sew ...................................................................... 20
Finishing to Sew .................................................................... 20
Sewing Continuously ............................................................ 20
Threading the Machine (3 threads} ........................................ 21
Thread and Needle Chart ...................................................... 22
Securing Ends ...................................................................... 24
Thread Tension (4 threads) .......................................... 26, 28
• Turning Corners ......................................................... 30 - 31
° Outside Corners ................................................................ 30
Inside Corners ....................................................................... 31
Adjustment ot Cutting Width ................................................... 36
Edging Curves ...................................................................... 31
Adjustment of Needle Plate Setting Knob .............................. 32
Adjustment ot Stitch Length .................................................. 33
Adiustment of Differential Feed Ratio .................................... 33
Thread Tension (3 threads) ................................................... 34
Changing Needle .................................................................. 36
Adjustment of Foot Pressure ................................................. 36
Removing the Presser Foot .................................................. 38
Attaching the Presser Foot .................................................... 38
To Disengage the Upper Knife .............................................. 38
To Activate the Upper Knife ................................................... 38
Overedging ............................................................................ 39
Ovedocking ........................................................................... 40
Elastic ............................................................................ 41 - 42
° Wide Elastic Band .............................................................. 41
• Narrow Elastic Band .......................................................... 42
Lace Application .................................................................... 43
Decorative Edge .................................................................... 44
Decorative Flatlook ................................................................ 45
Narrow Hem .......................................................................... 46
Rolled Hem ............................................................................ 47
Picot Edge ............................................................................. 48
Blind Hem .............................................................................. 49
Ribbing .................................................................................. 50
Pintuck .................................................................................. 51
Attaching Stretch Waistband ................................................. 52
Attaching Collars ................................................................... 53
Braiding ................................................................................. 54
Attach Sleeve ........................................................................ 55
Flared Skirt ............................................................................ 56
Gathering .............................................................................. 57
SECTION 4. CARE FOR YOUR MACHINE
Replacing the Upper Knife .................................................... 58
Cleaning Upper Knife Area ................................................... 58
Replacing the Light Bulb ....................................................... 59
Cleaning the Feed Dog ......................................................... 59
Oiling the Machine ................................................................ 60
Specification of the Machine .................................................. 61
SECTION 5, PERFORMANCE PROBLEMS CHART
What to Do When .................................................................. 62
PARTS LIST .................................................................................................. 64
INDEX ............................................................................................................ 66
CONTENIDO
SECCION I.
SECCION 2.
SECCION 3,
CONOZCA bl MAQUINA
Localice e ldentificme las plezas .......................................... 6 ~ 7
Coiocacidn del coiector de recortes de desperdicio ................. 8
Conto guardar fa caja de accesorios ......................................... 8
PREPARE LA MAQUINA PARA COSER
Enchufe fa maqtmm y encidndala ............................................... 9
Utilizaci6n dei pedal .................................................................. 9
C6mo girar e! votante de mano ................................................ lO
Apertura y clerre de la tapa lateral ......................................... 10
Apertttra y clerre de la tapa de los ojos_gtda .......................... 10
Posicidn de la barra teiescOpica de los guia-hilos .................. 1t
Colocaci6n de ta tapa de carrete y la red ............................... t !
Subida o bajada clel prensatetas .............................................. 1l
Enilebrado de la mdotuna ......................................... I3, f4 - !9
* Enilebrado del ojo-guia ttlferior. .................................. i4 - 15
, Enltebrado de1 ojo-guia stwerior. ................................ 16 ~ t 7
* Enhebrado de la aguja derecha ........................................... 18
o Enhebrado de ta aglua izqlnerda ......................................... 19
APRENDA LAS PUNTADAS
Para empezar a coser. .............................................................. 20
Para termmar de coser. ........................................................... 20
CostTtra conft_tta ...................................................................... 20
Enhebrado de ta nldqnma (3 hilos) .......................................... 21
Cuadro de hilos y agujas .......................................................... 22
Ajltste det ancho de corle ......................................................... 23
Como asegltrar los eaTrenlos de la costttra ............................. 25
Tensi6n de1 hilo (4 hilo._') .................................................... 27. 29
Doblado de esqumas ........................................................ 30 _ 31
o Esquinas exlertores .............................................................. 30
_, Esquinas tntemores ............................................................... 31
Bordes en curvas ...................................................................... 31
Ajuste del bot6n tie postci6n de la piaca de agujas ................. 32
Ajuste de la tongimd de plmtada .............................................. 33
Ajuste de la relaei6n de m,ance diferencial ............................. 33
TeIIsioIt de[ hilo (3 hilos) .......................................................... 35
Cambio de la agltda ................................................................... 37
Ajuste de ta presi6n del prensatelas ......................................... 37
Extraccidn det prensatelas ........................................................ 38
Cotocaci6n del prensatelas ....................................................... 38
Para desactn,ar ta cucltilla supertor ........................................ 38
Para acth,ar la cuchilla supertor .............................................. 38
Sobrehilado ............................................................................... 39
Remate en la parte de arriba de la cosmra .............................. 40
Eldstico .............................................................................. 41 - 42
,, Cinta el6stlca ancha .............................................................. 41
,, Cinta eldstlca estrecha .......................................................... 42
Aplicacldn de encaje ................................................................. 43
Borde decoram,o ....................................................................... 44
Decoracidn plana ...................................................................... 45
Dobladillo estrecho ................................................................... 46
Dobladillo enrollado ................................................................. 47
Borde de encaje ......................................................................... 48
Dobladi#o clego ........................................................................ 49
Cuelto acanalado ...................................................................... 50
Pliegue pequego ........................................................................ 51
Colocacidn de una cmta eldstica en la cinmra ........................ 52
Colocacidn de cuellos ............................................................... 53
Trenzado .................................................................................... 54
Cofocacidn de ma_Nas .............................................................. 55
Falda en campana ..................................................................... 56
Fmmcldo .................................................................................... 57
SECCION 4,
CUIDADO DE LA MAQUINA
Cambio de ta cuchilla superior ................................................ 58
Limpteza det tirea de ]a cuchilta stwerlor ................................ 58
Cambio de ta bombilla .............................................................. 59
Limpteza del trinm_ete de avance ............................................. 59
Engrase de la mhquma ............................................................. 60
Especificaciones de ia m6qmna ................................................ 6l
SECCION 5. CUADRO DE PROBLEMAS DE FUNCIONAMIENTO
Qttd hater cuando ...................................................................... 63
LISTA DE PIEZAS ............................................................................................... 65
[NDICE ................................................................................................................ 66
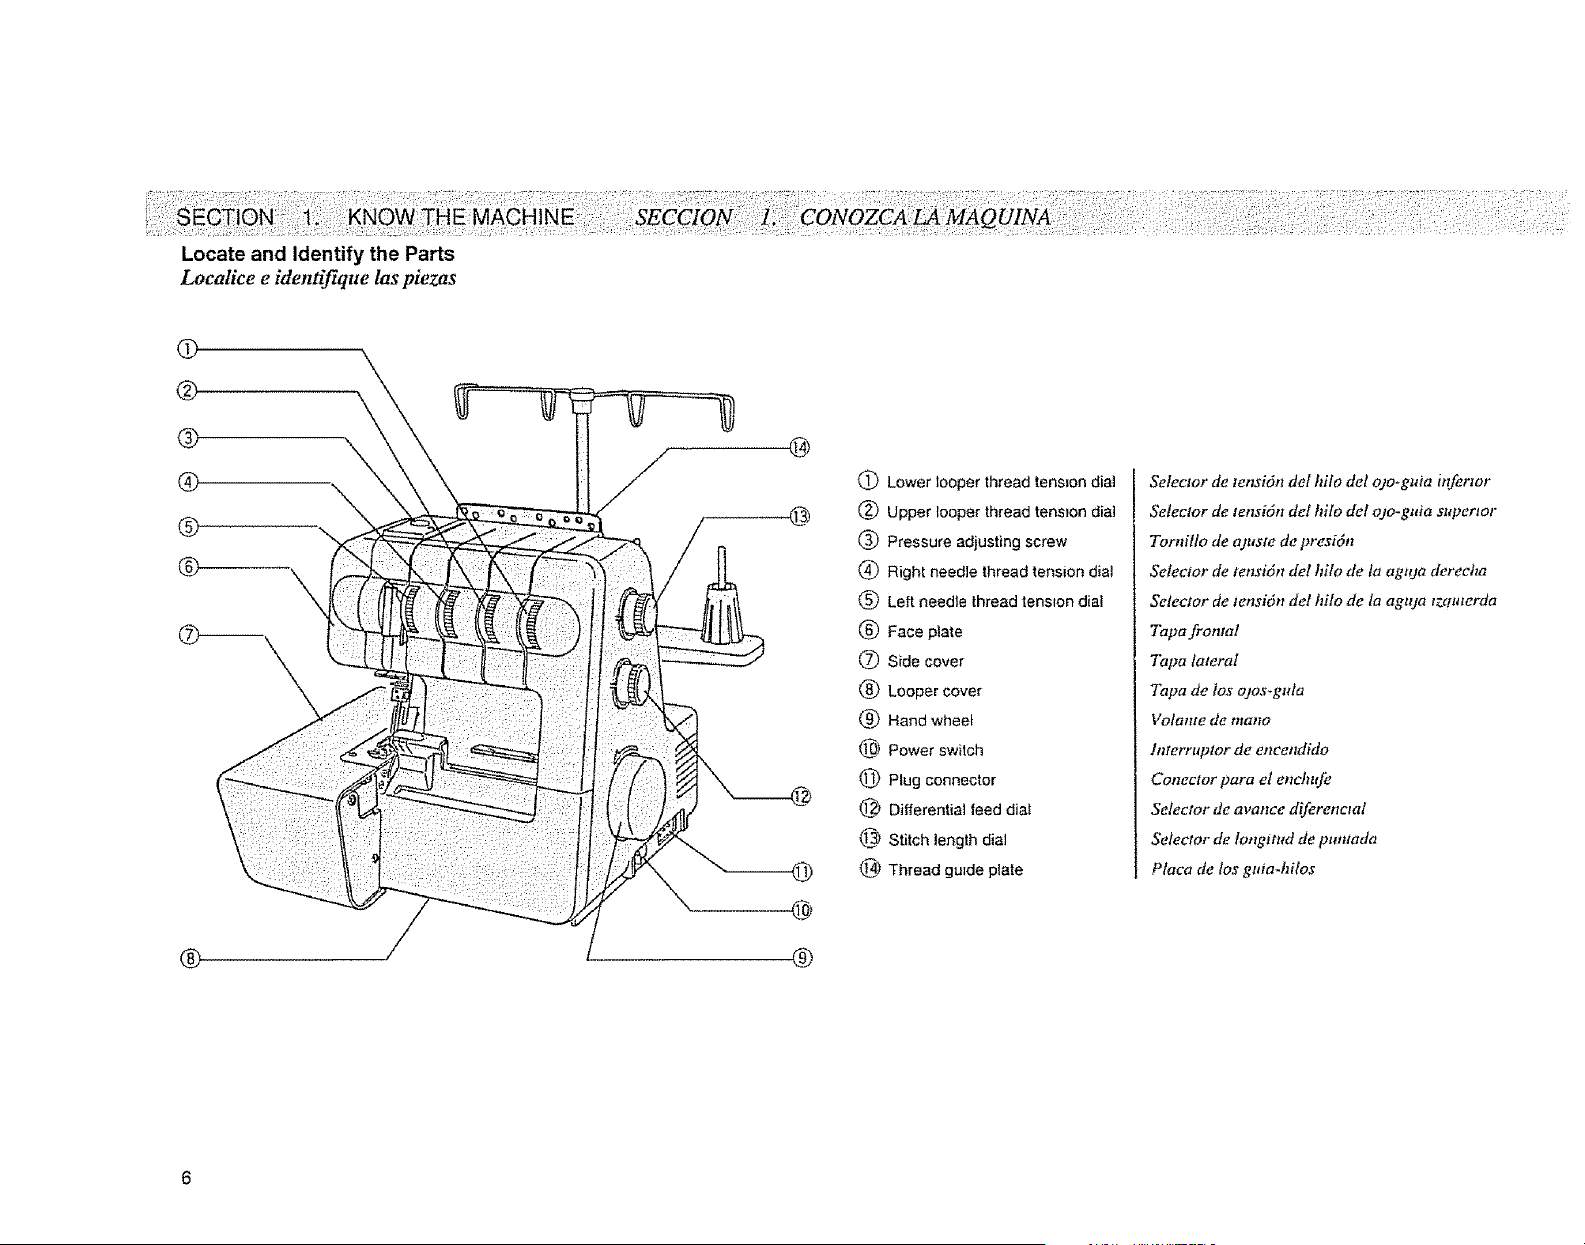
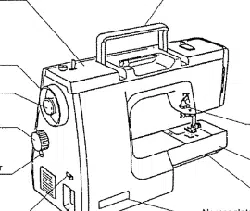
Locate and Identify the Parts
Localice e identifique tas piezas
@
@
(_ Lower looper thread lensJon dial
(_ Upper looper thread tension dial
® Pressure adjusting screw
(_ Right needle thread tension dial
® Le_t needle thread tension dial
(_ Face plate
(_ Side cover
(_ Looper cover
(_) Hand whee_
Power switch
(_ Plug connector
()_ Differential teed dial
Stitch length dial
@ Thread guide plate
Selector de tensi6n del hilo del ojo-guia mfertor
Selector de tensi6n del hilo del ojo-gnia saper_or
Tornitto de ajuste de presi6n
Selector de tensi6n del hilo de ta agtffa derecha
Selector de tensi6n del hifo de ta aguja tzttuterda
Tapafronml
Tapa lateral
Tapa de los ojos-gula
Volante de ntatto
lnterruptor de encendido
Conector para et enehufe
Selector de a vance diferenctal
Selector de Iongttud de pantada
Placa de los guia-hilos
® ®
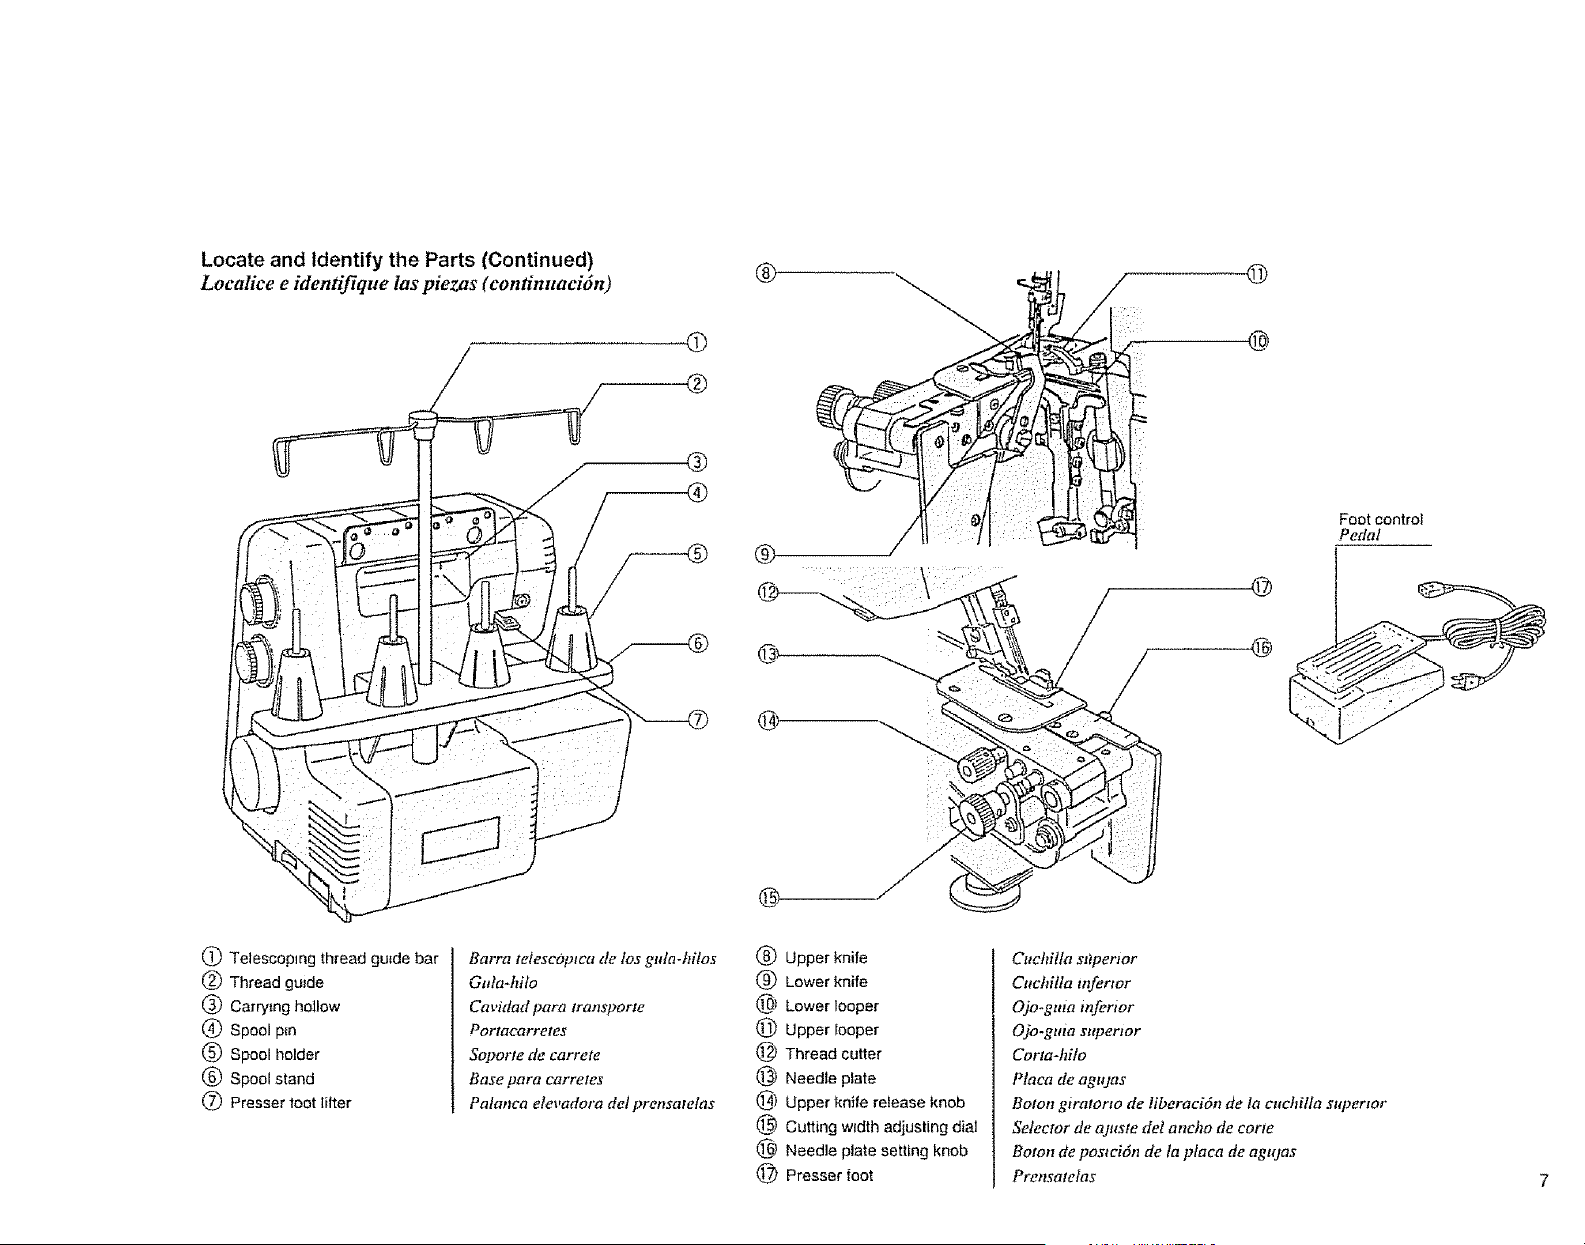
Locate and identify the Parts (Continued)
Localice e identifique !as piezas (confinuaci6tO
0
/ ®
/
®
®
@
®
@
®
Foot control
Pedal
C) Telescoping thread guide bar
(_) Thread guide
(_ Carrying hollow
(_ Spool p_n
(_) Spool holder
(_) Spool stand
(_) Presser toot lilter
Barra telescoptea de los gula.hilos
Guta-hito
Cavidad paro transporte
Portaearretes
Soporte de earrete
Base para earreles
Palanca elevadora de/prensatetas
(_ Upper knife
(_ Lower knife
@) Lower looper
(_ Upper looper
1@ Thread cutter
(_ Needle plate
_) Upper knife release knob
0 Cutting width adjusting dial
1_ Need]e plate setting knob
Presser loot
Cachitla sapenor
Cachilta inferior
Ojo-gaia inferior
Ojo-guia sapertor
Corta-hilo
Placa de agujas
Boron gtratorto de liberaci6n de la cuchilla supertor
Selector de ajuste det ancho de corxe
Boron de poswi6n de la ptaea de agajas
Preasatelas
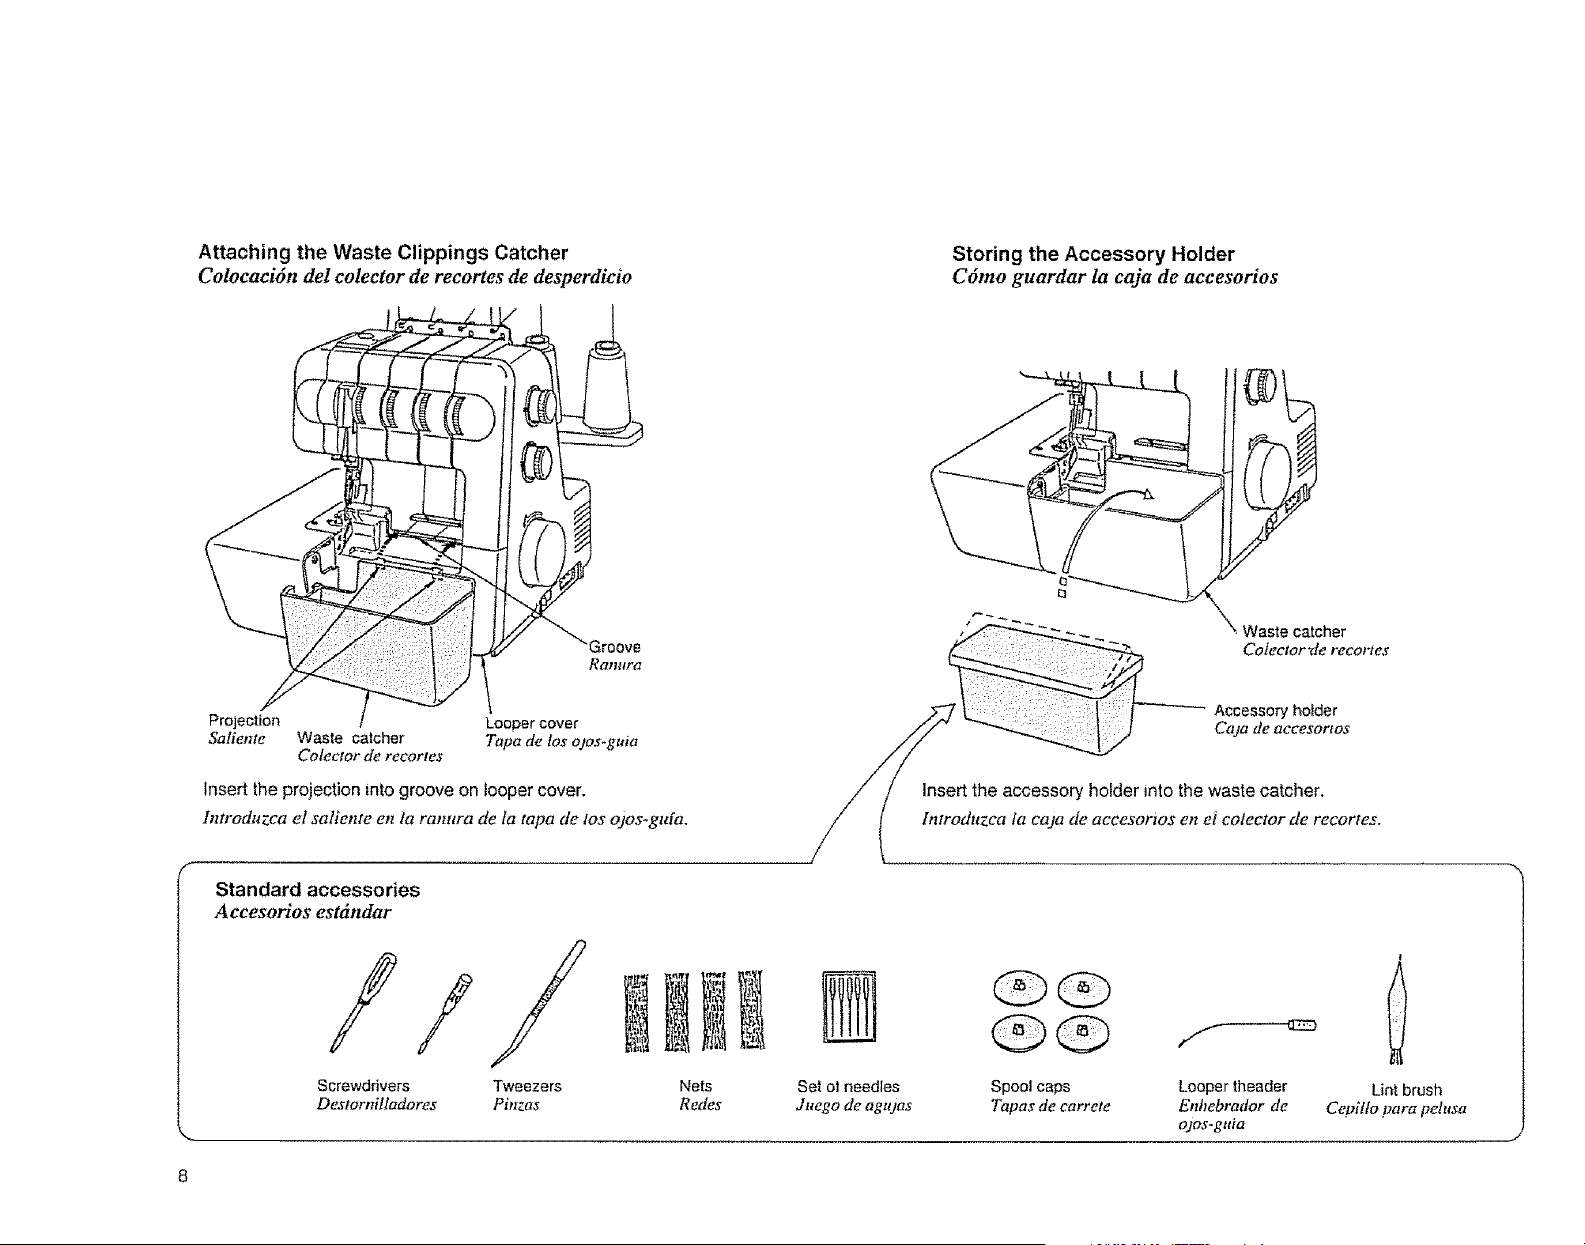
Attaching the Waste Clippings Catcher
Colocaci6n del colector de recortes de desperdicio
Storing the Accessory Holder
C6mo guardar la caja de accesorios
Groove
RQmtr_
Projection Looper cover
Saliente Waste calcher Tapa de los ojos-guia
Cotector de recortes
Insert the projection into groove on looper cover.
h_troduzca et saliente en ta ranura de la tapa de ios ojos-gufa,
Standard accessories
A ccesorios est&ndar
///
Screwdrivers Tweezers
Destorniltadores Pinzas
Nets
Redes
Waste catcher
Colector'de recorxes
Accessory holder
/ / Insert the accessory holder into the waste catcher.
/ /
/ l Zr_Trodt_ca 'a caj a de acCe_Or_OS _n e_ _0_0_ _e _0_.
QQ
Set ol needles Spool caps Looper theader
Juego de agtqas Tapas de carrete Enhebrador de
ojos-gt#a
Lint brush
Cepilto para petusa
sECTION 2: PREPARETHE R MACHINE FOR sEwiNG:SECCION:21: PR£PAR£Z_MAQUINAPARACOSER:II
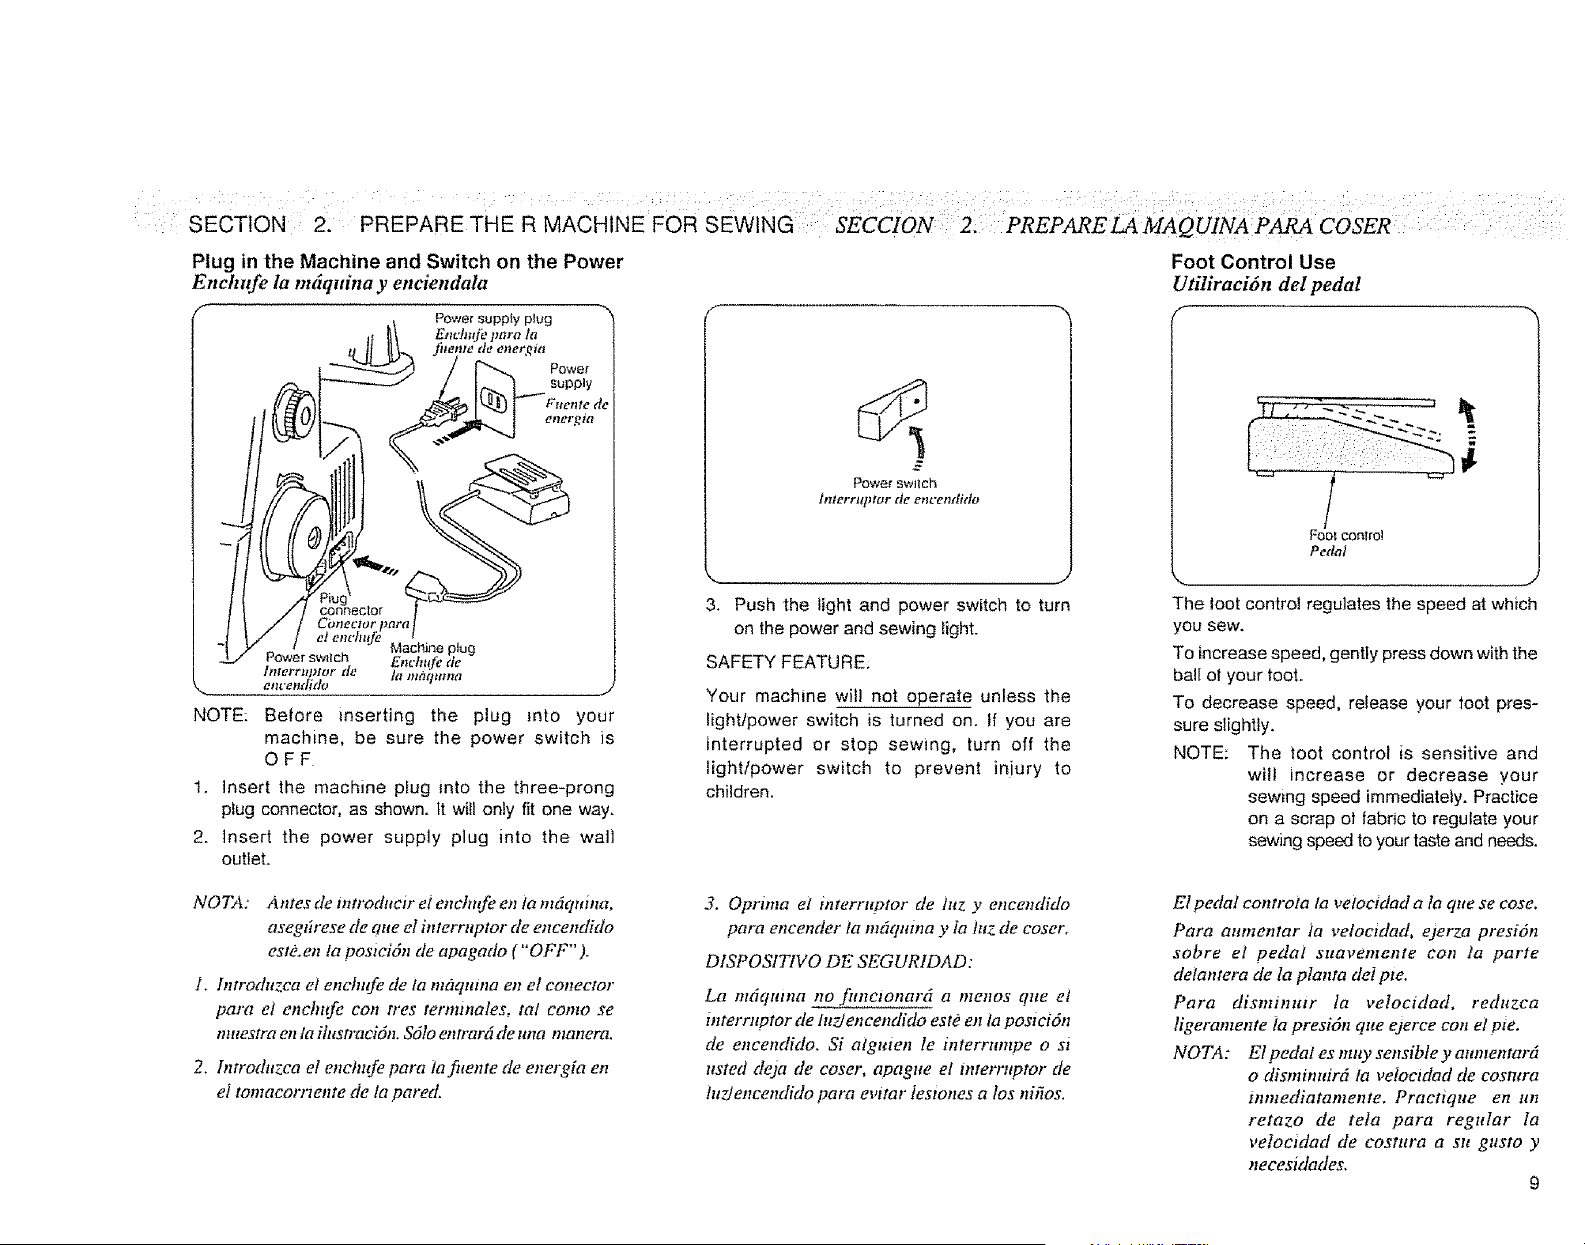
Plug in the Machine and Switch on the Power
Enchufe la m6quina y enciendala
f Power supply plug "_
Ench_d_ fmra 1o
juenle de errergia
__ Power
dncr_Rt
J
inserting the plug rata your
machine, be sure the power switch is
OFF
insert the machine plug into the three-prong
plug connector, as shown. It wilt only fit one way.
insert the power supply plug into the wall
outlet.
Power Swllch
ttrternqJtor tie em'endido
3. Push the light and power switch to turn
on the power and sewing light.
SAFETY FEATURE;
Your machine wil! not operate unless the
lightlpower switch is turned on. If you are
interrupted or stop sewing, turn off the
light/power switch to prevent injury to
children.
Foot Control Use
Utiliraci6n det pedal
5
Foolcontrol
Pedal
The loot control regulates the speed at which
you sew.
To increase speed, gently press down with the
ba!l at your toot.
To decrease speed, release your toot pres-
sure slightly,
NOTE: The toot control is sensitive and
will increase or decrease your
sewing speed immediately. Practice
on a scrap ol fabric to regulate your
sewing speed to your taste and needs.
NOTA: Antes de introducir el m_ctmfe en ta m6qmna,
asegth'ese tie aue el interruptor de encendido
est& en 1a postcidn tie apagado ("OFF").
1. hltroduzca el enchufe tie tn maqmna en el conector
para et enehufe con rres ternnnales, tal coma se
natestra en la ilustracidn. $61o entrar6 de una manera.
2. hm'oduzca et enchufe para ]afitente de energia en
el tomacarrlente de ta pared
3. Optima el inrerruptor de htz y encendido
para encender ia m6quma y la ill,2 de coser.
DISPOSITIVO DE SEGUR1DAD:
La m6quma no fimctonar6 a menos qae el
mterrnptor de htTJencendido este en la postci6n
de encendido. Si alguten le interrampe o s_
ttsted deja de coser, apague el mterrnptor de
htdencendido para evitar iestones a los nifios.
El pedat controia la vetocidad a la que se case.
Para aumentar fa velocldad, ejerza presi6n
sabre et pedal suavemante con ta parte
de!antera de la planta deI pte.
Para disminmr la velocidad, reduzca
ligeramente ta presi6n que ejerce con el pte.
NOTA: El pedat es muy sensible y aumentar6
o dismimtir6 la veiocidad de cosmra
tnmediatamente. Practtque en an
retazo de teIa para regular la
veloctdad de costura a su gusto y
necesidades.
9
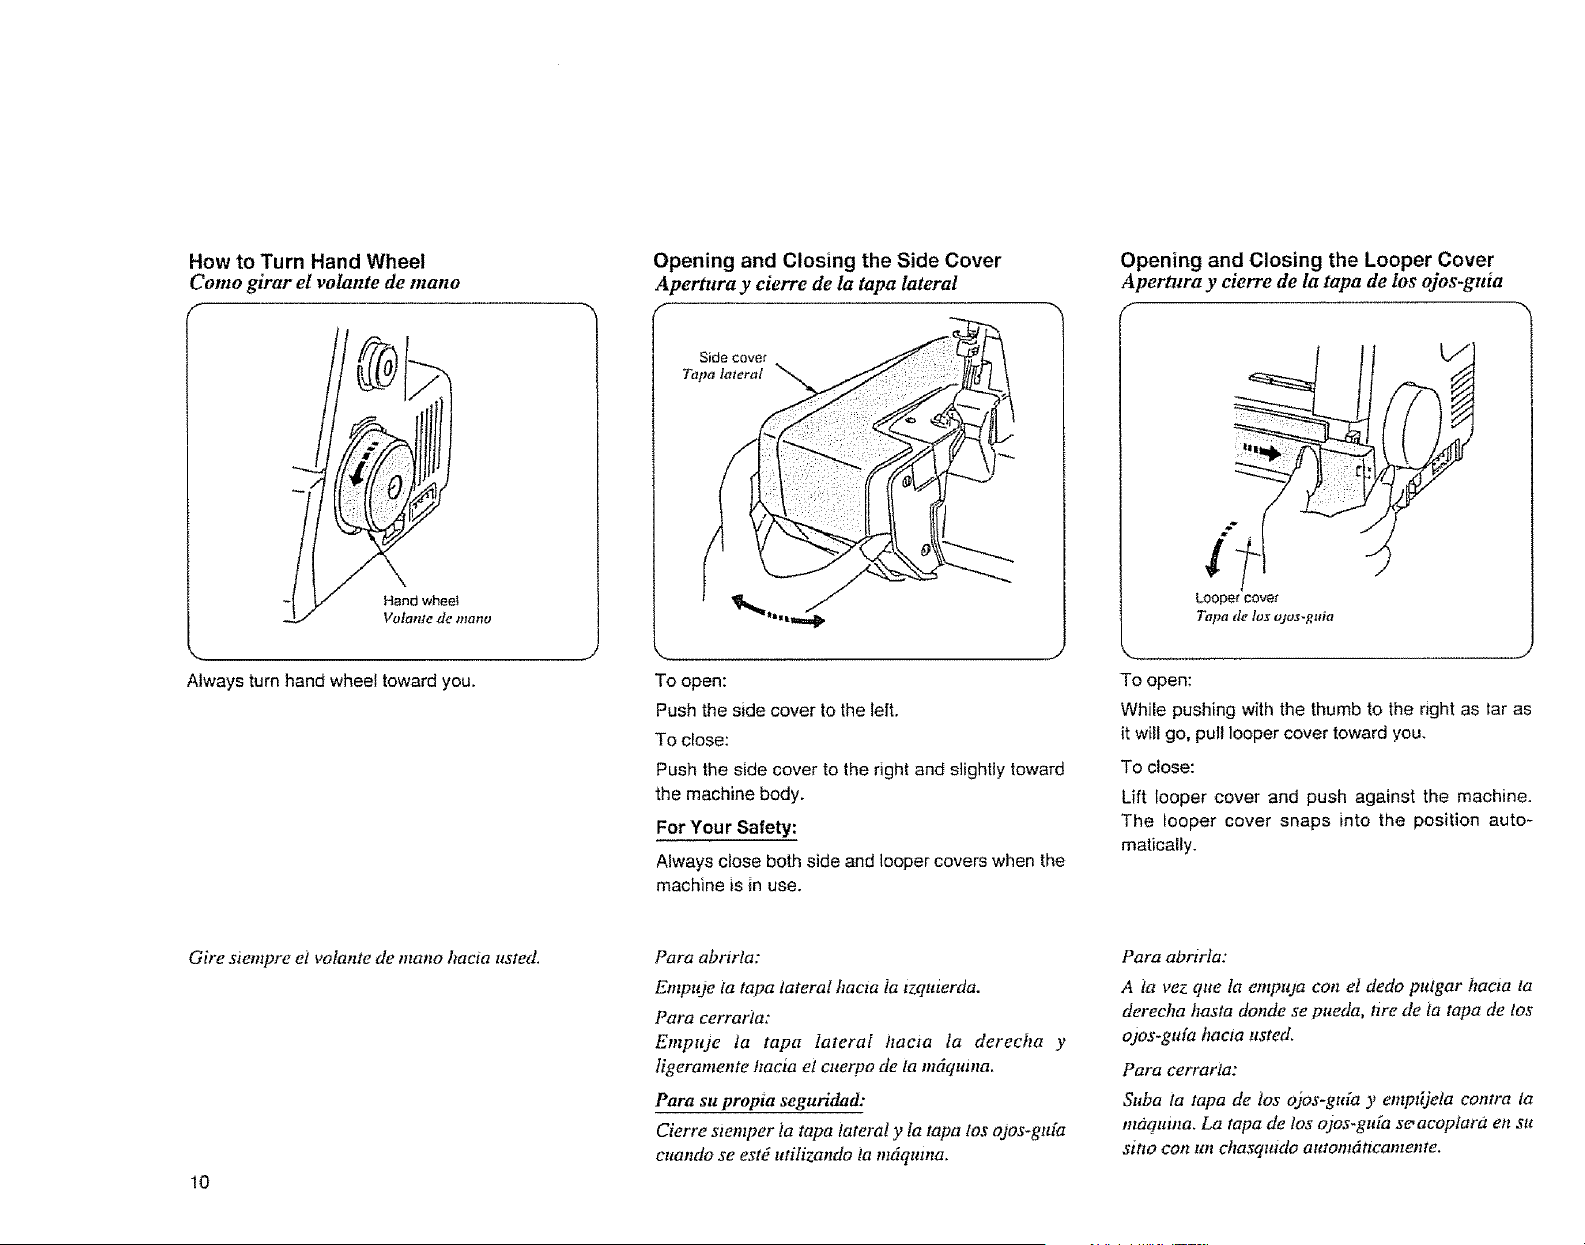
How to Turn Hand Wheel
Como girar el volante de mano
f
Always turn hand wheel toward you.
Opening and Closing the Side Cover
Apertura y cierre de la tapa lateral
f
To open:
Push the side cover to the left.
To close:
Push the side cover to the nght and slightly toward
the machine body.
For Your Safety:
Always close both side and looper covers when the
machine is in use.
Opening and Closing the Looper Cover
Apertura y cierre de la tapa de los ojos-gula
f
Looper cover
Talm de los ojos-guia
To open:
While pushing with the thumb to the right as tar as
it will go, pull looper cover toward you.
To close:
Lift looper cover and push against the machine.
The looper cover snaps into the position auto-
maticaily.
Gire siempre el volante de mano hacia usted,
10
Para abrirta:
Empuje ia tapa lateral hacza la tzquterda.
Para cerrarla:
Empuje ta tapa Iateral hacta la derecha y
ligeramente hacia et cuerpo de la mdqutna.
Para sit propia seguridad:
Cierre stemper ia tapa lateral y Ia tapa los ojos-ga[a
cuando se estd utilizando ia m6qtnna.
Para abrtrIa:
A la vez que la empuja con el dedo pulgar hacta ta
derecha hasta donde se pueda, ttre de la tapa de los
ojos-gafa haeia usted.
Para cerrarla:
Suba la tapa de tos o)os-guia y emp{tjela eontra la
maquina. La tapa de tos ojos-gtffa seaeoplara en su
sitto con ttn chagqtttdo autom#ticamente,
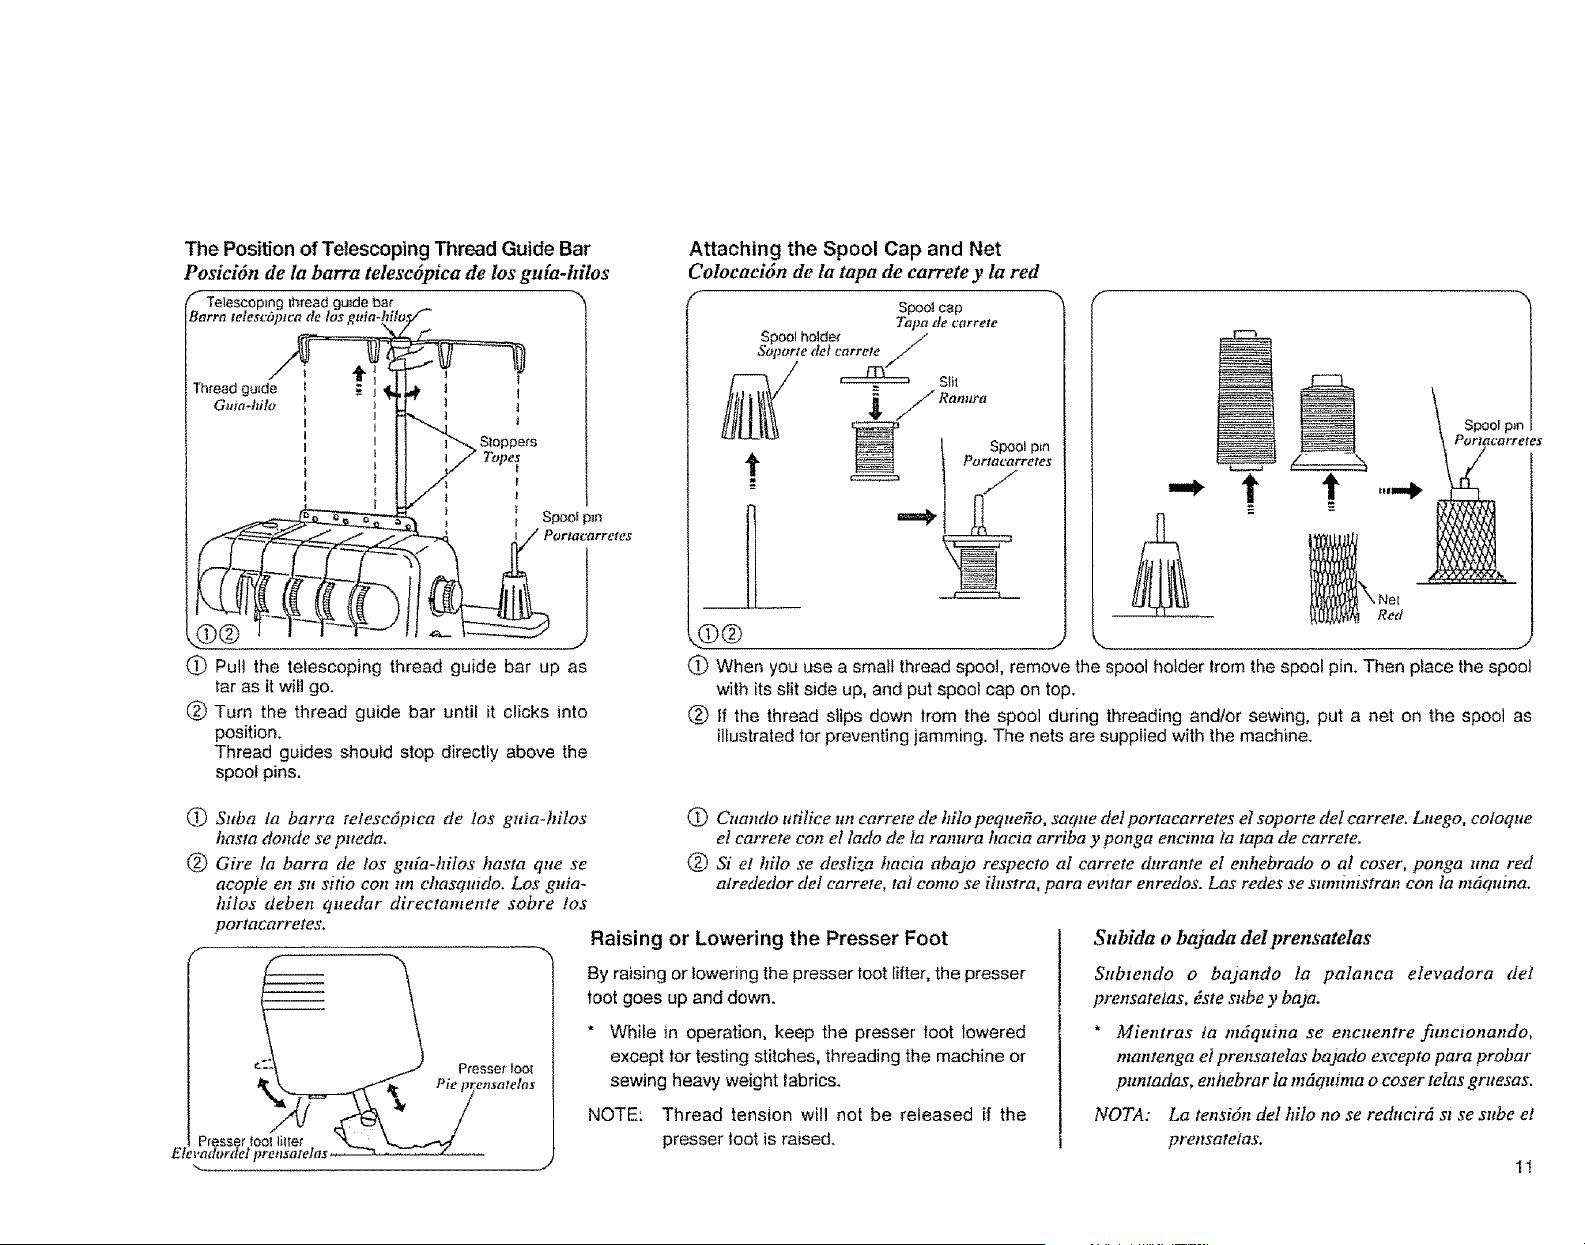
The Position of Telescoping Thread Guide Bar
Posici6n de la barra telesc@ica de los gMa-hilos
u_de bar
f
1
I Spool pln
C) Putl the telescoping thread guide bar up as
tar as it will go.
(_) Turn the thread guide bar until it clicks into
position.
Thread guides should stop directly above the
spool pins.
Attaching the Spool Cap and Net
Colocaci6n de la tapa de carrete y la red
f Spoo!cap
Tapa tfe carrete
Spool ho]der /"
Sopvrte del carrete //
/tItlll i/"°'"
LLtB
sooo_o,.
1 "
.0®
(_ When you use a small thread spool, remove the spool holder lrom the spool pin. Then place the spool
with its slit side up, and put spool cap on top.
(_) If the thread slips down from the spool during threading and/or sewing, put a net on the spool as
illustrated tor preventing jamming. The nets are supplied with the machine.
(_) Sttba ta barra telesc6ptca de los gma-hilos
basra donde se pueda.
(_ Gire fa barra de los gufa-hitos basra que se
acople en sn sitio con un chasqmdo. Los guia-
hilos deben quedar directamente sobre los
portacarretes.
Raising or Lowering the Presser Foot
Presser fool lil_et
Etevadordel prensa/elas
Presser 1oo1
Pie
(!) Cuando ufilice un carrete de hilo pequefio, saque del portacarretes el soporte del carrete. Lnego, coloque
el carrete con el lado de ta ranura hac_a arriba y ponga encmta ta tapa de carrete.
(_) Si et hilo se desliza hacia abajo respecto al carrete durante el enhebrado o al coser, ponga una red
alrededor det carrete, tat como se ihtstra, para ewtar enredos. Las redes se suministran con la m6quina,
By raising or lowering the presser toot lifter, the presser
toot goes up and down.
* While in operation, keep the presser loot lowered
except tor testing stitches, threading the machine or
sewing heavy weight [abrics.
NOTE: Thread tension will not be released if the
presser toot is raised.
Subida o bajada del prensatelas
Subtendo o badando la palanca elevadora det
prensatetas, dste sube y baja.
* Mientras ta m6quina se eneuentre ftmcionando,
mantenga ei prensatetas badado excepto para probar
pttntadas, enhebrar la m6qtttma o coser telas gruesas.
NOTA: La tensi6n de1 hilo no se reducir6 st se sube ei
prensatelas.
11
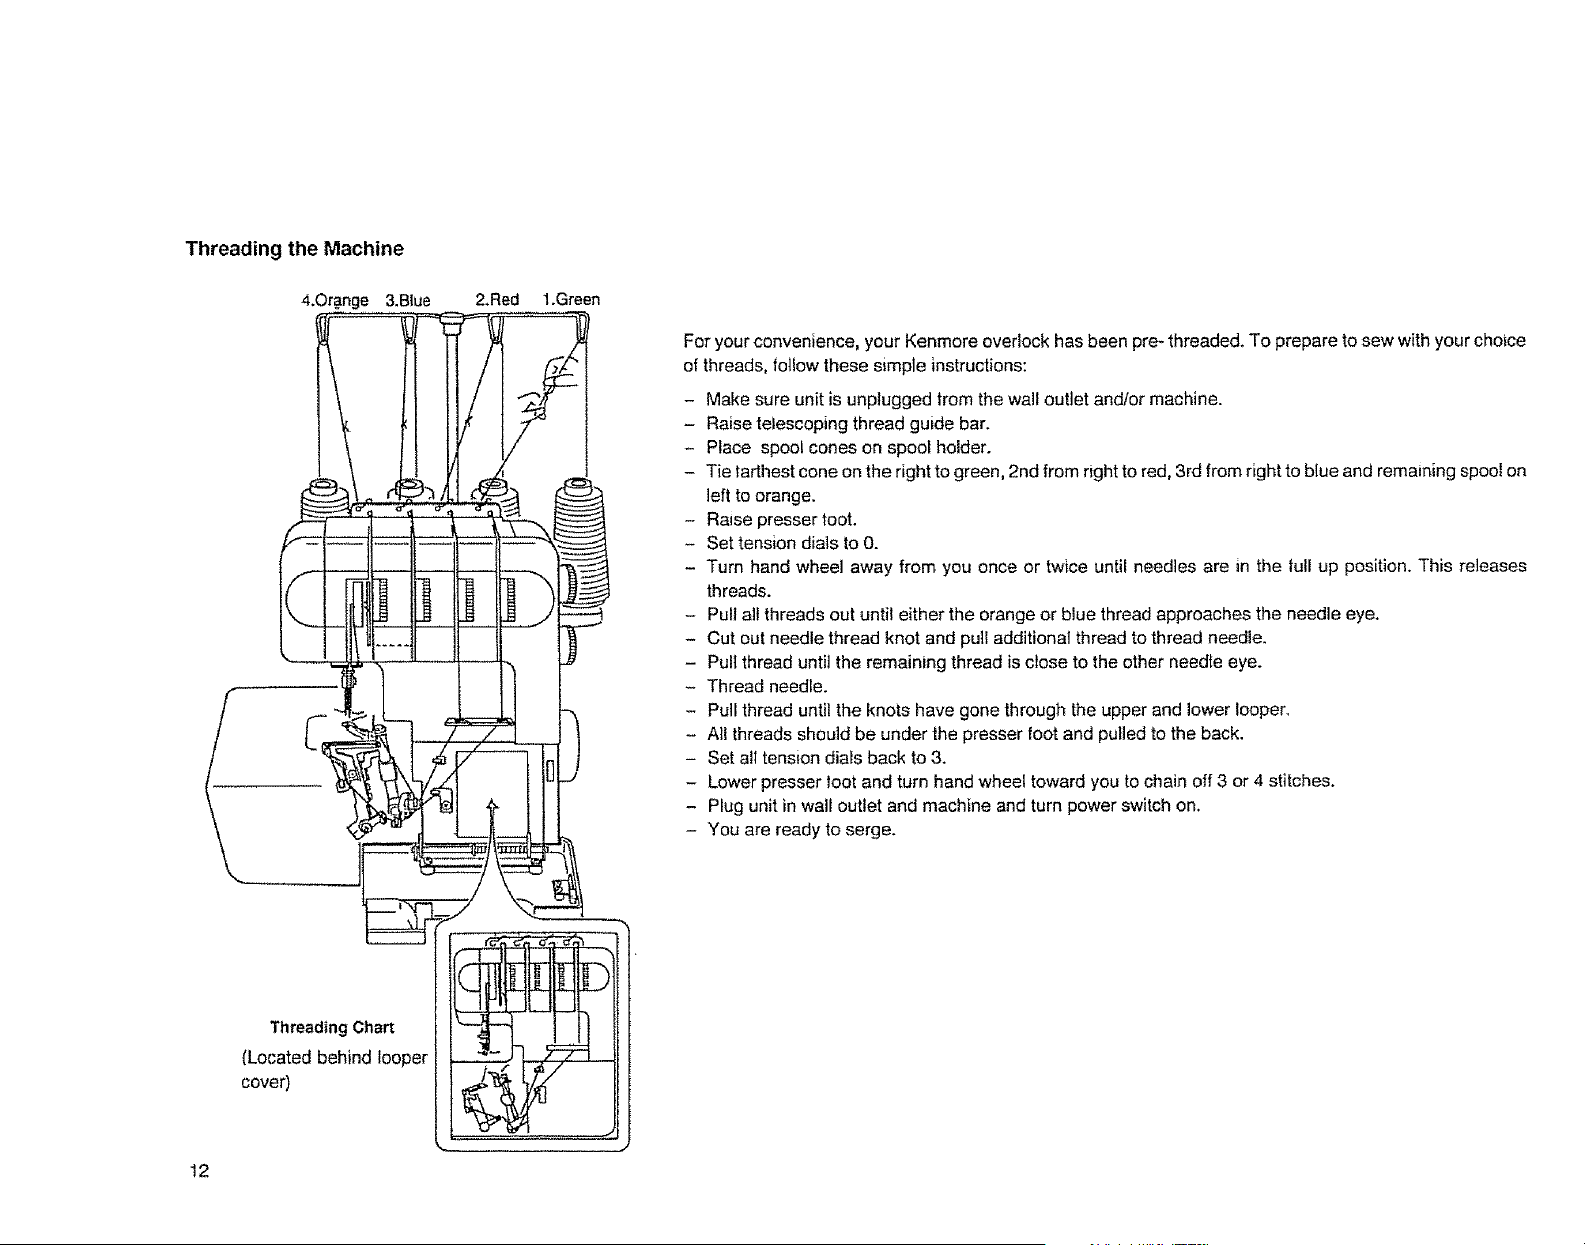
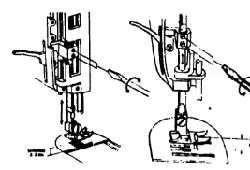
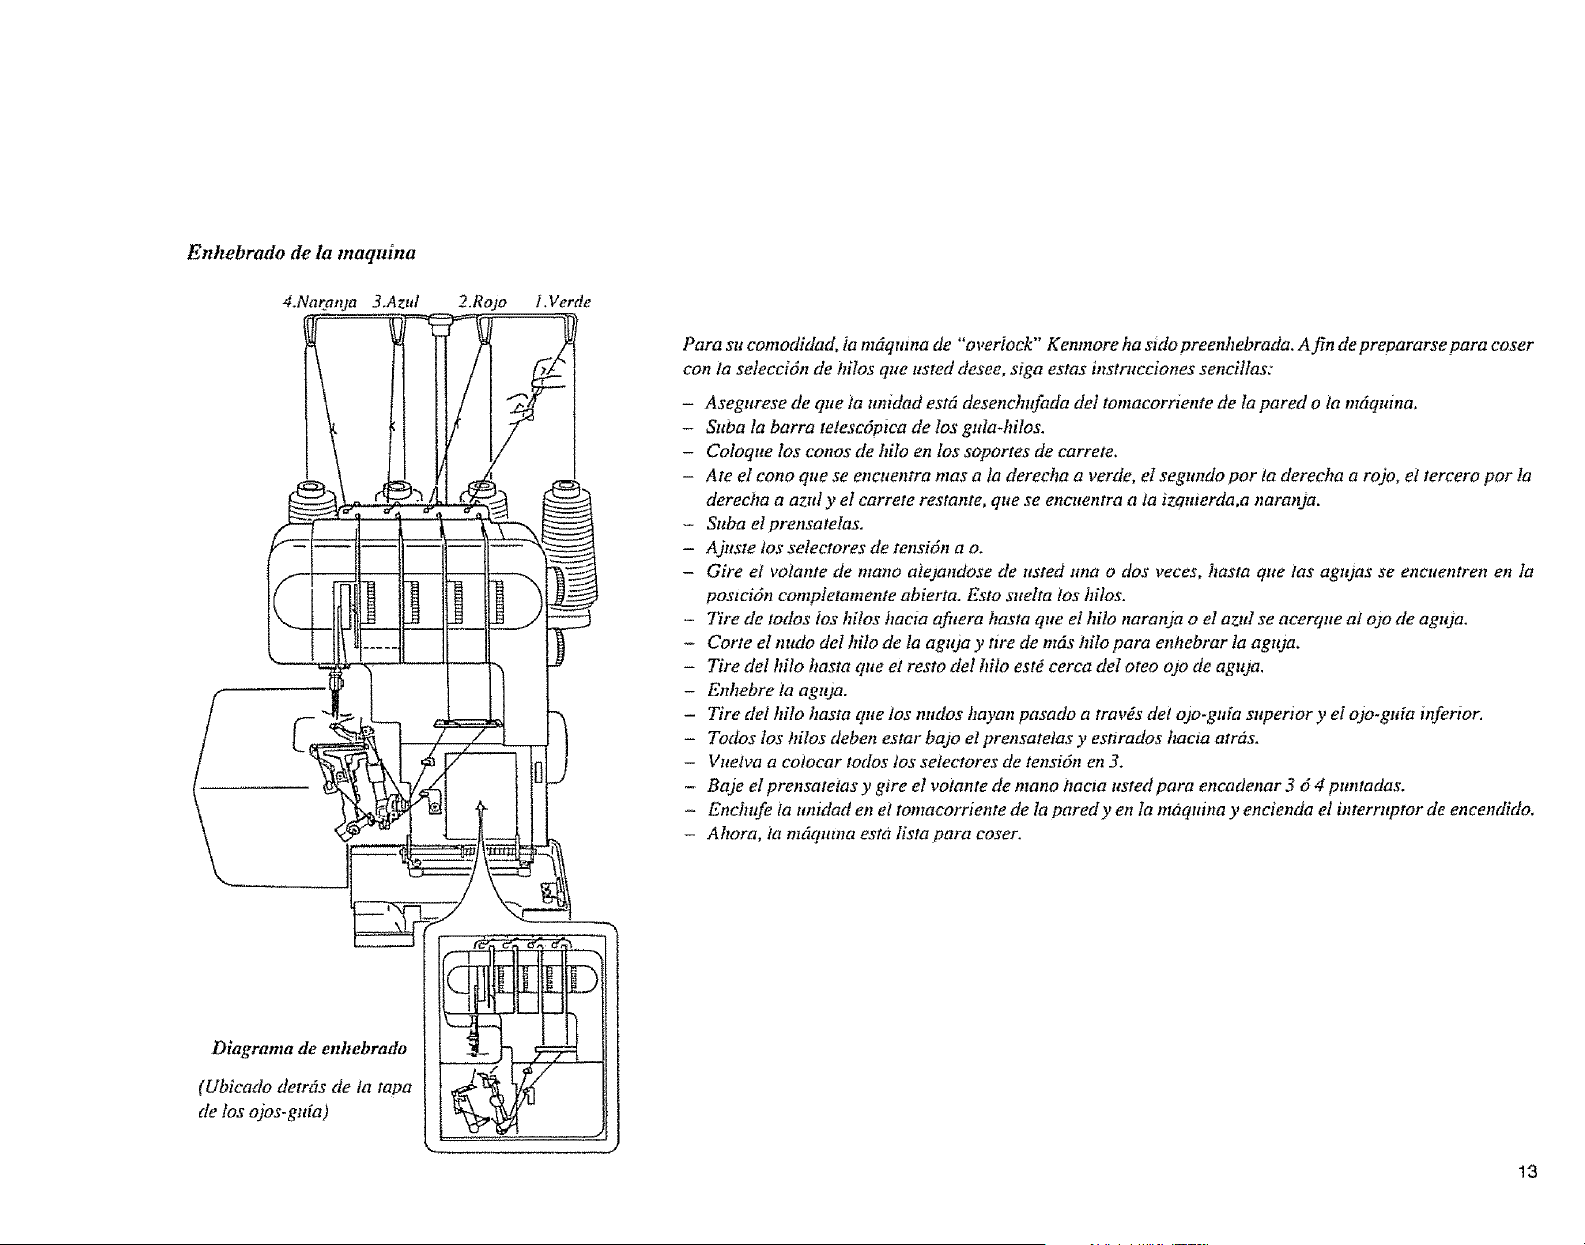
Threading the Machine
4.Orange &Blue
i
Threading Chart
(Located behind looper
cover)
12
2,Red 1.Green
For your convenience, your Kenmore overlock has been pre- threaded. To prepare to sew with your choice
of threads, follow these simple instructions:
- Make sure unit is unplugged from the wall outlet and/or machine.
- Raise telescoping thread guide bar.
- Place spool cones on spool holder.
- Tie farthest cone on the right to green, 2nd from right to red, 3rd from right to blue and remaining spool on
left to orange.
- Raise presser toot.
- Set tension diats to 0.
- Turn hand whee_ away from you once or twice until needles are in the full up position. This releases
threads.
- Pull all threads out until either the orange or blue thread approaches the needle eye.
- Cut out needle thread knot and pull additional thread to thread needle.
- Pull thread until the remaining thread is close to the other needfe eye.
- Thread needle.
-Pulf thread until the knots have gone through the upper and lower looper.
- All threads should be under the presser foot and pul]ed to the back.
- Set all tension dials back to 3.
- Lower presser loot and turn hand wheel toward you to chain off 3 or 4 stitches.
- Plug unit in wall outlet and machine and turn power switch on.
- You are ready to serge.
Enhebrado de la maquina
4.Naratqa 3.Azul 2.Ro3o l.Verde
Para su comodidad, ia m6qmna de "overiock " Kenmore ha sido preenhebrada. A fin de prepararse para coser
con la seleccidn de hitos qtte usted desee, siga estas instrucciones sencillas:
- Asegurese de que fa unidad est6 desenchufada del tomacorrtente de la pared o la m6quina,
- Saba la barra tetesc6pwa de los gula-hilos.
- Coloque los cohos de hilo en los soportes de carrete.
- Ate el cono que se encuentra mas a la derecha a verde, el segundo nor ta derecha a rojo, el tercero par la
dereeha a aztd y et earrete restante, que se encuentra a la izquierda,a naratua.
- Suba elprensatelas.
- Ajuste 1as selectores de tensidn a o.
- Gire et votante de ntano aie3andose de usted una o dos veces, hasta que las agtUas se encuentren en la
postcidn completamente abierta. Esto sttelta los hilos.
- Tire de todos 1as hilos hacia afttera hasta que el hilo naranja o el azu! se acerque ai ojo de aguja.
- Carte el tlttdo del hilo de ]a agttja y tire de m6s hito para enhebrar la aguja_
- Tire deI hito hasta queet resto de1 hilo est_ cerca deI area ojo de aguja.
- Enhebre la agtua.
- Tirede_hi_hastaque1_snud_shayanpasad_atrav_sde_-guiasttperi_rye_-gtdainferi_r_
- Todos los hilos deben estar bajo e} prensatetas y esnrados hacia atrfs.
- Vuelva a cotocar todos 1as setectores de tensi6n en 3.
- Baje el prensatelas y gire el volante de mano haeta listed para encadenar 3 6 4 pttntadas,
- Enchttfe_aunidadene_t_mac_rrientede_a_aredyen_amaquinayenciendae_interr_pt_rdeencendid_
- Ahora, ta nz6qtttna est(t lista para coser.
13
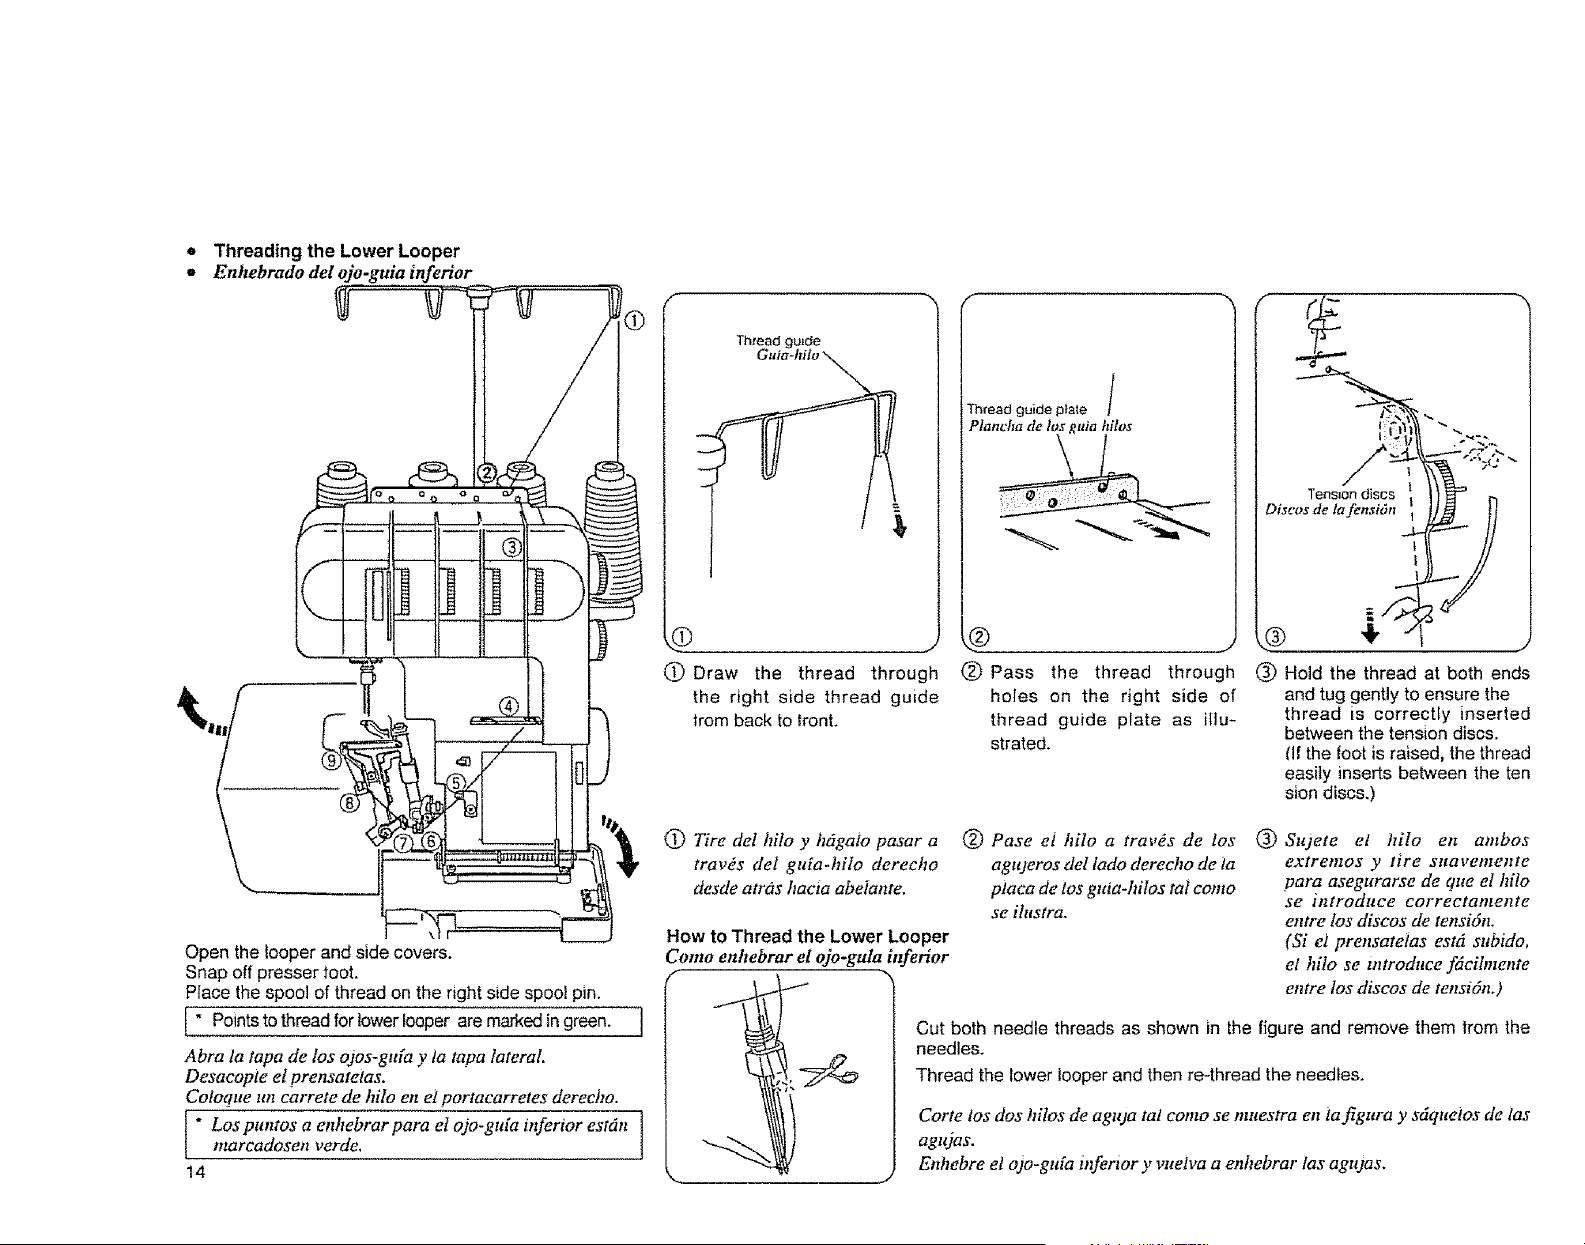
Threading the Lower Looper
Enhebrado del ojo-guia inferior
Open the looper and side covers.
Snap off presser foot.
Place the spool of thread on the right side spool pin.
[ " Points to thread for lower Iooper are mad<edin green. ]
Abra ta tapa de los ojos-gu(a y ia tapa lateral.
Desacople el prensatelas.
Coloqtte ttn carrete de hilo eft ei portacarretes derecho.
[ " Los puntos a enhebrar para el ojo-guia inferior estdn Jmarcadosenverde.
14
(_ Draw the thread through
the right s_de thread guide
from back to tronL
(_ Tire del hilo y h6galo pasar a
tray,s del guia-hilo derecho
desde atrds hacia abeiante.
How to Thread the Lower Looper
Como enhebrar el ojo-gula inferior
f
J
Thread guide p}ale /
j
(_) Pass the thread through
holes on the right side of
thread guide plate as illu-
strated.
Tension discs
Discos de ta fensi6n
® Hold the thread at both ends
and tug gently to ensure the
thread is correctly inserted
between the tension discs.
(lf the foot is raised, the thread
easily inserts between the ten
sion discs,)
(_) Pase el hilo a tray,s de los
agujeros del lado derecho de ia
piaca de los guia-hilos tal como
se ilustra.
® Slqete el hilo en ambos
extre#zos y tire sttavetnente
para asegurarse de que el hito
se introduce correctamente
entre los discos de tensMn.
(St et prensatetas est(t subido.
el hUo se tntroduce fdcihnente
entre los discos de tensi6n.)
Cut both needle threads as shown in the figure and remove them from the
needles.
Thread the lower looper and then re-thread the needles.
Corte los dos hilos de aguja ml como se muestra en ia figura y sdqueios de las
agujas.
Enhebre el ojo-gula ilferior y vueiva a enhebrar las agujas.
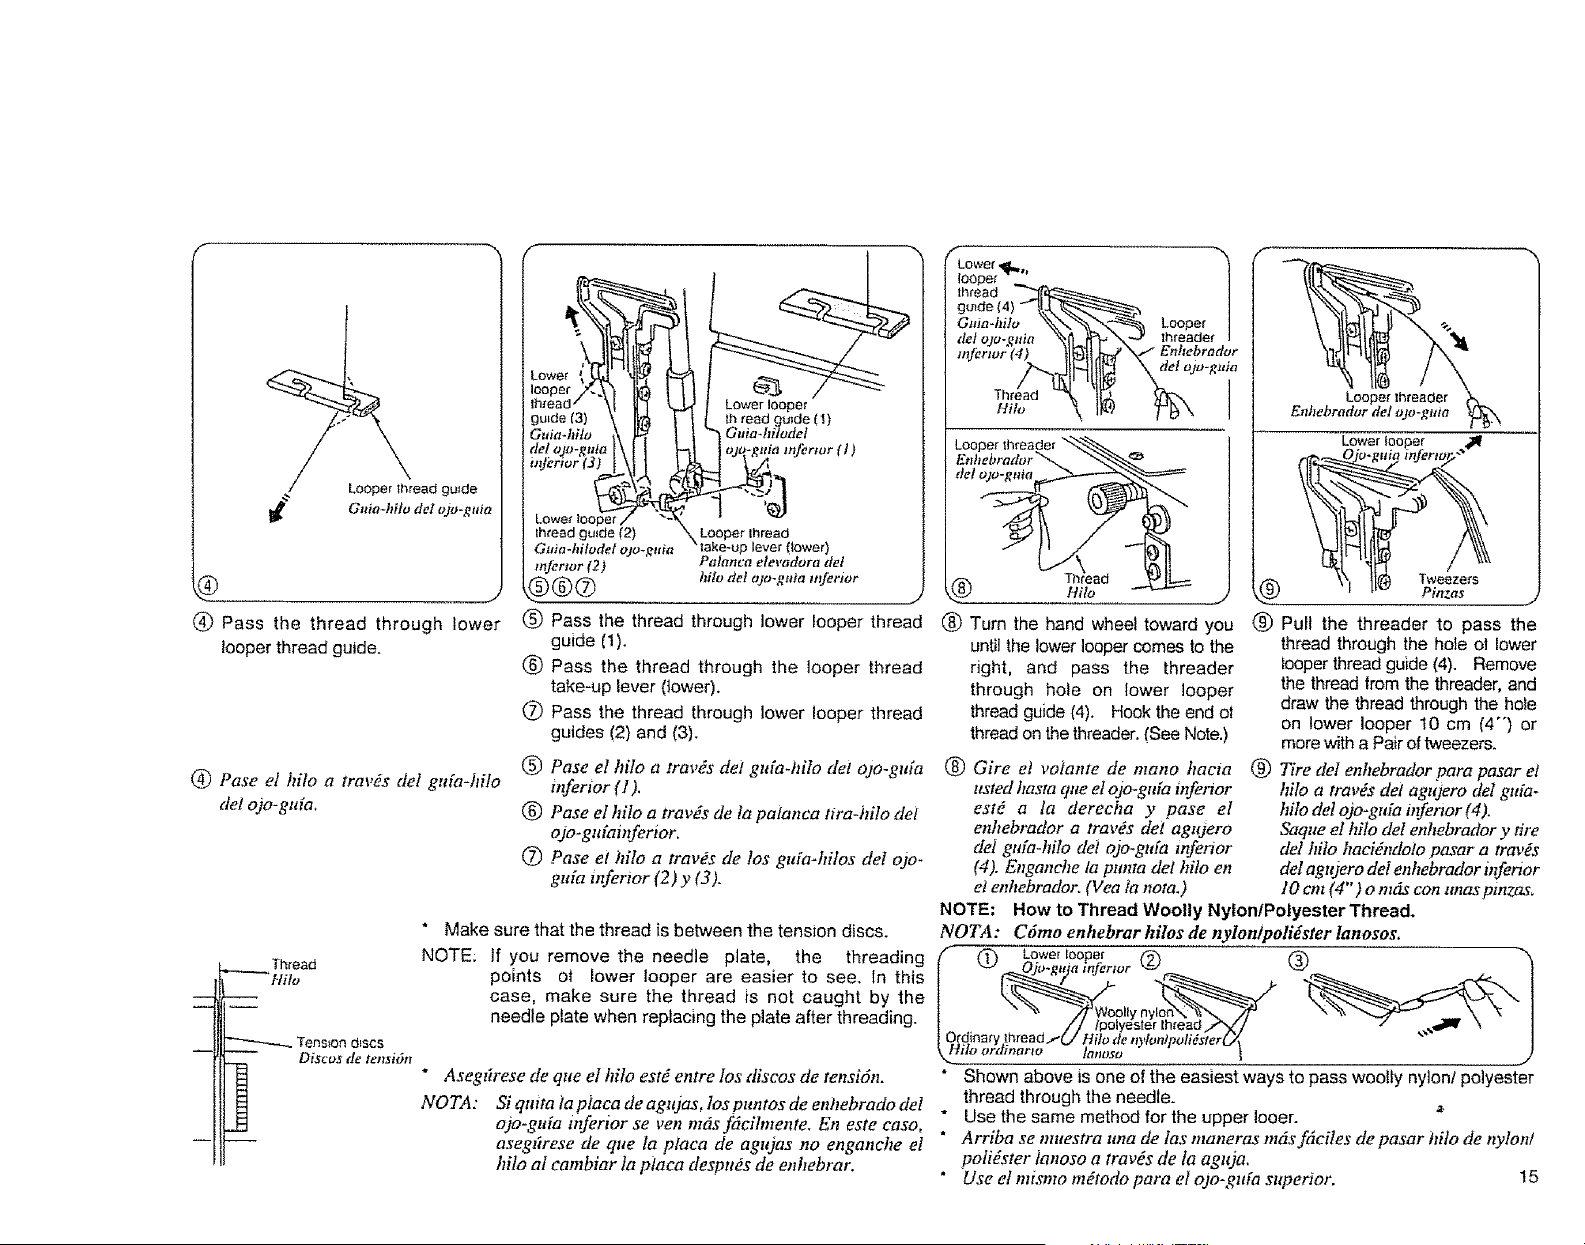
Pass the thread through lower
looper thread guide.
(_) Pase el kilo a travgs del gu&-hilo
del o)o-guia.
,..___._Thread
Hilo
N Tension d_scs
-- _ Discos tie tensi6n
Lower looper
[h read gulde (I)
Guia.hiladel
referrer (l)
Looper thread
lever (lower)
Palanca elevadora det
hilt) del ojo.gnia trlJertor
................... J
Pass the thread through lower looper thread
guide 11).
Pass the thread through the looper thread
take-up lever (tower).
Pass the thread through lower looper thread
guides (2) and (3).
Pase el kilo a travYs dei gufa-hilo de! ojo-guia
tlferior (I).
Pase el kilo a travds de la palanca tira-hilo dei
ojo-guiainferior.
Pase el kilo a travOs de los gtda-hilos deI ojo-
guia infertor (2) y (3).
" Make sure that the thread is between the tension discs.
NOTE: if you remove the needle plate, the threading
points of lower looper are easier to see. in this
case, make sure the thread is not caught by the
needle plate when replacing the plate after threading.
* Asegtirese de que el kilo estd entre los discos de tensidn.
NOTA: Si qaita ia placa de agujas, los puntos de enhebrado del
o)o-gtda ilferior se yen m_s f6cilmente. En este caso,
aseg#rese de que la placa de agujas no engancke el *
kilo al cambiar la placa despu#s de enhebrar.
Lower I1_,, 1
looper
thread
guide (4)
G_tia-hito Looper
del ojo-guia lhreaderl
inferior (4)
del ojo-guia
Hilo
Looper threader "_'_._,.
Enhebrador _._ _._
Hilo
®
J
Turn the hand wheel toward you
until the lower looper comes to the
right, and pass the threader
through hole on lower looper
thread guide (4). Hook the end ot
thread on the threader. (See Note.)
(_) Gire et voiante de mano hacia @
usted kasta qlte el ojo-gtda inferior
estO a la derecha y pase el
enhebrador a travds dei agujero
de1 gufa-hilo det ojo-gtda inferior
(4). Enganche ta ptmra del hilo en
et enhebrador. (Vea Ia nora.)
Looper threader _._
Enhebrador del ojo-guia
Lower looper ,_
Qjo-guia inferto_"_
,.®
®
J
Pull the threader to pass the
thread through the hole el lower
looper thread guide (4). Remove
the thread from the threader, and
draw the thread through the hole
on lower looper t0 cm (4-) or
more with a Pair of tweezers.
Tire del enhebrador para pasar el
kilo a trav#s def agujero (]el gttia-
kilo del o)o-gufa inferior (4).
Saque el hilo del enhebrador y tire
del hilo haeigndolo pasar a travgs
de! agtqero deI enhebrador inferior
10 em (4") o rods con unas pinzas.
NOTE: How to Thread Woolly Nylon/Polyester Thread.
NOT_: Cgma enhebrar kilos de nylanlpoh_ster lanosos.
fib Lower looper /'6h _1
"J Oj_-g,m ,nfertor _ _)
oily n
J.. , // /polyeste' th_ead..,-'_/
I Otdlnary,lhread_ Hitode nylonlpolidster(ff/_
_unnrro tanoso |
" Shown above is one of the easiest ways to pass woolly nylon! polyester
thread through the needle.
* Use the same method for the upper boer. _
Arriba se muestra una de tas maneras m6s fdciles de pasar hito de nylold
potigster ianoso a tray,s de ta aguja,
Use el n#smo m_todo para el ojo-gufa superior. 15
= Threading the Upper Looper
Enhebrado deI ojo-guia superior
f
Place the spool ot thread on the spool pin second
from the right.
; inP°intSred,to thread tor upper looper are marked
Coloque el carrete de hilo ell eAseglmdo pormcarretes
de la derecha.
_ os puntos a enhebrar para el o2o-gtffa superior
est6n marcados en rojo.
16
guide
Guia-hifo
C) Draw the thread through
the thread guide second
lrom the right from back to
{ront.
Thread guide
plate
Pfaca de los
guia*hites
(_) Pass the thread through the
holes in the second row
from the right ot thread
guide pIate as illustrated.
Tension __ "_ib-
Discos detensiOn _1_/
@ Hold the thread at both ends
and tug gently to ensure the
thread is correctly inserted
be tween the tension discs.
(If the toot is raised, the thread
easily inserts between the ten
sion discs.}
(_) Tire dei hilo a travds det
segundo guia-hito de la
derecha de atr6s hacia
adelante.
How to Thread the Upper Looper
C6mo enhebrar el ojo-gut'a superior
Looper thread gu:de
Guia-hilo dcl ojo-gu[a Upper looper
%.....
(_) Pase el hilo a trav#s de los
agujeros de la segunda fila
desde la derecha de la placa de
los gula-hilos tal como se
ilustra.
(_ Stqete el hilo en ambos
extremos y tire suavemente
para asegurarse de que el hito
se introduce correctamente
entre los discos de tension.
(St el prensateias estdt subido,
el hilo se introduce fdcilmente
entre fos discos de tensiSn.)
Turn the hand wheel toward you until the upper looper
comes to the middle point ot its travel, and unhook the
thread of the lowerlooper from the upper looper.
Thread lhe upper looper.
Oire el votante de mano hacta usted basra que el ojo-guia
superior se eneuentre en el punto medio de su recorrtdo y
desenganche e! hilo del ojo-gtda ittfertor desde et ojo-gtda
superior.
Enhebre el ojo-guia superior,
Looper lhread
guide
Guia-h#o del
oJo-gMa
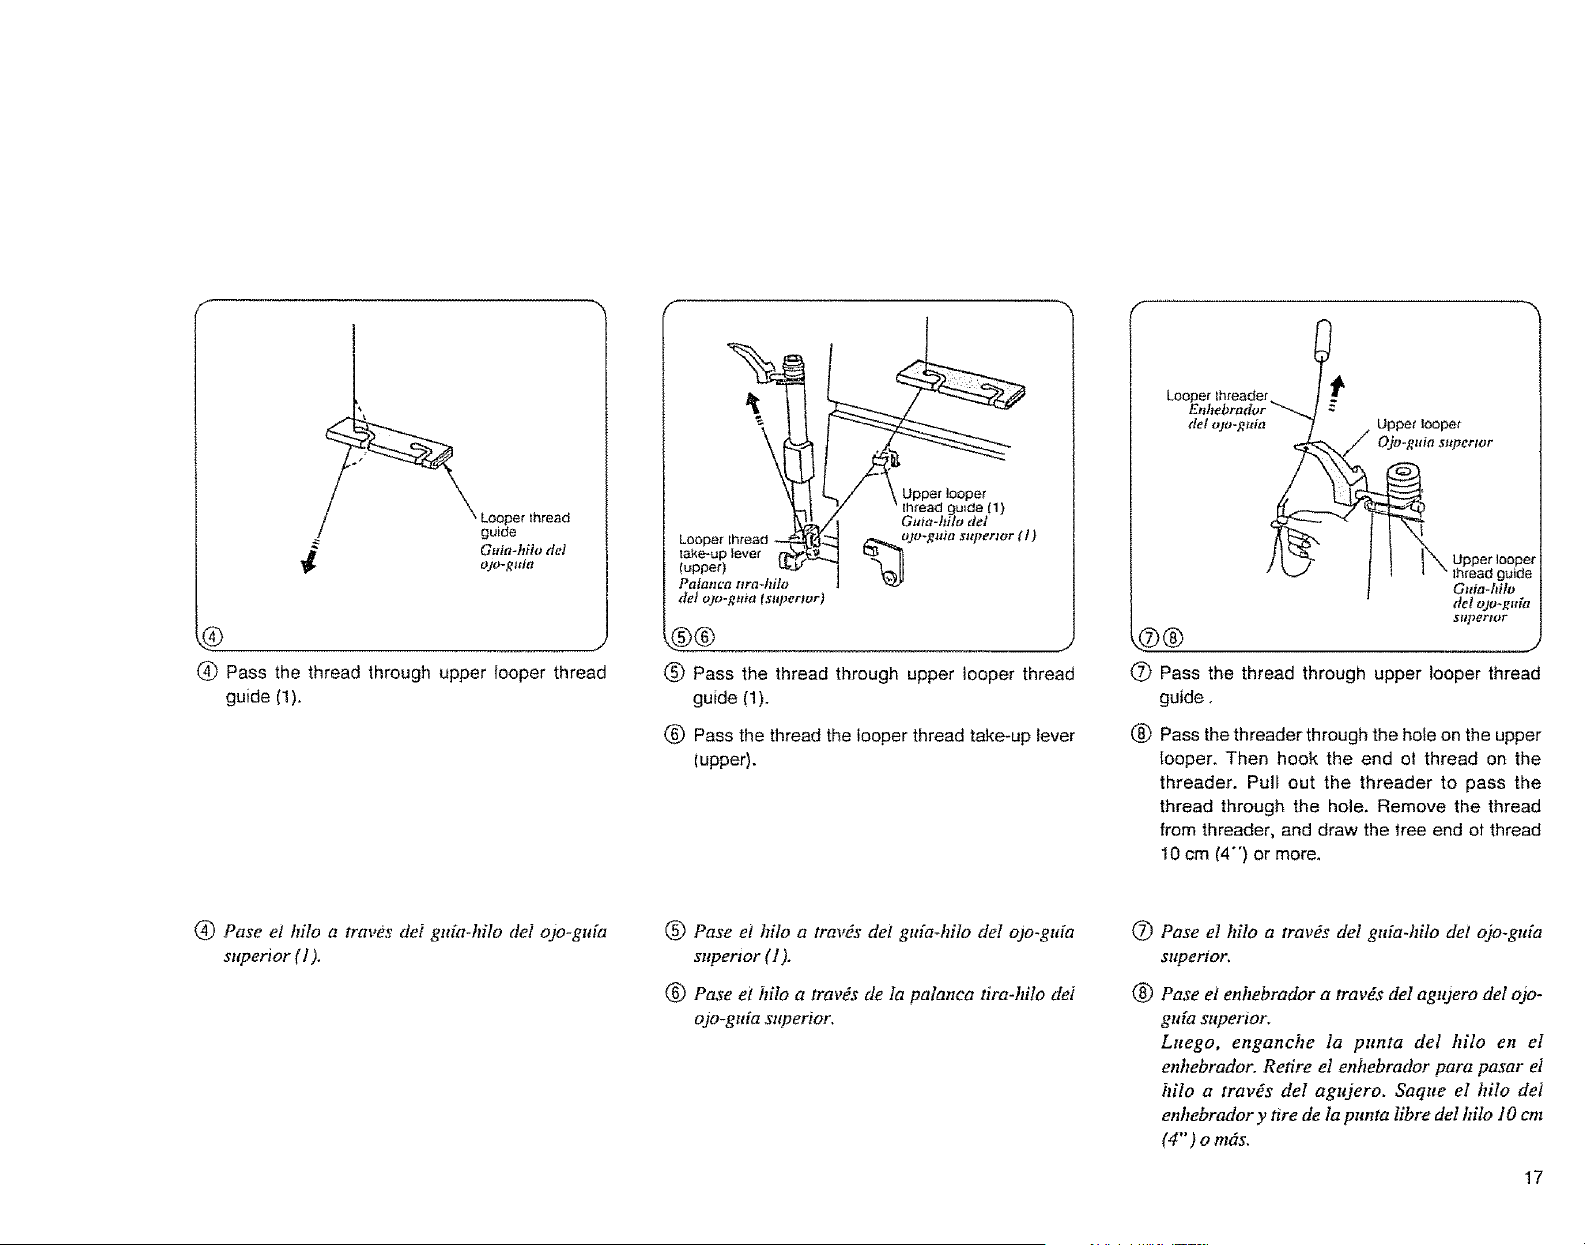
(_ Pass the thread through upper looper thread
guide (1),
Upper looper
mmaa guide (1)
Gum-hilo det
Looper _. oJo-guia stq_¢rtor ( I )
take-up lever
(upper)
Palanca nra-hilo
del ojo-gma fsupertor)
(_ Pass the thread through upper looper thread
guide (1).
(_) Pass the thread the looper thread take-up lever
(upper).
Looper _hfeader
Enhebradvr "_
del ojo-guia Upper Ioopernertor_.,.
] 1 _ t ! I "N Upper looper
• k.J t 1 l "thread guide
Guitl-hilo
del ojo*gu[a
St/pertor
7303
(_ Pass the thread through upper looper thread
guide,
03 Pass the threader through the hole on the upper
Iooper. Then hook the end o! thread on the
threader. Pulf out the threader to pass the
thread through the hole. Remove the thread
from threader, and draw the tree end ot thread
10 cm (4"') or more.
(_) Pase el hilo a traves dei guia-hilo deI ojo-gtda
superior (1).
(_) Pase el hilo a trav6s det gtda-hilo del ojo-guia
superior (1).
03 Pase et hiIo a travOs de Ia palanca tira-hilo dei
ojo-guia superior.
®
03
Pase et hilo a tray,s del guia-hilo det ojo-gtda
superior.
Pase el enhebrador a tray,s del agujero del o)o-
guia superior.
Luego, enganche la punta del hilo en el
enhebrador. Retire el enhebrador pare pasar el
hilo a tray,s deI agujero. Saque el hilo det
enhebrador y tire de la punta libre de1 hilo 10 cm
(4"') o rods,
17
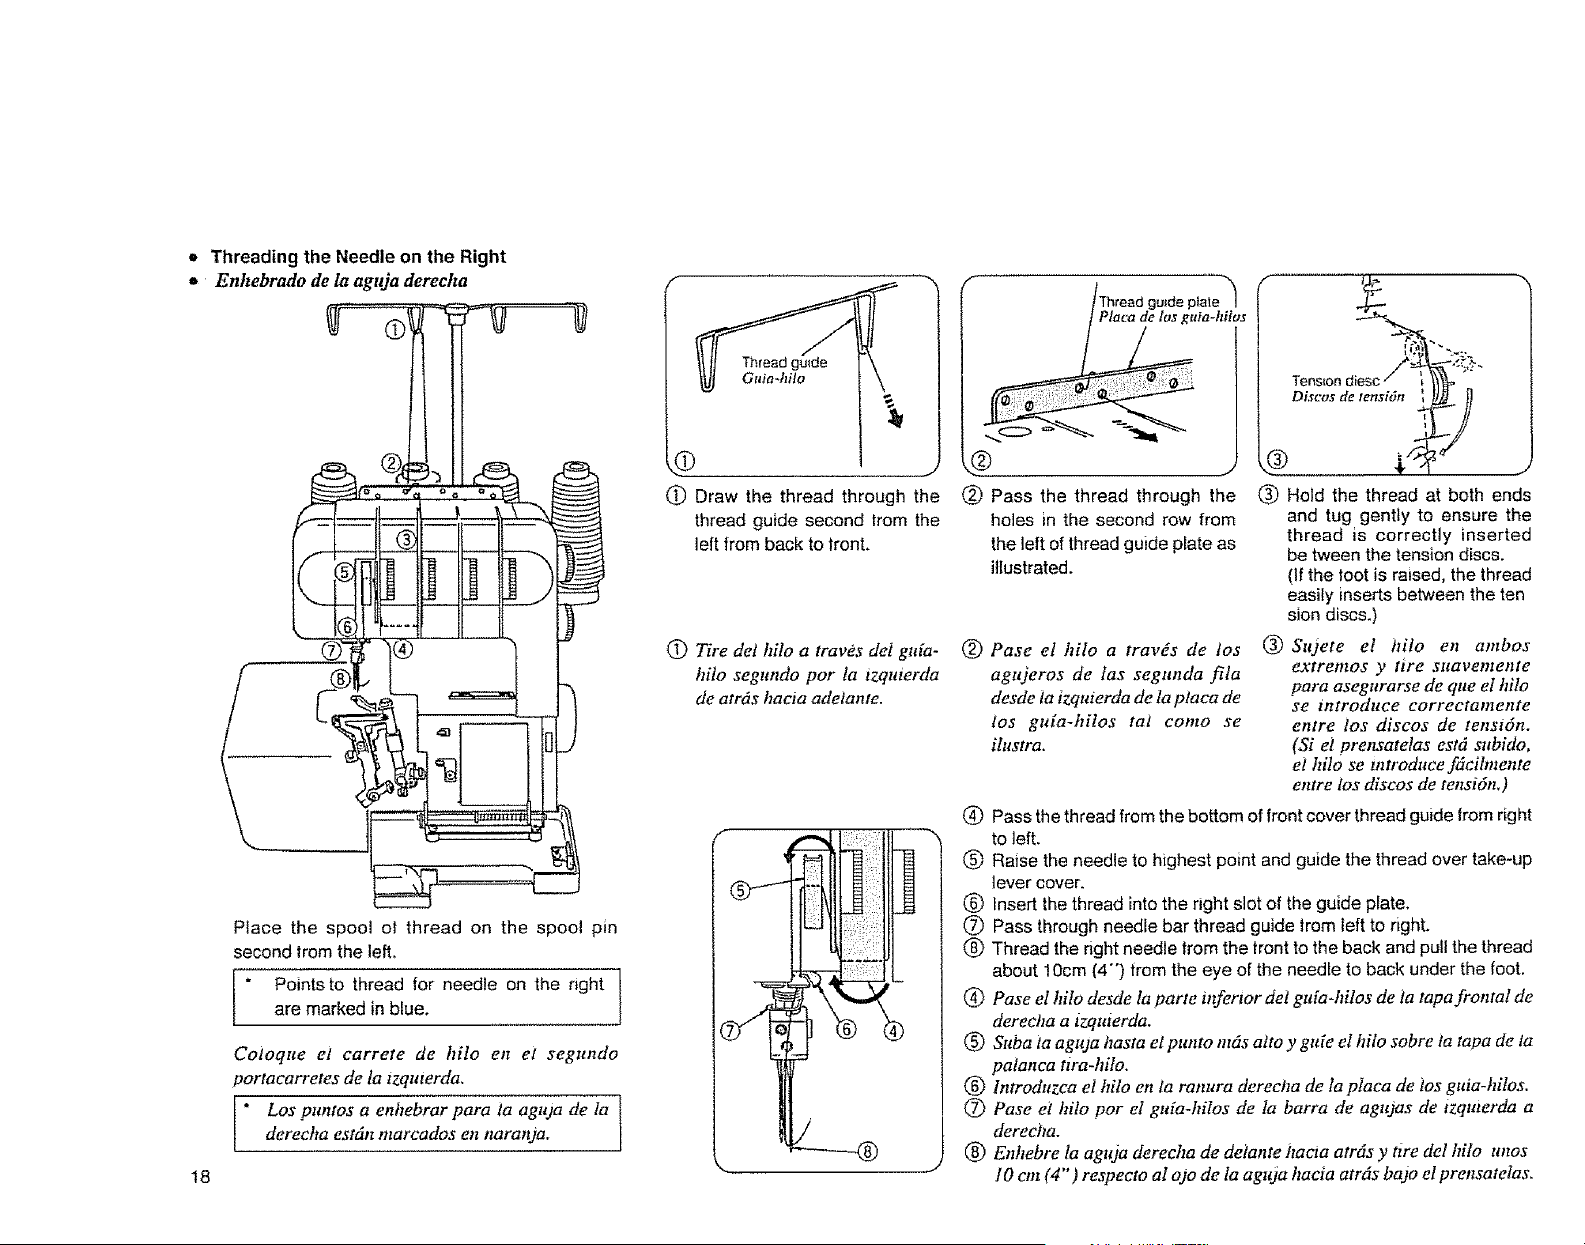
o Threading the Needle on the Right
_* Enhebrado de/a aglda dereeha
Place the spool ot thread on the spool pin
second lrom the left.
Points to thread for needle on the right
are marked in blue,
Coioque el carrete de hilo en el segundo
portacarretes de la izquterda.
* Los puntos a enhebrar para ia aguja de la
derecha est6n marcados en naranja.
18
\
(_ Draw the thread through the
thread guide second lrom the
left from back to tront.
(_) Tire det hilo a traves del gtda-
hito segundo por ta izquierda
de atrds hacia adeiante.
u
/" /Thread gu{de ptate "_
tia-hilos
(_) Pass the thread through the
holes in the second row from
the left of thread guide plate as
illustrated.
®
®
(_) Pase el hilo a tray,s de los ®
agujeros de tas segunda fila
desde ia izquierda de la ptaca de
los guia-hilos tat como se
ilustra.
Hold the thread at both ends
and tug gently to ensure the
thread ts correctly inserted
be tween the tension discs.
(If the toot is raised, the thread
easily inserts between the ten
sion discs.)
Szuete el hilo en ambos
extremos y tire suavemente
para asegurarse de que el hilo
se tfltrodttce correctamente
entre los discos de tenst6n.
(Si el prensatelas est6 subido,
el hilo se tntroduce f6cihnente
entre los discos de tensi6n,)
(_ Pass the thread from the bottom of front cover thread guide from right
to left.
Raise the needle to highest point and guide the thread over take-up
lever cover.
(_ insert the thread into the right slot of the guide plate.
(2) Pass through needle bar thread guide trom left to right.
(_ Thread the right needle from the lrant to the back and pull the thread
about 10cm {4-) from the eye of the needle to back under the foot,
(_) Pase el hilo desde la parte inferior det gtda-hilos de ia tapa frontal de
derecha a tzquterda.
(_) Suba ia aguja hasta el pztnto m_s attoy guie el hilo sobre la tapa de la
patanca tira-hilo.
(_) lntroduzca el hilo en la ranura derecha de la piaca de los guia-hilos.
(_) Pase el hilo por el guia-hilos de la barra de agujas de tzqmerda a
derecha.
(_) Enhebre la agtqa derecha de detante hacta atr6s y ttre de1 hito unos
10 cm (4"') respecto al o)o de la agtqa hacia atr6s baJo el prensatelas.
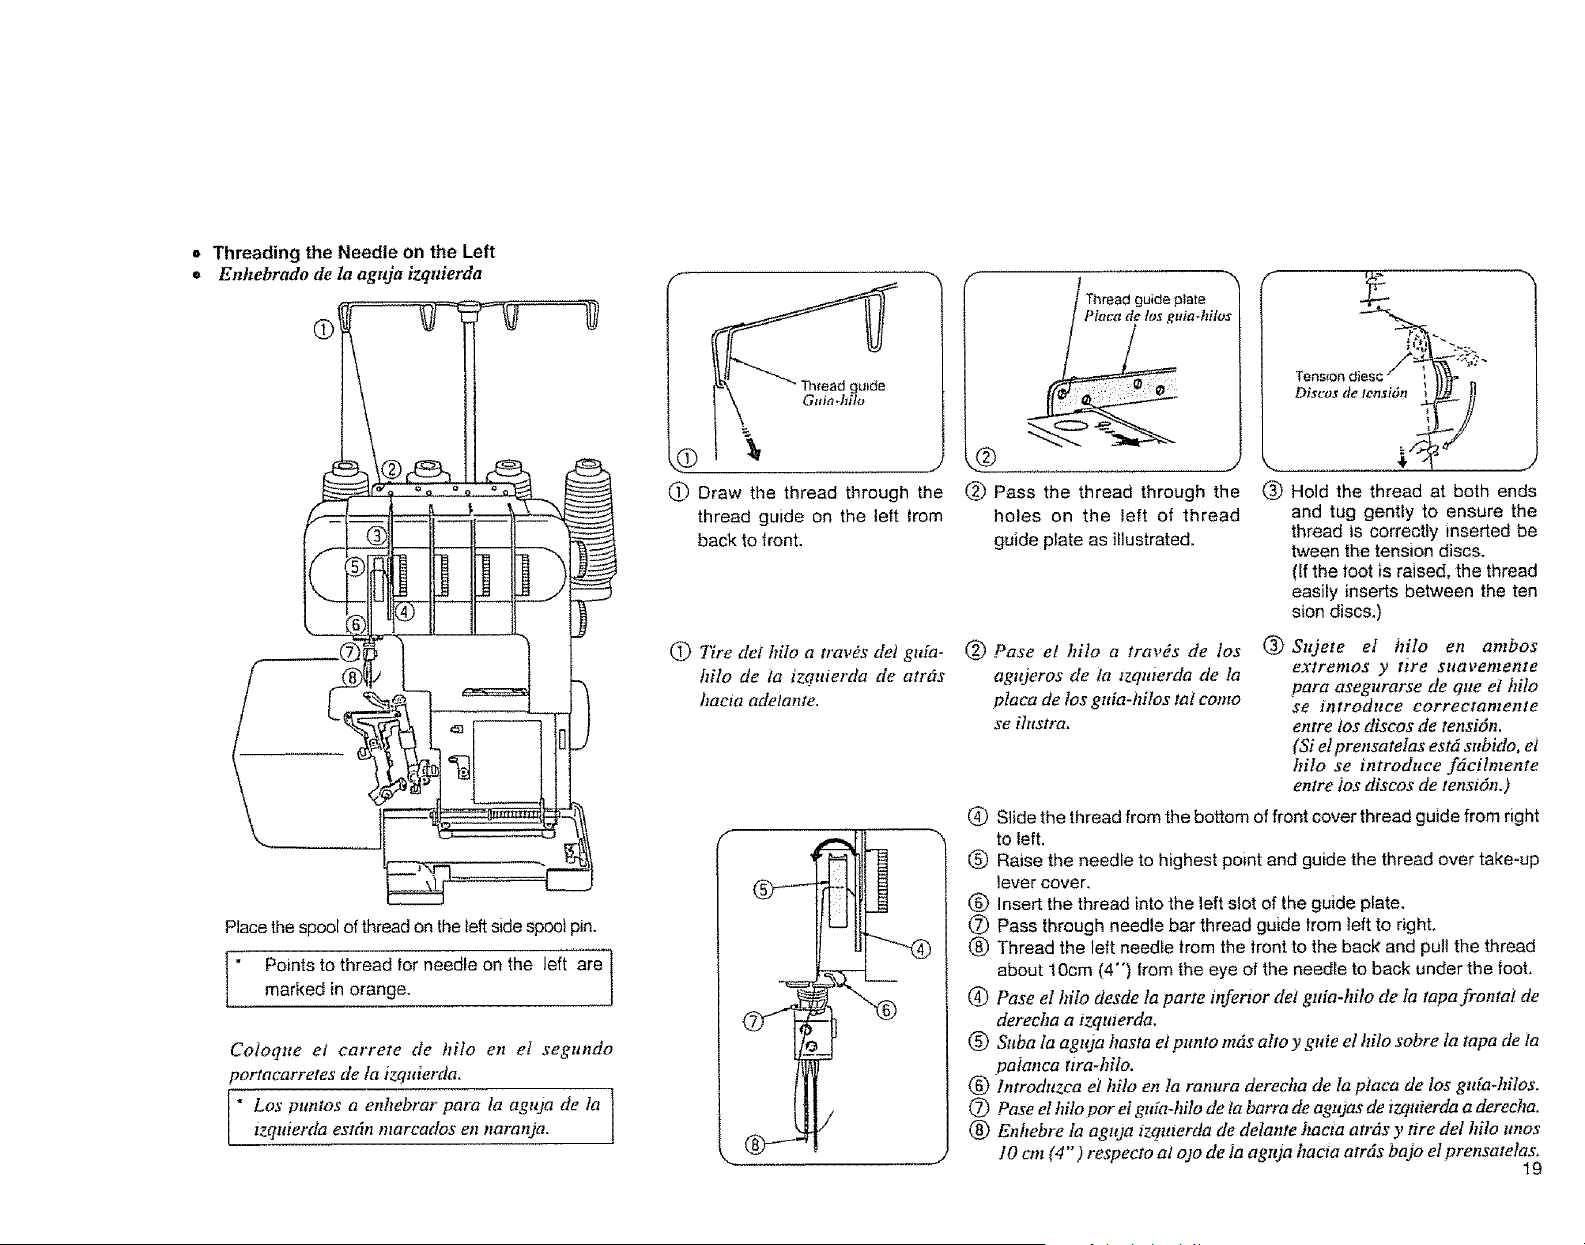
,* Threading the Needle on the Left
= Enhebradode la aguja izquierda
Place the spool of thread on the left side spool pin.
" Points to thread for needle on the left are
marked in orange.
Coioque el carrete de hilo en el segundo
portacarretes de la izquierda.
* Los puntos a enhebrar pora la agula de la 1
izquierda esr6n marcados en naranja.
!
=.
_) Draw the thread through the
thread guide on the left |tom
back to front.
C) Tire dei hUo a travOs det guia-
hilo de la tzquterda de atrtis
haeta adeiante.
"..¢
/
J
" l...oa00u,oo
(_ Pass the thread through the
holes on the left of thread
guide plate as illustrated.
® Hold the thread at both ends
and tug gently to ensure the
thread is correctly inserted be
tween the tension discs.
(if the Hootis raised, the thread
easily inserts between the ten
sion discs.)
(_ Pase et hito a trav_s de tos
ag_deros de in izqmerda de la
olaca de los guia-hitos tal como
se ihtstra,
®
Sujete el hilo en ambos
extremos y tzre suavemente
para asegurarse de queet hilo
se illtrodttee eorrectantente
entre los discos de tensi6n.
(Si el prensateias est6 subido, et
hilo se introduce f6cilmente
entre ios discos de tensi6n,)
(_ Slide the thread from the bottom of front cover thread guide from right
to left.
(_ Raise the needle to highest point and guide the thread over take-up
laver cover.
(_ Insert the thread into the left slot of the guide plate.
(_D Pass through needle bar thread guide lrom left to right.
(_) Thread the left needle trom the tront to the back and pull the thread
about lOcm (4-) from the eye of the needle to back under the toot.
@ Pase el hilo desde la parle inferior del guia-hilo de In tapafrontai de
derecha a tzqttterda.
@ Suba la aguja basra ei punto m6s alto y guie el hilo sobre la tapa de ia
paianca rira-hilo.
@ bltroduzca el hilo en la ranura derecha de la piaca de los guia-hilos,
(_ Pase el hilo por et guia-hilo de ta barra de agujas de izquierda a derecha.
@ Enhebre la agu)a izquterda de delante hacia atrds y tire del hilo tmos
10 em (4") respecto al ojo de ia aguja hacta atrds bajo el prensatelas,
19
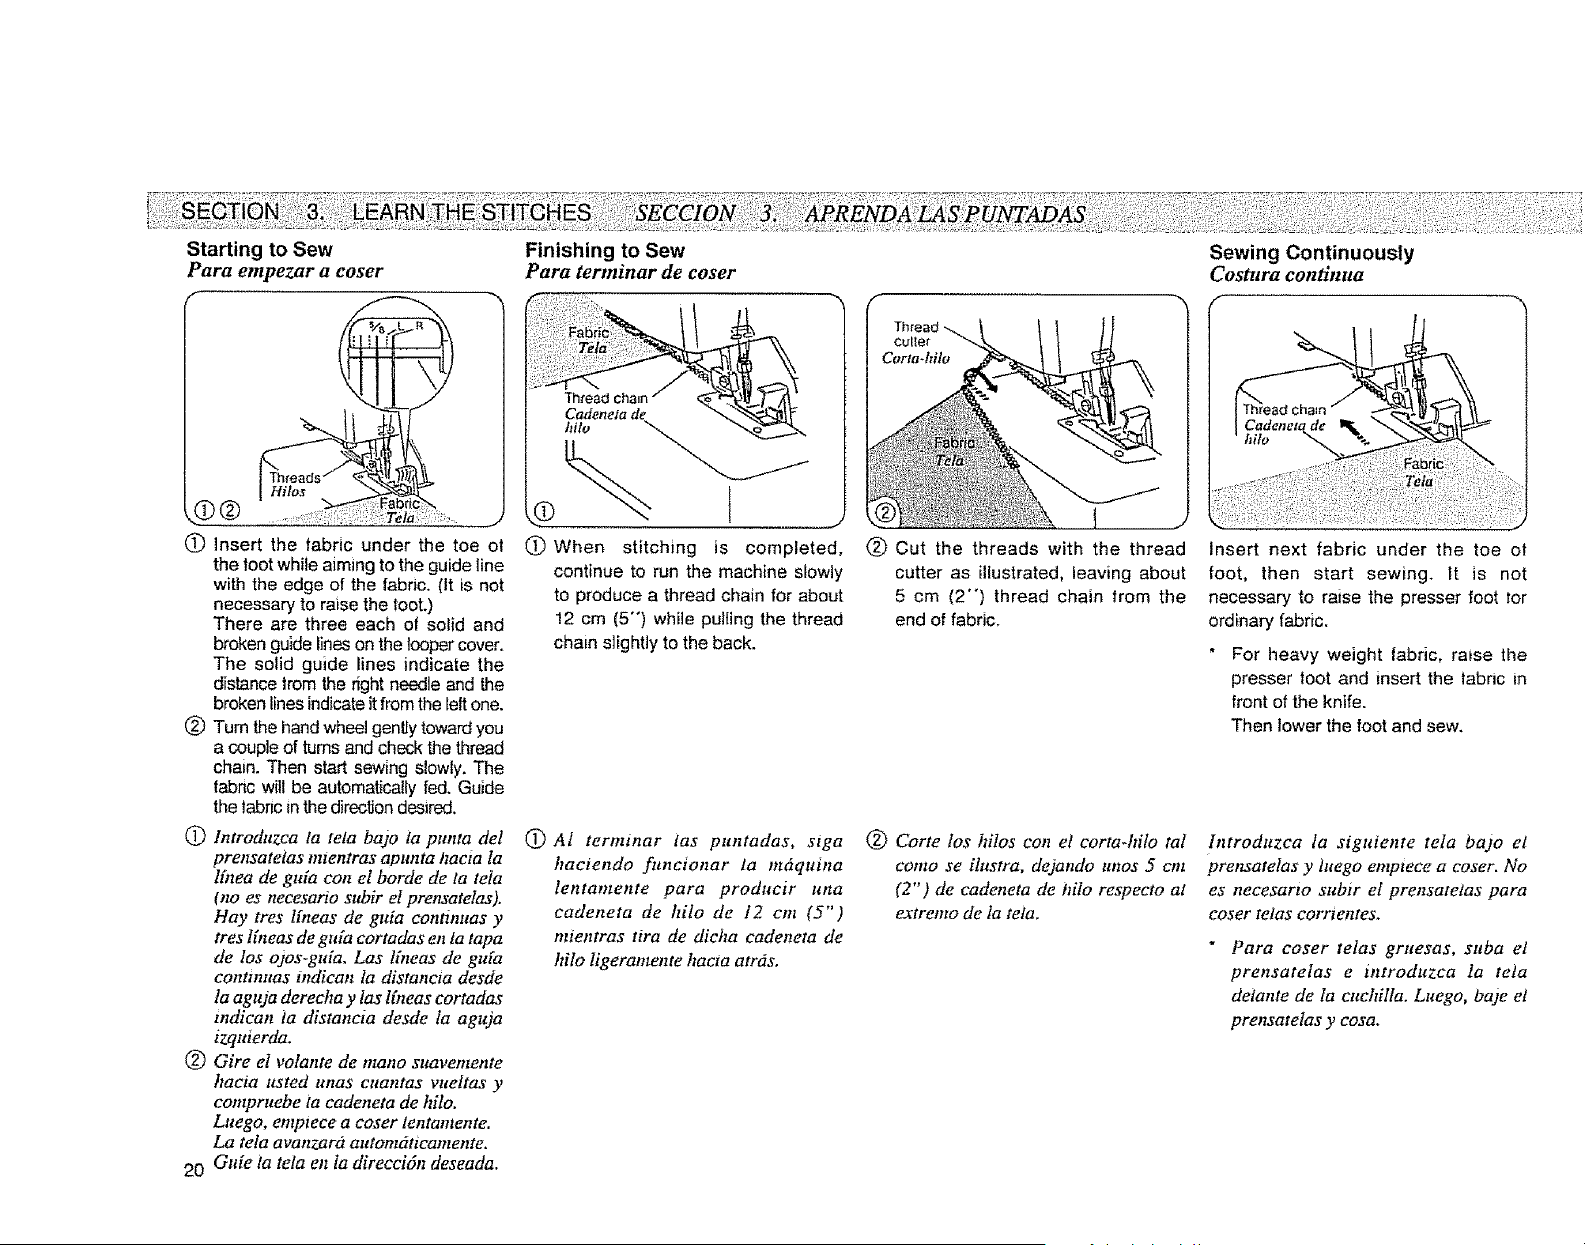
Starting to Sew
Para empezar a coser
f
(_ Insert the fabric under the toe ol
the toot while aiming to the guide line
with the edge of the fabric. (It is not
necessary to raise the toot.)
There are three each of solid and
broken guide lineson the looper cover.
The solid guide lines indicate the
distance trom the fight needle and the
broken [ines indicate it from the let[ one.
(_) Turn the hand wheel gently toward you
a couple of turns and check the thread
chain. Then start sewing slowly. The
fabnc will be automatically fed. Guide
the labric in the direction desired.
@ lntroduzca la tela bajo la pttnla del
prensatetas mtentras apunta hacia la
lhzea de guia con el borde de ta teia
(no es necesario sublr el prensatelas).
Hay tres lfneas de guia continuas y
tres lhteas de guia cortadas en la tapa
de los ojos-guia. Las lhteas de gufa
contmuas mdican Ia distancta desde
la aguja derecha y 1as lfneas cortadas
tndican la distancta desde la aguja
izquierda.
@ Gire el volante de mano suaventente
hacia usted unas cuantas vueltas y
compruebe la cadeneta de hilo.
Luego, emptece a coser lentamente.
La tela avanzara atttomdttcamente.
20 Guie ia teta en la direccidn deseada.
Finishing to Sew
Para terminar de coser
.® t
(_) When stitching is completedo
continue to run the machine slowly
to produce a thread chain for about
12 cm (5"') while pulling the thread
chain slightly to the back.
(_) AI ternunar ias puntadas, ,riga
haciendo funcionar la mdzquina
lentamente para producir una
cadeneta de hilo de 12 cm (5")
tmentras ttra de dicha cadeneta de
hilo ligeramente hacta atrds.
(_) Cut the threads with the thread
cutter as illustrated, leaving about
5 cm (2"') thread chain from the
end of fabric.
@ Carte los hilos con et corta-hilo ml
como se ilustra, dejando unos 5 cm
(2") de cadeneta de hilo respecto at
extremo de la tela.
Sewing Continuously
Costura continua
Insert next fabric under the toe ot
foot, then start sewing. It is not
necessary to raise the presser foot for
ordinary fabric.
* For heavy weight fabric, rinse the
presser loot and insert the labric in
front of the knife.
Then lower the foot and sew.
Introduzca la siguiente tela bajo el
prensatetas y hcego emplece a coser. No
es necesarto subir el prensatetas para
coser telas corrtentes.
Para coser telas gruesas, suba et
prensateIas e introduzca la teta
delante de la cuchilta. Luego, bate et
prensatetas y cosa.
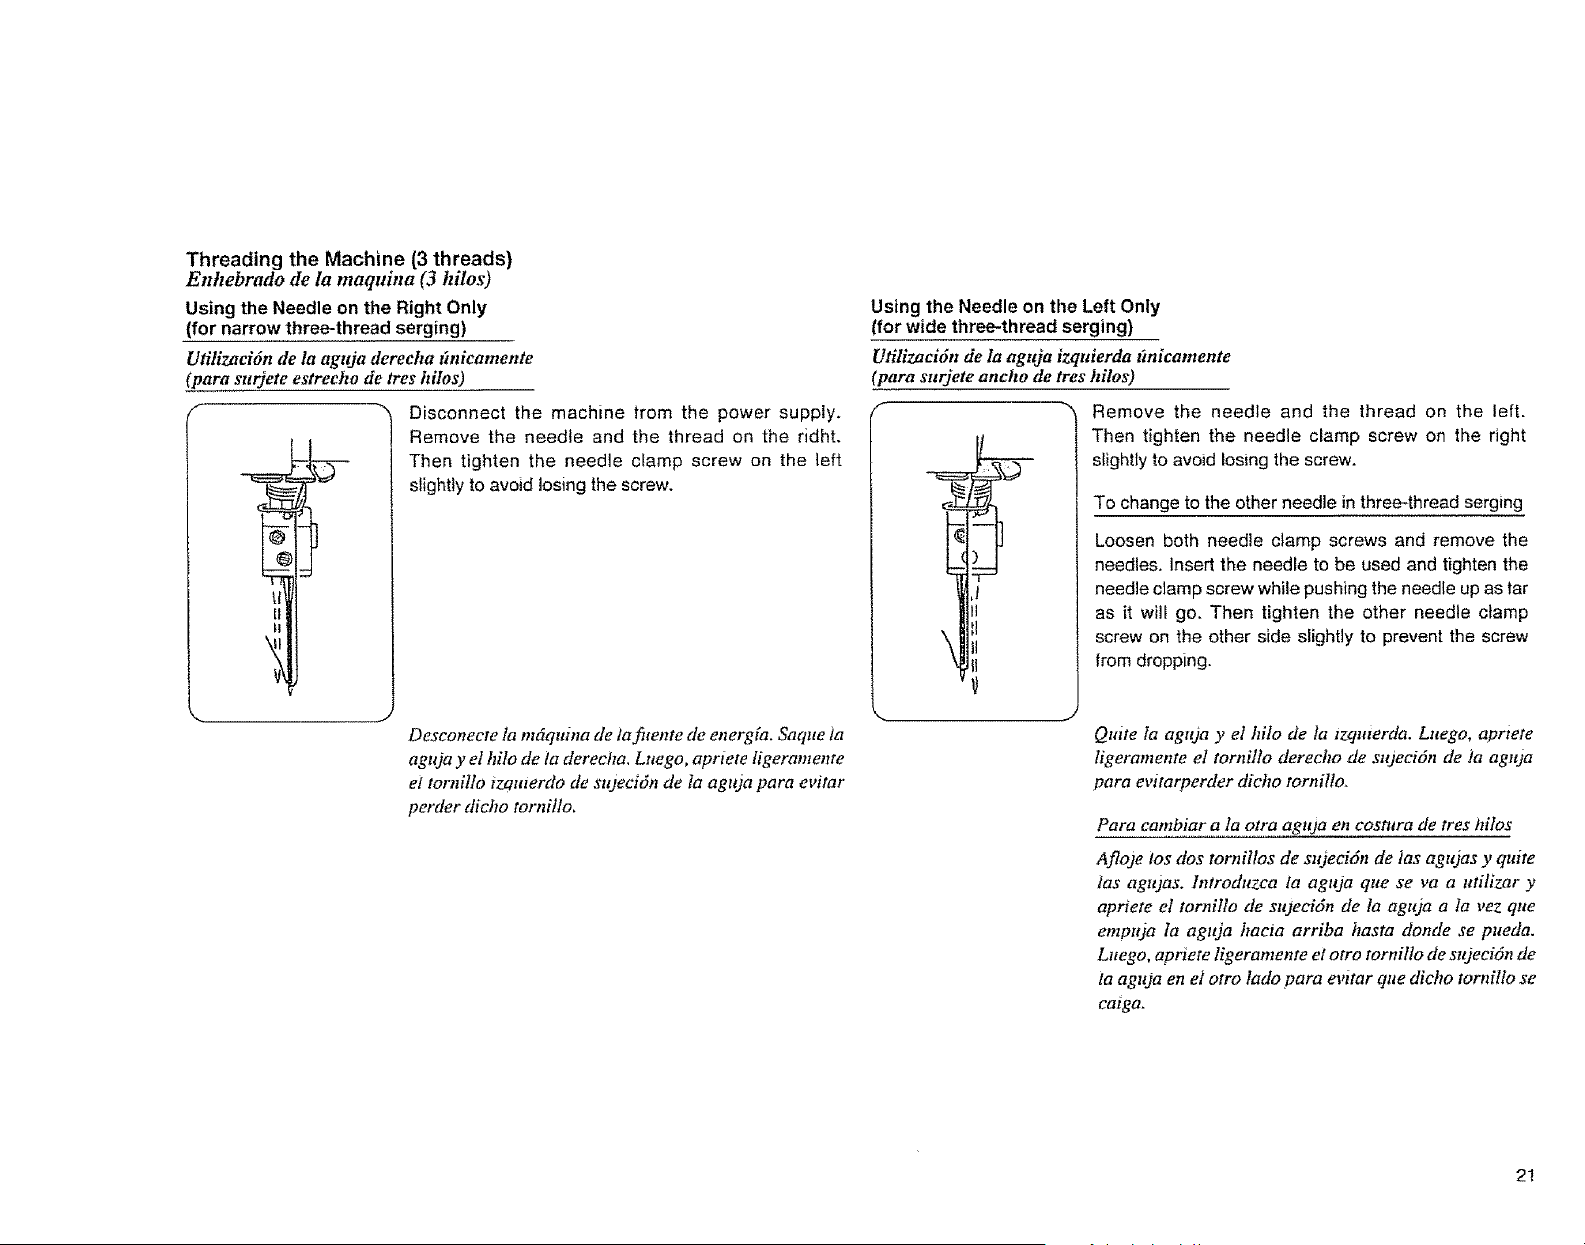
Threading the Machine (3 threads)
Enhebrado de la maquina (3 hilos)
Using the Needle on the Right Only
(for narrow three-thread serging)
Utilizaci6n de la aguja derecha _nicamente
(para surjete estrecho de Ires hilos)
tf
tl
Disconnect the machine from the power supply.
Remove the needle and the thread on the ddht.
Then tighten the needle clamp screw on the left
slightly to avoid losing the screw.
Desconecre la mdqmna de ta fuente de energia. Saque ia
aguja y el hilo de ta dereeha. Lnego, aprtete Iigeramente
el tornillo izamerdo de sujeciOn de la aguja para evitar
perder dicho tomfflIo,
Using the Needle on the Left Only
{for wide three-thread serging)
Utilizacidn de la agttja izquierda (micamente
(para surjete ancho de tres hilos)
Remove the needle and the thread on the Left.
Then tighten the needle clamp screw on the right
slightly to avoid losing the screw.
To change to the other needle in three-thread serging
Loosen both needle clamp screws and remove the
needles, Insert the needle to be used and tighten the
needle clamp screw while pushing the needle up as tar
as it will go, Then tighten the other needle clamp
screw on the other side slightly to prevent the screw
from dropping.
Quite [a agttja y el hilo de la lzqulerda. Lnego, aprtete
ligeramente el tornillo derecho de stqeei6n de la agtqa
para evitarperder dicho torni/lo.
Para cambiar a la otra aguja en cosmra de tres hifos
Afloje los dos tornillos de sujeci6n de ias agujas y quite
las agujas, h_troduzca ta aguja que se va a utilizar y
apriete el tornillo de su3ecidn de la aguja a la vez que
empuja la aguja hacta arriba hasta donde se pueda.
Luego, aprtete ligeramente el otro tornillo de sujeci6n de
la aguja en et otro lado para evttar que dicho tornilIo se
caiga.
2!
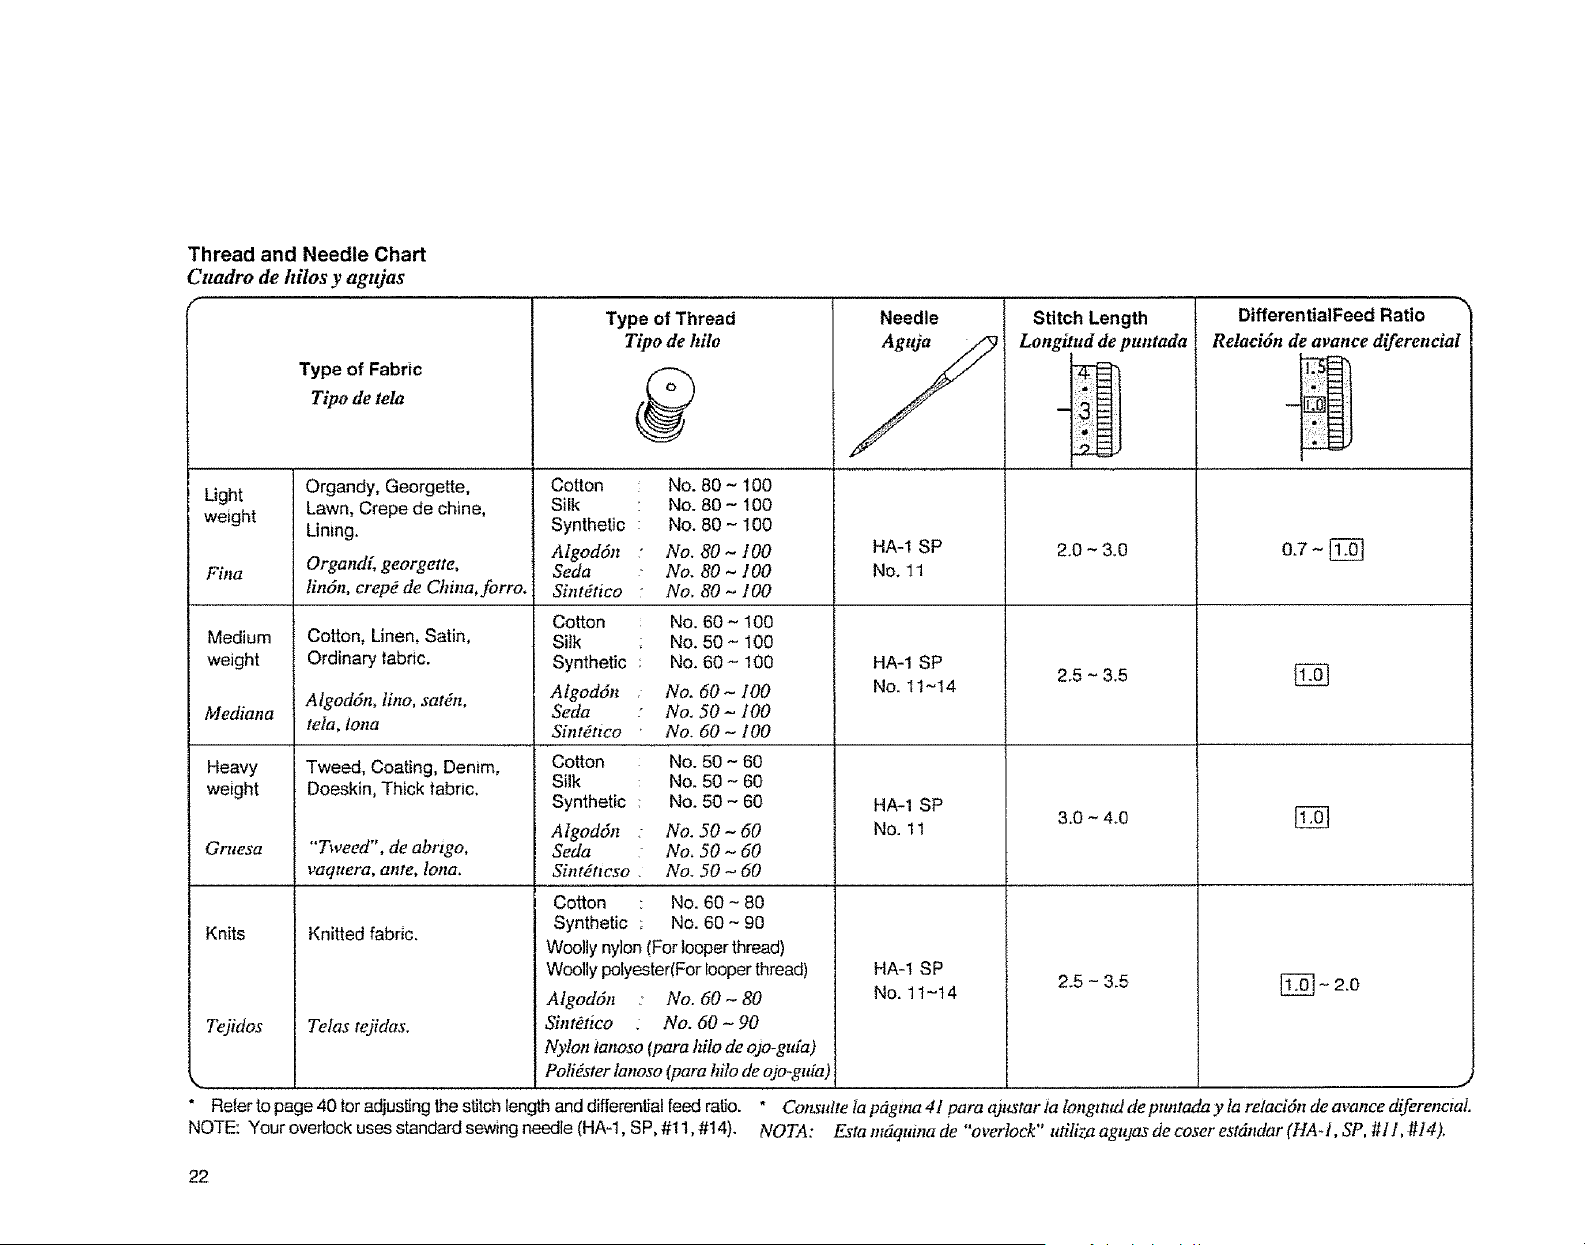
Thread and Needle Chart
Cuadro de hilos y agujas
f
Type of Fabric
Tipo de tela
Light
weight
Fina
Medium
weight
Mediana
Heavy
weight
Gruesa
Knits
i
Tejidos
Organdy, Georgette,
Lawn, Crepe de chine,
Lining.
Organd[, georgette,
lin6n, crepd de China, forro.
Cotton: Linen, Satin,
Ordinary fabric.
Algoddn, litw, sate;n,
tela, lona
Tweed, Coating, Denim,
Doeskin, Thick tabric.
"Tweed", de abrtgo,
vtlqltefa, ante, ]ona,
Knitted fabric.
Type of Thread
Tipo de hilo
Cotton : No. 80 - 100
Silk " No. 80 - 100
Synthetic - No. 80 - 100
Algoddn " No. 80~100
Seda " No. 80 ~ I00
Sintdtico " No. 80 ~ 100
Cotton No. 60 ~ 100
Sitk No. 50 - 100
Synthetic : No. 60 - 100
Atgod6n • No. 60- 100
Seda : No. 50- 100
Sintdtico No. 60 - 100
Cotton No. 50 - 60
Silk No. 50 - 60
Synthetic : No. 50 - 60
Algod6n . No. 50-60
Seda No. 50 _ 60
Sintdtwso No. 50 _ 60
Cotton : No. 60 - 80
Synthetic : No. 60 - 90
* Refer to pa!
NOTE: Your overlock uses standard sewing needle (HA-l, SP, #11, #14).
Needle
HA-1 SP
No. 11
HA-1 SP
No. 11-14
HA-1 SP
No. 11
Stitch Length
Longitud de puntada
DifferentialFeed Ratio
R etacidn de avarice diferencial
0.7~ _]
Woolly nylon (For looper thread)
Woolly polyesterCFor looper thread)
Algod6n : No. 60-80
Telas tejidas. Sintetico : No. 60 - 90
Nylon lanoso (para hilo de ojo-guia)
PotiEster lanoso (para hito de ojo-gttia)
e 40 for adjusting the stitch length and differential feed ratio.
HA-1 SP
No. 11-t4
* Consulte la pdgma 41 para
NOTA:
5¸¸;¸! -,!
.2"
2.0 ~ 3.0
2.5 - 3.5
3.0 ~ 4.0
2.5 - 3.5
[_- 2.0
it_star la longaud de puntada y ta retacidn de avance diferenciaL
Esta mdquma de "overlock" ufiliza agujas de coser est6ndar (HA-I , SP, #11, #14)_
22
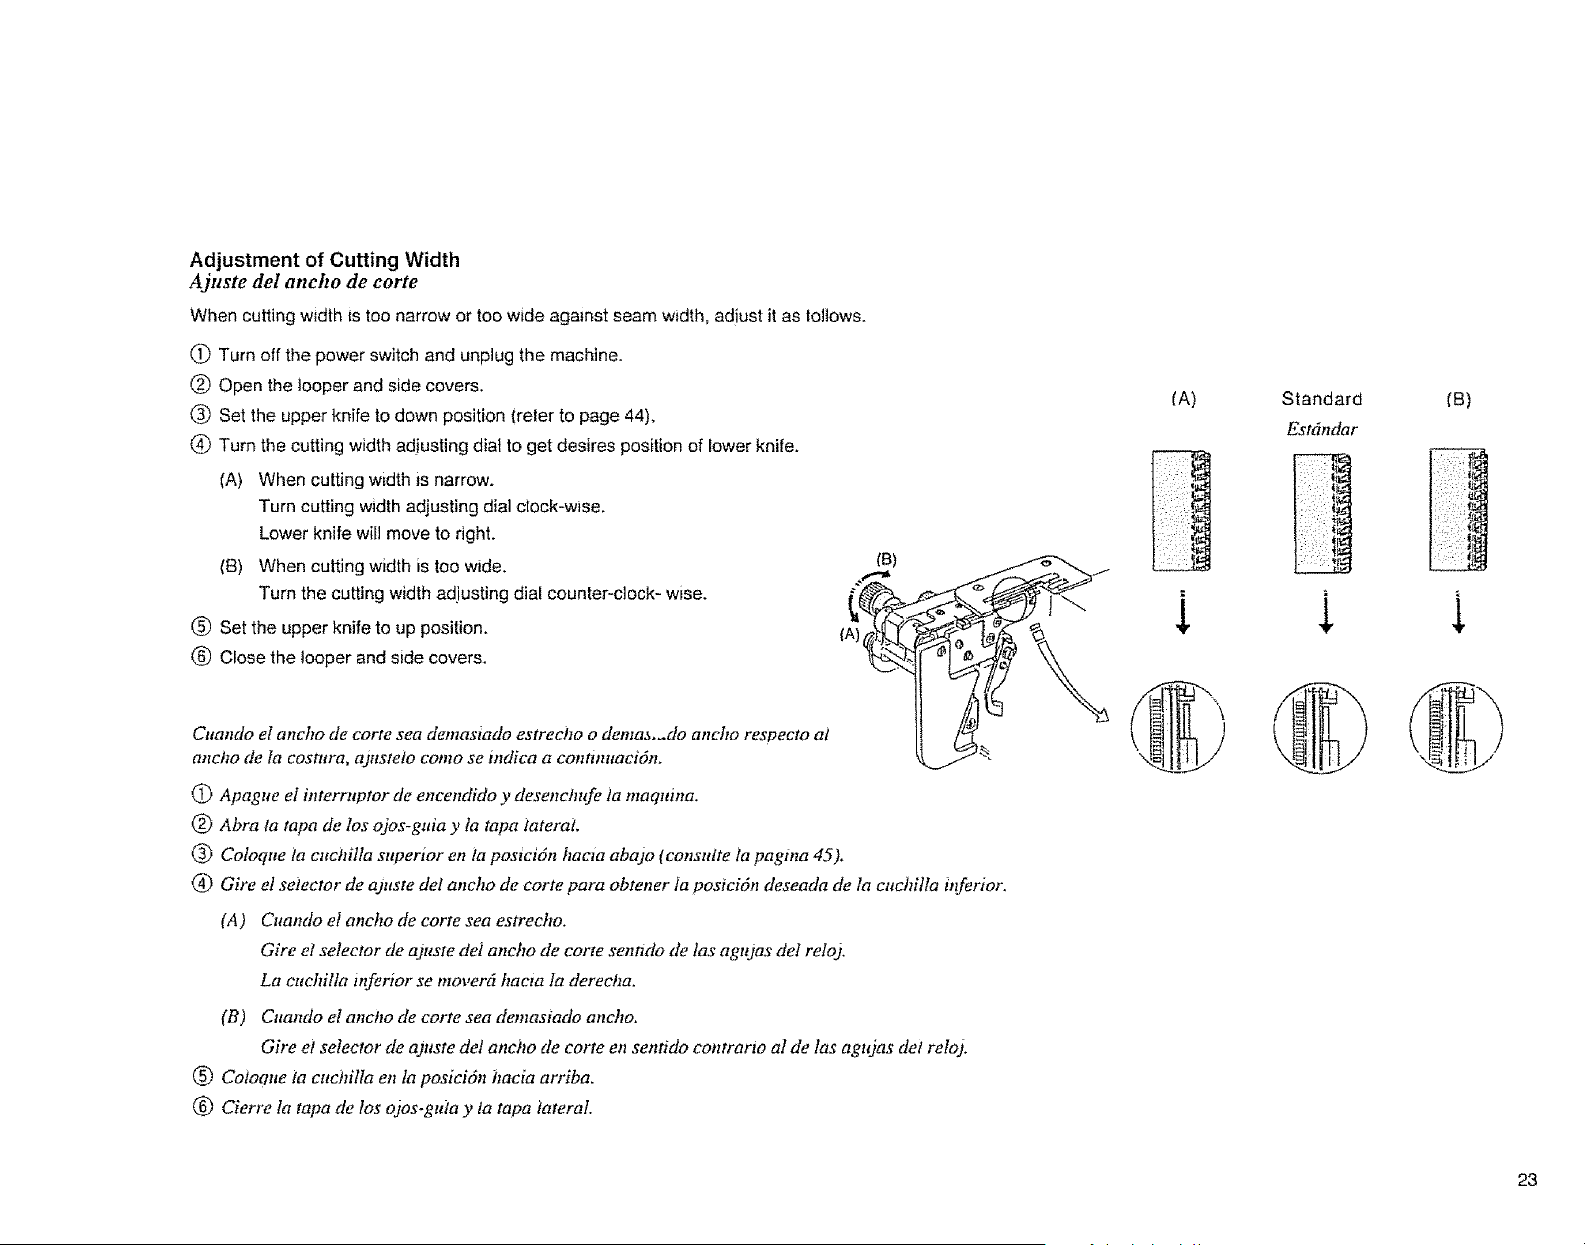
Adjustment of Cutting Width
Ajuste del ancho de torte
When cutting width is too narrow or too wide against seam width, adjust it as follows.
O Turn off the power switch and unplug the machine.
(_) Open the looper and side covers.
(_ Set the upper knife to down position (reler to page 44).
(_ Turn the cutting width adiusting dial to get desires position of lower knife.
(A} When cutting width is narrow.
Turn cutting width adjusting dial clock-wise.
Lower knife will move to right.
(B) When cutting width is too wide.
Turn the cutting width adjusting dial counter-clock- wise.
(_ Set the upper knife to up position. (A)
(_ Close the looper and side covers.
Cuando et ancho de corre sea demasiado estreeho o dema_.-do aneho respeeto at
aneho de la costttra, adusteto como se mdiea a eontinttaei6n.
(_ Apague el interruptor de eneendido y desenehufe ia maquitm.
(_ Abra ta tapa de los ojos-gaia y la tapa lateral.
@ Coloqtte la cuchilta superior en ta postcidn haeta abajo (eonsutte la pagma 45).
(_) Gire el selector de ajuste del ancho de carte para obtener la posici6n deseada de la ctlchitla inferior.
(A) Cuando el ancho de corte sea estrecho.
Gire et selector de ajuste dei ancho de corte senndo tie las agujas del relo).
La cuchilla inferior se moverd hacta la derecha.
(13) Cuando et ancho de corte sea demasmdo ancho.
Gire e} selector de ajuste del anctto de corte en sentido contrario al de las agzoas det relo 3.
@ Coiocme la cuchilla en la posici6n hacia arriba.
@ Cierre la tapa de los ojos-gttla y la tapa lateral.
IA)
Standard
Estdndar
(B)
i
23
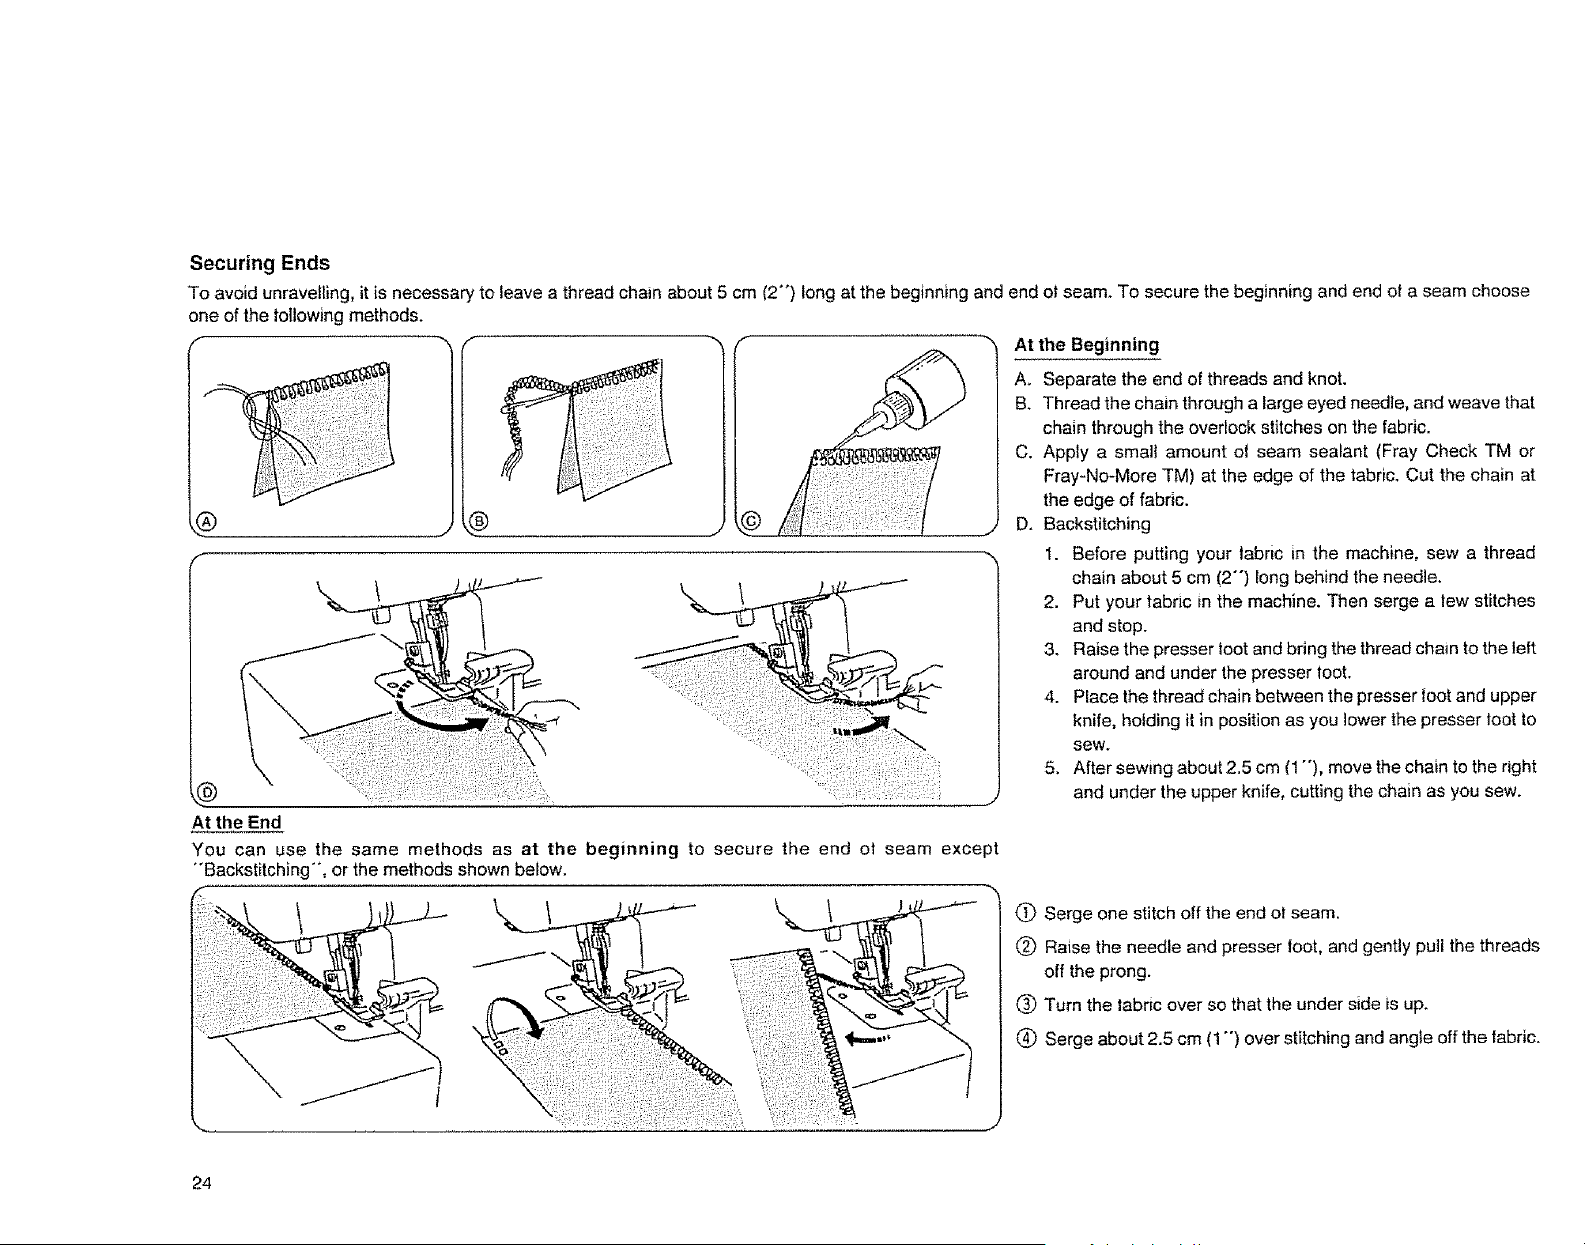
Securing Ends
To avoid unravelling, itis necessaryto leave a thread chain about 5 cm (2°°)long at the beginning and end of seam. To secure the beginning and end of a seam choose
one of the following methods.
f
J
D
At the End
You can use the same methods as at the beginning to secure the end ot seam except
"'Backstitching-, or the methods shown below.
At the Beginning
A. Separate the end of threads and knot.
B. Thread the chain through a large eyed needle, and weave that
chain through the overlock stitches on the fabric.
C. Apply a small amount of seam sealant IFray Check TM or
Fray-No-More TM) at the edge of the fabric. Cut the chain at
the edge of fabric.
D. Backstitching
1. Before putting your _abric in the machine, sew a thread
chain about 5 cm (2") long behind the needle.
2. Put your fabric in the machine. Then serge a few stitches
and stop.
3. Raise the presser foot and bring the thread chain to the left
around and under the presser toot.
4. Place the thread chain between the presser foot and upper
knife, hotding it in position as you lower the presser toot to
sew.
5. After sewing about 2.5 cm (1"'), move the chain to the right
and under the upper knife, cutting the chain as you sew.
(_ Serge one stitch off the end ot seam.
(_ Raise the needle and presser foot, and gently pull the threads
off the prong.
(_ Turn the |ebric over so that the under side is up.
(_) Serge about 2.5 cm (1 "') over stitching and angle off the fabric.
24
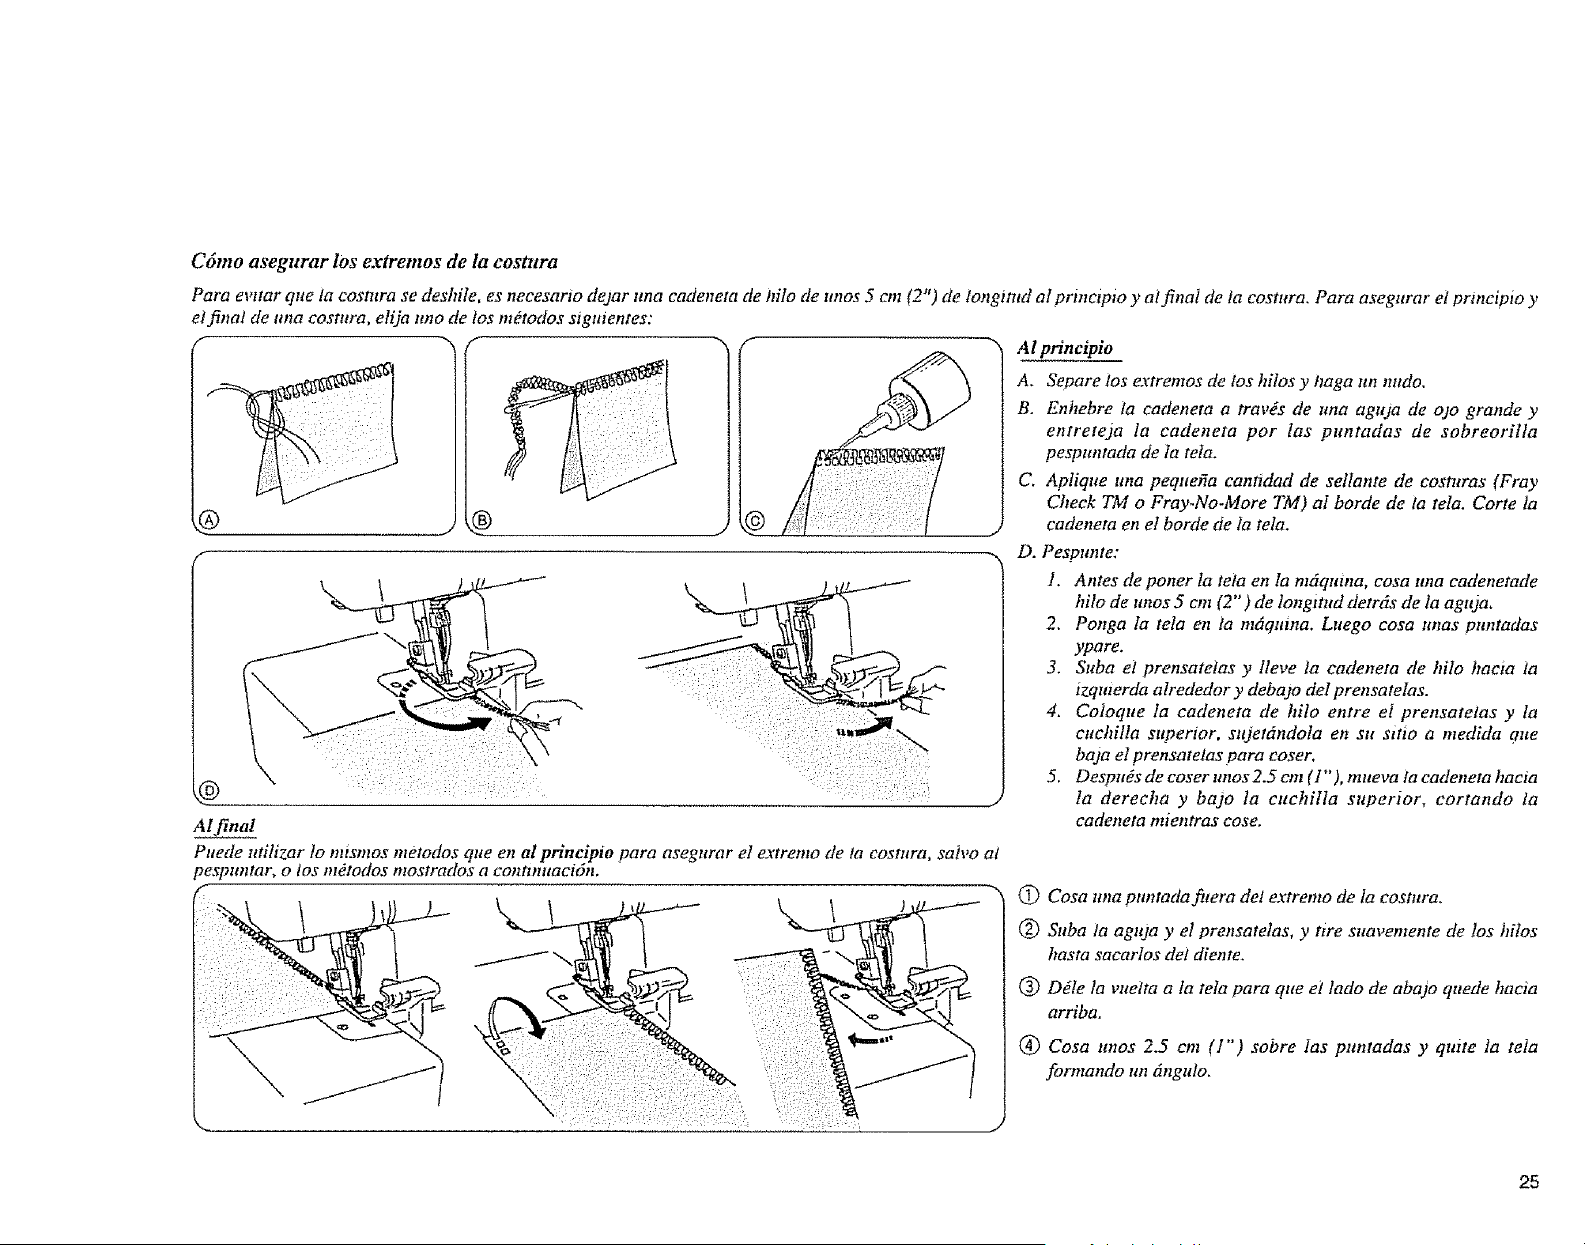
C6mo asegurar los extremos de la eostttra
Para evttar que la costura se deshile, es necesario dejar una cadeneta de JnIo"de unos 5 cm (2P")de tongtntd al_prmctpto.... y al final de ta eostura. Para asegurar et prmcipio y
ei finai de nna eostura, etija uno de tos mOtodos stgu_entes:
@
f
Al final
Puede utilizar to mtsmos metodos queen at principio para asegurar el extrento de ta eosmra, salvo at
pespuntar, o los mOtodos mostrados a conttnltaei6n,
.-..
Alpnnc_io
A. Separe los extremos de los hilos y haga un nndo.
B. Enhebre la eadeneta a travYs de una aguja de o to grande y
entrete3a la eadeneta par las puntadas de sobreorilla
pespunmda de la tela.
C. Aptique una peque_a eantldad de sellante de eosturas (Fray
Cheek TM o Fray-No-More TM) al horde de ta tela. Carte 1a
cadeneta en el borde de la tela.
Ol
Pe:_punte:
1. Antes de poner la tela en la m6qmna, eosa tma eadenemde
hilo de tmos 5 on (2") de longitud detrds de la agnja,
2. Ponga la tela en la m6quina. Luego eosa unas puntadas
ypare.
3. Suba el prensatetas y lleve la cadenem de hiIo haeia ia
tzqmerda alrededor y deba3o del prensatelas.
4. Coloque la eadeneta de hilo entre el prensatetas y la
euehilla superior, sujett_ndola en su sitio a medida oue
baja el prensatelas para easer,
5, Despa_s de coser unos 2.5 cm (l" ), mueva la eadenem haeia
la dereeha y bajo la euehiIla superior, eortando la
cadeneta mientras ease.
C) Cosa tma puntada fitera del extremo de la costura.
(_) Suba la aguja y el prensatelas, y tire suavemente de los hilos
hasta sacarlos de1 diente.
_) Ddle la vueita a ta tela para que ei 1ado de aba)o quede hacia
arriba.
(_) Cosa unos 2.5 em (1") sabre 1as puntadas y quite 1a tela
formando un 6ngtdo.
25
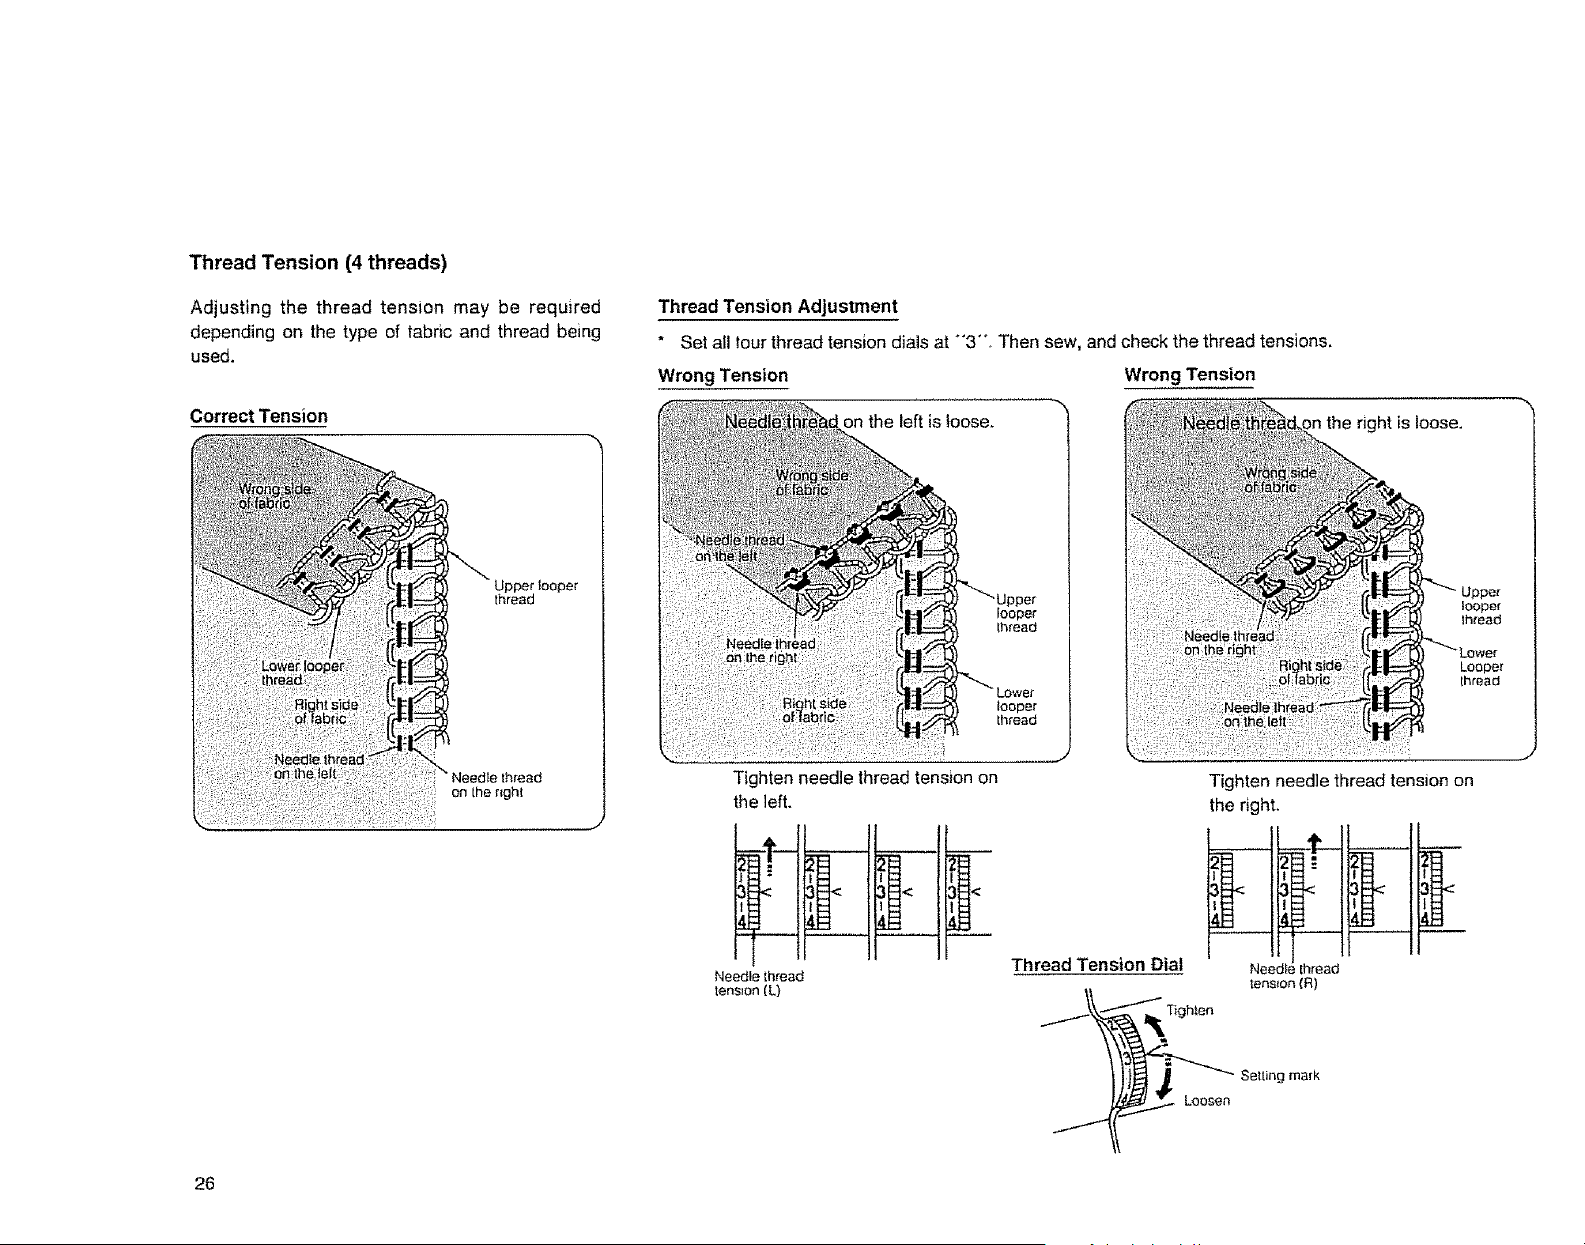
Thread Tension (4 threads)
Adjusting the thread tension may be required
depending on the type of tabric and thread being
used.
Correct Tension
Thread Tension Adjustment
* Set all tour thread tension dials at "3"°, Then sew, and check the thread tensions.
Wrong Tension Wrong Tension
on the left is toose.
right is loose.
Upper
looper
thread
Tighten needle thread tension on
the left.
Needle thread
ter)s_on(L)
Thread Tension Dial
/_Tighten
_._ Loosen
Tighten need]e thread tension on
the right.
÷ 11 II
_ens_on (R)
Set{ing mark
26
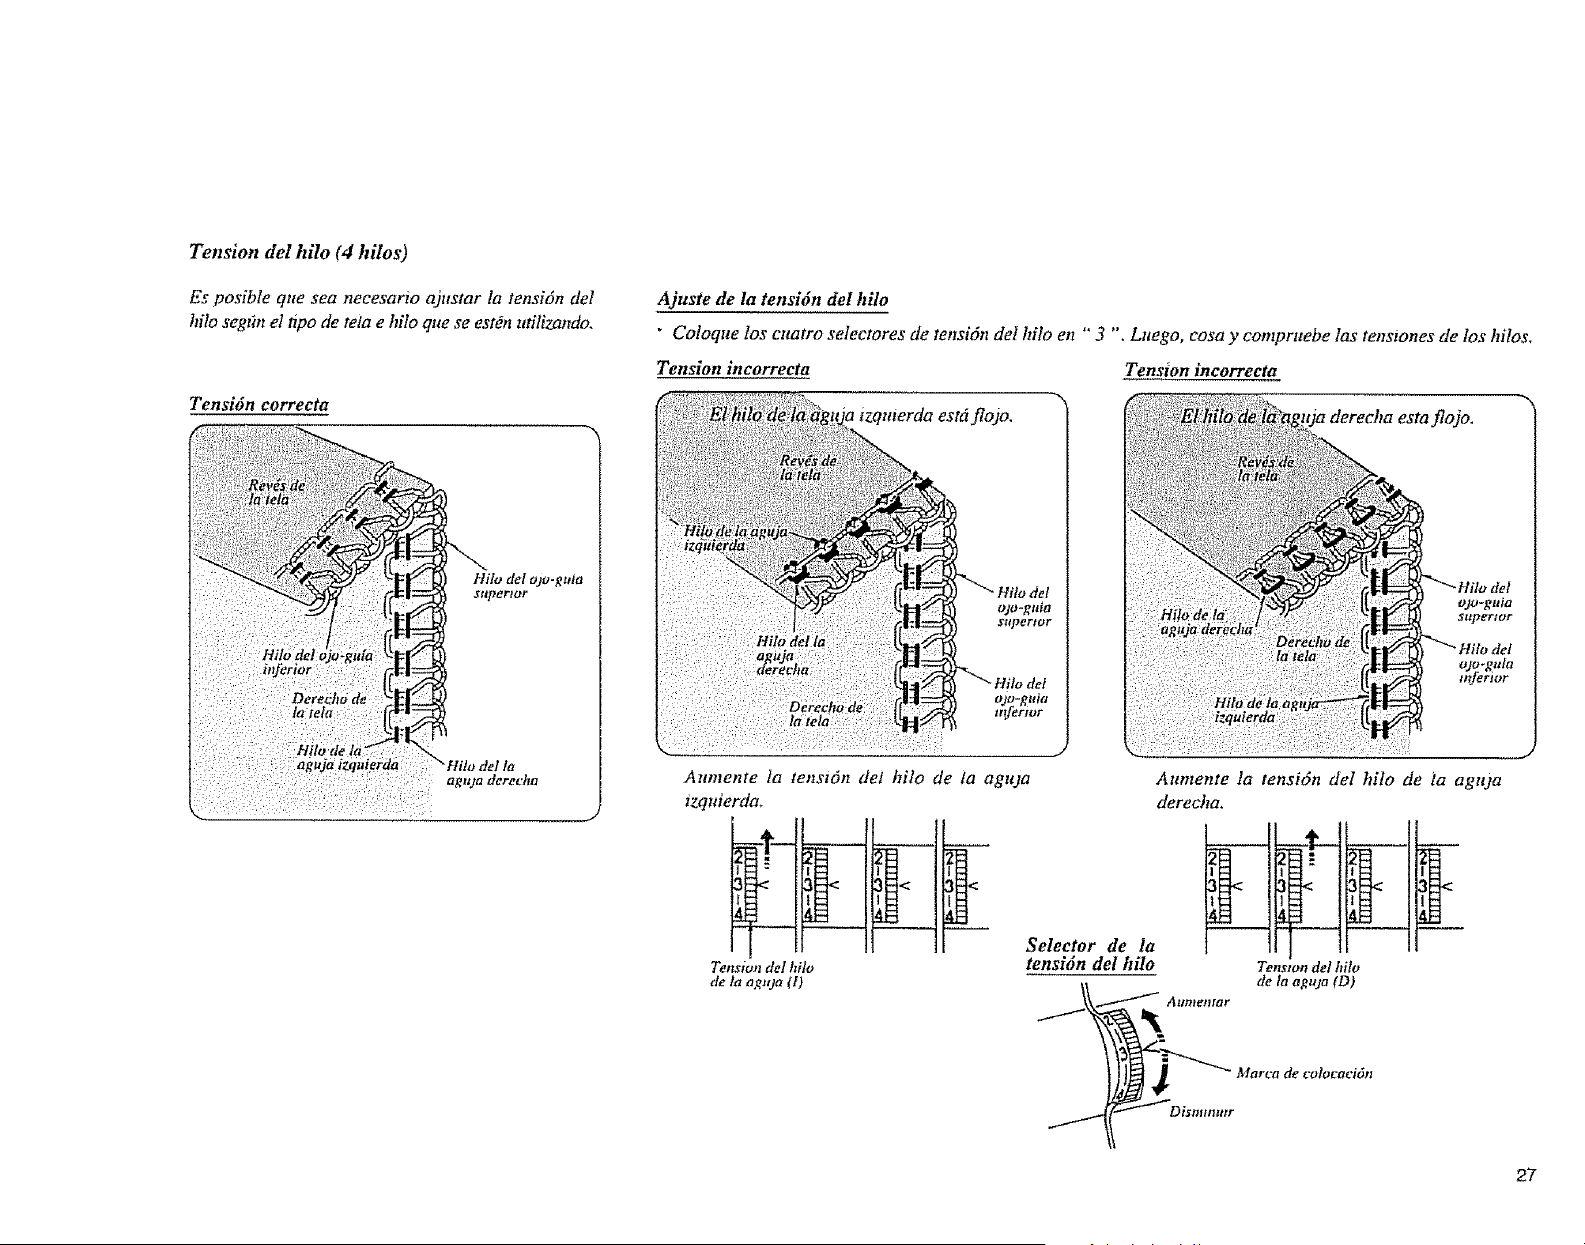
Tension del hilo (4 hilos)
Es posible que sea neeesario ajustar ta tensi6n del
hilo segt_n el tipo de tela e hilo que se est_n utiliz_nndo_
Tensi6n correcta
1 la
::: aguja derecha
Ajuste de la tensi6n del hilo
" Coloque los cuatro selectores de tensi6n deI hilo en '"3 ". Lxtego, cosa y compruebe las tensiones de los hilos.
Tension incorrecta Tension ineorrecta
o3o-gnia
sttpertor
...............
Anmente Ia tenst6n del hilo de la aguja
izquierda+
Tenswn del hito
de la ag_ua(I)
estaflo)o.
Hito def
ojo-guia
SUp_FtOF
Hilo t1€I
ojo+gula
tnferior
J
Aumente la tensi6n del hilo de ia agtua
derecha.
Selector de la
tensidn del hilo
Tenston del hilo
de la agujtt (D)
Marca de colocacidn
27
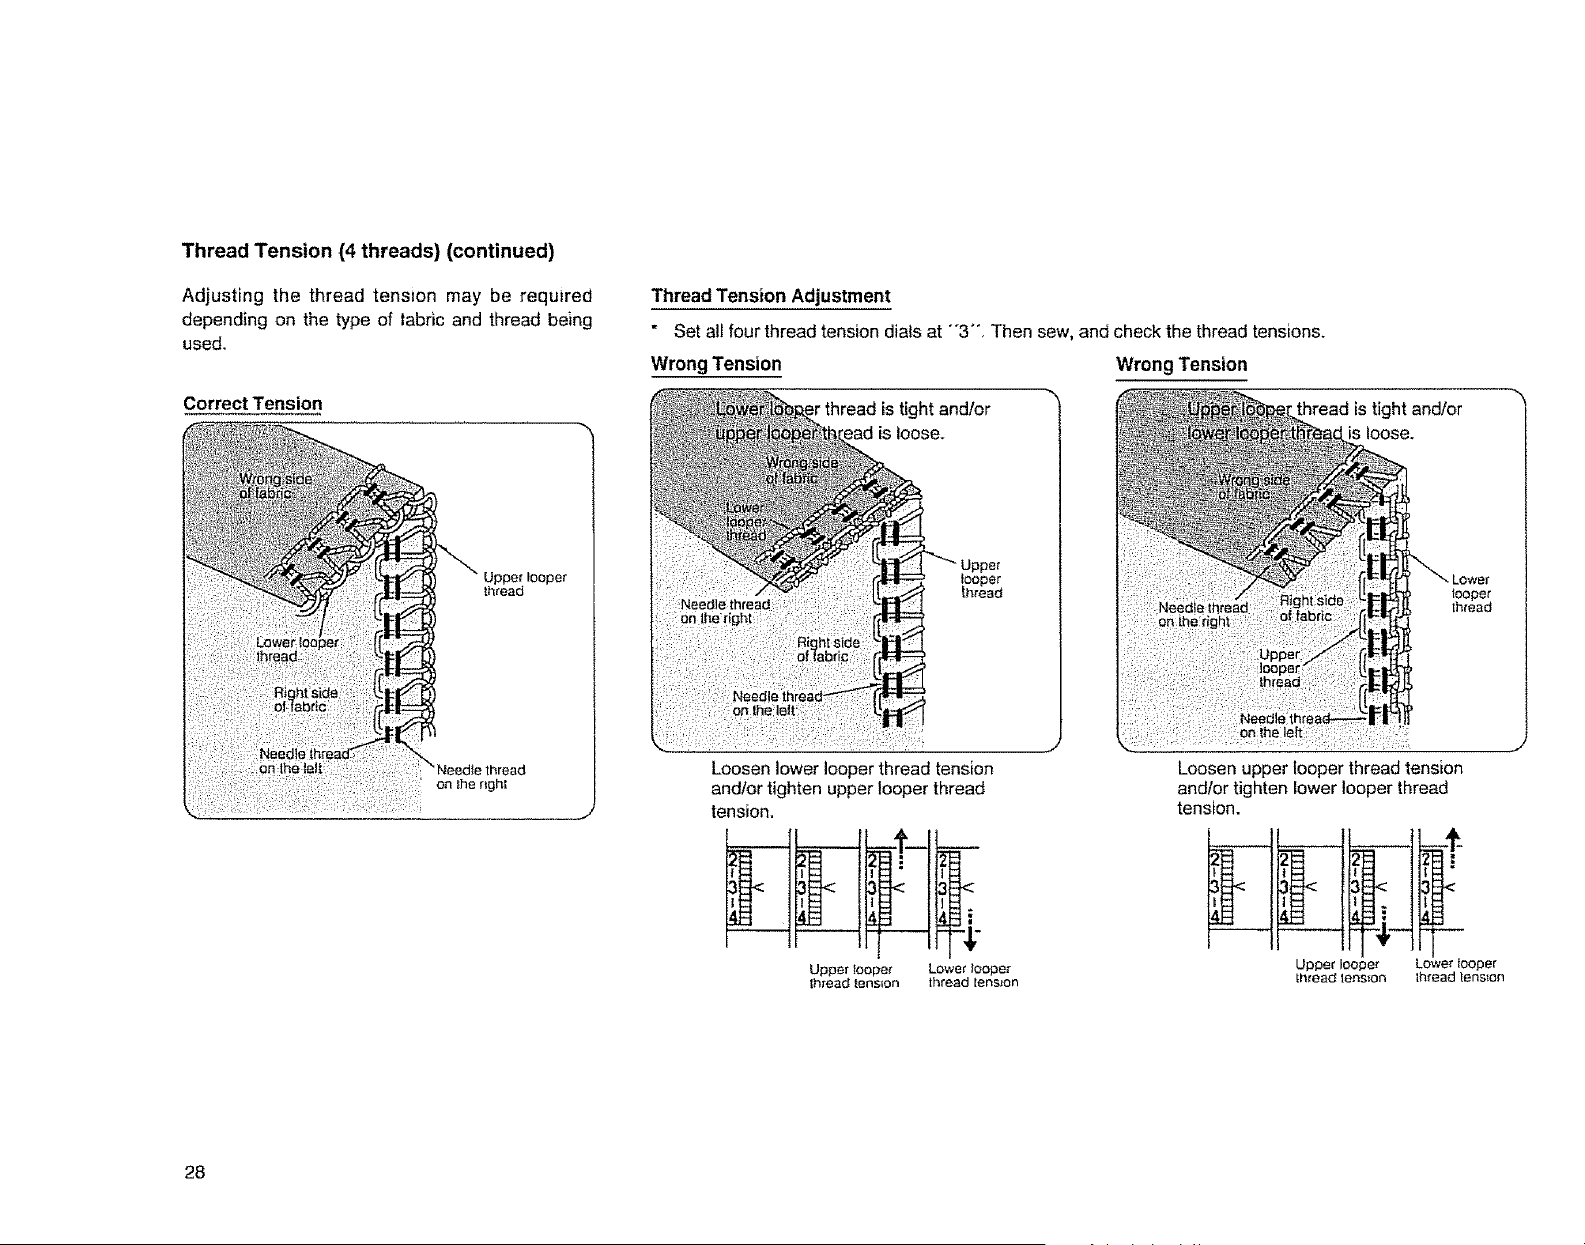
Thread Tension (4 threads) (continued)
Adjusting the thread tension may be required
depending on the type of labric and thread being
used.
Correct Tension
Upper looper
thread
Thread Tension Adjustment
• Set all four thread tension dials at "'3", Then sew, and check the thread tensions.
Wrong Tension Wrong Tension
is tight and/or thread is tight and!or
loose.
looper
thread
Loosen lower looper thread tension
and/or tighten upper looper thread
tension,
Upper looper
lhread tension
Lower looper
thread lens}on
Loosen upper looper thread tension
andfor tighten lower looper thread
tension.
Upper looper Lower _ooper
thread lens_on lhread tension
28
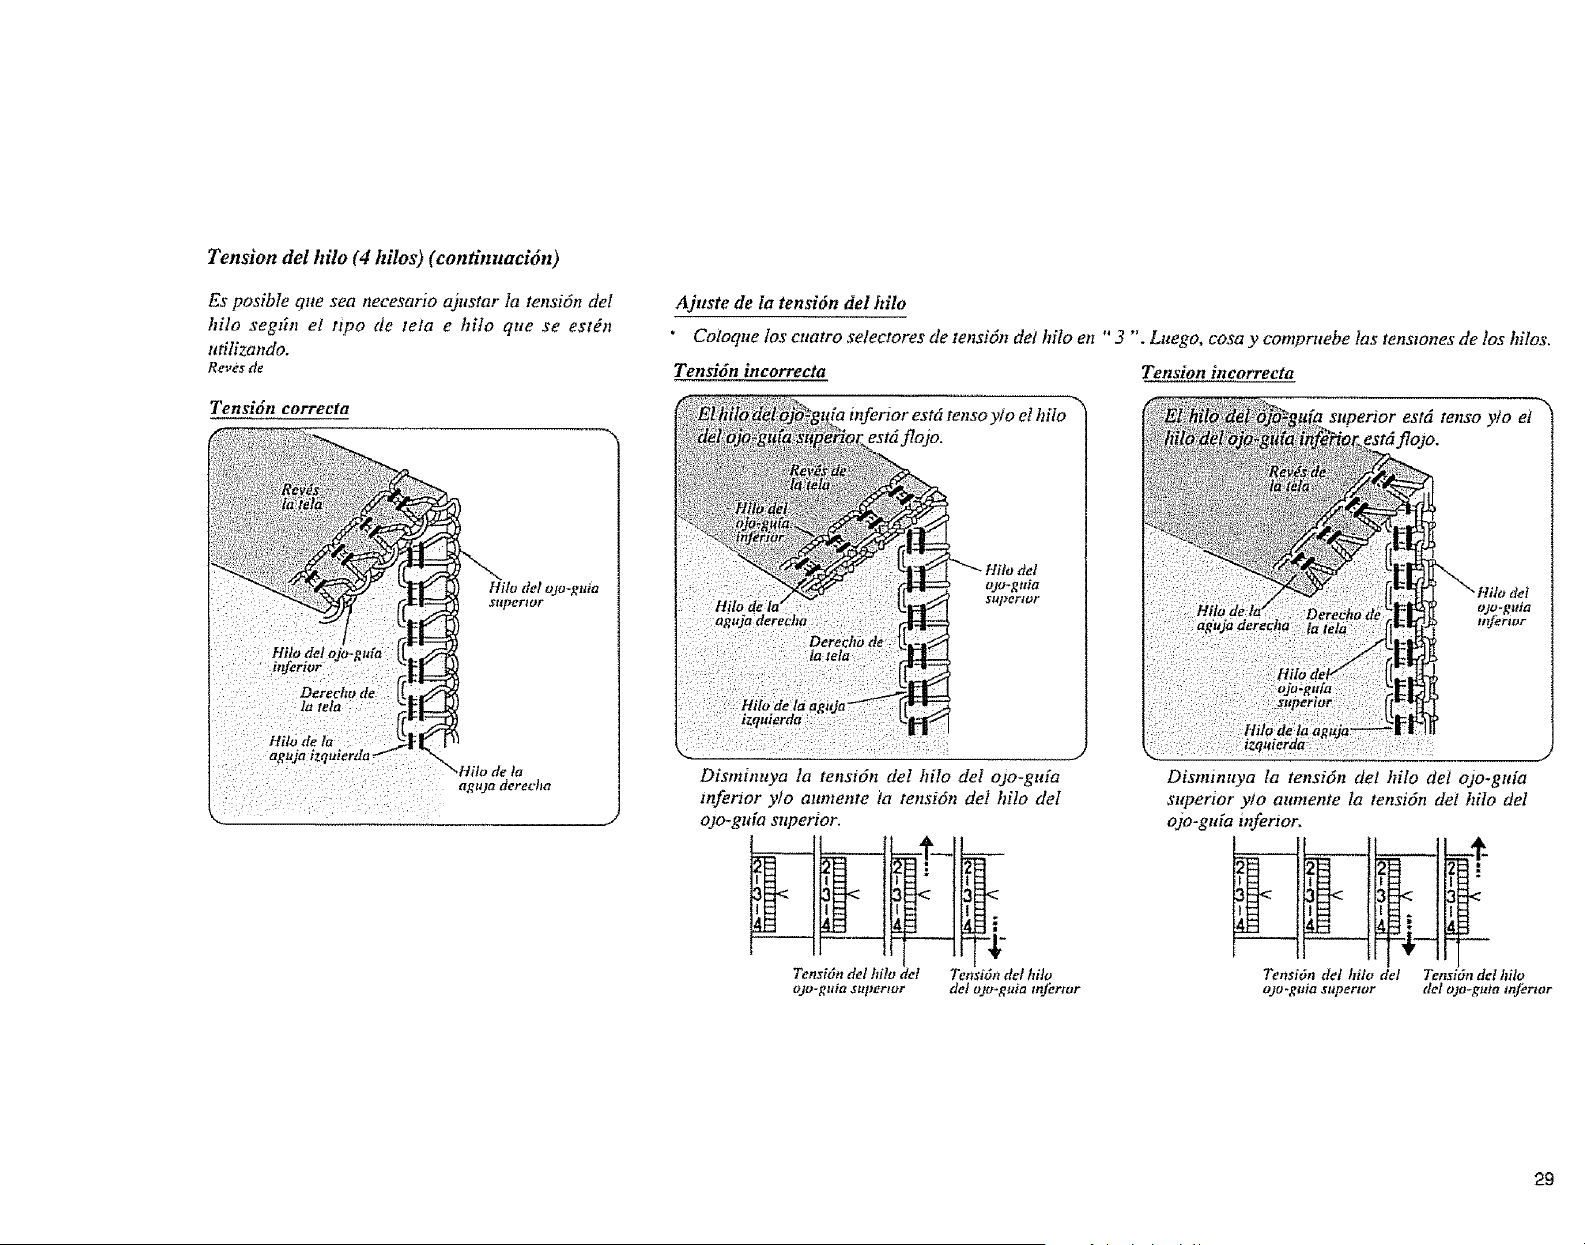
Tension del hilo (4 hilos) (eontinuacidn)
Es posible que sea necesario ajnstar la tensi6n del
hilo segffn el ttpo de tela e hi/o que se est_n
utilizando.
Re_,dsde
Ajuste de ta tensi6n del hilo
" Coloque los cuatro setectores de tensidn dei hilo en "3 "'.Luego, cosa y compruebe las tenstones de los hilos.
Tensi6n incorreeta Tension incorrecta
Tensidn correcta 3'/o el hilo "_ _"
estd tenso 3,/o et
....... : : ........ t
Disminuya la tensidn del hilo del ojo-gtffa
mferior y/o attmente la tensidn dei hilo del
ojo-gtffa superior.
Tensidn del hilo del Tensidn del hito
ojo-guia stqtertor del ojo.gttia mferttJr
ojo.guit;
Disminuya la tensidn det hilo dei ojo-guia
supertor y!o attmente la tensidn dei hilo deI
ojo-gula inferior.
Tensi6n del hilo del Tensi6ndel hilo
o3o-guia supertor del o to-gum referrer
29
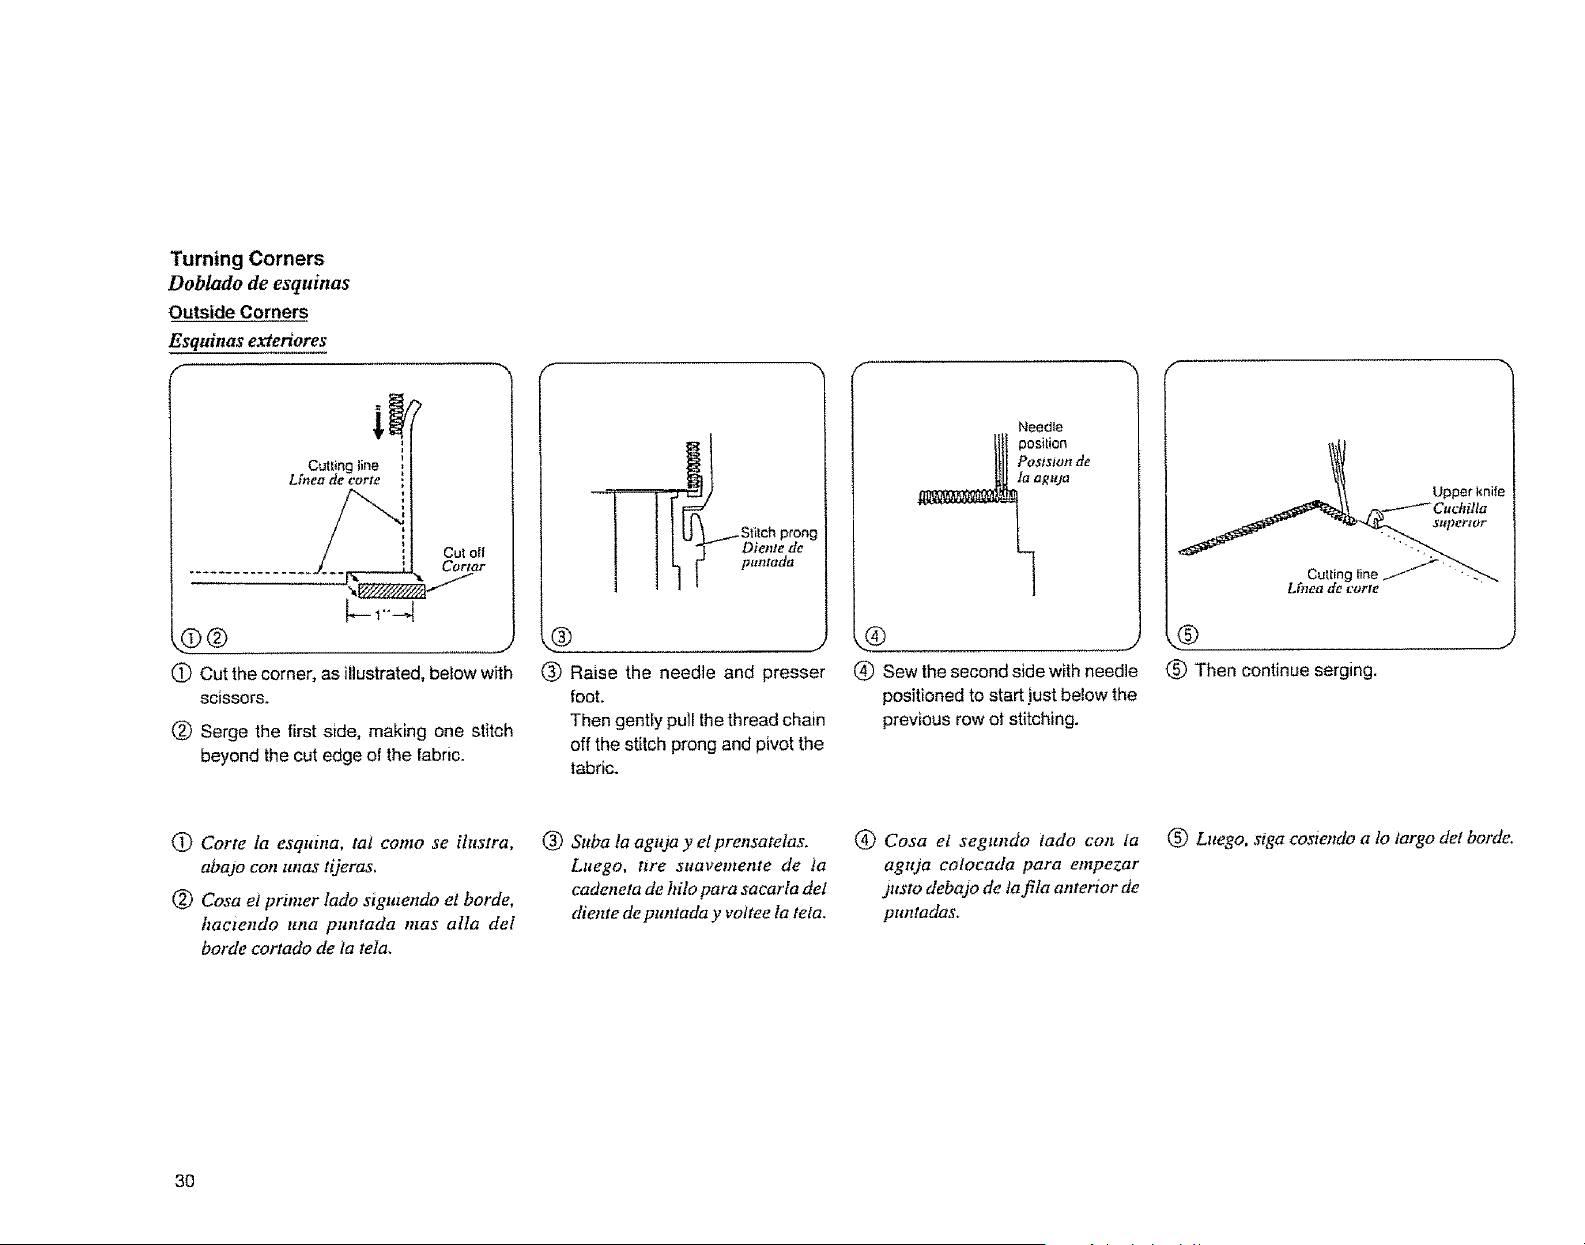
Turning Corners
Doblado de esquinas
Outside Corners
Esquinas exter_ores
f
Cut off
Cortar
@ Cut the corner, as illustrated, below with
scissors.
(_) Serge the first side, making one stitch
beyond the cut edge of the fabric.
f
(_ Raise the needle and presser
foot.
Then gently pull the thread chain
off the stitch prong and pivot the
tabric.
Needle
_i positi°n
Pustslt_rt de
aguja
(_ Sew the second side with needle
positioned to start just below the
previous row ot stitching.
Upper knife
Cuchilta
(_) Then continue serging.
(D Corte la esquina, tat come se ilustra,
abajo con unas tijeras.
_) Cosa el printer lade sigutendo et borde,
haciendo tt/la pltntada mas alia del
borde eortado de ia tela.
(_ Suba la aguja y el prensatelas.
Luego, tire suavemente de _a
cadetzeta de hilo para sacarla det
diente de puntada y voitee la teia.
@ Cosa el segundo iado con fa
aguja cotocada para empezar
justo debajo de ta fila anterior de
puntadas.
(_) Luego, siga cosiendo a lo largo det borde.
3O
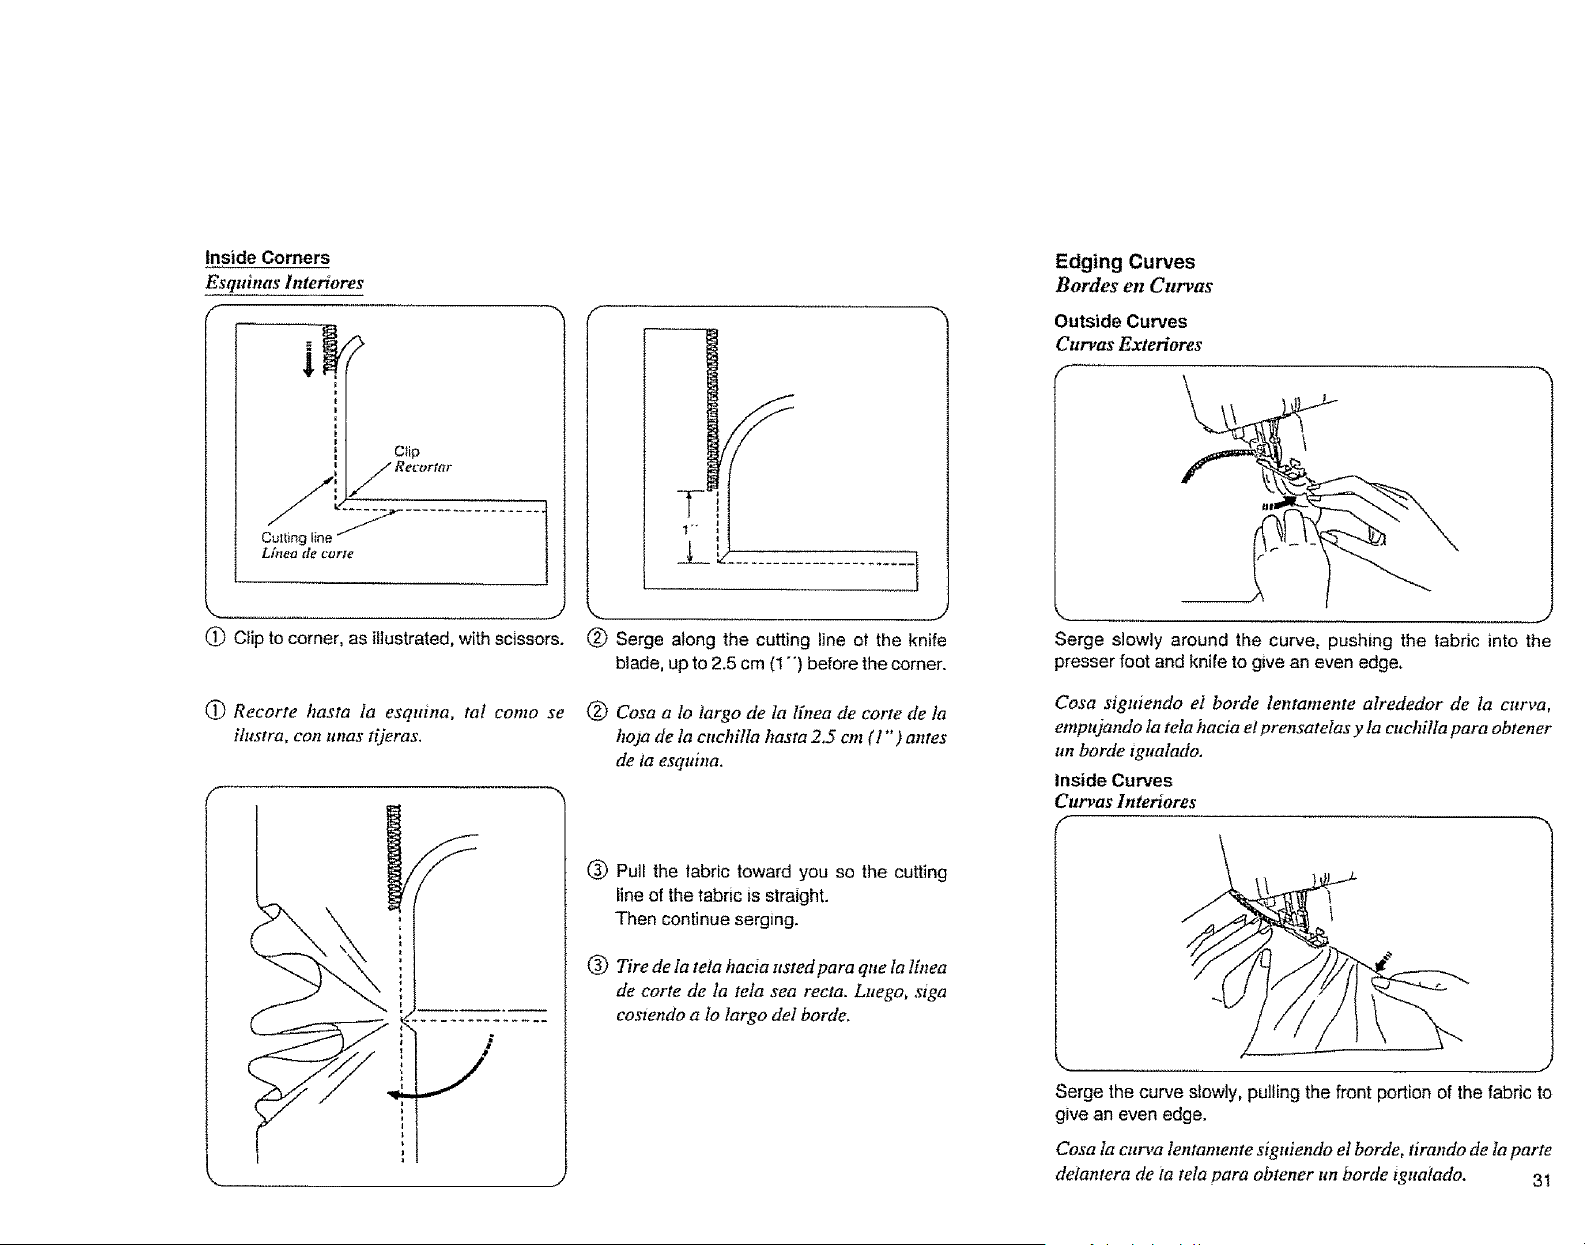
Inside Corners
Esquinas lnteriores
C_ip
! Re_'ortttr
CuI_ing line _
Line_ tie corze
(_ Clip to corner, as illustrated, with scissors.
C) Recorte basra ia esquina, tat canto se
ilustra, con unas tijeras,
f
(_) Serge along the cutting line el the knife
blade, up to 2.5 cm (1 "') before the corner.
(_) Cosa a lo largo de la linea de carte de la
hoja de la cuchilla hasta 2.5 em (1") antes
de ia esquina.
(_) Pull the fabric toward you so the cutting
line of the fabric is straight.
Then continue serging.
(_) Tire de la teia hacia usted para que la lh_ea
de carte de la tela sea recta. Luego, siga
cosiendo a 1o largo del borde.
Edging Curves
Bordes en Curvas
Outside Curves
Curvas Exteriores
\ i
Serge slowly around the curve, pushing the tabdc into the
presser foot and knife to give an even edge.
Cosa siguiendo ei borde lentamente alrededor de la curva,
empujando Ia tela hacia el prensatelas y la euehilla para obtener
un borde igualado.
Inside Curves
Curvas lnteriores
f
Serge the curve slowly, pulling the front portion of the fabric to
give an even edge.
Cosa la curva lentamente sigtdendo el borde, tirando de Ia parte
delantera de ia tela para obtener un borde tguatado. 31
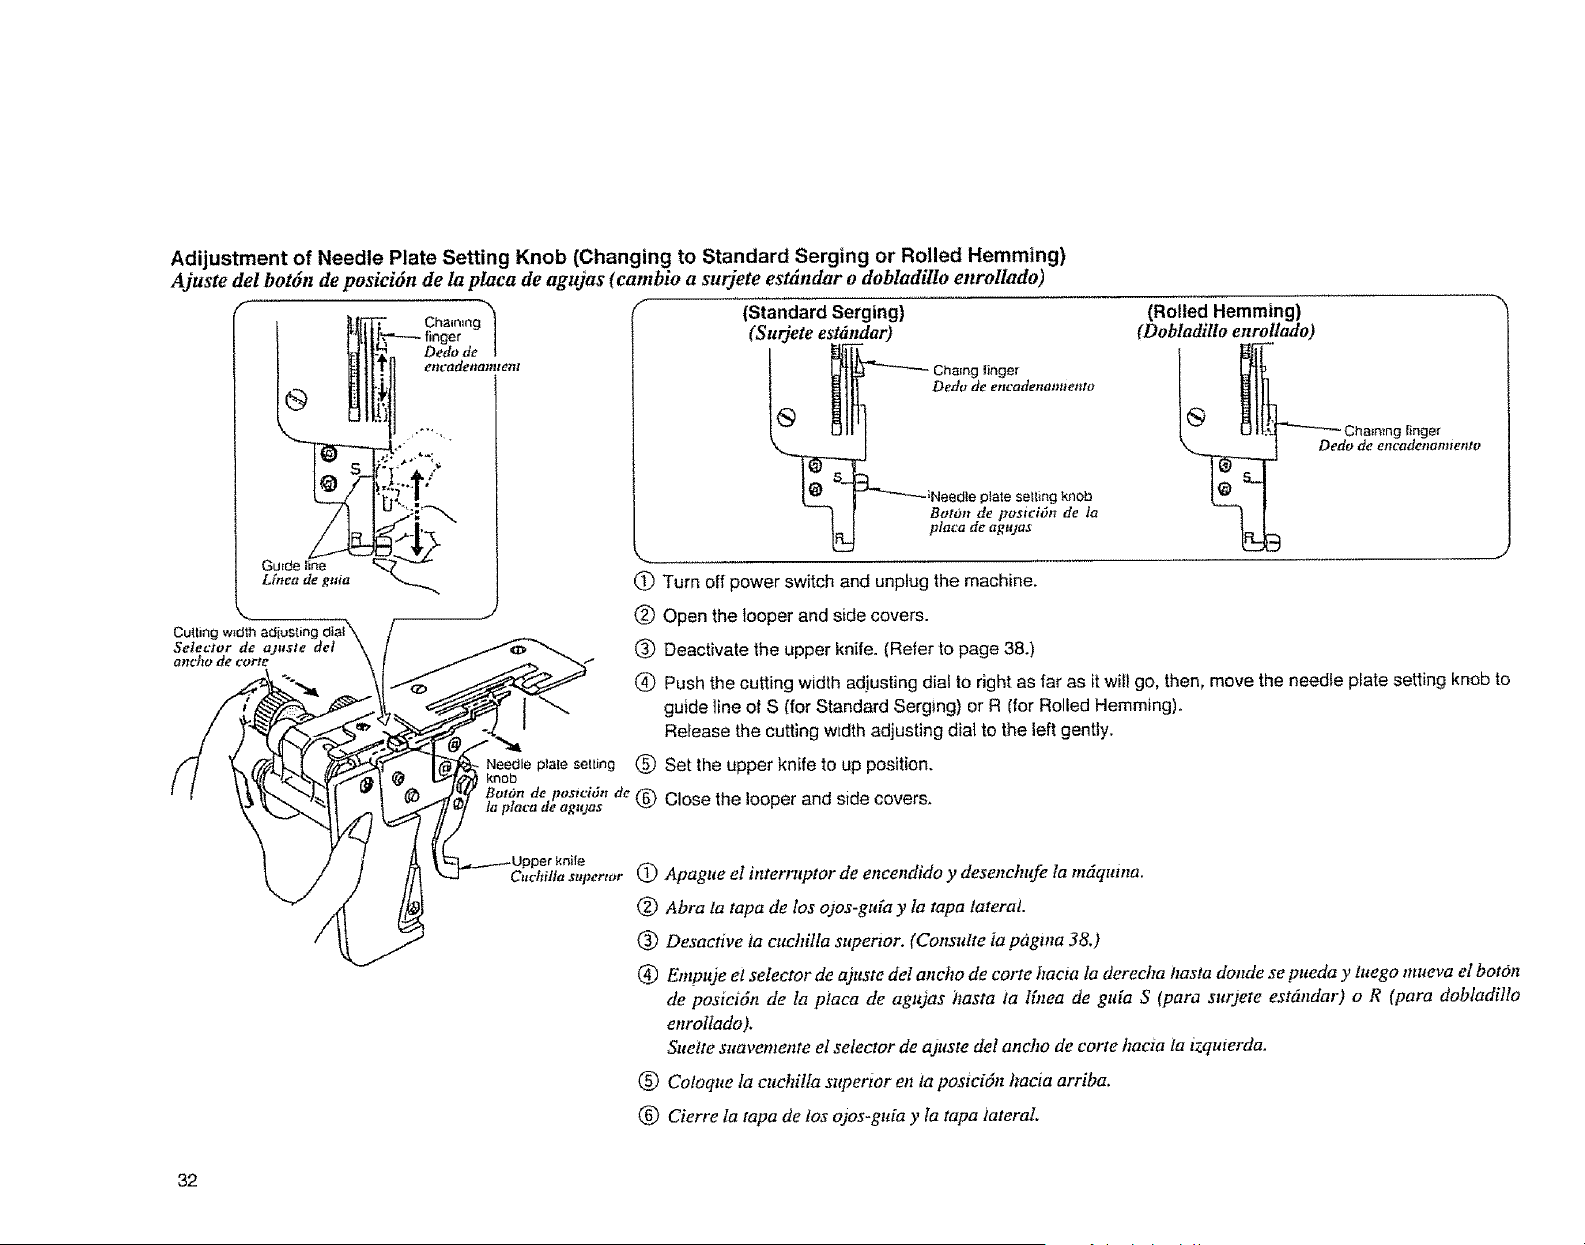
Adijustment of Needle Plate Setting Knob (Changing to Standard Serging or Rolled Hemming)
Ajuste del bot6n de posici6n de la placa de agujas (cambio a surjete esMndar o dobtadillo enrollado)
F Cha_nl{'=g'_ "- (Standard Serging) (Roiled Hemming)
finger ] (Surjete est_ndar) (Dobladillo enroltado)
Dedo de |
encadenamtem _ _ _ Chalng linger
Dcdo de ettcQde/tt_lHK, tff¢)
'" '" Dedo &
BorOn de postci6n de la
plata de agujas
Guideline _
Lfneadeguta I_ Turn off power switch and unplug the machine.
(_) Open the tooper and side covers.
Cutting wtdlh adjusting
Selector de ajuste del 3(_ Deactivate the upper knife. (Reter to page 38.)
atlcho de cort£
(_) Push the cutting width adjusting dial to right as far as it will go, then, move the needle plate setting knob to
guide line of S {for Standard Serging) or R CforRolled Hemming).
Release the cutting wtdth adjusting dial to the left gently.
Needleplale selting (_) Set the upper knife to up position.
knob
BorOn de position de (_ C_ose the looper and side covers.
la plata de agudas
Cuchilta supertvr
Q) Apague el interruptor de encendido y desenchufe ta m6quma.
(_ Abra la tapa de los o los-gufa y la tapa lateral.
_) Desactive ia cuchilla supemor. (Consulte ia pagtna 38.)
(_) Empuje el selector de ajuste del atzcho de corte hacta la derecha basra donde se pueda y luego mueva el botch
de posicidn de la placa de agujas hasta la Ifnea de gtda S (para surjete est6ndar) o R (para dobladillo
enroltado).
Suette suavemente el selector de ajuste det ancho de corte hacta ia izquterda.
(_) Coloque la cuchilla supertor en la posici6n hacia arriba.
(_) Cierre la tapa de los ojos-gtda y ta tapa lateral
32
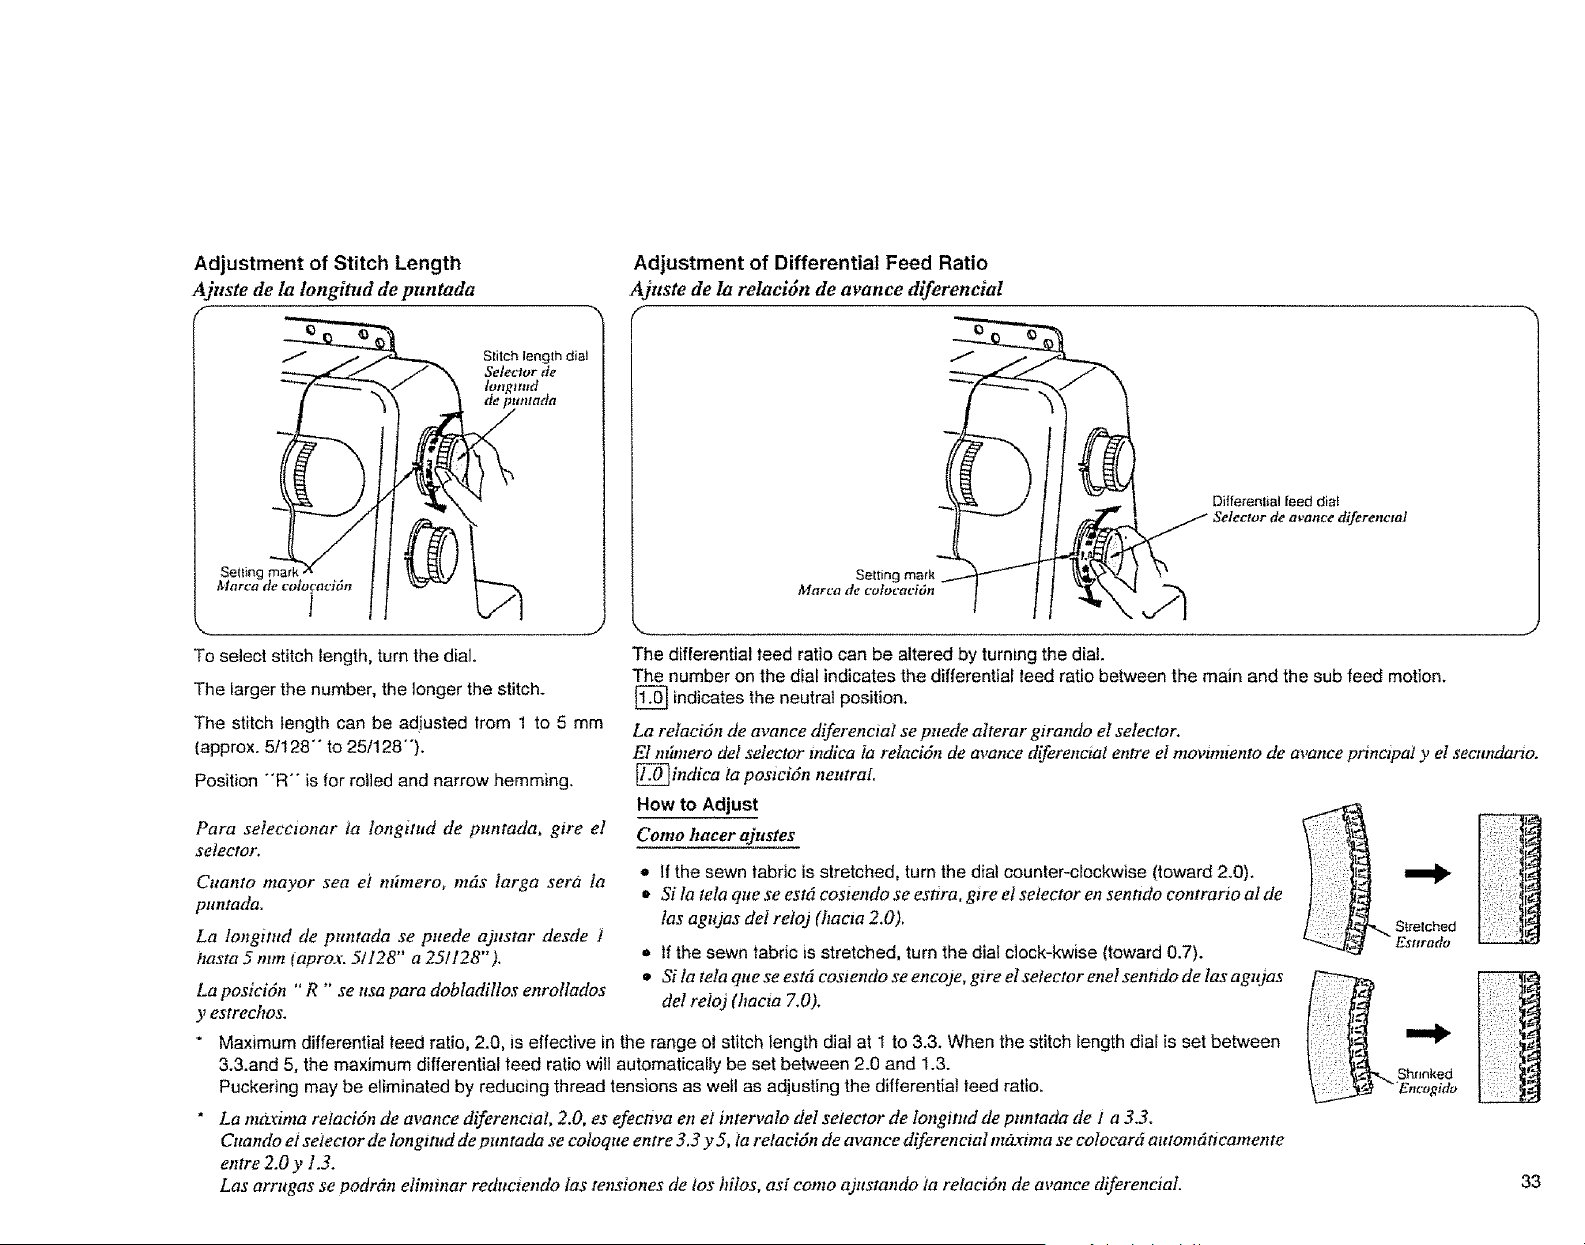
Adjustment of Stitch Length
Ajuste de la longitud de puntada
#
1
Stilch length dial
Selector de
I°"gttt;ttdda
To select stitch length, turn the dial.
The [arger the number, the longer the stitch_
The stitch length can be adiusted from 1 to 5 mm
{approx. 5/128"" to 251128"').
Position -R'" is for roiled and narrow hemming.
Para selecclonar ta longitud de puntada, gire et
selector.
Cttanto mayor sea el mbnero, m6s larga sara Ia
puntada.
La longitud de puntada se puede ajustar desde ]
basra 5 mm laprox. 51128" a _511_8 ),
Adjustment of Differential Feed Ratio
Ajuste de la relacidn de avance diferencial
f
€)
Setting mark
Marca de colocaci6n
Differen!_al feed Olaf
Selector de a*,ance diferenctal
o Si ta tela qua se est6 costendo se esttra, gire el selector en senndo contrario al de
1as agujas dei relo d (hacta 2.0).
,b If the sewn fabric is stretched, turn the dial clock-kwise (toward 0.7).
* Si la tela que se est6 cosiendo se encode, gtre elselector enel senndo de las agtqas
del reioj (haaa 7.0).
--, .J
The differential teed ratio can be altered by turning the dial.
The number on the dial indicates the dlfferential teed ratio between the main and the sub feed motion.
indicates the neutral position.
La relaciOn de avance diferencial se puede alterar girando el selector.
El m'tmero del selector mdiea ia relaei6n de avance diJ'erenctal entre el movmnento de avance prine, tpal y el sectmdario.
@indica la posicidn neutral
Como hacer ajustes
* If the sewn fabric is stretched, turn the dial counter-clockwise floward 2.0).
La posici6n "R "' se nsa para dobIadillos enrollados
y estrechos.
" Maximum differential teed ratio, 2.0, is effective in the range el stitch length dial at 1 to 3.3. When the stitch fength dial is set between
&&and 5, the maximum differential feed ratio will automatically be set between 2.0 and 1.3.
Puckering may be eliminated by reducing thread tensions as welt as adjusting the differential teed ratio.
" Lam_imarelaci_ndeavancediferencla_'2._'esefecnvaene_b_terva_de_se_e_t_rde_ng_tuddepun_adade_a3.3.
Cttando el selector de tongintd de puntada se coloque entre 3.3 y 5, ia relacidn de avance diferencial mo_rtma se cotocard atttomdticantente
entre 2.0 y 1.3.
Las arrugas se podrdn eliminar reductendo fas tensiones de los hilos, asi como ajustando la retacidn de avance dlferenciaL
Shnnked
_"Encogido
33
Thread Tension (3 threads)
Correct Tension
Upper looper
Ihread
J
Adjusting the thread tension may be
required depending on the type of fabric
and thread being used.
Thread Tension Adjustment
* Set all three thread tension dials at "'3"'. Then sew, and check the thread tensions,
Wrong Tension Wrong Tension Wrong Tension
and/or
Tighten needle thread tension,
Loosen lower looper thread tension
and!or tighten upper looper thread
tension,
Loosen upper looper thread tension
and/or tighten _ower looper thread
tension,
Needle lhread
|ensJon (L)
.leedte _hread
tension (R)
Upper looper Lower looper
lhread tension thread lens_oe
Upper looper Lower looper
lhread tension thread tension
34
Tension del hi!o (3 hilos)
Ajuste de la tensidn del hilo
" Coloque tos Ires seIectores de tensidn dei kilo en "3 ". Lnego, cosa y compruebe los tensiones de los hilos.
Tension correcta
Hilt)det ojo_guia
Tensi6n incorrecta
' la aguja estaflojo.
ojo-guia
iaferior
Es posible que sea neeesario a)ustar la
tensidn de los kilos seg6n el tipo de teta e
kilo que se est_n utilizando.
, J
Anmente la tensidn dei hilo de ta aguja.
Tensi6n de} kilo
de la agoja (t)
Tensidn del kilo
de la aguja (D)
Tensi6n ineorreeta
ojo-gttfa inferior est6
del o)o-guia superior
Hilo del
ojo-gt#a
$ttpertor
Hilo de ta
agoja
Disminuya ta tensidn dei kilo det
o)o-guia inferior y/o attmente la
tensidn del kilo del ojo-guia superior,
TensiOn del hilo del Tensi6n del kilo
oJo-guia superior def ojo-guia
inferior
Tnsi6n incorrecta
ojo-gtffa superior est6 h
hilo de! ojo-gufa
Hito del
ojo-g_tta
inferior
Disminuya la tensidn del hilo dei
ojo-guia sl(perior yio aumente la
tensidn del kilo del ojo-gu:a inferior.
Tensidn del hilo de1 Tenxidn del hito
OJo-gttia stq_erior del oJo-guia
inferior
35
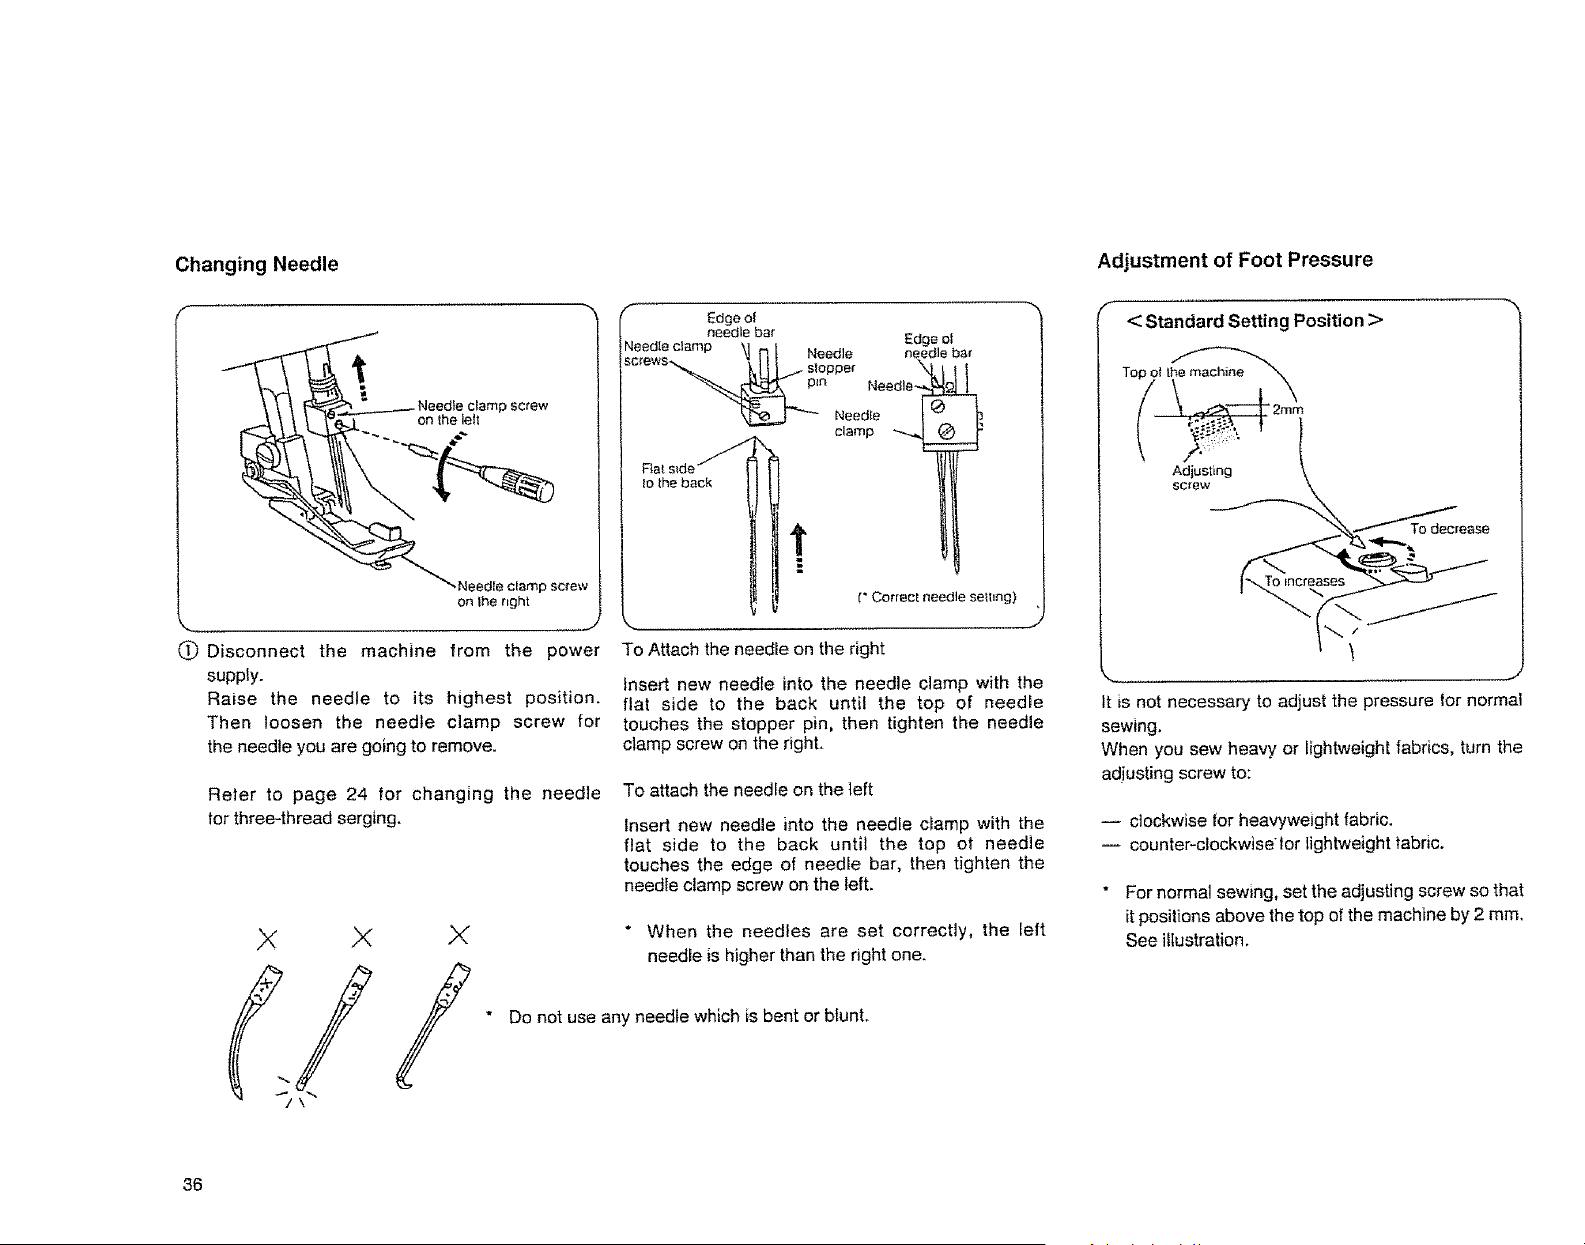
Changing Needle
on the right
C) Disconnect the machine from the power
supply.
Raise the needle to its highest position.
Then loosen the needle clamp screw for
the needle you are going to remove.
f
Edge o!
needle ba_ Edge ol
_. LItI-i,topper "q _t i
_--Needle i_ _
Iothe back
_" Correct needle selling)
To Attach the needle on the right
insert new needle into the needle clamp with the
flat side to the back until the top of needle
touches the stopper pin, then tighten the needle
clamp screw on the right.
Refer to page 24 for changing the needle
for three-thread serging.
To attach the needle on the teft
Insert new needle into the needle clamp with the
flat side to the back until the top el needle
touches the edge of needle bar, then tighten the
needle clamp screw on the left.
X X
\
X
* When the needles are set correctly, the left
needle is higher than the right one.
* Do not use any needle which is bent or blunt.
Adjustment of Foot Pressure
< Standard Setting Position >
Top/olt_
Adjusting
ease
It is not necessary to adjust the pressure br normal
sewing.
When you sew heavy or lightweight fabrics, turn the
adjusting screw to:
-- clockwise lor heavyweight fabric.
-- counter-clockwise!or lightweight fabric.
* For normal sewing, set the adjusting screw so that
it positions above the top of the machine by 2 mm.
See illustration.
36
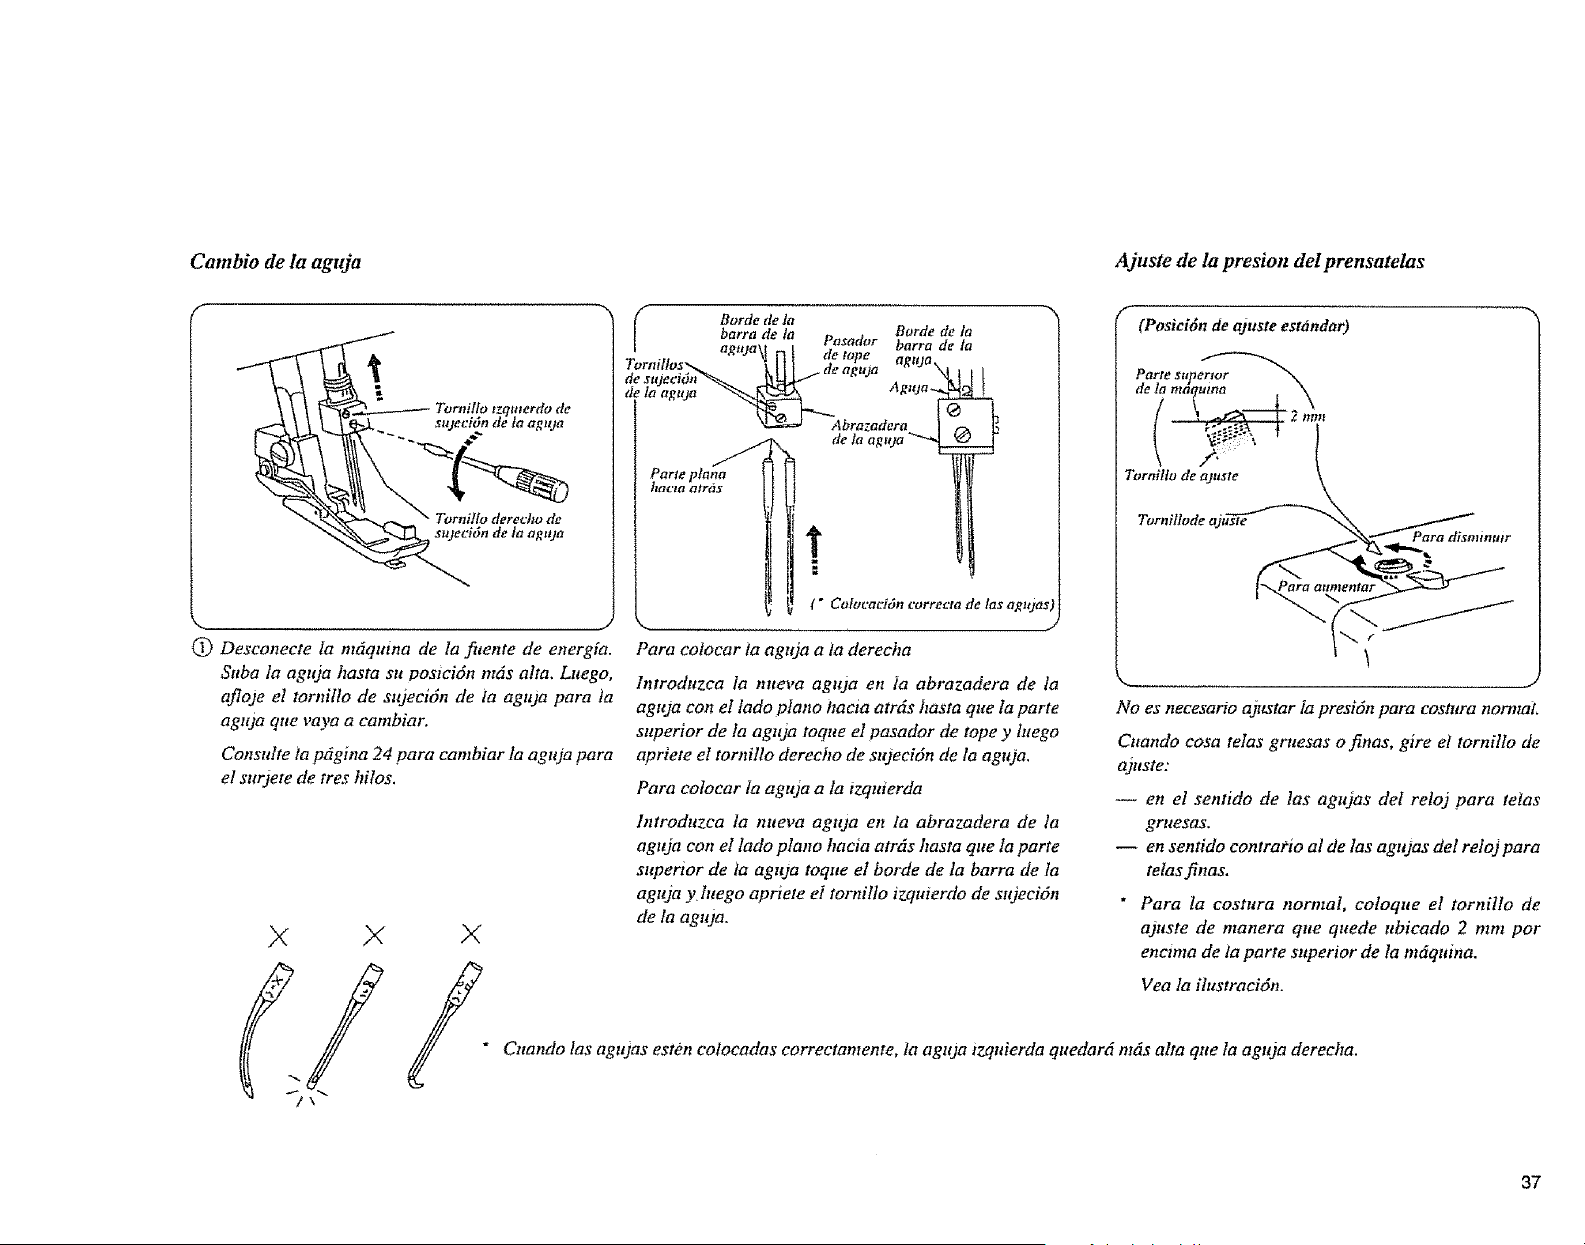
Cambio de la aguja Ajuste de la presion del prensatelas
sujeciOn de ta agtqa
J
(_) Desconecte la mdquina de la fitente de energia.
Suba la aguja basra su postcidn rods alta. Luego,
afloje el tornillo de stqecidn de la aguja para ta
agtua que vaya a cambiar.
Consulte ia p6gina 24 para cambiar la aguja para
el surjete de ires hilos.
Borde de la
Borde de la
barra tie ltt Pasador barra de la
agtqa_ r_ [ de tope agtua
Tornillos'__ _ II I de aguta \ "
d r stqeci6a_-._ h [..}J--._ ,,' - N_.t|
tJr la aguda _ zlguda_7_._
"'_"Abrazadera t
tie la ag_qa _
J
Parte plana
hacta tTtrds
T
i
(" Colucaci6n correcta de lasagujas)
............. J
Para cotocar la aguja a }a derecha
lntroduzca la mteva aguja en la abrazadera de la
aguja con el lado piano haeia atr6s hasta que la parte
superior de la aguja toque el pasador de tope y tuego
apriete el tornillo derecho de stqeci6n de la aguja,
Para colocar ta agu3a a ta tzqulerda
lntroduzca la nueva aguja en la abrazadera de la
aguja con el lado piano hacia atrds hasta que ta parte
supertor de ta aguja toque el horde de la barra de la
aguja y luego apriete el tornillo izquierdo de sujeci6n
de la aguja.
r"
(Posici6n de ajuste estandar)
Tornitlo de ajuste
Tornillode ajuste
Para ttismmutr
f
No es necesario ajztstar ia presidn para costrtra normal
Cuando cosa telas gruesas o finas, gire el tornillo de
ajttsle:
en el sentido de las agtuas del relo) para tetas
grttesas.
-- en sentido contratio al de las agujas del reloj para
telasfinas,
" Para la costura normal, coloque el tornillo de
ajuste de manera que quede ubicodo 2 mm por
enctma de la parte superior de la mdquina.
Vea la ilustraci6n.
Cnando las agtqas esten cotocados correctamente, la agtUa izquierda quedard mt_salta qne la agtqa derecha.
37
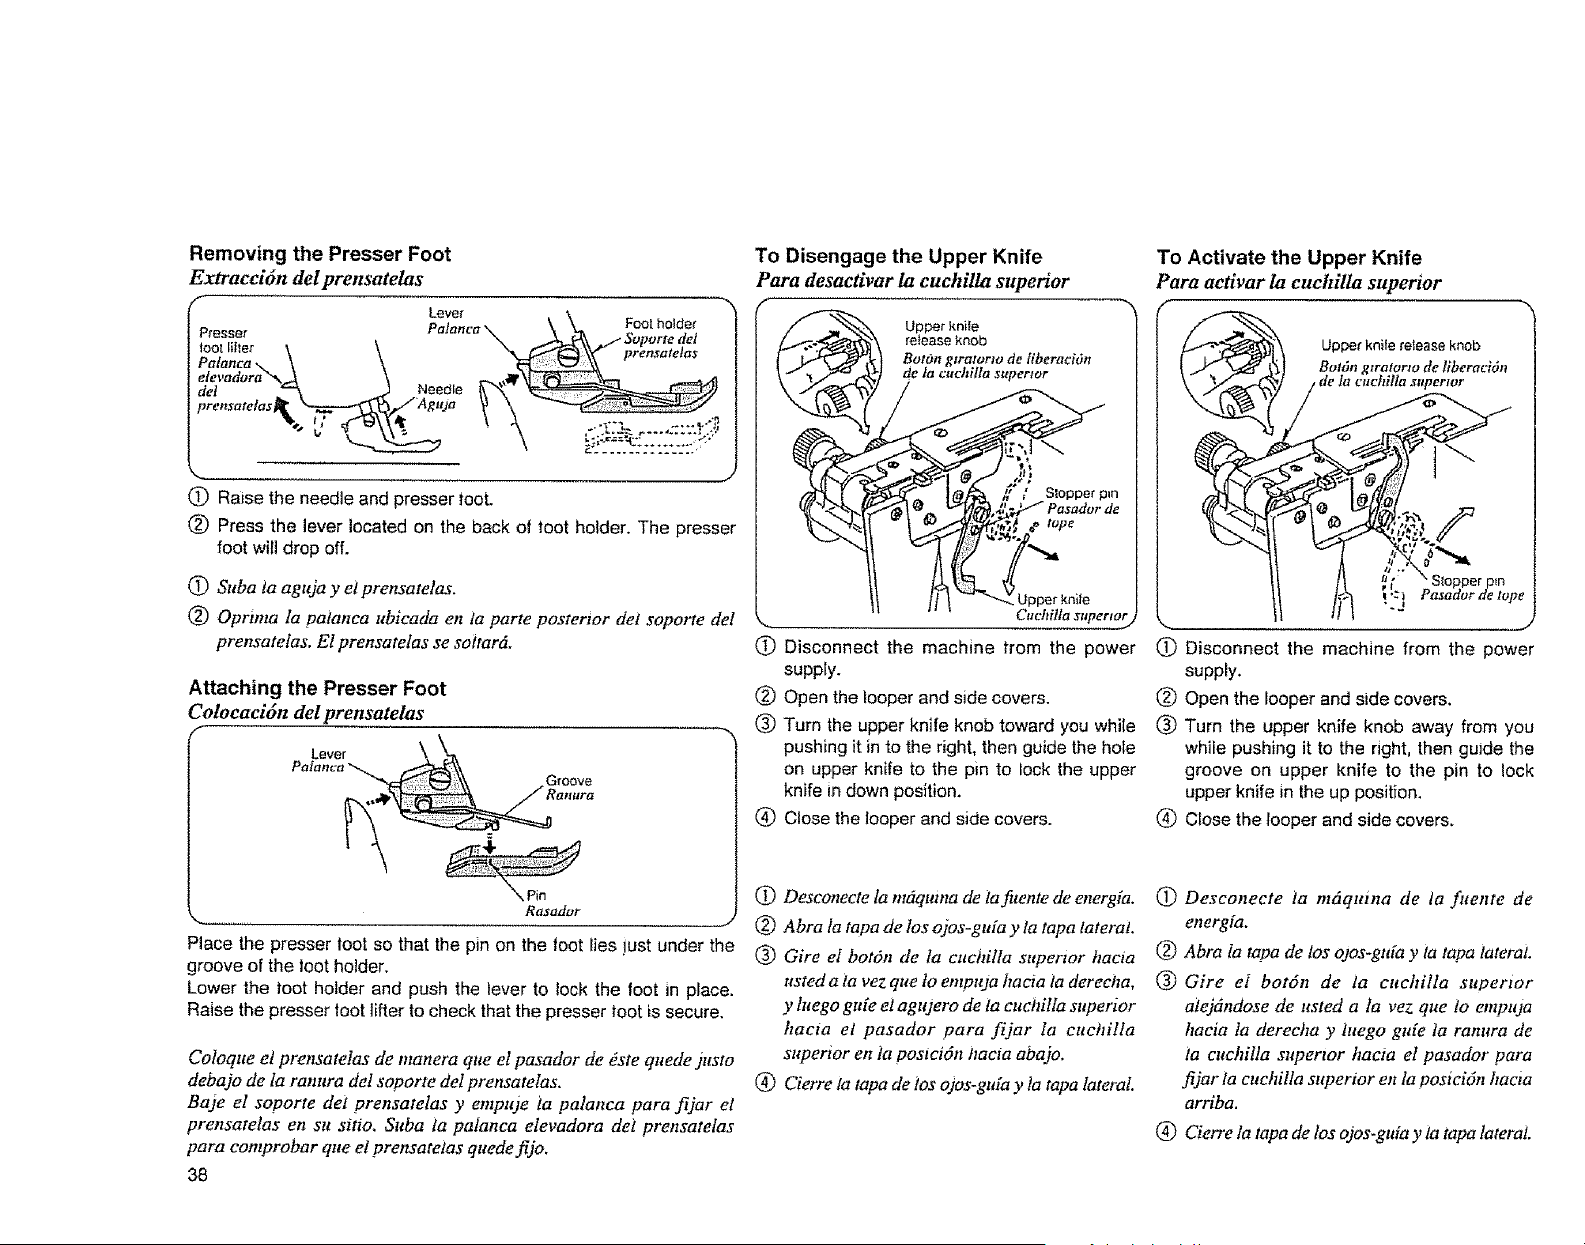
Removing the Presser Foot
Extracci6n del prensatelas
Level _.
Patanca \ \ Foot holder
Presser _x _ ...i Soporfe del
prensate]a$
Need_le
(_ Raise the needle and presser toot.
(_) Press the lever located on the back of toot holder. The presser
foot wi[] drop off.
(_) Suba ia aguja y el prensatelas.
(_) Opnma la pa/anca ubicada en ta parte posterior dei soporte del
prensatelas. El prensatelas se sottar6,
Attaching the Presser Foot
Colocacidn del prensatelas
f
Lever
"-, Pin
Rasador
Place the presser toot so that the pin on the foot lies just under the
groove of the foot holder.
Lower the loot holder and push the lever to lock the foot in #ace.
Raise the presser toot lifter to check that the presser loot is secure.
Coloque et prensatelas de manera que el pasador de dste quede )usto
debajo de la ranura del soporte del prensatelas,
Baje el soporte dei prensatelas y empuje ia palanca para fijar et
prensatelas en su sitio, Suba ta patanca elevadora del prensatelas
para comprobar que el prensatetas quede fijo.
38
To Disengage the Upper Knife
Para desactivar la cuchilla superior
Upper knife
release knob
BotOrrgtratorw de liberaci6n
de la cuchilla superior
pper knife
,, Cuchilla superior
C) Disconnect the machine from the power
supply.
(_) Open the |ooper and side covers.
(_) Turn the upper knife knob toward you while
pushing it in to the right, then guide the hole
on upper knife to the pin to lock the upper
knife in down position.
(_ Close the looper and side covers.
@ Desconecte la m#quma de tafitente de energfa.
(_) Abra la tapa de los ojos-gula y ta tapa lateral
(_ Gire el botOn de la cuchilla superior hacia
usted a ia vez que to empaja hacia ia derecha,
y laego gufe et agtqero de la cuchilla superior
hacm et pasador para fijar la cuchilla
superior en ta postcidn hacia abajo.
(_ Cierre la tapa de tos ojus-gMa y la tapa lateral.
To Activate the Upper Knife
Para activar la cuchilla superior
_ Upper knile release knob
_) BorOngtratomo de tiberaci6n
(_) Disconnect the machine from the power
supply.
(_) Open the looper and side covers.
(_ Turn the upper knife knob away from you
whiie pushing it to the right, then guide the
groove on upper knife to the pin to lock
upper knife in the up position.
(_) Close the looper and side covers.
(_) Desconecte ia m6quina de ta fuente de
energia,
(_) Abra ia tapa de los ojos-gtda y ta tctpa lateral.
(_) Gire el bot6n de la cuchilla superior
alej6ndose de usted a la vez que 1o empuja
hacia la derecha y htego gule la ranara de
ta cuchilla superior hacta el pasador para
fijar la cuchilla superior en la posici6n hacta
arriba.
(_ Cierre la tapa de los o)os,guia y la tapa laterat.
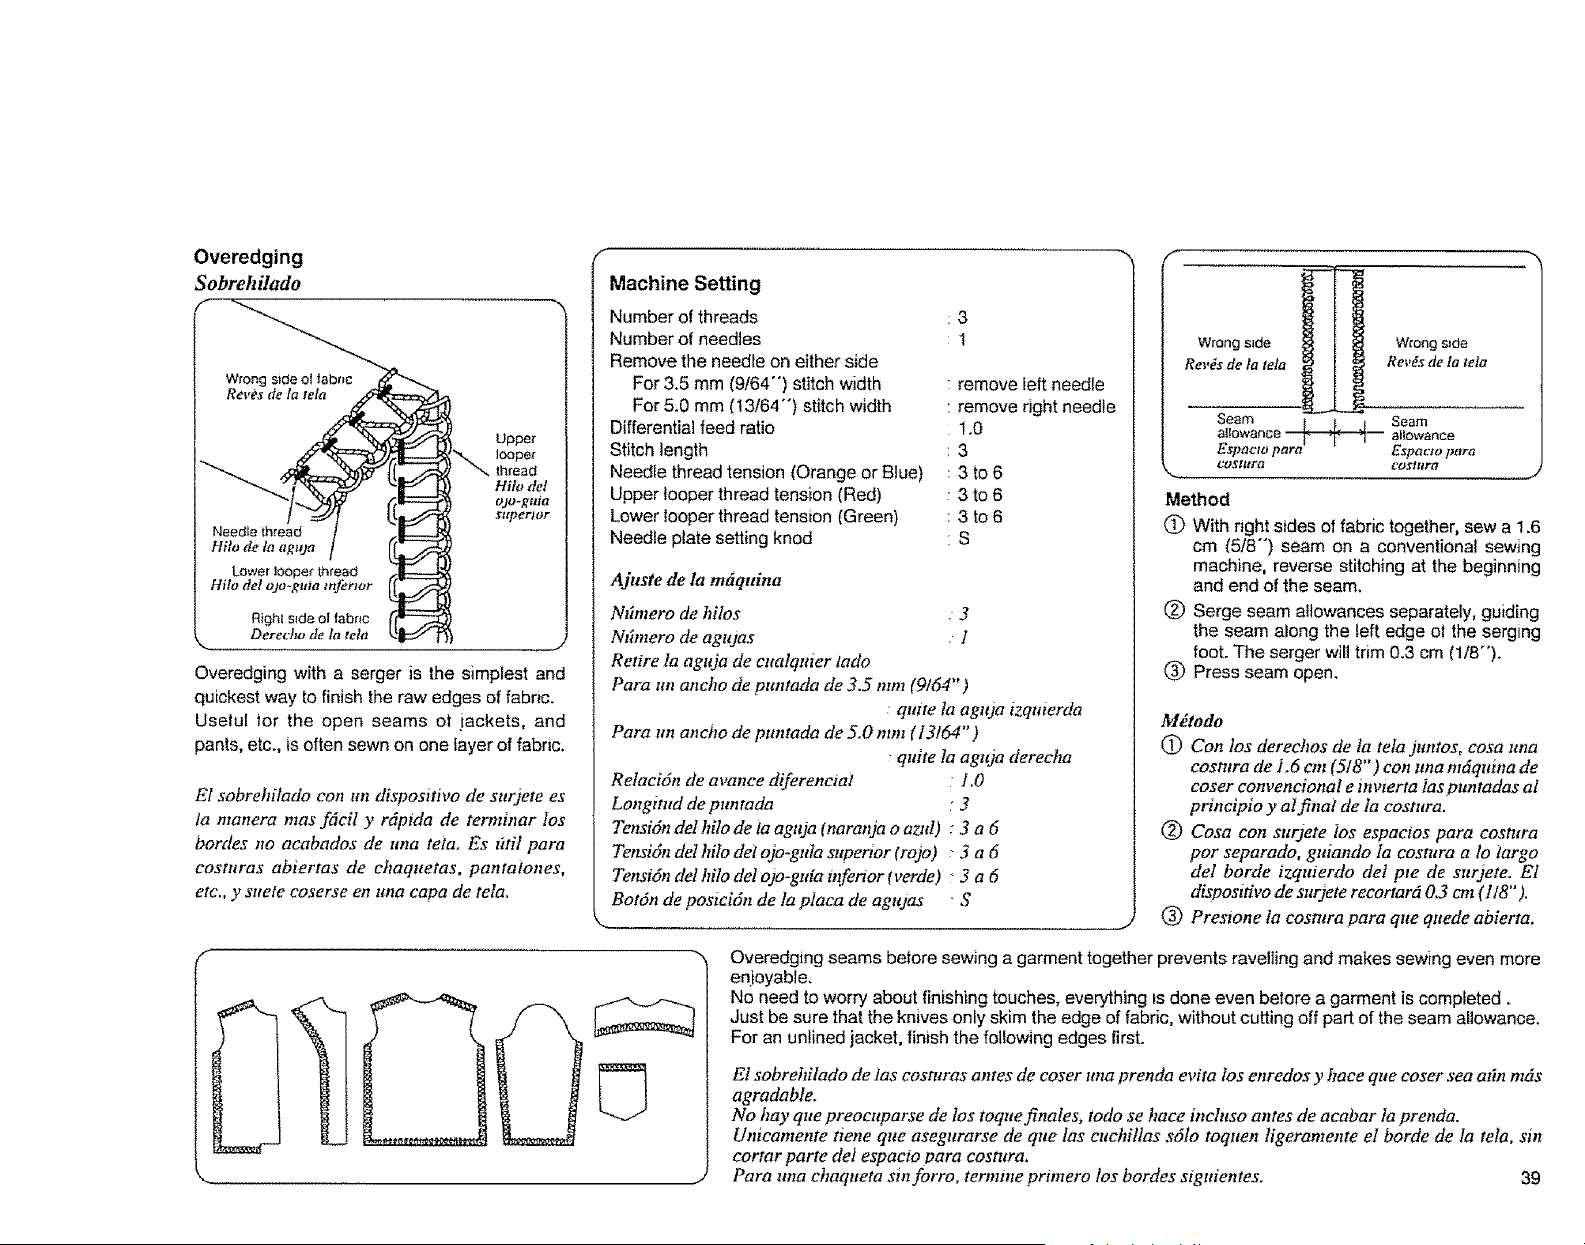
Overedging
Sobrehilado
Uppe_
Ioope_
Overedging with a serger is the simplest and
quickest way to finish the raw edges of fabric.
Useful for the open seams ot iackets, and
pants, etc., is often sewn on one layer of fabric.
El sobrehilado con un dispositivo de surjete es
la manera mas fdcil y rdpida de terminar los
hordes no acabados de nna teia. Es titil para
costuras abiertas de chaquetas, pantalones,
etc., y saele coserse en ztna capa de tela.
f
f
Machine Setting
Number of threads
Number of needles
Remove the needle on either side
For 3.5 mm (9/64"') stitch width
For 5.0 mm (13/64-) stitch width
Differential feed ratio
Stitch length
Needle thread tension (Orange or Blue)
Upper looper thread tension (Red)
Lower looper thread tension (Green)
Needle plate setting knod
3
1
remove leftneedle
remove right needle
t.0
3
3 to6
3to6
3 to6
S
Ajuste de la mtiquina
N#mero de hilos 3
Ntbnero de agtqas ]
Retire la agltja de eualquier 1ado
Para nn ancho de puntada de 3.5 mm (9164")
:qutte ta aguja izqtaerda
Para ttn aneho de puntada de 5.0 mm (13164")
• quite la aguja derecha
Relacidn de avance diferenciai
Longimd de puntada
Tensidn de1 hilo de la agtqa (naranja o azld)
TensiOn del hilo det ojo-guta superior (ro)o)
Tensidn de1 hilo de1 ojo-gMa ttfenor fverde)
Botdn de postcidn de la plaea de agtt3as
l,O
3
3a6
3a6
3a6
S
.................... ,J
Wrong s_de I _ Wrong s=de
Rev#sde la teta _ Rev_s de la tela
Seam I I i Seam
allowance _ albwance
Espacto partt Espaclo para
costura costttra
Method
C) With right sides of fabric together, sew a 1,6
cm (5/8"') seam on a conventional sewing
machine, reverse stitching at the beginning
and end of the seam.
(_) Serge seam allowances separately, guiding
the seam along the left edge el the serging
foot. The serger will trim 0.3 cm (1/8-).
(_ Press seam open.
Mdtodo
10 Con los derechos de la teta juntos° cosa una
cosmra de i.6 on (518"') con ltna mdquina de
eoser convencional e Htvterta ias punladas al
principio y at fina/ de la costura.
(_) Cosa con surjete los espacios para cosrttra
por separado, guiando Ia costura a lo largo
del borde izqutertto det pte de surjete. EI
dispositivo de surdete recortar6 0.3 cm (1/8" ).
(_) Presione la cosmra para que quede abierta.
Overedgmg seams betore sewing a garment together prevents ravelling and makes sewing even more
enjEoyabie,
No need to worry about finishing touches, everything is done even belore a garment is completed.
Just be sure that the knives only skim the edge of fabric, without cutting off part of the seam allowance.
For an unlined jacket, finish the following edges first.
El sobrehilado de tas cosmras antes de coser una prenda evita los enredos y haee que eoser sea aIin m_s
agradable.
No hay que preocuparse de los toque finales, todo se hace inchtso antes de acabar 1aprenda.
Unicamente tiene que asegurarse de que las cuchillas s61o toquen ligeramente el borde de la tela, sin
cortar parte de1 espacio tara costura,
Para una chaqueta sin forro, termme primero los bordes signientes. 39

Overlocking
Remate en la parte de arriba de la costura
With Kenmore 3/4D, you can trim, overedge and seam -- all inone operation --when making shirts,
blouses, swimsuits and any type of knit sportswear.
The flat narrow seam allowance can be pressed to one side.
Con la m6quina Kenmore 3141) se puede recortaro sobrehilar y hacer cosntras, todd en una sola
operaci6n, al hacer camisas, blusas, trajes de bafio y cuaIquier ttpo de ropa de tejido de "sport %
El espacto para cosmra delgado y p_ano se puede presionar hacia un 1ado.
Wrong stde /
Wrong side _-_
Reves de la teta /
/
This stitch is illustrated below.
ISsta puntada estd ihtstrada a continuaci6n.
Top s_de
Needle threads.._r, ll.i===
Hifos de las agluas _1-_
LO0p e r ,h rcad ......._(_|_:=:=_r,H==
Hifo d(,t tJjo-gltia (¢1_
k_. ..................................................... ./
For functional sewing, the color and weight ot all threads should match the tabric you are sewing.
Para coser fiuzcionahnente, el color y et peso de todos los hilos deben coincidir con la teta que usted
est_ cosiendo.
Note:
" We recommend sewing with conventional sewing machine a row ot straight stitch over the needle
thread line to reinforce seams in high stress areas.
No(a:
* Recomendamos coser con una m6quina de coser convencional unafila de puntadas rectas sobre
la linea de1 hilo de ta aguja para reforzar las costuras en tas 6teas donde ia tensi6n es elevada.
40
r
Machine Setting
Number of threads
Number ot needles
Differential Iced ratio
Stitch length
Needle thread tensions (Orange & B_ue)
Upper looper thread tension (Red)
Lower looper thread tension CGreen)
Needle plate setting knob
:4
2
1.0
3
3to6
3 to6
3to 6
S
Tensi6n del hilo del ojo-guia superior frojo) : 3 a 6
Tensidn deI hilo del o)o-guia inferior (verde) 3 a 6
BotOn de posicidn de la ptaca de agujas : S
k.
Ajuste de la mtiquina
Nfimero de hilos : 4
N#mero de agujas .2
Relacidn de avance diferenc_at 1,0
Longitud de puntada / 3
Tenstones deI hilo de ta aguja fnaranja y azul) : 3 a 6
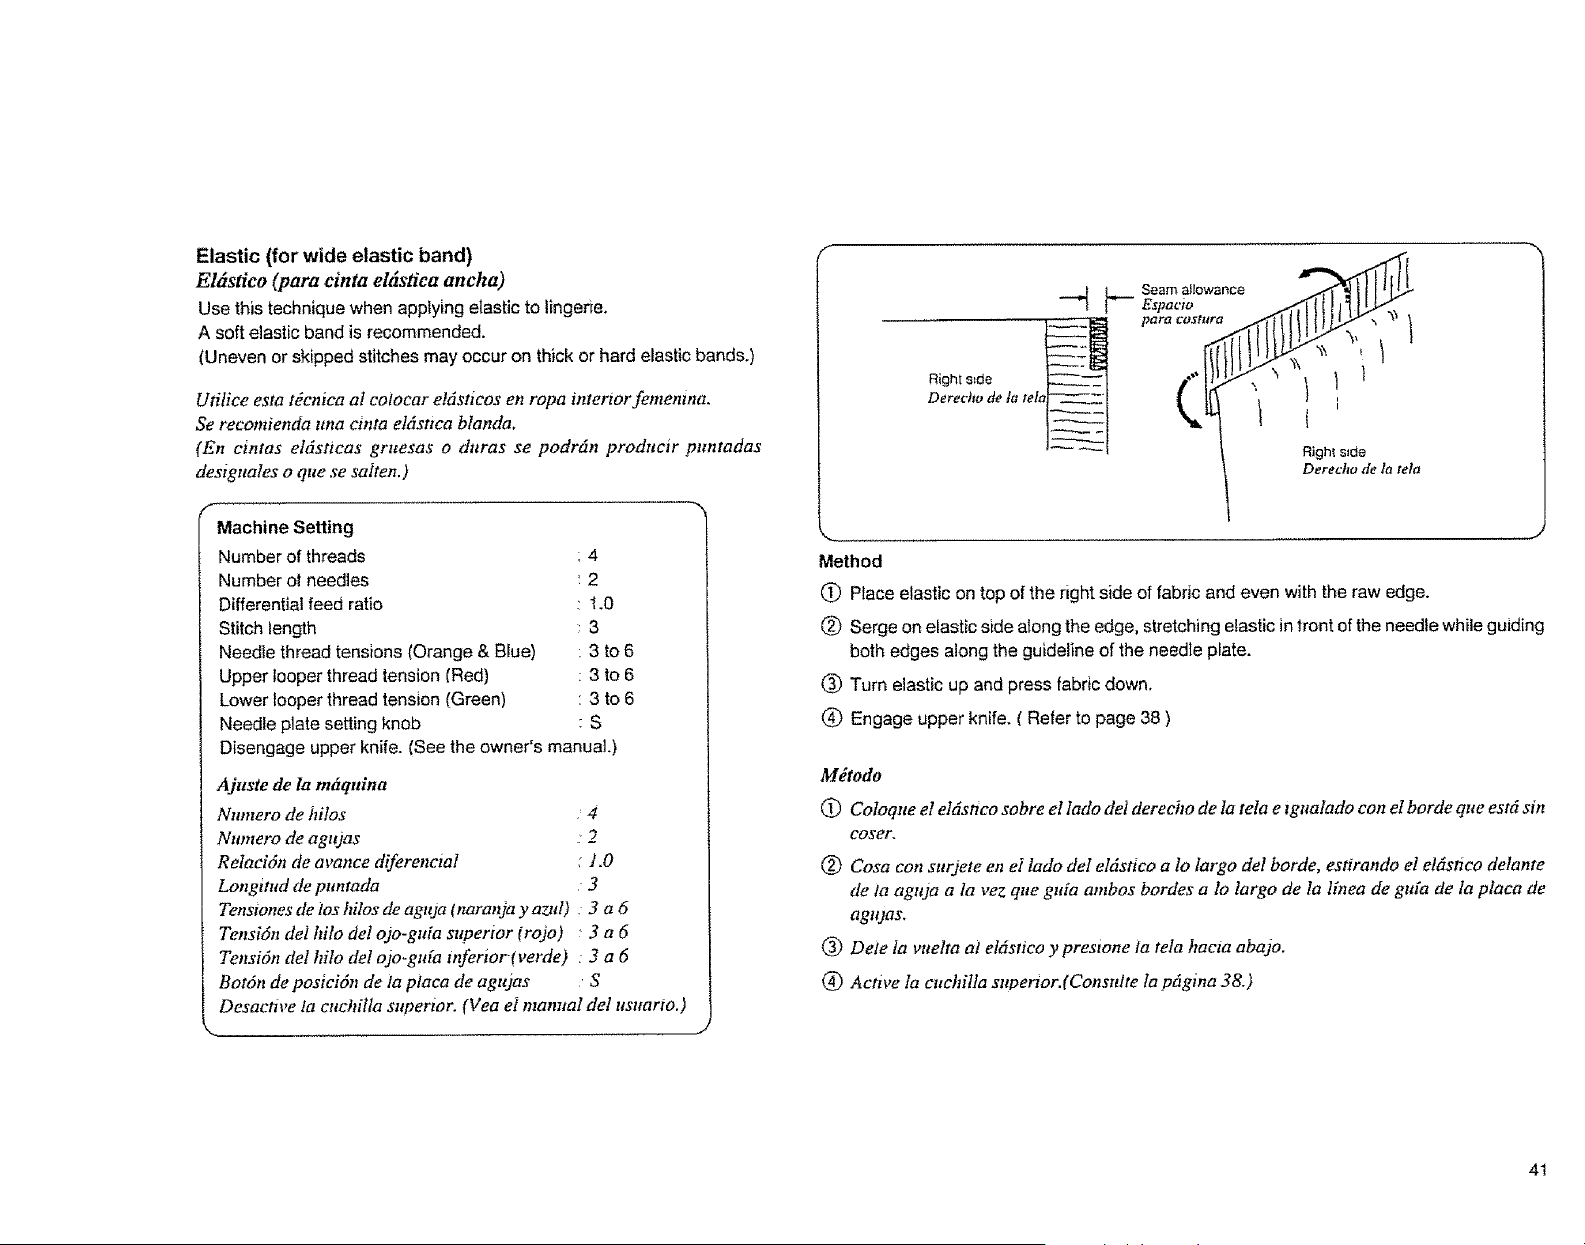
Elastic (for wide elastic band)
El6stico (para cinta el_stica ancha)
Use this technique when applying elastic to I_ngene.
A soft elastic band is recommended.
(Uneven or skipped stitches may occur on thick or hard elastic bands.)
Ufilice esta tdcnica al colocar eMsticos en ropa intenor fememna.
Se recomienda una cmta e16stzca blanda.
(En ctntas eldsticas gruesas o daras se podr6n producir
desigaales o que se salten.)
f
Machine Setting
Number of threads : 4
Number of needles : 2
Differential feed ratio : 1.0
Stitch length : 3
Needle thread tensions (Orange & Blue) : 3 to 6
Upper looper thread tension IRed) : 3 to 6
Lower looper thread tension (Green) : 3 to 6
Needle plate setting knob : S
Disengage upper knife. (See the owner's manual.)
Ajuste de la m{tquina
Nmnero de hilos 4
Numero de agajas : 2
Rdacidn de avance diferencial : 1.0
Longltud de puntada 3
Tenstones tie los hilos de aguja (naranja y a_dd) . 3 a 6
Tensidn del hilo del ojo-guia superior (rojo) 3 a 6
Tensi6n del hito dd ojo-guia inferior(verde) : 3 a 6
Bot6n de posici6n de la placa de agujas S
Desacnve ta cachiUa sttpertor. (Vea el mamtal del ttsttarto.
_antadas
FIigh!slde
Derecho de la tela
Method
(_ Place elastic on top of the right side of fabric and even with the raw edge.
(_) Serge on elastic side atong the edge, stretching elastic in front of the needle while guiding
both edges a!ong the guldeline of the needte plate.
(_) Turn elastic up and press fabric down.
(4(4(_Engage upper knife. ( Refer to page 38 )
Mdtodo
(_) Coloque el el_stico sobre et lado del derecho de }a tela e _gaatado con el borde que estd sin
coser.
(_) Cosa con surjete en ei lado deI el6sfico a lo largo del borde, estirando el eldst_co delante
de/a agaja a la vez qtte guia ambos hordes a lo largo de la linea de gtda de la placa de
agtqas.
(_ Dele ta vuelta ai el6stico y presione la tela hacta abajo.
(_) Active la cuchiIla supertor.(Constdte la p6gina 38.)
41
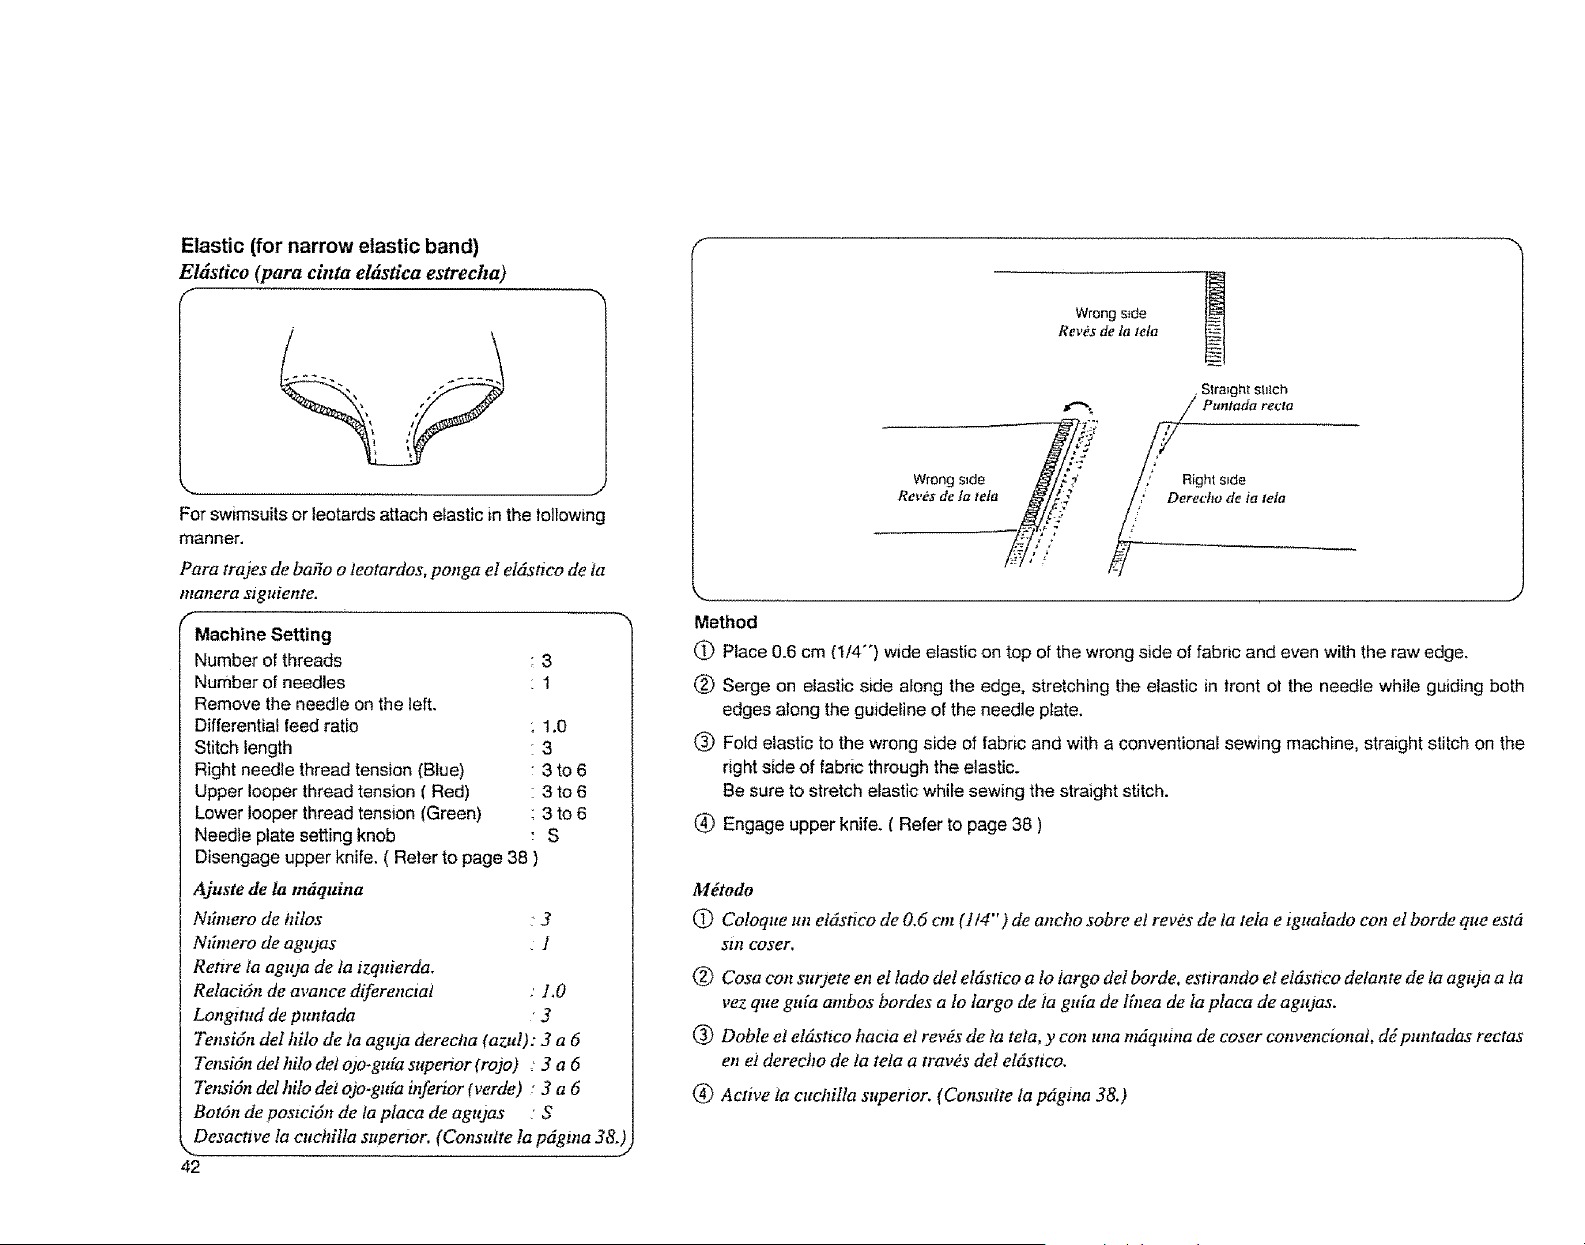
Elastic (for narrow etastic band)
EMstieo (para cinta elt_stica estrecha)
F
For swimsuits or leotards attach elastlc in the following
manner.
Para tra)es de bafio o ieotardos, ponga el eldstico de ta
manera stguiente.
r
Machine Setting
Number of threads 3
Number of needles 1
Remove the needle on the left.
Differential feed ratio 1,0
Stitch length 3
Right needle thread tension (Blue) 3 to 6
Upper looper thread tension (Red) 3 to 6
Lower looper thread tension (Green) 3 to 6
Needle plate setting knob S
Disengage upper knife. ( Reler to page 38 )
Ajuste de la m_quiita
Nibnero de hilos 3
Ntbnero de agujas 1
Retire la agitja de la tzquierda.
Relaci6it de avance diferenciai 1.0
Longttud de puntada 3
Teitsidit del hilo de la aguja derecha (azitl): 3 a 6
Tensi6n del hilo del ojo-gu[a superior (rojo) 3 a 6
Teitsi6it del hilo del ojo-guia b_ferior (verde) 3 a 6
Bot6n de postci6n de la ptaca de agujas S
Desacttve la cuchilla superior. (Consulte la p6gma 38.)
42
Method
(9
®
Wrongs_de i
Rev_s de la tela
, Straight SlJlch
f"% _a
Wrong s_ // Right
s_de
Rev_s de ta teta _///_ ]' ?Deret4_o de ia tela
Place 0.6 cm (114"') wide elastic on top of the wrong side of fabric and even with the raw edge.
Serge on elastic side along the edge, stretching the elastic in trent of the needle while guiding both
edges along the guideline of the needle plate.
(_ Fold elastic to the wrong side of fabric and with a conventional sewing machine, straight stitch on the
right side of fabric through the elastic.
Be sure to stretch elastic while sewing the straight stitch.
_) Engage upper knife. ( Refer to page 38 )
Mdtodo
(_ Coloque un el6stzco de 0.6 on (1/4") de ancho sobre et reves de ta teta e tguaiado con el borde que estd
silt Coser,
®
®
®
Cosa con surjete eit el lado del eldstico a 1o largo del borde, estirando el eldstico detante de la aguja a ta
vez que guia ambos bordes a 1o largo de la gitla de lhzea de Ia plata de agu)as.
Doble el eldstwo hacia el revOs de la tela, y colt uita mdquma de eoser coitvencioital, dL puntadas rectas
en el derecho de ta tela a travOs (]el eldsttco.
Active la cuchilla supertor. (Consulte la pdgiita 38.)
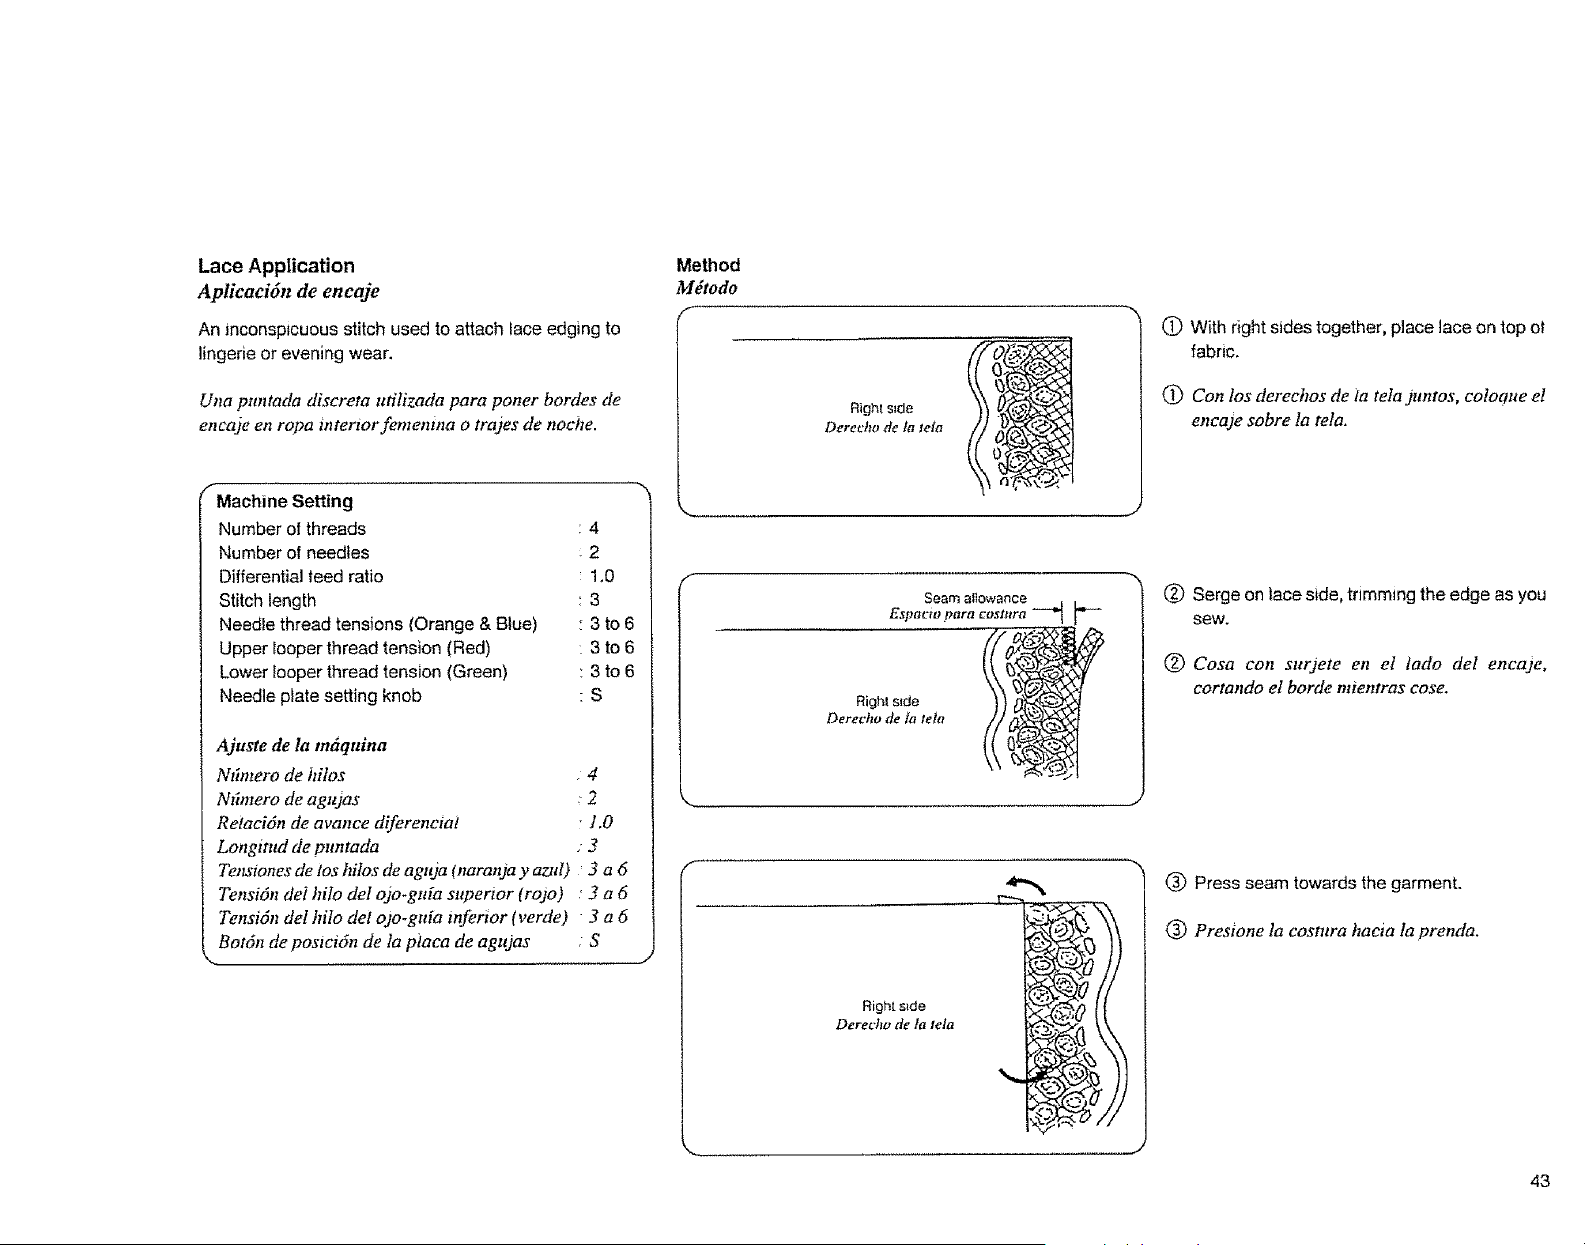
Lace Application
Aplicacidn de encaje
An inconsptcuous stitch used to attach face edging to
lingerie or evening wear.
Una puntada discreta ufitizada para poner borates de
eneaje en ropa mterior fememna o trajes de noche.
F
Machine Setting
Number oI threads : 4
Number of needles - 2
Differential teed ratio 1.0
Stitch length : 3
Needle thread tensions (Orange & Blue) : 3 to 6
Upper Iooper thread tension (Red) 3 to 6
Lower looper thread tension (Green) : 3 to 6
Needle plate setting knob : S
Ajuste de la tngtquina
N6mero de hilos .4
Nffmero de agujas • 2
Relaci6n de avance diferenctat " 1,0
Longirud de puntada : 3
Tensiones de los hilos de agtqa (naranja y azut) 3 a 6
TensiOn dei hilo del o)o-gMa supertor (rojo) : 3 a 6
Tensidn del hilo del ojo-guia inferior (verde) • 3 a 6
Bot6n de pos_cidn de la ptaca de agujas ; S
Method
Mdtodo
F
Rightside
Derecho de la teta
Right s_de
Derecho de ta teta
L
Right s_de
Derecho de la teta
(_ With right sides together, place lace on top ot
fabric.
(!) Con los dereehos de ta tela juntos, colooue el
eneaje sobre la tela.
(_ Serge on lace side, trimming the edge as you
sew.
(_) Cosa con surjete en el tado del encaje,
cortando el borde mientras cose.
,._
@ Press seam towards the garment.
(_) Presione la cosntra haeia la prenda.
43
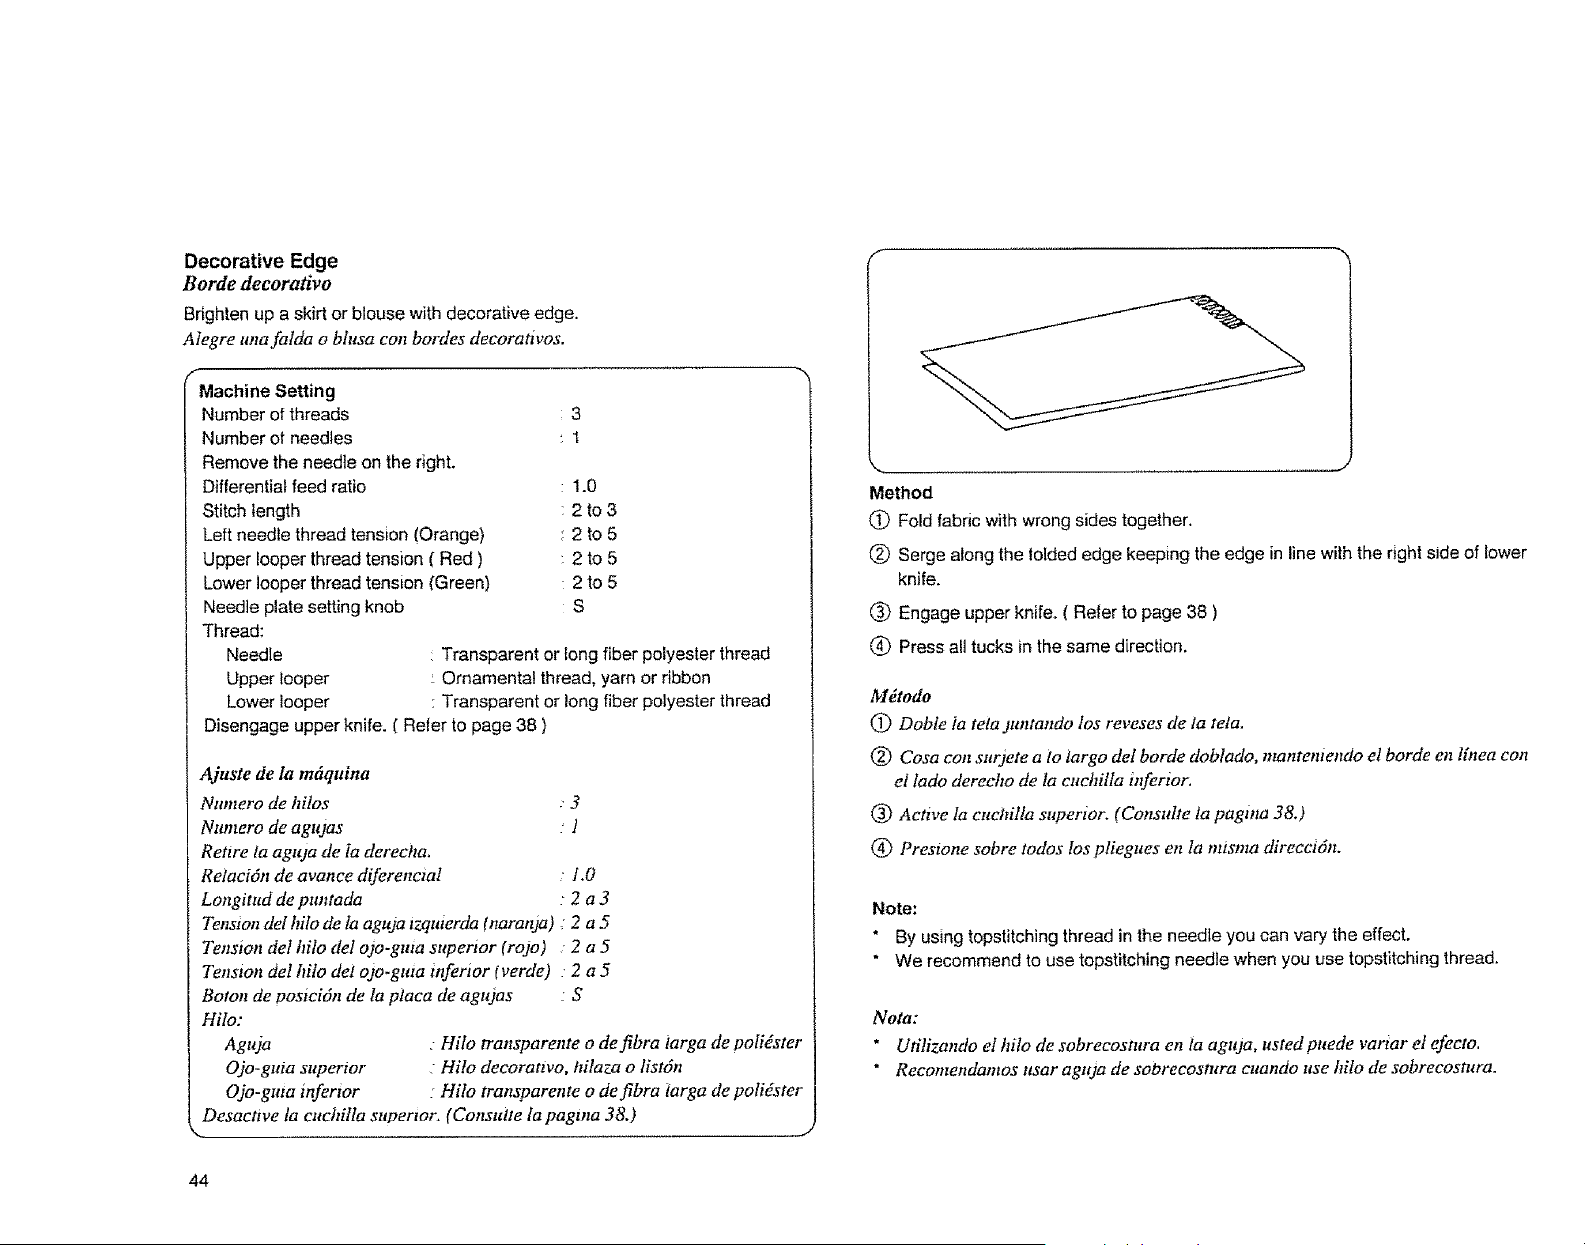
Decorative Edge
Borde decorativo
Brighten up a skirt or blouse with decorative edge.
Alegre una falda o bhlsa con bordes decorativos.
f
Machine Setting
Number of threads 3
Number of needles !
Remove the needle on the right.
Differential feed ratio 1.0
Stitch length 2 to 3
Left needle thread tension (Orange) 2 to 5
Upper looper thread tension ( Red ) 2 to 5
Lower looper thread tension (Green) 2 to 5
Needle plate setting knob S
Thread:
Needle Transparent or long fiber polyester thread
Upper looper Ornamental thread, yarn or ribbon
Lower looper : Transparent or long fiber polyester thread
Disengage upper knife. ( Refer to page 38 )
Ajuste de la m6quina
Nnmero de hilos : 3
Numero de agujas : ]
Rettre la agtqa de ia derecha.
Relaci6n de avance diferenctal 1.0
Longitud de puntada L 2 a 3
Tenston del hilo de 1a aguja lzquterda (naranja) : 2 a 5
Tension deI hilo del ojo-gttta superior (rojo) : 2 a 5
Tenston del hilo det ojo-guta mferior (verde) • 2 a 5
Boron de postcidn de la ptaca de agajas : S
Hilo:
Aguja : Hilo transparente o de fibra iarga de poli_ster
Ojo-guta supertor " Hito de¢orativo, hilaza o listdn
Ojo-gma inferior : Hilo transparente o de fibra targa de poIidster
Desacttve la cuchilla superlor. (Consulte la pagtna 38.)
44
J
Method
C) Fold fabric with wrong sides together,
(_ Serge along the tolded edge keeping the edge in line with the right side of lower
knife.
(_) Engage upper knife. ( Refer to page 38 )
(_) Press all tucks in the same direction.
M_todo
(_ Doble ia teia juntando los reveses de ia tela.
(_ Cosa con surjete a lo largo del borde doblado, mantemendo el borde en lh_ea con
et tado derecho de la euchilla inferior.
_) Active la euchilla superior. (Consulte la pagma 38,)
(_ Presmne sobre todos los pliegues en ta nUsma direcciSn.
Note:
" By using topstitching thread in the needle you can vary the effect,
* We recommend to use topstitching needle when you use topstitching thread.
Nora:
* Ufilizando el hilo de sobreeostura en la aguja, usted puede variar eI efeeto,
* Reeomendamos usar agttja de sobrecosntra euando use hilo de sobrecosntra.
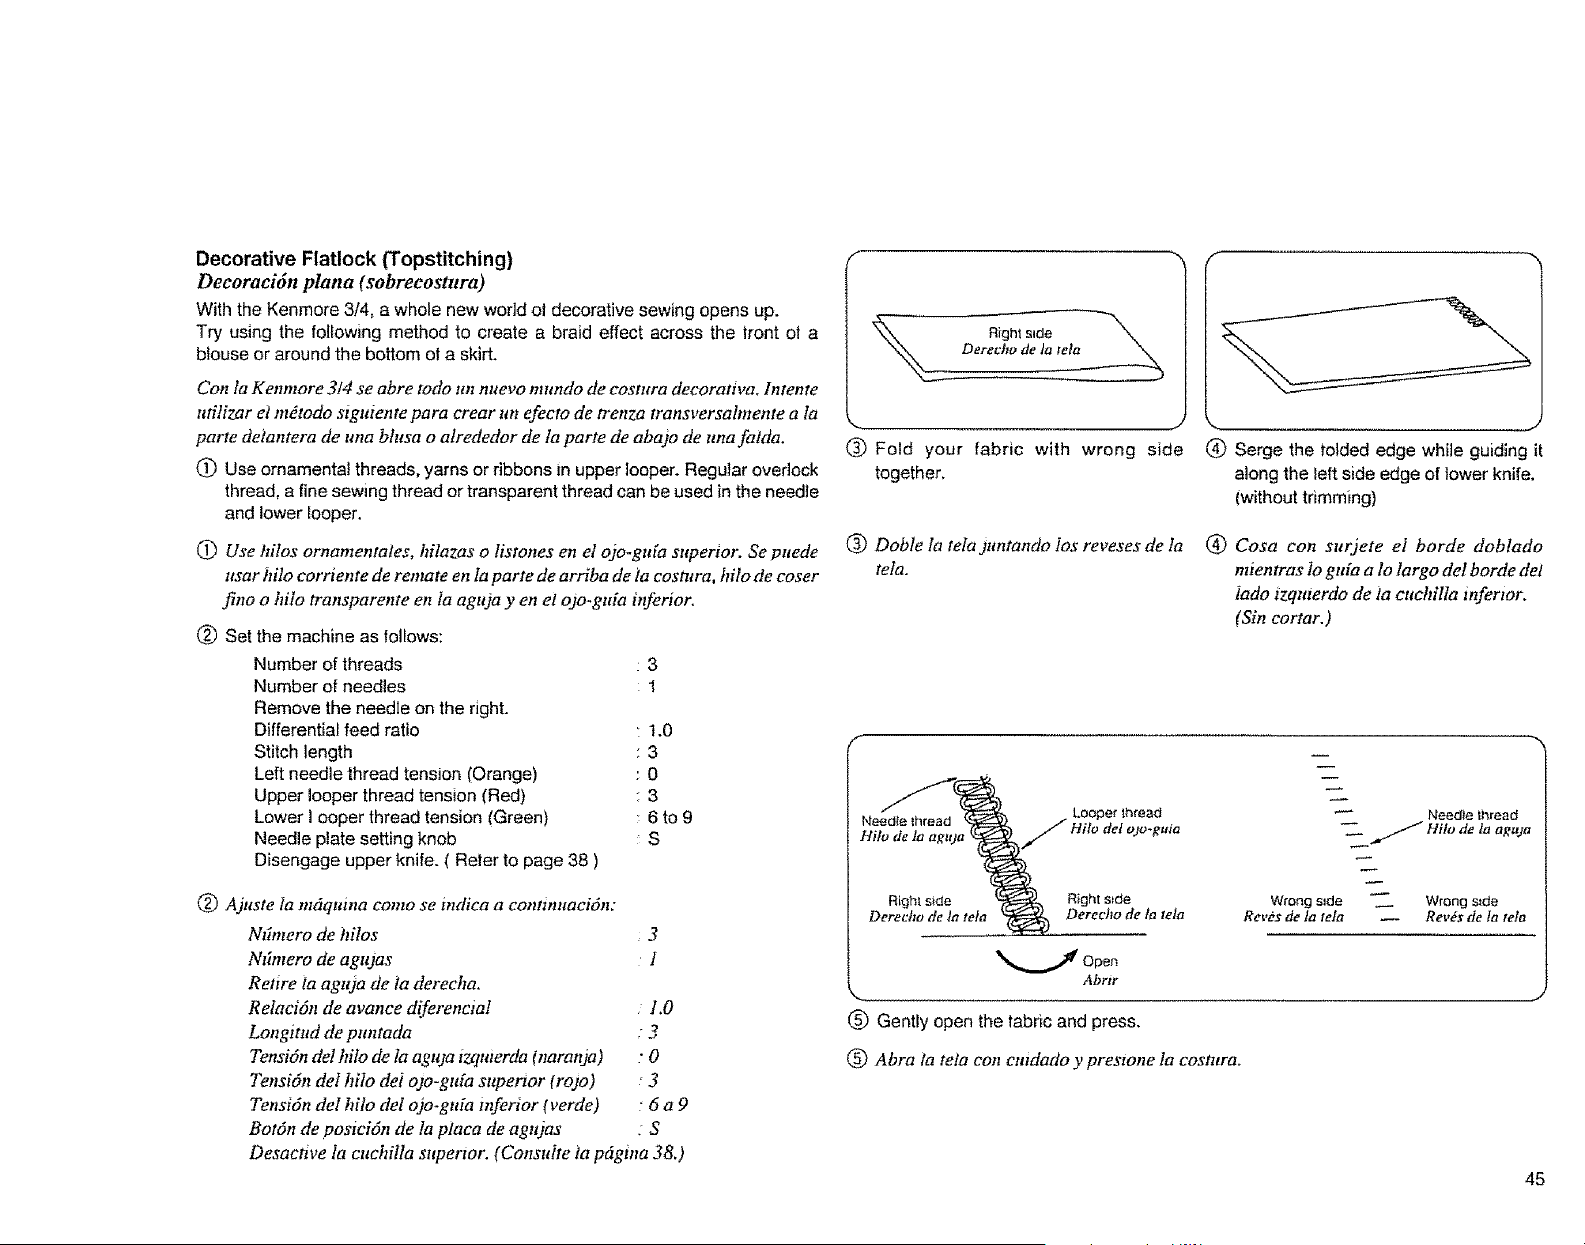
Decorative Flatlock (Topstitching)
Decoraci6n plana (sobrecostura)
With the Kenmore 3/4, a whole new worldol decorative sewing opens up.
Try using the following method to create a braid effect across the front ot a
blouse or around the bottom ot a skirt.
Con la Kenmore 314 se abre todo un nuevo mundo de costura decor°try°. Intente
utilizar el mdtodo stguiente par° crear tin efecto de trenza transversahnente a la
parte delantera de una bhtsa o alrededor de ta parte de abajo de una fatda.
(_ Use ornamental threads, yarns or ribbons in upper looper. Regular ovedock
thread, a fine sewing thread or transparent thread can be used in the needle
and lower Iooper.
(_) Use hilos ornamentates, hilazas o listones en el o_o-gu[a superior. Se puede
ttsar hilo corriente de remate en Ia parte de arriba de ta cosntra, hilo de coser
fino o hilo tranogarente en ia aguja y en el o3o-guia inferior.
(_) Set the machine as follows:
Number of threads 3
Number of needles 1
Remove the needle on the right.
Differential feed ratio 1.0
Stitch length 3
Left needle thread tension (Orange) 0
Upper looper thread tension (Red) 3
Lower I doper thread tension (Green) 6 to 9
Needle plate setting knob S
Disengage upper knife. (Reter to page 38 )
(_) Ajuste Ia m&quina como se indic° a contmttaeidn:
Ndmero de hilos 3
Nffmero de agujas 1
Retrre ia aguja de la dereeha.
ReIaci6n de °vance diferencia! 1.0
Longitud de puntada - 3
Tensidn del hilo de la aguja izqmerda (naranja) " 0
Tensi6n de1 hilo dei ojo-gtda supertor (rojo) • 3
Tensi6n del hilo deI ojo-guia inferior (verde) : 6 a 9
Bot6n de posici6n de la placa de agujas : S
Desacnve ia cuchilla superior. (Consuite ia p6gina 3&)
Derecho de Ja tela _
..,
Fold your fabric with wrong side
together_
(_ Doble la tela juntando ios reveses de la
tel°.
,,__._ j
(_ Serge the folded edge while guiding it
along the left side edge of lower knife.
(without trimming)
(_) Cosa con surjete el borde doblado
mientras Io gtda a lo largo del borde del
iado izqmerdo de ta euchilta infertor.
(Sin eortar.)
.,.,'_,(_ Loope_"lhfead
Abrtr
@ Gently open the tabric and press.
Needie thread
_ J Hilo de la ag_tja
Wrong s_de _ Wrong s_de
Re_,#sde ta tela _ Rev#s de ta tel°
, J
(_) Abra iateta con emdado y prestone la cosntra.
45

Narrow Hem
Dobladillo estrecho
A technique used to finish the outside edges of light to medium weight fabrics. Avoid using fabrics
that ravel easily.
Una t_cnica ufilizada para acabar los bordes exterlores de telas finas a medianas. Evtte usar telas
que se enreden f6cilmente.
f
Machine Setting
Number of threads : 3
Number el needles : 1
Remove the needle on the left.
Differential feed ratio : 1,0
Stitch length R
Right needle thread tension (Blue) : 3 to 5
Upper iooper thread tension (Red) : 2 to 6
Lower looper thread tension (Green) : 2 to 6
Needle plate setting knob R
Thread:
Needle
Upper looper
Lower looper
: Long fiber polyester thread
: Woolly nylon thread
: Long fiber polyester thread or woolly nylon thread
Ajuste de la mtiquina
Ntbnero de hilos : 3
Ndmero de agujas 1
Rettre la agu3a de la izquterda.
Retacidn de avance diferencial 1,0
Longtmd de puntada : R
Tensi6n del bile de la aguja derecha (azul): 3 a 5
Tensidn del bile del o3o-gnia superior(reid) : 2 a 6
Tensi6n del hilo del ojo-guia vtfenor tverde)
Bot6n de posicidn de la placa de agzqas
Hilo:
A guja
Ojct-guia st(pertor
Ojo-guia inferior
k,. ....
:2a6
R
Hilo de fibra larga de pofidster
Hilo de nylon lanoso
Hilo de fibra larga de poli6ster o hilo de nylon lanoso
46
W_ong s{de {abr{c _'_.,_
Reves de la lele _"'__
Lower looper thread _P'_
Hifo
d_guiamferto__ Upper looper thread
Derecho de la zeta
Need_e#_read/_r_=_
Hile de ta aguja _---/'_
Method
(_ Serge edge of fabric (one tayer) while lightly pulling the ends el
the threads to the back.
This edging is effective for soft knits.
Experiment with various threads, yarns and ribbons to create a
decorative effect.
For lettuce ]eat edging, stretch the fabric in front of the needle
while serging or use the differential teed set the ratio between
0.7 and t .0,
Mdtodo
Q) Cosa con surjete el borde de la tela (una capa) mientras ttra
ligeramente de tas puntas de los hitos hacia atr6s.
Este tipo de borde es eficaz para tefidos suaves,
Ea_perimente con varies hilos, hilazas y listones para crear un
efecto decorative.
Para lograr tt/z aspecto de costttras rizadas, estira ta tela
detante de la aguja a ta vez que la case con surjete o utilice una
retaci6n de avance diferencta! ajustada entre 0,7 y 1,0.
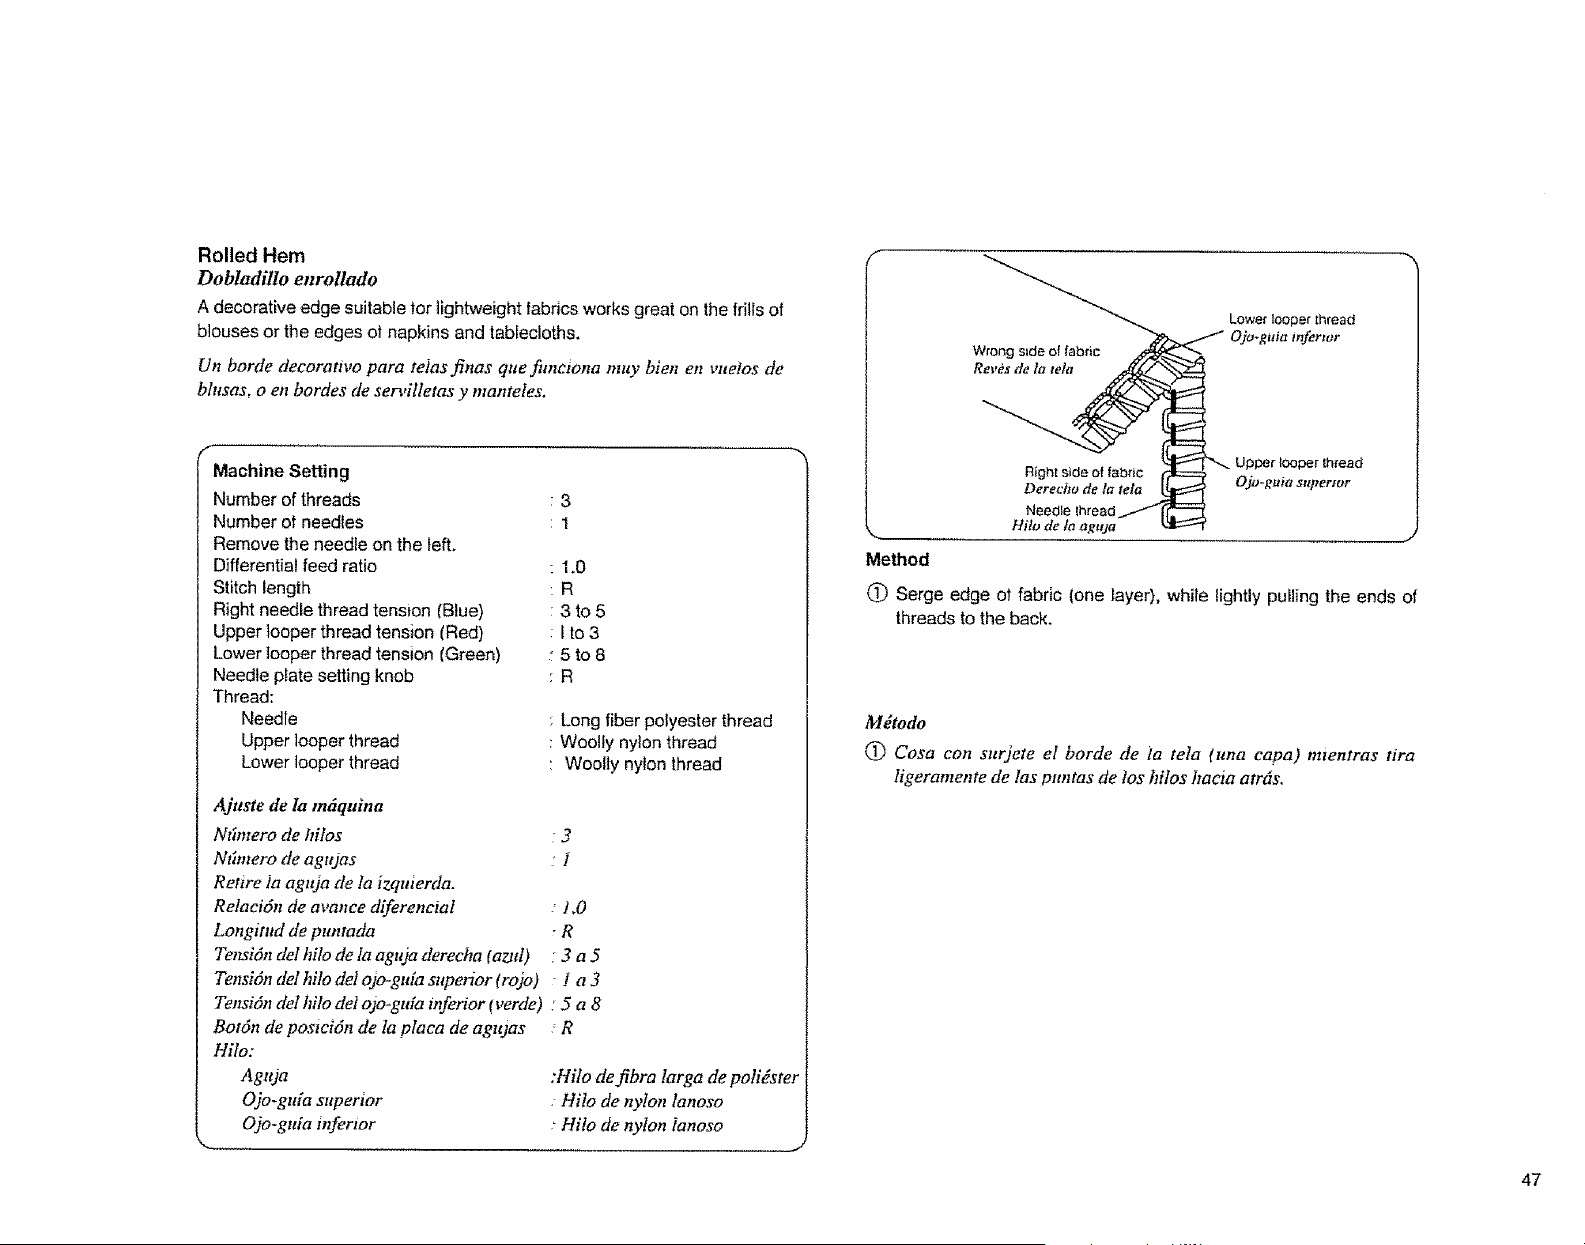
Rolled Hem
Dobladillo enrotlado
A decorative edge suitable tor lightweightfabrics works great on the frills of
blouses or the edges ot napkins and tablecloths,
Un borde decorattvo para telas finas que fimeiona muy Men en vuelos de
bhtsas, o en hordes de servilletas y mantetes.
f
Machine Setting
Number of threads
Number ot needles
Remove the needle on the leff_
Differential feed ratio
Stitch length
Right needle thread tension _Blue)
Upper looper thread tension (Red)
Lower looper thread tension (Green)
Needle p_atesetting knob
Thread:
Needle
Upper looper thread
Lower looper thread
Ajuste de la mfquina
Ntbnero de hitos
Ntimero de agujas
Retire _a aguja de la izqulerda.
Relaci6n de avance diferencial
Longitnd de punrada
Tensidn del hilo de la aguja derecha ¢aztd)
Tensi6n del hilo del o3o-guia superior (ro)o)
Tensi6n del hilo de1 odo-guia inferior _verde)
Bot6n de postci6n de la placa de agtqas
Hito:
Aguja
Ojo-gufa superior
Ojo-gtda inferior
:3
:1
: 1.0
:R
:3to5
:lto3
:5to8
:R
Long fiber polyester thread
Woolly nylon thread
Woolly nylon thread
3
:1
t,O
R
:3a5
ia3
:5a8
R
:Hilo de fibra larga de poli_ster
• Hilo de nylon lanoso
: Hito de nylon ianoso
..... J
Method
Lower looper thread
Ojo-gttia infertar
• • _ __ Upper lOoper thread
Rightsideo! fabric _ .
Derecho de la rela _ Ojo-guta sttpertor
(_ Serge edge ot fabric (one layer), while lightly pulling the ends of
threads to the back.
M_todo
C) Cosa con surjete el borde de ia tela (una capa) mtentras tira
Iigeramente de las ptttltas de 1os hilos hacia atr6s.
47
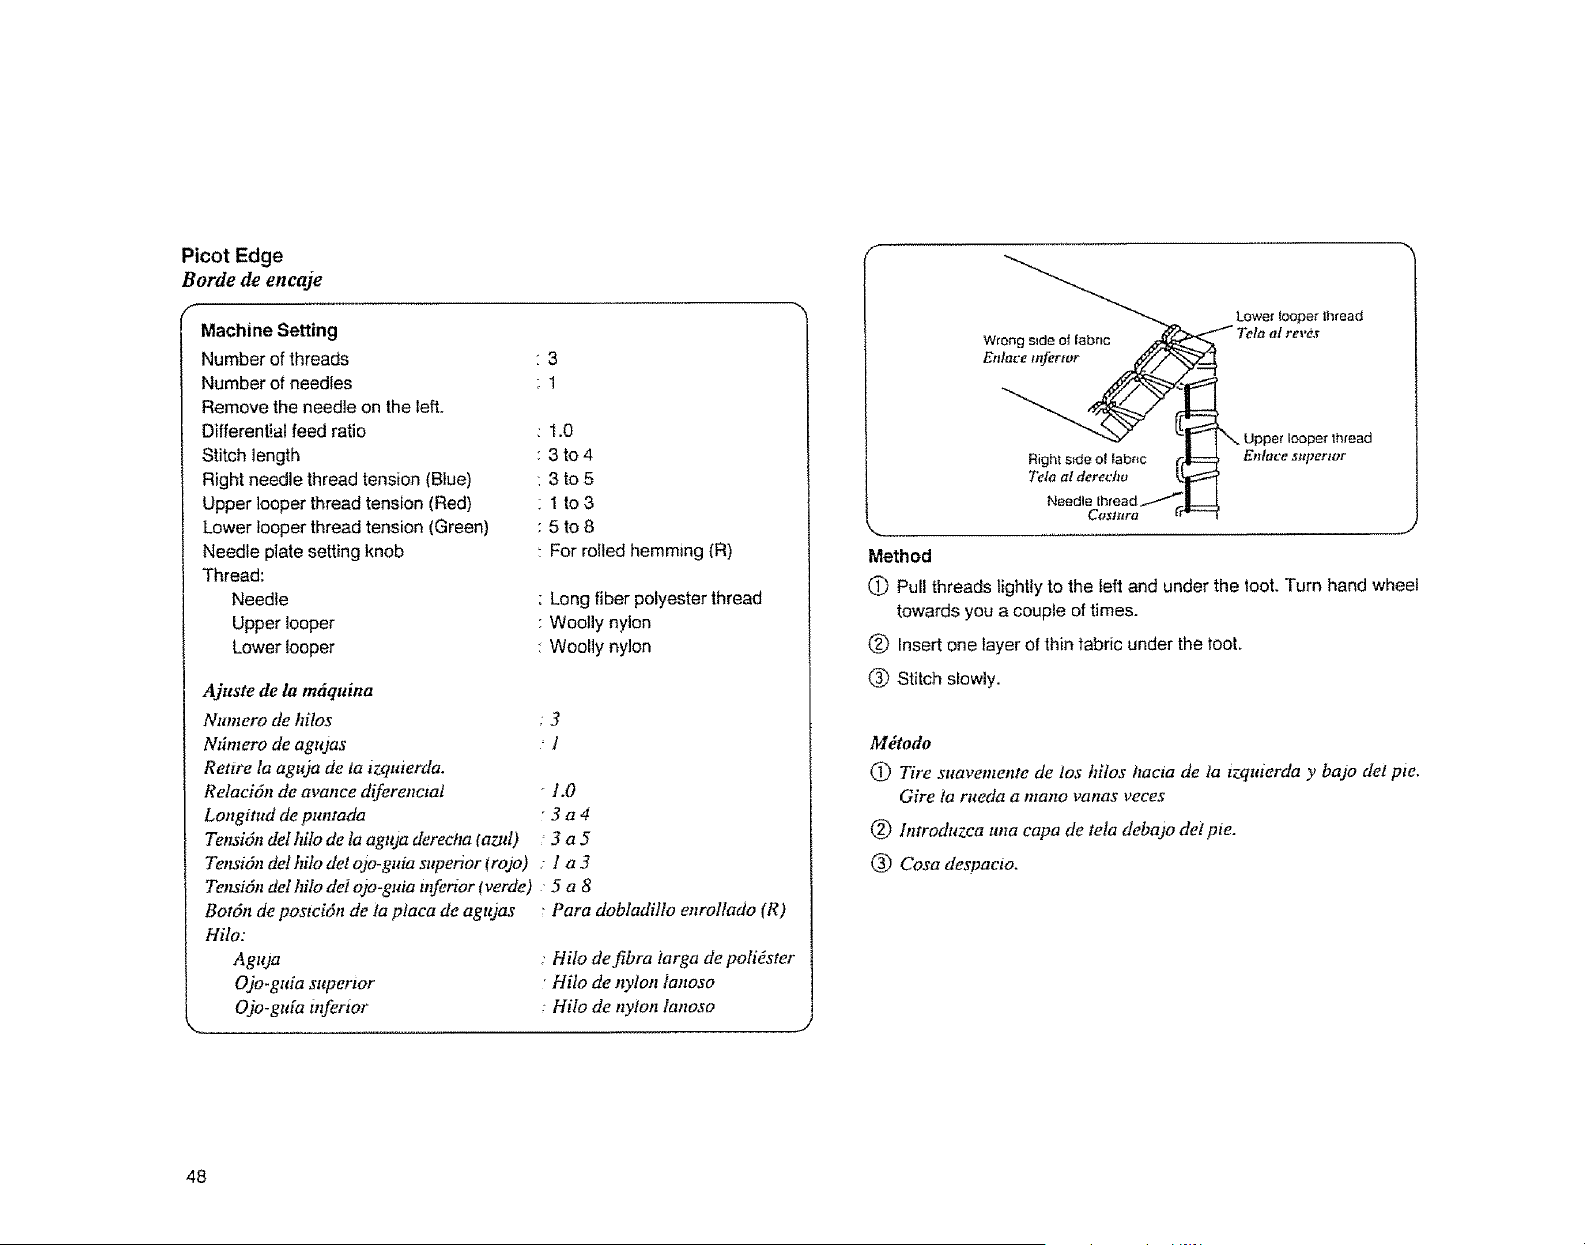
Picot Edge
Borde de encaje
f
Machine Setting
Number of threads
Number of needles
Remove the needle on the left.
Differential feed ratio
Stitch length
Right needle thread tension (Blue)
Upper looper thread tension (Red)
Lower looper thread tension (Green)
Needle plate setting knob
Thread:
Needle
Upper looper
Lower looper
3
1
1.0
:3t04
: 3to5
: lto3
: 5t08
: For rolled hemming (R)
Long fiber polyester thread
Woolly nylon
Woolly nylon
Ajuste de la m6quina
Numero de hilos
Ntimero de agujas
Retire la aguja de ta izquterda.
Relacidn de avance diferenctat
Longitud de puntada
Tensi6n del hilo de la aguja derecha (azttl)
Tensi6n del hilo det o3o-guia superior fro)o)
Tensi6n del hilo de1 ojo-guia itferior fverde)
Bot6n de posteidn de la placa de agujas
Hilo:
Aguja
Ojo.guia supertor
Ojo-gu{a tnfertor
3
1
1.0
3a4
3a5
la3
5a8
: Para dobladillo enrollado (R)
: Hito defibra 1arga de pofidster
•Hilo de nylon ianoso
: HiIo de nylon lanoso
/ Lower tooper thread
""-3 / Upper looper lhfead
Right side O! labr_c (?_:=:_ Enlttce supertor
Method
(_ PuII threads lightly to the left and under the toot. Turn hand wheel
towards you a couple of times.
(_ Insert one layer of thin fabric under the toot.
(_) Stitch sfowly.
M_todo
_) Tire suavemente de los hilos hacia de }a izquierda y bajo del pie,
Gire fa rueda a matzo vanas veees
(2) lntroduzca una capa de tela debajo dei pie.
@ Cosa despacio.
48
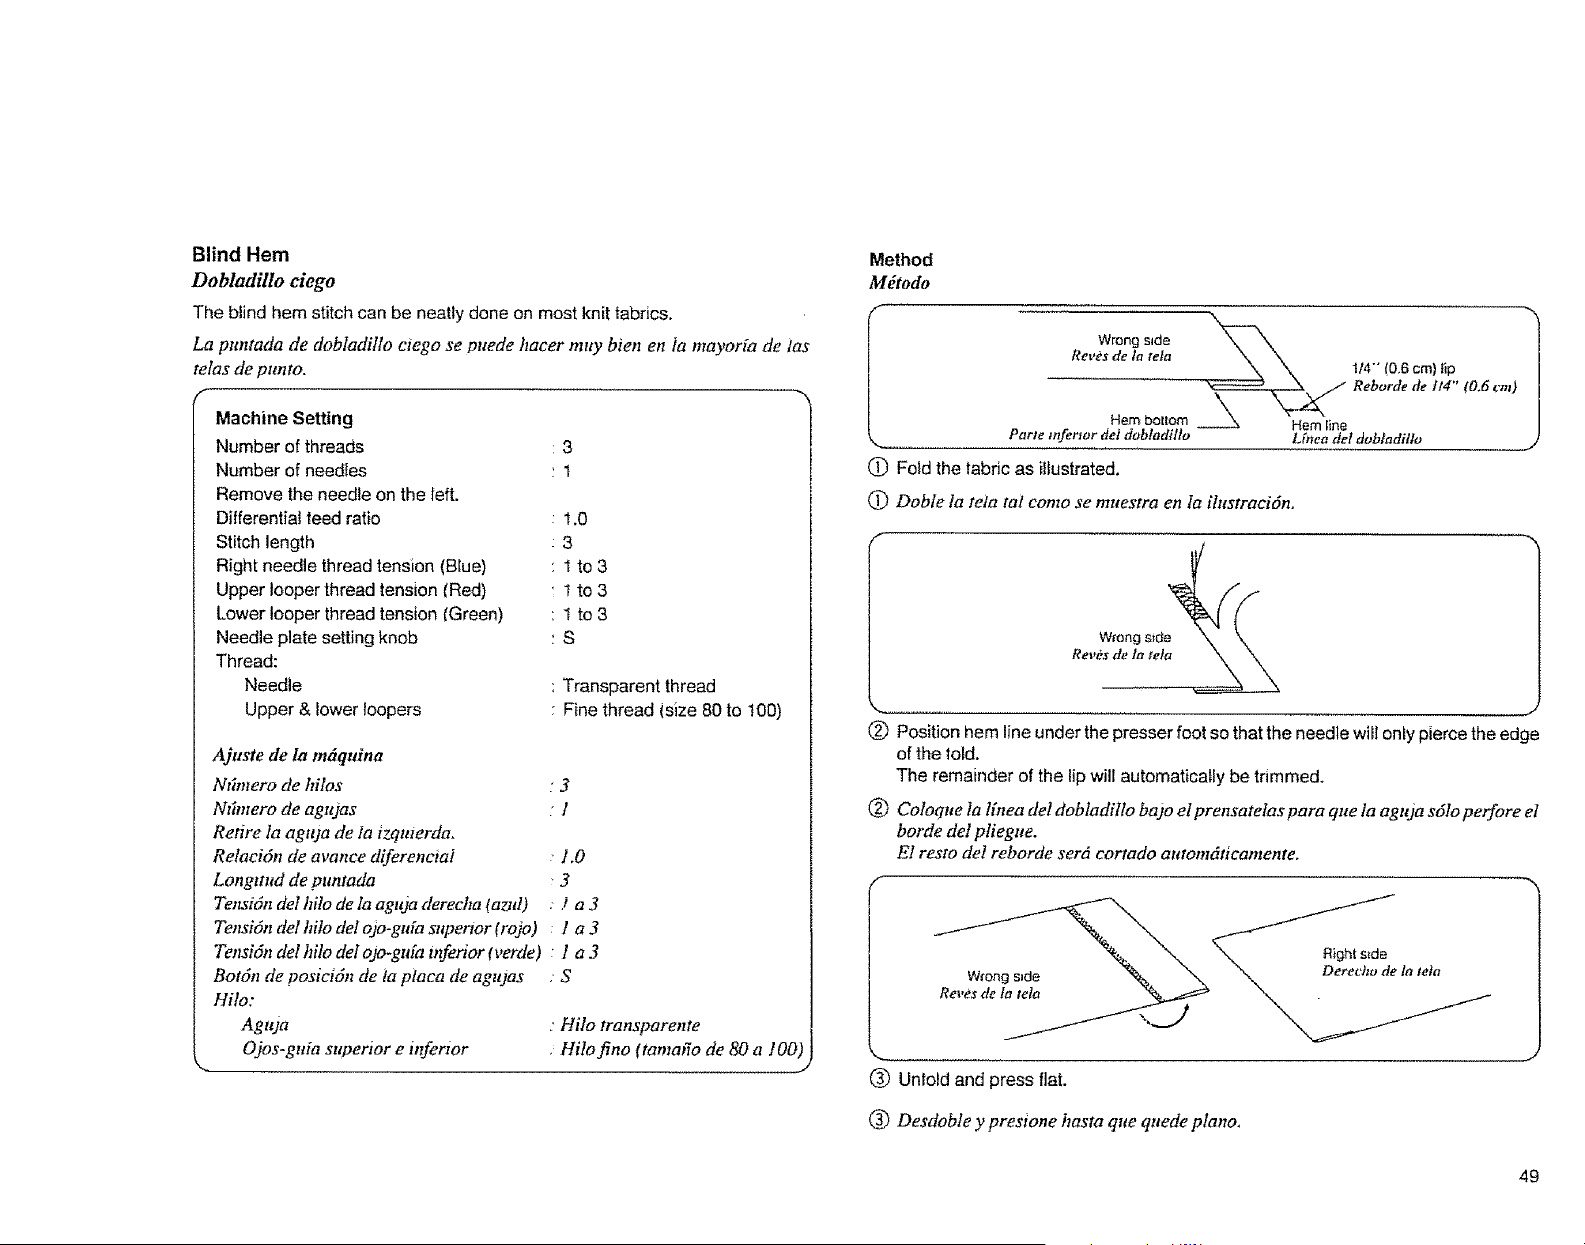
Blind Hem
Dobladillo ciego
The blind hem stitch can be neatly done on most knit fabrics.
La puntada de dobladillo eiego se puede hacer muy bien en ia mayorfa de fas
reins de punto.
f
Machine Setting
Number of threads
Number of needies
Remove the needle on the Ieft.
Differential teed ratio
Stitch length
Right needle thread tenmon (Blue)
Upper looper thread tension (Red)
Lower looper thread tension (Green)
Needle plate setting knob
Thread:
Needle
Upper & lower loopers
3
1
1.0
3
1 to3
t to3
1 to3
S
Transparent thread
Fine thread (size 80 to t00)
Ajuste de la m&quina
Nffmero de hilos : 3
Nffmero de agutas : 1
Retire la aguja de la izquzerda.
Relaci6n de avance diferenctal I,0
LongtttM de puntada • 3
Tensidn de! hilo de la aguja derecha (a_d) : .J a 3
Tensi6n del hito del ojo-gu[a supertor(rojo) : 1 a 3
Tensidn del hilo del ojo-gu[a inferior (verde) : 1 a 3
Botdn de posicidn de la placa de agttjas : S
Hilo:
Aguja : Hilo transparente
Ojos-guia superior e inferior , Hilo fino (tamafio de 80 a 100)
Method
Mdtodo
I Wrong side
Ret,es de la tefa
Hem botlom
Parte tnferJor del dobladillo
,,,,oooo,o
_-__Rebordedell4"(O.6t,ln)
Lfnea de/dobfadillo
10 Fold the fabric as illustrated.
(_) Dobte la tela tat eonzo se mueszra en la ilustraeidn.
W_'ongside
Rev_s de la tela
(_) Position hem line under the presser foot so that the needle will only pierce the edge
of the told.
The remainder of the lip will automatically be trimmed.
(_) Coloque Ia Hnea del dobladilto bajo el prensatelas para que la agtda s6Io perfore el
borde det pliegue.
E1 resto del reborde serf cortado automdticamente.
Re_,esde fa_
Right s_de
Deret'ho de la teta
(_ Unlold and press flat.
(_) Desdoble y presione tlasta que quede piano.
49
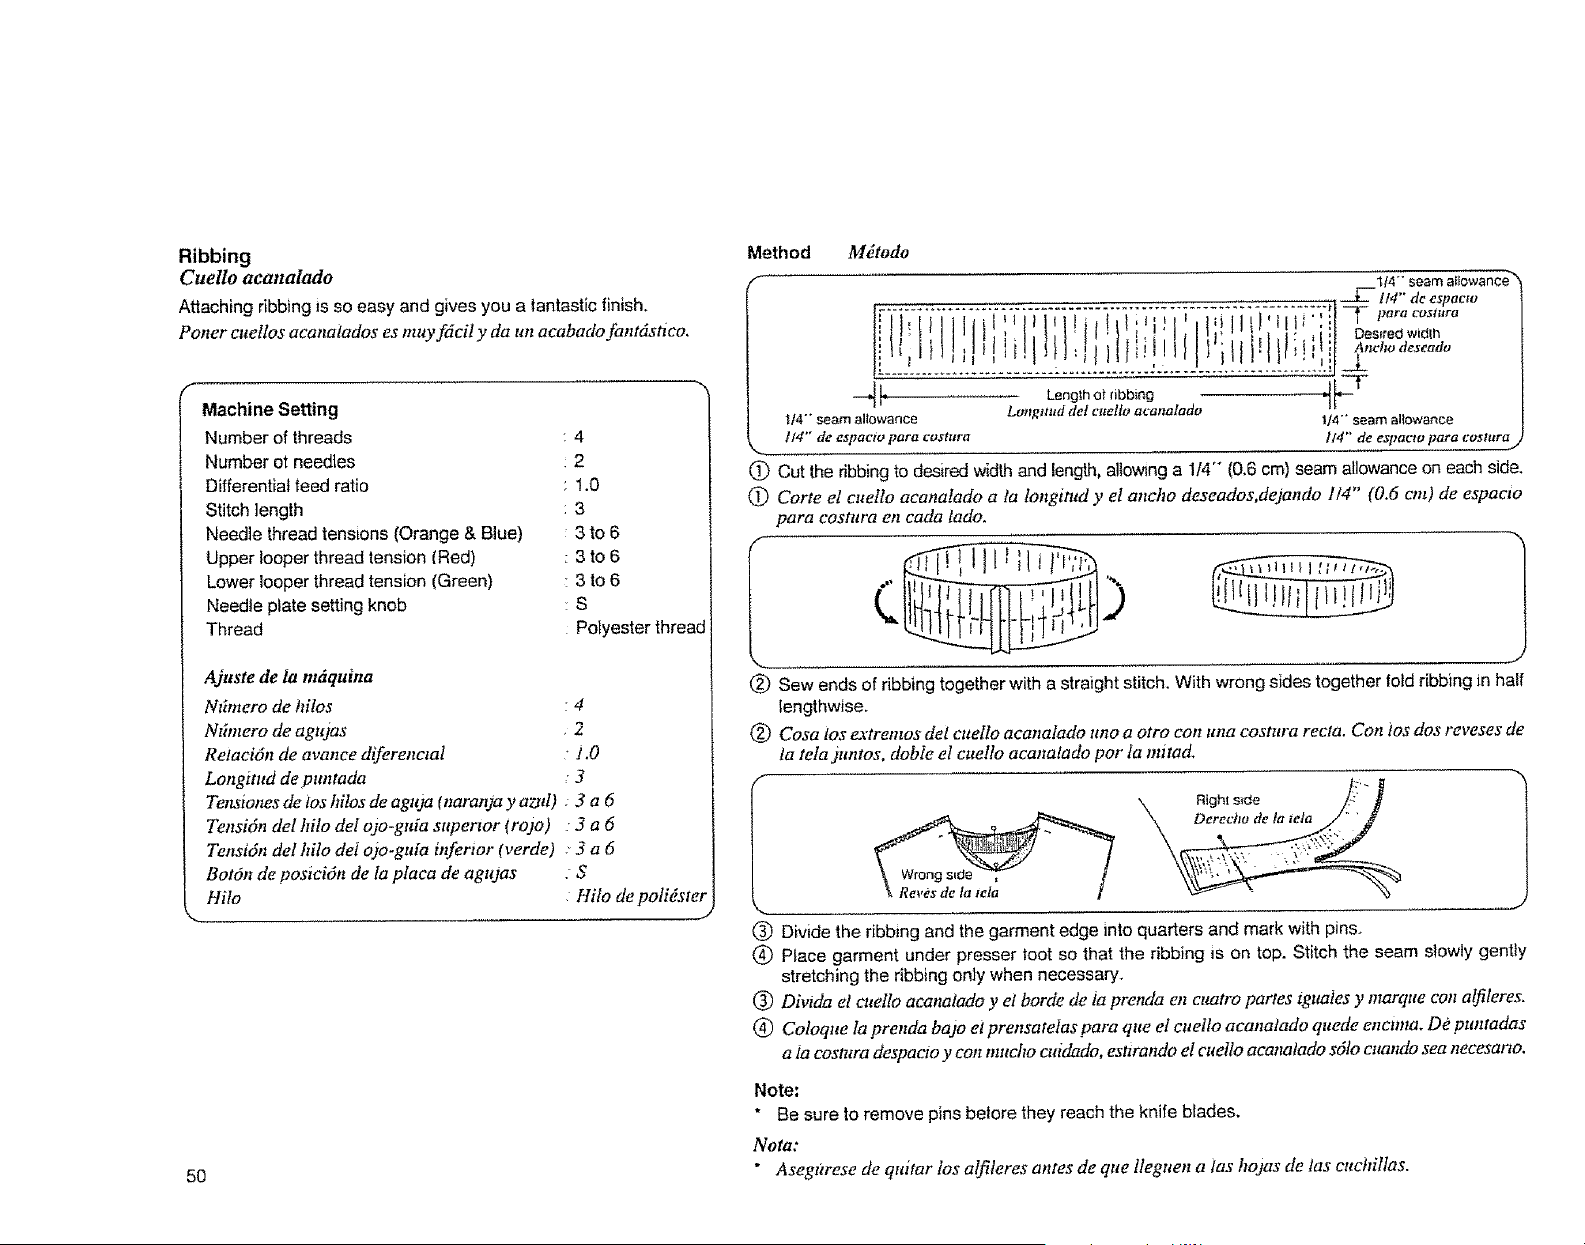
Ribbing
Cuello acanalado
Attaching ribbing Jsso easy and gives you a tantastic finish+
Poner cuellos acanatados es muyfdcil y da un aeabado fantdstico.
Machine Setting
Number of threads : 4
Number ot needles 2
Differential feed ratio ; 1.0
Stitch length : 3
Needle thread tensions (Orange & Blue) 3 to 6
Upper looper thread tension fRed) : 3 to 6
Lower looper thread tension (Green) : 3 to 6
Needle plate setting knob S
Thread Polyester thread
Ajuste de la m6quina
Ntimero de hilos : 4
Ntbnero de agujas ,2
Relaci6n de avance diferenctat : 1.0
Longitud de puntada : 3
Tensiones de los hilos de aguja Inaranja y a_d) : 3 a 6
Tensifn del hilo det ojo-guia supertor (rojo) : 3 a 6
Tensifn del hilo dei ojo-guia infertor (verde) : 3 a 6
BorOn de posici6n de la ptaca de agtqas _ S
Hilo Hilo de polifster
J
5O
Method M_todo
f 114- seam allowance_'
, _ ll4" de espacto
l , ' 1 : [ Desired w dlh
IN'" seam allowance Longnt_ddef caetfo acanalado 1/4- seam allowance
114" de espacto para costura 114" de espacto para eostar.u_a
(_ Cut the ribbing to desired width and length, allowing a 1/4- (0.6 cm) seam allowance on each side.
(_) Corte el cuello aeanafado a ta longimd y et ancho deseados, dejando 1/4" (0.6 cm) de espaclo
para costura en eada fado.
f-
(_) Sew ends of ribbing together with a straight stitch. With wrong sides together fold ribbing in half
lengthwise.
@ Cosa los extremos del cuelle aeanalado uno a otto con una costura recta. Con los des reveses de
la rein juntos, dobie et cuello acanatado por Ia mitad.
Derecho de tateta
@ Divide the ribbing and the garment edge into quarters and mark with pins.
(_ Place garment under presser loot so that the ribbing is on top. Stitch the seam slowly gently
stretching the ribbing only when necessary.
(_) Divida et cuel!o acanafado y el borde de ia prenda en cttatro partes tguales y marque con atfileres.
@ Coloque la prenda bajo el prensatelas para que el cuello acanatado quede enctma. D# puntadas
a la costltra despacto y con macho cuidado, esttrando el cuello acanatado sdlo cuando sea necesano.
Note:
" Be sure to remove pins belore they reach the knife blades.
Nota:
• Asegttrese de quitar los alfileres antes de que lleguen a (as hojas de 1as eudtillas.
Pintuek
Pliegue pequefio
Pintucks add a personal touch to your garment.
Los pliegues pequeiios afiaden un toque personal a sus prendas,
f ....
Machine Setting
Number of threads 3
Number at needles 1
Remove the needle on the left.
Differential feed ratio 1.0
Stitch length : 3 to R
Right needle thread tension ( Blue ) ; 3 to 6
Upper looper thread tension _Red ) : 3 to 6
Lower looper thread tension i Green ) 3 to 6
NeedIe p_ate setting knob • R
Thread:
Needle
Upper looper thread
Lower looper thread
Disengage upper knife. _Refer to page 38.)
Long fiber polyester thread
: Woolly nylon thread
: Long fiber polyester thread
Ajuste de ta mdquina
Ntlmero de hilos : 3
Namero de agujas : !
Retire ia aguja de ta tzquierda.
Relaci6n de a vance diferencial 1.0
LongtttM de ptmtada 3 a R
Tension del hilo de la aguja derecha (azul) : 3a6
Tetmon del hilo del ojo-gilza superior (raid) : 3 a 6
Tension del hilo de1 ojo-gttta inferior (verde) : 3 a 6
Baton de posiei6n de la placa de agujas - R
Hilo:
A guja
Ojo-gttia superior
Ojo-guia
Desacnve la cuehilla superior, (Consltlte 1opagina 38.)
: Hilo defibra larga depoliEster
Hilo de nylon tanoso
: Hilo defibra iarga de poli#ster
Method
M_todo
#
1
I
, Righl s_de
Derecho de la tefa
I
lii
(_) Draw guidelines for pintuck on the right side of the
fabric.
C) Trace lineas de gtda para pliegues pequefios en et
derecho de la rein.
J
\\\\\
\_ Righ! side _ _'\
(_) With wrong sides together told fabric along the
line drawn.
Then serge the folded edge' guiding it along the
guideline on needle plate.
©
Con los reveses de la tela juntos, doble la tela a lo
largo de la linen trazada.
Luego, cosa con surjete e! borde doblado, guidndolo
a lo largo de 1a l{nea de gufa de ia placa de agzqas.
(_ Repeat for additional pintucks. Be sure to sew
each tuck in the same direction.
(_ Press tucks fiat and in the same direction.
®
Repita para pliegues peque_os adicionales,
Aseg(trese de coser cada pliegue pequefio en la
misma direeei6n.
(_) Presione los pliegues para que queden pianos y en
la misma direcci6n,
Note:
Use pearl cotton, embroidery thread or metatlic thread in upper looper tar omamenta[ pintucks.
Nora:
Utilice aIgoddn periado, hilo decoratt voo hilo metdlieo en et ojo-gula superior para ha cer
pequeiios pliegues ornamentates. 51
Attaching Stretch Waistband
Colocaci6n de una cinta eMstica en la cintura
f
Machine Setting
Number of threads
Number ol needles
Differential feed ratio
Stitch length
Needle thread tensions (Orange & Blue)
Upper looper thread tension (Red)
Lower looper thread tension CGreen)
Needle plate setting knob
Thread
4
2
1.0
3
3to 6
3to 6
3to6
S
Polyester thread
Ajuste de la m_quina
Ntbnero de hilos
Nt_mero de agujas
Relaci6n de avanee diferenc_al
Longttud de puntada
Tenstones de los hilos de aguja (m_ranja y azul) •
Tensi6n del hilo del ojo-gtda superior (rojo)
Tet_sidn del hilo del ojo-gMa inferior (verde)
BorOn de poslci6n de la placa de agujas
Hilo
4
2
1.0
3
3a6
3a6
3a6
S
Hilo de poli_ster
J
Method
Mdtodo
f-
"x
C) With wrong sides together fold waistband in half
lengthwise and press. Then untold and serge ends
together.
(_ Con los reveses de ta tefa juntos, doble tongmMinalmenre
por la mitad la cinta el6stma y presione. Luego,
desd6btela y cosa los extremos uno con otro,
(_) Fold waistband again (with wrong sides together) and
serge it to the garment, leaving a 2,5 to 5 cm (1 to 2"')
opening for inserting elastic.
(_ Vuelva a doblar ta cinta eMstica (con los reveses de fa
teia juntos) y c6saia con surjete a ta t_renda dejando
2.5 a 5 cm f1 a 2" ) de abertttra para mtrodzwtr el eldstico.
(_) Insert elastic and sew the ends together,
(_) Introduzca el el6stico y cosa ios extremos uno con otro.
52
tl !
1
@ Serge remainder of band to garment.
Turn waistband up and press seam down.
@ Cosa con suuete et resto de ta cinta eldstzca a ta prenda.
Gire la cinta eldstica hacta arriba ypresione la cosmra
hacia abajo,
Attaching Collars
Colocaci6n de cuellos
f
Machine Setting
Number of threads
Number ot needles
Differential teed ratio
Stitch length
Needre thread tensions (Orange & Blue)
Upper looper thread tension (Red)
Lower loeper thread tension (Green}
Needle ptate setting knob
Thread
:4
:2
: 1,0
:3
:3to6
:3to6
;3to6
:S
: Polyester thread
Ajuste de la mdquma
N6mero de hilos : 4
Ndmero de agujas : 2
ReIaci6n de avarice diferenciai _ ] o0
Longmtd de puntada : 3
Tenstones de los hilos de aguda pTaranda y azul) : 3 a 6
Tensidn del hilo del o)o-guia superior trojo) : 3 a 6
Tensidn del hilo del odo-gtda infertor {verde) : 3 a 6
BotOn de posieidn de la plaea de agujas • S
Hilo _Hilo de polidster
M ......... -J
Method
Mdtodo
f-
! I i
s_Oe side
R v" Rel,_,,_
,it,, 1/ ttl ) ="J* t! tl II ,,f,,
L I fl/ Oerecho _ [ I {
" L de la teta _ k
?'%'
(D Make collar.
(_) Pin colar to right side of garment neckline,
matching center backs.
(_ Fold both front facings along lold line right
sides together and place over collar,
Pin right sides together.
(_) Serge neckline edge.
(_) Turn {acing right aides out and press lighly.
@ Haga el cuello.
(_) Sa3ete el cuello con alfileres at derecho de la
prenda en Ia ffnea del cuello, emparejando las
partes traseras centrates.
(_) Doble ambos frentes detanteros a lo 1argo de la
lfnea de doblado con los derechos de ia rela j
untos y cotdquetos e,cima dei cuello.
Sujete con alfileres los derechos de ta rela ,no
con oFro.
(_ Cosa con surjete el borde de 1a lfnea del cuello.
(_ Gire hacia afaera los derechos de la tela
enfrentados y presione ligeramente_
53
Braiding
Trenzado
When you want to make coordinatingtrim or belts, serge over a tape using ornamental threads, such as yarn, ribbon or buttonhole twist, in the upper looper.
Choose matching or contrasting colors depending on the effect desired.
Cuando quiera hacer cordones o cintTtronesque coordinen, cosa con surjete sobre tom cmta usando hilos ornamentaLestales cored hilaza, list6no punto de dial en el ojo-gtda superior.
Escoja colores que coincidan o contrasten segtbz el efecto deseado.
Machine Setting
Number of threads
Number of needles
Remove the needle on the right.
Differential feed ratio
Stitch length
Left needle thread tension (Orange)
Upper looper thread tension (Red)
Lower looper thread tension fGreen)
Needle plate setting knob
Thread:
Needle
Upper looper
Lower looper
Disengage upper knife. {Refer to page 38.)
3
t
1.0
lto3
3
lto3
3
S
Long fiber polyester thread
Buttonhole twist
Long fiber polyester thread
Ajuste de la m6quina
Ntbnero de hilos 3
Ntbnero de agujas , !
Retwe la aguja de la derecha.
Relaci6n de avarice diferenctat 1.0
Longttud de puntada " t a 3
Tenston de hilo de ta aguja derecha (nara&a) 3
Tensiondelhilodelojo-guiasuperior(rojo) : i a3
Tension del hito de1 ojo-guia inferior(verde) , 3
Boron de postcidn de ia placa de agujas S
Hilo:
A guja
Ojo-guia superior
Ojo-guia mfertor
: Hilo defibra targa de poligster
. Punto de ojal
: Hilo defibra larga de polidster
Desacttve la cuchilla supertor. (Consulte la pdgma 3& )
Method
M_todo
J
(_ Serge over tape.
Make sure the needle drops just off the left end of the tape.
(_) Cosa con surjete sobre /a cmta.
Asegttrese de que ta aguja baja hasta justo atttes dei e_rtremo izquierdo de ia cmta.
Note:
" You can use cord, yarn or ribbon instead of tape.
" To thread yarn, ribbon or buttonhole twist, use the same method applied |or
threading woolly nytontpolyester thread.
Nota:
* Puede usar cord6n, hilaza o listOn en vez de ctnta,
* Para enhebrar hilaza, liston o punto de ojat, ttse et mismo procedimiento que con
hilo de nyIon lanoso/polidster.
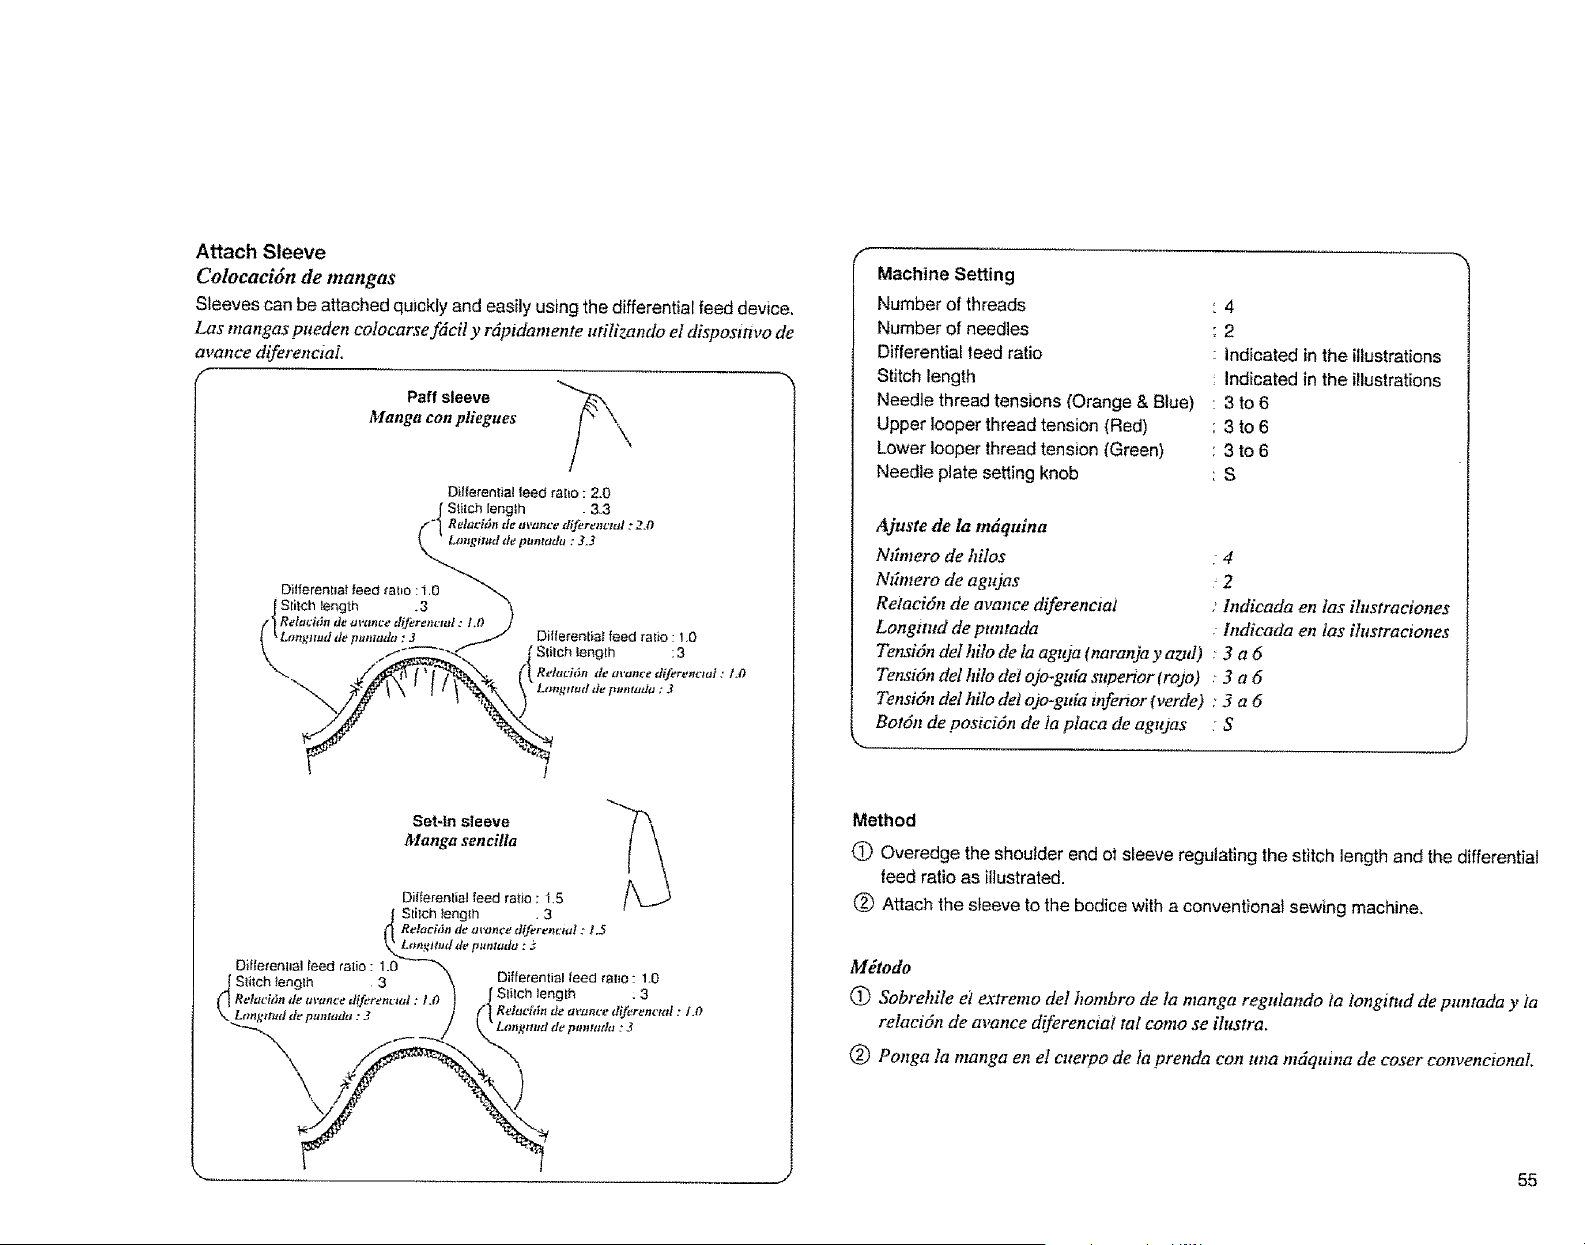
Attach Sleeve
Colocacidn de manges
Sleeves can be attached quickly and easily using the differential feed device.
Las manges paeden colocarse fdeil y rdpidamente ufilizando el dispos_t_vo de
avanee diferenciaL
Paff sleeve _'_X
Manga con pliegues
Differential feed falio : 2.0
Stitch length &3
Rela_'itJn de ilvonc_ dlferenL'ml : 2.#
Longimd #¢ puntadn : 3.3
Set-In sleeve _!k_
Manga sencilla
Differentia! feed ratio : /,5
Stitch _eng_h .3
(] R_laci_$n de al'tznce diferenc_at : 1.5
_ngttx_tt de puntada : 3
Oiffetetlllal feed ratio : 1.0
• S_itch fen lh 3_ \ Differential feed rello 1 0t
g 1 " "
j s,.c.,eo0,.
_ _ / \' Lo_J#m,ddep,nuuhs :3
\, \
S
Machine Setting
Number of threads
Number of needles
Differential teed ratio
Stitch length
Needle thread tensions (Orange & Blue)
Upper looper thread tension (Red)
Lower looper thread tension (Green)
Needle plate setting knob
Ajuste de la m6quina
Nfimero de hilos
Nffmero de agujas
Reiacidn de avance difereneiai
Longltud de puntada
Tensidn del hilo de la aguja (naranja y aztd)
Tensi6a del hilo det ojo-gMa sttperior (rojo)
Tensi6n del hilo det ojo-gtda inferior (verde)
Botdn de posici6n de la placa de agujas
4
2
Indicated in the illustrations
Indicated in the illustrations
3to6
3to6
3to 6
S
4
2
Indieada en las ihtstraciones
Indicada en tas ihtstraciones
3a6
3a6
3a6
S
_J
Method
(_ Overedge the shoulder end ol sleeve regulating the stitch length and the differential
feed ratio as illustrated.
(_) Attach the sleeve to the bodice with a conventional sewing machine.
M_todo
(_ Sobrehile e_ extremo del hombro de la manga regalando la longitud de puntada y _a
relaciOn de avance diferenciat tal como se ilustra.
(_) Ponga ]a manga en el euerpo de la prenda con una mdquma de coser convencional
55
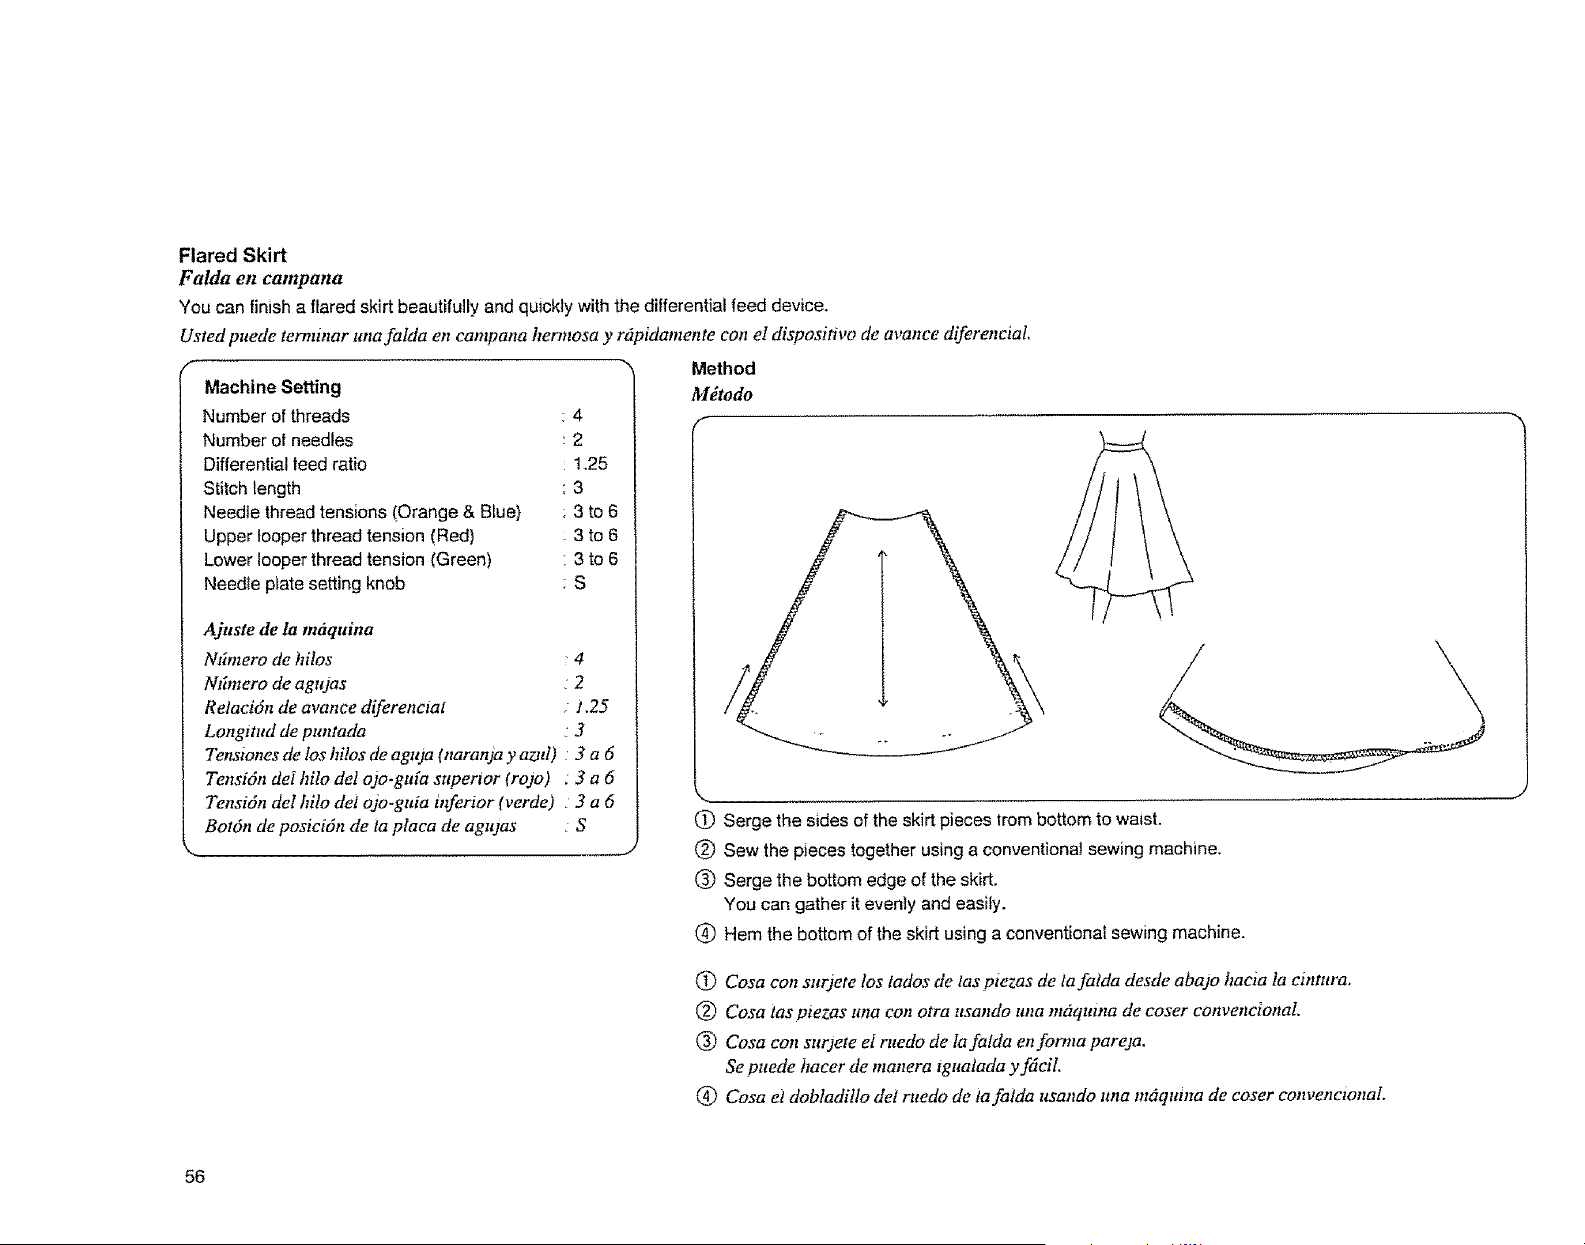
Flared Skirt
Falda en campana
You can finish a flared skirt beautifully and quickly with the differential feed device.
Usted puede terminar una falda en can(pana hermosa y r6pidamente con el dispositivo de avance diferenciat,
"_ Method
Machine Setting
Number of threads
Number of needles
Differential teed ratio
Stitch length
Needle thread tensions (Orange & Blue)
Upper looper thread tension (Red)
Lower looper thread tension (Green)
Needle p_ate setting knob
4
2
1.25
3
3to6
3to 6
3to6
S
Ajuste de la mtiquina
Ntbnero de hilos "4
Nfimero de agujas : 2
RelaciOn de avance difereneiat ; i.25
Longttud de puntada : 3
Tensiones de los hilos de aguja (naranja y azjd) ' 3 a 6
Tensi6n det hilo del ojo.gMa superior (rojo) : 3 a 6
Tensi6n del hilo del ojo-guia inferior (verde) 3 a 6
Bot6n de posici6n de ia placa de agzqas • S
....I
M_todo
f
C) Serge the sides of the skirt pieces from bottom to waist.
(_ Sew the pieces together using a conventional sewing machine.
(_ Serge the bottom edge of the skirt.
You can gather it evenly and easily.
(_ Hem the bottom of the skirt using a conventional sewing machine.
Q) Cosa con surjete los lados de tas piezas de la fatda desde abajo haeza la cintura.
(_) Cosa tas piezas una con otra usando una maquina de coser convencionaL
_) Cosa con surjete el ruedo de Ia fatda en forma pareja,
Se puede hacer de manera tgualada yfdciL
(_ Cosa el dobtaditlo del ruedo de ta falda usando una mdzquina de coser cmzvencionaL
56
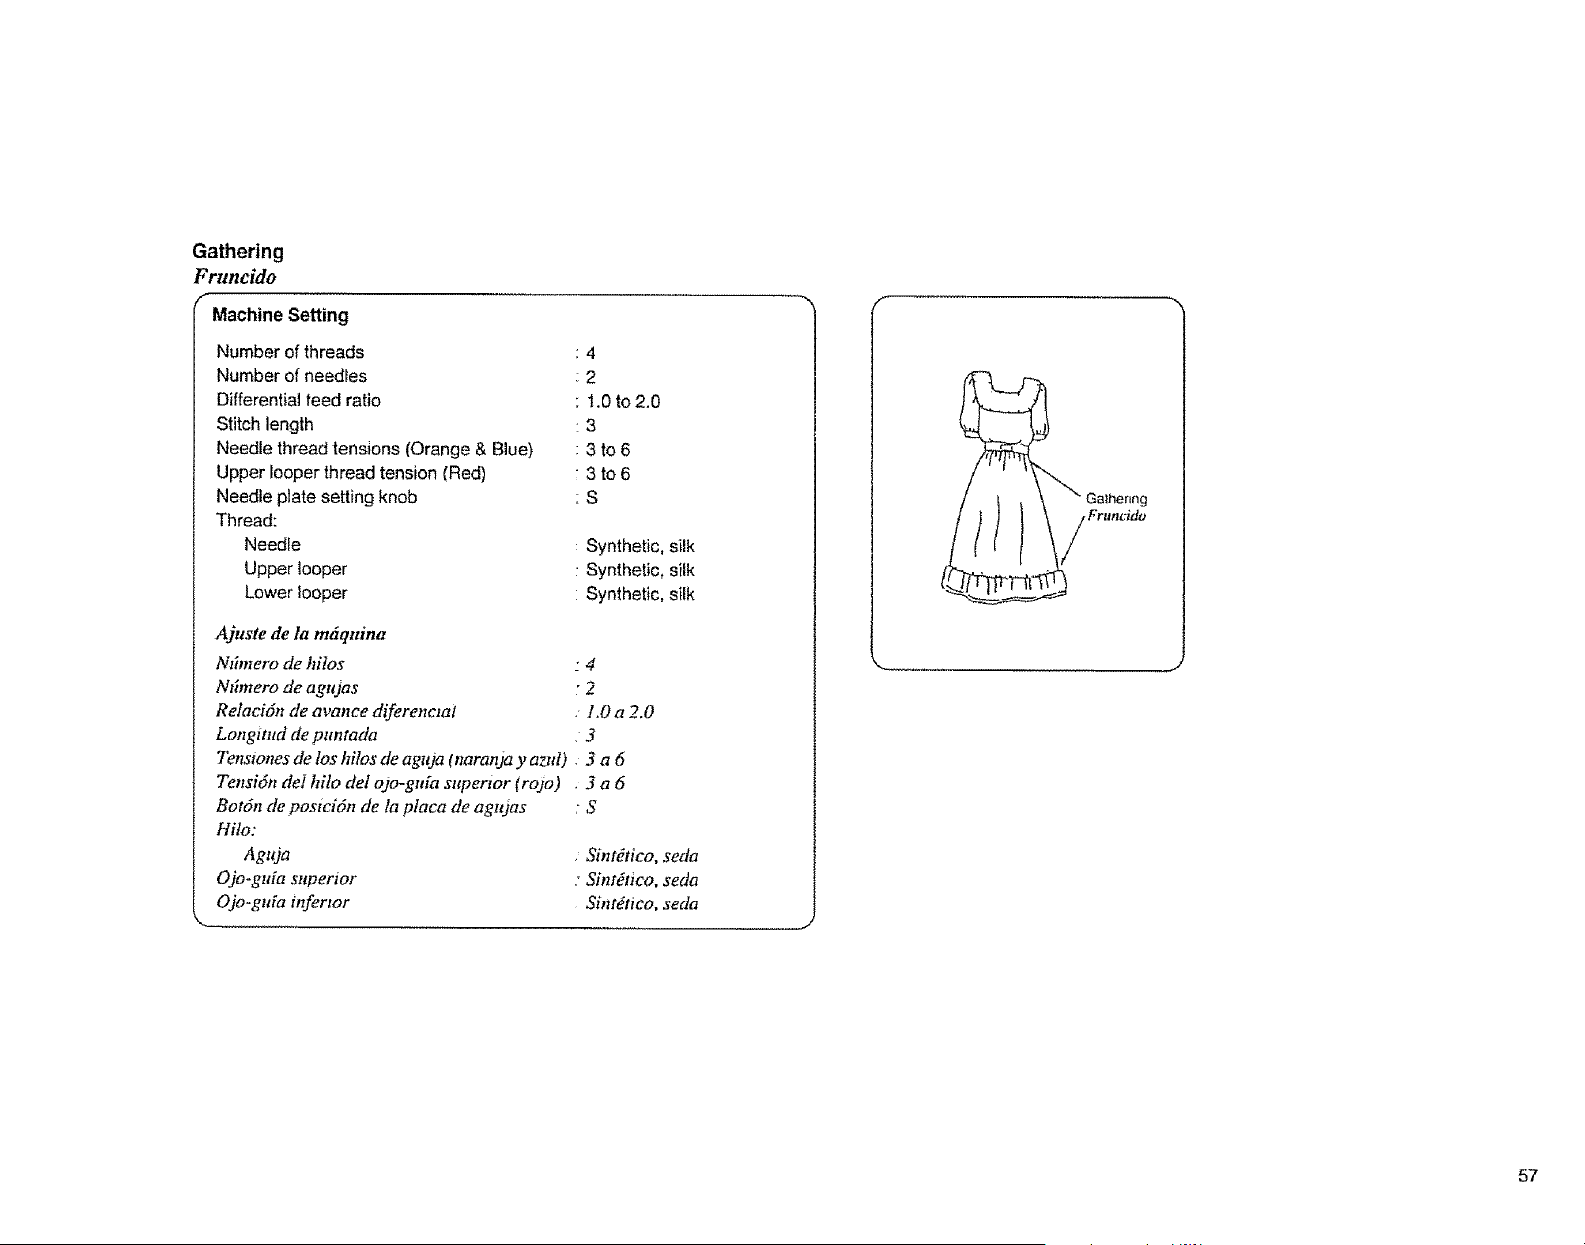
Gathering
Fruncido
f
Machine Setting
Number of threads
Number of needles
Differential teed ratio
Stitch length
Needle thread tensions (Orange & Blue)
Upper looper thread tension (Red)
Needle plate setting knob
Thread:
Needle
Upper looper
Lower tooper
4
2
1.0 to2.0
3
3 to6
3to6
:S
Synthetic, silk
Synthetic, silk
Synthetic, silk
Ajttste de la m6quina
Ntbnero de hilos 4
Ntlmero de agujas : 2
Relaci6n de avance diferenc2ai : 1.0 a 2,0
Longlntd de puntada , 3
Tenstones de los hilos de aguja tnaranja y az.td) . 3 a 6
Tensidn del hilo de1 ojo-guia superior Crojo) . 3 a 6
Botdn de posicidn de la placa de agulas ; S
Hilo:
Aguja
Ojo-guia superior
Ojo-gtffa inferior
M_
• Sint_tico, seda
: SintEtico, seda
Sintdtico, seda
Fruncido
57
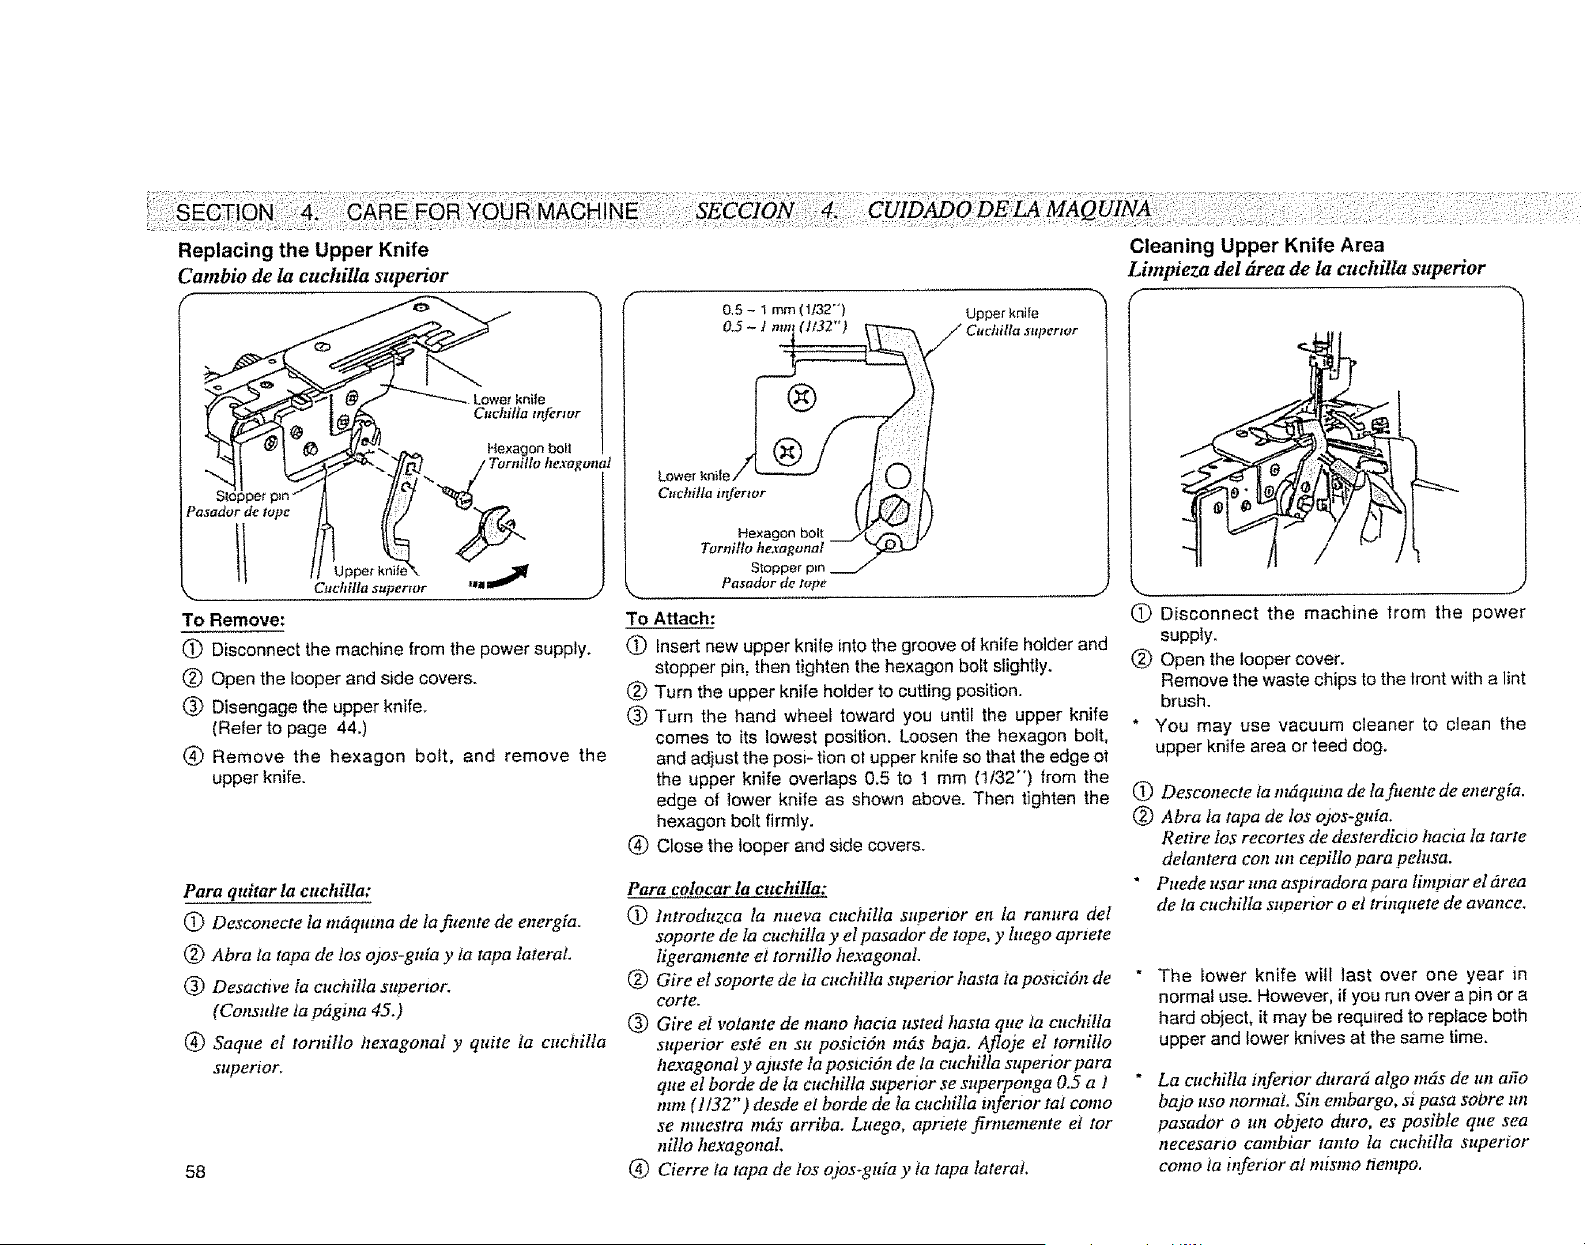
Replacing the Upper Knife
Cambio de la euchilla superior
f
Stopper p=n
Pasador de tope
knife
Cuchilfa mJ_mor
,,,_/,_,vq, ,,x.-. Hexagon bOlt
:_;"_... "][t_ / Tornillo h_:ragonat
oo ko,o', ,.....!' J
Cuchilla supertor
To Remove:
(_ Disconnect the machine from the power supply.
(_) Open the looper and side covers.
Disengage the upper knife.
(Refer to page 44.)
Remove the hexagon bolt, and remove the
upper knife.
Para quitar la cuchilla:
(_ Desconecte la mdqutna de ia fuente de energia.
(_) Abra ta tapa de los ojos-guia y la tapa lateral.
(_ Desacttve la euchilta snpertor.
(Consutte ta p6gina 45.)
(_ Saque el tornillo hexagonal y qutte la cnchilla
Superior.
58
Upper knife
Hexagon bolt
Tornillo heptagonal
Stopper p_n
.... Pasador de tope .,
To Attach:
(D insert new upper knife into the groove of knife holder and
stopper pin; then tighten the hexagon bolt sfightiy.
(_) Turn the upper knife holder to cutting position.
(_) Turn the hand wheel toward you until the upper knife
comes to its lowest position. Loosen the hexagon bolt,
and adjust the posi- tion ot upper knife so that the edge of
the upper knife overlaps &5 to 1 mm (1/32 °') from the
edge of lower knife as shown above. Then tighten the
hexagon bolt firmly.
(_ Close the looper and side covers.
Para colocar la cuchilla:
(!) lntroduzca la nueva cuchilta superior en la ranura de!
soporte de Ia cuchilla y el pasador de tope, y htego aprtete
Iigeramente e1 torni!lo hexagonal.
(_) Gire el soporte de la cnchilla sttpertor hasta ia postcidn de
carte.
(_) Gire el volante de mann haeia usted hasta que ta cuchilla
superior estd en su posici6n m6s baja. Afloje el tornillo
h_ragonal y ajuste la postci6n de la cuchilla superior para
que el borde de la cuchilla sttperior se superponga 0.5 a 1
mm (1]32"') desde el borde de la cuchilta tt_erior tai como
se muestra rods arriba. Luego, aprtete firmemente el tor
nillo hexagonal
(_) Cierre ia tapa de los ojos-guia y la tapa lateral.
Cleaning Upper Knife Area
Limpieza del 6rea de la cuchilla superior
/
.... J
C) Disconnect the machine from the power
supply.
(_ Open the looper cover.
Remove the waste chips to the front with a lint
brush.
* You may use vacuum cleaner to clean the
upper knife area or teed dog.
(_ Desconecte la m6qutna de la fitente de energia.
(_ Abra la tapa de los o)os-guia.
Retire ins recortes de desterdicio hacia la tarte
delantera con un cepillo para pelnsa.
* PuedeusarunaaspiradoraparaIimpiareldrea
de la cuehilla superior o el trinquete de avance.
The lower knife will tast over one year in
normal use. However, if you run over a pin or a
hard obiect, it may be required to replace both
upper and lower knives at the same time.
La cuchilla inferior durar6 alga m6s de un afio
ba)o nso normal Sin embargo, si pasa snore ttt!
pasador oun objeto duro, es posible que sea
necesarto cambiar tanto la cttchilla superior
como ia itferior al mismo tiempo.
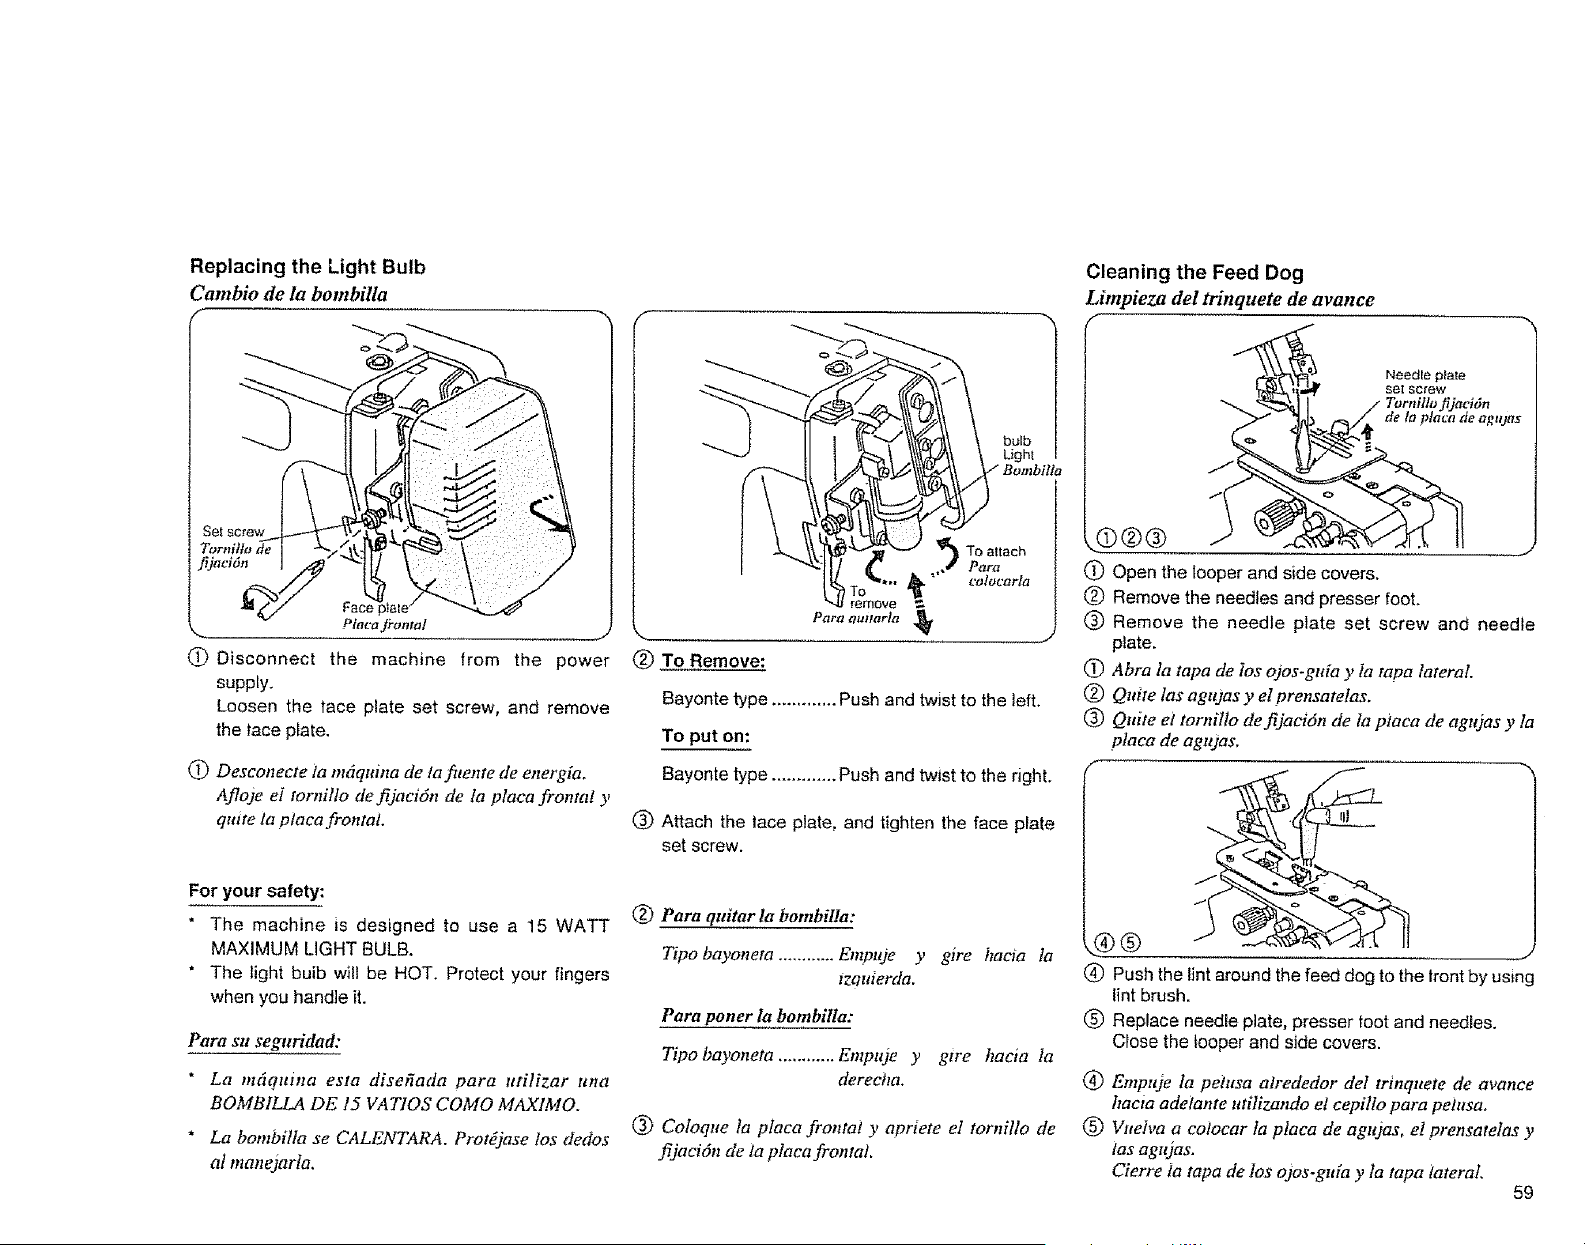
Replacing the Light Bulb
Cambio de la bombilla
Fac_
Pin€aft-areal
(_ Disconnect the machine from the power
supply.
Loosen the tace plate set screw, and remove
the lace plate.
@ Desconecte la m6quina de lafilente de energia.
Afloje el tornilto de fijacidn de la place frontal y
quite la piaca frontai.
For your safety:
* The machine is designed to use a 15 WATT
MAXIMUM LIGHT BULB.
* The light bulb w_l! be HOT. Protect your fingers
when you handle it.
Pare su seguridad:
* La mdqaina esta disefiada pare utilizer una
BOMBILLA DE 15 VATIOS COMO MAXIMO.
* La bombilla se CALENTARA. Protdjase los dedos
at manejarta.
-., f
bulb
Light
(_) TO Remove:
remove
Partz Om/arla
To altach
Pare
_/ocarla
Bayonte type ............. Push and twist to the left.
To put on:
Bayonte type ............. Push and twist to the right.
(_ Attach the lace plate, and tighten the face plate
set screw.
(_) Pare quitar la bombilla:
Tipo bayoneta ............ Empuje 3' gire hacia ta
lzouierda.
Pare poner la bombilla:
Tipo bayoneta ............ Empuje y gwe hacia 1a
derecha.
_) Coloque laptaca frontal y apriete el tornillo de
fijaci6n de la place frontaL
Cleaning the Feed Dog
Limpieza del tHnquete de avance
8)®®
@
@
®
@
@
®
.%@
®
®
_gtUos
Open the looper and side covers.
Remove the needles and presser foot.
Remove the needle plate set screw and needle
plate,
Abra la tape de los o)os-gtda y ia tapa lateral.
Quite las agujas y el prensatelas.
Qnite e1 tornillo de fijaci6n de la place de agujas y la
place de agujas_
,J
Push the lint around the feed dog to the front by using
lint brush.
Replace needle plate, presser foot and needles.
Close the looper and side covers.
@ Empuje la pehtsa alrededor del trmquete de avance
hacia adelante utilizando el cepillo pare pelusa,
(_) Vueiva a coiocar ta place de agajas, el prensatetas y
las agujas.
Cierre ia tape de los o3os-guia y la tape lateral,
59
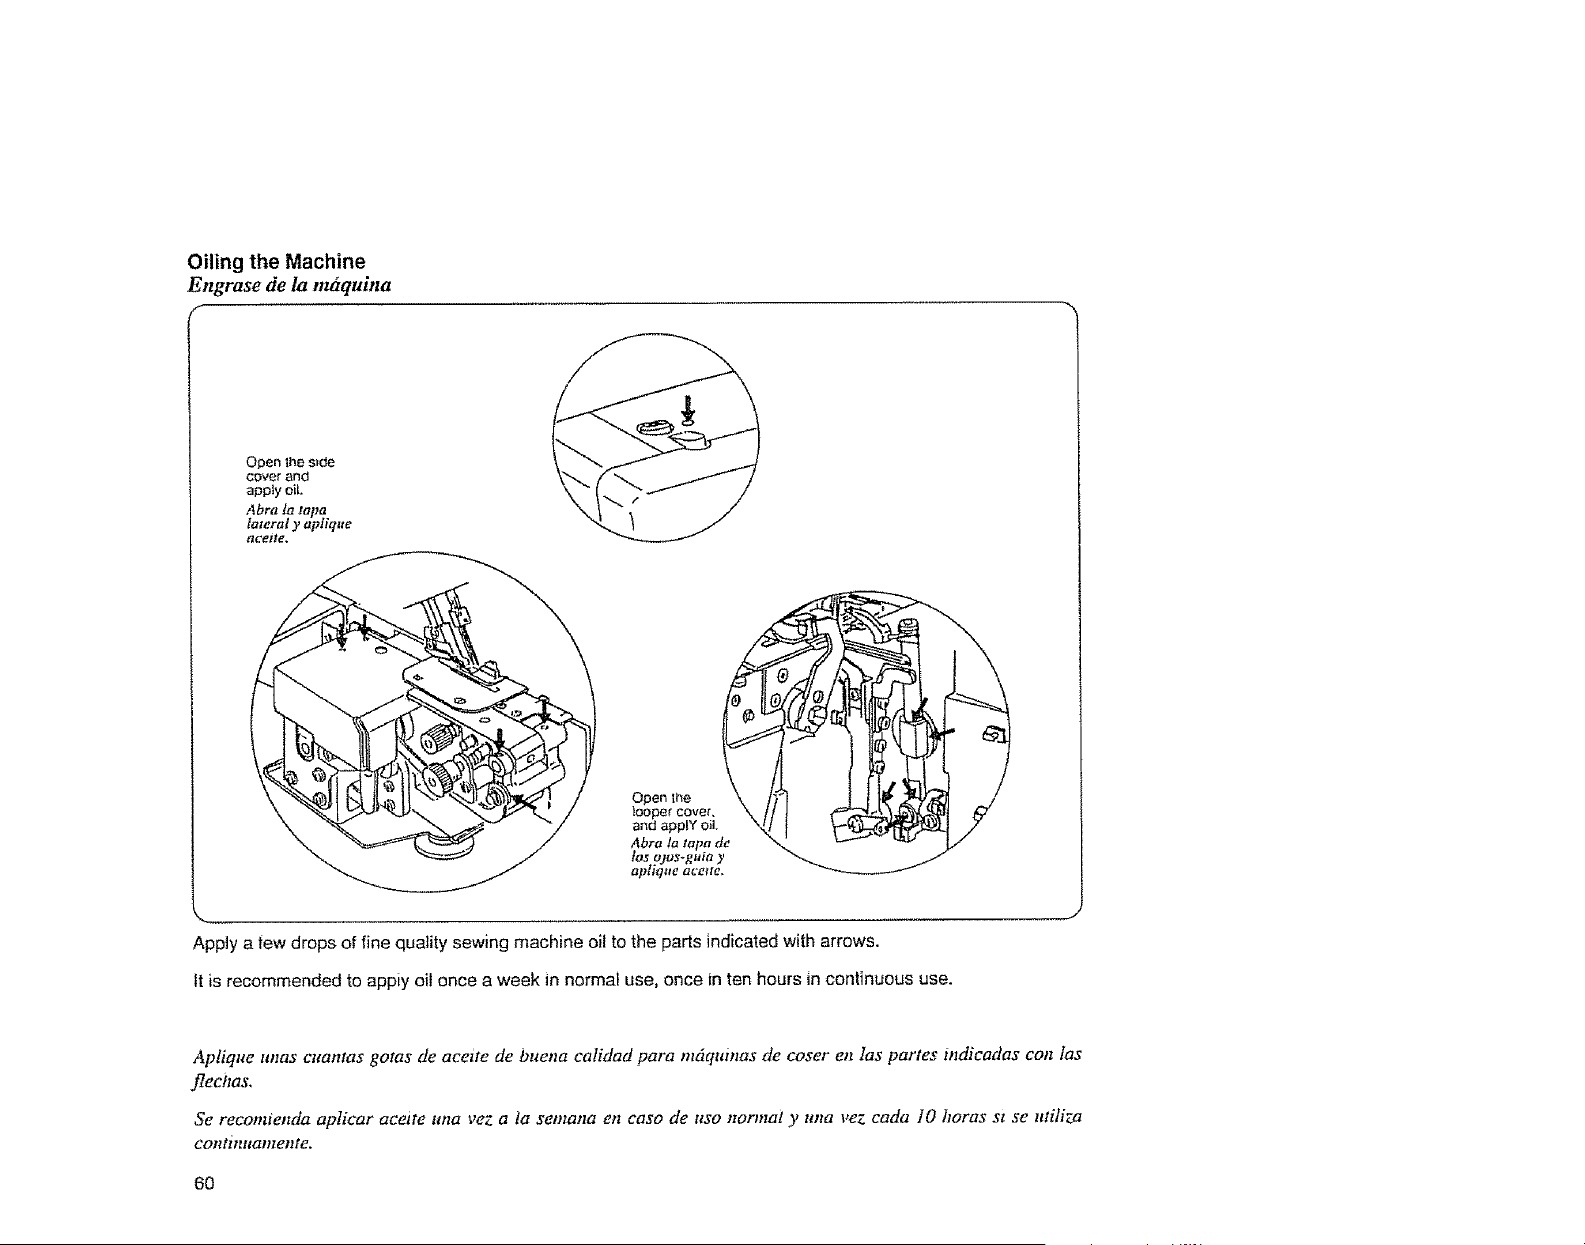
Oiling the Machine
Engrase de la nEzquina
F
Open lhe s_de
cover and
apply oil
Abra ta tapa
lateral y apfiqtte
aceite.
\
Open the
looper cover, \ It I _=_,_-L__,_"k_,
and applY oiL \'_,1 I _""_
Abra la tapa de x.Q _
los ojas-guia y _ /
aptique acette.
/
Apply a few drops of fine quality sewing machine oil to the parts indicated with arrows.
It is recommended to appiy oil once a week in normal use, once in ten hours in continuous use.
Aplique unas cuantas gores de acelte de buena calidad para mdqumas de coser en 1as partes mdicadas colt los
flechas,
Se recomienda aplicar acette lt/la vez a ta semana en caso de usa normal y tt/ta vez coda 10 horas st se ntiliza
continaatnente.
60
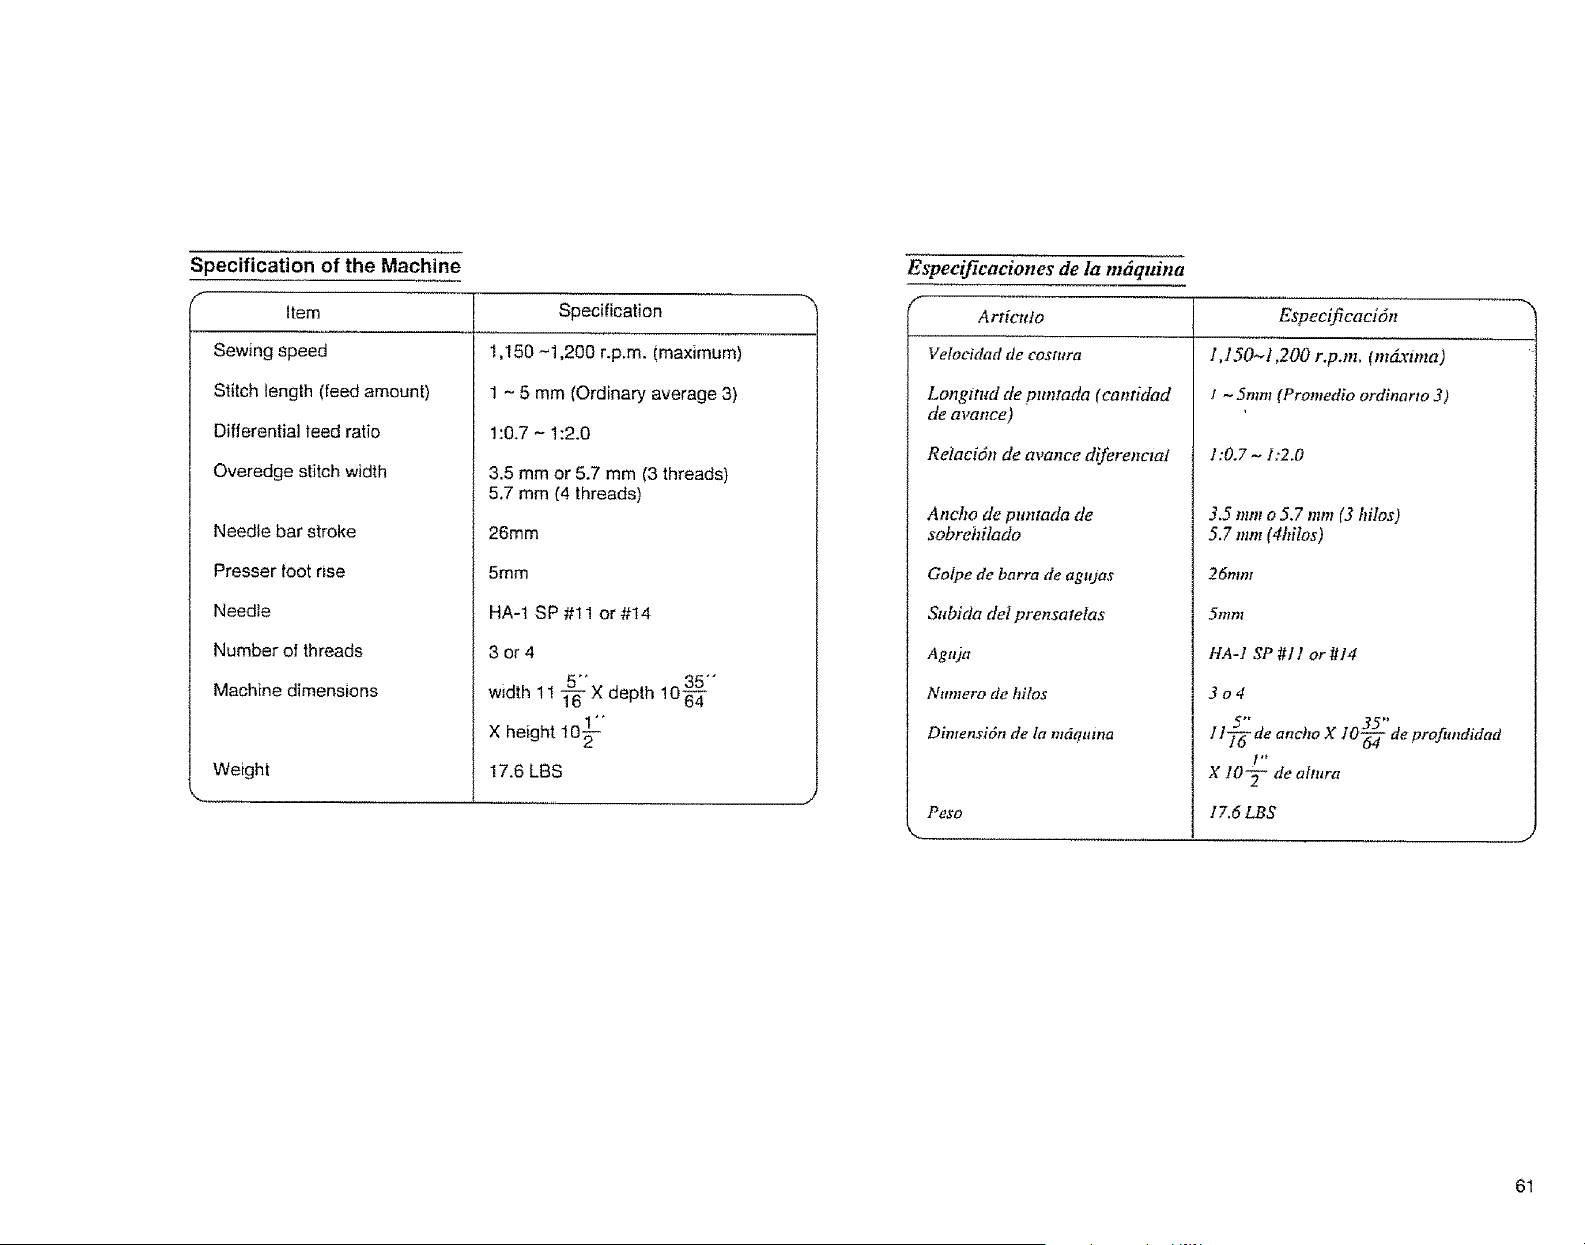
Specification of the Machine
Item
Sewing speed
Stitch length (feed amount)
Differential teed ratio
Overedge stitch width
Needle bar stroke
Presser foot rise
Needle
Number of threads
Machine dimensions
Weight
Specification
1,150 -1,200 r.p.m, (maximum)
1 - 5 mm (Ordinary average 3)
1:0.7 - 1:2.0
3.5 mm or 5.7 ram (3 threads)
5.7 mm (4 threads)
26mm
5ram
HA-1 SP#t1 or#14
3 or4
1035 °"
width 1! 1-_-"X depth 64
X height 10_"
17.6 LBS
Espeeificaciones de la m6quina
#
Articttlo
Velocidad de costura
LongmM de ptmtada (cantidad
de avance)
Retacidn de avance diferenctal
Ancho de ptmtada de
sobrehilado
Gotpe de barra de agtqas
Subida del prensatelas
Agtua
Numero de hilos
Dimensidn de la m6quma
Peso
Especificacidn
1,150~1,200 r.p.m. On6xima)
i - 5ram (Promedio ordinarto 3)
1:0.7 _ I:ZO
3.5 mm o 5.7 mm (3 hilos)
5.7 mm (4hiIos)
25ram
5mm
HA-1 SP #11 or#14
3o4
5" 35" .
1 l"]_ de ancho X 10-_ de profund_dad
X loft" de almra
17.6 LBS
61
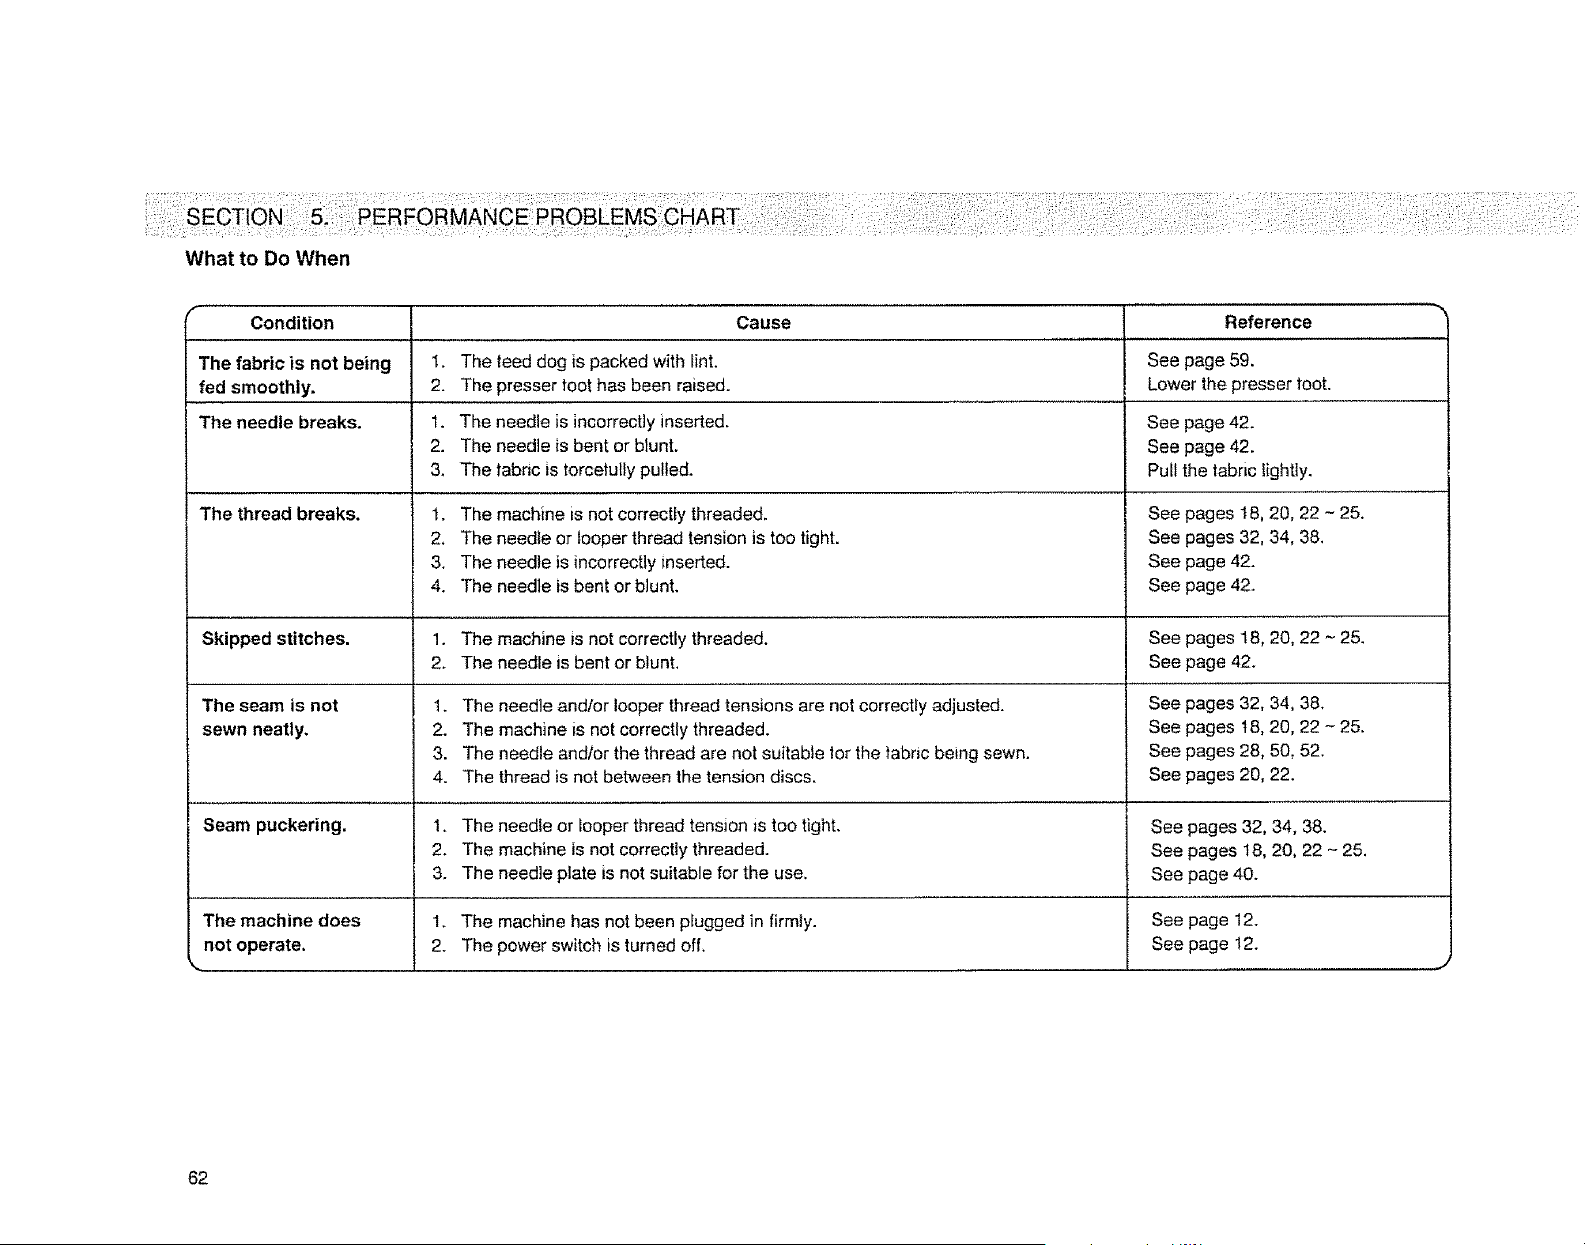
What to Do When
Condition Reference
The fabric is not being
fed smoothly.
The needle breaks.
The thread breaks.
Skipped stitches.
The seam is not
sewn neatly.
Cause
1. The teed dog is packed with lint.
2. The presser foot has been raised.
t. The needle is incorrectly inserted.
2. The needle is bent or blunt.
3. The tabric is torcetully pulled.
1. The machine is not correctly threaded.
2, The needle or looper thread tension is too tight.
3. The needte is incorrectly inserted.
4. The needle is bent or blunt.
1. The machine is not correctly threaded.
2. The needle is bent or blunt.
1. The needle andlor looper thread tensions are not correctly adjusted.
2. The machine is not correctly threaded.
3. The needle andlor the thread are not suitable |or the fabric being sewn.
4. The thread is not between the tension discs.
See page 59,
Lower the presser toot.
See page 42.
See page 42.
Pull the tabric lightly.
See pages 18, 20, 22 - 25.
See pages 32, 34, 38.
See page 42.
See page 42.
See pages 18, 20,22- 25.
See page42.
See pages 32, 34, 38.
See pages t8, 20, 22 - 25.
See pages 28, 50,52.
See pages 20, 22.
Seam puckering. 1. The needle or looper thread tension is too tight. See pages 32, 34, 38.
2. The machine is not correctly threaded. See pages 18, 20, 22 - 25.
3. The needle plate is not suitable for the use. See page 40.
The machine does 1. The machine has not been plugged in firmly. See page 12.
not operate, 2. The power switch is turned off. See page 12.
_. ,.._'
62
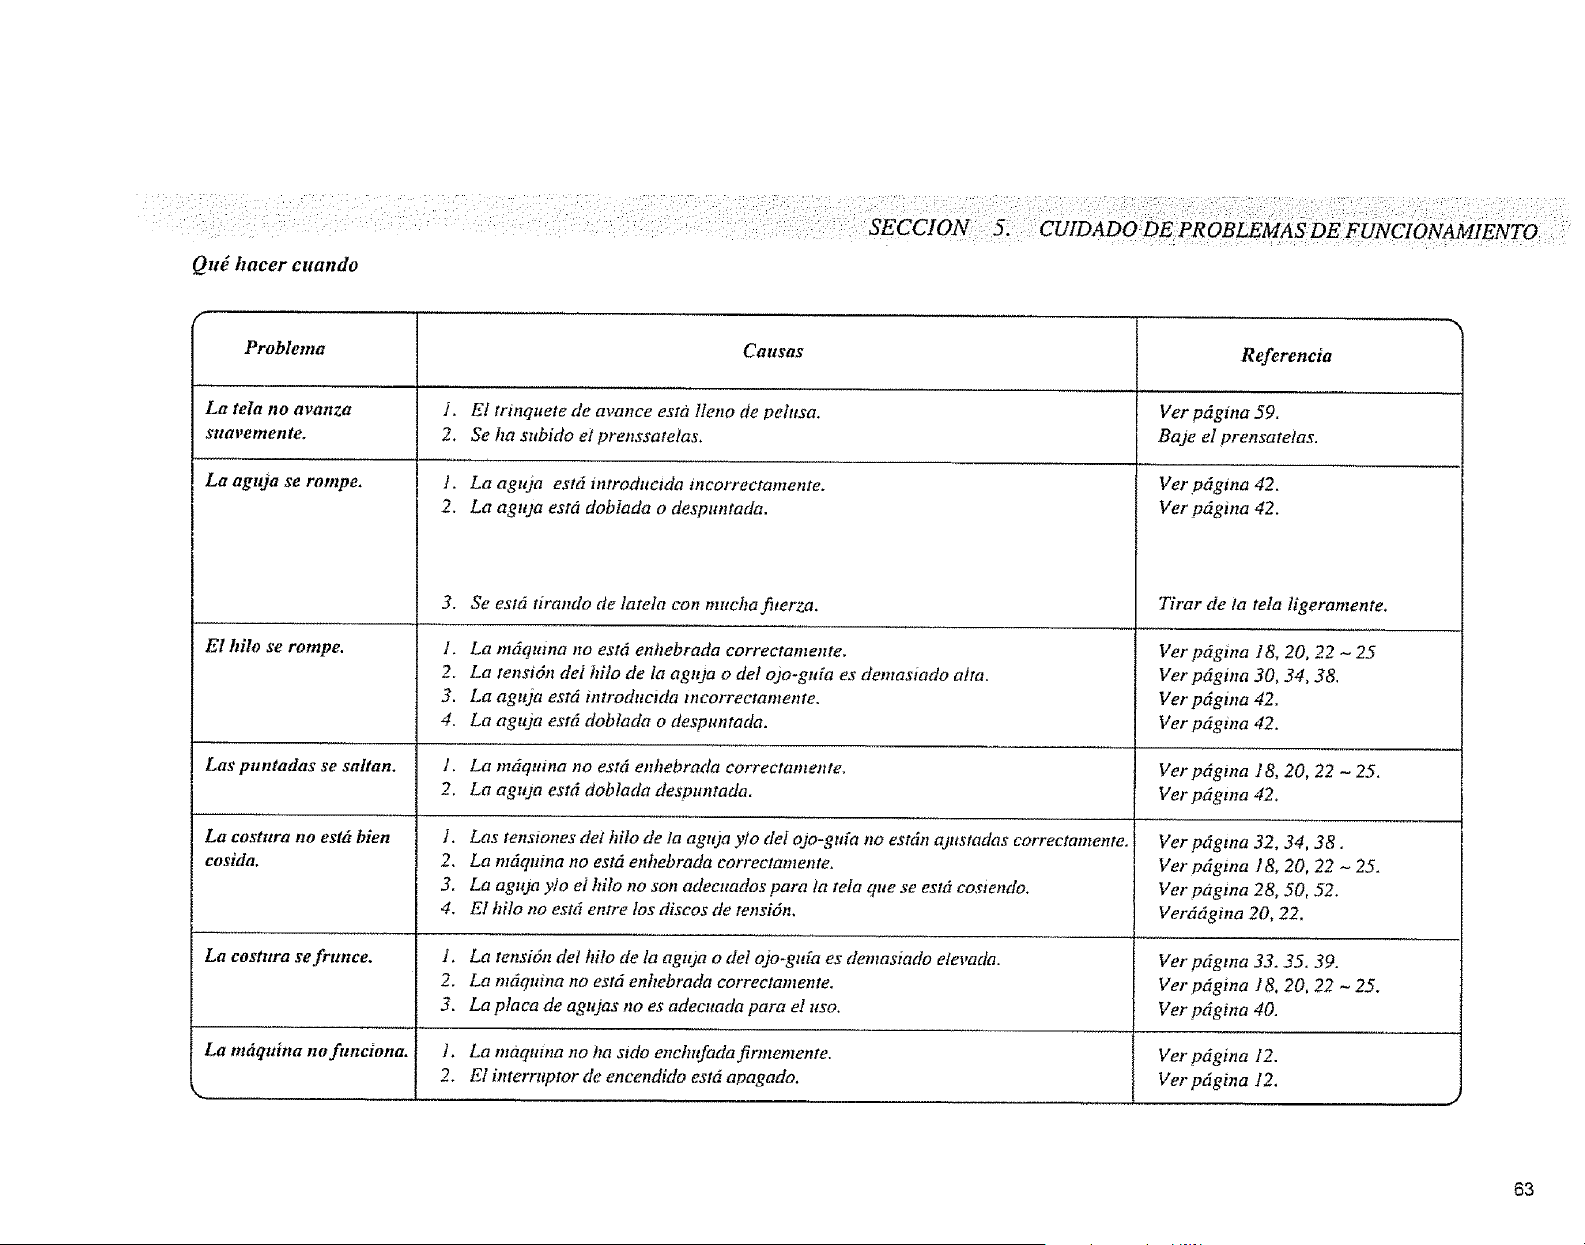
Qu_ hacer cuando
g
Problema
La tela no avanza
sttavemente.
La agtqa se rompe.
El kilo se rompe.
Las puntadas se saltan.
La costura no estd bien
cosida.
La costttra se frunce.
CQllSaS
J. El trinquete de avance esta lleno de pelusa.
2. Se ha subido et prenssatelas.
1. La aguja est6 introducida incorrectamente.
2. La agtqa estd doblada o despuntada.
3.
1.
2.
3.
4.
Se est6 tirando de latela con mucka fTterza,
La mdqtmra no est_ enhebrada correctamente.
La tensidtt del kilo de Ia aguja o del ojo-gttfa es demasiado atm.
La agtua est6 introdttctda mcorrectamente.
La aguja est6 doblada o despuntada.
1. La mdquina no estd enhebrada correctamente.
2, La aguja est6 doblada despuntada.
I. Las tenstones det kilo de la agttja ylo det ojo-gtda no estdn &ustadas correctamente.
2. La mdqmna no est6 enkebrada correctamente.
3. La aguja y]o el hilo no son adecuados para ia tela que se est6 cosiendo.
4. El kilo no est6 entre los discos de tensidn.
f, La tensidn det hilo de la aguja o det ojo-gtffa es demasiado elevada.
2. La mdquina no est6 enhebrada correctamente.
3. La plata de agujas no es adecuada para e! uso,
Referencia
Ver pdgina 59.
Baje el prensatefas.
Ver pdgina 42.
Ver pdgina 42.
Tirar de la tela ligeramente,
Ver pdgina 18, 20, 22 -25
Ver pdgina 30, 34, 38.
Ver pdgma 42.
Ver pdgina 42.
Ver pdgina 18, 20, 22 - 25.
Ver pdgma 42,
Ver pdgtna 32, 34, 38.
Ver pdgma 18, 20, 22 - 25.
Ver paglna 28, 50, 52.
Verddgina 20, 22.
Ver pdgma 33. 35.39.
Ver pdgina 18, 20, 22 _ 25.
Ver pdgina 40.
La mitquina no funciona. L La maqmna no ha sido enchufada firmemente. Vet pdgina 12.
2. Et interruptor de encendido cstd apagado. Ver pdgina12.
63
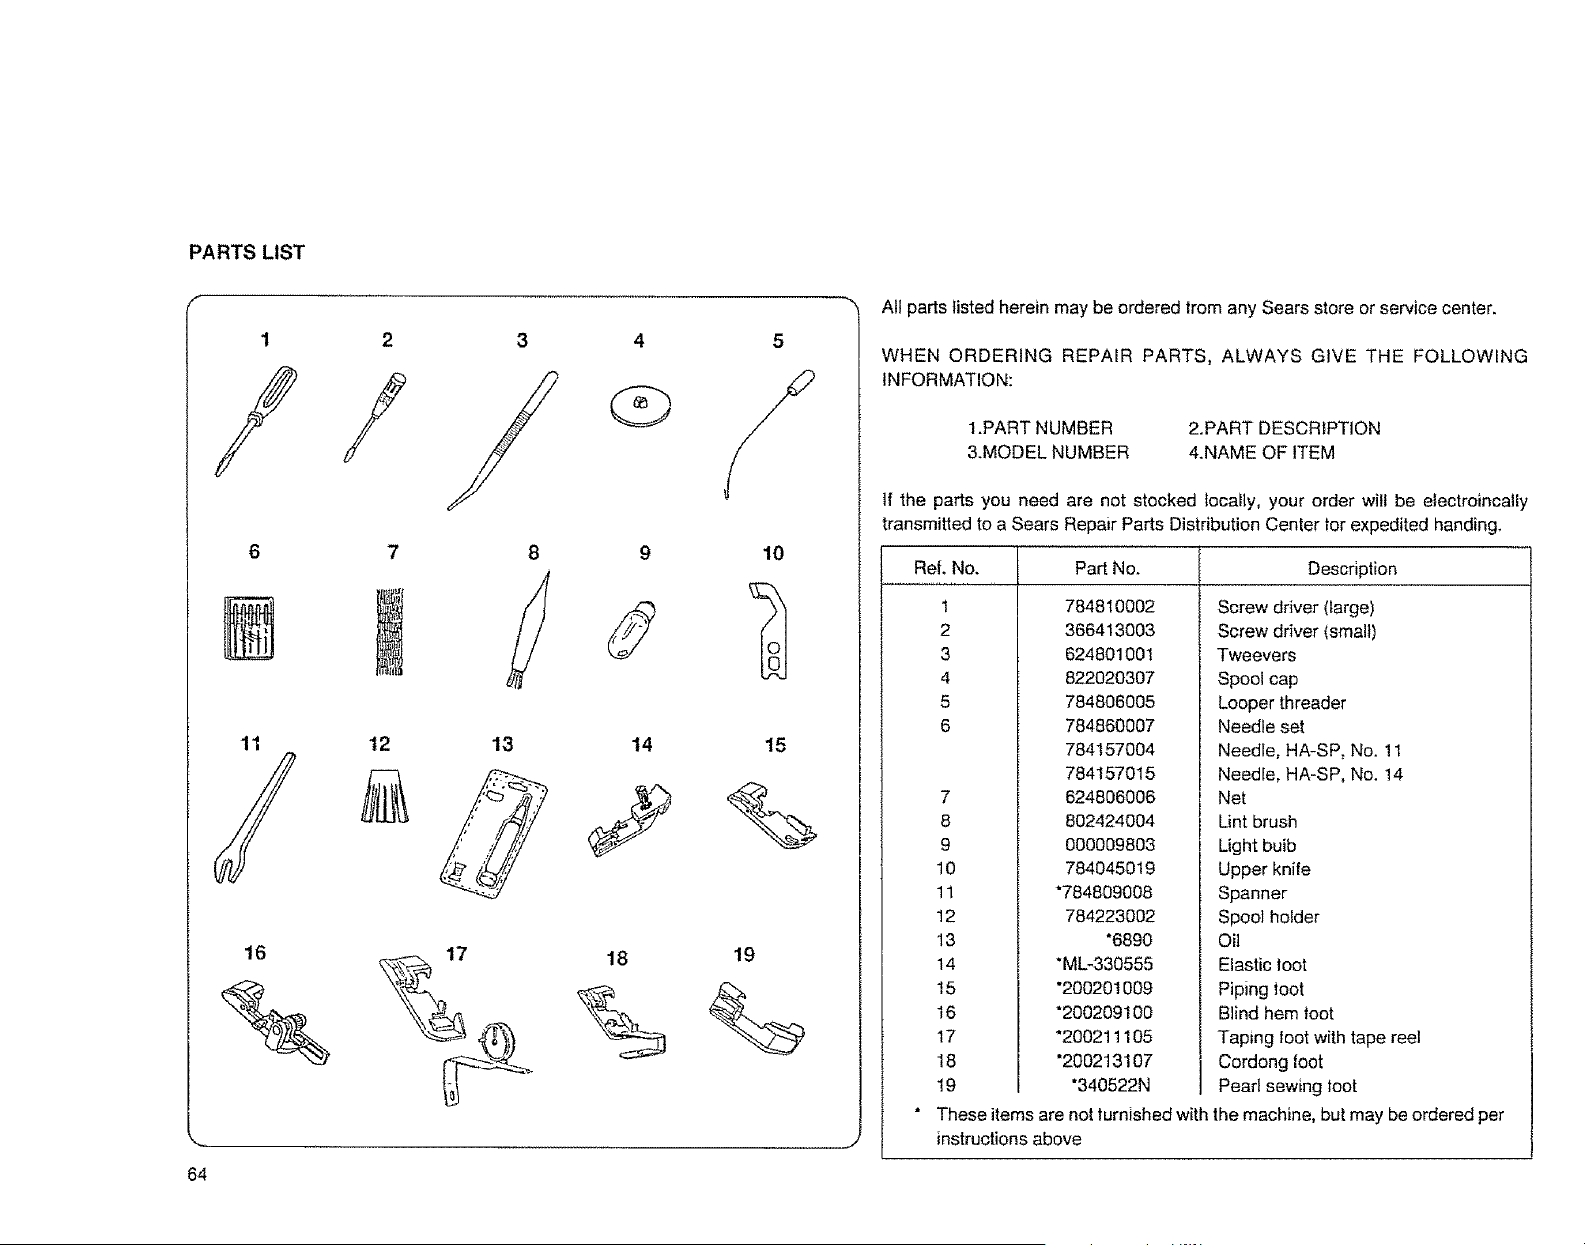
PARTS LIST
64
1 2 3 4
6
N
11
16
5
/
10
12 13 14 15
18 19
"_ All parts listed herein may be ordered from any Sears store or service center.
WHEN ORDERING REPAIR PARTS, ALWAYS GiVE THE FOLLOWING
INFORMATION:
1.PART NUMBER
&MODEL NUMBER
2.PART DESCRIPTION
4.NAME OF ITEM
if the parts you need are not stocked locally, your order wilt be electroincally
transmitted to a Sears Repair Parts Distribution Center lor expedited handing.
Ref. No. Part No. Description
1 784810002
2 366413003
3 624801001
4 822020307
5 784806005
6 784860007
784157004
784157015
624806006
802424004
000009803
784045019
*784809008
784223002
*6890
*ML-330555
"200201009
*200209100
*200211105
"200213107
"340522N
Theseitems are notlurnished with
instructions above
7
8
9
10
11
12
13
14
15
16
17
18
19
Screw ddver (large)
Screw driver (small)
mweevers
Spool cap
Looper threader
Needle set
Needle, HA-SP, No. 11
Needle, HA-SP, No. 14
Net
Lint brush
Light bulb
Upper knife
Spanner
Spool holder
Oil
Elastic loot
Piping toot
Blind hem toot
Taping foot with tape reel
Cordong foot
Pearl sewing toot
the machine, but may be ordered per
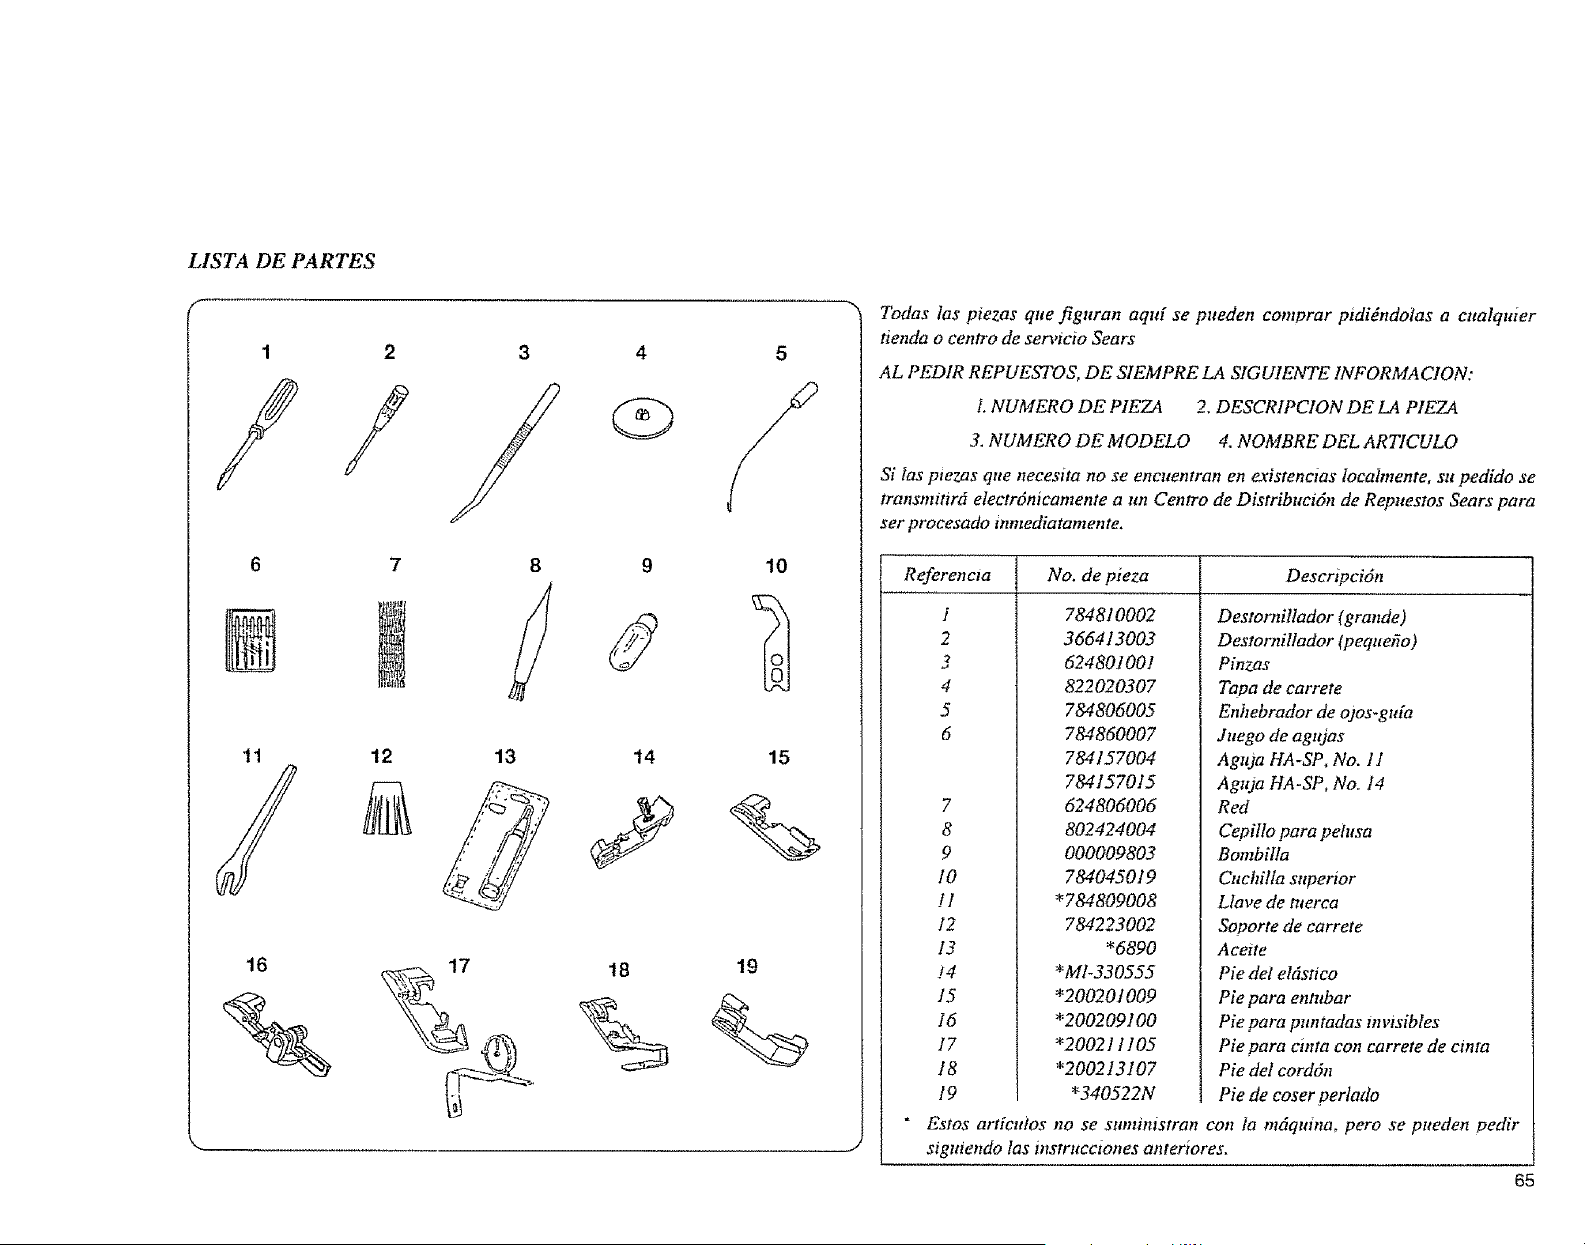
LISTA DE PARTES
F
1 2 3
///
7 86 9
11 12 13 14 15
/
Todas las piezas que figuran aquf se pueden comprar pidigndotas a cualquier
tienda o centro de seta,icio Sears
AL PEDIR REPUESTOS, DE SIEMPRE LA SIGU1ENTE INFORMACION:
I. NUMERO DE PIEZA 2. DESCRIPCION DE LA PIEZA
3. NUMERO DE MODELO 4. NOMBRE DEL ARTICULO
Si las ple_s que necesita no se encuentran en existenctas localmente, su pedido se
transmttw6 electrdnicamente a un Centro de Distribucidn de Repuestos Sears para
ser procesado mmediatamente.
Referencta Descripcidn
I
2
3
4
5
6
7
8
9
10
!1
12
13
!4
15
16
17
18
I9
*
No. de pieza
784810002
366413003
624801001
822020307
784806005
784860007
784157004
784157015
624806006
802424004
000009803
784045019
*784809008
784223002
*6890
*ML330555
*200201009
*200209100
*200211105
*200213107
"340522N
Destornillador (grande)
Destornillador (pequefio)
Pinzas
Tapa de earrete
Enhebrador de o)os-gtda
Juego de agujas
Aguja HA-SP, No. 1I
Aguja HA-SP, No. 14
Red
CepiIlo para pehtsa
Bombilla
Cuchilla superior
Ltave de tuerca
Soporte de carrete
A ceite
Pie det eldstico
Pie para entubar
Pie para puntadas mwsibles
Pie para cinta con carrete de cmta
Pie del cord6n
Pie de coser perlado
Estos arfieuios no se suministran con la mdqmna, pero se pueden pedir
sigtaendo las instruectones anteriores.
65
INDEX
A
Accessory holder ................................................ 8
B
Blind hem .......................................................... 49
Braiding ............................................................ 54
C
Chaining ........................................................... 32
Changing needle .............................................. 36
Collar ................................................................ 53
Curve ........................................................ 30 ~ 31
Curve ............................................................... 31
Cutting width adjusting dial ........................... 7, 23
D
Decorative edge ............................................... 44
Decorative Flatlock ........................................... 45
Differential feed dial ...................................... 6, 33
E
Elastic ....................................................... 41 ~ 42
F
Face plate ..................................................... 6, 59
Foot holder .................................................... 6, 38
Foot control ..................................................... 7, 9
G
Gathering ......................................................... 57
H
Hand whee! ...................................................... 10
L
Lace .................................................................. 43
Ught bulb .................................................... 59, 64
Lint brush ........................................ 8, 58 - 59, 64
Looper thread take up lever ....................... 15, 17
Looper threader ................................ 8, 15, 17, 64
Looper cover ................................................ 6, 10
Lower knife ......................................................... 6
Lower looper ................................................. 6, 15
Lower looper thread ... 14-15, 26 - 28, 34, 46 ~ 48
Lower looper thread guide ................................ 15
Lower looper thread tension die
.................... 16, 14,28,34,46-48
N
Narrow hem ...................................................... 46
Needle .................................................. 22, 36, 64
Needle bar thread guide ............................. 18, 19
Needle clamp ................................................... 36
Needle clamp screw ......................................... 36
Needle plate Setting knob ............................ 7, 32
Needle plate sew screw ................................... 59
Needle stopper pin ........................................... 36
Needle threads ............ 18-19, 26, 28, 34, 46 - 48
Needle thread guide .................................... 18-19
Needle thread tension dial ....... 6, 26, 34, 46 ~ 48
Net .......................................................... 8, 11, 64
O
Oiling ................................................................ 60
Overedging ....................................................... 39
Overlocking ...................................................... 40
P
Periormance problems chart ............................ 62
Picot edge ........................................................ 48
Pin tuck ............................................................. 51
Plug connector ............................................... 6, 9
Power switch .................................................. 6, 9
Pressure adjusting screw ............................. 6, 36
Presser foot ............................................ 7, 11,38
Presser foot lifter .................................... 7, 11,38
R
Ribbing ............................................................. 50
Rolled hem ...................................................... 47
S
Screwdrivers ................................................ 8, 64
Set screw ......................................................... 59
Side cover .................................................... 6, 10
Skirt .................................................................. 56
Sleeve .............................................................. 55
Spool cap ................................................ 8, 11,64
Spool holder ..................................... 6, 11, 12, 64
Spool pin ....................................................... 6, 11
Spool stand ........................................................ 6
Stitch length dial ........................................... 6, 33
Stoppers .......................................................... 11
Stopper pin ....................................................... 58
T
Telescoping thread guide bar ....................... 6, 11
Thread chain .................................................... 20
Thread cutter ................................................ 7, 20
Thread guide plate .................... 6, 14,16, 18 ~ 19
Tweezers ................................................ 8, 15, 64
U
Upper knife release knob ............................. 7, 38
Upper knife ....................................... 7, 38, 58, 64
Upper looper ........................................... 7, 16, 17
Upper looper thread ................ 26, 28, 34, 46 - 48
Upper looper thread guide ................................ 17
Upper looper thread tension dlal
...................... 6, 16,28,34,46 - 48
W
Waistband ........................................................ 52
Waste clipping catcher ....................................... 8
68
INDICE ALFABET1CO
Abrazadera de ia agtoa ..................................... 37
aguja ...................................................... 22, 37_ 65
B
Barra tetesc6ptca de los guia-hilos ................ 6, 11
Base para carretes ............................................... 6
Bombitta ...................................................... 59, 65
Borde deeoratn, o ............................................... 44
Borde de encaje ................................................. 48
Botdn de poslci6n de ta placa de agujas ....... 7, 32
Bot6n gtratorlo de liberacidn de ia cachilla
sttperzor .......................................................... 7, 38
c
Cadenem de hilo ................................................ 20
Caja de aceesortos .............................................. 8
Cambio de ta aguja ............................................ 37
Cepillo para pehtsa ..................................... 59, 65
Cinta eldstica en la ctntrtra ................................ 52
Cotector de recortes de desperdicio ................... 8
Conector para et enchufe ................................. 6, 9
Corta-hilo ........................................................... 20
Caadro de problemas de fimcionomiento ......... 63
Cuehilla inferior .................................................. 6
Cuchilla superior ............................... 7, 38, 58, 65
Cuello ................................................................. 53
Caello acanaiodo ............................................... 50
Curva .................................................................. 31
D
Decoraci6n plana .............................................. 45
Dedo de encadenamiento .................................. 32
Destornilladores ............................................ 8, 65
Dobladillo ciego ................................................. 49
Dobladillo enrollado ......................................... 47
DobladiUo estrecho ............................................ 46
E
Eldsnco ....................................................... 41 _ 42
Encaje ................................................................. 43
Engrase ............................................................... 60
Enhebrador de ojos-gu[a .................... 8, 15, 17, 65
Esquina ....................................................... 30 ~ 3I
F
Faida ................................................................... 56
Frtmctdo ............................................................. 57
G
Guia-hilo de aguja ..................................... 18 - 19
Gma-hilo de la barra de agujas ................... I8, 19
Gtffa-hilo deI o)o-gMa tnferior ........................... 15
GMa-hilo det ojo-gMa superior ......................... 17
H
Hilos de aguja ............... 18, 19, 27, 29, 35, 46-48
Hilo del ojo gMa infertor
.......... 14 - 15, 27 _ 29, 35, 46 _ 48
Hilo del o)o-guia supertor .......... 27° 29, 35, 46, 48
1
Interrttotor de encendido ................................. 6, 9
M
Mango ................................................................. 55
0
Ojo-gtda inferior ............................................ 6, 15
Ojo-gu{a st(perior ..................................... 7, 16, 17
P
Patanca elevadora del prensatelas .......... 7, l t , 38
Palanca tira-hilo del ojo-guia ...................... 15, 17
Pasador de tope .................................................. 58
Pasador de tope de aguja ................................... 37
Pedal ................................................................. 7, 9
Pinzas ....................................................... 8, 15, 65
Placa de ios gtna-hitos .............. 6, 14, 16, 18 - 19
Ptaca frontal ................................................ 6 - 59
Pliegue pequeiio ................................................. 51
Portocarretes .................................................. 6,11
Prensatelas ............................................... 7, 11,38
R
Red ............................................................ 8, 11.65
Remate en Ia porte de arriba de la cosntra ....... 40
S
Selector de ajuste del ancho de corte ............. 7, 23
Selector de avance diferencial ....................... 6, 33
Selector de longimd de ptmtada .................... 6, 33
Selector de tensidn del hilo de aguja
................................. 27,35, 46_48
SeIector de tensidn del hilo del ojo-gMa inferior
....................... 6, 14,29,35, 46-48
Selector de tetrsi6n del hilo del ojo-gMa supertor
......................... 6, 16, 29, 35, 46,48
Sobrehilodo ........................................................ 39
Soporte de carretes ............................. 6, 11, 13, 65
Soporte deI prensatetas .................................. 6,38
T
Tapa de carrete ........................................ 8, 11, 65
Tapa de los ojos-guia .................................... 6, 10
Tapa lateral .................................................... 6, 10
7bpes .................................................................. I1
Tornillo de ajuste de presidn ......................... 6, 37
Tornillo de fijaei6n ............................................ 59
Tornillo de sujeci6n de la aguja ........................ 37
Tornillo de sujeci6n de la placa de agujas ........ 59
Trenzado ............................................................. 54
V
Votante de mano ................................................. 10
67
# # #
# # #
z 9
If this overlook machine is used for commercial or rental purposes, _
the above warranty coverage applies for only 90 days from the date of _ ()
_) purchase. _
_) This warranty gives you specific legal rights, and you may also have _' I_
_=- other rights which vary trom state to state.
SEARS, ROEBUCK AND CO., _
D/817 WA, Hoffman Estates, IL 60179 1_ ()
WARRANTY
FULL FIVE YEAR WARRANTY ON MECHANICAL COMPONENTS
OF OVERLOCK MACHINE
For five years from thedate of purchase, Sears will, tree of charge_
repair detects inmaterial and workmanship which appear in the me-
chanical components of overlook machine head.
FULL TWO YEAR WARRANTY ON ELECTRICAL EQUIPMENT OF
OVERLOOK MACHINE
For two years from the date ot purchase, Sears will, free ot charge_
repair defects in material or workmanship which appear in the e_ectn-
cal equipment of the overlook machine, including electronic compo-
nents, motor, wlr}ng, switch and speed control.
FULL 90-DAY WARRANTY ON ALL PARTS AND MECHANICAL
ADJUSTMENTS
For 90 days from the date of purchase, Sears will, tree of charge,
replace any parts and provide mechanical service necessary for
proper operation of the overlook machine, except lot normal mainte-
nance.
WARRANTY SERVICE IS AVAILABLE BY RETURNING THE
OVERLOOK MACHINE TO THE NEAREST SEARS SERVICE
CENTER/DEPARTMENT IN THE UNITED STATES.
GARANTIA
GARANTIA COMPLETA DE 5 AIVOS PARA LOS COMPONENTES
MECANICOS DE LA MAQUINA DE " OVERLOCK "
Darante cmco aiios a parnr de la feeha de compra. Sears reparar6,
grataitamente, tos defectos de material y de fabrtcac_dn que se
pttedan producir en ios componentes mecfntcos det cabezal de ta
mfquma de "overtoek '"
GARANTIA COMPLETA DE 2 A_QOS EN EQUIPO ELECTR1CO
DE LA MAQUINA DE "OVERLOCK"
Darante dos afios a partzr de la fecha de compra, Sears reparart_,
gratattamente, los defectos de material o de fabrtcactdn que se
pttedan producir en ei eqtttpo eldctrico de la maqtana de "overfock "
mcho,endo componentes eIectrdmcos, motor, cableado, interntptor
y control de velocMad.
GARANTIA COMPLETA DE 90 DIAS PARA TODAS LAS
P1EZAS Y AJUSTES MECANICOS
Durante 90 dias a partzr de ta fecha de compra, Sears reemptazar6,
gratuitamente, cttalquier pteza y proveerd el servicio meci_nico
necesarto para et fitnctonamiento adecuado de ia mdquma de
'"overtock "', excepto para mantemmiento normal.
EL SERVICIO DE GARANTIA ESTA DISPONIBLE ENVIANDO LA
MA QU1NA DE "OVERLOCK" AL CENTRO/DEPARTAMENTO DE
SER VICIO SF_.ARS MAS PROXIMO EN LOS ESTADOS UN1DOS.
Siesta mdquma de "overlock'" se ufiliza para prop6sitos comerctales o de
alquiler, la cobertttra de garanffa citada rods arriba es vdlida tintcamente
darante 90 d[as a partir de la fecha de compra.
Esta garantia te confiere a usted derechos legales especfficos yes
posible que usted tambidn tenga otros derechos que varian de estado a
estado.
SEARS, ROEBUCK AND CO.,
1)/817 WA, Hoffman Estates, 1L 60179
#
#
#
#
#
#
#
_7
#
#
@
#
#
#
#
OVERLOOK
Now that you have purchased your Kenmore Overlock. should a need ever exist for repair parts or service,
s_mply contact any Sears Service Center. Be sute to provide a!l pertinent facts when you call or visit.
The model number oT your Overfock witi be shown on your nomenclature plate on the back of your
Overtock. See page 2 tor location.
WHEN ORDERING REPAIR PARTS, ALWAYS GIVE THE FOLLOWING INFORATION:
• MODEL NUMBER " NAME OF ITEM " PART DESCRIPTION
If the parts you need are not stocked Iocaooy, your order wilt be electronically transmitted to a Sears
Repair Parts Distribution Center for handing.
MA Q UINA DE "O VERLOCK' "
Ahora que usted ha comprado una nt{_quma de "Overloek" Kenmore. st en alguna ocasi6n se presenta la
neeesidad de obtener piezas de repuesto o servlcto, simplemente p6ngase en contacto con cualquter
Centro de Servtcto Sears. Asegtirese de proporcionar toda la nformaci6n 9 vaya
a uno de nuestros centros.