INSTALLATION AND
INSTRUCTION MANUAL
COMANDO WIRELESS
BROMIC STRATOS 3.0 / 5.0 / 7.0 / 9.0
Nov 2019-v1.0
BROMIC.COM/PLUMBING
1300 276 642
A member of the Bromic Group
USER INSTRUCTIONS
Manual
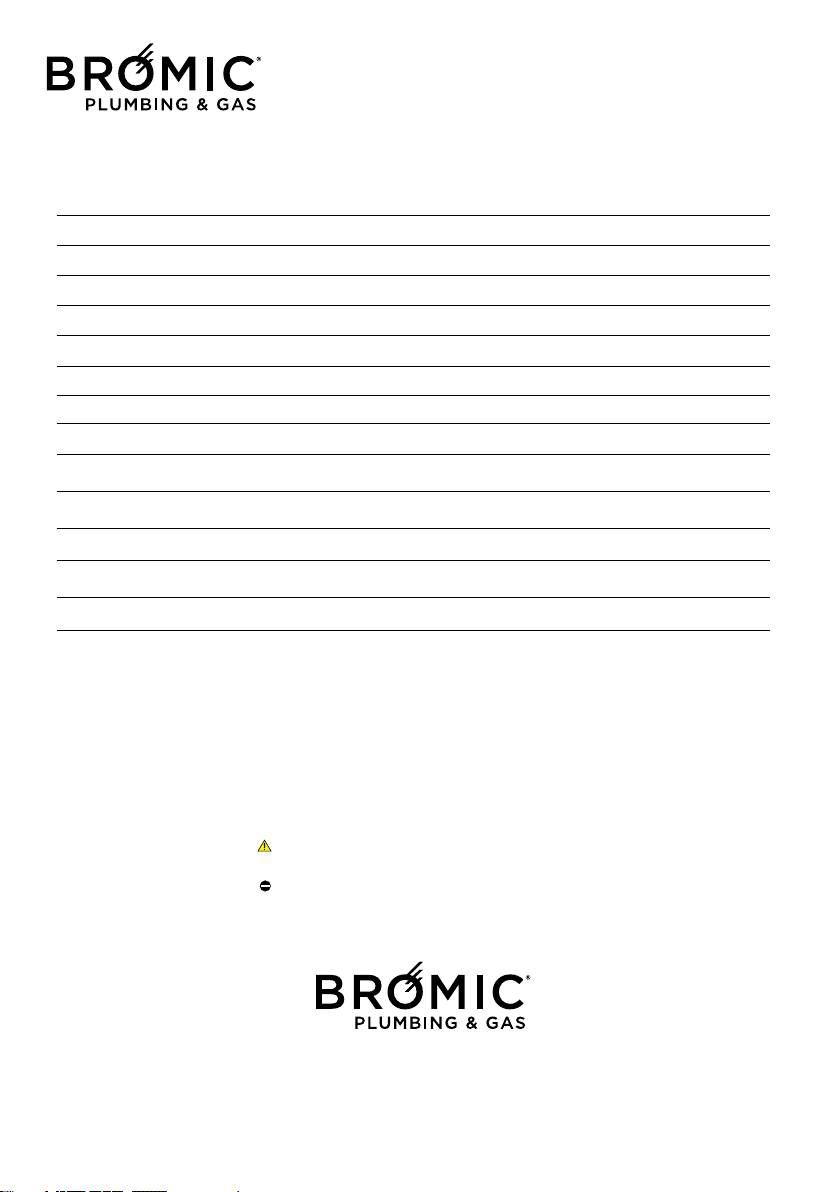
Radio chronothermostat
(Wireless)
Stratos
3.0 - 5.0 - 7.0 - 9.0
- sealed chamber -
0694
n° BL3197
Flued Indoor Gas Heater - Instruction Manual
2
July 2019 - V1
PLUMBING & GAS
2
GENERAL
COMPLIANCE
RANGE
2
GENERAL
COMPLIANCE
RANGE
2
GENERAL
COMPLIANCE
RANGE
Head Ofce: 10 Phiney Place, Ingleburn, Sydney, NSW 2565 Australia
Telephone: 1300 276 642 (within Australia) or NZ 0508 276 642
Email: [email protected] Web: www.bromic.com/plumbing
Note: Bromic Plumbing Pty Ltd reserves the right to make changes to specications, parts,
components and equipment without prior notication. This Installation, operation and service manual
may not be reproduced in any form without prior written consent from Bromic Plumbing Pty Ltd.
This manual contains important information about the assembly, operation, and maintenance of
Blow Heaters. Please pay close attention to the important safety information shown
throughout this instruction manual. Any safety information will be accompanied
by the following safety alert symbols:
DANGER, WARNING, IMPORTANT
!
!
!
MODEL CODE
BRAHMA STRATOS 3.0 NG 2620970
BRAHMA STRATOS 5.0 NG 2620971
BRAHMA STRATOS 7.0 NG
2620972
BRAHMA STRATOS 9.0 NG 2620973
The appliance purchased by you
is covered by a SPECIFIC WARRANTY
starting on the date of installation
After-Sales Service in your area.
In some parts of the manual, the following symbols are used:
IMPORTANT = jobs requiring special caution and adequate preparation.
FORBIDDEN = jobs that MUST NOT be performed.
BASIC SAFETY PRECAUTIONS 3
GENERAL PRECAUTIONS 4
MORE ABOUT THE MANUAL CONTROL 5
ABOUT THE RADIO WIRELESS CHRONOTHERMOSTAT 6
INSTALLING THE WIRELESS CONTROL 9
USING THE WIRELESS CONTROL 10
Description of keys 10
Description of display 11
Programming 13
COMMISSIONING 21
SWITCHING OFF FOR LONG PERIODS 23
CLEANING THE APPLIANCE 24
MAINTENANCE 24
TROUBLESHOOTING 25
Wireless Controller - Instruction Manual
3
BASIC SAFETY PRECAUTIONS
Please remember that certain basic safety pre-
cautions must be taken when using products
requiring gas and electricity:
- The appliance must not be used by children
and disabled persons if unassisted.
- If you smell gas, do not start electric
appliances or appliances such as switches,
household appliances, etc.
In this case:
• ventilate the premises by opening the doors
and windows;
• close the gas opening/closing device;
• promptly call the After-Sales service or profes-
sionally qualified personnel.
- Do not touch the appliance with wet or
damp parts of the body or if your feet are
wet.
- Cleaning is forbidden without first dis-
connecting the appliance from the power
mains.
- Do not pull, disconnect or twist the power
cables exiting from the appliance even
when this is disconnected from the power
mains.
- Do not place objects, curtains, etc., on the
appliance which could cause malfunctions
or prove to be a hazard.
DO NOT PLACE ARTICLES ON OR AGAINST
THIS APPLIANCE.
DO NOT USE OR STORE FLAMMABLE
MATERIALS NEAR THIS APPLIANCE.
DO NOT SPRAY AEROSOLS IN THE VICINITY
OF THIS APPLIANCE WHILE IT IS IN
OPERATION.
DO NOT MODIFY THIS APPLIANCE
4
Wireless Controller - Instruction Manual
4
GENERAL INFORMATION
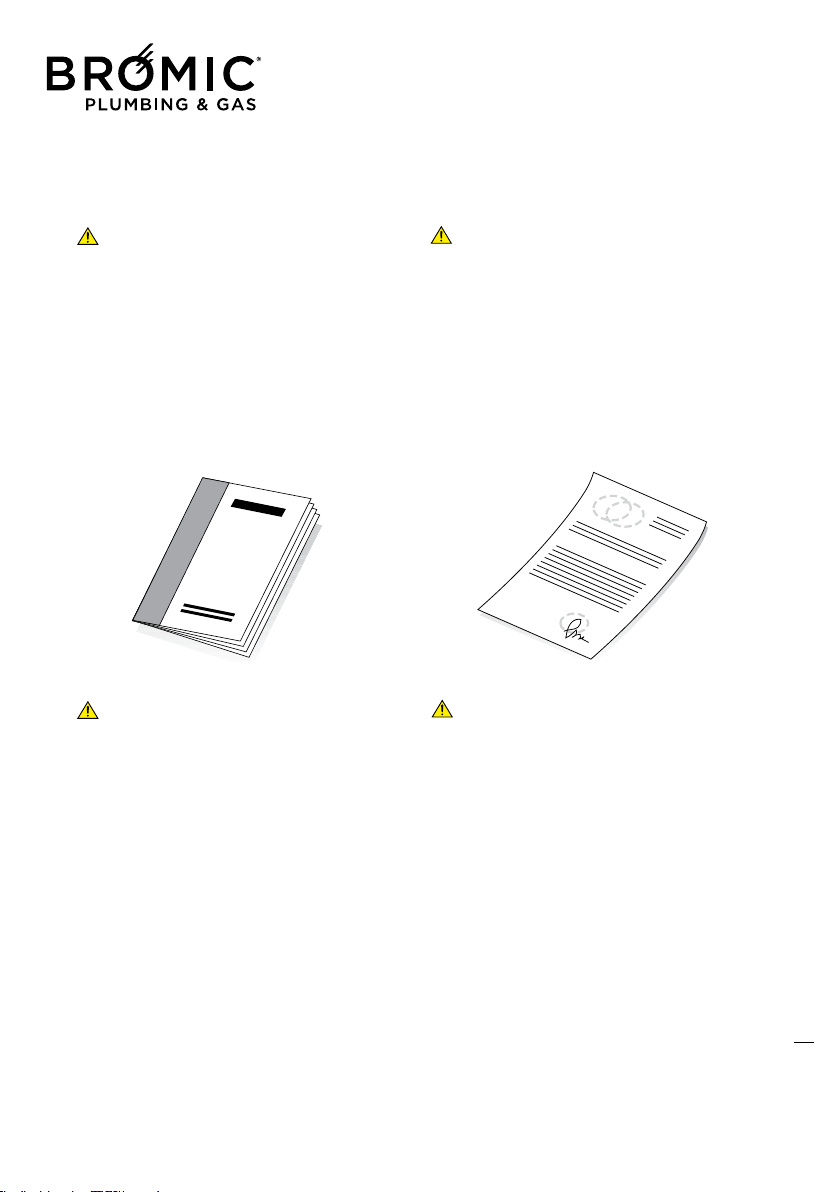
This booklet and that for the Installer and
After-Sales Centre are an integral part
of the appliance and consequently must be
looked after carefully and ALWAYS accompany
it even when it is transferred to another owner
or user or to another system.
In the event of its being damaged or lost, ask
your Authorised Local Technical Centre for
another copy.
The appliance must be used as intended by
the Manufacturer for the purpose for which
it was specifically made.
The Manufacturer disclaims all contractual and
non-contractual liability for injury caused to
persons and animals and damage to things
caused by installation, adjustment and main-
tenance errors or by improper use of the appli-
ance.
The appliance must be installed by an
autrhorised person.
- If the appliance is not used for a long peri-
od of time, the following operations must
be performed:
• position the master switch of the system, if fit-
ted, on “off” or remove the plug from the mains
power socket;
• close the gas tap.
5
Wireless Controller - Instruction Manual
5
6
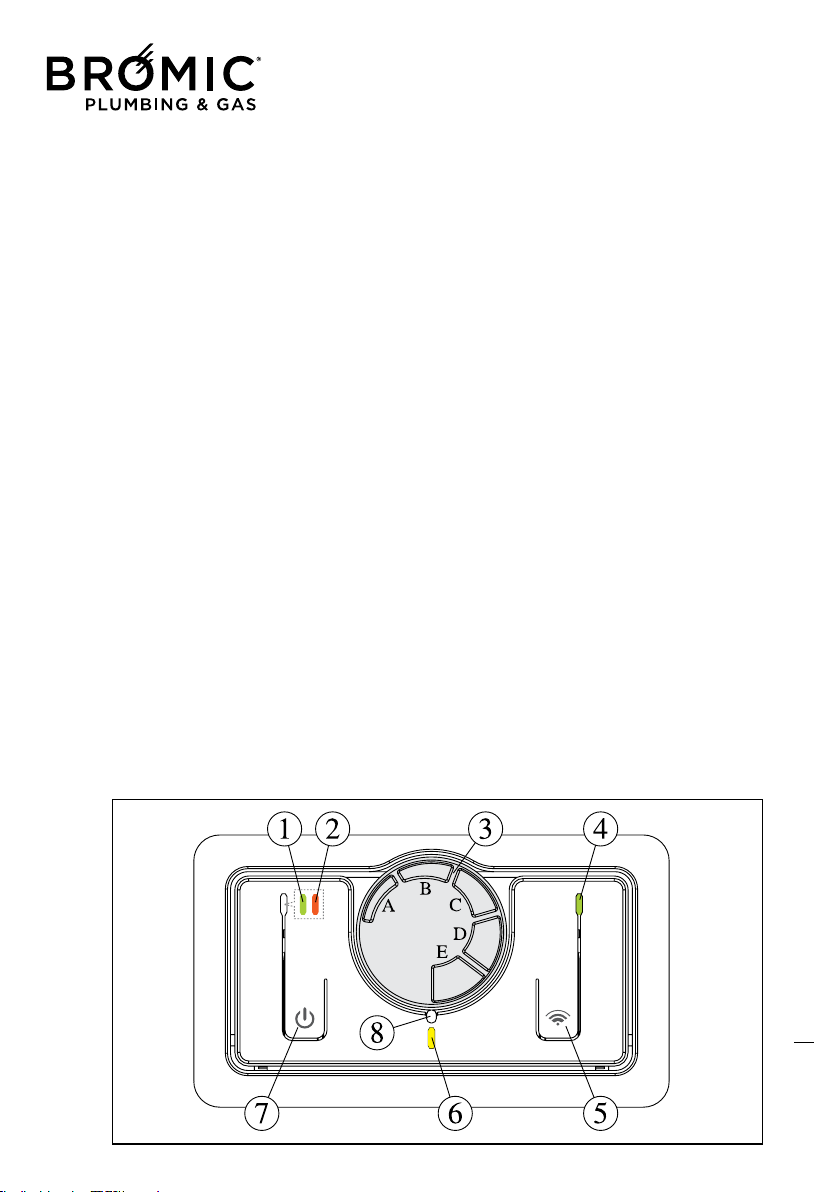
MORE ABOUT THE MANUAL CONTROL
1 - GREEN Led On = heater On
1b - GREEN Led Off = heater Off
2 - RED Led On = burner flame block
2b - RED Led Off = heater released
2c - RED Led SLOW flashing = pressure switch don’t switch ON
2d - RED Led FAST flashing = locked pressure switch
3 - Thermostat knob regulation (approximate value): from MIN 5°C to MAX 35°C
A = from 5°C to 10°C (rotate the trimmer all to the right)
B = from 11°C to 16°C
C = from 17°C to 22°C
D = from 23°C to 28°C
E = from 29°C to 35°C (rotate the trimmer all to the left)
NOTE: the thermostat is set at the max in a factory.
4 - GREEN Led On = Wireless control panel activated
4b - GREEN Led Off = Wireless control panel disabled
4c - GREEN Led flashing = waiting to recognize the Wireless
4d - GREEN Led flashing = Wireless default transmission (about. 2,5 minutes)
4e - GREEN Led flashing = Wireless data transmission by the change of any parameter
5 - Wireless On button switch = press and hold 2 seconds, LED 4 starts to blink to recognize
the Wireless
(waiting at MAX 60 seconds) after which it automatically reactivates the manual control
5b - Wireless Off button switch = press and hold 2 seconds, LED 4 turns off automatically activ
ting the
manual controls
6 - YELLOW Led FAST flashing = flame ignition cycle: start
6b - YELLOW Led SLOW flashing = burner ON turned to MIN heating
6c - YELLOW Led On = burner ON turned to MAX heating
6d - YELLOW Led Off = burner off, temperature reached
7 - Heater On/Off button switch
7b - RESET button switch = when switch On again, the Heater restart automatically
8 - Reference mark for setting the temperature.
6
MORE ABOUT THE MANUAL CONTROL
1 - GREEN Led On = heater On
1b - GREEN Led Off = heater Off
2 - RED Led On = burner flame block
2b - RED Led Off = heater released
2c - RED Led SLOW flashing = pressure switch don’t switch ON
2d - RED Led FAST flashing = locked pressure switch
3 - Thermostat knob regulation (approximate value): from MIN 5°C to MAX 35°C
A = from 5°C to 10°C (rotate the trimmer all to the right)
B = from 11°C to 16°C
C = from 17°C to 22°C
D = from 23°C to 28°C
E = from 29°C to 35°C (rotate the trimmer all to the left)
NOTE: the thermostat is set at the max in a factory.
4 - GREEN Led On = Wireless control panel activated
4b - GREEN Led Off = Wireless control panel disabled
4c - GREEN Led flashing = waiting to recognize the Wireless
4d - GREEN Led flashing = Wireless default transmission (about. 2,5 minutes)
4e - GREEN Led flashing = Wireless data transmission by the change of any parameter
5 - Wireless On button switch = press and hold 2 seconds, LED 4 starts to blink to recognize
the Wireless
(waiting at MAX 60 seconds) after which it automatically reactivates the manual control
5b - Wireless Off button switch = press and hold 2 seconds, LED 4 turns off automatically activ
ting the
manual controls
6 - YELLOW Led FAST flashing = flame ignition cycle: start
6b - YELLOW Led SLOW flashing = burner ON turned to MIN heating
6c - YELLOW Led On = burner ON turned to MAX heating
6d - YELLOW Led Off = burner off, temperature reached
7 - Heater On/Off button switch
7b - RESET button switch = when switch On again, the Heater restart automatically
8 - Reference mark for setting the temperature.
Wireless Controller - Instruction Manual
6
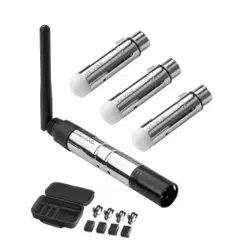
Wireless radio chronothermostat
WIRELESS
(optional, can also be purchased subsequently)
For the use and control of all gas appliances
in the range made by the Manufacturer.
7

Wireless Controller - Instruction Manual
7
ABOUT THE RADIO WIRELESS CHRONOTHERMOSTAT
The use of this control allows:
- the best positioning of the detection sensor (on wall or table base) for controlling the actual room
temperature;
- the possibility of controlling several appliances in the same room;
- programming daily and weekly operation.
Wireless radio chronothermostat without wires:
- one of a kind as regards ease of use and the control of all the operating modes the appliance is able
to offer;
- distinguished by a large graphic Display unit that helps the user to make the various control and
adjustment settings thanks to the “step-by-step” logic of the various menus
- uses an “NTC” sensor that allows controlling/setting even the smallest room temperature variations
(0.5°C), while maintaining the difference in temperature, between switch-off and switch-on, within
about 1°C.
Can also be purchased and used in a previously-installed appliance.
In detail, the Wireless control allows:
• Gas operation (normal and reduced output)
• Ventilation speed operation
• Power operation with heating element (disabled)
• Reset function(reset factory settings)
• Weekly programming
• 9 programs preset in factory
• 4 completely personalisable programs
• Graphic program display
• Room temperature display
• Time display
• Day of week display (1 = Monday, 2 = Tuesday, etc.)
• Ventilation speed display
• Heating output display
• Comfort / Reduced* / Antifreeze temperature
* Corresponds to off in AUTO function.
• Possibility of intervening manually without changing the set program
• AUTOMATIC mode
• MANUAL mode
• “Holiday” function (operation stopped during periods of absence)
• Push-button lock function (child safety)
• Low battery energy consumption function
• Battery function (about 2 years)
• Batteries down indicator
• Change batteries without memory loss (within 60 seconds)
• Control of several appliances in the same environment
8
Wireless Controller - Instruction Manual
8
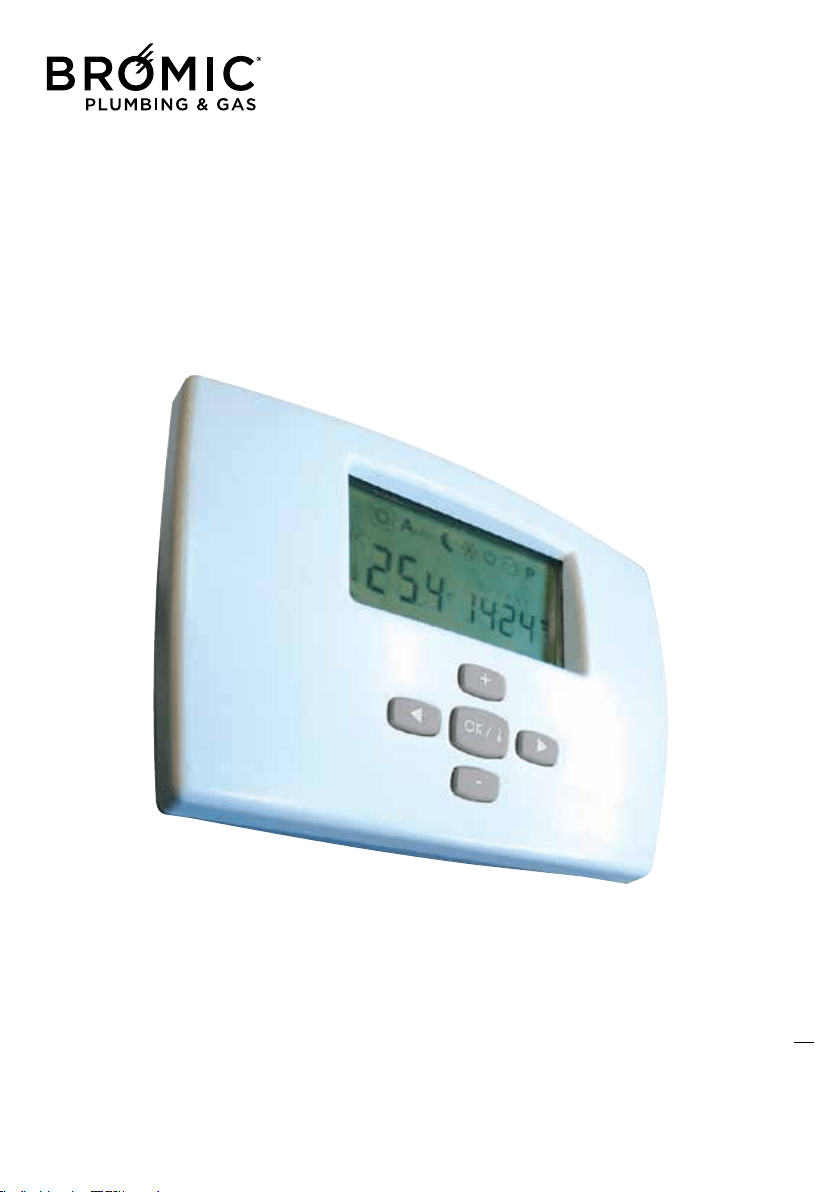
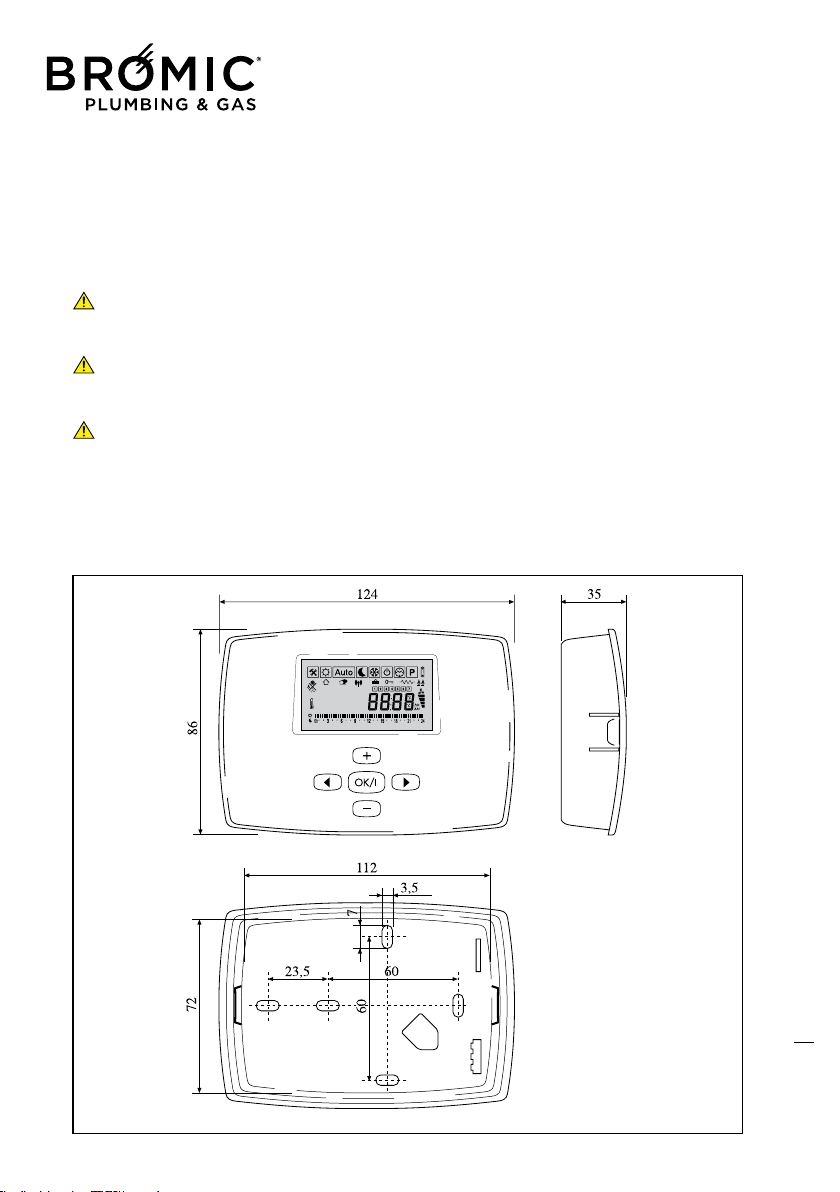
DIMENSIONS
The Remote Digital Control features a special elegant, compact and easy to use design.
This product, like all our products, has been made with special attention to detail, but also as regards
the materials used. It will provide the user with excellent performance levels over the years.
-Carefully read the following instructions as these provide important information on installation
and correct use of the Remote Control.
-The installer is kindly asked to give this booklet to the end user and to invite him/her to read its
contents.
-In case of malfunction or faults during the warranty period, contact the Manufacturer’s
Authorised Technical Assistance Centre only.
9
Wireless Controller - Instruction Manual
9
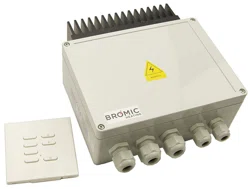
INSTALLING THE WIRELESS
CONTROL
BEFORE USING THE REMOTE CONTROL,
POSITIONING MUST BE DECIDED:
- on table base provided.
- wall fastening (distance from appliance MAX
6m);
If the wall fastening solution is preferred –
and therefore away from the appliance – to
prevent any problems or malfunctions, install
the Remote control (MIN height 1m and MAX
1.5m), being careful to:
- Not install close to heat sources;
- Not install in places directly exposed to sunrays;
- Not install in places exposed to frequent and
strong air currents;
- Not install in places exposed to water spray;
- Not install at distances above those indicated
by the Manufacturer.
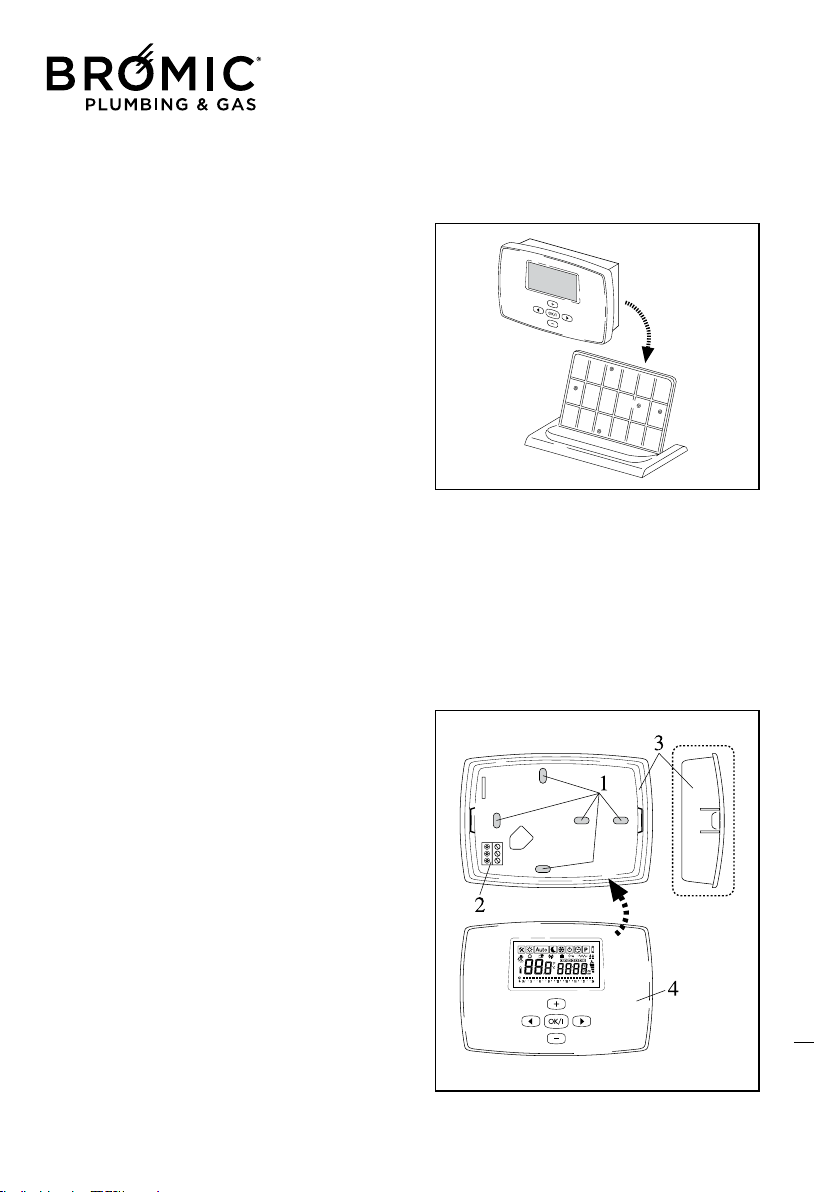
Fastening the Remote Digital Control:
- make sure all the material required is present
and integral;
- make sure the position is CORRECT, to prevent
Inside Room Temperature probe malfunctions;
- mark the position of the holes to be used for
drilling on the wall (1);
- fit screw anchors suitable for the selected wall;
- do not connect leads to the terminal board (2)
on the rear “shell” (3) of the Control;
- fasten the rear “shell” to the wall using the
screws provided;
- remove the plastic protection from the batteri-
es and check its integrity;
- refit the front part (4) of the control;
10
Wireless Controller - Instruction Manual
10
USING THE WIRELESS CONTROL
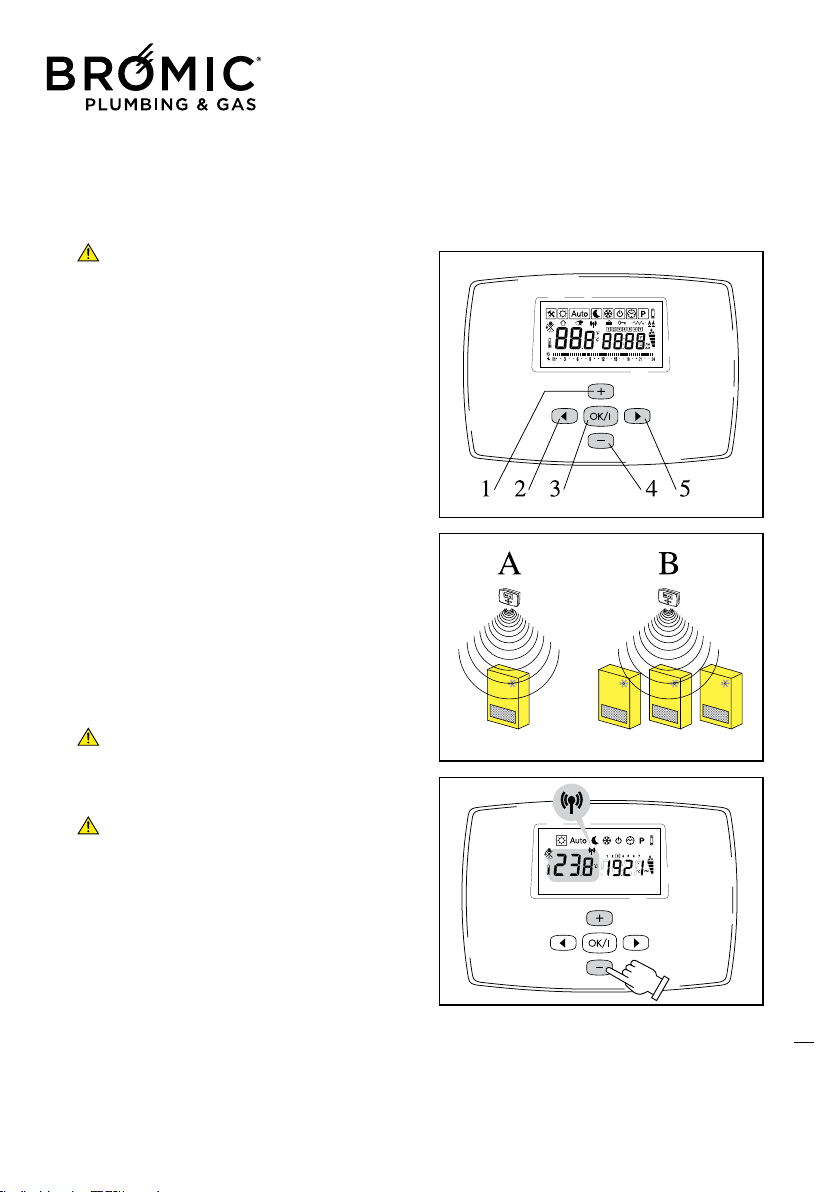
DESCRIPTION OF KEYS
note: the keys acquire different functions in
the different menus.
1 - Selection, increase value, etc.;
2 - Change MENU;
3 - OK, synchronisation, display, setting and
next parameter;
4 - Selection, decrease value, etc.;
5 - Change MENU.
• Required setting
- Switch on the remote digital Control after
removing the battery protection film;
- Make radio configuration:
A) one control unit controls one appliance;
B) one control unit controls several appliances,
in this case, simply repeat the identification
operation on each required appliance with the
same Wireless.
- Press the keys to select, move inside the various
MENUS and set the required parameter;
- MENU setting: the transmission of all the new
parameters to the appliance is done automati-
cally every 30 seconds;
- Changing the desired room temperature
value: transmission of the new parameter to the
appliance is immediate, followed by an automa-
tic update every 2.5 minutes. This time interval
allows the appliance to check the room tem-
perature several times and decide whether
or not to produce heat, thus avoiding random
ignition and pointless consumption.
11
Wireless Controller - Instruction Manual
11
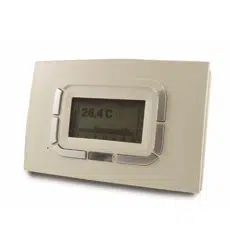
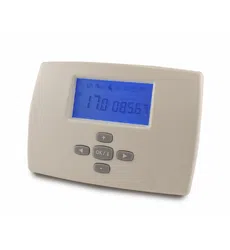
DESCRIPTION OF DISPLAY UNIT
This display page simultaneously provides a
whole series of information:
- current time and day (set by user)
- SUMMER/WINTER operation
- MIN/MAX operating output
- operating mode
- MIN/MAX tangential fan speed
- hours bar (00-24)
- current day of the week indicator
- room temperature
- required room temperature
- degree unit scale
- data transmission icon
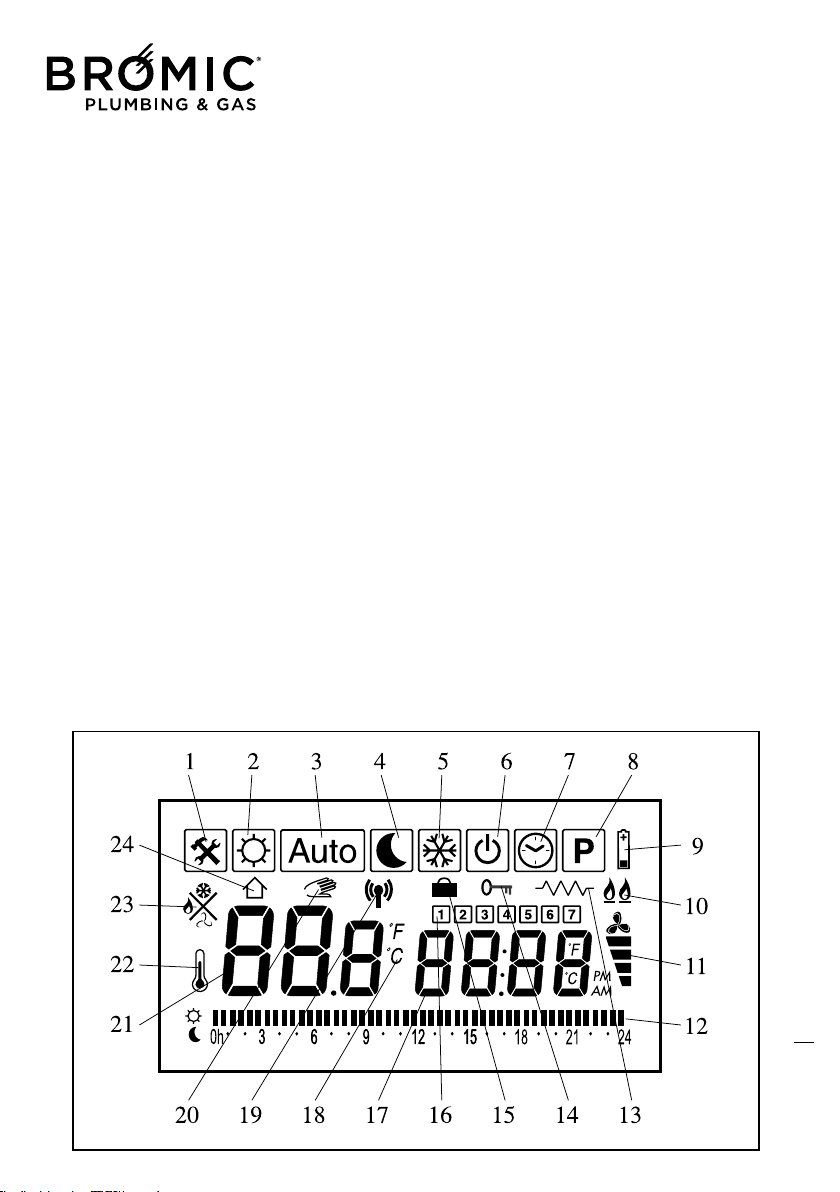
DESCRIPTION OF ICONS
1 – Fault indication
2 – Comfort temperature MENU
3 – Automatic Progr. MENU
4 – Reduced Temperature MENU
5 – Antifreeze Temperature MENU
6 - Off Control MENU
7 – Time and Day MENU
8 - Day time Progr. MENU
9 – Battery down
10 - MIN/MAX burner output
11 - MIN/MAX fan speed
12 - Day time On/Off Progr. bar
13 – Electric heating (disabled)
14 – Child safety
15 – Holiday function
16 – Day of week (1 = Monday, etc.)
17 - Time
18 - Fahrenheit/Celsius Degrees
19 – Radio transmission
20 - Manual progr.
21 – Room or set temperature
22 – Read room temperature
23 - Heating/Antifreeze/Summer vent.
24 – Read room temperature
12
Wireless Controller - Instruction Manual
12
13
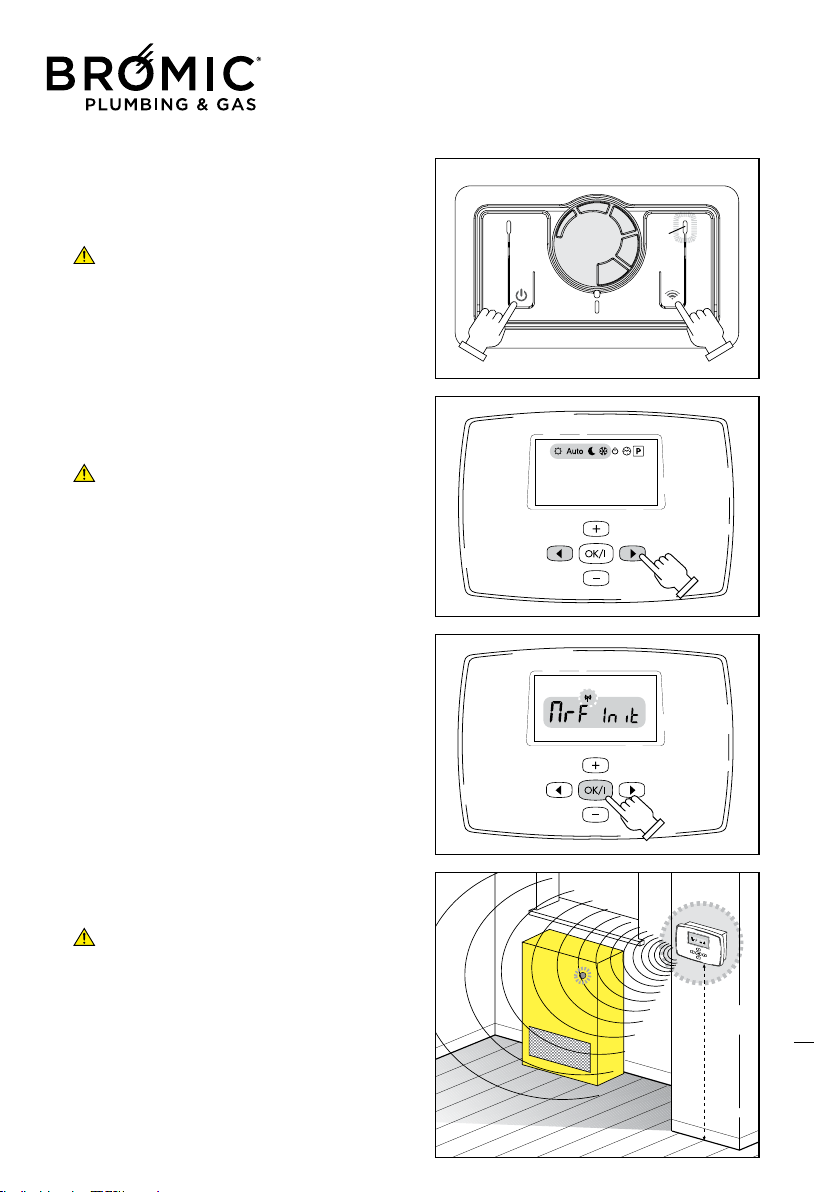
• WIRELESS CONTROL START
- Press the On/Off key (7) to start the appliance.
- Press the Wireless key (5) of the control for 2
seconds: the LED (4) flashes.
The appliance waits for the signal from
Wireless control for 60 seconds, after which the
manual control again takes control of the applian-
ce.
- Press the RIGHT or LEFT keys to position in SUN,
AUTO, MOON or SNOW MENUS only.
- Press the OK key for about 5 seconds: start of
Radio Configuration /Identification.
The Wireless sends its signal for about 4 minu-
tes after which the control returns to previous
programming, whether or not the appliance is
identified.
- The appliance identifies the Wireless and
switches on the LED (4) above the Wireless key.
- Press the OK key again to close the Radio
Configuration /Identification phase.
Wireless LED (4):
A) ON: Wireless on.
B) FLASHING: the appliance is waiting for a signal
from the Wireless or else you are out of range
(max 10 m). We recommend never exceeding the
MAX distance shown to prevent required room
temperature control problems.
C) OFF: Wireless off, the appliance is controlled
manually.
D) FLASHES 4 times and then remains on: data
reception by Wireless.
Communication between Wireless and
appliance occurs every 3 minutes to best con-
trol the set room temperature. If there is no com-
munication for more than 30 minutes (Wireless
faulty or batteries down), the manual control takes
control of the appliance again.
Wireless Controller - Instruction Manual
13
PROGRAMMING
If no type of operation is selected/set, after 30
seconds the Wireless automatically positions
on the AUTO menu.
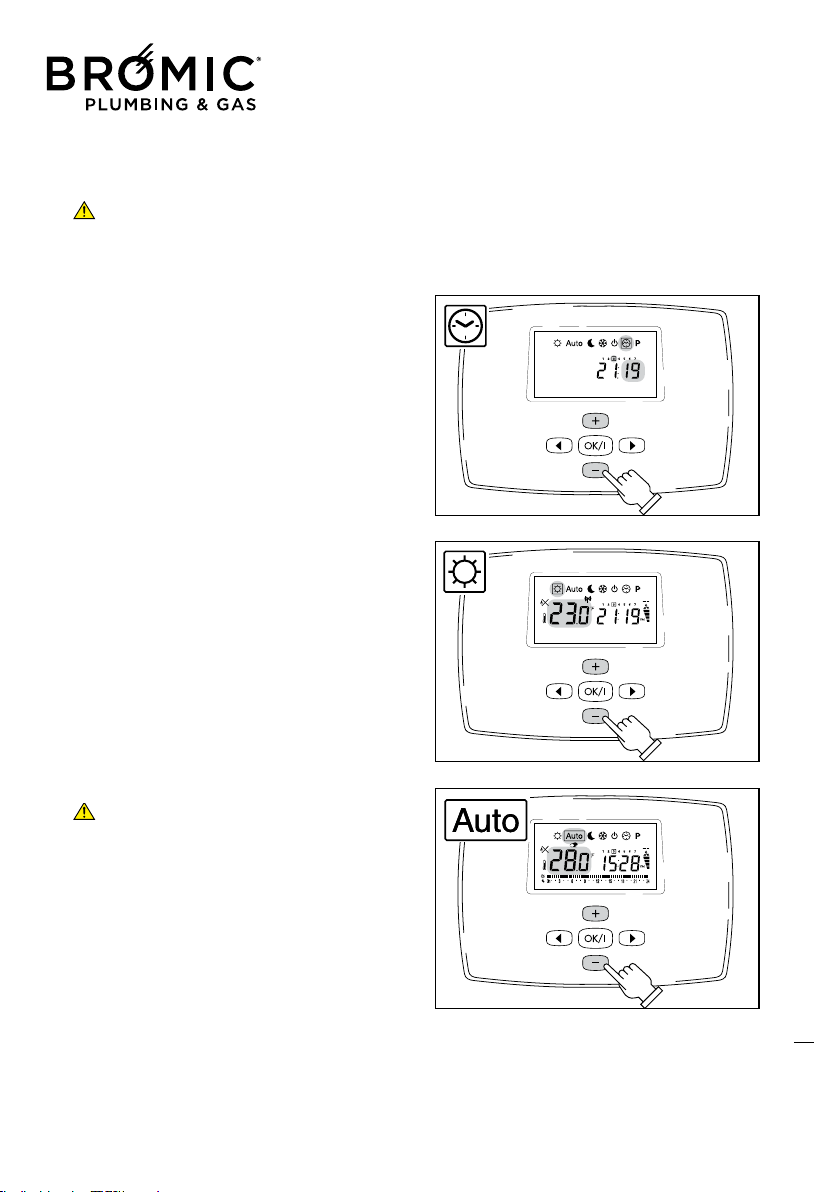
• TIME AND DAY OF WEEK
- Press the RIGHT or LEFT keys to enter this menu.
- Press + or – to set minutes.
- Press OK to confirm.
- Press + or – to set hour.
- Press the OK key to confirm.
- Press + or – to set day.
- Press OK to confirm.
• COMFORT MENU (required room temperature)
- Press the RIGHT or LEFT keys to enter this MENU.
- Press + or – to set the required value.
- Press OK to confirm.
The room temperature appears immediately after.
• AUTOMATIC MENU
This mode allows changing the temperature without chan-
ging the program.
- Press the RIGHT or LEFT keys to enter this MENU.
- Press + or – to set value.
- Press OK to confirm.
The HAND symbol lights up.
The “new” temporary temperature remains active until the
first change of temperature set in the program (the HAND
symbol goes off) caused by change of operation: switch from
comfort Temperature to Reduced Temperature and vice versa.
The on and off/reduced temperatures are those of
COMFORT and REDUCED.
To make sure the appliance does not switch on in AUTO
mode, simply set the temperature lower than that which can
be achieved in the room.
14
Wireless Controller - Instruction Manual
14
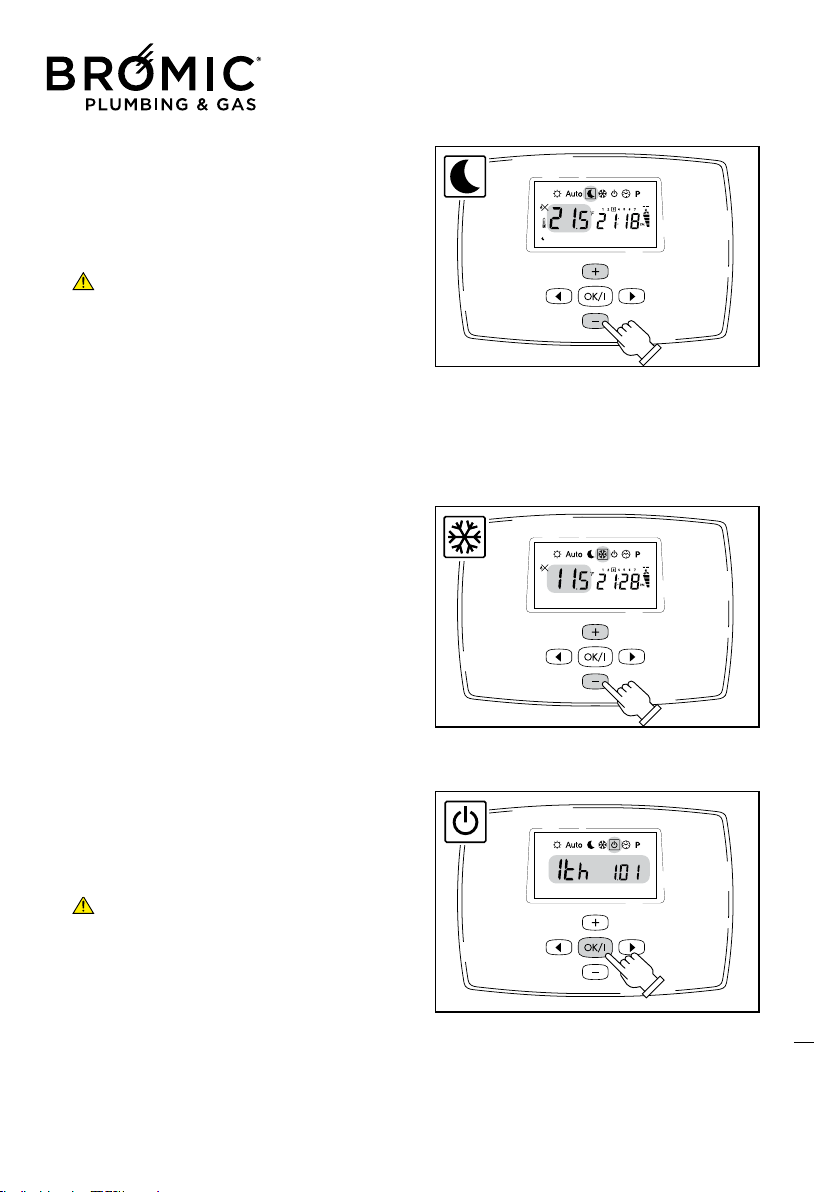
• REDUCED OPERATION
- Press the RIGHT or LEFT keys to enter this MENU.
- Press + or – to set the value.
- Press OK to confirm.
The room remperature reappears immediately after.
The appliance maintains the set temperature in continuous
mode (for hours or days, see Holiday function).
To make sure the appliance does not switch on in AUTO
mode, simply set the temperature lower than that which
can be achieved in the room.
• ANTIFREEZE MENU
- Press the RIGHT or LEFT keys to enter this MENU.
- Press + or – to set the temperature.
- Press OK to confirm.
The room temperature reappears immediately after
• MENU OFF
- Press the RIGHT or LEFT keys to enter this MENU.
The Display unit switches off after about 2 seconds causing
the Wireless and appliance to switch to STAND-BY: the
Wireless LED on the appliance flashes twice every 10 secon-
ds.
Press the On/Off key on the manual control to comple-
tely switch off the appliance.
The Wireless in STANDBY can be started again by pressing
any key. All the data/programs already set remain stored and
battery consumption becomes very low.
- Keep the OK key pressed to display the room temperature.
15
Wireless Controller - Instruction Manual
15
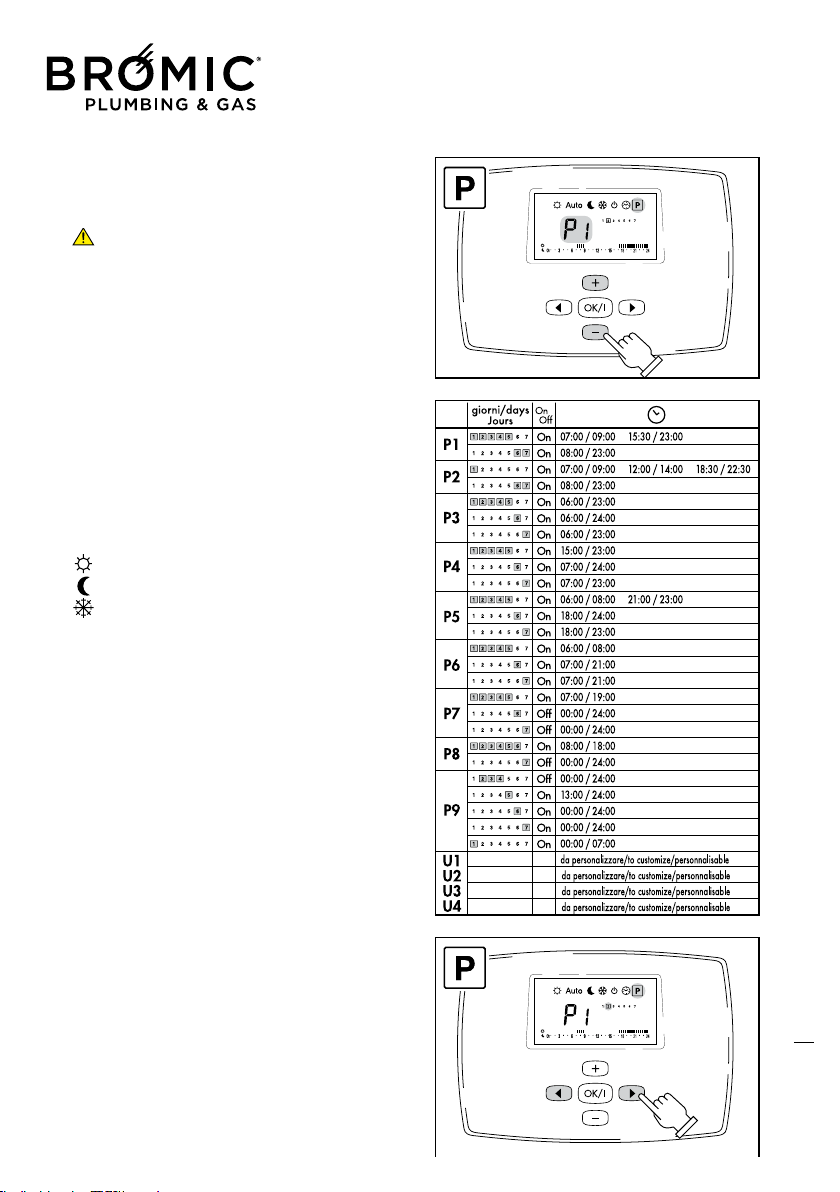
• PROGRAM MENU
This mode allows setting a program and relating it to the
days of the week (e.g., it is possible to have a different pro-
gram for each day of the week).
The programs from P1 to P9 are preset and cannot be
changed by the user.
P1) Morning, evening and weekends
P2) Morning, midday, evening and weekends
P3) Day and weekends
P4) Evening and weekends
P5) Morning and evening (bathroom)
P6) Morning, afternoon and weekends
P7) 7h - 19h (office)
P8) 8h - 19h, Saturday (shop)
P9) Weekend (holiday home)
U1, U2, U3 and U4) Programs to be personalised.
- COMFORT range: from 5 to 35°C
- REDUCED range: from 0.5 to 35°C
- ANTIFREEZE range: from 0.5 to 10°C
Preset programs: from P1 to P9
- Press the RIGHT or LEFT keys to enter this MENU.
- Press + or – to select the program.
- Press the RIGHT or LEFT keys to see the days from Monday
to Sunday.
- Press OK to confirm.
The program is selected and started.
16
On
07:00 / 09:00
P1
On
08:00 / 23:00
On
07:00 / 09:00
On
08:00 / 23:00
On
06:00 / 23:00
On
06:00 / 24:00
On
06:00 / 23:00
On
15:00 / 23:00
On
07:00 / 24:00
On
07:00 / 23:00
On
06:00 / 08:00
On
18:00 / 24:00
On
18:00 / 23:00
On
06:00 / 08:00
On
07:00 / 21:00
On
07:00 / 21:00
On
07:00 / 19:00
Off
00:00 / 24:00
Off
00:00 / 24:00
On
08:00 / 18:00
Off
00:00 / 24:00
Off
00:00 / 24:00
On
13:00 / 24:00
On
00:00 / 24:00
On
00:00 / 24:00
On
00:00 / 07:00
15:30 / 23:00
12:00 / 14:00 18:30 / 22:30
P2
P3
P4
P5
21:00 / 23:00
P6
P7
P8
P9
U1
U2
U3
U4
da personalizzare/to customize/personnalisab
da personalizzare/to customize/personnalisab
da personalizzare/to customize/personnalisab
da personalizzare/to customize/personnalisab
giorni/days
Jours

Wireless Controller - Instruction Manual
16
Personalisable programs: U1, U2, U3 and U4
- Press the RIGHT or LEFT keys to enter this MENU.
- U1 flashing: press the + or – keys to select the
required program (U1, U2, U3 or U4).
- Press OK to confirm.
- Flashing time: start programming day 1.
- Press the RIGHT or LEFT keys to position on the
required time.
- Press + to start (black sector, starts comfort tem-
perature).
- Press – to stop (off sector, starts reduced tempe-
rature).
One sector equals 30 minutes. Every time the
+ or – keys are pressed, the sector flashes and
automatically moves to the next.
- Press OK to confirm: end of program day 1 and
start of program day 2.
If you want the day 1 program for the entire
week, simply press the OK key until day 7.
In the example alongside, program U1, the time
band from 06.30 am to 3.30 pm has been deactiva-
ted but only on day 3 (Wednesday).
Every time a program is set/changed in the
“PROGRAM MENU”, the change is made auto-
matically in AUTO mode.
17
Wireless Controller - Instruction Manual
17
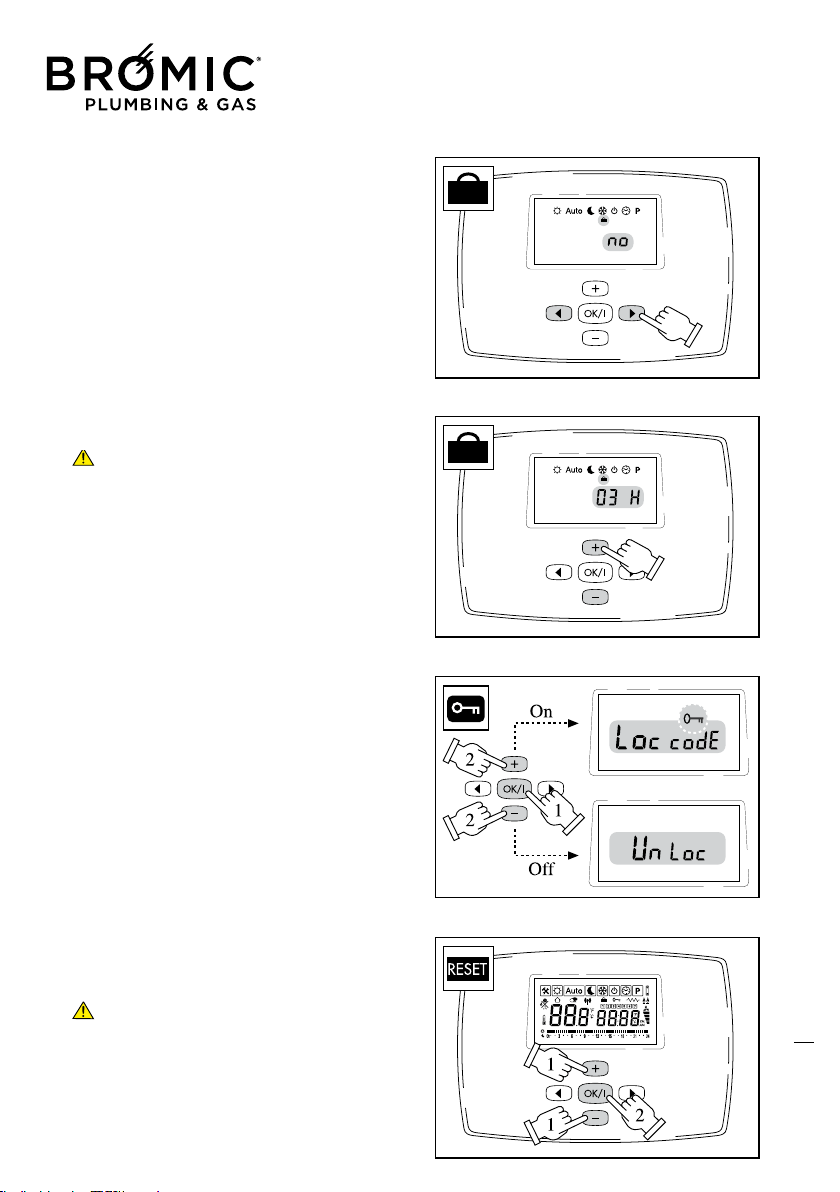
• SPECIAL FUNCTIONS
HOLIDAY
- Press the RIGHT or LEFT keys to enter this MENU: immedia-
tely after menu P.
In the example alongside, the departure point of the
HOLIDAY mode is shown – “NO” indicates the mode is not
operative.
- Press + or – to decide how many hours and how many days
delay to set.
After 24 hours, the gradual count switches to number
of days (MAX 95 days) and then returns to initial “NO”
position.
- Press OK to confirm: function on.
- Press the RIGHT or LEFT keys to select an operating MODE
(SUN, MOON or SNOW with relevant temperatures already
set) to be combined with the “HOLIDAY” function just star-
ted.
BLOCK KEYBOARD
- Press the RIGHT or LEFT keys to select any operating MODE,
except CLOCK and PROGRAM.
- Keep the OK key pressed.
- At the same time press + to EFFECT the block (Lock code +
key)
- At the same time press – to RELEASE the block (Unlock).
RESET
- Press the RIGHT or LEFT keys to enter the OFF MENU.
- Keep the keys + and – pressed.
- At the same time, press the OK key.
Wireless RESET with return to Factory settings: SUN 21°C,
MOON 17°C, SNOW 6°C, Prog. U1 all comfort. This mode
DOES NOT RESET “appliance BLOCK”, to be released by
means of the panel on board the machine.
The Display unit lights up for a few seconds; at this point
reset the time and re-programme.
18
Wireless Controller - Instruction Manual
18
19
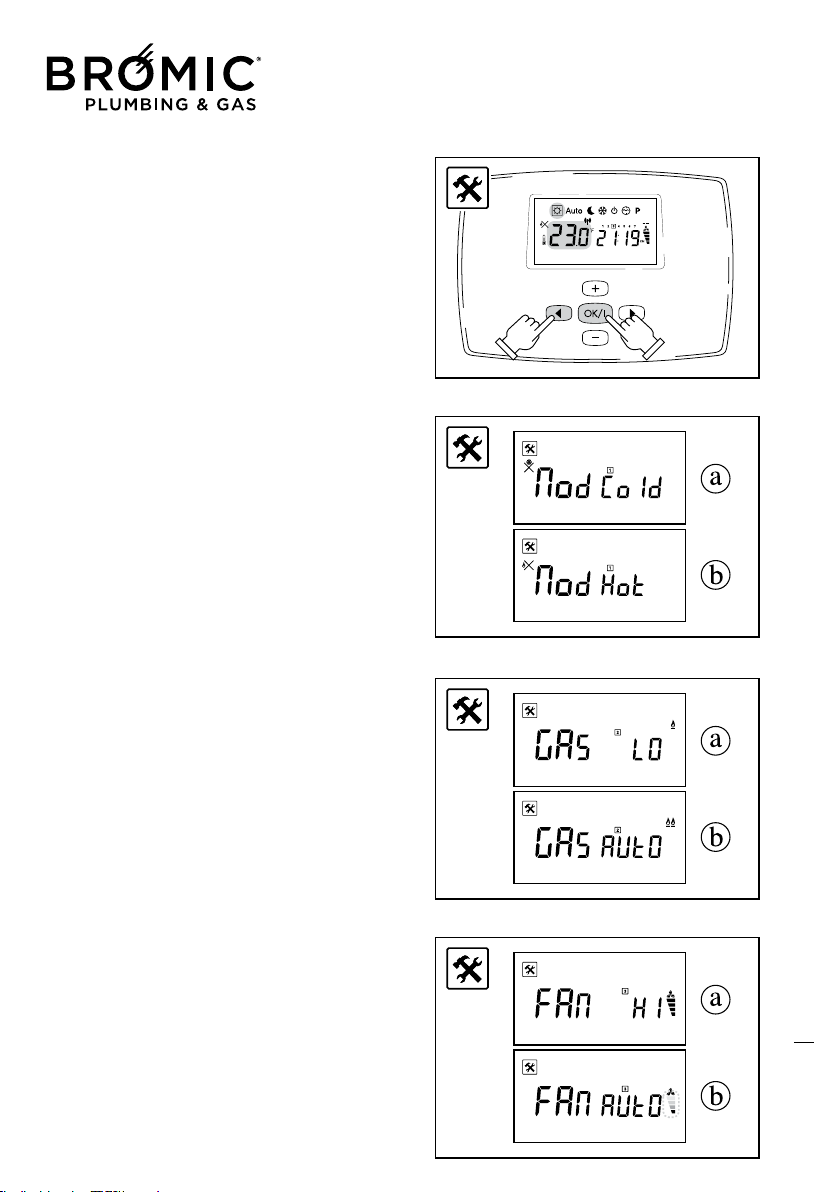
• HIDDEN FUNCTIONS
This series of hidden MENUS controls:
- Gas heating output
- Ventilation speed
- Electric heating (function disabled)
- Press the LH arrow and + OK keys together to enter the hid-
den MENUS.
1 - OPERATION
- Press + or – to select program:
a – COLD MODE, summer ventilation.
b – HOT MODE, gas heating.
- Press the OK key to confirm and continue;
2 – HEATING OUTPUT
- Press + or – to select program:
a - GAS LO, MIN operation.
b - GAS AUTO, MIN/MAX modulation.
- Press the OK key to confirm and continue;
3 – FAN SPEED
- Press + or – to select program:
a - FAN HI, MAX operation.
b - FAN AUTO, MIN/MAX modulation.
- Press the OK key to confirm and continue;
Wireless Controller - Instruction Manual
19
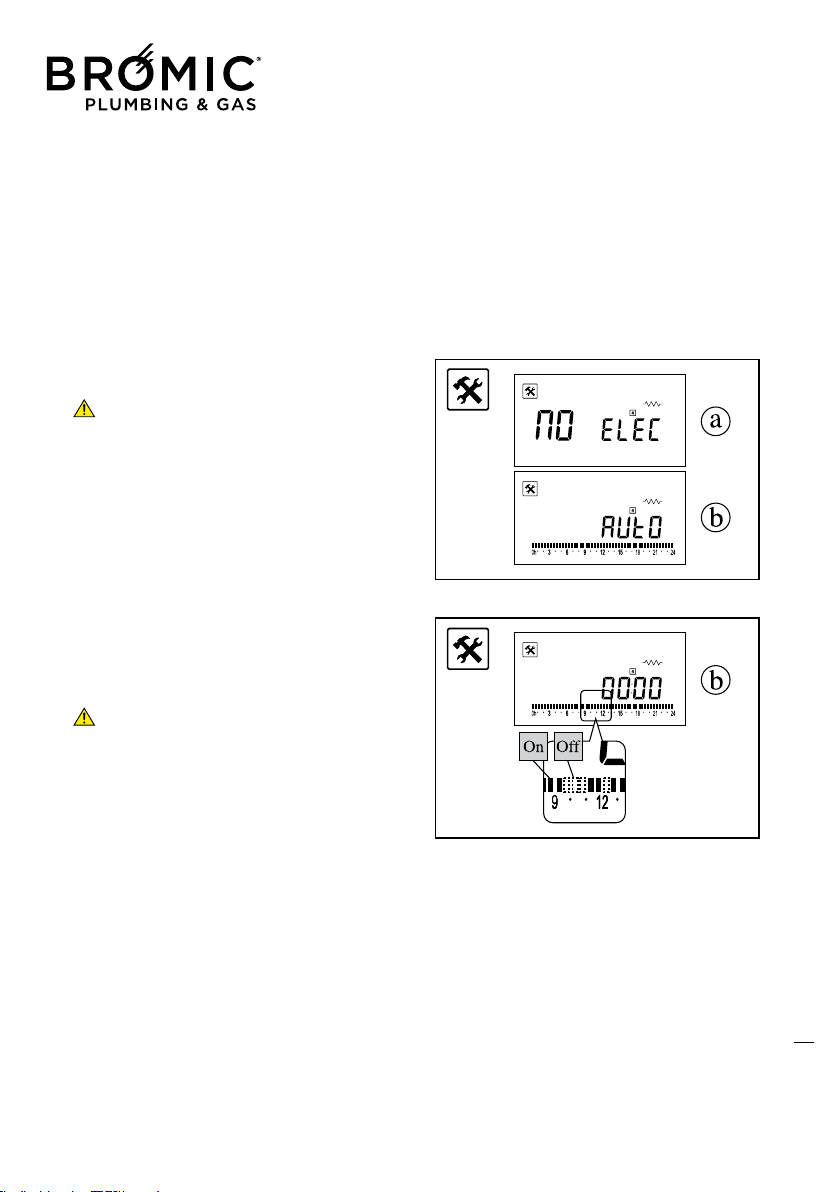
4 – ELECTRIC OPERATION (disabled)
This mode allows starting the operation of the
appliance with an electric heating element and
disengaging the gas supply.
- Press + or – to select the program:
a - NO ELEC, operation off
b - AUTO, operation started with Timer
a - NO ELEC
- Press the OK key to confirm and exit;
ALWAYS SELECT THIS OPTION TO AVOID
ELECTRIC OPERATION WHICH WOULD PREVENT
NORMAL GAS OPERATION OF THE APPLIANCE.
b - AUTO (DO NOT START THIS FUNCTION)
- Press the OK key to confirm and continue;
- Press + to start function (black sector).
- Press – to stop function (off sector).
A sector is equivalent to 30 minutes. Every time
+ or – are pressed, the sector flashes and auto-
matically moves on to the next one.
- Press the OK key to confirm and exit;
20
Wireless Controller - Instruction Manual
20
• SPECIFICATIONS
Operating temperature: 0°C - 50°C (32°F - 122°F).
Tolerance in set temperature values: 0.5°C (0.5°F).
Temperature ranges that can be set: comfort (35°C - 95°F)
and reduced (5°C - 41°F).
Adjustment characteristics: cycle (30 minutes) and cycle
interval (3 minutes stop).
Class and degree of protection: Class II - IP30.
Radio frequency: 433.92 MHz, <10mW.
Certification: EC/CE. EN 300220-3, EN 301489-1.
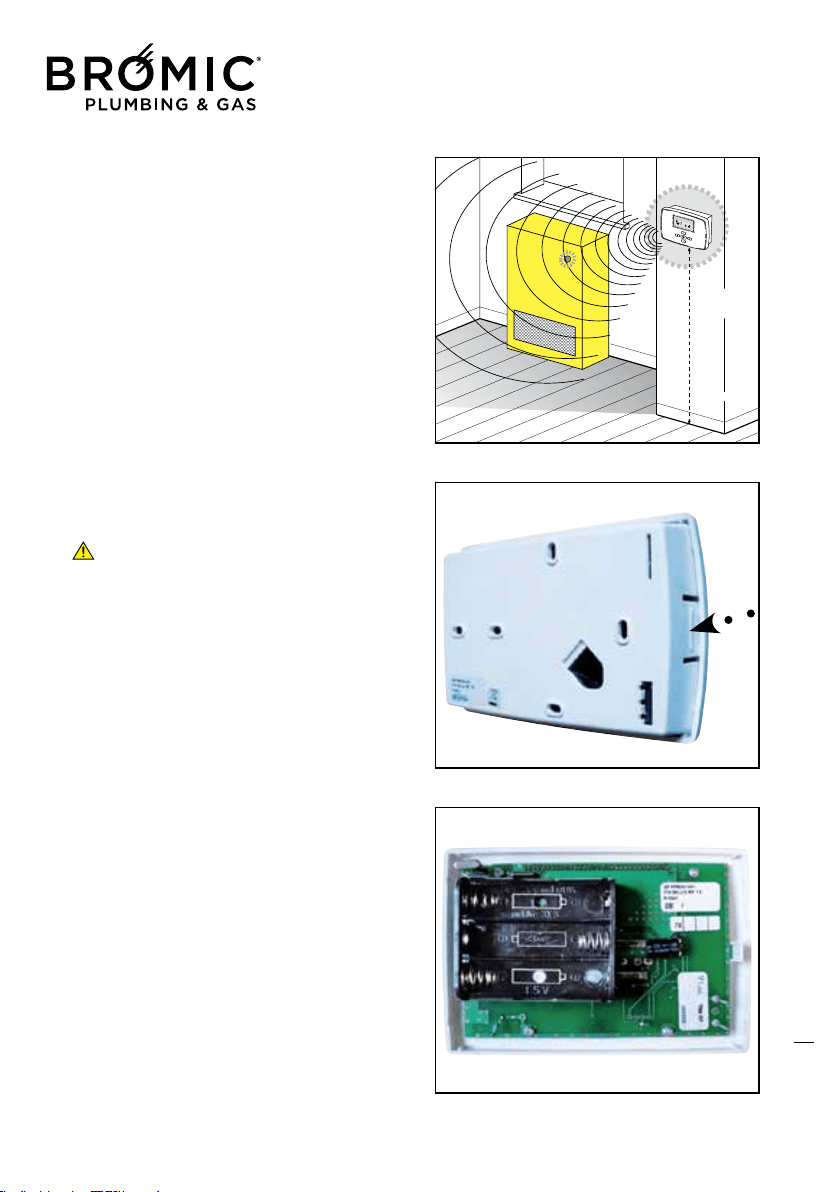
• CHANGING BATTERIES
This operation can be performed without losing all set data,
thanks to a small buffer battery.
Change the batteries within about 60 seconds, after
which the control will lose all the set data.
- Open the Wireless by applying a slight pressure on the side
tab.
- Fit the 3 batteries: type LR6 AA 1.5V alkaline.
- Close again without forcing.
21

Wireless Controller - Instruction Manual
21
COMMISSIONING
This appliance must only be installed by an authorised person.
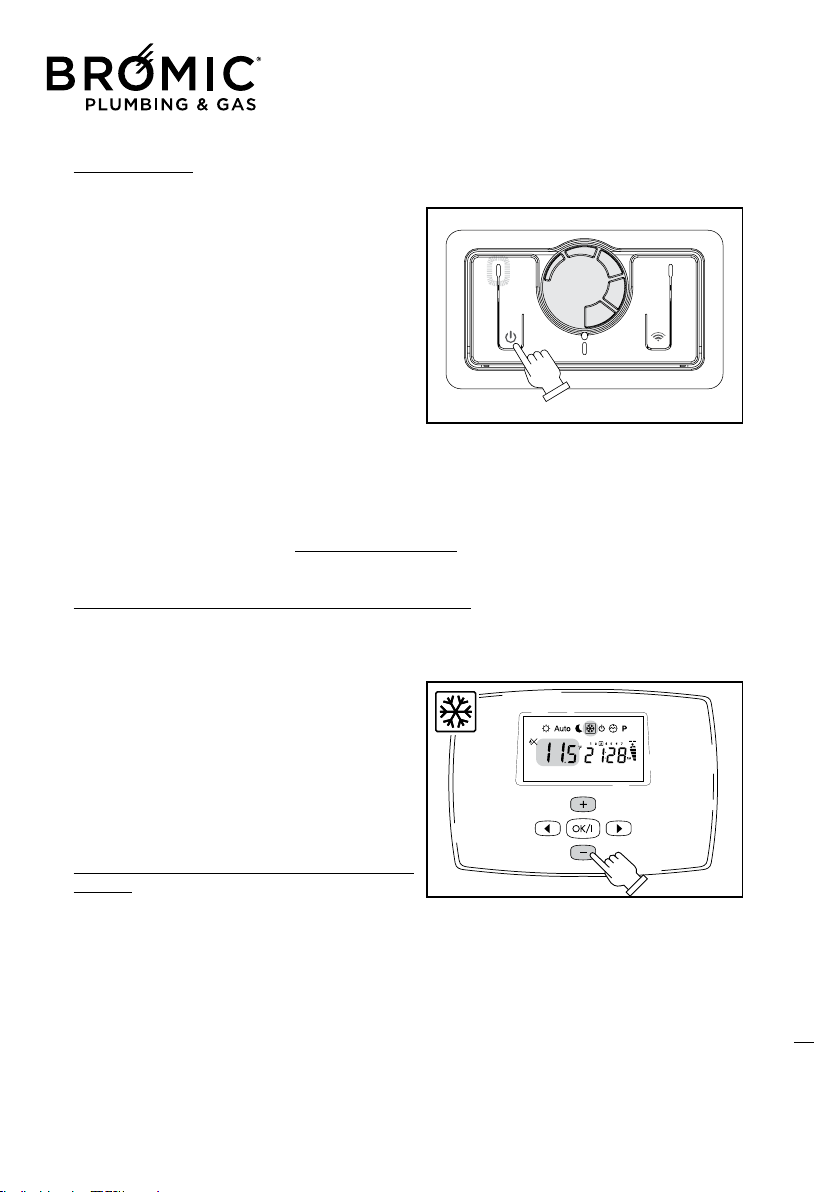
WINTER OPERATION
- Open the gas tap.
- Operate the master switch of the power mains or connect the power plug to the appliance.
- Press the On/Off key to start the appliance.
- Press the Wireless start key on the control on board the machine.
- Start the Wireless and perform the identification/start operations. Choose the required operating
mode.
If the room temperature is below the set value, the appliance starts the ignition procedure (yellow
LED flashes fast). After a short time, the electronic
control system will complete burner ignition (yel-
low LED on at MAX power and flashing slowly at
MIN power).
After about two minutes, the convection fan starts.
Once the set temperature has been reached “on the
thermostat” or in case of stop for “time program-
ming”; the burner will switch off (yellow LED off)
and the appliance will remain in standby until the
next heat request.
If the “GAS AUTO*” (Hidden Menu) heating fun-
ction is selected:
* Flame on at MAX, on the Display unit, an icon
appears with 2 notches + 2 flames.
* Flame on at MIN, on the Display unit, an icon
appears with 2 notches + 1 flame.
* Flame Off, on the Display unit, an icon appears
with just 2 notches.
22
ON
Wireless Controller - Instruction Manual
22
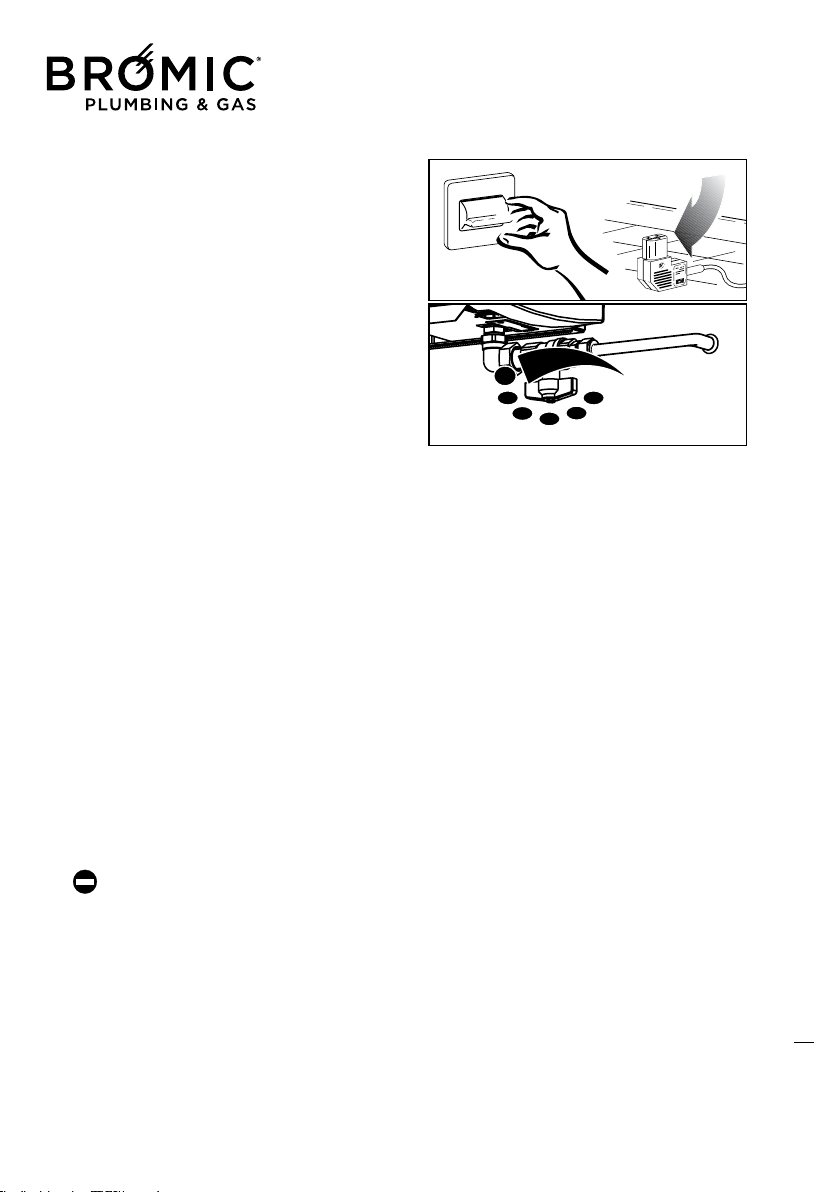
IGNITION FAILURE
If the RED LED comes on steady after about 40
seconds, this means the appliance has not com-
pleted the standard ignition procedure (BLOCKED
burner).
- Make sure the gas tap is open.
- Reset the appliance by turning it off and on by
means of the On/Off button.
- Check the condition of the WIRELESS start LED on
board the machine:
1 - OFF: appliance runs from controls on board the
machine;
2 - ON: appliance runs from Wireless;
3 – FLASHING at intervals: appliance off from
Wireless;
If, despite repeated attempts, the appliance remains “BLOCKED”, contact your Authorised Technical
Assistance Centre.
Absolutely no danger exists as regards domestic safety. When the appliance is in “BLOCK” position,
the gas supply to the burner is interrupted. It is always a good idea however to completely switch off
the appliance as indicated in the “APPLIANCE SWITCH-OFF” paragraph.
WINTER OPERATION WITH “ANTIFREEZE” (only with Wireless)
The appliance will operate in ANTIFREEZE mode if: the room temperature drops below the set tempe-
rature (by the Manufacturer or by the user). In this case, the burner will ignite to bring the room tem-
perature to a value about 1°C above that selected
as threshold value between 0.5°C and 10°C.
- Press the RIGHT or LEFT keys to enter the SNOW
Menu.
- Press + or – to set temperature.
- Press OK to confirm.
The room temperature will reappear immediately
afterwards.
“REDUCED OUTPUT” WINTER OPERATION (only with
Wireless)
During the half seasons, to limit thermostat operation, heating can be set at Reduced Output.
- Select the SUN Menu to access the HIDDEN Menu;
- Press the OK and LH arrow keys at the same time;
- Press the - or + keys to select “MOD HOT” operation;
- Press the OK key to confirm and continue;
23

Wireless Controller - Instruction Manual
23
- Press the - or + key to select “GAS LO*” operation;
* With the flame On, an icon appears on the Display unit with 1 base notch + flame.
* With flame Off, an icon appears on the Display unit with 1 base notch.
- Press the OK key to confirm and continue;
- Press the - or + key to select “FAN AUTO”: speed modulates between MIN* and MAX*;
- Press the - or + key to select “FAN HI”: speed is always MAX*;
* By setting MIN speed, an icon appears on the Display unit with 2 notches + fan.
* By setting MAX speed, an icon appears on the Display unit with 4 notches + fan.
- Press the OK key to confirm and continue;
- Press the OK key to confirm and continue (“AUTO/MO ELEC” function disabled);
- Press the OK key to confirm and continue (“00:00” time MO ELEC function disabled);
- Press the OK key to confirm and return to the visible Menus.
SUMMER VENTILATION (only with Wireless)
During the summer months, to eliminate thermostat operation, Summer Ventilation only can be set,
of course without gas consumption.
- Select the SUN Menu to access the HIDDEN Menu;
- Press the OK and the LH arrow keys together;
- Press the - or + keys to select “MOD COLD” operation;
- Press the OK key to confirm and continue;
- Press the - or + keys to select “GAS LO or GAS AUTO” operation (it does not matter which);
- Press the OK key to confirm and continue;
- Press the - or + keys to select “FAN AUTO”: speed modulates between MIN* and MAX*;
- Press the - or + keys to select “FAN HI”: speed is always MAX*;
* By setting MIN speed, an icon appears with 2 notches + fan.
* By setting MAX speed, an icon appears with 4 notches + fan.
- Press the OK key to confirm and continue;
- Press the OK key to confirm and continue (“AUTO/MO ELEC” function disabled);
- Press the OK key to confirm and continue (“00:00” time MO ELEC function disabled);
- Press the OK key to confirm and return to the visible Menus.
SWITCHING OFF THE APPLIANCE
The appliance can be turned off in “standby” position by means of the On/Off button. In this case, the
set program remains stored in the memory.
For GENERAL SWITCH-OFF use the master switch on the power supply or disconnect the power plug.
The appliance will switch off completely.
GENERAL switch-off of the appliance must only be done when the convection fan is no longer
working after a period of heating operation!
24
Wireless Controller - Instruction Manual
24
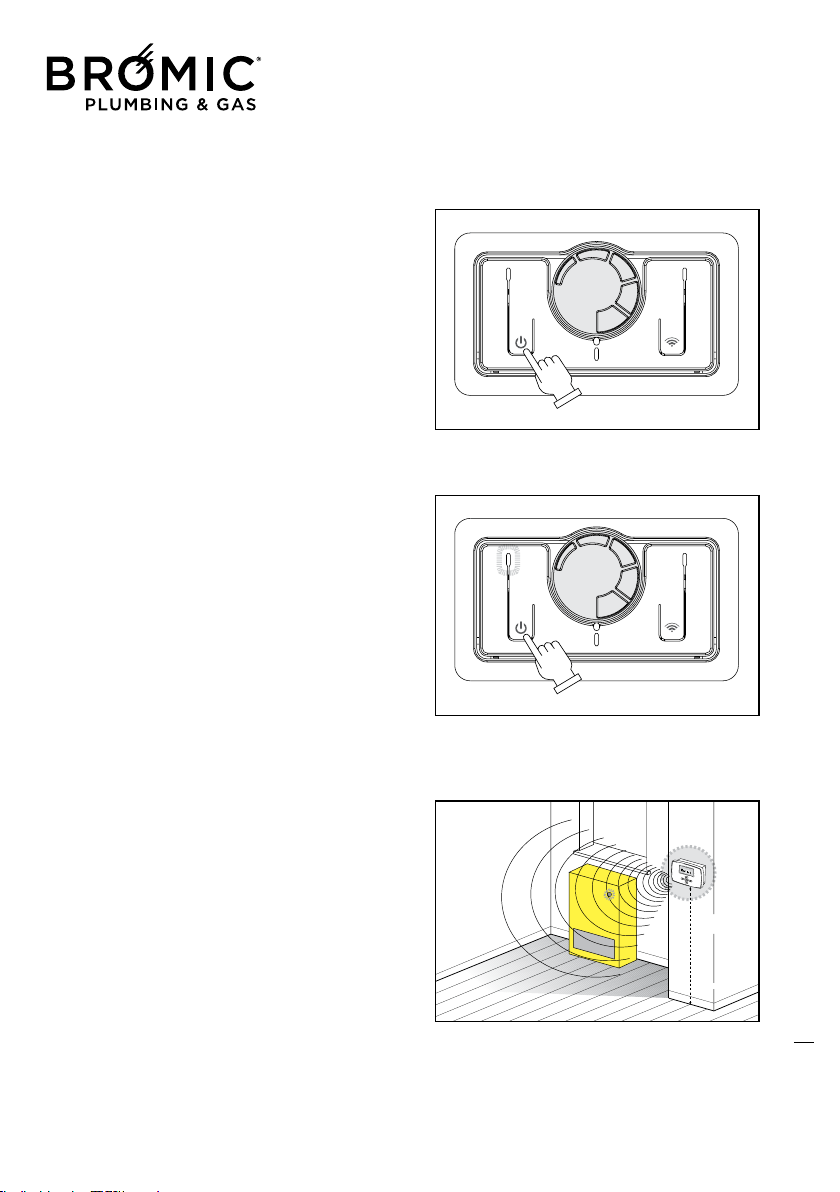
SWITCHING OFF FOR LONG PERIODS
If the appliance is not used for a long period of
time, the following operations should be per-
formed:
- Press the On/Off key on board the machine to
switch off the appliance.
- Remove the plug from the socket on the appli-
ance;
- Close the gas tap.
CLEANING THE APPLIANCE
Preliminary operations
- Press the On/Off key on board the machine to switch off the appliance;
- Move the omnipolar master switch, if fitted to the system, to “off” or remove the plug from the
socket on the appliance;
- Close the gas tap;
- Wait for the appliance to completely cool down.
Cleaning the outer surfaces
Clean the accessible parts to remove any dust deposits, spider webs and the like.
Use compressed air to blow away the dust, including at hard-to-access points.
To clean the plastic or painted parts, never use solvents or abrasive detergents as these could dama-
ge the treated parts.
Use neutral products readily available on the market.
Do not grease the synthetic material parts.
To clean the casing, use a soft cloth soaked in neutral-base home-cleaning products, etc. (Car sham-
poo, etc.).
Do not pour liquid directly onto the casing or onto other parts of the appliance, as this could
cause serious damage.
MAINTENANCE
Please remember that PERIODICAL MAINTENANCE – at least once a year – is essential for the safety,
efficiency and long working life of the appliance. It will also result in lower consumption and less pol-
luting emissions.
Maintenance can be periodically performed by an Authorised Technical person, which has all the
technical know-how required and, if necessary, original spare parts.
25
ON
OFF
Wireless Controller - Instruction Manual
25
TROUBLESHOOTING
• No power supply
If the appliance fails to start after pressing the On/
Off key on the control:
- Make sure the appliance plug is properly inserted
in the power socket.
- Make sure the master switch, if fitted, is in “on”
position.
If the appliance still fails to start, call the Technical
Assistance Centre.
• BLOCK stop and failed ignition (Red LED on)
- Make sure the fuel tap is open.
- Restore ignition conditions. Press the On/Off key
to turn the appliance off and back on and wait for
all ignition phases to be performed again.
This operation can be repeated 3 times at most
and, in the event of its not being successful, posi-
tion the master switch, where provided, on “off”
and contact the Technical Assistance Centre.
• No communication between Wireless and appli-
ance
- Make sure the Wireless and power batteries are
working properly.
- Check the distance between the Wireless and the
appliance (MAX 10m).
- Make sure the electronic board on the appliance
is working properly.
If there is no communication between the Wireless
and the appliance, the standard manual control
again takes control of the appliance automatically.
26

Australia & NZ
10 Phiney Place, Ingleburn NSW 2565
Sydney AUSTRALIA
Tel: 1300 276 642
NZ: 0508 276 642
BROMIC.COM/PLUMBING