Decalcification:
Cleaning Your Hot Water System:
Cleaning Your Coffeemaker:
Filter basket, carafe and lid:
Turn unit off and remove plug from outlet.
Wash filter basket, carafe and lid in warm, soapy water and rinse thoroughly, or clean in
upper rack of dishwasher. Dry after cleaning.
Wipe area under the filter basket with a damp cloth. NOTE: DO NOT PUT ANY WATER IN
THE UNIT ONCE FILTER BASKET IS REMOVED.
To clean base, wipe with damp cloth.
Do not use scouring pads or harsh cleaners on any parts of the coffeemaker. Never
immerse base of unit in water.
A flashing CLEAN light indicates unit needs to be decalcified. Fill the water reservoir to capacity with a mixture
of ¹⁄
³
white vinegar and ²⁄
³
water. Press and hold CLEAN button; when light comes on, turn coffeemaker on. Five
beeps sound when Clean cycle is complete; unit will shut off. Turn unit back on and if Clean light flashes, repeat
process; if not, run a brew cycle with water only. Unit is then ready to use
We recommend you decalcify your hot water system twice a year.
Dispense any water in your reservoir until the Add Water displays on LCD. Add 32 ounces of white vinegar.
Dispense 16 ounces of vinegar and discard; this will fill the inner tank. Let unit sit for 20 minutes, then turn off
and allow hot vinegar to cool. Drain internal reservoir over sink by removing water release tab on bottom of unit.
When vinegar has completely drained, replace tab. Refill reservoir with water and drain water as directed above.
Unit is now ready to use.
©2021 Cuisinart PG-39483A
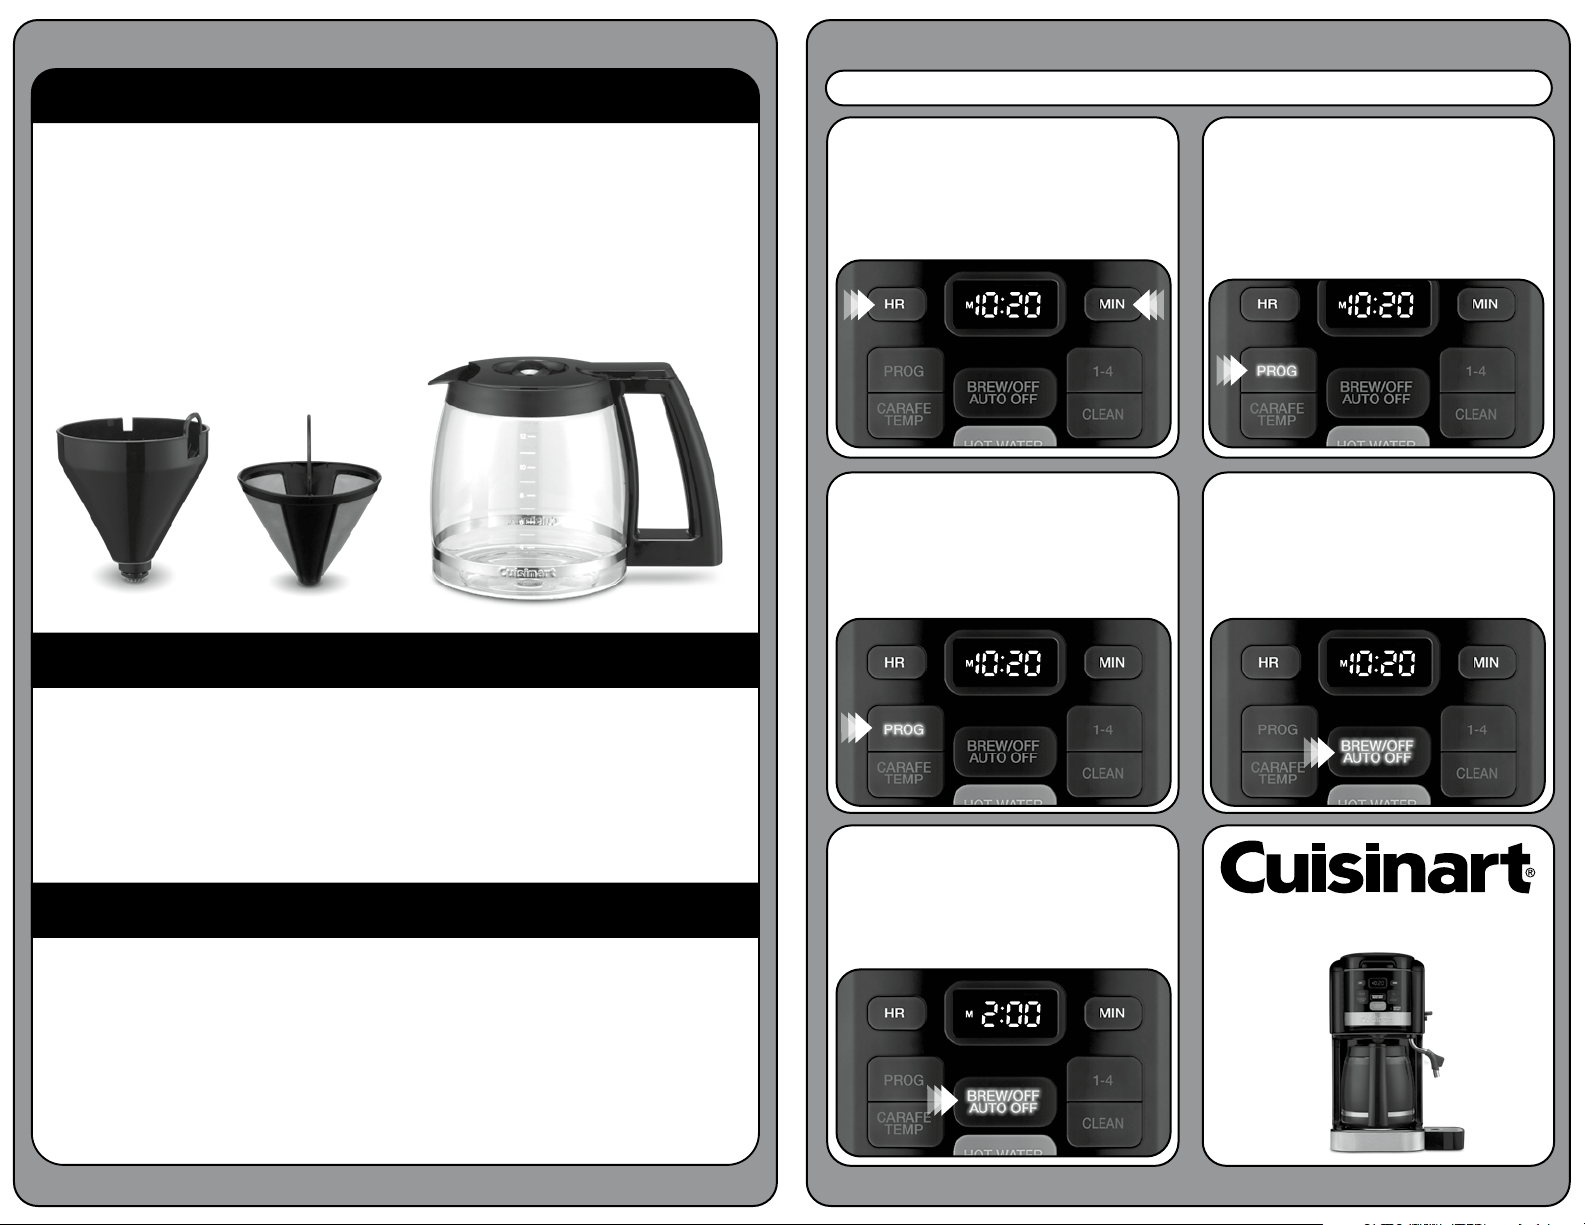
2.
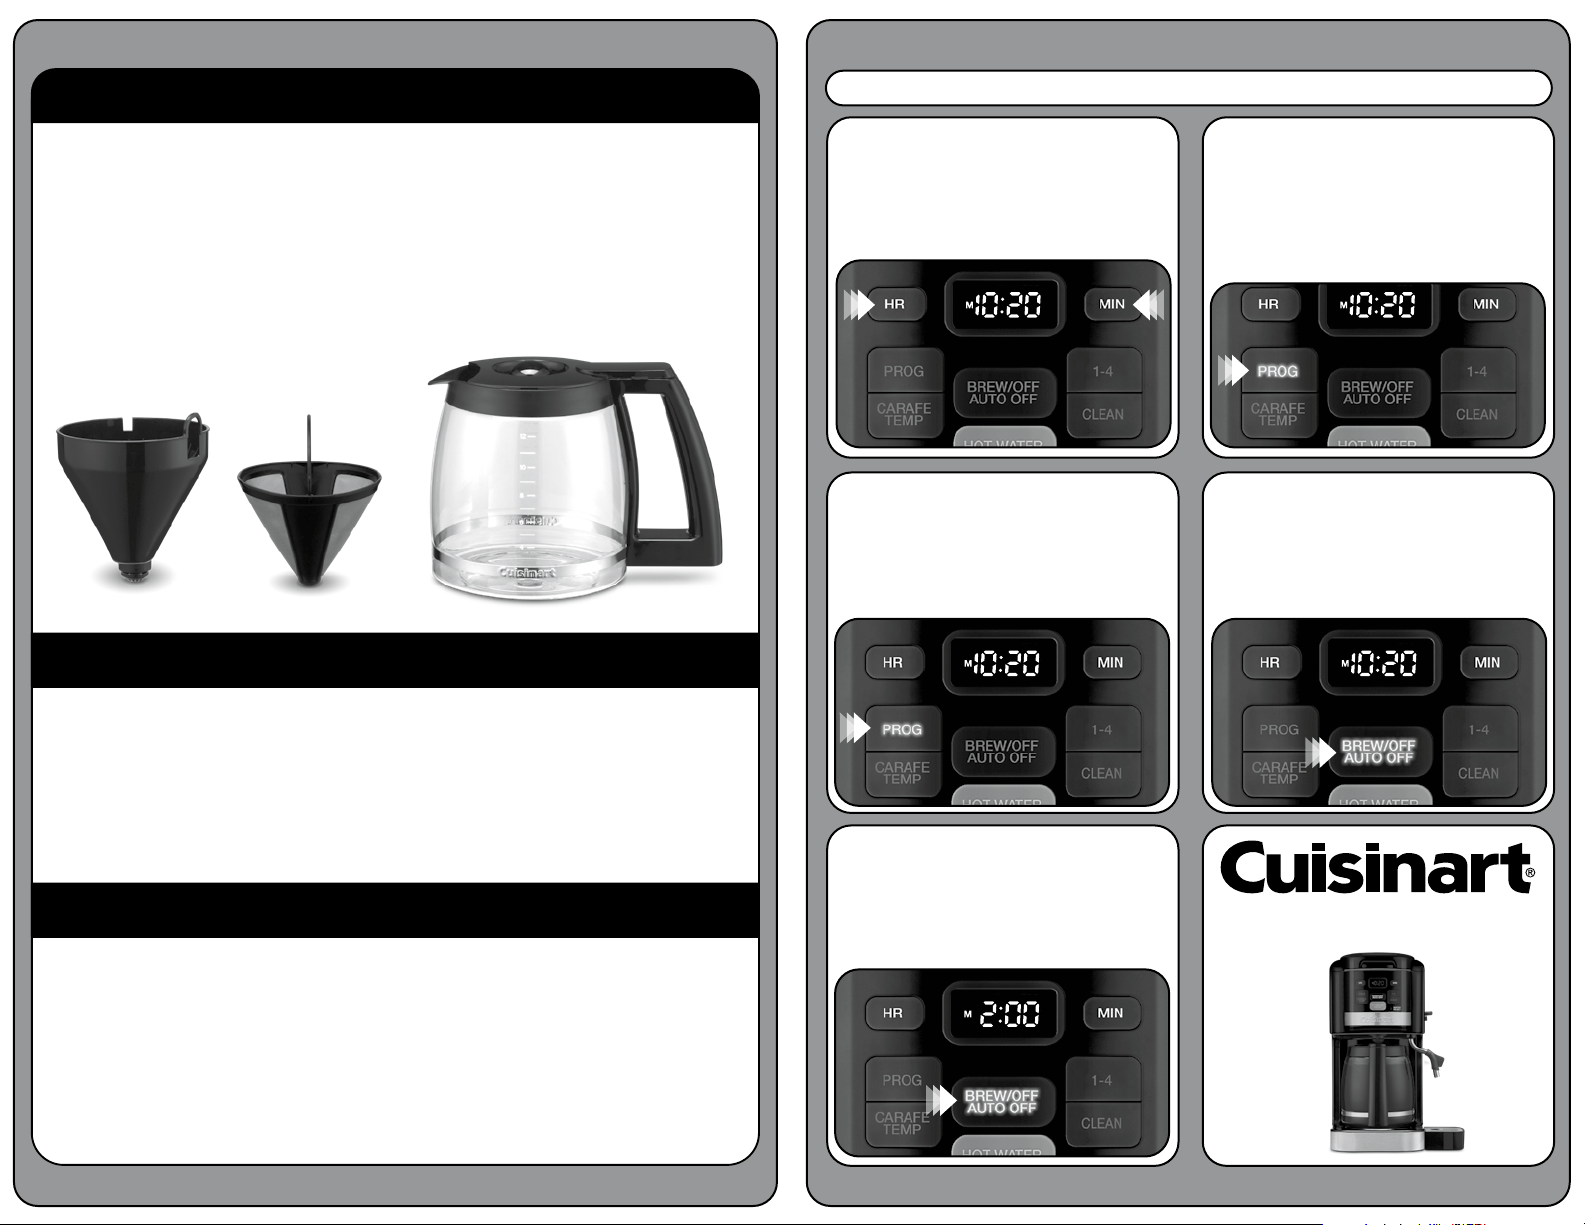
To Program the Brew start time: Press and
hold the PROG button for 2 seconds. The LED
indicator and digital display will flash the
default (12:00) or previously selected time. Program the
desired hour, using the HR and MIN buttons. Five
seconds after finishing, the unit will automatically exit
brew start time setup mode and the indicator light will
illuminate, letting you know brew start time is activated.
4.
The BREW/OFF/AUTO OFF indicator light
will come on when brew cycle begins. The
indicator light will turn off when the Keep
Warm cycle ends. To deactivate brew start time:
Press illuminated PROG button; light will go off,
indicating mode is turned off.
3.
To activate Brew start time using
previously selected time: Press the PROG
button. Previously set time will appear and
indicator will light up. Display will return to
clock setting.
5.
To Program the Auto Off: Press and hold
the BREW/OFF/AUTO OFF button for 2
seconds. The LED indicator and digital
display will flash the programmed Auto Off default
(2:00) or previously selected time. Program the
desired time, using the HR and MIN buttons.
1.
To Set the Time: Setting Hours and
Minutes: Press either button to select the
desired time. Hold buttons down to scroll
through the digits quickly, or press and release to
advance one digit at a time. Be sure the PM indicator
is on if setting a PM time.
PROGRAMMING
QUICK REFERENCE GUIDE
12-Cup Programmable Coffeemaker
& Hot Water System
Please see reverse side for setup and use instructions.
QUICK REFERENCE GUIDE
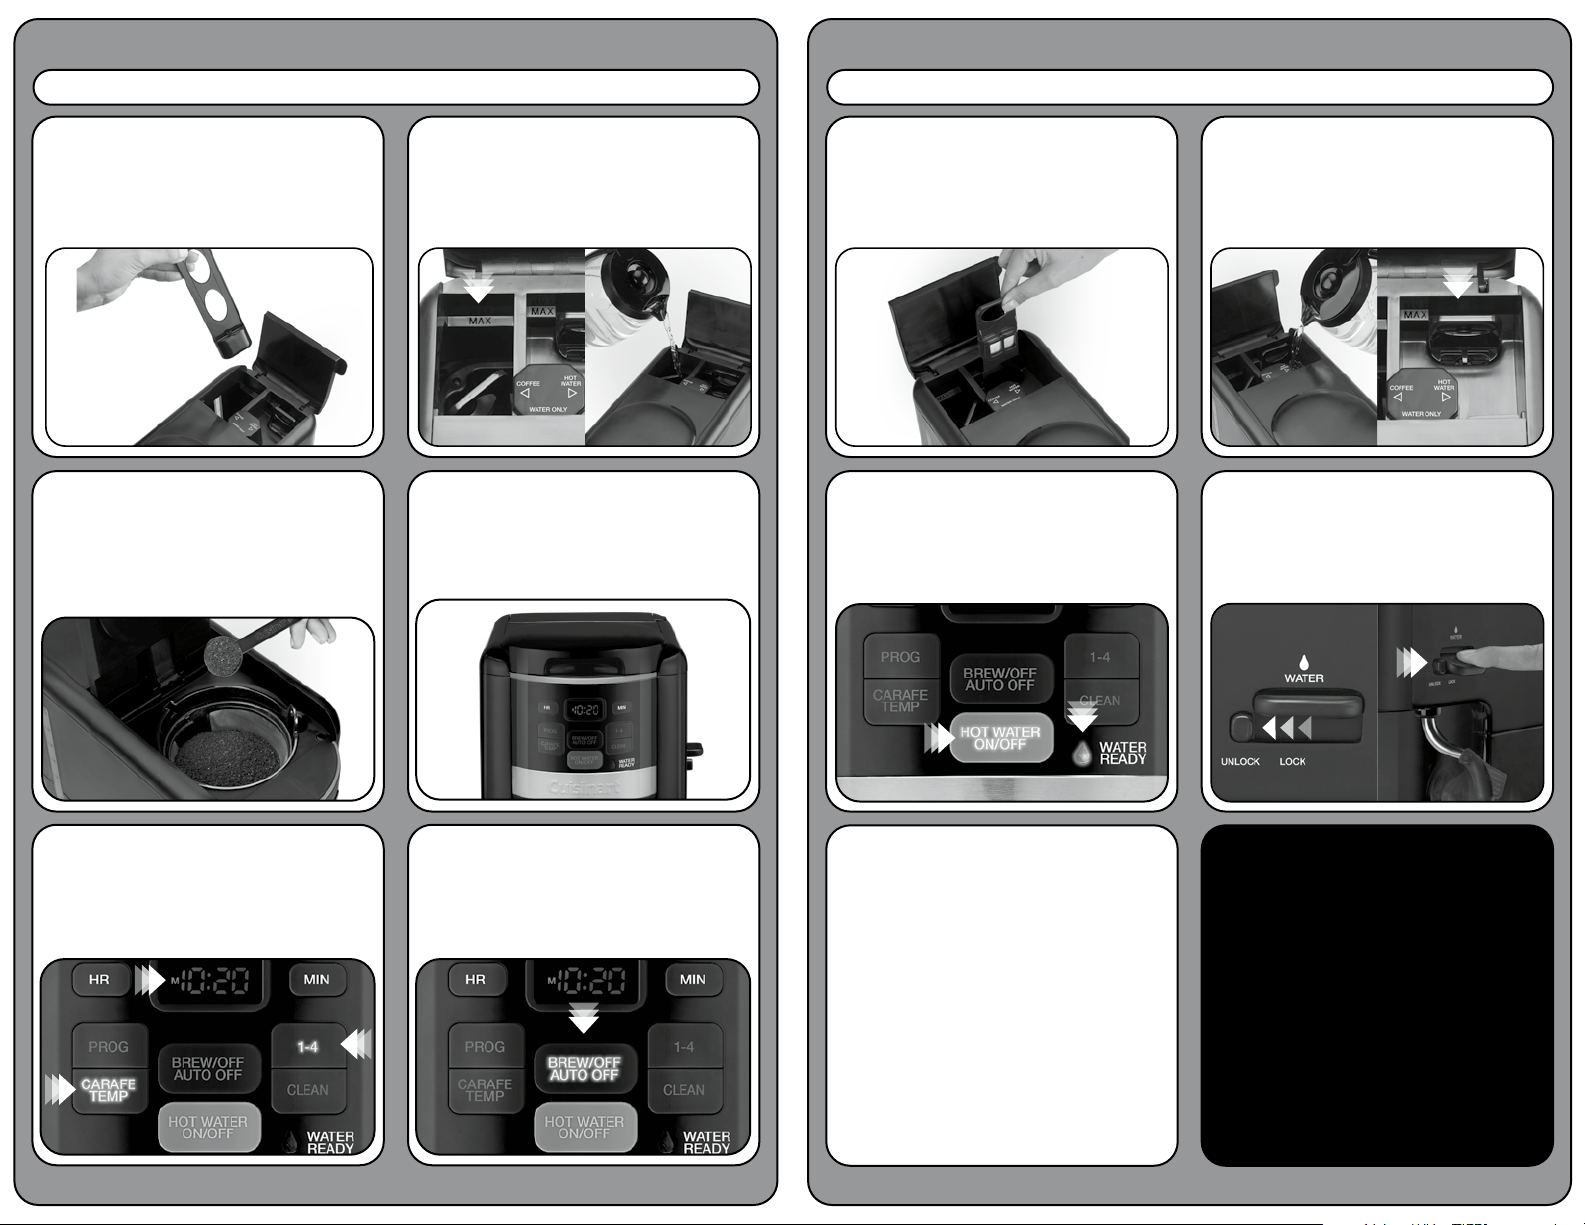
SETUP AND USE: Hot Water System
2.
Fill the hot water reservoir with cold water
to the maximum fill line.
1.
Fully immerse the charcoal water filter in
cold tap water and soak for 15 minutes.
Insert filter into the water filter holder.
Open the water reservoir and insert filter into the unit
(See complete instructions on page 8 of your
Instruction Booklet).
IMPORTANT!
Do not throw away. Read before
operating your new coffeemaker.
Keep for further reference.
These helpful hints are intended to be
a supplement to the Instruction Booklet.
In order to ensure proper operation and
optimum performance, please read the
entire Instruction Booklet.
3.
Press the HOT WATER ON/OFF button. The
HOT WATER ON/OFF button indicator light
will illuminate. The Water Ready indicator
will flash while the unit is heating. Once the unit has
heated, the Water Ready indicator will become solid.
4.
Move safety switch left to unlock. The unit
will dispense up to 13 oz. of hot water at a
time. NOTE: Hot Water System works
independently of Coffeemaker; it can be filled and
heated before, during, or after coffee is brewing.
Helpful Hint!
We recommend flushing both
the Coffeemaker and Hot Water
System before first use.
1. Coffeemaker: Fill the water reservoir with cold
water and follow directions for brewing coffee,
but DO NOT ADD COFFEE!
2. Hot Water System: Follow directions for using
Hot Water System, then dispense all hot water
to ush the system.
You are now ready to enjoy your new Cuisinart
Coffeemaker & Hot Water System!
QUICK REFERENCE GUIDE
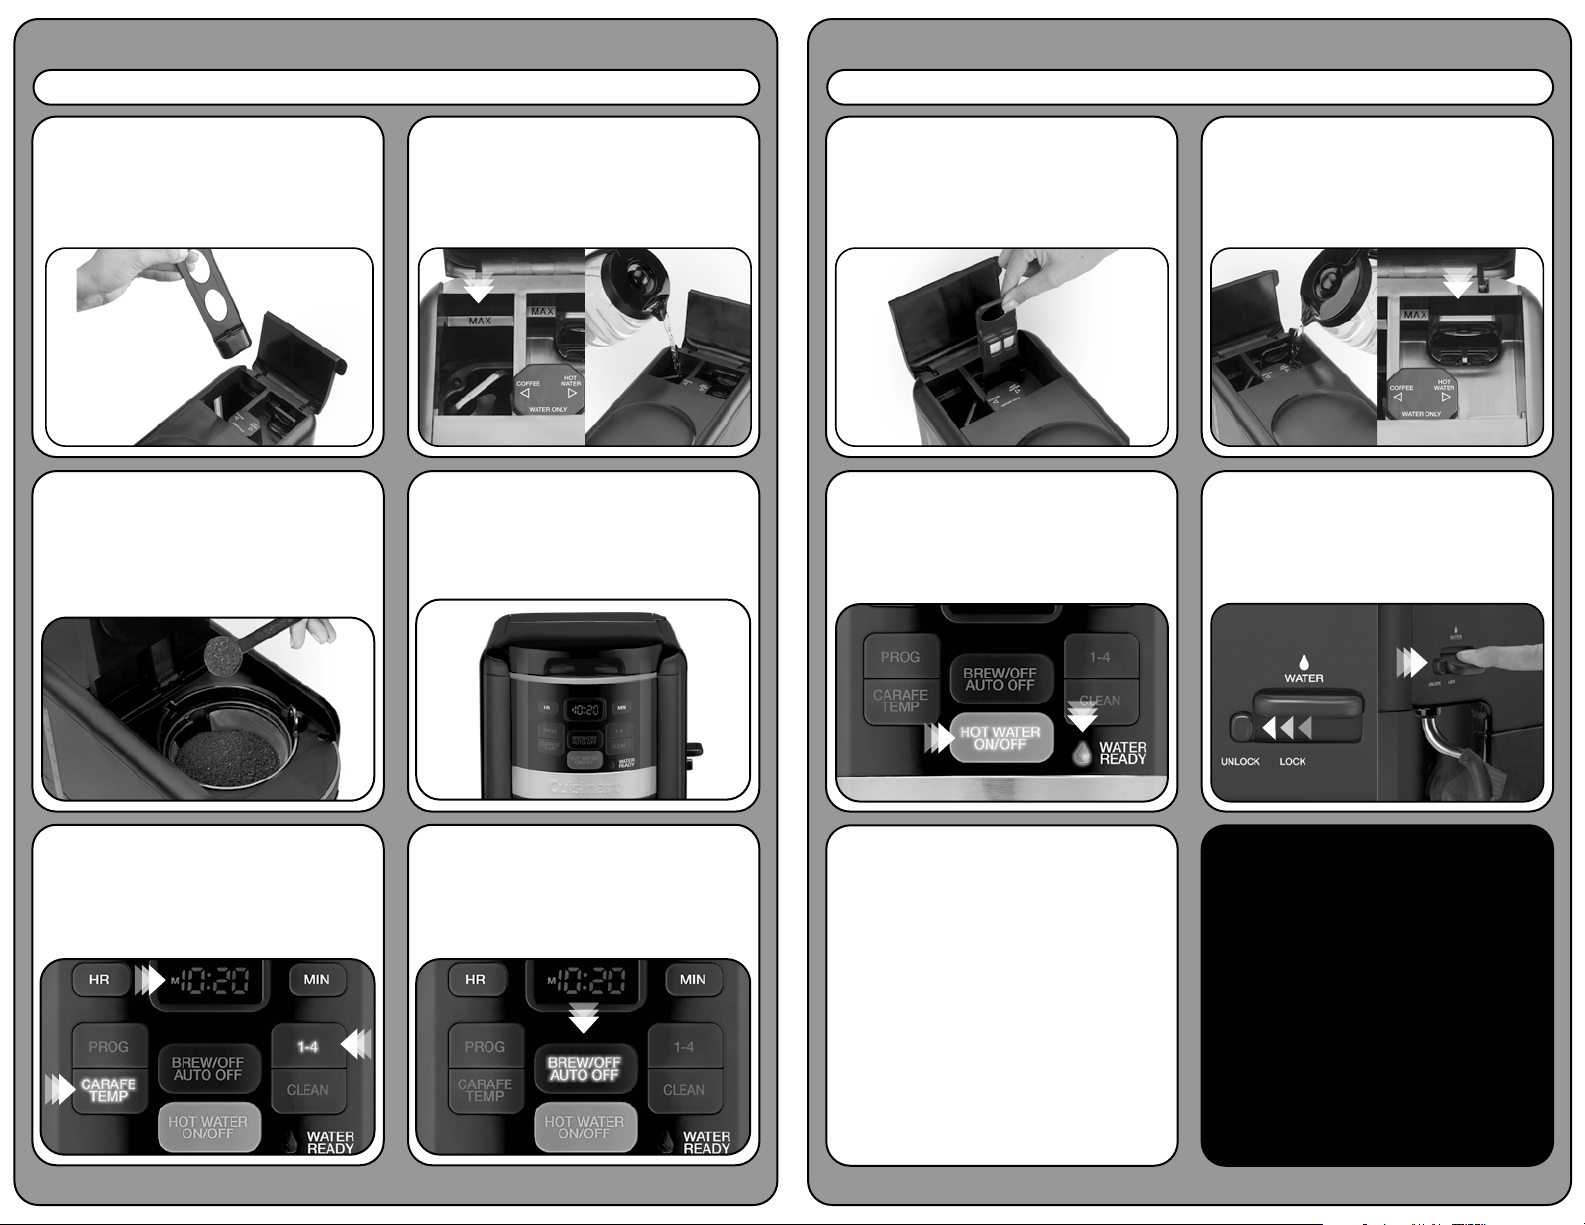
SETUP AND USE: Coffeemaker
2.
Pour desired amount of water into water
reservoir (a water level indicator is located
on the side of the unit).
4.
Check to make sure the filter
basket is securely in place and lid
is completely closed.3.
Insert a #4 paper filter or permanent filter.
Be sure that a paper filter is completely
open and fully inserted in the basket. It may
help to fold and flatten the seams of a paper filter
beforehand. Add 1 level scoop of ground coffee per
cup (maximum 15 scoops). Adjust the amount
according to taste.
5.
Setting Preferences: Push the 1–4
cup button if you are brewing fewer than 5
cups. Turn the Carafe Temperature dial to
Low (L), Medium (M), or High (H) and heater plate will
keep coffee at the temperature you select.
6.
To start brewing, press the BREW/OFF/
AUTO OFF button. When the brewing cycle
has been completed, five beeps will sound.
1.
Fully immerse the charcoal water filter in
cold tap water and soak for 15 minutes.
Insert filter into the water filter holder.
Open the water reservoir and insert filter into the unit
(See complete instructions on page 8 of your
Instruction Booklet).
Please see reverse side for Setup and Use: Hot Water System
Descalcificación:
Limpieza del dispensador de agua caliente:
Limpieza de la cafetera:
Portafiltros, jarra y tapa:
Apague y desenchufe el aparato.
Lave el portafiltros, la jarra y la tapa en agua jabonosa tibia o en la bandeja superior del lavavajillas.
Enjuague bien. Seque todas las piezas después de la limpieza.
Limpie el área bajo el portafiltros con un paño húmedo. NOTA: NO VIERTA AGUA EN EL DEPÓSITO
DESPUÉS DE HABER SACADO EL PORTAFILTROS.
Limpie la base con un paño húmedo.
No use productos o materiales abrasivos para limpiar la unidad. Nunca sumerja la base de la unidad
en agua.
Si la luz del botón de descalcificación CLEAN empieza a parpadear, esto significa que hay que descalcificar la
unidad. Llene el depósito de agua hasta la capacidad máxima con ¹⁄
³
de vinagre y ²⁄
³
de agua. Mantenga
presionado el botón CLEAN. Cuando la luz del botón CLEAN se encienda, encienda la unidad. Al final del ciclo
de descalcificación, la unidad emitirá cinco pitidos y se apagará. Vuelva a encender la unidad. Si la luz del
botón CLEAN sigue parpadeando, repita el proceso. Si no parpadea, repita el proceso con agua para
enjuagar el sistema interno. La unidad está lista para su uso.
Se recomienda descalcificar el dispensador de agua caliente dos veces al año.
Sirva agua hasta que el mensaje “Add Water” aparezca en la pantalla. Vierta 32 onzas (945 ml) de vinagre
blanco en el depósito. Sirva 16 onzas (475 ml) de vinagre; esto llenará el depósito interno. Encienda la unidad y
deje reposar el vinagre por 20 minutos. Luego, apague la unidad y permita que el vinagre se enfríe. A
continuación, vacíe el depósito interno, quitando el tapón ubicado debajo de la unidad. Una vez vacío el
depósito, cierre el tapón. Llene el depósito con agua y vacíelo otra vez. La unidad está lista para su uso.
2.
Para programar la hora de
encendido automático: Mantenga
presionado el botón PROG por 2 segundos; la hora
por defecto (12:00) o la hora previamente fijada aparecerá en
la pantalla, parpadeando. Programe la hora deseada, usando
los botones HR y MIN. Cinco segundos después de terminar la
programación, la unidad saldrá automáticamente del modo de
programación y el indicador luminoso se iluminará para indicar
que el encendido automático ha sido activado.
4.
El indicador del botón BREW/OFF/AUTO OFF se
encenderá cuando empiece el ciclo de preparación.
Se apagará al final del ciclo “mantener caliente”.
Para desactivar el encendido automático: Presione el botón
PROG iluminado; la luz se apagará, lo que indica que el modo
ha sido desactivado.
3.
Para activar el encendido automático usando
una hora previamente fijada: Presione el botón
PROG; la hora previamente fijada aparecerá en la
pantalla y el indicador luminoso se iluminará. Luego, la hora
regular aparecerá en la pantalla.
5.
Para programar el tiempo de apagado
automático: Mantenga presionado el botón
BREW/OFF/AUTO OFF por 2 segundos; el tiempo
por defecto (2 horas) o el tiempo de apagado automático
previamente fijado aparecerá en la pantalla, parpadeando.
Programe el tiempo deseado, usando los botones HR y MIN.
1.
Cómo fijar la hora: Presione el botón HR para
fijar la hora y el botón MIN para fijar los minutos.
Mantenga presionado el botón para desplazarse por
las horas o los minutos más rápidamente, o presione el botón
repetidamente para avanzar en incrementos de una hora o de
un minuto. Compruebe que el indicador “PM” está en la
pantalla si está fijando una hora de tarde/noche.
PROGRAMACIÓN
GUÍA DE REFERENCIA RÁPIDA
Cafetera programable de 12 tazas (1.75L)
& dispensador de agua caliente
Véase las instrucciones de preparación y uso al dorso.
©2021 Cuisinart PG-39483A-SP
GUÍA DE REFERENCIA RÁPIDA
PREPARACIÓN Y USO: Dispensador de agua caliente
2.
Llene el depósito de agua hasta la línea “MAX”
con agua fría.
1.
Remoje el filtro de agua de carbón en agua fría por
15 minutos, cerciorándose de que está
completamente sumergido en el agua. Introduzca el
filtro de agua de carbón en el soporte. Abra el depósito de agua
y coloque el filtro en la unidad (véase las instrucciones
completas en la página 8 del manual de instrucciones).
¡IMPORTANTE!
No tire este folleto a la basura.
Lea esta información antes de usar
su nueva cafetera & dispensador de
agua caliente Cuisinart
®
por primera
vez. Guarde esta información para
futura referencia.
Estos útiles consejos complementan el manual
de instrucciones. Para lograr un rendimiento
óptimo y una operación segura, lea el manual
de instrucciones.
3.
Presione el botón HOT WATER ON/OFF; el indicador
luminoso del botón HOT WATER ON/OFF se
encenderá. El indicador “Water Ready” (agua lista)
parpadeará durante el calentamiento. Una vez caliente el agua,
permanecerá en la pantalla.
4.
Deslice el botón de seguridad hacia la izquierda.
La unidad servirá 10 onzas (295 ml) de agua
caliente a la vez. NOTA: El dispensador de agua
caliente funciona independientemente de la cafetera. Por lo
tanto, puede calentar agua antes, durante o después de
preparar café.
¡Consejo útil!
Se recomienda limpiar el sistema interno
de la cafetera y del dispensador de agua
caliente antes del primer uso.
1. Cafetera: Llene el depósito de agua con agua
fría y siga las instrucciones de preparación,
pero ¡SIN USAR CAFÉ!
2. Dispensador de agua caliente: Llene el depósito
de agua hasta la línea “MAX” y siga las
instrucciones de la sección “Cómo conseguir
agua caliente" del manual de instrucciones.
¡Ahora está listo/a para disfrutar de su nueva
cafetera & dispensador de agua caliente
Cuisinart!
GUÍA DE REFERENCIA RÁPIDA
PREPARACIÓN Y USO: Cafetera
2.
Vierta agua en el depósito hasta el nivel deseado,
guiándose con el indicador de nivel de agua en el
costado de la unidad.
4.
Compruebe que el portafiltros está
correctamente instalado y que la tapa está
bien cerrada.
3.
Instale un filtro de papel n.° 4 o un filtro permanente
Cuisinart
®
. Compruebe que el filtro está
completamente abierto y correctamente instalado.
Puede resultar útil doblar y aplanar las costuras del filtro de
papel de antemano. Agregue 1 cucharada llena de café molido
por taza (145 ml) de café, hasta un máximo de 15 cucharadas.
Ajuste la cantidad de café molido a gusto.
5.
Fije sus preferencias: Si desea preparar
menos de 5 tazas de café, presione el botón 1–4.
Ponga el control de temperatura de la placa
calentadora (CARAFE TEMP) en el nivel deseado: “L” (baja),
“M” (media) o “H” (alta).
6.
Para iniciar el ciclo de preparación, presione el
botón BREW/OFF/AUTO OFF. Al final del ciclo de
preparación, la unidad emitirá cinco pitidos.
1.
Remoje el filtro de agua de carbón en agua fría por
15 minutos, cerciorándose de que está
completamente sumergido en el agua. Introduzca el
filtro de agua de carbón en el soporte. Abra el depósito de agua
y coloque el filtro en la unidad (véase las instrucciones
completas en la página 8 del manual de instrucciones).
Instrucciones de preparación y uso del dispensador de agua caliente al dorso.