Loading ...
Loading ...
Loading ...
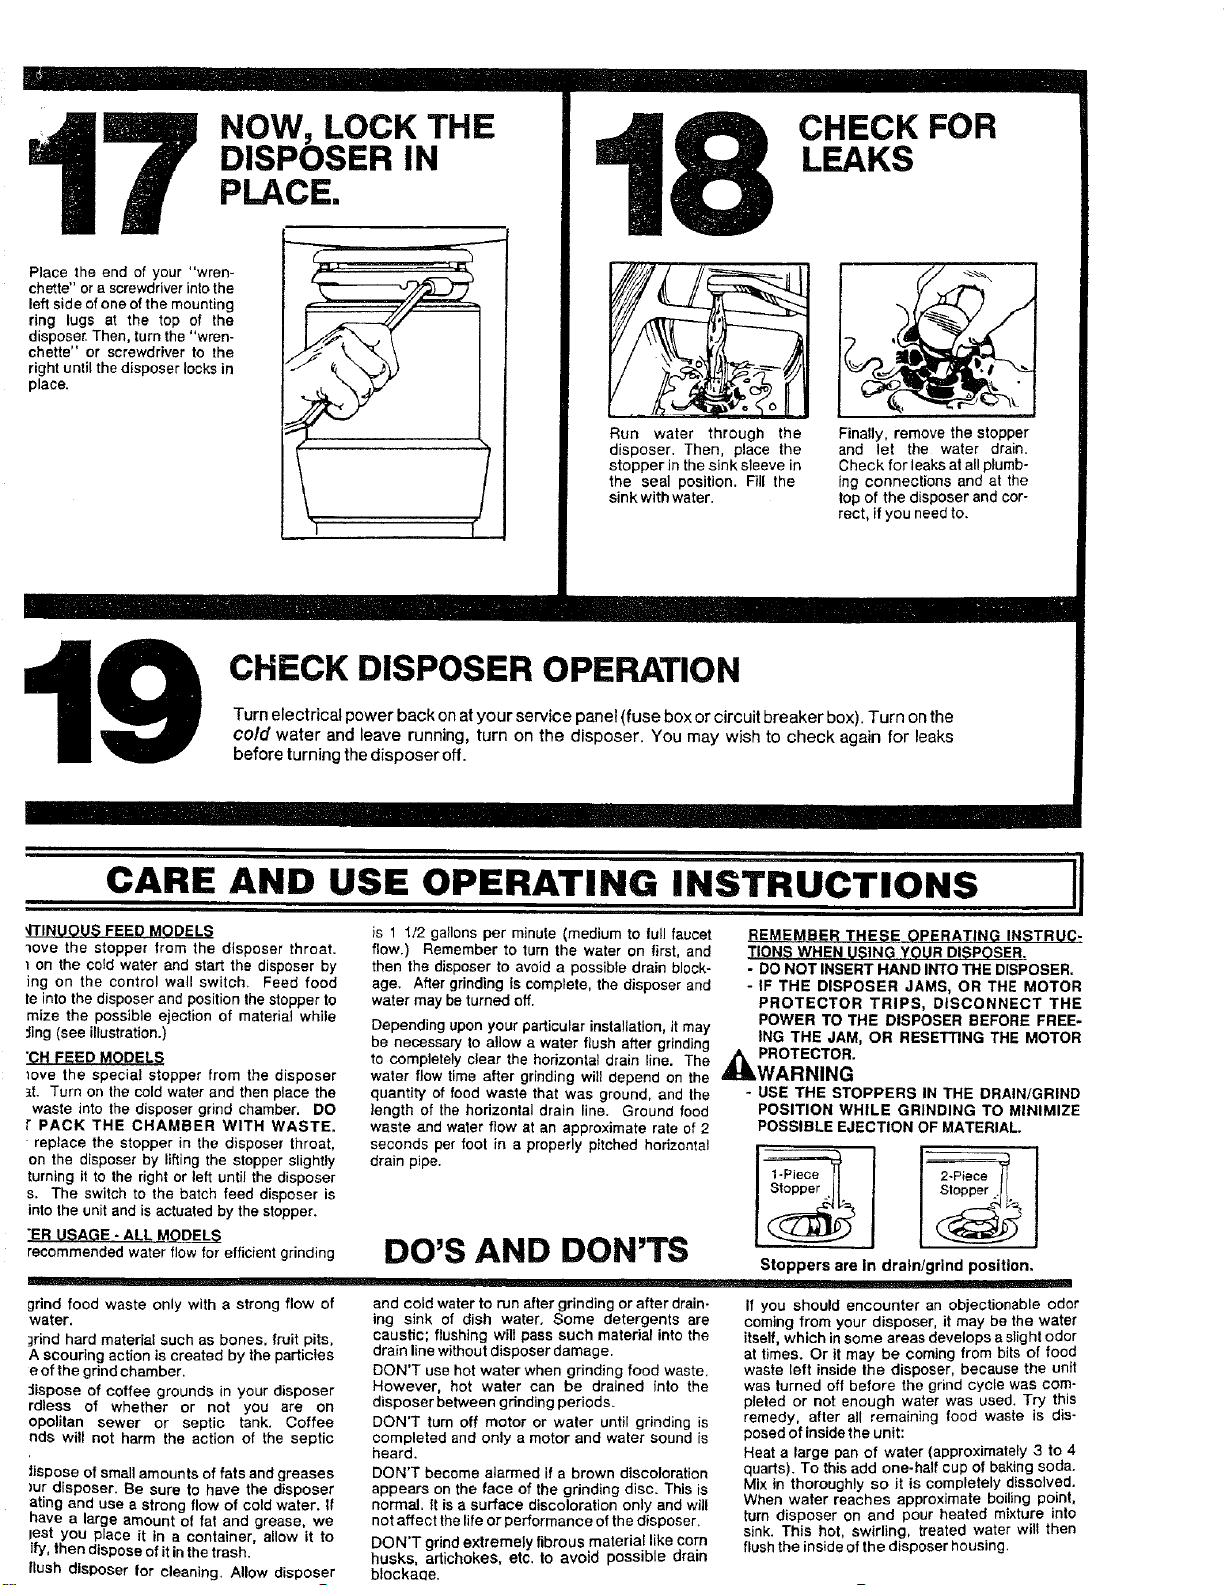
7 NOW, LOCKTHE
DISPOSER IN
PLACE.
Place the end of your "wren-
chette" or a screwdriver into the
left side of one of the mounting
ring lugs at the top of the
dispose_ Then, turn the "wren-
chette" or screwdriver to the
right until the disposer locks in
place.
8 CHECK FOR
LEAKS
Run water through the
disposer. Then, place the
stopper in the sink sleeve in
the seal position. Fill the
sink with water.
Finally, remove the stopper
and let the water drain.
Check for leaks at al! plumb-
ing connections and at the
lop of the disposer and cor-
rect, if you need to.
19
CHECK DISPOSER OPERATION
Turn electrical power back onat your service panel (fuse box or circuit breaker box). Turn on the
cold water and leave running, turn on the disposer. You may wish to check again for leaks
before turning the disposer off.
CARE AND USE OPERATING INSTRUCTIONS
qTINUOUS FEED MODELS
move the stopper |rom the disposer throat.
I on the cold water and start the disposer by
ing on the control wall switch, Feed food
te intothe disposer and position thestopper to
mize the possible ejection of material while
:_ing(see illustration.)
"CH FEED MODELS
love the special stopper from the disposer
_t. Turn on the cold water and then place the
waste into the disposer grind chamber. DO
t" PACK THE CHAMBER WITH WASTE.
replace the stopper in the disposer throat,
on the disposer by liftingthe stopper slightly
turning it to the right or left until the disposer
s. The switch to the batch feed disposer is
intothe unitand is actuated by the stopper.
"ER USAGE - ALL MODELS
recommended water flow for efficientgrinding
grind food waste only with a strong flow of
water,
;rind hard material such as bones, fruit pits,
A scouring action is created by the particles
e of the grind chamber.
::lispose of coffee grounds in your disposer
rdless of whether or not you are on
opolitan sewer or septic tank. Coffee
nds will not harm the action of the septic
tispose of smallamounts of fats and greases
)ur disposer. Be sure to have the disposer
ating and use a strong flow of cold water. If
have a large amount of fat and grease, we
lest you place it in a conta ner allow it to
i_, then dspose of it in the trash.
flush disposer for cleaning. Allow disposer
II
is 1 1/2 gallons per minute (medium to lull faucet
flow.) Remember to turn the water on first, and
then the disposer to avoid a possible drain block-
age. After grinding is complete, the disposer and
water may beturned off.
Depending upon your particular installation, it may
be necessary to allow a water flush after grinding
to completely clear the horizontal drain line. The
water flow time after grinding will depend on the
quantity of food waste that was ground, and the
length of the horizontal drain line. Ground food
waste and water flow at an approximate rate of 2
seconds per foot in a properly pitched horizontal
drain pipe.
DO'S AND DON"IS
and cold water to run after grinding or after drain-
ing sink of dish water. Some detergents are
caustic; flushing will pass such material into the
drain line without disposer damage.
DON'T use hot water when grinding food waste,
However, hot water can be drained into the
disposer between gdnding periods
DON'T turn off motor or water until grinding is
completed and only a motor and water sound is
heard.
DON'T become alarmed if a brown discoloration
appears on the face of the grinding disc. This is
normal. It isa surface discoloration only and will
not affect thelife or performance of the disposer,
DON'T grind extremely fibrous material like corn
husks, artichokes, etc. to avoid possible drain
blockaae.
REMEMBER THESE OPERATING INSTRUC-
TIONS WHEN USING YOUR DISPOSER.
- DO NOT INSERT HAND INTOTHE DISPOSER.
- IF THE DISPOSER JAMS, OR THE MOTOR
PROTECTOR TRIPS, DISCONNECT THE
POWER TO THE DISPOSER BEFORE FREE-
ING THE JAM, OR RESETTING THE MOTOR
_1, PROTECTOR'
WARNING
- USE THE STOPPERS IN THE DRAIN/GRIND
POSITION WHILE GRINDING TO MINIMIZE
POSSIBLE EJECTION OF MATERIAL.
Stoppers are In drain/grind position.
If you should encounter an objectionable odor
coming from your disposer, it may be the water
itself, which insome areas develops a slightodor
at times. Or it may be coming from bits of food
waste left inside the disposer, because the unit
was turned off before the grind cycle was com-
pleled or not enough water was used. Try this
remedy, after all remaining food waste is dis-
posed of inside the unit:
Heat a large pan of water (approximately 3 to 4
quarts). To this add one-half cup of baking soda.
Mix in thoroughly so it is completely dissolved.
When water reaches approximate boiling point,
tum disposer on and pour heated mixture into
sink. This hot, swirling, treated water will then
flush the inside of the disposer housing.
Loading ...