Home
Bookmarks
Home
Siemens
Siemens CM633GBS1BHB673G0S1A User Manual
Page 25
Siemens CM633GBS1BHB673G0S1A 60cm Pyrolytic Built-In Oven & 45cm Compact Built-In Oven with Microwave
User Manual - Page 25
For CM633GBS1BHB673G0S1A.
PDF File Manual
,
28 pages
,
Read Online
|
Download pdf file
More photos
Built-in oven
HB673G0.1A
Table of contents
en Instruction manual
( Important safety information 4
] Causes of damage 6
7 Environmental protection 6
* Getting to know your appliance 7
_ Accessories 9
K Before using for the first time 11
1 Operating the appliance 12
O Time-setting options 13
A Childproof lock 15
Q Basic settings 15
F Sabbath mode 16
. Cleaning function 16
D Cleaning agent 17
p Rails 19
q Appliance door 19
3 Trouble shooting 22
4 Customer service 23
P Dishes 24
8 Intended use
Intended use
( Important safety information
Important safety information
General information
: Warning
Risk of fire!
: Warning
Risk of burns!
: Warning
Risk of scalding!
: Warning
Risk of injury!
: Warning
Risk of electric shock!
: Warning
Hazard due to magnetism!
Halogen lamp
: Warning
Risk of electric shock!
Cleaning function
: Warning
Risk of fire!
: Warning
Risk of serious damage to health!
: Warning
Risk of burns!
] Causes of damage
Causes of damage
General information
Caution!
7 Environmental protection
Environmental protection
Saving energy
Environmentally-friendly disposal
* Getting to know your appliance
Getting to know your appliance
Note:
Control panel
Controls
Buttons and touch fields
Buttons
Meaning
Rotary selector
Display
Status bar
Progress line
Lapse of time
Temperature check
Note:
Operating modes menu
Operating mode
Use
Types of heating
Types of heating
Temperature
Use
--------
Default values
Further information
Cooking compartment functions
Opening the appliance door
Interior lighting
Note:
Cooling fan
Caution!
Note:
_ Accessories
Accessories
Accessories included
Note:
Inserting accessories
Notes
Locking function
Combining accessories
Optional accessories
Note:
Optional accessories
Order number
K Before using for the first time
Before using for the first time
Initial use
Note:
Setting the language
1. Use the rotary selector to select the required language.
2. Touch the ¿ arrow.
Setting the time
1. Turn the rotary selector to set the current time.
2. Touch the ¿ arrow
Setting the date
1. Use the rotary selector to set the current day, month and year.
2. Touch the ¿ arrow to confirm.
Cleaning the cooking compartment and accessories
Cleaning the cooking compartment
Settings
Cleaning the accessories
1 Operating the appliance
Operating the appliance
Switching the appliance on and off
Switching the appliance on
Note:
Switching off the appliance
Note:
Starting or interrupting operation
Tip:
Selecting an operating mode
1. Press the menu button. The operating modes menu opens.
2. Use the rotary selector to select the required operating mode. Depending on the operating mode, different options are available.
3. Use the ¿ arrow to reach the required operating mode.
4. Use the rotary selector to change the selection. Depending on the option, change different settings.
5. Press the Start/Stop button to start.
Setting the type of heating and temperature
1. Use the rotary selector to change the type of heating.
2. Press the arrow ¿ to switch to the temperature.
3. Use the rotary selector to change the temperature.
4. Press the Start/Stop button.
Rapid heat up
Making settings
1. Set the type of heating and temperature.
2. Press the c button.
Notes
Cancelling
O Time-setting options
Time-setting options
Time-setting option
Use
Notes
Timer
1. Press the 0 button. The field for the timer opens.
2. Use the rotary selector to set the timer duration. The timer starts after a few seconds.
When the time has elapsed,
Cancelling the timer duration
Changing the timer duration
Cooking time
1. Press the 0 button.
2. Set the cooking time using the rotary selector.
3. Press the Start/Stop button to start.
The cooking time has elapsed
Cancelling the cooking time
Changing the cooking time
End time
1. Touch the ¿ arrow to continue to "y End".
2. Set the end time using the rotary selector.
3. Confirm with the Start/Stop button.
The cooking time has elapsed
Correcting the end time
Cancelling the end time
A Childproof lock
Childproof lock
Activating and deactivating
The appliance door is locked
Q Basic settings
Basic settings
Changing settings
1. Press the "On/off" button.
2. Press the menu button. The operating modes menu opens.
3. Use the rotary selector to select "Settings".
4. Touch the arrow ¿.
5. Use the rotary selector to change the values.
6. Use the arrow ¿ to change to the next settings, and change them if necessary.
7. Press the menu button to save. "Save" or "Discard" appears on the display.
List of settings
Setting
Options
Caution!
Note:
Changing the time
1. Press the On/Off button.
2. Press the Menu button.
3. Use the rotary selector to select "Settings".
4. Touch the arrow ¿ to move to "Time of day".
5. Use the rotary selector to change the time.
6. Press the Menu button.
Power cut
F Sabbath mode
Sabbath mode
Starting Sabbath mode
1. Press the on/off button. A type of heating and a temperature are suggested in the display.
2. Turn the rotary selector anti-clockwise and select the "Sabbath mode" type of heating.
3. Tap the ¿ arrow and set the temperature using the rotary selector.
4. Press the 0 button to open the time-setting options menu. 25:00 hours are suggested.
5. Use the rotary selector to set the required cooking time.
6. Press the start/stop button to start. You can see the cooking time counting down in the status bar.
The cooking time has elapsed
Setting a later end time
Cancelling Sabbath mode
. Cleaning function
Cleaning function
Setting
Cleaning level
Duration
Note:
: Warning
Risk of burns!
Prior to initiating the cleaning function
Note:
: Warning
Risk of fire!
: Warning
Risk of serious damage to health!
Setting the self-cleaning function
1. Press the menu button. The operating modes menu opens.
2. Use the rotary selector to select "Self cleaning".
3. Touch the arrow ¿. Cleaning setting 3 is suggested. You can start the cleaning process immediately using the "Start/stop" button or
4. select a different cleaning setting using the rotary selector.
5. Press the "Start/stop" button. Instructions for the cleaning operation appear on the display.
6. Press the "Start/stop" button to start the cleaning operation.
Once the cleaning has finished
Cancelling the cleaning operation
Adjusting the cleaning setting
You can set the cleaning to run overnight
Once the cleaning function has ended
D Cleaning agent
Cleaning agent
Suitable cleaning agents
Caution!
Risk of surface damage
Tip:
: Warning
Risk of burns!
Area
Cleaning
Notes
Keeping the appliance clean
Tips
p Rails
Rails
Detaching and refitting the rails
: Warning
Risk of burns!
Detaching the rails
1. Lift the rail slightly at the front ‚ and detach it ƒ (figure !).
2. Then pull the whole rail towards you and take it out (figure ").
Attaching the rails
1. First, insert the rail in the middle of the rear socket ‚, until the rail rests against the cooking compartment wall, and push it back ƒ (figure !).
2. Then insert the rail into the front socket „, until the rail also rests against the cooking compartment wall here, and press it downwards … (figure ").
q Appliance door
Appliance door
Removing and fitting the appliance door
: Warning
Risk of injury!
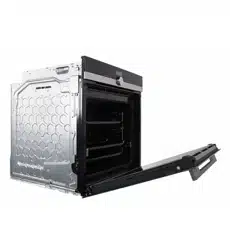
Removing the appliance door
1. Open the appliance door fully.
2. Fold open the two locking levers on the left and right (figure !).
3. Close the appliance door as far as the limit stop ‚. With both hands, grip the door on the left- and right- hand side ƒ, and pull it out upwards (figure ").
Fitting the appliance door
1. When attaching the appliance door, ensure that both hinges are inserted straight into the opening (figure !).
2. Open the appliance door fully. Fold both locking levers closed again (figure ").
3. Close the cooking compartment door.
Removing the door cover
1. Open the appliance door slightly.
2. Press on the right and left side of the cover (figure !).
3. Remove the cover (figure "). Close the appliance door carefully.
Note:
4. Open the appliance door again slightly. Put the cover back in place and press on it until it clicks audibly into place (figure #).
5. Close the appliance door.
Removing and installing the door panels
Removing the door from the appliance
1. Open the appliance door slightly.
2. Press on the right and left side of the cover (figure !).
3. Remove the cover (figure ").
4. Loosen and remove the screws on the left and right of the appliance door (figure #).
5. Before closing the door again, trap a tea towel which has been folded several times in the door (figure $).
6. Push both retainers on the intermediate panel upwards, but do not remove it (figure %). Hold the panel with one hand. Remove the panel.
: Warning
Risk of injury!
Fitting the door on the appliance
1. Insert the intermediate panel at the bottom into the retainer and push it in firmly at the top (figure !).
2. Push both retainers downwards (figure ").
3. Insert the front panel at the bottom into the retainers (figure #).
4. Close the front panel until both upper hooks are opposite the opening (figure $).
5. Press the front panel at the bottom until it clicks audibly into place (figure %).
6. Open the appliance door again slightly and remove the tea towel.
7. Screw both screws back in on the left and right.
8. Put the cover back in place and press on it until it clicks audibly into place (figure &).
9. Close the appliance door.
Caution!
3 Trouble shooting
Trouble shooting
Note:
: Warning
Risk of electric shock!
Fault table
Fault
Possible cause
Information/remedial action
--------
Maximum operating time exceeded
Replacing the bulb in the top of the cooking compartment
: Warning
Risk of electric shock!
: Warning
Risk of burns!
1. Place a tea towel in the cold cooking compartment to prevent damage.
2. Turn the glass cover anti-clockwise to remove it (figure !).
3. Pull out the bulb – do not turn it (figure "). Insert the new bulb, making sure that the pins are in the correct position. Push the bulb in firmly.
4. Screw the glass cover back in.
5. Remove the tea towel and switch on the circuit breaker.
Glass cover
4 Customer service
Customer service
E number and FD number
To book an engineer visit and product advice
P Dishes
Dishes
Information about the programs
Selecting and setting food
1. Press the menu button.
2. Use the rotary selector to select "Dishes".
3. Touch the arrow ¿. The first dish appears, along with a default value for the weight.
4. Use the rotary selector to select the required food.
5. Touch the arrow ¿.
Notes
The program has ended
Cancelling the program
Setting a later end time
Page 25/28
Page 1
Page 2
Page 3
Page 4
Page 5
Page 6
Page 7
Page 8
Page 9
Page 10
Page 11
Page 12
Page 13
Page 14
Page 15
Page 16
Page 17
Page 18
Page 19
Page 20
Page 21
Page 22
Page 23
Page 24
Page 25
Page 26
Page 27
Page 28
Contents
Table of Contents
Search
Previous
Next
Troubleshooting
Bookmarks
Loading ...
Loading ...
Loading ...
6
Loading ...
Loading ...
Loading ...
File type: PDF
File name: 48251769_cm633gbs1bhb673g0s1a.pdf
File size: 1.78 MB
File Language: English
Pages: 28
Author: Siemens
File created: 2014-06-04
Published: 2022-05-22
Updated: 2023-05-05
Download File
Table of Contents
×
Built-in oven
1
HB673G0.1A
1
Table of contents
3
en Instruction manual
3
( Important safety information 4
3
] Causes of damage 6
3
7 Environmental protection 6
3
* Getting to know your appliance 7
3
_ Accessories 9
3
K Before using for the first time 11
3
1 Operating the appliance 12
3
O Time-setting options 13
3
A Childproof lock 15
3
Q Basic settings 15
3
F Sabbath mode 16
3
. Cleaning function 16
3
D Cleaning agent 17
3
p Rails 19
3
q Appliance door 19
3
3 Trouble shooting 22
3
4 Customer service 23
3
P Dishes 24
3
8 Intended use
4
Intended use
4
( Important safety information
4
Important safety information
4
General information
4
: Warning
4
Risk of fire!
4
: Warning
4
Risk of burns!
4
: Warning
4
Risk of scalding!
4
: Warning
5
Risk of injury!
5
: Warning
5
Risk of electric shock!
5
: Warning
5
Hazard due to magnetism!
5
Halogen lamp
5
: Warning
5
Risk of electric shock!
5
Cleaning function
5
: Warning
5
Risk of fire!
5
: Warning
5
Risk of serious damage to health!
5
: Warning
5
Risk of burns!
5
] Causes of damage
6
Causes of damage
6
General information
6
Caution!
6
7 Environmental protection
6
Environmental protection
6
Saving energy
6
Environmentally-friendly disposal
6
* Getting to know your appliance
7
Getting to know your appliance
7
Note:
7
Control panel
7
Controls
7
Buttons and touch fields
7
Buttons
7
Meaning
7
Rotary selector
7
Display
7
Status bar
7
Progress line
8
Lapse of time
8
Temperature check
8
Note:
8
Operating modes menu
8
Operating mode
8
Use
8
Types of heating
8
Types of heating
8
Temperature
8
Use
8
--------
9
Default values
9
Further information
9
Cooking compartment functions
9
Opening the appliance door
9
Interior lighting
9
Note:
9
Cooling fan
9
Caution!
9
Note:
9
_ Accessories
9
Accessories
9
Accessories included
9
Note:
9
Inserting accessories
10
Notes
10
Locking function
10
Combining accessories
10
Optional accessories
11
Note:
11
Optional accessories
11
Order number
11
K Before using for the first time
11
Before using for the first time
11
Initial use
11
Note:
11
Setting the language
11
1. Use the rotary selector to select the required language.
11
2. Touch the ¿ arrow.
11
Setting the time
11
1. Turn the rotary selector to set the current time.
11
2. Touch the ¿ arrow
11
Setting the date
11
1. Use the rotary selector to set the current day, month and year.
11
2. Touch the ¿ arrow to confirm.
11
Cleaning the cooking compartment and accessories
11
Cleaning the cooking compartment
11
Settings
12
Cleaning the accessories
12
1 Operating the appliance
12
Operating the appliance
12
Switching the appliance on and off
12
Switching the appliance on
12
Note:
12
Switching off the appliance
12
Note:
12
Starting or interrupting operation
12
Tip:
12
Selecting an operating mode
12
1. Press the menu button. The operating modes menu opens.
12
2. Use the rotary selector to select the required operating mode. Depending on the operating mode, different options are available.
12
3. Use the ¿ arrow to reach the required operating mode.
12
4. Use the rotary selector to change the selection. Depending on the option, change different settings.
12
5. Press the Start/Stop button to start.
12
Setting the type of heating and temperature
12
1. Use the rotary selector to change the type of heating.
12
2. Press the arrow ¿ to switch to the temperature.
13
3. Use the rotary selector to change the temperature.
13
4. Press the Start/Stop button.
13
Rapid heat up
13
Making settings
13
1. Set the type of heating and temperature.
13
2. Press the c button.
13
Notes
13
Cancelling
13
O Time-setting options
13
Time-setting options
13
Time-setting option
13
Use
13
Notes
13
Timer
13
1. Press the 0 button. The field for the timer opens.
13
2. Use the rotary selector to set the timer duration. The timer starts after a few seconds.
13
When the time has elapsed,
13
Cancelling the timer duration
14
Changing the timer duration
14
Cooking time
14
1. Press the 0 button.
14
2. Set the cooking time using the rotary selector.
14
3. Press the Start/Stop button to start.
14
The cooking time has elapsed
14
Cancelling the cooking time
14
Changing the cooking time
14
End time
14
1. Touch the ¿ arrow to continue to "y End".
14
2. Set the end time using the rotary selector.
14
3. Confirm with the Start/Stop button.
14
The cooking time has elapsed
14
Correcting the end time
14
Cancelling the end time
14
A Childproof lock
15
Childproof lock
15
Activating and deactivating
15
The appliance door is locked
15
Q Basic settings
15
Basic settings
15
Changing settings
15
1. Press the "On/off" button.
15
2. Press the menu button. The operating modes menu opens.
15
3. Use the rotary selector to select "Settings".
15
4. Touch the arrow ¿.
15
5. Use the rotary selector to change the values.
15
6. Use the arrow ¿ to change to the next settings, and change them if necessary.
15
7. Press the menu button to save. "Save" or "Discard" appears on the display.
15
List of settings
15
Setting
15
Options
15
Caution!
15
Note:
15
Changing the time
15
1. Press the On/Off button.
15
2. Press the Menu button.
15
3. Use the rotary selector to select "Settings".
15
4. Touch the arrow ¿ to move to "Time of day".
15
5. Use the rotary selector to change the time.
15
6. Press the Menu button.
15
Power cut
16
F Sabbath mode
16
Sabbath mode
16
Starting Sabbath mode
16
1. Press the on/off button. A type of heating and a temperature are suggested in the display.
16
2. Turn the rotary selector anti-clockwise and select the "Sabbath mode" type of heating.
16
3. Tap the ¿ arrow and set the temperature using the rotary selector.
16
4. Press the 0 button to open the time-setting options menu. 25:00 hours are suggested.
16
5. Use the rotary selector to set the required cooking time.
16
6. Press the start/stop button to start. You can see the cooking time counting down in the status bar.
16
The cooking time has elapsed
16
Setting a later end time
16
Cancelling Sabbath mode
16
. Cleaning function
16
Cleaning function
16
Setting
16
Cleaning level
16
Duration
16
Note:
16
: Warning
16
Risk of burns!
16
Prior to initiating the cleaning function
16
Note:
16
: Warning
17
Risk of fire!
17
: Warning
17
Risk of serious damage to health!
17
Setting the self-cleaning function
17
1. Press the menu button. The operating modes menu opens.
17
2. Use the rotary selector to select "Self cleaning".
17
3. Touch the arrow ¿. Cleaning setting 3 is suggested. You can start the cleaning process immediately using the "Start/stop" button or
17
4. select a different cleaning setting using the rotary selector.
17
5. Press the "Start/stop" button. Instructions for the cleaning operation appear on the display.
17
6. Press the "Start/stop" button to start the cleaning operation.
17
Once the cleaning has finished
17
Cancelling the cleaning operation
17
Adjusting the cleaning setting
17
You can set the cleaning to run overnight
17
Once the cleaning function has ended
17
D Cleaning agent
17
Cleaning agent
17
Suitable cleaning agents
17
Caution!
17
Risk of surface damage
17
Tip:
17
: Warning
17
Risk of burns!
17
Area
18
Cleaning
18
Notes
18
Keeping the appliance clean
18
Tips
18
p Rails
19
Rails
19
Detaching and refitting the rails
19
: Warning
19
Risk of burns!
19
Detaching the rails
19
1. Lift the rail slightly at the front ‚ and detach it ƒ (figure !).
19
2. Then pull the whole rail towards you and take it out (figure ").
19
Attaching the rails
19
1. First, insert the rail in the middle of the rear socket ‚, until the rail rests against the cooking compartment wall, and push it back ƒ (figure !).
19
2. Then insert the rail into the front socket „, until the rail also rests against the cooking compartment wall here, and press it downwards … (figure ").
19
q Appliance door
19
Appliance door
19
Removing and fitting the appliance door
19
: Warning
19
Risk of injury!
19
Removing the appliance door
19
1. Open the appliance door fully.
19
2. Fold open the two locking levers on the left and right (figure !).
19
3. Close the appliance door as far as the limit stop ‚. With both hands, grip the door on the left- and right- hand side ƒ, and pull it out upwards (figure ").
19
Fitting the appliance door
20
1. When attaching the appliance door, ensure that both hinges are inserted straight into the opening (figure !).
20
2. Open the appliance door fully. Fold both locking levers closed again (figure ").
20
3. Close the cooking compartment door.
20
Removing the door cover
20
1. Open the appliance door slightly.
20
2. Press on the right and left side of the cover (figure !).
20
3. Remove the cover (figure "). Close the appliance door carefully.
20
Note:
20
4. Open the appliance door again slightly. Put the cover back in place and press on it until it clicks audibly into place (figure #).
20
5. Close the appliance door.
20
Removing and installing the door panels
20
Removing the door from the appliance
20
1. Open the appliance door slightly.
20
2. Press on the right and left side of the cover (figure !).
20
3. Remove the cover (figure ").
20
4. Loosen and remove the screws on the left and right of the appliance door (figure #).
20
5. Before closing the door again, trap a tea towel which has been folded several times in the door (figure $).
20
6. Push both retainers on the intermediate panel upwards, but do not remove it (figure %). Hold the panel with one hand. Remove the panel.
21
: Warning
21
Risk of injury!
21
Fitting the door on the appliance
21
1. Insert the intermediate panel at the bottom into the retainer and push it in firmly at the top (figure !).
21
2. Push both retainers downwards (figure ").
21
3. Insert the front panel at the bottom into the retainers (figure #).
21
4. Close the front panel until both upper hooks are opposite the opening (figure $).
21
5. Press the front panel at the bottom until it clicks audibly into place (figure %).
21
6. Open the appliance door again slightly and remove the tea towel.
21
7. Screw both screws back in on the left and right.
21
8. Put the cover back in place and press on it until it clicks audibly into place (figure &).
21
9. Close the appliance door.
21
Caution!
21
3 Trouble shooting
22
Trouble shooting
22
Note:
22
: Warning
22
Risk of electric shock!
22
Fault table
22
Fault
22
Possible cause
22
Information/remedial action
22
--------
22
Maximum operating time exceeded
22
Replacing the bulb in the top of the cooking compartment
22
: Warning
22
Risk of electric shock!
22
: Warning
22
Risk of burns!
22
1. Place a tea towel in the cold cooking compartment to prevent damage.
22
2. Turn the glass cover anti-clockwise to remove it (figure !).
22
3. Pull out the bulb – do not turn it (figure "). Insert the new bulb, making sure that the pins are in the correct position. Push the bulb in firmly.
22
4. Screw the glass cover back in.
22
5. Remove the tea towel and switch on the circuit breaker.
23
Glass cover
23
4 Customer service
23
Customer service
23
E number and FD number
23
To book an engineer visit and product advice
23
P Dishes
24
Dishes
24
Information about the programs
24
Selecting and setting food
24
1. Press the menu button.
24
2. Use the rotary selector to select "Dishes".
24
3. Touch the arrow ¿. The first dish appears, along with a default value for the weight.
24
4. Use the rotary selector to select the required food.
24
5. Touch the arrow ¿.
24
Notes
24
The program has ended
24
Cancelling the program
24
Setting a later end time
24
Search:
×
Search