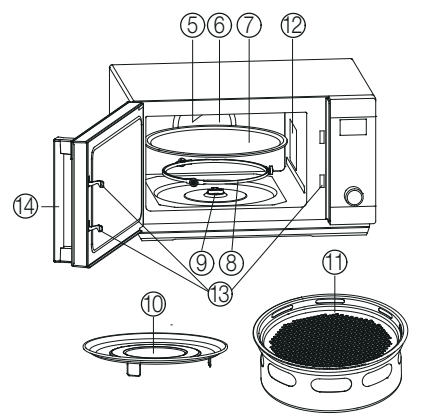
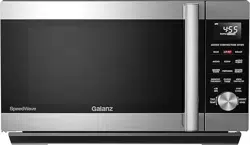
1. Control Panel 2. Display Screen 3. Menu / Time / Weight / Temperature / Level Selector Knob 4. Oven Window 5. Top Heating Element 6. Convection Fan & Back Wall Heating Element 7. Glass Turntable 8. Roller Ring 9. Shaft 10. Baking and Roasting Pan 11. Air Fry Kit 12. Wave Guide (Please do not remove the mica plate covering the wave guide) 13. Door Safety Lock System 14. Handle
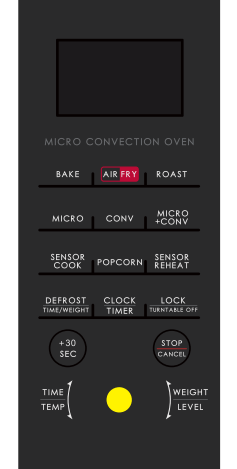
CONTROL PANEL
BAKE
Use to bake food (See Page 14).
AIR FRY
Use to air fry food (See Page 16).
ROAST
Use to roast food (See Page 18).
MICRO
Use to microwave food with selected power level
CONV
Use to set convection program (See Page 20).
MICRO+CONV
Use to set combination cooking program (See Page 21).
SENSOR COOK
Use to set the automatic sensor cook programs (See Page 22).
POPCORN
Use to set popcorn program (See Page 24).
SENSOR REHEAT
Use to set the automatic sensor reheat programs (See Page 23).
TIME / WEIGHT DEFORST
Press to set defrost program based on time (See Page 13).
Press to set defrost program based on weight (See Page 12).
CLOCK /TIMER
Press and hold to set the clock time (See Page 9).
Press to set the timer function (See Page 10).
LOCK / TURNTABLE OFF
Press and hold to set child lock (See Page 25).
Press to turn turntable on or off while in the microwave cooking mode (See Page 25).
+30 SEC
Press to add time during the cooking program (See Page 24).
STOP/CANCEL
Press to clear all previous settings before cooking starts.
Press once to pause current cooking program or press twice to cancel the program.
Menu / Time / Weight / Temperature / Level Selector Knob
Turn to select cooking menus, time, food weight, portion, temperature or power level.
OPERATION INSTRUCTIONS
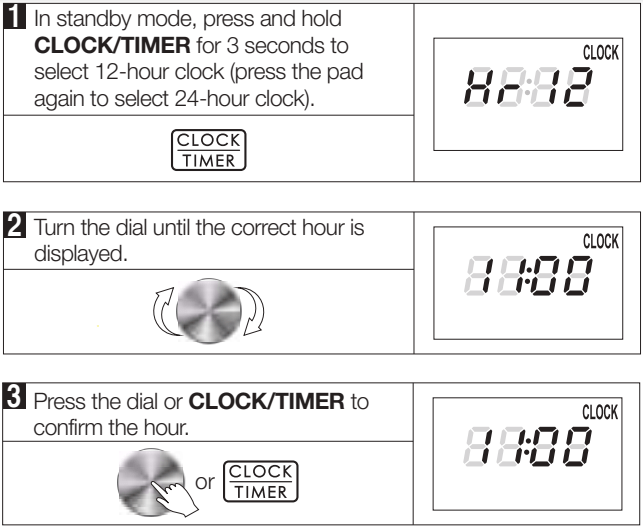
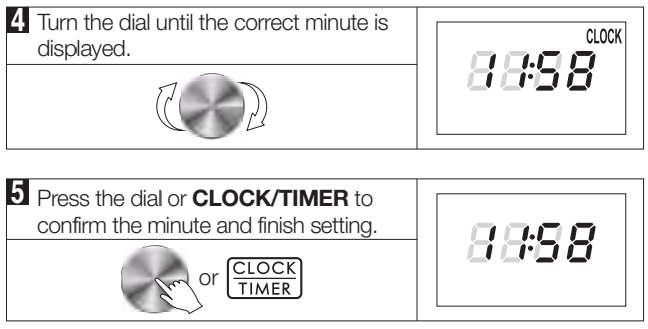
Setting the Clock
You can set the clock in 12-hour or 24-hour by pressing CLOCK/TIMER in standby mode.
Example: How to set a 12-hour clock at 11:58
NOTE: While in the process of setting the clock, you can cancel the settings by pressing the STOP/CANCEL
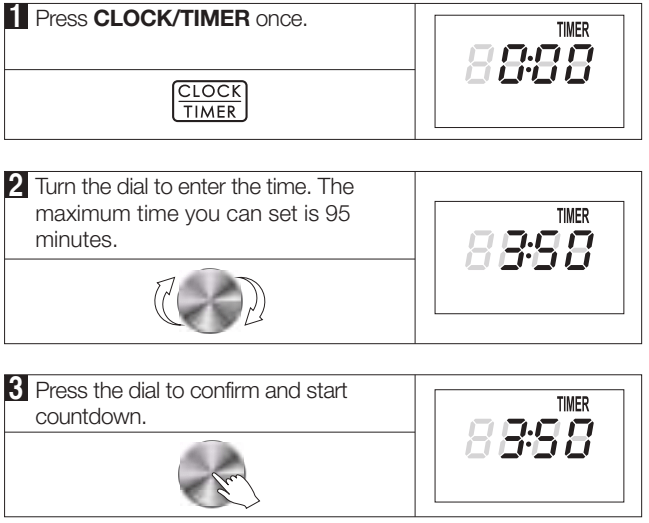
Timer
You can use the timer feature to count down a specific amount of time whether it’s for cooking or for anything else.
Example: How to set the timer for 3 minutes and 50 seconds.
NOTE: Timer countdown can be seen for 5 seconds by touching CLOCK/TIMER, if press STOP/CANCEL during these 5 seconds, the timer will be canceled.
Accessory Guide: Glass Turntable
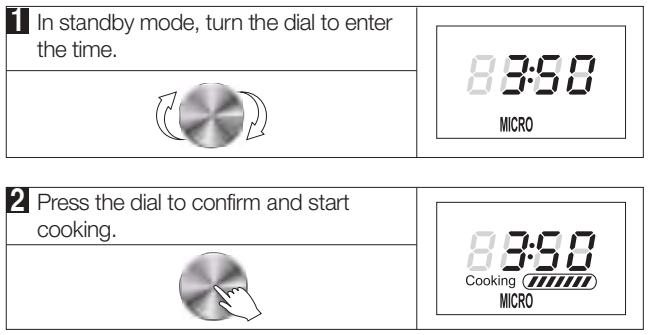
This feature allows you to start the oven quickly at maximum microwave power. The longest cooking time is 95 minutes.
Example: How to quick start microwave for 3 minutes and 50 seconds.
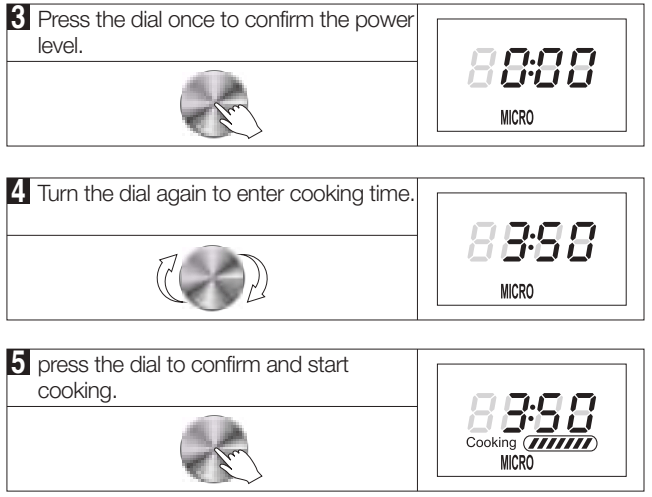
Microwave Cooking
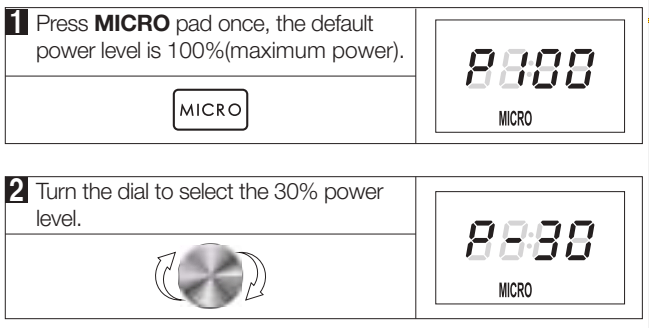
Accessory Guide: Glass Turntable
This feature allows you to choose the power level and cooking time of microwave function. The longest cooking time is 95 minutes.
Example: Cook at 30% power level for 3 minutes and 50 seconds.
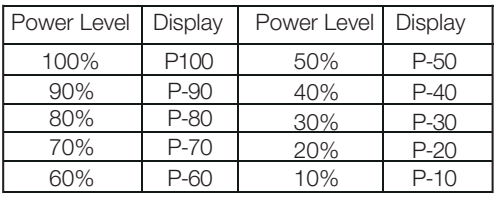
Power Level Chart:
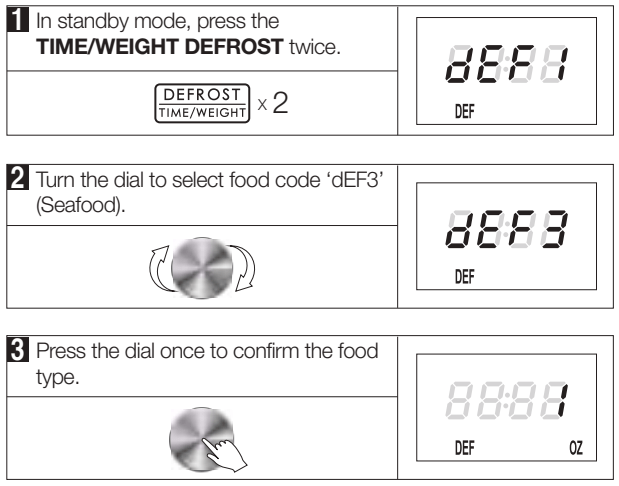
Weight Defrost
Accessory Guide: Glass Turntable
The defrosting time and power level are automatically set once the food category and the weight are selected.
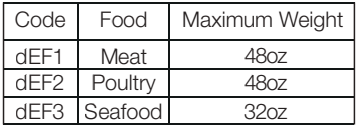
Example: How to defrost 8oz seafood.
Weight Defrost Food Chart:
NOTE:
During the defrosting program, the system will pause and alert the user to turn the food over when 1/3 of the defrosting time remains. After turning food over, close the door and press the dial to resume the defrosting.
Weight must be in pounds and ounces. If label gives weight in pounds only, change the fraction of a pound to ounces using the following chart.
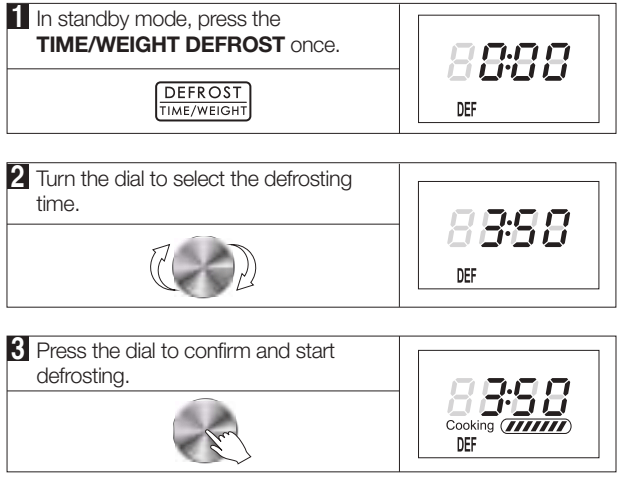
Time Defrost
Accessory Guide: Glass Turntable
The defrosting power is adjusted automatically once the cooking time is programmed
Example: How to defrost food for 3 minutes and 50 seconds.
NOTE: During the defrosting program, the system will pause and alert the user to turn the food over when 1/3 of the defrosting time remains. After turning food over, close the door and press the dial to resume the defrosting.
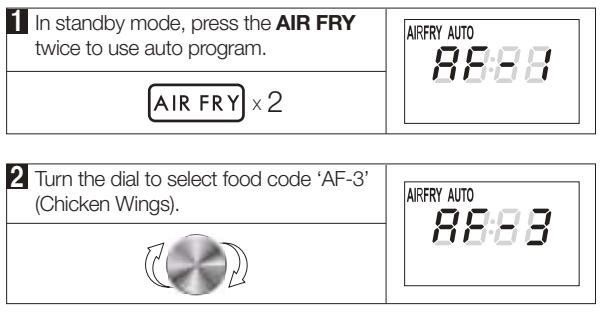
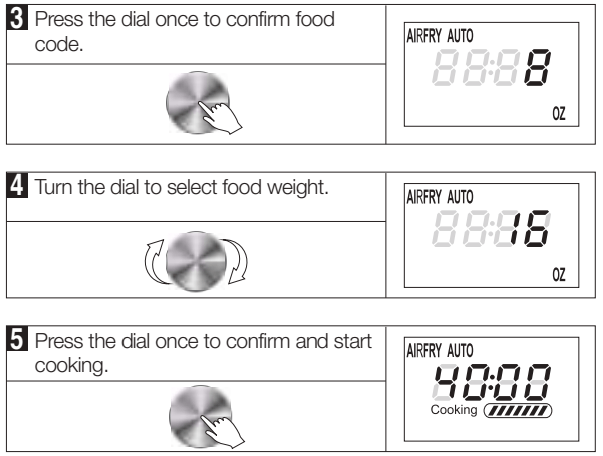
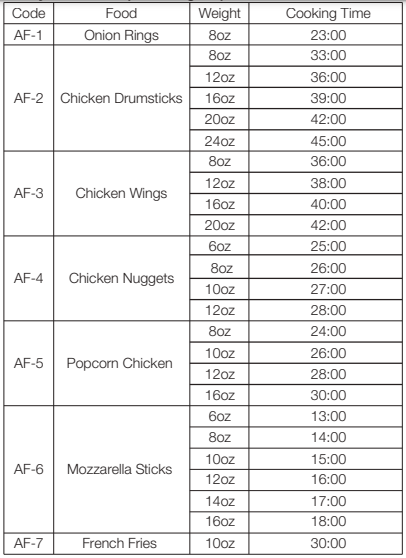
Air Fry
Accessory Guide: Glass Turntable & Air Fry Kit
For Air Fry cooking, you can select the type of food you want to cook from the programs listed on the cooking label located on the interior panel of the appliance.
Auto Program: How to air fry 16oz chicken wings.
Air Fry Food Chart (Auto Program):
Custom Program: How to set AirFry by choosing time and temperature (400°F for 30 minutes).
NOTE:
It can be programmed for four different temperatures. They are: 425°F(default) → 350°F → 375°F → 400°F.
The longest cooking time is 95 minutes.
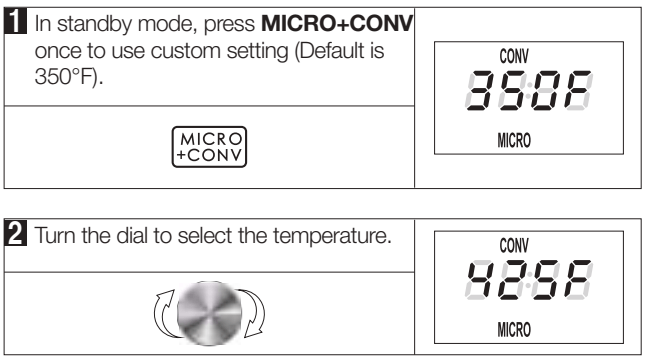
Microwave+Convection
Accessory Guide: Glass Turntable & Baking and Roasting Pan
This oven has six pre-programmed temperatures settings that make it easy to cook with both convection heat and microwave automatically. They are: 350°F→375°F→400°F→425°F →300°F →325°F. The longest time is 95 minutes.
Example: How to set the combination of microwave and convection at temperature 425°F for 30 minutes.
NOTE: You can check the convection temperature during cooking by pressing the MICRO+CONV.
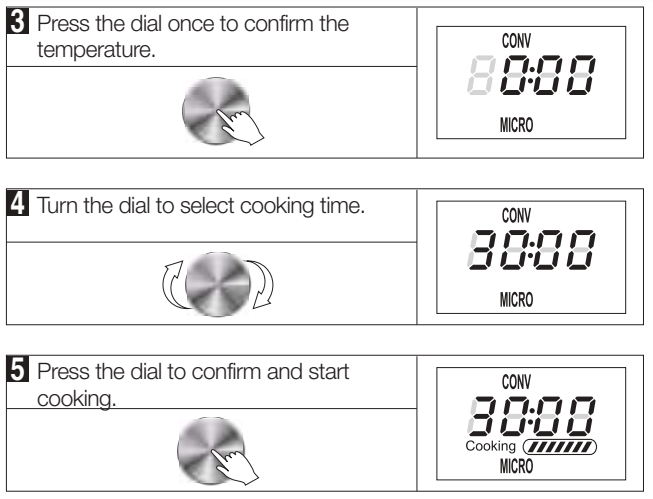
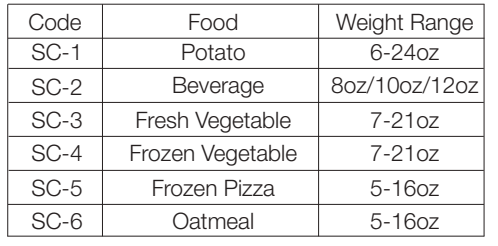
Sensor Cook
Accessory Guide: Glass Turntable
For sensor cook function, you can select the type of food you want to cook from the programs listed on the cooking label located on the interior panel of the appliance..
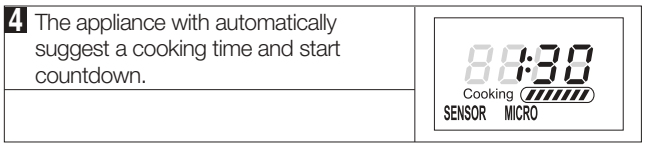
Auto Program: How to Cook 8oz fresh vegetable with sensor.
Sensor Cook Food Chart (Auto Program):
NOTE:
After cooking for a period of time, the system will detect whether there is error, if there is error, for example, the sensor short circuit or open circuit, the system will stop automatically with the display showing "Er60", beeps sound until press STOP/CANCEL pad.
If there is no error, the system will judge corresponding cooking time based on the steam generated by the food, after cooking for a period of time, the countdown will display on the screen.
During sensor cooking program, if press STOP/CANCEL pad once or open the door, the system will turn back to standby mode.
If during the longest sensor time the oven cannot judge the cooking time according the steam produced by food in the cavity, the cooking will auto-end.
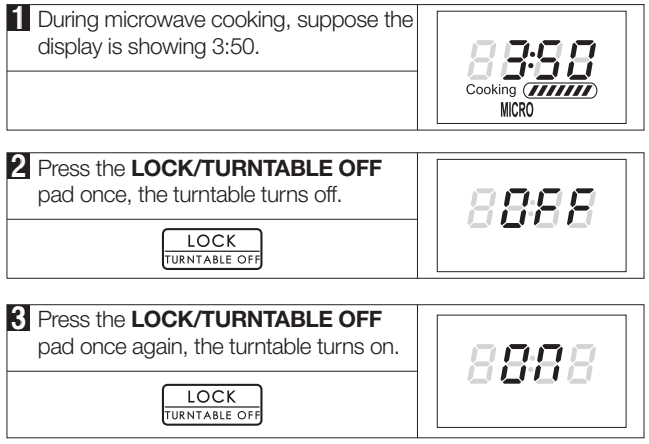
Turntable ON / OFF
The turntable is set to default as always turning. You can turn it on or off by pressing LOCK/TURNTABLE OFF during setting the Microwave program or during cooking in the Microwave program.
Example: How to set Turntable On/Off during MICRO programming.
NOTE: Below programs can use LOCK/TURNTABLE OFF during cooking or setting.
SENSOR COOK
SENSOR REHEAT
MICRO
TIME / WEIGHT DEFROST
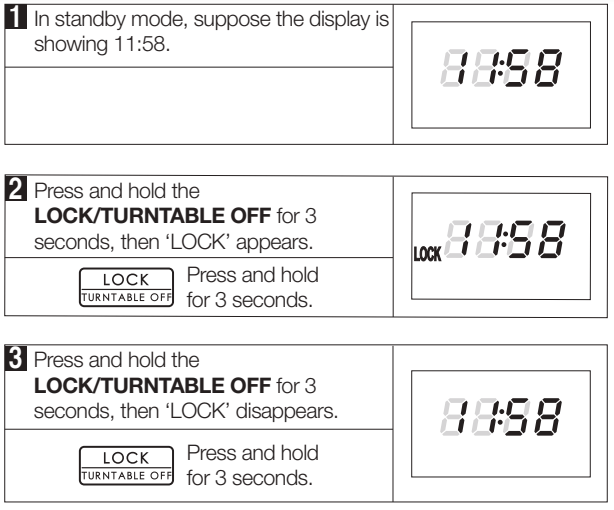
Child lock
The child proof lock prevents unsupervised operation by children.
Example1: How to set/cancel the child lock.
Automatic Protection Mechanism
OVERHEATING PROTECTION - The display may show Er10 which means the appliance has entered into high temperature overheat mode which will protect the appliance from further damage. Audible alert will be heard until STOP/CANCEL is pressed or the appliance is unplugged.
LOW TEMPERATURE PROTECTION - The display may show Er11 which means the appliance has entered into low temperature protection mode which will protect the appliance from further damage. Audible alert will be heard until STOP/CANCEL is pressed or the appliance is unplugged.
SENSOR MALFUNCTION PROTECTION - The display may show Er13 which means the appliance has entered into Sensor Malfunction protection mode which will protect the appliance from further damage. Audible alert will be heard until STOP/CANCEL is pressed or the appliance is unplugged.
CLEANING AND CARE
Turn off the oven and unplug the power cord from the wall when cleaning.
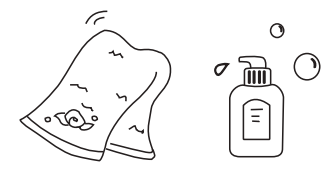
Keep the inside of the oven clean. When food splatters or spilled liquids adhere to oven walls, wipe with a damp cloth. Mild detergents may be used if the oven gets very dirty. Avoid using spray or other harsh cleaners. They may stain, streak or dull the door surface.
The outside of the oven should be cleaned with a damp cloth. To prevent damage to the operating parts inside the oven, water should not be allowed to seep into the ventilation openings.
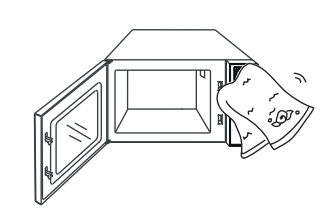
Wipe the door and window on both sides, the door seals and adjacent parts frequently with a damp cloth to remove any spills or spatters. Do not use abrasive cleaner.
Do not allow the control panel to become wet. Clean with a soft, damp cloth. When cleaning the control panel, leave oven door open to prevent oven from accidentally turning on.
If steam accumulates inside or around the outside of the oven door, wipe with a soft cloth. This may occur when the microwave oven is operated under high humidity condition. And it is normal.
It is occasionally necessary to remove the glass turntable, baking and roasting pan, air fry kit for cleaning. Wash them in warm sudsy water.
If the light bulb burns out, please contact customer service to have it replaced.
The oven should be cleaned regularly and any food deposits should be removed. Failure to maintain the oven in a clean condition could lead to deterioration of surface that could adversely affect the life of the unit and could possibly result in a hazardous situation.
Please do not dispose of this appliance into the domestic rubbish bin; it should be disposed to the particular disposal center provided by the municipalities.