Thank you for purchasing a Galanz product. Please read this manual carefully for correct usage and safety,
and keep for future reference. For service, support and warranty information, call 1-800-562-0738.
©2020 Galanz Americas Limited Company
IMPORTANT: Save for local electrical in spector’s use.
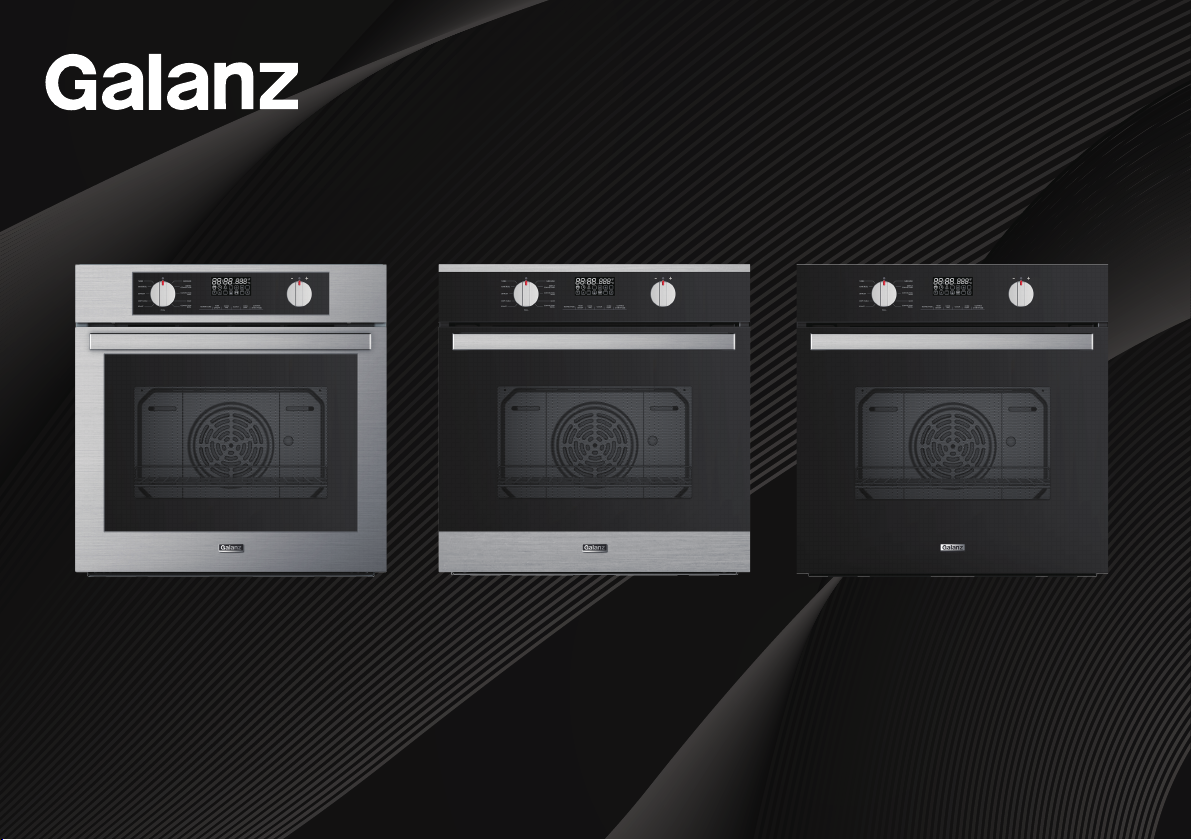
GL1BO24FSAN
GL1BO24SBAN
GL1BO24BKAN
Model#
24” Electric Convection Wall Oven
Installation Instructions

Important Safety Instructions .....................................................................................................................................1
Installation Requirements..............................................................................................................................................7
Tools and Parts..................................................................................................................................................................7
Location Requirements .................................................................................................................................................7
Electrical Requirements.................................................................................................................................................8
Installation Instructions ..................................................................................................................................................10
Unpack the Oven .............................................................................................................................................................10
Electrical Connection .....................................................................................................................................................11
Install Oven ........................................................................................................................................................................14
Product View..........................................................................................................................................................................15
Appliance Dimensions...................................................................................................................................................15
Front View...........................................................................................................................................................................15
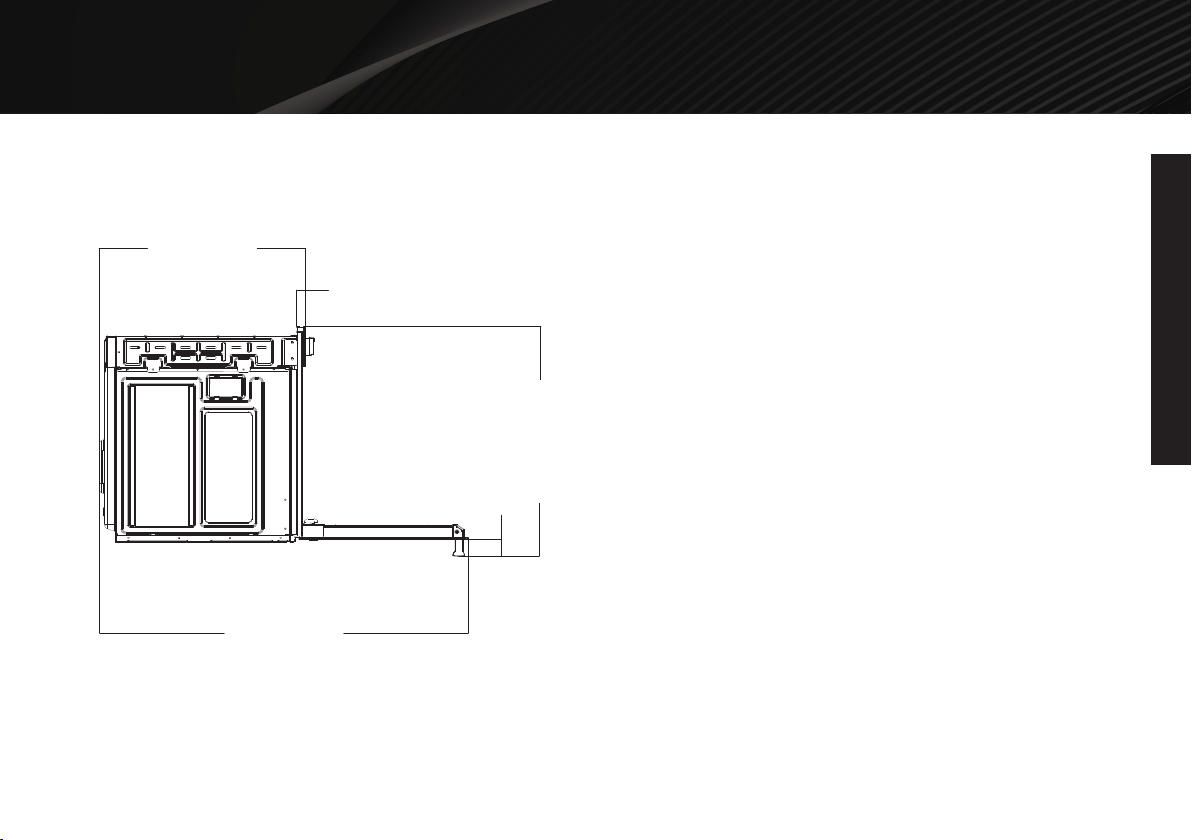
Top View..............................................................................................................................................................................16
Rear View ............................................................................................................................................................................16
Side View.............................................................................................................................................................................17
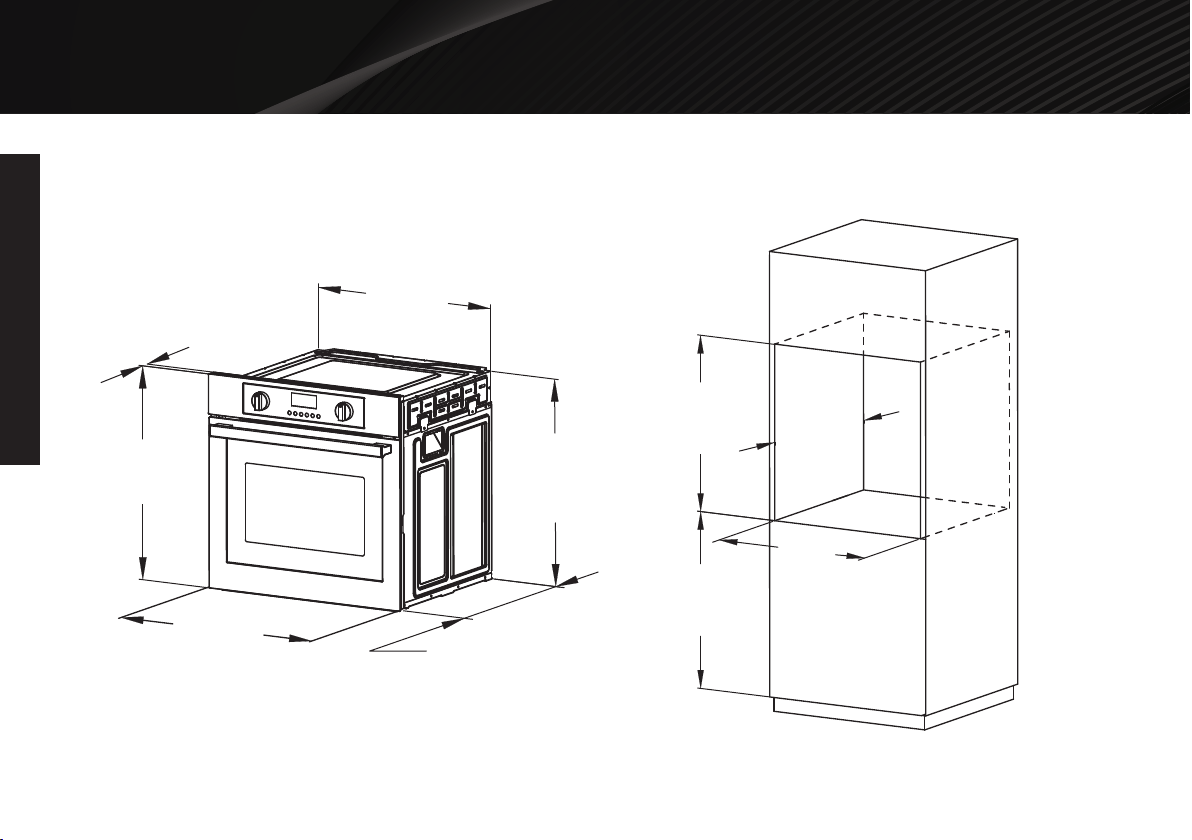
Cabinet Dimensions..........................................................................................................................................................18
Wall Mounted Unit ..........................................................................................................................................................18
Unit under the Counter.................................................................................................................................................19
CONTENTS
CONTENTS
IMPORTANT SAFETY INSTRUCTIONS
IMPORTANT SAFETY INSTRUCTIONS
2
WARNING
To avoid risk of property damage, personal
injury or death; follow information in this manual
exactly to prevent a fire or explosion. DO NOT
store or use
gasoline or other flammable
vapors and liquids in the vicinity of this or any
appliance.
To reduce the risk of fire, electric shock, or
injury to persons, installation work and electrical
wiring must be done by qualified standards,
including fire-rated conditions.
WARNING
DO NOT use commercial oven cleaners inside
the oven. Use of these cleaners can produce
hazardous fumes or can damage the porcelain
finishes.
WARNING
NEVER use this appliance as a space heater
to heat or warm the room. Doing so may result
in carbon monoxide poisoning and overheating
of the drawer.
WARNING
To prevent possible damage to cabinets and
cabinet finishes, use only materials and finishes
that will not discolor or delaminate and will with
stand temperatures up to 194℉ (90℃). Heat
and moisture resistant adhesive must be used
if the product is to be installed in laminated
cabinetry. Check with your builder or cabinet
supplier to make sure that the materials meet
these requirements.
WARNING
SAVE THESE INSTRUCTIONS
IMPORTANT SAFETY INSTRUCTIONS
IMPORTANT SAFETY INSTRUCTIONS
3
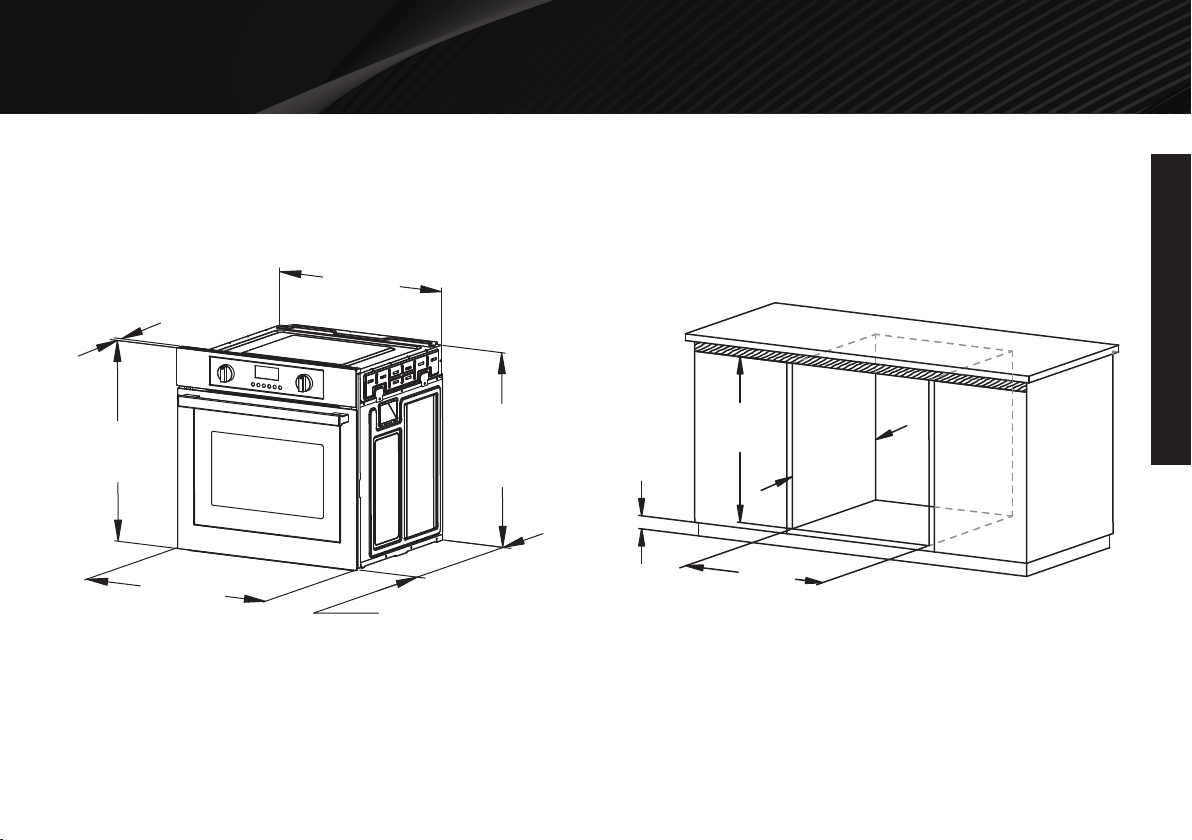
BURN/ELECTRIC SHOCK HAZARD
Make sure all controls are OFF and cavity is
COOL before cleaning. Failure to do so can
result in burns or electric shock.
WARNING
NEVER cover any slots, holes or passages in
the cavity or cover an entire rack with
materials such as aluminum foil. Doing so
blocks air flow through the oven and may cause
carbon monoxide poisoning.
Aluminum foil linings may also trap heat,
causing a fire hazard.
WARNING
DO NOT cook on the oven bottom. This could
result in damage to your appliance. Always use
oven racks when cooking in the oven.
WARNING
DO NOT store items of interest to children over
the unit. Children climbing to reach items could
be seriously injured.
CAUTION
This appliance is not to be used by persons
(including children) with reduced physical,
sensory or mental capabilities, or lack of exper
-ience and knowledge, unless they have been
given supervision or instruction concerning the
use of the appliance by a person responsible for
their safety. Children should be supervised to
ensure that they do not play with the appliance.
Children should not be left alone or unattended
in area where appliance is in use. They should
never be allowed to sit or stand on any part of
the appliance.
CAUTION
SAVE THESE INSTRUCTIONS
IMPORTANT SAFETY INSTRUCTIONS
IMPORTANT SAFETY INSTRUCTIONS
4
STATE OF CALIFORNIA PROP 65
The California Safe Drinking Water and Toxic
Enforcement Act requires the Governor of
California to publish a list of substances known
to the state to cause cancer, birth defects or
other reproductive harm and requires business
to warn customers of potential exposure to
such substances.
Exposure can be minimized by venting with an
open window or using a ventilation fan or hood.
WARNING
ELECTRIC SHOCK HAZARD
Disconnect the electric power at the main fuse
or circuit breaker before replacing bulb.
WARNING
Avoid any damage to oven vents. The vents
need to be unobstructed and open to provide
proper airflow for optimal oven performance.
NOTICE
BURN HAZARD
The oven door, especially the glass, can get hot.
Danger of burning: DO NOT touch the glass!
CAUTION
FIRE HAZARD
Remove all packing and foreign materials from
the oven. Any material of this sort left inside
may melt or burn when the appliance is used.
Failure to do so can result in death or fire.
WARNING
SAVE THESE INSTRUCTIONS
IMPORTANT SAFETY INSTRUCTIONS
IMPORTANT SAFETY INSTRUCTIONS
5
WARNING
Wear Proper Apparel
Loose-fitting or hanging garments should never
be worn while using the appliance.
WARNING
Storage in or on Appliance
Flammable materials should not be stored in an
oven or near surface units.
WARNING
Do Not Use Water on Grease Fires
Smother fire or flame or use dry chemical or
foam-type extinguisher.
WARNING
Use Only Dry Potholders
Moist or damp potholders on hot surfaces may
result in burns from steam. Do not let potholder
touch hot heating elements. Do not use a towel
or other bulky cloth.
WARNING
Use Care When Opening Door
Let hot air or steam escape before removing or
replacing food.
WARNING
Do Not Heat Unopened Food Containers
Build-up of pressure may cause container to
burst and result in injury.
SAVE THESE INSTRUCTIONS
IMPORTANT SAFETY INSTRUCTIONS
IMPORTANT SAFETY INSTRUCTIONS
6
Air Fry
WARNING
Keep oven vent ducts unobstructed
The oven vent is located above the right rear
surface unit. This area could become hot during
oven use. Never block this vent or place plastic
or heat-sensitive items on it.
Air Fry
WARNING
Placement of Oven Racks
Always place oven racks in desired location
while oven is cool. If rack must be moved while
oven is hot, do not let potholder contact hot
heating element in oven.
Air Fry
WARNING
DO NOT TOUCH HEATING ELEMENTS
OR INTERIOR SURFACES OF OVEN
Heating elements may be hot even though they
are dark in color. Interior surfaces of an oven
become hot enough to cause burns. During
and after use, do not touch, or let clothing or
other flammable materials contact heating
elements or interior surfaces of oven until they
have had sufficient time to cool. Other surfaces
of the appliance may become hot enough to
cause burns – among these surfaces are
(identification of surfaces – for example, oven
vent openings and surfaces near these
openings, oven doors, and windows of oven
doors).
SAVE THESE INSTRUCTIONS

8
INSTALLATION REQUIREMENTS
INSTALLATION REQUIREMENTS
In U.S.A.:
Be sure that the electrical connection and wire size are adequate
and in conformance with the National Electrical Code, ANSI/NFPA
No. 70-latest edition and all local codes and ordinances.
A copy of the above code standards can be obtained from:
National Fire Protection Association
One Batterymarch Park
Quincy, MA 02269
In Canada:
Be sure that the electrical connection and wire size are adequate
and in conformance with CSA standard C22.1,
Canadian Electrical Code, Part 1 - latest edition, and all local codes
and ordinances.
A copy of the above code standards can be obtained from:
Canadian Standards Association
178 Rexdale Blvd.
Toronto, ON M9W 1R3 CANADA
If codes permit and a separate ground wire is used, it is recommended that a qualified electrical installer determine
that the ground path is adequate and wire gauge is in accordance with local codes. Do not use an extension cord.
ELECTRICAL REQUIREMENTS
9
INSTALLATION REQUIREMENTS
INSTALLATION REQUIREMENTS
WARNING
ELECTRIC SHOCK HAZARD
The electrical power to the oven branch circuit
must be shut off while line connections are
being made. Do not use an extension cord
with this appliance. Electrical ground is required
on this appliance. The free end of the green
wire (the ground wire) must be connected to a
suitable ground. This wire must remain
grounded to the oven.
If cold water pipe is interrupted by plastic, non
metallic gaskets, union connections or other
insulating materials. Do not use for grounding.
Do not ground to a gas pipe. Do not have
a fuse in the neutral or grounding circuit. A
fuse in the neutral or grounding circuit could
result in an electric shock.
Check with a qualified electrician if you are in
doubt as to whether the appliance is properly
grounded. Failure to do so could result in death,
fire or electric shock.
Electrical Connection
To properly install your oven, you must determine the type of electrical
connection you will be using and follow the instructions provided for it
here.
•
Oven must be connected to the proper electrical voltage and
frequency as specified on the model/serial
number rating label.
All models are dual rated, and designed to be connected to either
208/240V AC, 60Hz, 3-wire or 4-wire, two-phase power supply.
• The electrical supply should be a 3-wire or 4-wire, two-phase AC.
Install a suitable conduit box (not furnished).
An appropriately sized, UL conduit connector must be used to
correctly attach the conduit to the junction box.
IMPORTANT: Local Codes may vary; installation electrical connections
and grounding must comply with all applicable local codes.
If local codes permit grounding through the electrical supply neutral,
connect both the white neutral wire and the green ground wire from
the oven to the white neutral electrical supply wire.
Circuit Required
208V, 60 Hz 240V, 60 Hz
12 Amp 15 Amp
10
INSTALLATION INSTRUCTIONS
INSTALLATION INSTRUCTIONS
UNPACK THE OVEN
1. Using two (2) or more people, remove the oven and set it on cardboard to avoid floor damage.
NOTE: Do not use the handle or any portion of the front frame for lifting.
2. Remove the shipping materials and tape from the oven.
3. Remove the hardware package from inside the bag containing literature.
4. Remove and set aside racks and other parts from inside the oven.
5. Move oven and cardboard close to the oven’s final location.
WARNING
EXCESSIVE WEIGHT HAZARD
Use two (2) or more people to move and install
oven. Failure to do so can result in back or
other injury.
INSTALLATION INSTRUCTIONS
INSTALLATION INSTRUCTIONS
11
ELECTRICAL CONNECTION
DIRECT WIRE
WARNING
Electric Shock Hazard
Disconnect power before servicing.
Use 8 gauge copper or 6 gauge aluminum wire.
Electrically ground range.
Failure to do so can result in death, fire or
electric shock.
Be sure your appliance is properly installed and
grounded by a qualified technician. Ask your dealer to
recommend a qualified technician or an authorized
repair service.
WARNING
Electric Shock Hazard
Grounding through the neutral conductor is
prohibited for new branch-circuit installations
(1996 NEC); mobile homes; and recreational
vehicles, or in an area where local codes
prohibit grounding through the neutral
conductor. For installations where grounding
through the neutral conductor is prohibited,
see the Ungrounded Neutral graphic.
Use grounding terminal or lead to ground unit.
Connect neutral terminal or lead to branch
circuit neutral in usual manner.
Failure to do so can result in death, fire or
electric shock.
3-WIRE CONNECTION (GROUNDED
NEUTRAL)
This appliance is manufactured with a green GROUND wire connected
to the oven chassis. After making sure that the power has been turned
off, connect the flexible conduit from the oven to the junction box using
a UL listed or CSA approved conduit connector. The Grounded Neutral
and Ungrounded Neutral Graphics on the following pages and the
instructions provided, present the most common way of connecting the
ovens. Your local codes and ordinances, of course, take precedence
over these instructions. Complete electrical connections according to
local codes and ordinances.
INSTALLATION INSTRUCTIONS
INSTALLATION INSTRUCTIONS
12
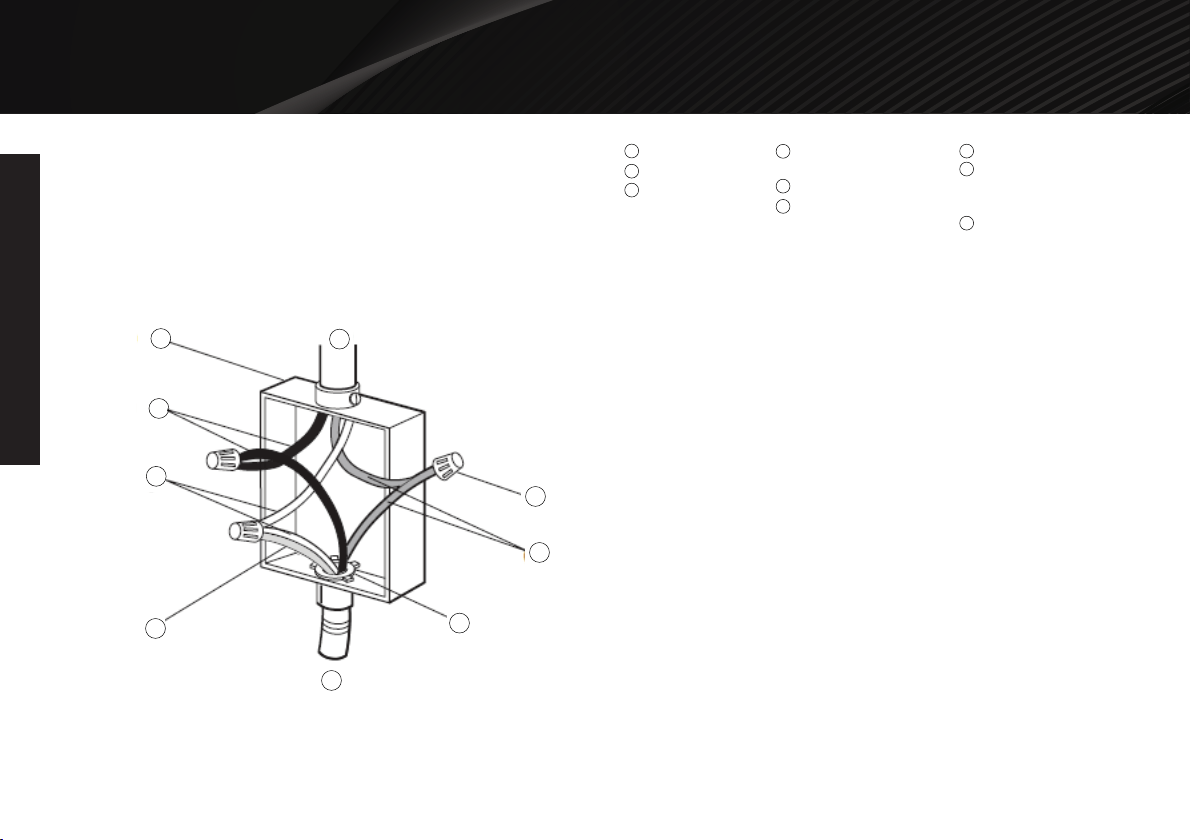
3-Wire Cable from Home Power Supply -
U.S. Only
IMPORTANT: Use the 3-wire cable from home power supply where
local codes permit a 3-wire connection.
1. Disconnect power before servicing.
2. Connect the 2 black wires B together using a UL listed or CSA
approved wire connector.
3. Connect the 2 neutral (white) wires C and the ground (green or
bare) wire D (of the oven cable) using a UL listed or CSA
approved wire connector.
4. Connect the 2 red wires G together using a UL listed or CSA
approved wire connector.
5. Install junction box cover.
Grounded Neutral
H
G
F
I
E
D
A
B
C
D
Ground(Green or
Bare)Wires
Cable from Oven
UL listed or CSA
Approved Conduit
Connector
E
F
Red Wires
UL listed or CSA
approved Wire
Connectors
House Electrical
Supply
G
H
I
A
B
C
Junction Box
Black Wires
Neutral(White)
Wires
INSTALLATION REQUIREMENTS
INSTALLATION REQUIREMENTS
14
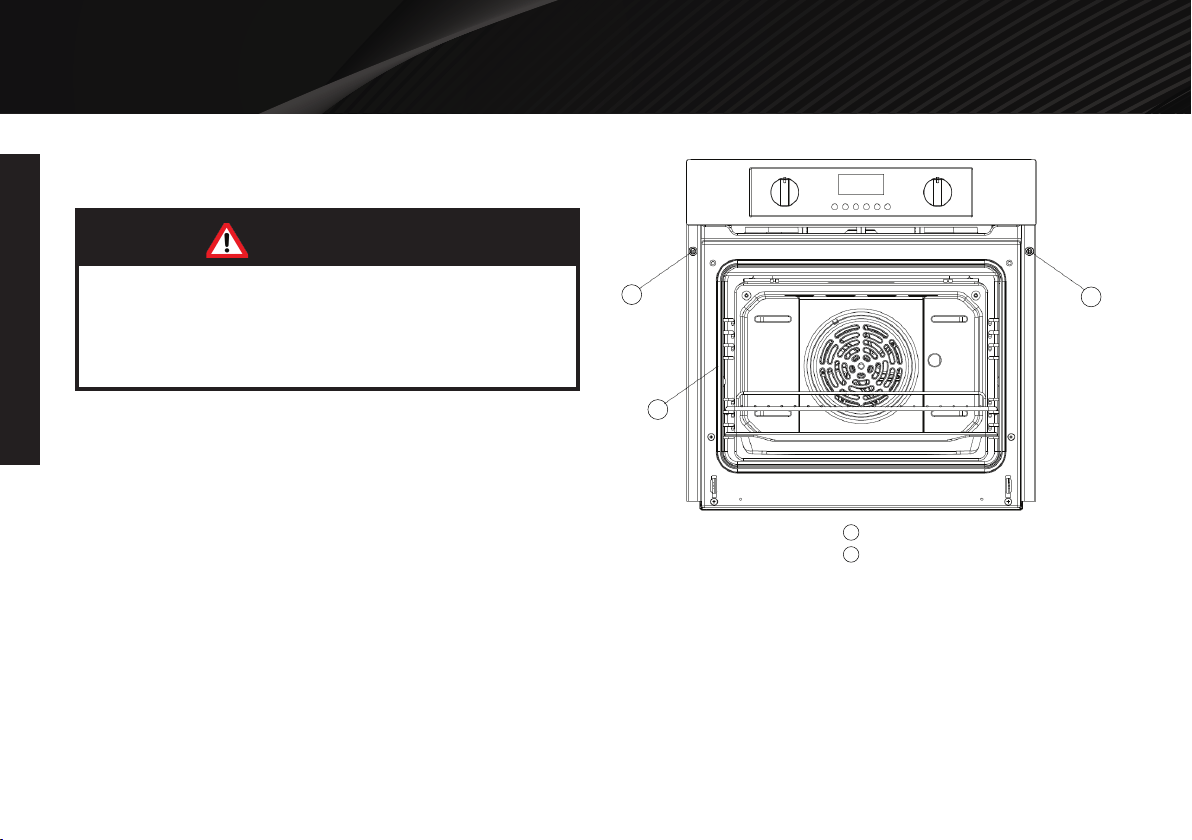
INSTALL OVEN
WARNING
Excessive Weight Hazard
Use two (2) or more people to move and install
oven. Failure to do so can result in back or
other injury.
1. Using two (2) or more people, lift the oven partially into the cabinet
cutout. Use the oven opening as an area to grip.
NOTE: Push against seal area of the oven front frame when
pushing the oven into the cabinet. Do not push against the outside
edges.
2. Push the oven completely into the cabinet until the back surface of
the front frame touches the front wall of the cabinet. Center the
oven within the cabinet cutout.
NOTE: With the oven door open, you will see two (2) holes on each
side of the front frame of the oven door opening.
A
Holes
B
Seal Area of Oven
A
A
B
3. Drill 1/8” pilot holes, through the four (4) holes in the front frame
and into the front wall of the cabinet.
4. Using the four (4) screws (provided), install the oven to the cabinet.
Replace the oven racks.
5. Reconnect power to the oven.
PRODUCT VIEW
PRODUCT VIEW
15
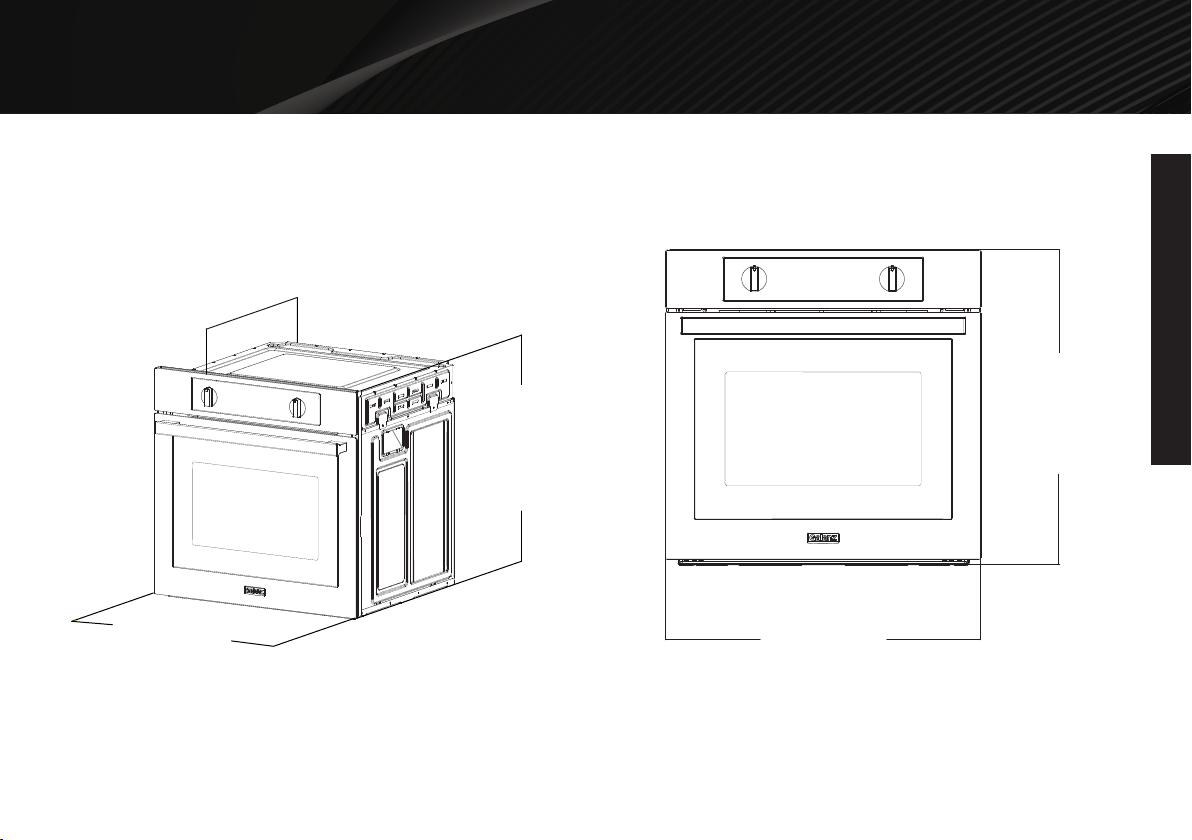
Appliance Dimensions
22 7/16 (570mm)
23 7/16 (595mm)
23 7/16(595mm)
Front View
23 7/16(595mm)
23 7/16 (595mm)
PRODUCT VIEW
PRODUCT VIEW
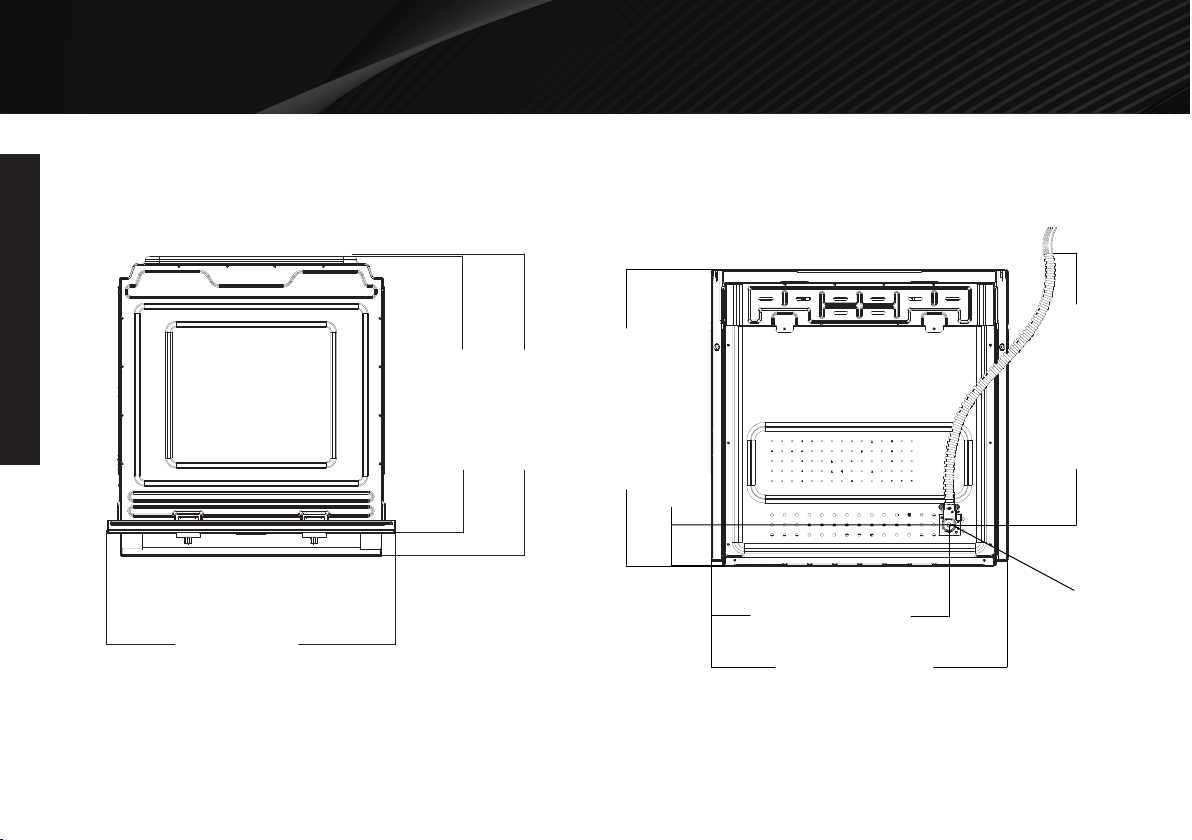
16
Top View
24 5/16 (618mm)
22 7/16 (570mm)
23 7/16 (595mm)
Rear View
Electrical
Connection
23 7/16 (595mm)
3 2/8 (82mm)
18 12/16 (477mm)
23 7/16 (595mm)
51 3/16 (1300mm)
PRODUCT VIEW
PRODUCT VIEW
17
Turntable ON / OFF
22 7/16(570mm)
1(25mm)
40 1/16(1018mm)
24 15/16(634mm)
1 14/16(47mm)
Side View
CABINET DIMENSIONS
CABINET DIMENSIONS
18
1”
(24mm)
22 7/16”
(570mm)
21 7/8”
(555mm)
23 7/16”
(595mm)
23 7/16”
(595mm)
22 7/16”
(570mm)
22 13/16”
(580mm)
≥ 22 716”
(≥570mm)
4 3/4”-43 1/2”
(121-1105mm)
22”
(560mm)
Wall Mounted Unit
CABINET DIMENSIONS
CABINET DIMENSIONS
19
Unit Under The Counter
1”
(24mm)
22 7/16”
(570mm)
21 7/8”
(555mm)
23 7/16”
(595mm)
23 7/16”
(595mm)
22 7/16”
(570mm)
22”
(550mm)
22 13/16”
(580mm)
≥ 22 7/16”
(≥ 570mm)
4 3/4”-10”
(121-254mm)

OPERATION INSTRUCTIONS
IMPORTANT
Do Not Return This Product To The Store
If you have a problem with this product, please contact the
“Galanz Customer Satisfaction Center” at
1-800-562-0738.
DATED PROOF OF PURCHASE, MODEL #, AND SERIAL #
REQUIRED FOR WARRANTY SERVICE
IMPORTANT
Ne pas Réexpédier ce Produit au Magasin
Pour tout problème concernant ce produit, veuillez contacter
le service des consommateurs “Galanz Customer Satisfaction Center”
au 1-800-562-0738.
UNE PREUVE D’ACHAT DATEE EST REQUISE POUR BENEFICIER DE LA GARANTIE.
IMPORTANTE
No regrese este producto a la tienda
Si tiene algún problema con este producto, por favor contacte el
“Centro de Servicio al Consumidor de Galanz”
al 1-800-562-0738 (Válido solo en E.U.A).
NECESITA UNA PRUEBA DE DE COMPRA FECHADA, NÚMERO DE MODELO
Y DE SERIE PARA EL SERVICIO DE LA GARANTÍA
Made in China
Fabriqué en Chine
Hecho en China

©2020 Galanz Americas Limited Company