EN
User Manual
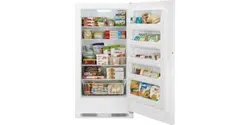
Upright Freezer
HVF430VW
HVF430VS
Thank You
EN
2
Thank you for purchasing a Haier Product.
Please read these instructions carefully before using this appliance. The instructions con
tain important information which will help you get the best out of the appliance and ensure
safe and proper installation, use and maintenance.
Keep this manual in a convenient place so you can always refer to it for the safe and proper
use of the appliance.
If you sell the appliance, give it away, or leave it behind when you move house, make sure
you also pass this manual so that the new owner can become familiar with the appliance
and safety warnings.
7KHV\PEROLQGLFDWHVWKHUHLVDULVNRIƪUH
W
ARNING: Risk of ƪUHƫDPPDEOH material.
VLQFHƫDPPDEOHPDWHULDOVDUHXVHG7DNHFDUHWRDYRLGFDXVLQJDƪUHE\LQJQLWLQJƫDPP
able material.
Manufacturer: Qingdao Haier Special Icebox Co., Ltd.
Address : Haier Garden, Qianwangang Road,Economic
Development Zone, Qingdao 266555, Shandong, P.R.China
www.haier.com.au
www.haier.co.nz

EN
Content
3
1 - Safety ............................................................................................................................................... 4
2 - Intended Use
.................................................................................................................................
11
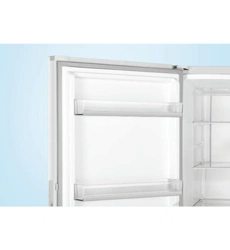
3 - Product Description .....................................................................................................................12
4 - Use ................................................................................................................................................... 13
5 - Equipment ..................................................................................................................................... 17
6 - Care and Cleaning ........................................................................................................................ 18
7 - Troubleshooting ........................................................................................................................... 20
8 - Installation ................................................................................................................................... 23
9 - Technical Data ............................................................................................................................ 27
1 - Safety
(1
Ensure that the power cable is not trapped by the freezer.
4
%HIRUHVZLWFKLQJRQWKHDSSOLDQFHIRUWKHƪUVWWLPHUHDGWKHIollowing safety
hints!
WARNING!
BeforHƪrst use
Make sure there is no trDQVSRUWGDPDJH
RHPRYHDOOSDFkaging and keep out of children´s reach.
Wait at least 2 hours before installing the appliance in order to ens-
ure the refrigerant circuit is full\HƩFLHQW
Handle the appliance always with at least two persons because it is
KHDY\
Do not cRYHUDLUYHQWRSHQLQJV
Installation
The appliance should be placed in a wHOOYHQWLODted place. Ensure a
spacHRIDWOHDVWFPDERYHDQGDround the appliance.
WARNING: Keep YHQWLODWLRQ openings in the appliance or in the in-
built structure clear of obstruction.
1HYHU place the appliance in a GDPS area or location where it PL
ght be splashed with water. Clean and dry water splashes and stains
with a soft clean cloth.
Do not install the appliance in direct sunlight or in the near of heat sou-
rces (e.g. stRYHsKHDters).
Install and OHYHO the appliance in an area suitable for its size and use.
Make sure that the electrical infRUPDWLRQ on the rating plate agr-
ees with the power supply. If it does noW contact an electrician.
The appliance is operated by a 220-240 VAC/50 Hz power supply.
$EQRUPDO YROWDJH fuctuation Pay cause the appliance to fDLOWRVWDUW
or GDPDJH to the tHPSHrature control or cRPSressor RUWKHUHPD\EH
an DEQRUPDO noise when operating. In such FDVH DQDXWRPDWLFUHJXODW
RUVKDOOEHPRXQted.
Do noWXVHPXOWLSOXJDGDSters and extension cables.
WARNING: Do not locate PXOWLSOH portable socket outlets or por-
table power supplies at the rear of the appliance.
WARNING:When positioning the appliancH ensure the supply cord
is not trDSSHGRUGDPDJHG
Do not step on the power cable.
Use a separate earthed socket for the power supply which is easy acc-
HVVLEOH7KHDSSOLDQFHPXVWEHHDUWKHG
EN
1 - Safety
5
Do not store or use LQƫDPPDEOH H[SORVLYH or corrRVLYH PDtHULDOVLQWKH
DSSOLDQcHRULQWKHYLFLQLty.
WARNING!
'DLO\XVH
7KLVDSSOLDQFHFDQEHXVHGE\FKLOGUHQDJHGIURP\HDUVDQGDERYH
DQGSHUVRQVZLWKUHGXFHGSK\VLFDOVHQVRU\RUPHQWDOFDSDELOLWLHVRU
ODFNRIH[SHULHQFHDQGNQRZOHGJHLIWKH\KDYHEHHQJLYHQVXSHUYLVLRQ
RULQVWUXFWLRQFRQFHUQLQJXVHRIWKHDSSOLDQFHLQDVDIHZD\DQGXQGHU
VWDQGWKHKD]DUGVLQYROYHG
&KLOGUHQVKDOOQRWSOD\ZLWKWKHDSSOLDQFH
&KLOGUHQDJHGIURPWR\HDUVDUHDOORZHGWRORDGDQGXQORDGUHIULJH
UDWLQJDSSOLDQFHVEXWQRWDOORZHGWRFOHDQDQGLQVWDOOWKHUHIULJHUDWLQJ
DSSOLDQFHV
.HHSDZD\FKLOGUHQXQGHU\HDUVRIDJHIURPWKHDSSOLDQFHXQOHVV
WKH\DUHFRQVWDQWO\VXSHUYLVHG
&OHDQLQJDQGXVHUPDLQWHQDQFHVKDOOQRWEHPDGHE\FKLOGUHQZLWKRXW
VXSHUYLVLRQ
7KHDSSOLDQFHPXVWEHSRVLWLRQHGVRWKDWWKHSOXJLVDFFHVVLEOH
OIFRDOJDVRURWKHULQƫDPPDEOHJDVLVOHDNLQJLQWRYLFLQLW\RIWKHDSSOLD
QFHWXUQRƩWKHYDOYHRIWKHOHDNLQJJDVRSHQWKHGRRUVDQGZLQGRZV
DQGGRQRWXQSOXJRUSOXJLQWKHSRZHUFDEOHRIWKHIUHH]HURUDQ\RWKHU
DSSOLDQFH
1RWLFHWKDWWKHDSSOLDQFHLVVHWIRURSHUDWLRQDWWKHVSHFLƪFDPELHQW
UDQJHEHWZHHQr&DQGr&7KHDSSOLDQFHPD\QRWZRUNSURSHUO\LI
LWLVOHIWIRUDORQJSHULRGDWDWHPSHUDWXUHDERYHRUEHORZWKHLQGLFDWHG
UDQJH
Do not pOace unstaEOH articaOsKeaYyREMHFts containersƪOOeGZLWKZater)
on top of tKe free]erto aYoiG personaO LQMury causeG Ey faOOLQJor HOHFtric
sKocN causeG Ey contact ZitK Zater.
Do noWOLIWWKHDSSOLDQcHE\LWVKDQGOHV
1HYHUSODcHWKHDSSOLDQcHKRUi]RQWDOO\RQWKHJrRXQGZKHQPRYLQJLW
Before any operDWLRQIirVWXQSOXJWKHDSSOLDQce frRPWKHPDLQV
Do noWWLOWWKHDSSOLDQcHPRrHWKDQrto prHYHQWGDPDJHRIWKHFRRO
LQJsystHPZKHQPRYLQJWKHDSSOLDQFH
8QSOXJ WKH DSSOLDQce in WKH HYHQW of a poZer interruption or EHIRUH
FOHDQLQJ $OOoZ at OHDVW 7 PLQXtes EHfore rHVWDUWLQJ WKH DSSOLDQFHDV
frHTXHQWVWDUWLQJPa\GDPDJHWKHcRPSressor.
&KHFN WKH cRQGLWLRQ of fRRG if a ZDUPLQJ in WKH free]er KDV taNHQSODFH
WARNING:
'RQRWGDPDJHWKHUHIULJHUDQWFLUFXLW
1 - Safety
EN
6
WARNING!
Do not pull on the door shelves. The door may be pulled slant, the door
shelves , may be pulled away, or the appliance may topple.
Open and close the door only with the handles. The gap between the
door and the cabinet is very narrow. Do not put your hands in these
areas to avoid pinching your ƪQJHrs. Open or close the appliance doors
only when there are no children standing within the range of door mo-
vement.
Never store bottled beer or beverages in the freezer, as these will burst
during freezing.
Do not store explosive substances such as aerosol cans with DƫDP
mable propellant in this appliance.
Do not store medicines, bacteria or chemical agents in the appliance
This appliance is a household appliance. It is not recommended to st-
ore materials that require strict temperatures.
Never store liquids in bottles or cans (besides high percentage spir-
its) especially carbonated beverages in the freezer as these will burst
during freezing.
Do not set unnecessarily l
o
w temperature in the freezer compartment.
Minus temperatures may occur at high settings. Attention: Bottles can
burst.
Do not touch frozen goods with wet hands (wear gloves). Especially
partment. There is the risk to freeze or the formation of frost blister.
FIRST aid: keep immediately under running cold water. Do not pull
Do not touch the inside surface of the freezer storage compartment
when in operation, especially with wet hands, as your hands may freeze
onto the surface.
WARNING: Do not use electrical devices inside the food storage co-
mpartments of the appliance, unless they are of the type recomme-
nded by the manufacturer.
WARNING: The lamps can only be replaced by manufacturer, togeth-
er with a part of the appliance.
do not eat ice lollies immediately after removal from the freezer com-
:If you are unsure of the refrigerant type check the rating
plate in the unit. It is hazardous for anyone other than an Authorized
Service Person to service this appliance. In Queensland – the authoriz
– ed Service Person MUST hold a Gas Work Authorization for hydro
-carbon refrigerants, to carry out Servicing or repairs which involve the
removal of covers.
WARNING
away!

EN
1 - Safety
WARNING!
Maintenance / cleaning
▶ 0DNHVXUHFKLOGUHQDUHVXSHUYLVHGLIWKH\FDUU\RXWFOHDQLQJDQG
PDLQWHQDQFH
▶ 'LVFRQQHFW WKH DSSOLDQFHIURP WKH HOHFWULFDO VXSSO\EHIRUHXQ-
GHUWDNLQJDQ\URXWLQHPDLQWHQDQFH$OORZDWOHDVWPLQXWHVEH-
IRUH UHVWDUWLQJWKHDSSOLDQFHDVIUHTXHQW VWDUWLQJ PD\GDPDJH
WKHFRPSUHVVRU
▶ +ROGWKHSOXJQRWWKHFDEOHZKHQXQSOXJJLQJWKHDSSOLDQFH
▶ 'RQRWFOHDQWKHDSSOLDQFHZLWKKDUGEUXVKHVZLUHEUXVKHVGH-
WHUJHQWSRZGHUSHWURODP\ODFHWDWHDFHWRQHDQGVLPLODURUJDQ-
LF VROXWLRQV DFLG RU DONDOLQHVROXWLRQV 3OHDVHFOHDQZLWK VSHFLDO
IUHH]HUGHWHUJHQWWRDYRLGGDPDJH
▶ 'RQRWVFUDSHRNjIURVWDQGLFHZLWKDVKDUSREMHFWV'RQRWXVH
VSUD\VHOHFWULFKHDWHUVOLNHKHDWHUKDLUGU\HUVWHDPFOHDQHUVRU
RWKHU VRXUFHV RI KHDW LQ RUGHU WR DYRLG GDPDJH WR WKH SODVWLF
SDUWV
▶ WARNING: 'RQRWXVHPHFKDQLFDOGHYLFHVRURWKHUPHDQVWRDF-
FHOHUDWHWKHGHIURVWLQJSURFHVVRWKHUWKDQWKRVHUHFRPPHQGHG
E\WKHPDQXIDFWXUHU
▶ ,IWKHVXSSO\FRUGLVGDPDJHGLWPXVWEHUHSODFHGE\WKHPDQX-
IDFWXUHULWVVHUYLFHDJHQWRUVLPLODUO\TXDOLnjHGSHUVRQVLQRUGHUWR
DYRLGDKD]DUG
▶ 'RQRWWU\WRUHSDLUGLVDVVHPEOHRUPRGLI\WKHDSSOLDQFHE\\RXU-
VHOI,QFDVHRIUHSDLUSOHDVHFRQWDFWRXUFXVWRPHUVHUYLFH
▶ (OLPLQDWHWKHGXVWRQWKHEDFNRIWKHXQLWDWOHDVWRQFHLQWKH\HDU
WRDYRLGKD]DUGE\njUHDVZHOODVLQFUHDVHGHQHUJ\FRQVXPSWLRQ
7
▶ 'RQRWVSUD\RUǍXVKWKHDSSOLDQFHGXULQJFOHDQLQJ
▶ 'RQRWXVHZDWHUVSUD\RUVWHDPWRFOHDQWKHDSSOLDQFH
▶ 'RQRWFOHDQWKHFROGJODVVVKHOYHVRUJODVVGRRUZLWKKRWZDWHU
6XGGHQWHPSHUDWXUHFKDQJHPD\FDXVHWKHJODVVWREUHDN
Disconnect the appliance from the power supply before cleaning.
▶
▶
▶ In case of heating check the condition of frozen goods.
▶ Before maintenance, deactivate the appliance and disconnect
the mains plug from the mains socket.
▶ (OHFWULFDOHTXLSPHQWVKRXOGEHVHUYLFHGRQO\E\TXDOLIHGHOHFWUL
cal experts, because improper repairs can cause considerable
consequential damages.

5HIULJHUDQWJDVLQIRUPDWLRQ
WARNING!
▶ 7DNLQJFDUHWRDYRLGFDXVLQJDnjUHE\LJQLWLQJǍDPPDEOHPDWHULDO
▶ WARNING: When positioning the appliance, ensure the supply
cord is not trapped or damaged.
▶ WARNING: Do not locate multiple portable socket-outlets or
portable power supplies at the rear of the appliance.
▶ Do not store explosive substances such as aerosol cans with a
ǍDPPDEOHSURSHOODQWLQWKLVDSSOLDQFH
▶ )RUǍDPPDEOHUHIULJHUDQWVLVXVHGLQWKHIUHH]HUSOHDVHEHFDUH-
ful when installing, handling, serving and recycling the appliance.
▶ Please contact to the service agent to dispose the appliance be-
FDXVHWKHǍDPPDEOHEORZLQJJDVZDVXVHG
WARNING!
7KH DSSOLDQFH FRQWDLQV WKH ǍDPPDEOH UHIULJHUDQW ,62%87$1(
5D 0DNH VXUH WKH UHIULJHUDQW FLUFXLW LV QRW GDPDJHG GXULQJ
WUDQVSRUWDWLRQ RU LQVWDOODWLRQ /HDNLQJ UHIULJHUDQW PD\ FDXVH H\H
LQMXULHV RU LJQLWH ,I D GDPDJH KDV RFFXUUHG NHHS DZD\ RSHQ njUH
VRXUFHVWKRURXJKO\YHQWLODWHWKHURRPGRnotSOXJRUXQSOXJWKH
SRZHU FRUGV RI WKH DSSOLDQFH RU DQ\ RWKHU DSSOLDQFH ,QIRUP WKH
FXVWRPHUVHUYLFH
,QFDVHRIH\HVJHWLQWRFRQWDFWZLWKWKHUHIULJHUDQWULQVHLWLPPH-
GLDWHO\XQGHUUXQQLQJZDWHUDQGFDOOLPPHGLDWHO\WKHH\HVSHFLDOLVW
WARNING:7KHUHIULJHUDWLRQV\VWHPLVXQGHUKLJKSUHVVXUH'RQRW
WDPSHUZLWKLW6LQFHWKHǍDPPDEOHUHIULJHUDQWVDUHXVHGSOHDVH
LQVWDOOKDQGOHDQGVHUYLFHWKHDSSOLDQFHVWULFWO\DFFRUGLQJWRWKHLQ-
VWUXFWLRQDQGFRQWDFWWKHSURIHVVLRQDODJHQWRURXUDIWHUVDOHVVHU-
YLFHWRGLVSRVHRIWKHDSSOLDQFH
8
1 - Safety
EN
EN
1 - Safety
9
Intended use
This appliance is intended to be used in household and similar app-
plications such as
-
ments;
- farm houses and by clients in hotels, motels and other residen
tial type environments;
- bed and breakfast type environments;
- catering and similar non-retail applications.
If the appliance is not used for an extended period of time.
- Take out the food.
- Unplug the power cord.
- Clean the appliance as described above.
- Keep the doors open to preventthecreationofbadodoursinside.
TRHQVXUHWKHVDIHSUHVHUYDWLRQRIIRRGVWXƩVSOHDVHFRPSO\
with this instruction for use.
The details on the most appropriate part in the compartment of
sidering the distribution of temperature that can be present in
of the manual.
To avoid contamination of food, please respect the following in
structions:
-
crease of the temperature in the compartments of the appli
ance.
- Clean regularly surfaces that can come in contact with food and
accessible drainage systems.
-StorHra ontainers in the freezer, so
that it is not in contact with or drip onto other food.
- 7wo-star frozen-food compartments are suitable for storing
pre-frozen food, storing or making ice cream and making
ice cubes.

1 - Safety
EN
10
- 2QH WZR DQG WKUHHVWDU FRPSDUWPHQWV DUH QRW
VXLWDEOH IRUWKHIUHH]LQJRIIUHVKIRRG
- ,IWKHUHIULJHUDWLQJDSSOLDQFHLVOHIWHPSW\IRUORQJSHULRGV
VZLWFKRIIGHIURVWFOHDQGU\DQGOHDYHWKHGRRURSHQWRSUH
YHQWPRXOGGHYHORSLQJZLWKLQWKHDSSOLDQFH
Disposal
The
V\PERORQWKHSURGXFWRURQLWVSDFNDJLQJLQGLFDWHVWKDW
WKLVSURGXFWPD\QRWEHWUHDWHGDVKRXVHKROGZDVWH,QVWHDGLWVKDOO
EHKDQGHGRYHUWRWKHDSSOLDFDEOHFROOHFWLRQSRLQWIRUWKHUHF\FOLQJ
RIHOHFWULFDODQGHOHFWURQLFHTXLSPHQW%\HQVXULQJWKLVSURGXFWLV
GLVSRVHGRIFRUUHFWO\\RXZLOOKHOSSUHYHQWSRWHQWLDOQHJDWLYHFRQ-
VHTXHQFHV IRU WKH HQYLURQPHQW DQG KXPDQ KHDOWK ZKLFK FRXOG
RWKHUZLVHEHFDXVHGE\LQDSSURSULDWHZDVWHKDQGOLQJRIWKLVSURG-
XFW)RUPRUHGHWDLOHGLQIRUPDWLRQDERXWUHF\FOLQJRIWKLVSURGXFW
SOHDVHFRQWDFW\RXUORFDOFLW\RǎFH\RXUKRXVHKROGZDVWHGLVSRVDO
VHUYLFHRUWKHVKRSZKHUH\RXSXUFKDVHGWKHSURGXFW
6LQFHWKHǍDPPDEOHLQVXODWLRQEORZLQJJDVHVDUHXVHGSOHDVHFRQ-
WDFWWKHSURIHVVLRQDODJHQWRURXUDIWHUVDOHVHUYLFHWRGLVSRVHRI
WKHDSSOLDQFH
:$51,1*
5LVNRILQMXU\RIVXIIRFDWLRQ
5HIULJHUDQWVDQGJDVHVPXVWEHGLVSRVHGRISURIHVVLRQDOO\(QVXUH
WKDWWKHWXELQJRIWKHUHIULJHUDQWFLUFXLWLVQRWGDPDJHGEHIRUHEH-
LQJSURSHUO\GLVSRVHGRI'LVFRQQHFWWKHDSSOLDQFHIURPWKHPDLQV
VXSSO\&XWRNjWKHPDLQVFDEOHDQGGLVSRVHRILW5HPRYHWKHWUD\V
and drawers as well as the door catch and seals to prevent children
DQGSHWVWRJHWFORVHGLQWKHDSSOLDQFH
2.1 Intended Use
“This appliance is intended to be used in household and similar applications such as
– farm houses and by clients in hotels, motels and other residential type environments;
– bed and breakfast type environments;
– catering and similar non-retail applications.
This appliance is intended for freezing food. It has been designed exclusively for use in dry-
interior house-holds. It is not intended for commercial or industrial use.
ards and loss of warranty claims.
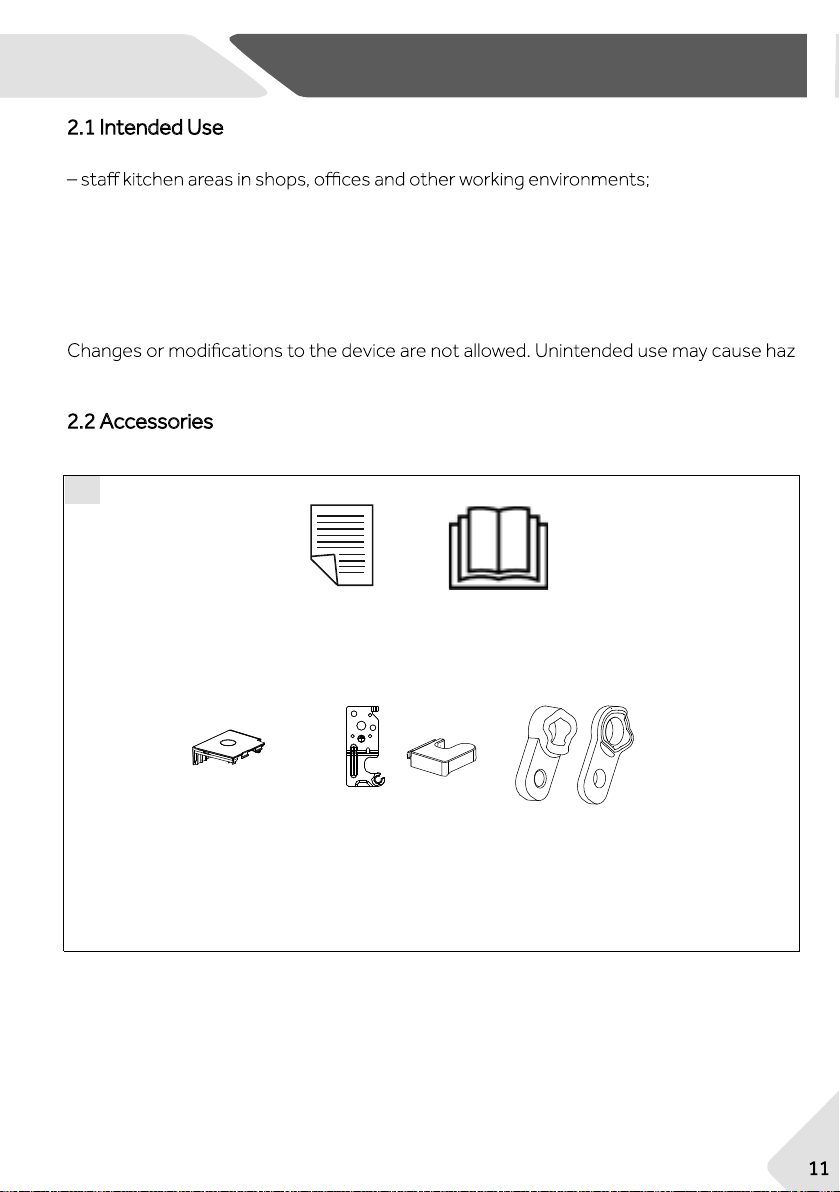
2.2 Accessories
Check the accessories and literature in accordance with this list:
User manualWarranty card
Axe covers
Upper right
hinge for door
reversibility
Upper right
hinge cover
2.2
EN
2-Intended use
11
Top left trim
end cover
6
8
1
7
2
5
3
4
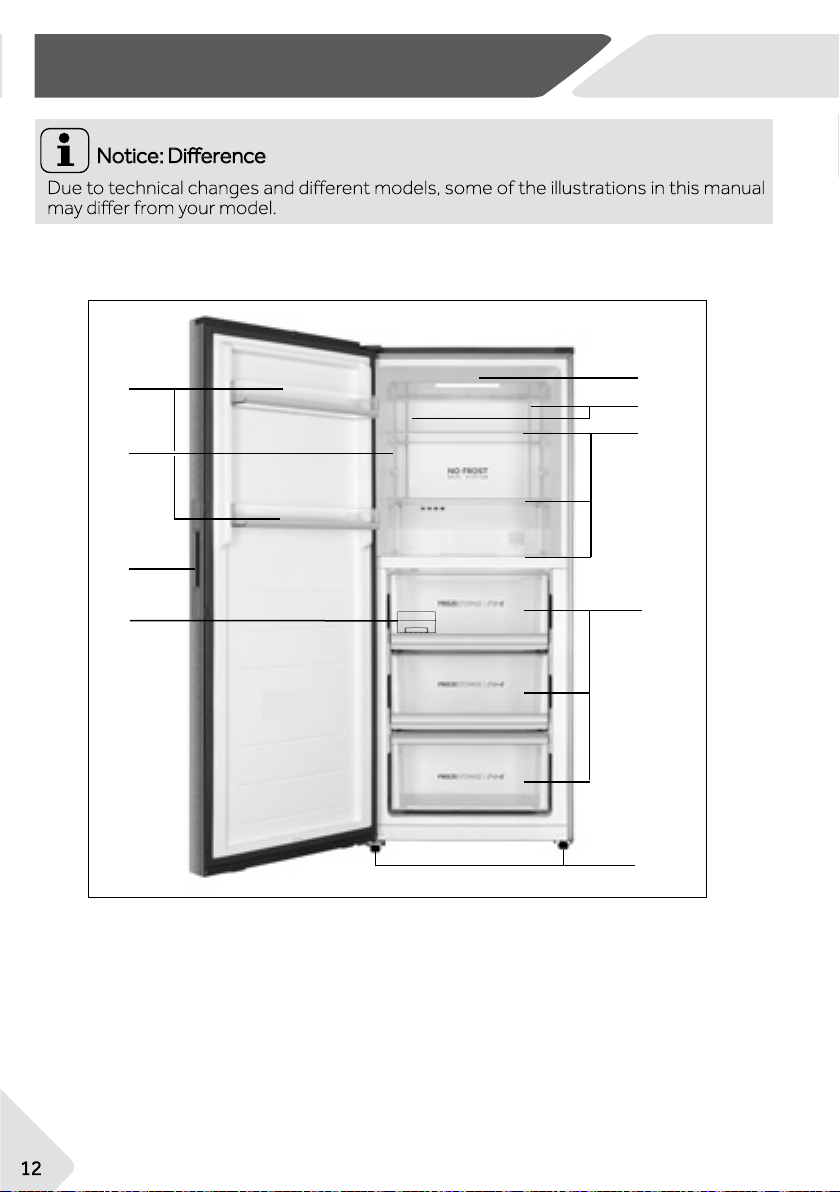
3-Product description
EN
12
1 LED light
2 Air-duct cover
3
4 Freeze storage bins
5
Adjustable feet
6
Adjustable door shelves
7
Rating plate
8
Door handle
Glass shelves
1RWLFH'LƩHUHQFH
9
9 Twist ice maker
13
EN
4-Use
Remove all packaging materials, keep them out of children reach and dispose them
in an environmentally friendly manner.
Clean the inside and outside of the appliance with water and a mild detergent before
putting any food in it.
After the appliance has been levelled and cleaned, wait for at least 2 hours before
connecting it to the power supply. See Section INSTALLATION.
Precool the compartment for 2 hours at high settings before loading with food.
The appliance is in operation as soon as it is connected to the power supply.
The freezer temperature is automatically set to -18 °C. This is the recommended
setting and the ideal temperature for frozen goods. If desired, you can change the
temperatures manually. Please see ADJUSTING THE TEMPERATURE.
Notice: Presettings
1.The appliance is preset to the recommended temperature of -18 °C. Under normal
ambient condition you don´t need to change the temperature.
2.When the appliance is switched on after being disconnected from the main power
supply, it may take up to 12 hours for the correct temperature to be reached.
4.3 Standby-mode of display
operation. The display locks automatically. It lights up automatically when any key
or opening the door.
%HIRUHƪUVWXVH
The function Super Freeze helps to cool down the compartment quickly.
4.2
pressing
f
4.5 Display lock and unlock
Automatic locking
The control panel can automatically enter theLock function. Display is automatically locked
after 30 seconds without operation.
Manual locking
When the display is unlocked, press “ Lock” (F) and hold for 3 seconds, after a beep, “ Lock”(f)
icon is light, display is locked. When the display is locked, press “Lock " (F) and hold for 3
seconds, after a beep, the " LoFNILFRQLVRƩDQGWKHGLVSOD\LVXQORFNHG
4 - Use
EN
14
Notice: Display lock
When
display is locked, functions such as temperature adjustment or function setting are
disabled. When above operation is attempted, “Lock”(f) icon will blink for 3 times to remind
that the display is locked.
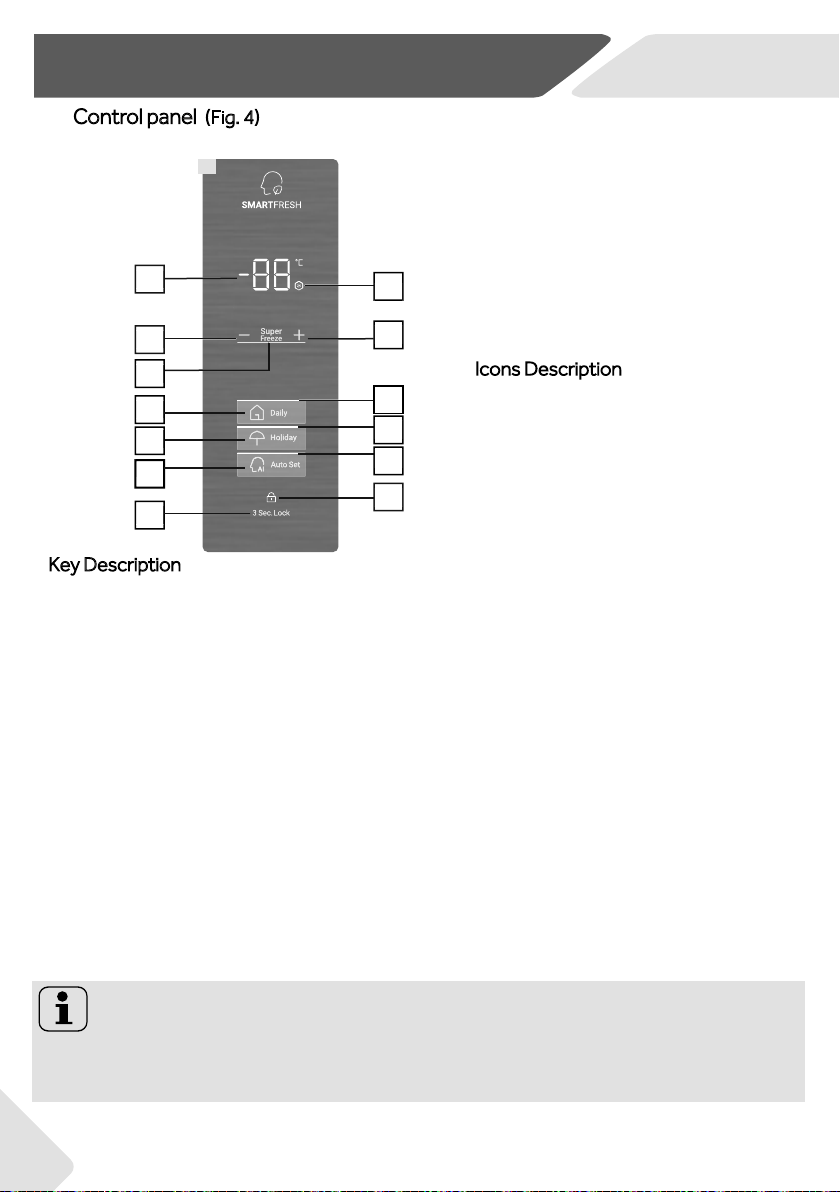
Control panel
(Fig. 4)
A˖Decreasing temperature setting key Press to decrease the temperature
B˖Super Freeze key Press to active the Super Freeze function
C˖Daily function key Press to active Daily functions
D˖Holiday key Press to active Holiday function
E˖Auto Set key ˖Press to active Auto Set function
F˖ Lock key ˖Press and hold for 3 seconds to lock or unlock
G: Increasing temperature setting key Press to increase the temperature
a˖Temperature display icon
b˖Super Freeze icon
c˖Daily function icon
d˖Holiday icon
e˖Auto Set icon
f˖ Lock icon
4
Key Description
Icons Description
4.4
A
B
C
D
F
E
a
G
b
c
d
e
f

4.6 Temperature setting
4.7 Daily function (C)
Notice: Super Freeze
1. In Super Freeze mode, temperature could not be adjusted. If you do so, Super Freeze
LFRQZLOOƫDVKIRUWLPHVWRUHPLQGWKDWWKHIUHH]HULVin Super Freeze mode.
,QWKH6XSHU)UHH]HPRGHLIWKH$XWR6HWIXQFWLRQRU+ROLGDy is set, "Super freeze" (b)
LVRƩWKH6XSHU)UHH]HIXQFWLRQDXWRPDWLFDOO\H[LWVDQGWKH$XWR6HWRU+ROLGD\IXQF
-tion is entered.
EN
4 - Use
15
TKe temperature range of tKis freezer can be set between -14℃ ~ -24℃;
:KHQGLVSOD\LVXQORFNHGLQWKHGDLO\IXQFWLRQSUHVV'HFreasing temperature setting"
$
after a beep, 7HPSHUDWXUHGLVSOD\LFRQDVWDUWVWRƫDVKDQGHQWHUVWKHWHmperature
VHWWLQJPRGH$QGWKHQHYHU\WLPH\RXSUHVVWKH'ecreasing Temperature 6HWWLQJ$
WKHEX]]HUEHHSVWKHWHPSHUDWXUHLVORZHUHGE\r&DQGWKHORZHVWYDOXH is -24 ℃.
$IWHUWKHWHPSHUDWXUHLVVHWWKHWHPSHUDWXUHVHWYDOXHLVGHWHUPLQHGDQGVWRSVƫDVKLQJ
DIWHUVHFRQGVZLWKRXWRSHUDWLRQ.
$IWHUWKHGLVSOD\LVXQORFNHGLQWKH'DLO\IXQFWLRQSUHVV " Increasing temperature setting"
*DIWHUDEHHSWKHLFRQ7HPSHUDWXUHGLVSOD\DVWDUWVWRƫDVKDQGHQWHUWHPSHUDWXUH
VHWWLQJPRGHDQGWKHQHYHU\WLPH\RXSUHVV,QFUHDVLQJWHPSHUDWXUHVHWWLQJ*WKH
EX]]HUEHHSVWKHWHPSHUDWXUHLQFUHDses by 1℃, up to -14 ℃$IWHUWKHWHPSHUDWXUH
LVVHWWKHWHPSHUDWXUHVHWYDOXHLVGHWHUPLQHGDQGLFRQDVWRSVEOLQNLQJDIWHUVHFRQGV
ZLWKRXWRSHUDWLRQ
Super Freeze mode is optimal for preserYing food nutrition, it could freeze food in less time.
Before putting lots of food inside tKe freezer, actiYate Super Freeze function to KaYe lower
temperature, to maNe sure better freeze result.
WKen display is unlocNed, by tRXFKing "Super Freeze " (B), tKe Super Freeze icon (b) will be lig
-Kt, tKe freezer worNs in Super Freeze mode. To H[LW manually Super Freeze function repeat
steps aboYe. 2WKHUZLVH tKe function will H[LW automaticaOO\DIWHUKRXUV
4.8 Super Freeze function (B)
TKe appliance is under 'aily function as soon as it is connected to tKe power supply for WKH
ƪrst time, and “'aily” icon (c) ligKts up. Only under tKis function,WKH temperature can be set.
4.9 Holiday function (D)
:KHQGLVSOD\LVXQORFNHGE\WRXFKLQJ+ROLGD\'WKH+ROLGD\LFRQGZLOOEHOLJKWWKH
IUHH]HUZRUNVLQ+ROLGD\IXQFWLRQ,QWKH+ROLGD\PRGHWRXFKLQJ+ROLGD\'WKH+ROLG
D\LFRQGLVRƩDQGWKHIUHH]HUH[LWVWKH+ROLGD\IXQFWLRQ,QWKH+ROLGD\PRGHLIWKH
WHPSHUDWXUHEHIRUHHQWHULQJ+ROLGD\LVKLJKHUWKDQ℃WKHQDIWHUHQWHULQJWKH+ROL
GD\IXQFWLRQWKHWHPSHUDWXUHLVDXWRPDWLFDOO\VHWWR℃LIWKHWHPSHUDWXUHEHIRUH
HQWHULQJ+ROLGD\LVORZHUWKDQ℃WKHQDIWHUHQWHULQJWKH+ROLGD\IXQFWLRQWKHWHP
SHUDWXUHLVXQFKDQJHG
,I\RXKDYHDODUJHDPRXQWRIIRRGWRIUHH]HDWRQHWLPHLWLVUHFRPPHQGHGWKDWWKHIXQ
FWLRQEHDFWLYDWHGKRXUVEHIRUHLQVHUWLQJIRRG)XQFWLRQZLll stop automatically after
KRXUVRUPDQXDOO\3RZHUFRQVXPSWLRQZLOOLQFUHDVHZKHQWKLV function is on.
4.12 PowerRƩPHPRU\
WLRQ/RFNLVQRWPHPRUL]HGDIWHUSRZHULVEDFNRQGLVSOD\LVXQORFNHG
4.13'RRURSHQDODUP
When Iree]er is kHSW RSHQ Ior PRre WKDQ 1 PLQXtH EHHSHU ZLOO PDke 3 EHHSV with intHUYDO
RI 0.5 secRQG The EHHSV ZLOO EH rHSHDtHG HYHU\ 30 secRQGV LI GRRU is kHSW RSHQ The
EHHSV ZLOO stRS XQWLO GRRU is FORVHG or DIter 7 PLQV RI GRRU RSHQLQJ The EHHSHUVWRSV
EHHSLQJDQGIUHH]HUOLJKWJRHVRƩ
4.14+LJKWHPSHrDturHDODUP
This Iree]er is HTXLSSHG with KLJK tHPSHrDture DODUP In Iree]e PRGH or 6XSHU Free]e
PRGH LI t HPSHrDture GLVSOD\ incon shows”HH” with EHHSsE\tRXFKLQJ Dn\ NH\WKHEHHS
ZLOO stRS EXW tHPSHrDture GLVSOD\ incon kHHSV EOLQNLQJ WKDW PHDQV tHPSHUDWXUHLQWKHIUHH
]er is too KLJK 3OHDVH check LIWKHGRRULVWLJKWO\FORVHGRULIODUJHDPRXQWRIZDUPIRRG
is SXW LQVLGH the Iree]er. $Iter D SHULRG tHPSHrDturHGLVSOD\ incon ZLOO stRS EOLQNLQJ
,I
it
GRHV not stRS EOLQNLQJŝ++ŞIRU D ORQJ WLPH DQG EHHSV WKDW Dre PDQXDOO\FDQcHOOHGULQJV
DJDLQSOHDVHFRQWDFWDIterVDOHVVHUYLce.
4.15 ErrRULQGLFDWLRQ
:KHQWKHGLVSOD\LFRQVKRZV((DQGRWKHUFRGHVDQGƫDVKHVLWLQGLFDWHVWKDWWKHIUHH]HU
LVIDXOW\,QWKLVVLWXDWLRQWKHIUHH]HUFRXOGVWLOOIUHH]HIRRGEXWXVHUVKRXOGFRQWDFWDIWHUVDOHV
VHUYLFHDVVRRQDVSRVVLEOHIRURSWLPDOFRQWURORIWKHIUHH]HU
4 - Use
EN
16
Notice: HoOiGD\ Iunction
,Q+ROLGD\PRGHWHPSHUDWXUHFRXOGQRWEHDGMXVWHG,I\RXGRVR+ROLGD\LFRQZLOOEOLQN
IRUWLPHVWRUHPLQGWKDWWKHIUHH]HULVLQ+ROLGD\PRGH
,Q+ROLGD\PRGHLI$XWR6HW'DLO\RU6XSHU)UHH]HIXQFWLRQLVVHW+ROLGD\LFRQGLVRƩ
+ROLGD\IXQFWLRQDXWRPDWLFDOO\H[LWVDQGHQWHUV$XWR6HW'DLO\RU6XSHU)UHH]HIXQFWLRQ
Notice: Auto Set IXQFWLRQ
,Q$XWR6HWPRGHWHPSHUDWXUHFRXOGQRWEHDGMXVWHG,I\RXGRVR$XWR6HWLFRQZLOOEOLQN
IRUWLPHVWRUHPLQGWKDWWKHIUHH]HULVLQ$XWR6HWPRGe.
,Q$XWR6HWPRGHLIWKH+ROLGD\'DLO\RU6XSHU)UHH]HIXQFWLRQLVVHWŝ$XWR6HWŞHLVRƩ
WKH$XWR6HWIXQFWLRQDXWRPDWLFDOO\H[LWVDQGHQWHUV+ROLGD\'DLO\RU6XSHU)UHH]HIXQFWLRQ
:KHQGLVSOD\LVXQORFNHGE\WRXFKLQJ$XWR6HW($XWR6HWLFRQHLVOLJKWWKHIUHH]HU
ZRUNVLQ$XWR6HWIXQFWLRQ,Q$XWR6HWPRGHE\WRXFKLQJ$XWR6HW(LFRQHLVRƩDQG
WKHIUHH]HUH[LWVWKH$XWR6HWIXQFWLRQ
$XWR6HWIXQFWLRQ(
:KHQWKHGRRULVFORVHGWKHGLVSOD\VFUHHQWXUQVRƩDXWRPDWLFDOO\VHFRQGVDIWHUZLWKRXW
RSHUDWLRQ7KHGLVSOD\ORFNVDXWRPDWLFDOO\,WOLJKWVXSDXWRPDWLFDOO\ZKHQWRXFKLQJDQ\NH\
RURSHQLQJWKHGRRU
4.11'LVSOD\FRQWUROIXQFWLRQ
8QGHUWKH$XWR6HWIXQFWLRQWKHIUHH]HU
RSHUDWHVDWr&VHWWLQJ
4.16 Energy saving tips
Make sure the appliance is properly ventilated (see INSTALLATION).
Do not install the appliance in direct sunlight or in the near of heat sources (e.g.
stoves, heaters).
Avoid unnecessarily low temperature in the appliance. The energy consumption in
creases the lower the temperature in the appliance is set.
Allow warm food to cool down before placing it in the appliance.
Make sure the door always closes correctly and unimpaired by food position. Keep
door gasket clean.
Defreeze frozen food in a fridge.
Clean the rear of the appliance regularly. Dust increases energy consumption.
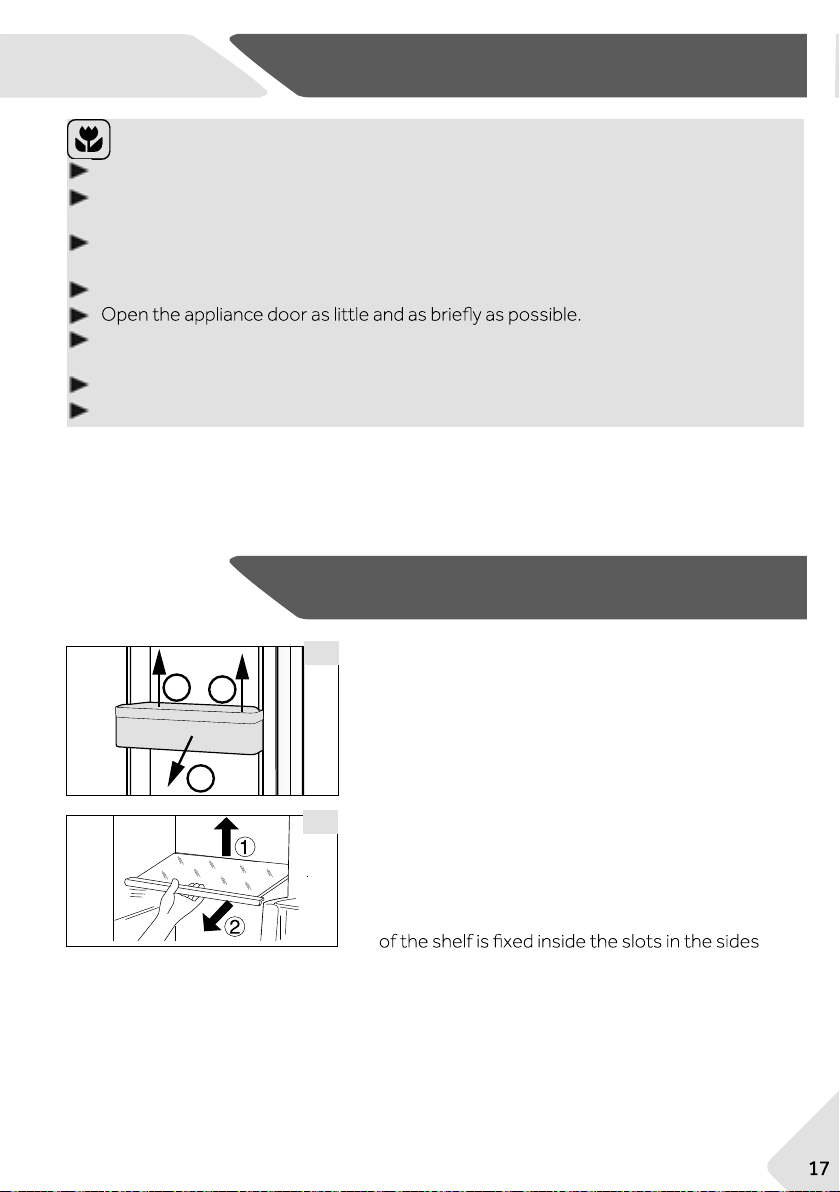
5.1 Removable door shelves
The door shelves can be removed for cleaning:
Place hands on each side of the shelf, lift it upwards (1)
and pull it out (2)(Fig. 5.1).
In order to insert the door shelf, the above steps are
carried out in reverse order.
5.2 Glass shelves
edge (1) and pulling it out (2) (Fig. 5.2).
To reinstall it, put it on the lugs on both sides and
push it to the most rearward position until the rear
1
2
1
5.1
5.2
4-Use
5-Equipment
17
(1
7RWDNHRXWDVKHOIUHPRYHLWE\ƪUVWXSOLIWLQJLWVKLQG
.
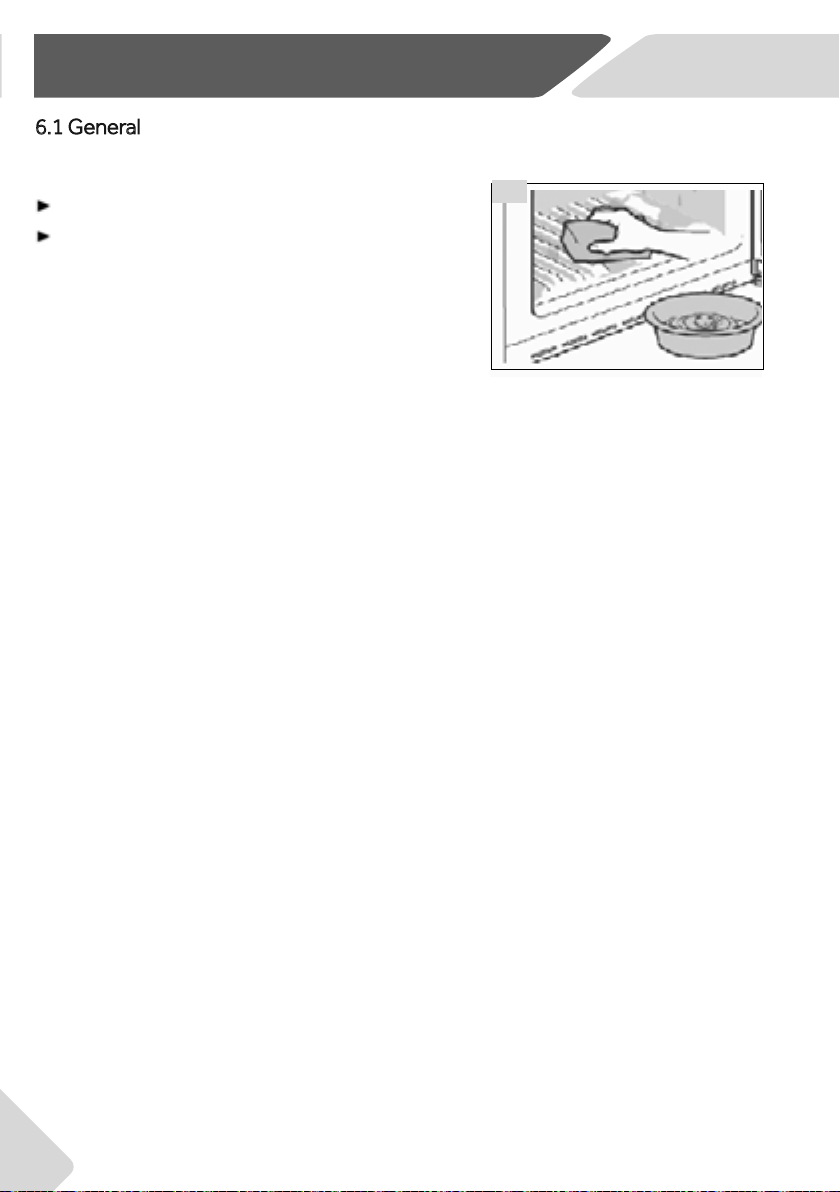
6.1 General
Clean the appliance when only little or no food is stored and unplug the appliance .
6.1
Always keep the door gasket clean.
Clean the inside and housing of the appliance with
a sponge damped in warm water and neutral det-
ergent.
1. Please scrub the interior and exterior of the
freezer, including door gasket, door shelves,
glass shelves, boxes and so on,with a soft
towel or sponge dipped in warm water (you may add neutral detergent into the
warm water).
2. If there is liquid spilled, remove all the contaminated parts, directly rinse with the
ƫow water, dry and place it back into the freezer.
3. If there is spilled cream (such as the cream, melting ice cream), please remove
time, then rinse with the ƫow water, dry and place it back into the frieezer.
4. In case some small part or component gets stucked inside of the freezer (bet-
ween shelves or storage bins), use small soft brush to release it. If you could not
reach the part, please contact Haier service.
all the contaminated parts, put into the warm water with about 40 °C for some
6-Care and Cleaning
EN
18

8- Care and Cleaning
6.2 Non-use for a longer period
If the appliance is not used for an extended period of time:
Take out the food.
Unplug the power cord.
Clean the appliance as described above.
Keep the door and freezer storage bins open to prevent the creation of bad odours inside.
Remove the door of the appliance (open the door and hold it before removing the screws)
to avoid children entering into the appliance and getting locked in.
6.3 Moving the appliance
1. Remove all food and unplug the appliance.
2. Secure shelves and other moveable parts in the freezer with adhesive tape.
3. Close the door and secure it with tape.
4. Do not tilt the freezer more than 45° to avoid damaging the refrigerating system.
5.
forcefully.
EN
6-Care and Cleaning
19
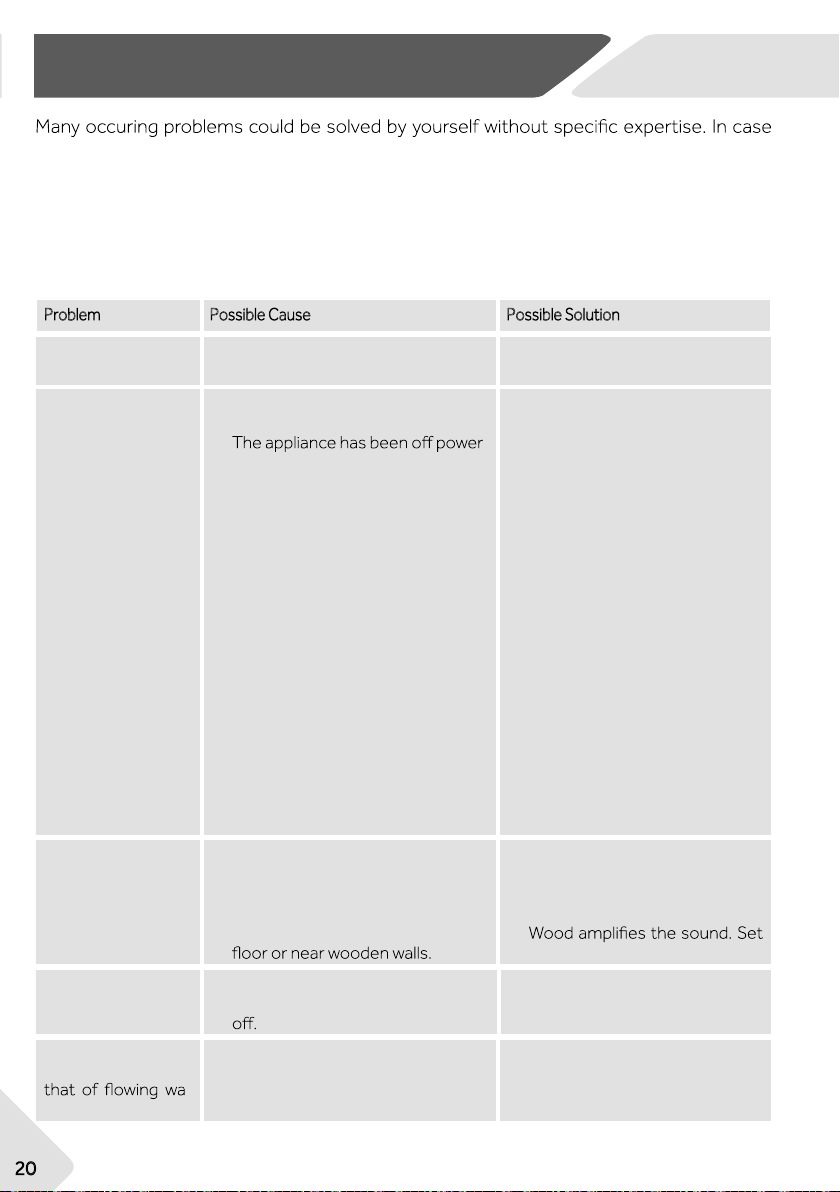
of a problem please check all shown possibilities and follow below instructions before you
contact an after sales service.
The acoustic alarm can be switched of by pressing any button.
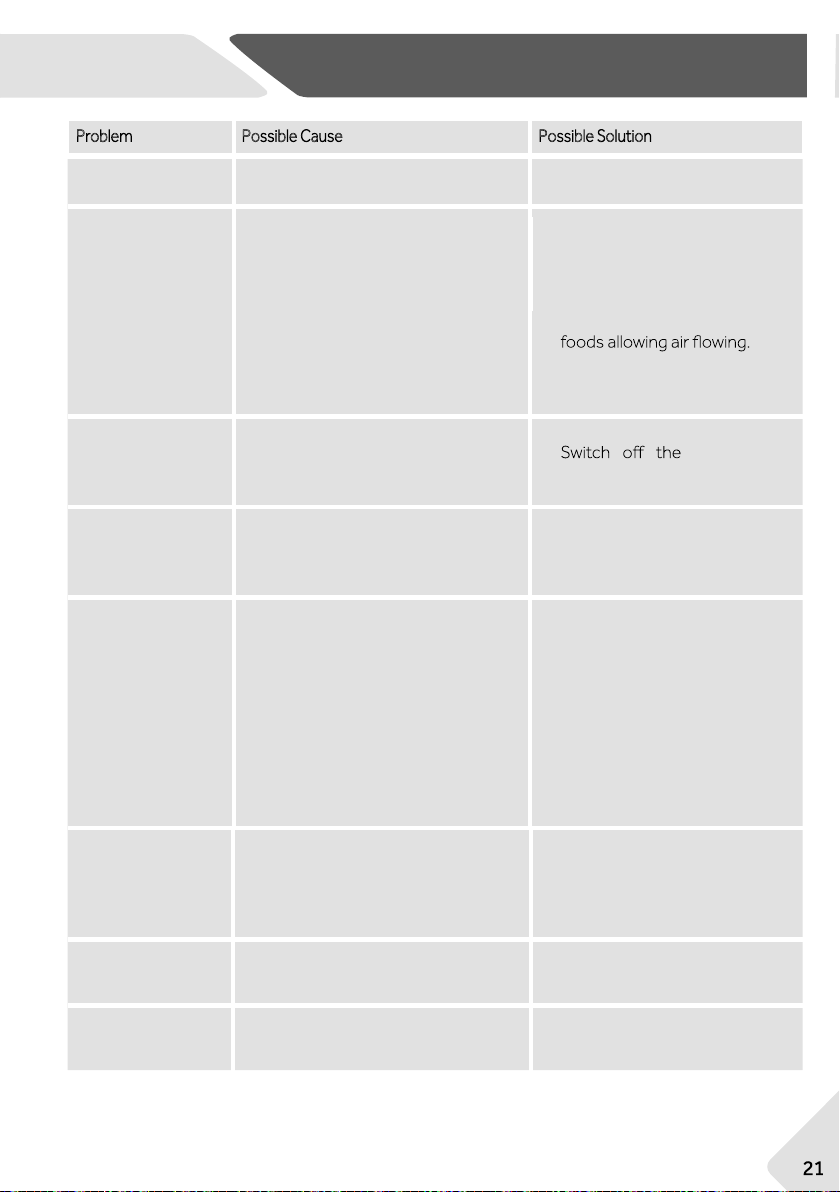
7.1 Troubleshooting
Problem Possible Cause Possible Solution
The compressor
does not work.
Ь Mains plug is not connected in the
mains socket.
Ь Connect the mains plug.
The appliance runs
frequently or for a
too long period of
time.
Ь The indoor or outdoor tempera
ture is too high.
Ь
for a period of time.
Ь The door of the appliance is not
tightly closed.
Ь The door has been opened too
frequently or for too long.
Ь The temperature setting is too low.
Ь The door gasket is dirty, worn,
cracked or mis-matched.
Ь The required air circulation is not
guaranteed.
Ь The interior is covered in ice.
Ь In this case, it is normal for the
appliance to run longer.
Ь Normally, it takes 8 to 12 hours
for the appliance to cool down
completely.
Ь Close the door and ensure the
appliance is located on a level
ground and there is no food or
container jarring the door.
Ь Do not open the door too fre
quently.
Ь Set the temperature higher un
til a satisfactory temperature is
obtained. It takes 24 hours for
the temperature to become
stable.
Ь Clean the door gasket or re
place them by the customer
service.
Ь Ensure adequate ventilation.
Ь Defrost the appliance.
The appliance
makes abnormal
sounds.
Ь The appliance is not located on
level ground.
Ь The appliance touches an object
close to it.
Ь The appliance stands on a wooden
Ь Level the appliance.
Ь Remove objects around the
appliance.
Ь
the appliance somewhere else.
The appliance
makes a clicking
sound
Ь This is normal. It is caused by the
refrigeration unit switching on or
Ь
A slight sound is to
be heard similar to
ter.
Ь
This is normal. Ь
Ь
Ь
7-Troubleshooting
EN
20
Problem Possible Cause Possible Solution
Ь
The appliance makes a
motor sound
Ь The refrigeration unit has just
turned itself on. This is normal
Ь
It is not cold enough
inside the appli
ance.
Ь The temperature is set too high.
Ь Goods that are too warm have
been stored.
Ь Too much food has been stored at
a time.
Ь The goods are too close to each
other.
Ь The door is not tightly closed.
Ь The door has been opened too
frequently or for too long.
Ь Reset the temperature.
Ь Always cool down goods be
fore storing them.
Ь Always store small quantities of
food.
Ь Leave a gap between several
Ь Close the door.
Ь Do not open the door too fre
quently.
It is too cold
inside
the appliance.
Ь The temperature is set too low.
Ь The
function
is
ac
tivated or has been running too
long.
Ь Reset the temperature.
Ь
function.
Moisture accumu
lates on the surface
of the appliance
Ь The climate is too warm and too
damp.
Ь This is normal in damp climate
and will change when the hu
midity decreases. Wipe dry with
a cloth.
Strong ice and frost
in the freezer com
partment.
Ь The goods were not adequately
packaged .
Ь The door is not tightly closed.
Ь The door has been opened too
frequently or for too long.
Ь The door gasket is dirty, worn,
cracked or mis-matched.
Ь Something on the inside prevents
the door from closing properly.
Ь Always pack the goods well.
Ь Close the door.
Ь Do not open the door too fre
quently.
Ь Clean the door gasket or re
place them by the customer
service.
Ь Reposition the shelves, door
racks, or internal containers to
allow the door to close.
The cooling system
does n
ot work.
Ь Mains plug is not connected to the
mains socket.
Ь The power supply is not intact.
Ь Connect the mains plug.
Ь Check the electrical supply to
the room. Call the local elec
tricity company!
The sides of the
cabinet and door
strip get warm.
Ь This is normal. Ь
You hear an alarm
signal.
Ь The door is open
Ь The temperature inside product is
too high
Ь Close the door or silence the
alarm manually.
EN
7 - Troubleshooting
21
Super Freeze Super Freeze

Problem Possible Cause Possible Solution
Ь
to open.
Ь Once the appliance runs, it has an
internal vacuum.
Ь Open the door seal gently to let
air enter the appliacne.
The door can’t be
closed properly. It
always leaves a gap.
Ь Because of the appliances’s low
temperature, the door seal can
easily get hard and deformed.
Ь Use a hair dryer or put a hot
towel on the spot where the
gasket is deformed.
Ь When the gasket is soft once
again, close the door and com
press it tightly.
7.2 Power Interruption
In the event of a power cut, food should remain safely cold for about 15 hours. Follow
these tips during a prolonged power interruption, especially in summer:
Open the door as few times as possible.
Do not put additional food into the freezer during a power interruption.
If prior notice of a power interruption is given and the interruption duration is longer
than 15 hours, make some ice and put it in a container in the top of the freezer com
partment.
As temperature in the freezer will rise during a power interruption or other failure,
the storage period and edible quality of food will be reduced. Any food that defrosts
should be either consumed, or cooked and refrozen (where suitable) soon after
wards in order to prevent health risks.
Notice: Memory function during power interruption
After restoration of power the appliance continues with the settings that were set be
fore the power failure.
7-Troubleshooting
EN
22
8.1 Unpacking
Take the appliance out of the packaging.
Remove all packaging materials.
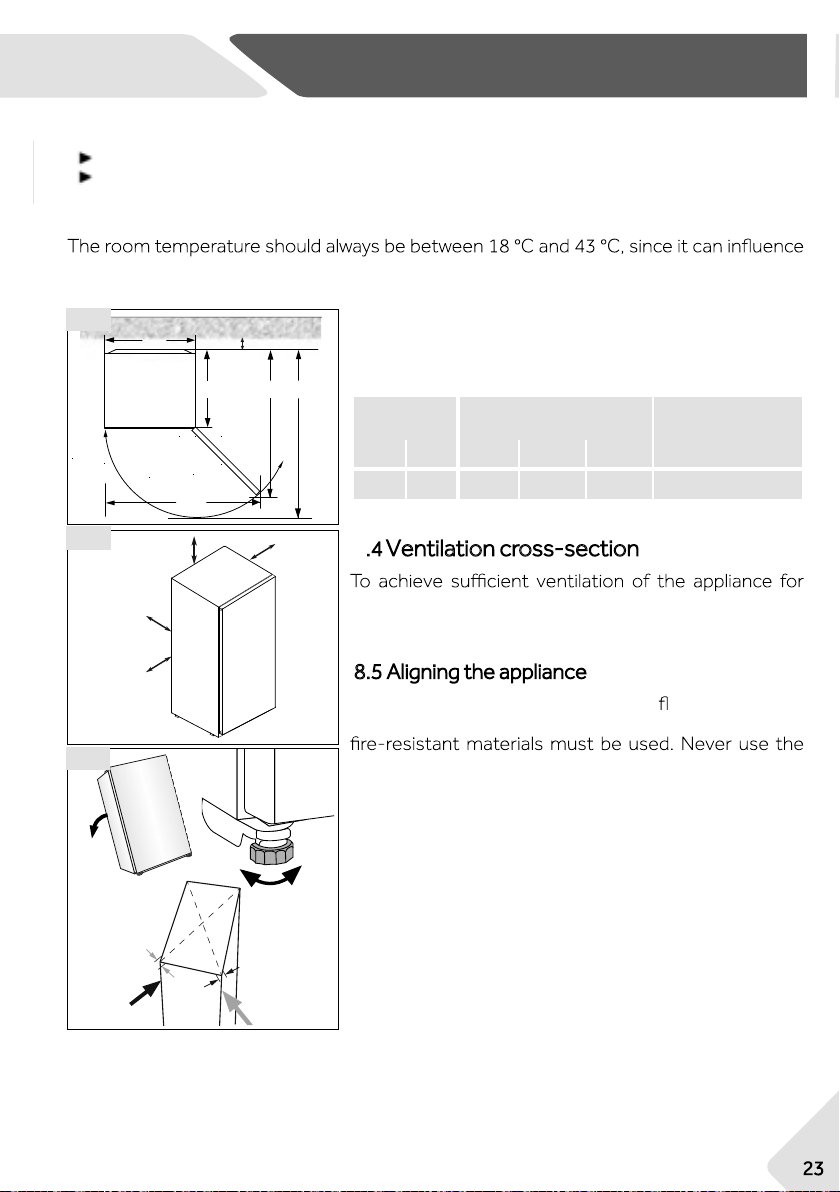
8.2 Environmental conditions
the temperature inside the appliance and its energy consumption. Do not install the appli
ance near other heat-emitting appliances (ovens, refrigerators) without isolation.
8.3 Space requirements
Required space to open the door (Fig. 8.1):
Width
in mm
Depth
in mm
Distance to wall
in mm
W1 W2 D1 D2 D3 D4
705 1076 603 1243 1327 50
safety reasons, the information of the required ventila
tion cross sections must be observed (Fig. 8.2).
8.5 Aligning the appliance
The appliance should be placed on a at and solid sur
face. If the appliance is placed on a pedestal, strong and
foam packing material as a pedestal.
1. Tilt the appliance slightly backwards (Fig. 8.3).
2. Set the feet to the desired level.
3. The stability can be checked by alternately bump
ing on the diagonals. The slight swaying should be
the same in both directions. Otherwise the frame
can warp; possible leaking door seals are the result.
A low tendency to the rear eases the closing of the
door.
W2
D1
D3
D2
W1
D4
8.1
5 cm
5 cm
5 cm
5 cm
8.1
PD[e
8.3
23
EN
8 - Installation
Ventilation cross-section8

8.6 Using adjustable feet
If the freezer is unstable, the feet can be adjusted: Ro
tate the adjustable feet according to the direction of
arrow (Fig. 8.4) to turn them up or down:
Turning the feet clockwise raises the appliance.
Turning the feet counterclockwise lowers it.
8.7 Waiting time
To the maintenance-free lubrication oil is located in the
capsule of the compressor. This oil can get through the
closed pipe system during slanting transport. Before
connecting the appliance to the power supply you have
to wait 2 hours (Fig. 8.5) so that the oil runs back into
the capsule.
8.8 Electrical connection
Before each connection check if:
Power supply, socket and fusing are appropriate to the rating plate.
The power socket is earthed and no multi-plug or extension.
The power plug and socket are strictly according.
Connect the plug to a properly installed household socket.
8.4
2 h
8.5
24
8 - Installation
EN
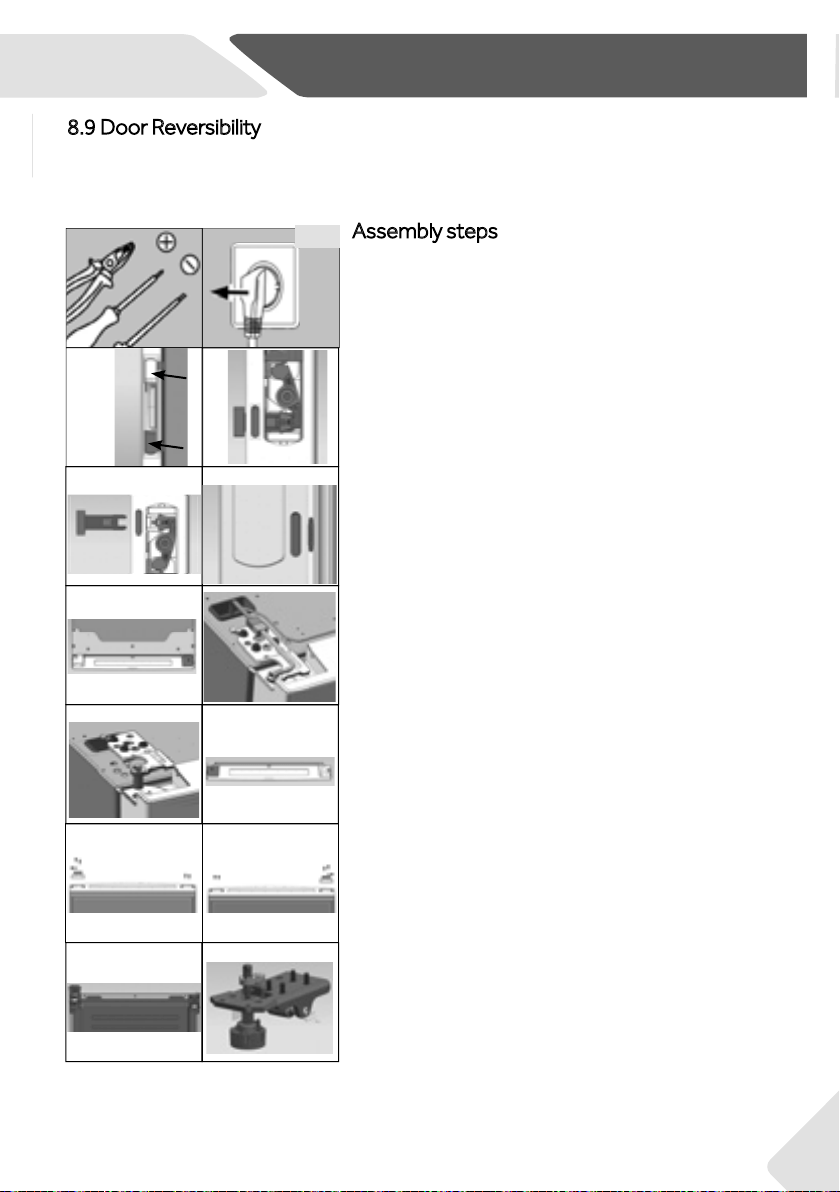
8.9 Door Reversibility
Before connecting the appliance to the power supply you should check, whether the door
swing must changed from left (as delivered) to right, if this is required by the installation
location and the usability.
25
EN
8 - Installation
1. Provide necessary tool.
2. Unplug the appliance.
3. Open the upper and lower handle covers on the right
side of the door.
4.
Pry the white slider slightly.
5. Take out the 2 push rod, and put the handle cover
back on.
6.
Remove the 2 rubber plugs on the left side of the
door and put it with the removed push rods for step
20.
7. Remove 7 screws and hinge cover. Be careful not
to tear the door cable.
8.
Unplug the connection cable.
9. Remove 3 hinge screws and the left upper hinge,
and remove the door carefully.
10.
Place a cardboard box or cloth under the door and place
the door horizontally. Remove the right door end cover,
take the left end cover from the accessory bag. Install
it on the top
left side of the door.
Assembly steps (Fig. 8.6):
1
2
8.6
10
3
4
6
5
7
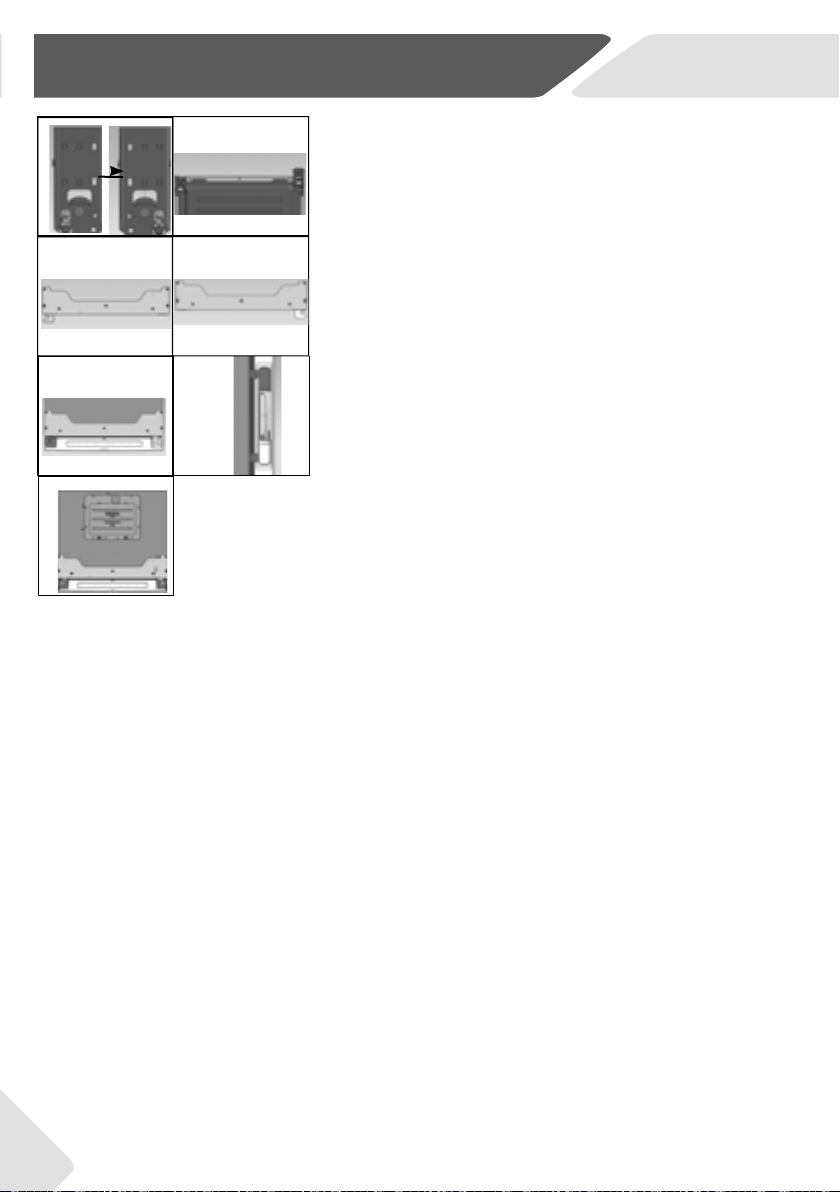
11.Remove 2 screws on the right bottom of the door. Re
-move 2 screws, door stopper and axe cover on the
left bottom of the door.
12.
Take door stopper from last step and the right axe
FRYHUIURPWKHDFFHVVRU\EDJƪ[WKHPZLWKVFUHZV
Fix 2 screws also on the other side of the door.
13.
Put the back of the cabinet down after placing thicker
pads underground. Remove 4 screws and the lower
hinge.
14. Unscrew the axe cover.
13
11
12
14
8
9
26
8 - Installation
EN
15.Take the right axe cover from the accessory bag.
Fix it with screw.
16.
Exchange position of caster plate and lower hinge
after replacement.
17.Disassemble the left small hinge cover and hinge
lid from the hinge cover.
18.
Change the hinge lid to the other side and take the
right small hinge cover from the accessory bag.
Install it on the hinge cover.
21.
Finished.
18
17
19
16
15
20
21
19. Mount the door, install the left hinge, plug the con-
QHFWLRQFDEOHDQGƪ[WKHKLQJHFRYHUZLWKVFUHZV
20. Install the removed push rod on the left side of
the door, and then insert the rubber plugs into the
handle push rod hole on the right side of the door.
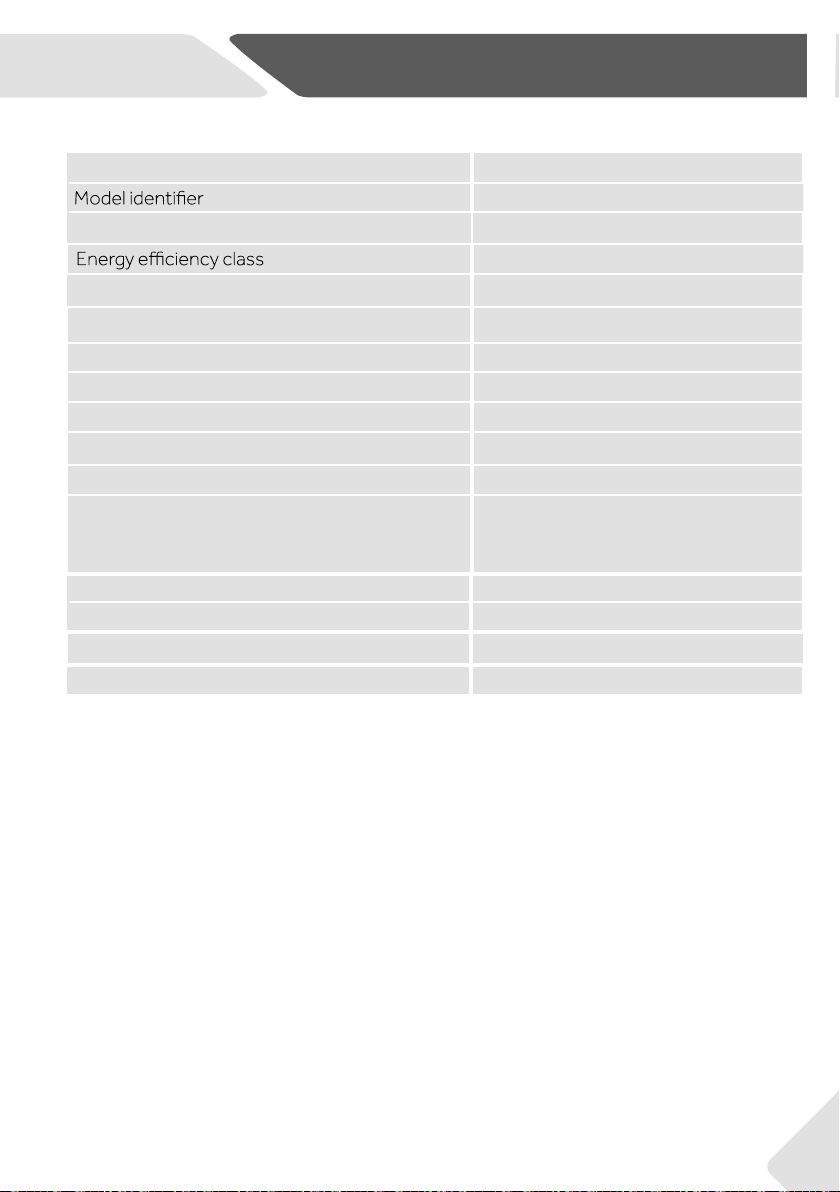
Trade mark
Haier
HVF430VW/HVF430VS
Category of the model Upright freezer
3.5 star
Product group
7
Storage volume cooling (L) not applicable
Storage volume freezing (L) **** 386
Star rating ****
Temperature of other compartments > 14 °C not applicable
Frostfree system yes
Climate class
This appliance is intended to be used at an am
bient temperature between 18 °C and 43 °C.
T
Construction type freestanding
Voltage / Frequency 220-240V ~/ 50Hz
Rated Current (A)
1.5
Coolant R600a
Dimensions (H/W/D in cm)
172,5/70,5/69,1
27
EN
9-Technical Data

HVF430VW/HVF430VS
0060530008